1
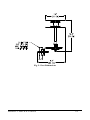
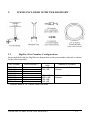
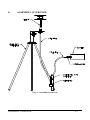
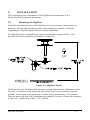
Paroscientific, Inc.
Digiquartz® Pressure Instrumentation
User’s Manual
For
DigiPort High Performance Pressure Port
For use with Digiquartz® Barometers
“The standard by which other standards are measured”
DIGIQUARTZ®
PRECISION PRESSURE INSTRUMENTS
USER’S MANUAL
FOR
DIGIPORT HIGH PERFORMANCE PRESSURE PORT
FOR USE WITH DIGIQUARTZ® BAROMETERS
DOCUMENT NO. 8007-001
REVISION C
SEPTEMBER, 2012
Please visit www.Paroscientific.com
for the latest manual revisions.
COPYRIGHT 2012 PAROSCIENTIFIC, INC.
Table of Contents
1.
INTRODUCTION......................................................................................... 1-1
2.
PRODUCT SPECIFICATIONS .................................................................. 2-1
2.1
2.2
3.
PERFORMANCE CHARACTERISTICS: ......................................................... 2-1
PHYSICAL CHARACTERISTICS: ................................................................. 2-1
ITEMS INCLUDED WITH THE DIGIPORT ........................................... 3-1
3.1
DIGIPORT PART NUMBER CONFIGURATIONS............................................ 3-1
4.
ASSEMBLY OVERVIEW ........................................................................... 4-1
5.
INSTALLATION .......................................................................................... 5-1
5.1
5.2
5.3
6.
MAINTENANCE .......................................................................................... 6-1
6.1
6.2
7.
MOUNTING THE DIGIPORT ....................................................................... 5-1
INSTALLING THE HOSE AND MOISTURE TRAP .......................................... 5-2
CONNECTING TO THE DIGIQUARTZ® BAROMETER ................................... 5-3
BAROMETER PORT INLET CLEANING........................................................ 6-1
CLEARING THE MOISTURE TRAP .............................................................. 6-2
TECHNICAL SUPPORT............................................................................. 7-1
TABLE OF CONTENTS
i
1.
INTRODUCTION
The Paroscientific DigiPort is a High Performance Pressure Port that serves as a
termination device permitting Digiquartz® barometers to accurately measure the true
atmospheric pressure in the presence of wind.
According to the World Meteorology Organization,
A barometer will not give a true reading of the static pressure if it is influenced
by gusty winds. Its reading will fluctuate with the wind speed and direction. At
sea, error is always present due to the ship’s motion. A similar problem will
arise if the barometer is installed in an air-conditioned room.” Air conditioning
may create a pressure differential between the inside and outside of a room.
Therefore, if a barometer is to be installed in an air-condition room, it is
advisable to use a static head with the barometer.
These dynamic fluctuations are superimposed on the static pressure and, with a
strong and gusty wind, may amount to 2 or 3 hPa. It is usually impractical to
correct for such fluctuations because the “pumping” effect on the mercury
surface is dependent on both the direction and the force of the wind, as well as
on the local circumstances of the barometer’s location. Thus the “mean value”
does not only represent the true static pressure. When comparing barometers,
the possibility of a difference in readings due to the wind effect should be borne
in mind.1
Accurate measurements of barometric pressure require an environmentally rugged
pressure port design that minimizes pressure errors under dynamic wind conditions.
Wind tunnel and field tests of the DigiPort show superior performance over all other
ports. Barometric readings with the DigiPort easily meet the requirements of GPS
Meteorology, Weather Stations, Digital Altimeter Setting Indicators, HighResolution Measurements of Atmospheric Waves, and Aircraft Wake-Turbulence
Detection.
Please access Paroscientific website at
http://www.paroscientific.com to obtain a
copy of the test report comparing various
pressure ports in a wind-tunnel test.
1
Guide to Meteorological Instruments and Methods of Observation (WMO – No.8)
INTRODUCTION
1-1
2.
PRODUCT SPECIFICATIONS
The DigiPort product is defined by Specification Control Drawing 7010-001.
Specifications are subject to change without notice.
2.1
Performance Characteristics:
Wind Dependence
Wind Speed
5 meters/sec (10 knots)
10 meters/sec (20 knots)
20 meters/sec (40 knots)
Max Wind Effect
0.01 hPa
0.03 hPa
0.12 hPa
Wind speed tested:
0 to 60 meters/sec (120 knots)
Wind Pitch or tilt range:
±25°
2.2
Physical Characteristics:
Material:
Aluminum with polyurethane white surface
Outer disk diameter:
7.0 in. (18 cm)
Outer disk spacing:
2.8 in. (7 cm)
Weight:
5 lb. (2.3 Kg) maximum
Operating Temperature:
-50° C to +60° C (-58° F to +140° F)
(with optional hose)
Humidity:
0-100%, condensing and non-condensing
Rain:
Self-draining holes protected from rain
Condensation:
Moisture Trap provided
Ice and biological
contamination:
Multiple redundant holes keep port open
PRODUCT SPECIFICATIONS
2-1
Fig. 2- Port Dimensions
PRODUCT SPECIFICATIONS
2-2
3.
3.1
ITEMS INCLUDED WITH THE DIGIPORT
DigiPort Part Number Configurations
Items included with the DigiPort are dependent on the part number ordered as shown
in the following table.
Part Number
1745-000
1745-003
1745-005
1745-010
1745-100
1745-103
1745-105
1745-110
Hose Included **
None
3 Meters
5 Meters
10 Meters
None
3 Meters
5 Meters
10 Meters
For Use
With
765-16B
760-16B
1000-16B
6000-16B
745-16B
740-16B
Adapter(s) Included
1/4 Hose to 1/4 Tube
Adapter
1/4 Hose to 1/8 A-Lok
Adapter
** Included hose is 1/4” Parker Push-Lok Hose
ITEMS INCLUDED WITH THE DIGIPORT
3-1
4.
ASSEMBLY OVERVIEW
Fig. 4- Assembly Overview
ASSEMBLY OVERVIEW
4-1
5.
INSTALLATION
This section discusses installation of the DigiPort and connecting it to a
Paroscientific Digiquartz® barometer.
5.1
Mounting the DigiPort
Install the mounting bracket of the DigiPort on a pole not more than 2 inches in
diameter. Be sure the mounting fixture and structure are capable of securely
supporting the DigiPort under adverse weather conditions.
The DigiPort must be installed in a vertical orientation as shown below. This
position will assure optimum performance of the port.
Figure 5.1- DigiPort Mount
Install the unit in a location where the ports remain unobstructed. Maintain at least
one foot of clearance in all directions and at least four feet of clearance from the
ground. Obstruction of the ports may result in erratic performance. The distance
from the port to the top of the mounting post should be at least 10 times the diameter
of the post. Tighten nuts with a 7/16” wrench.
INSTALLATION
5-1
5.2
Installing the Hose and Moisture Trap
It is essential to install the provided Moisture Trap to prevent any condensation from
obstructing air passage through the hose. Position the barometer and the DigiPort
and route the connecting hose in such a way that ensures there is a single low point
in the connecting hose for condensed moisture to collect. Locate and install the
Moisture Trap at that point. Failure to do so may result in damage to the barometer
and/or inaccurate pressure readings.
If possible, locate the moisture trap in an area that is protected from harsh
conditions. If the trap will be installed outdoors, it is recommended that it be
secured to something fixed such as the stake depicted in Figure 5.2.
Fig. 5.2- Moisture Trap
Using a sharp cutting tool, cut an appropriate length of 1/4” ID hose such that it will
comfortably reach between the port and the trap without having low spots where
condensation could collect. Cut a second length of hose to connect between the trap
and the Digiquartz® barometer port in a similar manner. Push the ends of each
length of hose over the barbed ends of the Moisture Trap wye until they are seated
securely. Other than the Moisture Trap being vertical, orientation is not important.
NOTE: A compliant 1/4” ID (inside diameter) hose is needed for
installation. You may need to obtain an appropriate hose if your
configuration did not include one. For reference, the standard hose
included with the DigiPort is a Parker Push-Lok 801-4 Color-Coded Hose.
Any similar hose is acceptable.
INSTALLATION
5-2
5.3
Connecting to the Digiquartz® Barometer
An adapter is required to connect the 1/4” ID hose to the port of a Paroscientific
Digiquartz® barometer. Paroscientific barometers use one of two kinds of ports as
depicted in the following table.
Digiquartz® Barometer
Model
Model 765-16B
Model 760-16B
Model 1000-16B
Model 6000-16B
Model 745-16B
Model 740-16B
5.3.1
Port Type
Swagelok 1/4” VCO
See para. 5.3.1
Parker 1/8” A-Lok
See para. 5.3.2
For barometers with a 1/4” VCO fitting, an adapter is provided to
join 1/4” tubing to 1/4” hose. This requires the use of the 1/4”
VCO to 1/4” Tube Adapter accessory that is included with these
barometers (pictured below).
Fig. 5.3.1a- Tube Adapter
Models 760 & 765
Use this adapter with the provided barbed hose adapter to connect
the hose to the barometer as shown below.
Fig. 5.3.1b- ¼” VCO Connection
Attach the adapters to the barometer and press the hose all the
way onto the barbed hose fitting.
INSTALLATION
5-3
5.3.2
For barometers with a 1/8” A-Lok fitting, a two-piece adapter is
provided to join a 1/8” A-Lok fitting to 1/4” Hose as shown
below.
Fig. 5.3.2- 1/8” A-Lok Connection
Attach the adapter to the barometer and press the hose all the way
onto the barbed hose fitting.
INSTALLATION
5-4
6.
MAINTENANCE
The DigiPort is a highly reliable instrument designed to operate for a long period of
time without the need for maintenance. Ensuring that the DigiPort remains clean and
debris-free will ensure the greatest overall performance.
Periodic cleaning of the port inlets and ensuring an unobstructed path at the moisture
trap are the only recommended maintenance items for this unit.
6.1
Barometer Port Inlet Cleaning
Clear out any debris that has collected between the upper and lower plates, including
the adjacent orifice plates. Check that flow is not obstructed through the port
assembly. If flow is obstructed, disassemble the upper plate and upper orifice plate
by unscrewing the 7/16-20 UNF flat head socket screw on top of the port. Use a
5/16” Allen hex wrench. This provides access to both orifice plates and the interior
of the upper end of the column. See Figure 6.1 below.
Fig. 6.1
Remove any debris from the various orifices and reassemble, applying a small
amount of thread-locking compound to the screw. Torque the screw to 25 inch-lb to
secure the assembly.
MAINTENANCE
6-1
6.2
Clearing the Moisture Trap
Although unlikely, it is possible for the hose to become obstructed if a sufficient
amount of condensed moisture or airborne contamination accumulates in the
moisture trap. As needed, unscrew the jar from the lid of the moisture trap to
remove any such accumulation. The connecting silicone tubing may also be
detached from the hose wye and rinsed clean as needed.
MAINTENANCE
6-2
7.
TECHNICAL SUPPORT
For additional technical support please contact an application
engineer at:
Paroscientific, Inc.
4500 148th Ave. N.E.
Redmond, WA 98052 USA
Tel: (425) 883-8700
Fax: (425) 867-5407
Internet: www.paroscientific.com
Email: [email protected]
TECHNICAL SUPPORT
7-1
Paroscientific, Inc.
4500 148th Avenue N.E.
Redmond, WA 98052, USA
Tel: (425) 883-8700
Fax: (425) 867-5407
http://www.paroscientific.com
E-mail: [email protected]
Doc. Number 8007-001 Rev. C
©Paroscientific, Inc. 2007