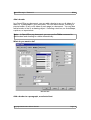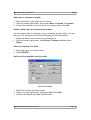
1
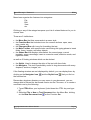
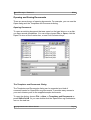
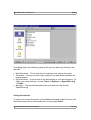
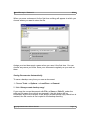
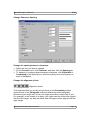
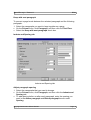
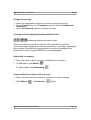
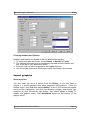
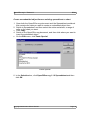
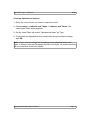
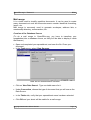
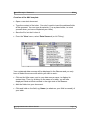
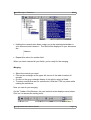
OpenOffice.org 1.1 User Manual Version1.1 (November 27,2003) User Manual for Writer Trademarks MIMOS logo is a registered trademark of MIMOS Berhad. OpenOffice.org is a trademark of OpenOffice.org All terms mentioned in this manual that are known to be trademarks or service marks have been appropriately marked. The publisher cannot attest to the accuracy of this information. Use of a term in this manual should not be regarded as affecting the validity of any trademark or service mark. Disclaimer While every effort has been made to make this manual as complete and as accurate as possible, no warranty or fitness is implied. The information provided here is on an “as is” basis. The authors and the publisher shall have neither liability nor responsibility to any person or entity with respect to any loss or damages arising from the information contained in this manual. Copyright Information Copyright © 2003-2004 MIMOS Berhad. Permission is granted to copy, distribute and/or modify this document under the terms of the GNU Free Documentation License, Version 1.2 or any later version published by the Free Software Foundation; with no Invariant Sections, no Front-Cover Texts, and no Back-Cover Texts. A copy of the license is included in the section entitled "GNU Free Documentation License". Acknowledgement Open Source R&D Group MIMOS Berhad Technology Park Malaysia Kuala Lumpur Tel : 603-89965000 Fax : 603-86579477 For further inquiries, please email to [email protected] What is OpenOffice.org? OpenOffice.org is an office suite. You will find it invaluable for any number of everyday tasks, from writing reports to creating professional presentations. OpenOffice.org contains the following applications: Writer, a fully-featured word processor. This is a powerful tool for creating professional documents, reports, newsletters, brochures, web pages and more. Calc, a sophisticated and feature-packed spreadsheet program. Use advanced spreadsheet functions and decision-making tools to perform sophisticated data analysis. Use built-in charting tools to generate impressive 2D and 3D charts. Impress, a tool presentations. Draw, a graphical component of OpenOffice.org. to create professional and effective multimedia Note: This manual only covers the first three(3) application. Page iii TABLE OF CONTENTS OPENOFFICE.ORG INTERFACE.......................................................................................................5 SELECTING TEXT........................................................................................................................................7 MOVING AND COPYING TEXT...................................................................................................................... 7 MOVING TEXT USING DRAG-AND-DROP.......................................................................................................7 OPENING AND SAVING DOCUMENTS............................................................................................8 OPENING DOCUMENTS................................................................................................................................ 8 THE TEMPLATES AND DOCUMENTS DIALOG................................................................................................... 8 SAVING DOCUMENTS.................................................................................................................................. 9 SAVING DOCUMENTS AUTOMATICALLY........................................................................................................10 EXPORTING DOCUMENTS TO PDF.............................................................................................................. 11 USING THE OPENOFFICE.ORG PROOFING TOOLS.................................................................12 CORRECT SPELLING ................................................................................................................................. 12 USING THE THESAURUS.............................................................................................................................13 DOING MORE WITH TEXT..........................................................................................................................14 APPLY CHARACTER FORMATTING.................................................................................................................14 CHANGE CHARACTER SPACING...................................................................................................................16 CREATING AND FORMATTING NUMBERED AND BULLETED LIST........................................................................ 20 ADD A BORDER........................................................................................................................................ 22 CREATING A TABLE ........................................................................................................................24 CREATE A TABLE......................................................................................................................................24 ADD ROWS OR COLUMNS TO A TABLE...........................................................................................................25 DELETE A TABLE, ROWS OR COLUMNS FROM A TABLE..................................................................................... 25 CLEAR THE CONTENTS OF A TABLE.............................................................................................................. 25 SPLIT A CELL INTO MULTIPLE CELLS IN A TABLE............................................................................................. 25 MERGE CELLS INTO ONE CELL IN A TABLE.................................................................................................... 26 FORMATTING PAGES....................................................................................................................... 26 CREATING AND MODIFYING PAGE NUMBERS ...............................................................................................26 CREATING HEADERS AND FOOTERS ............................................................................................................27 IMPORT GRAPHICS...........................................................................................................................27 INSERT A PICTURE ....................................................................................................................................27 INSERT A PICTURE FROM ANOTHER FILE........................................................................................................ 28 INSERT A SPREADSHEET INTO AN OPENOFFICE.ORG DOCUMENT ................................28 CREATE AN EMBEDDED OBJECT FROM AN EXISTING SPREADSHEET OR CHART.......................................................29 INDEXES AND TABLES OF CONTENTS........................................................................................30 CREATING A TABLE OF CONTENTS.............................................................................................................. 30 UPDATING A TABLE OF CONTENTS..............................................................................................................30 DELETING A TABLE OF CONTENTS.............................................................................................................. 30 CREATING ALPHABETICAL INDEXES.............................................................................................................31 MAIL MERGE...................................................................................................................................... 32 CREATION OF THE DATABASE SOURCE.........................................................................................................32 CREATION OF THE MAIL TEMPLATE............................................................................................................. 33 MERGING................................................................................................................................................34 OpenOffice.org1.1 Version1.1 Writer OpenOffice.org Interface OpenOffice.org Writer is a program in OpenOffice.org used for creating and editing text documents. In creating your text documents, you can add tables, graphics, charts and turn your documents into rich newsletters, brochures, articles, reports, proposals and even books. Menu Bar Function Bar Command Bar Main Toolbar Navigator Stylist Status Bar Figure 1. The picture in Figure 1 is an application window in OpenOffice.org Writer. You can see two types of command bars: menu bars and toolbars. Toolbars are graphical buttons located below the menu bars. Toolbar is a shortcut to common features while menu bars enable you to see the option related to a feature. Copyright©2003-2004 Mimos Berhad Page 5 OpenOffice.org1.1 Version1.1 Writer Menu bars organize the features into categories: File Edit View etc. Clicking on any of the categories opens up a list of related features for you to choose from. These are 5 visible bars : the Menu Bar that lists commands in a menu style, the Function Bar that includes icons for common actions: open, save, copy, paste, etc. the Command Bar with icons for formatting the text, the Main Toolbar, with specific tools used during the typing phase to insert fields, forms, images, and other objects, the Status Bar that displays information: the current page, current template, zoom percentage, insert or overwrite mode, selection mode, and hyperlink mode; as well as 2 floating windows which can be docked: the Stylist. Used to change the style of the text with few clicks. the Navigator. This tool is particularly useful in long documents with many chapters, sections, images, etc. If the floating windows are not displayed by default, you can display them by clicking on the Navigator icon the function bar. and the Stylist icon that you find on Remember, whatever disaster you may cause in your document, you are always able to Reload the last saved version via the File menu, or to create a new blank one by the following: 1. Type CTRL+N on your keyboard, (hold down the CTRL key and type N), 2. Selecting File -> New -> Text Document from the Menu Bar, clicking on the New Document Icon on the Function Bar. Copyright©2003-2004 Mimos Berhad Page 6 OpenOffice.org1.1 Version1.1 Writer Selecting, Moving, and Copying in OpenOffice.org Writer Selecting Text You can drag the mouse to select text. To select by dragging, move the insertion point to the beginning or the end of the desired text string, hold down the left mouse button, and move in the desired direction. After you select the text, the text is highlighted. There are a number of ways to select text. To Select A word Single line Entire document This is what you need to do Double-click anywhere in the word Triple-click anywhere in the paragraph Choose Edit, Select All from the menu bar, and hold Ctrl and click the left margin; or Ctrl+A or triple click the left margin. Moving and Copying Text 1. 2. 3. 4. Select the text you want to move or copy. Click the Cut or Copy button from the Standard Toolbar. Move where you want to place the text. Click the Paste button. Note : Cut, Copy and Paste are standard functions that have corresponding shortcut key you can use even if menu and toolbar options are not available. Select the text or object and press Ctrl+X to cut, Ctrl+C to copy, or Ctrl+V to paste. Moving Text Using Drag-and-Drop 1. 2. 3. 4. Identify the text you want to move and its destination. Select the text. Drag the text to its new location while holding down the left mouse button. Drop the selection into position by releasing the mouse button. Note : To drag is to click and hold the mouse button on anywhere in the selection, and then move the pointer to a new location, and release the mouse button. Copyright©2003-2004 Mimos Berhad Page 7 OpenOffice.org1.1 Version1.1 Writer Opening and Saving Documents There are several ways of opening documents. For example, you can use the Open dialog and the Templates and Documents dialog. Opening Documents To open an existing document that was saved on the hard drive or on a disk, you have several possibilities. You can either choose File –> Open, click the Open File icon on the function bar, or use Ctrl+O shortcut keys. The Templates and Documents Dialog The Templates and Documents dialog can be regarded as a kind of command center for OpenOffice.org documents. It provides easy access to your work directory and to the supplied sample documents. To open the dialog, choose File –> New –> Templates and Documents or press Shift+Ctrl+N. Or you can double-click the OpenOffice.org Quickstarter icon on the task bar. Copyright©2003-2004 Mimos Berhad Page 8 OpenOffice.org1.1 Version1.1 Writer The dialog offers the following areas, which you can select by clicking in the left field: New Document – This is one way of creating a new, empty document. Templates – Choose from the many ready-to-use document templates we have prepared. My Documents – A quick route to the documents in your work directory. To define your work directory, choose Tools –> Options –> OpenOffice.org –> Paths. Samples – The provided samples show you what you can do with OpenOffice.org Saving Documents To save your current document, use the Save command in the File menu, the Save Document icon on the function bar, or just press Ctrl+S. Copyright©2003-2004 Mimos Berhad Page 9 OpenOffice.org1.1 Version1.1 Writer When you save a document for the first time a dialog will appear in which you choose where you want to store the file. Assign your text document a name when you save it the first time. You can choose any name you'd like. Save your documents regularly as you work on them. Saving Documents Automatically To save a backup every time you save a document: 1. Choose Tools –> Options –> Load/Save –> General. 2. Mark 'Always create backup copy'. If you save the current document with File –> Save or (Ctrl+S), under the path and file name from which you opened it, the old version will be overwritten by the new version. If the Always create backup copy check box is marked, the old version is first copied to the backup directory. Copyright©2003-2004 Mimos Berhad Page 10 OpenOffice.org1.1 Version1.1 Writer Exporting Documents to PDF You can export the current document as an Adobe PDF (Portable Document Format) file. This format ensures that formatting will be kept as intended even if the user open the document in another computer with another operating system. A PDF file can be opened by the Adobe PDF Reader software, which is available for all operating system for which you can get the OpenOffice.org. You cannot open a PDF file in OpenOffice.org, but you can export any OpenOffice.org document to PDF. To export the current document to PDF, do one of the following as applicable. Click the Export Directly as PDF icon on the Function bar. Choose File –> Export as PDF. Enter a name and click OK. This will open a dialog with a choice of options. Copyright©2003-2004 Mimos Berhad Page 11 OpenOffice.org1.1 Version1.1 Writer Using the OpenOffice.org Proofing Tools Correct Spelling Spelling : English(United states) As you type, OpenOffice.org can automatically check your document and underline possible spelling errors (red line for spelling error). To correct an error, just retype the correct spelling or grammar. You also can re-check the document for spelling errors by clicking spellcheck button on the standard toolbar. If the document have spelling errors, a Spellcheck: English (USA) window will display, and then select the correction you want. If the document do not have any errors, a window shows up and says that the spelling check is complete. Copyright©2003-2004 Mimos Berhad Page 12 OpenOffice.org1.1 Version1.1 Writer Note: It is a U.S -English word, not British English word so the spelling : English (United States) window also will display if there is a different spelling between them. Using the Thesaurus The thesaurus offers assistance only when you call it. The function of thesaurus is to find synonyms. 1. Click the word you want to look up and choose Tools -> Thesaurus to open the Thesaurus dialog box or type CTRL+F7. 2. Click words in the Meanings column that best represent your context to see synonyms for them. Double-click to get a list of words that have the same or similar meaning. 3. To review previously looked up words, select from the drop-down list under Word. Copyright©2003-2004 Mimos Berhad Page 13 OpenOffice.org1.1 Version1.1 Writer Doing More with Text Text Appearance Formatting type The look of the character you type is automatically set when you begin typing, but you can change it by choosing different font formatting or others. The easiest way to make changes is by using formatting toolbar. Apply character formatting To apply character formatting to a single word, click the word. To apply character formatting to several words or a few characters within a word, select the text. Change the font of text or numbers 1. Select the text you want to change. 2. On the Formatting toolbar, click a font name in the Font box. Note : Font types may depend on your operating system. Change the size of text or numbers 1. Select the text you want to change. 2. On the Formatting toolbar, click a point size in the Font Size box. Apply bold formatting to text or numbers 1. Select the text you want to make bold. 2. Click Bold . Apply italic formatting to text or numbers Copyright©2003-2004 Mimos Berhad Page 14 OpenOffice.org1.1 Version1.1 Writer 1. Select the text you want to make italic. 2. Click Italic . Underline text or numbers 1. Select the text you want to underline. 2. Click Underline . Apply embossed, imprinted, outlined, or shadow formatting 1. Select the text you want to format. 2. On the Format menu, click Character, and then click the Font Effects tab. 3. Under Font Effects, select the options you want. Apply strikethrough formatting to text or numbers 1. Select the text that you want to format as strikethrough. 2. On the Format menu, click Character, and then click the Font Effects tab. 3. Select the Strikethrough check box. Subscript/ Superscript text or numbers 1. Select the text you want to format as subscript. 2. On the Format menu, click Character, and then click the Position tab. 3. If you choose Subscript, click the Subscript check box. 4. If you choose Superscript, click the Superscript check box. Copyright©2003-2004 Mimos Berhad Page 15 OpenOffice.org1.1 Version1.1 Writer Change Character Spacing Change the spacing between characters 1. Select the text you want to change. 2. On the Format menu, click Character, and then click the Spacing tab. 3. To expand or condense space between characters, click Expanded or Condensed in the Spacing box, and then specify how much space you want in the By box. Change the alignment of text alignment button Text alignment that you set by using buttons on the Formatting toolbar, shortcut keys or the Paragraph command affects an entire paragraph. Sometimes you might want to vary the alignment within a single line of text. For example, in the header of a report, you might want the report title aligned with the left margin, the date centered, and the page number aligned with the right margin. Copyright©2003-2004 Mimos Berhad Page 16 OpenOffice.org1.1 Version1.1 Writer Align text with the left margin 1. Select the text you want to align left. 2. Click Align Left . Center text 1. Select the text you want to center. 2. Click Centered . Align text with the right margin 1. Select the text you want to align with the right margin. 2. Click Align Right . Justify text 1. Select the text you want to justify. 2. Click Justified . Copyright©2003-2004 Mimos Berhad Page 17 OpenOffice.org1.1 Version1.1 Writer Line and Page Breaks Tabs Line and Page Breaks Tab To prevent a page break within a paragraph 1. Select the paragraphs that contain lines you want to keep together. 2. On the Format menu, click Paragraph, and then click the Text Flow. 3. Under Options, select the Do not split paragraph check box. Copyright©2003-2004 Mimos Berhad Page 18 OpenOffice.org1.1 Version1.1 Writer Keep with next paragraph To prevent a page break between the selected paragraph and the following paragraph: 1. Select the paragraphs you want to keep together on a page. 2. On the Format menu, click Paragraph, and then click the Text Flow. 3. Select the Keep with next paragraph check box. Indents and Spacing tab Indents and Spacing tab Adjust paragraph spacing 1. Select the paragraphs that you want to change. 2. On the Format menu, click Paragraph, and then click the Indents and Spacing tab. 3. To add spacing before or after each paragraph, enter the spacing you want in the Above paragraph and Below paragraph boxes under Spacing. Copyright©2003-2004 Mimos Berhad Page 19 OpenOffice.org1.1 Version1.1 Writer Change line spacing 1. Select the paragraphs in which you want to change line spacing. 2. On the Format menu, click Paragraph, and then click the Indents and Spacing tab. 3. Under Line Spacing, select the options you want. Creating and Formatting Numbered and Bulleted list. Numbering, bullets and indent button When you manually number the items in a list, OpenOffice.org Writer converts the typed numbers to automatic numbering. If you begin a paragraph with a hyphen, OpenOffice.org automatically converts the paragraph to a bulleted item when you press ENTER to end the paragraph. Add bullets or numbers 1. Select the items to which you want to add bullets or numbers. 2. To add bullets, click Bullets . To add numbers, click Numbering . Convert bullets to numbers and vice versa 1. Select the items that have bullets or numbers you want to change. 2. Click Bullet s or Numbering Copyright©2003-2004 Mimos Berhad button. Page 20 OpenOffice.org1.1 Version1.1 Writer Bullets Tab Modify bullet or number formats 1. Select the paragraphs that have the bullet or number format you want to change. 2. On the Format menu, click Numbering/Bullets, and then click the tab for the type of list you want to modify. 3. If you are satisied with your selection, then click OK. 4. Select the formatting options you want. Note : In the numbering tab, you can choose either to continue the previous list or restart numbering for your new number format. Remove bullets or numbering 1. Select the items from which you want bullets or numbers removed. 2. To remove bullets, click Bullets . 3. To remove numbers, click Numbering . Tips: To remove a single bullet or number, click between the bullet or number and the corresponding text, and then press BACKSPACE. To remove the indent, press BACKSPACE again. Copyright©2003-2004 Mimos Berhad Page 21 OpenOffice.org1.1 Version1.1 Writer Add a border In a OpenOffice.org document, you can add a border to any or all sides of a table, or a paragraph in your document. You can add a border, including a picture border, to any or all sides of each page in a document. You can also add a border or line to a drawing object - including a text box, an AutoShape, a picture, or imported art. Note : In OpenOffice.org document, you can use the Table command to add borders and shading to a table automatically. What do you want to do? Border tab Add a border to a paragraph, or selected text Copyright©2003-2004 Mimos Berhad Page 22 OpenOffice.org1.1 Version1.1 Writer 1. To surround a paragraph or specific text with a border, select the paragraph or the text. 2. On the Format menu, click Paragraph, and then click the Borders tab. 3. Select the options you want, then click OK. Add a border to a page in a document 1. 2. On the Format menu, select Page, and then click the Border tab. Select the options you want, then click OK. Note : To change a border on a page, repeat step 1 to 2. Remove a border from a page in a document You can remove borders from any or all sides of a page, a paragraph, or selected text in a document. 1. To remove a page/paragraph or any border, select the border. 2. On the Format menu, select Page, and then click the Border tab. 3. Under Line style, click None. Copyright©2003-2004 Mimos Berhad Page 23 OpenOffice.org1.1 Version1.1 Writer Creating A Table Create a table Tables are used to organize information and create interesting page layouts with side-by-side columns of text and graphics. The quickest way to create a simple table - for example, is by clicking the insert table icon from Main toolbar. Create Table Icon Insert a table 1. Click where you want to create a table. 2. Click icon from the main type menu, and specify the table name and number of rows and columns you want. Or from the main menu, click Insert and then click Table. 3. Specify the name of the table. 4. Select the number of rows and columns you want and then click OK. Copyright©2003-2004 Mimos Berhad Page 24 OpenOffice.org1.1 Version1.1 Writer Add rows or columns to a table 1. Place the cursor in the entire row or column. 2. Click the mouse right button, and choose Row or Column. Click Insert. 3. Choose the number of row or column you want to insert. Click OK. Delete a table, rows or columns from a table You can delete rows, or columns, or you can delete an entire table. You can also clear the contents of cells without deleting the cells themselves. 1. Select the table, rows or columns by clicking on it. 2. Click the mouse right button, select Row or Column and then select Delete. Clear the contents of a table 1. Select the items you want to clear. 2. Press DELETE. Split a cell into multiple cells in a table Split cells window Select the cell that you want to split. Click the mouse right button, and select Cell. Click Split. 3. Choose your option from Split Cells Window. 1. 2. Copyright©2003-2004 Mimos Berhad Page 25 OpenOffice.org1.1 Version1.1 Writer Merge cells into one cell in a table You can combine two or more cells in the same row or column into a single cell. For example, you can merge several cells horizontally to create a table heading that spans several columns. Select the cells that you want to merge. 2. Click the mouse right button, and select Cell then click Merge. 1. Formatting Pages Page numbers, headers, and footers make a lengthy document easier to follow. OpenOffice.org Writer can automatically numbering the pages, to inserting different headers and footers on odd and even pages. Creating and Modifying Page Numbers 1. To insert a page number, go to Insert, click Field and click Page Number to insert the page number. The Page Number Format dialog box allows you to choose a numbering style such as “A, B, C” or “1,2,3” and to include the chapter number. Click on Format, then click Page. Copyright©2003-2004 Mimos Berhad Page 26 OpenOffice.org1.1 Version1.1 Writer Creating Headers and Footers Headers and footers are placed in the top and bottom margins. 1. To insert a header and footer, choose Insert -> Header or Footer. 2. The existing document text is immediately dimmed and the Header text box at the top of your document opens. 3. Enter the text you want to appear in the Header text box. 4. Use the toolbar buttons to create and modify the headers and footers. Import graphics Insert a picture You can insert clip art or a picture from the Gallery, or you can insert a picture or a photo imported from other programs and locations. From the toolbar menu, click Tool then select Gallery. A list of 3D Pictures will appear and it sort by a categories. Just click your selection category and choose your selection by click the mouse right button, then select Insert -> Copy. To disable the graphic menu, click Hide/Show button at the bottom of the graphic menu. Copyright©2003-2004 Mimos Berhad Page 27 OpenOffice.org1.1 Version1.1 Writer Gallery Insert a picture from another file 1. Position the insertion point where you want to insert some clip art or a picture. 2. On the Insert menu, point to Graphic, click From File, and then select the suitable graphic by click the Open tab. Insert a spreadsheet into an OpenOffice.org document OpenOffice.org provides several ways to insert spread data into a OpenOffice.org document. For example, you can easily copy and paste a worksheet or chart. Or you can insert the worksheet or chart as a linked object or embedded object. The main differences between linking and embedding are where the data is stored and how it is updated after you place it in the document. An embedded worksheet or chart stores its information directly in the OpenOffice.org document. To edit the embedded object, just double-click it to start OpenOffice.org spreadsheet, make your changes, and then return to OpenOffice.org document. You can embed an existing worksheet or chart, or start from scratch by embedding a new, blank worksheet or chart. Because the information is totally contained in one OpenOffice.org document, embedding is useful when you want to distribute an online version of your document to people who won't have access to independently maintained worksheets or charts. Copyright©2003-2004 Mimos Berhad Page 28 OpenOffice.org1.1 Version1.1 Writer Create an embedded object from an existing spreadsheet or chart 1. Open both the OpenOffice.org document and the Spreadsheet workbook that contains the data you want to create an embedded object from. 2. Switch to Spreadsheet, and then select the entire worksheet, a range of cells, or the chart you want. 3. Click Copy. 4. Switch to the OpenOffice.org document, and then click where you want to insert the embedded object. 5. On the Edit menu, click Paste Special. Paste Special 6. In the Selection box, click OpenOffice.org 1.1.0 Spreadsheet and then click OK. Copyright©2003-2004 Mimos Berhad Page 29 OpenOffice.org1.1 Version1.1 Writer Indexes and Tables of Contents In your OpenOffice.org Writer documents you can have any number of predefined or user-defined indexes. For example, you can have a table of contents, alphabetical index, illustration index or bibliography. Creating a Table of Contents 1. Place the cursor where you want to create the table of contents. 2. Choose Insert –> Indexes and Tables –> Indexes and Tables. The Insert Index/Table dialog appears. Click the Index/Table tab and select “Table of Contents” as Type (the first time you start this dialog, this tab page and type are already selected). 3. Click on OK if you want to generate the table of contents from the headings and entries you have defined. 4. If you want to insert an additional paragraphs of another Paragraph Style into the table of contents, mark the Additional Styles check box and click the icon next to the box. A dialog will open where you can define which Paragraph Styles are also to appear in the table of contents and on which level they are to be shown. Updating a Table of Contents Place the cursor in the table of contents. Click the mouse right button and select Update Index/Table. You can also select Tools –> Update –> All Indexes and Tables to update all the indexes and tables of contents in a document. Deleting a Table of Contents Place the cursor in the table of contents. Click the mouse right button and select Delete Index/Table. Copyright©2003-2004 Mimos Berhad Page 30 OpenOffice.org1.1 Version1.1 Writer Creating Alphabetical Indexes 1. Place the cursor where you want to create the index. 2. Choose Insert –> Indexes and Tables –> Indexes and Tables. The Insert Index/Table dialog appears. 3. On the Index/Table tab, select “Alphabetical Index” as Type. 4. To generate the alphabetical key world index using the default settings, click OK. Note : If you want to change the formatting of the individual lines in the index, it is best to edit the Paragraph Styles in the Stylist. All direct formatting will be overwritten at the next update. Copyright©2003-2004 Mimos Berhad Page 31 OpenOffice.org1.1 Version1.1 Writer Mail merge It is a tools used to simplify repetitive documents. It can be used to create many documents at once but those documents contain identifical formatting, layout, etc. Mail merge is commonly used to generate envelopes, address lists, a membership directory, memorandum, etc. Creation of the Database Source (To do a mail merge in OpenOffice.org, you have to transform your spreadsheet into a database source, so that you'll be able to display it inside the Beamer) Open and completed your spreadsheet, and save the file. Close your document. In the Tools menu, select Data Sources. Data Source Administration Window Click on 'New Data Source'. Type a suitable name for it. Under Connection, choose the type of document that you will use as the Data Source. In the Tables tab, verify that your spreadsheet name has been selected. Click OK and your sheet will be usable for a mail merge. Copyright©2003-2004 Mimos Berhad Page 32 OpenOffice.org1.1 Version1.1 Writer Creation of the Mail template Open a new text document. Type the content of the letter. (You don't need to insert the address fields at this moment. You can type an asterisk (*) as a place holder, to orient yourself when you have completed your letter) Save the file, but don't close it. From the 'View' menu, select 'Data Sources' (or hit F4 key). Your registered data sources will be displayed in the Beamer and you only have to select the source with which you wish to work : Click on the little cross, next to your data source name, to display its content tree. Then, by clicking on the name of a table, you will see displayed fields and their records in the right side of the Beamer. Add the fields into your document. Click and hold on the field, eg. Name (or whatever your field is named), of your table. Copyright©2003-2004 Mimos Berhad Page 33 OpenOffice.org1.1 Version1.1 Writer Holding the mouse button down, drag it up to the asterisk placeholder in your document and release it. The field will be displayed in your document are : *<Nama> * * Repeat this action for another field. When you have inserted all your fields, you're ready for the merging. Merging Select the records you need. Click on the rectangle at the upper left corner of the table to select all records. Or click on the gray rectangle display to its right to select all fields. To select records that are not consecutive, hold the CTRL key down while making the selections. Now you can do your merging. On the Toolbar of the Beamer, the icon before the last displays some letters. Click on it to access the sorting tools : Copyright©2003-2004 Mimos Berhad Page 34 OpenOffice.org1.1 Version1.1 Writer You'll see the pop-up below : Sort the records, as you have selected them, in the previous procedure. Then choose the devices to which output is to be redirected. If you choose 'File', you have to select the file path by clicking on the button with 3 points to the right of the 'Path' text box, so you can browse your file system up to the file you wish to use. There will be a file created for use with the records selected. You can name this file according to whichever field name of your data source. Now the operation is terminated and the merging completed! Copyright©2003-2004 Mimos Berhad Page 35