1
StarOffice™ 5.2
User's Guide
Sun Microsystems, Inc.
901 San Antonio Road
Palo Alto, CA 94303
U.S.A. 650-960-1300
Part No. 806-4406-10
June 2000, Revision A
Copyrights and Trademarks
Copyright © 2000 Sun Microsystems, Inc. All rights reserved.
Use of the Software (including Documentation) is subject to the terms and conditions of accompanying license
agreement. Installation or use of the Software constitutes acceptance of all terms and conditions of the license.
Sun, Sun Microsystems, the Sun logo, StarOffice, the StarOffice logo, Java, Solaris, and JRE (Java Runtime Environment) are trademarks or registered trademarks of Sun Microsystems, Inc. in the United States and other
countries.
PostScript is a registered trademark of Adobe Systems Inc.
X-Printer is a registered trademark of Bristol Technology Inc.
SPARC is a registered trademark of SPARC International Inc.
UNIX is a registered trademark, which is solely licensed in the United States, and in other countries by X/Open
Company Ltd.
Motif is a registered trademark of Open Software Foundation Inc.
X Window System is a trademark of X Consortium Inc.
International Electronic Thesaurus © 1992 and International CorrectSpell © 1991, both from Lernout & Hauspie
Speech Products N.V. All rights reserved. International CorrectSpell is a registered trademark of Lernout &
Hauspie Speech Products N.V. No part of the computer algorithms or databases may be copied or reproduced
or disassembled in any manner whatsoever.
Word for Word © 1996 Inso Corp.
Adabas D Copyright Jan. 2000 Software AG.
R:BASE Technologies, Inc has licensed Oterro to Sun Microsystems, Inc. Oterro is a registered trademark of
R:BASE Technologies, Inc. R:BASE Technologies, Inc is not liable for any claims made against products from
Sun Microsystems, Inc.
The copyright for the import and export filters used in this program is the property of Independent JPEG-Group
and Sun Microsystems, Inc.
The copyright for the clip arts supplied is the property of Management Graphics.
The JRE (Java Runtime Environment) for OS/2 made by Sun Microsystems, Inc. is exclusively licensed to
owners of a IBM OS/2 license.
Portions allowing ASN.1 encoding and decoding are © 1997 Eric Young. All rights reserved.
Portions © 1998, 1999 James Clark. Portions © 1996,1998 Netscape Communications Corporation. Portions ©
1996, 1997 Kenneth Albanowski. You can find the original as well as - if applicable - the modified versions at
http://www.sun.com/staroffice.
The following statement only applies to vCard and vCalendar: © Copyright 1996 Apple Computer, Inc., AT&T
Corp., International Business Machines Corporation and Siemens Rolm Communications Inc. For purposes of
this license notice, the term Licensors shall mean, collectively, Apple Computer, Inc., AT&T Corp., International
Business Machines Corporation and Siemens Rolm Communications Inc. The term Licensor shall mean any of
the Licensors. Subject to acceptance of the following conditions, permission is hereby granted by Licensors
without the need for written agreement and without license or royalty fees, to use, copy, modify and distribute
this software for any purpose. The above copyright notice and the following four paragraphs must be reproduced in all copies of this software and any software including this software. THIS SOFTWARE IS PROVIDED
ON AN "AS IS" BASIS AND NO LICENSOR SHALL HAVE ANY OBLIGATION TO PROVIDE MAINTENANCE, SUPPORT, UPDATES, ENHANCEMENTS OR MODIFICATIONS. IN NO EVENT SHALL ANY
LICENSOR BE LIABLE TO ANY PARTY FOR DIRECT, INDIRECT, SPECIAL OR CONSEQUENTIAL
DAMAGES OR LOST PROFITS ARISING OUT OF THE USE OF THIS SOFTWARE EVEN IF ADVISED OF THE
POSSIBILITY OF SUCH DAMAGE. EACH LICENSOR SPECIFICALLY DISCLAIMS ANY WARRANTIES,
EXPRESS OR IMPLIED, INCLUDING BUT NOT LIMITED TO ANY WARRANTY OF NONINFRINGEMENT
OR THE IMPLIED WARRANTIES OF MERCHANTABILITY AND FITNESS FOR A PARTICULAR PURPOSE.
The software is provided with RESTRICTED RIGHTS. Use, duplication, or disclosure by the government are
subject to restrictions set forth in DFARS 252.227-7013 or 48 CFR 52.227-19, as applicable.
Contents
1. Introduction
17
Basics for Working with StarOffice
18
Intuitive Solutions with StarOffice
18
StarOffice for Advanced Users
Icons in the Documentation
18
18
Part I: Basics for Working with StarOffice
2. The StarOffice Help
21
3. The StarOffice Desktop
23
Overview of the Screen Elements
The Title Bar
The Menu Bar
19
23
25
26
The Function Bar
27
3
The Desktop
27
Document Windows
The Task Bar
29
The Explorer
29
The Beamer
28
31
Task Oriented Work with StarOffice Desktop
Setting up and Managing Projects
32
34
Adapting the Look & Feel of Your Operating System
Using the StarOffice Functions
38
Opening a Text Document
Opening a Spreadsheet
41
42
Writing an E-mail Message
Creating a Presentation
Creating a Drawing
42
42
43
Creating an HTML Document
43
Using the Database Functions
43
Working with a FrameSet
43
Creating a Master Document
Creating a Chart
44
Editing an Image
44
Creating a Formula
37
44
45
Creating New Documents with Templates and AutoPilots
Managing Events and Tasks
Adapting the Start Menu
4
StarOffice 5.2 User's Guide • June 2000
46
46
45
Working with the Windows and Bars in StarOffice
Modifying the Window View.
47
47
Hiding and Showing the Explorer, Beamer, Navigator and Stylist
Docking Windows
49
Enlarging and Reducing Docked Windows
Changeable Toolbars
The Task Bar
50
50
51
The Floating Toolbars
53
The Explorer and its Components
Groups in the Explorer
54
54
Creating a New Group in the Explorer
Explorer and Beamer
61
Basics for Working with Text
Entering New Text
56
56
4. Basics for Text Documents
Inserting Text
48
61
61
62
Selecting and Deleting Text
62
Text Navigation via the Keyboard
The Direct Cursor
64
Correcting Typing Errors
64
Opening and Saving Documents
Opening Documents
Saving Documents
64
65
65
66
Contents
5
Printing Documents
68
Viewing the Page to be Printed
69
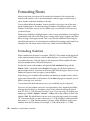
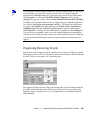
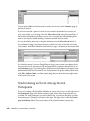
Printing Several Pages on One Sheet
Printing Brochures
The Toolbars
70
70
71
Creating Text With or Without Styles
Hard or Soft Formatting
72
Using Styles in StarOffice
73
Page Styles and Page Numbers
Page Style: Summary
72
80
86
The Standard Template
86
Organizing Document Templates on the Desktop
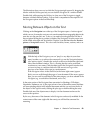
The Navigator
88
Moving Between Objects in the Text
Moving Between Reminders
90
Jumping to a Specific Page
Other Navigator Features
90
90
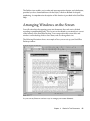
Arranging Windows on the Screen
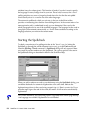
The Spellcheck Function
Auto Spellcheck
91
92
92
Checking Multilingual Texts
Starting the Spellcheck
93
94
Excluding Text from the Spellcheck
6
StarOffice 5.2 User's Guide • June 2000
89
95
87
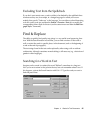
Find & Replace
95
Searching for a Word in Text
95
Searching for Whole Words Only
Match Case
96
Regular Expressions
97
Searching Backward
97
Current Selection Only
Searching for Styles
Attributes
96
97
97
98
Searching for Specific Formats
Similarity Search
99
99
Using Automatic Functions
100
Using AutoCorrect and AutoFormat
Using AutoText
100
103
Creating a Letter Template with the AutoPilot
Free Positioning of Text, Drawing Lines
Accentuating Text
113
Slanting Text
113
112
5. Working with Spreadsheets
The Structure of a Spreadsheet
Rows and Columns
105
106
Drawing Lines in Text
Curving Text
104
115
115
116
Multiple Sheets in a Document
117
Contents
7
Values and Formulas as Cell Contents
Calculations in a Spreadsheet
118
119
Using the Euro Conversion Function
What Can a Cell Contain?
Text
122
122
Numbers
123
Cells in Currency Format
Dates and Times
Formulas
Notes
120
124
125
127
128
How Can Cells Be Addressed?
Relative Addressing
Absolute Addressing
128
128
128
When to Use Relative or Absolute References
Addressing with Cell Names
Automatic Addressing
130
131
Cursor Positioning via the Keyboard
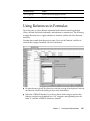
Using References in Formulas
133
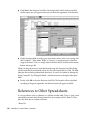
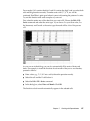
References to Other Spreadsheets
Automatic Fill
134
136
Using Sort Lists
136
Automatic Calculation of Series
Formatting Sheets
138
Formatting Numbers
138
Formatting Cells and Sheets
8
StarOffice 5.2 User's Guide • June 2000
139
136
132
129
Using AutoFormat for Sheets
Tables in Text Documents
139
140
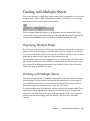
Dealing with Multiple Sheets
141
Displaying Multiple Sheets
141
Working with Multiple Sheets
Printing Spreadsheets
141
142
Database Functions in StarOffice Calc
Defining a Database Range
Sorting a Database
Filtering Data
143
143
145
146
Grouping Data and Calculating Subtotals
147
Importing Data from a Database to a Spreadsheet
Layout in Tables and Sheets
151
Creating Structured Spreadsheets
151
Preparing Tables in Text Documents
Working with Charts
153
156
6. Working with Presentations
A Simple Presentation
148
161
161
Creating a Presentation with the AutoPilot
162
Creating a Simple Presentation without the AutoPilot
Arranging Slides in the Slide View Mode
Incorporating Slide Show Effects
Showing a Presentation
166
168
169
169
Contents
9
Enhancing a Presentation
169
Defining a Background Color
Modifying the Slide Design
Presentation Styles
170
171
172
Slide Transition, Effects and Animation
Individual Presentations
174
176
Exporting, Printing, and Presenting
177
Transferring a Presentation
178
Printing a Presentation Slide
178
Exporting a Presentation to a File
179
Exporting your Presentation as a Series of HTML Pages
Exchanging Data via the Clipboard
Using the StarOffice Player
181
182
7. Basics for Drawings and Graphics
183
Vector Graphics and Pixel Graphics
183
Drawing Rectangles and Ellipses, Entering Text
Moving, Rotating and Putting Text on Objects
Arranging Objects
185
186
Aligning Objects
186
Drawing Sectors and Segments
Entering Text
183
187
188
Transforming Text to 3D
190
Drawing, Editing and Converting Curves and Objects
Drawing All Kinds of Curves
Editing a Curve
10
192
StarOffice 5.2 User's Guide • June 2000
191
190
180
Transforming Bitmaps into Vector Graphics
193
Converting into a Curve, Polygon, 3D or 3D Rotation Object
Working with Objects
196
Duplicating an Object
197
Cross-fading Between Two Objects
Working with a Group of Objects
198
199
Graphic Objects in Drawings and Presentations
Working with Colors
The Color Bar
201
202
202
Defining Custom Colors
203
Replacing Colors with the Eyedropper
205
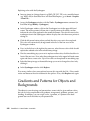
Gradients and Patterns for Objects and Backgrounds
Working with Color Gradients
207
Organizing the Attribute Tables
209
Defining a Background Color
8. Events & Tasks
206
209
211
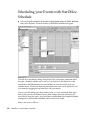
Scheduling your Events with StarOffice Schedule
Editing Events
194
212
213
How Days and Weeks Appear in the Event Window
Drag&Drop in the Event Window
216
Organizing your Tasks with StarOffice Schedule
View Options in the Task Window
The Details Section for Tasks
218
Printing your Events and Tasks
219
215
217
218
Contents
11
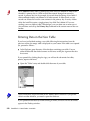
9. Working with StarOffice Base
StarOffice Base Glossary
221
221
Editing the Address Book as a Database Table
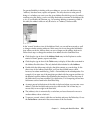
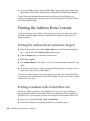
Printing the Address Book Contents
222
224
Printing the Address Book Contents as a Report
Printing a Database Table in StarOffice Calc
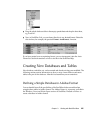
Creating New Databases and Tables
224
225
Defining a Simple Database in Adabas Format
225
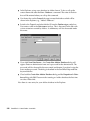
Creating a New Table in an Existing Database
227
Entering Data in the New Table
Creating a Form
230
232
Creating a New Form
232
Address Book Mask with Form Functions
Entering Data in Your Form
Creating a Report
240
241
Creating a New Report
241
Editing an Already Existing Report
Part II: Intuitive Solutions with StarOffice
10. Working with Text Documents
Templates and AutoPilots
Personal Uses
251
253
Labels and Business Cards
Resumes
Invitations
251
252
Letters with Envelopes
12
224
263
267
StarOffice 5.2 User's Guide • June 2000
258
245
249
235
Professional Uses
270
Business Letters
Fax
271
276
Form Letters
281
Invoices and Delivery Receipts
DTP Applications
289
Handouts and Flyers
Brochures
290
293
Newsletters
298
Large Documents
Books
286
306
307
Academic Papers
314
Business Reports
319
11. Working with Spreadsheets
Applications for Personal Use
Loans and Mortgages
Household Budget
325
325
326
328
Managing a Stocks Portfolio
331
Viewing Stock History as a Chart
Applications for Business Use
Shift Plan
344
Calendars
350
Recar Scenarios
340
344
353
Contents
13
Applications for Special Areas
Movies
356
356
Editing a Single dBase File in StarOffice Calc
Conversion Table
363
12. Working with Presentations
Presentations
365
365
Business Report
366
Product Introductions
Organization Charts
372
376
Recar Shareholder Meeting
381
13. Working with Drawings and Graphics
Graphics for Personal Use
CD Covers
3D Globe
385
385
386
388
Graphics for Business Use
Posters
359
393
393
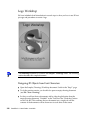
Logo Workshop
396
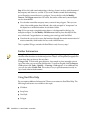
Construction Drawing
399
14. Applied Schedule Management with StarOffice Schedule
The Details View of Events and Tasks
Entering an Alarm for an Event
Organizing Recurring Events
Further Details
403
403
405
407
Synchronizing an Event Among Several Participants
14
StarOffice 5.2 User's Guide • June 2000
408
403
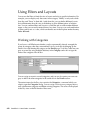
Using Filters and Layouts
410
Working with Categories
410
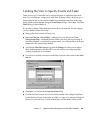
Limiting the View to Specific Events and Tasks
Using Various View Layouts
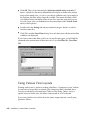
Finding Events
412
413
Further Information about Events
Displaying Weekends
414
414
Showing and Hiding Days and Weeks
The Task View
415
416
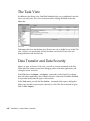
Data Transfer and Data Security
The StarOffice Schedule Server
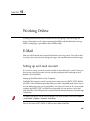
15. Working Online
E-Mail
411
416
417
419
419
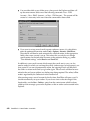
Setting up an E-mail Account
Sending and Receiving E-mail
Formatting E-mail Messages
E-mail Merge
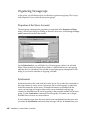
Newsgroups
419
422
427
428
430
Using Newsgroups
430
Organizing Newsgroups
World Wide Web
436
438
Surfing the World Wide Web
438
Finding Internet Pages and Saving Locally
441
Contents
15
Homepages
444
Creating a Homepage
444
Working with Frames and FrameSets
Text and Links
451
Uploading via FTP
455
16. Working with Databases
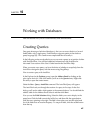
Creating Queries
449
457
457
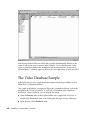
The Video Database Sample
Creating a Database
460
461
Planning the Structure
462
Creating Database Tables
Modifying Existing Tables
465
466
Creating and Modifying the Forms for "Movies" and "Tapes"
Entering Data
472
Creating Queries
Creating a Report
472
477
Combining the Use of StarOffice Base and StarOffice Calc
16
StarOffice 5.2 User's Guide • June 2000
477
467
CHAPTER
1
1
Introduction
The role of user's guides, especially in the software field, has changed in recent years.
Many of the usual basic duties of handbooks are often better conveyed in the electronic Help files provided. It is no longer feasible or possible to have a complete explanation of every available function in a guide, especially when you consider the
complexity of today's modern office programs.
With this User's Guide, we have attempted a new approach by taking into consideration suggestions and ideas from our customers. We would like to address all your
needs, but at the same time avoid several thousand pages of documentation. Thus, not
all of the StarOffice capabilities are explained in detail, and, unfortunately, due to the
relatively early printing of this guide, some of the latest capabilities may not have been
mentioned. You can always find the most up-to-date version of our User's Guide in
the StarOffice Help (see menu and icon). In each section of the Help guide there are
several hyperlinks which lead directly to related topics. Furthermore, in the StarOffice
Help you will find the detailed directions, explanations and tips which could not be
included in the printed User's Guide.
Everything found in this User's Guide can also be found in the StarOffice Help. Any
changes which may have been made to the program after this guide was printed have
been accounted for and updated in the StarOffice Help.
The User's Guide describes functions available in the Windows version of StarOffice.
Depending on the platform you use, some functions may be restricted. If functions
described either here or in the StarOffice Help are not available on your platform, this
is not a program error, but rather a system restriction based on the platform you are
using.
This guide is written for users who are already familiar with the basic operation of a
computer. This includes turning the computer on and off, and general operation
system functions such as starting and ending programs as well as opening and closing
documents.
17
Basics for Working with StarOffice
This guide will help you will learn the basic steps needed to operate StarOffice. Examples have been included to help you learn how to use the individual applications.
Intuitive Solutions with StarOffice
This section concentrates on the most commonly used procedures in StarOffice.
Whether you wish to create a business letter, an invitation, a loan calculation or a presentation, simply go to the appropriate topic and follow the instructions for creating
professional documents.
StarOffice for Advanced Users
The Advanced section contained in the electronic Help of StarOffice addresses this
need and explains the important areas in more detail. A detailed description of all
sections can be found in the StarOffice Help.
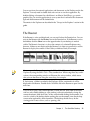
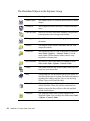
Icons in the Documentation
There are three icons in this documentation that mark sections containing helpful
additional information.
Important! This icon refers to a topic that contains important information regarding
data and system security.
Note: This icon refers to a topic that contains additional information. This information, for example, can refer to alternative ways to reach a certain goal.
Tip: This icon provides tips for working with the program in a more efficient manner.
18
StarOffice 5.2 User's Guide • June 2000
Part I: Basics for Working with
StarOffice
Welcome to the first section of the StarOffice User's Guide! This section was written
for people who are new to StarOffice. That means that you will find an explanatory
introduction to the StarOffice interface, basic knowledge necessary for working with
StarOffice, and you will become familiar with a selection of the diverse functions
available. Remember that any topics not described in detail in this guide can be found
in the StarOffice Help.
19
20
StarOffice 5.2 User's Guide • June 2000
CHAPTER
2
2
The StarOffice Help
If you are a newcomer to StarOffice you should activate the Extended Tips. Once activated, simply resting your mouse cursor on a screen element for a moment displays a
short description of that function. You can turn on the Extended Tips by selecting that
item from the Help menu. A check mark will appear left of the command to indicate
that the function is activated. Click again on the command to deactivate the Extended
Tips and the check mark will be removed.
We also recommend activating the Tips option in the Help menu (show the checkmark). Not only will the name of an icon appear when the mouse cursor rests on it,
but the tips are also useful in other situations, for example, in spreadsheets, where the
row or column number appears when you scroll up or down.
For additional Help, the Help Agent automatically opens for the more complex
dialogs or can be activated by pressing the Help button contained in the
dialogs themselves. Turn it on or off at any time by clicking the Help icon in
the Function bar (the uppermost icon bar).
The Help Agent is an extended Help function enabling you to browse and search for
explanations and terms using the provided hyperlinks. Start the Help Agent using the
F1 key, for example. Once you have found an interesting command which opens a
dialog, use the Show me button to display the corresponding text. This button is,
however, not always available. Ask the Help Agent questions using the Question
mark icon.
21
The general Help is activated by clicking the Help entry in the Explorer; by using the
Help menu; or with the corresponding icon in the Help Agent. The StarOffice Help
consists of the latest version of the entire User's Guide and includes helpful hyperlinks. Note that the StarOffice Help is context sensitive. That means that, if you want
help with a spreadsheet, you open a spreadsheet first and then activate the Help, or
choose the desired Help topic in the list box at the top of the Help window. The Find
function in the Help will then also be set to look for topics dealing with spreadsheets.
22
StarOffice 5.2 User's Guide • June 2000
CHAPTER
3
3
The StarOffice Desktop
This chapter gives you an overview of the components that make up the StarOffice
interface, a description of how to use them, and a first glance at the objects in the
StarOffice Explorer window.
Overview of the Screen Elements
After starting StarOffice you will see the components of the StarOffice interface on
your screen.
23
At the top you will find the Menu bar and the Function bar with their various icons,
and at the bottom the Task bar. Between them, you will see the StarOffice Desktop.
If you run StarOffice as your normal window, you can modify the size, minimize it to
a symbol and restore it, just as you would with other applications in your operating
system.
With the key combination Shift + Ctrl + J or with the View - Full Screen command,
you can change between the full screen view or normal view for your current document. In the Full Screen mode, you will only see the actual document displayed as a
full screen. However, the keyboard short cuts used to call up commands from the
menu still function, for example, Alt + F opens the File menu.
The desktop (your main work area), is the central element of the StarOffice Desktop.
The StarOffice Desktop for Windows displays the same icons as on your Windows
Desktop. Using the context menu of your Desktop icon in the Task bar, you can choose
if you want the Windows Desktop or the StarOffice Desktop. If you are using a
different operating system, your default will be the StarOffice Desktop after the installation process. In the Task bar of the Windows version, you will find the same icons as
in the Windows Start bar. Furthermore, the extended functionality of StarOffice is at
24
StarOffice 5.2 User's Guide • June 2000
your disposal. For example, by simply double-clicking the time display in the Task bar
you can view the StarOffice Schedule calendar.
In the following, the elements of StarOffice that you see on the screen will be described
in more detail.
The Title Bar
If the Integrated Desktop is not activated, StarOffice is displayed in the normal presentation with a Title bar in the upper border. To switch from the integrated to the nonintegrated desktop and vice versa, select the Integrated Desktop command from the
View menu or use the Ctrl + Shift + I shortcut.
Chapter 3
The StarOffice Desktop
25
In the Title bar, you usually see the StarOffice name and the title of the current document. Only when you have defined a title for the document will you see this title
instead of the file name. You can define a title for the current document under File Properties... - Description. If you save a document under a different name or copy the
file in the Explorer, remember to give the document a new title so that you can identify it.
The Menu Bar
The Menu bar is at the top of the StarOffice window. To display the contents of the
menu items, place the mouse cursor on any of the menu items and click the left mouse
button. The menu contents are displayed and you can select any of the commands by
clicking them.
The menus are ordered according to their basic functions. In the Edit menu you will
find functions necessary for editing a document (Copy and Paste, Cut, Undo, etc.). The
View menu contains functions with which you can control your view of a document
and other on-screen elements.
The commands, which can be used for editing, viewing, sequencing, formatting and
printing, etc. a document or its contents, can only be called up if the document is
open and acitve. Active means, in this case, that the document has to be in front of
any others on the screen. If you want the commands to correspond to an object in the
document, then that object has to be selected.
The menus are context sensitive, this means that those menu commands will be available that are relevant to the work being currently carried out. If the cursor is located
in a text, then all of those menu commands are available that are needed to edit the
text. If, for example, you have selected graphics in a document, then you will see all
of the menu commands that can be used to edit graphics.
At any onetime you will only be able to see those menu entries that can be called up.
The deactivated menu entries are hidden. If you wish to have the deactivated menu
commands shown in the menu bars as grayed out entries, go to Tools - Options... General - View and check the field Show inactive menu items.
You can change and customize the Menu bar in StarOffice according to your own
needs and preferences. The same applies to most of the Icon bars and Status bar (via
Tools - Configure or via the toolbars' context menu).
26
StarOffice 5.2 User's Guide • June 2000
The Function Bar
The toolbar beneath the Menu bar is the Function bar. This bar contains icons for some
important commands and functions that can be called up in StarOffice.
At the left of the Function bar, the URL field indicates the document you are currently
working on. In this space, you can also select or enter other URL addresses in order to
open those respective documents. (URL stands for Uniform Resource Locator and
refers to a general address for a document or folder, either in your file system or the
worldwide Internet.)
Under Tools - Options - General... - View you can choose to display large or normal
icons in the Toolbars, and can show these raised (3D) or flat.
Some other toolbars are the Object bar, the Main toolbar and the Option bar. These
bars will appear depending on the document type you are working with in StarOffice:
■
A toolbar containing specific graphics and drawing tools will be available when
you're working on a StarOffice Draw document.
■
When editing a text document, the text Object bar contains functions for bold or
italic font attributes, etc.
■
If your cursor is positioned within a frame in a text document, a special frame
Object bar is displayed that you can use to modify the frame properties.
The environment in StarOffice (menu commands, context menus, toolbars, status bars,
etc.) will always adapt to the object you're currently working on.
Some icons have a small green triangle, which means that you can open these icons by
holding the mouse button down a few seconds longer than usual. Some icons have a
context menu that you can open by right-clicking the mouse.
The Desktop
After starting StarOffice, the first thing you will see is the StarOffice Desktop
displayed in the work area. If you open a document or open a folder in the Explorer
(via double-click), the work area displays a window with the contents of the document
or folder. The Desktop is then either completely or partially covered, but it is still
always there in the background. Use the Desktop button in the Task bar to switch to
the Desktop whenever you want. If no document is open, you will only see the
Desktop. You can assign the desktop a color and/or background picture, either via the
Chapter 3
The StarOffice Desktop
27
Desktop's context menu - Properties or from the Gallery in the Explorer. You can also
arrange the icons for documents, applications, etc. on your desktop. You may use
various colors and fonts for the icon labels.
Using the context menus of the icons on your desktop, you can define a few additional
properties. Open a context menu by clicking the respective icon with the right mouse
button (you may need to click the object with the left mouse button first in order to
select it). If you use a mouse with only one button (Apple Macintosh), you can open
the context menu by clicking your mouse while pressing the Ctrl key. This can also be
done without a mouse by pressing Shift + Ctrl + F10.
The Desktop button is the first button to the right of the Start button in the Task bar.
However, you can insert other buttons between the Start button and the Desktop
button via Drag&Drop. You can read more about this in the Quickstart bar description
later in this chapter.
Document Windows
By opening a document on the desktop, you open a document window. Each document is opened as a Task. Each opened document has a button on the Task bar at the
bottom of your StarOffice window. Use this button to switch between having an active
document or putting it in the background. Via the context menu of the button you can
choose to display the document either in full size or as a "Floating Task" (a window
you can move around the screen). On the top left border of the document window you
will find the toolbars necessary for working with your document and at the lower
edge you will find the Status bar.
If you have one or more documents open, click on the respective button in the Task
bar to bring a particular window to the foreground, i.e. make it the active window.
Click the button in the Task bar again and it will be returned to the background. You
can also choose which window you want to have active by using the Window menu.
The Status bar displays various fields which show information corresponding to the
type of active document. Some of these fields can be used to activate special functions,
either by double-clicking or via the context menu. You can find detailed explanations
in the StarOffice Help.
28
StarOffice 5.2 User's Guide • June 2000
The Task Bar
StarOffice has a Task bar that displays all active tasks as icons. Click any icon to activate a specific task for viewing and editing this task. By clicking the current task
button you minimize this window or restore the full screen view. From left to right
you see the Start and Desktop icons followed by all StarOffice tasks and other system
tasks. On the right in the task bar you see a task tray where the e-mail indicator and
the time of day are shown.
The area between the Start button and the Desktop button in the Task Bar represents
the Quickstart Bar. You can drag documents, folders and programs into this area to
quickly start an application, or open a document or folder by clicking.
To AutoStart documents and other objects, set a link to an object in the
Office52\User\Config\Startup folder. The linked object is automatically activated
when you start StarOffice. If the object is a document, it is opened, if it is an executable
file, it is called, and so on.
The Start button opens a menu where you can choose from the various document
types available in StarOffice. The contents of this menu correspond to the
Office52\User\Config\Start folder on your hard disk. You can modify the contents of
this folder and the contents of the Start menu, but this will be discussed later on.
The Desktop button reacts differently to short or long clicks. A short click switches to
the current desktop whereas an extended click opens a menu where you can choose a
task from the desktop. The desktop button context menu (click right mouse button),
shows you a list of all desktops and can change the present desktop.
Further possibilities for modifying and controlling the current view can be found in
the context menu of the StarOffice tasks. These possibilities are described in detail in
the StarOffice Help.
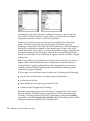
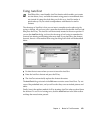
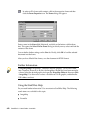
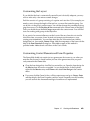
The Explorer
In a newly installed StarOffice, the Explorer is active but hidden in the left border of
the StarOffice window. Click the left border or the Show icon to display any hidden
windows docked on the left border. A click on the border (not the icon), only temporarily shows the hidden windows. To show them permanently, click the Show icon.
Further information about "docking" is found in the "Working with Windows and Bars
in StarOffice" section of this guide.
In the Explorer window you can manage all the elements available in StarOffice. To
open the Explorer, click the Explorer icon in the Function bar.
Chapter 3
The StarOffice Desktop
29
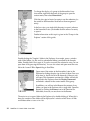
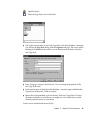
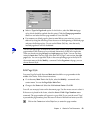
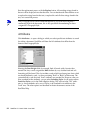
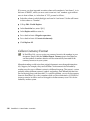
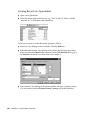
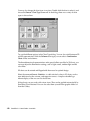
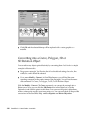
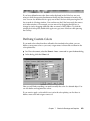
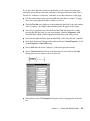
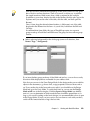
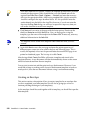
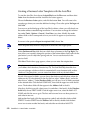
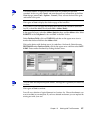
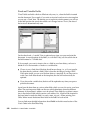
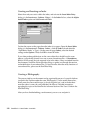
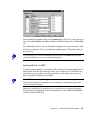
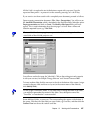
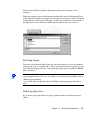
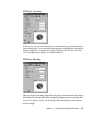
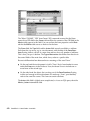
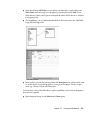
To change the display of a group to the hierarchical view
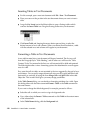
shown here, right-click the name of the group to open the
context menu, then select Hierarchical.
Click the plus sign in front of an entry to see the subentries (i.e.
the entries in the hierarchical level below the more general
entry).
In the Icon view, you single-click the entry to open it, whereas
in the hierarchical view you double-click the name of an entry
to open it.
Further information on this topic is given in the "Groups in the
Explorer" section of this guide.
Double-clicking the "Samples" folder in the Explorer, for example, opens a window
with all the folders (i.e. files and/or subordinate folders) contained in the Samples
folder. Double-click a file to open it. If you have several files selected at once, you can
open them all by pressing the Enter key. You can also select and open more than one
file in the "normal" File - Open dialog in StarOffice.
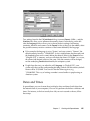
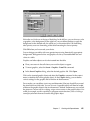
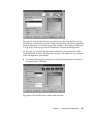
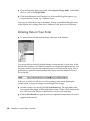
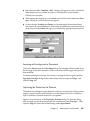
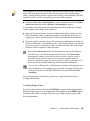
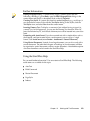
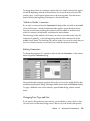
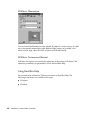
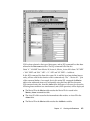
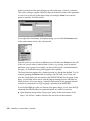
Open some of the entries in the hierarchical view in the
Explorer by clicking the plus sign in front of them. Once you
have done so, the first level in the hierarchy (if there is one)
will open. The documents contained in a folder will only be
displayed in the Explorer when the Display Documents
command is selected in the context menu of the group.
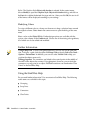
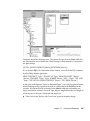
In addition, you will see in the Beamer the contents of any
folder you open in the Explorer with a single click. Open the
Beamer by clicking the Beamer icon in the Function bar.
Subfolders, however, are not shown in the Beamer.
The easiest way to open a folder in the Explorer is by double-clicking it. When this is
done, the contents of the folder will be displayed in a window which shows all files
and folders either as icons or in a list.
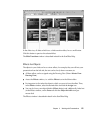
30
StarOffice 5.2 User's Guide • June 2000
You can put icons for external applications and documents on the Desktop and in the
Explorer. You only need to double-click such an icon to start that application. By
double-clicking a document for which there is no filter in StarOffice, e.g. a certain
graphics file, you start the application in your system that is related to this document
type and the document will be loaded there.
The entries in the Explorer are described in the "Groups in the Explorer" section in this
guide.
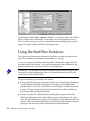
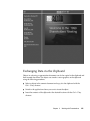
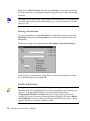
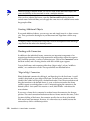
The Beamer
If the Beamer is active and displayed, you can see it below the Function bar. You can
activate the Beamer with the Beamer icon in the Function bar. If the Beamer is active
but hidden, click the Show icon on the upper border of your desktop to make it
visible. The Beamer's function is to show the contents of a selected Explorer entry;
however, folders are not displayed in the Beamer. It is often very practical to use the
Beamer to display the contents of the Gallery or Address Book, for example.
You can open the Beamer by pressing the Shift + Ctrl + B key combination, and the
Explorer by using the Shift + Ctrl + E key combination. When using these key combinations, the corresponding window will become the active window, which means
that you can then browse using the arrow keys, for example.
If, for instance, a folder is marked in the Explorer, all files contained in it will be
displayed in the Beamer. Double-click a StarOffice file in the Beamer to open it in the
work area.
If you want to open a file with the Beamer (or with the URL entry field in the Function bar or by double-clicking in a file window) without inadvertently closing the
current document, hold down the Ctrl key while double-clicking the document. You
can also switch to the desktop before opening the new document, since the desktop
can never be replaced by other documents. The desktop should always be the
starting point for new actions, such as opening a file.
Chapter 3
The StarOffice Desktop
31
The contents of the Beamer depends on the entry selected in the Explorer. You will
have different contents in the Beamer if you select a database, a Gallery theme or a
folder.
Task Oriented Work with StarOffice
Desktop
StarOffice Desktop is the basis for your work in StarOffice. It is the location where you
perform all your tasks, and therefore a very important component of the StarOffice
interface.
The desktop cannot be closed like ordinary document windows and is thus always
visible in the work area if you have no other files or windows open full screen.
StarOffice Desktop displays the documents, bookmarks and files that you want to
work with. Every currently open document provides the tools appropriate for use
with that document type. If you have opened a text document, for example, all tools,
(menu commands and icons on the toolbars) are provided for editing text. The appropriate functions are also automatically provided for working with spreadsheets, presentations and the other document types.
Each open document is represented by a button in the Task bar. You can switch from
one task to another by clicking the Task bar buttons. If you click repeatedly on the
same button, the document switches between the normal view and the minimized
view.
If you have various documents open, and you click the desktop button (icon), you
switch from having the Desktop in the foreground or in the background. You can use
this function, for example, if you have several documents tiled (horizontally or vertically arranged on the screen) and you want to search for something on your desktop.
Just click the Desktop button in the Task bar and the desktop will appear in front of
all other windows. Click the Desktop button again and the desktop will be switched
to the background. The previous arrangement of opened documents will be visible
again.
StarOffice displays icons and status information for each document window. If you
have set the document window as a Floating task (separate window) by using the
Floating Task command in the context menu of the Document icon in the Task bar),
you will notice that you can move the toolbars along with the floating window.
32
StarOffice 5.2 User's Guide • June 2000
The Desktop view cannot be closed. The desktop is always within reach and its icon
is always visible in the Task bar.
If you click anywhere on the desktop, for instance next to a document shown as a
Floating Task, the desktop will not be brought into the foreground. The StarOffice
Desktop has been programmed to react in accordance with your operating system. If
you want the desktop to be brought into the foreground, click the Desktop button in
the Task bar.
You can arrange and move the icons on the desktop with the mouse. Double-clicking
an icon opens the respective item, and you can also activate a context menu for each
icon or a selection of icons by clicking the right mouse button. The context menu offers
the most important commands for a given object in a particular context.
When you select an object from your desktop (or in a file window or message), you
can, without de-selecting the object, open the context menu of another object. Just click
the second object with the right button of your mouse and when you leave the context
menu the first selection will be active again.
The desktop is not an isolated item in the StarOffice interface. It is closely related to
the Explorer and the Beamer via the Drag&Drop function, which allows you to move
objects with the help of the mouse. You can not only Drag&Drop objects within the
desktop area, but also to and from the Explorer or Beamer, as long as there is an
acceptable place to store the selected object. Naturally, you can also move objects in
the other direction, from the Explorer or the Beamer to the desktop.
While dragging, hold down one of the Control keys to switch between the Move,
Copy or Create Link functions. For almost all actions performed with Drag&Drop, the
Ctrl key serves as a Control key; in a few instances, the Shift key is used, or both of
them together. When you drag objects with the mouse, they will generally be moved,
i.e., deleted from the original location and inserted in the new location. In this case, a
small frame appears next to the mouse pointer. If you hold down the Ctrl key while
dragging, a plus sign appears in a frame next to the mouse pointer, which indicates
that the object being dragged will be copied as soon as you let go. If you press the Shift
key and the Ctrl key at the same time, you create a link.
Chapter 3
The StarOffice Desktop
33
Setting up and Managing Projects
The basic idea of the desktop is to organize your daily work by project. You can create
a new folder in the desktop for every important business partner or business process.
This will ensure that you will never need to search for the "Smith" contract again, since
you know which folder it's in. Double-click on the folder icon to open it, then doubleclick on the respective document. It doesn't matter which StarOffice module is used to
open and edit the document, because you don't need to open the individual applications yourself. Simply work with the documents, and the required module will automatically be activated.
You can choose from a variety of document types, ranging from the usual text documents and spreadsheets, to images, presentations, charts, framesets, mail/news
messages, and other types of documents.
The Classic Office Method
Imagine that you need to create a folder for a new client. If the folder were to be for a
conventional file cabinet, it would contain letters, leaflets, and brochures that your
client has sent you, as well as the memos, letters, and faxes that you have sent the
client. The folder might also include references to other related materials, as well as a
list of contacts, telephone numbers, and e-mail addresses.
The StarOffice Desktop Method
If you work with the StarOffice Desktop, proceed as follows: First create a new folder
with the name of the client. You can do this by choosing New - Folder in the desktop
context menu. To open a context menu, click the right mouse button. An icon for the
new folder will appear on the desktop. You can now assign a name to the new folder,
for example "Project1." For especially important projects, you can add a group to the
Explorer so that you have easier access to it.
Now, simply Drag&Drop all standard documents that you need for this client into the
folder. This may include a copy of your billing form, a copy of your fax form, the
client's address as a text document, and all e-mail messages. Basically, everything that
you have in electronic form can be dragged into the appropriate folder on the desktop.
34
StarOffice 5.2 User's Guide • June 2000
Whenever you drag objects, you should decide carefully whether you need the
original, a copy or a link. You will only want to put a copy of your document
templates in the client folder, since you'll need the template in its original form for
other projects. If you modify the copy of the document template in the client folder, it
will affect only the template for that client.
You can also open and execute external applications via StarOffice. If, for example,
certain external applications are required for a project, simply use your mouse to drag
a link to that application in your project folder.
Links are a special case. A link is a file that contains a cross-reference to other files in
your file system or on the Internet. The Bookmarks in the Explorer are links that
contain references to pages on the Internet.
Working with Links
Via Drag&Drop, you have already grouped together some of the documents you'll
need for the client folder "Project1." Icons with small arrows are links to Internet newsgroups or to files on your hard disk or in your company network, for instance. All
icons indicate their respective origins; spreadsheet documents look like spreadsheets,
e-mail messages like envelopes (opened, if already read), and Internet links show a
globe.
Chapter 3
The StarOffice Desktop
35
By organizing with folders, all digitally available information and documents for a
project are put together and are therefore easy to find when you need them. Links can
help you be certain that the information is always current. If, for instance, you want to
add your price list to the project folder and want to be sure it is the up-to-date version
on your company's server, just create a link to this database in the folder. If you
double-click on the link, the most current version of the price list will be loaded.
If you click the right button of your mouse on a link, you will open the context menu
where you can find useful commands for working with links. The Original
command opens a submenu, where you can find commands that refer to the target
(i.e. the original document) of the link. If you go to the link's context menu and call
the Delete command, the link will be deleted and the original remains unmodified.
However, if you select the Delete command in the Original submenu in the context
menu, the original will no longer exist.
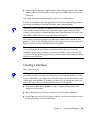
Creating New Documents with Templates
The Click & Go group in the Explorer contains several icons for opening new documents. It is also easy to store your own document templates here -- or more precisely,
links to these. For example, custom-design your own fax template, either by changing
one of the templates which came with the program, or create your own with the help
of the Fax AutoPilot (in the File menu). Create a link to the fax template in the Click &
Go group and click the icon to open your fax template. Just fill it in and send it off!
You can create a template from any document: Just set a link to the document, go to
the Link properties dialog and select the Open as template field.
E-Mail and News
Every e-mail message you have sent or received from a client should be dragged into
the project folder as a copy. If you want to reread a message at a later date, you will
know just where and how to find it.
In addition to e-mail messages, you can import project related news from the news
group into your project folder via Drag&Drop. If you expect to have a large number of
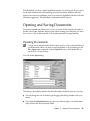
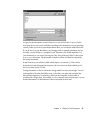
such documents, you can create a subfolder for them.
36
StarOffice 5.2 User's Guide • June 2000
Arranging Projects
You can arrange project folders hierarchically, so that each client folder contains additional subfolders. In this way, you are able to use the desktop to optimize the structure
of your work. For a clear overview, structure the folders to reflect the hierarchy of
your clients or your company's internal processes, for example.
Creating a New Desktop
As in "real life," you can sit at several different desks (e.g. at work or at home). StarOffice also lets you set up several desktops; a desktop for your private affairs and one
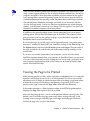
for your business matters, for example.
Right-click the Desktop icon in the Task bar to see a list of desktops. Here you can
switch from one desktop to another per mouse click. When you create a new desktop,
keep these simple rules in mind:
■
The desktop always shows the contents of a directory which you specify via the
Tools - Options - General... - Paths menu in the Desktop entry. Here you can
choose several directories at once.
■
In the context menu of every folder, you will also find a Desktop option. Select this
command to make this folder your actual desktop. It will be included in the list of
"desktop folders" under the Desktop icon, and you can switch to this folder at any
time with a single mouse click.
■
If, for instance, you want to make the "My Documents" folder your desktop, follow
these steps: In the Explorer double-click the folder. Once the folder is displayed,
right-click the mouse to see its context menu and select the Desktop command.
■
If you want to remove a folder from your Desktop folder list, switch to the folder
once again via the Desktop button context menu, and, using the folder's context
menu, select the Desktop command. The check mark before the Desktop entry will
be removed. Alternatively you can remove it with the Tools - Options - General... Paths menu.
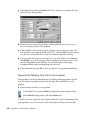
Adapting the Look & Feel of Your Operating System
In the StarOffice User's Guide, all of the screen displays are in the "StarOffice Look".
This setting is available on all platforms. If you wish, however, you can adjust the
Look & Feel of your StarOffice screen display to be similar to Mac/OS or X Window.
Chapter 3
The StarOffice Desktop
37
On the View tab under Tools - Options - General... you can choose the Look & Feel as
well as scaling for the screen display. For example, you can enlarge the font size to
150% for easier viewing. You can also control the mouse positioning options and the
display of window contents while they are being moved.
Using the StarOffice Functions
To activate one of the numerous functions in StarOffice, you need only open a document. This could be a text document, a spreadsheet or a message.
As soon as you open a certain document, StarOffice automatically supplies the tools
you might need for this context. You can edit the document using the Menu bar, the
various context menus, icons, key shortcuts or via Drag&Drop.
Use the Ctrl + Z to undo the last action. If you press this key combination again, the
second to last action will be undone, and so on. More information about this topic
can be found in the StarOffice Help.
To open a document, use one of these five options:
38
■
You can open the documents, directories or links that are displayed on the desktop
or in the Explorer by double-clicking them. Once open, you can double-click a
subfolder and so on, until you see the file you are looking for. Double-click the file
to open it. The open document replaces the actual task if you did not hold down
the Ctrl key while opening the document.
■
You can also open files in the Explorer by clicking the plus sign in front of the
folder icon (the Explorer notes which folders are open and set these in the "open"
status for future reference, if you do not set it otherwise). If the Beamer is open, the
contents will be displayed in the Beamer. Just double-click the document to open it.
Here again, the actual task will be replaced by the opened document.
StarOffice 5.2 User's Guide • June 2000
■
Type the path and name of the document in the URL field in the Function bar. You
can also use the practical AutoComplete function. Enter C:\au in the URL field and
the input text will then say C:\autoexec.bat (if you are using the Windows version,
it will depend on the available files in your system). Press the Enter key to accept
this file or document. For more information about the AutoComplete function in
the URL field, see the extensive StarOffice Help. If you use this function to open a
document, the current document will be replaced by the new one unless you press
the Ctrl key.
■
You can open a new document with the help of the links in the Click & Go group
in the Explorer, by selecting the Start button in the Task bar, or via the File - New
command. This method does not replace the current task, so both will be open at
the same time.
■
Go to File - Open... to open an existing document as a new task.
If you open a document with the Open command, the Open dialog will appear. This
dialog looks similar to the Save As dialog and offers several new functions that you
won't have seen in the standard dialogs of your operating system. These functions are
explained in detail in the StarOffice Help. A few helpful hints, however, are given
below:
■
You can change the size of the dialog by dragging the dialog's border with your
mouse.
■
With an extended click on the Up One Level icon you call up a submenu which
enables you to switch from the current directory to another directory further up in
the directory hierarchy. A short-click on the same icon brings you one level higher
in your directory without showing the submenu. You can also select all the drives
in a submenu.
■
An extended click on the Default directory icon opens a submenu with some
default directories. You will also find your custom-defined desktop folder.
■
The folder bookmarks that can be found and managed in the submenu of the
Default directory icon offer you various work-saving options. For example, you
can switch to any folder and use the Add Folder Bookmark... command to add it
to the list of your easy to reach folders. In the dialog that you call up using Edit
Folder Bookmarks..., you can rename or delete the entries shown, change their
order via Drag&Drop, and undo a change.
■
The last used directory in StarOffice can be found in the submenu of the Default
directory icon under the Last used command.
■
To quickly switch to another folder, e.g. the E:\Samples, simply enter E:\sam as
the File name. The AutoComplete function will again help you by completing the
folder name.
Chapter 3
The StarOffice Desktop
39
■
Select various documents simultaneously in the Open dialog or in the Folder
window and press the Open button to open all of them. You can find out more
about multiple search in the StarOffice Help.
■
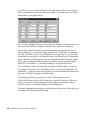
If, in StarOffice Calc, you want to open a database spreadsheet in text format which
has the .txt extension, select the corresponding file type in the File type list box. In
this case, the file type is "Text - txt - csv (StarOffice Calc)". In similar cases where
the extension is however a different type, you should open the document via the
File - Open menu. Other methods, like Drag&Drop for example, would load the
document as a text document in the StarOffice Writer, which is not what we want
here.
The links in the Click & Go group in the Explorer can be dragged to the Task bar. In
this case, each document will be applied as a new task. If you do not drag the links to a
free space on the Task bar but rather onto an available Task button, the new document
will be displayed together with the previous one in one window.
Another way to open a document is via Drag&Drop with your mouse. For example,if
you are using Windows, you can drag a document from the Windows Explorer to the
Task bar or to the Title bar of StarOffice. If you are working in the Integrated Desktop
mode and you are not able to see the Title bar, you can drag the document to the
Menu bar or to the Open icon on the Function bar.
In the Task bar at the bottom of the StarOffice Desktop you can
see the Start button. An extended-click with your mouse on
this button will open a menu which you can customize
according to your preferences. Choose a document type from
this menu and StarOffice will open a blank document of the
selected type.
You can have several documents open at the same time. Each
open document is displayed as a button in the Task bar.
Simply click a button to switch to the respective document.
The StarOffice applications contained in the upper part of the
menu can also be found in the File menu at the New
command.
40
StarOffice 5.2 User's Guide • June 2000
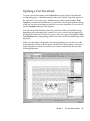
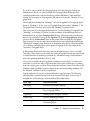
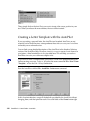
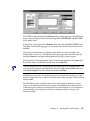
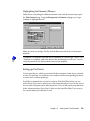
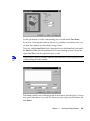
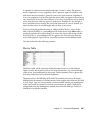
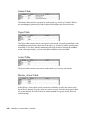
Opening a Text Document
To open a new text document, click the Start button on the Task bar and select the
corresponding entry. A blank document based on the "Default" Page Style appears in
the work area. If you want to use a different format, simply select the New - From
Template... command in the File menu. You will then see a Template Selection dialog
where you can choose a template on which to base a new document. Or, you can also
use the Templates directory in the Explorer.
You will note that the Menu bar, Status bar, and other toolbars in StarOffice change
depending on the document that is opened. As soon as you activate a document, e.g.
by clicking its button on the Task bar, or open a new one, e.g. by selecting File - New Text Document, the corresponding toolbars and menus for this document type will be
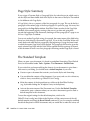
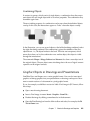
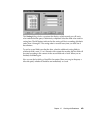
displayed.
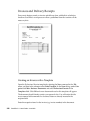
When a text document is displayed as the active document, you can show two additional important windows, the Navigator and the Stylist. These windows can be positioned anywhere on screen. For instance, your screen could look like the one in the
following illustration.
Chapter 3
The StarOffice Desktop
41
Don't worry if it seems that too many elements appear on your screen. If you are
writing a simple letter, for example, you don't have to display them all because only a
few of the tools are actually needed. However, needed information and aids can be
displayed in the work area so that you always have the necessary tools for a specific
task when working with StarOffice.
Even if your screen is set to a low resolution and you thus require lots of space for a
good screen display of the document, you can still activate all windows shown in the
illustration, and display them only if necessary. StarOffice's floating windows which
are displayed as needed, make this possible. These will be described in more detail in
the next chapter.
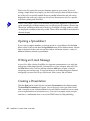
Opening a Spreadsheet
If you want to compute numbers or manage records in a spreadsheet, click the Start
button on the Task bar and select the Spreadsheet entry in the selection menu. A blank
sheet is displayed in the work area and the toolbars and menus contain a variety of
different functions tailored to spreadsheets.
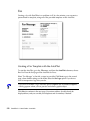
Writing an E-mail Message
As part of its office solution, StarOffice also supports communication via e-mail and
newsgroups, either internationally via Internet or in a local company network. Click
the Start button in the Task bar and then select the Mail entry to open a form for
composing an e-mail message. To send and receive e-mail and participate in Internet
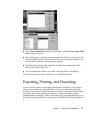
newsgroups you must first set up a Mail server, News server, and an Outbox.
Creating a Presentation
Click the Start button on the Task bar and select Presentation in the selection menu.
The AutoPilot Presentation will appear. You can choose to start work with a blank
slide, a template or one of the documents last used. With the AutoPilot you can create
your own presentation in an interactive way. You can, for example, create your presentation as a multimedia show or save it in HTML format for Web publishing.
42
StarOffice 5.2 User's Guide • June 2000
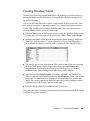
Creating a Drawing
Select the Drawing command from the Start menu to create a StarOffice Draw document. StarOffice Draw offers you lots of interesting drawing functions, for example,
vector charts, 3D objects (self-defined and default ones), layered objects and much
more. The default print orientation is portrait, which enables you to preview your
drawing document exactly as it will be printed.
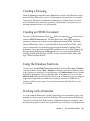
Creating an HTML Document
To create a HTML document click the Start button and then the More command and
select the HTML Document entry. The StarOffice Writer/Web interface appears,
containing a selection of working tools for editing and creating HTML documents.
The StarOffice Writer/Web is a special StarOffice Writer suitable for HTML, which
you can automatically use when browsing through the Internet or editing HTML
documents. If you open an existing HTML document, you can, via File - Open to get
the Open dialog, decide using the File type list box if you want to open the file in
StarOffice Writer/Web (File type "HTML") or in the normal StarOffice Writer (File
type "HTML StarOffice Writer").
Using the Database Functions
You can access the StarOffice Base database module via menu File - New - Database,
via the Start button menu - More - Database or through a new entry which you create
in the Explorer. An example of a useful database is the Address Book which is already
included in the Explorer. You can add other tables or databases of your own to the
Address Book database in the Explorer. These can be self-defined or you can integrate
larger pre-existing databases which are, for example, accessed via ODBC drivers
already installed in your system. You can read more about StarOffice Base in your
User's Guide.
Working with a FrameSet
As an advanced StarOffice user capable of generating your own Internet pages, you'll
probably also want to create your own FrameSets. These are documents that basically
only consist of frames. Each frame contains a different document, for example, a text
document in the primary frame and a hyperlink list in a sub-frame. You design the list
Chapter 3
The StarOffice Desktop
43
so that the reader of your page loads a different text document in the main frame
when he or she clicks a link. Instead of a hyperlink list, you can use an ImageMap. You
can learn more about using FrameSets in the StarOffice Help.
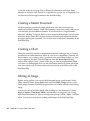
Creating a Master Document
Master documents are useful for larger publications since they can contain any
number of smaller documents. These sub-documents can be easily sorted, and you can
even add more text and additional indexes. If you already have a large document
where the "Heading" Paragraph Style is used to organize the document, you can easily
transform this document into a master document containing subordinate documents
by simply selecting one command. You can learn more about master documents in the
StarOffice Help.
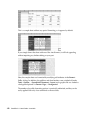
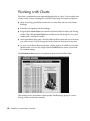
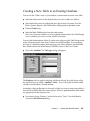
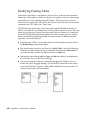
Creating a Chart
Charts are not usually created as independent documents (although, this is of course
possible) but are rather inserted as objects in a text or on a spreadsheet. Therefore, the
most common way to create a chart is to select in your spreadsheet the data you want
to have appear in the chart. Click the Chart icon from the Insert Object floating
toolbar (main toolbar). Draw a square of the size you want in the spreadsheet where
your chart is to be displayed. Now, use the AutoFormat function to create and design
your chart step by step. For more information about charts in StarOffice, refer to the
StarOffice Help.
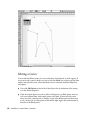
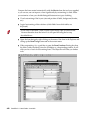
Editing an Image
Besides vector graphics, you can also edit bitmapped images (pixel images) in StarOffice. Open the menu of your Start button and select More - Image to access a StarOffice Image document. StarOffice Image enables you to create and edit a new bitmap
image.
You can also call up StarOffice Image when working in a text document (via menu
Insert - Graphics - From Image Editor), and then draw an image and save it along
with the text document. Or, open an existing bitmap image via File - Open... and then
edit it. You can learn more about working with bitmaps in the StarOffice Help.
44
StarOffice 5.2 User's Guide • June 2000
Creating a Formula
The More - Formula commands from the Start button menu opens StarOffice Math, a
module that enables you to compose mathematical formulas.
Similar to charts and images, you usually create formulas while working in another
document. For example, in a text document, you would set the cursor where you want
your formula to appear and then go to menu Insert - Object - Formula to insert a
formula. Another method would be to make an extended-click on the Insert Objects
icon in the Main tool bar and select Insert StarOffice Math object from the Floating
tool bar to insert a formula. You can edit this formula and it will be automatically
inserted in your text "As Character". When your formula is completed, double-click in
your text, and continue writing as usual. You do not need to save your formula in a
special folder, although you also have this option.
If you are familiar with StarOffice Math language, you can enter a formula in a text
document by writing, for example, "The formula reads as follows a sup 2 + b sup 2 = c
sup 2". Now, select the part of the text which has to be converted into a formula ("a
sup 2 + b sup 2 = c sup 2") and go to the Main tool bar and display the Insert Objects
floating tool bar and select the Insert StarOffice Math object icon. Your text will be
replaced by a formatted formula.
Keep in mind that you can't use formulas created in StarOffice Math for calculations.
StarOffice Math is only a Formula Editor, that is a module for writing and editing
formulas. If you want to calculate formulas you can use the StarOffice Calc spreadsheets and, for easy text-based calculations, you can use the Calculate function in text
documents.
Creating New Documents with Templates and
AutoPilots
Open the Start button menu and select More - From Template to access the New
dialog (this dialog can also be called up via File - New or using the Ctrl + N key
shortcut). This dialog enables you to select a template and create a new document
based on this template.
You can also choose from templates in the Templates entry in the Explorer. Just
browse through the templates by clicking through the list, and switch on the Preview
to view the selected entries (Preview icon in the Object bar).
As you can see, you have a choice of several professional document types for creating
new documents. Another very easy way to create new documents is using the Auto-
Chapter 3
The StarOffice Desktop
45
Pilots which can assist you in many ways when working with StarOffice. The AutoPilots can be found in StarOffice under the File menu.
Not only can you use the AutoPilot to create new documents, but also to create document templates customized to your needs. Your own document templates, which may,
for example, include your company logo, can then be found in the New dialog as a
document template. Generally, you only need to give the AutoPilot the information
once and then you can use it as a basis for creating new documents. You could also
simply adapt the predefined templates and sample documents to your specific needs.
Managing Events and Tasks
The Tasks & Events entry in the Explorer calls up the StarOffice Schedule. Click the
plus sign in front of this entry to access the events and tasks.
Adapting the Start Menu
You can customize the entries contained in menu File - New or in the Start button
menu (if you are working in a network environment, you normally do not have write
access to the share directory located on the server). New entries for documents in the
File menu are links in the Office52\User\Config\New folder. This folder contains a
link for each entry, i.e. to a new document, in the New menu. Besides links to documents, the New folder can also contain document copies readable in StarOffice.
The Start button entries correspond to the contents of the folder
Office52\share\config\start.
If you want, for example, to add an invoice form to the New menu, or the Start button
menu, follow these steps:
46
■
In the Explorer under Workplace, single-click the Office52\share\config\new folder.
■
Open the New submenu (by clicking the right mouse button).
■
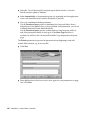
Select the command Link in the context menu. The Properties of Link dialog appears.
■
Under the Bookmark tab, enter a name for the new entry in the Name field, for
example, "Invoice".
■
In the Target URL field enter the path and name of the document you want to use
as a template or search for it with the File... button to register it correctly.
■
Check the Open as template box and click OK.
StarOffice 5.2 User's Guide • June 2000
Now you can open a blank invoice from the New menu or via the Start button any
time you want. You can enter data in the form and save it on your hard disk and/or
print it.
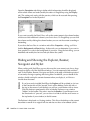
Working with the Windows and Bars in
StarOffice
With its various windows and toolbars, StarOffice is a powerful and versatile tool.
TheToolbars as well as the Menu and Status bars provide exactly the functions and
commands you need for the document you are working on.
In StarOffice, you can configure the user interface to fit your specific needs. For
example, the menu items can be modified by deleting or adding commands, copying
or moving items to other menus, renaming them, and so on. To make changes, use the
dialog under Tools - Configure.... A detailed description and examples of how to
configure your interface are provided in the StarOffice Help.
Modifying the Window View.
On your desktop, you can use the Detail View and the Icon View icons to select a
desired view. The Icon view enables you to see the icons on your desktop whereas in
the Detail View they will appear listed in writing. For each folder, StarOffice notes
which view you last used and will use that view on your desktop the next time.
With the Properties... command in the context menu of any folder window you can
access the Properties of Folder dialog.
Chapter 3
The StarOffice Desktop
47
Open the Description tab dialog to define which information should be displayed,
and in which format and order (modify the order via Drag&Drop using the Display
tab). This setting only works with the preview, which can be accessed after pressing
the Description icon in the Object bar.
If you want to modify the Detail View, call up the context menu in the column headers
and choose which additional columns you want to have. Via Drag&Drop you can shift
the columns and by clicking the column headers you can sort the content ascending or
descending.
If you chose the Icon View in a window and call the Properties... dialog, you'll also
find the Background and Font dialogs. In these tabs you can determine if you want to
have graphics or a color in the background of your icon. Using the font dialog, you can
determine and modify the font size and style below the symbol.
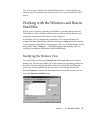
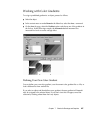
Hiding and Showing the Explorer, Beamer,
Navigator and Stylist
When working with StarOffice, you may discover that your screen is not always large
enough to display all of the StarOffice windows. You can temporarily hide windows
such as the Explorer, Beamer, Navigator and Stylist at the edge of the desktop instead
of constantly moving or opening and closing them. In addition, you can decide if the
window should overlap the current document when you display it, or if the two
should share the screen.
If you have newly installed StarOffice, the Explorer will be switched on (its icon
in the Function bar will be "pressed") but it will be hidden. On the left side, at
the top, in the corner of your desktop you will see a small button with an arrow.
Click this button to permanently show or hide the Explorer or any window
"hidden" in that border. The same is true for the Beamer: if your Beamer icon in
the Function bar is "pressed", you can show it or hide it with the small arrow on
the top border of your window, in the left corner.
The Explorer is displayed as a floating window. This allows the desktop or the current
document to remain in its original full size and does not have to be reduced (which
48
StarOffice 5.2 User's Guide • June 2000
could take too long if, for example, large graphics are involved). The floating window
momentarily overlaps the active document. When you hide the Beamer or Explorer
window again, the current document or desktop is accessible just as before.
On the border of the Explorer and Beamer windows there is a Stick icon resembling a thumbtack. Use this icon to change the Explorer or Beamer window
from a floating window (temporarily covers the other window) to a fixed one
(both windows are placed next to each other on the screen).
If, instead of using the arrow button, you click the left border where the Explorer is
hidden (note the arrow and thumbtack) or the border at the top where the Beamer is
hidden, the respective window will only be temporarily displayed. As soon as the mouse
is out of that window area for a few seconds, the window is hidden again, whether you
used the Stick mode or not. If you have clicked the border of the fixed Explorer and you
want to hide it, click somewhere else on the screen outside the Explorer. If the Explorer
is not fixed but floating, it will be automatically hidden as soon as your cursor leaves it.
The AutoHide function just described also applies to other windows such as the Navigator, Stylist, Help Agent or preview window in StarOffice Impress. If any of these
windows has been docked and hidden, you can show the window again by clicking
the its border. The window will then be automatically hidden again when you click in
your current document. The AutoHide function works with any of the four windows
which can be docked in this border.
Docking Windows
When you show the Explorer for the first time, it is displayed as a docked window at
the left side of the Desktop. You can convert docked windows to floating windows by
holding down the Ctrl key and double-click on the gray area of the window border
(with the Explorer and the Beamer hold the Ctrl key and double-click in a free area
inside the window). The originally docked window will appear if you repeat this action.
You can change the size of a floating window by dragging an edge with the mouse. The
shape of the mouse cursor indicates in which direction you can drag the window. Dragging on a corner of the window diagonally will change the height and width.
Move the floating window around on the screen by dragging the title bar. If you drag
with the mouse towards the edge of the StarOffice window while holding down the
Ctrl key, the border of the window will appear as an outline, indicating that the
window will be docked when you release the mouse button.
If you want to drag a floating window to the window edge without docking it there,
do not press any key while dragging.
Chapter 3
The StarOffice Desktop
49
Enlarging and Reducing Docked Windows
The size of any docked window can be modified by dragging the window border at
which the window is docked.
Move the mouse cursor to the window border closest to the center of your screen.
As soon as the cursor changes shape, press the mouse button and hold it
down. Now drag the window to the desired size.
If you have docked two or more windows on the same edge, you can shift the dividing
line between the two windows in the same way.
Changeable Toolbars
Toolbars adapt to every work environment; with the exception of the Function bar,
which always offers the same useful functions. When you open a text document, you
can see an optimal selection of icons in the Object bar (under the Function bar) and in
the Main toolbar (at the left-hand border of the screen), however, when you open a
spreadsheet other icons will appear that are suitable in that context.
The context-dependent and variable icons change even within the same document. For
example, set the mouse cursor in your document in one of the existing tables and you
will see Insert Column and Delete Column icons. If the cursor is in a bullet or
numbering list, you will see icons for changing the numbering order or hierarchy. In
these cases, you can also switch to the normal text Object bars, by clicking the last icon
on the right. StarOffice notes which bar you last used and in which context, and offers
this bar as default accordingly.
You can modify the position of most of the icons on the toolbars. In the context menu
(press the right button of your mouse) of your toolbars, you will find the Customize
command. With this command you can customize your icons as desired. You can also
drag the icons while holding the Alt key and position them where you like. You can
find an exact description in the StarOffice Help.
Sometimes there isn't enough room to place all icons on the Object bar. Although there
is a special symbol at the end of the bar to switch to other icons, this is often not very
practical. Fortunately, StarOffice offers you the option to configure invisible buttons.
These can be toggled on and off in the context menu. The Quick Configuration option
allows you to select the visible buttons without having to delete or redefine them.
50
StarOffice 5.2 User's Guide • June 2000
For example, if you want to copy an icon from the object bar to the Function bar so
that it is always visible, simply hold down the Alt key and drag the icon to its new
position. StarOffice automatically stores the new contents of the bar.
In the context menus of some of your Toolbars you will find the command Visible
Buttons. This command opens a submenu with a list of the existing icons. The ones
that are marked with a check are visible. Click an icon to change it from being visible
to invisible and vice versa. This submenu also shows the names of these icons.
You can also use the Visible buttons command in the context menu of the toolbars to
have a quick overview of the icon names and their functions.
To delete an icon, drag it away from its toolbar (in this case the Function bar) while
pressing the Alt key and then release the mouse button anywhere outside the Toolbar.
If you want to insert a dividing line on the Toolbar, drag an icon a bit to the right of its
current position while holding down the Alt key. To delete such a dividing line, shift
the icon at the right of the dividing line towards the left while holding down the Alt
key. You can even create your own icons and integrate them into the Toolbars.
The Task Bar
Drag&Drop in the Task Bar
In the Task bar, if you drag the button of an open task to another button in the task
bar, the following reactions occur, depending on which key is pressed while dragging:
Action
Result
Dragging task button A into task button B Task A is moved into task B as a new
window. Now, in task B, you can switch
from one window to the other by clicking
them. The name appearing on task B's
button (now used for both tasks) indicates the active window.
Drag&Drop as mentioned above while
holding down theCtrl key
A copy of task A is created in task B's
window.
Drag the task A button into an unoccupied area of the Task bar
Task A will be copied in a new window
as the new task B.
Chapter 3
The StarOffice Desktop
51
Action
Result
Drag task A's button into a unoccupied
area of the Task bar if more than one
window is contained in task A
Task A's active window is moved as a
new task B, this means that it is no longer
a window of Task A, but the independent
Task B.
Drag a file, a folder or a program to the
space between the Start and Desktop
buttons.
A button will be added with which you
can quickly call up the file, open a folder
or access a program.
Why Drag One Task into Another?
■
You will see the two or more documents on top of each other or next to each other
at all times (use the Window menu to choose how you want them to be divided)
thus enabling, for instance, easy Drag&Drop between documents.
■
You can define, for example, the address book and a text document or spreadsheet
along with other important information as a Floating Task and keep them
constantly visible on your screen.
■
You can save various drafts of your documents and view them on the screen simultaneously.
■
You can put the StarOffice Basic IDE in one window and a text document in
another window and then see which changes to your macros lead to which effects
in your text document.
■
It is also possible to place the Normal view and page preview of a document side
by side.
Surely you'll find lots of other uses. In any case, dragging one or more tasks into one
task window is a quick and easy way to order your information efficiently.
You can also arrange several individual tasks next to each other or on top of each other
(via the Window menu or in the Task bar context menu). This arrangement, however,
has disadvantages over managing tasks in one task window, e.g. the various title bars
waste space on the screen.
You can use the context menu option Task Always Visible to keep this task in the
foreground. The task will then automatically become a floating task. Floating tasks
have an icon which looks like a thumbtack, found in the upper left hand corner of the
title bar, and is used to shift to the always visible property and back. This can be used,
e.g., to fill in parts of a Master document via Drag&Drop or to summarize various
documents in one document.
52
StarOffice 5.2 User's Guide • June 2000
The Floating Toolbars
Some of the icons in the various toolbars open floating toolbars. A floating toolbar is a
small window which can be placed anywhere on your screen and offers a selection of
additional icons.
Open a new text document in order to view the Object bar and Main toolbar
for text documents. At the right end of the Object bar, which is located directly
above the text document, you will find the Background Color icon. This icon
opens a floating toolbar.
Click the icon to open a window offering a choice of background
colors. This window closes automatically once you have made a
selection, or when you click outside the window or press the
"Esc" key.
You can separate a floating toolbar from the toolbar it is attached
to. It will then remain open until you close it again. Simply click
on the icon, keeping the mouse button pressed till the floating
toolbar is opened, then release the mouse button and click the
title bar of the floating toolbar to drag it away from the icon.
If a frame follows the movement of the mouse, it means that your toolbar is now a
floating window. Release the mouse button where you would like to position the
window. You can move it at any time by dragging its title bar. To close it, click the
close button in the title bar. Some floating bars can be minimized and opened again by
double-clicks in the title bar. You can make as many selections as you like from the
floating window without the window closing automatically.
Most icons having floating toolbars utilize a shortcut. A short click on the visible icon
will activate that icon's function, a long click will open the floating toolbar.
The floating toolbars in the Main toolbar have another special feature.
In open documents, some icons in the Main toolbar are marked with a small triangle.
The triangle indicates that you can open a floating toolbar or selection menu by
clicking on that icon (with the exception of the Insert Fields icon, which with a shortclick opens a dialog and with a long-click shows a sub-menu). Please note that if you
select a function from the floating toolbar, the icon of the selected function will replace
the icon originally displayed in the Main toolbar.
In this way you can quickly access the last function chosen without having to open the
floating toolbar again. Just click the (new) icon in the Main toolbar.
Chapter 3
The StarOffice Desktop
53
Many of the tools in StarOffice Draw and StarOffice Impress only need to be doubleclicked for them to stay activated until you select a new tool. For example, in order to
drag open several rectangles you double-click the Rectangle icon. With an extendedclick on this icon, you will open its selection menu which enables you to select a new
function from those available.
The Explorer and its Components
The Beamer and the Explorer are your most important tools for working in the StarOffice Desktop. Both are closely related and complement each other.
Groups in the Explorer
Before describing the Explorer in more detail, the Explorer Groups will first be introduced.
54
StarOffice 5.2 User's Guide • June 2000
The Explorer already contains several groups. These appear as
buttons with the group names:
■
The New Group button serves to set up a new group or a
new group button. Click this button and enter in the dialog
the folder and folder content you want to have contained in
the new group. You can also drag a folder to this button.
■
Click & Go -This group contains, among other things, the
icons for creating new documents. It has the same contents
as Office52\share\config\new.
■
My Documents - The My Documents group is a link to the
directory which has been entered as My Documents in your
system. The link can be modified under Tools - Options...General - Paths. If My Documents doesn't exist in your
system, or if you haven't activated it, this group will refer to
the folder located under StarOffice/user/work.
■
Bookmarks - In this group you find a link to the directory
that is registered as the Bookmark folder in your system
(for example, in "Favorites"). You can also modify these
links on the Paths tab. If you do not have a Bookmark
folder in your system, this group will refer to the folder
under StarOffice\share\bookmark.
■
Explorer - This group provides you with easy access to all
usable drives (local, within a network or on the Internet).
If a group displays its content with a small or a large icon, you can run it with a single
mouse click. However, in the hierarchical view you have to double-click to get the
same effect.
If you call up the context menu of a group, you'll find commands for configuring the
group's view as well as for renaming and removing (deleting) the group.
You can re-arrange the group order via Drag&Drop. Just hold down the left mouse
button and drag a group to its new location in the Explorer.
Chapter 3
The StarOffice Desktop
55
Creating a New Group in the Explorer
If you want to include the StarOffice Help in its own group in the Explorer, simply do
the following:
■
Right-click the New Group button in the Explorer.
■
Select the Create New Group as Folder command from the context menu.
Note, you would select Create New Group as Folder if you wanted to create a new
folder in the Explorer. Just as you would select Create New Group as Link if you
wanted to view an existing folder and its contents as a new group in the Explorer.
If you want a new group to display the entire contents of a folder, you only need to
drag the folder from, say, the StarOffice Desktop to the New Group button. This
automatically does the same as the Create New Group as Link command in the
context menu.
After having selected Create New Group as Folder, you will see the New Group
button which is ready to be overwritten.
■
Enter the name of the new group. We have entered the word "Help" as an example.
Press the Enter key to confirm the new name. The new group has been created.
You can now, for example, place links to existing folders and documents in this group.
The easiest way to do this is via Drag&Drop. Drag the objects you want to have into
the new group window or drag them to the new group button.
■
For example, open the Explorer group and drag the Help entry to the new Help
group button.
■
In the context menu of the new group button, select one of the following views:
Large Symbols, Small Symbols or Hierarchical.
Explorer and Beamer
In the Explorer you can choose which directory, document, message or picture you
want to view or edit. Once you have decided, the selected object will appear in a new
window in the work area. You can switch back to the Desktop view by clicking its
button in the Task bar.
56
StarOffice 5.2 User's Guide • June 2000
■
If you double-click a folder in the Explorer, its contents will be shown in a new
window in the work area.
■
Clicking once on a folder in the Explorer will display its contents in the Beamer
(provided it is open). You can then open a file in the Beamer by double-clicking it
or by dragging and dropping the file into the work area. If you move the file with
Drag&Drop to the desktop, it will be copied into the current desktop directory. Dragging a file from the Beamer into a text document will create a hyperlink to the file.
■
If you click the plus sign before an entry in the Explorer, the subordinated entries
(such as folders or directories) will be listed in the Explorer. The contents of the
Beamer will not change.The opened status, e.g. of the Workplace entry, will remain
just as you left it the next time you open the Explorer. If you want, you can change
this setting under Tools - Options... - General - Desktop. If you click a plus sign
while holding down the Ctrl key, the entry will open down one level only.
In its hierarchical structure, the Explorer group shows the dependencies of the
elements in it much more clearly than is possible on the desktop. It can be an advantage, however, to put certain folders on the desktop and to have a separate window
for each one. For many actions, StarOffice offers you several other options for customizing your desktop and the Explorer. You will soon discover what methods are best
suited to your needs.
The various objects which can be displayed in the Explorer have different properties
and, for example, behave differently if they are clicked once or twice. Following is a
description of how the objects react to different actions. While working with the
Explorer, you may find additional information displayed in the Status bar, such as the
amount of free memory, number of selected files, etc.
Double-clicking an entry in the Explorer or Beamer generally closes the current view
in the work area and replaces it with that of the entry which has just been doubleclicked. For example, if you've opened a document and then open another document
or window, then the first document will be closed. To avoid this, press the Ctrl key
while you double-click an object and it will then be opened in another window.
Before opening a new document, it is better to switch back to the desktop (clicking
the desktop icon in the Task bar). By double-clicking the desired folder, you can
easily change to the respective document and also open it with a double-click.
If you open a document with the File-Open-dialog it will be opened as an extra document, that means, it will not replace the actual document.
Following is a chart of the entries that can be seen in the Explorer group when you
first install the program: Address book, Bibliography, Bookmarks, Gallery, Help, My
Documents, Recycle Bin, Samples, Tasks & Events, Templates, Workplace. Afterwards,
the optional entries which you can add to the Explorer are mentioned, such as Mail
Inbox and Outbox, Newsgroups, FTP Account, and Subscriptions.
Chapter 3
The StarOffice Desktop
57
The Predefined Objects in the Explorer Group
Icon
58
Name
Meaning
Address Book
The Address Book is a StarOffice Base database in dBase
format.
Workplace
The Workplace contains the drives/volumes and directories.
Tasks & Events
Here you can access StarOffice Schedule, your personal
events planner, tasks manager and calendar.
Bibliography
Use this Database to create a bibliography in your text
document.
Samples
The Samples folder contains subfolders and files with
sample documents.
Bookmarks
The Bookmarks entry is a link to the folder you entered
under Tools - Options... - General - Paths as a Bookmarks folder. The Bookmarks folder contains some
hyperlinks to Internet sites.
My Documents
This Entry is a link to the folder you entered as work
folder under Tools - Options - General - Paths.
Gallery
The Gallery contains clip art and sounds which you can
insert into your documents.
Help
Your bookmarks are shown here and you can access all
StarOffice Help topics from here. For further information
regarding this subject, read the "How to use the Help
System" topic in the StarOffice Help.
Recycle Bin
The Recycle Bin stores all files that have been deleted
within StarOffice. These files will be stored until you
decide to empty the Recycle Bin or after the specified
period of time elapses.
Templates
The Templates entry shows you the content of the
Templates folder. You can adapt this folder under Tools
- Options - General - Paths.
StarOffice 5.2 User's Guide • June 2000
Optional Objects to be Added Later
Icon
Name
Meaning
POP3 Account
A POP3 Inbox contains e-mails received from POP3
accounts.
IMAP Account
An IMAP Inbox receives your e-mails from IMAP
accounts.
VIM Account
A VIM Account is suitable for certain Intranet mail
systems.
Outbox
The Outbox stores your e-mails before and after sending
them.
News Server
A News Server displays all subscribed newsgroups.
FTP Server
An FTP account offers folders and files of an FTP server
via the Internet.
Link
Links can be created to any folder or file.
Database
Your own databases are managed in the Explorer.
Subscriptions
Subscriptions inform you when web sites have changed.
Search
A Search folder shows you filtered information on files
and messages.
A detailed explanation of the entries in the Explorer group can be found in the StarOffice Help .
Chapter 3
The StarOffice Desktop
59
60
StarOffice 5.2 User's Guide • June 2000
CHAPTER
4
4
Basics for Text Documents
For new StarOffice users, this section offers an introduction to writing, editing, and
printing text documents. This section of the StarOffice User's Guide is directed at an
audience with only minimum computer and operating system knowledge. More
advanced users should still skim through this part, since it contains some useful
StarOffice tips and tricks.
Basics for Working with Text
Now we'll have a look at how to enter your own text into a text document. To do so,
open a new text document. If you already opened one, make sure it is active.
Entering New Text
For starters, enter some text in your new document. Please note that line breaks are
controlled automatically by your software, so you don't need to manually insert them.
Press the Enter key only where you want to begin a new paragraph.
Type what you want to. Format headings, highlight words, and make other typographical changes after you have finished writing the main bulk of your text.
After you have become better acquainted with the various writing styles offered, you
might prefer to select a specific paragraph style while you write your text. Through the
automatic application of the Next stylefunction, you can format successive paragraphs
automatically. You can learn more about this topic in the StarOffice Help.
StarOffice Writer is able to perform a list of automatic corrections while you work.
This includes, for example, that all sentences start with a capital letter.
61
The automatic word completion also helps you when entering text. If you repeatedly
enter the same word (longer than 5 characters), you will note that after you type the
first three characters StarOffice Writer suggests the already familiar long word. Press
the Enter key (or another key that you specify) to accept the suggestion. If more than
one long word begins with the same three characters, you can enter the key combination Ctrl + Tab to search from the beginning of the list, and Shift + Ctrl + Tab to search
from the end of the list of familiar words. You can find more information about this
function in the StarOffice Writer Help under "Word completion".
You can see which AutoCorrection and AutoFormat functions are active by going to
Tools - AutoFormat/AutoCorrection... and clicking the Options tab. This is where
you can turn certain functions on and off. If you don't want any automatic replacements while making your entry, turn off this function using the Format - AutoFormat
command. If you don't want any automatic changes while you type, click away the X
in the boxes in the T column ("T" stands for "AutoFormat/AutoCorrect only while
Typing").
When you have finished writing your text, you might notice that single letters, words,
or sometimes even whole sentences are unnecessary or incorrect. StarOffice offers you
various possibilities for editing text.
To move the cursor in a specific direction, you can use the cursor keys (arrow keys) on
your keyboard, or click the mouse button once after placing your cursor in the desired
location.
Inserting Text
To insert new characters into an already existing text, simply place the cursor at the
position where the character(s) should be added and enter it/them. Any text following
your addition will be shifted as necessary.
If the text is not meant to be shifted but rather overwritten by new text, then the text
document should be in the Overwrite mode instead of in the default Insert mode. You
can switch between these modes by pressing the Insert (Ins) key. The selected mode
will be indicated in the Status bar with 'INSRT' or 'OVER.' You can also toggle this
function by clicking this field in the Status bar.
Selecting and Deleting Text
If you want to delete just one letter, the best way to do this is by placing the cursor
directly after the letter and then pressing the Backspace key (located just above the
62
StarOffice 5.2 User's Guide • June 2000
Enter key). The Backspace key deletes the character immediately to the left of the
cursor. You can also place the cursor directly in front of the letter to be deleted and
press the Delete (Del) key. This key always deletes the character immediately to the
right of the cursor. As you delete, the other characters automatically shift to fill the
spaces.
To delete several adjacent characters simultaneously, you should first select the area to
be deleted. Then either use your mouse or keyboard to delete. When using the mouse,
position the mouse cursor on the first character you wish to delete, press the left
mouse button and drag to the last character. When you release the mouse the selection
will be highlighted. If you now press the Backspace or (Del) key, the entire selected
area will be deleted.
Just as there are several ways to delete text, there are also several ways to select text. If
you want to select an entire word, click it twice. A triple-click selects the entire line. If
you want to select a string of words, select the first word with a double-click. Instead
of releasing the mouse button after the second click, hold it down while dragging over
the remaining words. In this case, the selected area expands to enclose each complete
word, so that exact "targeting" with the mouse is unnecessary. If before or after a
certain character the rest of a sentence should be deleted, place the mouse cursor
behind the character and drag while pressing the left mouse button either up or down
(depending on the beginning or end of the sentence). The text will then be selected and
can be deleted.
Select adjacent text by clicking the first character, and while pressing the Shift key,
click on the last character. You may use the arrow keys while pressing the Shift key, to
quickly move the cursor to the end of the area you wish to select. To select the entire
text in your document, press the Ctrl + A key combination.
The Multiple Selection function in StarOffice Writer is a practical feature that allows
you to select independent text sections and assign them one single command. Press
the Ctrl key when selecting your text areas. Then you can format all of them again,
for example.
Together with the dialog Find&Replace in the Edit menu, or with the Ctrl + G key
combination, you can easily, for example, search for every "StarOffice" appearing in
your text and change it to bold print. To do this, enter the word(s) - in this case
StarOffice - in the Search for text box and click Search All. The Multiple selection
function has now selected all of the corresponding items in your whole text. You only
need to select Bold in the Object bar or to press the Ctrl + F key combination to
complete the task.
Chapter 4
Basics for Text Documents
63
Text Navigation via the Keyboard
You can easily navigate within text via the keyboard using the Home, End, Page Up
and Page Down keys and, of course, the arrow keys. The Home key positions the
cursor at the beginning of a line; the End key moves the cursor to the end of a line.
When used along with the Ctrl key, the cursor is moved to the beginning or end of the
current document. The Page Up and Page Down keys enable you to scroll through the
pages of a document. Of course, the display moves in terms of screen pages, not
printed pages.
With the key combination Ctrl + PageUp or PageDn you can switch between a header
and the main text.
To switch between open windows use the key combination Ctrl +Tab or Ctrl + Shift +Tab.
Further key combinations are listed in the StarOffice Help.
The Direct Cursor
The direct cursor enables you to enter text at any position within the type area in your
text document.
Press the DirectCursor icon in the Main toolbar.
Now click on any empty area in your text document and begin typing. StarOffice automatically inserts the corresponding number of spaces, tabs and blank lines in front of
the first letter of the new text.
Using the direct cursor, it is easy to quickly write a letter with the date and the
recipient's address, etc. in the correct position. However, though quick and easy, this
isn't the best way to write a letter. It's generally better to create a personal letter
template with the help of the AutoPilot. That way, all your correspondence will have
a more professional look right from the start.
Correcting Typing Errors
It is not necessary to delete a word before replacing it with another word. It is enough
to simply select the old word and type in the new word which will then appear in the
same space. Even if you enter only one new character it will replace the entire selected
text. In the Insert mode, you can then enter further characters.
64
StarOffice 5.2 User's Guide • June 2000
With StarOffice, you have a useful Spellcheck function at your disposal. If you wish, it
can be used automatically while entering your text. Incorrectly spelled words will
appear with a red wavy underline, and, if you want, the Spellcheck function will offer
correction suggestions. The Spellcheck is explained in detail later on.
Opening and Saving Documents
Your newly entered text will be lost as soon as you turn off the computer. In order to
be able to read, edit, and print the text again after restarting your computer, you must
first save it as a file on the hard disk or on another permanent storage medium.
Opening Documents
To open an existing document that has been saved as a file on the hard drive or
on another data carrier, you have several possibilities. You can either go to the
File - Open menu command, click the Open File icon in the Function bar, or
use the Ctrl + O key shortcut.
You will see the Open dialog.
This dialog is described in detail in the StarOffice Help. However, here are a few tips:
■
You can change the size of the dialog by dragging the dialog's borders with your
mouse.
■
If you click the Default directory icon (the icon at the far right), you will immediately switch to the My Documents folder.
Chapter 4
Basics for Text Documents
65
■
An extended click on this icon, however, opens a submenu where you can choose
which directory you would like to see.
■
The Up One Level icon can also be short-clicked or long-clicked. A short-click will
bring you up one level in the hierarchy order. A long-click opens a submenu
containing the disk drive selection.
■
If you would like to see files containing a certain name, enter the name with placeholders in the File name list box and press the Enter key. If you use the *.text
pattern, for example, only the files containing the .txt extension at the end of their
names will be displayed. If you, on the other hand, use the s* pattern, all names
beginning with the letter s will be displayed.
■
A small plus sign before the name of a subdirectory means that that subdirectory
can be seen by clicking the plus sign. This sign is only visible if you selected the
Detail View icon.
■
All of the file names shown can be sorted columnwise with one click on a column
header. Click the Size column header, for example, and all files will be sorted in
ascending order according to their size, and another click on the header Size and
the contents will be sorted in descending order. A right-click on a column header
opens a submenu where you can also open further columns. If you right-click on a
file name, you will be offered another submenu with file related commands.
Saving Documents
To save your current document, use the Save command in the File menu, the
Save Document icon in the Function bar, or just press Ctrl + S.
When you save a document for the first time a dialog will appear in which you choose
where you want to store the file.
66
StarOffice 5.2 User's Guide • June 2000
Assign your text document a name when you save it the first time. You can, for the
most part, choose any name you'd like (according to the restrictions of your operating
system). When you want to open the document later, you can find it under that name.
If you do not save your documents, any changes made to opened documents may be
lost after a power failure or a computer crash. Therefore, you should regularly save
your documents as you work. Pressing the S key along with the Ctrl key is the easiest
way to save a document. The document on the data carrier will then be replaced by
the current document.
In the Status bar, you will find a field which displays an asterisk (*) if the current
document has been changed with respect to the last version on the hard disk (or if it
has not yet been saved as a file).
Storing documents as files on electronic storage media has many advantages. You can
exchange files with other StarOffice users, so that they can open, edit and print the
files on their computers. Transferring a file from one computer to the another is
possible with a floppy disk, for example, or via a company network (Intranet). You can
transfer documents via the Internet to almost anywhere in the world.
Chapter 4
Basics for Text Documents
67
Printing Documents
After you have finished creating your document, you can print it if you are planning
to send it by mail, for instance, or put it in a binder. Many documents are not
intended for printing, such as StarOffice Help pages, graphics for Internet pages, etc.
However, you may sometimes find it useful to print these documents for easier proofreading.
To print your current document, a printer should be connected to your computer,
either directly with a printer cable or indirectly via a network. If neither one is immediately available, you may also "print to a file". All information which is normally sent
to the printer will be first written into a file. The file's content can then be copied to
another computer where a printer connection is available (StarOffice does not need to
be installed on this computer).
StarOffice Writer always formats its documents so that you can print optimally.
That's why, even when you don't have a printer, you must specify a printer driver as
default printer.
You print the current document without the intervention of a dialog, by
clicking the Print File Directly icon in the Function bar.
Printing is controlled primarily with the Print dialog, which is activated via the File
menu or using the key combination Ctrl + P.
In this dialog, you can select a specific printer (if you have installed more than one
printer). Under Print document, you can determine how many pages you want to
have printed (or only certain pages), and how many copies you want.
68
StarOffice 5.2 User's Guide • June 2000
There are many different printer types and their capabilities vary dramatically. Operating systems support printers by use of software modules called drivers. Drivers are
programs designed to allow the printer capabilities to be best utilized by the applications running under a particular operating system. For this reason, the print functions
can differ depending on the operating system, the printer driver, and the type of printer.
The selected printer determines the height and width of your characters and thus
also line and page breaks. You have to take into consideration that, when changing
printers, your document's format can also change. This also applies if you open your
document on another computer with another printer.
In addition to the general printing options already mentioned, you can set special
printing options for individual document types in StarOffice. These options, which
give you control over how the contents or pages of your document are printed, are
described in detail in the StarOffice Help.
If you hate having to re-sort the pages you have printed because your printer prints
them into a "numerically backwards" pile, StarOffice can help: In the Print dialog, click
the Options button, and choose the Reversed option under Pages. The print order of
the pages should now be such that the pile the documents end up forming is in the
correct order.
If you have a fax modem connected to your computer, you can fax your current
StarOffice document directly from your computer. In StarOffice Writer, you can insert
a fax icon in the Function bar and, by clicking this icon, easily send a fax directly from
your computer. Detailed information on this subject can be found in the Advanced
section of the StarOffice Help.
Viewing the Page to be Printed
When printing graphics or tables, either separately or embedded in text, it is especially
useful to view the page layout exactly as it will be printed. This allows you to make
adjustments such as setting an optimal margin width or inserting a page break where
it makes the most sense (for instance, when printing a large table). You can see a
preview of the page layout with the Page View command in the File menu.
If the current document is a Web document written in the HTML page description
language, the Page View option will not be available.
After activating the page view, you can switch between different viewing scales. The
default is set to two letter-size pages next to each other, starting with page 1, and
showing successive pages with odd pages on the right and even pages on the left.
To leave the page view, just close the window.
Chapter 4
Basics for Text Documents
69
Printing Several Pages on One Sheet
With StarOffice it is easy to print several pages of a text document on one single sheet
of paper. Just follow these steps:
■
Switch to the page view (File - Page View/Page Preview).
■
Using the icons in the Object bar, choose to display either two or four pages. You
can also click the Zoom icon and define the number of pages to be shown by
setting the number of rows and columns. With an extended-click on the icon, you
will open a grid formed submenu that enables you to determine how many
columns and rows can be viewed and printed.
■
Click the Print Options icon in the page view's Object bar. This dialog enables you
to define various printing properties, for example, if the document should be
printed in portrait or landscape format or the distribution of the preview pages on
your pages to be printed.
If you save and close a document in the page view, the next time you open the document it will still be in this view. This setting can be easily changed if you go to Tools
- Options... - General - Save and you simply unmark the Document view check box
in the Restore editing view area.
Printing Brochures
StarOffice text documents consisting of more than one page can be printed automatically as a brochure. Two pages of a text document will be reduced in size and printed
next to each other on a page in landscape (horizontal) orientation. Both sides of the
page will be printed (most printers require that you take out the paper after the first
half of the printing process and feed it in again with the blank side of the page facing
upward). StarOffice will automatically print the pages so that you can read them as a
brochure. Simply put the pages together, fold them in the middle, and staple them.
A more detailed description of printing brochures can be found in the Advanced
section of the StarOffice Help.
70
StarOffice 5.2 User's Guide • June 2000
The Toolbars
If you open a new text document in StarOffice, the appearance of some of the toolbars
will change according to what you specifically need for that document. In a text document, for example, the Object bar and Main toolbar display the icons necessary for
editing text.
Assume you have just started StarOffice for the first time, and you have clicked the
Start button in the Task bar and then selected the command Text Document to open a
new, empty text document. The work area will appear as follows:
The Object bar, or more precisely, the text Object bar appears above the work area. It
contains list boxes and icons used to modify either selected text or text at the cursor
position.
A sure way to become quickly familiar with the various icons is to activate the menu
Help - Tips. If you rest the mouse cursor on an icon, the name of the icon will
appear. In addition, if you select the Extended Tips in the Help menu, a more
detailed help text will appear in the Help tips space as soon as you rest your mouse
pointer on a menu entry or a dialog element.
Chapter 4
Basics for Text Documents
71
On the horizontal ruler directly under the text Object bar, you can read the margins,
indents, and tabs for the current paragraph. If you wish, a vertical ruler can also be
displayed. You can choose this and other view options under Tools - Options - Text
Document - Layout.
The Main toolbar is displayed vertically in the left margin of the work area. Here you
will find several interesting floating toolbars. These are special icons, that when
dragged into your document with the mouse, turn into floating toolbar windows.
The Status bar at the bottom of each StarOffice document (not visible in this picture)
contains a number of fields that provide information about the status of the current
document. This information can be used if necessary to change certain document
options.
At the very bottom of the StarOffice window is the Task bar, which serves to create
new documents and switch between the desktop and various tasks.
The toolbars and other bars are described in detail in the StarOffice Help.
Creating Text With or Without Styles
A text without any special formatting can have a monotonous appearance. To outline
text, to highlight individual words, quotations, or references, or to separate certain
parts of the text, you can apply various types of formatting.
Hard or Soft Formatting
When working with StarOffice, you can select between a hard or a soft formatting for
applying text attributes such as bold, italics, font type and font size. A hard format is
obtained by directly applying a certain attribute to a text area. For example, by clicking
the Bold icon on the text Object bar you will directly apply the bold format to a
selected text area. The soft format, on the other hand, applies a defined Style to the
text. A Style is a named set of default settings for formatting text.
Hard formatting is more appropriate for one time use. If, for example, you want to
make a word bold, just position the cursor in the word and click the Bold icon. This
works quickly and intuitively.
Soft formatting using Styles is always preferable if you want to uniformly format long
texts. Using Styles requires more advance organization because you have to think
about the complete arrangement of the text before you write it. You first have to create
a Style (which with the help of the Stylist can be done quickly and easily). Only then
72
StarOffice 5.2 User's Guide • June 2000
will you be able to apply the defined Style to your text (which is again no problem
using the Stylist in StarOffice). You'll really appreciate the advantage of working with
Styles when you want to make extensive format changes.
Assume you have formatted each of the headings in a long text with a 24 point
Helvetica font. If you need to change all the headings to a 20 point Times font and in
bold, it would take a long time to make each change by hand. But if you had defined
the format as a Style, for example with the name "Head1", and applied it to the headings in the document, you would simply have to change the "Head1" Style, and all
headings would be automatically modified accordingly.
Using Styles in StarOffice
The Styles for characters, paragraphs, frames, numbering and pages (or cells in
spreadsheets) are always saved with the document. You can also copy the Styles from
one document to another. Styles with the same name will or will not be overwritten
(i.e. not replaced), as you choose.
Every document, together with the Styles it contains for characters, paragraphs,
frames, numbering and pages, can be saved as a document template. If you then open
a new document based on a certain template, you can use all the Styles contained in it.
When starting StarOffice for the first time, certain default settings for the templates
apply to all document types. Every time you open a text document via File - New Text Document, a new, empty document will be created based on these default
settings which represent a default template. As described in the StarOffice Help, any
document can be defined as a default template. The result is that the Styles you have
defined for the default template will be valid for all new documents based on that
template.
The Styles in the Stylist
Open the Stylist by selecting the Stylist command from the Format menu, by pressing
the F11 key, or by clicking the icon in the Function bar. A detailed description of all
options available in the Stylist can be found in the StarOffice Help.
Chapter 4
Basics for Text Documents
73
In the beginning, the whole concept of working with styles may seem strange. But
once you have worked with them a couple of times, you will see the advantage of
using them to format text. Here's a closer look at the Stylist.
At the top of the Stylist you can see some icons for switching to the various Style
groups. From left to right, these Styles are Paragraph, Text, Frame, Page and
Numbering. The main area of the Stylist lists the available Styles of the selected group.
Note that the available Styles depend on the selected category in the list box at the
bottom of the Stylist. For example, if you select the Automatic category, StarOffice will
do its best to decide, based on the context, which Styles can be used and will display
them. If you would like to view all the Styles in a group, select the "All Styles" category
in the list box.
Select Paragraph Styles, by clicking the icon at the far left in the Stylist. You will see a
display similar to the left illustration above. Double-click an entry from the list of
Paragraph Styles to apply the selected Style to the paragraph where your cursor is
currently positioned. Double-clicking another entry modifies the formatting of the
respective paragraph accordingly.
If, for example, you would like to format a certain line as a heading, do the following:
■
Type the line to be formatted as a heading and press the Enter key.
■
Set the cursor in the line.
■
Open the Stylist, for example, by pressing the F11 key.
■
Double-click the Paragraph Style "Heading 1".
Notice how the paragraph now has the "Heading 1" Paragraph Style. If you want to
know the attributes contained in this Paragraph Style, call the context menu of the
"Heading 1" Paragraph Style in the Stylist by right-clicking it and select the Modify...
command to access the Paragraph Style: Heading 1 dialog. This dialog contains all the
information about the properties of this Paragraph Style.
74
StarOffice 5.2 User's Guide • June 2000
If you don't want to modify this Paragraph Style, close the dialog by clicking the
Cancel button. But, if you want to modify this Paragraph Style define the corresponding modifications and close the dialog with the OK button. These modified
settings will now apply to all paragraphs (old and new) having the "Heading 1" Paragraph Style.
The modifications defined for "Heading 1" can also be applied to all Paragraph Styles
based on "Heading 1". In this case, no Paragraph Styles are based on "Heading 1". All
Paragraph Styles, however, are based on the "Heading" Paragraph Style.
This means that if you changed the left indent to 2" in the "Heading" Paragraph Style,
"Heading 1" to "Heading 10" will be also thus modified. All modifications that you
directly define in any of the Paragraph Style dialogs will have priority over the properties of a parent Style. If you go to the Organizer tab in the Paragraph Style dialog,
you can view in the Based on list box all the parent Styles on which this Paragraph
Style is based. You can also select the hierarchical view for the Stylist by selecting the
"Hierarchical" category from the list box at the bottom of the Stylist. This view enables
you to directly see which Styles are the parent Paragraph Styles and which are the
"secondary" Paragraph Styles.
In the previous illustration, the Stylist (seen on the right) displays a list of available
Text Styles. These Styles do not modify the whole paragraph, but only the single word
in which the cursor is currently positioned or a selected text range. We recommend
that you experiment with these Styles as well.
You can use or modify the existing Styles or define your own Styles. To create your
own Style, it is easiest to select a Style from the Stylist and use that Style as a starting
point for creating your own Style. Enter the desired attributes for this Style (that is, the
attributes which will differ from the original Style) and the remaining attributes will
be "inherited" attributes from the original Style.
Certain attributes of your text can be modified by using Style types. The following
table describes a partial selection of the most common Style types. You can view a
complete list of all Style types in the StarOffice Help under Stylist.
Style Type
Attribute selection
Text Styles
Font Style, Font Size, Language
Paragraph Styles
Indents and Spacing, Alignment, Hyphenation, Tabs,
Font, Language, Initials
Page Styles
Header, Footer, Margins, Columns
Frame Styles
Position, Anchoring, Borders
Numbering Styles
Numbering Type, Outline, Bullets, Assigning
Numbering Styles
Chapter 4
Basics for Text Documents
75
Hierarchical Styles
The Styles can be hierarchically linked to each other. You can derive one defined Style
(i.e. template) from another, so that the new template contains only the changes not
found in the "basic" template. If you decide to change the "basic" template later on, the
text in the deduced template will also be changed accordingly.
For example, the Paragraph Style "text body" uses the font "Times" in "12" point.
Derived from this Style, you have created an "indented text" template. Here you have
only defined the added left indent, whereas the font and point size stay the same. If
you decide to change the font style in the "text body", the font style will automatically
change in the "indented text".
Sticking with this example, if you redefined the left indentation in the "text body", it
would have no effect on the paragraphs formatted with "indented text" because, in the
hierarchy, the more closely associated format always has priority.
The Conditional Styles in StarOffice Writer enable you to group various context
dependent Styles under one name. You can, for example, create a "Business Letter"
conditional Style containing subordinate Styles for titles, bulleting, tables, etc. If you
now format a business letter with this Style, the context dependent subordinate Styles
will automatically be applied to the corresponding elements in the business letter. A
detailed description for the conditional Styles in text documents can be found in the
StarOffice Help.
Numbering Style
Using the corresponding icons in the Object bar, you can easily assign bulleting and
numbering to your text document. As with the icons for bold, italic, etc. you assign
hard formatting, which is not already determined by the template.
If you always use bulleting and numbering for certain formats, you can create a Paragraph Style containing a specific numbering Style from the Numbering tab page. You
determine how the format should look by using the numbering Styles which in turn
can be edited using the Stylist (click the Numbering Styles icon in the Stylist, call the
context menu and select the Modify... command). More detailed information can be
found in the StarOffice Help.
76
StarOffice 5.2 User's Guide • June 2000
How to Create a New Text or Paragraph Style
Using the Stylist, you can easily create new Styles:
■
First of all, apply hard formatting, which you want to subsequently define as a new
Style, to any characters or paragraphs. You can do this either via the icons in the
Text Object bar or by selecting the Character or Paragraph command in the Format
menu.
■
Select the text or paragraph containing the new formatting. For words or paragraphs, simply position the cursor in the respective word or paragraph.
■
At the top of the Stylist, click on the New Style by Example icon. The Create Style
dialog box appears.
■
Enter a name for the new Style and click OK.
That's all! As you can see in the Stylist, there is a new Style in the "Custom Styles "
category. Now you can use the new Style to soft format a document.
You can also create a new Style without using an already existing Style as a basis.
■
In the Stylist, choose whether you want to create, for example, a Paragraph Style or
Character Style, by clicking the respective icon.
■
Call the context menu of the Stylist (click right mouse button).
■
Select the New... command
■
Enter the data for the desired Style and close the dialog with OK.
The following example demonstrates how to define a Paragraph Style for a subtitle.
Assume you have several subtitles in your text which you want to format with a
custom Paragraph Style:
■
Position the cursor in a paragraph in the text that you want to format with the new
Paragraph Style.
■
Apply a Paragraph Style to the paragraph as an initial format. This way you do not
need to define all of the attributes yourself. For example, double-click on the
"Heading 1" Paragraph Style in the Stylist.
The paragraph is now formatted as "Heading 1." Now you can make any desired
changes, such as formatting the subtitles to appear in italics.
■
Select the entire paragraph. It will appear highlighted.
Chapter 4
Basics for Text Documents
77
■
Modify the type of characters by selecting an italic font in the Character dialog
(menu Format - Character - Font) or by clicking the Italics icon in the Text Object
bar.
■
In the Stylist, click on the New Style by Example icon and enter a name for the
new Style in the dialog box, for example, "Head1." Click OK.
The new custom Paragraph Style "Head1," can now be used for all your subtitles. The
hard formatting applied with the Italics icon (or via the Character dialog) is converted
to soft formatting due to the new Style.
To apply a Style to a text, position the cursor in the desired paragraph and doubleclick the desired Style in the Stylist. If the desired Style already exists in the text, you
can select it from the Apply Style list box in the Object bar at the left-hand side.
Creating a Document Template
To apply the newly defined Paragraph or Text Styles in other documents, create a
document template. When you create a document template from an existing document, it contains all Styles of the current document.
■
If you want, you can delete all text from the current document, leaving only the
Styles.
■
Call the menu command File - Templates - Save.
■
In the dialog Document Templates, select the category in which you would like to
save your template. In the New Template text field, enter the name for your
template and click OK.
Later, you can open a dialog with File - New - From Template... and select a template
to be used in creating a document. The defined Text and Paragraph Styles will then be
available for the new document.
Advantages of the Stylist
You have now learned how to apply the styles from the Stylist to your text and to
create your own individual Styles (or templates). The advantage of using Styles is that
you don't need to constantly redefine them. You just quickly and easily apply the
desired formatting to your text. Use all the options available in the Stylist and you will
discover that the StarOffice Stylist is a very powerful text editing tool.
78
StarOffice 5.2 User's Guide • June 2000
Formatting Multiple Paragraphs
In the previous examples in this section, you have applied the same "Head1" Paragraph Style to multiple paragraphs. The Stylist can save you a lot of time by applying
styles to several paragraphs at once. Here's how:
■
In the Stylist, select the Style you want to apply to multiple paragraphs. Click once
on the name of the Style.
■
At the top of the Stylist, click on the Fill Format Mode icon. The mouse pointer
changes to a symbol indicating this mode as soon as you move back into the document.
■
Click once on every paragraph in the text you want to apply the selected style to.
■
Finally, to switch off this mode, click the Fill Format Mode icon again or press the
Escape key.
A Simple Modification to a Style
After having formatted all headings with the new "Head1" Style, you may decide that
it would look better if the headings were spaced with slightly wider gaps between the
letters. Select the longest heading and increase the defined spacing until it fits onto one
line without a break. Now you want all other headings to be spaced in exactly the
same way. In this case, simply modify one of the paragraphs formatted with the
"Head1" Style, and then add the changes to the Style in the Stylist, making it valid for
all paragraphs of this type. Here are the steps:
■
In the text, select the longest heading formatted with the "Head1" Style. Click three
times in the heading to select the entire line.
■
Modify the formatting however you'd like. In keeping with this example, increase
the character spacing using the Character dialog via the Format menu or the
context menu. In the Spacing list box on the Font Effects tab, select the Expanded
option. Use the spin buttons to increase the spacing, so that the heading becomes
wider. Close the dialog with OK.
■
You have now additionally used hard formatting on one of the headings formatted
with the Style "Head1". All hard and soft formatting should now be added to the
"Head1" Paragraph Style. This Style is still selected in the Stylist.
■
At the top of the Stylist, click the Update Style icon. All headings formatted with
"Head1" will be automatically reformatted with the modified Style.
Chapter 4
Basics for Text Documents
79
It is also possible to determine, when creating a new template, that every alteration be
updated automatically. To do so, right-click the Style and then left-click modify... to
get the Paragraph Style dialog which contains various properties to define. On the
Organizer tab, click the AutoUpdate field. If you alter the format of, for example, a
paragraph which was formatted with this Paragraph Style, for example, the format of
all other paragraphs with the same Style will change automatically. Hard formatting
-as always- will not be affected by a Style (i.e. template) alteration.
Page Styles and Page Numbers
Let's start with a hypothetical Problem: You want to format a text document without a
page number on the title page, with lowercase or uppercase roman numerals (i, ii, iii...
or I, II, III...) on the pages of the table of contents (you don't know how many yet), and
then you want the next page to start with arabic numerals (1, 2, 3...).
Here's your Solution: Work with different Page Styles. Working with Page Styles in
StarOffice Writer is the same as working with "section breaks" in other word processing programs.
The page numbers should be placed either in the header or footer of the page, and not
in the text body. This prevents unnecessary repositioning, for example, when editing
or deleting text within the text body. You should follow these steps: create a new Page
Style, assign the pages a Page Style, edit Page Style. Now you can format the page
numbers in the Paragraph Style of the footer if you want.
Do not use the correction value defined on the Document tab of the Insert - Fields Other... menu to change the page number of a page. The correction value can only be
used for correcting the page number display of a document, for example, if you
would like to also display the number of the following page at the bottom of a page.
In other words, the correction value is used to change the page number display but
not the page number itself.
The manually entered page number (in contrast to the automatically numbered page
numbers) is an attribute of that particular page. This property is determined as "hard
formatting" in the first paragraph of that page.
Create Page Styles
■
80
Open the document in which you want to enter or change the page numbers. You
can also begin with a new text document, although you need to first enter some
text and page breaks to be able to follow the steps described here.
StarOffice 5.2 User's Guide • June 2000
Open the Stylist.
Select the Page Styles view in the Stylist.
■
Call up the context menu of one of the Page Styles and select the New... command.
You will see the Page Style dialog with the Organizer tab page. The cursor will be
blinking in the Name text box where you can directly enter the name of the first
new Page Style.
■
Enter "title page" and press the Enter key. You can change the properties of the
new Page Styles later.
■
In the context menu of the Stylist click the New... command again and define the
Page Style with the name "Table of contents".
■
Repeat the whole procedure again for the new "Main text" Page Style. Of course,
the names used here are only meant as examples. In a real situation you would
naturally enter the names of your choice.
You have now created the three new Styles.
Chapter 4
Basics for Text Documents
81
Apply Page Style
■
Place the cursor on the first page of your document. Double-click the Title page
entry in the Stylist.
So, now you have assigned the first page with this Page Style. To confirm this, you will
see the name Title page in the Page Style field in the Status bar below. By the way,
you can also call up to edit (double-click) and assign already existing Page Styles via
the context menu of the Page Style field in the Status bar.
If, however, you now scroll through the pages of your document, you may notice that
the Title page Page Style has been applied to every page. If all the pages had been
defined by the Standard Page Style, they are now all defined by the new Style. Page
Styles always apply to all preceding as well as following pages, unless a page break
occurs with a change of Page Style.
If, on the Organizer tab page, you select the Next style to a Page Style, that means
that after the page break (manual or automatic) the Next style will appear as page
style. In keeping with our example, you could enter Title page for the Page Style and
as the Next style Table of Contents. The next page after the title page will appear in
the Table of Contents Style. This saves you the steps, described below, needed to use
the Manual Break dialog.
Please note that you should always choose the Table of Contents Page Style as the
Next style to follow the Table of Contents, since you can't be sure how many pages
long your Table of Contents will be.
82
■
Now place the cursor at the beginning of the page where the Table of Contents
should begin. Go ahead and enter a manual page break with a change of Page
Styles.
■
Select the Insert - Manual Break ... menu command. The Insert Break dialog will
appear.
■
Select as Type the Page break option. In the list box select the Table of Contents
Page Style which will then begin at this point in your document. Click OK.
■
Place the cursor at the beginning of the first line in your main text.
■
Select here also the Insert - Manual Break... command. The Insert Break dialog
appears.
StarOffice 5.2 User's Guide • June 2000
■
Select as Type the Page break option. In the list box, select the Main text page
style, which should be applied after this point. Click the Change page number
check box and select the new page number 1. Now click OK.
■
If an unnecessary blank page has been inserted before your main text, you can
delete it by doing the following: Place the cursor at the beginning of the blank page
and press the Backspace key. Do not use the Delete (Del) key, since the newly
inserted page break will also be deleted.
The left and right pages of the main text have often various page Styles, therefore the
page number in the footer may be positioned alternatively to the left or right side.
There are already existing left page and right page page Styles. You can use these
instead of main text. The first page of the main text is page 1 and contains the right
page Style. You can assign these Styles to the corresponding pages in the Stylist in
the context menu with the Modify... command. In the Organizer tab page, you can
choose the next Style.
Edit Page Style
Your new Page Style with the name Main text should have a page number in the
middle of the footer. Follow these instructions:
■
Go to the entry Main Text in the Stylist, select the Modify... command in the
context menu. You see the Page Style: Main Text.
■
Change to the Footer tab. Select the field Activate Footer. Click OK.
You will see an empty footer on the document page. Use the mouse cursor to select it.
If the cursor is placed in the footer, select the Insert - Field - Page Numbers menu
command. The page number will appear in a gray field. If you want the word "Page"
to precede the page number, place the cursor in front of the field and enter your text.
Click on the Center icon in the Object bar, to center the page number.
Chapter 4
Basics for Text Documents
83
Page Break as Paragraph Style
In the first paragraph of the main text, hard paragraph formatting determining that
the text automatically begin on the new page 1 was automatically applied. This will
also apply if no text exists after the manual break on the new page. To check this for
the first paragraph after the manual break, open the Paragraph... command in the
context menu (not Edit Paragraph Style, since this is a hard formatting attribute for a
paragraph).
You will see here, that the manual break of a new page with another page style and
page number, is still the attribute of the first paragraph on the first page.
Change the Page Number Format
The page numbers can, like other text attributes, be specified as either "hard" (direct)
or "soft" (as a property of the Page Style). The hard format, however, should only be
used in a few instances. When hard formatting, you edit the the field directly as
follows:
■
84
Double-click the field with the page number. You will now see the Edit Fields:
Document dialog.
StarOffice 5.2 User's Guide • June 2000
■
Select the field format. Now click OK.
Normally, you would determine the page number format as a property of the Page
Style:
■
Open the context menu of the page and click the Page... command. You will see, for
example, the Page Style: Standard dialog. On the title bar of the dialog, the name
of the current Page Style will appear instead of "Standard".
■
Change to the Page tab.
■
In the Numbering field, use the list box to determine how you want the numbering
to look on all pages of the template. Then close the dialog with OK.
■
Now select the As Page Style format for the field which shows the page number
(see the description of hard formats above ).
If you want to change other properties in the footer e.g. the font, you need to edit the
Footer Paragraph Style so that the changes will apply to all footers.
■
Place the cursor in the footer. Call up the context menu and select the Edit Paragraph Style command.
If you want to increase the space between footer and text, you can do so in the Page
Style.
■
Change the Page Style in the Stylist with the Modify... command in the the context
menu. In the Page Style dialog you can determine the width and height of the
footer.
Chapter 4
Basics for Text Documents
85
Page Style: Summary
If you assign a Character Style or Paragraph Style, first select the text in which want to
use that Style and then double-click in the Stylist on the name of the Style. The method
is a bit different with Page Styles.
A Page Style is always a property of the first paragraph of a page. This can be the first
paragraph of the current page or the first paragraph of a previous page. Not every first
paragraph has the Page Style attribute. StarOffice Writer searches for the Page Style
attribute of the current page by starting at the cursor's position and going back
towards the beginning of the document, checking each first paragraph of a page to see
if it has a Page Style as attribute.
You can set another Page Style using, for example, the context menu of the field in the
Status bar which displays the current Page Style . If you do this, StarOffice Writer will
search backwards until the first paragraph at the beginning of a page has been found
in which the current Page Style will be applied. This paragraph will now be given the
newly selected Page Style and this Style will be applied from this point up to the end
of the document or until a new first paragraph containing another Page Style is found.
The Standard Template
When you open a new document, it is based on predefined formatting. These Default
Fonts can be modified under Tools - Options - Text Document - Default Fonts.
If you notice that you keep modifying the formats of your documents to give them a
look more to your liking, you should create a default template of your own:
■
Create or open a document that contains your favorite Styles and formatting.
■
You can delete the contents of the document, if you want, and save it in a directory
which is always accessible (e.g. Office52\User\Config).
■
Make the contents of the chosen directory visible on the StarOffice Desktop
(e.g., by double-clicking the "Workplace" entry in the Explorer).
■
Activate the context menu of the Document icon. Use the Set Default Template
command to open a submenu where you can select a document type to be used as
default template for this document.
To reset the original settings for the default template, switch to the
Office52\share\config\new folder in the Explorer, call the context menu of the old
default template and select the Reset Default command. If you, for example, modified
the default template for HTML documents and you would like to undo this action, call
86
StarOffice 5.2 User's Guide • June 2000
the context menu of the document in the name of which "HTML Document" appears,
and select the Reset Default command.
Organizing Document Templates on the Desktop
The StarOffice Desktop provides a quick and convenient way to manage document
templates without using menus and dialogs. You'll be amazed at how easy it is!
Creating a Custom Document Template on the Desktop
■
Write the document that you want to use as a template for later documents. Apply
the desired text formatting and modify the Character and Paragraph Styles as
necessary. if necessary, include graphics and fields, for example, to automatically
update the date in your document. You can use text, spreadsheet, presentation or
drawing documents as templates.
■
Assign a name to the document and save it anywhere on your hard disk.
■
Switch to the desktop by clicking the Desktop button in the Task bar.
■
Create a new link on the desktop which refers to the saved document. Click New Link... in the context menu of the desktop to open the Properties of Link dialog.
■
Enter a name for the link, for example "New Letter". Switch to the Bookmark tab.
■
Click the File... button and from the file selection dialog select the saved file with
the help of the Insert button.
■
Finally, be sure to select the Open as template check box.
■
Click OK.
■
On the desktop, open the context menu and select the Update command to update
the desktop view. The new link (e.g. New Letter) to the file will then appear.
■
You can now double-click the template on the desktop whenever you want to write
a new letter.
■
The new letter contains all the objects, Styles and formats you defined in the
original. At first, the name of the new letter is "Untitled," so when you save it you
will automatically be asked to assign a name and specify the location where you
want to store the document. The template will not be overwritten and can be used
as often as you like.
Chapter 4
Basics for Text Documents
87
Perhaps you'll want to change the template itself every now and then. You can carry
out the same steps described above again, but this time do not select the Open as
Template box, and this time assign a name such as Template for New Letter. An
icon will appear on the desktop which allows you to change your template at any
time with just a double-click.
The Navigator
In addition to the Stylist, which helps you format the document, the Navigator is
another essential aid in StarOffice. On the one hand, the Navigator enables you to
navigate, i.e. move directly to a certain position in your document. On the other hand,
it provides lots of information about the contents of the entire document at a glance.
In text documents, the Navigator provides you with complete lists of all graphics and
tables in your document. In addition, you can double-click the list entry in the Navigator, and by doing so, go straight to that place in your document.
However, the Navigator is also capable of much more. For example, in texts which
you have structured with headings, you can change the order and hierarchy levels of
whole chapters and subchapters simply by clicking the corresponding icons in the
Navigator. Or use the mouse to drag a file from the Beamer into the Navigator. You
can then copy parts of this file into the current document by dragging them from the
Navigator. This function is meant for more advanced users and will be described in
another section.
Activate the Navigator by clicking the corresponding item in the Edit menu.
88
StarOffice 5.2 User's Guide • June 2000
The illustration shows one way in which the Navigator might appear. By dragging the
title bar with the Ctrl key pressed, you can dock the Navigator on a window border.
Double-click, while pressing the Ctrl key, in a free area of the Navigator to toggle
between a docked and free window. You can find a comprehensive description of all
the Navigator options in the StarOffice Help.
Moving Between Objects in the Text
Clicking on the Navigation icon at the top of the Navigator opens a "mini navigator"
which you can, for example, use to move in your document from one graphic object to the
next one or to the previous one. To do so, you need to first drag the blue Title bar of
the navigation floating bar to position it outside of the Navigator. Now the arrow icons
will be visible at the right side. Just click the "Graphics" icon and then either the Previous
picture or Next picture arrows. This also works for tables, frames, sections, and so on.
With the help of the Navigator, you can "jump" to any object in your document. Another way to achieve the same result is to use the Navigation button
(the "mini navigator") found in the vertical scroll bar on the bottom right-hand
side of the document window. This is a floating bar that can be positioned
anywhere on your screen. Click the object type in the Navigation window that
you want to jump to, and then click one of the arrow icons to go to the
previous or next object of this type in your document.
If the Navigator arrows in the scroll bar (in the lower right corner) appear
black, you can scroll through the pages of your document. If the arrows appear
blue, you can scroll to each object of the same category you have selected in the
Navigator (e.g. to each table or bookmark, and so on).
In the main section of the Navigator there are entries for Headings, OLE objects,
Hyperlinks, References, etc. A plus sign in front of one of the entries means that there
are corresponding objects in the selected document and that you can have the list of
the objects of this type shown by clicking the plus sign or double-clicking the entry.
Double-click one of the object names to display it in the document and move the
cursor to that position.
By the way, the names of the elements in the Navigator can be easily modified: In the
context menu of the name (right-click the name) you will find the command for
renaming.
Chapter 4
Basics for Text Documents
89
Moving Between Reminders
In the Navigator, you can also set temporary reminders that stay in effect until you
close the document. This method makes it easy to move between particular locations
in the document, for example, if you want to look up or add something later.
■
Position the cursor at the position in the text where you want to set a reminder.
■
Click the Set Reminder icon in the Navigator. The reminder will not be visible in
the document.
■
If you want to jump to a reminder, select the Reminder entry in the "mini Navigator". You can now move through the reminders by clicking the Previous and
Next arrows.
Jumping to a Specific Page
One of the functions of the Navigator is to enable you to quickly jump to specific
pages in long documents. That's why there is a special trick to quickly open the Navigator: Just double-click on the display of the current page number in the Status bar. To
close the Navigator, double-click again on the display field in the Status bar.
At the top of the Navigator there is a spin box for selecting the number of the desired
page. After you enter the page number the desired page will automatically be
displayed. Press the Enter key to place the cursor on that page.
There is also a keyboard shortcut to do the same thing. Press the Ctrl + Shift + F5 key
combination to move the cursor to the spin box in the Navigator where you directly
enter the desired page number. Now press the Enter key.
You do not have to change to the new page. Simply enter a page number in the Navigator spin box and wait one or two seconds. The respective page will appear. If you
enter another number,then that page will appear. The cursor will be placed on the
page only when the Enter key has been pressed.
Other Navigator Features
The Navigator is especially helpful if you want information about the objects
contained in longer documents. For example, if you load a HTML page from the
Internet, a glance in the Navigator will show you the hyperlinks contained in the page.
(Even hidden hyperlinks without reference text will be displayed.)
90
StarOffice 5.2 User's Guide • June 2000
The Outline view enables you to order and rearrange entire chapters and subchapters,
provided you have formatted them with the Styles, which are defined for chapter
numbering. A comprehensive description of this function is provided in the StarOffice
Help.
Arranging Windows on the Screen
You will notice that after opening a new text document, the work area is divided
according to predefined defaults. This layout can be altered to your needs just as most
of the features of the StarOffice Desktop. You can reposition the various bars and
windows on the desktop, hide or show them, and also change their size.
The following illustration shows an example of how you can set up your StarOffice
Desktop window.
As you can see, there are various ways to arrange your screen elements.
Chapter 4
Basics for Text Documents
91
At least in the beginning, it's a good idea to keep the Navigator and Stylist visible.
Both windows are of great help when working with text documents. By familiarizing
yourself with these windows you will quickly become acquainted with the advantages
of modern word processing. Once a seasoned StarOffice user, you may prefer to
display and hide the desired windows as needed via key shortcuts or by clicking the
icons in the Function bar.
To dock a window, drag it with the pressed Ctrl key to any margin of your workplace.
You can hide all docked windows existing in the margins of the desktop with the Hide
icon (found also in the margin). Your text document now has maximum space on the
screen, leaving you plenty of room to draft your text. To view the window again, click
the Show icon at the side of the desktop where the docked window is hidden.
This illustration above also shows floating toolbar windows. These can be dragged
from the toolbar and positioned anywhere on the screen.
Floating windows can be reduced in size by double-clicking on the window's Title
bar. By doing so, only the title bar will remain. A renewed double-click will restore
the window to the original size.
You will also find in the View menu several commands that allow you to display just
the right toolbars to meet your needs.
The Spellcheck Function
StarOffice has an automatic Spellcheck function, which can either be active while you
enter text or be activated just when you want it.
Auto Spellcheck
The automatic spellcheck can be switched on or off with the Auto Spellcheck icon in
the Main toolbar. When activated, words not in the dictionary will be underlined in
red. StarOffice contains a dictionary called "Standard.dic," but you can also create your
own dictionary or adapt and supplement the standard dictionary according to your
own needs. You can create a custom dictionary in the Spelling/Language dialog, via
the menu command Tools - Options - General... - Spelling/Language.
When you proofread your text, the wavy underlines will draw your attention to
possible spelling mistakes. Of course, the Spellcheck function won't be able to catch
spelling mistakes that form other recognizable words (such as "fun" instead of "run").
92
StarOffice 5.2 User's Guide • June 2000
As long as the automatic spellcheck is activated, the red markings can be seen on the
screen but will not be printed.
The easiest way to correct words underlined in red is to click on the word with the
right mouse button. You will then see a context menu which offers some correctly
spelled alternatives to choose from, if any can be found in the dictionary you are
using. When you click one of the suggested words, it replaces the underlined word in
your document. If the word marked in red is spelled correctly and you want to add it
to your dictionary, you can do this with the context menu as well.
If you know you frequently misspell a particular word, you can make your work
much easier by using the suggestion in the context menu to replace the word. If you
click on the suggested word, StarOffice will not only replace the word underlined in
red, but will also remember this replacement for the rest of your current StarOffice
session. When you make the same typing mistake again, StarOffice will automatically
replace it with the correction you already used. This function is called AutoCorrect.
Checking Multilingual Texts
StarOffice Writer can run a spellcheck (including thesaurus and hyphenation) for
several languages. Using the "Custom Installation" option in the StarOffice Setup
program, and later via the "Modify Installation" function, you can specify which of the
languages available you would like to install.
You can specify the language of your document in the Stylist under the Standard
Paragraph Style. All other Paragraph Styles are derived from this Paragraph Style. You
can select a specific language on the Font tab. To assign different languages to various
paragraphs in your document, you can either use hard formatting or a new Paragraph
Style. You can also select a language for only certain words by way of the character
Style. The spellcheck function is, of course, only available for languages you have
installed.
With the Tools - Options - General - Spelling/Language command, you can put a
check in the All languages checkbox by clicking it with your mouse cursor. The spellcheck will then be activated for all installed languages. That means that all of the
languages will be utilized in the spellcheck and if the spelling of a word is correct in
any one ot the installed languages it will be considered correct (despite the language
Chapter 4
Basics for Text Documents
93
attribute it may have been given). This function is handy if you don't want to specify
the language for every foreign word in your text. Please note, however, that a lot of
spelling mistakes may now no longer be found due to the fact that the misspelled
word actually exists as a word in one of the other languages.
The automatic spellcheck, which you activate via the icon in the Main toolbar,
provides an interesting extra function for multilingual texts. In the context menu of an
unrecognized word (i.e. underlined in red), you can determine if the word or the
whole paragraph exists in one of the installed languages. The language for the word or
paragraph is then entered automatically as a "hard" format attribute according to the
language selection you make in the context menu.
Starting the Spellcheck
To check your entire text for spelling mistakes in the "classic" way (i.e. letting the
Spellcheck go through the whole document on its own), go to the Tools menu and
select the Spelling - Check command. A Spellcheck dialog will only appear if there
are words in your text unknown to the Spellcheck. The various options to be seen in
the Spellcheck dialog are described in detail in the StarOffice Help.
When you add an unknown word to your dictionary using the Spellcheck dialog, you
can define the breaks for automatic hyphenation at the same time. Indicate the
hyphenation positions in the word using an equal sign (=). Here's an extra tip: If you
place the equal sign at the end of the word, that means it will never be automatically
hyphenated.
In a HTML document, only formatting options supported in the HTML page description language are available. Hyphenation is not included.
94
StarOffice 5.2 User's Guide • June 2000
Excluding Text from the Spellcheck
If you don't want certain areas, words or tables to be checked by the spellcheck function because they are, for example, in a foreign language for which you have no
module, then specify "Unknown" as the language. You can either use hard formatting
to do this (select your text and then the Format - Character - Font tab) or modify the
corresponding format Style for the text (use the context menu and then the Edit Paragraph Style... command).
Find & Replace
The ability to quickly find specific text strings is a very useful word processing function. With the Search function in StarOffice, you can find variations of the word as
well as restrict the search to specific places in the document (such as the beginning of
words or the end of paragraphs).
The text strings found in the text can be replaced by other strings with or without
confirmation, although sometimes manual editing is still necessary (e.g. a deviation of
gender in other languages).
Searching for a Word in Text
Imagine you have read (or written) the word "Holland" somewhere in a long text.
Now you want to return to that point in the text, but can't remember where it was. If
this happens, activate the Search function with Ctrl + F. Type the word you want to
find and press Enter.
Chapter 4
Basics for Text Documents
95
StarOffice will start searching, moving from the cursor position downwards. When the
end of the document is reached, a dialog will appear asking if you want to continue
the search at the beginning of the document. Press the Enter key to confirm. If the text
string is found, it will be highlighted.
The Find & Replace dialog will remain open. You don't have to close the dialog and
you can move it to any place on the screen. However, if you do choose to close it, it
will retain the previously entered strings so you won't have to enter them again for the
next search, but can select them from the list box.
StarOffice provides a practical multiple selection function in combination with the
Find All button. For example, if you want every mention of "bold" in your text to
appear in bold print, enter this word in the Search for field and click the Find All
button. Any matches found will be highlighted. You can then simply click on the Bold
icon in the Text Object bar to format all matches at once.
As you can see in the dialog, there are several ways of expanding or restricting your
search in both the Options group box and with the buttons. Examples for each option
are described below.
Searching for Whole Words Only
Select the Whole words only option if you only want to find whole words that match
the searched for word. For instance, if the word "in" is entered as the search term in the
Search for field, all instances of "in" or "In" as stand-alone words in the text will be
found. Words like "bin" or "chin" will not be found if this check box is selected. If you
are searching for regular expressions or styles, do not select this option.
Match Case
When this check box is selected, the search is case-sensitive to upper and lower case
letters. So if you search for "in," it will be found, but not the word "In." You can
combine a Match case search with the Whole words only option.
96
StarOffice 5.2 User's Guide • June 2000
Regular Expressions
You can also use wildcards within the search word. In this case, select the Regular
expressions option. If you enter "c*an" as a search word, then any number of "c"s can
appear before the "an", but do not necessarily have to. Therefore, the words "an," "can,"
"ccan," etc., are found and highlighted.
The regular expressions are specified in a form known to Unix users. If, for example,
you want to set a wildcard for a only one character in your search, you only need to
type a period. If you, on the other hand want to set a placeholder for various consecutive characters you need to type a period and an asterisk (.*). The end of a paragraph
will be found using the dollar sign ($) and the first character of a paragraph using a
caret and a period (^.). The regular expression ^$ will find a blank line.
There are many more wildcards allowed for special functions shown in the Help
Agent. In the Find & Replace dialog, click the Help button, then select the Regular
expressions option.
Searching Backward
If you want to find in a particular part of a long text a specific word that is used often,
you would probably enter the word under Search for and then skip each irrelevant
location by repeatedly clicking the Find button. However, you might click Find once
too often by mistake. In this case, select Backward and click again on Find to return to
the previous location found.
Current Selection Only
Select the Current selection only option if you do not want to search the entire document. The search will be restricted to the range selected in the document. If you select
a text before activating the Find command, the search will automatically take place
only within the selected range.
Searching for Styles
This option enables you to quickly reformat all or part of a text. For example, text
formatted with the Style "Heading 2" can be replaced with the Style "Heading 3."
Select the Paragraph Style in the list box under Search for. Then select the new Paragraph Style in the Replace with field.
Chapter 4
Basics for Text Documents
97
Start the replacement process with the Replace button. All matching strings found in
the text will be displayed one after the other. You can decide each time whether or not
to replace the string found in the text, to replace this and all other strings found in the
text, or to cancel the process.
Only Paragraph Styles can be found and replaced. If you want find or replace a
numbering Style in the document, this is only possible if the numbering has been
assigned to a Paragraph Style.
Attributes
Click Attributes... to open a dialog in which you select specific text attributes to search
for within a document. StarOffice will then find all attributes that differ from the
format of the Paragraph Style.
Selecting the Font Weight field, for example, finds all words with a heavier than
normal font. Any words assigned the Bold attribute by way of either hard and soft
formatting will be found. This also includes words which have been given fonts which
are already defined as such, i.e. those containing "Bold" or "Black" in their name. The
system default is such that only "hard" attributes are searched for. However, after you
have searched for the attributes, you can select Including Styles (it will appear where
Search for Styles was) in the Find & Replace dialog. This will cause the "soft" attributes, i.e. those attributes set by way of Styles, to be searched for in addition to the
"hard" ones. The other options are described in the text documents section of the
StarOffice Help.
98
StarOffice 5.2 User's Guide • June 2000
Searching for Specific Formats
Click the Format... button to open a dialog in which to select the specific formats you
want to search for. For example, if you have manually centered a few lines in your
text, you can search for them using the options in the Text Format (Search) dialog.
If you want to replace the found attribute with another, first position the cursor in the
Replace with field. Next, click the Format button and then choose the replacement
attribute. The chosen attributes will be listed under the Search for and Replace with
fields. If you do not indicate the replacement for the attribute found in the text, the
default settings are automatically applied.
Similarity Search
With this function, you can look not only for the search word itself, but also other
similarly spelled words. Click on the button to the right of the "Similarity search"
option and a dialog will be opened in which you define the degree of similarity. There
is a wide range of variations which you can regulate. To test this function, enter the
search text "et" and activate the similarity search.
Using the Find All search method, you get a good idea of the what the various
settings do. All matches found in the text will be highlighted and you can easily see
how each word resembles the search word. Detailed information about a similarity
search can be found in the StarOffice Help.
Chapter 4
Basics for Text Documents
99
Using Automatic Functions
StarOffice helps you work better via a wide range of intelligent assistants, which are
all prefixed with "Auto." This introduction will familiarize you with the AutoPilot for
Letters, AutoCorrect, and AutoText. Please see the StarOffice Helpfor a comprehensive
description of these functions.
Using AutoCorrect and AutoFormat
If you want it to, StarOffice will format your documents as you type or thereafter, and
correct any typing errors you may make. Once you have gotten used to using the
AutoFormat and AutoCorrect functions while you type, you will be able to draft your
documents much more efficiently. Here are a couple of examples:
AutoCorrect functions are helpful if you often make the same typing errors. If, for
example, you tend to capitalize not only the first letter of some words but also the
second, simply select the AutoCorrect function that corrects mistakes of this sort while
you type.
The AutoFormat function formats your texts. For example, if a line begins with a
minus sign followed by either a tab or a space, the AutoFormat function will automatically reformat that line as part of a bulleted list. The bulleted list format will then also
apply to subsequent lines. If you press Enter in a new line (thus leaving it blank), the
automatic bulleting will be turned off.
AutoFormat for text documents is switched on and off with the Format - AutoFormat
menu command. In the submenu, select While Typing if you want the AutoFormat to
be active while you type. If you'd prefer to automatically format the whole document
or the current selection after you finish typing, use the Apply menu command.
By using the Apply and Edit Changes command you will see all document changes
made via AutoFormat. You then have the choice of accepting or rejecting all changes
or reviewing each change separately.
Various options associated with this function can be chosen by way of Tools- AutoCorrect/AutoFormat.... AutoCorrect offers you many options. Some can be turned on
and off, and some can be used for either while typing or post-editing. The replacement
and exception tables are language dependent, which means that StarOffice first
searches the list of the language specified in your text, then in a list of a similar
language, and then finally in all installed languages (e.g. first in English (US), then in
English (GB), then in "all languages").
100
StarOffice 5.2 User's Guide • June 2000
Note the options in the illustrated dialog. A detailed description of each option can be
found in the StarOffice Help. You could choose, for instance, to have all standard
quotation marks entered with the Shift + 2 key combination to automatically be
converted into custom quotes. You can also define which characters should be used
for custom quotes.
The option URL Recognition determines that addresses written in the URL format
will be automatically highlighted. StarOffice formats the URL text with hard character
attributes (color and underscoring) whose properties are taken from specified fonts. If
an HTTP address happens to have been used it looks in the cache to see if this URL
has been used recently or not at all. The characters are colored and underscored accordingly in different fashions. The fonts from which the hard formatting is taken, are
called "Internet Link" and "Visited Internet Link", these are found in the appropriate
template of the document type currently being used, for example, if you are using an
HTML document, this is the template Office52\share\template\english\internal\html.vor.
If you do not want to have URLs automatically recognized when they are written, you
have several options to disable this functionality:
■
If you are typing and text has been automatically converted into an URL, press the
key combination Ctrl + Z to undo this particular formatting step.
■
If you notice at a later point that text has been converted, select the text marked as
an URL and call up the command Format - Default. This reconverts the selected
characters to the "Default" character style.
You can switch off this functionality completely by removing the check in front of the
URL Recognition entry.
The Automatic *bold* and _underline_ option is useful when importing text that
contains no special text attributes, such as pure ASCII text. Text that is supposed to be
Chapter 4
Basics for Text Documents
101
bold or underlined is indicated by placing these special characters before and after it.
Once you have imported such text and formatted it with the aid of the AutoCorrect
function, the special text attributes will appear correctly in your text. You can also use
these special characters to apply bold or underline attributes directly to your text as
you type.
In the AutoCorrect dialog, the Replace tab contains a lot of automatically replaceable
words and phrases. You can enter your most frequent typing errors here to have them
automatically replaced with the correct spelling. You can also use AutoCorrect to enter
characters that are difficult to insert via the keyboard. For example, if you type (C),
this will immediately be converted into a copyright symbol if you have put an X in the
Use replacement table box on the Options tab page.
If you need to use the Euro-currency symbol in a document and you are using a font
which doesn't have this symbol, you can utilize one of the StarOffice font styles
which has it and insert the Euro symbol using the AutoCorrect function. Here's how:
In a text document, choose the Insert - Special Character... command. Select the font,
for example "Timmons", and click on the Euro symbol. Confirm with OK.
Now select the Euro symbol which you just inserted into your text document. Click
the Tools, AutoCorrect/AutoFormat... command. The selected Euro symbol has
already been inserted in the Replace with text box (even though it may not appear as
such since the system font used in the dialog might not yet recognize this symbol).
Enter in the Abbreviation text box "Eu" (without the quotation marks), for example,
and click New. Now close the dialog. As soon as you enter the Eu followed by a
space or at the end of a sentence, a Euro symbol will be inserted.
On the Exceptions tab, you can enter exceptions for two types of automatic correction
which are described below.
If you select the option to automatically start each sentence with a capital letter, then a
lower-case "d" following "e.g." would be capitalized, for example. You can enter "e.g."
as an exception to prevent this type of correction.
If you select the option to automatically convert the second of two capital letters at the
beginning of a word to a lower-case letter, you can enter exceptions that are correctly
written with two capital letters, such as PC and CD.
These exceptions can also be automatically incorporated into the tab page. To do this,
use Add Automatically fields on the Exceptions tab page. If you have selected these
and you then use an idiom in your text that is automatically corrected even though it
isn't wrong, you need to immediately press Ctrl + Z. Doing this not only undoes the
automatic "correction", but also sees to it that this particular "correction" will not be
made automatically again.
AutoCorrect can also be used to replace one word with another - for example, "ASAP"
with the text "as soon as possible".
102
StarOffice 5.2 User's Guide • June 2000
Using AutoText
StarOffice offers a user-friendly AutoText function which enables you to enter
text into letters, faxes, and other documents using preset or user-defined shortcuts instead of typing the whole thing out. In this way, AutoText makes it
quick and easy for you to draft correspondence with identical or similar
contents.
The advantage of AutoText is that you can insert a complete word or phrase just by
typing a shortcut. All you have to do is enter the shortcut for the desired AutoText and
then press the F3 key. The AutoText will be instantly inserted at the cursor position. If
you use the AutoText dialog you have the advantage of not having to remember the
shortcut, but selecting and inserting takes more time. If you don't know the shortcut,
however, there is a faster method than using the dialog itself which will be described
below.
■
Position the text cursor where you want to insert the AutoText.
■
Enter the AutoText shortcut and press the F3 key.
■
The AutoText automatically replaces the shortcut characters.
The AutoText dialog activated via the Edit menu contains several AutoTexts. Try out
some of the predefined texts, and you will see that they can even include pictures and
tables.
Finally, here is the quickest method of all for inserting AutoText when you don't know
the shortcut. To see a list of existing texts, click the AutoText icon in the Main toolbar
and keep the mouse button pressed.
Chapter 4
Basics for Text Documents
103
Then, simply click on the AutoText you want to insert at the cursor position in your
text. When you release the mouse button, the text will be inserted.
Creating a Letter Template with the AutoPilot
If you are writing a personal letter, the AutoPilot and standard AutoTexts are not
essential, but in formal business correspondence these aids can save you a lot of time
and make your work much easier.
You can find a more detailed description of the AutoPilots in the Intuitive Solutions
section of the StarOffice Help. However, since it is so easy to create a basic format for
your letters, a brief introduction is also provided here. This will help you see how
StarOffice can assist you with more complex tasks.
If you want to write a standard letter, please have a look at the predefined templates
before creating your own. To do so, just select the menu command File - New - From
Template... or use the Ctrl + N key combination.
Start the AutoPilot with the File - AutoPilot - Letter menu command.
In this short introduction, accept all the defaults provided by the AutoPilot without
changing them, and then print the result. You could click on the Create button right
104
StarOffice 5.2 User's Guide • June 2000
away, but to familiarize yourself with this function you should click Next on each
dialog page, so that you have seen every page at least once.
Have a look through the AutoPilot pages for creating a letter template. You don't have
to enter data or modify options on each page, but you can if you want to. Each page
allows you to make modifications according to your preferences. Of course, sender
and recipient addresses can also be entered manually, because, although predefined
elements will appear, you have the final say as to which elements you want to include
in your letter.
Your return address will be automatically taken from the data that you entered during
installation. You can change this data at any time by activating the Tools - Options General - User Data command to enter your revised data.
You do not need to go through all the steps of the AutoPilot each time you want to
write a letter. Although the AutoPilot does produce a document that you can immediately fill in, print, and send, the main purpose of the AutoPilot is to help you create a
customized document template.
The AutoPilot creates a template which can be edited and then used as a customized
template for all your letters. This ensures that your correspondence will have a consistent format. This also applies to other types of documents which can also be created
with the AutoPilot (e.g. faxes).
Thanks to the AutoPilot, you don't have to start from scratch but can use pre-existing
texts when creating your own templates, whether for business letters, faxes, memos, or
other documents.
Free Positioning of Text, Drawing Lines
If you want to improve the appearance of your documents, StarOffice offers many
ways to lend an original flair. You can insert objects ranging from simple lines to
graphics, pictures and even complete videos. This section describes how to insert
frames and lines in your text document and how to slant letters to visually emphasize
them.
Chapter 4
Basics for Text Documents
105
Accentuating Text
There are several ways to accentuate your text. Here are four possibilities:
■
Use the "normal" Formatting (e. g. with the icons in the text Object bar). Some
possibilities are: create the text in bold or in another font style, change the text color
and background, or center the text.
■
Use the context menu to help you optically accentuate a whole paragraph. Call the
context menu of the respective paragraph and select the Paragraph... command
and then, for example, the Borders tab. Now choose a border for your paragraph,
including a shadow if you want. You can also click the Spacing button and decide
on the space between the border and the paragraph.
■
Enter the text in a Text Frame. You have the following possibilities: The text can
receive a border, it can be placed outside of the text margin on the side of the page,
and you can link text frames if a text should flow from one frame to another.
Use the Text draw function: With the Text icon in the Draw function floating
toolbar (in the Main toolbar), drag open a frame and enter your text. This text
can be positioned as you'd like, which includes rotating at various angles, or
curving and slanting your text with the help of Format - FontWork.
How to Insert a Text Frame
If, when you are finished writing, you decide to place a paragraph in your text outside
the type area (for example, a title across the whole width of a page where the text is set
in two columns), you only need to use the function for inserting frames. To do this,
long-click the Insert icon on the Main toolbar to open a floating bar and long-click the
Insert frame manually icon. If this is the first time you are using a floating bar, the
following short description for working with the special StarOffice elements may be of
interest to you.
The Insert icon appears at the top of the Main toolbar in a text document. Click on the
icon and hold down the mouse button until a toolbar containing additional icons
appears.
You can now choose the icon representing the object you want to insert. Continue to
hold the mouse button and then select the icon, or drag the entire floating toolbar
away from the Main toolbar and position it anywhere on the screen. Like other
106
StarOffice 5.2 User's Guide • June 2000
windows, it has a Title bar and a close box. You can move the window by dragging the
title bar.
To insert text in a text frame after you have already typed it in, proceed as follows:
■
Select the entire paragraph that you want to place in the frame. One way to do this
is to place your cursor at the beginning of the paragraph, and then - holding down
the Shift key all the while - click at the end of the paragraph.
Long-click the Insert icon on the Main toolbar and open its floating bar. In the
Insert floating toolbar, hold down the mouse button on the Insert frame
manually icon. While still pressing the mouse button, move the pointer down
a bit and select the desired amount of columns by highlighting them in the
window that will appear. Release the mouse button when you have selected
the desired number.
■
If you now move the mouse cursor into the text document, a cross-hair symbol
indicates that you can drag open a frame. If you decide not to do so, press the
Escape key to change the cursor back to a text cursor again.
■
With the cross-hair symbol, drag a frame to mark the new area determined for the
paragraph.
The selected text is now automatically deleted from the normal, continuous text and
inserted in a text frame.
Click on the edge of the text frame if you want to activate it. An activated text frame
can be recognized by eight control points, four of which are located in the corners and
one in the middle of each side.
Once a text frame is activated, you can modify the position and size using the mouse.
If you drag an edge without positioning the mouse directly above a control point, you
move the whole frame. If you drag one of the control points, you can change the frame
size. The corner or edge opposite the point you drag will remain in place. By dragging
a control point on one of the sides, you can stretch or shrink the text frame in a single
direction, whereas dragging a control point at a corner expands or reduces both the
width and height of the frame. If you hold the Shift key while dragging any of the
eight control points, the frame size will change proportionally, i.e., with constant page
proportions.
The options in the context menu of a selected frame allow you to make further adjustments.
Chapter 4
Basics for Text Documents
107
In the context menu of a text frame, you can Arrange a text frame relative to other
frames, draw objects, pictures, etc., if the frames or objects overlap. In the Wrap
submenu, specify whether and on which side the normal text in your document
should flow around the text frame. The Frame command in the context menu is
equivalent to the menu command Format - Frame. It opens a dialog in which you can
define all the properties of a frame.
The functions available in text frames are the same as in text documents. In addition to
text, frames can contain pictures, multiple columns, etc.
To vertically center a text, for example on a title page, proceed as follows:
108
■
Write and select the text.
■
Click the above mentioned symbol Insert Frame Manually.
■
Create a frame on the page. The selected text will automatically appear in the
frame.
■
Format the text and resize the frame so that it fits closely around the text. To format
the text, first select it, then undo the frame selection by clicking outside the frame
and then clicking directly on the text. In order to select the frame again later, click
the border of the frame.
■
Open the context menu of the frame and change the anchor to "To Page".
■
Now you can use the mouse to drag the text frame to any position on the page. You
can also use the icons in the Object bar to move the frame horizontally and/or
vertically to one side or to the middle.
StarOffice 5.2 User's Guide • June 2000
■
You can call up the Frame dialog whenever the frame is selected (when the eight
control points are visible) by means of a double-click so that you can edit the properties of the selected frame.
■
Switch to the Borders tab of the Frame dialog and switch off the border, which
would otherwise be printed: Click on the icon at the far left in the Presets section
which shows no lines. The frame will lose its printable border. If you also want to
switch off the gray border which, although visible, will not be printed, use the
command View - Text Boundaries.
Using Draw Objects as Frames
In StarOffice you can use any draw object as a frame or a frame for text because you
can also put text in any object drawn. That means, you could, for example, use a
rectangle draw object instead of the frame described above. Let's say, for example, that
you want to draw a figure containing animated text. To do so, follow these steps:
■
With the Start button in the Task bar, open a new text document.
■
Select Format - Page... to select a blue background for the whole page.
Open the Draw Functions in the Main toolbar and click the Rectangle icon.
■
Draw a medium-sized rectangle in the middle of the page, as shown in the illustration:
Chapter 4
Basics for Text Documents
109
110
■
Open the context menu of the selected draw object.
■
Choose the Area command to assign a color or pattern to the area inside the
rectangle.
■
On the left side of the Area tab page, select the option Gradients, and choose e.g.
"gradient 4". Close the dialog box with OK.
■
Open the context menu once more and select the Line... command to define the
border properties of the rectangle.
StarOffice 5.2 User's Guide • June 2000
■
For the line, choose light red as the color with a width of 0.20 inches, for example.
Close the dialog box with OK.
■
Double-click in the middle of the rectangle and type in your text, for example "Sun
Microsystems presents StarOffice". It doesn't matter if the text extends beyond the
width of the rectangle.
■
Click again on the edge of the rectangle to select it, then open the context menu and
choose the Text... command.
■
In the Text dialog, select the Text Animation tab. Under Effects select the "Scroll
Through" option. On the Text tab page, you can set the text spacing from the left
and right borders if you want. (Note: the defined width of the border of a frame is
half outside and half inside the frame.) Click OK.
■
Finally, cancel the selection of the rectangle by clicking somewhere else in the
document. The animated text will then begin to scroll.
■
To change the size of the animated text, select the rectangle again and double-click
in the middle of it. Select the text as usual and, for example, apply font size 36. At
the same time you can choose a font color by using the context menu command
Character....
You can enlarge or reduce the page view either with the menu item View - Zoom...
or via the context menu of the scale field in the Status bar. If the screen display is to
be refreshed, press the Shift + Ctrl + R key combination.
Chapter 4
Basics for Text Documents
111
Drawing Lines in Text
You can incorporate lines in your text, the angle, width, color, etc. of which can be
defined however you'd like.
Create a basic horizontal line by applying the preset Paragraph Style Horizontal Line.
Place the cursor in a blank line and double-click the Horizontal Line Style in the Stylist
(HTML Styles). A line created with this Paragraph Style is also visible on Internet
pages. If perhaps the entry for horizontal lines cannot be seen in the list of Paragraph
Styles, switch in the Stylist from "Automatic" to the "All Styles" view.
With the command Format - Paragraph...- Borders, you can draw a border around a
paragraph. These borders may also be "incomplete," in that they consist only of a
single line beside or below a paragraph. This option is explained in detail in the
StarOffice Help.
To define line attributes precisely, use the Line draw object as follows:
■
In the Main toolbar, long-click the Show Draw Functions icon to open the Draw
Functions floating bar and select the Line icon. The mouse pointer will change to a
cross-hair symbol with a line beside it.
■
In your document, click where the line should begin, hold down the mouse button
and drag to the point where you want the line to end. If you also hold down the
Shift key, you can draw only horizontal, vertical, and diagonal lines.
■
Release the mouse button once the line has the desired direction and length. You
can then draw more lines. End this function by pressing the Esc key or by clicking
the Selection icon from the Draw Functions floating bar.
■
After clicking the Selection icon, you can select all of the lines at the same time by
clicking each line while holding down the Shift key. This multiple selection enables
you to assign all of them a common color, width or any other attribute.
Lines and other draw objects inserted in text are not defined in the HTML Internet
page description language. Instead of being exported directly in the HTML format,
they will be exported as graphics and the document will take on another appearance.
112
StarOffice 5.2 User's Guide • June 2000
Curving Text
You can curve a text created with the Text icon in the Draw floating toolbar.
After clicking the Text icon, the mouse cursor will take the form of a cross-hair. Now
you can drag open a delimiting frame for the text. Then enter your text. If you happen
to enter more text than your frame allows, the frame will automatically be elongated to
fit the text.
Click one time outside of your text, and then again within your text . With the first
click you leave the text entry mode, and with the second click you select as an object
the text you just entered.
Now you could, for instance, rotate your text exactly 90 degrees via the Rotation tab under Format - Position and Size, or click on the icon in the Object bar
and rotate the object manually with the mouse cursor. If you manually rotate
the object while holding down the Shift key, the object will rotate only at fixed
angles.
Slanting Text
You can achieve interesting graphic effects with short texts in headings, logos, etc.,
using the FontWork program module. Here's how:
Open the Drawing Functions floating toolbar from the Main toolbar and click
the Text icon.
■
Draw a text frame on your page, and then type in text, for example "StarOffice".
Chapter 4
Basics for Text Documents
113
■
Choose the menu command Format - FontWork. You will see the FontWork
window, where you can select the various options:
■
Click the upper-left icon with the semicircle to display the text as a curve.
■
Click Vertical in the Shadow options. Specify 0.10 inches for the x-axis shadow
distance. The text should now appear similar to the illustration.
■
Since the first and last letters are not very easy to see, insert two blank spaces
before and after the text. Double-click the text, edit it, and then click outside the
object.
If you activate the FontWork object by clicking it with the mouse, eight control points
will appear. To change the size and shape of an object, simply drag the one of these
points in the desired direction. Additionally, you can copy the finished object to the
clipboard and insert it from there into other documents where you can also modify its
size and other attributes.
You can also align text to a free-form line. First draw a free-form line (use the Drawing
Functions floating toolbar), and then double-click it to enter the desired text. Then
choose the command Format - FontWork to apply special text effects.
Here's a last tip to end this section. If you want to slant text so that it flows from
exactly one point on the page to another point, follow these steps: Draw a straight line
from one point to the other using the Draw Functions. In the list box of the Object bar,
select the "invisible" Line Style. Double-click on the now invisible line (the control
points at the ends are still visible: double click exactly between them). Now, enter the
text and you're done!
114
StarOffice 5.2 User's Guide • June 2000
CHAPTER
5
5
Working with Spreadsheets
StarOffice Calc is the powerful spreadsheet program in StarOffice. It provides all the
functions necessary for professional use, lots of financial and statistical functions as
well as database functions, plus much, much more!
Data can be clearly represented in charts, and advanced users, will also be able to use
StarOffice Basic (built-in macro programming language) in spreadsheets to automate
basic processes or even program their own dialogs.
In this section of the introduction to StarOffice you will learn how to work with
spreadsheets and also about creating tables in text documents.
The Structure of a Spreadsheet
A spreadsheet document consists of individual spreadsheets. Every spreadsheet
contains numerous cells, which are organized in rows and columns. Each cell can
contain either a mathematical formula or a text or value of almost any length.
A calculation can be entered directly as a mathematical formula, e.g., =4 + 5. But the
main reason for using a spreadsheet is that its formulas can refer to other cells. An
example of such a mathematical formula might be =SUM(A1:A8). This calculates the
sum of the values in cells A1 through A8 and enters the result in the cell containing the
formula. Additional formulas may also be entered in cells A1 through A8, each referring to other cells and their contents, and so on. As you can see, this allows you to
calculate extremely complex relationships.
Open a new spreadsheet with the command File - New - Spreadsheet. It is named
"Untitled1" until you save it under a different name. If you look at the new, still empty
document, you will notice several typical elements, which are discussed in the
following.
115
Rows and Columns
On a spreadsheet, rows are numbered from 1 to 32000 and the columns are designated
with the letters A through Z, AA through AZ, and so on; the last column is labeled
with the letters IV. Each cell on the sheet can be uniquely referenced by row and
column. For example, cell A1 is the first cell in the upper left corner of the sheet.
These numbers and letters appear along the edge of the window. The row header
contains the row numbers, and the column header names the columns. If you click on
one of these areas, the entire row or column will be selected. To select the entire sheet,
click on the unlabelled button at the intersection of the row and column headers at the
top left.
Enter some text in cell A1. While writing you will notice that the text appears both in
the cell and in the input line of the Formula bar. You will also notice that more text can
be entered than what actually appears to fit in the cell.
116
StarOffice 5.2 User's Guide • June 2000
In fact, each cell can hold large amounts of text; the text is displayed and printed in its
entire length as long as the adjacent cells to the right are empty. If the cell to the right
is not empty, a small triangle appears at the right of the cell indicating more text than
can be shown. (You can deactivate this function with the Text overflow check box
under Tools - Options - Spreadsheet Document - Contents.
If a number cannot be displayed in a cell because it is too long, or due to the formatting, e.g., currency format, you will see "###". In this case, you will need to increase the
column width. Set the width to "optimal" by simply double-clicking the right divider
in the column header.
You can use all the usual functions to edit the text. Notice, however, that the right and
left arrow keys will replace the cell cursor if you are in the Entry mode (by clicking in
a cell and entering characters). If you edit a cell with a double-click or have pressed the
F2 key or click in the entry row, you will enter the Edit mode. The left and right arrow
keys will now replace the text cursor. When you press the Enter key, the text in cell A1
is finished and the cursor automatically moves to cell A2. The active cell is always the
one with the cell cursor and that is where you can make entries and changes.
Multiple Sheets in a Document
At the lower edge of the spreadsheet document you will find tabs for switching among
the various sheets of your document. A new, empty spreadsheet initially contains
three sheets, each titled "SheetX" (X stands for the numbers 1 through 3).
Chapter 5
Working with Spreadsheets
117
Inserting Additional Sheets
■
Click on a sheet tab at the bottom edge of the window.
■
Open the context menu which contains the commands for editing the sheets of
your document.
■
Select the Insert... command. A dialog box appears where you can enter a name,
etc. for the new sheet(s).
■
Define the sheet's properties and confirm with OK.
Renaming a Sheet
■
Click on the tab of the sheet you want to rename, e.g. Sheet1.
■
Open the context menu and choose the Rename command. A dialog box appears
where you can enter a new name.
■
Enter a new name for the sheet and click OK.
■
Alternatively, you can enter a new name directly by clicking on the name you want
to change while holding the Alt key.
The name of a sheet may consist only of letters and numbers. Spaces are also
permitted.
Note that sheet names are not dependent on the name of the spreadsheet document.
You assign the name of the Spreadsheet itself the first time you save the document. A
spreadsheet may contain up to 256 sheets, each with a different name. But try to resist
the temptation to organize all your sheets in a single document. The more sheets you
have the longer it takes to load the spreadsheet document; and managing sheets in
individual files is, in fact, often easier.
Values and Formulas as Cell Contents
The individual cells in a sheet can contain text, numbers, date information, or
formulas. You can easily define or modify the cell contents, and recalculate formulas
with new data.
In sheets, values refer to numbers, date and time information, and the results from
formulas. You can highlight values by selecting Value Highlighting in the View
menu. You can also select this option under Tools - Options... - Spreadsheet Docu118
StarOffice 5.2 User's Guide • June 2000
ment - Contents; it will then apply to all present and future spreadsheets. If this
option is enabled, number and date information will automatically be displayed in
blue, and values in cells that contain formulas will be displayed in light green; text will
always appear in black. If Value Highlighting is not active, you can choose any colors
and other formatting you'd like for the sheet.
You have already seen that it is possible to enter text, even if it extends beyond the
width of a cell. If a number is too long to be displayed in a cell, the overflow symbol
"###" appears. Go to the Format menu and choose the command Column - Optimal
Width.... Confirm the dialog with OK, and the column width will automatically adjust
to the length of the longest number in the column. You can also double-click the right
edge of the column heading (i.e. the divider between this column header and the one
to the right of it) to achieve the same result.
Since the entire number information is always saved in the cell, you do not need to
adjust the cell size to the contents. Don't worry if the entire number cannot be
displayed. If desired, the numbers can be rounded off in the display.
The box at the bottom right in the Status bar always displays helpful information. In a
spreadsheet, this box can be used to permanently display the sum of all selected cells.
You can also display other values, such as the maximum value of all selected cells. Use
the context menu to change the value displayed in this field. In case of an error in the
spreadsheet, this field will also display an error message.
Calculations in a Spreadsheet
The following simple percentage example illustrates how to perform calculations in a
spreadsheet:
■
Position the cursor in cell A3.
■
Enter the number 150 and press the Enter key. The cursor then moves down to cell
A4.
■
Enter the number 16 in cell A4. This time, however, press the Tab key instead of the
Enter key. The cursor moves to the right to cell B4.
■
In cell B4, enter the following: =A3 * A4 / 100. If you begin an entry with an equal
sign, this indicates a formula. The formula appears in the input line of the Formula
bar.
Chapter 5
Working with Spreadsheets
119
■
Press Enter to finish the formula. You will see the result of the calculation (16 percent of 150) in cell B4.
■
Click on cell A3, enter 200, and press the Enter key. Notice that the calculation
result is adjusted automatically.
■
Click on cell B4, and then click at the end of the formula in the input line of the
Formula bar. A blinking text cursor indicates that you can make a new entry.
■
Add "+ A3" (without the quotation marks) to the formula and press the Enter key.
The newly calculated value of the formula appears in cell B4: the previous 16 percent of A3 plus the contents of A3.
You are now acquainted with the most important steps in working with spreadsheets:
creating and entering formulas, entering data (text and numbers), obtaining results,
modifying source data or formulas, and how to view results of new data or formulas.
You can also load a sample spreadsheet and fill it with your own data. StarOffice
provides you with various sample spreadsheets which you can edit and customize
according to your own needs.
In addition to the four basic arithmetic operations, other numerous operators are available, such as nested brackets and a wide variety of functions. The Function AutoPilot
(found under Insert - Function... assists you in entering functions.
Using the Euro Conversion Function
If you enter a formula (e.g. =4+5 or =A3*A4/100) in a cell and then press the Enter
key, the end result of your calculation will appear in the cell. You can also enter functions in your formula. An example could be =SIN(1), which shows you the result of
sine of one (rounded to two decimal places).
StarOffice Calc has several other functions, too, and you can add additional functions
yourself using StarOffice Basic or AddIns. The StarOffice Help shows you how to do
this. In most cases though, the standard functions provided in the program are enough
120
StarOffice 5.2 User's Guide • June 2000
to fulfill your needs. The function with the Syntax CONVERT(arguments) will be
introduced here as an example.
To convert the sum of 100 DM (German Mark) to Euro, enter the following formula in
a cell:
=CONVERT(100;"DEM";"EUR")
The result you get will be the amount of Euro equal to 100 German Marks. The
amount to be converted always appears first in the parentheses. It can be directly
entered, as here, or as a reference. If the amount is in cell D2 for example, you can
enter the formula D2 as the first part of the function. The other parts of the function
name the unit amount and the unit into which the conversion should take place. All
three parts of the function are separated by semicolons.
The formula =CONVERT(50;"EUR";"DEM") converts 50 Euro to German Marks.
If in column D you have a number of DM values in the entries from D2 to D20, and if
you would like the same values in Euro in column E from E2 to E20, do the following:
■
Click cell E2.
■
Enter the following: =CONVERT(
■
Click cell D2. Cell D2 is now the first part of the function, and the text cursor is still
positioned on D2 in the formula.
■
Enter ;"DEM"; "EUR"
(enter the text with the two semicolons and quotation marks) and press the Enter
key.
The whole formula is now concluded, and reads =CONVERT(D2;"DEM";"EUR").
The calculation result can be seen in cell E2.
■
Click in cell E2 and then on the small filled square at the bottom right in cell E2.
Now drag, while pressing the mouse button, all the way up to cell E20, and let go
of the mouse button at that position.
By following these steps, you have copied the formulas E2 to E20. The characteristics are automatically adjusted respectively so that each cell refers to the adjacent
cell to it's left.
The CONVERT function uses an extensive list of conversion factors, which you can
expand if necessary. This list can be found in the convert.ini file in the
Office52\User\Config directory. That is also where you can see in the comments how
to expand the list up to a maximum of 16383 entries.
The CONVERT function appears, like other functions, in the StarOffice Help in the
following syntax form:
Chapter 5
Working with Spreadsheets
121
CONVERT(Value; Text; Text)
The Value is the value to be calculated.
Both text parameters are strings; you must adhere to upper/ lower case letters (i.e.
case-sensitive)!
What Can a Cell Contain?
As you have seen in the examples above, cells can contain various elements. In the
following, a brief introduction to each of these elements is given.
Text
Since each cell in a sheet can contain a very long text, it is theoretically possible to
write a normal letter in a sheet. However, this would not make much sense since
StarOffice Writer has more useful writing tools.
When you enter text in a sheet, you can use almost all of the editing and formatting
functions available in a text document. For example, to select a word, you can doubleclick the word either in the input line or in a cell. If you select a different font or other
attribute from the text Object bar, the modifications will apply only to the selected
word.
The Ctrl + Enter shortcut keys are used to enter a manual line break. Under Format Cells... - Alignment you can also select the Line Break field, this will break the text
automatically at the right column margin.
You can even "calculate" with text. For example, if you enter text in both cell A1 and
cell A2, you can then insert a formula ("=CONCATENATE(A1;A2)") in cell A3 to
combine the two text strings. Many additional formulas and functions are possible.
You can also enter numbers in the "Text" cell format. Simply format the desired cells
with the cell format "Text" (click open the context menu of the cell and select Format
Cells... - Numbers tab - Text category), and enter numbers in the cells. These will be
interpreted as text. The display of these "numbers" starts on the left side of the cell just
like normal text. But note: You can't calculate with numbers in text format!
If you have already entered normal numbers in cells and have afterwards changed the
format of the cells to "Text", the numbers will remain normal numbers. They will not
be converted. Only numbers entered thereafter or numbers which are then edited will
become "text" numbers.
122
StarOffice 5.2 User's Guide • June 2000
If you decide to enter a number directly as text, enter an apostrophe (') first, for
example for years in column headings '1999, '2000 and '2001. The apostrophe will not
be shown in the cell, it only signalizes that the entry is to be recognized as a text. This
is useful, for example, if you enter a telephone number or ZIP code that begins with a
zero (0), because a zero (0) at the start of a sequence of digits is removed in normal
number formats.
Numbers
Numbers are the basic element used for calculation in spreadsheets and can have a
variety of formats. You can depict a particular number in many different ways, yet it
will always be recognized as the same number.
Enter the number 12345.6789, for example. You will see that the number appears in the
sheet with only two decimal places, i.e. 12345.68. However, the exact number with all
four decimal places is still remembered by the program.
You can also enter Fractions. For example, enter in any cell "0 1/5" (without quotation
marks). Once you leave that cell, the integer (i.e. whole number) will disappear and
the fraction will remain. You will now see in the input line the value 0,2 with which
will be calculated. Take the single character replacement for 1/2, 1/4 and 3/4 from the
AutoCorrect by way of the Tools - AutoCorrect - Replace tab, if you want to enter
them as fractions. If you want to see "1/10" not as a single character but rather as it is
written here, you have to change the format of the cell to accommodate such fractions
(using in the content menu of that cell, the Format Cells... command).
Use Format Cells in the context menu of a cell, or in the Menu barFormat - Cells, to
open the Cell Attributes dialog where you'll find all preset formats listed on the
Numbers tab page. Click a format to see a preview of it in the lower right corner of the
dialog. You can also define your own formats, which you can then apply to numbers
or other sheet contents.
There are various ways to enter integers starting with a zero:
■
Enter the number as text. The easiest way is to enter the number starting with an
apostrophe (for example, '0987). The apostrophe will not be entered in the cell and
the number will be formatted as text. Because it is in text format, however, you
won't be able to calculate with this number.
■
Format a cell with a number format such as \0000. This format can be assigned in
the Format code box under Format - Cells... - Numbers tab and defines the cell
display as "always put a zero first and then the integer, having at least three places,
and filled with zeros at the left if less than three digits".
Chapter 5
Working with Spreadsheets
123
If, however, you have imported an entire column with numbers in "text format", i.e. in
the form of "000123", which you now want to turn into "real" numbers again without
zeros in front of them, i.e. in the form of "123", proceed as follows:
■
Select the column in which the digits are found in "text format". Set the cell format
in that column as "Number".
■
Call up Edit - Find & Replace.
■
In the Search for box, enter ^[0-9].
■
In the Replace with box enter: &.
■
Put a check in front of Regular expressions.
■
Put a check in front of Current selection only.
■
Click Replace All.
Cells in Currency Format
In StarOffice Calc, you can assign any currency format to the numbers in your
document. Simply click the Number Format: Currency icon in the Object bar
and the number or number selection will be automatically formatted in the
currency format set in your system.
Misunderstandings could arise when original documents are exchanged internationally. Suppose, for example, that your StarOffice Calc document is downloaded by
another user who uses a different system in a different language. That person's system
probably utilizes different currency symbols and perhaps even different divider notation for decimal places and thousands. To avoid this problem, you can fix the currency
format in StarOffice Calc so that a number which you have formatted as $1,234.50, for
instance, remains in dollars and isn't changed to another currency even if it is downloaded by another system.
124
StarOffice 5.2 User's Guide • June 2000
Two settings found in the Cell attributes dialog (via menu Format - Cells... - and the
Numbers tab) allow you to influence the currency format. In the dialog, on the left
side, the Language list box allows you to choose the basic settings for monetary
currencies, decimals and commas. In the Format list box at the top in the middle, select
the possible currency notation variations of the format defined by the language.
■
If, for example, the language is set on "System" and your system is "German", the
default currency format is "1.234,00 DM". A dot is used between the thousands and
the hundreds places and a comma before the decimal. Select in the Format list box
"$ English (US)" as currency, and you will obtain the format "$1.234,00". As you see,
the comma and decimal point stay the same. Only the currency will be changed,
not the underlying Format determined by the computer system.
■
If, right from the start, you adjust the cell's language to "English (US)", your
system will take over the corresponding dividing symbols and the currency default
format will be "$1,234.00". You can also alter the format again to, e.g.
"1,234.00 DM". This way of writing a number is more familiar to people using an
American system.
Dates and Times
In spreadsheets you can do more than just display dates and times (both taken from
the internal clock of your computer). You can also perform calculations with dates and
times. For instance, to find out exactly how old you are in seconds or hours, follow
these steps:
Chapter 5
Working with Spreadsheets
125
■
Open a new spreadsheet. Enter your birthday in cell A1, e.g., "4/9/64" (without
quotation marks, because if an entry starts with quotation marks it is always interpreted as text.
■
Enter the following formula in cell A3: "=NOW()-A1" (without quotation marks).
After pressing the Enter key or clicking the Accept icon (the green check mark in the
Formula bar) you will see the result in date format. Since you would like to see the
difference between two dates as a number of days, you have to format cell A3 as a
number:
■
Set the cursor in cell A3, right-click this cell (i.e. call its context menu) and select the
Format Cells... command.
The Cell Attributes dialog will appear. On the Numbers tab, the Number category
will appear already highlighted. The format is set to "General" and causes, among
other things, the result of a calculation containing date entries to also be displayed as a
date. If you want to make a number be displayed instead, set the number format to
"-1,234" for example, and close the dialog with the OK button.
■
You should now see in cell A3 the number of days between today's date and the
specified date.
■
Experiment with some additional formulas: in A4 enter "=A3*24" to calculate the
hours, in A5 enter "=A4*60" for the minutes, and in A6 enter "=A5*60" for seconds
(all without quotation marks). Press the Enter key after each formula.
The time since your date of birth will be calculated and displayed in the various units.
The values are calculated as of the exact moment when you entered the last formula
and pressed the Enter key. This value is not automatically updated, although "Now"
continuously changes, of course. In the Tools menu, the menu item Cell Contents AutoCalculate is normally active; however, automatic calculation does not apply to
the function NOW. If it were, your computer would be solely occupied with updating
the sheet, and it would be difficult to enter additional data into a sheet that is
constantly changing.
126
StarOffice 5.2 User's Guide • June 2000
Canceling the automatic calculation function is only necessary if your spreadsheets
contain a very large amount of data or very complicated formulas which you want to
modify before viewing the calculation results. Calculation time naturally becomes
longer as the complexity and size of a spreadsheet increases.
Formulas
In the previous examples, you have already become acquainted with how formulas
work. Every formula begins with an equal sign. In addition to numbers and text, a
formula can include other elements such as format information, which defines how a
number should be formatted. Formulas also contain operators, logical operators, and
function calls.
Remember that the basic arithmetic signs (+, -, *, /) can be used in formulas using the
"Multiplication and Division before Addition and Subtraction" rule. Instead of
writing =SUM(A1:B1) it's better to write =A1+B1.
Parenthesis are also possible. The result of the formula =1+2*3 means something
different than =(1+2)*3.
In addition to numbers which are entered directly, formulas may also include
addresses of cells containing numbers. These references can be either relative or absolute. This important distinction is explained in the next section.
Here is a list of several examples of StarOffice Calc formulas.
= A1 + 10
Displays the contents of cell A1 plus 10.
= ROUND(A1;1)
Rounds the contents in cell A1 to one decimal
place.
= EFFECTIVE(5%;12)
Calculates the effective interest at 5% annually
with 12 payments.
=B8 - SUM(B10:B14)
Calculates the sum of the cells B10 to B14 minus
the value of B8.
=SUM(B8;SUM(B10:B14))
Calculates the sum of cells B10 to B14 and adds
the value to B8.
It is also possible to nest functions in formulas, as shown in the fifth example in the
table above. You can also nest functions. For example, instead of =ROUND(A1;1), you
could also calculate the sine function with =ROUND(SIN(A1);2). The Function
AutoPilot assists you with nested functions.
Chapter 5
Working with Spreadsheets
127
Notes
Each cell can also contain a note. Choose the command Insert - Note... to enter additional information for a cell. A small red square on the border of a cell indicates the
presence of a note. To view a note, select the cell and choose Show Note in the context
menu. The note appears as a Help tip (as long as you have selected Help - Tips to be
shown) and will remain in view until you deselect the Show Note context menu item.
Click in the displayed note to make modifications to it.
How Can Cells Be Addressed?
Cells can be addressed directly by specifying the row and column coordinates. You
may use either relative or absolute references, or you can assign names to cell areas.
Relative Addressing
The cell in column A, row 1 is addressed as A1. You can address a range of adjacent
cells by first entering the coordinates of the upper left cell of the area, then a colon
followed by the coordinates of the lower right cell. For example, the square formed by
the first four cells in the upper left corner is addressed as A1:B2.
By addressing an area in this way, you are making a relative reference to A1:B2. Relative here means that the reference to this area will be adjusted automatically when you
copy the formulas.
Absolute Addressing
Absolute references are the opposite of relative addressing. A dollar sign is placed
before each letter and number in an absolute reference, e.g., $A$1:$B$2.
StarOffice can convert the current reference, in which the cursor is positioned in the
input line, from relative to absolute and vice versa by pressing Shift +F4. If you start
with a relative address such as A1, the first time you press this key combination, both
row and column are set to absolute references ($A$1). The second time, only the row
(A$1), and the third time, only the column ($A1). If you press the key combination
once more, both column and row references are switched back to relative (A1)
128
StarOffice 5.2 User's Guide • June 2000
StarOffice Calc clearly shows you the references to a formula. If you click the formula
=SUM(A1:C5;D15:D24) in a cell, for example, both reference areas in the sheet will be
highlighted. The formula component "A1:C5" can appear highlighted in blue, for
instance, and the cell area in question is outlined in the same blue tone as well. The
next formula component "D15:D24" can by highlighted in the same way in a red tone.
When to Use Relative or Absolute References
What distinguishes a relative reference? Assume you want to calculate in cell E1 the
sum of the cells in range A1:B2. The formula to enter into E1 would be: =SUM(A1:B2).
If you later decide to insert a new column in front of column A, the elements you want
to add would then be in B1:C2 and the formula would be in F1, not in E1. After
inserting the new column, you would therefore have to check and correct all formulas
in the sheet, and possibly in other sheets.
Fortunately, StarOffice does this work for you. After having inserted a new column A,
the formula =SUM(A1:B2) will be automatically updated to =SUM(B1:C2). Row
numbers will also be automatically adjusted when a new row is inserted. Absolute and
relative references are always adjusted in StarOffice Calc whenever the referenced area
is moved. But be careful if you are copying a formula since in that case only the relative references will be adjusted not the absolute references.
Absolute references are used when a calculation refers to one specific cell in your sheet
which contains a percent value, for example. If a formula that refers to exactly this cell
is copied relatively to a cell below the original cell, the reference will also be moved
down if you didn't define the cell coordinates as absolute.
Aside from when new rows and columns are inserted, references can also change
when an existing formula referring to particular cells is copied to another area of the
sheet. Assume, for example, you entered the formula =SUM(A1:A9) in row 10. If you
want to calculate the sum for the adjacent column to the right, simply copy this
formula to the cell to the right. The copy of the formula in column B will be automatically adjusted to =SUM(B1:B9).
There are several ways to copy a formula. Here's an example:
■
Select the cell containing the formula.
■
Choose the Copy command from the Edit menu, or use the key combination
Ctrl+ C to copy.
■
Select the cell into which you want the formula to be copied.
■
Choose the Paste command from the Edit menu, or use the key combination
Ctrl+V. The formula will automatically be adjusted in the new cell.
Chapter 5
Working with Spreadsheets
129
If you want to copy a formula into multiple cells, there's a quick and easy way to copy
into adjacent cell areas:
■
Select the cell containing the formula.
■
Position the mouse on the bottom right of the highlighted border of the cell, and
continue holding down the mouse button until the pointer changes to a cross-hair
symbol.
■
With the mouse button pressed, drag it down or to the right over all the cells into
which you want to copy the formula.
■
When you release the mouse button, the formula will be copied into the cells and
automatically adjusted.
If you don't want values and texts to be automatically adjusted, then hold down the
Ctrl key when dragging. Formulas, however, are always adjusted accordingly.
Addressing with Cell Names
A convenient way of making the references to cells and cell ranges more readable in
formulas is to give them names. In the above example, name the range A1:B2 "Start."
You can then simply write "=SUM(Start)" in the formula. Even after rows and columns
are inserted or deleted, StarOffice recognizes named ranges correctly. Please note,
range names may not have spaces in them.
For example, it is much easier to read a formula for sales tax if you can write
"= Amount * Tax_rate" instead of "= A5 * B12". In this case, you would name cell A5
"Amount" and cell B12 "Tax_rate."
In order to specify range names, you must first select the area, then choose the
command Insert - Names - Define, or the Ctrl + F3 key combination. Enter the name
for the first area and click Add. You can also name other cell ranges in this dialog by
entering the desired name in the field and then selecting the respective cells. Use the
Define Names dialog to define names for formulas or parts of formulas you need
more often. Close the dialog with OK.
130
StarOffice 5.2 User's Guide • June 2000
Automatic Addressing
StarOffice can correlate names with areas for the most part automatically, as long as
you have entered the row and column coordinates. Refer to the following illustration.
The automatic formula recognition allows you to enter, for example, the formula
=SUM(January) in cell B8. This formula can then be copied to the right. Cell C8 shows
the formula =SUM(February), cell D8 =SUM(March), and so on. This feature also
works for horizontal calculations. Try it out by entering the formula =SUM(London) in
cell E4. The New York entry is a special case: Because this name contains a space, it
must be enclosed in single quotation marks: =SUM('New York').
Automatic recognition does not work with formulas. You cannot enter the formula
=SUM(sum) in cell E8. Instead you must enter =SUM(B8:D8) or =SUM(E3:E6). The
latter formula will also be inserted automatically if you place the cursor in cell E8 and
click the Sum icon in the Formula bar.
This function is active by default. If you want, you can turn it off under Tools Options... - Spreadsheet Document - Calculate. Remove the check in the check box in
front of Automatically find column and row labels.
You can also define the names yourself with Insert - Names - Labels....
To have names automatically recognized, the names must consist of alphanumeric
characters and the first character must be a letter. If you want to use non-alphanumeric characters (including spaces), enclose the names in single quotation marks ('). If a
single quotation mark appears in a name, e.g., "Jan '97", you have to enter a backslash
in front of the quotation mark (Jan \'97). This type of referencing is not compatible
with earlier versions of StarOffice.
StarOffice automatically recognizes an area, usually referred to as a "range", of cells
that belong together. To determine which cells make up a particular range, place the
cell cursor in the desired range and press Ctrl + *. Use the * from the numerical key
pad. The range will be highlighted.
Chapter 5
Working with Spreadsheets
131
Cursor Positioning via the Keyboard
Use the arrow keys on your keyboard to quickly move to another cell. A list of all
possible shortcut keys can be found in the StarOffice Help.
132
Shortcut Keys
Effect
Ctrl + Pos1
Positions the cursor in cell A1
Ctrl + End
Positions the cursor in the last cell containing data on the
spreadsheet. If the last row containing data is row 10 and
the last column in which values are found is column F, the
cursor will be positioned in cell F10.
Pos1
Positions the cursor in the first column (A) of the row
currently selected.
End
Positions the cursor in the last column containing data of
the currently selected row.
Ctrl + x
* is the multiplication
sign on the numeric key
pad
Selects the entire range in which the cursor is located. A
range is a contiguous area of cells containing data.
Enter - in a selected
range
Positions the cursor in the next cell when in a range. The
direction the cursor moves can be defined under Tools Options... - Spreadsheet - Input.
Ctrl + Left Arrow
Goes to the column at the left of the current range or goes
to the previous range. If a range does not exist, then goes
to the first column (A).
Ctrl + Right Arrow
Goes to the column at the right of the range currently
selected or goes to the next range. If a range does not exist
then goes to the last column (IV).
Ctrl + Up Arrow
Goes to the uppermost row of the range currently selected
or goes to the previous range. If a range does not exist,
then goes to the first row (1).
Ctrl + Down Arrow
Goes to the last row of the current range or goes to the
next range. If a range does not exist, it goes to the last row
(32000).
Ctrl+ Page Up
Go to previous spreadsheet
Ctrl + Page Down
Go to next spreadsheet
StarOffice 5.2 User's Guide • June 2000
Shortcut Keys
Effect
Alt + Page Up
Scrolls one screen page to the left
Alt + Page Down
Scrolls one screen page to the right
Using References in Formulas
Up to this point, you have become acquainted with formulas containing absolute
values, absolute and relative references, and references to named areas. The following
example illustrates how to apply references in formulas with the aid of the Function
AutoPilot.
Consider the example from the previous topic. Now, use the Function AutoPilot to
calculate the average of monthly sales for each location.
■
Position the cursor in cell B8, where you want the average to be displayed. Activate
the Function AutoPilot by clicking its icon in the Formula bar.
■
Select the AVERAGE function. If you do not know which category contains this
function, simply leave the default set to "all" categories and repeatedly press the
letter "A" until the AVERAGE function is selected.
Chapter 5
Working with Spreadsheets
133
■
Click Next in the Function AutoPilot. On the right half of the Function AutoPilot
another input area will appear where you can enter the arguments of the function.
■
Click in the input field in which you want to enter values, in this case starting with
field "number 1." Enter either "B3:B6" or "January" or use the mouse to select that
range in the sheet. To do so, simply click on the first cell, B3, hold down the mouse
button and drag to B6.
While you drag the mouse to mark the desired range, the Function AutoPilot dialog
will be automatically minimized so that only the active input field is visible. The field
indicates the area being selected with the mouse. You may also reduce or enlarge the
dialog "manually" by clicking the Shrink / Maximize button to the right of the input
field.
■
Finally, click OK to close the Function AutoPilot. The formula will be calculated
according to the given arguments, and the final result will appear in cell B8.
References to Other Spreadsheets
It is also possible to show a reference to a cell from another table. To do so, open a new
spreadsheet and enter the following formula in, for example, cell A1 (Sheet 1). Then
press the Enter key to confirm your entry.
=Sheet2.A1
134
StarOffice 5.2 User's Guide • June 2000
If you now click the Sheet 2 tab located on the lower border of the document, you will
access Sheet 2. Put the cursor in cell A1 and enter any number or text. Go back to Sheet
1 and you will see the same contents in cell A1 - Sheet1. If you now modify the content
of cell A1-Sheet 2, notice that the content of Sheet 1 will also change automatically.
In the same way, a reference can also refer to a cell from another document. For
example, without closing the new spreadsheet, open an existing spreadsheet document which was already saved as a file. If you also installed the Sample documents in
the Installation process, you can, for example, open the Movie 1 document from the
Explorer under Samples, double-click Spreadsheets.
Switch now to your new spreadsheet document and set the cursor on an empty cell.
Enter the equal sign (=), which indicates the start of a formula and go to the Movie 1
document and click cell C3. Go back again to the other document and notice that in the
Formula bar the formula reference has already been completed for you. It should read
as follows:
='file:///C|/Office52/share/samples/english/spreadsheets/Movie1.sdc'#$movievisits.C3
Confirm this formula by clicking the green check mark. The reference to a cell from the
other document contains the name of the other document in single quotation marks, a
number sign (#), the name of the sheet in the other document followed by a period and
the name of the cell. The spreadsheet's name automatically begins with a dollar sign,
since this table is an absolute reference.
If you closely examine the name of the other document in this formula, you will notice
that it is written as a URL. This means that you can also enter a URL from the Internet.
If, for example, you found an Internet page containing current stock exchange information in spreadsheet cells, you can load this page in StarOffice Calc. Just follow these steps:
Go to the Internet page containing the desired table and copy the URL from the URL
field in the Function bar. Take for example, the fictional URL:
http://www.staroffice-bank.de/kurse/STOXX.html
Call the Open dialog (via menu File - Open or Ctrl +O) and paste the URL in the File
name field.
Select now in the File type list box, select the filter "HTML" (StarOffice Calc)" (located
about two-thirds down the list) and click the Open button. The URL will be opened as
a spreadsheet document in StarOffice Calc.
Enter an equal sign in a cell to begin a new formula in your spreadsheet document.
Switch back to the document which you downloaded from the Internet, select the cell
with the content that interests you and go back again to your spreadsheet. Finally,
confirm this formula by clicking the green check mark in the input field. The formula
should now read as follows:
Chapter 5
Working with Spreadsheets
135
='http://www.staroffice-bank.de/kurse/STOXX.html'#Sheet1.C4
Save your spreadsheet document and close it. The next time you open it, the contents
of this cell will be updated if requested. When you open your document, you have the
choice of updating the links either always, on request or never (see menu Tools Options... - Spreadsheet Document - Other). You can also start an update manually
via Edit - Links....
In the StarOffice sample spreadsheets, which you can open via a link in the Explorer,
there is a Currency Converter that loads the current exchange rates from the Internet.
Automatic Fill
You can use the mouse to easily copy text, values, and other cell contents in your
spreadsheet. But keep in mind: If you copy several values at the same time, StarOffice
will form them into a logically structured series. If you copy text which has been
entered in one of the sort lists, the list will be continued correspondingly.
Using Sort Lists
Enter the text "Jan" or "January" in an empty cell. Select the cell, and click the mouse on
the lower right corner of the cell border. Drag over several cells to the right or downwards. When you release the mouse button, the highlighted cells will be filled with the
names of the months.
The predefined series can be found under Tools - Options... - Spreadsheet document Sort lists. You can also create your own lists tailored to your needs, such as a list of
your company's branch offices. When you later want to use the information in these
lists (for example, as headings), just enter the first name in the list and expand the
entry by dragging it with your mouse.
Automatic Calculation of Series
If you enter only one number in a cell which you drag over other cells to the right or
down, this number will be increased by 1. But if you select two or more neighboring
cells (which contain different numbers) and select and drag them both, the numbers
will continue in an arithmetic pattern if one is detected.
136
StarOffice 5.2 User's Guide • June 2000
For example, if A1 contains the digit 1 and A2 contains the digit 3 and you select both
cells and drag them downwards, a number series with 5, 7, 9, 11, etc. will be
continued. StarOffice is quite good when it comes to discerning the pattern of a series.
Try out this function with some examples of your own!
First, select the entire area of the sheet that you want to fill. Choose the Edit - Fill Series command and select the series type . If you choose 2 as your Start value, 2 as
the Increment, and Growth as the series type, the result will be a list of the powers
of 2.
As you can see in the dialog, you can also automatically fill in series of dates and
times. For example, to insert the first date of each month of the year as row headers,
proceed as follows:
■
Enter a date, e.g., "1/1/99" into a cell (without the quotation marks).
■
Select this cell and the 11 cells below it.
■
Select the Edit - Fill - Series command.
■
In the dialog box, select Date and Month. Click OK.
The first date of each month automatically appears in the selected cells.
Chapter 5
Working with Spreadsheets
137
Formatting Sheets
Nearly every sheet you create will also need to be formatted. You can adjust the
format of cell contents, such as text and numbers, and also apply a wide variety of
colors, borders, and other attributes to the cells.
You can either define the numbers' format yourself or you can use one of the many
preset number formats. For the formatting of numbers, StarOffice provides a wide
selection of cell Styles and you can also define your own cell Styles in the same way
you do text Styles.
Maybe you would like to highlight certain values in your spreadsheets, for example, in
a spreadsheet with sales have all the above-average values appear in green and all the
below-average values appear in red. This is easy with the conditional formatting for
spreadsheet documents. An introduction to conditional formatting can be found in an
example in the Advanced section of the User's Guide in the StarOffice Help.
Formatting Numbers
Enter a number into the sheet, for example, 1234.5678. This number will be displayed
in the standard number format, with two decimal places. You will see 1234.57 when
you confirm the entry. Only the display in the document will be rounded off; internally, the number retains all four decimal places.
Position the cursor in the number, and open the Cell Attributes dialog with the
Format - Cells... command. On the Numbers tab page you will find a selection of
preset number formats. A preview in the lower right of the dialog box shows how the
number will appear when you apply a certain format.
In this dialog, you can define other attributes (in addition to number formats) which
apply to the selected cells or cell contents. On the Font tab page, for example, you can
define a font type, size, and color.
You can format the date and time any way you would like (see list of options).
Up to now all year numbers were set in two-figure date values. Internally StarOffice
manages the year details as four-figure values so that when calculating the period
from 1/1/99 to 1/1/01 the result is exactly 2 years. If you are using a two figure year
number, go to Tools - Options - General... - Other, and set the number of years to be
added to 2000. The default limit is the one set in your operating system, for example,
"30". This means that if you enter a date such as 1/1/30 or higher it will be internally
dealt with as 1/1/1930. Smaller numbers, however, will be handled as if they were
numbers from the 21st century. For example, 1/1/20 will be read as 1/1/2020.
138
StarOffice 5.2 User's Guide • June 2000
Formatting Cells and Sheets
The distinction between hard and soft formatting holds true for cells as well as for text
documents. You have the choice, for instance, between applying a particular font size
directly as hard formatting to a cell or defining a Style to apply the desired font size.
For documents which you expect to work with extensively, it makes sense to use
Styles, but it doesn't make sense to use Styles for documents which will be immediately printed and not even saved.
Using AutoFormat for Sheets
In StarOffice there are so many creative ways to embellish your spreadsheets with
various attributes. This capability is especially important if you want to design interesting web pages, since in HTML format the careful placement of graphics and multicolumned texts or other effects are achieved by means of skillful arrangement and
partitioning of spreadsheets.
A quick way to format a sheet or cell range is with the Format - AutoFormat function.
First select the cells to be automatically formatted, including the column and row
headers and, if applicable, sum rows or columns. Then call up the AutoFormat dialog.
The preview shows an example of how each format you select in the Format field will
look. Click OK to apply the format to the selected range in the spreadsheet.
Check the format in the spreadsheet, for example, by calling up the context menu of
the cells and clicking the Format Cells... command.
By experimenting with the AutoFormat options, you will soon realize that you are not
limited to the standard sheet appearance with gridlines between the cells. You can
design your sheet so it no longer resembles a spreadsheet and looks good both on
screen and on paper.
Chapter 5
Working with Spreadsheets
139
If you cannot see color modifications made to the cell contents, it is probable that
there is still a check in front of the Value Highlighting option under Tools Options... - Spreadsheet Document - Contents or via the View menu. Only predefined colors will be highlighted in this case.
A format that you define yourself can be set as an AutoFormat:
■
Format a spreadsheet to your liking.
■
Select the whole sheet, e.g. by clicking the empty button in the top left corner
(above the first row header).
■
Call up the AutoFormat dialog and click Add.... A dialog will appear in which you
give the new format a name.
The format defined in this way can then be used in the future on other spreadsheets.
By choosing an appropriate background color and a pattern for the cells in the sheet,
you can create a very appealing spreadsheet.
Use the More button to display additional options in the dialog. In the additional
section that is then displayed, you can choose which properties of the chosen format
are to be excluded from the automatic formatting. For example, if you remove the
checkmark in front of Font, the font will not be taken into account by the AutoFormat.
Tables in Text Documents
In StarOffice, a distinction is made between spreadsheets and tables created in text
documents. Though you can carry out some calculations in tables, their main purpose
is to arrange text and graphics in tabular form. StarOffice is so advanced that it allows
you to insert a spreadsheet into a text document just as you would insert graphics. A
double-click on the inserted sheet changes the screen to display the icons and menus
used in editing a spreadsheet.
A sheet created in a spreadsheet document can be inserted into a text document with
Insert - Object or via Drag&Drop. This type of sheet differs in one important aspect
from tables created in a text document with Insert - Table: Tables in text documents
conform to text and HTML requirements. Although you cannot perform such extensive calculations with tables in text documents as with sheets in spreadsheets, you can
format them in ways which have a greater visual impact.
In a table created in a text document, open the context menu and click Table to activate the Table Format dialog. On the Background tab page, you can assign graphics to
a cell, a row, or the entire table. This function is essential for arranging small images
on an HTML page.
140
StarOffice 5.2 User's Guide • June 2000
Dealing with Multiple Sheets
You are not limited to a single sheet when working with a spreadsheet. You can create
multiple sheets within a single spreadsheet document. Each sheet has its own name,
displayed on the tabs at the bottom of the window.
You can append additional sheets to your document or insert them in front of the
current sheet. Activate the context menu of a sheet tab and choose the corresponding
command. Select Rename in the context menu to modify the name of a sheet.
Displaying Multiple Sheets
If you have too many sheets for all tabs to be simultaneously displayed, use the arrow
buttons to the left of the register to scroll through them. For example, if you click the
last arrow button with the vertical line, the tabs will shift so that the last sheet name is
displayed. In order to see the sheet itself, click the respective tab.
The tab display space can also be enlarged if it is too small to display all of the sheet
tabs. Simply shift the horizontal scroll bar to allocate more space for the tabs. To do
this, point to the dividing line between the tabs and the scroll bar. Press the mouse
button, and drag the divider to the right.
Working with Multiple Sheets
Each sheet of a spreadsheet is completely independent of the other sheets in a spreadsheet document. You can however, incorporate the same data into several sheets. If
you would like to insert data at the same location in the first three sheets, select all
three sheets together and enter the data in only one of the sheets.
To select multiple sheets, hold down the Ctrl key and click the respective tabs. These
selected tabs will be highlighted in white; the rest will remain gray. To cancel the
selection of one sheet, click its tab again while pressing the Ctrl key. If you click the
current sheet tab while holding down the Shift key, only this sheet will still be
selected.
Chapter 5
Working with Spreadsheets
141
If you have some experience in assigning sheet references, maybe you have noticed
that StarOffice Calc includes the name of the sheet in the reference. Instead of referring
to $A$1, StarOffice Calc refers to $Sheet1.$A$1.
■
If you want to address the first cell from both Sheet1 and Sheet2 in a single reference, for example, summarize, the 3D formula will read
=SUM(Sheet1.A1:Sheet2.A1). The sum function has one addend here, namely, the
range from Sheet 1.A1 to Sheet 2.A1. In this range there are two cells (as long as no
more cells are included between Sheet 1 and Sheet 2). The simple formula (not a 3D
formula) would only list two addends: =SUM(Sheet1.A1;Sheet2.A1).
■
If the range contains several cells, for example, if you want the four cells in the top
left corner to be summarized, the formula would then be
=SUM(Sheet1.A1:B2;Sheet2.A1:B2). Since the colon is used to separate the cells, the
sheets have to be separated by a semicolon.
■
If you also want to include any subsequently inserted sheets found between Sheet 1
and Sheet 2, the formula would then be =SUM(Sheet1.A1:Sheet2.B2).
The complete address of a cell also contains the path and file name of the spreadsheet.
The reference to cell A1 in Sheet 1 of the document "name.sdc" on drive C thus
appears as: "='file:///c|/name.sdc'#$Sheet1.A1". Notice the single quotation marks
surrounding the file address and the # symbol which indicates the location within the
file according to URL format. The colon after the disk drive is replaced with a vertical
line in URL syntax.
If you want a formula in one document to refer to cells in another, it is best to arrange
both sheets on the screen so that they can be seen at the same time (for example by
dragging its button in the task bar into the other button). If you want to refer to the
named areas in other documents rather than to cell addresses, you do not need to open
the other document. Simply drag the document from the Beamer to the Navigator. In
the Navigator, you can then click on the name of the area and drag it into the current
document.
Printing Spreadsheets
If you click the Print File Directly icon in the Function bar, all the sheets in your document will be printed. However, if you have selected a print range, then only that part
will be printed. You can set the print range by selecting the cells that you want to
print, then use the Format - Print Ranges - Define command. You can find further
information on this topic in the StarOffice Help.
If you only want to print the current sheet go to menu File - Print.... In the Print
dialog, select the Selection option and click OK. Only the current sheet will be
142
StarOffice 5.2 User's Guide • June 2000
printed. If, however, you have selected a certain range of cells, only those cells will be
printed, and done so only in the column width shown in the sheet.
If you want to simultaneously print various sheets, for example, Sheet 1 and Sheet 2,
select both of them beforehand (hold down the Ctrl key and click the sheet tabs). The
white tabs are the selected ones. Now, just go to the Print dialog and select the Selection option and only the selected sheets will be printed. After having printed the
desired sheets, remember to click the sheet you are working on while holding down
the Shift key so that only that sheet is selected. If you don't do this, all modifications
you then make will apply to all sheets.
Database Functions in StarOffice Calc
Spreadsheets in StarOffice Calc can also be used to manage records consisting of
several data fields, such as in a database. Think of each row in the StarOffice Calc
spreadsheet as a record, which has data fields in the individual columns. You can, for
example, sort and group the StarOffice Calc database by rows, search in it for key
words, calculate totals, and much more.
Note that the database ranges in StarOffice Calc spreadsheets have nothing in
common with the databases and tables of StarOffice Base.
In StarOffice Calc, you work with a spreadsheet that can contain several sheets. You
can combine several adjacent rows of a spreadsheet into a database area, for example,
to sort them together. Furthermore, you can import external files, for example files in
dBase format, into a StarOffice Calc spreadsheet. The records from the dBase file
would then become rows and the data fields would become columns in a StarOffice
Calc spreadsheet.
In StarOffice Base on the other hand, you work directly with dBase files (or databases in other formats), and you can, for example, link files in relation to each other
and run SQL queries. StarOffice Base is a database program. StarOffice Calc is a
spreadsheet calculation program in which it is possible to treat rows as a "database
range".
Defining a Database Range
For example, if you would like to manage your household budget with StarOffice
Calc, enter the records in an empty StarOffice Calc spreadsheet and select the area as a
database range.
Chapter 5
Working with Spreadsheets
143
Creating Records in a Spreadsheet
■
Open a new spreadsheet.
■
Enter the column titles in the first row, e.g., "Date" in cell A1, "Item" in cell B1,
"Amount" in C1. Then enter some information.
To format your sheet as in the illustration, proceed as follows:
144
■
Select row 1 by clicking on the row header. Click the Bold icon.
■
Select the entire column A by clicking on the column header. Open the context
menu and select the Format Cells command. In the Cell Attributes dialog, go to
the Numbers tab and choose a date format for Column A.
■
Select column C by clicking on the column header, and apply a currency format.
You only need to click the Number Format: Currency icon in the Object bar.
StarOffice 5.2 User's Guide • June 2000
Defining a Database Range
■
Select the entire sheet or just a three column area and define the selected area as a
database range via the Data - Define Range menu.
■
The selected range already appears in the Define Database Range dialog. Be sure
to check the box Contains column headers so that the first row is correctly taken
into account.
■
Enter a name for the range and close the dialog with OK.
The selected range is now defined as a database range, which among other things,
means that the rows (records) can be conveniently sorted. Sort lists and filters you
have defined for the database range will be updated.
Sorting a Database
If you want to organize your expenses according to amount, for example, place the
cursor in the database range and select the command Data - Sort. In the dialog, choose
the column "Amount" as sort criteria and click OK.
Chapter 5
Working with Spreadsheets
145
You may specify up to two additional criteria, one to follow the other, for the sort
function. For instance, you can sort the expenditures first by date, then by item if they
have the same date, and then by amount if they have the same date and item.
Filtering Data
To filter out only certain records so that you can modify them, use the spreadsheet
filtering function. You can choose between using a dialog to specify the criteria exactly
(in that case range definitions are also possible), or creating an AutoFilter that will
help whenever you want to filter according to specific values or text.
Imagine that your expenditure list is already a good 8000 records long. It would then
be extremely difficult to maintain an overview. Now you only want to view all records
that have been added since January 2, 1999 and have an amount greater than $100.
■
Place the cursor in the database range and open the Filter dialog with Data - Filter Standard Filter. Enter the following criteria: Date > 1/2/99 AND Amount > 100.
In the dialog, you can select the existing contents of the data fields in the combo boxes,
but you can also just as well enter the values directly.
146
StarOffice 5.2 User's Guide • June 2000
Click OK to display only those records that fulfill all the criteria. Return to the
previous view by clicking the AutoFilter icon in the Main toolbar.
If you want to display only records with a specific content, you can easily do this with
the aid of the AutoFilter:
■
Place the cursor in the database range.
■
Click the AutoFilter icon in the Main toolbar. Arrow buttons appear in the column
headers of the database range.
■
Click on the button next to the Date field and select for example, 2.1.99. Only
records that contain this date will be shown.
Once again, you can return to the previous view by clicking the AutoFilter icon in the
Main toolbar.
Grouping Data and Calculating Subtotals
If you want to expand the sample data and actually use it for a budget, you will
certainly also want to summarize the data in totals and subtotals. This can be done in
just a few simple steps.
■
Place the cursor in the database range.
■
Choose the command Data - Subtotals. The Subtotals dialog will appear.
■
Specify the desired options for calculating the subtotals. Group subtotals according
to "Date" (i.e. calculates a new subtotal for each date), and use the function "Sum"
(adds the subtotals) to calculate "Amount."
Chapter 5
Working with Spreadsheets
147
As soon as you press Enter or click OK, the sheet will be grouped according to the
subtotals. For every group of entries with an identical date, a subtotal is calculated.
The grand total is displayed at the bottom.
Notice the controls to the left of the row headers. They enable you to view which
records (rows) have been summarized. If you click on a minus sign, only the row with
the results is shown. The easiest way to control the display is with the small digits
above the group area. If you click on 1, only the grand total is displayed; 2 reveals the
subtotals, and 3 shows all elements.
Importing Data from a Database to a Spreadsheet
You can transfer individual StarOffice Base sheets from StarOffice Base databases to
your StarOffice Calc spreadsheet.
There are two possible methods for transferring data. Either you can load the desired
database file in a dBase or text format directly (via menu File - Open), whereby the
whole database sheets is imported into your StarOffice Calc spreadsheet; or you can
adopt the file as a StarOffice Base database in the Explorer, then open it from the
Explorer, and choose which records to transfer into the spreadsheet with Drag&Drop.
Opening a Database File in StarOffice Calc
You can import any file in dBase or text format to a StarOffice Calc spreadsheet. Open
it as you would open any StarOffice file.
148
StarOffice 5.2 User's Guide • June 2000
■
Choose the command File - Open.
■
In the Open dialog box, select the directory containing the database file. Enter the
name of the file, or select the type under File Type, for example the "dBase" type,
and click the name. Click Open. If you want to open a text file containing data
rows, select the "Text - txt -csv (StarOffice Calc)" file type.
■
When making a dBase import you will see a dialog, where you can choose the
character set of the file. For example, in some languages, databases created under
DOS use different characters than those used in databases created under Windows.
The dBase IV format uses Codepage 437 (US).
■
Click OK to confirm your action and to close the dialog; the database will be
loaded into the StarOffice Calc spreadsheet.
The first row provides information on the type and length of the individual data
fields. This information is contained as dBase header in the file. (When saving a
StarOffice Calc sheet with the file type "dBase", the first row of data is used to create
the header information.)
Before we start working with the data in the spreadsheet, let's look at the second
method used to transfer selected records from a StarOffice Base database into a StarOffice Calc spreadsheet.
Chapter 5
Working with Spreadsheets
149
Using Drag&Drop to Copy into a Sheet
This method is applicable for all formats. You can choose to have all or only selected
records imported into your spreadsheet document. With this method, it is necessary
that you first register the database in StarOffice, i.e. register it in the Explorer or on the
Desktop as described below.
An address database should already be one of the entries in the Explorer.
If the address database in the Explorer does not exist, or you want to enter a database
of your own, proceed as follows:
If you want to create a new database on your own, please refer to the instructions in
the Advanced section of the User's Guide in the StarOffice Help.
■
Open your context menu in a free area of the Explorer and choose New - Database....
■
In the dialog, go to the Type tab and, in the Database type, choose the "dBase"
entry to create a dBase database. Click Browse and select the file which contains
the database(s) in .dbf-format, for example C:\Office52\user\database. Close the
selection dialog with OK.
■
Switch to the General tab and enter a name used to represent the database as
shown in the Explorer, e.g. Address Book. Confirm the name with the Enter key.
A database entry is now recorded in the Explorer, which can be opened by clicking
on the plus sign next to the name.
Once you see the desired database in the Explorer, proceed as follows:
■
Click on the plus sign next to "Tables" to view the existing tables in the database. In
a dBase database, each *.dbf file in the directory is a table of its own.
■
Open your Beamer and then click "address" in the Explorer to display the address
records in the Beamer.
Note: If you double-click "address" (instead of a single-click) the addresses will appear
as a separate document on your desktop. Double-click while pressing the Ctrl key, so
that the new document does not delete the current StarOffice Calc spreadsheet on
your screen.
150
StarOffice 5.2 User's Guide • June 2000
You can select the records in the Beamer and insert them into your spreadsheet.
■
In order to manually select a record that you want to put into the spreadsheet, click
on the respective row header (the gray field without a text on the left). If you hold
down the Shift key, you can click on the first and last row headers to select a
contiguous area of records, or you can hold down the Ctrl key and click each
record individually.
■
Drag the selected records to the row headers in the sheet where the records are to
be inserted. Then release the mouse button.
To automatically transfer only certain records from a data file into a sheet you can also
use the filter in the Beamer:
■
Place the cursor in the data field which contains the data that should be the same in
all filtered records. For example, to filter only records that have "Main Street" in
their address, place the cursor in a field containing "Main Street".
■
Then click the AutoFilter icon.
Only the records with "Main Street" as part of the address are displayed in the
Beamer.
■
Select the Main Street records (for example, using the Shift key as described above)
and drag them into the spreadsheet. Release the mouse button where you want the
first field to be inserted to appear.
Layout in Tables and Sheets
You can use formats other than the preset standards to design your sheets and tables.
There are various ways to present an attractive layout. Here you will learn some techniques for visually structuring both spreadsheets and tables in text documents.
Creating Structured Spreadsheets
Spreadsheets are used primarily to calculate data. If your main purpose is to display
or print data in a clear structure, you should use the table function in a text document
instead. However, even though spreadsheets are used mostly for calculation, you can
still present data in an attractive format.
StarOffice helps you design your sheet in a variety of ways. For example, here are
three different views of the same sheet, varying only in layout:
Chapter 5
Working with Spreadsheets
151
This is a sample sheet without any special formatting, as it appears by default.
If you simply format the sheet with one of the AutoFormats, it will look appealing
without requiring any further editing on your part.
Here, the sample sheet was formatted by modifying cell attributes in the Format Cells... dialog. In addition, the gridlines and sheet headers were switched off under
Tools - Options... - Spreadsheet Document - Layout, and a graphic file was loaded as
a background picture via Format - Page... - Background.
The number of possible formatting options is practically unlimited, and they can be
easily applied with only a few commands or mouse clicks.
152
StarOffice 5.2 User's Guide • June 2000
Formatting Text in a Spreadsheet
■
Select the text you want to format.
■
Choose the desired text attributes from the spreadsheet Object bar. You can also
use the Format - Cells... command. The Cell Attributes dialog will appear in which
you can choose various text attributes on the Font tab.
Formatting Numbers in a Spreadsheet
■
Select the cells containing the numbers you want to format.
■
To format numbers in the standard currency format or as percentages, use the
icons in the spreadsheet Object bar. For other formats, use the Format - Cells...
command. You can choose from the preset formats or define your own on the
Numbers tab.
Formatting Borders and Backgrounds for Cells and Pages
■
Basically, you can assign a format to any group of cells by first selecting the cells
(for multiple selection, hold down the Ctrl key when clicking), and then activating
the Cell Attributes dialog via the Format - Cells... menu. In this dialog, you can
select attributes such as borders, shadows, and backgrounds.
■
To apply formatting attributes to an entire sheet, select the Format - Page...
command. You can define headers and footers, for example, to appear on each
printed page.
Preparing Tables in Text Documents
You have several formatting options at your disposal when inserting a table into a
text. Tables in text documents are particularly useful in designing Internet web pages.
The HTML page description language permits controlled and convenient positioning
of graphics on web pages only if you have first inserted them in tables. StarOffice
makes it easy to insert graphics into a table. Once you have done this, you only need to
save the finished document in the HTML format to have an attractive Internet page.
Chapter 5
Working with Spreadsheets
153
Inserting Tables in Text Documents
■
For this example, open a new text document with File - New - Text Document.
■
Place your cursor at the position in the text document where you want to insert a
table.
■
Long-click the Insert icon in the Main toolbar to open a floating toolbar which
contains the Insert Table icon. Drag the floating toolbar into your document.
■
Click Insert Table and, keeping the mouse button pressed, drag to select the
desired amount of rows and columns. When you release the mouse button, a table
with the selected rows and columns will appear in your document.
Formatting a Table in Text Documents
A new table inserted into a text document will be pre formatted. The first row will
have the Paragraph Style "Table Heading," and all other rows will have the "Table
Contents" Style. Text entered in the first row will automatically be bold and centered.
The following describes various formatting options that determine the overall appearance of a table.
First, note that cells in tables are not restricted to the size suggested by the grid of rows
and columns. You can easily merge adjacent cells into one cell or split individual cells
horizontally or vertically by using the icons Merge Cells and Split Cells in the table
Object bar. This in and of itself gives you many design possibilities.
In the Table Format dialog, you can decide on formatting attributes for a table. Open
this dialog either with the menu command Format - Table or the Table command in
the context menu.
If you want to change the table background, for example, proceed as follows:
154
■
Select the cells to which you want to assign a background color.
■
Now, either select the Format - Table command or click Table in the context menu
of the selected cells.
■
In the Table Format dialog, click the Background tab.
StarOffice 5.2 User's Guide • June 2000
Notice the two list boxes at the top of the dialog. In the left box, you can choose a color
or graphics as the background. In the right box you can define whether to apply the
background to the selected cells, the whole row, or the entire table. Cell formatting
takes priority over row formatting, while table formatting has lowest priority.
Click OK when you have made your choice.
You can design your tables with even greater impact using thematically appropriate
backgrounds. Background colors and graphics are always inserted behind text and
values in a table.
Graphics and other objects can also be inserted into the table.
■
Place your cursor in the cell where you want the object to appear.
■
To insert graphics, select the Insert - Graphics - From File command.
■
In the Insert Graphics dialog, select the desired graphics file. Click Open.
Click on the inserted graphic object and select the Graphics command in the context
menu (or double-click on the graphic object). In the Graphic dialog, you can define
various settings for the graphic and its function in the document.
For example, you can define a text wrap and determine if the text should flow around
the picture and on which side. You can also set a hyperlink which will then be loaded
whenever the graphic object in the text document is clicked. Furthermore, you can link
the picture to a macro and in so doing, assign various events to the graphic object. You
could, for example, use this capability to program certain functions, such as having a
sound played when the mouse touches the graphic object.
Chapter 5
Working with Spreadsheets
155
Working with Charts
Data from a spreadsheet can be represented graphically in a chart. You can select from
a wide variety of charts and diagrams suited for illustrating the structure of the data.
■
Open an existing spreadsheet or enter data in a new sheet with row and column
headings.
■
Select the data together with the headings.
■
Long-click the Insert Object icon found in the Main toolbar to display the floating
toolbar. Then click the Insert Chart icon and the cursor will change to a cross-hair
symbol with a small chart symbol.
■
In the spreadsheet, drag open a box that indicates the location and size of the chart
you want to insert. You can change the location and size of the chart at any time.
■
As soon as you release the mouse button, a dialog appears in which you can make
further entries. You can also simply click the Create button to create a chart with
the standard settings.
The AutoFormat Chart function is explained in detail in the StarOffice Help.
This example shows the number of times people of different age groups in various
cities go to the movie theater annually.
156
StarOffice 5.2 User's Guide • June 2000
If you prefer to have the cities rather than the age groups represented on the horizontal axis, you can "flip" the chart. Make sure the chart is selected, and then select the
Data in Columns icon in the Main toolbar.
You can make further modifications to the individual elements of the chart at any
time. Either double-click an area of the chart, or select various options in the Format
menu (if the chart is selected). If you double-click the color preview in the legend, for
example, you can automatically reformat each of the data points. Click the background
in the legend box, however, to format the background of the legend.
If you created the chart using the data from a StarOffice Calc spreadsheet, the records
that you click in the chart will be selected in the spreadsheet.
If you have a chart in the background of a StarOffice Calc spreadsheet and
want to edit it, open the Show Draw Functions floating bar and select the
Selection arrow. Use this arrow to select your chart.
In a StarOffice Calc chart, you can shift a data series to the front or to the back.The
series can be ordered in such a way so that the lowest 3D presentation is positioned at
the very front, and the highest at the very back. To change the arrangement in the
chart, you can use the context menu of a data series or under the Format - Arrange
menu command. The original data in the StarOffice Calc spreadsheet will, however,
not be rearranged. It is clear that after this rearrangement, the exchange of data from
columns to rows is no longer possible.
If you insert a chart into a presentation or drawing document with the Insert Chart
icon from the Insert Object floating toolbar, it will be displayed filled with sample
data. If you want to insert a chart into a spreadsheet document you need to first
select the cells in your spreadsheet where the chart is to be displayed.
You can also insert a chart composed of data from a StarOffice Writer table into a
StarOffice Writer document. If you have not selected any data in a StarOffice Writer
table, the command Insert - Object - Chart... in StarOffice Writer, inserts a chart
containing sample data.
You can modify the values of a chart containing sample data by double-clicking the
chart and then selecting the command View - Chart Data. If you want to modify the
values of a chart, generated from selected data, you have to modify the values in the
table cells. If this involves a chart in a text document, press the F9 key to update the
chart.
Modification of chart data is also possible if you, for example, have copied a chart
from a StarOffice Calc document into a StarOffice Writer document and now doubleclick the chart in the StarOffice Writer document. Remember, however, you are only
editing the copy and not the original document.
Chapter 5
Working with Spreadsheets
157
You may also change the chart type at any time. Double-click the chart to select it, and
choose the Format - Chart Type command. In the dialog, there are a variety of chart
types to choose from.
Try out the different options in the Chart Type dialog. You can also switch between 2D
and 3D representation. With the Columns chart type you can select a Combination
Chart of lines and columns.
The three-dimensional representations make special effects possible. In 3D charts, you
can even adjust the illumination settings, such as light source, ambient light and the
color filter.
3D charts can be rotated and flipped with the mouse for optimal design.
Select the command Insert - Statistics... to add statistical values to XY charts, such as
error indicators for the variance, and regression curves. A simple or double logarithmic display of the axes can also be set here.
In line charts you can work with various icons. These can be applied automatically by
StarOffice Chart if desired. You can also select them yourself from graphic folders or
from the Gallery.
158
StarOffice 5.2 User's Guide • June 2000
If you select individual data series or data points, you will find various options to
format how they look in the corresponding context menus. There are so many possibilities, that it is impossible to present them here. As shown in the illustration, data in
a 3D chart can be displayed using different layouts.
Chapter 5
Working with Spreadsheets
159
160
StarOffice 5.2 User's Guide • June 2000
CHAPTER
6
6
Working with Presentations
Presentations have more than just drawings and graphics to offer. Use presentations to
link several slides to form a slide show, to animate the elements on your slides and to
assign special transition effects between slides. Slides often contain text which, in the
Outline view mode, is displayed and entered in a hierarchical structure. You can
change the text or rearrange the order of the slides at any time.
For a presentation, first create the slides and their contents. If you want to include
graphic objects, create them in StarOffice Draw, which is described in its own chapter.
Many of the draw functions from StarOffice Draw are however also available in
StarOffice Impress. Use the manifold templates and sample presentations provided or
the Auto Pilot Presentation to achieve professional results with just a few mouse
clicks. You can also export the presentation automatically as an HTML page with
frames, navigation icons, and hyperlinks.
A Simple Presentation
In this section, you will learn step by step how to create your own presentation document and what you need to know about working with slides. Follow along with the
examples given here and for more detailed information regarding the dialogs
described in the examples, see the StarOffice Help.
As with text documents, there are various ways to start creating your presentation:
■
Use the AutoPilot Presentation by selecting File - AutoPilot - Presentation. The
AutoPilot will start automatically each time you create a new presentation,
although you can switch off the Automatic mode on the first page of the AutoPilot,
if desired. The AutoPilot is described in detail in the StarOffice Help.
■
If you turn off the AutoPilots via Tools - Options... - Presentation - Other, you can
start with an empty new document (e.g. by selecting File - New - Presentation).
161
■
Or you can open an existing document, which you modify as you wish and then
save under another name. The sample documents provided in the Explorer via
Samples - Presentations are perfect for this purpose.
■
You could select one of the many templates found in the New dialog. To open this
dialog press the Ctrl + N key combination.
Creating a Presentation with the AutoPilot
■
To start a new presentation, double-click the New Presentation icon on your
StarOffice Desktop or go to File - New - Presentation. You can also select the Start
button in the StarOffice Task bar to start a new presentation.
You will see the first in a series of AutoPilot Presentation dialog boxes that will guide
you step by step through the process of creating a presentation. The first dialog
enables you to start with an empty presentation, a template or an existing presentation. If you select the From template option, StarOffice Impress collects all existing
presentation templates and displays them in the list box.
■
162
For this example, select the "Sales Presentation" template and click Next.
StarOffice 5.2 User's Guide • June 2000
On page two of the AutoPilot dialog you can choose another Page Style if you want.
The selection of presentation layouts available to choose from are from the predefined
template directories. As on the first page of the AutoPilot, all templates are displayed
as Page Styles. On this page, however, the default is "Presentation Backgrounds".
On this page, you can select the presentation medium for your presentation: Slide,
Overhead, Screen or Paper. The dimensions, margins, and orientation of your presentation will depend on your selection.
■
To continue following this example, do not change the background or medium of
your presentation. Click Next.
Page three of the AutoPilot deals with the slide transition.
Chapter 6
Working with Presentations
163
■
Select the "Cross-Fade from left" transition type in the first list box. Leave the
default transition speed at "Medium".
■
Select Automatically as the presentation type (i.e. repeatedly runs through presentation, with fixed time lapses, until the Escape key is pressed).
■
Now you can determine further parameters:
Use the Duration of page spin box to determine how long each slide is shown
before the next one appears. Once you have finished your presentation, you can set
a different duration for each slide individually.
Use the Duration of pause spin box to determine how long the pause will be at
end of the presentation before it starts again. If the Show Logo check box is
marked, you will have the "Created with StarOffice" logo displayed on the pause
page.
The Default presentation type runs the presentation from beginning to end with
manual slide transition, e.g. by mouse click.
164
■
Click Next.
■
Enter additional text which you want to have appear in your presentation on page
four. Click Next.
StarOffice 5.2 User's Guide • June 2000
On the fifth and final page of the AutoPilot you can determine the number of the
slides you want to have in your presentation. You also see the list of names of all the
slides in your presentation. If there are some slides you want to remove from your
presentation, click the Page icon with the green check mark next to the name. The
check mark will disappear, which indicates that that slide will not be included in your
presentation. You can reverse this action by clicking the page icon again.
■
If you click the plus sign in front of a slide, the headings from the first outline level
will be shown.
If you check the Create summary check box, the Auto Pilot will create an additional
last slide with a summary of all the titles of the previous slides in the presentation.
Normally this is not necessary, since most templates already include such a page.
■
Click Create and your presentation will be created.
You can click Create on any of the AutoPilot pages. You don't always have to go
through all the pages of the Auto Pilot.
■
You can now edit, save, and print or run your presentation, etc.
■
To start a presentation on a computer screen, just press the Ctrl + F2 key combination or click the Presentation icon on the Main toolbar.
Chapter 6
Working with Presentations
165
Creating a Simple Presentation without the
AutoPilot
This section explains, with the help of a simple example, how to create a presentation
based on one of the existing templates.
■
Open a new presentation document with File - New - From Template... or the
Ctrl + N key combination.
■
In the New dialog, select the "Presentation Layouts" category and choose the
desired template, i.e. "World Map".
■
Click OK in the New dialog and in the following dialog, Modify Slide. You will
see a slide which contains predefined text which you can replace with your own.
If the document is in the Background view mode after you open it, you should
switch to the Slide view mode using the respective icon in the lower left corner of the
document window. A document will always be opened in the view mode in which it
was last saved.
166
StarOffice 5.2 User's Guide • June 2000
To create a second slide, click the Insert Slide... command in the small Presentation
window. (If the small presentation window is not visible, click the Presentation Box
On/Off icon on the Object bar). In the next dialog, select a page layout and confirm
with OK.
Alternatively you can also click in the area right of the "Slide 1" tab to create a new
slide, without any selection dialog. The new slide has the same layout as the current
slide.
■
You will then see "Slide 2". After pressing OK, click once on the lower text frame
and delete it, e.g. with the Delete key.
■
Click in the upper text frame and enter "Live in 3D". Now you are going to insert a
3D object.
■
Long-click the 3D Objects icon to open its floating toolbar. Select the Sphere icon.
■
Click on the slide below the Live in 3D text, drag open a 3D rectangle, and then
release the mouse button. You now have a 3D sphere.
■
Position the sphere in the center of the slide and enlarge the size by dragging one
of the control points.
■
Assign an interesting color or gradient to the sphere by way of the list boxes in the
Object bar. In a later chapter, we will describe how to put a bitmapped image as a
pattern on a 3D object, for example a world map from the Gallery.
Chapter 6
Working with Presentations
167
You can now save your presentation by pressing the Ctrl + S key combination and
specifying the name and location for the file.
Arranging Slides in the Slide View Mode
Switch to the Slide View by clicking the respective icon above the vertical
scroll bar located at the right of your screen. Now you can rearrange the position of individual slides and define effects for the transition between slides.
To change the sequence of the slides, simply click and drag them to another
position in the presentation.
If you call up the context menu of a selected slide, you will see the Show/Hide Slide
command.You can use this command later to temporarily remove individual slides
from your presentation, without deleting them from the actual document. A slide that
is not shown in the presentation receives a name highlighted in gray.
168
StarOffice 5.2 User's Guide • June 2000
Incorporating Slide Show Effects
In the Slide View mode, you can define transition effects to precede the display of each
slide:
■
Click on the second slide once to select it.
■
On the Object bar under Transition, select "Automatic" and enter the desired
display time for the first slide, for example 00:01:00. That means that the second
slide will be displayed for one minute.
■
Select a desired effect from the Effects list on the Object bar.
■
Click the small button to the left underneath the second slide to preview the
selected effects.
■
Save your presentation again using the Ctrl + S key shortcut.
Showing a Presentation
To see your finished presentation, click the Presentation icon on the Main toolbar. The
presentation will run automatically in the full screen mode.
If you click once, the second slide will be displayed (preceded by the defined transition effect). After the last slide, you will see a black slide, which means that the presentation is over. End the presentation by pressing the Escape key (also used to stop the
presentation before the end if necessary).
Feel free to add more slides to your presentation or try out other effects.
Enhancing a Presentation
This section introduces you to the various options in StarOffice Impress which enable
you to refine your presentation. Many of the methods used in StarOffice Draw can
also be used in StarOffice Impress. You can enter text and convert it into 3D, change
objects into curves and polygons, edit glue points and connectors, etc. Additional
information can be found in the StarOffice Draw chapter.
Chapter 6
Working with Presentations
169
Defining a Background Color
You can create and define the background of a drawing or presentation document by
either using the Background View mode or by assigning another slide design to
them.The slide design contains, among other things, the Presentation Style for the
background.
Click the Background View icon in the work area in the bottom
left corner to switch to the Background View.
The Background view mode enables you to edit the background of all the slides. All
objects (e.g. company logos, lines or texts, etc.) entered in this view will appear in the
background on all slides using the current slide design (master slide). In this way, you
can reproduce headers and footers on presentation slides. The objects you insert in the
Background view are safe from changes in the normal Slide view.
You can also define a uniform structure for the background without calling up the
Background view. Simply select Format - Page... and in the dialog click the Background tab. You can now choose the color, gradient, hatching or bitmap for the background. When you exit the dialog, you will be asked if you want the change to apply
to all slides or only the current slide. If you answer "yes", the presentation Background
Presentation Style will be changed for the current master slide. Just remember that the
change will affect all of the slides based on this slide design. If you answer "no", only
the background of the current page will be modified.
In StarOffice Impress you can modify the Presentation Styles in the Stylist by
following these steps:
■
In the Stylist, click the Presentation Styles icon, if it is not already clicked, to
display all available Styles of this kind.
■
Select the Background Style. Call its context menu (by right clicking it) and select
the Modify... command from the context menu.
■
In the dialog you will now see, choose the desired background color for all of the
slides using the current slide design. Click OK.
Note that this modification is only valid for the current presentation document.
170
StarOffice 5.2 User's Guide • June 2000
Modifying the Slide Design
The subordinate designs which make up the slide design determine the way an object
looks, including its background. The slide design can also be called a "Master Slide". In
StarOffice Impress, you can assign a different slide design to each slide if you want.
■
Go to the slide you want to assign another Master Slide to.
■
Right-click an empty area of your slide to open the context menu and select Slide Slide Design....
In the Slide Design dialog, you will see all of the slide designs assigned to your
current document. Click the Load... button to open the Load Slide Layout dialog
where you can select one of the presentation layouts provided in StarOffice.
Notice the Exchange background page check box. If it has a check mark in it, the new
slide design will apply to all pages of the current document. If it doesn't have a check
mark in it, then it will only apply to the current slide. This gives you the flexibility to
define a different slide design, and thus a different background, for example, for one
single slide.
Chapter 6
Working with Presentations
171
Presentation Styles
Along with the slide design you can also assign a whole set of Presentation Styles to
your slides. Open the Stylist to see a list of the pre-defined Styles. You can modify the
existing Styles (any modifications are valid only for those slides in the current document that uses this slide design) and you can create new Styles.
The Styles Outline 1 through Outline 9 enable you to give the outlined headings and
topics on your slides a uniform look.
■
Open a new presentation and modify the slide layout, using the Modify Slide
dialog. Select a layout that allows for more outline depth, for example, the one
called "Title, Text" (seen in the Help tip of the mouse pointer when it rests on the
various options).
The slide layout you choose determines the number of levels of your outline. If
you chose a slide layout which does not permit any outline, you will notice that
the outline functions are not available.
■
172
Activate the outline view mode by clicking View - Master View - Outline View
(starting in the Menu bar) or by pressing the F12 key.
StarOffice 5.2 User's Guide • June 2000
One way to create a completely new presentation is in the Outline View mode. All
slide titles will appear in a list along with the headings and sub-topics. The hierarchy
of the headings as well as the sequence of the slides can be easily modified.
■
The preview window should have opened; if it didn't, you can show it using View
- Preview. The Preview window enables you to view the slide's layout, including
text, background, and background objects. You can dock the Preview window at
the window border if you press theCtrl key and drag the window to the position
you choose.
■
In addition, open the Stylist either with the Format - Stylist menu command or
with the F11 key.
■
The cursor in now blinking next to the small icon for slide 1. Enter the desired text,
for example First Page. This will be the title for slide 1.
■
If you press the Enter key , you will see in the next line of the Outline view a small
icon for slide 2. Enter a title for the second slide, for example, Second Page.
■
Press the Enter key again. You can now enter the next text in the next line, which
begins with a small icon for slide 3 where you would enter the title for slide 3, but,
in this example slide 2 should get a subtitle.
■
Now press the Tab key before you enter any text. By doing that, you ensure that
the text you then enter here will be a subtitle on slide 2.
Chapter 6
Working with Presentations
173
■
You can also first start entering the text for the subtitle and then press the Tab key.
In a case like this where you have already entered text in the line, you will see a
message which warns you that with this action, you will delete slide 3 and asks for
a confirmation. Confirm it with OK.
■
Continue to enter more subtitles of the first level on page two. By pressing the Tab
key, you grade the line down one level and with Shift + Tab one level up. This
enables you to even make a new slide out of a sub-topic.
The levels you create following these steps, automatically contain the Presentation
Styles title, outline 1, outline 2, etc. These Styles can be modified by having a new slide
design assigned to them, for example, a new font, font size and font color. You can, of
course, edit these designs (for example, with the Stylist's context menu).
Slide Transition, Effects and Animation
Make use of the possibilities a computer presentation offers you in order to grab your
audience's attention with animated objects and interesting slide transitions.
Animated Slide Transition
If you want to show a series of slides, use the slide transition effects to present them in
an interesting way. For example, the current slide can roll out of the window while the
new slides rolls in. This effect is called "roll from left". To create an interesting transition between slides, follow these steps:
The best thing to do is to assign this effect in the Slide View. Simply click on the third
icon from the top in the scroll bar on the right of the presentation window or go to
View - Master View - Slide view.
174
StarOffice 5.2 User's Guide • June 2000
In the slide view, all slides which have a slide transition effect, have a small button.
Click this button to preview the selected effect.
The Slide Transition window is described in detail in the StarOffice Help.
Effects for Objects
The objects in your slide can have various effects, for example, they can roll into your
presentation from the left side, the text can be slowly drawn onscreen, etc.
■
All these effects can be assigned using the Drawing View (View - Master View Drawing View).
■
Access the Effects window, i.e. with the Effects icon in the Main toolbar.
■
It is important to first select the object in which you want to have the effect. Then,
in the Effects window, select the desired effect and click the Assign icon.
■
You can also have your object faded in (Effects button) and, additionally, faded out
(in the Effects window, on the Extras tab click the Object Invisible icon) per
mouse-click.
The Effects window is described in detail in the StarOffice Help,
Chapter 6
Working with Presentations
175
Animated Objects
StarOffice also enables you to animate objects using the "animated GIFs". The GIF
image format consists of several images in the same image document which are shown
in succession. You can choose how long the intervals between the images should be.
For example, you might have seen advertising images, where you have long pauses
between the images and after a few seconds you see a new image with or without text.
If the pauses are short and the images are similar, you can create your own short
"movie".
With StarOffice Impress you can create and edit animated GIFs. Just access the Animation window via the Animation icon in the Main toolbar.
The Animation window is described in the StarOffice Help. For detailed information
on how to create animated objects, see the Advanced section of the User's Guide in the
StarOffice Help.
Individual Presentations
You can show your slide presentation from beginning to end by clicking the Presentation icon in the Main toolbar or with the Ctrl + F2 key combination.
■
If there is a slide you don't want to show, go to the Slide View (menu View Master View - Slide View) and select the slide. Then select the Presentation Show/Hide Slide menu command.
The name of the selected slide will be now appear highlighted in gray, meaning that
the slide won't be shown.
■
Click the Presentation - Show/Hide Slide menu command again when you want
to have the slide shown again.
A more elegant way to keep individual slides hidden in certain presentations can be
found under Presentation - Custom Slide Shows.
176
StarOffice 5.2 User's Guide • June 2000
■
In the Custom Slide Shows dialog, first click New... and the Define Custom Slide
Show dialog will appear.
■
In this dialog, enter a name for your presentation. On the left, you can see a list of
the existing slides. Select a slide you want to show in your custom slide show and
click the button with the arrows pointing to the right.
■
The slide will be inserted in the right field. All slides listed on the right will be
shown in the custom slide show.
■
You can rearrange the order of your slides in the right field via Drag&Drop.
For more information on custom slide shows, see the StarOffice Help.
Exporting, Printing, and Presenting
You have several options for the output of presentation documents. You can create
ready-to-use presentations, print the slides in color, or have them exposed in high
resolution. You may also transfer them fully or partially to other applications in order
to use them again. When printing a presentation, you have the option of either
printing directly or printing to a file for later printing. By using StarOffice Player you
can show your presentation on a computer even if StarOffice has not been installed on
it.
Chapter 6
Working with Presentations
177
Transferring a Presentation
Presentations are usually comprised of several linked files. To simplify the transfer of
a presentation, use the File - Pack menu command to embed all linked graphics,
diagrams, etc. in your presentation. As a result, you will have one large file which
contains all of your presentation information. The StarOffice Player is able to run this
type of presentation.
If desired, this file can be compressed in the Pack dialog and distributed to several
different data storage mediums.
Printing a Presentation Slide
In StarOffice, you can print the current document by clicking the Print File Directly
icon in the Function bar. It will be printed immediately, without a dialog appearing
according to the printer default settings. There is an exception in text documents when
you have selected a certain area of text. In this case, a dialog will appear after you have
clicked the Print icon.This dialog asks you to confirm if you want to print the whole
text or only the selected area.
If you print via the Print dialog, you can choose to print only the current selection, the
current page/slide, or all pages/slides in the document. Take a look at the Print
dialog, activated with File - Print or with the Ctrl + P key shortcut.
The appearance of the Print dialog may vary according to the selected printer.
However, you will always have the option to specify whether you want to print the
entire presentation, certain slides, or only the current selection. You can also specify
how many copies to print and how these should be sorted.
178
StarOffice 5.2 User's Guide • June 2000
Click the Options... button in the Print dialog to display additional options. When
printing text, drawing and presentation documents, you can choose the Brochure
option for multi-page text. The size of the pages will be reduced and printed two to a
page and double-sided, so that you only need to fold the pile in the middle to create a
brochure.
Since presentation documents consist of vector graphics, they can be printed optimally
in any resolution supported by your printer or image-setter. If you want to print a
slide at a printing service or with a high-resolution color printer in a print shop, select
the check box Print to file in the Print dialog. The document will be saved as a file
which you can give to the printing service. Beforehand, however, you need to install
and select in your system the printer driver for the printer or image-setter used by the
printing service. Most print shops and printing services require files which were made
for PostScript printers. You can install a PostScript printer driver and print to a file
with it, even if you don't have a PostScript printer.
Exporting a Presentation to a File
If you want to edit a slide of your presentation in another program, you can export the
slide or only selected objects on the slide into a different file.
When exporting to a file, you can choose between various file formats. Depending on
the selected format, a dialog may appear in which you can make additional settings.
For example, if you export the current slide as a pixel image in JPG format, a dialog
will appear in which you can adjust the level of compression and thus the printout
quality.
■
Select the slide that you want to export by clicking the tab at the bottom of the
window. If you only want to export certain objects, select only those objects.
■
Click File - Export. You will see the Export dialog.
If you export an entire slide, it will be appear as a full page. To export only certain
objects, select them and check the Selection box in the Export dialog. Only by
doing this can you ensure that not too much white border will be exported as
well.
■
In the File Typefield, choose the file format that you want to export the desired
slide or selection to.
■
Enter a name and location for the new file and click Save.
Chapter 6
Working with Presentations
179
Exporting your Presentation as a Series of HTML
Pages
If you choose the HTML export file format, StarOffice Impress will automatically start
an AutoPilot which will help you create impressive presentations. A number of HTML
pages will be created which are linked together with hyperlinks and upon which the
graphics are incorporated as GIF or JPG images. If you want, you can then edit these
pages in the StarOffice text module, adding headings and additional hyperlinks, for
example. To export a presentation in HTML format:
■
Choose the File - Export... command
■
Choose the file type HTML
■
The HTML Export AutoPilot will appear. This will be described in more detail in
the StarOffice Help.
In the HTML Export AutoPilot you can choose whether the Internet presentation
should contain frames or not, if you want to navigate using graphic buttons or text
links and if the original StarOffice Impress presentation should be offered via a link on
the Start page to download.
In addition to the export of default HTML documents and HTML documents with
frames, you can now export Impress documents as WebCast and in the automatic
mode.
In a WebCast export, scripts will be automatically generated for webservers with
PERL or ASP support. Thus, a presenter (e.g. at a press conference done over the telephone with an accompanying slide show via the Internet) can change the pages in the
audience's Browsers.
The automatic export takes over the settings for the viewing length of each page in the
presentation. A default HTML presentation is the result, in which the pages are
"turned" automatically.
The sound reminders for turning the pages can also be exported, if desired. The sound
files would then be copied in the target directory and played back when a HTML page
is loaded.
180
StarOffice 5.2 User's Guide • June 2000
Exchanging Data via the Clipboard
Objects in a drawing or presentation document can also be copied to the clipboard and
then inserted elsewhere. The objects are stored as vector graphics on the clipboard
using the following procedure:
■
Select an object in the current document and copy it to the clipboard with the
Ctrl + C key shortcut.
■
Switch to the application where you want to insert the object.
■
Insert the contents of the clipboard at the desired location with the Ctrl + V key
shortcut.
Chapter 6
Working with Presentations
181
Using the StarOffice Player
The StarOffice Player is a separate application which also requires separate installation. Explicit directions are included in your installation instructions.
The Player will run the presentation exactly as it was created or according to your own
specifications. For example, you can choose a length of time for the automatic change
of slides which has priority over the instructions in the presentation document.
182
StarOffice 5.2 User's Guide • June 2000
CHAPTER
7
7
Basics for Drawings and Graphics
Using StarOffice Draw you can create drawings with different degrees of complexity.
This ranges from a simple drawing to an interactive multi-page document. Use StarOffice Draw for creating drawings and StarOffice Impress for creating presentations.
Vector Graphics and Pixel Graphics
You can draw and save vector graphics in StarOffice Draw. You can also export these
graphics as pixel graphics if desired. Furthermore, it is also possible to insert pixel
graphics (Bitmaps) into your drawing pages at any time. You can find more information about the difference between these two graphic types in the StarOffice Help.
This section describes vector graphics. Have a look for yourself at the module for
editing pixel graphics, StarOffice Image. It's worth a look because you'll find many
interesting filters which can be used to, among other things, create a charcoal drawing
from a pixel image.
Drawing Rectangles and Ellipses,
Entering Text
The drawing module in StarOffice, StarOffice Draw, has many functions for editing
vector graphics and designing graphic displays. The most commonly used functions
will be described in the following. Further tips can be found in the StarOffice Help.
Open a new drawing document with the File - New - Drawing menu command. In
addition to the blank drawing page, you will see the Main toolbar on the left and the
Object bar for drawings at the top of the work area. With the View - Toolbars
command, you can also display the Option bar at the bottom edge of the window.
183
If you use these instructions to create a presentation document instead of a new
drawing document, you will notice one of the visible differences between StarOffice
Impress and StarOffice Draw: The buttons at the top right above the scroll bar (only in
StarOffice Impress) indicate that you are in the drawing view, while the buttons at the
bottom left indicate that you are in the slide view.
In the Drawing view, you can draw and edit vector graphics. The other views, which
can only be activated in StarOffice Impress via the buttons at the upper right, help you
to create presentations. They will be introduced at another point later on and are also
described in the StarOffice Help.
The Slide view mode enables you to edit the individual slides of a presentation or
drawing, while the Background Mode allows you to define an identical background
for all your slides. In addition, the Layer view mode can be turned on or off. This
mode is used, for example, to manage objects which should not always be visible.
The Main toolbar contains several floating toolbars. These are icons which, when
opened, provide additional related icons. The floating toolbars are indicated by small
triangles and are opened by long-clicking the corresponding icon in the Main toolbar
until the floating toolbar appears. Since the toolbar is "floating", you can drag it away
from its original position and position it anywhere else in the work area.
■
Long-click the Rectangle icon to open the floating toolbar and click on the
Rectangle icon. The pointer changes to a cross-hair symbol with a small square.
■
Draw a rectangle on the slide. It has preset attributes, including a blue fill and a
thin black line as a border. There are eight control points which you can drag to
change the size of the object.
By clicking once on any tool, you are making the tool available for only one
single task. Double-click the icon to allow it to remain active until you choose
another tool.
■
Draw a few additional rectangles; these can also overlap existing ones. Long-click
the Ellipse icon to open the floating toolbar and draw some ellipses, as well. You
can additionally draw 3D objects, as you can see in the following illustration.
■
Click on each of the objects and modify the fill style/color, line color, and the line
width using the list boxes and icons on the Object bar.
The window might then appear as follows:
184
StarOffice 5.2 User's Guide • June 2000
Moving, Rotating and Putting Text on Objects
When you click on the object for the first time, the eight control points, with which you
can change the size will appear. Then just drag the whole object to move it to another
position on the slide.
Click the Rotate icon that in StarOffice Draw can be found in the Main toolbar
under Effects and directly in the Main toolbar in StarOffice Impress
If you position your mouse over a control point, the pointer indicates that you can
rotate the object by dragging the mouse. In the middle of the object, a small circle indicates the pivot point. It can be moved to any other position with the mouse. When you
drag the corners of the object with the mouse, the object rotates around the pivot
point. Dragging the middle points on the sides slants the object in relation to the opposite edge.
Chapter 7
Basics for Drawings and Graphics
185
Click on the object once again to display the eight control points. If you double-click
within the object, the control points change and the text cursor appears positioned in
the middle of the object. You can now enter text, which is automatically connected to
the object.
It is possible that rare disturbances show up on the screen. If this occurs, press the
Ctrl + Shift + R key combination to reset the screen.
Arranging Objects
If your objects are overlapping and you want to position individual objects in the foreground or background, use either the context menu commands, or use the icons on the
Arrange floating toolbar.
Click on an object which you want to move either in front of or behind other objects.
Then click on one of the icons in the upper row of the Arrange floating toolbar to
move the object completely to the back, for example. If you want to position it directly
behind another object, click the Behind Object icon. Then click on the object which
you want the current object to be positioned behind. You will only see an effect if the
objects are presently overlapping or are moved to do so later.
You can also select two objects at the same time (hold down the Shift key and click one
after the other) and then click Reverse. This switches the order of the two objects.
Aligning Objects
You can, of course, position the objects anywhere with the mouse. However, if you
want to position an object at exactly the upper margin of a slide, for instance, or center
two objects vertically above each other, simply use the icons on the Alignment
floating bar.
If you select an individual object and then click on one of the icons on the Alignment
floating bar, the object is aligned at the page margins. If you have selected two or more
objects together, they will be aligned to each other.
186
StarOffice 5.2 User's Guide • June 2000
A special type of alignment is the Distribution of objects. If you select at least three
objects at once, you can use the Distribution... command. In StarOffice Impress, this
command is found in the context menu, whereas in StarOffice Draw it is found in the
Modify menu.
The selected objects are distributed so that their borders or midpoints are the same
distance apart. The two objects that are the horizontally or vertically farthest apart
from each other are fixed points, i.e. immovable. The other objects between the outermost objects can be moved using this function.
Remember that everywhere in StarOffice a multi-level undo function is available.
Activate this function by clicking the Undo icon in the Function bar or by pressing
Ctrl + Z. Each time you use this command, it reverses a previous action.
Drawing Sectors and Segments
The Ellipse floating toolbar contains several icons for drawing sectors and segments.
Sectors look like "perfectly cut pieces of pie". Segments look like halves of a pie.
Drawing sectors of an ellipse or circle requires multiple steps, though the process functions intuitively:
■
Open the Ellipse floating toolbar and click on the Circle Pie icon. The pointer
changes to a cross-hair symbol accompanied by a small sector symbol.
■
Use the mouse to drag open the shape of a circle. The outline of a circle follows the
movement of the mouse.
Your first click defines the first corner of the delimiting rectangle which
surrounds the circle. The delimiting rectangle will later be obvious via the eight
control points seen when you select the circle. If you would prefer drawing the
circle starting from the center, so that the first click defines the center, press the
Alt key while dragging the mouse cursor.
■
Release the mouse button when the circle has reached the desired size. Now you'll
notice that a radius which follows the movement of the mouse is drawn in the
circle.
■
Position the radius at the point where you want to place one boundary of the sector
and click once.
■
Now when you move the mouse, you'll see that the first radius is set and a second
radius follows the movement of the mouse. As soon as you click again, the circle
pie is complete.
Chapter 7
Basics for Drawings and Graphics
187
Drawing ellipse pies is done in a similar fashion. The dimensions of the delimiting rectangle, formed when you first drew
the shape, determines the dimensions of the ellipse.
When drawing a segment, proceed in exactly the same manner as described above for
sectors. The only difference is that in the last step no second radius follows the movement of the mouse, but rather a secant (straight line) cuts through the circle.
With the other icons in the Ellipse floating toolbar, you can draw ellipses and arcs.
This process also functions as described above although, only the perimeter of the
ellipse or the circle is drawn.
Entering Text
If you want to enter a text in your drawing, you can decide if you want the text to have
a "normal" format as in a text document or if the text should be handled as a graphic
object that you can rotate, expand, minimize, etc. You can also have a "normal" text
appear in the form of a legend (in a frame with an arrow).
■
188
Open the Text floating bar in the toolbar.
StarOffice 5.2 User's Guide • June 2000
Normal text
■
You can enter "normal" text by clicking the Text icon.
■
Drag open a delimiting frame in your document which sets the position and maximum width the text area should have. If your text is long, you can extend the frame
in order to incorporate the whole text. Of course you can later modify the position
and the size of the frame using your mouse. However, you will not be able to make
the frame smaller than the text itself.
■
Enter the text. Select the text by holding down the Shift key while using the arrow
keys or use the mouse. You can now modify the font, the font style and size as you
would in regular text documents.
If you click the mouse on the document outside the text you leave the Text edit mode.
If you click the text once again, the text will be selected as an object. Now, you can, for
example, rotate or shift the entire text.
If you double-click the text you can edit it again, for example, delete characters or set
additional font attributes.
Fit Text to Frame
■
With the Fit Text to Frame icon, you can draw a delimiting frame which predetermines the position and size of the text. Once having done so, immediately enter
your text.
■
Enter your text and afterwards, click in any free area of the document. The text you
entered will be scaled so that it exactly fits into the frame.
Callouts
■
Using the Callouts icon, drag your mouse from the point which the reference
arrow should point to, to the point where the callout text should appear. Once you
release the mouse button, you can edit the size of the frame of the callout.
■
Double-click the line. The frame will appear with a wide gray border, which indicates that you are now in the Text edit mode.
■
Enter the callout text.
■
To modify the properties of the line, click the line and open the context menu
where you then select the Line... command. Under Style, you may choose an arrow
head for the line.
Chapter 7
Basics for Drawings and Graphics
189
Transforming Text to 3D
If a text is selected, you can transform the text into a 3D body with the Convert - To
3D command in the context menu. The 3D body will take on the area you created for
your text frame.
You can rotate the 3D text with the Rotate icon in the Effects floating bar in the
Main toolbar.
If you click inside the delimiting frame and drag while pressing the mouse button, the
object will rotate on all the axes at the same time, but if you click one of the eight
control points and drag it with a pressed mouse key, the object will rotate on only one
axis.
You can shift the pivot point, which first appears as a small circle in the middle. When
you then rotate the object, it will rotate around the new pivot point.
Click the 3D Controller icon to open the 3D Effects window and assign, e.g. a
different illumination to the 3D object. The 3D Effects window is described in detail in
the second section of the User's Guide and in the StarOffice Help.
Drawing, Editing and Converting
Curves and Objects
Vector graphics used in drawing and presentation documents consist not only of
ellipses and rectangles, but also of irregularly formed curves, which may form open or
closed figures. StarOffice Impress and StarOffice Draw allow you to draw and edit
unusual shapes with ease.
190
StarOffice 5.2 User's Guide • June 2000
Drawing All Kinds of Curves
You will find the tools for drawing special shapes in the Curves floating toolbar. Drag
the floating toolbar away from the Main toolbar into an empty drawing or presentation document.
■
Select the Curve icon. The cursor appears as a cross-hair symbol with an accompanying symbol that indicates the new function.
■
You can now create a curve with the mouse. The point where you first click the
mouse button determines the starting point. The direction in which the point
where you release the mouse button lies, defines the direction the curve takes from
the starting point. Now, move the mouse without holding the button down - the
curve will follow the movement of the mouse - and click where the second point of
the curve should be.
If you keep holding down the mouse button, you can define the direction of the curve
from the second point to the next point (just as you did from the starting point),
release the mouse and move to the third point, click again and keep the mouse button
pressed, and so on.
However, if you release the mouse button after clicking on the second point of the
curve and then click elsewhere on the slide, the second point will be defined as a
corner point. At a corner point, the curve abruptly changes direction, thus forming a
corner. If you define the third point as a corner point in the same way, you will get a
straight line between the second and third points.
If you hold down the Shift key, the directions will be limited to multiples of 45 degrees. If you hold down the Alt key, the curve closes, and you can draw additional
curves - which you can also combine to form a single object
■
To end the curve drawing mode, double-click on the last point made. Now, you
can continue working using other draw tools. Double-click on the starting point of
the curve to form a closed shape.
The curves described above are referred to as Bézier curves. Their shape is internally
defined by a function, named after the French mathematician Pierre Bézier. Every
point on a Bézier curve can produce a "symmetric" transition, meaning that the line
has the same curvature on both sides. Or the point can produce a "smooth" transition
where the curvatures of the curve on either side of the point are different. If at the
point the curve is not extended but instead comes to a peak or corner, then it is a
corner point. You can convert each type of point into any other type, which gives you
great influence over the shape of the curve.
Chapter 7
Basics for Drawings and Graphics
191
Editing a Curve
You can edit the Bézier points of a curve when they are displayed as small squares. If
you want to edit a curve which is not active, click the Select icon at the top of the Main
toolbar and select the curve. When the Bézier curve is selected, the Bézier Object bar
will appear.
192
■
Now click Edit Points on the far left of the Option bar at the bottom of the screen,
or in the Bézier Object bar.
■
Click once on the point you want to edit. It will appear as a filled square, and you
will see two Bézier lines with control points at the ends. (Please note that sometimes one of the control points is directly on top of the Bézier point and thus hard
to see.) In the case of corner points which define right angles, the control points lie
directly on the Bézier point.
StarOffice 5.2 User's Guide • June 2000
■
You may now move the Bézier point and the control points as you wish. Note how
the curve changes accordingly. The change in form of the cursor indicates in each
case the function that can be executed.
The Bézier Object bar contains several icons with which you can, among other options,
change the type of the selected point. A detailed explanation of the various options
can be found in the StarOffice Help.
■
If you want to change the type of Bézier point, select it. You will then see the type
of point indicated in the Bézier Object bar: Corner, Smooth or Symmetric.
■
Click one of the icons to change the type of point.
Of course, you can also edit curves in the "conventional" manner, i.e., changing width,
color, and (in the case of a filled curve) the object fill. The options for changing these
attributes are found in the Object bar. However, if the Edit points icon is not pressed
you can use the context menu or the Format and Modifymenus.
Try out the other icons on the Curves floating toolbar as well. If you finish a filled
curve with a double-click, it will automatically be closed, and the enclosed areas will
be filled. You can read more about these options in the StarOffice Help.
Transforming Bitmaps into Vector Graphics
With StarOffice Impress or StarOffice Draw, you can also transform pixel images, so
called bitmaps, into vector drawings. One of the advantages of vector graphics is that
they look good in any scale when printed. This is different when printing scaled
bitmaps, since unattractive effects may appear, such as missing or zigzag lines, etc.
■
Select the bitmap that you want to transform into a vector, for example, by clicking
it.
■
Select the commands Convert - To Polygon. In StarOffice Draw you can find this
command in the Modify menu, in StarOffice Impress in the context menu of the
selected object.
In the Convert to Polygon dialog you can set some parameters for the conversion and
preview the result.
Chapter 7
Basics for Drawings and Graphics
193
■
Click OK and the selected bitmap will be replaced with a vector graphic as a
metafile.
Converting into a Curve, Polygon, 3D or
3D Rotation Object
You can edit many objects quite effectively by converting them. Let's look at a simple
example to illustrate this:
■
Drag open a rectangle. You'll notice that it has the default settings for color, line
width, etc. and it should be selected.
■
Go to menu Modify - Convert (in StarOffice Impress you will find the corresponding command in the context menu of the rectangle). You will see the menu
sub-commands To Curve, To Polygon, To 3D, To 3D Rotation Object.
With the Modify - Convert - To Curve command, you convert the rectangle into a
Bézier curve. Now you can click the Edit Points icon in the Object bar (or in the
Option bar) and click the points to edit them. You can move the points, delete them,
make a corner point smooth, insert new points, etc. You can read about all the possible
conversions in the StarOffice Help under edit points and Bézier Object bar.
194
StarOffice 5.2 User's Guide • June 2000
With the command Modify - Convert - To Polygon you can convert the original
rectangle into a "Polygon with 4 points", as will then be stated in the Status bar.
You can now, for example, break a polygon down into its basic parts by using the
Break command in the Modify menu. The status bar will then read "4 Lines selected".
You can shift each of the lines separately.
Naturally, you can also modify the points of a selected polygon and insert new ones,
etc. with the Edit Points icon.
With the Modify - Convert - To 3D command you create a 3D object from a 2D object
by way of a so-called extrusion. The rectangle will be "pulled" into the third dimension
perpendicular to its surface area.
You can rotate the 3D object and edit it with the help of the 3D Effects window that is
called up via the context menu.
With the commandModify - Convert - To 3D Rotation Object you can create a 3D
object by means of a rotation extrusion. The rectangle will be rotated 360 degrees
around an axis into the third dimension.
You can also edit these 3D objects as you'd like. If you rotate the rectangle a little bit
before converting it to a 3D rotation object, more striking effects will be created, as you
can see from the picture on the right.
Here we converted only basic objects, simple rectangles. Just imagine how much you
can do when you convert complex objects.
Chapter 7
Basics for Drawings and Graphics
195
For example, drag a drawing from the Gallery to the page and convert it into a 3D
object. StarOffice positions the objects contained in the drawing in various 3D levels
corresponding to their arrangement in 2D levels. For example, the stars from the European flag in 3D stand out vividly from the blue background of the flag.
You can convert just about all objects to 3D:
■
Groups can be converted as long as they contain convertible objects.
■
Bitmaps will be laid as a texture over a rectangular object of adequate size.
■
Metafiles will be broken down into a group of polygons and then converted.
■
Draw objects with text on them display the text in raised form on their surface
(e.g. a rectangle which you have double-clicked and put text on).
Working with Objects
You can select, copy, cut, and paste individual objects in a presentation or drawing
document in nearly the same way you edit words in a text document. Additionally,
there are functions available only for graphic objects, such as duplicating, cross-fading,
or grouping. All elements in the drawing area such as rectangles, circles, lines, and so
forth are considered to be objects.
196
StarOffice 5.2 User's Guide • June 2000
Duplicating an Object
Duplicating an object allows you to easily make a set number of copies of an object
which differ in consistent degrees from one copy to the next in position, orientation,
size, and color.
If you want to draw two stacks of coins, for instance, you can use the duplicate function. Your basis consists of the two bottom coins:
■
Draw two ellipses or circles next to each other at the bottom of the slide.
■
Select both objects.
■
Choose the Edit - Duplicate... command to open the Duplicate dialog.
■
Enter the following values:
■
Select 30 as the number of copies. The x-axis is the horizontal axis from left to right.
If you enter positive values in the field for the x-axis placement, this causes a shift
to the right. If the stack of coins should increase from the bottom up, enter a negative value in the (vertical) y-direction.
■
If you want the coins to become smaller the higher they get, enter a negative value
for the width and height.
■
Finally, define a color scheme from bottom to top. Select, for example, a darker
yellow for the beginning color (bottom) and a lighter yellow color for the end color
(top).
■
With the aid of the Eyedropper in the Duplicate dialog, you can use the color of
the start object as the start color.
■
Click OK to create the duplicates.
Chapter 7
Basics for Drawings and Graphics
197
The duplicates are not automatically grouped. After the operation has been carried
out, only the top pair of coins will be selected. If you want to slant the coin stacks a
little, you first have to select all of the coins together.
■
To select all of the coins, press either the Ctrl + A key combination, if there are no
other objects on the page; or drag a selection frame around the coins.
■
Now click the Rotate icon in the Effects floating toolbar. When placing your cursor
on the control points which appear, you will see symbols indicating that you can
either rotate or slant the objects simultaneously.
■
Slant the stacks a little to the right, click once again in the selected area, and reduce
the size of the entire image. In the end, the stacks of coins may look something like
this:
Cross-fading Between Two Objects
The Cross-fading function is only available for drawings in StarOffice Draw and not in
StarOffice Impress documents. If you want to insert into a presentation an object that
has been created by cross-fading two objects, simply copy it from the drawing into the
presentation document by way of the clipboard.
In the process of cross-fading a transition between two objects is calculated and the
increments will be positioned on the page. In the increments, the form, orientation,
and color of the objects, as well as other attributes, are adjusted uniformly.
198
■
For example, in an empty drawing document, draw a red circle at the bottom left
and a bright green rectangle at the upper right.
■
Select both objects.
StarOffice 5.2 User's Guide • June 2000
■
If you want, set the line style for both objects to "invisible," so that the border is no
longer visible. Click in the Line Style list box at the left of the Object bar, and select
"Invisible" at the top of the list.
■
Choose the command Edit - Cross-fading. A dialog appears where you can define
further settings.
■
Select at least 50 increments for cross-fading, and click OK. StarOffice Draw calculates the increments and displays the results.
This new object is a group which consists of the specified
number of individual objects. If you wish, you may remove
the group setting and reedit the individual objects. The
Modify menu in StarOffice Draw contains all the necessary
commands for working with groups and these functions
can be also found in StarOffice Impress under the Format Group menu command or in the context menu. Further
information can be found in the StarOffice Help.
Working with a Group of Objects
Several objects at one time can be selected, grouped, combined, merged, subtracted
and intersected. Selecting several objects at the same time has a temporary effect - as
soon as you click elsewhere on the page or slide, the area will be deselected. Grouping
and combining are valid until the group or the combination is deselected with the
command in the context menu or in the Modify menu. You can also combine these
commands, for example, to group together several groups, add a combination and
combine the results as a group or combination.
Grouping Objects
You can combine several objects into a group. All changes made to a group will have
an effect on all objects in the group. In particular, groups can be moved, rotated, etc. as
a single object. In contrast to when you select several objects together, in groups you
do not have to worry that by accident an individual object will not be moved or
rotated with the other objects.
For example, if you want to draw a bicycle, you can first construct a wheel, composed
of a tire, rim, spokes, and hub, and then you can group these objects together. This
makes it easy to rotate the wheel, duplicate it, and move the second wheel to the appropriate position. Finally, draw the frame and the rest of the bicycle, and form a new group.
Chapter 7
Basics for Drawings and Graphics
199
To edit an object that is part of a group, you do not need to redefine the group; you
simply need to "enter" the group. You can edit an object in the group, and exit the
group when you are finished.
Enter Group
You enter a group by first selecting (either click it or use the keyboard - see instructions below). Then you can decide whether you want to use a context menu command,
the F3 key or double-click the group to enter it. When entering a group with a doubleclick, any existing selection will be canceled (i.e. there won't be any object in the group
selected).
Exit Group
To exit a group, you have a choice of using a menu command, the key combination
Ctrl + F3, or double-clicking outside all of the objects in the group. When you exit, the
group you just left will be selected, which means that you can quickly enter and exit a
group using the keyboard.
Depiction of the Group Entered
In order to emphasize the group and the contents thereof, all objects which aren't in
the entered group (including other groups), will be depicted in the new "Ghost Mode"
in faded colors. That makes it easy for you to see which objects are available for interaction and which aren't, as well as whether you are in a group or not.
Navigate Between Objects in a Group (or on a Page)
Using the Tab and Shift + Tab keys, you can move forwards and backwards selecting
every object in turn in a group entered by using F3 or on a page. Once you arrive at the
last object by repeatedly pressing the keys, the first object will be the next one selected.
In addition, you can utilize the Home and End keys to select the top or bottom object
on a page.
200
StarOffice 5.2 User's Guide • June 2000
Combining Objects
In contrast to groups, which consist of single objects, a combination fuses the component objects into one single object with its own new properties. The combination may
be undone again later.
The most striking property of a combination can be seen when the individual objects
overlap. In this case, the intersections appear as "holes" where the objects overlap.
In the illustration, you can see several objects at the left before being combined, and at
the right after being combined. The combination is given the attributes of the first
object drawn - i.e., the object farthest to the back. The holes are transparent, which
means that when you lay the combination over another object, that object is visible
through the intersections.
The commands Shapes - Merge, Subtract and Intersect also form a new object out of
the original objects. The new object comes into being due to the use of logical amount
operators on the original surfaces.
Graphic Objects in Drawings and Presentations
StarOffice Draw and Impress use a vector graphic format. You can also insert pixel
graphics or bitmap graphics into your presentations or drawings and export a document or certain sections of a document in a pixel graphic format.
If you, for example, would like to use text to label a Pixel image in JPG format, follow
these steps:
■
Open a new drawing document.
■
Insert a Pixel image via menu Insert - Graphics - From File....
■
Deselect the image by clicking somewhere else in the document.
■
Open the Text floating bar from the Main toolbar and select, for example, the Fit
Text to Frame icon.
Chapter 7
Basics for Drawings and Graphics
201
■
Draw a frame around the pixel image and enter some text inside this frame.
■
You can select this text and assign another color to it. The background of the text is
automatically transparent.
■
Select the pixel image and the text by, for example, drawing a frame around both.
On the Status bar you will read "2 draw objects selected".
■
Go to the File - Export... menu and, in the Export dialog, select the file type
"JPG -JPEG" and enter a name. Mark the Selection check box to export only the
selected objects.
■
Click Save. In another dialog you can now set the options to define the quality of
the JPG image. Remember that the higher the quality, the larger will the file be.
If you select a graphic object (for example, an inserted Pixel image) in StarOffice
Impress or StarOffice Draw, you will automatically see the Graphics Object bar. This
bar enables you to modify the color tone, brightness and contrast of your graphic
object.
You can also modify the transparency value of the graphic object. If you set a higher
transparency value, the image will be translucent and you can see objects which lie
behind it. The transparency will be preserved when the document is saved as a StarOffice document.
Working with Colors
Pick a color for an object using a list box in the Object bar to choose from several
predefined colors. The border color can de defined independently of the color used on
the surface of the object.
The Color Bar
If desired, you can display a Color bar on the border of a drawing, image or presentation document. The Color bar contains a large selection of colors, which can be applied
to a selected object simply by clicking on the desired color. Select the View - Toolbars
- Color Bar menu command to display the Color bar.
The Color bar displays all predefined colors with their respective names in the same
order as in the list box of the Object bar. If you define colors, these will appear at the
end of the Color bar and the bottom of the list box.
202
StarOffice 5.2 User's Guide • June 2000
If you have defined more colors than can be displayed in the Color bar, use your
mouse to shift the separator line between the bar and the document to increase the
size. You can also double-click in a gray area of the Color bar while pressing the Ctrl
key to make it a floating window. You can then use the Color bar exactly the same as
most other windows. For example, you can move it by dragging the title bar, or
change its size by dragging either the sides or corners of the window. To dock the
window back into place, double-click again on a gray area of the bar while pressing
the Ctrl key.
Defining Custom Colors
If you need colors other than those offered in the standard color palette, you can
define as many new colors as you want, assign names to them and save them in the
color palette files.
■
In a Draw document, select the Format - Area... command to open the Area dialog.
■
In the dialog, click the Colors tab.
Here you will find everything you need to modify the color of a selected object. You
can also define and organize new colors.
If you want to apply a color which is not yet in the color palette, you first have to
define a new color and assign a name to it.
Chapter 7
Basics for Drawings and Graphics
203
Modifications to the standard color palette are permanent. They will be saved automatically, and are irreversible. This will not present problems if you only want to
add one new color to the palette, but it can create difficulties if you change the standard colors.
■
To define a new color, the best thing to do is choose a color from the color palette
which resembles the new color. It will be displayed in the upper of the two
preview boxes.
■
Then, in the list box, set the color sample according to how you want to define the
new color. The list box includes both formats RGB and CMYK.
RGB and CMYK are regarded as the most common color definition models. RGB
stands for Red-Green-Blue. This describes the color components used when the
computer monitor colors are composed additively of the three primary colors. CMYK
stands for Cyan-Magenta-Yellow-blacK or Cyan-Magenta-Yellow-Key and is the color
model that best describes the subtractive creation of colors used in printing. Select the
color model corresponding to the medium of your choice (monitor or printer). If you
have image files printed by a printing service, ask them which color model and format
they use.
■
Define the colors by modifying the values in the spin boxes. Enter values directly,
or click the buttons to change the existing values. The result is shown immediately
in the lower preview box.
If you don't want to set the values using the spin boxes but would rather select them
from a color spectrum, just click the Edit button and you will see the Color dialog.
This dialog enables you to select the color in HSV or HSB model (Hue-SaturationValue/Brightness). Select the desired color and close the dialog by clicking the OK
button.
■
Once you have chosen a new color, you must specify whether it should replace the
original color or be defined independently. Click Modify, if you want to replace
the color displayed in the upper preview box. We suggest, however, that you only
replace custom-defined colors.
■
To set the new user-defined color, assign a name to the color in the Name field, and
click Add and OK.
Your new color will immediately be added to the palette of existing colors. If you close
the dialog with Cancel, the color of the current object will not change. However, the
modifications in the color palette will remain in effect.
In the Advanced section of the User's Guide and in the StarOffice Help you will find
more information about loading and saving color palettes and other palette files.
204
StarOffice 5.2 User's Guide • June 2000
Replacing Colors with the Eyedropper
Inserted images in bitmap format (for example, GIF, JPG) and metafiles in StarOffice
Draw, StarOffice Impress and StarOffice Image can be edited with the Eyedropper. In
StarOffice Draw and StarOffice Impress, you can call the eyedropper via Tools Eyedropper and in StarOffice Image via Modify - Eyedropper or using the icon in the
Main toolbar. The Eyedropper window will appear.
The Eyedropper can replace selected colors and, to a point, similar colors, with other
colors. You can replace up to four colors at one time. If you don't like the replacement
you can reverse it with one click on Undo in the Function bar. Use the Eyedropper to
match the colors of different bitmaps or to redo a bitmap with the colors of your
company logo.
The Transparency attribute is also considered as a color. You can replace the transparency of a picture with a color, for example, white. This is really helpful, especially if
your printer drive has a problem with printing transparent graphics.
If you want to produce an image on HTML pages to publish in the internet, like the
illustration of a product, for example, it usually looks better when you don't see a
rectangular picture, but rather only the illustration of the product which is then seen
against the uniform background of the web page. If there is a white background in the
picture behind the product, use the Eyedropper to replace the color white with "Transparent" (i.e. no color) and save and/or export the image in a format that supports the
transparency attribute (such as GIF). When using this method, be sure that the illustration of the product itself doesn't contain any white parts, since these would also
become transparent just like the background.
Chapter 7
Basics for Drawings and Graphics
205
Replacing colors with the Eyedropper:
■
Insert an image in a bitmap format (e.g. BMP, GIF, JPG, TIF) or in a metafile format
(e.g. WMF) and, in StarOffice Draw and StarOffice Impress, go to Insert - Graphics
- From File....
■
Access the Eyedropper window with the Tools - Eyedropper menu command (in
StarOffice Image Modify - Eyedropper).
■
In the Eyedropper window, click on the Eyedropper icon in the upper left-hand
corner. The mouse pointer will turn into a special pointer with which you then
indicate the color to be replaced in the current document. The color box next to the
eyedropper icon in the Eyedropper window displays the color the mouse pointer is
resting on.
■
Click the left mouse button when you find the color you want to have replaced.
This color will automatically be registered in the first of the four rows in the
Eyedropper window.
■
Now, in the list box to the right in the same row, select the new color which should
replace the selected color in the whole bitmap image.
■
If in the same editing step you want to replace another color, click the check box in
front of the next row. Now select the eyedropper icon in the upper left-hand corner
again and choose a new color. Up to four colors can be replaced in one editing step.
■
Select the bitmap image or the metafile image you want to change the colors in by
clicking it.
■
In the Eyedropper window click Replace.
If too many similar colors were replaced, reverse this step with the Ctrl + Z key combination and decrease the color tolerance in the spin box. Now, click Replace once again.
Gradients and Patterns for Objects and
Backgrounds
The objects in your drawings and presentations cannot only be given uniform colors,
but can also have complicated color gradients, transparency gradients, patterns, and
hatching. In addition, you can assign a color, a gradient, or a pattern to the background seen on all the slides in your presentation.
206
StarOffice 5.2 User's Guide • June 2000
Working with Color Gradients
To assign a predefined gradient to an object, proceed as follows:
■
Select the object.
■
In the context menu or under Formatin the Menu bar, select the Area... command.
■
On the Area tab page, select the Gradient option and choose one of the gradients in
the list box. In the following example, the Automatic default increment was
increased five levels to create a design effect.
Defining Your Own Color Gradient
You can define your own color gradient, save the current color gradient list as a file, or
load a different list from another file.
If you select an object and then define a new gradient, the new gradient will immediately be assigned to the selected object. If you don't want this to happen, cancel the
selection by clicking where there aren't any objects.
Chapter 7
Basics for Drawings and Graphics
207
■
In the Area dialog, click the Gradients tab. This is where you can define all of the
options for new color gradients.
■
From the list of existing color gradients, click the gradient you want to use as a
basis for creating your new color gradient.
■
Click the Add... button. In the dialog that appears, you can assign a name for the
new gradient. For example, enter the name "UFO" and click OK. The name appears
as a new entry at the end of the list and will already be selected for editing.
■
You can modify the options in any which way you want. When you are finished,
click Modify... to save the changes to the new gradient. In the preview box, you'll
see what the gradient would look like. Try out all the options under Type,
including different angles and beginning and end colors.
■
Close the Area dialog with OK. You can use the new color gradient immediately.
Interactively Defining Your Own Color Gradient
Color gradients can also be defined directly by clicking and dragging them with the
mouse. In order to be defined interactively, the object must already have a color
gradient.
■
Select an object which has a color gradient.
In StarOffice Draw, open the Effects floating toolbar from the Main toolbar.
On the Effects floating toolbar, click the Gradient icon.
You will now see two objects in color which are linked by a vector. Depending on the
type of gradient, you can move one or both of the objects with the mouse and thus
208
StarOffice 5.2 User's Guide • June 2000
determine the origin, end and angle of the color gradient. If the Color bar is displayed,
you can move colors by Drag&Drop to each object to determine the start and end
colors.
In a similar way the transparency of an object can be determined with the
Transparency icon. Here you can define a grayscale gradient which spans
from black (0% transparency, i.e. opaque) to white (100% transparent).
Organizing the Attribute Tables
The icons Load Gradients List and Save Gradients List (both located in the bottom
right-hand corner of the Gradients tab page in the Area dialog), activate dialogs for
opening and saving gradients. The current gradient list, for instance, might consist of
all gradients which you have defined for a certain project. Save the list, then reload the
standard list. This way you can keep the list (and the memory space) free from
resources you do not need. If you later want to continue working on this project,
reload the gradient list. The same procedure applies for loading and saving lists of
hatching and bitmaps.
You can find more information about these list files in the Advanced section of the
User's Guide in the StarOffice Help.
Defining a Background Color
You can draw and create the background of a slide in a presentation or drawing document either in the Background view or by assigning another Page Style to the slides.
Switch to the Background view using the icon in the lower lefthand corner of the work area.
In the Background view mode, you can edit the background page. All of the objects
you enter in this mode, whether they be company logos, lines, or text, will be
displayed in the background of all slides using the current Page Style. In the Slide
view mode, these objects are protected against changes.
You can also assign a uniform structure to the background without being in the Background view. Simply go to Format - Page... and in the dialog click the Background
tab. Now choose the color, gradient, hatching or bitmap for the background.
Chapter 7
Basics for Drawings and Graphics
209
210
StarOffice 5.2 User's Guide • June 2000
CHAPTER
8
8
Events & Tasks
Plan your events and tasks with StarOffice Schedule, a StarOffice module with Groupware functionality. A detailed description of all functions in StarOffice Schedule can
be found in the StarOffice Help. Further tips are provided in the Intuitive Solutions
section of the User's Guide. The following is a general introduction to working with
StarOffice Schedule.
The functions in StarOffice Schedule are mainly managed via the context menu
commands and via Drag&Drop with the mouse. For example, you can choose a time
scale with the aid of the context menu in the Event view; you can define an event by
dragging the respective block of time with the mouse (see next section); and you can
make more complex settings using the dialogs activated by the context menus in the
various views. The place of central administration for StarOffice Schedule is the Tasks
& Events entry in the Explorer with its subentries and their various context menus.
Events and tasks are automatically saved in StarOffice Schedule as soon as you enter
them.
You can synchronize data with a PalmPilot, a "digital personal assistant" which helps
you keep track of your events when you are on the go. Detailed instructions can be
found in the StarOffice Help.
211
Scheduling your Events with StarOffice
Schedule
■
Activate StarOffice Schedule by double-clicking Events under the Tasks & Events
entry in the Explorer. The main window of StarOffice Schedule will appear.
You will see, in the default setting of the Events View, the current workweek and to
the right, a monthly calendar and a task list. Use the icons in the Object bar or the
commands in the View menu to choose whether you want to have the tasks and
calendar shown. The division between these three main areas can be adjusted to suit
your needs by dragging the separator lines with your mouse.
You can save the settings you chose under a name as a view and reload them again
later so that you can use different layouts, filter settings and styles whenever you
want. Details about the views, styles and filters are described in the Applied schedule
management with StarOffice Schedule section of the User's Guide.
Enter a new event as follows:
212
StarOffice 5.2 User's Guide • June 2000
■
In the Events view, point to the start time for an event and then hold the mouse
button down and drag the mouse cursor to the time you expect the event to end.
This time period will now be emphasized in color.
■
Now, type in a description of the new event, for example, "Lunch with Tom". You
will see this text in the Events view.
■
To end the text input mode, click anywhere outside of that time block or press the
Enter key.
Editing Events
■
To move an event to a different time, click on the event, hold down the mouse
button and drag it to the desired position in the Events view.
■
To copy an event, drag it to the desired position while pressing the Ctrl key. A plus
sign next to the mouse pointer indicates that the event will be copied when you
release the mouse button.
■
Several events can be selected at the same time. All you have to do is hold down
the Ctrl key when you click them. Then just place the mouse pointer on one of the
events and drag it somewhere else and all the other selected events will be moved
as well.
■
To modify the starting or ending time for an event, use the mouse to shift the
upper or lower border. Note that the time scale which was set for this event will be
applied. (Choose a time scale using the context menu of the Event view when no
event is selected.)
■
If you want to change an event to a 5-minute scale, independently of the selected
time scale, drag it (just a little bit will make a difference!) while pressing the Alt
key. The Help tip then shows the time. The filled-in vertical strip at the left border
of the event indicates in color the time frame allotted for the event. The rest of the
strip on the left will remain white.
■
You can also enter events in the Month view (with the "31" icon). After doubleclicking on a day, enter a text for your event. If you double-click next to the date
(not on the actual digits), a day event will be set. Otherwise, a regular event will be
set, the data of which you can edit in the detail view. Drag the event with the
mouse to the new starting time (position the mouse on the left part of the event)
and drag the ending time (drag the right part of the event) to change the duration.
If you keep the Alt key pressed, you can alter the event time to a 5-minute scale.
Chapter 8
Events & Tasks
213
■
You can call the Event List View with the List icon in the Object bar. All events
appear here in list form, one below the other. With the context menu in the headers
you can determine which data fields you want to see for each event. By clicking the
column headers, you change the sort order either ascending or descending.
■
In the List view, if you start a Search (with the Find icon in the Object bar, using
Ctrl + F, or with the Tools - Find menu command), the search will be made in the
list which was compiled following the criteria from the selected filter. The search
has the effect of an additional temporary filter. As a result, only events will be
displayed which correspond to the current filter and search the conditions. All
other events will be hidden. You can determine which filters are set by using the
context menu.
■
If you start a search from a day, week or month view, it will search through all
events which satisfy the criteria set in the current filter. The search results in these
views will appear highlighted as you scroll upwards or downwards with your
scroll arrow. The additional events corresponding to the current filter are also
shown so that you get a better overview of your search results.
■
To delete an event, open the context menu and select the Delete command.
■
If you prefer to use the keyboard to switch between events, simply press the Tab
key. The next event will be selected and you can directly enter your text. Press the
Escape key to exit the text input mode. If you now press the Delete key, the event
will be deleted.
■
If an event will take place on a day, but no starting or ending times are defined, it
should be entered as a Day Event. Place the cursor in the top area in the Event
view of the day and enter the text as you would with any other event.
For a day event, as for other events, a colored bar at the left of the Event display area
marks the hours when there is an event. Click the Details icon in the Object bar to
open the details section, and then click "Details" and specify the setting under "Show
Time as...". The colors differ depending on the setting given. This way, you always
have an overview of your events and can see at a glance how much free time you still
have.
Each event that has a more specific time defined has a colored bar on its left margin.
The color indicates a particular category of the event (work, leisure time, hobby, social
events, and so on). If you want, you can define your own categories and change the
colors by way of the context menu.
214
StarOffice 5.2 User's Guide • June 2000
How Days and Weeks Appear in the Event Window
Use the icons in the Object bar to display a day, a week, or a month in the Event view.
In addition, you can also choose to view a workweek or multiple workweeks. There is
also an event list, which shows your events listed is rows.
You can enter, drag and copy events in all views. A 30-minute single event is best
entered in the day view, while a vacation lasting several weeks should be entered in
the month view.
■
To go to another day, another week or another month you can use the symbols in
the Object Bar or simply click on the calendar.
■
In the Day view you can use colors to distinguish between "working time" and
"leisure (free) time". Select the colors used for work time and leisure time using the
Event layout dialog. Open this dialog by clicking in an empty area of the Event
view to open the context menu, where you then click Current Layout - Define
Layout....
For example, in the Week view (the "7" icon), select the hours you spend at work on
Monday and click Background - Mark as Working Hours in the context menu. Do
the same for the other days. StarOffice Schedule remembers the setting you make
for one week and applies it to the other weeks.
■
Click the Workweek view icon (with the "5" on it). In the context menu of this view,
call the Workweek... menu command. Select the days which belong to your workweek in this dialog to customize the Workweek view. The adjacent Multiple
Workweeks icon displays all the weeks selected in the calendar. You can view, e.g.,
four weeks at once by marking four weeks in the calendar (click while pressing the
Ctrl key). To reduce the selection of weeks again, click the week(s) you want to
remove while pressing the Ctrl key.
■
The Event list view is synchronized with the other views. If you select an event
and call up the Event list, you will notice that this event is also selected and visible
there. Now, select an event in the Event list and switch to the Week view, notice
that the week with this event is displayed.
Define the properties for each event by clicking the Details icon in the Object
bar. At the bottom of the window, you can choose to sound an alarm before an
event (Reminder), or define if the event should be a regularly recurring event
(Recurrence), and much more. These options are also described in more detail
in the StarOffice Help.
Chapter 8
Events & Tasks
215
Drag&Drop in the Event Window
In StarOffice Schedule - as in the rest of StarOffice - the quickest way to get things
done is usually via the context menus, or by using Drag&Drop with your mouse.
The following examples illustrate the "intuitive use" of Drag&Drop:
216
■
If you have come across an e-mail or news posting which is relevant for an event,
you can simply drag the message from the mail document to the StarOffice
Schedule button in the task bar and, keeping the mouse button pressed, wait a
second until StarOffice Schedule pops up. Then drag the message to the event and
release the mouse button. In the event details section under Content - Also refer to,
you will find a reference to the message. You can also do the reverse and drag such
a reference back into your StarOffice.
■
When working in a text document drag an event or a task from StarOffice Schedule
into your document. A "clickable" Hyperlink will be inserted in your text document and if you click this link in your document, StarOffice Schedule will open and
it will show your event or your task.
■
If you want to keep track of who you are meeting or the people who are involved
in a certain event, open the address book in StarOffice (with the icon in the Object
bar), select the whole line for that person and drag it to the event. The first and last
name of each person will automatically be displayed in the details section under
Participants. You can also Drag&Drop other participants from Explorer - Tasks &
Events - Data Source to your events, as soon as you have entered other users there
(See the StarOffice Schedule on a Network section in the Help).
■
If you want to assign a task in the task window to a specific event (see next
section), i.e., if you want to transform a task into an event with start and end times,
you can do this by simply dragging the task from the task area into the event area.
The tasks have an icon on their left side which can be dragged with your mouse. By
using this icon, the task will be copied. By dragging the upper and lower margin
you can correct the start and end times (pressing the Alt key just like you did for
the 5-minute scale). In the field under Also refer to of the event details, you can
find a reference to the task. If you double-click the reference, you can see the details
area of the task with all its entries. If you drag further tasks into an event, these
tasks will also be registered as references to that particular event.
■
On the other hand, you can also drag an event into the task window. Just release it
on a free area or on the title bar (this also applies in the list view of the event) and
the event will be copied as a task.
StarOffice 5.2 User's Guide • June 2000
■
If certain messages, files, folders or bookmarks are important for an event, drag
them from the Explorer and Beamer to the event or task. StarOffice Schedule automatically distributes the information to the appropriate fields: In the details
section, references will appear under Content in the Also refer to field, people will
appear under Participants.
■
You can also drag any event onto your Desktop so you don't forget it. If you
double-click the event on the Desktop, StarOffice Schedule will open and the event
will be shown.
Organizing your Tasks with StarOffice
Schedule
You can keep track of all your tasks in the StarOffice Schedule task window.
The task window is displayed in the Event view at the lower right. You can drag the
separator with your mouse to enlarge or reduce the window.
If you only need to view and edit your tasks, you can also just double-click "Tasks"
under the Tasks & Events entry in the Explorer and access the Task view. In this case,
the task window takes up the whole screen, and no events will be shown. You can
access this view if you intend to print the tasks in a task printing form.
All tasks can be arranged according to category, due date, priority level or other
criteria.
■
Click in the "New task" line at the top of the task window, below "Title". Now a
blinking cursor will appear.
■
Enter a description of the task.
■
End the input mode by pressing Ctrl + Enter. The task will be added to the task list
and you can enter another task if you want.
■
Once the task has been completed, click the empty check box in front of the entry.
That will indicate that the task is done, and the current date will appear as the
"completion date."
Chapter 8
Events & Tasks
217
View Options in the Task Window
You can set your task window so that only unfinished tasks are shown. In this case, as
soon as you click the "finished" box, the task will disappear from the Task view.
Click an empty part of the window and choose the view for the task window under
Current Filter in the context menu. As it does in the Event view, the context menu
contains various commands depending on the location of your cursor/mouse pointer
when you activate it. In the column heads, for example, there are other commands for
setting the view than in the actual task area, and the context menu of a task shows
other commands than in a free area of the task window.
The Details Section for Tasks
You can also enter further details for each task.
■
Select the task in the task window.
■
Click the Details icon in the Object bar.
In the details section of a task, you can enter a start date and due date, percentage
completed, and the current status of the task. You can also sort and group tasks in the
task window according to these criteria.
218
StarOffice 5.2 User's Guide • June 2000
Printing your Events and Tasks
If you want to print your events or tasks in a particular format, you can use one of the
various print templates available. If you print with the icon Print File Directly on the
Function bar, a suitable print template will be applied automatically.
The print template used depends on the view you are using. If the day view is active
in the event calendar, for example, a day overview will be printed. If you prefer to use
another print form, you can select one from the list:
■
Select in the Event view the File - Print... command and in the Print dialog click
the Options button. A list of print forms for events will now appear. Now click the
desired print template, if necessary select the Event area, then close the dialog. In
the Print dialog, click the OK button.
■
If in the Task view you select the Print dialog and click "Options", you will see the
appropriate list of print forms for tasks.
In addition, the AutoPilot Print Forms can be helpful if you decide to create your own
print template.
■
The AutoPilot can be found in StarOffice Schedule with the File - Print... menu
command, where you then click the Options button. In the current Print Form
dialog, click on New form.
When printing for the first time in StarOffice Schedule, the print templates must first
be calculated. This way the defaults in your operating system (language, date format,
etc.) will be taken into account. Thus the first time you print may take an extra
minute or two.
You can edit the form with your data before printing if you select the Print Preview
field in the Print Form dialog. Instead of printing immediately, a StarOffice Writer
document is created which you can edit as you wish and then print.
Detailed instructions pertaining to the use of the AutoPilot can be found in the StarOffice Help.
The filter setting that is visible on your screen enables you to print your tasks and/ or
events anytime you want. For example, if you only want to print your "office" events,
just set a filter to only display the office events and click the Print File Directly icon on
the Function bar.
If you click the Print File Directly icon, the print form that corresponds to the current
view will be used. If you see a day view, the print form "Day overview" will be
printed. If a week view is displayed, the "Week overview" print form will be used, and
in the month view the "Month overview" will be used.
Chapter 8
Events & Tasks
219
If you select the print command via the context menu of an event or task, the Details
overview of the event or task will be printed.
The events in your event calendar that are defined as Day events will be specially
marked when being printed and do not contain any time specifications. If you entered
a location for a certain event, it will also be printed.
220
StarOffice 5.2 User's Guide • June 2000
CHAPTER
9
9
Working with StarOffice Base
StarOffice Base is the database module in StarOffice. In StarOffice Base, you manage
access to different database servers and database formats. A detailed description of all
StarOffice Base functions can be found in the StarOffice Help. In the following we will
look at the database included in StarOffice with which you will probably work the
most, the Address Book. In the following sections, you can learn about how to create a
new database, record a new table, as well as design a form. To start, however, here is
an overview of the database terms.
StarOffice Base Glossary
In StarOffice Base, the usual terminology for working with relational databases is used
as described in the following table.
Term
Description
Database
The total of all tables containing your data. A dBase database in
StarOffice Base appears as a folder in the file system.
Table
A Summary of a number of records with identical structure. A dBase
database appears as a file within the above mentioned folder.
Record
All information that comprises a record is displayed in a single row of
the table.
Field
Every record can consist of several fields. All records in a table have
the same field structure (same number, identical field type and in the
same order within the row). Fields are displayed as columns in a
table.
Form
View of an entire or partial table. Generally, a form shows only one
record at a time.
221
Term
Description
Query
View of an entire or partial table. Usually a query in tabular form
displays several records at the same time which can also be filtered
according to certain criteria.
Report
A report is a view of data in a table or in a form, which can also be
ordered by category, for example.
StarOffice can use the following formats:
■
Adabas (at present only in the Windows, Linux and Solaris Sparc versions of
StarOffice)
■
dBase (available on all Platforms)
■
Text (in StarOffice Base read only; write in StarOffice Calc)
■
JDBC Access to external databases
■
ODBC Access to external databases
■
ADO (only under Windows)
■
Oracle access under Windows and Unix also via the native drivers integrated in
StarOffice.
■
Microsoft Access 97 / 2000 under Windows access also via the native drivers integrated in StarOffice.
■
DB2 under Windows and Unix access also via the native drivers integrated in
StarOffice.
Editing the Address Book as a Database
Table
The Address Book is a ready-to-use database prepared in StarOffice Base. That is why
we often use the address book database as an example when explaining database functions.
In order to ease your work with the address book, the Address Book dialog is provided. Activate the dialog using Edit - Address Book. You can find detailed information about controlling the address data with the aid of this dialog in the StarOffice
Help.
222
StarOffice 5.2 User's Guide • June 2000
For greater flexibility in dealing with your addresses, you can also edit them using
"ordinary" database forms, reports and queries. The only decision to make prior to
doing so is whether you want to use the given Address Book dialog or not. In order to
continue using this dialog, you have to keep the database structure of the Address file
as it is. If you modify the structure, e.g., by inserting, deleting or renaming a field of
this table, the address table can only be used as an "ordinary" database table.
In the "normal" database view of the Address Book, you can add new records as well
as change or delete existing addresses. Make sure you do not change the field definitions when you do this, because then you can no longer use the address book mask.
Follow these steps to change the contents of an address book in StarOffice Base:
■
Click the plus sign in front of the Address Book entry in the Explorer to see the
entries for forms, queries, reports and tables.
■
Click the plus sign in front of the Tables entry to display all the tables contained in
the Address Book database. The only default table included is called address.
■
Double-click the table name to display the table contents on your desktop. In this
direct view of the Address Book table, you'll see the old field names which,
however, have been modified (e.g. Prefix = Formofaddr) in the related queries. For
example, if you open one of the templates provided with the program and then (in
the Beamer) open the Address Book linked to the template, you'll see that some of
the field names have been modified. For clarification, a list comparing old and new
field names can be found in the StarOffice Help.
■
An empty record at the bottom of the table is displayed where you can enter a new
address. Click the first field and type in data, then use the Tab or Enter key (or
mouse click) to move right to the next field.
■
The (address) data is automatically saved when you leave the record or move to
another address above or below it.
■
To remove a record, select it (click the row header) and press the Delete key. Or use
the Delete Rows command in the context menu of the row header.
Chapter 9
Working with StarOffice Base
223
■
To close the address book, select the Close Task option in the context menu of the
table's button in the Task bar. Alternatively, use the menu File - Close menu command.
You can find more detailed information about working with StarOffice Base, e.g.
creating or modifying forms, queries or reports in the second part of the User's Guide
and in the StarOffice Help.
Printing the Address Book Contents
To print a hardcopy of your address book, first create a report. An alternative to this
would be to drag the address book to a StarOffice Calc document and format and
print it out there.
Printing the Address Book Contents as a Report
■
Open the hierarchical view of the Address Book entry in the Explorer by clicking
the "+" sign in front of the Address Book database entry.
■
Click the Report entry or activate the context menu.
■
Select New - Report.
■
The Autopilot Report is activated to assist you in creating a report adapted to your
needs.
■
At the end of the dialogs, a report is created and displayed on your screen. All you
need to do to print it is go to File - Print....
Of course, you don't need to create a new report every time. Once created, StarOffice
saves the report in the database hierarchy in the Explorer so that you can use it to print
current data at any time.
Printing a Database Table in StarOffice Calc
Another possibility would be to use Drag&Drop to move a copy of your addresses
into an empty StarOffice Calc document. There you would have all the capabilities of
StarOffice Calc at your disposal to format, sort and print your document. Here's how:
224
■
Open an new spreadsheet (File - New - Spreadsheet).
■
Switch in the Explorer to the database table you would like to print.
StarOffice 5.2 User's Guide • June 2000
■
Drag the whole database table to the empty spreadsheet and drop the data there,
e.g. in cell A1.
■
Now, in StarOffice Calc, you can format the data in any desired format. Select the
data and use, for example, the practical Format - AutoFormat... function.
If you have created your own printing format, you can incorporate it into the AutoFormat list. See the instructions on how to do this in the StarOffice Help.
Creating New Databases and Tables
New databases and tables, etc. can be created and already existing ones modified. The
following section contains information on how to set up a new database and create
tables to be part of that database. After this has been done you can enter data.
Defining a Simple Database in Adabas Format
You can benefit from all the possibilities of the StarOffice database module when
using database tables in Adabas format. The Adabas Format is, at present, available in
the Windows, Linux and Solaris Sparc versions of StarOffice. Proceed as follows to
create a database in Adabas format:
Chapter 9
Working with StarOffice Base
225
■
In the Explorer, set up a new database in Adabas format. To do so, call up the
context menu and select the New - Database... command. The name of the database will be entered where you call up this command.
■
Use the text box on the General tab page to name the database which will be
shown in the Explorer, e.g., "Adabas Addresses".
■
Switch to the Type tab and select Adabas D from the Database type combo box.
Now enter a name in the Data source text box. This is the name for the files with
various extensions created by Adabas. A subdirectory will also be created under
this name.
■
If you click New Data Source..., the Create New Adabas Database dialog will
appear. Enter an administrator name and a password for the administrator. The
password will also be used for the user control and domain if you don't assign the
users another password. The dialog is described in the StarOffice Help under the
keyword Adabas.
■
Close both the Create New Adabas Database dialog and the Properties of <Database>dialog with OK. Please note that creating an Adabas database the first time
can take a little while.
Now there is a new entry for your Adabas database in the Explorer.
226
StarOffice 5.2 User's Guide • June 2000
Creating a New Table in an Existing Database
You can use the "Tables" entry of your database's context menu to create a new table.
■
Select the database entry in the Explorer that you want to add a new table to.
■
Open the database entry by clicking the plus sign in front of its name. Now the
Forms, Queries, Reports, and Tables entries are displayed in alphabetic order.
■
Click the Tables entry.
■
Select the New - Table option from the context menu.
Now you can choose whether you want to define the new table in the Table Design
view or whether you want to use the AutoPilot for tables.
You can find the description of how to create a new table using the Table Design mode
in the Advanced section of the User's Guide in the StarOffice Help. Also concerning
this topic is a detailed example about managing your video collection with StarOffice
Base which can be found in the Intuitive Solutions section of the User's Guide.
■
Choose the AutoPilot. The Table type dialog will appear.
The Databases list box used for choosing a database will only be visible if you call up
the AutoPilot by way of File - AutoPilot - Table.... If you call up the AutoPilot within
a database, the database is already defined.
According to the type (Business or Personal) of table you want to create, more tables to
choose from will be listed in the lower text box. These are predefined data fields which
are appropriate for the respective uses.
■
For instance, choose "Business" and in the lower list "Tasks". Now click Next to
activate the Field Selection dialog.
Chapter 9
Working with StarOffice Base
227
On the left, the dialog shows the data fields that are proposed for the table. Use the
arrow buttons in between the two text lists to move the fields from one list to the
other. All data fields which are listed on the right will be used in the new table.
■
You can select them individually with the top-most button or apply all fields with
the button below. Clicking the Next button brings up the Customization dialog.
Here you can enter a different name for the new table, rather than the one that is
suggested. The name may not contain any spaces or special characters. You can also
choose a new name for the field selected in the list on the left. Save your changes with
the Apply button.
■
228
Click the Next button to activate the Create Table dialog.
StarOffice 5.2 User's Guide • June 2000
This is where you determine how to proceed after the AutoPilot is finished:
■
Enter data into the table - with this option, the new table will be shown and you
can enter data immediately.
■
Do not show table - with this option, the new table is saved but not displayed.
Click the Create button.
If you want to modify the structure of the new table created with the AutoPilot, for
example, by deleting or adding a field, close it first. Now, in the Explorer, call the
context menu of the new table and select the Table Design command. For a more
detailed description of the Table Design windows, refer to the Advanced in the User's
Guide and in the StarOffice Help.
Chapter 9
Working with StarOffice Base
229
In an Adabas database table, a primary key must always be entered in order to edit
the table! A primary key is a field in which the contents change from record to
record. A primary key can, for example, also result from the joining of two fields if
their combined contents are different to all other records. In other words, no two
records are allowed to have the same contents in the primary key. In every Adabas
table, the AutoPilot creates a single primary key field. Don't delete it! If you are
creating your own Adabas table (Table design), you can select one or more rows at
the same time and call up the Primary Key command in the context menu of the row
header.
Entering Data in the New Table
If you have just finished creating a new table following the instructions from the
previous section, the empty table is displayed on your screen. If the table is not opened
yet, proceed as follows:
■
In the Explorer, open the entry of the database containing your table. You can
either double-click the database name or click once on the plus sign near the database name.
If you opened it by clicking the plus sign, you will see the sub-entries for tables,
queries, reports and forms.
■
Open the "Tables" entry and double-click the name of your table.
In this illustration, we put the table in the "Address Book" database. If you put the
table in another database, you need to open that database.
If you opened the database by double-clicking its name, four icons for the sub-entries
appear in the Desktop window.
230
StarOffice 5.2 User's Guide • June 2000
■
Now you can open the "Tables" entry with a double-click, thus displaying the table.
■
Now use the mouse to click in the first data field and enter data.
■
Use the Tab key to move to the next data field. If you use the Tab key in the last
field, you will automatically move to the first data field of the next record.
■
Clicking the Save button in the Function bar saves your changes. However, every
new or edited record will be automatically saved when you switch to another
record.
Chapter 9
Working with StarOffice Base
231
Creating a Form
This section describes how to create forms intuitively with StarOffice Base.
Creating a New Form
232
■
Open the desired database by clicking the plus sign in front of the entry in the
Explorer.
■
Click the Forms entry.
■
In the context menu, select New - Form. After having done so, a submenu will
appear in which you can choose to either use the AutoPilot or edit a certain document type directly.
■
Select the AutoPilot to help you create your form. Find more detailed information
about this intuitive aid in the StarOffice Help. Here is just a short introduction:
After activating the AutoPilot, the Table Selection page is displayed.
■
Confirm the table "address" for which the form will be defined. Click the Next
button to continue to the next page of the AutoPilot where you can choose the
fields to be used in the form.
■
You can either select all fields at once or select them individually. In the box on the
left, you can find all data fields not yet assigned, while on the right you can find all
fields already existing in the form. By pressing the four buttons in between the two
lists, you can move the selected (or all) fields back and forth.
■
After making your selection, click again on Next.
StarOffice 5.2 User's Guide • June 2000
On this page, you can choose from default field alignments.
■
Click Next.
You can now choose from various Page Styles. They assign, among other things, a
background to the form.
■
Click Next.
Nearly all of the AutoPilot 's questions have been answered. On this last page, enter a
name for the completed form. It will be listed under this name in the Explorer below
"Forms" and can be opened whenever you want.
Chapter 9
Working with StarOffice Base
233
■
Click Create. After a few moments you will see the completed form on your screen.
At the bottom of the form, there is a bar with control buttons which you use to browse
through the records.
234
StarOffice 5.2 User's Guide • June 2000
Address Book Mask with Form Functions
If you don't like the predefined address book mask found under Edit - Address Book,
you can define your own mask. The following example describes how to create a form
based on a text document. In the right half of the window, the form should show a
table with all of the addresses in short form. Any address selected there should be
displayed in detail in the left half of the window. The page background and the font
can be defined at will.
This example describes in detail how to connect form fields to a database with the aid
of their properties dialogs. Follow these steps if you want to understand the ins and
outs of how to set, read and edit the properties of form fields. If, however, you are
not interested in all the details right now, there is a tip after this example which
explains how to create database-related form fields by simply using Drag&Drop.
■
Open the Explorer to see the Address Book entry.
■
Click the plus sign in front of Address Book and you'll see all the subordinate
entries.
■
In the Forms entry, call the context menu and select the commands New - Form.
■
In the submenu select Text Document as the Document type.
In front of you, you now have an empty text document, which, after being saved, will
automatically be listed as a "form" in the "Address Book" Database. You can access it
in the Explorer any time by double clicking it.
■
Go to Format - Page... and choose a screen-friendly landscape format on the Page
tab in which you don't need to scroll to see the whole page.
■
Select the Online Layout because the screen doesn't recognize any non-printable
margins. Click the Online Layout icon on the Main toolbar.
■
Open the Form functions floating bar (long-click Form icon) and pull it away from
the Main toolbar so that it remains open.
■
In the Form Functions floating bar, click the Table Control icon.
■
Draw a big rectangle on the right half of the form. This determines the position and
size of the table view of your addresses. When you release the mouse button, you'll
see the AutoPilot Table Element window.
Chapter 9
Working with StarOffice Base
235
The Auto Pilot Table Element is described in detail in the StarOffice Help.
■
Select the addresses table on the first page and click Next.
■
From all the fields on the second sheet, choose the ones which allow easy identification of the address record searched for in the table, e.g. company, last name,
address and City. Click Create.
■
By dragging the headers in a table element, you can define both the sequence and
the width as you like.
Now, in the left part of the window, insert the boxes you want to see in each record.
For this example, enter two label fields and two text boxes, and then finish the
example according to your needs.
In this example, you'll first edit the "visible" details and then assign the "logical" properties. You can also do it the other way around.
■
236
Click the Label field icon and drag open a frame at the top left of the form. Later,
the word "Company" should be in this frame.
StarOffice 5.2 User's Guide • June 2000
If you don't draw the frame exactly on the border, you may notice that when you
release the mouse button, the frame will jump to the upper left-hand corner. That is
because it is anchored "as character", and there are no other characters on the page.
■
Call the context menu of the new label field and select the new anchor "To page".
Now you can drag the label field to where you want it.
■
Click the Text Box icon and draw a frame under the label field. Later, the contents
of the "Company" data field for the selected record will appear in this frame.
■
You can now simultaneously click both the label field and the text box (while
pressing the Shift key) and, in your context menu, select the Alignment - Left
command. Both objects will be aligned on the left in the same start position.
■
Now click outside both fields, then the label field, so that only this one is selected.
■
In the Form Functions floating toolbar click on the icon Control Properties. You'll
see the Properties: Label field dialog.
■
Next to title enter the word "Company" (without the quotation marks).
■
Next to Character Set click the key with the three dots and you'll see the Font
dialog where you can select a font and a font size.
■
Click in the text box. The Properties dialog now shows the properties of the text
box.
Chapter 9
Working with StarOffice Base
237
238
■
Switch to the Data tab.
■
In the list box Field Name select the field from the database table which you want
to have displayed here. In this case, select "Company".
■
The group from the first label field and from the first text box is now ready. If you
want, you can select both of them and use the Group - Group bycommands in the
context menu. The advantage you get in doing this is that, when you want to
change their position, fields which belong together can only be moved together.
■
Drag open a new label field and call it Lastname.
■
Drag open a new text box below it. This text box should display the Lastname data
field.
■
Format and group both of them as described above.
StarOffice 5.2 User's Guide • June 2000
Now that you have followed the example up to this point, you have a very good
idea of how to use form functions. There is, however, an easier way to perform
the simple insertion of field names from a table as required in this example:
In addition to your form, display the table in the Beamer (click the plus sign in the
Explorer until you see the name of the table, click the table, and then open the
Beamer).
One at a time, drag the desired column headers (= field names) out of the table
displayed in the Beamer into the form. As you do this, hold down the Shift and
Ctrl keys.
In combined date/time fields, this type of Drag&Drop creates two separate
groups made up of both label and field name: one group for time and one group
for date.
■
Select a pleasing background for the whole page (remove all selections, then
Format - Page... - Background).
If you insert further groups made up of label field and text box, you can have exactly
those data fields displayed that are needed for your address form.
Note that you are now in the Form Design Mode. In the design mode you can edit the
objects in the document, e.g. choose fonts, assign properties to the text boxes and so
on. If you see the data in the form and want to edit it, you should leave the Design
Mode and go to the User's Mode. To switch back later on, you can use the Design
Mode on/off icon in the floating bar. With the Open in Design Mode icon directly
next to it, you can determine in which mode the form should be opened later on: as
long as you are still working on the form's design, it is recommendable to have it open
in the Design Mode. If, later, you just want to use your form to work with your data,
switch off this function before saving it the last time.
Chapter 9
Working with StarOffice Base
239
■
Close the Properties dialog and switch off the Open in Design Mode, as described
above, as well as the Design Mode.
■
Click on the Save icon in the Function bar. In the small dialog that appears, you
can give the form a name, e.g. "Addresses Form".
Later on you will be able to access the address form by just double clicking this entry
in the Explorer or by setting a link to the "Addresses Form" entry on your Desktop.
Entering Data in Your Form
■
To open the form, double-click the name of the form in the Explorer.
You can see the first record (if the table already contains records) of your form. At the
bottom of the window, you'll find the control bar to navigate through the records. Use
the arrow symbols to go forwards and backwards to view each record. If you want to
go directly to a particular record number, then simply enter this number in the text
box on the left.
In this bar, you will also find icons to use for entering a new record, deleting the
current record, saving your changes and undoing the last change.
240
■
In order to enter a new record, click the New Record icon. The input fields in the
form appear either empty or filled with default values. Click in a field and enter the
data. You can use the Tab key or the Enter key to move to the next field.
■
Click the New Record icon again if you have completed the input and you want to
append another record.
StarOffice 5.2 User's Guide • June 2000
Each new or modified record is automatically saved when you switch to another
record. If you modify a record and the next thing you do is close the form, you will
see a dialog asking if you want to save the modified record.
Information concerning the programming of forms with StarOffice Basic for advanced
StarOffice Basic users can be found in the StarOffice Help. Advanced tips for supplementing StarOffice Writer, StarOffice Calc and StarOffice Impress documents with
interactive form fields can be found in the Advanced section of the StarOffice Help.
Creating a Report
Reports are necessary if you want to print database tables in a sophisticated layout.
The following tells you how to intuitively create a report with StarOffice Base.
Creating a New Report
■
Open the desired database in the Explorer by clicking the plus sign to the left of its
name. Open the Address Book, for example.
■
Click once on Reports.
■
Open the context menu and select New - Report.
After selecting the command, you will see the AutoPilot Report: Table Selection
which will assist you in creating a report.
You can also start the AutoPilot with the File menu. With this method, however, you
must select a database and a table in the first AutoPilot dialog.
■
Elect to do a report for your addresses table, for example and click Next. This
report will include all of the fields of the table.
Chapter 9
Working with StarOffice Base
241
■
In the Field Selection dialog of the AutoPilot, select the fields you want to see in
the report. In the left list box, you will see all of the fields of the table which have
not been assigned, in the right list box, all of the fields which have already been
included in the report are listed. Use the buttons between the two lists to move the
selected entries back and forth.
■
Click Next once you have all the desired fields for the report in the list box on the
right side.
The Structure dialog will now appear in which you determine how you want the data
fields to be organized in your report.
242
■
Select a data field you want to use to structure the report and click on the button
with the right arrow.
■
You can also structure your report according to several data fields. A "hierarchical"
structure will take form if the records in the level above have the same contents.
■
With the second button, i.e. the left arrow, you can undo your last action.
■
Click Next. The Sort Options dialog will appear.
StarOffice 5.2 User's Guide • June 2000
This is where you choose the data fields by which the contents of the report should be
sorted. The structure set in the previous dialog has higher priority than the sort order.
■
Select the data fields which define the structure. By pressing the AZ button you can
select another sort direction.
■
Click Next. You will see the Style Selection dialog.
■
First choose between the portrait or landscape print format. Since all data fields are
arranged side by side, the landscape format is generally preferred.
■
In the Style section, choose from a variety of default settings. If you click an option,
a preview of the layout will be shown.
■
Click Next. The dialog Format Style will be displayed.
Chapter 9
Working with StarOffice Base
243
■
In this dialog, you can also choose from a variety of default settings to optically
structure the report. If you click one of the format Styles situated in the right list
box, a Style preview will be displayed.
■
Click Next. You will see the last dialog Create.
■
Enter a name for your report and decide if you want your report to be displayed or
only saved.
■
Click Create.
A few minutes after the last dialog is closed, the report created will appear on your
screen.
244
StarOffice 5.2 User's Guide • June 2000
Editing an Already Existing Report
To edit a completed report, call the context menu of that report in the Explorer and
select the Report Design. You can then modify various formatting attributes, such as
the font styles or background colors in the table.
Chapter 9
Working with StarOffice Base
245
Select the desired cell and open the context menu to access commands for modifying
the appearance of the cell. Once completed, click the Save icon in the Function bar.
If you want to modify the appearance of the whole report, you can do so with the aid
of the Stylist. From the Stylist, assign the report a new Page Style or change the Style
for the first and following pages of the report.
The Style for the first page is called "First Page Landscape" (in the landscape format) or
"First Page Portrait" (in the portrait format). The following pages in which the title is
no longer displayed are called "Standard Landscape" and "Standard Portrait", respectively.
246
StarOffice 5.2 User's Guide • June 2000
■
In the Stylist, open the context menu of the Page Style you want to modify, and
select the Modify command. Set the properties of the Page Style in the dialog
displayed.
Here it is possible, for example, to create a two-column report or reports with colored
backgrounds. These modifications are also made in the Report Design mode.
You can save an unlimited number of reports, and access each one simply by doubleclicking the name of the report. The report is automatically updated with the current
values of the data fields.
If your database supports graphics as data fields, they can also be incorporated in your
reports. Graphics will automatically be fit to the column size. That means that if a
graphic image is wider than the column width, the width and height will be proportionally reduced in size.
The AutoPilot Report provides a frame template Image_XX, where the XX represents
the number of columns within the report. You can edit this frame template if you want
a different depiction of the images. You cannot group or sort by graphic images.
Chapter 9
Working with StarOffice Base
247
248
StarOffice 5.2 User's Guide • June 2000
Part II: Intuitive Solutions with
StarOffice
This section contains step-by-step instructions that can be immediately implemented
to get quick results. At the same time, you will be introduced to more detailed techniques for organizing and simplifying your daily work with StarOffice.
Put the User's Guide next to the keyboard of your computer and follow the examples.
Many of the solutions are available in completed form in StarOffice. There are several
StarOffice Basic macros (e.g. for printing all of the AutoText building blocks), diverse
templates and numerous informative and practical sample documents. A complete list
can be found in the StarOffice Help.
249
250
StarOffice 5.2 User's Guide • June 2000
CHAPTER
10
10
Working with Text Documents
Here you will find practical examples for working with text documents. There are
several ways to design your documents, regardless of whether you want to write a
business or personal letter, etc. You can either work with the templates provided,
which you can customize according to your needs, or you can use the AutoPilot to
create your own document templates.
Of course, you can just open a new document and create any type of object, text, or
other element you wish. This is, however, the more work-intensive and thus slower
way, so we will only describe it when it is the best solution and the goal cannot otherwise be achieved by using sample documents, templates or the AutoPilots.
Templates and AutoPilots
Numerous document templates are provided with the program and are available for
your use. This gives you the option of choosing an appropriate layout from a variety
of predefined formats. The appearance of the documents is predefined, but you can
adapt it to your own preferences and save it as a custom template. To display a userfriendly dialog listing the templates, select the menu command File - New - From
Template... or use the key combination Ctrl + N. You can also view a plain list in the
Explorer by clicking the Templates entry.
In addition to the document templates, the AutoPilot lets you adjust the layout of a
letter or even design one completely on your own. The AutoPilot is an easy-to-use
design tool that enables even the inexperienced user to create a unique letter template
within a matter of minutes.
251
Here is a rule of thumb: If you want to create a (formal) personal or business letter, the
document templates provided offer the best basis. We have also supplied appropriate
templates for many other uses. For example, if you wish to compose a resume or write
a thesis we would recommend using the corresponding template. If your requirements
are more specific, the AutoPilots can be used to create more individual, customized
templates.
Personal Uses
Below we describe working with text documents that are mainly for personal use.
Even if you'll "only" be using StarOffice for personal tasks such as sending a letter to a
relative overseas, applying for a new job or creating stylish invitations for an
upcoming event, you'll still need a wide selection of various documents.
StarOffice relieves you of the time-consuming task of designing your documents so
that you can concentrate on the actual content. After making any final adjustments to
the layout you find necessary, just type in the text you'll have a finished document!
We have not only supplied templates but also sample documents for personal use.
Sample documents are also there to be used as a source of inspiration.
The templates and the sample documents have one thing in common: both help you
create an attractively designed document quickly.
252
StarOffice 5.2 User's Guide • June 2000
Letters with Envelopes
A letter can be created in the blink of an eye using the word processing features of
StarOffice. We will show you how. If you wish to print an envelope with a return
address on it, no problem. StarOffice provides you with all you need to create a
personal letter in a matter of minutes.
Creating a Letter Template using AutoPilots
■
To start the AutoPilot, go to the File menu and choose the AutoPilot function.
Click on Letter in the submenu and you will see the first page of the AutoPilot for
Letters.
■
Select Personal Letter, and then click on the button Next. A second page with additional options appears. Choose the option No Logo, and click Next. A dialog will
appear in which you can enter the sender details.
■
You should already be able to see the sender address. Under Show sender? select
Yes. Now click the symbol top right in the Position and size area and once again
click Next.
Chapter 10
Working with Text Documents
253
If the entry field does not contain a sender, the required information has not been
entered into the program. If this should be the case, click Cancel and call the
register User Data (menu Tools - Options... - General) and enter the necessary
data into the appropriate fields. After having completed this, simply restart the
AutoPilot and repeat the steps described above. It is also possible to enter the
sender directly into the field in the AutoPilot; however, if you do not enter the
data into the User Data dialog you will have to repeat this step every time you
call on the AutoPilot to create a new template.
■
Click Next until you arrive at the page with the footer options. Deactivate the
check box Footer on and click Next twice. Now, on the page for saving the
template, type the name of the template in the Name field. If necessary, enter any
additional information in the Info field.
The template will be stored in the template folder under the name you have
entered.
■
Again click Next to access the next page and enter the printer paper trays if
different paper sources are to be used for the first and following pages. This is
usually not required, at least not for personal letters because the first page is not
printed on letterhead paper. The last step is to click Create.
After having clicked Create, StarOffice will create a template and store it in the
template directory. A new document will then be immediately shown on the screen
which has been created from the new template.
You can start to enter text and then print and save the document. However, if you
would like to keep on working on the layout of the document template or create an
envelope for it, close the new document without saving it and continue reading.
Creating an Envelope
This section contains a description of how to create a template for an envelope after
you have completed your letter template. We will also be giving tips on how to
continue polishing the design of your template(s).
As the envelope should be saved together with its template, you should first open the
letter template.
254
StarOffice 5.2 User's Guide • June 2000
■
Open the menu File - Templates - Edit. A dialog will appear in which you find the
letter template you just created and open it. The templates are found under Office52/user/template.
■
After opening the template, go to the Insert menu and choose the menu item Envelope. A dialog box with the same name appears.
■
On the tab pages Envelope and Format, you should specify the envelope format
and where you want the addresses of the sender and addressee to be positioned on
the envelope. On the Printer tab page you can define the appropriate print options.
Inserting an Envelope into a Document
Click on the Insert button in the Envelope dialog. The envelope will be inserted above
the first page of the active document. (In this case, before the first page of the personal
letter template)
To continue editing the envelope (for instance, to change the format again), open the
Page Style: Envelope dialog (in the context menu of the envelope click Page... and
select the Page tab).
Adjusting the Printer for the Printout
The method for printing envelopes depends on the type of printer used. Some printers
require a special cassette, while others have a multi-purpose tray that can feed envelopes. If in doubt, consult the manual for your printer.
Specify your print options in the Page Style: Envelope dialog. To open this dialog,
click an empty spot on the envelope, open the context menu, and select Page.... Then
select the Page tab. Define the desired settings under Paper Format.
Chapter 10
Working with Text Documents
255
Applying Various Fonts
To permanently change the font size and style for all paragraphs with a particular
paragraph format, you will need to modify the Paragraph Style. First, position the
cursor in the text that you want to modify and select the command Edit Paragraph
Style in the context menu.
You will see the Paragraph Style dialog, with various tabs. Click on the Font tab and
specify the type, size, and style of the font.
If you want to emphasize a particular passage in a letter, just select the text and click
the Bold or Italic icon. To format only a single word, simply place the cursor
anywhere in the word and click Bold or Italic.
Make any other necessary changes, then click the Save Document icon and close your
document template.
When creating a template, remember not to type a text for a particular letter. The
main purpose of a template is to define the general layout of a document. Use the
documents based on the template to add text for a letter.
Creating and Printing a Letter with an Envelope
Once you have created a customized template for personal letters, you will surely
want to try it out and write and print a letter.
■
Select the command File - New - From Template....
■
The New dialog will appear. Choose your new template and click OK.
StarOffice will create a document based on the template, though the template itself
remains unchanged no matter how you modify the document:
256
■
Enter the text of your letter in the document.
■
Check if the addressee information on the envelope is correct.
■
If you plan to print or edit this document later on, save it and enter a name.
■
Place an envelope in your printer. Select the command File - Print and print page
1, which is your envelope.
■
Place normal letter paper in your printer, select the command File - Print again,
and print the second page. If your letter has more than one page of text, you can
specify which pages you want to print under Pages.
StarOffice 5.2 User's Guide • June 2000
Standard Templates
StarOffice already includes a number of templates intended especially for personal
use. Of course, you can adapt these to your own preferences and requirements. You
will find several templates in the Personal Correspondence & Documents folder.
The names of the folders and templates are sometimes abbreviated, but when you
look at them in the StarOffice Explorer or on the StarOffice Desktop, the full name
will automatically be shown.
Summary
To edit a template, go to the File - Templates... - Edit) and choose the desired
template.
To create a document based on a template, open the New dialog (menu File - New From Template...), select the desired template and click OK.
Further Information
Using AutoCorrect. With the AutoCorrect function (Menu Tools AutoCorrect/AutoFormat) you can define a number of options which simplify your
work as you type. For example, you can have frequent typing errors (e.g. "teh"
instead of "the") automatically corrected.
Using the StarOffice Help
Do you need further information? Use our extensive StarOffice Help. The following
search terms are available for this topic:
■
AutoCorrect
■
AutoPilot
■
Envelope
■
Paragraph Styles
Chapter 10
Working with Text Documents
257
Labels and Business Cards
With StarOffice you can easily and quickly create labels, mailing labels, etc. StarOffice
takes you through the basic steps for creating them. Via a direct connection to your
database, you can use your already existing customer data for printing labels. StarOffice provides various layouts which should correspond to printing forms for labels,
mailing labels, business cards etc. that are commonly sold for use with computer
printers. However, you can easily create your own layouts if necessary.
Creating Labels and Business Cards
In the following, we will explain various ways to create your own labels or business
cards using StarOffice. You can use a template, as seen in the illustration above, or you
can call up a dialog via File - New - Business Cards or File - New - Labels. First let's
look at using the template.
The Business Cards template is shown in the illutration. One way to call up this
template is to click Ctrl + N. In the New dialog that appears, select Personal Correspondence & Documents on the left, and Business Cardson the right. Click OK. The
template will create a document with your personal data from the user data found
under Tools - Options... - General - User Data.
258
StarOffice 5.2 User's Guide • June 2000
You can edit the card at the top left in the document based on the business card
template. Click the Update all cards button to accept the changes for the other cards.
Click the Frames on button if the cards are to have a visible frame. The button now
appears as Frames off and you can use it to remove the frame again.
Another way to create business cards is via File - New - Business Cards, a dialog with
several tabs will be opened in which you determine how you want your business
cards to look. You can copy and edit your signature as text using fields and you can
also update your business and personal user data.
There is also another way to create business cards, i.e., by treating business cards as a
simplified special case of labels. Each business card generally contains the same text.
The label function, however, allows each label to contain different contents from a
database or, for example, allows a serial number to be incremented. Read on here to
find out how to work with the StarOffice label function.
Using the menu File - New - Labels, access the Labels dialog.
First, click on the Labels tab and determine the label format under Format. StarOffice
Writer contains several hundred of the most common formats for labels, business
cards and so on, to which you can add your own custom formats. You could also
extend this list to include your company formats (in the Labels.ini file, in the Office52\share\config folder. You will also find instructions in that file).
At the top of the Labels tabpage, in the Inscription field, enter the text for the labels.
Usually these are the database fields so that you can print the pages of labels with
varying contents as used in form letters, but you can just as well print the same text on
each label (e.g., for business cards). In the list boxes, choose the database and table
containing the data to be printed on your labels. Use the button with the large arrow
to transfer the chosen data field to the label text/inscription area. You can insert a line
break (with Enter) as well as insert any spaces and other fixed text you require.
If you cannot find a format you like among the ones provided, you can create your
own customized label formats on the Format tabpage. The prerequisite for this is that
you set the label type on the Labels tabpage to "User". On the Options tabpage, you
can decide whether to print all labels or only specified ones.
On the Options tabpage, it is important to notice that if the Synchronize contents
check box is selected, you will only need to enter and edit a continuously repeating
label once. When you press New Document, a small window containing the Synchronize labels button appears. As soon as you click it, the contents of the current label
will be copied to all labels on the sheet.
Click New document to create a new document based on the information you have
provided.
Chapter 10
Working with Text Documents
259
Creating Address Labels
If you want to create address labels do the following:
■
Open the Labels dialog with the File menu and New - Labels....
■
Choose the format of the label sheet to be printed. Remember to put a check in the
Synchronize contents check box on the tabpage Options needs to be activated.
Close the dialog with New Document.
■
When you see the label document, open the address book in the Beamer by
pressing the F4 key. If the Beamer covers the label in the top left corner, click the
Stick icon on the border of the Beamer.
■
Drag the desired data fields from the Beamer to the first label on the top right. For
example, select the NAME header and drag it into the label on the top right. You'll
see that the field name is inserted. Arrange the fields in order to accommodate a
complete address.
■
Now, place the cursor in the last text position (behind the last field).
■
Open the Fields dialog, for example, with the Ctrl key + F2 and go to the Database tab.
■
In the type list box select Next record, click Fields and then Close.
■
To synchronize the labels click the Synchronize button in the small window.
■
Select the records you want to have in your address label by clicking the headers in
the Beamer. Use the Shift or Ctrl key in the usual way to select various records at
the same time.
On the Database Bar, click the Update fields icon.
■
260
Now you can save and print your label document.
StarOffice 5.2 User's Guide • June 2000
Creating Labels with Consecutive Numbers
If you want to print, for example, consecutively numbered gift certificates or tickets,
follow the next steps:
■
Go to File - New - Labels to access the Labels dialog.
■
Click the Labels tab, and in the Format area choose the format you would like to
print. The labels are commonly available in sheets of heavier perforated paper or in
rolls of self adhesive paper labels.
■
If you want to print on normal paper, choose a page format that corresponds to
how you want the rows and columns to be. For example, 3 X 9 means that you will
have 3 columns and 9 rows on a sheet.
■
If you, on the other hand, want to determine your own format go to the Format tab.
■
On the Options tab, mark the Synchronize contents check box.
■
Click the New Document button.
Now you will see a document with your desired distribution. You will only need to
edit the first label in the top left corner and then press the Synchronize Labels button
so that all the labels look the same. This button is only visible if you previously
marked the Synchronize contents button on the Options tab.
Chapter 10
Working with Text Documents
261
■
Enter your text and format it as desired on the first label in the the top left corner.
■
Insert a field to implement consecutive numeration. Place the cursor in the position
where you would like to have the number appear and press Ctrl + F2, or via File Field - Other....
■
In the Fields dialog go to the Variables tab.
■
Select the Set Variable type if it is not already selected.
■
Enter a name in the Name field, for example Number.
■
To increase the variable by one number in each label, enter in the Value text box
the formula Number+1.
■
Click Insert and close the Fields dialog.
■
Click Synchronize Labels.
Now you can print and save your finished document.
Further Information
Printing Return Address Labels. To print labels with your own name and address,
click the Address check box (via File - New - Labels).
Printing a Single Label. To print a single label, select the Single Label option on the
Options tab. You can specify row and column of the label you would like to print.
This option is useful if you have only partially printed a page of labels and want to
use the leftover ones at a later time.
Using the StarOffice Help
Do you need further information? Use our extensive StarOffice Help. The following
search terms are available for this topic:
262
■
Labels
■
Business Cards
■
Inserting Fields
StarOffice 5.2 User's Guide • June 2000
Resumes
Do you need to create a new resume? In this chapter you'll see an example of how it
can be done quickly and easily with a resume template.
Just like an application letter, a resume is a document which has to be perfect. There
are two basic kinds of resumes, either functional or chronological. The chronological
format, which organizes information according to dates, is more common.
Creating a Chronological Resume with a Template
■
Open the document template by selecting the command New in the File menu,
and in the submenu choose From Template.... The New dialog appears. Select
Personal Correspondence & Documents under Categories and choose Resume for
Job Application from the Templates listed. Confirm your choice with OK.
■
Select the existing placeholders by clicking them one by one and overwriting them
with your own information.
■
Next, replace the sample text with your own, save and print the document.
After printing it, sign it and you might consider including your photo.
Chapter 10
Working with Text Documents
263
Adapting a Resume
If you need an additional heading in your resume, press the Enter key at the end of the
preceding line. Enter the desired heading text, open the Stylist by clicking the icon in
the Function bar and apply the Paragraph Style Subtitle. Press the Enter key again.
To delete a heading, select the entire line to be deleted and press the Delete key. If a
line remains, simply press Delete key once again.
Modifying Spacing Between Columns
If you want to alter the spacing between the "columns", i.e., between the left and right
text blocks, place the cursor in the text and in the context menu click the command
Edit Paragraph Style... to open the Paragraph Style dialog. Click on the tab Indents &
Spacing, and use the spin buttons to set the values From left and First line.
Only the first line is set to the left, by the value in the field First line. The "contrast" in
the text is achieved by indenting the paragraphs by the value specified in the field
From left. At the position where the other lines begin, a tab is set, so that all you have
to do is press (Tab) to jump to the text in the second column.
Make further modifications as necessary. Click on the Save icon and close your
template.
Do not type any text in a template which you don't want to appear in all future documents created with this template. A template serves primarily to define the general
layout of the document. You can later on type your text in a new document based on
the template.
264
StarOffice 5.2 User's Guide • June 2000
Tips for Opening Documents with Templates
When opening a StarOffice document, the program checks whether the document is
based on a document template included in the folder
Office52\share\template\english or Office52\user\template. It also checks the subdirectories of this folder and the template folders entered under Tools - Options... General - Paths.
Upon opening a document based on a template which has been changed changed in
the meantime, you will see the following dialog:
"The Styles in this document do not match your current Styles. Should your current
Styles be applied to this document?"
Reply with Yes, and the document will be loaded with the already existing template in
your StarOffice. The Styles that are contained in your document will be replaced by
the corresponding Styles in your StarOffice. This change is only permanent in the
document once you have saved it.
If you click No, the document is loaded in its original form. The Styles in your document will not be changed.
If no corresponding document template is found, you will be asked if you would like
to continue searching for the template in the future.
If you reply with Yes, it will look for the document template again when it next
reloads the document. This reply is suitable if, for example, you know that the
template is on a temporarily unavailable network drive.
If you reply with No and save the document, it will not look for the document
template when it next reloads the document. The document is then "separated" from
its template.
Chapter 10
Working with Text Documents
265
Further Information
Using a Uniform Font. To ensure that your application materials have a uniform
appearance, you should use the same font for your resume, cover letter and any
supporting documents. Make the necessary adjustments to the Character Styles you
are using.
Inserting Special Characters. If you need to use special characters or a symbol in
your document, open the special characters dialog (Menu Insert - Special Character...) and click the desired character from the available symbol/character sets. The
character will be inserted at the current cursor position.
Saving after Printing . The date of the last printing also belongs to the document
properties found under File - Properties... - General. If you save your document and
print it directly afterwards and then want to close it, you will be asked if you want to
save the "Changes in the document". Press Save if you want to have the print date in
the document properties, or press Discard if this information is not important to you.
Using the StarOffice Help
Do you need further information? Use our extensive StarOffice Help. The following
search terms are available for this topic:
266
■
Special Characters
■
Templates
StarOffice 5.2 User's Guide • June 2000
Invitations
At some point everyone sends out invitations, whether for a birthday party, a silver
wedding anniversary, or any other special occasion. With StarOffice you can create
attractive invitations.
Creating an Invitation
First you need to open the Invitation file by way of Samples - Texts One of many
ways to open this file is by double-clicking the Samples entry in the Explorer.The
contents of the folder will be displayed on the Desktop. Double click the Texts folder
or entry. You will see the contents of the Texts folder displayed on the Desktop. Doubleclick the Invitation entry or symbol. The file will be loaded and the document opened.
Select each paragraph, one at a time, and replace the sample text with your own. With
the command Format - Character you can apply a different font, font size, or other
attributes. For this example, choose the font "Times" and select "small caps" as a font effect.
Chapter 10
Working with Text Documents
267
If your invitation has more than two paragraphs, you might want to apply different
text formats by modifying the corresponding Paragraph Styles.
Select the remaining text and assign a different font and a smaller font size than the
heading of your invitation. If you have a color printer, you can also choose a color for
the text.
Another way to arrange your invitation is to enter text in a separate frame, and then
position this frame in the invitation. Your options for creatively designing text are
practically unlimited! These are only a few suggestions to get you started.
Inserting Text in Frames
At the top of the Main toolbar, click the Insert icon for a few seconds to open the
Insert floating toolbar. Release the mouse button and, using the Title bar, drag the
floating toolbar away from its initial position, which keeps it from closing again as
soon as the mouse is no longer positioned on it. At the left end of the floating toolbar,
click (with a normal short click) the Insert frame manually icon, and when you move
the mouse pointer across the document it will change to a small cross. Use it to drag
open a frame in your document.
Now, place the cursor directly within the frame (to do so you need to first remove the
selection of the frame by pressing the Escape key once), enter your text and apply any
desired formatting. The text is automatically given the Paragraph Style "Frame
contents". If you can't see the new text you are typing in, it could be that the Paragraph
Style "Frame contents" has been given a left indentation that is farther than the frame
is wide. In that case, open the Stylist and change the Paragraph Style "Frame contents".
(In the Stylist, right-click the "Frame contents" entry, then click Modify.... On the
Indents & Spacing tab page, modify the left indentation.)
Select the frame once again after entering the text by clicking on the frame border.
With the context menu, activate the Frame dialog and, on the Background tab page,
assign the frame a contrasting background color. You can use the mouse to position
the frame anywhere on the invitation.
Inserting Clip Art
StarOffice comes with a variety of graphic images, drawings, pictures and clip art.
They can all be found in the Gallery of the Explorer. Open the Gallery and then click
the theme you want. The contents of the theme will be displayed in the Beamer.
268
StarOffice 5.2 User's Guide • June 2000
To open the Beamer, click the Beamer icon in the Function bar.
Drag&Drop the desired graphic image into your document and position it anywhere.
To achieve additional effects, select the graphic image and use the context menu to
open the Graphics dialog. You will see several tabs that you can use to modify the
attributes of the image. If, for example, you want the text in your document to flow
along the contours of the graphic object, click the Wrap tab and choose either parallel
or dynamic as wrap style and select the Contour option.
You should choose a wrap style depending on the position of the picture in your
invitation. For example, if the picture is in the lower left corner, the Left wrap style
would be unsuitable. Here the Right wrap style would make more sense.
Using Draw Tools
To improve the design of your invitation, you can also use the Draw tools. In
the Main toolbar, click the Show Draw Functions icon to open the Draw Functions floating toolbar.
If you click the Line icon, the mouse pointer will change into a small cross.
Move the mouse into the document and, while pressing the mouse button,
draw the desired line. Define the line attributes in the usual way (via the
context menu of the line, Line...command).
Once you have finished creating your invitation, you can save it and print it.
Further Information
Creating Lines at Precise Angles. To create a precisely angled line, hold down the
Shift key while drawing. This will enable you to draw lines at exactly 45° angles.
Flipping Graphics. If a picture has been inserted in the wrong direction, you can
adjust it by flipping it vertically or horizontally (use the context menu, Graphics...
command - Graphics tab - Flip).
Using the StarOffice Help
Do you need further information? Use our extensive StarOffice Help. The following
search terms are available for this topic:
■
Graphics
■
Frame
Chapter 10
Working with Text Documents
269
Professional Uses
Now we will show you several text documents for professional use.
Especially when it comes to business correspondence you'll profit from the many
AutoPilots, templates and sample documents that are supplied in StarOffice. You can
standardize the layout of the documents used at your company to create a corporate
identity so that clients will immediately recognize that this correspondence is from
your company before even reading a single word.
Define a page layout including margins, font style and size, and insert your company
logo into all documents. Use additional design elements, which can be quickly and
easily created with the StarOffice drawing functions.
You can use the AutoPilot to create customized templates for even the most important
professional documents. Just as with the provided document templates, you may edit
and modify these templates as well. Whenever you want to create a new document,
such as a fax, you can open a new fax document based on your template, then simply
fill it out, save it and send it.
The templates can be selected by using the menu File - New - From Template.... You
can add as many templates and links to the File - New submenu as you want. The
StarOffice Help provides a detailed explanation of how this is done.
270
StarOffice 5.2 User's Guide • June 2000
Business Letters
StarOffice contains all the tools you need to create attractive business letters. StarOffice
provides several document templates for business letters, or you can also use the
AutoPilot to create your own templates.
You can either use the templates provided in StarOffice without any modifications or
you can make modifications before you use them. You can also, with the help of the
AutoPilot, create your own templates.
Customizing a Template
StarOffice provides several templates for business correspondence. Of course, these
can be adapted to your own ideas and specific needs. In the dialog that you open via
File - Templates - Organize..., you'll find a list of all the templates provided for each
theme.
Chapter 10
Working with Text Documents
271
Creating a Business Letter Template with the AutoPilot
To start the AutoPilot, first choose the AutoPilot from the File menu and then select
Letter from the submenu and the AutoPilot for Letters appears.
Choose the Business Letter option, and click the button Next. You will come to the
second page, where you can make additional settings. Choose the option No Logo and
click Next.
You are now on the third page of the AutoPilot for letters, where you will already see
the sender address entered during installation. You can enter or change this information under Tools - Options - General - User Data at any time. Modify the sender
address field so that it corresponds to how you wish it to appear on your business
letters.
In answer to the question Repeat in recipient field?, choose Yes.
In the recipient field, the data is displayed in small fonts and single-spaced.
Under Position and Size click the icon which shows placement at the Top Right. The
icons allow you to quickly change the position of the return address field, and with the
spin buttons you can adjust the spacing and size. You can see the results in the
preview field.
Click Next. The database page appears, where you can enter the recipient data.
Templates created with the AutoPilot are capable of extracting data directly from
your address book database (Function key F4). The StarOffice Help describes how
you can exchange a database which is connected with your document with another
database. Using templates, you can create form letters with any desired address.
In both of the upper list fields, you can choose the database and table from where the
addressee data is to be obtained. In the first list box, select "Address Book" and in the
other choose "address." Under Database fields you will see a list of all fields contained
in the selected table. Click the field COMPANY, then click the upper icon with the left
arrow. The database field will then appear in the Address field to the left.
After that, click the icon with a bent arrow (it symbolizes a line break). In the Database
fields field, choose FIRST NAME. Click the upper arrow icon, select the field LAST
NAME and click the arrow again. The first and last name have now been put next to
each other in one row.
Add another line break (click the appropriate symbol) and select the database field
STREET. Transfer STREET into the Address field at the left, double-click the bent
arrow icon to enter another line break, and select the next database field CITY.
272
StarOffice 5.2 User's Guide • June 2000
After CITY has been entered in the Address field, position the cursor after CITY and
insert a comma. Finally, transfer the remaining fields STATE/PROV and ZIP CODE
to the address field.
In the list box to the right of the Salutation field, select the field SALUTATION, and
click Next. On the following page, you can specify the standard letter elements to be
included.
Choose the typical elements of a business letter which you want to include, and
modify them as necessary. Click Next. On the footer page of the AutoPilot, clear the
check box Footer on, and keep clicking Next until you get to the Save page.
On the page for saving the template, enter a name for the template in the Name field.
If necessary, enter any additional information in the Info field.
The new template will be saved under the specified name in the template folder. You
can see the data entered in the Info field if you choose New from the File menu and
then From Template from the submenu and then click More.
Click Next one more time. On the final page, you can specify the printer trays to use.
For this example, this step is unnecessary since there is only one page. Finally, click the
button Create.
Now StarOffice creates a template and stores it in the template directory. On your
screen, a new document based on that template will immediately be displayed. You
could then type in specific text and print and save the document. If you would like to
continue editing your template, close the new document without saving it, and
continue reading.
Chapter 10
Working with Text Documents
273
Customizing a Business Letter Template
The AutoPilot defaults provide you with a "standard" business letter template. Thus,
the template may still need to be adapted to reflect your individual preferences. To do
this, you must open and edit the template.
But keep in mind that if you modify the template, the changes you make will affect
all documents based on this template.
To modify the template, go to File - Templates - Edit. Select the template you created
with the AutoPilot and edit it.
How to Change the Text Alignment
There are four options for text alignment: Left, Right, Centered and Justify. You can
easily change the alignment via the context menu. Click in the respective text passage
and open the context menu. Under Alignment, select Justify, for instance, to expand
the text between the left and right margins.
Make any necessary changes and click the Save icon and close the template.
Do not type specific text in the template unless you want it to appear in every letter.
A template defines only a basic layout for a document. Once you have created a
template, you can enter text into new documents based on the template.
274
StarOffice 5.2 User's Guide • June 2000
Summary
To modify a template, choose File - Templates - Edit.
To create a new document based on a template, open the New dialog (menu File New - From Template...), select the desired template and click OK.
Further Information
Incorporating Pictures. You can insert your company logo into a template with the
Select Picture button located on the right hand side of the second page of the
AutoPilot. You can also create a logo text instead of a graphic. Both logos and logo
texts can be modified at any time.
Changing the Standard Font. In the Standard Fonts tabpage (menu Tools - Options
- Text Document) you can modify and define all fonts of the standard template, so
that a new document is always opened with the preassigned font. Be sure to select
the check box Current Document Only, otherwise the standard fonts will be
changed in all your documents. Standard Font, changing the
Spellchecking. If you have activated Auto Spellcheck (menu Tools - Spelling Auto Spellcheck), the text will be checked for spelling errors as you type. Misspelled
or unrecognized words are underlined with a wavy red line. Alternatively, you can
select the command Tools - Spelling - Check or press the Function key (F7) to check
the spelling after a document is finished. The Spellcheck dialog provides a selection
of options for unknown words which may appear on the text.
Using the StarOffice Help
Do you need further information? Use our extensive StarOffice Help. The following
search terms are available for this topic:
■
Address Book
■
AutoPilot
■
Letter
■
Document Templates
■
Spellcheck
Chapter 10
Working with Text Documents
275
Fax
Creating a fax with StarOffice is no problem at all. In a few minutes, you can create a
personalized fax template, using one of the provided templates or the AutoPilot.
Creating a Fax Template with the AutoPilot
To start the AutoPilot, go to the File menu, and from the AutoPilot submenu, choose
Fax. You'll see the first page of the AutoPilot for Faxes.
Select "Fax Message" as the title, or type in your title. Click Next to go to the second
page, where further settings can be made. Select the No Logo option if you do not
want to incorporate a logo into your fax.
If you want to include a logo, select the option Graphics and click Select Graphics....
A dialog appears where you can preview and select a graphic object.
Click Next to continue to the next page. Your return address should already be
displayed here, and you can add your telephone and fax number, if desired.
276
StarOffice 5.2 User's Guide • June 2000
If no return address is displayed, the information has probably not yet been
recorded. In this case, click Cancel, and enter the necessary information on the User
Data tabpage (menu Tools - Options - General). Then, activate the AutoPilot again,
and return to this point.
Click again on Next to display the database page of the AutoPilot.
For a form fax, you can apply the recipient data directly from a database (Function
key F4) or from the address book (menu Edit - Address Book).
In the upper list boxes, select the Address Book database and the address table. Select
WORKTEL in the Telephone list box and FAX in the Fax list box.
Under Database Fields, click on COMPANY and then on the upper arrow icon to
transfer the database field into the Address field.
Click on the button with the bent arrow (it symbolizes a line break). Select the entry
FIRSTNAME under Database Fields, click on the upper arrow and then select LASTNAME. Enter another line break by clicking the bent arrow.
You can enter the complete recipient address, although this is generally not necessary
for faxes.
Click again on Next to continue.
You will see a selection of typical elements in a business fax. Choose the elements you
want to include in your template. If you have selected an element, you can replace the
existing text with your own.
Chapter 10
Working with Text Documents
277
After making the necessary changes, click Next. On this page of the Fax AutoPilot, you
can determine the appearance of the footer. Select the Footer on check box, and enter
any additional information (company name, bank account, etc.) to be displayed in the
footer.
Click Next once again. Under Template filename, assign a Name for the template and
enter, if necessary, other information in the Info field.
The template you have created will be stored in the template folder under the specified name.
Finally, click Create.
StarOffice will create a document template and store it in the template folder of your
directory. A new document based on this template will appear on the screen. You can
then type in your text, fax the document and print or save a copy. However, if you
first want to refine your fax template, continue reading.
Customizing a Fax Template
The AutoPilot is designed to ensure that you receive a fairly standardized fax format.
If you want to customize the fax template to your specific needs, you need to open the
template.
Remember that if you modify the template, the changes you make will affect all
subsequent documents based on this template.
To modify the template, go to File - Templates - Edit. Open the template and edit it.
Changing the Fax Title
Select the current title of the fax and overwrite it with a new title. You can then assign
various font attributes under menu Format - Character -, and click the Font tab.
Additional Elements (Phrases)
If you require other elements in your fax than the ones provided, click the table of
additional elements and insert another column or row via the context menu (Row Insert) or click on the Insert Row icon. You can then enter the desired text into the
new column or row.
278
StarOffice 5.2 User's Guide • June 2000
Highlighting the Elements (Phrases)
Select the row containing the additional elements and, with the context menu, open
the Table Format dialog. Using the Background and Borders tabpages you assign
attributes to highlight the row.
Make any necessary changes. Finally, click the Save icon and close your document
template.
A template is a blueprint or pattern for all documents of a certain type - such as a fax.
Therefore, in a template, enter only the text that should appear on all faxes. You can
enter the specific text in the documents based on the template.
Setting up Fax Driver
You can print the fax, which you created with the instructions stated above, and send
it with a fax machine. You could also use a modem with the corresponding fax driver
to send your fax without printing it.
Install the fax printer driver of your fax software. With StarOffice Writer, you can
easily choose if you want to print or to fax the current document. You can also insert a
fax icon next to the print icon in the Function bar. You can find step by step directions
in the Advanced section of the User's Guide or in the StarOffice Help. If you want to
fax your document, just click the fax icon.
Chapter 10
Working with Text Documents
279
Further Information
Fonts in Faxes. The transmission of faxes is always dependent upon the quality of
the connection. To ensure legibility, use clear fonts such as Arial or Helvetica, with a
large font size.
Graphics in Faxes. Since the transmission time for faxes depends on the size and
color depth of the inserted picture, we recommend either to avoid using graphics or
to insert only small ones, such as a logo. Graphics, in faxes Faxes, with graphics
Using the StarOffice Help
Do you need further information? Use our extensive StarOffice Help. The following
search terms are available for this topic:
280
■
AutoPilot Fax
■
Fax
StarOffice 5.2 User's Guide • June 2000
Form Letters
The form letter function enables you to send an identical letter to several people since
the salutation, address and other data is automatically inserted for each recipient. There
are two requirements to fulfill before creating a form letter. The first one is a previously
written and formatted business letter and the second one is a database containing the
recipient addresses, such as the Address Book database provided with StarOffice.
Creating a Form Letter
To create a form letter you need the recipients' addresses, which should be in the form
of a StarBase database table, and a text document containing the text of the letter.
Fields appear at the positions in the text where the name and address should be
printed. These fields draw their information from the corresponding database fields.
You can define these fields if you go to the Insert menu and choose Field and from the
sub menu select Other. The Fields dialog will appear, where you can define the fields.
Fields are a type of place holder in your document. These can be chosen when first
inserting a field or opening or printing a current document. You can carry out an
update manually with the F9 key.
Chapter 10
Working with Text Documents
281
Fixed and Variable Fields
"Fixed" fields are fields which are filled out only once, i.e., when the field is inserted
into the document. For example, if you write an invoice based on an invoice template
you can use a "fixed" date. The minute you set up the invoice document, you will see
in the field position the actual date which won't change later on. That is, the date of
the invoice is determined only once.
On the other hand, a "variable" Date is updated every time you open and print the
document. A manual update of the fields (i.e. with the F9 key) sets the actual date in
the field entered as "Variable date"
If, for example, you want to insert a date as a field in your form letter, you have to
decide if it is to be inserted as a fixed or as variable date:
■
Choose to use a fixed date if the date should never change, i.e., as if you typed in
the date directly (without a field). What is then the advantage of using a field?
Well, quite simple, you can save the form letter as a template. If you later want to
write a new form letter based on that template, the date will automatically be
updated.
■
If you choose the variable date, the date will be updated every time you open or
print the document.
Apart from the date there are various other fields which you can also use in your form
letter. The most important fields are the ones which determine where the different
elements of the recipient's address are to be placed. These fields have a direct connection to the database table which contains your address list. A field will be inserted in
the form letter for each data field (i.e. name, street, city, etc.). When printing, StarOffice Writer inserts the desired data fields in the fields for each record.
You can find more detailed information about Fields in the Advanced section of the
User's Guide in the StarOffice Help.
282
StarOffice 5.2 User's Guide • June 2000
With Drag&Drop, you can easily create a new document which contains form letter
fields. First open the document and let the Beamer display the desired database.
Select a column header and with a pressed mouse drag it in the document. The field
from this database will be automatically positioned in the document.
■
With menu File - New - From Template..., open a document based on the Professional Letter template from the Business Correspondence category.
A form letter based on the professional letter template will be displayed. It already
contains fields for the address, date, sender, etc.
■
Since the "Professional Letter" template is linked to the address database in StarOffice, the address table is opened automatically by the Beamer. If this doesn't
happen, press (F4) to open the database for the current document in the Beamer.
■
Select the records you want to use in the form letter by clicking the row headers at
the left in the Beamer. Use the Shift key and/or the Ctrl key to make your selection.
If you want to print a form letter for all the records in the table, click on the empty
field above the row headers to select all records.
Now click the Form Letter icon in the Database bar at the top of the Beamer.
(You must have a text document open for this function.) The Form Letter
dialog appears, where you can choose what you want to send as e-mail or
print. You can also choose here if you want to print selected records, all
records or a particular range. If you want to print a range, e.g., records 1 to 5,
make sure that the numbers follow the order displayed in the Beamer.
You can sort or filter records in the Beamer by clicking on the respective icons
in the Database bar. For example, to sort all records according to ZIP (postal)
code, place the cursor in the ZIP CODE field of any record and click Sort
Ascending.
Now your form letter is all ready to go! Here are a couple of advanced tips for
working with databases.
Avoiding Empty Lines
If you have chosen the form letter field COMPANY to appear in the recipient field, a
blank line might appear in your printed letter. That happens if the COMPANY database field in the database is empty. However, it is possible to prevent empty fields
from being included.
Chapter 10
Working with Text Documents
283
Place the cursor in front of the COMPANY form letter field in your text document.
Open the Insert Field dialog. On the Functions tab page, select the Hidden Paragraph
field type.
Now, in the Condition field, enter the following text (without quotation marks):
not(Company)
If the COMPANY database field is now empty, the COMPANY line will not be
printed, and the rest of the lines will be moved upward.
Importing Data
We have assumed that your address data already exists in the Adabas D database.
Often the addresses exist in another format e.g., as a dBase file, as a text file imported
from another program, or perhaps an entry with commas used as separations between
the data fields, or as a spreadsheet document from another application. This data can
be easily converted or copied into a database table in StarOffice standard format.
Instructions on how to do this can be found in the StarOffice Help under Copy table.
In the StarOffice Help you will find important information, for example, on how to use
a dBase table in StarOffice Base, how to use a database table in text format, and how to
open foreign formats in StarOffice Calc. As soon as an external database table is
opened in StarOffice Calc, it is quite easy to adopt the records from StarOffice Calc to
the StarOffice Base database.
Further Information
Exchanging Databases. To access another database, simply exchange the current
database with another (Edit - Exchange Database...).
Address Book Data Format. The Address Book represents a special database in DBF
format. You can insert, edit and delete records in the Address Book via Edit Address Book.
Sending Form Letters as E-mail. If, in the <Form Letter dialog (access via File - Form
Letter), you select the Mailing field, and in the Address field you select a data field
with the e-mail addresses, you can send your form letters as e-mails (a.k.a. "mail
merge").
284
StarOffice 5.2 User's Guide • June 2000
Using the StarOffice Help
Do you need further information? Use our extensive StarOffice Help. The following
search terms are available for this topic:
■
Address Book
■
Database
■
Exchanging Databases
■
Form Letter
Chapter 10
Working with Text Documents
285
Invoices and Delivery Receipts
Everyone in business needs an invoice and delivery form with built-in calculation
functions. StarOffice's word processor offers a predefined form that contains all the
necessary data.
Creating an Invoice with a Template
Open the Professional Invoice template by selecting the New command in the File
menu, and then in the submenu select From Template. In the New dialog, under Categories click Misc. Business Documents and select Professional Invoice in the
Templates field. Click OK and a new document based on this template will appear.
The document should already contain your personal data. You will notice that the
most common field commands for a business letter are already inserted in the
recipient field.
Enter the respective items for the invoice (e.g. invoice number) in the document.
286
StarOffice 5.2 User's Guide • June 2000
Next open the address book, either in the Beamer, as described for mail merge, or with
menuEdit - Address Book. If you open the address book as a window, click on the
customer's entry or enter the customer information as new data. Click the Merge icon
to transfer the customer information to the address fields of the invoice.
Save the invoice under a name that refers to the customer and the date. Print it with
the usual copies and then close the document.
Customizing an Invoice
You may need to make some adjustments to the invoice, such as adding an additional
row, or a different percentage for sales tax or VAT. To do this open the template.
Just keep in mind that if you change the template, all modifications will apply to
future documents based on this template.
To edit the template go to menu File - Templates - Edit. Open the template and edit it.
Select the Terms of Payment field and type in your payment conditions. You should
also enter your bank details since these will be the same for all invoices.
Modifying Sales Tax Rates
To change the sales tax rate, edit the formula in the cell to the right of the Plus 6%
Sales Tax cell. Place the cursor in the cell, press the F2 key and change the formula in
the input field of the Formula bar. Do not forget to readapt the text in the left field.
Make any other necessary changes, then click the Save document icon and close the
template.
In a template, only enter text that you want to appear in every document based on
this template. A template serves to determine the general layout of a document. You
can later enter specific text in a document based on the template.
Further Information
Highlighting Cells. To highlight a cell, select the cell and then click the Background
Color icon in the Object bar. Choose the desired color from the Background floating
toolbar by clicking it once.
Chapter 10
Working with Text Documents
287
Using the StarOffice Help
Do you need further information? Use our extensive StarOffice Help. The following
search terms are available for this topic:
288
■
Formula
■
Ruler
■
Formula Bar
■
Tables
StarOffice 5.2 User's Guide • June 2000
DTP Applications
This section describes how you can create superior DTP solutions with StarOffice.
DTP is the abbreviation for Desktop Publishing, which is publishing written documents using a desktop computer.
Although StarOffice is not a professional DTP program, but a general office application program with DTP capabilities, you will be surprised at how many interesting
and attention getting effects you can achieve all in one integrated user interface. The
high level of integration of StarOffice components makes it especially easy to combine
text, graphics, tables, sheets and charts, or to quickly edit and rearrange individual
objects.
In addition to the expected functions, such as support of all normal and special text
attributes, you can also use typographic features such as register-true for multicolumn text and expansion between individual letters.
You can easily create drawings and graphics, even in 3D view, and insert them into
your documents. An automatic contour wrap controls the text surrounding objects, or
you can use the convenient Contour Editor to define the wrap region yourself. You
can also insert linked frames, in which your text flows from one frame to the next.
Even if you do not want to publish your DTP documents on paper but publish them as
screen displays or in the Internet as web pages, StarOffice provides you with lots of
attractive displays to catch the reader's eye. Ticker text, animated in different ways is
only a pressed key away, simply create your GIFs in StarOffice and present even the
most complex of tables and FrameSets in the Internet.
The examples here are restricted to StarOffice DTP applications which are usually
printed on paper. For further information, please refer to the StarOffice Help.
Chapter 10
Working with Text Documents
289
Handouts and Flyers
Handouts and flyers are often used for advertising purposes and have to catch the
viewer's attention with only one page. Thus, it is important that your document's
layout is attractively designed.
StarOffice provides a template for a flyer. You can replace the existing text and other
elements with your own ideas. You could, for instance, rotate some of the text lines or
insert a clip-art from the Gallery.
Creating a Handout or Flyer
290
■
Open the New dialog with the key combination Ctrl + N.
■
In the left of this dialog, choose the Forms and Contracts category.
■
On the right, choose the Leaflet template and click OK.
■
The two-page template appears in portrait format. Now you can edit the text.
StarOffice 5.2 User's Guide • June 2000
With most printers, the completed document must be printed in two steps in order to
print both sides of the sheet.
■
Alternatively, place the cursor on page 1 and then open the print dialog (using File
- Print...).
■
In the Print dialog under Print range choose pages: 1. (Page 1 is will be entered if
the cursor is on page 1 of the document.) Click OK.
■
To print in both sides of the paper, print the first page and turn the printed page
over and re-insert it in the printer to print the reverse side. First, though, check that
the paper is placed in the correct direction.
■
Now print page 2 on the back of page 1.
■
Fold the leaflet as follows: the side with Frame 3 is folded over so it rests on Frame
2 and the side with Frame 1 is then folded over Frame 4.
Slanting Text
You can create another eye-catching effect by putting slanted text on your flyer. First,
drag open a text frame (Main toolbar: Show Draw Functions icon ). Type in your text.
Activate the Position and Size dialog with the Position and Size command in the
context menu and click the Rotation tab. Use the spin buttons to define the desired
Angle, or click directly on a point in the preview field. Finally, click OK to confirm
your settings and close the dialog.
Inserting Clip Art
StarOffice provides a variety of clip-art graphics in the Gallery of the Explorer. Open
the Gallery and click a theme to view the contents of this theme in the Beamer. (Activate the Beamer by clicking its icon in the Function bar).
You can now use drag&drop to drag the required graphic into your document and
place it anywhere you like. In order to create further effects select the graphic and call
up its context menu and select the corresponding dialog. You will now see a register
where you can modify the properties of the graphic.
Chapter 10
Working with Text Documents
291
Further Information
Using Unusual Paper Formats. Extra long or extra wide page formats in a flyer
might receive more attention. You can adjust the paper format with Format - Page.
Using Sample Flyer Under Samples in the Explorer you will find the Flyers document. It prints two half-sized pages on one regular-sized page and has a key to press
to copy one page onto the other.
Using the StarOffice Help
Do you need further information? Use our extensive StarOffice Help. The following
search terms are available for this topic:
292
■
Stylist
■
Pictures
■
Frames
StarOffice 5.2 User's Guide • June 2000
Brochures
Would you like to create an attractive brochure? You'll learn here how it's done. Not
long ago, powerful DTP programs were necessary in order to create brochures. Now,
with StarOffice, you can effortlessly create a professional-looking brochure, provided
you've had a little experience with word processing.
Printing a brochure with StarOffice is especially easy because it offers a function for
automatically reducing pages to half their size and placing them side by side on a
page. The pages are automatically printed on both sides and in the right order, so that
all you have to do after printing is staple them in the middle and fold them.
StarOffice has a sample document for a Brochure. It can be found in the folder
Samples - Text Documents in the Explorer.
Chapter 10
Working with Text Documents
293
Creating a Brochure
First of all create a new text document (menu File - New - Text Document).
Page Layout
Call up the Page Style dialog (context menu - Page...), click on the Page tab and set the
paper format and margins. Now select the entry Mirrored from the list box in the area
Page Layout.
If you define a Mirrored page layout, the Left and Right margins become Inner and
Outer. Make sure that the Inner margin is wide enough for the stapling later.
Creating Headers
In the Page Style dialog, click the Header tab. Click the Header on check box and use
the spin buttons to define the settings required. Finally, select the option AutoFit
height and choose Same content Left/Right.
If you choose the Same Content Left/Right option, when you edit a header, the
changes automatically appear in all headers in the document.
Inserting Pictures in a circle or an ellipse
You can add a visual impact by inserting a picture in a circle or ellipse on your title
page. First, create a circle with the draw tool, then select the Area command from the
context menu (or Format menu).
Go to the Bitmaps tab, click the Import button and select the desired graphic. The
picture will appear in the drawing object, and you can then freely position the
resulting object anywhere on the page.
294
StarOffice 5.2 User's Guide • June 2000
Similar effects can be created with other drawing objects as well, such as polygons or
rectangles.
Click on the next page and enter the text of the brochure. When the page is full,
StarOffice automatically creates a new page. To break up the page layout, you should
occasionally insert subheadings. In the Stylist, you can create custom heading styles in
the Paragraph Style dialog (context menu - New), or modify an existing style to suit
your needs.
Insert several graphics (menu Insert - Graphics) and place them in your document. In
order to define the properties of graphics, you should first select the graphic and call
up the Graphic command in the Format menu. The dialog box with the same name
will appear. You can now set the properties on each of the tab pages, e.g. if the graphic
is to be anchored to the paragraph and if the text is to flow around the graphic.
After you have completed your brochure, you can save it and then print it with the
command Print Brochure.
Print Brochure
The Print Brochure function enables you to directly print your document directly in
brochure format. The document will automatically be printed in a smaller format.
Select the Print command in the File menu. Click Properties and select the Landscape
format . Then click OK. The pages will automatically be scaled down to size for a
brochure.
Chapter 10
Working with Text Documents
295
Click Options to open the Printer Options dialog. In the Pages group box, select the
Brochure option. If you are using a duplex printer, choose the options Left Pages and
Right Pages.
If you don't have a duplex printer, only select Right Pages. The right pages will be
printed first. Then turn the pages over, replace them in the paper tray, and print again
with the Brochure field selected and this time Left Pages.
Whether or not you need to select the Reversed option depends on which side of the
page your printer prints out on ( i.e., whether the printed content faces up or down).
If you are asked in a dialog whether the format should replace the one in the document, say no.
It's a good idea to do a trial run to test this function, as it is highly dependent on the
printer used.
296
StarOffice 5.2 User's Guide • June 2000
Further Information
Creating Paragraph Styles. To create a new Paragraph Style for subheadings, display
the Paragraph Styles in the Stylist and in the context menu, choose New. Assign a
name to the Style on the tab Organize, and specify the properties in the other dialog
tabs.
Modifying a Style Category. All Styles listed in the Stylist are organized by category.
New Styles are automatically assigned to the Custom Styles category. To assign a
Style to a different category, select the Style from All or Custom Styles, and click
Modify in the context menu. On the Organize tab, select a new category (e.g., Text
Styles) from the Category list.
Inserting a Table. Position the cursor in the document where you want the table to
appear. Click the Insert icon in the Main toolbar and then Table in the floating
toolbar. Specify the number of rows and columns by dragging your mouse. You can
define other settings with the Table command in the context menu of an inserted
table.
Using the the StarOffice Help
Do you need further information? Use our extensive the StarOffice Help. The
following search terms are available for this topic:
■
Stylist
■
Styles
■
Tables
■
Print Brochure
Chapter 10
Working with Text Documents
297
Newsletters
Here you'll see how to design a newsletter/newspaper from a basic text document.
You can use this facility to create a newsletter for your company or club, or to help
celebrate a special event, for instance.
Creating a Newsletter from a Template
In the File menu select the command New - From Template.... Under Categories,
select Miscellaneous and from the Templates select Newspaper Template. Click OK
to display the document.
The document contains several items that you could make good use of in your newsletter. It contains, for example, an automatic numbering system and a field command
with the fixed date. Once a page is full, a next page is automatically created, and the
pages automatically alternate between left and right.
You can now enter your own text and insert graphic objects in the document. First,
overwrite the text in the header and adapt the existing fields to your needs. Then,
position a graphic image in the frame and enter your "headlines".
After you have finished creating the document, you can save and print it.
298
StarOffice 5.2 User's Guide • June 2000
However, if you would like to have a more personal and interesting layout, you can
edit the template a bit more.
The document is based upon a template. If you want to make permanent changes to
the layout, e.g. because you want the layout for your company newsletter to always
be the same, you should edit the template itself. To do so, go to File - Templates Edit.
Creating Page Styles
If you want to have a page which includes not only text but also several larger
graphics, you should create a separate Page Style for this purpose.
Open the Stylist and click the Page Styles icon. In the context menu, select the
command New to open the Page Styles dialog. In the tab Organize, assign a descriptive Name for the Style.
Next, click the Page tab and define the page format and margins. Select the check box
Activate under Register-true and choose the reference Paragraph Style Text Body.
If you activate the register-true option, the baselines of all paragraphs with the Text
Body Style will be exactly aligned so that they are at the same position in each
column and on each page in relation to the page. With double-side printing, the baselines of the register-true paragraph will have the same position. You will normally
take as a Paragraph Style the Style you used to create your actual text. To define
another Paragraph Style as register-true, call up the properties dialog of that Paragraph Style. Call it up, for example, in the Stylist via the context menu of that
particular Paragraph Style, select the Modify command. On the Indents and Spacing
tab, in the field under Register-true, select Activate.
Editing Headers
To edit a header, click in the header field in your document. With the context menu
(Page), activate the Page Styles dialog. Select the Headers tab and click Options. In
the Borders/Background dialog, choose a background color and click OK, then
confirm the following dialog as well.
Chapter 10
Working with Text Documents
299
Editing Columns
To change the number of columns or create a dividing line between columns, activate
the Page Styles dialog via the Page context menu.
Click on the Columns tab. Change the number of columns in the spin box Amount,
and modify the distance between the columns in the spin box Spacing. Make sure that
the Automatic Width field is selected.
To create a dividing line, select a narrow line from the Line list box under Separator,
set the Height to 75%, and define the position as Centered. Finally, click OK to close
the dialog.
If you would like to place a title or sub title in a larger text, you can put them at best in
a text frame. You can scale and place your text frame on one side. You can insert a
frame with the Insert Frame icon in the Insert floating bar. The text frames can or
can't have a border.
Editing Paragraph Styles
If you want to change the font, click the Paragraph Styles icon in the Stylist and select
the Paragraph Style you want to modify. Via the Modify command in the context
menu, call up the Paragraph Styles dialog. In this dialog, you will find several tabs
with various settings and options.
Experiment with different font effects, such as Drop Caps, for instance. Click on the
respective tab and select Show Drop Caps. You can even assign a Style to the drop
caps in the Text Styles list box under Contents.
300
StarOffice 5.2 User's Guide • June 2000
A newsletter or newspaper requires a variety of main headings, subheadings, and
text wraps to make it easier to read. In the Paragraph Styles dialog of the Stylist
context menu, it would thus be a good idea to create several appropriate Paragraph
Styles ( go to the Stylist - context menu - click New...).
Working with Frames
A frame positioned over one or more columns can give the newspaper a less crowded,
more interesting appearance. Such a frame can contain text, graphics, or even a chart.
Click the Insert icon in the Main toolbar and from the floating toolbar, select the Insert
Frame Manually icon. The mouse pointer changes into a small cross, which you use to
drag open a frame and position it over one or more columns in your document.
Formatting a Frame
Put the cursor in the frame (deselect the frame first, then click inside it) and enter your
text or graphics. The appearance and properties of the frame can, of course, be modified at any time. Select the frame by clicking it, call up the context menu and click
Frame.... A dialog with several tabs will appear where you can, for example, on the
Borders tab, apply a colored shadow to the frame.
Anchoring Frames
In the Frame dialog, click the Type tab and select the type of anchor under the heading
Anchor to. If the frame is to always remain on the same page - which is important for
a table of contents, for example, - select Page. If you want the frame to flow with the
text, e.g., for small symbols which always appear in the margin accompanying a
certain word in the text, select To Character. If, in flowing text, the frame should move
with the text as a character, select As Character. To anchor a frame to a specific paragraph, select Paragraph.
You can specify the type of anchor via the context menu. Alternatively, click
the Change Anchor icon in the Object bar to quickly change the anchor.
Chapter 10
Working with Text Documents
301
Defining Frame Wrap
To define the frame wrap, open the Frame dialog (context menu - Frame), and click
the Wrap tab. Select the desired wrap style, and under Spacing, define the spacing
between the frame and text. Finally, select the option First Paragraph.
The First Paragraph field (or the menu command in the context menu) ensures that
when a graphic is positioned between two paragraphs, only the first paragraph
wraps around the picture.
Define a Wrap Region
If you want to make your newsletter more attractive with objects or graphics, you can
have the text flow around the object. Just draw a Polygon with the Polygon icon in the
Show Draw Functions floating bar. Place the polygon over the text an give the Wrap Contour with your context menu.
You can also assign a wrap contour to your self defined 3D objects. Create a 3D object
with StarOffice Draw, copy it to the clipboard and insert it into your text document.
In the context menu of an object with a wrap contour you will find the Wrap - Edit
Contour... command This command calls the Contour Editor where you can manually
reedit the automatic contour. Instructions can be found in the StarOffice Help.
Flowing and linking frames
If you want your text to be continued like in a newspaper, from a frame on page 1 to a
frame on page 4, and where the text flow from frame to frame is done automatically,
you need to use linked frames.
Create two (or more) frames ( Insert floating bar, Insert Frame Manually), then select
the first frame (click the frame's border).
Click the Link Frames icon in the Object bar. Now, click the second frame.
To enter text in the linked frames, position the cursor in the first frame and type in text
or insert it from the clipboard.
If you want a text from a document to flow in the linked frames, first put the text
cursor in the first frame (first click the "normal" text to cancel the frame selection and
then click the frame).
302
StarOffice 5.2 User's Guide • June 2000
Now you have to decide if you want to have the text as a copy in the frame or if it
should keep a link to the original document (in this case it would always return to the
actual stand of the original document). If the text is only to be copied, choose the
command menu Insert - File.
If the text is a section linked to another file use the command menu Insert - Section...
The Insert Sections dialog will appear. Mark the Link check box and select the file
you want with the Browse button. Finally, click the Insert button.
Using Colored Backgrounds
To assign a colored background to a paragraph, place the cursor in that paragraph and
click the Background Color icon in the Object bar. A floating color palette will appear
from which you choose the desired color by clicking it once.
If you would like to make frequent use of a background color for a certain paragraph,
it would be best to create a Paragraph Style for this purpose.
Instead of a color background, you can have a background graphic image. The background graphic image is assigned to a paragraph either via the Paragraph Style (in
that case, all paragraphs based on this Style will have the same graphic background),
or edit it via menu Format - Paragraph.... Click the Background tab and in the list box
As select "graphics" in order to pick out an appropriate graphic image.
Chapter 10
Working with Text Documents
303
Creating a Table of Contents
A table of contents can be created manually, but if the contents are altered, the table of
contents must be manually updated, as well. It's much more convenient (and timesaving) to have StarOffice create a table of contents for you.
Now that you have entered your text, you may want to create a table of contents on
the front page of your newspaper or newsletter. To do so, follow these steps: insert a
frame manually on the front page, choose Page as anchor. Press the Escape key. Open
the Insert Index dialog (via Insert menu - Indexes - Indexes...). On the Index tab page,
select "Table of Contents" as Type, and enter an appropriate heading, e.g., "In this
issue..." in the Title field.
If you want to create a table of contents using the headings in the document, specify
the desired outline structure using the Evaluation level spin box.
First, you have to have assigned one of the Paragraph Styles which is determined for
the chapter numbering to the headings. You can determine the Styles under Tools Chapter Numbering.... The predefined Paragraph Styles are "Heading1" through
"Heading10". If you have used other Paragraph Styles of your own for the headings,
you can also incorporate these into the table of contents. To do so, go to the Insert
Index dialog, click the Index tab and in the Create from area, put a check in the Additional Styles check box. The Assign Styles dialog will appear.
This is where you determine to which level the Style should be assigned in the table of
contents for each Style used in the document.
You can choose more settings on the Entriesand Stylestab pages. Click OK and your
Table of contents will be created.
After your newsletter is finished, you can save and print it.
304
StarOffice 5.2 User's Guide • June 2000
Further Information
Using Font Types with Serif Typefaces. For text wrap, you should use serif typefaces, because these are more legible in a long text. Common serif typefaces include
"Times Roman" and "Palatino." For the headings, in contrast, sans-serif typefaces
such as "Arial" can be used.
Using Automatic Hyphenation. When working with columns, it makes sense to activate automatic hyphenation for every Paragraph Style (do so by calling up the
context menu of the Stylist and clicking Modify... to access the Paragraph Style
dialog - click theText Flow tab). Enter a "3" for Characters at line end and Characters
at line begin to ensure that hyphenated words have at least three characters at the
beginning or end of a line. For text alignment in columns, choose Justify on the
Alignment tab.
Using the StarOffice Help
Do you need further information? Use our extensive StarOffice Help. The following
search terms are available for this topic:
■
Field Commands
■
Stylist
■
Table of Contents
■
Headers
■
Chapter Numbering
Chapter 10
Working with Text Documents
305
Large Documents
Large documents are easily managed by our word processing functions.
The scale of a text document under StarOffice is almost limitless. Even if you have a
book with several hundred pages it is still remarkably easy to manage. You can maintain an overview in large documents quite simply by using the navigator in the way
described, or take advantage of the Navigation floating bar and make good use of the
other aids.
By means of stylized mechanisms it is, for example, extremely easy to automatically
create a table of contents from the headings in your document. You can, if you wish,
click on any one of these headings and immediately jump to the corresponding position in the document. The automatic hyperlinks make this possible.
Use the convenient administration of footnotes and endnotes in your professional
work.
Especially in large documents it is important to format by using Styles. If you wish to
modify the format at a later point you only need to change the Style.
The following examples show you how to work with large documents.
306
StarOffice 5.2 User's Guide • June 2000
Books
This section explains how you can create a book with StarOffice. You might create a
book for a number of purposes, such as an operating manual, or maybe you've even
got an idea for a novel. StarOffice provides the necessary templates.
Creating a Book from a Template
Select the New command in the File menu and then From Template in the submenu.
Choose Miscellaneous in the Categories box and then Book from the Templates.
Click OK to create a document based on this template.
Page Styles
The book template has been designed so that the required page styles are already
created in the Stylist and assigned to the text in the document. Page Styles exist for the
cover page, table of contents, text pages, and index. The layout of the text pages
defines a left page automatically following a right page and vice versa. the pages also
contain footers with field commands for the current page number.
Chapter 10
Working with Text Documents
307
To modify the appearance of a page, click on the page to be edited, and open the Page
Style dialog via the Page command in the context menu. For example, if you want to
assign a background color to the title page, click on the Background tab and select a
color.
You can, of course, edit and change the Page Styles later. You may want to modify
Page Styles of text pages, for example, since the appearance is different when the
pages are filled with text.
Entering Text
Select the existing gray fields and overwrite them with your own text.
Don't delete fields that cannot be selected -- i.e., those in which the cursor does not
change to a hand symbol when you rest the mouse on the field. These are fields
which are automatically updated after you enter your text and press (F9).
Enter the text of your book and format it with the Paragraph Styles in the Stylist.
StarOffice automatically creates additional pages as you type.
To insert graphics, go to the Insert menu and select Picture - From File. You can edit
and modify properties of an inserted graphic by selecting the picture and making the
desired changes on the various tabs of the Pictures dialog (Format - Picture).
Using AutoText
If you have often-repeated text passages in a document (e.g. for safety regulations or a
contract), the AutoText function will save you a lot of time.
Write, format and select the text that you want to define as an AutoText. Open the
AutoText dialog (Edit - AutoText...). Click on Categories... and type a name for the
new category in the Edit Categories dialog and click OK. Then, assign a descriptive
name to the AutoText in the Name field (all characters allowed by your operating
system can be used in names). Modify the shortcut as necessary. Finally, click the
AutoText button and New, before clicking Close.
308
StarOffice 5.2 User's Guide • June 2000
To insert an AutoText into your document, simply type the shortcut and press (F3).
Inserting Numbered Captions
To create captions for inserted graphics, select the graphic object or the frame and
open the Caption dialog (Insert - Caption...). Select the desired Category or enter your
own category in the combo box. Choose the type of numbering in the Numbering
field, and enter a descriptive text in the Caption field. Once you have done all that,
click OK.
Numbering is maintained automatically. StarOffice Writer combines pictures and
labels in a frame. To move a picture and its label, click the frame and drag it to a new
location in the document. Once the fields have been updated, e.g. with (F9), the
numbering is adjusted automatically.
Chapter 10
Working with Text Documents
309
Inserting a Cross-Reference
If you want to cross-reference another heading, select the heading and activate the
Insert - Referenced Field... dialog. In the field Field type, choose the command Set
reference and assign a descriptive name in the Name text field. (i.e. "Installation") and
click Insert.
Now, place the cursor at the desired location of the cross-reference, for example, after
"see also." Select the Insert Reference field type from the Insert Fields dialog. Choose
the corresponding reference ("Installation") under Select and click Insert. If the location of the page break changes, you can update the cross-reference with Tools Update - Reformat Pages or (F9).
You can easily set the caption references (like for example, see graphic 1) since the
captions are already there for you to select them. An assumption is that you have
already provided the tables, drawings, images, etc. with captions, which is possible via
menu Insert - Caption... You'll also see the text marks you have set in the text in the
Register where you set the references.
Inserting a Bookmark
Use bookmarks to mark locations in your text which you will perhaps want to edit
later, for example, and thus need to find easily. Position the cursor at the desired location and enter a descriptive text in the Insert Bookmark dialog (menu Insert - Bookmark...). All letters and digits are allowed in the name of a bookmark, however, do not
use any punctuation marks or other special characters! Close the dialog with OK.
Use the Navigator to jump to the bookmarks in a document. Open the Navigator with
the Navigator icon in the function bar. All of the bookmarks contained in your document can be seen under the entry Bookmarks and all you have to do to jump to a
particular place is to double click on the required bookmark.
310
StarOffice 5.2 User's Guide • June 2000
Creating Page Numbers for a Table of Contents
The book template already contains a page for the table of contents. However, this
index does not contain any footers to display page numbers. Place the cursor on this
page and double-click the field in the Status bar which shows the name of the Page
Style used. By doing so, you open a dialog in which you can edit the Page Style. On
the Footer tab page, mark the Footer on command.
Since the page numbering of a table of contents usually looks different than conventional numbering, go to the Page tab and in the Numbering list field, choose roman
numerals. Finally, click OK to determine the new Page Style.
In the footer, enter a page number with the command Insert - Fields - Page numbers.
Double-click directly in front of the inserted field to edit it. Choose the As Page Style
format. Close the dialog by clicking OK.
You'll notice that in the second page of the table of contents appears "ii". That is
because StarOffice already counts the first page of the table of contents.
Determine in your program that the first page of the table of contents appears as
"Page 1", that is as "Page i". For this you have various possibilities:
■
If the pages in the document are still empty, click on the first (empty) paragraph on
the table of contents page and go to the Format - Paragraph... menu (or select Paragraph... in the context menu). Click the Text Flow tab. In the Options area, you'll
find the Page number spin box. This box becomes active as soon as Break and
With Page Style have been clicked. Enter a "1" and click OK. You have now set a
hard format page number for the first paragraph. Have the table of contents
created automatically starting at the second paragraph on the first page so that the
first paragraph cannot be overwritten during a later update of your table of contents.
■
If you have already created a table of contents, the heading of your table of
contents will have automatically been inserted as the first paragraph. It has the
Contents 1 Paragraph Style. Right-click this Paragraph Style in the Stylist and go to
Modify... and use the Text flow tab to assign to the Paragraph Style the property
"Break with Page Style, page number 1".
Generating a Table of Contents
Position the cursor where your table of contents should begin. Open the Insert Index
dialog (via Insert - Indexes - Indexes..., click the Index tab and select the "Table of
Contents" as Type). If the table of contents is to be created from the headings (standard
setting), specify the desired outline depth in the Evaluation level spin box. On the
Entries and Styles tabs, you can make further adjustments. Click OK to insert the table
of contents.
Chapter 10
Working with Text Documents
311
Creating and Inserting an Index
Select the word you want to add to the index, and activate the Insert Index Entry
dialog (via the Insert menu - Indexes - Entry...). In the Index list box, select the Alphabetical Index option and click Insert and Close.
Position the cursor on the page where the index is to appear. Open the Insert Index
dialog (via the Insert menu - Indexes - Index..., click the Index tab and select the
"Alphabetical Index" as Type ). On the same tab page (Index), select the desired
settings under Options. Then, click OK to insert the index.
If you often produce publications on the same subject that should have the same
indexes, you probably already have one or more concordance files. A Concordance
file lists all the words that are supposed to be in the index, if they are indeed found in
the document. StarOffice Writer provides dialogs to guide you through the creation
and modification of concordance files. To find out more about the many functions of
concordance files, please see the StarOffice Help.
Creating a Bibliography
The sources cited in your document can be organized by means of a special database
(see link in the Explorer under the name "Bibliography"). In the entries themselves,
briefly note the source and the type (i.e. book, magazine, etc.) and in the database
enter the author's name, the year published, the title, etc. Detailed instructions
regarding this topic can be found in the Advanced section of the User's Guide in the
StarOffice Help.
After you have finished editing your document, you can save and print it.
312
StarOffice 5.2 User's Guide • June 2000
Further Information
Editing Paragraph Styles. To automatically assign a specific Style to the text
following a heading, e.g.,Text Body, open the Edit Paragraph Style dialog via the
context menu and specify a subsequent Style on the tab Organize.
Creating Text Styles. If a certain text format is needed frequently, e.g., small caps, it
may be useful to create a Style with the Text Styles dialog. In the Stylist, click the
Text Styles icon, and select New from the context menu.
Inserting Dummy Text. To display an amount of text without having to type it in
yourself (say, for trial purposes), you can use the Dummy Text function. Enter "dt",
press the function key F3, and a block of dummy text will be inserted into your document.
Formatting with AutoCorrect. If you have created text with a simple editor, such as
the Notepad, and later inserted it into your document, you can assign a "rough
format" with AutoCorrect (menu Format - AutoFormat - Format Document).
Using Master Documents. Instead of one large document, you can also work with a
master document. The individual chapters or headings in your document will then
be organized as partial documents within a master document. A detailed description
of master documents can be found in the StarOffice Help.
Using the StarOffice Help
Do you need further information? Use our extensive StarOffice Help. The following
search terms are available for this topic:
■
AutoText
■
Field Command
■
Master Document
■
Page Style
■
Indexes
Chapter 10
Working with Text Documents
313
Academic Papers
StarOffice provides students, teachers, and researchers various professional layout
options for academic papers. The provided template takes general requirements (e.g.,
structure, page margins, etc.) for an academic paper into account, but be sure to
inquire at your University, Institute, etc as to their particular guidelines and make the
necessary adjustments to the template.
Creating an Academic Paper with a Template
Open a document based on the thesis template via File - New - From Template.... In
the Categories field, select Education, and from the Templates choose Thesis. Click
OK to display the document.
314
StarOffice 5.2 User's Guide • June 2000
Please also note that the other templates listed under education, "Academic Presentation" and "Written Academic Lecture", help you structure small publications and get
them down on paper.
On the title page, fill in the prepared fields with the necessary data and add any additional information. You can also insert the logo of your university or college or other
graphics, if you wish.
The second page will later accommodate the indexes you create (Insert - Indexes). For
the time being, this page remains empty.
Delete the short text from the third page, and start typing the text of your thesis. While
you write, StarOffice automatically generates additional pages.
Editing Academic Papers
Although the layout of the template document fulfills general requirements for an
academic paper, you may wish to adjust the style and layout to your own preferences.
If you want to permanently change settings, such as page margins, you should
modify the template itself. To do this, you need to open and edit the template via File
- Templates - Edit.
Editing Margins
Click in the document and open the context menu. Select the Page command and in
the dialog, select the tab Page. Specify the new margins in the group box Margins.
Inserting Footnotes
Place the cursor directly at the end of the word, where you want to insert a footnote.
Open the Insert Footnote dialog ( Insert - Footnote) and select the desired format
under Numbering. Click OK.
If you want to edit the Paragraph Style for the footnotes later on, open the Stylist and
call up the context menu of the Footnote Paragraph Style. Click the Modify...
command.
Chapter 10
Working with Text Documents
315
Creating a Table of Contents
Position the cursor where you want your table of contents to begin. Open the Insert
Index dialog (via Insert - Indexes - Indexes... click the Index tab). In the Type list box,
select "Table of Contents". If the table of contents is created from the headings (the
standard setting), specify the desired outline depth with the option Evaluation Level.
First, you have to assign a paragraph format to the headings under Tools - Outline
Numbering.... The predefined formats are "Heading 1" through "Heading 10". On the
Entries and Styles tabs, be sure to define any other settings you want. Finally, click
OK to insert the table of contents into your document.
Creating a Bibliography
The sources cited in your document can be organized by means of a special database
(see link in the Explorer under the name "Bibliography"). In the entries themselves,
briefly note the source and the type (i.e. book, magazine, etc.) and in the database
enter the author's name, the year published, the title, etc. Detailed instructions
regarding this topic can be found in the Advanced section of the User's Guide in the
StarOffice Help.
Creating Outline Numbering
In order to maintain a clear outline, it is useful to work with numbering. To create a
numbered outline, select Outline Numbering in the Tools menu. In the dialog, select
Heading 1 in the Paragraph Style list box, and under Level select the level 1.
Next, select the desired number format in the Numbering list box. If you wish, specify
separators in the fields Before and After, and define the alignment on the Position tab.
316
StarOffice 5.2 User's Guide • June 2000
Now define the format of the remaining heading levels in your document.
If you want to save your custom outline numbering format, click Type and choose
the command Save As.
Navigating Within a Document
To go directly to a certain heading in your document, activate the Navigator with Edit
- Navigator.
In the Navigator, click the icons List Box On/Off and Content View to display the
contents of the document. Double-click on the desired heading in the Navigator to
immediately jump to this location in your document.
Creating Formulas
To integrate a Formula as an object into your document, select the command Insert Object - Formula.... After a few seconds,all the operation functions from StarOffice
Math will appear and you can create any formula you need.
For example, to create a Pythagorean formula, first click the
Commands window to set the text entry cursor in the
window (if it is not already there).
Enter the following text: a sup 2 + b sup 2 = c sup 2
Chapter 10
Working with Text Documents
317
Click outside the window from StarOffice Math (in your document). The frame
surrounding the inserted StarOffice Math formula will be automatically inserted with
the "As Character" option in the text of your document. With your frame's context
menu (click the border of the frame and then call the context menu) you can modify
the anchor, the alignment and other qualities. If you want to manually modify the
formula, double click the frame and you will go back to the Edit mode.
If you already know the commands necessary to create a formula, you can
enter your formula into the text directly without calling up the StarOffice Math
window. For this example, please enter the following text: a sup 2 + b sup 2 =
c sup 2. Select the text and then, on the Main toolbar, click to open the Insert
Objects floating toolbar where you then click the Insert StarOffice Math
objecticon.
After you have finished creating your document, you can save and print it.
Further Information
Updating an Index. To update an index, position the cursor anywhere in the index.
Right-click to open the context menu, and select an appropriate command to update.
Multiple Index Entries. To add an entry several times, you must activate the Add
Index Entry dialog and in the Entry field, type a different word and click Insert each
time.
Inserting Notes. Place the cursor at the position in your document where you want
to create a note, and activate the Insert Note dialog with the menu command Insert Note. Enter the desired text under Contents.
Changing the Outline Order. To change the order of your outline headings, open the
Navigator (press F5). Put the cursor on the entry for the headings and click the
Content View button. Now only the headings are visible in the navigator. Click the
heading of the outline level which is to be moved and, holding down the mouse
button, drag the heading to the desired position. The heading and any text belonging
to it will be moved.
Using the StarOffice Help
Do you need further information? Use our extensive StarOffice Help. The following
search terms are available for this topic:
318
■
Footnotes
■
Outline Numbering
■
Navigator
StarOffice 5.2 User's Guide • June 2000
Business Reports
Business reports can become very extensive documents. Here you will see how to
create a business report from a template. The standard components of a business
report such as tables, spreadsheets, or charts, can be quickly and intuitively created
and inserted in your report using StarOffice.
Creating a Company Report with a Template
In the File menu, select the New command and in the submenu choose From
Template.... Under Categories, select Misc. Business Documents and from the
Templates choose Report. Finally, click OK to display the document.
Chapter 10
Working with Text Documents
319
Modifying a Page Style
If you want to modify the margins, or add or delete headers or footers, click somewhere on the page and use the context menu Page... command, to open the Page Style
dialog. Alternatively, you can open the Stylist and click the respective Page Style, call
up the context menu and click Modify.... The name of the current Page Style can be
found displayed in the Status bar.
For example, to delete the header on a page, modify the Header tab settings. Deactivate the Header on option to delete the header from all pages with this Page Style.
To modify the margins, select the Page tab and enter the desired values under
Margins. After modifying the Page Styles, you can begin editing the document.
Editing a Business Report
Enter your own text into all of the fields in the document. You can use one of the
predefined field by selecting it and overwriting it with your title ("Business Report
I/2000). If you wish you can also insert you company logo on the title page.
The second page will later contain the table of contents and thus remains empty for
the time being.
Delete the text on the third page and insert the text of your business report here. While
you type, StarOffice automatically generates additional pages as you need them.
Creating Outline Numbering
To maintain a clear outline, it is useful to apply numbering to the headings. Select the
Outline Numbering command in the Tools menu. In the dialog, select 1 under Level
and in the Paragraph Style combo box, select Heading 1.
320
StarOffice 5.2 User's Guide • June 2000
Choose the desired number format in the Numbering list box. If you wish, enter separators in the fields Before and After and define the desired alignment on the Position
tab.
Now define the format for each of the further heading levels in your document. Alternatively, by entering "1-10" you can define the numbering for all 10 heading levels at
the same time.
If you want to save your custom-defined outline format, click Form and select the
command Save As to save your custom defined form
Inserting Sheets via DDE
To clearly present numbers, you need to be able to display the corresponding data in
tabular form. Since this data normally already exists in the form of a StarOffice Calc
spreadsheet, you can simply insert the spreadsheet or other object into your document, using the OLE function in StarOffice.
With DDE Dynamic Data Exchange) you can link documents with a target document.
If the source document is modified you can manually or automatically update the
link in the target document.
Select in the StarOffice Calc table the cells you want to have in your text document.
Copy them into the clipboard. In the text document go to menu Edit - Paste Special
and select there the DDE link.
Chapter 10
Working with Text Documents
321
Positioning Objects
The inserted objects, for example graphics and text frames, can be anchored in several
ways. Using frames as an example, here's an introduction to the various options:
Anchoring
Effect
as a Character
Frames are placed in the document like any other character,
hence, they have an impact on the line size of the line and the
line break.
to Character
Frame is with its X and Y coordinates associated to a character,
for example, in the X direction always to the margin and in the
Y direction always to the height of the character (marginal
frame). The frame should be set at "Flow".
to Paragraph
Frame is associated to a paragraph, changes its position with the
paragraph.
on the Page
Frame has always the same position in relation to the page
margins.
on Frame
Frame is inside the superior frame in a fixed position.
The position in relation to the anchor can be chosen through various possibilities. For
example, it is possible to set the frame on a fixed position in relation to a page margin,
to a paragraph margin, to a text area, etc.
On even-numbered pages, the frame position can be automatically mirrored so that a
corresponding position in relation to the left page border will be created out of a fixed
position in relation to the right page border. The values for "left" and "right" will
always be exchanged on even pages. "Left" will be renamed as "inner" and "right" as
"outer". In this way you can, for example, position a picture on the inner edge of the
page's outer frame. For example, if the picture is an arrow which is pointing to the
text, it makes sense to automatically mirror it on even pages. To do so, use the Mirror
on even pages option found on the Type tab in the Graphics dialog (access via Format
menu - Graphics...).
Inserting a Chart
Turn spreadsheet data into a chart in your spreadsheet document. (To do so, select the
range on the sheet, and click the Insert Objects icon - Insert Chart, then open the chart
in the sheet.) Now, copy the chart to the clipboard with the Copy icon in the Function
bar and paste it into your business report using Edit - Paste Special....
322
StarOffice 5.2 User's Guide • June 2000
Labeling Tables
If you want to add a caption to a sheet you have inserted into your text, select the
sheet and open the Caption dialog (via Insert - Caption...). In the Category combo
box, select Sheet, and choose a number format in the Numbering list box. Enter a
descriptive text in the Caption field.
Creating a Table of Contents
Position your cursor where you want the table of contents to begin. Open the Insert
Index dialog (Insert - Indexes - Indexes..., on the Index tab select "Table of Contents").
If you want to create the table of contents from the headings (standard setting), specify
the desired outline depth with the option Evaluation Level. You can define further
settings on the Styles and Entries tabs. Click OK to insert the table of contents into
your document.
After you have finished creating your report, you can save and print it.
Creating a Presentation from an Outline
Perhaps you not only want to print the business report, but also present it live. StarOffice can save you the work of typing in the themes again. Send the structure of the
business report (i.e. the outline of headings) to a presentation document. The only
prerequisite is that the headings must have been formatted with the paragraph
formats which you used for the Outline Numbering. (via Tools - Outline Numbering).
The predefined Paragraph formats are "Heading 1" through "Heading 10".
Choose File - Send - Outline to Presentation. A new presentation will be created
automatically. Each Heading 1 becomes a slide, with each Heading 2 as a first
subheading on the slide, and so forth. To include text along with the headings, choose
the Send - AutoAbstract to Presentation command. You can use a dialog to set the
number of outline levels and following paragraphs of text to include in your presentation.
You can easily edit all texts in the presentation, insert additional text and rearrange
slides. Working with presentations in the first part of the User Manual describes the
procedure.
Chapter 10
Working with Text Documents
323
Further Information
Creating a User-Defined Index. To create a custom index for inserted tables, go to
the Insert menu and click Indexes - Indexes... to open the Insert Index dialog. As
type, select "User-Defined". Under Create from, put a check in the Tables check box.
Using the StarOffice Help
Do you need further information? Use our extensive StarOffice Help. The following
search terms are available for this topic:
324
■
Outline Numbering
■
Object
■
Page Style
■
Index
StarOffice 5.2 User's Guide • June 2000
CHAPTER
11
11
Working with Spreadsheets
This section describes how to work effectively and efficiently with spreadsheets by
using practical examples.
For text and presentation documents there are two basic methods for creating a document quickly and easily - either via the AutoPilot or by using the provided templates
and sample documents.
There is no AutoPilot for creating spreadsheets. It makes no sense to use an AutoPilot
for this purpose, since the possible calculations in a spreadsheet are simply too
complicated and varied.
An alternative is to open an empty document and create all required formulas and
calculations yourself. You can do this, and will have to occasionally, but as a rule this
is too time consuming.
However, the templates offer a convenient solution. StarOffice provides a wide range
of templates for - almost - every purpose.
The following examples for the various application areas are all based on the provided
document templates and can therefore be easily reconstructed.
Applications for Personal Use
Here you will find several spreadsheet solutions that are particularly interesting for
personal use.
325
Loans and Mortgages
This function can be helpful for anyone who is planning to take out a loan or mortgage.
Calculating Loan or Mortgage Repayments
Open the New dialog (via File - New - From Template...). Under Categories, click
Finances, and choose Loan and Mortgage Calculation from the Templates list.
Confirm by clicking OK.
To calculate the annuity and monthly payment (including the whole mortgage term)
based on the interest rate and amortization, select the Mortgage tab.
If you want more information about monthly payments, interest, fees and the loan
redemption of a marketable customer credit, select the Credit tab.
Use the Loan tab page if you want to repay an amount within a specific period of
time. Use the Mortgage tab page to calculate the period of time in which you have to
raise a certain amount of money (principal and interest).
In the following example, the spreadsheet document created with the template will
be edited. If you want to change essential layout settings, work with the template
instead. To do so, go to the File menu and click Templates - Edit.
326
StarOffice 5.2 User's Guide • June 2000
One after the other, click each highlighted cell and enter the required data (loan
amount, period, etc.). Type the numbers directly into the cell or in the input line of the
Formula bar.
The final result is displayed after you have entered the last value.
To see which formulas are being used, click any cell to display the respective formula
in the Formula bar. By clicking the Function AutoPilot icon in the Formula bar, you
can view the structure of the formula. This is, however, only for spreadsheets which
are not protected, and the spreadsheet based on the Loan and Mortgage Calculations
template is protected. To disable the protection go to Tools - Protect Document Sheet....
Further Information
The document based on this template is protected. If you want to make modifications, disable the protection via Tools - Protect Document - Sheet....
Creating Colored Cells. Select the cell you want to apply a color to and click on the
Background color icon. Click on the desired color in the Color floating toolbar.
Renaming Sheets. The sheet names (e.g. Sheet 1, 2 etc.) are generated automatically.
To rename a sheet, click on the respective sheet tab, while holding down the Alt key.
You can then directly type in a new name.
Deactivating Automatic Cell Calculation. For calculation-intensive formulas, automatic calculation may not be the best option. Instead, you may want to perform the
calculation only after entering the last number. In this case, clear the selection of the
Automatic Calculation option (Tools - Cell Contents). The calculation will then only
be carried out after you press F9.
Apply print ranges. In the sample document, print ranges were used to print certain
cells.
Using the StarOffice Help
Do you need further information? Use our extensive StarOffice Help. The following
search terms are available for this topic:
■
Print Range
■
Spreadsheets
■
Renaming Spreadsheets
■
Cell Attributes
Chapter 11
Working with Spreadsheets
327
Household Budget
With StarOffice it's easy to draw up a household budget.
Creating a Household Budget
The household budget is already prepared as a template. All you have to do is enter
your personal data and store the document created in this manner under an appropriate name.
■
Display the New dialog with (Ctrl)(N).
■
In the left list box, select the Finances area and then in the right list box select the
Household budget. Click OK.
The household budget is a spreadsheet document comprising the following tables:
328
StarOffice 5.2 User's Guide • June 2000
Tables in the household Meaning
budget
User data
Here you can enter your name and other personal data.
Overview
Here you see the summary of your income and expenses,
both as numbers and in a chart.
Income
Here you can enter your monthly income and the most
important deductions.
Housing
The tables for the greatest monthly and/or yearly
expenses follow. The first expense here is your rent or
mortgage (depending on what you selected for user data)
and other living expenses.
Household expenses
This includes the cost of food, transportation, etc.
Bank
This is where you'll find the costs for loans and bank fees.
Insurance
Enter your monthly and yearly insurance expenses here.
Communication
This is where you enter telephone, Internet and television
costs.
Car Costs
If you entered a car in the user data, you can organize
your car expenses here.
Purchases
This is the place for your greatest annual purchase costs.
Vacation
Here you can enter the annual vacation expenses.
Leisure
This is the place to enter the average monthly expenses for
a few personal expenses.
Miscellaneous
Enter any other costs here.
■
First enter the appropriate data in the "User Data" table. If you click the "Read
From User Data" button, the user data entered under Tools - Options - General...
will be applied by the system. Select the appropriate option under "Housing" and
"Auto" - the following table will be adjusted accordingly.
■
Don't enter anything in the next "overview" table. Later the results from the other
tables will be displayed here.
On the templates, data may only be entered in white areas. The contents of areas
highlighted in gray are calculated by the program.
Chapter 11
Working with Spreadsheets
329
■
Continue to the "Income" table. Enter your monthly income here. Enter the appropriate values in the white fields only, not in the fields with a gray background,
since values in these fields are calculated with formulas automatically as soon as
there are values in other fields. The gray fields are protected.
■
Now go through the remaining tables and enter in the monthly and/or yearly
expenses everywhere. You can move back and forth between the tables as you
wish.
When you are finished, you can see the result of your household budget in the "Overview" table. You can select the table and print it out.
Further Information
Formatting Sheets. All entry fields in the template are designated by a uniform white
color. The sheet areas have been set off from the background by color. You may want
to use this style in your own tables as well to make them more readable.
Using StarOffice Help
Do you need more information? Then use our extensive StarOffice Help. The
following search terms are available for this topic:
330
■
Print Range
■
References
StarOffice 5.2 User's Guide • June 2000
Managing a Stocks Portfolio
This template is of interest for anyone who owns stock in a company. StarOffice Calc
stock management offers you a complete overview of your share portfolio figures, of
any transactions, selling values and much more. In the following section we describe
how you can conveniently organize your own portfolio.
You can always find out the current daily stock prices for your shares from newspapers, but they are much more current if you get them online, over the Internet.
StarOffice comes with a sample template that shows you what it might look like to
manage stock with a spreadsheet document. You will find the StarOffice Calc file
Stocks Manager under New - From Template... in the Finances area.
Managing Your Stocks Portfolio
First open the StarOffice Stocks Manager template delivered with StarOffice. We will
be working with this document in the following section.
Your portfolio management template consists of three components:
■
the actual portfolio overview
■
the representation of individual movements (i.e. transactions)
■
and the fees charged for each transaction.
We have already set up a fictitious portfolio for you that you can use to get an overview of the numerous possibilities for organizing stocks.
In the following explanation, we use these fictitious settings to make the various possibilities of this template more real for you.
Chapter 11
Working with Spreadsheets
331
If you would like to begin working with your real portfolio, however, click Reset.
After you have confirmed a security response, all entries are deleted. You can now
transfer your actual values. The procedure is explained further in the following overview.
In many foreign language (i.e. not English) versions of StarOffice, this template is in
Euro currency and can also be seen in the currency of a specific country by using
option buttons to switch back and forth. These options do not exist in StarOffice
versions for countries with no fixed currency exchange rate against the euro. The US
version also only uses Dollars in this template.
Portfolio Overview
The portfolio overview gives you a current overview of all individual positions in
your portfolio.
This tab page contains the following columns:
332
Column Header
Explanation
Name
This column displays the name and/or ticker symbol for
the stock.
Ticker Symbol
This is the unique stock identification code.
Quantity
Current number of shares
Each Purchased at
This contains the average purchase price per share, taking
into account the commission that was paid. Example: You
purchase 10 shares at 10 dollars each and pay a commission of 20 dollars. The purchase price of the shares
(without commission) is thus 100 dollars (10 shares * 10
dollars). But the price you actually paid for the shares
(taking into consideration the commission) is 120 dollars
(10 shares * 10 dollars + 20 dollars). If you divide this
figure by the number of shares purchased, you will find
that the price you paid per share was 12 dollars.
Current Price
This is the only column in which you should make a
setting on this tab. Enter the current price of the stock here.
Buying Price
This tells you the total cost for buying the current holdings, taking into consideration the commission paid.
Selling Value
In this column you have the possible profit from selling at
the current stock price (market value) less commissions.
StarOffice 5.2 User's Guide • June 2000
Column Header
Explanation
Potential Profit (amount) This displays the possible profit or loss if sold at the
current market price, taking into account the commission
as an amount and the change as a percentage.
Profits Realized
In this column you can see profits (hopefully) already realized from previous sales and dividends paid.
With Help Tips turned on, move the mouse pointer over the headers of the table. You
will see a brief explanation there of the functionality available from the headers.
But now on to your portfolio. As we have already explained, the Current Price column
(the entries in this column are in different colors) is the column in which you should
change the figures. All other columns are calculated automatically or are filled in
through the input screen.
Today you received a new stock price for Airtrans Inc. from the Internet. Because of a
very positive fiscal year that has just ended, a dividend (to be distributed today) has
been fixed at $1.15 per share. This news has caused the stock price to shoot up to
$37.60.
To apply the current stock price, click the cell containing the current price of Airtrans
Inc. and enter the new value. Confirm the entry. After you have confirmed the entry,
all figures associated with this value will be updated. Thus you have an immediate
overview of all information at your finger tips.
When you enter the value, there is no need to enter the currency in question. StarOffice is so "intelligent" that it automatically knows you want the formatting to be in
currency format. (You can adjust the currency in Menu - Format - Cell - Numbers).
Now you have applied the current price of Airtrans Inc. to your portfolio. But there is
also a dividend that is to be applied today.
Chapter 11
Working with Spreadsheets
333
Dividend Payment
To take the dividend into consideration, click the Dividend Payment button.
Select the appropriate entry in the list box (in our example Airtrans Inc.)
In the Dividends/Stocks field, enter $1.15, or in the Total Dividends field enter $345
(300 shares * $1.15).
Confirm your entries with OK.
The dividend that has been paid is added in the Realized Profits column and is
posted on the Transactions tab in the Dividend Paid column and in Realized Profit.
This is the current page view.
To switch back to the portfolio overview again, click the Sheet tab of the same name.
Sell Shares
Since Airtrans Inc. has actually made some money, you've decided to sell 100 shares.
We have placed a sell order at the current stock price with the brokerage firm (and will
proceed based on the execution of the order).
Click the Sell Shares button to accept this transaction into the portfolio view.
Select the appropriate entry in the list box (in our example Airtrans Inc.)
The entry screen shows you all the relevant values for Airtrans Inc. as well as an overview of fees that are payable as a result of these transactions.
In the Quantity field, change the setting to 100. The total number of shares of Airtrans
Inc. held in the account is 300, but only 100 shares are to be sold.
Confirm your entries with OK.
The profit created by this transaction is added into the Profits Realized column and is
recorded in a newly created line on the Movements tab page.
334
StarOffice 5.2 User's Guide • June 2000
Buy Shares
Since the cash assets has been increased by the partial sale of Airtrans Inc. stock, this
amount will be used to purchase new shares of stock.
The template also offers a convenient way of applying this purchase of shares in the
portfolio overview. You've decided to purchase shares of Widgets Unlimited Inc.
(Ticker Symbol 081566), which is trading today at 285 dollars. You have placed a
purchase order for 10 shares at the current market price with your broker (and will
proceed from the executed order).
To apply this transaction to the portfolio overview, click the Buy Shares button.
The entry screen is identical to the screen for selling shares.
Fill in the boxes for the name of the stock, the ticker symbol, the quantity and stock
price.
Confirm your entries with OK.
A new line is created for this transaction in the portfolio overview where you can see
all the pertinent figures.
A new line is created on the Movements tab.
When buying and selling shares, you can take shares at the buying price of zero (e.g.
free shares) or shares at the selling price of zero into account in your portfolio overview. You will be alerted to this via a separate dialog.
Stock Split
A stock split is the change from, for example, an old share to two new shares, whereby
the number of shares usually doubles in a 1 to 2 split and the value gets cut in half.
The point of this is, among other things, to make shares at least appear cheaper (one
share at $150 is more expensive than one share at $75).
In order to accommodate this action in the overview, click the Stock Split button.
The Stock Split input mask will appear.
Fill out the fields: Name of Stock, Exchange Rate (old->new), Exchange Date.
Confirm with OK.
In the portfolio overview, the row with the split stock will be updated.
Chapter 11
Working with Spreadsheets
335
Movements
This gives you an overview of all transactions you have initiated for your account.
This tab contains the following columns:
336
Table Header
Explanation
Name
This column displays the name and/or ticker symbol for
the stock.
Date
Date of the transaction
Quantity
Shares purchased are represented by positive numbers
and shares sold are represented by negative numbers.
Price
Actual buying or selling price
Commission
Costs of buying or selling
%
The current commission for the transaction calculated as a
percentage
Min.
Minimum commission applying to this transaction
Fixed
Fixed costs of this transaction
Paid
Commission actually paid for this transaction
Costs
Summary of costs (number of shares * current price + fees)
Proceeds
Proceeds realized (number of shares + selling price - fees)
Bought
Number of shares purchased
Sold
Number of shares sold
On Hand
The number of shares purchased minus the number of
shares already sold
Costs of On Hand
Proportional costs for purchasing the remaining shares
held (i.e. on hand).
Proceeds Realized
The sales proceeds after deducting the commission
Dividends paid
The total amount of dividends paid
Profit Made
In this column you can see profits (hopefully) already realized from previous sales, and dividends paid.
StarOffice 5.2 User's Guide • June 2000
Brokerage Fees
In order to buy or sell stock, you need to have access to a market (stock exchange)
where the shares are traded. Since only brokers have this access, it is customary in the
United States to submit your orders through and pay fees to your brokerage company.
In many other countries, banks and savings and loans institutions are more closely
associated with such transactions. Whether the order is placed through a bank or a
brokerage company, you will invariably pay a brokerage fee for each transaction. This
tab takes these fees into account. Here you will find a breakdown of the applicable
brokerage fee you must pay to your brokerage firm or credit institution. Traditionally,
this fee has been a percentage of the total value of the transaction, although flat rate
fees are now common in the United States. In our example, the fee is 1% of the total
transaction. Sometimes a minimum commission applies (in our example $25). Your
credit institution or brokerage company can provide you with all of this information.
Finally, a fixed amount is often charged in addition to other fees (for telephone
expenses, etc.). All of these fees are taken into consideration when you calculate the
actual return. This allows you to see the actual profit or loss you have realized at any
time, including fees.
Completing the Stocks Document
The document is now completely created and can be saved. In the following section
we use several examples to describe how you can make further adjustments to this
table.
Protecting a Table
If you want to prevent the values entered in a table from being modified by another
person, you must protect the table. To do this, display the Protect Table dialog (Tools
- Protect Document - Spreadsheet...). Enter a password, then click OK. You can also
protect the entire document. Then it is only possible to open it by entering the password.
■
All cells in a newly created spreadsheet document have the "protected" attribute.
You can turn this attribute on and off on the Cell protection tab of the Cell Attributes dialog, which you can bring up with the Format - Cell... command or with the
context menu Format Cells... command.
■
The "Protected" attribute can be set or removed for each cell individually. In any
case, it does not take effect until you protect the entire table and/or the entire
document. You can apply this protection with the Tools - Protect Document Spreadsheet... or Tools - Protect Document - Document... menu command.
Chapter 11
Working with Spreadsheets
337
■
You can set a password for protecting the table and the document, but this is not
required. If a password is set, then protection can only be removed later by
entering the correct password. If no password is set, there is still effective protection against your document being accidentally modified.
■
Table protection prevents modification of the contents of this specific table. Document protection prevents the tables from being inserted, deleted, resorted or
renamed.
■
If you have a document with confidential data that you want to protect from being
opened by unauthorized persons, you can protect it with a password. The password makes this protection of the entire document dependent on the protection
mechanism of cells, tables and documents described above. To save a document
with a password, choose File - Save As... and select the Save with Password box.
Creating a Reference
If you want to insert a value, say the result of your profits, into another table or into
another spreadsheet document, you must create a reference. Select the cell where you
want to insert the result and enter "=". Now select the cell that contains the original
result and press Enter. This cell can also be included in another spreadsheet or in
another file. The result is automatically inserted into the reference cell and is also
updated if changes are made later.
You can also drag the content of a cell into a cell of another document with
Drag&Drop. When you do this you have the choice of inserting a copy of the cell as it
is now into another document or creating a link so that the current content of the cell is
always reflected in the other document. You can find an introduction to Drag&Drop
operations between spreadsheet documents in the Advanced section of the User's
Guide in StarOffice Help.
After you have set all the necessary preferences and changes, you can save the document and print it.
338
StarOffice 5.2 User's Guide • June 2000
Further Information
The document based on this template is protected. In order to make modifications
you have to first disable the protection via Tools - Protect Document - Spreadsheet....
Insert Note To keep a note, e.g. to be reminded later to buy a certain stock, select the
appropriate cell and choose Note(on the Insert menu). The document will show you
a shaded area in which you can enter your annotations. To make the note visible at
all times, click the appropriate cell (cells with notes contain a small red point in the
corner, provided that "Note Tags" is selected: choose Tools - Options - Spreadsheet
Document... - Contents) and choose Display Note on the context menu. Otherwise
you will see the note only if you point to the cell with the mouse.
Inserting a table into another document. Select the cell range and copy it to the clipboard (Copy icon on the Function Bar). Open the document into which you want to
insert the table (generally a text document) and insert the table (Insert command).
Displaying Formulas. To clarify your table references, select the Formulas check box
(on the Tools - Options - Spreadsheet Document... - Contents tab). The best way to
examine an individual formula is by clicking the cell containing the formula and then
clicking the Function Autopilot icon on the Formula Bar.
Using print ranges. Print ranges have been used in the sample document to print
specifically targeted cells.
Using StarOffice Help
Do you need more information? Then use our extensive StarOffice Help. The
following search terms are available for this topic:
■
Note
■
Cell Protection
■
Cell Styles
■
Spreadsheet
■
Formula Bar
Chapter 11
Working with Spreadsheets
339
Viewing Stock History as a Chart
An effective way to display the numeric values of a StarOffice Calc table is with
StarOffice Chart. This section will show you some stock price charts as an example of
the interplay between tables and charts.
Entering Data for a Stock Chart
The data concerning stock prices must be available in a set order for it to be able to be
displayed in chart form. The illustration shows you how the data has been named and
organized in this example.
The typical data for stock price charts is arranged in the columns. The data in this
example has been generated at random. In real-life you might like to see opening and
closing prices on a daily basis instead of monthly, but we want to keep this example
simple.
340
StarOffice 5.2 User's Guide • June 2000
■
Volume - the total number of shares sold in the time period in question.
■
Opening stock price - the first bid price for a share of the stock at the time period in
question.
■
High stock price - the highest value of a share of the stock during the time period.
■
Low stock price - the lowest value of a share.
■
Closing stock price - the last value of a share of the stock at the close of trading
during the time period.
The Structure of a Stock Chart
The sales volume unit is one share or 1000 shares. A currency unit is used for prices.
Your charts will need two separate Y axes, which will also show the sales volume. The
volume is displayed in these charts as a bar chart in the background of the stock price
chart with the volume scale on the left Y axis. You will then see the currency values on
the right Y axis.
The high and low stock prices are connected by a vertical line.
When both the opening and closing prices are displayed you will see a rectangle
between them. The color of this rectangle indicates whether the difference is positive
(closing price is higher than opening price) or negative.
Creating a Stock Chart
■
Enter your stock price data in a new StarOffice Calc sheet and organize the data
into columns as in the example shown above.
■
Depending on which of the columns you select, a different type of stock price chart
will appear.
Selecting the three data columns, high, low and closing stock prices, will display these
three values as points on a vertical line. If you also select the opening price, a rectangle
will be displayed between the opening and closing stock prices. If you select volume
as well, it will be displayed in the background as a bar.
■
For example, select columns A, D, E and F in StarOffice Calc Table. To make a
multiple selection of this type, hold down the (Ctrl) key as you move the mouse
over the cells you want to include.
Chapter 11
Working with Spreadsheets
341
Click the Insert Chart icon on the Insert object floating bar of the Main
Toolbar. If you have not inserted any other object, the floating bar will already
show the Insert Chart icon, so that you can simply click it.
■
The mouse cursor changes into a cross. Now draw a rectangle in StarOffice Calc
Table to delimit the location and the size of the chart.
When you release the mouse button, you will see the first page of the AutoFormat
Chart dialog.
■
Click Next. The second page of the dialog appears.
■
Select Stock Chart.
■
Select Data Rows to Columns.
■
Click Create.
Now you can see a stock chart with vertical lines showing the high, low and closing
stock prices. Selecting several columns in the multiple selection described above will
add the corresponding objects to the chart.
342
StarOffice 5.2 User's Guide • June 2000
Further Information
Edit Chart. Simply click a chart to select it. You can then scale the chart with the
familiar eight control points. You can also delete it and move it.
To modify a chart, double-click it. The thicker border indicates that the chart is in
modify mode. Now if you single-click inside, the cell area in the chart will be
surrounded by a border. By clicking a data row in the chart, for example, you can
change the properties of the data (with the context menu or on the Format menu).
Using StarOffice Help
Do you need more information? Then use our extensive StarOffice Help. The
following search terms are available for this topic:
■
StarOffice Chart
■
Chart Data
Chapter 11
Working with Spreadsheets
343
Applications for Business Use
In this section, you will find examples of how to use spreadsheets for the most important types of professional business documents.
Shift Plan
StarOffice allows you to easily create an employee shift plan with a number of special
functions. The shift plan is a schedule which has been expanded to combine the schedules of many employees together into a single sheet. By linking it to other sheets, you
can use the shift plan information more effectively.
Creating a Shift Plan with a Template
Open a new document based on the employee schedule template. Select the New
command in the File menu, and then choose From Template... in the submenu. In the
Categories list, select Spreadsheets, and under Templates choose Shift Plan. Click
OK to display the document.
In this example, the document will be edited, not the template on which it is based.
To make changes to the basic layout, you should edit the template itself. To do this,
go to File - Templates - Edit.
The StarOffice templates often contain protected areas so that you cannot change
them by mistake. If, however, you do want to change a template, you have to first
disable the protection. For spreadsheets, the menu command to do this is found
under Tools - Protect Document.
The template and thus the document made from it lets you export the data from the
shift plan to StarOffice Schedule.
344
StarOffice 5.2 User's Guide • June 2000
The document consists of three sheets: Overall Plan, Individual Plan and Personnel.
Click the Personnel tab and enter the employee names and initials in the respective
columns.
Next, select the Overall Plan sheet. Enter the employee names in the cells and, if
necessary, change the predefined rows and columns. After the plan is completely
filled out, you can use the special functions of the Individual Plan.
Enter the initials of the employees in the cell to the right of the cell labeled Initials and
press the Enter key. This gives you an overview of the weekly shifts a particular
employee is scheduled to work.
This function can also be used to create a weekly shift plan for each employee.
Inserting a Date Row
The Overall Plan spreadsheet has only one row containing the days of the week. To
insert another row to add the dates, you first have to disable the protection of the sheet
via Tools - Protect Document - Spreadsheet. Then, select the cell Early shift and click
Row in the Insert menu. A new blank row will appear below the days of the week.
Click the cell below Sunday, type the respective date and press Enter. Select the cell
and move the mouse pointer to the lower right corner of the cell. The mouse pointer
will turn into a cross-hair symbol. Now drag a red selection frame across the newly
inserted row to the column Saturday. As soon as you release the mouse button, the
dates for each day will appear in the selected row.
Applying Colored Shading for Columns
Weekends and holidays are not usually work days; therefore it makes sense to distinguish these days from the rest. Select the columns Saturday and Sunday, click the
Background Color icon in the Object bar, and choose the desired color from the
floating toolbar.
Chapter 11
Working with Spreadsheets
345
Creating Individual Shift Plans
Since the style of every plan is dependent on the type of work which is done, this is
only an example of how a particular shift plan might look. You can, of course, use
additional features to create a customized plan according to your specific purposes.
Open a new spreadsheet (File - New - Spreadsheet).
Enter the names of the employees in a column. Next, insert a row for the the time
period, such as Monday, Tuesday, etc., or 01/12/99, 02/12/99, etc. You can also insert
two rows to display both types of information.
To create sequences in a spreadsheet (e.g., Mon., Tues., Wed.) use the list function.
Type "Mon" in a cell in the first row and then select the cell. Move the mouse pointer
to the lower right corner (the mouse pointer will turn into a small cross symbol), and
drag a frame over a range of cells. After you release the mouse button, the area will
automatically be filled with the other days of the week. You can create your own lists
under Tools - Options... - Spreadsheet Document in the Sort Lists Register.
Finally, assign a background color to the cells containing employee names and the
days of the week. Use a different color to highlight the columns "Saturday" and
"Sunday," if you wish.
Freezing a Column
Select the column to the right of the employee names by clicking on the column
header, and click Freeze in the Window menu. You can now scroll horizontally, while
the area to the left of the freeze line remains fixed. This enables you to constantly view
the column containing the employee names. This function is especially useful for large
sheets.
Conditional Formatting
With this function, you can display employee information simply by entering a letter.
This enables you, for example, to instantly find out if a particular employee is present,
sick, or on vacation.
First you must open the Stylist (click the icon in the Function bar) and create three Cell
Styles. For the Cell Styles, choose names that correspond to the information you want
to represent. In this case, you could choose: "Sick," "Vacation" and "Present."
Click in the Stylist, and open the context menu where you then click the New
command to activate the Cell Style dialog. On the Organize... tab, enter the word
346
StarOffice 5.2 User's Guide • June 2000
"Sick" and assign a background color to the Cell Style by way of the Background tab
page. Click OK and repeat this process for the two remaining Cell Styles.
Now, using the mouse, select the area you want to apply the conditional Style to. In
the Format menu, click Conditional Formatting to activate the corresponding dialog.
For Condition 1 define: Cell value - equals-"s" (s=sick). In the Cell Style list box,
select the Style Sick.
The use of quotation marks is absolutely necessary to define conditions!
For Condition 2 define: Cell value - equals-"v" (v=vacation). In the Cell Style list box,
select the Style Vacation.
For Condition 3 define: Cell value - equals-"p" (p=present). In the Cell Style list box,
select the Style Present.
If you now enter a "v" (without quotation marks) in a cell in the previously selected
area and press the Enter or Arrow key, the cell will be displayed in the defined color.
A maximum of three conditions per cell is possible.
Chapter 11
Working with Spreadsheets
347
Defining Validity
To ensure that unauthorized entries are not made to the shift plan, you can define
validity. Select the cells that you want to define the validity for and open the Validity
dialog (Data - Validity...). Define the permitted input criteria on the Values tab page.
In this example, the criteria for the lists and fields are: Text length, equal, and 1.
Next, click on the Error Alert tab. Select the option Show error message when invalid
values are entered and click Stop in the Action list box. Under Error message, enter
an appropriate text (e.g., "Only v (vacation), p (present), or s (sick) are valid entries.") .
If you wish, you can also type a title in the input field.
If a user were to now enter more than one letter in the corresponding cell in the sheet,
your defined message will appear: "Only v (vacation), p (present), or s (sick) are valid
entries."
Further Information
Creating Input Help. In the Validity dialog, you can create your own help function
for a previously selected area. Select the Input Help tab and check the box Show
input help when cell is selected. Enter a title in the respective field, and enter the
help text in the field below. This text is then displayed as a Help tip for the user.
Linking Sheet Information. The information contained in a schedule can also be
used by linking it to the vacation accounts and automatically subtracting used vacation days, for example.
348
StarOffice 5.2 User's Guide • June 2000
Using the StarOffice Help
Do you need further information? Then use our extensive StarOffice Help. The
following search terms are available for this topic:
■
Conditional Styles
■
Validity
■
Protecting Sheets
■
Background Colors
Chapter 11
Working with Spreadsheets
349
Calendars
To set up your own personal calendar you only have to enter important dates and
click a few buttons. StarOffice will do the rest.
Creating a Calendar with a Template
Open the New dialog (File - New - From Template...). In the Categories list, choose
Spreadsheets, and select Month/Year Calendar from the Templates.
Click OK to display the calendar in the work area.
In this example, you will be editing the document itself, not the calendar template. If
you want to change basic layout features, you will need to modify the template
instead. To do so, go to the File menu and select Templates - Edit.
First, under Calendar, specify whether you want to create a calendar for a month or an
entire year.
350
StarOffice 5.2 User's Guide • June 2000
Use the spin buttons to set the corresponding year or month under Time Frame.
If you know some important dates in advance, e.g., birthdays and anniversaries, you
can enter these directly into the calendar using a macro.
To do this, click Personal Data. Enter a descriptive text in the Event field, and specify
the Month and Day with the spin buttons. For a non-recurring occasion, choose the
option One-Time, and then specify the year, as well.
Keep the text as short as possible, otherwise the full text may not be displayed in the
corresponding cell of the calendar.
Click Insert, and the event will be displayed in the window of the dialog box. You can
now specify other dates, if you wish. To remove an event, select it in the window and
click Delete.
Chapter 11
Working with Spreadsheets
351
After you have entered all your important dates, click Create to display your personal
calendar.
You can customize the calendar according to your preferences. For example, to change
the background color for the days of the week, click on any "weekday cell" and open
the Stylist. The cell Style workweek will be selected. In the context menu, select
Modify to open the Cell Style: Workweek dialog. Click on the Background tab and
choose the desired color.
When your calendar is complete, you can save and print it.
Further Information
Viewing the Full Date. To see which date is hidden behind "THU 15," double-click
the corresponding cell and the full date will appear.
Using the StarOffice Help
Do you need further information? Use our extensive StarOffice Help. The following
search terms are available for this topic:
■
352
Cell Styles
StarOffice 5.2 User's Guide • June 2000
Recar Scenarios
Scenarios are important aids for making numbers that are dependent on each other
and their resulting calculations visible. Modify specific basic starting requirements in
the table and you will see the new result. You can give a name to the scenario created
in this manner and compare it with other scenarios.
Using ready-made scenarios
We have provided a ready-made example of scenarios for you to work with.
■
Open the Samples folder in the Explorer by double-clicking the entry. The folder
opens as a folder window.
■
Double-click the Tables folder window.
Now you can see the spreadsheet document that comes with the program.
■
Double-click the Recar AGM-Scenario document.
Now you will see a sample table in which several scenarios have been created.
Areas in which the scenarios that differ by initial values are located are surrounded by
frames. Select the appropriate scenario in the list box appearing at the top of every
frame.
Chapter 11
Working with Spreadsheets
353
Scenarios can also be selected in the Navigator:
■
Open the Navigator with the (F5) key or the Navigator icon on the Function Bar.
■
Click the Scenarios icon in the Navigator (the icon with the quotation marks and
question mark).
In the Navigator you can see the defined scenarios with the comments that have been
entered while creating the scenarios.
Creating Your Own Scenarios
To create a scenario you must select all the cells that provide the data for the scenario.
In our example you can create an additional scenario called "High Dollar Rate" for
example. Do the following:
■
Select the data cells that are already highlighted by the frame of the existing
scenario. You can also multiple-select data cells that are not contiguous, i.e. that are
distributed across the table. To select multiple data cells, hold down the Ctrl key as
you click each cell. In our example, however, simply select the range F18:F23.
■
Choose the Tools - Scenarios... command. The Create Scenario dialog will appear.
■
Enter "High Dollar Rate" as the name of the scenario and leave the other fields
unchanged with their default values. Close the dialog with OK. Your new scenario
is automatically activated.
■
Change the values in the frames to the values you want to apply to your new
scenario. In this case, modify the dollar rate and all other values that you believe
could be affected by it, i.e. economic growth and sales prices. In just a moment you
see the effects of your operating figures.
Further Information
Track to next link If you want to know which values in the scenario affect other
values, choose Tools - Detective - Track to next link. You will see arrows to the cells
that are directly dependent on the current cell.
354
StarOffice 5.2 User's Guide • June 2000
Using StarOffice Help
Do you need more information? Then use our extensive StarOffice Help. The
following search terms are available for this topic:
■
Scenarios
■
Ranges and reference in tables
■
Detective
Chapter 11
Working with Spreadsheets
355
Applications for Special Areas
Naturally, spreadsheets are also appropriate for applications with special requirements. In the following, we will introduce you to a number of special application uses
with StarOffice.
Movies
Spreadsheet documents Movie1 through Movie3 provide you with three linked tables
that will introduce you to several of the special StarOffice Calc techniques. Here you
will find conditional formatting of cells, user-defined buttons and direct cell references
to other documents.
The movie documents contain fictitious sample data. The only purpose of these documents is to provide you with a basis for your own experiments with various StarOffice
Calc features.
■
356
Open the Movie1 document, which you will find with the sample documents in
the Spreadsheets folder.
StarOffice 5.2 User's Guide • June 2000
Using Direct References to Other Documents
The Movie1 document contains cells that directly reference cells in Movie2 and
Movie3.
■
Click cell E8.
You see the formula used in the input line of the Formula Bar. At first glance it seems
long and complicated:
='file:///d|/Office52/share/samples/english/spreadsheets/movie1.sdc'#$movievisits.E8
The formula shows you how you can access cell E8 in the table with the name
"movievisits" in the file movie2.sdc." Between two single quotes ('), the name of the file
is given in URL notation. The URL refers here to the internal file system.
User-defined Buttons
At the top of document Movie1 you can see two buttons with which you can switch to
the other two documents. Specifically, the buttons simply load the respective document assigned to them. There are corresponding buttons in the other documents for
switching back.
The buttons used here are objects on he Form Functions floating toolbar.
Examining the Properties of Controls and Forms
The current document should be in the Edit mode. This is the case in our example. For
documents on the Internet, click the Edit icon on the Function Bar to select it.
■
Open the Form Functions floating toolbar on the Main Toolbar. The only icon on
the Form functions floating bar you can click is Design Mode On/Off. Click it to
switch the form into Design Mode.
■
Now you can click a button in the table to select it. In the Form Functions floating
bar you can see the Properties dialog for the control or form with the Control Properties and Form Properties icons.
Chapter 11
Working with Spreadsheets
357
Using StarOffice Help
Do you need more information? Then use our extensive StarOffice Help. The
following search terms are available for this topic:
358
■
Cell Format
■
References in Formulas
■
Form
StarOffice 5.2 User's Guide • June 2000
Editing a Single dBase File in StarOffice Calc
Here you'll see how you can edit individual dBase files in StarOffice. Normally, all
dBase files (or other formats) in a common folder are integrated as tables of a database
into StarOffice. You record the database in the Explorer via the context menu (New Database...). Every dBase file becomes a database table and all dBase files in the same
folder make up a database which you can conveniently access with StarOffice Base.
This is described in more detail later in this User's Guide and in the StarOffice Help.
You can open any dBase file or text database file in StarOffice Calc, as well, without
having to record it as a database first. In StarOffice Calc, individual records form a
database area. You can perform various tasks with the records: quick searches, sorting,
filtering, calculating subtotals, etc.
The following example refers to the address.dbf file found in the folder under
Office52/user/database/address.
First, open the file. Go to the File menu and select the Open command. In the Open
dialog which then appears, select the desired file and click Open. The Import dBase
dialog will appear. Under Character Set, select the font that you used to create the file
(usually you can leave the default setting as is) and click OK to open the database in a
spreadsheet.
In addition to displaying the column names, column headers also contain information such as "C" and "50." These items are necessary for the export so the field types
and sizes can be re-imported.
To edit data, position the cursor anywhere in the data area. StarOffice can automatically detect the data area to be edited.
Chapter 11
Working with Spreadsheets
359
Sorting Data
The Sort function enables you to change the order of your data. In the Data menu,
select Sort... to open the Sort dialog.
Define the desired criteria on the tab Sort Criteria . With the sort criteria, you can, for
example, define to sort according to cities and then according to names. The
Ascending option is the default value. This means that the cities "Atlanta," "Baltimore," "Chicago," and "Dallas," are displayed in this order. Under the city of "Atlanta,"
the first client names would be "Arnold," "Brown," "Carter," and so on.
You may define a maximum of three search criteria in the Sort dialog.
Click OK to display the data sorted according to your specifications.
Using the Standard Filter
Search conditions are defined using the Standard Filter. Only data which satisfy the
conditions will be displayed. One possibility might be, for example, to search for all
entries containing the city "Kissimmee".
To use this function, select the Filter command and then Standard Filter in the Data
menu. The Standard Filter dialog appears.
In the Field Name list box, select the entry "City,C,50 ". Define "=" as a condition and
"Kissimmee" as the value. When you click OK, all data satisfying the condition
"City = Kissimmee" will be displayed.
360
StarOffice 5.2 User's Guide • June 2000
You may define a maximum of three conditions in the Standard Filter dialog.
To redisplay all data, select the command Data - Filter - Remove Filter.
Saving Data in dBase Format
After editing the data, you can save it in dBase format. Go to the File menu and click
Save As... In the dialog which then appears, enter the desired name in the File Name
combo box and select dBase as the File Type.
In addition, you can define the size of the data fields. Select the desired field. The
input line shows a value, such as "City,C,50." You can determine the length, for
example, by simply typing "City,C,60" (without the quotation marks).
The following parameters are available for defining fields:
D
Defines the field as a date field.
L
Defines the field as a logical field (true or false).
N
Defines the field as a numerical field. "7.2" denotes a total length of 7 characters including two places after the decimal point. More specifically there can
be a maximum of four characters before the decimal point (including any
minus signs used), a character for the decimal delimiter and two places after
the decimal delimiter.
C
Defines the field as a text field. "C,30" specifies the length as 30 characters.
M
Defines the field as a memo field.
Chapter 11
Working with Spreadsheets
361
Further Information
Maximum Size. The maximum data fields permitted is 32,000 rows.
Avoiding Duplicates. When working with the Standard Filter, you can prevent
possible duplicate entries from being displayed. Click Options in the Standard Filter
dialog and select the No Duplicate option.
Using the StarOffice Help
Do you need further information? Use our extensive StarOffice Help. The following
search terms are available for this topic:
362
■
Filter
■
Sort
StarOffice 5.2 User's Guide • June 2000
Conversion Table
The StarOffice Calc universal de Luxe converter will help you convert various units of
measure.
Accessing the Conversion Table
You can open the conversion table using the Explorer and the desktop from the
Samples/Spreadsheets folder.
■
In the Explorer, switch to the Samples folder and open it by double-clicking. You
will see the subdirectories of the folder on the desktop.
■
Click the Spreadsheets subdirectory.
■
Double-click the Conversion Table name.
If you use the conversion table frequently, you should create a desktop link to it.
■
If the conversion table is the current document, grab the icon on the far left of the
Function Bar with the mouse and drag it first to the Desktop button on the Function Bar. Do not release the mouse button.
■
The desktop opens and you can now move the cursor to the location on the
desktop where you want to create the link for the conversion table. Release the
mouse button.
You can open the conversion table at any time by double-clicking this icon on the
desktop.
Chapter 11
Working with Spreadsheets
363
Working with the Conversion Table
The conversions in the table differ greatly in their complexity. Not much is required to
convert millimeters to centimeters - you might simply prefer to do it in your head.
However, converting gasoline consumption from liters per 100 kilometers to miles per
gallon is more complicated.
■
In the conversion table, go to the line in which the desired measurement unit is
calculated: length, surface, volume, weight, temperature or consumption.
■
Type the number of units you want to convert in the white entry field. If you want
to know how hot it is in Fahrenheit when your Celsius thermometer shows 20 degrees, enter the number 20 next to "temperatures".
■
Now select the new unit of measure (Fahrenheit) in the list box on the far right of
the same line. Click the gray-colored field in front of the list box. You will see the
result there immediately.
If you are a somewhat more advanced StarOffice user you can expand the conversion
table with additional units. To do this, choose the Tools - Macros... command and edit
the function macros in this file. You will see comments in the macros to which you
should pay particular attention.
Further Information
Entering annotations. You can enter notes for each field in the table. They will be
displayed if you allow the mouse to remain on the cell while Tip Help is activated.
To insert a note in the current cell, choose the Insert - Note command.
Using StarOffice Help
Do you need more information? Then use our extensive StarOffice Help. The
following search terms are available for this topic:
364
■
Links
■
Form
StarOffice 5.2 User's Guide • June 2000
CHAPTER
12
12
Working with Presentations
In the following section you will find a description of how to create presentations in
StarOffice together with practical examples.
If you want to create presentation documents, there are several methods to create the
desired document fast and simply: You can start with the new AutoPilot Presentation
or use the included templates and sample documents, which you change as you wish.
You can also begin with a completely empty document.
Presentations
The following examples illustrate how you can quickly create professional graphic
designs and presentations with StarOffice.
365
Business Report
In this section we will explain how you can create a business report for a presentation.
A presentation with StarOffice can be created in just a few minutes (if you want to
leave out all the extra features which take a lot of time and patience). Even an inexperienced presenter can quickly achieve professional results. The following example
assumes that the presentation is to be made on a computer.
Creating a Business Report in Presentation Form
A template for a business report is provided, which you can fill out with your own
text and data.
■
366
Go to the Menu bar and select File - New - Presentation. The AutoPilot for Presentations will appear. Select From Template on the first page. Now select "Presentations" in the list box and then in the field beneath it, "Business Report". Click
Create.
StarOffice 5.2 User's Guide • June 2000
All that's left is to replace the text in the business report with your own. Save the
report and then print it - or present it on the screen by pressing Ctrl + the F2 key.
If you want to start from scratch with a completely new document, proceed as follows:
Open an empty presentation document ( File - New - Presentation). You will now see
the AutoPilot Presentation which is described in the StarOffice Help. Select the option
Empty presentation and click on Create. The Modify slide layout dialog will now
appear. This is used to determine how the start page is to look. Enter a name and
select the required layout, e.g. Title Slide.
The term "slide" refers to a page in your presentation. It has nothing to do with an
actual slide of the old slide projector sort.
You will now see the first page, the "title slide". Click on the existing text and overwrite
it with your own text, for example "Energy Software" and "Annual Turnover 2000".
To insert another slide, click the area next to the tab at the bottom of the screen. Assign
a name for the new slide and choose a layout (in the context menu of the slide tab,
click Modify Slide).
Do not assign a name like "Slide2." If you later want to change the order of the slides,
you might not remember the content of this slide. Clear, descriptive names like
"Overview" or "Introduction" are more useful.
Insert additional slides, as necessary. The corresponding tabs appear at the bottom of
the screen. Click the tab of the slide you want to edit, e.g. Overview, and then click the
Outline View icon above the vertical scroll bar.
Chapter 12
Working with Presentations
367
Entering Text in the Outline View
To establish an outline, use the Outline View mode. With the icons in the Object bar,
you can either promote or demote an outline point one level, or move it up or down in
the hierarchy. You can also use icons in the Main toolbar to determine which outline
levels you want to have displayed.
In the Outline view, all slides in the presentation document are listed hierarchically,
and the title of each slide is preceded by a slide icon.
Enter the desired text and use the icons in the Main toolbar to structure your outline.
You can create a subsection to a slide by placing the cursor at the start of the respective
line and pressing the Tab key. Use the Shift + Tab key combination to move the line up
one level in the hierarchy. After you have finished editing the presentation outline,
click the Drawing View icon (directly above the Outline View icon) to return to the
normal view.
Changing the Slide Layout
To change the slide layout, you must be in the Drawing View (the first icon in the
vertical scroll bar). Double-click the tab of the slide you want to modify and select the
desired layout from the pre-defined layouts.
Designing Slides
To design a slide, you have to be in the Drawing View as well, and the Select tool must
be activated.
If you want to change the font size and style of the title, for example, select it and
assign new attributes from the Font and Font Size fields in the Object bar.
You can also define borders by clicking the paragraph you want to apply a border to
and defining the attributes in the list boxes Line Width and Line Style.
To assign a uniform background and recurring elements, such as company name and
presentation topic, to all your slides, click the Background view icon in the horizontal
scroll bar. Don't worry about the default text visible in the background mode - not this
text, but rather the text you've replaced it with appears on the slides. You can drag
open a frame for your background text using the Text floating toolbar in the Main
toolbar in this view..
Open the Stylist by clicking the Stylist icon in the Function bar. Then, click the Presentation Styles icon. Select a background style, and open the Modify dialog via the
context menu. Click the corresponding slide tab and make your changes.
368
StarOffice 5.2 User's Guide • June 2000
By modifying the Background Style you can assign all slides the same background.
Since the Background view can be activated at any time, it is always possible to make
changes at a later time.
Preparing a Slide Show
A few additional steps are necessary before your presentation is complete.
Defining or Changing Slide Order
To change the slide order, click the Slide View icon in the vertical scroll bar. In this
mode, all slides in the presentation document are displayed in reduced size. Click the
slide you want to move and drag it with the mouse to the desired position. The position where the slide will be inserted is indicated by a vertical black bar.
Creating Cross-Fade Effects
To apply cross-fade effects, you have to be in the Slide View or Drawing View.
Click on the slide when in the Slide View mode. Set the effect and transition period
that is to apply to the slide Transition using the two left list boxes.
If you are in the Drawing View, choose the Slide Transition command in the Presentation menu. A dialog appears in which you can define slide transition effects.
Chapter 12
Working with Presentations
369
In the list box Slide Transition, select the option Manual. You can then switch from
one slide to the next in your presentation by clicking the mouse or pressing the right
arrow key.
Although you can choose from a wide variety of cross-fade effects, you should generally select similar effects for the slide transition (e.g., "Uncover from left," "Uncover
from top," etc.).
Starting a Presentation
To start a presentation, click the Slide Show icon in the Main toolbar or choose the
Slide Show command in the Presentation menu. The on-screen presentation starts
immediately.
Presentation settings can be adjusted under Presentation - Presentation Settings....
In this dialog, you can determine which slides to include in the presentation. Select
any other desired options, and click OK.
Further Information
Using Your Mouse as a Pointer. Select the option Mouse pointer as pen in the Slide
Show dialog in order to highlight charts or point to important aspects during a presentation. To change slides manually, you must double-click the mouse.
Changing Bullet Symbols in Outline View. To change a bullet symbol in the
Outline view, place your cursor in the desired line/paragraph and click the Bullets
and Numbering icon (only visible in the Object bar of the Drawing view). A dialog
appears where you can choose a different symbol.
370
StarOffice 5.2 User's Guide • June 2000
Using the StarOffice Help
Do you need further information? Take advantage of our extensive StarOffice Help.
The following search terms are available for this topic:
■
Slide Show
■
Slide View
■
Stylist
■
Slide Layout
■
Drawing View
Chapter 12
Working with Presentations
371
Product Introductions
Do you need an impressive presentation to introduce a new product? The following
example shows how to create a presentation for a product introduction based on a
template.
Creating a Presentation with a Template
In the File menu, select the command New, and in the submenu, select From
Template.... The New dialog appears. Under Categories, select Presentations, and
from the Templates select Introducing a New Product. Click OK to display the document.
Since each presentation will naturally have to be adapted to a specific purpose, you
could also choose any other template to base your presentation document on.
372
StarOffice 5.2 User's Guide • June 2000
Type your own text over the existing title. If you wish, insert a picture (Insert menu)
and position it in your document.
At the bottom of the screen, click the name of the second slide to make it the active
slide and then edit it.
If you have several slides, not all slide tabs may be visible. By clicking the arrow
icons in the horizontal scroll bar, you can "shift" the tabs to view them. You can also
expand the area in which the tabs are displayed. If you place your mouse on the
scroll bar divider, the pointer changes to a double-headed arrow, and you can move
the divider while holding down the mouse button.
Edit each slide of your presentation, and modify the presentation background, if
desired.
After adding any finishing touches, you can start the presentation by clicking the
Slide Show icon in the Main toolbar.
Inserting, Deleting and Renaming Slides
To insert an additional slide, activate the slide that you want to put the new slide
behind. Now click the empty space between the tab and the horizontal scroll bar and a
new slide appears with the page layout of the previous slide. Alternatively, select the
the Insert Slide... command in the context menu of the slide tab area. In the Insert
Slide dialog, you can assign a name to the new slide and define a layout.
If you want to delete a slide, click the tab at the bottom of the work area to activate it
and open the context menu. Select Delete Slide.... Confirm the subsequent warning
with Yes to delete the slide.
To rename a slide, activate the respective slide by clicking the name on the tab, then
press the (Alt) key and click the slide name again. The old name will be selected and
can then be overwritten.
Creating Handouts
If you want to provide handouts to help the audience follow your presentation, you
can use the Handout View mode. Since the handouts contain both the individual
slides and space for notes, they can be a very helpful presentation aid.
In the vertical scroll bar, click the Handout View icon. Open the Modify Slide dialog
via the context menu (Slide - Modify Slide...) to specify how many slides are printed
on a single sheet of paper.
Chapter 12
Working with Presentations
373
Click OK to create the handouts. To print them, go to File - Print... and click Options...
to open a further window in which you then decide how the handout should be
printed.
Organizing and Printing Notes
Enter notes for individual slides in the Notes view. You can access the Notes view
using the Notes icon located at the right of the document window scroll bar.
■
You can enter and print a page of notes for each slide. To print, choose the File Print... menu command and click Options.... The Printer Options dialog appears.
■
In the Printer Options dialog, in the Contents area, select Notes. Click OK. In the
Print dialog, select the slides you want to print (all or specific ones) and click OK.
Be sure to go back and deselect Notes in the Printer Options dialog, otherwise the
document will always be printed with notes.
The settings in Printer Tools apply only to the current document. If you want
specific settings for all presentations, choose Tools - Options - Presentation... and
select the Print tab.
374
StarOffice 5.2 User's Guide • June 2000
Further Information
Using the Navigator. You can quickly go from one slide to another by using the
Navigator. All the slides of your presentation are listed there, and you can simply
double-click a slide to jump to the respective position in your document.
Using the StarOffice Help
Do you need further information? Use our extensive StarOffice Help. The following
search terms are available for this topic:
■
Handout View
■
Slide Layout
Chapter 12
Working with Presentations
375
Organization Charts
No matter whether you want to clearly present the structure of your company or the
layout of your homepage, here's how it's done! The following example illustrates how
easy it is to present complex structures in a clear and comprehensible manner.
StarOffice provides a sample document of an organization chart. The Organization
Chart can be found in the folder Samples - Presentations. The following example
can be accomodated to your daily use.
Creating Company Organization Charts
First, open the sample document Organization Chart. The structure and the
connecting lines provide a good overview of the organization in the sample company.
376
StarOffice 5.2 User's Guide • June 2000
Follow along with this example to adapt the structure to the structure of your
company.
Delete the company name in the document background (switch to Background View
in the horizontal scroll bar) and replace it with your own company's name. Change the
sample address at the bottom of the page, as well. Now, click in the various frames of
the organization chart, select the contents and overwrite it with your own text.
Edit Jump Targets
The corners at the bottom right of the boxes are Interactionareas, which are referencesensitive and react to a mouse click. To edit or view the interaction assigned to an area,
click while pressing the (Alt) key. Then, open the context menu and select the Interaction... command.
The Interaction Gallery theme contains additional buttons you can drag to your
pages using the mouse. This way, your slides can contain interactive objects without
additional programming.
You can link your own graphic objects, 3D Objects and object groups with Interaction.
Modifying Object Size
If you want to change the object size, drag a selection frame around the respective
objects.
Chapter 12
Working with Presentations
377
Instead of using a selection frame, you can also click on the individual objects and
press the Shift key at the same time to make a multiple selection.
After you have selected the frames, open the Position and Size dialog from the
context menu. In the tab Size, you can apply the same size to all selected frames under
the group box Size.
Creating Additional Objects
If you need additional objects, you can copy one and simply insert it as often as necessary. Then, position the rectangles in your document and align them with the snap
lines.
To display vertical and horizontal snap lines, click on the respective ruler and drag a
snap line from the ruler to the desired position.
Working with Connectors
In addition to the individual frames, connectors are important components of an
organization chart because they help represent the relationships within the organization. StarOffice provides a variety of connector types. Click on the Connectors icon in
the Main toolbar, and a floating window with the available types appears.
You can link frames and connectors either from "edge to edge" or from "middle to
middle," or a combination of both. These possibilities are described below.
"Edge to Edge" Connectors
Select the desired connector by clicking it, and then drag it to the first frame. A small
symbol is displayed on every edge of the frame. Put the mouse pointer on one of the
symbols (the symbol will be given a dashed-line border). Press the mouse button and
drag the connector to the desired frame. As soon as the mouse touches the frame,
symbols appear on each edge here as well. Continue dragging the connector to the
desired symbol - that symbol also receives a small, black border - and release the
mouse button.
If you move a frame that is connected to another frame, the connector also changes
position. The actual connection line between the two frames remains the same, so that
for minor shifting of the frames, the connector usually does not have to be edited.
With major frame movements, however, it is often necessary to reedit, because the
connector may shift to a different position.
378
StarOffice 5.2 User's Guide • June 2000
To change the position of a connector, simply click on it. Small control points appear,
at both the beginning and end of the connector. If you rest the mouse on one of the
control points, a small square appears next to the mouse pointer. Press the mouse
button and drag the beginning or end point to the desired frame.
"Middle to Middle" Connectors
If you select a connector from the Connectors floating toolbar and click in the middle
of one of the frames, a black, dashed-line border appears around the entire frame.
Press the mouse button and drag the connector into the middle of another frame,
which also receives a black border, and release the mouse button.
The advantage of this method is that when you want to move the frames later, the
connector fits perfectly, so that the beginning and end of the connectors lie in the
middle of each frame. This function will come in handy if you want to switch the position of two frames, because you will not have to edit the connectors manually.
Editing Connectors
To change the properties of a connector, select it and click Connector... in the context
menu to open the Connector dialog.
Choose the desired connector type from the list box. You can also modify the line skew
and the line spacing in this dialog. All changes will be shown in the small Preview window.
To apply a different color to the connector, open the Line dialog with the context
menu.
Changing Font Type and Size
If you want to change the font type and size, you should do so using a Style, so that
you only have to make these changes once. Click in one of the frames and open the
Chapter 12
Working with Presentations
379
Stylist. The Graphics Style Object with shadow is selected. In the context menu,
choose Modify to open the Graphics Style: Object with shadow dialog, and click on
the Font tab to define the desired font type and size. After you click OK, the text in all
of the frames will be displayed according to your settings.
Modifying Colors
To assign a different color to a frame, use the mouse to drag a selection frame around
the respective frame. Select Area in the context menu to open the dialog of the same
name.
Select a color on the Object Fill tab. Further design options are available with the
various color schemes in the Gradients tab. Choose one of the existing color gradients,
all of which can also be edited and modified.
Further Information
Using a Snap Grid. To work with greater precision, you can also use the grid function. To display a grid, click the option Use Snap Grid on the tab Grid under Tools Options - Presentation. In addition, you can also select Visible Grid to help you
position the objects more easily.
Editing gluepoints. The connectors are linked to the control points in the middle of
the sides of the objects they connect. Using gluepoints, however, you can dock the
connectors to every point on an object. Detailed instructions are found under "Glue
Points" in the StarOffice Help.
Using the StarOffice Help
Do you need further information? Use our extensive StarOffice Help. The following
search terms are available for this topic:
380
■
Grouping
■
Snap Lines
■
Connectors
■
Glue Points
StarOffice 5.2 User's Guide • June 2000
Recar Shareholder Meeting
You can use the "Recar Shareholder Meeting" sample document to work with crossfade effects in a presentation. Watch the presentation and then change the built-in
effects to suit your taste.
StarOffice comes complete with a sample document for a presentation with crossfade effects. The Recar Shareholder Meeting document is located in the Samples Presentations folder. We will be working with this sample document in the
following example, and you will learn how to adapt it to your own personal requirements.
Chapter 12
Working with Presentations
381
■
Open Samples in the Explorer by clicking the plus sign in front of the name.
■
Double-click the Presentations subdirectory.
■
A new task displays all documents in the Presentations folder for you.
■
Double-click the "Recar Shareholder Meeting" document. Now you see the first
slide of the presentation.
■
You can start the show with Ctrl + F2. Then use the left mouse button to switch
from one effect to the next through the presentation.
If there are no animated objects on a slide (for example text that runs into the image
or objects that fall onto the image from above), then clicking with the mouse will take
you to the next slide. If there are animated objects, clicking will run the next
animated effect until you have gone through all of the effects, after which clicking
with the mouse will take you to the next slide.
To move quickly through the slides while the presentation is being shown in order to
view a particular slide quickly, for example, your best option is to use the Page
Up/Page Down keys. Doing so brings up the previous or next slide immediately
without activating the animated objects on the current slide.
You will see both types of effects in the Recar Shareholder Meeting presentation:
animated objects on individual slides and animated transitions between slides.
Inserting an Animated Effect into the Presentation
■
Activate the Drawing View, e.g. go to the View menu and select Master View Drawing View.
■
In the Drawing view, switch to the "Micro 1300 GL" slide (see illustration).
■
Click the Effects icon on the Main Toolbar to display the Effects window. (If the
document appears as read-only, click the Edit File icon on the Function bar so that
the Main Toolbar will remain visible and you can edit the document.
■
Click the Preview Window icon in the Effect window. The preview window
displays a reduced depiction of the current slide. Click the preview window to
start the preview for the current slide.
As you can see, there is a text effect on the slide. The text appears to come together
slowly from randomly placed pixels. This effect is called "dissolving". It can be found
in "Other" effects. Text effects are applied automatically one after the other on each
paragraph of the text.
382
StarOffice 5.2 User's Guide • June 2000
If you click the text in the preview window, you will see the effect again. But if you
click the text in the document, the applied effect will be displayed in the Effect
window. Clicking the background of the slide in the preview window (in a place
where no objects are present) displays all effects, both those during the transition to
this slide and the objects in the slide.
■
To assign another effect to the text, first select the text by clicking it.
■
Now select the desired effect in the Effect window. Click the Assign icon to link
the effect to the selected text.
Assigning a New Effect During Slide Transition
The slide transition effects can be best viewed and assigned in the Slide view.
■
Click the Slide View icon (the third from the top on the right border of the Document window).
You can see the slides arranged to form an overview on the slide table. Each slide that
has a transition effect has a small slide transition icon under it on the left.
■
Click the slide transition icon.
You can see the assigned effect directly on the slide table. The slide Object Bar contains
the most important properties of the slide transition. You can also modify them there.
To run the presentation automatically, you must select all slides and assign "Automatic" to them as a transition (use the slide Object Bar). Then you can indicate a delay
time between slide transitions in the Time field. If you start the "Presentation with
Time Keeping" (icon in the slide Object Bar), StarOffice Impress will automatically
enter the time assigned to each slide for you. During the "Presentation with Time
Keeping" you will see a timer that runs during the presentation with information
about the delay time.
■
Open the Slide Transition window by choosing the Presentation - Slide Transition menu command.
In the Slide Transition window you can select the effect that will be created when
switching to the current slide.
■
Select an effect and click Assign. You can then select another slide in the document. The Slide Transition window can remain open.
Chapter 12
Working with Presentations
383
Further Information
Linking OLE Objects. On the "Margin" and "Sales Forecast" you will see two examples of linked OLE objects, a table and a chart. The easiest way to insert OLE objects
into a presentation is to drag them with Drag&Drop from your document into the
target slide. Note, however, that if you are recreating the presentation to show it on
another computer, you must make sure that all the linked objects are available on the
new computer.
Using StarOffice Help
Do you need more information? Then use our extensive StarOffice Help. The
following search terms are available for this topic:
384
■
Effect
■
Sound
■
Animation
■
Slide Transition
StarOffice 5.2 User's Guide • June 2000
CHAPTER
13
13
Working with Drawings and
Graphics
Here you can learn how to create drawings and graphics using StarOffice by referring
to the practical examples.
Naturally, there is no AutoPilot for creating drawings and graphics. You can either
open an empty document and design all the elements yourself, or work with the
sample graphics (e.g., the clip-art collection in the Gallery) and the StarOffice
templates.
Since the spectrum of applications for graphics is so varied, it is impossible to provide
samples for every purpose. Still, before you start drawing and designing your own
graphics, you should check whether there is a document template that suits your
needs.
The following solutions for the various application areas are based mainly on the
provided document templates, so you can follow along with the described steps.
Graphics for Personal Use
Here you will find a few examples of working with graphics for personal use.
385
CD Covers
If you have access to a CD recorder, also known as a "CD burner," the possibility of
creating an original cover for your CDs should be of interest to you. With the provided
StarOffice template, you can create a custom-designed cover in a matter of minutes.
Creating a CD Cover from a Template
Select the desired template in the New dialog by using the menu File - New - From
Template.... Select the entry Miscellaneous from the list field Categories and the entry
CD from the field Templates.
In the following, you will be editing the document, not the template. If you would
like to make permanent changes to the layout, you have to edit the template. To open
the template, go to the File menu and click Templates - Edit.
After having opened the document you can start editing it. The cover is made up of
two parts.
In order to fill both parts with text double-click into them. Use the context menu to
select font, style and sizes.
Insert graphics into the document if you wish and place them where you want.
After you have finished designing the cover, you can save it, print it and cut it out
along the guides.
386
StarOffice 5.2 User's Guide • June 2000
Further Information
Graphics in Circles. Drag open a circle and position it in your document. Select Area
from the context menu to open the Area dialog. On the Bitmaps tab, click the Import
button and select a graphic to insert in the circle. Of course, you can also use other
draw objects as well, such as polygons or rectangles.
Using the StarOffice Help
Do you need further information? Use our extensive StarOffice Help. The following
search terms are available for this topic:
■
Bitmaps
■
Main Toolbar
Chapter 13
Working with Drawings and Graphics
387
3D Globe
By following the directions below, you will create a three-dimensional world globe in
just a few steps with StarOffice.. You will be able to rotate the finished world globe in
any which way you want with the mouse.
Creating Texture on a 3D Object
Just a quick note before we start: If you only need the world globe shown here and
don't want to learn how to create one yourself, then you should use the globe we have
provided for you. Open the Gallery and then the 3D theme and you will find what
you are looking for. Open the Beamer and simply drag the globe into your document.
To create a 3D world globe, first open an empty drawing document, insert a sphere
into it and then create a map of the world from the Gallery as texture on the sphere.
You can then adjust the illumination.
388
■
Open an empty drawing document with the Drawing command on the Start
menu. Now you can see the new document and the associated toolbars.
■
At the left of the Main Toolbar, open the 3D Objects floating bar. Select Sphere on
the floating toolbar.
■
Hold down the Shift key and draw a rectangle in the document. This lets you
create an exact sphere.
■
Open the Gallery in the Explorer by clicking the plus sign in front of the name. In
the Explorer you can see the list of Gallery themes as Gallery subdirectories.
StarOffice 5.2 User's Guide • June 2000
■
Double-click the Clipart topic. The Beamer will open automatically and display the
graphic images.
■
Click the rectangular world map (world1.wmf).
■
Hold down the Shift and (Ctrl) keys and drag the map of the world onto the
sphere. This lays the map of the world on the sphere as a texture.
The texture is laid onto the sphere in its original size in the default setting. Since the
map of the world is much larger than the sphere, you see only a small segment as a
green area on the sphere. This will soon be changed.
■
Click the sphere to select it.
■
Display the context menu for the sphere and select the Area. There you will see the
Area dialog and the Areatab.
■
Click in the Bitmap field and remove the selection before Tile. Close the dialog
with OK.
Now you can see the map of the world as texture on the sphere. StarOffice has automatically selected the most appropriate projection method, as you can see clearly if
you click twice on the sphere and then rotate it.
On the Other tab under Tools - Options - General... you can specify if you want to
move 3D objects in full display.
Chapter 13
Working with Drawings and Graphics
389
Illuminating a 3D Object
Now you need to provide illumination for the world globe. Select an overall blue illumination, for example, so that the oceans will have a blue color, and a yellow highlight
that will shine on the side of the earth facing the sun.
■
Select the world globe since the illumination preferences you set always refer to the
currently selected object.
Open the 3D Effects window by clicking the 3D Controller icon at the bottom
of the Main Toolbar.
In the 3D Effects window, click on the Illumination button. That's where you
can change the default setting of the light source to "blue" and move it down
and to the left. Then click Assign. You can also have a second light source in
"yellow" shine on the earth from the above right.
Further Information
Take a look at the 3D Effects window. The individual tabs and icons are described in
detail in StarOffice Help. We give just a brief overview here:
3D Effects: Favorites
Here you can see a few special effects that you can use on the 3D object. If you want to
save a few interesting effects so that they are available for selection on this tab, file the
appropriate 3D object in the Gallery, more specifically in the 3D topic folder.
390
StarOffice 5.2 User's Guide • June 2000
3D Effects: Geometry
In this section, you can control the quality at which the surface is geometrically calculated and displayed. You can produce interesting effects by deliberately reducing the
number of segments of a sphere, for example. Properties of the 3D font, such as the
slant of the edge (bevel), depth, etc. are determined here.
3D Effects: Shading
Here you can specify the setting of the shader (flat, phong or Gouraud) to be used to display
the 3D object. Gouraud provides the best shading, but requires the most computing time.
You can also specify a shadow for the 3D object here and select the camera distance
and focal length.
Chapter 13
Working with Drawings and Graphics
391
3D Effects: Illumination
You can control the illumination of the selected 3D object in a variety of ways. In addition to the general ambient light, eight additional light sources are available, all of
which you can align, adjust for color, or turn on and off individually.
3D Effects: Textures and Material
With these two sections you control the appearance of the surface of 3D objects. The
numerous possibilities are presented for you in the StarOffice Help.
Using StarOffice Help
Do you need more information? Then use our extensive StarOffice Help. The
following search terms are available for this topic:
392
■
3D objects
■
3D effects
StarOffice 5.2 User's Guide • June 2000
Graphics for Business Use
Do you need professional graphics for your office? StarOffice offers a wide variety of
options to cover all the graphic needs in your company.
Posters
Here you'll find a solution if you need a poster for your next open house, office party
or any other purpose. With a little imagination - and StarOffice - you can create a
lively, eye-catching poster.
StarOffice includes a few sample posters. Automobile is one such poster, found in
the Samples - Drawings folder of the Explorer. Use it as an inspiration for creating
your own poster!
Chapter 13
Working with Drawings and Graphics
393
Creating a Poster
Open a new drawing document (File - New - Drawing).
Click on the blank slide and in the context menu, select Slide - Page Setup.... The Page
Setup dialog will appear containing two tabs: Page and Background. Define the
format, orientation, as well as the margins of the page on the Page tab.
Switch to the Background tab. Choose a background from the default colors, gradients, hatching and Bitmaps.
Next, select the Text tool in the Main toolbar, click on the slide and enter your
text. The text frame adjusts to fit the length of the text automatically.
To rotate the text, click the Rotate icon (click Main toolbar then Effects floating
toolbar). Then use the mouse to rotate one of the corner points of the text.
Type in additional text with the Text tool. Use the options in the context menu to
format the text, and then position it anywhere on the slide.
Use the Draw tools in the Main toolbar to insert additional objects.
After you have finished designing your poster, you can save, print and close the document.
Further Information
Creating a Poster with a small Background Picture. If your graphic image doesn't
cover the entire background of the poster, you can take a small picture and position it
in the middle of your document.
Distorting Graphics. To create interesting effects for vector graphics, use the distortion function. Select the graphic image and open the Position and Size dialog via the
context menu. Click the Slant/Corner Radius tab and specify the desired angle of
distortion under Angle. You can also define a negative value for the angle.
Tiling Pages With the tile function, you can print a document with a large format
using a printer which uses a small format, e.g. print a 34"x44" document on a printer
for 8 1/2"x11". In the Print dialog, click the Properties button and set the paper
format on which you will be printing. Next, click Options in the Print dialog and
select Tile pages under Page Options. The document will then automatically be
distributed over four pages and printed. This function works the other way around,
too: e.g. if you select the 8 1/2"x 11" paper format but your document has a format
half the size and you select Tile pages, your document will be printed twice on one
sheet of paper. The enlargement or reduction occurs automatically in whichever
direction is necessary.
394
StarOffice 5.2 User's Guide • June 2000
Using the StarOffice Help
Do you need further information? Use our extensive StarOffice Help. The following
search terms are available for this topic:
■
Area
■
Graphics
■
Lines
■
Position and Size
Chapter 13
Working with Drawings and Graphics
395
Logo Workshop
We have included a brief introduction in several steps to show you how to use 3D text
passages and procedures to create a logo.
The Workshop document is located in the Samples - Drawings folder. The following
section describes this sample document.
Designing 3D Objects from Font Characters
396
■
Open the Samples/Drawings/Workshop document. Switch to the "Step 1" page.
■
To do the practice exercise, you should also open an empty drawing document
(use File - New - Drawing).
■
So that you will see the two documents side by side, drag the button from the
empty drawing document, "Untitled1" on the Task Bar to the "Workshop" button
on the Task Bar. This combines the two documents into a single task and the
contents of the documents will be shown next to each other on the screen.
StarOffice 5.2 User's Guide • June 2000
Step 1: Create a text box containing a single capital letter. You can format it with a
character set of your choice. Then set the font size to about 400 pt. This font size is just
to let you check: when you convert to 3D the text will take up exactly the space you
have drawn for the text, independent of the font size you selected.
■
Draw the text box with the Text icon on the floating bar of the same name on the
Main Toolbar. Select the letter and then manually enter 400 in the Size field in the
text Object Bar. Then you can select another type face, such as bold.
Step 2: Select the text field with the letter and choose Convert - To 3D on the Modify
menu. You can modify the color of the object by selecting Area on the Format menu.
Of course it is also possible to assign a gradient or a bitmap graphic to the object.
■
After you have switched to the Step 2 page in the "Workshop" document, click
again in the other task window and select the letter "S" again.
Step 3: The 3D object can be modified in a different way. Select the object and then
select the Format/ 3D Effects menu item. The options available include options for
setting the depth of the object and the focal length of the camera. In addition, you can
set the individual illumination and the texture model.
■
The sample object was given its special shape by adjusting the camera to an
extremely short focal length.
Chapter 13
Working with Drawings and Graphics
397
Step 4: Now let's add some handwriting to the logo. Insert a text box with the name of
the company and format as you like. If you want a border around the handwriting,
you will need to convert the text to a polygon. You can do this with the Modify Convert - To Polygon menu item. Of course, the surface of the newly created object
can also be modified.
■
For a border around the company name, convert it into polygons. Then you can
select a line width greater than 0.00 and a line style not equal to "transparent" on
the object bar to make the borders of each letter visible.
Step 5: You can create a simple drawing object as a background for the logo, for
example an ellipse. Use the Modify - Position menu item to place the object all the
way to the back. Congratulations on creating your own logo with StarOffice!
■
Note that the you can also access the functions through the context menu instead of
menu commands, which makes for less work with the mouse.
This is a perfect 3D logo, created with StarOffice in only five easy steps!
Further Iinformation
Using Snap Lines. You can make it easier to align objects by using snap lines. Drag
the lines from the rulers to the desired position. Objects will be pulled (snapped) into
place when they get close to the snap lines.
Using a Grid. To work with great precision, for example to place rectangles one on
top of the other, you can use the grid function. To turn on the grid, click the Snap to
Grid option in the Tools - Options... - Drawing - Grid register. As an additional aid,
you can also select Visible Grid. This makes it easy to place documents exactly on
top of each other in the document.
Using StarOffice Help
Do you require additional information? Then use our extensive StarOffice Help. The
following search terms are available on this topic:
398
■
3D effects
■
Snap Lines
■
Line Style
■
Polygon
StarOffice 5.2 User's Guide • June 2000
Construction Drawing
Here you will find an example of how to create a construction drawing using StarOffice.
StarOffice includes a sample document for a construction plan. The document
Engine is found in the folder Samples - Drawings.
Creating a Construction Plan
Click the Rectangle icon and drag the floating toolbar into your work area. Then,
select Curves and Lines and Arrows and drag these floating toolbars into your work
area as well. Choose a tool with which to begin, e.g. Rectangle, and use it to drag open
an area to represent the first surface. Finally, draw in the details with the Line tool.
Chapter 13
Working with Drawings and Graphics
399
Using Snap Lines
It is advisable to use snap lines to help you position lines and objects more precisely.
Snap lines are lines which are visible only on the screen and are used for the sole
purpose of precise positioning and alignment. You can create an unlimited number
of horizontal and vertical snap lines.
To display a snap line, click on a ruler and hold down the mouse button to drag it into
your document. To move the snap line, rest the mouse pointer on it until a double
arrow appears. Shift the line by holding down the mouse button and dragging the line
to the desired position. If you want to delete a snap line, simply drag it back onto the
ruler. In StarOffice Draw, you can also position snap lines in a numerically exact way
using the Edit Snap Line...command in the context menu of the snap line.
Using Dimension Lines
With StarOffice you can insert dimension lines directly into your drawing.
Drag the snap lines from the ruler into your document and position them so that there
is a snap line over every major line in the drawing. Then, click the Dimension Line
icon on the Lines floating toolbar. The mouse pointer will turn into a cross and you
can drag a dimension line directly from one side to the other, or, even better, from one
snap line to another.
To obtain an absolutely horizontal or vertical dimension line or one at a 45° angle,
press the Shift key while dragging the dimension line.
To edit the look of dimension lines, select them, open the context menu and click
Dimensions.... A dialog appears, where you can determine the appearance and position of the dimension lines.
400
StarOffice 5.2 User's Guide • June 2000
If you want to increase the space between a dimension line and the measured object,
move the mouse pointer to one of the control points on the dimension line. The mouse
pointer will turn into another icon, enabling you to either expand or reduce the space.
Working with Multiple Layers
The next step is to position the details in the motor drawing. It is a good idea to use
the layer function if you want to try out several different variations.
You can visualize layers as transparent sheets, one on top of the other, which
together form a complete picture. It is also possible to view individual "transparencies", i.e. layers.
To get a better overview, turn on the Layer view, by pressing the symbol on
the bottom left border of the work area. Alternatively, you can also activate the
menu command View - Layer (a check will appear in front of the command).
To insert a new layer, open the dialog Insert Layer. It can also be opened through the
context menu of the tabs Layout, Controls and Dimension Lines arranged at the
bottom of the screen. Enter a unique name, e.g. "Sketch1". Repeat this procedure for
another level and enter the name as "Sketch2".
Click the tab Sketch1 and position the details in your document, for instance, by
selecting clip-art elements in the Beamer and inserting them via Drag&Drop.
After you have positioned the details on Layer1, click the Sketch2 tab and arrange
elements there as well. You will notice that you can see the elements from Sketch1. To
change this, click the Sketch1 tab and call up the context menu and select Modify
Layer. In the Modify Layer dialog, remove the check from the Visible check box and
click OK to view only the Layout level and the Sketch2 level.
As a rule all layers will be displayed. If you only wish to view a particular layer, you
should deactivate the Visible field on all the other layers.
After you have completed your drawing, you can save and print the document.
Chapter 13
Working with Drawings and Graphics
401
Further Information
Using One Color per Layer. If more than one layer at a time is displayed, apply an
identical color to all elements on the same layer for a better overview.
Using the StarOffice Help
Do you need further information? Use our extensive StarOffice Help. The following
search terms are available for this topic:
402
■
Layers
■
Snap Lines
■
Dimensions Line
StarOffice 5.2 User's Guide • June 2000
CHAPTER
14
14
Applied Schedule Management with
StarOffice Schedule
Here you will find information on working with StarOffice Schedule for advanced
applications. You will find an Introduction to StarOffice Schedule in the first section of
this guide.
The Details View of Events and Tasks
You can enter and view additional information for every event and task in the Details
section .
Entering an Alarm for an Event
■
An event displays a small alarm clock when a reminder has been linked to it.
■
Select an event for which you would like to be given a reminder. The reminder can
be a sound that is triggered at a certain time before the event, a dialog that appears
on the screen, or an e-mail that StarOffice Schedule sends you or one of the other
addressees.
■
Click the event that will be given a reminder (or enter a new event).
■
Open the Details section by clicking the Details icon on the Object Bar.
You will see the Details section. Click the buttons at the left to access the various pages
of the Details section. You can drag the separator between the Details section and the
event window higher or lower with the mouse.
403
■
Click Reminder in the Details section. Now you can specify whether you want to
be reminded by a dialog or by e-mail.
■
For each reminder, you can specify how long before the event you want be
reminded, for example, anywhere from 5 minutes to as much as 2 weeks beforehand.
■
If you also want to hear a sound, select it from the sounds in the Gallery.
Aside from a dialog with or without sound, you can also have an e-mail sent to
remind yourself and others about the event.
The e-mails will be sent by the StarOffice Schedule Server, assuming that the calendar
has been put on a server. If you work locally and not with a StarOffice Schedule Server
in a network, your local StarOffice Schedule will send the e-mail provided that the
StarOffice Schedule Server or your local StarOffice Schedule is running at the time that
the reminder is supposed to be sent.
An unlimiled number of recipients can be assigned to the reminder e-mail. To do so,
go to the Details page Reminder / E-mail and click the Add button on the right. A
dialog will appear in which you can define various settings. This dialog is described in
detail in the StarOffice Help.
404
StarOffice 5.2 User's Guide • June 2000
If you want an alarm or dialog to remind you about upcoming events as soon as you
start StarOffice, you must have already set it up to do so by right-clicking the
Explorer entry Tasks & Events and to open the context menu. In the context menu,
click Properties... to call up the StarOffice Schedule Properties dialog. On the
Settings tab page, put a check in front of Start Schedule Reminders with StarOffice.
In addition, for each individual user who is supposed to get a reminder, there has to
be a check in the Display event reminders check box. This check box can be found
by going to the Explorer and single-clicking each Tasks & Events - Data Sources [computer name] and then right-clicking [user name] to open the context menu.
Select Properties... and then you'll see the check box in question on the Settings tab.
If you want to use reminder e-mails, you have to enter information concerning the
mail server that should send your e-mails, etc. A dialog will let you know which data
is missing, and then the Dialog in which you enter the necessary information will
appear.
Organizing Recurring Events
Many events occur at regular intervals, from the yearly event of tax filing to a weekly
meeting for a sports event. You only need to enter an event like this once (the first time
it occurs). Then you can specify it as a recurring event.
Let's suppose that the event is to take place starting today on each workday until the
last Friday of the following month. It always lasts from 9 to 10 a.m. except for next
Thursday, when it will goes from 11 to 12. Complicated? It's no problem with StarOffice Schedule:
Chapter 14
Applied Schedule Management with StarOffice Schedule
405
■
Enter an event today (on a workday) from 9 to 10 a.m. Hold down the mouse
button while you drag from 9 to 10, and then type in your text, for example
"process incoming mail".
■
Display the Details section if it is no longer open (Details icon in the Object Bar).
■
Switch to the Recurrence tab in the Details section.
■
Select daily recurrence and select Every Workday.
■
In the field End recurrence by click the arrow to show the calendar there with
which you can select the last Friday of the following month and click it. The event
is automatically entered into the field. Of course you can also enter the date
directly.
■
Click the event to be modified in Events view.
Now all recurrences are automatically entered, which you can verify in the Month
view. In the Week view, recurring events are identified by two arrows pointing at each
other in a circular fashion.
Instead of an end date in the Recurrence area, you could also have first had the event
repeat "continuously", i.e., forever. Then you would have switched in the Month view
to the last day on which the event took place, for example, and would have brought
up the context menu of the event from there. Then you will find the command Set as
final event of a recurring series there.
On the context menu of a recurring event you will also find the command Break off
from recurring series. This is just the right command to select to handle the event that
deviates from the series (next Thursday from 11 till 12).
406
■
Switch to the event of the recurring series that you want to handle individually.
■
Bring up the command Break off from recurring series on the context menu. Drag
the event to its new time.
StarOffice 5.2 User's Guide • June 2000
It is important that you first break the event that deviates from all the others in the
series off from the series! If you simply drag any event from a series to a new time or
change something else about it, this change will automatically apply to it and all
following events. This will therefore create a new series with the modified data. It is
only if you first break the event to be modified off from the series that the changes
apply only to this one event.
Further Details
The Details page shows you once more numerically and in overview format all the
individual details for the event or task.
In the list box Display Time As you can select how the event will be displayed, for
example "Not in Office". Another color will then be displayed next to the time bar on
the left, for example green for "tentative", blue for "busy" or red for "not in the office".
For events that are defined as "free" the color next to the time bar remains white.
You can also enter a location for the event and assign it to specific categories. The categories can be entered directly into the Categories combo box or selected from the
provided list. The category determines the color the event will have on its left border
(i.e. different colors for different categories). You can define the category colors yourself by right-clicking a free space in the event calendar to open the context menu and
using the Categories... command.
The section Working with categories describes how to delete a category that has just
been entered from the list of categories.
Finally, you can also assign a priority to the event here. Priority 1 is the highest
priority. For example, you can use filters to display only events or tasks of the highest
priority. The section below describes how to use filters (and layouts).
Chapter 14
Applied Schedule Management with StarOffice Schedule
407
You can enter additional information for each event or task on the Contents page of
the Details section.
If you have received a piece of e-mail or have created a document for an event or a
task, for example, you can drag it into the Also refer to field using Drag and Drop. A
link will be created there and then you can view or modify the corresponding document at any time by double-clicking a reference created in this manner.
It is not absolutely necessary to drag the references into the Also refer to field. It is
also sufficient to drag it into the event entry in the Event view or into the task in the
task window. StarOffice Schedule automatically assigns a reference in the correct field.
In a similar manner, if you use Drag&Drop to drag a person from your address book
into an event or task, this person will automatically be assigned to the left list box on
the Participant page. You can drag the whole line from the address book displayed in
the Beamer directly into this field. If you would rather call up the Address Book mask
with Edit - Address Book, you then simply drag the icon from the lower right corner
of the mask to the event.
Synchronizing an Event Among Several
Participants
If you are working with StarOffice Schedule on a network you can use the right area of
the Participants page in the Details section to find a time when all participants are
available. For each participant you add to the left list, you will see the times at which
that participant is already busy listed on the right. The right side is called the Participant Availability View. The context menu of the column headers contains the
408
StarOffice 5.2 User's Guide • June 2000
Options... command, which allows you to choose from a number of view options for
this participant availability display.
You can set a vertical mark in motion with the width of the event by clicking the
double arrow icon. The mark automatically searches for the next free event in the
desired direction and then remains in place at the locations where all participants are
still free for this event. You can recognize the events of the participants by the colored
bars: Green stands for "proposed", Blue stands for "busy" and Red for "outside the
office." If no data is available for the participant, the corresponding line is shown with
hatching. The uppermost line of the participant availability display sums up the
known events of all participants.
If no event of the specified length is found, you can also move the two limiting bars of
the vertical mark with the mouse, for example to shorten the duration of the event.
To move the common event to the newly found position, click the Apply New Times
icon in the far right of the Participant area. Then the event will be entered for all
participants, as long as they have access to their event calendars. E-mail is generated
for the other participants.
In the column labeled Transfer data to participants, there is an envelope icon. Click it
to decide whether or not the participant should be automatically informed about
changes to this event. If the participant should not be informed, the envelope will
appear crossed out.
As StarOffice Schedule has to know where the data is to be sent, you can only choose
to inform the participant if a Schedule URL or a Mailto URL has been entered in the
Calendar URL column. In general, this URL will be entered automatically when you
select the participant from the list, but you can also enter the necessary information
manually.
If you have activated Transfer data to participants, the event data will be automatically transferred to the participant whenever a change is made in the future. If you
entered an e-mail address as URL, the participant will receive an e-mail. If you were
able to enter a Schedule URL because you have network access to the participant's
calendar, the changed event data will be transferred directly to that calendar.
Deactivate the Transfer data to participants function if you don't want to inform them
automatically. Another way to inform them is by e-mail. Do so by calling the context
menu of the event and clicking Send as E-mail....
In the Advanced section of the User's Guide in the StarOffice Help, you can find more
information on using StarOffice Schedule on a network.
Chapter 14
Applied Schedule Management with StarOffice Schedule
409
Using Filters and Layouts
You can use the filters to limit the view of events and tasks to specific information. For
example, you can display only the events in the category "Hobby" or only tasks which
have the word "Recar" in their title. Aside from that, you can define different layouts
that will determine how the view is divided up to show different pieces of information. You can combine filters and layouts as you'd like and save them under different
names so that you can easily retrieve them at any time. You can save each combination
of filters and layouts as a view, which can then be seen in the Explorer under the entry
Tasks & Events.
Working with Categories
If you have a well filled event calendar, you have presumably already arranged the
events by category when they were entered. It is easy to do this by bringing up the
Details view and selecting the category on the Details page. To do this, select one category or several (by using multiple selection) in the Category combo box or type the
name of the categories into the box.
You can assign an event to several categories, and you can also create your own category to add to the other categories in the combo box in the Details section.
The context menu for the Day view contains the Categories... command which you
select to open the Categories dialog. You can assign a color to every category here as
well as define new categories and delete existing categories. The colors are displayed
in the Day view on the left border of the events.
410
StarOffice 5.2 User's Guide • June 2000
Limiting the View to Specific Events and Tasks
There are two ways to limit the view to certain categories or with other filter conditions: You can either use a temporarily valid filter, or define a filter which you give a
name to then be able to call it up later under that name. Both take place in the same
dialog which we describe here using the Event Filters dialog as an example. The Task
Filters dialog is almost identical.
If you want to define a filter which only shows the events from the "leisure" category
you have defined, follow these steps:
■
Bring up the context menu in Events view.
■
Select the Filter Set - Define Filter... command. You can also run the View Define Event Filter... command from the toolbar, but since almost everything in
StarOffice Schedule is controlled by context menus, you will probably want to give
preference to the context menu method.
■
You'llsee the Filter for Events dialog with the Settings tab. Here you can enter a
filter condition directly and click OK if you only want to use a temporary filter
(without assigning it its own name).
■
If you want to actually name and save the filter, however, then switch to the Selection tab.
■
Click New. You will see the Create New Filter dialog.
■
Give the new filter a name. If you have already created a few (complicated) filters,
use the dialog to choose to create the new filter as a copy of an already existing one.
In that case, you only have to make modifications and not define it from scratch.
Chapter 14
Applied Schedule Management with StarOffice Schedule
411
■
Click OK. Take a look at the check box Selection enabled in this view only. If
there is a check in it, the newly defined filter will only be available in the context
menu of the current view - as soon as you choose a different view, for example, in
the Explorer, this filter will no longer be available. That means that filters which
you need for leisure and hobby events do not show up in the views that you use
for work. (New views can be defined via the context menu of the Tasks & Eventsentry in the Explorer.)
■
Switch back to the Settings tab and now enter the category "leisure" or select it
from the combo box.
■
Click OK to end the Event Filters dialog. Now only the events which meet the filter
conditions are displayed.
If you want to remove the filter so that you can see all events again, you will find the
command in the context menu of the events view. It is called Filter Set - Turn Filter
Off.
Using Various View Layouts
Working with layouts is similar to working with filters. A "temporary layout" without
its own name is not possible, in contrast to the "temporary filters" described above.
You always edit the layout named in the Title bar of the dialog. There is always a
specific layout set for the view, but filters can be turned on or off as desired.
If you want to define a layout that shows the events compressed into a small space,
proceed as follows:
412
StarOffice 5.2 User's Guide • June 2000
■
Click an empty area in the Events view to call the context menu.
■
Choose the Current Layout - Define Layout... command. Alternatively, you can
use the View - Define Event Layout... command in the Menu bar; however, since
nearly everything in StarOffice Schedule is controlled via context menus, you
might prefer to use the context menu alternative.
■
The Event layout: Default Layout dialog is displayed. In accordance with the
above description for the filter, you can change here to the Selection tab, create a
new layout and then define its properties on the various tabs for Day and Month
views.
In the Event Layout dialog, you can specify how the time scale and the Month view
should appear and which days of the week belong to the workweek. Take a close look
at the tab pages. The tab pages Sort, Group and Columns are used to define the look
of the List view of events (Event list; click the List icon in the Object bar).
Finding Events
The convenient search features of StarOffice make it simple to find a specific event
again once it is recorded.
You can start a search by clicking Search On/Off (the icon with the binoculars) in the
Object bar. You will see the StarOffice Schedule search window which displays two
buttons: Conditions and Additional Conditions.
■
Enter the conditions by which you want to limit the search. If you want to see all
events in which the word "leisure time" occurs and whose end falls in the last
week, enter the word you are searching for in the Title Contains text box and select
the condition "End - last week" next to Date.
■
On the Additional Conditions page, if you wish you can add an additional condition, for example "location contains Hamburg". The conditions you put together on
this second page will be accepted into the large list box with the Add button. If you
add several conditions, they will automatically be linked by AND. All of the conditions must therefore apply for the event to be found.
Chapter 14
Applied Schedule Management with StarOffice Schedule
413
■
Switch into the event in which you want to see the event that have been found. In
the Day and Month view you can move to the next event that matches the search
conditions with the arrow keys. In the List view, on the other hand, you see all
events that were found at once.
Note that a filter set by you still applies and limits the search accordingly.
■
Then click one of the search buttons, either forward or backward, or on the Update
button. You will only see the Update button in the Events list. The other two
buttons also appear in the Day, Week and Month views.
■
If you want to close the search window, click Exit in the search window or click
again on the Search On/Off icon.
Further Information about Events
The Day, Week and Month views and the List view can be configured on the most part
using the context menu commands.
Displaying Weekends
414
■
On the context menu for events view you can select between Monday or Sunday as
the beginning of the week.
■
In the context menu of the workweek view you will see the Workweek... command
with which you can specify which days are part of your normal workweek.
■
In the context menu of the column headers in a Month view you will find a
command for displaying weekends. This command only effects the Month view.
You have a choice between the normal view of Saturday and Sunday, weekends
hidden or a horizontally or vertically subdivided view of Saturday and Sunday
where the two together take up the area of a single weekday.
StarOffice 5.2 User's Guide • June 2000
Showing and Hiding Days and Weeks
In the Week view as in the Month view, you can hide certain days from view. You will
find the command for hiding days in the context menu of a column header.
In the Month view, you can show and hide weeks. To do so, call the context menu of a
day or week and select Weeks in the submenu that appears.
To hide a certain day, call up the context menu of that day by clicking the respective
column header. If you want to hide a particular week in the Month view, you have to
call up the context menu of one of the days of that week (not in a column header and
not on an event).
The easiest way to hide days and weeks or to show them again is by using the
calendar. It has certainly occurred to you that there is a close connection between the
display in Events view and the display in Calendar.
■
Just for practice, call up the Multiple Workweeks view. You will also see which
days are now shown in the event overview in the calendar.
■
Hold the Shift key down and click additional weeks in the calendar. The view in
the Events view changes correspondingly when you change the selection in the
calendar. This also applies in the Week view if, in the calendar, you remove individual days from the selection while pressing the Ctrl key. These days will not be
shown in the Events view.
■
Now switch to a week or workweek view. Then hold down the mouse button and
drag over a few days in the calendar to select them. The Events view shows you
precisely these days.
Chapter 14
Applied Schedule Management with StarOffice Schedule
415
The Task View
In addition to the Events view, StarOffice Schedule offers you an additional view that
shows you only tasks. This view can be accessed by clicking the Tasks icon in the
Object bar.
Preferences that have already been set in Events view are available for you in the Task
view. All tasks you specify here will also be taken over into the Events view and
displayed there in the area for tasks.
Data Transfer and Data Security
When you open an Event or Task view, you will see several commands in the StarOffice menu bar which are used for exchanging events with other applications and
storing the events and tasks.
In the File menu, the Import... and Export... commands can be found. To exchange
data with other applications, the vCalendar Format is often used. StarOffice Schedule
also provides many other file types to choose from.
In the Tools menu you will find the Archive... command which opens a dialog that
helps you to be able to export events and tasks to a file. This file can be read in again
later via File - Import....
416
StarOffice 5.2 User's Guide • June 2000
The StarOffice Schedule Server
If you don't work with StarOffice Schedule on a network, then your events will be
managed locally. If, for example, you set reminder e-mails to be sent, StarOffice
Schedule will send them when appropriate, provided that StarOffice is running at that
time.
If you work on a network, all colleagues should set up their calendars on a StarOffice
Schedule Server. That way, everyone has access to the events scheduled by other
colleagues (assuming that they allow access). Reminder e-mails are then sent at the
defined time by the server and colleagues with calendars on a StarOffice Schedule
Server which can be reached over the network can receive invitations and change
notices directly (i.e. they will immediately appear in their calendars).
The StarOffice Schedule Server is a software application, which is installed on your
computer independently of StarOffice. More detailed information about the installation and administration of the StarOffice Schedule Server can be found in the StarOffice Help.
Chapter 14
Applied Schedule Management with StarOffice Schedule
417
418
StarOffice 5.2 User's Guide • June 2000
CHAPTER
15
15
Working Online
Working with StarOffice online includes e-mail, newsgroups, web browsing, and
more. A description of all aspects concerning StarOffice and the Internet (browsing,
HTML, homepages) is provided in the StarOffice Help.
E-Mail
Here you will learn the most essential information for using e-mail. You will see how
to set up your e-mail accounts, design messages, and create broadcast mail messages.
Setting up an E-mail Account
It is a must to set up an e-mail account in order to send and receive e-mails. Once you
have set up your mail account you can actively participate in the exchange of mail
directly out of StarOffice.
Setting up StarOffice Mail on Your Computer:
StarOffice Mail supports e-mail accounts that use the protocols SMTP/POP3, IMAP4
and VIM. Ask your Internet provider if they provide a compatible mail server, how it
is to be addressed, what your e-mail address and your password are. If your provider
confirms that SMTP/POP 3 or IMAP4 are supported, you can process your e-mail
with StarOffice. The VIM protocol is mainly used for internal company mail exchange
via Intranet.
In order to be able to use the e-mail functions you have to enter your e-mail address
under Tools - Options - General - User Data.
First of all create a POP3, IMAP or VIM account under StarOffice.
419
■
You can either click on any folder or on a free space in the Explorer and then call
up the context menu. Select one of the following commands: New - POP3
Account..., New - IMAP Account..., or New - VIM Account.... The account will be
created as a new entry in the area where the command has been called.
■
If you want to set up several e-mail accounts and news servers, it is advisable to
enter the pertinent information under Tools - Options - Internet - Mail/News.
These details will then be used automatically as default entries in the appropriate
fields when a new account is set up. This means that you only have to change
specific entries for the individual accounts on the properties dialog, e.g. under
"User-defined settings" on the Receive and Send tabs.
In addition to your e-mail account which accepts the e-mails sent to you, you also
need an outbox in which you can keep the e-mails (and messages for newsgroups) you
have posted. If you are not permanently online, the outgoing e-mails will remain in
the outbox as unsent mails until you go online again. These e-mails will then be transmitted to the mail server without any further steps being required. The online/offline
mode is regulated by the Online icon in the Function bar.
After creating a news or mail account for the first time, StarOffice will query you if it
should automatically set up an outbox. If you do not want to take advantage of this
functionality, use the New - Outbox... entry from the context menu which has been
called up from an empty space on the Explorer so that an outbox can be created in the
Explorer.
420
StarOffice 5.2 User's Guide • June 2000
You only need to create one outbox. If you write new messages and e-mails by
calling up the command New - Message from the context menu of a mail or news
server, the outbox automatically "knows" that the message it to be sent to that server.
The information about which server is to receive the message in an unchangeable
component of a message.
You can create several outboxes, but these will only be different views of the actual
outbox. If you have set up several outboxes, you can use the Rules to determine that
a specific outbox only shows the e-mails that you have sent to a particular addressee
or particular newsgroup. Simply hide all other contents by creating an appropriate
Rule (context menu of the outbox - Properties... - Rules).
E-mails that have or have not yet been sent will remain in the outbox, which means
that you can simultaneously use it as a transmission journal. You are able to delete
e-mails from the outbox if you want - this simply moves them to the Recycle Bin and
you can then decide if they are to be irreversibly removed from the system.
Further Information
Use several accounts. You can set up several mail accounts if you have several
providers. Open the Properties dialog in the other accounts and enter the applicable
personal settings for the account on the Receive and Send tabs. To send mail via a
specific account, choose the New - Mail command on the account's context menu.
Divide Outbox. There is only one Outbox, but you can set up several views of the
Outbox. To do so, use the New - Outbox... command in the context menu (click an
empty area in the Explorer). In each of the new views, you can use rules to determine
what the Outbox should show.
Using the StarOffice Help
Do you need further information? Use our extensive StarOffice Help. The following
search terms are available for this topic:
■
Mail Servers
■
Outbox
Chapter 15
Working Online
421
Sending and Receiving E-mail
Here you learn what is needed to send and receive e-mails.
How to retrieve your e-mails
In order to be able to retrieve the e-mails that are waiting for you on the mail
server, you need to make a distinction between the online and offline modes,
which are called by using the Internet Online/Offline icon in the Function bar
Retrieving Mail while Continuously Online
Click the e-mail account entry in the Explorer. (You need to have checked the
command Update When Opened in the context menu of the server entry. If you have
activated the hierarchical view of the Explorer you need to double-click; if you have
the icon view of the Explorer, simply single click.). If the check box Include in update
function has been activated on the Contents tab of the account properties dialog, you
only have to double-click the Globe icon (which blinks when you've got new
messages) on the bottom right of the Task bar.
You can also determine on the Contents tab that the mails are updated at regular
intervals, e.g. every 20 minutes. If you do this you do not have to call up your mails.
When the automatic update function recognizes that there are new mails, the message
icon in the Task bar will blink. The StarOffice Help also describes how you can link a
sound (under Windows) to denote the arrival of new mail.
Retrieving and Reading E-mails Offline
If you only connect to the Internet when needed (e.g. by telephone or modem), you
should operate your StarOffice in the offline mode; the Internet Online/Offline icon
on the right of the Function bar is not pressed in. When StarOffice requests a file or
other information from the Internet, e.g. an automatic updating of a server account
(see. above) or by double-clicking a FTP server entry in the Explorer or by clicking on
a hyperlink pointing to the Internet, you will first see a message advising you that you
are currently working in the offline mode together with the query if you want to
switch to the online mode. This procedure protects you from unwanted connection to
the Internet.
Open the context menu of the account and select the Update command. You can also
double-click the account entry as long as the Update When Opened command from
the context menu has been checked. In the icon view of the Explorer, a simple click
will be enough; in the hierarchical view, however, a double-click will be necessary for
opening your messages. After confirming, StarOffice accesses the Online mode,
422
StarOffice 5.2 User's Guide • June 2000
retrieves your e-mail from the provider's server, and also sends any unsent messages
contained in the outbox.
The message document with the list of e-mails or newsgroup contributions will now
appear.
The senders, subjects, dates and times of the new e-mails will be displayed in the
message document. E-mails that have not been read will be shown in bold type, those
already read will be in normal type. By clicking on one of the column headers you can
sort the e-mails according to this criterion. Another click on the headers reverses the
order shown. The context menu of the column headers contains commands for regulating the view of this overview area.
You can see the content of an e-mail in the content area of the message document if
you click the corresponding line in the overview area. By holding down the Ctrl key
and double-clicking an entry you can view the message as an independent task.
E-mail attachments are displayed in their own area. If you want to view an attachment, simply click the entry for the corresponding mime type of the attachment. The
name of the attachment opened will be shown in bold. The context menu of an attachment contains commands for opening and saving the attachment as a file. The easiest
way to save an attachment is to move it from the attachment area to a folder by
Drag&Drop.
If you have received a mail which contains several attachments, they can all be
selected and opened or saved at the same time.
StarOffice treats the contents of e-mails and messages as text documents. This means
you can apply all of the StarOffice Writer formatting options (as well as many other
capabilities) to your e-mails and messages. However, the addressee will only be able
to view the additional formatting if they are using StarOffice.
If you find the font of your message to be too small, you can define a font size for
ASCII texts in the Soffice.ini file located in the StarOffice directory. Enter the
following line with the required value into the [INet] section:
MailTextFontHeight=X. (The X denotes the size required.) If you do not use this
option, StarOffice automatically uses a font size of 10.
Chapter 15
Working Online
423
On the View tab of the e-mail account property dialog, you have the option to delete
a received e-mail from your server. This settings work in correlation with the option
whether a message is to be save locally: if you've checked "save locally" and "delete
from server", then the new mail will be deleted from your server directly after
loading it to your hard drive. If save locally isn't activated, the e-mail will only be
deleted from the server after you have deleted it from your mail account (which
moves them to the Recycle Bin) and then deleted them from the Recycle Bin.
If you delete a selected mail with the Shift + Del keys instead of just the Del key, the
message will be immediately deleted without passing thorough the Recycle Bin.
The e-mail header area contains the standard e-mail information. Use the context
menu of the mail account entry in the Explorer to define the information you want to
see in the header area. Select the Properties... command and go to the Headers tab.
Now check the information you want to have displayed in the header and you can set
the font, font size and sequence under the Display sub-tab.
Use the context menu to add the address of the sender quickly and easily to the
address book. Position the mouse on the sender's name and right-click to call the
context menu.
Sending E-mail.
E-mails are initially collected in the Outbox. It is, therefore, obvious, that you would
compose a new e-mail by using the New - Message command contained in the context
menu of the Outbox. This is, however, only recommended if you are using a single
provider. When reading e-mails or postings from newsgroups or looking at the
contents of your outbox, you will see the Message bar will appear at the top of your
screen which contains the New Message icon. This icon also opens a message template
for composing e-mails. You are also able to activate this function by using the File New menu or by pressing the Start button in the Task bar and selecting the Mail
command to open a new e-mail template.
If you are using more than one mail account, you should open the context menu of
the appropriate account and call the New - Message command. This ensures that the
message is sent through the correct account.
The description of the Explorer in the Help contains the relevant information of how
to complete a message document or fill out an e-mail form.
■
424
Open the address database in the Beamer to drag an e-mail address to the
addressee field (using Drag&Drop). To open the address database in the Beamer,
place the cursor in the contents area (where you enter the e-mail text), then press F4
(don't forget to activate the stick pin!).
StarOffice 5.2 User's Guide • June 2000
■
If you simply enter the name or e-mail address of the recipient in the text box,
StarOffice will complete the entry as soon as the first few characters match an
existing entry in the Address Book. The contents of the fields EMAIL and NAME
are used for reference. When the last name is found, the address will be entered as
follows: "[Name], [First name]" <eMail>. If the AutoComplete suggestion is wrong,
simply continue writing and it will be overwritten.
■
If you want, insert a signature by using the corresponding icon on the Object bar:
several of these of contained in the AutoText.
■
To send attachments, select the file directory on the left in the Explorer (under
Workplace) and the required files in the Beamer, then drag all the files to the
attachment area in the message document. You can also send attachments by
choosing Attach File... on the context menu in the attachment area. The Open
dialog appears, in which you can select files and attach them to the message.
Click the Send icon in the Function bar or in the Message bar to send the
completed e-mail or message.
The e-mail or message will be put into the outbox by clicking on theSend
Messageicon. If you are in the online mode, a copy will be sent directly to the server of
the Internet provider.
If you are in the offline mode, (the Internet Online/Offline icon in the Function bar is not activated), the message will be sent as soon as you go online
again (by either activating the Internet Online/Offline icon, or by selecting
Update from the context menu of the outbox).
Saving Mail to Send Later
You can save an e-mail or newsgroup message you are writing as a file. You can open
it again later, edit it or complete it and then send it (and/or save it again).
■
Click the Save Document icon in the function bar or close the unsent message. If
you close a unsent message by clicking in the upper right hand corner, a dialog will
appear to offer one of the following options: Send, Save, Discard or Back to
message. If you select Save, a File selection dialog will appear to save the message
as a document. This message document can be opened by the normal "open"
command, and can be re-edited or sent.
■
Select Send Message to move the message into the outbox. If StarOffice is currently
online (the online icon in the function bar is activated), the message will be sent to
the corresponding server. If you are offline, the message in the outbox will be sent
the moment you go online again. It is no longer possible to edit your message at
this stage.
Chapter 15
Working Online
425
Sending E-mail to Multiple Recipients.
If you always send e-mail to the same list of recipients, you can create a Distributor for
your e-mail as follows:
■
Create a link on the Desktop or in the Explorer.
■
Enter "Newsletter Distributor" as a name, for example.
■
Enter a target URL, such as
"mailto:Username1,Username2,Username3?Subject=Newsletter". Instead of username1, etc., enter the appropriate e-mail addresses separated by a comma. The text
following ?Subject= appears as the subject of every e-mail.
■
To compose your newsletter simply click on this link. A message document will be
shown and you can enter text and add new recipients or delete individual ones, if
you want.
■
The mailto: hyperlink is written in a text document, for example and automatically
recognized as an URL. You can then use Drag&Drop to place this URL on the
Desktop or in the Explorer. If you then need to use the distributor in a mail simply
drag it from the Desktop or Explorer to the large recipient field of the new mail
document.
Further Information
Attach file to Mail. If you want to send an attachment with your e-mail, click the
Attach Document icon in the Object bar to display a dialog, where you will be able to
select the desired file. Alternatively, you can Drag&Drop the file to the Attach tab in
the small window containing the Formats, Attachments, and Tools tabs.
Use Drag&Drop. You do not need to type in the recipient's address; instead, you can
drag the e-mail address to the appropriate field using Drag&Drop, e.g. if the address
is part of the address book.
You can also design the mail contents using Drag&Drop. When dragging contents
from a document into your mail, use the Task Bar as a clipboard (see Drag&Drop
Instructions)
Use StarOffice Help
Do you need any more information? Use our extensive StarOffice Help. The following
search term is helpful for this topic:
■
426
Mail Server
StarOffice 5.2 User's Guide • June 2000
Formatting E-mail Messages
This section contains a brief description of how to design your e-mail. In this way, you
can lend an added personal touch.
Improving the Appearance of E-Mail Messages
To create an e-mail message, select the command File - New - Mail. Enter the text of
your message and the recipient(s).
Click the Formats tab in the upper right corner of the mail window to choose a text
format. Check the HTML option, because this mail format can be read by all web
browsers. You can also choose multiple formats, but this will make your message
longer.
The StarOffice format gives you the widest variety of design possibilities. However,
you should choose this format only if you are certain that the recipient also uses
StarOffice. Otherwise, some of the information may be lost.
Click in the main window of the e-mail message, and use the commands in the context
menu to format your message. For example, in the Page dialog, you can assign a background color or a background picture.
Avoid using too many colors for messages intended as newsgroup postings.
Anything more than a pure ASCII message is generally taboo in newsgroup
etiquette.
However, for e-mails you can use all the available design options, provided that the
recipient can view them. But keep in mind, the more layout options you use, the
longer the band width, thus increasing the transfer time for your e-mail.
Further Information
Using ASCII Code. If you only want to send "plain" messages, keep the standard
ASCII setting in the Formats tab.
Long Transmission Time. If you have assigned a large (memory intensive) graphic
to the background, it will take longer to send your message.
Chapter 15
Working Online
427
Using the StarOffice Help
Do you need further information? Use our extensive StarOffice Help. The following
search terms are available for this topic:
■
Mail Server
E-mail Merge
Instead of mailing a standard form letter, you can send the same type of letter as
e-mails via the Internet. You'll be surprised how easy it is to send documents as e-mail
with StarOffice.
Sending Form Letters as E-mail
First, create the text document you want to send as an e-mail merge. It could be a
typical business letter, for example. The steps for creating a business letter are
described in another topic.
Open the required database and the table containing the required data by clicking on
the addition sign in the Explorer. You should then press Crtl + Shift + B and the
Beamer will be opened with the table.
Activate the Form Letter dialog (File menu). Under Records, select the data records to
be used and choose the Mailing option under Output. In the Address Field list box,
select the field that contains the URL, usually named EMAIL.
Enter the desired text in the Subject field and click OK.
428
StarOffice 5.2 User's Guide • June 2000
A small dialog provides information on the status of the send operation. A cancel
button is available.
Further Information
Defining a Format. An e-mail should be sent in the ASCII format only so that it can
be transmitted quickly and cheaply. This applies especially to messages sent to newsgroups. If you require additional formatting such as tables, hyperlinks, graphics, you
can additionally select the HTML format. If you are certain that the recipient also
uses StarOffice to read e-mail you should also select the StarOffice format if your email contains formatting that are more complex than the formats supported by
HTML.
Using the StarOffice Help
Do you need further information? Use our extensive StarOffice Help. The following
search terms are available for this topic:
■
Form Letter
■
Distributor
Chapter 15
Working Online
429
Newsgroups
At this point you will learn how best to manage the use of newsgroups. Newsgroups
are an interesting part of the internet.
Using Newsgroups
In this section you will learn how to set up a news server, only see those newsgroups
you want, read news and post your own contributions.
How to set up StarDiscussion on your computer
Set up first in StarOffice a news server account.
■
Click on a folder or a free area in the Explorer and then activate the Context menu.
Enter New - News... in the context menu. The account will then appear as an entry
in a folder you selected the context menu with..
■
Select for example, Sun Microsystem's news server,starnews.sun.com, for free
support and exchange with other StarOffice users.
■
Do not forget to name the account in the General tab page. This account will be
shown where it was set up, for example, in the Explorer.
■
If you want to add more than one news server, it is wise to enter the
following:Extras - Options- Internet... in the Mail/News tab page. Now when you
open a new account, the account will appear automatically as a default in the corresponding field. In the Properties dialog of the account, make only the most necessary changes, for example, in the Recieve and Send tab pages under "user's
settings".
In addition to your news server account you will need anInbox, if you want to recieve
and collect e-mails and messages from newsgroups. If you are seldom online, the
messages will stay in the outbox until you go online again. The messages and e-mails
will then be automatically sent for you to the corresponding mail servers. The
online/offine mode can be activated with the iconInternet Online/Offline in the function bar.
When applying a new news server or mail server, StarOffice will ask you if you want
to automatically set up an outbox. You always have the opportunity to manually set
up a New - Outbox in the context menu of the Explorer or a folder.
430
StarOffice 5.2 User's Guide • June 2000
Subscribing to Newsgroups
First open the Explorer and select the News server entry.
In the context menu of the news server, select the Properties command. Click on the
Subscribe tab for a list of all available newsgroups.
To subscribe to all newsgroups, click All, or click the check box next to each group
name to subscribe to individual newsgroups.
You can use the Text Box Filter to look for specific newsgroups. If you are interested,
e.g., in groups of support enter "Support" in the Text Box. After a few seconds you will
see in the Text Box only the groups which namesshow the term "Support". Now you
can look for a specific group and subscribe to it if you want. With the button All you
can subscribe to all the groups displayed, and if you press the button None, you can
unsubscribe all groups displayed.
To display only subscribed newsgroups in the Explorer, proceed as follows: Click the
news server entry and activate the context menu. Select the option Show - Subscribed
Groups. Then, click the plus sign next to the news server to view your subscribed
newsgroups.
If you later want to redisplay all newsgroups, click again on the news server entry,
activate the context menu, and go to Show - All Groups. Please note, that the total
number of entries in the Explorer (newsgroups, workplace folders and other entries)
should not exceed 8000 entries. If there are too many groups on the news server,
display only the Subscribed Groups or Active Groups.
Canceling a Subscribed Newsgroup
Click on the subscribed newsgroup, open the context menu, and click again on
Subscribed to remove the check mark. If you wish to stop your subscription to several
newsgroups you can use the text field Filter on the tabpage Subscribed as described
above.
How to read the messages in the newsgroups
To recieve messages in newsgroups, both the online and offline modes must be differenciated by switching on/off the Internet Online/Offline icon in the Function bar.
Chapter 15
Working Online
431
Reading Messages in the Online Mode (Internet Online/Offline icon
is activated)
If you have a permanent Internet connection, you do not need to locally save the
header and contents of a message. To read a message, double-click a news server entry
in the Explorer and the list containing all newsgroups will be displayed in the
Explorer. Double-click a newsgroup to open another list containing the headers of the
message documents. Finally, click any header for displaying the message's contents.
Reading Messages in StarOffice in the Offline Mode
Choose Update on the context menu of a newsgroup to access new headers and/or
contents of newsgroup messages from the news server. Select (click while pressing the
(Ctrl) key) several or all of the newsgroups you subscribed to and then right-click to
open the context menu for this selected group. This way, you can update the selected
newsgroups together.
You can choose from two different work methods. On the Contents tab of the Properties dialog of a news server (the properties of which apply to all its newsgroups), you
can set whether to load and locally save all contents or only the contents of messages
whose header you selected.
■
Open the context menu of the news server and select the command Document
Contents - Save locally or mark the Save documents locally check box (call
context menu of the news server, select Properties command and go to Contents
tab).
■
If you check the Selected only box, only those messages whose headers you
selected and those you read online will be loaded and saved the next time you load
messages. If Selected only is not checked, all messages will be loaded and saved
locally.
■
To select the newsgroups you want to read offline in the Explorer, click them while
you press the (Ctrl) key.
■
Choose the Update command on the context menu or one of the selected newsgroups. Right-click the newsgroup to access the context menu.
StarOffice connects (online mode) to the news server and saves the headers of all new
messages on your local hard drive. In addition, the following occurs:
■
432
Save document contents locally is checked and Selected only is not checked: All
new messages, including headers and contents, will be loaded and saved locally.
StarOffice 5.2 User's Guide • June 2000
■
Save document contents locally and Selected only are both checked: The contents
of selected messages will be loaded and saved locally.
■
Save document contents locally is not checked: Only new headers will be
loaded(i.e. the contents will not be loaded or saved).
■
When you terminate the online connection of your dialup program, you can read
the contents (on the Contents tab) or select the headers whose contents you want to
read (by clicking the green dot in the Selected column until a red flag appears).
If you locally saved many messages for reading them offline, after some time your
hard disk will be completely overfilled with data. Use the Contents tab (under
Storage options) from the Properties dialog to limit the number of the locally saved
documents.
Choose Synchronize or Update on the context menu of a newsgroup to select all the
messages that are no longer on the news server but in your local cache and which
you want to delete. As soon as you choose the Reorganize command of the account,
the messages are deleted locally. Selected messages are not deleted.
Besides, the local cache of the selected newsgroups can be deleted if you call the
context menu of one of the selected newsgroups and select the Clear Cache
command from the context menu of a selected newsgroup. Call then the context
menu of the server and select the commands File - Reorganize to regain free space in
the hard disk.
The Update command on the context menu of a news server lets you update the list of
newsgroups and display the names of new groups on the News Server Properties Subscribed - New tab. The Synchronize command on the context menu of a news
server lets you read the complete list of newsgroups on the server and compare it with
your local copy of the list. You can also display deleted newsgroups (on the
Subscribed - Deleted tab).
The Update on Open command on the news server context menu lets you update the
list of newsgroups and check for new entries for each subscribed group. Headers or
contents of the new entries will not be retrieved.
If you use more than one news server, you can update all of them at the same time by
double-clicking the news notifier on the bottom right of the Taskbar. Be sure to check
Include in update function(Contents tab in the Properties dialog) for every news
server.
You can read, reply, print your messages and much more by clicking, double-clicking
and using the context menu. For example, click the column header of the list of
messages to sort it and click again to sort them again but in reverse order. Call the
context menu of the column's header to view various commands for defining the view.
Chapter 15
Working Online
433
To easily read your message, scroll its contents downwards by pressing the space bar.
When there is nothing left of a message to scroll, the next unread message will appear.
After reading all the unread messages of a newsgroup, the next newsgroup will
appear containing unread message, and so on.
In the normal view of news documents, you only see the important rows of the header
of the currently selected message. Additional lines can be displayed by going to the
Header tab. This is called up by going to the context menu of the newsgroup and
selecting the Properties... command. Among others you can see in the Reference line
if the message received refers to a previous one and if so, which one. View the references listed by clicking on the number listed (as long as it is still available on server).
A newsgroup message can contain Attachments. To find out how to read and save
them, refer to the section on Reading e-mail.
If you double click the (Control)-keys while placing the cursor on a message, it will
open as a floating bar.
Sending Newsgroup Messages
Your written messages and e-mails are collected in the outbox. There are often many
different news servers that can appear in your outbox, since you have the option to
connect to many news servers. If you want " to reply" or "to forward" a message document, StarOffice will know automatically to which news server the message should be
sent to. If you plan to write a new message, useNew - Message in the Context menu.
You can alternatively open a new document (New - Message in the Context menu of
the outbox) and then move the newsgroup from the Explorer window into the
receiving field. You can also select the chosen Newsgroup in the Explorer window
and click on the iconNew Message in the Message bar. If you don't inform StarOffice
with one of these possibilities, the news server will be used entered in the outbox
property dailog.
Often you will want to respond to already sent messages, for this reason select Reply
to Mail and Post Reply in the Message bar. Both open a message document and enter
the chosen recipient and subject in the corresponding fields (the subject can also be
connected in the form mailto:[email protected]?Subject="subject" with a
hyperlink. See Internet-Glossary).
How to fill out this message document will be explained later on under the e-mail
accounts description. Other notes and tips for writing e-mails, such as setting attachments to a mail are explained in the User's Guide and are also valid for messages in
newsgroups.
■
434
Enter if you would like to add a Signature - we have several signatures as automatic text documents on hand for you.
StarOffice 5.2 User's Guide • June 2000
To send a finished e-mail or message, click on the iconSend Message in the
function or message bar.
An e-mail or message will be added to the outbox, by activating the icon Send
Message. When online, a copy will be sent immediately to the server of the Internet
provider.
When you are offline (the icon Internet Online/Offline in the function bar is
not activated), your message will be sent the moment you go online. This is
when the iconInternet Online/Offline is activated, or at the moment when
you activate the Update entry in the context menu's outbox.
Further Information
Mark Group Read. You may restrict the display of newsgroup articles to only active
articles (unread articles in a subscribed newsgroup). To view only new articles, click
on the newsgroup, and select Read from the context menu. There will be no more
active articles until new articles are sent to the group.
Newsgroup Contents Display. Next to each newsgroup, you will see one or two
numbers, which represent the contents of the newsgroup. If only one number
appears, it represents all Read messages in the group. If two numbers are shown, the
first indicates the number of unread messages, and the second the total number of
messages.
Using the StarOffice Help
Do you need further information? Use our extensive StarOffice Help. The following
search terms are available for this topic:
■
Subscribing
■
Mail Servers
■
Newsgroups
Chapter 15
Working Online
435
Organizing Newsgroups
At this point, you will discover how to effectively organize newsgroups. This is especially important if you work with many newsgroups.
Properties of the News Accounts
The newsgroups and respective properties are organized in the Properties of News
dialog. Activate this dialog by clicking on the news server icon, and selecting the Properties command from the context menu.
On the Subscribed tab, you will find a list of all newsgroups (unless you activated
filters). There should also already be an Outbox. A check mark next to a newsgroup
indicates that it is subscribed. You can add or cancel newsgroup subscriptions in this
dialog. If you want to subscribe to all groups, click All.
Synchronize
Synchronizes data in the cache with data on the server. If you select this command via
the context menu of a news server, for instance, the list of newsgroups is updated to
match the current list on the server. All header information is reloaded from the
server, any messages no longer existent on the server are deleted, and message
contents are reloaded from the server according to the properties defined for the newsgroup. Use the Synchronize command if the newsgroups or contents are no longer
readable due to an error on your hard drive.
If you loaded messages from the server which were later deleted from the server and
you select the Synchronize command, these messages will also be deleted from your
436
StarOffice 5.2 User's Guide • June 2000
hard drive unless you have marked them. Marked messages remain on your hard
drive until you delete them with the Delete command or remove the mark and then
execute the Synchronize function.
Any message that you post to a newsgroup can also be canceled in a news program
designed for exactly this purpose. The message will be immediately deleted from the
news server. As soon as you synchronize the respective newsgroup in StarOffice, the
canceled message will also be deleted from your hard drive.
In the context menu of a POP3 mail server, select the Update command to load new
messages, as well as any messages deleted locally, but still existing on the server. After
updating your mail and newsgroups, if you suspect some messages are incomplete or
that the transfer was defective, you can reload the messages with Synchronize. No
e-mails will be deleted from your hard drive.
Sorting Articles
When you open a newsgroup, all articles of the group are displayed in an overview
frame above the mail document.
The overview frame displays various headers, e.g, Sender, Title and Date. Click on
Sender to display the contents in ascending or descending alphabetical order (each
click changes the direction) according to sender name. Click Title to list the contents in
ascending or descending alphabetical order based on the text in the subject line. Click
Date to list the contents according to either the oldest or most recent date.
The active sort order is indicated by a small gray arrow in the header. The direction
of the arrow (pointing up or down) indicates ascending or descending order.
The column header context menu contains commands that allow you to show columns
with additional information. You can change the order of the columns by using
Drag&Drop.
Further Information
Modifying Header Width. If you want to modify the width of any header, place
your mouse at the dividing line between two rows. The pointer turns into a double
arrow. Press the mouse button and hold it while dragging the line. As a result, the
width of the respective column changes.
Chapter 15
Working Online
437
In the header of a newsgroup article, you will find relevant information such as the
subject, date, author, and the corresponding newsgroup. This information is also
included in a printout.
Using the StarOffice Help
Do you need further information? Use our extensive StarOffice Help. The following
search terms are available for this topic:
■
Mail Document
■
News Server
World Wide Web
Experience the infinite possibilities of the World Wide Web with just a few mouse
clicks - it's a breeze with StarOffice. You'll need to know a few things before you begin,
however, so please read on.
Surfing the World Wide Web
This section contains a description of how to surf the World Wide Web with StarOffice. The WWW is only a small part of the Internet. But it is the most interesting part
for many users due to the graphics, sounds and animations used and to the direct
access to a lot of product information and perhaps because it is very easy to use.
Using StarOffice as Web Browser
After starting StarOffice, you must make some initial settings in the Internet Options
and Browser Options dialogs (Tools menu), as described in the StarOffice Help.
StarOffice comes with few sample Internet addresses. Open the Explorer (with the
icon in the Function bar) and click on the Bookmarks folder. These folders contain a
selection of www. addresses which can be called by double clicking on the name.
If you wish to go straight to a specific address, simply key it into the URL field in the
function bar, e.g. "http://www.sun.com" or "www.sun.com". After entering the name
press the Enter key and the Stop icon will be shown in red which is a sure sign that the
address entered is being loaded.
438
StarOffice 5.2 User's Guide • June 2000
If it takes too long to load a page, you can interrupt the process by clicking Stop, and
try again. Sometimes the second attempt to load a URL is faster. If several objects are
being loaded at the same time you can click on Stop while holding down the (Crtl)
key which stops all loading. A long click on Stop will open a list of the loading that is
currently taking place.
After the page is loaded, you can click on hyperlinks to go to other web pages. By
clicking the Browse Backward and Browse Forward buttons, you can return to the
previous page or move forward to the next page. A selection list can also be opened by
a long click on either of these icons in order to jump to a specific site.
Use the search capabilities of the many search engines in the Internet. Click the Search
icon in the Hyperlink bar to conveniently access these search engines.
It is even easier to search with the Function Bar URL field. For example, enter ?StarOffice in the field and press Enter. The search term following the question mark will
be searched for by the search engine you last started (on the Hyperlink Bar).
If you want to save a graphic you see while browsing, click on it and open the context
menu. Select the command Save Picture... to open a dialog in which you can save the
graphic.
The context menu also contains numerous menu commands which allow you to save
the background, switch off the graphics view, and much more.
Creating Bookmarks
If you find an Internet page that you want to return to regularly, or even if you just
want to keep track of the location, it makes sense to assign a bookmark to this web
page. To do this, simply click the Bookmark icon (far left in the Function bar) and drag
it to the desired folder in the Explorer while holding down the mouse key.
You can also save hyperlinks as a bookmark. You can later use these hyperlinks for
your own homepage without having to type a single letter of the Internet address.
Drag the link while holding down the mouse key to the Explorer group Bookmarks.
If, on the other hand, you drag it to Workplace in the Explorer the former will open
and show you where it could be saved, e.g. on the hard disk, in the network or in a
disk drive. Drag the icon while holding down the mouse key to the required location,
e.g. hard disk C. C will then automatically open and you can store the link in one of
the folders contained here.
Bookmarks should not be filed at random. The following topic explains the most
effective way to organize links.
Chapter 15
Working Online
439
Importing Bookmarks
This feature is particularly important if you have used another web browser such as
Netscape, and have already created web page bookmarks there.
In the Netscape browsers, bookmarks are managed with the Bookmark.htm file. This
file is saved either in your Netscape\Program\Defaults directory or in your user
directory Netscape\Users\Initials. In the folder which you arrive at via StarOffice
Bookmarks in the Explorer, there is an icon for Importing Netscape Bookmarks. Use it
to import your already existing Netscape bookmarks.
Microsoft's Internet Explorer organizes its bookmarks as links in a folder on your hard
disk. If the Internet Explorer was already installed on your system at the time of the
StarOffice installation, the entry Bookmarks will automatically point to the Internet
Explorer bookmarks directory. If you install the Internet Explorer after having
installed StarOffice you can drag the "My Documents" folder to a group button in the
StarOffice Explorer. A new group will be formed containing your bookmarks.
Using Microsoft Internet Explorer as the browser
If you have Microsoft Internet Explorer (IE) Version 4 or 5 installed in your Windows
system, you can use it instead of StarOffice Writer/Web to browse in StarOffice.
StarOffice automatically recognizes the installed IE and Tools - Options... - Browser
has an External Browser tab.
You can select and deselect IE as the external browser on this tab. All StarOffice documents will continue to be opened with StarOffice. You can also set domains that are
always opened with the StarOffice browser and other domains that are always opened
with IE. If IE is active as the external browser (i.e. it is displaying an HTML page), the
StarOffice menus will contain some IE commands.
Editing a Web Page
After the page has been loaded, it can be edited. To edit an Internet page, click the Edit
icon in the Function bar.
You are now able to edit the document, i.e. add text, delete, select a different font
color, etc. After this you can save the document on your hard disk by using the
command Save As... (menu File), the direct command Save can not be selected if you
have read only access rights to the Internet server from which you have loaded the page.
The following section describes how to locally save a page from the Internet with all
linked pictures.
440
StarOffice 5.2 User's Guide • June 2000
Further Information
Undo Editing Lines. If you have activated the Edit command in a page that you have
loaded, the individual elements will be framed with editing lines. These can be
switched off by clicking Reload.
Editing Graphics. You can edit a graphic in an HTML document by selecting Edit (in
the context menu or the Function bar). Click on the graphic and select the Picture
command in the context menu. A dialog appears, where you can modify the graphic
properties.
Using the StarOffice Help
Do you need further information? Use our extensive StarOffice Help. The following
search terms are available for this topic:
■
Explorer
■
Bookmarks
Finding Internet Pages and Saving Locally
This section contains details about how to find information on the Internet easily when
using StarOffice and how you can save the pages found locally.
Searching and Finding on the Internet
The question beginners most often ask is "How can I find my way through the
hundreds of millions of pages on the Internet?" The answer is to activate the Hyperlink bar (View - Toolbars - Hyperlink bar). Enter the word or words in the URL Name
combo box on the Hyperlink bar. Click the Find icon on the right-hand side of the bar,
then click AltaVista, for example, in the submenu. This is one of the many Internet
search engines that lets you place all the pages you found in an index, which you can
easily access.
Of course, most pages are in English. Foreign pages can be found if you enter the
search words in the corresponding language.
For example, enter "searching the Internet" (with quotation marks) and click AltaVista.
The reply appears in a few seconds. Today, 24,241 matches were found; and almost all
of them explain in English how to search the Internet. You will probably find more
pages under the theme "Wombat" (46,450 pages today).
Chapter 15
Working Online
441
Keeping Track of Interesting Pages
If you find a page you think you might want to visit more often, you have at least two
options:
Add a Bookmark
You can place a bookmark on the page by clicking the Bookmark icon on the Function
Bar (to the left of the URL combo box) and holding down the mouse button as you
drag the entry to Bookmarks in the Explorer (or another folder). A link to the current
page is created in the bookmark folder. Later, when you double-click the bookmark,
the page will be newly loaded from the Internet.
Save It
You can save the page as is on your hard drive with the File - Save As... menu
command. Enter a location and name for the page and click OK. The page is copied on
your hard drive, and can be opened and edited at any time without an Internet
connection. However, if there are "active links" on the page (e.g. for loading a new
graphic every few seconds), StarOffice may attempt to connect to the Internet after you
load the page from your hard drive.
Saving an HTML Page with Graphics
Unfortunately, when you save an HTML page, the graphics are not automatically
saved locally; they are saved as links to the graphics files on the Internet.
You can save a single graphic locally by right-clicking the graphic and choosing the
Save Graphic... command on the context menu. A recently loaded HTML page should
still work offline from the cache to display the linked graphics. However, to save the
HTML page and all the graphics so that you can load it completely even after the
cache is deleted, do the following:
442
■
Choose the File - Open command.
■
Enter the page's entire URL in the File Name input field (e.g.
http://www.abc.xx/main.htm). Do not enter the name of a FrameSet, only a document name. (In a FrameSet, you can click each individual frame to place the URL
on the Function bar or copy it from the URL box.)
■
Select "HTML(StarOffice Writer)" in the File type list box.
StarOffice 5.2 User's Guide • June 2000
■
Click OK to load the page if you are online.
■
Click Edit on the Function bar.
■
Choose the Edit - Links... menu command. The Links dialog appears.
■
Select all the links with the mouse (select the first one, then scroll to the last one
and hold down the Shift key as you click).
■
Click the Link button. If Link is not visible, then you are dealing with a FrameSet
(see above) or you loaded the page as an HTML file type rather than an HTML
(StarOffice Writer) file type. Confirm the prompt and close the dialog.
■
Save the document and all graphics locally on your hard drive with the File - Save
As... menu command. Select how you want to save the document in File Type.
If you save the page locally as an HTML Document, the graphics are included as
linked graphics in the same folder in which the document is saved. The graphics are
automatically renamed.
When you save the StarOffice Writer document locally, the graphics are embedded in
the document.
Further Information
Use Hyperlink Bar. The hyperlink bar can be used for many purposes. You can use it
to edit hyperlinks and insert new ones, insert bookmarks into the Bookmark folder
and find information in the Internet.
Using the StarOffice Help
Do you need further information? Use our extensive StarOffice Help. The following
search terms are available for this topic:
■
Explorer
■
Beamer
Chapter 15
Working Online
443
Homepages
Here you can find information about selected topics relating to homepages. With
StarOffice, you can quickly create or edit your own homepage, and modify the document properties.
See the StarOffice and the Internet topic in the StarOffice Help for more detailed information.
You can easily create your own homepage with the AutoPilot. Use the Homepage
template under File - AutoPilot - Web Page. Detailed information about the AutoPilot
can be found in the StarOffice Help.
Creating a Homepage
Here you will discover how you can create an interesting background design for your
homepage. HTML offers much more than just simple white or gray backgrounds.
You must follow some basic steps to make your homepage available to the Internet.
■
Create the Web page(s) in StarOffice.
■
Create or search for the graphic objects you want to include on the page and save
all graphics as files in a directory. It is best to use the directory where your HTML
text files are also located or a subdirectory of thereof. You should also save
graphics taken from the Gallery in an extra file.
■
Insert the graphic elements as links in the StarOffice text documents.
■
Test how Web pages appear and work in the different Web browsers.
■
Load the Web pages to your homepage space with your Internet Service Provider.
So that you do not start with a blank page when creating Web pages, StarOffice has
interactive help for creating homepages that you can use as a good starting point for
your own Web pages.
444
StarOffice 5.2 User's Guide • June 2000
Designing your Own Homepage Using StarOffice.
■
Use the AutoPilot to create a homepage. It offers you interactive help; the idividual
steps are explained under File - AutoPilot.
■
Give your HTML pages a title. This title will appear in the Title bar of Web
browsers if your page is displayed, and will also be included as a bookmark. You
can enter the title of your pages via File - Properties - Description in the Title field
of this dialog.
■
Save this HTML page as an HTML file in a directory where you store your Web
pages. For example, you could store them in "C:\Homepage".
In this directory, you can store all your Web pages and later upload them to your
Internet Service Provider.
■
Enter the name "Start.htm" or "Index.htm". Ask your provider if the first (Start)
page of your homepage should have a specific name, so that your homepage is
automatically loaded when browsing it without entering any page specification.
■
Check whether the URLs for the Web pages in the file system will be saved with
the related paths. This is important so that links to other elements of your
homepage in each directory and each drive work properly. Select the File System
field on the Saving Related URLs tab of Tools - Options... - General - Save.
Chapter 15
Working Online
445
Directory Structure of the Homepage
By using the AutoPilot, you can insert graphics problem-free into your Web page from
your ISP's server.
■
Create a folder on your hard disk for your homepage. Name it, for example,
"homepage". It should correspond to the start directory of your homepage space on
your ISP's server, i.e., the one you save as your HTML start file. This file should be
called "index.htm".
■
As much as possible, copy all graphics into a subdirectory of the homepage directory. Name this subdirectory, e.g., "graphics". (It is a good idea to enter all file and
folder names in lowercase, since some servers differentiate between uppercase and
lowercase letters in file and folder names.
■
Also create a subdirectory called "graphics" in the space reserved for your
homepage on your ISP's server.
■
Only make references on your HTML pages to graphics that are stored in your
"graphics" subdirectory in which you have integrated references of type
<IMG SRC="graphics/picture1.gif">. This assumes that all graphics were inserted
as links, and that you had already converted all graphics into GIF or JPG format.
In fact, StarOffice can automatically convert embedded graphics to GIF files and
insert their corresponding tags into HTML pages, but you have no control over the
file names. In this case, several graphics can be embedded, but several files will
also be created.
■
Test your homepage locally. You could test your pages offline (Online icon on your
Function bar). If everything is working well, you can upload your HTML pages to
your homepage storage space with your ISP, and store graphics in a local folder
using the same names as you gave your provider.
Integrating Graphics in Homepages
When working on your homepage, it makes sense, as long as you didn't start right
away with your StarOffice Writer/Web Document program, to activate OnlineLayout-Mode. You can then only choose commands that call up the allowable page
items in HTML mode. The Online-Layout appears in the View menu.
Graphics on the Internet must be in GIF or JPG (or PNG) format. You can save images
in StarOffice, e.g. you can open a PCX file and then save the images in JPG format in
your homepage directory. Integrated graphics in other formats will be converted into
JPG format by StarOffice automatically when exporting as HTML documents and will
be given often non-meaningful names. In every case, it is better to have a well-structured and organized homepage where conversion to GIF or JPG is done.
446
StarOffice 5.2 User's Guide • June 2000
■
Open StarOffice Image and load graphics.
■
Save the graphic using File-Save As.... in either GIF or JPG file format preferably in
a subdirectory of C:\Homepage (see above).
■
Close StarOffice Image.
■
Next, place the cursor on your homepage where you want to insert the graphic
image.
■
Select a JPG graphic using the Insert-Picture-From File command for the
Homepage directory and select Link.
■
The graphic image will be inserted once you press the Open button.
If you want to further edit the graphic image, e.g. enlarge it, you should change the
size of the it in program that originally created it. Otherwise there could be certain
unwanted effects ("jagged" effect when enlarging, thin lines disappearing when minimizing).
Changing Your Homepage's Background
■
Click in a free area of the page so that the picture is no longer selected.
■
Call up Format-Page and select Background.
■
In the list box As select Color.
■
Select another background color and click OK.
If you select Graphic in the list box, you can also link a background graphic. Try it the
next time. You can then select whether you want the background graphic to be
centered, anchored to a margin, or tiled.
Uploading Homepage Files to Your ISP
When you are satisfied with the way your homepage appears, you can upload all the
files in your homepage directory to your Internet service provider. Ask your ISP about
the exact procedure.
If CompuServe is your provider, you will find all the necessary information in the GO
HOMEPAGE forum. You will also find a program there called "Publishing Wizard"
that was created specifically for uploading all files in your directory on your hard disk.
Chapter 15
Working Online
447
After uploading the files, CompuServe immediately makes them available to all
Internet users (if they know the URL of your homepage). You can update your files
yourself using this wizard on line.
Use AOL Client to upload your pages to AOL. If you have another provider, you
should have no problem directly uploading your files by FTP and directly linking by
FTP when editing files.
Creating Simple Homepages
If you want to quickly set up a homepage on the Internet with a few graphics, you
don't even have to plan ahead:
■
Open a new, empty page for your homepage
(with File - New - HTML Document).
■
Write and format the text, integrate any pictures (whether as a link or directly
embedded, by either using the Insert - Graphics dialog or via Drag&Drop from the
Gallery).
■
Save the document locally. The graphic links will appear in the HTML source code,
if you want to check it, but you do not have to be concerned about it.
■
Open the Tools - Options - Browser - HTML dialog and make sure to select Copy
Local Graphics to Internet.
■
You can create links to the Internet.
■
Save the page using File - Save As..... Enter the full URL of your homepage at your
ISP in the File Name field. e.g.
http://homepages.provider.com/myname/index.htm.
StarOffice now automatically converts all linked and embedded graphics on the page
into GIF format. The graphics are assigned new understandable names. Links to these
graphics will be integrated into the HTML document as <IMG SRC="abc123.gif"> with
the relative path. Then the HTML pages and all graphics will be uploaded to the specified directory.
448
StarOffice 5.2 User's Guide • June 2000
Further Information
Using the Correct Graphic Format. If you have a specific graphic in mind that you'd
like to use for the background, pay attention to the graphic format. HTML export
supports the formats JPG and GIF, so remember to convert your graphic to the
appropriate format yourself as StarOffice also automatically generates a new name
for the graphic when it converts from HTML.
Using the StarOffice Help
Do you need further information? Use our extensive StarOffice Help. The following
search terms are available for this topic:
■
Homepage
Working with Frames and FrameSets
Frames are often found on HTML pages, although they are not limited to the Internet.
They can also be used to intelligently connect documents to each other locally. StarOffice enables you to design FrameSets in order to lend your homepages an interesting
layout. Additional tips on working with framesets can be found in the Advanced
section of the User's Guide.
■
Open a new FrameSet (menu File - New - FrameSet).
A new empty FrameSet will be displayed which currently consists of only one Frame.
Click into the large frame and call up the command Split Vertically from the context
menu. The Frame will then be split vertically.
All commands for editing a FrameSet can be found in the context menu and in the
FrameSet Object bar.
You can modify the size of the frames (relative to one another) by moving the mouse
to the space between the frames and then, when the mouse pointer becomes a double
arrow, holding down the mouse button while moving the space in the desired direction. Use the FrameSet - Frame Spacing spin box in the Object bar to adjust the width
of the space.
To insert additional frames, first click the frame in which the new frame is to be
created, and then select Split Vertical or Split Horizontal from the context menu.
Chapter 15
Working Online
449
In order to fill a frame with contents, click in the respective frame and then
click the Frame Properties icon. The Frame dialog will appear.
Enter a name in the Name field (if desired), and click on the button with the three
dots. This opens the Select File for Frame dialog in which you may select and load the
contents of the frame.
You can define further settings on the Size tab. Finally, click OK to load the selected
document into the frame.
After you have filled all the frames, save the document in HTML format.
Further Information
Using ImageMaps. ImageMaps, "reference sensitive graphics," can also be loaded
into a frameset. However, to do this, the ImageMap should first have been created in
a frame. Select the desired graphic and open the ImageMap Editor in the menu (Edit
- ImageMap). Use the mouse to select a clickable area of the graphic, and define the
URL address and text.
Using the StarOffice Help
Do you need further information? Use our extensive StarOffice Help. The following
search terms are available for this topic:
450
■
ImageMap
■
FrameSet
StarOffice 5.2 User's Guide • June 2000
Text and Links
Here you will see how to integrate text and links into your document. You can create
an HTML document quickly and easily without leaving the familiar workplace of
StarOffice.
Integrating Texts and Links
Open a new HTML document (File - New - HTML Document).
If you click on the Online Layout icon or create a new HTML document, StarOffice
offers only the editing tools and functions permitted in HTML. This ensures that you
will not assign attributes that will be invisible when later viewed with a web
browser.
Display the Hyperlink bar with the command View - Toolbars - Hyperlink Bar.
Enter text in your document and format it with the Styles provided in the Stylist.
To insert a hyperlink, proceed as follows: Select the word that you want to define as a
link, which a user can click on to go to a specific address. The box URL Text displays
the selected word(s). Place the cursor in the Internet URLs field and enter the desired
URL address.
Press Enter or click on the Hyperlink icon (Hyperlink Bar). The selected word appears
colored and underlined in the text. If you move the mouse over the word, the mouse
pointer turns into a hand symbol. You can then click on the link to go directly to the
specified address.
Overwriting Links
If you would like to modify a link, select the link in the text and simply overwrite it.
Hold down the (Alt) key when you click the link, so that it is not executed.
Chapter 15
Working Online
451
Assigning Links to a Frame
To guarantee that a document accessed via hyperlink appears in a specific frame of a
frameset, define a hyperlink as described and click the Frame icon, directly next to the
Internet URLs field.
A pull-down box appears with standard HTML frame names and any names you've
assigned: _top, _parent, _blank and _self. A dot marks the chosen frame. If no frame
has been selected, the dot appears alone at the bottom. Simply click on the desired
frame and insert the link as usual.
Frame
Name
Meaning
_top
The document appears in the highest frame of the hierarchy; if none
exists, it will appear in the same frame
_parent
The document appears in the next frame of the hierarchy; if none exists,
it appears in the same frame
_blank
The document will be inserted in a new, empty frame
_self
The document will be inserted in the same frame
Assigning Links to Self-Defined Frames
Working with framesets is significantly easier if you design your own frames, and
especially if you name them yourself.
First design your HTML document, inserting text, links and graphics, and save the
document.
Open a new frameset (File - New - FrameSet) and divide it into multiple frames by
clicking the icons Split Horizontally and Split Vertically.
Click in each frame and activate the Frame dialog (via the context menu or the Properties icon). Enter the name of the frame in the Name field of the Properties tab. Click on
the button with three dots and select the contents of the frame. The path to these
contents will be displayed in the Contents field.
Assign the names of the frames so that you'll know exactly which frame is which.
One possibility is to use descriptive names, such as "TopL," "BottomC," and so forth.
After you have filled all the frames, save the document and close it. You can later
reload it and edit the links. If, for example, you want the Sun Microsystems homepage
to appear in Frame 3, proceed as follows:
452
StarOffice 5.2 User's Guide • June 2000
Select the link to Sun Microsystems and click the Frame icon in the Hyperlink bar.
From the list box, choose "Frame 3" and click Insert.
The sequence of the steps described here must be followed exactly.
When you click on the edited link, the Sun Microsystems homepage now appears in
the "Frame 3".
Inserting Links via Drag&Drop
Open the Explorer and the folder containing the links.
Do not double-click to open the folder; instead, click the plus sign in front of the
folder icon.
The contained links will be shown in the Beamer. (Click the Beamer icon in the Function bar to open the Beamer). Click the required link and drag it, while holding down
the mouse key, from the Beamer to the desired position in your HTML document.
When you let go of the mouse key the link will be inserted. A StarOffice document,
however, will not be inserted as a link but as a protected area; if you still want to insert
it as a link, then you must first drag it from the Beamer into the hyperlink bar and
insert it from there.
Relative and Absolute Links
To incorporate hyperlinked files in a document, at least two conditions must be
defined: whether to save the document relatively or absolutely, and whether or not the
file already exists.
■
StarOffice functions differently, depending on the settings under Tools - Options General - Save, where you can define whether links should be saved as relative or
absolute. Saving a link relatively is only possible if the source document and target
link are on the same drive.
You should create the same directory structure on your hard disk drive as you
have in your homepage area with the Internet provider. Name the start directory
for your homepage on your hard disk drive, e.g. "homepage". The start file is then,
e.g. "index.htm" where the complete path details are "c:\homepage\index.htm".
This can become the following URL on the provider server, e.g.
"http://www.myprovider.com/mypage/index.htm". If you have relative
addressing then enter the link relative to the location of the starting document. If
you have stored all the graphics of your homepage in a subfolder
Chapter 15
Working Online
453
"C:\homepage\graphics" then the target of the graphic object "picture.gif" is
"graphics\picture.gif". This is the relative path starting from the location of the file
"index.htm". Save the graphics in the file "mypage/graphics" on the provider
server. If you now transfer the document "index.htm" to the provider server by
using the dialog File - Save As..., and if you have selected the field Copy local
graphics to Internet on the tab page found under Tools - Options... - Browser HTML, StarOffice will then automatically copy the graphic object into the correct
directory on the server.
An absolute path such as "C:\homepage\graphics\picture.gif" would no longer
function on the provider server. Neither a server nor a computer of a reader needs
to have a C: hard drive: (operating systems such as Unix or MacOS do not recognize drive letters) and even if the folder homepage\grahics existed your picture
would not be available. It is better to use relative addressing for file links.
A link to a web page, e.g., "www.stardivision.com" or
"www.myprovider.com/mypage/index.htm" is an absolute link.
■
StarOffice also reacts differently, depending on whether the file referred to in the
link exists, and where it is located. StarOffice checks every new link and sets a
target and protocol automatically. The result can be seen in the generated HTML
code after saving the source document.
The following rules apply: A relative reference ("graphic/picture.gif") is only
possible when both files exist on the same drive. If the files are on different drives
in your local file system, the absolute reference follows the "file:" protocol
("file:///data1/xyz/picture.gif"). If the files are on different servers or if the target
of the link is not available, the absolute reference uses the "http:" protocol
("http://data2/abc/picture.gif").
Therefore, be sure to organize all files for your homepage on the same drive as the
start file of the homepage. In this way, StarOffice can set the protocol and target so
that the reference on the server is always correct.
When you rest your mouse on a hyperlink, a help tip displays the absolute reference,
since StarOffice uses absolute path names internally. The complete path and address
can only be seen when you view the result of the HTML export, i.e., by loading the
HTML file as "Text" or opening it with a text editor.
Further Information
Inserting Multiple Links. As long as the list boxes in the Hyperlink bar contain both
the name and address of a URL, you can reinsert the link by clicking the Hyperlink
icon.
454
StarOffice 5.2 User's Guide • June 2000
Using the StarOffice Help
Do you need further information? Use our extensive StarOffice Help. The following
search terms are available for this topic.
■
FrameSet
Uploading via FTP
Here you'll find out how to upload data via FTP. This simply means that you copy
data from your computer to a server via the Internet.
In order to copy to another server, you must be allowed to write on the server's
storage medium. If your access is restricted to read only, you cannot store any data
there.
Upload Files via FTP
Open the Explorer. If you have not yet created an FTP account in the Explorer, click an
empty area in the Explorer and activate the context menu. Select New - FTP Account...
to open the Properties of FTP Account dialog.
In the Server field on the Server tab page, enter the corresponding URL, for example,
ftp.servername.com. If required, enter your user name and password. Enter a name for
the FTP server on the General tab page. The entry will appear in the Explorer under
this name. Click OK.
Chapter 15
Working Online
455
Do not select the option Login as Anonymous, because "anonymous" users are
normally restricted to "read only" rights on a server.
Open the FTP account in the Explorer and login to the FTP server with the necessary
access data. If the login was successful, the directories of the server will be displayed.
Using Drag&Drop, you can now move your data into the desired server directory.
Further Information
Restriction with Firewalls. When "firewalls" are in use, (special computers interposed between company networks and the Internet) it is not possible to upload data
outside your network via FTP.
Using the StarOffice Help
Do you need further information? Use our extensive StarOffice Help. The following
search terms are available for this topic:
■
456
FTP
StarOffice 5.2 User's Guide • June 2000
CHAPTER
16
16
Working with Databases
Here we describe how you can work intuitively with StarOffice Base.
Creating Queries
One great advantage of relational databases is that you can access the data of several
linked tables with a single query. StarOffice Base supports queries in the database
query language SQL. This sounds more complicated than it actually is.
In the following section we describe how you can create a query in an intuitive fashion
with StarOffice Base. You will find additional information in the StarOffice for
Advanced Users section of the User's Guide found in the StarOffice Help.
When you create a new query you have the choice of whether to accept help from the
AutoPilot or design the query with the mouse using Drag&Drop.
How to create a query with AutoPilot:
In the Explorer (in the Explorer group), open the Address Book by clicking on the
plus sign in front of it. One of the entries you'll see is the Queries entry. Right-click
this entry to open the context menu.
Select the New - Query - AutoPilot command. The AutoPilot Query will appear.
The AutoPilot leads you through the creation of a query in five steps. In the first
dialog, you'll see the tables which pertain to the current database. You should find the
address table for the Address Book. Select it and then click Next.
Now you see the Field Selection dialog. Select the fields you want to display in the
query here. Click the field name in the left list box and then click the upper button
with the arrow pointing to the right. The field is then taken over into the right-hand
list of the fields that are used in the query. To accept all fields, click the second button
from the top.
457
In a similar way you can select the fields on the right and move them to the left with
the two lower buttons to remove them from the query. Click Next again to see all the
desired fields in the right-hand list.
Now you see the Filter dialog where you can specify the filters for the query. Here you
can specify the conditions according to which records will be seen in the query.
For example, to query all records in which the company name starts with "Star" or
contain "Hamburg" as the location. Select the field name "COMPANY" and the condition "like". Enter Star* or Star% in the Value field. If you enter Star* i.e. if you use the
placeholder you are familiar with from file dialogs, StarOffice Base will automatically
replace the asterisk with the percent sign, the correct placeholder within SQL queries.
If you select an additional field name in the second line, you can expand the query.
Select CITY, the condition "=" and enter Hamburg at the right of the text box.
The * placeholder, which is automatically replaced by the placeholder %, stands for
any number of characters. The ? placeholder, which is automatically replaced by the
placeholder _, stands for exactly one character. You can find additional information on
the syntax of the SQL language in StarOffice Help.
This filtering will display records if they satisfy either condition (or both).
To link the conditions with an AND rather than a logical OR, select this AND in the
list box at the far left. Only the records where the company name begins with Star
AND the company is located in Hamburg would be displayed.
Clicking the Preview button displays a table showing which records will be displayed
according to the defined query. Click Next.
458
StarOffice 5.2 User's Guide • June 2000
This Sorting dialog also has a preview that displays which records you will see in
what order before the query is definitively completed. Select the fields to be used for
sorting here. The AZ buttons indicate that the sorting will be in ascending alphabetic
order, from A through Z. The sorting order is reversed every time you click one of
these buttons.
To sort by several fields one after the other, select the additional sorting fields in
whichever field is next, 2, 3 or 4. Records with content that matches the first field will
be sorted according to the contents in the second field and so forth. When you are
finished, click Next again.
Now you see the last dialog of AutoPilot for queries. Here you can give the query a
title and specify whether it should be run immediately or saved.
Chapter 16
Working with Databases
459
After closing the AutoPilot you will be able to see the finished query directly on the
screen. It can also be seen as an entry under "Queries". If you alter the query on the
screen, e.g hide the columns, this modification will be automatically saved so that
when the query is called up again it will have the same appearance as when you left it.
The Video Database Sample
In the following, we use a sample document to demonstrate the possibilities of StarOffice Base as a relational database.
This sample is included as a compressed file in the "standard installation" and can be
included in the "custom installation" as well, but isn't included in the "minimum
installation". After installation, you can unpack the sample:
460
■
Open the Samples entry in the Explorer either with a single click (icon view), a
double-click (hierarchical view) or by clicking the plus sign in front of the entry.
■
Open the now visible Databases entry.
StarOffice 5.2 User's Guide • June 2000
■
Double-click the "generate sample database" link which now appears. The sample
database, like any Adabas database, takes up at least 42MB of free space on your
hard drive.
This sample database can be immediately put to use as a video database.
If, however, you'd like to take this opportunity to learn about the planning, creation,
structuring and editing of a relational database, then continue reading.
When this Guide was printed, the Adabas database format used in the example was
only available under Windows, Linux and Solaris Sparc. Under other operating
systems, you can set up a relational database link to StarOffice Base if you use a suitable ODBC or JDBC driver for accessing a relational database.
Let's assume you want to manage your video tape collection with a database. The
question is, How? In the following we'll show you, step by step, how to proceed and
help you create your first relational database in StarOffice.
Here we explain how we set up our sample database, the video database. You don't
have to go through the steps taken to create the database because it is already
included in the program in ready-to-use form. Nevertheless, if you want to set up
your own relational database application you can learn the basic procedure from the
explanation provided here.
Creating a Database
This is very easy to do:
All the steps described here and which can be followed in StarOffice describe basic
procedures and the results that are achieved. If you are using the Windows or Unix
version of StarOffice, you already have all the files discussed and don't need to carry
out the steps described here. If, however, you do wish to go through the steps yourself, make sure you do not overwrite the files that we have supplied.
■
The command File - New - Database... opens a property dialog where some
settings have to be made.
■
Specify the database name "Video Collection" on the dialog's General tab .
■
On the Type tab, you first have to choose Adabas. For further information, refer to
Creating a Database in the StarOffice Help.
Chapter 16
Working with Databases
461
You can also set up a database on your StarOffice Desktop or in any folder. Simply
call up the context menu and select New - Database....
Names under Adabas are not allowed to begin with SYS, these names are reserved
for internal purposes.
Planning the Structure
When you set up the tables of a relational database, it is important to plan the structure carefully. Be sure you know at an early stage which tables with which data fields
and which type of queries you require.
For most applications, it makes sense to "standardize" the data. This means you should
set up the structure of the database so that all data are stored just once. This has the
advantage that you only have to type in the data once. Each query can then collect the
required data from several tables.
To ensure that the assignment of records functions unambiguously for several tables,
each table must have a primary key. The simplest solution is to specify a primary key
in Adabas format, by setting up an ID field that has different contents for each new
record. In the table design, this field is determined as the primary key via the context
menu of the row header.
In our example, there are several genres, e.g. Action or Comedy, and each genre can be
assigned to as many movies as is desired (none, one, several). It is a good idea to set
up one table for the movies and another table for the genres. In the Movie table, for
each movie there will be a reference to a corresponding entry in the Genre table. This
has several advantages:
■
You only have to type in each genre once - namely when you design the genre
table. If you make a typing error, you may also correct it later at precisely that
point (in Table Design).
■
For each new movie you enter, you can select the desired genre from the list of all
genres. Typing errors are not possible here. Also, you no longer have to wonder
whether the genre for a comedy movie should be entered as "Fun" or "Comedy" or
"Funny", because you will find only one entry, e.g. "Comedy", in the list. This guarantees that when you filter all movies by genre you really will find all the corresponding movies.
Just as with the Genre table, we have set up a separate Tapes table for video cassette
tapes. Again, each movie can only be assigned to exactly one tape, while one tape may
have several (none, one or several) movies on it.
462
StarOffice 5.2 User's Guide • June 2000
Assignment is somewhat more complicated when it comes to actors. The genre-tomovie assignment is a 1-to-n assignment - thus 1 genre can appear in n movies, and
each movie must have exactly 1 genre. By contrast, the actor-to-movie assignment is
an m-to-n assignment. A given actor from the Actors table can appear in several (none,
one, several) movies in your video collection. Vice versa, several (none, one or several)
actors from the Actors table can appear in each movie. Therefore it is not enough, to
have a record that shows exactly one actor in the form mask of a movie. Instead, you
need a list that can be of variable length and can show several actors.
We have solved this problem by using an additional table, Movies_Actors. In this
table, a Movie ID (MID), i.e. an unambiguous ID for the movie in the Movie table, is
present for each movie for which there is an actor in the Actors table, along with the
Actor ID (AID), i.e. an unambiguous ID for a given actor. If several actors from the
Actors table appear in a given movie, several IDs are shown in the additional table.
Thus the database has the following structure:
Movies Table
The Movies table, which is the central table, describes the movies in the database.
There is exactly one record for each movie. Several parameters, e.g. name and length
of the movie, are placed directly in the record. Other parameters, such as genre, tape
and actor, can be accessed via relational references.
The primary key is the MID (Movie ID) field. The contents must always be clearly
different from the contents of all other records. In the sample video database, this field
is of the "digit" type, and a macro makes sure that the field contents are unambiguous
when a new record is created. If you create a new database in which a field always
automatically contains unambiguous contents, then select the field type Text(fix) in
StarOffice for an Adabas database.
Chapter 16
Working with Databases
463
Genres Table
The Genres table contains one genre in each record, e.g. Action or Comedy. There is
one unambiguous primary key and an optional descriptive text for each record.
Tapes Table
The Tapes table contains one of your tapes in each record. For each record there is one
unambiguous primary key, the name of the tape, e.g. Action 01, and the running time
in minutes. If you have already numbered your tapes and have written the numbers
on the video tape stickers, you can enter these numbers in the name field.
Actors Table
The Actors table contains one actor in each record (or, of course, one actress).
Movies_Actors Table
In the Movies_Actors table, exactly one movie is linked to exactly one actor in each
record that is present. If a given actor has roles in several of the movies present, there
are several records. If several actors have been entered for a given movie, there are
several records.
464
StarOffice 5.2 User's Guide • June 2000
Creating Database Tables
The next step after having created the database and planning its structure consists of
creating the tables into which the data is to be keyed. Several tables are required for
the practical example.
You can use the Table AutoPilot to create a large number of tables, each with a structure suitable for business or personal purposes. For a detailed description of how to
use the Table AutoPilot, please refer to StarOffice Help. Here, we explain how to
create the Movies table by hand, in Table Design.
■
Select the Tables entry in the Explorer window under the open new database entry
with the right mouse key and use the context menu New - Table - Table Design.
■
An empty document will be opened containing the column headings "field name",
"field type" and "description". Complete the rows as shown in the illustration. A
more detailed description of creating tables is contained in the StarOffice Help.
■
The primary key now has to be defined. Click on the header of the row containing
the entry "MID" and call up the context menu. Select the entry Primary Key
contained there. StarOffice Base will then place a small key icon as a marker.
Furthermore the corresponding context menu entry will be checked.
■
Apply the condition Entry Required to the fields "MNAME" and "MLENGTH".
There is a selection field contained in the area Field Properties where a Yes should
be entered. This determines that every movie in your database has a name and a
length. The name is required for identification purposes and the length is needed
to determine if it will fit onto a specific cassette tape.
■
Save your design under the name Movies and close the box.
Set up the other tables you need in accordance with the structure described above, and
save them along with your name.
Chapter 16
Working with Databases
465
Modifying Existing Tables
The relations applicable to your database will now be set. A relation will connect the
Primary key of one table to a field in another. In our sample you can only refer to tapes
contained in the "Tape" table from the table "Movies". This means that you have to
make sure that values of the "TID" field in the "Movies" table only refer to data records
contained in the "TID" field of the "Tapes" table.
The TID field is the primary key of the Tapes table, and the TID field in the Movies
table is an Outside key or a Reference key. The two fields do not have to have the same
name, but for purposes of clarity it may be useful if they do. However, it is important
that in the TID data field of the Movies table each value is present just once; we have
already ensured that by defining the field as the primary key. In addition, the field
type must of course be identical.
466
■
Select the entry "Tables" in your video database with the right mouse key and use
the Relationships context menu option.
■
The initially empty work area you'll see has the Add Table... icon in the Object bar.
Click the icon and a dialog will appear. Select the tables from the Table name list
(one after the other) and use the respective button to Add them.
■
Immediately after clicking Add, the Tapes and Movies windows are displayed in
the work area. Now you can close the dialog.
■
You can rearrange the windows as desired by dragging the Title Bars. You can
modify the size by dragging the edges. Use the Remove command (in the context
menu of the Title Bar) to remove a table added accidentally from the window. Of
course the table itself will not be deleted.
StarOffice 5.2 User's Guide • June 2000
■
You can set the relation itself by selecting the respective field in the one and dragging it to the other table's window. In this case, select the VideoID field in the
Movies window and drag it (hold the left mouse button pressed and move the
mouse) to the TID field in the Movies table window. Now you can release the
button and the 1:n relation is displayed as a line between the tables. This term
means that several movies can be assigned to one tape. You can create other relations in the same way by dragging the mouse.
■
If you double-click one of the connecting lines, you will open the Relations dialog,
in which you can provide further information about what is to happen to the
linked records during update and delete operations.
■
The last step is to close the Relation window. The relations will be automatically
saved.
Creating and Modifying the Forms for "Movies"
and "Tapes"
Database forms can be used in many different ways. For example you can use a form
as an "entry" mask for your data records or to display your data in a pleasing way,
naturally including the buttons that are automatically available to navigate through
the data. We will now create a simple form. The forms supplied with the video collection provided can be examined if you call up their context menu with the command
Form Design.
■
Select Forms in the Explorer's database entry.
■
Call up New - Form in the context menu of this entry. You will now see a small
selection dialog where you select the AutoPilot.
■
On the first page of the AutoPilot for Forms you'll find the tables and queries
stored in this database from which to choose. Let's begin with the "Movies" table.
■
Click Next once to call the Fields Selection dialog. Accept all suggestions and click
Next again.
■
Under Style in the Fields Alignment tab page, select Columns oriented
■
The subsequent Templates dialog provides different types of effects, select here 3D
Effect and continue.
■
In the next dialog, name the form Only_Movies and select the Use Document
Immediately option under After Creation.... Finally, click the Create button.
Chapter 16
Working with Databases
467
Compare the form created automatically with the Movies form that we have supplied;
as you can see, one can improve a form significantly by customizing it a little. When
you customize a form, you should distinguish between two types of editing:
■
Visual customizing of the layout (size and position of fields, background, border,
etc.).
■
Logical customizing of data relations (which fields from which tables are
displayed).
If you want to customize a form, it must not be already open in normal mode.
You must therefore close the form if it is still open following the last step
described above.
468
■
Open the form design by right-clicking on the name of the form in the Explorer and
calling up the Form Design command in the context menu.
■
When customizing, it is a good idea to open the Form Functions floating bar from
the Main Toolbar and drag it into the Workplace as a freestanding window. It will
offer you lots of tools for customizing forms. The Object Bar will offer you further
tools.
StarOffice 5.2 User's Guide • June 2000
Customizing the Layout
If you feel that the form's automatically created layout is basically adequate, you may
wish to make only a few minor cosmetic changes.
Each line consists of a group consisting of a caption and a text box. If, for example, you
merely want to change the length of the text box, you must first enter the group. You
can do this via the group's context menu. You can then change this parameter by dragging the mouse or via the Position & Size command in the context menu of the object.
Later you should choose the Exit Group command in the context menu. You will find
icons for working with groups in the Object Bar.
If you want to have more influence over the layout of the new form, do not start the
AutoPilot when you create a form. Instead use an empty text document as your
starting point immediately. You can then select the size of the entire form and the
background via, for example, Format - Page. Add the components of the form with the
help of the Form Functions floating bar. A detailed example of this method is
provided under Addressbook as database in the User's Guide.
Customizing Control Elements and Form Properties
The Genre field should not contain just any genre name that occurs to you when you
enter the film. Instead, it should contain just one of the genre names that you previously entered in the Genre table.
■
Close the form design that AutoPilot has created for you. Open the form design for
the Movies form that we have supplied. As you already know: In the Explorer,
right-click the Movies entry under Forms and select Form Design in the context
menu.
■
If you now click the Genre list box, call the context menu and go to Group - Enter
and then display the Form Properties and the Control Properties one after another,
you will see how the aforementioned logical condition was implemented.
Chapter 16
Working with Databases
469
The "Select "GNAME", "GID" from Genres" SQL command ensures that the Genre
name whose GID field in the Genres table matches the contents of the GID field in the
Movies table appears in this field. You can see from the form properties on the Data
tab that the Movies table serves as the basis for the form.
The Genre field, the Tape field and the Actors field are each one field in a subform.
Each form that you set up, e.g. in a text document, with the help of the Form Functions floating toolbar, consists of a main form and may have any number of subforms.
This is how you spot a subform: The Type of data source data differs from the data in
the control fields of the main form, which always refer to a specific table.
Be sure to differentiate here between the two meanings of the word "form".
■
On the one hand the text document is itself a "Form" that is found under its name
under the Form entry in the Database. It can, but doesn't have to include one or
more forms of the second type:
■
On the other hand, the objects that you drag out of the Form Functions floating
toolbar and arrange in the text document also make up a "form", provided they
refer to the same data source. This form can contain subforms.
The Actors table field is slightly more complicated, as it uses an SQL query about the
Movies_Actors intermediate table.
470
StarOffice 5.2 User's Guide • June 2000
SQL has been selected as the type of datasource, and an SQL command has then been
entered in the Data source text box. The SQL command looks like this:
Select "A"."ANAME" from Movies M, Actors A, Movies_Actors MA where "M"."MID"
= "MA"."MID" and "MA"."AID" = "A"."AID" and "M"."MID" = :ActMovie
In this SQL command, the three alias names M, A and MA have been defined temporarily, and are valid for the duration of this command only. The "... Movies M ..." part
of the command defines, for example, that in this entire SQL command the Movies
table can be addressed more easily and quickly using the name M. Thus the entire
SQL command states that, from the Actors table, the names of all actors for whom the
following three conditions are simultaneously met (AND operation) will be displayed:
■
The Movie ID in the Movies table matches the Movie ID of a record in the
Movies_Actors intermediate table.
■
The Actor ID of this record in the intermediate table matches an Actor ID in the
Actors table.
■
The Movie ID in the Movies table matches the ActMovie variable.
Chapter 16
Working with Databases
471
You will also find the aforementioned variable, ActMovie, in the Link to text box. The
content of the Link from text box specifies that the Actors control field refers to the
Movie ID that is the current Movie ID in the superordinate main form. In other words,
you should see the actors who have roles in the movie that is displayed in the upper
part of the form.
There isn't enough space here for us to provide an introduction to SQL, the database
query language, as this would take many hundreds of pages. For an initial overview of
SQL and some of the many SQL commands, please refer to StarOffice Help.
■
Once you have finished customizing the form, click the Open in Design Mode
icon in the Form Functions floating toolbar, so that it is no longer activated. Then
close the floating toolbar and click the Save icon in the Function Bar.
Deactivating Open in Design Mode ensures that if you open the form at a later time
you will not be in the Design Mode again, and you will be able to see and enter data
immediately.
Entering Data
If the form design is closed, you can double-click the name of the form in the Explorer
to call up the form in Data Mode.
■
Now you can begin keying in data. Note that you have to enter data in the Tapes
table before being able to assign the appropriate data to the Movies table.
■
Simply click in the text window to enter your data. The icons Next Record and New
Record in the symbol bar on the bottom margin are used to continue entering data.
Creating Queries
Queries are used to sort and lookup data in a database. StarOffice Base uses SQL as
query language, which is briefly described in the StarOffice Help. However, you do
not need to learn SQL it can also be carried out more simply as StarOffice Base can
create SQL queries for you if you interactively describe what you want in the query.
■
472
Select the Queries entry in your database and use the context menu to activate the
Query Design mode using New - Query - Query Design.
StarOffice 5.2 User's Guide • June 2000
■
In the next dialog Add Table you can select your table with a simple click in the
Table Name area and assign is to the query by pressing the button Add. If you
select Movies, Genres and Tapes for examaple the tables will be shown as windows
in the query mask.
■
Via Drag&Drop, you can add the desired fields in the lower work area. Add fields
to get the following result:
■
In the toolbar, you can find (among others) the Run Query icon, which can be used
to see the results of your design prior to saving your first query. Finally, assign a
name, e.g. "Movies, Genres and Videotapes".
To learn about some of StarOffice Base's special capabilities, take a look at the queries
that we have supplied.
■
Open the query design for the Movies of a Genre query.
Chapter 16
Working with Databases
473
In the lower section of the query design you will see the entry =:Genre as a criterion.
This causes a dialog to appear which asks the user about the contents of this parameter
as soon as he or she calls up the query. Enter, for example, Action if you want the
query to search for all Action movies.
If you right-click a line header of the query design, you can click the Functions entry
in the context menu so that it has a check mark.
From this point on you will see an additional row with the name Function. In the cells
of this row you can select a function from a list box, e.g. average, count, maximum,
minimum, sum or group. For example, you may wish to insert a calculated field into
the query - if the database being used supports this capability.
The Group function requires that a further function has already been defined. Try, for
example, grouping the Movies table according to the GID field, i.e. by Genre, and
have the system display the maximum for the MLENGTH field for each group. In the
query, you will then see the movie with the longest running time for each Genre for
which you have at least one movie. A detailed explanation of this aggregate function
and what it corresponds to in SQL language is provided in StarOffice Help.
If you click the SQL tab at the very bottom of the query design, you can view the SQL
command that StarOffice Base has generated based on your data at any time.
■
474
Open the query design for the "empty tapes" query (in the context menu of the
entry). You will see a window similar to the one shown in the screenshot.
StarOffice 5.2 User's Guide • June 2000
The query should list all empty tapes. This means all tapes from the Tapes table that
are not entered in one of the Movies. The following has been entered as a criterion in
the query design:
NOT IN ( SELECT DISTINCT [Movies].[TID] FROM [Movies] )
If you click the SQL tab at the bottom of the window, you will see the SQL statement
that StarOffice Base has generated:
SELECT DISTINCT "Tapes"."TNAME" AS "Tapes" FROM "ENGLISH"."Movies"
"Movies","ENGLISH"."Tapes" "Tapes" WHERE "Movies"."TID" = "Tapes"."TID" AND
"Tapes"."TID" NOT IN ( SELECT DISTINCT "Movies"."TID" FROM "Movies" )
In the query with the name "Space on Recorded Tapes", you have the option of immediately entering an SQL expression instead of a field name in the Field line. In this
instance, all cassettes that have an entry in the Movies table and are therefore not
empty are listed in a formula. For each Tape, the play length minus the total length of
all the movies on the tape is calculated and displayed.
■
Take a look at the "Movies with Tom Cruise" query in the query design.
Chapter 16
Working with Databases
475
All movies for which the assigned name of a given actor, ANAME, matches a given
text are to be displayed, along with their name, MNAME. This is determined based on
the key fields and the Movies_Actors intermediate table.
As you can see, in the criterion line a check is performed to determine whether the
name ANAME matches the text "Tom Cruise." You can, for example, rewrite the criterion so that all actors whose name contains the text "Tom" will be found. The criterion
will then look like this:
LIKE '%Tom%
If you double-click the connecting line between two tables, the Joint properties dialog
will appear. Now that you are an experienced SQL user you can define the JOIN properties of the query in this dialog. Of course, now you are an experienced user you
could also switch over to the SQL tab at any time and manually edit the SQL
command that StarOffice Base has predefined.
Further information about creating queries with and without Autopilot can be found
in StarOffice Help and in the Advanced section of the User's Guide in StarOffice Help.
476
StarOffice 5.2 User's Guide • June 2000
Creating a Report
Reports allow a summarized view of previously defined records. Based on a query or
table, the records can be listed in different ways. Here again, a StarOffice Base
Autopilot assists you in creating the report.
■
Use the context menu of the previously selected Reports entry in your database
(New - Report - Autopilot).
■
On the first page of the dialog, select the "Movies" query to base the report on that
selection and click Next.
■
Apply the entries on the next page that you wish to see in the report. The sequence
you select determines how the columns are arranged in the completed report.
■
All settings on the subsequent pages can be accepted as they are by simply using
the Next button and finally terminating the Autpilot with Create .
You can post-edit StarOffice 5.2 reports simply because they have been created in the
form of a StarOffice Writer document. You can use the Stylist, for example, to edit the
Styles for the pages (first and next pages) and the table contents. You can also save the
edited report under a different name if you wish by choosing File - Save As.... You
will find a description of this in the introduction to StarOffice Base in the User's Guide.
Now you have finished creating your first StarOffice Base database. You can try the
numerous possibilities that we only mentioned or have not even discussed yet. You
can also use the Databases chapter in the StarOffice Help and the Help Agent to learn
more about queries, reports etc. in StarOffice Base
Combining the Use of StarOffice Base
and StarOffice Calc
This section will explain how StarOffice Base and StarOffice Calc can be used together.
For example, StarOffice Base and StarOffice Calc can be used together for editing a
dBase database table. To edit a database file in dBase format using StarOffice Base you
must copy this file to a folder that is already registered as a database folder, and then
update this database entry in The Explorer via its context menu. Or you can create a
new database entry for this one file in The Explorer.
If you simply want to quickly display a DBF file on a diskette, it is easier to open this file
in StarOffice Calc. Select the "dBase" file filter in the File Open dialog, or display the directory in The Explorer and double-click the file so that it is opened in StarOffice Calc.
Chapter 16
Working with Databases
477
Do not change the information contained in the first row, which describes the structure of the dBase file. You can change the contents of the data fields as long as you
keep the same type for each cell, i.e. do not enter text in any number fields. You can
add or delete entire rows (records). Save the document, and a message will ask if you
would rather save it in StarOffice Calc 5.0 format. Select "No", so that the document is
saved in dBase format.
478
StarOffice 5.2 User's Guide • June 2000
Index
3D charts 158
3D objects 195
3D rotation object 195
3D rotation object, converting into a 194
3D sheet references 142
3D world globe 388
A
absolute addressing 128
academic papers 314
accentuating text 106
adapt Start button and New menu 46
add a Bookmark 442
add automatically 102
Address Book, editing 222
Address Book mask with form functions 235
address database 150
addressing formulas with names 131
addressing with cell names 130
advantages of the Stylist 78
alias names in SQL 471
aligning objects 186
aligning text to lines 113
align text to a freeform line 114
ambient light 158
anchoring 322
anchoring frames 301
animated text 109
animation 174
application letter 263
apply a Style to a text 78
apply Page Style 82
arithmetic pattern 136
arranging objects 186
assistants 100
asterisk 67
attach file to e-mail 426
attachment, saving 423
attachment, sending 425
attributes 98, 138
attribute tables, loading and saving 209
AutoCalculate 126
AutoCorrect 93
AutoFilter 146, 147
AutoFormat 100
AutoFormat for sheets 139
AutoFormat for spreadsheets 151
AutoHide 49
automatic *bold* 101
automatic addressing 131
automatically replaceable words 102
automatic calculation of series 136
automatic Fill 136
automatic hyperlink formatting 101
479
automatic hyphenation 94
automatic Styles 80
automatic text replacement 102
automatic URL recognition 101
AutoPilot 45, 104
AutoPilot Presentation 161, 162
AutoPilots and templates 46
AutoSpellcheck 92
AutoStart documents 29
AutoText 103, 308
avoiding duplicates 362
avoiding empty lines 283
B
background, defining 170
background, of a folder window 48
background color, define 209
background picture 152
Background view 170, 184, 209
Bar Chart 158
basic arithmetic 127
basic arithmetic operations 120
Beamer 31, 54
Beamer, show 48
Bézier objects 191
Bézier points 192
bitmap graphics 183
bitmapped image 44
bitmaps, transform to vector graphics 193
bold format 72
bookmark 310, 439
bookmarks in the text 90
break off from recurring series 406
breaks 94
brochure 179
brochures, printing 70
budget 147
bullet symbols in Outline view 371
Business cards, creating 258
480
StarOffice 5.2 User's Guide • June 2000
C
calculated field 474
calculating formulas 45, 115
calculations in spreadsheets 119
callouts 189
canceling a subscribed newsgroup 431
capital letter 102
CD cover 386
cell 115
cell A1 116
cell attributes 153
cell contents 118
cell format 122, 153
cell notes 128
cell ranges, recognition of 131
cells as Internet references 134
cells in date format 125
cells in number format 123
cells in text format 122
cells in time format 125
Cell Styles 138
center text on page 108
change the page number format 84
change the size 185
chapters and subchapters 88
character spacing 79
chart 156
chart 44, 322
chart, inserting 156
chart, select 157
chart for stock prices 340
charts using statistics 158
checking multilingual texts 93
clear cache 433
Click & Go 55
clip art 268, 291
clipboard 181
closing a document automatically 57
closing a window automatically 57
CMYK 204
codepage 437, 149
Color Bar 202
colored backgrounds 303
colored cells 327
colored shading for columns 345
color filter 158
color gradients, defining 207
color gradients, using 207
color sample 204
column header 116
column headings in dBase files 359
columns 300
combination chart 158
combining objects 201
combining text cells 122
complete address 142
concordance file 312
conditional formatting 346
configure New menu 46
configure Start button 46
configure the user interface 47
connectors 378, 379
context menu 33, 93
control keys 33
control points 107, 184, 185, 193
control points, dragging 107
converting into 3D 194
converting into a Curve 194
copy a formula 129
copyright symbol 102
corner 193
corner point 191
correction value 80
create a document template 78
create new documents 45
create new Style 77
create Style 77
creating a bibliography 312, 316
creating a DDE link 321
creating address labels 260
creating a document template 78
creating a formula 45
creating a handout or flyer 290
creating and inserting an index 312
creating a new table in an existing database 227
creating a Paragraph Style 77
creating a presentation from an outline 323
creating a query 457
creating a report with StarOffice Calc 224
creating a scenario 354
creating a Style 77
creating a table of contents 304, 316
creating a Text Style 77
creating a user-defined index 324
creating forms 232
creating headers 294
creating homepages 445
creating lines at precise angles 269
creating records in a spreadsheet 144
creating simple homepages 448
creating structured spreadsheets 151
cross-fade effects 369
cross-fading between two objects 198
cross-fading objects 198
cross-reference 35, 310
currency format 124
current selection only 97
cursor keys 62
curves 193
curves, drawing 191
curving text 113
customizing the interface 47
custom quotes 101
custom Styles 77
D
data, filter 146
data, group 147
database 43
database, creating a 225
database, importing into a sheet 148
database, planning the structure 462
Index
481
database, sort 145
database filters 360
database range, define 143
database table in StarOffice Calc 224
database workshop 460
data in columns 157
date, fixed and variable 282
date row 345
dates and times 125
dates in cells 125
dBase data, inserting into a sheet 148
dBase file in StarOffice Calc 359
default fonts 86
default Page Style 41
define a wrap region 302
define category 410
define colors 203
define event colors 410
defining a database range 143
defining custom colors 203
delete category 410
deleting text 62
designing 3D fonts 396
designing text documents 105
desktop 27, 32, 54
desktop, create a new 37
desktop, remove a folder entry 37
desktop, working with the 32
desktop and templates 87
desktop button 29, 32
desktop icon 37
Details view, modify 48
dictionary 92
dimension lines 400
direct cursor 64
displaying formulas 339
distorting graphics 395
distributor 426
dividend payment 334
dividing line on the toolbar 51
docking windows 49
482
StarOffice 5.2 User's Guide • June 2000
document, open a 38
document, printing a 178
document contents - save locally 432
document template has been changed 265
document templates 73
document Windows 28
Drag&Drop 33
Drag&Drop in the Event window 216
Drag&Drop in the Task bar 51
drawing 43
drawing, lines and curves 191
drawing arrows in text 112
drawing lines in text 112
drawing sectors and segments 187
Drawing view 184
duplicating 197
E
editing a curve 192
editing a format 74
editing and creating Styles 75
editing an image 44
editing gluepoints 380
editing Page Style 83
editing points 192
EFFECTIVE 127
effects 174
ellipse 187
ellipses and arcs 188
e-mail, recieving 422
e-mail, saving 425
e-mail, sending 424
e-mail, setting up 419
e-mail attachment, saving 423
e-mail attachment, sending 425
e-mail distributor, defining 426
e-mail form letters 428
e-mail merge 428
e-mail Message 42
enlarging and reducing text frames 107
enlarging and reducing docked windows 50
entering a group 200
entering alarms 403
entering a StarOffice Math formula 45
entering fractions 123
entering new text 61
entering text at any position 64
Enter key 61
envelopes 254
error indicators 158
Euro conversion 120
European flag in 3D 196
event, searching for an 214
event list view 214
events, entering into Schedule 212
events, printing 219
event with alarm/reminder 403
examine control properties 357
exchanging data via the clipboard 181
excluding text from the Spellcheck 95
exiting a group 200
expanded 79
Explorer 29, 54
Explorer, creating a new group 56
Explorer, show 48
Explorer, overview of icons 58
exporting to a file 179
Extended Tips 71
extrusion 195
eyedropper 205
F
Favorites 55
faxes, with graphics 280
fax template 278
file, open a 38
Fill format mode 79
filling curves 193
filling in lists with data 136
filter events 411
filters 360
filter tasks 411
finding formatting 98
finding Events 413
finding text 95
first paragraph 302
Fit Text to Frame 189
fixed and variable fields 282
floating toolbars 53, 106
floating window 49
flowing and linking frames 302
folder bookmarks 39
folder windows, background and font 48
font, in a folder window 48
fonts in faxes 280
font size 139
font size in the message 423
font weight 98
FontWork 113
format, editing 74
formatting, spreadsheets 153
format a certain line as a heading 74
format numbers in a spreadsheet 153
format text in a spreadsheet 153
formatting 72
formatting, using 74
formatting cells and sheets 139
formatting multiple paragraphs 79
formatting numbers 138
formatting tables 139
formatting text 72
formatting with AutoCorrect 313
format transfer 79
Form Design Mode 239
form letter, creating a 281
form letter, insert fields in 283
form letter as e-mail 428
form letters, avoiding empty lines 283
form letters, exchange database 284
Formula bar 116
formula editor 45
Index
483
formulas 317
formulas in cells 127
fractions 123
frame 43, 301
frame, jump to next 89
frame for text 109
FrameSet, creating a 43
FrameSet, frame spacing 449
frames for text 106
frame wrap 302
freezing a column 346
full view 24
Function AutoPilot 127
Function bar 27
fuzzy search 99
hiding, Explorer, Beamer, etc. 48
hierarchy levels 88
highlighting cells 288
highlighting references 129
homepage, background of 447
homepage, folder structure 446
horizontal line 112
household budget 328
HTML, graphics, saving locally 442
HTML document 43
HTML export file format 180
HTML export of Drawing objects 112
HTML in spreadsheet cells 134
hyperlink formatting 101
hyperlinks 90
G
I
Gallery 291
generating a table of contents 311
ghost mode 200
gradients 110
graphic, jump to next 89
graphics, in faxes 280
graphics, Vectors and Bitmaps 183
grouping objects 199
group read 435
growth 137
icons, context for 50
icons in the Main toolbar 53
icons on the desktop 33
image, labeling 201
ImageMaps 450
IMAP e-mail, installation 419
importing ASCII text 101
importing bookmarks 440
importing text 101
importing records into a sheet 150
incorporating new templates in the menu 46
incorporating slide show effects 169
individual presentations 176
inform participant automatically 409
input Help 349
input line 116
Insert (Ins) key 62
inserting additional sheets 118
inserting a table into another document 339
inserting dummy text 313
inserting footnotes 315
inserting graphics in homepages 446
inserting graphics in HTML pages 446
H
Handout view 373
hard format 72
hatching 206
headers 299
headers, in database ranges 145
headers and footers on presentation slides 170
headings, applying 74
Help Tips 71
hidden paragraph 284
484
StarOffice 5.2 User's Guide • June 2000
inserting sheets via DDE 321
inserting text 62
inserting text frames 106
inserting text in frames 268
insert mode 62
insert note 339
insert table 154
integers starting with a zero 123
interaction 377
Internet newsgroups 42
Internet presentation 180
intersection 201
invisible buttons 50
J
JOIN 476
joint properties 476
jump to page 90
jump to specific pages 90
K
keeping track of interesting pages 442
key positioning in spreadsheets 132
L
labels, creating 258
labels, synchronizing 259
languages and spellcheck 93
Layer view 184
layout 151
leading zeros 123
letter template 104
light source 158
lines, drawing 191
lines in organization charts 378
Line Style 199
link 35, 46
link formatting 101
linking to the desktop 363
load gradients list 209
logarithmic display of the axes 158
M
mail, sending 424
mail distributor, defining 426
mailing labels 258
mails, reading 431
managing events and tasks 46
manual break 82
marginal frame 322
margins 315
master document 44
master slide 170
match case 96
mathematical formula 115
Menu bar 26
merging cells 154
message, saving 425
message document 424
minimize StarOffice 24
mirror automatically 322
modifying a Style 79
modifying toolbars 51
mouse as a pointer 371
mouse positioning 38
move, copy or create link 33
moving between objects in the text 89
moving text frames 107
multiple selection 96
multiple sheet references 142
multiple sheets 117, 141
My Documents 55
Index
485
N
names in spreadsheets 130
natural language addressing 131
navigating within a document 317
navigation button 89
navigation icon 89
navigation window 89
Navigator 88, 375
never hyphenate word 94
New command 40
new folder 46
New menu 46
new page number, continue with 80
news, reading 431
news account, setting up a 430
news server, setting up a 430
news server, updating 433
news servers, updating several 433
new Style by example 77, 78
next Style 61, 82
no fonts available 68
notes 318
notes in cells 128
NOW 126
numbered captions 309
number format 138
Numbering Style 76
numbers in cells 123
numbers starting with a zero 123
O
object, duplicating 197
object, scaling 107
object overlap 201
ODBC databases, inserting into sheets 148
offline mode 432
open a document 38
open as template 87
opening a database file in StarOffice Calc 148
486
StarOffice 5.2 User's Guide • June 2000
opening a database in a sheet 148
opening a text document 41
opening documents with templates 265
open template 45
optimal column width 119
organization charts 376
organizing and printing notes 374
organizing document templates on the
desktop 87
organizing recurring events 405
original 36
outboxes, several 421
outline doesn't work 172
Outline Numbering 316, 320
outline order 318
Outline view 91, 173, 368
Outside key 466
overwrite mode 62
P
pack 178
page break as Paragraph Style 84
page number 90
page number, change 80
page number, correction 80
Page Styles 86, 299, 320
Page Styles and page numbers 80
Page view 69
paragraphs, formatting multiple 79
Paragraph Styles 61, 74, 313
Paragraph Styles, search 97
participant availability view 408
patterns 206
pictures in a circle 294
pivot point 185
Player for presentations 182
polygon, transform into a 193
POP 3 e-mail, installation 419
positioning objects 322
positioning graphics 153
position text in middle 108
poster 394
PostScript file, creating a 179
predefined objects in Explorer group 58
preparing a slide show 369
preparing tables in text documents 153
presentation 42, 370
presentation, create a 166
presentation, export as HTML 180
presentation, exporting a 179
presentation, with the AutoPilot 162
presentation slide, printing a 178
Presentation Styles 172
presentation with time keeping 383
primary key 230, 466
print a page 178
print brochure 295
print document 68
printer driver as default printer 68
printing a draft 70
printing an overview 70
printing a presentation 177
printing a single label 262
printing a spreadsheet 142
printing brochures 70
printing handouts 70
printing in StarOffice Schedule 219
printing labels 258
printing return address labels 262
printing service 179
printing several pages on one sheet 70
printing the Address Book 224
print order 69
print to file 68, 179
professional invoice 286
protecting a table 337
Q
quick configuration 50
quotation marks 126
R
range of cells 131
ranges and references in spreadsheets 129
receive e-mail 422
recognize name as address 131
records, selecting in Beamer 151
records in spreadsheets 143
reference in news headers 434
reference key 466
references 127
references, absolute and relative 129
references in formulas 133
references to multiple sheets 142
references to other spreadsheets 134
referencing spreadsheets to other documents 134
register-true 299
regression curves 158
regular expressions 97
relative addressing 128
relative and absolute links 453
reminder 90
reminder, entering 403
rename 118
renaming sheets 118, 327
replace Euro symbol 102
reply messages 434
report, creating a 241
report design 245
reset the screen 186
resume 263
return address 105
reverse 186
RGB 204
rotate 198
rotate 198
rotate text 106
rotate the object by dragging 185
ROUND 127
row header 116
ruler 72
Index
487
S
save 66
save gradients list 209
saving after printing 266
saving e-mail attachments 423
saving graphics from HTML pages locally 442
saving images locally 442
saving in dBase format 361
saving mail to send later 425
saving Web pages with pictures 442
scaling for the screen display 38
scaling message contents 423
screen display 42
search for attributes 98
search for event 408
search function 95
searching and finding on the Internet 441
searching backward 97
searching for an event 214
searching for a word in text 95
searching for specific formats 99
searching for Styles 97
searching for templates when opening a file 265
searching for whole words only 96
searching with the URL field 439
search Numbering Style 98
search with placeholders 97
section break 80
segments 187
select, a chart 157
select file for frame 450
selecting and deleting text 62
selecting sheets 141
select multiple sheets 141
sending attachments 425
sending e-mail 424
sending e-mail to multiple recipients 426
sending messages 434
set as final event of a recurring series there. 406
setting and jumping to reminders 90
setting up e-mail account 419
488
StarOffice 5.2 User's Guide • June 2000
setting up and managing projects 34
sheet, adding to spreadsheet 118
sheet, filling with database information 148
sheet, rename 118
sheets, multiple 141
sheets, selecting 141
show, Explorer, Beamer, etc. 48
show/hide slide 168
showing and hiding days and weeks 415
showing a presentation 169
similarity search 99
size of the object 184
slanting text 113, 291
slanting letters 105
slanting text 114
slide layout and outline 172
slide order 168
slides 368
slide show 169
slide transition 174
slide view 168, 184
smooth 193
soft format 72
sort 145
sorting data 360
sort lists 136
space between footer and text 85
Spellcheck 92
Spellcheck, automatic 92
Spellcheck, multilingual 93
Spellcheck exclusion 95
split cells 154
spreadsheet 115
spreadsheet 42
spreadsheet, format numbers 153
spreadsheet, format text 153
spreadsheet document 115
spreadsheet formula references, examples 127
spreadsheet program 115
spreadsheets, ### in 119
spreadsheets, format 153
standard dictionary 92
standard Filter 146, 360
standard Font, changing the 275
standard number format 138
standard quotation marks 101
standard template 86
StarOffice Base, basics 221
StarOffice Base forms, creating 232
StarOffice Base report, creating a 241
StarOffice Calc, basics 115
StarOffice Calc formulas 127
StarOffice Discussion, setting up 430
StarOffice Draw, basics 183
StarOffice Impress, basics 161
StarOffice Mail, setting up 419
StarOffice Math 45
StarOffice Player 182
StarOffice Schedule, basics 211
StarOffice Stocks Manager 331
StarOffice Writer, basics 61
Start button 29, 40
starting the Spellcheck 94
statistical values in charts 158
Status bar 119
Stick, icon 49
stock chart 340
stock price history as a chart 340
stocks portfolio 331
Style 72
Style, update automatically 80
Style category 297
Styles in StarOffice 73
Styles in the Stylist 73
Style types 75
Stylist 73
Stylist, advantages 78
subform 470
subscribing to newsgroups 431
subtotal 148, 147
SUM 127
sum of all selected cells 119
switching between headers and text 64
switching documents automatically 57
switching windows automatically 57
symmetric 193
synchronize contents 259
synchronize event 408
synchronize labels 259
Synchronizing a news server 433
T
table, jump to next 89
table background 154
table cell does not react to formatting 140
tables 323
tables, inserting in text documents 154
tables in text documents, formatting 154
Task Bar 29
Task bar, Drag&Drop 51
tasks, managing 217
tasks, printing 219
tasks in StarOffice Schedule, managing 217
template 45
template, customized 105
template, update automatically 80
templates on the desktop 87
text, how to insert 62
text, multiple selection 96
text, rotate 189
text and lines 112
text centered on page 108
text format (search) 99
text frame 106, 108
text in cells 122
text in picture, inserting 201
text navigation 64
Text Object bar 72, 78
Text Styles 75, 313
text wrap 155
tickets 261
tiling pages 395
Index
489
times in cells 125
toolbars, modifying 51
tools, context for 50
transforming bitmaps into vector graphics 193
transparency 205
transparent 201
triple-click 63
turn off hyphenation 94
type of Bézier point 193
types of addressing 128
typing errors 64, 102
U
underlined in red 92
undo 187
undo Editing Lines 441
undo the last action 38
update Style 79
updating a news server 433
updating an index 318
updating newsgroups 432
updating several servers 433
uploading homepages 447
URL field, search 439
URL in Calc 134
URL recognition 101
user-defined buttons 357
using a grid 398
using a snap grid 380
using direct references to other documents 357
using Drag&Drop to copy into a sheet 150
using drawing objects as frames 109
using drawing tools 269
using illumination 390
using Microsoft Internet Explorer as the
browser 440
using scenarios 353
using snap lines 398, 400
using sort lists 136
using StarOffice as Web browser 438
using texture 388
490
StarOffice 5.2 User's Guide • June 2000
V
validity 348
value highlighting 118
values in a chart, changing 157
values in sheets 118
vector graphics, create from bitmap 193
vector graphics and pixel graphics 183
vertically center 108
Video Database as sample 460
Viewer for presentations 182
visible buttons 51
W
wavy underlines 92
Web document 69
wildcards 97
window, show 48
window docking 49
window view 47
word completion 62
working with StarOffice Desktop 32
world globe 388
X
XY chart 158
Y
Y2K Problem 138
year 2000 138
Z
zero, entering a 123