1
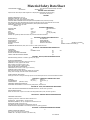
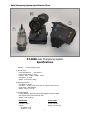
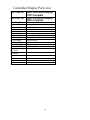
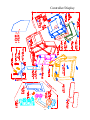
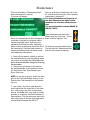
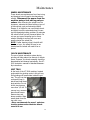
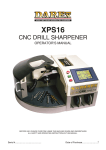
2
Table of Contents
Safety Instructions ................................................................................. page 4-5
Material Safety Data Sheet ..................................................................... page 6
Auto Specification Sheet......................................................................... page 7
Quick Start Instructions ......................................................................... page 8
Connecting Auto Sharpening System to XT-3000................................... page 9-14
Auto Controller/Display Details ............................................................ page 15-18
Auto Sharpening Fixture Details ........................................................... page 19-23
Auto Sharpening Fixture Parts List ....................................................... page 24
Auto Sharpening Fixture Schematic ..................................................... page 25
Geared Chuck Parts List ....................................................................... page 26
Geared Chuck Schematic ...................................................................... page 27
Auto Controller/Display Parts List ........................................................ page 28
Auto Controller/Display Schematic ...................................................... page 29
Maintenance ......................................................................................... page 31-32
Trouble Shooting Guide ........................................................................ page 33
*For Technical Service visit our web site at http://www.darex.com
Or call Darex at 800-547-0222
3
Or contact your Darex Distributor
PP17296KF Rev 0
Safety Instructions
Safety Instructions
FOR YOUR OWN SAFETY, READ INSTRUCTION MANUAL BEFORE OPERATING MACHINE!
Caution:
•
•
•
WE DO NOT RECOMMEND OPERATING MACHINE WITHOUT A VACUUM SYSTEM RUNNING
GRINDING DUST INHALED/INGESTED CAN BE
HARMFUL TO YOUR HEALTH.
GRINDING PARTICALS WILL CAUSE DAMAGE
TO THE INTERNAL COMPONENTS
Caution:
•
•
•
•
•
•
•
•
•
•
•
•
•
•
•
230v~,50Hz,6A
•
230v~,50Hz,8A
•
•
WHEN USING ELECTRIC TOOLS, BASIC
SAFETY PRECAUTIONS SHOULD ALWAYS BE
FOLLOWED TO PREVENT THE RISK OF FIRE,
ELECTRIC SHOCK AND PERSONAL INJURY,
INCLUDING THE FOLLOWING:
WHEN MAINTENANCE OR MACHINE
ADJUSTMENTS ARE PERFORMED ON
SHARPENER ALWAYS: Push the emergency stop
button, unplug unit from power supply and use a
“LOCK OUT” “TAG OUT” procedure.
FOLLOW INSTRUCTIONS ENTITLED “DAREX
XT-3000 Maintenance" in this Instruction Manual.
NEVER TOUCH INTERNAL PARTS OF THE
SHARPENER WHEN THE SHARPENER IS ON The
rotating grinding wheel can cause injury.
USE CAUTION WHEN REPLACING THE GRINDING WHEEL Follow instructions entitled “How to
change a wheel”, on page 21 of the XT-3000
Instruction Manual.
KEEP GUARDS IN PLACE and in working order.
See Decal at left.
REMOVE WRENCHES Always check to see that any
tools have been removed from sharpener before
turning it on.
KEEP WORK AREA CLEAN Cluttered areas and
benches invite accidents.
DON'T USE IN DANGEROUS ENVIRONMENT Do
not use power tools in damp or wet locations, or
expose them to rain. Do not use tools in the
presence of flammable liquids or gases.
KEEP WORK AREA WELL LIT
STORE EQUIPMENT in a safe place when not in
use.
DON'T FORCE TOOL It will do the job better and
safer at the rate for which it was designed.
USE THE RIGHT TOOL Don’t force tool or
attachment to do a job it was not designed for.
ALWAYS USE SAFETY GLASSES Also use face or
dust mask if cutting operation is dusty. Everyday
eyeglasses only have impact resistance lenses and
they are NOT safety glasses. See Decal at left.
AVOID ACCIDENTAL STARTING Make sure switch
is in the “OFF" position before plugging it in.
USE RECOMMENDED ACCESSORIES Consult the
owner's manual for recommended accessories. The
use of improper accessories may cause hazards. See
Decal at left.
CHECK FOR DAMAGED PARTS Before further use
of the tool, a guard or other part that is damaged
should be carefully checked to assure that it will
operate properly and perform its intended function.
Check for alignment of moving parts, binding of
moving parts, breakage of parts, mounting and any
other conditions that may affect its operation. A
guard or other part that is damaged should be
properly repaired or replaced.
NEVER LEAVE TOOL RUNNING UNATTENDED
Turn power off.
USE PROPER EXTENSION CORD Make sure
extension cord is in good condition. When using an 4
•
•
•
•
•
•
•
•
•
•
•
extension cord be sure to use one heavy
enough to carry the current the Drill
Sharpener will draw. An undersize cord will
cause a drop in line voltage, resulting in a
loss of power and/or overheating.
DO NOT USE DAMAGED OR UNSHAPED
WHEELS Use grinding wheels suitable for
speed of grinder.
THE CONTINUOUS A-WEIGHTED sound
pressure level at the operator’s ear is not
over 60dB (A).
RISK OF INJURY DUE TO ACCIDENTAL
STARTING. Do not use in an area where
children may be present.
THE WEIGHTED ROOT MEAN SQUARE
ACCELERATION VALUE to which the arms
are subjected to does not exceed 2.5 m/s2.
KEEP CHILDREN AWAY. All visitors should
be kept safe distance from work area.
MAKE WORKSHOP KID PROOF with padlocks or master switches.
WEAR PROPER APPAREL. Do not wear
loose clothing, neckties, rings, bracelets or
other jewelry which may get caught in moving parts. Nonslip footwear is recommended.
Wear protective hair covering to contain long
hair.
DON’T OVERREACH. Keep proper footing
an balance at all times. .
MAINTAIN TOOLS WITH CARE. Keep
tools sharp and clean for best and safest performance. Follow instructions for lubricating
and changing accessories.
DISCONNECT TOOLS before servicing,
when changing accessories, such as blades
and the like.
NEVER STAND ON TOOL. Serious injury
could occur if the tool is tipped or if the
grinding tool is unintentionally contacted.
Safety Instructions
GROUNDING INSTRUCTIONS
•
•
•
FOR ALL GROUNDED CORD CONNECTED
TOOLS:
In the event of a malfunction or breakdown, grounding provides a path of least resistance for electric
current to reduce the risk of electric shock. This tool
is equipped with an electric cord having an equipment-grounding conductor and a grounding plug.
The plug must be plugged into a matching outlet that
is properly installed and grounded in accordance with
all local codes and ordinances. Do not modify the
plug provided if it will not fit the outlet, have the
proper outlet installed by a qualified electrician. Improper connection of the equipment-grounding conductor can result in a risk of electric shock. The conductor with insulation, having an outer surface that is
green with or without yellow stripes, is the equipment-grounding conductor. If repair or replacement
of the electric cord or plug is necessary, do not connect the equipment-grounding conductor to a live
terminal. Check with a qualified electrician or serviceman if the grounding instructions are not completely
understood, or if in doubt as to whether the tool is
properly grounded. Use only 3-wire extension cords
that have 3-prong grounding plugs and 3-pole receptacles that accept the tool’s plug. Repair or replace
damaged or worn cord immediately.
GROUNDED, CORD-CONNECTED TOOLS INTENDED FOR USE ON A SUPPLY CIRCUIT HAVING A NOMINAL RATING LESS THAN 150
VOLTS: See Table 1 for minimum gauge cords.
Table 1 Minimum Gauge Cords
Ampere Rating
M o re t han
Not mo re t han
0
6
10
12
6
10
12
16
Volts
120 V
240 V
Total length of cord (f eet / meters)
25 / 7.5
50 / 15 100 / 30 150 / 45
50 / 15 100 / 30 200 / 60 300 / 90
AWG
18
16
16
14
18
16
14
12
16
16
14
12
14
12
Not Recommended
5
US DEPARTMENT OF LABOR
Administration
Material Safety Data Sheet
Form Approved Occupational Safety and Health
0MB No 44-Ri 367
MATERIAL SAFETY DATA SHEET
Required under USDL Safety & Health Regulations for Ship Repairing, Shipbuilding and Chip breaking
129 CFR 1915, 1916.19171
SECTION I
MANUFACTURERS NAME: Darex LLC
EMERGENCY PHONE NO: (541) 488-2224
ADDRESS: 210 E. Hersey Street Ashland, Oregon 97520
CHEMICAL NAME & SYNONYMS Diazon-Electroplated Diamond/CBN Products, Diamond (uncoated)
Man-Made Diamond. RVG. MBG. MBS Product Families. Standard Series and 300 Series Diamond Micron Powder
TRADE NAME & SYNONYMS: Electroplated CBN Wheels, Electroplated Diamond Wheels
CHEMICAL FAMILY: Abrasive Any Grade
FORMULA: n/a
SECTION II COMPOSITION
CHEMICAL NAME
Nickel
Industrial Diamond
REGULATED
Yes
No
CAS#:
7440-02-0
7882-40-3
AGIH TLV
1 0 mgm3
10.0 mg m3 (PNOC)
CARCINOGEN
Yes
No
Materials are regulated by OSHA 29 CFR 1910.1200, Hazard Communication Standard
BOILING POINT (F)
SPECIFIC GRAVITY
VAPOR DENSITY
SOLUBILITY IN WATER
SOLVENT
APPEARANCE AND ODOR Solid, Clear, White To
FLASH POINT
(METHOD USED)
EXTINGUISHING MEDIA
SPECIAL FIRE FIGHTING PROCEDURES:
UNUSUAL FIRE AND EXPLOSION HAZARDS:
SECTION III - PHYSICAL AND CHEMICAL DATA
n/a
MELTING POINT
n/a
VAPOR PRESSURE
n/a
EVAPORATION RATE
n/a
SOLUBILITY IN ALCOHOL
n/a
Yellow To Dark Crystals Silver Color.
n/a
n/a
n/a
n/a
SOLUBILITY IN OTHER
PERCENT VOLATILE BY VOLUME (%)
n/a
SECTION IV - FIRE AND EXPLOSION HAZARD DATA
n/a
FLAMMABLE LIMITS
LEL
UEL
n/a
n/a
n/a
SECTION V - HEALTH, FIRST AID AND MEDICAL DATA
PRIMARY ROUTE(S) OF ENTRY: Inhalation, Ingestion, Skin, Eye(s)
EFFECTS OF OVEREXPOSURE
INHALATION: Difficulty in breathing (Dust from wheel use).
INGESTION: If a dust, symptoms are variable.
SKIN: Irritation (especially if sensitive to Ni ).
EYE(S): Irritation (from Ni or diamond particle).
FIRST AID AND MEDICAL INFORMATION:
INHALATION: Move to fresh air. Give oxygen if necessary
INGESTION: Obtain medical attention.
SKIN: Wash thoroughly with water Obtain medical help if necessary
EYE(S): Flush thoroughly with water. Obtain medical assistance
OTHER POTENTIAL HEALTH RISKS
Nickel (Ni) is listed as a carcinogen Avoid long exposure. Consult medical personnel for first aid and medical information
SECTION VI - CORROSIVELY AND REACTIVITY DATA
STABILITY:
Unstable ( )
Stable (x)
POLYMERIZATION:
May occur ( )
Will not occur (x)
INCOMPATIBILITY:
(Materials to avoid)
n/a
HAZARDOUS COMPOSITIONS PRODUCTS:
n/a
CONDITIONS TO BE AVOIDED: Contact with strong acids/caustics, enclosed areas.
SECTION VII - SPILL, LEAK AND DISPOSAL PROCEDURES
STEPS TO BE TAKEN IN CASE MATERIAL IS RELEASED OR SPILLED: Normal clean up procedure
WASTE DISPOSAL METHOD:
Waste will contain nickel. Dispose in accordance with all applicable Federal, state, and local regulations.
SECTION VIII – PERSONAL PROTECTION INFORMATION
RESPIRATORY PROTECTION:
Respiratory protection as needed see OSHA-29 CFR 1910.134
VENTILATION: LOCAL EXHAUST: strongly preferred
MECHANICAL (GENERAL): Use only if adequate to maintain below TLV’s.
PROTECTIVE GLOVES: As desired by user.
EYE PROTECTION: Recommended see OSHA29 CFR 11910.215
OTHER PROTECTIVE EQUIPMENT: Use standard precautions for grinding operations.
SECTION IX - STORAGE AND HANDLING PROCEDURES
NORMAL STORAGE AND HANDLING:
Store in clean, dry area, away from chemicals.
NORMAL USE: Use adequate ventilation (See Section VIII )
6
Form OSHA-20
Auto Sharpening System Specification Sheet
B
C
A
XT-3000 Auto Sharpening System
Specifications
Warranty - 1 year on defective parts
A) Geared Chuck:
Chuck Body Material
- 303 Stainless
Knob and Cam Material - 12L14
Capacity - 3mm - 12mm or 12mm - 21mm
Gear Spline - 45 Tooth
Weight - 2.1lbs each (0.95kg)
B) Sharpening Fixture:
Gear Material - Acetal;
Gear Motor - 12 VDC, rated current 350 mA, typical current 150 mA
Home switch - Slotted Optical
Weight - 6.0 lbs ( 2.72 kg)
C) Controller/Display:
Housing Material - Glass filled, Acrylonitrile Butadiene Styreme (ABS)
STN Graphic LCD w/ Green LED back light
Weight - 1.5lbs (0.68 kg)
Power Inlet:
Voltage: 115v~
Frequency: 60hz
Current:
Grind Motor: 3.2A
Accessory: 8.0A
Power Outlet:
Voltage: 115v~
Current : 8A Max
Fusing : 8A Time Lag
7
Quick Start Set Up
9. Un-box the chuck.
10. Align and secure the drill in the chuck.
(XT-3000 Instruction Manual
PP16180KF for Alignment details)
11. Insert chuck into Sharpening fixture.
Secure chuck in sharpening fixture, see
page 21.
12. Power on the machine by pushing the
rocker switch into the ON position, this
The Auto Sharpening System comes
equipped with a sharpening fixture, a
Controller/Display and a chuck/chucks.
Available chuck options listed below. The
Automated Sharpening System is for
use with the XT-3000 Expandable
Tool Sharpener only and not for use
with other sharpeners.
LEX400 LEX400i LEX450 LEX451i LEX500 LEX500i -
will immediately start the grinding
wheel in motion and power up the
115v w/3-12mm Chuck
230v w/3-12mm Chuck
115v w/12-21mm Chuck
230v w/12-21mm Chuck
115v w/3-21mm Chucks
230v w/3-21mm Chucks
Controller/Display screen.
13. Set up the LCD screen on the Controller/Display, see pages 15-18.
14. (THIS STEP IS NOT NECESSARY
WHEN PURCHASING AND XT-3000
A COMPLETE) Calibrate Final Grind Drill Stick Out on sharpening fixture, see
pages 22-23.
15. Press Start on the Controller/Display
screen to begin sharpening. NOTE: The
sharpening fixture will immediately begin to rotate and sharpen the drill. Make
sure hands and clothing are free of the
sharpening fixture.
16. Once the chuck has stopped, release
the chuck and remove from sharpening
fixture.
17. If a split point drill is desired, insert
chuck into splitting port. DO NOT remove drill from chuck until split is complete. (See XT-3000 Instruction Manual,
PP16180KF, for Split Point details)
Detailed set up instructions begin on
page 9.
1. Remove from shipping box and remove all packaging material.
2. Attach sharpening fixture to XT base,
making sure the sharpening fixture is
secure. For more information on
mounting the sharpening fixture, see
page 9.
3. Attach Controller/Display with mounting bracket provided, see page 10.
4. Connect DIN cable from sharpening
fixture to Controller/Display, see page
12.
5. Connect power from outlet source to
back of Controller/Display inlet, see
page 13.
6. Connect Pigtail Jumpers from the
back of Controller/Display to XT-3000
Base casting inlet. For detailed set up
information, see page 13.
7. The accessory receptacle is located at
the top of the power receptacle on the
back of the Controller/Display and will
allow you to use a dust extraction system in conjunction with the use of the
XT3000. *We highly recommend
the use of a vacuum when the
machine is in use.
8. Make sure the grit tray is in place and
secure.
8
Automated Sharpening System
Attaching Sharpening Fixture to
Base Casting:
Make sure all contact areas are clean and free
of metal dust.
1. Rotate the locking lever so the flat edge is
on top, horizontal and in a
straight line
with the base
casting.
2. Position the
sharpening fixture so that the 2 location holes
on the base of
the alignment
fixture are
aligned with
the 3/8 dowel
pins.
3. After sharpening fixture is in place, rotate
the locking lever clockwise until snug. This will
secure the sharpening fixture to the base.
9
Automated Sharpening System
Mounting Auto
Controller/
Display to
Base Casting:
5. Peel adhesive backing
from dual-lock
tape.
1. Install and tighten
the two, 6mm BHSHC
screws from the stamped bracket to the control
box.
6. Carefully
align Controller/
Display to XT
base casting
2. Align control box to main casting and transfer and press
punch or mark for drilling mounting screw holes. firmly.
3. Drill through
casting.
5. Using 2, 10-24 thread forming screws,
insert into mounting bracket. While pushing hard, drive
in screws until
seated.
4. Using an alcohol wipe, thoroughly clean the
XT base casting surface where the adhesive will
make contact.
10
Automated Sharpening System
Connecting Sharpening Fixture
to Controller/Display:
1.
Connect the mini DIN power cable coming
from the Sharpening Fixture to the mini DIN
receptacle located slightly underneath the bottom of the Controller/Display.
Important: Be sure you have the DIN
pins and receptacle aligned correctly
before engaging. Improper connection can result in a blown optical
switch in the sharpening fixture which
will make the unit nonfunctional.
11
Power Connections - Back view
Automated Sharpening System
/Vacuum Receptacle
/From Controller/Display
/To Power Source
/From Controller/Display
12
Automated Sharpening System
Connecting Auto Controller/
Display to XT-3000:
Connecting AC Power to Auto
Controller/Display:
1. Located on the back of the XT-3000 base
casting is the secondary power receptacle.
1. Located on the back of the Controller/
Display is the primary power receptacle.
Within this receptacle you will find a power
inlet and accessory receptacle.
Caution: Do not connect a separate
power source to this Inlet!
2. The secondary accessory receptacle is located on the top and
the secondary power inlet is located on the bottom of the receptacle.
3. Connect
both pigtail
jumpers
coming from
the Controller/Display to
the appropriate positions
in the secondary receptacle located at the back of the XT3000.
2. Provided with the XT-3000 is a power cord.
Plug the cord into to a power outlet and into
the power inlet located on the back of the
Controller/Display.
Caution: Only one supply source can be
connected to this equipment!
13
Automated Sharpening System
Connecting Vacuum:
Vacuum Port Connector
(Optional)
The accessory receptacle on the back of the
Controller/Display is located in the
top position on the receptacle. This
will allow you to connect a dust
extraction system to be used during sharpening.
*We highly recommend the
use of a dust extraction system
when the auto sharpening system is in
use. DAREX offers a vacuum system compatible with your XT3000.
Call DAREX for pricing.
The grit tray has a knock out plug that can be
removed by hand
and replaced with
the vacuum tube
(SA16030TA).
•
•
SA12075EA - 115V Vacuum
SA12072EA - 230V Vacuum
Use this port to connect a vacuum hose to
the XT3000. This method of extracting dust
particles from
the machine
will keep it
cleaner and is
recommended.
Grit Tray/Vacuum Port Connection:
Grit tray
At the back of the machine, located underneath
the grinding motor is
the grit tray. Drill
Make sure the grit tray is in place and secure
grindings will
before connecting the
accumulate inside the
vacuum hose.
grit tray. The grit tray
has a magnetic liner
to attract and hold
these dust particles.
Do not let the tray
become more than
1/3 full.
To remove tray, unscrew brass thumb screw.
Remove tray and dump contents. Wipe excess
dust from the tray
with a rag.
14
Display Details
To operate the Auto Attachment you must first
power up the XT-3000 sharpener. Once powered up, the grinding wheel on the XT-3000
will begin to turn at full speed and the Controller/Display screen will illuminate.
CYCLE START/SELECT/SAVE:
CYCLE STOP/STOP/EXIT:
ARROW UP:
ARROW DOWN:
To access the complete menu, touch
the System Settings button located
on the left of the screen.
This will display the full menu:
• Clean Up Turns
• Auto/Manual Select
• Reset Bit Count
• Language Selection
• Motor Stall Delay
• Grind Sensitivity
• Factory Bit Count
• Software Version
Use the Arrow up and Arrow down buttons to view the entire menu. When
the text of the menu option has
changed to bold, the secondary menu
option can be accessed.
To select and enter into each secondary menu
touch
SYSTEM SETTING:
Pressing
will allow you to exit the
screen you are working in.
15
Display Details
Pressing “Save ”,
CLEAN UP TURNS:
By selecting “Clean up turns”,
The display shows:
Pressing “Exit”,
ing.
stores and exits.
exits without sav-
AUTO:
By selecting “Auto”,
The display shows:
The “Clean up turns” is active only when in “Auto”
Sharpening mode.
Pressing “Arrow up”
by one.
advances clean up pass
Pressing “Arrow down”
Pressing “Save ”,
Pressing “Exit”,
reduces pass by one.
When “start”
is pressed, the
sharpening
fixture will begin to
sharpen.
During sharpening, you will see the number of rotations on the screen increase.
When the grind is complete, the programmed cleanup passes will appear and
begin to count down to 0. The sharpening
port will rotate to the home position and
stop.
At the end of each sharpening, the Bit
Count increases.
stores and exits.
exits without saving.
AUTO/MANUAL SELECT:
By selecting “Auto/Manual”,
The display shows:
Pressing “Arrow up”
will highlight each
or “Arrow down”
menu option.
By pressing “stop”
during the Auto
Cycle the unit stops and returns home.
16
Display Details
MANUAL:
By selecting “Manual”,
The display shows:
By pressing “Arrow up”,
Manual turns increases.
By pressing “Arrow Down”,
RESET BIT COUNT:
By selecting “Reset Bit Count”,
The display shows:
the number of
the number
of Manual turns is decreased.
This automatically saves the new setting.
After pressing “Start”,
sharpening begins.
Pressing “Arrow up”,
“Arrow down”,
option.
or
will highlight each menu
Pressing “Save”,
only, if the
resets the bit count,
“yes” is highlighted.
Pressing “Exit”,
exits without saving.
the manual
The display starts counting down the number
of turns. At the end of sharpening, the Bit
LANUGUAGE SELECTION:
Count increases.
By pressing “Stop”,
the manual sharp- By selecting “Language Option”,
ening ends.
The display shows:
Pressing “Arrow up”
or “ Arrow down”
will highlight each language option.
17
Display Details
Pressing “Select”,
lection and exits.
Pressing “Exit”,
displays language seexits without saving.
MOTOR STALL DELAY:
This screen will appear on the display:
The Grind Sensitivity is a measure of how
quickly the controller responds to the material take off during AUTO grinding. A
lower number generally creates more
turns, a higher number means
fewer turns before the controller decides it
has reached the proper material removal.
This variable is set at a factory default of
25. When Darex CBN and Diamond wheels
are used, the setting of 25 is appropriate
and will not need to be changed.
FACTORY BIT COUNT:
“Motor Stall Delay is used to detect a prolonged
period of the Gear Motor not turning, sensing a
blocked or jammed condition. The available settings are 2, 3 or 4 seconds; the factory default
is 3 seconds.
If the unit detects a 3 seconds lapse and the
chuck has not rotated at least a half turn, the
unit will shut itself off and “Sharpening Interrupted” will appear.
This screen displays the accumulative
number of times the cycle start button has
been pressed. This number cannot be reset and will be used for warranty evaluations.
SOFTWARE VERSION:
The system will reset itself.
.GRIND SENSITIVITY:
This screen displays the current version of
software. You will need to know the software version for upgrade status and
troubleshooting.
18
Alignment Instructions
Each chuck has an
orientation line
scribed on the chuck
dog of the cam.
To achieve the highest level of concentricity, in
the alignment step, insert the chuck into the
alignment port with the white line in the 12
o’clock position.
19
20
Auto Sharpening Fixture
SECURE CHUCK IN SHARPENING FIXTURE
After the drill has been properly aligned and
secured in the chuck, be sure to lock the chuck
into the automated sharpening fixture.
Insert chuck into
sharpening port
with the white line
on the dog,
aligned
Located on the front of
the sharpening fixture
is a spring loaded handle assembly.
This is the “Cam Follower” assembly.
Grip the Cam Follower
“Knob”, rotate the assembly as far clockwise
as possible.
with the locating mark on the face of the
sharpening tube housing.
This will allow you
to insert the chuck
into the sharpening
tube without interference.
21
Auto Sharpening System
Gripping the
follower “Knob”,
gently pull back
and rotate the
“Cam Follower”
assembly as far
counterclockwise as possible.
Before you begin sharpening with your Auto
system, take the time to calibrate Final GrindDrill Stick Out. This will help retain your current point split depth calibration.
Release the “Knob”.
3. Using a height gauge,
measure the amount of
drill protruding from the
end of the chuck to the
tip of the drill. (Drill
Stick Out - Before Grind)
This will secure
the chuck in the
sharpening fixture.
To remove the
chuck, wait for
the sharpening fixture to come to a
complete stop. Simply rotate the “Cam
Follower” assembly
as far clockwise as
possible.
NOTE: It is not necessary to pull back
when rotating the “Cam Follower” assembly
clockwise.
DRILL STICK OUT- FINAL GRIND:
IMPORTANT: This step is NOT necessary
for the XT-3000-A & XT-3000I-A Complete.
The Drill Stick Out - Final Grind amount on the
Auto Sharpening system must be calibrated to
produce the same Drill Stick Out - Final Grind
amount as produced on your existing Manual 22
Verify Final Grind Drill Stick Out On Manual
System First:
1. Rotate material removal knob
to minimum take off setting. 2. Align drill in chuck. Once drill is
set to length, aligned and
securely captured in the chuck, remove from
alignment port.
4. Sharpen the drill
until spark out has
been achieved.
Remove chuck from
sharpening port. Without removing
the drill, re-measure the
amount of Drill Stick Out
after grinding. Your
Auto system must be adjusted to produce the
same Final Grind - Drill Stick Out measurement as the manual system.
5. Remove the Manual System and install the
Auto Sharpening System.
6. Using the same drill bit, repeat steps 1-4 to
determine the Final Grind - Drill Stick Out
measurement currently produce by the Auto
Sharpening System.
You will need to adjust the Swing Bearing
assembly on your Auto sharpening attachment to duplicate the Final Grind - Drill Stick
Out measurement produced by the Manual
system, see page 23 for calibration details.
Auto Sharpening System
CALIBRATING DRILL STICK OUT - FINAL
GRIND :
The swing cam on the chuck rests and rides
on the Swing Bearing assembly. This bearing
assembly is eccentric. The Auto Sharpening
Fixture will arrive with this bearing positioned
so that the drill will NOT make contact with
the grinding wheel. By repositioning the bearing, the amount of material removed from the
end of the drill will change, changing the Final
Grind - Drill Stick Out amount.
1. Using a 3mm hex
wrench, loosen the
Swing Bearing Assembly, located on
the back of the Pivot
Base Casting.
2. To increase the amount of material removed from the end
of the drill and reduce the Drill Stick
Out amount, slightly
rotate the bearing
clockwise.
3. After repositioning the bearing, be
sure to retighten the assembly bolt, securing
the new position of the Swing Bearing Assembly.
4. Sharpen the drill and verify the amount of
Final Grind - Drill Stick Out.
Repeat this procedure until the Final Grind Drill Stick Out amount measures the same as
produced with the Manual system.
Once the Final Grind - Drill Stick Out has been
calibrated, it will not be necessary to make
this adjustment again.
23
Auto Sharpening Fixture Parts List
SA17050TA Auto Sharpening
Fixture Complete
1) - PP17128PF
2) - SA17121TA
3) - PP17125MF
4) - PP17131PF
5) - SA17145EA
6) - SA16652TA
7) - PP17065TF
Gear Cover
Drive Gear Assembly
Gear Motor
Motor Cover
Switch Harness
Feed Bearing Assembly
Gear Chuck Tube Liner
8) - PP12220FF
9) - PP17075PF
10) - SA16645TA
11) - PP16650RF
12) - SA16615SA
13) - PP16630BF
14) - SA16657TA
15) - SA17085TA
16) - PP17079FF
17) - PP17078PF
3mm x .5 x 6mm
Park Cam Wear Plate
Spring Tensioner Assembly
Return Spring
Pivot Lever Assembly
Docking Plate
Swing Bearing Assembly
Follower Bearing Assembly
5mm x .8 x 16mm
Follower Plunger Knob
24
Auto Sharpening Fixture
25
Geared Chuck - Auto
ITEM
ITEM_DESC
SA17010TA
3-12MM GEARED CHUCK (OPTIONAL)
1) - PP17013TF
3-12MM GEARED CHUCK BODY (B BP S N)
2) - SA12565RA
CHUCK JAW SPRINGS (5 PIECES)
3) - SA16425SA
JAW SET (5 PIECES)
4) - SA17018TA
3-12MM GEARED CHUCK CAM/KNOB ASSEMBLY
5) - PP16442FF
3-21MM SNAP RING
6) - PP16440FF
JAW KEY SCREW
7) - PP16420TF
3-12MM CLOSING SCREW
8) - PP16435LF
JAW RACE
9) - PP16430TF
3-12MM JAW GUIDE (B BP S N)
ITEM
ITEM_DESC
SA17025TA
12-21MM GEARED CHUCK (OPTIONAL)
1) - PP17030TF
12-21MM GEARED CHUCK BODY (B BP S N)
2) - SA12567RA
CHUCK JAW SPRINGS (7 PIECES)
3) - SA16427SA
JAW SET (7 PIECES)
4) - SA17040TA
12-21MM GEARED CHUCK CAM/KNOB ASSEMBLY
5) - PP16442FF
3-21MM SNAP RING
6) - PP16440FF
5MM X .8MM X 10MM SSS
7) - PP16418TF
12-21MM CLOSING SCREW (B BP S N)
8) - PP16470LF
12-21MM JAW RACE
9) - PP16465TF
12-21MM JAW GUIDE (B BP S N)
26
Geared Chuck - Auto
27
Controller/Display Parts List
SA17060TA
SA17061TA
1) - SA17230EA
2) - SA17173TA
3) - SA17185EA
4) - PP117228PF
5) - PP17231EA
6) - PP17180FF
7) - PP17225PF
8) - PP17190EF
9) - PP17195PF
10) - PP17198EF
11) - PP17238EF
11) - PP17240EF
Not Shown PP17250FF
Not shown PP12057EF
Auto Controller/Display
115V Complete
Auto Controller/Display
230V Complete
Interface Harness Assembly
Mounting Bracket Assembly
Display Assembly
Housing Main Side
Interface PWB
Dual Lock Mounting Tape
Housing Base Side
Display PMB w/LCD
Display Housing
Membrane Switch Panel
115V Relay
230V Relay
Vac. Fuse 115V
Vac. Fuse 230V
28
Controller/Display
29
30
Maintenance
This unit will display a “Maintenance Alert“
when maintenance is required.
The screen will display:
This is a good time to inspect the rest of the
XT machine and perform any other necessary
maintenance, see page 32.
For best performance and longevity of
the Auto Sharpener we highly recommend the use of a dust extraction system.
For more information contact DAREX @
800-547-0222.
Once maintenance has been completed, using the “Arrow up” “Arrow
Every 100 sharpenings this alert will appear as down” buttons, highlight “Yes”.
a reminder to perform the required routine
maintenance listed below. Performing this
maintenance will keep the auto sharpening
fixture running properly and extend the life of To select yes press the select button.
the components. It will also help prevent exThis will clear the “Maintenance Alert”
cessive grit build up which will cause premaand you may resume sharpening.
ture sharpening interruptions.
1. Power off the machine, waiting to perform
the maintenance only once the grinding wheel
has come to a complete stop. Disconnect the
power from the machine using a lock out tag
out procedure.
2. Vacuum any grit found on the machine.
Pay special attention to the electronic controller, the Follower Cam Tube Assembly and
Chuck Tube Liner.
NOTE: Do not use an air gun, as this can blow
grit into the Controller/Display housing or the
Follower Cam Tube Assembly on the sharpening port.
3. Use a clean, dry cloth to wipe down the
chuck bodies and the inside liner of the chuck
port. After using a dry cloth to clean these,
use the lubricated cloth, (gun cloth or similar)
provided, to re-apply a very fine lubrication to
these surfaces. (You can also use a clean cloth
with a light spray of silicone. Avoid aggressive
solvent based lubricants like WD-40.)
31
Maintenance
WHEEL MAINTENANCE
These wheels are maintenance free from truing
and dressing but will need to be cleaned periodically. Disconnect the power from the
machine using a lock out tag out procedure. After removing the wheel from the
sharpener, saturate the wheel with any type of
oil-less solvent, such as Automotive Brake
Cleaner. It is helpful to use a soft bristle brush
and lightly brush the saturated wheel, loosening the impacted grinding particles. Re-saturate
the wheel to flush out any loosened debris. Do
not use any type of dressing tool on these
wheels. Damage to surface will occur and
greatly shorten the wheel life.
NOTE: If after cleaning wheel, the drills still
discolor or burn, the wheel life may be exhausted and the wheel will need to be replaced.
CHUCK MAINTENANCE
The use of a dust extraction system during
grinding will help reduce the amount of maintenance, however, the chuck assembly should be
disassembled and cleaned periodically. See XT3000 instruction manual for detailed disassembly instructions.
GRIT TRAY
At the back of the XT-3000 machine, located
underneath the grinding motor is the grit tray.
Drill grindings will accumulate inside the grit
tray. The grit tray has
a magnetic liner to
attract and hold these
dust particles. Do not
let the tray become
more than 1/3 full. To
remove tray, unscrew
brass thumb screw.
Remove tray and
dump contents. Wipe
excess dust from the
tray with a rag.
Darex recommends the use of a dust extraction system when the Auto Attachment is in use.
32
Trouble Shooting
The unit stopped working and the screen
displays “Sharpening Interrupted”:
• This message will appear if the user
presses the “Stop” button during sharpening. It will also appear if the controller detects a large load on the chuck turning
motor. This is typically caused by dirt or
grit accumulating on the Chuck Body,
Chuck Tube Liner, or the Cam Follower
Assembly. Turn the machine off and perform the standard maintenance procedures
listed on pages 31 & 32. Restart the machine and see if it runs without interruption. If the controller continues to show
this message, call Darex customer service
for assistance.
•
•
•
The optical switch in the Sharpening Fixture in faulty, call Darex customer service
for assistance.
Check the small cable coming from the
sharpening port to the Gear Motor.
Finally, remove both covers on the Gear
Motor and Gear located on the Sharpening
Fixture. Verify the Drive Gear is secured to
the Gear Motor.
The unit powers up and runs the sharpening system, but the vacuum does not
come on:
• The vacuum receptacle for the Auto sharpening system is located on the back of the
Controller/Display housing, see page 14.
Make sure this connector is firmly seated.
• The connector is fused with two 8A time
The display does not come on when I
plug the unit it:
delay fuses (1.6A on the 230V interna• The auto controller receives its power
tional model). Make sure these fuses are
through the AC plugs in the rear of the
intact. If a fuse is found to be blown, then
unit. Make sure there is power to the outboth fuses should be replaced with the aplet you are using.
propriate capacity. You can find the part
numbers for these fuses listed on page 28.
• Make sure the wiring on the back of the
Note: Using fuses not supplied by DAREX is
unit matches that of the user manual
(power comes in to the controller, and
not recommended and may cause damage
both pigtails are firmly seated between the
to the Controller/Display.
controller and the XT unit).
• Try unplugging and re-plugging these
If the grind motor starts but the Auto
cords to ensure they are well seated.
Display is off:
• Finally, make sure the on/off switch on the • The internal relay may be defective. This
XT-3000 machine is powered on. The discan be detected by checking for voltage at
play will not come on until you power up
the vacuum output receptacle with an
the XT-3000. If unsuccessful, call Darex
electrical meter.
customer service for assistance @ 800547-0222.
The unit powers up, the display is on, but
pushing the “Start” button to sharpen
nothing happens:
• There is a cord that connects the sharpening port to the Auto Controller/Display,
see page 11. Be sure that the 5 pin DIN
connector on this cord is firmly seated into
the connector on the Controller/Display,
paying careful attention to cord/connector
orientation. Important: See information
on page 11. Inspect the cable, coming
from the controller to the sharpening port,
33
34
35
36