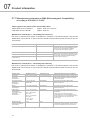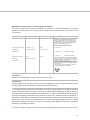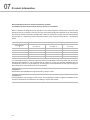
1
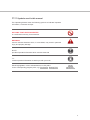
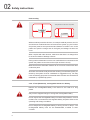
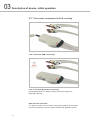
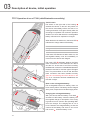
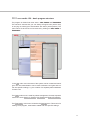
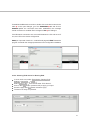
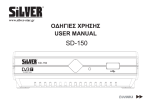
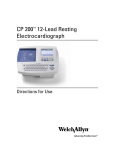
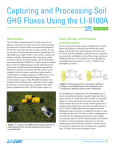
seca CT 320/321
and
seca cardio 150
Operating Manual
Table of contents
01
Introduction
02
Safety instructions
03
04
2
01.1 Symbols on the device. . . . . . . . . . . . . . . . . . . . . . . . . . . . . . . . . . . . . . . . . . . . . . . . . . . . . . . . . 4
01.2 Intended use . . . . . . . . . . . . . . . . . . . . . . . . . . . . . . . . . . . . . . . . . . . . . . . . . . . . . . . . . . . . . . . . . . . . . 4
01.3 Symbols used in this manual. . . . . . . . . . . . . . . . . . . . . . . . . . . . . . . . . . . . . . . . . . . . . . . . . 5
02.1
02.2
02.3
02.4
02.5
02.6
02.7
General notes . . . . . . . . . . . . . . . . . . . . . . . . . . . . . . . . . . . . . . . . . . . . . . . . . . . . . . . . . . . . . . . . . . . . 6
Operator instructions and user requirements . . . . . . . . . . . . . . . . . . . . . . . . . . . . 6
Safety installations and safe working . . . . . . . . . . . . . . . . . . . . . . . . . . . . . . . . . . . . . . 7
Information on EMC (Electromagnetic Compatibility) . . . . . . . . . . . . . . . . . 11
Maintenance (regular safety checks) . . . . . . . . . . . . . . . . . . . . . . . . . . . . . . . . . . . . . 12
Disclaimer . . . . . . . . . . . . . . . . . . . . . . . . . . . . . . . . . . . . . . . . . . . . . . . . . . . . . . . . . . . . . . . . . . . . . . . . 12
Warranty . . . . . . . . . . . . . . . . . . . . . . . . . . . . . . . . . . . . . . . . . . . . . . . . . . . . . . . . . . . . . . . . . . . . . . . . . 13
Description of device, initial operation
03.1
03.2
03.3
03.4
Part names, components for ECG recording . . . . . . . . . . . . . . . . . . . . . . . . . . . 14
Operation of seca CT 321 (with Bluetooth connectivity) . . . . . . . . . . . . . 16
seca cardio 150 – basic program structure . . . . . . . . . . . . . . . . . . . . . . . . . . . . . . 17
Connecting the ECG device to the PC
03.4.1 ECG device with USB port . . . . . . . . . . . . . . . . . . . . . . . . . . . . . . . . . . . . . . . . . 18
03.4.2 ECG device with Bluetooth connection . . . . . . . . . . . . . . . . . . . . . . . . . 19
03.4.3 Selecting ECG device for resting ECG . . . . . . . . . . . . . . . . . . . . . . . . . . 21
Hygiene
04.1 Cleaning and disinfection . . . . . . . . . . . . . . . . . . . . . . . . . . . . . . . . . . . . . . . . . . . . . . . . . . . . 22
04.2 Recommended cleaning agents and disinfectants . . . . . . . . . . . . . . . . . . . . 23
05
Carrying out an examination
05.1 Preparing the patient, examination procedure . . . . . . . . . . . . . . . . . . . . . . . . . . 24
05.2 Electrode application . . . . . . . . . . . . . . . . . . . . . . . . . . . . . . . . . . . . . . . . . . . . . . . . . . . . . . . . . . 25
05.3 First work steps in seca cardio 150. . . . . . . . . . . . . . . . . . . . . . . . . . . . . . . . . . . . . . . . 26
05.4 Recording resting ECG
05.4.1 Monitoring and electrode control. . . . . . . . . . . . . . . . . . . . . . . . . . . . . . . . . . 28
05.4.2 Starting and ending a resting ECG . . . . . . . . . . . . . . . . . . . . . . . . . . . . . . . 28
05.4.3 Editing options during the recording process . . . . . . . . . . . . . . . . . . 29
05.4.4 Online ECG printing . . . . . . . . . . . . . . . . . . . . . . . . . . . . . . . . . . . . . . . . . . . . . . . . . . 29
06
Working with the evaluation
06.1 Opening the evaluation . . . . . . . . . . . . . . . . . . . . . . . . . . . . . . . . . . . . . . . . . . . . . . . . . . . . . . . 30
06.2 Resting ECG evaluation
06.2.1 Screen pages within an evaluation . . . . . . . . . . . . . . . . . . . . . . . . . . . . . . . 32
06.2.2 Comparing several evaluations from one patient . . . . . . . . . . . . . 33
06.2.3 Note on navigation in the evaluation . . . . . . . . . . . . . . . . . . . . . . . . . . . . . 33
06.2.4 Overview of evaluation pages . . . . . . . . . . . . . . . . . . . . . . . . . . . . . . . . . . . . . 34
06.3 Writing the report . . . . . . . . . . . . . . . . . . . . . . . . . . . . . . . . . . . . . . . . . . . . . . . . . . . . . . . . . . . . . . . 42
06.4 Ending the evaluation . . . . . . . . . . . . . . . . . . . . . . . . . . . . . . . . . . . . . . . . . . . . . . . . . . . . . . . . . 43
07
Product Information
07.1 Technical data and system requirements . . . . . . . . . . . . . . . . . . . . . . . . . . . . . . . . 44
07.2 Manufacturer declaration on EMC (Electromagnetic
Compatibility) according to IEC 60601-1-2:2007. . . . . . . . . . . . . . . . . . . . . . . 46
07.3 EC Declaration of Conformity . . . . . . . . . . . . . . . . . . . . . . . . . . . . . . . . . . . . . . . . . . . . . . . 49
07.4 Shutdown, storage and transport . . . . . . . . . . . . . . . . . . . . . . . . . . . . . . . . . . . . . . . . . . 51
07.5 Disposal . . . . . . . . . . . . . . . . . . . . . . . . . . . . . . . . . . . . . . . . . . . . . . . . . . . . . . . . . . . . . . . . . . . . . . . . . . 51
07.6 Keyboard navigation and shortcuts. . . . . . . . . . . . . . . . . . . . . . . . . . . . . . . . . . . . . . . . 52
3
01
Introduction
01.1 Symbols on the device
Device conforms with the standards and guidelines of the EU
Observe the Operating Manual
Separate collection of electrical and electronic equipment,
do not dispose with domestic waste
Protection class classification of medical electrical equipment
according to IEC 60601-1 (type BF, defibrillation protected)
01.2 Intended use
seca CT 320/321 is a 12-channel PC ECG device which is designed for
recording, analysing and evaluating ECG recordings in medical practices
and hospitals.
seca CT 320/321 is perfectly safe for patients with a pacemaker. The ECG
recording is not affected by pacemaker pulses. seca CT 320/321 is not
suitable for intracardiac use.
4
01.3 Symbols used in this manual
This Operating Manual uses the following symbols to indicate important
information, comments and tips:
ACTIONS THAT ARE PROHIBITED
or not allowed under any circumstances!
WARNING
used to indicate situations which, if not avoided, may result in personal
injury and property damage
NOTE
provides important information which must be observed
TIP
contains practical information to assist you with your work
Words highlighted in colour indicate buttons or click paths
for the corresponding program point, e.g. Examination, Resting ECG
Words
highlighted...
5
02
Safety instructions
02.1 General notes
Strict compliance with the safety instructions protects against personal injury and property damage during device operation. This Operating Manual
is designed to accompany the product and must be kept ready to hand
close to the device.
As either the operator or user of this device you should have read and
understood this Operating Manual, in particular the safety instructions.
Laws and regulations applicable to the product
This system is designed in accordance with Medical Device Directive
93/42/EEC, Class IIa, and meets the requirements of protection class I
or II (depending on the power supply unit used; seca CT 321 meets the
requirements of protection class III – device with an internal power supply),
type BF (defibrillation protected), according to IEC 60601-1
Other devices which are part of the system must meet the requirements of
the Standard for Information Technology Equipment (IEC 60950) and the
Standard for Electrical Medical Devices (IEC 60601-1).
The electrical installations in the rooms in which the system is used must
meet the requirements of the applicable safety standards.
02.2 Operator instructions and user requirements
As the operator you are responsible for:
Ensuring that the operating personnel have been instructed in the
technical use of the device and they have read the Operating Manual
The device is used as intended by suitably trained specialist staff
Compliance with the safety regulations and safety instructions,
provisions for safety at work and accident prevention regulations
Compliance with the maintenance instructions
Users must meet the following requirements:
Knowledge of the correct use of the device
Command of the required device handling processes
Knowledge of the safety regulations applicable when using such devices
Understanding of the potential hazards
The device may only be used by medical specialist staff, e.g. physician’s
assistants, nurses, assistant medical technicians, physicians, etc.
For users outside the Federal Republic of Germany, the respective national accident prevention measures, regulations and requirements apply.
6
02.3 Safety installations and safe working
seca CT 320/321 must only be used in a technically perfect condition.
Regularly carry out a visual inspection of the device and the cables, in
particular the patient cable. Only use accessories approved by seca.
The device is protected against defibrillation only in connection with the
manufacturer’s patient cable.
In the event of defibrillation, take note of the manufacturers’ instructions
regarding the safe and proper use of the defibrillator. Defibrillation has an
interfering effect on the ECG recording. seca CT 320/321 has a recovery
time of less than ten seconds.
Installation of the system
Portable socket outlets must not be laid on the ground.
Portable multiple socket outlets which are supplied with the system are to
be used only for supplying devices which are part of the system. Additional
portable multiple socket outlets, lines and other equipment, which are not
part of the system, must not be connected to the system.
When using a multiple socket outlet, the maximum permitted load
is 3200 VA.
Slots which are not used in the delivered system (portable multiple socket
outlets) must be provided with covers.
Ambient conditions, handling
seca CT 320/321 is not suitable for use in rooms or areas with a risk of
explosion.
Strong electromagnetic sources in the immediate vicinity of the seca
CT 320/321 may result in recording errors (e.g. HF electrosurgical devices,
mobile phones, induction furnaces).
The device must not be operated simultaneously with HF surgical equipment.
The device must be protected against the ingress of moisture, dust or dirt
and also against mechanical impacts such as damage due to dropping or
transit damage.
7
02
Safety instructions
Patient safety
Safety distances of devices to the patient
1.5 m
2.5 m
1.5 m
2.5 m
1.5 m
1.5 m
1.5 m
1.5 m
Without medical protective devices, for example medical protector, the PC
and all the non-medical devices connected to the system (e.g. the monitor
and printer) must be set up and used at a distance of at least 1.5 m to the
patient unit (see the orange area in the figure) as leakage currents can
occur.
When coupled with other devices, make sure that there is no danger due
to the accumulation of leakage currents.
During routine maintenance work to non-medical devices connected to the
system the patient must not be touched (risk of electric shock).
Make sure that the electrode contacts do not come into contact with other
conductive parts.
All results of automatic analysis and the resulting unconfirmed reports produced by the system must be considered as suggestions only. For diagnosis and therapy purposes it is essential that the results are checked and
assessed by a qualified physician.
seca CT 321 (Bluetooth), rechargeable lithium-ion battery
Remove the rechargeable battery if the device is not used for a long
period.
Only use the supplied charger to charge the rechargeable battery.
Do not expose the rechargeable battery to extreme temperatures, fire and
moisture. Do not immerse the rechargeable battery in liquids. Observe the
operating and storage conditions.
Do not subject the rechargeable battery to strong shocks or drop it. The
recharge-able battery must not be disassembled, modified or short
circuited.
8
Hygiene
For cleaning and disinfection observe the legal requirements and the
current state of technology.
Use only cleaning agents and disinfectants approved by seca for cleaning
and disinfection. Clean and disinfect your device in accordance with the
specifications given in chapter 04 Hygiene.
Display of the ECG signal in seca cardio 150
If electrodes become detached from the patient during an ECG recording
or the electrode contact is too weak, a red signal line will be displayed
on the corresponding ECG channel in seca cardio 150. Below the ECG
recording a hint will appear (in red letters) indicating which electrodes are
concerned. Reattach them.
The appearance of red signal lines in seca cardio 150 does not indicate
that the patient has an asystole.
seca cardio 150 provides pacemaker detection. Here, the pacemaker
pulse from the ECG signal (in two channels at least) is detected and then
projected into the ECG recording as an (artificial) spike, precisely timed.
However, the pulse width of the pacemaker is not calculated with the
pacemaker detection in seca cardio 150.
The device is not suitable for binding pacemaker checks. In case of doubt,
use the device approved by the pacemaker manufacturer (see the patient’s
pacemaker record).
9
02
Safety instructions
System and data security
The device must only be used with the supplied seca software
(seca cardio 150).
As the operator you are responsible for ensuring regular data backups
(patient databases, evaluations etc.) and system backups. We recommend that you backup the data at the latest before new installations, updates and far-reaching system configurations.
seca cardio 150 new installations, updates and system configurations may
only be performed by your authorised seca dealer.
Only change data generated in seca cardio 150 within seca cardio 150
itself and not in your EPR system (Electronic Patient Record) or your hospital information system (HIS).
seca does not accept any responsibility for any changes to data in your
EPR system or your HIS which were made after the export from seca
cardio 150.
To ensure the safe operation of seca cardio 150, deactivate the screensaver and energy management options on your PC.
Set up your operating system in such a way to prevent the PC from being
switched off either accidentally or automatically during the examination
(standby mode/idle mode).
10
02.4 Information on EMC (Electromagnetic Compatibility)
The use of other accessories, other converters and leads than those indicated, except for the converters and leads sold by seca as spare parts
for inner components, can lead to increased electromagnetic emissions
or to a reduced electromagnetic immunity of the system. For connecting
the device to other equipment, only specially screened cables supplied by
seca must be used.
11
02
Safety instructions
02.5 Maintenance (regular safety checks)
The operator is responsible for maintenance. The operator must ensure
that the device is checked for proper condition at the latest every two
years. The functionality and the state of accessories must be checked at
regular intervals. If damaged and/or heavily soiled, the complete system
must no longer be used.
All interventions in the existing system, changes to system components,
enhancements as well as internal cleaning and repairs may only be performed by your authorised seca dealer or seca.
Technical safety check
After each system or device repair, modification or conversion, a technical
safety check must be performed by your authorised seca dealer.
02.6 Disclaimer
The manufacturer is not responsible for improper operation, failure to comply with the safety instructions and non-observation of specifications due
to negligence.
seca will only assume responsibility for the safety and reliability of the
seca CT 320/321 when all changes, enhancements, repairs and other
work to the device or system have been performed by an authorised seca
dealer or seca and the Operating Manual has been observed during device operation.
12
02.7 Warranty
Our product philosophy is committed to providing you with faultless products which meet your expectations. Should you have reason to complain
we aim to rectify any defects immediately or provide a replacement delivery.
This does not include damage that can be attributed to usual wear and tear,
improper use, unauthorised modification of parts and the use of violent
force.
After the expiration of the warranty period only use original spare parts
and accessories from seca. This is the only way to ensure the safe and
trouble-free operation of your device.
Warranty periods
seca CT 320/321 . . . . . . . . . . . . . . . . . . . . . . . . . . . . . . . . . . . . . . . . . . . . . . . . . . . . . . . . . . . 12 months
ECG electrodes . . . . . . . . . . . . . . . . . . . . . . . . . . . . . . . . . . . . . . . . . . . . . . . . . . . . without warranty
13
03
Description of device, initial operation
03.1 Part names, components for ECG recording
seca CT 320 (with USB connectivity)
seca CT 321 (with Bluetooth connectivity)
Rechargeable lithium-ion battery, Charger with power supply unit,
Bluetooth USB stick
Note about the electrodes
For optimal results, we recommend using high-quality ECG electrodes
and ECG preparation cream to prepare the electrode application points.
14
seca CT 320/321 – Length of patient cables
R, L, F, N . . . . . . . . . . . . . . . . . . . . . . . . . . . . . . . . . . . . . . . . . . . . . . . . . . . . . . . . . . . . approx. 1050 mm
C1 – C6. . . . . . . . . . . . . . . . . . . . . . . . . . . . . . . . . . . . . . . . . . . . . . . . . . . . . . . . . . . . . . . approx. 700 mm
15
03
Description of device, initial operation
03.2 Operation of seca CT 321 (with Bluetooth connectivity)
On/off switch
The switch on the right side of the housing
switches the device on and off. Only switch on
the device immediately before the start of recording and switch it off again directly after the
recording is completed. The maximum operation
duration is 4 hours after which the rechargeable
battery will need to be replaced or charged.
When the device is switched on, the lower LED
indicates the charge status of the battery:
Green: 100 % – 65 %
Orange: 65 % – 35 %
Red:
< 35 %
If the lower LED flashes red after switch-on, the
rechargeable battery must be immediately removed from the device and charged.
indicates whether the BlueThe upper LED
tooth connection is active between the device
and the PC. At the start of an ECG recording,
the Bluetooth connection is established between
the device and the PC and the upper LED lights
blue. The precondition for this is that the Bluetooth connection has been installed correctly
(see 03.4 Connecting the ECG device to the
PC). If no connection has been established, the
LED will not light.
Note on the rechargeable battery
The rechargeable lithium-ion battery does not
have memory effect. The battery can be charged
at any time, irrespective of the discharging times.
Charging the rechargeable battery
With your thumb, slide the battery cover back
and take out the battery. Insert the battery into
the supplied charger. A description of the charging method can be found in the Operating Manual of the charger. The charging time is 2 to 3
hours. Reinsert the charged battery so that the
contacts of the battery and seca CT 321 come
into contact . Close the battery cover.
16
03.3 seca cardio 150 – basic program structure
The program is divided into three areas – User, Patient and Examination.
This structure ensures that you can always recognize who (which user)
is carrying out what type of examination with whom (which patient). The
main menus of each area can be reached by clicking on User, Patient or
Examination.
In the User main menu the users of the system can be created and managed. The user administration can be used to allocate user rights and control user-specific settings, e.g. the creation of a separate patient database
for each user.
The Patient main menu is used for patient management. Its most important
functions include Search for Patient, New Patient and Search Evaluation.
The Examination main menu is linked to the Settings area. This area is for
making cross-program, examination-related and user-specific settings.
17
03
Description of device, initial operation
03.4 Connecting the ECG device to the PC
Precondition:
seca cardio 150 is installed on your PC and ready for operation.
The seca devices and components may only be connected to the PC after
seca cardio 150 has been installed. The required device drivers are installed using the seca cardio 150 standard setup or via targeted selection
during the seca cardio 150 setup.
03.4.1 ECG device with USB port
Connecting the USB cable to the PC
Connect the USB cable of the ECG device to the PC. Power is supplied
via the USB cable. The Windows driver installation for the new hardware
starts automatically. Select the “Find driver automatically” option. Use the
Next and Finish buttons to control the installation process.
Setting up the interface in seca cardio 150
Start seca cardio 150. Select Examination, Settings, Connection, Device .
Select ECG, seca CT 32x in the device selection list; select USB in the
interface selection list . Click on the Save button (at bottom left).
Selecting ECG device for resting ECG
See section 03.4.3 Selecting ECG device for resting ECG.
18
03.4.2 ECG device with Bluetooth connection
Note on Bluetooth USB stick
The supplied Bluetooth USB stick is supported by Windows XP and
Windows 7, but not by Windows 2000 and Windows Vista.
To ensure the smooth installation of the supplied Bluetooth USB sticks in
WINDOWS XP, the full installation of the current seca cardio 150 version
(not the update) must be carried out from the CD, even if another version
of seca cardio 150 is already installed. Otherwise, the operating system
will need to be accessed manually. The seca cardio 150 installation must
be completed before connecting the Bluetooth USB stick to the PC.
For WINDOWS 7, no subsequent installation of seca cardio 150 or
additional access is required as the Bluetooth USB stick is already known
in the operating system.
Overview Bluetooth installation
1.
Connect the Bluetooth USB stick to the PC
2.
Driver installation for the Bluetooth USB stick
3.
Check the driver installation
4.
Install the Bluetooth interface in seca cardio 150
5.
Allocate the device for examination
(see 03.4.3 Device settings for resting ECG)
A description of work steps 1. to 3. can be found in the “Quick guide for installing Bluetooth devices in seca cardio 150”. This Quick Guide is located
on your seca cardio 150 CD.
IMPORTANT:
Before continuing with the configuration of the Bluetooth interface in seca
cardio 150, make sure that the Bluetooth USB stick is correctly connected
and the power supply to the ECG device is guaranteed.
19
03
Description of device, initial operation
Installing the BT interface in seca cardio 150
Start seca cardio 150. Select Examination, Settings, Connection, Device
. Select ECG, seca CT 32x in the device selection list and Autom. BTCOM search in the interface selection list.
Click on the Save button (at bottom left).
Then select Examination, Settings, Connection, i.s. medical band . Activate the Microsoft Stack option, click on Save and then on Open (to
the left of Microsoft Stack). The message “Interface is enabled” appears .
Switch on seca CT 321 and click on the Search button . The “i.s. medical band search” dialogue appears. Restart the search if the device is not
found (repeat the process several times if necessary). Select the desired
device and click on Confirm. The previously selected device is displayed
in the table on the i.s. medical band page . Save your input.
20
To establish the Bluetooth connection, double-click on the device name in the
table . In the open dialogue, go to the Connection
tab and click on
Connect .After the connection has been established, the message
“Serial connection is enabled! End” will appear. End the dialogue.
If the Bluetooth connection was successful between the PC and seca CT
321, the LED on the device will light blue.
Save your input and close the i.s. medical band page with End. Restart the
program to transfer the changed parameters to the configuration database.
03.4.3 Selecting ECG device for Resting ECG
In seca cardio 150, select: Examination, Resting ECG,
Settings, Connection , Device .
Select seca CT 32x from the list under “ECG Device”.
Click on the Save button (at bottom left) to apply your input.
Close the page with End (button at bottom right).
The device is ready for operation.
21
04
Hygiene
04.1 Cleaning and disinfection
Important notes
Use only cleaning agents and disinfectants recommended by seca.
Unsuitable agents may damage the device.
Observe the manufacturer’s specifications (e.g. regarding dosage
and contact times).
The device must never be immersed in liquids
or cleaned with too much water.
The device must not be connected to a power source during cleaning
and disinfection.
Surface cleaning
Make sure that the exterior of the device is always aesthetic and clean.
Wipe the device using a damp cleaning cloth and a mild (acid-free!) cleaning agent or a suitable disinfectant.
Cleaning agents and disinfectants must not be sprayed directly on or into
the device.
22
04.2
Recommended cleaning agents and disinfectants
Disinfectants:
All alcohol-based disinfectants (e.g. propanol, ethanol)
approved for medical use.
23
05
Carrying out an examination
05.1 Preparing the patient, examination procedure
Make sure that the ECG device is connected to the PC
and the power supply to the device is guaranteed.
Check that your patient is lying comfortably and is not cold.
Shave, clean and dry the electrode application points thoroughly.
Place the electrodes on the patient.
Connect the patient leads to the electrodes.
Start seca cardio 150 and click on:
Examination, Resting ECG, New Resting ECG,
select the patient for the examination and start the recording
(a precise description can be found in Chapter 05.2).
The patient should not move or talk during the recording process.
24
05.2
Electrode application
Chest wall, standard according to Wilson
V1 (C1)
V2 (C2)
V3 (C3)
V4 (C4)
V5 (C5)
V6 (C6)
red
yellow
green
brown
black
purple
4. Intercostal space at the right sternal border
4. Intercostal space at the left sternal border
On the left on the 5th rib between C2 and C4
5. Intercostal space on the left midclavicular line
On the left on the anterior axillary line, on the level of C4
On the left on the midaxillary, on the level of C4
red
yellow
green
black
Right arm
Left arm
Left leg
Right leg
Extremities
R
L
F
N
25
05
Carrying out an examination
05.3 First work steps in
seca cardio 150
Note on the procedure
The steps necessary to record and evaluate
ECG data in seca cardio 150 are shown without
a surgery IT system or HIS connection.
Program start, calling the ECG
Start seca cardio 150 and log on with your user
name and password if required.
Click on: Examination
New Resting ECG .
26
, Resting ECG
,
Selecting the patient
Select a patient for the examination. Enter
the patient's name or the first letter of their
name into the input fields of the patient search
screen .
Select the patient from the list below the input
fields
and confirm your selection by clicking
the Select Patient button. You can also select
the patient by double clicking on the corresponding name.
New patient
If the patient is not in your database, click on
the New patient button. Enter the patient data.
The fields marked with an asterisk are mandatory.
Save the details to enter the patient in your
database.
27
05
Carrying out an examination
05.4 Recording resting ECG
05.4.1 Monitoring and electrode control
The patient’s ECG signal will be shown on the display but not recorded
(monitoring). Work steps before the start:
Choose the type of lead (standard, left, right, Nehb, Cabrera).
Check if all electrodes are attached optimally. If there are red lines
on the screen, the contact between the skin and electrode(s) is insufficient and the corresponding electrodes need to be reattached. For ECG
devices with USB connection, the Electrodes button provides you with
a graphic representation of the signal quality of all electrodes.
Set the required filters (Options menu ).
The preset standard procedures
for automatic ECG and manual
recordings are described
in this chapter.
These procedures can
be changed in the
seca cardio 150 settings:
1) Settings for
Auto-start recordings
or automatic ECG
In seca cardio 150, select
Examination, Resting ECG,
Settings, General, Workflow.
The recording duration and
procedures after the recording
can be set in the
“Automatic ECG” area.
Click on Save to apply changes.
Print settings for
automatic ECG:
The contents for a printout after
an automatic ECG recording
can be compiled at
Examination, Resting ECG,
Settings, Print, Automatic in the
“Printout Automatic ECG” area.
This setting is only required if
the automatic ECG print pages
should contain content other
than the data already defined
in the standard print settings for
resting ECG (see Examination,
Resting ECG, Settings, Print,
Default, “Printout” area).
2) Settings for
manual recordings
Under Examination,
Resting ECG, Settings, General,
Workflow in the Workflow area
(in the first block “After recording”) the procedures after the
recording can be set.
Click on Save to apply changes.
Note on the recording duration:
At least 10 seconds of the ECG
signal must be recorded.
A recording cannot be ended
before this time has elapsed.
28
05.4.2 Starting and ending a resting ECG
Automatic ECG (Auto Start button ):
Click on Auto Start to start the automatic recording. The standard setting for the duration of automatic recording is ten seconds. After the ten
seconds have elapsed the recording is automatically ended, saved, measured and printed out 1).
Manual recording (Start button or Enter key):
If you want to perform a recording without a time limitation (e.g. because
of suspected irregularities), you have to activate the recording with Start
. Click on End to close the recording. Click on Confirm in the End dialogue to ensure that the recording is saved, measured and displayed as
an evaluation 2).
05.4.3 Editing options during the recording process
Marking ECG sections
Automatic marking: By clicking on the Mark button , the last six seconds
are automatically marked. A dialogue appears for specifying 3), saving and
printing the marked part .
Manual marking: By clicking on the Start Mark button you can determine
the length of the marking yourself. The marking continues to run until you
click on the Stop Mark button. A dialogue appears for specifying 3), printing
and saving the marked part .
Tip:
Keyboard shortcut
+
–
Change amplitude
(mm/mV)
3) TIP: Text modules
for specifying marked parts
Use: If a part is marked during
the recording , the “Marking”
dialogue appears. The marked
parts will be automatically
specified by pressing a previously configured text module
button or the corresponding key
(e.g. F5).
Configuring text modules:
Under Examination, Resting ECG, Settings, General,
Marking the text modules can
be configured for specifying marked parts. A name is
assigned to the text module in
the “Name” field. This name
later appears on the button for
calling the text module. In the
“Text module” field, enter the
text which will later be used to
specify the marked parts.
Save your input.
Viewing and marking ECG, measuring HF during a pause
Clicking on Pause , will stop the screen display. The recording continues
to run and is displayed on one channel (fig. right). The scroll bar can
be used to scroll through the current recording.
The tools Mark, Measure HR and Calliper can be found at the top right
in the Mouse menu. By dragging the red cursor
in the ECG, you can
mark ECG sections (using the Mark mouse function). A dialogue appears
for specifying, printing and saving the marked part. With Continue you
return to the normal view of the recording.
05.4.4 Online ECG printing
Click on Print . A screen page of the ECG signal is printed from the point
of clicking. The printout contains 4.5 to 9 sec of the ECG signal, depending on the display speed 4).
4) Note on online printing:
Under Examination, Resting
ECG, Settings, Print, Default,
you can define in the “Online
ECG printout” area whether
the ECG should be printed as it
appears on the monitor or if
online printing should be carried
out according to previously
defined print settings for
analysed ECG.
29
06
Working with the evaluation
06.1 Opening the evaluation
seca cardio 150 offers different options to open an evaluation, e.g. via the
evaluation search or the main menu of the respective examination.
Opening an evaluation via the evaluation search
Click with the right mouse button on the Patient button. This opens the
evaluation search.
In the Examinations area, enter what type of evaluation you are searching
for, e.g. Resting ECG . In the Properties area
you can define more
search criteria.
If you set the confirmed preference to No, you will receive a list of all the
evaluations which have not yet been confirmed – a type of to-do list.
To start the search, click on Search Evaluation or activate Search automatically option . This option triggers an automatic search in your database whenever the search criteria are changed.
The right part of the screen displays a list of all the evaluations which correspond to the activated search criteria. To open the desired evaluation,
select it from the list and click on the Show Evaluation button or doubleclick on the evaluation.
Reference between
End dialogue
and search screen
In order to make
proper use of the
search screen, the
correct examination status must be
defined in the End
dialogue when closing
an examination.
Example: An
examination can only
be found in the search
screen with the
preference “confirmed:
No” when the evaluation status “Confirmed”
is NOT selected
in the End dialogue.
30
If you want to use the same search criteria for the next search, activate the
Save Selection option.
Opening an evaluation via the examination main menu
Open the examination main menu via Examination, Resting ECG and then
click on Show Evaluation .
The patient search screen appears. In this screen select the patient whose
evaluation you want to open. Enter the patient’s name or the first letter of
their name into the input fields of the patient search screen .
Select the patient from the list below the input fields and confirm your
selection by clicking the Select Patient button. You can also select the
patient by double-clicking on the corresponding name.
A list containing all the evaluations of the patient is then displayed. Select
the desired evaluation from the list and open it by means of a double-click
or via the Show Evaluation button.
31
06
Working with the evaluation
06.2 Resting ECG evaluation
06.2.1 Screen pages within an evaluation
The ECG evaluation is divided into two main areas, ECG and Measurement (the ECG page is preset as the start page of the evaluation). From
the subpages of the two areas the main page of the other area can be
accessed at any time.
ECG overview
Zoom
Complete ECG
Magnified display of a channel
as 2-channel ECG strip display
(mouse function:
zoom, double click on ECG)
Start page: ECG 1)
Complete ECG,
e.g. 12-channel display
Start page: Measurement 1)
1) Note on setting the start page
The start page of the evaluation can be set under:
Examination, Resting ECG, Settings,
General, Workflow, in the "Workflow,
show evaluation" area.
Averaged complexes
of all channels
Measurement
Single complex
Tabular display
Averaged complex of a channel
of all measured values
and vector loop
Further pages in the Options menu:
Events
32
Heart Rate Variability
Scatter diagram
Graphic for accessing
Histogram, graphics for
Graphic representation
events
SDNN5, ANN5, pNN50,
of Heart Rate Variability
(e.g. VPB) in the ECG
rMSSD, PSD
in the form of a cloud
06.2.2 Comparing several evaluations from one patient
The current evaluation can be compared to other evaluations of the patient
using the Comparison button. The comparison pages can only be opened
if additional ECG evaluations from the patient are available. The Evaluation button will bring you back to the single view.
Comparison: ECG
Comparison of current and further
evaluations
Start page: ECG:
Complete ECG,
e.g. 12-channel display
(View: 2 x complete ECG, e.g. 12-channel display)
Comparison: Report
Direct comparison of available reports;
(up to four report texts on one screen page)
Start page: Measurement
Averaged complexes
of all channels
Comparison: Measurement
Averaged complexes of
several evaluations
06.2.3 Note on navigation in the evaluation
The buttons for opening further evaluation pages are located on the lower
edge of the screen. The labelling of the buttons changes as soon as you
switch to a different evaluation page. The button that has been clicked
always contains the name of the page you just left.
Example: You click on the Measurement button in the evaluation
(view: ECG start page). You go to the the Measurement screen and the
previously clicked Measurement button changes to ECG. By clicking on
ECG, you can return to the previous ECG viewing mode.
33
06
Working with the evaluation
06.2.4 Overview of evaluation pages
Elements on the ECG start page
2) Settings for
the Print button:
Under Examination,
Resting ECG, Settings, General,
Workflow in the “Workflow,
Default” area, you can define
whether the extended print
menu should be displayed
when the Print button is clicked
(standard setting) or whether
printing should be conducted
automatically according to the
standard print settings (= option
Default printout) without any additional settings being made.
The standard print setting
for resting ECG can be found
under Examination, Resting
ECG, Settings, Print, Default.
Click on Save to apply
your changes.
34
Options for ECG display
Mouse functions for detailed viewing and measuring of the ECG signal
(Zoom, Analysis, Measure HR, Calliper, Mark)
Further evaluation pages
Button for printing the evaluation 2)
Button for closing the evaluation
If the Measurement view is set as the start page, the same operating and
navigation elements can be found there ( to ).
The start page of the evaluation can be set under:
Examination, Resting ECG, Settings, General, Workflow in the
“Workflow, Show evaluation” area.
Content in the Options menu 3)
Print menu for temporary changes to the print settings
Button for exporting the evaluation (e.g. Excel, PDF, e-mail, DICOM)
Manual blood pressure input (“F9” key)
Trend graphic for displaying events in the ECG (e.g. VPB)
Tables and graphics for Heart Rate Variability 4)
(e.g. SDNN5, ANN5, pNN50, rMSSD, PSD)
Deletion of ECG outside the marked sections
New analysis of ECG signal for resetting manual changes in the ECG,
additions to the report remain
Automatic creation of a new report
after manual changes have been made in the ECG recording
Anti-drift filter for compensating fluctuations in the zero line
Deactivation of all filters (display of raw data)
Fade in and fade out of additional content in the right half of the screen:
e.g. HR curve and ST trend, averaged complexes and report
or measurement table
Fade in and out of pacemaker spikes
Graphic flattening of ECG signal
3) Note on Options menu:
The scope and content
of the Options menu changes
based on which page of the
evaluation you are currently on;
e. g. on the Measurement
page in the Options menu,
you can activate the display of
ST values and set which marks
should be displayed in the
averaged complexes.
4) Note on
Heart Rate Variability:
For the heart rate variability
to be displayed, at least five
minutes of ECG need to be
recorded!
35
06
Working with the evaluation
Evaluation pages in the ECG area
Extended ECG start page with additional content.
In the Options menu, select Report to show the additional contents.
Measured values (Measurement), HR curve and (ST) Trends can
also be displayed instead of the report.
Select: ECG Evaluation > ECG Overview
Overview of complete ECG as 2-channel ECG strip display.
36
Select: ECG evaluation, mouse function Zoom, double click on ECG
Magnified display of a channel. By double clicking on the ECG again,
all or the set channels are displayed again.
Mouse functions:
Measure HR
The selection list “Mouse“ (top right, above the ECG) contains, besides
Zoom, the Analysis, Measure HR, Calliper and Mark mouse functions.
37
06
Working with the evaluation
Evaluation pages in the Measurement area
Select: ECG Evaluation > Measurement
Averaged complexes of all channels. In the Options menu, you can
display the ST values for the averaged complexes.
Under Examination,
Resting ECG, Settings,
Diagnostic, Calculation
can be set if the QTc duration
is to be calculated according
to Bazett (preset) or Fridericia.
Save your input.
Select: ECG Evaluation > Measurement > Measurement
Tabular display of all measured values.
38
Using the All button,
all averaged complexes will
be shown on top of each other,
highlighted light grey.
Select: ECG Evaluation > Measurement > Single Complex
Averaged complex of a channel and vector loop.
Further evaluation pages from the Options menu
Select: ECG evaluation > Options > Events
If the red cursor in the top graphic is moved over an event mark
(= orange line), the corresponding ECG section will be displayed.
39
06
Working with the evaluation
Select: ECG evaluation > Options > HRV (Heart Rate Variability)
Using the Diagram 1 and Diagram 2 menus, additional graphics
for Heart Rate Variability can be opened.
Select: ECG evaluation > Options > HRV > Scatter diagram
The more regular the heart rate, the fewer the points which differ
from the diagonal of the diagram.
40
Comparison pages (comparison of different evaluations)
The Comparison button
is deactivated (light grey) if no
further evaluations of the
patient are available.
Select: ECG Evaluation > Comparison > ECG
The current evaluation is compared with a further evaluation;
the selection lists above the ECG offer further evaluations for comparison.
With the Report button, the reports can be directly compared to each other.
TIP: additional display
of measured values
The display of measured values
in the averaged complexes can
be activated in the settings.
This setting is available under
Examination, Resting ECG,
Settings, General, ECG.
In the “Default settings for ECG"
area, select the AVG complex
comparison with measured
values option.
Select: ECG evaluation > Comparison > Measurement
Comparison of averaged complexes of several evaluations
41
06
Working with the evaluation
06.3 Writing the report
The report is opened by right-clicking on the
evaluation interface. In the context menu, select
Report.
Enter your data in the white text field . If the
“Add report” option is active in the system settings (on page Examination, Settings, Resting
ECG, Diagnostic, Report), an automatic report is
already present in the text field. When you click
on Confirm your input is saved and the evaluation gets the “Confirmed” status (see “End dialogue”).
In the event that your report text is not yet complete but you want to save it nevertheless, without reaching “Confirmed” status, reset the evaluation "Confirmed" status in the “End dialogue”.
Text modules for writing reports
On the page Examination, Resting ECG, Settings, Diagnostic, Report text modules for writing
a report can be created . A total of four groups
with up to eight text modules can be stored.
The text modules are called in the “Report dialogue” using keyboard commands (F5 to F12).
A report module can be created from normal
text as well as variables. When using a report
module in the “Report dialogue”, the actual value
from the evaluation is used instead of the variable and is automatically inserted in the report
text. The structure of a variable is @VARIABLE
(e.g. Heart Rate, Resting: @HF_R). The Shortcuts for export values
button provides you
with a list containing all the available variables.
If the report modules should be shown in the
“Report dialogue”, make sure that the Enable
option is activated. Alternatively, the text modules can be shown in the “Report dialogue” via
the Show modules button.
There is also the option of entering a text or a
user-defined report text (also as normal text and
variables), which will be automatically shown
in each report . The predefined text can be
changed later in the “Report dialogue”.
Save your input.
42
06.4 Ending the evaluation
The evaluation is closed with the End button.
The end dialogue is opened. The status of an
examination can be changed here .
Confirmed
A confirmed evaluation can be reset to “Not confirmed” by deselecting the “Confirmed” option
(e.g. if reporting has not been completed).
Printed
Indicates if the evaluation has been printed.
Locked
After reporting has been completed by an authorised person, set the status of the evaluation
to “Locked”. After that, the evaluation can still be
viewed, but no longer changed.
Click on Confirm
to close the examination.
43
07
Product information
07.1
Technical data and system requirements
Technical data of seca CT 320/321
Frequency response
0.05 – 500 Hz
Accuracy
< 1.5%
Time constant
3.2 sec
Sampling rate
1.0ms / 1000 Hz for extremities and chest wall
A/D converter
24 bit
0.25ms/ 4000 Hz for pacemaker
Input impedance
> 50 MΩ
Amplitude quantification
0.3 μV/bit
CMRR
> 70 dB
Impedance measurement *)
At all electrode leads (not N) with automatic quality indication
Defibrillation protection
Electrical strength 5000 V
Recovery time after defibrillation < 10s
Voltage supply
USB devices
USB cable
BT devices
Rechargeable lithium-ion battery
Energy consumption
Max. 2.5 watt during recording
IT connection
USB (cable length 2.50 m)
or Bluetooth (range up to 80 m, depending on ambient conditions)
Software, additional functions Power filter, muscle filter,
(seca cardio 150)
AD filter (Anti-drift), pacemaker recognition
Operating conditions
Temperature
+10°C ... +40°C
Air humidity
25 ... 95% rH
Air pressure
700 ... 1060 hPa
Transport and storage
Temperature
-20°C ... +45°C
conditions
Air humidity
25 ... 95% rH
Air pressure
700 ... 1060 hPa
Size
approx. 160 * 85 * 25 mm (L * W * H)
Weight
approx. 300 g
Patient leads
approx. 1050 mm (extremities)
Classification
Safety class II
(seca CT 320)
Safety class III
(seca CT 321)
approx. 700 mm (chest)
Class IIa
Type BF defibrillation protected (not intracardiac)
IEC 60601-1
IEC 60601-2-25
IEC 60601-2-51
*) Does not apply to Bluetooth devices
44
System requirements
Operating system
Windows XP (x64)
Windows Vista (x64)
Windows 7 (x64)
Windows Server 2003 (x64)
Windows Server 2008 (x64)
Windows Server 2008 R2
Older versions are not supported.
PC
The PC hardware must meet the minimum requirements
of the operating system used.
seca cardio 150 requires additional RAM (256 MB).
Ensure that there is enough free hard disk space
for the seca cardio 150 evaluations.
File size of the evaluations:
Resting ECG approx. 200 KB (approx. 10 sec ECG)
Hardware & ports
DVD or CD-ROM drive
USB port
45
07
Product information
07.2
Manufacturer declaration on EMC (Electromagnetic Compatibility)
according to IEC 60601-1-2:2007
Cable lengths of the patient leads and the USB cables
Patient leads seca CT 320/321
approx. 1050 mm & 700 mm
USB cable seca CT 320/321
approx. 2500 mm
Manufacturer’s Declaration – electromagnetic emissions
The seca CT 320/321 ECG device is designed for operation in the electromagnetic environment
stated below. The customer or user of seca CT 320/321 should make sure that it is used in such an
environment.
Emission Measurements
Compliance
Electromagnetic Environment - Guidelines
HF emissions according to CISPR11
Group 1
seca CT 320/321 uses HF energy only for its
internal function. Its level of HF emission is therefore very low and is unlikely to be sufficient
to interfere with other electronic devices.
HF emissions according to CISPR11
Class B
Harmonics according to IEC61000-3-2
Not applicable
Voltage fluctuations/flickers according
to IEC61000-3-3
Not applicable
seca CT 320/321 is suitable for use in all establishments, including domestic establishments and
those directly connected to the public low voltage
power supply network that supplies buildings
used for domestic purposes.
Manufacturer’s Declaration – electromagnetic immunity
The seca CT 320/321 ECG device is designed for operation in the electromagnetic environment
stated below. The customer or user of seca CT 320/321 should make sure that it is used in such an
environment.
Immunity Tests
IEC 60601 Test Level
Compliance Level
Electromagnetic Environment - Guidelines
Electrostatic
discharge (ESD)
according to
IEC 61000-4-2
± 6 kV contact discharge
± 8 kV air discharge
± 6 kV contact discharge
± 8 kV air discharge
Floors should be made of wood or concrete or be
equipped with ceramic tiles. If the floor is provided
with synthetic material, the relative air humidity
must be at least 30 %.
Fast transient electric
interference factors/bursts
according to
IEC 61000-4-4
± 2 kV for net wires
± 1 kV for input and
output wires
Not applicable
The quality of the supply voltage should
correspond to the one of a typical business or
clinical environment.
Surges
according to
IEC 61000-4-5
± 1 kV push-pull voltage
± 2 kV push-push voltage
Not applicable
The quality of the supply voltage should
correspond to the one of a typical business or
clinical environment.
Voltage drops,
short-time interruptions
and fluctuations
in the supply voltage
according to
IEC 61000-4-11
< 5 % UT for 0.5 period
(> 95 % drop)
Not applicable
The quality of the supply voltage should correspond to the one of a typical business or clinical
environment.
40 % UT for 5 periods
(60 % drop)
If the user of seca CT 320/321 requires
continued function, even if interruptions in the
energy supply occur, it is recommended to supply
seca CT 320/321 from an interruption-free
power supply.
70 % UT for 25 periods
(30 % drop)
< 5 % UT for 5 s
(> 95 % drop))
Magnetic field with
supply frequency
(50/60 Hz) according to
IEC 61000-4-8
3 A/m
3 A/m
Magnetic fields with net frequency should
correspond to the typical values, as they can be
found in the business and clinical environment.
COMMENT: UT is the net AC voltage before applying the test levels
46
Manufacturer’s Declaration – electromagnetic emissions
The seca CT 320/321 ECG device is designed for operation in the electromagnetic environment
stated below. The customer or user of seca CT 320/321 should make sure that it is used in such an
environment.
Immunity Tests
IEC 60601 Test Level
Compliance Level
Electromagnetic Environment - Guidelines
Portable and mobile radio sets should not be
used at a closer distance to the device including the leads than the recommended protective
distance which is determined according to the
equation of transmitting frequency.
Recommended protective distance:
Conducted HF transients
3 Veffective value
[U1] V
according to
150 KHz to 80 Mhz
10 Veffective value
IEC 61000-4-6
Radiated HF transients
3 V/m
according to
80 MHz to 2.5 GHz
10 V/m
IEC 61000-4-3
d = (3.5/U1) √P
d = (3.5/E1) √P
80 MHz to 800 MHz
d = (7/E1) √P
800 MHz to 2.5 GHz
with P as the nominal power of the transmitter in
watt (W) according to the indications of the transmitter manufacturer and d as the recommended
protective distance in meters (m).
According to an examination on-site a) the field
strength of stationary radio transmitters should be
inferior to the compliance level b) with regard to
all frequencies.
In the vicinity of devices carrying the following
symbol, interferences are possible:
COMMENT 1:
With 80 Hz and 800 MHz the higher frequency range is valid.
COMMENT 2:
These guidelines may not apply in every case. The propagation of electromagnetic variables is influenced by absorptions and reflections of buildings, objects and people.
a) The field strength of stationary transmitters, such as e.g. base stations of mobile phones and
mobile transmitting stations, amateur radio stations, AM and FM broadcasting as well as television
networks cannot be exactly predetermined theoretically. In order to determine the electromagnetic
environment regarding the stationary transmitters, a study of the location should be considered. If
the measured field strength exceeds the above-mentioned compliance levels at the location where
the device is used, the device should be watched in order to prove the intended functions. If unusual
performance features are observed, it may be necessary to take additional measures, for example
reorienting or relocating the device.
b) Over the frequency range from 150 kHz to 80 MHz the field strength should be inferior to 10 V/m.
47
07
Product information
Recommended protective distances between portable
and mobile HF telecommunication devices and seca CT 320/321
seca CT 320/321 is designed for the operation in an electromagnetic environment in which the HF
transients can be controlled. The user can help avoid electromagnetic interferences by maintaining
the minimum distance between portable and mobile HF telecommunication devices (transmitters)
and the device – depending on the initial performance of the communication device – as indicated
below.
Protective distance depending on the transmitting frequency in m
Nominal power
of the transmitter
W
150 kHz to 80 MHz
80 MHz to 800 MHz
800 MHz to 2.5 GHz
d= (3.5/U1) √P
d= (3.5/E1) √P
d= (7/E1) √P
0.01
0.04
0.04
0.08
0.1
0.11
0.11
0.22
1
0.35
0.35
0.70
10
1.11
1.11
2.22
100
3.50
3.50
7.00
For transmitters whose maximum nominal power is not indicated in the above table, the recommended protective distance d can be determined in meters (m), using the equation affiliated with the
corresponding column. P is the maximum nominal power of the transmitter in watt (W) according to
the indications of the manufacturer of the transmitter.
COMMENT 1:
With 80 MHz and 800 MHz the higher frequency range is valid.
COMMENT 2:
These guidelines may not apply in every case. The propagation of electromagnetic variables is influenced by absorptions and reflections of buildings, objects and people.
48
07.3
EC Declaration of Conformity
Konformitätserklärung
declaration of conformity
Certificat de conformité
Dichiarazione di conformità
Declaratión de conformidad
Overensstemmelsesattest
Försäkran om överensstämmelse
Konformitetserklæring
vaatimuksenmukaisuusvakuutus
Verklaring van overeenkomst
Declaração de conformidade
Δήλωση Συμβατότητας
Prohlášení o shodĕ
Vastavusdeklaratsioon
Megfelelőségi nyilatkozat
Atitikties patvirtinimas
Atbilstības apliecinājums
Oświadczenie o zgodności
Izjava o skladnosti
Vyhlásenie o zhode
Onay belgesi
Das 12-Kanal-PC-EKG-Gerät
The 12-channel PC ECG
L’appareil ECG 12 canaux connectable à un ordinateur
L’elettrocardiografo 12 canali per PC
El aparato PC ECG de 12 canales
12-kanal-pc-EKG-apparatet
12-kanals-PC-EKG-apparat
PC-EKG-apparatet med 12 kanaler
12-kanavainen PC-EKG-laite
Het 12-kanaals PC-ECG-apparaat
O aparelho de ECG para PC de 12 canais
Η συσκευή ΗΚΓ 12 καναλιών Η/Υ
12-kanálový PC EKG přístroj
12 kanaliga EKG-arvutiseade
A 12 csatornás számítógépes EKG készülék
12 kanālu EKG datoram pieslēdzama ierīce
12 kanālu datora EKG ierice
12-kanałowy komputerowy aparat EKG
12-kanalna PC-EKG naprava
12-kanálový PC EKG prístroj
12 Kanal PC-EKG Cihazı
320
49
07
Product information
Konformitätserklärung
declaration of conformity
Certificat de conformité
Dichiarazione di conformità
Declaratión de conformidad
Overensstemmelsesattest
Försäkran om överensstämmelse
Konformitetserklæring
vaatimuksenmukaisuusvakuutus
Verklaring van overeenstemming
Declaração de conformidade
Δήλωση Συμβατότητας
Prohlášení o shodĕ
Vastavusdeklaratsioon
Megfelelőségi nyilatkozat
Atitikties patvirtinimas
Atbilstības apliecinājums
Oświadczenie o zgodności
Izjava o skladnosti
Vyhlásenie o zhode
Onay belgesi
Das 12-Kanal-PC-EKG-Gerät
The 12-channel PC ECG
L’appareil ECG 12 canaux connectable à un ordinateur
L’elettrocardiografo 12 canali per PC
El aparato PC ECG de 12 canales
12-kanal-pc-EKG-apparatet
12-kanals-PC-EKG-apparat
PC-EKG-apparatet med 12 kanaler
12-kanavainen PC-EKG-laite
Het 12-kanaals PC-ECG-apparaat
O aparelho de ECG para PC de 12 canais
Η συσκευή ΗΚΓ 12 καναλιών Η/Υ
12-kanálový PC EKG přístroj
12 kanaliga EKG-arvutiseade
A 12 csatornás számítógépes EKG készülék
12 kanālu EKG datoram pieslēdzama ierīce
12 kanālu datora EKG ierice
12-kanałowy komputerowy aparat EKG
12-kanalna PC-EKG naprava
12-kanálový PC EKG prístroj
12 Kanal PC-EKG Cihazı
321
50
07.4 Shutdown, storage and transport
Putting out of operation and storage
Clean and disinfect seca CT 320/321 and its components before putting
it out of operation.
Make sure that the storage location is dust-free, dry and away from direct
sunlight.
After a long period of non-operation, seca CT 320/321 may only be used
again if a technical safety check has been carried out by your authorised
seca dealer.
Transport
Clean and disinfect seca CT 320/321 and its components
before transport.
Use the original packaging for transport. This is a sensitive piece of electronic equipment.
If the original packaging is not available, pack the device in a way that it is
protected against collision, humidity and dust.
The device must comply with the operating conditions when it is put into
operation again, e.g. operating temperature (see 07.1 Technical Data...).
Ambient conditions for storage and transport
Temperature:
Air humidity:
Air pressure:
-20° ... +45°C
25 ... 95% rH
700 ... 1060 hPa
07.5 Disposal
The device and all its components must be disposed of in a proper manner in
compliance with applicable regulations (that is, in accordance with the
valid laws governing electrical and electronic waste). The device must not
be disposed of as normal domestic waste.
The original packaging is recyclable
(cardboard/waste paper).
51
07
Product information
07.6 Keyboard navigation and shortcuts
Use the quick links in the main navigation, the keyboard navigation and
the keyboard shortcuts to enable fast and convenient working.
Quick links in the main navigation
LEFT-CLICK
User master data
Call last patient
Examination main menu
RIGHT-CLICK
Evaluation search
Call last patient
Evaluation last displayed
LEFT-CLICK
User master data
Patient master data
Examination main menu
RIGHT-CLICK
All the patient’s evaluations
Evaluation last displayed
of this examination
Keyboard navigation
When you press the Alt key, the initial letter of all the buttons on a screen
page is underlined. Pressing an initial letter in combination with the Alt key
triggers the corresponding button.
52
Generally accepted keyboard shortcuts
Esc
End, Cancel
Confirm, continue
Ctrl
I
Program Information
Ctrl
H
User main menu
Ctrl
P
Patient main menu
Ctrl
U
Examination main menu
Ctrl
S
Patient master data of the selected patient
Ctrl
A
All examinations of the selected patient
Ctrl
G
List of recently opened evaluations
(same as clicking on the arrow button
at top right)
Ctrl
F
List of recently opened evaluations
Ctrl
L
Evaluation search
Ctrl
F1
Create system report, service e-mail
53
Generally accepted keyboard shortcuts for open evaluation
Ctrl
N
Report dialogue
Ctrl
K
Medication input dialogue
Ctrl
R
Call comparison 1)
Ctrl
T
Call trend 1)
Ctrl
D
Call print 1)
Ctrl
E
Call settings 1)
Ctrl
O
Call Options menu 1)
Resting ECG keyboard shortcuts during the recording
Start the recording
Esc
1)
2)
54
End the recording
+
Increase amplitude
–
Decrease amplitude
F9
Blood pressure input dialogue 2)
Keyboard shortcuts will only work if the corresponding button is available on the screen page.
This keyboard shortcut is also available in the evaluation display.
55
Medical Scales
and Measuring Systems
since 1840
seca gmbh & co. kg
Hammer Steindamm 9–25
22089 Hamburg • Germany
Telephone +49 40 20 00 00 0
Fax +49 40 20 00 00 50
[email protected]
GEB-0160 DK-1161 V002 20.02.2012
All contact data under www.seca.com
seca operates worldwide with headquarters in Germany
and branches in France, United Kingdom, North America, Switzerland, China, Japan, Mexico, Austria, Poland and U.A.E