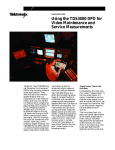
1
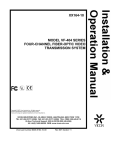
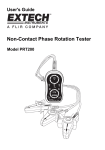
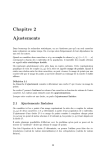
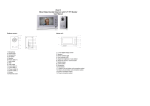
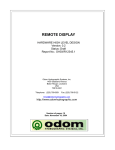
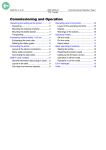
PTN Electronics WP19 Programmable Control Panel User Manual WP19 --- Programmable Control Panel Please read this manual carefully before using this product. WP19 Programmable Control Panel Content table 1. 2. 3. 4. 5. 6. 7. 8. 9. Introduction ............................................................................................................................................. 5 Front Panel ............................................................................................................................................. 6 Real Panel .............................................................................................................................................. 7 Demo Connection Picture .................................................................................................................... 8 Connection of Programming and Looping ......................................................................................... 9 Software control ................................................................................................................................... 10 Technical Specification ....................................................................................................................... 19 Optional base ....................................................................................................................................... 19 Troubleshooting & Maintenance........................................................................................................ 19 2 PTN Electronics Limited www.PTN-electronics.com WP19 Programmable Control Panel Attention: This is a manual for WP19 control panel. This manual is only an instruction for operators, not for any maintenance usage. The functions described in this version are updated till Dec 2010. Any changes of functions and parameters since then will be informed separately. Please refer to the dealers for the latest details. This manual is copyright PTN Electronics Limited. All rights reserved. No part of this publication may be copied or reproduced without the prior written consent of PTN Electronics Limited. All product function is valid till 2010-12-1 3 PTN Electronics Limited www.PTN-electronics.com WP19 Programmable Control Panel ! Operation Notice Equipment In order to ensure the credibility use of the product and the user’s safety, please comply with the following items during installation and maintenance: The system must be earthed properly. Please do not use two blades plugs and ensure the alternating power supply ranged from 100v to 240v and from 50Hz to 60Hz. Do not put the machine in a place of too hot or too cold. To avoid any damage by over heat, please keep the working environment good in ventilation to radiate the heat when running the machine. The machine should be turned off when in rainy and humid days or nonuse for a long time. The AC power supply line should be disconnected with the power socket during the following operation. A. Take out or reinstall any component of the machine. B. Disconnect or re-connect any connector of the machine. Please do not attempt to maintain and uncover the machine for there is a high-voltage component inside and the risk of the electric shock. Do not splash any chemical product or liquid on or near the equipment. 4 PTN Electronics Limited www.PTN-electronics.com WP19 Programmable Control Panel 1. Introduction WP19 is a programmable Wall Control Panel. Every button is programmable and works either individually or together. WP19 is built in the programmable 1 RS232, 1 RS485, 3 Infrared, 3 Relay & 3 I/O. It can fully control the PTN product, as well as third party devices such as projectors, screens etc. It is an easy-to-use control device for presentation show rooms, classrooms and boardrooms. Every button can be programmed to send the bi-direction RS232 and RS485 commands simultaneously to control third party devices. Every button can be programmed to send the infrared code, control the relay, I/O, to let them work simultaneously to control the third party devices. Every button is built in the infrared code and RS232 code learning function, and baud-rate setting. The buttons are built in the logic analysis function, interlock, toggle, duration etc . ID looping function. 16pcs WP19 can be looped together and control together, by ID identifying. USB or RS232 programming function, working with PTN PC software (WP19). Crystal and backlit buttons with easy user-friendly customizable changeable labels. The backlit brightness is controllable. Dimension: dual-gang electron box, 172cm long and 86cm wide. 5 PTN Electronics Limited www.PTN-electronics.com WP19 Programmable Control Panel 2. Front Panel The programming USB port and IR code learning sensor. Crystal and luminescent, programmable buttons: Every button can be programmable with software or RS232 series command. And every label inside the button can be changeable. You can choose the label you need and change it very easily like this: (For the specific transparent paper table, please contact the local distributor or reseller for it) 6 PTN Electronics Limited www.PTN-electronics.com WP19 Programmable Control Panel 3. Real Panel ⑨ ① ② ③ ④ ⑤ ⑥ ⑦ ⑧ The WP19 has various ports in the rear panel, including the ID setting, Lopping port, RS232 port, RS485 port, I/O port, IR port, Relay port etc. Now, it is the simple introduction below: RS232 output looping port. It is for the looping function of two or more WP19 connection. This port is connected to the WP19 behind, to send out the looping internal commands. (check the connection demo picture as below) RS232 input looping port. It is for the looping function of two or more WP19 connection. This port is receiving the control internal commands from the WP19 ahead. (check the connection demo picture as below) Power connector. 24VDC. Be sure that the “+” and “-”, never mixed connection. The RS232 port. Di-direction communication. It has three functions: a) It can be connected to the PC (direct cable), and use the PTCOM 2.1 for programming. This function is totally the same as the USB port, which is in the side panel. (Please check this function from item 5 of page 9) b) RS232 output function. It can be programmed different RS232 commands, and control the outer RS232 device. (Please check this function from item 1.1 of page 11) c) RS232 input function. It can be programmed and compared with the input RS232 commands. (Please check this function from item 1.8 of page 15.) The RS485 port. The RS485 can be programmed as different commands and control the third-party device. Low-Voltage relay port. The three relay ports are programmable by the PTCOM 2.1 Infrared port. The three IR ports are programmable by the PTCOM 2.1. Input/Output port. The three I/O ports can be programmed to two different functions a) Output function. It will provide the 5VDC power output when it is active. 7 PTN Electronics Limited www.PTN-electronics.com WP19 Programmable Control Panel b) Input function. It can be trigger by the outer 5VDC power. This function is also programmable. USB port and Infrared sensor port. a) The USB port is for programming. It is to default the function of each button. b) The IR sensor port is to learn the IR code, to build the IR database. 4. Demo Connection Picture The WP19 can active all the ports at one time. It means every button can send the RS232 and RS485 commands, IR code and control the relay and I/O at the same time. The demo system diagram: System Diagram 8 PTN Electronics Limited www.PTN-electronics.com WP19 Programmable Control Panel 5. Connection of Programming and Looping WP19 can be connected to the computer for programming, to default the functions of every button. It can be connected by USB or RS23, working with the PTCOM 2.1 software. It is shown as below: Programming Connection Several pieces WP19 can be also looped to be a system. It is looped by the inter RS232 commands. Please check the demo picture as below: Several WP19 Looping connecting 9 PTN Electronics Limited www.PTN-electronics.com WP19 Programmable Control Panel 6. Software control You can use this PTN software to easily set the RS232 series command of every button. Main window: We will introduce the configuration functions, one by one. 1) Buttons configuration: Left click each button. There will pop up a “Parameter Set” window. The user can configure all the functions of each buttons, including the IR, Series command, Relay, Baud rate, Brightness etc 10 PTN Electronics Limited www.PTN-electronics.com WP19 Programmable Control Panel Select the control type, RS232 or USB. If you are using the RS232, please select the right COM port. 1.1 Series Commands (RS343 and RS485) Setting This function is to set the RS232 commands for each button. Select the command sending solution: Input the RS232 commands. It is the ASCII format. To use Hex format please click the “Hex”. This baud rate is for test only, the sending baud rate need to be set in “Baud rate” parameter 1.2 IR (Infrared) Commands Setting This function is to set the right IR command and sending port for each button. It means when you press this button, it will send out the preset IR command from the preset port 11 PTN Electronics Limited www.PTN-electronics.com WP19 Programmable Control Panel Select an IR library Select the IR sending port, from 1 to 3. (Same as ports in the rear panel) Select the right IR function from the IR library. 1.3 I/O (input and output) Port Setting This function can be set as input function or output function. The output function will send out 5VDC power pulse to the outer device. The input function is to be active by the outside 5VDC power. When the button is active by “input 5VDC power”, all the functions of this button will be active, including the series, relay, IR etc. The performance is the same as the button is pressed. Select the controlling port number, from 1 to 3. (same as ports in the rear panel) To set the I/O to be active by high level or low level To set the I/O as “input” function or “output” function. 12 PTN Electronics Limited www.PTN-electronics.com WP19 Programmable Control Panel 1.4 Relay Port Setting (Low-Voltage Relay) This function is to control the relay close or open. When it is active, the relay will be open or close, depending on the setting. When it is selected, the relay will be default to be open. Otherwise, the relay will be default to be close. Select the controlling port number, from 1 to 3. (Same as ports in the rear panel) 1.5 Button Characters Setting This function is to set the button character, including regular function, interlock-group function, and self-lock function. The Lock Type has three functions, including “Non” (Regular), Inter-Lock, Self-Lock. 1: Non (Regular): It is the regular active function. It means when you press the button, it will be active. When you release your pressing, the button will be off. 2: Inter-Lock: It is the interlock-group function. Several buttons can be set to be a inter-lock group, and only one of them can be active. 3: Self-Lock: It is self lock function. It means when the button is press, it will keep active, until you press it again to turn it off. 13 PTN Electronics Limited www.PTN-electronics.com WP19 Programmable Control Panel Select the button character from this table When the button is selected to be “inter-lock”, you need to select the group number. 1.6 Setting the Sending Character This function is to set the serial code sending character, including the pressing sending, releasing sending and No-sending. No Sending: It means, when the button is pressed, it won’t send out any serial commands. Sending On Press: It means when the button is pressed, it will send out the serial commands. Sending On Loose: It means when the button is released, it will send out the serial commands. Select the sending character, to be pressing sending, or releasing sending, or No-sending. 1.7 Setting the brightness level of each button This function is to set back-light brightness level, from 1 to 9, from dim to bright. 14 PTN Electronics Limited www.PTN-electronics.com WP19 Programmable Control Panel Select the brightness level from this table, ranging from 1 to 9. 1.8 Setting the RS232 input comparison function This function is to set comparison function of input RS232 commands. The button has one default RS232 command, and it will make the comparison with the input RS232 command. If they are matching, the button will be active. If they are not matching, the button will be off. 1.9 Setting the baud-rate of each button This function is to set baud-rate of each button, ranging from 2400bps to 115200bps. The baud-rate of each button can be customized. But the stop bite, parity, data bite could not be change. The default data bite is “8”, the parity is “Non”, the step bite is “1”. 15 PTN Electronics Limited www.PTN-electronics.com WP19 Programmable Control Panel Select the baudrate from this table, ranging from 2400bps to 115200bps. 1.10 Setting the active duration of each button This function is to set the duration time of the button active. For example, when we set 3 seconds duration time to one button, the button will keep active for 3 seconds and off by itself when pressed. 1.11 Time toggle function of each button This function is to set toggle function of each button. When it is selected “On/Off”, this function is active. For example, a button is set time-toggle function to be “1 second”. It means, when this button is pressed, it will keep sending out the serial command every 1 second. 16 PTN Electronics Limited www.PTN-electronics.com WP19 Programmable Control Panel 2) IR learning function: The WP19 is built in the infrared learning function. Its in-built IR sensor can capture the IR code from IR remote, store and make the database. This function is shown below: 2.1 Enter the IR learning status, by “Function”, “Studio IR”, “COM” or “USB” 2.2 IR learning page 17 PTN Electronics Limited www.PTN-electronics.com WP19 Programmable Control Panel Enter the name of your IR device Click the “Learn” to start the IR code learning. Click right to add or delete an IR function. 2.3 IR learning Use the IR remote face to the IR sensor. Press the button. (In 10 seconds) For example, pressing the “Play”, “Pause”, “stop”, ”next”, “prev”. As picture below: 2.4 Rename functions and Save The content will change when IR code is learnt successfully. Click to save all the learning. Click right can rename the IR functions. 18 PTN Electronics Limited www.PTN-electronics.com WP19 Programmable Control Panel 7. Technical Specification Specification Program Port 1 x RS232, 1 x RS485, 3 x USB or RS232 Output Port RS232 Learning Programmable RS232, by PTN Baud Rate And 9600 baud, 8 data bits, 1 stop Function software Protocol bit, no parity Software PTCOM 2.1 Temperature -20 ~ +70°C 20Hz ~20KHz Humidity 10% ~ 90% Frequency Response Power Supply 100VAC~240VAC, 50/60 Hz Case Dual-gang electron box, Dimensions 172x86mm (EU standard) Power Consumption Product Weight Infrared, 3 x Relay, 3 x I/O 8W 0.4kg 8. Optional base PTN provide an optional base for this programmable control panel, it can be fixed on the desk, use-friendly in education and corporate applications. 9. Troubleshooting & Maintenance 1. When WP19 cannot work, please check and make sure the power cord connection is well, power connector cannot be mixed or connect wrong. Then restart, if still not work, the WP19 may be broken. Please send it to the dealer for repairing. 2. When USB cannot open or without response, please make sure the USB driver is installed correctly, and then reconnect the USB cable. 3. When uploading the USB cannot be found, please restart the software or WP19. 4. When the LED of a button cannot be lighted, please check if there is a compare event in this button. If yes, delete the compare and try again. If still not work, the LED may be broken. Please send the unit to dealer for repairing. 5. When serial commands sending without function executed, please check the baud rate and make sure is correct, and the serial connection is well. Remarks: For any more questions or problems, please try to get help from your local distributor, or email PTN at [email protected]. 19 PTN Electronics Limited www.PTN-electronics.com