1
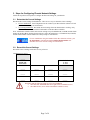
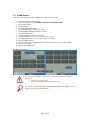
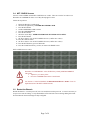
®
Gambro Renal Products
Technical Assistance Services
http://tech.usa-gambro.com
800/525-2623
Technical Update
GENERAL INFORMATION
303/232-6800
PH-EXALIS,GI,11049 – 9/2008
Equipment Type:
Phoenix
Subject:
Communications Phoenix – Configuration Exalis
From:
Charles Zuelchner
This document describes how to configure the Phoenix network settings for use with the Gambro Exalis
ethernet-based communications system. “Exalis” is a registered trademark of Gambro.
Network settings can be thought of as "Correct Settings" and "Current Settings". Correct Settings are the
settings your Phoenix needs for proper operation. Current Settings are the actual settings on your Phoenix
at this moment -- they may or may not be correct.
Please read the Tech Bulletin "Communications Phoenix - Primer" before using this
document. The "Primer" addresses the terminology, techniques, and background information
needed to understand this document.
Table of Contents
1.
2.
3.
When to Re-Configure Network Settings............................................................................................... 2
Current Settings ...................................................................................................................................... 2
Steps for Configuring Phoenix Network Settings................................................................................... 3
3.1. Determine the Correct Settings....................................................................................................... 3
3.2. Record the Correct Settings ............................................................................................................ 3
3.3. COMM Screens .............................................................................................................................. 4
3.4. NET CONFIG Screens ................................................................................................................... 5
3.5. Restart the Phoenix......................................................................................................................... 5
4. Test Your Phoenix.................................................................................................................................. 6
4.1. Verify that the Blue Screen is Correct ............................................................................................ 6
4.2. Add this Phoenix to Your Data Collection Software...................................................................... 6
4.3. Connect the Phoenix to the Network .............................................................................................. 6
Page 1 of 6
Communications Phoenix – Configuration Exalis
1. When to Re-Configure Network Settings
The network settings on the Phoenix must be re-configured in each of the following cases.
•
•
•
•
•
•
When receiving a Phoenix as a new purchase or from another dialysis unit.
After reloading Phoenix software.
After using the Tech Card to apply settings to a Phoenix.
When using Exalis for the first time.
When your IT department has made a non-transparent change to the dialysis network.
When the Blue Screen does not display the Correct Settings.
2. Current Settings
The only certain way to determine the Current Settings of a Phoenix is to restart the Phoenix and record the
Blue Screen. If any line of the Blue Screen does not match the correct settings, then you'll know exactly
which network configuration screen to go to in order to fix the problem.
See Sections 1.2 and 1.3 in the Tech Bulletin "Communications Phoenix - Primer" for an
in-depth discussion of the Blue Screen.
Page 2 of 6
3. Steps for Configuring Phoenix Network Settings
Follow the steps below in sequence to configure the Network Settings for your Phoenix.
3.1. Determine the Correct Settings
Determine the Correct Settings for this Phoenix. There are two ways to determine Correct Settings.
•
For new installations: Your IT department or the vendor of your data collection software will tell
you the correct settings for each Phoenix.
• For existing installations: Record the network settings from one Phoenix that is working. Only
the Machine ID (CCM ID) and the fourth number in the IP Address will differ.
Note: All Phoenix will have all the same network settings except for Machine ID (CCM ID) and the fourth
number in the IP Address (both are shown with gray cells in the table below). The Machine ID (CCM ID)
and the fourth number in the IP Address are always unique to each Phoenix.
For new installations using the Gambro Exalis data collection software, your
IT department in conjunction with the Gambro Exalis installer will
determine the correct network settings for each Phoenix.
3.2. Record the Correct Settings
Record the Correct Settings in this table for easy reference.
COMM Screens 1 and 2
CCM ID
___
COMM SYSTEM
OFFLINE TIMEOUT
RIMS
IP ADDRESS
1:30
2nd
___
___
SUBNET MASK
2nd
___
GATEWAY
___
4th
3rd
___
3rd
___
2nd
4th
___
3rd
___
___
___
4th
___
___
Remember that the following fields are always ALL ZEROES:
• NET ROUTE1 and MASK ROUTE1 (eight fields on COMM screen 2).
• SECURE LEVEL (all 32 fields on both NET CONFIG screens).
Page 3 of 6
3.3. COMM Screens
Enter the Correct Settings onto the COMM Screens. Follow the steps below.
1.
2.
3.
4.
5.
6.
7.
8.
9.
10.
11.
12.
13.
14.
15.
Ensure the Phoenix is in Idle mode.
Select the Navigation Keys: HOME►CONFIG►MACHINE►COMM.
Press the SET button.
Set the CCM ID.
Set COMM SYSTEM = RIMS.
Set the IP ADDRESS (confirm ALL values).
Set the SUBNET MASK (confirm ALL values).
Press the "NEXT" button.
Set the GATEWAY (confirm ALL values).
Set the NET ROUTE1 to ALL zeroes (confirm ALL values).
Set the MASK ROUTE1 to ALL zeroes (confirm ALL values).
Press the "PREV" button.
Exalis users must reset COMM SYSTEM = EXALIS. All other users must retain "RIMS".
Press the SET button.
Return to the HOME screen.
COMM Screens 1 and 2
Remember to CONFIRM all values EVEN if they already APPEAR CORRECT.
This means
1. Tap the key so it turns yellow.
2. Press the CONFIRM button on the Control Panel.
See Section 1.4 in the Tech Bulletin "Communications Phoenix - Primer" for an indepth discussion of the COMM Screens.
Page 4 of 6
3.4. NET CONFIG Screens
Set ALL values to ZERO on both NET CONFIG Screen 1 and 2. There are a total of 32 values to set.
Remember to CONFIRM all values even if they already appear correct.
Follow the steps below.
1.
2.
3.
4.
5.
6.
7.
8.
9.
10.
11.
12.
13.
Ensure the Phoenix is in Idle mode.
Select the Navigation Keys: HOME►MACHINE►CALIB.
Press the SET button.
Set the PASSWORD CODE to 65505.
Press the CONFIRM button.
Press the SET button.
Select the Action Keys: OPERATIONS►MAIN SETTING►NET CONFIG.
Press the SET button.
Set all 16 values to zero on NET CONFIG Screen 1 (confirm ALL values).
Press the "NEXT" button.
Set all 16 values to zero on NET CONFIG Screen 2 (confirm ALL values).
Press the SET button to get out of edit-mode.
Press the CLOSE Action Key (3 times) to return to the HOME screen.
NET CONFIG Screens 1 and 2
Remember to CONFIRM ALL values EVEN if they already APPEAR CORRECT.
This means
3. Tap the key so it turns yellow.
4. Press the CONFIRM button on the Control Panel.
See Section 1.5 in the Tech Bulletin "Communications Phoenix - Primer" for an indepth discussion of the NET CONFIG Screens.
3.5. Restart the Phoenix
Restart the Phoenix -- turn the power Off, wait 5 seconds, then turn the power On. A restart is necessary to
accept to new network settings. Verify that the Blue Screen shows the Correct Settings during this restart.
Now the Phoenix Network Settings are fully configured.
Page 5 of 6
4. Test Your Phoenix
Your Phoenix is now ready for testing.
4.1. Verify that the Blue Screen is Correct
The first test is to verify that the Blue Screen shows the Correct Settings. This is best done when restarting
the Phoenix (Step 3.5).
4.2. Add this Phoenix to Your Data Collection Software
Ensure that Exalis knows the CCM ID and IP Address of this particular Phoenix. If this Phoenix is new to
your dialysis unit, you will have to add it to your data collection software.
Exalis contains a list of Machine IDs (CCM IDs) and IP Addresses that is supposed to match every Phoenix
in use. If you add a new Phoenix to the dialysis unit, you must add the new Phoenix to Exalis. If a
particular Phoenix is not listed in Exalis, then Exalis will never even try to communicate with the Phoenix.
• Use the Exalis "Layout" function for adding a new Phoenix to Exalis.
• Refer to "Define the facility layout" in Section 1.5 of the Exalis Operator
Manual.
• To open the Exalis Operator Manual, select Help►User Manual (pdf)
from the menu.
4.3. Connect the Phoenix to the Network
Connect the Phoenix to the network. Verify that the Phoenix comes online.
If the Phoenix does not come online, perform troubleshooting using the Tech Bulletin "Communications
Phoenix - Troubleshooting".
Page 6 of 6