1
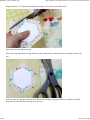
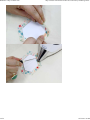
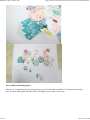
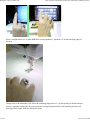
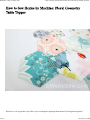
WeAllSew « http://weallsew.com
5 of 23
http://weallsew.com/2014/01/23/how-to-sew-hexies-by-machine-geometr...
Hexies are so in vogue these days! Have you ever thought to applique them instead of sewing them together?
1/27/2015 9:14 AM
WeAllSew « http://weallsew.com
6 of 23
http://weallsew.com/2014/01/23/how-to-sew-hexies-by-machine-geometr...
Try my technique of sewing hexies entirely by machine – no hand basting or removing papers later! Two
cardboard templates are all you need! Complete this tabletop with a very modern chevron quilting design…
it’s so easy to do!
Supplies
5/8 yard of white fabric (Art Gallery Fabrics Pure Elements 408, White Linen)
One 20″ x 20″ square of Warm & White batting
One fat quarter of seafoam green fabric (Art Gallery Fabrics Squared Elements, Seafoam)
Fabric scraps in assorted colors (Art Galley Fabrics Rapture collection)
Iron and ironing board/surface
Spray starch
Stiletto
40-weight cotton thread, eggshell (Aurifil Pat Bravo Eye Candy, #2311)
Microtex Sharp needle, size 80/12
Hand sewing needle
Air-erasable marker, purple
Large 60° triangle ruler
Cardstock for hexie templates
All-purpose presser foot (BERNINA Reverse Pattern Foot #1/1C) or open-toe or clear embroidery foot
(BERNINA Open Embroidery Foot #20/20C or BERNINA Clear Embroidery Foot #39/39C)
Walking foot or dual feed (BERNINA Walking Foot #50 or BERNINA Dual Feed)
Download and print the template:
Floral_Geometry_Table_Topper_-_Hexie_Templates_121814.pdf (306.8 KiB, 86 hits)
Step 1) Cut the fabric.
From the white fabric, cut two 20″ x 20″ squares.
From the COLOR fabric, cut one 6″ x 20″ strip; the rest will be used later for binding.
1/27/2015 9:14 AM
WeAllSew « http://weallsew.com
7 of 23
http://weallsew.com/2014/01/23/how-to-sew-hexies-by-machine-geometr...
From the assorted color fabric scraps, cut
Eleven 4-1/2″ x 4-1/2″ squares
Ten 3-1/2″ x 3-1/2″ squares
Step 2) Make the hexies.
Download and print the hexies templates on cardstock. Cut on the lines.
Place one of the 4-1/2″ fabric squares, wrong side up, on a flat surface. Place a large hexie template on top.
Holding it in place with your fingers, trim the fabric around the hexie shape leaving approximately 3/8″
around all sides. Repeat for a total of eleven large hexies.
1/27/2015 9:14 AM
WeAllSew « http://weallsew.com
8 of 23
http://weallsew.com/2014/01/23/how-to-sew-hexies-by-machine-geometr...
Repeat with the 3-1/2″ blocks and small hexie template, for a total of ten small hexies.
Heat your iron to its highest setting.
Place one of the large hexies wrong wide up on the ironing board, with the large hexie template centered on
top.
Fold one edge over and press with the iron. Repeat for all edges, using your finger or a stiletto to hold the
edge down as you fold each new edge over to press.
1/27/2015 9:14 AM
WeAllSew « http://weallsew.com
9 of 23
http://weallsew.com/2014/01/23/how-to-sew-hexies-by-machine-geometr...
1/27/2015 9:14 AM
WeAllSew « http://weallsew.com
10 of 23
http://weallsew.com/2014/01/23/how-to-sew-hexies-by-machine-geometr...
Flip the hexie over. Spray with starch and press, leaving the iron in place a few seconds. Remove the iron and
wait a few seconds to let the hexie cool off. Unfold 2-3 sides and remove the cardstock template. Repeat for
the remaining large hexies.
1/27/2015 9:14 AM
WeAllSew « http://weallsew.com
11 of 23
http://weallsew.com/2014/01/23/how-to-sew-hexies-by-machine-geometr...
Repeat for the small hexies.
Set all twenty-one hexies aside.
Step 3) Applique the hexies to the top.
1/27/2015 9:14 AM
WeAllSew « http://weallsew.com
12 of 23
http://weallsew.com/2014/01/23/how-to-sew-hexies-by-machine-geometr...
Press one of the 20″ squares, then lay it out on a flat surface. Fold in half, finger-press a soft crease to mark
the center, and then unfold the fabric.
Place ten large hexies on the square, centered on/above/below the crease as shown in the photo.
After all the big hexies are in place, play with the placement of the ten small hexies.
Pin all hexies in place by inserting a pin in the center of each one, taking care to realign points and edges as
needed.
Thread your sewing machine with off-white 40-weight cotton thread in the needle and on the bobbin.
Select a gathering stitch (#12 on most BERNINA sewing machines; check your machine’s user manual for a
similar stitch on your machine). Adjust the width to 4.0 mm and the length to 1.0 mm.
1/27/2015 9:14 AM
WeAllSew « http://weallsew.com
13 of 23
http://weallsew.com/2014/01/23/how-to-sew-hexies-by-machine-geometr...
Engage needle stop up/down if your machine has this feature.
Attach an open-toe or clear embroidery foot to your sewing machine. BERNINA’s Clear Embroidery Foot
#39/39C is fantastic! It has a clear acrylic base that lets you see exactly where you are sewing. It also has red
center and side marks to help with the alignment of decorative rows of stitches as you sew.
Tip: If your machine has a foot selection feature, be sure to click on the presser foot icon and select Foot
#20/20C or 39/39C.
Begin sewing in the center of two adjoining hexies. Start slowly. Aim the needle where the edges of the two
hexies meet. This stitch (the gathering stitch) will catch the edges of both hexies as you sew. Move to the
outside edge. Try to sew one continuous line, as long as possible, without getting stuck in a corner.
Tip: Use a stiletto to help hold the edges in place as you sew.
When you get to a corner, lift the presser foot and pivot the piece to continue sewing.
1/27/2015 9:14 AM
WeAllSew « http://weallsew.com
14 of 23
http://weallsew.com/2014/01/23/how-to-sew-hexies-by-machine-geometr...
Tip: To secure all thread tails at the end of the project, leave a 5″ to 6″ tail of needle thread each time you
start and end a line of stitching. Later, thread these tails into a hand sewing needle, then pass the threads to
the backside of the project to hide them.
Continue in this manner, sewing all sides of each hexie and removing pins as you stitch. Make sure all of the
edges and points of the hexies are lining up correctly down the center of the 20″ square as you continue
sewing. You will find that there are some sections, where the sides of the hexies meet, that you need to close
before sewing more of the outside edges.
When all sides are stitched, hide the thread tails by pulling them to the wrong side of the project. Press.
1/27/2015 9:14 AM
WeAllSew « http://weallsew.com
15 of 23
http://weallsew.com/2014/01/23/how-to-sew-hexies-by-machine-geometr...
Step 4) Make the backing square.
Place the 6″ x seafoam green strip wrong side up on your ironing table and fold in 1/4″ along each long edge;
press. Fold the fabric again, this time in half, and finger-press to make a soft crease.
1/27/2015 9:14 AM
WeAllSew « http://weallsew.com
16 of 23
http://weallsew.com/2014/01/23/how-to-sew-hexies-by-machine-geometr...
Fold the remaining 20″ square of white fabric in half; finger-press to make a soft crease.
Place the COLOR strip right side up on top of the solid backing fabric, lining up the creases. Pin in place.
Remove the presser foot and reattach the all-purpose foot. Be sure to click on the presser foot icon and select
Foot 1/1C if your machine has this option.
1/27/2015 9:14 AM
WeAllSew « http://weallsew.com
17 of 23
http://weallsew.com/2014/01/23/how-to-sew-hexies-by-machine-geometr...
Select a straight stititch (#1 on most BERNINA sewing machines). Topstitch 1/8″ inside both long edges of
the strip.
Change back to the embroidery foot. Place the remaining large hexie (#11) on the backing as desired and pin
in place. Applique in place like the previous hexies, leaving long thread tails at the beginning and end, and
pivoting at each corner. Hide the thread tails; press.
1/27/2015 9:14 AM
WeAllSew « http://weallsew.com
18 of 23
http://weallsew.com/2014/01/23/how-to-sew-hexies-by-machine-geometr...
Tip: BERNINA sewing machines have a temporary altered memory feature. This means that when you switch
between stitches, the machine remembers the last settings for each stitch you’ve used. For instance, when you
reselect stitch #12 for this project, the machine automatically remembers the 4 mm stitch width and 1 mm
stitch length until you change the settings or turn off your machine. Some models, like the B 780, also have a
history function that memorizes the settings of the last 15 stitches used, even when you turn off your machine.
A real time saver!
Step 5) Assemble and quilt the table topper.
Select a straight stitch. Switch to a walking foot, or, if your machine has a dual feed feature, engage it.
Insert the metal seam guide bar to the back of the presser foot. Adjust to 1/2″ from the center needle position
and secure in place.
1/27/2015 9:14 AM
WeAllSew « http://weallsew.com
19 of 23
http://weallsew.com/2014/01/23/how-to-sew-hexies-by-machine-geometr...
Place the 60 degree triangle ruler on top of the fabric, aligning the base of the ruler with the top edge of the
fabric, and draw four line with an air-erasable maker to form a chevron design on one side. Repeat on the
opposite side.
Position the three layers as follows: Top (right side up), backing (right side down), and batting. Pin.
Begin sewing over the first line, leaving a 6″-long thread tail at the beginning of the stitching. Only sew on
the solid white fabric; do not sew over the hexies. When you get to a hexie, stop and pull a 6″-long thread tail;
cut the thread. Then place the needle where you need to start again and continue sewing, leaving a 6″-long
thread tail at the beginning and end of every line of stitching.
Tip: To avoid puckering issues, decrease the needle (top) tension of your machine about 1 point and reduce
the presser foot pressure slightly if your sewing machine has this feature.
1/27/2015 9:14 AM
WeAllSew « http://weallsew.com
20 of 23
http://weallsew.com/2014/01/23/how-to-sew-hexies-by-machine-geometr...
Use the guide to follow the first line of quilting, stitching the second line 1/2″ away. When you reach the
center of the “V,” lower the needle into the fabric, lift the presser foot, and pivot the piece 60 degrees, then
sew back up the other side of the “V.”
Continue stitching lines, creating a zigzag chevron. (I used eight lines of stitching on my table topper.) Repeat
for the other half of the quilt. Hide the thread tails between the layers of fabric.
Using the remaining seafoam green fabric, cut binding strips and bind the edges of your table topper using
your favorite binding technique.
Enjoy!
1/27/2015 9:14 AM
WeAllSew « http://weallsew.com
21 of 23
January 23, 2014 by Pat Bravo
http://weallsew.com/2014/01/23/how-to-sew-hexies-by-machine-geometr...
Like
101
67
305
Rating: 3.0/5 (20 votes cast)
Rate this post:
Related content to Post: How to Make an Arrows and Hexies Bed Runner
Category: projects, quilting, what's hot
Tags of Post: easy-to-sew hexies, hexie applique, hexies, piecing hexagons
Trackback URL: http://weallsew.com/2014/01/23/how-to-sew-hexies-by-machine-geometric-floraltable-topper/
This article has 5 comments
1.
1/27/2015 9:14 AM
WeAllSew « http://weallsew.com
22 of 23
http://weallsew.com/2014/01/23/how-to-sew-hexies-by-machine-geometr...
sherry
Still getting ruffles on everything. Tried logging in again and did not work
January 24, 2014 | Log in to Reply
WeAllSew
Hi, Sherry – Try deleting the app and reinstalling. That should load the updated app – v. 1.2.1. Jo
January 24, 2014 | Log in to Reply
Pingback from: We Heart It, It’s Free | AllPeopleQuilt.com Staff Blog
2.
vkhodgman
I liked how you wrote this tutorial with the Bernina specifications. Often I don’t use my machine to it’s
full capacity and this helps me know what feet, settings, thread to use.
February 11, 2014 | Log in to Reply
Pingback from: WeAllSew « http://weallsew.com
Leave a Reply
You must be logged in to post a comment.
Most Popular Posts
How to Make a Billboard Messenger Bag
How to Make a Snuggly Owl
More
Archives
January 2015 (12)
December 2014 (47)
More
Most Popular Experts
Maddie Flanigan
Anneliese
More
© 2008-2011 BERNINA of America
| BERNINAUSA
| Privacy
| Terms and Conditions
1/27/2015 9:14 AM
WeAllSew « http://weallsew.com
23 of 23
http://weallsew.com/2014/01/23/how-to-sew-hexies-by-machine-geometr...
| Contact us
1/27/2015 9:14 AM