1
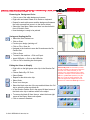
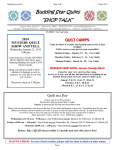
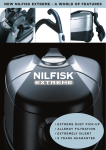
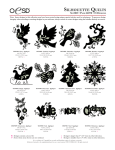
DesignWorks- PaintWork Skillbuilder
Using a Bitmap
The following exercise covers the basics of a PaintWork
Design. For detailed CutWork Software instructions, review
the DesignWorks manual. Go to Help> Help Topics. Click on
the Index Tab and enter these topics in the search box:
• Paint Fill
• PaintWork Transformations
• Vector
• Bitmap
Double click on the listed topics to find out more information
about the topic or select the topic and click on Display.
Open the DesignWorks Software
• Double click on the DesignWorks icon to open the software
and select Next in the New Design dialog box or if the software is open, select File> New.
• In the Fabric dialog box, click Next.
• In the Artwork Source dialog box, place a radio dot by From
File.
• Click on Browse. Navigate to the location of the BERNINA
DesignWorks Samples.
• Select the Training folder.
• Locate owl_2.tif. Click on Open.
• From the Hoop drop down selection, choose BERNINA
Large Oval 255 x 145, #93 hoop. Click Next.
• Select Trace (convert to outline). Click Next; then Trace.
• From the Color Reduction dialog box, click Finish.
• In the Color Reduction dialog box, select Edding Textilstifte
Pens from the Brushes Palette.
• Click on Finish.
Notes:
Exercise includes:
* Vector & Bitmap Designs
* Creating a PaintWork Design
* PaintWork Transformations
Instructions are written for full DesignWorks
Software Suite installation.
Refer to User’s Guide (Help>DesignWorks on
-line Help)
The Wizard will walk through the steps
needed to begin creating the design. Adjustments are made to the stitch types for the
design, according to the fabric selected.
Choose color either for visibility on the design
space or choose a color that most closely
resembles the finished project media to preview Crystal/Thread/Paint color options as
they will appear on the final project.
By default, DesignWorks Suite
selects Paint Fill.
When a Bitmap image is selected,
It can be Traced or used as a Backdrop.
Trace turns the image into a vector .When
opened as backdrop, the image is imported
and you can manually draw the design with
the drawing tools in the software.
.
© 2013 BERNINA of America, Inc
1
Removing the Background Color
Notes:
• Click on one of the white background corners.
• Right click and select Delete or hit Delete on keyboard.
• Repeat for each white corner and the background between
the owl’s ears and feet (zoom in to the feet to delete).
• Select the View Menu. Make sure there is a check mark in
front of Realistic Paint.
• Now the design is ready to be painted.
Saving and Sending the File
• Select the Slow Redraw icon.
• Click on Start.
• Preview your design “painting out”.
• Click on File > Save As.
• Navigate to the location to save the file and name the file,
Painted Owl.
• Click on Save.
• To send to the machine > Click on Export.
• Insert USB stick > Click on the USB stick.
• Click on OK in the dialog box that opens.
Editing the Colors to Simplify
• Right click on the light green color chip in the Brushes Pal-
ette.
• Choose Select By> Fill Color.
• Select Delete.
• Repeat for the white color chip.
• Select Undo.
Selection By Color is used when you want
to make a change to all the objects that have
the same color. When selected you can
change colors, apply different fill and outline
properties. The object can be selected by the
Fill color, by Pen color (outlines) or by the
Any color ( both Fill & Pen selected). The
menu will appear with a Right-click on the
desired color. Select the Select by sub menu.
• Zoom In on the eyes.
• Select the black outer rim of the eye and hold down the Ctrl
key to select the other eye black rim.
• In the Brushes Palette, click in the upper left hand corner of
the black color chip to add an outline to the object.
• To remove the black fill from the eye, select the lower right
corner of the Empty/ None color square.
• Click on screen to deselect.
© 2013 BERNINA of America, Inc
.
2
Notes:
• Select the white of the eye and hold down the Ctrl key to se-
lect the other white of the eye.
• Select Delete.
• Right click on the white color chip in the Brushes Palette and
choose Select By> Fill Color.
• In the Brushes Palette, in available colors, click in the lower
right corner of the brown color chip.
Editing the Paint Design
• Select the two black rims of the eyes by holding the Ctrl key
to select both.
• In Object Properties, select the Outline Tab. Select the Zig-
zag icon.
• Right click on the green color chip in the Brushes Palette
and choose Select By> Fill Color.
• To change the angle of the paint fill, select the Direction
icon.
• Click and drag across one of the wings to change the direc-
tion of the paint fill.
Saving and Sending the File
• Select the Slow Redraw icon.
• Click on Start.
• Preview your design “painting out”.
• Click on File > Save As.
• Navigate to the location to save the file and name the file,
Painted Owl Edited.
• Click on Save.
• To send to the machine, click on Export.
• Insert USB stick. Click on the USB stick.
• Click on OK in the dialog box that opens.
The PaintWork Accessory Tool and compatible
BERNINA embroidery machine are needed to
execute a completed PaintWork design.
© 2013 BERNINA of America, Inc
For more information about
PaintWork see pages 446– 486
in the DesignWork User Manual
3