1
Martine BOCCANFUSO
Marc EMILE
Axialis IconWorkshop 6.1
Corporate Edition
Getting Started Guide
How-To Procedures
Reference Manual
Copyright © 1996-2006 Axialis Software – All Rights Reserved
http://www.axialis.com
Table of Contents
INTRODUCING, LICENSE
What is Axialis IconWorkshop™?
25 25 What can I do with IconWorkshop™?
25 What formats are compatible with Axialis IconWorkshop™?
26 Why choose Axialis IconWorkshop™?
26 What's New in Version 6.10?
Features included since version 6.0
User License Agreement - Corporate Edition
27 28 29 IMPORTANT NOTICE
29 License Grant
29 Restrictions
30 Term
30 Copyright/Ownership
30 Disclaimer of Warranties
30 Disclaimer of Damages
30 Object Packs - Terms Of Use
30 License Grant
31 Restrictions
31 Copyright/Ownership
31 Disclaimer of Warranties
31 Disclaimer of Damages
31 Sample Icons - Terms Of Use
IconBuffet copyrighted icons
Acknowledgments
31 32 32 Icons and Images used in the program
32 Translations
32 VisiBone Color Swatches
32 Compression Support
32 PNG Support
33 JPEG Support
33 JPEG 2000 Support
33 System Requirements
33 Minimum
33 Recommended
33 iii
Axialis IconWorkshop 6.10
GETTING STARTED TUTORIAL
What is an Icon?
35 What are the differences between an image and an icon?
35 What is the structure of an icon?
36 Which image formats should I include in my icons?
37 What is the RGB icon format with Alpha Channel?
38 Can we save an icon to a file?
40 Can we save several icons into one file?
40 What's New with Windows Vista™ Icons?
40 How to create an icon?
40 Macintosh® vs Windows® icons
42 What are the differences between Windows® and Macintosh® icons?
42 Image formats included in Macintosh® icons
43 Various Macintosh® file types
44 Information about the new 256x256 format for Tiger (OS-X 10.4)
45 Information about the future 512x512 icon format for Leopard (OS-X 10.5)
45 Introducing Windows Vista™ Icons
Windows Vista™ - A Resolution-Independent User Interface
46 46 Windows Vista™ 256x256 PNG Compressed Icons
47 Compatibility with Windows® XP
48 Create a Windows Vista™ Compressed Icon with Axialis IconWorkshop™
48 Use of Windows Vista™ Compressed Icons in Software Projects
50 Conclusion
51 Lesson 1 - Creating a new icon from scratch
52 Start the new icon project
52 A Quick Tour of the Editor Window
53 Lesson 2 - Drawing an icon using the built-in tools
55 Selecting a tool, a color and drawing
55 Drawing a letter in the circle
55 Lesson 3 - Adjusting the icon image
57 Changing the brightness and contrast of our icon
57 Moving the image
57 Creating a shadow behind the icon (Windows® XP style)
58 Lesson 4 - Adding new image formats
58 Adding a new icon format based on the current image
59 A Faster way to create a new format
61 Adding several formats in one operation
62 Lesson 5 - Saving the icon, storing it in the Librarian
Adding the icon to the librarian
Lesson 6 - Creating a new icon from an existing image
Opening an image file in Axialis IconWorkshop™
iv
35 63 64 65 65 Table Of Contents
Creating a Windows® icon from this image
66 Creating a Macintosh® icon
69 A quick look at the icons stored in the Librarian
71 Lesson 7 - Composing an icon from several image objects
71 Create the new icon
71 Adding the first object: The folder background
72 Adding the second object: The document
73 Adding the third object: The folder front
74 Creating all the image formats
75 Going further...
77 Exercises
77 Lesson 8 - Using an object pack to create an icon
78 Defining, Creating the Icon Project
78 Building the Icon Using Image Objects
79 Finalizing the Icon by Creating All the Formats
83 Creating a Macintosh® version of the icon
85 Exercises
85 Lesson 9 - Creating and Using a Windows Vista™ icon
85 Creating the Windows Vista™ Icon from an existing image
86 Using a Windows Vista™ Compressed Icon in a Software Project
88 Lesson 10 - Creating Icons Using Photoshop® Templates
89 How do the Photoshop® templates work?
90 Install the Photoshop-to-IconWorkshop™ transfer plug-in
91 Create a Windows® XP icon
91 Create a Windows Vista™ icon using a 3-image Project Template
94 Lesson 11 - Batch creating several icons from images
Opening the folder containing the image in the Axialis Explorer
98 98 Creating the Windows® icons
99 Creating the Macintosh® icons
100 Lesson 12 - Creating a new Icon Library
101 Creating an Icon Library in the Librarian
101 Lesson 13 - Adding icons to the Icon Library
Adding an icon to the Icon Library (from the Librarian)
102 102 Adding an icon to the Icon Library (from an opened icon document)
103 Adding icons to the Icon Library (from the Axialis Explorer)
103 Lesson 14 - Compiling the Icon Library
Selecting the Library, starting the compilation wizard
104 104 Specifying the compilation options using the wizard
105 Testing the compiled installation package
107 A word to finish...
108 v
Axialis IconWorkshop 6.10
HOW-TO PROCEDURES
How to Create an Icon from an Image File
109 1. Open the image file in Axialis IconWorkshop™
109 2. Create an icon from this image
109 How to Create an Icon from a Cursor File...
111 1. Open the cursor file in Axialis IconWorkshop™
111 2. Create an icon from this cursor
111 How to Create an Icon from a Transparent GIF File
112 1. Open the GIF file in Axialis IconWorkshop™
112 2. Create an icon from this GIF image
113 How to Create an Icon from a Web Image
114 Get the Image from the Web
114 Create an icon from an image in the page using the Clipboard
114 Create an icon from an image in the page using a temporary file
115 How to Create an Icon from the Clipboard
116 Creating the Icon from the Clipboard Contents
116 How to create attractive icons using image objects
117 Defining, Creating the Icon Project
118 Building the Icon Using Image Objects
120 Finalizing the Icon by Creating All the Formats
124 Creating a Macintosh® version of the icon
125 How to create Windows Vista™ compliant icons
Creating the Windows Vista™ Icon from an existing image
How to Create Windows® XP Compliant Icons...
126 126 128 Introduction
128 What about the new Windows® XP icon format?
129 Windows® XP Icon Style Characteristics
129 Windows® XP Icon Color Depth and Size
130 Color Palette used in Windows® XP Icons
130 Perspective and Grouping Objects in Icons
131 Drop Shadow
132 Outlines
132 Transferring the Image to IconWorkshop™ to Create an Icon
132 How to Use IconWorkshop™ with Adobe Photoshop®
vi
109 133 Transferring an Image from Photoshop® to Axialis IconWorkshop™ to Create an Icon
133 Creating Icons using Photoshop® Templates
133 Transferring an Icon Image from IconWorkshop™ to Photoshop®
133 Install the Photoshop-to-IconWorkshop™ transfer plug-in
134 Transferring an Image from Photoshop® to IconWorkshop™® using the plug-in
134 Table Of Contents
How to Use IconWorkshop™ with Paint Shop Pro®
137 Transferring an Image from Paint Shop Pro® to IconWorkshop™® to Create an Icon
137 Transferring an Icon Image from IconWorkshop™® to Paint Shop Pro®
137 How to use IconWorkshop™ with Freehand®
Transferring an Image from Freehand® to IconWorkshop™® to Create an Icon
137 138 How to use StuffIt Expander™ to read Macintosh® Icons
138 Installing and Configuring StuffIt Expander™ for Windows®
138 Uncompressing a SIT/HQX Archive File
139 Uncompressing Macintosh® icons packed in a ZIP file
140 How to Convert a Macintosh® Icon to Windows®
What's the difference between Windows® and Macintosh® icons?
140 140 Which image formats are included in Macintosh® icons?
140 Convert the icon to Windows®, keeping all Macintosh® formats
141 Creating a Windows® icon from a Macintosh® icon
141 Where to find Macintosh® icons?
142 How to unpack Macintosh® icon archives?
143 How to convert a Windows® Icon to Macintosh®
143 What's the difference between Windows® and Macintosh® icons?
143 Which image formats are included in Macintosh® icons?
144 Convert the icon to Macintosh®, keeping all Macintosh® compatible image formats
144 Creating a Macintosh® icon from a Windows® icon
145 How to transfer an icon to a Macintosh® computer
146 What file format should I use to transfer an icon?
146 Transfer an icon between Windows® OS and Macintosh® OS using MacBinary
147 Transfer an icon to Macintosh® OS using a LAN
148 How to batch convert icons between Macintosh® and Windows®
149 Select the icons you wish to convert
149 Convert the icons From Macintosh® to Windows®
150 Convert the icons From Windows® to Macintosh®
150 How to Batch Create Icons From Images, Cursors
151 Select the source images, icons or cursors
151 Batch create Windows® icons
151 Batch create Macintosh® icons
152 How to Batch Create PNG images with Transparency from Icons...
152 Select the Source Icons
153 Create the Images
153 How to Change the User Interface of IconWorkshop
154 To switch to Standard Windows® Interface
154 To switch to Axialis Interface
154 To Change the Color of the Axialis Interface
154 To Change the Colors of the Full Screen and Documents Backgrounds
155 vii
Axialis IconWorkshop 6.10
To Customize the Main Toolbar Buttons
155 To Customize the Main Toolbar Aspect
155 How to Change the Editor Drawing Area Aspect
To Change the Chessboard Texture of the Transparent Areas
155 To Change the Grid Aspect
156 How to change the Scale 1:1 window size
156 Switch the Preview 1:1 window to 256x256
157 Switch the Preview 1:1 window to 128x128
157 Switch between docking and floating mode
158 How to Search the Icons I have on My Computer
158 Searching for files on your computer
158 Grab the Icons, add them into a library
159 How to Create Different Color Versions of an Icon...
159 Opening the existing icon, modifying the image HUE (overall color)
159 Creating a new icon from this image
160 How to Create a PNG, BMP, PSD or JPEG 2000 Image with Transparency...
Open the image file in Axialis IconWorkshop™
160 161 Save the Image as an External Bitmap
161 The JPEG 2000 options
161 How to create a Web-optimized GIF image from an icon
161 Open the icon file in IconWorkshop™
162 Save the image as a GIF file with Web optimization
162 How to modify or extract icons included in program files
163 Modifying an icon included in a program file
163 Extracting icons from a program file
164 Adding to the Librarian icons from a program file
164 How to Create a Snapshot Picture of My Icons...
164 Creating a Snapshot of an Opened Icon
165 Creating a Detailed Snapshot of Several Icons
165 Creating a Quick Thumbnail Snapshot of Several Icons
166 How to Add a Favorite Icon to my Web Site
166 Create the Correct Icon Formats
167 Saving Your Icon To your Local Hard Disk
167 Associate the Icon with a Web Page
167 My Icon is ignored, Why?
167 How to Compile Icon Libraries with Activation Codes...
viii
155 168 A word on Activation Codes
168 Compile an Icon Library with Activation Code
169 Generate Codes based on the User Name
170 Generate Codes based on Serial Numbers
170 Table Of Contents
CREATING ICONS
Create a new Windows® icon project
173 173 Choosing the icon project type
173 Defining the first image format
174 Add image formats in a Windows® icon
175 Adding a new image format
175 Adding quickly a standard image format
176 Adding several images formats in one operation
177 Save a Windows® icon
178 Saving the project in a file
179 Saving the project by adding it in the Librarian
179 Save a Macintosh® icon as Windows® format
179 Saving a Macintosh® icon using a Windows® format
179 Convert a Macintosh® icon to a Windows® format
180 What's the difference between Windows® and Macintosh® icons?
180 Which image formats are included in Macintosh® icons?
180 Convert the icon to Windows®, keeping all Macintosh® image formats
181 Creating a Windows® icon from a Macintosh® icon
181 Create a Windows® icon from an image File...
182 Open the image file in IconWorkshop™
183 Create an icon from this image
183 Batch create several Windows® icons from images
184 Select the source images, icons or cursors
184 Batch create Windows® icons
185 Create a new Macintosh® icon project
186 Choosing the icon project type
186 Defining the first image format
186 Add image formats in a Macintosh® icon
188 Adding a new image format
188 Adding quickly a standard image format
189 Adding several images formats in one operation
189 Save a Macintosh® icon
190 Saving the project in a file
190 Saving the project by adding it in the Librarian
190 Save a Windows® icon as Macintosh® format
191 Saving a Windows® icon using a Macintosh® format
191 Remark about the Macintosh® icon format
191 Convert a Windows® icon to Macintosh® format
What's the difference between Windows® and Macintosh® icons?
192 192 ix
Axialis IconWorkshop 6.10
Which image formats are included in macintosh® icons?
192 Convert the icon to Macintosh®, keeping all Macintosh® compatible image formats
193 Creating a Macintosh® icon from a Windows® icon
193 Create a Macintosh® icon from an image File...
195 Open the image file in Axialis IconWorkshop™
195 Create an icon from this image
195 Batch create several Macintosh® icons from images
Select the source images, icons or cursors
197 Batch create Macintosh® icons
197 CREATING ICONS FROM IMAGE OBJECTS
What is an Image Object?
199 199 Why Image Objects?
199 Specifications of an Image Object
200 Different Types of Image Objects
200 Using Image Objects with Axialis Products
201 How to use Image Objects to Create Icons?
202 Downloading and Installing Object Packs
202 Defining, Creating the Icon Project
202 Building the Icon Using Image Objects
204 Finalizing the Icon by Creating All the Formats
208 Creating a Macintosh® Icon
209 Downloading Object Packs from Internet
209 Download Object Packs from your Web Browser
210 Download Object Packs from the Axialis Application
211 CREATING ICONS USING PHOTOSHOP® TEMPLATES
213 How do the Photoshop® Templates work?
213 How do the Photoshop® templates work?
213 How many templates are included in IconWorkshop?
214 What is the difference between "Simple Icon" and "Icon Project" templates ?
214 Install the Photoshop-to-IconWorkshop™ transfer plug-in
215 Use a Simple Icon Template to create an icon
215 Create a Windows® XP icon using a Simple Icon Template
216 Adding other formats using the template
218 Use an Icon Project Template to create an icon
Create a Vista™ icon using a 3-image Icon Project Template
Create your own Photoshop® Templates
x
197 219 220 223 Photoshop Templates - A Technical Overview
224 Create the XML description file
227 Table Of Contents
WORKING WITH ICONS
Add a new image format in an icon
235 235 Adding a new image format
236 Adding quickly a standard image format
237 Adding several images formats in one operation
237 Remove an image format in an icon
239 Work with selections
239 Creating a selection
240 Selecting the whole image
240 Discarding a selection
240 Deleting the selected image
240 Creating a floating selection
240 Place selection in Background/Foreground
241 Place the floating selection in background
241 Place the floating selection in foreground
242 Draw using the tools
242 Show/Hide the tool palette
243 Using the tools
243 Applying gradients while drawing
243 Using various brush shapes
244 Produce smooth edges while drawing
244 Show/Hide the color palette window
244 Assigning Foreground / Background colors
244 Adjusting Foreground / Background colors
244 Using RGB or HSB color modes
245 Specifying a transparent color
245 Swap Foreground and Background colors
245 To Move/Copy a part of a drawing
Copying part of a drawing in the same image
245 245 Moving part of a drawing in the same image
246 Copying part of a drawing using the Clipboard
246 Move part of a drawing using the Clipboard
246 Transparency settings
246 Clipboard options during a paste operation
247 Resize/Rotate image
247 Resize part of the drawing using the mouse
247 Resize part of the drawing using a dialog box
248 Rotate part of the drawing
248 Rotate part of the drawing to 90° angle
248 Adjust Brightness/Contrast
Adjust brightness and contrast of a portion of image
248 248 xi
Axialis IconWorkshop 6.10
Adjust Hue/Saturation/Brightness
Adjust hue, saturation and brightness of a portion of image
Adjust Opacity
Adjust Opacity
249 250 250 Apply Filters
250 Apply Filter
251 Apply Filter to the RGB components (colors) only
251 Apply Filter to the Alpha Channel (opacity) only
252 Add a drop shadow
Apply the drop shadow effect
Add Text
Adding text to an icon image
Import an image into an icon project
252 252 253 253 254 Using the image import function
254 Using drag & drop from the Librarian
254 Copy/Paste alpha channels
256 Extract an alpha channel (Copy)
257 Apply an alpha channel (Paste)
257 Modify/Extract icons in program files (EXE, DLL)
257 Modifying an icon included in a program file
258 Extracting icons from a program file
258 Adding to the Librarian icons from a program file
259 Work with colors
259 Show/Hide the color palette window
260 Assigning Foreground / Background colors
260 Adjusting Foreground / Background colors
260 Using RGB or HSB color modes
260 Specifying a transparent color
260 Swap Foreground and Background colors
261 Methods to define colors RGB/HSB
261 RGB Method
261 HSB Method
261 Customized palette
261 To modify a color in a customized palette
262 Copy Color as HTML
262 Load color palette (256 color table)
262 Load a color palette
262 Save a color palette
262 Save a 256 color palette
xii
249 263 Table Of Contents
Create a gradient
Create a gradient in a 256 color palette
Create New Swatch
Create a new swatch
Customized Swatch
263 263 263 263 264 Modify a color swatch
264 Rename a color swatch
264 Delete a color swatch
264 Load Swatches
Load swatches
265 265 Save Swatches in a file
265 Save swatches in a file
265 Create a gradient of swatches
Create a gradient of swatches
Working with the Photoshop® plug-in
Why a Photoshop® plug-in for Axialis IconWorkshop™?
Install the Photoshop® Plug-in
Install the Photoshop® plug-in
Use the Photoshop® Plug-in
Use the Photoshop® plug-in
Convert a Macintosh® icon to a Windows® format
265 265 266 266 266 267 267 268 270 What's the difference between Windows® and Macintosh® icons?
270 Which image formats are included in Macintosh® icons?
270 Convert the icon to Windows®, keeping all Macintosh® image formats
271 Creating a Windows® icon from a Macintosh® icon
271 Convert a Windows® icon to Macintosh® format
273 Convert the icon to Macintosh®, keeping all Macintosh® compatible image formats
273 Creating a Macintosh® icon from a Windows® icon
273 Convert several Macintosh® icons to Windows® format
275 Select the source icons
275 Batch convert the icons
275 Convert several Windows® icons to Macintosh® format
276 Select the source icons
276 Batch convert the icons
276 Convert a PNG icon to a Windows® icon
277 Open the PNG image file in IconWorkshop™
277 Create an icon from this PNG image
277 xiii
Axialis IconWorkshop 6.10
Convert a PNG icon to a Macintosh® icon
Open the PNG image file in IconWorkshop™
279 Create an icon from this PNG image
279 Convert several PNG icons to Windows® icons
281 Select the source PNG images
281 Batch create the Windows® icons
281 Convert several PNG icons to Macintosh® icons
282 Select the source PNG images
282 Batch create the Macintosh® icons
282 Convert a Windows®/Macintosh® icon to PNG
283 Open the icon file in IconWorkshop™
283 Save the image as a PNG file
284 Convert several Windows®/Macintosh® icons to PNG (batch process)
284 Select the Source Icons
284 Create the PNG images
284 Convert an image to a Windows® icon
285 Open the image file in IconWorkshop™
286 Create an icon from this image
286 Convert an image to a Macintosh® icon
288 Open the PNG image file in Axialis IconWorkshop™
288 Create an icon from this PNG image
288 Convert several images to Windows® icons (batch processing)
290 Select the source images
290 Batch create the Windows® icons
290 Convert several images to Macintosh® icons (batch processing)
291 Select the source images
291 Batch create the Windows® icons
291 Convert an icon to an image
292 Open the icon file in IconWorkshop™
292 Save the image as an image file
293 The JPEG 2000 options
293 Convert an icon to a Web-optimized GIF image
293 Open the icon file in IconWorkshop™
294 Save the image as a GIF file with Web optimization
294 Convert several icons to images (batch processing)
xiv
279 295 Select the Source Icons
295 Create the Images
295 The JPEG 2000 options
296 The GIF options
297 Table Of Contents
Normalize several icons (batch processing)
298 Select the icons to normalize
298 Normalize the icons
298 Batch Processing Icons
299 Batch create several Windows® icons from images
300 Select the source images, icons or cursors
300 Batch create Windows® icons
300 Batch create several Macintosh® icons from images
301 Select the source images, icons or cursors
301 Batch create Macintosh® icons
301 Convert several Macintosh® icons to Windows® format
302 Select the source icons
302 Batch convert the icons
302 Convert several Windows® icons to Macintosh® format
303 Select the source icons
303 Batch convert the icons
303 Convert several Windows®/Macintosh® icons to PNG (batch process)
304 Select the Source Icons
304 Create the PNG images
305 Normalize several icons (batch processing)
306 Select the icons to normalize
306 Normalize the icons
306 Create a new icon project from clipboard
Creating the Icon from the Clipboard Contents
Capture an icon
307 307 308 Capture an icon
308 Create an icon from this image
309 Save an icon image as an external bitmap file
310 Open the icon file in Axialis IconWorkshop™
310 Save the image as an image file
310 The JPEG 2000 options
311 Create an Icon Snapshot Picture
Creating a Snapshot of an Opened Icon
311 311 Creating a Detailed Snapshot of Several Icons
312 Creating a Quick Thumbnail Snapshot of Several Icons
312 WORKING WITH ICON LIBRARIES
313 What is an Icon Library?
313 System Compatibility
313 xv
Axialis IconWorkshop 6.10
File structure
Create a new icon library
Create a new icon library
Open a library as a separate document
313 313 314 Open an icon library
314 Other ways to open an icon library
315 Change the icon display
315 Edit an icon in a library
315 Open and edit the icon
315 Update icon in the library
316 Save the library
316 Open an icon as a new icon from the library
Open the icon as a new document
Import icons into the library
316 316 317 Import icons in a library
317 Import icons from the Axialis Explorer window
318 Import a selection of icons from another icon library
318 Export icons from a library
318 Export icons as individual icon files (ICO, ICNS...)
318 Export icons as library file or DLL
319 Delete icons in a library
Delete icons in a library
319 319 Rename icons in alibrary
320 Rename icons in a library
320 Sort item by name
320 Sort icons by name in a library
320 Change icon order using drag a drop
320 Create a snapshot picture of icons in a library
321 Creating a Detailed Snapshot of Several Icons
321 Creating a Quick Thumbnail Snapshot of Several Icons
321 COMPILING AND DISTRIBUTING ICON LIBRARIES
Specify a filename and location
Specify a filename and location
323 323 323 Add a description to a compiled file
323 Add a description to a compiled file
323 Add an information text
Add an information text
xvi
313 324 324 Table Of Contents
Add a User License Agreement
Add a User License Agreement
324 324 Use an Activation Code
325 Use an Activation Code
325 More information on Activation Codes
326 Compile
Compile
326 326 Generate Activation Codes
326 Company and Library IDs
327 Generate an Activation Code based on a User Name
327 Generate a List of Activation Codes in Serial
327 More information on Activation Codes
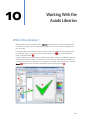
328 WORKING WITH THE AXIALIS LIBRARIAN
What is the Librarian?
329 329 Change the Librarian folder location
330 Show/hide the Librarian
330 Change the Librarian position on screen
330 Show and hide the Librarian Window
330 Show/hide the Librarian
330 Change the Librarian position on screen
331 Change the Librarian position on screen
331 Change the Librarian folder location
331 Change the Librarian folder location
331 Open an item in the librarian
331 Open an item full screen
332 Open an item full screen
332 Toggle the auto full screen option
332 Edit an image with an external editor program
332 Create a new folder
333 Go to the Parent Folder
333 Go to the Parent Folder
333 Change a folder icon
333 Import files
333 Export files
334 Select items
334 Select all items in the folder
334 Select all items in the folder
334 xvii
Axialis IconWorkshop 6.10
Rename one or more items
334 Search items
335 Delete items
335 Restore previously deleted items in the Librarian
336 Empty the Deleted Items folder
336 Preview items in the librarian explorer
336 Send media items via email
336 Change the item display
337 Change display
337 Display a grid in the detailed list
337 Show info tooltips
337 Show folders
337 Display the item properties
Display item properties
338 338 Print the actual folder
338 Create a new icon library
339 Create a new icon library in the librarian
339 Delete an icon library
339 Add icons into an icon library
Adding icons using the Import function
340 Adding icons using Drag & Drop from within the Librarian
340 Adding an icon from an opened document
340 Adding icons from the Axialis Explorer
341 Import a selection of icons from another icon library
341 Edit an icon in an icon library
341 Open and edit the icon
342 Update icon in the library
342 Save the library
342 Working with icons in a library
342 Open an icon as a new icon from the library
342 Delete icons in a library
342 Rename icons in a library
343 Sort icons by name in a library
343 Change icon order using drag a drop
343 Export icons from an icon library
xviii
340 344 Export icons as individual icon files (ICO, ICNS...)
344 Export icons as library file or DLL
344 Table Of Contents
Open an icon library as a document
Open an icon library
344 345 Add items to the librarian from the Explorer Document
345 To add an opened document to the librarian
345 Add items using the import function
346 Downloading Object Packs from Internet
346 Download Object Packs from your Web Browser
346 Download Object Packs from the Axialis Application
348 WORKING WITH THE AXIALIS MEDIA FILE EXPLORER
349 Create a new Explorer window
349 Search media files on the computer
350 Create an Icon Snapshot Picture
350 Creating a Snapshot of an Opened Icon
350 Creating a Detailed Snapshot of Several Icons
351 Creating a Quick Thumbnail Snapshot of Several Icons
351 Batch create several Windows® icons from images
352 Select the source images, icons or cursors
352 Batch create Windows® icons
352 Batch create several Macintosh® icons from images
353 Select the source images, icons or cursors
353 Batch create Macintosh® icons
353 Convert several Macintosh® icons to Windows® format
354 Select the source icons
354 Batch convert the icons
354 Convert several Windows® icons to Macintosh® format
355 Select the source icons
355 Batch convert the icons
355 Convert several Windows®/Macintosh® icons to PNG (batch process)
356 Select the Source Icons
356 Create the PNG images
357 Convert several icons to images (batch processing)
358 Select the Source Icons
358 Create the Images
358 The JPEG 2000 options
359 The GIF options
359 Normalize several icons (batch processing)
Select the icons to normalize
361 361 xix
Axialis IconWorkshop 6.10
Normalize the icons
361 Supported Media Types
362 Icon Files
362 Cursors
362 Images
362 Open a media file
363 Open a media file
363 Open a media full screen
363 Switch ON/OFF the Auto Full Screen option
363 Zoom in, zoom out, change display mode (in full screen mode)
363 Print a media file
Print a media file (image, animation or video still only)
364 Print a media file as a poster (image, animation or video still only)
364 Print as preview
365 Change display mode
365 Change display mode (image)
Display full screen
365 366 Open a media full screen
366 Switch ON/OFF the Auto Full Screen option
366 Zoom in, zoom out, change display mode (in full screen mode)
366 Copy a media file to the Clipboard
366 Copy to the Clipboard
367 Paste the media file in a project
367 Resize an image
367 Resize the image
367 Undo the change
367 Save the modified image
367 Crop an image
368 Select the image portion to keep
368 Crop the image
368 Undo the change
368 Save the modified image
368 Change the color depth of an image
368 Change to True Colors with Alpha Channel
369 Change to True Colors
369 Change to Indexed Colors
369 Undo the change
370 Save the modified image
370 Create a Windows® icon from an image File...
Open the image file in IconWorkshop™
xx
364 370 370 Table Of Contents
Create an icon from this image
Create a Macintosh® icon from an image File...
371 372 Open the image file in Axialis IconWorkshop™
372 Create an icon from this image
372 CUSTOMIZING WINDOWS® ICONS
Customize System Settings
375 375 Icon sizes
375 Icon Spacing
375 Icon Display
375 Windows® Icon Cache
376 Customize Folders
376 Customize Folders
376 Remarks
376 Customize Start menu
377 Customize Start Menu
377 Customize Desktop
Customize Start Menu
Miscellaneous
Miscellaneous
CUSTOMIZING THE APPLICATION
377 377 378 378 379 Customize the main toolbar
379 Show/hide the Main Toolbar
379 Change Main Toolbar text style
379 Add/remove/move buttons in the Main Toolbar
379 Show/hide the Recently Used Bar
380 Empty the Recently Used List
380 Show/hide the Toolbars
380 Show/hide the Main Toolbar
380 Show/hide the Recently Used Bar
380 Show/hide a Local Toolbar
381 Show/hide the Status Bar
381 Show/hide the Librarian
381 Show and hide the Librarian Window
Show/hide the Librarian
381 381 Change the Librarian position on screen
381 Change the Librarian position on screen
381 xxi
Axialis IconWorkshop 6.10
Change the Librarian folder location
382 Change the Librarian folder location
382 How to change the Scale 1:1 window size
382 Switch the Preview 1:1 window to 256x256
383 Switch the Preview 1:1 window to 128x128
384 Switch between docking and floating mode
384 Manage favorite documents
Add a Document to the Favorite List
384 Add a Folder to the Favorite List
384 Open an Item from the Favorite List
385 Modify the Favorite List
385 Options in the General Tab
385 Create a new Icon Project window
385 Create a new Explorer window
385 Warn if insufficient video colors
385 Display Welcome and tips windows
386 Warn if Icon files are not associated with Axialis IconWorkshop™
386 Warn if Windows® components are missing (Internet Explorer®, Quick time,...)
386 Show Splash Screen when application starts
386 Application language
386 Icon overlay image type in explorer
386 Use External Internet Browser
386 Choose Windows® or Macintosh® when creating an icon
387 Choose format when creating a new Windows® icon
387 Choose format when creating a new Macintosh® icon
387 Show information message when opening EXE file
387 Remember folder during "Save As" operation
387 Maximize document windows at opening
387 Prompt for options when transferring from Photoshop®
387 Editor options
387 Transparency - Style
388 Transparency - Color Scheme
388 Transparency - Custom colors
388 Grid - Style
388 Grid - Color
388 Grid - Draw stronger lines at fixed intervals
388 Prompt for resize/crop options when pasting
388 Prompt for palette options when pasting
388 Warn if insufficient video colors to edit image
389 Image order compatible with Windows® Explorer
389 User Interface options
xxii
384 389 User Interface Style - Windows® Standard User Interface
389 User Interface Style - Axialis Software User Interface
389 Table Of Contents
Background colors - Full Screen Mode
389 Background colors - Document windows
390 Background colors - Scale 1:1 preview
390 Options in the Toolbars Tab
Local Toolbar Display (within document windows)
390 390 Display standard buttons
390 Display "Recently Used" Bar
390 Empty "Recently Used" List
390 Text options - No Text label, Show Text labels, Selective Text Label on Right
391 Options in the File Associations Tab
391 If you use Windows Vista™
391 If you use a previous versions of Windows®
391 Options in the Librarian Tab
392 Options in the Images Tab
392 JPEG: Writing options
393 WMF: Default Load Size
393 Kodak PhotoCD
393 Image Display mode
393 Options in the Temporary Files Tab
393 Store thumbnail previews on disk for fast browsing
393 Exclude files from Removable & CDROM drives
394 Exclude files from Network drives
394 MISCELLANEOUS FEATURES, TIPS, UNINSTALL
Quick-open a file using the Recently Used Bar
395 395 Quick-open a media file or project
395 Quick-open a recently-opened media file or project
395 Quick-create a new project
395 Manage favorite files
396 Add a Document to the Favorite List
396 Add a Folder to the Favorite List
396 Open an Item from the Favorite List
396 Modify the Favorite List
396 Paste an image as a new document
Paste an image as a new document
Desktop Reorganization
Reorganize Desktop at any Time
396 397 397 397 Toggle Automatic Desktop Reorganization
397 Change Reorganisation mode
397 xxiii
Axialis IconWorkshop 6.10
Acquire a new image from a Twain device
Acquire an image from a Twain device
Uninstall or repair the application
398 398 Uninstall the application
398 Repair the application files
399 REGISTERING, UPGRADING, ONLINE FEATURES
Downloading Object Packs from Internet
401 401 Download Object Packs from your Web Browser
401 Download Object Packs from the Axialis Application
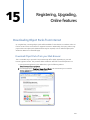
403 Online Registration using Internet
Why Register?
403 403 To Register Online Using Internet
403 To Access your Customer Account
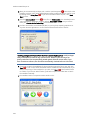
406 Upgrade the application using Internet
Upgrade your Application Online Using Internet
Online Customer Service on Internet
406 406 407 Accessing Customer Service from the Application
407 Accessing Customer Service from an Internet Browser
408 Contact Axialis Software Team
Contacting us using an Internet Browser
INDEX
xxiv
398 408 408 409 1
Introducing, License
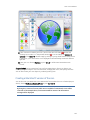
What is Axialis IconWorkshop™?
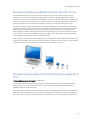
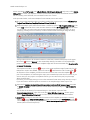
Axialis IconWorkshop™ is a powerful tool designed to work with Windows® and Macintosh® icons.
It has a fully integrated workspace which permits you to work efficiently and create professional
icons in minutes.
What can I do with IconWorkshop™?
•
•
•
•
•
•
•
•
•
•
•
•
•
•
•
Create, read and save Windows Vista™ icons up to 256x256 with alpha channel and PNG
compression.
Create, read and save Windows® XP icons up to 256x256 with alpha channel.
Create, read and save Macintosh® icons up to OSX 10.4 and 10.5 (including the latest
256x256 Tiger format and 512x512 Leopard Format).
Modify, add, remove icons in EXE and DLL files. This is very useful to compress 256x256 icons
for Windows Vista™ in programs (MS VS 2005 does not support compilation of compressed
icons in resources).
Creating attractive icons in seconds using ready-to-use Image Object Packs.
Composing icons in seconds using mouse drag & drop and a powerful built-in image editor.
Create icons with several built-in formats from images (BMP, PNG, JPEG 2000, PSD...) in one
operation.
Convert icons from Windows® to Macintosh® and vice versa.
Apply automated operations to several icons at once (batch procedures) : Conversion Win <->
Macintosh; Icon creation from images; Image creation from icons; Icon format normalizing...
Work easily with Adobe Photoshop® using a transfer plugin. With ready-to-use Photoshop
templates, create icons in one step with several formats.
Work easily with Adobe Illustrator ® using a transfer plugin.
Manage your icons using a built-in Librarian.
Browse your computer for icons and images using a built-in explorer with preview.
Customize your Windows® icons.
Compile icon libraries and distribute them.
25
Axialis IconWorkshop 6.10
What formats are compatible with Axialis IconWorkshop™?
Axialis IconWorkshop™ is the only icon tool to support creation, reading and writing of Windows®
XP, Windows Vista™, (ICO, ICL) and Macintosh® (ICNS, RSC, BIN) icons. Axialis IconWorkshop™
supports Windows® XP Icons with alpha channel images (smooth transparency) and Macintosh®
icons up to Macintosh® OSX v10.4 (Tiger) and 10.5 (Leopard).
This new version supports creation of Windows Vista™ icons with PNG compression and image
sizes up to 256x256.
Why choose Axialis IconWorkshop™?
Because Axialis IconWorkshop™ is the most complete icon tool available on the market. It has
powerful features and is easy to use.
Create quality Windows® XP and Macintosh® icons
Windows® XP and Macintosh® OSX come with a new generation of icons using variable
transparency. This feature permits to create beautiful icons with smooth borders and shadows. You
need a professional tool to create such icons. Axialis IconWorkshop™ has been designed with one
goal in mind: "Icon Quality". Enjoy the powerful editor which permits to create the various image
formats of an icon from an original drawing without quality loss. Axialis IconWorkshop™ is the only
icon editor to create icons for both Windows® and Macintosh® systems.
Create icons for Windows Vista™
Windows Vista™, the next version of Windows® to arrive, includes a new PNG compressed icon
format. It permits to create icons up to 256x256 with alpha channel with smaller file size. Axialis
IconWorkshop™ now fully supports this new format in all features: edition, automatic format
creation, batch creation, batch conversion, format normalization... Don't wait and create today
your icons for Windows Vista™. To get more information about Windows Vista™ icons, read this
topic: "Introducing Windows Vista™ Icons".
Make program files containing Windows Vista™ compressed icons
Microsoft Visual Studio versions 6 to .NET 2005 do not support creation of executables with PNGCompressed 256x256 icons for Windows Vista™. Axialis IconWorkshop permits to compress icons
directly in EXE/DLL files.
Create icons the professional way using ready-to-use Photoshop templates
Create icons the professional way using ready-to-use Photoshop templates - 10 ready-to-use
Photoshop® templates are provided with Axialis IconWorkshop™. Load templates in Photoshop®
directly from IconWorkshop™, draw your icons in several formats and transfer the whole work in
IconWorkshop: Your icon is created in one step. You can even create your own template using an
easy to use XML descriptive format.
Create attractive icons from Image Objects in seconds
The first Axialis Object pack for icons has been included in Axialis IconWorkshop™. It is a library of
150 graphical objects which will permit you to create an unlimited number of icons with various
glossy effects and shapes simply using drag & drop. The images come in 256x256 high-quality
PNG format. It permits to create icons containing various sizes up to 256x256 for Windows® XP,
Windows Vista™ and MacOS®. To read more about this exclusive feature, read this topic: "Creating
Icons from Image Objects".
26
Introducing, License
Convert icons between Macintosh® and Windows® formats
Macintosh® designers are prolific, especially when it comes to icon creation. Use Axialis
IconWorkshop™ to read Macintosh® icons and convert them to Windows®. It reads all kind of
Macintosh® icons up to OS-X. You can also convert your Windows® icons for the Macintosh®.
If you're a software developer, you'll enjoy the ability to create applications for both Windows®and
Macintosh® platforms by converting your icons. If you're simply a Windows® user you'll be able to
use your icons on both systems.
Automatically create icons from images
Axialis IconWorkshop™ features a powerful editor. But sometimes it's easier to create an icon from
an existing image. Basically, you can import all kind of existing images: PSD, PNG, BMP, JPEG, GIF,
JPEG 2000...
An exclusive feature permits to create an icon, with its several image formats, in just one
operation! All is done automatically: Alpha channel is preserved, palettes are calculated for 256
color formats and even 16 color formats with transparency are generated.
Export icons to images to illustrate your applications
If you create applications, you know that images are required to create an attractive user interface.
Axialis IconWorkshop™ permits to export any image included in an icon (Windows®/Macintosh®) to
an external bitmap file. You'll be able to easily use these images in your program to create beautiful
toolbars for example.
Redistribute your icons
A compilation feature permits you to create professional installation packages to
redistribute your Icon Libraries. It produces a compressed install program (the result is up to
70% smaller) convenient for Web distribution. Also, an advanced system, based on
activation codes, permits you to protect your Icon Libraries. The user will be prompted for a
personal code to proceed with the installation. An activation code generator is also
provided.
Customize Windows® icons
A built-in feature permits you to customize many Windows® icons. It works with all
Windows® version up to Windows® XP. This new version permits you to customize each
folder icon individually.
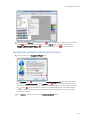
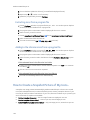
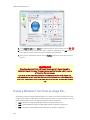
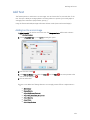
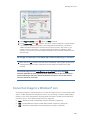
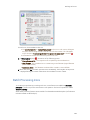
What's New in Version 6.10?
This version includes several major improvements:
•
•
•
Compatible with Windows Vista™ - Many Windows Vista™ compatibility issues have been fixed
in this version.
New Interface for Windows Vista™ - The application automatically detects Windows Vista™ and
propose a new user interface compatible with the new Aero™ visuals.
Make program files containing Windows Vista™ compressed icon - Microsoft Visual Studio
versions 6 to .NET 2005 do not support creation of executables with PNG-Compressed
256x256 icons for Windows Vista™. Axialis IconWorkshop permits to compress icons directly in
EXE/DLL files and use Windows Vista™ icons in your software projects.
27
Axialis IconWorkshop 6.10
•
•
•
•
•
•
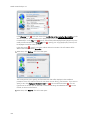
Create icons the professional way using ready-to-use Photoshop templates - 10 ready-to-use
Adobe Photoshop® Templates are provided with Axialis IconWorkshop™. Load templates in
Photoshop® directly from IconWorkshop™, draw your icons in several formats and transfer the
whole work in IconWorkshop. Your icon is created in one step. You can even create your own
template using an easy to use XML description file.
Support for 512x512 Macintosh icons for OSX 10.5 Leopard - Create extra large 512x512
icons for the new MacOS 10.5. Axialis IconWorkshop now fully support this size.
New Object Pack #2 for Icons (Realistic Buttons) - This pack is composed of 500 hi-res image
objects which have been designed to create icons in the style of Windows Vista™. Using this
pack you can easily create beautiful sets of buttons to be used in your projects (websites,
application GUI, toolbars, dialog boxes...). With 156 symbols included and many shape effects
(circle, rounded square, octagon, triangle) you can create a large variety of icons. The full set of
objects is available for download on our web site to registered customers only.
New Object Pack #3 for Icons (Quick Toolbars) - A collection of 256 image objects which
permits to quickly create program toolbars. Using drag & drop, you can create in seconds icons
and buttons for your toolbars by associating basic objects and overlays symbols. The objects do
not contain details and have thick borders to allow the creation of small icons suitable for
toolbars (32x32, 24x24, 16x16). The objects, which are provided in 256x256 format with
alpha channel, permit to easily create icons containing various sizes for Windows XP®, Windows
Vista™ & MacOS®. The full set of objects is available for download on our web site to registered
customers only.
New Object Pack #4 for Icons (Web 2.0 Icons) - This pack is composed of 601 image objects
which permits to quickly create icons in the style of Web 2.0. Using drag & drop, you can create
in seconds icons and buttons for your websites and applications by associating background
shapes, glossy effects, shadows and various ready-to-use texts and symbols. The icons can also
be saved as optimized GIF, JPEG or PNG images for inclusion in your websites. To permit you to
work faster, more than 500 ready-to-use derived symbols and texts have been added to the
pack, including effects like outer light glow, soft shadow, emboss and 15° rotation. The full set
of objects is available for download on our web site to registered customers only.
Other enhancements and bug fixes.
Features included since version 6.0
This version includes several major improvements:
•
•
28
Full Windows Vista™ icon support with PNG compression - Axialis IconWorkshop™ now loads,
creates, edits, saves Windows Vista™ icons. Windows Vista™ the next version of Windows® to
arrive, includes a new PNG compressed icon format. It permits to create icons up to 256x256
with alpha channel with smaller file size. Axialis IconWorkshop™ now fully supports this new
format in all features: edition, automatic format creation, batch creation, batch conversion,
format normalization... Don't wait and create today your icons for Windows Vista™.
Object Pack for Icons (Glossy Buttons) - The first Axialis Object Pack for icons has been
included in Axialis IconWorkshop™. It is a library of 150 image objects which will permit you to
create an unlimited number of icons with various glossy effects and shapes simply using drag &
drop. The images come in 256x256 high-quality PNG format. It permits to create icons
containing various sizes up to 256x256 for Windows® XP, Windows Vista™ and Macintosh® OS.
Introducing, License
•
•
•
•
•
•
Illustrator® to Axialis IconWorkshop™ transfer plug-in - Now you can import vector images with
transparency directly from Illustrator into Axialis IconWorkshop™ through memory. You don't
need to create a temporary file anymore. Read More...
Full tutorial on how to use Image Objects - Creating icons from image objects is easy and
produce hi-quality results. This tutorial will learn you how to create attractive icons in minutes
using Image Objects.
Background floating selection - Using this command you can easily place a floating object in
background of your icon. This is useful to add a shadow or a colored halo around an icon.
Copy/Paste Alpha Channels as Masks - Now you can use a grayscale mask image to apply it as
Alpha Channel to an icon. Also, you can extract an alpha channel from an icon to create a
grayscale mask image.
256x256 and floating Preview Window - The preview window is now adjustable (256x256 or
128x128). It can also be set as a floating window (easier to move in 256x256 mode).
Other enhancements and bug fixes.
User License Agreement - Corporate Edition
IMPORTANT NOTICE
Read this License Agreement carefully before using this Software. BY USING THIS
SOFTWARE IN ANY WAY YOU ACKNOWLEDGE THAT YOU HAVE READ, UNDERSTAND AND
AGREE TO THE TERMS OF THIS AGREEMENT. IF YOU DO NOT AGREE TO THESE TERMS, DO
NOT USE THIS SOFTWARE IN ANY WAY, AND PROMPTLY RETURN IT OR DELETE ANY
COPIES OF THIS SOFTWARE IN YOUR POSSESSION.
License Grant
Axialis Software ("AXIALIS") grants you a non-exclusive license to use this software, and any
associated documentation ("The Software"), as indicated herein. If you have purchased a
Single User License, one copy of the Software may be installed and used, for internal use
only, on a single computer. The Software is in "use" on a single computer when it has been
loaded into temporary memory (i.e. RAM) or installed into permanent memory (hard disk or
other device) of that computer. If you have purchased a Multiple User License (you specified
several copies of the software when you purchased it), the Software may be installed and
used, for internal purposes only, on the number of computers authorized at the time of
purchase.
You MAY: (a) redistribute compiled Icon Libraries for commercial purpose; (b) make a copy
of the software for archival purpose only; (c) install the Software on another computer only if
you change of workstation. In such a case you must uninstall the software from the previous
workstation.
29
Axialis IconWorkshop 6.10
Restrictions
You MAY NOT: (a) copy and distribute the Software or any portion of it; (b) sublicense,
lease, rent, or transfer this Software to another; (c) cause or permit reverse engineering,
disassembly, decompilation or alteration of this Software; (d) remove any product
identification, copyright notices, or other notices or proprietary restrictions from this
Software; (e) copy the documentation accompanying the software.
Term
This License is effective until terminated. You may terminate it at any time by destroying the
Software, together with all copies thereof. This License will also terminate if you fail to
comply with any term or condition of this Agreement. Upon such termination, you agree to
destroy the Software, together with all copies thereof.
Copyright/Ownership
This Software and its source code are proprietary products of AXIALIS and are protected by
copyright and other intellectual property laws. The Software is licensed and not sold. You
acquire only the right to use the Software and do not acquire any rights, express or implied,
in the Software other than those specified in this License.
Disclaimer of Warranties
The Software is supplied "AS IS". AXIALIS disclaims all warranties, expressed or implied,
including, without limitation, the warranties of merchantability and of fitness for any
purpose. The user must assume the entire risk of using the Software.
Disclaimer of Damages
AXIALIS assumes no liability for damages, direct or consequential, which may result from the
use of the Software, even if AXIALIS has been advised of the possibility of such damages.
Any liability of the seller will be limited to refund the purchase price.
Object Packs - Terms Of Use
This is a legal agreement between you (the "User") and Axialis Software Corporation ("Axialis"). This
agreement refers to the image objects (the "Objects") included in the product or packs downloaded
from our website: http://www.axialis.com/objects. By using the objects, the user agrees to the
following terms.
IMPORTANT: This agreement does not refer to the sample icons provided in the product. To get
more information on the sample icons terms of use, read this page: "Sample Icons - Terms of Use".
30
Introducing, License
License Grant
Axialis grants the User a non-exclusive, non-transferable, royalty-free license to use these objects
as indicated herein. The objects, which cannot be used "as is". The Objects must be assembled
together to create icons (the "Icons").
You MAY: (a) assemble the Objects to create Icons using an Axialis product only; (b) use the Icons
in personal or commercial projects; (c) use the Icons in softwares, documentations or websites; (d)
redistribute, loan, rent, sell the Icons created using the Objects as long as they have been created
with an Axialis product.
Restrictions
You MAY NOT: (a) use the Object "as is" without assembling them using an Axialis product; (b)
redistribute, loan, rent, sell the Objects "as is"; (c) use the Icons to create pornographic, immoral,
illegal or defamatory material
Copyright/Ownership
The Objects are proprietary products of AXIALIS and are protected by copyright and other
intellectual property laws. The Objects are licensed and not sold. You acquire only the right to use
the Objects and do not acquire any rights, express or implied, in the Software other than those
specified in this License.
Disclaimer of Warranties
The Objects is supplied "as is". AXIALIS disclaims all warranties, expressed or implied, including,
without limitation, the warranties of merchantability and of fitness for any purpose. The user must
assume the entire risk of using the Objects.
Disclaimer of Damages
AXIALIS assumes no liability for damages, direct or consequential, which may result from the use of
the Objects, even if AXIALIS has been advised of the possibility of such damages. Any liability of the
seller will be limited to refund the purchase price if any.
Sample Icons - Terms Of Use
In version 6.10 and more, the sample icons have been created by the Axialis Team. As a result, you
can freely use and/or redistribute them in any projects as long as you've purchased Axialis
IconWorkshop (see User License Agreement).
If you use these images on a website, please add the following HTML tag:
31
Axialis IconWorkshop 6.10
<a href="http://www.axialis.com/icons/">Icons</a> by <a
href="http://www.axialis.com">Axialis Software</a>
IconBuffet copyrighted icons
Icons in folder "Librarian/Icons/Tutorials/Redmond - ©2006 IconBuffet" are copyrighted and
cannot be used. Please contact the authors at http:/www.iconbuffet.com.
Acknowledgments
Icons and Images used in the program
Thanks to these great icon artists for giving us permission to include some of their icons and
images in the program (toolbar buttons, icons, dialog illustration):
. Foood - Some images in dialog boxes, (Iconaholic.com ).
. IconBuffet - Toolbar icons courtesy of IconBuffet, part of Mahattan and Redmond icon set
(IconBuffer.com )
. Jairo Boudewyn - Special thanks to Jairo who made the IconWorkshop™ icon
(JairoBoudewyn.com )
. Marvilla - Some images in dialog boxes (Iconica )
Translations
Thanks to Jörg Schmalenberger for the German translation (Website
).
Thanks to Yinchao Wang for the Simplified Chinese translation (Website
Thanks to Ivan Stambolic for the Serbian translation (Website
).
).
VisiBone Color Swatches
Thanks to Bob Stein for his great "Web Safe by VisiBone" color swatch (located in application data
> Color Swatches > Web Safe by VisiBone.axco).
Compression Support
Thanks to Jean-loup Gailly and Mark Adler for writing the fantastic and free ZLIB
compression/decompression library which is used in Axialis products. Visit the official ZLIB Web
page at: http://www.gzip.org/zlib/
32
Introducing, License
PNG Support
Thanks to the creators of the PNG graphic file format and its related source code. Visit the official
PNG Web page at: http://www.libpng.org/pub/png/
JPEG Support
Thanks to Thomas G. Lane and the Independent JPEG Group for the JPEG graphic file format and its
source code. Visit the official JPEG Web page at: http://www.ijg.org
JPEG 2000 Support
Thanks to the Joint Photographic Experts Group for defining the JPEG 2000 graphic standard. Visit
the official JPEG 2000 Web page at: http://www.jpeg.org/jpeg2000/index.html
Thanks to Michael D. Adams, creator of JASPER. This JPEG 2000 C library is used in Axialis
products. Official JASPER website: http://www.ece.uvic.ca/~mdadams/jasper/
System Requirements
Axialis IconWorkshop™ has been designed to work with Windows® 95, Windows® 98, Windows®
ME, Windows® NT4, Windows® 2000, Windows® XP, Windows Vista™.
Minimum
•
•
•
•
Pentium® class CPU - 500 Mhz
65536 color video card - 1024x768
128 Mb RAM
Microsoft Windows® 95 (with ComCtl32 v4.72+) or Windows® NT 4.0 SP4
Recommended
•
•
•
•
Pentium® 3/4 or AMD Athlon - 1.2 Ghz or more
True Color Video Card (24 or 32 bits - 16,8 M colors) - 1280x1024
512 Mb RAM
Microsoft Windows® ME, Windows® 2000, Windows® XP, Windows Vista™
33
2
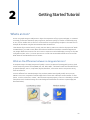
Getting Started Tutorial
What is an Icon?
An icon is a graphic image, a small picture or object that represents a file, program, web page, or command.
Icons help you execute commands, open programs or documents quickly. To execute a command by using
an icon, click or double-click on the icon. It is also useful to recognize quickly an object in a browser list. For
example, all documents using the same extension have the same icon.
That's almost all you need to know if you only use icons. But to create icons, which is the purpose of Axialis
IconWorkshop™, you need to more about them. What's the difference between a standard image and an
icon image? What's the structure of an icon? How to create an icon which will display correctly on all screen
configurations (size, colors...)? Can we save an icon to a file? Can we assemble several icons into one file?
What about the new Windows® XP icon format?
What are the differences between an image and an icon?
A computer image is a bitmap (composed of pixels) or vector (composed of drawing paths) picture, which
can be saved using various formats (BMP, PSD, GIF, JPEG, WMF...). All these formats have several different
properties (bitmaps, vectors, compressed, layered, animated...) and can be used to store pictures at any
sizes and resolution.
Icons are different from standard images. They are have standard sizes (usually small): 16x16, 32x32,
48x48... One icon is composed of several images. Each of them with a different size and number of colors
(mono, 16 colors, 256 colors, 16.8M...). And the most important property of an icon is the ability to include
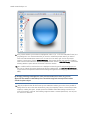
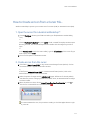
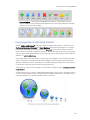
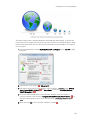
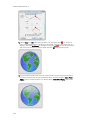
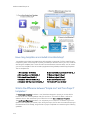
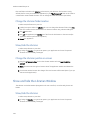
transparent areas. This allows seeing the screen background behind the icon within its square image (see
illustration below).
35
Axialis IconWorkshop 6.10
What is the structure of an icon?
An icon is a group of images of various formats (size and colors). Furthermore, each image can include
transparent area. That's why you'll find a transparent color in the drawing palette for 16 or 256 color
images and a variable opacity parameter using an alpha channel for the new RGB/A image format (opacity =
0 means transparent).
You need to include several images in an icon to permit Windows® or Macintosh® OS to choose the
appropriate format when displaying it on screen. It may change based on screen number of colors and
display location. For example, in the Windows® task bar icons are displayed using 16x16 image format and
on the desktop, they are displayed at larger sizes (48x48, 96x96, 256x256). In Windows Vista™, some
intermediate sizes are used (24x24, 32,32, 48x48 and 64x64). If a size does not exist in the icon,
Windows Vista™displays it automatically by resizing "on the fly" the largest size 256x256.
The Macintosh® OSX uses the large formats 128x128, 256x256 and even 512x512 in OSX 10.5. All those
formats include an alpha channel to create smooth transparency and permits nice resize effects .
This is very important to create several image formats in an icon (especially if you wish to redistribute it) in
order to be compatible with all screen configurations. Axialis IconWorkshop™ includes a powerful feature
which permits to create new formats based on existing images in a few clicks.
The image format 128x128 is used under Macintosh® OS 10.0 or more only. OSX 10.4
(codename "Tiger") supports icons up to 256x256. OSX 10.4 (codename Leopard) supports
icons up to 512x512. Axialis IconWorkshop™ fully supports creation and edition of OSX icons
up to 256x256 and 512x512.
Windows® XP does not display 128x128 icon formats in normal mode. By default, icon display in
Windows® versions prior to Microsoft Vista™ is limited to 48x48 icons. Microsoft Windows
Vista™ supports icon formats up to 256x256 with compression. Axialis IconWorkshop™ fully
supports creation and edition of Windows Vista™ icons. To know more read this topic:
"Introducing Windows Vista™ Icons".
36
Getting Started Tutorial
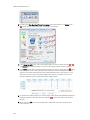
Which image formats should I include in my icons?
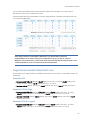
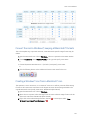
To be compatible with all display cases and screen configurations, you must consider creating icons
containing various image formats. See below the minimum and recommended formats for different OS
versions:
Windows® 95, Windows® 98, Windows® ME, Windows® 2000
• Recommended: 48x48 (256 colors, 16 colors), 32x32 (256 colors, 16 colors), 16x16 (256 colors,
16 colors).
• Minimum: 32x32 (256 colors, 16 colors), 16x16 (256 colors, 16 colors).
Windows® XP
• Recommended: 48x48 (RGB/A, 256 colors, 16 colors), 32x32 (RGB/A, 256 colors, 16 colors),
24x24 (RGB/A, 256 colors, 16 colors), 16x16 (RGB/A, 256 colors, 16 colors).
• Minimum: 32x32 (RGB/A, 256 colors, 16 colors), 16x16 (RGB/A, 256 colors, 16 colors).
• Optional: 128x128 (RGB/A).
Windows Vista™
• Recommended: 256x256 (RGB/A), 64x64 (RGB/A), 48x48 (RGB/A, 256 colors, 16 colors), 32x32
(RGB/A, 256 colors, 16 colors), 24x24 (RGB/A, 256 colors, 16 colors), 16x16 (RGB/A, 256 colors,
16 colors).
• Minimum: 256x256 (RGB/A), 48x48 (RGB/A, 256 colors), 32x32 (RGB/A, 256 colors), 16x16
(RGB/A, 256 colors).
• Optional: 256x256 (256 colors, 16 colors), 64x64 (256 colors, 16 colors), other formats are
possible to deal with HIDPI screens (see below).
If you create an icon for recent versions of Windows®, the compatibility is ensured with previous
versions. For example, if you create an icon containing a 256x256 image for Windows Vista™, it
will display fine under Windiws® XP. Based on our tests, the only exception we've found is: If you
add 24x24 image formats in your icon, it won't be compatible with Windows®98 and
Windows®2000. The icon displays correctly in IconWorkshop™ but will be considered invalid by
Windows®.
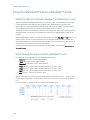
Windows Vista™ for HI-DPI screens
On hi-dpi screens (high DPI resolution LDC screens), Windows Vista™ code will downscale the images for
sizes between 64x64 and 256x256. If you want your icon to be compatible with future screens, we
recommend you to add the following sizes:
• Recommended: 256x256 (RGB/A), 64x64 (RGB/A, 256 colors), 48x48 (RGB/A, 256 colors),
40x40 (RGB/A, 256 colors), 32x32 (RGB/A, 256 colors), 24x24 (RGB/A, 256 colors), 22x22
(RGB/A, 256 colors), 16x16 (RGB/A, 256 colors).
Examples of scaling ratios applied to some common icon sizes:
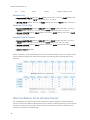
DPI
96
120
144
Scale Factor
100%
137%
150%
16x16 Icon Size
16x16
22x22
24x24
32x32 Icon Size
32x32
40x40
48x48
48x48 Icon Size
48x48
66x66 (scaled by code)
72x72 (scaled by code)
37
Axialis IconWorkshop 6.10
192
200%
32x32
64x64
96x96 (scaled by code)
Macintosh® OSX
• Recommended: 128x128 (RGB/A), 48x48 (RGB/A, 256 colors, 16 colors), 32x32 (RGB/A, 256
colors, 16 colors, mono), 16x16 (RGB/A, 256 colors, 16 colors).
• Minimum: 48x48 (RGB/A, 256 colors), 32x32 (RGB/A, 256 colors), 16x16 (RGB/A, 256 colors).
Macintosh® OSX 10.4 Tiger
• Recommended: 256x256 (RGB/A), 128x128 (RGB/A), 48x48 (RGB/A, 256 colors, 16 colors),
32x32 (RGB/A, 256 colors, 16 colors, mono), 16x16 (RGB/A, 256 colors, 16 colors).
• Minimum: 128x128 (RGB/A), 48x48 (RGB/A, 256 colors), 32x32 (RGB/A, 256 colors), 16x16
(RGB/A, 256 colors).
Macintosh® OSX 10.5 Leopard
• Recommended: 256x256 (RGB/A), 128x128 (RGB/A), 48x48 (RGB/A, 256 colors, 16 colors),
32x32 (RGB/A, 256 colors, 16 colors, mono), 16x16 (RGB/A, 256 colors, 16 colors).
• Minimum: 128x128 (RGB/A), 48x48 (RGB/A, 256 colors), 32x32 (RGB/A, 256 colors), 16x16
(RGB/A, 256 colors).
• Optional: 512x512 (RGB/A).
Below is a summary of the standard image formats that should be included in icons. If an image format is
missing, Windows® displays the nearest existing image. The resulting image is generally blurred and
distorted.
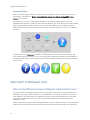
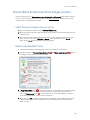
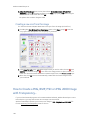
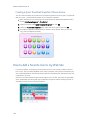
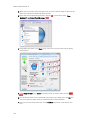
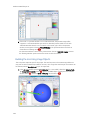
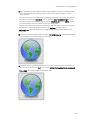
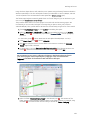
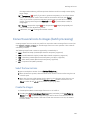
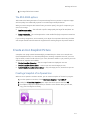
What is the RGB icon format with Alpha Channel?
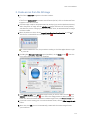
Also called RGB/A, this image format contains 16.8M colors coded in RGB plus an additional opacity
channel. This channel is called the "Alpha Channel". Each channel is coded using 8 bits per pixel. As a result
each pixel is coded in 32 bits (32 BPP - Bits Per Pixel). See the illustration below to understand how
channels are organized in an RGB/A image.
38
Getting Started Tutorial
This is a new image format that you can find in new generation of icons. This image format is called
Windows® XP RGB/A by Axialis IconWorkshop™.
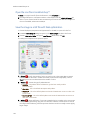
The main advantage of this image format is that it permits to display a smooth transparency in icons. The
resulting image is displayed with smooth contours on all backgrounds. It permits also to create dropped
shadows behind icons. This interesting effect, which is recommended by Microsoft, is usually used in
Windows® XP icons.
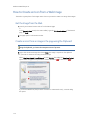
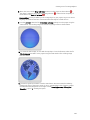
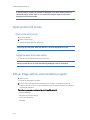
The following illustration shows the difference between a standard image format transparency (in 256
color formats for example) and the new Windows® XP smooth transparency:
Windows® and Macintosh® icons support RGB/A images. These icons can be displayed in
Windows®XP, Windows Vista™ and in Macintosh®OS 10 or more. Older systems does not
support RGB/A icons. That's the reason why you need to include other standard formats in your
icons.
39
Axialis IconWorkshop 6.10
Can we save an icon to a file?
Yes, the extension for a Windows® icon file is "ICO". The extensions for Macintosh® icons are "ICNS", "RSC",
"RSRC" and "BIN". Only one icon can be saved in an icon file. If you want to group several icons in a file you
must create a library (see below).
Axialis IconWorkshop™ fully support Windows® and Macintosh® icon files. You can create, read and save
icons using those file formats. The MacBinary format "BIN" is used to transfer icons between Windows® and
Macintosh® preserving Macintosh®resource forks (see "Macintosh® vs Windows® icons" topic to read
more).
Can we save several icons into one file?
Yes, you can assemble several icons in one file called an Icon Library. The extension for a standard Icon
Library is ICL.
Axialis IconWorkshop™ fully supports ICL files. It can create, read and save ICL library files. Furthermore, ICL
is fully supported by all versions of Windows®. For example, you can customize a Windows® shortcut by
selecting a new icon in an ICL file. If you manage a large number of icons, we recommend you to store them
in ICL files. ICL file size is limited to 64MB.
Creation of Macintosh® icon libraries is not yet supported by Axialis IconWorkshop™. However you can read
RSRC files with several icons embedded as well as Icontainer libraries. Additionally you can save Macintosh®
icons in ICL files. A small overlay image permits to distinguish them in Axialis IconWorkshop™. However you
won't be able to open those ICL files under Macintosh®OS. Future versions of Axialis IconWorkshop™ will
support Macintosh® icon library creation.
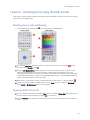
What's New with Windows Vista™ Icons?
Microsoft Windows Vista™ comes with a new format of icons supporting PNG compression and sizes up to
256x256. The standard Windows Vista™ icons now includes the following image formats (grayed formats
are optional):
256x256 - RGB/A
64x64 - RGB/A
48x48 - RGB/A
32x32 - RGB/A
24x24 - RGB/A
16x16 - RGB/A
256x256 - 256c
64x64 - 256c
48x48 - 256c
32x32 - 256c
24x24 - 256c
16x16 - 256c
256x256 - 16c
64x64 - 16c
48x48 - 16c
32x32 - 16c
24x24 - 16c
16x16 - 16c
The problem is: if you simply make the icon and save it in standard Windows® XP ICO format, the resulting
file will be 400Kb on disk. The solution is to compress the images. Only the 256x256 images are
compressed. The compression scheme used is PNG (Portable Network Graphic) because it has a good
lossless ratio and supports alpha channel. The compressed icon sizes are 100Kb to 150Kb.
Axialis IconWorkshop™ permits to create Windows Vista™ icons. To read more about Windows Vista™ icons
and how to create them using Axialis IconWorkshop™, read this article: "Introducing Windows Vista™ Icons".
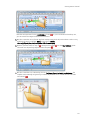
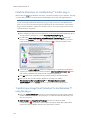
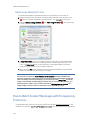
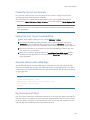
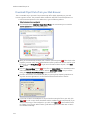
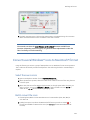
How to create an icon?
Graphics are among the primary ways of advertising the sale of goods or services. This is true for computing
when designing software or website interfaces. The primary solution is to draw icons using either an image
40
Getting Started Tutorial
or vector editor. Then, when the image is done, use Axialis IconWorkshop™ to convert this image to an icon.
If you don't use an external image editor, Axialis IconWorkshop™ contains some drawing tools that permit
you to draw your own icons.
Axialis IconWorkshop™ offers alternate solutions for Adobe Photoshop® users and programmers who don't
have drawing skills.
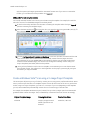
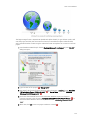
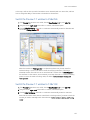
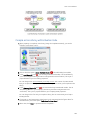
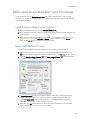
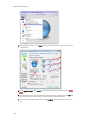
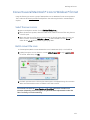
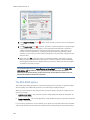
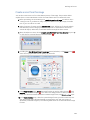
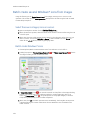
Using Project Templates for Photoshop®
If you work with Adobe Photoshop®, a new feature has been added which permits you to draw your icon at
different sizes and automatically export it into IconWorkshop™. The resulting icon is automatically created
with all its formats. Several ready-to-use templates have been added for Windows® and Macintosh® icon
creation. See below how the templates work:
41
Axialis IconWorkshop 6.10
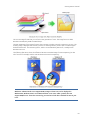
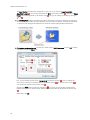
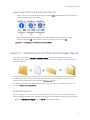
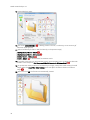
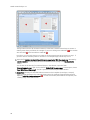
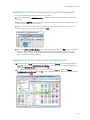
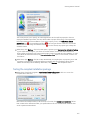
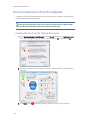
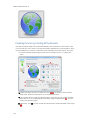
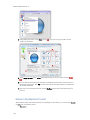
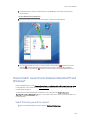
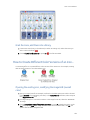
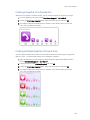
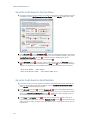
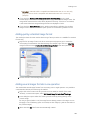
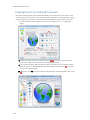
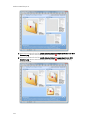
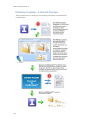
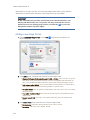
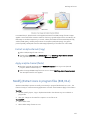
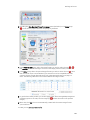
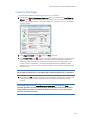
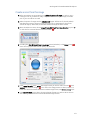
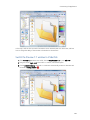
Using Image Objects
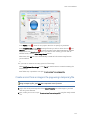
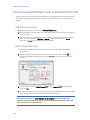
Most of us are not graphic designers and we have a problem when it comes to create attractive icons or
web graphics. The question is: "How to create attractive custom icons without drawing skills?" Image
Objects are the answer.
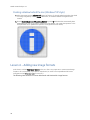
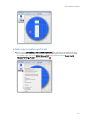
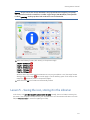
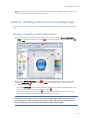
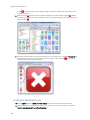
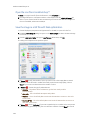
The solution is to use a set of image objects already done by a skilled computer graphic artist, and
assembling them together to create a final artwork that will match your needs. Using a set of existing image
objects the possibilities are almost infinite. You can create many different icons or graphics simply by
adjusting various parameters of each object like Hue (tint), Saturation, Brightness, Contrast, Size, Opacity
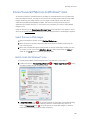
and more:
This association can be easily done with Axialis IconWorkshop™ using a few mouse clicks and drag-anddrops. Creating different versions of an icon is very easy with an object pack. See below some examples of
the help icon made in a few minutes simply using the mouse and without drawing one pixel (non-exhaustive
list of course!):
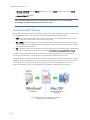
Macintosh® vs Windows® icons
What are the differences between Windows® and Macintosh® icons?
Microsoft Windows® and Apple Macintosh® icons are very similar. They both have several image formats
embedded in the same icon. But the file format is totally different. You cannot use Macintosh® icons as is
under Windows®. The file format is not compatible. You must convert them to Windows® ICO file format
(with Axialis IconWorkshop™ of course!). This is the same under Macintosh® OS which cannot read
Windows® icon files.
Axialis IconWorkshop™ supports the following Macintosh® icon files: ICNS, RSC and BIN. You can easily open
them into the Icon Editor and save them as Windows® ICO format. During this operation, we recommend
42
Getting Started Tutorial
you to remove special Macintosh® formats which are useless under Windows®. You can also read a
Windows® icon and save it as Macintosh® format.
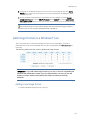
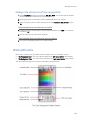
Recommended image formats embedded in icons are slightly different in Windows® and Macintosh®. See
the comparison tables below:
Some image formats are unavailable in Macintosh® icon specifications. Therefore
IconWorkshop™ won't event permit you to create them. If you try to save or convert a
Windows® icon to Macintosh®, some format will be removed. Note that all image formats can be
created in Windows® icons, even custom formats not listed above.
Image formats included in Macintosh® icons
Only a limited list of image formats are available in Macintosh® icons (no other or intermediate formats can
be defined):
Macintosh® OSX
• Recommended: 128x128 (RGB/A), 48x48 (RGB/A, 256 colors, 16 colors), 32x32 (RGB/A, 256
colors, 16 colors, mono), 16x16 (RGB/A, 256 colors, 16 colors).
• Minimum: 48x48 (RGB/A, 256 colors), 32x32 (RGB/A, 256 colors), 16x16 (RGB/A, 256 colors).
Macintosh® OSX 10.4 Tiger
• Recommended: 256x256 (RGB/A), 128x128 (RGB/A), 48x48 (RGB/A, 256 colors, 16 colors),
32x32 (RGB/A, 256 colors, 16 colors, mono), 16x16 (RGB/A, 256 colors, 16 colors).
• Minimum: 128x128 (RGB/A), 48x48 (RGB/A, 256 colors), 32x32 (RGB/A, 256 colors), 16x16
(RGB/A, 256 colors).
Macintosh® OSX 10.5 Leopard
• Recommended: 256x256 (RGB/A), 128x128 (RGB/A), 48x48 (RGB/A, 256 colors, 16 colors),
32x32 (RGB/A, 256 colors, 16 colors, mono), 16x16 (RGB/A, 256 colors, 16 colors).
43
Axialis IconWorkshop 6.10
• Minimum: 128x128 (RGB/A), 48x48 (RGB/A, 256 colors), 32x32 (RGB/A, 256 colors), 16x16
(RGB/A, 256 colors).
• Optional: 512x512 (RGB/A).
The 32x32 Monochrome format is recommended for Macintosh® icons to ensure display
compatibility on old Macintosh® systems with B/W screens.
Various Macintosh® file types
Macintosh® icons can be saved using two different file formats: "ICNS" and "RSC" (or "RSRC" is used). A third
format MacBinary "BIN" is used for transfer purpose between Windows® and Macintosh®.
•
•
•
ICNS - This is the standard Macintosh® icon file format. Only one icon (with several formats) can be
saved in this format. This format is the most commonly used.
RSC or RSRC - This is the Macintosh® resource file format. It is used mainly by developers. This format
can contain several icons. Axialis IconWorkshop™ support reading of RSC files with several icons but can
write only RSC files with one icon.
BIN - MacBinary format. This format permits to easily transfer files between Macintosh® and Windows®.
For more information on this format, visit this website: http://en.wikipedia.org/wiki/MacBinary .
To transfer and icon between Windows® and Macintosh®, the easiest method is to use the MacBinary
format. This format permits to generate an icon compatible with the Macintosh® OS forks.
The MacBinary format permits to merge the 2 forks in one file handy for transfer, mail attachment or Web
publishing. When IconWorkshop™ saves an icon in MacBinary format, it writes the icon in the resource fork.
The data fork is left empty. As a result, as soon as you receive or see the file in Macintosh®, the icon
appears automatically. Then, you can handle it using the standard Finder/MacOS user interface.
44
Getting Started Tutorial
Information about the new 256x256 format for Tiger (OS-X 10.4)
The new Macintosh® OS version 10.4 (Tiger) introduces a new icon format which permits to create
256x256 icons. In the upcoming months a new generation of flat LCD displays will have much higher
resolutions. The screens won't be larger but the number of pixels per inch (DPI) will increase. This will result
in smaller items on screen including icons. To compensate this effect, Apple® has planned to create a new
resolution-independent user interface and the ability to display icons with higher definition in Tiger.
This format is highly compressed and permits to create large 256x256 icons using less than 100 KB. The
compression is based on JPEG 2000. This format is similar to JPEG but can include a transparency channel
(Alpha Channel). However, JPEG 2000 has an additional option which permits to compress the image
without quality loss (unlike JPEG which "destructs" the original image to increase the compression ratio). In
OS-X 10.4 icons, the icons are compressed using this lossless method, keeping the original image quality.
The resulting compression ratio is about 1:2 (similar to PNG).
Keep in mind that a 256x256 icon is 28 times the size of a 48x48 icon! It will change deeply the way you'll
create icons in the future. But be sure we'll add many features to help you in future versions. To get an idea
of things to come, see an icon snapshot comparing sizes from 256x256 to 16x16:
Information about the future 512x512 icon format for Leopard (OS-X
10.5)
This is preliminary subject to change (August 2007)
The next Macintosh® OS version 10.5 (Leopard) introduces an extra large icon format which permits to
display 512x512 icons on future HI-DPI screens. This format uses the same compression format as
256x256 format for Tiger (see above).
A 512x512 icon is 4 times the size of a 256x256 icon and 114 times the size of a 48x48 icon! Keep this in
mind when you're designing the image. The 512x512 image can be complex with a high level of details. To
get a better idea, see an icon snapshot comparing sizes between 512x512 and 256x256 image formats:
45
Axialis IconWorkshop 6.10
Introducing Windows Vista™ Icons
Microsoft Windows Vista™ include many new features and enhancements. The most visible evolution will be
the new Graphical User Interface (GUI). A first look at Aero (the codename for the Windows Vista™ user
experience) reveals a slicker interface with sharper graphics.
But the changes are not only visual. Aero has been designed to comply with computer technology that will
be delivered over the next decade. Many new features have been implemented in Aero to support the
hardware changes to come.
Windows Vista™ - A Resolution-Independent User Interface
One of the most important enhancements of Aero is its ability to deal with the high-resolution displays of
the future, and that feature a resolution-independent UI. At present, monitors generally have a resolution of
96-DPI (dots/pixels per inch). Simply put, 48x48 icons are displayed on screen in a half-inch square.
Future LCD screens however will support resolutions up to 192 DPI. Therefore, to be displayed at the same
size without quality loss, icons must include much larger images. That's the reason why Windows Vista™
introduces a new standard for Windows® icon size: 256x256 pixels.
The screenshot below shows the Windows Vista™ File Explorer displaying icons using the maximum
resolution available: 256x256. Of course the result seems a bit "large" on a 96-DPI screen, but keep in mind
that this technology has been designed for future screens. The icon files have been created with Axialis
IconWorkshop™.
46
Getting Started Tutorial
Windows Vista™ displaying 256x256 icons
An additional option will permit you to display icons at smaller sizes more attune to medium-res screens
(say 120-DPI) screens. In such cases Aero uses the 256x256 image and shrinks it the desired size without
any quality-loss. The result looks really slick with real-time zoom!
Windows Vista™ 256x256 PNG Compressed Icons
Microsoft Windows Vista™ comes with a new format of icons supporting PNG compression and sizes up to
256x256. The standard Windows Vista™ icons now includes the following image formats (grayed formats
are optional):
256x256 - RGB/A
64x64 - RGB/A
48x48 - RGB/A
32x32 - RGB/A
24x24 - RGB/A
16x16 - RGB/A
256x256 - 256c
64x64 - 256c
48x48 - 256c
32x32 - 256c
24x24 - 256c
16x16 - 256c
256x256 - 16c
64x64 - 16c
48x48 - 16c
32x32 - 16c
24x24 - 16c
16x16 - 16c
The problem is: if you simply make the icon and save it in standard Windows® XP ICO format, the resulting
file will be 400Kb on disk. The solution is to compress the images. Only the 256x256 images are
compressed. The compression scheme used is PNG (Portable Network Graphic) because it has a good
lossless ratio and supports alpha channel. The compressed icon sizes are 100Kb to 150Kb.
See below the different formats included in our sample icon down.ico (the 16-color formats are not
displayed but are present in the icon):
Example of Windows Vista™ icon images
47
Axialis IconWorkshop 6.10
The PNG compression is embedded in the ICO file for the 256x256 images only. PNG
compressed Windows Vista™ icons cannot be read and edited with an Windows® XP-only
compatible icon editor, nor can you open them with a PNG image editor. You will require a
Windows Vista™ compatible icon editor, like Axialis IconWorkshop™ , to edit such icons.
Compatibility with Windows® XP
Windows Vista™ compressed icons are compatible with Windows® XP. They can be used in Windows® XP
but only using the standard formats (48x48, 32x32 and 16x16) which will be read and displayed. The
256x256 PNG formats will be ignored.
For example, if you save the down.ico (see link above) on your Windows® XP desktop, it will be displayed as
48x48. The most important fact is that Windows® XP won't reject Windows Vista™ icons.
Can we add other formats, such as 128x128, in Windows Vista™ icons?
Yes, but this is not recommended. 128x128 format is used by Windows® XP Desktop or Dock-Bar
applications. These applications will probably support 256x256 icon format when ported under Windows
Vista™.
Can we create 256x256 icons which display under Windows® XP?
Simply by creating uncompressed versions of the icons. They will work on all versions of Windows.
However, if you want to display at large size under Windows® XP, you must install a Deskptop Enhancer
application. The drawback is the icon file size: 400Kb for an icon! Using Axialis IconWorkshop™ you can
easily remove the PNG compression option.
Create a Windows Vista™ Compressed Icon with Axialis
IconWorkshop™
Here is a step-by-step tutorial on how to create a Windows Vista™ compressed icon using Axialis
IconWorkshop™.
1. Create a 256x256 version of your icon image using any image/vector editor. Save your artwork
with smooth transparency (32 BPP alpha channel) using a file format that is compatible with Axialis
IconWorkshop™: BMP, PNG, JP2000, PSD.
You can also transfer your work from Adobe Photoshop® using the Axialis transfer plug-in (see this
tutorial) or you can create an icon by assembling several image objects (see this tutorial).
In this procedure, we'll use this file: down.png (we recommend you to download it and save it on your
disk - use right click and choose "Save Target As"). You can also find the file in the Librarian, folder
"Objects/Pack 2 - Realistic Buttons". If this object pack is not present in the folder, you can download
it from here.
2. Launch Axialis IconWorkshop™ and open the image file. It is loaded in an image document window,
not an icon editor window, as shown below ( ):
48
Getting Started Tutorial
3. If the scale-1:1 preview window is not in 256x256 mode, the preview image will be cropped. It is
recommended that you switch to 256x256 preview mode if you want to work with 256x256
Windows Vista™ icons. To switch to this mode, right-click in the preview window, a menu opens.
Choose "256x256 Display". The preview window now looks as shown above in floating mode ( ).
Use the same method to return to the previous state: choose "128x128 Display", remove the
"Floating Window" option and use the mouse to dock the window.
4. Select the whole image. Choose Edit/Select All or press Ctrl+A. An animated selection rectangle is
now drawn around the image.
5. Choose File/Create Windows® Icon From Selection or press "I". A large dialog box opens. This dialog
box will permit you to create all the image formats you want to include in your icon in one simple
step:
6. Type the Name of the new icon project ( ). The root of the image file is proposed by default.
49
Axialis IconWorkshop 6.10
7. Select the images formats to include in the icon ( ) by clicking on the images. To create a Windows
Vista™ icon, it is recommended that you follow the Windows Vista™ specifications as specified
above. Don't forget to add the 256x256 Windows Vista™ formats in RGB/A (Windows® XP), 256
and 16 color modes ( ).
8. To create a fully-compliant Windows Vista™ icon, you'll need to compress the 256x256 formats in
PNG. Select the associated option ( ).
9. You can also choose to apply the dithering option to the 256/16 color images as well as add a filter
effect to smooth/sharpen the resulting images in RGB/A mode ( ). View the results in the preview
images.
10. When done, click OK. A new icon project is created in a document window:
11. The main window with the grid ( ) is the edition area where you can retouch the icon. The gray
chessboard-like texture behind the icon is the transparent portion of the icon (the alpha channel
info has been preserved). The scale 1:1 preview is displayed in the associated window ( ).
12. All the available formats are displayed in a list ( ). You can select them to edit ( ) or preview ( )
them. See the application built-in help (press F1) to learn how to add/remove formats or work with
this icon project.
13. The compressed format (only the 256x256 formats can be compressed) are marked with this
overlay PNG compression image: . You can add/remove this option by choosing Draw/Compressed
Image Format (Windows Vista™) or by pressing "K". You can also use the local toolbar or a right-click
menu.
14. When done, save the icon by choosing Edit/Save or pressing Ctrl+S.
Use of Windows Vista™ Compressed Icons in Software Projects
Windows Vista™ PNG compressed 256x256 icons will be supported in Microsoft Visual Studio® 2008
(codename "ORCAS"). We've tested PNG compressed icons on Visual C++ 6.0 and Visual .NET 2003/2005
and they all reject the icon during the resource compilation:
50
Getting Started Tutorial
Error RC2176: old DIB in res\app.ico; pass it through SDKPAINT
This is unsurprising to us since this new ICO file format introduces a new header which points to raw PNG
data. Of course the compiler returns a false error message. The DIB header is not old, it is PNG. Passing it
through SDKPAINT does not help.
Windows Vista™ compressed icons have also been reported as not functioning in the Delphi programming
environment. New components will no doubt be developed in the future that identify these shortfalls.
Compiling a Program with a 256x256 PNG icon using Visual C++ 6.0 and .NET 2003/2005
Create a 256x256 icon with all formats embedded as recommended for Windows Vista™. Save your icon
without compressing your 256x256 formats (approximately 400Kb icon file). Once the icon is created,
work on your project as usual. The compiler will handle correctly the image since it won't be a PNG image.
When your project is finished and before releasing the program file, follow the procedure below:
1. Open the EXE file containing the uncompressed icon in IconWorkshop.
2. The file opens in a document window with all the embedded icons displayed. Be sure to display all the
formats in raw: choose "View/Display Icons/All Formats In Raw".
3. Double-click on the icon you want to compress. It opens in another document window.
4. In the list of available formats (vertical list on left), right-click on the first "256x256 RGB/A" format,
a menu opens. Choose "PNG Compressed Image Format (Windows Vista)". A small overlay icon
indicating the compression is displayed ( ).
5. Repeat step 4 with the other 256x256 image formats (if any).
6. Save the icon "File/Save". Close the icon window.
7. Back in the EXE document window, you see the compression overlay icon ( ) displayed on all the
256x256 formats. Repeat steps 3 to 6 for all the other icons containing 256x256 images (if any).
8. Save your EXE document, close the window.
9. You're done! The EXE file size is smaller indicating that the compression is made.
Conclusion
Windows Vista™ icons deliver a new framework of icon presentation for high definition monitors and
operating systems while remaining compatible with Windows® XP and lower definition screens. The larger
256x256 icon format provides additional opportunities for icon designers to explore more subtle and
detailed development in their aim to create visual symbols that aid the user in their use of the computer
environment.
51
Axialis IconWorkshop 6.10
Lesson 1 - Creating a new icon from scratch
In this lesson, we'll create a new blank icon and take a look at the Icon Editor window.
Start the new icon project
1. Choose File/New/Icon Project or press Ctrl+N. A new dialog box opens:
2. Axialis IconWorkshop™ support both Windows® and Macintosh® icons (see format comparison to
learn more). We'll start this tutorial by creating a Windows® icon. Select the Microsoft Windows®
Icon Project option ( ). click OK ( ). A second dialog box opens.
2. In the Project Name edit zone ( ), enter the icon project name: "MyFirstIcon". Do not specify any
extension.
52
Getting Started Tutorial
3. In the Colors group ( ), select: XP with Alpha Channel (RGB/A - 32 bits). This format will be used
only if the icon is displayed under Windows® XP. This format uses an additional Alpha Channel to
create smooth shades and object borders (see what is an icon to learn more).
We strongly recommend you to always start creating your icons with this color mode.
Yes, even if you don't have Windows® XP, this is easier to start working in this mode then create the
other image formats from this one. Also, if you upgrade to Windows® XP in the future all your icons
will display using this smooth mode. Of course, if you plan to redistribute your icons, this color mode
is highly recommended.
4. In the Size in Pixels group ( ), choose: 48x48. In this tutorial, we start using this size since this is
the largest size supported by default in Windows® XP (on the Desktop).
We strongly recommend you to start an icon project using the largest size you plan to include in
your icon.
This is easier to draw a large image then create the other image formats from this one. Additionally,
the smaller formats will be created with better results (shrinking an image always produces better
results). See what is an icon to learn more about icon formats.
5. Click OK, the dialog box closes.
A Quick Tour of the Editor Window
6. This new Editor Window opens:
The Drawing Area ( ) permits you do draw your icon image. This area use the 2 mouse buttons to
draw: Left button for the Foreground Color, Right button for the Background Color. As a result, you
cannot right-click in the drawing area to open a local context menu. To open a local menu, right-click
around the drawing area ( ) or in the Image Format list ( ).
The Image Format List ( ) shows all the image formats available in your icon (only 1 image for the
moment). The selected image ( ) format is always displayed in the Drawing Area. You can
show/hide this list (Press "I" or choose View/Icon Image Formats/Show). You can also place it on the
left or right side of the Edit Window (choose View/Icon Image Formats/Left or Right).
53
Axialis IconWorkshop 6.10
The Local Toolbar includes many commands. For now, just try to click the Image Format List
show/hide button ( ). You can also show/hide the Grid in the drawing editor ( ). Actually the Zoom
Factor is automatically based on the window size ( ). but you can change it manually by clicking on
+ or - ( ).
7. The Drawing Area displays a special texture (like a chessboard). This texture indicates a transparent
area. Actually, as you have not drawn anything, the icon is fully transparent. Transparent areas allow
to see the screen background behind the icon within its square image (see illustration below).
8. This texture can be customized to meet your needs. Choose Edit/Preferences or press "F2". A dialog
box opens, choose the Editor tab:
First, you can modify the size of the Transparency chessboard squares ( ). Then, to change the
colors of the texture you can either select a predefined scheme ( ) or choose custom colors ( ).
You can see the changes in the preview area ( ).
Changing the Grid aspect may also be interesting ( ). To finish, you can activate or deactivate a
feature which permits to draw stronger (darker) lines at fixed intervals. By default this interval is 8
( ).
When done, click OK.
54
Getting Started Tutorial
Lesson 2 - Drawing an icon using the built-in tools
In this lesson, we'll start drawing a basic information image (a blue filled circle with a "i" letter drawn inside),
using some of the available tools.
Selecting a tool, a color and drawing
1. Click the Filled Ellipse drawing tool ( ) or Draw/Drawing Tools/Filled Ellipse:
2. Left-click the Blue Color (#3F6FFF) we'll use to draw the circle in the color swatches ( ). Check
that the drawing Opacity is 255 ( ).
3. Using the Left Mouse Button, start drawing your circle from coordinates (3,3) to (44,44). Press
SHIFT key while drawing to create a circle (width = height) rather than an ellipse. The circle is
dynamically drawing while moving the mouse. When you release the mouse button, the circle border
is automatically smoothed. It works only with RGB/AP image formats. It can be enabled/disabled by
pressing "E" (Smooth Edges in the local toolbar).
4. When done, you see the blue circle in the drawing area and in the Preview 1:1 floating palette ( ).
5. Ooops! If you made a small error while drawing, you can Undo what you did. Choose Edit/Undo or
press Ctrl+Z or Alt+Backspace. Now you can try again.
Drawing a letter in the circle
6. To do so, Axialis IconWorkshop™ includes a Text feature. First select White Color (255,255,255) in
the color swatches (the procedure is similar to you did before).
7. Click the Text tool (a 'A' letter button at the lower-right corner of the Drawing Tools). A Dialog box
opens:
55
Axialis IconWorkshop 6.10
8. In the Text to add zone ( ), type the "i" letter. In the Font list ( ), choose "Tahoma". In the Size
zone, choose 30 and click Bold ( ). You can check the result in the preview zone ( ). When done,
click OK.
9. A large selection box has been added in the upper-left corner on the drawing area. This selection
contains the large "i" letter drawn in white. This is a floating selection that can be moved over the
existing image.
10. Move the mouse pointer over this selection area. The pointer automatically switches to a fourarrow cursor ( ). Now left-click in this area (keep the button pressed) and move your mouse to the
center on the Drawing Area in order to get the following result ( ):
11. You can apply the floating selection by click left-clicking anywhere.
CONGRATULATIONS! you've created your first icon image
56
Getting Started Tutorial
Lesson 3 - Adjusting the icon image
In this lesson, we'll modify the icon image we've drawn in Lesson 2 using some of the Adjustment Tools
available. These tools do NOT permit you to draw something but to modify appearance of an existing image
(brightness, contrast, hue, size, rotate...).
Changing the brightness and contrast of our icon
1. Select the whole image: Use the selection tool (upper-left button of the tool palette) and select the
whole icon using Drag & Drop or Press Ctrl+A. When done, an animated dashed rectangle has been
created.
All adjustments apply to the selection only.
2. Choose Draw/Adjustments Effects/Brightness-Contrast or press "B". A Dialog box opens:
3. In the Brightness group ( ) specify -5 either using the slider or the edit zone. In the Contrast group
( ) specify 20. We recommend you to click on the Preview option to see the change in real time in
the editor and preview windows. When done, click OK. The image has been adjusted (a stronger blue
color).
Moving the image
4. Select the image: Use the selection tool (upper-left button of the tool palette) and select the whole
icon using Drag & Drop or Press Ctrl+A. When done, an animated dashed rectangle has been
created.
5. We want to move the image by one pixel in the upper-left direction.
Using the mouse: Move the mouse pointer over this selection area. The pointer automatically
switches to a four-arrow cursor ( ). Now left-click in this area (keep the button pressed) and
move your mouse by one pixel up and one pixel left.
Using the keyboard: Press the Up Arrow key and the Left Arrow key once.
6. Important: By doing this, you've transformed the selected portion in a Floating Selection. A floating
selection can be moved over the rest of the image preserving the transparent area. When you've
finished moving this selection you must apply it by cleft-clicking anywhere in the image.
57
Axialis IconWorkshop 6.10
Creating a shadow behind the icon (Windows® XP style)
7. Select the image: Use the selection tool (upper-left button of the tool palette) and select the whole
icon using Drag & Drop or Press Ctrl+A. When done, an animated dashed rectangle has been
created.
8. Choose Draw/Adjustments Effects/Drop Shadow or press "D". A shadow has automatically been
added behind the icon. If you want to create a stronger shadow, just repeat the operation. In the
example below we've repeated the operation twice (pressed "D" two times).
Lesson 4 - Adding new image formats
In this lesson, we'll add New Image Formats to the icon. This is very important to create several image
formats in an icon (especially if you wish to redistribute it) in order to be compatible with all screen
configurations (see What is an Icon for more info).
The following table shows the common Windows® and Macintosh® image formats:
58
Getting Started Tutorial
IMPORTANT - If you add 24x24 image formats in your icon, it won't be compatible with
Windows® 98 and Windows®2000. If you use these Windows® versions, the icon will display
correctly in Axialis IconWorkshop™ but will be considered as invalid by Windows®.
In this tutorial we'll choose to comply with Windows® XP standard icon formats. We won't add the
256x256 Alpha format which is not supported by Windows® XP (we recommend it for Windows
Vista™). So we'll add the following images:
•
•
•
•
•
•
•
•
48x48 - Windows® XP Alpha (already done)
32x32 - Windows® XP Alpha
16x16 - Windows® XP Alpha
48x48 - 256 colors
32x32 - 256 colors
16x16 - 256 colors
32x32 - 16 colors
16x16 - 16 colors
Adding a new icon format based on the current image
1. Select Draw/New Image Format or press Ins. You can also click on the button ( ) in the local toolbar
or right-click in the Image Format List ( ) then choose New Image Format.
59
Axialis IconWorkshop 6.10
2. A Dialog box Add a New Windows® Image Format opens:
3. In the Colors ( ) and Size groups ( ), Axialis IconWorkshop™ propose you to create the next
missing image format (based on the recommended Windows® image formats - see the above table).
Leave the actual selection as is "XP Alpha Channel" and 32x32.
4. You can choose to create this new format based on an existing image format. By default, Axialis
IconWorkshop™ choose the best existing image format to create the new one. You can change this
proposal and choose your own selection (this is not recommended). Be sure the option Creation
based on the following image is selected ( ).
5. When done, Click OK. The new image format is created and the previous image format has been
automatically resized. The new format is selected in the list (see below ) and is displayed in the
drawing area ( ):
60
Getting Started Tutorial
A Faster way to create a new format
4. If you want to create quickly a new standard image format, just right click on an image format in the
list. A menu opens and proposes you to create the next missing format based on the selected image.
For example, right-click on the 32x32 Windows® XP image format and choose Create 16x16
Windows® XP Image Format in the menu (see below ):
61
Axialis IconWorkshop 6.10
5. The new image format is automatically created and selected.
Of course you can repeat the same operation to create the other formats. However we prefer to
learn you a faster method to create all the other formats on one operation (see below).
Adding several formats in one operation
6. Right-click on the 48x48 Windows® XP format in the list of available icon formats ( on the left of
the editor window), a context menu opens, select Add Several Image Formats from This Image (see
below ).
7. A new dialog box opens. This will permit you to add several formats in one step based on the image
you've selected in step 6 (in our case 48x48 RGB/A).
62
Getting Started Tutorial
Remark - As you can see, the format 256x256 is also proposed but the image has poor quality.
This is because it has been created from a smaller original image (48x48 RGB/A). This operation
is called "upscaling". It always produce bad results and is not recommended.
8. Select the following formats (click directly on the preview image)
48x48 - 256 Colors ( )
32x32 - 256 Colors ( )
16x16 - 256 Colors ( )
32x32 - 16 Colors ( )
16x16 - 16 Colors ( )
We don't select any format larger than 48x48. You can just ignore (select or not) the image formats
already present in the image ( ). You can also apply or not the dithering option to the 256/16 color
images (try and see the results in the preview images).
7. When done click OK. The formats are automatically created.
Lesson 5 - Saving the icon, storing it in the Librarian
In this lesson, we'll save the icon we've created in the Librarian. Actually, the icon is loaded in memory but
not saved. If the computer is turned off now, your work will be lost. For the moment we'll save it as an ICO
file (see What is an Icon for more info regarding icon files).
63
Axialis IconWorkshop 6.10
Adding the icon to the librarian
1. To save this icon to the librarian, you must be sure that the librarian is visible. If the librarian window
is not visible ( ), check the Librarian button in the main toolbar ( ) or press ESC.
2. Select the folder "Icons" in the Librarian tree ( ). This is where we want to save the icon, its
contents appears in the zone below ( ).
3. Choose the File/Add to the librarian or click on the command button in the local toolbar (see below
):
4. A dialog box Add Icon to the Librarian prompts you. In the Name edit zone be sure the name is
correct (it propose you the name you gave to the icon project).
5. When done, click OK. The icon is saved and added to the librarian:
64
Getting Started Tutorial
6. Now you can close the Icon Project Document window then open it again by double-clicking on the
associated item in the librarian (see above picture).
Lesson 6 - Creating a new icon from an existing image
In this lesson, we'll create a new icon from an existing image. We'll create a Windows® and a Macintosh®
icon.
Opening an image file in Axialis IconWorkshop™
1. First, we're going to load a file which is located in the Librarian. You must be sure the librarian is
visible. If the librarian window is not visible ( ), check the Librarian button in the main toolbar ( )
or press ESC.
2. Select the "Media Files/Images" folder ( ). In the thumbnail preview list (below), you see a file
named "Sphere.png" ( ). Select it and press Enter or just double-click on it. The file opens in a
document window ( ).
The image "Sphere.png" is a Transparent PNG file. It means that it includes transparent areas in the
image. This is where you see the "chessboard" texture ( ).
Note that the drawing tools are grayed ( ) because Axialis IconWorkshop™ does not currently
support edition/drawing of images. Drawing is supported in icons only.
It is highly recommended to create icons from transparent images. Axialis IconWorkshop™ will
convert images to 32 BPP with transparency when possible. The following image formats can
include transparency: Photoshop PSD, PNG, RGB, GIF, JPEG 2000 and WMF.
65
Axialis IconWorkshop 6.10
Creating a Windows® icon from this image
3. Before proceeding, we recommend you to select the portion of image you wish to use to create
your icon. If you leave too many transparent area around your image (this is the case in this image),
the visible part of your icon will be too small.
4. Select the portion of image: Use the selection tool (upper-left button of the tool palette) and select
a 256x256 portion of the image (do not cut the shadow below the sphere). This will produce the
best results when creating the 256x256 formats of the icon. To track the size of the selection onthe-fly, see the selection indicator in the status bar (lower-right corner of the main window:
). When done, an animated dashed rectangle has been created. See the result below:
5. When the selection is done, choose Image/Create Windows® Icon from Selection or press "I". You
can also click the following command button in the local toolbar ( ):
6. A large dialog box New Windows® Icon From Image opens (see below). In the Icon Project Name
zone ( ), enter the icon project name: "MySphereIcon". Do not specify any extension.
66
Getting Started Tutorial
7. In the Standard Image Formats for Windows group, select the image formats to add in the icon (
). Just click on the image preview to select. We recommend you to add the following formats in
a Windows® icon:
256x256 - RGB/A
64x64 - RGB/A
48x48 - RGB/A
32x32 - RGB/A
16x16 - RGB/A
48x48 - 256 colors
32x32 - 256 colors
16x16 - 256 colors
32x32 - 16 colors
16x16 - 16 colors
You can also apply or not the dithering option to the 256/16 color images as well as add a filter
effect to smooth/sharpen the resulting images in RGB/A mode (try and see the results in the
preview images).
8. When done, click OK. The icon is automatically created with the various image formats you've
chosen. You can click on the various image formats you've created ( ) to see the results in the
editor window.
67
Axialis IconWorkshop 6.10
9. In the preview window you see the icon displayed at scale 1:1 (or 1:2 for the 256x256 format) on a
gray background. It is recommended that you switch to 256x256 preview mode if you want to
work with 256x256 Windows Vista™ icons. To switch to this mode, right-click in the preview
window, a menu opens. Choose "256x256 Display". The preview window now operates in floating
mode. Use the same method to return to the previous state: choose "128x128 Display", remove the
"Floating Window" option and use the mouse to dock the window.
10. As it could be useful to see how the icon is displayed on several type of background lightness, an
easy way to change the preview background has been implemented. Just click with the left button
of your mouse in the preview window and the background lightness will change (cycle from white to
black).
By changing the background lightness of the preview window (left-click in it), you can
appreciate how Axialis IconWorkshop™ has resized the image and created perfect borders
around the sphere object.
11. Why don't take a look at all the formats you've created and admire your work? This is possible to
display all the format on the same document by using the "Snapshop" feature. Choose "Edit/Create
Snapshot". A dialog box opens, several options are available. Select White Background and 16/2
colors (if necessary). Click OK. The following image document is created (see below). You can print
it or save it for reference.
68
Getting Started Tutorial
12. Don't forget that the icon is created in memory but not saved. Please save it in the librarian (in the
"Icons" folder) as specified in Lesson 5 (name it "MySphereIcon"). It is saved in ICO format.
Creating a Macintosh® icon
Close the Windows® icon document you've just created, return to the "sphere.png" document and redo
steps 3 & 4 of the previous topic.
5. When the selection is done, choose Image/Create Macintosh® Icon from Selection or press "M". You
can also click the following command button in the local toolbar ( ):
6. A large dialog box New Icon From Image opens (see below). In the Icon Project Name zone, enter the
icon project name: "MySphereIcon". Do not specify any extension.
69
Axialis IconWorkshop 6.10
). Just click on
7. In the Image Formats group, select the image formats to add in the icon (
the image preview to select. We recommend you to add the following formats in a Macintosh® icon:
256x256 - RGB/A
128x128 - RGB/A
48x48 - RGB/A
32x32 - RGB/A
16x16 - RGB/A
48x48 - 256 colors
32x32 - 256 colors
16x16 - 256 colors
32x32 - 16 colors
16x16 - 16 colors
32x32 - Mono
You can also apply or not the dithering option to the 256/16 color images as well as add a filter
effect to smooth/sharpen the resulting images in RGB/A mode (try and see the results in the
preview images).
8. When done, click OK. The icon is automatically created with the various image formats you've
chosen. You can click on the various image formats you've created ( ) to see the results in the
editor window.
9. In the preview window ( ) you see the icon displayed at scale 1:1 on a gray background. Click with
the left button of your mouse in this window to change the background lightness (cycle from white
to black).
10. Save it in the librarian (in the "Icons" folder) as specified in Lesson 5 (name it "MySphereIcon" and
choose the ICNS file format). To learn more about Macintosh® file formats, see Macintosh® vs
Windows® icons.
70
Getting Started Tutorial
A quick look at the icons stored in the Librarian
The two icons are now stored in the Librarian. The folder "Icons" should be selected and the 2 newly
created icons displayed as shown below:
Note that Macintosh icons are displayed with a small overlay symbol which permits to easily
distinguish their type ( ). The Windows® icons do not have any overlay symbol ( ).
Lesson 7 - Composing an icon from several image objects
Lesson 7 - Composing an icon from several image objects
In this lesson, we'll create a new icon from several images (we also call these images "Objects") by
assembling them in order to create a composite icon. The most famous example of composite icon is the
document folder icon:
Using the three objects above, we'll make this icon in minutes using exclusively features included in Axialis
IconWorkshop™. The icon will include formats from 256x256 to 16x16 in RGB/A, 256 and 16 colors
(based on the recommended formats specified in What is an icon topic).
This folder image has been created by Axialis Team. It's free of charge so you can use them in your own
icons (see Sample Icons Terms Of Use).
Create the new icon
First, we're going to create the new icon. When creating a new icon, we choose the first image format to
insert in it (usually the largest one). The largest one will be 256x256 RGB/A, so we'll start with this format.
1. Choose File/New/Icon Project or press Ctrl+N. A new dialog box opens:
71
Axialis IconWorkshop 6.10
2. Select the Windows® Icon Project option ( ). A second dialog box opens.
2. In the Project Name edit zone ( ), enter the icon project name: "Document Folder". Do not specify
any extension.
3. In the Image Color Format group ( ), select: XP with Alpha Channel (RGB/A - 32 bits).
4. In the Image Size group ( ), choose: 256x256 (Vista).
5. Click OK, the dialog box closes. The new blank icon document is created, the 256x256 RGB/A image
format is selected.
Adding the first object: The folder background
6. To add an object, you must be sure that the librarian is visible. If the librarian window is not visible
( ), check the Librarian button in the main toolbar ( ) or press ESC.
72
Getting Started Tutorial
7. Select the folder "Objects/Samples/Large" in the Librarian tree ( ). The contents of the folder
appears in the zone below. Using the slider ( ) scroll the window contents until you see the file
"Folder Back.png".
8. Using drag & drop ( ) place the file "Folder -Back.png" in the editor window ( ). The object is
automatically added to the icon project as a floating selection ( below):
Adding the second object: The document
9. We'll perform a similar operation to add the document object. In the same folder, select the object
named "Folder -Document .png". Use mouse drag & drop from this object ( ) to the icon project
window ( ):
73
Axialis IconWorkshop 6.10
10. The document object is added onto the back pane of the folder already present. This is the way
image objects work (click here to learn more). The transparency around the object is used to create
a layer-type effect. You can add as many objects as you want on top of each other using this
method. Once an object is added you can also resize / move it using the mouse or the arrow keys.
Adding the third object: The folder front
11. We'll perform a similar operation to add the document object. In the same librarian folder, select
the object named "Folder - Front.png". Use mouse drag & drop from this object ( ) to the icon
project window ( ). The resulting icon looks like this:
12. The front folder object is opaque (we don't the document object through it). In order to get better
results, we're going to make it a little transparent. Select Draw/Adjustments Effects/Opacity or
press the "O" key. A dialog box opens. Set the opacity to -20 using either the edit zone ( ) or the
slider ( ):
74
Getting Started Tutorial
13. When done click OK. The transparency of the front object has been adjusted so that you can
slightly see the document through the front panel.
Congratulations! The 256x256 image format is done. Now we're going to create the other formats of the
icon from this one.
Creating all the image formats
As we've seen in lesson 4, an icon contains several formats. We'll add them using the fastest method: adding
several formats in one operation.
14. Right-click on the 256x256 RGB/A format in the list of available icon formats ( on the left of the
editor window), a context menu opens, select Add Several Image Formats from This Image (see
below ).
75
Axialis IconWorkshop 6.10
15. A new dialog box opens:
16. The format 256x256 RGB/A ( ) is already present in the icon, so selecting it is not necessary (if
selected it will be ignored).
17. Select the following formats to add (click directly on the preview image)
48x48, 32x32, 16x16 - RGB/A ( )
48x48, 32x32, 16x16 - 256 Colors ( )
32x32, 16x16 - 16 Colors ( )
64x64 - RGB/A ( ) is recommended for Windows Vista™
18. If you plan to use your icon under Windows Vista™, we recommend you to compress the 256x256
formats. Check the option "PNG Compress 256x256 Formats for Windows Vista™ ( )
19. To get the best results possible, we recommend you to apply a sharp filter while creating the small
images. Select the Apply Filter when Resizing option and adjust the slider as shown in the above
image ( ).
20. When done click OK. The formats are automatically created:
76
Getting Started Tutorial
You're done! Congratulations! Now save/add the icon in the librarian in the "Icons" folder (follow the
same procedure as lesson 6). If you want to compare the icon you've done with ours, you can open
this file: "Icons/Tutorials/Folder - Document.ico" (we also added 24x24 formats).
Going further...
When you make an icon by creating small sizes automatically, sometimes details are lost especially while
converting the large 256x256 image into small sizes (32x32 to 16x16). You may need to retouch or
simply redo these images. Check the icon we've done and saved as "Icons/Tutorials/Folder - Document
2.ico". It contains different versions for sizes 64x64 to 24x24 and 16x16. You can easily do this using the
same method based on objects:
1. Browse the folder "Objects/Samples/Medium". You'll find medium-resolution objects you can use to
create sizes 64x64 to 24x24.
2. Browse the folder "Objects/Samples/Small". You'll find small-resolution objects you can use to create
sizes 16x16.
Exercises
Using the following objects:
Objects\Samples\Large\Document.png
Objects\Samples\Large\Document - Text.png
Objects\Samples\Large\Pen.png
create this icon:
2. Using the following objects:
Objects\Samples\Large\Document.png
Objects\Samples\Large\File Types\PSD.png
Objects\Samples\Large\Document - Picture.png
create this icon:
3. Using the following objects:
Objects\Samples\Large\Screen.jp2
Objects\Samples\Large\Overlays\Forbidden.jp2
(resize this object in the lower-right corner),
create this icon:
77
Axialis IconWorkshop 6.10
Lesson 8 - Using an object pack to create an icon
This lesson it similar to previous one, but will permit you to go further: Create hi-quality and attractive icons
using basic image objects. Object Packs are libraries containing a large number of image objects made by a
professional designer. We regularly publish new objects packs that you can download on Internet. To create
your icons, you just have to assemble basic objects together.
This assemblage is easily done with Axialis IconWorkshop™ using a few mouse clicks and drag-and-drops.
Creating different versions of an icon is very easy with an object pack. See below some examples of the
help icon made in a few minutes simply using the mouse and without drawing one pixel (non-exhaustive list
of course!):
To follow this tutorial, you need to have the "Glossy Buttons" object pack installed in the
librarian. Search the Librarian for the folder "Objects\Pack 1 - Glossy Buttons"). This pack is
included in Axialis IconWorkshopä 6.0 or more. If you can't find the folder, download the "Glossy
Buttons" pack from Internet.
Defining, Creating the Icon Project
Before using the image objects, we need to create a new icon project. An icon contains several image
formats (see "What's an Icon?") so we need to define all these formats before going on.
We'll create an icon compatible with Windows Vista™ (256x256, 64x64 formats), Windows® XP; (48x48,
32x32, 24x24, 16x16 formats) and Dock Bar applications (128x128 format). To simplify the project,
we won't add indexed color formats (256, 16 colors). Using the objects we'll make a "Glossy Earth" icon
with bottom shadow. The resulting icon will look like this:
78
Getting Started Tutorial
The largest image format is 256x256 XP (ie RGB with Alpha channel). To get the best results, we'll start the
project with this new format and work with it to assemble the objects. When finished, we'll create all the
other formats using this 256x256 format as template. Let's create our new icon project:
1. Launch IconWorkshop™. Choose File/New/Windows® Icon Project or press Ctrl+W. A dialog box
opens:
2. Type the name of the project ( ): "Glossy Earth".
3. Now specify the format of the first image to add in the project: In Image Color Format , choose "XP
with Alpha Channel (RGB/A 32 bits)" ( ). In Image Size , choose and "256x256 (Vista™) ( ).
4. As we want the 256x256 format to be used under Windows Vista™, we choose to compress it as
PNG: Click the option "PNG Compress 256x256 format" ( ). To learn more about Windows Vista™
icons, read this article: "Introducing Windows Vista™ Icons".
5. When done, click OK. A new icon project window is created with the 256x256 format created.
6. If the scale-1:1 preview window is not in 256x256 mode, the preview image will be cropped. It is
recommended that you switch to 256x256 preview mode to work with 256x256 Windows Vista™
icons. To switch to this mode, right-click in the preview window, a menu opens. Choose "256x256
Display". The preview window is now in floating mode.
Use the same method to return to the previous state: choose "128x128 Display", remove the
"Floating Window" option and use the mouse to dock the window.
Building the Icon Using Image Objects
This is the most important part of the project. The time has come to be creative! No problem it's easy and
fun with Axialis IconWorkshop™. Before we start, don't forget that each step of the creation can be
undone/redone (Ctrl+Z/Ctrl+Y) up to 16 steps back.
7. In the Librarian window (choose View/Librarian if it is not visible), select the "Objects/Pack 1 Glossy Buttons/Circle" folder ( ). A list of available object is displayed in the contents window
below ( ). Find the "Circle - Blue.png" file and select it ( ).
79
Axialis IconWorkshop 6.10
8. When done, use a mouse Drag-and-Drop to add it into the project as shown above ( ). The object
is added to the project as a floating selection ( ). Take a look at the quality of the artwork in the
Scale 1:1 window ( ).
Congratulation! you've just added your first image object to your project! As you can see it's very
easy and intuitive. Now let's continue and add other objects to build the icon.
IMPORTANT
To follow the next steps, the "Preserve Transparency" option must be set (press "T" or select
Draw/Preserve Transparency). If this option is not set, the transparency will not be kept each
time you add a new image object and the objects already added will be fully replaced.
9. From the Librarian, select the file "Circle Inner Light.png" and add it to the project using the same
method. The resulting image now includes a cyan light effect as shown below:
10. To create the Earth image, we now add the map object. From the librarian, select the file "World
Map.png" and add it to the project using the same method. The resulting image looks like below:
80
Getting Started Tutorial
11. The result is good but we want to make it even better. We can increase the realism by changing the
color of the map to green. To do so, Axialis IconWorkshop™ has a feature to adjust the
Hue/Saturation/Brightness of an image. Choose Draw/Adjustments-Effects/Hue-Saturation or
press "U". A dialog box opens:
12. Set the Hue to "-100" either using the slider or by typing the value ( ). It "shifts" the colors of the
floating image in the spectrum. As a result, the map is now green. Also, we slightly increase the
Brightness of the map by specifying "6" ( ). You can see the results in real-time in the Preview 1:1
window. When done click OK. Now the map is green:
81
Axialis IconWorkshop 6.10
13. Do you recall the name of the icon? Yes, "Glossy Earth"! So, let's add the glossy effects. First, using
the same drag-and-drop method as above, we add the object "Circle Effect 3.png". Then to increase
the effect, we add the object "Circle Effect 6.png". Now it looks like this:
14. Now the final touch: the shadow. We want to add a shadow at the bottom and under the earth.
This will produce an interesting effect, just like if the globe was laid on a white horizontal plan.
First, we need to move the whole Earth 10 pixels up (just to leave more space for shadow at the
bottom of the image). Important: To do so, we must select the whole image. Actually, only the last
object we've added is selected. Choose Edit/Select All or press Ctrl+A. There is no visual change but
now you're ready to move the whole image.
To move the image, you can use the mouse (with a drag-and-drop) or use the arrow keys of the
keyboard. To move the image 10 pixels up, hit UpArrow 10 times or press Shift+UpArrow. The
resulting selection rectangle is now 10 pixels outside the top of the editor area.
15. We can now add the shadow. Select the object "Circle Shadow.png" in the librarian and add it to the
project. The resulting image looks like this:
82
Getting Started Tutorial
16. Obviously, there is a problem: The shadow is in front of the Earth Globe! The solution is as easy as a
keystroke: Press the End key or choose Edit/Set Floating Selection to Background.
You're done! The resulting image should look like this:
Finalizing the Icon by Creating All the Formats
Now that the largest image is done (256x256 RGB/A), we'll create all the other formats of the icons from
this one. This is done in one step with Axialis IconWorkshop™ Corporate Edition. Using the Personal Edition,
you need to create each format manually (see product help for more info).
17. Choose Draw/Add Several Image Formats from This Image or press "V". A dialog box opens:
83
Axialis IconWorkshop 6.10
18. Select the images formats to include in the icon by following the specifications as we defined them
above: the format 256x256 RGB/A is already included in the icon, so it will be ignored ( ); select
formats 48x48 to 16x16 RGB/A by clicking on the associated check boxes ( ); Add the formats
128x128 RGB/A ( ) and 64x64 RGB/A ( ).
19. As we want our icon to be used under Windows Vista™, we can compress the 256x256 formats as
PNG ( ). You can also choose to apply the smooth/sharpen filter to get better results in small
formats ( ). View the results in image previews.
20. When done, click OK. The new formats are automatically created and added to the project ( ):
21. Take a moment to admire your work :) Click on the various formats ( ) and see the resulting icon
at scale 1:1 in the preview window ( ). You can change the background lightness of the Scale 1:1
window simply by clicking in it using the left button of the mouse. It will permit you to see how the
icon is displayed on different backgrounds with different lightness.
22. Save your icon: Choose File/Save or press Ctrl+S. It will be saved as Windows® ICO format.
84
Getting Started Tutorial
Congratulations! You've created your first icon from Image Objects. There is no limit to your creativity using
these objects. You can resize them, changing their color, their opacity and more. You can even create your
own objects by combining existing ones.
Creating a Macintosh® version of the icon
You can also save your Windows® icon as Macintosh® format. When the icon is finished (step 22 above),
choose File/Save as Macintosh® Icon or press Ctrl+Alt+S.
By doing this, some icon formats which are not available for Macintosh® icons will be removed.
In the example above, format 24x24 will be removed. An information message will be displayed.
Exercises
If you want to practice, try to recreate these sample icons made using the Glossy Objects pack:
Lesson 9 - Creating and Using a Windows Vista™ icon
In this lesson, we'll create an icon fully compliant with Windows Vista™ specifications and we'll learn how to
use it in a software project. Windows Vista™ includes many new features and enhancements. The most
visible evolution is the new Graphical User Interface (GUI). A first look at Aero (the codename for the
Windows Vista™ user experience) reveals a slicker interface with sharper graphics.
Microsoft Windows Vista™ comes with a new format of icons supporting PNG compression and sizes up to
256x256. The standard Windows Vista™ icons now includes the following image formats (grayed formats
are optional):
85
Axialis IconWorkshop 6.10
256x256 - RGB/A
64x64 - RGB/A
48x48 - RGB/A
32x32 - RGB/A
24x24 - RGB/A
16x16 - RGB/A
256x256 - 256c
64x64 - 256c
48x48 - 256c
32x32 - 256c
24x24 - 256c
16x16 - 256c
256x256 - 16c
64x64 - 16c
48x48 - 16c
32x32 - 16c
24x24 - 16c
16x16 - 16c
The problem is: if you simply make the icon and save it in standard Windows® XP ICO format, the resulting
file will be 400Kb on disk. The solution is to compress the images. Only the 256x256 images are
compressed. The compression scheme used is PNG (Portable Network Graphic) because it has a good
lossless ratio and supports alpha channel. The compressed icon sizes are 100Kb to 150Kb.
To get more information on Windows Vista™ Icons, we recommend you to read this topic: Introducing
Windows Vista™ Icons
Creating the Windows Vista™ Icon from an existing image
Here is a step-by-step tutorial on how to create a Windows Vista™ compressed icon using Axialis
IconWorkshop™.
1. Create a 256x256 version of your icon image using any image/vector editor. Save your artwork
with smooth transparency (32 BPP alpha channel) using a file format that is compatible with Axialis
IconWorkshop™: BMP, PNG, JP2000, PSD.
You can also transfer your work from Adobe Photoshop® using the Axialis transfer plug-in (see this
tutorial) or you can create an icon by assembling several image objects (see this tutorial).
In this procedure, we'll use this file: down.png (we recommend you to download it and save it on your
disk - use right click and choose "Save Target As"). You can also find the file in the Librarian, folder
"Objects/Pack 2 - Realistic Buttons".
2. Launch Axialis IconWorkshop™ and open the image file. It is loaded in an image document window,
not an icon editor window, as shown below ( ):
3. If the scale-1:1 preview window is not in 256x256 mode, the preview image will be cropped. It is
recommended that you switch to 256x256 preview mode if you want to work with 256x256
Windows Vista™ icons. To switch to this mode, right-click in the preview window, a menu opens.
Choose "256x256 Display". The preview window now looks as shown above in floating mode ( ).
86
Getting Started Tutorial
Use the same method to return to the previous state: choose "128x128 Display", remove the
"Floating Window" option and use the mouse to dock the window.
4. Select the whole image. Choose Edit/Select All or press Ctrl+A. An animated selection rectangle is
now drawn around the image.
5. Choose File/Create Windows® Icon From Selection or press "I". A large dialog box opens. This dialog
box will permit you to create all the image formats you want to include in your icon in one simple
step:
6. Type the Name of the new icon project ( ). The root of the image file is proposed by default.
7. Select the images formats to include in the icon ( ) by clicking on the images. To create a Windows
Vista™ icon, it is recommended that you follow the Windows Vista™ specifications as specified
above. Don't forget to add the 256x256 Windows Vista™ formats in RGB/A (Windows® XP), 256
and 16 color modes ( ).
8. To create a fully-compliant Windows Vista™ icon, you'll need to compress the 256x256 formats in
PNG. Select the associated option ( ).
9. You can also choose to apply the dithering option to the 256/16 color images as well as add a filter
effect to smooth/sharpen the resulting images in RGB/A mode ( ). View the results in the preview
images.
10. When done, click OK. A new icon project is created in a document window:
87
Axialis IconWorkshop 6.10
11. The main window with the grid ( ) is the edition area where you can retouch the icon. The gray
chessboard-like texture behind the icon is the transparent portion of the icon (the alpha channel
info has been preserved). The scale 1:1 preview is displayed in the associated window ( ).
12. All the available formats are displayed in a list ( ). You can select them to edit ( ) or preview ( )
them. See the application built-in help (press F1) to learn how to add/remove formats or work with
this icon project.
13. The compressed format (only the 256x256 formats can be compressed) are marked with this
overlay PNG compression image: . You can add/remove this option by choosing Draw/Compressed
Image Format (Windows Vista™) or by pressing "K". You can also use the local toolbar or a right-click
menu.
14. When done, save the icon by choosing Edit/Save or pressing Ctrl+S.
Using a Windows Vista™ Compressed Icon in a Software Project
Windows Vista™ PNG compressed 256x256 icons will be supported in Microsoft Visual Studio® 2008
(codename "ORCAS"). We've tested PNG compressed icons on Visual C++ 6.0 and Visual .NET 2003/2005
and they all reject the icon during the resource compilation:
Error RC2176: old DIB in res\app.ico; pass it through SDKPAINT
This is unsurprising to us since this new ICO file format introduces a new header which points to raw PNG
data. Of course the compiler returns a false error message. The DIB header is not old, it is PNG. Passing it
through SDKPAINT does not help.
Windows Vista™ compressed icons have also been reported as not functioning in the Delphi programming
environment. New components will no doubt be developed in the future that identify these shortfalls.
88
Getting Started Tutorial
Creating a project using a 256x256 PNG icon with Visual C++ 6.0 and .NET 2003/2005
Create a 256x256 icon with all formats embedded as recommended for Windows Vista™. Save your icon
without compressing your 256x256 formats. If your icon already contains PNG compression (like the one
we've created in the procedure above), follow this procedure:
1. Open the icon file containing the PNG compressed formats icon in IconWorkshop.
2. On the left side of the document window you see all the formats available. Locate the 256x256
formats which are compressed: A small overlay icon indicating the compression is displayed ( ). For
each of them, do the following step:
3. Right click on the format (in the list if available formats, not in the editor area). A menu opens,
choose "PNG Compressed Image Format (Windows Vista)" to remove the compression.
4. Save the icon. Redo the same procedure for all the 256x256 icons of the project.
Once the icon is saved without compression, work on your project as usual. The compiler will handle the icon
images correctly since they are not PNG. When your project is finished and before releasing the program
file, follow the procedure below:
1. Open the EXE file containing the uncompressed icon in IconWorkshop.
2. The file opens in a document window with all the embedded icons displayed. Be sure to display all the
formats in raw: choose "View/Display Icons/All Formats In Raw".
3. Double-click on the icon you want to compress. It opens in another document window.
4. In the list of available formats (vertical list on left), right-click on the first "256x256 RGB/A" format,
a menu opens. Choose "PNG Compressed Image Format (Windows Vista)". A small overlay icon
indicating the compression is displayed ( ).
5. Repeat step 4 with the other 256x256 image formats (if any).
6. Save the icon "File/Save". Close the icon window.
7. Back in the EXE document window, you see the compression overlay icon ( ) displayed on all the
256x256 formats. Repeat steps 3 to 6 for all the other icons containing 256x256 images (if any).
8. Save your EXE document, close the window.
9. You're done! The EXE file size is smaller indicating that the compression is made.
Lesson 10 - Creating Icons Using Photoshop® Templates
In this lesson, we'll create 2 icons using Photoshop® templates. Templates permit you to use the powerful
tools of Photoshop to draw your icon in different formats, then transfer the work to IconWorkshop. Axialis
IconWorkshop™ creates the icon automatically in one step.
A template is a ready-to-use image which contains enpty/transparent square areas where you can draw
your icons in different formats. This image is designed to be placed in background of your drawing project.
You make your artwork in layers that you add on top of this backround template. You can add as many
layers as you want and you can save your project as individual files for future use or modifications. Once
your work is done, just export it into IconWorkshop, the image will be temporary flatten and the icon
created.
If you do not work with Photoshop®, go directly to lesson 11.
89
Axialis IconWorkshop 6.10
How do the Photoshop® templates work?
Select "new icon project from template" in IconWorkshop™. Choose one template (10 templates are
provided, see below). Adobe Photoshop® is launched and a new image document is created with the
template image in background. Draw your images, creating layers as necessary. You can save the work as a
PSD file for later use. Choose "Export to IconWorkshop™". The Axialis plugin is launched, a XML description
file is read (you can create your own, see in help) and the icon is created in IconWorkshop™. Just retouch it
if you want and save it.
How many templates are included in IconWorkshop?
10 templates are included in IconWorkshop. Each template is composed of 2 files: a PNG file with
transparency which is the image file on which you'll draw the different sizes of your icon; a XML file
describing the template (this is a text file with the same filename, extension XML). You can create your own
new templates. Files are located in [Application Data]/Axialis/IconWorkshop/Templates. The 10 templates
are:
1. Windows Icon - All Formats
2. Windows Vista Icon (256x256,...)
3. Windows XP Icon (48x48,...)
4. Macintosh OSX Icon (128x128,...)
5. Macintosh OSX Tiger Icon (256x256,...)
6. Macintosh OSX Leopard Icon (512x512,...)
7. Windows Project (2 Sizes)
8. Windows Project (3 Sizes)
9. Macintosh Project (2 Sizes)
10. Macintosh Project (3 Sizes)
What is the difference between "Simple Icon" and "Icon Project" templates ?
The simple icon templates (numbers 1 to 6) have been designed to permit you to draw all the formats of
the icon, including RGB/A, 256 and 16 colors. If a format is left blank, it will not be added to the icon.
The icon project templates (numbers 7 to 10) permit you to create 2 or 3 versions of your icon (based on
the template you choose). Then, during the export, the formats are created according to the XML
descrition file. Usually, image formats in project templates are created using the following guidelines:
• 512x512, 256x256, 128x128 to 72x72 : Image in perspective with details, light effects and
shadows.
90
Getting Started Tutorial
• 64x64 to 24x24 : Image in perspective with a few details, limited light effects and shadows. A
border is added to enhance visibility.
• 16x16: Flat image without details and large borders.
Install the Photoshop-to-IconWorkshop™ transfer plug-in
Before using the as detailed in next topic, you need to install it on your computer. The plug-in can be easily
installed from within Axialis IconWorkshop™ in one fast and simple operation.
If you've already installed the Photoshop® plug-in with a version of IconWorkshopatr prior to
6.10, you must install it again by following the procedure below. A new export plug-in will be
installed in addition to the filter plug-in. The export plug-in will be used with Photoshop®
Templates
1. Before installing the plug-in you need to close the Photoshop® application (if it is opened in
background). Choose File/Install Photoshop® Plug-in...
2. The dialog box Install the Photoshop to IconWorkshop Transfer Plug-in opens (see below). In the
Location edit zone ( ), specify the Photoshop plug-in folder. If you don't know the exact folder
path, click the browse button ( ) to choose the folder in a list.
3. If you want to create a subfolder "Axialis" to install the plug-in module (recommended to organize
your folder properly), activate the option "Install in a subfolder Axialis" ( ). Note that creating a
subfolder may fail with some compatible applications.
4. Click OK. When done, a message informs you that the plug-in has been installed.
5. Now you can start your Photoshop® application. The plug-in is visible in Filter/Axialis/Transfer To
IconWorkshop™ and File/Export/Export to Axialis IconWorkshop™ menus. Read this for more info
on how to use the plug-in filter.
Create a Windows® XP icon
In this first part, we'll create a simple icon for Windows® XP. To do this, we'll use an "Icon Template". This
kind of template (see above), permits you to create each format of the icon separatly. A typical Windows®
91
Axialis IconWorkshop 6.10
XP icon contains 9 or 12 formats: sizes 48x48, 32x32, 16x16 (optional 24x24), each one in colors RGB/A,
256 and 16. As a result, the templates contains 12 areas where you can draw the different formats of the
icon. If a drawing area is left blank, the associated format is not created.
In the procedure below, we'll create 3 RGB/A formats: 48x48, 32x32 and 16x16.
1. First, be sure the Photoshop® plug-in has been installed (see previous topic). Choose File/New/Icon
Project from Photoshop Template/Windows XP Icon (48x48...).
2. Adobe Photoshop® opens and a new document is created. Its name is "IW-Template-003 copy". The
term "copy" means that this is a new document based on the file "IW-Template-003" but not linked
to it. As a result, you won't overwrite the original template image by saving your over it by error
(simply by pressing Ctrl+S for instance). It's like a new document containing an image at startup.
The figure above shows the document window as it has been created in Photoshop®. In the upperleft corner ( ) there is a barcode to let IconWorkshop identify the number of the template (this
permits IconWorkshop to associate the template image with the associated XML file). Do not modify
or remove this barcode.
The template is divided in 3 groups ( ), one per color mode. We'll draw image formats only for the
RGB/A color mode in sizes 48x48, 32x32 and 16x16 ( ). We'll leave the other formats blank ( ).
At the bottom of the template you'll find some instructions on how to use the template ( ). This
part of the template is not used during the export into IconWorkshop™ and the icon creation. If you
want to save your icon project as a separate PSD file, you can remove this part (crop the image
above the doted line).
From here, you can simply draw your icons in the associated format zones and go directly to step 7.
If you don't want to draw and prefer to use read-to-use sample images, follow steps 3 to 6.
3. Open the file "[Axialis Librarian]\Objects\Samples\Medium\Folder With Document.png". We mean
by [Axialis Librarian] the folder where is stored the Axialis Librarian (usually in the My Documents
folder).
You can also do this directly from IconWorkshop™: in the Librarian, open the folder
"Objects\Samples\Medium", right-click on the file "Folder With Document.png". A menu opens,
choose "Open With/Adobe Photoshop®". The file is opened in a Photoshop document window.
4. Copy/Paste the image of the Folder with Document into the Template (a new layer is created),
select it ( ). Choose Edit/Transform/Scale and adjust the image into the 48x48 RGB/A square ( ).
The resulting image should be perfectly adjusted inside the transparent square ( ), not over the
borders (which will not be exported).
92
Getting Started Tutorial
Redo the same operation for the 32x32 RGB/A format ( ). In you're an advanced Photoshop user,
you can retouch the images to enhance the final result.
5. Now let's create the 16x16 format. We'll use another image which will produce better results in very
small sizes (located in subfolder "Small"). Open the file "[Axialis
Librarian]\Objects\Samples\Small\Folder With Document.png".
6. Redo the operation similar to step 4 ( ) and adjust the image ( ) into the 16x16 RGB/A square.
The result must be perfectly adjusted inside the square ( ):
7. Now let's create the icon: In Photoshop, choose File/Export/Export to Axialis IconWorkshop. The
template is automatically recognized by IconWorkshop and the icon is created with the 3 formats
we've drawn ( ):
93
Axialis IconWorkshop 6.10
Only the squares with images generated the associated formats. Now if you want to create other
formats, you can follow the same procedure as in Lesson 4.
Adding other formats using the template
You can also add new formats from the one you've drawn using the template. For example, let's add the
256 color formats from the RGB/A images we've already drawn:
8. Go back to Photoshop and select the document containing the template. Select the layer "Layer 0"
(the one containing the template image).
9. Select the Paint Bucket tool: and using the color you want (we used pure green RGB:0,255,0), fill
the 3 squares 48x48, 32x32 and 16x16 in the group 256 colors ( ):
10. Choose File/Export/Export to Axialis IconWorkshop. A new icon document is created with the 256
color formats added. The formats has been automatically created from the largest and most
coloured image, in our case 48x48 RGB/A. The problem is that the 16x16 format has also been
created from this detailed image, not from the 16x16 image we've already created. Using Icon
Project Templates (see below) will solve this problem.
11. Once you have finished to work on an icon template, we recommend you to save the document
using the PSD format. This will permit to work again later on the project, preserving all your layers
and effects you may have added.
Create a Windows Vista™ icon using a 3-image Project Template
This second part will permit you to go further by creating an icon using a more professional method. We've
seen in previous topic that basic icon templates require to draw all the formats of the icon to get the best
results. Using Icon Project Templates, you draw 2 or 3 versions of your icon (depending on the template
you use) and IconWorkshop automatically creates the icon formats using pre-defined rules.
For exemple, the template "Windows® Project (3 Sizes)" lets you draw 3 images. Use the recommended
guidelines below to draw the images. Then, IconWorkshop creates each format of the icon accordingly:
94
Original Template Image
Drawing Guidelines
Created Icon Sizes
256x256
Image in perspective with
details, light effects and
shadows.
256x256, 128x128
Getting Started Tutorial
192x192
Image in perspective with a
few details, limited light
effects and shadows. Add
larger borders to enhance
visibility
64x64, 48x48,
32x32, 24x24
128x128
Flat image without details and
a large border.
16x16
This is an advanced method for creating icons but this is the one which produces the most professional
results. The final icon contains hi-res images for operating systems which support them such as Windows
Vista™ or MacOS 10.4/10.5. It contains also smaller images which are easily identifiable by the user in all
resolutions.
Note that the small sizes are generated from larger original images. For exemple, the 16x16 size is created
from a 128x128 image (ratio 8:1). This permits an easier drawing experience and produce better results.
In the procedure below, we'll create a fully featured Windows Vista™ icon of the image "Folder With
Document" that we've already used above.
1. First, be sure the Photoshop® plug-in has been installed (see topic above). Choose File/New/Icon
Project from Photoshop Template/Windows Project (3 Sizes)
2. Adobe Photoshop® opens and a new document is created. Its name is "IW-Template-008 copy":
95
Axialis IconWorkshop 6.10
The figure above shows the document window as it has been created in Photoshop®. It contains 3
drawing areas where you'll draw the 3 images of your icon: the large size 256x256 ( ), the medium
size 192x192 ( ) and the small size 128x128 ( ).
From here, you can simply draw your 3 images in the associated zones and go directly to step 7. If
you don't want to draw and prefer to use read-to-use sample images, follow steps 3 to 6.
3. Open the file "[Axialis Librarian]\Objects\Samples\Large\Folder With Document.png". We mean by
[Axialis Librarian] the folder where is stored the Axialis Librarian (usually in the My Documents
folder).
You can also do this directly from IconWorkshop™: in the Librarian, open the folder
"Objects\Samples\Large", right-click on the file "Folder With Document.png". A menu opens, choose
"Open With/Adobe Photoshop®". The file is opened in a Photoshop document window.
4. Copy/Paste the image of the Folder with Document into the Template (a new layer is created),
select it. Move the image in the 256x256 drawing area. The resulting image should be perfectly
adjusted inside the transparent square ( ), not over the borders (which will not be exported). The
resulting image should look like this:
96
Getting Started Tutorial
5. Repeat the procedure for the file "[Axialis Librarian]\Objects\Samples\Medium\Folder With
Document.png". Move it into the drawing area 192x192 ( ).
6. Repeat the procedure for the file "[Axialis Librarian]\Objects\Samples\Small\Folder With
Document.png". Move it into the drawing area 128x128 ( ). See below the resulting document
window:
7. Now let's create the icon: In Photoshop, choose File/Export/Export to Axialis IconWorkshop. The
template is automatically recognized by IconWorkshop and the icon is created with all the formats
as described in the template ( ):
97
Axialis IconWorkshop 6.10
8. Various image formats have been created. Simply remove the formats you don't wish to include in
your icon. Save the icon.
9. Once you have finished to work on an icon template, we recommend you to save the document
using the PSD format. This will permit to work again later on the project, preserving all your layers
and effects you may have added.
Lesson 11 - Batch creating several icons from images
We have seen how to create one icon from an image. A more powerful feature permits to automate this
operation to create several icons from a group of images. Each image will be used to produce one icon with
several formats embedded. This automated operation is called a "Batch" feature.
Several batch features are included in Axialis IconWorkshop™. It permits to greatly increase productivity
especially if you deal with numerous icons in your daily work. In this lesson, we'll see one of them but we
strongly recommend you to test all of them to get a better idea of the power of Axialis IconWorkshop™.
We'll start with a set of 18 images in 256x256 JPEG2000 format. We'll create the 9 first icons in
Windows® format and the 9 others in Macintosh® format.
Opening the folder containing the image in the Axialis Explorer
Axialis IconWorkshop™, like all the Axialis products, contains a built-in file explorer that permits to do all
kinds of operations on files associated with the application. We use to call this file explorer "Axialis Media
File Explorer". It looks like the Windows® explorer, has different views including a great thumbnail mode with
fast preview and permits various operations on files like copy/move/rename...
All the batch functions are available from the Axialis Explorer window. That's the reason why we'll start this
lesson by opening the folder which contains the images in this explorer, even if those files are located in the
Librarian.
1. First, you must be sure the librarian is visible. If the librarian window is not visible, check the Librarian
button in the main toolbar ( ) or press ESC.
2. Select the "Media Files/Images/Rounded Buttons" folder ( ). In the thumbnail preview list (below),
you see all the files included in the folder ( ).
98
Getting Started Tutorial
3. Right-click in the librarian tree, a menu opens. Choose the command "Open Folder in Explorer" ( ). A
new Explorer window opens in the working area ( ) and the folder contents is automatically
displayed. You see all the images displayed in thumbnail mode with preview. If this is not the case, be
sure to select in menu: "Explorer/Display/Large Icons" and "Explorer/Display/Auto Preview".
Creating the Windows® icons
4. In the Explorer window, select the 9 first images in the list. To do this, click on the first image, press
the SHIFT key (keep it pressed) and click on the 8th image. The images are selected.
5. Right-click on one of the selected images, a menu opens. Select the command "Batch Create
Windows® Icons from Selection...".
6. A dialog box opens. In "Standard Image Formats" ( ), Windows Vista™ Formats and "Other Formats"
( ) choose the image formats you wish to add in the icons.
7. In Image Adjustment group ( ), you can add a smooth or sharp filter to the image shrinking process.
You can also use or not a dithering method to render image using 256 or 16 colors. In Transparency
99
Axialis IconWorkshop 6.10
group ( ), an option permits to use opaque images (i.e. without transparency) and specify a color
to make transparent.
8. When done click OK. All the icons are created and added to the same folder (see below ). Names
are preserved, only the extension is changed to ICO. The Librarian is updated accordingly since this is
the same folder ( ):
9. Let's take a look at a newly created icon. Double-click on a created icon, for example "Cancel.ico". A
document window opens as shown above with all the image formats available ( ). When you've
checked all the formats, close this window.
Creating the Macintosh® icons
10. In the Explorer window, select the 7 last images in the list. Use the same method as above.
11. When the images are selected, Right-click on one of them, a menu opens. Select the command
"Batch Create Macintosh® Icons from Selection...".
100
Getting Started Tutorial
12. A dialog box opens. First we need to choose the Macintosh® file format we wish to use (there are 3
formats supported by IconWorkshop™ - see this topic to learn more). Choose "MacBinary Icon
(BIN)".
13. In groups "Standard Image Formats" ( ) and "Other Formats" ( ) choose the image formats you
wish to add in the icons. The other options are the same as above.
14. When done click OK. All the Macintosh® icons are created and added to the same folder. Names are
preserved, only the extension is changed to BIN. The Librarian is updated accordingly since this is the
same folder.
15. Let's take a look at a newly created icon. Double-click on a Macintosh® icon, for example
"Phonea.bin". A document window opens as shown above with all the image formats available. When
you've checked all the formats, close this window.
Lesson 12 - Creating a new Icon Library
If you plan to deal with a large number of icons, we strongly recommend you to create Icon Libraries to save
them. You can assemble an unlimited number of icons in an Icon Library. The extension for a standard Icon
Library is ICL. Axialis IconWorkshop™ fully support ICL files. It can create, read and save ICL library files.
Also, ICL file format is fully supported by all versions of Windows®. For example, you can customize a
Windows® shortcut by selecting a new icon in an ICL file.
Axialis IconWorkshop™ has a powerful feature to support ICL files in its built-in Librarian that permits you to
consider ICL files as folders. In this lesson, we'll create a new Icon Library in the Librarian.
Creating an Icon Library in the Librarian
1. To create an Icon Library in the librarian, you must be sure that the librarian is visible and located to
the correct folder (select the "Icons" folder ). If the librarian window is not visible, check the
Librarian button in the main toolbar ( ) or press ESC.
101
Axialis IconWorkshop 6.10
2. To create the Icon Library, select Librarian/New Icon Library or right-click on the current folder in
the tree and choose New Icon Library in the menu or press Ins.
3. A new entry is inserted in the tree, type the name of the new library ( ). Enter "Spheres" then hit
Enter.
4. The new Icon Library is now created. Its contents (empty for now) is displayed in the area below.
Now you can add icons to this library. This is what we'll do in next lesson.
Lesson 13 - Adding icons to the Icon Library
Now that we've created a new icon library (named "Spheres"), we'll add to it the 2 icons we've previously
created.
Adding an icon to the Icon Library (from the Librarian)
1. Be sure the librarian is visible and select the "Icons" folder. Also, if necessary, click on the "plus icon"
located on left of the folder ([+]) to expand the tree branch and show the sub-libraries (including
our newly created "Spheres" library).
2. In the list below, select "MySphereIcon.ico".
3. Now, using the mouse, Drag & Drop the icon to the Icon library in the tree above. Release the mouse.
The file has been copied to the Icon Library. If you want you can delete it from the folder.
4. Now, verify by selecting the Spheres library in the tree. The icon appears in the list below. Note that
the aspect of the items in the list below has changed. It has been optimized to display icons only
(check options in the local toolbar to display icons in this list).
102
Getting Started Tutorial
Adding an icon to the Icon Library (from an opened icon document)
5. Be sure the librarian is visible and select the "Icons" folder.
6. In the list below, select "MySphereIcon.icns". Hit Enter or double-click on it. It opens in a document
window.
7. Now, select the Spheres library in the tree (if necessary, click on the "plus icon" located on left of the
folder ([+]) to expand the tree branch).
8. Return to the document window and choose File/Add to the Librarian or press F3 or click on the
associated button in the local toolbar (see below )
9. A dialog box Add Icon to the Librarian opens. Keep the proposed name, click OK. The icon is no added
to the icon library "Sphere". The icon has been saved and inserted in the library. Now close the
document. As you can see, the Apple Macintosh icons can also be added into ICL files. To identify
them, a small apple overlay is displayed.
Adding icons to the Icon Library (from the Axialis Explorer)
10. Select the folder "Icons" folder and create a new Icon Library "Buttons" (use the same methode as
lesson 12, step 2): select Librarian/New Icon Library or right-click on the current folder in the tree
and choose New Icon Library in the menu or press Ins.
11. Let's add the icons we've created from the button images in lesson 11. Select the "Media
Files/Images/Rounded Buttons" folder ( ). In the thumbnail preview list (below), you see all the files
included in the folder ( ):
103
Axialis IconWorkshop 6.10
12. Right-click in the librarian tree, a menu opens. Choose the command "Open Folder in Explorer" ( ).
A new Explorer window opens in the working area ( ) and the folder contents is automatically
displayed. You see all the images displayed in thumbnail mode with preview. If this is not the case, be
sure to select in menu: "Explorer/Display/Large Icons" and "Explorer/Display/Auto Preview".
13. Select all the ICO and BIN files. If you want to select all the ICO files in one operation, press the "+"
key. A dialog opens, type "*.ICO", click OK. Redo the same for the BIN files (uncheck the option
"Replace the current selection").
14. Once the files are selected, select the Icon Library "Buttons" ( )that you've just created in the
librarian (it is empty). Back into the Explorer Window, click on the "Add to the librarian" button or
press F3 ( ).
The icon files are added into the library ( ) in one step. The list is populated and you see all the icons
in the librarian window ( ). Right-click on the list and choose "Save Now", or just select another
folder and you'll be prompted to save the library. The library is saved into an ICL file named
"Buttons.icl" located in the "Icons" folder.
Lesson 14 - Compiling the Icon Library
In this lesson, we'll compile the "Buttons" library we've created in previous lessons. This will produce an EXE
installable package (one compressed file) ready for distribution.
Selecting the Library, starting the compilation wizard
1. First, we're going to select the library which is located in the Librarian. You must be sure the librarian
is visible. If the librarian window is not visible ( ), check the Librarian button in the main toolbar ( )
or press ESC.
104
Getting Started Tutorial
2. Select the library "Buttons" in the librarian tree ( ), the icons included in the library appear in the list
below ( ). Select all the icons in the library or press Ctrl+A. Right-click in this list and choose
Compile as EXE Installable Package ( ) or click the associated button ( ). A dialog box opens.
Specifying the compilation options using the wizard
3. The first screen of the Compilation Wizard opens:
In the Filename zone ( ), enter the name of the installation program file that will be generated. For
example type "Button Icons Install". In the Location zone ( ), specify the folder where you want to
create the installation package, you can change this folder manually or browse your disks by clicking
the "..." button ( ). We recommend to specify or use a well identified folder, for example the My
Documents folder (recommended under Windows Vista™). If the folder does not exists, you'll be
prompted to create it.
4. Click "Next >>". The second screen of the Compilation Wizard opens:
105
Axialis IconWorkshop 6.10
In the Filename zone ( ), enter the name of the ICL file that will be created by the installation on the
end user computer. We recommend you to always keep the ICL name proposed by Axialis
IconWorkshop™. In the Title zone ( ), specify the title that will be displayed (using large font) in the
install procedure window. In the Copyright zone ( ), specify your copyright/property notice (it will
be displayed in bold font under the title).
In the other zones ( ), specify your name, website link and a comment. This information will be
added in the install procedure About Box.
5. When done, click "Next >>". The 3rd screen opens:
This screen permits you to specify an information text that will be displayed in the installation
procedure. This is very useful to inform the user about the icon library, your business... If you want to
specify a text, click Display an Information Text box ( ). The zone below activates ( ). You can
type the text in this box. You can also load or save text files using the related buttons ( ). For this
tutorial, we don't use this feature.
7. When done, click "Next >>". The 4th screen opens:
106
Getting Started Tutorial
This screen permits you to specify an License Agreement text that will be proposed to the user
during the installation procedure. The user will be asked to accept all the terms of this agreement
before proceeding with the installation. If you want to specify a text, click Add a User License
Agreement box ( ). The zone below activates ( ). You can type the text in this box. You can also
load or save text files using the related buttons ( ). For this tutorial, we propose you to keep this
standard License.
7. When done, click "Next >>". The 5th screen opens. It permits you to implement an Activation feature
in your distribution package. If you choose to use this feature, the user who will install the icon
library will be prompted to enter a personal Activation Code to proceed with the installation. To read
more about this advanced feature, see Use an Activation Code topic. For this tutorial, we won't use
this feature.
8. When done, click "Next >>". The last screen named Ready to Compile opens. It proposes you to read
a summary of the options you selected before proceeding with the compilation. Always read in
details this summary before validating. When done, click "Next >>". The compilation starts...
Testing the compiled installation package
9. When done, a large button appears "Test the Installation Package Now". Click on it to test the
compiled file. It looks this:
Now follow the install procedure to see the result. Of course, the "Button Icons Install.exe" file has
been created in the destination folder you specified above. This is a standalone EXE install file that
can be copied and redistributed.
107
Axialis IconWorkshop 6.10
A word to finish...
This tutorial is now finished. Now that you've seen the basic features of Axialis IconWorkshop™ and
understood the philosophy of use, we propose you to go further and explore the features by testing
the numerous commands available in menus and toolbars.
When you need an answer about a feature, check this help in the reference section about the related
command. You can also check the "How To..." section if you wish to execute a particular task.
108
3
How-to Procedures
How to Create an Icon from an Image File
1. Open the image file in Axialis IconWorkshop™
1. Choose "File/Open", browse your folders and select your file (Windows® standard dialog
box).
or
Choose "File/New/File Explorer" or press Ctrl+E. A built-in Axialis file explorer window opens.
Browse your disks, see the thumbnail preview and double-click the image file you wish to
open.
or
In the Recently Used zone (in the main toolbar), type the full pathname of the image file you
wish to open then hit Enter.
2. The image file opens in a document window.
Axialis IconWorkshop™ will convert images to 32 bpp with transparency when possible. This
is much more convenient to create icons. The following image formats can include
transparency: Photoshop® PSD, PNG, RGB, GIF, JPEG 2000 and WMF.
2. Create an icon from this image
3. Before proceeding, we recommend you to select the portion of image you wish to use to
create your icon. If you leave too many transparent areas around your image, the visible
part of your icon will be too small.
4. Select the portion of image: Use the selection tool (upper-left button of the tool palette)
and select the portion of image you wish to use (do not cut the shadow if there is one
around the object). When done, an animated dashed rectangle has been created.
5. When the selection is done, choose Image/Create New Icon from Selection or press "I" or
click the first command button in the local toolbar ( ):
109
Axialis IconWorkshop 6.10
To create a Macintosh® icon, the procedure is similar, just click the Apple® button in right
or press "M".
6. The dialog box New Icon From Image opens (see below). In the Name group ( ), enter the
icon project name. Do not specify any extension.
7. In the Image Formats group, select the image formats you wish to add in the icon ( ) and
unselect the unwanted images ( ). Just click on the image preview to select/unselect. To
know more about the desired Windows® standard image format, see What is an Icon topic.
8. If you wish to start creating your icon with an unlisted format, click the Other Image Format
button.
9. When done, click OK. The icon is automatically created with the various image formats
you've selected.
110
How-to Procedures
How to Create an Icon from a Cursor File...
Axialis IconWorkshop™ permits you to create icons from Static (CUR) or Animated Cursors (ANI).
1. Open the cursor file in Axialis IconWorkshop™
1. Choose "File/Open", browse your folders and select your file (Windows® standard dialog
box).
or
Choose "File/New/File Explorer" or press Ctrl+E. A built-in Axialis file explorer window opens.
Browse your disks, see the thumbnail preview and double-click the image file you wish to
open.
or
In the Recently Used zone (in the main toolbar), type the full pathname of the cursor file you
wish to open then hit Enter.
2. The cursor file opens in a document window.
2. Create an icon from this cursor
3. If the file is a Static Cursor (CUR), it may contain several image formats (see list). Click on
the desired format. It appears in the editor window.
or
If the file is an Animated Cursor (ANI), it contains several frames (see list). Click on the
desired frame. It appears in the editor window.
4. Select the portion of image: Use the selection tool (upper-left button of the tool palette)
and select the portion of image you wish to use. When done, an animated dashed rectangle
has been created.
5. When the selection is done, choose Image/Create New Icon from Selection or press "I" or
click the first command button in the local toolbar ( ):
To create a Macintosh® icon, the procedure is similar, just click the Apple® button in right
or press "M".
111
Axialis IconWorkshop 6.10
6. The dialog box New Icon From Image opens (see below). In the Name group ( ), enter the
icon project name. Do not specify any extension.
7. In the Image Formats group, select the image formats you wish to add in the icon ( ) and
unselect the unwanted images ( ). Just click on the image preview to select/unselect. To
know more about the desired Windows® standard image format, see What is an Icon topic.
8. If you wish to start creating your icon with an unlisted format, click the Other Image Format
button.
9. When done, click OK. The icon is automatically created with the various image formats
you've selected.
How to Create an Icon from a Transparent GIF File
GIF is a famous and widely used image format. Additionally, some GIF files include transparent
areas, which is convenient to create icons. Axialis IconWorkshop™ permits you to create icons from
Static or Animated GIF files.
1. Open the GIF file in Axialis IconWorkshop™
1. Choose "File/Open", browse your folders and select your file (Windows® standard dialog
box).
or
Choose "File/New/File Explorer" or press Ctrl+E. A built-in Axialis file explorer window opens.
Browse your disks, see the thumbnail preview and double-click the image file you wish to
open.
or
In the Recently Used zone (in the main toolbar), type the full pathname of the cursor file you
wish to open then hit Enter.
2. The GIF file opens in a document window.
112
How-to Procedures
2. Create an icon from this GIF image
3. If the file is a Static GIF, it appears in the editor window.
or
If the file is an Animated GIF, it contains several frames (see list). Click on the desired frame.
It appears in the editor window.
4. If the GIF image contains transparent areas they are kept (you see the Chessboard texture).
Select the portion of image: Use the selection tool (upper-left button of the tool palette)
and select the portion of image you wish to use. When done, an animated dashed rectangle
has been created.
5. When the selection is done, choose Image/Create New Icon from Selection or press "I" or
click the first command button in the local toolbar ( ):
To create a Macintosh® icon, the procedure is similar, just click the Apple® button in right
or press "M".
6. The dialog box New Icon From Image opens (see below). In the Name group ( ), enter the
icon project name. Do not specify any extension.
7. In the Image Formats group, select the image formats you wish to add in the icon ( ) and
unselect the unwanted images ( ). Just click on the image preview to select/unselect. To
know more about the desired Windows® standard image format, see What is an Icon topic.
8. If you wish to start creating your icon with an unlisted format, click the Other Image Format
button.
9. When done, click OK. The icon is automatically created with the various image formats
you've selected.
113
Axialis IconWorkshop 6.10
How to Create an Icon from a Web Image
The Web is a great place to find images. Here is how to proceed to create icons using these images.
Get the Image from the Web
1. Launch your Internet browser and surf to the desired page.
or
In the Recently Used zone (in the main toolbar), type the full Internet address of the desired
page, hit Enter.
2. The page opens in a document window.
Create an icon from an image in the page using the Clipboard
Using the clipboard, you loose the transparent areas if present.
3. Right-click the desired image then choose Copy. The image is copied into the clipboard.
5. If you want to create an icon using the whole image:
Select New/Icon Project From Clipboard or press Ctrl+Q. The dialog box New Icon Project
opens. Select the type of icon you wish to create: Windows® ( ) or Macintosh® ( ):
If you choose Windows® (the procedure is similar for a Macintosh® icon), a second dialog
box opens.
114
How-to Procedures
In the Name group ( ), enter the icon project name. Do not specify any extension.
In the Image Formats group, select the image formats you wish to add in the icon ( ) and
unselect the unwanted images ( ). To know more about the desired Windows®® standard
image format, see What is an Icon topic. If you wish to start creating your icon with an
unlisted format, click the Other Image Format button.
When done, click OK. The icon is automatically created with the various image formats
you've selected.
or
5. If you want to create an icon using a portion of the image:
Select Edit/Paste as New Image or press Ctrl+I. A new document is created containing the
desired image.
Now follow Step 2 procedure as in topic: Create an Icon from an Image File.
Create an icon from an image in the page using a temporary file
Using a temporary file, you keep the transparent areas if present.
3. Right-click the desired image then choose Save Picture As. Store the image on your hard
disk using a new filename.
4. Now, create your icon as in topic: Create an Icon from an Image File using the newly created
file.
115
Axialis IconWorkshop 6.10
How to Create an Icon from the Clipboard
Creating an Icon from the Clipboard Contents is the quickest way to proceed. It permits also to
transfer images from external programs.
If the external program (from where you copied the image) does not support 32Bpp
images with transparent alpha channel, the transparency will be lost.
Creating the Icon from the Clipboard Contents
1. Select New/Icon Project From Clipboard or press Ctrl+Q. The dialog box New Icon Project
opens. Select the type of icon you wish to create: Windows® ( ) or Macintosh® ( ):
2. If you choose Windows® (the procedure is similar for a Macintosh® icon), a second dialog
box opens.
3. In the Name group ( ), enter the icon project name. Do not specify any extension.
116
How-to Procedures
4. In the Image Formats group, select the image formats you wish to add in the icon ( ) and
unselect the unwanted images ( ). To know more about the desired Windows® standard
image format, see What is an Icon topic. If you wish to start creating your icon with an
unlisted format, click the Other Image Format button.
5. When done, click OK. The icon is automatically created with the various image formats
you've selected.
How to create attractive icons using image objects
Graphics are among the primary ways of advertising the sale of goods or services. This is true for
computing when designing software icons or website interfaces. The primary solution is to draw
icons using either an image or vector editor. Then, when the image is done, use Axialis
IconWorkshop™ to convert this image to an icon. Also, if you don't want to use an external image
editor, Axialis IconWorkshop™ contains some drawing tools that permit you to draw your own
icons. But most of us are not graphic designers and we have a problem when it comes to create
attractive icons or web graphics.
The question is: "How to create attractive custom icons without drawing skills?" Image Objects are
the answer.
The solution is to use a set of image objects already done by a skilled computer graphic artist, and
assembling them together to create a final artwork that will match your needs. Using a set of
existing image objects the possibilities are almost infinite. You can create many different icons or
graphics simply by adjusting various parameters of each object like Hue (teint), Saturation,
Brightess, Contrast, Size, Opacity and more.
For example, using 6 image objects from our Glossy Buttons object pack, you can easily create an
attractive help icon:
This association can be easily done with Axialis IconWorkshop™ using a few mouse clicks and dragand-drops. Creating different versions of an icon is very easy with this pack. See below some
examples of the help icon made in a few minutes simply using the mouse and without drawing one
pixel (non-exhaustive list of course!):
117
Axialis IconWorkshop 6.10
Object Packs are libraries containing a large number of image objects made by a professional
designer. We regularly publish new objects packs that you can download on Internet. To create
your icons, you just have to assemble basic objects together. See below examples of icons made
using the Glossy Objects pack:
To follow this tutorial, you need to have the "Glossy Buttons" object pack installed in the
librarian. Search the Librarian for the folder "Objects\Pack 1 - Glossy Buttons"). This
pack is included in IconWorkshop™ 6.0 or more. If you can't find the folder, download
the "Glossy Buttons" pack from Internet
Defining, Creating the Icon Project
Before using the image objects, we need to create a new icon project. An icon contains several
image formats (see "What's an Icon?") so we need to define all these formats before going on.
We'll create an icon compatible with Windows Vista™ (256x256 format), Windows® XP; (48x48,
32x32, 24x24 and 16x16 formats) and Dock Bar applications (128x128 format). To simplify
the project, we won't add indexed color formats (256, 16 colors). Using the objects we'll make a
"Glossy Earth" icon with bottom shadow. The resulting icon will look like this:
118
How-to Procedures
The largest image format is 256x256 XP (ie RGB with alpha channel). To get the best results, we'll
start the project with this new format and work with it to assemble the objects. When finished,
we'll create all the other formats using this 256x256 format as template. Let's create our new icon
project:
1. Launch Axialis IconWorkshop™. Choose File/New/Windows® Icon Project or press Ctrl+W. A
dialog box opens:
2. Type the name of the project ( ): "Glossy Earth".
3. Now specify the format of the first image to add in the project: In Colors, choose "Windows
® XP with Alpha Channel (RGB/A 32 bits)" ( ). In Size in Pixels, choose and "256x256
(Windows Vista™)"Glossy Earth" ( ).
4. As we want the 256x256 format to be used under Windows Vista™, we choose to
compress it as PNG: Click the option "Compress 256x256 Windows Vista™ format" ( ). To
learn more about Windows Vista™ icons, read this article: "Introducing Windows Vista™
Icons".
5. When done, click OK. A new icon project window is created ( ):
119
Axialis IconWorkshop 6.10
6. If the scale-1:1 preview window is not in 256x256 mode, the preview image will be
cropped. It is recommended that you switch to 256x256 preview mode to work with
256x256 Windows Vista™ icons. To switch to this mode, right-click in the preview
window, a menu opens. Choose "256x256 Display". The preview window now looks as
shown above in floating mode ( ).
Use the same method to return to the previous state: choose "128x128 Display", remove
the "Floating Window" option and use the mouse to dock the window.
Building the Icon Using Image Objects
This is the most important part of the project. The time has come to be creative! No problem it's
easy and fun with IconWorkshop™. Before we start, don't forget that each step of the creation can
be undone/redone (Ctrl+Z/Ctrl+Y) up to 16 steps back.
7. In the Librarian window (choose View/Librarian if it is not visible), select the "Objects/Pack
1 - Glossy Buttons/Circle" folder ( ). A list of available object is displayed in the contents
window below ( ). Find the "Circle - Blue.png" file and select it ( ).
120
How-to Procedures
8. When done, use a mouse Drag-and-Drop to add it into the project as shown above ( ).
The object is added to the project as a floating selection ( ). Take a look at the quality of
the artwork in the Scale 1:1 window ( ).
Congratulation! you've just added your first image object to your project! As you can see it's
very easy and intuitive. Now let's continue and add other objects to build the icon.
IMPORTANT
To follow the next steps, the "Preserve Transparency" option must be set (press "T" or
select Draw/Preserve Transparency). If this option is not set, the transparency will not
be kept each time you add a new image object and the objects already added will be fully
replaced
9. From the Librarian, select the file "Circle Inner Light.png" and add it to the project using the
same method. The resulting image now includes a cyan light effect as shown below:
10. To create the Earth image, we now add the map object. From the librarian, select the file
"World Map.png" and add it to the project using the same method. The resulting image
looks like below:
11. The result is good but we want to make it even better. We can increase the realism by
changing the color of the map to green. To do so, IconWorkshop™ has a feature to adjust
the Hue/Saturation/Brightness of an image. Choose Draw/Adjustments-Effects/HueSaturation or press "U". A dialog box opens:
121
Axialis IconWorkshop 6.10
12. Set the Hue to "-100" either using the slider or by typing the value ( ). It "shifts" the
colors of the floating image in the spectrum. As a result, the map is now green. Also, we
slightly increase the Brightness of the map by specifying "6" ( ). You can see the results in
real-time in the Preview 1:1 window. When done click OK. Now the map is green:
13. Do you recall the name of the icon? Yes, "Glossy Earth"! So, let's add the glossy effects.
First, using the same drag-and-drop method as above, we add the object "Circle Effect
3.png". Then to increase the effect, we add the object "Circle Effect 6.png". Now it looks
like this:
122
How-to Procedures
14. Now the final touch: the shadow. We want to add a shadow at the bottom and under the
earth. This will produce an interesting effect, just like if the globe was laid on a white
horizontal plan.
First, we need to move the whole Earth 10 pixels up (just to leave more space for shadow at
the bottom of the image). Important: To do so, we must select the whole image. Actually,
only the last object we've added is selected. Choose Edit/Select All or press Ctrl+A. There is
no visual change but now you're ready to move the whole image.
To move the image, you can use the mouse (with a drag-and-drop) or use the arrow keys of
the keyboard. To move the image 10 pixels up, hit UpArrow 10 times or press
Shift+UpArrow. The resulting selection rectangle is now 10 pixels outside the top of the
editor area.
15. We can now add the shadow. Select the object "Circle Shadow.png" in the librarian and add
it to the project. The resulting image looks like this:
16. Obviously, there is a problem: The shadow is in front of the Earth Globe! The solution is as
easy as a keystroke: Press the End key or choose Edit/Set Floating Selection to Background.
You're done! The resulting image should look like this:
123
Axialis IconWorkshop 6.10
Finalizing the Icon by Creating All the Formats
Now that the largest image is done (256x256 RGB/A), we'll create all the other formats of the
icons from this one. This is done in one step with Axialis IconWorkshop™ Corporate Edition. Using
the Personal Edition, you need to create each format manually (see product help for more info).
17. Choose Draw/Add Several Image Formats from This Image or press "V". A dialog box
opens:
18. Select the images formats to include in the icon ( / ) by clicking on the associated
check boxes. Follow the specifications as we defined them above.
19. You can also choose to apply the dithering option to the 256/16 color images as well as
add a filter effect to smooth/sharpen the resulting images in RGB/A mode ( ). View the
results in the preview images.
20. When done, click OK. The new formats are automatically created and added to the project
( ):
124
How-to Procedures
21. Take a moment to admire your work :) Click on the various formats ( ) and see the
resulting icon at scale 1:1 in the preview window ( ). You can change the background
lightness of the Scale 1:1 window simply by clicking in it using the left button of the mouse.
It will permit you to see how the icon is displayed on different backgrounds with different
lightness.
22. Save your icon: Choose File/Save or press Ctrl+S. It will be saved as Windows® ICO
format.
Congratulations! You've created your first icon from Image Objects. There is no limit to your
creativity using these objects. You can resize them, changing their color, their opacity and more.
You can even create your own objects by combining existing ones.
Creating a Macintosh® version of the icon
You can also save your Windows® icon as Macintosh® format. When the icon is finished (step 22
above), choose File/Save as Macintosh®Icon or press Ctrl+Alt+S.
By doing this, some icon formats which are not available for Macintosh® icons will be
removed. In the example above, format 24x24 will be removed. An information
message will be displayed
125
Axialis IconWorkshop 6.10
How to create Windows Vista™ compliant icons
In this topic, we'll see how to create a Windows Vista™ compliant icon. Windows Vista™ includes
many new features and enhancements. The most visible evolution is the new Graphical User
Interface (GUI). A first look at Aero (the codename for the Windows Vista™ user experience)
reveals a slicker interface with sharper graphics.
Microsoft Windows Vista™ comes with a new format of icons supporting PNG compression and
sizes up to 256x256. The standard Windows Vista™ icons now includes the following image
formats (grayed formats are optional):
256x256 - RGB/A
64x64 - RGB/A
48x48 - RGB/A
32x32 - RGB/A
24x24 - RGB/A
16x16 - RGB/A
256x256 - 256c
64x64 - 256c
48x48 - 256c
32x32 - 256c
24x24 - 256c
16x16 - 256c
256x256 - 16c
64x64 - 16c
48x48 - 16c
32x32 - 16c
24x24 - 16c
16x16 - 16c
The problem is: if you simply make the icon and save it in standard Windows® XP ICO format, the
resulting file will be 400Kb on disk. The solution is to compress the images. Only the 256x256
images are compressed. The compression scheme used is PNG (Portable Network Graphic)
because it has a good lossless ratio and supports alpha channel. The compressed icon sizes are
100Kb to 150Kb.
To get more information on Windows Vista™ Icons, we recommend you to read this topic:
Introducing Windows Vista™ Icons
Creating the Windows Vista™ Icon from an existing image
1. In this procedure, we'll use the following image file to create the Windows Vista™ icon:
"Down.png" (located in Librarian: "Objects\Pack 2 - Realistic Buttons"). If you can't find the
file, download the "Realistic Buttons " pack from Internet.
To get the best results possible, the source image must be 256x256 - RGB/A.
2. Open the Librarian window, go to the folder "Objects\Pack 2 - Realistic Buttons" and open
the file "Down.png". It is loaded in an image document window, not an icon editor window,
as shown below ( ):
126
How-to Procedures
3. If the scale-1:1 preview window is not in 256x256 mode, the preview image will be
cropped. It is recommended that you switch to 256x256 preview mode if you want to
work with 256x256 Windows Vista™ icons. To switch to this mode, right-click in the
preview window, a menu opens. Choose "256x256 Display". The preview window now
looks as shown above in floating mode ( ).
Use the same method to return to the previous state: choose "128x128 Display", remove
the "Floating Window" option and use the mouse to dock the window.
4. Select the whole image. Choose Edit/Select All or press Ctrl+A. An animated selection
rectangle is now drawn around the image.
5. Choose File/Create Windows® Icon From Selection or press "I". A large dialog box opens.
This dialog box will permit you to create all the image formats you want to include in your
icon in one simple step:
6. Type the Name of the new icon project ( ). The root of the image file is proposed by
default.
7. Select the images formats to include in the icon ( ) by clicking on the images. To create a
Windows Vista™ icon, it is recommended that you follow the Windows Vista™
specifications as specified above. Don't forget to add the 256x256 vista formats in RGB/A
(Windows® XP), 256 and 16 color modes ( ).
8. To create a fully-compliant Windows Vista™ icon, you'll need to compress the 256x256
formats in PNG. Select the associated option ( ).
9. You can also choose to apply the dithering option to the 256/16 color images as well as
add a filter effect to smooth/sharpen the resulting images in RGB/A mode ( ). View the
results in the preview images.
10. When done, click OK. A new icon project is created in a document window:
127
Axialis IconWorkshop 6.10
11. The main window with the grid ( ) is the edition area where you can retouch the icon.
The gray chessboard-like texture behind the icon is the transparent portion of the icon (the
alpha channel info has been preserved). The scale 1:1 preview is displayed in the associated
window ( ).
12. All the available formats are displayed in a list ( ). You can select them to edit ( ) or
preview ( ) them. See the application built-in help (press F1) to learn how to add/remove
formats or work with this icon project.
13. The compressed format (only the 256x256 formats can be compressed) are marked with
this overlay PNG compression image: . You can add/remove this option by choosing
Draw/Compressed Image Format (Windows Vista™) or by pressing "K". You can also use
the local toolbar or a right-click menu.
14. When done, save the icon by choosing Edit/Save or pressing Ctrl+S. The resulting icon size
is 150Kb.
How to Create Windows® XP Compliant Icons...
In this topic, we'll see how to create icons which deal with the new Windows® XP Style. We'll also
see which image formats must be included in such icons in order to be compatible with all screen
configurations (see What is an Icon for more info).
This topic is based on a Microsoft® article named "Creating Windows® XP Icons". Click here to read
the original document.
Introduction
Windows® XP introduces a new style in icon design (see image below). We recommend you to
follow the guidelines described in this topic to create compliant icons.
128
How-to Procedures
The best way to proceed is to start creating large scale versions of your images in an external
vector or bitmap drawing program, such as Macromedia® Freehand®, Adobe® Photoshop® or Jasc®
Paint Shop Pro®. The next step will be to import them into IconWorkshop™ to create your icons.
All these programs support the new Alpha Channel (a.k.a. 32 BPP Smooth Transparency) feature in
images. This will help you to create beautiful icons with smooth edges.
What about the new Windows® XP icon format?
This is not a new icon format at all. This is a new image format that you can find in new generation
of icons. This new image format is called "Windows® XP format" in Axialis IconWorkshop™.
This image format contains a 24 bit image, providing 16,8 million colors to the image, plus an
additional 8 bit image called the opacity image (a.k.a. Alpha Channel). As a result, the image color
depth is 32 bits (i.e. you need 32 bits to define one pixel). The main advantage of this image
format is that it permits to display a smooth transparency in icons. The resulting image is displayed
with smooth contours on all backgrounds. It permits also to create dropped shadows behind icons.
This interesting effect, which is recommended by Microsoft, is usually used in Windows® XP icons.
The following illustration shows the difference between a standard image format transparency (in
256 color formats for example) and the new Windows® XP smooth transparency:
Windows® XP Icon Style Characteristics
To create a Windows® XP compliant icon, try to respect the following characteristics:
129
Axialis IconWorkshop 6.10
1. Color is rich and complementary to the Windows® XP look.
2. Angle and perspective provide a dynamic energy to the images.
3. Edges and corners of elements are soft and slightly rounded.
4. Light source is coming from the upper left-hand corner with additional ambient light
illuminating other parts of the icon.
5. The use of gradients provides dimension and gives the icon a richer look.
6. A drop shadow provides contrast and dimension.
7. Outlines provide definition.
8. Everyday objects, such as computers and devices, have a more modern consumer look.
Windows® XP Icon Color Depth and Size
To be compatible with all display cases and screen configurations, you must consider creating icons
containing various image formats based on the following rules:
IMAGE SIZES:
16x16: Displayed in taskbar, windows upper-left corner, detailed lists...
24x24: Displayed in Windows® 2000, Windows® XP menus (facultative)
32x32: Displayed in desktop, lists...
48x48: Displayed in Windows® XP explorer and system lists...
IMAGE COLORS:
Monochrome: Displayed by Windows® if the screen is monochrome (rare, facultative)
16 colors: Displayed by Windows® if the screen is 16 or 256 colors (recommended)
256 colors: Displayed by Windows® if the screen is 16bits or True Colors (recommended)
Windows® XP: Displayed by Windows® XP if screen is True Color or more (recommended)
If an image format is missing, Windows® displays the nearest existing image. It works but the result
is generally distorted.
Color Palette used in Windows® XP Icons
The following colors are generally used in Windows® XP icons:
130
How-to Procedures
We have created a file containing these color swatches. The file "Windows® XP.axco" is located in
"Color Swatches" subfolder of the installation directory. For your information, this file format is
compatible with ACO color files used by Adobe® Photoshop®.
Perspective and Grouping Objects in Icons
This is the perspective grid that Windows® XP style icons use:
Not all objects work well at 16 × 16 at an angle. The following objects are usually shown in a
straight-on manner:
• Document icons
• Icons that are symbols (such as warning or information icons)
• Icons that are single objects (such as the magnifying glass)
131
Axialis IconWorkshop 6.10
Create overlapping secondary objects at an angle unless it makes more sense, due to readability
and integrity, that they are rendered straight on. Consider also how your icons may be viewed as a
set to help determine how to group objects.
Drop Shadow
Windows® XP icons use a drop shadow to provide definition and added dimension.
Adding a drop shadow effect is very simple using IconWorkshop™. Once the object is created,
choose Draw/Adjustments Effects/Drop Shadow. Don't forget to leave 2 or 3 free pixels in the
right and bottom side of the object before applying the shadow.
Outlines
When illustrating Windows® XP-style icons, add an outline to the image to provide definition and
ensure that the image works well on different background colors.
Transferring the Image to IconWorkshop™ to Create an Icon
1. Axialis IconWorkshop™ supports the native Photoshop® PSD image format with Layers and
PNG with transparency. If you use Photoshop®, save your image to a PSD file. If you use
Paint Shop Pro®, Freehand® or Corel Draw®, save it to PNG with transparency.
2. In Axialis IconWorkshop™, choose "File/Open", browse your folders and select your file
(Windows® standard dialog box).
or
Choose "File/New/File Explorer" or press Ctrl+E. A built-in Axialis file explorer window opens.
Browse your disks, see the thumbnail preview and double-click the image file you wish to
open.
or
In the Recently Used zone (in the main toolbar), type the full pathname of the image file you
wish to open then hit Enter.
3. The image file opens in a document window. If the image contains layers, you see them on
the left side of the document window. You can select one layer by clicking on it. Its
contents appears automatically in the main area. Now you can create an icon from this
image (see Step 2 of topic How to Create an Icon from an Image File).
132
How-to Procedures
How to Use IconWorkshop™ with Adobe Photoshop®
If you use Adobe® Photoshop® to create and retouching your images, here is how to proceed to
work with Axialis IconWorkshop™:
Transferring an Image from Photoshop® to Axialis
IconWorkshop™ to Create an Icon
1. Axialis IconWorkshop™ supports the native Photoshop® PSD image format with Layers. In
Photoshop save your image to a PSD file.
2. In IconWorkshop™, choose "File/Open", browse your folders and select your file
(Windows®standard dialog box).
or
Choose "File/New/File Explorer" or press Ctrl+E. A built-in Axialis file explorer window opens.
Browse your disks, see the thumbnail preview and double-click the image file you wish to
open.
or
In the Recently Used zone (in the main toolbar), type the full pathname of the image file you
wish to open then hit Enter.
3. The image file opens in a document window. If the image contains layers, you see them on
the left side of the document window. You can select one layer by clicking on it. Its
contents appears automatically in the main area. Now you can create an icon from this
image (see Step 2 of topic Create an Icon from an Image File).
Creating Icons using Photoshop® Templates
Templates permit you to use the powerful tools of Adobe Photoshop® to draw your icon in
different formats, then transfer the work to IconWorkshop. Axialis IconWorkshop™ creates the
icon automatically in one step.
Transferring an Icon Image from IconWorkshop™ to Photoshop®
1. Open an icon in IconWorkshop™. Select the desired image format by clicking on it. It
appears in the editor window.
2. Choose Draw/Save Image as Bitmap. A dialog box opens. Choose to Preserve Transparency
Information (this will permit you to keep transparent areas in your PSD image file). When
done, click OK.
3. A standard Save Image As dialog box opens. In the Save as Type list, select "Adobe
Photoshop (PSD)". Choose a destination folder and type a new filename. When done, click
OK. The file has been created.
4. In Photoshop®, open the newly created file. It opens, containing one layer with
transparency. Now you can retouch it or use it as necessary.
133
Axialis IconWorkshop 6.10
Install the Photoshop-to-IconWorkshop™ transfer plug-in
Before using the plug-in as detailed in next topic, you need to install it on your computer. The plugin can be easily installed from within Axialis IconWorkshop™ in one fast and simple operation.
If you've already installed the Photoshop® plug-in with a version of IconWorkshopatr
prior to 6.10, you must install it again by following the procedure below. A new export
plug-in will be installed in addition to the filter plug-in. The export plug-in will be used
with Photoshop® Templates
1. Before installing the plug-in we recommend you to close the Photoshop® application (if it is
actually opened in background). Choose File/Install Photoshop® Plug-in...
2. The dialog box Install the Photoshop to IconWorkshop™ Transfer Plug-in opens (see
below). In the Location edit zone ( ), specify the Photoshop plug-in folder. If you don't
know the exact folder path, click the browse button ( ) to choose the folder in a list.
3. If you want to create a subfolder "Axialis" to install the plug-in module (recommended to
organize your folder properly), activate the option "Install in a subfolder Axialis" ( ). Note
that creating a subfolder may fail with some compatible applications.
4. Click OK. When done, a message informs you that the plug-in has been installed.
5. Now you can start your Photoshop® application. The plug-in is visible in
Filter/Axialis/Transfer To IconWorkshop™ and File/Export/Export to Axialis
IconWorkshop™ menus. Read this for more info on how to use the plug-in filter.
Transferring an Image from Photoshop® to IconWorkshop™®
using the plug-in
1. First of all, launch Photoshop® and open or create an image file. You don't need to launch
Axialis IconWorkshop™ before using the plug-in. It will be automatically launched by the
plug-in if necessary.
2. Select the layer and the portion of the image you want to transfer to Axialis
IconWorkshop™ ( ). If you don't create a selection area, the whole layer image will be
transferred. Only rectangular selections are supported for transfer.
134
How-to Procedures
3a. Export the image in the Current Layer only :
Use this command if you want to transfer the image in the current layer only. The images in
the other layers will be ignored. If you want to export a flatten image, choose the command
in step 3b.
Choose the Filter/Axialis/Transfer to Axialis IconWorkshop™... command in the Photoshop
menu.
3a. Export the flatten image (all layers merged):
Use this command if you want to transfer the image as displayed. The images in all layers will
be merged during the export (the layers will be kept in Photoshop).
Choose the File/Export/Export to Axialis IconWorkshop™... command in the Photoshop
menu.
4. Axialis IconWorkshop™ is automatically launched (or activated if running in background) and
the dialog box Install the Photoshop® to IconWorkshop™ Transfer Plug-in opens (see
below).
3. The image is about to be transferred in Axialis IconWorkshop™. You can choose one of the
following operations: Create a New Icon using this Image ( ): You create a new icon with
several formats based on the image (see step 4); Create a New Image Document ( ):
IconWorkshop™ opens a new document containing the image. You'll be able to perform
various operations on the image (resize, crop, save...) and even create a new icon from a
portion of it; Paste the Image in the Current Icon Document ( ): This option is enabled only
if an icon document is already opened in IconWorkshop™. It pastes the image in the current
editor area (just like the Clipboard paste operation).
4. If you choose the first option (Create a New Icon using this Image), the following dialog box
opens (see below). As Axialis IconWorkshop™ support creation of both Windows® and
135
Axialis IconWorkshop 6.10
Macintosh® icons, you're prompted to choose the format. Select option
or option for Macintosh®.
for Windows®
5. By choosing Windows®, the following dialog box opens (a similar dialog opens if you choose
Macintosh®)
6. In the Name group ( ), enter the icon project name. Do not specify any extension.
7. In the Image Formats group, select the image formats you wish to add in the icon ( ) and
unselect the unwanted images ( ). Just click on the image preview to select/unselect. To
know more about the desired Windows® standard image format, see What is an Icon topic.
8. You can also apply or not the dithering option to the 256/16 color images as well as add a
filter effect to smooth/sharpen the resulting images in RGB/A mode (try and see the
results in the preview images).
9. If you wish to start creating your icon with an unlisted format, click the Other Image Format
button.
10. When done, click OK. The icon is automatically created with the various image formats
you've selected.
136
How-to Procedures
How to Use IconWorkshop™ with Paint Shop Pro®
If you use Corel® Paint Shop Pro® to create and retouching your images, here is how to proceed to
work with Axialis IconWorkshop™:
Transferring an Image from Paint Shop Pro® to IconWorkshop™®
to Create an Icon
1. Axialis IconWorkshop™ supports the PNG image format with Transparency. In Paint Shop
Pro, save your image to a PNG file.
2. In IconWorkshop™, choose "File/Open", browse your folders and select your file (Windows®
standard dialog box).
or
Choose "File/New/File Explorer" or press Ctrl+E. A built-in Axialis file explorer window opens.
Browse your disks, see the thumbnail preview and double-click the image file you wish to
open.
or
In the Recently Used zone (in the main toolbar), type the full pathname of the image file you
wish to open then hit Enter.
3. The image file opens in a document window. Its contents appears automatically in the main
area. If the image contains transparency, it has been kept (see the chessboard texture).
Now you can create an icon from this image (see Step 2 of topic Create an Icon from an
Image File).
Transferring an Icon Image from IconWorkshop™® to Paint Shop
Pro®
1. Open an icon in IconWorkshop™. Select the desired image format by clicking on it. It
appears in the editor window.
2. Choose Draw/Save Image as Bitmap. A dialog box opens. Choose to Preserve Transparency
Information (this will permit you to keep transparent areas in your PSD image file). When
done, click OK.
3. A standard Save Image As dialog box opens. In the Save as Type list, select "Portable
Network Graphic (PNG)". Choose a destination folder and type a new filename. When done,
click OK. The file has been created.
4. In Paint Shop Pro®, open the newly created file. It opens, containing the image with
transparency. Now you can retouch it or use it as necessary.
How to use IconWorkshop™ with Freehand®
If you use Macromedia® Freehand® to create your images, here is how to proceed to work with
Axialis IconWorkshop™:
137
Axialis IconWorkshop 6.10
Transferring an Image from Freehand® to IconWorkshop™® to
Create an Icon
1. Axialis IconWorkshop™ supports the PNG (Portable Network Graphic) image format with
Transparency. In Freehand®, save your image to a PNG file.
2. In IconWorkshop™, choose "File/Open", browse your folders and select your file
(Windows®standard dialog box).
or
Choose "File/New/File Explorer" or press Ctrl+E. A built-in Axialis file explorer window opens.
Browse your disks, see the thumbnail preview and double-click the image file you wish to
open.
or
In the Recently Used zone (in the main toolbar), type the full pathname of the image file you
wish to open then hit Enter.
3. The image file opens in a document window. Its contents appears automatically in the main
area. If the image contains transparency, it has been kept (see the checkboard texture).
Now you can create an icon from this image (see Step 2 of topic Create an Icon from an
Image File).
How to use StuffIt Expander™ to read Macintosh® Icons
Most of the websites which propose Macintosh® icons to download, provide them in archives using
SIT/HQX packed file format. This file format is widely used by Macintosh®users.
To uncompress these archive files under Windows, you need a specific tool: StuffIt Expander™ for
Windows®. Click to visit StuffIt website and download the software. This how-to procedure has
been designed for version 9.0 of StuffIt Expander.
You can either purchase the full version which is required to compress files and create SIT archives
or download the "StuffIt Standard Free Trial". They both contain the StuffIt Expander portion which
is free and permit to extract files from SIT archives.
Installing and Configuring StuffIt Expander™ for Windows®
1. Download the StuffIt Expander program from this page:
http://www.stuffit.com/win/expander/index.html. Click the "Download NOW" button.
Launch the installation program you've downloaded. Follow the procedure as usual.
2. Once installed, start the program: Start/Programs/StuffIt/StuffIt Tools/Expander. The
StuffIt Expander main window opens.
3. In the main menu, choose Edit/Application Options. A dialog box opens, select the
Associations tab. Select at least "StuffIt Archives" ( ) and "BinHex Encoded Files" ( ). If
you don't want to associate the other archive types to StuffIt (ZIP, ARC, ARJ, RAR...),
unselect them.
138
How-to Procedures
We recommend you to remove the association with MacBinary (BIN) files because
IconWorkshop™ supports this type directly.
4. When done, select the Cross Platform tab:
5. Select the option "Encode the data and resource forks of each file together into MacBinary
format" ( ). It means that the files will be extracted as MacBinary which is a format fully
supported by IconWorkshop™. For more information on MacBinary format, see this topic.
6. When done, click OK. The program is now installed and properly configured.
Uncompressing a SIT/HQX Archive File
1. Open Windows® Explorer and browse to the folder in which you saved the archive file.
2. Double-click on the archive file. The StuffIt program starts and automatically uncompress
the archive contents into a subfolder.
3. Now you can browse the newly created subfolder to see the Macintosh® icons. We
recommend you to use IconWorkshop™ built-in explorer (Ctrl+E) to browse it and see the
Macintosh® icons in preview thumbnail.
139
Axialis IconWorkshop 6.10
Uncompressing Macintosh® icons packed in a ZIP file
More and more website now propose to download Macintosh® icons in ZIP archives. You can
simply extract them with any ZIP unpacker (StuffIt support this format too). The unpacked files
will be read without problems by IconWorkshop™.
How to Convert a Macintosh® Icon to Windows®
In this topic, we'll see how to create Windows® Icons from Apple® Macintosh® Icons.
What's the difference between Windows® and Macintosh® icons?
Microsoft Windows® and Apple Macintosh® icons are very similar. They both have several image
formats embedded in the same icon. But the file format is totally different. You cannot use
Macintosh® icons under Windows® because the file format is not compatible. You must convert
them to Windows® ICO file format (with Axialis IconWorkshop™ of course!).
All kinds of formats can be included in a Windows® ICO file (you can even create non-square icons).
With Macintosh® icon files this is not possible. Only some strictly-defined image formats can be
included.
Axialis IconWorkshop™ supports the following Macintosh® icon files: ICNS, RSC and BIN. Icons from
system 7.5, 8.5, 9.x and 10.X are supported. You can easily open them into the Icon Editor and
save them as Windows® ICO format. During this operation, we recommend you to remove special
Macintosh® formats which are useless under Windows®.
To learn more about Windows® and Macintosh® icon file formats, read this topic: Macintosh® vs
Windows® icons
Which image formats are included in Macintosh® icons?
Here is the list of image formats you can find in Macintosh® Icons:
• Tiger (256x256) - 32 bits (alpha channel)
• Thumbnail (128x128) - 32 bits (alpha channel)
• Huge (48x48) - 32 bits (alpha channel), 256 colors, 16 colors, mono
• Large (32x32) - 32 bits (alpha channel), 256 colors, 16 colors, mono
• Small (16x16) - 32 bits (alpha channel), 256 colors, 16 colors, mono
• Mini (16x12) - 256 colors, 16 colors, mono
The new OS-X icons can contain very large image formats (128x128, 256x256 - 32 bits). Those
formats are also supported. Although those image sizes are not actually used in Windows®, it's a
good idea to start from hi-res sizes to create a new Windows® icon.
Here is a summary of image formats you can find in Macintosh® Icons:
140
How-to Procedures
Convert the icon to Windows®, keeping all Macintosh® formats
This is the simplest way to proceed. However, some Macintosh® specific image formats may be
useless.
1. Open the Macintosh® icon. Choose File/Open... The icon is opened in a document window.
2. Choose File/Save As, select Windows® (ICO) as file type and specify a new name.
or
2. Choose File/Save As Windows® Icon... (Ctrl+Alt+S) and specify a new name.
or
2. Click the following button on the toolbar and choose a new name for this icon.
Creating a Windows® icon from a Macintosh® icon
This operation is not a conversion, it's a creation of a new icon. It will not preserve all the existing
formats. It will create a new icon based on the largest and most coloured image included in the
original Macintosh® icon (usually 128x128 or 48x48 with alpha channel).
1. Open the Macintosh® icon. Choose File/Open...
2. When the icon is opened, select the largest and the "most coloured" image format in the list
(best with 128x128 or 48x48 with alpha channel).
3. Right-click on the selected image format in the list ( ), a menu opens. Select "New
Windows® Icon Project from this Image..." ( ).
141
Axialis IconWorkshop 6.10
4. A large dialog box opens. In the Name group ( ), enter the icon project name. Do not
specify any extension.
5. In the Image Formats group, select the image formats you wish to add in the icon (
).
6. You can also add extra formats (128x128 or 256x256 may be used in future versions of
Windows®). When done, click OK. The new Icon Project document window is created with
all formats embedded.
7. Save your icon to Windows® format. choose File/Save and choose a new name (.ICO) for
this icon.
Where to find Macintosh® icons?
Many websites offer various Macintosh®® icons package for download. Try to search using Google
or Yahoo for the following terms:
• "Mac icons"
142
How-to Procedures
•
"Macintosh icons"
How to unpack Macintosh® icon archives?
Most of these websites propose to download icons in archives using SIT/HQX packed file format.
This file format is widely used by Macintosh® users. To unpack these archive files under Windows®,
you need a specific tool: StuffIt Expander™ for Windows®. Click here to visit StuffIt website.
To know how to use StuffIt Expander™ to unpack Macintosh® icons under Windows®, see the
following topic: How to Use StuffIt Expander® to Read Macintosh® Icons
IMPORTANT NOTICE
Converting a Macintosh® icon to Windows® format does NOT change Copyright or
Intellectual Property of an icon. The image/icon is property of its author and still property
of this author after a conversion.
As a result, do NOT redistribute converted icons without permission of the author. Also,
some Macintosh® authors do not wish that you convert/use their icons under Windows®. In
such a case, please respect author wish and do not convert its icons, even for your personal
use.
How to convert a Windows® Icon to Macintosh®
In this topic, we'll see how to create Macintosh® Icons from Windows® Icons.
What's the difference between Windows® and Macintosh® icons?
Microsoft Windows® and Apple Macintosh® icons are very similar. They both have several image
formats embedded in the same icon. But the file format is totally different. You cannot use
Windows® icons under Macintosh® because the file format is not compatible. You must convert
them to Macintosh® ICO file format (with IconWorkshop™ of course!).
All kinds of formats can be included in a Windows® ICO file (you can even create non-square icons).
With Macintosh® icon files this is not possible. Only some strictly-defined image formats can be
included. As a result, some image formats cannot be converted to Macintosh® icon.
Axialis IconWorkshop™ supports the following Macintosh® icon files creation: ICNS, RSC and BIN.
Icons from system 7.5, 8.5, 9.x and 10.X are supported. You can easily open Windows® icons into
the Icon Editor and save them as Macintosh® format. During the conversion, formats which are not
supported under Macintosh® will be removed.
To learn more about Windows® and Macintosh® icon file formats, read this topic: Macintosh® vs
Windows® icons
143
Axialis IconWorkshop 6.10
Which image formats are included in Macintosh® icons?
Here is the list of image formats you can find in Macintosh® Icons:
• Tiger (256x256) - 32 bits (alpha channel)
• Thumbnail (128x128) - 32 bits (alpha channel)
• Huge (48x48) - 32 bits (alpha channel), 256 colors, 16 colors, mono
• Large (32x32) - 32 bits (alpha channel), 256 colors, 16 colors, mono
• Small (16x16) - 32 bits (alpha channel), 256 colors, 16 colors, mono
• Mini (12x16) - 256 colors, 16 colors
The new OS-X icons can contain very large image formats (128x128, 256x256 - 32 bits). Those
formats are also supported. Although those image sizes are not actually used in Windows, it's a
good idea to start from hi-res sizes to create a new Windows® icon.
Here is a summary of image formats you can find in Macintosh® Icons:
Some image formats are unavailable in Macintosh® icon specifications. Therefore
IconWorkshop™ won't event permit you to create them. If you try to save or convert a
Windows® icon to Macintosh®, some format will be removed. Note that all image
formats can be created in Windows® icons, even custom formats not listed above.
Convert the icon to Macintosh®, keeping all Macintosh®
compatible image formats
This is the simplest way to proceed. However, some Windows® specific image formats may not be
converted.
1. Open the Windows®icon. Choose File/Open... The icon is opened in a document window.
2. Choose File/Save As, select Macintosh® (ICNS, RSC or BIN) as file type and specify a new
name.
144
How-to Procedures
or
2. Choose File/Save As Macintosh® Icon... (Ctrl+Alt+S) and specify a new name.
or
2. Click the following button on the toolbar and choose a new name for this icon.
Creating a Macintosh® icon from a Windows® icon
This operation is not a conversion, it's a creation of a new icon. It will not preserve all the existing
formats. It will create a new icon based on the largest and most coloured image included in the
original Windows® icon (usually 256x256 or 48x48 with alpha channel).
1. Open the Windows® icon. Choose File/Open...
2. When the icon is opened, select the largest and the "most coloured" image format in the list
(best with 256x256 or 48x48 with alpha channel).
3. Right-click on the selected image format in the list ( ), a menu opens. Select "New
Macintosh® Icon Project from this Image..." ( ).
4. A large dialog box opens. In the Name group, enter the icon project name. Do not specify
any extension.
145
Axialis IconWorkshop 6.10
5. In the Image Formats group, select the image formats you wish to add in the icon (
).
6. You can also add other formats (256x256 to be used in Tiger). When done, click OK. The
new Icon Project document window is created with all formats embedded.
7. Save your icon to Macintosh® format. choose File/Save and choose a new name for this
icon.
How to transfer an icon to a Macintosh® computer
With Axialis IconWorkshop™ you're able to create Macintosh® icons. To use them under
Macintosh® OS, you need to transfer the files using a LAN (local area network)
What file format should I use to transfer an icon?
Under Macintosh® files are stored in 2 parts called "Forks". A fork can be empty but at least one
must contain data. The two forks cannot be empty.
• The Data Fork - This is the file itself, its contents. For example, in a text document, this the text.
• The Resource Fork - This is the part that is used by Macintosh® OS to display the file in the
Finder or the Desktop. Usually the resource fork contains an icon.
When you simply transfer a file between Windows® and Macintosh®, the resource fork
is lost. To transfer the 2 forks you need to use the MacBinary format.
To transfer an icon to Macintosh® you can either convert it to ICNS, RSC or MacBinary:
146
How-to Procedures
•
•
•
ICNS - This is the standard Macintosh® icon file format. Only one icon (with several formats)
can be saved in this format. This format is the most commonly used.
RSC or RSRC - This is the Macintosh®resource file format. It is used mainly by developers. This
format can contain several icons. IconWorkshop™ support reading of RSC files with several
icons but can write only RSC files with one icon.
MacBinary - This format permits to easily transfer files between Macintosh® and Windows®. For
more information on this format, visit this website: http://en.wikipedia.org/wiki/MacBinary .
We strongly recommend to use this file format to transfer your icons to Macintosh® because it
is compatible with Macintosh® file system which separate each file in two parts called "forks":
The data fork and the resource fork. The data fork contains the data included in the file (a text
file for example). The resource fork contains the image or icon which permits to display it on
screen. See below for more information on transfer from Windows® to Macintosh®.
Transfer an icon between Windows® OS and Macintosh® OS using
MacBinary
To transfer and icon between Windows® and Macintosh®, the easiest method is to use the
MacBinary format. This format permits to generate an icon compatible with the Macintosh® OS
forks. Once transferred, the icon will be automatically displayed in the Macintosh® Finder and on
the Desktop.
The MacBinary format permits to merge the 2 forks in one file handy for transfer, mail attachment
or Web publishing. When IconWorkshop™ saves an icon in MacBinary format, it writes the icon in
the resource fork. The data fork is left empty. As a result, as soon as you receive or see the file in
Macintosh®, the icon appears automatically. Then, you can handle it using the standard
Finder/MacOS user interface.
In the following procedures, we'll use the MacBinary format to transfer an icon from Windows® to
Macintosh®.
147
Axialis IconWorkshop 6.10
Transfer an icon to Macintosh® OS using a LAN
Before proceeding, be sure the Macintosh® and the Windows® computer are properly connected
to the same LAN. The procedure below was done on Macintosh® OS 10.4 (Tiger).
On the Macintosh® computer
1. Click
and select System Preferences. A window opens. In Internet & Network group,
select Sharing. The following window opens:
2. Select the Service tab ( ), in the list select Windows® Sharing service ( ).
3. If necessary, select the user accounts you want to activate ( ).
On the Windows® computer
4. Double-click in the icon My Network Places ( ). A window opens. In Local Network group
( ), open the folder which is related to your Macintosh® computer. Browse the folders and
locate a target directory ( ).
148
How-to Procedures
5. In IconWorkshop™, save your Macintosh® icon as MacBinary in the folder that you have
located above.
On the Macintosh® computer
6. Launch the Finder and browse the folder where you have saved the BIN file.
7. Use mouse Drag & Drop to copy or move the file on the Desktop ( ). Double click on the
BIN file ( ), StuffIt Expander® is launched and the icon file is automatically created as
resource fork on the Desktop ( ). Now you can use freely as a standard Macintosh® icon.
How to batch convert icons between Macintosh® and
Windows®
Using IconWorkshop™ you can Convert Several Icon from Macintosh® to Windows® and vice-versa
in one operation. This is what we call a batch procedure. We'll perform this task using the built-in
IconWorkshop™ explorer.
To get more info about Macintosh® to Windows® icon conversion see How to Convert a
Macintosh® Icon to a Windows® Icon topic. In this topic we'll focus on how to convert several icons
in one operation.
Select the icons you wish to convert
1. Open a new Axialis Explorer window. Choose File/New/File Explorer...
149
Axialis IconWorkshop 6.10
2. When the window is opened, select the folder which contains the Macintosh® icons using
the tree in the left pane.
3. When done, the Macintosh® icons appears (with preview) in the right pane. Select the icons
you wish to convert. You can use Shift/Ctrl + Mouse to select several icons. Use Ctrl+A to
select all. Use +/- to select/unselect by specifying filters.
Convert the icons From Macintosh® to Windows®
4. Choose Explorer/Batch Convert Macintosh® Icons To Windows®(ICO) or Ctrl+Shift+W
5. A dialog box opens. You can choose to convert all the formats or only a selection of them.
When done, click OK.
6. The batch operation starts. The hourglass mouse pointer is displayed during the conversion.
When done the Windows® icons are added to the folder contents.
The created icons have the same filenames as the original icon with ICO appended. A smart
system has been added to index the files if necessary to avoid overwriting.
IMPORTANT NOTICE
Converting a Macintosh® icon to Windows® format does NOT change Copyright
or Intellectual Property of an icon. The image/icon is property of its author and
still property of this author after a conversion.
As a result, do NOT redistribute converted icons without permission of the
author. Also, some Macintosh® authors do not wish that you convert/use their
icons under Windows®. In such a case, please respect author wish and do not
convert its icons, even for your personal use.
Convert the icons From Windows® to Macintosh®
4. Choose Explorer/Batch Convert Windows® Icons To Macintosh® (ICNS, RSC, BIN) or
Ctrl+Shift+M
5. A dialog box opens. First select the Macintosh® file format you wish to create. 3 formats
are available for Macintosh® icons (see this topic to learn more about the file formats).
6. You can choose to convert all the formats or only a selection of them. When done, click OK.
7. The batch operation starts. The hourglass mouse pointer is displayed during the conversion.
When done the Windows® icons are added to the folder contents.
The created icons have the same filenames as the original icon with ICNS, RSC or BIN
appended. A smart system has been added to index the files if necessary to avoid
overwriting.
150
How-to Procedures
How to Batch Create Icons From Images, Cursors
Using this feature you can Create Several Icons (Macintosh® or Windows®) from images, existing
icons or cursors in one operation. This is what we call a batch procedure. We'll perform this task
using the built-in IconWorkshop™ explorer.
Select the source images, icons or cursors
1. Open a new Explorer window. Choose File/New/File Explorer...
2. When the window is opened, select the folder which contains the Source Files using the tree
in the left pane.
3. When done, the Source Files appears (with preview) in the right pane. Select the icons you
wish to convert. You can use Shift/Ctrl + Mouse to select several icons. Use Ctrl+A to
select all. Use +/- to select/unselect by specifying filters.
Batch create Windows® icons
4. Choose Explorer/Batch Create Windows® Icons from Selection or Ctrl+Shift+C.
5. A dialog box opens. In "Standard Image Formats" ( ) and "Extra Image Formats" ( ) choose
the image formats you wish to add in the icons.
6. In Image Adjustment group ( ), you can add a smooth or sharp filter to the image shrinking
process. You can also use or not a dithering method to render image using 256 or 16
colors. In Transparency group ( ), an option permits to use opaque images (i.e. without
transparency) and specify a color to make transparent.
7. When done, click OK. The batch operation starts immediately, the hourglass mouse pointer
is displayed during the creation. When done the new Windows® icons are added to the
folder contents.
151
Axialis IconWorkshop 6.10
Batch create Macintosh® icons
4. Choose Explorer/Batch Create Macintosh® Icons from Selection or Ctrl+Shift+D.
5. A dialog box opens. First we need to choose the Macintosh® file format we wish to use
( there are 3 formats supported by IconWorkshop™ - see this topic to learn more).
6. In groups "Standard Image Formats" ( ) and "Extra Image Formats" ( ) choose the image
formats you wish to add in the icons.
6. In Image Adjustment group, you can add a smooth or sharp filter to the image shrinking
process. You can also use or not a dithering method to render image using 256 or 16
colors. In Transparency group, an option permits to use opaque images (i.e. without
transparency) and specify a color to make transparent.
7. When done click OK. All the Macintosh® icons are created and added to the same folder.
Names are preserved, only the extension is changed.
The created icons have the same filename as the original document with different
extension (depending on the icon types). A system has been implemented to index the
files if necessary to avoid overwriting. If you create icons from Image Files, the whole
image is selected and resized keeping its aspect ratio. If it contains transparency, it is
kept during the creation. If you create icons from an Existing Icons or Cursors, the
largest image is used as source to create the icons. Transparency is kept.
How to Batch Create PNG images with Transparency
from Icons...
Creating PNG images from icons can be very useful. For example, PNG with transparency is the
standard icon format for Linux® KDE® Desktop Environment. Also some useful "Dock" applications
152
How-to Procedures
have been ported to Windows® (clones of Macintosh® OS-X Dock toolbar). Most of these
applications also are using 128x128 PNG with transparency as icons. See MobyDock and Y'z Dock
websites for more info).
You can either create one PNG image from one icon (see topic How to Create a PNG, BMP or PSD
Image with Transparency) or several images from icons in one operation. This is what we call a
Batch procedure:
Select the Source Icons
1. Open a new Explorer window. Choose File/New/File Explorer...
2. When the window is opened, select the folder which contains the Source Files using the tree
in the left pane.
3. When done, the Source Files appears (with preview) in the right pane. Select the icons you
wish to convert to images. You can use Shift/Ctrl + Mouse to select several icons. Use
Ctrl+A to select all. Use +/- to select/unselect by specifying filters.
Create the Images
4. Choose Explorer/Batch Create Images from Icons or Ctrl+Shift+V.
5. The dialog box Batch Create Images From Icons opens (see below). In the Icon Format to
Extract group ( ), choose the image format you wish to extract from the icons. You can
choose only one image format. If this exact format does not exists in an icon, the nearest
format is chosen.
5. In the Image File Format group ( ), select the file format you wish to use for the images to
create.
6. In the Transparency group ( ), choose if you wish to create transparent or opaque images.
If you choose to preserve transparency, the images will be automatically converted to
32BPP with alpha channel (even if the chosen icon format is 256 or less colors). If you
choose to remove transparency, the images will be generated using 24BPP (no alpha
channel). In such a case, you must specify a background color (to fill the transparent areas
with this color).
153
Axialis IconWorkshop 6.10
7. When done, click OK. The batch operation starts immediately, the hourglass mouse pointer
is displayed during the creation. When done the new Images are added to the folder
contents.
The created images have the same filename as the original document with .PNG, .PSD ot
.BMP appended. A smart system has been added to index the files if necessary to avoid
overwriting. If this exact chosen format does not exists in an icon, the nearest format is
chosen for extraction.
How to Change the User Interface of IconWorkshop
All of our softwares have a specific "Axialis" interface. Since the release of Microsoft® Windows®
XP we decided to implement a feature that permits you to choose between Axialis and Microsoft
Standard interface. You can also change various settings to customize your interface.
To switch to Standard Windows® Interface
1. Choose Edit/Preferences or press F2. A dialog box opens.
2. Select the User Interface tab. In the User Interface Type group, select the Windows®
Standard User Interface option (see the preview image).
3. When done, Click OK. The interface switches back to Windows® classic (or the active XP
theme).
To switch to Axialis Interface
1. Choose Edit/Preferences or press F2. A dialog box opens.
2. Select the User Interface tab. In the User Interface Type group, select the Axialis Software
User Interface option (see the preview image).
3. When done, Click OK. The interface switches back to Axialis model.
To Change the Color of the Axialis Interface
1. Choose Edit/Preferences or press F2. A dialog box opens.
2. Select the User Interface tab. In the User Interface Type group, select the Axialis Software
User Interface option (see the preview image).
3. In the Color list below, select the desired color.
4. When done, Click OK. The Axialis interface color changes.
154
How-to Procedures
To Change the Colors of the Full Screen and Documents
Backgrounds
1. Choose Edit/Preferences or press F2. A dialog box opens.
2. Select the User Interface tab. In the User Interface Type group, select the Axialis Software
User Interface option (see the preview image).
3. In the Background Colors group, select the desired colors.
4. When done, Click OK.
To Customize the Main Toolbar Buttons
1. Right-click the main toolbar and choose Customize Buttons or press Ctrl+F9. A dialog box
opens.
2. You can remove, add or move buttons using this standard Windows® dialog box.
3. When done, Click OK.
To Customize the Main Toolbar Aspect
1. Choose Edit/Preferences or press F2. A dialog box opens.
2. Select the Toolbars tab. In the Main Toolbar group, you can change various settings.
3. When done, Click OK.
How to Change the Editor Drawing Area Aspect
To Change the Chessboard Texture of the Transparent Areas
1. Choose Edit/Preferences or press "F2". A dialog box opens, choose the Editor tab:
155
Axialis IconWorkshop 6.10
2. You can modify the size of the Transparency chessboard squares ( ). Then, to change the
colors of the texture you can either select a predefined scheme ( ) or choose custom
colors ( ). You can see the changes in the preview area ( ).
3. When done, click OK.
To Change the Grid Aspect
1. Choose Edit/Preferences or press "F2". A dialog box opens, choose the Editor tab (see
above picture).
2. Change the Grid aspect in the related group ( ). To finish, you can activate or deactivate a
feature which permits to draw stronger (darker) lines at fixed intervals. By default this
interval is 8 ( ).
3. When done, click OK.
How to change the Scale 1:1 window size
If you create Windows Vista™ or Macintosh® OSX 10.4 Tiger® icons, you need to work with
256x256 images. Also, all the image objects provided by Axialis have a native 256x256 resolution.
In order to get the best results possible, you must frequently preview the artwork at scale 1:1 in
the associated window in Axialis IconWorkshop™.
In previous versions of Axialis IconWorkshop™, the Scale 1:1 window was fixed to 128x128 for a
better integration in the application interface. Now the preview window can be resized to display
256x256 images at scale 1:1. Some features has been implemented to deal with this new size in
order to have limited impact on the user experience.
By default, the Scale 1:1 window's size is 128x128 ( ):
156
How-to Procedures
In this topic, we'll see how to switch the window size to 256x256 and vice-versa. Also, we'll see
how to change the ability of the window to be docked to the interface.
Switch the Preview 1:1 window to 256x256
1. If the Preview 1:1 window is not visible, choose View/Preview 1:1 or press Alt+F10.
2. Using the mouse, right-click in the Scale 1:1 window, a local menu opens.
3. Choose 256x256 Display. The Scale 1:1 window is automatically resized to 256x256 and
becomes a floating window ( ):
When the window is in floating mode, it can placed anywhere over the user interface
without docking. It is set in this mode to avoid the annoying side effect of docking a
256x256 window: The side-bars are so stretched that it creates a lot of wasted spaces in
the interface. For that reason, we recommend you to keep the Scale 1:1 window in floating
mode. To revert this mode to docking mode, see below "Switch between docking and
floating mode".
Switch the Preview 1:1 window to 128x128
1. If the Preview 1:1 window is not visible, choose View/Preview 1:1 or press Alt+F10.
2. Using the mouse, right-click in the Scale 1:1 window, a local menu opens.
3. Choose 128x128 Display. The Scale 1:1 window is automatically resized to 128x128.
Note that the window state does not switch back to docking mode. If you want to dock the
window you need to manually switch the mode. See "Switch between docking and floating
mode".
157
Axialis IconWorkshop 6.10
Switch between docking and floating mode
1. Using the mouse, right-click in the Scale 1:1 window, a local menu opens.
2. Choose Floating Window (no docking).
If the window was docked: It is changed into a floating window (a frame and a title bar
appear). It can placed anywhere over the user interface without docking.
If the window was floating: Nothing is visually changed but if you move it over the right or
left borders of the main window it will be docked when you'll release the mouse button.
How to Search the Icons I have on My Computer
Many files containing icons are present on your computer's hard disks. Axialis IconWorkshop™
includes a search feature to help you locate and grab these icons.
Searching for files on your computer
1. Choose Edit/Search/On the Computer or press Ctrl+G.
2. A search option dialog box opens. In the "Named" zone ( ), specify a filename search
criterion. If the filename contains a portion of the specified text, the file is selected. You can
also use the standard DOS characters '*,?'. Example : Image*.*
3. In the "Look In" zone ( ), specify the folder from which you wish to start the search. If you
want to perform a deep search (including subfolders), select the Include Subfolders option.
If you specify folder "C:\" with subfolders, the whole disk bill be scanned. It can be a very
long process!
4. In the "Type" list ( ), specify the type of file you wish to find ("All Icon Files").
5. You can also specify Date and Size options ( and
).
6. When done, click OK. The search begins... When finished, a Search Results window opens,
containing the found items ( ):
158
How-to Procedures
Grab the Icons, add them into a library
1. Create a new Icon Library in the Librarian (or select an existing one). Select the items you
wish to add to the library ( ).
2. Choose File/Add to the Librarian or press F3 ( ). The files are added.
How to Create Different Color Versions of an Icon...
In interesting effect is to create different color versions of the same icons. For example, creating
Red and Green versions of our "Blue Sphere" icon:
Opening the existing icon, modifying the image HUE (overall
color)
1. Open your original icon file. As example, we'll work on the Blue Sphere icon which is located
in the Librarian (if not displayed, press ESC). In the Icons/Tutorial subfolder, select and open
the "MySphereIcon.ico" icon.
2. The image file opens in a document window. In the image format list, select the 48x48 Win
XP image:
3. Choose Draw/Adjustments Effects/HUE-Saturation or press "U". A Dialog box opens. In the
Hue group specify 140 either using the slider or the edit zone. When done, click OK. The
sphere color has been changed to Red!
159
Axialis IconWorkshop 6.10
4. Select the whole image (press Ctrl+A) then Choose Draw/Adjustments Effects/HUESaturation or press "U". A Dialog box opens. In the Hue group specify 140 either using the
slider or the edit zone. When done, click OK.
The sphere color has been changed to Red!
Creating a new icon from this image
5. In the menu choose Edit/New Windows® Icon Project from this Image (Ctrl+Shift+Y).
6. The dialog box New Windows®Icon From Image opens. In the Name group ( ), enter the
icon project name "Red Sphere". Do not specify any extension.
7. In the Image Formats group, select the image formats you wish to add in the icon ( ) and
unselect the unwanted images ( ). Just click on the image preview to select/unselect. To
know more about the desired Windows® standard image format, see What is an Icon topic.
8. When done, click OK. The icon is automatically created with the various image formats
you've selected.
How to Create a PNG, BMP, PSD or JPEG 2000 Image
with Transparency...
If you work with external programs such as Macromedia® Freehand®, Adobe® Photoshop® or Jasc®
Paint Shop Pro®, you may need to save an Icon Image to an external file.
Axialis IconWorkshop™ permits you to save an icon image to PSD, PNG, BMP or JPEG 2000 file
formats preserving the transparency areas of the icon.
160
How-to Procedures
Open the image file in Axialis IconWorkshop™
1. Open your original icon file (from the librarian or using File/Open...).
2. The image file opens in a document window. In the image format list, select the image you
wish to save to an external file.
Save the Image as an External Bitmap
3. Choose Draw/Save Image as Bitmap. A dialog box opens. Choose to Preserve Transparency
Information (this will permit you to keep transparent areas in your image file). When done,
click OK.
4. A standard Save Image As dialog box opens. In the Save as Type list, select the format you
wish to use to save the image. Choose a destination folder and type a new filename. When
done, click OK. The file has been created.
5. In your external program, open the newly created file. It opens, containing the icon image
with transparency. Now you can retouch it or use it as necessary.
The JPEG 2000 options
JPEG 2000 is the latest generation of compressed image format. It permits to compress images
with low quality loss. Additionally it permits to encode images with alpha channel.
When you save an image in JPEG 2000 format you need to specify the type of compression you
want for this image:
• Lossless compression - This will result in perfect image quality but larger file size (about 3050% of original image).
• Lossy compression - This can be adjusted to create smaller files (high compression means low
quality - see preview).
If you use lossy compression, we recommend you to adjust the compression level using the slider
and compare the difference between the original and the resulting image in the preview window.
How to create a Web-optimized GIF image from an icon
CompuServe GIF image format is widely used in Web pages because the majority of Web browsers
recognize it. However this format has some limitations and images need to be optimized to meet
Web requirements like size, colors and transparency:
• GIF Images don't support partial transparency (alpha channel). It means that either a pixel is
transparent, either it isn't.
• GIF Images cannot contain more than 256 colors.
• GIF Images support reduced palettes. Limited number of colors will result in smaller file but will
produce lower image quality.
Axialis IconWorkshop™ permits you to save an icon image to GIF file formats preserving the
transparency areas of the icon. Only one image will be extracted from the icon. We recommend
you to extract the 256 color image from the icon if available.
161
Axialis IconWorkshop 6.10
Open the icon file in IconWorkshop™
1. Open your original icon file (from the librarian or using File/Open...).
2. The image file opens in a document window. In the image format list, select the image you
wish to use to create the GIF file. We recommend you to extract the 256 color image from
the icon if available, otherwise use RGB/A.
Save the image as a GIF file with Web optimization
3. Choose File/Export/CompuServe GIF (Optimized for the Web) or press Ctrl+Shift+G.
4. A standard Save Image As dialog box opens. In the Save as Type list select the format.
5. Choose a destination folder and type a new filename. When done, click OK.
6. A dialog box CompuServe GIF Optimizer opens:
7. In Colors ( ), specify the number of colors you wish to use in the image palette. Limited
number of colors will result in smaller file but will produce lower image quality. Choose
"Auto" if you're not sure about desired the number of colors.
8. In Palette ( ), choose the type of palette desired:
• Adaptive - The palette will be calculated to get the best results possible
(recommended).
• Web Safe - This is the default Netscape® Web palette.
• Windows® - This is the default palette used under old Windows® versions in 256 color
screen mode.
• Macintosh® OS - This is the default palette used under old Macintosh® OS versions in
256 color screen mode.
9. In Dither ( ), choose "Diffusion" if you want IconWorkshop™ to simulate colors not present
in the palette by pixel mixing using the "error diffusion" method. Choose "None" to encode
the image without dithering. Diffusion produces the best results but usually creates slightly
larger images.
162
How-to Procedures
10. In Transparency ( ), specify if you want to preserve transparency or not. Of you choose
opaque, the transparent areas of the icon will be converted to solid color (the "Matte"
color). If you choose to preserve transparency and encodes your GIF file from a RGB/A
images, you may need to adjust the "Threshold" value ( ) to produce better results on
image edges.
11. In Preview, compare the original ( ) and the optimized ( ) images (image quality and
size) to find the best adjustments possible.
12. When done, click OK. The image file has been created.
How to modify or extract icons included in program files
Axialis IconWorkshop™ permits to modify icons directly in program files like EXE, DLL, OCX... This
feature is handy to customize existing applications.
We strongly recommend to make a copy of the original program file before modifying it
using this feature
Modifying an icon included in a program file
1. Choose File/Open and select a program file EXE, DLL, OCX... You can also open an Explorer
window (Ctrl+E) and double click on a program file.
2. The program opens in a document window ( ) displaying all the icons it contains. If not
already set, we recommend you to choose the display option "All Formats In Raw". In this
mode, one icon is displayed on each row with all the formats it contains ( ):
3. To modify an icon just double click on it or select it and press Enter.
4. The icon opens in an editor window. Just modify it as if it was a standard icon file (don't
forget the above limitations though).
5. When done, update it by choosing File/Save or press Ctrl+S. Close the editor window.
163
Axialis IconWorkshop 6.10
6. The icon has been updated in the list (if you modified the displayed format).
7. Repeat steps 3 to 7 for other icons if necessary.
8. Update the program file by choosing File/Save.
Extracting icons from a program file
1. Choose File/Open and select a program file EXE, DLL, OCX... You can also open an Explorer
window (Ctrl+E) and double click on a program file.
2. The program opens in a document window displaying all the icons it contains.
3. Select the icons you wish to extract.
4. Choose Icons/Export as Windows® icons ( : choose Icons/Export as Macintosh® icons)
5. Select the destination folder and click OK.
6. The icons are extracted as ICO ( : ICNS, RSC or BIN as chosen).
Adding to the Librarian icons from a program file
1. Choose File/Open and select a program file EXE, DLL, OCX... You can also open an Explorer
window (Ctrl+E) and double click on a program file.
2. The program opens in a document window displaying all the icons it contains.
3. Select the icons you wish to add to the librarian. Choose File/Add to the Librarian or press
F3.
If the selected item in the librarian is a folder
4. A dialog box opens. Choose either to extract them as separate icons (ICO) or to create an
icon library (ICL).
5. Click OK. The icons are extracted as requested.
If the selected item in the librarian is an icon library
4. The icons are immediately added to the selected library.
How to Create a Snapshot Picture of My Icons...
A Snapshot is an image created automatically by Axialis IconWorkshop™ to show one or several
icons (with embedded formats) on a decorated background. Creating a Snapshot Picture of your
icons may be useful to make a visual archive of your icons, illustrate a website or just promote your
work. Three kinds of snapshots are available:
•
•
•
164
Detailed snapshot of one icon - The icon image formats are displayed in one raw.
Detailed snapshot of several icons - One icon per raw, several images per icon.
Quick/Thumbnail snapshot of several icons - Only one image per icon, several icons per raw.
How-to Procedures
Creating a Snapshot of an Opened Icon
When an icon is opened in an editor window, you can create a snapshot of the work in progress.
1. From the opened icon window, Choose Edit/Create Snapshot or Ctrl+Shift+P
2. A dialog box Create Icon Snapshot opens. Adjust the various options then click OK.
3. The Snapshot image (see sample below) is created in a new window. Now you can save,
copy, print this image as necessary.
Creating a Detailed Snapshot of Several Icons
You can create a snapshot of several icons from within an opened Icon Library (ICL), Program File
(EXE, DLL, OCX...), a Search Result window or from the built-in Explorer.
1. Select several icons from a list (only icons within libraries or Macintosh®/Windows® files).
Choose Edit/Create Snapshot or Ctrl+Shift+P
2. A dialog box opens, select Detailed Snapshot then click OK.
3. A dialog box Create Icon Snapshot opens. Adjust the various options then click OK.
4. The Snapshot image (see sample below) is created in a new window. Now you can save,
copy, print this image as necessary.
165
Axialis IconWorkshop 6.10
Creating a Quick Thumbnail Snapshot of Several Icons
You can create a snapshot of several icons from within an opened Icon Library (ICL), Program File
(EXE, DLL, OCX...), a Search Result window or from the built-in Explorer.
1. Select several icons from a list (only icons within libraries or Macintosh®/Windows® files).
Choose Edit/Create Snapshot or Ctrl+Shift+P
2. A dialog box opens, select Quick Thumbnail Snapshot then click OK.
3. A dialog box Create Icon Snapshot opens. Adjust the various options then click OK.
4. The Snapshot image (see sample below) is created in a new window. Now you can save,
copy, print this image as necessary.
How to Add a Favorite Icon to my Web Site
If you own a website, it's interesting to associate an icon to it. This is what is called a "shortcut
icon". In fact, this icon will be displayed on the visitor's computer if he chooses to bookmark your
site. It will be displayed in the Favorites menu as well as in the Address bar (see below) if the user
comes back to your site.
Shortcut icons work with Microsoft® Internet Explorer® v5.0 or later. They have no special Web
server requirements and are a great way to add brand recognition without requiring the user to
download a custom version of Internet Explorer®.
166
How-to Procedures
Create the Correct Icon Formats
First you must create your icon. You can either start from scratch or create an icon from an
existing image (your company's logo for example).
We recommend you to include these image formats in order to be compatible with all visitor
configurations: 16x16 256 colors, 16x16 16 colors. You can optionally add 16x16 Windows® XP.
Make sure to create an icon that is 16x16 pixels. Otherwise, the icon will be ignored by
Internet Explorer.
Saving Your Icon To your Local Hard Disk
1. When you've finished creating your icon, choose File/Save or Ctrl+S...
2. The standard Windows®save dialog box opens, select a specific location, then specify
favicon.ico as your icon filename. This is important to name it "favicon.ico". If you use a
different filename, it will not be considered as a Shortcut Icon.Uploading it to your Web Site
3. Launch your FTP client (or any program) you use to upload/update your files to your web
site. Connect it to your website.
4. When you're connected, upload your file to the root folder of your HTML pages (where is
located your home page html file). You must keep the "favicon.ico" filename unchanged
during the upload.
Associate the Icon with a Web Page
You can also associate the icon with a Web page by saving the icon with a file name other than
favicon.ico and adding a line of HTML code in the head section of your Web document. The line of
code includes a link tag that specifies the location and name of the file. You can include this link tag
on a per-page basis.
<HEAD>
<LINK REL="SHORTCUT ICON"
HREF="http://www.domain.com/iconname.ico">
<TITLE>Page Title</TITLE>
</HEAD>
My Icon is ignored, Why?
First, check that it meets the IE requirements (see above). If this is the case, keep in mind that the
only way a shortcut icon appears on a user's Favorites menu and Address bar is if the user chooses
to add your page as a favorite. You can add a button or link on your page that prompts the user to
add your page. Use the following code to test with this feature:
167
Axialis IconWorkshop 6.10
<SCRIPT>
<!-if ((navigator.appVersion.indexOf("MSIE") > 0)
&& (parseInt(navigator.appVersion) >= 4)) {
var sText = "<U><SPAN STYLE='color:blue;cursor:hand;'";
sText +=
"onclick='window.external.AddFavorite(location.href,";
sText += "document.title);'>Add this page to your
favorites</SPAN></U>";
document.write(sText);
}
//-->
</SCRIPT>
How to Compile Icon Libraries with Activation Codes...
This new version of Axialis IconWorkshop™ includes a feature to compile Icon Libraries as install
package ready for distribution. Additionally, a feature has been added to force the user to enter an
activation code to proceed with installation (optional feature).
Important: Before reading with this topic, you need to know how to compile an Icon Library. Click
here to read the related topics if necessary.
A word on Activation Codes
Two kinds of Activation Codes have been implemented in Axialis IconWorkshop™:
Based on the user name: The user has to enter its name and the activation code using this
format: 1234-1234-1234-1234 (4 groups of 4 digits).
•
•
168
•
Pro: The user has to provide his name if he wants to publish the code.
Con: The author has to manually generate a code for each user.
Based on a Serial Number: The user just enters a longer activation code using this format:
123456-1234-1234-1234-1234
Pro: The author can automatically generate a list of codes.
•
Con: The user can anonymously publish his code.
How-to Procedures
Compile an Icon Library with Activation Code
1. When preparing to compile an Icon Library (using the Compilation Wizard), you see the
following screen (Step 5 of 6):
2. Click to check the option "Use an Activation Code" ( ). The whole dialog box enables.
3. In the Icon Library ID zone ( ), you see a large hexadecimal number. This ID will identify
your Icon Library (used during activation code generation and verification). This is just a
proposal based on your Icon Library properties.
You can change it but we recommend you to keep it "as is" and to enter the same ID each
time you compile THIS library. Of course, you will change this ID when you'll compile another
Library.
4. In the Company/Author ID zone ( ), you see another large hexadecimal number. This ID
will identify yourself or your company (used during activation code generation and
verification). This is just a proposal based on your Company Name properties.
You can change it the first time you compile a Library, but we recommend you to keep it
unchanged after.
5. If you want to use the Activation Codes based on the username (see the figure above for
the differences), check the option "Code Based on User Name".
6. When done, click "Next" to proceed with the compilation...
169
Axialis IconWorkshop 6.10
Generate Codes based on the User Name
1. If you have chosen to use the system of activation codes based on the username during the
compilation: Choose Edit/Generate Activation Codes or press Alt+F6. A dialog box opens:
2. In the Library ID ( ) and the Company ID ( ), enter the hexadecimal numbers you entered
at compilation for the requested Icon Library. If you can't recall these numbers, click on the
"Get IDs from History File" button ( ). A dialog box opens, displaying a list of the
compilation you have done, select the right line then OK.
3. In the User Name zone ( ), enter the name of the user then click the "Generate" button
( ), the code is generated and displayed in the Code zone ( ). A text is also automatically
copied in the clipboard as in this example (useful if you send an email to your customer):
Your User Name : John Smith
Your Activation Code : 1527-9872-0984-6717
Generate Codes based on Serial Numbers
1. If you have chosen to use the system of activation codes NOT based on the username (i.e.
based on Serial Codes) during the compilation: Choose Edit/Generate Activation Codes or
press Alt+F6. The above dialog box opens.
2. In the Library ID (see above ) and the Company ID ( ), enter the hexadecimal numbers
you entered at compilation for the requested Icon Library. If you can't recall these numbers,
click on the "Get IDs from History File" button ( ). A dialog box opens, displaying a list of
the compilation you have done, select the right line then OK.
3. In the From and To Number zones ( ), enter the first and the last number of the list of
codes to generate. When done, click the "Generate To File" button ( ). A standard Save As
dialog box opens. Select a location and a new filename (TXT). When done, click OK. The file
is generated.
170
How-to Procedures
171
4
Creating Icons
Before reading this chapter, we recommend to read these topics:
• What is an icon? (chapter 2, page 37)
• Macintosh vs Windows icons (chapter 2, page 44)
• Introducing Windows Vista icons (chapter 2, page 48)
• What is an image object? (chapter 4, page 201)
Create a new Windows® icon project
When you create a new icon project, you first select the type of the icon which is either Windows®
or Macintosh®. The second step is to choose the first image format you wish to include in the icon.
An icon contains several image formats. Usually you start to create the largest one then create the
others from this one.
Choosing the icon project type
1. Choose File/New/Icon Project or press Ctrl+N. A new dialog box opens:
2. Axialis IconWorkshop™ support both Windows® and Macintosh® icons (see format
comparison to learn more). Select the Microsoft Windows® ( ).
173
Axialis IconWorkshop 6.10
Defining the first image format
If you have chosen to create a Windows® icon project, a second dialog box opens. An icon can
contain several image formats (size and colors). In this dialog, you specify the properties of the
first image format you wish to include in this icon. You'll be able to add several other image formats
later. See Creating a new image format in an icon.
3. In Project Name ( ), type the name of the project without extension.
4. In the Colors group ( ), choose:
• XP Alpha Channel (RGB/A - 32 bits). Uses true colors to get the best results. This
format will be used only if the icon is displayed under Windows® XP. Also, it uses an
additional Alpha Channel to create smooth shades and object borders. We strongly
recommend you to start creating an icon with this color mode
• 256 Indexed colors (8 bits): Uses a customizable 256 color palette. You will be able to
modify this palette to produce smoother gradients or specific colors.
• 16 colors (4bits): Uses the system standard palette (16 static colors). This is the native
Windows® mode.
• True colors 16.8M (24 bits): Uses true colors. This format may be incompatible with
some display drivers.
• Monochrome (1 bit): Uses only 2 colors (black and white). This is an obsolete color
mode.
5. In the Size in Pixels group ( ), choose:
• 256x256, 128x128, 64x64, 48x48, 32x32, 24x24, 16x16...
• You can specify a custom icon size. If you want the height equal to width, choose
“Square aspect”
If you create a rectangular icon (width not equal to height), Windows® will
automatically display it using the square aspect. Except for 16x16 icons (displayed in
Explorer, Task), Windows® cannot display various icon sizes. All icons are displayed using
the same size (specified in Display Properties).
174
Creating Icons
6. If you want to use default settings for new icon with current dialog settings, click Set As
Default. This is useful if you have chosen not to be prompted (with this dialog box) when
creating a new icon.
7. You can ask Axialis IconWorkshop™ to bypass the new icon dialog box. Choose Do not
prompt in the Future or choose Edit/Preferences and in General tab, check "Create a new
icon project window" option. In this case the new icon will always have the default settings.
We recommend you to start with the largest and most coloured image you plan to
include in the icon. For example 48x48 Windows® XP RGB/A
Add image formats in a Windows® icon
This is very important to create several image formats in an icon (especially if you wish to
redistribute it) in order to be compatible with all screen configurations (see What is an Icon for
more info).
The following table shows the common Windows® image formats:
IMPORTANT - If you add 24x24 image formats in your icon, it won't be compatible with
Windows® 98 and Windows® 2000. If you use these Windows® versions, the icon will
display correctly in Axialis IconWorkshop™ but will be considered as invalid by
Windows®.
Adding a new image format
1. Choose Draw/New image Format or press "Ins"
175
Axialis IconWorkshop 6.10
2. In the Colors group, choose the color mode of the new image format:
• Windows® XP colors With Alpha Channel (16.8M - 32 bits). Uses true colors to get the
best results. This format will be used only if the icon is displayed under Windows® XP.
Also, it uses an additional Alpha Channel to create smooth shades and object borders.
• 256 Indexed colors (8 bits): Uses a customizable 256 color palette. You will be able to
modify this palette to produce smoother gradients or specific colors.
• 16 colors (4bits): Uses the system standard palette (16 static colors). This is the native
Windows® mode..
• True colors 16.8M (24 bits) Rarely used, this format may be incompatible with some
display drivers.
• Monochrome (1 bit): Uses only 2 colors (black and white). This is an obsolete color
mode
3. In the Size in Pixels group, choose the size of the new image format:
• Standard sizes: 256x256, 64x64, 48x48, 32x32, 24x24, 16x16.
• Extra sizes: 128x128, 72x72, 80x80, 96x96, 256x256.
• Custom size: You can specify any size including non square size. If you want the height
equal to width, click Square aspect.
4. If you check the "Create a new image based on the following image" option, Axialis
IconWorkshop™ will create a new image based on a copy of the selected image format. The
image will be resized and the colors will be adjusted if necessary. If the box is not checked,
it will create a blank new image. All image formats are displayed in the list.
5. If you check the "Apply Dithering" option, Axialis IconWorkshop™ will dither the resulting
image in 256 or 26 color modes. This option permits to use smoother gradients in icons.
Adding quickly a standard image format
This method produces the same result as above using a faster procedure. It is available for standard
formats only.
1. Right click on an image format in the list. A menu opens and proposes you to create the
next missing format based on the selected image. For example, right-click on the
32x32Windows® XP image format and choose Create 16x16 Windows® XP Image Format
in the menu (see below ):
176
Creating Icons
2. The new format is automatically added to the icon.
Adding several images formats in one operation
This method adds several image formats from an existing one in a single operation. It is possible to
create standard and extra formats using this method.
1. Right-click on the format in the list you wish to use as model ( on the left of the editor
window), a context menu opens, select Add Several Image Formats from This Image (see
below ).
177
Axialis IconWorkshop 6.10
2. A new dialog box opens:
3. Select the formats you wish to add by clicking directly on the preview image ( ...
)
You can just ignore (select or not) the image formats already present in the image. You can
also apply or not the dithering option to the 256/16 color images (try and see the results
in the preview images).
4. When done click OK. The formats are automatically created:
Save a Windows® icon
Once an icon project has been created, you need to save it in a file on disk. The only file format for
Windows® icons is ICO.
178
Creating Icons
Saving the project in a file
1. Choose File/Save
2. Select or create the file’s folder from the Save In Drop Down box
3. Enter the filename for the new icon in the File Name Text box. Axialis IconWorkshop™ will
add the file extension (ICO) automatically
4. Click on the Save button
If the filename is already in use, Axialis IconWorkshop™ will present a prompt. Click on
the Yes button to overwrite the existing file.
Saving the project by adding it in the Librarian
1. Choose File/Add to the Librarian (F3)
2. Enter the name of the icon file to create, do not specify the extension. Click OK.
3. The file is automatically added to the librarian. An ICO file is created if the selected Librarian
item is a folder. If an icon library is selected, the icon is added to this library.
Save a Macintosh® icon as Windows® format
It could be useful to save an opened Macintosh® icon to Windows®. This is an handy way to
convert and icon from one system to another.
Saving a Macintosh® icon using a Windows® format
1. Open a Macintosh® icon. Choose File/Save As
2. Choose File/Save As, select Windows® (ICO) as file type and specify a new name.
or
2. Choose File/Save As Windows® Icon... (Ctrl+Alt+S) and specify a new name.
or
2. Click the following button on the toolbar and choose a new name for this icon.
3. Click on the Save button
If the filename is already in use, Axialis IconWorkshop™ will present a prompt. Click on
the Yes button to overwrite the existing file.
179
Axialis IconWorkshop 6.10
Convert a Macintosh® icon to a Windows® format
What's the difference between Windows® and Macintosh® icons?
Microsoft Windows® and Apple Macintosh® icons are very similar. They both have several image
formats embedded in the same icon. But the file format is totally different. You cannot use
Macintosh® icons under Windows® because the file format is not compatible. You must convert
them to Windows® ICO file format (with Axialis IconWorkshop™ of course!).
All kinds of formats can be included in a Windows® ICO file (you can even create non-square icons).
With Macintosh® icon files this is not possible. Only some strictly-defined image formats can be
included.
Axialis IconWorkshop™ supports the following Macintosh® icon files: ICNS, RSC and BIN. Icons from
system 7.5, 8.5, 9.x and 10.X are supported. You can easily open them into the Icon Editor and
save them as Windows® ICO format. During this operation, we recommend you to remove special
Macintosh® formats which are useless under Windows®.
To learn more about Windows® and Macintosh® icon file formats, read this topic: Macintosh® vs
Windows® icons
Which image formats are included in Macintosh® icons?
Here is the list of image formats you can find in Macintosh® Icons:
• Leopard (512x512) - 32 bits (alpha channel)
• Tiger (256x256) - 32 bits (alpha channel)
• Thumbnail (128x128) - 32 bits (alpha channel)
• Huge (48x48) - 32 bits (alpha channel), 256 colors, 16 colors, mono
• Large (32x32) - 32 bits (alpha channel), 256 colors, 16 colors, mono
• Small (16x16) - 32 bits (alpha channel), 256 colors, 16 colors, mono
• Mini (16x12) - 256 colors, 16 colors, mono
The new OS-X icons can contain very large image formats (256x256, 512x512 - 32 bits). Those
formats are also supported. It's a good idea to start from hi-res sizes to create a new Windows®
icon.
Here is a summary of image formats you can find in Macintosh® Icons:
180
Creating Icons
Convert the icon to Windows®, keeping all Macintosh® image
formats
This is the simplest way to proceed. However, some Macintosh® specific image formats may be
useless.
1. Open the Macintosh®icon. Choose File/Open... The icon is opened in a document window.
2. Choose File/Save As, select Windows® (ICO) as file type and specify a new name.
or
2. Choose File/Save As Windows® Icon... (Ctrl+Alt+S) and specify a new name.
or
2. Click the following button on the toolbar and choose a new name for this icon.
Creating a Windows® icon from a Macintosh® icon
This operation is not a conversion, it's a creation of a new icon. It will not preserve all the existing
formats. It will create a new icon based on the largest and most coloured image included in the
original Macintosh® icon (usually 256x256 or 48x48 with alpha channel).
1. Open the Macintosh® icon. Choose File/Open...
2. When the icon is opened, select the largest and the "most coloured" image format in the list
(best with 256x256 or 48x48 with alpha channel).
3. Right-click on the selected image format in the list ( ), a menu opens. Select "New
Windows® Icon Project from this Image..." ( ).
4. A large dialog box opens. In the Name group ( ), enter the icon project name. Do not
specify any extension.
181
Axialis IconWorkshop 6.10
5. In the Image Formats group, select the image formats you wish to add in the icon ( to
).
6. You can also add extra formats (128x128 or 256x256). When done, click OK. The new
Icon Project document window is created with all formats embedded.
7. Save your icon to Windows® format. choose File/Save and choose a new name (.ICO) for
this icon.
IMPORTANT NOTICE
Converting a Macintosh® icon to Windows® format does NOT change Copyright or
Intellectual Property of an icon. The image/icon is property of its author and still property
of this author after a conversion.
As a result, do NOT redistribute converted icons without permission of the author. Also,
some Macintosh® authors do not wish that you convert/use their icons under Windows®. In
such a case, please respect author wish and do not convert its icons, even for your personal
use.
Create a Windows® icon from an image File...
An interesting feature of Axialis IconWorkshop™ is to create an icon from an existing file. Some
image formats support 32 BPP alpha channel transparency which is very interesting to create hiquality RGB/A images in icons. The following image formats are supported:
•
•
•
182
BMP - Windows® bitmap (32 BPP alpha channel transparency supported).
PNG - Portable Network Graphic (32 BPP alpha channel transparency supported).
PSD - Photoshop (32 BPP alpha channel transparency and layers supported).
Creating Icons
•
•
•
•
•
JP2 - JPEG 2000 (32 BPP alpha channel transparency supported).
JPG - JPEG
TGA - Targa
GIF - Compuserve GIF
Others - Various other formats supported: TIFF, PCD (PhotoCD), PIC (Apple PICT), PCX (Zsoft),
WMF (Windows® MetaFile)
Open the image file in IconWorkshop™
1. Choose "File/Open", browse your folders and select your file (Windows® standard dialog
box).
or
Choose "File/New/File Explorer" or press Ctrl+E. A built-in Axialis file explorer window opens.
Browse your disks, see the thumbnail preview and double-click the image file you wish to
open.
or
In the Recently Used zone (in the main toolbar), type the full pathname of the image file you
wish to open then hit Enter.
2. The image file opens in a document window.
Axialis IconWorkshop™ will convert images to 32 bpp with transparency when possible. This
is much more convenient to create icons. The following image formats can include
transparency: Photoshop® PSD, PNG, RGB, GIF, JPEG 2000 and WMF.
Create an icon from this image
3. Before proceeding, we recommend you to select the portion of image you wish to use to
create your icon. If you leave too many transparent areas around your image, the visible
part of your icon will be too small.
4. Select the portion of image: Use the selection tool (upper-left button of the tool palette)
and select the portion of image you wish to use (do not cut the shadow if there is one
around the object). When done, an animated dashed rectangle has been created.
5. When the selection is done, choose Image/Create Windows® Icon from Selection or press "I"
or click the first command button in the local toolbar ( ):
6. The dialog box New Windows® Icon From Image opens (see below). In the Name group ( ),
enter the icon project name. Do not specify any extension.
183
Axialis IconWorkshop 6.10
7. In the Image Formats group, select the image formats you wish to add in the icon ( ) and
unselect the unwanted images ( ). Just click on the image preview to select/unselect. To
know more about the desired Windows® standard image format, see What is an Icon topic.
8. In the Extra Formats group, select the optional image formats you wish to add in the icon.
The following table shows the common Windows® image formats:
9. To get the best results possible, you can also apply a filter when resizing RGB/A images and
a dithering option to the 256/16 color images (try and see the results in the preview
images).
10. If you wish to start creating your icon with an unlisted format, click the Other Image
Format button.
11. When done, click OK. The icon is automatically created with the various image formats
you've selected.
Batch create several Windows® icons from images
Using this feature you can Create Several Icons from images, existing icons or cursors in one
operation. This is what we call a batch procedure. We'll perform this task using the built-in Axialis
IconWorkshop™ explorer.
Select the source images, icons or cursors
1. Open a new Explorer window. Choose File/New/File Explorer...
184
Creating Icons
2. When the window is opened, select the folder which contains the Source Files using the tree
in the left pane.
3. When done, the Source Files appears (with preview) in the right pane. Select the icons you
wish to convert. You can use Shift/Ctrl + Mouse to select several icons. Use Ctrl+A to
select all. Use +/- to select/unselect by specifying filters.
Batch create Windows® icons
4. Choose Explorer/Batch Create Windows® Icons from Selection or Ctrl+Shift+C.
5. A dialog box opens. In "Standard Image Formats" ( ) and "Extra Image Formats" ( ) choose
the image formats you wish to add in the icons.
6. In Image Adjustment group ( ), you can add a smooth or sharp filter to the image shrinking
process. You can also use or not a dithering method to render image using 256 or 16
colors. In Transparency group ( ), an option permits to use opaque images (i.e. without
transparency) and specify a color to make transparent.
7. When done, click OK. The batch operation starts immediately, the hourglass mouse pointer
is displayed during the creation. When done the new Windows® icons are added to the
folder contents.
The created icons have the same filename as the original document with different
extension (depending on the icon types). A system has been implemented to index the
files if necessary to avoid overwriting. If you create icons from Image Files, the whole
image is selected and resized keeping its aspect ratio. If it contains transparency, it is
kept during the creation. If you create icons from an Existing Icons or Cursors, the
largest image is used as source to create the icons. Transparency is kept.
185
Axialis IconWorkshop 6.10
Create a new Macintosh® icon project
When you create a new icon project, you first select the type of the icon which is either Windows®
or Macintosh®. The second step is to choose the first image format you wish to include in the icon.
An icon contains several image formats. Usually you start to create the largest one then create the
others from this one.
Choosing the icon project type
1. Choose File/New/Icon Project or press Ctrl+N. A new dialog box opens:
2. Axialis IconWorkshop™ support both Windows® and Macintosh® icons (see format
comparison to learn more). Select the Apple Macintosh® ( ) option.
Defining the first image format
If you have chosen to create a Macintosh® icon project, a second dialog box opens. An icon can
contain several image formats (size and colors). In this dialog, you specify the properties of the
first image format you wish to include in this icon. You'll be able to add several other image formats
later. See Creating a new image format in an icon.
3. In Project Name ( ), type the name of the project without extension.
186
Creating Icons
4. In the Colors group ( ), choose:
• RGB Alpha Channel (RGB/A - 32 bits). Uses true colors to get the best results. This
format will be used only if the icon is displayed under Macintosh® OSX. It uses an
additional alpha channel to create smooth shades and object borders. We strongly
recommend you to start creating an icon with this color mode
• 256 Indexed colors (8 bits): Uses a fixed 256 color palette.
• 16 colors (4bits): Uses the system standard palette (16 static colors). This is the native
Windows® mode.
• Monochrome (1 bit): Uses only 2 colors (black and white).
5. In the Size in Pixels group ( ), choose:
• 16x16, 24x24, 32x32, 48x48, 128x128... 256x256 is used under Macintosh® OSX
10.4 (Tiger) or more only.
An icon can contain several image formats (size and colors). In this dialog, you specify
the properties of the first image format you wish to include in this icon. You'll be able to
add several other image formats later. See Creating a new image format in an icon.
6. If you want to use default settings for new icon with current dialog settings, click Set As
Default. This is useful if you have chosen not to be prompted (with this dialog box) when
creating a new icon.
7. You can ask Axialis IconWorkshop™ to bypass the new icon dialog box. Choose Do not
prompt in the Future or choose Edit/Preferences and in General tab, check "Create a new
icon project window" option. In this case the new icon will always have the default settings.
We recommend you to start with the largest and most coloured image you plan to
include in the icon. For example 48x48 RGB/A
187
Axialis IconWorkshop 6.10
Add image formats in a Macintosh® icon
This is very important to create several image formats in an icon (especially if you wish to
redistribute it) in order to be compatible with all screen configurations.
The following table shows the common Macintosh® image formats:
IMPORTANT - Macintosh® icon format is not open. You cannot add image formats which
are not defined in Macintosh® icon specifications. Some image formats are not available.
Adding a new image format
1. Choose Draw/New image Format or press "Ins"
2. In the Colors group, choose the color mode of the new image format:
• RGB With Alpha Channel (16.8M - 32 bits). Uses true colors to get the best results.
This format will be used only if the icon is displayed under Macintosh® OSX only. Also, it
uses an additional Alpha Channel to create smooth shades and object borders.
• 256 Indexed colors (8 bits): Uses a fixed 256 color palette.
• 16 colors (4bits): Uses the system standard palette (16 static colors).
• Monochrome (1 bit): Uses only 2 colors (black and white).
3. In the Size in Pixels group, choose the size of the new image format:
• Standard sizes: 128x128, 48x48, 32x32, 16x16, 16x12.
188
Creating Icons
• Extra sizes: 256x256 which is compatible with Macintosh® OSX 10.4 or more only
(Tiger), 512x512 which is compatible with Macintosh® OSX 10.5 or more only
(Leopard)
4. If you check the "Create a new image based on the following image" option, Axialis
IconWorkshop™ will create a new image based on a copy of the selected image format. The
image will be resized and the colors will be adjusted if necessary. If the box is not checked,
it will create a blank new image. All image formats are displayed in the list.
5. If you check the "Apply Dithering" option, Axialis IconWorkshop™ will dither the resulting
image in 256 or 26 color modes. This option permits to use smoother gradients in icons.
Adding quickly a standard image format
This method produces the same result as above using a faster procedure. It is available for standard
formats only.
1. Right click on an image format in the list. A menu opens and proposes you to create the
next missing format based on the selected image. For example, right-click on a 128x128
image format and choose Create 48x48 RGB/A Image Format in the menu (see below ):
2. The new format is automatically added to the icon.
Adding several images formats in one operation
This method adds several image formats from an existing one in a single operation. It is possible to
create standard and extra formats using this method.
1. Right-click on the format in the list you wish to use as model (on the left of the editor
window), a context menu opens, select Add Several Image Formats from This Image.
2. A new dialog box opens. Select the formats you wish to add by clicking directly on the
preview image
You can just ignore (select or not) the image formats already present in the image. You can
also apply or not the dithering option to the 256/16 color images (try and see the results in
the preview images).
3. When done click OK. The formats are automatically created:
189
Axialis IconWorkshop 6.10
Save a Macintosh® icon
Once an icon project has been created, you need to save it in a file on disk. Various file formats are
available for saving Macintosh® icons:
•
•
•
ICNS - This is the standard Macintosh® icon file format. Only one icon (with several formats)
can be saved in this format. This format is the most commonly used.
RSC or RSRC - This is the Macintosh®resource file format. It is used mainly by developers. This
format can contain several icons. IconWorkshop™ support reading of RSC files with several icons
but can write only RSC files with one icon.
BIN - MacBinary format. This format permits to easily transfer files between Macintosh® and
Windows®. For more information on this format, visit this website:
http://en.wikipedia.org/wiki/MacBinary .
We strongly recommend to use this file format to transfer your icons to Macintosh® because it
is compatible with Macintosh®file system which separate each file in two parts called "forks":
The data fork and the resource fork. The data fork contains the data included in the file (a text
file for example). The resource fork contains the image or icon which permits to display it on
screen. See below for more information on transfer from Windows® to Macintosh®.
Saving the project in a file
1. Choose File/Save
2. Select or create the file’s folder from the Save In Drop Down box
3. Enter the filename for the new icon in the File Name Text box.
4. Choose the file format you wish to use (see above). Axialis IconWorkshop™ will add the file
extension (ICO) automatically
5. Click on the Save button
If the filename is already in use, Axialis IconWorkshop™ will present a prompt. Click on
the Yes button to overwrite the existing file.
Saving the project by adding it in the Librarian
1. Choose File/Add to the Librarian (F3)
2. Enter the name of the icon file to create, do not specify the extension. Click OK.
3. The file is automatically added to the librarian. An ICNS, RSC or BIN file is created if the
selected Librarian item is a folder. If an icon library is selected, the icon is added to this
library.
190
Creating Icons
Save a Windows® icon as Macintosh® format
It could be useful to save an opened Windows® icon to Macintosh®. This is an handy way to
convert and icon from one system to another. Various file formats are available for saving
Macintosh® icons:
•
•
•
ICNS - This is the standard Macintosh® icon file format. Only one icon (with several formats)
can be saved in this format. This format is the most commonly used.
RSC or RSRC - This is the Macintosh®resource file format. It is used mainly by developers. This
format can contain several icons. IconWorkshop™ support reading of RSC files with several
icons but can write only RSC files with one icon.
BIN - MacBinary format. This format permits to easily transfer files between Macintosh® and
Windows®. For more information on this format, visit this website:
http://en.wikipedia.org/wiki/MacBinary .
We strongly recommend to use this file format to transfer your icons to Macintosh® because it
is compatible with Macintosh®file system which separate each file in two parts called "forks":
The data fork and the resource fork. The data fork contains the data included in the file (a text
file for example). The resource fork contains the image or icon which permits to display it on
screen. See below for more information on transfer from Windows® to Macintosh®.
Saving a Windows® icon using a Macintosh® format
1. Open a Macintosh® icon. Choose File/Save As
2. Choose File/Save As, select Macintosh® (ICNS, RSC or BIN) as file type and specify a new
name.
or
2. Choose File/Save As Macintosh® Icon... (Ctrl+Alt+S), select the Macintosh® file format (see
above) and specify a new name.
or
2. Click the following button on the toolbar, select the Macintosh® file format (see above) and
specify a new name for this icon.
3. Click on the Save button
Remark about the Macintosh® icon format
The following table shows the common Macintosh® image formats:
191
Axialis IconWorkshop 6.10
Macintosh® icon format is not open. You cannot add image formats which are not
defined in Macintosh® icon specifications. Some image formats are not available.
During the save operation you may be prompted to confirm loss of Windows® specific image
formats not available in Macintosh® icons.
Convert a Windows® icon to Macintosh® format
What's the difference between Windows® and Macintosh® icons?
Microsoft Windows® and Apple Macintosh® icons are very similar. They both have several image
formats embedded in the same icon. But the file format is totally different. You cannot use
Windows® icons under Macintosh® because the file format is not compatible. You must convert
them to Macintosh® ICO file format (with Axialis IconWorkshop™ of course!).
All kinds of formats can be included in a Windows® ICO file (you can even create non-square icons).
With Macintosh® icon files this is not possible. Only some strictly-defined image formats can be
included. As a result, some image formats cannot be converted to Macintosh® icon.
Axialis IconWorkshop™ supports the following Macintosh® icon files creation: ICNS, RSC and BIN.
Icons from system 7.5, 8.5, 9.x and 10.X are supported. You can easily open Windows® icons into
the Icon Editor and save them as Macintosh® format. During the conversion, formats which are not
supported under Macintosh® will be removed.
To learn more about Windows® and Macintosh® icon file formats, read this topic: Macintosh® vs
Windows® icons
Which image formats are included in macintosh® icons?
Here is the list of image formats you can find in Macintosh® Icons:
• Leopard (512x512) - 32 bits (alpha channel)
• Tiger (256x256) - 32 bits (alpha channel)
• Thumbnail (128x128) - 32 bits (alpha channel)
• Huge (48x48) - 32 bits (alpha channel), 256 colors, 16 colors, mono
• Large (32x32) - 32 bits (alpha channel), 256 colors, 16 colors, mono
• Small (16x16) - 32 bits (alpha channel), 256 colors, 16 colors, mono
192
Creating Icons
•
Mini (12x16) - 256 colors, 16 colors
The new Macintosh® OS-X icons can contain very large image formats (128x128, 256x256 - 32
bits). Those formats are also supported. Although those image sizes are not actually used in
Windows®, it's a good idea to start from hi-res sizes to create a new Windows® icon.
Here is a summary of image formats you can find in Macintosh® Icons:
Some image formats are unavailable in Macintosh® icon specifications. Therefore
IconWorkshop™ won't event permit you to create them. If you try to save or convert a
Windows® icon to Macintosh®, some format will be removed. Note that all image
formats can be created in Windows® icons, even custom formats not listed above.
Convert the icon to Macintosh®, keeping all Macintosh®
compatible image formats
This is the simplest way to proceed. However, some Windows® specific image formats may not be
converted.
1. Open the Windows® icon. Choose File/Open... The icon is opened in a document window.
2. Choose File/Save As, select Macintosh® (ICNS, RSC or BIN) as file type and specify a new
name.
or
2. Choose File/Save As Macintosh® Icon... (Ctrl+Alt+S) and specify a new name.
or
2. Click the following button on the toolbar and choose a new name for this icon.
Creating a Macintosh® icon from a Windows® icon
This operation is not a conversion, it's a creation of a new icon. It will not preserve all the existing
formats. It will create a new icon based on the largest and most coloured image included in the
original Windows® icon (usually 128x128 or 48x48 with alpha channel).
1. Open the Windows® icon. Choose File/Open...
193
Axialis IconWorkshop 6.10
2. When the icon is opened, select the largest and the "most coloured" image format in the list
(best with 128x128 or 48x48 with alpha channel).
3. Right-click on the selected image format in the list ( ), a menu opens. Select "New
Macintosh® Icon Project from this Image..." ( ).
4. A large dialog box opens. In the Name group, enter the icon project name. Do not specify
any extension.
5. In the Image Formats group, select the image formats you wish to add in the icon (
).
6. You can also add other formats (256x256 to be used in Tiger). When done, click OK. The
new Icon Project document window is created with all formats embedded.
7. Save your icon to Macintosh® format. choose File/Save and choose a new name for this
icon.
194
Creating Icons
Create a Macintosh® icon from an image File...
An interesting feature of Axialis IconWorkshop™ is to create an icon from an existing file. Some
image formats support 32 BPP alpha channel transparency which is very interesting to create hiquality RGB/A images in icons. The following image formats are supported:
•
•
•
•
•
•
•
•
BMP - Windows® bitmap (32 BPP alpha channel transparency supported).
PNG - Portable Network Graphic (32 BPP alpha channel transparency supported).
PSD - Photoshop (32 BPP alpha channel transparency and layers supported).
JP2 - JPEG 2000 (32 BPP alpha channel transparency supported).
JPG - JPEG
TGA - Targa
GIF - Compuserve GIF
Others - Various other formats supported: TIFF, PCD (PhotoCD), PIC (Apple PICT), PCX (Zsoft),
WMF (Windows® MetaFile)
Open the image file in Axialis IconWorkshop™
1. Choose "File/Open", browse your folders and select your file (Windows® standard dialog
box).
or
Choose "File/New/File Explorer" or press Ctrl+E. A built-in Axialis file explorer window opens.
Browse your disks, see the thumbnail preview and double-click the image file you wish to
open.
or
In the Recently Used zone (in the main toolbar), type the full pathname of the image file you
wish to open then hit Enter.
2. The image file opens in a document window.
Axialis IconWorkshop™ will convert images to 32 bpp with transparency when possible. This
is much more convenient to create icons. The following image formats can include
transparency: Photoshop® PSD, PNG, RGB, GIF, JPEG 2000 and WMF.
Create an icon from this image
3. Before proceeding, we recommend you to select the portion of image you wish to use to
create your icon. If you leave too many transparent areas around your image, the visible
part of your icon will be too small.
4. Select the portion of image: Use the selection tool (upper-left button of the tool palette)
and select the portion of image you wish to use (do not cut the shadow if there is one
around the object). When done, an animated dashed rectangle has been created.
5. When the selection is done, choose Image/Create Macintosh® Icon from Selection or press
"M" or click the first command button in the local toolbar ( ):
195
Axialis IconWorkshop 6.10
6. The dialog box New Macintosh® Icon From Image opens (see below). In the Name group
( ), enter the icon project name. Do not specify any extension.
7. In the Image Formats group, select the image formats you wish to add in the icon ( to
and unselect the unwanted images. Just click on the image preview to select/unselect.
)
8. In the Other group, select the optional image formats you wish to add in the icon ( ). Note
that the 32x32 mono is recommended if you want the icon to be compatible with older
systems. The format 256x256 works only under Macintosh® OSX 10.4 (Tiger) or more.
The format 512x512 works only under Macintosh® OSX 10.5 (Leopard) or more. The
following table shows the common Macintosh® image formats:
8. To get the best results possible, you can also apply a filter when resizing RGB/A images and
a dithering option to the 256/16 color images (try and see the results in the preview
images).
9. When done, click OK. The icon is automatically created with the various image formats
you've selected.
196
Creating Icons
Batch create several Macintosh® icons from images
Using this feature you can Create Several Icons from images, existing icons or cursors in one
operation. This is what we call a batch procedure. We'll perform this task using the built-in Axialis
IconWorkshop™ explorer.
Select the source images, icons or cursors
1. Open a new Explorer window. Choose File/New/File Explorer...
2. When the window is opened, select the folder which contains the Source Files using the tree
in the left pane.
3. When done, the Source Files appears (with preview) in the right pane. Select the icons you
wish to convert. You can use Shift/Ctrl + Mouse to select several icons. Use Ctrl+A to
select all. Use +/- to select/unselect by specifying filters.
Batch create Macintosh® icons
4. Choose Explorer/Batch Create Macintosh® Icons from Selection or Ctrl+Shift+D.
5. A dialog box opens. First we need to choose the Macintosh® file format we wish to use
( there are 3 formats supported by Axialis IconWorkshop™ - see this topic to learn more).
6. In groups "Standard Image Formats" ( ) and "Extra Image Formats" ( ) choose the image
formats you wish to add in the icons.
6. In Image Adjustment group, you can add a smooth or sharp filter to the image shrinking
process. You can also use or not a dithering method to render image using 256 or 16
colors. In Transparency group, an option permits to use opaque images (i.e. without
transparency) and specify a color to make transparent.
7. When done click OK. All the Macintosh® icons are created and added to the same folder.
Names are preserved, only the extension is changed.
197
Axialis IconWorkshop 6.10
The created icons have the same filename as the original document with different
extension (depending on the icon types). A system has been implemented to index the
files if necessary to avoid overwriting. If you create icons from Image Files, the whole
image is selected and resized keeping its aspect ratio. If it contains transparency, it is
kept during the creation. If you create icons from an Existing Icons or Cursors, the
largest image is used as source to create the icons. Transparency is kept.
198
5
Creating Icons from
Image Objects
What is an Image Object?
Image objects are simple, basic graphical elements which are assembled together to create more
complex artworks like icons, buttons, sprites and more. Image objects permit you to be creative
without drawing one pixel, just by using mouse drag & drop and applying effects. In the near future
all Axialis products will support Image Objects.
Why Image Objects?
Graphics are among the primary ways of advertising the sale of goods or services. This is true for
computing when designing software or website interfaces. The primary solution is to draw icons
using either an image or vector editor. Then, when the image is done, use Axialis IconWorkshop™ to
convert this image to an icon. Also, if you don't want to use an external image editor, Axialis
IconWorkshop™ contains some drawing tools that permit you to draw your own icons. But most of
us are not graphic designers and we have a problem when it comes to create attractive icons or
web graphics. The question is: "How to create attractive custom icons without drawing skills?"
Image Objects are the answer.
The solution is to use a set of image objects already done by a skilled computer graphic artist, and
assembling them together to create a final artwork that will match your needs. Using a set of
existing image objects the possibilities are almost infinite. You can create many different icons or
graphics simply by adjusting various parameters of each object like Hue (teint), Saturation,
Brightess, Contrast, Size, Opacity and more.
For example, using 6 image objects from our Glossy Buttons object pack, you can easily create an
attractive help icon:
199
Axialis IconWorkshop 6.10
This association can be easily done with Axialis IconWorkshop™ using a few mouse clicks and dragand-drops. Creating different versions of an icon is very easy with this pack. See below some
examples of the help icon made in a few minutes simply using the mouse and without drawing one
pixel (non-exhaustive list of course!):
Specifications of an Image Object
An image object is a simple raster or vector image which can be saved as standard or proprietary
file format. However, to comply with Axialis requirements, image objects must match the following
specifications:
• Objects can be vector or raster images;
• Objects file format must be compatible with Axialis Software products: PNG, JPEG2000,
BMP, PSD, ICO, ICNS (more formats to be supported in the future);
• Raster objects must contain RGB images and include alpha-channel transparency (RGB/A
32 bits-per-pixel format). Indexed images with color palette are not accepted.
• Raster objects size must be 256x256. Overlay objects object can be 128x128. Complex
multi-resolution objects can include several versions on the same image at different sizes
(useful for small icons).
• Objects can contain layers;
Different Types of Image Objects
All objects are simply images. However we can separate them in three types:
• Basic Objects - These objects are the most simple possible. For instance, the Glossy Buttons
pack contains only basic objects. Basic objects cannot be used alone. They are designed to
be added as layers to other basic or simple objects. Typical basic objects are: geometric
shapes, reflect effects, lightning effects, shadows and more. See below examples of basic
objects (from Glossy Buttons pack):
• Overlay Objects - These objects can be used alone but are generally added to already-done
images. The aim of overlay objects is to add a supplementary information to the image,
usually actions or types. Overlay objects can be created from basic objects and added to
your existing object collection. See below examples of overlay objects (from Axialis
IconWorkshop™ standard objects):
200
Creating Icons from Image Objects
• Complex Objects - These objects are detailed ones which can be used alone. However,
they're usually used with overlays images applied to them. See below examples of complex
objects (few of them with overlays):
Using Image Objects with Axialis Products
Actually Axialis IconWorkshop™ is the only product to support image objects. In the near future,
Professional Screensaver Producer and CursorWorkshop will support image objects. On a regular
basis, new image object packs will be available for download on our website. Packs are free but
some of them are reserved to registered customers. Additionally, third-party authors may propose
their own object packs (additional fees may be required). Links to selected object packs will also be
added to our website object page.
Using image objects in Axialis products is a child's play. The installation is easy and fully automated.
Objects are added in the Axialis Librarian folder and appear in the associated integrated window
(present in all Axialis products). Once the pack is installed, dealing with objects is fun and intuitive.
It can be done exclusively with the mouse using drag and drops.
To learn how to create icons from object we recommend to read this tutorial: Creating Icons from
Image Objects
To follow this tutorial, you need to install Axialis IconWorkshop™ 6.0 (Tryout or Corporate version)
or more. The Glossy Buttons pack is already included in Axialis IconWorkshop™. You'll learn how to
create the following icon, containing several formats, in minutes:
201
Axialis IconWorkshop 6.10
How to use Image Objects to Create Icons?
Using image objects in Axialis IconWorkshop™ is a child's play. Objects are present in the Axialis
Librarian folder and appear in the associated integrated window (present in all Axialis products).
Additional object packs can be downloaded from our website. Dealing with objects is fun and
intuitive. It can be done exclusively with the mouse using drag and drops.
Before reading this tutorial, we recommend you to visit this page to learn more about Image
Objects: What is an Image Object?
Downloading and Installing Object Packs
Axialis IconWorkshop™ already includes some objects packs. However, on a regular basis, new
object packs will be available for download on our website. Packs are free but some of them are
reserved to registered customers. Additionally, third-party authors may propose their own object
packs (additional fees may be required). Links to selected object packs will also be added to our
website object page .
1. Open your Internet browser and visit our page: "Download Image Object Packs". We
recommend you to read the License Agreement before downloading packs.
2. When you're interested by an object pack (click "Read More" to get additional information
on this pack), click the "Download Now" button. It is an executable file (EXE) so you may be
prompted by Windows® or any other antivirus application to confirm the download and
execution of the file. Click "YES".
.
Installing packages downloaded from Internet is potentially dangerous . Install packages
that you download on Internet may contain viruses. However your security is our
priority and all our files are periodically tested against all known viruses. Also, if you
have an antivirus software installed, the file will be automatically checked before it is
launched.
3. Once the file is downloaded, launch the installation and follow the procedure. When finished,
the objects are installed in the "Axialis Librarian" folder. If IconWorkshop™ is installed it is
automatically launched.
Defining, Creating the Icon Project
Before using the image objects, we need to create a new icon project. An icon contains several
image formats (see "What's an Icon?") so we need to define all these formats before going on.
We'll create an icon compatible with Windows Vista™ (256x256 format), Windows® XP; (48x48,
32x32, 24x24 and 16x16 formats) and Dock Bar applications (128x128 format). To simplify
the project, we won't add indexed color formats (256, 16 colors). Using the objects we'll make a
"Glossy Earth" icon with bottom shadow. The resulting icon will look like this:
202
Creating Icons from Image Objects
The largest image format is 256x256 Windows® XP (ie RGB with alpha channel). To get the best
results, we'll start the project with this new format and work with it to assemble the objects. When
finished, we'll create all the other formats using this 256x256 format as template. Let's create our
new icon project:
1. Launch IconWorkshop™. Choose File/New/Windows® Icon Project or press Ctrl+W. A dialog
box opens:
2. Type the name of the project ( ): "Glossy Earth".
3. Now specify the format of the first image to add in the project: In Colors, choose "XP with
Alpha Channel (RGB/A 32 bits)" ( ). In Size in Pixels, choose and "256x256 (Windows
Vista™)"Glossy Earth" ( ).
4. As we want the 256x256 format to be used under Windows Vista™, we choose to
compress it as PNG: Click the option "Compress 256x256 Windows Vista™ format" ( ). To
learn more about Windows Vista™ icons, read this article: "Introducing Windows Vista™
Icons".
5. When done, click OK. A new icon project window is created ( ):
203
Axialis IconWorkshop 6.10
6. If the scale-1:1 preview window is not in 256x256 mode, the preview image will be
cropped. It is recommended that you switch to 256x256 preview mode to work with
256x256 Windows Vista™ icons. To switch to this mode, right-click in the preview
window, a menu opens. Choose "256x256 Display". The preview window now looks as
shown above in floating mode ( ).
Use the same method to return to the previous state: choose "128x128 Display", remove
the "Floating Window" option and use the mouse to dock the window.
Building the Icon Using Image Objects
This is the most important part of the project. The time has come to be creative! No problem it's
easy and fun with IconWorkshop™. Before we start, don't forget that each step of the creation can
be undone/redone (Ctrl+Z/Ctrl+Y) up to 16 steps back.
7. In the Librarian window (choose View/Librarian if it is not visible), select the "Objects/Pack
1 - Glossy Buttons/Circle" folder ( ). A list of available object is displayed in the contents
window below ( ). Find the "Circle - Blue.png" file and select it ( ).
204
Creating Icons from Image Objects
8. When done, use a mouse Drag-and-Drop to add it into the project as shown above ( ).
The object is added to the project as a floating selection ( ). Take a look at the quality of
the artwork in the Scale 1:1 window ( ).
Congratulation! you've just added your first image object to your project! As you can see it's
very easy and intuitive. Now let's continue and add other objects to build the icon.
9. From the Librarian, select the file "Circle Inner Light.png" and add it to the project using the
same method. The resulting image now includes a cyan light effect as shown below:
10. To create the Earth image, we now add the map object. From the librarian, select the file
"World Map.png" and add it to the project using the same method. The resulting image
looks like below:
11. The result is good but we want to make it even better. We can increase the realism by
changing the color of the map to green. To do so, IconWorkshop™ has a feature to adjust
the Hue/Saturation/Brightness of an image. Choose Draw/Adjustments-Effects/HueSaturation or press "U". A dialog box opens:
205
Axialis IconWorkshop 6.10
12. Set the Hue to "-100" either using the slider or by typing the value ( ). It "shifts" the
colors of the floating image in the spectrum. As a result, the map is now green. Also, we
slightly increase the Brightness of the map by specifying "6" ( ). You can see the results in
real-time in the Preview 1:1 window. When done click OK. Now the map is green:
13. Do you recall the name of the icon? Yes, "Glossy Earth"! So, let's add the glossy effects.
First, using the same drag-and-drop method as above, we add the object "Circle Effect
3.png". Then to increase the effect, we add the object "Circle Effect 6.png". Now it looks
like this:
206
Creating Icons from Image Objects
14. Now the final touch: the shadow. We want to add a shadow at the bottom and under the
earth. This will produce an interesting effect, just like if the globe was laid on a white
horizontal plan.
First, we need to move the whole Earth 10 pixels up (just to leave more space for shadow at
the bottom of the image). Important: To do so, we must select the whole image. Actually,
only the last object we've added is selected. Choose Edit/Select All or press Ctrl+A. There is
no visual change but now you're ready to move the whole image.
To move the image, you can use the mouse (with a drag-and-drop) or use the arrow keys of
the keyboard. To move the image 10 pixels up, hit UpArrow 10 times or press
Shift+UpArrow. The resulting selection rectangle is now 10 pixels outside the top of the
editor area.
15. We can now add the shadow. Select the object "Circle Shadow.png" in the librarian and add
it to the project. The resulting image looks like this:
16. Obviously, there is a problem: The shadow is in front of the Earth Globe! The solution is as
easy as a keystroke: Press the End key or choose Edit/Set Floating Selection to Background.
You're done! The resulting image should look like this:
207
Axialis IconWorkshop 6.10
Finalizing the Icon by Creating All the Formats
Now that the largest image is done (256x256 RGB/A), we'll create all the other formats of the
icons from this one. This is done in one step with Axialis IconWorkshop™ Corporate Edition. Using
the Personal Edition, you need to create each format manually (see product help for more info).
17. Choose Draw/Add Several Image Formats from This Image or press "V". A dialog box
opens:
18. Select the images formats to include in the icon ( / ) by clicking on the associated
check boxes. Follow the specifications as we defined them above.
19. You can also choose to apply the dithering option to the 256/16 color images as well as
add a filter effect to smooth/sharpen the resulting images in RGB/A mode ( ). View the
results in the preview images.
20. When done, click OK. The new formats are automatically created and added to the project
( ):
208
Creating Icons from Image Objects
21. Take a moment to admire your work :) Click on the various formats ( ) and see the
resulting icon at scale 1:1 in the preview window ( ). You can change the background
lightness of the Scale 1:1 window simply by clicking in it using the left button of the mouse.
It will permit you to see how the icon is displayed on different backgrounds with different
lightness.
22. Save your icon: Choose File/Save or press Ctrl+S. It will be saved as Windows® ICO
format.
Congratulations! You've created your first icon from Image Objects. There is no limit to your
creativity using these objects. You can resize them, changing their color, their opacity and more.
You can even create your own objects by combining existing ones.
If you want to practice, try to recreate these sample icons made using the Glossy Objects pack:
Creating a Macintosh® Icon
You can easily create a Macintosh® icon using a similar procedure. When creating the project,
choose "File/New/ Macintosh®Icon Project" or press Ctrl+M and follow the same building method.
You can also save your Windows® icon as Macintosh® format. When the icon is finished (step 22
above), choose File/Save as Macintosh®Icon or press Ctrl+Alt+S.
Downloading Object Packs from Internet
On a regular basis, new image object packs will be available for download on our website. Packs are
free but some of them are reserved to registered customers. Additionally, third-party authors may
propose their own object packs (additional fees may be required). Links to selected object packs
will also be added to our download page.
209
Axialis IconWorkshop 6.10
Download Object Packs from your Web Browser
This is a standard way to proceed. The procedure may differ slightly depending on your web
browser type and version. The procedure below is based on Microsoft® Internet Explorer® 6.0:
1. Launch Internet Explorer®. In the Address bar, type the following address:
"http://www.axialis.com/objects".
2. The web page opens: "Download Image Object Packs". We recommend you to read the
License Agreement before downloading packs.
3. When you're interested by an object pack, read the quick description ( ). Take a look at the
popularity and user rating. Once downloaded and tested you'll be also able to vote for it just
by clicking on the Rating Stars ( ). To get more information about the pack, click "Read
More" button.
4. Click the "Download Now" button ( ). If the file is in "FREE ACCESS", the download process
starts immediately. Otherwise, the file is marked "REGISTERED USERS" and you need to
enter your Genuine Axialis Product Key to download the file.
5. The file to download is an executable file (EXE) so you may be prompted by Windows® or
any other antivirus application to confirm the download and execution of the file.
6. If you want to launch the installation of the pack without saving the file on your disk, click
"Run" ( ). In such a case, the file downloads and the installation starts automatically. If you
want to save a copy of the install pack to your disk, click "Save" ( ). The file will be saved
to a folder of your choice. When finished, you'll have to explore this folder later to launch
the installation manually.
210
Creating Icons from Image Objects
7. The installation starts in a separate window similar to this:
Click Next to go the 2nd screen. You must read carefully the license agreement and accept
it before going further. This is very important to understand the way you can use the
objects. Click "Yes, I agree all the terms" and click Next.
8. The files are copied on your computer. The target location is the "Axialis Librarian\Objects"
folder (usually located in the "My Documents") folder. This folder is easy accessible from all
Axialis products in the built-in Librarian window. To get more information about the
Librarian, see this topic: Working With The Axialis Librarian
9. When finished, the associated Axialis application is launched or activated automatically (here
Axialis IconWorkshop™) and the built-in Librarian is opened. The new object pack folder is
automatically selected.
You're done. Now enjoy the new objects and be creative!
Download Object Packs from the Axialis Application
This is a faster way to proceed. The procedure is very similar but the website is access from within
the application.
1. Launch IconWorkshop™ (or any compatible Axialis Application).
. The
2. Choose Librarian/Download Object Packs (Internet) or click the associated button:
"http://www.axialis.com/objects" page opens in a document window inside the application.
Just follow the procedure as specified above.
3. The new objects are installed and the folder is automatically selected.
211
6
Creating Icons using
Photoshop® Templates
How do the Photoshop® Templates work?
Templates permit you to use the powerful tools of Adobe Photoshop® to draw your icon in
different formats, then transfer the work to IconWorkshop. Axialis IconWorkshop™ creates the
icon automatically in one step.
A template is a ready-to-use image which contains empty/transparent square areas where you can
draw your icons in different formats. This image is designed to be placed in background of your
drawing project. You make your artwork in layers that you add on top of this background template.
You can add as many layers as you want and you can save your project as individual files for future
use or modifications. Once your work is done, just export it into IconWorkshop™, the image will be
temporary flatten and the icon created.
In order to transfer the images from Photoshop® to IconWorkshop™, you need to install the Axialis
transfer plug-in. This is a small software component which permits you to export the images
directly in memory without saving them to a file.
How do the Photoshop® templates work?
Select "new icon project from template" in IconWorkshop™. Choose one template (10 templates
are provided, see below). Adobe Photoshop® is launched and a new image document is created
with the template image in background. Draw your images, creating layers as necessary. You can
save the work as a PSD file for later use. Choose "Export to IconWorkshop™". The Axialis plugin is
launched, a XML description file is read (you can create your own) and the icon is created in
IconWorkshop™. Just retouch it if you want and save it.
213
Axialis IconWorkshop 6.10
How many templates are included in IconWorkshop?
10 templates are included in IconWorkshop. Each template is composed of 2 files: a PNG file with
transparency which is the image file on which you'll draw the different sizes of your icon; a XML file
describing the template (this is a text file with the same filename, extension XML). You can create
your own new templates. Files are located in [Application Data]/Axialis/IconWorkshop/Templates.
The 10 templates are:
1. Windows Icon - All Formats
2. Windows Vista Icon (256x256,...)
3. Windows XP Icon (48x48,...)
4. Macintosh OSX Icon (128x128,...)
5. Macintosh OSX Tiger Icon (256x256,...)
6. Macintosh OSX Leopard Icon (512x512,...)
7. Windows Project (2 Sizes)
8. Windows Project (3 Sizes)
9. Macintosh Project (2 Sizes)
10. Macintosh Project (3 Sizes)
What is the difference between "Simple Icon" and "Icon Project"
templates ?
The Simple Icon Templates (numbers 1 to 6) have been designed to permit you to draw all the
formats of the icon, including RGB/A, 256 and 16 colors. If a format is left blank, it will not be
added to the icon. We recommend you to follow this tutorial: Use a Simple Icon Template
The Icon Project Templates (numbers 7 to 10) permit you to create 2 or 3 versions of your icon
(based on the template you choose). Then, during the export, the formats are created according to
the XML descrition file. Usually, image formats in project templates are created using the following
guidelines:
214
Creating Icons using Photoshop Templates
• 512x512, 256x256, 128x128 to 72x72 : Image in perspective with details, light effects
and shadows.
• 64x64 to 24x24 : Image in perspective with a few details, limited light effects and shadows.
A border is added to enhance visibility.
• 16x16: Flat image without details and large borders.
Install the Photoshop-to-IconWorkshop™ transfer plug-in
Before using the as detailed in next topic, you need to install it on your computer. The plug-in can
be easily installed from within Axialis IconWorkshop™ in one fast and simple operation.
1. Before installing the plug-in you need to close the Photoshop® application (if it is opened in
background). Choose File/Install Photoshop® Plug-in...
2. The dialog box Install the Photoshop to IconWorkshop Transfer Plug-in opens (see below).
In the Location edit zone ( ), specify the Photoshop plug-in folder. If you don't know the
exact folder path, click the browse button ( ) to choose the folder in a list.
3. If you want to create a subfolder "Axialis" to install the plug-in module (recommended to
organize your folder properly), activate the option "Install in a subfolder Axialis" ( ). Note
that creating a subfolder may fail with some compatible applications.
4. Click OK. When done, a message informs you that the plug-in has been installed.
5. Now you can start your Photoshop® application. The plug-in is visible in File/Export/Export
to IconWorkshop menu. Read this for more info on how to use the plug-in filter.
Use a Simple Icon Template to create an icon
Before reading this topic, we recommend to learn how the Photoshop templates work.
215
Axialis IconWorkshop 6.10
The Simple Icon Templates have been designed to let you to draw all the formats of the icon,
including RGB/A, 256 and 16 colors. If a format is left blank, it will not be added to the icon. 10
templates are included in IconWorkshop, 6 of them are simple icon templates (numbers 1 to 6):
1. Windows Icon - All Formats
2. Windows Vista Icon (256x256,...)
3. Windows XP Icon (48x48,...)
4. Macintosh OSX Icon (128x128,...)
5. Macintosh OSX Tiger Icon (256x256,...)
6. Macintosh OSX Leopard Icon (512x512,...)
Create a Windows® XP icon using a Simple Icon Template
In this tutorial, we'll create a simple icon for Windows® XP. To do this, we'll use an "Icon Template".
This kind of template (see above), permits you to create each format of the icon separatly. A
typical Windows® XP icon contains 9 or 12 formats: sizes 48x48, 32x32, 16x16 (optional
24x24), each one in colors RGB/A, 256 and 16. As a result, the templates contains 12 areas where
you can draw the different formats of the icon. If a drawing area is left blank, the associated
format is not created.
In the procedure below, we'll create 3 RGB/A formats: 48x48, 32x32 and 16x16.
1. First, be sure the Photoshop® plug-in has been installed (see previous topic). Choose
File/New/Icon Project from Photoshop Template/Windows XP Icon (48x48...).
2. Adobe Photoshop® opens and a new document is created. Its name is "IW-Template-003
copy". The term "copy" means that this is a new document based on the file "IW-Template003" but not linked to it. As a result, you won't overwrite the original template image by
saving your over it by error (simply by pressing Ctrl+S for instance). It's like a new
document containing an image at startup.
The figure above shows the document window as it has been created in Photoshop®. In the
upper-left corner ( ) there is a barcode to let IconWorkshop identify the number of the
template (this permits IconWorkshop to associate the template image with the associated
XML file). Do not modify or remove this barcode.
The template is divided in 3 groups ( ), one per color mode. We'll draw image formats only
for the RGB/A color mode in sizes 48x48, 32x32 and 16x16 ( ). We'll leave the other
formats blank ( ). At the bottom of the template you'll find some instructions on how to
use the template ( ). This part of the template is not used during the export into
IconWorkshop™ and the icon creation. If you want to save your icon project as a separate
PSD file, you can remove this part (crop the image above the doted line).
216
Creating Icons using Photoshop Templates
From here, you can simply draw your icons in the associated format zones and go directly to
step 7. If you don't want to draw and prefer to use read-to-use sample images, follow steps
3 to 6.
3. Open the file "[Axialis Librarian]\Objects\Samples\Medium\Folder With Document.png". We
mean by [Axialis Librarian] the folder where is stored the Axialis Librarian (usually in the My
Documents folder).
You can also do this directly from IconWorkshop™: in the Librarian, open the folder
"Objects\Samples\Medium", right-click on the file "Folder With Document.png". A menu
opens, choose "Open With/Adobe Photoshop®". The file is opened in a Photoshop document
window.
4. Copy/Paste the image of the Folder with Document into the Template (a new layer is
created), select it ( ). Choose Edit/Transform/Scale and adjust the image into the 48x48
RGB/A square ( ). The resulting image should be perfectly adjusted inside the transparent
square ( ), not over the borders (which will not be exported).
Redo the same operation for the 32x32 RGB/A format ( ). In you're an advanced
Photoshop user, you can retouch the images to enhance the final result.
5. Now let's create the 16x16 format. We'll use another image which will produce better
results in very small sizes (located in subfolder "Small"). Open the file "[Axialis
Librarian]\Objects\Samples\Small\Folder With Document.png".
6. Redo the operation similar to step 4 ( ) and adjust the image ( ) into the 16x16 RGB/A
square. The result must be perfectly adjusted inside the square ( ):
7. Now let's create the icon: In Photoshop, choose File/Export/Export to Axialis IconWorkshop.
The template is automatically recognized by IconWorkshop and the icon is created with the
3 formats we've drawn ( ):
217
Axialis IconWorkshop 6.10
Only the squares with images generated the associated formats. Now if you want to create
other formats, you can follow the same procedure as in Lesson 4.
Adding other formats using the template
You can also add new formats from the one you've drawn using the template. For example, let's
add the 256 color formats from the RGB/A images we've already drawn:
8. Go back to Photoshop and select the document containing the template. Select the layer
"Layer 0" (the one containing the template image).
9. Select the Paint Bucket tool: and using the color you want (we used pure green
RGB:0,255,0), fill the 3 squares 48x48, 32x32 and 16x16 in the group 256 colors ( ):
10. Choose File/Export/Export to Axialis IconWorkshop. A new icon document is created with
the 256 color formats added. The formats has been automatically created from the largest
and most coloured image, in our case 48x48 RGB/A. The problem is that the 16x16 format
has also been created from this detailed image, not from the 16x16 image we've already
created. Icon Project Templates will solve this problem.
11. Once you have finished to work on an icon template, we recommend you to save the
document using the PSD format. This will permit to work again later on the project,
preserving all your layers and effects you may have added.
218
Creating Icons using Photoshop Templates
Use an Icon Project Template to create an icon
Before reading this topic, we recommend to learn how the Photoshop® templates work.
The Icon Project Templates (numbers 7 to 10) permit you to create 2 or 3 images of your icon
(depending on the template you choose). Each image is designed to match the level of details
required for large, medium and small sizes. During the export, the formats are created according to
the XML descrition file. Usually, image formats in project templates are created using the following
guidelines:
• 1st Image (256x256) --> Formats 256x256, 128x128 to 72x72 : Image in perspective
with details, light effects and shadows.
• 2st Image (192x192) --> Formats 64x64 to 24x24 : Image in perspective with a few
details, limited light effects and shadows. A border is added to enhance visibility.
• 3rd Image (128x128) --> Format 16x16: Flat image without details and large borders.
By default, 10 templates are included in IconWorkshop, 4 of them are project icon templates
(numbers 7 to 10):
7. Windows Project (2 Sizes)
8. Windows Project (3 Sizes)
9. Macintosh Project (2 Sizes)
10. Macintosh Project (3 Sizes)
219
Axialis IconWorkshop 6.10
Create a Vista™ icon using a 3-image Icon Project Template
In this tutorial we'll create an icon using a professional method. We've seen in previous topic that
basic icon templates require to draw all the formats of the icon to get the best results. Using Icon
Original Template Image
Drawing Guidelines
Created Icon Sizes
256x256
Image in perspective with
details, light effects and
shadows.
256x256, 128x128
192x192
Image in perspective with a
few details, limited light
effects and shadows. Add
larger borders to enhance
visibility
64x64, 48x48,
32x32, 24x24
128x128
Flat image without details
and a large border.
16x16
Project Templates, you draw 2 or 3 versions of your icon (depending on the template you use) and
IconWorkshop automatically creates the icon formats using pre-defined rules.
For example, the template "Windows® Project (3 Sizes)" lets you draw 3 images. Use the
recommended guidelines below to draw the images. Then, IconWorkshop creates each format of
the icon accordingly:
This is an advanced method for creating icons but this is the one which produces the most
professional results. The final icon contains hi-res images for operating systems which support
them such as Windows Vista™ or MacOS 10.4/10.5. It contains also smaller images which are
easily identifiable by the user in all resolutions.
220
Creating Icons using Photoshop Templates
Note that the small sizes are generated from larger original images. For exemple, the 16x16 size is
created from a 128x128 image (ratio 8:1). This permits an easier drawing experience and produce
better results.
In the procedure below, we'll create a fully featured Windows Vista™ icon of the image "Folder
With Document" that we've already used above.
1. First, be sure the Photoshop® plug-in has been installed (see topic above). Choose
File/New/Icon Project from Photoshop Template/Windows Project (3 Sizes)
2. Adobe Photoshop® opens and a new document is created. Its name is "IW-Template-008
copy":
The figure above shows the document window as it has been created in Photoshop®. It
contains 3 drawing areas where you'll draw the 3 images of your icon: the large size
256x256 ( ), the medium size 192x192 ( ) and the small size 128x128 ( ).
From here, you can simply draw your 3 images in the associated zones and go directly to
step 7. If you don't want to draw and prefer to use read-to-use sample images, follow steps
3 to 6.
3. Open the file "[Axialis Librarian]\Objects\Samples\Large\Folder With Document.png". We
mean by [Axialis Librarian] the folder where is stored the Axialis Librarian (usually in the My
Documents folder).
You can also do this directly from IconWorkshop™: in the Librarian, open the folder
"Objects\Samples\Large", right-click on the file "Folder With Document.png". A menu opens,
choose "Open With/Adobe Photoshop®". The file is opened in a Photoshop document
window.
4. Copy/Paste the image of the Folder with Document into the Template (a new layer is
created), select it. Move the image in the 256x256 drawing area. The resulting image
should be perfectly adjusted inside the transparent square ( ), not over the borders
(which will not be exported). The resulting image should look like this:
221
Axialis IconWorkshop 6.10
5. Repeat the procedure for the file "[Axialis Librarian]\Objects\Samples\Medium\Folder With
Document.png". Move it into the drawing area 192x192 ( ).
6. Repeat the procedure for the file "[Axialis Librarian]\Objects\Samples\Small\Folder With
Document.png". Move it into the drawing area 128x128 ( ). See below the resulting
document window:
222
Creating Icons using Photoshop Templates
7. Now let's create the icon: In Photoshop, choose File/Export/Export to Axialis IconWorkshop.
The template is automatically recognized by IconWorkshop and the icon is created with all
the formats as described in the template ( ):
8. Various image formats have been created. Simply remove the formats you don't wish to
include in your icon. Save the icon.
9. Once you have finished to work on an icon template, we recommend you to save the
document using the PSD format. This will permit to work again later on the project,
preserving all your layers and effects you may have added.
Create your own Photoshop® Templates
Before reading this page, we recommend to learn how the Photoshop® templates work. This article
provides information on the following topics:
• Photoshop® Templates - A Technical Overview
• Create the PNG image file
• Create the XML description file
By default, Axialis Iconworkshop™ is provided with 10 templates. However, we have designed the
system to permit you to create your own ones. This topic explains in details how you can create
templates that will match your specific needs.
223
Axialis IconWorkshop 6.10
Photoshop Templates - A Technical Overview
The figure below shows in details how the Photoshop® templates are implemented in
IconWorkshop™:
224
Creating Icons using Photoshop Templates
When you select the command File/New/Icon Project from Photoshop Project, IconWorkshop
populates a menu with all the templates it finds in folder "[Application
Data]\Axialis\IconWorkshop\Templates". The folder "[Application Data]" has different locations
depending on Windows versions. If you want to open the Axialis IconWorkshop application data
folder, choose the command File/Open Application Data Folder in IconWorkshop menu to open it in
Windows Explorer. It contains several data files (Color Swatches, Color Tables, Templates). The
Photoshop template files are located in the sub-folder "Templates".
By choosing one of the templates, it opens the associated PNG file (same root filename as the
XML description file) in Photoshop as a new document. The name of the document has the name of
the template image with the string "Copy" added to the end. This is very important because it
means that the document window is not attached to the original PNG file. This has been
implemented this way to avoid overwriting of the original PNG template file. If you choose file/save
(Ctrl+S) you'll be prompted to enter a new filename.
Once you have drawn your image files, be sure to remove any selection and export it into
IconWorkshop by choosing File/Export/Export to Axialis IconWorkshop. The image is temporary
flatten (not the original work which keeps the layers if any) and the export plug-in is executed
automatically.
During the export process, the plug-in recognizes that the image is a template by detecting a
special "barcode" located in the upper-left corner of the image:
This barcode should not be modified or removed during the artwork creation. If the plug-in can't
find this barcode, the whole image will be exported to create an icon like it is usually done with the
plugin. This is not what we expect with the Photoshop templates. We want the plugin to extract
portions of the image as described in the associated XML file to create the different formats. This
barcode permits to the plugin to identify which XML file is associated with this template image.
This is a binary-based barcode which permits to generate a number up to 255. Therefore, you can
create 245 additional templates (10 templates are already provided). You'll need to create your
own barcode to identify the template you'll create (see later in this topic).
Once the plug-in has identified the template by its number, IconWorkshop searches for the
associated XML description file in folder "[Application Data]\Axialis\IconWorkshop\Templates".
The filename must have the following format: "IW-Template-NNN.xml" (where "NNN" is the
template number: "001","002"...). When the file is found, it is read, all the template data are loaded
and the icon is created based on this data.
As a conclusion, if you want to create a new template, you must:
1. Create a PNG image file named "IW-Template-NNN.png" ( ) with the transparent drawing
zones. The file must be RGB/A (32-bit with alpha channel) to permit IconWorkshop to
support transparency.
225
Axialis IconWorkshop 6.10
2. Create the associated XML description file named "IW-Template-NNN.xml".
3. Place the 2 files in folder "[Application Data]\Axialis\IconWorkshop\Templates" and reload
IconWorkshop.
Create the PNG image file
In this image file, you need to place at least the drawing zones and the barcode as discussed
previously. We recommend you also to add some texts to identify the drawing zones and give
instructions to the person who will draw the icon. However, this is not necessary. Only the barcode
and the content of the drawing zones will be used. To create the PNG file, we recommend you to
use Adobe Photoshop. Once the image is done, save it as PSD for future edition and save a copy as
PNG in the IconWorkshop Template folder. The PNG file must be saved as RGB/A 32 bits.
1. Launch Adobe Photoshop. Create a new RGB/A image. Specify the size as requested by
your template.
2. Create the barcode. To do so, we recommend you to copy/paste an existing barcode from
the templates provided with IconWorkshop and modify it to reflect your template number.
The code must be located at the same position as in the existing template (pixel 2,2). Only
the rectangle and its content is used. The text "DO NOT MODIFY OR REMOVE" and the
arrow can be removed. They're here only for info. The barcode is binary-based from left to
right (lower digits are left, upper digits are right). To get more info about the Binary
Numeral System, we recommend to read this article:
http://en.wikipedia.org/wiki/Binary_numeral_system. The barcode is composed of 8 bars. A
thin bar (1 pixel) means O and a thick bar (3 pixels) means 1:
3. Create the drawing zones. You can create 2 types of templates:
• If you create a Simple Icon Template, each zone must be specified at scale 1:1. You must
make one different zone for each format.
• If you create an Icon Project Template, the drawing zones are usually larger than the final
icon formats. Each zone can be used to make several icon formats.
226
Creating Icons using Photoshop Templates
4. When the image template is done, first save it as PSD for future use, then save it as PNG
with RGB/A transparency (32 bits). Use a filename as specified above. For example, if the
template is number 21, save it as "IW-Template-021.png" in IconWorkshop template
folder.
Create the XML description file
The description file permits to specify the necessary information associated to the template. This
will permit IconWorkshop to create the icon. The file is in text format using XML syntax. We have
choosen this format because the XML syntax provides an excellent way to describe objectoriented data. Additionally, an XML file is a text file, so it can be created and edited with any text
editor, including Windows® Notepad. However, if you don't have an advanced text editor, we
recommend you to use Notepad++ which is a freeware text editor supporting XML syntax
highlighting.
227
Axialis IconWorkshop 6.10
Basically, XML is a tag-based text file. This means that each element (text, numerical or
structured) must be enclosed between a root opening tab and a corresponding closing tag:
<NAME>This is the name</NAME>
The root element can be preceded by an optionnal XML declaration. We recommend to add the
following declaration at the first line of the XML file:
<?xml version="1.0"?>
You can add comments at any location in the file by using the following syntax (one per line is
recommended):
<!-- This is a comment --!>
Each element can be a simple data element (one per line is recommended):
<WIDTH>256</WIDTH>
or a structured object element. The FORMAT object below contains several data members (the
indentation is not necessary but recommended for an easier reading):
<FORMAT>
<WIDTH>256</WIDTH>
<HEIGHT>256</HEIGHT>
<BPP>32</BPP>
<COMPRESSION>JPEG2000</COMPRESSION>
<X_POS>551</X_POS>
<Y_POS>90</Y_POS>
</FORMAT>
The TEMPLATE object
This is the main object of the description file. Add the opening tag of this object after the XML
declaration. The closing tag of this object ends the declaration file (nothing will be read after its
closing tag).
The TEMPLATE object contains the following data members:
REF (numerical)
This member specifies the number of the template. It must match the number coded in the
barcode included in the associated PNG image file (see above).
NAME (text)
228
Creating Icons using Photoshop Templates
This member specifies the name of the template. This text will appear in the IconWorkshop
menu. This will permit the user to identify the template and launch it from IconWorkshop. It
must be informative but not too long to preserve the menu appearance.
TYPE (fixed data)
This member specifies the type of the template. Two types can be specified: Simple Icon
Template and Icon Project Template. See above in this page the difference between the two
template types.
ICON - The template is a Simple Icon Template.
PROJECT - The template is a Simple Icon Template.
TARGET_OS (fixed data)
This member specifies the format of the icon: Windows® or Macintosh®:
WINDOWS - This will create a Windows® icon (ICO).
MACINTOSH - This will create a Macintosh® icon (ICNS, BIN...)
FORMAT (list of structured objects)
You can specify a list of several formats to be created. Add one FORMAT structured object per
icon format you wish to create. The FORMAT object has 2 versions depending on the template
type (simple icon or icon project). See later in this page for the descriptions of the FORMAT
object.
See below an example of a TEMPLATE object:
<TEMPLATE>
<REF>006</REF>
<NAME>Macintosh OSX Leopard Icon (512x512,...)</NAME>
<TYPE>ICON</TYPE>
<TARGET_OS>MACINTOSH</TARGET_OS>
<FORMAT>
...
</FORMAT>
<FORMAT>
...
</FORMAT>
...
...
</TEMPLATE>
The FORMAT object
This object is intended to be used as a member of the TEMPLATE object. A list of several FORMAT
objects can be added in the TEMPLATE object. The data members present in the FORMAT object
change depending on template type. Some members are used only in Simple Icon templates, others
are used only in Icon Project templates.
The FORMAT object contains the following data members:
229
Axialis IconWorkshop 6.10
WIDTH (numerical)
This member specifies the width in pixels of the icon format to create.
HEIGHT (numerical)
This member specifies the height in pixels of the icon format to create.
BPP (numerical)
This member specifies the bits per pixels of the icon format to create.
32 - The image is RGB/A (with alpha channel).
24 - The image is RGB (obsolete format, RGB/A is recommended).
8 - The image is 256 colors.
4 - The image is 16 colors.
1 - The image is monochrome.
COMPRESSION (fixed data)
This member specifies the type of the image compression. If you don't want to compress the
image, don't add this member or specify NONE. This member is to be used with 256x256 or
more format sizes.
NONE - No compression (or just don't specify the COMPRESSION member).
PNG - The compression is PNG. Used in Windows Vista™ icons only.
JPEG2000 - The compression is Jpeg 2000. Used in Macintosh® Tiger or more icons only.
X_POS (Simple Icon Templates only - numerical)
This member specifies the X position in pixels of the upper-left corner of the drawing zone
associated with this format in the template image. This permits to locate the first pixel in the
upper-left corner inside the drawing area (not the border).
Y_POS (Simple Icon Templates only - numerical)
This member specifies the Y position in pixels of the upper-left corner of the drawing zone
associated with this format in the template image. This permits to locate the first pixel in the
upper-left corner inside the drawing area (not the border).
SRC_X (Icon Project Templates only - numerical)
This member specifies the X position in pixels of the upper-left corner of the drawing zone
associated with this format in the template image. This permits to locate the first pixel in the
upper-left corner inside the drawing area (not the border).
SRC_Y (Icon Project Templates only - numerical)
This member specifies the Y position in pixels of the upper-left corner of the drawing zone
associated with this format in the template image. This permits to locate the first pixel in the
upper-left corner inside the drawing area (not the border).
SRC_WIDTH (Icon Project Templates only - numerical)
This member specifies the width in pixels of the drawing zone associated with this format in the
template image.
SRC_HEIGHT (Icon Project Templates only - numerical)
This member specifies the height in pixels of the drawing zone associated with this format in the
template image.
See below an example of a FORMAT object in a Simple Icon Template:
230
Creating Icons using Photoshop Templates
<FORMAT>
<WIDTH>512</WIDTH>
<HEIGHT>512</HEIGHT>
<BPP>32</BPP>
<COMPRESSION>JPEG2000</COMPRESSION>
<X_POS>25</X_POS>
<Y_POS>90</Y_POS>
</FORMAT>
See below an example of a FORMAT object in an Icon Project Template:
<FORMAT>
<WIDTH>256</WIDTH>
<HEIGHT>256</HEIGHT>
<BPP>32</BPP>
<COMPRESSION>PNG</COMPRESSION>
<SRC_X>25</SRC_X>
<SRC_Y>90</SRC_Y>
<SRC_WIDTH>256</SRC_WIDTH>
<SRC_HEIGHT>256</SRC_HEIGHT>
</FORMAT>
When the XML description file is done, save it as a XML text file. Use a filename as specified above.
For example, if the template is number 21, save it as "IW-Template-021.xml" in IconWorkshop
template folder.
Once you have created the PNG and the XML files in the template folder, restart IconWorkshop
and check the menu File/New/IconProject from Photoshop Template. Your template should be
visible in the list (sorted by template numbers).
231
233
7
Working with Icons
Before reading this chapter, we recommend to read these topics:
• What is an icon? (chapter 2, page 37)
• Macintosh vs Windows icons (chapter 2, page 44)
• Introducing Windows Vista icons (chapter 2, page 48)
• What is an image object? (chapter 4, page 201)
Add a new image format in an icon
This is very important to create several image formats in an icon (especially if you wish to
redistribute it) in order to be compatible with all screen configurations (see What is an Icon for
more info).
The following table shows the common Windows® and Macintosh® image formats:
If you add 24x24 image formats in your icon, it won't be compatible with Windows® 98 and
Windows® 2000. If you use these Windows® versions, the icon will display correctly in Axialis
IconWorkshop™ but will be considered as invalid by Windows®.
235
Axialis IconWorkshop 6.10
Macintosh® icon format is not open. You cannot add image formats which are not defined in
Macintosh® icon specifications. See above, some image formats are not available.
IMPORTANT
All the commands in the procedure specified below are related to Windows® icons.
Working with Macintosh® icons is very similar and many commands also exist for
Macintosh® icons (the following image informs you about this: ). In such a case,
dialog boxes contents may differ slightly.
Adding a new image format
1. Choose Draw/New image Format or press "Ins" ( : image formats are different for
Macintosh® icons)
2. In the Colors group, choose the color mode of the new image format:
• Windows® XP colors With Alpha Channel (16.8M - 32 bits). Uses true colors to get the
best results. This format will be used only if the icon is displayed under Windows® XP.
Also, it uses an additional Alpha Channel to create smooth shades and object borders.
• 256 Indexed colors (8 bits): Uses a customizable 256 color palette. You will be able to
modify this palette to produce smoother gradients or specific colors.
• 16 colors (4bits): Uses the system standard palette (16 static colors). This is the native
Windows® mode..
• True colors 16.8M (24 bits) Rarely used, this format may be incompatible with some
display drivers.
• Monochrome (1 bit): Uses only 2 colors (black and white). This is an obsolete color
mode
3. In the Size in Pixels group, choose the size of the new image format:
• Standard sizes: 256x256, 64x64, 48x48, 32x32, 24x24, 16x16.
• Extra sizes: 128x128, 72x72, 80x80, 96x96.
236
Working with Icons
• Custom size: You can specify any size including non square size. If you want the height
equal to width, click Square aspect.
4. If you check the "Create a new image based on the following image" option, Axialis
IconWorkshop™ will create a new image based on a copy of the selected image format. The
image will be resized and the colors will be adjusted if necessary. If the box is not checked,
it will create a blank new image. All image formats are displayed in the list.
5. If you check the "Apply Dithering" option, Axialis IconWorkshop™ will dither the resulting
image in 256 or 26 color modes. This option permits to use smoother gradients in icons.
Adding quickly a standard image format
This method produces the same result as above using a faster procedure. It is available for standard
formats only.
1. Right click on an image format in the list. A menu opens and proposes you to create the
next missing format based on the selected image. For example, right-click on the 32x32 XP
image format and choose Create 16x16 Win XP Image Format in the menu (see below ).
( : proposed image formats are different for Macintosh® icons)
2. The new format is automatically added to the icon.
Adding several images formats in one operation
This method adds several image formats from an existing one in a single operation. It is possible to
create standard and extra formats using this method.
1. Right-click on the format in the list you wish to use as model ( on the left of the editor
window), a context menu opens, select Add Several Image Formats from This Image (see
below ).
237
Axialis IconWorkshop 6.10
2. A new dialog box opens ( : image formats are different for Macintosh® icons):
3. Select the formats you wish to add by clicking directly on the preview image ( ...
)
You can just ignore (select or not) the image formats already present in the image. You can
also apply or not the dithering option to the 256/16 color images (try and see the results
in the preview images).
4. When done click OK. The formats are automatically created:
238
Working with Icons
Remove an image format in an icon
1. Select the image format you wish to remove in the list.
2. Choose Draw/Remove image format or press "Del". Axialis IconWorkshop™ asks you if you
want really to remove the following image format. If you're sure, click Yes.
Work with selections
The Selection tool permits to select a rectangular area of the image to perform an action. The
following commands will apply to the selection only:
• Filters - Smooth, blur, sharpen, details...
•
•
•
•
Adjustments - Brightness, contrast, hue, saturation, opacity
Clipboard - Cut/copy/paste
Other - Resize, rotation, mouse move, mouse copy
Other - Resize, rotation, mouse move, mouse copy...
The selection is a non persistent tool. If you activate another tool in the palette, the
active selection is discarded
•
239
Axialis IconWorkshop 6.10
.
Creating a selection
1. Choose the selection tool
.
2. Using the mouse, drag & drop in the image to define a selection rectangle. Press the SHIFT
key to make a square selection.
Only simple rectangular selections are allowed. Furthermore you cannot add a selection
to an existing selection. A new selection discards the previous one.
Selecting the whole image
1. Choose Edit/Select All or press Ctrl+A.
Discarding a selection
1. Select another tool.
or
1. Click anywhere in the drawing area without moving the mouse while the button is pressed.
Deleting the selected image
1. Choose Edit/Erase or press Del.
Creating a floating selection
A floating selection contains an image which can be moved over the existing one respecting
transparency is any.
1. Create a selection.
2. Use the mouse or the arrow keys to move the selection. The selected portion of the image
is placed in the floating selection. Press the Ctrl key while starting to move the selection to
make a copy of the selected image.
3. Discarding the floating selection applies the floating image into the background. Choose
Edit/Erase or press Del to remove the floating selection.
8 handles are located around the selection. You can use them to resize the selection (see
this topic). The result is a floating selection.
240
Working with Icons
Place selection in Background/Foreground
In some cases it is useful to place the floating selection in background. For example, you've added a
custom shadow or halo object and you want to place it behind the current icon image. Before
proceeding with this topic you need know how to work with selections.
Place the floating selection in background
A floating selection is a selected image which is floating over the actual image. Floating selections
are automatically created when you add an image object, paste an image or copy/move a selection.
1. Once the floating selection is active, it is placed in foreground of the existing icon. In the
example below, the shadow is visible over the earth icon:
2. Choose Draw/Set Floating Selection To Background or press End. The floating selection is
placed under the actual icon image as shown below. Note that the selection is still active so
you can work with it: move, resize, copy... To apply the selection just click once anywhere in
the image.
241
Axialis IconWorkshop 6.10
Place the floating selection in foreground
A floating selection is a selected image which is floating over the actual image. Floating selections
are automatically created when you add an image object, paste an image or copy/move a selection.
1. The selection must be active and placed in background.
2. Choose Draw/Set Floating Selection To Background or press Home. The floating selection is
placed over the actual icon image. To apply the selection just click once anywhere in the
image.
Draw using the tools
Several tools permits to draw directly into an existing icon image:
Selection tool - Allows you to define a region of the icon in the editor in order to
copy, cut or paste it. This tool doesn't draw anything, it just select a portion of the
image. Position the cross in the upper left corner of the desired region, then hold
down the left mouse button and drag to the diagonally opposite corner. Release
the left mouse button when you have selected the desired region.
Color Picker tool - Allows you to pick up a color from the editing surface by
clicking with the left mouse button for a foreground color and the right button for
a background color.
Color Replacer tool - Allows you to rub out the foreground color and replace it by
the background color.
Pencil tool - Permits to free-hand draw using a single point shape. One click
produces a single pixel. The resulting drawing is not smoothed even in RGB/A
mode.
Brush tool - Permits to free-hand draw using various brush shapes. One click
produces a single shape based on the actual brush (below in the tool palette). The
resulting drawing is smoothed for better results in RGB/A mode if the Smooth
Edges option is activated (see below).
Flood fill tool - Allows you to color an enclosed region. The cursor changes to a
paint bucket with a cross. The cross serves as a pointer. Choose two colors in the
standard or customized palette. Click on the left or right mouse button for the
color you want. Position the cross inside an enclosed surface. All the pixels of the
enclosed region will be filled with the selected color..
Line tool - Draws a strait line. The line shape is based on the actual brush (below
in the tool palette). The resulting drawing is smoothed for better results in RGB/A
mode if the Smooth Edges option is activated (see below). The left mouse button
uses the foreground color. The right button uses the background color. Gradients
are used if selected.
Rectangle tool - Draws an empty rectangle. The rectangle line is based on the
actual brush (below in the tool palette). The resulting drawing is smoothed for
better results in RGB/A mode if the Smooth Edges option is activated (see
below). The left mouse button uses the foreground color. The right button uses
242
Working with Icons
the background color. Gradients are used if selected. Press Shift key to draw a
square.
Filled Rectangle tool - Draws a filed rectangle. The resulting drawing is smoothed
for better results in RGB/A mode if the Smooth Edges option is activated (see
below). The left mouse button uses the foreground color. The right button uses
the background color. Gradients are used if selected. Press Shift key to draw a
square.
Ellipse tool - Draws an empty ellipse. The ellipse line is based on the actual brush
(below in the tool palette). The resulting drawing is smoothed for better results in
RGB/A mode if the Smooth Edges option is activated (see below). The left mouse
button uses the foreground color. The right button uses the background color.
Gradients are used if selected. Press Shift key to draw a circle.
Filled Ellipse tool - Draws a filed ellipse. The resulting drawing is smoothed for
better results in RGB/A mode if the Smooth Edges option is activated (see
below). The left mouse button uses the foreground color. The right button uses
the background color. Gradients are used if selected. Press Shift key to draw a
circle.
3D Rectangle tool - Draws a rectangle with 3D edges. The upper-left part is
drawn using the foreground color, the lower-right part using the background
color. Press Shift key to draw a square.
Show/Hide the tool palette
1. Choose View/Drawing tools or CTRL+F10
Using the tools
1. Select one of the available tools and specify your foreground and background colors (see
Work with colors).
2. Use left mouse button to draw using the foreground color.
3. Use right mouse button to draw using the background color.
Applying gradients while drawing
1. Select one of the available tools.
2. Select one gradient mode:
3. Use left mouse button to draw gradients from foreground to background color.
4. Use right mouse button to draw gradients from background to foreground color.
243
Axialis IconWorkshop 6.10
Using various brush shapes
1. Select on of the following tools: Brush, Line, Rectangle, Ellipse, 3D.
2. Select one of the following brushes:
3. Just draw using the mouse
Produce smooth edges while drawing
1. Select on of the tools supporting smooth edges (see above).
2. Be sure the Draw/Smooth Edges (E) option is enabled.
3. Just draw using the mouse. The image is smoothed when you release the mouse button to
produce better results.
The smooth edges option is available for images using RGB/A (Windows® XP) color format only.
Work with colors
Before using a drawing tool, you need to select a drawing color. You can define 2 colors:
• The Foreground Color - This color will be assigned to the left mouse button while drawing.
•
The Background Color - This color will be assigned to the right mouse button while drawing.
You can define and assign colors using the color palette docking window.
The Color Palette contents changes depending on the color mode of the actual icon
image format (RGB/A, 256, 16, Mono) .
Show/Hide the color palette window
1. Choose View/Colors or CTRL+F11
Assigning Foreground / Background colors
1. Select foreground or background color by clicking the associated area (see above). The
selected area is marked with a thicker and darker border.
2. Using the mouse, click in the color palette. The associated color is assigned.
3. If you're in RGB/A mode, you can adjust the opacity.
Adjusting Foreground / Background colors
1. Select foreground or background color by clicking the associated area (see above). The
selected area is marked with a thicker and darker border.
244
Working with Icons
2. Using the mouse, adjust the color using the color adjustment sliders.
In RGB/A mode, adjusting the color using the above method doesn't change the color in
the Color Palette. In 256 color mode, the color is changed accordingly.
Using RGB or HSB color modes
1. In the command toolbar, click the command
sliders.
or in the Context Menu select RGB/HSB
2. The color mode and the sliders are changed accordingly.
•
RGB and HSB modes permit to specify colors using different methods:
RGB - Permits to specify colors using Red, Green, Blue components
•
HSB - Permits to specify colors using Hue, Saturation, Brightness components
Specifying a transparent color
1. Select foreground or background color by clicking the associated area (see above). The
selected area is marked with a thicker and darker border.
2. In RGB/A mode: Adjust the opacity slider to 0.
or
2. In 256, 16 or mono mode: Click on the transparent button (just below the color palette).
Swap Foreground and Background colors
1. Click the swap button
in the color management window.
To Move/Copy a part of a drawing
Before proceeding with this topic you need know how to work with selections.
Copying part of a drawing in the same image
1. Select a region with the selection tool.
2. Place the mouse pointer over the selected area. It changes to this:
3. Press the CTRL or Alt key (keep pressed). Use drag & drop to copy the selected image.
4. The copied part of the image is now a floating selection. Place it to the desired location and
apply the floating selection.
245
Axialis IconWorkshop 6.10
Moving part of a drawing in the same image
1. Select a region with the selection tool.
2. Place the mouse pointer over the selected area. It changes to this:
3. Use drag & drop to copy the selected image.
4. The copied part of the image is now a floating selection. Place it to the desired location and
apply the floating selection.
Copying or moving an image from one icon to another requires that you use the
Clipboard.
Copying part of a drawing using the Clipboard
1. Select the drawing region with the selection tool in the source image.
2. Choose Edit/Copy.
3. Select the target image. Choose Edit/Paste. A dialog box opens, select the appropriate
option (see below).
4. The copied part of the image is pasted as a floating selection. You can place it using the
mouse ( ) or using the arrow keys.
Move part of a drawing using the Clipboard
1. Select the drawing region with the selection tool in the source image.
2. Choose Edit/Cut. The selected portion is cleared.
3. Select the target image. Choose Edit/Paste. A dialog box opens, select the appropriate
option (see below).
4. The copied part of the image is pasted as a floating selection. You can place it using the
mouse ( ) or using the arrow keys.
Transparency settings
When you paste an image in an icon, it creates a floating selection. By default, this floating object is
applied respecting its transparency (if any). It means that you see the background image through
the floating object. This option can be changed. The other applying method don't keep the
background image, it erases it (even if the floating object contains transparency).
To toggle this option follow this procedure:
1. Select Draw/Preserve Transparency or press "T".
2. The option toggles from active to inactive.
246
Working with Icons
Clipboard options during a paste operation
When you paste an image in an icon, you're prompted to choose a method:
•
•
•
•
•
•
•
Paste at scale 1:1 in the editor area - Pastes the contents of the clipboard in the upper left
corner of the editor area at scale 1:1 (no stretching). If the image is bigger than the editor area,
it will be cropped.
Resize image to fit the editor area - Pastes the contents of the clipboard in the whole editor
area with stretching. If the image is bigger than the editor area it will be reduced, if it is smaller it
will be enlarged.
Paste at scale 1:1 in the selection area - Pastes the contents of the clipboard in the upper left
corner of the selection area at scale 1:1 (no stretching). If the image is bigger than the selection
area, it will be cropped.
Resize image to fit the selection area - Pastes the contents of the clipboard in the selection area
with stretching. If the image is bigger than the selection area it will be reduced, if it is smaller it
will be enlarged.
If you check the option "Do not prompt in the future (always best choice)", the application will
not prompt you again and the best choice will be automatically chosen:
If no area is selected in the editor - Automatically pastes the contents of the clipboard in the
upper left corner of the editor area at scale 1:1 (no stretching). If the image is bigger than the
editor area, it will be cropped.
If a selection area exists - Automatically pastes the contents of the clipboard in the selection
area with stretching. If the image is bigger than the selection area it will be reduced, if it is
smaller it will be enlarged.
Resize/Rotate image
Resize part of the drawing using the mouse
1. Select a region with the selection tool. The selection border contains 8 handles which
permits you to resize the image. Handles located in the corners ( ) permits to resize the
image in two dimensions. The other ones, located in the middle of the borders ( ) permit
to resize the image in one dimension:
247
Axialis IconWorkshop 6.10
2. Place the mouse pointer over one of the handles. It changes to this a double-arrow
indicating the way you'll be able to resize the image.
3. Use drag & drop to resize the selected image. If you resize in 2 dimensions (corner handles),
you can keep and original aspect ratio of the image by pressing the Shift key.
4. Release the mouse button, resized part of the image is now a floating selection. Place it to
the desired location and apply the floating selection.
Resize part of the drawing using a dialog box
1. Select a region with the selection tool.
2. Choose Draw/Scale or press "S". A dialog box opens.
3. Specify the new size and click OK.
4. The resized part of the image is now a floating selection. Place it to the desired location and
apply the floating selection.
Rotate part of the drawing
1. Select a region with the selection tool.
2. Choose Draw/Rotate or press "R". A dialog box opens.
3. Specify the rotate angle and click OK.
4. The rotated part of the image is now a floating selection. Place it to the desired location and
apply the floating selection.
Rotate part of the drawing to 90° angle
1. Select a region with the selection tool.
2. Choose Draw/Rotate 90° CCW or press "Z". A dialog box opens.
3. The rotated part of the image is now a floating selection. Place it to the desired location and
apply the floating selection.
Adjust Brightness/Contrast
Before proceeding with this topic you need know how to work with selections.
This feature works only with RGB/A (Windows® XP) image formats.
Adjust brightness and contrast of a portion of image
1. Select a region with the selection tool. If no selection is active, the adjustments will apply to
the whole image.
248
Working with Icons
2. Choose Draw/Adjustments-Effects/Brightness-Contrast or press "B".
3. The dialog box Adjust Brightness - Contrast opens
4. To get a better idea of the adjustments you're doing, we recommend you to activate the
Preview option. It permits you to see the changes in background (editor and preview
windows).
5. Specifies the Brightness value you wish to add to the current image. The value you specify is
added (or subtracted if this is a negative value) to the current image brightness. Valid
values are in range -100 (dark) to +100 (very light).
6. Specifies the Contrast value you wish to add to the current image. The value you specify is
added (or subtracted if this is a negative value) to the current image contrast. Valid values
are in range -100 (low contrast) to +100 (high contrast).
7. When done, click OK.
Adjust Hue/Saturation/Brightness
Before proceeding with this topic you need know how to work with selections.
This feature works only with RGB/A (Windows® XP) image formats.
Adjust hue, saturation and brightness of a portion of image
1. Select a region with the selection tool. If no selection is active, the adjustments will apply to
the whole image.
2. Choose Draw/Adjustments-Effects/Hue-Saturation-Brightness or press "U".
3. The dialog box Adjust Hue - Saturation - Brightness opens.
4. To get a better idea of the adjustments you're doing, we recommend you to activate the
Preview option. It permits you to see the changes in background (editor and preview
windows).
5. Specifies the Hue value you wish to add to the current image. The value you specify is
added (or subtracted if this is a negative value) to the current image hue (tint). By changing
this value, you shift all image colors (in the color spectrum). Valid values are in range -180
to +180.
6. Specifies the Saturation value you wish to add to the current image. The value you specify is
added (or subtracted if this is a negative value) to the current image color saturation. Valid
values are in range -100 (grey scale) to +100 (very coloured).
7. Specifies the Brightness value you wish to add to the current image. The value you specify is
added (or subtracted if this is a negative value) to the current image brightness. Valid
values are in range -100 (dark) to +100 (very light).
8. When done, click OK.
249
Axialis IconWorkshop 6.10
Adjust Opacity
Before proceeding with this topic you need know how to work with selections. The opacity is a
value stored in the alpha channel of an image. It permits to adjust the visibility/transparency of the
image.
When the opacity of a pixel is set to 255, the pixel is totally opaque. It means that when you draw
it on a background image (like displaying an icon on Windows® desktop), you don't see this image
"behind" the pixel. The pixel is 100% displayed over the background. When the opacity is 0, the
pixel is totally transparent. In such a case you simply see the background. If the opacity is set to
128 (50%) you see the pixel and the background 50%-50%.
Opacity is set pixel by pixel in an RGB/A image. It permits to create very nice effects (light
shadows, halos, semi-transparencies, smooth edges...).
The opacity adjustment feature included in Axialis IconWorkshop™ permit to change the opacity of
a selection of pixels. Adjustment is made in percents from -100% (more transparent) to +100%
(more opaque). This feature is very interesting for floating selections. It permits to add semitransparent overlay objects to existing icons.
This feature works only with RGB/A (Windows® XP) image formats.
Adjust Opacity
1. Select a region with the selection tool or paste a floating selection. If no selection is active,
the adjustments will apply to the whole image.
2. Choose Draw/Adjustments-Effects/Opacity or press "O".
3. The dialog box Adjust Opacity opens.
4. To get a better idea of the adjustments you're doing, we recommend you to activate the
Preview option. It permits you to see the changes in background (editor and preview
windows).
5. Specifies the Opacity value you wish to add to the current image. The value you specify is
added (or subtracted if this is a negative value) to the current image opacity. Valid values
are in range -100 (more transparent) to +100 (more opaque).
6. When done, click OK.
Apply Filters
Before proceeding with this topic you need know how to work with selections.
Using filters you can apply various effects to existing images. Filters apply to the current selection
if any. Otherwise they apply to the whole image. Various filters are implemented in Axialis
IconWorkshop™:
250
Working with Icons
•
•
•
•
•
•
•
•
Smooth and Smooth more: The Smooth filter lets you smooth edges in an image. The Smooth
filter tones down differences in adjacent pixels, resulting in only a slight loss of detail while
smoothing the overall image or selected area.
Blur, Blur more: The Blur filter softens an image. Blur filters are useful for retouching. They
smooth transitions by averaging the pixels next to the hard edges of defined lines and shaded
areas in an image. The Blur More filter produces an effect three or four time stronger than that
of the Blur filter.
Sharpen and sharpen more: The Sharpen filter accentuates the edges in the image by finding the
edges and increasing the contrast between adjacent pixels. The Sharpen More filter applies a
stronger sharpening effect than does the Sharpen filter.
Details: The Details filter lets you add more details in an image.
Find Edge: The Find Edge filter removes colors and shades in the image. It keeps only the
frontiers between color areas.
Enhance Edge, Enhance Edge more: This filter maximizes the visible information in an image to
reveal all the detail and use all available colors. It adjusts the balance of the highlights and
shadows and the overall light and intensity of the image.
Contour: The Contour filter lets you get contours of objects in an image.
Emboss: This effect converts the image into a bas-relief. It highlights the areas of contrast with
black or white pixels and colors the low contrast areas a medium grey. Colors appear when there
is a large difference in the contrast.
Filters work only with RGB/A (Windows®XP) image formats.
Apply Filter
1. Select a region with the selection tool or paste a floating selection. If no selection is active,
the adjustments will apply to the whole image.
2. Choose Draw/Filters or click
and select the desired filter in the sub-menu.
3. The filter is applied to the entire icon or floating selection.
Apply Filter to the RGB components (colors) only
Sometimes it's useful to apply a filter to the colors of an icon but not to its alpha channel
(transparency). For example, adding a smooth filter to an image without changing the sharpness of
its edges.
1. Select a region with the selection tool or paste a floating selection. If no selection is active,
the adjustments will apply to the whole image.
2. Press the Shift key (keep pressed) and choose Draw/Filters or click
desired filter in the sub-menu.
and select the
3. The filter is applied to the colors of the entire icon or floating selection.
251
Axialis IconWorkshop 6.10
Apply Filter to the Alpha Channel (opacity) only
Sometimes it's useful to apply a filter to the opacity of an icon but not to its image colors. For
example, adding a smooth filter to the edges of an image without changing the sharpness of the
image inside the object.
1. Select a region with the selection tool or paste a floating selection. If no selection is active,
the adjustments will apply to the whole image.
2. Press the Ctrl key (keep pressed) and choose Draw/Filters or click
filter in the sub-menu.
and select the desired
3. The filter is applied to the colors of the entire icon or floating selection.
Add a drop shadow
Before proceeding with this topic you need know how to work with selections.
The "Drop Shadow" effect permits to simulate a shadow behind an icon to produce a false 3D
effect. Adding this shadow is important to make Windows® XP compliant icons. It is part of the
Windows® XP icon specifications as published by Microsoft®.
This feature works only with RGB/A (Windows® XP) image formats.
Apply the drop shadow effect
1. Select a region with the selection tool or use a floating selection. If no selection is active,
the adjustments will apply to the whole image.
2. Choose Draw/Adjustments-Effects/Drop Shadow or press "D".
3. The drop shadow is applied immediately. Repeat the operation to create a stronger shadow.
252
Working with Icons
Add Text
This feature permits to add a text in an icon image. You can choose the font, size and color of the
text. The text is added as an image placed in a floating selection. It permits you to easily adjust it
and apply filters and effects (drop shadow, opacity...).
Using this feature with RGB/A images will create the best results (texts with smooth edges).
Adding text to an icon image
1. Select the color you wish to use for the text. The foreground color will be used to draw it.
See Work with colors.
2. Choose Draw/Add Text or press Ctrl+T. A dialog box opens:
3. Enter the text to add ( ).
4. In the Font Attributes group, select the Font ( ) and the Size ( ). You see a preview at the
bottom of the dialog box ( ).
5. Click OK when done.
The text is now added as a floating selection. You can apply various effects or adjustments to
it:
•
•
•
•
•
•
•
Move/Copy
Resize/Rotate
Adjust Brightness/Contrast
Adjust Hue, Saturation, Brightness
Adjust Opacity
Apply Filters
Add a Drop Shadow
253
Axialis IconWorkshop 6.10
Import an image into an icon project
To increase your productivity in creating icons, you may need to import images in your project.
Several methods are available IconWorkshop™ to perform this operation. Some image formats
support 32 BPP alpha channel transparency which is very interesting to create hi-quality RGB/A
images in icons. The following image formats are supported:
• BMP - Windows®bitmap (32 BPP alpha channel transparency supported).
•
•
•
•
•
•
•
PNG - Portable Network Graphic (32 BPP alpha channel transparency supported).
PSD - Photoshop (32 BPP alpha channel transparency and layers supported).
JP2 - JPEG 2000 (32 BPP alpha channel transparency supported).
JPG - JPEG
TGA - Targa
GIF - Compuserve GIF
Others - Various other formats supported: TIFF, PCD (PhotoCD), PIC (Apple PICT), PCX
(Zsoft), WMF (Windows® MetaFile)
Using the image import function
1. Choose File/Import/Image or press Shift+Ctrl+I. A standard Windows® file open dialog box
opens.
2. Select a file to import and click Open. The image opens in a separate document window. A
dialog box opens to remind you the procedure. We recommend to read this dialog carefully.
3. Select a portion of the image and use Clipboard Copy/Paste to import the image in your
icon. See the topic Move/Copy image to learn more on how to use the clipboad. The image
colors will be automatically adjusted to match the icon format specifications (automatic
conversion to 256 colors for example).
4. You can also create a new icon from the selected portion of the image (See Create a
Windows® icon from an image or Create a Macintosh® icon from an image).
If the image to be imported does not have the same color palette as the icon in the
current edit window, Axialis IconWorkshop™ asks you if you want to replace the current
icon palette by the palette attached to the image being pasted.
Using drag & drop from the Librarian
The most productive way to create an icon is to use drag & drop from the librarian to add objects
(images ready to add in an icon) in your icon project. Using this method you can create a
"composite" icon in a few minutes. The most famous example of composite icon is the document
folder icon:
254
Working with Icons
Using the three objects above, we'll make this icon in minutes using exclusively features included in
Axialis IconWorkshop™. The icon will include formats from 256x256 to 16x16 in RGB/A, 256 and
16 colors (based on the recommended formats specified in What is an icon topic).
This folder image has been created by Axialis Team. It's free of charge so you can use them in your
own icons (see Sample Icons Terms Of Use).
The procedure below starts from a new project but it works also with an existing project. We
recommend you to start with the largest icon image that you plan to add in your icon (here
256x256 RGB/A). Then you'll be able to add the other formats easily using this first one as model.
1. Choose File/New/Icon Project or press Ctrl+N. A new dialog box opens:
2. Select the Windows® or Macintosh®. click OK. A second dialog box opens. In the Project
Name edit zone ( ), enter the icon project name: "Document Folder". Do not specify any
extension.
3. In the Colors group ( ), select: Windows® XP with Alpha Channel (RGB/A - 32 bits).
4. In the Size in Pixels group ( ), choose: 256x256.
5. Click OK, the dialog box closes. The new blank icon document is created, the 256x256
RGB/A image format is selected.
6. To add an object, you must be sure that the librarian is visible. If the librarian window is not
visible ( ), check the Librarian button in the main toolbar ( ) or press ESC.
We recommend you to create a collection of objects in the librarian that you'll use in
your future projects. Some sample objects (copyright-free) are included in the
"Objects/" sub-folder of the Librarian. We'll use them in this topic.
7. Select the folder "Objects/Samples/Large" in the Librarian tree ( ). The contents of the
folder appears in the zone below. Select an object in the folder contents. For example, using
the slider ( ) scroll the window contents until you see the file "Folder - Back.png".
255
Axialis IconWorkshop 6.10
Note that this floating selection can be moved by using drag & drop from the inner zone
( ). It can also be resized using the handles placed around the selection ( ). Here is the list
of operations you can perform on this object:
• Move/Copy
• Resize/Rotate
• Adjust Brightness/Contrast
• Adjust Hue, Saturation, Brightness
• Adjust Opacity
• Apply Filters
• Add a Drop Shadow
Now do the same to add other objects. If you want to learn step-by-step how to create the
above Document Folder, read this part of the tutorial: Lesson 7 - Composing an icon from
several image objects
Copy/Paste alpha channels
Alpha channels are widely used in modern icon creation. Windows® supports icons with alpha
channels since Windows® XP and Macintosh®®since OS 10.0. The main advantage of alpha
channels is that it permits to display a smooth transparency in icons. The resulting image is
displayed with smooth contours on all backgrounds. It permits also to create dropped shadows
behind icons. Images with alpha channels are called "RGB/A" or "Windows® XP" in Axialis
IconWorkshop™.
This image format contains 16.8M colors coded in RGB plus an additional opacity channel. This
channel is called the "Alpha Channel". Each channel is coded using 8 bits per pixel. As a result each
pixel is coded in 32 bits (32 BPP - Bits Per Pixel). See the illustration below to understand how
channels are organized in an RGB/A image.
256
Working with Icons
In IconWorkshop™, alpha channels can be applied/extracted from RGB/A image formats. Images
applied or extracted will be treated as masks. A mask is a grayscale image which is associated to an
RGB image to simulate transparency. In a mask, a white pixel makes the associated RGB pixel fully
visible (100% opacity). A black pixel produces a transparent pixel (0% opacity). Grey pixels
produce partially visible pixels from the RGB image (depending on the value from 1% to 99%).
Extract an alpha channel (Copy)
1. Select a RGB/A image format in an icon.
2. Choose either a selection or the whole image. Choose Edit/Copy Alpha Channel as Mask.
The grayscale image is now placed in the Windows® Clipboard.
Apply an alpha channel (Paste)
1. Place the grayscale mask image in the Windows® Clipboard from any source (external
program, Axialis IconWorkshop™...)
2. Select the target RGB/A image format in an icon. Choose Edit/Copy Alpha Channel as Mask.
The new alpha channel is now applied.
Modify/Extract icons in program files (EXE, DLL)
Axialis IconWorkshop™ permits to modify icons directly in program files like EXE, DLL, OCX... This
feature is handy to customize existing applications. However some limitations apply to this feature:
You CAN:
•
Visualize, Modify, Export, Copy in Clipboard and Add to the Librarian any icon included in a
program file.
• Save your changes in the same file or export it to icon files or ICL
You CANNOT:
•
•
Add or delete icons
Add or delete image formats in icons
257
Axialis IconWorkshop 6.10
We strongly recommend to make a copy of the original program file before modifying it
using this feature.
Modifying an icon included in a program file
1. Choose File/Open and select a program file EXE, DLL, OCX... You can also open an Explorer
window (Ctrl+E) and double click on a program file.
2.The program opens in a document window ( ) displaying all the icons it contains. If not
already set, we recommend you to choose the display option "All Formats In Raw". In this
mode, one icon is displayed on each row with all the formats it contains ( ):
3. To modify an icon just double click on it or select it and press Enter.
4. The icon opens in an editor window. Just modify it as if it was a standard icon file (don't
forget the above limitations though).
5. When done, update it by choosing File/Save or press Ctrl+S. Close the editor window.
6. The icon has been updated in the list (if you modified the displayed format).
7. Repeat steps 3 to 7 for other icons if necessary.
8. Update the program file by choosing File/Save.
Extracting icons from a program file
1. Choose File/Open and select a program file EXE, DLL, OCX... You can also open an Explorer
window (Ctrl+E) and double click on a program file.
2. The program opens in a document window displaying all the icons it contains.
3. Select the icons you wish to extract.
4. Choose Icons/Export as Windows® icons ( : choose Icons/Export as Macintosh® icons)
5. Select the destination folder and click OK.
6. The icons are extracted as ICO ( : ICNS, RSC or BIN as chosen).
258
Working with Icons
Adding to the Librarian icons from a program file
1. Choose File/Open and select a program file EXE, DLL, OCX... You can also open an Explorer
window (Ctrl+E) and double click on a program file.
2. The program opens in a document window displaying all the icons it contains.
3. Select the icons you wish to add to the librarian. Choose File/Add to the Librarian or press
F3.
If the selected item in the librarian is a folder
4. A dialog box opens. Choose either to extract them as separate icons (ICO) or to create an
icon library (ICL).
5. Click OK. The icons are extracted as requested.
If the selected item in the librarian is an icon library
4. The icons are immediately added to the selected library.
Work with colors
Before using a drawing tool, you need to select a drawing color. You can define 2 colors:
•
•
The Foreground Color - This color will be assigned to the left mouse button while drawing.
The Background Color - This color will be assigned to the right mouse button while drawing.
You can define and assign colors using the color palette docking window:
259
Axialis IconWorkshop 6.10
The Color Palette contents changes depending on the color mode of the actual icon
image format (RGB/A, 256, 16, Mono).
Show/Hide the color palette window
1. Choose View/Colors or CTRL+F11
Assigning Foreground / Background colors
1. Select foreground or background color by clicking the associated area (see above). The
selected area is marked with a thicker and darker border.
2. Using the mouse, click in the color palette. The associated color is assigned.
3. If you're in RGB/A mode, you can adjust the opacity.
Adjusting Foreground / Background colors
1. Select foreground or background color by clicking the associated area (see above). The
selected area is marked with a thicker and darker border.
2. Using the mouse, adjust the color using the color adjustment sliders.
In RGB/A mode, adjusting the color using the above method doesn't change the color in
the Color Palette. In 256 color mode, the color is changed accordingly.
Using RGB or HSB color modes
1. In the command toolbar, click the command
sliders.
or in the Context Menu select RGB/HSB
2. The color mode and the sliders are changed accordingly.
RGB and HSB modes permit to specify colors using different methods:
•
•
RGB - Permits to specify colors using Red, Green, Blue components
HSB - Permits to specify colors using Hue, Saturation, Brightness components
Specifying a transparent color
1. Select foreground or background color by clicking the associated area (see above). The
selected area is marked with a thicker and darker border.
2. In RGB/A mode: Adjust the opacity slider to 0.
or
2. In 256, 16 or mono mode: Click on the transparent button (just below the color palette).
260
Working with Icons
Swap Foreground and Background colors
1. Click the swap button
in the color management window.
Methods to define colors RGB/HSB
Axialis IconWorkshop™ uses two methods for defining color palettes or swatches.
•
•
The RGB (Red/Green/Blue)
The HSB (Hue/Saturation/Brightness)
RGB Method
The RGB color model is the standard representation. In this model, each value represents the Red,
Green or Blue lights. RGB colors are called "Additive", that is, the values of each color component
are combined to emit the final color. This way, as any RGB value is incremented, the resulting color
becomes lighter. The white color, for instance, is given by the maximum value of each value
(Red=255, Green=255, Blue=255), and black is given by the absence of light in each value
(Red=0, Green=0, Blue=0).
HSB Method
The HSB color model is just a mathematical representation of color, in a way more similar to our
color perception. For instance, the HSB model breaks the color into three components: The Hue
(which would be the "pure" color), the percentage of Saturation ("how much" color) and the
Brightness of the color (also a percentage). The Hue comes in the range of 0 to 360. This model
comes in handy where the RGB model can't help, for instance, classifying similar colors, classifying
colors by levels of darkness, sorting colors, etc.
Customized palette
Axialis IconWorkshop™ supplies a standard palette with 256 colors. Images in 256 colors use fixed
color palettes. You can customize this palette by creating your own colors using RGB values or the
standard Windows® dialog box. Opening a new color palette causes all colors in the current image
to be remapped using the new palette. It is therefore recommended that the desired color palette
be opened before beginning a 256-color image.
The palette is initialized with the color palette of the image being edited. When a new
image 256-color image is created, the palette is initialized with 256 colors from the
default palette file.
261
Axialis IconWorkshop 6.10
To modify a color in a customized palette
1. Select the color in the palette
2. Double-click on this color or choose Color/Modify color. The standard Windows® “Color”
box opens.
3. Modify your color using the scroll box or in the color box
4. If you want add the customized color
5. Click on the <Add color> button and the color will be automatically placed in your
customized color palette, replacing the color selected in the standard palette.
You can change the Hue and Saturation of the color, and then move the slider in the
color gradient to change the luminescence (Lum).
Copy Color as HTML
1. Choose Color Copy HTML color. It will allow to copy the actual color as a HTML compatible
string in the clipboard. This is an interesting feature if you use to deal with HTML codes.
Load color palette (256 color table)
Axialis IconWorkshop™ allows you to load a color palette from a file and apply it to the image. You
can create your own customized color palette.
Load a color palette
1. Choose Color/Load palette (256 color table)
2. Select the file’s folder from the Color Tables In Drop Down box
3. Click on the file type from the File Type Drop Dow box
• AXCT or PA8 (Axialis® Colors Table)
• ACT (Adobe® color Tables)
• PAL (Jasc® color Tables - usually 256 colors)
4. Click on the palette file that you want to select in the Contents List box.
5. Click on the Open button
The palette opens automatically and is linked to the edit window.
Save a color palette
Axialis IconWorkshop™ allows you to customize and save your own color palettes.
262
Working with Icons
Save a 256 color palette
1. Modify the customized color palette. (See Related Topics)
2. Choose Color/Saver Swatches/Palette
2. Select or create the file’s folder from the Look in Drop Down box
3. Enter the filename for the new palette in the File Name Text Box. Axialis IconWorkshop™
will add the file extension (.AXCT) automatically in the File Type Drop down box.
4. Click on the Save button.
If the filename is already in use, Axialis IconWorkshop™ will present a prompt. Click on
the Yes button to overwrite the existing file.
Create a gradient
This feature permits to create a gradient of colors in a 256 color palette.
Create a gradient in a 256 color palette
1. Create an icon with 256 colors (indexed)
2. Select a color with the left mouse button
3. Select another color with the right mouse button
4. Choose Color/Create a Palette Color Gradient
5. This operation will create custom color gradient into the actual image palette (from
Foreground to Background color. Choose the First and the Last color of the gradient.
6. Click OK. The gradient is automatically displayed in the palette.
Create New Swatch
The latest Microsoft® Windows® platform, Windows® XP, introduces a new style in icon design.
The Windows® XP icon is all about fun, color, and energy. It uses true colors to get the best results.
Also, it uses an additional Alpha Channel to create smooth shades and object borders. We strongly
recommend you to start creating an icon with this color mode. Windows® XP images are not tied to
a color palette. The palette Windows® can contain 16, 256 or more colors.
Create a new swatch
1. Choose Draw/New Swatch
2. The dialog box Add Swatch opens. You can add a new color Swatch to the Actual List.
263
Axialis IconWorkshop 6.10
3. In the Color area, click to change the color swatch.
4. In the Name area, specify the Color Swatch Name as it will appear in a tool tip when you'll
pass the mouse pointer over it.
If the name is empty (blank field), the program will display the Html color string in
the tool tip.
5. If the options "Insert at the current location" or "Append at the end of the list" are checked
you can specify where you wish to add the new color swatch: Inserted at the current
location or appended at the end of the list (last position).
Customized Swatch
Modify a color swatch
1. Select the color
2. Double-click on this color or choose Color/Modify Swatch color. The standard Windows®
“Color” box opens.
3. Modify your color using the scroll box or in the color box
4. If you want add the customized color
5. Click on the <Add color> button and the color will be automatically placed in your
customized color palette, replacing the color selected in the standard palette.
You can change the Hue and Saturation of the color, and then move the slider in the
color gradient to change the luminescence (Lum).
Rename a color swatch
1. Select the color
2. Choose Color/Rename Swatch color. Enter the name of the selected color. When you move
on a color, you can see its name.
Delete a color swatch
1. Select the color
2. Choose Color/Delete Swatch color.
264
Working with Icons
Load Swatches
Axialis IconWorkshop™ allows you to load color swatches from a file and apply it to the image. You
can create your own customized color swatches.
Load swatches
1. Choose Color/Load Swatches
2. Select the file’s folder from the Color Swatches In Drop Down box
3. Click on the file type from the File Type Drop Dow box
• AXCO, PAL (Axialis Color Swatches)
4. Click on the color swatches file that you want to select in the Contents List box.
Axialis IconWorkshop™ displays a message. It asks you if you want to replace the actual
swatches with this file content. This action can't be undone. If you choose Yes, you'll
loose the changes you made to the actual swatches. If you choose Append, you add the
leaded swatches to the actual list or choose Cancel to stop and go back.
Save Swatches in a file
Save swatches in a file
1. Choose Color/Save Swatches/Palette
2. Select the file’s folder from the Color Swatches In Drop Down box
3. Enter the filename. Axialis IconWorkshop™ adds automatically .AXCO (Axialis Color
Swatches)
Create a gradient of swatches
This feature permits to add a gradient of swatches to the list. Several swatches will be added in one
operation.
Create a gradient of swatches
1. Choose Color/Create Gradient.
265
Axialis IconWorkshop 6.10
2. The dialog box Add color Gradient opens. It will create and add a new set of Gradient color
Swatches to the actual list.
3. In the area Create, specify the number of color swatches you wish to create.
4. Choose the first color and the last color of gradient.
5. Specify where you wish to add the new set of color swatches: Inserted at the current
location or appended at the end of the list (last position).
Working with the Photoshop® plug-in
A plug-in is a program extension module. In fact, this is a small a program which is "plugged"
(added) into another application to enhance it or add a new feature to it. The plug-in must be
compatible with the "parent" application specifications.
Adobe® created a powerful plug-in interface for Photoshop®. This plug-in model is now a widely
used standard in the graphical industry. As a result, a Photoshop® compatible plug-in can also be
used with various other graphical applications (Illustrator®, Paint Shop Pro®...).
Why a Photoshop® plug-in for Axialis IconWorkshop™?
We created such a plug-in to permit you to transfer an image or a drawing directly from
Photoshop® (or any plug-in compatible application) to Axialis IconWorkshop™ through the
memory.
This is much more fast and secure. No more temporary PSD or PNG file to transfer your image into
Axialis IconWorkshop™. No more risk to loose your file while transferring it.
Before using this plug-in you have to install it in the Photoshop® plug-ins directory. Please read this
for more info.
Install the Photoshop® Plug-in
Using the Photoshop to IconWorkshop™ plug-in, you'll be able to transfer an image or a drawing
directly from Photoshop® (or any plug-in compatible application) to IconWorkshop™ through the
memory. Read this topic for more info about the plug-in...
If you've already installed the Photoshop® plug-in with a version of IconWorkshopatr
prior to 6.10, you must install it again by following the procedure below. A new export
plug-in will be installed in addition to the filter plug-in. The export plug-in will be used
with Photoshop® Templates
266
Working with Icons
Install the Photoshop® plug-in
1. Before installing the plug-in we recommend to close the Photoshop® application (if it is
opened in background). Choose File/Install Photoshop® Plug-in...
2. The dialog box Install the Photoshop® to IconWorkshop™ Transfer Plug-in opens (see
below). In the Location edit zone ( ), specify the Photoshop plug-in folder. If you don't
know the exact folder path, click the browse button ( ) to choose the folder in a list.
3. If you want to create a subfolder "Axialis" to install the plug-in module (recommanded to
organize your folder properly), activate the option "Install in a subfolder Axialis" ( ). Note
that creating a subfolder may fail with some compatible applications.
4. Click OK. When done, a message informs you that the plug-in has been installed.
5. Now you can start your Photoshop® application. The plug-in is visible in
Filter/Axialis/Transfer To IconWorkshop™ and File/Export/Export to Axialis
IconWorkshop™ menus. Read this for more info on how to use the plug-in filter.
You can install the Plug-in in various other compatible applications. See your application
help file for more info on how to proceed. If Photoshop® is installed on your computer,
the plug-in folder will be automatically added to the edit zone. Also, you'll be prompted
to install the plug-in the first time you'll launch IconWorkshop™.
Use the Photoshop® Plug-in
To use the Photoshop® to Axialis IconWorkshop™ plug-in, you must start the Photoshop®
application first. The plug-in is accessible from within Photoshop® only. Before using the plug-in as
detailed in next topic, you need to install it on your computer. The plug-in can be easily installed
from within Axialis IconWorkshop™ in one fast and simple operation.
267
Axialis IconWorkshop 6.10
If you've already installed the Photoshop® plug-in with a version of IconWorkshopatr
prior to 6.10, you must install it again by following this procedure. A new export plug-in
will be installed in addition to the filter plug-in. The export plug-in will be used with
Photoshop® Templates
Use the Photoshop® plug-in
1. First of all, launch Photoshop® and open or create an image file. You don't need to launch
Axialis IconWorkshop™ before using the plug-in. It will be automatically launched by the
plug-in if necessary.
2. Select the layer and the portion of the image you want to transfer to Axialis
IconWorkshop™ ( ). If you don't create a selection area, the whole layer image will be
transferred. Only rectangular selections are supported for transfer.
3a. Export the image in the Current Layer only :
Use this command if you want to transfer the image in the current layer only. The images in
the other layers will be ignored. If you want to export a flatten image, choose the command
in step 3b.
Choose the Filter/Axialis/Transfer to Axialis IconWorkshop™... command in the Photoshop
menu.
3a. Export the flatten image (all layers merged):
Use this command if you want to transfer the image as displayed. The images in all layers will
be merged during the export (the layers will be kept in Photoshop).
Choose the File/Export/Export to Axialis IconWorkshop™... command in the Photoshop
menu.
4. Axialis Axialis IconWorkshop™ is automatically launched (or activated if running in
background) and the dialog box Install the Photoshop® to Axialis IconWorkshop™ Transfer
Plug-in opens (see below).
268
Working with Icons
3. The image is about to be transferred in Axialis IconWorkshop™. You can choose one of the
following operations: Create a New Icon using this Image ( ): You create a new icon with
several formats based on the image (see step 4); Create a New Image Document ( ):
Axialis IconWorkshop™ opens a new document containing the image. You'll be able to
perform various operations on the image (resize, crop, save...) and even create a new icon
from a portion of it; Paste the Image in the Current Icon Document ( ): This option is
enabled only if an icon document is already opened in Axialis IconWorkshop™. It pastes the
image in the current editor area (just like the Clipboard paste operation).
4. If you choose the first option (Create a New Icon using this Image), the following dialog box
opens (see below). As Axialis IconWorkshop™ support creation of both Windows® and
Macintosh® icons, you're prompted to choose the format. Select option for Windows®
or option for Macintosh®.
5. By choosing Windows®, the following dialog box opens (a similar dialog opens if you choose
Macintosh®)
6. In the Name group ( ), enter the icon project name. Do not specify any extension.
7. In the Image Formats group, select the image formats you wish to add in the icon ( ) and
unselect the unwanted images ( ). Just click on the image preview to select/unselect. To
know more about the desired Windows® standard image format, see What is an Icon topic.
8. You can also apply or not the dithering option to the 256/16 color images as well as add a
filter effect to smooth/sharpen the resulting images in RGB/A mode (try and see the
results in the preview images).
269
Axialis IconWorkshop 6.10
9. If you wish to start creating your icon with an unlisted format, click the Other Image Format
button.
10. When done, click OK. The icon is automatically created with the various image formats
you've selected.
Convert a Macintosh® icon to a Windows® format
What's the difference between Windows® and Macintosh® icons?
Microsoft Windows® and Apple Macintosh® icons are very similar. They both have several image
formats embedded in the same icon. But the file format is totally different. You cannot use
Macintosh® icons under Windows® because the file format is not compatible. You must convert
them to Windows® ICO file format (with Axialis IconWorkshop™ of course!).
All kinds of formats can be included in a Windows® ICO file (you can even create non-square icons).
With Macintosh® icon files this is not possible. Only some strictly-defined image formats can be
included.
Axialis IconWorkshop™ supports the following Macintosh® icon files: ICNS, RSC and BIN. Icons from
system 7.5, 8.5, 9.x and 10.X are supported. You can easily open them into the Icon Editor and
save them as Windows® ICO format. During this operation, we recommend you to remove special
Macintosh® formats which are useless under Windows®.
To learn more about Windows® and Macintosh® icon file formats, read this topic: Macintosh® vs
Windows® icons
Which image formats are included in Macintosh® icons?
Here is the list of image formats you can find in Macintosh® Icons:
• Leopard (512x512) - 32 bits (alpha channel)
• Tiger (256x256) - 32 bits (alpha channel)
• Thumbnail (128x128) - 32 bits (alpha channel)
• Huge (48x48) - 32 bits (alpha channel), 256 colors, 16 colors, mono
• Large (32x32) - 32 bits (alpha channel), 256 colors, 16 colors, mono
• Small (16x16) - 32 bits (alpha channel), 256 colors, 16 colors, mono
• Mini (16x12) - 256 colors, 16 colors, mono
The new OS-X icons can contain very large image formats (256x256, 512x512 - 32 bits). Those
formats are also supported. It's a good idea to start from hi-res sizes to create a new Windows®
icon.
Here is a summary of image formats you can find in Macintosh® Icons:
270
Working with Icons
Convert the icon to Windows®, keeping all Macintosh® image
formats
This is the simplest way to proceed. However, some Macintosh® specific image formats may be
useless.
1. Open the Macintosh®icon. Choose File/Open... The icon is opened in a document window.
2. Choose File/Save As, select Windows® (ICO) as file type and specify a new name.
or
2. Choose File/Save As Windows® Icon... (Ctrl+Alt+S) and specify a new name.
or
2. Click the following button on the toolbar and choose a new name for this icon.
Creating a Windows® icon from a Macintosh® icon
This operation is not a conversion, it's a creation of a new icon. It will not preserve all the existing
formats. It will create a new icon based on the largest and most coloured image included in the
original Macintosh® icon (usually 256x256 or 48x48 with alpha channel).
1. Open the Macintosh® icon. Choose File/Open...
2. When the icon is opened, select the largest and the "most coloured" image format in the list
(best with 256x256 or 48x48 with alpha channel).
3. Right-click on the selected image format in the list ( ), a menu opens. Select "New
Windows® Icon Project from this Image..." ( ).
271
Axialis IconWorkshop 6.10
4. A large dialog box opens. In the Name group ( ), enter the icon project name. Do not
specify any extension.
5. In the Image Formats group, select the image formats you wish to add in the icon ( to
6. You can also add extra formats (128x128 or 256x256). When done, click OK. The new
Icon Project document window is created with all formats embedded.
7. Save your icon to Windows® format. choose File/Save and choose a new name (.ICO) for
this icon.
272
).
Working with Icons
Convert a Windows® icon to Macintosh® format
Convert the icon to Macintosh®, keeping all Macintosh®
compatible image formats
This is the simplest way to proceed. However, some Windows® specific image formats may not be
converted.
1. Open the Windows® icon. Choose File/Open... The icon is opened in a document window.
2. Choose File/Save As, select Macintosh® (ICNS, RSC or BIN) as file type and specify a new
name.
or
2. Choose File/Save As Macintosh® Icon... (Ctrl+Alt+S) and specify a new name.
or
2. Click the following button on the toolbar and choose a new name for this icon.
Creating a Macintosh® icon from a Windows® icon
This operation is not a conversion, it's a creation of a new icon. It will not preserve all the existing
formats. It will create a new icon based on the largest and most coloured image included in the
original Windows® icon (usually 128x128 or 48x48 with alpha channel).
1. Open the Windows® icon. Choose File/Open...
2. When the icon is opened, select the largest and the "most coloured" image format in the list
(best with 128x128 or 48x48 with alpha channel).
3. Right-click on the selected image format in the list ( ), a menu opens. Select "New
Macintosh® Icon Project from this Image..." ( ).
273
Axialis IconWorkshop 6.10
4. A large dialog box opens. In the Name group, enter the icon project name. Do not specify
any extension.
5. In the Image Formats group, select the image formats you wish to add in the icon (
).
6. You can also add other formats (256x256 to be used in Tiger). When done, click OK. The
new Icon Project document window is created with all formats embedded.
7. Save your icon to Macintosh® format. choose File/Save and choose a new name for this
icon.
274
Working with Icons
Convert several Macintosh® icons to Windows® format
Using this feature you convert a group of Macintosh® Icons to Windows® format in one operation.
This is what we call a batch procedure. We'll perform this task using the built-in IconWorkshop™
explorer.
Select the source icons
1. Open a new Explorer window. Choose File/New/File Explorer...
2. When the window is opened, select the folder which contains the source files using the tree
in the left pane.
3. When done, the source files appears (with preview) in the right pane. Select the icons you
wish to convert. You can use Shift/Ctrl + Mouse to select several icons. Use Ctrl+A to
select all. Use +/- to select/unselect by specifying filters.
Batch convert the icons
4. Choose Explorer/Batch Convert Macintosh® Icons To Windows® (ICO) or Ctrl+Shift+W
5. A dialog box opens. You can choose to convert all the formats ( ) or only a selection ( )
of formats. When done, click OK.
6. The batch operation starts. The hourglass mouse pointer is displayed during the conversion.
When done the Windows® icons are added to the folder contents.
The created icons have the same filename as the original document with different
extension (depending on the icon types). A system has been implemented to index the
files if necessary to avoid overwriting.
275
Axialis IconWorkshop 6.10
Convert several Windows® icons to Macintosh® format
Using this feature you convert a group of Macintosh® Icons to Windows® format in one operation.
This is what we call a batch procedure. We'll perform this task using the built-in IconWorkshop™
explorer.
Select the source icons
1. Open a new Explorer window. Choose File/New/File Explorer...
2. When the window is opened, select the folder which contains the source files using the tree
in the left pane.
3. When done, the source files appears (with preview) in the right pane. Select the icons you
wish to convert. You can use Shift/Ctrl + Mouse to select several icons. Use Ctrl+A to
select all. Use +/- to select/unselect by specifying filters.
Batch convert the icons
4. Choose Explorer/Batch Convert Windows® Icons To Macintosh® (ICNS, RSC, BIN) or
Ctrl+Shift+M
5. A dialog box opens. First select the Macintosh® file format you wish to create ( ). 3
formats are available for Macintosh® icons (see this topic to learn more about the file
formats).
6. You can choose to convert all the formats ( ) or only a selection ( ) of formats. When
done, click OK.
7. The batch operation starts. The hourglass mouse pointer is displayed during the conversion.
When done the Windows® icons are added to the folder contents.
The created icons have the same filename as the original document with different
extension (depending on the icon types). A system has been implemented to index the
files if necessary to avoid overwriting.
276
Working with Icons
Convert a PNG icon to a Windows® icon
An interesting feature of IconWorkshop™ is the ability to create an icon from a PNG icon. PNG is an
image file format, not really an icon format. Icons usually contain several formats. PNG images
contain only one image used as icon. This image is usually a large one (128x128 or 256x256) with
alpha channel (RGB/A 32 BPP). This format is used by numerous GUI and applications (Linux KDE,
dock bars...). This format is very interesting to create hi-quality RGB/A images in icons.
Open the PNG image file in IconWorkshop™
1. Choose "File/Open", browse your folders and select your file (Windows® standard dialog
box).
or
Choose "File/New/File Explorer" or press Ctrl+E. A built-in Axialis file explorer window opens.
Browse your disks, see the thumbnail preview and double-click the image file you wish to
open.
or
In the Recently Used zone (in the main toolbar), type the full pathname of the image file you
wish to open then hit Enter.
2. The image file opens in a document window.
Create an icon from this PNG image
3. Before proceeding, we recommend you to select the portion of image you wish to use to
create your icon. If you leave too many transparent areas around your image, the visible
part of your icon will be too small.
4. Select the portion of image: Use the selection tool (upper-left button of the tool palette)
and select the portion of image you wish to use (do not cut the shadow if there is one
around the object). When done, an animated dashed rectangle has been created.
5. When the selection is done, choose Image/Create Windows® Icon from Selection or press "I"
or click the first command button in the local toolbar ( ):
6. The dialog box New Windows® Icon From Image opens (see below). In the Name group ( ),
enter the icon project name. Do not specify any extension.
277
Axialis IconWorkshop 6.10
7. In the Image Formats group, select the image formats you wish to add in the icon ( ) and
unselect the unwanted images ( ). Just click on the image preview to select/unselect. To
know more about the desired Windows® standard image format, see What is an Icon topic.
8. In the Extra Formats group, select the optional image formats you wish to add in the icon.
The new formats 128x128 and 256x256 are expected to work with next version of
Windows® (codename Longhorn). The following table shows the common Windows® image
formats:
9. To get the best results possible, you can also apply a filter when resizing RGB/A images and
a dithering option to the 256/16 color images (try and see the results in the preview
images).
10. If you wish to start creating your icon with an unlisted format, click the Other Image
Format button.
11. When done, click OK. The icon is automatically created with the various image formats
you've selected.
12. Now you can save your icon in a file.
278
Working with Icons
Convert a PNG icon to a Macintosh® icon
An interesting feature of IconWorkshop™ is the ability to create an icon from a PNG icon. PNG is an
image file format, not really an icon format. Icons usually contain several formats. PNG images
contain only one image used as icon. This image is usually a large one (128x128 or 256x256) with
alpha channel (RGB/A 32 BPP). This format is used by numerous GUI and applications (Linux KDE,
dock bars...). This format is very interesting to create hi-quality RGB/A images in icons.
Open the PNG image file in IconWorkshop™
1. Choose "File/Open", browse your folders and select your file (Windows® standard dialog
box).
or
Choose "File/New/File Explorer" or press Ctrl+E. A built-in Axialis file explorer window opens.
Browse your disks, see the thumbnail preview and double-click the image file you wish to
open.
or
In the Recently Used zone (in the main toolbar), type the full pathname of the image file you
wish to open then hit Enter.
2. The image file opens in a document window.
Create an icon from this PNG image
3. Before proceeding, we recommend you to select the portion of image you wish to use to
create your icon. If you leave too many transparent areas around your image, the visible
part of your icon will be too small.
4. Select the portion of image: Use the selection tool (upper-left button of the tool palette)
and select the portion of image you wish to use (do not cut the shadow if there is one
around the object). When done, an animated dashed rectangle has been created.
5. When the selection is done, choose Image/Create Macintosh® Icon from Selection or press
"M" or click the first command button in the local toolbar ( ):
6. The dialog box New Macintosh® Icon From Image opens (see below). In the Name group
( ), enter the icon project name. Do not specify any extension.
279
Axialis IconWorkshop 6.10
7. In the Image Formats group, select the image formats you wish to add in the icon ( to
and unselect the unwanted images. Just click on the image preview to select/unselect.
)
8. In the Other group, select the optional image formats you wish to add in the icon ( ). Note
that the 32x32 mono is recommended if you want the icon to be compatible with older
systems. The new format 256x256 works only under OSX 10.4 (Tiger) or more. The
following table shows the common Macintosh® image formats:
8. To get the best results possible, you can also apply a filter when resizing RGB/A images and
a dithering option to the 256/16 color images (try and see the results in the preview
images).
9. When done, click OK. The icon is automatically created with the various image formats
you've selected.
10. Now you can save your icon in a file.
280
Working with Icons
Convert several PNG icons to Windows® icons
An interesting feature of IconWorkshop™ is the ability to create Windows® icons from PNG icons.
PNG is an image file format, not really an icon format. Icons usually contain several formats. PNG
images contain only one image used as icon. This image is usually a large one (128x128 or
256x256) with alpha channel (RGB/A 32 BPP). This format is used by numerous GUI and
applications (Linux KDE, dock bars...). This format is very interesting to create hi-quality RGB/A
images in icons.
Using this feature you can Create Several Windows® Icons from PNG files in one operation. This is
what we call a batch procedure. We'll perform this task using the built-in IconWorkshop™ explorer.
Select the source PNG images
1. Open a new Explorer window. Choose File/New/File Explorer...
2. When the window is opened, select the folder which contains the PNG images using the
tree in the left pane.
3. When done, the PNG files appear (with preview) in the right pane. Select the files you wish
to convert to icons. You can use Shift/Ctrl + Mouse to select several files. Use Ctrl+A to
select all. Use +/- to select/unselect by specifying filters.
Batch create the Windows® icons
4. Choose Explorer/Batch Create Windows® Icons from Selection or Ctrl+Shift+C.
5. A dialog box opens. In "Standard Image Formats" ( ) and "Extra Image Formats" ( ) choose
the image formats you wish to add in the icons.
6. In Image Adjustment group ( ), you can add a smooth or sharp filter to the image shrinking
process. You can also use or not a dithering method to render image using 256 or 16
colors. In Transparency group ( ), an option permits to use opaque images (i.e. without
transparency) and specify a color to make transparent.
281
Axialis IconWorkshop 6.10
7. When done, click OK. The batch operation starts immediately, the hourglass mouse pointer
is displayed during the creation. When done the new Windows® icons are added to the
folder contents.
The created icons have the same filename as the original PNG files with different
extension (depending on the icon types). A system has been implemented to index the
files if necessary to avoid overwriting. When you create icons from PNG Image Files, the
whole image is selected and resized keeping its aspect ratio. If it contains transparency,
it is kept during the creation.
Convert several PNG icons to Macintosh® icons
An interesting feature of IconWorkshop™ is the ability to create Macintosh® icons from PNG icons.
PNG is an image file format, not really an icon format. Icons usually contain several formats. PNG
images contain only one image used as icon. This image is usually a large one (128x128 or
256x256) with alpha channel (RGB/A 32 BPP). This format is used by numerous GUI and
applications (Linux KDE, dock bars...). This format is very interesting to create hi-quality RGB/A
images in icons.
Using this feature you can Create Several Macintosh® Icons from PNG files in one operation. This is
what we call a batch procedure. We'll perform this task using the built-in IconWorkshop™ explorer.
Select the source PNG images
1. Open a new Explorer window. Choose File/New/File Explorer...
2. When the window is opened, select the folder which contains the PNG images using the
tree in the left pane.
3. When done, the PNG files appear (with preview) in the right pane. Select the files you wish
to convert to icons. You can use Shift/Ctrl + Mouse to select several files. Use Ctrl+A to
select all. Use +/- to select/unselect by specifying filters.
Batch create the Macintosh® icons
4. Choose Explorer/Batch Create Macintosh® Icons from Selection or Ctrl+Shift+D.
5. A dialog box opens. First we need to choose the Macintosh® file format we wish to use
( there are 3 formats supported by IconWorkshop™ - see this topic to learn more).
6. In groups "Standard Image Formats" ( ) and "Extra Image Formats" ( ) choose the image
formats you wish to add in the icons.
282
Working with Icons
6. In Image Adjustment group, you can add a smooth or sharp filter to the image shrinking
process. You can also use or not a dithering method to render image using 256 or 16
colors. In Transparency group, an option permits to use opaque images (i.e. without
transparency) and specify a color to make transparent.
7. When done click OK. All the Macintosh® icons are created and added to the same folder.
Names are preserved, only the extension is changed.
The created icons have the same filename as the original PNG files with different
extension (depending on the icon types). A system has been implemented to index the
files if necessary to avoid overwriting. When you create icons from PNG Image Files, the
whole image is selected and resized keeping its aspect ratio. If it contains transparency,
it is kept during the creation.
Convert a Windows®/Macintosh® icon to PNG
PNG is an image file format, not really an icon format. Icons usually contain several formats. PNG
images contain only one image used as icon. This image is usually a large one (128x128 or
256x256) with alpha channel (RGB/A 32 BPP). This format is used by numerous GUI and
applications (Linux KDE, dock bars...).
Using this feature you can extract an image from an icon and convert it to a PNG icon. Only one
image will be extracted from the icon. We recommend you to extract the largest RGB/A image
from the icon since IconWorkshop™ supports creation of PNG images with alpha channel.
Open the icon file in IconWorkshop™
1. Open your original icon file (from the librarian or using File/Open...).
283
Axialis IconWorkshop 6.10
2. The image file opens in a document window. In the image format list, select the image you
wish to use to create the PNG file. We recommend you to extract the largest RGB/A image
from the icon since IconWorkshop™ supports creation of PNG images with alpha channel.
Save the image as a PNG file
3. Choose File/Export/Save as PNG with Transparency or press Ctrl+Shift+T.
4. A standard Save Image As dialog box opens. In the Save as Type list appears only the PNG
format.
5. Choose a destination folder and type a new filename. When done, click OK.
6. The PNG file has been created.
Convert several Windows®/Macintosh® icons to PNG
(batch process)
PNG is an image file format, not really an icon format. Icons usually contain several formats. PNG
images contain only one image used as icon. This image is usually a large one (128x128 or
256x256) with alpha channel (RGB/A 32 BPP). This format is used by numerous GUI and
applications (Linux KDE, dock bars...).
Using this feature you can Create Several PNG Images from Windows® or Macintosh® icon files in
one operation. This is what we call a batch procedure. We'll perform this task using the built-in
IconWorkshop™ explorer. Only one image will be extracted from each icon and each time one PNG
file will be created. We recommend you to extract the largest RGB/A image from the icon since
IconWorkshop™ supports creation of PNG images with alpha channel.
Select the Source Icons
1. Open a new Explorer window. Choose File/New/File Explorer...
2. When the window is opened, select the folder which contains the source icon files using the
tree in the left pane.
3. When done, the source icons appears (with preview) in the right pane. Select the icons you
wish to convert to images. You can select Windows® and/or Macintosh® icons. Use
Shift/Ctrl + Mouse to select several icons. Use Ctrl+A to select all. Use +/- to
select/unselect by specifying filters.
Create the PNG images
4. Choose Explorer/Batch Create Images from Icons or Ctrl+Shift+V.
5. The dialog box Batch Create Images From Icons opens (see below). In the Icon Format to
Extract group ( ), choose the image format you wish to extract from the icons. You can
choose only one image format. If this exact format does not exists in an icon, the nearest
format is chosen.
284
Working with Icons
6. In the Image File Format group ( ), select the PNG file format.
7. In the Transparency group ( ), choose if you wish to create transparent or opaque images.
If you choose to preserve transparency, the images will be automatically converted to
32BPP with alpha channel (even if the chosen icon format is 256 or less colors). If you
choose to remove transparency, the images will be generated using 24BPP (no alpha
channel). In such a case, you must specify a background color (to fill the transparent areas
with this color).
We strongly recommend you to use RGB/A (alpha channel transparency) for extraction.
8. When done, click OK. The batch operation starts immediately, the hourglass mouse pointer
is displayed during the creation. When done the new Images are added to the folder
contents.
The created images have the same filename as the original document with PNG
extension appended. A smart system has been added to index the files if necessary to
avoid overwriting. If this exact chosen format does not exists in an icon, the nearest
format is chosen for extraction.
Convert an image to a Windows® icon
An interesting feature of IconWorkshop™ is to convert an image into an icon. Some image formats
support 32 BPP alpha channel transparency which is very interesting to create hi-quality RGB/A
images in icons. During the operation the image will be converted in several formats that will be
included in the icon. The following image formats are supported:
•
•
•
BMP - Windows® bitmap (32 BPP alpha channel transparency supported).
PNG - Portable Network Graphic (32 BPP alpha channel transparency supported).
PSD - Photoshop (32 BPP alpha channel transparency and layers supported).
285
Axialis IconWorkshop 6.10
•
•
•
•
•
JP2 - JPEG 2000 (32 BPP alpha channel transparency supported).
JPG - JPEG
TGA - Targa
GIF - Compuserve GIF
Others - Various other formats supported: TIFF, PCD (PhotoCD), PIC (Apple PICT), PCX (Zsoft),
WMF (Windows® MetaFile)
Open the image file in IconWorkshop™
1. Choose "File/Open", browse your folders and select your file (Windows® standard dialog
box).
or
Choose "File/New/File Explorer" or press Ctrl+E. A built-in Axialis file explorer window opens.
Browse your disks, see the thumbnail preview and double-click the image file you wish to
open.
or
In the Recently Used zone (in the main toolbar), type the full pathname of the image file you
wish to open then hit Enter.
2. The image file opens in a document window.
Create an icon from this image
3. Before proceeding, we recommend you to select the portion of image you wish to use to
create your icon. If you leave too many transparent areas around your image, the visible
part of your icon will be too small.
4. Select the portion of image: Use the selection tool (upper-left button of the tool palette)
and select the portion of image you wish to use (do not cut the shadow if there is one
around the object). When done, an animated dashed rectangle has been created.
5. When the selection is done, choose Image/Create Windows® Icon from Selection or press "I"
or click the first command button in the local toolbar ( ):
6. The dialog box New Windows® Icon From Image opens (see below). In the Name group ( ),
enter the icon project name. Do not specify any extension.
286
Working with Icons
7. In the Image Formats group, select the image formats you wish to add in the icon ( ) and
unselect the unwanted images ( ). Just click on the image preview to select/unselect. To
know more about the desired Windows® standard image format, see What is an Icon topic.
8. In the Extra Formats group, select the optional image formats you wish to add in the icon.
The new formats 128x128 and 256x256 are expected to work with next version of
Windows® (codename Longhorn). The following table shows the common Windows® image
formats:
9. To get the best results possible, you can also apply a filter when resizing RGB/A images and
a dithering option to the 256/16 color images (try and see the results in the preview
images).
10. If you wish to start creating your icon with an unlisted format, click the Other Image
Format button.
11. When done, click OK. The icon is automatically created with the various image formats
you've selected.
12. Now you can save your icon in a file.
287
Axialis IconWorkshop 6.10
Convert an image to a Macintosh® icon
An interesting feature of IconWorkshop™ is to convert an image into an icon. Some image formats
support 32 BPP alpha channel transparency which is very interesting to create hi-quality RGB/A
images in icons. During the operation the image will be converted in several formats that will be
included in the icon. The following image formats are supported:
•
•
•
•
•
•
•
•
BMP - Windows® bitmap (32 BPP alpha channel transparency supported).
PNG - Portable Network Graphic (32 BPP alpha channel transparency supported).
PSD - Photoshop (32 BPP alpha channel transparency and layers supported).
JP2 - JPEG 2000 (32 BPP alpha channel transparency supported).
JPG - JPEG
TGA - Targa
GIF - Compuserve GIF
Others - Various other formats supported: TIFF, PCD (PhotoCD), PIC (Apple PICT), PCX (Zsoft),
WMF (Windows® MetaFile)
Open the PNG image file in Axialis IconWorkshop™
1. Choose "File/Open", browse your folders and select your file (Windows® standard dialog
box).
or
Choose "File/New/File Explorer" or press Ctrl+E. A built-in Axialis file explorer window opens.
Browse your disks, see the thumbnail preview and double-click the image file you wish to
open.
or
In the Recently Used zone (in the main toolbar), type the full pathname of the image file you
wish to open then hit Enter.
2. The image file opens in a document window.
Create an icon from this PNG image
3. Before proceeding, we recommend you to select the portion of image you wish to use to
create your icon. If you leave too many transparent areas around your image, the visible
part of your icon will be too small.
4. Select the portion of image: Use the selection tool (upper-left button of the tool palette)
and select the portion of image you wish to use (do not cut the shadow if there is one
around the object). When done, an animated dashed rectangle has been created.
5. When the selection is done, choose Image/Create Macintosh® Icon from Selection or press
"M" or click the first command button in the local toolbar ( ):
288
Working with Icons
6. The dialog box New Macintosh® Icon From Image opens (see below). In the Name group
( ), enter the icon project name. Do not specify any extension.
7. In the Image Formats group, select the image formats you wish to add in the icon ( to
and unselect the unwanted images. Just click on the image preview to select/unselect.
)
8. In the Other group, select the optional image formats you wish to add in the icon ( ). Note
that the 32x32 mono is recommended if you want the icon to be compatible with older
systems. The new format 256x256 works only under Macintosh® OSX 10.4 (Tiger) or
more. The following table shows the common Macintosh® image formats:
8. To get the best results possible, you can also apply a filter when resizing RGB/A images and
a dithering option to the 256/16 color images (try and see the results in the preview
images).
9. When done, click OK. The icon is automatically created with the various image formats
you've selected.
10. Now you can save your icon in a file.
289
Axialis IconWorkshop 6.10
Convert several images to Windows® icons (batch
processing)
An interesting feature of IconWorkshop™ is to convert an image into an icon. Some image formats
support 32 BPP alpha channel transparency which is very interesting to create hi-quality RGB/A
images in icons. During the operation the image will be converted in several formats that will be
included in the icon.
Using this feature you can Create Several Windows® Icons from image files in one operation. This is
what we call a batch procedure. We'll perform this task using the built-in IconWorkshop™ explorer.
Select the source images
1. Open a new Explorer window. Choose File/New/File Explorer...
2. When the window is opened, select the folder which contains the images using the tree in
the left pane.
3. When done, the files appear (with preview) in the right pane. Select the image files you wish
to convert to icons. You can use Shift/Ctrl + Mouse to select several files. Use Ctrl+A to
select all. Use +/- to select/unselect by specifying filters.
Batch create the Windows® icons
4. Choose Explorer/Batch Create Windows® Icons from Selection or Ctrl+Shift+C.
5. A dialog box opens. In "Standard Image Formats" ( ) and "Extra Image Formats" ( ) choose
the image formats you wish to add in the icons.
6. In Image Adjustment group ( ), you can add a smooth or sharp filter to the image shrinking
process. You can also use or not a dithering method to render image using 256 or 16
290
Working with Icons
colors. In Transparency group ( ), an option permits to use opaque images (i.e. without
transparency) and specify a color to make transparent.
7. When done, click OK. The batch operation starts immediately, the hourglass mouse pointer
is displayed during the creation. When done the new Windows® icons are added to the
folder contents.
The created icons have the same filename as the original image files with different
extension (depending on the icon types). A system has been implemented to index the
files if necessary to avoid overwriting. When you create icons from Image Files, the
whole image is selected and resized keeping its aspect ratio. If it contains transparency,
it is kept during the creation.
Convert several images to Macintosh® icons (batch
processing)
An interesting feature of IconWorkshop™ is to convert an image into an icon. Some image formats
support 32 BPP alpha channel transparency which is very interesting to create hi-quality RGB/A
images in icons. During the operation the image will be converted in several formats that will be
included in the icon.
Using this feature you can Create Several Macintosh® Icons from image files in one operation. This
is what we call a batch procedure. We'll perform this task using the built-in IconWorkshop™
explorer.
Select the source images
1. Open a new Explorer window. Choose File/New/File Explorer...
2. When the window is opened, select the folder which contains the images using the tree in
the left pane.
3. When done, the files appear (with preview) in the right pane. Select the image files you wish
to convert to icons. You can use Shift/Ctrl + Mouse to select several files. Use Ctrl+A to
select all. Use +/- to select/unselect by specifying filters.
Batch create the Windows® icons
4. Choose Explorer/Batch Create Macintosh® Icons from Selection or Ctrl+Shift+D.
5. A dialog box opens. First we need to choose the Macintosh® file format we wish to use
( there are 3 formats supported by IconWorkshop™ - see this topic to learn more).
6. In groups "Standard Image Formats" ( ) and "Extra Image Formats" ( ) choose the image
formats you wish to add in the icons.
291
Axialis IconWorkshop 6.10
6. In Image Adjustment group, you can add a smooth or sharp filter to the image shrinking
process. You can also use or not a dithering method to render image using 256 or 16
colors. In Transparency group, an option permits to use opaque images (i.e. without
transparency) and specify a color to make transparent.
7. When done click OK. All the Macintosh® icons are created and added to the same folder.
Names are preserved, only the extension is changed.
The created icons have the same filename as the original image files with different
extension (depending on the icon types). A system has been implemented to index the
files if necessary to avoid overwriting. When you create icons from Image Files, the
whole image is selected and resized keeping its aspect ratio. If it contains transparency,
it is kept during the creation.
Convert an icon to an image
If you work with external programs such as Macromedia® Freehand®, Adobe® Photoshop® or Jasc®
Paint Shop Pro®, you may need to save an icon image to an external file.
Axialis IconWorkshop™ permits you to save an icon image to PSD, PNG, BMP, GIF or JPEG 2000
file formats preserving the transparency areas of the icon. Only one image will be extracted from
the icon. We recommend you to extract the largest RGB/A image from the icon since
IconWorkshop™ supports creation of PNG images with alpha channel.
Open the icon file in IconWorkshop™
1. Open your original icon file (from the librarian or using File/Open...).
292
Working with Icons
2. The image file opens in a document window. In the image format list, select the image you
wish to use to create the PNG file. We recommend you to extract the largest RGB/A image
from the icon since IconWorkshop™ supports creation of PNG images with alpha channel.
Save the image as an image file
3. Choose File/Export/Image or press Ctrl+Shift+E.
4. A standard Save Image As dialog box opens. In the Save as Type list select the desired image
file format.
5. Choose a destination folder and type a new filename. When done, click OK.
6. If you've chosen JPEG 2000, an option dialog box with preview opens (see below). If you've
chosen GIF, read Convert an icon to a Web-optimized GIF image to learn more about the
options.
7. The image file has been created.
The JPEG 2000 options
JPEG 2000 is the latest generation of compressed image format. It permits to compress images
with low quality loss. Additionally it permits to encode images with alpha channel.
When you save an image in JPEG 2000 format you need to specify the type of compression you
want for this image:
•
•
Lossless compression - This will result in perfect image quality but larger file size (about 3050% of original image).
Lossy compression - This can be adjusted to create smaller files (high compression means low
quality - see preview).
If you use lossy compression, we recommend you to adjust the compression level using the slider
and compare the difference between the original and the resulting image in the preview window.
Convert an icon to a Web-optimized GIF image
CompuServe GIF image format is widely used in Web pages because the majority of Web browsers
recognize it. However this format has some limitations and images need to be optimized to meet
Web requirements like size, colors and transparency:
•
•
•
GIF Images don't support partial transparency (alpha channel). It means that either a pixel is
transparent, either it isn't.
GIF Images cannot contain more than 256 colors.
GIF Images support reduced palettes. Limited number of colors will result in smaller file but will
produce lower image quality.
Axialis IconWorkshop™ permits you to save an icon image to GIF file formats preserving the
transparency areas of the icon. Only one image will be extracted from the icon. We recommend
you to extract the 256 color image from the icon if available.
293
Axialis IconWorkshop 6.10
Open the icon file in IconWorkshop™
1. Open your original icon file (from the librarian or using File/Open...).
2. The image file opens in a document window. In the image format list, select the image you
wish to use to create the GIF file. We recommend you to extract the 256 color image from
the icon if available, otherwise use RGB/A.
Save the image as a GIF file with Web optimization
3. Choose File/Export/CompuServe GIF (Optimized for the Web) or press Ctrl+Shift+G.
4. A standard Save Image As dialog box opens. In the Save as Type list select the desired image
file format.
5. Choose a destination folder and type a new filename. When done, click OK.
6. A dialog box CompuServe GIF Optimizer opens:
7. In Colors ( ), specify the number of colors you wish to use in the image palette. Limited
number of colors will result in smaller file but will produce lower image quality. Choose
"Auto" if you're not sure about desired the number of colors.
8. In Palette ( ), choose the type of palette desired:
• Adaptive - The palette will be calculated to get the best results possible
(recommended).
• Web Safe - This is the default Netscape® Web palette.
• Windows - This is the default palette used under old Windows® versions in 256 color
screen mode.
• Macintosh® OS - This is the default palette used under old Macintosh® OS versions in
256 color screen mode.
9. In Dither ( ), choose "Diffusion" if you want IconWorkshop™ to simulate colors not present
in the palette by pixel mixing using the "error diffusion" method. Choose "None" to encode
294
Working with Icons
the image without dithering. Diffusion produces the best results but usually creates slightly
larger images.
10. In Transparency ( ), specify if you want to preserve transparency or not. Of you choose
opaque, the transparent areas of the icon will be converted to solid color (the "Matte"
color). If you choose to preserve transparency and encodes your GIF file from a RGB/A
images, you may need to adjust the "Threshold" value ( ) to produce better results on
image edges.
11. In Preview, compare the original ( ) and the optimized ( ) images (image quality and
size) to find the best adjustments possible.
12. When done, click OK. The image file has been created.
Convert several icons to images (batch processing)
Creating images from icons can be very useful. You can either create one image from one icon (see
topic Convert an icon to an image) or several images from icons in one operation. This is what we
call a batch procedure.
The following image format creation is supported by IconWorkshop™:
•
•
•
•
•
BMP - Windows® bitmap (32 BPP alpha channel transparency supported).
PNG - Portable Network Graphic (32 BPP alpha channel transparency supported).
PSD - Photoshop (32 BPP alpha channel transparency and layers supported).
JP2 - JPEG 2000 (32 BPP alpha channel transparency supported).
GIF - Compuserve GIF (Web optimized)
Select the Source Icons
1. Open a new Explorer window. Choose File/New/File Explorer...
2. When the window is opened, select the folder which contains the Source Files using the tree
in the left pane.
3. When done, the Source Files appears (with preview) in the right pane. Select the icons you
wish to convert to images. You can use Shift/Ctrl + Mouse to select several icons. Use
Ctrl+A to select all. Use +/- to select/unselect by specifying filters.
Create the Images
4. Choose Explorer/Batch Create Images from Icons or Ctrl+Shift+V.
5. The dialog box Batch Create Images From Icons opens (see below). In the Icon Format to
Extract group ( ), choose the image format you wish to extract from the icons. You can
choose only one image format. If this exact format does not exists in an icon, the nearest
format is chosen.
295
Axialis IconWorkshop 6.10
5. In the Image File Format group ( ), select the file format you wish to use for the images to
create.
6. In the Transparency group ( ), choose if you wish to create transparent or opaque images.
If you choose to preserve transparency, the images will be automatically converted to
32BPP with alpha channel (even if the chosen icon format is 256 or less colors). If you
choose to remove transparency, the images will be generated using 24BPP (no alpha
channel). In such a case, you must specify a background color (to fill the transparent areas
with this color).
7. When done, click OK. If you have chosen to create JPEG 2000 or GIF images, an option
dialog box opens (see below about the options). The batch operation starts immediately,
the hourglass mouse pointer is displayed during the creation. When done the new Images
are added to the folder contents.
The created images have the same filename as the original document with PNG, PSD,
BMP, GIG or JP2 appended. A smart system has been added to index the files if
necessary to avoid overwriting. If this exact chosen format does not exists in an icon,
the nearest format is chosen for extraction.
The JPEG 2000 options
JPEG 2000 is the latest generation of compressed image format. It permits to compress images
with low quality loss. Additionally it permits to encode images with alpha channel.
When you save an image in JPEG 2000 format you need to specify the type of compression you
want for this image:
•
•
Lossless compression - This will result in perfect image quality but larger file size (about 3050% of original image).
Lossy compression - This can be adjusted to create smaller files (high compression means low
quality - see preview).
If you use lossy compression, we recommend you to adjust the compression level using the slider
and compare the difference between the original and the resulting image in the preview window.
296
Working with Icons
The GIF options
CompuServe GIF image format is widely used in Web pages because the majority of Web browsers
recognize it. However this format has some limitations and images need to be optimized to meet
Web requirements like size, colors and transparency:
• GIF Images don't support partial transparency (alpha channel). It means that either a pixel is
transparent, either it isn't.
• GIF Images cannot contain more than 256 colors.
• GIF Images support reduced palettes. Limited number of colors will result in smaller file but will
produce lower image quality.
Axialis IconWorkshop™ permits you to save an icon image to GIF file formats preserving the
transparency areas of the icon. Only one image will be extracted from the icon. We recommend
you to extract the 256 color image from the icon if available.
The GIF option dialog box includes several options:
1. In Colors ( ), specify the number of colors you wish to use in the image palette. Limited
number of colors will result in smaller file but will produce lower image quality. Choose
"Auto" if you're not sure about desired the number of colors.
2. In Palette ( ), choose the type of palette desired:
• Adaptive - The palette will be calculated to get the best results possible
(recommended).
• Web Safe - This is the default Netscape® Web palette.
• Windows® - This is the default palette used under old Windows® versions in 256 color
screen mode.
• Macintosh® OS - This is the default palette used under old Macintosh® OS versions in
256 color screen mode.
297
Axialis IconWorkshop 6.10
3. In Dither ( ), choose "Diffusion" if you want IconWorkshop™ to simulate colors not present
in the palette by pixel mixing using the "error diffusion" method. Choose "None" to encode
the image without dithering. Diffusion produces the best results but usually creates slightly
larger images.
4. In Transparency ( ), specify if you want to preserve transparency or not. Of you choose
opaque, the transparent areas of the icon will be converted to solid color (the "Matte"
color). If you choose to preserve transparency and encodes your GIF file from a RGB/A
images, you may need to adjust the "Threshold" value ( ) to produce better results on
image edges.
5. In Preview, compare the original ( ) and the optimized ( ) images (image quality and size)
to find the best adjustments possible.
Normalize several icons (batch processing)
The normalization permits to format several icons in order to produce an uniform set. As a result,
after normalization all the icons have the same image formats embedded. This feature is useful if
you plan to distribute your icons.
We'll perform this task using the built-in IconWorkshop™ explorer.
Select the icons to normalize
1. Open a new Explorer window. Choose File/New/File Explorer...
2. When the window is opened, select the folder which contains the icons using the tree in the
left pane.
3. When done, the files appear (with preview) in the right pane. Select the icons files you wish
to normalize. You can use Shift/Ctrl + Mouse to select several files. Use Ctrl+A to select all.
Use +/- to select/unselect by specifying filters.
Normalize the icons
4. Choose Explorer/Batch Normalize Icon Formats in Icons or Ctrl+Shift+N.
5. A dialog box opens. In "Windows® Icons" group, select the formats you want to include in
the Windows® icons ( ). In "Macintosh® Icons" group, select the formats you want to
include in the Macintosh® icons ( ).
298
Working with Icons
For each icon, the normalization rules are:
• The selected formats are created if not present in the icon. In such a case, the largest
and most coloured image format is used as source for the creation. This rule applies
only if the option "Create image format if not present in source icon" is checked ( )
• The unselected formats are removed if present in the icon.
5. In "Write Options" group ( ), choose one of the following options:
• Overwrite source file - The original icon file is replaced by the normalized icon.
• New filename - The normalized icon is created using a new filename (original filename
plus an index number).
• Create new folder - The filenames are identical but created in a new subfolder.
6. When done, click OK. The batch operation starts immediately, the hourglass mouse pointer
is displayed during the creation. When done the normalized icons are created.
Batch Processing Icons
To increase your productivity in working with icons, some features are available in automatic
processes. It permits to process several icons in one operation. This kind of operation is called a
"Batch Processing".
All the batch processing features are accessible from the Axialis Media File Explorer (a file browser
included in Axialis IconWorkshop™).
299
Axialis IconWorkshop 6.10
Batch create several Windows® icons from images
Using this feature you can Create Several Icons from images, existing icons or cursors in one
operation. This is what we call a batch procedure. We'll perform this task using the built-in Axialis
IconWorkshop™ explorer.
Select the source images, icons or cursors
1. Open a new Explorer window. Choose File/New/File Explorer...
2. When the window is opened, select the folder which contains the Source Files using the tree
in the left pane.
3. When done, the Source Files appears (with preview) in the right pane. Select the icons you
wish to convert. You can use Shift/Ctrl + Mouse to select several icons. Use Ctrl+A to
select all. Use +/- to select/unselect by specifying filters.
Batch create Windows® icons
4. Choose Explorer/Batch Create Windows® Icons from Selection or Ctrl+Shift+C.
5. A dialog box opens. In "Standard Image Formats" ( ) and "Extra Image Formats" ( ) choose
the image formats you wish to add in the icons.
6. In Image Adjustment group ( ), you can add a smooth or sharp filter to the image shrinking
process. You can also use or not a dithering method to render image using 256 or 16
colors. In Transparency group ( ), an option permits to use opaque images (i.e. without
transparency) and specify a color to make transparent.
7. When done, click OK. The batch operation starts immediately, the hourglass mouse pointer
is displayed during the creation. When done the new Windows® icons are added to the
folder contents.
300
Working with Icons
The created icons have the same filename as the original document with different
extension (depending on the icon types). A system has been implemented to index the
files if necessary to avoid overwriting. If you create icons from Image Files, the whole
image is selected and resized keeping its aspect ratio. If it contains transparency, it is
kept during the creation. If you create icons from an Existing Icons or Cursors, the
largest image is used as source to create the icons. Transparency is kept.
Batch create several Macintosh® icons from images
Using this feature you can Create Several Icons from images, existing icons or cursors in one
operation. This is what we call a batch procedure. We'll perform this task using the built-in Axialis
IconWorkshop™ explorer.
Select the source images, icons or cursors
1. Open a new Explorer window. Choose File/New/File Explorer...
2. When the window is opened, select the folder which contains the Source Files using the tree
in the left pane.
3. When done, the Source Files appears (with preview) in the right pane. Select the icons you
wish to convert. You can use Shift/Ctrl + Mouse to select several icons. Use Ctrl+A to
select all. Use +/- to select/unselect by specifying filters.
Batch create Macintosh® icons
4. Choose Explorer/Batch Create Macintosh® Icons from Selection or Ctrl+Shift+D.
5. A dialog box opens. First we need to choose the Macintosh® file format we wish to use
( there are 3 formats supported by Axialis IconWorkshop™ - see this topic to learn more).
301
Axialis IconWorkshop 6.10
6. In groups "Standard Image Formats" ( ) and "Extra Image Formats" ( ) choose the image
formats you wish to add in the icons.
6. In Image Adjustment group, you can add a smooth or sharp filter to the image shrinking
process. You can also use or not a dithering method to render image using 256 or 16
colors. In Transparency group, an option permits to use opaque images (i.e. without
transparency) and specify a color to make transparent.
7. When done click OK. All the Macintosh® icons are created and added to the same folder.
Names are preserved, only the extension is changed.
The created icons have the same filename as the original document with different
extension (depending on the icon types). A system has been implemented to index the
files if necessary to avoid overwriting. If you create icons from Image Files, the whole
image is selected and resized keeping its aspect ratio. If it contains transparency, it is
kept during the creation. If you create icons from an Existing Icons or Cursors, the
largest image is used as source to create the icons. Transparency is kept.
Convert several Macintosh® icons to Windows® format
Using this feature you convert a group of Macintosh® Icons to Windows® format in one operation.
This is what we call a batch procedure. We'll perform this task using the built-in IconWorkshop™
explorer.
Select the source icons
1. Open a new Explorer window. Choose File/New/File Explorer...
2. When the window is opened, select the folder which contains the source files using the tree
in the left pane.
3. When done, the source files appears (with preview) in the right pane. Select the icons you
wish to convert. You can use Shift/Ctrl + Mouse to select several icons. Use Ctrl+A to
select all. Use +/- to select/unselect by specifying filters.
Batch convert the icons
4. Choose Explorer/Batch Convert Macintosh® Icons To Windows® (ICO) or Ctrl+Shift+W
5. A dialog box opens. You can choose to convert all the formats ( ) or only a selection ( )
of formats. When done, click OK.
302
Working with Icons
6. The batch operation starts. The hourglass mouse pointer is displayed during the conversion.
When done the Windows® icons are added to the folder contents.
The created icons have the same filename as the original document with different
extension (depending on the icon types). A system has been implemented to index the
files if necessary to avoid overwriting.
Convert several Windows® icons to Macintosh® format
Using this feature you convert a group of Macintosh® Icons to Windows® format in one operation.
This is what we call a batch procedure. We'll perform this task using the built-in IconWorkshop™
explorer.
Select the source icons
1. Open a new Explorer window. Choose File/New/File Explorer...
2. When the window is opened, select the folder which contains the source files using the tree
in the left pane.
3. When done, the source files appears (with preview) in the right pane. Select the icons you
wish to convert. You can use Shift/Ctrl + Mouse to select several icons. Use Ctrl+A to
select all. Use +/- to select/unselect by specifying filters.
Batch convert the icons
4. Choose Explorer/Batch Convert Windows® Icons To Macintosh® (ICNS, RSC, BIN) or
Ctrl+Shift+M
5. A dialog box opens. First select the Macintosh® file format you wish to create ( ). 3
formats are available for Macintosh® icons (see this topic to learn more about the file
formats).
303
Axialis IconWorkshop 6.10
6. You can choose to convert all the formats ( ) or only a selection ( ) of formats. When
done, click OK.
7. The batch operation starts. The hourglass mouse pointer is displayed during the conversion.
When done the Windows® icons are added to the folder contents.
The created icons have the same filename as the original document with different
extension (depending on the icon types). A system has been implemented to index the
files if necessary to avoid overwriting.
Convert several Windows®/Macintosh® icons to PNG
(batch process)
PNG is an image file format, not really an icon format. Icons usually contain several formats. PNG
images contain only one image used as icon. This image is usually a large one (128x128 or
256x256) with alpha channel (RGB/A 32 BPP). This format is used by numerous GUI and
applications (Linux KDE, dock bars...).
Using this feature you can Create Several PNG Images from Windows® or Macintosh® icon files in
one operation. This is what we call a batch procedure. We'll perform this task using the built-in
IconWorkshop™ explorer. Only one image will be extracted from each icon and each time one PNG
file will be created. We recommend you to extract the largest RGB/A image from the icon since
IconWorkshop™ supports creation of PNG images with alpha channel.
Select the Source Icons
1. Open a new Explorer window. Choose File/New/File Explorer...
2. When the window is opened, select the folder which contains the source icon files using the
tree in the left pane.
3. When done, the source icons appears (with preview) in the right pane. Select the icons you
wish to convert to images. You can select Windows® and/or Macintosh® icons. Use
304
Working with Icons
Shift/Ctrl + Mouse to select several icons. Use Ctrl+A to select all. Use +/- to
select/unselect by specifying filters.
Create the PNG images
4. Choose Explorer/Batch Create Images from Icons or Ctrl+Shift+V.
5. The dialog box Batch Create Images From Icons opens (see below). In the Icon Format to
Extract group ( ), choose the image format you wish to extract from the icons. You can
choose only one image format. If this exact format does not exists in an icon, the nearest
format is chosen.
6. In the Image File Format group ( ), select the PNG file format.
7. In the Transparency group ( ), choose if you wish to create transparent or opaque images.
If you choose to preserve transparency, the images will be automatically converted to
32BPP with alpha channel (even if the chosen icon format is 256 or less colors). If you
choose to remove transparency, the images will be generated using 24BPP (no alpha
channel). In such a case, you must specify a background color (to fill the transparent areas
with this color).
We strongly recommend you to use RGB/A (alpha channel transparency) for extraction.
8. When done, click OK. The batch operation starts immediately, the hourglass mouse pointer
is displayed during the creation. When done the new Images are added to the folder
contents.
The created images have the same filename as the original document with PNG
extension appended. A smart system has been added to index the files if necessary to
avoid overwriting. If this exact chosen format does not exists in an icon, the nearest
format is chosen for extraction.
305
Axialis IconWorkshop 6.10
Normalize several icons (batch processing)
The normalization permits to format several icons in order to produce an uniform set. As a result,
after normalization all the icons have the same image formats embedded. This feature is useful if
you plan to distribute your icons.
We'll perform this task using the built-in IconWorkshop™ explorer.
Select the icons to normalize
1. Open a new Explorer window. Choose File/New/File Explorer...
2. When the window is opened, select the folder which contains the icons using the tree in the
left pane.
3. When done, the files appear (with preview) in the right pane. Select the icons files you wish
to normalize. You can use Shift/Ctrl + Mouse to select several files. Use Ctrl+A to select all.
Use +/- to select/unselect by specifying filters.
Normalize the icons
4. Choose Explorer/Batch Normalize Icon Formats in Icons or Ctrl+Shift+N.
5. A dialog box opens. In "Windows® Icons" group, select the formats you want to include in
the Windows® icons ( ). In "Macintosh® Icons" group, select the formats you want to
include in the Macintosh® icons ( ).
For each icon, the normalization rules are:
• The selected formats are created if not present in the icon. In such a case, the largest
and most coloured image format is used as source for the creation. This rule applies
only if the option "Create image format if not present in source icon" is checked ( )
• The unselected formats are removed if present in the icon.
5. In "Write Options" group ( ), choose one of the following options:
306
Working with Icons
• Overwrite source file - The original icon file is replaced by the normalized icon.
• New filename - The normalized icon is created using a new filename (original filename
plus an index number).
• Create new folder - The filenames are identical but created in a new subfolder.
6. When done, click OK. The batch operation starts immediately, the hourglass mouse pointer
is displayed during the creation. When done the normalized icons are created.
Create a new icon project from clipboard
Creating an Icon from the Clipboard Contents is the quickest way to proceed. It permits also to
transfer images from external programs.
If the external program (from where you copied the image) does not support 32Bpp
images with transparent alpha channel, the transparency will be lost.
Creating the Icon from the Clipboard Contents
1. Select New/Icon Project From Clipboard or press Ctrl+Q. The dialog box New Icon Project
opens. Select the type of icon you wish to create: Windows® ( ) or Macintosh® ( ):
2. If you choose Windows® (the procedure is similar for a Macintosh® icon), a second dialog
box opens.
307
Axialis IconWorkshop 6.10
3. In the Name group ( ), enter the icon project name. Do not specify any extension.
4. In the Image Formats group, select the image formats you wish to add in the icon ( ) and
unselect the unwanted images ( ). To know more about the desired Windows® standard
image format, see What is an Icon topic. If you wish to start creating your icon with an
unlisted format, click the Other Image Format button.
5. When done, click OK. The icon is automatically created with the various image formats
you've selected.
Capture an icon
This version of IconWorkshop™ does no longer include the Capture feature as it was implemented
in previous editions. A new function takes a snapshot of the screen and places it in a window. This
will allow you to copy/paste portions of it in your icon.
Capture an icon
1. Choose Draw/Capture icon
2. The screen snapshot has been opened in a document window. You can adjust the image
settings.
3. Select the area you want to import in your icon. The selected area can have any size. It will
be enlarged/reduced as necessary.
4. Use Copy/Paste to import the image in your icon. The image colors will be automatically
adjusted to match the icon format specifications (automatic conversion to 32bpp Alpha
Channel).
308
Working with Icons
Create an icon from this image
You can also create a new icon from the selected portion of the image. The procedure below
explains how to create a Windows® icon but the same feature exists for Macintosh® icons.
5. Before proceeding, we recommend you to select the portion of image you wish to use to
create your icon. If you leave too many transparent areas around your image, the visible
part of your icon will be too small.
6. Select the portion of image: Use the selection tool (upper-left button of the tool palette)
and select the portion of image you wish to use (do not cut the shadow if there is one
around the object). When done, an animated dashed rectangle has been created.
7. When the selection is done, choose Image/Create Windows® Icon from Selection or press "I"
or click the first command button in the local toolbar ( ):
8. The dialog box New Windows® Icon From Image opens (see below). In the Name group ( ),
enter the icon project name. Do not specify any extension.
9. In the Image Formats group, select the image formats you wish to add in the icon ( ) and
unselect the unwanted images ( ). Just click on the image preview to select/unselect. To
know more about the desired Windows® standard image format, see What is an Icon topic.
10. In the Extra Formats group, select the optional image formats you wish to add in the icon.
The new formats 128x128 and 256x256 are expected to work with next version of
Windows® (codename Longhorn). The following table shows the common Windows® image
formats:
309
Axialis IconWorkshop 6.10
11. To get the best results possible, you can also apply a filter when resizing RGB/A images
and a dithering option to the 256/16 color images (try and see the results in the
preview images).
12. If you wish to start creating your icon with an unlisted format, click the Other Image
Format button.
13. When done, click OK. The icon is automatically created with the various image formats
you've selected.
Save an icon image as an external bitmap file
If you work with external programs such as Macromedia® Freehand®, Adobe® Photoshop® or Jasc®
Paint Shop Pro®, you may need to save an icon image to an external file.
Axialis IconWorkshop™ permits you to save an icon image to PSD, PNG, BMP, GIF or JPEG 2000
file formats preserving the transparency areas of the icon. Only one image will be extracted from
the icon. We recommend you to extract the largest RGB/A image from the icon since Axialis
IconWorkshop™ supports creation of PNG images with alpha channel.
Open the icon file in Axialis IconWorkshop™
1. Open your original icon file (from the librarian or using File/Open...).
2. The image file opens in a document window. In the image format list, select the image you
wish to use to create the PNG file. We recommend you to extract the largest RGB/A image
from the icon since Axialis IconWorkshop™ supports creation of PNG images with alpha
channel.
Save the image as an image file
3. Choose File/Export/Image or press Ctrl+Shift+E.
4. A standard Save Image As dialog box opens. In the Save as Type list select the desired image
file format.
5. Choose a destination folder and type a new filename. When done, click OK.
6. If you've chosen JPEG 2000, an option dialog box with preview opens (see below). If you've
chosen GIF, read Convert an icon to a Web-optimized GIF image to learn more about the
options.
310
Working with Icons
7. The image file has been created.
The JPEG 2000 options
JPEG 2000 is the latest generation of compressed image format. It permits to compress images
with low quality loss. Additionally it permits to encode images with alpha channel.
When you save an image in JPEG 2000 format you need to specify the type of compression you
want for this image:
• Lossless compression - This will result in perfect image quality but larger file size (about 3050% of original image).
• Lossy compression - This can be adjusted to create smaller files (high compression means low
quality - see preview).
If you use lossy compression, we recommend you to adjust the compression level using the slider
and compare the difference between the original and the resulting image in the preview window.
Create an Icon Snapshot Picture
A Snapshot is an image created automatically by IconWorkshop™ to show one or several icons
(with embedded formats) on a decorated background. Creating a Snapshot Picture of your icons
may be useful to make a visual archive of your icons, illustrate a website or just promote your work.
Three kinds of snapshots are available:
•
•
•
Detailed snapshot of one icon - The icon image formats are displayed in one raw.
Detailed snapshot of several icons - One icon per raw, several images per icon.
Quick/Thumbnail snapshot of several icons - Only one image per icon, several icons per raw.
Creating a Snapshot of an Opened Icon
When an icon is opened in an editor window, you can create a snapshot of the work in progress.
1. From the opened icon window, Choose Edit/Create Snapshot or Ctrl+Shift+P
2. A dialog box Create Icon Snapshot opens. Adjust the various options then click OK.
3. The Snapshot image (see sample below) is created in a new window. Now you can save,
copy, print this image as necessary.
311
Axialis IconWorkshop 6.10
Creating a Detailed Snapshot of Several Icons
You can create a snapshot of several icons from within an opened Icon Library (ICL), Program File
(EXE, DLL, OCX...), a Search Result window or from the built-in Explorer.
1. Select several icons from a list (only icons within libraries or Macintosh®/Windows® files).
Choose Edit/Create Snapshot or Ctrl+Shift+P
2. A dialog box opens, select Detailed Snapshot then click OK.
3. A dialog box Create Icon Snapshot opens. Adjust the various options then click OK.
4. The Snapshot image is created in a new window. Now you can save, copy, print this image
as necessary.
Creating a Quick Thumbnail Snapshot of Several Icons
You can create a snapshot of several icons from within an opened Icon Library (ICL), Program File
(EXE, DLL, OCX...), a Search Result window or from the built-in Explorer.
1. Select several icons from a list (only icons within libraries or Macintosh®/Windows® files).
Choose Edit/Create Snapshot or Ctrl+Shift+P
2. A dialog box opens, select Quick Thumbnail Snapshot then click OK.
3. A dialog box Create Icon Snapshot opens. Adjust the various options then click OK.
4. The Snapshot image (see sample below) is created in a new window. Now you can save,
copy, print this image as necessary.
312
8
Working with Icon Libraries
What is an Icon Library?
An Icon Library is a file containing several icons stored in Windows® format. The default file
extension for icon libraries is ICL. We recommend you to use this format to manage your icon sets.
It permits faster access and hard disk space gain. Features in Axialis IconWorkshop™ permit you to
easily use ICL files in the librarian.
System Compatibility
ICL files are compatible with Microsoft® Windows® systems only. This file format is not compatible
with Macintosh®.
File structure
The ICL file type uses the Windows® executable DLL format structure. Windows® DLL are
executable portions which are detached from the main program and stored in files on disk. They are
loaded and launched by the main program but they're not self-executable.
As all Windows® program files, DLL files contains 2 parts: A code portion which contains the
algorithms to run, and a resource portion which contains the data used by the programs (icons,
images, dialogs, texts...). In ICL files, the code portion is empty. Only the resource portion has data
which is exclusively composed of icons.
ICL files exist in 16-bit and 32-bit versions. Axialis IconWorkshop™ generates ICL files in 32-bit
format.
Create a new icon library
Axialis IconWorkshop™ permits to create new icon libraries from scratch.
Create a new icon library
1. Choose File/New/Icon Library or press Ctrl+L.
313
Axialis IconWorkshop 6.10
A new Icon Library window opens. Its contents is empty. Now you can add/remove icons to
this library. You can save this icon library as an ICL file. See topic Open a library as a separate
document to read more about options in the document window.
Open a library as a separate document
Axialis IconWorkshop™ allows you to open a library in a separate document window. This operation
is very useful when moving or copying icons from one library to another to keep them visible on
screen. You can also import into and export from a document.
Open an icon library
1. Choose File/Open, a standard dialog box opens. Browse your disks and select an ICL file.
Click Open.
2. A document window opens containing the icon library. The window title bar contains the
name of the file ( ).
3. All the icons contained in the library are displayed in the window list ( ). This list is
organized vertically (next icon is below).
4. Although ICL is a Windows® file format, Axialis IconWorkshop™ has the ability to distinguish
the original type of each icon embedded in the library. If the icon file type was initially ICO
( ), no sign is added near the icon. If the file was ICNS, RSC or BIN ( ), a small Macintosh®
sign is added ( ). This ability to distinguish icons is useful for future extraction and edition
of icons (image and file formats are different).
5. Some features permit to import, export, compile, edit, rename, sort, delete icons ( ).
6. You can change the way icons are displayed using different options ( ).
314
Working With Icon Libraries
Other ways to open an icon library
1. In the Recently Used edit zone (below the main toolbar), enter the full pathname of the ICL
file, then hit Enter.
or
1. Open a new Explorer window. Choose File/New/File Explorer...
2. When the window is opened, browse to the folder containing the ICL file.
3. Select the file, then hit Enter or double-click on it.
or
1. In the Librarian, select an icon library in the tree, then hit Enter or double-click on it.
Change the icon display
Icons contain different image formats (size and color). Therefore a system has been implemented
to let you display icons in different formats.
1. To display different image sizes, select Icon Library/Display icons/16x16, 32x32 or 48x48.
These commands are also available in the toolbar (see above ). The list updates displaying
different formats. If a format is not present in an icon, the nearest format is displayed.
2. If you want to display all the formats included in each icon, choose Icon Library/Display
icons/All Formats In Raw
3. To display different image color formats, select Icon Library/Display icons/Mono, 16 colors,
256 colors or True Color. These commands are also available in the toolbar (see above ).
4. You can also choose to display or not information below the icons Icon Library/Display
icons/Icon Information.
Edit an icon in a library
Once a library is opened in a document window, you can edit any icon included in it. You can edit
icons and add/remove formats without restriction. When done, the icon will be updated in the
library.
Open and edit the icon
1. First, open the icon library. Once the icon library is opened in a document window, doubleclick on the icon you wish to modify or hit Enter ( ).
315
Axialis IconWorkshop 6.10
2. A window opens with the selected icon ready for modification. The title of the window is
something similar to this: IconName - Icon (embedded in "LibraryName")
3. You can edit the icon like any independent icon file. See Editing Icons to learn more about
icon edition.
Update icon in the library
4. Once the icon has been modified, you need to save your work. As the icon is not linked to an
icon file, you'll update it into the icon library. Click on the "floppy" icon in the toolbar or
select File/Save. The operation is done in memory and the file is updated in the library.
5. You can close the icon edition window. The work has been saved in the library but not on
disk. Now you need to save the Icon Library to make the changes permanent.
Save the library
6. Be sure to activate the icon library window. Click on the "floppy" icon in the toolbar or select
File/Save.
7. The ICL file is updated on disk.
Open an icon as a new icon from the library
This feature is useful if you want to use an icon contained in a library as a template to create a new
icon.
Open the icon as a new document
1. First, open the icon library. Once the icon library is opened in a document window, select on
the icon you wish to use as template ( ).
316
Working With Icon Libraries
2. Choose Icon Library/Open As New Icon or press Ctrl+Enter.
3. A new window opens with the selected icon ready for modification. The link between this
icon and the library does not exist anymore. Therefore, if you select File/Save, you'll be
prompted to choose a new name for the icon file. It just work like a newly created icon.
Import icons into the library
The fastest way to build an icon library is to import your icons directly in it. Several features
permits to do this.
Import icons in a library
1. Create a new icon library or open an existing one.
2. Once the library is opened in a window, choose Icon Library/Import Icons or press Ins.
3. A standard dialog box opens, select the files you wish to import. You can select several files.
The following file types are supported:
•
•
•
•
Windows® icons (ICO)
Macintosh® icons (ICNS, RSC, BIN)
Icon libraries (ICL)
Windows® executables (EXE, DLL, OCX...)
4. When done, click Open. The icons are imported in the icon library. If a file contains several
icons, all the icons included in the file are imported. When finished, all the new icons are
added and selected in the library.
Although ICL is a Windows® file format, Axialils IconWorkshop™ has the ability to
distinguish the original type of each icon embedded in the library. If the icon file type
was initially ICO, no sign is added near the icon. If the file was ICNS, RSC or BIN, a small
Macintosh® sign is added ( ). This ability to distinguish icons is useful for future
extraction and edition of icons (image and file formats are different).
317
Axialis IconWorkshop 6.10
Import icons from the Axialis Explorer window
1. Create a new icon library or open an existing one.
2. Open a new Explorer window. Choose File/New/File Explorer... When the window is opened,
select the folder which contains the icon files using the tree in the left pane. The same file
types as above are supported.
3. Arrange the windows to get them visible side-by-side in the application
4. Using a mouse drag & drop, copy the icon files from the Axialis Explorer window to the icon
library window.
5. The icons are imported in the icon library. If a file contains several icons, all the icons
included in the file are imported. When finished, all the new icons are added and selected in
the library.
Import a selection of icons from another icon library
1. Create a new icon library or open an existing one (1st icon library).
2. Open another icon library containing the icons you want to import (2nd icon library).
3. Arrange the windows to get them visible side-by-side in the application
4. Select the icons you want to import in the 2nd icon library (you can use Shift key to select
several icons).
5. Using a mouse drag & drop and pressing the Ctrl key, copy the icon files from the 2nd
library into the 1st icon library window.
Press and keep pressed the Ctrl key during the drag & drop operation to copy the
icons. Otherwise, they'll be moved into the 1st library (deleted from the 2nd library)
6. The icons are imported in the icon library.
Export icons from a library
Once a library has been built, you'll probably need to export icons embedded in it to create
individual icon files or partial libraries. Several methods are available to perform exports.
Export icons as individual icon files (ICO, ICNS...)
1. Open the icon library containing the icons you wish to export.
2. Once the library is opened in a window, select the icons you wish to export (you can use
Shift key to select several icons).
3. Choose Icon Library/Export as Windows® icon or Icon Library/Export as Macintosh® icon.
318
Working With Icon Libraries
Conversion between Windows® and Macintosh® will be done automatically during
this operation if necessary
4. If only one icon is selected: a save-as-like standard dialog box opens. Choose the
destination folder and specify the filename. Click Save button when done. One file is
created.
or
5. If several icons are selected: a folder-browser standard dialog box opens. Choose the
destination folder. Click Save button when done. Several files are created.
Export icons as library file or DLL
1. Open the icon library containing the icons you wish to export.
2. Once the library is opened in a window, select the icons you wish to export (you can use
Shift key to select several icons).
3. Choose Icon Library/Export as ICL or DLL.
4. A save-as-like standard dialog box opens. Choose either ICL or DLL as file type. Choose the
destination folder and specify the filename. Click Save button when done. One file is
created with all the icons embedded.
If you create a DLL using IconWorkshop™ the file will be a 16-bit executable. As a result
you won't be able to load it programmatically in an external 32-bit project. An option to
save as 32-bits DLL will be implemented very shortly in IconWorkshop™.
Delete icons in a library
Delete icons in a library
1. Open the icon library containing the icons you wish to delete.
2. Once the library is opened in a window, select the icons you wish to delete (you can use
Shift key to select several icons).
3. Choose Icon Library/Delete or press Del.
4. A dialog box Delete Icons opens. It asks you if you really want to permanently delete the
selected icons from the current library.
This action can't be undone. If you choose "Yes", the icons will be lost forever. Choose
'No' to stop and go back.
319
Axialis IconWorkshop 6.10
Rename icons in alibrary
Rename icons in a library
1. Open the icon library containing the icons you wish to rename.
2. Once the library is opened in a window, select the icons you wish to rename (you can use
Shift key to select several icons).
3. Choose Icon Library/Rename or press F6.
4. A dialog box Rename icons opens. Enter a New Name for the selected icons.
If you rename more icons, they are automatically indexed. For example, "computer" will
be indexed by "computer 1", "computer 2", ... "computer n".
5. If the option Add 'zero' characters in indexes (001, 002 ...) is checked, 'zero' characters will
be added in the names. For example, 27 items with new name Image will be renamed
Image01, Image02 ... Image27.
Sort item by name
Sort icons by name in a library
1. Open the icon library containing the icons you wish to sort.
2. Once the library is opened in a window, select the icons you wish to sort (you can use Shift
key to select several icons). If you want to sort all the icons select them all (or just select
one icon).
3. Choose Icon Library/Sort by name.
4. The icons are sorted using their names (in the selection only).
If you select only one icon in the library, Axialis IconWorkshop™ warns you that there is
only one icon selected and propose you to sort all the icons
Change icon order using drag a drop
1. Once the icons are selected, use mouse drag & drop to move them within the library.
If you press the Ctrl key while using drag & drop, the icons are duplicated.
320
Working With Icon Libraries
Create a snapshot picture of icons in a library
A Snapshot is an image created automatically by IconWorkshop™ to show one or several icons
(with embedded formats) on a decorated background. Creating a Snapshot Picture of your icons
may be useful to make a visual archive of your icons, illustrate a website or just promote your work.
Two kinds of snapshots are available for libraries:
•
•
Detailed snapshot of icons - One icon per raw, several images per icon.
Quick/Thumbnail snapshot of icons - Only one image per icon, several icons per raw.
Creating a Detailed Snapshot of Several Icons
1. Select several icons from the list of icons. Choose Edit/Create Snapshot or Ctrl+Shift+P
2. A dialog box opens, select Detailed Snapshot then click OK.
3. A dialog box Create Icon Snapshot opens. Adjust the various options then click OK.
4. The Snapshot image (see sample below) is created in a new window. Now you can save,
copy, print this image as necessary.
Creating a Quick Thumbnail Snapshot of Several Icons
1. Select several icons from the list of icons. Choose Edit/Create Snapshot or Ctrl+Shift+P
2. A dialog box opens, select Quick Thumbnail Snapshot then click OK.
321
Axialis IconWorkshop 6.10
3. A dialog box Create Icon Snapshot opens. Adjust the various options then click OK.
4. The Snapshot image (see sample below) is created in a new window. Now you can save,
copy, print this image as necessary.
322
9
Compiling and Distributing
Icon Libraries
Specify a filename and location
You are about to create an installable icon library. This is the most convenient and use-friendly way
to distribute your icons. The ICL Icon library will be compressed, then included in an install program.
The resulting package will be smaller than the original ICL. This is perfect to distribute your icons on
the Web page for example.
Specify a filename and location
1. Activate the Icon library window document.
2. Choose Icon Library/Compile as EXE installable Package or Right click and choose Compile as
EXE installable Package
3. In the Filename area, specify the name of the install procedure executable file (usually
Install.exe. You don't need to specify an extension here (.EXE by default).
4. In the Location area, specify the location where you want to create the installation package.
If you specify a new folder, it will be created. You must type a folder full pathname here.
Add a description to a compiled file
You can customize your screen saver by specifying a Title, a Copyright, a Web and a Comment. This
information will be displayed in the Configure dialog box of the screen saver.
Add a description to a compiled file
1. Click on the NEXT button in the Compile an Installable Icon Library- Step 1 of 6 dialog box.
2. In the Filename area, specify the final filename of the Icon Library (The name of the ICL file
created after the installation). Now, you can personalize your Icon Library below. This
information will be displayed in About and installation Screens.
323
Axialis IconWorkshop 6.10
3. In the Title area, specify the Title that will be displayed in large Font at the top of the Install
window.
4. In the Copyright area, specify a Copyright that will be displayed (in medium bold font) under
the title at the top of the install window
5. In the Author area, specify the Author name. Usually, the person name who created icons.
6. In the Web Site area, specify the Web Address of your personal page or company site (for
example: http://www.axialis.com).
7. In the About box Comment area, specify a Comment associated with the icon library. This
comment will be displayed in the About box of the install procedure. (1024 characters
max).
Add an information text
You can specify an Information text that will be displayed during the installation. Using this text,
you can fully describe your icon library contents and/or provide info about you or your
organization.
Add an information text
1. Click on the NEXT button in the Compile an Installable Icon Library- Step 2 of 6 dialog box.
2. If you check Display an Information Text, you'll display an Information Text in the install
procedure. This will be a kind of "Read Me" text that will be displayed in a window titled
"Important Information". You can type the text in the area, use copy/paste from an external
editor or use the "Load" button (see below) to read a text from an external file.
3. If you click the Load button, you can select an external text file to load using a standard
Windows® browse dialog box.
4. If you click on the Save button, you save the actual text to an external text file using a
standard Windows® browse dialog box.
Add a User License Agreement
You can specify a User License Agreement text that will be displayed before the installation starts.
The use must agree with this agreement to proceed.
Add a User License Agreement
1. Click on the NEXT button in the Compile an Installable Icon Library- Step 3 of 6 dialog box.
2. If you check Add a User License Agreement, you'll display a User Agreement Text in the
install procedure. The user will have to agree the terms of this user agreement before
324
Compiling and Distributing Icon Libraries
proceeding with the install procedure. You can type the text, use copy/paste from an
external editor or use the "Load" button (see below) to read a text from an external file.
4. If you click the Load button, you can select an external text file to load using a standard
Windows® browse dialog box.
5. If you click on the Save button, you save the actual text to an external text file using a
standard Windows® browse dialog box.
6. If you click on Load Default button, it will reset the User Agreement to a standard text
(proposed by default by Axialis IconWorkshop™).
Use an Activation Code
Using this feature, you'll be able to force the user to enter an Activation Code to Install the Icon
library. The Codes will be generated using the two following ID numbers.
Use an Activation Code
1. Click on the NEXT button in the Compile an Installable Icon Library- Step 4 of 6 dialog box.
2. If you check Use an Activation Code, you'll force the user to enter an Activation Code during
the install procedure. If you do so, the user will have to enter a valid Activation Code
(provided by you and that you can generate with this program) to proceed with the
installation. You'll be able to Generate Activation Codes using a built-in feature after the
compilation (Alt+F6).
3. In the Icon Library ID area, specify the Library ID (an 8 digit hexadecimal number - 32 bits)
that will be used to generate the Activation Codes. Two IDs are used to generate the
codes: The Library ID (which is different for each library you compiled) and the Company ID
(which is constant but differs for another company).
4. In the Company/Author ID area, specify the Company ID (an 8 digit hexadecimal number 32 bits) that will be used to generate the Activation Codes. Two IDs are used to generate
the codes: The Library ID (which is different for each library you compiled) and the
Company ID (which is constant but differs for another company).
Each digit in a hexadecimal number is coded from 0 to 9 and A to F (A=10 ... F=15). This
is a typical computer notation. The number here is just a proposal based on several Icon
Library properties. You can freely modify and customize it. If you customize this
number, do not enter a 'simplistic' one. Don't forget to place this number in a sure place.
You'll need it to generate the Activations Codes later (using the built-in feature, after
the compilation - Alt+F6).
5. If you check Code based on User Name, you wish the install procedure to require an
Activation Code based on the User Name. This option is more secure but forces you to
generate one Code per user (see below). If you don't activate this option, the install
procedure will use a standard numerical Activation Code.
325
Axialis IconWorkshop 6.10
More information on Activation Codes
Two kinds of Activation Codes have been implemented in Axialis IconWorkshop™:
•
•
Based on the user name: The user has to enter its name and the activation code using this
format: 1234-1234-1234-1234 (4 groups of 4 digits).
• Pro: The user have to provide his name if he wants to publish the code.
• Con: The author has to manually generate a code for each user.
NOT based on the user name: The user just enters a longer activation code using this format:
123456-1234-1234-1234-1234
• Pro: The author can automatically generate a list of codes.
• Con: The user can anonymously publish his code.
You'll be able to Generate Activation Codes using a built-in feature after the compilation
(Alt+F6).
Compile
You are about to compile your icon library file.
Compile
1. Click on the NEXT button in the Compile an Installable Icon Library- Step 5 of 6 dialog box.
2. The application displays the Compilation Summary.
3. Click on the More Info About Copyright button and read this text carefully.
4. Click on the Go and Compile button. Axialis IconWorkshop™ is compiling your Icon Library.
Creating Icon Library, Compressing Data, Creating EXE Installation Package and Verifying
Package files.
5. The application displays Compilation Successfully Completed if no error occurred during
compilation. Otherwise, errors can be displayed in the dialog box.
6. You can Test the Installation Package Now if you click on it.
Generate Activation Codes
With this feature, you can generate Activation Codes for previously compiled Icon Libraries. To
create serial codes, you need the Company ID and Library ID you used during the compilation.
You can generate tow kinds of Activation Codes: Based on User Name (one code generated for
each user) or in serial (a list of codes ban be generated).
326
Compiling and Distributing Icon Libraries
Company and Library IDs
1. In the Library ID area, specify the Library ID (an 8 digit hexadecimal number - 32 bits) that
will be used to generate the Activation Codes. Two Ids are used to generate the codes: The
Library ID (which is different for each library you compiled) and the Company ID (which is
constant but differs for another company). You must specify the same number you
specified when you compiled the Icon Library.
2. In the Company ID area, specify the Company ID (an 8 digit hexadecimal number - 32 bits)
that will be used to generate the Activation Codes. Two Ids are used to generate the codes:
The Library ID (which is different for each library you compiled) and the Company ID (which
is constant but differs for another company). You must specify the same number you
specified when you compiled the Icon Library.
3. Click the Get IDs from history file button if you can't recall the Library ID and/or the
Company ID you used when you compiled the Icon Library. This will open a window and
display a history list of the compilations you made.
Each digit in a hexadecimal number is coded from 0 to 9 and A to F (A=10 ... F=15). This
is a typical computer notation. If you can't recall the Library ID or company ID you
specified at compilation, click the button on right side of this edit zone to choose this it
in a history list.
Generate an Activation Code based on a User Name
If you choose an Activation Code based on the User Name during Compilation, specify the name of
the User and Click the Generate button.
1. In the User Name area, specify the name of the user for who you want to generate an
Activation Code. This name must have at least 6 letters. The activation code will be
displayed in the edit zone on right and copied in the clipboard as in this example:
Your User Name
: John Smith
Your Activation Code : 1527-9872-0984-6717
2. Click the Generate Button. It will generate an Activation Code based on the User Name you
specified on left. The activation code will be displayed in the edit zone on right and copied in
the clipboard.
3. In the Code area displays the resulting Activation Code (based on the user name specified
on left).
You don't need to copy this code in the clipboard. A special string has already been
created and copied in the clipboard when you clicked on the "Generate" button
Generate a List of Activation Codes in Serial
If you don't choose a Username based Activation Code, you can specify a range of code generation
then click generate to save result in a text file.
327
Axialis IconWorkshop 6.10
1. In the From Number and To Number areas, specify the range of Activation Codes you wish
to generate.
Using this feature you can automatically generate a list of activation codes. These codes
will not be based on the Username. They will be indexed using a 6 digit number (thus,
codes can be generated from 000001 to 999999). In these 2 fields, you can specify
the lower and the upper bounds. When done, click on the button placed on right to
create a list of codes and save it in a text file.
2. Click on the Generate file button, it will generate a list of codes and save it in a text file.
Don't forget to specify the generation range (fields on left) before proceeding.
More information on Activation Codes
Two kinds of Activation Codes have been implemented in Aixialis IconWorkshop™:
• Based on the user name: The user has to enter its name and the activation code using this
format: 1234-1234-1234-1234 (4 groups of 4 digits).
• Pro: The user have to provide his name if he wants to publish the code.
• Con: The author has to manually generate a code for each user.
• NOT based on the user name: The user just enters a longer activation code using this format:
123456-1234-1234-1234-1234
• Pro: The author can automatically generate a list of codes.
• Con: The user can anonymously publish his code.
328
10
Working With the
Axialis Librarian
What is the Librarian?
The application contains a powerful built-in Librarian that permits you to efficiently manage your
icon libraries as well as your icon project files. The Librarian is a docked window (integrated in the
user-interface).
In the figure below, the librarian is located on the left side of the application. Using the upper part
of the librarian window, you can browse the folders included in it ( ). The files included in this
folder are displayed below ( ).
Using this Librarian you can organize your files like a file explorer. However, the librarian shows only
media and working files (images, icons, libraries...). One of the most useful feature is the ability to
use mouse Drag & Drops to add files to your projects. For example, in the figure below, we add the
Ok.jp2 ( ) image from the Librarian to the opened project using drag & drop ( ):
329
Axialis IconWorkshop 6.10
Files and folders included in the Librarian are located on your disk drive. This location is set by
default (the first time you installed the application) in your "My Documents" folder. A sub-folder is
created and is named "Axialis Librarian". You can change this folder and location (see below).
Change the Librarian folder location
1. Select View/Preferences or press F2.
2. A dialog box opens. Select the Librarian tab. You can change the Librarian folder in the Path
field. You can also use the Browse button to choose a location using a browse dialog box.
3. Click OK when done.
4. Now quit the application and transfer your files from the old location to the new one (the
application does not perform this operation).
5. Restart the application.
Show/hide the Librarian
1. Select View/Librarian or press ESC.
2. By hiding the Librarian, you gain some space in your application work area. The opened
windows are automatically rearranged.
Change the Librarian position on screen
1. Using the left mouse button, click on the Librarian window title and keep the button
pressed.
2. Move the mouse over the right or bottom side of the application window and release the
button.
3. The Librarian window location has changed. This new location will be saved (even if you quit
and restart the application).
Show and hide the Librarian Window
The Librarian is a docked window (integrated in the user-interface). It can be easily shown and
hidden.
Show/hide the Librarian
1. Select View/Librarian or press ESC.
2. By hiding the Librarian, you gain some space in your application work area. The opened
windows are automatically rearranged.
330
Working With The Axialis Librarian
Change the Librarian position on screen
The Librarian is a docked window (integrated in the user-interface). Its location can be easily
changed.
Change the Librarian position on screen
1. Using the left mouse button, click on the Librarian window title and keep the button
pressed.
2. Move the mouse over the right or bottom side of the application window and release the
button.
3. The Librarian window location has changed. This new location will be saved (even if you quit
and restart the application).
Change the Librarian folder location
Files and folders included in the Librarian are located on your disk drive. This location is set by
default (the first time you installed the application) in your "My Documents" folder. A sub-folder is
created and is named "Axialis Librarian". You can change this folder and location (see below).
Change the Librarian folder location
1. Select View/Preferences or press F2.
2. A dialog box opens. Select the Librarian tab. You can change the Librarian folder in the Path
field. You can also use the Browse button to choose a location using a browse dialog box.
3. Click OK when done.
4. Now quit the application and transfer your files from the old location to the new one (the
application does not perform this operation).
5. Restart the application.
Open an item in the librarian
1. Go to the librarian.
2. Select the folder or item.
3. Choose Librarian/Open item.
331
Axialis IconWorkshop 6.10
If you have chosen a folder, its contents are displayed. If you have chosen a media file
(Animation, Image, Sound, Video...) or a Screen Saver projects (SSP), the file will be
displayed in a document window.
Open an item full screen
Open an item full screen
1. Go to the librarian.
2. Select the icon image.
3. Choose Librarian/Open item Full screen.
The icon project files (ICO, ICNS, RSC, BIN, ICL) cannot be displayed full screen
Toggle the auto full screen option
1. Activate the command Librarian/Auto Full Screen.
When you open an item, it will be automatically displayed in full screen window.
Edit an image with an external editor program
1. Select an item.
2. Choose Librarian/Open Item With...
3. A list of image-editing programs installed on your computer is displayed. Choose the
program you wish to use. It is automatically launched, the image is ready to be modified in
the external application.
The following programs are detected by Axialis IconWorkshop™:
• Adobe Photoshop®
• Microsoft® Expression® Design
• Corel® Paint Shop Pro®
• The GIMP
332
Working With The Axialis Librarian
Create a new folder
Go to the Parent Folder
1. Go to the librarian.
2. Select the folder where you wish create a new folder.
3. Choose Librarian/New Folder, type the name of the folder and hit Enter.
Go to the Parent Folder
1. Choose Librarian/Parent Folder.
This command permits you to return to the parent folder.
Change a folder icon
1. Select a folder in the librarian
2. Click right and choose the option "Change icon".
3. The dialog box "Change Folder icon" opens.
4. In the area Icon file, enter the filename (.ICO, .ICL .EXE, ou .DLL) or click the button Browser.
The icons list displays. Select the new icon.
The new icon will be displayed in the Explorer Windows.
Import files
1. Select the folder where you're going to import the files.
2. Choose Librarian/Import.
3. Select the file type from the File Type Drop Down box.
•
•
•
•
Icons files (ICO, ICNS, RSC, BIN).
Icon Library files (ICL).
Images files (BMP, PNG, JP2, JPEG, PSD, GIF...),
Cursor files (CUR, ANI, ACL).
4. Click on the file that you want to select in the Contents List box and click on the Open
button. The imported files will be automatically placed in the librarian.
333
Axialis IconWorkshop 6.10
Export files
1. Select one or several items to export.
2. Choose Librarian/Export. The dialog box "Browse folder" opens.
3. Choose the destination folder for the selected item.
Select items
Select all items in the folder
1. Select the Folder in the librarian.
2. Choose Librarian/Select Files.
3. You can choose one of these options:
• Select (Num+): You can add file type to the selection. The dialog box "Expand
Selection" opens. Specify file type to add to the selection . For example *.JPG. If you
select the "Replace the current selection" check box, the application unselects all files
already selected and select files with the current selection.
• Unselect (Num -): You can remove file type from the selection. The dialog box "Shrink
Selection" opens. Specify file type to remove from the current selection. For example
"*.JPEG". The application unselects all files already selected.
• Select all (Ctrl Num +): You select all the items in the selected folder.
• Unselect all (Ctrl Num -): You clear all the items in the selected folder.
• Invert selection (Num *): You invert the selection in the selected folder.
Select all items in the folder
1. Choose Librarian/Select all items.
Rename one or more items
1. Select one or more items.
2. Choose Librarian/Rename.
3. If you have selected one item, enter in the edit zone, the new name of the item.
4. If you have selected several icons, the dialog box "Rename several media items" opens.
5. Enter the name of the item. The items will be automatically indexed. For example, "Image"
will rename "Image1", "Image2",..."ImageN".
6. If you select the "Add zero characters in index" check box, the items will be indexed
differently. For example, "Image" will rename "Image001", "Image002" ... "Image00n".
334
Working With The Axialis Librarian
Search items
1. Choose Librarian/Search.
2. The dialog box "Search Media Files in the Librarian" opens.
3. In the Type area, choose the type of Items to find (All types, Images, Icons, Cursors...)
4. In the Name area, enter a search criterion for the item's filename (blank=no search on
name). Wildcards are needed to perform multi-files search. For example, to get all the PNG
files with "B" as the first letter, enter "b*.PNG".
5. In the Author area, enter a search criterion for the item's author (blank=no search on
author). Do not use wildcards. For example, to find the files made by John Smith, you can
just enter "smith".
6. In the Keyword area, enter a search criterion for the item's keywords (blank=no search on
keywords). Do not use wildcards. For example, to find the files that have the 'ball' keyword,
just enter "ball". Enter the Name, the Author, the Keyword and the Description of the item.
7. In the Description area, enter a search criterion for the item's description (blank=no search
on description). Do not use wildcards. For example, to find the files that contain the word
'rock' in the description, just enter "rock".
The "Name" is the name of file, "Author", "Keyword" and "Description" are fields that you
can enter in the dialog box Librarian/Properties/Description. You can specify only one
criteria per field. Blank fields will be ignored. Search is not case sensitive
8. Each time you launch the "Search" command, the application will create a "Found Media
Files" document window.
9. You can work in each "Found Media Files" document window.
Delete items
1. Select items from the librarian.
2. Choose Edit/Delete.
3. An information dialog box prompts you. Click OK.
The selected files or folders are moved to the "Deleted Items" special folder. You can
restore them back to their original locations at any time (see Restore previously deleted
items) or you can also permanently deleted them (see Empty the Deleted Items folder)
335
Axialis IconWorkshop 6.10
Restore previously deleted items in the Librarian
1. Go to the folder "Deleted items" from the librarian.
2. Select one or more items.
3. Right click and choose Restore or Double click or Return on the item(s).
4. The dialog box "Restore deleted items" opens. You can restore the selected items back to
their original locations. Click YES.
Empty the Deleted Items folder
1. Right click and choose Empty Folder.
2. The dialog box Empty folder "Deleted items" opens.
3. If you are sure to permanently delete all the items, click YES.
You will not be able to UNDO this operation.
Preview items in the librarian explorer
1. Select one or more items in the librarian.
2. Activate Librarian/Preview.
3. The item is displayed in the thumbnail.
The option Preview is only available if you activate the command
Librarian/Display/Large icons. Only pictures can be previewed in thumbnails
Send media items via email
1. Select one or more items.
2. Choose Librarian/Send as email.
3. The dialog box "Send Media Items" opens.
4. In the To, specifies the list of recipients. You can specify several recipients by separating
email addresses with a semicolon (;) or click to select the recipients directly from your
Address Book. This feature is implemented only if you use Microsoft Outlook® address book
5. In the Subject area, enter description for the selected items attached as an Internet email.
336
Working With The Axialis Librarian
6. In the Message area, enter a message for the selected items attached as an Internet email.
7. Click on the Send button
Change the item display
Change display
1. Choose Librarian/Display and click on Large icons, Small icons, Lists or Details.
2. You can also sort the items by Name, Size, Date, Size, Ascending or Descending.
3. You can activate the command Librarian/Display/Auto Preview. This option will allow you to
display an image preview for all items but it is CPU time consuming. If you have not
selected this option, you'll have to manually preview each selected item by selecting the
command Librarian/Preview.
• If you choose Large icons, all items will be displayed by using large icons with preview,
Filename, File Size, Dimensions and File format.
• If you choose Small icons, all items will be displayed by using small icons without
preview but with the filename.
• If you choose List, all items will be displayed in a list.
• If you choose Details, the application displays information about each item in the
window.
Display a grid in the detailed list
If you have chosen the option "Librarian/Display/Details", you can show grid in report view.
1. Choose Librarian/Show Grid to toggle the option.
Show info tooltips
For each item, you can display an information tooltip.
1. Choose the option Librarian/Show Info Tooltips to toggle this feature. When you pass over
an item, a tooltips displays. You can read the Filename, The File Type, Size/Colors, Date,
Time and Size.
Show folders
This option permits to show all folder items in the list.
1. Choose Librarian/Show Folders.
337
Axialis IconWorkshop 6.10
Display the item properties
Display item properties
1. Select one or more items.
2. Choose Librarian/Properties.
3. The dialog box "Items Properties" opens.
4. In ITEM PROPERTIES tab, you can read the next information (Filename, Location, Last
Modification, File Size, Format, Size/Colors, Memory used)
5. In EXTENDED INFORMATION tab, you can enter the Name, Author and Keywords in their
areas.
6. In DESCRIPTION tab, you can enter the Description of the file in its area.
7. In PREVIEW tab, you can visualize an image preview.
These keywords "Filename, Author, Keywords and Description" will be used later to easily retrieve
the item using the Find feature. You can select several items, open the "Properties" dialog box and
specify the same keywords to all of them in one operation. Please insert a comma between
keywords.
If you select more items, the ITEM PROPERTIES tab has been replaced by the SELECTION tab. You
can read the item total number and the total size of the selected files. For Example:
» Items: 4 Items
» Total Size: 121.44 Kb (124 353 bytes)
If you select folders, the Librarian/Properties command opens the standard Windows® Properties
dialog box.
Print the actual folder
1. Choose Librarian/Print
2. In the group Selection, you can select Print all items or Print Selected items in the librarian,
Explorer or search result window.
3. In the group Items size, choose the options:
•
•
•
•
Very Small (0.8 in.)
Small (1.6 in.)
Medium (2.4 in.)
Large (3.2 in.)
4. In the group Header and Footer, check the "Print Header & Footer Text" box. The Print
Header and Footer text option allows to specify macros that will be automatically replaced
338
Working With The Axialis Librarian
by its related variable text at printing. A macro must be specified between brackets {}. Fill
the different areas "Header and Footer" by using macros and/or static text
•
•
•
•
{PATHNAME}: Your username
{DATE}: Actual print date
{TIME}: Actual print time
{PAGE}: Page Number
Create a new icon library
If you plan to deal with a large number of icons, we strongly recommend you to create Icon
Libraries to save them. Before proceeding we strongly recommend you to read this topic: What is
an Icon Library?
You can assemble an unlimited number of icons in an Icon Library. The extension for a standard Icon
Library is ICL. Axialis IconWorkshop™ fully support ICL files. It can create, read and save ICL library
files. Also, ICL file format is fully supported by all versions of Windows®. For example, you can
customize a Windows® shortcut by selecting a new icon in an ICL file.
Axialis IconWorkshop™ has a powerful feature to support ICL files in its built-in Librarian that
permits you to consider ICL files as folders.
Create a new icon library in the librarian
1. To create an Icon Library in the librarian, you must be sure the librarian is visible. If the
librarian window is not visible, check the Librarian button in the main toolbar or press ESC.
2. To create the Icon Library, first select the folder where you want to create it.
3. Choose Librarian/New Icon Library or right-click on the current folder in the tree and
choose New Icon Library in the menu or press Ins.
4. A new entry is inserted in the tree, type the name of the new library ( ) then hit Enter.
5. The new Icon Library is now created. Its contents (empty for now) is displayed in the area
below. Now you can add icons to this library.
Delete an icon library
1. In the Librarian, select the icon library you wish to delete in the tree.
2. Choose Edit/Delete.
3. An information dialog box prompts you. Click OK.
339
Axialis IconWorkshop 6.10
The icon library is moved to the "Deleted Items" special folder. You can restore it back
to its original location at any time (see Restore previously deleted items) or you can also
permanently deleted them (see Empty the Deleted Items folder)
Add icons into an icon library
In the Librarian, you can add icons in an icon library using different methods.
Adding icons using the Import function
1. Select the icon library in which you want to add icons.
2. Choose Librarian/Import.
3. Select the file type from the File Type Drop Down box.
•
•
•
•
Icons files (ICO, ICNS, RSC, BIN).
Icon Library files (ICL).
Images files (BMP, PNG, JP2, JPEG, PSD, GIF...),
Cursor files (CUR, ANI, ACL).
4. Select the icon files you want to add in the icon library and click Open. The icons have been
imported to the Icon Library.
Although ICL is a Windows® file format, Axialis IconWorkshop™ has the ability to
distinguish the original type of each icon embedded in the library. If the icon file type
was initially ICO, no sign is added near the icon. If the file was ICNS, RSC or BIN, a small
Macintosh® sign is added ( ). This ability to distinguish icons is useful for future
extraction and edition of icons (image and file formats are different).
Adding icons using Drag & Drop from within the Librarian
1. Be sure the librarian is visible. Also, be sure the target icon library is visible in the tree. Make
it visible if necessary.
2. Select a folder that contains icons and select the icons you want to add into the library.
3. Now, using the mouse, Drag & Drop the icons to the icon library in the tree above. Release
the mouse. The icons have been imported to the Icon Library.
Adding an icon from an opened document
1. Open an icon document from any source or just create a new one.
2. In the Librarian, select the icon library in which you want to add the icon.
3. In the icon document, select File/Add to the Librarian or press F3.
340
Working With The Axialis Librarian
4. A dialog box opens, enter the name for the icon in the icon library and click OK. The icon has
been added to the Icon Library.
Adding icons from the Axialis Explorer
1. Open an Axialis Explorer window. Choose File/New/File Explorer or press Ctrl+E.
2. When the window is opened, select the folder which contains the icon files using the tree in
the left pane. The same file types as above are supported.
3. In the Librarian, select the icon library in which you want to add the icon.
4. Using a mouse drag & drop, copy the icon files from the Axialis Explorer window to the icon
library window. You can also choose File/Add to the Librarian or press F3.
5. The icons are imported in the icon library. If a file contains several icons, all the icons
included in the file are imported. When finished, all the new icons are added and selected in
the library.
Import a selection of icons from another icon library
1. In the Librarian, select the icon library in which you want to add the icon (1st icon library).
2. In the workspace, open an icon library containing the icons you want to import (2nd icon
library).
3. Select the icons you want to import in the 2nd icon library (you can use Shift key to select
several icons).
4. Using a mouse drag & drop and pressing the Ctrl key, copy the icon files from the 2nd
library into the 1st icon library window.
Press and keep pressed the Ctrl key during the drag & drop operation to copy the
icons. Otherwise, they'll be moved into the 1st library (deleted from the 2nd library)
5. The icons are imported in the icon library.
After adding icons to an icon library, it is marked as modified. Therefore if you select
another one or a folder, you'll be prompted to save it. Click YES or you'll lose the
modifications.
Edit an icon in an icon library
Once a library is selected in the Librarian, you can edit any icon included in it. You can edit icons and
add/remove formats without restriction. When done, the icon will be updated in the library.
341
Axialis IconWorkshop 6.10
Open and edit the icon
1. First, select the library. Once the icon library contents is displayed, double-click on the icon
you wish to modify or select it and hit Enter.
2. A window opens with the selected icon ready for modification. The title of the window is
something similar to this: IconName - Icon (embedded in "LibraryName")
3. You can edit the icon like any independent icon file. See Editing Icons to learn more about
icon edition.
Update icon in the library
4. Once the icon has been modified, you need to save your work. As the icon is not linked to an
icon file, you'll update it into the icon library. Click on the "floppy" icon in the toolbar or
select File/Save. The operation is done in memory and the file is updated in the library.
5. You can close the icon edition window. The work has been saved in the library but not on
disk. Now you need to save the Icon Library to make the changes permanent.
Save the library
6. Be sure to activate the icon library window. Click on the "floppy" icon in the toolbar or select
another library of folder, you'll be prompted to save it. Click YES..
7. The library file is updated on disk.
Working with icons in a library
Open an icon as a new icon from the library
This feature is useful if you want to use an icon contained in a library as a template to create a new
icon.
1. First, select the icon library which contain the icon. Select on the icon you wish to use as
template.
2. Right-click on it and choose Open As New Icon or press Ctrl+Enter.
3. A new window opens with the selected icon ready for modification. The link between this
icon and the library does not exist anymore. Therefore, if you select File/Save, you'll be
prompted to choose a new name for the icon file. It just work like a newly created icon.
Delete icons in a library
1. First, select the icon library which contain the icons to delete.
2. Once the library contents is displayed, select the icons you wish to delete (you can use Shift
key to select several icons).
3. Right-click on them and choose Delete or press Del.
342
Working With The Axialis Librarian
4. A dialog box Delete Icons opens. It asks you if you really want to permanently delete the
selected icons from the current library.
This action can't be undone. If you choose "Yes", the icons will be lost forever. Choose
'No' to stop and go back.
Rename icons in a library
1. First, select the icon library which contain the icons to rename.
2. Once the library contents is displayed, select the icons you wish to rename (you can use
Shift key to select several icons).
3. Right-click on them and choose Rename or press F6.
4. A dialog box Rename icons opens. Enter a New Name for the selected icons.
If you rename more icons, they are automatically indexed. For example, "computer" will
be indexed by "computer 1", "computer 2", ... "computer n".
5. If the option Add 'zero' characters in indexes (001, 002 ...) is checked, 'zero' characters will
be added in the names. For example, 27 items with new name Image will be renamed
Image01, Image02 ... Image27.
Sort icons by name in a library
1. First, select the icon library which contain the icons to sort.
2. Once the library contents is displayed, select the icons you wish to sort (you can use Shift
key to select several icons). If you want to sort all the icons select them all (or just select
one icon).
3. Choose Icon Library/Sort by name.
4. The icons are sorted using their names (in the selection only).
If you select only one icon in the library, Axialis IconWorkshop™ warns you that there is
only one icon selected and propose you to sort all the icons
Change icon order using drag a drop
1. Once the icons are selected, use mouse drag & drop to move them within the library.
If you press the Ctrl key while using drag & drop, the icons are duplicated.
343
Axialis IconWorkshop 6.10
Export icons from an icon library
Once a library has been built in the Librarian, you'll probably need to export icons embedded in it to
create individual icon files or partial libraries. Several methods are available to perform exports.
Export icons as individual icon files (ICO, ICNS...)
1. Select the icon library containing the icons you wish to export.
2. Select the icons you wish to export (you can use Shift key to select several icons).
3. Right-click on the icons and choose Export as Windows® icon or Export as Macintosh® icon.
Conversion between Windows® and Macintosh® will be done automatically during
this operation if necessary
4. If only one icon is selected: a save-as-like standard dialog box opens. Choose the
destination folder and specify the filename. Click Save button when done. One file is
created.
or
4. If several icons are selected: a folder-browser standard dialog box opens. Choose the
destination folder. Click Save button when done. Several files are created.
Export icons as library file or DLL
1. Select the icon library containing the icons you wish to export.
2. Select the icons you wish to export (you can use Shift key to select several icons).
3. Right-click on the icons and choose Export as ICL or DLL.
4. A save-as-like standard dialog box opens. Choose either ICL or DLL as file type. Choose the
destination folder and specify the filename. Click Save button when done. One file is
created with all the icons embedded.
If you create a DLL using IconWorkshop™ the file will be a 32-bit executable. As a result
you'll be able to load it programmatically in an external 32-bit project.
Open an icon library as a document
Axialis IconWorkshop™ allows you to open an icon library embedded in the librarian in a separate
document window. This operation is very useful when moving or copying icons from one library to
another to keep them visible on screen. You can also import into and export from a document.
344
Working With The Axialis Librarian
Open an icon library
1. Select an icon library in the Librarian folder tree. Double-click on it or hit Enter.
2. A document window opens containing the icon library. The window title bar contains the
name of the file ( ).
3. All the icons contained in the library are displayed in the window list ( ). You can now freely
work with the library.
When you open an icon library as a document, it is grayed in the Librarian window to
avoid errors.
Add items to the librarian from the Explorer Document
1. Select a folder in the librarian where you want to add items.
2. Select one or more items in the Explorer Document.
3. Right click and choose Add to the librarian.
To add an opened document to the librarian
1. Select a folder in the librarian where you want to add Media Files.
2. Open a Document or activate an existing document window.
3. Right click and choose Add to the librarian.
345
Axialis IconWorkshop 6.10
Add items using the import function
1. Select the folder where you're going to import the files.
2. Choose Librarian/Import.
3. Select the file type from the File Type Drop Down box.
•
•
•
•
Icons files (ICO, ICNS, RSC, BIN).
Icon Library files (ICL).
Images files (BMP, PNG, JP2, JPEG, PSD, GIF...),
Cursor files (CUR, ANI, ACL).
4. Click on the file that you want to select in the Contents List box and click on the Open
button. The imported files will be automatically placed in the librarian.
Downloading Object Packs from Internet
On a regular basis, new image object packs will be available for download on our website. Packs are
free but some of them are reserved to registered customers. Additionally, third-party authors may
propose their own object packs (additional fees may be required). Links to selected object packs
will also be added to our download page.
Download Object Packs from your Web Browser
This is a standard way to proceed. The procedure may differ slightly depending on your web
browser type and version. The procedure below is based on Microsoft® Internet Explorer® 6.0:
1. Launch Internet Explorer®. In the Address bar, type the following address:
"http://www.axialis.com/objects".
2. The web page opens: "Download Image Object Packs". We recommend you to read the
License Agreement before downloading packs.
346
Working With The Axialis Librarian
3. When you're interested by an object pack, read the quick description ( ). Take a look at the
popularity and user rating. Once downloaded and tested you'll be also able to vote for it just
by clicking on the Rating Stars ( ). To get more information about the pack, click "Read
More" button.
4. Click the "Download Now" button ( ). If the file is in "FREE ACCESS", the download process
starts immediately. Otherwise, the file is marked "REGISTERED USERS" and you need to
enter your Genuine Axialis Product Key to download the file.
5. The file to download is an executable file (EXE) so you may be prompted by Windows® or
any other antivirus application to confirm the download and execution of the file.
Installing packages downloaded from Internet is potentially dangerous. Install packages
that you download on Internet may contain viruses. However your security is our
priority and all our files are periodically tested against all known viruses. Also, if you
have an antivirus software, the file will be automatically checked before it is launched
6. If you want to launch the installation of the pack without saving the file on your disk, click
"Run" ( ). In such a case, the file downloads and the installation starts automatically. If you
want to save a copy of the install pack to your disk, click "Save" ( ). The file will be saved
to a folder of your choice. When finished, you'll have to explore this folder later to launch
the installation manually.
7. The installation starts in a separate window similar to this:
347
Axialis IconWorkshop 6.10
Click Next to go the 2nd screen. You must read carefully the license agreement and accept
it before going further. This is very important to understand the way you can use the
objects. Click "Yes, I agree all the terms" and click Next.
8. The files are copied on your computer. The target location is the "Axialis Librarian\Objects"
folder (usually located in the "My Documents") folder. This folder is easy accessible from all
Axialis products in the built-in Librarian window. To get more information about the
Librarian, see this topic: Working With The Axialis Librarian
9. When finished, the associated Axialis application is launched or activated automatically (here
Axialis IconWorkshop™) and the built-in Librarian is opened. The new object pack folder is
automatically selected.
You're done. Now enjoy the new objects and be creative!
Download Object Packs from the Axialis Application
This is a faster way to proceed. The procedure is very similar but the website is access from within
the application.
1. Launch IconWorkshop™ (or any compatible Axialis Application).
2. Choose Librarian/Download Object Packs (Internet) or click the associated button:
. The
"http://www.axialis.com/objects" page opens in a document window inside the application.
Just follow the procedure as specified above.
3. The new objects are installed and the folder is automatically selected.
348
11
Working With the Axialis
Media File Explorer
The application contains a powerful Axialis Media File Explorer that permits you to browse your disks,
locate media files, display them as thumbnail with preview, organize them and more...
All the media files supported by the application can be opened in a specific viewer document window.
You can open several types of media files including Icons, Cursors, Images, Animations. Each viewer type
has its own features. Some of them are more common than others (print, display full screen...). Let's see
one of the most useful.
Create a new Explorer window
1. Choose File/New/New Explorer or press CTRL+E.
2. A new Explorer document window is created in the working area ( ). You can open several
Explorer windows.
3. The Explorer window is divided in two parts. On the left pane you can see the Folder Tree
( ). On the right pane, all the supported files present in the selected folder are listed in
thumbnail view ( ). The separator between the 2 panes can be moved using the mouse.
349
Axialis IconWorkshop 6.10
4. Many functions are available. Most of them are accessible by clicking buttons in the local
toolbar ( ).
Search media files on the computer
1. Choose Explorer/Search.
2. The dialog box "Search on the Computer" opens.
3. In the Named area, enter a search criterion for the item's filename (blank=no search on
name). Wildcards are needed to perform multi-files search. For example, to get all the PNG
files with "B" as the first letter, enter "b*.PNG".
4. In the Look In area, enter a pathname (blank=no search on author).
5. If you check the option "Include Subfolders",
6. In the Type area, enter a search criterion for the item's type (blank=no search on
keywords). Do not use wildcards.
7. If you check the Date option, the search will use the specified date as a search criterion. In
the Between and And areas, specify the date range for the search. The file must have been
modified after/before this date to be selected.
8. If you check the Size option , the search will use the specified size as a search criterion. You
can choose At Least or At Most options. The file must have at most/ at least the specified
size.
Create an Icon Snapshot Picture
A Snapshot is an image created automatically by IconWorkshop™ to show one or several icons
(with embedded formats) on a decorated background. Creating a Snapshot Picture of your icons
may be useful to make a visual archive of your icons, illustrate a website or just promote your work.
Three kinds of snapshots are available:
• Detailed snapshot of one icon - The icon image formats are displayed in one raw.
• Detailed snapshot of several icons - One icon per raw, several images per icon.
• Quick/Thumbnail snapshot of several icons - Only one image per icon, several icons per raw.
Creating a Snapshot of an Opened Icon
When an icon is opened in an editor window, you can create a snapshot of the work in progress.
1. From the opened icon window, Choose Edit/Create Snapshot or Ctrl+Shift+P
2. A dialog box Create Icon Snapshot opens. Adjust the various options then click OK.
3. The Snapshot image (see sample below) is created in a new window. Now you can save,
copy, print this image as necessary.
350
Working With The Axialis Media File Explorer
Creating a Detailed Snapshot of Several Icons
You can create a snapshot of several icons from within an opened Icon Library (ICL), Program File
(EXE, DLL, OCX...), a Search Result window or from the built-in Explorer.
1. Select several icons from a list (only icons within libraries or Macintosh®/Windows® files).
Choose Edit/Create Snapshot or Ctrl+Shift+P
2. A dialog box opens, select Detailed Snapshot then click OK.
3. A dialog box Create Icon Snapshot opens. Adjust the various options then click OK.
4. The Snapshot image is created in a new window. Now you can save, copy, print this image
as necessary.
Creating a Quick Thumbnail Snapshot of Several Icons
You can create a snapshot of several icons from within an opened Icon Library (ICL), Program File
(EXE, DLL, OCX...), a Search Result window or from the built-in Explorer.
1. Select several icons from a list (only icons within libraries or Macintosh®/Windows® files).
Choose Edit/Create Snapshot or Ctrl+Shift+P
2. A dialog box opens, select Quick Thumbnail Snapshot then click OK.
3. A dialog box Create Icon Snapshot opens. Adjust the various options then click OK.
4. The Snapshot image (see sample below) is created in a new window. Now you can save,
copy, print this image as necessary.
351
Axialis IconWorkshop 6.10
Batch create several Windows® icons from images
Using this feature you can Create Several Icons from images, existing icons or cursors in one
operation. This is what we call a batch procedure. We'll perform this task using the built-in Axialis
IconWorkshop™ explorer.
Select the source images, icons or cursors
1. Open a new Explorer window. Choose File/New/File Explorer...
2. When the window is opened, select the folder which contains the Source Files using the tree
in the left pane.
3. When done, the Source Files appears (with preview) in the right pane. Select the icons you
wish to convert. You can use Shift/Ctrl + Mouse to select several icons. Use Ctrl+A to
select all. Use +/- to select/unselect by specifying filters.
Batch create Windows® icons
4. Choose Explorer/Batch Create Windows® Icons from Selection or Ctrl+Shift+C.
5. A dialog box opens. In "Standard Image Formats" ( ) and "Extra Image Formats" ( ) choose
the image formats you wish to add in the icons.
6. In Image Adjustment group ( ), you can add a smooth or sharp filter to the image shrinking
process. You can also use or not a dithering method to render image using 256 or 16
colors. In Transparency group ( ), an option permits to use opaque images (i.e. without
transparency) and specify a color to make transparent.
7. When done, click OK. The batch operation starts immediately, the hourglass mouse pointer
is displayed during the creation. When done the new Windows® icons are added to the
folder contents.
352
Working With The Axialis Media File Explorer
The created icons have the same filename as the original document with different
extension (depending on the icon types). A system has been implemented to index the
files if necessary to avoid overwriting. If you create icons from Image Files, the whole
image is selected and resized keeping its aspect ratio. If it contains transparency, it is
kept during the creation. If you create icons from an Existing Icons or Cursors, the
largest image is used as source to create the icons. Transparency is kept.
Batch create several Macintosh® icons from images
Using this feature you can Create Several Icons from images, existing icons or cursors in one
operation. This is what we call a batch procedure. We'll perform this task using the built-in Axialis
IconWorkshop™ explorer.
Select the source images, icons or cursors
1. Open a new Explorer window. Choose File/New/File Explorer...
2. When the window is opened, select the folder which contains the Source Files using the tree
in the left pane.
3. When done, the Source Files appears (with preview) in the right pane. Select the icons you
wish to convert. You can use Shift/Ctrl + Mouse to select several icons. Use Ctrl+A to
select all. Use +/- to select/unselect by specifying filters.
Batch create Macintosh® icons
4. Choose Explorer/Batch Create Macintosh® Icons from Selection or Ctrl+Shift+D.
5. A dialog box opens. First we need to choose the Macintosh® file format we wish to use
( there are 3 formats supported by Axialis IconWorkshop™ - see this topic to learn more).
6. In groups "Standard Image Formats" ( ) and "Extra Image Formats" ( ) choose the image
formats you wish to add in the icons.
353
Axialis IconWorkshop 6.10
6. In Image Adjustment group, you can add a smooth or sharp filter to the image shrinking
process. You can also use or not a dithering method to render image using 256 or 16
colors. In Transparency group, an option permits to use opaque images (i.e. without
transparency) and specify a color to make transparent.
7. When done click OK. All the Macintosh® icons are created and added to the same folder.
Names are preserved, only the extension is changed.
Remarks
The created icons have the same filename as the original document with different
extension (depending on the icon types). A system has been implemented to index the
files if necessary to avoid overwriting. If you create icons from Image Files, the whole
image is selected and resized keeping its aspect ratio. If it contains transparency, it is
kept during the creation. If you create icons from an Existing Icons or Cursors, the
largest image is used as source to create the icons. Transparency is kept.
Convert several Macintosh® icons to Windows® format
Using this feature you convert a group of Macintosh® Icons to Windows® format in one operation.
This is what we call a batch procedure. We'll perform this task using the built-in IconWorkshop™
explorer.
Select the source icons
1. Open a new Explorer window. Choose File/New/File Explorer...
2. When the window is opened, select the folder which contains the source files using the tree
in the left pane.
3. When done, the source files appears (with preview) in the right pane. Select the icons you
wish to convert. You can use Shift/Ctrl + Mouse to select several icons. Use Ctrl+A to
select all. Use +/- to select/unselect by specifying filters.
Batch convert the icons
4. Choose Explorer/Batch Convert Macintosh® Icons To Windows® (ICO) or Ctrl+Shift+W
5. A dialog box opens. You can choose to convert all the formats ( ) or only a selection ( )
of formats. When done, click OK.
354
Working With The Axialis Media File Explorer
6. The batch operation starts. The hourglass mouse pointer is displayed during the conversion.
When done the Windows® icons are added to the folder contents.
The created icons have the same filename as the original document with different
extension (depending on the icon types). A system has been implemented to index the
files if necessary to avoid overwriting.
Convert several Windows® icons to Macintosh® format
Using this feature you convert a group of Macintosh® Icons to Windows® format in one operation.
This is what we call a batch procedure. We'll perform this task using the built-in IconWorkshop™
explorer.
Select the source icons
1. Open a new Explorer window. Choose File/New/File Explorer...
2. When the window is opened, select the folder which contains the source files using the tree
in the left pane.
3. When done, the source files appears (with preview) in the right pane. Select the icons you
wish to convert. You can use Shift/Ctrl + Mouse to select several icons. Use Ctrl+A to
select all. Use +/- to select/unselect by specifying filters.
Batch convert the icons
4. Choose Explorer/Batch Convert Windows® Icons To Macintosh® (ICNS, RSC, BIN) or
Ctrl+Shift+M
5. A dialog box opens. First select the Macintosh® file format you wish to create ( ). 3
formats are available for Macintosh® icons (see this topic to learn more about the file
formats).
355
Axialis IconWorkshop 6.10
6. You can choose to convert all the formats ( ) or only a selection ( ) of formats. When
done, click OK.
7. The batch operation starts. The hourglass mouse pointer is displayed during the conversion.
When done the Windows® icons are added to the folder contents.
The created icons have the same filename as the original document with different
extension (depending on the icon types). A system has been implemented to index the
files if necessary to avoid overwriting.
Convert several Windows®/Macintosh® icons to PNG
(batch process)
PNG is an image file format, not really an icon format. Icons usually contain several formats. PNG
images contain only one image used as icon. This image is usually a large one (128x128 or
256x256) with alpha channel (RGB/A 32 BPP). This format is used by numerous GUI and
applications (Linux KDE, dock bars...).
Using this feature you can Create Several PNG Images from Windows® or Macintosh® icon files in
one operation. This is what we call a batch procedure. We'll perform this task using the built-in
IconWorkshop™ explorer. Only one image will be extracted from each icon and each time one PNG
file will be created. We recommend you to extract the largest RGB/A image from the icon since
IconWorkshop™ supports creation of PNG images with alpha channel.
Select the Source Icons
1. Open a new Explorer window. Choose File/New/File Explorer...
2. When the window is opened, select the folder which contains the source icon files using the
tree in the left pane.
3. When done, the source icons appears (with preview) in the right pane. Select the icons you
wish to convert to images. You can select Windows® and/or Macintosh® icons. Use
Shift/Ctrl + Mouse to select several icons. Use Ctrl+A to select all. Use +/- to
select/unselect by specifying filters.
356
Working With The Axialis Media File Explorer
Create the PNG images
4. Choose Explorer/Batch Create Images from Icons or Ctrl+Shift+V.
5. The dialog box Batch Create Images From Icons opens (see below). In the Icon Format to
Extract group ( ), choose the image format you wish to extract from the icons. You can
choose only one image format. If this exact format does not exists in an icon, the nearest
format is chosen.
6. In the Image File Format group ( ), select the PNG file format.
7. In the Transparency group ( ), choose if you wish to create transparent or opaque images.
If you choose to preserve transparency, the images will be automatically converted to
32BPP with alpha channel (even if the chosen icon format is 256 or less colors). If you
choose to remove transparency, the images will be generated using 24BPP (no alpha
channel). In such a case, you must specify a background color (to fill the transparent areas
with this color).
We strongly recommend you to use RGB/A (alpha channel transparency) for extraction.
8. When done, click OK. The batch operation starts immediately, the hourglass mouse pointer
is displayed during the creation. When done the new Images are added to the folder
contents.
The created images have the same filename as the original document with PNG
extension appended. A smart system has been added to index the files if necessary to
avoid overwriting. If this exact chosen format does not exists in an icon, the nearest
format is chosen for extraction.
357
Axialis IconWorkshop 6.10
Convert several icons to images (batch processing)
Creating images from icons can be very useful. You can either create one image from one icon (see
topic Convert an icon to an image) or several images from icons in one operation. This is what we
call a batch procedure.
The following image format creation is supported by IconWorkshop™:
•
•
•
•
•
BMP - Windows® bitmap (32 BPP alpha channel transparency supported).
PNG - Portable Network Graphic (32 BPP alpha channel transparency supported).
PSD - Photoshop (32 BPP alpha channel transparency and layers supported).
JP2 - JPEG 2000 (32 BPP alpha channel transparency supported).
GIF - Compuserve GIF (Web optimized)
Select the Source Icons
1. Open a new Explorer window. Choose File/New/File Explorer...
2. When the window is opened, select the folder which contains the Source Files using the tree
in the left pane.
3. When done, the Source Files appears (with preview) in the right pane. Select the icons you
wish to convert to images. You can use Shift/Ctrl + Mouse to select several icons. Use
Ctrl+A to select all. Use +/- to select/unselect by specifying filters.
Create the Images
4. Choose Explorer/Batch Create Images from Icons or Ctrl+Shift+V.
5. The dialog box Batch Create Images From Icons opens (see below). In the Icon Format to
Extract group ( ), choose the image format you wish to extract from the icons. You can
choose only one image format. If this exact format does not exists in an icon, the nearest
format is chosen.
358
Working With The Axialis Media File Explorer
5. In the Image File Format group ( ), select the file format you wish to use for the images to
create.
6. In the Transparency group ( ), choose if you wish to create transparent or opaque images.
If you choose to preserve transparency, the images will be automatically converted to
32BPP with alpha channel (even if the chosen icon format is 256 or less colors). If you
choose to remove transparency, the images will be generated using 24BPP (no alpha
channel). In such a case, you must specify a background color (to fill the transparent areas
with this color).
7. When done, click OK. If you have chosen to create JPEG 2000 or GIF images, an option
dialog box opens (see below about the options). The batch operation starts immediately,
the hourglass mouse pointer is displayed during the creation. When done the new Images
are added to the folder contents.
The created images have the same filename as the original document with PNG, PSD,
BMP, GIG or JP2 appended. A smart system has been added to index the files if
necessary to avoid overwriting. If this exact chosen format does not exists in an icon,
the nearest format is chosen for extraction.
The JPEG 2000 options
JPEG 2000 is the latest generation of compressed image format. It permits to compress images
with low quality loss. Additionally it permits to encode images with alpha channel.
When you save an image in JPEG 2000 format you need to specify the type of compression you
want for this image:
• Lossless compression - This will result in perfect image quality but larger file size (about 3050% of original image).
• Lossy compression - This can be adjusted to create smaller files (high compression means low
quality - see preview).
If you use lossy compression, we recommend you to adjust the compression level using the slider
and compare the difference between the original and the resulting image in the preview window.
The GIF options
CompuServe GIF image format is widely used in Web pages because the majority of Web browsers
recognize it. However this format has some limitations and images need to be optimized to meet
Web requirements like size, colors and transparency:
• GIF Images don't support partial transparency (alpha channel). It means that either a pixel is
transparent, either it isn't.
• GIF Images cannot contain more than 256 colors.
• GIF Images support reduced palettes. Limited number of colors will result in smaller file but will
produce lower image quality.
Axialis IconWorkshop™ permits you to save an icon image to GIF file formats preserving the
transparency areas of the icon. Only one image will be extracted from the icon. We recommend
you to extract the 256 color image from the icon if available.
359
Axialis IconWorkshop 6.10
The GIF option dialog box includes several options:
1. In Colors ( ), specify the number of colors you wish to use in the image palette. Limited
number of colors will result in smaller file but will produce lower image quality. Choose
"Auto" if you're not sure about desired the number of colors.
2. In Palette ( ), choose the type of palette desired:
• Adaptive - The palette will be calculated to get the best results possible
(recommended).
• Web Safe - This is the default Netscape® Web palette.
• Windows® - This is the default palette used under old Windows® versions in 256 color
screen mode.
• Macintosh® OS - This is the default palette used under old Macintosh® OS versions in
256 color screen mode.
3. In Dither ( ), choose "Diffusion" if you want IconWorkshop™ to simulate colors not present
in the palette by pixel mixing using the "error diffusion" method. Choose "None" to encode
the image without dithering. Diffusion produces the best results but usually creates slightly
larger images.
4. In Transparency ( ), specify if you want to preserve transparency or not. Of you choose
opaque, the transparent areas of the icon will be converted to solid color (the "Matte"
color). If you choose to preserve transparency and encodes your GIF file from a RGB/A
images, you may need to adjust the "Threshold" value ( ) to produce better results on
image edges.
5. In Preview, compare the original ( ) and the optimized ( ) images (image quality and size)
to find the best adjustments possible.
360
Working With The Axialis Media File Explorer
Normalize several icons (batch processing)
The normalization permits to format several icons in order to produce an uniform set. As a result,
after normalization all the icons have the same image formats embedded. This feature is useful if
you plan to distribute your icons.
We'll perform this task using the built-in IconWorkshop™ explorer.
Select the icons to normalize
1. Open a new Explorer window. Choose File/New/File Explorer...
2. When the window is opened, select the folder which contains the icons using the tree in the
left pane.
3. When done, the files appear (with preview) in the right pane. Select the icons files you wish
to normalize. You can use Shift/Ctrl + Mouse to select several files. Use Ctrl+A to select all.
Use +/- to select/unselect by specifying filters.
Normalize the icons
4. Choose Explorer/Batch Normalize Icon Formats in Icons or Ctrl+Shift+N.
5. A dialog box opens. In "Windows® Icons" group, select the formats you want to include in
the Windows® icons ( ). In "Macintosh® Icons" group, select the formats you want to
include in the Macintosh® icons ( ).
For each icon, the normalization rules are:
• The selected formats are created if not present in the icon. In such a case, the largest
and most coloured image format is used as source for the creation. This rule applies
only if the option "Create image format if not present in source icon" is checked ( )
• The unselected formats are removed if present in the icon.
361
Axialis IconWorkshop 6.10
5. In "Write Options" group ( ), choose one of the following options:
• Overwrite source file - The original icon file is replaced by the normalized icon.
• New filename - The normalized icon is created using a new filename (original filename
plus an index number).
• Create new folder - The filenames are identical but created in a new subfolder.
6. When done, click OK. The batch operation starts immediately, the hourglass mouse pointer
is displayed during the creation. When done the normalized icons are created.
Supported Media Types
All the media files supported by the application can be opened in a specific viewer document
window. You can open several types of media files including Icons, Cursors and Images. Each
viewer type has its own features. Here is the list of media files supported by the application:
Icon Files
•
•
•
•
•
•
Windows® Icons (ICO)
Macintosh® Icons (ICNS, RSC)
MacBinary files containing Macintosh® Icons (BIN)
Windows® Icon Libraries (ICL)
Macintosh® Icontainer Libraries (ICONTAINER)
Windows® Executable Files (EXE, DLL, OCX, CPL...)
Cursors
•
•
Static Windows® Cursors (CUR)
Animated Windows® Cursors (ANI)
Images
•
•
•
•
•
•
•
•
•
•
362
Windows® Images (BMP, DIB, WMF)
Portable Network Graphic Images (PNG)
Photoshop® Images (PSD)
JPEG 2000 Images (JP2)
JPEG (JPG, JPEG)
CompuServe GIF (GIF)
Animated GIF (GIF)
Macintosh® Images (PICT, PIC, PCT, QTI)
Targa® Images (TGA)
TIFF (TIF, TIFF)
Working With The Axialis Media File Explorer
•
•
•
•
Kodak® FlashPix® Image (FXP)
Kodak® PhotoCD® Images (PCD)
Amiga® Images (IFF, LBM)
ZSoft® Paintbrush Images (PCX)
Open a media file
Using the explorer, you can easily open a media file.
1. Create a New Explorer window by choosing File/New/New Explorer (Ctrl+E).
2. Browse your disks and select the appropriate folder in the left pane. The media files included
in the folder appear in the right pane.
Open a media file
3. Select the file you wish to open.
4. Double click on it or choose Explorer/Open Item (Enter) or right-click on it and choose
Open in the menu.
Open a media full screen
3. Select the file you wish to open fullscreen.
4. Choose Explorer/Open Item Full Screen (F11) or right-click on it and choose Open Full
Screen in the menu.
Switch ON/OFF the Auto Full Screen option
3. Choose Explorer Auto Full Screen option or press Ctrl+F11.
If the Auto Full Screen (Ctrl+F11) option is ON, the file is opened full screen using the
simple open command.
Zoom in, zoom out, change display mode (in full screen mode)
5. While viewing a file fullscreen, you can zoom in or zoom out by pressing [+] or [-] keys.
6. With image files, you can zoom using the left/right mouse buttons. Move the mouse to
slide the image on screen (if larger than screen - in zoom mode for example). You can also
use the arrow keys. A double-click quits the fullscreen mode.
7. Three display modes are available (scale, best fit, stretched). You can change the mode by
pressing the Tab key.
363
Axialis IconWorkshop 6.10
Print a media file
Using the explorer, you can easily print a media file (image, animation or video still only).
1. Create a New Explorer window by choosing File/New/New Explorer (Ctrl+E).
2. Browse your disks and select the appropriate folder in the left pane. The media files included
in the folder appear in the right pane.
3. Select the file you wish to open.
4. Double click on it or choose Explorer/Open Item (Enter) or right-click on it and choose
Open in the menu.
Print a media file (image, animation or video still only)
5. Choose the File/Print. An option dialog box opens.
6. In Options group, choose Print image in one page option.
7. In Header & Footer group, click the Print Header and Footer Texts option if you want to
print texts at the top and bottom of the printout.
8. In the fields below, Specifies the Header and Footer texts to print. You can specify macros
that will be automatically be replaced by its related variable text at printing. A macro must
be specified between brackets {…}:
•
•
•
•
•
{DATE} Actual print date.
{TIME} Actual print time.
{FILENAME} Filename of the file to print (no path).
{PATHNAME} Filename and full path of the file to print.
{PAGE} Page number.
You can also specify a separator “|” to split the text in two parts. The first part will be
printed on the left side and the second part on the right side of the page. If no separator
is specified the text is centered.
9. When done, click OK and continue the print procedure.
Print a media file as a poster (image, animation or video still only)
This feature permit to print an image in very large format. The image is printed on several pages
that you'll have to collate after the printing to create a large poster.
5. Choose the File/Print. An option dialog box opens.
6. In Options group, choose Print image as a poster option. Specify Height and Width in inches.
7. In Header & Footer group, click the Print Header and Footer Texts option if you want to
print texts at the top and bottom of the printout.
8. In the fields below, Specifies the Header and Footer texts to print. You can specify macros
that will be automatically be replaced by its related variable text at printing. A macro must
be specified between brackets {…}:
364
Working With The Axialis Media File Explorer
•
•
•
•
•
{DATE} Actual print date.
{TIME} Actual print time.
{FILENAME} Filename of the file to print (no path).
{PATHNAME} Filename and full path of the file to print.
{PAGE} Page number.
You can also specify a separator “|” to split the text in two parts. The first part will be
printed on the left side and the second part on the right side of the page. If no separator
is specified the text is centered.
9. When done, click OK and continue the print procedure.
Print as preview
5. You can print in a preview window. It may be useful to see the result before printing.
Choose the File/Print Preview. An option dialog box opens. Follow the above procedures.
Change display mode
1. Create a New Explorer window by choosing File/New/New Explorer (Ctrl+E).
2. Browse your disks and select the appropriate folder in the left pane. The media files included
in the folder appear in the right pane.
3. Select the file you wish to open.
4. Double click on it or choose Explorer/Open Item (Enter) or right-click on it and choose
Open in the menu.
Change display mode (image)
5. Choose the View/Normal display if you want to see the image or video at fixed scales. In
this mode, you can use the zoom commands: Zoom In [+], Zoom Out [-], scale 1:1 (Space)
6. Choose the View/Best Fit display if you want the image to be stretched to the maximum
available size when displayed within the document window. The image proportion will
always be kept. Zoom commands are disabled.
7. Choose the View/Maximized display if you want the image to be stretched to the maximum
available size when displayed within the document window. The image may be distorted.
Zoom commands are disabled.
365
Axialis IconWorkshop 6.10
Display full screen
Using the explorer, you can easily open a media file full screen.
1. Create a New Explorer window by choosing File/New/New Explorer (Ctrl+E).
2. Browse your disks and select the appropriate folder in the left pane. The media files included
in the folder appear in the right pane.
Open a media full screen
3. Select the file you wish to open fullscreen.
4. Choose Explorer/Open Item Full Screen (F11) or right-click on it and choose Open Full
Screen in the menu.
If the Auto Full Screen (Ctrl+F11) option is ON, the file is opened full screen using the
simple open command.
Switch ON/OFF the Auto Full Screen option
3. Choose Explorer Auto Full Screen option or press Ctrl+F11.
Zoom in, zoom out, change display mode (in full screen mode)
5. While viewing a file fullscreen, you can zoom in or zoom out by pressing [+] or [-] keys.
6. With image files, you can zoom using the left/right mouse buttons. Move the mouse to
slide the image on screen (if larger than screen - in zoom mode for example). You can also
use the arrow keys. A double-click quits the fullscreen mode.
7. Three display modes are available (scale, best fit, stretched). You can change the mode by
pressing the Tab key.
Copy a media file to the Clipboard
When a file is opened in a viewer document window, you can copy it in the clipboard. Two elements
are copied in the Clipboard:
• The displayed image (if the document contains an image)
• The full pathname to the document file. It may be useful to add the document in a project for
example.
1. Create a New Explorer window by choosing File/New/New Explorer (Ctrl+E).
2. Browse your disks and select the appropriate folder in the left pane. The media files included
in the folder appear in the right pane.
3. Select the file you wish to copy.
366
Working With The Axialis Media File Explorer
4. Double click on it or choose Explorer/Open Item (Enter) or right-click on it and choose
Open in the menu.
Copy to the Clipboard
5. Select Edit/Copy (Ctrl+C).
Paste the media file in a project
6. Select a project document (screensaver or other) and choose Edit/Paste (Ctrl+V).
Resize an image
The application contains a high quality image resize feature (a.k.a resampling). This may be useful to
change an image size without loosing quality.
1. Create a New Explorer window by choosing File/New/New Explorer (Ctrl+E).
2. Browse your disks and select the appropriate folder in the left pane. The media files included
in the folder appear in the right pane.
3. Select the file you wish to open.
4. Double click on it or choose Explorer/Open Item (Enter) or right-click on it and choose
Open in the menu.
Resize the image
5. Select Image/Resize Image (R), a dialog box opens.
6. Enter the new size in pixels by specifying Width and Height.
7. Click OK when done. The image is resized.
Undo the change
8. If you want to undo the resize operation, select Edit/Undo (Ctrl+Z).
9. You can also redo the change by choosing Edit/Redo (Ctrl+Y).
Save the modified image
10. As the document has been changed, you'll be prompted to save it when you'll close the
window. You can only save the new image to a JPEG, BMP, PNG, JP2, GIG or PSD file.
367
Axialis IconWorkshop 6.10
Crop an image
Cropping an image means reducing its size be removing unwanted parts (usually around the image
or borders). But this is done without resizing the image content. This may be useful if interesting
part of an image is not properly centered.
1. Create a New Explorer window by choosing File/New/New Explorer (Ctrl+E).
2. Browse your disks and select the appropriate folder in the left pane. The media files included
in the folder appear in the right pane.
3. Select the file you wish to open.
4. Double click on it or choose Explorer/Open Item (Enter) or right-click on it and choose
Open in the menu.
Select the image portion to keep
5. First be sure the Selection Mode is the active mode. Select Image/Selection Mode (Z) if
necessary.
6. Select the portion of the image you wish to keep using the mouse. A selection rectangle is
displayed when done.
Crop the image
7. Select Image/Crop Image (C).
8. The image is cropped.
Undo the change
9. If you want to undo the crop operation, select Edit/Undo (Ctrl+Z).
10. You can also redo the change by choosing Edit/Redo (Ctrl+Y).
Save the modified image
11. As the document has been changed, you'll be prompted to save it when you'll close the
window. You can only save the new image to a JPEG, BMP, PNG, JP2, GIF or PSD file.
Change the color depth of an image
The image viewer includes a feature to change the color depth of an image. This may be useful to
reduce the file size of an image. Three image color depth are supported by the application:
•
368
True Colors with Alpha Channel (32 Bits) - Each pixel of the image is coded using 4 bytes. It
creates high quality image and supports alpha channel transparency. The file size is very big.
Working With The Axialis Media File Explorer
•
•
True Colors (32 Bits) - Each pixel of the image is coded using 3 bytes. It creates high quality
image but does NOT support alpha channel transparency. The file size is big.
Indexed colors (32 Bits) - Each pixel of the image is coded using 1 bytes. It can only display 256
colors stored in a color table (aka palette). It creates low quality image and does NOT support
alpha channel transparency. The file size is small.
1. Create a New Explorer window by choosing File/New/New Explorer (Ctrl+E).
2. Browse your disks and select the appropriate folder in the left pane. The media files included
in the folder appear in the right pane.
3. Select the file you wish to open.
4. Double click on it or choose Explorer/Open Item (Enter) or right-click on it and choose
Open in the menu.
Change to True Colors with Alpha Channel
5. Select Image/Convert to True Color with Alpha. A dialog box opens.
6. This dialog permits you to create a transparent area in your image. This feature is useful to
create a sprite-ready image with transparent background. To do this, you must click the
Convert The Following Color To Transparent option. In the field below, select the color that
you want to transform to transparent in the image. This is usually the background color of
your image.
7. Click OK when done.
8. The image is converted. All the area containing the color specified have been transformed
to transparent.
Change to True Colors
5. Select Image/Convert to True Color. If the image was 32 bits (with Alpha Channel), a dialog
box opens.
6. This dialog permits you to specify the color you wish to use as background color.
7. Click OK when done.
8. The image is converted. All the area containing transparency have been transformed to the
specified color.
Change to Indexed Colors
5. Select Image/Convert to True Color. If the image was 32 bits (with Alpha Channel), a dialog
box opens.
6. This dialog permits you to specify the color you wish to use as background color.
7. Click OK when done.
8. The image is converted. All the area containing transparency have been transformed to the
specified color. A color table has been associated to the image.
369
Axialis IconWorkshop 6.10
Undo the change
9. If you want to undo the crop operation, select Edit/Undo (Ctrl+Z).
10. You can also redo the change by choosing Edit/Redo (Ctrl+Y).
Save the modified image
11. As the document has been changed, you'll be prompted to save it when you'll close the
window. You can only save the new image to a JPEG, BMP, PNG or PSD file.
Create a Windows® icon from an image File...
An interesting feature of Axialis IconWorkshop™ is to create an icon from an existing file. Some
image formats support 32 BPP alpha channel transparency which is very interesting to create hiquality RGB/A images in icons. The following image formats are supported:
•
•
•
•
•
•
•
•
BMP - Windows® bitmap (32 BPP alpha channel transparency supported).
PNG - Portable Network Graphic (32 BPP alpha channel transparency supported).
PSD - Photoshop (32 BPP alpha channel transparency and layers supported).
JP2 - JPEG 2000 (32 BPP alpha channel transparency supported).
JPG - JPEG
TGA - Targa
GIF - Compuserve GIF
Others - Various other formats supported: TIFF, PCD (PhotoCD), PIC (Apple PICT), PCX
(Zsoft), WMF (Windows® MetaFile)
Open the image file in IconWorkshop™
1. Choose "File/Open", browse your folders and select your file (Windows® standard dialog
box).
or
Choose "File/New/File Explorer" or press Ctrl+E. A built-in Axialis file explorer window opens.
Browse your disks, see the thumbnail preview and double-click the image file you wish to
open.
or
In the Recently Used zone (in the main toolbar), type the full pathname of the image file you
wish to open then hit Enter.
2. The image file opens in a document window.
Axialis IconWorkshop™ will convert images to 32 bpp with transparency when possible. This
is much more convenient to create icons. The following image formats can include
transparency: Photoshop® PSD, PNG, RGB, GIF, JPEG 2000 and WMF.
370
Working With The Axialis Media File Explorer
Create an icon from this image
3. Before proceeding, we recommend you to select the portion of image you wish to use to
create your icon. If you leave too many transparent areas around your image, the visible
part of your icon will be too small.
4. Select the portion of image: Use the selection tool (upper-left button of the tool palette)
and select the portion of image you wish to use (do not cut the shadow if there is one
around the object). When done, an animated dashed rectangle has been created.
5. When the selection is done, choose Image/Create Windows® Icon from Selection or press "I"
or click the first command button in the local toolbar ( ):
6. The dialog box New Windows® Icon From Image opens (see below). In the Name group ( ),
enter the icon project name. Do not specify any extension.
7. In the Image Formats group, select the image formats you wish to add in the icon ( ) and
unselect the unwanted images ( ). Just click on the image preview to select/unselect. To
know more about the desired Windows® standard image format, see What is an Icon topic.
8. In the Extra Formats group, select the optional image formats you wish to add in the icon.
The following table shows the common Windows® image formats:
371
Axialis IconWorkshop 6.10
9. To get the best results possible, you can also apply a filter when resizing RGB/A images and
a dithering option to the 256/16 color images (try and see the results in the preview
images).
10. If you wish to start creating your icon with an unlisted format, click the Other Image
Format button.
11. When done, click OK. The icon is automatically created with the various image formats
you've selected.
Create a Macintosh® icon from an image File...
An interesting feature of Axialis IconWorkshop™ is to create an icon from an existing file. Some
image formats support 32 BPP alpha channel transparency which is very interesting to create hiquality RGB/A images in icons.
Open the image file in Axialis IconWorkshop™
1. Choose "File/Open", browse your folders and select your file (Windows® standard dialog
box).
or
Choose "File/New/File Explorer" or press Ctrl+E. A built-in Axialis file explorer window opens.
Browse your disks, see the thumbnail preview and double-click the image file you wish to
open.
or
In the Recently Used zone (in the main toolbar), type the full pathname of the image file you
wish to open then hit Enter.
2. The image file opens in a document window.
Axialis IconWorkshop™ will convert images to 32 bpp with transparency when possible. This
is much more convenient to create icons. The following image formats can include
transparency: Photoshop® PSD, PNG, RGB, GIF, JPEG 2000 and WMF.
Create an icon from this image
3. Before proceeding, we recommend you to select the portion of image you wish to use to
create your icon. If you leave too many transparent areas around your image, the visible
part of your icon will be too small.
372
Working With The Axialis Media File Explorer
4. Select the portion of image: Use the selection tool (upper-left button of the tool palette)
and select the portion of image you wish to use (do not cut the shadow if there is one
around the object). When done, an animated dashed rectangle has been created.
5. When the selection is done, choose Image/Create Macintosh® Icon from Selection or press
"M" or click the first command button in the local toolbar ( ):
6. The dialog box New Macintosh® Icon From Image opens (see below). In the Name group
( ), enter the icon project name. Do not specify any extension.
7. In the Image Formats group, select the image formats you wish to add in the icon ( to
and unselect the unwanted images. Just click on the image preview to select/unselect.
)
8. In the Other group, select the optional image formats you wish to add in the icon ( ). Note
that the 32x32 mono is recommended if you want the icon to be compatible with older
systems. The format 256x256 works only under Macintosh® OSX 10.4 (Tiger) or more.
The format 512x512 works only under Macintosh® OSX 10.5 (Leopard) or more. The
following table shows the common Macintosh® image formats:
373
Axialis IconWorkshop 6.10
8. To get the best results possible, you can also apply a filter when resizing RGB/A images and
a dithering option to the 256/16 color images (try and see the results in the preview
images).
9. When done, click OK. The icon is automatically created with the various image formats
you've selected.
374
12
Customizing
Windows® Icons
IMPORTANT NOTICE FOR WINDOWS VISTA™ USER
The feature "Customize Windows® Icons" including in the application has known compatibility
issues with Windows Vista™. We don't recommend to use it with this operating system. Axialis
Software will soon release a free separate utility that will permit to customize icons in all
versions of Windows®. Stay tuned...
Customize System Settings
Icon sizes
Specify the default Windows® icon display size "Normal (32x32)". If you use a large screen
resolution, we recommend you to switch to large icon size "Large (48x48)".
Icon Spacing
Specifies the distance between icons in pixels "Horizontal and Vertical".
Icon Display
If the option "Display icons using 256 colors or True colors" is checked, Axialis IconWorkshop™
Displays desktop icons using all the colors supported by your current display and your color palette
settings.
To display icons using 256 or 16.8 million colors you must change your display settings
to Hi Color (65536 colors) or True Colors (16.8 M colors)
If the option "Display an arrow in shortcuts" is checked, a small arrow is displayed on Shortcut icons
(bottom left corner). If it is not checked, the arrow is hidden.
375
Axialis IconWorkshop 6.10
You can customize the arrow appearance by changing the associated overlay icon. See
"Miscellaneous" tab.
Windows® Icon Cache
Rebuild cache: Windows® has an internal cache to manage images of all the icons it displays.
Sometimes this internal icon cache is corrupted and icons displays incorrectly. By clicking on this
button "Rebuild" you force Windows® to rebuild its internal icon cache and solve the problem.
Repair Damaged cache: Window®s has an internal cache to manage images of all the icons it
displays. Sometimes this internal icon cache is corrupted and icons displays incorrectly. By clicking
on this button "Repair" you force Windows® to delete and repair its internal icon cache and solve
the problem.
Customize Folders
To access the Customize Folders Tab options, choose Edit/Customize Windows® icons. The
"Customize Windows® Icons" dialog box opens, click on the Customize Folders to get the related
options.
Using this feature, you can customize any hard drive disk folder (or subfolder) appearance with the
icon of your choice.
Customize Folders
1. In the Folder area, specify the full pathname to the folder you wish to customize. To
customize drive icons, you can also specify a root folder.
2. If you click the Change icon button, you can select a new custom icon.
3. If you click Default icon button, you can restore the folder standard icon. Don't forget to
Apply the changes for each folder.
4. In the Info Tip area, specify the custom info tip message you wish to assign to this folder.
This message is displayed in a small window when you pass the mouse pointer over the
folder in Windows® explorer.
Remarks
• You can also customize a Local Hard Drive disk icon: Select the hard drive root folder
("C:\" for example and customize its icon.
• You can customize any folders as long as it is located on a write enabled disk. For
example, CDROM folders can't be customized.
• Any files containing icons (ICO, ICL, DLL , EXE...) can be used to select the custom icon.
• To avoid future visual ambiguity, we recommend you to use icons showing a folder (See
"My Documents" or "Fonts" folder)
376
Customizing Windows® Icons
Customize Start menu
Axialis IconWorkshop™ displays the list of available Windows® items to customize. Each item entry
includes a description and small symbols on right showing its status: "Custom icon", "Windows®
standard icon" or "Modified (changed must be applied").
Customize Start Menu
1. If you click the Change icon button, you can change the icon associated with the selected
item. Axialis IconWorkshop™ opens a dialog box "Change icon". Specify the File Name of
your Library. All icons are displayed in list. Choose your icon and click OK.
2. If you click the Restore Default button, you can revert to the default Windows® icon
associated with the selected item.
3. If you click the Restore Default button, you can revert to the default Windows® icon for all
items in the list
Some of them may not be available or inoperative on your Windows® version.
Customize Desktop
Axialis IconWorkshop™ displays the list of available Windows® items to customize. Each item entry
includes a description and small symbols on right showing its status: "Custom icon", "Windows®
standard icon" or "Modified (changed must be applied").
Customize Start Menu
1. If you click the Change icon button, you can change the icon associated with the selected
item. Axialis IconWorkshop™ opens a dialog box "Change icon". Specify the File Name of
your Library. All icons are displayed in list. Choose your icon and click OK.
2. If you click the Restore Default button, you can revert to the default Windows® icon
associated with the selected item.
3. If you click the Restore Default button, you can revert to the default Windows® icon for all
items in the list
Some of them may not be available or inoperative on your Windows® version.
377
Axialis IconWorkshop 6.10
Miscellaneous
IMPORTANT NOTICE FOR WINDOWS VISTA™ USER
The feature "Customize Windows® Icons" including in the application has known
compatibility issues with Windows Vista™. We don't recommend to use it with this
operating system. Axialis Software will soon release a free separate utility that will
permit to customize icons in all versions of Windows®. Stay tuned...
Axialis IconWorkshop™ displays the list of available Windows® items to customize. Each item entry
includes a description and small symbols on right showing its status: "Custom icon", "Windows®
standard icon" or "Modified (changed must be applied").
Miscellaneous
1. If you click the Change icon button, you can change the icon associated with the selected
item. Axialis IconWorkshop™ opens a dialog box "Change icon". Specify the File Name of
your Library. All icons are displayed in list. Choose Your icon and click OK.
2. If you click the Restore Default button, you can revert to the default Windows® icon
associated with the selected item.
3. If you click the Restore Default button, you can revert to the default Windows® icon for all
items in the list
Some of them may not be available or inoperative on your Windows® version.
378
13
Customizing the
Application
Customize the main toolbar
The main toolbar is Internet Explorer®-like and you can fully customizing it. You can add/remove
buttons or change the order they are displayed, show/hide labels and areas and more...
Show/hide the Main Toolbar
1. Right-click on the main toolbar or the top menu and choose Standard Buttons in the menu
or press F9.
Change Main Toolbar text style
1. Right-click in the main toolbar or the top menu and choose No Text Labels to remove all the
texts.
2. Right-click in the main toolbar or the top menu and choose All Text Labels to display texts
under each button.
3. Right-click in the main toolbar or the top menu and choose Selective Text Labels to display
texts on right of important buttons only.
Add/remove/move buttons in the Main Toolbar
1. Choose View/Customize Main Toolbar in the menu or right-click in the main toolbar and
choose Customize Buttons command or double-click the main toolbar.
2. The dialog box "Customize Toolbar" Opens.
3. An available toolbar buttons list displays. You can add these buttons in the Current toolbar
buttons list by selecting one button and clicking on the Add Button.
4. If you want to delete a button in the current toolbar, you must select it and click on the
Remove button.
5. You can Move Up or Move Down the button in the Current Toolbar buttons list. Select the
button and click on Move Up/Move Down. You can also use the Drag and Drop to move
the buttons.
379
Axialis IconWorkshop 6.10
6. If you want to go back with the Default Main toolbar, click on the Reset button.
Show/hide the Recently Used Bar
This bar permits to quick open a file in the application. It contains a long edit zone and is usually
located under the main toolbar.
1. Right-click in the main toolbar or the top menu and choose Recently Used Bar to show/hide
the bar.
Empty the Recently Used List
1. Choose View/Preferences. The dialog box "Preferences" opens.
2. Select the "Toolbars" tab.
3. Click on the "Empty Recently Used List" button. Click OK.
You can move toolbar buttons directly from the Toolbar by pressing ALT + selecting the
button and moving with the mouse. You can move or resize the Recently Used bar using
the mouse: Place the mouse pointer on the left side of the Recently Used area. When the
cursor changes into a cross with 4 arrows, move it using drag and drop.
Show/hide the Toolbars
The main toolbar is Internet Explorer®-like and you can fully customizing it. You can add/remove
buttons or change the order they are displayed, show/hide labels and areas and more...
Show/hide the Main Toolbar
Document windows contain local toolbars. To hide the local toolbar of a document window,
select it and follow this procedure:
1. Right-click on the main toolbar or the top menu and choose Standard Buttons in the menu
or press F9.
Show/hide the Recently Used Bar
This bar permits to quick open a file in the application. It contains a long edit zone and is usually
located under the main toolbar.
1. Right-click in the main toolbar or the top menu and choose Recently Used Bar to show/hide
the bar.
380
Customizing the Application
Show/hide a Local Toolbar
Document windows contain local toolbars. To hide the local toolbar of a document window,
select it and follow this procedure:
1. Choose View/Local Toolbar or press Alt+F9.
Show/hide the Status Bar
1. Choose View/Status Bar or press Alt+F8.
Show/hide the Librarian
1. Choose View/Librarian or press Esc.
When the command has a check mark next to it, it means that the toolbar is displayed.
When you point to a menu command, the status bar at the bottom of the window
displays a description of the command.
Show and hide the Librarian Window
The Librarian is a docked window (integrated in the user-interface). It can be easily shown and
hidden.
Show/hide the Librarian
1. Select View/Librarian or press ESC.
2. By hiding the Librarian, you gain some space in your application work area. The opened
windows are automatically rearranged.
Change the Librarian position on screen
The Librarian is a docked window (integrated in the user-interface). Its location can be easily
changed.
Change the Librarian position on screen
1. Using the left mouse button, click on the Librarian window title and keep the button
pressed.
381
Axialis IconWorkshop 6.10
2. Move the mouse over the right or bottom side of the application window and release the
button.
3. The Librarian window location has changed. This new location will be saved (even if you quit
and restart the application).
Change the Librarian folder location
Files and folders included in the Librarian are located on your disk drive. This location is set by
default (the first time you installed the application) in your "My Documents" folder. A sub-folder is
created and is named "Axialis Librarian". You can change this folder and location (see below).
Change the Librarian folder location
1. Select View/Preferences or press F2.
2. A dialog box opens. Select the Librarian tab. You can change the Librarian folder in the Path
field. You can also use the Browse button to choose a location using a browse dialog box.
3. Click OK when done.
4. Now quit the application and transfer your files from the old location to the new one (the
application does not perform this operation).
5. Restart the application.
How to change the Scale 1:1 window size
If you create Windows Vista™ or Macintosh® OSX 10.4 Tiger® icons, you need to work with
256x256 images. Also, all the image objects provided by Axialis have a native 256x256 resolution.
In order to get the best results possible, you must frequently preview the artwork at scale 1:1 in
the associated window in Axialis IconWorkshop™.
In previous versions of Axialis IconWorkshop™, the Scale 1:1 window was fixed to 128x128 for a
better integration in the application interface. Now the preview window can be resized to display
256x256 images at scale 1:1. Some features has been implemented to deal with this new size in
order to have limited impact on the user experience.
By default, the Scale 1:1 window's size is 128x128 ( ):
382
Customizing the Application
In this topic, we'll see how to switch the window size to 256x256 and vice-versa. Also, we'll see
how to change the ability of the window to be docked to the interface.
Switch the Preview 1:1 window to 256x256
1. If the Preview 1:1 window is not visible, choose View/Preview 1:1 or press Alt+F10.
2. Using the mouse, right-click in the Scale 1:1 window, a local menu opens.
3. Choose 256x256 Display. The Scale 1:1 window is automatically resized to 256x256 and
becomes a floating window ( ):
383
Axialis IconWorkshop 6.10
When the window is in floating mode, it can placed anywhere over the user interface
without docking. It is set in this mode to avoid the annoying side effect of docking a
256x256 window: The side-bars are so stretched that it creates a lot of wasted spaces in
the interface. For that reason, we recommend you to keep the Scale 1:1 window in floating
mode. To revert this mode to docking mode, see below "Switch between docking and
floating mode".
Switch the Preview 1:1 window to 128x128
1. If the Preview 1:1 window is not visible, choose View/Preview 1:1 or press Alt+F10.
2. Using the mouse, right-click in the Scale 1:1 window, a local menu opens.
3. Choose 128x128 Display. The Scale 1:1 window is automatically resized to 128x128.
Note that the window state does not switch back to docking mode. If you want to dock the
window you need to manually switch the mode. See "Switch between docking and floating
mode".
Switch between docking and floating mode
1. Using the mouse, right-click in the Scale 1:1 window, a local menu opens.
2. Choose Floating Window (no docking).
If the window was docked: It is changed into a floating window (a frame and a title bar
appear). It can placed anywhere over the user interface without docking.
If the window was floating: Nothing is visually changed but if you move it over the right or
left borders of the main window it will be docked when you'll release the mouse button.
Manage favorite documents
If you have favorite documents (media files or icon projects) or folders, you can add them to a
"Favorite List" to retrieve them faster. You can also easily manage this list.
Add a Document to the Favorite List
1. Select an open document in a window.
2. Choose Favorites/Add to Favorites.
• In the area "Name" displays the name of the document as it will appear in the Favorite
List. You can change the name and click OK.
Add a Folder to the Favorite List
1. Open a New Explorer window and select the desired folder.
2. Choose Favorites/Add to Favorites.
384
Customizing the Application
• In the area "Name" displays the name of the document as it will appear in the Favorite
List. You can change the name and click OK.
Open an Item from the Favorite List
1. Open the Favorites menu.
2. Choose the desired item to open it.
• If the item is a document, a Document Window opens.
• If the item is a folder, an Explorer Window opens.
Modify the Favorite List
1. Choose Modify/Favorites.
2. The Favorite List contents displays. You must select the document you want to change or
remove from the list.
3. If you want to change the name of the selected document (you will change the name that
appears in the list, not the filename on disk) click the Rename button.
4. If you want to remove the selected document from the list (you will NOT delete the file or
folder on the disk) click the Remove button.
Options in the General Tab
To access the General Tab options, choose View/Preferences. The "Preferences" dialog box opens,
click on the General tab to get the related options.
Create a new Icon Project window
If this option is checked, the application will automatically create a new icon project window each
time it starts.
Create a new Explorer window
If this option is checked, the application will automatically create a new explorer window each time
it starts.
Warn if insufficient video colors
If this box is checked, the application warns you if your display configuration is insufficient (less
than 65536 colors) each time it starts.
Remark: It is highly recommended to configure screen settings to Hi Colors (65536) or True Colors
(16.8M) when using the application.
385
Axialis IconWorkshop 6.10
Display Welcome and tips windows
If this option is checked, the application automatically opens the welcome window and displays a
new Tip of The Day each time it starts
Warn if Icon files are not associated with Axialis IconWorkshop™
If this box is checked, the application prompts you when it starts if Icon files (ICO, ICL) are not
properly associated with it. If this box is not checked, the application will ignore bad file association.
It is highly recommended to associate icons and ICL files with the application in order to
permit fast icon project access from Windows® Explorer.
Warn if Windows® components are missing (Internet Explorer®,
Quick time,...)
If this box is checked, the application prompts you at startup if the Windows® component named
Internet Explorer®, Quick Time® ... are missing or have an older version. The application includes a
special feature that permits you to use a built-in "Internet Explorer® like" toolbar. These
components must be installed in order to use this very useful toolbar. You can install this
component directly from this warning window.
Show Splash Screen when application starts
When you launch the application, a logo of Axialis IconWorkshop™ displays.
Application language
Select the language you want for the application. Default language is English. Additional languages
may be available on our website. If you choose <automatic>, the language will be set by the
application (according your Windows® language).
Icon overlay image type in explorer
In explorer lists, if you choose the large display (thumbnail), overlay icons are added to distinguish
Windows® and Macintosh® files. You can choose to display Large or Small icons. None is chosen if
you don't want overlay icons.
Use External Internet Browser
If this option is checked, you can use another External Internet Browser.
386
Customizing the Application
Choose Windows® or Macintosh® when creating an icon
If this box is checked, the application prompts you to choose Windows® or Macintosh® type when
you launch the New Icon Project (Ctrl+N) command. If it is unchecked, it automatically selects
Windows® or Macintosh® based on your default settings ("Set as default "button in the New Icon
Project dialog box). You can uncheck this option if you always create icons for the same OS.
Choose format when creating a new Windows® icon
If this box is checked, the application prompts you to choose the first image format you wish to
include in a new Windows® icon project. If it is unchecked, the default format ("Set as default
"button in the New Windows® Icon Project dialog box) is automatically created.
Choose format when creating a new Macintosh® icon
If this box is checked, the application prompts you to choose the first image format you wish to
include in a new Macintosh® icon project. If it is unchecked, the default format ("Set as default
"button in the New Macintosh® Icon Project dialog box) is automatically created.
Show information message when opening EXE file
If this box is checked, the application automatically shows information associated to the EXE file.
Remember folder during "Save As" operation
If this box is checked, the application automatically saves the current folder.
Maximize document windows at opening
If this box is checked, the application automatically maximizes document windows at opening.
Prompt for options when transferring from Photoshop®
If this box is checked, the application will prompt you when the Photoshop® is in action. Otherwise,
the first option will be chosen automatically
Editor options
To access the Editor Tab options, choose View/Preferences. The "Preferences" dialog box opens,
click on the Editor tab to get the related options.
387
Axialis IconWorkshop 6.10
Transparency - Style
Specifies how Axialis IconWorkshop™ displays the pattern representing transparent backgrounds
(transparent areas of icons). Select None to choose a solid background or Small to Large to select
the size of the check board style background. You can adjust the background colors or choosing a
defined scheme below.
Transparency - Color Scheme
Specifies a transparent background predefined color scheme. Choose Custom to manually choose
the colors
Transparency - Custom colors
Click to specify the color of the background area or the first color of the check board style
background pattern and click to specify the second color of the check board style background
pattern.
Grid - Style
Specifies how the Grid appears in the drawing area:
•
•
•
Lines - To draw the grid using solid lines (strong display).
Dashed Lines - To display the grid using very small dashed lines (light display).
Dashed Lines - Each pixel is represented by a small dot in the upper-left corner of the pixel
square (very light display).
Grid - Color
Specifies the color of the color grid.
Grid - Draw stronger lines at fixed intervals
If this option is checked, a stronger grid line (a line with a darker color) is drawn at fixed intervals.
Prompt for resize/crop options when pasting
If this box is checked, a dialog box lets you choose for resize/crop options each time you perform a
paste operation in an icon image. If this option is not checked, a default resize option will be used.
Prompt for palette options when pasting
If this box is checked, a dialog box lets you choose for color options you each time you perform a
paste operation which requires an icon palette modification. This event occurs only for 256 color
image formats. If this option is not checked, a default option will be used
388
Customizing the Application
Warn if insufficient video colors to edit image
If this box is checked, Axialis IconWorkshop™ displays a warning message each time you edit an
image format which exceeds your display capabilities.
Image order compatible with Windows® Explorer
If this option is checked, the order in which image formats are saved in ICO files permits to better
display them in Windows® Explorer. If this option is not checked the icons may be displayed as
16x16 in Windows® Explorer.
If you're a developer and work with Visual Basic, you may encounter issues if you check
this option. Icons may be considered as invalid.
User Interface options
To access the User Interface Tab options, choose View/Preferences. The "Preferences" dialog box
opens, click on the User Interface tab to get the related options.
User Interface Style - Windows® Standard User Interface
Allows to use Windows® interface style.
If you want to use the new Windows Vista™ AERO interface feature, you must choose
this option.
User Interface Style - Axialis Software User Interface
Allows to use Axialis Software specific user interface. If you choose this interface you can adjust
the color of windows title, controls and more. You can also specify the desired application main
color. This color will be applied to every windows and dialog boxes (in the application only).
You can only specify a tint value (HUE). You cannot modify the lightness or the
saturation of the color.
Background colors - Full Screen Mode
Click here to change the color of the screen background (when you open a media file using full
screen).
389
Axialis IconWorkshop 6.10
Background colors - Document windows
Click here to change the color of the document windows background (when you open a document
window).
Background colors - Scale 1:1 preview
Click here to change the background color of the "scale 1:1" preview window (This small window
permits you to see the result of your icon drawing at scale 1:1).
Did you know - You can change the brightness of the preview window by clicking in it
using the left mouse button
Options in the Toolbars Tab
To access the Toolbars Tab options, choose View/Preferences. The "Preferences" dialog box opens,
click on the Toolbars tab to get the related options.
Local Toolbar Display (within document windows)
If this option is checked, a local toolbar will be initially visible (within the document window) each
time you'll open a document. Otherwise, it will be initially hidden. You can set your preferences for
each document category.
Display standard buttons
Specifies whether you want the application to display application standard buttons in the toolbar.
Display "Recently Used" Bar
If this box is checked, the application displays a 'Recently Used' area in the Toolbar. This area
permits you to quickly reopen a file recently opened with this program. To open a file simply click
on it in the list. You can also specify a HTTP of FTP file by typing its URL, search an expression in
the edit area and just hit 'enter'.
Empty "Recently Used" List
Allows you to empty the Recently Used list.
390
Customizing the Application
Text options - No Text label, Show Text labels, Selective Text
Label on Right
Specifies how text descriptions of the toolbar buttons appear:
• No Text Labels - To display only icons in the Toolbar.
•
•
Show Text Labels - To display the names of the buttons underneath each button on the toolbar.
Selective Text Labels on Right - To display the names of certain buttons, such as Search and
Library, on their right side.
Options in the File Associations Tab
To access the File Associations Tab options, choose View/Preferences. The "Preferences" dialog
box opens, click on the File Associations tab to get the related options. Use this feature to choose
which file types will be associated with IconWorkshop™. Windows® identifies file types by their
extensions. Axialis IconWorkshop supports the following file types:
• Icons (*.ico, *.icns, *.bin, *.rsc, *.rsrc)
• Icon Libraries (*.icl, *.icontainer)
• Cursors - read only (*.cur, *.ani)
• Images (*.bmp, *.gif, *. jp2, *.jpg, *.jpeg, *.png, *.pict, *.psd, *.qti, *.qtif, *.tga, *.tif, *.tiff)
If you use Windows Vista™
Windows Vista includes a new centralized feature which permits to easily manage file associations
and default programs. Axialis IconWorkshop™ is fully compliant with this new Windows Vista
feature. Click on the button "Set File Associations for IconWorkshop" to access directly to this
feature.
If you use a previous versions of Windows®
Media Types Details Group
This list specifies the list of supported media files. You can select one or more files to perform an
action ('Change Editor' for example). To associate a media file type to Axialis Pro Screen Saver
Producer, just check the associated box within this list. To restore the original media file
association, uncheck this box.
Click on the All button to select all the media file types in the list.
Click on the Associate/Restore button to restore the original associations of the selected media file
types.
Media Types Details Group
You can change the icon to associate with a selected extension by clicking on the Change icon
button.
391
Axialis IconWorkshop 6.10
Click to change the default Player/Viewer for the selected media file types. This application will be
launched when you'll choose the Open command in Windows® explorer.
Click to change the default Editor application for the selected media file types. This external
application will be launched when you'll choose the Edit command in Windows® or Axialis Pro
Screen Saver Producer explorers.
Options in the Librarian Tab
To access the Librarian Tab options, choose View/Preferences. The "Preferences" dialog box opens,
click on the Librarian tab to get the related options.
You can change the location of the librarian on your hard disk by specifying a new path to the
directory structure containing your Icon Projects, Libraries and Media files.
1. Specify a Path for the librarian or click on the Browse button.
If you specify the new location for the librarian, the change will occur the next time
you launch Axialis IconWorkshop™.
2. If you check "Confirm before saving libraries in librarian" the application prompts you to
confirm if you want save libraries in the librarian.
3. If you check "Show Information Window when deleting items in the librarian" the application
displays information to tell you that the selected items have been moved in the Folder
"Deleted items". You will be able to restore them back to their original locations at any time
and also permanently delete them.
4. If you check "Enable Librarian Item Extended Information" the application permits to add
extended information to each file in the Librarian (Author, keywords, comment). This
information is useful to increase the search capabilities.
This feature adds a hidden information file associated with each item (file with
extension ".ii").
Options in the Images Tab
To access the Images Tab options, choose View/Preferences. The "Preferences" dialog box opens,
click on the Images tab to get the related options.
392
Customizing the Application
JPEG: Writing options
Image Quality - Specify the JPEG compression level (values from 1 to 99). A low compression level
(1 to 10) produces small files but the image quality is very low. A high compression level (80 to
99) produces very good quality images but larger files.
WMF: Default Load Size
Width and Height - Specify the WMF default width and Height. WMF is a vector format. It means
that it can be opened and displayed at any size without quality loss. To display it, the application
needs to convert it to bitmap and need a default size to perform the conversion.
Kodak PhotoCD
Default Load Size - Specify the default Kodak PhotoCD® (PCD) load size. Kodak PhotoCD® is a
multi-resolution format. It means that each PCD file includes several resolutions of the same
picture. Small resolutions are fast to load but with poor quality. High resolutions have good quality
but are memory consuming.
Image Display mode
•
•
•
Various - Click to set default image display to 'Various Scales'. It means that images will be
initially displayed at scale 1:1 (with possibility to change scale)
Best Fit - Click to set default image display to 'Best Fit'. It means that images will be stretched
to the maximum available size when displayed (within document windows or full screen). The
image aspect ratio will always be kept.
Full Window - Click to set default image display to 'Full Window'. It means that images will be
stretched to the maximum available size when displayed (within document windows or full
screen). The image may be distorted when stretched.
Options in the Temporary Files Tab
To access the Temporary files tab options, choose View/Preferences. The "Preferences" dialog box
opens, click on the Temporary files to get the related options.
Store thumbnail previews on disk for fast browsing
Pictures preview you see in the Explorer windows are stored in a special folder for quick viewing
later. This feature greatly improves preview speed when you browse your computer.
Using the slider below, you can define the amount of disk use you can allocate to the cache folder.
We recommend you to allocate the maximum space possible (200 MB). If the space used by cache
files is greater than this allocated space, the folder will be purged by 10 percents.
393
Axialis IconWorkshop 6.10
If you click Delete Files, all the files in the cache folder will be deleted. You'll be prompted to
confirm.
Exclude files from Removable & CDROM drives
If this option is checked, the files located on removable and CD volumes won't be cached. This
option avoids cache overloading.
Exclude files from Network drives
If this option is checked, the files located on network volumes won't be cached. This option avoids
cache overloading.
394
14
Miscellaneous Features,
Tips, Uninstall
Quick-open a file using the Recently Used Bar
This bar permits to quick open a file in the application. It contains a long edit zone and is usually
located under the main toolbar.
Quick-open a media file or project
1. In the Recently Used edit zone, enter the full pathname of a file and press Enter. The
application automatically opens the requested file.
Quick-open a recently-opened media file or project
1. In the Recently Used edit zone, click on the down arrow button (located on the right side of
the bar). A large drop-list opens, select the file in the list.
Quick-create a new project
1. In the Recently Used area, enter the full pathname of a file that does not exist and press
Enter.
2. As the file does not exists, the File not Found dialog box opens. It asks you if you want to
create a new document using this filename. Click on YES. A new project is created.
If you specify a filename without a folder location, the application automatically
searches (or creates if you specify a project) the file in the default "Open" folder (this is
the location you specify the last time you used the Open dialog box).
395
Axialis IconWorkshop 6.10
Manage favorite files
If you have favorite documents (media files or projects) or folders, you can add them to a "Favorite
List" to retrieve them faster. You can also easily manage this list.
Add a Document to the Favorite List
1. Select an opened document window.
2. Choose Favorites/Add to Favorites. In the area "Name" displays the name of the document
as it will appear in the Favorite List. You can change the name and click OK.
Add a Folder to the Favorite List
1. Open a New Explorer window and select the desired folder (Ctrl+E).
2. Choose Favorites/Add to Favorites. In the area "Name" displays the name of the document
as it will appear in the Favorite List. You can change the name and click OK.
Open an Item from the Favorite List
1. Open the Favorites menu.
2. Choose the desired item to open it. If the item is a file, a document window opens. If the
item is a folder, an Axialis Explorer window opens.
Modify the Favorite List
1. Choose Modify/Favorites.
2. The Favorite List contents displays. You must select the document you want to change or
remove from the list.
3. If you want to change the name of the selected document (you will change the name that
appears in the list, not the filename on disk) click the Rename button.
4. If you want to remove the selected document from the list (you will NOT delete the file or
folder on the disk) click the Remove button.
Paste an image as a new document
If an image is present in the Clipboard, you can paste it in the application and create a new Image
document window.
396
Miscellaneous Features, Tips, Uninstall
Paste an image as a new document
1. Select an image item in the application (Librarian, Explorer, opened image document - with
or without selection) and choose Edit Copy.
2. You can also copy an image from an external application.
3. Choose Edit/Paste as a new image.
4. A new document is created. The image is displayed in a new "ImageN" window.
5. Choose File/Save As from the edit window or File/Add to librarian. You can save the image
as a JPEG, PNG, BMP or PSD format or add it to the Librarian (F3).
This command will permit you to easily add new image files to the application. Each time
you select this command you create a new document window.
Desktop Reorganization
The application features a dynamic system to ergonomically reorganize the application Desktop
area. With this system, document windows are tiled and grouped by type. Desktop is divided in 2
parts: Explorer and Search Result windows in one part, Media Document windows in the other part.
It can be automatic or manual.
Reorganize Desktop at any Time
1. Choose Windows/Reorganize Desktop or press F12.
2. You can also click on the Display button on the main toolbar.
This feature is useful only if you don't choose an automatic reorganisation option (see
below).
Toggle Automatic Desktop Reorganization
If this option is enabled, a Desktop Reorganization is performed each time you open, close, reduce
or restore a window
1. Choose Window/Automatic Reorganization.
Change Reorganisation mode
1. Choose Windows/Full Window Reorganization if you want the application to display each
document window using all the available space.
2. Choose Windows/Tile Reorganization if you want the application organize the windows
using an ergonomic tile scheme.
397
Axialis IconWorkshop 6.10
You can switch from one win to another using Ctrl+F6 or Shift+Ctrl+F6.
Acquire a new image from a Twain device
If you have a Twain compatible scanner, video capture card or numeric camera, you can acquire
and create a new image document from within the application.
Acquire an image from a Twain device
1. If you have several capture devices, select the desired device using the File/Select Source
command then click OK.
2. Choose File/Acquire to open the Twain interface.
Each time you acquire an image a new document window is created.
Uninstall or repair the application
Uninstall the application
This procedure removes all the application files (program, samples, temporary files) and cleans the
Windows®registry.
1. Open Start menu in the Windows® task bar, choose Control Panel. Double-click on the Add
or Remove Programs icon. In the list, choose "Axialis IconWorkshop™" and click
Change/Remove. The Axialis Setup window opens.
or
1. Open Start menu in the Windows® task bar, choose All Programs >. Select "Axialis
Software". In the sub-menu, choose "Uninstall or repair Axialis IconWorkshop™". The Axialis
Setup window opens.
2. Select "Uninstall Application" then click Next. Follow the instructions.
If you have added new files in the librarian, Uninstall DOES NOT remove them. Please
delete them manually.
398
Miscellaneous Features, Tips, Uninstall
Repair the application files
If you experience technical issues with the application, some files may be corrupted. In such a case,
try to repair the installed files. This procedure keeps your settings. It just restores the program and
the help files. To perform this operation, the original setup file must be present on your hard disk.
1. Open Start menu in the Windows® task bar, choose Control Panel. Double-click on the Add
or Remove Programs icon. In the list, choose "Axialis IconWorkshop™" and click
Change/Remove. The Axialis Setup window opens.
or
1. Open Start menu in the Windows® task bar, choose All Programs >. Select "Axialis
Software". In the sub-menu, choose "Uninstall or repair Axialis IconWorkshop™". The Axialis
Setup window opens.
2. Select "Repair Installation" then click Next. Setup will try to launch the installation file at the
original location. If the program is not present or elsewhere, please specify the right
location using the opened dialog box.
3. The repair procedure starts. When completed, a final message is displayed. Click Finish.
If you upgraded online since your original installation, you need to upgrade again. The
repair process resets your program version.
399
15
Registering, Upgrading,
Online features
Downloading Object Packs from Internet
On a regular basis, new image object packs will be available for download on our website. Packs are
free but some of them are reserved to registered customers. Additionally, third-party authors may
propose their own object packs (additional fees may be required). Links to selected object packs
will also be added to our download page.
Download Object Packs from your Web Browser
This is a standard way to proceed. The procedure may differ slightly depending on your web
browser type and version. The procedure below is based on Microsoft® Internet Explorer® 6.0:
1. Launch Internet Explorer®. In the Address bar, type the following address:
"http://www.axialis.com/objects".
2. The web page opens: "Download Image Object Packs". We recommend you to read the
License Agreement before downloading packs.
401
Axialis IconWorkshop 6.10
3. When you're interested by an object pack, read the quick description ( ). Take a look at the
popularity and user rating. Once downloaded and tested you'll be also able to vote for it just
by clicking on the Rating Stars ( ). To get more information about the pack, click "Read
More" button.
4. Click the "Download Now" button ( ). If the file is in "FREE ACCESS", the download process
starts immediately. Otherwise, the file is marked "REGISTERED USERS" and you need to
enter your Genuine Axialis Product Key to download the file.
5. The file to download is an executable file (EXE) so you may be prompted by Windows® or
any other antivirus application to confirm the download and execution of the file.
Installing packages downloaded from Internet is potentially dangerous. Install packages
that you download on Internet may contain viruses. However your security is our
priority and all our files are periodically tested against all known viruses. Also, if you
have an antivirus software, the file will be automatically checked before it is launched.
6. If you want to launch the installation of the pack without saving the file on your disk, click
"Run" ( ). In such a case, the file downloads and the installation starts automatically. If you
want to save a copy of the install pack to your disk, click "Save" ( ). The file will be saved
to a folder of your choice. When finished, you'll have to explore this folder later to launch
the installation manually.
7. The installation starts in a separate window similar to this:
402
Registering, Upgrading, Online features
Click Next to go the 2nd screen. You must read carefully the license agreement and accept
it before going further. This is very important to understand the way you can use the
objects. Click "Yes, I agree all the terms" and click Next.
8. The files are copied on your computer. The target location is the "Axialis Librarian\Objects"
folder (usually located in the "My Documents") folder. This folder is easy accessible from all
Axialis products in the built-in Librarian window. To get more information about the
Librarian, see this topic: Working With The Axialis Librarian
9. When finished, the associated Axialis application is launched or activated automatically (here
Axialis IconWorkshop™) and the built-in Librarian is opened. The new object pack folder is
automatically selected.
You're done. Now enjoy the new objects and be creative!
Download Object Packs from the Axialis Application
This is a faster way to proceed. The procedure is very similar but the website is access from within
the application.
1. Launch IconWorkshop™ (or any compatible Axialis Application).
2. Choose Librarian/Download Object Packs (Internet) or click the associated button:
. The
"http://www.axialis.com/objects" page opens in a document window inside the application.
Just follow the procedure as specified above.
3. The new objects are installed and the folder is automatically selected.
Online Registration using Internet
Why Register?
Join the family of registered Axialis Software customers by registering your program. The online
registration is NOT a purchase procedure. Registration can be completed in just a few seconds
using Internet. Your personal information be kept strictly confidential and not given or sold to
anyone.
If you register, you'll get the following benefits:
• LIFETIME FREE UPGRADES for the REST OF YOUR LIFE! Incredible but TRUE! Never pay again for
future versions (for registered customers and using Internet online update only).
• Receive up-to-the-minute notices about new products and offers from Axialis Software.
• Free technical support (using Internet email only).
To Register Online Using Internet
1. Choose the command ?/Online Registration.
2. A dialog box opens. Read general info then click Register Now.
3. A second "Online Registration Using Internet" dialog box opens:
403
Axialis IconWorkshop 6.10
Your Personal Login Data: To register, you must specify yourself as a customer. If this is the
first time you register using this online system, choose "New Customer". Otherwise, specify
your personal login data.
• Check the "I'm a New customer (or I don't have a Username)" option if you've never
registered an Axialis Product using this online registration system. Choose this option
only if you don't have an Axialis Customer username/password logon data. Otherwise,
choose the other option "I Already Have a Username".
• Check the "I already have a Username" option if you've already registered an Axialis
Product using this online registration system. Choose this option only if you have an
Axialis Customer username/password logon data. Otherwise, choose the other option
"I'm a New Customer".
If you've registered another Axialis program using this new registration system (such as
AX-CDPlayer, Screen Saver Producer) you should already have an Axialis Username
4. If you're a New Customer:
A personal account will be created with your personal info (name, email, address, country,
username, password, hint question...). A "New Customer" dialog box opens:
• Name - Specify your Name here. This is not a username but your Real Name. Ex: "John
Smith".
• Email - Specify here your personal e-mail address. This address is important. It will be
used to send you information about new products, offers... Confirm this address in the
Confirm field.
• Address - Specify here your personal address (street, city, state, zip...). This field is
facultative.
• Country - Specify here your country.
• Language - Specify here your preferred language. This field is facultative.
• Username - Specify here your desired Username. As a new customer you must specify
a new username. If the username you specified already exists, you will be asked to
choose a different one. This field is not case sensitive and must contain at least 6
characters. This field is very important: it must be easy to remember, but not too easy!
It's not recommended to specify spaces in your username.
• Password - Specify here your Password. As a new customer you must specify a new
password. This field is not case sensitive and must contain at least 6 characters. This
field is very important: it must be easy to remember, but not too easy! It's not
recommended to specify spaces in your password. Confirm this password in the
Confirm field. This confirmation is useful to avoid errors.
• Question - Specify here your password Hint Question. If you have lost your password,
you'll be able to retrieve it using this question. In such a case, your personal hint
question will be asked to you. If your answer is correct (if it matches your hint answer)
then your password will be given to you. Specify a personal question only. Ex: "What's
the last name of your neighbor?"
• Answer - Specify here your password Hint Answer. If you have lost your password,
you'll be able to retrieve it using this answer. In such a case, your personal hint question
will be asked to you. If your answer is correct (if it matches this hint answer) then your
password will be given to you. Specify short answer that must not be too easy for
404
Registering, Upgrading, Online features
other people. This field is not case sensitive. It's not recommended to specify spaces in
your answer.
Your personal information will be kept strictly confidential and will never be sold or
given to any third company.
5. If you already have a Username:
• Specify in the Username area, your personal Axialis Customer Username. If you're
already an Axialis customer (if you already have registered a program using this new
online registration system, not the old one), you should have a personal Username. The
username is not case sensitive.
• Specify in the Password area your personal Axialis Customer Password. If you're already
an Axialis customer (if you already have registered a program using this new online
registration system, not the old one), you should have a personal Password. The
password is not case sensitive.
If you have lost your password click on the Lost Password button. A Web page will open
and your personal hint question will be asked to you. If your answer is correct, your
password is displayed. You specify the hint question and answer when you create your
customer account (new customer).
6. When done, click on the Next button. A fourth "Online Registration Using Internet" dialog
box opens.
• In the "The Product You purchased" area, provide information about the product your
purchased..
• In the "Product Key" area, specify the Product Key you received after your purchase.
The product key has been sent to you when you purchased the product or received an
upgrade. It has the following format: 12345678-12345-12345-12345-12345. In
this edit zone, you find a copy of the key you specified when you installed the program.
We recommend you to leave it as is.
• In the "Where did you purchase Axialis IconWorkshop™" enter the name of the reseller
(or Web site) where you purchased the program. Please specify also the date and the
order number (if possible).
A correct information is required to register. If you don't specify this info, your
registration will be rejected.
7. When done, click on the Next button. A five "Online Registration Using Internet" dialog box
opens:
Ready to Register: You are about to send your registration information. You must be
connected to Internet before proceeding. If you are not connected to Internet, please
connect now. If you're connected to Internet through a proxy/firewall server, fill the proxy
related fields.
If you' using a modem, check that you're connected to Internet. If you're connected to
Internet without a Firewall, click Register Now. If you use a Firewall, check the Connected
to Internet using a Proxy/Firewall box and fill the following fields:
405
Axialis IconWorkshop 6.10
• Address & Port - Specify here the HTTP Proxy address and port number (usually 80).
• Proxy authentication is required - If this box is checked, the application will send an
authentication message to the proxy server when connecting to Internet. Check this
option only if your server requires authentication then fill the following fields:
• Login & Password - Specify here the Proxy Authentication Login & Password.
8. Click the Register Now button. The last dialog box opens showing the registration progress.
9. Congratulations! You're registered.
To Access your Customer Account
We recommend you to log into your customer account here to check that your registration has
been successfully completed. You need your username and password to access your account.
Upgrade the application using Internet
This is an update system which is reserved to registered users only. It is part of Axialis Lifetime
License. It works through Internet to automatically upgrade your application to the latest release.
It's FREE and for LIFE! Pay once and get all new versions for using Online Update.
Upgrade your Application Online Using Internet
1. Choose the command ?/Free Online Update.
2. A "Online Update" dialog box opens. Axialis Online Update will check our server for a new
version and download a patch if necessary. To upgrade your application online, you must be
a registered user of this application. customer Username and Password:
• It requires authentication then specify your Axialis Customer Username and Password.
If you're already an Axialis customer (if you already have registered a program using
this new online registration system, not the old one), you should have a personal
Username and Password. Username and Password are NOT case sensitive.
• If you have lost your password, click the "Oops! I've lost my password..." button. A Web
page will open and your personal hint question will be asked to you. If your answer is
correct, your password is displayed. You specify the hint question and answer when
you create your customer account (new customer).
• To Continue, click Next.
We strongly recommend you to save and close all the opened screen saver project
Windows® before proceeding (at the end of the download procedure, the application
will be restarted).
3. A "Ready to Register" dialog box opens. If you' using a modem, check that you're connected
to Internet. If you're connected to Internet without a Firewall, click Update Now. If you use
406
Registering, Upgrading, Online features
a Firewall, check the Connected to Internet using a Proxy/Firewall box and fill the following
fields:
4. In the HTTP Settings group specify:
• Address & Port - Specify here the HTTP Proxy address and port number (usually 80).
• Proxy authentication is required - If this box is checked, the application will send an
authentication message to the proxy server when connecting to Internet. Check this
option only if your server requires authentication then fill the Login & Password fields
below.
5. In the FTP Settings group specify:
• Firewall Type - Specify here the FTP Firewall Authentication type you use. We support
the following types:
. SITE hostname
. USER after logon
. Proxy OPEN
. Transparent
. USER with no logon
. USER FireID@Remotehost
. USER RemoteID@remoteHost fire ID
. USER remoteID@fireID@remoteHost
• Address & Port - Specify here the FTP Proxy address and port number (usually 80).
• Login & Password - Specify here the Proxy Authentication Login & Password.
6. Click the Update Now button. The last dialog box opens showing the download progress.
If a new version is available, a patch is downloaded and the application is restarted to be
upgraded.
Online Customer Service on Internet
The customer services are available to registered Axialis customers only. Once you've purchased
an Axialis product we strongly recommend you to register online using either the feature included
in the program or using the online form.
Accessing Customer Service from the Application
1. Launch the application.
2. Select Help/Customer Area.
3. The built-in Browser opens displaying the customer service page.
407
Axialis IconWorkshop 6.10
IMPORTANT
The application will access the Internet. This may result in an alert message from your
firewall program (if any installed). You can configure your firewall to authorize the
application to access to Internet. Axialis applications DO NEVER access the Internet
without informing you. Also, our applications do not (and will never) contain spyware or
malicious code.
Accessing Customer Service from an Internet Browser
1. Launch your Internet Browser
2. Enter this URL in the address bar: http://www.axialis.com/customer/
Contact Axialis Software Team
Due to recent SPAM growth, you cannot contact us by direct email anymore. We've created a
contact page on our website. It includes various ways to contact us. The most convenient way is
to use the contact forms accessible from this page. Using this form, we'll receive a message and
the rest of the discussion bill be made by email.
Contacting us using an Internet Browser
1. Launch your Internet Browser
2. Enter this URL in the address bar: http://www.axialis.com/contact/. You can choose on of
the following topic to contact us:
•
•
•
•
•
•
•
•
Ask a technical question about a program
Report a bug in a program
Suggest a new function in a program
Send feedback about this website
Ask questions about prices, site license
Get information about Axialis Software company
Send a Translation Proposal
Other
If you're a customer or have a purchase question, please check our Customer FAQ before
contacting us.
408
Index
Adjusting
A Acknowlegments................................................................ 34
Acquire
new image .............................................................................402
Acquire ............................................................................... 402
Activate code
icon image ................................................................................ 59
Adjusting ...............................................................................59
Adobe Photoshop® ......................................................... 135
Ajust Opacity .................................................................... 252
Application
Use ...........................................................................................327
Customizing .......................................................................... 381
Activate code ................................................................... 327
Activation Codes ............................................................. 170
actual folder
Apply filters ....................................................................... 252
Axialis IconWorkshop ........................................................27
Axialis Software
Print .........................................................................................340
User Licence Agreement ...................................................... 31
actual folder...................................................................... 340
Add
Axialis Software ..................................................................31
description .............................................................................325
Batch ......................................................................................87
Batch Convert Several Macintosh® Icons
drop shadow .........................................................................254
Favorite Icon .........................................................................168
information text ...................................................................326
opened document................................................................347
Useer license Agreement ...................................................326
Add ...................................................................................... 168
Add ...................................................................................... 254
Add ...................................................................................... 325
Add ...................................................................................... 326
Add ...................................................................................... 326
Add ...................................................................................... 347
Add icons into
icon library .............................................................................342
Add icons into .................................................................. 342
Add image formats .............................................. 177, 190
Add items .......................................................................... 347
Add items using Import function ................................ 348
Add Text ............................................................................ 255
Adding icons
Icon Library ............................................................................100
Adding icons ..................................................................... 100
Adding new image formats ............................................. 60
Adjust Brightness/Contrast ......................................... 250
Adjust Hue/Saturation/Brightness ............................ 251
B Windows® Icons................................................................... 151
Batch Convert Several Macintosh® Icons ................ 151
Batch Create Several Icons .......................................... 153
Batch create several Macintosh® icons........ 199, 303,
355
Batch Create several PNG images ............................. 154
Batch create several Windows icons.... 186, 302, 354
Batch Processing Icons .................................................. 301
bitmap ................................................................................ 312
BMP..................................................................................... 162
built-in tools ........................................................................57
C Capture
icon.......................................................................................... 310
Capture .............................................................................. 310
Change
color depth ............................................................................ 370
Editor Drawing Area Aspect ............................................. 157
item display ........................................................................... 339
Librarian folder location ........................................... 333, 385
Librarian position ....................................................... 333, 384
The Program Preferences1 .............................................. 389
User Interface....................................................................... 156
409
Axialis IconWorkshop 6.10
Change ............................................................................... 156
Change ............................................................................... 157
Change ............................................................................... 333
Change ............................................................................... 333
Change ............................................................................... 339
Change ............................................................................... 370
Change ............................................................................... 384
Change ............................................................................... 385
Change ............................................................................... 389
Change display mode ..................................................... 367
clipboard ................................................................. 309, 368
Clipboard Contents......................................................... 118
color depth
Convert several icons .................................................... 360
Convert several images
Macintosh® icons ................................................................ 293
Windows® icons ................................................................... 292
Convert several images ................................................. 292
Convert several images ................................................. 293
Convert several Macintosh® icons
Windows® format .......................................... 277, 304, 356
Convert several Macintosh® icons............................. 277
Convert several Macintosh® icons............................. 304
Convert several Macintosh® icons............................. 356
Convert several PNG icons
Macintosh® icons ................................................................ 284
Change ....................................................................................370
Windows® icons ................................................................... 283
color depth........................................................................ 370
color palette
Convert several PNG icons ........................................... 283
Convert several PNG icons ........................................... 284
Convert several Windows® icons
Save .........................................................................................264
color palette ..................................................................... 264
colors ....................................................................... 246, 261
Compile
Icon Library ............................................................................103
Compile .............................................................................. 103
Compile .............................................................................. 328
Compile Icon Libraries ................................................... 170
compiled file ..................................................................... 325
computer
Macintosh® format ........................................ 278, 305, 357
Convert several Windows® icons ............................... 278
Convert several Windows® icons ............................... 305
Convert several Windows® icons ............................... 357
Convert several Windows®/Macintosh® icons
PNG .................................................................... 286, 306, 358
Search media files ................................................................352
Convert several Windows®/Macintosh® icons ...... 286
Convert several Windows®/Macintosh® icons ...... 306
Convert several Windows®/Macintosh® icons ...... 358
Copy
computer ........................................................................... 352
Contact Axialis Software Team .................................. 413
Convert
Copy .................................................................................... 368
Create
image............................................................................ 287, 290
gradient .................................................................................. 265
Macintosh® Icon.............................................. 142, 182, 272
Icon .......................................................... 111, 113, 114, 118
PNG icon...................................................................... 279, 281
Icon From............................................................................... 116
Windows® icon ................................................ 145, 194, 275
Icon Snapshot Picture .............................................. 313, 352
Windows®/Macintosh® icon .............................................285
Macintosh® icon ........................................................ 197, 374
Convert .............................................................................. 142
Convert .............................................................................. 145
Convert .............................................................................. 182
Convert .............................................................................. 194
Convert .............................................................................. 272
Convert .............................................................................. 275
Convert .............................................................................. 279
Convert .............................................................................. 281
Convert .............................................................................. 285
Convert .............................................................................. 287
Convert .............................................................................. 290
Convert several icons
new Explorer window ......................................................... 351
media file ............................................................................... 368
new folder ............................................................................. 335
new icon............................................................. 54, 67, 73, 80
new icon library ............................................................ 91, 341
new icon project .................................................................. 309
new image format ............................................................... 237
new Macintosh® icon project........................................... 188
new Windows® icon project ............................................. 175
PNG ......................................................................................... 162
Snapshop Picture ................................................................. 166
snapshot picture .................................................................. 323
Web-optimized GIF image ................................................ 163
images .......................................................................... 297, 360
Windows® icon ........................................................... 184, 372
Convert several icons .................................................... 297
Create ....................................................................................54
410
Index
Create.................................................................................... 67
Create.................................................................................... 73
Create.................................................................................... 80
Create.................................................................................... 91
Create................................................................................. 111
Create................................................................................. 113
Create................................................................................. 114
Create................................................................................. 116
Create................................................................................. 118
Create................................................................................. 162
Create................................................................................. 163
Create................................................................................. 166
Create................................................................................. 175
Create................................................................................. 184
Create................................................................................. 188
Create................................................................................. 197
Create................................................................................. 237
Create................................................................................. 265
Create................................................................................. 309
Create................................................................................. 313
Create................................................................................. 323
Create................................................................................. 335
Create................................................................................. 341
Create................................................................................. 351
Create................................................................................. 352
Create................................................................................. 372
Create................................................................................. 374
Create Different Color Versions
Icon ..........................................................................................161
Create Different Color Versions ................................. 161
Create Gradient ............................................................... 267
Create New Swatch ....................................................... 265
Create Windows XP Compliant Icons ........................ 130
Crop
image.......................................................................................370
Crop .................................................................................... 370
Cursor File ......................................................................... 113
Cursors ............................................................................... 153
Customize
Application .............................................................................381
main toolbar ..........................................................................381
Customize ......................................................................... 381
Customize ......................................................................... 381
Customize Folders .......................................................... 378
customized palettes ....................................................... 263
D Define colors .................................................................... 263
Delete
image format ........................................................................241
Delete ................................................................................. 241
Delete ................................................................................. 321
Delete items ..................................................................... 337
Deleted Items folder
Empty ..................................................................................... 338
Deleted Items folder ...................................................... 338
description
Add .......................................................................................... 325
description ........................................................................ 325
Desktop.............................................................................. 379
Desktop Reorganization ................................................ 401
Display
item properties .................................................................... 340
Display ................................................................................ 340
Display full screen ........................................................... 368
DLL ...................................................................................... 259
document .......................................................................... 346
Draw using
tools ........................................................................................ 244
Draw using ........................................................................ 244
Drawing
icon using .................................................................................. 57
Drawing.................................................................................57
drop shadow
Add .......................................................................................... 254
drop shadow ..................................................................... 254
E Editor Drawing Area Aspect
Change ................................................................................... 157
Editor Drawing Area Aspect......................................... 157
Editor options ................................................................... 392
Empty
Deleted Items folder........................................................... 338
Empty ................................................................................. 338
EXE ...................................................................................... 259
existing
image ......................................................................................... 67
existing ..................................................................................67
Explorer Document ........................................................ 347
Export files ........................................................................ 336
Export icons ........................................................... 320, 346
external editor program ................................................ 334
extract icons included .................................................... 165
F Favorite Icon
Add .......................................................................................... 168
Favorite Icon ..................................................................... 168
Favorites
Managing ............................................................................... 388
411
Axialis IconWorkshop 6.10
Favorites ............................................................................ 388
file using
Quick-open............................................................................399
file using ............................................................................. 399
filename
Specify ....................................................................................325
filename ............................................................................. 325
G General tab ....................................................................... 389
Generate Activation Codes .......................................... 328
gradient
Create .....................................................................................265
gradient.............................................................................. 265
H Have on My Computer .................................................. 160
hide
Librarian window ....................................................... 332, 384
hide...................................................................................... 332
hide...................................................................................... 384
I icon
Capture ...................................................................................310
Create ..................................................... 111, 113, 114, 118
Open ........................................................................................318
transfer ...................................................................................148
icon image
Adjusting .................................................................................. 59
icon image ............................................................................ 59
Icon Library
Add icons into .......................................................................342
Adding icons ..........................................................................100
Compiling ...............................................................................103
Open ........................................................................................346
Icon Library ....................................................................... 100
Icon Library ....................................................................... 103
Icon Library ....................................................................... 315
Icon Library ....................................................................... 342
Icon Library ....................................................................... 346
Icon Snapshot Picture
Create .......................................................................... 313, 352
Icon Snapshot Picture .................................................... 313
Icon Snapshot Picture .................................................... 352
icon using
Drawing .................................................................................... 57
icon using.............................................................................. 57
Icons
Search All ............................................................................... 160
Icons .......................................................................................37
Icons .......................................................................................65
Icons .................................................................................... 111
Icons .................................................................................... 113
Icons .................................................................................... 114
Icons .................................................................................... 154
Icons .................................................................................... 160
Icons .................................................................................... 161
Icons .................................................................................... 323
Icons .................................................................................... 344
IconWorkshop .................................................................. 156
image
Convert ........................................................................ 287, 290
Convert several icons ............................................... 297, 360
Crop ........................................................................................ 370
existing ...................................................................................... 67
Paste ....................................................................................... 401
Resize ..................................................................................... 369
Save ........................................................................................ 312
image .....................................................................................67
image .....................................................................................87
image .................................................................................. 153
image .................................................................................. 184
image .................................................................................. 186
image .................................................................................. 197
image .................................................................................. 199
image .................................................................................. 287
image .................................................................................. 290
image .................................................................................. 294
image .................................................................................. 297
image .................................................................................. 302
image .................................................................................. 303
image .................................................................................. 312
image .................................................................................. 354
image .................................................................................. 355
image .................................................................................. 360
image .................................................................................. 369
image .................................................................................. 370
image .................................................................................. 370
image .................................................................................. 372
image .................................................................................. 374
image .................................................................................. 401
Image File........................................................................... 111
image format
Delete ..................................................................................... 241
Create Different Color Versions ......................................161
image format .................................................................... 241
image into
Saving........................................................................................ 65
Import..................................................................................... 256
412
Index
image into ......................................................................... 256
Images tab......................................................................... 397
Import
image into ..............................................................................256
Import................................................................................. 256
Import files ........................................................................ 335
Import icons into
library ......................................................................................319
Import icons into ............................................................. 319
information text
Add ..........................................................................................326
information text .............................................................. 326
Install
Photoshop® plug-in.............................................................268
Install .................................................................................. 268
item
Preview ...................................................................................338
item display
Change ....................................................................................339
item display ....................................................................... 339
item full screen
Open ........................................................................................334
item full screen ................................................................ 334
item properties
Display ....................................................................................340
item properties ................................................................ 340
item1
Open ........................................................................................333
item1 .................................................................................. 333
J Jasc Paint Shop Pro® ...................................................... 139
L layers ............................................................................. 73, 80
Librarian ...........................................................65, 331, 338
Librarian folder location
Change ......................................................................... 333, 385
Librarian folder location ................................................ 333
Librarian folder location ................................................ 385
Librarian position
Change ......................................................................... 333, 384
Librarian position ............................................................. 333
Librarian position ............................................................. 384
Librarian tab ...................................................................... 396
Librarian window
hide ............................................................................... 332, 384
Librarian window ............................................................. 332
Librarian window ............................................................. 384
library
Import icons into ..................................................................319
Open ....................................................................................... 316
library .................................................................................. 316
library .................................................................................. 317
library .................................................................................. 318
library .................................................................................. 319
library .................................................................................. 320
library .................................................................................. 321
library .................................................................................. 322
library .................................................................................. 323
library .................................................................................. 343
library .................................................................................. 344
library .................................................................................. 346
Load Swatches ................................................................. 267
location............................................................................... 325
M Macintosh Icons .............................................................. 153
Macintosh® ............................................................ 145, 148
Macintosh® format
Convert several Windows® icons ............... 278, 305, 357
Macintosh® format.................................... 193, 194, 275
Macintosh® format......................................................... 278
Macintosh® format......................................................... 305
Macintosh® format......................................................... 357
Macintosh® icon
Convert ............................................................. 142, 182, 272
Convert several images ..................................................... 293
Convert several PNG icons ............................................... 284
Create ........................................................................... 197, 374
Save .............................................................................. 181, 192
Macintosh® icon .............................................................. 142
Macintosh® icon .............................................................. 181
Macintosh® icon .............................................................. 182
Macintosh® icon .............................................................. 190
Macintosh® icon .............................................................. 192
Macintosh® icon .............................................................. 197
Macintosh® icon .............................................................. 272
Macintosh® icon .............................................................. 281
Macintosh® icon .............................................................. 284
Macintosh® icon .............................................................. 290
Macintosh® icon .............................................................. 293
Macintosh® icon .............................................................. 374
Macintosh® vs Windows® icons ....................................44
Macromedia Freehand® ................................................ 139
main toolbar
Customize ............................................................................. 381
main toolbar ...................................................................... 381
Manage favorite files ..................................................... 400
Managing
Favorites ................................................................................ 388
413
Axialis IconWorkshop 6.10
Managing ........................................................................... 388
media file
Copy ........................................................................................368
Open ........................................................................................365
new Macintosh® icon project
Create ..................................................................................... 188
new Macintosh® icon project ...................................... 188
new Windows® icon project
Print .........................................................................................366
Create ..................................................................................... 175
media file ........................................................................... 365
media file ........................................................................... 366
media file ........................................................................... 368
Media Types Tab ............................................................. 395
Miscellaneous ................................................................... 380
Miscellaneous Features ................................................. 399
Modify icons ..................................................................... 259
Modify Swatch color...................................................... 266
more icons.............................................................. 321, 322
more items ........................................................................ 336
Move-Copy
new Windows® icon project ........................................ 175
Normalize several icons ............................ 300, 308, 363
part ..........................................................................................247
library...................................................................................... 316
Move-Copy ...................................................................... 247
My Icons ............................................................................ 166
my Web Site ..................................................................... 168
N name ................................................................................... 322
new document ................................................................. 401
new Explorer window
Create .....................................................................................351
new Explorer window .................................................... 351
new folder
Create .....................................................................................335
new folder ......................................................................... 335
new icon
Creating ............................................................. 54, 67, 73, 80
new icon ............................................................................... 54
new icon ............................................................................... 67
new icon ............................................................................... 73
new icon ............................................................................... 80
new icon ............................................................................ 318
new icon library
Create ............................................................................. 91, 341
new icon library .................................................................. 91
new icon library ............................................................... 341
new icon project
Create .....................................................................................309
new icon project .............................................................. 309
new image
Acquire....................................................................................402
new image ......................................................................... 402
new image format
Create .....................................................................................237
new image format .......................................................... 237
414
O Online Customer Service on Internet........................ 412
Online features ................................................................ 405
Online Registration using Internet ............................. 408
Open
icon.......................................................................................... 318
icon library ............................................................................. 346
item full screen .................................................................... 334
item1 ...................................................................................... 333
media file ............................................................................... 365
Open ................................................................................... 316
Open ................................................................................... 318
Open ................................................................................... 333
Open ................................................................................... 334
Open ................................................................................... 346
Open ................................................................................... 365
Open color palette .......................................................... 264
opened document
Add .......................................................................................... 347
opened document ........................................................... 347
Options.......................... 389, 394, 395, 396, 397, 398
P part
Move-Copy .......................................................................... 247
part ...................................................................................... 247
Paste
image ...................................................................................... 401
Paste ................................................................................... 401
Photoshop® plug-in
Install ...................................................................................... 268
Use .......................................................................................... 269
Photoshop® plug-in ........................................................ 268
Photoshop® plug-in ........................................................ 269
PNG
Convert several Windows®/Macintosh® icons. 286, 306,
358
Create ..................................................................................... 162
PNG ..................................................................................... 162
PNG ..................................................................................... 285
PNG ..................................................................................... 286
PNG ..................................................................................... 306
Index
PNG ..................................................................................... 358
PNG icon
Convert........................................................................ 279, 281
PNG icon ............................................................................ 279
PNG icon ............................................................................ 281
Preview
item .........................................................................................338
Preview .............................................................................. 338
Print
actual folder ..........................................................................340
media file ................................................................................366
Print .................................................................................... 340
Print .................................................................................... 366
program files ......................................................... 165, 259
PSD Image ......................................................... 73, 80, 162
Q Quick-open
file using .................................................................................399
Quick-open ....................................................................... 399
R Read Macintosh® Icons
Use StuffIt Expander® ........................................................140
Read Macintosh® Icons ................................................. 140
Recently Used Bar ........................................................... 399
Rename ................................................................... 322, 336
Resize
image.......................................................................................369
Resize ................................................................................. 369
Resize/Rotate .................................................................. 249
Restore previously deleted items............................... 338
Search All
Icons........................................................................................ 160
Search All ........................................................................... 160
Search items ..................................................................... 337
Search media files
computer ............................................................................... 352
Search media files ........................................................... 352
Select files ......................................................................... 336
selections ........................................................................... 241
Send media items via email .......................................... 338
separate document ........................................................ 316
several icons ........................................................................87
Show ........................................................................ 332, 384
Show/hide
Toolbars ................................................................................. 383
Show/hide ......................................................................... 383
Snapshop Picture
Create ..................................................................................... 166
Snapshop Picture ............................................................ 166
snapshot picture
Create ..................................................................................... 323
snapshot picture .............................................................. 323
Sort item ............................................................................ 322
Specify
filename ................................................................................. 325
Specify................................................................................ 325
Start menu ........................................................................ 379
Supported Media Types ................................................ 364
System Requirements .......................................................35
System Settings .............................................................. 377
T S Sample Icons Terms Of Use ............................................ 33
Save
color palette ..........................................................................264
icon ............................................................................................ 65
image.......................................................................................312
Macintosh® icon ........................................................ 181, 192
Windows® icon .......................................................... 180, 193
Save ....................................................................................... 65
Save .................................................................................... 180
Save .................................................................................... 181
Save .................................................................................... 192
Save .................................................................................... 193
Save .................................................................................... 264
Save .................................................................................... 312
Save Swatches ................................................................. 267
scratch .................................................................................. 54
screen ...................................................................... 333, 384
Temporary Files tab ........................................................ 398
The Program Preferences1
Changing ................................................................................ 389
The Program Preferences1 .......................................... 389
Tips ...................................................................................... 399
Toolbars
Show/hide ............................................................................. 383
Toolbars ............................................................................. 383
Toolbarstab ....................................................................... 394
tools
Draw using ............................................................................ 244
tools .................................................................................... 244
transfer
icon.......................................................................................... 148
transfer .............................................................................. 148
Transparency ......................................................... 154, 162
Transparent GIF File ....................................................... 114
Twain device ..................................................................... 402
415
Axialis IconWorkshop 6.10
U Uninstall ............................................................................. 403
Uninstallation .................................................................... 399
Upgrading .......................................................................... 405
Use
Activate code ........................................................................327
Photoshop® plug-in.............................................................269
Use ...................................................................................... 269
Use ...................................................................................... 327
Use iconworshop .................................................. 135, 139
Use standard .................................................................... 263
Use StuffIt Expander®
Welcome ...............................................................................27
What's New ..........................................................................29
Windows® format
Convert several Macintosh® icons ............ 277, 304, 356
Windows® format ...................................... 181, 182, 272
Windows® format ........................................................... 277
Windows® format ........................................................... 304
Windows® format ........................................................... 356
Windows® icon
Batch Convert Several Macintosh® Icons ..................... 151
convert .............................................................. 145, 194, 275
Convert several images ..................................................... 292
Read Macintosh® Icons ......................................................140
Convert several PNG icons ............................................... 283
Use StuffIt Expander® ................................................... 140
Useer license Agreement
Create ........................................................................... 184, 372
Add ..........................................................................................326
Windows® icon ................................................................ 142
Windows® icon ................................................................ 145
Windows® icon ................................................................ 151
Windows® icon ................................................................ 177
Windows® icon ................................................................ 180
Windows® icon ................................................................ 184
Windows® icon ................................................................ 193
Windows® icon ................................................................ 194
Windows® icon ................................................................ 275
Windows® icon ................................................................ 279
Windows® icon ................................................................ 283
Windows® icon ................................................................ 287
Windows® icon ................................................................ 292
Windows® icon ................................................................ 372
Windows®/Macintosh® icon
Useer license Agreement .............................................. 326
User Interface
Change ....................................................................................156
User Interface .................................................................. 156
User Interface options ................................................... 393
User Licence Agreement
Axialis Software...................................................................... 31
User Licence Agreement.................................................. 31
using Internet ................................................................... 411
V Version 5.1........................................................................... 29
W Web Image ........................................................................ 116
Web-optimized GIF image
create ......................................................................................163
Web-optimized GIF image ........................................... 163
Web-optimized GIF image ........................................... 295
416
Save .............................................................................. 180, 193
Convert .................................................................................. 285
Windows®/Macintosh® icon ........................................ 285
Working......................................................... 241, 246, 261