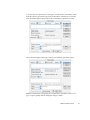
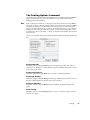
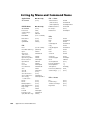
1
User Manual BBEdit 6.5 Professional HTML and Text Editor for the Macintosh Bare Bones Software, Inc. BBEdit 6.5 Product Design Rich Siegel, Patrick Woolsey, Jim Correia, Steve Kalkwarf Product Engineering Jim Correia, Jon Hueras, Steve Kalkwarf, Rich Siegel Engineers Emeritus Chris Borton, Lindsay Davies, Tom Emerson, Pete Gontier, Brad Hanson, Erling Johansen, Scott Marcy, Jamie McCarthy, John Norstad, Jon Pugh, Mark Romano, Leonard Rosenthol, Rob Vaterlaus Quality Assurance Akikaze Media Services (Micah Bly), Christian Smith, Patrick Woolsey Documentation John Gruber, Jerry Kindall, Philip Borenstein, Simon Jester, Rich Siegel, Patrick Woolsey Additional Engineering Polaschek Computing <http:.//www.polaschek-computing.com/> Mac OS X icons Ultra Maroon Design PCRE Library Package written by Philip Hazel © 1997-2000 University of Cambridge, England PopupFuncs™ Technology Eric Slosser Installer VISE™ courtesy of MindVision Software <http://www.mindvision.com/> Visibone color arrangements © 1999-2000 VisiBone <http://www.visibone.com/> SpellWright™ Spelling System © 1994 Lex-Tek International BBEdit and the BBEdit User’s Guide are copyright ©1992-2001 Bare Bones Software, Inc. All rights reserved. Printed in USA. Bare Bones Software, Inc. P. O. Box 1048 Bedford, MA 01730–01048 (781) 687-0700 (781) 687-0711 fax http://www.barebones.com/ Sales information: Technical support: [email protected] [email protected] “It Doesn’t Suck” is a registered trademark of Bare Bones Software. Information in this document is subject to change without notice and does not represent a commitment on the part of the copyright holder. The software described in this document is furnished under a license agreement. This document may not, in whole or in part, be copied, photocopied, reproduced, translated, or reduced to any electronic medium or machine-readable form without prior consent, in writing, from the copyright holder. Warranty and license information is printed on the CD-ROM package and included on the next page of this user manual. Frontier is a trademark of UserLand Software. THINK C, THINK Pascal, and THINK Reference are trademarks of Symantec Corporation. CodeWarrior is a trademark of Metrowerks, Inc. Macintosh, Mac OS, Mac OS X, Power Macintosh, AppleScript, MPW and ToolServer are trademarks of Apple Computer, Inc. PowerPC is a trademark of International Business Machines Corp. All other trademarks are the property of their respective owners. License Agreement: You, the Licensee, assume responsibility for the selection of the program BBEdit to achieve your intended results, and for the installation, use, and results obtained from the program. Breaking the package seal and installing the program constitutes your acceptance of these terms and conditions. If you do not accept these terms and conditions, then do not break the package seal or install the software, and return the package for a full refund. License: You may use the program and documentation on a single machine and copy the program and documentation into any machine-readable or printed form for backup or support of your use of the program and documentation on the single machine, provided that no more than one copy of the program and documentation may be used on a single machine by no more than one user at a time. You may not use, copy, modify, or transfer the program or documentation, or any copy thereof, in whole or in part, except as provided in this Agreement. If you use, copy, modify, or transfer the program or documentation, or any copy thereof, in whole or part, except as expressly provided for in this agreement, your license is automatically terminated. The license is effective on the date you accept this Agreement, and remains in effect until terminated as indicated above or until you terminate it. If the license is terminated for any reason, you agree to destroy the program and documentation, together with all copies thereof, in whole or in part, in any form, and to cease all use of the program and documentation. Limited Warranty and Limitation of Remedies: The program, documentation and any support from Bare Bones Software, Inc., are provided “as is” and without warranty, express and implied, including but not limited to any implied warranties of merchantability and fitness for a particular purpose. In no event will Bare Bones Software, Inc. be liable for any damages, including lost profits, lost savings, or other incidental or consequential damages, even if Bare Bones Software, Inc. is advised of the possibility of such damages, or for any claim by you or any third party. General Terms: This Agreement can only be modified by a written agreement signed by you and Bare Bones Software, Inc. and changes from the terms and conditions of this Agreement made in any other manner will be of no effect. If any portion of this Agreement shall be held invalid, illegal, or unenforceable, the validity, legality, and enforceability of the remainder of the Agreement shall not in any way be affected or impaired thereby. This Agreement shall be governed by the laws of The Commonwealth of Massachusetts, without giving effect to conflict of laws provisions thereof. As required by United States export regulations, you shall not permit export of the program or any direct products thereof to any country to which export is then controlled by the United States Office of Export Administration, unless you have that agency’s prior written approval. Use, duplication and disclosure by the United States Government of the program or any part thereof is subject to restrictions as set forth in subdivision (g)(3) of Rights in Data - General Clause in Federal Acquisition Regulations (“FAR”) 52.227.14, the Commercial Computer Software Restricted Rights Clause in FAR 52.227.19. and/or subdivision c(1)(ii) of Rights in Technical Data and Computer Software Clause in Department of Defense FAR 252.227.7013. Acknowledgment: You acknowledge that you have read this agreement, understand it, and agree to be bound by its terms and conditions. You further agree that it is the complete and exclusive statement of the agreement between you and Bare Bones Software, Inc. which supersedes all proposals or prior agreements, oral or written, and all other communications between you and Bare Bones Software, Inc. relating to the subject matter of this agreement. Table of Contents Chapter 1 Welcome to BBEdit 1 Getting Started . . . . . . . . . . . . . . . . . . . . . . . . . . . . . . . . . . . . . . . . . . . . . 1 What is BBEdit? . . . . . . . . . . . . . . . . . . . . . . . . . . . . . . . . . . . . . . . . . . . . 1 How Can I Use BBEdit? . . . . . . . . . . . . . . . . . . . . . . . . . . . . . . . . . . . . . . 2 Working with Development Environments – 2 Writing HTML Documents – 2 Human Interface Notes . . . . . . . . . . . . . . . . . . . . . . . . . . . . . . . . . . . . . . 3 Dynamic Menus – 3 • Bypassing Options Dialogs – 3 • Menu Command Keys – 3 • Contextual Menus – 4 • Snappy Palettes – 4 • Dialog Box Command Keys – 4 Changes from Previous Versions . . . . . . . . . . . . . . . . . . . . . . . . . . . . . . 6 Chapter 2 Installing BBEdit 9 Basic Installation . . . . . . . . . . . . . . . . . . . . . . . . . . . . . . . . . . . . . . . . . . . . 9 System Requirements – 9 • Installing BBEdit – 9 Additional Software . . . . . . . . . . . . . . . . . . . . . . . . . . . . . . . . . . . . . . . . 10 Internet Control Panel – 10 • ToolServer Support – 11 BBEdit Support Folder . . . . . . . . . . . . . . . . . . . . . . . . . . . . . . . . . . . . . . 11 Dictionaries – 12 • Glossary – 12 • Help – 12 • HTML Templates – 12 • Language Modules – 12 • MacPerl Support – 13 • Menu Scripts – 13 • Plug-Ins – 13 • Scripts – 14 • Search Scripts – 14 • Shutdown Items – 14 • Startup Items – 14 • Stationery – 15 • Unix Support – 15 Other BBEdit Files and Folders . . . . . . . . . . . . . . . . . . . . . . . . . . . . . . 15 BBEdit Preferences Folder – 15 • BBEdit Prefs Data – 15 • BBEdit FTP Bookmarks – 16 • Clipboards – 16 • File Filters – 16 • BBEdit Grep Patterns – 16 • ToolServer Worksheet – 16 • Recent Files & Favorites – 16 • Recent Folders & Favorites – 17 BBEdit Table Builder . . . . . . . . . . . . . . . . . . . . . . . . . . . . . . . . . . . . . . . 17 Chapter 3 Working with Files 19 Launching BBEdit . . . . . . . . . . . . . . . . . . . . . . . . . . . . . . . . . . . . . . . . . 19 Startup Items – 20 Memory Considerations . . . . . . . . . . . . . . . . . . . . . . . . . . . . . . . . . . . . 20 Creating and Saving Documents . . . . . . . . . . . . . . . . . . . . . . . . . . . . . 21 Save As Options – 23 • File Saving Options – 23 • Long File Names – 25 • Saving with Authentication – 25 Opening Existing Documents . . . . . . . . . . . . . . . . . . . . . . . . . . . . . . . . 26 Opening Multi-Byte Documents – 26 • Using the Open Command – 27 • Using the Open Hidden Command – 29 • Using the Open Recent Command – 29 • Opening Several Files at Once – 29 • Using the Open Selection Command – 29 v Opening From and Saving to FTP Servers . . . . . . . . . . . . . . . . . . . . . FTP Browsers . . . . . . . . . . . . . . . . . . . . . . . . . . . . . . . . . . . . . . . . . . . . . Using Stationery . . . . . . . . . . . . . . . . . . . . . . . . . . . . . . . . . . . . . . . . . . . Using File Groups . . . . . . . . . . . . . . . . . . . . . . . . . . . . . . . . . . . . . . . . . 31 34 34 35 Creating a File Group – 35 • Using File Groups – 36 • Removing Files from a File Group – 37 Making Backups . . . . . . . . . . . . . . . . . . . . . . . . . . . . . . . . . . . . . . . . . . . 37 Automatic Backups – 38 • Manual Backups – 38 Printing . . . . . . . . . . . . . . . . . . . . . . . . . . . . . . . . . . . . . . . . . . . . . . . . . . 39 Options Available from Print Dialog – 40 • The Printing Options Command – 41 Chapter 4 Editing Text with BBEdit 43 Basic Editing . . . . . . . . . . . . . . . . . . . . . . . . . . . . . . . . . . . . . . . . . . . . . . 44 Moving text – 45 • Multiple Clipboards – 45 • Drag and Drop – 46 Multiple Undo . . . . . . . . . . . . . . . . . . . . . . . . . . . . . . . . . . . . . . . . . . . . 46 Window Anatomy . . . . . . . . . . . . . . . . . . . . . . . . . . . . . . . . . . . . . . . . . 46 The Status Bar – 47 • The Function Pop-Up Menu – 49 • The Split Bar – 49 Cursor Movement and Text Selection . . . . . . . . . . . . . . . . . . . . . . . . . 50 Clicking – 50 • Arrow Keys – 51 • Scrolling the View – 52 • The Delete Key – 52 • The Numeric Keypad – 53 • Go To Line Command – 53 • Function Keys – 54 Text Options . . . . . . . . . . . . . . . . . . . . . . . . . . . . . . . . . . . . . . . . . . . . . . 54 Editing Options – 55 • Display Options – 56 Font & Tabs . . . . . . . . . . . . . . . . . . . . . . . . . . . . . . . . . . . . . . . . . . . . . . . 57 Text Transformation . . . . . . . . . . . . . . . . . . . . . . . . . . . . . . . . . . . . . . . . 58 Balance – 58 • Exchange Characters – 58 • Change Case – 59 • Shift Left and Shift Right – 59 • Add Line Breaks – 60 • Remove Line Breaks – 60 • Rewrap Quoted Text – 60 • Increase and Decrease Quote Level – 60 • Strip Quotes – 60 • Hard Wrap – 60 • Zap Gremlins – 61 • Entab – 62 • Detab – 62 • Resolve URL – 62 How BBEdit Wraps Text . . . . . . . . . . . . . . . . . . . . . . . . . . . . . . . . . . . . 63 Soft Wrapping – 64 • Hard Wrapping – 64 The Mark Submenu . . . . . . . . . . . . . . . . . . . . . . . . . . . . . . . . . . . . . . . . 67 Setting Markers – 67 • Clearing Markers – 68 • Using Grep to Set Markers – 68 The Insert Submenu . . . . . . . . . . . . . . . . . . . . . . . . . . . . . . . . . . . . . . . . 69 Inserting Files – 69 • Inserting a Folder Listing – 69 • Inserting Paths – 69 • Inserting a Toolbox Call Template – 70 • Inserting a Page Break – 70 Comparing Text Files . . . . . . . . . . . . . . . . . . . . . . . . . . . . . . . . . . . . . . . 70 Multi-File Compare Options – 73 Using the Spelling Checker . . . . . . . . . . . . . . . . . . . . . . . . . . . . . . . . . 74 Checking Spelling – 74 • Selecting Active Dictionaries – 76 • Editing the User Dictionary – 76 • Using an External Spelling Checker – 76 vi Chapter 5 Working with International Text 77 An International Text Primer . . . . . . . . . . . . . . . . . . . . . . . . . . . . . . . . 77 How Script Systems Work . . . . . . . . . . . . . . . . . . . . . . . . . . . . . . . . . . 78 Using Script Systems . . . . . . . . . . . . . . . . . . . . . . . . . . . . . . . . . . . . . . . 79 Script Systems in BBEdit – 80 Unicode . . . . . . . . . . . . . . . . . . . . . . . . . . . . . . . . . . . . . . . . . . . . . . . . . . 81 Saving Unicode Files – 81 • Opening Unicode Files – 82 Chapter 6 Working with Windows 83 Window Menu . . . . . . . . . . . . . . . . . . . . . . . . . . . . . . . . . . . . . . . . . . . . 83 Minimize Window – 83 • Bring All to Front – 84 • Palettes – 84 • Arrange – 87 • Get Info – 88 • Super Get Info – 88 • Reveal in Finder – 89 • Zoom – 89 • Quick Find – 89 • Send to Back – 89 • Exchange with Next – 89 • Synchro Scrolling – 89 • Window Names – 89 Chapter 7 Searching 91 Basic Searching and Replacing . . . . . . . . . . . . . . . . . . . . . . . . . . . . . . 92 Search Settings – 94 • Special Characters – 95 Multi-File Searching . . . . . . . . . . . . . . . . . . . . . . . . . . . . . . . . . . . . . . . 95 Multi-File Search Results: Batch Find – 97 • Multi-File Search Results: File by File – 98 • Specifying the Search Set – 99 • Multi-File Search Options – 101 • File Filters – 102 Multi-File Replacing . . . . . . . . . . . . . . . . . . . . . . . . . . . . . . . . . . . . . . 104 Replacing in Files with Projector CKIDs – 105 Quick Search . . . . . . . . . . . . . . . . . . . . . . . . . . . . . . . . . . . . . . . . . . . . . 106 Search Menu Reference . . . . . . . . . . . . . . . . . . . . . . . . . . . . . . . . . . . . 107 Find – 107 • Quick Search – 107 • Find Again – 107 • Find Selection – 107 • Enter Search/Replace String – 107 • Replace – 107 • Replace All – 108 • Replace & Find Again – 108 • Find in Next File – 108 • Open All Matches – 108 • Find & Replace All Matches – 108 • Go to Line – 108 • Go to Center Line – 108 • Go to Previous/Next Error – 108 • Go to Previous/Next Placeholder – 108 • Find Differences – 109 • Apply to New – 109 • Apply to Old – 109 • Find in Reference – 109 • Find Definition – 109 Chapter 8 Searching with Grep 111 Changes in BBEdit 6.5 . . . . . . . . . . . . . . . . . . . . . . . . . . . . . . . . . . . . . What is Grep or Pattern Searching? . . . . . . . . . . . . . . . . . . . . . . . . . Recommended Books and Resources . . . . . . . . . . . . . . . . . . . . . . . . Writing Search Patterns . . . . . . . . . . . . . . . . . . . . . . . . . . . . . . . . . . . . 112 112 112 113 Most Characters Match Themselves – 113 • Escaping Special Characters – 113 • Wildcards Match Types of Characters – 114 • Character Classes Match Sets or Ranges of Characters – 116 • Matching Non-Printing Characters – 117 • Other Special Character Classes – 118 • Quantifiers Repeat Subpatterns – 118 • Combining Patterns to Make Complex Patterns – 119 • Creating Subpatterns – 120 • Using Alternation – 121 • The ‘Longest Match’ Issue – 122 • Non-Greedy Quantifiers – 122 vii Writing Replacement Patterns . . . . . . . . . . . . . . . . . . . . . . . . . . . . . . 123 Subpatterns Make Replacement Powerful – 123 • Using the Entire Matched Pattern – 124 • Using Parts of the Matched Pattern – 124 • Case Transformations – 125 Examples . . . . . . . . . . . . . . . . . . . . . . . . . . . . . . . . . . . . . . . . . . . . . . . . 126 Matching Identifiers – 126 • Matching White Space – 126 • Matching Delimited Strings – 127 • Marking Structured Text – 127 • Marking a Mail Digest – 128 • Rearranging Name Lists – 128 Advanced Grep Topics . . . . . . . . . . . . . . . . . . . . . . . . . . . . . . . . . . . . 129 Matching Nulls – 129 • Backreferences – 129 • POSIX-Style Character Classes – 131 • Non-Capturing Parentheses – 131 • Perl-Style Pattern Extensions – 132 • Comments – 133 • Pattern Modifiers – 133 • Positional Assertions – 135 • Conditional Subpatterns – 137 • Once-Only Subpatterns – 138 • Recursive Patterns – 140 Chapter 9 Browsers 141 Browser Overview . . . . . . . . . . . . . . . . . . . . . . . . . . . . . . . . . . . . . . . . 141 List Pane – 141 • Status Bar – 142 • Text View Pane – 142 • Splitter – 142 Disk Browsers . . . . . . . . . . . . . . . . . . . . . . . . . . . . . . . . . . . . . . . . . . . . 142 Using Disk Browsers – 143 • Using the List Pane in Disk Browsers – 144 • Using the Text Pane in Disk Browsers – 144 Search Results Browsers . . . . . . . . . . . . . . . . . . . . . . . . . . . . . . . . . . . 145 Error Results Browsers . . . . . . . . . . . . . . . . . . . . . . . . . . . . . . . . . . . . 146 Chapter 10 Preferences 147 The Preferences Command . . . . . . . . . . . . . . . . . . . . . . . . . . . . . . . . . 148 Application Preferences . . . . . . . . . . . . . . . . . . . . . . . . . . . . . . . . . . . 149 Optional Application Services – 149 • Optional Mac OS Services – 149 • Show Full Paths in ‘Open Recent’ Menu – 149 • Remember Dialog Box Placement – 150 • Window Menu – 150 • Verify Open Files After – 150 Browser Display Preferences . . . . . . . . . . . . . . . . . . . . . . . . . . . . . . . 150 Results Lists – 150 • Show File Icons – 151 Differences Preferences . . . . . . . . . . . . . . . . . . . . . . . . . . . . . . . . . . . . 151 Arrange Windows On – 151 • Differences Window Placement – 151 • Arrange Windows – 151 • Multi-File Differences – 151 Editor Defaults Preferences . . . . . . . . . . . . . . . . . . . . . . . . . . . . . . . . 151 Auto-Indent – 152 • Balance while Typing – 152 • Smart Quotes – 152 • Auto-Expand Tabs – 152 • Show Invisibles – 152 • Syntax Coloring – 153 • Soft Wrap Text – 153 File Filters Preferences . . . . . . . . . . . . . . . . . . . . . . . . . . . . . . . . . . . . . 153 File Search Preferences . . . . . . . . . . . . . . . . . . . . . . . . . . . . . . . . . . . . 154 Find All Matching Files – 154 • Skip (…) Folders – 154 • Follow Folder Aliases – 154 • Default <…> Directory – 154 • Unix Search Paths – 154 File Types Preferences . . . . . . . . . . . . . . . . . . . . . . . . . . . . . . . . . . . . . 155 Fonts Preferences . . . . . . . . . . . . . . . . . . . . . . . . . . . . . . . . . . . . . . . . . 155 viii FTP Settings Preferences . . . . . . . . . . . . . . . . . . . . . . . . . . . . . . . . . . . 156 Remember Passwords – 156 • Store Passwords in Keychain – 156 • Include Passwords in Proxy URL Drags – 157 • List FTP Files on the “Open Recent” Menu – 157 • Passive FTP – 157 • Show Document Icons – 157 • Show Files Starting with “.” – 157 • FTP Bookmarks – 157 Function Popup Preferences . . . . . . . . . . . . . . . . . . . . . . . . . . . . . . . 158 Show Includes – 158 • Sort Items by Name – 158 • Show Function Prototypes – 158 Glossary Preferences . . . . . . . . . . . . . . . . . . . . . . . . . . . . . . . . . . . . . . 158 Ignore Trailing CR – 158 • Glossary is Language Sensitive – 158 HTML Colors Preferences . . . . . . . . . . . . . . . . . . . . . . . . . . . . . . . . . 158 Color Palette Layout – 159 • Color Swatch Size – 159 • Color Picker – 159 HTML Markup Preferences . . . . . . . . . . . . . . . . . . . . . . . . . . . . . . . . 159 HTML Tags – 159 • Quoting Tag Attributes – 159 • XML/HTML Markup Rules – 159 • CSS Markup Formatting – 159 HTML Palette Preferences . . . . . . . . . . . . . . . . . . . . . . . . . . . . . . . . . 160 Palette Width – 160 • Button Height – 160 • Buttons on Main HTML Tools Palette – 160 HTML Preview Preferences . . . . . . . . . . . . . . . . . . . . . . . . . . . . . . . . 160 When Previewing Files with Unsaved Changes – 160 Web Browsers Available for Preview – 161 HTML Tools Preferences . . . . . . . . . . . . . . . . . . . . . . . . . . . . . . . . . . . 161 HTML Updater – 161 • Syntax Checker Warnings – 161 • Link Checker Warnings – 162 HTML Web Site Preferences . . . . . . . . . . . . . . . . . . . . . . . . . . . . . . . . 162 Web Server Name – 162 • Site Path on Server – 162 • Default Page Name – 162 • Local Site Root – 162 • Look for Templates and Include Files In – 162 Languages Preferences . . . . . . . . . . . . . . . . . . . . . . . . . . . . . . . . . . . . 162 Language for Untitled Windows – 163 • Default Language – 163 Software Update . . . . . . . . . . . . . . . . . . . . . . . . . . . . . . . . . . . . . . . . . 163 Spelling Preferences . . . . . . . . . . . . . . . . . . . . . . . . . . . . . . . . . . . . . . 164 Built-In – 164 • Use Dictionaries – 164 • Word Services – 164 Startup Preferences . . . . . . . . . . . . . . . . . . . . . . . . . . . . . . . . . . . . . . . 164 State Preferences . . . . . . . . . . . . . . . . . . . . . . . . . . . . . . . . . . . . . . . . . 165 Honor Saved State – 165 • Default State for New Documents – 166 • Always Add State – 166 Status Bar Preferences . . . . . . . . . . . . . . . . . . . . . . . . . . . . . . . . . . . . . 166 Show Status Bar – 166 • Show Philip Bar – 166 • Show Tab Stops – 167 • Show Line Numbers – 167 • Show Cursor Position – 167 • Show Current Function – 167 • Function Popup – 167 • Window Options – 167 • Markers – 167 • File Options – 167 • Insert Menu – 167 • File Path – 167 • Get Info Icon – 168 • Super Get Info Icon – 168 • Document Icon – 168 • Show All/Hide All – 168 • Button Puffiness – 168 Text Colors Preferences . . . . . . . . . . . . . . . . . . . . . . . . . . . . . . . . . . . . 168 ix Text Editing Preferences . . . . . . . . . . . . . . . . . . . . . . . . . . . . . . . . . . . 169 Enable Shift-Delete for Forward Delete – 169 • Drag & Drop Editing – 169 • Use Numeric Keypad for Cursor Movement – 169 • Allow Single-Click Line Selection – 170 • Double-Click to Balance – 170 • Confirm Non-Undoable Editing Actions – 170 • Use “Hard” Line Numbering… – 170 • Use Emacs Key Bindings – 170 • Exchange Command and Option Key Behavior – 170 • Allow Text Smoothing – 170 • Extra Space in Text Views – 171 Text Files: Opening Preferences . . . . . . . . . . . . . . . . . . . . . . . . . . . . . 171 Translate Line Breaks – 171 • If a File’s Type is Unknown – 171 • Interpret File Contents – 172 Text Files: Saving Preferences . . . . . . . . . . . . . . . . . . . . . . . . . . . . . . . 172 Force New Line at End – 172 • Default Line Breaks – 172 • Make Backups Before Saving – 173 Text Printing Preferences . . . . . . . . . . . . . . . . . . . . . . . . . . . . . . . . . . 173 Text Search Preferences . . . . . . . . . . . . . . . . . . . . . . . . . . . . . . . . . . . . 174 Report Single-File ‘Replace All’ Results – 174 • Remember Find Dialog’s Start At Top Setting – 174 • Color Grep Patterns in Find Dialog – 175 • Multi-File Search and Replace – 175 • Grep Patterns – 175 Tools Preferences . . . . . . . . . . . . . . . . . . . . . . . . . . . . . . . . . . . . . . . . . 175 Script Editor – 175 • Coding Tools – 175 • Mac OS API Reference – 176 • Preferred Reference – 176 Windows Preferences . . . . . . . . . . . . . . . . . . . . . . . . . . . . . . . . . . . . . 176 Chapter 11 BBEdit HTML Tools 177 Introduction to the HTML Tools . . . . . . . . . . . . . . . . . . . . . . . . . . . . 178 Recommended Books – 178 • Recommended On-Line Resources – 178 • SGML Resources – 179 • What You Need – 179 Configuring the HTML Tools . . . . . . . . . . . . . . . . . . . . . . . . . . . . . . . 180 Using the BBEdit HTML Tools . . . . . . . . . . . . . . . . . . . . . . . . . . . . . . 180 Creating a New Document – 181 HTML Tool Descriptions . . . . . . . . . . . . . . . . . . . . . . . . . . . . . . . . . . . 183 Tag Maker – 184 • Edit Tag – 185 • Document Type – 186 • Character Set – 186 • CSS Submenu – 186 • Body Properties – 190 • Head Elements – 190 • Block Elements – 191 • Lists – 193 • Tables – 193 • Forms – 194 • Inline Elements – 196 • Phrase Elements – 199 • Font Style Elements – 200 • Frames – 200 • Check – 201 • Update – 202 • Includes – 203 • Utilities – 204 • Misc – 205 • Preview – 206 The HTML Tools Palettes . . . . . . . . . . . . . . . . . . . . . . . . . . . . . . . . . . 207 HTML Tools Palette Tips – 207 • HTML Tools Palette – 207 • Other Palettes – 209 HTML Translation. . . . . . . . . . . . . . . . . . . . . . . . . . . . . . . . . . . . . . . . . 210 Templates . . . . . . . . . . . . . . . . . . . . . . . . . . . . . . . . . . . . . . . . . . . . . . . . 211 Custom Markup . . . . . . . . . . . . . . . . . . . . . . . . . . . . . . . . . . . . . . . . . . 212 x Chapter 12 Using the Glossary 213 The Glossary Command . . . . . . . . . . . . . . . . . . . . . . . . . . . . . . . . . . . Language Sensitivity of the Glossary . . . . . . . . . . . . . . . . . . . . . . . . Manually Sorting the Glossary . . . . . . . . . . . . . . . . . . . . . . . . . . . . . Using the Glossary . . . . . . . . . . . . . . . . . . . . . . . . . . . . . . . . . . . . . . . The Set Key Button . . . . . . . . . . . . . . . . . . . . . . . . . . . . . . . . . . . . . . . Glossary Substitutions . . . . . . . . . . . . . . . . . . . . . . . . . . . . . . . . . . . . Using OSA Scripts with the Glossary . . . . . . . . . . . . . . . . . . . . . . . . Chapter 13 Scripting BBEdit 213 214 214 214 215 216 217 219 Verba Sapientia . . . . . . . . . . . . . . . . . . . . . . . . . . . . . . . . . . . . . . . . . . . 219 AppleScript Overview . . . . . . . . . . . . . . . . . . . . . . . . . . . . . . . . . . . . 220 About Macintosh Scripting – 220 • Scriptable Applications and Apple Events – 220 • Recordable Applications – 221 • Saving Scripts – 222 • Using Scripts with Applications – 222 • Scripting Resources – 222 BBEdit and AppleScript . . . . . . . . . . . . . . . . . . . . . . . . . . . . . . . . . . . 224 Recording Scripts for BBEdit – 224 • Reading an AppleScript Dictionary – 226 • Sample Scripts – 230 • AppleScript Pitfalls – 230 • Moving Scripts to BBEdit 6 – 231 Working with Scripts . . . . . . . . . . . . . . . . . . . . . . . . . . . . . . . . . . . . . . 237 The Scripts Menu – 237 • Manually Sorting the Scripts List – 238 • Attaching Scripts to Menu Items – 238 Chapter 14 Working with Development Tools 241 Configuring BBEdit for Development Environments . . . . . . . . . . 242 Syntax Coloring – 242 Working with Development Environments . . . . . . . . . . . . . . . . . . . 243 Switching Between Source and Header Files – 243 Shell Worksheets . . . . . . . . . . . . . . . . . . . . . . . . . . . . . . . . . . . . . . . . . 243 Perl, Python, and Shell Scripting . . . . . . . . . . . . . . . . . . . . . . . . . . . . 245 Using MacPerl on Mac OS 9 – 245 • Using Unix Scripts on Mac OS X – 245 • Language Resources – 246 • Line Endings and Perl/Unix Scripts – 247 • Camel/Shebang Menu – 247 • Filters and Scripts – 250 • Filters – 250 • Scripts – 251 • Additional Notes – 251 • Working with Metrowerks CodeWarrior . . . . . . . . . . . . . . . . . . . . . 252 Using the CodeWarrior Menu – 252 Working with MPW . . . . . . . . . . . . . . . . . . . . . . . . . . . . . . . . . . . . . . 253 BBEdit and ToolServer – 254 • BBEdit and Projector – 256 xi Chapter 15 BBEdit Plug-Ins 265 Using BBEdit Plug-Ins . . . . . . . . . . . . . . . . . . . . . . . . . . . . . . . . . . . . . 265 The Tools Menu and Floating Window – 266 The Set Key Button – 266 Supplied Plug-ins . . . . . . . . . . . . . . . . . . . . . . . . . . . . . . . . . . . . . . . . . 267 Add/Remove Line Numbers – 267 • Columnize – 267 • Concatenate – 267 • Configure TeX Coloring – 267 • Convert to ASCII – 267 • Clear Lines Containing – 268 • Copy Lines Containing – 268 • Cut Lines Containing – 268 • Educate Quotes – 269 • Hex Dump – 269 • Make Prototypes – 269 • Prefix/Suffix Lines – 269 • Reverse – 269 •Send PostScript™ – 269 • Sort – 269 • Un/Comment – 269 Third-Party Plug-ins . . . . . . . . . . . . . . . . . . . . . . . . . . . . . . . . . . . . . . 270 Finding more plug-ins – 270 • Plug-in compatibility – 270 • Mac OS X Plug-ins – 270 Appendix A Command Reference 271 Assigning Keys . . . . . . . . . . . . . . . . . . . . . . . . . . . . . . . . . . . . . . . . . . . 271 Listing by Menu and Command Name . . . . . . . . . . . . . . . . . . . . . . 272 Listing by Default Key Equivalents . . . . . . . . . . . . . . . . . . . . . . . . . . 279 Appendix B Editing Shortcuts 283 Mouse Commands . . . . . . . . . . . . . . . . . . . . . . . . . . . . . . . . . . . . . . . . 283 Arrow and Delete Keys . . . . . . . . . . . . . . . . . . . . . . . . . . . . . . . . . . . . 284 Emacs Key Bindings . . . . . . . . . . . . . . . . . . . . . . . . . . . . . . . . . . . . . . 285 Appendix C Placeholders and Include Files 287 Placeholders . . . . . . . . . . . . . . . . . . . . . . . . . . . . . . . . . . . . . . . . . . . . . 287 Using the #RELATIVE# Placeholder – 290 Include Files . . . . . . . . . . . . . . . . . . . . . . . . . . . . . . . . . . . . . . . . . . . . . 291 Simple Includes – 291 • Persistent Includes – 291 • Include Files with Variables – 292 • Including AppleScripts – 293 • Including Perl Scripts – 294 • Other Include Notes – 295 Index xii 297 xiii xiv CHAPTER 1 Welcome to BBEdit This chapter introduces you to BBEdit, a high-performance HTML and text editor for the Macintosh. Getting Started . . . . . . . . . . . . . . . . . . . . . . . . . . . . . . . . . . . . . . . . . . . . . . 1 What is BBEdit? . . . . . . . . . . . . . . . . . . . . . . . . . . . . . . . . . . . . . . . . . . . . . 1 How Can I Use BBEdit? . . . . . . . . . . . . . . . . . . . . . . . . . . . . . . . . . . . . . . . 2 Working with Development Environments – 2 Writing HTML Documents – 2 Human Interface Notes. . . . . . . . . . . . . . . . . . . . . . . . . . . . . . . . . . . . . . . . 3 Dynamic Menus – 3 • Bypassing Options Dialogs – 3, Menu Command Keys – 3 • Contextual Menus – 4 • Snappy Palettes – 4 • Dialog Box Command Keys – 4 Changes from Previous Versions. . . . . . . . . . . . . . . . . . . . . . . . . . . . . . . . . 6 Getting Started Thank you for your selection of BBEdit, the premier HTML and text editor for the Macintosh. If you are new to BBEdit, we recommend that you read at least Chapters 1 through 4 of this manual to familiarize yourself with the installation and basic operation of BBEdit. You may also wish to read or preview any other chapters which cover features that you frequently use. After you have installed BBEdit, the best way to learn it is to use it. Complete online assistance is available from the Help menu. If you have used previous versions of BBEdit, we recommend that you read at least Chapter 1 for an overview of significant changes in this version, and Chapter 2 for information relevant to installation and upgrading. What is BBEdit? BBEdit is a high-performance HTML and text editor. Unlike a word processor, which is designed for preparing printed pages, a text editor focuses on providing means of producing and changing content. Thus, BBEdit doesn’t offer fancy formatting capabilities, headers and footers, graphics tools, a thesaurus, and other staples of feature-laden “office” software. Instead, it focuses on helping you manipulate text in ways that word processors generally can’t. In service of this goal, BBEdit offers powerful regular expression-based (“grep”) search and replace, multi-file search, sophisticated text transformations, intelligent text coloring, and other features not usually found (or missed) in word processors. 1 BBEdit also has features that make it easier to edit specific kinds of text, such as source files for programming languages and HTML (Hypertext Markup Language) files for the World Wide Web. In fact, since the rise of the Web, BBEdit has become the tool of choice for Macintosh Web designers who need more flexibility than visual Web authoring tools can provide. How Can I Use BBEdit? Use BBEdit any time you need to create or edit Web pages, source files, or text documents of any kind. Whether you need to find (or change!) all the occurrences of some text in a set of files, or modify or reformat large text files of any sort, or quickly tweak a Web page, BBEdit is the right tool for the job. Working with Development Environments BBEdit found its initial following among the Macintosh programming community with its core development-oriented tools. Although we have added many features to BBEdit since its first incarnation, this source editing functionality is as strong now as ever. The function pop-up menu can parse many programming languages to give you quick access to functions defined in your files. You can even integrate BBEdit with popular development environments, including CodeWarrior, MPW, Projector, and Perl (or any other Unix scripting language on Mac OS X). Chapter 14 provides more information on how to set BBEdit up for this type of work. Writing HTML Documents BBEdit is an ideal tool for writing HTML documents for use on the Internet. In addition to many options for preparing text content, such as wrapping, case changes, and searching, BBEdit offers a powerful set of tools to make editing Web pages easier. The Tag Maker command speeds creation of HTML tags, while the Edit Tag option allows quick changes to existing markup, and the HTML Tools palette makes dragging and dropping tags simple, or lets you access commands with just a click. Using BBEdit, you can easily preview your work in most Macintosh Web browsers, including iCab, Internet Explorer, Netscape, OmniWeb, and Opera. For more information on using the HTML Tools to create, edit, and preview Web pages, see Chapter 11. 2 Chapter 1: Welcome to BBEdit Human Interface Notes BBEdit enhances the behavior of its menus and dialogs as follows. Dynamic Menus Important Many of BBEdit’s pull-down menus are dynamic. If you hold down the Shift or Option keys while a menu is open, you can see some of the items change. The illustration below shows what the File menu looks like normally (left) and when you hold down the Option key (right). You can use the Shift and Option keys when you choose an item from a menu or when you use the Command key equivalents. Bypassing Options Dialogs You may have noticed that commands which require additional settings to be made before they are performed appear on the menu with ellipses after their names. To bypass this step and use the command with its most recent settings, hold down the Option key while selecting the menu item. For example, Zap Gremlins… from the Text menu becomes Zap Gremlins when the Option key is pressed, and when selected, will zap gremlins in the frontmost text document using the current settings. Menu Command Keys Many of BBEdit’s commands have keyboard shortcuts. BBEdit lets you re-assign the shortcuts for any menu item, glossary entry, plug-in, or Open Scripting Architecture (OSA) script to suit your own way of working. To change the keyboard shortcut for any menu item, choose the Set Menu Keys command (in the Edit menu on Mac OS 9 and earlier; in the BBEdit (Application) menu on Mac OS X). Human Interface Notes 3 Many other BBEdit features can have keyboard shortcuts assigned as well. Here’s how to set them: new in 6.5 Feature Set Keys In… Menu Commands Set Menu Keys… (Edit menu on Mac OS 9, BBEdit menu on Mac OS X) Plug-ins Plug-In Tools list Glossary items Glossary list Scripts Scripts list Perl/Unix Filters and Scripts Perl/Unix Filters and Scripts lists Stationery Stationery list To display any of BBEdit’s floating palette windows, use the Palettes submenu in the Window menu. Contextual Menus When you control-click on selected text or at the insertion point in a text window, BBEdit’s contextual menu provides quick access to a few relevant and frequently-used commands, so you don’t have to hunt around in the menu bar for them. new in 6.5 Snappy Palettes When you move or resize palettes (floating windows), they will “snap” to the edges of the screen and the edges of other palettes. You can override this behavior by holding down the Shift key while dragging or resizing. Dialog Box Command Keys You can use command keys to click buttons or select options in most of BBEdit’s dialogs. Certain keys have the same meaning in all dialog boxes: • Pressing either the Return or Enter key is the same as clicking the default button. • Typing Command-Period or pressing the Escape key is the same as clicking the Cancel button. • You can use the Cut, Copy, Paste, Clear, and Select All commands in any dialog box that has a text field (either from the Edit menu or with their key equivalents). 4 Chapter 1: Welcome to BBEdit To see the other key equivalents for a dialog box, hold down the Command key. After a brief delay, the key equivalents appear next to the buttons in the dialog. For example, this is the Find & Replace dialog without the Command key equivalents showing: This is the Find & Replace dialog box with the Command key equivalents visible. BBEdit waits briefly before displaying the Command key equivalents so that you can type a sequence quickly without making the dialog box flicker. Human Interface Notes 5 Changes from Previous Versions BBEdit 6.0 and 6.1 represented a major under-the-hood reworking of the software which allowed us to add many important new capabilities and to prepare for the future, especially with the release of Mac OS X. Major features and improvements introduced in these versions included: • Native support for Mac OS X (in BBEdit 6.1). • International text support that lets you edit documents in any left-to-right script system supported by your Macintosh, including multi-byte scripts like Chinese and Japanese using inline input. Additionally, BBEdit can read and write Unicode files. • Enhanced scripting support allows recording of commands, and any BBEdit menu command can be replaced or augmented by a script—in other words, BBEdit is now recordable and attachable. • Enhanced syntax coloring, with greater flexibility, as well as built-in support for PHP3. • Plug-in support for syntax coloring means that third-party developers are able to add modules to BBEdit to provide support for coloring languages that BBEdit doesn’t support out of the box. • Expanded contextual menu support, including access to the Tag Maker and Edit Tag commands for quickly adding or modifying HTML markup. • Support for additional Web standards such as WML (Wireless Markup Language) and XHTML in BBEdit’s HTML tools. • Advanced multi-file search filters that let you chose precisely which files to search, based on partial filename, parent folder name, creator, type, creation date, last modification date, Projector status, and more. • Enhanced FTP capabilities, including use of alternate ports, allowing the use of third-party port reflectors and SSH tunnels for FTP, and new FTP Browser windows which present a persistent view of remote directories. • Multiple clipboards, to ease copying and moving multiple bits of text. • Expanded online help (using Apple’s HTML Help system) provides the complete contents of this manual right inside BBEdit, including frequentlyneeded tidbits like glossary placeholders and grep metacharacters. • The BBEdit Table Builder is no longer available. (For a discussion of this, please see Chapter 2.) Since then, we have been working on further enhancing BBEdit’s core strengths, and its integration with the Mac OS X platform. Here is an overview of the major improvements that BBEdit 6.5 incorporates: • BBEdit 6.5 is now supplied as a single application which runs on Mac OS 8.6 or later, and is native on Mac OS X. For use on Mac OS X, at least version 10.0 is required, and version 10.1 or later is recommended. Also, when running on Mac OS 8.6 or 9, BBEdit now requires CarbonLib, version 1.4 or later. 6 Chapter 1: Welcome to BBEdit • Integrated support for CSS (cascading style sheets): syntax coloring, function navigation, and markup support, including contextual markup via Tag Maker. • All-new regular expression matching, using the “PCRE” engine to bring new power and flexibility to BBEdit’s search and replace capabilities, including the use of back-references within search patterns, “non-greedy” searching, and discrete match quantifiers. • Enhancements to BBEdit’s powerful file filtering option for multi-file searching: you can now filter files based on their content. • Pervasive integration with Unix scripting systems: you can now run Perl, Python, and Unix shell scripts and filters from within BBEdit. [Mac OS X] • Manual selection of the source language for any file, plus new automatic guessing of language based on content for files without file name extensions. • Syntax coloring, function navigation, and updated keywords to support PHP4 (PHP3 was included in 6.0). • Syntax checking support for WML 1.2 and 1.3. • Pervasive support for “long” an d Unicode file names. [Mac OS X] • Super Get Info integration: if you have Super Get Info installed, click an icon to get information about the open document. [Mac OS X] • Authenticated saves: automatically prompts for administrator name and password when working with protected files. [Mac OS X] • New “bbedit” command-line tool: invoke BBEdit from anywhere in the Unix command line to open files. [Mac OS X] • Syntax coloring and function navigation for Objective-C source code. • External editor support for CodeWarrior Pro 7 (IDE 4.2.5 and later) when running on both Mac OS 9 and Mac OS X. • Floating tool palettes now support snap-to-edge dragging. new in 6.5 BBEdit 6.5 also contains a plethora of additional enhancements, tweaks, and bug fixes throughout the program. Look for the “new in 6.5” marker in the margin throughout this manual to find things that have changed significantly or been added since the last major version, BBEdit 6.1. (If you are viewing the PDF version of the manual, you can also search for this marker.) For a detailed summary of all recent changes, see BBEdit’s online help (available from the Help menu) or visit the BBEdit support section of our Web site. Changes from Previous Versions 7 8 Chapter 1: Welcome to BBEdit CHAPTER 2 Installing BBEdit This chapter tells you how to install BBEdit on your Macintosh. It also describes the files BBEdit creates, where it puts them, and how to install or remove optional components of BBEdit. In this chapter Basic Installation. . . . . . . . . . . . . . . . . . . . . . . . . . . . . . . . . . . . . . . . . . . . . 9 System Requirements – 9 • Installing BBEdit – 9 Additional Software . . . . . . . . . . . . . . . . . . . . . . . . . . . . . . . . . . . . . . . . . 10 Internet Control Panel – 10 • ToolServer Support – 11 BBEdit Support Folder . . . . . . . . . . . . . . . . . . . . . . . . . . . . . . . . . . . . . . . 11 Glossary – 12 • Help – 12 • Plug-Ins – 13 • Scripts – 14 Other BBEdit Files and Folders . . . . . . . . . . . . . . . . . . . . . . . . . . . . . . . . . 15 BBEdit Preferences Folder – 15 • BBEdit Grep Patterns – 16 BBEdit Table Builder. . . . . . . . . . . . . . . . . . . . . . . . . . . . . . . . . . . . . . . . . 17 Basic Installation BBEdit 6.5 is now supplied as a single application file which runs on both Mac OS 8.6 or later, and Mac OS X. Specific system requirements and installation instructions are described below, and the organization of BBEdit’s supporting files is described in subsequent sections. System Requirements IMPORTANT To run BBEdit 6.5, a minimum of Mac OS 8.6 or later, with CarbonLib 1.4 or later, is required, and Mac OS 9.1 or later is recommended. If you are using Mac OS X, version 10.0 or later is required, and version 10.1 (or any later public release) is strongly recommended. Note Throughout this manual, to identify those options which are only applicable to specific versions of Mac OS, the term “Mac OS 9” will refer to both Mac OS 8.6 and 9.x, while the term “Mac OS X” will refer to Mac OS X 10.0 and later. Installing BBEdit Depending on how you obtained BBEdit, you will receive either a CD-ROM, or a self-mounting disk image file (a “.smi” file). To install BBEdit 6.5, just drag the “BBEdit 6.5” folder from the CD-ROM or disk image to the Applications folder, or other desired location, on your hard drive. 9 Additionally, you should verify that your Mac has the following software installed: • If you are running Mac OS 8.6, check that you have version 1.4 or later of CarbonLib installed in your system Extensions folder, or use the “CarbonLib 1.4 Installer” from the CD-ROM (or the support section of our web site), to update your current version. You will need to reboot your Mac after installing the new version. • If you are running Mac OS 9 or later, check that you have version 1.4 or later of CarbonLib installed in your system Extensions folder, or use Apple’s Software Update control panel to obtain the latest version. You will need to reboot your Mac after installing the new version. • If you are running Mac OS X, no updates to your system components are required. However, if you wish to install the new “bbedit” command-line tool (see Chapter 4 for details), then you should run the “Install BBEdit Unix Support.pkg” which comes on the CD-ROM or disk image. Once you have installed the BBEdit 6.5 folder, and verified that you have the necessary supporting files as described above, you can begin using BBEdit immediately. Important If you are upgrading from a previous version of BBEdit, please read the section “BBEdit Support Folders” carefully, since the organization of supporting files has changed from older versions. We have provided specific suggestions and tips for transferring your custom support files with each category. The following sections describe some of the BBEdit files and additional software that you may wish to use. Additional Software The following pages describe additional software that you may wish to use with BBEdit. This software lets you take advantage of special features such as Internet services, and MPW’s ToolServer. Internet Control Panel On Mac OS 9 and earlier, the Internet control panel (located in the Control Panels folder on your startup disk) is a software module that keeps track of which Internet client applications you use (Web browser, FTP program, etc.), what your email address is, which news server you use, which mail server holds your mail, and many other Internet-related settings. This control panel is included as part of the system software, and replaces the stand-alone Internet Config application. By default, BBEdit will display the client applications designated in the Internet control panel on the Internet Helpers menu (left). You can use this menu to launch any displayed client application from within BBEdit. If you wish to suppress this menu, turn off the Internet Helpers Menu option in the Application panel of the Preferences. Having the menu active is not necessary in order to use the Resolve URL command or its Command-click shortcut. 10 Chapter 2: Installing BBEdit ToolServer Support If you are planning to use BBEdit with ToolServer, first make sure that MPW and ToolServer are correctly installed. (MPW is the Macintosh Programmer’s Workshop, Apple’s free development environment for Mac OS 9 and earlier.) You can get ToolServer as part of the MPW package available from Apple’s Web site; it is also included with CodeWarrior. You can find the ToolServer Support folder in your BBEdit application folder. This folder contains the following folders: • Copy to MPW folder: Drag the items in this folder to the same folder as the ToolServer application. • Copy to MPW Tools folder: Drag the items in this folder to the Tools folder that’s in the same folder as the ToolServer application. • Copy to MPW Scripts folder: Drag the items in this folder to the Scripts folder that’s in the same folder as the ToolServer application. Once you have dragged the items to the appropriate places in your ToolServer folder, delete the ToolServer Support folder. Next, if you open the BBEdit Support folder, you will notice that it contains a folder called ToolServer Tools. You can place MPW tools (or aliases to MPW tools) in this folder. When BBEdit starts up, it scans the contents of this folder for MPW tools and text files and adds them to the ToolServer menu (left). After you install the ToolServer files, make sure that you activate the ToolServer option in the Tools panel of the Preferences. BBEdit Support Folder This section describes the arrangement of BBEdit’s support folders. These are the locations that BBEdit scans when you launch it to locate a variety of items which add additional functionality, such as plug-in tools, spell checker dictionaries, and more. All these folders are contained in a folder called BBEdit Support, which must be present in the same folder as the BBEdit application. (In previous versions of BBEdit, all of these folders, some with slightly different names, were individually located in the same folder as the BBEdit application.) Although the items contained in these support folders are not essential for doing basic tasks with BBEdit, they provide additional functionality you may wish to retain. If you are working on a Macintosh with very limited disk space or memory (RAM), and you don’t need the functionality these folders provide, you can remove them. Note In order to prevent alias loops, BBEdit will not follow aliases to folders which are placed inside any of the folders contained in the BBEdit Support folder. We also recommend that you do not try to share plug-ins or tools between BBEdit and other applications, and that you not make aliases to plug-ins or tools located on remote (server) volumes. BBEdit Support Folder 11 Dictionaries The Dictionaries folder contains the dictionaries used by BBEdit’s built-in spell checker. Words that you add to your personal dictionary are stored in the file called User Dictionary in this folder. To use the spell checker, use the Check Spelling command in the Text menu. Upgrading If you have added words to the User Dictionary for your previous version of BBEdit, you should move or copy that file into the Dictionaries folder. You do not need to move any of the other dictionary files. Glossary The Glossary folder holds text files whose contents can be inserted into an editing window with the click of a button or a keystroke. Glossary files can also use special placeholders to insert varying or context-sensitive information, e.g. a date, or the name of the current file. Initially, this folder contains several sample glossary sets (for C source code, HTML, WML, Mac OS X Property List files, and plain text), which you can use or modify as you like. See Chapter 12 for more information on the Glossary. Upgrading If you are upgrading from a previous version, you have two options for migrating your current custom Glossary items. You can either move all of your custom files into the Universal folder within the Glossary folder, or create new Glossary sets for your existing files. Help The Help folder contains complete online documentation, equivalent to the contents of the printed or PDF user manual, in Apple’s HTML Help format. You can access this information from the Help menu at any time. HTML Templates This folder contains HTML document templates for use with the New HTML Document function. A sample set of templates are provided, which you can modify or add to as you wish. Please see Chapter 11 for more information on BBEdit’s HTML tools. Upgrading You can move or copy over any customized template or include documents that you wish. Language Modules This folder contains plug-in modules that tell BBEdit about new programming, scripting, or markup languages so it can colorize them appropriately and provide the pop-up function menu in the status bar of document windows written in that language. Three modules are supplied with the default installation—Python, Setext, and TeX. A list of additional modules from third-party developers is available on our Web site. Important 12 The factory-supplied language modules will run on both Mac OS X and Mac OS 9. Some third-party language modules may need to be updated to run on Mac OS X. Visit our Web site for the latest information. Chapter 2: Installing BBEdit MacPerl Support new in 6.5 This folder contains the Perl Scripts and Perl Filters folders, which are used to build the Camel menu and the floating Perl Scripts and Perl Filters palettes when running on Mac OS 9 and earlier. (See “Unix Support”, below, if you are running BBEdit on Mac OS X.) You can place scripts and filters within sub-folders (up to four levels deep) of their respective folders to organize them. Some example Perl scripts and filters are also supplied with the standard installation. The Perl Output file stores output from Perl, and the Perl Logs folder stores output logs for specific source files. See Chapter 14 for more information on this folder. Upgrading You can move or copy over any Perl scripts or filters that you wish. Note, however, that BBEdit 6.1 looked for a single folder named “Perl Support” that was used on both Mac OS 9 and Mac OS X. Starting with BBEdit 6.5, this is no longer the case. Perl scripts and filters must now be placed in the Unix Support folder for use on Mac OS X. See Chapter 14, “Working with Development Tools”, for more details. Menu Scripts This folder contains scripts which are attached to BBEdit menu items. Some sample scripts are provided with the BBEdit installation package, but you will need to move them into this folder to use them. See Chapter 13 for more information on writing and using these scripts. Plug-Ins The Plug-Ins folder contains a standard set of code modules that add additional features to BBEdit. You can place plug-ins within sub-folders (one level deep) to organize them. If you are not planning to use any of the included BBEdit plug-ins, you can remove the Plug-Ins folder from the BBEdit Support folder. (Some of the functions discussed in this manual may require one plug-in or another.) Note BBEdit plug-ins were originally known as BBEdit extensions. Plug-ins are identical to BBEdit extensions; only the name has changed. Plug-ins are sometimes referred to as tools, since they appear on the Tools menu in BBEdit. Additional plug-ins and information are available from our web site. If you are interested in writing your own BBEdit plug-ins, you can also find the BBEdit Plug-In SDK there. Upgrading If you have any third-party plug-ins that you wish to use with BBEdit 6.5 on Mac OS 9 or earlier, you may move or copy them into the Plug-ins folder. You will not be able to use any third-party plug-ins which have not been updated to function on Mac OS X. Contact the developers of your plug-ins or visit the Bare Bones Software web site for more information on the availability of updated plug-ins. WARNING You should not copy any of the factory-supplied plug-ins from previous versions of BBEdit, including those provided with BBEdit 6.0 or 6.1, to use with BBEdit 6.5. BBEdit Support Folder 13 Scripts The Scripts folder contains compiled OSA scripts that appear in the Scripts menu (left). (Most OSA scripts are AppleScripts.) You can place scripts in this folder and use the Scripts menu to run the script. Scripts may be placed within sub-folders (up to four levels deep) to organize them. A floating Scripts palette lets you activate scripts with a double-click and assign keyboard shortcuts to any script. Several basic scripts are supplied in this folder, and more examples are available on the BBEdit CD. Upgrading Some scripts written for use with versions of BBEdit prior to 6.0 will not work with BBEdit 6.5. Please see Chapter 13 for more details and tips on converting your existing scripts. Search Scripts The Search Scripts folder contains any compiled OSA scripts you prepare which return a list of files. These scripts are listed in a pop-up menu in the Find dialog, if a Multi-File search using a Script target is selected. Please see Chapter 7 or a general scripting reference guide for more information on how to prepare such scripts. This folder is installed empty by default. Shutdown Items The items in this folder are opened when you quit BBEdit. Usually, this function will be used to run scripts of some sort. This folder is installed empty by default. Startup Items When launched, BBEdit will look for a folder named Startup Items in the BBEdit Support folder. If this folder is found, BBEdit will open any documents it finds in that folder. If the file is one BBEdit knows how to open (such as a text file or file group), BBEdit will open a document window appropriate to the file. This folder is installed empty by default. If you place a compiled OSA (AppleScript, or any other OSA-compliant scripting language) script in this folder, BBEdit will execute the script. If you place a folder alias here, BBEdit will open a disk browser window based at that folder. If you place other types of documents in this folder, BBEdit will ask the Finder to open them. If you often edit HTML files, for instance, you may want to place an alias to your Web browser (or your visual HTML editor) in the BBEdit Startup Items folder so that it will start up automatically whenever you run BBEdit. Upgrading 14 You can copy or move any document or application aliases from the Startup Items folder of your previous version of BBEdit. If you have any OSA scripts in this folder, please reference the caution previously given for the Scripts folder, and see Chapter 13 for more details on converting scripts. Chapter 2: Installing BBEdit Stationery This folder contains stationery files for use with BBEdit’s Stationery List feature, which can be selected from the Palettes submenu in the Window menu. Stationery files may be placed within sub-folders (up to four levels deep) to organize them. When you want to create a new file, you can choose one of the files in the Stationery List as its basis. The contents of the stationery file will be copied into a new document window, but this window will be untitled and must be given a name and saved. Unix Support new in 6.5 This folder contains the Unix Scripts and Unix Filters folders, which are used to build the Shebang menu and the floating Unix Scripts and Unix Filters palettes when running on Mac OS X. These folders are analogous to those in the MacPerl Support folder, except that on Mac OS X, BBEdit supports any Unix scripting language— including Perl, Python, and shell scripts. You can place scripts and filters within subfolders (up to four levels deep) of their respective folders to organize them. Some example Perl, Python, and shell scripts and filters are supplied with the standard installation. The Unix Script Output file stores output from scripts, and the Unix Script Logs folder stores output logs for specific source files. See Chapter 14 for more information on this folder. Upgrading You can move or copy over any Perl scripts or filters that you wish from previous versions of BBEdit. See Chapter 14, “Working with Development Tools”, for information on how to share Perl scripts and filters when running the same copy of BBEdit on both Mac OS 9 and Mac OS X. Other BBEdit Files and Folders When you start up BBEdit it may create the following files and folders: BBEdit Preferences Folder BBEdit stores various settings files in a folder named BBEdit Preferences, which can be located either in the BBEdit Support folder, or in the Preferences folder of your System folder. The settings in the BBEdit Support folder have precedence, although if neither is found, BBEdit will create a set of default preferences in your system Preferences folder. Note On Mac OS X, the default location for the BBEdit Preferences folder is in the Preferences folder in the Library folder in the current user’s home folder. Settings in the BBEdit Support folder have precedence. BBEdit Prefs Data Basic BBEdit settings are stored in a file called BBEdit Prefs Data in the BBEdit Preferences folder. Upgrading BBEdit 6.5 will not import preference settings from versions of BBEdit prior to BBEdit 6.0. If you are upgrading to BBEdit 6.5 from BBEdit 5.1 or earlier, you will need to reset any preferences for which you do not want to use the factory default value. Other BBEdit Files and Folders 15 BBEdit FTP Bookmarks BBEdit stores user-defined FTP bookmarks in this file, which is found in your active BBEdit Preferences folder. (In some previous versions of BBEdit, these bookmarks were stored in the Prefs file). Upgrading If you wish to convert FTP bookmarks from BBEdit 5.x, you can do so in the FTP Settings pane of the BBEdit Preferences window. Clipboards BBEdit stores the last-used Clipboard contents (for each of its multiple clipboards) in this file upon quitting. This file is new to BBEdit 6. Note If you lock the Clipboards file, by selecting it in the Finder, doing Get Info, and setting the Lock option, BBEdit will not preserve clipboard contents across runs. File Filters BBEdit stores user-defined file filter patterns in this file, which is found in your active BBEdit Preferences folder. BBEdit Grep Patterns BBEdit stores user-defined search patterns in this file, which is found in your active BBEdit Preferences folder. (In some older versions of BBEdit, these patterns were stored in the Prefs file). Upgrading If you have added any custom grep patterns to a previous version of BBEdit, you can replace the default file created by BBEdit with your customized version. Also, if you use a substantial number of custom patterns, we recommend that you maintain a backup copy of this file. ToolServer Worksheet If you use ToolServer, BBEdit stores the file ToolServer Worksheet in the BBEdit Preferences folder. The worksheet file contains a record of your interactions with ToolServer. Recent Files & Favorites This folder contains up to 12 aliases to the most recent local files that you have opened, or FTP clippings for any files opened from FTP servers. The items stored in this folder are used to create the Open Recent list on BBEdit’s File menu or in the Find Differences file lists. Note 16 You may lock items in this folder to have them persist as Favorites. To do this, open the Recent File & Favorites folder, and use the Finder’s “Get Info” command to open an info window for each item (alias) you wish to lock, then turn on the “Locked” option. Locked items will be displayed at the bottom of the list below a separator line, and are not counted against the 12 item limit. Chapter 2: Installing BBEdit Recent Folders & Favorites This folder contains up to 12 aliases to folders which have recently been searched, or compared in a Find Differences operation. The items stored in this folder are used to create the folder search popup menu in the Find dialog, or in the Find Differences folder lists. Note You may lock items in this folder to have them persist as Favorites. To do this, open the Recent Folder & Favorites folder, and use the Finder’s “Get Info” command to open an info window for each item (alias) you wish to lock, then turn on the “Locked” option. Locked items will be displayed at the bottom of the list below a separator line, and are not counted against the 12 item limit. BBEdit Table Builder Starting with BBEdit 6.0, Table Builder is no longer included in the BBEdit package. After thorough consideration, we decided that in order to expand Table Builder’s capabilities sufficiently to meet the needs of a majority of our customers, it would be necessary to replicate much of the functionality presently provided by existing visual HTML editors. Please note that if you have Table Builder from a previous version of BBEdit, you can still use it to prepare tables for use in BBEdit 6.5. Create and edit a table in Table Builder, then use the Copy HTML command from its Edit menu, and paste the resulting markup into the desired part of your HTML document in BBEdit. BBEdit Table Builder 17 18 Chapter 2: Installing BBEdit CHAPTER 3 Working with Files This chapter discusses how to use BBEdit to manipulate text files. In this chapter Launching BBEdit. . . . . . . . . . . . . . . . . . . . . . . . . . . . . . . . . . . . . . . . . . . 19 Startup Items – 20 Memory Considerations . . . . . . . . . . . . . . . . . . . . . . . . . . . . . . . . . . . . . . 20 Creating and Saving Documents . . . . . . . . . . . . . . . . . . . . . . . . . . . . . . . . 21 Save As Options – 23 • File Saving Options – 23 Long File Names – 25 • Saving with Authentication – 25 Opening Existing Documents . . . . . . . . . . . . . . . . . . . . . . . . . . . . . . . . . . 26 Opening Multi-Byte Documents – 26, Using the Open Command – 27 Using the Open Hidden Command – 29 Using the Open Recent Command – 29 Opening Several Files at Once – 29 Using the Open Selection Command – 29 Opening From and Saving to FTP Servers . . . . . . . . . . . . . . . . . . . . . . . . . 31 FTP Browsers . . . . . . . . . . . . . . . . . . . . . . . . . . . . . . . . . . . . . . . . . . . . . . 34 Using Stationery . . . . . . . . . . . . . . . . . . . . . . . . . . . . . . . . . . . . . . . . . . . . 34 Using File Groups. . . . . . . . . . . . . . . . . . . . . . . . . . . . . . . . . . . . . . . . . . . 35 Creating a File Group – 35 • Using File Groups – 36 Removing Files from a File Group – 37 Making Backups . . . . . . . . . . . . . . . . . . . . . . . . . . . . . . . . . . . . . . . . . . . . 37 Automatic Backups – 38 • Manual Backups – 38 Printing . . . . . . . . . . . . . . . . . . . . . . . . . . . . . . . . . . . . . . . . . . . . . . . . . . 39 Options Available from Print Dialog – 40 The Printing Options Command – 41 Launching BBEdit To launch BBEdit, double-click the BBEdit application icon or a BBEdit document. Holding down the following keys at launch has the indicated effects, overriding any options set in the Startup panel of the Preferences. When one of these keys is held down, BBEdit will beep after it finishes launching. Modifier(s) Function Option Suppress startup items only Shift Disable all plug-ins, tools, external services, and startup items 19 Startup Items When launched, BBEdit will look for a folder named Startup Items in the BBEdit Support folder, which is in the same folder as the application. If this folder is found, BBEdit will open any documents it finds in that folder. If the file is one BBEdit knows how to open (such as a text file or file group), BBEdit will open a document window appropriate for the file. If you place a compiled OSA (AppleScript, or any other OSA compliant scripting language) script in this folder, BBEdit will execute the script. If you place a folder alias here, BBEdit will open a disk browser window based at that folder. If you place other types of documents in this folder, BBEdit will ask the Finder to open them. If you often edit HTML files, for instance, you may want to place an alias to your Web browser (or your visual HTML editor) in the BBEdit Startup Items folder so that it will start up automatically whenever you run BBEdit. If you wish, you may place the actual Startup Items folder in any convenient location, create an alias to it, and place the resulting alias in the BBEdit Support folder. Be sure to name the alias “Startup Items” so that BBEdit can locate it. Memory Considerations On Mac OS 8.6 and 9, BBEdit uses system memory (often referred to as “temporary memory”) for documents and for most editing operations, so that you can open large files without having to increase BBEdit’s memory partition. If you have a large document open, you may not be able to launch other applications until you close it. You should generally increase BBEdit’s memory partition only if you use third-party plug-ins which require more memory to load. These operations all use memory in BBEdit’s application partition. A good starting point would be to add 500K to BBEdit’s Preferred memory size, and ordinarily, you should never need to add more than 1000K. Note 20 Mac OS X deals with memory very differently than do previous versions of the Mac OS. On Mac OS X, you no longer need to set memory partitions on a per-application basis. Chapter 3: Working with Files Creating and Saving Documents To create a new document window within BBEdit, pull down the File menu and move to the New submenu. Since BBEdit allows creating several kinds of documents, you will see several options, as follows: If you choose to create a new Text Document, BBEdit opens an empty text window. “With selection” opens a new text window containing any text selected in the active document and having the same display font, saving you the trouble of copying and pasting it. “With Clipboard” opens a new text window and automatically pastes the contents of the current Clipboard into it. “HTML Document” brings up a dialog with options for creating a new HTML-structured document (see Chapter 11 for more information on working with HTML documents). “File Group” opens a new File Group (see Using File Groups below for more information). “Disk Browser” opens a new disk browser (see Chapter 9 for more information). “FTP Browser” opens a new FTP browser (see later in this chapter for more information). new in 6.5 “Shell Worksheet” opens a new shell worksheet using your default shell (as set in the Tools panel of your preferences). “Shell Worksheet…” opens a dialog listing all the Unix shells installed on your system; choose from the list, and a new shell worksheet will be opened using that shell. Shell worksheets are only available on Mac OS X. Creating and Saving Documents 21 When you want to save the new document you have created: 1 Choose the Save or Save As command from the File menu BBEdit opens the Save As directory dialog. On Mac OS X: On Mac OS 9 and earlier: 2 Give the file a name 3 Change any desired options (see below) 4 Click Save to save the file 22 Chapter 3: Working with Files Save As Options BBEdit’s Save As dialog is the standard Save dialog with a few additions. Save As Stationery When this option is selected, BBEdit saves the document as a stationery pad. When you later open this document, BBEdit uses it as the basis of a new untitled document. The new document will inherit the contents and display settings of the stationery document, but BBEdit will prompt you for a name when you save it. Save Selection Only This option is not available and cannot be selected in the current version of BBEdit. It will return in future releases. Options Button The Options button opens a dialog box that lets you specify how much state information BBEdit saves with the file, what kind of line breaks to save, and what file type to use. See the next section on “File Saving Options” for more information. File Saving Options When you use the Save As command, the Option button opens a dialog box that lets you control how much state information is saved with the file, what file creator to use, and what kind of line breaks to use. Setting the File Creator The File Creator is the information stored with the files that tells the Finder which application created the file. The default creator is naturally BBEdit, but you can choose other types from this pop-up menu. Note If you save a file with a file creator other than BBEdit, double-clicking the document will launch the application that matches the selected file creator. If you don’t have that program installed, you might get an error message. You can still open it in BBEdit by dragging it onto the BBEdit application icon, or by using BBEdit’s Open command. You can add additional file types and set the default for this pop-up menu with the File Types panel of the Preferences. Creating and Saving Documents 23 Saving State Information The state information that BBEdit can save with a file includes the placement of the window, the scroll bar position, the font and size of the text, etc. BBEdit stores either MPW state information or BBEdit state information. The following table shows what information is saved: Information MPW State BBEdit State Window position and size • • Font & Tab • • Scroll bar setting • • Current selection range • • Printing options • Text display options • Manual language selection • You can choose which state information to save from the Save State pop-up menu in the Options dialog when you use the Save As command. Note Starting with BBEdit 6.0, the default state format changed to MPW (in previous versions it was BBEdit). Setting the Line Breaks The line breaks setting let you choose what kinds of line breaks BBEdit writes when you save the file. Choose: • Macintosh line breaks (ASCII 13) if you are using the file only on a Macintosh or will be sending it to another Macintosh user. • Unix line breaks (ASCII 10) if the file resides on a Unix file server or if you will be sending it to someone who uses a Unix system. • DOS line breaks (ASCII 13/10) if the file resides on a DOS or Windows file server or if you will be sending it to someone who uses a DOS or Windows system. Note On Mac OS 9 and earlier, almost all applications expect or require files formatted with Macintosh line breaks. However, many of the Unix tools supplied with Mac OS X require files to be formatted with Unix line breaks. Saving as Unicode You can choose to save a file as Unicode. Unicode is an international standard for text encoding that provides the characters needed for many of the world’s languages. Chapter 5 contains more information on handling Unicode files with BBEdit. • Save as Unicode. Saves the file as Unicode if marked. 24 Chapter 3: Working with Files • Swap Bytes. Since Unicode uses two bytes to represent each character, this leaves the question of which of the two bytes comes first—whether it is “littleendian” or “big-endian.” By default, BBEdit writes Unicode big-endian (the standard). By marking Swap Bytes, you can write little-endian files instead, which some Windows software requires. • UTF-8 Encoding. UTF-8 encoding is a more compact variant of Unicode that uses 8-bit tokens where possible to encode frequently-used sequences from the file. • Include Byte Order Mark. When saving Unicode files, you should always include a Byte Order Mark (BOM) so that the reading application knows what byte order the file’s data is in. For maximum compatibility, the BOM should be used whenever possible, and should only be left off if there is a specific reason to do so, such as providing compatibility with a broken third-party application. Note Anyone preparing HTML files in UTF-8 format may want to save them without the byte order mark, due to a bug in Microsoft Internet Explorer 5.0 for the Macintosh. This should be addressed in a future version of Internet Explorer. When you save as Unicode, you can also choose Unicode from the Line Breaks pop-up in this dialog. Unicode has its own line-ending standard. Files saved as Unicode from BBEdit are given a type of ‘utxt’—the standard for Unicode text files on the Mac. UTF-8 files are given a type of ‘TEXT’ for compatibility with other applications; however, BBEdit will also recognize such files with type ‘UTF8’. new in 6.5 Long File Names When running on Mac OS X (and only on Mac OS X), BBEdit supports the use of “long” and Unicode file names. Such file names can be up to 255 characters long when stored on disks formatted as HFS Plus. Mac OS 9 will accept and preserve files with long names, but you cannot create names greater than 31 characters, and longer names will appear truncated in most applications, including the Finder. For example, a file named “This file has a name that is 47 characters long” will appear in Mac OS 9 as “This file has a name that#19958”. When running on Mac OS 9, BBEdit can open files with long names and will preserve the full name when saving, but it will display the truncated name in most places. Saving with Authentication new in 6.5 On Mac OS X, BBEdit 6.5 now supports saving files which require Administrator privileges, if you possess the necessary user and password information to enable this. For example, you can edit and save files which are owned by “root”. Authenticated saving is particularly useful when used in conjunction with BBEdit’s Open Hidden command, which allows you to see and open files in hidden folders (like /bin and / usr). When you open a file for which you do not have write privileges, BBEdit will display a slash through the pencil icon in the status bar. To edit the file, click the pencil icon. BBEdit will prompt you to confirm whether you wish to unlock the file. (Option-click the pencil icon to skip the confirmation dialog.) Creating and Saving Documents 25 When you are finished editing, simply choose Save from the File menu. BBEdit will prompt you to authenticate as a user with Administrator privileges. Type your “short” username and password to save the file. Opening Existing Documents There are several ways to open existing documents with BBEdit. • Double-click any file with a BBEdit document icon. • If BBEdit is running, choose the Open, Open Hidden, or Open Recent commands from the File menu. • Select the name of a file in a BBEdit editing window, then use the Open Selection command in the File menu. • Double-click a file name in a browser’s file list. (See Chapter 9, “Browsers”.) • Drag a file’s icon to the Windows floating window. (See Chapter 6, “Working with Windows”.) • Drag a file’s icon to the BBEdit icon or to an alias of the icon. Note There’s a bug in the Finder that can cause Drag and Drop not to work if you try to drop icons onto an alias of BBEdit. This behavior is usually triggered by moving BBEdit to another disk or rebuilding your desktop. If this happens, throw away your alias to BBEdit and make a new one. BBEdit can natively open files with type ‘TEXT’, ‘utxt’, ‘UTF8’, and ‘PICT’. (Of course, you cannot edit PICT files in BBEdit, but it will display them.) If you have QuickTime installed, you can play movie files by opening them with BBEdit. You can also have BBEdit ask QuickTime to try to open non-text files (by selecting the appropriate setting in the Application panel of the Preferences dialog). BBEdit can then open image files and sounds in their own windows, rather than displaying them as text. If this preference is not active, then BBEdit will open the files in their “raw” condition as if they were text documents. Opening Multi-Byte Documents When opening multi-byte text documents, BBEdit will automatically recognize and appropriately handle those files which contain appropriate font information. If a file meets any of the following criteria: • it starts with a UTF-16 (Unicode) byte order mark • it starts with a UTF-8 byte order mark • it contains a ‘styl’ resource which indicates a font that maps to a multi-byte script • it contains an MPW state resource which indicates a font that maps to a multibyte script then BBEdit will treat it as a multi-byte file. 26 Chapter 3: Working with Files If no font information is available, BBEdit will assume the file content is MacRoman and display it accordingly. In order to correct this, once the file is open, change the display font to one appropriate for the contents, and BBEdit will perform the required conversion. Changing BBEdit’s default font to a non-Roman font does not affect this behavior. For more details, please see Chapter 5. Note If a font change results in a document’s contents being converted from a single-byte script to a multi-byte script, BBEdit will mark the document as being ‘dirty’ or changed. Using the Open Command To open a file with the Open command: 1 Choose Open from the File menu. BBEdit displays the Open dialog box. On Mac OS X: Opening Existing Documents 27 On Mac OS 9: 1 Select the file you want to open. 2 Change any desired options. (See below.) 3 Click Open to open the file. You can use the following options when you open a file. Show (or File Types) Pop-Up Menu This pop-up menu lets you choose what kinds of files can be selected from the Open dialog. (Its title is either “Show” or “File Types”, depending on the version of the dialog you are using.) If you know a file contains text, but it doesn’t appear in this dialog box, it means that the Macintosh type of the file is not set to ‘TEXT’. This is sometimes the case with files received from other computers or downloaded from the Internet. Choose Any File from the File Types pop-up menu to open the data fork of any file as a text file. Important Given that Mac OS X does not set the file type of any text file created by a Unix program to a useful value, you may find it useful to turn on the Map the File Name option in the Text Files: Opening panel of the Preferences window. With this preference turned on, BBEdit will inspect the file’s name to see if it can determine whether the file is text or not. BBEdit will first attempt to map the file name to the list of suffix-tolanguage mappings specified in the Languages preferences. If a file name matches up with a language (even if the language is “None”), then the file is assumed to be a text file. Thus, you can use BBEdit’s own suffix mappings to convince it to recognize as text any files whose suffixes are not in Mac OS X’s built-in list of file-suffix-to-file-type mappings. If no match is found in the Languages preferences, BBEdit will next apply the Internet Config file name mappings. (See Chapter 10, “Preferences”, for more details. Translate Line Breaks When this option is selected, BBEdit translates DOS or Unix line breaks when opening a file. Otherwise, BBEdit leaves the original line breaks untranslated. 28 Chapter 3: Working with Files Read As When opening a file, you can tell BBEdit what encoding it uses. Usually, BBEdit will correctly auto-detect the encoding, but if it doesn’t, you can close the file and try again, manually specifying the desired format. Chapter 5 includes more information on encodings. Using the Open Hidden Command The Open Hidden command in the File menu presents a dialog with the same appearance and behaviors as the standard Open dialog, except that it shows invisible files (including, on Mac OS X, files whose names begin with a period.) Using the Open Recent Command The Open Recent hierarchical submenu contains a list of files you have opened recently. To open one of these files, choose it from the Open Recent submenu. Opening Several Files at Once new in 6.5 In older versions of the Mac OS, the standard file Open dialog box only allowed you to choose a single file at once; to open more than one file at a time, you needed to keep going back to the Open dialog for each file. BBEdit solved this problem by providing a separate Open Several dialog, which allowed you to choose multiple files at one time and open them all. The new Mac OS Navigation Services Open dialogs—on both Mac OS 9 and Mac OS X—allow you to select more than one file at a time. Because BBEdit now uses Navigation Services, its separate Open Several command has been removed. If you want to open more than one file, just use the regular Open command, and hold down the Shift key while you select multiple files. (On Mac OS X, use the Command key instead when selecting separate files, and the Shift key when selecting a range of files.) Using the Open Selection Command The Open Selection command lets you open a file that’s referenced in the text of a document. It is particularly useful for programmers to open #include files or any document referenced by another file. To open a file whose name is referenced in the text of a document: 1 Double-click to select the file name. If the name contains spaces, drag across it with the mouse instead. 2 Choose Open Selection from the File menu If a suffix of the form “.x” follows the name, BBEdit automatically expands the selection to include the suffix. BBEdit looks for the file first in the same folder as the file that contains the reference to the file, then in any folders within that folder. BBEdit next searches your Templates and Includes folder, followed by the site root, if these folders have been defined in your Opening Existing Documents 29 HTML Web Site preferences. If the CodeWarrior IDE is running and a project is open, BBEdit will ask the IDE for the search paths to the current project’s current target, and look for files in those folders as well. If the name of the file is surrounded by angle brackets, BBEdit starts its search in the folder that you specified in the File Search panel of the Preferences. If BBEdit can’t find the file, it displays a Choose Folder dialog that gives you a chance to find the file manually. In some cases, there may be more than one file with the same name in the various folders BBEdit looks in. Normally, BBEdit opens the first one it comes to, then stops. If you want BBEdit to find all the files that match the selected name, be sure to select the Find All Matches option in the File Search panel of the Preferences. Open File by Name If there is no selection, or there is no text editing view in the front window, Open Selection becomes Open File by Name. Choosing the command lets you specify a name or an exact path for the file to be opened; BBEdit will open it as described above for Open Selection. You may also specify that only the <…> folder specified in the Preferences should be searched for the file. You may use the following wildcards in the Open File by Name dialog, if you activate the Match Wildcards checkbox: 30 Wildcard Meaning ? Any single character * Any number of characters # Any numeric character \ Escapes one of the above. To enter a literal backslash, use \\. Chapter 3: Working with Files Opening From and Saving to FTP Servers BBEdit can open files from, and save them to, Internet FTP servers. To open a file, choose Open from FTP Server on the File menu. The following dialog appears: Enter the name of the server and specify your user name and password in the appropriate fields, then click the Connect button to initiate an FTP transaction. You can also select the “Go To” button to bring up a dialog in which you can type the exact pathname of a directory to view. Note BBEdit now allows you to open an FTP connection on ports other than the default (port 21). To specify an alternate port, place it on the end of the host name, separated by a colon, e.g. ftp.example.com:1111. Alternately, select an item from the Bookmarks pop-up menu to fill in a predefined server, user name, and password. Bookmarks can be set by entering the appropriate information in the FTP dialog and choosing Add from the Bookmarks pop-up menu, or by using the bookmark list in the FTP Settings preference panel. To store FTP passwords, BBEdit now takes advantage of Apple’s Keychain Manager, which is installed as part of Mac OS 9 and later. WARNING As a security measure, we do not recommend preserving FTP passwords on systems which do not have Keychain support. If you do need to store such information, we suggest you consider using the bookmark facility of a stand-alone FTP client, or a secure information storage application such as PGP or Web Confidential. In the FTP dialog, the Remember Password option applies only to the last FTP session that was initiated before dismissing the FTP dialog. The Auto-Connect option depends on this switch, so if “Remember Password” is turned off or disabled, “Auto-Connect” will be disabled. Opening From and Saving to FTP Servers 31 As long as the Keychain is unlocked, whenever you enter a server and user name pair for which there is a record, the corresponding password will be filled in automatically. This will happen regardless of whether the Remember Password option in the dialog is on or off. If the Keychain is locked, the Remember Password option will also be disabled and you will need to retype your password every time you use the FTP dialog. You can click on the key icon in the FTP dialog (above the password field) to unlock the Keychain, or to query it for a password if the Keychain is already unlocked. The Passive FTP checkbox tells BBEdit to open a connection to the FTP server in passive mode, where the server will send BBEdit the number of the port to use for the session. If this option is turned off, BBEdit will specify the port number. We recommend use of passive mode when possible; however, not all servers or networks support it, so if you encounter difficulties, try turning this checkbox off. The Show Files Starting with “.” checkbox tells BBEdit whether to display hidden or admin files in the chosen directory, such as .login, .forward, .signature, etc. Starting a filename with a period is a Unix convention to make it invisible in most directory listings. Once the connection is made, you can use the Open button and the directory popup to navigate through the directories, just as you would navigate through the folders on your hard drive. Click Delete to remove the file from the server. You can use the Get Info button to reveal the size, modification date, and if applicable, file system permissions of the selected file. You can edit the file’s name and click the Rename button to rename the file on the server; you can also make changes to the permissions and click the Set button to change them. (Take care not to set the permissions such that the file becomes inaccessible to you!) BBEdit also supports FTP URL clippings. You can make a clipping of the FTP URL for a file, add the clipping to a file group, double click on it, and BBEdit will open the specified file for editing. If the clipping contains the FTP URL for a directory, BBEdit will open a new FTP Browser window (see next section for more information about FTP Browsers). Alternatively, you can double-click on an FTP clipping in a disk browser, or drop one on BBEdit’s icon in the Finder with the same results as just described. Dragging the window proxy icon from an editing window corresponding to a file opened from an FTP server will create a clipping containing that file’s URL. Once you have selected a file and opened it, BBEdit displays the file in a text editing window. The status bar displays the URL of the FTP file, not the pathname of the file on your hard drive as it does for local files. The window path pop-up menu in editing windows for files opened via FTP now displays the file’s path on the FTP server, rather than the local path to the temporary file. Choosing one of the items from the pop-up will open a new FTP Browser window to the chosen directory. Note 32 When you open a file from an FTP server, BBEdit downloads it “raw” (in binary mode), then performs a standard linefeed conversion on the downloaded file. Chapter 3: Working with Files After editing a file opened from an FTP server, pressing Command-S or choosing Save from the File menu saves the new version back to the FTP server. If you want to save the file in a different directory or under another name, choose “Save to FTP Server…” to open a dialog that works much like the “Open from FTP Server…” dialog. Like a standard Save dialog for saving a local file, it includes a field for the name of the file so that you can name it before saving. Note When you save a file to an FTP site using either Save or Save to FTP Server, and the file has Unix (LF) or Windows (CR+LF) line endings, BBEdit uploads the file in binary mode, preserving its line endings exactly as they are on your local machine. However, if the file has Macintosh (CR) line endings, it is uploaded in text mode so that the server can convert the line endings as appropriate. Finally, you can use Save a Copy to FTP Server to upload a copy of your current file to an FTP server while keeping your local file open. This is especially useful when you maintain Web site content on your local hard drive and only need to upload changes made in one or two files to the server. Opening From and Saving to FTP Servers 33 FTP Browsers new in 6.5 BBEdit now offers FTP Browser windows. To open an FTP Browser, choose New FTP Browser from the New submenu of the File menu. FTP Browsers enable you to maintain an open connection to an FTP server. Enter your server address, user name, and password, or choose a bookmark from the Bookmarks menu. The buttons and pop-up menus work the same as those in the Save to FTP Server and Open from FTP Server dialogs. To open a file, double-click it or select it and click the Open button. For editing purposes, files opened from an FTP Browser behave exactly like those opened via the Open from FTP Server command. To refresh the contents of the listing, click the button in the lower right with the circular arrow icon. You can double-click a folder to change directories. If you hold down the Option key when opening a folder, it will open in a new FTP Browser window. You can select a range of files and directories by Shift-clicking, and you can select (and de-select) multiple items one at a time by Command-clicking. Using Stationery Like most modern Macintosh programs, BBEdit supports stationery pads. A stationery pad is a template document that, when opened, results in a new, untitled document with the content from the stationery file. In other words, you do not edit the stationery document itself, you use it as a starting point for a new document. To create a stationery pad, click the Save As Stationery checkbox when saving the file from BBEdit. Alternately, any document can be changed into a stationery pad in the Finder by clicking the Stationery Pad checkbox in the document’s Get Info window. You can create new documents from a stationery pad by opening the pad the same way you would open any other document. Or you can choose New With Stationery from the File menu, and select the desired stationery pad from the contents of the Stationery folder (inside the BBEdit Support folder). Or you can use BBEdit’s Stationery List, which is available from the Windows menu. 34 Chapter 3: Working with Files The Stationery List is a floating window that displays all the stationery pads you have placed inside the Stationery folder in the BBEdit Support folder. You can create a new document from any of these pads by double-clicking them in this list. To assign a keyboard shortcut to a stationery pad, click the Set Key button, then type the desired key in the Set Key dialog and click OK. Manually Sorting the Stationery By default, items in the Stationery List are displayed in alphabetical order. However, you can force them to appear in any desired order by including any two characters followed by a right parenthesis at the beginning of their name. For example “00)Web template” would sort before “01)HTML Template”. For such files, the first three characters are not displayed in BBEdit. You can also insert a divider by including an empty folder whose name ends with the string “-***”. (The folder can be named anything, so it sorts where you want it.) These naming conventions are the same as those used by the utilities FinderPop and OtherMenu. Using File Groups If you frequently work with many related files, you may want to create a file group for them. A file group is a special kind of BBEdit file that contains references to other files and folders. These files will usually be BBEdit text files, but you can place any kind of file in a file group, including aliases to a file and URL clippings. File groups are persistent. Once you have created one, you can save it to disk using the Save command, then open it in a later BBEdit session to have instant access to the same set of files. Creating a File Group To create a new file group pull down the File menu and select File Group from the New submenu. A new File Group window appears. To add files to a file group, drag them from the Finder into the file group window, or click the Add Files button. When you click the Add Files button, BBEdit opens the Open dialog so you can choose multiple files to be added at once. You can also add a file by dragging its icon from the status bar to the group window, or by dragging a file entry from a search results window. Using File Groups 35 In addition to file and folder references, BBEdit supports URLs in file groups. You can drag a URL (text or clipping file) to a file group window, and the URL will be saved in the group. If you subsequently open the item BBEdit will hand off the URL to designated helper, or open it directly if it is an FTP URL. To add folders to a file group, drag them from the Finder into the file group window, or click the Add Folder button. BBEdit displays the following dialog: You can click Choose to choose a folder using an Open dialog, or just drag the desired folder to the white area from the Finder. You can add both folders and files, just files, or just folders, and you can choose to also add all nested folders and, optionally, to skip folders whose names are enclosed by parentheses. new in 6.5 When adding a folder to a file group with the “Add Folder” button, you can now choose whether to add all of the folder’s contents. By choosing not to add a folder’s contents, you can create a file group that consists only of folders, which can be handy for navigating and searching project roots without worrying about keeping in sync with the folders’ contents. Once you have added items to a file group, you can save it to disk for later use. Using File Groups To open a file in a file group, double-click it, or select it and click the Open button. If the file is a BBEdit document, BBEdit opens it. If it’s a folder, it’s opened in a disk browser. If it’s an FTP URL clipping, BBEdit will open the remote file (or open an FTP Browser if the clipping points to a directory). Otherwise, BBEdit tells the Finder to open the file. Note When opening a file group converted from BBEdit 5.x format, BBEdit will mark the file group document “dirty” (in need of saving) and alerts you to this. You will thus be prompted to save the file group when closing it even if you have not made changes to it. If you added nested folders, they appear in the File Group with disclosure triangles, as in a Finder list view. Click the triangle to reveal the files and folders inside that folder. You can use a file group as the basis of a multi-file search. See Chapter 7, “Searching”, for more information. Items in file groups display the Projector status of the individual file just to the left of the file’s icon. 36 Chapter 3: Working with Files Removing Files from a File Group To remove a file from a file group, drag it from the file group into the Trash in the Finder, or select the items you want to remove and click the Remove button. Note Removing an item from a file group, even by dragging it to the Trash, does not delete the original file—only its entry in the file group. Making Backups BBEdit can automatically make a backup copy of a document before saving it. You can also manually take a snapshot of a document at any time to make it easier to revert to previous versions. Note Starting with version 6.0, BBEdit now uses a new format for its backup preferences which is not readable by any previous version. If you open a document containing old backup preferences, these will be converted into the new format immediately upon opening. BBEdit names backup files with the same name as the original file and appends the date and a sequence number. For example, the first backup made on August 10, 1996 of “My Text File” would be named “My Text File (8-10-96)-1”. The name of the original may be shortened if the date and sequence number would make the name of the backup file longer than 31 characters. Note Versions of BBEdit prior to 6.1 named backup files with dates separated by “/” (e.g. “My Text File (8/10/96)-1”). This has been changed to avoid conflicts with Unix file naming conventions. The Text Files: Saving panel of the Preferences includes an option that allows you to specify the default backup options for new files and for files that do not have state information. (See Chapter 10 for more details.) You can override this default on a fileby-file basis, or manually back up a file at any time. A document must be saved and named before you can set its backup options or make a backup manually. Note If the file being backed up contains Projector version-control information, this information is removed from the copy. Making Backups 37 Automatic Backups To make automatic backups of a document, follow these steps: 1 Choose the Backup Options command from the File menu. BBEdit opens the Backup Options dialog box. 2 Specify the folder where you want BBEdit to save the backups. You can choose the document folder, the preferred backup folder (set in BBEdit’s Preferences), or some other folder. In the latter case, click Set or drag a folder icon from the Finder to the text box. 3 Select the Make Backup before Saving option. BBEdit will make a backup before you save the file. The backup will contain the previously saved version of the file. 4 Click OK. Manual Backups To make backups manually, follow the same steps above, but do not select the Make Backup before Saving option. To make a backup at any point, choose the Make Backup Now command from the File menu. BBEdit opens a standard directory dialog box so that you can change the location and the name of the backup file. The default folder is the folder you specified in the Backup Options dialog box and the default name is the standard backup name as described at the beginning of this section. 38 Chapter 3: Working with Files Printing To print a document, choose the Print command from the File menu. BBEdit opens the standard system print dialog box for your currently selected printer. If you are using Mac OS 9, the print dialog might look like this: Note that the exact appearance and layout of options in the print dialog will vary depending on what printer you are using. With current versions of the LaserWriter driver or in the Mac OS X Print dialog, for instance, the BBEdit-specific printing options are on a “page” of their own, where they can be selected by a pop-up menu at the top of the dialog. The resulting dialog is shown on the following page. Note You set the default settings for most printing options in the Printing section of the Preferences. Printing 39 To print one copy of the active document without opening the print dialog box, choose the Print One Copy command from the File menu. Options Available from Print Dialog You can set the following options from the print dialog box. Font Button Click this button to open a dialog box that lets you set the font, size, style, and tab settings to use while printing. Use Document’s Font When this option is selected, BBEdit uses the document’s font when printing. Fractional Widths When this option is selected, BBEdit prints proportionally-spaced fonts with better letter spacing. This option works only on PostScript printers. Options Button Click this button to open the Printing Options dialog box. See “The Printing Options Command” below. Print Selection Only When this option is selected, BBEdit prints only the selected text. 40 Chapter 3: Working with Files The Printing Options Command The Printing Options command in the Edit menu lets you further specify how BBEdit prints your documents. You can set the defaults for most of these options in the Printing panel of the Preferences. Note When creating a new document, or opening a text document which doesn’t have BBEdit saved state, or with the “Printing Settings” switch turned off in the State preferences, BBEdit will obtain the print options for the document from the preferences, just before printing. Thus, for these types of documents, you can use the Printing preferences to control behavior globally, instead of having to change print settings on a per-document basis. Note that if you change the options in the “Print…” dialog, the document settings will be divorced from the preferences. You can also open this dialog box by using the Options button in the main print dialog box. Print Backwards When this option is selected, BBEdit prints documents last page first. This option is useful if you are printing to a printer like the original LaserWriter that does not arrange pages in the proper order. Frame Printing Area When this option is selected, BBEdit draws a frame around the printed text. Print Page Headers When this option is selected, BBEdit prints the page number, the name of the file, and the time and date printed in a header at the top of each page. Print Line Numbers When this option is selected, BBEdit prints line numbers along the left edge of the paper. Print Two-Up When this option is selected, BBEdit prints two pages on one sheet of paper. Use this option to save paper. Printing 41 1-Inch Gutter When this option is selected, BBEdit leaves a one-inch margin along the left edge of the paper. Use this option if you usually put your pages in three-ring binders. Print Full Pathname When this option is selected, BBEdit prints the full path name of the file being printed in the header. Time Stamp The Time Stamp options let you choose whether the date that appears in the header is the date that the file was last modified or the date that the file was printed. Print Rubber Stamp When this option is selected, BBEdit prints a message in gray diagonally across the page. Use the pop-up menu to choose a font, and type the message in the text box. BBEdit chooses the right sized font to print the message. If your printer supports grayscale printing, BBEdit prints the rubber stamp in gray, otherwise it is printed in outline style. Note 42 This feature is not supported by all printer drivers. Chapter 3: Working with Files CHAPTER 4 Editing Text with BBEdit This chapter describes the basics of editing text with BBEdit, wrapping text, text manipulations, and file comparison. In this chapter Basic Editing. . . . . . . . . . . . . . . . . . . . . . . . . . . . . . . . . . . . . . . . . . . . . . . 44 Moving text – 45 • Multiple Clipboards – 45 • Drag and Drop – 46 • Multiple Undo . . . . . . . . . . . . . . . . . . . . . . . . . . . . . . . . . . . . . . . . . . . . . 46 Window Anatomy . . . . . . . . . . . . . . . . . . . . . . . . . . . . . . . . . . . . . . . . . . 46 The Status Bar – 47 • The Function Pop-Up Menu – 49 • The Split Bar – 49 Cursor Movement and Text Selection . . . . . . . . . . . . . . . . . . . . . . . . . . . . 50 Clicking – 50 • Arrow Keys – 51 • Scrolling the View – 52 • The Delete Key – 52 • The Numeric Keypad – 53 • Go To Line Command – 53 • Function Keys – 54 Text Options . . . . . . . . . . . . . . . . . . . . . . . . . . . . . . . . . . . . . . . . . . . . . . . 54 Editing Options – 55 • Display Options – 56 Font & Tabs . . . . . . . . . . . . . . . . . . . . . . . . . . . . . . . . . . . . . . . . . . . . . . . 57 Text Transformation . . . . . . . . . . . . . . . . . . . . . . . . . . . . . . . . . . . . . . . . . 58 Balance – 58 • Exchange Characters – 58 • Change Case – 59 • Shift Left and Shift Right – 59 • Add Line Breaks – 60 • Remove Line Breaks – 60 • Rewrap Quoted Text – 60 • Increase and Decrease Quote Level – 60 • Strip Quotes – 60 • Hard Wrap – 60 • Zap Gremlins – 61 • Entab – 62 • Detab – 62 • Resolve URL – 62 How BBEdit Wraps Text . . . . . . . . . . . . . . . . . . . . . . . . . . . . . . . . . . . . . . 63 Soft Wrapping – 64 Hard Wrapping – 64 The Mark Submenu . . . . . . . . . . . . . . . . . . . . . . . . . . . . . . . . . . . . . . . . . 67 Setting Markers – 67 • Clearing Markers – 68 • Using Grep to Set Markers – 68 The Insert Submenu . . . . . . . . . . . . . . . . . . . . . . . . . . . . . . . . . . . . . . . . . 69 Inserting Files – 69 • Inserting a Folder Listing – 69 • Inserting Paths – 69• Inserting a Toolbox Call Template – 70 • Inserting a Page Break – 70 Comparing Text Files . . . . . . . . . . . . . . . . . . . . . . . . . . . . . . . . . . . . . . . . 70 Multi-File Compare Options – 73 Using the Spelling Checker . . . . . . . . . . . . . . . . . . . . . . . . . . . . . . . . . . . . 74 Checking Spelling – 74 Selecting Active Dictionaries – 76 Editing the User Dictionary – 76 Using an External Spelling Checker – 76 43 Basic Editing BBEdit behaves like most Macintosh word processors and text editors. Characters that you type in an active window appear at the insertion point, a vertical blinking bar. You can click and drag the mouse to select several characters or words, and the selected text is highlighted in black or in a color that you choose with the Appearance control panel. Selected text in an inactive window appears framed in the highlight color: If you select some text and then type, whatever you type replaces the selected text. To delete selected text, press the Delete key, or choose “Clear” from the Edit menu. If you have a keyboard with a numeric keypad on it, you can press the “Clear” key on the keypad to delete the selected text. In addition to clicking and dragging, you can use three selection commands in the Edit menu to select text. To select… Choose this from the Edit menu… line containing the insertion point Select Line paragraph containing the insertion point Select Paragraph entire text Select All You can then cut, copy, or perform any other action that affects selected text. Note 44 BBEdit defines a paragraph as a block of text surrounded by blank lines (lines containing no characters other than tabs or spaces). The beginning and end of the document also mark the beginning and end of paragraphs. Chapter 4: Editing Text with BBEdit Moving text To move text from one place to another, follow these steps: 1 Select the text you want to move 2 Choose Cut from the Edit menu BBEdit removes the text from the window and stores it on the Clipboard. 3 Use the scroll bars to move to the new place for the text if necessary, then click to set the insertion point where the pasted text is to be inserted 4 Choose Paste from the Edit menu You can Paste the contents of the Clipboard as many times as you want in any BBEdit window or in any other application. Pasting inserts the text stored on the Clipboard at the insertion point. If there is a selection, pasting replaces the selection with the contents of the Clipboard. To place text on the Clipboard without deleting it, choose Copy from the Edit menu. Tip To add selected text to the existing contents of the Clipboard, hold down the Shift key as you choose the Cut or Copy commands. When you hold down the Shift key, BBEdit changes these commands to Cut & Append and Copy & Append. Multiple Clipboards new in 6.5 BBEdit now supports six separate clipboards. Each time you use the Cut or Copy command, BBEdit automatically switches to the next clipboard (wrapping back around to clipboard #1 after the sixth). This way, the last six things you copied or cut are always available for pasting—sort of a “clipboard history.” By default, the Paste command pastes text from the most recently-used clipboard, so if you do nothing special, BBEdit works just like any other Macintosh program. However, by using the Previous Clipboard command on the Edit menu, you can access the previous clipboard contents. Next Clipboard moves forward through the clipboard history. There are also buttons in the Clipboard window (below) that let you move back and forth through the clipboards. Once you have selected a clipboard using one of these methods, the next Cut, Copy, or Paste command will use the clipboard you chose. (Subsequent Cut or Copy commands will advance to the next clipboard. Paste never advances automatically.) Note For compatibility with international text content, the clipboard window displays text in the font and size and face that it was put on the clipboard with. Changing the display font in the clipboard window does not change the underlying data. Basic Editing 45 Drag and Drop Another way to move text from one place to another is to use Macintosh Drag and Drop. To use Macintosh Drag and Drop, follow these steps: 1 Select the text that you want to move 2 Place the mouse pointer within the selected area 3 Click and hold down the mouse button 4 Drag the mouse pointer to the place you want to move the text to within the current window or another BBEdit window If you drag and drop text to another window, BBEdit copies the text to that window without removing it from the original window. In addition, you can drag and drop an item from the Finder onto an editing window in BBEdit. If the item is a text file, then the file’s contents are inserted. If the item is a folder, then a listing of the item’s contents is inserted. If you hold down the Command key while dragging a folder, the path of the item is inserted instead. Multiple Undo BBEdit provides the ability to undo multiple edits, one action at a time. The number of edits that may be undone is limited only by available memory. The practical limitation is determined by the extent of the edits and the amount of free memory. The Undo command essentially reverses any change you may have made to the content of your file. Each action, which is generally punctuated by a mouse click, is one undoable incident. So, for example, if you type the sentence “This is a Test.”, and then click to highlight the second capital “T” and replace it with a lowercase “t,” and then highlight the word “is” and click on the HTML tools to change the style of the word to bold, that’s three distinct actions. In this example, you can select the Undo command once to reverse your action of inserting the bold tags. Selecting Undo again would change the lowercase “t” back to an uppercase “T”. A third Undo would eliminate the sentence altogether—untype it, as it were. BBEdit also supports multiple Redos. If you haven’t made any changes after performing an Undo, you can redo each action, in order, by selecting that command from the Edit menu, or typing Command-Shift-Z. However, once you perform a new action, you cannot redo any actions that you undid before you made that change. Window Anatomy BBEdit windows have the same controls you are familiar with from other Macintosh applications (for example, windows are resizable and zoomable, and have both vertical and horizontal scroll bars). Two additional features, which may be less familiar, are also included: the status bar and the split bar. 46 Chapter 4: Editing Text with BBEdit If you choose the Show Line Numbers and Show Cursor Position options, BBEdit windows have additional elements. The next section, “Text Options,” discusses these additional elements. The Status Bar The status bar is a panel at the top of editing windows that contains buttons and popup menus that let you work with the text in the window. On Mac OS X, the status bar display is toggled by the button in the top right corner of the window, as shown below: On Mac OS 9 and earlier, the status bar display is toggled by the “key” icon in the top right corner of the window: If the window contains a document that has been saved to disk, the status bar contains the full path to the file and the last time the file was changed. If the file hasn’t been saved to disk, the status bar displays (New Document) instead of the file name. Note Windows in which the text view status bar isn’t adjacent to the window title bar (e.g. disk browsers and search results) no longer have a status bar control (on Mac OS 9 or Mac OS X), but do honor the global status bar preference, and you can use the Text Options dialog to show and hide the status bar on a per-window basis. The icons on the status bar are indicators, buttons, and pop-up menus that give you quick access to commonly-used functions. The following table explains each icon. Icon Meaning A solid diamond indicates the document has been modified. A hollow diamond means only the state of the document (window position, selection range, scrolling position, etc.) has changed. Window Anatomy 47 Icon Meaning The pencil icon indicates that the document can be modified. If the pencil has a slash across it, the document cannot be modified because the file is read-only, the disk is locked, or the file is part of a source-control system project (such as Projector or CVS) and is checked out. If the file is not on a locked disk, you can click the pencil icon to toggle the document’s editability. The Function pop-up menu gives quick access to routines and functions in languages that BBEdit can parse. In HTML documents this menu lists the contents of the TITLE tag (if any), all named anchors in your document, i.e., those defined with <A NAME="…">, all level 1-6 headings, any tags which have ID attributes, and any “BBmark” indicators, as well as all BBEdit include files referenced by the document. The Text Options pop-up menu contains commands such as Soft Wrap Text and Show Invisibles that let you control how the text appears in the window. The Mark pop-up menu contains commands such as Set Marker and Find & Mark that let you set or mark specific locations in the file; when present, these marked locations will be listed on the pop-up menu below the commands. The File-pop-up menu contains commands that let you save the document, set line-break options, specify what state information is saved, and set Unicode file options if applicable. The Insert pop-up menu contains commands that let you insert the contents of files, folder listings, and page breaks. The Path pop-up menu displays the list of folders that contain the document. You can use this pop-up menu to open any of the folders along the path in the Finder. For files which contain Projector state information, the Projector button displays a dialog box that shows the path to the current document, as well as its revision status. If a file does not contain such information, this button will not be displayed. The Info button displays a dialog box that lists the number of characters, words, lines, and pages in the document. Clicking this button is the same as choosing the Get Info command from the Windows menu. The Super Get Info button asks Super Get Info to display information regarding the current document. This button is only available if you are running on Mac OS X and have Super Get Info installed on your computer. (Super Get Info is a Mac OS X file info utility from Bare Bones Software, see our web site for more details.) The Document icon button represents the current document. Clicking this icon is the same as choosing Reveal in Finder from the Windows menu: it opens the Finder window that contains the document. You can also drag the document icon to any other application, or you can drag it to the Trash (which is the same as choosing Close & Delete from the File menu). The key control shows and hides the status bar when running on Mac OS 9 and earlier. (On Mac OS X, the status bar display is toggled by the button in the top right corner of the window.) 48 Chapter 4: Editing Text with BBEdit The Function Pop-Up Menu The Function pop-up menu lists the functions defined in this file for a programming language source file, or the tags described in the table above for an HTML document. The following indicators appear in the pop-up to show the type of function. Indicator Meaning • the function containing the insertion point † C/C++ typedef ◊ C/C++ “#pragma mark” directive italic name C/C++ function prototype 1-6 heading level (in HTML files) tag name tag name for the indicated name or ID attribute value (in HTML files) The Split Bar Every editing window has a split bar, a small black bar above the scroll bar, that lets you split the window into two panes. Splitting the window lets you edit a document in two places at the same time. Each pane is independently scrollable, and unlike previous versions of BBEdit, scrolling the non-active split view no longer automatically changes view focus. To split the window, drag the split bar some distance into the window and let go. To return to a single-pane window, drag the split bar back to its original place near the top of the window. You can drag anywhere on the split bar, not just at the right end. Tip Double-clicking the split bar unsplits a split window, or restores the last-used split position. If the window has never been split, the window is split 50-50. To force a 50-50 split for a previously-split window, you can Option-double-click on the split bar when it is closed. Window Anatomy 49 Cursor Movement and Text Selection BBEdit gives you several ways to move the insertion point and change the selection. You can click and drag using normal Macintosh text selection techniques or you can use the various keys on the keyboard. Clicking You can select text in an editing window in the normal Macintosh fashion, by clicking and dragging. Holding down the Shift key while clicking extends the selection. No Modifier Shift Click Move insertion point Extend selection Double-click Select word Extend selection to word Triple-click Select line Triple-clicking is the same as clicking in a line and then choosing the Select Line command in the Edit menu. Holding the Command and Option keys as you click or double-click triggers special actions: Option Click Double-click Command Command + Option Open URL Look up selected word in programming reference Select word and search for next occurrence of the word Holding down the Option key as you double-click on a word is the same as selecting the word and choosing Find in Reference in the Search menu. BBEdit optionally allows you to select entire lines by clicking in the left margin of an editing window. Click and drag to select multiple lines. Double-click to select an entire paragraph; double-click and drag to select a range of paragraphs. A checkbox in the Text Editing preferences (not shown), labeled Allow Single-Click Line Selection, controls this behavior. If the checkbox is turned off, clicking in the left margin moves the insertion point to the beginning of the clicked line, as in previous versions of BBEdit. Note that the line number bar, if displayed, is not part of the left margin. 50 Chapter 4: Editing Text with BBEdit Arrow Keys Use the arrow keys to move the insertion point right, left, up, and down, and augment these movements with Command and Option: No Modifier Option Command Control Up Up one line Up one screen Start of document (scroll view up) Down Down one line Down one screen End of document (scroll view down) Left Left one character Left one word Start of line (scroll view left) Right Right one character Right one word End of line (scroll view right) Holding down the Shift key extends the selection. For example, pressing Shift-OptionRight Arrow selects the word to the right of the insertion point. new in 6.5 If you are used to a word processor or text editor that uses Command key combinations to page through your document, you may want to swap the meaning of the Option and Command keys: 1 Choose Preferences from the Edit menu to open the BBEdit Preferences window 2 Select the Text Editing panel in the list at the left edge of the dialog 3 Under the heading Exchange Command and Option Key Behavior when Moving, select either the Horizontal, Vertical or both settings as you prefer. When active, these settings will change the sense of the up- and down-arrow keys as follows: No Modifier Option Command Up Up one line Start of document Up one screen Down Down one line End of document Down one screen Left Left one character Start of line Left one word Right Right one character End of line Right one word When the Shift key is held down, the arrow keys behave as described in the table above, except that the selection range is extended to include the new placement of the insertion point. (This is the same effect as typing the arrow-key combination, and then holding down the Shift key and clicking at the original placement of the insertion point, or at the end of the original selection range.) Cursor Movement and Text Selection 51 new in 6.5 Scrolling the View When holding down the Control key, the arrow keys will scroll document windows without moving the insertion point. The Delete Key The Delete key deletes the character to the left of the insertion point. If you have selected text, the delete key deletes all the text in the selection. You can use the Command and Option keys to modify the way the Delete key works: Modifier Action none Deletes character to the left of the insertion point Option Deletes to the beginning of the word to the left of the insertion point Command Deletes to the beginning of the line Command-Option Deletes to the beginning of the document Holding down the Shift key with the Delete key makes the Delete key work the same way as the Forward Delete key on Extended Keyboards. This feature is particularly useful on PowerBooks. If you want to enable this feature: 1 Choose Preferences from the Edit menu to open the Preferences window 2 Select Editor from the list at the left edge of the dialog box 3 Select the Enable Shift-Delete check box Note 52 If you have activated the Horizontal setting for Exchange Command and Option Key Behavior as described in the previous section, then the effects of Command and Option shown in the table above will l be reversed accordingly. Chapter 4: Editing Text with BBEdit The Numeric Keypad Most Macintosh keyboards have a numeric keypad on the right side. Normally, you use the keys on the keypad to enter numbers. If you prefer, you can use the numeric keypad to move the insertion point: 1 Choose Preferences from the Edit menu to open the Preferences window 2 Select Text Editing from the list at the left edge of the dialog box 3 Mark the Use Numeric Keypad for Cursor Movement checkbox start of line 7 up 8 Scroll up left show selection Right end of line down Scroll down 4 1 5 2 9 6 3 You can use the Shift key with the keys on the numeric keypad to extend a selection. You can use the Command and Option keys with the 2, 4, 6, and 8 keys as you would the arrow keys. To change the behavior of the numeric keypad, hold down the Option key and press the Clear key at the upper left-hand corner of the numeric keypad. (This key is also labeled Num Lock on some keyboards.) This toggles the keypad between moving the cursor and entering numbers. Go To Line Command To move the insertion point to a specific line, use the Go To Line command in the Search menu. When you choose this command, BBEdit opens the Go To Line dialog box. Type the number of the line you want to move to and click Go To. Note The Go To Line command honors the “Use ‘Hard’ Line Numbering in Soft-Wrapped Text Views” option in the Text Editing pane of the Preferences window. Cursor Movement and Text Selection 53 Function Keys If your keyboard has function keys, you can use the following key equivalents for cutting and pasting, to scroll, and to move the insertion point. No Modifier Note Option Command Shift F1 Undo Redo F2 Cut Cut & Append F3 Copy Copy & Append F4 Paste del forward delete Home scroll to top of document move insertion point to start of document End scroll to end of document move insertion point to end of document Pg Up scroll page up Pg Dn scroll page down delete to end of word delete to end of line Holding down the Command and Option keys as you press the forward delete key deletes to the end of the document. Text Options You can use the Text Options command (formerly Window Options) to change the way BBEdit edits text and the way it displays text and additional elements in its windows. The Text Option dialog box is divided into two parts. The Editing options on the left control the way BBEdit behaves while you type. The Display options on the right control the appearance of the BBEdit window. 54 Chapter 4: Editing Text with BBEdit You can change many of the text options through the Text Options pop-up menu (left) in the status bar. Changes you make in the Text Options dialog box affect only the current window. To make changes for all new windows that you open, use the Editor Defaults and Status Bar sections of the Preferences window. Editing Options These options control the way BBEdit behaves as you type text in the active document window. Changes you make here affect only that window. To change editing behavior in windows you open in the future, use the Editor Defaults section of the Preferences dialog in the Edit menu. Auto Indent When this option is selected, pressing Return automatically inserts spaces or tabs to indent the new line to the same level as the previous line. Tip To temporarily invert the sense of the Auto Indent option, hold down the Option key as you press the Return key. Balance While Typing When this option is selected, BBEdit flashes the matching open parenthesis, brace, or bracket when you type a closing one. This option is useful when you use BBEdit to edit source files to ensure that all delimiters are balanced. Smart Quotes When this option is on, BBEdit automatically replaces straight quotes (" ') with typographer’s quotes (“ ” ‘ ’). If you need to type a straight quote when this option is selected (or to type a typographer’s quote when the option is deselected), hold down the Control key as you type the " or ' key. Note Smart quote marks should not be used in HTML documents, as they will not display correctly; you must use straight quotes, or entity codes, instead. We recommend leaving this option turned off if you edit HTML content or program code. Smart Editing Note The “Smart Editing” option has been removed from BBEdit 6.5. (It wasn’t smart enough.) Auto-Expand Tabs When this option is selected, BBEdit inserts an appropriate number of spaces when you type Tab, rather than inserting a Tab character. Soft Wrap Text When this option is selected, BBEdit soft wraps the text in the file to the right margin that you choose: the Philip Bar, the window width, or a specific number of characters. The Philip Bar is a gray line in the status bar that indicates the right edge of the usable viewing area on a 9-inch (classic Mac) monitor. See “How BBEdit Wraps Text” later in this chapter to learn how wrapping works in BBEdit. Text Options 55 Display Options These options control the way BBEdit displays the text in the active document window. Changes you make here affect only that window. To change display characteristics for windows you open in the future, use the settings available in the Status Bar panel of the Preferences dialog. Status Bar This option shows or hides the status bar in the active window. When this option is selected, two sub-options are available. • The Philip Bar option shows or hides a thin gray line in the status bar. • The Tab Stops option shows or hides tick marks in the status bar that indicate the tab stops in the window. Tip On Mac OS 9, click the key icon in document windows to show or hide the status bar without opening the Text Options dialog box. On Mac OS X, click the button in the top right corner of the window. Line Numbers This option adds line numbers along the left edge of the window. Cursor Position Adds a panel at the bottom left frame of the window that displays the location (line and column) of the insertion point or the last-changed end of the selection range. Show Invisibles This option shows or hides non-printing characters in the window. Select this option when you want to see line breaks, tabs, and “gremlins” (other invisible characters). BBEdit uses these symbols: Symbol Meaning ∆ tab ◊ space • non-breaking space ¬ line break ¶ page break ¿ other non-printing or special characters When the Show Invisibles option is selected, the Show Spaces sub-option is available, letting you turn off the visually “noisy” spaces. Note 56 BBEdit 6.5 no longer hides the form feed character, which was invisible in older versions. However, when the Show Invisibles option is active, form feeds will still be replaced by the special character mark shown above. Chapter 4: Editing Text with BBEdit Syntax Coloring When this option is selected, and the editing window contains a document in a programming language BBEdit recognizes, BBEdit displays keywords and other language elements in color. There are several methods used by BBEdit to determine which language (if any) to use for a particular file. The primary way to active syntax coloring in a document is simply to save it with an extension (or “suffix”, if you prefer) that indicates which programming or markup language the file is using. For example, if you save your file with “.html” at the end of the file name, BBEdit will then color your HTML tags and anchors. Other common suffixes are .tex for TeX files and .c for C files. new in 6.5 For any file whose name does not have an extension, or has an extension which does not match any of the mappings in BBEdit’s preferences, BBEdit will attempt to “guess” which language the file is using and apply the appropriate syntax coloring. If BBEdit guesses wrong (or is unable to guess), you can resort to the Language submenu of the Window Options pop-up in the Status Bar, or the Language pop-up in the Text Options dialog, which gives you the ability to manually select any installed language to be applied to the document, regardless of its name. If the file is saved with “BBEdit” state, the manual language selection will persist and override any suffix mapping. By default, BBEdit recognizes over 20 different languages, and several dozen suffix mappings. You can add new suffixes to map to existing languages, or (by writing a syntax coloring plug-in), add syntax coloring support for new languages as well. All the specific languages that BBEdit recognizes, and the suffixes or extensions it expects for them, are listed in the Languages panel of the Preferences, and can also be changed there. You can choose the colors that BBEdit uses for syntax coloring in the Text Colors panel of the Preferences window. Font & Tabs You can choose the font, font size, text style, and tab spacing for a window by choosing Font & Tabs from the Text menu. The Font & Tabs dialog, shown here, appears. You can choose the desired font, font size and style using controls in this dialog. You can also tell BBEdit how many spaces occur between each tab stop. Important The chosen display style will be used for all text in the window; BBEdit does not support the use of selective text styles. Font & Tabs 57 Note The changes you make here only affect the current document. This dialog’s settings will be saved with the document if you choose BBEdit State information when saving. To set the default font, size, style, and tab information for new documents (or for documents that don’t have a saved state), see the Fonts panel of the Preferences. BBEdit also displays a Fonts menu in its menu bar by default as a shortcut to opening the Font & Tabs dialog to change the font. This menu is especially useful when working with multi-byte text documents, for which you need to choose specific display fonts. If you do not need this menu, use the Application panel of the Preferences to turn it off. Text Transformation BBEdit provides several commands that transform text in useful ways. All of these commands are in the Text menu. Balance Locates the pair of parentheses, braces, brackets, or smart (curly) quotes that surround the insertion point or the current selection. If there are unmatched delimiters within this area, BBEdit beeps. You can also double-click on a delimiter character to invoke this command. When syntax coloring is active for a document, Balance (including auto-balance) will ignore balance characters that appear inside of strings or comments. Exchange Characters This command, formerly known as Twiddle, swaps two characters according to the following rules: • If there is no selection and the insertion point is not at the beginning or end of a line or of the document, this command transposes the two characters on either side of the insertion point. • If the insertion point is at the beginning of a line or document, this command transposes the two characters following the insertion point. • If the insertion point is at the end of a line or document, this command transposes the two characters before the insertion point. • If there is a selection, this command transposes the characters at either end of the selection. If you hold down the Option key as you choose this command, Exchange Characters becomes Exchange Words. Exchange Words behaves like Exchange Characters, except that it acts on entire words, rather than individual characters. 58 Chapter 4: Editing Text with BBEdit Change Case This command lets you change between upper and lower case characters, or capitalize word, line, or sentence starts. You can choose to change the text in the current selection or in the whole document. When you choose the Change Case command, the following dialog appears: The radio buttons let you choose how to change the case of the text. To limit the change to the selection, click the Selection Only option. The following table explains the function of each radio button in this dialog. This button… Changes the text like this… Upper Case Every character changes to upper case. Lower Case Every character changes to lower case. Capitalize Words The first character of every word changes to upper case, other characters remain unchanged. Capitalize Sentences The first character or every sentence changes to upper case, other characters remain unchanged. Capitalize Lines The first character of every line changes to upper case; the other characters remain unchanged. Form Words The first character of every word changes to upper case; other characters change to lower case. Form Sentences The first character of every sentence changes to upper case; other characters change to lower case. Shift Left and Shift Right These commands indent or outdent the selected text by one tab stop. If you hold down the Shift key while choosing one of these commands, the selected text will be indented or outdented by one space instead of one tab stop. BBEdit will also now entab and detab on-the-fly as you shift text. For example, if the selected text is indented one tab stop and you apply Shift Left One Space, the tab will be converted to spaces, and the text will be outdented one space. If you then apply Shift Right One Space, the spaces will be converted back to a single tab. Text Transformation 59 Add Line Breaks This command, formerly named “Insert Line Breaks”, inserts a hard line break at the end of each line of text as displayed. If there is any text selected, only that text will have line breaks added; otherwise, line breaks will be added to the entire document. See “How BBEdit Wraps Text” later in this chapter for more information. Remove Line Breaks This command, formerly named “Unwrap”, removes carriage returns and spaces between groups of text. Use this command to turn text that has hard line breaks into text that can be soft-wrapped. See “How BBEdit Wraps Text” below for more information. Rewrap Quoted Text Rewraps hard-wrapped text with Internet-style quoting, while retaining the quoting characters. In Internet messages, it is common to use the “>” symbol to indicate that part of a message is quoted from a message that’s being replied to. As a message gets batted back and forth in a discussion, the oldest bits of text will end up having several “>” symbols in front of them. Each line of text in the message has a carriage return at the end, making rewrapping the text to a different width somewhat problematic. In this command, BBEdit first extracts each chunk of quoted text—that is, successive lines of text with the same number of markers. The markers are temporarily removed and BBEdit removes the hard line breaks in the text, forming it into a soft-wrapped paragraph. The text is then hard-wrapped according to the settings in the dialog, which are the same as for the Hard Wrap command (described later) and the quote markers are re-inserted. Increase and Decrease Quote Level Inserts or deletes a standard Internet quote character (“>”) from the selected hardwrapped text, or on the current line if there is no selection. Strip Quotes Removes all Internet-style quoting from the selected hard-wrapped text, or from the entire document if there is no selection. Hard Wrap This command wraps long lines by inserting hard line breaks and can re-flow (fill) paragraphs if desired. See “How BBEdit Wraps Text” below for more information. 60 Chapter 4: Editing Text with BBEdit Zap Gremlins This command removes or replaces non-printing characters. Use this command when you have a file that may contain extraneous control characters or “gremlins”. The check boxes in the left half of the dialog box determine which types of characters the Zap Gremlins command affects, while the radio buttons determine what is done with gremlins that are found. Filter Line Feeds When this option is selected, Zap Gremlins converts as if the file were opened with LF Translation turned on. Zap Non-ASCII Characters When this option is selected, Zap Gremlins zaps all characters in the file which do not fall in the 7-bit or ASCII range. Examples of such characters include special Macintosh characters such as bullets (•) and typographer’s quotes (“ and ”, ‘ and ’), as well as all multi-byte characters. In general, such special characters are those that you type by holding down the Option key. Zap Control Characters When this option is selected, Zap Gremlins zaps a specific group of invisible ASCII characters, also known as control characters. Control characters can cause compilers and other text-processing utilities to malfunction, and are therefore undesirable in many files. The radio buttons in the bottom part of the dialog determine how the Zap Gremlins command zaps the offending characters. These options do not affect the line break characters that the Filter Line Feeds option filters. Zap Null (ASCII 0) Characters When this option is selected, Zap Gremlins will zap all instances of the null character (ASCII 0). If Zap Control Characters is selected, this option will be enabled automatically. It is included separately in case you wish to remove only nulls without affecting other control characters which may be present in a file. Note Older versions of BBEdit were unable to perform Grep searches on files which contained nulls; this limitation has been removed in BBEdit 6.5, but nulls may cause malfunctions in other external text-processing programs. Text Transformation 61 Delete Removes the zapped character completely from the text. This option is useful if you are only interested in destroying gremlins, and you don’t care where they were in the text. Replace with Code Replaces the gremlin character with an escaped hexadecimal code. The escape code is in the convention used by the C programming language and Apple’s Rez resourcedescription language: \0x followed by the character code in hexadecimal (base 16). This option is useful to identify both the value and location of gremlin characters. Later, you can search for occurrences of \0x to locate the converted characters. (Searching for the grep pattern of “\\0x..” will select the entire character code for easy modification or deletion.) Replace with Replaces the gremlin with the character you type in the edit field next to the radio button. This option is useful for identifying the location of gremlins, but not their value. Selection Only If this checkbox is marked, only the selection is processed. Otherwise gremlins will be zapped throughout the entire document. Entab Converts runs of spaces into tabs, according to the setting in the Font & Tabs dialog box. This transformation is useful when downloading text from a mainframe computer or on-line service, when the document uses spaces to line up columns of text. If you don’t use a monospaced font, columns usually won’t line up unless you Entab the text first. Detab Converts tabs into runs of spaces, according to the setting in the Font & Tabs dialog box. This command is useful when uploading text to a mainframe or on-line service that has no concept of tabs as column separators. Resolve URL To resolve a URL (Uniform Resource Locator), place the insertion point anywhere in the URL and choose this command. BBEdit examines the URL and launches the appropriate Internet helper application. If the URL is not valid, or the helper application can’t be found, BBEdit beeps. Tip Note You can also Command-click anywhere in a URL to resolve it, or Control-click to bring up the contextual menu and select Resolve URL from it. Some Web browsers cannot resolve URLs if the request is sent when the browser is starting up. If your Web browser doesn’t properly resolve the URL, wait until the browser has finished starting up, and then try again. Bare Bones Software gratefully acknowledges John Norstad for providing the URL parsing code. 62 Chapter 4: Editing Text with BBEdit How BBEdit Wraps Text BBEdit wraps text in one of two ways: soft wrapping or hard wrapping. Soft wrapping is like the word wrapping found in most word processors. When the insertion point reaches a right margin as you type, the word processor automatically moves the insertion point to the beginning of the next line. You never need to type a carriage return at the end of a line, only to start a new paragraph. If you place the insertion point in the middle of a paragraph and start typing, the text reflows so that words that are pushed out beyond the right margin end up on the next line. Usually, you use soft wrapping when you are editing memos, mail messages, and other prose. It is also useful for HTML documents. With soft wrapping, you generally don’t have to scroll the window horizontally to see all the text in the file. Unlike soft wrapping, hard wrapping requires a carriage return at the end of every line. When soft wrapping is turned off, BBEdit lets you type as far as you like on a line, and never automatically moves the insertion point to the beginning of the next line. You have to manually type a carriage return to start a new line. You usually use hard wrapping to write programs, tabular data, resource descriptions, and so on. With hard wrapping, each line of source code or data appears on its own line in the window, although you may have to scroll the window horizontally to see the entire line if it’s long. Tip If you open a file in BBEdit that appears to consist of a few very long lines, you should select the soft wrapping option for that file. This table summarizes the commands to soft wrap and hard wrap text. The sections that follow give you details about using the wrapping commands. To do this… Do this… Soft wrap text as you type Choose Soft Wrap Text from the Text Options pop-up menu (left) or select the Soft Wrap Text option from the Text Options dialog Convert hard-wrapped text to softwrapped text Use the Remove Line Breaks command in the Text menu, and activate soft wrapping Convert soft-wrapped text to hardwrapped text Use the Add Line Breaks command in the Text menu Hard wrap text to a specific margin, reflowing paragraphs as needed Use the Hard Wrap command in the Text menu Users of very old versions of BBEdit or BBEdit Lite will note that the Wrap while Typing option (which hard-wrapped text automatically by inserting a Return when you reach the right margin) has been relegated to the dustbin of history. It has been superseded by soft wrapping. How BBEdit Wraps Text 63 Soft Wrapping To turn on soft wrapping for the active window do one of the following: • Choose Soft Wrap Text from the Text Options pop-up menu (left) in the status bar • Select the Soft Wrap Text option from the Text Options dialog box by choosing Text Options from the Edit menu To specify the wrapping margin, use the Text Options command. You can have text wrap at the Philip bar, the edge of the window, or a specific character position. To make soft wrapping the default for new windows, select the Soft Wrap Text option in the Editor Defaults panel of the Preferences. You can also use the settings in that panel to specify the default wrapping margin. To “freeze” the current line endings and hard-wrap the text at the current soft wrapping settings, use the Add Line Breaks command to insert a carriage return at the end of each line. While BBEdit prefers to break lines at white space when soft wrapping, lines will now be broken as close as possible to the designated wrap width if they do not contain any white space. This way, long URLs and other extended strings of characters are visible without scrolling horizontally. Soft Wrapping and Imported Text In most cases, files that were created by the SimpleText or TeachText applications should be soft wrapped when you open them in BBEdit. Exporting Soft Wrapped Text BBEdit will not insert hard line breaks into Unix or DOS-format files upon saving, although versions of BBEdit prior to 4.5 did. Soft Wrapping in Browsers Use the Text Options dialog from the Edit menu to control soft-wrapping (and other display options) for files viewed in a browser window. Soft Wrapping and Line Numbers A new preference, Use “Hard” Line Numbering in Soft-Wrapped Text Views, controls the way line numbers are displayed when you use soft wrapping. If this option is turned on, the line number bar, cursor position display, and “Go To Line” commands in editing views will use line numbers that correspond to “hard” carriage returns in the document, rather than to soft-wrapped line breaks. To restore the behavior of previous versions of BBEdit, turn this preference off. Hard Wrapping The easiest way to hard wrap text is to type a carriage return whenever you want to start a new line. If the file you are editing is a program (where long lines are normal in some languages), it’s best to turn off soft wrapping altogether. 64 Chapter 4: Editing Text with BBEdit To turn off soft wrapping for the active window, do one of the following: • Choose Soft Wrap Text from the Text Options pop-up menu in the status bar • Deselect the Soft Wrap Text option from the Text Options dialog box by choosing Text Options from the Edit menu To turn off soft wrapping for new windows, deselect the Soft Wrap Text option in the Editor section of the Preferences. BBEdit provides two ways to convert soft-wrapped text into hard-wrapped text. The first is a simple technique that uses a single command. The second way is a bit more complicated but gives you much more control over wrapping. Hard Wrapping Soft-Wrapped Text To convert soft-wrapped text to hard-wrapped text, use the Add Line Breaks command in the Text menu. This command inserts a carriage return at the end of every line of the text as it appears in the window. If your wrapping margin is the edge of the window, you will get different results depending on the width of the window. Note The Add Line Breaks command does not turn off soft wrapping. Hard Wrapping and Filling Text The Hard Wrap command in the Text menu gives you more flexibility over hard wrapping text than the Add Line Breaks command. While Add Line Breaks merely freezes the line breaks as they appear in the editing window, the Hard Wrap command lets you specify a wrapping margin, apply the command to the selection only, and reflow paragraphs. When you choose the Hard Wrap command, BBEdit opens this dialog box: The controls on the left half of the dialog control how much of the text is hard wrapped, and the maximum length of lines after hard wrapping. The controls on the right side of the dialog control how this command deals with paragraphs. The Selection Only option limits the effect of the command to the selected text. If this option is not selected, the command affects the entire contents of the window. The Limit buttons let you specify the wrapping margin. If the Paragraph Fill option is selected, BBEdit forms the lines into paragraphs before wrapping the lines. An example is the best way to illustrate this option. How BBEdit Wraps Text 65 Start with this text: This is what happens when you wrap to 65 characters with Paragraph Fill off: BBEdit breaks the long line at the 65-character right margin (twice, because the line was so long) and leaves the short lines alone. This is what happens to the same text when you wrap with Paragraph Fill on: BBEdit joins all the lines together to form a paragraph, then wraps the text to the 65character margin. The Paragraph Indentation buttons let you indent paragraphs after they’ve been wrapped. • Flush Left does not indent paragraphs at all. • First Line Only indents the first line by one tab stop. The rest of the paragraph is flush against the left edge of the window. • All Lines indents all lines in the paragraph by one tab stop. • Reverse Indent places the first line in the paragraph flush against the left edge of the window, and will indent all other lines in the paragraph by one tab stop. • Same As First Line indents all lines to the same indentation as the first line of the selection or document. 66 Chapter 4: Editing Text with BBEdit Mark the Relative to First Line checkbox to make any paragraph indents relative to the original indent of the first line of the selection or document. If you want paragraph indents to be relative to the left margin of the document, make sure this checkbox isn’t marked. Click the Hard Wrap button to perform the Hard Wrap command. Click the Don’t Wrap button to save the settings without changing the text. Tip If you hold down the Option key as you choose the Hard Wrap command, BBEdit uses the last Hard Wrap settings to perform the operation, without displaying a dialog box. The Mark Submenu A marker is a selection range that you can name. Select a marker from the Mark submenu to move quickly to a particular section of your file. BBEdit uses the same markers as the MPW editor. Note If you are programming, you may be tempted to use markers to mark functions in your source code. However, if BBEdit supports the language you are using, this is not usually necessary—your functions will automatically appear on the Function pop-up menu in the document window. Setting Markers To set a marker: 1 Select the text you want to mark. 2 Choose the Set Marker command from the Mark pop-up menu (left), or Controlclick on the selected text and choose Set Marker… from the contextual menu. BBEdit opens the Set Marker dialog box so you can name the marker. If you have selected a range of text, the dialog box will contain the first characters of the selection. 3 Click Set to set the marker. If you hold down the Option key as you choose Set Marker, BBEdit sets the marker using the leading characters of the selected text as the name of the marker without displaying a dialog box. The Mark Submenu 67 Clearing Markers To clear a marker: 1 Choose the Clear Markers command from the mark pop-up menu. BBEdit displays the list of markers. Select the marker you want to delete. 2 Click Clear to clear the marker BBEdit also offers a Clear All Markers command, which clears all the markers in the document in one fell swoop. You can access this command by holding down the Option key and using the Marker pop-up menu. Using Grep to Set Markers You can use the Find & Mark All command in the mark submenu to mark text that matches a Grep pattern. To learn more about using Grep patterns, see Chapter 8, “Searching with Grep.” To use Grep to mark text: 1 Choose the Find & Mark All command from the mark submenu. BBEdit opens the Find & Mark All dialog box, shown here. 68 Chapter 4: Editing Text with BBEdit 2 Type the pattern in the Search For field and the marker names in the Mark With field. You can also choose stored patterns from the Patterns pop-up menu. 3 Click Find & Mark to mark the matching text. BBEdit searches the active window for text that matches the pattern and marks it the way you specified. The Insert Submenu In addition to typing, you can use the commands in the Insert submenu of the Edit menu to insert text into the active window. These commands, which are also available on the Insert menu in the document status bar, let you insert the contents of other files, folder listings, Macintosh Toolbox templates, and page break characters. Inserting Files The Insert File command inserts the contents of a file into the document you are editing. When you use this command, BBEdit opens a directory dialog box that lets you select the file to insert. BBEdit inserts the file at the insertion point or replaces the selected text. Tip You can also use the File command on the Insert pop-up menu in the status bar, or drag a file’s icon from the Finder into a BBEdit editing window, to insert the contents of that file. Inserting a Folder Listing The Insert Folder Listing command inserts a textual listing of a folder hierarchy. When you use this command, BBEdit displays a directory dialog box that lets you select a folder to insert. BBEdit inserts the folder listing at the insertion point or replaces the selected text. Tip You can also use the Folder Listing command on the Insert pop-up menu in the status bar to insert a folder listing. You can also drag a folder’s icon from the Finder into a BBEdit editing window to insert a folder listing. Inserting Paths The Insert File Path and Insert Folder Path commands respectively insert the full path information for a selected file, or the full path information for the contents of the selected folder hierarchy into the document you are editing. When you use these commands, BBEdit opens a directory dialog box that lets you select the file or folder to obtain path information for. BBEdit inserts the path information at the insertion point or replaces the selected text. The Insert Submenu 69 Inserting a Toolbox Call Template To paste a call template for a Toolbox function from THINK Reference, select the function’s name and choose Toolbox Call Template from the Insert submenu in the Edit menu. BBEdit launches THINK Reference if necessary and replaces the selected text with a call template for the function. If there is no selection when you choose the Toolbox Call Template command, BBEdit prompts you for the name of a function and inserts its call template at the insertion point. Tip You can also use the Toolbox Call Template command on the Insert pop-up menu (left) in the status bar to insert a Toolbox call template. Inserting a Page Break To insert a page break, choose the Page Break command from the Insert submenu in the Edit menu. This will place a form-feed character (ASCII 12) at the location of the insertion point. BBEdit uses this character to indicate the start of a new page when printing. Tip You can also use the Page Break command on the Insert pop-up menu in the status bar to insert a page break. Comparing Text Files If you have ever had to reconcile changes between two different versions of a file, or even larger numbers of documents, you know how laborious this task can be. BBEdit’s Find Differences command is a powerful tool for doing such comparisons faster and more effectively. Using Find Differences, you can compare any two files, or the contents of two folders. You can also specify options to eliminate minor variations in document content, such as different amounts of whitespace, from being considered. Note 70 CodeWarrior project files can no longer be compared with this command; please see Chapter 14 for more details. Chapter 4: Editing Text with BBEdit To compare files: 1 Choose the Find Differences command from the Search menu. BBEdit opens the Find Differences dialog box. 2 Click the Files radio button. 3 Use the New and Old pop-up menus to select the files you want to compare. If the files you want to compare are already open, they’ll appear in the pop-up menus. Otherwise, you can select them by clicking the Other… button next to one of the pop-up menus, or by dragging the files’ icons from the Finder into the New and Old boxes in the Find Differences dialog. You can also select recently opened files from the Recent Files item on the popup menu. The terms “new” and “old” are used for convenience since most often you will want to compare the changes in the same file across time. However, the Find Differences feature can be used to compare any two files. 4 Select the Compare options that apply. When the Case Insensitive option is selected, BBEdit considers uppercase and lowercase letters the same. When Ignore Curly Quotes is marked, BBEdit treats typographers’ quotes the same as straight quotes. When one of the Ignore Spaces option is selected, BBEdit ignores any tabs and spaces at the beginning, or end, of lines, or runs of more than one space. (See below for an explanation of Don’t List Identical Files.) 5 Click Compare to perform the comparison. Comparing Text Files 71 If the two files are different, BBEdit tiles the windows for the two files side by side and opens a Differences window below them. Tip You can change this arrangement with the Arrange command in the Windows menu. To change the default arrangement, use the Differences section of the Preferences dialog. The Differences window lists all of the differences between the new file and the old file. To see the differences, click a line in the Differences window. BBEdit scrolls and selects that spot in both files. Use the Apply to New and Apply to Old buttons to make the new file look like the old file or vice versa. After you use the Copy to New or Copy to Old buttons, BBEdit italicizes the line in the Differences window to indicate that you have already applied that change. new in 6.5 If a Differences results window is open and frontmost, The Compare Again command in the Search menu will re-compare the two files being compared and refresh the list of differences accordingly. The small button (with the circular icon) between the Apply to New and Apply to Old buttons performs the same function. For folders, the Find Differences command lists all of the files and marks those which are different with a bullet. Note 72 You can now compare the current Clipboard contents against any file. To do so, just select Clipboard from either the New or Old pop-up menus in the Find Differences dialog when the Clipboard window is open. Chapter 4: Editing Text with BBEdit Multi-File Compare Options When comparing multiple files at once (by selecting the Folders button in the Find Differences dialog), you have the following additional options. List Identical Files Normally, when you compare folders using the Find Differences… command, BBEdit presents you with three lists: one list of the items that are in the first folder but not in the second folder, another list of the items that are in the second folder but not in the first one, and another list of the items that appear in both folders. The list of items that appear in both folders generally displays a bullet next to items that are not identical. For example, if you have an archived mail folder that you are comparing against a current mail folder, mailbox files that appear in both the old and new file will all be listed together; however, if there have been any changes to the contents of particular mailbox files, the changed mailbox files will be listed with bullets next to them. If you are comparing very large folders, however, the list of common items can be extremely long, making the flagged items hard to find. When you deselect the List Identical Files checkbox, BBEdit will only list the flagged items (the ones that have been changed) in the list of items that appear in both folders. Flatten Hierarchies Normally, BBEdit retains the hierarchy of the files being compared in a folder. In other words, when comparing folders, it looks in each subfolder of the first folder you select and tries to match it with a file of the same name in the same subfolder of the second folder, and so on down for all subfolders. If you choose Flatten Hierarchies, BBEdit considers the files in the folders as a single flat list, allowing a file in one folder to match a file of the same name in the other folder, regardless of whether they are in the same subfolder in both hierarchies. Compare Projector States If you mark this checkbox, BBEdit will flag files that have different Projector information (CKID resources) even if they are otherwise identical. Files which differ in their Projector states are underlined in the results list. Only List Text Files If this option is set, BBEdit does not list non-text files when comparing folders. Skip (…) Folders Set this option to skip subfolders whose names are enclosed in parentheses when comparing folders. new in 6.5 Use File Filter File Filters allow you to select files for comparison with great precision. If either file in a compared pair matches the filter, then the files are eligible for comparison; if neither file matches the filter, then the files won’t be compared. For more information on creating, editing, and using file filters, please see Chapter 7, “Searching”. Previous versions of BBEdit had an “Only Compare if Contents…” field in the Find Differences Dialog. This option has been superseded by the ability to apply File Filters, which can perform much more powerful queries on the contents of a file. Comparing Text Files 73 Using the Spelling Checker The Check Spelling command in the Text menu lets you check the spelling of the text in your documents. You can use BBEdit’s built-in spelling checker, or you can use an external spelling checker that supports Apple’s Word Services Suite. Note BBEdit’s spelling checker is only capable of working with Mac Roman text, so the Check Spelling command will be disabled for non-Roman documents if the built-in checker is selected. If you are using a Word Services spelling checker which is capable of handling nonRoman content, then it should work normally. Checking Spelling The Check Spelling command in the Text menu opens the built-in spelling checker or an external spelling checker to check the spelling of words in the active document. This section describes the built-in spelling checker. To learn how to set BBEdit to use an external spelling checker, see “Using an External Spelling Checker” later in this section. The spelling checker matches each word in the document against the words in its dictionaries. If a word isn’t in a dictionary, the spelling checker offers a suggested correction. Sometimes the questioned word may actually be spelled correctly. In those cases, you can add the word to the User Dictionary or you can skip the word. 1 Choose the Check Spelling command in the Text menu BBEdit opens the Check Spelling dialog box. 2 Set spelling options. Select Selection Only to limit spelling checking to the selected text. Select Start At Top to check from the beginning of the text; otherwise, BBEdit checks from the insertion point to the end of the document. Select Skip ALL CAPS to avoid checking words consisting of only capital letters. These settings will now persist across runs of the application. 74 Chapter 4: Editing Text with BBEdit 3 Click Start to begin checking. BBEdit scans the text. Words that aren’t in a dictionary appear in the Questioned Word text box. The text box in the middle of the dialog shows the questioned word in context. BBEdit lists guesses for the questioned word in the list box. The first one appears in the Replace With box. 4 If the Questioned Word is a misspelled word, choose the correct word from the Guesses list or type it yourself in the Replace With box. Click the Questioned Word box to copy it to the Replace With box. Then make the correction in the Replace With box. This technique is useful if the questioned word is only slightly misspelled and the correct word is not in the Guesses list. 5 Use the buttons along the right side of the dialog box to handle the questioned word: Skip All: Ignore every instance of the questioned word, but don’t add it to the User Dictionary. Add: Add the questioned word to the User Dictionary. Replace: Replace this instance of the questioned word with the text in the Replace With text box. Replace All: Replace every instance of the questioned word with the text in the Replace With text box. Skip: Ignore this instance of the questioned word. Using the Spelling Checker 75 Selecting Active Dictionaries BBEdit uses the American English dictionary by default. However, you can use multiple dictionaries at a time. To configure the built-in spelling checker to use additional dictionaries: 1 Choose Preferences from the Edit menu and select the Spelling panel. 2 Make sure the Built-In option is selected. 3 Click the Add button and select an additional supplemental dictionary. To stop using a dictionary, select it in the list and click Forget. Editing the User Dictionary When you use the Add button in the Check Spelling dialog box to add it to your personal dictionary, the spelling checker adds it to the User Dictionary file in the BBEdit Dictionaries folder. While the Add button is adequate for adding a few words, it would be tedious to use it to add dozens or hundreds of words to the User Dictionary. The User Dictionary is a BBEdit text file that you can edit yourself. Each word must be on a separate line. The file begins with a “magic” number that lets the spelling checker verify that the file is a dictionary. Also, it has Unix line breaks. If you just edit the file and save it, BBEdit will do the right thing. We do not recommend that you try to create a user dictionary from scratch. Warning Do not change or remove the magic number, or your User Dictionary will no longer be recognized by the spelling checker. Using an External Spelling Checker You can use any external spelling checker that supports Apple’s Word Services Suite. To set up an external spelling checker: 1 Choose Preferences from the Edit menu and select the Spelling page. 2 Select the Word Services option. 3 Click the Set button and select an external spell checker. You can also drag the icon of the spelling checker from the Finder to the text box to the left of the Set button. To start the external spelling checker, use the Check Spelling command just as you would for the built-in spelling checker. See the documentation for your spelling checker for details on how to use it once it has been invoked. 76 Chapter 4: Editing Text with BBEdit CHAPTER 5 Working with International Text This chapter describes how BBEdit’s newly introduced support for international text formats, including Unicode, works. If you need to work with such text, we strongly recommend that you read through this entire chapter to familiarize yourself with how BBEdit handles it. In this chapter An International Text Primer . . . . . . . . . . . . . . . . . . . . . . . . . . . . . . . . . . 77 How Script Systems Work. . . . . . . . . . . . . . . . . . . . . . . . . . . . . . . . . . . . . 78 Using Script Systems . . . . . . . . . . . . . . . . . . . . . . . . . . . . . . . . . . . . . . . . 79 Script Systems in BBEdit – 80 Unicode . . . . . . . . . . . . . . . . . . . . . . . . . . . . . . . . . . . . . . . . . . . . . . . . . . 81 An International Text Primer Starting with the release of version 6.0, BBEdit became fully compatible with left-to-right non-Roman script systems. (English and most other European languages use Roman characters—the kinds of letters you are reading now.) Inside your Mac, text is stored as a series of numbers—like graphics, sound, and every other type of information. A standard called ASCII (the American Standard Code for Information Interchange) defines what numbers are used for each of the letters, punctuation marks, and other symbols you can type on your computer. As its name implies, ASCII is intended for use with United States English—it has a dollar sign instead of the pound sign you’d use in Britain, for instance, and none of the accented letters you’d use in Spanish or French. However, since ASCII defines only 128 codes, and a byte can hold 256 different codes, Apple uses the remaining values to store characters used by other European languages that use the same basic alphabet as English, as well as symbols frequently needed by American and European users. The extended Macintosh character set includes the various accented characters used by languages like Spanish, French, and German, so only one character set is needed to represent text written in any of these languages. This character set is often referred to as “Macintosh ASCII” (technically a misnomer, because ASCII explicitly leaves the extra codes undefined) or “MacRoman”. Although the Romans didn’t have all the letters used in these modern languages, our letters evolved from theirs, so the kind of alphabet used to write English and these other languages is referred to as “Roman”. 77 Of course, many languages don’t use the Roman alphabet. Russian is written using an alphabet called Cyrillic, which has more in common with Greek than with anything else. (MacRoman does have Greek letters in it, however, so you can write Greek text on a Mac without switching alphabets.) Hebrew and Arabic both have alphabets of their own, and to make things even more confusing, text in these languages is written rightto-left, rather than the Roman-derived left-to-right. Furthermore, Asian languages (such as Chinese and Japanese) often have a different character for each word or concept. This means, first of all, that you can’t fit all the different characters you need for a language in a single byte anymore. A byte can only hold a single number with a value from 0 to 255. Plenty for English, plenty even for many other languages, but unworkable for ideographic languages with thousands of distinct characters. So, to support these languages, one needs to use two bytes to store each character. This means that all text display and manipulation features of all software have to be revised to support text in which characters are stored as more than one byte. It also means that the computer has to provide some way for users to type text without requiring a keyboard with thousands of keys. Starting with Mac OS 8.5, Apple included the ability to view text in all these different languages with the operating system (this package was called “Multilingual Internet Access” and had to be custom-installed). To actually write text using various alphabets, you still had to purchase the appropriate Language Kit if it didn’t already come with your computer. (A Mac sold in Japan, for example, would have Japanese language capability right out of the box, but Macs purchased in the United States require the JLK to be installed separately.) With Mac OS 9, Apple began including all the available language kits with the OS as custom installations, so now every Mac user can have the capability if they want it. This only works in applications that support international text, of course. If your text editor assumes that every character fits in a single byte, then simple tasks like exchanging two adjacent characters can actually wreak havoc on two-byte text. BBEdit 6.5 fully supports editing and processing of left-to-right international text. (Right-to-left systems such as Hebrew and Arabic are not currently supported.) How Script Systems Work Apple uses the term “script systems” or just “scripts” to refer to all the various attributes used by a particular way of writing. In other parts of this manual, we often use “script” to refer to a sequence of instructions written in the AppleScript scripting language (or another language, such as Frontier, Perl, or JavaScript). In this chapter, we use “script” specifically to refer to a writing system. Among other things, a script defines: • The alphabet (actual character shapes) or ideograms used, in the form of one or more TrueType fonts. (This is why the TrueType standard allows fonts to contain thousands of different characters.) • The direction of writing. • One or more keyboard layouts for allowing input of text, if the writing system being used has few enough letters to reasonably fit on a standard keyboard. 78 Chapter 5: Working with International Text • If the language being supported requires many different characters, the script system also defines an input method—a special floating window or other software help that allows you to specify the symbol you want phonetically, or from a short list of symbols that sound like what you typed. • Routines that programmers can call to display, alphabetize, and otherwise manipulate text in the selected writing system. Just as the Mac allows you to use different type styles and fonts in a single document, a program that supports international text may let you use these different writing systems in a single document. The computer keeps track of which text is displayed in which scripts and automatically selects an appropriate font to display each script. When you copy and paste text, information on what script it’s in comes with it. In short, it works just the way you think it should. When writing in other languages, it is fairly common to use an English term where no native word is available, so most scripts also include a Roman character set to allow users to type the occasional English word without having to constantly switch back and forth between the Roman script and the international one. (This is especially fortunate for Web design, because all HTML is in English, although the content of the Web page need not be.) The part of the Mac OS that allows applications to handle text in different scripts is called WorldScript. Thus, you will often see applications referred to as “WorldScriptaware” or “WorldScript-savvy”. Using Script Systems Throughout this section, we will assume you are using a U.S. English (or another Roman-based) version of the Mac OS. If you are not, you probably already know how all this works, because you already use it all the time. Once you have installed one or more Language Kits on your computer, you will see a new menu in the menu bar. This menu allows you to change keyboard layouts or script systems as you work. Actually, even if you have never used a non-Roman script system before, you may have used this menu before. You can use the Keyboard control panel to tell your Mac that you frequently type in keyboard layouts other than U.S. English, and the chosen layouts appear in the menu. (For example, if you use the Dvorak keyboard layout, you might use this menu to switch between Dvorak and QWERTY.) However, since the Roman script is suitable for several languages, choosing one of these keyboard layouts still leaves you in the Roman script. If you have only the Roman script installed, it is possible to turn off the menu by choosing only one layout in the Keyboard control panel. However, once you install additional script systems, this menu will always appear, even if you have chosen only one keyboard layout for use with the Roman script. Using Script Systems 79 To start entering text in another script, you simply choose it from the menu. The icon for the associated script system appears in the menu bar in place of the American flag (or the icon for your usual Roman keyboard layout). Scripts that don’t have very many characters have keyboard layouts that map each key on your keyboard to a keyboard in the appropriate alphabet; you can open the Key Caps desk accessory to see what keys you must press to generate each character. If you are using a script with its own input method, like Chinese or Japanese, another menu appears to the left of the script menu to allow you to control the input method and other text encoding options. On Mac OS 9 and Mac OS X, you can find more information about the input methods for installed multi-byte script systems in the Help Center. If you are using a Language Kit under Mac OS 8.6, you should read the documentation that comes with the Language Kit for complete instructions. By default, the Mac automatically changes the script system to the script of the surrounding text when you click the mouse to move the insertion point. For example, if you are currently typing Chinese, and click in an English portion of a document, the Mac automatically changes to the Roman script. The same happens if you change the font to a Roman font. If you would rather set the script manually, you can turn off the behavior by opening the Keyboard control panel, clicking the Options button, and unmarking the Font and Keyboard Synchronization checkbox in the options dialog. It is then your responsibility to choose both an appropriate font and an input method for the script you wish to write in. Script Systems in BBEdit As a text editor, BBEdit supports only one font per document window. To begin writing text in a non-Roman script, simply choose an appropriate font from the Font menu (or from the Font & Tabs dialog, which you can open from the Text menu). If you have turned off Font and Keyboard Synchronization as described above, you will also need to select the correct input method from the keyboard menu. (We recommend leaving this option on, so BBEdit can automatically switch to the correct input method when you change document windows.) Although BBEdit can display and edit text in only one script system at a time, keep in mind that many script systems allow entry of Roman text without switching scripts. It is also possible to create text files that contain text in more than one script with BBEdit, although not all the text will be readable at the same time. Simply change the font and input method as necessary and begin entering text in the new script. The text you have already entered will appear as gibberish, but it is still there and will be saved correctly. If you want to view or edit that text, switch back to the first font and script system (the newly entered text will become gibberish). (Naturally, whatever application you want to use such text files with will need to provide some way of defining which script systems should be used for which text.) You can use international text throughout BBEdit—for example, in the Find & Replace dialog, in the HTML Tools, and everywhere else you’d use regular Roman text. Likewise, BBEdit will provide the necessary style information so that if you copy and paste, or drag & drop, international text into another application, that application will have enough information to handle the text correctly (assuming it is capable of doing so). 80 Chapter 5: Working with International Text BBEdit remembers the script system used in a document when you save it, so the next time you open it, you won’t need to choose the font. However, files that do not have this stored information, such as those you download from the Internet, may not be readable until you choose an appropriate font and script for them. Note When saving a multi-byte document, BBEdit will write out a ‘styl’ resource in the document’s resource fork. This ensures compatibility with applications that don’t know how to interpret the MPW state resource (or which otherwise can’t properly select the document font on their own). When performing a multi-byte search, BBEdit respects the saved information about each file’s script system if the file has it. If the file does not contain any information about its script system, and the preference for Allow File Script Guessing is set (in the Text Search panel), BBEdit assumes it is in the same script as the text you are searching for. Unicode The various script systems Apple introduced to handle non-Roman scripts served well enough for years, but eventually, keeping track of which script was being used for text became a hassle, especially on the Internet, where there were several different encoding standards vying for supremacy, and email messages would often have information about what script they were in stripped right out of them by mail servers that assumed ASCII was sufficient. This led to the development of a new international standard for character encoding, dubbed Unicode. Like existing Asian encodings, Unicode uses two bytes to represent each character of text. However, as the name implies, Unicode is a single code that contains characters from Roman, Cyrillic, Asian, Middle Eastern, and various other scripts. (Asian languages get short shrift, unfortunately. There just isn’t room for all the characters of Korean, Japanese, and Chinese in a single two-byte code. Only the most frequently used characters from each are included. Fortunately, most speakers of Asian languages don’t use anywhere near all the symbols—which are, remember, words and not letters—available in their language.) Apple began supporting Unicode in Mac OS 8.1, and all later versions of Mac OS include this capability. Saving Unicode Files BBEdit 6.5 supports Unicode in addition to Apple’s proprietary text encoding systems. When saving a file, you can choose to save text composed in any script as a Unicode document by clicking the Options button in the Save dialog. The Options dialog gives you the following Unicode-related choices: • Save as Unicode. Saves the file as Unicode if marked. Otherwise, the text is saved using the script system in effect at the time the file is saved. • Swap Bytes. Since Unicode uses two bytes to represent each character, this leaves the question of which of the two bytes comes first—whether it is “littleendian” or “big-endian”. By default, BBEdit writes Unicode big-endian, the Unicode standard. By marking Swap Bytes, you can write little-endian files instead; some programs require this format. Unicode 81 • UTF-8 Encoding. UTF-8 encoding is a more compact variant of Unicode that uses 8-bit tokens where possible to encode frequently-used sequences from the file. (This format makes it easier to view and edit content in non-Unicodeaware editors.) • Include Byte Order Mark.When saving Unicode files, you should always include a Byte Order Mark (BOM) so that the reading application knows what byte order the file’s data is in. For maximum compatibility, the BOM should be used whenever possible, and should only be left off if there is a specific reason to do so, such as providing compatibility with a broken third-party application. • When you save as Unicode, you can also choose Unicode from the Line Endings pop-up in this dialog. Unicode has its own line-ending standard. Files saved as Unicode from BBEdit are given a type of ‘utxt’—the standard for Unicode text files on the Mac. UTF-8 files are given a type of ‘TEXT’ for compatibility with other applications; however, BBEdit will also recognize such files with type ‘UTF8’. Opening Unicode Files When opening files, BBEdit will ordinarily determine the format of a file based on its file type and content, and automatically process Mac text, Unicode, and UTF-8. However, some files are structured such that BBEdit is unable to correctly determine their format based on their type or contents. The cases that we know of are: • UTF-8 files whose type is ‘TEXT’ and which lack a byte-order mark. (If a UTF-8 file is of type ‘TEXT’ but has a byte-order mark, it will be correctly interpreted as UTF-8.) • Byte-swapped Unicode files which were written without a byte-order mark (usually by broken Windows software); • Unicode files whose type is ‘TEXT’ (instead of the Mac standard ‘utxt’) and which lack a byte-order mark. (If a UTF-16 file lacks a BOM but is of type ‘utxt’, BBEdit will treat it as big-endian Unicode.) If you know that a file you are trying to open is in Unicode but it displays as gibberish on your screen, close its window without saving. Then, try reopening the file, using the Open As pop-up menu in the Open dialog to specify whether to treat the file as Unicode, byte-swapped (little-endian) Unicode, or UTF-8. When opening a malformed UTF-8 document, BBEdit will present an alert to warn you. When such a file is encountered during multi-file searching, a warning will be logged. 82 Chapter 5: Working with International Text CHAPTER 6 Working with Windows This chapter describes the commands in the Window menu. These commands let you arrange and access editing and browser windows quickly, and also to access BBEdit’s extensive set of tool palettes and floating windows. In this chapter Window Menu . . . . . . . . . . . . . . . . . . . . . . . . . . . . . . . . . . . . . . . . . . . . . 83 Minimize Window . . . . . . . . . . . . . . . . . . . . . . . . . . . . . . . . . . . . . . . . . . 83 Bring All to Front . . . . . . . . . . . . . . . . . . . . . . . . . . . . . . . . . . . . . . . . . . . 84 Palettes . . . . . . . . . . . . . . . . . . . . . . . . . . . . . . . . . . . . . . . . . . . . . . . . . . . 84 ASCII Table – 84 Glossary – 84 Plug-In Tools – 85 Scripts – 85 Stationery – 85 Windows – 85 HTML Markup Tools – 86 Perl/Unix Tools, Filters, and Scripts – 86 Arrange . . . . . . . . . . . . . . . . . . . . . . . . . . . . . . . . . . . . . . . . . . . . . . . . . . 87 Get Info . . . . . . . . . . . . . . . . . . . . . . . . . . . . . . . . . . . . . . . . . . . . . . . . . . 88 Super Get Info . . . . . . . . . . . . . . . . . . . . . . . . . . . . . . . . . . . . . . . . . . . . . 88 Reveal in Finder . . . . . . . . . . . . . . . . . . . . . . . . . . . . . . . . . . . . . . . . . . . . 89 Zoom . . . . . . . . . . . . . . . . . . . . . . . . . . . . . . . . . . . . . . . . . . . . . . . . . . . . 89 Window Names . . . . . . . . . . . . . . . . . . . . . . . . . . . . . . . . . . . . . . . . . . . . 89 Window Menu new in 6.5 The Window menu has been reorganized to provide easy, centralized access to all of BBEdit’s tool palettes and floating windows, in addition to offering commands which you can use to access and organize editing and results windows on screen. BBEdit also offers several preference options (in the Applications panel of the Preferences dialog) so that you have greater control over the listing of open documents. You can choose whether items are grouped by window kind, or are all listed together without dividers. You can also elect to sort windows by name or in order of creation. Please refer to Chapter 10 for additional details. Minimize Window new in 6.5 This command puts the frontmost window into the Mac OS X Dock. Click the window icon in the Dock to restore the window. Hold down the Option key and this command will become Minimize All Windows. If you are not using Mac OS X, this command will not be available on the menu. 83 Bring All to Front new in 6.5 In Mac OS 9 and earlier, each application’s windows are all grouped together in a single layer. In Mac OS X, windows from different applications can be interspersed. BBEdit’s Bring All to Front command will bring all un-minimized BBEdit windows to the front. If you are not using Mac OS X, this command will not be available on the menu. Palettes new in 6.5 The Palettes sub-menu provides quick access to all of BBEdit’s numerous tool palettes and floating utility windows. In previous versions of BBEdit, the commands to access these items were scattered—the HTML Tools palettes were in the Markup menu, the AppleScript floating window in the Script menu, etc. Choosing an item from this submenu opens the corresponding palette. If a window or palette is already open, selecting the corresponding listing on the sub-menu will bring it to the front. new in 6.5 When moved or resized, palettes and floating windows now automatically “snap” to the edges of the screen and the edges of other palettes. You can override this behavior by holding down the Shift key while dragging or resizing. ASCII Table The ASCII Table command opens a floating window that contains the 127 entries of the ASCII character set plus all of the standard extended (8-bit) Macintosh character set (MacRoman). The decimal value for each character is displayed in the center column, while in the right-hand column, the character value is displayed in either hexadecimal “escape” format, or in URL-encoded format, based on the language mapping of the frontmost text window. Depending on the modifier keys you hold down, the Insert button inserts the selected ASCII code in different formats: Note Clicking Insert while holding… Inserts in this format… None Escape code appropriate to the front window, e.g. (\x69) or (%69) Option Decimal value, e.g. (105) Command Literal character, e.g. (i) You can also double-click on a line in the ASCII table to insert the entry into the editing window. Clicking the Show button in the ASCII Table window displays the ASCII value of the character to the right of the insertion point or the first character of the selection. Glossary BBEdit’s powerful Glossary provides an easy way to store and access frequently used text of any sort. For details on using the Glossary, including its language-sensitive mode, please refer to Chapter 12. 84 Chapter 6: Working with Windows Plug-In Tools The Tools floating window displays a list of all the plug-ins in your BBEdit Plug-Ins folder. Any plug-ins you have installed will appear both in this Tool List window and on the Tools menu itself. See Chapter 15, “BBEdit Plug-Ins”, for more information on installing plug-ins. Scripts The Scripts floating window displays all the currently installed OSA scripts in your BBEdit Scripts folder. In most cases, OSA scripts are all AppleScripts. See Chapter 13, “Scripting BBEdit”, for information about using AppleScript with BBEdit. Stationery The Stationery List is a floating window that displays all the stationery pads you have placed inside the Stationery folder in the BBEdit Support folder. You can create a new document from any of these pads by double-clicking it in this list. Although the document created will have the content and all the state information from the stationery pad, it is a new untitled document separate from the stationery pad. To create a stationery pad, click the Save As Stationery checkbox when saving the file from BBEdit. Alternately, any document can be changed into a stationery pad in the Finder by clicking the Stationery Pad checkbox in the document’s Get Info window. By default, items in the Stationery List are displayed in alphabetical order. However, you can force them to appear in any desired order by including any two characters followed by a right parenthesis at the beginning of their name. (For example “00)Web template” would sort before “01)HTML Template.”) For such files, the first three characters are not displayed in BBEdit. You can also insert a divider by including an empty folder ending with the string “-***”. (The folder can be named anything, so it sorts where you want it.) These conventions are the same as those used by the utilities FinderPop and OtherMenu. Note In the Glossary, Tools, Stationery, or any of the Scripts floating windows, the Set Key button allows you to assign key equivalents to any item contained in that window. You can use combinations of the Command, Shift, Option, and Control keys, plus any single other key, to create such equivalents, except that any equivalent must contain either the Command or Control keys (or both). You can also map Function keys directly to items, with or without the use of a modifier. Windows The Windows list displays the names of all the open windows, ordered either by name or creation order, or separated by window kind as determined by your preferences (see Chapter 10). Document windows, which correspond to text files, will have a document icon shown next to them. Display windows, such as browsers and search results windows, will not have icons next to them, A diamond to the left of a window’s name means that the file has been modified. To bring any window to the front, double-click its name in the Windows window. You can open a file by dragging its icon from the Finder or from a file group window to the Windows floater. Window Menu 85 The buttons at the top of the Windows window perform Save, Close, or Print commands on the selected windows. Pressing the Option key while clicking a button makes its command apply to all selected windows (for which the command is possible). HTML Markup Tools The main HTML Markup Tools palette is a comprehensive listing of BBEdit’s numerous markup functions and tools. See “HTML Tools Palette” on page 207 in Chapter 11 for details on what these tools do. You can adjust the number of tools that appear in the main HTML Tools Palette in the HTML Palette panel of the Preferences window. Several other HTML palettes are available, each with a specific focus. These include Block, CSS, Entities, Font Style, Forms, Inline, Phrase, Tables, Utilities, and Web Safe Colors. For more information on these tools, please see Chapter 11, “BBEdit HTML Tools”. Perl/Unix Tools, Filters, and Scripts On Mac OS 9 and earlier, BBEdit offers integration with MacPerl, the classic Mac OS port of the Perl programming language. If you have a copy of MacPerl installed on your system (and the “Perl Integration” checkbox is selected in the Tools panel of the Preferences window), you will see “Perl Tools”, “Perl Filters”, and “Perl Scripts” menu items available at the bottom of the Palettes sub-menu. MacPerl is freely available; for more information, see the MacPerl web site (http://www.macperl.com). On Mac OS X, BBEdit integrates directly with any Unix scripting language, including Perl, shell scripts, and any other scripting languages you install (such as Python or Ruby). On Mac OS X, these menu items are named “Unix Tools”, “Unix Filters”, and “Unix Scripts”. The Tools list contains of subset of the commands available in the Camel/Shebang menu. Filters are shell scripts which read the selection of the current document window as STDIN, and replace the selection with STDOUT. For more information about these tools, please see Chapter 14, Working with Development Tools. 86 Chapter 6: Working with Windows Arrange The Arrange command gives you several ways to organize BBEdit windows. When you choose the Arrange command, BBEdit opens the Arrange Windows dialog box. The radio buttons at the top of the dialog specify which screen the windows will be arranged on. You can choose the main screen, the largest screen, or the smallest screen. Icon Description Stacks every window so that some part is visible no matter which window is frontmost. If you select the Leave Room for Finder options in the Windows section of the Preferences dialog, BBEdit leaves room along the right side or bottom of the screen for Finder icons. BBEdit offers three different ways to stack windows: down and to the left, straight down, and down and to the right. These are the top three choices in the dialog. BBEdit tiles the windows in two or three rows (or columns). If you have more than three windows open, BBEdit stacks additional windows behind the three front windows. BBEdit figures out how many rows and columns it needs to tile windows. The larger your screen, the more rows and columns BBEdit uses. The windows are never narrower than half of a classic Macintosh screen. BBEdit tiles the front two window horizontally or vertically and stacks any additional windows behind the two front windows. Note To arrange the windows using the same settings as the last time you used this command, hold down the Option key as you choose Arrange from the Windows menu. Window Menu 87 BBEdit is also Display Manager aware. If you change the size of a screen which contains floating palettes, BBEdit will reposition the palettes to take the new screen size into account (this may entail resizing the window as well). Get Info The Get Info command displays a dialog box that lists the number of characters, words, line, and pages in the selected text and in the document. Using this command is the same as clicking the info button in the status bar. To find out how many pages the document will take to print, click the Paginate button. To put the full path to the file on the Clipboard, click the Copy Path button. Super Get Info new in 6.5 If you hold down the Option key while pulling down the Window menu, the Get Info command becomes Super Get Info. This command provides integration with Super Get Info, Bare Bones Software’s Mac OS X file info utility. If you choose it, BBEdit will ask Super Get Info to open an info window on the file associated with the current editing window. If the frontmost window is not an editing window, or does not have an associated file on disk, this command will be disabled. The Super Get Info command is only available if: • you are running on Mac OS X; • you have Super Get Info installed on your computer; Super Get Info is a utility designed to serve as a supplement for the Mac OS X Finder’s Show Info command. Super Get Info allows you to open more than one info window at a time; view and edit the Macintosh type and creator codes associated with a file; view and edit the Unix owner, group, and permission settings associated with a file or folder; and much more. For more information, or to download a free demo version, visit our web site. 88 Chapter 6: Working with Windows Reveal in Finder If the active window is a document that is saved in a file, the Reveal in Finder command opens the Finder window that contains this file. Using this command is the same as clicking (without dragging) the document icon button in the status bar. (The actual icon in the icon bar is the same as the document’s icon in the Finder.) If the selected text in a document is the name of a file, hold down the Option key as you open the File menu and choose the Reveal Selection command to have BBEdit open the Finder folder that contains that file. Zoom There is no longer a Zoom command on the Window menu, but the key equivalent Command-/ (which users of earlier versions of BBEdit may be used to) still works. Zoom will produce the same effect as clicking a window’s zoom box: it makes the active window larger if it is small, or returns it to its original size if it was previously enlarged by a Zoom command. When zooming windows, BBEdit will now move the window as little as possible (consistent with maximizing the window’s size). This behavior is similar to what the Finder does when zooming a window. The “Move as Little as Possible” switch in the Windows preference panel controls this behavior; turning this switch off will revert the behavior to be the same as previous versions of BBEdit. new in 6.5 Quick Find The Quick Find command is no longer located in the Window menu; it is now in the Search menu. See Chapter 7, “Searching”, for details. Send to Back This command sends the front window behind all the other windows. Exchange with Next This command makes the second window the active window. Choose this command repeatedly to alternate between the front two windows. Synchro Scrolling When you have two or more windows open, Synchro Scrolling makes both files scroll when you scroll one. This feature is useful to look over two versions of the same file. Window Names The last items in the Window menu are the names of all the open documents, browsers, and other editing windows. Choose a window’s name from this menu (or use its numbered Command key equivalent, if applicable) to bring that window to the front. Tip You can also use the Windows floater to select windows quickly. Window Menu 89 90 Chapter 6: Working with Windows CHAPTER 7 Searching This chapter describes BBEdit’s powerful Find command, now enhanced with a flexible file filtering mechanism. It tells you how to search for text in the active window or within a set of files. BBEdit can also do advanced pattern, or grep, searching. To learn about pattern searching, you should read this chapter first, then read Chapter 8, “Searching with Grep”. In this chapter Basic Searching and Replacing . . . . . . . . . . . . . . . . . . . . . . . . . . . . . . . . . 92 Search Settings – 94 Special Characters – 95 Multi-File Searching . . . . . . . . . . . . . . . . . . . . . . . . . . . . . . . . . . . . . . . . . 95 Multi-File Search Results: Batch Find – 97 Multi-File Search Results: File by File – 98 Specifying the Search Set – 99 Multi-File Search Options – 101 File Filters – 102 Multi-File Replacing . . . . . . . . . . . . . . . . . . . . . . . . . . . . . . . . . . . . . . . . 104 Replacing in Files with Projector CKIDs – 105 Quick Search . . . . . . . . . . . . . . . . . . . . . . . . . . . . . . . . . . . . . . . . . . . . . 106 Search Menu Reference. . . . . . . . . . . . . . . . . . . . . . . . . . . . . . . . . . . . . . 107 Find – 107 Quick Search – 107 Find Again – 107 Find Selection – 107 Enter Search/Replace String – 107 Replace – 107 Replace All – 108 Replace & Find Again – 108 Find in Next File – 108 Open All Matches – 108 Find & Replace All Matches – 108 Go to Line – 108 Go to Center Line – 108 Go to Previous/Next Error – 108 Go to Previous/Next Placeholder – 108 Find Differences – 109 Apply to New – 109 Apply to Old – 109 Find in Reference – 109 Find Definition – 109 91 Basic Searching and Replacing This section describes the basic steps for searching and replacing text in a window. Later sections in this chapter cover more advanced techniques. To search and replace text in the active window, follow these steps: 1 Choose Find from the Search menu. BBEdit opens the Find & Replace dialog box. For now, disregard the bottom part of the dialog—the Multi-File Search checkbox and everything below it. The section “Multi-File Searching” later in this chapter discusses this part of the dialog box. 2 Type the string you are looking for in the Search For text box. You can use special characters in the Search For text box to search for tabs, line breaks, or page breaks. See “Special Characters” later in this section. BBEdit remembers the last 12 search terms you used since launching the application. If you are searching for something you recently searched for, you can choose it from the pop-up menu above the Search For field. Click the § button to enter the document selection in the Search For field. 3 Type the replace string (if any) in the Replace With text box. BBEdit also remembers the last 12 replace terms you used since launching the application. These appear on the pop-up menu above the Replace With field. Click the § button to enter the document selection in the Replace With field. 4 Mark any checkboxes in the middle part of the dialog box that you want to apply to your search. For more info about these options, see “Search Settings” later in this section. 5 Click one of the buttons along the right side of the dialog box. 92 Chapter 7: Searching Note The size of both the search and replace strings is now limited only by available memory. However, the memory requirements for searching multi-byte text files are generally at least double those for single-byte text. The following table explains what each of the buttons does. This button… Does this… Find Finds the first occurrence of the text in the active window. Shortcut: Cmd-F Find All Finds all the occurrences of the search string and displays the results in a search results window. Shortcut: Cmd-Opt-F Replace If there is a selection, replaces the current selection with the replace string. Otherwise, finds the first occurrence of the text in the active window after the current insertion point and replaces it with the replace string. Shortcut: Cmd-R Replace All Replaces every occurrence of the search string in the active window with the replace string. Shortcut: Cmd-Opt-R Don’t Find Saves the settings of the Find dialog box without doing a search. Shortcut: Cmd-D Cancel Doesn’t do the search and restores the settings of the dialog box to their previous state. Shortcut: Cmd-. BBEdit closes the Find dialog, then selects the search string in the active window if the search was successful. Once BBEdit finds your text, you can use the commands in the Search menu (see “Search Menu Reference” later in this chapter). The table below summarizes the most common commands you can use at this point. This command… Does this… Find Again Finds the next occurrence of the search string without displaying the Find dialog again. To reverse the search direction, hold down Shift. Replace Replaces the selection with the replace text Replace All Replaces all occurrences of the search string with the replace string. Replace & Find Again Replaces the selection with the replace string and looks for the search string again. Basic Searching and Replacing 93 Search Settings The checkboxes in the Find dialog box let you control how BBEdit searches your document for the indicated text. Note You can set the defaults for many of these settings in the Text Search section of the Preferences. Use Grep When this checkbox is selected, BBEdit treats the search and replace strings as Grep patterns. Otherwise, BBEdit searches the document for text that matches the search string as it appears literally, and will replace any matched text with the replace string. To learn more about pattern searching see Chapter 8, “Searching with Grep”. Start at Top When this checkbox is selected, BBEdit always starts searches from the beginning of the document. Choosing this option will disable the Wrap Around and Search Backwards settings. Wrap Around When this checkbox is selected, BBEdit continues searching from the beginning of the document if a match isn’t found (or from the end of the document if searching backwards). Otherwise, BBEdit stops searching when it reaches the end (or the beginning if searching backwards) of the file. Choosing this option will automatically disable Selection Only. (Unavailable if Start at Top is checked.) When performing a Replace All with Wrap Around selected, the replace is transformed into “Start at Top” to allow for performance optimizations. Search Backwards When this checkbox is selected, BBEdit searches from the insertion point to the beginning of the file. Otherwise, BBEdit searches from the insertion point to the end of the file. (Unavailable if Start at Top is checked.) Search Selection Only When this checkbox is selected, BBEdit searches only the selected text. Otherwise, BBEdit searches the entire document. (Unavailable if Wrap Around or Start at Top is checked.) Extend Selection When this checkbox is selected, BBEdit extends the selection from the current insertion point to the end of the matched search string. Case Sensitive When this checkbox is selected, BBEdit treats upper- and lowercase letters as different letters. Otherwise, BBEdit treats upper- and lowercase letters as if they were the same. Match Entire Words When this checkbox is selected, BBEdit matches the search string only if it is surrounded in the document text by word-break characters (white space or punctuation). Otherwise, BBEdit matches the search string anywhere in the text. 94 Chapter 7: Searching Multi-File Search When this checkbox is selected, BBEdit searches a set of files for the search string. See “Multi-File Searching” below to learn more about searching in several files. Batch Find When this checkbox is selected and you are doing a multi-file search, BBEdit collects all the matches into a search results window. To learn more about multi-file searching, see “Multi-File Searching” later in this chapter. Exclude Matches When this checkbox is selected and you are doing a multi-file search, BBEdit finds all the files that don’t contain the search string rather than the files that do. Special Characters You can use the following special characters to search for line breaks and other nonprinting characters, as well as hexadecimal escapes to search for any desired 8-bit character. Character Matches… \r line break (carriage return) \n Unix line break (line feed) \t tab \f page break (form feed) \xNN hexadecimal character code NN (e.g. \x0D for CR) \\ backslash (\) The form of a hex escape is “\xNN”, where “N” is any single hex digit [0-9,A-F]. The “x” may be upper or lower case. (You can use the ASCII Table on the Windows menu to find the hex value for any 8-bit Mac character.) You can perform a literal search for any character, including a null, using this option. Malformed escapes are treated as literal strings. Note In previous versions of BBEdit, you could not perform a Grep search for a null character (ASCII 0), even if it was escaped. This limitation has been removed effective with the release of BBEdit 6.5. Multi-File Searching The only difference between single-file searching and multi-file searching is that in multi-file searching you need to specify the files to be searched. BBEdit gives you a great deal of flexibility in how to do this. You can search all the files in a given directory, in a file group, in open editing windows, or in a BBEdit results window. new in 6.5 For finer control, you can use BBEdit’s new advanced multi-criteria filtering options, or even identify a set of files to search via an OSA script. Multi-File Searching 95 To look for a string in several files, do the following steps: 1 Choose Find from the Search menu to open the Find & Replace dialog box (if it’s not already open). 2 Mark the Multi-File Search checkbox. 3 Type the string you are looking for in the Search For text box. 4 Type the replace string (if any) in the Replace With text box. Be sure to read the section “Multi-File Replacing” later in this chapter if you use the replacement features. 5 Mark any checkboxes in the middle part of the dialog box that you want to apply to your search. To learn more about these options, see “Search Settings” earlier in this chapter. 6 To have BBEdit collect the results of the search in a search results window, select the Batch Find checkbox. Otherwise, BBEdit searches for the search string file by file. 7 If you want BBEdit to find only files that do not contain the search string, select the Exclude Matches checkbox. 8 Use the controls in the bottom part of the dialog to specify the set of files to search. See “Specifying the Search Set” later in this chapter for more information. 9 Click one of the buttons along the right side of the dialog box to begin the search. 96 Chapter 7: Searching The table below tells you what each of the buttons does. This button… Does this… Find Batch Find on: Not available when the multi-file search option is selected. Batch Find off: Finds the first occurrence of the search string in the first file of the set. Find All Finds all the occurrences of the search string in all the files in the set. Batch Find on: BBEdit displays the results in a search results window. Batch Find off: BBEdit opens all files that contain matches. Replace Not available when the multi-file search option is selected. Replace All Finds all the occurrences of the search string in all the files in the set and replaces them with the replace string. Don’t Find Saves the settings of the Find dialog box without doing a search. Cancel Doesn’t do the search and restores the settings of the dialog box. If you selected the Batch Find option, read the following section “Multi-File Search Results: Batch Find”. If you did not, read the section “Multi-File Search Results: File by File” below. Multi-File Search Results: Batch Find If you selected the Batch Find option, BBEdit displays every occurrence of the search string in the set of files searched using a search results browser. Multi-File Searching 97 The items at the top of the window tells you how many matches BBEdit found in the set of files you specified, as well as specifying whether there were any error conditions or warnings generated during the search. You can display or hide any combination of errors, warnings, and matches, by checking the appropriate options. The middle panel lists each line that contains the matched text. (Depending on how you have configured BBEdit, this list may be a Finder-style hierarchical list, where each match in a file is listed under the file’s name as shown above, or a flat list where each occurrence is simply displayed in order.) Every match is identified by file name and line number. To see the contents of a file, click a line in the list of matched searches. The part of the file that contains the search string appears in the lower pane. You cannot edit text in a search results browser. To edit a file, double-click the line that contains the match you want to edit, and the specified file will open at the point where the associated match occurred. After you have opened a file, you can use the Find Again, Replace, Replace All, and Replace & Find Again commands in the Search menu to continue searching it, as if you had chosen a File by File search. See the next section for information on File by File searching. Note You can use a search results window as the basis of another multi-file search. See “Specifying the Search Set” later in this chapter. Multi-File Search Results: File by File If you did not select the Batch Find option, BBEdit opens the first file that contains the search string. At that point you can use the commands in the Search menu to further control the search. This command… Does this… Find Again Finds the next occurrence of the search string within the same file. To search backwards, hold down the Shift key. BBEdit beeps if it can’t find any more occurrences of the search string in the current file. Use the Find in Next File command. Replace Replaces the selection with the replace string. Replace All Replaces all occurrences of the search string with the replace string within the current file. Replace & Find Again Replaces the selection with the replace string and looks for the search string again. BBEdit beeps if it can’t find any more occurrences of the search string. Use the Find in Next File command. Find in Next File 98 Chapter 7: Searching Looks for the search string in the next file in the set of files to be searched. This command… Does this… Find & Replace All Matches Replaces every occurrence of the search string with the replace string in each of the files being searched. See “Find & Replace All Matches” in the “Search Menu Reference” section at the end of this chapter. Specifying the Search Set When the Find dialog box is expanded, the controls in the bottom part of the dialog box let you specify which files BBEdit should consider in the multi-file search. The pop-up menu just below the Multi-File Search checkbox controls which files BBEdit should search. You can search: • all open text documents • the files in a given folder • the files listed in any results browser (e.g. a search results browser, an HTML syntax errors browser, or a compile errors browser) • the files in a file group • the list of files returned by an OSA script You can further restrict which of these files will be searched by applying a file filter. See the following section on File Filters for more details. Some of the other options change depending on what you select from this pop-up menu. Searching the Files in a Folder To search the files in a folder: 1 Choose Folder from the Search Type pop-up menu. 2 Choose a folder from the second pop-up menu. This pop-up menu displays up to 12 recently-used folders, as well as the folder you have designated as the local root of your Web site (if any), the folder you have designated as your Templates/Includes folder, and any favorite folders you have designated (see Chapter 2). If the folder you want to search isn’t in the pop-up menu, choose Other and select the folder using the Open dialog, or click the Other button on the right-hand side of the dialog. You can also drag a folder from the Finder to the box that displays the path of the chosen folder. Multi-File Searching 99 3 To search folders within the folder you chose, click on the Options button and select the Search Nested Folders option in the Multi-File Search Options dialog. You can also choose to skip any folders whose names are enclosed in parentheses here by selecting the Skip (…) Folders option, and you can specify whether to search only text files or all files. Searching the Results of a Previous Multi-File Search If a multi-file search finds many files that contain your search string, you may want to narrow the search. You can do this if you selected the Batch Find option to do the initial search and the results are in a search results window. Note As mentioned above, you can also search the list of files presented in any results browser, not just search results browsers. To narrow a search based on the results of an earlier search: 1 Choose Results Window from the Search Type pop-up menu. 2 Choose the desired search results window from the Search Target pop-up menu (the second menu). The Search Target pop-up menu defaults to the frontmost search results window. If you have more than one open, you can choose another from the menu. Searching All the Open Documents You can limit the set of files to be searched to the open editing windows. One advantage of this kind of multi-file search is that you can search windows that haven’t been saved to a file yet. To search all the open windows, choose Open Documents from the Search Type pop-up menu. The text box below the pop-up menu tells you how many windows will be searched. Searching the Files in a File Group If the files you are working with are all listed in a BBEdit file group, you can limit the multi-file search to the files in the group. 100 Chapter 7: Searching To search the files in a file group: 1 Choose File Group from the Search Type pop-up menu. 2 Choose the group from the Search Target pop-up menu. BBEdit lists all open file groups on this menu. To search in a file group that’s not open, click the Other button on the right-hand side of the Find dialog, and select that file group using the standard Open dialog. Searching with a Script new in 6.5 To specify the set of files to be searched using a compiled OSA script, choose Script from the pop-up menu, then click the Other button and select the desired script, or drag the script file onto the pathname box next to the pop-up menu. The script should return a list of the files to be searched. This provides unprecedented flexibility, since an OSA script can do pretty much anything it wants to generate a list. When calling the script, BBEdit will first try a handler named MultiFileSearch; if there is no such handler, BBEdit will call the script’s run handler. The script should return a list of the files to be searched. Here is a very simple example script: on MultiFileSearch -- note that this requires the "BB Commands" OSAX return folder listing of alias "Projects:BBEdit:files:" ¬ only returning files of type {"TEXT"} with recursion end MultiFileSearch on run -- you could do something different here in case -- the script was run manually by the user end run Of course, you don’t have to use the BB Commands OSAX to generate file lists; any other scripting tool which can produce the same type of output will work fine. Multi-File Search Options Click the Options button to display the Multi-File Search Options dialog, shown here. To search all the files in subfolders of the selected folder, mark the Search Nested Folders checkbox. The Skip (…) Folders checkbox skips folders whose names are enclosed in parentheses. The “Search Invisible Folders” checkbox allows you to search inside invisible folders. Multi-File Searching 101 You can also choose to search only text files or to search all file types. If you have graphics or other types of files in the search set, it may be a good idea to restrict the search to only text files. This setting is in addition to any file filter (see next section) and is in fact applied before the filter. File Filters If you do not want to search every file in the set you selected, but want to include only those that meet certain criteria (such as those created on a certain date, or only those created by BBEdit and not some other program, or those that are C source code), you can use a file filter. Mark the Use File Filter checkbox, then choose the desired file filter from the Filters pop-up menu. If none of the filters you have already defined meets your needs, you can define a new one, or create a temporary filter. Note The process of creating and managing file filters has changed in BBEdit 6.5 from its original incarnation in BBEdit 6.0. If you use file filters, we suggest you read through this section again. New Filter To define a new saved file filter, select New Filter from the pop-up menu. BBEdit will ask you for a filter name, then the Edit File Filter dialog, below, appears. You can also define new file filters in the File Filters pane in the Preferences window (see chapter 10). Note If you have the Preferences dialog open, you will not be able to add filters in the Find dialog. To work around this, close the Preferences dialog before using the Find dialog to add new filters. The Edit File Filter dialog lets you specify multiple criteria that determine whether a given file is selected by the filter. You can choose whether these criteria are exclusive (that is, whether a file must meet every listed test to be selected) or inclusive (that is, whether a file that meets any of the tests is selected) using the Every (AND) and Any (OR) radio buttons at the top of the dialog. 102 Chapter 7: Searching To add a test, click More Criteria. A new row appears in the dialog, as shown below. The leftmost column lets you specify which attribute of a file you wish to test. BBEdit lets you test a file’s name, the name of its enclosing folder, its creator or type, its creation and modification date (or both date and time), or its Finder label, visibility, Projector status, or the programming or markup language it is written in. new in 6.5 BBEdit 6.5 now lets you test the content of a file, using the “Contents” criterion. The middle column lets you choose the test to be applied to the selected attribute. The available options here change depending on what attribute you selected. If you choose Visibility in the first column, for instance, your only choices are whether the file is or is not visible, However, if you choose File Name in the first column, the middle column lets you test to see if the name does or does not exactly match, contain, begin with, or end with a particular string. You can also test filenames to see if they match wildcard or Grep patterns. Note In wildcard patterns, the asterisk (*) and question mark (?) characters have special meanings. The asterisk matches any number of characters, such that “*.c” matches any file whose name ends with “.c”. The question mark matches a single character, so that “foo?” matches “food,” fool,” “foot,” and many other names. Both the asterisk and the question mark can be used anywhere in a wildcard pattern, and any number of either can be used in a single pattern. Grep patterns, also known as regular expressions, are a powerful method of selecting filenames based on classes of text or repeating text. They are covered in great detail in the next chapter. The right column specifies the match criterion. For example, when filtering by File Name, you type the text you want the name to match, contain, begin with, or end with (or not). When filtering by Language, you choose a supported language from a pop-up menu. When filtering by Projector status, you choose a valid status from a pop-up menu (or “missing” to indicate that you want documents that don’t have Projector status information). Tip To quickly set a match criterion, drag a file from the Finder to a field in the Define File Filter dialog. BBEdit inserts the appropriate attribute from the dragged file, if possible. Multi-File Searching 103 When using a time or date criterion, you can use the special words below to specify dates and times relative to the current date and time. Word Means… now current date and time today midnight on the current date yesterday current date and time minus 24 hours tomorrow current date and time plus 24 hours You can add any number of criteria using the More Criteria button. To delete the last criterion, click the Fewer Criteria button. To select any single criterion for deletion, press the Option key and click on the desired item. To select multiple continuous criteria, press Option-Shift and drag across the items, or to select discontinuous criteria, press Command-Option and click on the desired items. Click Save to save the file filter and use it for this search. BBEdit will ask you to name the filter, and it will then appear on the Filters pop-up menu in the Find dialog (and in the Define File Filter dialog). Click Revert to undo any changes you have made to the filter. (Hold the Option key when you click Revert to skip the confirmation alert.) Temporary Filters Select “(current criteria)” from the pop-up menu in the Find dialog to reuse the last set of criteria applied (either from using a saved filter, or from using the Edit button to define criteria). Thus, you can use filter criteria on the fly, without the need to create and store a throwaway filter. Editing and Deleting Filters To edit a file filter you have already defined, choose it from the Filters pop-up menu, change it as desired, and click Save. Since each filter must have a unique name, saving it will replace the old version of the filter. To delete a filter entirely, visit the File Filters panel in the Preferences window. (You can also create or modify filters there.) Multi-File Replacing If you want to replace only some occurrences of text in multiple files, you can simply do a File-by-File or Batch Search as described earlier in this chapter, then use the Replace commands on the Find menu to change only the instances you want to change. However, BBEdit can also change all occurrences of a string in a group of files with one command. Globally replacing text in more than one file works the same as replacing it in a single file. The only possible complication is that, if you make a mistake, it can have much wider consequences. If you are not sure what effect a replace operation will have, test it out on a few sample files, or a copy of your data, first! Note 104 The Batch Find option has no effect on a multi-file replace operation. Chapter 7: Searching To do a multi-file search and replace, replacing all occurrences: 1 Set up the find and replace strings in the Find dialog as described in the section “Multi-File Search”. 2 Choose the files to be searched as described in “Specifying the Search Set”. 3 Click Replace All in the Find dialog box, or use its key equivalent of CommandOption-R. BBEdit displays the Find & Replace All Matches dialog box: This is what each of the options does: This option… Leave Open Replaces all occurrences of the search string with the replace string and… Leaves all the files open so that you can inspect the replacements. If there are many files that contain the search string, BBEdit may run out of memory. Save to Disk Saves each file with the changes. When the Confirm Saves setting is active, you will have an opportunity to approve the changes before BBEdit saves them to disk. You should not turn this off unless you are sure that the replace operation being done is what you want. Show Results Opens a results browser listing each of the files which was changed, and the number of changes in each file. Replacing in Files with Projector CKIDs Important In order to track the modification status of files and determine whether a given file is editable at any point in time, MPW’s Projector source control system places a resource of type “ckid” in each file. Many other Mac applications, including BBEdit, also honor these “ckid” resources. This allows Projector (or similar systems like Mac CVS) to work, by preventing files from being changed accidentally. Multi-File Replacing 105 During a multi-file replace, whenever BBEdit attempts to modify a file which is designated Read-Only, it will display the following dialog asking you how to handle the file. Choosing the Cancel button will stop the multi-file replace operation and leave the current file untouched. Choosing the Skip button will cause BBEdit to skip this file only (leaving it untouched), and continue the multi-file replace operation. Choosing the MRO & Update button will cause BBEdit to mark the file Modify Read-Only, change the file, and continue the multi-file replace operation. If you select the Don’t Ask Again option before clicking Skip or MRO & Update, then BBEdit will apply the same action to all files with this Projector state that it encounters during this (and only this) search operation. Note An equivalent dialog will also be displayed when you perform any other batch operation that modifies files, and a file with a Read-Only “ckid” is encountered. Quick Search The Quick Search command, formerly located on the Window menu, is now available on the Search menu. Whenever you need to interactively locate a string in a window, you can use this feature. Quick Search lets you do an incremental search. In other words, it shows the matching text as you type the search string, so you only have to type until you find the text you want. To use Quick Search: 1 Choose Quick Search from the Search menu. 2 Type the string you are looking for in the Quick Search window. As you type, BBEdit selects the first occurrence of what you have typed so far. 3 To find the next occurrence of the matching text, click Find Again. You can use the Case Sensitive and Find Backwards options to change the way Quick Search looks for text. 106 Chapter 7: Searching You can keep the Quick Search window open all the time and bring it to the front when you want to search. Quick Search always searches in the text view of the window immediately behind the Quick Search window. Search Menu Reference This section describes all of the commands in the Search menu. Find Opens the Find dialog box. You can set the search and replace strings, choose searching options, and, for a multi-file search, specify the set of files to search. Quick Search Opens the Quick Search window. You can use this window to interactively search for text strings, as described in the previous section. Find Again Uses the previous settings of the Find dialog box to search for the next occurrence of the search string. Tip Hold down the Shift key to search in the opposite direction from the current search direction. For example, if you have set the Backwards option in the Find dialog, holding down Shift while performing a Find Again will search forward in the document. Find Selection Uses the selected text as the search string and finds the next occurrence of the selected text. This command is the same as using the Enter Search String command followed by the Find Again command. Tip Hold down the Shift key to search in the opposite direction from the current search direction, just as for Find Again. Hold down the Option and Command keys as you doubleclick on a word to search for the next occurrence of that word. Enter Search/Replace String Choose the Enter Search String command to enter the currently selected text into the Find dialog as the search string (without opening the dialog). This command does not perform a search, but only sets the contents of the search string. When you hold down the Option key, this command becomes Enter Replace String, and behaves identically except that it enters the selected text as the replace string. Replace Replaces the selected text (usually an occurrence of the search string) with the replace string. Search Menu Reference 107 Replace All Replaces every occurrence of the search string in a file with the replace string. Replace & Find Again Replaces the selected text with the replace string and searches for the next occurrence of the search string. Find in Next File When doing a non-batch multi-file search, this command looks for the first occurrence of the search string in the next file. Open All Matches This command opens all the files in the search set that contain at least one occurrence of the search string. Find & Replace All Matches In a multi-file search-and-replace for which Batch Find is turned off, this command finds every occurrence of the search string in every file in the search set and replaces them with the replace string. When you choose this command, BBEdit opens a dialog that gives you an opportunity to approve replacements. Go to Line When you choose this command, BBEdit opens the Go To Line dialog box. Type in a line number and the frontmost text window will jump to display that line. Note The Go To Line command honors the “Use ‘Hard’ Line Numbering in Soft-Wrapped Text Views” option in the Text Editing pane of the Preferences window. Go to Center Line Will move the insertion point to the beginning of the middle or center line of the displayed text. Go to Previous/Next Error If an error browser is open, this command will open the listed error which came before or after the selected error. See Chapter 9 for more information on error browsers. Go to Previous/Next Placeholder When you use a glossary file that contains multiple #INSERTION# cookies, the second and subsequent cookies are replaced with the string #•#. You can use the Go To Previous/Next Placeholder commands to jump back and forth between these special strings from the keyboard. For example, you might use this command when filling in the parameters of a function call, or a series of tag attributes. 108 Chapter 7: Searching Find Differences Finds the differences between two files, or all of the files contained in two folders. See Chapter 4 for more details. Apply to New Applies the currently selected difference to the “New” version of two files which are being compared. See Chapter 4 for more details Apply to Old Applies the currently selected difference to the “Old” version of two files which are being compared. Find in Reference Looks up the selected text using your chosen Macintosh Toolbox reference program. Find Definition Looks up the selected text from whatever project document is currently open in CodeWarrior. Search Menu Reference 109 110 Chapter 7: Searching CHAPTER 8 Searching with Grep The Grep option in BBEdit’s Find command offers a powerful way to make changes to your data that “plain text” searches simply can’t. Grep patterns, also known as regular expressions, allow you to find, and change, text that matches a set of conditions you specify. Combined with the multi-file search and replace features described in Chapter 7, BBEdit’s grep capabilities can make many editing tasks quicker and easier, whether you are modifying Web pages, extracting data from a file, or just re-arranging a phone list. For example, suppose you have a list of people’s names that you want to alphabetize. If the names appear last name first, you can easily put these names in a BBEdit window and use the Sort tool. But if the list is arranged first name first, a simple grep pattern can be used to put the names in the proper order for sorting—as you will see in this chapter. In this chapter Changes in BBEdit 6.5 . . . . . . . . . . . . . . . . . . . . . . . . . . . . . . . . . . . . . . . 112 What is Grep or Pattern Searching?. . . . . . . . . . . . . . . . . . . . . . . . . . . . . 112 Recommended Books and Resources . . . . . . . . . . . . . . . . . . . . . . . . . . . 112 Writing Search Patterns. . . . . . . . . . . . . . . . . . . . . . . . . . . . . . . . . . . . . . 113 Most Characters Match Themselves – 113 Escaping Special Characters – 113 Wildcards Match Types of Characters – 114 Character Classes Match Sets or Ranges of Characters – 116 Matching Non-Printing Characters – 117 Other Special Character Classes – 118 Quantifiers Repeat Subpatterns – 118 Combining Patterns to Make Complex Patterns – 119 Creating Subpatterns – 120 • Using Alternation – 121 The ‘Longest Match’ Issue – 122 • Non-Greedy Quantifiers – 122 Writing Replacement Patterns. . . . . . . . . . . . . . . . . . . . . . . . . . . . . . . . . 123 Subpatterns Make Replacement Powerful – 123 Using the Entire Matched Pattern – 124 Using Parts of the Matched Pattern – 124 Case Transformations – 125 Examples . . . . . . . . . . . . . . . . . . . . . . . . . . . . . . . . . . . . . . . . . . . . . . . . 126 Matching Identifiers – 126 • Matching White Space – 126 • Matching Delimited Strings – 127 • Marking Structured Text – 127 • Marking a Mail Digest – 128 • Rearranging Name Lists – 128 Advanced Grep Topics . . . . . . . . . . . . . . . . . . . . . . . . . . . . . . . . . . . . . . 129 Matching Nulls – 129 • Backreferences – 129 • POSIX-Style Character Classes – 131 • Non-Capturing Parentheses – 131 • Perl-Style Pattern Extensions – 132 • Comments – 133 • Pattern Modifiers – 133 • Positional Assertions – 135 • Conditional Subpatterns – 137 • Once-Only Subpatterns – 138 • Recursive Patterns – 140 111 Changes in BBEdit 6.5 Important In a substantial change from all previous versions, BBEdit 6.5 incorporates a new and considerably more powerful grep search engine based on the PCRE package. This core technology brings many useful new features and options, as well as performance enhancements, to BBEdit’s search and replace capabilities. However, in order to harness its power to best advantage, even if you were familiar with grep searching in previous versions of BBEdit, you should read through this chapter again. In particular, many new special characters and constructs are now available, while the meaning of some previously-used options has changed. What is Grep or Pattern Searching? A grep pattern, also known as a regular expression, describes the text that you are looking for. For instance, a pattern can describe words that begin with C and end in l. A pattern like this would match “Call”, “Cornwall”, and “Criminal” as well as hundreds of other words. In fact, you have probably already used pattern searching without realizing it. The Find dialog box’s “Match Case” and “Entire Word” options turn on special searching patterns. Suppose that you are looking for “corn”. With the “Match Case” option turned off, you are actually looking for a pattern that says: look for a C or c, O or o, R or r, and N or n. With the “Entire Word” option on, you are looking for the string “corn” only if it’s surrounded by white space or punctuation characters; special search characters, called metacharacters, are added to the search string you specified to indicate this. What makes pattern searching counterintuitive at first is how you describe the pattern. Consider the first example above, where we want to search for text that begins with the letter “C” and ends with the letter “l” with any number of letters in between. What exactly do you put between them that means “any number of letters”? That’s what this chapter is all about. Note Grep is the name of a frequently-used Unix command that searches using regular expressions, the same type of search pattern used by BBEdit. For this reason, you will often see regular expressions called “grep patterns”, as BBEdit does. They’re the same thing. Recommended Books and Resources Mastering Regular Expressions by Jeffrey E.F. Friedl. O’Reilly & Associates, 1997. ISBN 1-56592-257-3 Although it does not cover BBEdit’s grep features specifically, Mastering Regular Expressions is an outstanding resource for learning the “how-to” of writing useful grep patterns. 112 Chapter 8: Searching with Grep BBEdit-Talk The BBEdit-Talk online mailing list covers a wide range of topics and questions about using BBEdit, which frequently include searching and the use of grep patterns. To subscribe to this list, please visit the support section of our Web site, which offers the option to sign up. http://www.barebones.com/support/lists.html Tech Note BBEdit’s grep engine is based on the PCRE library package, which is open source software, written by Philip Hazel, and copyright by the University of Cambridge, England. For details, see <ftp://ftp.csx.cam.ac.uk/pub/software/programming/pcre/>. Writing Search Patterns new in 6.5 This section explains how to create search patterns using BBEdit 6.5’s grep syntax. For readers with prior experience, this is essentially like the syntax used for regular expressions in the Perl programming language. (However, you do not need to understand anything about Perl in order to make use of BBEdit’s grep searching.) Most Characters Match Themselves Most characters that you type into the Find dialog box match themselves. For instance, if you are looking for the letter “t”, Grep stops and reports a match when it encounters a “t” in the text. This idea is so obvious that it seems not worth mentioning, but the important thing to remember is that these characters are search patterns. Very simple patterns, to be sure, but patterns nonetheless. Escaping Special Characters In addition to the simple character matching discussed above, there are various special characters that have different meanings when used in a grep pattern than in a normal search. (The use of these characters is covered in the following sections.) However, sometimes you will need to include an exact, or literal, instance of these characters in your grep pattern. In this case, you must use the backslash character \ before that special character to have it be treated literally; this is known as “escaping” the special character. To search for a backslash character itself, double it \\ so that its first appearance will escape the second. For example, perhaps the most common “special character” in grep is the dot: “.”. In grep, a dot character will match any character except a return. But what if you only want to match a literal dot? If you escape the dot: “\.”, it will only match another literal dot character in your text. So, most characters match themselves, and even the special characters will match themselves if they are preceded by a backslash. BBEdit’s grep syntax coloring helps make this clear. Note When passing grep patterns to BBEdit via AppleScript, be aware that both the backslash and double-quote characters have special meaning to AppleScript. In order to pass these through correctly, you must escape them in your script. Thus, to pass \r for a carriage return to BBEdit, you must write \\r in your AppleScript string. Writing Search Patterns 113 Wildcards Match Types of Characters These special characters, or metacharacters, are used to match certain types of other characters: Wildcard Matches… . any character except a line break (i.e. a carriage return) ^ beginning of a line (unless used in a character class) $ end of line (unless used in a character class) Being able to specifically match text starting at the beginning or end of a line is an especially handy feature of grep. For example, if you wanted to find every instance of a message sent by Patrick, from a log file which contains various other information like so: From: Rich, server: barebones.com To: BBEdit-Talk, server: lists.barebones.com From: Patrick, server: example.barebones.com you could search for the pattern: ^From: Patrick and you will find every occurrence of these lines in your file (or set of files if you do a multi-file search instead). It is important to note that ^ and $ do not actually match return characters. They match zero-width positions after and before returns, respectively. So, if you are looking for “foo” at the end of a line, the pattern “foo$” will match the three characters ‘f’, ‘o’,and ‘o’. If you search for “foo\r”, you will match the same text, but the match will contain four characters: ‘f’, ‘o’, ‘o’, and a return. In softwrapped files, ^ and $ will also match after and before soft line breaks, respectively. You can combine ^ and $ within a pattern to force a match to constitute an entire line. For example: ^foo$ will only match “foo” on a line by itself, with no other characters. Try it against these three lines to see for yourself: foobar foo fighting foo The pattern will only match the second line. 114 Chapter 8: Searching with Grep WARNING In previous versions of BBEdit, the # character was a wildcard that matched any digit (0-9). Beginning with BBEdit 6.5, this is no longer true. If you have grep patterns written with a previous version of BBEdit which use # for this purpose, you will need to change these patterns. The easiest way to make them compatible with BBEdit 6.5 is to use the \d character class, which has the exact same meaning that # used to—it matches any character from 0-9. Character classes are explained in the next section. Other Positional Assertions new in 6.5 BBEdit’s grep engine supports additional positional assertions, very similar to ^ and $. Escape Matches \A only at the beginning of the document (as opposed to ^, which matches at the beginning of the document and also at the beginning of each line) \b any word boundary, defined as any position between a \w character and a \W character, in either order \B any position that is not a word boundary \z at the end of the document (as opposed to $, which matches at the end of the document and also at the end of each line) \Z at the end of the document, or before a trailing return at the end of the doc, if there is one Examples (the text matched by the pattern is underlined) Search for: Will match: Will match: Won’t match: \bfoo\b bar foo bar foo bar foobar Search for: Will match: Will match: \bJane\b Jane's Tell Jane about the monkey. Search for: Will match: Won’t match: \Afoo foobar This is good foo. Writing Search Patterns 115 Character Classes Match Sets or Ranges of Characters The character class construct lets you specify a set or a range of characters to match, or to ignore. A character class is constructed by placing a pair of square brackets […] around the group or range of characters you wish to include. To exclude, or ignore, all characters specified by a character class, add a caret character ^ just after the opening bracket [^…]. For example: Character Class Matches [xyz] any one of the characters x, y, z [^xyz] any character except x, y, z [a-z] any character in the range a to z You can use any number of characters or ranges between the brackets. Here are some examples: Character Class Matches [aeiou] any vowel [^aeiou] any character that is not a vowel [a-zA-Z0-9] any character from a-z, A-Z, or 0-9 [^aeiou0-9] any character that is neither a vowel nor a digit A character class matches when the search encounters any one of the characters in the pattern. However, the contents of a set are only treated as separate characters, not as words. For example, if your search pattern is [beans] and the text in the window is “lima beans”, BBEdit will report a match at the “a” of the word “lima”. To include the character ] in a set or a range, place it immediately after the opening bracket. To use the ^ character, place it anywhere except immediately after the opening bracket. To match a dash character (hyphen) in a range, place it at the beginning of the range; to match it as part of a set, place it at the beginning or end of the set. Or, you can include any of these character at any point in the class by escaping them with a backslash. 116 Character Class Matches []0-9] any digit or ] [aeiou^] a vowel or ^ [-A-Z] a dash or A - Z [--A] any character in the range from - to A [aeiou-] any vowel or - [aei\-ou] any vowel or - Chapter 8: Searching with Grep Character classes respect the setting of the Case Sensitive checkbox in the Find dialog. For example, if Case Sensitive is on, [a] will only match “a”; if Case Sensitive is off, [a] will match both “a” and “A”. Matching Non-Printing Characters As described in Chapter 7 on searching, BBEdit provides several special character pairs that you can use to match certain non-printing characters. You can use these special characters in grep patterns as well as for normal searching. new in 6.5 You can now also specify any character in a grep pattern by means of its hexadecimal character code (escape code). For example, to look for a tab or a space, you would use the character class [\t ] (consisting of a tab special character and a space character). Character Matches \r line break (carriage return) \n Unix line break (line feed) \t tab \f page break (form feed) \a alarm (hex 07) \cX a named control character, like \cC for Control-C \b backspace (hex 08) (only in character classes) \e Esc (hex 1B) \xNN hexadecimal character code NN (e.g. \x0D for CR) \x{NNNN} any number of hexadecimal characters NN… (e.g. \x{0} will match a null, \x{304F} will match a Japanese Unicode character) \\ backslash Use \r to match a line break in the middle of a pattern and the special characters ^ and $ (described above) to “anchor” a pattern to the beginning of a line or to the end of a line. In the case of ^ and $, the line break character is not included in the match. Writing Search Patterns 117 Other Special Character Classes BBEdit several other sequences for matching different types or categories of characters. Special Character Matches \s any whitespace character (space, tab, carriage return, line feed, form feed) \S any non-whitespace character (any character not included by \s) \w any word character (a-z, A-Z, 0-9, _, and some 8-bit characters) \W any non-word character (all characters not included by \w, including carriage returns) \d any digit (0-9) \D any non-digit character (incl. carriage return) A “word” is defined in BBEdit as any run of non-word-break characters bounded by word breaks. Word characters are generally alphanumeric, and some characters whose value is greater than 127 are also considered word characters. Note that any character matched by \s is by definition not a word character; thus, anything matched by \s will also be matched by \W (but not the reverse!). Quantifiers Repeat Subpatterns The special characters *, +, and ? specify how many times the pattern preceding them may repeat. {}-style quantifiers allow you to specify exactly how many times a subpattern can repeat. The preceding pattern can be a literal character, a wildcard character, a character class, or a special character. Pattern Matches p* zero or more p’s p+ one or more p’s p? zero or one p’s p{COUNT} match exactly COUNT p’s, where COUNT is an integer p{MIN,} match at least MIN p’s, where MIN is an integer p{MIN, MAX} match at least MIN p’s, but no more than MAX Note that the repetition characters * and ? match zero or more occurrences of the pattern. That means that they will always succeed, because there will always be at least zero occurrences of any pattern, but that they will not necessarily select any text (if no occurrences of the preceding pattern are present). 118 Chapter 8: Searching with Grep For this reason, when you are trying to match more than one occurrence, it usually better to use a + than a *, because + requires a match, whereas * can match the empty string. Only use * when you are sure that you really mean “zero or more times”, not just “more than once”. Try the following examples to see how their behavior matches what you expect: Pattern Text Matches .* Fourscore and seven years Fourscore and seven years [0-9]+ I’ve been a loyal member since 1983 or so. 1983 \d+ I’ve got 12 years on him. 12 A+ BAAAAAAAB AAAAAAA A{3} BAAAAB AAA (first three A’s) A{3,} BAAAAB AAAA A{1,3} BAAAAB AAA on the first match, the remaining A on the second match c?andy andy likes candy “andy” on the first match, “candy” on the second A+ Ted joined AAA yesterday “AAA” on the first match; “a” from yesterday on the second Combining Patterns to Make Complex Patterns So far, the patterns you have seen match a single character or the repetition of a single character or class of characters. This is very useful when you are looking for runs of digits or single letters, but often that’s not enough. However, by combining these patterns, you can search for more complex items. you are already familiar with combining patterns. Remember the section at beginning of this discussion that said that each individual character is a pattern that matches itself? When you search for a word, you are already combining basic patterns. You can combine any of the preceding grep patterns in the same way. Here are some examples. Pattern Matches Examples \d+\+\d+ a string of digits, followed by a literal plus sign, followed by more digits 4+2 1234+5829 \d{4}[\t ]B\.C\. four digits, followed by a tab or a space, followed by the string B.C. 2152 B.C. Writing Search Patterns 119 Pattern Matches Examples \$?[0-9,]+\.\d* an optional dollar sign, followed by one or more digits and commas, followed by a period, then zero or more digits 1,234.56 $4,296,459.19 $3,5,6,4.0000 0. (oops!) Note again in these examples how the characters that have special meaning to grep are preceded by a backslash (\+, \., and \$) when we want them to match themselves. Creating Subpatterns Subpatterns provide a means of organizing or grouping complex grep patterns. This is primarily important for two reasons: for limiting the scope of the alternation operator (which otherwise creates an alternation of everything to its left and right), and for changing the matched text when performing replacements. A subpattern consists of any simple or complex pattern, enclosed in a pair of parentheses: Pattern Matches (p) the pattern p and remembers it You can combine more than one subpattern into a grep pattern, or mix subpatterns and other pattern elements as you need. Taking the last set of examples, you could modify these to use subpatterns wherever actual data appears: Pattern Matches Examples (\d+)\+(\d+) a string of digits, followed by a plus sign, followed by more digits 4+2 1234+5829 (\d{4})[\t ]B\.C\. four digits, followed by a tab or a space, followed by the string B.C. 2152 B.C. \$?([0-9,]+)\.(\d*) an optional dollar sign, followed by one or more digits and commas, followed by a period, then zero or more digits 1,234.56 $4,296,459.19 $3,5,6,4.0000 0. What if we wanted to match a series of digits, followed by a plus sign, followed by the exact same series of digits as on the left side of the plus? In other words, we want to match “1234+1234” or “7+7”, but not “5432+1984”. 120 Chapter 8: Searching with Grep Using grouping parentheses, you can do this by referring to a backreference, also known as a captured subpattern. Each set of parentheses in the pattern is numbered from left to right, starting with the opening parenthesis. Later in the pattern, you can refer to the text matched within these backreferences by using a backslash followed by the number of the backreference. Pattern Matches Examples (\d+)\+\1 a string of digits, followed by a plus sign, followed the same digits 7+7 1234+1234 (\w+)\s+\1 double words the the (\w)(\w)\2\1 a word character, a second word character, followed by the second one again and the first one again abba We will revisit subpatterns in the section on replacement, where you will see how the choice of subpatterns affects the changes you can make. Using Alternation The alternation operator | allows you to match any of several patterns at a given point. To use this operator, place it between one or more patterns x|y to match either x or y. As with all of the preceding options, you can combine alternation with other pattern elements to handle more complex searches. Pattern Text is… Matches… a|t A cat each “a” and “t” a|c|t A cat each “a”, “c”, and “t” a (cat|dog) is A cat is here. A dog is here. A giraffe is here. “A cat is”, “A dog is” A|b+ Abba “A”, “bb”, and “a” Andy|Ted Andy and Ted joined AAA yesterday “Andy” and “Ted” \d{4}|years I’ve been a loyal member since 1983, almost 16 years ago. “1983”, “years” [a-z]+|\d+ That’s almost 16 years. “That”, “s”, “almost”, “16”, “years” Writing Search Patterns 121 The ‘Longest Match’ Issue When creating complex patterns, you should bear in mind that the quantifiers +, *, ? and {} are “greedy”. That is, they will always make the longest possible match possible to a given pattern, so if your pattern is E+ (one or more E’s) and your text contains “EEEE”, the pattern matches all the E’s at once, not just the first one. This is usually what you want, but not always. Suppose, for instance, that you want to match an HTML tag. At first, you may think that a good way to do this would be to search for the pattern: <.+> consisting of a less-than sign, followed by one or more occurrences of a single character, followed by a greater-than sign. To understand why this may not work the way you think it should, consider the following sample text to be searched: <B>This text is in boldface.</B> The intent was to write a pattern that would match both of the HTML tags separately. Let’s see what actually happens. The < character at the beginning of this line matches the beginning of the pattern. The next character in the pattern is . which matches any character (except a line break), modified with the + quantifier, taken together, this combination means one or more repetitions of any character. That, of course, takes care of the B. The problem is that the next > is also “any character” and that it also qualifies as “one or more repetitions.” In fact, all of the text up to the end of the line qualifies as “one or more repetitions of any character” (the line break doesn’t qualify, so grep stops there). After grep has reached the line break, it has exhausted the + operator, so it backs up and sees if it can find a match for >. Lo and behold, it can: the last character is a greater-than symbol. Success! In other words, the pattern matches our entire sample line at once, not the two separate HTML tags in it as we intended. More generally, the pattern matches all the text in a given line or paragraph from the first < to the last >. The pattern only does what we intended when there is only one HTML tag in a line or paragraph. This is what we meant when we say that the regular quantifiers try to make the longest possible match. new in 6.5 Non-Greedy Quantifiers To work around this “longest match” behavior, you can modify your pattern to take advantage of non-greedy quantifiers. 122 Quantifier Matches… +? one or more *? zero or more ?? zero or one {COUNT}? match exactly COUNT times {MIN,}? match at least MIN times {MIN, MAX}? match at least MIN times, but no more than MAX Chapter 8: Searching with Grep Astute readers will note that these non-greedy quantifers correspond exactly to their normal (greedy) counterparts, appended with a question mark. Revisting our problem of matching HTML tags, for example, we can search for: <.+?> This matches an opening bracket, then one or more occurrences of any character other than a return, followed by a closing bracket. The non-greedy quantifer achieves the results we want, preventing BBEdit from “overrunning” the closing angle bracket and matching across several tags. A slightly more complicated example: how could you write a pattern that matches all text between <B> and </B> HTML tags? Consider the sample text below: <B>Welcome</B> to the home of <B>BBEdit!</B> As before, you might be tempted to write: <B>.*</B> but for the same reasons as before, this will match the entire line of text. The solution is similar. We’ll use the non-greedy *? quantifer: <B>.*?</B> Writing Replacement Patterns Subpatterns Make Replacement Powerful We covered subpatterns earlier when discussing search patterns and discussed how the parentheses can be used to limit the scope of the alternation operator. Another reason for employing subpatterns in your grep searches is to provide a powerful and flexible way to change or re-use found information as part of a search-and-replace operation. If you do not use subpatterns, you can still access the complete results of the search with the & metacharacter. However, this precludes reorganizing the matched data as it is replaced. new in 6.5 Pattern Matches… & the entire matched pattern [replacement only] (p) the pattern p and remembers it [search only] \1, \2, …, \99 the nth subpattern in the entire search pattern BBEdit 6.5 now remember up to 99 backreferenced subpatterns. Previous versions were limited to 9. Writing Replacement Patterns 123 Using the Entire Matched Pattern The & character is useful when you want to use the entire matched string as the basis of a replacement. Suppose that in your text every instance of product names that begin with the company name “ACME” needs to end with a trademark symbol (™). The following search pattern finds two-word combinations that begin with “ACME”: ACME [A-Za-z]+ The following replacement string adds the trademark symbol to the matched text: &™ For example, if you start with ACME Magnets, ACME Anvils, and ACME TNT are all premium products. and perform a replace operation with the above patterns, you will get: ACME Magnets™, ACME Anvils™, and ACME TNT™ are all premium products. Using Parts of the Matched Pattern While using the entire matched pattern in a replacement string is useful, it’s often more useful to use only a portion of the matched pattern and to rearrange the parts in the replacement string. For example, suppose a source file contains C-style declarations of this type: #define Util_Menu 284 #define Tool_Menu 295 and you want to convert them so they look like this, Pascal-style: const int Util_Menu = 284; const int Tool_Menu = 295; The pattern to find the original text is straightforward: #define[ \t]+.+[ \t]+\d+[^0-9]*$ This pattern matches the word “#define” followed by one or more tabs or spaces, followed by one or more characters of any type, followed by one or more tabs or spaces, followed by one or more digits, followed by zero or more characters that are not digits (to allow for comments), followed by the end of the line. The problem with this pattern is that it matches the entire line. It doesn’t provide a way to remember the individual parts of the found string. If you use subpatterns to rewrite the above search pattern slightly, you get this: #define[ \t]+(.+)[ \t]+(\d+)[^0-9]*$ The first set of parentheses defines a subpattern which remembers the name of the constant. The second set remembers the value of the constant. 124 Chapter 8: Searching with Grep The replacement string would look like this: const int \1 = \2; The sequence \1 is replaced by the name of the constant (the first subpattern from the search pattern), and the sequence \2 is replaced by the value of the constant (from the second subpattern). Our example throws out any comment that may follow the C-style constant declaration. As an exercise, try rewriting the search and replace patterns so they preserve the comment, enclosing it in (*…*) style Pascal comment markers. Here are some more examples: Data Search for Replace Result 4+2 (\d+)\+(\d+) \2+\1 2+4 1234+5829 (\d+)\+(\d+) \1+\1 1234+1234 2152 B.C. (\d{4})[\t ]B\.C\. \1 A.D. 2152 A.D. 1,234.56 \$?([0-9,]+)\.(\d+) \1 dollars and \2 1,234 dollars and cents 56 cents $4,296,459.19 \$?([0-9,]+)\.(\d+) \1 dollars and \2 4,296,459 dollars cents and 19 cents $3,5,6,4.00000 \$?([0-9,]+)\.(\d+) \1 dollars and \2 3,5,6,4 dollars cents and 00000 cents Case Transformations new in 6.5 Replace patterns can also change the case of the original text when using subpattern replacements. The syntax is similar to Perl’s, specifically: Modifier Effect \u Make the next character uppercase \U Make all following characters uppercase until reaching another case specifier (\u, \L, \l ) or \E \l Make the next character lowercase \L Make all following characters lowercase until reaching another case specifier (\u, \U, \l ) or \E \E End case transformation opened by \U or \L Writing Replacement Patterns 125 Here are some examples to illustrate how case transformations can be used. Given some text: mumbo-jumbo and the search pattern: (\w+)(\W)(\w+) the following replace patterns will produce the following output: \U\1\E\2\3 \u\1\2\u\3 MUMBO-jumbo Mumbo-Jumbo Note that case transformations also affect literal strings in the replace pattern: \U\1\2fred \lMUMBLE\2\3 MUMBO-FRED mUMBLE-jumbo Finally, note that \E is not necessary to close off a modifier; if another modifier appears before an \E is encountered, then that modifier will take effect immediately: \Ufred-\uwilma FRED-Wilma Examples The example patterns in this section describe some common character classes and shortcuts used for constructing grep patterns, and addresses some common tasks that you might find useful in your work. Matching Identifiers One of the most common things you will use grep patterns for is to find and modify identifiers, such as variables in computer source code or object names in HTML source documents. To match an arbitrary identifier in most programming languages, you might use this search pattern: [a-z][a-zA-Z0-9]* This pattern matches any sequence that begins with a lowercase letter and is followed by zero or more alphanumeric characters. If other characters are allowed in the identifier, add them to the pattern. This pattern allows underscores in only the first character of the identifier: [a-z_][a-zA-Z0-9]* The following pattern allows underscores anywhere but the first character, but allows identifiers to begin with an uppercase or lowercase letter: [a-zA-Z][a-zA-Z0-9_]* Matching White Space Often you will want to match two sequences of data that are separated by tabs or spaces, whether to simply identify them, or to rearrange them. 126 Chapter 8: Searching with Grep For example, suppose you have a list of formatted label-data pairs like this: User name: Occupation: Spouse: Bernard Rubble Actor Betty You can see that there are tabs or spaces between the labels on the left and the data on the right, but you have no way of knowing how many spaces or tabs there will be on any given line. Here is a character class that means “match one or more white space characters.” [ \t]+ So, if you wanted to transform the list above to look like this: User name("Bernard Rubble") Occupation("Actor") Spouse("Betty") You would use this search pattern: ([a-z ]+):[ \t]+([a-z ]+) and this replacement pattern: \1\("\2"\) Matching Delimited Strings In some cases, you may want to match all the text that appears between a pair of delimiters. One way to do this is to bracket the search pattern with the delimiters, like this: ".*" This works well if you have only one delimited string on the line. But suppose the line looked like this: "apples", "oranges, kiwis, mangos", "penguins" The search string above would match the entire line. (This is another instance of the “longest match” behavior of BBEdit’s grep engine, which was discussed previously.) Once again, non-greedy quantifiers come to the rescue. The following pattern will match "-delimited strings: ".+?" Marking Structured Text Suppose you are reading a long text document that doesn’t have a table of contents, but you notice that all the sections are numbered like this: 3.2.7 5.19.001 Prehistoric Cartoon Communities Restaurants of the Mesozoic Examples 127 You can use a grep pattern to create marks for these headings, which will appear in the Mark pop-up menu. Choose Find & Mark All from the Mark pop-up menu in the status bar. Then, decide how many levels you want to mark. In this example, the headings always have at least two digits and at most four. Use this pattern to find the headings: ^(\d+\.\d+\.?\d*\.?\d*)[ \t]+([a-z ]+) and this pattern to make the file marks: \1 \2 The ^ before the first search group ensures that BBEdit matches the numeric string at the beginning of a line. The pattern \.?\d* matches a (possible) decimal point and a digit sequence. The other groups use the white space idiom and the identifier idiom. You can use a similar technique to mark any section that has a section mark that can be described with grep. Marking a Mail Digest You can elaborate the structured text technique to create markers for mail digests. Assume that each digest is separated by the following lines: From: Sadie Burke <[email protected]> Date: Sun, 16 Jul 1995 13:17:45 -0700 Subject: Fishing with the judge Suppose you want the marker text to list the subject and the sender. You would use the following search string: ^From:[ \t]+(.*)\r.*\rSubject:[ \t]+(.*) And mark the text with this replacement string: \2 \1 Note that for the sequence \r.*\r in the middle of the search string, the \r before “Subject” is necessary because as previously discussed, the special character . does not match carriage returns. (At least, not by default. See “Advanced Topics”, below, for details on how to make dot match any character, including carriage returns.) Rearranging Name Lists You can use grep patterns to transform a list of names in first name first form to last name first order (for a later sorting, for instance). Assume that the names are in the form: Junior X. Potter Jill Safai Dylan Schuyler Goode Walter Wang 128 Chapter 8: Searching with Grep If you use this search pattern: ^(.*) ([^ ]+)$ And this replacement string: \2, \1 The transformed list becomes: Potter, Junior X. Safai, Jill Goode, Dylan Schuyler Wang, Walter Advanced Grep Topics new in 6.5 BBEdit’s new PCRE-based grep engine offers unparalleled syntactical power. The topics below cover areas that show how grep can effectively match very complicated patterns of text—matches which were impossible to achieve with older versions of BBEdit. However, with this power comes complexity. If you are new to grep, it is possible that the topics covered in this section will not make much sense to you. That’s OK. The best way to learn grep is to use it in real life, not by reading example patterns. In many cases, the basic grep syntax covered previously in this chapter will be all that you need. If you are an experienced user of grep from previous versions of BBEdit, however, many of the topics covered below will be of great interest. Matching Nulls The grep engine used in previous versions of BBEdit was unable to search text that contained null characters (ASCII value zero). This limitation is removed in BBEdit 6.5. Here’s one way to match a null: \x{0} Backreferences The following charts explain the rules BBEdit uses for determining backreferences. In Search Patterns Modifier Effect \0 A backslash followed by a zero is an octal character reference. Up to two further octal characters are read. Thus, “\040” will match a space character, and “\07” will match the ASCII BEL (\x07), but “\08” will match an ASCII null followed by the digit 8 (because octal characters only range from 0-7). \1-9 A backslash followed by a single decimal digit from 1 to 9 is always a backreference to the Nth captured subpattern. Advanced Grep Topics 129 Modifier Effect \10-99 A backslash followed by two decimal digits, which taken together form the integer N (ranging from 10 to 99), is a backreference to the Nth captured subpattern, if there exist N capturing sets of parentheses in the pattern. If there are fewer than N captured subpatterns, the grep engine will instead look for up to three octal digits following the backslash. Any subsequent digits stand for themselves. So, in a search pattern, “\11” is a backreference if there are 11 or more sets of capturing parentheses in the pattern. If not, it matches a tab. “\011” always matches a tab. “\81” is a backreference if there are 81 or more captured subpatterns, but matches an ASCII null followed by the two characters “8” and “1” otherwise. In Character Classes Modifier Effect \OCTAL Inside a character class, a backslash followed by up to three octal digits generates a single byte character reference from the least significant eight bits of the value. Thus, the character class “[\7]” will match a single byte with octal value 7 (equivalent to “\x07”). “[\8]” will match a literal “8” character. In Replacement Patterns 130 Modifier Effect \NNN+ If more than two decimal digits follow the backslash, only the first two are considered part of the backreference. Thus, “\111” would be interpreted as the 11th backreference, followed by a literal ‘1’. You may use a leading zero; for example, if in your replacement pattern you want the first backreference followed by a literal ‘1’, you can use “\011”. (If you use “\11”, you will get the 11th backreference, even if it is empty.) \NN If two decimal digits follow the backslash, which taken together represent the value N, and if there is an Nth captured substring, then all three characters are replaced with that substring. If there is not an Nth captured substring, then all three characters are discarded, i.e., the backreference is replaced with the empty string. \N If there is only a single digit N following the backslash and there is an Nth captured substring, then both characters are replaced with that substring. Otherwise, both characters are discarded, i.e., the backreference is replaced with the empty string. In replacement patterns, \0 is a backreference to the entire match (exactly equivalent to ‘&’). Chapter 8: Searching with Grep POSIX-Style Character Classes BBEdit now provides support for POSIX-style character classes. These classes are used in the form [:CLASS:], and are only available inside regular character classes (in other words, inside another set of square brackets). Class Meaning alnum letters and digits alpha letters ascii character codes 0-127 cntrl control characters digit decimal digits (same as \d) graph printing characters, excluding spaces lower lower case letters print printing characters, including spaces punct punctuation characters space white space (same as \s) upper upper case letters word “word” characters (same as \w) xdigit hexadecimal digits For example: [[:digit:]]+ is the same as: [\d]+ POSIX-style character class names are case-sensitive. It is easy to forget that POSIX-style character classes are only available inside regular character classes. The pattern [:space:], without enclosing square brackets, is just a character class consisting of the characters ‘:’, ‘a’, ‘c’, ‘e’, ‘p’, and ‘s’. The names “ascii” and “word” are Perl extensions; the others are defined by the POSIX standard. Another Perl extension supported by BBEdit is negated POSIX-style character classes, which are indicated by a ^ after the colon. For example, to match any run of non-digit characters: [[:^digit:]]+ Non-Capturing Parentheses As in previous versions of BBEdit, bare parentheses cluster and capture the subpatterns they contain. The portion of the matching pattern contained within the first pair of parentheses is available in the backreference \1, the second in \2, etc. Opening parentheses are counted from left to right to determine the numbers of the captured subpatterns. For example, if the following grep pattern: ((red|white) (king|queen)) Advanced Grep Topics 131 is matched against the text “red king”, the backreferences will be set as follows: \1 \2 \3 "red king" "red" "king" Sometimes, however, parentheses are needed for only for clustering, not capturing. BBEdit now supports non-capturing parentheses, using the syntax: (?:PATTERN) That is, if an open parenthesis is followed by “?:”, the subpattern matched by that pair of parentheses is not counted when computing the backreferences. For example, if the text “red king” is matched against the pattern: (?:(red|white) (king|queen)) the backreferences will be set as follows: \1 \2 "red" "king" Perl-Style Pattern Extensions BBEdit 6.5’s grep engine supports several extended sequences, which provide grep patterns with super-powers from another universe. Their syntax is in the form: (?KEY…) in other words, an open parenthesis followed by a question mark, followed by a KEY for the particular grep extension, followed by the rest of the subpattern and a closing parenthesis. This syntax—specifically, an open parenthesis followed by a question mark—was not valid in older versions of BBEdit, thus, none of these extensions will conflict with old patterns. We have already seen one such extension in the previous section of this document— non-capturing parentheses: (?:…). The remainder are listed in the chart below, and discussed in detail afterward. 132 Extension Meaning (?:…) Cluster-only parentheses, no capturing (?#…) Comment, discard all text between the parens (?imsx-imsx) Enable/disable pattern modifiers (?imsx-imsx:…) Cluster-only parens with modifiers (?=…) Positive lookahead assertion (?!…) Negative lookahead assertion (?<=…) Positive lookbehind assertion (?<!…) Negative lookbehind assertion (?()…|…) Match with if-then-else (?()…) Match with if-then Chapter 8: Searching with Grep Extension Meaning (?>…) Match non-backtracking subpattern (“once-only”) (?R) Recursive pattern Comments The sequence (?# marks the start of a comment which continues up to the next closing parenthesis. Nested parentheses are not permitted. The characters that make up a comment play no part in the pattern matching at all. Search for: foo(?# Hello, this is a comment)bar Will match: foobar Pattern Modifiers The settings for case sensitivity, multi-line matching, whether the dot character can match returns, and “extended syntax” can be turned on and off within a pattern by including sequences of letters between “(?” and “)”. Modifier Meaning Default i case insensitive according to Case Sensitive checkbox in Find dialog m allow ^ and $ to match at \r on s allow . to match \r off x ignore most whitespace and allow inline comments in grep patterns off i — By default, BBEdit obeys the “Case Sensitive” checkbox in the Find dialog (or the corresponding property of the search options when using the scripting interface). The (?i) option overrides this setting. m — By default, BBEdit’s grep engine will match the ^ and $ metacharacters after and before returns, respectively. If you turn this option off with (?-m), ^ will only match at the beginning of the document, and $ will only match at the end of the document. (If that’s what you want, however, you should consider using the new \A, \Z, and \z metacharacters instead of ^ and $.) s — By default, the magic dot metacharacter . matches any character except return (‘\r’). If you turn this option on with (?s), however, dot will match any character. Thus, the pattern (?s).+ will match an entire document. x — When turned on, this option changes the meaning of most whitespace characters (notably, tabs and spaces) and #. Literal whitespace characters are ignored, and the # character starts a comment that extends until a literal return or the ‘\r’ escape sequence is encountered. Ostensibly, this option intends to let you write more “readable” patterns. Advanced Grep Topics 133 Perl programmers should already be familiar with these options, as they correspond directly to the -imsx options for Perl’s m// and s/// operators. Unadorned, these options turn their corresponding behavior on; when preceded by a hyphen (-), they turn the behavior off. Setting and unsetting options can occur in the same set of parentheses. Example Effect (?imsx) Turn all four options on (?-imsx) Turn all four options off (?i-msx) Turn ‘i’ on, turn ‘m’, ‘s’, and ‘x’ off The scope of these option changes depends on where in the pattern the setting occurs. For settings that are outside any subpattern, the effect is the same as if the options were set or unset at the start of matching. The following patterns all behave in exactly the same way: (?i)abc a(?i)bc ab(?i)c abc(?i) In other words, all four of the above patterns will match without regard to case. Such “top level” settings apply to the whole pattern (unless there are other changes inside subpatterns). If there is more than one setting of the same option at the top level, the right-most setting is used. If an option change occurs inside a subpattern, the effect is different. An option change inside a subpattern affects only that part of the subpattern that follows it, so, if the “Case Sensitive” checkbox is turned on: Search for: (a(?i)b)c Will match: abc or aBc and won’t match anything else. (But if “Case Sensitive” is turned off, the “(?i)” in the above pattern is superfluous and has no effect.) By this means, options can be made to have different settings in different parts of the pattern. Any changes made in one alternative do carry on into subsequent branches within the same subpattern. For example: Search for: (a(?i)b|c) matches “ab”, “aB”, “c”, and “C”, even though when matching “C”, the first branch is abandoned before the option setting. 134 Chapter 8: Searching with Grep These options can also be set using the clustering (non-capturing) parentheses syntax defined earlier, by inserting the option letters between the ‘?’ and ‘:’. The scope of options set in this manner is limited to the subpattern contained therein. Examples: Search for: Will match: (?i:saturday|sunday) SATURDAY or Saturday Search for: Will match: Won’t match: (?i:foo)(?-i:bar) foobar or FOObar FOOBAR or fooBAR or SUNday (etc.) Positional Assertions Positional assertions “anchor” a pattern, without actually matching any characters. Simple assertions have already been described: those which are invoked with the escape sequences \b, \B, \A, \Z, \z, ^ and $. For example, the pattern \bfoo\b will only match the string “foo” if it has word breaks on both sides, but the \b’s do not themselves match any characters; the entire text matched by this pattern are the three characters ‘f’, ‘o’, and ‘o’. Lookahead and lookbehind assertions work in a similar manner, but allow you to test for arbitrary patterns to anchor next to. If you have ever said to yourself, “I would like to match ‘foo’, but only when it is next to ‘bar’,” lookaround assertions fill that need. Positive lookahead assertions begin with “(?=”, and negative lookahead assertions begin with “(?!”. For example: \w+(?=;) will match any word followed by a semicolon, but the semicolon is not included as part of the match. foo(?!bar) matches any occurrence of “foo” that is not followed by “bar”. Note that the apparently similar pattern: (?!foo)bar does not find an occurrence of “bar” that is preceded by something other than “foo”; it finds any occurrence of “bar” whatsoever, because the assertion (?!foo) is always true when the next three characters are “bar”. A lookbehind assertion is needed to achieve this effect. Positive lookbehind assertions start with “(?<=”, and negative lookbehind assertions start with “(?<!”. For example: (?<!foo)bar does find an occurrence of “bar” that is not preceded by “foo”. The contents of a lookbehind assertion are restricted such that all the strings it matches must have a fixed length. However, if there are several alternatives, they do not all have to have the same fixed length. Thus (?<=Martin|Lewis) Advanced Grep Topics 135 is permitted, but (?<!dogs?|cats?) causes an error. Branches that match different length strings are permitted only at the top level of a lookbehind assertion. This is different compared with Perl 5.005, which requires all branches to match the same length of string. An assertion such as (?<=ab(c|de)) is not permitted, because its single top-level branch can match two different lengths, but it is acceptable if rewritten to use two top-level branches: (?<=abc|abde) The implementation of lookbehind assertions is, for each alternative, to temporarily move the current position back by the fixed width and then try to match. If there are insufficient characters before the current position, the match is deemed to fail. (Lookbehinds in conjunction with non-backtracking [a.k.a. “once-only”] subpatterns can be particularly useful for matching at the ends of strings; an example is given in the section on once-only subpatterns below.) Several assertions (of any sort) may occur in succession. For example, (?<=\d{3})(?<!999)foo matches “foo” preceded by three digits that are not “999”. Notice that each of the assertions is applied independently at the same point in the subject string. First there is a check that the previous three characters are all digits, and then there is a check that the same three characters are not “999”. This pattern does not match “foo” preceded by six characters, the first of which are digits and the last three of which are not “999”. For example, it doesn’t match “123abcfoo”. A pattern to do that is: (?<=\d{3}...)(?<!999)foo This time the first assertion looks at the preceding six characters, checking that the first three are digits, and then the second assertion checks that the preceding three characters are not “999”. Assertions can be nested in any combination. For example, (?<=(?<!foo)bar)baz matches an occurrence of “baz” that is preceded by “bar” which in turn is not preceded by “foo”, while (?<=\d{3}(?!999)...)foo is another pattern which matches “foo” preceded by three digits and any three characters that are not “999”. Assertion subpatterns are not capturing subpatterns, and may not be repeated, because it makes no sense to assert the same thing several times. If any kind of assertion contains capturing subpatterns within it, these are counted for the purposes of numbering the capturing subpatterns in the whole pattern. However, substring capturing is carried out only for positive assertions, because it does not make sense for negative assertions. 136 Chapter 8: Searching with Grep Conditional Subpatterns Conditional subpatterns allow you to apply “if-then” or “if-then-else” logic to pattern matching. The “if” portion can either be an integer between 1 and 99, or an assertion. The two forms of syntax are: if-then: if-then-else: (?(condition)yes-pattern) (?(condition)yes-pattern|no-pattern) If the condition evaluates as true, the “yes-pattern” portion attempts to match. Otherwise, the “no-pattern” portion does (if there is a “no-pattern”). If the “condition” text between the parentheses is an integer, it corresponds to the backreferenced subpattern with the same number. (Don’t precede the number with a backslash.) If the corresponding backreference has previously matched in the pattern, then the condition is satisfied. Here’s an example of how this can be used. Let’s say we want to match the words “red” or “blue”, and refer to whichever word is matched in the replacement pattern. That’s easy: (red|blue) To make it harder, let’s say that if (and only if) we match “blue”, we want to optionally match a space and the word “car” if they follow directly afterward. In other words, we want to match “red”, “blue”, or if possible, “blue car”, but we do not want to match “red car”. We can’t use the pattern: (red|blue)( car)? because that will match “red car”. Nor can we use: (red|blue car|blue) because in our replacement pattern, we want the backreference to only contain “red” or “blue”, without the “ car”. Using a conditional subpattern, however, we can search for: ((blue)|(red))(?(2) car)? Here’s how this pattern works. First, we start with “((blue)|(red))”. When this subpattern matches “blue”, \1 and \2 are set to “blue”, and \3 is empty. When it matches “red”, \1 and \3 are set to “red”, and \2 is empty. Next comes the conditional subpattern “(?(2) car)?”. The conditional test is on “2”, the second backreferenced subpattern: if \2 is set, which in our case means it has matched the word “blue”, then it will try to match “ car”. If \2 is not set, however, the entire conditional subpattern is skipped. The question mark at the end of the pattern makes this conditional match optional, even if \2 is set to “blue”. Here’s an example that uses an assertion for the condition, and the if-then-else form. Let’s say we want to match a run of digits of any length, followed by either “ is odd” or “ is even”, depending on whether the matched digits end with an odd or even digit. \d+(?(?<=[13579]) is odd| is even) Advanced Grep Topics 137 This pattern starts with “\d+” to match the digits. Next comes a conditional subpattern, with a positive lookbehind assertion as the condition to be satisfied. The lookbehind assertion is true only if the last character matched by \d+ was also in the character class [13579]. If that’s true, then we next try to match “ is odd”; if it isn’t, we try to match “ is even”. Thus, this pattern will match “123 is odd”, “8 is even”, etc., but will not match “9 is even” or “144 is odd”. Once-Only Subpatterns With both maximizing (greedy) and minimizing (non-greedy) repetition, failure of what follows normally causes the repeated item to be reevaluated to see if a different number of repeats allows the rest of the pattern to match. Sometimes it is useful to prevent this, either to change the nature of the match, or to cause it to fail earlier than it otherwise might, when the author of the pattern knows there is no point in carrying on. Consider, for example, the pattern “\d+foo” when matching against the text “123456bar”. After matching all 6 digits and then failing to match “foo”, the normal action of the grep engine is to try again with only 5 digits matching the \d+ item, and then with 4, and so on, before ultimately failing. Once-only subpatterns provide the means for specifying that once a portion of the pattern has matched, it is not to be re-evaluated in this way, so the matcher would give up immediately on failing to match “foo” the first time. The notation is another kind of special parenthesis, starting with “(?>”, as in this example: (?>\d+)bar This kind of parentheses “locks up” the part of the pattern it contains once it has matched, and a failure further into the pattern is prevented from backtracking into it. Backtracking past it to previous items, however, works as normal. In most situations, such as in the example above, the time saved by using once-only subpatterns is insignificant—a few small fractions of a second, at most. With some complicated grep patterns or with humongous lines of text, however, you can save tremendous amounts of time using once-only subpatterns. Once-only subpatterns are not capturing subpatterns. Simple cases such as the above example can be thought of as a maximizing repeat that must swallow everything it can. So, while both \d+ and \d+? are prepared to adjust the number of digits they match in order to make the rest of the pattern match, (?>\d+) can only match an entire sequence of digits. Once-only subpatterns can be used in conjunction with lookbehind assertions to specify efficient matching at the end of a line of text. Consider a simple pattern such as: abcd$ when applied to a long line of text which does not match (in other words, a long line of text that does not end with “abcd”). Because matching proceeds from left to right, the grep engine will look for each “a” in the subject and then see if what follows matches the rest of the pattern. If the pattern is specified as: ^.*abcd$ 138 Chapter 8: Searching with Grep the initial .* matches the entire line at first, but when this fails (because there is no following “a”), it backtracks to match all but the last character, then all but the last two characters, and so on. Once again the search for “a” covers the entire string, from right to left, so we are no better off. However, if the pattern is written as: ^(?>.*)(?<=abcd) there can be no backtracking for the .* item; it can match only the entire line. The subsequent lookbehind assertion does a single test on the last four characters. If it fails, the whole match fails immediately. For long strings, this approach makes a significant difference to the processing time. When a pattern contains an unlimited repeat inside a subpattern that can itself be repeated an unlimited number of times, the use of a once-only subpattern is the only way to avoid some failing matches taking a very long time (literally millions or even billions of years, in some cases!). The pattern: (\D+|<\d+>)*[!?] matches an unlimited number of substrings that either consist of non-digits, or digits enclosed in <>, followed by either ! or ?. When it matches, it runs quickly. However, if it is attempts to match this line of text: aaaaaaaaaaaaaaaaaaaaaaaaaaaaaaaaaaaaaaaaaaaaaaaaaaaa it takes a long time before reporting failure. So long, in fact, that it will effectively “freeze” BBEdit. This isn’t really a crash, per se, but left to run on its own, it might take years before it finally fails. (We’re not sure, frankly, because much like determining how many licks it takes to get to the center of a Tootsie Pop, we don’t feel like waiting long enough to find out.) The reason this takes so long to fail is because the string can be divided between the two repeats in a large number of ways, and all have to be tried before the grep engine knows for certain that the pattern won’t match. (The example used [!?] rather than a single character at the end, because both PCRE and Perl have an optimization that allows for fast failure when a single character is used. They remember the last single character that is required for a match, and fail early if it is not present in the string.) If the pattern is changed to ((?>\D+)|<\d+>)*[!?] sequences of non-digits cannot be broken, and failure happens quickly. Advanced Grep Topics 139 Recursive Patterns Consider the problem of matching a string in parentheses, allowing for unlimited nested, balanced parentheses. Without the use of recursion, the best that can be done is to use a pattern that matches up to some fixed depth of nesting. It is not possible to handle an arbitrary nesting depth. Perl 5.6 has provided an experimental facility that allows regular expressions to recurse (amongst other things). It does this by interpolating Perl code in the expression at run time, and the code can refer to the expression itself. Obviously, BBEdit’s grep engine cannot support the interpolation of Perl code. Instead, the special item (?R) is provided for the specific case of recursion. The following recursive pattern solves the parentheses problem: \(((?>[^()]+)|(?R))*\) First it matches an opening parenthesis. Then it matches any number of substrings which can either be a sequence of non-parentheses, or a recursive match of the pattern itself (i.e. a correctly parenthesized substring). Finally there is a closing parenthesis. This particular example pattern contains nested unlimited repeats, and so the use of a once-only subpattern for matching strings of non-parentheses is important when applying the pattern to strings that do not match. For example, when it tries to match against this line of text: (aaaaaaaaaaaaaaaaaaaaaaaaaaaaaaaaaaaaaaaaaaaaaaaaaaaaa() it yields “no match” quickly. However, if a once-only subpattern is not used, the match runs for a very long time indeed because there are so many different ways the + and * repeats can carve up the subject, and all have to be tested before failure can be reported. 140 Chapter 8: Searching with Grep CHAPTER 9 Browsers Browsers are special kinds of windows that let you see a lot of information about files at once. Browsers typically have two panes: one pane lets you select a file, the other displays detailed information about the file (often its contents). If you have used the Batch Find option in a multi-file search, you have already seen an example of a BBEdit browser. In this chapter Browser Overview . . . . . . . . . . . . . . . . . . . . . . . . . . . . . . . . . . . . . . . . . 141 List Pane – 141 Status Bar – 142 Text View Pane – 142 Splitter – 142 Disk Browsers. . . . . . . . . . . . . . . . . . . . . . . . . . . . . . . . . . . . . . . . . . . . . 142 Using Disk Browsers – 143 Using the List Pane in Disk Browsers – 144 Using the Text Pane in Disk Browsers – 144 Search Results Browsers . . . . . . . . . . . . . . . . . . . . . . . . . . . . . . . . . . . . . 145 Error Results Browsers . . . . . . . . . . . . . . . . . . . . . . . . . . . . . . . . . . . . . . 146 Browser Overview All BBEdit browsers share the same basic structure and behavior. All browsers have a status bar, a file list, and a text pane. List Pane The top pane of a browser lists the items available in the browser. This pane shows different information for different kinds of browsers: Browser File List pane contains Disk browser Files and folders that BBEdit can open Search results File and line number of each match Error results (or) general results File, line number, and status message for each condition You can open both files and folders from the list pane. When you double-click a folder name, BBEdit replaces the file list pane with the contents of the folder. When you double-click a file name, BBEdit opens the file in an editing window. If the file list pane also included a line number, BBEdit scrolls to that line. 141 Controls above the list may allow you to determine what kinds of items are displayed in the list. For example, in disk browsers, there’s a pop-up menu that lets you choose to display text files, all files, or other types of files, and another that lets you return the browser to a parent directory of the current folder. In error browsers, checkboxes allow you to hide or show all errors, warnings, or notes. For results browsers, BBEdit can either show an error hierarchy (where all the errors associated with a particular file are grouped under that file, using disclosure triangles similar to those in the Finder’s list views to reveal or hide the error list), or a flat listing showing each individual error encountered on a separate line. You can choose which of these display methods to use by default in the Browser Display preferences. To remove items from the display list, select them and press the Delete key, or choose Clear from the Edit menu. Status Bar The browser status bar is like the status bar in editing windows. Some browsers have additional buttons and controls in the status area as well. These standard items—the pencil icon, the Function pop-up, the Text Options pop-up, the Mark pop-up, the Path pop-up, the Projector button, and the Info button—should already be familiar to you, as they appear on BBEdit document windows by default. See Window Anatomy in Chapter 4 for an explanation of these standard BBEdit functions. Text View Pane When you click an item in the list pane, BBEdit displays its contents in the text view pane. If you click a folder, BBEdit lists the names of the files in the folder. If you click a file name, BBEdit displays the contents of the file. new in 6.5 When the current focus is in the bottom pane, the space bar acts like the “Page Down” key, and Shift-space acts as “Page Up”. Splitter You can change the size of the file list pane or the text view pane by dragging the double line that separates them. Double-clicking on the splitter bar will collapse the text view pane completely, and double-clicking on it again (in the bottom of the browser window) will restore the text pane to its previous proportions. Disk Browsers Use a disk browser to explore the contents of a disk or a folder without opening each file one at a time. 142 Chapter 9: Browsers To open a disk browser, pull down the File menu and select Disk Browser from the New submenu. BBEdit opens a new disk browser that starts at the desktop: The file list pane displays all of the disks on the Finder desktop. If you click a disk in the file list pane, the text pane displays all the items on the disk that BBEdit can open. Note You can also open a disk browser starting at any particular folder, by dragging that folder onto BBEdit’s icon in the Finder. Using Disk Browsers The controls in the disk browser let you open files and folders, limit the kinds of files to show in the list pane, and navigate through your disks and folders. Show pop-up menu The pop-up menu on the upper left section of the list pane lets you specify the kinds of files you want BBEdit to list in the browser. You can select “All Available”, meaning all types of files BBEdit recognizes that it can open, or “Any File” which will display every file present in a folder regardless of type or kind. You can also select from one of the more specific types listed below: text files, PICT files, QuickTime movies, QuickTime images, BBEdit file groups, and MacPerl runtimes (stand-alone Perl applications). Directory Pop-up Menu This pop-up always shows the currently selected folder. When a disk browser is first opened, this will usually be the Desktop folder, i.e. the “invisible” folder in which all items that appear on the desktop are stored. If you have opened any volume or folder within a volume, the current folder will be shown here instead. On Mac OS X, new disk browsers will open with a view of the current user’s home folder. You can use this menu to “back out” of any folder you are currently in to a higher level folder (like you can in the Finder). You can also choose the Other… option to get a folder selection dialog from which you can choose any folder on any currently mounted volume. Disk Browsers 143 Open Button Clicking the Open button in the status bar opens the selected item, or you can doubleclick on the item. If you open a folder, BBEdit displays the contents of that folder in the file list pane. If you click one or more files, BBEdit opens those files into editing windows. Tip Hold down the Option key as you Open or double-click on a file name to open the file with the application that created it. Using the List Pane in Disk Browsers The list pane of a disk browser displays disks, files, and folders. When you are at the desktop level, the list shows all mounted volumes and the files and folders on the Desktop. When you click a folder or disk, BBEdit displays the names of all the files it can open in the text pane. (The names listed in the text pane cannot be double-clicked to open them. You can however select a name and use the Open Selection command to open that file.) When you click a file name, BBEdit displays the contents of the file in the text pane. To open a folder or disk and display its contents in the file list pane, do one of the following: • double-click it • select it and click Open in the status bar • select it and press Command-Down Arrow To go up one level to the enclosing folder or disk, do one of the following: • select the enclosing folder from the directory pop-up menu • press Command-Up Arrow Using the Text Pane in Disk Browsers When you select a folder or disk in the file list pane, BBEdit displays the names of all the files and folders contained in that folder or disk in the text pane. When you click on a file name, BBEdit displays the contents of the file in the text pane if the file is of a type that BBEdit recognizes (“TEXT”, “utxt”, or “UTF8”). You can search the contents of the text pane with the Find command or with the Quick Search window, and you can copy text from the text pane. You cannot edit a file’s contents in the text pane. To edit a file, use the Open button in the status bar to open it in an editing window. 144 Chapter 9: Browsers Search Results Browsers If you selected the Batch Find option when performing a multi-file search, BBEdit displays every occurrence of the search string in the searched files in a search results browser. The items at the top of the window tell you how many matches BBEdit found in the set of files you specified, as well as whether any error conditions or warnings were generated during the search. The list pane lists each line that contains the matched text. (Depending on how you have configured BBEdit, the list may be arranged hierarchically, with every match attached to the file that contains it in a Finder-like list view, or they may be listed one after the other in a simple flat list.) Every match is identified by file and line number. Results browsers now have an Open button. Clicking this button while pressing the Option key will ask the Finder to open the selected items. To see the contents of a file, click a line in the list of matched searches. The part of the file that contains the search string appears in the lower pane. You cannot edit text in a search results browser. To edit the file, double-click the line that contains the match you want to edit. After you have opened the file, you can use the Find Again, Replace, Replace All, and Replace & Find Again commands in the Search menu to continue searching it, as if you had chosen a File by File search. See Chapter 7 for more information on searching. Search Results Browsers 145 Error Results Browsers When you use the HTML syntax checker, link checker, or update tool, BBEdit will open an error results browser to display any errors generated by the command. BBEdit will also open an error results browser to list compilation errors generated by commands issued to CodeWarrior from the Compiler menu, or errors generated by Perl scripts. Each entry in the list pane corresponds to an error, warning, or note. You can use the checkboxes for each type of item to suppress or display the associated results as desired. If you click on a entry in the file list, BBEdit displays the location of the error. If you double-click an item in the file list, BBEdit opens the associated file into an editing window and selects the section of text related to the error. 146 Chapter 9: Browsers CHAPTER 10 Preferences You can use the Preferences command to customize much of BBEdit’s behavior. You can decide which windows are open when you launch BBEdit, set the default options for windows, set the default options for searches, and so on. This chapter describes BBEdit’s extensive Preferences options. In this chapter The Preferences Command . . . . . . . . . . . . . . . . . . . . . . . . . . . . . . . . . . . 148 Application Preferences . . . . . . . . . . . . . . . . . . . . . . . . . . . . . . . . . . . . . 149 Browser Display Preferences. . . . . . . . . . . . . . . . . . . . . . . . . . . . . . . . . . 150 Differences Preferences . . . . . . . . . . . . . . . . . . . . . . . . . . . . . . . . . . . . . . 151 Editor Defaults Preferences. . . . . . . . . . . . . . . . . . . . . . . . . . . . . . . . . . . 151 File Filters Preferences . . . . . . . . . . . . . . . . . . . . . . . . . . . . . . . . . . . . . . 153 File Search Preferences . . . . . . . . . . . . . . . . . . . . . . . . . . . . . . . . . . . . . . 154 File Types Preferences. . . . . . . . . . . . . . . . . . . . . . . . . . . . . . . . . . . . . . . 155 Fonts Preferences . . . . . . . . . . . . . . . . . . . . . . . . . . . . . . . . . . . . . . . . . . 155 FTP Settings Preferences . . . . . . . . . . . . . . . . . . . . . . . . . . . . . . . . . . . . . 156 Function Popup Preferences . . . . . . . . . . . . . . . . . . . . . . . . . . . . . . . . . . 158 Glossary Preferences. . . . . . . . . . . . . . . . . . . . . . . . . . . . . . . . . . . . . . . . 158 HTML Colors Preferences . . . . . . . . . . . . . . . . . . . . . . . . . . . . . . . . . . . . 158 HTML Markup Preferences. . . . . . . . . . . . . . . . . . . . . . . . . . . . . . . . . . . 159 HTML Palette Preferences. . . . . . . . . . . . . . . . . . . . . . . . . . . . . . . . . . . . 160 HTML Preview Preferences . . . . . . . . . . . . . . . . . . . . . . . . . . . . . . . . . . 160 HTML Tools Preferences . . . . . . . . . . . . . . . . . . . . . . . . . . . . . . . . . . . . . 161 HTML Web Site Preferences . . . . . . . . . . . . . . . . . . . . . . . . . . . . . . . . . . 162 Languages Preferences . . . . . . . . . . . . . . . . . . . . . . . . . . . . . . . . . . . . . . 162 Software Update. . . . . . . . . . . . . . . . . . . . . . . . . . . . . . . . . . . . . . . . . . . 163 Spelling Preferences . . . . . . . . . . . . . . . . . . . . . . . . . . . . . . . . . . . . . . . . 164 Startup Preferences . . . . . . . . . . . . . . . . . . . . . . . . . . . . . . . . . . . . . . . . . 164 State Preferences. . . . . . . . . . . . . . . . . . . . . . . . . . . . . . . . . . . . . . . . . . . 165 Status Bar Preferences. . . . . . . . . . . . . . . . . . . . . . . . . . . . . . . . . . . . . . . 166 Text Colors Preferences . . . . . . . . . . . . . . . . . . . . . . . . . . . . . . . . . . . . . . 168 Text Editing Preferences . . . . . . . . . . . . . . . . . . . . . . . . . . . . . . . . . . . . . 169 Text Files: Opening Preferences. . . . . . . . . . . . . . . . . . . . . . . . . . . . . . . . 171 Text Files: Saving Preferences . . . . . . . . . . . . . . . . . . . . . . . . . . . . . . . . . 172 Text Printing Preferences . . . . . . . . . . . . . . . . . . . . . . . . . . . . . . . . . . . . 173 Text Search Preferences . . . . . . . . . . . . . . . . . . . . . . . . . . . . . . . . . . . . . . 174 Tools Preferences . . . . . . . . . . . . . . . . . . . . . . . . . . . . . . . . . . . . . . . . . . 175 Windows Preferences . . . . . . . . . . . . . . . . . . . . . . . . . . . . . . . . . . . . . . . 176 147 The Preferences Command To open the Preferences window on Mac OS X, choose the Preferences command from the BBEdit menu. On Mac OS 9 and earlier, choose Preferences from the Edit menu. The small text area at the top left of the Preferences window, next to the Revert and Save buttons, gives you a brief description of the contents of the currently displayed preferences panel. The list along the left side of the window lets you select the preferences panel to use. To save your preferences, click Save. To have BBEdit “back out” any unsaved changes you make while in the Preferences window, click Revert. Please note that Revert will only return settings which you have changed since the last Save operation to their saved condition; it does not restore default settings. In order to completely reset all preference settings to their default values, you must quit BBEdit, remove the existing BBEdit Prefs Data file from the BBEdit Preferences folder, and relaunch BBEdit to have it generate a fresh set of preferences. Chapter 2 contains details about the organization of BBEdit’s preference files. Note BBEdit’s Preferences window is now non-modal; you can leave it open as you work. It does not automatically close when you click Save or Revert. You can of course close it with the close box or by choosing Close from the File menu. The following sections describe each of the preferences panels in detail. 148 Chapter 10: Preferences Application Preferences The Application preferences control which application and system services BBEdit uses, how entries are sorted on the Windows menu, when open files are verified, and various other global settings. Note Previous versions of BBEdit allowed Navigation Services and Appearance Manager support to be turned off. Starting with BBEdit 6.5, these two services are no longer optional. Optional Application Services BBEdit Plug-ins When this option is selected, BBEdit makes the Tools menu available in the menu bar so that you can use BBEdit plug-ins (small add-on programs that add functionality to BBEdit). BBEdit plug-ins are stored in the BBEdit Support folder. See Chapter 2 to learn more about the organization of the BBEdit Support folder, or Chapter 15 for information about the standard plug-ins supplied with BBEdit. Internet Helpers Menu When this option is selected, BBEdit uses information provided by the Internet control panel to provide access to client software through the Internet Helpers menu (left). See the Additional Software section of Chapter 2 to learn more about Internet services. Font Menu Mark this checkbox to display a Font menu in BBEdit’s menu bar. Since BBEdit edits plain text, most users won’t need to change the font often. However, if you frequently edit text in more than one language, you may find this option convenient. Optional Mac OS Services QuickTime Translation If you mark this checkbox, and have a recent version of QuickTime installed, BBEdit will ask QuickTime if it recognizes any files that BBEdit doesn’t. If QuickTime recognizes the file as one it can display, BBEdit will open it for viewing; otherwise, the file will be opened as “raw” text. QuickTime Playback This checkbox controls whether BBEdit opens QuickTime movies for playback in a movie window, or if it just opens them as text data in an editing window. The default is to recognize QuickTime movies and display them with a player. Changes to this preference take effect immediately. Show Full Paths in ‘Open Recent’ Menu Mark this checkbox to show the complete pathname of recently-opened files, rather than just their names, in BBEdit’s Open Recent submenu. (If a recent file is missing, only its name will appear, regardless of this setting.) Application Preferences 149 Remember Dialog Box Placement Mark this checkbox to have BBEdit remember the location of the Find dialog, and most other dialogs between sessions. If you turn the checkbox off, BBEdit will open dialogs at a default location every time you use them. Window Menu Show Full Paths Mark this checkbox to show the complete pathname of open documents, rather than just their names, in BBEdit’s Window menu. Group by Window Kind Mark this checkbox to group windows of the same kind together in the Window menu. For example, text editing windows, disk browsers, and search results browsers are all different kinds of windows. Within each group, windows will be sorted as determined by the Sort Windows By radio buttons to the right. If you turn the checkbox off, all windows are listed together, sorted as determined by the Sort Windows By radio buttons. Sort Windows by Choose Name to sort windows alphabetically by name. Choose Creation Order to show the windows in the order they were created, or opened, in the current BBEdit session. Verify Open Files After If you frequently make changes to files with another program while they are open in BBEdit, or you often edit shared files that might be changed by someone else, you may want to mark one or more of these checkboxes. If the option for Activating BBEdit is checked, for instance, BBEdit will check the modification date of each open document each time you switch to BBEdit, alerting you if any changes have been made to the file while BBEdit was not the frontmost application. Similar functions are available to have BBEdit perform this check after running an OSA script, running a Perl script or filter, running a ToolServer (MPW) script, or running a BBEdit plug-in. Browser Display Preferences The Browser Display preferences control the initial appearance of BBEdit’s built-in browsers for search results, compile errors, disk contents, and so forth. Results Lists For search results browsers, you can have BBEdit either display a hierarchical listing (where all the matches associated with a particular file are grouped under that file, using disclosure triangles similar to those in the Finder’s list views to reveal or hide the match list), or a flat listing showing each individual match encountered on a separate line. In the latter case, you can also tell BBEdit to expand all the file nodes initially, by checking Expand Listing. This preference also governs the default display of hierarchical or flat error listings in error browsers. 150 Chapter 10: Preferences Show File Icons When this option is selected, browsers that display files, folders, and disk volumes will also display small icons for the items. When this option is deselected, the browsers list only the names of files and folders. Differences Preferences The Differences preferences control the way the Find Differences command places its windows. Arrange Windows On The Arrange Windows radio buttons let you choose which screen BBEdit uses to display Differences windows. You can choose the main screen, the largest screen, or the smallest screen. When you mark the Use Two Screens checkbox, BBEdit displays the Differences window on the second screen. This option gives you the largest view of the items you are comparing. Keep Windows Arranged provides control over whether BBEdit re-arranges the windows being compared when you click on a difference item. Differences Window Placement The two Above/Beneath Compared Files radio buttons let you choose whether the differences window should be above or below the windows of the items you are comparing. Arrange Windows You can now specify whether differences windows are arranged left to right or top to bottom using the Arrange Windows radio buttons. (Previously, BBEdit always arranged differences windows left to right. Multi-File Differences When comparing multiple files, the Show File Icons checkbox determines whether the files’ Finder icons are shown in the Differences window. Editor Defaults Preferences The Editor Defaults preferences control the behavior of newly created document windows and documents without saved state information. Many of the preferences in this panel are the same as those in the Text Options dialog box and in the Text Options pop-up menu (left) in the status bar. The difference is that the Text Options control the behavior of the active window, while the Preference controls the behavior of new windows. Differences Preferences 151 Note Many of the keyboard behavior settings formerly located in this panel have moved to the Text Editing panel. Auto-Indent When this option is selected, pressing the Return key in new windows automatically inserts spaces or tabs to indent the new line to the same level as the previous line. Tip To temporarily invert the sense of the Auto Indent option while typing, hold down the Option key as you press the Return key. Balance while Typing When this option is selected, BBEdit flashes the matching open parenthesis, brace, bracket, or curly quote when you type a closing one. This option is useful when editing source files to ensure that all delimiters are balanced. Smart Quotes When this option is on, BBEdit automatically substitutes curly (or typographer’s) quotes (“ ” ‘ ’) for straight quotes (" '). Tip Note To type a straight quote when this option is selected (or to type a curly quote when the option is deselected), hold down the Option key as you type a single or double-quote. You should avoid using Smart Quotes when editing HTML documents. Auto-Expand Tabs When this option is selected, BBEdit inserts an appropriate number of spaces instead of a tab character every time you press the Tab key. Show Invisibles This option shows or hides non-printing characters in the window. Select this option when you want to see line breaks, tabs, and gremlins (invisible characters). BBEdit uses these symbols to represent non-printing characters: 152 Symbol Meaning ∆ tab ◊ space • non-breaking space ¬ line break ¶ page break ¿ other non-printing characters Chapter 10: Preferences Show Spaces If this setting is checked (and Show Invisibles is active), BBEdit will display placeholder characters for spaces. Uncheck this option to suppress the display of spaces, which will reduce clutter when you are displaying invisible characters. Note Non-breaking spaces (typed by pressing Option-space) will not be displayed with a placeholder. Syntax Coloring When this option is selected and the editing window contains a document in one of the languages that BBEdit knows how to parse, BBEdit displays keywords and other language elements in color. The languages that BBEdit knows about are the ones listed in the Languages panel of the Preferences dialog. Remember that the document must be saved to a file and that the file must end with a suffix (extension) that corresponds to a language that BBEdit can parse. You can select the colors that BBEdit uses for syntax coloring in the Text Colors panel of the Preferences. Soft Wrap Text When this option is selected, BBEdit soft wraps the text in the file to the right margin that you choose: the Philip bar, the window width, or a specific number of characters, as selected by the options below the checkbox. (The Philip bar is the light gray line in the status bar that indicates the right edge of the usable viewing area on a 9-inch classic Mac monitor.) Note The “Smart Editing” option has been removed from BBEdit 6.5. (It wasn’t smart enough for us.) File Filters Preferences The File Filters preferences lists all the file filters you have defined for multi-file searching. You can create, edit, rename, or delete filters using the buttons on the righthand side of this panel. For more information on creating and using file filters, see Chapter 7. Note If you have the Preferences dialog open, you will not be able to add filters in the Find dialog. To work around this, close the Preferences dialog before using the Find dialog to add new filters. File Filters Preferences 153 File Search Preferences The File Search preferences control the way BBEdit searches for files when you use the Open File by Name or Open Selection commands from the File menu. Find All Matching Files When this option is selected, BBEdit looks for all the files that match the entered or selected text. Otherwise BBEdit stops looking as soon as it finds the first file that matches the selected name. Skip (…) Folders When this option is selected, BBEdit does not search folders whose names are enclosed in parentheses. Follow Folder Aliases When this option is selected, BBEdit follows folder aliases when searching for a file matching the specified name. Otherwise, BBEdit ignores folder aliases and searches only regular folders. If the Follow to Remote Volumes option is on, BBEdit will follow folder aliases even if the target folder is on a file server. Note Using this option can substantially increase the length of time required to perform a search. Default <…> Directory The text box displays the default path that BBEdit uses to locate files whose names are enclosed in angle brackets when you use the Open File by Name or Open Selection commands. To change the default search directory, do one of the following: • Click the Choose button and select the folder from the directory dialog box. • Drag the icon of the folder to the path text box. Note When running on Mac OS X, the default value for the Default <…> Directory setting is the current user’s login folder. Unix Search Paths Note The Unix Search Paths options are only available when using BBEdit on Mac OS X. These paths are designed to make it easier to work with Unix source code, which uses include statements of the form: #include <xxx/yyy.h> A more concrete example: the canonical Unix include directory is “/usr/include”. It contains its own subdirectories, but since Unix command-line compilers don’t usually do recursive searches, you need to qualify the include file’s name if you want to include a file out of one of the subdirectories: #include <sys/ioctl.h> 154 Chapter 10: Preferences With the new Unix Search Paths settings, you can now add “/usr/include” to the list (actually, that’s one of the factory defaults). When you select “sys/ioctl.h” and choose “Open Selection”, BBEdit attempts to construct a file path using each of the directories shown in the Unix Search Paths list. If one resolves to a file, BBEdit will open the resulting file. Thus, the partially-qualified selection “sys/ioctl.h” now resolves to /usr/include/sys/ioctl.h and the file opens. File Types Preferences The File Types preferences let you set the creator signatures of the files that BBEdit can save. Entries in this part of the Preferences appear in the list of file types in the Options section of the Save As dialog. When BBEdit saves a new file, it sets the type of the file to ‘TEXT’ and usually sets the file’s creator to “R*ch”. You can choose a different creator by selecting it from the File Creator pop-up menu in the Options section of the Save As dialog. The Find All button allows you to easily add all the applications you have that are capable of opening text files. This may be a long list, so you may prefer to add only the applications you actually use. To set the default creator signature 1 Select an application from the list. 2 Click Make Default. A check mark appears next to the default creator. When saving files, BBEdit will save new files with this creator signature unless you choose a different one. When saving a file that already exists, BBEdit never changes the creator. To add a new application to the list 1 Click Add and select an application from the Open dialog box. To delete an item from the list 1 Select an application from the list. 2 Click Remove. Fonts Preferences The Fonts panel displays a list of the text encodings you can use with BBEdit, and the default font you wish to use with each encoding. On many systems, only the Roman script will be supported. (The Roman script is used for English and many European languages.) If you have additional Language Kits installed or are running a non-English version of Mac OS, other scripts may be available. File Types Preferences 155 Note This list displays every encoding supported by the Mac OS. Encodings with list entries displayed in normal text are installed and available on your Mac. Encodings whose list entries are dimmed represent script systems that are not installed on your Mac. To choose the default text encoding for new documents, select the desired encoding in the list, then click the Make Default button. Note If a document does not contain any script or font information, BBEdit will assume it contains Roman text. To choose the default font, font size, and tab stop spacing for a particular encoding, click Set Font & Tabs. The Font & Tabs dialog box, below, appears. You can choose the desired font, font size and style using controls in this dialog. The font should be appropriate to the encoding selected; for example, you should not choose Monaco as the font to use for Japanese text. You can also tell BBEdit how many spaces occur between each tab stop. Individual documents may override these settings if they contain appropriate state information. (See Chapter 3 for more details on document states.) The settings you choose here are defaults which BBEdit uses for new windows and for documents with no saved state information. FTP Settings Preferences The FTP Settings panel lets you change the default settings of some options in the Open from FTP Server and Save to FTP Server dialogs. Remember Passwords Mark this checkbox to have BBEdit store the passwords for FTP sites. Store Passwords in Keychain This checkbox determines whether BBEdit stores saved FTP passwords in the Mac OS Keychain, or whether they are stored in plain text in the bookmarks file. Warning 156 BBEdit is not a security program. If you choose not to use the Keychain, your stored FTP server passwords can be easily obtained by anyone with access to your computer. If security is important to you, and you do not run a version of the Mac OS which includes the Keychain, we suggest you consider using PGP, or an application such as Web Confidential <http://www.web-confidential.com/>. Chapter 10: Preferences Include Passwords in Proxy URL Drags Dragging the window proxy icon from an editing window corresponding to a file opened from an FTP server will now drag that file’s URL, rather than a representation of the local temporary file. To control whether the dragged URL includes the FTP account password, set the Include Passwords in Proxy URL Drags checkbox in the FTP preferences panel (see above). By default this setting is turned off so that you don’t accidentally create clippings containing passwords, as this may be a security risk. List FTP Files on the “Open Recent” Menu Mark this checkbox to show files opened from FTP sites on the Open Recent submenu of the File menu. (If this box is not checked, the Open Recent submenu lists only local files.) Passive FTP Mark this checkbox to make passive FTP mode (where the server determines the port number for the FTP connection) the default. Use Passive FTP whenever possible. Show Document Icons Mark this checkbox to display icons for the files in the Open from FTP Server and Save to FTP Server dialogs. Since FTP servers do not provide Macintosh type and creator information, BBEdit determines the displayed icon based on the file’s name suffix (.html, .sit, etc.). These suffix to type mappings are configured in the Internet control panel. Show Files Starting with “.” The Unix convention for creating invisible or hidden files is to begin their names with a period. Often, configuration files and scripts (such as .newsrc or .login) begin with periods so that they don’t clutter most directory listings. This setting is off by default, so that you will not see such files in FTP listings. In order to display them, mark this checkbox. FTP Bookmarks This list displays the bookmarks you have defined for FTP servers you use frequently with BBEdit. Click Add to create a new bookmark. Click Change to edit the selected bookmark, or Remove to delete it. The Convert button allows you to choose a BBEdit 5.x (5.0 or 5.1) preferences file; if one is in the Preferences folder of your active system, BBEdit will automatically select that directory. After choosing a source prefs file, BBEdit will read in the FTP bookmarks from that file, add them to your current bookmark list, and re-sort the list. Note If you have the Preferences dialog open, you will not be able to add bookmarks in the Open From/Save To FTP Server dialogs. To work around this, close the Preferences dialog before using the FTP dialogs to add new bookmarks. FTP Settings Preferences 157 Function Popup Preferences The Function Popup preferences control how the function pop-up menu (left) in the status bar behaves. Show Includes When this option is selected, the function pop-up menu includes the files named in #include directives. Sort Items by Name When this option is selected, the items in the function pop-up menu are sorted by name. Otherwise, items in the pop-up menu appear in the same order as they appear in the file. Show Function Prototypes When this option is selected, the function pop-up menu includes the names of function prototypes as well as the function definitions. Otherwise, the function pop-up menu does not include entries for function prototypes. Glossary Preferences The Glossary preferences determine how BBEdit handles Glossary entries. Ignore Trailing CR Click Ignore Trailing CR to have BBEdit strip off all whitespace from the end of a glossary entry when inserting it. This allows glossary entries to be inserted in the middle of a line, rather than as a block of text. You can use the #INLINE# cookie in a glossary entry to achieve the same effect, but only for that one entry. Glossary is Language Sensitive Mark this checkbox to make BBEdit’s glossary language-sensitive. If this feature is active, then each time you bring a window to the front, BBEdit automatically selects the first glossary set whose name maps to the same language as that window. For example, if the front window is an HTML document, BBEdit selects the first glossary set whose name ends in .html or .htm, or any of the other file suffixes mapped to HTML in the Languages panel of the preferences. If there is no such entry, the active glossary set is unchanged. HTML Colors Preferences The HTML Colors Preferences let you choose the appearance of the Web Safe Colors palette. 158 Chapter 10: Preferences Color Palette Layout You can choose from four layouts: 36x6 (a horizontal layout), 6x36 (a vertical layout), and two different VisiBone layouts, which organizes the colors in a sort of circular layout that places similar colors close together. VisiBone 2 is a newer, more compact representation. Color Swatch Size You can choose the size of the swatches to be displayed in the palette. The default is Small. new in 6.5 Color Picker The Color Picker option allows you to choose whether the color swatch buttons in various HTML dialogs use BBEdit’s web-safe pop-up menu (the factory default, and consistent with previous versions), or whether clicking on the swatch brings up the standard Mac OS color picker dialog. Holding down the Option key on your keyboard while clicking on the swatch reverses the sense of the preference. HTML Markup Preferences This panel lets you choose the format of tags generated by BBEdit’s HTML tools. HTML Tags You can choose to generate uppercase or lowercase HTML tags, or to obtain this setting from a Dreamweaver HTML Source Profile. You can choose a Dreamweaver HTML Source Profile to use by clicking the Choose button or by dragging a profile to the gray area from the Finder. Quoting Tag Attributes You may choose to always enclose tag attributes in quote marks, or to only enclose attributes when the HTML standard would require it. XML/HTML Markup Rules If you are working with a document that does not contain a DOCTYPE specification or an XML declaration, you can specify whether BBEdit’s HTML Tools should insert HTML or XML-style tags by selecting the appropriate radio button. new in 6.5 CSS Markup Formatting The New Line Before Block Start checkbox controls how the CSS markup and formatting tools place the opening braces for block markup. If the checkbox is on, you get this style: H1 { color: green; } HTML Markup Preferences 159 If it’s off, you get: H1 { color: green; } The Put Simple Rules on One Line checkbox will format a single line of CSS like this: H1 { color: green; } HTML Palette Preferences This preferences panel determines how the HTML tools floating palette is displayed. Palette Width Choose normal or narrow buttons. The names of some buttons may be truncated when using narrow buttons. Button Height Choose normal or short buttons. Using short buttons allows the palette to require less space vertically. Buttons on Main HTML Tools Palette This list allows you to select which buttons are displayed on the palette. You can select a series of buttons by Shift-clicking their names in the display area, or a discontinuous group of buttons by Command-clicking on each button name. After you make a selection, click Show or Hide to mark or unmark the selected buttons. HTML Preview Preferences The HTML Preview Preferences tell BBEdit how you prefer to preview HTML documents. When Previewing Files with Unsaved Changes Choose to preview files with unsaved changes by saving the changes to a temporary file, by saving the current file just before previewing it, or by asking whether to save the file. If you choose the latter option, and select Save when asked, the file will be saved and then previewed; if you choose Don’t Save, the file will be previewed from disk (without any unsaved changes). 160 Chapter 10: Preferences Web Browsers Available for Preview This list displays the Web browsers known to BBEdit’s HTML Tools. All available versions of a browser displayed in this list will appear in the pop-up menu used with the Preview command. For example, if you have Netscape Navigator 3.0 and 4.0 on your hard disk, and an entry for one of them in the preferences list, then both versions will be available for Previewing. To add a Web browser to the list 1 Click Add. An Open dialog appears. 2 Select the desired browser application file, then click Open. The browser is added to the list. To change a Web browser application file 1 Click the Web browser to be changed. 2 Click Change. An Open dialog appears. 3 Select the desired browser application file, then click Open. The browser entry is updated. To remove a Web browser from the list 1 Click the Web browser to be removed. 2 Click Remove. Deleting a Web browser from this list does not delete it from your hard disk, only from the Preview list. HTML Tools Preferences The HTML Tools preferences set options for the HTML Tools. HTML Updater Mark the Preserve File Dates checkbox to have modification dates remain unchanged when updating HTML files using the Update Tool. Syntax Checker Warnings You can have the HTML Syntax Checker warn you when an HTML element is implicitly closed. Examples of these sorts of tags are <P> and <LI>. The closing tags for these elements are optional. If this checkbox is marked, BBEdit will warn you if it detects that you omitted the closing tag. HTML Tools Preferences 161 Link Checker Warnings Choose the type of warnings to be issued by the HTML link checker. Remote Links flags each off-site link so that it can be checked for validity manually. Incorrect Pathname Case flags situations where the name of a file as specified in an HTML document does not exactly match the name of the file on disk, which can cause problems when files are uploaded to servers with a case-sensitive file system. Folder Aliases in URL Path warns you if any file paths contain aliases rather than real folders. HTML Web Site Preferences This preference panel lets you tell BBEdit about the Web server where your pages will be hosted. Web Server Name Enter the name of your Web server here in URL format; this might be something like “http://www.example.com/”, for instance. BBEdit uses this information to determine which links are on (local to) your server. Site Path on Server Enter the server path of your site’s main page here. For example, if your Web site is at “http://www.example.com/foo/bar/”, you would enter “http:// www.example.com/” for the Web Server Name and “foo/bar” for the Site Path on Server. Default Page Name Specify the default name used by your server for the document that is sent to a Web browser when a browser accesses a directory without specifying a file name. Most servers use “index.html”, “default.html”, “main.html”, or “home.html”. Local Site Root Use the Choose button to select the folder that is the root of your Web site on your local hard disk (or on a mounted server volume). You can also drag the icon of the folder to the text box to the left of the Choose button. Look for Templates and Include Files In Use the Choose button to select the folder that contains your HTML document templates and Include files. You can also drag the icon of the folder to the text box to the left of the Choose button. Languages Preferences The Languages preferences list how BBEdit associates file name suffixes (e.g. .html) with the source language a file contains. 162 Chapter 10: Preferences To add a new suffix mapping 1 Click Add. The Add Suffix dialog appears. 2 Enter the suffix, choose the language from the pop-up menu, and click a radio button to tell BBEdit whether this type of file is a source file, an include file, or neither. 3 Click Add to save the new mapping. Note You can use wildcards in the suffix to indicate single characters (?), any number of characters (*), or a single digit (#). For example, “page.#html” could map to a different language from “.html”. To change a suffix mapping 1 Select an item from the list. 2 Click Change. The Change Suffix dialog appears. 3 Fill in the Change Suffix dialog with the appropriate suffix, choose a language from the pop-up menu, and select a radio button to indicate whether this type of file is a source file, an include file, or neither. To delete a suffix mapping 1 Select an item from the list. 2 Click Remove. To reset all suffix mappings to default settings 1 Click Reset All. Language for Untitled Windows Choose a language from the pop-up menu to have BBEdit treat all new (unsaved) text windows as the indicated language. This allows you to see syntax coloring and use the Function Pop-up in the window’s status bar before you name and save the file. Default Language The language selected with this pop-up menu tells BBEdit what language to assume for files that don’t have any of the listed suffixes, so that syntax coloring and the Function pop-up will be available for those files. This setting replaces both the <default> and <no suffix> entries presented by the suffix mapping list in previous versions. Software Update new in 6.5 This preferences panel controls the integrated version-checking capability built into BBEdit 6.5. The Check Automatically checkbox controls whether BBEdit automatically looks to see if there is a new version available from Bare Bones Software. Regardless of the setting of the checkbox, you can always check manually by clicking the Check Now button. Software Update 163 The version checking mechanism used by BBEdit protects your privacy. It works by requesting information about the currently available version from Bare Bones Software’s web server, and does not transmit any information about you or your computer. Spelling Preferences The Spelling preferences control whether BBEdit uses its built-in spelling checker or an external one. You can also tell the built-in spelling checker which dictionaries to use. Built-In This option specifies that BBEdit should use the built-in spelling checker when you choose the Check Spelling command from the Text menu. Use Dictionaries BBEdit can use more than one dictionary for spell checking. Click Add to add a new one (or drag it into the list), or Forget to remove the selected dictionary from the list. Note You cannot add the User Dictionary to this list; it is always assumed to be active as long as the appropriate file is present in BBEdit’s Dictionaries folder. If there is no User Dictionary file, a new empty file will be created the first time you perform a spelling check. Word Services When this option is selected, BBEdit uses an external spelling checker when you choose the Check Spelling command from the Text menu. The external spelling checker must support Apple’s Word Services Suite. To set the external spelling checker, click the Set button and select the application’s icon. You can also drag the spelling checker icon to the text box to the left of the Set button. Startup Preferences The Startup preferences control what BBEdit does when you launch it, or when the application icon is double-clicked and there are no open windows in BBEdit (even if the application is already running). Do Nothing This option specifies that BBEdit should not open any windows or perform any other actions. New Text Document This option specifies that BBEdit should open a new, empty text editing window. New Disk Browser This option specifies that BBEdit should open a disk browser starting at the desktop. 164 Chapter 10: Preferences Open This option specifies that BBEdit should bring up the standard Open dialog, allowing you to select and open a file. Open from FTP Server This option specifies that BBEdit should bring up the Open from FTP Server dialog, allowing you to connect to an FTP server and open a file. You can hold down the following modifiers during launch to override these actions. Modifier(s) Function Option Suppress startup items only Shift Disable all plug-ins, tools, external services, and startup items State Preferences The State preferences control how BBEdit reads and writes state information in text files. Honor Saved State When this option is selected, BBEdit honors state information that may be stored in a file. The following sub-options let you fine tune which state information BBEdit honors. Window Position When this option is selected, BBEdit restores the window of the document to the same position as when the file was closed. Otherwise BBEdit opens the window in its default position. Font Settings When this option is selected, BBEdit restores the font information stored with a document. Otherwise it uses the default font settings. Selection Range When this option is selected, BBEdit restores the insertion point or selection range to the same position as when the file was closed. Otherwise, the insertion point is at the beginning of the file. Scrollbar Position When this option is selected, BBEdit restores the scroll bar position to the same position as when the file was closed. Otherwise, BBEdit opens the file with the top of the file showing. Option Settings When selected, BBEdit reads document-specific options, such as soft wrap, show invisibles, and line numbering, from the saved state information. State Preferences 165 Printing Settings When this option is selected, BBEdit restores the printing information stored with a document. Otherwise it uses the default printing settings. Default State for New Documents The Default State for New Documents setting lets you choose the kind of state information that BBEdit adds when you create and save a file. You can choose to save no state information, MPW state information, or BBEdit state information. See the section on Saving State Information in Chapter 3 for more details on the different types of states. Always Add State When this option is selected, BBEdit always adds state information when you save a file. Otherwise, BBEdit saves state information only for files that already have state information. Status Bar Preferences This preferences panel lets you choose which icons and pop-up menus appear in the status bar of BBEdit document windows. Show Status Bar Mark this checkbox to display the status bar by default. (You can always show it or hide it independently for each window.) Show Philip Bar Displays the Philip Bar, which represents the usable width of the screen on a 9-inch (“classic”) Macintosh monitor, in the status bar. 166 Chapter 10: Preferences Show Tab Stops Displays tab stops in the status bar, using the tab width set in the Editor section of the Preferences. Show Line Numbers This option displays line numbers along the left edge of the window. Show Cursor Position Adds a panel at the bottom left corner of the window that displays the location (line and column) of the insertion point, or the endpoint of a just-changed selection range (if the cursor has not been moved yet after the change). Show Current Function Display the name of the function the insertion point is in (if any) at the bottom left corner of the window. Function Popup The Function Popup displays a list of the functions (for source code files) or named anchors (for HTML files) in the document, allowing you to jump to any function or anchor instantly. Window Options The Window Options pop-up menu allows you to set wrapping, display, and editing preferences for the current window, as with the Window Options command on the Edit menu. Markers This pop-up menu lets you define and locate named markers in a document. File Options This pop-up menu lets you save your file and set end-of-line and other compatibility options. Insert Menu The Insert pop-up menu lets you insert the contents of another text file (or a toolbox call template) into the current document. File Path The File Path displays the folder structure that contains the file being edited. You can choose any folder from this menu to open it in the Finder. Status Bar Preferences 167 Get Info Icon Click this icon to display the Info window, which contains the file’s path along with character, word, line, and page counts for the file and the selection. Super Get Info Icon Click this icon to ask Super Get Info to display file information pertaining to the current document. This option is only available if you are running on Mac OS X and have Super Get Info installed on your system. Document Icon The Document Icon serves as a proxy for the document file. You can click the icon to reveal the current file in the Finder, or drag it anywhere the original file can be dragged. Show All/Hide All Shows or hides all the icons on the document status bar. Button Puffiness On Mac OS 9, you can choose the degree of the 3D effect used on the status bar buttons, from minimal to excessive. These options have no effect in Mac OS X, and are therefore disabled. Text Colors Preferences The Text Color preferences let you select the colors that BBEdit uses when the syntax coloring option is on. You can also select a default window background color and a default text color, which will apply to all text windows, although we feel compelled to point out that there are good reasons why the default Macintosh text color scheme is what it is. You can turn on syntax coloring globally by: • setting the Syntax Coloring option in the Editor page of the Preferences You can turn on syntax coloring in any specific file window by: • choosing syntax coloring from the window options pop-up menu (left) • selecting the Syntax Coloring option from the Windows Option dialog The color bars show the colors that BBEdit uses to display different language elements. To change colors, click the color box. BBEdit will open the system Color Picker dialog box that you can use to select a new color. To restore all the colors to their default settings, click the Reset to Factory Colors button. Note 168 When the Color Attributes Separately checkbox is selected (as is the default), BBEdit lets you specify different colors for HTML attribute names, attribute values, and processing instructions, in addition to anchor, image, and other tags. When turned off, HTML attributes are colored the same as the tag, as in previous versions of BBEdit. Chapter 10: Preferences Text Editing Preferences The Text Editing preferences control some of BBEdit’s optional text editing features. Many of these preferences were located in the Editor preferences panel in previous versions of BBEdit. Enable Shift-Delete for Forward Delete When this option is selected, holding down the Shift key with the Delete key makes the Delete key work the same way as the Forward Delete key on Extended Keyboards. This feature is particularly useful on PowerBooks. Drag & Drop Editing When this option is selected, you can use the mouse to drag text from one part of a window to another or from one window to another. In dialog boxes that let you specify a file, you can drag the file’s icon from the Finder to the dialog box. Note Regardless of this setting, you can drag a file from the Finder (or other application) into an editing window. Use Numeric Keypad for Cursor Movement To use the numeric keypad to move the insertion point (like Microsoft Word), select the Keypad Cursor Controls option. start of line 7 8 up Scroll up left show selection Right end of line down Scroll down 4 1 5 2 9 6 3 You can use Shift key with the keys on the numeric keypad to extend a selection. You can use the Command and Option keys with the 2,4,6, and 8 keys as you would the arrow keys. Tip To toggle the behavior of the numeric keypad between moving the cursor and typing numbers, hold down the Option key and press the Clear key at the upper left-hand corner of the numeric keypad. (This key is also labeled Num Lock on the Apple Extended Keyboard.) Text Editing Preferences 169 Allow Single-Click Line Selection If the checkbox is turned on, clicking in the left margin of an editing window selects an entire line. The pointer changes to a right arrow when it is in the left margin. Click and drag to select multiple lines. Double-click to select an entire paragraph; double-click and drag to select a range of paragraphs. If this option is off, clicking in the left margin moves the insertion point to the beginning of the clicked line, as in previous versions of BBEdit. Note that the line number bar, if displayed, is not part of the left margin. Double-Click to Balance When this preference is turned on, you can double click on any opening or closing parenthesis, brace, or bracket — ( ) { } [ ] — to select the entire range of text enclosed by a balanced pair. Confirm Non-Undoable Editing Actions To have BBEdit stop warning you when you are about to perform an action that cannot be undone, turn this checkbox off. Use “Hard” Line Numbering… If this switch is turned on, then the line number bar, cursor position display, and “Go To Line” commands in editing views will use line numbers that correspond to “hard” carriage returns in the document, rather than to soft-wrapped line breaks. To restore the behavior of previous versions of BBEdit, turn this preference off. Use Emacs Key Bindings If turned on, this option allows you to use the basic Emacs navigation keystrokes to move around in editing views. It is not a full Emacs emulation mode; rather, it is more of a comfort blanket for individuals with Emacs key bindings hard-wired into their muscle memory. See Appendix B, “Editing Shortcuts”, for a list of the Emacs commands BBEdit supports. If you turn on the Display Status Window option, a small floating window will appear when you type an Emacs shortcut, indicating which command you have applied. Exchange Command and Option Key Behavior These two checkboxes let you swap the meaning of the Option and Command keys when used with cursor navigation keys to move through a window’s contents. You can set this separately for horizontal and vertical cursor movement. For details on using cursor navigation keys, see Chapter 4 and Appendix B. Allow Text Smoothing If turned on, this option allows the system to draw smoothed (anti-aliased) text in textediting views. When turned off, text smoothing is suppressed, which may make certain fonts and sizes more readable. This option is only available on Mac OS X. 170 Chapter 10: Preferences Extra Space in Text Views To have BBEdit leave extra empty space when you scroll to the end of a text view, choose Half Window or Full Window here. Text Files: Opening Preferences The Text Files: Opening preferences control BBEdit’s behavior when it opens files. Translate Line Breaks When this option is selected, BBEdit translates DOS or Unix line breaks when opening a file. Otherwise, BBEdit leaves the original line breaks untranslated. If a File’s Type is Unknown These settings tell BBEdit how to deal with files whose type and creator codes are not set. Usually, such files are created by Unix programs running on Mac OS X, but they may also be downloaded from remote servers. You can choose: • Ignore It—BBEdit will behave consistently with previous versions: since the file’s type is not “TEXT” (or any other type which is recognizable as a text-file type), BBEdit will ignore the file in situations where a text file is required. • Assume It’s Text—BBEdit will assume that the file should be treated as text. This will give maximum exposure to such files, at the expense of occasionally seeing a file which doesn’t actually contain text (like binary data or executable files on Mac OS X). • Map the File Name—BBEdit will inspect the file’s name to see if it can figure out whether the file is text or not. BBEdit will first attempt to map the file name to the list of suffix-to-language mappings specified in the Languages preferences. If a file name matches up with a language (even if the language is “None”), then the file is assumed to be a text file. Thus, you can use BBEdit’s own suffix mappings to convince it to recognize as text any files whose suffixes are not in Mac OS X’s built-in list of file-suffix-to-file-type mappings. If no match is found in the Languages preferences, BBEdit will next apply the Internet Config file name mappings. (On Mac OS 9 and earlier, you can configure these mappings in the Internet control panel; on Mac OS X, a set of default mappings is present but these are not currently user-configurable.) Regardless of the OS you are running BBEdit on, you should select whichever setting makes the most sense for the sorts of files you work with: if the files are downloaded from remote hosts and often don’t have correct file types, but you know that they’re always text, then you can select Assume It’s Text. Note Given that Mac OS X does not set the file type of any text file created by a Unix program to a useful value, you may find it more useful to use Map the File Name; this will generally yield the best results. Text Files: Opening Preferences 171 Interpret File Contents These settings establish the default behavior when reading text files; either the contents are auto-detected using information in the file itself, or you can force BBEdit to always interpret the file’s contents as UTF-8, Unicode (UTF-16), or byte-swapped Unicode. This not only establishes the default behavior when opening files without using the file dialogs, it also establishes the default setting of the “Read As:” pop-up menu when using the Open dialog. Note Previous versions of BBEdit contained a “Soft Wrap SimpleText Documents” preference setting; it has been removed. Now, SimpleText documents are always soft-wrapped when opened (unless they contain saved BBEdit state that says otherwise). Text Files: Saving Preferences The Text Files: Saving preferences control BBEdit’s behavior when it saves files, now including file backup settings. Force New Line at End When this option is selected, BBEdit will always add a line break at the end of the file if it doesn’t already end with one. Default Line Breaks The default line breaks options let you choose what kinds of line breaks BBEdit writes when you save the file. You can choose: • Macintosh line breaks (ASCII 13) if you are using the file only on a Macintosh. • Unix line breaks (ASCII 10) if the file resides on a Unix file server or if you are sending it to someone who uses Unix. • DOS line breaks (ASCII 13/10) if the file resides on a DOS file server or if you are sending it to someone who uses a DOS system 172 Chapter 10: Preferences Additionally, if the setting for Use Unicode Line Breaks is on, BBEdit will use Unicode line breaks by default for newly created (or converted) Unicode documents, instead of the chosen platform-specific line breaks. Make Backups Before Saving Select this checkbox to tell BBEdit to make automatic backup copies of every file as you save it. This preference setting establishes the defaults for newly created documents, and for documents in which there are no saved backup settings. If you prefer that BBEdit create backup files in the same folders that your documents are already saved in, choose the option for Use Document’s Folder. This is the default setting. Should you prefer to save backups in a different folder, choose the Use Folder setting instead. You can click the Choose button to select the desired backup folder using a dialog, or just drag the folder to the box. Even if you do not set BBEdit to perform general backups here, you can still set backup options for individual files by using the Backup Options command on the File menu. Text Printing Preferences The Printing preferences control how BBEdit prints your documents. Default for Page Setup The Page Setup button lets you set the default options for the Page Setup dialog box. Defaults for Printing The Printing button lets you set the default options for the Printing dialog box. Default Font To set the default printing font, click the Default Font button. BBEdit opens a dialog that lets you specify the font and the width of tab stops. The current printing font settings appear in the text box to the right of the button. Use Document’s Font When this option is selected, BBEdit uses the document’s font when printing. Fractional Widths When this option is selected, BBEdit prints proportionally-spaced fonts with better letter spacing. Print Backwards When this option is selected, BBEdit prints documents last page first. This option is useful if you are printing to a printer like the original LaserWriter that does not arrange pages in the proper order. Frame Printing Area When this option is selected, BBEdit draws a box along the edges of the printed text. Text Printing Preferences 173 Print Page Headers When this option is selected, BBEdit prints the page number, the name of the file, the time and date printed in a header at the top of each page. Print Full Pathname When this option is selected, BBEdit prints the full path name of the file being printed in the header. Print Line Numbers When this option is selected, BBEdit prints line numbers along the left edge of the paper. Print Two-Up When this option is selected, BBEdit prints two pages on one sheet of paper. Use this option to save paper. 1-Inch Gutter When this option is selected, BBEdit leaves a one-inch margin along the left edge of the paper. Use this option if you usually put your pages in three-ring binders. Print Color Syntax If this checkbox is marked, BBEdit prints colorized text in color. You should generally use this option only on color printers, as colorized text may come out in difficult-toread dithered shades of gray. Time Stamp The Time Stamp options let you choose whether the date that appears in the header is the date that the file was last modified or the date that the file was printed. Text Search Preferences The Text Search preferences let you set default options to use with the Find command. Note In BBEdit 6.0, the Text Search preferences panel contained checkboxes for Wrap Around, Use Grep, Case Sensitive, and Entire Words. These preferences were used only to establish the defaults for parameters not supplied AppleScript find and replace operations, but their presence caused confusion. In all later versions, including BBEdit 6.5, the value for any of these parameters not explicitly supplied in script commands is “false”, and these settings have been removed from the panel. Report Single-File ‘Replace All’ Results When this option is selected, BBEdit displays a dialog telling you how many replacements it made when you perform a Replace All operation on a single file. Remember Find Dialog’s Start At Top Setting Mark this checkbox to have BBEdit remember the state of the Start At Top checkbox in the Find & Replace dialog from one invocation to the next. 174 Chapter 10: Preferences Color Grep Patterns in Find Dialog When this preference is turned on, and “Use Grep” is turned on in the Find dialog, BBEdit will apply syntax coloring to Grep search and replace patterns. Multi-File Search and Replace Mark Allow File Script Guessing to have BBEdit guess for the script used in documents that do not contain information about their encoding. This is useful when searching documents in various languages. If this checkbox is marked, BBEdit uses the script of the search string when searching a file whose script could not be determined; otherwise, it uses MacRoman. Grep Patterns This list displays all the grep patterns (regular expressions) you have defined for use in the Find dialog’s Patterns pop-up menu. Click Add to add a new one. Click Change to edit the selected pattern. Click Remove to delete the selected pattern. Note If you have the Preferences window open, you will not be able to add grep patterns from the Find dialog. To work around this, close the Preferences window before using the Find dialog to add new grep patterns. Tools Preferences The Tools preferences control the way BBEdit integrates with programming tools, such as development environments and Toolbox references. Script Editor When this option is selected, you can use the Open Script Editor command in the Script menu (left). To set the script editor to use with the Open Script Editor command, do one of the following: • Click the Set button and select the script editor from the dialog box. • Drag the icon of the script editor to the path text box. Note The script editor setting is stored separately for Mac OS X and Mac OS 9 and earlier. This makes it easier to share one set of preferences under both operating systems without having to reset the script editor when switch-booting. Coding Tools These options let you select which development environments you plan to use with BBEdit. These include BBEdit’s built-in HTML tools and a variety of programming packages, including Metrowerks CodeWarrior and Absoft Fortran, as well as the Dreamweaver visual HTML editor from Macromedia. On Mac OS 9 and earlier, BBEdit can integrate with MacPerl; on Mac OS X, BBEdit can integrate with any Unix scripting tool. MPW’s ToolServer and SourceServer (Projector) are also supported. Turning off the tools you do not plan to use will allow BBEdit to start up faster. Tools Preferences 175 Note BBEdit no longer supports Kodex, MPW 411, or the THINK C, THINK Pascal, and Symantec C++ environments. Mac OS API Reference These options let you specify which Macintosh Toolbox reference program you plan to use with BBEdit. You can choose to use THINK Reference, Toolbox Assistant, ObiWan, or all three. Preferred Reference The Preferred Reference radio buttons lets you specify which of the Toolbox reference databases is your preferred reference. BBEdit uses the preferred database when you Option-double-click on a Toolbox name or when you choose the Find in Reference command. Note The ToolServer option is disabled when running on Mac OS X. The “Mac OS X Developer Help” option is only available on Mac OS X. With this turned on, you can use Find in Reference to search the Carbon API help book. Windows Preferences The Windows preferences control the size and appearance of both newly-created windows, and windows which do not contain their own display state information. (See the State panel to tell BBEdit how to store state information in files.) Window Zooming The Maximum Width pop-up menu lets you specify the maximum width of a zoomed window. The default setting is “13-inch Display”. The Zoom Windows To pop-up menu lets you choose which screen BBEdit should use when zooming. You can choose the main screen, the nearest screen, the largest screen or the smallest screen. (The nearest screen is the screen that contains most of the active window.) Always Zoom Windows Mark this checkbox to always expand windows to their maximum size when opening them, regardless of their saved window size state. Move As Little As Possible When this option is selected, BBEdit keeps the windows as close to their original location as possible when you zoom them. Window Stacking These icons determine how BBEdit stacks windows: down and to the left, straight down, or down and to the right. Leave Room for Finder When these options are selected, BBEdit leaves room on the right side and/or the bottom of the screen so that you can see icons on the Desktop. 176 Chapter 10: Preferences CHAPTER 11 BBEdit HTML Tools This chapter describes the use of BBEdit’s HTML Tools, a powerful suite of utilities for creating and maintaining HTML documents and entire Web sites. In this chapter Introduction to the HTML Tools . . . . . . . . . . . . . . . . . . . . . . . . . . . . . . . 178 Recommended Books – 178 Recommended On-Line Resources – 178 SGML Resources – 179 What You Need – 179 Configuring the HTML Tools . . . . . . . . . . . . . . . . . . . . . . . . . . . . . . . . . 180 Using the BBEdit HTML Tools . . . . . . . . . . . . . . . . . . . . . . . . . . . . . . . . 180 Creating a New Document – 181 HTML Tool Descriptions. . . . . . . . . . . . . . . . . . . . . . . . . . . . . . . . . . . . . 183 Tag Maker – 184 Edit Tag – 185 Document Type – 186 Character Set – 186 CSS Submenu – 186 Body Properties – 190 Head Elements – 190 Block Elements – 191 Lists – 193 Tables – 193 Forms – 194 Inline Elements – 196 Phrase Elements – 199 Font Style Elements – 200 Frames – 200 Check – 201 Update – 202 Includes – 203 Utilities – 204 Misc – 205 Preview – 206 The HTML Tools Palettes . . . . . . . . . . . . . . . . . . . . . . . . . . . . . . . . . . . . 207 HTML Tools Palette Tips – 207 HTML Tools Palette – 207 Other Palettes – 209 HTML Translation . . . . . . . . . . . . . . . . . . . . . . . . . . . . . . . . . . . . . . . . . 210 Templates . . . . . . . . . . . . . . . . . . . . . . . . . . . . . . . . . . . . . . . . . . . . . . . . 211 Template Setup – 211 Using a Template – 211 Custom Markup . . . . . . . . . . . . . . . . . . . . . . . . . . . . . . . . . . . . . . . . . . . 212 177 Introduction to the HTML Tools Important Please be sure to read both this introduction and the next section, “Configuring the HTML Tools”, before attempting to create Web pages using these tools. Already the most powerful set of utilities ever created for the World Wide Web developer, the BBEdit HTML Tools are even more powerful in version 6.5. The HTML tools streamline the process of creating HTML documents, help you check for common usage errors, and speed up development time, without sacrificing flexibility or forcing you to work within the limits of visual editing tools. Some of the most important improvements to the HTML Tools should be transparent to you. All of the tools now support entry and editing of double-byte text. The HTML Tools will also automatically recognize and insert tags in the correct format when used in XHTML documents. Note Anyone preparing HTML files in UTF-8 format may want to save them without the byte order mark, due to a bug in Microsoft Internet Explorer 5.0 for the Macintosh. This should be addressed in a future version of Internet Explorer. The BBEdit HTML Tools and their documentation are written with the assumption that you already understand HTML. If you don’t, we suggest one or more of the following references. None are published by or otherwise affiliated with Bare Bones Software, Inc., but other BBEdit users have found them useful for HTML usage and design issues. Recommended Books Learning Web Design, Jennifer Niederst. O’Reilly and Associates, 2001. ISBN: 0-59600036-7 Cascading Style Sheets: The Definitive Guide, Eric A. Meyer. O’Reilly and Associates, 2000. ISBN: 1-56592-622-6 HTML & XHTML: The Definitive Guide - 4th Edition, Chuck Musciano, Bill Kennedy. O’Reilly and Associates, 2000. ISBN: 0-59600-026-X Teach Yourself Web Publishing with HTML 4 in a Week, Laura Lemay, Arman Danesh. Sams, 1997. ISBN: 1-57521-336-2 HTML 4 for the World Wide Web: Visual QuickStart Guide, Elizabeth Castro. Ventana Press, 1998. ISBN: 0-20169-696-7 HTML 4.0 Sourcebook, Ian Graham. Wiley & Sons, 1998. ISBN: 0-47125-724-9 HTML Stylesheet Sourcebook, Ian Graham, Wiley and Sons, 1997. ISBN 0-47119-664-9 Recommended On-Line Resources HTML Help by The Web Design Group http://www.htmlhelp.com/ Apple Internet Developer info http://developer.apple.com/internet/ The Yale C/AIM WWW Style Manual http://info.med.yale.edu/caim/StyleManual_Top.HTML 178 Chapter 11: BBEdit HTML Tools The Bare Bones Guide to HTML by Kevin Werbach (no relation to Bare Bones Software) http://werbach.com/barebones/ The W3 Consortium site http://www.w3.org/ evolt.org - Browser Archive http://browsers.evolt.org/ WebReference.com by Mecklermedia http://www.webreference.com/ WebMonkey by Wired Digital http://www.webmonkey.com/ DevEdge by Netscape http://developer.netscape.com/ SGML Resources HTML is an application of SGML and shares many concepts and characteristics with it. You do not need to know SGML to create Web pages, but you may find that studying it improves your understanding of some HTML issues. What is SGML and why should I use it? by the SGML Project http://www.oasis-open.org/cover/exetwhat.html SGML on the Web by Softquad Inc. http://www.ncsa.uiuc.edu/SDG/Software/Mosaic/WebSGML.html What You Need Before you start, make sure you have the following available. • A modern Web browser for previewing your pages. We suggest having each of iCab, Microsoft Internet Explorer, OmniWeb, and Netscape Navigator or Communicator available, as these are the most widely used browsers, but do not always display pages the same way. • A general-purpose FTP client such as Fetch, Interarchy, or Transmit. While BBEdit does have built-in FTP tools, such dedicated applications are, naturally, more powerful, and of course, also allow you to upload things other than text files. You will find them useful in creating and managing your Web site. • Access to a Web server, either your own or someone else’s, where you will publish your pages on the Web. (Your Internet provider is a good place to start and can help you find the answers to questions about obtaining your own domain name, setting up your own dedicated server, and so on.) You will also want to be familiar with BBEdit’s basic capabilities. The other chapters in this manual will help you learn more about editing and searching text using BBEdit. Introduction to the HTML Tools 179 Configuring the HTML Tools Before using the HTML Tools, you should prepare your source documents and your copy of BBEdit. Although you can change your settings at any time, we suggest visiting the Preferences before starting. First, create a folder to contain working (draft) copies of your HTML documents. Put the HTML documents you are working on in this folder (either copying them from your Web site or moving them from elsewhere on your hard drive), then upload them to your Web server when you are satisfied with them. Next, open BBEdit and choose Preferences from the Edit menu. BBEdit’s Preferences window appears. For now we will only set the preferences for working with HTML. Refer to the following sections of this manual for further details: • “HTML Colors Preferences” on page 158 to choose a layout for the Web Safe Colors palette. • “HTML Markup Preferences” on page 159 to choose options for formatting HTML tags and attributes. • “HTML Palette Preferences” on page 160 to select the appearance of the HTML Tools palette. • “HTML Tools Preferences” on page 161 to tweak the function of the HTML Tools. • “HTML Web Site Preferences” on page 162 to tell BBEdit where your Web site is (locally and on your server). Using the BBEdit HTML Tools There are two ways to use BBEdit’s HTML Tools: via the HTML Tools floating palette and through the Markup pull-down menu. These two methods are functionally equivalent in most respects. Most beginning users find it easiest to use the HTML Tools through the palette. There are three basic types of buttons on the HTML Tools Palette: • Those you simply click to perform an action, or bring up a settings dialog before performing an action, e.g. New Document or Table Builder • Those that provide pop-up menus containing related options, e.g. Heading, Frames, and Utilities • Those which contain both a clickable button and a pop-up list, e.g. List, Table, or Preview Buttons containing a gripstrip (a double vertical bar on the left-hand side) may be used via drag-and-drop. For example, the Image button may be dragged into a document window to display the Image tool dialog. Subsequently, the specified <IMG> tag is placed at the point where the button was dropped. 180 Chapter 11: BBEdit HTML Tools Tip You can Command-click a pop-up menu to bypass the menu display; the tool will perform the last-used action again. The second means of using the HTML Tools is from BBEdit’s Markup menu. This allows you to make your own choice between the drag and drop convenience of palettes, and the less-screen intensive menus; either way, you will still be able to access all of the HTML Tools’ capabilities. Every HTML Tools function is available through an item on the Markup menu or one of its submenus. Keyboard equivalents (if assigned) are displayed next to the menu item. (On Mac OS 9, you can change or assign keyboard shortcuts to menu commands by choosing Set Menu Keys from the Edit menu; on Mac OS X, the Set Menu Keys command is in the BBEdit menu.) Many tool dialogs offer keyboard shortcuts for activating buttons. Hold the Command key down when a dialog is open to see these shortcuts. Most of the HTML Tools commands apply to the document which you currently have in the foreground—either at the current insertion point, or on the current range, as appropriate. Some of the utility functions, however, can operate on many documents. The Tool Descriptions section provides more details on how each function works. Creating a New Document You can create an HTML document simply by taking any text file and adding HTML markup to it, but there’s a better way. BBEdit includes a New Document command to create the basic skeleton of an HTML document for you. To create a new HTML document, you can do either of the following: • Chose New… from the File menu, then select HTML Document from the submenu • Click the New Document… button on the HTML Tools palette In either case, the following dialog appears: Using the BBEdit HTML Tools 181 Note If the front-most window in BBEdit is editable, you can deselect the Create New Window option in the dialog. This will insert the document template around the current text contents of the window. In many cases, you can simply specify a title for the document and click OK, ignoring the other options. However, we suggest that you fill out this dialog as completely as possible. The function of each field is described below. Insert XML Declaration Choose this checkbox to have BBEdit insert an XML declaration. If the DOCTYPE selected in the pop-up menu below is not an XML-based type (i.e. is not an XHTML version), then this checkbox will be disabled. Note Although an XML declaration is required for XML documents whose character set is not UTF-8 or ISO 8859-1, some currently shipping Web browsers (including Internet Explorer 5.0 for Macintosh) cannot handle documents with XML declarations. Insert DOCTYPE Choose the type of this HTML document from the pop-up menu to have BBEdit insert an SGML prologue containing the desired document type. This information is largely ignored by browsers; however, HTML syntax checkers (such as the one built into BBEdit) use it to determine which constructs are legal according to the HTML standard you select. Available DOCTYPEs include HTML 3.2, Transitional, Frameset, and Strict versions of HTML 4.0, HTML 4.01, and XHTML 1.0, and Compact HTML 2.0 (CHTML). HTML, Head, and Body Every HTML document should contain <HTML>, <HEAD>, and <BODY> tags. Mark these checkboxes to have BBEdit insert these tags automatically. Give BBEdit Credit Generates a <META NAME="generator" CONTENT="BBEdit 6.5"> tag in the document, indicating that you used BBEdit to create it. Title Enter the HTML title for the document (which can be different from the file name) here. This text will appear in the title bar of a browser’s window when this document is opened. Lang Indicates the language this document is written in. This information can be used by search engines and translation software to help Web users find pages in their own language. Charset Indicates the character set used by the document. If you do not specify a character set, the character set chosen in the user’s browser will be used. Base Enter the URL for this document’s BASE tag. The BASE tag indicates the actual location of the document on a server, and all relative URLs specified in the document will be resolved by the browser relative to this location. No BASE tag is created if you leave this field blank. 182 Chapter 11: BBEdit HTML Tools Meta Enter the META tag to be included at the top of the document here, if any. (META tags can be used for “client-pull” techniques, for indicating search keywords, and for a wide variety of other purposes.) Link If you want to use a LINK tag to specify a relationship between this document and other documents, an email address, style sheet, or other information about the document, enter the desired information in this field. Note If you use a template to create the HTML document, the template must include the #META# and #LINK# placeholders to indicate the location at which this information should be inserted into the generated document. Template This pop-up menu displays the templates present in the Templates folder specified in the HTML Web Site Preferences. (The names of template files must end with “.tmpl” for them to be displayed on the menu.) Selecting a template other than Default will use the specified template to create a new document, potentially ignoring some or all of the settings specified in this dialog. HTML Tool Descriptions This section describes all of the HTML Tools as they appear in the hierarchical Markup menu. For a description of the tools as they appear on the palette, see the HTML Tool Palette Index which appears after the Tool Descriptions. Note Tools that create tags insert the tag at the insertion point unless otherwise specified. Such tools also place an end tag automatically where appropriate. You should already be familiar with HTML before using BBEdit’s HTML tools. The dialogs BBEdit displays will help you to associate correct attributes with each tag, and provide shortcuts to help you enter information, but they do not (and cannot) tell what the final results of your markup will be. There is no substitute for knowing HTML. HTML Tool Descriptions 183 Tag Maker Tag Maker is BBEdit’s context-sensitive HTML authoring tool. When you choose it from the menu or the palette, or invoke it by pressing Command-M, it provides a list of the tags that are valid in the current HTML context of the insertion point, then lets you insert and configure one. For example, if the insertion point is positioned inside the document’s header section (delineated by the <HEAD> and </HEAD> tags), Tag Maker displays the following list of tags: Choosing, for example, BASE inserts a <BASE> tag at the insertion point. Choosing TITLE inserts a <TITLE></TITLE> pair, with the insertion point positioned between the two tags for easy entry of a title. If you hold down the Option key while clicking the Insert button, Tag Maker automatically displays a follow-up dialog for editing the attributes of the new tag, if the tag takes attributes and BBEdit has a tag editing dialog for it. When there is only one tag permitted in the current context, Tag Maker does not display the Insert Tag dialog, but simply inserts the appropriate tag at the insertion point. (Choose Undo from the Edit menu if this tag is not what you expected.) If there are no valid tags in the current context. Tag Maker sounds the system alert beep. new in 6.5 Tag Maker also works with CSS. With the insertion point in a CSS selector or declaration, Tag Maker will open a list of valid properties. Option-click while clicking the Insert button and Tag Maker will open a follow-up dialog for editing the property (for classes that BBEdit offers editing dialogs). Invoking Tag Maker when the insertion point is not within a CSS selector will create a new skeleton rule set. Tag Maker is also available by using contextual menus. Simply control-click at any point in your markup, and BBEdit will open a contextual menu that includes all valid attributes or properties for the context of the insertion point. 184 Chapter 11: BBEdit HTML Tools Once you have used Tag Maker to enter a tag, you can place the insertion point inside a tag and invoke Tag Maker again to show a list of available attributes for the tag. (Attributes which are already present in the tag are not shown in the list.) The list below, for instance, shows attributes of the <BODY> tag (under HTML 4.0 Transitional). Selecting an attribute from the list adds it to the tag and places the insertion point at the proper location for typing a value. Edit Tag Another way to add or edit the attributes of a tag is to place the cursor inside the tag and choose Edit Tag from the Markup menu or the HTML Tools palette. Choosing Edit Tag displays a dialog appropriate to editing the most common attributes used with the current tag. (The dialog shown is for a BODY tag. Dialogs for other tags will look different.) new in 6.5 Edit Tag also works with CSS. Choose Edit Tag while the insertion point is within a selector’s property or value, and BBEdit will display an appropriate dialog for editing many common properties. HTML Tool Descriptions 185 Document Type Choosing Document Type brings up a dialog which allows you to select the desired document type (DTD) for the current document. If the document already contains an SGML <!DOCTYPE> declaration, this will be used as the default. You may choose any of BBEdit’s supported document types or enter one of your own. Character Set Choosing Character Set brings up a dialog which allows you to enter a character set specification for the current document. To insert this specification, check the Meta Tag box, choose a character set from the pop-up menu of supplied standard types or type in a character set name, and click Apply. To remove any existing character set specification, uncheck the Meta Tag box and click Apply. Optionally, if the current document is an XML document, you can insert an XML Declaration (either alone, or in addition to the Meta tag) by checking the XML Declaration box and clicking Apply. new in 6.5 CSS Submenu This submenu allows you to create, edit, and format Cascading Style Sheet markup. BBEdit 6.5 now has built-in support for CSS. When editing standalone CSS files or HTML files with embedded CSS, syntax coloring is available, and the Function pop-up menu in the status bar lists CSS selectors, as well as CSS files referenced by @import directives and <link> tags. Choose an external stylesheet from the Function pop-up and BBEdit will open that stylesheet for editing. The CSS function parser supports the following syntax for laying a mark in the function menu: /* bbmark string to appear in the menu */ @import The @import directive instructs a Web browser to load an external style sheet. This dialog box allows you to select a file (or drag and drop one from the Finder) and choose whether to use the optional ‘url’ notation for specifying the location of the style sheet. (Remember that @import must come before other CSS rules inside a <style> tag or in a standalone CSS document; otherwise it will not work.) 186 Chapter 11: BBEdit HTML Tools Format The CSS Format command will reformat your CSS markup for easier reading. In standalone CSS files, if there is a selection range, only the selected text is formatted. If there is no selection range, the whole file will be formatted. In HTML files with embedded CSS, if there is a selection range, only the selected text will be formatted. If there is no selection range, BBEdit will format all CSS in the <style></style> tag pair that encloses the insertion point. If the insertion point is outside a <style></style> tag pair, or if the selection range spans a <style></style> tag pair, the formatter will simply beep. When formatting CSS embedded into HTML, BBEdit will indent the CSS based on the indent level of the opening <style> tag, plus one additional tab stop for better readability. There are two preference settings in the HTML Markup panel in the Preferences window which control how the CSS formatter and markup tools place the braces for block markup. The “New Line Before Block Start” checkbox controls the placement of opening braces. If the checkbox is on, you get this style: H1 { color: green; } If it’s off, you get: H1 { color: green; } The “Put Simple Rules on One Line” checkbox will format a single line of CSS like this: H1 { color: green; } BBEdit’s CSS markup tools (listed below) use the same rules for formatting as does the Format command. Box The Box dialog allows you to specify a selector’s width and height properties, as well as the properties for float, clear, and display. HTML Tool Descriptions 187 Border The Border dialog allows you to edit the border-width, border-color, and border-style properties for a selector. The first row allows you to specify values that apply to all four sides. The color buttons allow you to select colors from your preferred web color palette (as specified in the HTML Colors panel in the preferences window); the pop-up menus next to them allow you to select colors by name. The icons on the left side of the dialog represent (from top to bottom), the entire border, top, right, bottom, and left. Background Allows you to edit background-image, background-color, background-repeat, background-position, and background-attachment properties. The Image field allows you to select an image file by clicking the File button, or by using drag and drop from the Finder. 188 Chapter 11: BBEdit HTML Tools Padding/Margins These similar dialogs allow you to edit the padding and margin properties. In both cases, the icons on the left edge of the dialogs represent the entire box, top, right, bottom, and left, respectively. Font Allows you to edit values for the following font properties: color, font-size, line-height, font-family, font-style, font-weight, and font-variant. Note that BBEdit will parse the “font:” shortcut property, but never generates it; instead, BBEdit generates exploded values for font-style, font-variant, font-family, and font-weight. HTML Tool Descriptions 189 Text Allows you to edit the following text properties: text-decoration, text-indent, text-align, vertical-align, line-height, text-transform, word-spacing, letter-spacing, and whitespace. Body Properties Edits attributes of the BODY tag in the current document, including the background image, background color, text color, link color, active link color, and visited link color. The background image can be specified by typing or by clicking the File button. Link, background, and text colors are chosen from the 216-color “Web-safe palette” which appears when clicking on one of the color swatches. (Option-clicking on a color swatch will bring up the system color picker, so you can select colors that are not in the Websafe palette.) Head Elements This submenu allows you to add tags that are valid in the document’s head. The tag is inserted at the current insertion point, even if the insertion point is not a contextually valid location for the tag. Base The BASE tag determines the default location of documents referenced in the current document. You will be prompted to enter the Href (the document or folder that all relative links in the document should be considered relative to). You can enter the Href by typing it into the supplied field or by clicking the Folder button to select a folder on your hard disk. Choose Full addressing to have the entire path be entered; choose Root addressing to enter the path relative to the folder containing your HTML files, or Relative to enter the path relative to the current document. The Target field determines the frame in which hyperlinked documents will appear by default. Both fields are optional. 190 Chapter 11: BBEdit HTML Tools Link The LINK tag tells the browser about a document related to the current document. The most common use for this tag is to point to an externally-defined CSS stylesheet document. You can choose to indicate whether this link defines a REL (forward relation) or REV (reverse relation), the type of the relation (for example, a stylesheet), the media, the URL of the referenced file (including Full, Root, or Relative addressing), and optional Type, Hreflang, Target, and Charset attributes. Meta META tags are used to define browser-specific or optional information that is not a part of the HTML specification. You can choose to create either a NAME or an HTTP-EQUIV variation of the META tag. The latter is frequently used for “client-pull” applications in browsers that support it, but more generically it makes most browsers behave as if the specified line was received as part of the HTTP protocol header. After choosing the type of META tag and the desired value of the NAME or HTTP-EQUIV field, enter a value for the tag’s CONTENT attribute and optionally its SCHEME attribute. (You can choose from some common values for the NAME field by using the pop-up menu to the right of that field. If the HTTP-EQUIV value is “content-type”, then you can also select from some common values for the Content field by using the pop-up menu to its right.) Script Begins a section of client-side script code (by default, JavaScript, although some browsers support other scripting languages). You can choose to execute a script contained in an external file by entering a URL in the Source field (click File to choose the file using an Open dialog). You can also enter values for the TYPE of script, the script LANGUAGE it is written in, and the character set or CHARSET of the script. Mark the DEFER checkbox to add a DEFER attribute. Noscript Begins a section of HTML to be displayed only if the Web browser does not support client-side scripting; often used to provide alternate content following a <SCRIPT> block. A matching </NOSCRIPT> tag is also inserted. Style Begins a stylesheet declaration. You will be prompted to enter the type and title of the stylesheet, and optionally select the Media type it is to be used with. Block Elements This submenu lets you add HTML elements that behave as paragraphs or other types of text blocks. Since many block elements can be containers for other elements, most have an explicit or implicit ending tag (e.g., </P> to close a paragraph) as well as an opening tag (e.g. <P>). If text is selected when one of these commands is chosen, these opening and ending tags are placed before and after the selection. Paragraph Begins a new paragraph element. You can specify alignment, ID, a class (for obtaining formatting cues from a stylesheet), and inline CSS style information. If a selection exists, each paragraph in the selection has <P> and </P> tags inserted around it. HTML Tool Descriptions 191 Div Begins a new division. A division is a generic block of text containing one or more paragraphs (or other block elements) that all have some type of structural attribute in common. Use <DIV> when no predefined block type is appropriate. You can specify alignment, ID, a class (for obtaining formatting cues from a stylesheet), and inline CSS style information. Horizontal Rule Inserts a <HR> tag. You may specify the alignment, the thickness (size) of the rule, its width, and whether it contains a three-dimensional “shade”. Heading Inserts a heading of any level and allows you to specify the alignment of the heading. H1 through H6 Inserts a heading of the specified level. (The alignment attribute used will match the last one chosen when using the Heading tool.) Address Inserts an <ADDRESS> block. The formatting of this element is browser-dependent but it is usually used to indicate that a block of text is a postal address. Blockquote Inserts a block quote, i.e., several lines of text that have been quoted from another document. (Most browsers display this as indentation, leading many authors to use this tag to indent a section of text, although stylesheets are a more correct and flexible way to accomplish this.) You may optionally indicate the document being quoted, if it is available on the Web, using the Cite field. Center Inserts a block centering tag. This tag, while permitted in current HTML specifications, is deprecated since it includes no information about the content being centered. It is generally considered better form to use stylesheets or P or DIV tag ALIGN attributes, instead. Deleted Text Inserts a block formatted to indicate that the enclosed text has been deleted (usually with a horizontal line through it, i.e., “struck out”). You may optionally specify a citation (indicating a reference to another file) and a date and time. Inserted Text Inserts a block formatted to indicate that the enclosed text has been inserted (usually by underlining the text). You may optionally specify a citation (indicating a reference to another file) and a date and time. Noscript Begins a section of HTML to be displayed only if the Web browser does not support client-side scripting; often used to provide alternate content following a <SCRIPT> block. A matching </NOSCRIPT> tag is also inserted. 192 Chapter 11: BBEdit HTML Tools Preformatted Begins a section to be reproduced with line breaks as specified in the HTML document. (Normally, browsers convert carriage returns to white space for display, breaking lines only at <P> or <BR> tags.) Most browsers use a monospaced font for this type of block. Lists These commands add numbered or bulleted lists to your HTML documents. If text is selected, the selected text is converted to a list, with each line (terminated by a carriage return) becoming a list item. List Inserts a list. You can choose the type of list (unordered, ordered, definition, menu, or directory) and you can choose the type of marker for an unordered (“bulleted”) list. You can also suggest a compact display format for the list. When converting existing text to a list, you can choose to ignore blank lines in the text being converted, to mark up only list items (and not insert the list header), and whether to indent the list items. When converting text to a definition list, DT (term) and DD (definition) tags are applied to alternating lines in the selection. Unordered/Ordered/Definition/Menu/Directory Converts the selected text to the indicated type of list, or inserts a new list, as with the List command, using the options set in the last List dialog displayed. List Items Converts selected text to list items (one line becomes one item), or inserts an <LI> tag if no text is selected. Tables The commands on this submenu all have to do with building HTML tables. HTML tables are frequently used for layout purposes as well as for the display of tabular data, although strictly speaking their use for layout should be avoided as much as possible. BBEdit fully supports HTML 4 tables, which are considerably more flexible than the HTML 3.2 tables many users may be familiar with. If some tags or attributes in this section are unfamiliar to you, we strongly encourage you to study the HTML 4 standard before attempting to use them. Table Inserts <TABLE> and </TABLE> tags around the selected text. You can specify border, width, spacing, padding, frame, ruling, alignment, and background color. If there is no selection, you can have BBEdit generate a “shell” for the table (including all <TR> and <TD> elements inside the table for the number of rows and columns you specify) and optionally insert placeholder “label” text in each cell. Row Inserts <TR> and </TR> tags in the document, before and after the selection if there is one. You can specify the desired horizontal and vertical cell alignment and a row background color. If horizontal alignment to a specific character is specified, you can also indicate the character that determines alignment and the character offset to the first alignment character in the line. HTML Tool Descriptions 193 TD, TH Inserts a table data cell element or a heading cell element. (Both have the same options, thought most browsers render TH elements differently from TD elements.) You can specify the width and height of the cell, the number of rows and/or columns it should span, its vertical and horizontal alignment (including alignment to a character and the offset to the first such character), whether the text in the cell should be permitted to wrap, the background color of the cell, and the scope of the header information in this cell, if any. You can also specify the axes, an abbreviated version of the cell’s content, and which header cells contain information about the current cell. Many of the less familiar and infrequently-used attributes have use in certain applications such as speech-accessibility. To provide maximum accessibility for tabular data, we suggest consulting the HTML 4 specification. Caption Specifies a caption for a table. You may also optionally specify the caption’s vertical alignment. Colgroup, Col These tags are used to define column and column groups. Browsers that understand HTML 4 tables can, for example, be told to format a number of columns the same way, or to place rules between column groups, using this construction. The contents of a column group may be one or more <COL> elements (or none at all, if the SPAN attribute is used). You can specify the span of the column or group, its desired width, and its vertical and horizontal alignment. Cells within this column group may inherit some or all of these attributes depending on the attributes of the individual <TD> or <TH> elements. THead, TFoot, TBody Defines an optional table section element. These tags are new in HTML 4 and can be used independently of the <TH> tag; the latter indicates that particular cells should be displayed in a heading “style” (usually displayed by browsers as boldface). <TH> may be used anywhere in a table that a “heading look” is desired. In contrast, these three related tags define the logical divisions of a table. Browsers might hold the table’s header and/or footer fixed on the screen while scrolling a lengthy body up and down, for instance. All three tags allow you to select vertical and horizontal alignment, which may be inherited by cells inside the element depending on the attributes of <TR>, <TD>, and <TH> tags. Convert to Table Provides a quick way to convert tab-delimited or comma-delimited lines of text to tables. You must specify the delimiter to be used (either tabs or commas), and you can optionally have the entire first row of the table and/or the first cell of each row converted to <TH> rather than <TD> elements. If One Cell Per Line is marked, each cell will be placed on its own line in the resulting HTML; otherwise cells will be placed on a single line. Forms This submenu contains commands that help you build HTML forms, which are used for accepting user data for processing by a client-side script or a server-side CGI program (or other server-side technology, such as Active Server Pages). 194 Chapter 11: BBEdit HTML Tools Form Defines a form. The Method can be either GET (encoding the form data in the URL) or POST (sending the form data separately after the HTTP transaction header). The Action should be the URL of the CGI program (or other server-side script, such as ASP). Enctype and Accept-Charset define the encoding type and character set for the transaction (usually, you will not need to use these fields). Use the On Submit and On Reset fields to enter the names of JavaScript handlers to be used for the Submit and Reset buttons, respectively. The Target field sets the frame to be used for the page returned by the CGI. Button Creates a form button. Choose a type (Submit, Reset, or Button), specify a name and value for the form element, and set optional attributes such as Disabled, Tab Index (the order in which the button will be reached by the Tab key), and Access Key (the key the user can press to activate the button in the browser). (The latter two options are HTML 4 features and may not work on all popular browsers.) You can also enter the names of JavaScript onFocus and onBlur handlers for the button. Field Set, Legend In HTML 4, you can group your form’s fields and other controls into sets of related fields by using the FIELDSET container. Within the FIELDSET container, the LEGEND tag is used to define a title for the field set. Browsers differ in how they represent field sets visually, but some browsers may draw a rectangle around the related controls as in dialog boxes. In this case the Align attribute of the LEGEND tag can be used to set the alignment of the legend relative to the visual representation of the field set. (Browsers which do not support these tags will ignore them, and the contents of the LEGEND container will be displayed as any other text.) Input Defines an input field, which can be a text or password input, various types of buttons, and even files, images or hidden fields. Specify the name and the default value of these fields, and, if applicable, their size, maximum length, tab index, access key, and disabled or read-only attributes. (Disabled, Read Only, Tab Index, and Access Key are HTML 4 features and may not be supported by all popular browsers.) You may also specify handlers for the JavaScript onFocus, onBlur, onSelect, and onChange handlers. Label HTML 4 allows you to specify that text next to a control is a Label, and in browsers that understand the tag, clicking the label associated with a button activates the corresponding control. BBEdit lets you create a <LABEL> tag, specifying the name of the control it should be associated with, an optional keyboard equivalent to activate the control, and onFocus and onBlur JavaScript handlers. Select Defines a scrolling list or pop-up menu. Enter the name of the control, the number of items to display (leave the size blank for a pop-up menu rather than a scrolling list), and whether the list allows multiple items to be selected. Optionally mark the control as disabled and specify onFocus, onBlur, and onChange handlers. HTML Tool Descriptions 195 Option Group Using the <OPTIONGROUP> tag, you can create submenus in pop-up menus in browsers that support them. All <OPTION> tags within an <OPTIONGROUP> container are displayed as items cascading from the specified submenu label. (In browsers that don’t understand <OPTIONGROUP> users will see a simple straight list of all <OPTION>s.) Option An option on a pop-up menu or in a scrolling list. Enter the desired label and value for the option, and mark the Selected checkbox to make the option the default or initial choice. Text Area Defines a scrolling text area field for entering large amounts of data. You can specify the name of the file, its size in rows and columns, and optional HTML 4-only attributes such as Disabled, Read Only, Access Key, and Tab Index. You can also specify script handlers for onFocus, onBlur, onSelect, and onChange events. Inline Elements Inline elements are HTML elements that can appear as part of a paragraph, such as anchors, images, applets, client-side scripts, image maps, and more. Anchor Inserts an HTML anchor (<A>) tag. Anchors can either be hyperlinks or used as the target of hyperlinks to provided multiple targets on a single page. The anchor must have an associated URL in the HREF field to be a link; it must have a name in the Name field to be a target. The Target field is used to specify which frame the linked page should appear in. When specifying a URL, you can choose a recently-used URL from the Recent URLs pop-up menu, or choose another file from the same folder as the current document using the Current Folder pop-up menu. If you click the File button, you will be prompted to choose a file from an Open dialog. Normally, all types of files will be displayed here. If you select the “Only Show HTML and Image Files” checkbox at the bottom of the Anchor dialog, however, you will only see images and files whose names match those defined as HTML in the Languages section of BBEdit’s Preferences dialog. Alternatively, you can drag and drop a file into the HREF field in order to insert its path and name. BBEdit displays a warning message when the URL doesn’t exist on your computer or is outside the scope of your site; these warnings can be disabled using the checkboxes at the bottom of the dialog. Image Inserts an <IMG> tag to display an image. As with the Anchor tag, you can select the Source from the Recent URLs or Current Folder pop-ups, by typing a URL, or by clicking the File button. If the Canto Cumulus image cataloging tool is running on your computer, you can also click the Cumulus button to choose an image from Cumulus’s catalog, or you can use drag and drop. 196 Chapter 11: BBEdit HTML Tools After choosing an image file, you can specify alternate text (which will appear in browsers that don’t support images or for users who are surfing with image-loading turned off), enter the Size of the image, select the amount of horizontal and vertical Space for wrapping around the image, and choose the thickness of the border and the image’s alignment. (Image height and width should be specified whenever possible to speed layout of the page in the browser; BBEdit will enter these values for you automatically when you choose an image file.) You can also mark the Is Map checkbox to use a server-side image map or the Use Map checkbox to use a client-side image map embedded in the HTML document. Applet Inserts the <APPLET> tag for specifying a Java applet. You will need to specify the location the folder that contains your main Java class file (the codebase) as well as the name of the main class file. If the file is in a .ZIP or .JAR archive, you can specify its name here as well. If you will control the applet via a client-side script, enter a name for it. As with images, you should always enter the desired size for the applet’s display area to speed browser layout. You can also specify alignment and white space around the applet, along with ALT text to be displayed if the applet can’t be used. Object The <OBJECT> tag is a generic tag for including almost any type of data in a page, including images and Java applets. (It can also be used to insert ActiveX controls and data intended to be used by plug-ins.) However, it is an HTML 4 tag and may not be supported in all popular browsers. For this reason we suggest using <IMG> and <APPLET> for those types of objects and use <OBJECT> only for embedding other types of data, such as that used by plug-ins. For an example of this, see the Web Design Group’s HTML Help reference page: http://www.htmlhelp.com/reference/html40/special/object.html The <OBJECT> tag, like the <IMG> and <APPLET> tags, allows you to reserve screen space in the browser window, recommend an amount of white space between the object and surrounding text, align the object, set its border, specify alt text to be displayed if the object can’t be displayed, and so forth. You will also need to specify at least the codebase and class ID of the object for ActiveX controls, and fill in the Data field for embedded objects such as Shockwave animations which will be handled by plug-ins. The Standby field can be used to tell browsers a text message to be displayed while the object is loading. For more information on the <OBJECT> tag, consult the HTML 4 specification. Param To pass parameters to a Java applet, ActiveX control, or plug-in, the <PARAM> tag can be used between the <OBJECT> and </OBJECT> (or <APPLET> and </APPLET>) tags. Each parameter to be passed to the object requires a separate <PARAM> tag. You must specify the name and value of each parameter; the actual parameter names and values required will vary depending on the object being embedded. HTML Tool Descriptions 197 Script Begins a section of client-side script code (by default, JavaScript, although some browsers support other scripting languages). You can choose to execute a script contained in an external file by entering a URL in the Source field (click File to choose the file using an Open dialog). You can also enter values for the TYPE of script, the script LANGUAGE it is written in, and the character set or CHARSET of the script. Mark the DEFER checkbox to add a DEFER attribute. Map Embeds a client-side image map in the document. You must enter a name by which the map can be referenced in the Use Map attribute of the Image tag. Individual clickable areas within the image map are provided by the <AREA> tags inserted between the <MAP> and </MAP> tags. Area Defines a clickable area within a client-side image map. Each clickable area requires a separate <AREA> tag. You will need to specify the document to be loaded when the area is clicked (or mark the No HREF checkbox to cause clicks in the area to be ignored), along with its Target frame if the page is being used in a frameset. You can choose the desired map shape (rectangular, circular, polygonal, or the default URL) using the Shape pop-up menu and enter the desired coordinates of the shape in a comma-separated list in the Coords field. (For rectangles this is in the order left, top, right, bottom; for circles it is in the order X, Y, radius. For polygons this should be a comma-separated list of coordinates in X, Y form.) You can also set the tab index of the field for keyboard control on browsers that support it. JavaScript onFocus and onBlur handlers are also supported. Convert to Client Side Map Converts the selected text, which should be a server-side image map file in NCSA server format, to a client-side image map. You must specify a name for the converted imagemap. Break Enters a line break tag, <BR>, into the document. If multiple lines are selected, a line break tag will be inserted after each. Font Selects the font, size, and/or color for the selected text. This tag is deprecated and should generally not be used; stylesheets are a more flexible and more content-oriented way of achieving this end. Base Font Selects the default font, size, and/or color for the text in this document. Like <FONT>, this tag is deprecated; it is considered better form to use stylesheets. Bidirectional Override Inserts a <BDO> tag to note that the enclosed text is in a language that should be rendered in a different direction (either left-to-right or right-to-left) than the default text order for the document’s primary language. You can specify the desired text order and the language, so that savvy browsers can switch fonts or script systems to display the text correctly. 198 Chapter 11: BBEdit HTML Tools Quotation Marks the selected text as a quotation. Use this only for short quotes within a paragraph; use <BLOCKQUOTE> for quotations consisting of a paragraph or more of text. Span Marks the selection as belonging to a certain class of information—such as a book title—usually so its text style can be retrieved from a stylesheet. (In contrast with <DIV>, which marks paragraph-level classes, <SPAN> marks character-level classes.) You will be prompted for an ID for this span, a class name (which should correspond to a stylesheet entry), and inline style information. All are optional. Subscript Marks the selected characters as a subscript (lowered below the baseline). Superscript Marks the selected characters as a superscript (raised above the baseline). Phrase Elements Phrase elements are HTML tags that mark sentences or phrases within a block element (such as a paragraph) with certain content-related styles, such as emphasis, strong emphasis, citation, and so on. Indirectly this determines the displayed format of the enclosed text (although exactly what “emphasis” and so on mean is left up to the browser and/or the stylesheet). Abbreviation The enclosed text is an abbreviation. Acronym The enclosed text is an acronym. Citation The enclosed text is a citation of another document. Computer Code The enclosed text is computer source code. Deleted Text Inserts a block formatted to indicate that the enclosed text has been deleted (usually with a horizontal line through it, i.e., “struck out”). You may optionally specify a citation (indicating a reference to another file) and a date and time. Defined Term The enclosed text is term defined in a glossary. Emphasis The text should be displayed with visual emphasis (most browsers interpret this as italic text). HTML Tool Descriptions 199 Inserted Text Inserts a block formatted to indicate that the enclosed text has been inserted (usually by underlining the text). You may optionally specify a citation (indicating a reference to another file) and a date and time. Input Text (Kbd) The enclosed text is text to be entered on a computer keyboard (used in instructions). Sample Output The enclosed text is sample output from a computer program (used in instructions). Strong Emphasis The text should be displayed with strong emphasis (most browsers interpret this as boldface). Variable The text is a placeholder in an instruction or tutorial, and should be replaced with an actual value of the appropriate type before actually performing the indicated operation. Font Style Elements Like Phrase Elements, Font Style Elements mark relatively short pieces of text within a block element. However, they are concerned more with the appearance of the text than its structural function in the document. Big Displays the enclosed text in a larger font than usual. Small Displays the enclosed text in a smaller font than usual. Bold Displays the enclosed text in boldface type. Italic Displays the enclosed text in italic type. Strike-Through Displays the enclosed text in a strike-through style. Teletype Text Displays the enclosed text in a monospaced font, as on a computer terminal or teletype. Underline Displays the enclosed text in an underlined style. Frames The commands on the Frames submenu help you design documents that use frames. The first document loaded by the browser contains at least one <FRAMESET> tag and one or more <FRAME> tags, which specify the number and sizes of the desired browser window subdivisions and indicate the URLs of the files to be loaded into each. 200 Chapter 11: BBEdit HTML Tools Frame Set Defines a frame set, a series of one or more frames. Indicate whether the frame set divides the browser window vertically (ROWS) or horizontally (COLS). Then indicate the size of each frame in a comma-separated list, using * to tell the browser to use whatever space is left over from the other specified frames. Frame sets can be nested. For example, if you want to create a framed Web page with three rows, with the middle row divided into two independent columns, you would first define a frame set consisting of three rows. Instead of defining the second row with a <FRAME> tag, however, you would open another <FRAMESET> tag there, this time to specify the two columns for the middle frame (which would then be specified by <FRAME> tags). Frame Defines a frame in a frame set document. You will need to specify the URL of the file to be displayed in this frame (either using the button, or by drag and drop). If the frame will be targeted by links in another frame, you will also need to give the frame a name. You can optionally specify a long description for the frame, choose whether the frame can be scrolled, and indicate whether the user should be able to resize the frame. You can also set margins and borders for the frame. (Borders are the visible lines between frames. Margins determine how far each frame’s content appears from its border or from the window edge.) No Frames HTML markup included between the <NOFRAMES> and </NOFRAMES> tags is displayed by browsers which do not support frames. This is where you should include a link to a non-frame (or text-only) version of the site. Although many current browsers support frames, some users do not like the feature and intentionally disable it in their browser. Check The Check submenu contains utilities for finding errors in your HTML markup and document links. You can run syntax or link checks on the current document, a specified folder, or the current site (as defined in the HTML Web Site preferences). You can also perform a Balance Tags operation on the current document. When checking a Folder or a Site using these tools, a dialog like the one below appears. This dialog allows you to choose the desired folder (click the Folder button to choose a folder using an Open dialog, or drag a folder from the Finder to the gray box), optionally specify that subfolders whose names are enclosed in parentheses should not be checked, and indicate that nested folders should or should not be included in the check. HTML Tool Descriptions 201 If a Check Syntax or Check Links operation generates any errors or warnings, BBEdit will display an error results browser listing. For more details on the new error results browser format, please refer to Chapter 9. Syntax A syntax check validates your HTML document to the specification defined in the <!DOCTYPE> SGML prolog at the top of the HTML document. Errors are displayed in an error results browser. Scroll through the list at the top of the window to see the errors that have been found; single click to see the text that caused the error in the lower part of the window. Double-click an error message to open the file for editing. Note that an HTML document can display the way you expect it to in a browser and still contain invalid HTML. Browsers are designed to be lenient in the markup they accept, so you can get away with a certain amount of “sloppy” markup. However, producing well-formed (syntactically correct) HTML documents is the best way to assure that your document will display in some reasonable fashion in a wide variety of Web browsers, even those you haven’t tested the page in. Links BBEdit scans your document, or a folder of documents, looking for links and object references (such as images and Java applets) that cannot be resolved. Note that BBEdit only looks at pages on your site as defined in the HTML Web Site preferences, not at any links that go offsite. (BBEdit will, in fact, generate warnings for offsite links unless you disable the Remote Links warning in the HTML Tools preferences.) Balance Tags When Balance Tags is selected, BBEdit expands the selection to encompass the content of next outermost set of enclosing tags. The easiest way to understand how this works is to see it in action. Place the insertion point in an HTML document’s <TITLE> element and choose Balance Tags. The title will be selected, since it lies between the tags <TITLE> and </TITLE>. Choose Balance Tags again, and BBEdit selects everything between <HEAD> and </HEAD>, the next set of enclosing tags outside the <TITLE> element. Choosing the command once more will select everything between <HTML> and </HTML>. Use this command to quickly select an element for editing or just to check to see whether all your nested elements are formed correctly. If BBEdit sounds the system alert beep when you expect it to select text, it can’t find a matching set of tags around the selected text. Update The Update menu contains commands for updating IMG tags, includes, and placeholders in the current document, the selected folder, or the current site (as selected in the HTML Web Site preferences). BBEdit displays a results browser after the operation so you can see what was changed. For more details on the results browser format that BBEdit displays, please refer to Chapter 9. Choose the Document, Folder, or Site command from the Update submenu to update all includes and placeholders in the selected set of file(s). (Appendix C contains information regarding the use of placeholders.) 202 Chapter 11: BBEdit HTML Tools Choose the Document Images, Folder Images, or Site Images command from the Update submenu, to update the HEIGHT and WIDTH attributes of image tags (and optionally to insert empty ALT attributes when missing) in the selected set of file(s). When choosing to update a Folder or a Site using either of these sets of tools, a dialog like the one below appears. This dialog allows you to choose the desired folder (click the Folder button to choose a folder using an Open dialog, or drag a folder from the Finder to the gray box), optionally specify that subfolders whose names are enclosed in parentheses should not be updated, and indicate that nested folders should or should not be included in the update. new in 6.5 Updating Files with Projector CKIDs During an Update operation, whenever BBEdit attempts to modify a file containing a Projector ‘ckid’ resource which is designated Read-Only, it will display the following dialog asking you how to handle the file. Choosing the Cancel button will stop the Update operation and leave the current file untouched. Choosing the Skip button will cause BBEdit to skip this file only (leaving it untouched), and continue the multi-file replace operation. Choosing the MRO & Update button will cause BBEdit to mark the file Modify Read-Only, update the file, and continue the Update operation. If you select the Don’t Ask Again option before clicking Skip or MRO & Update, then BBEdit will apply the same action to all files with this Projector state that it encounters during this (and only this) Update operation. Includes The Includes submenu contains commands for inserting one-time include directives, “persistent” include directives, and placeholders. See Appendix C for more information. HTML Tool Descriptions 203 Choosing Include or Persistent Include prompts you to choose a file using an Open dialog, then inserts the appropriate markup. Choosing Placeholders displays a scrolling list of available placeholders; selecting one and clicking Insert places it into the document. Utilities The Utilities submenu contains commands for automatically editing the current HTML document for ease of editing and for consistency. Format Formats the current HTML document for easier editing. The appearance of the document in a browser is generally not affected (except in the case of Document Skeleton). You can choose from the following: • Hierarchical: nested HTML structures are indented Note This command may add whitespace, which can affect display in a browser • Gentle Hierarchical: the same as Hierarchical, with less indenting • Plain: places each tag on a separate line with no indenting • Compact: the absolute minimum white space • Gentle Compact: A slightly more human-readable version of Compact. • Source Format Profile: Formats the document according to the Dreamweaver Source Format Profile selected in the HTML Markup panel of the Preferences. • Document Skeleton: a hierarchical view with all non-tag content removed • Don’t Reorganize: allows normalizing of case, quote, and entity settings, as well as encoding entities within attributes, without otherwise changing the existing structure. You can also have the Format command operate on the whole document or only the selection, normalize the tags to upper or lower case (according to your settings in the HTML Tools preferences), normalize quote marks around attributes, and encode special characters, or entities, found in attributes. If you choose the Format… command (with the ellipsis), BBEdit displays a dialog allowing you to choose the formatting options. If you choose the Format command without the ellipsis, BBEdit uses the previous options. Optimize Reformats the document to use the absolute minimum of characters while remaining syntactically valid. You will have difficulty editing your document in this format (in fact, if you don’t have Soft Wrap turned on in the Window Options, you might think most of your document has vanished, because the command strips out all line breaks), but rest assured that your document will appear the same in your browser as it always has. Use one of the Format commands discussed above to put your page back into an editable format if you need to make changes. Also applies the various Cleaner tools automatically. 204 Chapter 11: BBEdit HTML Tools Translate Allows you to translate plain text to HTML or vice versa. The dialog that appears gives you flexible options for translating Macintosh characters to HTML entities, converting paragraphs to <P> tags and vice versa, removing HTML tags entirely, and so on. You can choose to have the results displayed in a new document window and to convert only the selection rather than the whole document. See “HTML Translation” later in this chapter for more information. Remove Comments or Markup Removes all HTML comments or HTML tags, respectively, from the selection. Note that removing comments will not remove comment markers around client-side scripts like JavaScript, where they are required for proper functioning of the page on older browsers, but will remove the comment markers used by placeholders and indexes, making these items difficult to update in the future. Comment, Uncomment Commenting adds comment markers (<!-- -->) around the selected text so that it is ignored by the browser. (It also converts any previously existing comment markers in the selection range to use double square brackets [[ ]] in place of < >, and ~~ in place of --, to prevent older browsers from misinterpreting the comment.) Uncommenting removes all comment tags from the selection and converts any double-bracket comments back to real HTML comments. Normalize Tag Case, Make Tags Upper or Lower Case Converts all HTML tags in the document to the desired case: upper, lower, or normalized (which is either upper or lower depending on your HTML Markup Preferences settings). Misc The Misc submenu contains a motley assortment of commands that just didn’t seem to fit anywhere else in our hierarchy, including commands related to using BBEdit with other HTML editors. Dreamweaver Choose Dreamweaver to open the current HTML document in Macromedia Dreamweaver (or to return to Dreamweaver if you opened a page in BBEdit from there). Document Size Displays a report about the document’s size and the amount of time it will require to download at various connection speeds. Index Document Generates a list of links to all the <A> (anchor) tags in the current document that have a NAME attribute, providing a clickable index of all these anchors. If you have used the <A> tag to mark your main topics (for example, all <H2> headers) this produces an instant topic-level index of the current document. The index is placed after the <BODY> tag, unless the insertion point is in an already-existing index, in which case the old index is replaced with the new one. (Do not remove the comment markers around the index if you want to be able to update it in the future.) Index Document also adds <A name> tags to all heading tags which do not already have them. HTML Tool Descriptions 205 Index Folder Works like Index Document, but produces an index of the HTML files within a specific folder. You can choose from five different styles of indexes, including that provides full information about every referenced file. The best way to see what each format of index looks like is to experiment for yourself. Index Site Creates an index of all the HTML documents in your site, as with Index Folder. GoLive, Home Page, or PageMill Cleaner Cleans up the often gnarly HTML code created by these WYSIWYG editing tools. This will make the file easier to edit, smaller, and, often, slightly quicker to load into a browser. The GoLive cleaner removes font tags with no semantic value—that is, tags which contain nothing at all, or just white space. The PageMill cleaner removes the “NATURALSIZEFLAG” attribute that PageMill puts in <IMG> tags, and turns every two consecutive line break tags into paragraph (<P>) tags. Preview The Preview commands allow you to view your creation in a browser. You can choose a browser from the Preview With submenu, or use Preview by itself to use the last chosen browser. You can also preview the page in all running browsers or in a text-only format. (On Mac OS X, browsers running in the Classic environment are labeled “(Classic)”.) 206 Chapter 11: BBEdit HTML Tools The HTML Tools Palettes The main HTML Tools Palette is the place from which you will probably access the HTML Tools most frequently. You can invoke the HTML Tools palette at any time by selecting it from the Palettes sub-menu in the Window menu. BBEdit remembers which palettes you had open when you quit, so if you open the HTML Tools palette, it will remain open until you close it again, even on subsequent uses of BBEdit. The default HTML Tools Palette is shown to the left. You can choose the buttons to be displayed on this palette in the HTML Palette preferences. HTML Tools Palette Tips A list of all the tools that are available on the HTML Tools palette appears below. In most cases, their behavior corresponds obviously with the Tool Descriptions in the last section. In the few cases where there are significant differences, these are noted. Many of the tools also work with drag-and-drop. Those that do are marked with “gripstrips”—two vertical slashes at the left side of the button. You can drag these tools into your document to have them take effect wherever you drop it. Some palette buttons are actually pop-up menus. Clicking a pop-up menu button while holding the Command key invokes that menu’s last-selected menu option. Try pressing Option and watch how the palette changes. Many buttons that normally display a settings dialog can be forced to use their previous settings by holding Option as you click. The Preview button previews your document in a new browser window when you Option-click. HTML Tools Palette Tool Menu-Based Equivalent New Document File>New>HTML Document Tag Maker Markup>Tag Maker Edit Tag Markup>Edit Tag Document Type Markup>Document Type Character Set Markup>Character Set CSS Markup>CSS submenu Body Properties Markup>Head Elements>Body Properties Head Elements Markup>Head Elements submenu Anchor Markup>Inline Elements>Anchor Image Markup>Inline Elements>Image Break Markup>Inline Elements>Break Font Markup>Inline Elements>Font Paragraph Markup>Block Elements>Paragraph The HTML Tools Palettes 207 208 Tool Menu-Based Equivalent Div Markup>Block Elements>Div Heading Markup>Block Elements submenu Dreamweaver Markup>Misc>Dreamweaver Block Elements Markup>Block Elements submenu Inline Elements Markup>Inline Elements submenu List Markup>Lists>List, Markup>Lists submenu Table Markup>Tables>Table, Markup>Tables submenu Forms Markup>Forms submenu Phrase Elements Markup>Phrase Elements submenu Font Style Elements Markup>Font Style Elements submenu Frames Markup>Frames submenu Check Syntax Markup>Check>Document Syntax Check Links Markup>Check>Document Links Update Marku>Update>Document Balance Tags Markup>Check>Balance Tags Check Markup>Check submenu Update Markup>Update submenu Includes Markup>Includes submenu Utilities Markup>Utilities submenu Misc Markup>Misc submenu Preview Markup>Preview, Markup>Preview With submenu Chapter 11: BBEdit HTML Tools Other Palettes In addition to the main HTML Tools palette, BBEdit incorporates a number of other palettes that may be useful to HTML authors. First, several of the pop-up menus on the HTML Tools palette can be used to open floating palettes for specific tools. At the bottom of the pop-up menus for CSS, Block Elements, Inline Elements, Table, Forms, Phrase Elements, Font Style Elements, and Utilities is a menu item that opens the specified menu as a palette. For example, choosing Inline Palette from the bottom of the Inline Elements pop-up menu opens a new palette containing a button for each of the items on that menu. You probably won’t need to open all these “sub-palettes” at once, but they can be quite convenient to open temporarily when you are working on a particular type of element (form, table, etc.). In addition to being able to open them from the main HTML Tools palette, each palette can also be accessed from the Palettes sub-menu in the Window menu. Two other palettes are also of particular interest to Web authors: the HTML Entities palette and the Web Safe Colors palette. HTML Entities In HTML, extended characters must be encoded as entities, since different computers define the extended ASCII characters differently. The HTML Entities floating window lists these entities. Entities can be inserted by name (© is the copyright symbol, ©) or number (&169; for ©) by choosing the desired method from the small pop-up menu at the top of the HTML Entities palette. (We suggest inserting entities by name, since they are more readable, unless browser compatibility requires use of the decimal versions.) Double-click an entity name to insert it into the active document, or click once to select the desired entity, then click Insert. The list of entities presented in the HTML Entities floating palette is now sortable by decimal value, name (case insensitive so &ecaute; and É are grouped together), or character (sorted by the character position after all diacriticals have been stripped, so that all “a”s are grouped, etc.). Click on a column label to set the sort order accordingly. (The default is to sort by decimal value.) The HTML Tools Palettes 209 Web Safe Colors The Web Safe Colors palette displays the 216 colors that display properly in Web browsers on all computers running in 256-color mode. The colors are based on a 6x6x6 color cube that adds red, green, and blue in 20% increments. Use a color from this palette for Web page backgrounds and text to reduce the chance that the incorrect color (possibly dithered) will be used instead of a pure color. Note There are four layouts available: horizontal, vertical, and VisiBone and VisiBone 2. You can choose a layout in the HTML Colors panel of the Preferences. Click a color swatch to insert the color’s RGB value, in HTML format (i.e. “#RRGGBB”) at the insertion point. You can also drag a color swatch into a document window to place the color value. new in 6.5 The Web Safe Color palette is now CSS-aware, and will insert color values in CSS format, i.e. unquoted and minimized, when appropriate. HTML Translation The following options are available in the Translate tool, available in the Utilities submenu of the Markup menu. Remove Tags When converting HTML to TEXT the tool will remove all HTML tags and comments. Paragraphs When converting TEXT to HTML the Translate tool finds paragraphs in the same way the Paragraph tool does, then adds opening and closing paragraph tags around them. When converting HTML to TEXT, it makes sure that there are line breaks around each paragraph in the resulting text. HTML Entities When converting TEXT to HTML, the Translate tool converts characters from their positions in the standard Macintosh character set into HTML entities, either using names or the code (in decimal or hexadecimal). You can specify whether the tool should ignore < and >. This is useful when translating text already marked up as HTML. You can also specify that all Unicode text should be converted to entities. 210 Chapter 11: BBEdit HTML Tools Templates In addition to providing many facilities for creation and markup of individual documents, the HTML Tools also incorporate a Template facility, which can be used to quickly create (or revise) a set of HTML documents that share a common format, structure, or content. You can design a skeleton document, make a template from it, and then use that template over and over again to produce new pages ready to fill with content, or to insert into existing text documents to provide an uniform structure or appearance. Templates may also employ Placeholders and Include Files (see Appendix C), adding even more power to this useful function. Template Setup A folder named “HTML Templates”, which contains some sample templates, is provided as part of the standard BBEdit installation. We suggest, in most cases, that you continue to use this as your templates folder. If you would prefer, however, you can set up your own template folder wherever you like (as described in Configuration of the HTML Tools, above). If you plan to maintain multiple sets of templates for different projects, you may find this option very useful. Note The HTML Tools cannot currently be configured to handle multiple different servers at once. If you need to work with multiple servers, however, you will find that all HTML Preference settings can be changed via AppleScript. An example script, which demonstrates how to switch between multiple server configurations is provided in the Scripting Samples folder which comes with BBEdit. Using a Template A template is a simple text file that contains boilerplate text and/or HTML content, which will form the foundation for the document you are creating. Template files must have the filename suffix “.tmpl” in order to be recognized. When creating a template file, you can convert or reuse an existing document, or you can write one from scratch. Simply rename the file by adding the suffix “.tmpl” to it, and then move or copy it into your active HTML Templates folder. Templates are always invoked using the New Document tool. Even if you wish to impose a template on an existing document, you still do it through New Document. The Template option appears as a pop-up menu at the bottom left of the New Document dialog. All template files in the Templates folder appear in this menu. (The “Default” setting is not a template per se, but rather a directive to create a blank HTML document framework containing whatever Title, Base, Meta, Link, SGML Prologue, etc. values you specify. It is always available, regardless of the contents in your Templates folder.) Once you have specified the appropriate settings, and chosen “Create,” BBEdit will open an new Untitled window containing the full text of the selected template file. If you invoke the Document tool while working on an existing document, you will see a checkbox called “Create New Window” next to the Template menu. Normally this option will be on, but if you deactivate it, then the specified template (and other applicable Document values) will be inserted into the currently open document, so as to enclose the document’s contents within the template’s <BODY> tags. The contents of the document are inserted at the template’s #BODYTEXT# placeholder, so each template to be used in this manner must contain this placeholder. The HTML Tools Palettes 211 Regardless of whether you use a Template to create a new document, or to impose HTML markup on an existing document, the template file itself is never changed. Rather, its contents are simply copied into the document that the template has been used on. Note Templates can make full use of Placeholders and Include Files, which are fully documented in Appendix C. Custom Markup Important 212 Neither the Custom Markup tool (supplied in versions of BBEdit prior to 5.0) nor any plug-ins created with this tool will work in BBEdit 6.5. The types of functions performed by the Custom Markup tool may be accomplished more effectively with OSA (AppleScript or Frontier) scripts, BBEdit’s Glossary command, or via some combination of these. Chapter 11: BBEdit HTML Tools CHAPTER 12 Using the Glossary This chapter describes BBEdit’s Glossary command. The Glossary provides an easy way to store and access frequently used text of any sort. Its ability to perform keyword substitution, combined with an option to run OSA scripts and insert their results, further extends its usefulness. In this chapter: The Glossary Command . . . . . . . . . . . . . . . . . . . . . . . . . . . . . . . . . . . . . 213 Language Sensitivity of the Glossary . . . . . . . . . . . . . . . . . . . . . . . . . . . 214 Manually Sorting the Glossary . . . . . . . . . . . . . . . . . . . . . . . . . . . . . . . . 214 Using the Glossary . . . . . . . . . . . . . . . . . . . . . . . . . . . . . . . . . . . . . . . . . 214 The Set Key Button . . . . . . . . . . . . . . . . . . . . . . . . . . . . . . . . . . . . . . . . . 215 Glossary Substitutions . . . . . . . . . . . . . . . . . . . . . . . . . . . . . . . . . . . . . . 216 Using OSA Scripts with the Glossary . . . . . . . . . . . . . . . . . . . . . . . . . . . 217 The Glossary Command BBEdit’s powerful Glossary provides an easy way to store and access frequently used text of any sort, whether this is sections of program code, HTML markup, or just about anything else you want! The Glossary’s new language-sensitive set selection makes it even easier to use than before, while its ability to perform keyword substitution, combined with an option to run OSA scripts and insert their results, further extends its flexibility. Choosing the Glossary command from the Palettes submenu in the Window menu opens the Glossary floating window, shown at left. This window lists the contents of the active glossary set, plus the contents of the Universal Items glossary set, and any glossary items which are contained directly within the Glossary folder (i.e. which do not belong to a set). In order to create a glossary item, type or paste the desired text, or text and keywords, into a BBEdit document window, then save the text into an appropriate place within the Glossary folder. 213 You can create multiple levels of folders inside the Glossary folder, to better organize different types of content. The first level of these folders appear in the Set pop-up menu, allowing you to reveal only the group of glossary items you wish to work with at a given time. (Any glossary items that are not placed in a subfolder are always shown in the Glossary window, as are the contents of the Universal Items set.) Language Sensitivity of the Glossary If you have selected the Glossary is Language Sensitive option in the Glossary panel of the Preferences, BBEdit will select a glossary set to use with the top document window according to the following rules: • If there is a glossary set whose name ends in the same suffix as the document, that set will be activated. • If there is a glossary set with the same language mapping as the current document (as determined from the Languages mappings in the Preferences), that set will be activated. • If there are multiple glossary sets with the same language mapping (e.g. “HTML Glossary.html” and “HTML Glossary.shtml”), then the glossary set which appears first on the Set pop-up will be activated. (You can control the order in which glossary sets appear as described below in Manually Sorting the Glossary.) These selection rules are intended to provide you the greatest possible amount of flexibility, while automatically doing the right thing as often as possible. Manually Sorting the Glossary By default, items in the Glossary are displayed in alphabetical order. However, you can force them to appear in any desired order by including any two characters followed by a right parenthesis at the beginning of their name. (For example “00)Web template” would sort before “01)HTML Template.”) For such files, the first three characters are not displayed in BBEdit. You can also insert a divider by including an empty folder whose name ends with the string “-***”. (The folder can be named anything, so it sorts where you want it.) These conventions are the same as those used by the utilities FinderPop and OtherMenu. Using the Glossary To use the Glossary, double-click a item’s name to insert its contents at the insertion point (if there is a selection, it is replaced with the glossary item’s contents). Alternately, click the item’s name once to select it, then click Insert, or drag the item into an editing window. You can also assign key equivalents for easy access to frequently used glossary items. See the section describing the Set Key button below for instructions. To quickly edit a glossary item, you can either select it and hold down the Option key to change the Insert button to Open, or you can Option-double-click on the item. 214 Chapter 12: Using the Glossary The Set Key Button The Set Key button in the Glossary floating window lets you assign key equivalents to a glossary item. You can use any combination of the Command, Shift, Option, and Control keys in the key equivalents. Assigning a Key to a Glossary Item To assign a key to a Glossary item: 1 Select the item you wish to assign a key equivalent to in the Glossary window. 2 Click the Set Key button to display the Set Key dialog. 3 Type the key equivalent. You can use any key combined with Command plus Shift, Option, or Control modifiers if desired. The equivalent must use at least the Command or the Control modifier key to be valid. You can also use Function keys, with or without additional modifiers. 4 Click Save. Note If you try to assign a key sequence that is already used elsewhere, BBEdit warns you that there is a conflict and asks you whether you want to reassign that key sequence to the new item. Removing a Key Assignment To remove a key assignment from a glossary item: 1 Choose the item from the Glossary window. 2 Click Set Key. 3 BBEdit opens the Set Key dialog. 4 Click Reset BBEdit removes the key assignment from the glossary item. The Set Key Button 215 Glossary Substitutions When you insert a glossary entry containing a placeholder into an editing window, BBEdit replaces the placeholder with appropriate substitution text. This is similar to the functionality BBEdit provides in its HTML Templates and Update features. Placeholder Replaced by… #CLIPBOARD# Contents of the Clipboard #DATE# Current date (formatted according to your Date & Time control panel preferences) #FILE# Name of the window into which entry is inserted #FUNCTION# If the entry is being inserted into a source file, the name of the current function #INDENT# When used in glossary items with multiple lines, causes every line in an item after the first, to be indented to the same whitespace level as the line on which the item was inserted (see the supplied WML Glossary for examples) #INLINE# Strips all trailing vertical white space from the entry before insertion (see also the Filing and Glossary panels in the Preferences) #INSERTION# Marks place where BBEdit will place insertion point after inserting glossary entry; if multiple #INSERTION# placeholders are used, second and subsequent occurrences are replaced with “#•#”, which can be used with Find Placeholder in the Find menu #NAME# User name defined in the Sharing Setup or File Sharing control panel #SCRIPT name# Runs the OSA script specified by name, inserting the result into the glossary entry #SELECT# Selected text #SELSTART# and #SELEND# Used to mark a range within the inserted material which will be selected after the insertion is complete #TIME# Current time (formatted according to your Date & Time control panel preferences) #UUID# Universally Unique Identifier. 128-bit value guaranteed to be unique. A UUID is made unique over both space and time by combining a value unique to the computer on which it was generated (usually the Ethernet hardware address) and a value representing the number of 100nanosecond intervals since October 15, 1582. Placeholders are not case-sensitive. If you want to include a literal placeholder in a Glossary entry, escape the first # with a backslash, as in \#DATE#. 216 Chapter 12: Using the Glossary Suppose you have defined the following glossary entry: typedef struct #select# { #insertion# } #select#, *#select#Ptr, **#select#Handle; If the selected text in your editing window is MyStruct and you insert this glossary entry, this is what BBEdit inserts in the editing window: typedef struct MyStruct { | } MyStruct, * MyStruct Ptr, ** MyStruct Handle; (The blinking insertion point will be at the position indicated by the vertical bar in the text above.) Using OSA Scripts with the Glossary The keyword #script filename# provides a powerful means to insert variable or conditional content by allowing access to any compiled OSA script from a Glossary item. The script itself can either be located in the same folder as the glossary item which calls it, in which case you need only specify its name, e.g. “MyDateScript”, or you can supply a full pathname to a script on any mounted volume, e.g “Hard Drive:My Project:Scripts:MyDateScript”. An instance of a keyword referencing the latter would be: #script Hard Drive:My Project:Scripts:MyDateScript# The script must return a text string (or a value that can be coerced to a string). This result string can itself contain additional Glossary keywords, which will be interpreted before the entry is placed into the current document. Warning It is possible to call additional scripts in this manner by nesting them with the first; however, you should take care not to create a script execution loop, which would hang your system. Using OSA Scripts with the Glossary 217 218 Chapter 12: Using the Glossary CHAPTER 13 Scripting BBEdit BBEdit offers access to nearly all of its features and commands via any OSAcompliant scripting language, such as AppleScript or UserLand’s Frontier. This chapter provides a brief overview of AppleScript, discusses BBEdit’s scripting model, and explains how you can use scripts within BBEdit. An excellent way to learn how to script BBEdit is to look at the scripts others have written for it, or to turn on recording in your script editor while you perform actions in BBEdit. A number of example scripts are included in the Documentation folder. The BBEdit-Talk mailing list is also a good resource for learning more about scripting. To subscribe to this list, please visit the support section of our Web site, which offers you the option to sign up directly. http://www.barebones.com/support/lists.html In this chapter Verba Sapientia . . . . . . . . . . . . . . . . . . . . . . . . . . . . . . . . . . . . . . . . . . . . 219 AppleScript Overview . . . . . . . . . . . . . . . . . . . . . . . . . . . . . . . . . . . . . . 220 About Macintosh Scripting – 220 Scriptable Applications and Apple Events – 220 Recordable Applications – 221 Saving Scripts – 222 Using Scripts with Applications – 222 Scripting Resources – 222 BBEdit and AppleScript . . . . . . . . . . . . . . . . . . . . . . . . . . . . . . . . . . . . . 224 Recording Scripts for BBEdit – 224 Reading an AppleScript Dictionary – 226 Sample Scripts – 230 AppleScript Pitfalls – 230 Moving Scripts to BBEdit 6 – 231 Working with Scripts . . . . . . . . . . . . . . . . . . . . . . . . . . . . . . . . . . . . . . . 237 The Scripts Menu – 237 Manually Sorting the Scripts List – 238 Attaching Scripts to Menu Items – 238 Verba Sapientia Important Beginning with version 6.0, many facets of BBEdit’s scripting support have changed substantially, and we recommend that you review the following sections on “BBEdit and AppleScript” and “Working with Scripts” carefully regardless of whether you are new to scripting BBEdit or are familiar with scripting previous versions. 219 AppleScript Overview If you are familiar with AppleScript, you should have little difficulty scripting BBEdit. It has a robust and highly flexible object model. If you don’t know much about scripting, though, read on for an introduction to the necessary concepts. About Macintosh Scripting In System 7 Pro, Apple introduced the Open Scripting Architecture (OSA), and with it AppleScript. OSA and AppleScript became a standard part of the Macintosh experience, and both have been with us ever since. Note AppleScript is by far the most popular OSA language, but there are others, including UserLand Frontier and a relatively new JavaScript implementation. Most OSA languages are capable of accomplishing more or less similar things, although the actual commands to do so are usually very different from one language to the next. In this chapter, we will focus on AppleScript, since it’s the scripting language that comes with the Mac OS. However, BBEdit can be scripted by any OSA language, and we will use “OSA script” and “AppleScript” interchangeably in this chapter just to remind you of that. Unlike macro utilities such as QuicKeys or Keyquencer, OSA scripts do not (with occasional exceptions) manipulate an application’s user interface. In other words, an OSA script does not operate by pretending it’s a user, pulling down menus, clicking with the mouse, and typing on the keyboard. It is technically possible for an OSA script to do so, but this is not the primary use for scripts. OSA scripts talk directly to a program’s internals, bypassing its user interface and allowing scripts to interact directly with its data or facilities. If you wanted to insert some text into a document, emulating a user typing into the application’s window is just about the least efficient way of accomplishing this imaginable; with AppleScript, you’d just tell the application to insert the text directly. If you wanted the application to save the frontmost document, you wouldn’t mime selecting Save from the File menu, but rather just tell the application to save document 1. Scriptable Applications and Apple Events Since OSA scripts must have direct access to an application’s internal data structures, any application that will be used in an OSA script must be designed to allow this access. We say such applications are scriptable. BBEdit is scriptable, as are many, many other programs. However, it’s important to note that not every application is scriptable, and OSA scripts aren’t the best solution for automating applications that aren’t. What goes on in an application that’s scriptable? The foundation of OSA scripting is something called the Apple Event. Macintosh applications are designed around an event loop; they go around in circles waiting for you, the esteemed user, to do something (select a menu command, press some keys, etc.). These actions are passed to the application by the operating system in the form of an event. The application decodes the event to figure out what you did, then performs an appropriate operation. After an event has been handled, the application goes back to waiting for another one. (At this point, the Mac OS may decide to give some time to another application on your computer.) 220 Chapter 13: Scripting BBEdit Apple Events are special events that applications send to each other, enabling a feature called inter-application communication (IAC). (It’s a mouthful, but it just means applications can talk to each other.) Apple Events are also the way OSA scripts tell applications what to do, and which data to retrieve. So to be scriptable, an application must first support Apple Events. Apple Events in their naked form are raw and cryptic things—bits of hieroglyphics only a programmer could love. So a scriptable application also has a scripting dictionary. The scripting dictionary tells any application that lets you write OSA scripts (like the Script Editor that comes with the Mac OS) the English-like equivalent for each Apple Event and each event’s parameters. It’s important to note that because Apple Events were originally designed to allow applications to communicate with each other, OSA scripts automatically inherit the ability to talk to more than one application. It’s common in the publishing industry, for instance, to write scripts that obtain product information from a FileMaker Pro database and insert it into a QuarkXPress file. This integration is one of the Mac OS’s primary strengths. You use AppleScript’s tell verb to indicate which application you are talking to. If you are only sending one command, you can write it on one line, like this: tell application "BBEdit 6.5" to count windows If you are sending several commands to the same application, it’s more convenient to write it this way: tell application "BBEdit 6.5" count windows repeat with x from 1 to the result save window x end repeat end tell Apple’s Script Editor automatically indents the lines inside the tell block for you so you can more easily follow the organization of the script. Recordable Applications Once an application accepts Apple Events, it actually makes a good deal of sense for an application to be designed in two parts: the user interface that you see, and the “engine” that does all the work. (An application designed this way is sometimes said to be factored.) The user interface then communicates with the engine via Apple Events. The design of the Apple Event system makes it possible to “record” events into a script. This feature not only lets you automate frequently-performed tasks with little hassle, it also can be an enormous aid in writing larger and more complicated scripts, because the application tells you what events and objects to use for the kind of task you record. Because of the important recording functionality they enable, applications that have been factored and use Apple Events to let the two halves communicate are said to be recordable. It’s important to note that not all scriptable applications are recordable. AppleScript Overview 221 Saving Scripts Any OSA script can be saved in what’s called a compiled script file. A compiled script file contains the actual Apple Events; by generating these events when you save the file, the OSA language doesn’t have to convert your English-like commands into events each time you run the script, which means it loads faster. When double-clicked in the Finder, a compiled script file automatically opens in the Script Editor, where it can be run. A script can also be saved as a stand-alone application, or applet, in which case doubleclicking the script’s Finder icon automatically runs the script. Both types of files can be saved with or without the English-like source code; if you save it without the source code, other users you give the script to won’t be able to make any changes to it (of course, you should also keep a copy of the script with the source for yourself). Using Scripts with Applications Although you can place a script applet in your Apple menu, or on your Finder desktop, and use it any time you need it, many applications (including BBEdit) provide a special menu that lets you launch compiled scripts intended specifically for use with that one application. Since you don’t have to save them as applets, they take up less disk space and launch more quickly. They also show up only in the application you use them with, rather than cluttering your Apple menu. Some applications go even further, allowing you to define scripts to be run when certain things happen in the program. For example, an application might let you define a script to be executed when the user chooses any menu item. The script might then perform some pre-processing, then exit by telling the application whether to continue with the menu command or to cancel it. As a simple example, a script might check to see what printer is selected when the user chooses the Print command. If it’s the expensive color dye-sublimation printer, on which printing a page costs several dollars, the script could remind the user of that fact and confirm their intention (through an alert) before continuing with the print operation. An application that supports such a feature (or any method of integrating user-written scripts seamlessly into its user interface) is said to be attachable, because the scripts become “attached” to the features of the program. (BBEdit is now attachable; more details about using this feature are provided later in this chapter.) Scripting Resources Covering all the details you might need to write your own AppleScripts is not something we can reasonably do in this manual. AppleScript, despite its deceptively simple English-like syntax, is a sophisticated object-oriented language with many subtleties. For this reason, we suggest you consult supplemental documentation and resources if you are a beginning scripter. A good place to start is with someone else’s script: find a script that does almost what you want it to and repurpose it. Even if you can’t find a script that does anything close to what you want, reading others’ scripts is a good way to get a handle on the way AppleScript “thinks” and how BBEdit’s particular AppleScript implementation behaves. 222 Chapter 13: Scripting BBEdit In addition to the basic AppleScript documentation included with a standard Mac OS installation. You may find the following resources useful in your quest to understand scripting: Books Goodman, Danny: Danny Goodman’s AppleScript Handbook, Second Edition (iUniverse, 1998) Trinko, Tom: AppleScript for Dummies (IDG Books, 1995) Mailing Lists AppleScript Users http://www.lists.apple.com/applescript-users.html The official list for AppleScript users run by Apple Computer. BBEdit-Talk, BBEdit-Scripting http://www.barebones.com/support/lists.html The discussion lists for BBEdit often cover BBEdit-specific scripting topics and are a good place to ask questions about BBEdit’s AppleScript implementation. Mac Scripting http://www.its.unimelb.edu.au/hma/pub/macscrpt/ Unofficial list covers AppleScript and other Macintosh scripting languages, with occasional forays into peripheral topics. Web Sites AppleScript at Apple Computer http://www.apple.com/applescript/ This is the starting point for AppleScript from the people who invented it. Includes a tutorial and a good amount of technical information. The AppleScript Sourcebook http://www.AppleScriptSourcebook.com/ An extensive collection of links and articles about AppleScript. AppleScript Primer http://www.maccentral.com/columns/briggs.shtml MacCentral columnist Bill Briggs offers an ongoing series of lessons for beginning scripters. Quite a range of topics covered, increasing in difficulty as time goes on. Note that the oldest columns are on the bottom. MacScripter.Net http://macscripter.net/ and http://osaxen.com/ A good selection of AppleScript-related news and topics, including “MacScripter’s Magazine” (a standalone multimedia tutorial for AS beginners), and a very comprehensive list of scripting additions on its related site. AppleScript Overview 223 ScriptWeb http://www.scriptweb.com/ This site covers all scripting languages, not just AppleScript. Also, it has an extensive directory of scripting additions. Software FaceSpan http://www.facespan.com/ FaceSpan lets you create real Macintosh applications using AppleScript. It includes a visual development environment that lets you create your user interface, to which you then attach scripts. PreFab Player http://www.prefab.com/player.html This handy utility allows you complete control over the Macintosh user interface, allowing you to script even unscriptable applications to a degree. Script Debugger http://www.latenightsw.com/ Despite the name, it’s more than a debugger; it’s actually an enhanced replacement for Apple’s Script Editor, featuring variable monitoring, step/trace debugging, an object browser for an application’s objects, and much more. Scripter http://www.mainevent.com/scripter.html The original enhanced script editor for the Macintosh, Scripter also features extensive debugging capabilities and also comes with ScriptBase, a database that lets you easily store large data items persistently. BBEdit and AppleScript BBEdit has been scriptable for years, though we have continually worked to improve its level of scripting refinement. BBEdit has long provided access to scripts in its menu bar and, more recently, through a floating Scripts palette. In BBEdit 5.0, many BBEdit plug-ins became scriptable, as did the HTML authoring tools. BBEdit now takes a further step forward, by being both attachable and recordable. (See the following section “Attaching Scripts to Menu Items for complete details on BBEdit’s attachability.) Important Recording Scripts for BBEdit Any language is easier to read than to write, easier to understand than to speak. AppleScript is no different. That’s because, even though all the commands it uses are English words arranged in ways that more or less make grammatical sense, you still have to know (or find out from the application’s dictionary) exactly which words to use, and what order they should go in. But it’s easy to get started making scripts by recording them. 224 Chapter 13: Scripting BBEdit First, launch both BBEdit and the Script Editor. (If you don’t know where your copy of the Script Editor is, use Find File or Sherlock to locate it. If you don’t have it—maybe you deleted it because you thought you’d never use it—just re-install it from your Macintosh system software CD.) When you launch the Script Editor, a new, blank script window appears. Click the Record button, circled in the illustration below. Now switch to BBEdit and perform your task. Remember that the Script Editor is recording everything you do in every recordable application you are running, not just BBEdit. If you do something in the Finder, for instance, that will get recorded too. Since almost everything you do is recorded, remember that if you make an error, and then Undo it, your recorded script will faithfully make the same mistake and undo it when you run it later. It will be possible to fix minor errors later, but things always go more smoothly if you don’t make any mistakes, so take your time and try to do it right the first time. Now switch back to the Script Editor and click the Stop button. After a brief pause, your script is compiled and ready for use. Try clicking the Run button to see it work. (It might not work correctly. If you recorded a search and replace operation changing every “cat” to “dog”, you already changed the document while recording the script, and of course the script won’t do anything when you run it.) Next, let’s save the script in the BBEdit Scripts folder so it shows up in BBEdit’s script menu. Choose Save As from the File menu, then use the Script Editor’s Save dialog to put the script in your BBEdit Scripts folder. Now try selecting it from the script menu in BBEdit. BBEdit and AppleScript 225 Reading an AppleScript Dictionary To display an application’s AppleScript dictionary, you can simply drag that application onto the Script Editor icon, or use the Script Editor’s Open Dictionary command. As we noted earlier, all scriptable applications include a dictionary that tells AppleScript how to convert English-like commands into the Apple Events actually expected by the application. The Script Editor uses this same information to display a sort of “vocabulary guide” that helps you write your scripts. we will naturally use BBEdit’s dictionary, shown below, to illustrate how to read a dictionary. You may want to make the window bigger if you have room on your screen. It’s kind of small by default. Down the left side is a list of every event and object supported by the application. An event is a verb—it tells the application what to do. A class is a noun: a piece of data, or a structured collection of data, inside the program. In BBEdit, for instance, classes are things like files, windows, the clipboard, browsers, and so on. Suites The first thing you will notice is that the events and classes are divided into suites. A suite is just a collection of related events and classes. Apple, for instance, has decreed that all applications should support particular events, which together are called the Required Suite. Another Apple-defined suite is the Standard Suite: if an application has certain common functions, they should use these standard terms, so that scripters don’t need to learn a new term for each application they work with. After that, it’s a free-forall—each developer is free to organize their events and classes however they think best. In addition to the Required and Standard suites, BBEdit has a Miscellaneous suite, a BBEdit Suite, a Text suite, and an HTML Scripting suite. If you have the appropriate software installed, you will also see the MacPerl Scripting suite, and the Projector Scripting suite. Additionally, if you have any scriptable plug-ins installed (as many of the supplied ones are), you will see additional suite entries for each such plug-in. 226 Chapter 13: Scripting BBEdit Within each suite, events—verbs—are displayed in normal text, while classes— nouns—are italicized. Most commands sent to BBEdit will start with one of the verbs. (In some cases, get might be implied.) Events Let’s look more closely at one of the events—Save is a good one to start with. It’s shown below. The right side of the window shows the syntax of the selected event, as well as a brief description of its function. The boldface words are keywords; they must be included exactly as shown or the script won’t compile. The normal text tells you what kind of information goes after each keyword. For example, after save you must give a reference; the italicized comment next to that line indicates that it’s a reference to the window to be saved. In other words, some window object, which in BBEdit would be window 1 for the frontmost window, or window "Text File" if you want to specify a window by name. (we will show you how to figure all that out in a moment—you have to look at the window class’s dictionary entry.) Anything in square brackets is optional. Most of the rest of the save event is optional, in fact. The basic event just saves the frontmost window to the same file from which it was opened. However, you can also optionally include the word to followed by a file reference. (You specify a file simply by using the word file followed by the path name of the file, as in file "Macintosh HD:Desktop Folder:My file".) If you specify a file to save the window to, the text will be saved into that file instead of the file it came from—like using Save As instead of Save. The last three optional parts of the save event are denoted as boolean. That means they take either a true or a false value. In AppleScript, there are a couple of different ways to specify boolean values. You can write saving as stationery true to tell BBEdit to save the file as a stationery document. Or you can write with saving as stationery. You will notice that the last two parameters default to true if you don’t specify them as false. To do that, you’d use add to recent list false or without add to recent list. Whichever way you write it, you will notice that when you compile the script, AppleScript rewrites it using “with” or “without”. Since that’s the syntax AppleScript seems to like best, that’s probably the one you should get used to thinking in. Let’s take a look at another one: the prosaic get. Select get from BBEdit’s dictionary listing and take a quick look at its class definition.You use get to retrieve information from an application. You must specify a reference to the object you want to retrieve, and you can specify a coercion—a condition that tells AppleScript to treat one type of data as if it were another—by adding the as clause. However, after that is the Result: BBEdit and AppleScript 227 line, which we haven’t seen before. This line tells you what type of value the command returns. (This value is placed in the AppleScript system variable called the result.) Get can retrieve any kind of object, so it can return anything, as indicated here. Other events might return a specific type of result, or none at all. (Save didn’t have a Result: line in its dictionary entry, which means it doesn’t return a result.) Classes and the Class Hierarchy Let’s look now at a typical class definition: window will do nicely. It’s in the BBEdit Suite, toward the bottom. All windows in BBEdit belong to this class. A class defines a particular kind of object; a particular example of an object belonging to the class is said to be an instance of that class, or just an object of that class. So here we are looking at the class itself; each individual window object has all these properties. After a tag line that tells you about the class (“an open window”) comes the plural form. AppleScript lets you refer to windows either singly or as a group, so it needs to know what the plural of every term is. For example, try this little script: tell application "BBEdit 6.5" to count windows The result of this script is the total number of window objects currently displayed by BBEdit. After the plural form comes a list of properties. Some objects don’t have properties— for example, a string—but many applications do. An object’s properties are merely a collection of data that describes that particular object. For example, as you look down the list of window properties, you will see that every window has a name, every window has a position, every window has bounds (the area of the screen it covers), and so on. 228 Chapter 13: Scripting BBEdit The first item on the list, though, is <inheritance> item. This tells you that a window is a kind of item, and that it therefore has all the properties of an item. Take a quick look at item’s class definition, shown below. You will see three properties: properties, ID, and container. The first entry properties is a record containing all the object’s properties. In other words, because a window is an item, it has, in addition to all its listed properties, another property which returns all the other properties as a record—a single piece of data that can be stored in a variable. Every class in BBEdit is part of a hierarchy with the item class at the top, so every object in BBEdit “inherits” the properties property. This catch-all property can be handy for making exact duplicates of objects, among other uses. You may realize that BBEdit has several kinds of windows; you can see their classes listed in the dictionary: clipboard window, differences window, disk browser window, file group window, text window, tool window, and the like. Let’s look at text window: BBEdit and AppleScript 229 You can see that a text window inherits all the properties of the window class. And, since the window class inherits all the properties of the item class, this means that the text window class also has the properties property defined by the item class. To make explicit what you might have already gathered, classes in AppleScript form a hierarchy. That is, classes can be based on other classes. Such a class is called a subclass, and the class on which a subclass is based is referred to as its parent class. (In AppleScript, classes can only have one parent. Multiple inheritance is a feature found in more complex languages.) The idea of a class hierarchy makes it easier for us to add new features to BBEdit, since when we want to create a new kind of window, half the work is already done. However, when scripting, you may need to flip back and forth between two or more class definitions to find all the properties of the object you are working with. (This is, technically speaking, a limitation of Apple’s Script Editor. There’s no reason the inherited properties couldn’t automatically be included in a subclass listing by a smarter editor, for example, Script Debugger, which does this.) Now that we’ve got the class hierarchy under control, let’s look at the properties themselves more closely. we will stick with the text window class at this point. Properties of an object are referred to using the preposition of. For example, the following line of script returns the font of the frontmost text editing window. tell application "BBEdit 6.5" to get display font of text window 1 Note You can in fact just write get display font of window 1. AppleScript will figure out that window 1 is more specifically a text window, and therefore has a display font property, even though the generic window class doesn’t have any such property. All the properties of the object are available even if you didn’t use its specific class name. You can set the properties using the set event, like so: tell application "BBEdit 6.5" to set display font of text window 1 to "Geneva" Let’s go back to the window class for a moment. Most of the properties of this class are marked with the abbreviation [r/o]. That stands for Read-Only. In other words, you can only get these properties, not set them. Sample Scripts BBEdit includes a selection of sample scripts (in the BBEdit Documentation folder), all of which contain descriptions of their own operation. To learn more about a sample script, just open it in your preferred script editor. You can also check our Web site for more sample scripts. AppleScript Pitfalls Here are some things to watch out for when scripting BBEdit with AppleScript. 230 Chapter 13: Scripting BBEdit The Escape Issue AppleScript uses the backslash character as an escape character. You can use \r to indicate a carriage return or \t to indicate a tab character. More importantly, you can use \" or \' to include a quote mark or apostrophe in a string that’s delimited by quotes or apostrophes. If you want to specify a real backslash, you must write \\. That’s not all that confusing until you start writing AppleScripts that call on BBEdit’s powerful grep searching capability. BBEdit also uses the backslash as an escape character. If you want to search for an actual backslash in a document, you have to tell BBEdit to search for \\. However, if you do that in AppleScript, you must keep in mind that AppleScript will first interpret the backslashes before passing them to BBEdit. To pass one backslash to BBEdit from AppleScript, you must write two in AppleScript. So to tell BBEdit to search for a single literal backslash from an AppleScript, you must write no fewer than four backslashes in the script. Each pair of backslashes is interpreted as a single backslash by AppleScript, which then passes two backslashes to BBEdit. And BBEdit interprets those two backslashes as a single one for search purposes. (This proliferation of backslashes can make your scripts look a bit like a blown-over picket fence.) The Every Item Issue When writing a script that loops through every item of a BBEdit object (for example, every line of a document), don’t do it like this: repeat with i in every line of document 1 -- do stuff here... end repeat This forces BBEdit to evaluate “every line of document 1” every time through the loop, which will slow your script significantly. Instead, write set theLines to every line of document 1 repeat with i in theLines -- do stuff here... end repeat More Memory When running scripts that work with large chunks of data, you may need to increase BBEdit’s memory allocation. When BBEdit runs a script, the script and its data are held in BBEdit’s application memory partition. Important Moving Scripts to BBEdit 6 As mentioned earlier, BBEdit’s scripting model has changed significantly from previous versions (before version 6.0). The good news is, it’s more powerful than ever. The bad news is, some of your existing scripts may need revision to work properly. This section provides a high-level overview of BBEdit’s scripting model; where appropriate, it will contrast the new scripting framework against previous versions of BBEdit. This will suggest how you can modify your existing scripts for compatibility with BBEdit 6.5. BBEdit and AppleScript 231 Note Because the scripting dictionary is always changing, it should be considered the definitive reference in situations where it and this document differ. We have found Script Debugger from Late Night Software to be an excellent tool for browsing and navigating BBEdit’s scripting dictionary. You can find out more at <http://www.latenightsw.com/>. ‘Lines’ and ‘Display_lines’ Starting with BBEdit 6.1, the “line” element refers to a “hard” line, that is, a stream of characters that begins at the start of file or after a line break, and which ends at the end of file or immediately before a line break. This is consistent with the previous semantics of “line” in hard-wrapped documents, and these semantics now apply in soft-wrapped documents as well. Important The new “display_line” element refers to a line of text as displayed on screen (bounded by soft and/or hard line breaks). The “startLine” and “endLine” properties of a text object now always refer to the “hard” start and end of lines. In other words, if a text object crosses multiple softwrapped lines, the startLine and endLine properties will be the same. The new “startDisplayLine” and “endDisplayLine” properties have been added to the text object class, and they provide the startLine and endLine semantics for softwrapped views from previous versions of BBEdit. Documents vs. Windows In previous versions of BBEdit, the object classes document and window could be used interchangeably, and generally had the same properties listed in the scripting dictionary. This is no longer the case, and this constitutes one of the biggest differences between BBEdit 6.5 and pre-6.0 versions of BBEdit. The class window now corresponds to a window on screen, and thus the properties of the window class now refer strictly to properties of a window on screen. If a document is associated with a window, then the document is accessed as the document property of the window: document of window 1 The class document now refers to a document, and as with a window, the document’s properties pertain strictly to the condition of a document (i.e. something that can be saved to disk and opened later). Note that this does not mean a document must be saved to a file, only that it could be. As a rule, documents and windows are associated with each other, but it’s important to remember that there is not a one-to-one correspondence between windows and documents. For example, the About box is a window which has no document associated with it. Furthermore, in current versions of the application, there is no such thing as a document with no associated window. Here is a general overview of the object classes used in BBEdit: Classes of Windows • window: the basic window class contains properties that can be fetched and set for any window on screen: position, size, and so forth. 232 Chapter 13: Scripting BBEdit • palette: the palette class refers to windows that float above all others on the screen; the HTML tools palette, scripts list, etc. • text window: the text window class provides properties which are specific to text-editing windows as on-screen entities. These properties pertain mostly to the display of text in the window: show invisibles, auto_indent, etc. In addition to the text-editing-specific properties, the basic window properties are also accessible. • group window: provides a way to reference windows corresponding to open file groups. A group window does not present any properties beyond the basic window class, but provides a way to differentiate file group windows from other types of window. • disk browser window: provides a way to reference windows corresponding to open disk browsers. A disk browser window does not present any properties beyond the basic window class, but provides a way to differentiate disk browser windows from other types of window. • results browser: provides a way to reference results generated by a batch operation. A results browser does not present any properties beyond the basic window class, but provides a way to differentiate results windows from other types of window. • search results browser: a subclass of results browser, referringspecifically to the results of a single-file Find All command or a multi-file search. Classes of Document As with windows, there are various classes of document: • document: the basic document class contains properties that apply to any sort of document: whether it has unsaved changes, the alias to the file on disk, etc. • text document: text documents contain information specific to text files opened for editing in BBEdit. The text document class provides much greater access to document properties than before; a text document’s Projector state is now accessible, for example, and properties are generally much more consistent. • group document: refers to a document corresponding to an open file group. A file group document doesn’t present any properties beyond the basic document class, but provides a way to differentiate file group documents from other types of document. • picture document: refers to a document corresponding to an open picture file. A picture document doesn’t present any properties beyond the basic document class, but provides a way to differentiate picture documents from other types of document. • movie document: refers to a document corresponding to an open QuickTime movie file. A movie document doesn’t present any properties beyond the basic “document” class, but provides a way to differentiate movie documents from other types of document. BBEdit and AppleScript 233 • QuickTime document: refers to a document corresponding to an imported Quicktime image file. A QuickTime document doesn’t present any properties beyond the basic “document” class, but provides a way to differentiate QuickTime documents from other types of documents. Getting and Setting Properties One significant improvement in BBEdit’s new scripting framework is the ability to get and set multiple properties of an object with a single scripting command. Every object has a property called properties. This property returns a record which contains all of the properties which can be fetched for that object. For example, the script command properties of text window 1 will return a result like this one: {id:241732, container:application "BBEdit 6.5", bounds:{278, 45, 918, 861}, closeable:true, index:1, modal:false, file:file "Files:WebSite:index.html", modified:true, name:"index.html", position:{278, 45}, resizable:true, selection:"some text", text:text 1 of text window 1 of application "BBEdit 6.5", titled:true, visible:true, zoomable:true, zoomed:false, display font:"ProFont", display font size:9, style:{plain}, tab width:4, auto indent:true, auto balance:true, smart quotes:false, show invisibles:false, expand tabs:false, soft wrap text:false, soft wrap mode:Philip bar, soft wrap width:72, show spaces:true, show status bar:true, show philip bar:true, show tab stops:false, show cursor position:false, show function position:false, show line numbers:false, color syntax:true, split proportion:0} Conversely, to set one or more properties at once is very easy: set properties of text window 1 to { show invisibles: true, show spaces : true, soft wrap text : true } Only the properties specified will be changed. The rest will not be modified. It is important to note that when setting properties in this fashion, you can only set modifiable properties. If you attempt to set any read-only properties, a scripting error will result: set properties of text window 1 to { show invisibles: true, modal: false, expand tabs: true } The above script command will turn on Show Invisibles and then report a scripting error, since modal is a read-only property. Scripting Searches Scripting searches with BBEdit 6.5 is fundamentally different from pre-6.0 versions, and significantly more powerful, while being much easier to use. Consider the scripting command below: tell application "BBEdit 6.5" find "BBEdit(.+)$" searching in window 1 options ¬ { search mode: Grep } with selecting match end tell 234 Chapter 13: Scripting BBEdit In previous versions, the find command always operated on the front window. Now, you must explicitly specify the text to be searched, either by specifying an explicit tell target, or by supplying a searching in parameter. So the following scripts are equivalent: tell application "BBEdit 6.5" find "BBEdit" searching in window 1 end tell and tell application "BBEdit 6.5" tell window 1 find "BBEdit" end tell end tell Note that either the tell-target or the searching in parameter must resolve to something that contains text. As a shortcut, you can specify a window, and if the window contains text, the search can proceed. You can also specify a text object: find "Search Text" searching in (lines 3 thru 5 of window 2) Also unlike previous versions of BBEdit, the defaults for parameters not specified in the find command are no longer controlled by the user interface (i.e. the Find dialog). When performing a find, BBEdit will return a record describing the results of the search. This record contains a Boolean which indicates whether the search was successful, a reference to the text matched by the search, and the text string matched by the search. Given the first example above, the results might look like this (after reformatting for clarity): { found:true, found object:characters 1 thru 23 of text window "BBEdit Scripting Notes" of application "BBEdit 6.5", found text:"BBEdit Scripting Notes" } Given the above and BBEdit’s improved support for the text object model, the singleoccurrence replace is now obsolete. Instead, to do a single find and replace via AppleScript, you can write: tell application "BBEdit 6.5" set result to (find "BBEdit" searching in window 1¬ with selecting match) if (found of result) then set text of (found object of result) to "Replacement" end if end tell BBEdit and AppleScript 235 When performing a grep search, you can’t just replace the matched pattern with a replacement string; the grep subsystem needs to compute the substitutions. The grep substitution event is provided for this purpose; given a preceding successful Grep search, it will return the appropriate replacement string. So if you perform a grep search, the script would look like: tell application "BBEdit 6.5" set result to find "BBEdit(.+)$" searching in window 1 ¬ options {search mode:grep} if (found of result) then set text of (found object of result) to ¬ grep substitution of "\\1" end if end tell Note that when using a backslash “\” character in AppleScript, it needs to be “escaped” by means of another backslash; thus, in the above example, “\\1” used in the script, will become the grep replacement string “\1” when passed to BBEdit. Scripting Multi-File Searches In BBEdit 6, a multi-file search is a simple extension of the find scripting command. To search a single file or folder for all occurrences matching the search parameters, specify the file or folder as the searching in parameter of the search. For example, to find all occurrences of “index.html” in a web site, one might use the following scripting command: find "index.html" searching in (alias "Files:WebSite:") Likewise, to find JavaScript line comments: find "//.+$" searching in (alias "Files:WebSite:") ¬ options {search mode: Grep} To search in a single file: find "crash" searching in (alias "Files:WebSite:index.html") Scripting the Clipboard BBEdit now has multiple clipboards. These are fully accessible via the scripting interface. Most operations (due to the way Mac OS works with respect to clipboard data) require the application to be frontmost. Here are some examples: count clipboard • Returns the number of clipboards supported by the application clipboard 1 • Returns {index:1, contents:"Files:WebSite:", length:14, is multibyte:false, display font:"ProFont", display font size:9, style:{plain}} clipboard 1 as text 236 Chapter 13: Scripting BBEdit • Returns "Files:WebSite:" clipboard 1 as reference • Returns clipboard 1 of application "BBEdit 6.5" current clipboard • Returns the current clipboard as a record (you can coerce it to reference or text or get individual properties) To set the text in a given clipboard to literal text: set contents of clipboard 3 to "foobar" To set the text in a clipboard to text represented by an object specifier: set contents of clipboard 3 to selection of window 2 To copy the contents of one clipboard to another: set contents of clipboard 5 to clipboard 3 or, to set the current clipboard to the contents of a different clipboard, (thus making it exportable to the system clipboard): set current clipboard to clipboard 3 as text or finally, with even less typing involved: set current clipboard to clipboard 5 To make any clipboard the current clipboard, select it: select clipboard 5 Working with Scripts The Scripts menu (left) in BBEdit’s menu bar contains several commands. It also lists all OSA scripts present in the Scripts folder within the BBEdit Support folder, providing a quick way to access frequently-used scripts. You can place scripts within sub-folders (up to 4 levels deep) of the Scripts folder to organize them. Note Scripts written for use in the menu should be saved as compiled script documents, not script applications. The Scripts Menu In addition to the list of available scripts, the Scripts menu provides the following commands. Open Script Editor Choose this item to switch to your preferred AppleScript editor (as chosen in the Tools panel of the Preferences). If the script editor is not running, BBEdit launches it. Open Scripting Dictionary Choose this item to switch to your preferred AppleScript editor and open BBEdit’s scripting dictionary for viewing. If the script editor is not running, BBEdit launches it. Working with Scripts 237 Start Recording Select this item to record all available actions that you perform within BBEdit (or any other recordable applications which you switch to). When this command is active, the menu item will change to Stop Recording, and a tape icon will flash over the Apple menu. When you choose Stop Recording, BBEdit will display a Save dialog which allows you to save a script file containing the recorded actions. new in 6.5 Scripts Palette The Scripts List command, which opens a floating window listing the available scripts, is now located in the Palettes submenu in the Window menu. Manually Sorting the Scripts List By default, items in the Scripts List are displayed in alphabetical order. However, you can force them to appear in any desired order by including any two characters followed by a right parenthesis at the beginning of their name. (For example “00)Save All” would sort before “01)Close All.”) For such files, the first three characters are not displayed in BBEdit. You can also insert a divider by including an empty folder whose name ends with the string “-***”. (The folder can be named anything, so it sorts where you want it.) These conventions are the same as those used by the utilities FinderPop and OtherMenu. Attaching Scripts to Menu Items BBEdit now lets you attach scripts to menu items. By this, we mean that you can write scripts that BBEdit automatically calls before or after performing a menu command. For example, if you want BBEdit’s Open From FTP Server command to launch your favorite FTP client, you can simply attach a script to that menu item. Scripts can return a value that tells BBEdit whether to continue with the command that was selected, or to cancel the operation (in which case only the script is executed). Scripts attached to BBEdit menu items are stored in the Menu Scripts folder, which should be inside the BBEdit Support folder. These files should be compiled scripts, not script applications. Scripts are named to indicate which menu item they go with: first the name of the menu (or the submenu) upon which the item is immediately located, then a bullet “•” (Option-8) character, then the name of the menu item. For example, to attach a script to the Open From FTP Server menu item, you would name it “File•Open From FTP Server”, while to attach a script to the New Document menu item, you would name it “New•Text Document”. Some of BBEdit’s menus have icons rather than names. BBEdit uses the following names for its icon menus: Scripts, MacPerl, Projector, ToolServer, Compiler, and Internet. Furthermore, the New With Stationery submenu is named Stationery for purposes of attachability; similarly, the Perl Scripts and Perl Filters menus are named Perl Scripts and Perl Filters, respectively. 238 Chapter 13: Scripting BBEdit When you choose a menu item with an attached script, BBEdit runs its MenuSelect handler, if it has one, passing it the menu name and item name of the selected menu item as parameters. If no MenuSelect function is present, BBEdit executes the script’s run handler. The MenuSelect handler can return a boolean value to indicate whether BBEdit should continue by performing the action usually invoked by the menu command (“false” means yes, “true” means stop after executing the script). If MenuSelect returns false, BBEdit will call the script’s PostMenuSelect handler, if it has one, after it performs the menu command. Here is a simple example, which adds a confirmation dialog to the Quit command (addressed as “File•Quit”). Note that we test the menu and item names to make sure the script is attached to the Quit command—if it’s attached to some other command, it does nothing. on MenuSelect(menuName, itemName) if menuName = "File" and itemName = "Quit" then display dialog "Are you sure you wish to quit?" ¬ buttons {"Yes", "No"} default button {"No"} if the button returned of the result is "No" then return true else return false end if end if end MenuSelect Working with Scripts 239 240 Chapter 13: Scripting BBEdit CHAPTER 14 Working with Development Tools This chapter tells you how to set up BBEdit to work with development environments. You can use BBEdit with MPW’s ToolServer and SourceServer (Projector) and as an external editor for Metrowerks’ CodeWarrior. For Perl development, BBEdit integrates with MacPerl on Mac OS 9, and the native Perl environment on Mac OS X. On Mac OS X, you can also work with Python, run shell scripts, and access other Unix scripting tools, as well as use shell worksheet windows for frequently-used shell commands. In this chapter Configuring BBEdit for Development Environments. . . . . . . . . . . . . . . . 242 Syntax Coloring – 242 Working with Development Environments . . . . . . . . . . . . . . . . . . . . . . . 243 Switching Between Source and Header Files – 243 Shell Worksheets. . . . . . . . . . . . . . . . . . . . . . . . . . . . . . . . . . . . . . . . . . . 243 Default Worksheet Stationery – 245 Perl, Python, and Shell Scripting . . . . . . . . . . . . . . . . . . . . . . . . . . . . . . . 245 Using MacPerl on Mac OS 9 – 245 Using Unix Scripts on Mac OS X – 245 Language Resources – 246 Line Endings and Perl/Unix Scripts – 247 Camel/Shebang Menu – 247 Filters and Scripts – 250 Filters – 250 Scripts – 251 Additional Notes – 251 Working with Metrowerks CodeWarrior . . . . . . . . . . . . . . . . . . . . . . . . . 252 Using the CodeWarrior Menu – 252 Working with MPW . . . . . . . . . . . . . . . . . . . . . . . . . . . . . . . . . . . . . . . . 253 BBEdit and ToolServer – 254 BBEdit and Projector – 256 241 Configuring BBEdit for Development Environments Before you can use BBEdit with a development environment, you need to let BBEdit know which development environments you plan to use. Choose Preferences from the Edit menu to open the Preferences window. Select Tools from the list along the left side of the dialog. Click the check boxes to select the development tools you plan to use. (Note that some tools are only available under specific versions of Mac OS. More information can be found in Chapter 10.) If you made any changes in the default Tools options, click the Save button. Now, you must quit and relaunch BBEdit in order for these changes to take effect. Note BBEdit no longer supports Kodex, or the THINK C, THINK Pascal, and Symantec C++ environments. Syntax Coloring Although it’s not essential, you may want to turn on syntax coloring when you use BBEdit with a development environment. When syntax coloring is on, BBEdit displays keywords and other language elements in color. You can turn on syntax coloring by: • choosing Syntax Coloring from the Text Options pop-up menu in the status bar • selecting the Syntax Coloring option from the Text Options dialog box • setting the Syntax Coloring option in the Editor Defaults page of the Preferences (this sets the default for new windows) 242 Chapter 14: Working with Development Tools Working with Development Environments Once you have set up BBEdit for the development environments you plan to use, the development tools communicate with BBEdit to report errors and changes in files. You use the commands in the appropriate menu (the Compiler menu, the ToolServer menu, or the Camel/Shebang menu) to send instructions to the development environment. To switch to a development environment (or to launch it if it’s not running), choose it from the appropriate menu. When you choose the Compile command (or any other command that causes files in the project to be recompiled), the development environment temporarily becomes the active application. If there are any compilation errors, BBEdit creates a Compile Errors browser that you can use to examine the errors. Switching Between Source and Header Files When you edit a C or C++ source file, you can press Command-Tab or Control-Tab to switch to the corresponding header file and vice versa. BBEdit uses the information in the Languages page of the Preferences window to determine whether a file is a source or header file. Note The Application Switcher control panel, or the Dock on Mac OS X, will intercept CommandTab keystrokes by default. Because of this, you can also use Control-Tab to switch between source and header files. Shell Worksheets new in 6.5 When running on Mac OS X, BBEdit 6.5 now allows you to store and execute Unix command lines by means of a “Shell Worksheet”. There are two new commands in the New submenu in the File menu: “Shell Worksheet (/path/to/preferred/shell)”, and “Shell Worksheet…”. You can set the preferred shell in the Tools panel of the preferences. The pop-up therein lists the shells that are known to the system (and which actually exist). This preferred shell is listed next to the first “Shell Worksheet” command in the New submenu, so that you know which shell will be used. For situations in which you may want to use a different shell, you can use the “(New) Shell Worksheet...” command. This command brings up a dialog box listing the available shells; you can select whichever one you desire. Working with Development Environments 243 Using Worksheets To run a Unix command in a shell worksheet, type the command, and then press the Enter key or press Command-Return. (Keep in mind that Enter and Return are different keys; pressing Return by itself inserts a carriage return, and does not execute any commands.) The output of the shell command will appear below the line on which you typed Enter or Command-Return. Unlike a terminal, this does not have to be at the end of the document. With worksheets, you can type commands anywhere in the window, or place the insertion point back on a previously executed command to run it again. You can run more than one command at a time by selecting multiple lines and pressing Enter or Command-Return. The output will appear beneath the selected lines. You can delete and edit lines in a worksheet window just like you can in regular BBEdit text windows. Note If you select a string, only the exact selection range will be executed. Otherwise, the entire line that the insertion point is on will be executed (even if the insertion point is in the middle of that line). Keep in mind that shell worksheets are not terminal windows. If you have ever used MPW (or BBEdit’s MPW ToolServer Worksheet), you will probably feel right at home using shell worksheets. If you are only familiar with terminal emulators, however, you will find that shell worksheets work quite differently. Command-line-editing gestures don’t work, nor will any Unix commands which expect to be dealing with terminals (for example, try running “emacs” in a shell worksheet). When dragging files into a shell worksheet window, the behavior is different than when dragging files into regular text windows. An unmodified drag will insert the POSIX-style path of the dragged file at the drop location. (Multiple dragged files generate multiple paths, separated by carriage returns.) If you hold down the Command key while dragging, it will cause the file’s contents to be inserted (or a folder listing, if the item you are dragging is a folder). The default working directory for new shell windows is the user’s home directory. New shell windows are colored using the “Unix Shell Script” language. WARNING 244 If you are not familiar with Unix command line tools, we strongly urge you to obtain and read an introductory guide to using a Unix shell. Command line tools can be very useful, but if used incorrectly, they can render files, or even your entire system, unusable. Chapter 14: Working with Development Tools Default Worksheet Stationery When creating a new worksheet window, BBEdit will look for a worksheet stationery file named “Default Worksheet Stationery”. This file is located in the Stationery folder in the BBEdit Support folder. (See Chapter 2 for more information regarding the BBEdit Support folder.) If the default worksheet stationery exists, you will see the contents of this file in every new worksheet window you create. BBEdit 6.5 ships with a default worksheet stationery file that provides a small tutorial on using worksheet windows. When you grow tired of seeing this tutorial in every new worksheet, you can either remove the “Default Worksheet Stationery” file from the Stationery folder, or replace it with one of your own. Perl, Python, and Shell Scripting BBEdit 6.5 provides robust integration with Perl, Python, and Unix shell scripting languages. Previous versions of BBEdit understood Perl syntax and would color Perl source code appropriately. These versions could run Perl scripts, and provided support for special kinds of scripts known as filters, which operate on the text in a BBEdit document window, very much like BBEdit plug-ins. new in 6.5 When running on Mac OS X, BBEdit 6.5 extends the support provided in previous versions for Perl to encompass other Unix scripting languages, such as Python and shell scripts. Using MacPerl on Mac OS 9 On Mac OS 9 and earlier, BBEdit works with the Macintosh version of Perl, dubbed MacPerl. MacPerl is free software, and can be downloaded from the MacPerl web site. BBEdit can not run Python or Unix shell scripts when running on Mac OS 9, but it will provide syntax coloring and function browsing for files containing code in these languages. http://www.macperl.org/ BBEdit’s MacPerl features are accessed through the Camel menu, pictured at left. (Why a camel? Because the camel is both the official mascot of the Perl programming language, and also the Finder icon for the MacPerl application.) Using Unix Scripts on Mac OS X When running on Mac OS X, BBEdit works with the native Unix Perl tool. Starting with version 6.5, BBEdit now supports similar integration with Python, shell scripts, and any other Unix scripting language. The default Mac OS X installation includes Perl and several Unix shells (including tcsh and zsh). Python, however, is not installed by default. See the Python web site for download links and installation instructions. (Note that for integration with BBEdit, you will need the Unix-flavored version of Python for Mac OS X, not the Carbonized version of MacPython.) http://www.python.org/ Perl, Python, and Shell Scripting 245 BBEdit’s Unix shell scripting features—which encompass Perl, Python, shell, and any other Unix scripting language—are accessed via the new Shebang menu: “#!”. (Why “Shebang”? Because executable Unix scripts traditionally start with the two-character sequence “#!”. Some people pronounce these two characters “hash-bang”, others say “sharp-bang”, but the most common pronunciation is simply “shebang”.) The “shebang line” is the first line of the script, and includes a Unix-style path to the interpreter for the language. For example, “#!/usr/bin/perl”, or “#!/usr/local/bin/ python”. While BBEdit does not entirely depend upon the accuracy of the shebang line for Perl and Python files (if you have the correct language mapping set for the file contents), it is a good practice for these, and necessary for any other shell scripts, that the shebang line given must be a correct full path to the executable. BBEdit 6.5’s new Shebang menu completely supersedes the Camel menu, and encompasses the same commands. (Although some of the commands are not applicable to every scripting language, as noted below.) Language Resources Perl is an acronym for Practical Extraction and Report Language (or alternatively, Pathologically Eclectic Rubbish Lister) and was developed by Larry Wall. If you are interested in learning Perl, the quintessential Perl references are: Learning Perl (3rd Edition), by Randal L. Schwartz & Tom Phoenix. O’Reilly and Associates, 2001. ISBN: 0-596-00132-0 Programming Perl (3rd Edition), by Larry Wall, Tom Christiansen, Jon Orwant. O’Reilly and Associates, 2000. ISBN: 0-596-00027-8 The following are excellent Internet resources for the Macintosh implementation of Perl, and Perl in general: Perl.com from O’Reilly and Associates http://www.perl.com/ MacPerl.org http://www.macperl.org/ Perl and MacPerl Mailing Lists http://www.macperl.com/depts/mlists.html http://lists.perl.org/ Picking Up Perl, a freely redistributable Perl tutorial book by Bradley M. Kuhn http://www.ebb.org/PickingUpPerl/ comp.lang.perl.misc, comp.lang.perl.moderated Usenet news groups 246 Chapter 14: Working with Development Tools Python is a portable, interpreted, object-oriented programming language, originally developed by Guido van Rossum. If you are interested in learning Python, consider the following books: Learning Python, by Mark Lutz & David Ascher. O'Reilly and Associates, 1999. ISBN: 1-56592-464-9 Programming Python (2nd Edition), by Mark Lutz. O’Reilly and Associates, 2001. ISBN: 0-596-00085-5 Internet resources for Python: Python home page http://www.python.org Python Cookbook http://aspn.activestate.com/ASPN/Cookbook/Python comp.lang.python Usenet news group Line Endings and Perl/Unix Scripts To execute scripts, the script interpreter for any given language requires source code to be encoded with native line endings -- Mac line breaks for MacPerl, and Unix line breaks for Unix Perl and the other shell scripting languages on Mac OS X. BBEdit will automatically make sure that the script source sent to each interpreter matches its line ending expectations. This means that on Mac OS 9 and earlier, BBEdit will send scripts to MacPerl with Mac line endings, regardless of the line endings of the file on disk; and on Mac OS X, BBEdit will always send scripts to Perl, Python, and other script interpreters with Unix line endings. You can thus save your scripts and filters with whatever line breaks you choose, and BBEdit will do the right thing behind the scenes to make sure the interpreter for each language gets the line endings it expects. This also means that for Perl, the same scripts and filters will work on both Mac OS 9 and Mac OS X. Camel/Shebang Menu The commands in this menu are also available in a floating tool palette, called “Perl Tools” on Mac OS 9, and “Unix Tools” on Mac OS X. In either case, the palette is accessible via the Palettes submenu of the Window menu. Perl, Python, and Shell Scripting 247 Open MacPerl Available only on Mac OS 9, this command locates and launches the MacPerl application. At the first launch, the MacPerl application is located by its creator type. If you have more than one copy of MacPerl installed, this will usually find the version with the most recent modification date. If you prefer to use a different version of MacPerl, simply launch that copy of MacPerl yourself, via the Finder. If you hold down the Option key, this command changes to Open Shuck, and selecting it will launch Shuck, MacPerl’s helper application for viewing POD documentation files. Check Syntax Checks the syntax for the frontmost window. Errors are displayed in a standard BBEdit error browser (see Chapter 9, “Browsers”, for more details on working with error browsers). This command is only available for Perl scripts. Run Runs the script in the frontmost window by default. Any output from the script is displayed in a new BBEdit window. On Mac OS 9, this output window is titled “Perl Output”, and the file is created in the MacPerl Support folder in the BBEdit Support folder. On Mac OS X, the output window is titled “Unix Script Output”, and the file is created in the Unix Support folder in the BBEdit Support folder. By default, errors for Perl and Python scripts are displayed in an error browser; errors for other languages are displayed as text in the output window. Hold down the Option key while choosing Run to display the Run a Script dialog, which allows you to set options that will be used when the command is executed. Selection Only: Check this box to execute only the selected text in the frontmost document window. Save Before Running: Check this box to save the source file before running the script. Output to: Choose to display output in a new window, to direct it to the Perl/Unix Output file, or to write it to a file in the Logs folder in the Perl/Unix Support folder. Use Debugger: Check this box to run Perl scripts with Perl’s debugger. Run in Terminal/Run in MacPerl: On Mac OS X, this command runs the script in a new Terminal window. On Mac OS 9, it runs the script in MacPerl, and brings the MacPerl application to the foreground. 248 Chapter 14: Working with Development Tools Chdir to Script’s Folder: Check this box to set the working directory to the folder that contains the script before running it. This checkbox is only available when running on Mac OS 9 and earlier. Output Options: Mark these checkboxes to clear the output file before writing and to save it after writing, respectively. Run in MacPerl Available only on Mac OS 9, this command will run the script in MacPerl, regardless of the most recent settings in the Run Perl Script dialog above. Run in Terminal Available only on Mac OS X, this command will run the script in a new Terminal window, regardless of the settings in the Run Perl Script dialog. Run in Debugger Runs the script in the Perl debugger, regardless of whether the Use Debugger option is set for the Run command; also, any output options set in the Run command will be ignored. The Run in Debugger command is not available for languages other than Perl. Note When you choose Run in Terminal or Run in Debugger on Mac OS X, BBEdit will create a file called Terminal.term or Debugger.term inside the Terminals folder in the Unix Support folder. This file will be opened by the Mac OS X Terminal application. After the script has run, if you customize the font, colors, and window size and position, just choose Save from the Terminal’s Shell menu, and those settings will be saved for the next Run in Terminal or Run in Debugger session that you start. Run File Runs a script from an arbitrary file rather than from a BBEdit window. The Run a Script File dialog appears. You can select a file by clicking the File button or by dragging a file to the path box at the top of the dialog from the Finder. The options are the same as the ones described above for the Run a Script dialog. Export To Available only on Mac OS 9, this command exports the current document to a CGI Script, a Droplet (a drag-and-drop application), or a Runtime (a self-contained script that doesn’t require MacPerl installed to execute). If additional export file format extensions are installed in the MacPerl Extensions folder (in the same folder as MacPerl itself), these will appear in this submenu as well. (These features are specific to MacPerl.) Note When asking MacPerl to edit a Perl runtime, BBEdit will first check to see whether it is configured as the Editor helper in the Internet control panel. If the Editor helper doesn’t exist or doesn’t point to BBEdit, BBEdit will ask you if you want to change this helper setting. If you choose Yes, BBEdit will set the Editor helper to point to itself and proceed, otherwise it will abort (and not ask MacPerl to edit the runtime). Find in Perl Reference/Find in Reference Looks up the selected text using the appropriate reference application. If there is no selection, a dialog will open in which you can enter a search string. On Mac OS 9 and earlier, this command is named Find in Perl Reference, and reference lookups are displayed in Shuck, a POD viewer that comes with MacPerl. Perl, Python, and Shell Scripting 249 On Mac OS X, this command is named Find in Reference, and reference lookups are performed by command line tools (perldoc for Perl, pydoc for Python) and displayed as text in a window in BBEdit. The Find in Reference command is not available for languages other than Perl and Python. View POD Views the current window as POD. On Mac OS 9 and earlier, the window is opened in Shuck. On Mac OS X, the window contents are processed by the command line pod2text tool, then displayed in a new window in BBEdit. Note POD stands for Plain Old Documentation, and is the standard Perl documentation format. Filters and Scripts Before you begin using MacPerl or Unix scripts with BBEdit, you should locate and familiarize yourself with the “MacPerl Support” and “Unix Support” folders, both of which live in the BBEdit Support folder. (See Chapter 2 for details about the BBEdit Support folder.) Inside these folders are sub-folders for storing Filters, Scripts, and other files used for MacPerl and Unix shell scripting integration. new in 6.5 If you are running BBEdit 6.5 on Mac OS 9, BBEdit will use the “MacPerl Support” folder. If you are running Mac OS X, BBEdit will use the “Unix Support” folder. The contents of these two folders will be used to build the Scripts list and Filters list, two floating palettes that allow you to run your scripts or filters with a double-click. Scripts and filters placed in these folders will also appear in their respective submenus at the bottom of the Camel/Shebang menu. Filters Filters operate on the selected text of the frontmost window. The current selection is passed as input to the filter, and any output generated by the filter overwrites the selection. In other words, filters act like plug-ins for text manipulation. There are two ways to run filters: through the Filters list palette or the Filters submenu at the bottom of the Camel/Shebang menu. To open the Filters list palette, select it from the Palettes submenu in the Window menu. You can run a filter by selecting it from the list and clicking the Run button, or you can simply double-click the filter name in the list. Hold down the Option key while double-clicking a filter or selecting it from the menu to open the file for editing instead of running it. Optionally, filter output can be sent to a different window, instead of overwriting the selection—hold down the Command key while selecting a filter from the Filters list palette, or from the Filters submenu, to open the Filter Options dialog. Changes made in the Filter Options dialog affect all filters, and remain in effect until you make changes in the Filter Options dialog again. 250 Chapter 14: Working with Development Tools Using Filters with Multi-Byte Text Filters are now two-byte savvy. If the front window is Unicode, the selection is written out as big-endian Unicode with a byte order mark. Your filter is responsible for handling the input correctly. If the front window contains 8-bit text, the input is written out as usual. Scripts Scripts are similar to filters, but do not operate on the text of the frontmost window. Like filters, you can run scripts from either a submenu at the bottom of the Camel/ Shebang menu, or from the Scripts list palette. The same options as for filters apply when running scripts—hold down the Command key while double-clicking a script in the list or selecting it from the menu to open the Run Options dialog; hold down the Option key while double-clicking on a script or selecting it from the menu to open the file for editing instead of running it. Additional Notes In addition to the features detailed above, there are some additional considerations about BBEdit’s Perl integration which it may help you to be aware of. Setting Menu Keys for Filters and Scripts The Filters and Scripts lists both have a “Set Key” button at the top of their palettes. Select a filter or script from the list and click this button to set a keyboard shortcut for the selected item. Manually Sorting the Filter and Script Lists By default, items in the Perl Filters List are displayed in alphabetical order. However, you can force them to appear in any desired order by including any two characters followed by a right parenthesis at the beginning of their name. (For example “00)Foo” would sort before “01)Bar.”) For such files, the first three characters are not displayed in BBEdit. You can also insert a divider by including an empty folder whose name ends with the string “-***”. (The folder can be named anything, so it sorts where you want it.) These conventions are the same as those used by the utilities FinderPop and OtherMenu. Canceling Perl Operations While waiting for a MacPerl task to complete, BBEdit will display a progress dialog. If you need to cancel the operation, you can switch to MacPerl and do so there -- the Perl task is canceled and the BBEdit task is then canceled as well. (BBEdit cannot cancel the task directly, because there is no way to signal MacPerl to do so.) On Mac OS X, the progress dialog for Unix scripting tasks has an enabled Cancel button, and you can cancel the task directly from within BBEdit. Since BBEdit must kill the spawned Perl (or Python, or shell) process with a SIGINT, any unflushed data in open filehandles (including STDOUT and STDERR) will be lost unless the script takes measures to prevent this. Perl, Python, and Shell Scripting 251 Out-of-memory Conditions in MacPerl MacPerl will inconveniently run out of memory at times. Sometimes it outputs a string to STDERR saying so, and sometimes it doesn’t. What it does always do is report an error back via an Apple Event. When this happens, BBEdit will report a MacPerl error of type “n” where n is the error number, usually 2. This is not useful for performing specific diagnostics, but at least you will know that something went wrong. In the case of Perl filters, the selection is not cleared when this happens. Instead, you receive an error message telling you that something went wrong in MacPerl. Working with Metrowerks CodeWarrior The following sections describe the range of commands which you can send to Metrowerks’ CodeWarrior. For complete information on setting up and using BBEdit as an external editor with the CodeWarrior IDE, please refer to the appropriate section of your CodeWarrior user manual. Note Due to the continual change in CodeWarrior project format, BBEdit does not currently offer support for browsing or performing Find Differences on such files. Using the CodeWarrior Menu This section describes each of the commands in the CodeWarrior menu (left). CodeWarrior IDE Choose this item to switch to CodeWarrior. If CodeWarrior is not running, BBEdit launches it. Compile This command tells CodeWarrior to compile the source file in the active window. The active window must belong to a project that’s open in the development environment. Check Syntax This command tells the target development environment to check the syntax of the source file in the active window. The active window must belong to a project that’s open in the development environment. Show in Debugger This command makes the selected text visible in the source-level debugger if the debugger is running. Set Breakpoint Use this command to make the selected text visible in the source-level debugger and to set a breakpoint. If you hold down the option key when you open the Compiler menu, this command becomes Set Breakpoint & Go, which sets the breakpoints and begins execution of the program. If CodeWarrior’s source-level debugger is not active, this command is not available. 252 Chapter 14: Working with Development Tools Add If the active editing window has been saved on disk, and it isn’t part of an open project, this command adds the file to the project. Add & Compile If the active editing window has been saved on disk, and it isn’t part of an open project, this command adds the file to the project and compiles it. This command is the same as using the Add command followed by the Compile command. Precompile Tells CodeWarrior to precompile the source file in the active window. BBEdit displays a standard file dialog that lets you specify the name of the precompiled header. The active window must belong to a project that’s open in CodeWarrior. Preprocess Tells CodeWarrior to preprocess the source file in the active window and to place the results in a new untitled editing window. The active window must belong to a project that’s open in CodeWarrior. Bring Up To Date Tells CodeWarrior to check the project for modified files and to recompile and reload any files that have changed. Make Tells CodeWarrior to issue a make command to recompile and link all modified files in the open project. Debug Tells CodeWarrior to run the open project in the CodeWarrior debugger. Run Tells CodeWarrior to run the open project without using the source debugger. If choosing this command causes CodeWarrior to recompile files, compiler errors may not be reported to BBEdit. If that happens, use Make instead, and then select Run. Working with MPW MPW is the Macintosh Programmer’s Workshop, Apple’s development environment for use with Mac OS 9 or earlier system versions. The complete MPW package can be downloaded at no cost from Apple’s developer Web site. MPW ToolZone http://developer.apple.com/tools/mpw-tools/ MPW Download ftp://ftp.apple.com//developer/Tool_Chest/Core_Mac_OS_Tools/ Working with MPW 253 You can use MPW with BBEdit in two ways. First, you can use the ToolServer application to run MPW tools inside BBEdit without running MPW itself. ToolServer can execute scripts and MPW commands but includes no user interface. BBEdit provides the user interface in this instance, essentially replacing the MPW Shell. Second, you can use BBEdit to edit source files that are being managed by Projector. Projector is a database-backed source-control system integrated into the MPW Shell. It is also available in a stand-alone MPW application called SourceServer, for those who do not want to run the whole MPW shell for this functionality. BBEdit and ToolServer ToolServer is the MPW “back end,” the part of MPW that runs scripts and MPW tools, without any of the MPW editing capabilities. ToolServer is an excellent way to use MPW tools without having to use MPW itself. This section tells you how to use ToolServer with BBEdit. To learn about ToolServer and the MPW tools, see the documentation that comes with ToolServer. Note ToolServer support is not available on Mac OS X. Special Files To communicate with ToolServer, BBEdit uses a few custom scripts and tools. For details on installing these items, see Chapter 2. BBEditStartup This script establishes the link between BBEdit and ToolServer and runs whenever you start ToolServer from BBEdit. It also executes any scripts in the same folder as ToolServer whose names begin with BBEditStartup•. This is similar to the MPW’s UserStartup• functionality. You should not need to modify this script. If you need to customize the startup process, create a BBEditStartup• file. BBEditShutDown This script breaks the link between BBEdit and ToolServer and runs whenever you turn off ToolServer or quit BBEdit while ToolServer is running. It also executes any BBEditShutDown files. You should not modify this script. If you need to customize shutting down, create a BBEditShutdown• file. BBEditStartup•411 Note The use of MPW 411 is no longer supported. File and Line Commands To enhance its support of ToolServer, BBEdit also comes with customized versions of the File and Line commands. Within ToolServer, File and Line are not ordinarily available, but with these scripts, you can use File and Line from within BBEdit. These commands are particularly handy to have when working with compiler error output. RBBEdit This tool is essential for ToolServer to work with BBEdit. Without this tool, none of BBEdit’s ToolServer support will work correctly. You should copy this tool to the Tools folder which is in the same directory as ToolServer (and as MPW, if it’s installed). 254 Chapter 14: Working with Development Tools Using ToolServer After you have installed all the files that BBEdit needs to support ToolServer, use the Start ToolServer command in the ToolServer menu (left). When ToolServer is running, the command changes to Stop ToolServer. To stop ToolServer, choose this command again. After opening ToolServer, BBEdit opens the ToolServer Worksheet. In this window you can type MPW shell commands just as you would with the MPW Shell. (You can also open the Worksheet from the ToolServer menu.) To send a command to ToolServer, place the insertion point anywhere on the line and press Return or choose the Send Command command from the ToolServer menu. You can also use Send Command in any BBEdit document window to send the current line to ToolServer. In either case, the results appear in the ToolServer Worksheet. new in 6.5 There is now a ToolServer Worksheet command on the ToolServer menu; this command is useful for reopening the worksheet if you have closed it while ToolServer is still in use. Note also that if you close the worksheet, but do something that causes ToolServer to send output to BBEdit (e.g. run a script from the ToolServer menu or the ToolServer Scripts floater), BBEdit will automatically open the worksheet. To execute a file full of commands (for example, the output of a make file), open the file, and choose Execute Commands from the ToolServer menu. ToolServer executes each command in the file. The Go To Next Error and Go To Previous Error commands on the Search menu work in the ToolServer Worksheet. ToolServer Tools By placing MPW tools (or aliases to tools) in the ToolServer Tools folder inside the BBEdit Support folder, you can make tools available in the ToolServer menu in BBEdit. new in 6.5 These tools are also available in the ToolServer Tools list, which can be opened from the ToolServer menu. This list works like the other hierarchical floating windows in BBEdit (for example, the Scripts floater); you can assign keyboard shortcuts to tools as well. By default, items in the ToolServer Tools List are displayed in alphabetical order. However, you can force them to appear in any desired order by including any two characters followed by a right parenthesis at the beginning of their name. (For example “00)Compile” would sort before “01)Build.”) For such files, the first three characters are not displayed in BBEdit. You can also insert a divider by including an empty folder whose name ends with the string “-***”. (The folder can be named anything, so it sorts where you want it.) These conventions are the same as those used by the utilities FinderPop and Other Menu. BBEdit behaves in a number of possible ways when you choose a tool or script from the ToolServer menu or the Tools List: • If the menu item is an MPW tool that supports Commando, BBEdit makes ToolServer active to display the Commando dialog for that tool. Working with MPW 255 • If the menu item is an MPW tool that does not support Commando, or a script file whose name ends with an ellipsis (“…”, Option-Semicolon), BBEdit displays a dialog in which you can type the arguments for the tool. You can press Return in the argument text to insert a carriage return—use the Enter key as a shortcut for the Run button. • If the menu item is a script with a ‘cmdo’ resource in it, BBEdit makes ToolServer active to display the Commando dialog for that script. • If the menu item is a script that doesn’t have an ellipsis at the end of its name, and it doesn’t have a ‘cmdo’ resource in it, BBEdit just executes that script. BBEdit and Projector Projector is Apple’s source-control database, which is available via the MPW Shell or through the stand-alone SourceServer application included with MPW. Either method works seamlessly with BBEdit thanks to the Projector pull-down menu, shown at left. To get the most out of this function, you should already be familiar with MPW’s sourcemanagement functions. Before you start, make sure SourceServer support is enabled in the Tools panel of the BBEdit Preferences. Important Note BBEdit now supports SourceServer when running on Mac OS X, but since Projector is only available for Mac OS 9, you must run Projector under the Classic Environment. Previously, you had to mark a checkbox when opening a file, or in the Preferences, to have BBEdit recognize Projector information attached to a file. Starting with version 5.1, BBEdit always recognizes Projector state information, and this feature can no longer be disabled. Check In Checks the source file in the frontmost window (or some other file) into the project. The local copy will be deleted. The Check In dialog appears. File This field defaults to the frontmost window’s file. Click the File button to choose a different file, or drag a file from the Finder to the rectangle displaying the file path. Task Description A notes field that can be used to record the reason the file was checked out. 256 Chapter 14: Working with Development Tools Keep Modifiable Check this box to allow you to continue to edit the file after it has been checked in. Use this function when you wish to record a revision but are not yet finished working on the file. Check In as Branch Check this box to start a new branch on the source tree for this file. Delete after Checking In Check this box to delete the local copy of a file after checking it in. Touch after Checking In Check this box to set the source file’s modification date and time to the current date and time. Verify Contents Check this box to make sure the file written to the database matches the local file before deleting the local file. Check Out Checks the source file in the frontmost window (or some other file) so it can be modified. When you open a file which contains Projector information, you are not permitted to edit it until you formally check it out using this command. The Check Out dialog box appears. File This field defaults to the frontmost window’s file. Click the File button to choose a different file, or drag a file from the Finder to the rectangle displaying the file path. Task Description A notes field that can be used to record the reason the file was checked out. Revision Lists the available revisions of the document. By default, the current local version is selected. Click List Previous Revisions to retrieve a list of all revisions from the database. New Branch Check this box to start a new branch on the source tree for this file. Working with MPW 257 Put History in CKID Check this box to store the revision data in the document’s ‘ckid’ resource. If this is done, the Revision list will display a list of all revisions without having to check in the Projector database. Touch Modification Date Check this box to set the source file’s modification date and time to the current date and time. Verify Contents Check this box to make sure the file you are checking out is actually the same file as the one in the Projector database. Projector does this by checking out another copy, comparing the two files, and then deleting the copy. Get Revision Gets a revision for the current document or for some other file. The Get Revision dialog appears. new in 6.5 Get Revision now works on files that have been checked out or on which Modify Read Only has been used. Get Revision will perform a checkout or Modify Read Only operation if necessary, and notifies you that you will lose your changes. File This field defaults to the frontmost window’s file. Click the File button to choose a different file, or drag a file from the Finder to the rectangle displaying the file path. Revision Lists the available revisions of the document. Put History in CKID Check this box to store the revision data in the document’s ‘ckid’ resource as well as in the database. (If this is done, the Revision list will display a list of all revisions without having to check in the Projector database.) Touch Modification Date Check this box to set the source file’s modification date and time to the current date and time. Verify Contents Check this box to make sure the file you are checking out is actually the same file as the one in the Projector database. Projector does this by checking out another copy, comparing the two files, and then deleting the copy. 258 Chapter 14: Working with Development Tools Cancel Check-Out If the front window is checked out, this command discards any changes made to it and retrieves the latest version. Hold down the Shift key to choose a file to be canceled instead of canceling the front window. Edit Task Comment Choose this command to edit the checkout comment for this file. Hold down the Shift key to choose a file instead of editing the comment for the front window. Compare Revisions This command compares the contents of the frontmost window with another revision of the file. You will be prompted to choose the desired revision (the current version you have on disk is highlighted when the dialog opens). The results will appear in the same format used by the Compare Files command (see page 70). Revision History This command retrieves a complete version history of the frontmost window and displays it in a new BBEdit document window. New Project Creates a new project database from an existing folder of source files. If any of the files are already in a project, they will be orphaned before the new project is created. The New Project dialog appears. The New Project command skips over files named “.DS_Store” and “.FBCIndex”, folders named “.FBCLockFolder”, and invisible files (like “Icon^M”). If for some perverse reason you want these files checked in, the “Check In” command will allow you to do so. Save Project As Click the Choose button to specify the location of the database, usually on a server volume. Working with MPW 259 Search Folder Click the Choose button to choose the folder that contains your source files., or drag the folder from the Finder to the gray box. Scan Nested Folders Check this box to scan all subfolders of the selected folder for files to include in the new project. Skip (...) Folders Check this box to have BBEdit skip any files whose names are enclosed in parentheses when scanning. Checking In Check the boxes for the types of files you want to add to the project. You can choose text files, resource files, or all files. Keep Modifiable Check this box to allow you to continue to edit the file after it has been added to the project. Use this function when you wish to record a revision but are not yet finished working on the file. Touch after Checking In Check this box to set the source file’s modification date and time to the current date and time. Verify Contents Check this box to make verify the contents of the file after adding it to the Projector database. Projector does this by checking out another copy, comparing the two files, and then deleting the copy. 260 Chapter 14: Working with Development Tools Check In Folder Allows you to check in an entire folder of files at once. You are first prompted for the folder that contains the files you want to check in. Then a folder browser like the one below appears showing all the files in that folder and its subfolders. Select the file or files to be checked in (you can select multiple files by holding Shift or Command while you click) or press Command-A to select all listed files. Then click the Check In button. If you have selected one file, the Check In dialog, discussed on page 256, appears to allow you to set the check-in options. If more than one file is selected, the Batch Check In Options dialog, below, appears. The bottom part of the Batch Check In Options dialog offers essentially the same functionality as is found in the Check In dialog. The top of the Batch Check In Options dialog controls how the check-in comments for these files are set. You can choose to use the comment in the file’s ‘ckid’ resource, to prompt for the comment for each file, or to use a single comment for all checked-in files. Working with MPW 261 After you have set the options using one of these dialogs, click OK to check in the files. The Check In Folder dialog will remain on the screen after check-in is complete. You can check in sets of files using different check-in options by choosing other files, then clicking Check In again. Click Done when you have finished checking in files. Check Out Folder Use this command to check out an entire folder of files at once. The Check Out Folder dialog, below, appears. Click the pop-up menu to select the folder to be checked out, or drag a folder from the Finder. The menu contains a list of recently-used folders. Report Empty Projects Check this box to have BBEdit notify you if it finds an empty project during the checkout process. Verify Contents Check this box to make sure the file you are checking out is the same file displayed in the document window. Projector does this by checking out another copy, comparing the two files, and then deleting the copy. Delete Obsolete Files Check this box to have files marked as “obsolete” in the Projector database deleted from the folder. Put History in CKID Check this box to store the revision data in the document’s ‘ckid’ resource. If this is done, the Revision list will display a list of all revisions without having to check in the Projector database. Don’t Touch Mod Date Check this box to prevent Projector from updating the files’ modification date to today’s date. Checking Out: Choose which files to check out: • Latest Revisions fetches a copy of every file in the project which is newer than the corresponding local project. Any new files which were added to the project since the last checkout will also be checked out. 262 Chapter 14: Working with Development Tools • Update Existing fetches a copy of every file in the project which is newer than the corresponding local project. Any new files added to the project since the last checkout are not checked out. • Everything fetches a copy of the latest revision of every file in the project. new in 6.5 Find Lurkers Choose this command and BBEdit will ask you to select a folder. BBEdit will produce a list of all the files which are currently checked out as writable, MRO’d, or new in that folder (recursively). Make Obsolete Marks the current document as “obsolete” in the Projector database. BBEdit will close the document’s editing window, and move the associated file to the Trash. Hold down the Shift key to choose a file instead of obsoleting the frontmost window’s file. Remove Projector Info Removes the ‘CKID’ resource from the current file, losing all embedded Projector state information and comments. Hold the Shift key to choose a file instead of operating on the frontmost window. Open Log File Opens the “SourceServer.log” file, or brings it to the front if it is already open. Working with MPW 263 264 Chapter 14: Working with Development Tools CHAPTER 15 BBEdit Plug-Ins BBEdit plug-ins are code modules that enhance BBEdit’s features, and which appear within BBEdit itself on the Tools menu. This chapter describes the basic plug-ins that ship with BBEdit. Other developers have also written many BBEdit plug-ins, some of which are included on the BBEdit CD-ROM, and many more are available from various Web sites (including our own). If you would like to write your own plug-ins for BBEdit, please refer to the BBEdit Plug-in Developer’s Kit, available from the Bare Bones Software web site. In this chapter Using BBEdit Plug-Ins . . . . . . . . . . . . . . . . . . . . . . . . . . . . . . . . . . . . . . 265 The Tools Menu and Floating Window – 266 The Set Key Button – 266 Supplied Plug-ins . . . . . . . . . . . . . . . . . . . . . . . . . . . . . . . . . . . . . . . . . . 267 Add/Remove Line Numbers – 267 Columnize – 267 Concatenate – 267 Configure TeX Coloring – 267 Convert to ASCII – 267 Clear Lines Containing – 268 Copy Lines Containing – 268 Cut Lines Containing – 268 Educate Quotes – 269 Hex Dump – 269 Make Prototypes – 269 Prefix/Suffix Lines – 269 Reverse – 269 Send PostScript™ – 269 Sort – 269 Un/Comment – 269 Third-Party Plug-ins . . . . . . . . . . . . . . . . . . . . . . . . . . . . . . . . . . . . . . . . 270 Finding more plug-ins – 270 Plug-in compatibility – 270 Mac OS X Plug-ins – 270 Using BBEdit Plug-Ins To use BBEdit plug-ins, you need to activate the BBEdit Plug-ins option in the Application section of the Preferences dialog. BBEdit plug-ins are accessed through the Tools menu; any plug-in installed in your BBEdit Plug-ins folder will appear on that menu. Some plug-ins require that there be an active window or a selection range. These tools may be dimmed when this condition is not met. 265 Plug-ins reside in the BBEdit Plug-ins folder in the BBEdit Support folder, which must be in the same folder as the BBEdit application. You can group plug-ins into sub-folders (1 level deep) to organize them with the BBEdit Plug-ins folder. When you organize your plug-ins this way, BBEdit creates submenus on the Tools menu for each folder. The Tools Menu and Floating Window The first item in the Tools menu opens a floating window that contains the names of all the plug-ins. Any plug-ins you have installed will appear both in this Tool List window and on the Tools menu itself. If you have simply installed them in the BBEdit Plug-ins folder, they will appear as individual items on the Tools menu. If you have placed them into folders inside the main BBEdit Plug-ins folder, then the tools will appear in sub-menus that mirror their layout within that folder. In the Tools List window, any plug-ins will appear under the sub-menu named BBEdit Tools, unless they are in their own folder, in which case they will appear in separate sub-menus. The Set Key Button The Set Key button in the BBEdit Tools floating window lets you assign key equivalents to a plug-in. You can use any combination of the Command, Shift, Option, and Control keys in the key equivalents. Assigning a Key to a BBEdit Tool To assign a key to a BBEdit plug-in: 1 Select the tool you wish to assign a key equivalent to in the Tools List. 2 Click the Set Key button to display the Set Key dialog. 3 Type the key equivalent. You can use any key combined with Command plus Shift, Option, or Control modifiers if desired. The equivalent must use at least the Command or the Control modifier key to be valid. You can also use Function keys, with or without additional modifiers. 4 Click Save. Warning 266 If you try to assign a key sequence that is already used elsewhere, BBEdit will warn you that there is a conflict and ask you whether you want to reassign that key sequence to the new item. Chapter 15: BBEdit Plug-Ins Removing a Key Assignment To remove a key assignment from a BBEdit plug-in: 1 Choose the Tool from the Tools List window. 2 Click Set Key. 3 BBEdit opens the Set Key dialog. 4 Click Reset BBEdit removes the key assignment from the plug-in. Supplied Plug-ins This section describes the standard BBEdit plug-ins installed with BBEdit. Add/Remove Line Numbers This plug-in applies or removes line numbers to each line of the text in the active window or in the selection. Columnize Organizes the selected line-delimited text into column-delimited text, either by row or by column. Concatenate Merges two or more files and places the results in a new untitled window. Configure TeX Coloring Brings up a dialog box which allows you to choose whether math strings should be colored in TeX documents. (The factory default is for these strings not to be colored.) Convert to ASCII Converts all eight-bit Macintosh characters in the active window to their 7-bit ASCII equivalents. This plug-in is useful for preparing text for an email message, or for posting to an information service that doesn’t handle 8-bit characters. When selected from the Tools menu, it opens this dialog box: Supplied Plug-ins 267 Each pair of buttons on the left half of the dialog determines how to convert a particular 8-bit character. The plug-in also converts typographer’s quotes (“ ” and ‘ ’) to straight quotes (" and '). The pairs of buttons in the right half of the dialog box determine what action the plugin takes. You can choose to convert only the selected text (if there is a selection in the active window), and you can choose to place the results on the Clipboard rather than replacing the text in the window. This plug-in was written by Jamie McCarthy, based on a prototype “Prepare Usenet Posting” plug-in by Rich Siegel. Note This plug-in can be used to reverse the effects of the Educate Quotes plug-in. Clear Lines Containing Removes from the active window all the lines that contain a specified search string. Unlike Cut Lines Containing, however, this plug-in does not affect the contents of the clipboard. Copy Lines Containing Copies to the Clipboard all the lines that contain the specified string. Cut Lines Containing Cuts from the active window all the lines that contain a specified search string. This plug-in places the cut lines on the Clipboard. The Clear/Copy/Cut Lines Containing dialog boxes (next page) now have a grep popup menu. This is the same menu from the Find dialog. You can add or delete patterns in the Text Search panel of the Preferences. Also like the Find dialog, these plug-ins now have a Selection (§) button—clicking this button enters the current selection from the frontmost document window into the search pattern field. Note 268 Starting with BBEdit 6.1, the old Cut/Copy Lines Containing plug-in has been replaced by a plug-in named Process Lines Containing which contains both the Cut and Copy Lines Containing commands, as well as the new Clear Lines Containing command. Chapter 15: BBEdit Plug-Ins Educate Quotes Converts straight quotes (" and ') to typographer’s quotes (“ ” and ‘ ’) in the text of the active window. Hex Dump This plug-in provides a hex dump for a file that you choose. Make Prototypes Generate ANSI-style function prototypes for existing C functions. This plug-in places the prototypes in a new untitled window. Prefix/Suffix Lines This plug-in adds or removes a prefix from all the lines of the text of the active window or of the selected text. Reverse Reverses the order of the lines in the active window, or the selected lines. Salary Adjust This plug-in directs your payroll service to adjust your gross salary by the amount you specify, in minimum increments of 10 units of your local currency. You must have an Internet connection to use this plug-in. Send PostScript™ Sends the current document in PostScript™ format to any PostScript printer available to your computer. (This plug-in is only available when running BBEdit on Mac OS 9 and earlier.) Sort The Sort plug-in sorts lines by collating them in alpha-numeric order. It can be set to ignore white space at the beginning of lines, sort on leading numerical quantities only, ignore case, and sort in descending order. (For a more fully-featured line sorting plugin, check out LineSort, a shareware plug-in by Craig Maynard.) Un/Comment This plug-in automates the task of commenting and uncommenting sections of code in various programming languages. Use the companion Un/Comment Settings plug-in to set up the comment strings for the supported languages. Supplied Plug-ins 269 Third-Party Plug-ins In addition to the standard plug-ins described above, a wide variety of BBEdit plug-ins are available from third parties. Finding more plug-ins An extensive though not exhaustive listing of plug-ins in the support section of the Bare Bones Software web site: http://www.barebones.com/support/plugins.html WARNING Plug-in compatibility Any third-party plug-in which does not present a floating palette, and does not explicitly include support for multi-byte text will be disabled if the front document window contains multi-byte (or Unicode) text. However, BBEdit cannot determine whether plug-ins that do present floating palettes are capable of safely processing multi-byte text, and will not disable them, so you should exercise caution when using such plug-ins on multi-byte text. (It is unlikely that you will crash the program, but your text may be corrupted or scrambled.) Mac OS X Plug-ins Important 270 When running on Mac OS X, you will not be able to use any third-party plug-ins which have not been updated to support BBEdit 6.1 or later versions. Contact the developers of your plug-ins or visit the Bare Bones web site for more information on the availability of updated plug-ins. Chapter 15: BBEdit Plug-Ins APPENDIX A Command Reference This section is a quick reference for key assignments and a comprehensive list of the commands that are available from BBEdit’s user interface. In this appendix Assigning Keys. . . . . . . . . . . . . . . . . . . . . . . . . . . . . . . . . . . . . . . . . . . . 271 Listing by Menu and Command Name . . . . . . . . . . . . . . . . . . . . . . . . . . 272 Listing by Default Key Equivalents . . . . . . . . . . . . . . . . . . . . . . . . . . . . . 279 Assigning Keys You can assign your own keyboard shortcuts to BBEdit’s menu commands by choosing “Set Menu Keys…” from the Edit menu. The Set Keys dialog, below, appears. To set the key assignment for a menu command, find it in the Set Keys dialog, click the Set button, and type the desired keystroke. To remove the key assignment from the selected menu command, click the Clear button instead. Click Reset All to restore all key assignments to BBEdit’s defaults. 271 Listing by Menu and Command Name Apple Menu Mac OS 9 only File --> New: About BBEdit (none) BBEdit Menu Mac OS X only Text Document (with selection) (with Clipboard) HTML Document… Cmd-N Cmd-Shift-N Cmd-Opt-Shift-N Cmd-Ctl-N About BBEdit Preferences Set Menu Keys… Services Hide BBEdit (none) Cmd-; (none) submenu (none or Cmd-H) File Group… Disk Browser (none) Cmd-Opt-N Hide Others Show All Quit BBEdit (none) (none) Cmd-Q Undo Redo Cut Cut & Append Copy Cmd-Z Cmd-Shift-Z Cmd-X Cmd-Shift-X Cmd-C (see left column) (submenu) Cmd-O Cmd-Shift-O Copy & Append Paste Clear Select All Cmd-Shift-C Cmd-V (none) Cmd-A Cmd-D Cmd-D Cmd-Opt-D submenu Cmd-W Cmd-Opt-W Cmd-Shift-W Cmd-S Cmd-Opt-S (none) (none) Cmd-Shift-S Cmd-Opt-Shift-S Select Line Select Paragraph Insert Show Clipboard Previous Clipboard Next Clipboard Text Options… Preferences (MacOS 9) Set Menu Keys…( “ ) Cmd-L Cmd-Opt-L submenu (none) ^-[ ^-] Cmd-Opt-; Cmd-; (none) (none) (none) (none) (none) (none) Cmd-P Cmd-Opt-P Cmd-Shift-P Cmd-Q File… Folder Listing… Toolbox Call Templ. Page Break File: New New With Stationery Open… Open from FTP Server… Open Selection Open File by Name Reveal Selection Open Recent Close Close All Close & Delete Save Save All Save As… Save As Selection… Save to FTP Server… Save a Copy to FTP Server… Revert… Revert Backup Options… Make Backup Now… Page Setup… Print… Print All Print One Copy Quit (Mac OS 9 only) 272 Appendix A: Command Reference Edit: Edit -> Insert: (none) (none) (none) (none) Text: Font & Tabs… Balance Exchange Characters Exchange Words Change Case… Change Case Shift Left Shift Left One Space Shift Right Shift Right One Space Hard Wrap… Hard Wrap Add Line Breaks Remove Line Breaks Rewrap Quoted Text… Rewrap Quoted Text Increase Quote Level Decrease Quote Level Strip Quotes Zap Gremlins… Zap Gremlins Entab… Entab Detab… Detab Resolve URL Check Spelling… Search: (none) Cmd-B Cmd-` Cmd-Opt-` (none) (none) Cmd-[ Cmd-Shift-[ Cmd-] Cmd-Shift-] Cmd-\ Cmd-Opt-\ (none) (none) Cmd-’ Cmd-Opt-’ Cmd-Opt-] Cmd-Opt-[ (none) (none) (none) (none) (none) (none) (none) (none) Cmd-F12 Find… Quick Search Find Again Find Again (reverse) Find Selection Find Selection (reverse) Enter Search String Enter Replace String Replace Replace All Replace & Find Again Find In Next File Open All Matches Find & Replace All Matches Go To Line… Go To Line Go To Center Line Go To Previous Error Go To Next Error Go To Previous P’holder Go To Next Placeholder Find Differences… Apply to New Apply to Old Compare Again Find in Reference… Find Definition… (none) (see following pages) submenu (none) (none) (none) Internet Control Panel News Reader Mail Client FTP Client (none) (none) (none) (none) (none) Cmd-Ctl-/ (none) (none) Cmd-1 thru 0 Web Browser Gopher Client WAIS Client Telnet Client (none) (none) (none) (none) Tools: (installed plug-ins) (none) Cmd-J Cmd-Opt-J Cmd-Shift-J Cmd-Opt-Up Cmd-Opt-Down Ctrl-Shift-‘ Ctrl-‘ (none) Cmd-left-arrow Cmd-right-arrow (none) Cmd-Cmd-Opt-- Markup: Window: Palettes Arrange… Get Info Super Get Info (Mac OS X) Reveal in Finder Send To Back Exchange With Next Synchro Scrolling (open windows list) Cmd-F Cmd-Opt-F Cmd-G Cmd-Shift-G (none or Cmd-H) Cmd-Shift-H Cmd-E Cmd-Opt-E Cmd-= Cmd-Opt-= Cmd-T (none) (none) Internet Helpers: Listing by Menu and Command Name 273 Window->Palettes: CodeWarrior: ASCII Table Glossary Plug-in Tools Scripts Stationery Windows HTML Markup Tools Block CSS Entities Font Style Forms Inline Phrase Table Utilities (none) (none) (none) (none) (none) (none) (none) (none) (none) (none) (none) (none) (none) (none) (none) (none) Web Safe Colors Perl Tools Perl Filters Perl Scripts ToolServer Scripts (none) (none) (none) (none) (none) ToolServer: Mac OS 9 only Projector: Start ToolServer ToolServer Worksheet Send Command Commando… Execute Commands Cancel Current Cmd. ToolServer Tools List (none) (none) (none) (none) (none) Cmd-. (none) Check In… Check Out… Modify Read-Only Get Revision… Cancel Check Out Edit Task Comment… Compare Revisions… Revision History… New Project… Check In Folder… (none) (none) (none) (none) (none) (none) (none) (none) (none) (none) (none) (none) (none) (none) Check Out Folder… Find Lurkers Make Obsolete… Remove Projector Info Open Log File (none) (none) (none) (none) (none) Scripts: Open Script Editor Open Scripting Dict. Start Recording (installed scripts) 274 Appendix A: Command Reference CodeWarrior IDE Absoft IDE Compile Check Syntax Debug Set Breakpoint Set Breakpoint & Go Add Add & Compile Precompile… Preprocess Bring Up To Date Make Run (none) (none) Cmd-K Cmd-Y Cmd-I Cmd-Shift-I Cmd-Opt-Shift-I (none) (none) (none) (none) Cmd-U (none) Cmd-R Perl: Mac OS 9 only Shebang (#!): Mac OS X only Open MacPerl Open Shuck Check Syntax Check Selection Syntax Run Run… Run in MacPerl Run in Debugger Run File… Export To CGI Script… Droplet… Runtime… Find in Perl Reference View POD Perl Filters Perl Scripts (none) (none) (none) (none) (none) (none) (none) (none) (none) submenu (none) (none) (none) (none) (none) submenu submenu Check Syntax Check Selection Syntax Run Run… Run in Terminal Run in Debugger Run File… Find in Reference… View POD Unix Filters Unix Scripts (none) (none) (none) (none) (none) (none) (none) (none) (none) submenu submenu Listing by Menu and Command Name 275 Markup: CSS Tag Maker… Edit Tag… Document Type Character Set CSS Body Properties… Head Elements Block Elements Lists Tables Forms Inline Elements Phrase Elements Font Style Elements Frames Check Update Cmd-M Cmd-Opt-M (none) (none) submenu (none) submenu submenu submenu submenu submenu submenu submenu submenu submenu submenu submenu @import… Box… Padding… Border… Margins… Background… Font… Text… Format Includes Utilities Misc Preview Preview in New Window Preview With submenu submenu submenu Cmd-Ctl-P (none) (none) Base… Link… Meta… Script… Noscript Style… (none) (none) (none) (none) Cmd-Ctl-H (none) (none) (none) (none) (none) (none) (none) (none) (none) (none) (none) (none) (none) List… Unordered Ordered Definition Menu Directory List Item Block Elements: Paragraph… Paragraph Div… Horizontal Rule… Heading… H1 H2 H3 H4 H5 H6 Address Blockquote… Center Deleted Text… Inserted Text… Noscript Preformatted 276 Appendix A: Command Reference (none) (none) (none) (none) (none) (none) (none) (none) (none) Head Elements: (none) (none) (none) (none) (none) (none) Lists: Cmd-Ctl-L (none) (none) (none) (none) (none) (none) Tables: Table… Row… Row TD… TD TH… TH Caption Colgroup… Col… THead… TFoot… TBody… Convert to Table… Forms: Cmd-Ctl-T (none) (none) (none) (none) (none) (none) (none) (none) (none) (none) (none) (none) (none) Inline: Anchor… Image… Applet… Object… Param… Script… Map… Area… Convert to Client Side Map… Break… Break Font… Base Font… Bidirectional Override… Quotation Span Subscript Superscript (none) (none) (none) (none) (none) (none) (none) (none) (none) (none) Phrase: Cmd-Ctl-A Cmd-Ctl-I (none) (none) (none) (none) (none) (none) (none) Cmd-Ctl-B (none) Cmd-Ctl-F (none) (none) (none) (none) (none) (none) Font Style: Big Small Bold Italic Strike-Through Teletype Text Underline Form… Button… Field Set Legend… Input… Label… Select… Option Group… Option… Text Area… Abbreviation Acronym Citation Computer Code Deleted Text… Defined Term Emphasis Inserted Text… Input Text (Kbd) Sample Output Strong Emphasis Variable (none) (none) (none) (none) (none) (none) (none) (none) (none) (none) (none) (none) Frames: (none) (none) (none) (none) (none) (none) (none) Frame Set… Frame… No Frames (none) (none) (none) Listing by Menu and Command Name 277 Check: Document Syntax Document Links Folder Syntax… Folder Links… Site Syntax Site Links Balance Tags Update: Cmd-Ctl-Y Cmd-Ctl-K (none) (none) (none) (none) Cmd-Opt-B Includes: Persistent Include… Include… Placeholders… 278 Appendix A: Command Reference Cmd-Ctl-U (none) (none) (none) (none) (none) Utilities: (none) (none) (none) Format… Format Optimize Translate… Remove Comments Remove Markup Comment Uncomment Normalize Tag Case Make Tags Upper Case Make Tags Lower Case (none) (none) (none) (none) Cmd-Ctl-X (none) (none) (none) Preview as Text in All Running Browsers (installed browser listing) Misc: Dreamweaver Document Size Index Document Index Folder… Index Site… GoLive Cleaner HomePage Cleaner PageMill Cleaner Document Folder… Site Document Images Folder Images Site Images Cmd-Opt-Shift-F (none) (none) Cmd-Opt-T (none) (none) (none) (none) (none) (none) (none) Preview With: (none) (none) n/a Listing by Default Key Equivalents Key Command Cmd-' Rewrap Quoted Text… Cmd-- Search: Find in Reference… Cmd-. ToolServer: Cancel Current Command Cmd-; Edit: Preferences… Cmd-= Search: Replace Cmd-A Edit: Select All Cmd-B Text: Balance Cmd-C Edit: Copy Cmd-D File: Open File by Name Cmd-E Search: Enter Search String Cmd-F Search: Find… Cmd-G Search: Find Again Cmd-H Search: Find Selection or Hide BBEdit Cmd-I Compiler: Debug Cmd-J Search: Go To Line… Cmd-K Compiler: Compile Cmd-L Edit: Select Line Cmd-M Markup: Tag Maker… Cmd-N File: New: Text Document Cmd-O File: Open… Cmd-P File: Print… Cmd-Q File: Quit Cmd-R Compiler: Run Cmd-S File: Save Cmd-T Search: Replace & Find Again Cmd-U Compiler: Bring Up To Date Cmd-V Edit: Paste Cmd-W File: Close Cmd-X Edit: Cut Cmd-Y Compiler: Check Syntax Cmd-Z Edit: Undo Listing by Default Key Equivalents 279 280 Key Command Cmd-[ Text: Shift Left Cmd-] Text: Shift Right Cmd-\ Text: Hard Wrap… Cmd-` Text: Exchange Characters Cmd-left-arrow Search: Apply to Old Cmd-right-arrow Search: Apply to New Cmd-Ctl-/ Windows: Send To Back Cmd-Ctl-A Inline: Anchor… Cmd-Ctl-B Inline: Break… Cmd-Ctl-F Inline: Font… Cmd-Ctl-H Block Elements: Heading… Cmd-Ctl-I Inline: Image… Cmd-Ctl-K Check: Document Links Cmd-Ctl-L Lists: List… Cmd-Ctl-N File: New: HTML Document… Cmd-Ctl-P Markup: Preview Cmd-Ctl-T Tables: Table… Cmd-Ctl-U Update: Document Cmd-Ctl-X Misc: Index Site… Cmd-Ctl-Y Check: Document Syntax Cmd-Opt-' Rewrap Quoted Text Cmd-Opt-- Search: Find Definition Cmd-Opt-/ Windows: Exchange With Next Cmd-Opt-; Edit: Window Options… Cmd-Opt-= Search: Replace All Cmd-Opt-B Check: Balance Tags Cmd-Opt-D File: Reveal Selection Cmd-Opt-E Search: Enter Replace String Cmd-Opt-F Windows: Quick Search Cmd-Opt-J Search: Go To Line Appendix A: Command Reference Key Command Cmd-Opt-L Edit: Select Paragraph Cmd-Opt-M Markup: Edit Tag… Cmd-Opt-N File: New: Disk Browser Cmd-Opt-P File: Print All Cmd-Opt-S File: Save All Cmd-Opt-T Utilities: Translate… Cmd-Opt-W File: Close All Cmd-Opt-\ Text: Hard Wrap Cmd-Opt-up Search: Go To Previous Error Cmd-Opt-down Search: Go To Next Error Cmd-Opt-` Text: Twiddle Words Cmd-Opt-Shift-F Utilities: Format… Cmd-Opt-Shift-I Compiler: Set Breakpoint & Go Cmd-Opt-Shift-N File: New: (with Clipboard) Cmd-Opt-Shift-S File: Save a Copy to FTP Server… Cmd-Shift-; Edit: Printing Options… Cmd-Shift-C Edit: Copy & Append Cmd-Shift-G Search: Find Again (reverse) Cmd-Shift-H Search: Find Selection (reverse) Cmd-Shift-I Compiler: Set Breakpoint Cmd-Shift-J Search: Go To Center Line Cmd-Shift-N File: New: (with selection) Cmd-Shift-O File: Open from FTP Server… Cmd-Shift-P File: Print One Copy Cmd-Shift-S File: Save to FTP Server… Cmd-Shift-W File: Close & Delete Cmd-Shift-X Edit: Cut & Append Cmd-Shift-Z Edit: Redo Cmd-Shift-[ Text: Shift Left One Space Cmd-Shift-] Text: Shift Right One Space Listing by Default Key Equivalents 281 282 Appendix A: Command Reference APPENDIX B Editing Shortcuts In BBEdit you can perform many editing functions (including word selection or deletion) directly from the keyboard. Chapter 4 contains complete details on BBEdit’s text editing features. This appendix is a quick reference to available keyboard and mouse shortcuts for word selection and deletion. In this appendix Mouse Commands . . . . . . . . . . . . . . . . . . . . . . . . . . . . . . . . . . . . . . . . . 283 Arrow and Delete Keys. . . . . . . . . . . . . . . . . . . . . . . . . . . . . . . . . . . . . . 284 Emacs Key Bindings . . . . . . . . . . . . . . . . . . . . . . . . . . . . . . . . . . . . . . . . 285 Mouse Commands No Modifier Shift Click move insertion point extend selection Double-click select word extend selection to word Triple-click select line Triple-clicking is the same as clicking in a line and then choosing the Select Line command in the Edit menu. Holding the Command and Option keys as you click or double-click triggers special actions: Option Click Double-click Command Command/Option Open URL look up selected word in programming reference select word and search for next occurrence of the word 283 Arrow and Delete Keys You can use the arrow keys to move the insertion point right, left, up, and down. You can augment these with the Command and Option keys to move by word, line, or screens, or with the Shift key to create or extend selections. For example, pressing ShiftOption-Right Arrow selects the word to the right of the insertion point. In BBEdit 6.5, you can now hold down the Control key while using the arrow keys to scroll through editing windows without moving the position of the insertion point. Note 284 Key Modifier Action (left/right) Arrow (none) Move 1 character left/right (left/right) Arrow Option Move 1 word left/right (left/right) Arrow Command Move to beginning/end of line (up/down) Arrow (none) Move up/down 1 line in file (up/down) Arrow Command Move to top/bottom of file (up/down) Arrow Option Move to previous/next screen page [any of the above] Shift Make or extend a selection range Delete (none) Deletes selection range, or character preceding (to the left of) the insertion point. Delete Command Deletes all characters backwards to beginning of line Delete Option Deletes all characters back to beginning of word Delete Shift (same as Forward Delete) Forward Delete (none) Deletes selection range, or character after (to the right of) the insertion point Forward Delete Command Deletes all characters forward to end of the current line Forward Delete Option Deletes all characters forward to end of word Forward Delete Shift (same as Forward Delete alone) The meaning of the Command and Option modifiers listed above may be exchanged, depending on which settings you have selected for Exchange Command and Option Key Behavior in the Text Editing panel of the Preferences. Appendix B: Editing Shortcuts Emacs Key Bindings The Text Editing panel of the Preferences window contains a checkbox labeled Use Emacs Key Bindings. When this option is turned on, BBEdit will enable the following Emacs-style keyboard navigation commands. The Escape key is specified in lieu of the Emacs “Meta” key; to use these key equivalents, press and release the Escape key followed by the specified letter key, e.g. to type “Esc-V” press and release the Escape key, then type the letter V. Key Sequence Action Ctl-A beginning-of-line (Move insertion point to start of current line) Ctl-B backward-char (Move insertion point backward 1 place) Ctl-D delete-char (Delete forward 1 character) Ctl-E end-of-line (Move insertion point to end of current line) Ctl-F forward-char (Move insertion point forward 1 place) Ctl-G keyboard-quit (cancel pending arguments) Ctl-K kill-line (Delete to end of current line) Ctl-L recenter (Scrolls the current view so the selection is centered on screen) Ctl-N next-line (Move insertion point down one line) Ctl-O open-line (Inserts line break without moving insertion point) Ctl-P previous-line (Move insertion point to start of line above current) Ctl-R isearch-backward (Quick Search with the Backwards option) Ctl-S isearch-forward (Quick Search) Ctl-T transpose-chars (Exchange Characters) Ctl-U universal-argument (See note below) Ctl-V scroll-up (Page down) Ctl-W kill-region (Cut) Ctl-Y yank (Paste) Ctl-_ undo (Undo) Emacs Key Bindings 285 Key Sequence Action Ctl-X Ctl-C save-buffers-kill-emacs (Quit) Ctl-X Ctl-F find-file (Open file) Ctl-X Ctl-S save-buffer (Save current document) Ctl-X Ctl-W write-file (Save As) Esc-< beginning-of-buffer (Move insertion point to start of document) Esc-> end-of-buffer (Move insertion point to end of document) Esc-Q fill-paragraph (Hard Wrap with current settings) Esc-V scroll-down (Page up) Esc-W copy-region-as-kill (Copy) The universal-argument command (Ctl-U) does not work quite the same way as it does in Emacs. In BBEdit, it is a simple repeat-count. For example, if you type Ctl-U, then type a 3, then type Ctl-N, the insertion point will move down three lines. There is no visual feedback as you type the number, and no way to backspace or otherwise edit the number. If you make a mistake, the best you can do is type Ctl-G (keyboard-quit) and start over. 286 Appendix B: Editing Shortcuts APPENDIX C Placeholders and Include Files This Appendix is a reference which lists the placeholder tokens used by BBEdit templates and include files, and describes the use and capabilities of include files. In this appendix Placeholders . . . . . . . . . . . . . . . . . . . . . . . . . . . . . . . . . . . . . . . . . . . . . . 287 Using the #RELATIVE# Placeholder – 290 Include Files . . . . . . . . . . . . . . . . . . . . . . . . . . . . . . . . . . . . . . . . . . . . . . 291 Simple Includes – 291 Persistent Includes – 291 Include Files with Variables – 292 Including AppleScripts – 293 Including Perl Scripts – 294 Other Include Notes – 295 Placeholders Placeholders are processed under the following circumstances: • When a new HTML document is created from a template, the placeholders in the template are replaced with their current values. (The new document receives the substituted text; the original template file is not modified.) • When the Update Document command (part of the HTML Tools) is invoked, any placeholders in the documents being updated are replaced with their current values. (Since the placeholders are replaced, subsequent updates do not update the substituted text.) Although this command is part of the HTML Tools, it can be used in any document whenever you want to use placeholders. • When a file is included in another file using the #bbinclude directive (or a related directive), any placeholders in the included file are replaced with their current values before the text is included. (The include file itself is not changed, only the included text is substituted.) All of the above methods of invoking placeholders can also invoke included files, which can have placeholders of their own. Note The placeholders described in this chapter are only for use with the HTML Tools’ Update command. They cannot be used with BBEdit’s Glossary function, nor can Glossary placeholders be used in include or template files. 287 BBEdit supports the following placeholders. Placeholders are not case-sensitive. 288 Placeholder Replaced By… #ABBREVDATE# Abbreviated date, e.g. Sun, Oct 07, 2001 #BASE# The BASE tag as entered using the New HTML Document command #BASE_URL# The value of the BASE URL specified in an HTML document’s header (useful if you want to refer to the document’s location on the server) #BODYTEXT# When invoking a template using the New HTML Document command, and the Create New Window checkbox is not marked, the current contents of the frontmost window (if any) will replace this placeholder #CHARSET# The character set specified in the New HTML Document command #COMPDATE# Compact Date format, e.g. 07-Oct-01 #CREATIONDATE# The creation date of the current file, e.g. 07-Oct-01 #CREATIONTIME# The creation time of the current file, in the format specified in the Date & Time control panel #DIRPATH# The path on the server as specified in the HTML Web Site panel of the Preferences. Strips any leading slash from the path string #DOCSIZE# The size of the current document plus included images in bytes #DOCTITLE# The title of the current document as extracted from the <TITLE> tag #DONT_UPDATE# Marks a document so that the HTML Update tool will ignore it during processing #FILENAME# The filename of the current file #GENERATOR# Generator name used for “Give BBEdit Credit” in New HTML Document function (e.g. “BBEdit 6.5”) #IC_EMAIL# “Email address” returned by Internet control panel #IC_ORGANIZATION# “Organization” value returned by the Internet control panel (not available on Mac OS X) #IC_REALNAME# “Name” value returned by Internet control panel #LANGUAGE# The language specified in the New HTML Document command, in format (space)lang=”en” #LINK# The LINK tag as entered using the New HTML Document command #LOCALPATH# The full local path to the current file #LONGDATE# Long Date format, e.g. Sunday, October 07, 2001 Appendix C: Placeholders and Include Files Placeholder Replaced By… #MACHINE# The machine name as specified in the Sharing Setup or File Sharing control panel. (In Mac OS X, this returns “localhost”, rather than the name specified in the Sharing panel in System Preferences. This is a bug in the OS.) #META# Any META tag entered using the New HTML Document command #MODIFIEDDATE# Modification date of the current file, e.g. 07-Oct-01 #MODIFIEDTIME# Modification time of the current file, in the format specified in the Date & Time control panel #MONTHDAYNUM# Numeric value of the day of the month #MONTHNUM# Numeric value of the current month #PATH# Path to access your documents from the Web server, as specified in your HTML Web Site Preferences #PREFIX# As #DIRPATH# but does not strip the leading slash of the path #REAL_URL# The real URL for the current document in its current location #RELATIVE# The relative path from the current file back up to the Local Server Root (inserts a path of the form “../../” to tell the browser to “back up” to the site’s root directory) #ROOT# Path to the Local Site Root, as specified in your HTML Web Site Preferences #ROOTPATH# The file’s path relative to the Local Server Root specified in the HTML Web Site preferences to the current file #SERVER# URL of your Web server, as specified in your HTML Web Site Preferences. #SHORTDATE# Short Date. Day, month, year, e.g. 07/10/01 #TIME# Current time, in the format specified in the Date & Time control panel #TITLE# Title of the current document as entered using the New HTML Document command #USERNAME# The owner name (from the File Sharing control panel on Mac OS 9 and earlier, or the currently logged in user on Mac OS X) #YEARNUM# The current year, e.g. 2001 Placeholders 289 Using the #RELATIVE# Placeholder When dealing with large Web sites that have multiple content folders, it is often useful to specify relative rather than absolute paths for linking documents. The #RELATIVE# placeholder allows you to easily generate relative references in templates and include files by providing a virtual path that uses the “..” construction to “back up” the hierarchy to the root directory of the site. To use this placeholder, write your links as if they were all relative to the top of your web site, including #RELATIVE# as the first “directory” in the path. For example, consider that you have the following file structure, where each page includes a file which references the separate GIF image. My_Web_Site: Folder1: File1.html Folder2: File2.html File3.html Folder3: Folder4: Folder5: File4.html Graphics: Buttons: my_footer_button.gif If you write a relative link as follows: <img src="#relative#Graphics/Buttons/my_footer_button.gif" alt=""> and then run the Update command, the following links will be generated. In File1.html, ../Graphics/Buttons/my_footer_button.gif In File2.html, ../Graphics/Buttons/my_footer_button.gif In File3.html, ../Graphics/Buttons/my_footer_button.gif In File4.html, ../../../Graphics/Buttons/my_footer_button.gif 290 Appendix C: Placeholders and Include Files Include Files An include file, or just an “include”, is a special form of placeholder whose substitution happens to be the contents of another file. If you have used C or certain other programming languages, you may already be familiar with the concept. Using includes, you can reuse standard bits of text content or HTML markup in several templates or glossary entries without having to revise all of those individual files whenever you revise the included text. Simple Includes A simple include takes the following form: #bbinclude "footer.html" When such an include is used in a template or glossary entry, it is replaced with the contents of the specified file when the template is used to build a new document, or when the glossary entry is inserted. (The original template or glossary file is not changed.) Imagine that you have ten different templates, each of which contains your name, address, phone number, email address, and a copyright statement with the current year in them. Rather than pasting this info into all ten templates, you can create a file named "address.html," put it in your Templates folder, and include this statement: #bbinclude "address.html" in each of the templates, at the appropriate point. Later, when the new year arrives, or you move, you only have to update one file, not all ten templates. (You could use the #YEARNUM# placeholder for the year and only need to update the include file when you move!) Headers and footers are probably the most common uses for include files, but any template or glossary entry may use as many include statements as you wish. Included files themselves may also use #bbinclude directives, up to 16 levels deep. Note BBEdit looks for include files first in the same directory as the document containing the directive, then in the same directory as the document into which the processed document is being inserted, and finally in the HTML Templates folder specified in your preferences. Persistent Includes Simple includes are appropriate for use situations where you want the inclusion to happen only once. Once the file has been included, however, it cannot be changed in any automated fashion. Since the #bbinclude directive is replaced by the included text, the Update tool can’t tell the included text is any different from any other text. Includes become even more powerful, however, when you can update existing files to incorporate revised include text at a later date. For example, suppose you generate several dozen HTML documents using a template that uses an #bbinclude directive to insert a standard footer containing your email address. Later, you change your email address. After you change it in the footer document, only new HTML files you create from the template will include your new address. What you’d really like to be able to do is update all the files you have already created to include the revised footer. Include Files 291 Since this capability is needed primarily in Web site maintenance, BBEdit lets you embed the include directive in an HTML comment. An “end bbinclude” comment is also required. The included text is inserted between the two comment markers, but the comments themselves remain in place. The comments are not shown in the browser. This is known as a persistent include. A persistent include looks like this: <!-- #bbinclude "footer.html" --> <!-- end bbinclude --> The first time a persistent include is processed, it is handled much like a simple include. However, since the include directives remain in place, and because they mark the beginning and end of the inserted text, the Update tool can “rip out” the obsolete included text and replace it with the updated file. Using persistent includes and the Update Folder or Update Site commands, you can easily make these sorts of changes to entire sites in moments. Warning Any changes you have made to the included text after its initial inclusion will be discarded when the persistent include is updated, even if you have not changed the include file. Include Files with Variables Include files can be extended even further through the use of variables, which provide a means of inserting arbitrary text when the included file is processed, so that not all instances of the included file are exactly the same. Variables are essentially placeholders that you make up yourself. Some possible uses are to insert names, taglines, alt strings for images, or filenames (for files other than the current document) into documents. Note A variable name consists of a string of alphanumeric characters, enclosed in number signs (the ‘#’ character). Spaces are not allowed in variable names, but underscores may be used to represent word breaks. Variables can be placed anywhere in an include file, just like placeholders. When you include that file in a document, you specify the variable names and values with it. Consider an include file named "footer.html", which contains the following <HR> <IMG SRC="#MY_GRAPHIC#" ALT="#MY_ALT_DESC#"> <H1>#MY_TITLE#</H1> <BIG>This document copyleft 1998-2001 by Sid Zookim.</BIG> 292 Appendix C: Placeholders and Include Files In your document, the Include reference would look like this: … <BODY> … <!-- #bbinclude "footer.html" #MY_GRAPHIC#="test1.gif" #MY_ALT_DESC#="a test image" #MY_TITLE#="A Test Title" --> <!-- end bbinclude --> … </BODY> … Note that the values of placeholders are specified inside the HTML comment of a persistent include, using a #PLACEHOLDER#=”Value” syntax. The quote marks around the value are mandatory; if you need to include a quote mark in the actual value, escape it with a backslash. Including AppleScripts BBEdit allows included files to be compiled AppleScript scripts. The script should contain an “on include” handler which is passed two parameters: a reference to the file from which the script is being called, and a record containing one field for each variable passed in the #bbinclude directive. Scripts can of course also retrieve information from BBEdit, other scriptable applications, or the Mac OS. The handler’s return value is inserted into the file that included it. Given the HTML document below: <html> <head> <title>Include Test</title> <meta name="generator" content="BBEdit 6.5"> </head> <body> <!-- #bbinclude "foo.script" #x#="3" #author#="JEK"--> <!-- end bbinclude --> </body> </html> The following script inserts three lines: the first containing the file’s path, the second containing the parameter “x” passed to it in the #bbinclude directive, and the third containing the parameter “author.” on include(f, vars) set s to f as text set s to "File Path: " & s & return & return as text set s to s & "x: " & x of vars & return & return as text set s to s & "Name: " & author of vars & return as text return s end include Include Files 293 The resulting document might look like this: <html> <head> <title>Include Test</title> <meta name="generator" content="BBEdit 6.5"> </head> <body> <!-- #bbinclude "foo.script" #x#="3" #author#="JEK"--> File Path: Boot:Desktop Folder:incl_test.html x: 3 Name: JEK <!-- end bbinclude --> </body> </html> Including Perl Scripts If you have MacPerl installed on your computer, or if you are running BBEdit on Mac OS X, you can write include scripts in Perl. The script must be a text file with a name ending an extension BBEdit recognizes as Perl. (See the Languages panel of the BBEdit Preferences.) The name of the file being processed is passed to the script as its first argument, and any variables in the include statement are passed as additional arguments. All these can be retrieved via @ARGV in your Perl script. Any text sent to STDOUT by the script will be taken as the value of the #bbinclude operation and inserted into the HTML file. If an error occurs while running the script, the STDERR output, if any, will be inserted into the file along with the STDOUT, and a single line indicating the error will be added to the error browser. For example, enter this directive in your HTML file: <!-- #bbinclude "foo.pl" #length#="2" #width#="3" --> <!-- end bbinclude --> Then use this source code for “foo.pl”, and save it in the same folder as the HTML file, or in the Templates and Includes folder specified in the HTML Web Site panel of your BBEdit preferences: #!/usr/bin/perl -w my $file = shift @ARGV; my %args = @ARGV; my $area = $args{"length"} * $args{"width"}; print "Filename: $file\n"; print "Area: $area\n"; When you run the Update command, BBEdit will place the filename in the script’s variable $file and the “length” and “width” variables in the associative array (hash) %args. After the update, the BBEdit file will look like this: 294 Appendix C: Placeholders and Include Files <!-- #bbinclude "foo.pl" #length#="2" #width#="3" --> Filename: Mac HD:Desktop Folder:sample.html Area: 6 <!-- end bbinclude --> In addition, BBEdit will pass information about the current HTML Tools settings to the script in the following environment variables: BBEditServerURL BBEditServerPath BBEditDefaultFileName BBEditTemplateDirectory BBEditRootDirectory BBEditLowercaseTags BBEditLowercaseAttributes BBEditAlwaysQuoteAttributes To access these in your Perl code, use the %ENV environment variable hash. For example, this line of Perl will print the web server name specified in your BBEdit HTML Web Site preferences: print $ENV{BBEditServerURL}; Other Include Notes Warning Older versions of BBEdit supported the use of “#include” as an alternative to “#bbinclude”. However, this syntax made it difficult to mix BBEdit includes and Microsoft Active Server Page (ASP) directives, so it is no longer supported. If you have existing documents which use the older syntax, simply change “#include” to “#bbinclude” to use them with BBEdit 6.5. Include Files 295 296 Appendix C: Placeholders and Include Files Index Symbols B (cont.) #RELATIVE# 290 batch find 95, 96 BBEdit Dictionaries folder 12 BBEdit extensions see plug-ins BBEdit Glossary folder 12 BBEdit Plug-ins folder 12 BBEdit Scripts folder 14 BBEdit Startup Items folder 12 BBEdit state information 24 BBEditShutDown file 254 BBEditStartup file 254 BBEditStartup•411 file 254 BBEdit-Talk mailing list 113 BDO tag 198 bi-directional override 198 BIG tag 200 Block Elements submenu 191 BLOCKQUOTE tag 192 BODY tag 190 bookmarks 31 BR tag 198 breakpoints 252 Bring Up To Date command 253 broken links 202 Browser Display Preferences 150 browser plug-ins 197 browsers 141 differences 72 disk browser 142 errors 243 file list panel 144 search results 97, 145 splitter 142 status bar 142, 143 text panel 142, 144 BUTTON tag 195 A A (anchor) tag 196 ABBR tag 199 active windows 44 ActiveX controls 197 Add & Compile command 253 Add command 253 Add/Remove Line Numbers plug-in 267 ADDRESS tag 192 alternation 121 AppleScript 14, 20 and searching 101 attaching scripts to menu items 238 in HTML documents 212, 293 pitfalls 230 reading dictionary 226 recording 224 scripts menu 237 updating to BBEdit 6 231 APPLET tag 197 Application Preferences 149 Apply to New command 109 Apply to Old command 109 AREA tag 198 Arrange command 87 arranging windows 87 arrow keys 284 ASCII conversion 267 ASCII table 84 attaching scripts to menu items 238 auto-indent 55 automatic backups 38 B B (bold) tag 200 backgrounds in HTML documents 190 backups 37 automatic 38 manual 38 backward searching 94 Balance Tags command 202 balancing parentheses 55, 58 BASE tag 182, 190 BASEFONT tag 198 C C programming language 62 Cancel button 4 Cancel Check-Out command 259 capitalize lines 59 sentences 59 words 59 CAPTION tag 194 Cascading Style Sheets 186 297 C (cont.) C (cont.) case sensitivity 94 case transformations 125 CENTER tag 192 changing case 59 character classes 116 Check In command 256 Check In Folder 261 Check Out command 257 Check Out Folder command 262 Check Spelling command 12, 74 Check submenu 201 Check Syntax command 252 checking links 202 checking spelling 74 external spell checker 76 user dictionary 76 CITE tag 199 Clear command 4, 44 Clear key 44 Clear Lines Containing plug-in 268 clearing a marker 68 client-pull 191 client-side image maps 198 client-side scripts 191, 192, 198 Clipboard 45 #clipboard# placeholder 216 clipboards, multiple 45 CODE tag 199 CodeWarrior 11, 252 COL tag 194 COLGROUP tag 194 colored text 57 in HTML documents 190 Columnize plug-in 267, 268 Command and Option keys in document windows 51 Command key 5 command keys assigning to menu items 271 in dialogs 4, 181 in menus 3 listing by default key 279 listing by menu 272 shortcuts 283 Command-Period 4 comments 269 removing 205 Compare Revisions command 259 comparing files 70 multiple files 73 Compile command 243, 252 compile errors Compile Errors browser 243 complex patterns 119 Concatenate Files plug-in 267 context-sensitive HTML 184, 185 control characters 61 Convert to ASCII plug-in 267 Convert to Client Side Map command 198 Convert to Table command 194 Copy & Append command 45 Copy command 4, 45, 268 Copy Lines Containing plug-in 268 creating documents 21 from templates 211 HTML documents 21, 181 with clipboard 21 with selection 21 creator 23 CSS 186 @import 186 format 187 cursor movement 50 using arrow keys 51 cursor position 47, 56 custom markup 212 Cut & Append command 45 cut and paste 45 Cut command 4, 45, 268 Cut Lines Containing plug-in 268 298 Index D #date# placeholder 216 DD tag 193 defined term 199 definition list 193 DEL tag 192, 199 Delete key 44, 52, 284 deleted text 192 deleting text 44 Detab command 62 development environments 241 configuring BBEdit for use with 242 source and header files 243 DFN tag 199 dialog keyboard shortcuts 4, 181 dictionary, AppleScript 226 Differences command 72 Differences Preferences 151 directory list (HTML) 193 disk browsers 14, 20, 21, 26, 142 file list panel 144 status bar 143 text panel 144 Display_lines 232 DIV (division) tag 192 DOCTYPE 182 D (cont.) F (cont.) documents comparing 70 creating 21 double-clicking 23 editing text 44 icon 48 inserting text 69 modification indicator 47 on FTP servers 31 revealing in Finder 89 saving 21, 22 window anatomy 46 DOS line breaks 24 double-clicking 23, 26 drag-and-drop in document windows 46 to BBEdit application icon 23, 26 to Windows floating window 26 with HTML Tools 207 Dreamweaver 205 DT tag 193 dynamic menus 3 file groups 21, 35 file list panel 144 #file# placeholder 216 File Search Preferences 154 File Types Preferences 155 File-pop-up menu 48 Filters 250 filters, file 102 Find & Mark All command 68 Find & Mark command 48 Find & Replace All Matches 99, 105 Find & Replace All Matches command 108 Find Again command 93, 107 Find All 93, 97 Find command 91, 107 Find Definition command 109 Find dialog 92 Find Differences command 109 Find in Next File command 98, 108 Find Selection command 107 finding text see searching floating windows ASCII table 84 Glossary 213 HTML Entities 209 HTML Tools 180, 207, 209 Tool List 266 Web Safe Colors 210 window list 85 font for printing 40 FONT tag 198 Fonts menu 58 Fonts preferences 155 foreign text 77 form sentences 59 FORM tag 194, 195 form words 59 Format command 204 Forms submenu 194 Forward Delete key 52, 54 fractional widths 40 FRAME tag 201 Frames submenu 200 FRAMESET tag 201 freezing line endings 64 Frontier 212 FTP 31 alternate ports 31 FTP Browsers 34 FTP Settings Preferences 156 function keys 54 #function# placeholder 216 E Edit Tag command 185 Edit Task Comment command 259 editing text 44 shortcuts 283 Editor Defaults Preferences 151 Educate Quotes plug-in 269 EM tag 199 Emacs Key Bindings 170, 285 End key 54 Entab command 62 Enter key 4 Enter Search String command 107 error browser 243 escape codes 62, 113 Escape key 4 Exchange with Next command 89 exclude matches 96 expanding tabs 55 extending the selection 51, 53 extensions see plug-ins external spell checker 76 F F keys 54 FIELDSET tag 195 file filters 102 File Filters Preferences 153 Index 299 F (cont.) G (cont.) Function pop-up menu 48, 49 Function Popup Preferences 158 functions prototypes 269 grep (cont.) setting markers with 68 subpatterns 120, 123 wildcards 114 G H Get Info command 48, 88 Get Revision command 258 Glossary 12, 84, 213 language sensitivity 214 manually sorting 214 substitutions 216 Glossary Preferences 158 Go To Center Line command 108 Go To Line command 53, 108 Go To Previous Error command 108 Go To Previous Placeholder 108 gremlins 61 grep 94 alternation 121 backreferences 129 character classes 116 comments 133 complex patterns 119 conditional subpatterns 137 entire matched pattern 124 escape codes 113, 117 examples 126 excluding characters 116 longest match issue 122 lookahead assertions 135 lookbehind assertions 135 marking a mail digest 128 marking structured text 127 matching delimited strings 127 matching nulls 129 matching white space 126 matching words and identifiers 126 non-capturing parentheses 131 non-greedy quantifiers 122 non-printing characters 117 non-repeating subpatterns 138 once-only subpatterns 138 pattern modifiers 133 positional assertions 135 POSIX character classes 131 quantifiers 118 ranges 116 rearranging name lists 128 recursive patterns 140 repetition 118 replacement patterns 123 replacing with subpatterns 124 Hard Wrap command 63, 65 hard wrapping 60, 63, 64 Head Elements submenu 190 header files 243 headers 41 heading tags 192 Hex Dump plug-in 269 hex escapes 95, 117 hexadecimal 62 hidden files on FTP servers 32 highlighting of text 44 hollow diamond 47 Home key 54 HR tag 192 HTML books on 178 CSS 186 document title 182 Web sites about 178 HTML Colors Preferences 158 HTML document 21 HTML Entities palette 209 HTML Markup Preferences 159 HTML Palette Preferences 160 HTML Preview Preferences 160 HTML Templates folder 211 HTML Tools 177–212 Block Elements 191 checking HTML 201 colors 210 custom markup 212 Edit Tag 185 entities 209 forms 194 frames 200 Head Elements 190 include files 291 indexing 206 inline elements 196 lists 193 Markup menu 181 miscellaneous 205 new document 181 optimizing documents 204 palette 180, 207, 209 phrase elements 199 300 Index H (cont.) K HTML Tools (cont.) preferences 180 reformatting documents 204 scripting 212 scripts 293 tables 193 Tag Maker 184, 185 templates 211 tool descriptions 183 translation 205, 210 updating documents 202 utilities 204 variables 292 HTML Tools Preferences 161 HTML Web Site Preferences 162 human interface 3 KBD tag 200 key icon 48 keyboard shortcuts 266, 271, 283 in dialogs 4, 181 keywords see placeholders I I (italic) tag 200 image maps 198 IMG tag 196 inactive windows 44 include files 291 variables 292 see also templates indenting 59 indexing HTML documents 205, 206 Info button 48 Inline Elements submenu 196 INPUT tag 195 INS tag 192, 200 Insert pop-up menu 48 inserted text 192 inserting files 69 inserting folder listings 69 inserting page breaks 70 inserting project listings 70 inserting text 69 inserting Toolbox calls 70 #insertion# placeholder 216 insertion point 44 installing BBEdit 9 international text 26, 77 invisible characters 56 invisible files 29 on FTP servers 32 Invisible Folders 101 J Java applets 197 JavaScript 191, 192, 198 L LABEL tag 195 Languages Preferences 162 language-sensitive glossary 214 launching BBEdit 19 LEGEND tag 195 LI tag 193 line breaks 24, 60 line feeds 61 line numbers 47, 56 on printouts 41 line prefixes and suffixes 269 link checker 202 LINK tag 183, 191 list items (HTML) 193 Lists submenu 193 longest match issue 122 lower case 59 M Macintosh Drag and Drop 46 see also drag-and-drop Macintosh line breaks 24 MacPerl 245 Macromedia Dreamweaver 205 Make Prototypes plug-in 269 MAP tag 198 Mark pop-up menu 48, 67 markers clearing 68 setting 67 Markup menu 181 menu list (HTML) 193 menus 3 META tags 182, 183, 191 Misc submenu 205 monospaced font 193, 200 mouse shortcuts 283 moving text 45 moving the cursor 50 using the arrow keys 51 MPW 11, 67, 253, 254 MPW tools 255 Scripts folder 11 state information 24 Tools folder 11 Index 301 M (cont.) P (cont.) multi-byte text 26, 77 multi-file comparisons 73 multi-file search 95 multiple clipboards 45 multiple Undo 46 placeholders 287 #RELATIVE# 290 AppleScript 217 in glossaries 216 plug-ins 12, 265 PostScript 269 PRE tag 193 Precompile command 253 Preferences 148 Application 149 Browser Display 150 Differences 151 Editor 51, 53, 242 Editor Defaults 151 File Filters 153 File Search 154 File Types 23, 155 FTP Settings 156 Function Popup 158, 243 Glossary 158 HTML Colors 158 HTML Markup 159 HTML Palette 160 HTML Preview 160 HTML Tools 161 HTML Web Site 162 Languages 57, 162 Printing 39 Services 10 Spelling 164 Startup 164 State 165 Status Bar 166 Text Colors 168 Text Editing 169 Text Files Opening 171 Saving 172 Text Printing 173 Text Search 174 Tools 11, 175, 242 Windows 56, 176 Prefix/Suffix Lines plug-in 269 prefixes 269 preformatted text 193 Preprocess command 253 Print One Copy command 40 printing 39 Printing Options command 41 Projector 256 prototypes 269 pull-down menus 3 Python scripts 245 N #name# placeholder 216 New Project command 259 NOFRAMES tag 201 Non-Greedy Quantifiers 122 non-printing characters 56, 95 NOSCRIPT tag 191, 192 numeric keypad 53 O OBJECT tag 197 OL tag 193 Open command 23, 26 options 28 Open Hidden 29 Open Recent command 26, 29 Open Selection command 26, 29 Open Several command 26 Opening 26 Opening Existing Documents 26 optimizing HTML 204 OPTION tag 196 OPTIONGROUP tag 196 ordered lists 193 outdenting 59 P P (paragraph) tag 191 page breaks 70 Page Down key 54 Page Up key 54 paragraph (definition) 44 Paragraph Fill option 65 PARAM tag 197 passive FTP 32 Paste command 4, 45 Path pop-up menu 48 pattern matching see grep pencil icon 48 Perl 245 Perl scripts 245 persistent includes 291 Philip Bar 55, 56 Phrase Elements submenu 199 302 Index Q S (cont.) QUOTATION tag 199 searching (cont.) exclude matches 96 extending selection 94 for non-printing characters 95 for whole words 94 grep 94 see also grep in a folder 99 in multiple files 95 in results of a previous search 100 in selection only 94 menu reference 107 multiple files 95 non-printing characters 117 replacing in multiple files 104 results window 97, 145 search set 99 with scripts 101 wrap around 94 Select All command 4, 44 Select Line command 44 Select Paragraph command 44 #select# placeholder 216 SELECT tag 195 selected text 44 selecting text 44, 50 by clicking 50 extending the selection 51 Send PostScript plug-in 269 Send to Back command 89 Set Breakpoint command 252 Set Marker command 48, 67 Set Menu Keys 3 Set Target command 252 setting markers 67 using grep 68 SGML 179 prologue 182 Shebang Menu 247 Shell scripts 245 shell worksheet 243 Shift-Delete keystroke 52 shifting text 59 Show Invisibles command 48 Show pop-up menu 143 simple includes 291 SMALL tag 200 Smart Editing 55, 153 smart quotes 55 Soft Wrap Text command 48 soft wrapping 55, 63, 64 as default 64 with imported text 64 solid diamond 47 R RBBEdit tool 254 recording scripts 224 Redo command 46 reflowing paragraphs 65 reformatting HTML 204 regular expressions see grep #relative# placeholder 290 Remove Line Breaks command 63 removing comments 205 repetition metacharacters 118 Replace 93 Replace & Find Again command 93, 98, 108 Replace All 93, 97, 98, 105, 108 Replace command 107 replacing text 44 see also searching Return key 4 Reveal in Finder command 89 Reverse Lines plug-in 269 Revision History command 259 Rewrap Quoted Text 60 Rez 62 rubber stamp 42 S SAMP tag 200 Save a Copy to FTP Server command 33 Save As command 22 Save As options 23 file creator 23 line breaks 24 Options button 23 Save As Stationery 23 Save Selection Only 23 state information 24 Save command 22 Save to FTP Server command 33 #script# placeholder 217 script systems 77 SCRIPT tag 191, 198 Scripts 251 Scripts menu 14 Scripts palette 14 scrolling, synchronized 89 search results window 97, 145 searching 92 backward 94, 106 batch find 95 case sensitive 94, 106 Index 303 S (cont.) T (cont.) Sort plug-in 269 source files 243 source management 256 SourceServer 256 SPAN tag 199 special folders 11 spell checking 74 external spell checker 76 user dictionary 76 Spelling Preferences 164 split bar 49 in browsers 142 startup items 20 Startup Preferences 164 state 24 State Preferences 165 stationery 23, 87 Stationery List 87 status bar 47 hiding 48, 56 in browsers 142 in disk browsers 143 Status Bar Preferences 166 STRIKE tag 200 STRONG tag 200 STYLE tag 191 stylesheets 191 SUB (subscript) tag 199 subpatterns 120 substitution in glossaries 216 suffixes 269 SUP (superscript) tag 199 Synchro Scrolling command 89 syntax checking 202 syntax coloring 57 Text highlighting 44 text panel 144 Text Printing Preferences 173 Text Search Preferences 174 text transformation 58 text wrapping 63 TEXTAREA tag 196 TFOOT tag 194 TH tag 194 THEAD tag 194 THINK Reference 70 #time# placeholder 216 time stamps 42 Tool List floating window 266 Toolbox Call Template command 70 Tools menu 266 Tools Preferences 175 ToolServer 254 Tools folder 255 TR tag 193 transformations, case 125 Translate Line Breaks 171 translation 267 HTML 205, 210 TT tag 200 two-up printing 41 typing text 44 typographer’s quotes 269 T TABLE tag 193 Tables submenu 193 tabs converting to and from spaces 62 Tag Maker command 184, 185 TBODY tag 194 TD tag 194 templates for HTML documents 183, 211 scripts 293 variables 292 Text Colors Preferences 168 Text Editing Preferences 169 Text Files: Opening Preferences 171 Text Files: Saving Preferences 172 304 Index U U (underline) tag 200 UL tag 193 Un/Comment plug-in 269 Undo command 46 Unicode 24, 77 Unix line breaks 24 Unix shell scripts 245 unordered lists 193 Update submenu 202 updating to BBEdit 6 231 upgrading to BBEdit 6 11 upper case 59 User Dictionary 12 user interface 3 UTF-8 25 Utilities submenu 204 V validation 201, 202 VAR tag 200 variables 292 VisiBone 210 W watermark 42 Web Safe Colors palette 210 wildcards 114 window list 85 Window Options pop-up menu 48 windows arranging 87 exchanging with next 89 Info button 88 sending to back 89 split bar 49 status bar 47 Windows floating window 26 Windows menu 83 Windows Preferences 176 worksheet 243 wrap around 94 Wrap while Typing option 63 wrapping text 55, 63 X XML declaration 182 Y (none) Z Zap Gremlins command 61 Index 305