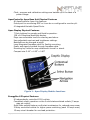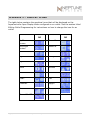
1
AquaController Apex Setup and Programming Guide WELCOME TO AQUACONTROLLER APEX ................................................... 1 FEATURES ................................................................................................ 1 TABLE OF ACRONYMS............................................................................... 3 TYPICAL AQUACONTROLLER SYSTEM COMPONENTS ................................ 3 SETUP OVERVIEW .................................................................................... 4 PHYSICAL INSTALLATION ........................................................................ 5 Base System Initial Connections ................................................................. 5 NETWORK SETUP ..................................................................................... 7 Automatic Network Configuration (default) ..................................................... 7 Manual Network Configuration (Optional) ....................................................... 9 Configure the Apex Hostname (optional) ...................................................... 12 Configure the Apex Web Interface Port Number (optional) ............................. 13 Configure the Apex Web Interface Administrator Credentials .......................... 13 Restart the Apex (optional) ........................................................................ 14 EMAIL SETUP ......................................................................................... 14 Enable/disable Email Authentication ............................................................ 16 Send a test alarm email ............................................................................. 17 Email Troubleshooting ............................................................................... 17 CONFIGURING THE APEX TO BE ACCESSIBLE FROM THE INTERNET ....... 18 CLOCK SETUP ......................................................................................... 19 APEX MODULE SETUP ............................................................................. 21 EnergyBar 8 ........................................................................................... 21 Probe Module 1 ....................................................................................... 21 Probe Module 2 ....................................................................................... 23 Probe Module 3 ....................................................................................... 23 Updating AquaBus Modules ........................................................................ 23 Delete an Apex Module .............................................................................. 23 Rename an Apex Module ............................................................................ 23 Configure an Apex Module ......................................................................... 24 LEGACY MODULE SETUP ......................................................................... 24 Addressing Legacy Modules ........................................................................ 24 Connecting Legacy Modules ........................................................................ 25 Adding Legacy Modules to the Apex System ................................................. 25 X10 Outlets .............................................................................................. 25 Adding Legacy Outlets ............................................................................... 26 Deleting Legacy Outlets ............................................................................. 26 Probe Expansion PX-1000 .......................................................................... 28 PROBE SETUP ......................................................................................... 28 Temperature Probe Setup .......................................................................... 28 Temperature Probe Calibration ................................................................... 29 Temperature Probe Maintenance ................................................................. 30 pH Probe Setup ........................................................................................ 30 Ph Probe Calibration .................................................................................. 31 pH Probe Maintenance ............................................................................... 33 ORP Probe Setup ...................................................................................... 33 ORP Probe Calibration ............................................................................... 34 ORP Probe Maintenance ............................................................................. 37 Conductivity Probe Setup (optional) ............................................................ 37 Conductivity Range ................................................................................. 38 Temperature Compensation ..................................................................... 39 Conductivity Probe Calibration .................................................................... 39 Conductivity Probe Maintenance ................................................................. 40 Dissolved Oxygen Setup (optional).............................................................. 40 Dissolved Oxygen Range .......................................................................... 41 Dissolved Oxygen Calibration ..................................................................... 42 Dissolved Oxygen Probe Maintainence ......................................................... 43 PROGRAMMING OUTLETS ....................................................................... 44 Default program ....................................................................................... 44 Programming with Wizards......................................................................... 44 Light ..................................................................................................... 44 Pump .................................................................................................... 45 Heater ................................................................................................... 45 Chiller ................................................................................................... 45 pH Control ............................................................................................. 46 ORP Control ........................................................................................... 46 Editing Outlet Programming ....................................................................... 47 Advanced Programming ............................................................................. 47 Virtual Outlets .......................................................................................... 49 Order of Operation .................................................................................... 50 Repeat Interval......................................................................................... 51 Programming with Hysteresis ..................................................................... 52 Set Points .............................................................................................. 52 Minimum Time ........................................................................................ 52 Defer ..................................................................................................... 53 Programming Alarms and Warnings ............................................................. 53 Triggering alarms or events on Power Outages ........................................... 54 Sample Alarm Email ................................................................................ 55 Switch inputs ........................................................................................... 56 Identifying Ports and Switches on Expansion Modules .................................... 57 Seasonal Programming .............................................................................. 58 Seasonal Temperature Variation ............................................................... 58 Seasonal Lighting Adjustment ................................................................... 59 Moon Lighting ......................................................................................... 60 Programming Feed Timers ......................................................................... 60 Variable Speed Port Programming ............................................................... 61 Pump Profile Type ................................................................................... 62 Ramp Profile Type ................................................................................... 63 Editing Profiles ........................................................................................ 63 Programming with Profiles........................................................................ 64 DISPLAY SETUP ..................................................................................... 64 Edit Status Screens ................................................................................... 65 Locking the Display ................................................................................... 65 Daytime and Nighttime Display Brightness ................................................... 66 Display Contrast ....................................................................................... 67 SOUND SETUP ........................................................................................ 70 USING THE AQUACONTROLLER APEX ..................................................... 71 Viewing Status ......................................................................................... 71 Manual Control ......................................................................................... 71 Graphing ................................................................................................. 72 Feed Timer Operation ................................................................................ 75 LOGGING ............................................................................................... 75 Log Interval ............................................................................................. 76 Data Log .................................................................................................. 76 Power Fail Log .......................................................................................... 76 INITIALIZE MEMORY ............................................................................. 77 SELF TEST .............................................................................................. 78 LOAD/SAVE CONFIGURATION................................................................ 78 XML MENU.............................................................................................. 79 UPDATING FIRMWARE ........................................................................... 80 Preparing the update ................................................................................. 80 Updating the Apex Base Module Firmware .................................................... 81 Updating the Apex Base Module Web Interface ............................................. 82 Upgrading Apex Modules ............................................................................ 83 Troubleshooting when updating using the Apex Flash Utility ........................... 84 APPENDIX 1 – APEX DISPLAY MENU STRUCTURE .................................. 86 APPENDIX 2 – DISPLAY ICONS .............................................................. 88 APPENDIX 3 – PROGRAMMING REFERENCE ........................................... 89 Defer....................................................................................................... 89 Fallback ................................................................................................... 89 If DoW .................................................................................................... 90 If Feed .................................................................................................... 90 If Moon .................................................................................................... 91 If ORP ..................................................................................................... 91 If Outlet................................................................................................... 92 If pH ....................................................................................................... 92 If Power................................................................................................... 93 If Sun ...................................................................................................... 94 If Switch .................................................................................................. 94 If Temp ................................................................................................... 95 If Time .................................................................................................... 95 Minimum Time .......................................................................................... 96 OSC ........................................................................................................ 96 Set.......................................................................................................... 97 APPENDIX 4 – ADVANCED PROGRAMMING EXAMPLES ........................... 97 Default Program ....................................................................................... 97 Automatic Top Off ..................................................................................... 98 Kalkwasser Control ................................................................................. 100 Alternating Pumps................................................................................... 102 Sequenced Pumps ................................................................................... 103 Resonant Waves ..................................................................................... 104 Alternate with Variable Speed Pumps ........................................................ 105 Growing Surge with Variable Speed Pumps ................................................ 107 APPENDIX 5 – TROUBLESHOOTING AND HELP ..................................... 108 APPENDIX 6 – TELNET COMMANDS ...................................................... 108 INDEX .................................................................................................. 109 NEPTUNE SYSTEMS LIMITED WARRANTY ............................................. 112 WELCOME TO AQUACONTROLLER APEX Congratulations on your purchase of the AquaController Apex system. The AquaController Apex System delivers an expandable, professional quality aquarium controller at hobbyist prices. The AquaController Apex is the most flexible, expandable system on the market today. FEATURES Very simple menu driven configuration Monitor and control - pH, ORP and temperature (ORP probe port not included on Apex Lite) Galvanic isolation on probe inputs Expansion through add-on probe modules and Energy Bars Flexible control Wave maker Seasonal temperature and lighting adjustments Moon cycle simulation Email and audible alarming Connectivity – Ethernet built in 4 Feed Timers 4 Variable speed ports on Apex (not on Apex Lite) Digital Inputs Modular expansion through AquaBus Legacy device Support – All ACIII accessories supported User updateable firmware State of the art electronics integration AquaController Apex Lite Base Unit Physical Features Multicolor LED to indicate status of the AquaController Apex Base Module. Ethernet port for connecting to standard networks for web configuration, control and monitoring. Probe port for monitoring pH with a pH probe. Temperature port. Two AquaBus connectors for easy expansion and flexible cabling options. I/O Port for connecting PX-1000 or the Breakout box for 6 digital inputs. Control Port for connecting DC8, DC4, DC4HD, AquaSurf or Lunar Simulator. Alternate power port can provide backup power in case the EnergyBar(s) lose power so email alarms can be sent, status and logs can be viewed on the Apex Display. Page | 1 AquaController Apex Clock, program and calibration settings are backed up in the case of a power outage. AquaController Apex Base Unit Physical Features All AquaController Apex Lite features Probe port for monitoring ORP or it can be re-configured to monitor pH. 4 Integrated Variable Speed Ports. Apex Display Physical Features 7 Push buttons for speedy and flexible operation. 128 x 64 Graphical backlight display. Plays user selectable tones for warning and alarm. User adjustable contrast and brightness settings. Backlight can be dimmed at night. Long integrated AquaBus cable for flexible mounting. Power and signal provided through AquaBus cable. Mounting key holes for easy attachment to wall or stand. Compact size 3.40" x 4.05" x 0.65" Figure 1 - Apex Display Module functions EnergyBar 8 Physical Features 8 Independently controlled 120V outlets. Completely silent operation on the 6 solid state switched outlets (5 amps max per outlet). Solid State outlets feature a soft-start mechanism for reduced pump wear. 2 Relay controlled outlets for higher power switching (each 10 amps max). 15 amp circuit breaker for overload protection. Page | 2 AquaController Apex Built-in powered 6 port AquaBus hub to easily add accessory modules. High reliability direct wired connection to the AquaController Apex system through the AquaBus. Powers the AquaController Apex Display, Apex Base Module and accessories through the AquaBus. Active electrical current monitoring, power failure detection and logging through the AquaController Apex. If communication failure occurs between the AquaController Apex system and the EnergyBar 8 (cable is unplugged for example), each outlet can be configured to revert to a user defined default setting or maintain the last setting. Up to 240 EnergyBar 8 devices can be connected together for up to 1920 switched outlets on a single AquaBus. Compact custom aluminum enclosure with 4 mounting holes (10.0" x 3.75" x 1.8"). TABLE OF ACRONYMS DHCP – Dynamic Host Configuration Protocol DNS – Domain Name Service IP – Internet Protocol ISP – Internet Service Provider ORP – Oxygen Reduction Potential RSS – Really Simple Syndication SMTP – Simple Mail Transfer Protocol URL – Uniform Resource Locator XML – eXtensible Markup Language TYPICAL AQUACONTROLLER SYSTEM COMPONENTS Page | 3 Apex Base Module Apex Display Module Apex EnergyBar 8 Apex Temperature Probe pH Probe (optional) ORP Probe (not supported on Apex Lite, optional on Apex) AquaBus Cable Ethernet cable Mounting screws Installation and Getting Started Guide AquaController Apex SETUP OVERVIEW The AquaController Apex can be setup using either the Apex Display Module or the Apex Web Interface or a combination of both methods. This manual provides you with instructions to perform setup functions from both the display and Web Interface. The manual will point out the few setup and maintenance functions that can only be performed from the Display Module. If network connectivity features are to be used (web based monitoring, web based control, email alerts, etc) it is recommended to spend the time setting up the network interface right away to allow the flexibility to program from the Web Interface. Basic steps to a successful installation: 1. Physical Installation 2. Network Setup (optional) 3. Email Setup (optional) 4. Configuring the Apex to be Accessible from the Internet (optional) 5. Clock Setup 6. Apex Module Setup 7. Legacy Module Setup (optional) 8. Probe Setup 9. Programming Outlets 10. Display Setup 11. Sound Setup 12. Using the AquaController Apex Setup through the AquaController Display Module is performed using the arrow, contextual and select keys to navigate menus and scroll through selections. Setup through this method does not require a functioning network interface or networked computer with a browser and is a great option when having network problems or trying to setup the network interface for the first time. All setup and maintenance functions can be performed through the Display Module. Setup through AquaController Apex Web Interface is very convenient. The information is presented on the much larger computer web browser screen so more information can be viewed at once. Programming changes and settings are typed through the keyboard and selected with mouse clicks as opposed to scrolling through screens. There are a few settings and much of the maintenance functions that cannot be performed through the web interface and must be performed through the Apex Display. Page | 4 AquaController Apex Whichever interface you use for setup, you can be up and running with a basic AquaController Apex configuration in as little as 15 minutes. However, to take full advantage of the advanced programming features may take additional time and you may find yourself adding functions and enabling features every few days until you get it customized just the way you like it. Don‟t be afraid to ask for help from the very active user community in Neptune System‟s sponsor forum on ReefCentral.com, it is a great source for programming examples. PHYSICAL INSTALLATION The Apex Base Module, EnergyBar 8 and Apex display should be securely mounted in a location free from moisture. Use wood screws through the mounting tabs of the EnergyBar 8 and Apex Base Module or if mounting on drywall, use drywall anchors (anchors not included). The Apex Display can be mounted using the keyhole slots on the back of the display or with strong Velcro. Mount all modules above the water line of the aquarium. Be sure to utilize drip loops on all power cords, AquaBus cables and probe cables. Plug the EnergyBar 8 into a circuit protected by a Ground Fault Circuit Interrupter (GFCI). WARNING: Water damage will void your warranty! Mount all modules in locations safe from moisture exposure. BASE SYSTEM INITIAL CONNECTIONS Refer to Figure 2 - Apex Base Module Connections and Figure 3 - Apex Lite Base Module Connections for the connection locations. Figure 2 - Apex Base Module Connections Figure 3 - Apex Lite Base Module Connections Page | 5 AquaController Apex Plug one end of the included AquaBus cable into one of the AquaBus ports on the Apex Base Module and the other end into one of the EnergyBar 8 AquaBus ports. Plug the Apex Display Module AquaBus cable into an available AquaBus port on the EnergyBar 8 or Apex Base Module (the display can be connected to any available AquaBus port on the entire AquaBus system). The order modules are connected is not important and the AquaBus is plug and play meaning you do not need to power down the system to connect a new module. The entire length of the AquaBus should be kept to a maximum of 200 feet. WARNING: NEVER plug standard USB devices into any AquaBus connector or AquaBus accessories into computer USB ports. Damage to the AquaBus accessory and/or USB device may result. Plug the included Ethernet cable into the port labeled Ethernet on the Apex Base Module and into an available port on your Ethernet hub, switch or router. WARNING: Be sure to plug the Ethernet cable into the Ethernet port and not into the variable speed ports or damage to the AquaController Base Module may occur. Plug the Temperature Probe in to the port labeled Temp on the Apex Base Module and place the other end of the Temperature Probe in the aquarium water in an area of medium to high flow to ensure an accurate reading. Connect the pH probe (optional accessory) to the port labeled pH on the Apex Base Module. Push the BNC female connector on to the male connector and turn ¼ turn clockwise to lock the connector in place. Connect the ORP probe (optional accessory) to the port labeled pH/ORP on the Apex Base Module. Push the BNC female connector on to the male connector and turn ¼ turn clockwise to lock the connector in place. (ORP Probe not available on Apex Lite) Plug the EnergyBar 8 power cord into an outlet protected by a Ground Fault Circuit Interrupter (GFCI) and that can provide ample power for all the items plugged into the EnergyBar 8. Page | 6 AquaController Apex The LED Status indicators on the EnergyBar and Apex Base Modules will flash yellow while they are initializing and in a few minutes they should light solid green and the Apex Display Module will display the default Status Screen. If there are no EnergyBars on the system (if you are using all legacy DC8 or DC4 modules for example), it will be necessary to purchase a 12V adapter to power the Apex Base Module. This AC adapter is available through your authorized dealer or from Neptune Systems and should be connected to a quality surge suppressor to protect your system. NETWORK SETUP The AquaController Apex network interface and integrated Web Interface allow you to setup, monitor and control the Apex system from standard web browsers around the home network and if properly enabled, around the world. Network setup is not required to setup and use the AquaController Apex but it is required to enable the Web Interface and the ability to send email/text alarms. The AquaController Apex ships with DHCP enabled which allows the Apex base module to automatically configure the IP address of the Apex base module on networks with DHCP enabled (common for home networks). While simple, the nature of DHCP means the assigned IP address can and will change from time to time which can cause problems with accessing the Apex from outside the home network. Therefore if you plan on accessing the AquaController Apex from outside the home network, it is best to assign the AquaController Base Module a fixed or static IP address. You can either configure your home router DHCP server to assign the Apex the same IP address all the time (see your router documentation for a feature called IP reservations) or continue with manual network configuration in the section titled Manual Network Configuration (Optional), otherwise continue with the section titled Automatic Network Configuration (default). The yellow LED indicator on the Apex Base module Ethernet port indicates there is power to the network module. The green LED indicates the presence of Ethernet Link layer connection. AUTOMATIC NETWORK CONFIGURATION (DEFAULT) The AquaController Apex ships with Dynamic Host Configuration Protocol (DHCP) enabled. This allows the Apex base module to automatically acquire a network IP Page | 7 AquaController Apex address from the network to which it is connected (if DHCP is enabled on the network which is common for home networks). Soon after system startup, the Apex base module will request IP configuration from the DCHP server and configure itself with that information. Once configured, the Apex Web Interface can be accessed by typing the following URL into a compatible web browser from a computer browser on the same network: http://apex NOTE: Accessing your AquaController Apex using the host name will not work from Macintosh computers. Access your Apex using the IP address. When presented with the login screen, type the default user name “admin” and password “1234” (without the quote marks). Figure 4- Logon Credential Entry Some systems may take some time for the host name “apex” to be recognized on the network. If http://apex does not work, you can try again later or you can use the Apex base module IP address to access the Web Interface. The assigned IP address can be determined from the DHCP server status screen (typically found on the home network router, see home router documentation for more information) or from the Apex Display. From the Apex Display, navigate to System – Net Setup – IP Address to display the assigned IP address. Once you determine the IP address assigned to the Apex, simply type the IP address into a compatible web browser. For example: 192.168.1.50 or http://192.168.1.50 NOTE: If the Apex Web Interface can be opened, the currently enabled IP configuration can be viewed at the bottom of the Network Setup page at Configuration – Network Setup. Page | 8 AquaController Apex WARNING: Be aware that when using DHCP, the IP addressed assigned to the Apex base module can and will change from time to time. This can cause problems for browsers in finding the Apex Web Interface on your network. In addition, if the Apex is to be accessed outside its home network, manually configuring a fixed IP address is recommended to avoid firewall problems. See the section titled Manual Network Configuration (Optional) for instructions on configuring a fixed IP address. If the Apex cannot contact a DHCP server, it will configure itself with the following network settings. If your network uses a different network configuration than what is listed below, the Apex will be unreachable from a PC browser and you should manually set the network configuration using the steps listed in the section titled Manual Network Configuration (Optional). IP Address 192.168.1.50 Subnet Mask (netmask) 255.255.255.0 Gateway Address 192.168.1.1 Primary DNS 192.168.1.1 Alternate DNS 192.168.1.1 MANUAL NETWORK CONFIGURATION (OPTIONAL) If the network where the Apex Base Module is connected does not have DHCP services or if the Apex is to be accessed from outside the home network (from a cell phone or remote PC for example), manually configuring the network interface on the AquaController Apex is strongly recommended. You need to determine an IP address to use that is compatible with your home network. This IP address must be unique on the network. If you are unsure what IP address to use, consult the documentation that came with your home network router to learn how to determine a valid IP address to use. Figure 5 - Typical ipconfig Command Output Page | 9 AquaController Apex In addition to the IP address, you need the Subnet Mask, and the IP address of the Default Gateway and DNS Server. These can also be determined by referring to the documentation that came with your home network router. Alternately, you can determine this information from another PC on the same network to which the Apex Base Module will be connected. Simply open a command prompt (Start – Run – type “cmd” – click OK) then type “ipconfig /all” and press enter. You should see a screen similar to the one shown in Figure 5 - Typical ipconfig Command Output which contains the 4 required elements of a typical IP network configuration. To manually set the network configuration you must first disable automatic configuration (DHCP). To Enable/disable DHCP: Apex Display: System – Net Setup – DHCP On – push the Select button to toggle DHCP off. Web Interface: Configuration – Network Setup – click the Disabled radio button, press the Update Network Settings button to save changes. To set the IP address: Apex Display: System – Net Setup – IP Address – use the up/down arrows to change the number of the highlighted character, use the left/right arrows to select the character to change, when done, press OK. Web Interface: Configuration – Network Setup – click in the AquaController IP Address box and type the IP address, press the Update Network Settings button to save changes. To set the Subnet Mask: Apex Display: System – Net Setup – Netmask – use the up/down arrows to change the number of the highlighted character, use the left/right arrows to select the character to change, when done, press OK. Web Interface: Configuration – Network Setup – click in the Netmask box and type the Subnet Mask, press the Update Network Settings button to save changes. To set the Default Gateway: Apex Display: System – Net Setup – Gateway – use the up/down arrows to change the number of the highlighted character, use the left/right arrows to select the character to change, when done, press OK. Page | 10 AquaController Apex Web Interface: Configuration – Network Setup – click in the Gateway box and type the default gateway, press the Update Network Settings button to save changes. Page | 11 AquaController Apex To set the Primary DNS: Apex Display: System – Net Setup – DNS Server – use the up/down arrows to change the number of the highlighted character, use the left/right arrows to select the character to change, when done, press OK. Web Interface: Configuration – Network Setup – click in the Primary DNS server box and type the default gateway, press the Update Network Settings button to save changes. To set the Secondary DNS (optional): Apex Display: System – Net Setup – Alt DNS Server – use the up/down arrows to change the number of the highlighted character, use the left/right arrows to select the character to change, when done, press OK. Web Interface: Configuration – Network Setup – click in the Secondary DNS server box and type the default gateway, press the Update Network Settings button to save changes. WARNING: Incorrectly changing the IP configuration may render the Web Interface inaccessible to your PC. If this occurs, make corrections to the IP configuration from the Apex Display Module. CONFIGURE THE APEX HOSTNAME (OPTIONAL) The Apex Base Module hostname is the friendly name used to address the Apex Web Interface. The default value is “apex”. You can either keep the default or choose a hostname more fitting to your system. To change the Apex hostname: Apex Display: System – Net Setup – Host Name – use the up/down arrows to select the appropriate letters and the left/right arrows to select the digit to change, when done, press OK. Web Interface: Configuration – Network Setup – click in the Hostname box and type the hostname, press the Update Network Settings button to save changes. NOTE: Hostnames are not case sensitive although you can configure the hostname with upper and lower case letters. Hostnames are limited to 15 digits, do not use spaces or special characters in your hostname. WARNING: Changing the hostname may render the Web Interface inaccessible when using the new hostname in a web browser until the Apex Page | 12 AquaController Apex is restarted. This is not a limitation of the Apex, rather the DNS service running on your home network. CONFIGURE THE APEX WEB INTERFACE PORT NUMBER (OPTIONAL) The Apex Base Module Web Interface uses an industry standard port number of 80. In most cases, there is no need to change this port number. If the need arises, use the following instructions to change the port number. The AquaController Apex can be configured to use any port number up to port 9999. To update the Port Number: Apex Display: System – Net Setup – Http Port – use the up/down arrows to select the appropriate number, when done, press OK. Web Interface: Configuration – Network Setup – click in the HTTP port (default 80) box and type the desired port number, press the Update Network Settings button to save changes. WARNING: If the Port number is changed, the new port number must be appended to the end of the URL in the browser window. For example: http://apex:8080 where 8080 is the port number configured on the Apex. CONFIGURE THE APEX WEB INTERFACE ADMINISTRATOR CREDENTIALS The Apex Base Module Web Interface uses the default user credentials of “admin” and “1234”. It is strongly suggested that these credentials be changed to something you can remember to protect your system from unauthorized access. To update the Administrator Login name: Apex Display: System – Net Setup – Admin Login – use the up/down arrows to change the character of the highlighted digit, use the left/right arrows to select the digit to change, when done, press OK. Web Interface: This option is not available from the Web Interface. To update the Administrator Password: Apex Display: System – Net Setup – Admin Password – use the up/down arrows to change the character of the highlighted digit, use the left/right arrows to select the digit to change, when done, press OK. Web Interface: This option is not available from the Web Interface. Page | 13 AquaController Apex NOTE: Web Interface Credentials are only editable from the Apex Display Module. WARNING: The Web Interface Credentials can be viewed and changed from the Apex Display Module. If the Apex Display Module is in a nonsecure area, the Apex Display should be secured with a Display Password, see the section titled Locking the Display for more information. RESTART THE APEX (OPTIONAL) In some cases, resetting the AquaController Apex is needed for settings to take effect. The Restart function can be use as opposed to power cycling the Apex System. This option is only available from the Apex Display Module. To Restart the Apex system: Apex Display: System – Net Setup – Restart – push the Select Button. The Apex system will immediately restart. Web Interface: This option is not available from the Web Interface. EMAIL SETUP The AquaController Apex can be configured to send email alerts when certain conditions are encountered. This is helpful to notify you of problems when you are away from your system. Sending email requires a properly setup Network interface with internet access (see the section titled Network Setup for more information). Correct settings for the default gateway and DNS (these are not required to get the Web Interface operational) are required for email operation. You will need to acquire the following information from your email hosting company to setup email alarms on the Apex: SMTP server address – The host name of your email provider‟s SMTP server. SMTP port – The port number your email provider uses for the SMTP protocol. 25 is the industry standard for SMTP but some ISPs block port 25 for security reasons and therefore some email providers use different port numbers to avoid this problem. From Address – The email address you are sending the email messages from. Typically needs to be a valid address to the operator of the SMTP server. To Address – The email address you wish to send the alarm messages to. Any valid email address can be used. Alternate To Address – An optional additional email address to send the alarm messages to. Any valid email address can be used. Mailbox Username and Password – The credentials used to log in and send mail (typically the same credentials are used to check mail). These credentials Page | 14 AquaController Apex are only required if your mail provider requires you to log in to access the SMTP server (usually not required for ISP mailboxes while on the ISP‟s network). NOTE: Setting these parameters up correctly is the first step in email alarm setup. See the section titled Programming Alarms and Warnings in the Programming Outlets section for information on programming the conditions that trigger the alarm email to be sent. Enable/disable the Email feature Apex Display: System – Email Setup – Email: – push the Select button to toggle this feature on and off. Web Interface: Configuration – Network setup – click the Enabled or Disabled radio button next to Email Enable, press the Update Network Settings button to save changes. SMTP Server name Apex Display: System – Email Setup – SMTP server – use the up/down arrows to change the highlighted digit, use the left/right arrows to select the highlighted digit, when done, press OK. Web Interface: Configuration – Network setup – click in the SMTP Server field and type the appropriate server name, press the Update Network Settings button to save changes. SMTP Port number Apex Display: System – Email Setup – SMTP port – use the up/down arrows to change the port number, when done, press OK. Web Interface: Configuration – Network setup – click in the SMTP port (default 25) field and type the appropriate port number, press the Update Network Settings button to save changes. From Address Apex Display: System – Email Setup – From address – use the up/down arrows to change the highlighted digit, use the left/right arrows to select the highlighted digit, when done, press OK. Web Interface: Configuration – Network setup – click in the From Address field and type the appropriate email address, press the Update Network Settings button to save changes. Page | 15 AquaController Apex To: Address Apex Display: System – Email Setup – To address – use the up/down arrows to change the highlighted digit, use the left/right arrows to select the highlighted digit, when done, press OK. Web Interface: Configuration – Network setup – click in the To Address field and type the appropriate email address, press the Update Network Settings button to save changes. Alternate To: Address Apex Display: System – Email Setup – Alt to address – use the up/down arrows to change the highlighted digit, use the left/right arrows to select the highlighted digit, when done, press OK. Web Interface: Configuration – Network setup – click in the To Address field and type the appropriate email address, press the Update Network Settings button to save changes. Email retransmit delay This is the period of time (in minutes) between re-sending alarm emails when alarm conditions continue to be true. Apex Display: System – Email Setup – ReEmail delay – use the up/down arrows to change the delay time, when done, press OK. Web Interface: Configuration – Network setup – click in the Re-email delay (minutes) field and type the appropriate number of minutes, press the Update Network Settings button to save changes. ENABLE/DISABLE EMAIL AUTHENTICATION Some email providers, especially non-ISP providers, require authentication before access to the SMTP server is granted. If Email Authentication is enabled, the credentials from the User Name and User Password fields are used to authenticate with the SMTP server. Apex Display: System – Email Setup – Email Auth: – push the Select button to toggle authentication on and off. Web Interface: Configuration – Network setup – click the Enabled or Disabled radio button next to Email Authentication, press the Update Network Settings button to save changes. Page | 16 AquaController Apex User Name (only required if Email Authentication is enabled) Apex Display: System – Email Setup – User name – use the up/down arrows to change the highlighted digit, use the left/right arrows to select the highlighted digit, when done, press OK. Web Interface: Configuration – Network setup – click in the User name field and type the appropriate user name, press the Update Network Settings button to save changes. User Password (only required if Email Authentication is enabled) Apex Display: System – Email Setup – User password – use the up/down arrows to change the highlighted digit, use the left/right arrows to select the highlighted digit, when done, press OK. Web Interface: Configuration – Network setup – click in the User password field and type the appropriate user password, press the Update Network Settings button to save changes. NOTE: Use a password of 14 characters or less or authentication errors will occur. SEND A TEST ALARM EMAIL This function can be used to send a test email to verify end-to-end operation of all components needed to send email alarms. Apex Display: System – Email Setup – Email test: – push the Select button to send a test message. Web Interface: Configuration – Network setup – click the checkbox next to Email test, press the Update Network Settings button to send a test message. EMAIL TROUBLESHOOTING If emails are not working follow these steps to debug: Telnet into the AquaController In the start -> run box of your PC type “telnet 192.168.1.50” (replace 192.168.1.50 with the host name or IP address of your Apex Base Module. Login to the AquaController, using the controller‟s login and password (default login is „admin‟, and the password is „1234‟). Once logged in via telnet you should see the “AquaController>” prompt each time you press the enter key. At the AquaController prompt type: cons 1 maild Page | 17 AquaController Apex mail If you don‟t understand the debug messages please email the log to [email protected], and we‟ll help you determine what is wrong. This function can be used to send a test email to verify end-to-end operation of all components needed to send email alarms. Apex Display: System – Email Setup – Email test: – push the Select button to send a test message. Web Interface: Configuration – Network setup – click the checkbox next to Email test, press the Update Network Settings button to send a test message. CONFIGURING THE APEX TO BE ACCESSIBLE FROM THE INTERNET After configuring and verify the operation of the network interface, you can configure your home network router so that the AquaController can be accessed from the internet. WARNING: Change the administrator user name and password of the AquaController before enabling access to the AquaController Apex from the Internet (see the section titled Configure the Apex Web Interface Administrator Credentials for instruction). Do not leave the default user name and password configured or you are exposing your system to unauthorized access. Configure your router so that incoming port 80 TCP requests are forwarded to the AquaController IP address on port 80. This configuration is usually done in the router's virtual server setup menu, port forwarding, or the UPnP section. Consult your router‟s setup manual for details on setting up this access. NOTE: On some routers (Linksys), you must enable UPnP or port forwarding at the global level before port forwarding will work. A good resource to use to setup your router‟s port forwarding is www.portforward.com. This website has instructions on setting up port forwarding for many different types of routers. To access the AquaController Apex from the internet you need to know your WAN IP address; the WAN IP address can be found by going to www.whatismyip.com from a computer on your home network. Your WAN IP address is the address you Page | 18 AquaController Apex will use when trying to access the controller from outside your home network (a cell phone browser or other computers on the internet). If your internet connection has a dynamic IP address assignment (most do), your WAN IP address may change from time to time. When the WAN IP address changes, you will need to determine and use the new IP address which can be a hassle. To avoid this situation, you can sign up for a free dynamic DNS service like www.dyndns.org. These services allow you to create an internet host name (myaquarium.dyndns.org for example) that will resolve to your WAN IP address. The site will have software you can install on one of the PCs on your network to automatically update the WAN IP when it changes. Follow the setup instructions at the site to create a host name, install and configure software. Some routers , have built-in support for dyndns accounts so no client PC software is required. Some ISPs block incoming port 80 requests, so you will have to use a different external port number. Choose any 4 or 5 digit number up to 65535 for example 4567. In this case you would configure your router to forward incoming TCP requests on port 4567 to port 80 of the AquaController IP address. When accessing the AquaController from the internet, you will need to add the port number to the end of your address like http://11.22.33.44:4567 or http://www.myaquarium.dyndns.org:4567. CLOCK SETUP By default, the AquaController Apex Automatic Clock Set feature will automatically set the date and time to Greenwich Mean Time (GMT) as long as the Apex has a properly setup Network connection with access to the internet (see the section titled Network Setup for more information on setting up Network access). If the Apex does not have access to the Internet, or if the Automatic Clock Set feature is disabled, the date and time needs to be set manually. You will need to specify what time zone you are in and whether the Apex should automatically adjust for Day Light Saving Time. You can also select to view the time in 12 or 24 hour formats and chose to make automatic daily micro adjustments to the internal clock with the Leap Second feature. NOTE: The AquaController Apex clock is powered by an internal backup battery and will keep time in the case of power failure. Page | 19 AquaController Apex Enable/disable Automatic Clock Set feature Apex Display: System – Clock Setup – Auto Set: – push the Select button to toggle this feature on and off. Web Interface: Configuration – Clock setup – click the Enable or Disable radio button next to Auto Clock Set. Manually set the Tank Time Apex Display: System – Clock Setup – Tank Time Set – use the up/down arrows to change the highlighted item, use the left/right arrows to select the item to highlight, when done, press OK. Web Interface: Configuration – Clock setup – click in the Time zone field and type the appropriate date and time. NOTE: When Auto Clock Set is enabled, you are unable to manually change the date and time. Time Zone (in GMT offset) Apex Display: System – Clock Setup – Time zone – use the up/down arrows to change the appropriate time zone (in GMT offset) for your area, when done, press OK. Web Interface: Configuration – Clock setup – click in the Time zone field and type the appropriate time zone (in GMT offset). NOTE: Please refer to www.worldtimezone.com for information on the correct time zone in GMT offset for your area. Enable/disable automatic Daylight Saving Time adjustments Apex Display: System – Clock Setup – DST: – push the Select button to toggle this feature on and off. Web Interface: Configuration – Clock setup – click the Enable or Disable radio button next to Daylight Savings Time. Select to view the time in 12 or 24 hour format Apex Display: System – Clock Setup – 12/24 Hr: – push the Select button to toggle between 12 and 24 hour formats. Web Interface: This option is not available from the Web Interface. The Leap Seconds allows you to fine tune the accuracy of the AquaController Apex clock. The number programmed into the AquaController Apex indicates how Page | 20 AquaController Apex many seconds to adjust the internal clock per day. For example if the clock is gaining 1.5 seconds per day, a value of -1.5 would be entered to offset this inaccuracy. The AquaController Apex uses this value to slow its time down by 1.5 seconds each day. To set the Leap Second adjustment Apex Display: System – Clock Setup – Leap Second – use the up/down arrows to set the Leap Seconds per day (either positive or negative leap seconds), when done, press OK. Web Interface: This option is not available from the Web Interface. APEX MODULE SETUP All Apex modules connect to the system through the AquaBus. Once connected, they are automatically detected and added to the system configuration. All Apex modules are upgraded using the steps and directions found in the section titled Updating Firmware. To connect a new Apex Module to the system, plug one end of the AquaBus cable into an available AquaBus port on the system, and the other end into the new Apex Module. Power and communication signals are passed through the AquaBus to the new Apex Module. The order modules are connected is not important and the AquaBus is plug and play meaning you do not need to power down the system to connect a new module. The entire length of the AquaBus should be kept to a maximum of 200 feet. WARNING: NEVER plug standard USB devices into any AquaBus connector or AquaBus accessories into computer USB ports. Damage to the AquaBus accessory and/or USB device may result. ENERGYBAR 8 AquaController Apex Energy Bar 8 (EB8) provides 6 solid state and 2 relay controlled outlets to control typical 120V AC items such as lights, heaters, chillers, etc. In addition, EB8 provides power to the other modules in the system through the AquaBus. It includes a 6 port AquaBus hub for flexible configuration options. EB8 outlets are programmed using the steps outlined in the section titled Programming Outlets. PROBE MODULE 1 AquaController Apex Probe Module 1 (PM1) adds a Temperature and pH/ORP ports to the Apex system. This module connects anywhere on the AquaBus and includes 2 AquaBus ports for flexible connection options. PM1 also includes 6 Page | 21 AquaController Apex digital inputs for connecting float switches, sensors, etc. PM1 temperature and pH or ORP probes are enabled/disabled and calibrated using the same menus and procedures as the Apex Base Module probes, see the section titled Probe Setup for more information. Page | 22 AquaController Apex PROBE MODULE 2 AquaController Apex Probe Module 2 (PM2) adds a Temperature and Conductivity ports to the Apex system. This module connects anywhere on the AquaBus and includes 2 AquaBus ports for flexible connection options. PM2 also includes 6 digital inputs for connecting float switches, sensors, etc. PM2 temperature and Conductivity probes are enabled/disabled and calibrated using the same menus and procedures as the Apex Base Module probes, see the section titled Probe Setup for more information. PROBE MODULE 3 AquaController Apex Probe Module 3 (PM3) adds a Temperature and Dissolved Oxygen ports to the Apex system. This module connects anywhere on the AquaBus and includes 2 AquaBus ports for flexible connection options. PM3 also includes 6 digital inputs for connecting float switches, sensors, etc. PM3 temperature and Dissolved Oxygen probes are enabled/disabled and calibrated using the same menus and procedures as the Apex Base Module probes, see the section titled Probe Setup for more information. UPDATING AQUABUS MODULES See the section titled Updating Firmware for instructions on updating AquaBus modules. DELETE AN APEX MODULE To delete an Apex Module from the system: Apex Display: Setup – Module Setup – Delete Module – use the up/down arrows to highlight the Apex module to delete, push Select to delete. Web Interface: Configuration – Module Setup – in the Module: box in the Module Configure area, select the Apex module to delete from the dropdown list, click the Delete Module radio button, click the Submit Module Update button. RENAME AN APEX MODULE To rename an Apex Module from the system: Apex Display: Setup – Module Setup – Modify Name – use the up/down arrows to highlight the Apex module to rename, push Select, use the up/down arrows to change the highlighted digit, use the left/right arrows to select the highlighted digit, when done, press OK. Web Interface: Configuration – Module Setup – in the Module Configure area, in the Module: box, select the Apex module to rename from the Page | 23 AquaController Apex dropdown list, click the Rename radio button, click the Submit Module Update button. CONFIGURE AN APEX MODULE Some AquaBus modules have configuration settings that can be updated through the Config Modules menu found from the Apex Display at Setup – Module Setup – Config Module. The Apex Wireless Expansion Module (WXM) is the first of these modules. If you have a WXM, please see the instructions that came with the WXM for setup instructions. If you do not have a WXM, this menu item will do nothing, this is normal. LEGACY MODULE SETUP All legacy modules except the PX-1000 must be manually added to the Apex system configuration. Once added to the system, they are configured/programmed just like any other port or outlet on the Apex system. The following legacy modules are supported: Direct Connect 4 – Provides control of four 120V AC outlets Direct Connect 4 HD – Provides control of four heavy duty 120V AC outlets Direct Connect 8 – Provides control of eight 120V AC outlets Lunar Simulator – provides lunar cycle control of LED lights AquaSurf – provides variable voltage control ports for variable speed Tunze Streams pumps You need to assign all legacy modules (except the PX-1000) a unique address before adding to the Apex system. See the section titled Connecting Legacy Modules for instructions on connecting the Legacy Modules to the Apex system. Finally, the Legacy Modules must be manually added to the Apex system configuration by following the directions in the section titled Adding Legacy Modules to the Apex System. After the legacy modules have been added to the system, they are configured and programmed like all other Apex ports and outlets. ADDRESSING LEGACY MODULES The address needs to be unique to all other legacy modules on the system. You do not need to worry about Apex module addresses as they are automatically assigned on the AquaBus and will not conflict with legacy addresses. Once the Page | 24 AquaController Apex unique address is assigned, set the switches on the Direct Connect module using the instructions found in user manual for the legacy module. CONNECTING LEGACY MODULES All legacy modules (except PX-1000) are connected to the port labeled Control on the Apex Base Module. If more than one legacy module is used, it is daisychained one to the next just as they were with previous AquaController systems. Cables between devices should be less than 10 feet and neatly coiled and routed away from power cables, ballasts and motors. Maintain a drip loop in all cables. ADDING LEGACY MODULES TO THE APEX SYSTEM All legacy modules (except PX-1000) must be manually added to the Apex system. Once added, the appropriate number of outlets will be added to the system with default names and programming. You can identify legacy module outlets by looking for the address listed at the end of the default outlet name (Light1_A1, Light_A2, etc.). The name and program for each outlet can be changed using the instructions found in the section titled Programming Outlets. Before adding the legacy module to the Apex system, make sure to configure the starting address and connect the module to the Apex system as described in previous sections. To add a Legacy Module to the system: Apex Display: Setup – Module Setup – Add Module – use the up/down arrows to highlight Type:, push Select, use the up/down arrows to choose the legacy module to add, push Select, press up/down arrows to highlight Start Addr:, push select, use the up/down arrows to choose the starting address for the legacy module, push Save to add the module or Exit to quit without saving. Web Interface: Configuration – Module Setup – in the Add Module section, choose the legacy module to add from the drop down list, type the starting address in the Start Control Address box, click the Add Module button to save. X10 OUTLETS The AquaController Apex will work with X10 controlled outlets, however Neptune Systems does not support it. Users are strongly urged to use Direct Connect or Energy Bar outlets to control their system as the communication between the AquaController Apex Base Module and the outlet is much more reliable and is not prone to errors as X10 communications can be. If X10 must be used, the X10 Page | 25 AquaController Apex Control Interface (i.e. IM513) is plugged in to the Control port on the AquaController Apex Base Module or in to the last legacy device in the Control chain. All X10 addresses must be manually added to the Apex system. Blocks of X10 addresses (i.e. B1 – B8) can be added by adding a DC4 or DC8 at the appropriate starting X10 address and deleting any extra X10 outlets that are not to be used. To add a DC4 or DC8, follow the instructions in the section titled Adding Legacy Modules to the Apex System. To add a single X10 address follow the instructions in the next section titled Adding Legacy Outlets. WARNING: X10 connected devices can be unreliable and prone to noise and environmental conditions. Users are urged to use EnergyBar or legacy Direct Connect outlets with the AquaController Apex system to ensure the most reliable control. ADDING LEGACY OUTLETS Follow the instructions in this section to add a single Legacy Outlet for use with X10 modules or to be used as a Virtual Outlet. The X10 Outlet must be set to a unique address in the system (it must not conflict with other legacy outlets on the system). To Add an X10 Outlet to the system: Apex Display: Setup – Outlet Setup – Add Outlet – use the up/down arrows to highlight the item to change: Name: - use the up/down arrows to change the highlighted digit, use the left/right arrows to select the highlighted digit, when done, press OK. Icon: - use the up/down arrows to select the icon to be displayed on the Status Screens, when done, press OK. Addr: - use the up/down arrows to select the X10 address configured for this module. When done, push Save to save changes and add the X10 Outlet. Web Interface: This option is not available from the Web Interface. DELETING LEGACY OUTLETS Follow the instructions in this section to delete a single Legacy Outlet. To Delete an X10 Outlet to the system: Apex Display: Setup – Outlet Setup – Delete Outlet – use the up/down arrows to highlight the outlet to delete, push Select, push OK to confirm. Page | 26 AquaController Apex Web Interface: Configuration – Module Setup – in the Delete Outlet: box near the middle of the page, select the outlet to delete from the dropdown box, click the Delete Outlet button. Page | 27 AquaController Apex PROBE EXPANSION PX-1000 The PX-1000 adds Temperature, pH and pH/ORP ports to the AquaController system. It connects to the port labeled I/O on the Apex Base Module. Connect Temperature, pH and ORP probes to the PX-1000 as needed. Power for the PX1000 is supplied by the included AC adapter. Only every 3rd PX-1000 needs a power adapter. Before the Probe Expansion will be recognized, it needs to be enabled on the Apex system as follows: To enable/disable Probe Expansion: Apex Display: System – Misc Setup – Probe Exp: Off – push the Select button to toggle Probe Expansion on and off. The AquaController Apex must be rebooted before this change takes effect. Either power cycle the Apex Base Module (disconnect the AquaBus cable for 10 second and reconnect) or see the section titled Restart the Apex (optional) for instructions on how to restart the Apex. Web Interface: This option is not available from the Web Interface. Once the Probe Expansion is enabled, the PX-1000 should be automatically added to the system. Up to 3 PX-1000 expansion modules can be daisy-chained together off the I/O port. Each PX-1000 provides 6 digital inputs for float switches, sensors, etc. PX-1000 temperature, pH and ORP probes are enabled/disabled and calibrated using the same menus and procedures as the Apex Base Module probes, see the section titled Probe Setup for more information. PROBE SETUP The AquaController Apex system uses various probes to monitor your system. The measurements from these probes can be displayed on the Apex Display Module and Web Interface. The measurements from these probes can be used to control your system and alert you of problems through email alerts or audible alarms, see the section titled Programming Alarms and Warnings in the Programming Outlets section for more information on setting up email alerts and audible alarms. TEMPERATURE PROBE SETUP A port to connect a temperature probe is included on the Apex Base Module and on several of the Apex system expansion modules. Setup and configuration of Page | 28 AquaController Apex these temperature probes is the same for all probes on the system. The Base Module temperature probe will be identified as “Temp”, the probe on the PX1000 Probe Expansion as “TempA”, “TempB” and so on, and probes on Apex Probe Modules (PM1, PM2, etc) as “TmpX3”, “TmpX4” and so on . The temperature probes are connected to the port labeled “Temp” on the base or expansion module. Simply push the probe cable plug into the port until the plug clicks into place. To remove the plug, push down on the tab and gently pull the plug out of the port. WARNING: Do not remove the rubber cap from the tip of the temperature probe or damage to the probe will occur. All probes should be rinsed in clean tap water before placing in the aquarium. Place the temperature probe in an area with high flow that is continuously wet (not an overflow that may drain dry, for example). Maintain a drip loop in the wire back to the Apex module. To enable a Temperature probe: Apex Display: Setup – Temp Setup – Temp Enable – If you have more than one Temperature port on your system, use the up/down arrow keys to choose the port you wish to configure, press Select, then use the up/down arrow keys to select on/off for that port, press Save when done or Exit to discard changes. Web Interface: This option is not available from the Web Interface. To display Temperature in Fahrenheit or Celsius: Apex Display: Setup – Temp Setup – Temp Scale: Fahrenheit – Press Select to toggle between Fahrenheit and Celsius. Web Interface: This option is not available from the Web Interface. TEMPERATURE PROBE CALIBRATION The AquaController Apex temperature probes have been calibrated at the factory and should not need to be calibrated. However, the AquaController Apex includes the ability to perform a calibration if desired. To calibrate a Temperature probe: Apex Display: Setup – Temp Setup – Temp Calibrate – If you have more than one Temperature probe enabled on your system, use the up/down Page | 29 AquaController Apex arrow keys to choose the probe you wish to calibrate, press Select, then use the up/down arrow keys to select the correct probe temperature, press Select when done. Web Interface: This option is not available from the Web Interface. TEMPERATURE PROBE MAINTENANCE Temperature probes do not need maintenance other than cleaning on an infrequent basis. To clean the probe, gently brush the probe with a soft brush to remove any debris. Rinse the probe in tap water. Soaking the probe in acids (vinegar) solution is not typically needed but can be used to dissolve calcium build up. PH PROBE SETUP A port to connect a pH probe is included on the Apex Base Module, Apex Lite Base Module and on Probe Module 1. The ORP port on the Apex Base Module can be configured as a second pH port if needed. Setup and configuration of these pH ports and calibration of the connected probes is the same for all probes on the system. The Base Module pH probe will be identified as “pH”, if the ORP port is configured for pH, it will be identified as pH2, the pH probe(s) on the PX1000 Probe Expansion as “pHA”, “pHB” and so on, and probes on Apex Probe Module 1 (PM1) as “pHx3”, “pHx4” and so on. The pH probe is connected to the port labeled “pH” on the base module. If using the ORP port on the Apex Base Module for pH, or the port on Probe Module 1, the probe will be connected to the port labeled “pH/ORP”. Push the BNC female connector on to the male connector and turn ¼ turn clockwise to lock the connector place. To remove the probe, turn ¼ turn counter clockwise and gently pull the connector straight off the base module. Remove the cap from the pH probe and discard the solution in the cap. All new probes should be rinsed in clean tap water before placing in the aquarium. Place the pH probe in an area with high flow that is continuously wet (not an overflow that may drain dry, for example). Maintain a drip loop in the wire back to the Apex Base or Probe Module. WARNING: We do not recommend fully submerging the pH probe as this will cause the probe to fail prematurely. Page | 30 AquaController Apex NOTE: Do not let the tip of the pH probe dry out as damage to the probe will result. If you are not using your pH probe for an extended period of time, make sure the tip is submerged in Probe Storage solution at all times. If storage solution is not available, tap water can be used (RODI water should not be used). To enable pH probes: Apex Display: Setup – pH Setup – pH Enable – If you have more than one pH port on your system, use the up/down arrow keys to choose the port you wish to configure, press Select, then use the up/down arrow keys to select on/off for that port, press Save when done or Exit to discard changes. Web Interface: This option is not available from the Web Interface. NOTE: To configure the pH/ORP port on an Apex Base Module to be used for pH, simply set pH2 ON in the pH Enable menu. Similarly, to configure the pH/ORP port on a Probe Expansion or Probe Module to be used for a pH probe, simply set pHA, pHB, pHx3, pHx4, etc to the ON setting in the pH Enable menu. The Apex system pH probes can be configured to automatically adjust the pH to compensate for changes in tank temperature. To enable/disable this feature: Apex Display: Setup – pH Setup – Temp Comp: Off – Press Select to toggle temperature compensation on and off. Web Interface: This option is not available from the Web Interface. NOTE: If temperature compensation is to be used on Probe Expansion or Probe Modules, a temperature probe must be connected and enabled on that module. PH PROBE CALIBRATION pH probes need to be calibrated to perform properly. The following procedure should be repeated periodically to keep your pH reading accurate as pH probes tend to drift out of calibration over time. As the pH probe ages, it will drift out of calibration very quickly or may not be capable of being calibrated at all. If this occurs, it will be necessary to replace the pH probe. NOTE: If you wish to use the automatic temperature compensation feature, you should enable it before calibrating your pH probes. In this case, it is important for the calibration solution to be at the same temperature as the temperature probe at calibration time. Page | 31 AquaController Apex The Apex system uses a 2 point calibration system which results in very accurate readings between the 2 points and less accurate readings outside the points. Choose the calibration solutions based on the range of pH the probe is expected to read. See the table below for recommended calibration solutions: Expected Range 6.0 - 7.5 Low Solution 4.0 High Solution 7.0 Fresh Water Aquarium Salt Water 7.8 – 8.5 7.0 10.0 Aquarium Calcium 6.5 – 7.0 4.0 7.0 Reactor Table 1 - Calibration Solutions NOTE: For best results, use pH calibration solutions in packets as the solution in bottles tend to shift pH after they have been opened. To calibrate a pH probe: 1. Acquire the proper pH calibration solution packets and place in aquarium water (unopened) to acclimate them to the system temperature. 2. From the Apex Display, open the pH calibration menu: Setup – pH Setup – pH Calibrate. 3. If you have more than one pH probe enabled on your system, use the up/down arrow keys to choose the probe you wish to calibrate, press Select or OK. 4. Use the up/down arrow keys to select the value of the Low Calibration Solution used, push Select. 5. Dry the Low Calibration Solution packet off and carefully open the corner of the low solution, just enough to get the pH probe inserted in the packet. 6. Remove the pH probe to be calibrated from the tank, rinse it in probe storage solution (or tap water), gently shake the excess solution off the probe, and place the probe in the Low Calibration Solution. Periodically swirl the probe in the solution to ensure an accurate reading. Ensure the probe is submerged in calibration solution at all times. 7. Wait for the low reading to stop changing. This may take a few minutes up to 5 minutes depending on the type and condition of pH probe being calibrated. The value of the reading while calibrating may not match the value of the solution being used, this is normal. Once the reading has stabilized, press Select or OK. 8. Use the up/down arrow keys to select the High Calibration Solution used, push Select. Page | 32 AquaController Apex 9. Dry the High Calibration Solution packet off and carefully open the corner of the low solution, just enough to get the pH probe inserted in the packet. 10. Remove the pH probe from the Low Calibration Solution, rinse it in probe storage solution (or tap water), gently shake the excess solution off the probe, and place the probe in the High Calibration Solution. Periodically swirl the probe in the solution to ensure an accurate reading. Ensure the probe is submerged in calibration solution at all times. 11. Wait for the high reading to stop changing. This may take a few minutes up to 5 minutes depending on the type and condition of pH probe being calibrated. The value of the reading while calibrating may not match the value of the solution being used, this is normal. Once the reading has stabilized, press Select or OK. 12. The Apex system will use the calibration measurements to calibrate the pH probe. 13. The calibration fluid can be used to calibrate more than one probe however the pH calibration should be discarded after use as they will degrade over time after opening. If the calibration measurements were not accurate or were out of range, the calibration may fail which will be indicated on the Apex Display. In this case, the default calibration settings will be used. You can attempt the calibration procedure again, however this usually indicates that the pH probe is too far out of range and should be replaced. PH PROBE MAINTENANCE pH probes should be periodically cleaned and recalibrated for best performance. It is not recommended to clean the probes unless calibration is to be performed. The period between cleanings is up to the user but typically every 1-3 months is normal. To clean the probe, gently brush the sides and tip of the probe with a soft brush to remove any debris. Rinse the probe in tap water. Soaking the probe in acid (vinegar) or alkali (borax) solution to remove mineral deposits is not typically needed but can be used to try and bring back an old probe that cannot be calibrated. Typical lifespan for a pH probe in aquarium use is 12-24 months. ORP PROBE SETUP The Apex Base Module has a port that can use used to measure ORP, the Apex Lite Base Module does not include an ORP port. The port on Probe Module 1 can be configured to read ORP or pH. The ORP port on the Apex Base Module can be reconfigured as a second pH port if needed. Setup and configuration of the ORP ports and calibration of the connected probes is the same for all probes on the system. The Base Module ORP probe will be identified as “ORP”, the ORP probe Page | 33 AquaController Apex on the PX1000 Probe Expansion as “ORPA”, “ORPB” and so on, and probes on Apex Probe Module 1 (PM1) as “ORPx3”, “ORPx4” and so on. The ORP probe is connected to the port labeled “pH/ORP” on the Apex Base Module and Probe Module 1. Push the BNC female connector on to the male connector and turn ¼ turn clockwise to lock the connector place. To remove the probe, turn ¼ turn counter clockwise and gently pull the connector straight off the base module. All new probes should be rinsed in clean tap water before placing in the aquarium. Place the ORP probe in an area with high flow that is continuously wet (not an overflow that may drain dry, for example). Maintain a drip loop in the wire back to the Apex Base or Probe Module. NOTE: New ORP probes typically read low and require a break-in period. It may take as long as a week to break-in the ORP probe. During this break-in period control functions based upon ORP are not recommended. WARNING: We do not recommend fully submerging the ORP probe as this will cause the probe to fail prematurely. To enable ORP probes: Apex Display: Setup – ORP Setup – ORP Enable – If you have more than one ORP port on your system, use the up/down arrow keys to choose the port you wish to configure, press Select, then use the up/down arrow keys to select on/off for that port, press Save when done or Exit to discard changes. Web Interface: This option is not available from the Web Interface. NOTE: To configure the pH/ORP port on an Apex Base Module to be used for ORP, simply set ORP ON in the ORP Enable menu. Similarly, to configure the pH/ORP port on a Port Module 1 to be used for an ORP probe, simply set ORPx3, ORPx4, etc to the ON setting in the ORP Enable menu. ORP PROBE CALIBRATION ORP probes do not need to be calibrated to operate properly, they should operate normally for the life of the probe without calibration. However, the AquaController Apex includes the ability to perform a 2 point calibration if desired. Page | 34 AquaController Apex Special calibration solution must be made from standard pH 4.0 and 7.0 calibration solution by dissolving Quinhydrone powder in the solutions. Simply dissolve Quinhydrone powder into the 4.0 and 7.0 solutions until the powder no longer dissolves. Adding too much powder does not harm anything, it just wastes the powder. To calibrate an ORP probe: 1. Create the ORP 4.0 and 7.0 solutions as described above. 2. From the Apex Display, open the ORP calibration menu: Setup – ORP Setup – ORP Calibrate. 3. If you have more than one ORP probe enabled on your system, use the up/down arrow keys to choose the probe you wish to calibrate, press Select or OK. 4. Remove the ORP probe to be calibrated from the tank, rinse it in tap water, gently shake the excess water off the probe, and place the probe in the 7.0/Quinhydrone Calibration Solution. Periodically swirl the probe in the solution to ensure an accurate reading. Ensure the probe is submerged in calibration solution at all times. 5. Wait for the 7.0/Quinhydrone reading to stop changing. This may take a few minutes up to 5 minutes depending on the type and condition of ORP probe being calibrated. The value of the reading while calibrating may not match the value of the solution being used, this is normal. Once the reading has stabilized, press Select or OK. 6. Remove the pH probe from the 7.0/Quinhydrone Calibration Solution, rinse it in tap water, gently shake the excess water off the probe, and place the probe in the 4.0/Quinhydrone Calibration Solution. Periodically swirl the probe in the solution to ensure an accurate reading. Ensure the probe is submerged in calibration solution at all times. 7. Wait for the high reading to stop changing. This may take a few minutes up to 5 minutes depending on the type and condition of ORP probe being calibrated. The value of the reading while calibrating may not match the value of the solution being used, this is normal. Once the reading has stabilized, press Select or OK. 8. The Apex system will use the calibration measurements to calibrate the ORP probe. 9. The calibration fluid can be used to calibrate more than one probe however the ORP calibration should be discarded after use as they will degrade over time after opening. If the calibration measurements were not accurate or were out of range, the calibration may fail which will be indicated on the Apex Display. In this case, the default calibration settings will be used. You can attempt the calibration Page | 35 AquaController Apex procedure again, however this usually indicates that the ORP probe is too far out of range and should be replaced. Page | 36 AquaController Apex ORP PROBE MAINTENANCE ORP probes should be periodically cleaned for best performance. The period between cleanings is up to the user but typically every 1-3 months is normal. To clean the probe, gently brush the sides and tip of the probe with a soft brush to remove any debris. Rinse the probe in tap water. Soaking the probe in acid (vinegar) or alkali (borax) solution to remove mineral deposits is not typically needed but can be used to try and bring back an old probe that has stopped working. CONDUCTIVITY PROBE SETUP (OPTIONAL) A port to connect a Conductivity probe is included on the optional expansion Probe Module 2 (PM2). The Conductivity probe will be identified as “Condx3”, “Condx4”, etc on the Apex system. The number in the probe identifier corresponds to the AquaBus number assigned to the PM2. If a temperature probe is connected to the PM2, it is identified as “Tmpx3”, “Tmpx4”, etc. with the same AquaBus number as the conductivity probe. NOTE: The AquaController Apex firmware version must be at least version 4.02 to support the Probe Module 2. The PM2 connects to the Apex system via AquaBus. It does not matter into which AquaBus connector it is plugged into. When the probe module has been successfully added to the system the status light will change from flashing yellow to solid green. NOTE: The Conductivity reading can be added to the Apex Display and Web Interface Status Screens. See the section titled Display Setup for more information. To enable the Conductivity probe: Apex Display: Setup – Cond Setup – Cond Enable – If you have more than one Conductivity port on your system, use the up/down arrow keys to choose the port you wish to configure, press Select, then use the up/down arrow keys to select on/off for that port, press OK when done or Exit to discard changes. Web Interface: This option is not available from the Web Interface. Page | 37 AquaController Apex CONDUCTIVITY RANGE The PM2 supports 4 conductivity ranges to support the conductivity measurement of various solutions. The four ranges are described in Table 2 - Conductivity Range Options: Range Units Calibration Description Solution Low 0 to 850 447 S/cm Typically used to S/cm measure the purity of RO/DI water. Medium 0.00 to Typically used to 8.50 measure the mS/cm conductivity of a fresh water tank. High 0 to 85.0 53.0 Typically used to mS/cm mS/cm measure the conductivity of a salt water aquarium. Salinity 0 to 45.0 53.0 Typically used to PPT mS/cm measure the salinity of a saltwater aquarium. Table 2 - Conductivity Range Options NOTE: When the conductivity range is in salinity mode, the probe is still actually reading the conductivity of the water. Since the ratio of ions in salt water is very well defined, there is a direct correlation between the conductivity of the water and the salinity of the tank. NOTE: If the conductivity range is changed, don‟t forget to update outlet programs that are based on the conductivity reading as the values will change with the change in range. To select the Conductivity range: Apex Display: Setup – Cond Setup – Cond Range – If you have more than one Conductivity port on your system, use the up/down arrow keys to choose the port you wish to configure, press Select, then use the up/down arrow keys to select the range for that port, press OK when done or Exit to discard changes. Page | 38 AquaController Apex Web Interface: This option is not available from the Web Interface. TEMPERATURE COMPENSATION Conductivity measurements are temperature dependent. The degree to which temperature affects conductivity varies from solution to solution. Seawater typically has a temperature correction factor of 2.1 to 2.3 %/C. In order for the PM2 to automatically compensate for changes in conductivity as the temperature of the water changes, you must connect a temperature probe to the PM2 and set the temperature compensation as described below. To set the Temperature Compensation: Apex Display: Setup – Cond Setup – Temp Comp – use the up/down arrow keys to select the temperature compensation in %/C, press OK when done or Exit to discard changes. Web Interface: This option is not available from the Web Interface. NOTE: Leave the Temperature Compensation set to 0.0 if you are not using temperature compensation or do not have a temperature probe attached to the PM2. Other temperature probes on the system cannot be used for temperature compensation of the conductivity probe. CONDUCTIVITY PROBE CALIBRATION NOTE: Set the Conductivity Range and Temperature Compensation settings before calibrating the Conductivity Probe. See the previous section for instructions on setting these parameters. To calibrate a Conductivity probe: Apex Display: Setup – Cond Setup – Cond Calibrate – 1. If you have more than one Conductivity probe enabled on your system, use the up/down arrow keys to choose the probe you wish to calibrate, press Select. 2. Remove the conductivity probe from any solution and dry it off. Wait for the numbers on the bottom of the LCD screen to stop changing. It does not matter what value is displayed only that it is not changing. When the display stops changing press the select button. 3. Use the Up and Down buttons to select the calibration solution. Press the select button when the correct value is displayed. See Table 2 Conductivity Range Options for the recommend calibration solution. Page | 39 AquaController Apex 4. Place the Conductivity probe into the calibration solution. Wait for the numbers on the bottom of the LCD screen to stop changing. When the display stops changing press the select button. 5. The conductivity probe should now be properly calibrated. NOTE: Many conductivity calibration solutions do not have the same ionic composition as salt water so using a refractometer to measure the salinity of the calibration solution is not valid. For example the Neptune 53.0 mS/cm conductivity calibration standard will not have a salinity of 35 PPT or a specific gravity of 1.0259. Web Interface: This option is not available from the Web Interface. CONDUCTIVITY PROBE MAINTENANCE Conductivity probes should be periodically cleaned for best performance. The period between cleanings is up to the user but typically every 1-3 months is normal. To clean the probe, gently brush the sides and tip of the probe with a soft brush to remove any debris. Rinse the probe in tap water. Soaking the probe in acid (vinegar) or alkali (borax) solution to remove mineral deposits is not typically needed but can be used to try and bring back an old probe that has stopped working. DISSOLVED OXYGEN SETUP (OPTIONAL) A port to connect a Dissolved Oxygen probe is included on the optional expansion Probe Module 3 (PM3). The Dissolved Oxygen probe will be identified as “DOx3”, “DOx4”, etc. The number in the probe identifier corresponds to the AquaBus number assigned to the PM3. If a temperature probe is connected to the PM3, it is identified as “Tmpx3”, “Tmpx4”, etc. with the same AquaBus number as the conductivity probe. NOTE: The AquaController Apex firmware version must be at least version 4.03 to support the Probe Module 3. The following precautions should be observed when installing the dissolved oxygen probe: The DO probe should not be located above air diffusers or in area with air bubbles in the water column. Air bubbles will cause erroneous readings. The DO probe should mounted with the membranes pointing up so that bubbles do not collect on the membrane surface. A cable tie can be use to Page | 40 AquaController Apex secure the DO probe to its cable so that it hangs in membrane up orientation. The DO probe should be mounted in a location that has at least 3cm/sec of water movement. The PM3 connects to the Apex system via AquaBus. It does not matter into which AquaBus connector it is plugged into. When the Probe Module has been successfully added to the system the PM3 status light will change from flashing yellow to solid green. NOTE: The Dissolved Oxygen reading can be added to the Apex Display and Web Interface Status Screens. See the section titled Display Setup for more information. To enable the Dissolved Oxygen probe: Apex Display: Setup – DO Setup – DO Enable – If you have more than one Dissolved Oxygen port on your system, use the up/down arrow keys to choose the port you wish to configure, press Select, then use the up/down arrow keys to select on/off for that port, press Save when done or Exit to discard changes. Web Interface: This option is not available from the Web Interface. In order for the Dissolved Oxygen probe to read correctly, the altitude of the probe must be set. To set the altitude of your system: Apex Display: Setup – DO Setup – Altitude – use the up/down arrow keys to set your system altitude to the nearest 100 feet, press OK when done or Exit to discard changes. Web Interface: This option is not available from the Web Interface. In order for the Dissolved Oxygen probe to read correctly, the salinity of your system must be entered. To set the salinity of your system: Apex Display: Setup – DO Setup – Salinity – use the up/down arrow keys to set your system salinity, press OK when done or Exit to discard changes. Web Interface: This option is not available from the Web Interface. DISSOLVED OXYGEN RANGE The PM3 supports 2 dissolved ranges as described in the table below: Range Page | 41 Units Description AquaController Apex SAT PPM 0 to 200% Percent of dissolved oxygen in the water column. 100% indicates a saturated DO level. 0.0 to The parts/million of oxygen in the 20.0 ppm water column. Table 3 - Dissolved Oxygen Range Options NOTE: If the dissolved oxygen range is changed, don‟t forget to update outlet programs that are based on the dissolved oxygen reading as the values will change with the change in range. To set the Dissolved Oxygen range: Apex Display: Setup – DO Setup – DO Range – use the up/down arrow keys to choose the range, press OK when done or Exit to discard changes. Web Interface: This option is not available from the Web Interface. DISSOLVED OXYGEN CALIBRATION NOTE: Set the Dissolved Oxygen Range, system Altitude and Salinity before calibrating the Dissolved Oxygen probe. See the previous section for instructions on setting these parameters. To calibrate a Dissolved Oxygen probe: Apex Display: Setup – DO Setup – DO Calibrate – 1. If you have more than one Dissolved Oxygen probe enabled on your system, use the up/down arrow keys to choose the probe you wish to calibrate, press Select. 2. Plug the Dissolved Oxygen Zero adapter into the DO port on the PM3. Wait for the numbers on the bottom of the LCD screen to stop changing. It does not matter what value is displayed only that it is not changing. When the display stops changing press the select button. 3. Unplug the DO Zero Adapter and plug in the DO probe into the DO port on the PM3. Take the DO probe out of water and dry the membrane. Allow 10 minutes for the probe to reach temperature equilibrium. Do not place probe in direct sunlight. 4. Wait for the numbers on the bottom of the LCD screen to stop changing. When the display stops changing press the select button. 5. The dissolved probe should now be properly calibrated. Page | 42 AquaController Apex Web Interface: This option is not available from the Web Interface. DISSOLVED OXYGEN PROBE MAINTAINENCE Dissolved Oxygen probes should be kept clear of any organic matter. Gently wipe the probe with a soft cloth to keep clean. Page | 43 AquaController Apex PROGRAMMING OUTLETS DEFAULT PROGRAM To make getting started with the AquaController Apex easy, outlets on installed outlet modules are setup with default assignments and programs that can be used as-is, modified to suit your specific needs or erased and reprogrammed to whatever you need. The default assignment and program for the 8 outlets on an EnergyBar 8 is listed below: Outlet 1: Light1 – suitable for actinic lighting Outlet 2: Light2 – suitable for daytime lighting Outlet 3: Pump1 – oscillate on and off with Pump 2 Outlet 4: Pump2 – oscillate on and off with Pump 1 Outlet 5: Heater – on at 77 and off at 78 degrees Outlet 6: Chiller – on at 79 and off at 78 degrees Outlet 7: CO2 – CO2 on at 8.00 and off at 7.90 Outlet 8: Ozone – Ozone on at 360 and off at 375 To edit the default program, see the instructions in the section titled Editing Outlet Programming for instructions. PROGRAMMING WITH WIZARDS The AquaController Apex includes several programming Wizards to program common outlet functions. These allow you to easily program an outlet without learning the Apex programming language and process. The Apex includes 6 Wizards as described below. To program an outlet using one of these Wizards, see the section titled Editing Outlet Programming for instructions. NOTE: See the section titled Programming with Hysteresis for information on selecting proper set points to prevent outlets from cycling on and off too frequently. LIGHT This Wizard is used to program lights and includes a safety feature that will turn off lighting if the temperature of the tank gets too high. Fallback – the state the outlet should switch to if contact between the EnergyBar and base module is lost (on or off). Page | 44 AquaController Apex On time – the time the light should turn on in 24 hour format (hours:minutes). Off time – the time the light should turn off in 24 hour format (hours:minutes). Shutdown probe – the name of the temperature probe that should be monitored to shutdown the outlet in an overheating situation (Temp, TempA, Tmpx3, etc). Device shutdown value – the temperature that must be reached to turn off the outlet. Hysteresis – amount of time to leave the lights off (to prevent rapid cycling of the outlet). PUMP This Wizard is used to program pumps or power heads to oscillate on and off. Fallback – the state the outlet should switch to if contact between the EnergyBar and base module is lost (on or off). Initial Off Time – when this outlet first starts, this is the amount of time the pump should be off before proceeding to the On Time (minutes:seconds). On Time – after the Initial Off Time expires, this is the amount of time the pump should be On before proceeding to the Off Time (minutes:seconds). Off Time – after the On Time expires, this is the amount of time the pump should be Off before proceeding to Initial Off Time (minutes:seconds). Feed timer – the Feed Timer that should turn off this pump (A, B, C or D). Feed timer delay – the time after the Feed Timer expires before starting the pump back up. HEATER The Heater Wizard is used to program heater outlets. See the section titled Set Points in the Programming with Hysteresis section for help in choosing on and off set points. The settings for this Wizard are: Fallback – the state the outlet should switch to if contact between the EnergyBar and base module is lost (on or off). Probe name – the name of the temperature probe that should be used to control this outlet (Temp, TempA, Tmpx3, etc). On temperature – the temperature at which the heater should turn On. Off temperature – the temperature at which the heater should turn Off. CHILLER Page | 45 AquaController Apex The Chiller Wizard is used to program chiller outlets. See the section titled Set Points in the Programming with Hysteresis section for help in choosing on and off set points. The settings for this Wizard are: Fallback – the state the outlet should switch to if contact between the EnergyBar and base module is lost (on or off). Probe name – the name of the temperature probe that should be used to control this outlet (Temp, TempA, Tmpx3, etc). On temperature – the temperature at which the chiller should turn On. Off temperature – the temperature at which the chiller should turn Off. PH CONTROL The pH Control Wizard is used to program the administration of additives that alter the pH of your system. These can include CO2 in planted aquariums, control of the pH inside calcium reactors, limiting Kalkwasser introduction or the automated introduction of buffer solution. See the section titled Set Points in the Programming with Hysteresis section for help in choosing high and low set points. The settings for this Wizard are: Fallback – the state the outlet should switch to if contact between the EnergyBar and base module is lost (on or off). Probe name – the name of the pH probe that should be used to control this outlet (pH, pH1, pHA, pHB, pHx3, pHx4 etc). High value – the high value at which the outlet is turned on or off (based on the setting of On When). Low value – the low value at which the outlet is turned on or off (based on the setting of On When). On when – when set to High, the outlet is On when the pH value is above the High Value setting. When set to Low, the outlet is On when the pH value is below the Low Value. (Low or High). ORP CONTROL The ORP Control Wizard is used to program the administration of additives that alter the ORP level of your system, most commonly ozone. See the section titled Set Points in the Programming with Hysteresis section for help in choosing high and low set points. The settings for this Wizard are: Fallback – the state the outlet should switch to if contact between the EnergyBar and base module is lost (on or off). Probe name – the name of the ORP probe that should be used to control this outlet (ORP, ORPA, ORPB, ORPx3, ORPx4 etc). High value – the high value at which the outlet is turned on or off (based on the setting of On When). Page | 46 AquaController Apex Low value – the low value at which the outlet is turned on or off (based on the setting of On When). On when – when set to High, the outlet is On when the ORP value is above the High Value setting. When set to Low, the outlet is On when the ORP value is below the Low Value. (Low or High). EDITING OUTLET PROGRAMMING The program for an outlet can be edited from either the AquaController Apex Display or the Web Interface. To edit an outlet from the Apex Display: Modify the Outlet properties: Setup – Outlet Setup – Modify Outlet – use the up/down arrows to highlight the outlet you wish to modify, push Select. From this screen you can edit: Name: the name of the outlet that appears on the Status Screen and is referred to in programs. Prog Type: choose to use a Wizard (Light, Pump, Heater, etc) or choose Advanced to custom program the outlet. Icon: choose the icon that will represent this outlet on the Status Screens. Addr: the address of the outlet (this can only be changed for Legacy outlets, it is automatically configured for EnergyBar outlets). Modify the Outlet Program: Setup – Outlet Setup – Program Outlet – use the up/down arrows to highlight the outlet you wish to program, push Select. From this screen you can edit the various parameter of the Wizard you have selected for this outlet (see the section titled Programming with Wizards for more information) or if Advanced is selected, you can edit the program for the outlet (see the section titled Advanced Programming for more information). To edit an outlet from the Web Interface: Configuration – Outlet Setup – Status – from the Outlet drop down box near the top of the screen, choose the outlet to edit. Outlet Name: the name of the outlet that appears on the Status Screen and is referred to in the program. Control Type: choose to use a Wizard (Light, Pump, Heater, etc) or choose Advanced to custom program the outlet. Icon: choose the icon that will represent this outlet on the Status Screens The bottom half of this page will either allow you to edit the various parameter of the Wizard you have selected for this outlet in the Control Type field (see the section titled Programming with Wizards for more information) or if Advanced is selected, you can edit the program for the outlet (see the section titled Advanced Programming for more information). ADVANCED PROGRAMMING Page | 47 AquaController Apex The AquaController Apex include a very powerful programming environment that can be used to control outlets based on time, measurements from probes, inputs from switches, the state of other outlets and more. To enable the Advanced Programming mode, simply set the Program or Control Type to Advanced in the Outlet Setup as described in the section titled Editing Outlet Programming. Once an outlet is configured for Advanced Programming, you edit, add and delete commands from the Apex Web Interface. NOTE: When switching an outlet programmed with a Wizard (pump, temp, etc) to advanced programming mode, the commands to perform the functions of the Wizard will be automatically entered into the Advanced Programming area. This can be a time saver when setting up an outlet for the first time. To modify the Advanced program for an outlet: Apex Display: Setup – Outlet Setup – Program Outlet – From this screen you can: Edit: use the up/down arrows to highlight and existing command you wish to edit, push Select to enter Edit Mode. Use the up/down arrows to change the command, push Select to move to the next parameter, use the up/down arrows to change the parameter, repeat until all parameters are set, push Save to save changes or Exit to discard changes. Delete: use the up/down arrows to highlight and existing command you wish to delete, push the left/right arrows until the command displayed at the top of the screen indicates Delete Statement, push Select to Delete the command, push Save to save changes or Exit to discard changes. Insert New Command Before the highlighted command: use the up/down arrows to highlight and existing command near where you would like to insert the new command, push the left/right arrows until the command displayed at the top of the screen indicates Insert Before, push Select to insert a new command before the highlighted command, use the up/down arrows to select the command you wish to add, push Select to move to the next parameter, use the up/down arrows to change the parameter, repeat until all parameters are set, push Save to save changes or Exit to discard changes. Insert New Command After the highlighted command: use the up/down arrows to highlight and existing command near where you would like to insert the new command, push the left/right arrows until the command displayed at the top of the screen indicates Insert After, push Select to insert a new command after the highlighted command, use the up/down arrows to select the command you wish to add, push Select to move to the next parameter, use the up/down arrows to change the parameter, Page | 48 AquaController Apex repeat until all parameters are set, push Save to save changes or Exit to discard changes. Web Interface: Configuration – Outlet Setup – in the Outlet box near the top of the page, select the outlet to edit from the dropdown box. When the Control Type for this outlet is set to Advanced, an Advanced Setup box will appear on the lower half of this page with the existing Advanced program displayed. Simply edit/add/delete the commands, one per line in the Advanced Program area. When finished, click the Update Outlet button to verify the commands and save the program. NOTE: If you enter a command incorrectly, an error message will appear above the Outlet box indicating which line contains the error when you attempt to save the Advanced program. Remedy the error and click Update Outlet to save. See the section titled Appendix 3 – Programming Reference to learn the proper usage and syntax for AquaController Apex commands. See the section titled Appendix 4 – Advanced Programming Examples for examples of Apex Program code. VIRTUAL OUTLETS Virtual outlets are outlets that are programmed to perform a function may not have a physical outlet associated with the outlet program. Unused EnergyBar or Direct Connect outlets can be used for Virtual Outlets but a no cost way to add Virtual Outlets is to add a virtual DC8 to the configuration that does not actually exist (see the section titled Adding Legacy Outlets for instructions). Just make sure to use an address space that does not conflict with any physical outlets you have. Virtual outlets are an advanced programming tool that can solve programming issues. The status of switches cannot be displayed on the Display Screens, only outlets and probes are allowed. To solve this, setup a Virtual Outlet that turns on and off in response to the switch. Take for example, you have a float switch in the sump to measure sump level that you would like to display on a Status Screen. You could create a Virtual Outlet called Sump_Low and program it as follows: <Virtual Outlet Sump_Low> Page | 49 AquaController Apex If Switch1 = CLOSED Then OFF If Switch1 = OPEN Then ON This will make Sump_Low turn on and off in response to the float switch which can be included on a Status Screen or referred to in other outlet programming. In addition, creating Virtual Outlets for switch inputs that have meaningful names makes programming and reading your program much easier as you do not have to remember that “Switch1” is your sump low switch. Another possible use for Virtual Outlets is to create timing signals to trigger events on other outlets. Take for example, you would like to oscillate an outlet between 2 pump Profiles. Create a Virtual Outlet to create the timing signal when to switch Profiles: <Virtual Outlet Timer> OSC 0:00/30:00/30:00 Then ON <Outlet Pump> If Timer = ON Then PF1 If Timer = OFF Then PF2 This will cause Pump to switch between PF1 and PF2 every 30 minutes. ORDER OF OPERATION The order commands are listed in most outlet programs is not important, however, there are some cases in which order is important. For example, the order of the command in this program are not important: If Temp > 80 Then OFF If Temp < 78 Then ON The order of these 2 commands is not important as the conditions that make each of these commands true will never compete with each. They will never compete with each other for “control” of the outlet. However, consider these commands: If pH > 8.50 Then OFF If Outlet Light1 = ON Then OFF If Switch1 CLOSED Then ON Page | 50 AquaController Apex If Switch1 OPEN Then OFF In this example, the state of the pH command is overruled by the state of Light1 and they all are overruled by Switch1 commands. Whenever Switch1 is closed, the outlet is on and whenever it is open, the outlet is off, the first 2 commands are essentially ignored. However, simply reordering the commands yields a totally different program: If If If If Switch1 CLOSED Then ON Switch1 OPEN Then OFF Outlet Light1 = ON Then OFF pH > 8.50 Then OFF The same commands in this order allow the state of Light1 and pH to override the state of the Switch1. When considering order of operation, keep the following in mind: 1. Program commands are executed (processed) in the order they are listed in the Advanced Program list. As commands are executed, the AquaController Apex keeps track of the “internal” state of the outlet but does not actually switch the outlet. The last true program statement is used to set the outlet state. 2. Once all the commands for an outlet are executed, if the internal state of the outlet is different than the actual outlet state, a control command is sent to the outlet and the actual outlet state is switched. 3. Steps 1 & 2 are continuously executed as fast as possible for all outlets configured on the AquaController Apex system. Depending on the number of outlets and program complexity, all outlet programs are usually executed 1 to 2 times per second. REPEAT INTERVAL As described in the previous section titled Order of Operation, the internal state of the outlet is not sent to switch the actual outlet each and every time the outlet program is executed, it only sends the outlet update commands when the state of the outlet has changed. In the remote possibility that an outlet misses a command for some reason, the outlet may get out of sync with the state the Apex Base Module. To remedy this condition, the AquaController Apex is programmed to repeat the state of all outlets on a periodic basis. The period between these updates is called the Repeat Interval. Page | 51 AquaController Apex NOTE: The repeat interval is only used for legacy control bus devices like the DC8, DC4HD, etc. AquaBus devices always have the correct outlet state once communication is restored. To modify the Repeat Interval (default is 5 minutes): Apex Display: Setup – Outlet Setup – Repeat Interval –use the up/down arrow keys to select the repeat interval, press OK to save or Exit to discard changes. Web Interface: This option is not available from the Web Interface. NOTE: Do not set the Repeat Interval too frequent as the excess communication on the Control bus (legacy devices) can interfere with normal operation especially on larger systems. PROGRAMMING WITH HYSTERESIS Consider a heater outlet that is programmed to turn on the heater when below 80 degrees and turn it off at temperatures above 80 degrees. When the temperature is hovering around the set point of 80 degrees, the heater could potentially come on and off very rapidly as the temperature fluctuates between 79.9 and 80.1. Also consider the float switch in the sump that controls an automatic top off system. As the ripples in the water‟s surface raise the float switch up and down when the water level is right at the float‟s set point, the switch can rapidly open and close causing the automatic top off pump to rapidly turn on and off. The AquaController provides several programming methods to avoid the unnecessary stress on controlled equipment by programming with hysteresis. SET POINTS The simplest method to add hysteresis to your programming is to use set points that avoid the possibility of rapid on/off outputs. Take the temperature example, simply programming the heater to come on at temperatures over 80.0 and turn off at temperatures below 79.7 will require that the aquarium temperature to drop below 79.7 before turning the heater on. The heater will then have to raise the temperature of the tank above 80 before the heater will turn off. The time it takes to heat the aquarium .3 degrees will significantly reduce the number of on/off cycles. MINIMUM TIME Page | 52 AquaController Apex The Minimum Time command will keep an outlet in the on or off state for a minimum amount of time. For example, in the Light Wizard, when the light is turned off because the tank temperature rose above the Off Temp, the Minimum Time command is used to keep the lights off for a minimum of 30 minutes to prevent the light outlet from being switched on and off rapidly when the temperature is hovering around the set point. See Appendix 3 – Programming Reference for more information on the Minimum Time command. DEFER The Defer command will defer turning on or off an outlet for a period of time. Take the float switch example above, when the switch position to fill the tank is encountered, the Defer command can delay turning on the automatic top off pump until the switch is continuously in the fill position for a certain amount of time to ensure the level has dropped sufficiently. See Appendix 3 – Programming Reference for more information on the Defer command. PROGRAMMING ALARMS AND WARNINGS The AquaController Apex can sound audible alarms and warning from the Apex Display modules, send email alarms and be programmed to switch outlets on in the case of an alarm condition. Programming the alarm and warning set points is similar to using the Advanced Programming mode for an outlet. At the very beginning of the outlet program, the following statement must be placed: Set OFF This command initializes the alarm or warning outlet in the off state and will reset the alarm or warning outlet when the alarm condition subsides. The Apex alarm outlets are as follows: SndAlm_I6 – when this outlet is triggered, the Apex Display will sound the Alarm tone as configured in the section titled Sound Setup. SndWrn_I7 – when this outlet is triggered, the Apex Display will sound the Warning tone as configured in the section titled Sound Setup. EmailAlm_I5 – when this outlet is triggered, the Apex system will send an alarm email to the email address(s) as configured in the section titled Email Setup. Any Outlet - – when this outlet is triggered, the outlet will power any item plugged in (beeper, lamp, etc.) By default, the following alarm trigger points have been programmed into the Email Alarm outlet: Page | 53 AquaController Apex Set Off If Temp > 82.0 Then ON If Temp < 75.0 Then ON Theses statements will trigger an email to be sent when the temperature measured by probe Temp is greater than 82 or less than 75. Any statement can be added to the Email_Alm_I5 outlet. Some common examples are listed below: If pH > 8.50 Then ON If pH > 7.50 Then ON If ORP > 410 Then ON If ORP < 300 Then ON Defer 000:10 Then On You can use a Defer statement on the alarm to prevent sending or sounding alarms for conditions that are short lived. The above Defer statement will defer the alarm for 10 seconds. See Appendix 3 – Programming Reference for proper usage of these commands as well as other commands that can be used to trigger Alarms and Warnings. TRIGGERING ALARMS OR EVENTS ON POWER OUTAGES The If Power statement can be used in alarm or outlet programs to perform tasks when power is lost to the Apex system. The Apex system can trigger events when power has been lost to an EnergyBar or to that Apex Base Module itself. If Power Apex OFF 005 Then On This command will trigger when power has been lost to the Apex Base Module through the AquaBus. It will remain true for 5 minutes after the power is ON again. If Power EB8_3 OFF 000 Then ON This command will trigger when power to EnergyBar at AquaBus Address 3 has lost power. Page | 54 AquaController Apex You can trigger events based on the power state of the 12V connector on the AquaController Base Module as well. You need to enable this feature (it is off by default to allow monitoring of power at a system level). To enable power monitoring of the 12V power jack: Apex Display: System – Misc Setup – Power Monitor: OFF – up – push the Select button to toggle Power Monitor on and off. Web Interface: This option is not available from the Web Interface. Power Monitor allows you to connect your EnergyBar 8 to an uninterruptible power source and by connecting an Neptune Systems Apex 12V power supply to a non-backed up power source, be able to trigger events when the power fails. See Appendix 3 – Programming Reference for proper usage of the If Power command as well as other commands that can be used to trigger events. SAMPLE ALARM EMAIL Listed below is the information that is sent in a typical email alarm message. Alarm Statement: If Temp > 82.0 Then ON Mar 08 2106 19:20:10 Temp pH ORP 100 8.07 400 VarSpd1_I1 is PF1 Auto VarSpd2_I2 is PF2 Auto VarSpd3_I3 is PF3 Auto VarSpd4_I4 is PF4 Auto SndAlm_I6 is OFF Auto SndWrn_I7 is OFF Auto EmailAlm_I5 is ON Auto Light1_3_1 is OFF Auto Light2_3_2 is OFF Auto Pump1_3_3 is ON Auto Pump2_3_4 is OFF Manual Heater_3_5 is OFF Auto Chiller_3_6 is ON Auto CO2_3_7 is OFF Auto Ozone_3_8 is ON Manual Page | 55 AquaController Apex Power Failed: Mar 01 2010 18:50:42 Power Restored: Mar 01 2010 18:51:11 Power OK: EB8_3 (28 Minutes - 01.6 Amps) SWITCH INPUTS The AquaController Apex has a Mini DIN8 connector for switch inputs labeled I/O. These inputs can be used for switches, float switches, water sensors, flow sensors, etc. Switch inputs on the Base Module are identified as Switch1, Switch3, etc. Switch inputs on a PX-1000 are identified as SwitchA1, SwitchB4, etc. The letter is the PX-1000 address assigned to the PX-1000. Switch inputs connected to probe modules are identified as Switchx3_2, Switchx5_3, etc. The first number in the switch name corresponds to the AquaBus address assigned to the probe module. The second number corresponds to the switch input number (1 - 6). WARNING: Do not apply voltage to the switch inputs or damage to the AquaController Apex may occur. Figure 6 - Switch Input Connector Pin Number 1 2 3 4 5 6 7 Page | 56 AquaController Apex Description Input 1 Input 2 Input 3 Input 4 Input 5 Input 6 Reserved 8 Ground Table 4 – Switch Input Connector Pin-out The pin-out of the connector is shown in Figure 6 - Switch Input Connector. Connect switches to the AquaController Apex by connecting one wire from the mechanical switch to the ground pin (pin 8), and the other wire from the switch to one of the six digital inputs (pin 1-6). Connections can be easily made using a Neptune I/O Breakout box available at your local Neptune Retailer. The breakout box features spring loaded connectors to make connections easy without tools or soldering. The Apex and accessory inputs are TTL level (5V) inputs with internal pull-up resistors. With nothing connected, the switch inputs will indicate OPEN (Logic 1 5V). When connected to Ground (Pin 8) the switch will indicate CLOSED (Logic 0 0V). NOTE: If a Legacy Port Expansion PX1000 is connected to the Apex Base Module, inputs 3, 4, 5 and 6 are not available. However, the PX-1000 includes 6 additional inputs. Switch Inputs are programmed using the If Switch command. For example, if you wanted to turn a pump on when a float switch closes, you would add this command to the pump outlet program: If Switch1 CLOSED Then ON See the section titled Appendix 3 – Programming Reference and Appendix 4 – Advanced Programming Examples for more information. IDENTIFYING PORTS AND SWITCHES ON EXPANSION MODULES Probes and switches on AquaController Apex Base Modules are identified as pH, ORP, Temp, Switch1, Switch2, etc. Probes and switches on Apex Probe Modules (PM1, PM2, etc.) are identified with and “X” and the AquaBus number assigned to the Probe Module. For example, pHx3, ORPx3, Tmpx3 and Switchx3_1, Switchx3_2 are probes and switches on the Probe Expansion assigned AquaBus number 3. pHx4, ORPx4, Tmpx4 and Switchx4_1 and SwitchX4_2 are probes and switches on the Probe Expansion assigned AquaBus number 4. Page | 57 AquaController Apex Probes and switches on legacy probe expansion PX-1000 are identified with ascending letters. Probes and switches on the first legacy port expansion module are identified with an A, the second expansion module with a B and so on. For example, pHA1, ORPA, TempA and SwitchA1 are probes and switches on the first expansion module, pHB1, ORPB, TempB and SwitchB1 are probes and switches on the second expansion module and so on. SEASONAL PROGRAMMING The AquaController Apex includes several advanced programming features that can help you closely simulate the seasonal variations that occur in nature. These require programming the outlet in advanced mode, see the section titled Advanced Programming for more information. The Seasonal Table menu from the Web Interface is used to view the daily settings for Sunrise, Sunset, Temperature, and phase of the moon for the various seasonal adjustments features of the AquaController Apex. To view the Seasonal Table: Apex Display: This option not available from the Apex Display. Web Interface: Season Table – select the month you wish to view from the drop down box near the bottom of the page and click Refresh to update the table. SEASONAL TEMPERATURE VARIATION The AquaController Apex and vary the temperature based on the typical temperatures from a reef at 15° north latitude, called Regional Temperature or RT. The temperature will get as low as 75 degrees in February and as high as 80.5 in August. To enable this feature, replace the insert the code RT+0 in temperature commands in Advanced Programming mode. The 0 is used as the offset from the Regional Temperature and can be a positive or negative number (+1.2, -2.0, etc). The Regional Temperature code can be used in all commands and situations where temperature is concerned. For example, the following commands could be used on the heater outlet: If Temp < RT+-0.3 Then ON If Temp > RT+0.2 then OFF Page | 58 AquaController Apex This will turn the heater outlet on when the Temp probe measures the Regional Temperature less .3 degrees. The heater outlet will turn off at Regional Temperature plus .2 degrees. The following command could be used to trigger an alarm: If Temp > RT+2 Then ON This will turn on the alarm when the aquarium temperature reaches 2 degrees above the Regional Temperature set point. SEASONAL LIGHTING ADJUSTMENT The AquaController Apex can simulate the varying lengths of daylight during the seasons of the year based upon a typical tropical reef at 15° north latitude. The If Sun command is used to turn outlets on and off that automatically adjust to these seasonal adjustments throughout the year. An offset from the standard time is provided so multiple lights can be cycled on and off in sequence. The following commands could be used to control a light on a system: Light1: If Sun 000/000 Then ON Page | 59 AquaController Apex Light2: If Sun 060/-045 Then ON The first statement turns Light1 on at sunrise of the particular day based on the settings in the Seasonal Table and off at sunset. Light2 turns on 60 minutes after sunrise and turns off 45 minutes before sunset. MOON LIGHTING The AquaController Apex can be used to simulate the moonrise and moonset as well as varying the intensity of the light source. The AquaController Apex moonrise and moonset times match the true lunar cycle. An optional offset from the standard moonrise and moonset is provided. Just like in the real world, the moonrise and moonset are approximately 50 minutes later each day. So during a new moon the moonrise is in the morning and the moonset is in the evening. Typically during a full moon the moonrise time is in the evening and the moonset time is in the morning. It is possible for the moon light to be on during day time hours. The following Advanced Programming command can be used to control an outlet for moon simulation: If Moon 000/000 Then ON This command will turn the outlet on at moonrise and off at moonset each day. The If Moon command combined with the Neptune Lunar Simulator module and LEDs, will vary the intensity of the LEDs based on the phase of the moon in addition to turning them on and off at moonrise and moonset. PROGRAMMING FEED TIMERS The AquaController Apex has 4 feed timers. Each timer can be programmed to enable or disable items in the tank for a period of time and return them to normal operation after the feed timer expires. To control an outlet with a Feed Timer, enter the following command in the Advanced Program for that outlet. See Appendix 3 – Programming Reference for more information on the If Feed command. If FeedA 000 Then OFF In this example, the outlet will be switched off when Feed timer A is activated. Page | 60 AquaController Apex NOTE: The Pump Wizard included a parameter to turn off the pump when a Feed Timer is activated. See the section titled Programming with Wizards for information on how to program the Feed Timer using the Pump Wizard. To configure the duration of the Feed Timer: Apex Display: Setup – Outlet Setup – Feed Interval – use the up/down arrows to select the Feed Timer Interval to change, push Select, use the up/down arrows to set the interval (minutes), push Select or OK to save changes, push Exit to discard changes. Web Interface: This option is not available from the Web Interface. See the section titled Feed Timer Operation in the Using the AquaController Apex section for instructions on using Feed Timers. VARIABLE SPEED PORT PROGRAMMING The AquaController Apex includes 4 variable speed ports that can be used to control Tunze Streams Pumps or lighting ballasts with 0-10V variable intensity features. The AquaController Lite does not have any variable speed ports however variable speed ports can be added to the Apex Lite using an AquaSurf. NOTE: The AquaSurf does not support the Ramp Profile type and therefore is not appropriate for controlling lighting ballasts. Variable speed ports can be turned on and off with normal programming commands however this does not provide a way to vary the output voltage which in turn varies the speed of the pump or brightness of the lighting. To take full advantage of variable speed ports, we use Profiles. You can define up to 16 Profiles, each of which can define a unique set of operating conditions. The Profile in use for a port can be switched based on programming events such as feed timers, time of day, switch levels, etc. Each variable speed port can be programmed to use a different Profile, or they all can use the same Profile, it is up to you. Be default, variable port 1 uses Profile 1, variable speed port 2 uses Profile 2, etc. The Apex system features 2 different types of Profiles; pump and ramp. Page | 61 AquaController Apex PUMP PROFILE TYPE The Pump Profile is typically used to oscillate the speed of a pump from one speed to a higher speed and back. Popular use of this feature is to create resonant or chaotic waves in larger tanks depending on if the waves are synchronized or not. The Pump Profile uses the Minimum Intensity setting to specify the speed of the pump when set “off” by the Profile and the Maximum Intensity setting to specify the speed of the pump when set “on” by the Profile. When the pump is turned off by a line of program code like “If FeedA then OFF”, the pump will be totally off (the Minimum Intensity setting is not used). The pump Profile contains the following parameters: Synchronize: when enabled, a port using this Profile will synchronize its Initial Off time with the previous pump Profile (i.e. if enabled on Profile 2, it will sync with Profile 1). Synchronize is useful for creating large waves through constructive interference with pumps on either side of the tank. Divide by 10: when enabled, all times in the Profile are divided by 10 (i.e. 56 seconds becomes 5.6 seconds). Figure 7 - Profiles Setup Screen Initial Off Time: when a pump with this Profile is first activated, it will be OFF initially for this time (in seconds unless divide by 10 is enabled). On Time: once the Initial Off Time expires, the pump will be ON for this amount of time (in seconds unless divide by 10 is enabled). Off Time: once the On Time expires, the pump will be OFF for this amount of time (in seconds unless divide by 10 is enabled). Minimum Intensity: the port output in percent when the pump is “off” Maximum intensity: the port output in percent when the pump is “on” WARNING: Tunze recommends an intensity of 30% or higher for Tunze Streams Pumps. For best results and longevity of your pumps, never set Page | 62 AquaController Apex the Minimum Intensity lower than 30%. For example, assume the following settings: Synchronize = off Divide by 10 = off Initial off time = 10 On time = 15 Off time = 20 Minimum Intensity = 30 Maximum Intensity = 70 Using this Profile, the pump will run at 30% for 10 seconds, 70% for 15 seconds, 30% for 20 seconds, 30% for 10 seconds, 70% for 15 seconds, 30% for 20 seconds, etc. RAMP PROFILE TYPE The Ramp Profile is used to ramp the port output voltage (up or down) from one intensity to another over a period of time. It is typically used to ramp lights on of off but can also be used with pumps to simulate varying intensity of tidal currents for example. Ramp Time: period in minutes over which the ramp should occur. Start Intensity: the starting intensity in percent End Intensity: the ending intensity in percent EDITING PROFILES Editing Profiles from the Apex Display Edit the Profile name and Type Setup – Profile Setup – Edit Type – use the up/down arrows to highlight the Profile you wish to edit, press Select. To edit the Profile Name, highlight Name: and push Select, use the up/down arrow keys to change the character, use the left/right arrows to select the digit to edit, press Select when done. To Edit the Profile Type highlight Type: and push Select, use the up/down arrow keys to toggle between Ramp and Pump, press Select when done. Push Save to save or Exit to discard changes. Edit Profile Settings Setup – Profile Setup – Edit Settings – use the up/down arrows to highlight the Profile you wish to edit, press Select. Highlight the parameter you wish to change and push Select, use the up/down arrow keys to change the value, press Select when done. Page | 63 AquaController Apex Push Save to save or Exit to discard changes. Editing Profiles from the Web Interface: Configuration – Profile Setup – in the Profile: box, select the Profile you wish to edit from the drop down box, type the Profile name in the Name: box, select the Profile type from the Control Type drop down box, enter the parameters for the Profile, click the Update Profile when done. PROGRAMMING WITH PROFILES The AquaController Apex has 4 variable speed ports. By default, they are named VarSpd1_I1 through VarSpd4_I4. Variable speed ports are programmed using the Advanced Programming mode, see the section titled Advanced Programming for more information on editing outlet programs in Advanced Mode. Once the Profiles have been defined, use the command below to assign the active Profile to a variable speed outlet: Set PF1 Replace PF1 with the name of the Profile you wish to use on the outlet. This will run the variable speed port with Profile PF1. Profiles can also be set with conditional commands like: If Outlet Light1 = ON Then PF2 If Time 2:00 to 2:10 Then PF4 If FeedA Then PF6 You can also turn off variable speed ports using standard OFF commands like: IF Outlet Light1 = OFF Then OFF If FeedB Then OFF NOTE: When the variable stopped port is set off using a command like these, the port will be completely off (it will not use the Minimum speed setting of any Profile). DISPLAY SETUP The Apex Display features an attractive, backlit graphic display and buttons to program and operate the AquaController Apex system and to monitor the status Page | 64 AquaController Apex of the aquarium. The Apex Display can be configured with 4 different Status Screens, each of which can be configured to display tank time, tank parameters measured be probes (pH1, pH2, ORP, Temp, etc.) as well as the status of outlets and alarms that are most important to you. Each of the Status Screens can be uniquely configured with a few parameters displayed in large characters or many parameters in smaller characters, the AquaController Apex system will automatically adjust the character size to best utilize the display space. The location and order of the status information on the Status Screen is completely customizable. Pressing the left/right arrow keys on the Apex Display while on the Status Screen will scroll through the 4 configured Status Screens. EDIT STATUS SCREENS Use these instructions to edit the 4 Status Screens to suit your needs. Apex Display: System – Display Setup – Home Display – place the -> on the Status Screen you wish to edit and push the Select button to open the Status Page X Edit screen. Use the up/down arrow keys to highlight the item to edit, press the Select button to edit that item. Press the up/down arrows to cycle through the selections for that item. After changing a selection, press OK to save changes or Exit to cancel changes. Repeat this process for the other Status Screens. Web Interface: Configuration – Display setup – from the Display drop down box, choose the Status Screen you wish to edit. Click the Enabled or Disabled radio button next to each item which will display or not display the items for that section. Choose the item to display in each enabled section by clicking the drop down box and selecting the item. When you are satisfied with your selections, click the Update Display button at the bottom of the screen to save your changes. Repeat this process for the other Status Screens. NOTE: The outlets and probes that appear in the lists are automatically updated when you add or remove outlets or probes. Therefore you may need to edit the Status Screens when system changes are made. LOCKING THE DISPLAY The AquaController Apex Display can be protected by the Display Lock. When enabled, users will have to unlock the display to access programming options. The Apex Display will still show the status of the system and the feed timers can Page | 65 AquaController Apex be used when Display Lock is enabled. When the Apex Display is locked and the Select button pressed, you will be asked to enter the Display Password. The default Display Lock password is “xyz”. NOTE: If the Display Lock Password is lost or forgotten, the Apex system must be power cycled or re-booted to gain access so the password can be reset. To set the Display Lock Password: Apex Display: System – Display Setup – Display Password – use the up/down arrows to change the highlighted digit, use the left/right arrows to select the highlighted digit, when done, press OK. Web Interface: This option is not available from the Web Interface. To Enable or Disable the Display Lock: Apex Display: Control / Status – Display Lock – push the Select button to toggle the lock on or off. Web Interface: This option is not available from the Web Interface. DAYTIME AND NIGHTTIME DISPLAY BRIGHTNESS The AquaController Apex Display can automatically adjust the brightness of the display backlight according to the time of day. This is helpful when the display backlight may be distracting at night. To set the start and end of day: Apex Display: System – Display Setup – Set Daytime – use the up/down arrows to place the -> next to the Day Start or Day End and push the Select button. Use the up/down arrows to change the highlighted digit, use the left/right arrows to select the highlighted digit, when done, press OK. Web Interface: This option is not available from the Web Interface. To set the Day Brightness: Apex Display: System – Display Setup – Day Brightness – use the up/down arrows to choose a comfortable brightness to use during the day, when done, press OK. Web Interface: This option is not available from the Web Interface. To set the Night Brightness: Page | 66 AquaController Apex Apex Display: System – Display Setup – Night Brightness – use the up/down arrows to choose a comfortable brightness to use during the day, when done, press OK. Web Interface: This option is not available from the Web Interface. NOTE: Both the Day and Night brightness is adjustable between 20 (brightest) and 0 (backlight off). All Apex Displays on the system share the same Day and Night brightness settings, however the intensity and contrast can be independently set for each Apex Display on the system. DISPLAY CONTRAST The AquaController Apex Display contrast can be adjusted with the following procedure. To adjust the contrast of the Apex Display: Apex Display: System – Display Setup – Display Contrast – use the up/down arrows to change the contrast of the LCD display from 0 to 20 (default is 5), when done, press OK. Web Interface: This option is not available from the Web Interface. CONFIGURING THE DASHBOARD The new Apex Dashboard, released in the 4.20 version of the firmware brings a new dimension to tank control and automation. The Dashboard provides a graphical representation of your outlets, probes and switches. It even enables you to embed streaming video from a web cam. Page | 67 AquaController Apex The Dashboard is comprised of a palette and tiles. Your palette is like a blank canvas. Tiles contain the status of outlets, probes and embedded URL‟s. You can have up to 4 Dashboards on a controller. You access and configure them via your web pages on the Dashboard menu. Initially, every outlet and probe will have a tile on the pallet. You then can configure your individual Dashboards by simply dragging tiles around. There‟s a virtual drawer called „Unused Tiles‟ that contains any tile you don‟t want displayed. You can‟t delete tiles but you can store them in this “drawer” of Unused Tiles. Later if you want one of those tiles, simply drag it back to your palette. To begin configuring your Dashboard, click „edit‟ on the far right of the pallet. When you do, the Unused Tiles tile will appear along with an option to save. Simply drag tiles around until you are satisfied with the look. Then save. Note that with your probe tiles there will be a small wrench in the right corner. This gives you additional options. If you click the wrench it will toggle between expanded and compressed mode. In expanded mode you get the current probe reading and a graph of recent probe data. In the compressed mode you simply get the current probe reading. Probe tiles can consume a fair amount of space and this gives you flexibility in what you want to see. EMBEDDING STREAMING VIDEO The Dashboard has a special tile that is blank in the Unused Tiles. This tile can be configured with a URL of any web cam that can stream video in a MJPEG format with a URL. USB web cams typically can‟t stream video out to the internet. You‟ll need to get an IP enabled web cam. To configure an IP Camera, simply drag the blank tile to the position on your palette that you want the video to appear. Now save your Dashboard. Then go back into edit mode. You will now see another wrench on that blank Page | 68 AquaController Apex tile, this one on the left side. If you click on that wrench you will get an input screen where you can enter an internal and a external URL. This will be the streaming URL for your camera. For a detailed discussion of internal and external addresses, see the Chapter on Networking. Essentially most home systems will have a different IP address for internal access and external access. This is true for your controller and it will be true for your web cam. DETERMINING YOUR STREAMING URL Unfortunately there‟s no standard naming convention for streaming video URL‟s. Every camera manufacturer is different. There are some sources on the web where you can search for your camera and determine what the naming convention is. One such source is https://github.com/ingenuitas/SimpleCV/wiki/List-of-IPCamera-Stream-URLs. Another is http://www.bluecherrydvr.com/2012/01/technical-information-list-ofmjpeg-and-rtsp-paths-for-network-cameras/. When you think you have the proper syntax for your camera, you can test it in your browser. Just enter the full URL into an empty browser window. You might get prompted for a user name and password for your camera. If you get a video stream you‟re good to go. Just go back to the Dashboard tile and enter that complete URL. Don‟t forget to save. ABOUT TILES Your tiles are far more than just a graphical representation of whether your outlet is ON, AUTO or OFF. By clicking on a tile name when in normal mode, you will go directly to the Outlet Configuration for that outlet. This is a quick and easy way to verify or change your outlet program. In edit mode, if a tile has a wrench displayed, there are other things you can do with that tile. Probe tiles can expand or compress. Your video tile will let you Page | 69 AquaController Apex enter a URL. And clicking in a tile under the ON, AUTO or OFF words will change the state of that outlet accordingly. SOUND SETUP The AquaController Apex Display can play sounds when alarms or warning conditions are met according to the Apex programming. The sounds that are played are selected as follows. To select the Alarm Sound: Apex Display: System – Sound Setup – Alarm Sound – use the up/down arrows to select the sound to be played. Press Select to save settings. Web Interface: This option is not available from the Web Interface. To select the Warning Sound: Apex Display: System – Sound Setup – Warning Sound – use the up/down arrows to select the sound to be played. Press Select to save settings. Web Interface: This option is not available from the Web Interface. The Apex Display can play a tone whenever keys are pressed to provide key press feedback. To enable/disable Key press beep: Apex Display: System – Sound Setup – Key Press Beep – Press Select to toggle between ON and OFF. Web Interface: This option is not available from the Web Interface. Page | 70 AquaController Apex USING THE AQUACONTROLLER APEX VIEWING STATUS Status Screens can be viewed from both the Apex Display and the Web Interface. The information shown on the Status Screens are edited according to the instructions in the section titled Edit Status Screens. The 4 dots in the upper right corner of the Apex Display screen indicate which of the 4 Status Screens is currently displayed. On the screen shown in Figure 8 Home Screen Display, you can see the 4 dots in the upper right corner indicating this is Status Screen 4. Figure 8 - Home Screen Display To select the Status screen to view: Apex Display: Home – the home screen on the Apex display shows one of the Status Screens. Simply pressing the left and right arrow keys will cycle through each of the 4 Status Screens. Web Interface: Status – as you hover over the Status Menu item, choose the Status Display you wish to view. All Status displays the status of all probes and outlets on the Apex system. The 4 Status Screens on the Web Interface display the same information as the 4 Status Screens that are viewed from the Apex Display. MANUAL CONTROL The AquaController Apex provides an easy way to override the AquaController Apex program for outlets configured on the system. You may wish to do this to turn an item off to perform maintenance, to test operation, or simply to turn the lights on in the middle of the night. Page | 71 AquaController Apex NOTE: For items or groups of items you frequently need to turn off or on for maintenance or other events, consider setting up a Feed Timer which will temporarily override the outlet but automatically return it to normal operation after a period of time. See the section titled Programming Feed Timers for more information on setting up Feed Timers. Outlets can set to the following 3 states: AUTO – The outlet will turn on and off based on the AquaController program ON or MANUAL ON – The outlet is locked on OFF or MANUAL OFF – The outlet is locked off When an outlet is set to Manual ON or Manual OFF, the Apex Display will display ON or OFF (as illustrated in Figure 9 - Manual ON and OFF Indicators) instead of the Icon you have configured for the outlet. Figure 9 - Manual ON and OFF Indicators To manually turn an outlet on or off: Apex Display: Control/Status – Manual Control – use the up/down arrows to select the outlet to override, push Select, use the up/down arrows to select the outlet state (see below for outlet state definitions), push Select to save. Web Interface: Status – from any of the Status pages, select the outlet state from the drop down list next to the outlet you wish to override, click the Update button to save changes. WARNING: When manually setting the state of and outlet, it will remain in the state (AUTO, Manual ON, Manual OFF) indefinitely until changed by you. GRAPHING The AquaController Apex can display graphs of the various probe values over time. These graphs are helpful in viewing trends and determining if conditions are normal or askew. The Data Logs collected by the AquaController are used to generate the graphs. Therefore, increasing or decreasing the Logging interval (see the section titled Log Interval for information on changing the Log interval) Page | 72 AquaController Apex will have an impact on the resolution of the graphs. The AquaController Apex can display graphs of all probes enabled on the system as well as the electrical current draw through each EnergyBar 8 connected to the system. Page | 73 AquaController Apex To view Graphs: Apex Display: Data Log – Graph – will display the first graph for the current day. Press the up/down arrows to change the graph displayed (Temp, pH, ORP, AMP, etc.). Push the left/right arrows to change the day that is graphed. NOTE: When a day in the future is selected from the Apex Display, a blank graph will be displayed. Web Interface: Graphs – the Web Interface will open the last graph viewed as the page is loaded. You can select a day to view by typing in the date in the Date field or you can click the calendar icon next to the date field and choose the day from the calendar. You can choose the time period for the graph from the dropdown box. Select the probe for which you would like to view the graph from the final drop down list. When you have made your selections, click the Update button to display the graph. As you hover the mouse pointer over a graph, a marker will appear to assist in determining the value of the probe at that time. Additionally, you can “zoom in” on a window of time on the graph by clicking and dragging over the period you would like to zoom. You can move the “zoom in” window by clicking and dragging the slider at the top of the graph. Click the Full Graph button to restore the full graph. Figure 10 - Web Interface Graph Page | 74 AquaController Apex NOTE: Since the graphs are generated from the Data Logs, graphs in the past may display more or fewer probes based on the Apex system configuration on the day of the graph. FEED TIMER OPERATION The AquaController Apex has 4 user defined feed timers. See the section titled Programming Feed Timers in the Programming Outlets section for information on how to program feed timers. To activate Feed Timers Apex Display: Control/Status – Feed – or from the Home screen, simply press the down arrow. Quickly press the up/down arrow repeatedly to cycle through feed timer A, B, C and D, stop pressing the up/down arrow when the display indicates the Feed Timer desired. A second later, the Feed Timer will start and the display will count down the feed timer. The Exit button can be pressed to continue the feed timer in the background and resume the display to normal operation. Web Interface: Status – near the bottom of all the status pages, select the Feed Timer to be activated from the Feed drop down box, click the Feed button. The Feed Timer will be executed in the background, the Apex Display nor the Web Interface will provide a count down timer. To Cancel the Feed Timers Apex Display: Control/Status – Feed Cancel or from the Feed Timer display, push the Cancel button. The Feed Timer will be canceled and all outlets returned to their normal function as if the Feed Timer was never invoked. Web Interface: Status – near the bottom of all the status pages, click the Feed Cancel button. The Feed Timer will be canceled and all outlets returned to their normal function as if the Feed Timer was never invoked. LOGGING The AquaController Apex periodically saves status information for each activated probes on the system. This information is used to create graphs and to track the history of your system. The AquaController Apex will continue to save log entries until the log memory is full at which time the oldest log entry will be Page | 75 AquaController Apex automatically over-written. The AquaController Apex contains enough log memory to store over a year of log entries for a typical system. LOG INTERVAL The log interval determines how frequently log entries are saved. Setting the log interval too long can miss important events in the log like temperature or pH spikes. Setting the interval too short will fill the Apex memory prematurely preventing the ability to see trends over time. The default log interval is 10 minutes. Acceptable settings are from 1 to 250 minutes. To change the Log Interval: Apex Display: Data Log – Log Interval – use the up/down arrows to change the log interval, push OK to save changes, Exit to cancel changes. Web Interface: This option is not available from the Web Interface. DATA LOG The Data Log displays the raw data collected from each probe with the time stamp of the measurement. This data can be viewed in 3 ways: Apex Display: Data Log – Display Log – Displays the data log on the Apex Display. Web Interface: XML – XML Datalog – lists the day‟s data log in XML format. Web Interface: Data Log – select the day and length of log you wish to view from the selection boxes near the top of the page and click the Update Button to view the log. Figure 11 - Data Log POWER FAIL LOG Page | 76 AquaController Apex All power failures to individual EnergyBars and Apex Base Modules are logged by the AquaController Apex. The list of these failures can be found in the power fail log. To view the Power Fail Log: Apex Display: Data Log – Power Fail Log – Power Log – lists the time stamps when the power failed and when it was restored. Web Interface: Status – the last power failure and power restore event is listed at the bottom of the Status Screen. To clear the Power Fail Log: Apex Display: Data Log – Power Fail Log – Reset Log – the log is immediately reset. Web Interface: This option is not available from the Web Interface. INITIALIZE MEMORY The AquaController Apex includes a utility to clear the device programming and reset certain items back to the factory default settings. This can be used to clear the device when being used on a new system or to clear error conditions. Four Initialize Memory functions are available: WARNING: Initializing memory will result in resetting the AquaController Apex programming information back to the factory default sate. YOUR PROGRAMMING WILL BE ERASED. Make sure you save your configuration information by following the instructions in the section titled Load/Save Configuration and you are sure you know what you are doing before using these utilities. Initialize All - resets all configuration settings back to the factory default values including the AquaBus device table, outlet configuration, and Profile configuration. Apex Display: System – Init Memory – Init All – confirm that you wish to initialize all memory back to default factory values by pressing the Yes button. Web Interface: This option is not available from the Web Interface. Initialize AquaBus - resets the AquaBus Device Table back to the factory default values. Page | 77 AquaController Apex Apex Display: System – Init Memory – Init AquaBus Dev – confirm that you wish to initialize selected memory back to default factory values by pressing the Yes button. Web Interface: This option is not available from the Web Interface. Initialize Outlets - resets the Outlet configuration back to the factory default values. Apex Display: System – Init Memory – Init Outlets – confirm that you wish to initialize selected memory back to default factory values by pressing the Yes button. Web Interface: This option is not available from the Web Interface. Initialize Profiles - resets the Profile settings back to the factory default values. Apex Display: System – Init Memory – Init Outlets – confirm that you wish to initialize selected memory back to default factory values by pressing the Yes button. Web Interface: This option is not available from the Web Interface. SELF TEST The self test function is used to check basic functionality of the Apex Base Module. If the base module passes the diagnostic, the word “Passed” will be displayed. If your base module fails the Self test, please contact Neptune Support through one of the methods listed in Appendix 5 – Troubleshooting and Help. The Self Test screen is also an easy way to check the firmware version and date installed as well as the Base Module serial number. To perform the Self Test: Apex Display: Self Test Web Interface: This option is not available from the Web Interface. LOAD/SAVE CONFIGURATION The AquaController Apex Load/Save Configuration function is used to backup and restore your AquaController programming and configuration information. The Save Configuration function is used to backup all information into a single file to be stored on your computer. You should save your configuration before making drastic configuration changes, upgrading firmware, adding or removing modules, etc. just in case you need to restore your AquaController to a previously, known good state. Page | 78 AquaController Apex To Save the AquaController Apex configuration: Apex Display: This option not available from the Apex Display. Web Interface: Configuration – Load/Save – in the Save Apex Configuration box near the bottom of the page, click the Save Configuration button, follow the prompts to save the configuration file. Figure 12 - Load Save screen NOTE: The Save function creates a file titled Apexcfg.bin in the location you specify. You can rename the file but leave the file extension as .bin for easy identification. All configuration information (Outlet, Profile, Display, Network and Miscellaneous) is stored in this single file. To Load the AquaController Apex configuration: Apex Display: This option not available from the Apex Display. Web Interface: Configuration – Load/Save – in the Load Apex Configuration box near the top of the page, click the Browse button to select the Save file you wish to load, click the check boxes next to the elements you wish to load, click the Restore Configuration button. The Apex will restart automatically. XML MENU The XML menu from the Web Interface provides a RSS feed function for status reporting, several XML outputs to retrieve the current status of the AquaController Apex probes and outlets as well as the history of the measured Page | 79 AquaController Apex probe values. These functions have been made available for advanced users and programmers. UPDATING FIRMWARE The AquaController Apex system includes the ability to update the software that runs the controller and modules, otherwise known as firmware. The process of updating the firmware is also known as flashing which is a term derived from the fact that the firmware is stored in “flash” memory on the modules. The ability to update the firmware allows problems that were discovered after shipment to be fixed as well as add new features for years to come. The firmware is updated on the Apex Base module through the same network connection you use to access the Web Interface. When the Apex Base Module is updated, new versions of the firmware for supported Apex Modules is copied to the Base Module as well. Using commands from the Web Interface of the Apex Display, you can easily update the Apex Module firmware through the AquaBus. This means you don‟t have to tear your system apart to perform an update. The Apex Flash Utility is used to update the firmware on the Base Module and must be run from a typical Microsoft Windows computer. Follow the directions in the following section to prepare your computer to run the Apex Flash Utility. NOTE: Other computer platforms including Apple Macintosh OS 10 can be used to run the Apex Flash Utility. See the Readme.txt file included with the firmware download for more information. PREPARING THE UPDATE 1. Install Microsoft .Net framework version 3.5. a. Downloaded the .NET framework from Microsoft‟s site http://www.microsoft.com/downloads/details.aspx?displaylang=en&F amilyID=ab99342f-5d1a-413d-8319-81da479ab0d7 b. Follow the directions from Microsoft to install the .NET framework 2. Download the Apex firmware package a. Go to http://www.neptunesys.com b. Open the Support tab c. Click Downloads 3. Unzip the Apex firmware package to a folder on your PC a. Make note of the folder you unzip the Apex firmware package b. The Apex Flash Utility and the firmware package will be unzipped NOTE: Newer versions of Microsoft Windows come with unzip utilities. If you are running an older version of Microsoft Windows, you may have to download and Page | 80 AquaController Apex install a software package to unzip the Apex firmware package. To unzip a file, typically you can right-click the downloaded file and select “extract” or “unzip” from the right-click menu. UPDATING THE APEX BASE MODULE FIRMWARE WARNING: Backup your AquaController Apex configuration before updating firmware. See the directions in the section titled Load/Save Configuration. The Apex Flash Utility will not delete your settings but you should have a backup on hand just in case. NOTE: The firmware update will not work if the Apex Base module is connected to your network through a wireless bridge. You should have the Apex base module hardwired to the network when performing firmware updates. NOTE: The AquaController Apex will only allow update from computers on its home network (subnet). This is to prevent unauthorized access from outside your home network. 1. Browse to the folder where the Apex firmware package was unzipped in the previous section. 2. Double-click Apex Flash Utility.exe the Apex Flash Utility should open as shown in Figure 13 - The Apex Flash Utility. Figure 13 - The Apex Flash Utility 3. The File name field contains the name of the firmware file you are about to flash to the Apex Base Module. It defaults to the file that came with the downloaded package. If you would like to change the file to flash, type the file name in the box or click the Browse button to select the file. Page | 81 AquaController Apex 4. Enter the Network Address to the Apex controller you wish to update. a. Accept the default of Apex if you have not renamed the AquaController Apex. b. If you have changed the host name, enter the new host name. c. Alternately, you can simply enter the IP address that is assigned to the Apex Base Module (current IP address assigned can be viewed from the Apex Display at System – Net Setup – IP Address). NOTE: For best results, use the IP address of the AquaController Apex in the Apex Flash utility, not the host name. This is especially important if you are using automatic IP address assignment (DHCP) as the IP address for the device can change when the AquaController Apex re-boots after updating the firmware. 5. Enter HTTP Port that your AquaController is configured to use for the Web Interface. a. Accept the default of 80 if you have not changed it b. If you have changed the HTTP Port on the Apex, enter the current HTTP Port (current HTTP Port can be viewed from the Apex Display at System – Net Setup – HTTP Port. 6. Enter the Apex Administrator User name and Password a. Defaults are admin and 1234 b. If you have changed the Administrator User Name and Password, enter the current credentials (current user name can be viewed from the Apex Display at System – Net Setup – Admin Login, current password can be viewed from the Apex Display at System – Net Setup – Admin Password). NOTE: You can click the Show Password checkbox to 7. Click the Update Firmware button to update the firmware a. You should see several update steps occur and when compete, you should see “Operation Complete” in the log at the bottom of the screen. b. Depending on network speeds, the process should take less than a minute. 8. After the firmware has been updated, the AquaController Apex will restart. You can confirm the correct firmware has been installed by running a self test from the Apex Display. 9. Continue updating your system by updating the Web Interface using the directions in the next section. UPDATING THE APEX BASE MODULE WEB INTERFACE Once the Apex Base Module Firmware is updated, the next step is to update the Web Interface firmware. Page | 82 AquaController Apex Figure 14 - Apex Flash Utility Updating Web Pages NOTE: Please allow the Apex Base module a few minutes to restart before proceeding with updating the Web Interface firmware. 1. From the Apex Flash Utility with the parameters filled out as in the previous section, click the Update Web Pages button. 2. You should see several update steps occur and when compete, you should see “Operation Complete” in the log at the bottom of the screen. a. The update process should take less than 3 minutes depending on network speeds. UPGRADING APEX MODULES The firmware version of software installed on the Apex Base Module can be flashed to each Apex Module through the AquaBus using the directions in this section . The version of firmware installed on all Apex modules is listed in the table at the bottom of the Configuration – Module Configuration – page on the Web Interface. To upgrade an Apex Module Firmware: Apex Display: Setup – Module Setup – Update Module – use the up/down arrows to highlight the Apex module to update, push Select to update. Web Interface: Configuration – Module Setup – in the Module Configure area, in the Module: box, select the Apex module to update from the dropdown list, click the Update Firmware radio button, click the Submit Module Update button, a new browser window will open to display the update status. Page | 83 AquaController Apex TROUBLESHOOTING WHEN UPDATING USING THE APEX FLASH UTILITY Do NOT update over a wireless network. It is impossible for the firmware to load correctly over a wireless connection. Please use wired connections only. For best results, use the IP address of the AquaController Apex in the Apex Flash utility, not the host name. This is especially important if you are using automatic IP address assignment (DHCP) as the IP address for the device can change when the AquaController Apex re-boots after updating the firmware. If the firmware update fails for some reason and the Apex base module does not boot up correctly, it can still be recovered. An Apex base module with corrupt firmware is indicated by a flashing yellow status LED. To recover the system: 1. Remove power to the Apex Base Module. 2. Restart the Apex flash utility. Make sure that a valid IP address is in the Network Address box (not a hostname) 3. Start the firmware update by pressing the firmware update button. 4. Wait for the firmware update to timeout. 5. Re-apply power to the Apex base module. The status LED will flash yellow, and connect to the flash utility. Error – Object reference not set to an instance of an object. Typical Cause – Incorrect Host Name, check the spelling of the host name or enter the IP address of the Apex Base Module. Error - Waiting for input from Apex: timed out. Typical Cause – Incorrect password – Check the password and enter the correct value. Error – Unable to connect to the remote server. Typical Cause - Wrong HTTP: Port Number – check the setting and enter the correct port number. Page | 84 AquaController Apex If you continue to have trouble updating the firmware, please email the log from the bottom of the Apex Flash Utility window to [email protected]. Page | 85 AquaController Apex APPENDIX 1 – APEX DISPLAY MENU STRUCTURE Page | 86 AquaController Apex Page | 87 AquaController Apex APPENDIX 2 – DISPLAY ICONS The table below contains the graphical icons that will be displayed on the AquaController Apex Display when configured on an outlet. See the section titled Editing Outlet Programming for instructions on how to change the icon for an outlet. Icon On and Off Up/Down Arrows Sound A Left/Right Arrows Sound B Thermometer Thumbs Light A Hourglass Light B Note Moon Arrows Clock Bell Email Fan Calendar Spigot Bars Sun Manual On-Off Page | 88 Icon AquaController Apex On and Off APPENDIX 3 – PROGRAMMING REFERENCE DEFER The Defer command requires that the internal program state of the outlet be in the specified state for a specified period of time before actually switching the state of the outlet. The internal program state is determined by executing all the commands in the outlet program listed before and after the defer command. The Defer command is executed after all other commands on the outlet no mater where it is placed in the program. Defer 010:15 Then OFF In this example, the off state will be deferred for 10 minutes 15 seconds. Syntax Defer MMM:SS then Y MMM = time in minutes:seconds up to 999:59 max Y = ON to defer the outlet on state or OFF to defer the outlet off state FALLBACK The Fallback command is used to specify the state the outlet should switch to if the EnergyBar were to lose contact with the Apex Base Module for an extended period of time. Once contact with the Apex Base module is resumed, the outlet will resume the programmed state as dictated by the Apex Base Module. The Fallback function is only available on EnergyBar outlets, not legacy devices such as Direct Connect 8. Fallback = ON In this example, if the EnergyBar loses contact with the Apex Base Module for an extended period of time, the EnergyBar will switch this outlet on. Syntax Fallback Y Y = ON to set the Fallback state to on or OFF to set the fallback state to off Page | 89 AquaController Apex IF DOW The If DoW command is used to control outlets based on the Day of the Week. If DoW S-T-TFS Then ON In this example, the outlet will be on all days of the week except Monday and Wednesday. Syntax If DoW XXXXXXX Then Y XXXXXXX = place a the capital initial for the days when the statement should be true and “-“ to mark the days the command should be false Y = ON to turn the outlet on or OFF to turn the outlet off IF FEED To control an outlet with a Feed Timer, enter the If Feed command in the program for that outlet. A delay time can also be specified that will delay returning the outlet to its normal program state for a period of time after the Feed Timer expires. This delay is not performed if the Feed Timer is canceled. Multiple If Feed commands can be used on a single outlet program. If FeedA 025 Then OFF In this example, the outlet will be off whenever Feed A is activated and will remain off for 25 minutes after Feed A timer has expired. Syntax If FeedX MMM Then Y X = the feed timer to use (A, B, C or D) MMM = time in minutes up to 999 minutes max Y = ON to turn the outlet on or OFF to turn the outlet off Page | 90 AquaController Apex IF MOON The If Moon command allows for an outlet to be controlled based on the moonrise and moonset of the lunar cycle. The numeric fields are used to adjust when the outlet is switched either before or after the lunar cycle time. The first number is the number of minutes to add or subtract from the moonrise time, and the second number is the number of minutes to add or subtract from the moonset time. If Moon 000/000 Then ON In this example, the outlet is on at moonrise and off at moonset. If Moon -20/010 Then ON In this example, the outlet is on 20 minutes before moonrise and off 10 minutes after moonset. Syntax If Moon RRR/SSS Then Y RRR = minutes before (negative) or after (positive) moonrise (360 or -360 max) SSS = minutes before (negative) or after (positive) moonset (360 or -360 max) Y = ON to turn the outlet on or OFF to turn the outlet off IF ORP The If ORP command allows for an outlet to be controlled in response to the ORP measurement. If ORP > 450 Then ON In this example, whenever probe ORP measures more than 450, the outlet is on. Syntax If ORPX C T Then Y ORPX = the name of the ORP probe (ORP, ORPA, ORPB, ORPx3, ORPx4, etc) C = the conditional either >, <, or = T = target ORP in number 000 to 999 Y = ON to turn the outlet on or OFF to turn the outlet off Page | 91 AquaController Apex IF OUTLET The If Outlet command is used to control an outlet based on the state of another outlet. If Outlet Light1 = ON Then OFF In this example, whenever outlet Light1 is on, the outlet containing this command will be off. Syntax If Outlet O = X Then Y O = the name of the Outlet to be followed X = ON or OFF Y = ON to turn the outlet on or OFF to turn the outlet off IF PH The If pH command allows for an outlet to be controlled in response to a pH measurement. If pH > 8.35 Then ON In this example, whenever probe pH measures more than 8.35, the outlet is on. Syntax If pHx C T Then Y pHx = the name of the pH probe (pH, ph2, pHA, pHB, pHx3, pHx4, etc) C = the conditional either >, <, or = T = target pH in number 4.00 to 11.99 Y = ON to turn the outlet on or OFF to turn the outlet off Page | 92 AquaController Apex IF POWER The If Power command allows for outlets to be controlled in response to whether or not power is present to the Apex base unit or any of the EnergyBars. If Power Apex OFF 010 Then ON In this example, if power to the Apex base module is off, and for 10 minutes after power is restored the outlet will be turned on. If Power EB8_3 ON 005 Then OFF In the this example, if power to the EnergyBar with module address 3 is on and for 5 minutes after power is ON the outlet will be off. Syntax If Power ITEM X MMM Then Y ITEM = the item to monitor (Apex, EB8_3, EB8_6, etc) X = the power state to trigger on MMM = minutes up to 999 to wait after trigger is true before setting the outlet state Y = ON to turn the outlet on or OFF to turn the outlet off If Power Monitoring is enabled, the If Power Apex commands will trigger based on the state of the 12V auxiliary power connector on the Apex Base Module. See the section titled Triggering alarms or events on Power Outages in the Programming Alarms and Warnings section for instructions on how to enable Power Monitoring. Page | 93 AquaController Apex IF SUN The If Sun command allows for an outlet to be controlled based on the sunrise and sunset variations listed in the Seasonal Table. The numeric fields are used to adjust when the outlet is switched either before or after the time in the Seasonal Table. The first number is the number of minutes to add or subtract from the sunrise time, and the second number is the number of minutes to add or subtract from the sunset time. If Sun 000/020 Then ON In this example, the outlet is on at sunrise and off 20 minutes after sunset. If Sun -60/000 Then ON In this example, the outlet is on 60 minutes before sunrise and off at sunset. Syntax If Sun RRR/SSS Then Y RRR = minutes before (negative) or after (positive) sunrise (360 or -360 max) SSS = minutes before (negative) or after (positive) sunset (360 or -360 max) Y = ON to turn the outlet on or OFF to turn the outlet off IF SWITCH The If Switch command allows for an outlet to be controlled in response to an open or closed switch. If Switch2 = Closed Then ON In this example, whenever Switch2 is closed, the outlet is on. Syntax If SwitchX = X Then Y SwitchX = the name of the switch (Switch1, SwitchA1, SwitchC4, Switchx3_1, Switchx4_5, etc.) X = OPEN trigger when the switch is open, CLOSED trigger when the switch is closed. Y = ON to turn the outlet on or OFF to turn the outlet off Page | 94 AquaController Apex IF TEMP The If Temp command allows for an outlet to be controlled in response to the temperature measurement. If Temp > 80 Then ON In this example, whenever probe Temp measures more than 80 degrees, the outlet is on. Syntax If TempX C T Then Y TempX = the name of the temperature probe (Temp, TempA, TempB, Tmpx3, Tmpx4, etc) C = the conditional either >, <, or = T = target temperature in either numerical (80, 72.3, etc) or Regional Temp reference (RT, RT+1.0, RT +-2, etc) Y = ON to turn the outlet on or OFF to turn the outlet off IF TIME The If Time command is used to control outlets based on the time of day. If Time 08:10 to 14:30 Then ON In this example, the outlet will be on between 8:10 AM and 2:30 PM. Syntax If Time FF:FF to SS:SS then Y FF:FF = the time in 24 hour format when the outlet should be true SS:SS = the time in 24 hour format when the outlet should be false Y = ON to turn the outlet on or OFF to turn the outlet off Page | 95 AquaController Apex MINIMUM TIME The Minimum Time command will keep an outlet in the on or off state for a minimum amount of time. To use this command, specify the amount of time you would like it to be in effect and whether you want it to keep the outlet off or on. Both a Minimum on and a minimum off time can be specified on a given outlet. Min Time 010 Then OFF In this example, the outlet will be kept in the off state for a minimum of 10 minutes. Syntax Min Time MMM:SS then Y MMM = time in minutes:seconds up to 999:59 max Y = ON to keep the outlet on or OFF to keep the outlet off OSC The OSC command is used to program an outlet to periodically turn on and off. This is typically used to perform wave maker functions. OSC 010:00/015:00/05:00 Then ON In this example, the outlet will be off for 10 minutes, on for 15 minutes, off for 5 minutes, repeats with on of 15 minutes. Syntax OSC FFF:FF/SSS:SS/TTT:TT Then Y FFF:FF = the initial off time in minutes:seconds up to 999:59 max SSS:SS= the first on time in minutes:seconds up to 999:59 max TTT:TT = the second Off time in minutes:seconds up to 999:59 max Y = ON to turn the outlet on or OFF to turn the outlet off Page | 96 AquaController Apex SET The Set command is used to set an outlet on or off. Set = ON In this example, if the outlet will be set on. Syntax Set Y Y = ON to turn the outlet on or OFF to turn the outlet off NOTE: Commands later in the outlet program may override this command. See the section titled Order of Operation for more information. APPENDIX 4 – ADVANCED PROGRAMMING EXAMPLES DEFAULT PROGRAM When an EnergyBar 8 or Direct Connect 8 is added to the system, the following default program is added to each outlet: Light 1 <Real Outlet 1> Fallback Off Set Off If Time 08:00 to 20:00 Then ON Light 2 <Real Outlet 2> Fallback Off Set Off If Time 08:30 to 19:30 Then ON Pump 1 <Real Outlet 3> Fallback On OSC 000:00/005:00/005:00 Then ON If FeedA 000 Then OFF Pump 2 <Real Outlet 4> Fallback On OSC 005:00/005:00/000:00 Then ON If FeedA 000 Then OFF Heater <Real Outlet 5> Fallback Off If Temp < 77.0 Then ON If Temp > 78.0 Then OFF Page | 97 AquaController Apex Chiller <Real Outlet 6> Fallback Off If Temp > 79.0 Then ON If Temp < 78.0 Then OFF CO2 <Real Outlet 7> Fallback Off If pH > 8.00 Then ON If pH < 7.90 Then OFF Ozone <Real Outlet 8> Fallback Off If ORP > 375 Then ON If ORP < 360 Then OFF AUTOMATIC TOP OFF The AquaController Apex can be used to automatically add top off water to your aquarium through controlling a top-off pump based on the state of float switches in the aquarium sump. A top-off pump should be selected to pump 1.5 to 2 times the daily top-off needs of your aquarium. For example, if your tank needs 5 gallons of top-off water per day, you should find a pump that can pump 7.5 to 10 gallons per day. Consider peristaltic pumps, diaphragm pumps or very small power heads with ball valves limiting their output. Don‟t forget to take into account head loss when selecting a pump. The size of the top-off water reservoir should be selected to contain 5-10 days of water to minimize the refill frequency. It is strongly suggested that top-off systems not be connected to an unlimited water supply to avoid adding too much water in the case of a float switch or system failure. Inexpensive float switches are available from many local and on-line sources. Some are available with mounting hardware, some come with just the raw switch. For this project, we will use 2 float switches, one to indicate Sump_Low which indicates top-off water is needed and Sump_High as an alarm to indicate that something has gone wrong and the sump is over-full. Optionally, you could add a third to indicate when the sump is too low. Build a mounting system with switch Sump_Low right at the water level you would like to keep your sump and Sump_High mounted 1 or 2 inches higher. These should be normally open switches (when the float is not raised by the water, the switch is open, i.e. does Page | 98 AquaController Apex not make a complete circuit). Connect one end of each switch to the ground connection on the I/O connector on the AquaController Apex. Connect the other float switch lead from Sump_Low to input 1, and the other lead of Sump_High to input 2. Connections are made easier with the addition of the optional Neptune I/O Breakout Box from your retailer Program Example using raw switch commands: ATO Automatic Top Off, this outlet is where the top-off pump is connected. Switch1 Sump Low float switch Switch2 Sump High float switch Outlet Programs ATO <Real Outlet> Fallback OFF If Switch1 CLOSED Then ON If Switch1 OPEN Then OFF If Switch2 CLOSED Then OFF SndAlm <System Outlet> If Switch2 CLOSED Then ON … other alarm commands EmailAlm <System Outlet> If Switch2 CLOSED Then ON … other alarm commands The program for outlet ATO, sets the fallback state for the top-off pump OFF for situations when contact with the Apex Base module is lost (you would not want the pump to stay in the on state if this were to occur). The 2 Switch1 commands, turn the outlet on and off when the sump is low. The Switch2 command, overrides the Switch1 commands (see the section titled Order of Operation for more information) when the sump is too full. Finally, the Email_Alarm and SndAlm are triggered when the sump is too high. Program Example using virtual outlets for switches: Using Virtual Outlets to track the state of the switches makes the outlet programs easier to understand and allows the status of the switches to be viewed on Status Screens from the AquaController Apex Display and Web Interface (see the section Page | 99 AquaController Apex titled Virtual Outlets for more information). The same ATO program is listed below with the use of Virtual Outlets for the 2 switch inputs. Assign and create the following outlets using the instructions in earlier sections of this manual. ATO Automatic Top Off, this outlet is where the top-off pump is connected. Sump_High create as a Virtual Outlet to indicate the state of the Sump_High float switch. Sump_Low create as a Virtual Outlet to indicate the state of the Sump_Low float switch. Outlet Programs Sump_Low <Virtual Outlet> If Switch1 CLOSED Then ON If Switch1 OPEN Then OFF Sump_High <Virtual Outlet> If Switch2 CLOSED Then ON If Switch2 OPEN Then OFF ATO <Real Outlet> Fallback OFF If Outlet Sump_Low = ON Then ON If Outlet Sump_High = ON Then OFF SndAlm <System Outlet> If Outlet Sump_High = ON Then ON … other alarm commands EmailAlm <System Outlet> If Outlet Sump_High = ON Then ON … other alarm commands You can see that assigning Virtual Outlets to the Switches makes reading and understanding what is going on in the outlet programs much easier. KALKWASSER CONTROL Page | 100 AquaController Apex Many reef aquariums which are heavily stocked with stony corals require large additions of calcium. One popular method to add calcium to these systems is mixing calcium hydroxide powder with fresh top-off water. However, this mixture is highly alkaline (high pH) which if added in large amounts, can raise the pH of the system to unhealthy levels. This program example builds on the Automatic Top Off program from the previous example (section titled Automatic Top Off). Assign and create the following outlets using the instructions in earlier sections of this manual. ATO Automatic Top Off, this outlet is where the top-off pump is connected. Sump_High create as a Virtual Outlet to indicate the state of the Sump_High float switch. Sump_Low create as a Virtual Outlet to indicate the state of the Sump_High float switch. pH pH probe used to measure the pH of the main display. Outlet Programs Sump_Low <Virtual Outlet> If Switch1 CLOSED Then ON If Switch1 OPEN Then OFF Sump_High <Virtual Outlet> If Switch2 CLOSED Then ON If Switch2 OPEN Then OFF ATO <Real Outlet> Fallback OFF If Outlet Sump_Low = ON Then ON If Outlet Sump_High = ON Then OFF If pH > 8.30 Then OFF SndAlm <System Outlet> If Outlet Sump_High = ON Then ON If pH > 8.60 Then ON … other alarm commands EmailAlm <System Outlet> Page | 101 AquaController Apex If Outlet Sump_High = ON Then ON If pH > 8.60 Then ON … other alarm commands The 3 additions to the basic ATO example are in bold. The command inserted at the end of the ATO Outlet Program, will override the status of the ATO outlet and turn it off when pH has risen above 8.50. The other 2 additions will send an email and sound an audible alarm when the pH rises above 8.60. ALTERNATING PUMPS The AquaController Apex can be used to simulate the tide in an aquarium. This can be accomplished by having two power heads at opposite ends of the aquarium which are alternately turned on and off. The following outlet programs will produce this effect using If Time commands. Assign and create the following outlets using the instructions in earlier sections of this manual. Pump1 Outlet is where Pump 1 is connected. Pump2 Outlet is where Pump 2 is connected. Outlet Programs Pump1 <Real Outlet> Fallback On If Time 00:00 to If Time 06:00 to If Time 12:00 to If Time 18:00 to Pump2 <Real Outlet> Fallback On If Time 00:00 to If Time 06:00 to If Time 12:00 to If Time 18:00 to 06:00 12:00 18:00 00:00 Then Then Then Then ON OFF ON OFF 06:00 12:00 18:00 00:00 Then Then Then Then OFF ON OFF ON This program will alternately power Pump 1 and Pump 2 to create a tidal back and forth flow. The same effect can be achieved with If Time and If Outlet statements to simplify the program a bit: Outlet Programs Page | 102 AquaController Apex Pump1 <Real Outlet> Fallback On If Time 00:00 to 06:00 Then ON If Time 06:00 to 12:00 Then OFF If Time 12:00 to 18:00 Then ON If Time 18:00 to 00:00 Then OFF Pump2 <Real Outlet> Fallback On Set On If Outlet Pump1 = ON Then OFF Finally, the program can be simplified even further with the OSC (Oscillate) command. Outlet Programs Pump1 <Real Outlet> Fallback On OSC 360:00/360:00/360:00 Then ON Pump2 <Real Outlet> Fallback On Set On If Outlet Pump1 = ON Then OFF NOTE: Pump1 could be configured using the Pump Wizard as opposed to the OSC command, they perform the same function. SEQUENCED PUMPS The OSC (short for oscillate) command makes programming repetitive commands very easy. The first time parameter is the initial off time in minutes:seconds. The second parameter is the on time in minutes:seconds, and the third parameter is the final off time. Each pump outlet will initially start in the initial off state, then go to the on state, and then to the final off state. This cycle will repeat over and over again. Suppose that it is desired to have three power heads turn on one at a time for 5 minutes each. The following AquaController Apex outlet program will produce this effect: Outlet Programs Pump1 <Real Outlet> Fallback ON Page | 103 AquaController Apex OSC 10:00/05:00/00:00 Then ON Pump2 <Real Outlet> Fallback ON OSC 05:00/05:00/05:00 Then ON Pump3 <Real Outlet> Fallback On OSC 00:00/05:00/10:00 Then ON RESONANT WAVES Using an accurately timed pump, it is possible to create large waves in aquariums using a process known as constructive interference. Waves generated by the pump reflect off the far wall of the tank and when timed correctly, will add to the next wave generated by the pump. A single Tunze Streams 6000 pump has generated 2+” waves in a standard 55 gallon tank. Using the sub-second adjustment feature of the Pump Profile, you can tune the waves to create these large waves. Setup a pump Profile with the following settings: Resonate <Real Pump Profile> Synchronize = OFF Divide by 10 = ON Initial off time = 0 On time = XX Off time = YY Minimum Intensity = 30 Maximum Intensity = 100 Use the following table for starting points for the On and Off times in the Profile. Make sure you multiply the numbers in the table by 10 (i.e. 0.8 seconds should be entered as 08). Tank Width (feet) 3 4 6 Page | 104 AquaController Apex On Time Off Time 0.5 seconds 0.8 seconds 1.2 seconds 0.6 seconds 0.8 seconds 1.2 seconds 8 1.8 1.7 seconds seconds Table 5- Pump Profile Timing to Resonate Pump_R <Real Pump Outlet> Set Resonate You may have to adjust the times in the Profile for your specific aquarium but these settings should be good starting point. WARNING: This type of program with a sufficiently sized pump can create LARGE waves that could overflow the sides of your aquarium. ALTERNATE WITH VARIABLE SPEED PUMPS One possible use for Profiles and variable speed Tunze Streams Pumps is to create waves from one side of the tank, then switch to the other side and create waves of flow from that side of the tank. With the AquaController Apex, this is quite simple. This program also will reduce the flow to 30% at night and shut down the pumps when Feed Timer A is activated. Let‟s start with the Profiles needed. Separate Left and Right Profiles are created so the maximum and minimum flows can be adjusted separately. R_Streams Synchronize = OFF Divide by 10 = OFF Initial off time =3 On time = 3 Off time = 5 Min Intensity = 30 Max Intensity = 100 L_Streams Synchronize = OFF Divide by 10 = OFF Initial off time =3 On time = 3 Off time = 5 Min Intensity = 30 Max Intensity = 100 Night Synchronize = OFF Divide by 10 = OFF Initial off time =3 On time = 3 Off time = 5 Min Intensity = 30 Max Intensity = 30 Table 6 - Pump Profiles for Alternating The following outlet programs are needed: Page | 105 AquaController Apex Streams_Timer <Virtual Outlet> OSC 010:00/010:00/000:00 Then ON Lights <real outlet with lights> … Program to run lights (not important to this example) Streams_L <Real variable speed port where the Left Streams pump is connected> Set L_Streams If Outlet Lights = OFF Then Night If Outlet Streams_Timer = ON Then OFF If FeedA 000 Then OFF Streams_R <Real variable speed port where the Right Streams pump is connected> Set R_Streams If Outlet Lights = OFF Then Night If Outlet Streams_Timer = OFF Then OFF If FeedA 000 Then OFF The Streams_Timer virtual outlet is used to create the timing for switching pumps. Modify the OSC command to set how frequently the active pump should alternate between the left and right pump. The Lights outlet is shown for illustrative purposes only, its program is not important to this example. The program on each Streams pump starts by setting the left or right Profile. This Profile is overridden by the Night Profile when outlet Lights is OFF (night). The next statement turns either the left or the right streams OFF based on the state of the Streams_Timer (the different program statements allow only the left or right pump to remain on at one time). The final command turns both pumps off when Feed Timer A is active. Page | 106 AquaController Apex GROWING SURGE WITH VARIABLE SPEED PUMPS Several pumps synchronized together can be used to create a growing surge in the aquarium if each pump is slowly powered up, one after the other. Create 4 Profiles with the following settings: Profile1 Synchronize = OFF Divide by 10 = OFF Initial off time = 5 On time = 20 Off time = 00 Min Intensity = 00 Max Intensity = 100 Profile2 Synchronize = ON Divide by 10 = OFF Initial off time = 10 On time = 15 Off time = 00 Min Intensity = 00 Max Intensity = 100 Profile3 Synchronize = ON Divide by 10 = OFF Initial off time = 15 On time = 10 Off time = 00 Min Intensity = 00 Max Intensity = 100 Profile4 Synchronize = ON Divide by 10 = OFF Initial off time = 20 On time = 5 Off time = 00 Min Intensity = 00 Max Intensity = 100 Table 7 - Growing Surge Profiles Assign each of the variable speed ports one of these Profiles. For example: VarSpd1_I1 <Variable Set Profile1 VarSpd2_I2 <Variable Set Profile2 VarSpd3_I3 <Variable Set Profile3 VarSpd4_I4 <Variable Set Profile4 Page | 107 Speed Port 1> Speed Port 2> Speed Port 3> Speed Port 4> AquaController Apex APPENDIX 5 – TROUBLESHOOTING AND HELP Support is available from the following sources: Support section of our web site at www.neptunesys.com. Email support at [email protected]. Phone support at (408) 578-3022 (Monday – Friday 9-5 Pacific). The Neptune Sponsor Forum on Reef Central: www.reefcentral.com/forums/forumdisplay.php?f=368 – This forum is primarily a user group but is occasionally monitored by Neptune Staff. Do not use the forum for formal support; the best way to reach us is directly through email or phone. APPENDIX 6 – TELNET COMMANDS The telnet interface allows for the user to access the controller data through a text based user interface. Telnet Commands The following commands are available from the Ethernet telnet interface. They are all single letter commands which are executed by typing the letter followed by a carriage return. l The list command will display all the defined outlet names and program statements. This command is useful in debugging the program used by the AquaController Apex. c The current status command will display the current conditions in the aquarium. It will also list the state of all the control modules. d The data log command will print to the telnet port the latest data logs in the Apex flash memory. on XXX This command puts device XXX in manual mode and turns it on. XXX is the outlet name. Example: on LT1 off XXX This command puts device XXX in manual mode and turns it off. XXX is the outlet name. Example: off LT1 auto XXX This command puts device XXX into automatic module. XXX is the outlet name. Example: auto LT1 Page | 108 AquaController Apex INDEX Acronyms Table of Acronyms, 3 Advanced Programming. See Programming Advanced Alarm. See Programming: Alarms and Warnings Apex Module Setup, 20 AquaBus Connections, 6 Backup. See Save Configuration Calibration Conductivity Probe, 35 Dissolved Oxygen Probe, 38 ORP Probe, 31 pH Probe, 28 Temperature, 26 Chiller Wizard, 40 Clock. See Setup:Clock Setup Command Reference. See Programming: Command Reference Conductivity Calibration, 35 Probe Maintainence, 36 Probe Setup, 33 Data Log, 67 Day of Week, 79 Default Program, 86 Defer, 78 Display, 58 Brightness (daytime and nighttime), 60 Contrast, 61 Locking, 59 Status Screen, 59 Dissolved Oxygen Page | 109 AquaController Apex Calibration, 38 Probe Maintainence, 38 Probe Setup, 36 DOW. See Day of Week Email Setup. See Setup:Email Setup EnergyBar 8 Features, 2 Setup, 20 Ethernet. See Setup:Network Setup Fallback, 78 Features, 1 Apex Display, 2 AquaController Apex, 2 AquaController Apex Lite, 1 EnergyBar 8, 2 Feed Timers Operation, 66 Programming, 54, 79 Firmware Update, 70 Graph, 63 Graphics, 77 Heater Wizard, 40 Help, 97 Hostname, 11 Hysteresis, 47 Icons, 77 If DOW, 79 If Moon, 80 If ORP, 80 IF Outlet, 81 If pH, 81 If Power, 82 If Sun, 83 If Switch, 83 If Temp, 84 If Time, 84 Initialize Memory, 68 Internet. See Setup:Network Setup Configuring the Apex to be accessible from the Internet, 17 Light Wizard, 39 Lock the Display, 59 Log Interval, 67 Login Credentials, 12 Maintainence Conductivity Probe, 36 Disolved Oxygen Probe, 38 ORP Probe, 33 Ph Probe, 30 Temperature Probe, 27 Manual Control, 62 Memory, Initialize, 68 Menu Tree, 76 Min Time, 85 Modules Configure, 22 Delete, 21 Legacy Setup, 22 Rename, 21 Moon, 80 Order of Operation. See Programming: Order of Operation ORP Calibration, 31 Probe Maintainence, 33 Probe Setup, 30 Programming Reference, 80 Programming Wizard, 41 OSC, 85 Oscillate, 85 Outlet, 81 pH Page | 110 AquaController Apex Calibration, 28 Probe Maintainence, 30 Probe Setup, 27 Programming Reference, 81 Programming Wizard, 41 PM2, 33 Calibration, 35 PM3, 36 Calibration, 38 Port Web Interface, 12 Power, 82 Power Fail Log, 67 Probe Expansion 1000. See PX-1000 Probe Module 1, 20 Probe Module 2, 21 Probe Module 3, 21 Profiles, 56, 57, 58 Programming Advanced, 42 Alarms and Warnings, 48 Command Referance, 78 Default Program, 39, 86 Editing Outlet, 42 Feed Timers, 54, 79 Hysteresis, 47 Order of Operation, 45 Outlets, 39 Profiles, 56, 57, 58 Seasonal, 52 Triggering on power events, 49 Variable Speed Ports, 55 Virtual Outlets, 44 Wizard, 39 Programming Examples Alternating Pumps, 91 Automatic Top Off, 87 Kalk Top-Off, 89 Resonant Waves, 93 Sequenced Pumps, 92 Variable Speed Pumps, 94, 96 Pump Wizard, 40 PX-1000, 25 Reboot. See Restart Repeat Interval, 46 Restart, 13 Restore Configuration, 69 Save Configuration, 69 Seasonal. See Also Programming Seasonal Moon, 54, 80 Sun, 53, 83 Temperature, 53 Self Test, 69 Set Command, 86 Setup Administrator Credentials, 12 Apex Module Setup, 20 Base System Initial Connections, 5 Clock Setup, 18 Conductivity, 33 Conductivity Calibration, 35 Configuring the Apex to be Accessible from the Internet, 17 Display, 58 Dissolved Oxygen, 36 Dissolved Oxygen Calibration, 38 Email Setup, 13 Hostname, 11 Network Automatic, 7 Manual, 9 Network Setup, 7 ORP, 30 ORP Calibration, 31 pH Calibration, 28 pH Probe, 27 Physical Installation, 5 Page | 111 AquaController Apex Probe Setup, 25 Setup Overview, 4 Sound, 61 Switch Inputs, 50 Temperature, 25 Temperature Calibration, 26 Variable Speed Ports, 55 Web Interface Port, 12 Sound, 61 Status, 62 Status Screen, 59, 62 Sun. See If Sun Support, 97 Switch Input Identifying, 52 Pinouts, 50 Programming Example, 87 Programming Reference, 83 Telnet, 97 Temperature Calibration, 26 Probe Maintainence, 27 Probe Setup, 25 Programming Reference, 84 Time, 84 Programming Reference, 85 Troubleshooting Email Troubleshooting, 16 Firmware Updates, 74 General Information, 97 Self Test, 69 Update Firmware, 70 User Name, 12 Variable Speed Ports, 55 Virtual Outlets. See Programming: Virtual Outlets Warning. See Programming: Alarms and Warnings Web Interface Port, 12 Wizard, 39 X10, 23, 24 NEPTUNE SYSTEMS LIMITED WARRANTY Neptune Systems warrants this product to be free from defects in material and workmanship for a period of 1 year from the date of purchase. Probes carry a 90day warranty. If repair or adjustment is necessary and has not been the result of abuse, misuse, or accidental damage, within the 1-year period, please return the product with proof of purchase, and correction of the defect will be made without charge. For your protection, items being returned must be carefully packed to prevent damage in shipment and insured against possible damage or loss. Neptune Systems will not be responsible for damage resulting from careless or insufficient packaging. Before returning please obtain a return authorization (RMA) number from Neptune Systems at (408) 578-3022. Returned merchandise will not be accepted without a RMA number. Except for the warranty set forth above, Neptune Systems is not responsible for any damages including, but not limited to, consequential damage occurring out of or in connection with the delivery, use or performance of Neptune Systems‟ products. Buyer‟s remedies for breach of warranty shall be limited to repair, or replacement and full or partial adjustment to purchase price. Neptune Systems, Inc. 6288 San Ignacio Ave. Unit #B San Jose, CA 95119 http://neptunesys.com Phone 408.578.3022 Fax 408.578.9383 ©2010 Neptune Systems - All Rights Reserved Apex Manual V2 Page | 112 AquaController Apex CE DECLARATION OF CONFORMITY Manufacturer: Neptune Systems, LLC. 6280 San Ignacio Ave. Suite E, San Jose, CA 95119, USA. 408-578-3022 Product: Apex Base Unit Model No. APEXBASE The undersigned hereby declares, on behalf of the Neptune Systems, LLC. of San Jose, California that the abovereferenced product, to which this declaration relates, is in conformity with the provisions of: EN 60950-1+A1:2009 EN 60335-1:2010 The Technical Construction File required by this Directive is maintained at the corporate headquarters of Neptune Systems, LLC, 6280 San Ignacio Ave. Suite E, San Jose, California. ________________________ The symbol to the right means that according to local laws and regulations your product should be Curt Pansegrau disposed of separately from household waste. When President this product reaches its end of life, take it to a collection point designated by local authorities. Some collection points accept products for free. The separate collection and recycling of your product at the time of disposal will help conserve natural resources and ensure that it is recycled in a manner that protects human health and the environment.