1
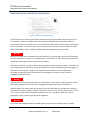
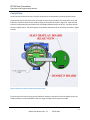
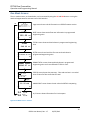
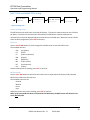
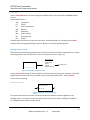
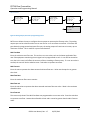
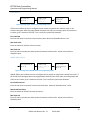
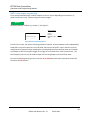
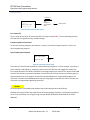
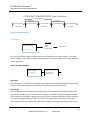
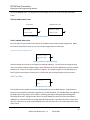
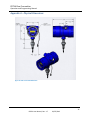
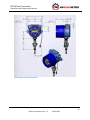
GEARFLO™ PDTX4 Four-Wire Meter Mounted Flow Transmitter OPERATING INSTRUCTIONS (877) 356-5463 | (p) 330-331-7331 | (f) 330-331-7172 | www.FLO-CORP.com Part of the PDFlo Family of FLO-CORP Products | © 201 FLO-CORP | REVA 112 1 Wdyϰ Flow Transmitter Operation and Programming Manual Table of Contents Safety Definitions and Information............................................................................................................... 4 Unpacking ..................................................................................................................................................... 4 Product Description ...................................................................................................................................... 5 Screen selection and programming changes ............................................................................................ 5 Hazardous Area Installation Instructions ...................................................................................................... 6 Specifications ................................................................................................................................................ 7 Connections .................................................................................................................................................. 8 Hook-up board layout ............................................................................................................................... 9 Main board layout................................................................................................................................... 10 Analog output ......................................................................................................................................... 11 Limit & frequency output........................................................................................................................ 11 Reset input .............................................................................................................................................. 12 Run Mode Screens ...................................................................................................................................... 13 LOGO screen ........................................................................................................................................... 14 RATE screen ............................................................................................................................................ 14 TOTAL screen .......................................................................................................................................... 14 RATE / TOTAL screen............................................................................................................................... 15 GRAND TOTAL screen ............................................................................................................................. 15 STATUS screen ........................................................................................................................................ 15 ANALOG OUT screen ............................................................................................................................... 16 LIMIT screen ............................................................................................................................................ 16 Control Functions ........................................................................................................................................ 17 Programming .............................................................................................................................................. 19 Entering programming mode.................................................................................................................. 19 Changing values and making selections.................................................................................................. 19 RATE, TOTAL and GRAND TOTAL scaling ................................................................................................ 20 K-factor (scaling factor) ....................................................................................................................... 20 RATE unit ............................................................................................................................................. 20 RATE time base ................................................................................................................................... 20 Wdyϰ User Manual, Rev. 1.7 02/07/2012 Wdyϰ Flow Transmitter Operation and Programming Manual TOTAL unit........................................................................................................................................... 21 Analog output scaling ............................................................................................................................. 21 Fixed output source ............................................................................................................................ 21 RATE source ........................................................................................................................................ 22 TOTAL source ...................................................................................................................................... 23 GRAND TOTAL source ......................................................................................................................... 23 LIMIT / Pulse output programming......................................................................................................... 24 Limit 1 & Limit 2 .................................................................................................................................. 25 Frequency output programming ......................................................................................................... 27 Gate Time filter ....................................................................................................................................... 27 Linearizer programming .......................................................................................................................... 28 Calibrating Analog Output .......................................................................................................................... 30 I/O Manual Adjustment .............................................................................................................................. 31 Analog output adjustment ...................................................................................................................... 31 Fine mA adjustment ............................................................................................................................ 32 Coarse mA adjustment........................................................................................................................ 32 Limit & frequency adjustment ................................................................................................................ 32 Fine limit output adjustment .............................................................................................................. 33 Coarse limit output adjustment .......................................................................................................... 33 ON/OFF Limit output adjustment ....................................................................................................... 33 Monitor external reset input .................................................................................................................. 34 Appendix A – Physical Dimensions ............................................................................................................. 35 Appendix B – Default Variable Values ........................................................................................................ 37 Appendix C – Revision History .................................................................................................................... 38 Limited Warranty ........................................................................................................................................ 39 3 Wdyϰ User Manual, Rev. 1.7 02/07/2012 Wdyϰ Flow Transmitter Operation and Programming Manual Safety Definitions and Information Do not attempt to install or use your &>KͲKZW Meters product until you have read the safety instructions in this section. Save this manual and keep it in an easily accessible place. Warning! Warning means that failure to follow this safety statement may result in extensive product damage, serious personal injury, or death. Caution Caution means that failure to follow this safety statement may result in minor or moderate personal injury, property or equipment damage. Notice Notice is a statement that informs about installation, operation, maintenance, performance issues, or general tips that are important but do not create a hazard or safety concern. Unpacking Separate the Wdyϰ Flow Transmitter from packaging materials and check for any visual signs of damage. If you determine there are damages caused by shipping, file a claim with the shipping company. If the flow transmitter appears to have been improperly assembled or does not operate properly, return it for replacement or repair (see Limited Warranty information at the end of this manual). Caution Before connecting, programming, or operating the Wdyϰ Flow Transmitter, read this manual. 4 Wdyϰ User Manual, Rev. 1.7 02/07/2012 Wdyϰ͘Flow Transmitter Operation and Programming Manual Product Description The Wdyϰ is a digital flow transmitter housed in an epoxy painted aluminum instrument enclosure. The Wdyϰ is certified for use in Class 1, Div 1 hazardous areas in both Canada and the US. The unit’s graphical, backlighted LCD display makes it easy to monitor flow rate and total in user selectable engineering units. The sensor used with the unit will mount on many meter models modified for use with the 3/8” NPT sensor mounting thread. Meter model available are the JVM, JVS, JVHS and ZHM gear meters and HM high pressure turbines. Screen selection and programming changes You can make program or mode changes, or reset the totalizer in two ways; 1. With the housing cover removed, enter information using the 4 pushbuttons 2. With the housing cover closed, hold the attached magnet wand against the side of the cover to activate hall switches located on the internal circuit board. You can also reset the totalizer and monitor flow rate limits and total output remotely via a computer or PLC. 5 Wdyϰ User Manual, Rev. 1.7 02/07/2012 Wdyϰ Flow Transmitter Operation and Programming Manual Hazardous Area Installation Instructions Figure 1: Hazardous area certification tag The Wdyϰ unit is an explosion-proof flow transmitter with local display which may be used in Class 1, Div 1 locations. Above is a sample of the name plate that should be clearly attached to each unit. Please make sure this name plate is on the unit and that the information matches what is shown above, prior to installation. If either the name plate is not on the unit or the unit name plate does not match what is shown above, please notify &>KͲKZW to determine appropriate course of action. Warning! Because the Wdyϰ uses an explosion-proof enclosure for its area protection, power must be removed from the unit before the covers are removed while in a hazardous area. Also, disconnect power before loosening or adjusting the swivel collar on the hub adapter. For proper installation, it is also necessary that the conduit entries are properly sealed. To maintain the unit’s explosion-proof certification, anything threaded into the NPT conduit openings must engage by a minimum of 5 full threads. If original units received from &>KͲKZW are versions which have the sensor installed, this sensor will be properly installed with a minimum of 5 full threads of engagement from the factory. Warning! When an Wdyϰ is installed into the flow meter with which it is to be used, it is also necessary to make sure there is a minimum of 5 full threads of engagement between the meter and Wdyϰ unit. When wiring the unit, please make sure to observe any local codes that may be required. A common requirement is to have a conduit seal within 18 inches of the unit. Also, the unit may be used in a Class I, Div. II area, but must still be installed according to Class I, Div I standards. Make sure units are powered by a Class 2 power supply for proper regulation. Warning! Please note that the Wdyϰ must be installed properly into a flow meter before power is applied. 6 Wdyϰ User Manual, Rev. 1.7 02/07/2012 Wdyϰ Flow Transmitter Operation and Programming Manual Specifications Power Requirements: 9-24 VDC/200mA, Class 2 (customer supplied) Sensor/Monitor Input Ratings: o Frequency Input Range: 0.3-4,500 Hz o Sensor Supply Voltage: 12 VDC @ 50mA Max. o Magnetic Sensor Input: 15mVP-P Min., 24VPEAK Max. o High Level Pulse Input: 2VPEAK Min., 24VPEAK Max. Analog Output 4-20 mA: 16-bit isolated loop powered 2-wire output; 9-24 VDC, Class 2 loop supply; max. load impedance = 500 Ohm @ 24V; max. load impedance = 250 Ohm @ 12V Three Opto-Isolated Open-Collector Outputs: 5-30 VDC, Class 2 rating, 40 mA Max. (minimum load impedance required = 600 Ohm @ 24 VDC) Opto-Isolated Reset Input: 12-24 VDC Input, Class 2, 3.3Kohm Impedance Temperature Ratings: -4 to 140°F (-20 to 60°C) ambient; 185°F (85°C) max. fluid temperature (standard); 350°F (175°C) max. fluid temperature with optional high temperature pickup version. Enclosure Certification: Type 4X Connection: spring terminal strips; ¾" NPT conduit entrance Display update rate: 250 milliseconds (4 times per second) Analog output update rate: 20 milliseconds (if Gate Time filter off) 7 Wdyϰ User Manual, Rev. 1.7 02/07/2012 Wdyϰ Flow Transmitter Operation and Programming Manual Connections On dual access enclosure versions, the hook-up board can be accessed by removing the blind cover. To get access to the hook-up board on the single access enclosure models, first remove the cover and loosen the 4 stainless steel screws visible through the face plate as shown in Figure 18. Note that the screws are captured on the back side of the main display board and will not fall out. Carefully remove the main display board. The hook-up board is located at the bottom of the enclosure as shown in Figure 2 below. Figure 2: Single access enclosure model, hook-up board location To get access to the sensor wiring terminal which is located on the back of the main display board, the same procedure must be followed for both the single and dual access enclosure models. 8 Wdyϰ User Manual, Rev. 1.7 02/07/2012 Wdyϰ Flow Transmitter Operation and Programming Manual Hook-up board layout Figure 3: Hookup board connection diagram Maximum wire gauge: 16 AWG Pin Pin Pin Pin 1: 2: 3: 4: (+) Reset (-) Reset (+) Frequency Out (-) Frequency Out Pin 5: Pin 6: Pin 7: Pin 8: Pin 9: Pin 10: Pin 11: Pin 12: Pin 13: Pin 14: (+) Supply Voltage (-) Supply Voltage / Ground Housing Ground +Vcc mA Loop Output See Figure 5 & Figure 6 on page 11 for mA signal polarity mA Loop Output (+) Limit 1 (-) Limit 1 (+) Limit 2 (-) Limit 2 NOTE: See page 7 for electrical specifications 9 Wdyϰ User Manual, Rev. 1.7 02/07/2012 Wdyϰ Flow Transmitter Operation and Programming Manual Main board layout Figure 4: Main board input signal connection Maximum wire gauge: 12 AWG Pin A: Magnetic Coil input Pin B: Magnetic Coil input Pin C: Ground Pin D: High level pulse Input Pin E: (+) 12Vdc Output for sensor supply NOTE: See page 7 for electrical specifications 10 Wdyϰ User Manual, Rev. 1.7 02/07/2012 Wdyϰ Flow Transmitter Operation and Programming Manual Analog output The isolated 16-bit 4-20mA output can be wired for use with Loop powered inputs or for ground referenced inputs. The analog signal has an LED in series which varies in intensity as the mA signal varies. This can be used for troubleshooting purposes. When using the analog signal with inputs used with loop powered signals, it is important to note that the Wdyϰ͘still requires a separate power supply to power the unit as shown Figure 5 below. 3'7; 5 3'7; 5 (+) SUPPLY VOLTAGE 6 R sense (+) 9 9-24 Vdc (Class 2) 0.01uF 10 R sense (-) 8 (-) 9 ANALOG CIRCUIT 9-24 Vdc (Class 2) 9-24 Vdc (Class 2) 6 (+) SUPPLY VOLTAGE ANALOG CIRCUIT (-) 0.01uF 10 Figure 5: Loop powered analog output Figure 6: Ground referenced analog output When using the analog signal with ground referenced inputs, jumper pins 8 and 9 together as shown in Figure 6 above. Analog signal is taken from pin 10 and returns to pin 2 (supply ground). Limit & frequency output Three opto-isolated NPN open-collector outputs can sink or source depending on connection. Attention must be paid to polarity of connections. See page 7 for electrical specification and page 9 for Limit 1, Limit 2 & Frequency pin-out pairing. 50mA Polyfuse 3, 11, 13 (+) OPTOISOLATOR (-) 4, 12, 14 Figure 7: Limit1, Limit 2 & Frequency outputs 11 Wdyϰ User Manual, Rev. 1.7 02/07/2012 Wdyϰ Flow Transmitter Operation and Programming Manual Reset input Opto-isolated external reset input will trigger the Wdyϰ to reset the totalizer when the input sees a momentary transition from low (ground) to high (near supply). 3'7; 3.3Kohm 1 MOMENTARY SWITCH (+) 12-24 Vdc (Class 2) OPTOISOLATOR 2 (-) Figure 8: External reset input 12 Wdyϰ User Manual, Rev. 1.7 02/07/2012 Wdyϰ Flow Transmitter Operation and Programming Manual Run Mode Screens The run mode screens, as shown below, can be accessed by using the UP and DN buttons or using the attached magnet wand to activate internal hall switches. RT-30 S/N 0000000 UP Software Version 1.1.3 HART SW version 1.1.0 Logo screen shows critical information on Wdyϰ firmware version UP/DN RATE 100.00 GPM LN RATE screen shows active flow rate information in programmed engineering units GT UP/DN TOTAL 249.00 TOTAL screen shows totalized volume in programmed engineering units GAL UP/DN RT 12345.67 TO 12345.67 GPM GAL LN RT/TO screen shows both the flow rate and total values in programmed engineering units GT UP/DN GRAND TOTAL 12345.67 GAL GRAND TOTAL screen shows totalized volume in programmed engineering units and is not affected if TOTAL is reset. UP/DN STATUS L1 OFF : L2 OFF RA 2345.67 HZ TO 1234567 PUL ANLG 20.00mA STATUS screen shows data summary. Flow and total are in un-scaled units of Hertz for flow and Pulses for total. UP/DN ANALOG OUT XX 20.00 mA LN ANALOG OUT screen shows the mA value the Wdyϰ is outputting. GT UP/DN DN L1 L2 Rate ON/OFF Total ON/OFF L1/L2 screen shows information for Limit outputs. Figure 9: Run Mode screens - overview 13 Wdyϰ User Manual, Rev. 1.7 02/07/2012 Wdyϰ Flow Transmitter Operation and Programming Manual LOGO screen RT-30 S/N 0000000 Software Version 1.1.3 HART SW version 1.1.0 Figure 10: Logo screen The LOGO screen shows 3 or 4 lines of important data for the display unit which is needed if contacting the factory for support issues. 1. 2. 3. 4. Line 1 shows the basic model name Line 2 shows the unique serial number of the unit. Line 3 shows the firmware version of the unit Line 4 shows the firmware version of the HART protocol. NOTE: Line 4 will only show if the unit was purchased with the HART protocol option RATE screen RATE 00100.00 GPM LN GT Figure 11: RATE screen The RATE screen displays the flow rate in the programmed engineering units. If the linearizer is active, ‘LN’ shows in lower left corner. If the Gate Time filter is active, ‘GT’ shows in lower right corner. TOTAL screen TOTAL 00249.00 GAL Figure 12: TOTAL screen The TOTAL screen displays the flow total in programmed engineering units. Pressing the RESET button resets the value back to zero (0). The Total can also be reset remotely by connecting a momentary voltage to the external RESET pin. 14 Wdyϰ User Manual, Rev. 1.7 02/07/2012 Wdyϰ Flow Transmitter Operation and Programming Manual RATE / TOTAL screen RT 12345.67 TO 12345.67 LN GPM GAL GT Figure 13: RATE/TOTAL screen The RT/TO screen shows both the flow rate and total values in programmed engineering units. If the linearizer is active, ‘LN’ shows in lower left corner. If the Gate Time filter is active, ‘GT’ shows in lower right corner. Pressing the RESET button resets the total value back to zero (0). The Total can also be reset remotely by connecting a momentary voltage to the external RESET pin. GRAND TOTAL screen GRAND TOTAL 12345.67 GAL Figure 14: GRAND TOTAL screen The GRAND TOTAL screen displays the flow total in programmed engineering units. The GRAND TOTAL value does not reset when the TOTAL value is reset and is therefore often used to collect a day total in batch applications. To reset the GRAND TOTAL a password is required. The password is 53126. This password cannot be changed. STATUS screen STATUS L1 OFF : L2 OFF RA 2345.67 HZ TO 1234567 PUL ANLG 20.00mA Figure 15: STATUS screen The STATUS screen shows multiple values and is used more as a summary screen, especially if trouble shooting a system. The following values are shown: 1. The output state of Limit 1 and Limit 2 2. The flow rate in un-scaled units of Hertz (frequency). NOTE: The Gate Time filter and linearizer, if active, do not affect the flow rate value in the STATUS screen. This is the raw incoming frequency. 3. The total value in un-scaled units of Pulses. 4. The analog output in milliamps (mA). NOTE: Because the mA value is an actual signal output, it is affected by the Gate Time and linearizer, if activated. 15 Wdyϰ User Manual, Rev. 1.7 02/07/2012 Wdyϰ Flow Transmitter Operation and Programming Manual ANALOG OUT screen ANALOG OUT XX 20.00 mA LN GT Figure 16: ANALOG OUT screen The ANALOG OUT screen shows the mA value the Wdyϰ is outputting. The 2 letters in the upper right corner indicate what variable the mA output has been assigned to represent. 1. FX – Fixed mA output 2. RA – mA output is scaled to represent the RATE value 3. TO – mA output is scaled to represent the TOTAL value 4. GR – mA output is scaled to represent the GRAND TOTAL value If the linearizer is active, ‘LN’ shows in lower left corner. If the Gate Time filter is active, ‘GT’ shows in lower right corner. LIMIT screen L1 L2 Rate ON/OFF Total ON/OFF Figure 17: LIMIT screen The L1/L2 screen shows what the Limits are programmed to represent and the state of the output. The first line of each limit represents what the Limit is programmed for: 1. OFF – Limit output has been turned off. 2. Frequency – The Limit outputs the incoming frequency 3. Rate – The Limit output will change state when the flow rate reaches the programmed value 4. Total – The Limit output will change when the TOTAL reaches the programmed value 5. Grand Total - The Limit output will change when the GRAND TOTAL reaches the programmed value The second line of each limit represents the actual state of the output pin(s) 16 Wdyϰ User Manual, Rev. 1.7 02/07/2012 Wdyϰ Flow Transmitter Operation and Programming Manual Control Functions There are two methods that can be used to scroll through screens or make changes within programming modes. If in a safe area with the front cover removed, the 4 push buttons showing through the front face plate can be used with the button function as shown on the face plate. Figure 18: Front view Warning! If programming or screen changes are to be made while the Wdyϰ is in the hazardous area, do not remove cover to use the push buttons. Keep cover on and use the magnetic wand. Only use push buttons in a non-hazardous area. Alternately, with the cover closed it is possible to make changes using the magnetic wand attached to the outside of the unit. The push button functions are duplicated with internal Hall switches which activate when the magnetic wand is held in the 3, 6, 9 or 12 o’clock positions as shown in Figure 19 and Figure 20. The face plate is marked at each position with the corresponding function. 17 Wdyϰ User Manual, Rev. 1.7 02/07/2012 Wdyϰ Flow Transmitter Operation and Programming Manual Figure 19: Dual access magnetic switch locations Figure 20: Single access magnetic switch locations 18 Wdyϰ User Manual, Rev. 1.7 02/07/2012 Wdyϰ Flow Transmitter Operation and Programming Manual Programming Entering programming mode The Wdyϰ programming menu can be accessed from 4 of the run mode screens; [RATE], [TOTAL], [ANALOG OUT] and limit [L1/L2] screens. To enter the programming menu from these screens, press and hold the ENT button for 3 seconds until one of the programming screens appears (see Figure 21). The programming menu will show the screen relevant to the run mode screen from which the programming menu was entered. Use the buttons as shown in Figure 21 below to navigate through the screens. When exiting the programming menu, the Wdyϰ will always return to the run mode screen from which the programming menu was entered. Run Mode menu Rate/Total Scaling? NO YES Rate/Total programming menu YES EXIT Back to Run Mode (hold for 3 seconds) Analog Programming? NO EXIT ENT NO YES Analog programming menu YES EXIT Limits Programming? NO NO YES EXIT Back to Run Mode YES EXIT Limit programming menu NO EXIT Back to Run Mode Gate Time Programming? NO YES EXIT YES Gate Time programming menu NO EXIT Back to Run Mode Linearizer Programming? NO YES EXIT YES Linearizer programming menu NO EXIT Back to Run Mode Figure 21: Main programming menu Changing values and making selections When in a programming screen which requires a value to be changed, the active character is indicated by an underscore. To increment the value use the UP button and to decrease the value use the DN button. The character value will wrap around when reaching either 9 or 0. Once a character has been changed press the SEL button to move to the next character to the right. If at the right most character, pressing SEL will bring the cursor back to the left most character. If a value has a decimal point whose position can be changed, press the SEL button until the underscore is under the decimal point. Press the DN button to move the decimal point to the left and press the UP button to move the decimal point to the right. NOTE: Not all programming screens allow the decimal point location to be changed such as any milliamp value. Once a variable has been changed to the desired value, press the ENT button to accept the value and move to the next screen or programming value. If an incorrect value is programmed, a warning screen will appear. Press any button to exit a warning screen. 19 Wdyϰ User Manual, Rev. 1.7 02/07/2012 Wdyϰ Flow Transmitter Operation and Programming Manual RATE, TOTAL and GRAND TOTAL scaling Enter K-Factor in Pulses per Gallon : 000001.000 ENT Select RATE Units > _____________ Select RATE Time Base _____________ ENT Select RATE Units _____________ Select RATE Time Base > _____________ Select TOTAL units ENT _____________ EXIT Figure 22: Scaling menu K-factor (scaling factor) The Wdyϰ uses only one K-factor for scaling all displays. This value is always entered in units of Pulses per Gallon. Once the rate and total units are selected, the Wdyϰ uses internal calculations to automatically correct the displayed values to match the user selected units. When the correct K-factor value has been programmed, press ENT to continue. RATE unit Use the UP and DN buttons to scroll through the available units to scale the RATE screen. The available units are: GAL (US gallons) LIT (Liters) CC (Cubic centimeters) BBL (Barrels) (Milliliters) ML M3 (Cubic meters) OZ (Liquid ounces) PUL (Pulses) Once the desired unit is showing, press ENT to continue. RATE time base Use the UP or DN buttons to select the time base to use in conjunction with the previously selected RATE units to define the flow rate unit. The available time units are: Seconds Minutes Hours Days When the correct time base is showing, press ENT to continue. NOTE: If the rate unit & time base are selected as PUL & Seconds, the RATE screen will show the unit as Hz, NOT PUL/SEC. 20 Wdyϰ User Manual, Rev. 1.7 02/07/2012 Wdyϰ Flow Transmitter Operation and Programming Manual TOTAL unit Use the UP and DN buttons to scroll through the available units to scale the TOTAL and GRAND TOTAL screens. The available units are: GAL (US gallons) LIT (Liters) CC (Cubic centimeters) BBL (Barrels) ML (Milliliters) M3 (Cubic meters) OZ (Liquid ounces) PUL (Pulses) The Rate and Total units do not have to be the same. Once the desired unit is showing, pressing ENT completes the scaling programming and returns display to the main programming menu. Analog output scaling When entering the Analog programming menu, the first screen asks to select the Analog Source, or what the analog output value is to represent. There are 4 choices as shown in Figure 23. Source options Select Analog Source _____________ UP/DN ~Fixed Output ~RATE ~TOTAL ~GRAND TOTAL Scaling menu ENT Figure 23: Analog source selection screen Using the UP and DN buttons scrolls through the 4 choices that the mA output can represent: a fixed mA output value, the input flow rate, the totalizer value or the grand totalizer value. Press ENT when correct choice is showing. Fixed output source Fixed mA output 02.00 mA EXIT Figure 24: Fixed mA output programming screen This option allows the user to select a constant mA value the Wdyϰ will output regardless of any changing values. A constant mA signal could be used as an external indicator showing if the Wdyϰ is on. Allowable values are from 2mA to 20mA. 21 Wdyϰ User Manual, Rev. 1.7 02/07/2012 Wdyϰ Flow Transmitter Operation and Programming Manual RATE source Min Flow Rate > 00000.00 GPM Min Flow mA 04.00 mA Min Flow Rate 00000.00 GPM Min Flow mA ENT > 04.00 mA Max Flow Rate > 00000.00 GPM ENT Max Flow mA 20.00 mA Max Flow Rate 00000.00 GPM ENT Max Flow mA > 20.00 mA EXIT ENT Zero Flow mA EXIT 02.00 mA Figure 25: Analog Output, RATE source programming screens RATE source allows the user to configure the mA output to represent the flowrate value. The analog output span can be scaled for either zero to max flow or a non-zero flow to max flow. If the flow rate goes above the programmed maximum flow rate, the analog output will continue to increase, up to a maximum of 22mA. This is useful for system fault detection. Min Flow Rate Enter the minimum user flow rate. This can be a non-zero value, such as the lowest application flow rate if the equipment monitoring the mA signal can be programmed as such. It can also be entered as zero, but in this case it will affect the accuracy of the mA reading vs flow accuracy. If a non-zero value is entered, the user will also be asked to enter a mA value to represent zero flow. Min Flow mA Enter the mA to represent the above entered minimum flow rate. Value must be equal to or greater than 2mA. Max Flow Rate Enter the maximum flow rate to monitor. Max Flow mA Enter the mA value to represent the above entered maximum flow rate value. 20mA is the maximum allowable value. Zero Flow mA This screen only shows if the Min Flow Rate was programmed as a non-zero value. Enter the mA value to represent zero flow. Lowest value allowable is 2mA and it cannot be greater than the Min Flow mA value. 22 Wdyϰ User Manual, Rev. 1.7 02/07/2012 Wdyϰ Flow Transmitter Operation and Programming Manual TOTAL source Zero Total mA 04.00 mA ENT Max Total Value > 00000.00 GAL Max Total mA 20.00 mA Max Total Value 00000.00 GAL Max Total mA ENT > 20.00 mA ENT Figure 26: Analog Output, TOTAL source programming screens TOTAL source allows the user to configure the mA output to represent the Totalizer value. If the totalizer value goes above the programmed maximum total value, the analog output will continue to increase, up to a maximum of 22mA. This is useful for system fault detection. Zero Total mA Enter the mA value to represent a zero totalizer value. Minimum allowable value is 2mA. Max Total Value Enter the maximum totalizer value to monitor. Max Total mA Enter the mA to represent the above entered maximum totalizer value. 20mA is the maximum allowable value. GRAND TOTAL source Zero Grand Total mA 04.00 mA ENT Max Grand Total Value > 00000.00 GAL Max Grand Total mA 20.00 mA Max Grand Total Value 00000.00 GAL Max Grand Total mA ENT > 20.00 mA ENT Figure 27: Analog Output, GRAND TOTAL source programming screens GRAND TOTAL source allows the user to configure the mA output to represent the Grand Total value. If the Grand Total value goes above the programmed maximum Grand Total value, the analog output will continue to increase, up to a maximum of 22mA. This is useful for system fault detection. Zero Grand Total mA Enter the mA value to represent a zero Grand Total value. Minimum allowable value is 2mA. Max Grand Total Value Enter the maximum Grand Total value to monitor. Max Total mA Enter the mA to represent the above entered maximum totalizer value. 20mA is the maximum allowable value. 23 Wdyϰ User Manual, Rev. 1.7 02/07/2012 Wdyϰ Flow Transmitter Operation and Programming Manual LIMIT / Pulse output programming Three opto-isolated NPN open-collector outputs can sink or source depending on connection (i.e., power can flow in or out). Output ratings are listed on page 7. Notice Connection polarity: collector (+), emitter (-). See Figure 7. Source options Select Limit > ______________ Select Limit type ______________ UP/DN ~Limit 1 ~Limit 2 ~Frequency Out ~Exit ENT Figure 28: Limit programming choices From the first screen, the output to be programmed is selected. All three outputs can be independently setup and if any of the outputs are not to be used, they can be turned off. Limit 1 and Limit 2 can be configured as a frequency output matching the incoming frequency from the flow meter, as a totalizer cycle output, a flow rate set point trigger or to trigger on a set value of the Total or Grand Total. The third Frequency Out can only be used to output the incoming frequency from the flow meter. To exit the LIMIT programming screen, press the UP or DN button until Select Limit option shows Exit. Then press the EXIT button 24 Wdyϰ User Manual, Rev. 1.7 02/07/2012 Wdyϰ Flow Transmitter Operation and Programming Manual Limit 1 & Limit 2 Limit 1 & 2 Source options Select Limit Limit 1 Select Limit type > _____________ UP/DN ~OFF ~Frequency ~Cycle Output ~Limit Scaling menu ENT Figure 29: Limit 1 & Limit 2 output options Turn Limits OFF To turn either of the Limits off, choose the OFF Limit Type and press ENT. The corresponding Limit pin will now stay low regardless of any variable changes. Frequency Output on Limit pins To have the incoming frequency be routed to a Limit pin, choose the Frequency option. There is no other programming required. Cycle Output (pulsed output) Enter cycle volume 00000.00 GPM ENT Figure 30: Cycle Output volume scaling The CYCLE OUT limit function provides an incremental output signal for a remote totalizer, typically at a lower resolution and frequency. Assigning a limit to the CYCLE OUT function toggles the state of the limit output whenever the TOTAL increments by the programmed cycle amount. The output remains ON until the cycle amount accumulates and does not turn OFF until the cycle amount accumulates again as represented in Figure 31 on page 26. The total accumulated between a rising and falling edge is the cycle value. The total accumulated between any two rising edges is twice the cycle value. You enter the cycle value in programmed engineering total units. Caution Do not program a cycle amount that produces more than 20 pulses per second (20 Hz). Consider the maximum flow rate to determine the resulting output frequency. The frequency produced (in Hz) is the actual flow rate in Engineering Units per Minute divided by 120, divided by the CYCLE AMOUNT. 25 Wdyϰ User Manual, Rev. 1.7 02/07/2012 Wdyϰ Flow Transmitter Operation and Programming Manual C YC LE OUT (PULSE OUTPUT) Lim it Fu n c tio n 2 x C YC LE A M OUN T LIM IT ON C YC LE A M OUN T LIM IT ON C YC LE A M OUN T C YC LE A M OUN T LIM IT OFF C YC LE A M OUN T C YC LE A M OUN T LIM IT OFF LIM IT OFF Figure 31: Cycle Output definition Limit outputs Limit Types ~Rate ~Total ~Grand Total Select Limit Type > ______________ < UP/DN Scaling menu ENT Figure 32: Limit output sources Each Limit can be set to trigger its output based on a certain flow rate or total set point. This is often used to indicate if a flow rate is outside its intended limits or if a certain total value has been reached in a batch application. RATE Limits/Limit MARGIN Rate Value > 00000.00 GPM Limit Margin 00000.00 GPM Rate Value 00000.00 GPM Limit Margin ENT > 00000.00 GPM ENT Figure 33: Rate limit variables Rate Value The limit output will be off if the incoming flow rate is below the programed Rate Value and the output will be on if the incoming flow rate is equal to or above the programmed Rate Value. Limit Margin The Limit Margin variable is programmed in engineering units and determines whether the Rate Limit functions as an absolute limit or activates within a margin or “window” around the programmed Rate Value. When the Limit Margin is programmed as zero, the limit activates whenever the flow rate equals or exceeds the programmed value. When you enter a Limit Margin value other than zero, the limit is active whenever the selected flow rate is within the “window” of the programmed Rate Value, plus or 26 Wdyϰ User Manual, Rev. 1.7 02/07/2012 Wdyϰ Flow Transmitter Operation and Programming Manual minus the MARGIN value. The programmed Limit Margin must be less than the programmed Rate Value. TOTAL & GRAND TOTAL Limits TOTAL Limit GRAND TOTAL Limit Total Value 00000.00 GAL Grand Total Value ENT 00000.00 GAL ENT Figure 34: Total & Grand Total limit variables TOTAL / GRAND TOTAL Value Enter the Total or Grand Total value at which the respective Limit output should change state. When the Total or Grand Total is reset to zero, the limit pin changes back to initial state. Frequency output programming Select Limit Frequency Output Select Limit type > ON ENT Figure 35: Frequency Output programming The third output can only be set to output the incoming frequency. From the top Limit programming menu, choose the Frequency Output option, press ENT and use the UP or DN button to turn the output frequency on. There are no other variables to program. The output frequency is not affected by the Gate Time filter and cannot be linearized. It is always the raw incoming frequency from the sensor. Gate Time filter Gate Time Filter (in seconds) 001.0 ENT Figure 36: Gate Time variable This variable sets the sample time on the incoming frequency for the RATE displays. Programmed in tenths of a second with an allowable range from 0.1 to 999.9 seconds, this variable affects the update of the display and analog output, and is useful in stabilizing the display and output when dealing with fluctuating flow rates. Setting the Gate Time to zero (0) disables the Gate Time filter and all data is updated at an internal default rate of approximately 0.02 seconds. If the Gate Time filter is active (any non-zero value) any run mode screen affected by the filter will show ‘GT’ in the lower right hand corner of the screen. 27 Wdyϰ User Manual, Rev. 1.7 02/07/2012 Wdyϰ Flow Transmitter Operation and Programming Manual Linearizer programming Linearizer Programming? NO YES EXIT Activate Linearizer? NO YES YES YES Figure 37: Linearizer activation screens The Wdyϰ has a 30-point linearizer which can be used to increase the linearity of the flow rate reading. When entering the Linearizer programming mode, the first question asked is if the Linearizer should be activated. If the linearizer has already been programmed, de-activating the linearizer does not erase any previously programmed table values. It only turns off the use of the linearizer and causes the Wdyϰ to use the single programmed K-Factor value under the Rate/Total programming menu for its calculations. If the Linearizer is used, the minimum number of points required for programming is 2. Point 1 > Freq. = 0000.000 Hz K-F = 00000.00 PPG Point 1 ENT Freq. = 0000.000 Hz ENT > K-F = 00000.00 PPG Figure 38: Linearizer variables When programming the linearizer, each table point requires a frequency value and K-Factor to be entered. To obtain these values it may be necessary to have a separate calibration done on the flow meter ahead of time. Often this information can be found on the original calibration sheet from the manufacturer. Freq. variable When populating the linearizer table, it is required that Point 1 has the lowest frequency and each subsequent table point frequency must be in continuously increasing frequency value. The frequency value represents the signal from the flow meter at each flow rate to be programmed into the linearizer table. K-F variable The K-Factor is the scaling factor in Pulses per Gallon for each frequency programmed. When the desired number of linearizer table points have been programmed on the next table point leave the frequency value as zero and press ENT. This is understood by the Wdyϰ as meaning end of table programming and saves the table values and exits the linearizer programming menu. Clearing the linearizer table To clear a previously programmed linearizer table, enter the linearizer table and change Point 1 Freq. to zero (0). After pressing the ENT button, the Wdyϰ will display a warning that all table values will be 28 Wdyϰ User Manual, Rev. 1.7 02/07/2012 Wdyϰ Flow Transmitter Operation and Programming Manual cleared. If this is correct, press the YES button. This will cause all table values to be set to zero and the Linearizer will be turned OFF. The user has the ability to press NO button to cancel this option and return to Point 1 programming screen. Changing the linearizer table To change a table Point value, enter the programming screen and press the ENT button to get to the table value to change. After changing the relevant values, continue pressing the ENT button through the remaining table values until reaching the end of the programmed table (first table point whose Freq. is zero) to exit the table. Adding linearizer table point To add more table points, it must be noted that data can only be added to the end of a table. Therefore, if the additional point(s) to add do not have a frequency greater than the last entered point, it will require the user to manually “shift” the table points by entering the new points after the next smallest existing value and then re-entering the remaining points. If an existing table is changed and has more points than required, once the required points have been entered and the next table value has the Freq. changed to zero, all remaining points will automatically be reset to zero when exiting the table. 29 Wdyϰ User Manual, Rev. 1.7 02/07/2012 Wdyϰ Flow Transmitter Operation and Programming Manual Calibrating Analog Output The analog output can be calibrated to correct for any variances caused by the users input equipment. The calibration routine allows the user to adjust the 4mA and 20mA output values. The calibration routine is entered from the STATUS screen. NOTE: When entering the calibration routine, any incoming frequency to the Wdyϰ is ignored. Before starting the calibration routine, make sure the analog output is connected to the intended readout equipment. To calibrate the Wdyϰ it is necessary to enter the analog value read from the user’s readout equipment. STATUS L1 OFF : L2 OFF RA 12345.67 HZ TO 0123456789 PUL ANLG 20.00 mA I/O Function > Calibrate Output ENT (hold for 3 seconds) ENT Trim Analog Out 4mA Press ENT When Ready ENT Enter measured mA value : ENT Trim Analog Out 20mA Press ENT When Ready ENT 04.000 mA Enter measured mA value : ENT 20.000 mA Measure 20mA Value and Press ENT EXIT Measure 4mA Value and Press ENT ENT Figure 39: Analog output calibration routine From the run mode STATUS screen, press and hold the ENT button for 3 seconds to enter the I/O Function programming screen. Press the UP or DN button to display the ‘Calibrate Output’ choice and then press ENT. At the first mA adjustment screen, the Wdyϰ outputs the value that should equal 4mA output. Adjust the mA value to match the value shown on the user’s readout equipment and press ENT when done. At the second mA adjustment screen, the Wdyϰ outputs the value that should equal 20mA output. Adjust the mA value to match the value shown on the user’s readout equipment and press ENT when done. At the next screen, the Wdyϰ outputs the corrected 4mA value. At the last screen the Wdyϰ outputs the corrected 20mA value. If either measured output is still not close enough to the required value, enter the calibration routine again. When done, press EXIT until back at STATUS screen. 30 Wdyϰ User Manual, Rev. 1.7 02/07/2012 Wdyϰ Flow Transmitter Operation and Programming Manual I/O Manual Adjustment Whether for troubleshooting purposes or to manually control external equipment, the Wdyϰ allows the user to enter an I/O routine in which the analog output, Limit outputs and Frequency outputs can be controlled and the external Reset input can be monitored. A good use of this feature is to verify communication between the Wdyϰ outputs and the users’ readout equipment in a controlled fashion before final system installation. STATUS L1 OFF RA 12345.67 TO 0123456789 ANLG 20.00 : L2 OFF HZ PUL mA I/O Function > Test output ENT ENT (hold for 3 seconds) Adjust mA output? NO YES mA output menu YES EXIT Adjust Limit outputs? NO NO EXIT Back to STATUS screen YES Limit Output menu YES EXIT Monitor Reset input? NO NO EXIT Back to STATUS screen YES Reset Monitor screen YES EXIT NO EXIT Back to STATUS screen Figure 40: I/O adjustment top menu When entering the I/O programming mode from the STATUS screen, use the UP or DN button to change the I/O Function to ‘Test output’ as shown in Figure 40 above and press ENT. Next choose which I/O to change. Analog output adjustment The user can manually control the mA output to any value between 2mA to 20mA in one of two ways. Fine adjustment allows user to program a specific mA value to output. Coarse adjustment allows user to increment or decrement the mA value in 1mA steps using the UP and DN buttons. 31 Wdyϰ User Manual, Rev. 1.7 02/07/2012 Wdyϰ Flow Transmitter Operation and Programming Manual Fine mA adjustment Enter mA value to output > Fine adjustment Coarse adjustment SEL Output = 04.00 mA ENT Figure 41: Fine mA output adjustment screens When choosing the Fine adjustment option, the screen will appear which shows the active mA output value. Change this number to any desired value between 2mA and 20mA and when ENT button is pressed, the Wdyϰ will output this value. This also returns the screen to the adjustment type screen. Press SEL to see output value again and make new change. Coarse mA adjustment Fine adjustment > Coarse adjustment SEL Use UP/DN keys to change output in 1 mA increments Output = 04.00 mA EXIT Figure 42: Coarse mA output adjustment screens When choosing the Coarse adjustment option, the screen will appear where the mA output value can be changed. When pressing the UP button, the screen value (and mA output value) increments by 1mA, to a max of 20mA. When pressing the DN button, the screen value (and mA output value) decrements by 1mA to a min of 2mA. This is the fastest way to test the mA output range if no specific mA output value is required. Press the EXIT button to leave this mode. Limit & frequency adjustment The Limit and Frequency outputs can be manually controlled to change states simultaneously using one of 3 methods. The fine adjustment allows the user to enter a specific frequency to output between 2Hz to 4,500Hz. The coarse adjustment allows the user to output a frequency and change the rate in 25Hz increments using the UP and DN buttons. The ON/OFF adjustment allows the user individually toggle the output state between on and off using the UP, DN and SEL buttons. 32 Wdyϰ User Manual, Rev. 1.7 02/07/2012 Wdyϰ Flow Transmitter Operation and Programming Manual Fine limit output adjustment > Fine adjustment Coarse adjustment ON/OFF adjustment Enter frequency value to output SEL Output = 0500.00 Hz ENT Figure 43: Fine Limit adjustment screens When choosing the Fine adjustment option, the screen will appear which shows the active frequency output value on the Limit 1, Limit 2 and Frequency outputs. Change this number to any desired value between 2Hz and 4,500Hz and when ENT button is pressed, the Wdyϰ will output this value on the 3 outputs at the same time. This also returns the screen to the adjustment type screen. Press SEL to see output value again and make new change. Coarse limit output adjustment Fine adjustment > Coarse adjustment ON/OFF adjustment SEL Use UP/DN keys to change output in 25 Hz increments Output = 0500.00 Hz ENT Figure 44: Coarse Limit adjustment screens When choosing the Coarse adjustment option, the screen will appear where the frequency output value can be changed. When pressing the UP button, the screen value (and Hz output value) increments by 25Hz to a max of 4,500Hz. When pressing the DN button, the screen value (and Hz output value) decrements by 25Hz to a min of 2Hz. Press the EXIT button to leave this mode. ON/OFF Limit output adjustment Fine adjustment Coarse adjustment > ON/OFF adjustment SEL UP > LIMIT 1 = OFF DN > LIMIT 2 = OFF SEL > FREQUENCY = OFF EXIT Figure 45: ON/OFF Limit adjustment screens When choosing the ON/OFF adjustment option, the screen will appear showing the current state of each output pin. By pressing the UP, DN and SEL buttons, each associated output as shown in Figure 45 above will change the state. 33 Wdyϰ User Manual, Rev. 1.7 02/07/2012 Wdyϰ Flow Transmitter Operation and Programming Manual Monitor external reset input When choosing the Monitor Reset input option, if the external reset input will be used to reset the TOTAL value, this screen will show the current state of the pin as interpreted by the Wdyϰ firmware. Monitor Reset input? NO YES EXIT Reset input status YES Reset = OFF EXIT Figure 46: External Reset input monitor screens To monitor the current state of the external Reset pin, press the YES button from the Monitor Reset input screen. The screen that follows will show what the current state of the pin is. Using an external control signal, toggle the voltage level between high and low and monitor that the Wdyϰ also sees the change. 34 Wdyϰ User Manual, Rev. 1.7 02/07/2012 Wdyϰ Flow Transmitter Operation and Programming Manual Appendix A – Physical Dimensions Figure 47: Dual access model dimensions 35 Wdyϰ User Manual, Rev. 1.7 02/07/2012 Wdyϰ Flow Transmitter Operation and Programming Manual Figure 48: Single access model dimensions 36 Wdyϰ User Manual, Rev. 1.7 02/07/2012 Wdyϰ Flow Transmitter Operation and Programming Manual Appendix B – Default Variable Values Analog output 2mA (Fixed) Frequency output OFF Gate Time 1.0 Seconds GRAND TOTAL units GAL K-factor 1 Limit 1 OFF Limit 2 OFF Linearizer OFF RATE unit GAL RATE time base Minutes TOTAL GAL (always same as TOTAL units) 37 Wdyϰ User Manual, Rev. 1.7 02/07/2012 Wdyϰ Flow Transmitter Operation and Programming Manual Appendix C – Revision History Date Revision Change description Wdyϰ firmware version 02/07/12 Rev. 1.7 Initial release V 1.3.8 38 Wdyϰ User Manual, Rev. 1.7 02/07/2012 WARRANTY POLICY FLO-CORP (Flow Line Options Corp.) warrants to the original purchaser of its products that such products will be free from defects in material and workmanship under normal use and service for a period which is of twelve months from the date of purchase. This warranty covers only those components of the products which are non-moving and not subject to normal wear. Moreover, products which are modified or altered will not be covered under warranty. Flow Line Options obligation under this warranty is solely and exclusively limited to the repair or replacement, at Flow Line Options decision, of the products (or components thereof) which Flow Line Optionsʼ examination proves to its satisfaction to be defective. FLOW LINE OPTIONS SHALL HAVE NO OBLIGATION FOR CONSEQUENTIAL DAMAGES TO PERSONAL OR REAL PROPERTY, OR FOR INJURY TO ANY PERSON. This warranty does not apply to products which have been subject to electrical or chemical damage due to improper use, accident, negligence, abuse or misuse. Abuse shall be assumed when indicated by electrical damage to relays, reed switches or other components. The warranty does not apply to products which are damaged during shipment back to Flow Line Optionsʼ factory or designated service center or are returned without the original casing on the products. Moreover, this warranty becomes immediately null and void if anyone other than service personnel authorized by Flow Line Options attempts to repair the defective products. Products which are thought to be defective must be shipped prepaid and insured to Flow Line Optionsʼ factory or a designated service center (the identity and address of which will be provided upon request) within 30 days of the discovery of the defect. Such defective products must be accompanied by proof of the date of purchase. Flow Line Options further reserves the right to unilaterally waive this warranty and to dispose of any product returned to Flow Line Options where: a. There is evidence of a potentially hazardous material present with product. b. The product has remained unclaimed at Flow Line Options for longer than 30 days after dutifully requesting disposition of the product. THERE ARE NO WARRANTIES WHICH EXTEND BEYOND THE DESCRIPTION ON THE FACE OF THIS WARRANTY. This warranty and the obligations and liabilities of Flow Line Options under it are exclusive and instead of, and the original purchaser hereby waives, all other remedies, warranties, guarantees or liabilities, express or implied. EXCLUDED FROM THIS WARRANTY IS THE IMPLIED WARRANTY OF FITNESS OF THE PRODUCTS FOR A PARTICULAR PURPOSE OR USE AND THE IMPLIED WARRANTY OF MERCHANT ABILITY OF THE PRODUCTS. This warranty may not be extended, altered or varied except by a written instrument signed by a duly-authorized officer of Flow Line Options Corp.