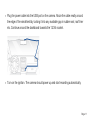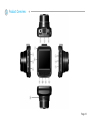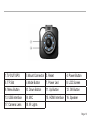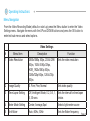
1
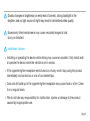
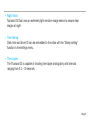
Page 1
Thank you for purchasing Tsumara G3
»» Motorcams Ltd retains all rights to this manual in accordance with copy right laws.
»» Motorcams Ltd will occasionally update the firmware for this product. All information and
specifications in this manual are subject to change without a prior notice.
»» In the event of an accident Motorcams Ltd do not take any responsibility for damages
(property, business and/or indirect damages).
Warranty and Disclaimer
»» We take no responsibility for accidental damage, injuries and other losses caused by
improper use of the product.
»» This product is a video event data recorder for vehicles but does not guarantee that all
accidents will be recorded.
»» This product creates a recorded video to help determine what happened before, during
and after a crash or event.
Contents
1.Safety Instructions . . . . . . . . . . . . . . . . . . . . . . . . . . . . . . . . . . . . . . . . .
2.What’s Included? . . . . . . . . . . . . . . . . . . . . . . . . . . . . . . . . . . . . . . . . . . .
3.Product Features . . . . . . . . . . . . . . . . . . . . . . . . . . . . . . . . . . . . . . . . . . .
4.Installing the Camera . . . . . . . . . . . . . . . . . . . . . . . . . . . . . . . . . . . . . . . . .
5.Product Overview . . . . . . . . . . . . . . . . . . . . . . . . . . . . . . . . . . . . . . . . . .
6.Operating Instructions . . . . . . . . . . . . . . . . . . . . . . . . . . . . . . . . . . . . . . . . .
•
•
•
•
•
4
7
8
10
12
14
Menu Navigation
Operating Modes
Connecting the Camera to a Computer
Charging
Reset
7. Troubleshooting . . . . . . . . . . . . . . . . . . . . . . . . . . . . . . . . . . . . . . . . . . . .
8. Specifications . . . . . . . . . . . . . . . . . . . . . . . . . . . . . . . . . . . . . . . . . . . .
20
21
1 Safety Instructions
This manual covers what should be done to protect the user’s safety and prevent
property damage. Please make sure to read these safety instructions before using
the product.
Do not disassemble, repair and/or alter the product.
This may cause a fire, an electric shock and/or malfunction. Contact the service
center if you need to have the product fixed. User may not be entitled to free
service if and when product malfunction is caused by user’s fault.
Do not install the product in a location where it obscures the driver’s view.
This may be in violation of The Road Traffic Act Regulation 79a
Do not operate the product while driving.
Use after stopping/parking your car in a safe place.
Do not wet the product.
This may cause a fire, an electric shock and/or malfunction.
Page 4
Drastic changes in brightness (on entry/exit of tunnels), strong backlight in the
daytime, and no light source at night may result in diminished video quality.
Excessively tinted windscreens may cause recorded images to look
blurry or distorted.
Installation Cautions
»» Installing or operating the device while driving may cause an accident. Only install and/
or operate the device while the vehicle is not in motion.
»» If the cigarette lighter receptacle emits fumes or a funny smell, stop using the product
immediately and contact us or one of our dealerships.
»» Dust and dirt build-up in the cigarette lighter receptacle may cause heat or a fire. Clean
it on a regular basis.
»» We do not take any responsibility for malfunction, injuries or damage to the product
caused by inappropriate use.
Page 5
Memory Card Cautions
»» Do not forcefully remove the SD card while the product is in recording mode. Be sure to turn off the camera before removing the SD card.
»» Formatting the SD Card Formatting the SD card on a regular basis can help prevent potential read-write errors
and corrupted files.
»» The maximum lifespan of a SD card is six months. We are not liable for any SD card errors after this period.
»» Be sure to back up your recorded videos using an additional storage device.
»» Format the SD card by using the camera’s format function found in the settings menu.
Select “YES” when prompted.
»» Always use SD cards recommended by our company. We are not responsible for any
issues caused by using an incompatible SD card.
Page 6
2 Whats Included?
Main Unit
Car Charger
Mount
USB-cable
GPS Mouse
»» Check to make sure all the components above are included.
»» Components may be changed without notice to improve product functionality and/or
quality.
»» Original Tsumara components are recommended. The use of third party components
may restrict warranty.
»» Tsumara G3 comes with a pre-installed 32GB memory card.
Page 7
3 Product Features
• Extreme HD Video:
The Tsumara G3 is capable of outputting video at 2304x1296p as well as
2560x1080p 21:9 super widescreen format for extremely clear video and broad
panoramas both day and night.
• G-Sensor:
When the camera detects gravity acceleration of 4G or more the current file will
automatically be saved and cannot be deleted by the Loop Record function.
• GPS:
GPS records speed and location. To play back video with GPS data please use the
“Registrator Viewer” application available here: http://dashcams.co.uk/downloads/
• USB/HDMI:
The camera connects to a computer via USB and to a TV/Monitor via HDMI.
Page 8
• Night Vision:
Tsumara G3 Dual uses an extremely light sensitive image sensor to ensure clear
images at night.
• Time Stamp:
Date, time and driver ID can be embedded in the video with the “Stamp setting”
function in the settings menu.
• Time Lapse:
The Tsumara G3 is capable of shooting time lapse photography with intervals
ranging from 0.2 – 30 seconds.
Page 9
4 Installing the Camera
»» We recommend installing the camera behind the rear view mirror to avoid obstructing
the driver’s view. »» Make sure the surface is clean and dry in the installation area. Remove the red film from the adhesive mount. Position the camera on the windshield with the lens pointing forwards and adjust the angle by rotating the camera body.
Page 10
»» Plug the power cable into the USB port on the camera. Route the cable neatly around
the edge of the windshield by tucking it into any available gap in rubber seal, roof liner
etc. Continue around the dashboard towards the 12/24v socket. »» Turn on the ignition. The camera should power up and start recording automatically.
Page 11
5 Product Overview
Page 12
1.TV-OUT/GPS
2. Mount Connector 3. Reset
4. Power Button
5. TF Slot
6. Mode Button
7. Power Led
8. LCD Screen
9. Menu Button
10. Down Button
11. Up Button
12. OK Button
13. USB interface
14. MIC
15. HDMI Interface
16. Speaker
17. Camera Lens
18. IR Lights
Page 13
6 Operating Instructions
Menu Navigation
From the Video Recording Mode (default on start up) press the Menu button to enter the Video
Settings menu. Navigate the menu with the UP and DOWN buttons and press the OK button to
enter/exit sub-menus and select options.
Video Settings
#
Menu Item
Description
Function
1
Video Resolution
2560x1080p 30fps, 2304x1296
30fps, 1920x1080p 30fps,
HDR_1920x1080p 30fps,
1280x720p 60fps, 1280x720p
30fps
Sets the video resolution
2
Image Quality
S. Fine, Fine, Normal
Sets video quality
3
Time Lapse Setting
Off, Intelligent Mode, 0.2, 0.5, 1,
5, 30 secs
Sets the interval for time lapse
photos
4
Meter Mode Setting
Center, Average,Spot
Selects light meter source
5
Anti-flicker
Auto, 60Hz, 50Hz
Sets the flicker frequency
Page 14
#
Menu Item
Description
Function
6
Stamp Setting
Date, Time Driver ID
Selects info to embed in veideo
7
Loop Record Function
Off, 1 , 3, 5 mins
The length of the file segments
8
ADAS Detect
Off N/A
Advanced Driver Assistance
System
9
ADAS Calibration
Off, Low, Medium, High
Adjusts ADAS sensitivity
10
G-sensor Setting
Off, Low, Medium, High
Adjust G-Sensor Sensitivity
11
Motion Detection
On, Off
Activates Motion Detection
feature
12
G-sensor
Off, Low, Medium, High
Adjusts G-Sensor Sensitivity
13
MIC
On, Off
Enables Audio Recording
15
Park Mode
On, Off
Activates Parking Mode
Page 15
General Settings
#
Menu Item
Description
English, French, German,
Czech, Dutch, Polish, Russian,
Japanese, Chinese
Function
1
Language Setting
Selects OS language
2
Card Volume
3
System Mode
4
Driver ID Setting
Sets Unique ID for operator
5
Time Setup
Sets the system time
6
Format
Formats the SD card
7
Default Setting
8
Auto Power Off
Off, 1, 3, 5 mins
Sets auto off interval
9
Backlight Off
Off, 1, 3, 5 mins
Sets delay before screen turns
off
10
Delay Power Off
Off, 15, 30 secs, 1 min
Sets Off delay time
Displays SD card info
NTSC, PAL
Selects TV system
Resets unit to factory default
Page 16
#
Menu Item
Description
Function
11
Night Light
On, Off
Activates the IR leds
12
GPS
On, Off
Activates GPS module
13
Beep Sound Setting
On, Off
Turns system sound on/off
14
Version Info
Displays current FW version
Operating Modes
1. Video Mode
The camera defaults to Video Mode when switched on manually or connected to the car
charger and will start recording automatically. Press the OK button to start/stop recording
manually. A flashing red icon at the top of the screen and a flashing blue led indicator on the
camera body indicates that the camera is recording. When the camera is connected to the
12/24V car charger it will shut off automatically after you turn off the ignition or unplug the
charger.
Page 17
Emergency Function >
While in record mode click the the Menu button once to manually “protect” a file from being
overwritten by the Loop Record function.
Audio Recording >
- Use the UP button to toggle the Microphone on/off
Night Lights >
- Use the DOWN button to switch the Night Lights on/off
2. Photo Mode
- From video mode (default) click the Mode button once to enter Photo Mode
- Press the OK button to take a still photo.
- Press the Menu button to access the photo settings menu
3. Media Mode
- From Video Mode (default) click the Mode button twice to enter Media Mode
- From Photo Mode (default) click the Mode button once to enter Media Mode
Page 18
- Use the the UP/DOWN buttons to navigate video and photo files.
- Select a file by pressing the OK button. Press OK again to start/ pause video or view photos
- Press the Menu button to access the Media Mode specific settings menu where you can
delete a file or all files and select playback options.
4. Connecting the Camera to a Computer
Connect the camera to your PC with the USB cable. The camera will connect as a standard
media device. Go to My Computer->Removable disk->Normal where you will find all the files
currently on the memory card. The files protected with the Emergency Save function are stored
in the Event folder.
5. Charging
When attached to the car charger the camera will charge the battery while operating normally.
The camera will also charge the battery when connected to a computer via USB. 6. Reset
If you need to Reset the unit you can do so by using a thin objet to push down the Reset
button located on the top of the camera body (3)
Page 19
7 Troubleshooting
Unable to record video or take stills
The memory card may be full and require formatting. Format the card from settings menu.
The camera stops recording
Your memory card might be incompatible with the camera. Make sure you are using a good
quality micro SD card class 10.
Files are corrupted/unreadable
Format the memory card from the settings menu.
Unclear video
Make sure the camera lens is clean. Wipe with microfibre lens cloth.
Page 20
8
Specifications
Video Resoloution
2560x1080, 2304x1296 , 1920x1080p,
1280x720p
Viewing Angle
170°
Screen
2.0″LCD(TXD)/16:9/960*240
Video Format
.mp4
Storage
Supports Micro SDXC/SDHC Class10 Max
64GB
Connectivity
USB / HDMI
AV/HDMI/out
NTSC/PAL
GPS
External GPS mouse
Dimensions
53mm(L)x54.5mm(W)x16mm(H)
Page 21
Motorcams Ltd >> UK Headquarters
Address:
Unit D, 28 High Street, Hampton Hill, Middlesex TW12 1PD,
UK
Web:
www.tsumara.co.uk
E-mail:
[email protected]
Conformité Eurpéene
(European Communities; EC)
EU Joint Standard Certifica-
Federal Communications Commision
Electromagnetic Wave Suitability
Page 23