1
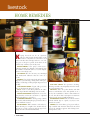
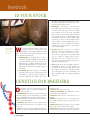
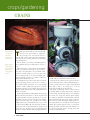
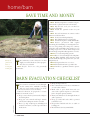
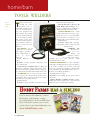
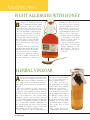
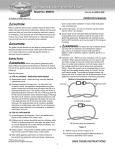
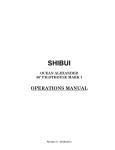
(-$G8>< =I<< 9FELJ >L@;<
%33%.4)!, 4)03 &/2
,)6 % 34/ #+
" ! 2 .
# 2 / 03
+ ) 4 # ( % .
livestock
HOME REMEDIES
Feed store fixes
Medicine
cabinet fixes
2 HOBBY FARMS
Kitchen cures
PHOTOS BY KAREN K. ACEVEDO
K
eeping livestock can be an expensive
endeavor, but keeping them healthy can be
even more costly. Here are some time-tested
home remedies that can help your horse, cow, rabbit, goat or sheep in a pinch; all of them can be
found easily—and most you already own!
RESCUE REMEDY: A few sprays of this stressreducing formula (for humans and animals) into
the animal’s mouth will calm it so it can be helped.
(www.rescueremedy.com)
TEA TREE OIL: The oil is an anti-yeast, antifungal
and antibacterial substance that also comes as a
cream.
OATMEAL: Uncooked oatmeal aids in keeping the
digestive system moving, cutting down on the possibility of a blockage and keeping the digestive tract
healthy.
LIVE-CULTURE YOGURT: Yogurt adds good, live
bacteria back into the digestive system.
GAS-X: Used to treat bloat problems in ruminants (Pepto Bismol and baking soda also work).
PEDIALYTE/GATORADE: Dehydration can accompany diarrhea and needs attention to replenish
fluids and rebalance electrolytes.
HYDROGEN PEROXIDE: A dosing syringe (minus
the needle) filled with hydrogen peroxide works to
clean and flush a wound.
NUTRI-DRENCH: With vitamins and molasses,
Nutri-drench goes straight to the animal’s bloodstream in seconds, raising its blood sugar level.
(http://bovidr.com/nutridrench.html)
ALOE HEAL CREAM: Aloe promotes healing,
allowing a wound to mend quickly from the inside
out. (www.farnam.com)
MOLASSES: Fill a five-gallon bucket with half
molasses and half hot water and sprinkle it on a
five-by-five roundbale to enhance rumen function
in cows; this allows better absorption of nutrients
and increased energy for milk production.
DIATOMACEOUS EARTH: The fossilized remains
of hard-shelled algae is a quick, easy way to treat
animals for worms.
PROBIOS: Live microbiotic gel is given orally to
help establish and maintain beneficial intestinal
bacteria. It stimulates appetite and aids digestion.
(www.probios.com)
livestock
PHOTOS BY JULIE WALKER
HAND MILKING 101
Left: Examine
the first few
squirts of milk
for strings,
lumps or a
watery consistency that
might indicate
mastitis.
Right: When
finished milking, dip teats
in a fresh antibacterial
solution.
M
any hobby farmers dream big; they want
their own goat-milk soap company, their
own Grade-A dairy to produce artisan
cheeses or even the ability to sell raw milk right off
their farm. This all begins with milking! Some
farmers may have to milk their animals out of
necessity: the loss of a lamb, calf, foal or kid.
Whatever the reason, it’s beneficial to have at least
a basic working knowledge of how to milk animals.
Hand milking is a team effort between you and
the animal. When the milker preps his animal by
washing her udder, the hypothalamus in her brain
signals her posterior pituitary gland to release oxytocin into her bloodstream, causing tiny muscles
around those milk-holding alveoli to contract. In
other words, she “lets down her milk.”
Milk letdown lasts five to eight minutes and
milking must be completed during that time. It is
imperative to provide a quiet atmosphere for milk
letdown; if the animal becomes excited, frightened
or experiences pain, her adrenal gland secretes
adrenaline, which constricts blood vessels and capillaries in her udder and blocks the flow of oxytocin
needed for effective milk letdown.
Whatever the species, the same, basic handmilking protocol applies. Let’s imagine you’re
milking a goat. You will need:
✓ Squeaky-clean hands with short fingernails
✓ A recently sterilized, seamless, stainless steel
milking pail
✓ Udder wash and paper towels
✓ Teat dip and a teat dip cup or a pair of dispos-
3 HOBBY FARMS
able, 3-ounce paper cups
✓ A strip cup with a dark, perforated insert
✓ A sturdy milking stand set up against a wall in
your milking area with grain waiting in the
feed cup
STEP 1 Lead the doe to the milking stand, ask her
to hop up and secure her head in the stanchion.
STEP 2 Wash her udder using your favorite prepping product. Dry each half using a paper towel,
then massage her udder for 30 seconds to facilitate
milk letdown.
STEP 3 Squirt the first few streams of milk from
each teat into your strip cup and examine it for
strings, lumps or a watery consistency that might
indicate mastitis.
STEP 4 Place milking pail slightly in front of the
goat’s udder, sit down and grasp a teat in each hand.
STEP 5 Trap milk in each teat by wrapping your
thumb and forefinger around its base. Squeeze with
your middle finger, then your ring finger and then
your pinky, in one smooth, successive motion to
force out milk trapped in the teat cistern into your
pail (never, ever pull on her teats). Relax your grip
to allow the cistern to refill and do it again.
Alternate squeezing one teat while the other refills.
STEP 6 Gently bump or massage the goat’s udder
to encourage additional milk letdown as the teats
deflate and become increasingly more flaccid. Don’t
finish by stripping the teats between your thumb and
first two fingers; this hurts and annoys the goat.
STEP 7 Pour enough teat dip into the teat cup (or
paper cups) to dip each teat in fresh solution and
allow the teats to air dry.
livestock
KIM & KARI BAKER
ID YOUR STOCK
A freeze brand
is an effective
way to identify
your stock.
W
e’ve all heard horror stories of the cows
getting out, horses being stolen, dogs
getting lost or sheep playing Houdini. Cut
down on the chances of losing your livestock with
these identification methods.
✓ FREEZE BRAND: A relatively painless, easy-toread freeze brand is a highly effective method
of animal identification. Freeze brands are
applied using a cold iron, which destroys the
cells in the skin that produce color in the hair.
The hair grows back white and in the image of
the brand.
✓ HOT BRAND: Once the only type of branding
performed on livestock, the hot brand is still
used on horses, cattle, sheep, pigs and goats. A
hot iron is applied to the animal’s face, neck,
shoulder or rump. The heat from the iron kills
the hair-producing cells and hair does not
grow back in the affected area.
✓ MICROCHIP:
Electronic
identification
microchips have been used by cat and dog
owners for some time now, and are becoming
more widely used on livestock, including
horses, alpacas, cattle, sheep, pigs and goats.
A veterinarian injects a tiny computer chip
into a ligament at the base of the animal’s neck
(injection site varies in food animals). Each
chip contains a unique number that corresponds to the owner’s information, which is
maintained electronically by a microchipregistering company.
✓ TATTOO: Lip and ear tattoos are another
method of livestock identification. Owners
who choose to tattoo their horses, cows,
sheep, goats or pigs on the ear or inside the lip
can use whatever symbols they prefer,
although some states—and breed associations—have livestock identification programs
with rules regarding tattoos.
✓ TAGS: Cattle, sheep, goats and pigs can also be
marked with ear tags or leg tags. Poultry can
be tagged on the leg or wing. Made from
nylon, plastic or metal, these tags may contain
any information you wish, including your
phone number, address or other identifying
characters.
GENETICS FOR BREEDERS
D
on’t know your genes from your jeans? No
problem. Here’s a short vocabulary list to
get you started:
CHROMOSOME: The rod-like structures within the
cell nucleus where genetic information is encoded;
consists of DNA molecules coiled around proteins.
DNA: The double-stranded molecule in cells that
carries genetic information.
DOMINANT: This form of a gene always shows
itself in the next generation, even if only one copy
passes on.
GENE: The basic unit of heredity within cells; it
consists of a segment of DNA or RNA located along
4 HOBBY FARMS
the chromosome.
GENETICS: The study of heredity.
GENETICIC VARIATION: The difference in the
genetic make-up of organisms.
GENOTYPE: The genetic constitution of an
organism.
HEREDITY: The way traits (i.e., coat/feather color
or wool-fiber diameter) pass from generation to
generation.
PHENOTYPE: The physical expression, or visible
characteristics, of an organism’s genotype.
RECESSIVE: This form of gene only shows itself in
the next generation when two copies are passed on.
livestock
TRAILERS FOR MOVING
Compact Goat Gopher
O
ut here, trailers need to haul everything
from cattle, hay and tools to tractors, split
wood and produce. Find out which trailer
best suits your needs.
✓ SLIDE-IN TOPPERS are small, metal-and-wire
cages that slide onto a trailer or in the back of
a truck for moving small livestock, like the
Alum-Line Popper (at right) or the Goat
Gopher, above. These trailers are great for
moving smaller livestock when a full-sized
trailer is unnecessary.
Alum-Line Popper
✓ UTILITY TRAILERS are flat trailers without walls
that hitch to the back of the vehicle for hauling
equipment and materials. These trailers are the
perfect solution for transporting goods that may
be to bulky too fit in a covered trailer. They’re
much easier to load then the back of a pickup.
✓ STOCK TRAILERS are covered trailers that hitch
to the back of the vehicle for hauling livestock
and other farm-related cargos. These trailers
have an open design with no dividers to separate livestock or cargo. They’re perfect for get5 HOBBY FARMS
ting that load of hay in even when it rains!
✓ HORSE TRAILERS are designed specifically for
the needs of horses; these covered trailers
with dividers can carry horses, tack, hay and
more. Horse trailers come in a vast array of
styles, from the most simplistic that holds
only one horse to large, fancy affairs that must
be hauled with a semi and can hold upwards of
12 horses.
crops/gardening
CROPS TO CONSIDER
O
ne of the benefits of living off the land is the
ability to grow the majority of what you eat.
Check out these veggie varieties that can
enhance your summer dinner table (These varieties
are natural climbers and benefit from trellising):
Tomatoes
✓ HONEY GRAPE: Delicious, bite-sized fruit.
✓ SUPER SIOUX: Mid-sized, 4- to 6-ounce fruit
produces well until a hard freeze.
✓ RUTGERS: This 5- to 7-ounce tomato is excellent for canning.
✓ BIG BOY: These tasty, crack-resistant tomatoes
can reach one pound.
✓ BRANDYWINE: This is a 10- to 16-ounce
favorite with lots of flavor.
✓ EARLY GIRL: Popular, early maturing variety
with 4- to 5-ounce fruit.
Pole Beans
✓ KENTUCKY WONDER: 6- to 8- foot long vines;
long-time favorite.
✓ BLACK-SEEDED BLUE LAKE: 6- to 8-foot long
vines; stringless and vigorous grower known
for excellent flavor.
✓ KENTUCKY BLUE POLE: 6- to 8-foot long vines;
a hybrid of Kentucky Wonder and Blue Lake.
✓ SCARLET RUNNER: 8- to 12-foot long vines;
crimson-red flowers are edible, as well as the
beans themselves. Scarlet Runners are ideal
for kids’ forts.
Peas
✓ SUGAR SNAP: 4- to 5-foot long vines; longtime favorite of sweet, early peas.
6 HOBBY FARMS
✓ TALL TELEPHONE: Up to 6-foot long vines;
great for canning and freezing, as well as eating out of the garden.
Melons
✓ MOON AND STARS WATERMELON: Unique
looking, 25- to 30-pound watermelon with
dark pink flesh.
✓ SUGAR BABY WATERMELON: 6- to 10-pound.
fruit.
✓ BLENHEIM ORANGE MUSKMELON: 2-pound
melons that mature early.
Cucumbers
✓ MARKETMORE 76: 8- to 9-inch slicer.
✓ ARMENIAN: Looks like a cross between a
cucumber and a melon; it’s best eaten when
it’s around 12 inches long.
Squash and Pumpkins
✓ JACK-BE-LITTLE PUMPKIN: More ornamental
than edible, but cute as a button.
✓ PATTY PAN SQUASH: The saucer-shaped
squash is a prolific producer.
✓ ZUCCHINI JACKPOT HYBRID: Early summer
squash starts producing in approximately 50
days.
crops/gardening
NO-TILL
Mulch is the
magic bullet in
no-till
gardening.
AMY GRISAK
N
o-till gardens can help save your back and
the soil you plant in. Discover the benefits
of farming “the lazy way.”
Planning a no-till garden starts like planning a
traditional garden. Sketch out a rough map of
where crops should go based on the previous years’
location, and devise an estimated planting and
harvesting schedule to anticipate the seasonsuccessive planting time frame. Leave enough
room in the walkway to kneel between mature
plants and to push a wheelbarrow without crushing
stems or vines by using 12-inch planting rows bordered by at least a 36-inch walking space, or 30inch rows and 18-inch pathways. This also keeps
the planting beds from becoming packed down.
Regardless of the method, mulch is the magic bullet in no-till gardening. The pathways are critical,
as well. First line them with cardboard or several
layers of newspaper, then pile on grass clippings,
leaves or old straw. The straw comes apart in flakes,
making it easy to layer like golden pavers. If barley
or oats sprout from it, they are easy to pull and add
back to the garden. Normally, one layer of straw
will last the entire season, making a soft, mud-free
path that’s easy on the knees.
Be sure not to plant the same family of plants in
the same area during consecutive years. A three-
year rotation is the best bet to minimize potential
disease and keep plant-specific insects from knowing exactly where to find the tastiest cabbage, potatoes, tomatoes and other garden favorites.
SAVING TOMATO SEEDS
L
ove the Brandywine, Amish Paste or Oxheart
tomatoes you grew this summer? Save
money next year by learning how
to save your own seeds! It isn’t
tough, but it can be a bit messy.
STEP 1 Squeeze out the jelly-like
substance containing the seeds from
the cavity of the ripest tomatoes from
the best plants. Add 1⁄4-cup of water,
put in a dish and cover loosely.
STEP 2 Ferment for three to four
days in a warm place, stirring once a
day.
STEP 3 Pour off liquefied pulp
and floating seeds, retaining the
seeds that have sunk to the bottom.
7 HOBBY FARMS
STEP 4 Place these seeds in a dish and
dry for three to seven days.
STEP 5 Label and store in a tightly
sealed, glass container in a cool place.
Heat and moisture are the worst enemies of stored seeds.
For a complete seed-saving guide
that describes specific techniques for
saving the seeds of 160 different vegetables, purchase Seed to Seed, Second
Edition, by Suzanne Ashworth. This
book can be ordered from Seed
Savers Exchange at www.seed
savers.org or by calling (563) 3825990. Seed Savers is located in
Decorah, Iowa.
crops/gardening
GRAINS
Right: A handoperated grain
mill will grind
grain into a
useable grade
of flour.
T
hink your homemade bread could benefit
from an even more hands-on approach?
Try growing your own grains! There’s
nothing like sowing, harvesting and winnowing
your own grains to make delicious, homemade
bread and pastries.
Wheat, barley, oats and rye should be planted
in ground that has been cultivated for at least a
year.
While full sun is a prerequisite for maximum
yields, cereal grains tolerate poor soils, low moisture and cool temperatures. As you till the land,
work in as much compost as you can spare and
lime if indicated by a soil test kit. Tilling just
before planting guarantees a fluffy seedbed in
which to broadcast your seeds.
A sicklebar mower is the tool of choice for smallgrain harvesting, but you can also use a scythe—a
two-handed knife mounted on a long handle
(called a “snath”). With a bit of practice, you’ll be
swinging it in large arcs parallel to the ground, cutting the stalks at their base and laying them down
flat in a neat pile.
Gather up a bundle of stalks with the heads facing
in the same direction (this is a “sheaf” of grain) and
tie them together near the top with a piece of stem.
Stick three or more sheaves into the crop stubble,
grain toward the sky, and carefully start stacking
additional sheaves around them, like a teepee; this
is called a shock. When the shock is large enough to
wrap your arms around, bind them together and
start a new one. At this point, you can bring them
inside to continue drying—either hung upside down
8 HOBBY FARMS
LEFT: CHARLES CAPALDI, RIGHT: COURTESY LEHMANS
Left:Homemad
e bread made
with homegrown grains
can’t be beat!
from the rafters or shocked on the barn floor.
No matter how you harvest, the grain needs to be
separated from the layer of bran and husk that protect it. Lay out the sheaves on a large tarp and pound
them with a flail—a foot-long piece of wood
attached to a handle by a leather thong.
The stalks (technically “straw”) can be used for
livestock bedding or mulch. The grain is collected
for winnowing, something best done on a windy day
or in front of a strong fan. Put the grain and the
loose hulls (or chaff) that surround it into a shallow
basket. Flip the basket up so the grain is airborne
and catch it as it falls. The lighter chaff will be carried away by the breeze, leaving the winnowed grain
behind. The winnowed grain can be scooped into
burlap bags. Make sure that it has dried down to 10
to 15 percent moisture before storing; grain that
isn’t dry enough will mold.
crops/gardening
TOOLS: WEED CONTROL
Rocket Weeder
Echo C.A.R.B. SRM-210i
Weed Dragon
W
eeding may not be the most exciting summertime chore, but it’s one that can
quickly get out of hand if neglected.
Reclaim your garden with these helpful tools.
✓ ORGANIC MULCH helps stop erosion, halts
weed growth, moderates soil temperature and
moisture, keeps fruits and vegetables clean,
and nourishes the soil as it decomposes.
Organic mulches include straw or weed-free
hay; wood chips; and shredded bark, leaves or
newspaper. Be sure you know where your
mulch comes from so you don’t accidentally
sow your fields with weeds!
✓ STRING TRIMMERS are a quick, temporary fix
that cut weeds off at ground level. Trimmers
come with two- and four-cycle engines. Twocycle engines burn a mix of gasoline and oil;
four-cycle engines run on gasoline.
✓ MANUAL WEEDERS are a low-tech mode of
weeding that use tools ranging from the most
basic hoes to combination models that cultivate, rake, pull and dig.
✓ ORGANIC HERBICIDES kill or inhibit the
growth of weeds safely and effectively. Most
organic herbicides require at least two
applications.
✓ FLAME WEEDERS are an easy and effective way
to remove weeds on a large scale. Flame weeding destroys the plant’s cell structure.
✓ NATURAL WEEDERS are specific breeds of livestock, such as particular breeds of sheep,
geese or goats, that prefer to browse on tough
weeds. All three species require company
(multiple animals), adequate fencing, predator protection, shelter, water and supplementary feed.
HOT OFF THE P R E S S E S !
Check out the newest titles from our Popular
Farming Series: Organic Farm and Heirloom
Farm. You can order them by calling (800)
PET-BOOK or by logging on to
www.shopanimalnetwork.com
Get your copy today!
9 HOBBY FARMS
home/barn
SOAP
Homemade
soap is not difficult to make,
but steps must
be followed
precisely.
H
omemade soap is not difficult to make and
is a delightful treat for birthdays, holidays
or those special overnight guests. Make
some today!
Select a mold that’s large enough for approximately 8 pounds of soap and line it. Set on newspaper. Put on safety glasses and rubber gloves.
Measure 12 ounces of lye into the 2-cup measuring
cup.
Measure cold water into the 4-quart steel pot.
Slowly stir lye into the water. Use caution—the lye
will heat the water to boiling and cause fumes for a
few minutes. This is your lye/water solution. Set it
aside to cool down to 95 degrees F.
Now add the oils into your soap kettle and slowly
heat to 100 degrees F.
Once the correct temperatures have been
reached for both the lye/water solution and the oils,
it’s time to blend them together.
Pour the lye/water solution into the melted oils.
Stir slowly, steadily and constantly with a stainless
steel or wooden spoon. The mixture will need to be
stirred for 25 to 45 minutes or more. Do not leave
unattended. As the liquid begins to saponify, you’ll
witness the true magic of soapmaking. Pay attention
Country
Oatmeal Soap
■ 2-cup measuring cup
■ 4-quart steel pot
GUSTAV STUDIO
■ 2 large, stainless steel or wooden
INGREDIENTS:
■ 32 oz. coconut oil
■ 16 oz. palm oil
■ 17 oz. virgin olive oil
■ 12 oz. almond oil
■ 8 oz. caster oil
■ 32 oz. soft water
■ 12 oz. sodium hydroxide (lye)
■ 1⁄3 cup ground oatmeal
■ 2 tsp cinnamon
■ 3 T. cinnamon essential oil or
fragrance
■ 1 T. orange oil or fragrance
TOOLS:
■ 12-quart stainless steel pot (soap
kettle)
10 HOBBY FARMS
■
■
■
■
■
■
■
■
■
■
■
■
■
■
spoons
2 large, flexible spatulas
Whisk
Measuring cups
Measuring spoons
Soap mold, lined
Mold liner, plastic or bakery paper
Cutting tool
Safety glasses
Waterproof latex or rubber gloves
Digital scale
Candy thermometer
Blender
Paper towels
Lined trash can
to the consistency of the liquid; it will start to thicken as the oils and the lye/water solution bind
together. Eventually it will resemble thin pudding.
Once it does, it will have achieved the “trace” stage.
This is when you can drizzle spoon contents onto
the surface of the liquid mass and see the trace of it
on the surface. The mixture will not completely
drop off the mixing spoon.
Separate approximately one-third of the mixture
into the pot used for the lye/water solution, add the
cinnamon and fragrance to it and mix well. Pour the
uncolored soap mixture into the mold, then slowly
pour the colored mixture into the uncolored soap,
swirling it in a thin stream.
Do not mix or stir. This will create a beautiful
marbling effect throughout the bars.
Once the soap is poured into the mold, cover the
mold and allow the soap to finish saponifying for at
least 24 hours.
When the soap is 24 to 36 hours old, it will be
time to remove it from the mold and cut it into bars.
Do not wait—this is best done as early as possible.
Ideally, cutting the soap should feel like cutting
fresh fudge—fairly easy to slice. If you made soap in
a block, decide in advance how you want to measure
the bars. The tool you use to cut the soap should
slice through the entire length or width to prevent
cracking. Position your cutting tool and slice
straight down in one cut.
Stack the bars to cure for at least six weeks in a
dry area.
home/barn
SAVE TIME AND MONEY
TIP #2: Mulch your garden to control weeds, pro-
T
ime and money seem to always be in short
supply on a farm. Check out some tips guaranteed to save you both!
TIP #1: Recycle and re-use old, potentially
useful items.
Mulch your
garden to cut
down on
weeding and
watering ime.
vide nutrients to plants and retain soil moisture.
TIP #3: Buy the best tools you can afford so
they’ll last a long time.
TIP #4: Install the optimal feeder for your
animals.
TIP #5: Research and invest in cement or other
substrate for the barn floor.
TIP #6: Feed your animals quality hay.
TIP #7: Buy in bulk and store feed properly.
TIP #8: Install fencing that’s sturdy and durable.
TIP #9: Practice prevention with regular
deworming, hoof trimming, vaccinating and veterinary care. Keep living and eating areas sanitary:
Lining the stalls with rubber mats makes for easy
cleaning, keeps horses off the mud and prevents
them from ingesting unhealthy quantities of sand.
TIP #10: Use rotational grazing systems.
TIP #11: Choose self-sustaining breeds and plants.
TIP #12: When building farm structures from
scratch, think through your goals before you start
and plan ahead.
TIP #13: Design facilities for ease of use.
TIP #14: Find and learn from a good breeder.
TIP #15: Purchase a guardian animal to protect
livestock.
BARN EVACUATION CHECKLIST
KAREN K. ACEVEDO
T
he reasons for evacuation can vary throughout the country: fires, mudslides, flooding
and even severe winter weather can all be
reasons for you to have to leave in a hurry.
If disaster threatens, be prepared to evacuate
animals at a moment’s notice:
✓ Keep a contact list for your network of helpers
beside the phone
✓ Keep pets crate-trained and larger animals
schooled on loading into trailers or trucks
✓ Have a “go-bag” ready for pets, including food
and water containers, as well as special food or
medications
11 HOBBY FARMS
✓ Bring small pets indoors
✓ Have identification and contact information
on each collar or halter
✓ Mark stalls or pens—both front and rear
exits—with a splotch of paint or colored ribbon to designate priority animals
✓ Train your animals to leave through all exits of
stalls or pastures
✓ Keep gas tanks full and vehicles pointed
toward the road
✓ Keep trailers hitched and close to stable or
loading pens
✓ Decide what to do if any animal balks
home/barn
FIRST AID KIT
U
nfortunately, accidents are a part of life on a
farm, whether they be relatively minor
(Bessie twisted her ankle running in for
evening feed) or pretty major (Lassie got a bit too
close to a porcupine and the quills are in deep).
Having a comprehensive first-aid kit on hand can
save precious time when tending a sick animal and
can help save money on non-essential vet calls.
Here are some basic staples to keep in your kit
that are applicable no matter what livestock you
keep:
❑ Small, digital rectal thermometer
❑ Veterinary lubricant
❑ Halter and lead ropes or other appropriate
restraint devices
❑ Hobbles and/or twitch (for horses)
❑ Premoistened towelettes
❑ Cotton roll
❑ Sterile saline solution
❑ Isopropyl alcohol
❑ Novalsan disinfectant
❑ Two empty (generic) spray bottles
❑ Fly spray repellent/wound treatment
❑ Nutritional and/or anti-scour drench in
pump bottle
❑ Disposable syringes in 3, 6, 12 and 60 ccs
12 HOBBY FARMS
❑ Six, 1⁄2” x 18 gauge sterile, disposable needles
❑ Six, 3⁄4” x 18 gauge sterile, disposable needles
❑ Two, 3⁄4” x 16 gauge sterile, disposable needles
❑ Intravenous (IV) unit
❑ Gauze rolls
❑ One package sterile gauze pads
❑ Two, 2” gauze bandages
❑ Two rolls of elastic tape
❑ Dose syringe
❑ Balling gun and/or pill forceps
❑ Dehorning tools (if applicable)
❑ Electrolytes for newborns
❑ Milk replacer for orphaned newborns
❑ Bottle(s) and appropriate nipples for milk
replacer
❑ Antibiotic ointment or salve
❑ Optical antibacterial ointment or dust
❑ Blood stopper (i.e., hemodust)
❑ Mineral oil
❑ One propylene glycol
❑ Udder infusion antibiotic
❑ Two or more pairs of disposable, sterile
surgical gloves
❑ One pair of stainless steel, veterinary surgical
scissors
❑ One each of veterinary forceps and hemostat
❑ Injectable antibiotics
❑ Topical antibiotics (aerosol)
❑ Obstetrical pullers
❑ Stomach tubes
❑ Bloat medicine
❑ Hoof trimming shears
❑ Hoof knife and hoof pick (for horses)
❑ Hair and/or wool trimming shears (electrical
and/or manual)
❑ Adequate supply of obstetrical gloves for the
birthing season
❑ Tincture of iodine (7%)
❑ Iodine spray (1%)
❑ Heat lamp (for lambs, goat kids and piglets)
❑ Notebook and ballpoint pen
home/barn
TOOLS: WELDERS
Hobart
Stickmate
LX 235
T
hings tend to break
around the farm.
Knowing how to
weld and having the proper
tools are essential in getting your equipment up
and running, preventing
your cows from wandering
to the next field or fixing
that trailer for the next
load of hay. Check out this
list of welders to find one
right for your farm and
skill level.
GAS WELDERS use the
combustion of acetylene
with oxygen to produce
flame temperatures of
4,000
to
6,000
degrees F.
Level: Beginner to
expert
Benefits: versatile, portable, inexpensive and
easy learning curve
Acetylene Tag-A-Long Kit Features: welding and
cutting tips, regulators, oxygen and acetylene cylinders, hose, check valves cylinder wrench, safety goggles and operation manual (www.hobartwelders.com)
STICK WELDERS use an electric current to strike
an arc between the material being welded and a
consumable, flux-covered, steel electrode rod that,
as it melts, becomes filler material.
Level: Beginner
Benefits: versatile, portable, inexpensive equip-
ment and easy learning curve
Lincoln Electric’s AC-225 AC
Stick Welder Kit Features: electrodes, welding helmet and Welder’s
Guide (www.lincolnelectric.com)
STICK/TIG WELDERS have a stick
welder with tungsten inert gas capability that uses a nonconsumable
electrode made of tungsten, a gas
mixture and a separate filler material.
Level: Expert
Benefits: lightweight, portable,
high-quality welds, works well with
thin materials
TIGMATE
Kit
Features:
electrode
holder, gas
regulator, amperage control, flow meter,
shielding gas hose and “How-To” DVD
(www.hobartwelders.com)
MIG/FLUX-CORE WELDERS use wire continually
fed through a welding gun from a spool or drum as
an electrode to complete the electrical circuit and
an inert or semi-inert gas mixture to shield welds
from contamination. Most MIG welders also feature flux-core welding capabilities.
Level: Beginner to expert
Benefits: faster welding speeds, greater metal
penetration
Hobart’s Handler 125 EZ Kit Features: welder,
welding gun and tips, work cables, spool shaft and
sample wire, power cord and user’s manual.
Hobby Farms has a sibling
If you’re interested in farmhouse activities
like knitting, candlemaking, cooking,
decorating and more, check out Hobby Farm
Home! Look for the current issue on newsstands or buy a copy at www.hobbyfarms.com
www.hobbyfarms.com
13 HOBBY FARMS
food/kitchen
HOW TO MAKE YOGURT
H
Heat the milk to 185 degrees F, then let it cool to
about 115 degrees F. Put the fresh yogurt culture in
the bowl and slowly add the warm milk to it. The
temperature of the combined ingredients needs to
be about 110 degrees. Once all of the milk has been
added, stir gently with a clean, wooden spoon. Next,
ladle the warm, cultured milk into either a gallon
glass jar with a rim and lid or several smaller canning jars with rims and lids.
Place the jar or jars in the appropriate-sized
cooler and fill the cooler with warm (about 120
ADRIANNE L. SHTOP
ave extra milk on your farm and don’t know
what to do with it? Try making homemade
yogurt! The possibilities of tasty additions
are endless: Make some today!
Yogurt is created from bacterial fermentation of
the milk sugar called lactose. The process releases
lactic acid that thickens the milk, gives it a sour
taste and hinders the growth of bad organisms.
To make your own yogurt, you’ll need:
✓ A food thermometer marking temperatures of
0 to 200 degrees F
✓ 1 cup of plain, fresh, pasteurized commercial
yogurt with “active” bacterial cultures or one
freezedried packet of yogurt culture
✓ 1 gallon of milk
✓ An insulated cooler
✓ A sterilized, 1-gallon glass jar or several
smaller sterilized canning jars with rims and
lids
✓ A large glass or ceramic bowl
✓ A wooden spoon
degrees F) tap water. Since the cooler itself is cool,
the temperature will drop to about 110 to 112
degrees F. Close the lid and set the cooler aside. Let
the bacteria do its thing for the next 10 to 16 hours.
The warm water-bath method has worked consistently. Other options are to keep the cultured milk
warm with a light in the oven or on a heating pad.
When the mixture has thickened, remove the jars
from the cooler and pop them into the refrigerator.
Be sure to pull a cupful of the yogurt to start your
next batch.
DRINK NIGHT: BEE’S KISS
I
t’s a fair bet that any drink with the name “bee” in
the title is bound to incorporate a drizzle of honey.
In the case of this pre-Prohibition cocktail, the
name has a flirtatious meaning as well: A “bee’s kiss”
was the term for the fluttering of the eyelashes
against the cheeks, lips or nose of one’s beloved.
Ingredients:
✓ 2 oz. gold rum (or two-thirds gold and onethird dark rum)
✓ 1 oz. cream
14 HOBBY FARMS
✓ 2 tsp. honey
Place ingredients in a cocktail shaker with
cracked ice. Shake and strain into a chilled cocktail
glass. If desired, dust with a sprinkle of ginger or
nutmeg. For your further drinking pleasure,
replace the cream with the juice of one lime, omit
the sprinkle of spice and you have a delightful cocktail called Air Mail.
Recipe reprinted from Cocktail Hour, by Susan
Waggoner, published by Stewart, Tabori & Chang.
food/kitchen
FIGHT ALLERGIES WITH HONEY
B
eekeepers are finding that there is
more to making honey than simply
keeping bees. Honey tastes differently from one state to the next, from one
county to the next and even from one farm
to the next. Each batch is a little different,
as the bees frequent diverse flowers,
plants and trees in various areas and
can fly up to three miles from the hive.
The nectar source, as well as the time
of year in which the honey was harvested, affects the taste and color of
the honey.
Like wine, honey is a product of the
land. Depending on what the bees have
dined on, honey can have a floral undertone; it can also be spicy or even bitter.
Raw honey is gaining in popularity
as an allergy antidote. Raw honey has
not been filtered to remove wax
remnants or pollen, nor has it
been heat-treated to prolong
shelf life. With the same taste,
but a different consistency, raw
honey is said to be more nutritious and higher in enzymes than
filtered honey. Alternativemedicine fanciers recommend
a teaspoonful of raw, unfiltered, local honey daily to
abate seasonal allergies.
The trace amounts of pollen
in the honey are said to help
develop immunity in the
allergy-sufferer, but honey
must contain local pollens to
be effective.
HERBAL VINEGAR
A
ny herbs can be used to create herbal vinegar
and, used in combination with any of the
sundry vinegars available at the market, can
give a unique boost to salad dressings and marinades. They can be used in any recipe that calls for
vinegar.
The most commonly used base vinegars for
herbal concoctions are cider and red wine—both
good choices for strongly flavored herbs like basil
or thyme—or white wine, which is good for herbs
with a more subtle taste, such as lemon balm.
Champagne vinegar is also a good choice for delicate flavors. White distilled vinegar is harsher than
the others, so it might not give the best results. The
key is to experiment and find combinations you
like. For gift-giving, look for decorative jars with
tight-fitting, non-metallic stoppers such as the
Weck canning jars. (www.weckcanning.com)
It takes about one cup of fresh herb leaves,
15 HOBBY FARMS
picked just before the plant flowers, or 1⁄2-cup of dried leaves to
flavor one quart of vinegar.
Use a large, clean, glass jar
with a tight-fitting, non-rusting
lid. Place herbs in jar and crush
slightly with a wooden spoon.
In a pan, warm the vinegar,
but do not boil. Pour over herbs
and cover tightly. Set the mixture
in a dark place and let soak for
two to three weeks. Strain
through cheesecloth into airtight
containers. Insert a large fresh
leaf of the herb into the container
before closing. Store at room
temperature.
These herbal vinegars are
great Christmas or hostess gifts!
food/kitchen
FOOD PROCESSING EQUIPMENT
Ball Home
Canning Kit
C
anning, drying, grinding and juicing are a
few of the options available to help harness
your gardens harvest.
Canners
Water-bath Canners and complete kits include a
water-bath canner with a wire canning rack, six
pint-sized Mason jars with gingham-print lids and
rings, a bubble-freer spatula, jar funnel, lid wand
and jar lifter.
Pressure Canners should feature a rack for jars,
a lid that can be clamped or locked down to make
the cooker steam-tight, a gauge that accurately registers internal steam pressure, at least one vent port
and a gasket to prevent steam leakage.
Nesco Snackmaster
Express
Juicers
Centrifugal Juicers feature a bottom-mounted
shredder disk and a strainer basket with straight
sides. Produce is fed into the top of the machine
and pressed through a chute, where it contacts the
shredding disk. Juice is released as part of the
shredding process and flows out the front of the
juicer while pulp remains inside.
Masticating Juicers first grate, then chew the
pulp to further break down its cell-wall structure.
They then press the pulp to extract its juice. Most
masticating juicers process
even leafy vegetables with ease.
Country Living Grain Mill
Grain Mills
Food Dehydrators
Most dehydrators belong to one of two types: rigid
boxes with removable trays or units composed of
stackable trays. Features to look for include:
✓ Metal or high-grade plastic, double-wall
construction
✓ Enclosed heating elements
✓ An enclosed 85 to 160 degree F thermostat
✓ A fan or blower
✓ Four to 10 open-mesh trays made of sturdy,
lightweight plastic
✓ A dial for regulating temperature
✓ A timer
✓ The UL seal of approval
16 HOBBY FARMS
Stone Mills grind a bit finer
than burr grinders, but they’re
harder to turn by hand and gum
up when used to process oilbearing seeds.
Burr Mills are easier to
operate because they use steel
burrs instead of old-fashioned
grinding stones. They are also
seed-friendly
and
more
versatile.
Cider Presses
A hardwood, single-tub cider
and wine press is capable of
grinding and efficiently squeezing apples, grapes,
fruits and vegetables. HF