1
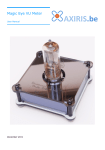
Nixie Clock Manuela Office
User Manual
May 2011
Safety Precautions
Adjusting the Clock's Precision
Do not power on the clock when tubes are damaged or missing.
Option 10 in the option mode allows you to adjust the clock's precision. If you decrease
the value by one, the clock runs approx. 1.3 s slower per month. If you increase the
value by one, the clock runs approx. 1.3 s faster per month.
Use the power supply that came with the clock, or use a power supply that's compliant
with the technical specifications of the clock.
Do not expose the clock to rain or moisture. Do not put the clock in sunlight for a long
time. Do not expose the clock to high temperatures. Do not cover the clock.
Always clean the clock with a dry or very slighty damp cloth. Do not use any detergents.
The coating of the red tubes is vulnerable. Power off the clock before cleaning. The clock
must be completely dry when it's powered on.
Do not subject the clock to mechanical shocks. Avoid any mechanical shocks to the tubes
and to the top of the tubes in particular.
Keep out of reach of children.
In order to adjust the clock's precision you have to determine how much time the clock
deviates over a period of time. Use a reference clock to this purpose. Examples of a
reference clock include a GPS clock and the clock on the Teletext pages.
Measure the period in hours and the deviation in seconds. The deviation is positive when
the clock runs too fast, it is negative when the clock runs too slow. When you determine
the deviation, you must only take whole seconds into account disregarding any fractional
part.
Once you've determined the values for the period and the deviation, use the following
formula to calculate the adjustment:
adjustment = − (deviation × 550 ÷ period)
Technical Information
Power supply
12 VDC, 500 mA
Power consumption
3 W max.
Example
Suppose the clock runs 2 seconds behind over a period of 72 hours. Hence the deviation
is -2 s. According to the formula, the adjustment is −(−2 × 550 ÷ 72) = ~15. In order
to adjust the clock's precision, you'll have to add 15 to the value of option 10 in the
option mode.
DC-connector
Dimensions
(without base)
174 mm x 44 mm x 100 mm (W x D x H)
Nixie Tubes
Siemens ZM1100/ZM1180 red
Background light
Golden yellow LEDs
Time format
▪ 12 hour format
▪ 24 hour format
Date format
▪ DD-MM-YY (day-month-year)
▪ MM-DD-YY (month-day-year)
Alarm snooze time
1..9 minutes
Backup power
30 minutes
Durability Tubes
▪ Tube life saving mode with adjustable brightness (to prevent wearing
out)
▪ Periodical animations (to prevent cathode poisioning)
2
Contact Information
Official website: http://www.axiris.be/
User Manual
User Manual
7
Cycling Digits
Alarm Tone
Installation
Connect the DC plug of the power supply to the DC connector on the back of the clock.
Plug the power supply into a power socket. The clock is now powered on.
option
▪
▪
▪
▪
1:
2:
3:
4:
Left to right
Right to left
All tubes at once
Random
option
Please note there's no ON/OFF switch. To power off the clock remove the power supply
from the power socket and/or disconnect the DC connector from the clock.
▪ 1..9: Fast to slow pace
▪ 10: No alarm tone
After you've powered on the clock, the clock will show the display mode.
Brightness of Tube Saving Mode
Brightness
Control Panel
option
option
When you power off the clock, the clock will remember all settings for approximately 30
minutes. All settings will be lost thereafter, meaning you'll have to set up again after
powering on the clock.
▪ 0: Off
▪ 1..10: Minimal to maximal
▪ 1..10: Minimal to maximal
Clock's Precision
Start of Tube Saving Mode
option
option
Press ALARM/SET to increment
the value by one.
Press DATE/ADJUST to decrement the value by one.
▪ 00..23: Midnight to 23 hours
Duration of Tube Saving Mode
option
▪ 00: No saving mode
▪ 01..23: Active hours
▪ 24: Saving mode always active
Use the slide switch LED to turn on/off the background lightning.
The meaning of the buttons OPTION/MODE, ALARM/SET and DATE/ADJUST
depends on the clock's current mode.
You can operate the buttons OPTION/MODE and ALARM/SET in two ways:
6
User Manual
▪
Push briefly: Push the button and release immediately. This operation is called
pushing the button.
▪
Hold: Push the button for at least one second and release afterwards. This operation
is called holding the button.
User Manual
3
Display Mode
Option Mode
Push OPTION/MODE to show time, alarm and date.
Option mode allows you to change various settings of the clock. Press OPTION/MODE
to step through the available options. The value of the currently selected option flashes.
Push DATE/ADJUST to change the value.
Push ALARM/SET to turn on or off the alarm. The orange dot to the right indicates
whether the alarm is turned on. When the alarm goes off push ALARM/SET to stop the
alarm.
Push DATE/ADJUST to show the current date for a number of seconds. When the alarm
goes off push DATE/ADJUST to snooze. The alarm will go off again after the snooze
time has expired.
The clock will revert to display mode when you don't push any button for at least fifteen
seconds.
Time Format
Display Date
Hold OPTION/MODE to activate the option mode.
Hold ALARM/SET to activate the setup mode.
option
Setup Mode
value
▪ 12: 12 hour format
▪ 24: 24 hour format
Setup mode allows you to set the time, the alarm and the date.
Leading Zero
Push OPTION/MODE to cycle through the various settings:
time ► alarm ► date ► back to display mode
Push ALARM/SET to step through the various values of a setting. The currently selected
value flashes. Push DATE/ADJUST to change the value.
Time
option
option
Automatically show date:
▪ 0: Disabled
▪ 1: At 00/10/20/30/40/50 sec.
▪ 2: At 00/20/40 seconds
▪ 3: At 00/30 seconds
▪ 4: At 40 seconds
▪ 5: At 50 seconds
▪ 6: At the top of the hour
▪ 7: At midnight
Date Scrolling Speed
▪ 0: Disabled
▪ 1: Enabled
Alarm
Digit Cross Fading
option
hours
minutes
seconds
hours
minutes
▪ 1..4: Fast (1) to slow (4)
snooze
Snooze time is expressed in minutes
option
Date
Date format DD-MM-YY
Date format MM-DD-YY
Tubes Animation Method
Digit cross fading in the tubes:
▪ 0: Disabled
▪ 1..9: Fast (1) to slow (9)
option
Date Format
day
month
year
month
day
year
option
▪
▪
▪
▪
▪
▪
0:
1:
2:
3:
4:
5:
No animation
Cycling digits
Waving digits
Cycling digits
Cycling digits
Cycling digits
every minute
every minute
every 10 min.
every hour
at midnight
▪ 1: DD-MM-YY (day-month-year)
▪ 2: MM-DD-YY (month-day-year)
4
User Manual
User Manual
5