1
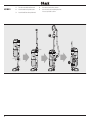
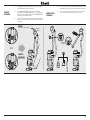
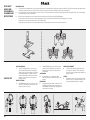
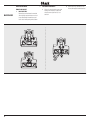
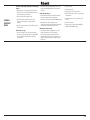
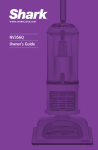
OWNER’S GUIDE
NV340UK
™
SLIM-LIGHT
™
Thank you for purchasing the Shark® Rotator™ Slim Light Liftaway™ Vacuum.
THANK YOU!
This Owner’s Guide is designed to help you get a complete understanding of your new vacuum cleaner. Please read it carefully and keep it future reference.
For a list of what is included with this model, refer to inside flap of box.
RECORD THIS INFORMATION:
RECOMMENDED FILTER CLEANING SCHEDULE:
Model Number:���������������������������������������������
See the MAINTENANCE section for filter cleaning instructions
Date of Purchase (Keep receipt):
__________________________________________________________
TECHNICAL SPECIFICATIONS:
Voltage:
220-240V~, 50/60Hz
Watts:750W
Power Nozzle: 80W
Foam filter:
Felt Filter:
HEPA Filter:
1229FC340 1229FC340 XHF340 Every month
Every month
Every 12 months
This appliance complies with the European directives for electromagnetic compatibility (EMC) 2004/108/EC and its revisions, as well as Low Voltage Directive (LVD)
2006/95/EC and its revisions.
This marking indicates that this product should not be disposed with other household wastes throughout the EU. To prevent possible harm to the
environment or human health from uncontrolled waste disposal, recycle it responsibly to promote the sustainable reuse of material sources. To return
your used device, please use the return and collection systems or contact the retailer where this product was purchased. They can take this product for
environmental safe recycling.
2
READ ALL INSTRUCTIONS BEFORE USE
IMPORTANT SAFEGUARDS
When using an electrical appliance, basic safety precautions should
always be observed, including the following:
WARNING
This appliance is not intended for use by persons with reduced physical,
sensory or mental capabilities, or lack of experience and knowledge,
unless they have been given supervision or instruction concerning use of
the appliance by a person responsible for their safety.
Children shall not use or play with this appliance. Close supervision is
necessary to keep appliance out of reach of children during use.
WARNING
TO REDUCE THE RISK OF FIRE, ELECTRIC SHOCK OR INJURY:
1 DO NOT use outdoors or on wet surfaces.
2Unplug from electrical outlet when not in use and before cleaning or
servicing.
3 DO NOT use with damaged cord or plug.
4 DO NOT use if the appliance is not working, has been dropped, dropped into
water, damaged or left outdoors.
5 NO SERVICEABLE PARTS. Incorrect re-assembly or repair can cause a risk
of electrical shock or injury to persons when the appliance is used. Contact
Customer Service.
6DO NOT pull or carry vacuum cleaner by the cord or use the cord as a handle.
7 DO NOT unplug by pulling on cord; to unplug, grasp the plug, not the cord.
8 DO NOT handle plug or vacuum cleaner with wet hands.
9DO NOT run the vacuum cleaner over the power cord, close a door on the
cord or pull cord around sharp corners.
10 The use of an extension cord is not recommended.
11 DO NOT leave vacuum cleaner when plugged in.
12 Keep cord away from heated surfaces.
13 Turn off all controls before plugging or unplugging the vacuum cleaner.
14Always turn off the vacuum cleaner before connecting or disconnecting
Power nozzle.
CAUTION: Power nozzle contains electrical connections
and the Power nozzle is not a serviceable part
15Store your vacuum cleaner with the power cord secured around the two cord
holders - as shown in the storage instructions.
GENERAL USE
16 Use only as described in this manual.
17DO NOT put any objects into openings. DO NOT use with any opening
blocked; keep free of dust, lint, hair, and anything that may reduce air flow.
18 Keep your work area well lit.
19Keep the vacuum cleaner moving over the carpet surface at all times to
avoid damaging the carpet fibers.
20DO NOT place vacuum cleaner on unstable surfaces such as chairs or tables.
21 DO NOT use without dust cup and/or filters in place.
HOSE ATTACHMENTS
22DO NOT use if air flow is restricted; if the air paths, the hose, or the
accessories become blocked, turn the vacuum cleaner off. Remove all
obstructions before you turn on the unit again.
23Keep the end of the hose and accessory openings away from face and body.
24Keep cleaning tools and hose suction openings away from hair, face, fingers,
uncovered feet, or loose clothing.
25Only use manufacturer’s recommended attachments.
DUST CUP/FILTERS/ACCESSORIES
Before turning on the vacuum:
26Make sure that all filters are thoroughly dry after routine cleaning.
27Make sure that dust cup and all filters are in place after routine
maintenance.
28Make sure accessories are free of blockages.
29Use only manufacturer’s recommended accessories and replacement parts.
GENERAL CLEANING
30DO NOT pick up large-sized objects.
31DO NOT pick up hard or sharp objects such as glass, nails, screws or coins
that could damage the vacuum cleaner.
32DO NOT pick up smoking or burning objects such as hot coals, cigarette
butts, or matches.
33DO NOT pick up flammable or combustible materials such as lighter fluid,
gasoline, or kerosene or use vacuum in areas where they may be present.
34DO NOT pick up toxic solutions such as chlorine bleach, ammonia, or drain
cleaner.
35DO NOT use in an enclosed space where vapors are present from paint,
paint thinner, moth-proofing substances, flammable dust or other explosive
or toxic materials.
36DO NOT vacuum up any liquids.
37DO NOT immerse vacuum cleaner in water or other liquids.
38DO NOT use outdoors or on wet surfaces; use only on dry surfaces.
39Use extra care when cleaning on stairs.
SAVE THESE INSTRUCTIONS
FOR HOUSEHOLD USE ONLY
3
1
ASSEMBLY
4Insert the hose into the hose connector.
Place the vacuum body onto floor nozzle.
2Insert the wand into top of the vacuum.
5Insert the crevice tool and dusting brush into
the accessory holder as shown.
3Insert the handle into the top of the wand.
3
CLICK
2
CLICK
CLICK
CLICK
1
4
5
4
1Press POWER to clean bare floor surfaces, area rugs or areas abovefloor. The brushroll will not spin in this mode.
2Press POWER and BRUSHROLL to clean carpets. The brushroll
indicator lights will illuminate GREEN. If there is a jam, the indicator
light on floor nozzle will illuminate RED. Refer to MAINTENANCE (P12)
for instructions on removing blockages.
UPRIGHT
CLEANING
4To clean with the hose, press the WAND or HANDLE release button
(depending on the amount of reach required) then lift the handle up.
ABOVE FLOOR
CLEANING
5Attach desired cleaning accessory. Note, the handle will slide into
the accessory and the wand will slide over the accessory.
3Place your left foot gently on the floor nozzle and tilt the handle back
to start cleaning. Note: The brushroll will only spin once the vacuum is
reclined back.
POWER
Bare floor or wand cleaning
4
1
4
OR
OR
5
POWER +
BRUSHROLL
Carpet cleaning
1
3
2
5
LIFT-AWAY ™
CLEANING
1Press LIFT-AWAY to lift the pod off the floor
nozzle.
2To clean with the hose, press the WAND or
HANDLE release button, then lift the handle
up.
Use for portable
cleaning on stairs
or anywhere
2
1
2
OR
6
LIFT-AWAY ™
CLEANING
Use for portable
cleaning on stairs
or anywhere
3Attach the desired cleaning tool. Should you
need to increase or decrease the amount of
suction, refer to Helpful Tips (P10), SUCTION
RELEASE.
4
se the shoulder strap to facilitate cleaning
U
while moving around.
NOTE:Select cleaning accessories are included
with this model. Additional accessories are
available for purchase.
SHOULDER STRAP -XTRP340
For a list of what is included with this model,
refer to inside flap of box.
3
4
OR
OR
7
CYLINDER
CLEANING
Convert your upright
to a convenient
cylinder
1From the Lift-Away™ mode, place the pod onto
the cylinder caddy.
4
Use the posts on the caddy to store additional
cleaning accessories while you clean.
2Press WAND release button then lift handle
up.
5To release pod from caddy, press LIFT-AWAY
and continue to use with cleaning wand or
replace wand and pod on Power nozzle per
assembly instructions.
3Attach the desired cleaning tool. Should you
need to increase or decrease the amount of
suction, refer to Helpful Tips (P10), SUCTION
RELEASE.
NOTE:Select cleaning accessories are included
with this model. Additional accessories are
available for purchase.
CYLINDER CADDY - 3057FHW340
For a list of what is included with this model,
refer to inside flap of box.
4
3
5
1
8
ACCESSORIES
Crevice Tool
33 cm flexi – 3054FLI340
Power Brush
Accessory Bag
(not shown)
crevice tool for reaching
hard to reach places.
Designed for removal of
pet hair and ground in dirt
from carpeted stairs and
upholstery.
Dust-Away™ Hard
Floor Attachment /
1 Dust-Away™ Pad
Dusting Brush
3056FLI340
3053FLI340
NOTE: Select cleaning
accessories are included.
Others are available for
purchase.
For a list of what is
included with this model,
refer to inside flap of box.
3050FC340
Cleans hard surfaces and
upholstery.
XDSTY340
Hard floor attachment
vacuums up large particles,
then re-usable microfiber
pads traps extra fine dirt
and dust for superior bare
floor clean.
Cylinder Caddy
3057FHW340
UNLESS OTHERWISE SPECIFIED:
DIMENSIONS ARE IN INCHES
TOLERANCES:
FRACTIONAL
ANGULAR: MACH
BEND
TWO PLACE DECIMAL
THREE PLACE DECIMAL
INTERPRET GEOMETRIC
TOLERANCING PER:
PROPRIETARY AND CONFIDENTIAL
THE INFORMATION CONTAINED IN THIS
DRAWING IS THE SOLE PROPERTY OF
<INSERT COMPANY NAME HERE>. ANY
REPRODUCTION IN PART OR AS A WHOLE
WITHOUT THE WRITTEN PERMISSION OF
<INSERT COMPANY NAME HERE> IS
PROHIBITED.
5
MATERIAL
USED ON
NEXT ASSY
APPLICATION
4
NAME
DATE
DRAWN
TITLE:
CHECKED
ENG APPR.
MFG APPR.
Q.A.
COMMENTS:
SIZE DWG. NO.
A nv650_asm
FINISH
3
2
REV
SHEET 1 OF 1
SCALE: 1:5 WEIGHT:
DO NOT SCALE DRAWING
1
9
DUST-AWAY ™
HARD FLOOR
ATTACHMENT &
CLEANING PADS
INSTRUCTIONS
HELPFUL TIPS
MICROFIBRE PAD
1Slip two of the tabs between the suction nozzle and the duster base and attach them to the front fasteners on the base. Then pull the other two tabs tightly around
to the back fasteners on the base. For best results, ensure that the pad is flat against the bottom surface and secured tightly.
2Use the Dust-Away™ to clean dry bare floor surfaces. Do not use to clean damp floors or wet/sticky messes. Only use pads provided by Shark®, which are designed
to work with the Dust-Away™ attachment.
3
Wash the pads separately with warm water either in the washing machine or by hand using liquid detergent.
Do not use bleach or fabric softeners as they may damage or leave a coating that will reduce the cleaning performance of the pads.
Tumble dry low or line dry to extend the life of the microfibre fabric.
For best floor cleaning results, we recommend replacing your microfibre pads every 3-4 months following normal use.
SUCTION CONTROL
1This unit is equipped with a suction control
collar to help with push and pull on high pile
carpets, area rugs and to release suction when
dusting delicate objects or drapery. Located
at base of top handle, rotate the collar 90° to
minimise suction. Be sure to close again for
maximum suction.
POWER BUTTONS
2The POWER button turns on suction only. This is
ideal for use on bare floors, delicate area rugs
and for use with accessories.
3The BRUSHROLL button spins the floor brush,
ideal for use on carpeted surfaces. Note: The
floor brush will only spin once the vacuum is
reclined back.
CORD HOOKS
4For quick cord access, rotate upper hook
180° and remove cord. Rotate it back for cord
storage.
HEADLIGHTS
5Designed to illuminate debris in dark areas, the
headlights illuminate any time the power is on.
The headlights are long-lasting and designed to
last the life of the vacuum.
HEIGHT ADJUSTMENT
6This floor nozzle has been optimised to work
on all types of carpets as well as bare floors
so there is never any need to adjust heights for
different surfaces.
FILTERS
7Remember to clean your filters regularly under
normal use. Also, for optimal performance, tap
clean filters between washes as needed.
7
1
4
2
10
3
5
EMPTY THE DUST CUP
1Pull up on the dust cup release latch and lift
the dustcup off the pod.
MAINTENANCE
2Holding the dust cup over a garbage bag or can,
press the bottom empty release latch.
3Press the top dust cup release latch to access
the dust screen and remove built-up debris as
required. Turn the dust cup over and empty the
upper chamber by holding it by the handle on
the side of the dust cup.
CLEAN THE FILTERS
See cleaning schedule on page 2
4With the dust cup removed, remove and rinse
the foam and felt filters every month. Let air dry
completely before replacing. Hand wash only.
Tap loose dirt off filters between washes as
needed.
5Once a year open the filter grill and remove
and rinse the HEPA filter. Let air dry
completely before replacing. Hand wash only.
1
3
1229FC340
4
Foam
Felt
2
HEPA
XHF340
5
11
CHECK FOR BLOCKAGES
2 BOTTOM OF FLOOR NOZZLE
REMOVE AND INSPECT:
1
HOSE AND TUBES
MAINTENANCE
Remove floor nozzle and extension wand and
shine a flashlight up from the bottom to check
for possible blockage. Remove dustcup and
hose to check intake opening and hose elbow.
aUsing a coin, turn the locking screws to the
unlock position and pull up to expose the
airway. Remove any obstructions, close
and relock.
a
b
a
12
bRemove any string, carpet fibers or hair
that may be wrapped around the brushroll.
Vacuum is not picking up dirt. No suction or light
suction
•
Check filters to see if they need cleaning. Follow
instructions for rinsing and drying the filters before
re-inserting back into the vacuum.
• Dust cup may be full; empty dust cup.
TROUBLESHOOTING
GUIDE
•Check hose, hose connections, nozzles and
accessories for blockages; clear blockages if
required.
•Close the suction release on the handle to increase
suction power.
Vacuum lifts area rugs
•Suction is powerful. Take care when vacuuming
area rugs or rugs with delicately sewn edges. Open
the suction release on the handle to decrease
suction power.
•Turn off the unit to disengage the brush roll and
restart with the POWER button for suction only
cleaning.
1. Turn the unit off.
Brush roll does not spin
4. Check for blockages in hose, accessories and
inlet openings.
•Pull the handle toward you and release the floor
nozzle to disengage the auto-off feature.
•Turn the unit on by pressing the BRUSHROLL button.
•Immediately turn off and unplug vacuum,
disconnect the nozzle and remove blockage before
reconnecting and turning vacuum back on.
Vacuum turns off on its own
2. Unplug the vacuum.
3. Empty the dust cup and clean filters.
5. Allow the unit to cool for a minimum of 45
minutes.
6. Plug in the vacuum.
7. Restart the unit using either the POWER or
POWER + BRUSHROLL buttons.
•
This vacuum cleaner is equipped with a motor
protective thermostat. If for some reason
your vacuum overheats, the thermostat will
automatically turn the unit off. Should this occur,
perform the following steps to restart the motor
thermostat:
13
Euro-Pro, Shark, Rotator, Dust-Away and LiftAway are trademarks of Euro-Pro
Operating LLC. All other brand names may be trademarks of their respective owners.
14
WARRANTY TERMS AND CONDITIONS
The conditions below describe the prerequisites and scope of our warranty. They do not affect your statutory rights or the obligations of your retailer and your contract with them.
Shark® Guarantees
A household appliance like a vacuum cleaner constitutes a sizeable investment. Your new machine needs to work properly for as long as possible. The guarantee it comes with is an important
consideration - and reflects how much confidence the manufacturer has in its product and manufacturing quality.
Every Shark® machine comes with a free parts and labour guarantee. Our customer service helpline (0800 862 0453) is open from 9.00am to 6.00pm Monday - Friday. It’s free to call, and you’ll be put
straight through to a Shark representative. You’ll also find online support at www.sharkclean.eu/uk.
How do I register my extended Shark® guarantee?
You can register your guarantee online within 28 days of purchase. To save time, you’ll need the following information about your machine:
• Serial number (on the machine rating label)
• Date you purchased the machine (receipt or delivery note)
• To register online, please visit www.sharkclean.eu/uk/register-guarantee
IMPORTANT
• Both the 12 months and the extended 4 years guarantee will only cover your product from the date of purchase.
•Please keep your receipt at all times. Should you need to use your extended guarantee we will need your receipt to verify the information you have supplied to us is correct. The inability to produce
a valid receipt may invalidate your guarantee.
What are the benefits of registering my free Shark® guarantee?
When you register your guarantee we’ll have your details to hand if we ever need to get in touch. You can also receive tips and advice on how to get the best out of your Shark® vacuum and hear the
latest news about new Shark® technology and launches.
If you register your guarantee online, you’ll get instant confirmation that we’ve received your details.
How long are new Shark® machines guaranteed for?
Our confidence in our design and quality control means that your new Shark® vacuum cleaner is guaranteed for a total of five years. (12 months plus an extended warranty of 4 years).
What is covered by the free Shark® guarantee?
Repair or replacement of your Shark® machine (at Shark®’s discretion), including all parts and labour. A Shark® guarantee is in addition to your legal rights as a consumer.
What is not covered by the free Shark® guarantee?
• Blockages – For details of how to unblock your vacuum cleaner, please refer to the Operating Manual.
• Normal wear and tear such as brush bar, fuse, belt, batteries etc.
•Accidental damage, faults caused by negligent use or care, misuse, neglect, careless operation or handling of the vacuum cleaner which is not in accordance with the Shark® Operating Manual
supplied with your machine.
• Use of the vacuum cleaner for anything other than normal domestic household purposes.
• Use of parts not assembled or installed in accordance with the operating instructions.
• Use of parts and accessories which are not Shark® Genuine Components.
• Faulty installation (except where installed by Shark®).
• Repairs or alterations carried out by parties other than Shark or its agents.
What happens when my guarantee runs out?
Shark® does not design products to last for a limited time. We do appreciate that there may be a desire for our customers to want to repair their vacuum cleaners after the warranty has elapsed. In this
case please contact our free phone customer service help line and ask about our out warranty program, on 0800 862 0453.
Where can I buy genuine Shark® spares and accessories?
Shark® spares and accessories are developed by the same engineers who developed your Shark® vacuum. You’ll find a full range of Shark® spares and replacement parts for all Shark® machines at
www.sharkclean.eu/uk/parts. Accessories are at www.sharkclean.eu/uk/accessories.
Please remember that using non-Shark® spares invalidates your guarantee.
15
Euro-Pro Europe Limited
1 Mariner Court
Calder Park
Wakefield
WF4 3FL
Freephone 0800 862 0453
www.sharkclean.eu
NV340UK_31_140711.2
Printed in China
© 2014 Euro-Pro Operating LLC
Illustrations may differ from actual product.