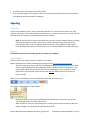
1
Osnium WS – Wisconsin Administrators Manual End Domestic Abuse WI - DRAFT 11/18/2015 STILL IN PROCESS OF REVIEW Contents First Login and License ................................................................................................................................. 3 Do you have the correct database and screen layout? ................................................................................ 3 Agency Options ............................................................................................................................................ 4 Understanding the Osnium WS Database Structure .................................................................................... 4 Tools.............................................................................................................................................................. 6 Recycling Bin ............................................................................................................................................. 6 Show Log File/Send Log File ...................................................................................................................... 6 Audit Trail .................................................................................................................................................. 6 Change Type.............................................................................................................................................. 6 Perform Full Backup .................................................................................................................................. 6 Edit Model ................................................................................................................................................. 6 Add Staff and Volunteers ............................................................................................................................. 7 ! CAUTION: Do not lose your Administrator account password. ........................................................... 7 ! CAUTION ON DELETING USERS .............................................................................................................. 7 Add a User ................................................................................................................................................. 8 Options .................................................................................................................................................. 8 Assign a Role ............................................................................................................................................. 9 Roles ...................................................................................................................................................... 9 Reset an Existing User’s Password .......................................................................................................... 10 Delete a User........................................................................................................................................... 10 Set Required Fields and Initial (Default) Values ........................................................................................ 10 Make a field required.............................................................................................................................. 10 Set initial (default) values ....................................................................................................................... 11 Modify Drop-down and Multiple Choice Options ..................................................................................... 11 ! CAUTION ABOUT DELETING OPTIONS ................................................................................................. 11 Fields used in funder reports .................................................................................................................. 12 Fields to customize for your agency ....................................................................................................... 12 How to Customize Drop-down and Multiple Choice Options................................................................. 14 Osnium WS Administrator Manual- Wisconsin pg 1 of 28 End Domestic Abuse WI DRAFT 11/18/15 Create a new drop-down or multiple choice value ............................................................................ 14 Edit or remove an existing value ......................................................................................................... 14 Understanding Activities: Services & Topics ............................................................................................. 15 Master Services List ................................................................................................................................ 15 State/Federal Funder Services ................................................................................................................ 15 Agency Defined Services ......................................................................................................................... 16 Topics Covered ........................................................................................................................................ 16 How to Customize Categories, Services and Topics Covered ................................................................... 17 ! CAUTION ABOUT DELETING SERVICES ................................................................................................ 17 ! Cautions about modifying Services ..................................................................................................... 17 ! CAUTION ABOUT DELETING CATEGORIES ........................................................................................... 17 ! Cautions about modifying Categories ................................................................................................. 18 Modify Categories and Services in the Custom Fields Editor ................................................................. 18 Remove Services from a Category ...................................................................................................... 18 Remove one Service from several Categories .................................................................................... 19 Add a Service ....................................................................................................................................... 19 Delete a Service................................................................................................................................... 20 Add a Category .................................................................................................................................... 20 Delete a Category................................................................................................................................ 20 Blank rows ........................................................................................................................................... 20 Customize Topics Covered in the Custom Fields Editor.......................................................................... 21 Topics .................................................................................................................................................. 21 Topic Categories.................................................................................................................................. 22 Case Notes .................................................................................................................................................. 22 Reporting .................................................................................................................................................... 23 Using Lists ............................................................................................................................................... 23 Reports .................................................................................................................................................... 23 Import a Report................................................................................................................................... 23 Export a Report ................................................................................................................................... 24 Creating Reports ................................................................................................................................. 24 Screen Layout Customization (Model File) ................................................................................................ 24 ! CAUTION: ALWAYS BACK UP YOUR MODEL FILE BEFORE MAKING CHANGES!!! .............................. 25 Back Up, Import and Distribute the Model File ...................................................................................... 25 Osnium WS Administrator Manual- Wisconsin pg 2 of 28 End Domestic Abuse WI DRAFT 11/18/15 Export Model file................................................................................................................................. 25 Import Model file ................................................................................................................................ 25 Distribute Model File (after testing) ................................................................................................... 25 ! CAUTIONS ABOUT CHANGING THE SCREEN LAYOUT: ........................................................................ 26 How to Customize the Model File........................................................................................................... 26 First Login and License 1. Log in as Administrator. 2. Copy and paste your license file into the window, click OK, and then log back in. If you didn’t receive the license file or if you have problems, contact the Osnium support line at 1-888-6764861, option 2. (If you don’t see the license window, go to Tools > Show/Program Options > License File). 3. Create a new user and assign the role “Administrator (No Customization).” A user with this role will be able to add other users, set required fields and initial values, and change drop-down options. 4. Log out of Administrator and log in as the user with the “Administrator (No Customization)” role. The user who is logged in is shown on the status bar at the bottom left of the window. (No Customization) just means you can’t change the screen layouts. Modifying screen layouts, which can be done only with full Administrator permission, should be done deliberately and only with care; it’s best not to assign the full Administrator role to a regular user, but only log in to an Administrator account when needed). *Use the Administrator account carefully - only when you need to do screen layout customization or other technical tasks. Be sure to read the customization instructions carefully so you don’t do anything that will cause problems with your database! *If you change the Administrator password make SURE you record it somewhere. You don’t want to get locked out of your database. Also, this password is what Osnium uses to provide tech support when you give them access to your database. (Be sure someone at your agency knows your SQL password as well, if you use something more complex than what Osnium suggests.) Do you have the correct database and screen layout? If your screen does not look like you think it should, you may need to download and distribute the correct Model File for Wisconsin. The Model File determines the screen layout based on the fields we have defined. One way to know if you have the Wisconsin version: Look for a column headed “Review Data” in the Person find screen. This is a field that only exists in the Wisconsin version. You should also see it in a client screen as a checkbox at the bottom of the middle column. Osnium WS Administrator Manual- Wisconsin pg 3 of 28 End Domestic Abuse WI DRAFT 11/18/15 If your database doesn’t seem right, contact Osnium tech support to get the correct Model File and database. They can help you with the process or direct you to the instructions. Agency Options Tools > Show Options > Program Options Many of these fields are optional and a few don’t show up anywhere or don’t do anything, including information about your agency. Contact Osnium if you need clarification on any of these. Program Options Days Until Notes Are Locked: Enter the number of days after which users cannot edit case notes in the Case Notes tab. An administrator can unlock case notes temporarily if necessary. Enter 0 if you do not want to lock case notes. Max Stays: Change the value to the maximum number of beds in the shelter. Enter 0 for unlimited. This will calculate the current occupancy rate when you click the Shelter Stats icon. (If you receive the message “Software License has exceeded the limit of Stays” there may be an issue with your license file. Contact Osnium.) Scheduler – your agency’s preference, if you use the scheduler. Security Idle Minutes Before Lockout: This locks the COMPUTER, not the database. If you your computers are already password protected and set to lock after a period of inactivity, you don’t need to set this. If you have any computers or laptops located or taken to unsecured locations, be sure you have some level of password protection and lockout, to prevent unauthorized access if a user forgets to close the database. A value of 0 will not lock the computer. Use Default Model From: Screen layout automatically assigned to new users. Administrator is the Wisconsin screen layout/Model File that came with your initial database, which you may have changed. Don’t leave this blank, or you will get the “vanilla” version of Osnium which is nothing like the Wisconsin version. Understanding the Osnium WS Database Structure Osnium WS is not “locked down” as the Alice database was. The advantages are that agencies have the ability to do more advanced customization. The disadvantage is that it is easier to change things that might negatively affect data-entry, reporting, and general use of the database. Osnium WS Administrator Manual- Wisconsin pg 4 of 28 End Domestic Abuse WI DRAFT 11/18/15 The database is made up of: 1. The Software The software makes the whole thing work. Future software updates with new features are OPTIONAL to install. Updates are not needed to make changes in the screen layout or to import new or updated reports. Updating the software should not affect any of the visual elements or any of your data. Still, it is recommended that you determine what changes were made before deciding to install a software update. (An example: while we were customizing our Wisconsin database, they added the “Merge clients” feature which could not be restricted by user role, so our choice was to leave it in or to hide the icon and not have it available at all). Updating the software requires access to the server. 2. The Database The database consists of - Sections and data fields that have been customized for Wisconsin programs (such as Events, Client tabs, and fields in each screen); - Program options, users, and all of the data users enter; - Drop-down and multiple choice options, required fields and initial values that have been created for Wisconsin programs, as well as any further customization of these by your agency; - Reports that came with the initial installation as well as additional reports you have imported; - Filters that came with the initial database and any that you add; - Role definitions that were customized specifically for Wisconsin programs. These can be changed by each agency. Osnium has instructions in their documentation but you may need their assistance in identifying some of the elements. *Option lists, required fields and initial values can be customized by people with the Administrator (No Customization) role. Most users can import reports and create or edit filters. 3. The Model File The Model File determines visual items, including - Label styles like bold, italic - Screen layout - Show or hide fields or tabs - Lists that came with the initial database - User-options such as window size, columns, back-end field names *The Model File can only be changed by someone with the overall Administrator role. Osnium WS Administrator Manual- Wisconsin pg 5 of 28 End Domestic Abuse WI DRAFT 11/18/15 Tools Click the Tools tab at the top of the screen. Recycling Bin The Recycling Bin can be used to restore accidentally deleted data. If you delete a client, you may need to restore not only the client record, but associated data from tabs. Data and changes to data are stored forever in the recycling bin. Show Log File/Send Log File The log is a record of everything that has ever happened in the database. This is technical back-end stuff, to send to Osnium to review and provide support. Audit Trail The audit trail icon appears when you are in a client record or in another record such as Activity, Event, etc. Click the icon to show a history of the changes that were made, including dates and users. Change Type Generally you would use this if a child/dependent becomes an adult client, or if an abuser becomes a client. A record of the new type will be created. All items from tabs will be moved to the NEW record and removed from the old one. Some information may not be transferred from the old profile if there is no place for it in the new profile. You may wish to type some of this information in Notes (parent, schools, abuser info, etc.), and delete the old record to avoid confusion. Perform Full Backup This allows you to manually back up both your database and model file to the computer where the database is installed. Ideally you will have a regular backup system for your server or computer. If desired, you can schedule WS backups using a SQL script. Instructions can be found on the Osnium website (http://betadocs.osnium.com/index.aspx?node=56) or you can ask for assistance from Osnium. Edit Model The Model File is the screen layout and reflects the structure of the Wisconsin database. It will also contain any changes your agency makes to the screen customization (see the section on Screen Customization). Export Model File: Use this before you make any changes to your screen layout, in case you need to revert to a previous layout. You can also use this to save a new screen layout. Import Model File: Import a saved model file to distribute to users. The model file can be one you exported, the original Wisconsin model file from Osnium, or a modified model file that another Wisconsin program has shared). Osnium WS Administrator Manual- Wisconsin pg 6 of 28 End Domestic Abuse WI DRAFT 11/18/15 CAUTION: Do not “Clear Model File Changes.” This sets the database back to the factory default, which is EXTREMELY different from the Wisconsin layout. If you inadvertently reset your model file, you will need to get the Wisconsin model file from Osnium or from another program, import it and distribute it to all users. Distribute Model File: If you have made changes to the screen layout as a user with the Administrator role, you will need to distribute the model file from the Administrator account to other users so they can see the changes. You may want to distribute the model file to a test account to see how it operates before distributing it to all users. Be careful not to distribute a model file with a more limited view to the Administrator account. NOTE: It is possible to have different model files for different users. Contact Osnium for information on additional items in the Tools tab. Add Staff and Volunteers All staff and volunteers need to be in the staff list if you want to enter them in client, event or volunteer records. You must have an Administrator (No Customization) or Administrator role to add users. ! CAUTION: Do not lose your Administrator account password. Record it SECURELY. Osnium will need this password to provide online tech support or to help if you get locked out of the database. (They may be able to reset the administrator account if they can directly access the SQL database on your server, but that means you can’t lose that password, either). ! CAUTION ON DELETING USERS *If you delete someone from the staff list, you can no longer see that person in the list when you run reports based on Advocate, Staff or Volunteer. You will not lose any existing data. Existing entries will still appear in records and reports. But you will not be able to filter by deleted users when you run reports. This is true even if you re-add the user. Instead of deleting, uncheck the “Is Active” checkbox. Then add a filter to the staff dropdown lists to show only people who have the box checked if it isn’t already there. How to do this: o Open a client screen o Click the “Primary Advocate” field o RIGHT-click on one of the column titles and select “Column Chooser” o Double-click the “Is Active” field to add it to the list. o Hover over the “Is Active” title and click the little funnel. o Choose “Checked.” Osnium WS Administrator Manual- Wisconsin pg 7 of 28 End Domestic Abuse WI DRAFT 11/18/15 Now all of your staff drop-down lists will only display active users. If you need to turn off the filter temporarily, uncheck the box at the bottom of the drop-down list. Note that your settings will appear for all users, in all staff lists in the database. You can block access to the database for any user who remains in the staff list by checking the “Account Locked” checkbox. Add a User From the File menu, select Users > Staff. Once you are in the Staff List, select New > Staff Options First Name Last Name User Name (what they will use to log in, for example MObama – make it something you can identify when looking at the log file) Role (see below) Staff Info (optional, not meant for confidential personnel use) Show in Scheduler - if you use the scheduler (calendar). Volunteer - this checkbox is visible in staff option lists so you know who’s a volunteer. If a volunteer is hired as staff, create a NEW user record for them that’s not marked Volunteer. Then you’ll be able to count their previous activity as volunteer time, and remove their volunteer user account after you’re done entering all of their volunteer data). Allow Edit Own Schedule Only – this is also a feature of the scheduler. If not checked, this user can edit other people’s schedules as well as their own. Is Active - if you uncheck this box they will not be able to log in, and their name will not appear in staff lists when the “Is Active = True” filter is turned on in staff drop-down lists. You can leave the box checked if you want their names to appear as active in staff drop-down lists, and check the Account locked box to prevent them from logging in. Change Password On First Logon - allows a user to create their own password; you can go back and check this box any time for a user to reset their password. Account locked - blocks the user from logging in. Use when you want to keep “Is Active” checked so their name will appear in Staff drop-down lists where the “Is Active = True” filter is turned on. By default, new users will have the same Model File (screen layout) as the Administrator, unless you have changed that in Tools > Show Options > Security Options. Click the “Reset Password” button and enter a password you will give to the new user (or existing user). If you’ve checked “Change Password On first Login” they will be prompted to enter a new password when they first log in. If the box is unchecked, this will be their password. Osnium WS Administrator Manual- Wisconsin pg 8 of 28 End Domestic Abuse WI DRAFT 11/18/15 Assign a Role The simplest configuration: Assign Administrator (No Customization) to staff who will be adding users, editing dropdown options, setting required fields and default values, and deleting records. Assign Staff (Limited) or Staff Limited (Can Delete) to users who will be entering and viewing any kind of data, or running reports. Assign Volunteer (No Client Access) to users who will be entering Events, Volunteer time and Donations, but should not see any client information. Other roles offer read-only access or the ability to limit viewing of case notes. NOTE: Permissions can be created and modified but it’s a very detailed and complex process, so ask for Osnium’s assistance if you need changes. Roles ADMINISTRATORS *Do NOT assign the Administrators role to an individual. This role is intentionally filtered out of the list of roles, unless you turn off or change the filter. Use this role with care! It is advisable NOT to assign this role to a regular user, but log into it deliberately when needed for screen customization or tech support. This permission is initially assigned to the fixed user account “Administrator”. Osnium can use this account to provide assistance, and advises NOT to change the password they have provided unless you are very careful about recording it. Customizing the screens and some other administrator tasks can interfere with the functioning of the database if not done correctly. BASIC ROLES Administrators (No Customization) (No Customization) just means you can’t change screen layouts, which is a more advanced task and can have undesirable consequences if not done properly. This role can: Create and modify Staff (users) Delete any data or client records Create or remove values for drop-down and multiple choice fields Set required fields or create warnings for blank fields Set initial values (defaults) Staff (Limited) Useful for most staff. Can add and edit records but can’t add new drop-down or multiple choice options (except for specified fields*). Cannot delete data or client records. Staff (Limited – can delete) Same as Staff (Limited) but can delete data (except client records). Osnium WS Administrator Manual- Wisconsin pg 9 of 28 End Domestic Abuse WI DRAFT 11/18/15 Staff (Read Only - Can Read Case Notes) View everything but can’t add or change any data. Volunteer (No Client Access) Can enter data in Events, Volunteer Time and Donations. Cannot access client information. ROLES THAT LIMIT CASE NOTES VIEWING: *Case notes refers to the entries in the Case Notes tab, not the notes in various other screens. Osnium tech support can help you with purging for Case Notes if desired. Administrators (No Customization - can view and edit only their own case notes) Same as Administrators (no customization) but can view/edit only case notes they have entered. This user does have the ability to change their own permission, however. Staff (Limited – can view and edit only their own case notes) Same as Staff (Limited) but can view and edit only case notes they have entered. Staff (Read Only - Can't read Case Notes) View everything except case notes; can’t add or change any data. Reset an Existing User’s Password Users > Staff Double-click to open the person’s account. Click the “Reset Password” button and enter a password you will give to the new user. If you’ve checked “Change Password On first Login” they will be prompted to enter a new password when they log in. If the box is unchecked, this will be their password. Save & Close. Delete a User See CAUTION ON DELETING USERS before doing this! Highlight or open the user’s record and click the red X to delete. You will get a couple of warnings – be sure you have selected the correct user record and you really want to delete it! Set Required Fields and Initial (Default) Values Refer to additional documentation to determine which fields are required by funders. Make a field required Navigate to the screen where the field is visible. Right Click on the field then select “Make Field Required” Fill out the options: Osnium WS Administrator Manual- Wisconsin pg 10 of 28 End Domestic Abuse WI DRAFT 11/18/15 Custom Description: The text that will pop up when saving if this field is left blank. Result Type: o Error: The record cannot be saved unless the field is filled in. o Warning: The user can choose to leave the field blank and ignore the warning. o Information: Just shows a little “I” in the field if you save without closing. Not particularly useful. Make this field required everywhere: NO! Uncheck this box. It’s best to require fields separately for each screen where the field appears. You do not want to inadvertently make a field required on another screen if the field is shared. In some cases you may have hidden the field on a different screen and then you won’t be able to save a record from that screen at all – you’ll have to use the Administrator account to unhide the field, clear the required field, and hide it again. Click OK. To make a required field optional, right-click on the field and select “Clear Required Field.” Set initial (default) values An Initial Value is data that will be automatically entered when creating a new entry. This is for convenience when entering data in drop-down or text fields. For example, if you only have one funder for your shelter, you can make that funder the initial value on the Stays screen. You cannot set different initial values for each user; they are the same for everyone. Enter the value you want as the default (from a dropdown box or type it in if it’s a text field). Right-click and choose “Set as Initial Value.” To clear, right-click and choose “Clear Initial Value.” Modify Drop-down and Multiple Choice Options NOTE: Services, Categories and Topics Covered are best modified in the Custom Fields Editor. ! CAUTION ABOUT DELETING OPTIONS If you delete an option from a drop-down or multiple choice list, you can no longer choose that option from the Parameters drop-down lists when running reports. If you have not entered the option anywhere this will not be a problem. If this option has been entered somewhere, and you want to be able to see it in report filters, consider renaming it (preface it with “X” or “X-Do not use”). If you do delete an option, you will not lose any existing data. Existing entries will still appear in report results and on lists. Osnium WS Administrator Manual- Wisconsin pg 11 of 28 End Domestic Abuse WI DRAFT 11/18/15 Fields used in funder reports IMPORTANT: Many of the option lists were created specifically to ensure that information will correctly report to state and federal funders. Refer to the documentation on funder reporting before modifying options in these fields. On the Activity screen, Categories and Services are specifically worded to flow to the correct sections of DCF, SAVS and VAWA (STOP or SASP) reports. Changing these or adding new ones will make the reports inaccurate. See the section on ACTIVITIES/Services for more information. You will want a value in a drop-down or multiple choice field if you will need to calculate, filter or sort by that value. If you only need the information for reference, you can enter it in Notes or other typable fields. Fields to customize for your agency Feel free to change drop down and multiple choice options for these fields to reflect your agency’s structure and preference, as long as it doesn’t conflict with funder requirements. Field Funder Client/Child Profile Fields Primary Program Primary Language Primary Referral Source Highest Education Completed Other Demographics Characteristics Custody Hotline Calls Call Reasons Referral Destinations Caller Type Primary Referral Source Notes This field appears in Hotline Calls, Activities, Stays, Events, Court Advocacy, and Outcomes. You do not need to add DCF or SAVS to the funders list. DCF and SAVS ask you to report clients based on the type of victimization and services provided regardless of funding source. This field appears in Clients, Children/Dependents, Activities, Case Notes, Court Advocacy, Waiting List and Outcomes. It is not used for any state or federal funder reports. Add languages that are common at your program. Anything other than Spanish, Hmong, Russian or American Sign Language will count as “Other” for DCF. This field appears in Clients, Children and Hotline Calls. Deaf/deaf, Hard of hearing, Homeless, Immigrant/Refugee/Asylum seeker and Veteran are used in several funder reports. Add any other demographics you wish to track. Children/Dependents screen only The list can be used to report to VOCA details of information and referral topics provided by phone. This field is also found in the client Referrals tab. The list can be used to report to VAWA-STOP. This field appears in Clients, Children and Hotline Calls. Osnium WS Administrator Manual- Wisconsin pg 12 of 28 End Domestic Abuse WI DRAFT 11/18/15 Intakes Geographic Incident Location Assault Location Type All Victimizations Activities Service Site Program Type Category/Service Agency Service Stays Stay Type Reason for Leaving Case Notes Type of Case Note Program Type Court Advocacy CASE RO Billing Information Transaction Type Events Audience WCASA is interested in Prison/Jail/Corrections and College/University campus data for sexual assaults. Keep Stalking, Trafficking – Labor and Trafficking – Sex. This field appears in Activities, Hotline Calls and Stays. This field appears in Clients, Children/Dependents, Activities, Case Notes, Court Advocacy, Waiting List and Outcomes. It is not used for any state or federal funder reports. BE CAREFUL. Services in many of the categories are mapped to DCF, SAVS, VOCA, STOP, SASP and HUD reports so shouldn’t be changed. Refer to the Master Services list to see how each service is counted on these reports. You can add services to the “Other: Not required by state/federal grants” if they don’t overlap any of the services in the Master services list. Optional – use to clarify or more specifically describe services. STOP asks for data by Emergency Shelter and Transitional Housing. (HUD has its own separate field for this) This field appears in Clients, Children/Dependents, Activities, Case Notes, Court Advocacy, Waiting List and Outcomes. It is not used for any state or federal funder reports. All choices in the Cases section can be changed. But if you are reporting restraining orders to STOP, be sure to keep the RO Victim Type choices, and TRO and Injunction outcomes. If you are reporting restraining orders to STOP, be sure to keep the RO Victim Type choices, and TRO and Injunction outcomes. Payments and credits need to be entered as negative numbers in order for the balance to calculate. Used mainly to track repeat audiences and can be added by any staff while entering data. To not allow staff to enter new audiences, contact Osnium (or follow their documentation) to help you change permissions. Demographics Outcomes Outcome Volunteer Time Osnium WS Administrator Manual- Wisconsin pg 13 of 28 End Domestic Abuse WI DRAFT 11/18/15 Type of Activity Volunteer Type Donations Donation Type Campaign or Source How often to contact Can be added by any staff while entering data. How to Customize Drop-down and Multiple Choice Options Check the documentation to be sure you understand how changes might affect funder reporting. Note which fields are used in more than one place in the database; any changes to drop-down options will appear in all of those places. Start by navigating to a screen that has the field you want to modify. (Categories, Services and Topics Covered should not be customized from the Activity screen; use the Custom Fields Editor instead). Create a new drop-down or multiple choice value Open the field as if you were making a selection Click the “New” button (only administrators will see this, except for a few fields such as referral destination, event audiences and some address fields which all users can modify) Type in the new value Save & Close. Edit or remove an existing value Select the value as if you were entering data. Right-click and select “Open Item.” Correct the spelling or wording. Save and Close Refresh the screen to see the new value in the list. Deleted or misspelled values that have been previously entered will remain where they have been entered, and will be visible in lists and report results, but will no longer be available as drop-down choices. *CAUTION: If you remove an option from a drop-down or multiple choice list, you will no longer be able to choose that option from filter parameters drop-down lists when you run reports, even if you later re-add it spelled the same way. You may wish to rename it instead, (perhaps add an “X” in front or “X-Do not use”) so people know not to choose it in the future. (Deleted values will still appear in list filters, just not in reports). Click the REFRESH button if you don’t see your changes. All users should see the modified option list right away without logging out/in. Osnium WS Administrator Manual- Wisconsin pg 14 of 28 End Domestic Abuse WI DRAFT 11/18/15 Understanding Activities: Services & Topics Plan ahead how you will use the various options for recording Activities/Services. You can use some or all of these options, depending on your reporting needs. You can hide any of the fields you don’t want to use once you are sure you will not need to replace your Model File with a revised Wisconsin layout. Master Services List ! Refer to the Master Services List spreadsheet file to see how each category and service combination flows to the custom funder reports. State/Federal Funder Services Categories and Services have predefined options to facilitate reporting to DCF, SAVS, VOCA, SASP, STOP or HUD. Each combination of Category + Service maps to a service defined by DCF, SAVS, VOCA, SASP, STOP and HUD. Your services will automatically count in the right place on these reports. If you don’t report to any of these funders, you do not have to keep the existing categories and services. If you do report to DCF, SAVS, VOCA, SASP, STOP or HUD: - You can remove services that you don’t provide from various categories, or delete them completely. - You can remove or delete categories that don’t apply to your agency. ! CAUTION: See There is a category called “Other: Not required by state/federal grants” Use this category to add services your agency provides that aren’t reportable to any of the above funders. Any services you add here: - Should not overlap any of the funder-defined categories, and - Will not show up on the above funder reports. Osnium WS Administrator Manual- Wisconsin pg 15 of 28 End Domestic Abuse WI DRAFT 11/18/15 Agency Defined Services You can define your own drop-down options here, if you want to track services more specifically. *If the State/Federal Funder Services work for you, you don’t need to use this field or the Service Description field. It’s up to you. Agency Service drop-down list: - You can use this in addition to the State/Federal Funder Services, to track services in more detail. You’ll be able to filter services reports by this field, and get totals. For example, you might want to define a more specific Support Group. Service Description is a text field: - Use this field for any more detail that you wish to look up for an individual client, or possibly to appear in a report. You can’t filter or count by values in this field. Topics Covered We’ve prefilled the options with the check this list with the new report list of topics in VOCA’s new performance measures, but you can change this list if you don’t have and don’t anticipate receiving VOCA funding. If you have VOCA funding and these items meet your needs, you may want to keep them, rename them to somewhat match what VOCA is asking, or remove items that you don’t do. You may also need to change the options if VOCA’s final list is different from what we have entered. The Topics Covered multiple choice list is useful when you will need to list or report totals of topics covered. - You can enter more than one option in this section. Osnium WS Administrator Manual- Wisconsin pg 16 of 28 End Domestic Abuse WI DRAFT 11/18/15 - Use this in addition to the Funder Services and/or Agency Defined Services. For example, you might choose “Crisis Counseling” as the Funder Service and under Topics Covered, enter “Safety Planning”, “Information about legal options”, and “Emotional support” How to Customize Categories, Services and Topics Covered ! Refer to the Master Services List to see how existing categories and services will be automatically mapped to some of the funder reports. Adding or renaming new services in these categories will cause inaccurate reports for some funders. ! CAUTION ABOUT DELETING SERVICES If you delete a service, you can no longer choose that service from the Parameters drop-down lists when running reports. If you have not entered the service or category anywhere this will not be a problem. If you have already entered this service in any activity records, you can uncheck the “Show in Activity” box and it will no longer be an option for data-entry, but you will still see it in the reports parameters. If you do delete a service, you will not lose any existing data. Entries will still appear in report results and on lists. ! Cautions about modifying Services Don’t add or change the spelling of any services in these categories; they need to stay as is to count correctly on funder reports: o Counseling & Advocacy – DV o Counseling & Advocacy – SA o Counseling and Advocacy – Dual DV/SA o Children & Youth Activities (except services that aren’t reportable to DCF) You can remove services from a category if you don’t provide those services; they can be added back in later if necessary. You are essentially unlinking the service from the category so it doesn’t show up when you select that category, rather than deleting it. You can delete a service that you don’t provide at all. BUT if you have existing activities where that service has already been entered, it is advisable instead to uncheck the “Show in Activity” box so you will not lose the ability to select it sfrom report parameters. ! CAUTION ABOUT DELETING CATEGORIES If you delete a category, you can no longer choose that category from the Parameters drop-down lists when running reports. If you have not yet entered the category in any activities this will not be a problem. If you have already entered this category in an activity record and you want to be able to see it in filter drop-down lists, you have a few options: o Rename the category – maybe preface it with “X-Do not use” Osnium WS Administrator Manual- Wisconsin pg 17 of 28 End Domestic Abuse WI DRAFT 11/18/15 o Remove all services from the category, so if someone does select it, they will not see any services to enter. If you do delete a category, you will not lose any existing data. Entries will still appear in report results and on lists. ! Cautions about modifying Categories You can remove a category from all services if you don’t use that category; it can be added back in later if necessary. SEE CAUTION ABOUT DELETING CATEGORIES. The category Other: Not required by state/federal grants can be used for services you provide that don’t have anything to do with DV/SA clients, for example if you have a food pantry for the general public or provide general homeless shelter. Be sure these are items your staff will not choose when they should be choosing services from the DV/SA funder categories. You can add new categories and add services to those categories, but make sure they don’t overlap any of the categories needed for DV/SA funder reporting. Staff should choose the category first in order to see the correct list of services. Modify Categories and Services in the Custom Fields Editor While you can theoretically modify categories and services directly in the Activity screen, it can be messy and sometimes you’ll have trouble seeing your changes. It’s much better to use the Custom Fields Editor. Go to Tools > Show Options Click Custom Fields Editor at the left Find the field “Funder Activity Session Type” in the dropdown (start typing it into the “Type” field at the top to quickly jump to the field). *If at any point you think you made a mistake, click the “Cancel” button at the bottom of the screen and don’t save your changes. If you have saved all of your changes and you still don’t see them, click the “Refresh” icon from the Person screen. COLUMNS Click a column title to sort by that column. Category is the left column which is titled “Funder.” It has nothing to do with the funder but this was the original terminology that Osnium used before we modified the database. Service is the right column which is titled “Activity Session Type” Remove Services from a Category RIGHT-click a category at the left and select “Open Item.” - You will see the Name of the category (be careful not to edit it unless you intend to) and a list of all the services that are in that category. (The same service can be in more than one category). - Highlight each service that you don’t want in the category, and click “Remove”. This will cause the service to not show up when you choose that category, but the services will remain in the database. Osnium WS Administrator Manual- Wisconsin pg 18 of 28 End Domestic Abuse WI DRAFT 11/18/15 - Be careful not to edit the category name, unless it is your own category and not used for a custom funder report. Save & Close the category when you are done. When you click OK to exit this screen, be sure to save changes. Remove one Service from several Categories RIGHT-click the service at the right (any instance of the service) and select “Open Item.” - You will see the Name of the service (be careful not to edit it unless you intend to) and a list of all the Categories where it appears. - Highlight and remove each category where you don’t want the service to appear. - The “Show in Activity” checkbox should be the only one checked. - Be careful not to edit the service name unless you are not using it for any of the custom funder reports. - Save & Close the Service when you are done. - When you click OK to exit this screen, be sure to save changes. Add a Service Click the “New” button or right-click anywhere and select “New.” Click the Activity Session Type field and then the “New” button at the bottom of that screen. Type the name of the service Add any Categories for you wish the service to appear Uncheck all of the boxes except “Show In Activity” Save & Close Close the Funder Activity Session Type window – no need to save this one. Click OK to close the Custom Fields Editor and save your changes. (You will not see the new service in the list until you close this window. Check an Activity screen to be sure it is there; click the “Refresh” icon at the top of the screen if necessary.) Osnium WS Administrator Manual- Wisconsin pg 19 of 28 End Domestic Abuse WI DRAFT 11/18/15 Delete a Service If you delete a service, you can no longer choose that service from the Parameters drop-down lists when running reports. If you have not entered the service or category anywhere this will not be a problem. If you have already entered this service in any activity records, you can uncheck the “Show in Activity” box and it will no longer be an option for data-entry, but you will still see it in the reports parameters. If you REALLY want to delete the service: Sort the “Activity Session Type” column so you can find all of the places where the service appears. Click each row and click the red “X” to delete the item. Confirm that you want to delete it. Click OK to exit this screen and save your changes. Add a Category Click the “New” button. Click the “Funder” field (remember, it’s not really the Funder, it’s the Category) Click the “New” button at the bottom of the window. Type your new category Add services that you want to appear in this category (or create new ones) Click “Save & Close.” Close the Funder Activity Session Type window (no need to save) Click OK to exit this screen and save your changes. Delete a Category ! SEE CAUTION ABOUT DELETING CATEGORIES If you delete a category, you can no longer choose that category from the Parameters drop-down lists when running reports. If you have already entered this category in any activity records, you may prefer to rename or remove all services from the category instead. (It looks like you may be able to right-click, Open Item and delete the category here; it remains in the custom fields editor but doesn’t appear in the drop-down list. Not sure if it is still available in report parameters, still checking.) How to completely delete a category: Sort the “Funder” column so you can find all of the places where the category appears. Click each row and click the red “X” to delete the item. Confirm that you want to delete it. Click OK to exit this screen and save your changes. You may need to refresh the screen or log out and back in to see changes. Blank rows If you have inadvertently added a blank row, just click on it and click the red “X” (or right-click on it and delete). Osnium WS Administrator Manual- Wisconsin pg 20 of 28 End Domestic Abuse WI DRAFT 11/18/15 Customize Topics Covered in the Custom Fields Editor ! This list is used for VOCA reporting beginning October 1, 2015. Feel free to modify it if you don’t report to VOCA, or if you want to remove any topics you never cover. VOCA has modified their topics & categories since the original database came out, so you will have to make some changes. Follow the separate instructions for VOCA Reporting Configuration and Instructions. Use the Custom Fields Editor to modify Topics Covered; it doesn’t work very well (if at all) from the Activity screen. Go to Tools > Show Options Click Custom Fields Editor at the left For topics, find the field “Session Topic” in the dropdown (start typing it into the “Type” field at the top to quickly jump to the field). For categories, find the field “Session Topic Category.” Be careful because you edit the Topics and the Categories directly from the lists. Click a column title to sort by that column. *If at any point you think you made a mistake, click the “Cancel” button at the bottom of the screen and don’t save changes. If you have saved all of your changes and you still don’t see them, click the “Refresh” icon from the Person screen. Topics In the Custom Fields Editor go to “Session Topic.” Each Topic-Category combination is its own item (one line). If you edit a topic or category, any data already entered in an Activity will change to the new text. Don’t rename an option to a completely different item; just re-word (or combine similar items) as needed and your existing entries will change to match. You can move a topic to a different category after you have entered data, and the change will apply to existing entries. This is a good thing, it means you don’t have to move anything you have already entered. If you delete a topic or category, any data you have previously entered will still appear in the report. You’ll have to figure out where to count these items, or else try to correct your data before running the report. To add a Topic Click “New” at the top, select the category, and type your new topic. To delete a Topic-Category combination ! CAUTION: If you delete a Topic-Category combination, your existing data will remain and show up in reports, but you will no longer be able to filter by that topic category if there are any reports where you can select it from the filter parameters. Osnium WS Administrator Manual- Wisconsin pg 21 of 28 End Domestic Abuse WI DRAFT 11/18/15 Highlight the Category-Topic line that you want to delete, and click the red “X” (or right-click the item and delete). To edit a Topic Highlight the topic and edit directly within the list. If for some reason you have a topic in more than one category (you wouldn’t for VOCA), you will need to edit it in each one. Topic Categories In the Custom Fields Editor go to “Session Topic Category.” To add a Topic Category Click the blank row at the top to add a new row. Click the blank area in the Category column and click the “New” button. To delete a Topic Category ! CAUTION: If you delete a topic category, your existing data will remain and show up in reports, but you will no longer be able to filter by that topic category when running reports where it is a parameter. Highlight the category you want to delete, and click the red “X” (or right-click the category and delete) If you still have any topics in that category you will need to delete each Topic-Category line in “Session Topic.” To edit a Topic Category name Click a Category and edit it directly in the list. - Be careful about doing this if you report to VOCA. Blank rows If you have inadvertently added a blank row, just click on it and click the red “X” (or right-click on it and delete). Case Notes Decide on a notes policy for your users regarding what information you will enter in Case Notes and what you will enter in various other notes screens in the database. Items entered in the Case Notes tab can be purged (you would ask Osnium to do this), while the Notes fields in various screens can’t. Case Notes viewing can be restricted by role. Case Notes can be locked for editing: go to Agency Options and set days to lock case notes (can’t edit or delete). Note that an agency administrator can temporarily unlock case notes if they need to be edited or deleted. Osnium WS Administrator Manual- Wisconsin pg 22 of 28 End Domestic Abuse WI DRAFT 11/18/15 If you don’t enter case notes you can hide this tab. Users should be aware of your agency’s policies on using the Notes fields, taking into consideration confidentiality and the potential for subpoena. Reporting Using Lists Any list in the database (Person, Events, individual client tabs, etc.) can be used to search, sort, filter, calculate and export. If you can get what you need from a list, you may not need to run a report. See the documentation on using Lists in the Wisconsin Basic User’s Manual. HINT: xls and xlsx files will export with tables where you can do more complex filtering, including selecting more than one value. If you have any column calculations they will appear at the bottom of the table, or you can add your own calculations to the spreadsheet. And if you’ve never created a Pivot Table, learn how! Excel’s Insert > Recommended Pivot Tables is amazing! Reports See detailed instructions for running reports in the Basic User’s Manual. Import a Report You don’t have to be an administrator to import or run reports. Reports for Wisconsin are made available via the Reports link at http://osnium.com/wisconsin. - Select the report from the list and click the Download button at the bottom of the screen. Note where it was saved (usually to your Downloads folder). The file will have an extension of .repx and probably a blank file icon. (If you don’t see the extension, go to your computer’s Folder Options from the search box, and in the View tab uncheck “Hide extensions for known file types” and OK) When you are in the Reports area, click the Reports tab at the top of the screen. Click Import / Export Reports > Import Report - Navigate to the report file that you downloaded, and double-click to import it. You can also select multiple reports to import and then OK WAIT. Be patient. You won’t see an hourglass or anything, but in several seconds you will see a popup message “The report(s) were imported successfully.” Osnium WS Administrator Manual- Wisconsin pg 23 of 28 End Domestic Abuse WI DRAFT 11/18/15 - If you accidentally import an extra copy of the report, right-click on it and select Delete. Export a Report To share a report file with another agency, click Import / Export Reports > Export Report. Send it to someone by email for them to save and import. Creating Reports The report creation tool is a complex interface and will generally require Osnium tech support. You can use some of your 8 hours of annual support for this. Reports can be shared among agencies, so you may want to coordinate with other Wisconsin programs to spread out your requests and not use up all of your support time. If you do request a report, provide clear and detailed documentation of what you need to cut down on the time used. Osnium can post reports they create for you to the download page for other Wisconsin users to import. Screen Layout Customization (Model File) Only people with Administrators role can edit the model file. Ideally you will not give this role to individual users, but log into an account with the Administrator role deliberately when you want to make screen layout changes. ! SUGGESTION: Create an additional generic account with the Administrator role to experiment with or make Model File changes (maybe Administrator – Test Model File). Unless you distribute the model file from this user, your changes will only appear for this user, and you will still have the original Model File associated with the Administrator. You may wish to wait a few months before customizing your screen layout until we are certain that there aren’t glitches where we need to replace the model file for all Wisconsin agencies. But if you do want to make changes right away, keep track of your changes so you can recreate them if necessary. Or, instead of replacing your model file you can manually replicate any changes that we make. The Model File for Wisconsin holds all the customizations we created, and is the initial layout agencies see when first installing the database. It includes: - Location and visibility of fields on forms - Visibility of Tabs - Visual changes to screens and field labels - Lists (including find lists for each area as well as custom lists in File menu > Lists) - Navigation menus and icons - Window resizing - List columns Osnium WS Administrator Manual- Wisconsin pg 24 of 28 End Domestic Abuse WI DRAFT 11/18/15 NOTE: Modifications to list columns apply only to the user, so if you add a column, let other people know they can add it, or else you can to distribute your model file to other users. Remember that distributing your model file will override anything they have done to theirs. ! CAUTION: ALWAYS BACK UP YOUR MODEL FILE BEFORE MAKING CHANGES!!! Tools > Edit Model > Export Model File If necessary you will be able to get the original Wisconsin Model File from Osnium or another program. Back Up, Import and Distribute the Model File Tools > Edit Model These options are only available to users with the role Administrator or Administrator (No Customization) ! DO NOT USE Clear Model File Changes!!!! This will reset your database screens to the “vanilla” version of WS, which looks nothing like our Wisconsin database. Export Model file Back up your Model File before you make any changes. If necessary you can import and redistribute it if you make a mistake. Note where you saved the backup. Import Model file Use this to import a new Model File, or a saved Model File if you need to restore a previous layout. You will need to distribute the Model File to all users after importing (and testing). Distribute Model File (after testing) You will need to distribute the new (or restored) Model File to all users. They must log out and back in to see the changes. Be sure you have a backup of the previous Model File. Use the model from the account that was used to make the changes (an Administrator), or from the account to which you imported the Model File. Check the Boxes for each user who should get this Model File. Or click “Add Users From Roles” and select all the roles that should get this Model File. Osnium WS Administrator Manual- Wisconsin pg 25 of 28 End Domestic Abuse WI DRAFT 11/18/15 Click “OK.” You will not see a confirmation, so be sure you are doing this correctly AND that you have a backup of the previous Model File. NOTE: You can have multiple model files that are different for each user. However, permissions and roles may be a more secure way to prevent users from accessing certain areas or features. ! CAUTIONS ABOUT CHANGING THE SCREEN LAYOUT: If you hide a required field, you will not be able to save the record without entering something, and since you can’t see it you won’t be able to enter anything. Always make required fields optional before hiding them, or before hiding a tab or screen that contains a required field. Some fields, tabs and other elements have been renamed. If you hide them and later wish to make them visible, you may need to contact Osnium to find out what they are actually called. On some screens there are hidden fields which may be used in other screens for a different purpose. Be careful not to hide anything in your administrator’s Model File that an administrator might need access to. You will not see a confirmation message after making changes, when closing the Customization window. Some of the changes you can make: Unbold/bold labels; change label colors (but make sure your colors won’t conflict with color schemes your staff might select) Hide fields you are not using – but make REQUIRED fields optional first. Hide tabbed sections you will not be using – but first make all REQUIRED fields in that tab optional. *Keep a record of any changes you’ve made in case you need to recreate them – Make a list, or take a screen shot. How to Customize the Model File 1. Log in to the Administrator account. 2. Backup your Model File (Tools > Edit Model > Export Model File) and note where you saved it. 3. Go to the screen you want to customize. Right-click on the screen and select “Customize Layout.” Osnium WS Administrator Manual- Wisconsin pg 26 of 28 End Domestic Abuse WI DRAFT 11/18/15 4. The Customization window will open. You can move it out of the way if necessary. It contains visual elements and hidden fields that we have chosen not to include in our version of the database. (Note that some fields you may see here may have been repurposed and used in other screens, so they may not be what you would expect). 5. Make your changes. 6. Close the Customization window or right-click and select “Hide Customization Form.” 7. Distribute the new Model File to users. Field labels Right-click on a field label (next to where you enter data). Be sure you do not rename an actual field! - Rename: This will rename the label that you see next to the field - only on this screen. It will not change the actual field name. - Appearance: Bold, italicize, underline or change the color of the label – only on this screen. It will only affect the label and not the text in the field. - Hide item: Hide the label but not the field. - Close the Customization window when you are done. Hide a Field - NEVER HIDE A REQUIRED FIELD! Make it optional first. If you hide a required field, you will not be able to save the record - Right-click on a field (not the label) - Select “Hide Item” if you don’t want to see this field. The associated label will also be hidden. - Close the Customization window when you are done. Hide a Tab - CLEAR ANY REQUIRED FIELDS in a tab before hiding it. If you hide a tab with a required field, you will not be able to save the client record even if you don’t see the tab. - Right-click on a tab. - Select “Hide Item.” - Close the Customization window when you are done. Re-ordering Tabs - Use the left mouse button to drag the tab to a new location and let go. - Close the Customization window when you are done. Restore a hidden item - Go to the Customization window - If the field or tab is not in Hidden Items, click “Add” to get to the Object Model window. - Look for your field or tab. You may need Osnium’s help to find the correct field or tab, especially if it has been renamed from the original. - Select the item and click “Add.” - Drag the item from the Customization window to the place you want it on your screen. - Close the Customization window when you are done. Osnium WS Administrator Manual- Wisconsin pg 27 of 28 End Domestic Abuse WI DRAFT 11/18/15 Add Layout Items From the Customization window you can add screen elements, such as: - Label: not associated with a field but can be text added to the screen - Separator: place between columns to allow users to resize columns - Splitter: visual element to set off areas of the screen. - Empty Space Item: visual element to block out space between fields or sections. Osnium WS Administrator Manual- Wisconsin pg 28 of 28 End Domestic Abuse WI DRAFT 11/18/15