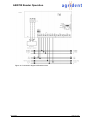
1
Agrident GmbH, Steinklippenstr. 10, D-30890 Barsinghausen
Phone +49 5105 520614 - Fax +49 5105 520616
ASR700
Reader Operation
Manual
V08/08/06
ASR700 Reader Operation
© Copyright 2006 by Agrident GmbH
All rights reserved. No part of this publication may be reproduced, stored in a retrieval system,
or transmitted, in any form or by any means, electronic, mechanical, photocopying, recording or
otherwise, without prior written permission of Agrident GmbH.
Agrident GmbH reserves the right to make changes to any and all parts of this documentation
without obligation to notify any person or entity of such changes.
August 2006 (BUS/JR)
Agrident GmbH
Steinklippenstr. 10
30890 Barsinghausen
Germany
Phone +49 (0) 51 05 520614
Fax +49 (0) 51 05 520616
E-Mail: [email protected]
www.agrident.com
08.08.2006
Page 2 of 55
ASR700 Reader Operation
Contents
1.
Introduction.......................................................................................................... 6
1.1
2.
ASR700 Hardware .............................................................................................. 7
2.1
Description ............................................................................................ 7
2.1.2
Contact less identification with RFID..................................................... 7
2.1.3
Transponder types supported ............................................................... 7
Installing and connecting the ASR700 and antenna..................................... 8
2.2.1
Installing the housing ............................................................................ 8
2.2.2
Fitting the antenna ................................................................................ 9
2.2.3
Electrical connection ........................................................................... 10
2.2.4
Auto tuning .......................................................................................... 16
2.3
4.
Application.................................................................................................... 7
2.1.1
2.2
3.
Definition of terms ........................................................................................ 6
Operation ................................................................................................... 24
2.3.1
Basic settings ...................................................................................... 24
2.3.2
First-time use of the ASR700 – an example........................................ 24
2.3.3
Read function ...................................................................................... 24
2.3.4
Displaying the read function ................................................................ 24
2.3.5
Output of the transponder data ........................................................... 25
2.3.6
Connecting the reader to a control computer ...................................... 26
Operating modes............................................................................................... 27
3.1
Operating in slave request mode (Cfg_mode register 0x02) ...................... 27
3.2
Operating in slave continuous mode (Cfg_mode register 0x01)................. 28
3.3
Operating in master mode (Cfg_mode register 0x00) ................................ 29
Configuration of the ASR700 reader ................................................................. 30
4.1
Factory configuration.................................................................................. 30
4.2
Configuration possibilities........................................................................... 30
4.3
Description of the individual registers......................................................... 31
4.3.1
Cfg_Delaytime..................................................................................... 31
4.3.2
Cfg_Format ......................................................................................... 31
4.3.3
Cfg_Mode............................................................................................ 32
4.3.4
Cfg_Node ............................................................................................ 32
4.3.5
Cfg_RF................................................................................................ 32
4.3.6
Cfg_Timeout........................................................................................ 32
4.3.7
Cfg_Optimisations............................................................................... 33
08.08.2006
Page 3 of 55
ASR700 Reader Operation
5.
Protocol description ........................................................................................... 34
5.1
Interface parameter .................................................................................... 34
5.2
Frame......................................................................................................... 34
5.3
Control codes ............................................................................................. 34
5.4
Escape sequence....................................................................................... 34
5.5
Addresses .................................................................................................. 34
5.5.1
Destination address DST .................................................................... 34
5.5.2
Source address SRC .......................................................................... 34
5.5.3
Address ranges ................................................................................... 34
5.5.4
Device type addresses........................................................................ 35
5.6
Message commands and acknowledgements............................................ 36
5.7
Description of the individual messages ...................................................... 37
5.7.1
Connect_RQ ....................................................................................... 37
5.7.2
Get_Amplitude .................................................................................... 37
5.7.3
Get_Config .......................................................................................... 37
5.7.4
Get_HDX_Sample............................................................................... 37
5.7.5
Get_Last_ID ........................................................................................ 38
5.7.6
Get_Phase .......................................................................................... 38
5.7.7
Get_PhaseAmplitude .......................................................................... 38
5.7.8
Get_RSSI ............................................................................................ 38
5.7.9
Get_Single_ID..................................................................................... 39
5.7.10
Get_SNR............................................................................................. 39
5.7.11
Get_TuningResult ............................................................................... 39
5.7.12
Get_Tuning ......................................................................................... 40
5.7.13
Get_Version ........................................................................................ 40
5.7.14
Reset_All............................................................................................. 40
5.7.15
Retransmit_Request ........................................................................... 41
5.7.16
Save_Config........................................................................................ 41
5.7.17
Set_Config .......................................................................................... 41
5.7.18
Set_TuningData .................................................................................. 41
5.7.19
Start_AutoTuning ................................................................................ 42
5.8
Description of the acknowledgements........................................................ 42
5.8.1
ACK..................................................................................................... 42
5.8.2
NAK..................................................................................................... 42
5.9
ID-Format ................................................................................................... 42
5.9.1
Format of ID ........................................................................................ 42
5.9.2
ID-without time stamp ......................................................................... 42
08.08.2006
Page 4 of 55
ASR700 Reader Operation
5.9.3
ID- with time stamp ............................................................................. 43
5.9.4
Example ID- without time stamp Format ASCII ................................... 43
5.9.5
Example ID- without time stamp Format ASCII and SCP format......... 43
5.9.6
Example ID- without time stamp Format ASCII short format............... 43
5.9.7
Example ID- without time stamp Format ASCII short format 16.......... 44
5.10
CRC Calculation......................................................................................... 45
5.10.1
6.
CRC-Algorithm .................................................................................... 45
Clock synchronisation of ASR 700 readers ....................................................... 46
6.1
Installation .................................................................................................. 46
6.2
Setting at the ASR700................................................................................ 46
7.
Technical data ................................................................................................... 48
8.
Influence of noise, Interference and metal objects on the reading range .......... 49
8.1
Computer monitors..................................................................................... 49
8.2
Other electronic equipment ........................................................................ 49
8.3
Data cables ................................................................................................ 49
8.4
Mains cables .............................................................................................. 49
8.5
Fluorescent and Low Voltage Lighting ....................................................... 50
8.6
Other readers ............................................................................................. 50
8.7
Effects of metal near readers ..................................................................... 50
9.
Safety and care ................................................................................................. 51
10.
Warranty ........................................................................................................ 51
11.
Appendix........................................................................................................ 52
11.1
RF synchronisation..................................................................................... 52
11.2
Description of commands and acknowledgements .................................... 52
11.3
Description of the registers......................................................................... 53
11.4
Factory configuration.................................................................................. 54
12.
Trouble shooting ............................................................................................ 55
08.08.2006
Page 5 of 55
ASR700 Reader Operation
1.
Introduction
Before attempting to use the product for the first time read through the user manual carefully.
The functional description of the ASR700 reader will help you make best use of the full capabilities of the system. The protocol description in chapter 5 provides you with all the information
you need to integrate the reader into your own application software.
1.1
Definition of terms
Explanation of abbreviations used in this user manual
RF:
RFID:
Radio Frequency (in this case the long-wave band)
Radio Frequency Identification. Method to transmit data without contact using transponders.
Reader:
A device which is able to communicate with transponders using an internal
or external antenna. The reader generates a high frequency field in order to
get the data of a transponder. The received data is transmitted by an interface to an external controller (e.g. PC etc.).
Transponder:
Data carrier for RFID applications, available in various models and types.
Raw data:
Complete data contents of a transponder, which means ID and additional information (for example header or trailer).
ID:
Identification number of a transponder.
ISO 11784/85:
International standard regarding the use of RFID technology in the identification of animals; it defines the transponder types to be supported and the ID
notation.
FDX:
Transponder type, which transmits its data while the HF field, is on (full duplex).
FDX-B:
FDX transponder with 128 bits of raw data, ID notation in compliance with
ISO 11784/85.
HDX:
Transponder type, which transmits its data directly after HF field, goes off
(half duplex). 104 bits of raw data, ID notation in compliance with ISO
11784/85.
Master mode:
Read mode in which the reader works as master. The reader makes field on
and off permanently and transmits received transponder data automatically.
Slave request:
Read mode in which the field is normally off. The reader makes field on and
off only after a request by the controller. If a transponder was read during
activation time the ID is transmitted to the controller.
Slave continuous: Read mode in which the reader makes field on and off permanently. The
reader transmits received transponder data only after a request from an external controller.
08.08.2006
Page 6 of 55
ASR700 Reader Operation
2.
ASR700 Hardware
2.1
Application
2.1.1 Description
The ASR700 is a stationary reader, which is used for contact less identification in combination
with passive transponders. The hardware of the ASR700 reader is designed for noisy environments. With the on board signal processor it is possible to read transponders where other readers could not detect them (for example in slaughterhouses).
It has been developed for stationary use. Combined with one of our antennas it provides a flexible and universal RFID system.
Antennas with various dimensions and read ranges are available to closely match individual requirements.
The ASR700 reader is compatible with the ISO 11784/5 standard and can read HDX- or FDX-B
compatible transponders. The transponders are registered within an extremely short time and
over a wide detection area. Individual parameters of the read function can be configured.
It can be run using a computer, but application software is then required to drive the reader and
to further process the transponder data supplied.
The message format of the transmitted transponder data is configurable. For description of the
data protocol see chapter 5.
2.1.2 Contact less identification with RFID
How RF identification works.
The items to be identified are fitted with passive transponders, which contain the identification
data. A reader is required for communication with the transponders. The reader generates a
high frequency field using an antenna. This high frequency field activates each transponder,
which is inside the reading range. The high frequency field is used for supplying the transponder with energy and for transmitting the transponder data to the reader. From the received
data, the reader generates a data block (ID message). This ID message is sent out by an interface to a controller for further processing.
The reading range depends on the antenna and the environment.
The following things may influence the reading range (see also chapter 8):
• Mounting antenna on or near metal
• Noisy environment (for example electrical machines, screens etc.)
• Antenna mistuned (see chapter 2.2.4 auto tuning for details)
The demonstration software Asrdemo.exe includes tools for checking the tuning state of the antenna and the noise of the environment.
2.1.3 Transponder types supported
The ASR700 reader is compatible with the ISO 11784/5 standard and can read HDX- or FDX-B
compatible transponders.
08.08.2006
Page 7 of 55
ASR700 Reader Operation
2.2
Installing and connecting the ASR700 and antenna
2.2.1 Installing the housing
A mounting hole is provided at each of the four corners of the bottom part of the housing to allow installation of the ASR700 reader. The holes are accessible after removal of the housing
cover. Four suitable screws are needed to mount the unit at the place of installation. We recommend flat head screws.
Figure 1: Installing the housing
08.08.2006
Page 8 of 55
ASR700 Reader Operation
2.2.2 Fitting the antenna
If at all possible the antenna should not be permanently exposed to direct sunlight; installing the
device in an area sheltered from ultraviolet light will extend its service life.
Installing in the immediate vicinity of metallic objects may lead to detuning of the antenna. For
this reason do not tune the antenna before the antenna has been installed. Avoid fitting to metallic surfaces since this may result in severe reduction of the reading distance.
To fasten the antenna to the base, use flat head screws with a thread diameter not greater than
5 mm as well as suitable washers. Do not use dish-head screws for this purpose as this could
lead to the plastic frame being damaged.
The connecting cable to the reader should be fastened in place with cable clips or similar in
such a way that the cable does not project and thus become a potential danger.
Important! For advice regarding choosing a suitable antenna, contact the ASR700 dealer.
Under no circumstances is it permitted, for functional reasons or in connection with equipment
approvals, to lengthen the cable of the antenna.
For information on tuning see chapter 2.2.4.
Figure 2: Antenna
08.08.2006
Page 9 of 55
ASR700 Reader Operation
2.2.3 Electrical connection
The electrical connections for the power supply, the communication interfaces with the controller (RS232 or RS485), and for connecting the antenna are made via terminal strips st2 and st7
on the printed circuit board.
The corresponding cables are routed through the watertight screwed conduit cable entries. We
recommended that the interface cable be routed through the screwed conduit entry PG3, the
power supply cable through PG4 and the antenna cable through PG5.
Connections for synchronization should be routed through PG1 and PG2.
Important! Please close the unused screwed conduit entries with the enclosed blind plugs.
Please use only round cables, otherwise the protection class cannot be guaranteed.
To ensure the water tightness thoroughly tightens the screwed conduit entries.
ST1
Additional tuning capacitors
ST2
Antenna
ST7
Power supply, communication interface and synchronization
ST4,ST5
LED's D1 (red) ,D2 (green) and D9 (yellow) and tuning switch
ST3,ST6,ST10,ST11,ST12,ST13 Reserved for internal use
ST8,ST9
Reserved for future use
LED1,2,3
Tuning indicators, power on (yellow) and good read (green)
LED22
Indicator for polyswitch
LED12,18,20,26,27,28,29,30
Reserved for service
J13
Master/Slave selection if synchronisation is needed
J14,15,16
Communication interface selection
Switch S1,S2
Reserved for internal use
Their function is described in the next sections.
PG5
08.08.2006
PG4
PG3
PG2
PG1
Page 10 of 55
ASR700 Reader Operation
Communication interfaces
To select and activate the required communication interface the jumpers J4, J5 and J6 must be
set as follows:
TxD
RxD
GND
Figure 3: Jumper settings for RS232
Terminal block ST7
3
4
5
Interface connection RS232
Meaning
J4 J5 J6
TxD
See Figure 3
RxD
GND
An RS232 interface needs three wires (TxD, RxD and GND)
TxD:
Where a device transmits data
RxD:
Where a device receives data
GND:
Ground
08.08.2006
Page 11 of 55
ASR700 Reader Operation
To use the RS232 interface, connect TxD of the PC to RxD of the ASR700/766, RxD of the PC
to TxD of the ASR700/766 and both Ground signals.
ASR700/766 ST7
Pin 3 TxD
Pin 4 RxD
Pin 5 GND
Connection
PC SUB-D 9 pole
Pin 2 RxD
Pin 3 TxD
Pin 5 GND
To detect TxD and RxD disconnect the data lines (TxD and RxD).
Do Voltage measurement between Ground and one of the lines.
The TxD line should be approximately –12V (could be less)
The RxD line should be approximately 0V.
A
B
GND
Figure 4: Jumper settings for RS485
Terminal block ST7
3
4
5
08.08.2006
Interface connection RS485
Meaning
A / T+ / R+
B / T- / RGND
J4 J5 J6
See Figure 4
Page 12 of 55
ASR700 Reader Operation
Power supply
Connecting terminals 1 (+) and 2 (-) are available on terminal block ST4.
A linear regulated power supply of 13,8V is recommended (ripple must be smaller than 50mV).
Maximum current is 1A. Typical current is 700mA.
Terminal block ST7
1
2
Power supply
Meaning
Power supply +13,8V
Power supply -
After connecting the power supply to the ASR700, the yellow LED lights, indicating the ASR700
is ready for work. The green LED is on after a transponder was read. If the red LED is on, a tuning procedure for the antenna is necessary.
During the tuning process the LED's have different meanings (see chapter 2.2.4).
Important! The chassis ground (GND) of the reader must be connected to the protective conductor of the supply network.
If the antenna is integrated into a metal structure this structure should also be connected to the
protective conductor of the supply network.
08.08.2006
Page 13 of 55
ASR700 Reader Operation
External signals and auto tuning
The following schematic figures show how to connect external LEDs and the auto-tuning switch.
13,8V
-ve
Pin1
Figure 5: Connection diagram ASR700/766
08.08.2006
Page 14 of 55
ASR700 Reader Operation
Figure 6: Connection diagram for LEDs and auto tuning switch
Terminal block ST4
1
2
3
4
5
6
7
8
LEDs and auto tuning switch
Meaning
+5V
Output Red LED (open collector with R = 470Ω)
+5V
Output Yellow LED (open collector with R = 470Ω)
+5V
Output Green LED (open collector with R = 470Ω)
Input for auto tuning switch
GND
Terminal block ST5
1
2
3
4
5
6
7
8
LEDs and auto tuning switch
Meaning
+5V
Output Red LED (open collector with R = 470Ω)
+5V
Output Yellow LED (open collector with R = 470Ω)
+5V
Output Green LED (open collector without R)
Input for auto tuning switch
GND
Important! If using terminal block ST5 (RJ45 connector), there is no built in resistor on the open
collector output pin 6. An external resistor (RV) has to be connected.
08.08.2006
Page 15 of 55
ASR700 Reader Operation
Antennas
The antenna is connected to terminal block ST2
Terminal block ST2
1
2
3
Antenna connection
Meaning
Antenna A1 (transparent white)
Antenna A2 (transparent pink)
Shield G
2.2.4 Auto tuning
Every individual antenna will have an inductivity, which deviates slightly from the reference value. Another important tuning criteria are the environment of the mounting place (metal near the
antenna, temperature drift etc.).
The environment will influence the inductance and the Q factor of the antenna. For example
metal near the antenna reduces the Q factor and the inductance of the antenna.
The inductivity of the externally connected antenna together with the capacitors on the board
forms a resonant circuit. It should be tuned to the nominal frequency of 134 kHz.
To get the optimum reading range it's necessary to adapt the capacitor to the antenna.
To find the optimal tuning for each antenna and each environment, an auto tuning function is
implemented in the ASR700.
Auto tuning means to automatically get the optimal tuning (which means the optimal reading
range) for the combination of reader, antenna and environment.
If one of the parameters changes (for example the antenna is mounted in another place), a new
auto tuning procedure has to be done, in order to adapt the reader antenna combination to the
new environment.
Auto tuning is done by a few switch able capacitors on board the ASR700. The auto tuning
works only in a certain area (fine tuning). If the maximum peak is outside this area, there are
two additional capacitors which can be switch on or off by setting or removing the jumpers on
ST1.
For to start the auto tuning function it's necessary to connect pin 7 and pin 8 of terminal block
ST4 or ST5 or send an auto tuning command from the controller to the ASR700 (see chapter
5.7.19).
08.08.2006
Page 16 of 55
ASR700 Reader Operation
Activating the Tune button on the front of the reader starts auto tuning.
After starting the auto tuning the yellow LED and the red LED are on.
The reader now measures the voltage of the antenna for all capacitor combinations.
After measuring the tuning cycle is represented optically. All LED's switch off. The optical representation starts with the yellow LED, followed by the green LED and finishes with the red LED.
Flashing of one or two of the LED’s shows the final result of the auto tuning procedure:
Signalisation
Red LED is flashing
Red and green LED's are flashing
Green LED is flashing
Yellow and green LED's are flashing
Yellow LED is flashing
Meaning
Capacitance to low, set one of the jumpers on
terminal block ST1 and repeat auto tuning
Capacitance a bit to low, set one of the jumpers
on terminal block ST1 and repeat auto tuning
Auto tuning successful
Capacitance a bit too high, remove one of the
jumpers on terminal block ST1 and repeat auto
tuning
Capacitance too high, remove one of the jumpers
on terminal block ST1 and repeat auto tuning
Table 1: LED meaning of auto tuning result
Important! Do not hold a transponder into the antenna field during the auto tuning process or
during the request of tuning status.
The auto tuning procedure should be repeated until only the green LED is flashing.
If necessary, remove or set one of the jumpers on terminal block ST1 (see Table 1).
If it is not possible, the inductance of the antenna used might be too low or too high.
After auto tuning is finished, the yellow LED is on and the red LED is off.
If the red LED is on, there were some changes in the environment (e.g.: temperature drift or
metal is placed near the antenna etc.). In this case a new auto tuning procedure is recommended to get the optimum reading range.
Note: The red LED does not mean, that the reader is not able to read transponders. The red
LED only means, that the combination of reader, antenna and environment is not optimally
tuned.
The green LED represents the top of the tuning curve (see the following examples). The yellow
LED represents the area left from the top of the tuning curve and the red LED represents the
area right from the top of the tuning curve.
That means if the yellow LED is on for approximately the same time as the red LED, the top of
the tuning curve is in the middle, which is optimal.
08.08.2006
Page 17 of 55
ASR700 Reader Operation
Example: Optimal tuning curve
In this example as a result only the green LED is flashing.
The time of the yellow LED is approximately the same time of the red LED.
Don't care about additional peaks.
Figure 7: Example for optimal tuning curve
Example: Tuning curve ok
In this example as a result only the green LED is flashing.
The time of the yellow LED is longer then the time of the red LED, which means the top of the
tuning curve, is on the right but still ok.
Figure 8: Example for tuning curve ok
08.08.2006
Page 18 of 55
ASR700 Reader Operation
Example: Top of tuning curve on right border
In this example as a result the green LED and the red LED are flashing.
The time of the yellow LED is much longer than the time of the red LED (the red LED might be
not visible), that means the top of the tuning curve is on the right border. The cause of this problem is, that the inductance of the antenna is to low for the capacitor set which is used by the
auto-tune function.
In this case it is recommended to set one of the jumpers on ST1 and repeat the auto tuning procedure.
If all are jumpers set, and the maximum is still on the right border, the inductance of the used
antenna is on the lower limit for the reader. That means that changing's in the environment may
reduces the inductance of the antenna, so the maximum is outside the right border.
Figure 9: Example for top of tuning curve on right border
08.08.2006
Page 19 of 55
ASR700 Reader Operation
Example: Top of tuning curve outside the right border
In this example as a result the red LED is flashing.
The time of the yellow LED is much longer than the time of the red LED (the red LED might be
not visible), that means the top of the tuning curve is outside of the right border
The cause of this problem is, that the inductance of the antenna is to low for the capacitor set
which is used by the auto-tune function.
In this case it is recommended to set one of the jumpers on ST1 and repeat the auto tuning procedure.
If all jumpers are set, and the maximum is still outside the right border, the inductance of the
used antenna is too low for the reader. That means with this antenna the full reading range
could not be reached.
Figure 10: Example for top of tuning curve outside the right border
08.08.2006
Page 20 of 55
ASR700 Reader Operation
Example: Top of tuning curve on left border
In this example as a result the green LED and the yellow LED are flashing.
The time of the yellow LED is much shorter than the time of the red LED (the yellow LED might
be not visible), that means the top of the tuning curve is on the left border.
The cause of this problem is, that the inductance of the antenna is to high for the capacitor set,
which is used by the auto-tune function.
In this case it is recommended to remove one of the jumpers on ST1 and repeat the auto tuning
procedure.
If all jumpers are removed, and the maximum is still on the left border, the inductance of the
used antenna is on the higher limit for the reader. That means that changing's in the environment might increases the inductance of the antenna, so the maximum is outside the left border.
Figure 11: Example for top of tuning curve on left border
08.08.2006
Page 21 of 55
ASR700 Reader Operation
Example: Top of tuning curve outside the left border
In this example as a result the yellow LED is flashing.
The time of the yellow LED is much shorter than the time of the red LED (the yellow LED might
be not visible), that means the top of the tuning curve is outside of the left border.
The cause of this problem is, that the inductance of the antenna is to high for the capacitor set,
which is used by the auto-tune function.
In this case it is recommended to remove one of the jumpers on ST1 and repeat the auto tuning
procedure.
If all jumpers are removed, and the maximum is still outside the left border, the inductance of
the used antenna is too high for the reader. That means with this antenna the full reading range
could not be reached.
Figure 12: Example for top of tuning curve outside the left border
Auto tuning tools
All tuning curves are taken by using the auto tuning tools of the demo software Asrdemo.exe:
Figure 13: Auto tuning tool
For getting the tuning curve of an antenna, press "Tuning Data" and wait until the progress bar
has finished. After the progress bar has finished, click on "Show". The dialog "Antenna Tuning
Data" appears with the tuning curve of the antenna.
It's also possible to get the tuning state of the reader by pressing the "Get" button.
If the result is 0x00, the combination of reader, antenna and environment is optimal; otherwise
(0xFE, 0xFF, 0x01 or 0x02) the combination of reader, antenna and environment is not optimal.
For starting an auto tuning procedure, press "Start".
Saving and sending tuning data
It's possible to store the tuning curve in a file named "*.dat".
This can be done by pressing the "Save" button in the "Antenna Tuning Data" dialog.
08.08.2006
Page 22 of 55
ASR700 Reader Operation
Figure 14: Example of tuning curve
08.08.2006
Page 23 of 55
ASR700 Reader Operation
2.3
Operation
2.3.1 Basic settings
The ASR700 reader comes preset with a factory configuration. Following installation of the
reader and an antenna, and the reader has been tuned; the reader is ready for operation in
combination with suitable application software.
2.3.2 First-time use of the ASR700 – an example
Requirements:
• The power supply is connected
• The RS232 interface is selected
• An antenna has been connected and tuned
Objective:
To set the so-called master mode. This is a read mode in which the RF field is permanently activated. As soon as a transponder is detected, an ID message is put out by the specified interface.
Start–up:
Once the RS232 interface has been connected to one of the serial interfaces of the computer
(COM1, COM2,…), start the demo software Asrdemo.exe that should already be installed on
the computer.
For more detailed information on Asrdemo.exe please refer to the corresponding manual.
2.3.3 Read function
Once the read function has been activated (different operating modes) a transponder brought
into the detection area is quickly registered.
Note that the following factors may reduce the reading range:
• Alignment of the transponder to the antenna: the transponder axis (disk transponder: central
axis standing vertically on the plane of the circular face; glass transponder: longitudinal axis
corresponds to the central axis) is parallel to the antenna axis (corresponds to the central
axis standing vertically on the antenna surface); the larger the angel between transponder
and antenna axis, the shorter the range will be.
• Temperature range / environmental conditions: best results will be achieved within the temperature range approved for operation and the environmental conditions described in chapter 8.
• Installing the transponder on metal surfaces can have a negative effect on the read distance.
• Size of the transponder: the larger the transponder the larger the read distance with the same reader.
• Running multiple RFID systems simultaneously: these can be sources of interference for
each other.
Important! Please note that there should be no more than one transponder of the same type in
the detection area of the reader at any time since multiple transponders of the same type can
under certain circumstances make reliable detection impossible. Also avoid the simultaneous
presence of two different transponders in off mode (see chapter 1, register Cfg_Format) since
this could lead to problems with processing the transponder data.
2.3.4 Displaying the read function
The ASR700 confirms when a transponder has been read successfully by giving a visual signal:
the green LED (Read LED, see chapter 2.2.1) on the top of the housing lights up for a short
time.
08.08.2006
Page 24 of 55
ASR700 Reader Operation
2.3.5 Output of the transponder data
The transponder data, which are read in by the ASR700, can be made sent in various data formats as ID messages to the communication interface.
The ID message data formats can be selected during configuration (for example: ASCII or binary) and this means that the user can have optimum integration into an application. For example the advantage of ASCII is its good legibility although displaying it requires a large number of
characters; while binary means a short and effective display, but one, which is difficult to read.
The contents of the raw data and the ID message will vary according to the transponder type.
The raw data is displayed as follows:
Transponder type
HDX as per ISO 11784/85
FDX-B as per ISO 11784/85
Raw data without checksum
13 bytes (104 bits, without 16 prebits / 8-bit header)
16 bytes (128 bits)
This raw data can now be output as follows:
Transponder type
ID message
ASCII*
ID message
Binary* (Compact coding)
ID message
Transponder byte structure*
ID message
Raw data*
ID message
Short ASCII 15*
ID message
Short ASCII 16*
ID message
ASCII + SCP Format*
HDX as per ISO 11784/85
16 characters (decimal, as per
ISO)
8 bytes
FDX-B as per ISO 11784/85
16 characters (decimal, as per
ISO)
8 bytes
13 bytes
13 bytes
13 bytes
16 bytes
15 bytes
15 bytes
16 bytes
16 bytes
10 bytes
10 bytes
*For the complete frame structure see chapter 5.
08.08.2006
Page 25 of 55
ASR700 Reader Operation
2.3.6 Connecting the reader to a control computer
Point-to-point connection
This structure is particularly suited to applications with just a few (or even a single) readers.
Each reader is connected to the control computer by its own interface. To reduce sensitivity to
interference and to increase the possible length of the line, the RS485 interface can also be
used instead of the RS232.
Reader
Reader
Reader
Control
Computer
Reader
Reader
Each reader can be addressed by the control computer using suitable addresses (broadcast
addresses, individually assigned network or device addresses) and by its own interface (for example, the COM port in PCs: Reader 1 = COM1, Reader 2 = COM2,…).
Single master bus system
This structure is particularly suited to applications with several readers (a maximum of 32 per
control computer interface).
An RS485 bus interface is used as interface and this networks multiple readers with the control
computer by a 2-wire bus. It allows a network to be set up at no great expense.
Reader
Reader
Reader
Reader
Reader
Host
Each reader can be addressed by the control computer of the shared bus interface using the
individually assigned network or equipment address. This can be, for example, by an
RS232/RS485 converter at a COM port of a PC.
In order to organize access to the bus the control computer is declared sole master (single
master network). Each reader connected to the bus must have its own individual network address.
Before installing a reader in a bus structure, the reader must be assigned as a yet unassigned
network address by point-to-point connection. Configuration of the network address is effected
using, for example, the ASR700 demo software.
08.08.2006
Page 26 of 55
ASR700 Reader Operation
3.
Operating modes
The ASR700 supports three operating modes, which can be configured.
If changing the operation mode, the reader will not accept a mode change command until it has
finished processing/transmitting a response, (see chapter 5) any command it has already received. Using bus systems (see chapter 2.3.6) avoid changing from slave modes (see chapter
3.1, 3.2) into master mode (see chapter 3.3) since this could result in data collisions on the
lines.
The data buffers are cleared when there is a change of operating mode.
3.1
Operating in slave request mode (Cfg_mode register 0x02)
In slave request mode the read function is not activated until reception of a command
('Get_Single_ID'; for description see chapter 5.7.9) - in other words a request. The user software on the control computer can look after controlling the read function. The ID message of an
acquired transponder is transmitted once in the appropriate format at the interface. After the detection of a transponder and the transmission of the ID message – or after a timeout has
elapsed – the read function terminates. If a transponder is not detected before the timeout
elapses a blank ID message will be transmitted. Switching the RF field on and off is handled
automatically by the ASR700.
PC
ASR700
"Get_Single_ID"
Read function activated
Transponder detected
Read function deactivated
"ID-Message"
A fresh transmission of the 'Get_Single_ID' command causes the read procedure to be repeated.
When 'Get_Last_ID' is transmitted (see chapter 5.7.5) a new read cycle is not started but instead the last registered transponder ID is transmitted.
In this mode the interface protocol is bi-directional. The control computer here functions as a
command transmitter and the reader as the responding partner. The receiver confirms commands.
Note: In the case of a bus set-up using RS485 connection, data collision is possible on the bus
if several readers are addressed simultaneously with 'Get_Single_ID' or 'Get_Last_ID'.
Possible applications
Point-to-point connection with RS232/RS485: only one reader is connected by computer serial
interface.
Bus system with RS485: several readers are connected to a computer, configured with different
network addresses and are interrogated in sequence by the computer; for example,
08.08.2006
Page 27 of 55
ASR700 Reader Operation
'Get_Single_ID' to reader 1, reply from reader 1, 'Get_Single_ID' to reader 2, reply from reader
2, and so on.
3.2
Operating in slave continuous mode (Cfg_mode register 0x01)
In slave continuous mode the read function or the RF field is continuously activated. It autonomously detects a transponder, which is present and sends the transponder data to an internal
ring buffer memory (two IDs in size). Repeated addition of the same ID entry to the buffer can
be blocked with the aid of the configurable 'Delay time'. Every time an ID is added to the buffer
the 'Delay time' is restarted. The contents of the buffer can be read out (output of the oldest ID)
by the control computer with the command 'Get_Last_ID'. The response comes after max. 120
ms. If the buffer memory is empty a blank ID message will be transmitted. Repetition of the
command is a way of emptying the buffer.
ASR700
Buffer 2 IDs
PC
"Get Last ID"
Maximum 2 Ids in buffer
Oldest ID is transmitted
"ID-Message"
Interrogation by 'Get_Single_ID' starts a new read cycle.
After a request with 'Get_Single_ID', if a transponder is detected within the configured time-out
period, the ID will be transmitted (a blank ID in the case of failure to pick up a transponder).
Note: In the case of a bus set-up using RS485 connection, data collision is possible on the bus
if several readers are addressed simultaneously with 'Get_Single_ID' or 'Get_Last_ID'.
Possible applications
Point-to-point connection with RS232/RS485: only one reader is connected by computer serial
interface.
Bus system with RS485: several readers are connected to a computer, configured with different
network addresses and are interrogated in sequence by the computer; for example,
'Get_Last_ID' to reader 1, reply from reader 1, 'Get_Last_ID' to reader 2, reply from reader 2,
and so on.
08.08.2006
Page 28 of 55
ASR700 Reader Operation
3.3
Operating in master mode (Cfg_mode register 0x00)
In master mode the read function or the RF field is continuously activated. After a transponder
was detected, it's transponder data are transmitted as ID message at the serial interface. Before transmitting, the transponder data are prepared in compliance with the chosen output format. Repeated output of the same ID can be configured with the 'Cfg_Delaytime' register.
PC
ASR700
Read function activated
Transponder detected
"ID-Message"
Transponder detected
"ID-Message"
Communication is unidirectional from the reader to the control computer; no response is required. The complete protocol (see chapter 5) of the reader doesn't need to be implemented in
the user software if only master mode is used.
It only makes sense to use master mode in conjunction with point-to-point communication
(see chapter 2.3.6) since data collisions at the bus interface could result.
Possible applications
Point-to-point connection with RS232/RS485: only one reader is connected by computer serial
interface.
08.08.2006
Page 29 of 55
ASR700 Reader Operation
4.
Configuration of the ASR700 reader
For information on programming the configuration described below, please refer to the corresponding parts of chapter 5.
Note on notation of addresses, data and commands:
Single quotation marks designate ASCII values, for example '0' (zero).
If a date is preceded by the designation '0x', this indicates that the date is in hexadecimal notation; for example, 0x30 (hex notation of the ASCII zero).
Binary data are shown as bit patterns consisting of '0' and '1'; for example, 00110000 (binary
notation of the ASCII zero).
4.1
Factory configuration
The ASR700 reader comes preset with a factory configuration.
Parameter
Mode (Cfg_Mode*)
Data output format (Cfg_Format*)
Transponder types (Cfg_RF*)
Time out (Cfg_Timeout*)
Delay time (Cfg_Delaytime*)
Network address (Cfg_Node*)
Interface (fixed)
Setting
Slave request mode (0x02)
ASCII output of the ID (0x02)
All transponder types (0x0E)
100ms (0x01)
50ms (0x01)
0x01
9600 Baud, 1 Start bit, 8 Date bits, No Parity, 1 Stop bit
*For register details see the following chapters
4.2
Configuration possibilities
The ASR700 reader can be configured on the application-specific basis by means of configuration commands. Here special registers – listed in the following table – are addressed.
Register
Cfg_
Adr
Bits to
set
Cfg_
0x35
Delay time
Cfg_
Format
0x32
Cfg_Mode
0x31
Cfg_Node
0x36
Cfg_RF
0x33
0
1
0,1
1,2
0,1,2
0,1,2,4
5**
1
2
1,2
Cfg_
Time-out
08.08.2006
0x34
Hex value
of
Settings
0x01*
0x01*
0x01
0x02
0x03
0x06
0x07
0x17
0x20
0x00*
0x01
0x02
0x00
0x01*
0x0E*
0x02
0x04
0x06
0x01*
Significance of the registers or their configuration
Time interval for repeated ID message.
Repetition blockage for time 't' of an already transmitted/saved ID message:
Time 't' = register value * approx. 50 ms (0x00 results in no repetition)
Format of the ID message
ASCII notation
Transponder byte structure
Compact coding
Output of raw data without CRC
ASCII short format 15
ASCII short format 15
Use SCP format
Operation mode
Slave continuous mode
Slave request mode
Master mode
Individual network address of a reader; range of
values: 0x00 to 0xEF, except 0x02,0x03,0x10
Configuration of the RF interface
FDX-B reception activated
HDX reception activated
FDX-B and HDX activated
Time in which the field is active.
After the time-out period the field activated with
Get_single_ID is switched off unless a transponder
is detected within the time interval (after this the field
Page 30 of 55
ASR700 Reader Operation
Register
Cfg_
Adr
Bits to
set
Hex value
of
Settings
Significance of the registers or their configuration
is switched off immediately);
Time = register value x approx. 100 ms
(Value 0x00 also yields approx. 100 ms)
* Default values specified.
** Combinations with other mentioned bit combinations for Cfg_Format are possible.
Note: Configuration of bits not described above will not be accepted and this results in the response 'NAK'.
Following a 'Save_Cfg' command the configuration data are saved in the EEPROM where they
will be retained even in the absence of the power supply.
Important! If no 'Save_Cfg' command is given the new configuration data will be lost when the
power supply is switched off and will have to be redone after switching on again.
4.3
Description of the individual registers
4.3.1 Cfg_Delaytime
The repeat rate of the ID message of the same transponder can be defined by using the configuration register Cfg_Delaytime. It can be set to any interval between 50ms and approximately
13 seconds.
If Cfg_Delaytime is set to 0x00, the transponder ID will be transmitted only once on serial
interface until another transponder has been read.
If the transponder is read again after this time (Delay time), in master mode the ID will be output
once more at the serial interface, independent of how often it is detected within the time interval.
In slave continuous mode, renewed addition to the internal buffer will not take place until the delay time has elapsed, independent of how often it is detected within the time interval. In slave
request mode the delay time is ignored.
4.3.2 Cfg_Format
ID message:
The configuration register Cfg_Format is used for setting the output format of the transponder
ID. The transponder data decoded as per ISO 11784 can be displayed in ASCII format directly
on simple output terminals. For special application three further ASCII formats are available
which are transmitted without any checksum. CR LF finishes them. With the raw data format
however the complete transponder data, including control and back-up data, are provided with
CRC or parity check components. In addition, intermediate steps during data conversion can
also be selected, such as the 'transponder byte structure' or the binary notation for transponder
data decoded as specified in ISO 11784. For a detailed description of ID message, see chapter
5.9.
In slave request mode an ID is always output only at the moment of detection, not at the time
when the transponder leaves the detection area.
08.08.2006
Page 31 of 55
ASR700 Reader Operation
4.3.3 Cfg_Mode
Configuration register Cfg_Mode defines the operating mode.
Operating
Register
Mode
Value
Slave request 0x02
Mode
Slave
continuous
mode
0x01
Master
mode
0x00
Data output by
command from host
'Get_Single_ID'
New ID* is send to host
'Get_Last_ID'
The ID* last registered is sent to
the host
'Get_Last_ID'
Oldest ID* is sent to the host
'Get_Single_ID'
New ID* is send to host
Reader transmit autonomously
with valid new ID
'Get_Single_ID'
New ID* is send to host
'Get_Last_ID'
The ID* last registered is sent to
the host
RF field
Is switched on only by command
'Get_Single_ID' and switched off
after time-out or transponder detection
Is activated at all times
Is activated at all times
*ID can mean either a blank ID or a read transponder number
4.3.4 Cfg_Node
If the reader is used in a network with several readers, it is possible to give the reader an individual network address by using the Cfg_Node register.
4.3.5 Cfg_RF
In applications where for example only one transponder type is used, the configuration register
Cfg_RF can be used to hide other types supported by the reader (FDX-B, HDX) and thus speed
up acquisition.
4.3.6 Cfg_Timeout
The switch off time of the RF field for a single read cycle in slave request mode can be defined
with the configuration register Cfg_Timeout. Once the time-out period has elapsed and no
transponder has been registered, the read cycle is terminated and a blank ID sent to the control
computer.
The configuration data stored in the EEPROM become effective at switch-on. The command
'Set_Config' causes the configuration to be changed temporarily in RAM. With the
'Save_Config' command the modified configuration data are saved in the EEPROM where they
remain, even when the power supply is off.
The default values can be restored with the 'Reset_All' command.
Important! Following 'Reset_All' the host program must be able to communicate with the default
values (network address: 0x01)
Note: If a 'Set_Config' command accesses an undefined register, 'NAK' will be returned.
The reader can be configured and individual functions demonstrated with the Asrdemo.exe
demo program, which is supplied as standard. This program has its own user manual.
08.08.2006
Page 32 of 55
ASR700 Reader Operation
4.3.7 Cfg_Optimisations
The ASR700 reader is optimised for noise reduction. In most applications there is no need to
change the optimisations.
Optimised for noise reduction means that a certain time is need to calculate out parts of the
noise. This time might be to long for some applications (e.g. pass troughs, gates or raceways)
For this reason three optimisations for the reading speed are possible.
The ASR700 is delivered with optimisation High noise setting (see below).
The used optimisation for the application is depending on the size of the antenna, the speed of
the transponder and the noise of the environment.
Four optimisations are available at software version 3.16:
•
High noise setting
In this time step the ASR700 reader works with longest possible reading cycles (in compliance with ISO 11784/85), to offer a maximum of noise reduction.
It is recommended to use this time step mode in noisy environments (e.g. in a slaughterhouse).
This is the default time step mode of the ASR700.
•
High speed setting
In this time step the ASR700 reader works with shortest possible reading cycles (in compliance with ISO 11784/85), to offer a high reading speed but may be with minor noise reduction (depending on the speed of the transponder).
It is recommended to use this time step mode in noiseless environments, were high reading speed is necessary (e.g. on trucks, pass troughs, gates or raceways).
•
Median setting
This time step is a compromise between Low speed time step and Fast speed time step. It
offers a higher reading speed than Low speed operating mode and more noise reduction
than High speed operating mode.
•
Variable timing
This time step combines high reading speed with noise reduction. If no transponder is in
the field, the reader operates with shortest possible reading cycles (in compliance with ISO
11784/85). If a transponder signal is detected, the reading cycle will be stretched if necessary (in compliance with ISO 11784/85). Noise reduction is less than with High noise setting, because of the variable timing.
Register
Cfg_
Optimisations
Cfg_
Adr
Bits to
set
0x39
1
2
1,2
Hex value
of
Settings
0x00*
0x00
0x01
0x02
0x03
Significance of the registers or their configuration
Optimisations
High noise setting
High speed setting
Median setting
Variable timing setting
* Default values specified.
Send 'Save_Cfg' command after configuration of Cfg_Optimisations, otherwise the new configuration data will be lost when the power supply is switched off and will have to be redone after
switching on again.
08.08.2006
Page 33 of 55
ASR700 Reader Operation
5.
Protocol description
5.1
Interface parameter
9600 Baud
1 Start bit
8 Date bits
No Parity
1 Stop bit
5.2
Frame
STX
0x02
DST
0xFF
SRC
0xF0
Message
n Bytes Data
CRC
8 Bit CRC
ETX
0x03
STX
Start of a frame
DST
Destination address (Example Broadcast).
SRC
Source address (Example 0xF0 = HOST address)
Message n Byte Data (see also ID-Output in section 1.6)
CRC
8 Bit CRC concerning CCITT (x8+x4+x3+x2+1)
ETX
End of frame
5.3
Control codes
Name
STX
ETX
DLE
5.4
Value
0x02
0x03
0x10
Description
Start of frame
End of frame
ESCAPE: the control code after the ESCAPE character will be
interpreted as data and not as control code
Escape sequence
If in a data frame a character or codes is equivalent a control code it will be replaced by:
Sequence
Replace
DLE-STX
STX
DLE-ETX
ETX
DLE-DLE
DLE
In the frame of the ASR700 a CRC comes always behind a DLE!
5.5
Addresses
5.5.1 Destination address DST
The destination address denotes the receiver of a message frame. There are individual addresses and broadcast addresses available. The broadcast address is useful to send a message to several readers at the same time or to communicate with a reader where the individual
address is not known.
5.5.2 Source address SRC
The destination address denotes the transmitter of a message frame.
The ASR responds with its individual network address, independent if the request was a broadcast request or not.
5.5.3 Address ranges
A broadcast address allows each and every reader to be addressed irrespective of the device
type or individual address. Avoid broadcast addresses on bus systems because of the possible
data collision during the response. If the individual address of the reader is unknown use a
point-to-point connection and configure the individual network address with a broadcast request
(Set_Config) or get the individual network address (Get_Config).
08.08.2006
Page 34 of 55
ASR700 Reader Operation
Each reader type has an individual device specific address.
Therefore, on a bus system with different device types it is possible to address them by using
the device type address.
In point-to-point connection all address types can be used without restriction.
In bus systems it's recommended to use an individual network address for each reader.
The 8-bit address field allows 256 addresses.
The control characters (STX, ETX and DLE) are not allowed.
The valid addresses are shown in the following table:
Address
0x00
0x01
0x04…0x0F
0x11…0xEF
0xF0
0xF1…0xFE
0xFF
Description
Reserved for future address expansion
Default address as shipped
Network addresses (device addresses)
Network addresses (device addresses)
Computer address (host address)
Fixed device type addresses
Broadcast address
5.5.4 Device type addresses
Device type address
0xF1…0xF2
0xF3
0xF4
0xF5…0xFE
08.08.2006
Description
Reserved
Mobile reader
ASR reader (stationary reader)
Reserved
Page 35 of 55
ASR700 Reader Operation
5.6
Message commands and acknowledgements
The reader supports the following commands
Command /
Request
Connect_RQ
Get_Amplitude
Get_Config
Get_HDX_Sample
Cod.
Hex
0x01
0x83
0x29
0x91
Get_Last_ID
Get_Phase
Get_PhaseAmplitud
e
Get_RSSI
Get_Single_ID
0x24
0x82
0x86
0x85
0x22
Frequency
C-pattern,
Frequency
-
Get_SNR
Get_TuningResult
Get_Tuning
0x0A
0x89
0x43
-
Get_Version
Reset_All
Retransmit_
Request
Save_Config
Set_Config
0x09
0x18
0x30
-
0x2A
0x28
Set_TuningData
Start_AutoTuning
0x8A
0x87
Address,
cfg_new
Trim data
-
Response/
Cod.
Acknowledgements Hex
ACK
0x06
NAK
Output
ID_message
08.08.2006
Addnl.
Data
Address
-
0x15
Addnl.
Data
cmd,
Data
cmd
Cod.
Hex
0x23
Addnl.
Data
ID,…
Description
Interrogate connection status
Output the amplitude of the antenna
Output the current configuration
Output 512 byte RSSI after field of approximately
over the length of a HDX transponder telegram
Interrogate the oldest ID in the buffer
Output phase difference of antenna
Output phase difference and amplitude of the
antenna
Output RSSI after field off is transmitted
Start a read cycle, field is switched on before and
off after acquisition
Output the reader serial number
Output result of last auto trim
Interrogation of the state of antenna tuning (corresponds to what is displayed by the antenna
tuning LEDs), see chapter 2.2.4
Output of the reader and software version
Copy default configuration from ROM to RAM
Repetition of the last output
Copy configuration from RAM into EEPROM
Set new configuration temporarily (RAM)
Set temporarily trim data
Starts auto tuning process
Description
Last command has been executed, following data
Last command has not been executed
Description
Transponder ID
Page 36 of 55
ASR700 Reader Operation
5.7
Description of the individual messages
5.7.1 Connect_RQ
The reader sends an acknowledgement when it is operationally ready.
Request:
STX
0x02
DST
0xFF
SRC
0xF0
CMD
0x01
CRC 8
0xFB
ETX
0x03
DST
0xF0
SRC
0x01
ACK
0x06
CMD
0x01
DLE
0x10
Answer:
STX
0x02
CRC 8
0x16
ETX
0x03
5.7.2 Get_Amplitude
Request:
STX
0x02
DST
0x01
SRC
0xF0
CMD
0x83
CRC 8
0xFB
ETX
0x03
DST
0xF0
SRC
0x01
ACK
0x06
CMD
0x83
RES
0x00
Answer:
STX
0x02
RES:
AMP:
AMP
0x66
DLE
0x10
CRC 8
0x40
ETX
0x03
Reserved for future use
Amplitude value of the antenna (in this example 0x66)
5.7.3 Get_Config
The content of the selected configuration register (RAM) is output.
Request:
STX
0x02
ADR:
DST
0x01
SRC
0xF0
CMD
0x29
ADR
0x31
CRC 8
0x63
ETX
0x03
Address to read (in this example 0x31 = mode register)
Answer:
STX
0x02
CNT:
DST
0xF0
SRC
0x01
ACK
0x06
CMD
0x29
CNT
0x02
DLE
0x10
CRC 8
0xD3
ETX
0x03
Contents of selected configuration register (in this example 0x02)
5.7.4 Get_HDX_Sample
The reader outputs 512 Bytes RSSI data after field of approximately over the length of a HDX
transponder telegram.
Request:
STX
0x02
DST
0x01
SRC
0xF0
CMD
0x91
CRC 8
0x24
ETX
0x03
Answer:
STX
0x02
DST
0xF0
D5111…D0:
08.08.2006
SRC
0x01
ACK
0x06
CMD
0x91
D511
xx
…
…
D0
xx
DLE
0x10
CRC 8
xx
ETX
0x03
512 Byte RSSI data.
Page 37 of 55
ASR700 Reader Operation
5.7.5 Get_Last_ID
In slave continuous mode a 'Get_Last_ID' command transmits the oldest ID from the buffer. The
ID message is transmitted immediately. If the buffer memory is empty, a blank ID will be transmitted at once. The RF field remains switched on.
In slave request and in master mode the ID last registered is transmitted.
Request:
STX
0x02
DST
0xFF
SRC
0xF0
CMD
0x24
CRC 8
0x53
ETX
0x03
Answer: ID message
5.7.6 Get_Phase
The phase shift of the antenna is transmitted.
Request:
STX
0x02
RES:
DST
0x01
SRC
0xF0
CMD
0x82
RES
0x3A
CRC 8
0x13
ETX
0x03
Reserved for future use, must be set to 0x3A
Answer:
STX
0x02
PHI:
DST
0xF0
SRC
0x01
ACK
0x06
CMD
0x82
PHI
0x17
DLE
0x10
CRC 8
0xB7
ETX
0x03
Phase shift of the antenna (in this example 0x17)
5.7.7 Get_PhaseAmplitude
The phase shift and the amplitude of the antenna are transmitted.
Request:
STX
0x02
CP:
RES:
DST
0x01
SRC
0xF0
CMD
0x86
CP
0x3F
RES
0x3A
CRC 8
0xC8
ETX
0x03
Capacitor pattern used for measurement (in this example 0x3F)
Reserved for future use, must be set to 0x3A
Answer:
STX
0x02
PHI:
RES:
AMP:
DST
0xF0
SRC
0x01
ACK
0x06
CMD
0x86
PHI
0x17
RES
0x00
AMP
0x67
DLE
0x10
CRC 8
0xD5
ETX
0x03
Phase shift of the antenna (in this example 0x17)
Reserved for future use
Amplitude value of the antenna (in this example 0x67)
5.7.8 Get_RSSI
The RSSI after field off is transmitted.
Request:
STX
0x02
DST
0xFF
SRC
0xF0
CMD
0x85
CRC 8
0xA1
ETX
0x03
DST
0xF0
SRC
0x01
ACK
0x06
CMD
0x29
RSSI
0x02
Answer:
STX
0x02
RSSI:
08.08.2006
DLE
0x10
CRC 8
0xD3
ETX
0x03
Value of the RSSI (in this example 0x02)
Page 38 of 55
ASR700 Reader Operation
5.7.9 Get_Single_ID
Starts a single read cycle by activating the RF field. The response with the ID message will not
be given, until a transponder has been registered. If a transponder is not detected within the
configured time-out period, a blank ID will be returned.
In the slave request mode after detection of a transponder - or after a time-out has elapsed –
the read function terminates and the RF field is switched off. In the other modes the ASR700 returns to its previous state.
Request:
STX
0x02
DST
0xFF
SRC
0xF0
CMD
0x22
CRC 8
0x7A
ETX
0x03
Answer: ID message
5.7.10 Get_SNR
Returns the reader serial number.
Request:
STX
0x02
DST
0xFF
SRC
0xF0
CMD
0x0A
CRC 8
0xE7
ETX
0x03
DST
0xF0
SNR2
0x31
SRC
0x01
SNR1
0x30
ACK
0x06
SNR0
0x31
CMD
0x94
DLE
0x10
SNR5
0x30
CRC 8
0x68
Answer:
STX
0x02
SNR3
0x30
SNR5…SNR0:
SNR4
0x30
ETX
0x03
Six byte serial number in ASCII notation (in this example '000101')
5.7.11 Get_TuningResult
Returns the result of last auto trim.
Request:
STX
0x02
DST
0xFF
SRC
0xF0
CMD
0x89
CRC 8
0xF3
DST
0xF0
SRC
0x01
ACK
0x06
CMD
0x89
ETX
0x03
Answer:
STX
0x02
CP1:
CP0:
PHI:
08.08.2006
CP1
0x43
CP0
0x5C
PHI
0x16
DLE
0x10
CRC 8
0x13
ETX
0x03
Capacitor pattern 1 (in this example 0x43)
Capacitor pattern 0 (in this example 0x5C)
Phase shift of the antenna (in this example 0x16)
Page 39 of 55
ASR700 Reader Operation
5.7.12 Get_Tuning
The tuning status is automatically measured on a cyclical basis – every time the RF field is
switched on. The Get_Tuning request does not initiate measurement of the tuning status but
simply delivers an already measured (frozen) status.
Request:
STX
0x02
DST
0xFF
SRC
0xF0
CMD
0x43
CRC 8
0x6C
ETX
0x03
Answer:
STX
0x02
Status:
PHI:
DST
0xF0
SRC
0x01
ACK
0x06
CMD
0x43
STATUS
0x00
PHI
0x1A
DLE
0x10
CRC 8
0x69
ETX
0x03
Tuning status (in this example 0x00)
Phase shift of the antenna (in this example 0x1A)
A status unequal 0x00 means a new auto tuning should be initiated.
5.7.13 Get_Version
Returns the reader and software version.
Request:
STX
0x02
DST
0xFF
SRC
0xF0
CMD
0x09
CRC 8
0x4B
ETX
0x03
Answer:
STX
0x02
VER7
0x37
SEP
0x2F
DST
0xF0
VER6
0x30
DVER3
0x31
VER10…VER0:
SEP:
DVER3…DVER0:
SRC
0x01
VER5
0x30
DVER2
0x2E
ACK
0x06
VER4
0x56
DVER1
0x30
CMD
0x09
VER3
0x33
DVER0
0x35
VER10
0x41
VER2
0x2E
DLE
0x10
VER9
0x53
VER1
0x31
CRC 8
0x01
VER8
0x52
VER0
0x32
ETX
0x03
Eleven-byte version string (in this example 'ASR700V3.12').
Separator '/'
Three-byte version string signal processing software (in this example
1.05)
5.7.14 Reset_All
This restores the default configuration (factory-set values in ROM) by overwriting all of the configuration registers in RAM.
The network address is set to 0x01.
Request:
STX
0x02
DST
0xFF
SRC
0xF0
CMD
0x18
CRC 8
0x38
ETX
0x03
Answer:
STX
0x02
08.08.2006
DST
0xF0
SRC
0x01
ACK
0x06
CMD
0x18
DLE
0x10
CRC 8
0xF2
ETX
0x03
Page 40 of 55
ASR700 Reader Operation
5.7.15 Retransmit_Request
The reader returns the last output (ID message, version, serial number, ACK, NAK etc.).
Request:
STX
0x02
DST
0xFF
SRC
0xF0
CMD
0x30
CRC 8
0xA5
ETX
0x03
Answer: Last output
5.7.16 Save_Config
Saves the current configuration from RAM to the EEPROM. The user configuration saved in the
EEPROM is copied to RAM after Power on.
Request:
STX
0x02
DST
0xFF
SRC
0xF0
CMD
0x2A
CRC 8
0xC9
ETX
0x03
DST
0xF0
SRC
0x01
ACK
0x06
CMD
0x2A
DLE
0x10
Answer:
STX
0x02
CRC 8
0x4B
ETX
0x03
5.7.17 Set_Config
The 'Set_Config' request programs a configuration register (in RAM) with the following new values. The corresponding configuration determines how the device will currently work. When the
device is switched off, the changes made with 'Set_Config' will be lost unless they are saved
with 'Save_Config'.
If the configuration address is not found, or the format of the following configuration value is invalid or a configuration is not supported, a NAK will be sent.
Request:
STX
0x02
DST
0xFF
SRC
0xF0
CMD
0x28
ADR
0x31
CFG
0x00
CRC 8
0xEE
ETX
0x03
ADR:
Address of the configuration register (in this example 0x31 => mode)
CFG:
Configuration data to program into selected configuration register (in this example 0x00)
Answer:
STX
0x02
DST
0xF0
SRC
0x01
ACK
0x06
CMD
0x28
DLE
0x10
CRC 8
0x1C
ETX
0x03
5.7.18 Set_TuningData
This command is used to set temporarily the tuning data.
Example: The antenna was moved quickly between two reading positions or the environment
changes between two states (metal present or not). For both situations an auto tuning could be
done by ' Start_AutoTuning' and the result could be got using 'Get_TuningResult'.
For each situation the optimal tuning parameters could be set with 'Set_TuningData'.
Request:
STX
0x02
CP1:
CP0:
PHI:
DST
0xFF
SRC
0xF0
CMD
0x8A
CP1
0x47
CP0
0x5F
PHI
0x1B
CRC 8
0x24
ETX
0x03
Capacitor pattern 1 (in this example 0x47)
Capacitor pattern 0 (in this example 0x5F)
Phase shift of the antenna (in this example 0x1B)
Answer:
STX
0x02
08.08.2006
DST
0xF0
SRC
0x01
ACK
0x06
CMD
0x8A
DLE
0x10
CRC 8
0xCD
ETX
0x03
Page 41 of 55
ASR700 Reader Operation
5.7.19 Start_AutoTuning
Starts the auto tuning process (see chapter 2.2.4)
The auto tuning will take about 10.5 Seconds. After it is done, the ASR700 sends the Telegram
for receipt.
Request:
STX
0x02
DST
0xFF
SRC
0xF0
CMD
0x87
CRC 8
0x69
ETX
0x03
DST
0xF0
SRC
0x01
ACK
0x06
CMD
0x87
DLE
0x10
Answer:
STX
0x02
5.8
CRC 8
0xDD
ETX
0x03
Description of the acknowledgements
5.8.1 ACK
Correctly received data and executed commands are acknowledged with an ACK.
Answer:
STX
0x02
DST
0xF0
DATn…DAT0:
SRC
0x01
ACK
0x06
CMD
0x87
DATn
xx
…
xx
DAT0
xx
DLE
0x10
CRC 8
xx
Possible further data.
5.8.2 NAK
If the frame is valid, unrecognised commands or commands which cannot be executed because
of wrong data, will be acknowledged with NAK.
Answer:
STX
0x02
5.9
DST
0xF0
SRC
0x01
ACK
0x15
CMD
xx
DLE
0x10
CRC 8
xx
ETX
0x03
ID-Format
5.9.1 Format of ID
Name
0x23
Ptr1
ID-Field
Ptr2
Type-Field
Ptr3
Timestamp
0x00
Position
0
1
2
2+n
3+n
3+n+m
4+n+m
5+n+m+p
Description
Identification of ID-output
Length of ID-Field incl. Ptr1
n Bytes ID
Length of Type-Field incl. Ptr2
n Byte Transpondertyp
Length of time field
Time stamp: hh.mm.ss.aa (optional)
0-Ptr Stop Character (time field only)
Table 1: Format of ID
This format is not valid for ASCII format combined with SCP format (see chapter 5.9.5), ASCII
short format (see chapter 5.9.6) and ASCII short format 16 (see chapter 5.9.7).
5.9.2 ID-without time stamp
0x23
Ptr1
ID 0...n
Ptr2
Type 0...m
0x00
Table 2: ID-without time stamp
08.08.2006
Page 42 of 55
ETX
0x03
ASR700 Reader Operation
5.9.3 ID- with time stamp
0x23
Ptr1
ID 0...n
Ptr2
Type 0...m
Ptr3
Time 0...p
0x00
Table 3: ID- with time stamp
5.9.4 Example ID- without time stamp Format ASCII
Examples of ID- telegram without time stamp.
STX
0x02
ID5
‘0’
ID15
‘5’
DST
0xF0
ID6
‘0’
DLE
0x10
STX
DST
SRC
Code
Ptr1
ID0...ID15
DLE
Ptr2
Typ0...Typ1
Ptr3
DLE
CRC
ETX
SRC
0xF4
ID7
‘0’
Ptr2
0x03
Id_Out
0x23
ID8
‘0’
Typ0
‘0’
Start of Text
0xF0
Source = 0xF4
0x23
0x11
‘0982000009184195’
0x10
0x03
‘01’
0x00
0x10
0xBA
0x03
Ptr1
0x11
ID9
‘9’
Typ1
‘1’
ID0
‘0’
ID10
‘1’
Ptr3
0x00
ID1
‘9’
ID11
‘8’
DLE
0x10
ID2
‘8’
ID12
‘4’
CRC 8
0xBA
ID3
‘2’
ID13
‘1’
ETX
0x03
ID4
‘0’
ID14
‘9’
=> Start of Telegram
=> HOST
=> ASR700
=> ID-Output
=> 1 Byte Length + 16 Byte ID
=> 1 Byte Length + 2 Byte Transpondertyp
=> HDX Transponder regarding ISO
=> No time stamp (Identification of STOP)
=> Before CRC always DLE
=> End of Telegram
5.9.5 Example ID- without time stamp Format ASCII and SCP format
ID0
‘0’
CR
0x0D
ID0...ID15
CR
LF
ID1
‘9’
LF
0x0A
ID2
‘0’
ID3
‘0’
ID4
‘3’
ID5
‘1’
ID6
‘6’
ID7
‘3’
ID8
‘6’
ID9
‘0’
‘0900316360’
0x0D
0x0A
If in addition to the ID format the Format Option Short is activated (see chapter 4.3.2), the data
will be transmitted without frame. The last characters of the telegram will be <CR> (0x0D) <LF>
(0x0A).
5.9.6 Example ID- without time stamp Format ASCII short format
ID0
‘9’
ID10
‘1’
ID0...ID15
CR
LF
ID1
‘8’
ID11
‘6’
ID2
‘4’
ID12
‘3’
ID3
‘0’
ID13
‘6’
ID4
‘1’
ID14
‘0’
ID5
‘0’
CR
0x0D
ID6
‘9’
LF
0x0A
ID7
‘0’
ID8
‘0’
ID9
'3'
‘984010900316360’
0x0D
0x0A
If Short ASCII is activated (see chapter 4.3.2), 15 data bytes will be transmitted in ASCII notation without frame. The leading zero is not transmitted. The last characters of the telegram will
be <CR> (0x0D) <LF> (0x0A).
08.08.2006
Page 43 of 55
ASR700 Reader Operation
5.9.7 Example ID- without time stamp Format ASCII short format 16
ID0
‘0’
ID10
‘3’
ID0...ID15
CR
LF
ID1
‘9’
ID11
‘1’
ID2
‘8’
ID12
‘6’
ID3
‘4’
ID13
‘3’
ID4
‘0’
ID14
‘6’
ID5
‘1’
ID15
‘0’
ID6
‘0’
CR
0x0D
ID7
‘9’
LF
0x0A
ID8
‘0’
ID9
‘0’
‘0984010900316360’
0x0D
0x0A
If Short ASCII 16 is activated (see chapter 4.3.2), 16 data bytes will be transmitted in ASCII notation without frame. The leading zero is transmitted. The last characters of the telegram will be
<CR> (0x0D) <LF> (0x0A).
08.08.2006
Page 44 of 55
ASR700 Reader Operation
5.10 CRC Calculation
The 8 Bit CRC will be calculated with the CCITT-CRC-8 Polygon x8+x4+x3+x2+1 with all Bytes
including STX without the Checksum itself. An ESCAPE before the checksum has to be calculated as well.
A frame from the ASR700 to the Host always has a DLE in front of a CRC.
5.10.1 CRC-Algorithm
CRC-Algorithm
char CalcCRC8 (char CRC, char byte)
{
unsigned char count;
for (count = 0; count < 8; ++count)
{
if (((CRC & 0x01) ^ (byte & 0x01)) != 0)
{
CRC ^= 0x70;
CRC >>= 1;
CRC |= 0x80;
}
else
{
CRC >>= 1;
CRC &= 0x7F;
}
byte >>= 1;
}
return (CRC);
}
08.08.2006
Page 45 of 55
ASR700 Reader Operation
6.
Clock synchronisation of ASR 700 readers
When two or more antenna fields are overlapping there might be some interferences with FDX
transponders. This is due to the very small differences of the frequency generated by the oscillator (clock) of the readers.
To prevent this interference it is possible to synchronize the readers, this means that the clock
generated by the oscillator of one reader is used for the additional readers. The reader, which
generates the oscillator clock, is called clock master and the readers that receive the oscillator
clock are called clock slave.
6.1
Installation
• The total length of the cables for the synchronization should not exceed 4 meters.
• Recommended types of cable for the connection are shielded twisted pair or coaxial cable
RG58 or coaxial cable RG174.
A connection between –UB (ST7 pin2) and G (e.g. ST7 pin5 or ST7 pin7) influences and may
improve the reading range.
If the Agrident power supply is used, it’s possible to connect earth and ground of the power supply (fuse, F2), which also influences the reading range of the devices.
6.2
Setting at the ASR700
Clock master Jumper 3 open, that means to use the reader’s own oscillator for generating the
frequency.
Clock slave Jumper 3 closed, that means use the clock coming in at ST7 pin 9 (Clock In). If
the connection (from ST7 pin 8 Clock Out of the master) is not made, the slave will not work.
Figure 15: Connection diagram ASR700 as master
08.08.2006
Page 46 of 55
ASR700 Reader Operation
Figure 16: Connection diagram ASR700 as slave
08.08.2006
Page 47 of 55
ASR700 Reader Operation
7.
Technical data
Frequency of the RF carrier generated
Transponder types supported
Environmental conditions
Dimensions
Safety class
Power supply
Interface
Weight
08.08.2006
134,2 KHz
-HDX-compatible (ISO 11784/5)
-FDX-B-compatible (ISO 11784/5)
Operation: 0-60 °C
Storage: -25° - 80 °C
Air humidity: 5 – 90 % (non-condensing)
L x B x H: 300x 200 x 150 mm
???
13,8V DC, max. 1A, typical 700mA
RS232, RS485
Configuration: 9600 baud, 8, N, 1
Approx. 3000 g for ASR700
Page 48 of 55
ASR700 Reader Operation
8.
1
Influence of noise, Interference and metal objects on the reading range
Most of what affects ISO RFID readers is actually electrical interference, although it is often
more commonly referred as "noise".
Tag reading is a 2-way process, but most interference problems affect the much weaker transmissions from tag to reader. The tag to reader transmission is at a frequency of 134,2 kHz.
There are many interference sources that have been identified. Some are rarely seen, but as a
result are not easily diagnosed. Anything that can produce magnetic fields at around 100 kHz is
a potential source of interference. The effect of noise and interference increases over proportionally. Therefore these effects are much more severe on stationary readers with larger antennas.
8.1
Computer monitors
All computer monitors produce magnetic fields from their scan coils. By far the worst are those
whose line scan frequency has a harmonic around 100 kHz. Modern monitors often change
their scan frequency depending on how they are being used. The other variable is how well
screened the monitor is.
Some monitors will reduce the reading range of a stationary reader at a distance of 3 meters
(10 feet) or more. Others make no difference at a distance of 1 meter. When we quote distances in such cases, they are taken from the centre of the reader's antenna.
We advise that users are warned that any computer monitor may have a serious effect, and if
necessary you should do a Site Survey. If you get the result that a monitor isn't making a lot of
difference, ask them to take it through all the video modes they might use. For instance operate
under DOS and Windows, and if any high-resolution graphics packages are used, get the user
to load them. Only after all of this can you be reasonably confident.
Other CRT (cathode-ray tube) products such as televisions and oscilloscopes can also produce
interference, but they rarely present a real problem.
8.2
Other electronic equipment
All electronic equipment should be suspect, although very rarely does it cause significant interference. (The tendency towards better control of EMC should help, but few standards limit unintentional emission at 134.2 kHz.)
8.3
Data cables
There are cases where computer data cables can cause interference, which affects readers.
This is unusual, and most network cables are very good. However, you should nevertheless be
aware of the possibility.
As with so many interference sources, data cables don't create interference until the building is
fully functional. Beware of doing a Site Survey on an empty building.
8.4
Mains cables
It is more common to see some interference from mains cables. The most usual situation is
close to the main distribution board for a building. The reason for this is that this may be where
there is a separate earth connection, for instance to ground gas and water pipes. Normally the
interference currents in the mains conductors are balanced. The current flows along one core of
the cable and back down another, giving only a small net current to create interference. The
other connections at a distribution board destroy the balance, hence the problem.
It is best to avoid putting readers close to high power cables, sub-stations etc. unless you are
sure. This is another case where the interference will go up once the building is occupied.
1
Identec Ltd. – Cryptag Census Site Manual
08.08.2006
Page 49 of 55
ASR700 Reader Operation
8.5
Fluorescent and Low Voltage Lighting
Both types of lighting can on rare occasions produce interference.
Some fluorescent lights generate radio frequencies, but the emission levels are generally small.
We have come across Low Voltage lighting systems that generate high emission levels in their
"transformer" module, which actually contains a switch-mode converter. These do not meet current EMC regulations, but may have been legal when installed.
8.6
Other readers
One potential source of interference that is easily overlooked is other readers, and other products that use the same frequency band. Low power products are restricted to a few frequency
bands, so there may be cases where two legitimate products are trying to use the same band.
An ISO HDX tag will not read properly if it is picking up transmissions from two different ISO
readers that are not synchronised. Nearly always it won't respond at all, but if it has started responding to one it may give peculiar responses to both.
(ISO tags do not respond to signals from tagging systems such as shop-door systems, but the
reading range my be affected by their signals.)
8.7
Effects of metal near readers
Usually metal near the antenna of a reader which reduces performance, but it is possible to use
the effects of metal to advantage.
Metal close to an aerial loop can act as a short circuit, sucking energy out of the reader. It will
affect the tuning of the antenna, but even if the antenna is returned there could still be a loss of
range. The reading zone will change its shape, with the range behind the metal reduced.
The effect on the reading range is greater when the metal is closer to the antenna loop. Many
factors affect the range, but typically a complete sheet of metal, 100 mm (4 inches) behind the
antenna loop, reduces the reading range by about 25%. (If the metal is ferrous, it will have
slightly more effect.) This is after the antenna loop has been retuned.
When the metal is only close to part of the loop, the effect is reduced. If the metal is only close
to one side of the loop the effect is minimal.
As metal affects tuning, metal doors can pose a problem. If the antenna loop is too close, it’s
tuning will change when the doors are open. If the tuning is optimised when the doors are open,
the range will drop when the doors close (or vice versa).
Ferrous metal (e.g. steel) introduces new considerations. A sheet of ferrous metal reduces the
reading range by more than non-ferrous metal. It also acts as a better screen, with the range
behind the metal reduced to around 50% of the range in front. The shape of the reading zone
behind the metal is distorted, making the region where tags will be read less predictable.
Ferrous metal (of any shape) can concentrate magnetic fields, and this has been known to give
an unexpected increase in range. On the other hand, it can also concentrate interference signals towards a reader. What you should be on the lookout for is a situation where a relatively
long and thin ferrous metal structure has one end close to the antenna loop.
08.08.2006
Page 50 of 55
ASR700 Reader Operation
9.
Safety and care
The manufacturer accepts no liability for damage resulting from improper use or use not consistent with that described in these operating instructions.
• The ASR700 reader contains no parts that can be repaired by the user. For this reason the
Reader may only be repaired by authorised customer service personnel.
• In both operation and storage of the reader please ensure compliance with the environment
conditions specified in the technical data.
• Clean the ASR700 reader only with a damp cloth. Use only water and any commercially
available cleaning agent.
Any modification to the ASR700 reader will render the warranty null and void.
10. Warranty
The manufacturer of the ASR700 reader Electronic will provide a warranty of
12 months
from the day the device is shipped and subject to the following conditions:
a. Without submission of proof of purchase no warranty can be given.
b. In the event that defects are detected the manufacturer is entitled to choose between up to
two attempts at repair or a one time replacement of the faulty device. The warranty period for
the repaired item or replacement item is 3 months, but will always extend to the end of the
original warranty period. No further claims can be entertained, especially claims for compensation for consequential losses. This exclusion of liability does not apply to claims made on
the basis of the Product Liability Act.
c. Warranty claims cannot be entertained unless the Agrident system was installed properly
and used properly and for the purpose intended.
No warranty obligations exist in particular when:
1. Damage is attributable to improper use of the device, to an incorrect connection or incorrect
operator action;
2. The device was not cared for and maintained in accordance with the manufacturer's recommendations and this is the cause of the damage;
3. The damage is due to any modification to the device;
4. The damage is due to force majeure, for example, lightning strike;
5. The damage is due to wear resulting from overstressing mechanical parts.
08.08.2006
Page 51 of 55
ASR700 Reader Operation
11. Appendix
11.1 RF synchronisation
If only one reader is to be accessed at any one time by the control computer – in other words,
only that reader's RF field is activated – then wire-based synchronisation will not be necessary.
If several readers are operated in the immediate vicinity of each other (in other words, closer
together than 3 m) and the readers have been configured for HDX acquisition, it is possible that
the corresponding synchronisation will be necessary. This is described in chapter 6.
11.2 Description of commands and acknowledgements
Command /
Request
Connect_RQ
Get_Amplitude
Get_Config
Get_HDX_Sample
Cod.
Hex
0x01
0x83
0x29
0x91
Addnl.
Data
Address
-
Get_Last_ID
Get_Phase
Get_PhaseAmplitude
0x24
0x82
0x86
Get_RSSI
Get_Single_ID
0x85
0x22
Frequency
C-pattern,
Frequency
-
Get_SNR
Get_TuningResult
Get_Tuning
0x0A
0x89
0x43
-
Get_Version
Reset_All
Retransmit_
Request
Save_Config
Set_Config
0x09
0x18
0x30
-
0x2A
0x28
Set_TuningData
Start_AutoTuning
0x8A
0x87
Address,
cfg_new
trim data
-
Response/
Acknowledgements
ACK
Cod.
Hex
0x06
NAK
Output
ID_message
08.08.2006
Description
Interrogate connection status
Output the amplitude of the antenna
Output the current configuration
Output 512 byte RSSI after field of approximately over
the length of a HDX transponder telegram
Interrogate the oldest ID in the buffer
Output phase difference of antenna
Output phase difference and amplitude of the antenna
Output RSSI after field off is transmitted
Start a read cycle, field is switched on before and off
after acquisition
Output the reader serial number
Output result of last auto trim
Interrogation of the state of antenna tuning (corresponds
to what is displayed by the antenna tuning LEDs), see
chapter 2.2.4
Output of the reader and software version
Copy default configuration from ROM to RAM
Repetition of the last output
Copy configuration from RAM into EEPROM
Set new configuration temporarily (RAM)
Set temporarily trim data
Starts auto tuning process
Description
0x15
Addnl.
Data
cmd,
data
cmd
Cod.
Hex
0x23
Addnl.
Data
ID,…
Description
Last command has been executed, following data
Last command has not been executed
Transponder ID
Page 52 of 55
ASR700 Reader Operation
11.3 Description of the registers
Register
Cfg_
Adr
Cfg_
Delaytime
0x35
Cfg_
Format
0x32
Cfg_Mode
0x31
Cfg_Node
0x36
Cfg_RF
0x33
Bits to
Set
0
1
0,1
1,2
0,1,2
5**
1
2
1,2
5
Cfg_
Time-out
0x34
Hex value
of
settings
0x01*
Significance of the registers or their configuration
Time interval for repeated ID message
Repetition blockage for time 't' of an already transmitted/saved ID message:
Time 't' = register value * approx. 50 ms (0x00 results in
no repetition)
0x01*
Format of the ID message
0x01
ASCII notation
0x02
Transponder byte structure
0x03
Compact coding
0x06
Output of raw data without CRC
0x07
ASCII short format
0x20
Use SCP format
0x00*
Operation mode
0x01
Slave continuous mode
0x02
Slave request mode
0x00
Master mode
0x01*
Individual network address of a reader; Range of values:
0x00 to 0xEF, except 0x02,0x03,0x10
0x0E*
Configuration of the RF interface
0x02
FDX-B reception activated
0x04
HDX reception activated
0x06
FDX-B and HDX activated
0bxx1x100x Use 125 kHz (this option is possible if only H4002 transponders activated) available at version 1.61 or later
0x01*
Time in which the field is active
After the time-out period the field activated with
Get_single_ID is switched off unless a transponder is
detected within the time interval (after this the field is
switched off immediately);
Time = register value x approx. 100 ms
(Value 0x00 also yields approx. 100 ms)
* Default values specified.
** Combinations with other mentioned bit combinations for Cfg_Format are possible.
08.08.2006
Page 53 of 55
ASR700 Reader Operation
11.4 Factory configuration
Parameter
Mode (Cfg_Mode*)
Data output format (Cfg_Format*)
Transponder types (Cfg_RF*)
Time out (Cfg_Timeout*)
Delay time (Cfg_Delaytime*)
Network address (Cfg_Node*)
Interface (fixed)
08.08.2006
Setting
Master mode (0x00)
ASCII output of the ID (0x02)
All transponder types (0x0E)
100ms (0x01)
50ms (0x01)
0x01
9600 Baud, 1 Start bit, 8 Date bits, No Parity, 1 Stop bit
Page 54 of 55
ASR700 Reader Operation
12. Trouble shooting
For any undescribed problem please contact us:
Agrident GmbH
Steinklippenstr. 10
30890 Barsinghausen
Germany
Telephone
FAX
e-mail
08.08.2006
+49 5105 520614
+49 5105 520616
[email protected]
Page 55 of 55