1
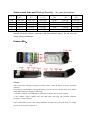
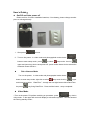
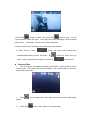
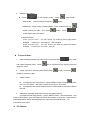
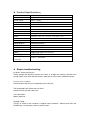
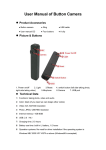
Introduction: Thank you for purchasing high-resolution digital camera。Mini design, elaborate and attractive appearance, and easy to take; and meet every perfect moment. This user manual will be detail about how to use, also provide detailed information for you, Including the use, operation, installation, matters needing attention and technical specifications, etc. Please read this manual carefully and understand thoroughly before using the product, please reserve this manual carefully, we hope that our products can meet your needs, and long-term service to you. Install and Remove memory card: 1: According to the directions to insert the card slot until the memory card is fixed on the memory card slot. 2: Remove memory card, gently press memory card, Memory card automatic popup. 3: If not insert the memory card will show “No Card”, as below. Notice: 1:Please note the insert direction,If reverse insert,Might damage the machine and the memory card。 2:When you insert the memory card, Machine will set the memory card. Product Features: Super potable Mini DV with screen, easy to use, 2 inch LTPS TFT LCD 45 degrees turning lens 4 prefocus lens,Focal Range:12cm~ infinity 4X digital zoom Night LED flash light Video specifications:MJPEG (AVI) Built-in micphone(speaker) Replaceable high capacity rechargeable Li-batteries Support high capacity SD(SDHC)memory card HD multimedia AV-OUT ,can use to connect HDTV directly Video record time and Filming Quantity:(for your information) T-F 卡 16G 8G 4G 2G 1G 1280*720 (720P) 240 min 120 min 60 min 30 min 15 min 720*480 (D1) 240 min 120 min 60 min 30 min 15 min 1280*1024 (1.3M) 12160(张) 6080(张) 3040(张) 1520(张) 760(张) 2048*1536 (3M) 10960 5530 2760 1380 690 2592*1944 (5M) 9440(张) 4720(张) 2360(张) 1180(张 590(张) 3264*2448 (8M) 6386(张) 3193(张) 1565(张 753(张) 386(张) Remark: According memory card brand and other different setting, The file size and filming quantity will different。 Product Mix: Charge Three times before charging to charge more than 12 hours, make the battery to achieve maximum efficiency. The battery is built-in lithium rechargeable battery, so when you use it the first time, please charge firstly. The method for charging as following: 1.) Connect computer: use USB cable to connect the computer, then it can be charged. 2.) Use adaptor: connect charger plug with USB cable, then plug into electrical connector receptacle, it can be charged. Notice: when battery power is not enough, MINI DV will enter into protection mode, so it cannot be turn on. Now, please charge for it. User’s Guide: Out/Off and Auto power-off Please confirm if correct installation batteries, If low battery, please change another piece or recharge directly. 1. Short press to boot. 2. Turn on the power,In video mode and photographed mode choice " button to enter setup mode,press to select " setup mode,then by upper and lower keys choice auto power-off,press confirm button choice selects the Automatic Power Off time 。 Set a time and date Turn on the power,In video mode and photographed mode choice " button to enter setup mode,right-click to select setup mode,then by " upper and lower keys choice “Date/Time” ,through the next right button choice Date/Time, the press key fixing Date/Time,Press confirm button,setup completed。 Video Mode 1.Turn on the power,DV perform switching on procedure,press key choice video mode,in the upper left corner will display a red camera symbols,Now has entered the Filming standby mode。 2.Press “REC ” button to video,then press “REC ” button to stop,you can cyclic operation。When the video,in the upper left corner will display a timer is started keeping time ;Video stop,The timer also stop immediately 。 3.Video Format / Video Timestamp /Fps/ Metering modes selection In Video Format , Press “ ” button can show video format/video timestamp/fps/metering modes sub-menu,By choice an option that you need,Press confirm button into option, Then press “ ” exit sub-menu. Camera Video 1. Turn on the power, DV perform switching on procedure,Press left button choice camera mode,in the upper left corner will display a red camera symbols,Now has entered the photo mode. 2. Press keys for digital zoom,Your finger is best not to tremble when taking photos。 3. Press “REC ” button, after “Kacha” to finish shooting. 4. Autodyne and others Press “ ” in the camera mode ,Press “ “Video mode”,choice autodyne and press ” down button, button. Additionally,Image quality,Metering Mode,Flash,exposure etc,By button choice you want,Then press button , Press “ ” button again exit to last menu。 Shortcut Mode Under preview mode ,you can choice you want by press right button. Example :continuous,2S autodyne,10S autodyne Under preview mode ,you can choice you want by press left button. Example :forced flash, auto flash , flash off, Playback Mode 1. After the starting enters into video mode, now press replay into single Playback mode,Press key,enter left or right button can choose to browse photos or video. 2. If play video file or recording documents, Press to stop or continue to play. 3. to play, and press “ ” delete function In playback mode(Play photos) ,choice “MENU” button,Press “ ” down key choice file delete,then select delete the content or all content . In playback mode, Press delete button to confirm whether you want to delete the files 4. slideshow / specially good effect / rotate / set startup picture In playback mode (Play photos),choice “MENU” button,select slideshow,and press confirm button,enter into submenu choice Interval play or Cycle play. Other function partial application, Above the operating mode, especially the special parts,can personalize your photo. PC Camera When you first use PC camera, please install driver. The driver name is SPCA1528_V2220_M…Setup.exe, which is placed in attached CD. When you install please double press this document, and as per guide to do. After that there will be an AMCAP icon on the computer desk. Under power off or power on mode, use USB cable to connect computer, the mode is U disk mode. Then short press MODE button, at this moment it can be switched into PC camera mode. Then double press AMCAP icon can be used as PC camera. TV-OUT Use the black port of AV line contact with TV-out jack and TV,can realize TV-OUT,you can choice you want in Replay mode. Keys function 1. Record/Photo Mode Starting Up Video/Stop/Confirm (T) Up Key 1/2/3/4X digital zoom (w) Down key 4/3/2/1X digital zoom (<<) Left Key Autodyne in camera mode (>>) Right key Choose flashlight Photo/Video/Record Switch function keys Shortcut menu 2. Playback mode Replay function Play Video/Confirm Stop/ Play in video display (<<) Left Key Last page (>>) Right Key Next page MENU Shortcut menu (lock/delete shortcut key) Product Specifications: CCD COMS Chip Lens 4 prefocus lens, 7.45mm Focal Range 12cm ~ infinity Display 2.0 inch LTPS TFT LCD AV-OUT TV synthetic signals: NTSC Photo 1.3M,3M,5M,8M Video Format AVI Video 1280*720(30 fps/S);720*480(30 fps/S) Zoom 4X digital zoom Audio External: SDHC SD card(max :32G,SDHC card) Shutter Electronic shutter Shutter speed 1/2~1/1000 s White Balance Auto/Sunny/Cloudy LED light Auto/Open/Close Interface USB2.0 / AV OUT Battery 800mAh USB USB2.0 high speed transmission Size/Weight 119*55*13.2 Working temperature / humidity 0~40℃ / 10%~80% Simple troubleshooting No photo, Video and Record? Please change the definition of photo and video, or change the memory card that have enough space, and check that the memory card has no failure and is installed correctly. No image show on HDTV? Please confirm that AV line is completely into the AV jack, The photographs and videos are not clear? Please use the soft cloth clean lens Can’t start flash? Battery state low Operate Tooltip: This DV is similar to the computer, If appear crash conditions,Please push down the POWER key, cut the power, same to reset function 。