1
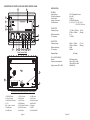
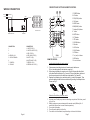
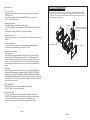
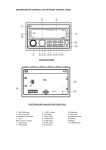
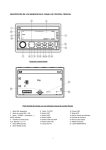
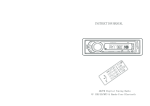
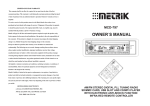
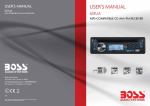
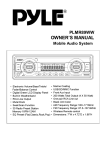
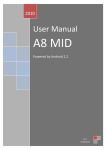
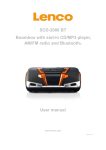
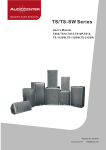
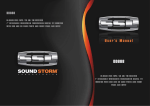
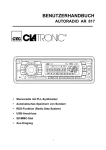
DESCRIPTION OF CONTROLS ON THE FRONT CONTROL PANEL
8
SPECIFICATION
4
GENERAL
Supply Voltage
Current Consumption
Power Output
Number of channels
Unit Dimensions
1
19
DC 12V. Negative Ground
Max.10A
4 x 60 W
2 STEREO channels.
(L X W X H): 7" X 3.93" X 4.13"
178 X 100 X 105 (mm)
3
17
FM SECTION
Frequency range
18
Effective sensitivity
I.F Frequency
16
15
2
6
7
5
9 12
AM SECTION
Frequency range
Effective sensitivity
I.F Frequency
10 13 11 14
Front Control Panel
Preamp Output
21
SD
22
Front Cabinet after removing Front Control Panel
9. 1/TOP/>|| button
10. 2/INT button
11. 3/RPT button
12. 4/RDM button
13. 5 DIR-/HANG UP button
14. 6 DIR+/TEL button
15. AUX IN jack
Page 1
530khz - 1710Khz
522Khz - 1620Khz
40dB.
450KHz
(U.S.A.)
(Europe)
MP3 audio system.
20Hz -100Hz <=5dB
10KHz-20KHz <=5dB.
50dB [1KHz] .
Signal to noise (SD & USB)
1. RELEASE button
2. SEL & VOL knob
3. POWER & MUTE button
4. LCD
5&6. >>| And |<< buttons
7. BAND button
8. MODE button
(U.S.A)
(Europe)
1 V Output
SD or USB PLAYBACK
System
Frequency characteristics
20
87.5 Mhz - 107.9Mhz
87.5Mhz - 108Mhz
3uV.
10.7MHz.
16. USB socket
17. APS button
18.IR Remote Sensor
19.MICPHONE
20.Card slot
21.RESET
22. FLASHING LED
Page 10
DESCRIPTION OF BUTTONS ON REMOTE CONTROL
WIRES CONNECTION
19
WHITE (L)
RED (R)
18
1. POWER button
2. A.P button
3. SCN(SCAN) button
4. CLK button
5. MODE button
6. BND(BAND) button
7. Number(0~9) buttons
8. * button
9. MUTE button
10. T-M button
11. TEL button
12. CLEAR button
13. # button
14. LOC button
15. LOUD button
16. ST button
17. >>| and |<< buttons
18. SEL button
19. + and - buttons
FRONT OUTPUT
GREY
BT ANTENNA
FRONT OUTPUT
FUSE 10 A
1
17
2
3
16
4
ISO SOCKET SKETCH
RADIO ANTENNA JACK
ISO SOCKET
5
15
6
14
7
CONNECTOR A
1.
2.
3.
4. MEMORY +12V
5. AUTO ANTENNA B+
6.
7. POWER B+
8. GROUND
CONNECTOR B
1. VIOLET R.R SP(+)
2. VIOLET BLACK R.R SP(-)
3. GREY F.R SP(+)
4. GREY BLACK F.R SP(-)
5. WHITE F.L SP(+)
6. WHITE BLACK F.L SP(-)
7. GREEN R.L SP(+)
8. GREEN BLACK R.L SP(-)
8
13
9
12
10
11
REMOTE CONTROL
Load/unloading battery of remote control
1. Please remove insulating sheet out of remote control before use.
Pull out insulating sheet in the direction as per fig. 1.
2. When changing battery for remote control, first pull the movable block hold
in the direction as indicated in Fig. 2 arrow A. Then pull the battery holder out
from the remote control in the direction as indicated in Fig.2 arrow B.
3. Replace the old battery by a new battery with (+) polarity side upward. Then
return the battery holder to the remote control by pressing the battery holder.
Please see Fig.3.
+ side up
B
A
Fig.1
Fig.2
Fig.3
Note about the battery of remote control:
Page 9
1. Improper use of battery may cause overheating or explosion. Which may result
in jury or fire .
2. Battery leakage may cause damage to the remote control(Battery Life: 6
months with normal use in normal room temperature).
3. Do not short the battery.
4. Do not throw the battery into the fire.
5. To avoid the risk of accident, keep the battery out of reach of children.
Page 2
INSTALLATION METHOD
Common operation:
1. To turn the unit on/off .
When the unit is power Off, it may be switched On by pressing any button except
RELEASE button.
When the unit is switched On, press and hold POWER button for more than 1
second, to switch the power off.
This is an anti-theft installation method. The main unit wears a METAL MOUNTING SLEEVE.
Please connect the wiring, eg, the Power Supply, the Speakers and the Antenna according to
the requirements of this Instruction Manual, then install the metal mounting sleeve into the car
as per the diagram illustrated below.
2. To select function mode
Press MODE button to change function mode as follows:
-->TUNER -->USB(after inserting USB stick)-->CARD(after inserting SD card)-->BT-->
AUX-->
When there is no media (USB/CARD), that mode will be skipped.
UNIT CHASSIS
3. To adjust the volume level
Rotate VOL knob or press + or - button on remote control to adjust volume level during
playback.
4. To mute or resume sound
Press MUTE button to eliminate or resume sound immediately during playback.
To resume the sound immediately, you can rotate VOL knob.
Bend the tabs on the metal mounting
sleeve against the DASHBOARD with
a screwdriver
FRONT PANEL
METAL MOUNTING SLEEVE
PLASTIC TRIM RING
5. To set sound mode and menu
1).To set sound mode:
Press SEL button shortly and repeatedly to select mode of VOL(volume), BASS
(without preset DSP), TRE(treble)(without preset DSP), BAL(balance) and FAD
(fader) in the sequence and circulation. In each mode, the waiting time is about 5
seconds, and when the waiting time is over, it will return to the last display mode.
After selecting a sound mode, use volume control to set level of the selected sound
mode.
2).To set menu:
Press SEL button and hold for more than 2 seconds to turn on BEEP ON/BEEP OFF,
then press SEL button shortly and repeatedly to select USER SET (FLAT/CLASSIC/
ROCK/POP), VOL LAST/VOL DEFA(AVOL) , AMERICA3/EUROPE(in RADIO mode),
STEREO/MONO(in RADIO mode), LOUD OFF/LOUD ON, DX/LOCAL(in RADIO mode)
CLK ON/CLK OFF,CLK 12/CLK 24,CL(Adjust the clock))mode. After selecting a desired
item, use volume control to set.
3) BEEP ON/BEEP OFF
BEEP ON mode: The beep is generated when any key is pressed.
BEEP OFF mode: The beep sound is disabled.
4) VOL LAST/VOL DEFA
VOL LAST: The volume level when switching off will be restored with power On.
VOL DEFA: The volume level of the main unit after power on is a constant valume.
when selecting VOL DEFA item, press SEL button to display AVOL , then
you can pre-set the constant volume level after power on with VOL control.
Page 3
Page 8
B) Dial with remote control with the following procedures:
1) Briefly press TEL button , then CALL will appear on LCD.
2) Input telephone number with number buttons 0-9.
3) Briefly press CLEAR button to cancel the incorrectly entered number if necessary.
4) Press and hold CLEAR button to cancel all numbers entered if necessary.
5) Briefly press TEL to start dialing. The talking time will appear on LCD if dialing
is successful and it is received.
C) Redial
Press TEL button on remote control twice or press 6 DIR+ button on the unit,
it will show the last dialed phone number on LCD and dial the number directly.
4. Accept/ Reject/ End Call
A) During ringing, press TEL button to accept the call.
B) During ringing, press CLEAR button to reject the call.
C) During talking, press CLEAR button to end the call.
Note:
During ringing, CALL IN appears and then the phone number.
During talking, talking time appears.
5. Talking volume level setting
While talking, use volume control to adjust volume level, but this volume
level can not be saved.
6. Dialling or receiving calls while the unit is in sleep mode
When the car radio is in standby mode (Acc on and Power off), when dialling
or receiving a call, the car radio will power on automatically. After the call is
completed, the radio will revert to standby mode.
7. To transfer the audio of a file played by Mobile Phone to the Car Audio Player
If the mobile phone supports A2DP and could play audio files, when the Mobile
Phone plays an audio file(For some Mobile Phones, you must first select Play
by BT ), the playback will be transferred to the Car Audio Player.
In A2DP mode, if the Blue tooth device of the Mobile Phone supports AVRCP,
the functions of the >>|, |<< and PLAY/PAUSE buttons are the same as one
in media mode(no fast forward/backward functions for the >>|/|<< buttons).
The other buttons normally available in media mode are not available.
6. ID3 FUNCTION
In USB/CARD mode, during playback, if you press CLK button on remote
control then the information of the songs title, artist, etc will display on the LCD. As long as
the current playing music contains relevant ID3 tag information. Press again to cancel the
ID3 function.
7. ST BUTTON
In FM mode, press the ST button briefly on remote control to select stereo or mono sound
mode.
8. LOUD BUTTON
When press shortly, the LOUD mode is turned on, its to enhance the bass sound
effect when the volume level is low. Press again to cancel the loudness effect.
9. LOC BUTTON
Radio station search mode is divided by this LOCAL/DX switch, this button can
be used to control an attenuator in the tuner during search. The detecting level of
seek, scan, auto-memory will be reduced as much as the attenuated level of
the tuner. In radio mode, press the LOC button to change local reception or
distance reception. (Note: This button is only for FM reception. In AM mode,
LOC is void.)
10. To remove front control panel
Press RELEASE button to release front control panel from unit chassis, then you
can remove it from unit chassis.
When front control panel is removed, the LED indicator on front cabinet flashes.
11. To reset unit
Before operating the unit for the first time, or after replacing the car battery or
changing the connections. You must reset the unit.
(To reset the unit, remove the front control panel, then press RESET button and hold
for more than 8 seconds with a cuspidal object.)
RADIO OPERATION:
1. To select radio band
Press BAND button briefly and repeatedly to select a desired radio band in
sequence and circulation as follows:
-->FM1-->FM2-->FM3-->AM1(MW1)-->AM2(MW2)-->
.
2. To search for radio station manually or automatically
Press >>| or |<< button briefly to manual tune up/down for your desired radio stations
step by step.
Press and hold >>| or |<< button for 1 second, to automatically tune up/down for
a radio station of strong signal.
You can also press SCN button on remote control to automatically tune up for a radio
station of strong signal.
3. To store current station or turn on a preset one
1) Press one of the 6 number buttons and hold for more than 1 second to store the
Page 7
Page 4
current station in the preset memory bank of the number button for the current band.
In this way the unit can store 30 preset stations.
2) Press one of the 6 number buttons briefly to turn on the preset station stored in
the preset memory bank of the number button for the current band.
Press APS button on the unit or A.P button on the remote control to preview the 6
preset stations stored in the preset memory bank.
4. To scan for each preset station or auto search for the strongest stations
When pressing and holding APS button on the unit or A.P button on the remote control for
more than 1 second, the radio searches from the current frequency and checks the signal l
until the 6 strongest stations are found. And then the 6 strongest stations are preset to the
strength leve corresponding preset memory numbered bank. The auto-storage operation is
implemented in the each selected band. When the auto-storage operation is finished, the
radio executes Preset scan.
USB/Card OPERATION:
1. To insert or pull out SD card or USB stick
When needing to playback SD or USB music, insert SD card or USB
stick into SD slot or USB socket. Then the playing mode will be changed into
SD or USB mode and display Card or USB on LCD (When SD card and
USB stick are both inserted into their slot or socket, the playing mode will be changed
into the mode of the latter one), and then play the first track of SD card or USB.
2. Press the >>| button briefly to play next track.
Press the |<< button briefly to play the current track from the beginning of it if the playing time
is more than 4 seconds. Press the |<< button briefly to play the previous track if the playing
time is less than 4 seconds.
3. To play fast forward or backward
Press and hold >>| or |<< button to play fast forward or backward.
4. To play previous or next 10th track or to play previous or next file
Press 5DIR- or 6DIR+ button to play previous or next 10th track.
Long press 5DIR- or 6DIR+ button to play previous or next file.
5. How to use 1/>|| button
During playback, press 1/>|| button to pause playback. When in pause mode,
press 1/>||/TOP button to play again.
Press and hold 1/>||TOP button to select the first track for playback.
6. To scan tracks
During playback, press INT button briefly to play the first 10 seconds of each track,
press INT button again to cancel INT function and retain playing the track currently
selected.
7. To repeat track(s)
During playback, press RPT button briefly to play the current track repeatedly, and
the LCD will display RPT ONE.
Page 5
Press RPT button twice to play the tracks in the Album repeatedly, and the LCD will
display RPT DIR.
Press RPT button thrice to cancel RPT function, and the LCD will display OFF.
8. To play tracks in random
During playback, press RDM button briefly to play all tracks in random. Press it again
to cancel RDM function.
9. Tracks search
Press BAND button, it will activate TRACK SEARCH mode . The LCD will
display TRK 0/00/000(deside on the total number of tracks in the SD card or
USB stick) and flash the 0 on the biggest digit position. Then rotate VOL knob
to select a number on the flashing digit position from 0 ~ 9. Then press SEL
button to confirm the number and flash the 0 on next smaller digit position.
With the same means, select the number on the flashing digit position with
VOL knob. After finishing selecting the numbers on all digits position, press
1/PLAY button to play the track of the selected serial number.
Bluetooth Hands-Free System:
1. Pairing
Turn on Bluetooth mode of mobile phone, then select the function for Finding
Bluetooth Device and enter it. After finishing finding, it will show the name of
Bluetooth Device if found, select it and enter it, then it will show an interface that
asks you to input password. Input the password 0000 and enter it, then the
LCD of the car audio system will display “BT READY” and “BLUETOOTH” .
2. Connection or disconnection
A) Use mobile phone to do connection or disconnection
1) In connection status, find the paired and connected Bluetooth Device, then
press the disconnection button to do disconnection.
2) In disconnection status, find the paired and disconnected Bluetooth Device,
then press the connection button to do connection.
B) When powering on (after Acc of the car was switched off ), the unit will search
for the once connected mobile phone,then pair and connect.
Note:
In connection status: Mobile phone transfers to car audio player whenever a
dialling takes place; Mobile phone transfers to car audio player whenever
receiving a call.
Press and hold 6 DIR+ button on the front panel to switch between Unit and Phone
during BT phone conversation.
3. Dialling when in connection status
A) Dial with mobile phone directly.
Page 6