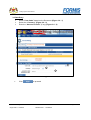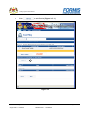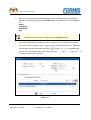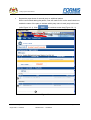
1
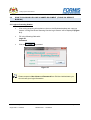
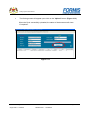
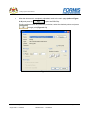
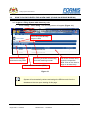
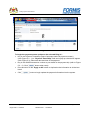
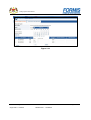
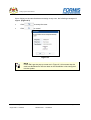
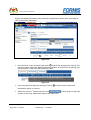
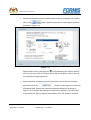
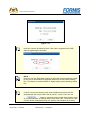
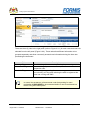
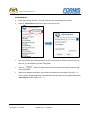
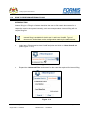
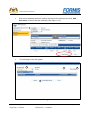
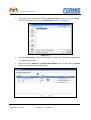
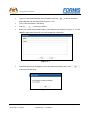
e-Filing System USER MANUAL (FOR COURT USERS) Sistem Komputer Bersepadu Mahkamah (e-Kehakiman) Release No.: 1.0 Prepared by FORMIS Network Service Sdn Bhd Project System Bersepadu Mahkamah (E-Kehakiman) NOTICE The information contained in this document is proprietary to FORMIS Network Service Sdn Bhd (FORMIS) and Pejabat Ketua Pendaftar Mahkamah Persekutuan Malaysia (PKPMP). It shall be kept strictly confidential and may only be used, modified or copied for internal use by the employees of FORMIS and PKPMP. No part of this document may be reproduced or transmitted in any form or by any means, electronic or mechanical, including photocopying or recording, or by any information storage and retrieval system, or disclosed to any third party for any purpose, without permission in writing by FORMIS and PKPMP. For further information please contact: Applications Division FORMIS Network Services SDN BHD (Reg No: 188270-U) 20th Floor, Menara PanGlobal, 8 Lorong P. Ramlee 50250 Kuala Lumpur, Malaysia. Tel: (603) 2070 5588 Fax: (603) 2031 9403 ECOURTS-UM(I)-01 Release No : 1.0 Origin Date: 11/04/2011 Release Date : 11/04/2011 Page i of iv Project System Bersepadu Mahkamah (E-Kehakiman) DOCUMENT ACCEPTANCE NOTICE The endorsement in this Sistem Bersepadu Mahkamah (E-Kehakiman) e - Filing User Manual ECOURTS-UM(I)-01 Release No. 1.0 by PKPMP Project Manager and FORMIS Project Manager indicates the satisfaction and acceptance of this document. This document is in conjunction with Engagement Agreement, Proposal and Project Scope Document as finalised and mutually agreed. In case of any conflicts arising out on this aspect, this document will be the final and binding on both sides. Please review this document and get back to us on any further change within five (5) working days from the receipt of this document. Non-response is considered as acceptance of the document in full Accepted By: Project Manager, FORMIS Project Manager, PKPMP Name : Name : Designation : Designation : Date : Date : ECOURTS-UM(I)-01 Release No : 1.0 Origin Date: 11/04/2011 Release Date : 11/04/2011 Page ii of iv Project System Bersepadu Mahkamah (E-Kehakiman) DOCUMENT RELEASE NOTICE DRN No.: ECOURTS-UM(I)-01 This e - Filing User Manual is a controlled document. For identification of amendments, each page contains a document title (in the header); document reference number; origin date; release number and date; section identifier and page number (in the footer) within each section of the e - Filing User Manual. Changes will only be issued as complete replacement sections upon a release notice signed by the PKPMP Project Manager and the FORMIS Project Manager of the Sistem Komputer Bersepadu Mahkamah (E-Kehakiman) project. This is Release 1.0 of the document Sistem Komputer Bersepadu Mahkamah (E-Kehakiman) User Manual for PKPMP printed on 11 April 2011. Authorised By: Project Manager, FORMIS Project Manager, PKPMP Name : Name : Designation : Designation : Date : Date : ECOURTS-UM(I)-01 Release No : 1.0 Origin Date: 11/04/2011 Release Date : 11/04/2011 Page iii of iv Project System Bersepadu Mahkamah (E-Kehakiman) AMENDMENTS IN THIS RELEASE: (Including problems cleared and changes applied) Section Heading Reason for Change REVISION HISTORY Previous Release Current Section Heading Release No. No. ECOURTS-UM(I)-01 Release No : 1.0 Origin Date: 11/04/2011 Release Date : 11/04/2011 Date of Release Page iv of iv e-Filing System User Manual TABLE OF CONTENTS 1.0 HOW TO ACCESS TO THE E-FILING SYSTEM ....................................................... 1 2.0 HOW TO SCAN AND UPLOAD SCANNED DOCUMENT (FILING VIA SERVICE BUREAU) .................................................................................................................. 3 3.0 HOW TO DO DATA ENTRY FOR A NEW CASE (FILING VIA SERVICE BUREAU)12 4.0 HOW TO PRINT PAYMENT NOTICE ...................................................................... 24 5.0 HOW TO UPDATE PAYMENT TIMESTAMP (FILING VIA SERVICE BUREAU) .... 27 6.0 HOW TO ASSIGN CASE NUMBER FOR THE CASE THAT SUBMITTED BY LAWYER THROUGH ONLINE SUBMISSION ......................................................................... 30 7.0 HOW TO PROCESS DOCUMENT .......................................................................... 35 8.0 HOW TO REVERT APPROVED DOCUMENT (BUT NOT REGISTERED) FOR NEW CASE (DUE TO MISTAKE MADE ON MENTION DATE)........................................ 46 9.0 HOW TO PERFORM INCOMING TASK FILTERING AND CASE SEARCH ........... 47 10.0 HOW TO REJECT A DOCUMENT OR A NEW CASE ............................................ 51 11.0 HOW TO PERFORM INTERNAL FILING ................................................................ 57 12.0 HOW TO TRANSFER EXISTING CASE TO ANOTHER COURT ............................ 62 13.0 HOW TO CHANGE ENCLOSURE NUMBER .......................................................... 66 14.0 HOW TO PUT ON-HOLD OF A NEW CASE REGISTRATION BUT ALLOW THE CASE TO BE REGISTERED INTO CMS............................................................................ 68 15.0 HOW TO ESCALATE NOTICE OF APPEAL TO HIGHER COURT ........................ 69 ECOURTS-UM(I)-01 Release No : 1.0 Origin Date: 11/04/2011 Release Date : 23/06/2011 Section 1- Page 1 of 1 e-Filing System User Manual 1.0 HOW TO ACCESS TO THE E-FILING SYSTEM To access to e-Filing system, double click on the Mozilla Firefox (version 3.6) web browser (Figure 1.1). e-Filing version 1 is currently support on Mozilla Firefox and Google Chrome web broweser. Double click on Mozilla Firefox OR Google Chrome. Figure 1.1 ECOURTS-UM(I)-01 Release No : 1.0 Origin Date: 11/04/2011 Release Date : 23/06/2011 Section 1- Page 1 of 70 e-Filing System User Manual In the browser’s address bar, please type in the following address http://efiling.kehakiman.gov.my/eFiling/ (Figure 1.2). Please type in the address in here. Figure 1.2 NOTE: e-Filing portal is accessible from both LAN (Local Area Network) and public internet via http://efiling.kehakiman.gov.my ECOURTS-UM(I)-01 Release No : 1.0 Origin Date: 11/04/2011 Release Date : 23/06/2011 Section 1- Page 2 of 70 e-Filing System User Manual 2.0 HOW TO SCAN AND UPLOAD SCANNED DOCUMENT (FILING VIA SERVICE BUREAU) 2.1 Login to Scanning Station Click on the scanning client short-cut icon on the Windows desktop and a pop-up screen ‘e-Filing Document Scanning Service Login Screen’ will be displayed (Figure 2.1). Fill in the following fields with: Login ID Password Click on to proceed. Figure 2.1 NOTE: Please request a User Name and Password from Division Administrator you do not know your login information ECOURTS-UM(I)-01 Release No : 1.0 Origin Date: 11/04/2011 Release Date : 23/06/2011 Section 1- Page 3 of 70 e-Filing System User Manual Upon successful login, e-Filing Scanning Service Client will be shown. (Figure 2.2) Figure 2.2 Click button to log out from the scanning station. (Figure 2.3) Figure 2.3 ECOURTS-UM(I)-01 Release No : 1.0 Origin Date: 11/04/2011 Release Date : 23/06/2011 Section 1- Page 4 of 70 e-Filing System User Manual 2.2 How to Scan a Document into System Select the all the fields that have been listed: (i) Filing Type New Case – for the case that has not register in e-Filing System Existing Case – for the case that has been register in e-Filing System (ii) Court Location (iii) Court (iv) Type of Action Figure 2.4 Fill in all the required fields: (Figure 2.5) (i) Law Firm - Law Firm name (ii) Calling No - Queue Number (iii) Filer Email - Email from Law Firm Figure 2.5 ECOURTS-UM(I)-01 Release No : 1.0 Origin Date: 11/04/2011 Release Date : 23/06/2011 Section 1- Page 5 of 70 e-Filing System User Manual NOTE: Correct email address is needed when filing is done via service bureau. Invalid email will lead to sending filing notification to irrelevant party. Scanned document (PDF document) will automatically populated in the table listing once the PDF file generated after the scanning process. If court user would like to add PDF document from a storage media such as CD/DVD or pendrive, user need to click on button to browse and add the document (Figure 2.6). Figure 2.6 For example, Select the Document(s) from C:\ScannedDoc\Capture3\efsxxxxxxxxx.pdf and click . (Figure 2.7) ECOURTS-UM(I)-01 Release No : 1.0 Origin Date: 11/04/2011 Release Date : 23/06/2011 Section 1- Page 6 of 70 e-Filing System User Manual Figure 2.7 Once user has successfully added. Select the “Grouping” and the “Document Type” (Figure 2.8) Select the Select the grouping. document type. Figure 2.8 Check the “Delete” check box in order to remove the selected file ECOURTS-UM(I)-01 Release No : 1.0 Origin Date: 11/04/2011 Release Date : 23/06/2011 Section 1- Page 7 of 70 e-Filing System User Manual Check this box. Figure 2.9 *Select to confirm Filing Scanning Service (Figure 2.10) delete or to return to the e- Figure 2.10 After insert the ‘Grouping’ and ‘Document Type’, click to generate SRN Slip. (Figure 2.11). Figure 2.11 ECOURTS-UM(I)-01 Release No : 1.0 Origin Date: 11/04/2011 Release Date : 23/06/2011 Section 1- Page 8 of 70 e-Filing System User Manual Upon clicking “Generate SRN”, the following page will appear (via a user’s default web browser). NOTE: Please install Mozilla Firefox 3.6 web browser Click (Figure 2.12) to start upload the scanned document(s) to the e-Filing server. Figure 2.12 ECOURTS-UM(I)-01 Release No : 1.0 Origin Date: 11/04/2011 Release Date : 23/06/2011 Section 1- Page 9 of 70 e-Filing System User Manual The flowing screen will appear upon click on the “Upload” button. (Figure 2.13) When the file is successfully uploaded, the status of the document will show “Completed”. Figure 2.13 ECOURTS-UM(I)-01 Release No : 1.0 Origin Date: 11/04/2011 Release Date : 23/06/2011 Section 1- Page 10 of 70 e-Filing System User Manual After the document is completely uploaded, back to the main page (refer to Figure 2.12) and press on to print the SRN Slip. Printing preference will be shown as per below, select the desired printer and press to begin print (Figure 2.13) Figure 2.13 ECOURTS-UM(I)-01 Release No : 1.0 Origin Date: 11/04/2011 Release Date : 23/06/2011 Section 1- Page 11 of 70 e-Filing System User Manual 3.0 HOW TO DO DATA ENTRY FOR A NEW CASE (FILING VIA SERVICE BUREAU) 3.1 Login to e-Filing System with data entry role Select ‘Filing’ > ‘Scan Filing’. The following screen will appear (Figure 3.1) List of filing that already keyed in data Search the scanned document using SRN Incoming scanned document(s) from the scanning counter List of item for data entry under the respective SRN. Click on the item to begin to do data entry. Scan reference number (SRN) Figure 3.1 NOTE: System will automatically retrieve and assign the SRN records from the database to the user upon loading of this page ECOURTS-UM(I)-01 Release No : 1.0 Origin Date: 11/04/2011 Release Date : 23/06/2011 Section 1- Page 12 of 70 e-Filing System User Manual Click on the link in the “Document Name” column in order to view the content of the PDF file. A pop-up screen will be appear in order to allow user to read the content (Figure 3.2) Click on this to view document. 3 Figure 3.2 ECOURTS-UM(I)-01 Release No : 1.0 Origin Date: 11/04/2011 Release Date : 23/06/2011 Section 1- Page 13 of 70 e-Filing System User Manual Figure 3.3 1 2 # 1 2 3 4 5 6 7 3 4 5 6 7 Description Copy the selected text into system clipboard Click to open the saved notes for this document Activate text search panel Text selection cursor Magnifier Single or double page viewing Turn the page to counter clock wise or clock wise ECOURTS-UM(I)-01 Release No : 1.0 Origin Date: 11/04/2011 Release Date : 23/06/2011 Section 1- Page 14 of 70 e-Filing System User Manual 3.2 Data Entry Select “Case Code” based on the Document (Figure 3.4 - 1) Select the “Currency” (Figure 3.4 - 2) Enter the “Amount of Claim” (if any) (Figure 3.4 - 3) 1 2 3 Figure 3.4 Click to proceed ECOURTS-UM(I)-01 Release No : 1.0 Origin Date: 11/04/2011 Release Date : 23/06/2011 Section 1- Page 15 of 70 e-Filing System User Manual Click to add Parties (Figure 3.5 - 1) 1 Figure 3.5 ECOURTS-UM(I)-01 Release No : 1.0 Origin Date: 11/04/2011 Release Date : 23/06/2011 Section 1- Page 16 of 70 e-Filing System User Manual Upon clicking “Add Party”, the following screen will appear. Select the appropriate Party and Identity type for this case’s party. Figure 3.6 ECOURTS-UM(I)-01 Release No : 1.0 Origin Date: 11/04/2011 Release Date : 23/06/2011 Section 1- Page 17 of 70 e-Filing System User Manual Next, fill in the relevant information depend on the identity type you have selected. Example, for identity type equal to ‘Identity Card’, you need to key in the information for: Name Identity No Nationality Age NOTE: The field requested to key in depends on the Identity selected. Key in any characters in the text box (item 1 in Figure 3.7) to lookup for the correct firm name from the system. Click to begin search for the law firm. Select the correct law firm name from the list and click (Figure 3.7 -1 ). The selected Law firm will be in the Counsel Name list. Finally, click on to add the party for this new case. (Figure 3.7 - 2) 1 2 Figure 3.7 ECOURTS-UM(I)-01 Release No : 1.0 Origin Date: 11/04/2011 Release Date : 23/06/2011 Section 1- Page 18 of 70 e-Filing System User Manual Repeat the steps above for second party or additional parties. When user finished adding the parties, user will need to click on the small check box beside the name of the party to indicate which party name is main party in this case (refer Figure 3.8 -1). Click to continue to next step (Figure 3.8 - 2) 1 1 2 Figure 3.8 ECOURTS-UM(I)-01 Release No : 1.0 Origin Date: 11/04/2011 Release Date : 23/06/2011 Section 1- Page 19 of 70 e-Filing System User Manual Double check the Details (Figure 3.9) Click Click to edit (if needed) to save the case into filing cart and ready for upload Figure 3.9 ECOURTS-UM(I)-01 Release No : 1.0 Origin Date: 11/04/2011 Release Date : 23/06/2011 Section 1- Page 20 of 70 e-Filing System User Manual Upon clicking “Save to Filing Cart”, the following screen will appear. The filer’s email address will be automatically retrieved from database if scanning clerk have keyed in the email address. However, if the email address was not available then the clerk will need to key in by him/herself. Figure 3.10 NOTE: The email address can be found from the scanning request slip that the lawyer/despatch boy provided System will display successful message upon confirmation of saving the data into system and case number automatically generated (refer Figure 3.11) Figure 3.11 All the data entries that has been done by the clerk will be shown in “Filing Cart” tab (Figure 3.12) ECOURTS-UM(I)-01 Release No : 1.0 Origin Date: 11/04/2011 Release Date : 23/06/2011 Section 1- Page 21 of 70 e-Filing System User Manual Figure 3.12 Click on any of the listed item (SRN) to confirm for submission (Figure 3.13) Click on to submit the filing. Click on to delete the filing under this SRN Click on to back to Filing Cart listing Figure 3.13 Upon successful submission of filing, the following message will be displayed (Figure 3.14) ECOURTS-UM(I)-01 Release No : 1.0 Origin Date: 11/04/2011 Release Date : 23/06/2011 Section 1- Page 22 of 70 e-Filing System User Manual Figure 3.14 NOTE (1) : Every SRN that has successfully keyed in will assign with a unique filing ID in the format of ‘FILXXXXXXXXXXX’ NOTE (2) : SRN generated from the other state will be available for data entry at the targeted court. Example, Pulau Pinang’s lower court scans the case document to submit for Kuala Lumpur’s lower court. Kuala Lumpur’s lower court will need to retrieve the SRN from the system to perform the data entry. Current practice: Upon scanning of documents from court A to court B, court A will need to call up court B and request for data entry base on the SRN given by court A. Court B will retrieve the SRN from the system and start data entry and assign case number. ECOURTS-UM(I)-01 Release No : 1.0 Origin Date: 11/04/2011 Release Date : 23/06/2011 Section 1- Page 23 of 70 e-Filing System User Manual 4.0 HOW TO PRINT PAYMENT NOTICE 4.1 Login to the e-Filing System with user that granted with payment notice screen Main Screen of Payment Notice (Figure 4.1) In normal circumstances, system will list all the SRN that are ready for payment notice printing. User able to filter the listing of SRN by court type (refer Figure 4.1 – 1) or by retrieving a specific SRN from the system (refer Figure 4.1 – 2). Filtering by SRN Click “Advanced Search” Key in Scan Reference No Click to start search for the SRN 1 2 Figure 4.1 ECOURTS-UM(I)-01 Release No : 1.0 Origin Date: 11/04/2011 Release Date : 23/06/2011 Section 1- Page 24 of 70 e-Filing System User Manual Click on any of the item in the listing and the following screen will be shown (Figure 4.2) Click on Click on to back to the SRN Listing Page to print the Payment Notice 1 Figure 4.2 ECOURTS-UM(I)-01 Release No : 1.0 Origin Date: 11/04/2011 Release Date : 23/06/2011 Section 1- Page 25 of 70 e-Filing System User Manual NOTE : Normally, the clerk will generate two (2) copies of payment notice slip to lawyer/despatch boy and request them to make payment at the payment counter. The payment counter will produce the printed receipt on the payment slip NOTE : Court staff need to inform the lawyers/despatch boys that they can check their filing status online via e-Filing portal at http://efiling.kehakiman.gov.my under ‘Public Service’ section by using the ‘Extraction Code’ stated in the payment notice slip Alternatively, lawyer also can wait for e-mail notification from e-Filing to get notification pertaining their filing status ECOURTS-UM(I)-01 Release No : 1.0 Origin Date: 11/04/2011 Release Date : 23/06/2011 Section 1- Page 26 of 70 e-Filing System User Manual 5.0 HOW TO UPDATE PAYMENT TIMESTAMP (FILING VIA SERVICE BUREAU) 5.1 Login into e-Filing system using login id which able to access payment update screen NOTE : Lawyer/despatch boy will need to return the paid payment notice slip back to the registration counter for the payment update into e-Filing system. Upon successful update of the payment status into the system, the said document(s) will be ready to be processed by level 1 and level 2 staffs Refer to main Screen of Payment Status Update in Figure 5.1 Enter the EFS Filing Reference Number and click button Figure 5.1 All document(s) in belong to the same filing id will appear (Figure 5.2) ECOURTS-UM(I)-01 Release No : 1.0 Origin Date: 11/04/2011 Release Date : 23/06/2011 Section 1- Page 27 of 70 e-Filing System User Manual 1 2 3 Figure 5.2 To begin the payment status update on the selected filing id… Key in the Payment Timestamp (Date of payment made via payment counter) (refer Figure 5.2 - 1) in “Payment Timestamp” field and a pop-up calendar will appear (refer Figure 5.3). Select the date and time of the payment. Key in the eSKHD transaction number as per stated on the payment slip (refer to Figure 5.2 – 2). Click button when ready. Point and click on the ‘Apply to All’ button to duplication the information to all the item listed. Click button to begin update the payment information into the system. ECOURTS-UM(I)-01 Release No : 1.0 Origin Date: 11/04/2011 Release Date : 23/06/2011 Section 1- Page 28 of 70 e-Filing System User Manual Figure 5.32 ECOURTS-UM(I)-01 Release No : 1.0 Origin Date: 11/04/2011 Release Date : 23/06/2011 Section 1- Page 29 of 70 e-Filing System User Manual 6.0 HOW TO ASSIGN CASE NUMBER FOR THE CASE THAT SUBMITTED BY LAWYER THROUGH ONLINE SUBMISSION Login into e-Filing system as level 1 or 2 user, Figure 6.1 ECOURTS-UM(I)-01 Release No : 1.0 Origin Date: 11/04/2011 Release Date : 23/06/2011 Section 1- Page 30 of 70 e-Filing System User Manual Incoming cases which doesn’t has a case number will have marking of XXXX for running number and year. Click the case to view the details. (Figure 6.2) 2 1 Figure 6.2 # 1 2 Description Left panel provide the listing of available incoming task awaiting for processing Right panel provide the detail information of the case and other action tools for document processing upon selection of any item in 1 NOTE : Listing of incoming tasks in user’s eWorkspace is depending on the document distribution rules made for the respective court unit. The system can distribute the case according for case type code or no configuration at all for new case. If there is no configuration done for new cases, all the cases will be visible by all the level 1 staffs. Whoever pick up the task from the list will be ‘locked’ to his/her user account and not visible to other (refer Figure 6.3) ECOURTS-UM(I)-01 Release No : 1.0 Origin Date: 11/04/2011 Release Date : 23/06/2011 Section 1- Page 31 of 70 e-Filing System User Manual Upon clicking on the case that does not assign to any user, the following message will appear. (Figure 6.3) Click to accept the case. Click to cancel Figure 6.3 NOTE : If user didn’t get the pop-up screen as in Figure 6.3, this means that the case was distributed to the user base on the distribution rules configured into the system. ECOURTS-UM(I)-01 Release No : 1.0 Origin Date: 11/04/2011 Release Date : 23/06/2011 Section 1- Page 32 of 70 e-Filing System User Manual System will display the details of the case and it related action button upon confirmation / click for document processing. 2 1 Figure 6.4 Point and click on the document type name 1 to open the document for viewing. The system will also display the digital signature information of this PDF file by placing your mouse pointer on top of the document type name. Figure 6.5 User may need to change the case type code at 2 if they found the case code selected by lawyer is incorrect. Select the correct 1st mention date and click to auto assign a new case number for this case reqistration request refer Figure 6.6 ECOURTS-UM(I)-01 Release No : 1.0 Origin Date: 11/04/2011 Release Date : 23/06/2011 Section 1- Page 33 of 70 e-Filing System User Manual NOTE : User need to manually calculate and provide the mention date for the new case Figure 6.6 ECOURTS-UM(I)-01 Release No : 1.0 Origin Date: 11/04/2011 Release Date : 23/06/2011 Section 1- Page 34 of 70 e-Filing System User Manual 7.0 HOW TO PROCESS DOCUMENT DOCUMENT PROCESSING BY LEVEL 1 or LEVEL 2 Login into e-Filing system as level 1 or 2 user Figure 7.1 ECOURTS-UM(I)-01 Release No : 1.0 Origin Date: 11/04/2011 Release Date : 23/06/2011 Section 1- Page 35 of 70 e-Filing System User Manual At Incoming Task tab, pick and click one of the case listed on the left panel that need to process Figure 7.2 ECOURTS-UM(I)-01 Release No : 1.0 Origin Date: 11/04/2011 Release Date : 23/06/2011 Section 1- Page 36 of 70 e-Filing System User Manual The details of the case will show on the right panel, click on to view the document Action buttons explanation: edit the document via the document editor applet (refer Figure 7.4) download the PDF document for viewing view the case flow Figure 7.3 ECOURTS-UM(I)-01 Release No : 1.0 Origin Date: 11/04/2011 Release Date : 23/06/2011 Section 1- Page 37 of 70 e-Filing System User Manual Upon clicking , the following pop-up screen will appear (Figure 7.4) Figure 7.4 ECOURTS-UM(I)-01 Release No : 1.0 Origin Date: 11/04/2011 Release Date : 23/06/2011 Section 1- Page 38 of 70 e-Filing System User Manual Description of Action Buttons Activate mouse pointer Colour chooser for text, line and free hand Free hand writing/drawing tools Line drawing tools Text typing tools Insert time stamp Insert signature (with or without the seal image) Insert seal image Erase all of the marking on PDF file one by one (except typed word) Erase all marking in PDF File Add note to the document (not visible to lawyer) Accept the processed PDF file ready for next level of processing (e.g. to be escalate to level 2) Reject document Save changes made by user in the PDF File Close the edtor After finished processing the PDF File, click “Accept” to accept the document. Upon accepting document, system will prompt for user’s processing authorization password (refer Figure 7.5). ECOURTS-UM(I)-01 Release No : 1.0 Origin Date: 11/04/2011 Release Date : 23/06/2011 Section 1- Page 39 of 70 e-Filing System User Manual Provide the password and click to proceed. System will prompt confirmation box upon successful of acceptance by the system (refer Figure 7.6) Figure 7.5 Figure 7.6 NOTE : e-Filing user’s processing authorization password is only available for level 1 user group. Authorization password is another layer of security introduced in the system apart from the login password. User can change their authorization password at ‘My Profile’ > ‘Basic Details’ ECOURTS-UM(I)-01 Release No : 1.0 Origin Date: 11/04/2011 Release Date : 23/06/2011 Section 1- Page 40 of 70 e-Filing System User Manual If the said document required second level approval then click on the button to escalate the document to the respective second level staff. Figure 7.7 NOTE : The escalation button will not appear for document type doesn’t required second level approval. NOTE : All document(s) need to be processed by the staff before escalation can be done. DOCUMENT PROCESSING BY LEVEL 2 Level 1 staff will escalate the respective case to the selected level 2 officer for processing and required their digital signature or seal on the document. Level 2 officer will click on the button to place their signature. First, system will prompt for user action if court seal is required on the signature (refer Figure 7.8). Click ‘Yes’ if seal image is needed. ECOURTS-UM(I)-01 Release No : 1.0 Origin Date: 11/04/2011 Release Date : 23/06/2011 Section 1- Page 41 of 70 e-Filing System User Manual Figure 7.8 System will also ask if the filing date need to be attached on the signature as well, Click ‘Yes’ if the filing date is needed (refer Figure 7.9). Figure 7.9 Figure 7.10 ECOURTS-UM(I)-01 Release No : 1.0 Origin Date: 11/04/2011 Release Date : 23/06/2011 Section 1- Page 42 of 70 e-Filing System User Manual Once the document has been amended with necessary markings, user need to click on the button. System will prompt for user’s digital signature as shown in Figure 7.11 1 2 Figure 7.11 Officer need to click on the input box 1 and locate/select the GITN’s SoftCert (GovCert) from their PC or PenDrive. Key in the correct PIN in order to access the certificate for digital signature. Upon completion of processing all the documents, level 2 officer will need to point and click on the button to start register the case into eFiling and CMS. System will prompt a scheduling dialog box (as shown in Figure 7.12) to request the hearing time and time for mention. This information is required by the CMS to register the schedule. Click ‘OK’ button to proceed. ECOURTS-UM(I)-01 Release No : 1.0 Origin Date: 11/04/2011 Release Date : 23/06/2011 Section 1- Page 43 of 70 e-Filing System User Manual Figure 7.12 NOTE : User can choose ‘No Mention Date’ if the case is registered into CMS without registering the schedule NOTE : User can use the ‘Remember’ feature to allow the previous selection made by the user to automatically repopulate when they revisit back the dialog box. This feature is made available in digital signing and scheduling dialog box. NOTE : If Level 2 user notice that any new case escalated to him/her was not assigned with the correct case code by Level 1, Level 2 user can use button to revert the new to initial stage (back to level 1) and request them to reassign with correct case code. The previous case number will be released back into the system and available for reuse by ECOURTS-UM(I)-01 Release No : 1.0 Origin Date: 11/04/2011 Release Date : 23/06/2011 Section 1- Page 44 of 70 e-Filing System User Manual other case. Level 2 will be requested to fill up the following screen prior to initialize the transfer: Please take note that… This feature is only applicable for new cases which haven’t registered into e-Filing system. Escalation can only be done for court unit which belong to the same jurisdiction and location. Example, from KMKL magistrate to session (both from lower court) or KMKL Commercial to Commercial Bankruptcy (both from high court) The previously assigned case number will be recycled/reused for subsequent new case registration. ECOURTS-UM(I)-01 Release No : 1.0 Origin Date: 11/04/2011 Release Date : 23/06/2011 Section 1- Page 45 of 70 e-Filing System User Manual 8.0 HOW TO REVERT APPROVED DOCUMENT (BUT NOT REGISTERED) FOR NEW CASE (DUE TO MISTAKE MADE ON MENTION DATE) Login into e-Filing system as level 1 or 2 user Retrieve the case from the Incoming Task panel Key in the correct mention date into ‘1st Mention Date’ field Click on the button which located beneath the mention date (refer Figure 8.1). Figure 8.1 System will clear all the marking made by users on all the documents and subsequently these document will be ready for court staffs to re-do all the documents. ECOURTS-UM(I)-01 Release No : 1.0 Origin Date: 11/04/2011 Release Date : 23/06/2011 Section 1- Page 46 of 70 e-Filing System User Manual 9.0 HOW TO PERFORM INCOMING TASK FILTERING AND CASE SEARCH INCOMING TASK FILETERING Login into e-Filing as level 1 or level 2 and access the eWorkspace screen To apply filtering on the incoming task’s listing items, click on ‘Advanced Filter’ in order to expand the filtering section (refer Figure 9.1 & 9.2) Figure 9.1 Figure 9.2 You can apply the filtering with the following criteria i. By range of filing Date ii. By case Number iii. By filing type (new or existing case) iv. By filing method (service bureau or online) Click button to apply the filtering on the incoming task listing items. System will display the search result under the filtering box as shown Figure 9.1 ECOURTS-UM(I)-01 Release No : 1.0 Origin Date: 11/04/2011 Release Date : 23/06/2011 Section 1- Page 47 of 70 e-Filing System User Manual 2 1 Figure 9.3 There are three (3) tabs in the right panel (refer to Figure 9.3-1) for each case that user has selected from the left panel (Figure 9.6-2). These tabs allow different information to be grouped separately and allow user easily access these information during the time user processing the document. Tab Pending Filing Processed Filing On Hold Filing Description Provide listing of document that pending for processing Provide listing of processed and accepted documents for the respective case Document(s) that pending for new case registration is allow to put on-hold in e-Filing while allowing the staff to registered the case into e-Filing and CMS NOTE : In normal circumstances, all documents under that pending for case registration IS REQUIRED to be processed before it can be registered into both e-Filing and CMS system ECOURTS-UM(I)-01 Release No : 1.0 Origin Date: 11/04/2011 Release Date : 23/06/2011 Section 1- Page 48 of 70 e-Filing System User Manual CASE SEARCH Login into e-Filing as level 1 or level 2 and access the eWorkspace screen Click on ‘Case Search’ tab (refer Figure 9.4 & Figure 9.5) Figure 9.4 Figure 9.5 User can search any cases belong to his court unit (base on his/her login ID account) base on (i) Case Number (ii)Case Filing Date Click on button to start retrieve the record from the system based on the criteria provided System will display the search result under the filtering box as shown Figure 9.6 – 2. Total number of searched items that meet the filtering criteria will be display beside the ‘Case Search’ (refer Figure 9.6 – 1) ECOURTS-UM(I)-01 Release No : 1.0 Origin Date: 11/04/2011 Release Date : 23/06/2011 Section 1- Page 49 of 70 e-Filing System User Manual 3 1 2 3 Figure 9.6 There are three (3) tabs in the right panel (refer to Figure 9.6-3) for each case that user has selected from the left panel (Figure 9.6-2). These tabs allow different information to be grouped separately and allow user easily access these information. Tab Pending Filing Processed Filing Rejected Filing Description Provide listing of document that pending for processing Provide listing of processed and accepted documents for the respective case Provide listing of rejected documents and reason for rejection ECOURTS-UM(I)-01 Release No : 1.0 Origin Date: 11/04/2011 Release Date : 23/06/2011 Section 1- Page 50 of 70 e-Filing System User Manual 10.0 HOW TO REJECT A DOCUMENT OR A NEW CASE Login into e-Filing as Level or Level 2 user and select the case that need to process from Incoming Task panel. Details about the case will be display on the right panel, click on icon to view the document. (Figure 10.1) edit the document via the document editor applet download the PDF document view the case processing flow history Figure 10.1 ECOURTS-UM(I)-01 Release No : 1.0 Origin Date: 11/04/2011 Release Date : 23/06/2011 Section 1- Page 51 of 70 e-Filing System User Manual Upon clicking icon the following screen will appear (Figure 10.2) Figure 10.2 If second level is required to approve this document (need second level to approve for the rejection); the Level 1 staff can provide his/her reason why this document is advised for rejection in the section. User need to click on the [+] button to expand/disclose the text box in order to allow him/her to place their remarks Figure 10.3 ECOURTS-UM(I)-01 Release No : 1.0 Origin Date: 11/04/2011 Release Date : 23/06/2011 Section 1- Page 52 of 70 e-Filing System User Manual Upon clicking on button, the following screen will appear to request for Level 1 authorization password (Figure 10.4). Click button to proceed. Figure 10.4 Level 1 user will need to escalate this document to Level 2 user for his/her authorization of this request for rejection. LEVEL 2 AUTHORIZATION FOR REJECTION When Level 2 receive the rejected document from Level 1, level 2 will notice that the document was partially rejected (circle in red as per Figure 10.6) Figure 10.5 Open the document to process by point and click on the icon. Level 2 staff is required to read the content in the Footnote before reject the said document. Click on button when ready. System will prompt a dialog box as shown in Figure 10.4 to request for staff authorization password. Click ‘OK’ once ready Upon successful authentication using the Level 2 staff authorization password, system will display an electronic form named ‘Penolakan Dokumen’ to request for user’s reason of rejection (Figure 10.6). User need to select/tick the reason of ECOURTS-UM(I)-01 Release No : 1.0 Origin Date: 11/04/2011 Release Date : 23/06/2011 Section 1- Page 53 of 70 e-Filing System User Manual rejection as per listed in the form (refer Figure 10.6 -1) or write their remark in the text box (refer Figure 10.6 -2) Click on to save the form into the system 1 2 Figure 10.6 System will prompt for confimation as per shown in Figure 10.7. Click ‘Yes’ to proceed. ECOURTS-UM(I)-01 Release No : 1.0 Origin Date: 11/04/2011 Release Date : 23/06/2011 Section 1- Page 54 of 70 e-Filing System User Manual Figure 10.7 Figure 10.8 If user just need to reject certain documents, the above steps will be sufficient. However, for rejection on new case filing, user will need to click on the button. Figure 10.9 ECOURTS-UM(I)-01 Release No : 1.0 Origin Date: 11/04/2011 Release Date : 23/06/2011 Section 1- Page 55 of 70 e-Filing System User Manual NOTE : The ‘Penolakan Dokumen’ form will only available for Level 2 (or the last level who process the document) ECOURTS-UM(I)-01 Release No : 1.0 Origin Date: 11/04/2011 Release Date : 23/06/2011 Section 1- Page 56 of 70 e-Filing System User Manual 11.0 HOW TO PERFORM INTERNAL FILING INTRODUCTION Internal filing in e-Filing is a feature that allow the user to file certain documents for a respective case in the system internally, such as correspondents. Internal filing will not require filing fee. NOTE : Internal filing is available for both Level 1 and Level 2 staffs. Type of document is limited base on the configuration made by the administrator Login into e-Filing portal as level 2 staff and point and click on ‘Case Search’ tab (refer Figure 11.1 -1) 1 2 Figure 11.1 Expand the ‘Advanced Filter’ and search for the case that required for internal filing Figure 11.2 ECOURTS-UM(I)-01 Release No : 1.0 Origin Date: 11/04/2011 Release Date : 23/06/2011 Section 1- Page 57 of 70 e-Filing System User Manual Click on the selected case from search result list at the left panel and click ‘Add Document’ button to start file internally (refer Figure 11.3) Figure 11.3 The following screen will appear 1 2 3 4 Figure 11.4 ECOURTS-UM(I)-01 Release No : 1.0 Origin Date: 11/04/2011 Release Date : 23/06/2011 Section 1- Page 58 of 70 e-Filing System User Manual Select the document from the listing in ‘Document Type’ (Figure 11.4-1) and select your PDF document by click on the ‘Document’ (refer 11.4-2 and 11.5) Figure 11.5 Click on ‘Add Listing’ confirm the document for internal filing. Repeat the steps above for additional document. User may click on ‘Submit’ or ‘Submit without Email’ button. If user click on ‘Submit’ button, user will get the following screen: 1 2 Figure 11.6 ECOURTS-UM(I)-01 Release No : 1.0 Origin Date: 11/04/2011 Release Date : 23/06/2011 Section 1- Page 59 of 70 e-Filing System User Manual Type in a valid email address of the recipient and click to add a recipient’s email address into the listing (refer Figure 11.6-2) Tick on the check box in the listing Click on Place your email subject and content in the dialog as per display in Figure 11.7. Click button to proceed ‘Send’ to start send the email out to the respective recipient(s) Figure 11.7 The following screen will appear once email was successfully sent. Click to end the internal filing. Figure 11.8 ECOURTS-UM(I)-01 Release No : 1.0 Origin Date: 11/04/2011 Release Date : 23/06/2011 Section 1- Page 60 of 70 e-Filing System User Manual NOTE: If the drop down list does not have needed document type, please request your Division Administrator to add new the document for case code. NOTE: Ensure PDF file is in small size (< 3 Mb) which is adequate to be sent via e-mail. Some email servers have file size limitation in accepting the email with attachment. ECOURTS-UM(I)-01 Release No : 1.0 Origin Date: 11/04/2011 Release Date : 23/06/2011 Section 1- Page 61 of 70 e-Filing System User Manual 12.0 HOW TO TRANSFER EXISTING CASE TO ANOTHER COURT INTRODUCTION There are two (2) type of case transfer available in e-Filing system: # 1 2 Type of Case Transfer New case transfer Existing case transfer Description To transfer the incoming new case registration to another court which belong to the same jurisdiction (e.g. Magistrate to Session court – lower court to lower court). This type of transfer is use for replacing the previously assigned case number to another case number such as incident happen when assign the wrong case code Refer section 7 for more details To transfer all the document in the respective existing case to different court which belong to a different jurisdiction and location (e.g. From session court KMKL to High Court Shah Alam) NOTE: Transferring of existing via e-Filing system is only applicable if the targeted court has implemented with e-Filing system NOTE: Usually request on transferring of a case required judge’s order to be released before the case transferring can be made. Thus, e-Filing user is required to ensure such document has been filed before transfer of case is committed. NOTE: Case transfer feature is only available for Level 2 user only! ECOURTS-UM(I)-01 Release No : 1.0 Origin Date: 11/04/2011 Release Date : 23/06/2011 Section 1- Page 62 of 70 e-Filing System User Manual Login to e-Filing as Level 2 user Switch the left panel to ‘Case Search’ and search for the required case number When a case was selected from the left panel, user will need to point and click on the ‘Transfer Case’ button as per shown in Figure 12.1 Figure 12.1 A pop-up dialog box will appear as shown in Figure 12.2. User will need to select the destined court for this case to be transferred to. Choose the (i) Court location (ii) Jurisdiction (iii) Court type and (iv) Division Type your remark on the text box as shown in Figure 12.2 – 2 and finally click on ‘OK’ button once ready. System will prompt for confirmation (Figure 12.3) , click ‘YES’ to confirm or ‘No’ to cancel. Finally, system will notify the user that his/her request has been successfully submitted (refer Figure 12.4) ECOURTS-UM(I)-01 Release No : 1.0 Origin Date: 11/04/2011 Release Date : 23/06/2011 Section 1- Page 63 of 70 2 e-Filing System User Manual Figure 12.2 Figure 12.3 ECOURTS-UM(I)-01 Release No : 1.0 Origin Date: 11/04/2011 Release Date : 23/06/2011 Section 1- Page 64 of 70 e-Filing System User Manual Figure 12.4 NOTE: System will block a case from transferring if the system there is any pending document which yet to be processed. Ensure there is no document in the ‘Pending Filing’ . ECOURTS-UM(I)-01 Release No : 1.0 Origin Date: 11/04/2011 Release Date : 23/06/2011 Section 1- Page 65 of 70 e-Filing System User Manual 13.0 HOW TO CHANGE ENCLOSURE NUMBER INTRODUCTION Enclosure number was assign automatically by the e-Filing system upon the filing of document. Both Level 1 and 2 users are allowed to adjust the enclosure number. Login into e-Filing as Level 1 or Level 2 In eWorkspace, switch the left panel to ‘Case Search’ and search for the required existing case number Click on the case number and the case detail will be displayed at the right panel Select the ‘Processed Filing’ tab. All the processed document will be listed. Figure 13.1 ECOURTS-UM(I)-01 Release No : 1.0 Origin Date: 11/04/2011 Release Date : 23/06/2011 Section 1- Page 66 of 70 e-Filing System User Manual Click and hold the enclosure number of the document and drag it up or down to change the sequence of the document. Refer to Figure 13.2. Click and hold. Move the document up or down Figure 13.2 Click to save the change made to the system. The enclosure number will be rearrange after the changes made to the system. Figure 13.3 ECOURTS-UM(I)-01 Release No : 1.0 Origin Date: 11/04/2011 Release Date : 23/06/2011 Section 1- Page 67 of 70 e-Filing System User Manual 14.0 HOW TO PUT ON-HOLD OF A NEW CASE REGISTRATION BUT ALLOW THE CASE TO BE REGISTERED INTO CMS INTRODUCTION When there is a situation where user needs to register the case into CMS in order for scheduling purposes without process all the document in e-Filing first; user can instruct eFiling to temporary halt/skip the processing of the document. Login into e-Filing system as Level 2 Search or click any of the new case in the Incoming Task list Under the ‘Pending Filing’ tab, click on the button Figure 14.1 The selected document that put on-hold by the user will disappear from ‘Pending Filing’ and move into ‘On Hold Filing’ tab (refer Figure 14.2) Figure 14.2 Repeat the steps above for other documents. After this, user can press on the ‘Register Case’ to register into the system while documents were put on-hold. ECOURTS-UM(I)-01 Release No : 1.0 Origin Date: 11/04/2011 Release Date : 23/06/2011 Section 1- Page 68 of 70 e-Filing System User Manual 15.0 HOW TO ESCALATE NOTICE OF APPEAL TO HIGHER COURT Upon filing of notice of appeal on the existing case, court user can escalate the notice of appeal to higher court (RKKK, Court of Appeal, Federal Court) for filing for new appeal case. NOTE: Application administrator will need to ensure that the document properties for Notice of Appeal were properly configured with ‘Appeal’ flag turn on. Once court officer click on the ‘Accept’ button in eWorkspace, the following screen below will be displayed which will request user to provide the destination of court to file the appeal case. 1 2 3 4 Figure 15.1 # 1 2 3 4 Description Select court to escalate to for filing of appeal case Name of judge who handle this case (retrieve from CMS) Email address of the judge who handle this case Content of the email ECOURTS-UM(I)-01 Release No : 1.0 Origin Date: 11/04/2011 Release Date : 23/06/2011 Section 1- Page 69 of 70 e-Filing System User Manual Court user will need to click on the ‘Confirm’ button to continue for next action. System will automatically escalate the notice of appeal to the respective court and email to judge and lawyer will be delivered upon successful registration of appeal case. Figure 22.2 ECOURTS-UM(I)-01 Release No : 1.0 Origin Date: 11/04/2011 Release Date : 23/06/2011 Section 1- Page 70 of 70