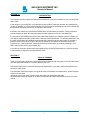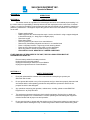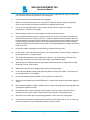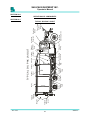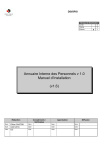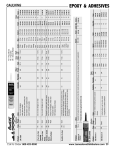
1
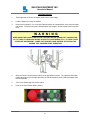
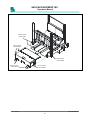
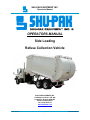
SHU-PAK EQUIPMENT INC.
Operator’s Manual
OPERATORS MANUAL
Side Loading
Refuse Collection Vehicle
SHU-PAK EQUIPMENT INC.
176 McGovern Road. R.R. #32
Cambridge, Ontario. N3H 4R7
Phone: (519) 653-2472
Fax: (519) 653-2719
www.SHU-PAK.com
Rev. 08/2010
SPOPERMAN09-e
i
SHU-PAK EQUIPMENT INC.
Operator’s Manual
Table of Contents
1.0
1.1
1.2
INTRODUCTION
. ............................................................................................................. ..1
Vehicle Summary . ............................................................................................................. ..2
Hydraulic System Summary ................................................................................................. ..3
2.0
2.1
2.2
2.3
2.3.1
2.3.2
2.4
2.5
2.6
2.7
2.8
2.9
2.9.1
2.9.2
2.9.3
2.10
2.11
2.12
OPERATIONS ....................................................................................................................... ..4
Safety Precautions ............................................................................................................... ..5
Employer, Employee Responsibility ..................................................................................... ..7
Pre-trip Inspection ................................................................................................................ 10
Checking Oil Tank Level .................................................................................................... 11
Cleaning Behind Crusher Panel ....................................................................................... 11
Warning and Safety Decals .................................................................................................. 13
SHU-PAK Safety Decal Location ......................................................................................... 16
Mirror Adjustment ................................................................................................................. 17
Operation of Electric Controls .............................................................................................. 19
Activating Hydraulic System ................................................................................................. 21
Operation of Hydraulic Controls ........................................................................................... 23
Crusher Panel .................................................................................................................... 23
Body Hoist ....................................................................................................................... 24
Hydraulic Tailgate .............................................................................................................. 25
Loading Hopper .................................................................................................................... 26
“Packing Out" Body .............................................................................................................. 28
Operating Your SHU-PAK On Route ................................................................................... 29
3.0
3.1
3.1.1
TROUBLE SHOOTING .......................................................................................................... 37
Trouble Shooting Guide ....................................................................................................... 38
Trouble Shooting Chart ..................................................................................................... 39
A1.0
A1.1
A1.2
A1.3
A2.0
A2.1
A2.2
A2.3
A2.4
APPENDIX A - DEFINITIONS ................................................................................................ A1
Definitions
.............................................................................................................. A2
Definition of Terms for SHU-PAK Packer ............................................................................... A2
Definitions of Hydraulic Terminology ...................................................................................... A3
List of Abbreviations A5
Definitions of Components ...................................................................................................... A6
Typical Shu Pak
Typical Right Hand Drive Modification .................................................................................. A7
Typical Right Hand stand Up Drive – Tilt Cab or CF-109 Models .......................................... A8
Typical Right Hand Drive Modification – C109 ....................................................................... A9
B1.0
APPENDIX B – SPECIAL OPTION ....................................................................................... B1
Cart Dumping System ............................................................................................................ B2
Rev. 08/2010
SPOPERMAN09-e
ii
SHU-PAK EQUIPMENT INC.
Operator’s Manual
SECTION 1.0
INTRODUCTION
Rev. 08/2010
SPOPERMAN09-e
1
SHU-PAK EQUIPMENT INC.
Operator’s Manual
SECTION 1.0
INTRODUCTION
This manual has been prepared to familiarize and assist you in the safe operation of your new SHU-PAK
Side Loader.
In the design of your SHU-PAK, every attempt has been made to make the operation and maintenance
as easy as possible. It is of the utmost importance that all personnel operating this vehicle be familiar with
the operation and safety procedures, as outlined in this manual.
Included in the manual are recommended maintenance and lubrication procedures. These procedures
must be followed to obtain the best performance and life expectancy from your new SHU-PAK.
It is the goal of SHU-PAK Equipment Inc. that a SHU-PAK customer is a satisfied customer. Should you
ever require replacement parts, please refer to the SHU-PAK Parts Manual. To facilitate identification, all
the major components have detailed drawings identifying both the part and part number. If you have a
problem, which is beyond the scope of this manual, please do not hesitate to contact the SHU-PAK
Equipment Inc. Parts Department. Please provide as much information as possible pertaining to your
Side Loader (model, serial, part numbers, etc).
In an effort to continually provide the best possible product, SHU-PAK Equipment Inc. reserves the right
to make design changes to its products without notice.
SECTION 1.1
VEHICLE SUMMARY
Thank you for buying a SHU-PAK. SHU-PAK Equipment believes that with proper care and maintenance
your side-loader will always be a valuable asset to your fleet
SHU-PAK Equipment Inc. believes that with proper maintenance, your Side Loader will be efficient and
durable for many years.
The information listed below will be your guide for service information and maintenance, please keep this
manual in a safe place.
Always have your body serial number ready when calling for information and parts.
An identification sticker is located on the side or back wall of the Right Hand Stand Up Drive side of the
vehicle.
Rev. 08/2010
SPOPERMAN09-e
2
SHU-PAK EQUIPMENT INC.
Operator’s Manual
SECTION 1.2
HYDRAULIC SYSTEM SUMMARY
Pump
Commercial
P75A-178-CEOQ-20-7
Muncie
PM31-7CFSL-PMV-55-2B
Permco
7500A167CDNM20-00
Commercial
Contact SHU-PAK
Hydro Control
Contact SHU-PAK
Return Line Filter
Shu-Pak
810227
Suction Strainer
Omniflex
H39-14
Breather
Great Lakes
TRM-2-34-N
Hoses
Aeroquip
MatchMate Plus Hoses - GH781 (Double Wire Braid)
Hydraulic Oil
AW22
Main Valve
Main relief pressure should be set at 1850 psi.
Rev. 08/2010
SPOPERMAN09-e
3
SHU-PAK EQUIPMENT INC.
Operator’s Manual
SECTION 2.0
OPERATIONS
Rev. 08/2010
SPOPERMAN09-e
4
SHU-PAK EQUIPMENT INC.
Operator’s Manual
SECTION 2.0
OPERATIONS
SECTION 2.1
LOCKOUT / TAGOUT PROCEDURE
This section serves as a guideline for lockout/tagout and does not constitute proper training. It is
the vehicle owner’s responsibility to develop and train all their employees on the correct use of Lockout/
Tagout. It is critical to the safety of service personnel that they are trained prior to inspecting, repairing or
performing maintenance. This applies anytime they perform work on the unit whether it is in the shop or
on the road.
-
Engage parking brake
Raise any part of the unit that requires repair / service and block it using a support designed
to handle the weigh (I.e.: body props or tailgate props)
Shut down engine
Place wheel chocks
Remove ignition key and store it in a controlled area
Remove key from battery kill switch and store it in a controlled area
Place a completed Lockout / Tagout tag on both steering wheels
Place an Out of Service sign on the dash or on the windshield
Move all joysticks to ensure all residual energy is released
FOLLOW ALL LOCAL MINISTRY OF LABOUR GUIDELINES
IF WELDING WILL BE REQUIRED TO THE UNIT, THE FOLLOWING ITEMS MUST BE
DISCONNECTED PRIOR TO:
Remove battery cables from battery terminals
Unplug the Anti-Lock brake module
Unplug the transmission Electronic Control Module
Unplug the engines Electronic Control Modules
SECTION 2.1.1
SAFETY PRECAUTIONS
1.
Read and understand the contents of this manual before attempting to operate your
SHU-PAK Side Loader.
2.
Do not operate this vehicle or any of its components until you have been properly instructed and
are familiar with the safe operating procedures and qualified to operate the vehicle for the
purpose for which it was designed.
3.
Any questions concerning the operation, maintenance, or safety, please contact SHU-PAK
Equipment Inc. at (519) 653-2472
4.
This equipment operates using heavy-duty hydraulic equipment. Serious injury or death can
result from improper use, or maintenance. Persons operating and maintaining this equipment
must be familiar with its proper use and operation.
5.
Do not enter the body or hopper with the engine running! Remove the ignition key and keep it in
a safe place before entering the body. A Lockout tag must be affixed to the dash warning other
Rev. 08/2010
SPOPERMAN09-e
5
SHU-PAK EQUIPMENT INC.
Operator’s Manual
personnel that someone is servicing the truck. If you are not equipped with a tag, you should ask
your supervisor about being trained in Lock-Out/Tag-Out.
6.
Do not exceed the specified RPM with pump engaged.
7.
Before the first operation each day, or if damage is suspected, always inspect the right hand
drive, packer and body for improper maintenance or damage before using.
8.
Do not operate right hand stand up drive, packer & body if there are signs of improper
maintenance or indications of damage.
9.
Before starting to load truck, ensure tailgate lock pins are securely in-place.
10.
Use the right hand stand up drive for house-to-house pick-up only. The maximum speed for the
right hand stand up drive is 20 mph (32 K.P.H.). Watch for children and other persons who may
be approaching the vehicle from the left hand side. Set your view mirrors accordingly. Keep both
hands on steering wheel when driving. Do not leave right hand stand up drive until vehicle has
completely stopped and work brake is fully locked. Set the parking brake if more than 10 feet from
trash, or on a hill.
11.
Be sure the vehicle is standing on level and firm ground before raising body.
12.
Do not stand or work under the body, when it is in a raised position, unless the body is supported
by the body props or a suitable support.
13.
This vehicle was designed to be operated by one person. It is not the intent of this manual to
show helper instructions as this vehicle cannot safely accommodate a helper.
14.
When driving from right hand stand up drive at the landfill always hook-up safety chain on right
hand side of cab or close the door.
15.
Stand clear of the path of the tailgate swing when opening the tailgate.
16.
Do not open the tailgate unless ejecting/dumping load or servicing the vehicle. The refuse may
be exerting pressure on the tailgate.
17.
Do not raise tailgate until area behind is clear of persons or obstructions.
18.
Open and close tailgate at low engine RPM ONLY. Always insert safety lock pins after tailgate is
closed.
19.
Never allow the tailgate to freefall. Always have the engine running and the pump engaged when
operating any hydraulic function.
20.
Use extreme caution when backing up. Ensure that there are no people or that there are no
obstructions in the vehicle’s path. Ensure that the back-up alarm is operating properly.
21.
Stay clear of the hopper when the operating hydraulics. Keep clear of all moving parts.
22.
Do not pressurize hydraulic cylinders, while removed from the vehicle, with air, oil, etc. This may
cause the cylinders to react unexpectedly resulting in injury or death.
Rev. 08/2010
SPOPERMAN09-e
6
SHU-PAK EQUIPMENT INC.
Operator’s Manual
23.
It is the responsibility of the operators and mechanics’ to learn the correct and safe operation of
the vehicle. Questions regarding the operation of your SHU-PAK should be directed to SHU-PAK
Equipment Inc. at (519) 653-2472
24.
Safety is our primary concern and it should be yours. When working with the hydraulics. Take
precaution to prevent injury to yourself or others. Wear protective clothing to cover exposed skin
and wear safety glasses to protect your eyes. If injured, seek immediate medical attention.
25.
When performing maintenance, use caution, as many of the components are heavy. If required,
use lifting devices to assist. Wear proper safety attire, (i.e. Use safety glasses, safety shoes and
other safety equipment), to help prevent injury to yourself and others.
26.
Do not operate any vehicle function until you are sure that all persons are clear of the hopper and
any other hazardous areas.
27.
Hydraulic hoses, tubes, and fittings should be inspected for cracks, cuts, leaks abrasion, and
wear on a weekly basis.
28.
All body safety decals must be in place. Complete decal packs or individual decals are available
from SHU-PAK Equipment Inc. at (519) 653-2472.
29.
When cleaning around the rear of the vehicle, never go underneath an open tailgate unless
properly supported by the tailgate prop or a suitable support. Use a brush or broom with an
extended handle, so that the cleaning may be done from the side of the vehicle.
Rev. 08/2010
SPOPERMAN09-e
7
SHU-PAK EQUIPMENT INC.
Operator’s Manual
SECTION 2.2
EMPLOYER, EMPLOYEE RESPONSIBILITY
(Exert from American National Standard ANSI Z2455.1-1992)
6.0
OPERATIONAL REQUIREMENTS
6.1
Employer Responsibility
The employer shall properly maintain mobile equipment to meet all applicable regulatory safety standards
and shall be responsible for the following:
a.
Providing for instruction and training of employees in safe methods of work before assigning them
to operate clean, service, maintain, or repair the equipment. Such instruction and training shall
include procedures provided by the manufacturer. The employer shall maintain records of the
names of employees and the dates of training:
b.
Monitoring the employee's operation of equipment and taking appropriate action to ensure proper
use of the equipment, including adherence to safe practices;
c.
Establishing and following a program of periodic and regular inspections of all equipment to
ensure that all parts, component equipment, and safeguards are in safe operating condition and
adjusted in accordance with the manufacturer's recommended procedures. This shall include
keeping all malfunction reports, and records of inspections and maintenance work performed;
d.
Repairing, prior to placing equipment into service, any mechanical malfunction or breakdown that
affects the safe operation of the equipment;
e.
Meeting the appropriate lighting requirements during hours of darkness. Equipment may be used
during hours of darkness when light is available for adequate visibility in the area of operation
including the riding steps, loading hoppers, and overhead obstructions;
NOTE: This provision does not require the manufacturer to install extra lighting on the
equipment.
f.
Ensuring that the container-lifting mechanism will not be used to lift any weight that is reasonably
believed to exceed the load rating of any of the individual components of the container-lifting
mechanism;
g.
Ensuring that component equipment, bodies, or tilt-frames, when raised for servicing or
maintenance, have additional support in accordance with manufacturer's instructions;
h.
Utilizing the manufacturer's recommended procedures for the lockout/tag out of energy sources in
a program complying with part 1910.147 of title 29 of the Code of Federal Regulations (OSHA).
The procedure will include control of all keys;
i.
Ensuring that all service opening covers and access doors are maintained and in place while the
vehicle is in use;
j.
On hoist-type and title frame equipment that services and carries detachable containers, or on
compactor-container combinations, affixing a signer mark near the cab on the driver's side
stating the minimum overhead clearance required for the vehicle height dimensions when all
equipment, including the container or compactor-container combination, is positioned for normal
over-the-road travel;
Rev. 08/2010
SPOPERMAN09-e
8
SHU-PAK EQUIPMENT INC.
Operator’s Manual
k.
Specifically inspecting safety equipment and other protective devices to ensure that these
devices are not disabled or bypassed, and not to permit the operation of mobile equipment unless
these devices are fully functional. These inspections shall be in accordance with 6.1(c);
l.
Ensuring that no person uses a collecting vehicle to tow a trailer unless that collecting vehicle has
been certified by a final stage manufacturer for such use;
m.
Removing or blocking to prevent the use of riding steps on any vehicle that is used to tow a
trailer;
NOTE: Only riding steps which are located behind the rearmost axle of the combination
may be used (see 3.41 and 7.1.10).
n.
Ensuring that no person uses a rear loader vehicle to tow a trailer during collection activities.
6.2
OPERATOR/EMPLOYEE RESPONSIBILITY
6.2.1
General
Operators/employees who work on mobile equipment shall be responsible for the following:
a.
Using all applicable safety features provided on the mobile equipment;
b.
Using mobile equipment only after being properly instructed and trained in accordance with the
instructions given in 6.1 and 6:2;
c.
Reporting any damage, or malfunction of, the mobile equipment by submitting a report to the
employer, either when the damage or malfunction occurs, or as soon thereafter as practicable by
the termination of the operating day. Such reports shall be documented by the employer;
d.
Ensuring that access doors, if installed, are closed and locked before operations may begin;
e.
Ensuring that the area of operation around container dumping systems, loading systems, and the
container is clear of persons during all phases of the dumping operation prior to energizing the
dumping system;
f.
Ensuring that all persons are clear of the point of operation before actuating any packing cycle
controls or container dumping controls, the operator/employee shall be ready to stop the packing
cycle or container dumping operation if necessary;
g.
Ensuring that all persons are clear of the tailgate before the tailgate is opened or shut, and the
operator shall warn all persons not to cross under an open tailgate,
h.
Operating all equipment in accordance with the manufacturer's instructions, which includes
ensuring the proper position of all locks, doors, lids, etc.;
i.
Riding only in the cab or on riding step(s) designed for that purpose, and not on any part of
mobile equipment;
j.
Ensuring that no one disables or bypasses safety equipment or other protective devices, and that
mobile equipment is not operated unless these devices are fully functional;
Rev. 08/2010
SPOPERMAN09-e
9
SHU-PAK EQUIPMENT INC.
Operator’s Manual
k.
Adhering to the employer's lockout/tag out procedure when repairing or servicing mobile
equipment;
l.
Remaining at the operator's position during collection activities until the vehicle has come to a
complete stop and the brakes are set.
6.2.4
Vehicles Equipped with Riding Steps
Operators/employees of any vehicle equipped with riding steps shall be responsible for:
a.
Ensuring that no persons ride on steps when the vehicle is backing up, when the vehicle is
exceeding 10 MI/HR or operating in reverse, or when the distance traveled exceeds 1/5 mile;
b.
Ensuring that no person ride on the loading sill or in the hopper.
NOTE: SHU-PAK Side Loaders are not equipped with riding steps. They are sometimes
equipped with a load platform on the side of the hopper. The loading platforms
should never be used for riding - note 6.2.4. (b) Above.
Rev. 08/2010
SPOPERMAN09-e
10
SHU-PAK EQUIPMENT INC.
Operator’s Manual
SECTION 2.3
PRE-TRIP INSPECTION
Prior to the daily operation of your SHU-PAK Side Loader, a pre-trip inspection should be preformed. The
following only applies to the SHU-PAK body. These checks should be combined with the pre-trip
inspection as defined by the chassis manufacturer.
Inspect all decals making sure they are in place and readable, replace any as required. Replacement
labels can be purchased from SHU-PAK Equipment Inc. Parts Department.
Check all lights and alarms and make sure they are properly working. Replacement lights and alarms
can be purchased from SHU-PAK Equipment Inc. Parts Department.
Check the oil level in the hydraulic tank. The sight gauge is installed on the side of the tank. The
level must be checked with all the cylinders in the retracted position. Add clean hydraulic oil as
necessary.
Check all hoses and hydraulic lines for oil leaks and repair as necessary.
Check that the area behind the ram is clear of debris, etc. Clean as required.
Check the brakes, turn signals, foot throttle, transmission linkage and that the mirrors are adjusted
and set correctly on the Right Hand Stand Up Drive.
Check the operation of the packer button (stop, forward and reverse button).
Check the condition of the Step, Packer, Body Locks and Crusher Panel.
Check the rear doors, door locks, and door hinges. Ensure that the tailgate lock pins are securely in
place.
W A R N I N G
READ AND UNDERSTAND THE CONTENTS OF THIS MANUAL BEFORE ATTEMPTING TO
OPERATE YOUR SHU-PAK SIDE LOADER.
W A R N I N G
DO NOT ENTER THE BODY OR HOPPER WITH THE ENGINE RUNNING!
REMOVE THE IGNITION KEY BEFORE ENTERING THE BODY
Rev. 08/2010
SPOPERMAN09-e
11
SHU-PAK EQUIPMENT INC.
Operator’s Manual
C A U T I O N
DO NOT LEAVE THIS VEHICLE UNATTENDED UNLESS THE ENGINE IS SHUT OFF AND THE
IGNITION KEY HAS BEEN REMOVED.
Rev. 08/2010
SPOPERMAN09-e
12
SHU-PAK EQUIPMENT INC.
Operator’s Manual
SECTION 2.3.1
CHECKING OIL TANK LEVEL
Ensure that all cylinders are in their retracted positions (the packer ram is in the home position, the
tailgate is closed and the body is in the down position). If the cylinders are not retracted, there is the
possibility of overfilling the tank. There is a sight glass located on the side of the tank. The oil level
should be min. ½ ways up the sight gauge. Add oil as required. To help prevent the oil from over heating,
fill the tank to the top mark of the sight glass.
Before removing the oil filler cap and adding oil, clean any foreign matter from around the filler cap.
Remember to screen all oil before filling tank; dirt, chips, metal particles in oil will cause serious damage
to the hydraulic system.
If the tank sight glass is not visible or dirty, the oil level should be approximately 3" below the top of tank.
Oil volume in the tank at the top mark approx. 45 Imp. Gal. (54 U.S. Gal.)
Oil volume in the tank at the bottom mark approx. 38 Imp. Gal. (45 US. Gal.)
For maximum efficiency, it is recommended that a high-grade oil, with good cold weather operating
characteristics, be used, e.g. "Gesso Polar 47" or equivalent.
It is also recommended to clean and wash oil reservoir and strainer regularly.
SECTION 2.3.2
CLEANING BEHIND CRUSHER PANNEL
1.
Start the engine and engage the hydraulic pump.
2.
Lower the crusher panel.
3.
Extend the ram to extreme out position, push the red button to stop ram.
4.
SHUT OFF the hydraulic system and remove the ignition key and complete Lock-Out Tag
procedure.
W A R N I N G
DO NOT ENTER THE BODY WITH ENGINE RUNNING!
REMOVE THE IGNITION KEY BEFORE ENTERING THE BODY
5.
Clean the dirt out from under the cylinder anchors and along the square tube. This can be done
using a scraper to dig out the dirt or by using a high-pressure water hose to force the dirt out from
under the cylinder anchors.
6.
Make a visual inspection of the components. Check the following components for security and
misalignment:
a.
b.
c.
d.
e.
Guide shoe.
Rollers (both sides of hopper).
Cylinders and cylinder pins.
Hoses and fittings.
Electrical limit switches.
Rev. 08/2010
SPOPERMAN09-e
13
SHU-PAK EQUIPMENT INC.
Operator’s Manual
7.
Start up the hydraulic system. Raise the crusher panel and return the packer ram.
Clean Behind The
Packer Ram
IMPORTANT: The area behind the packer ram must be cleaned out daily. If trash is allowed to
collect in this area, it will cause the packer to malfunction.
Rev. 08/2010
SPOPERMAN09-e
14
SHU-PAK EQUIPMENT INC.
Operator’s Manual
SECTION 2.4
WARNING AND SAFETY DECALS
W A R N I N G
DO NOT OPERATE THIS VEHICLE OR PACKER UNTIL YOU HAVE READ AND UNDERSTAND
THE DECALS AFFIXED TO THE VEHICLE OUTLINING THE FOLLOWING CAUTIONS AND
DANGERS.
Location:
Installed on the Right Hand Stand Up
drive close to the steering wheel. (1
required).
Purpose:
This decal is installed as a warning that
injury could result to the operator or other
persons if unit is not operated in a safe
manner.
Operator must read and understand the
decal before operating vehicle from Right
Hand Stand Up side.
Location:
Installed on the right hand side of the
hopper assembly, (1 required).
Purpose:
This decal is installed as a warning that
injury could result to the operator or other
persons if unit is not operated in a safe
manner.
Operator must read and understand decal
before operating, cleaning or performing
maintenance on unit.
Location:
Right Hand Stand Up side near steering
wheel (1 required).
Purpose:
This vehicle is designed for door-to-door
pick up service. With respect to the stand
up drive controls, 20 MPH (32 KMH) is
considered a safe operating speed. To
operate the unit other than door to door,
the sit down left side position must be used.
Rev. 08/2010
SPOPERMAN09-e
15
SHU-PAK EQUIPMENT INC.
Operator’s Manual
Location:
On both sides of hopper (2 required).
Purpose:
Access to hopper is required for both
maintenance and cleaning. Before
entering hopper, disengage P.T.O., stop
engine, and remove ignition key and take
it with you. This will prevent cranking of
the engine by someone else while inside
the hopper.
Location:
The tailgate (2 required).
Purpose:
This decal is installed, as a warning that
the vehicle moves in reverse at times and
care must be taken when walking behind
vehicle. The operator must exercise
extreme care when backing up the
vehicle.
When the vehicle is at its unloading site,
the tailgate area must be kept clear for the
purpose of opening and dumping the load.
Injury could result to persons standing behind hydraulically operated tailgate when it is
being raised. Operator must be sure area behind gate is clear of persons.
Location:
Installed on the left hand drivers door
and on rear tailgate (2 required).
Purpose:
Left Hand Decal: This cautions other
vehicles or pedestrians, located to the
left of the vehicle, that the vehicle may
move even though an operator cannot
be seen in the left hand driver’s seat.
Rear Decal: This warns vehicles or pedestrians approaching, from the rear, to use
caution when passing the vehicle on either the left or right hand side.
The operator, knowing that he/she may not be seen when driving from right hand side,
must proceed with caution, using the side and fender mirrors.
Rev. 08/2010
SPOPERMAN09-e
16
SHU-PAK EQUIPMENT INC.
Operator’s Manual
Location:
Both sides of hopper (2 required).
Purpose:
The crusher panel operates quickly with
force in a downward movement in order to
crush refuse in the hopper.
The packer panel moves horizontally into
the body under extreme force in order to
compact the refuse.
It is the responsibility of the operator to
stand clear and to ensure the crusher or
packer panel is clear of other persons
while operating.
Location:
Both sides of chassis frame behind
hopper (2 required).
Purpose:
When raising the packer body, the unit
must be parked on level ground to avoid
upset.
To prevent injury due to hydraulic or
equipment failure, use safety prop and
seal scraper or long stick when cleaning
under body.
Location:
Left side of hopper and in cab.
Purpose:
This is to state the "minimum overhead
clearance required" for the vehicle height
dimension when all equipment is
positioned for normal over-the-road travel.
If any of the SHU-PAK operating, warning or caution decals should become detached from
vehicle, replacements are obtainable from:
SHU-PAK EQUIPMENT INC.
176 McGovern Road.
R.R. #32
Cambridge, Ontario. N3H 4R7
Phone: (519) 653-2472
Fax: (519) 653-2719
OR
YOUR LOCAL DISTRIBUTOR
Rev. 08/2010
SPOPERMAN09-e
17
SHU-PAK EQUIPMENT INC.
Operator’s Manual
SECTION 2.5
SHU-PAK SAFETY DECAL LOCATION
G
J
I
H
K
H
R
P
L
D
A
E
B
C
F
SECTION 2.5.1
Item
A
B
C
D
E
F
G
H
I
J
K
L
M
N
O
P
Q
R
S
Rec'd.
1
1
1
1
1
2
2
2
2
2
2
2
2
2
2
2
2
2
2
M
Q
N
S
O
Description
ATTENTION, ADJUST MIRRORS... (Cab General)
CAUTION, 5 lb FIRE EXTINGUISHER... (Cab General)
CAUTION, OPERATING SPEED... (Cab General)
CAUTION, DO NOT... (Cab General)
WARNING, TRANS. WILL AUTO... (Cab General)
WATCH FOR OVERHEAD...
CAUTION, RIGHT HAND DRIVE
CAUTION, KEEP CLEAR OF...
TAILGATE LOCK
DANGER, STAND CLEAR WHEN...
DANGER, TAILGATE PROP MUST...
DANGER, ALWAYS USE SAFETY PROP...
CAUTION, STOP ENGINE AND REMOVE...
DANGER, STAND CLEAR WHEN...
DRAIN DAILY
EMERGENCY STOP
MUST CLEAN BEHIND...
OVERHEAD CLEARANCE...
CAUTION, DO NOT... (Body General)
INSTALLATION OF SAFETY DECALS
1.
Clean vehicle surface
2.
Thoroughly wet vehicle surface with a soap-water solution
3.
Apply decal.
4.
Roll or squeegee out all bubbles
Rev. 08/2010
SPOPERMAN09-e
18
SHU-PAK EQUIPMENT INC.
Operator’s Manual
SECTION 2.6
MIRROR ADJUSTMENT
Top View
Right Hand Stand Drive Rear View Mirrors
Left Hand Rear View Mirrors
Set these mirrors to give greatest viewing coverage
Fender Mount
Convex Mirrors
Fender Mount
Convex Mirrors
Left Hand Rear
View Mirrors
Right Hand Stand
Drive Rear View Mirrors
Rev. 08/2010
SPOPERMAN09-e
19
SHU-PAK EQUIPMENT INC.
Operator’s Manual
SECTION 2.7
OPERATION OF ELECTRIC CONTROLS
1.
Push Button Control Pendant:
Mounted on the right and optionally on the left hand sides of the hopper. A selector switch, in the
cab, allows the operator to select from which side of the vehicles he/she wishes to operate the
vehicle. See Packer Control Selector switch.
2.
Stop Switch Button - Stop (Red):
When the stop button (Red) is pushed, it will shut down any cycle and stop the ram.
3.
Reverse Packer Button - Reverse (Black):
When the packer switch button (black) is pushed, the forward cycle of packer ram will stop and
will automatically reverse and return to its home position,
If the Enable High Idle switch turned on, the engine RPM will increase automatically when the
button is pushed.
4.
Forward Packer Button - (Green):
When the packer switch button (green) is pushed, the packer ram will move into body, reverse
and returns to its home position automatically. The number of cycles can be controlled, see
Automatic Cycle Switch.
If the Enable High Idle switch is turned on, the engine RPM will increase automatically when the
button is pushed.
5.
Automatic Cycle Switch: (On curbside control box)
With the selecting switch in the “ON” position, the packer will cycle three (3) times when the green
button is pressed.
With the selector switch on the “OFF” position, the packer will cycle only once when the green
button is pressed.
6.
Packer Control Selector Switch:
This switch allows the operator to select on which side of the packer controls will be active.
Flipping the switch to right will allow operation of the packer ram controls from the right hand side.
Flipping the switch the left will allow operation from the left hand side.
7.
Enable High Idle Switch:
On This switch should normally be in this position. The high idle will automatically activate
when the packer cycle begins.
Off The high idle cannot be turned on by any source. Use this position when servicing or
cleaning the unit.
Rev. 08/2010
SPOPERMAN09-e
20
SHU-PAK EQUIPMENT INC.
Operator’s Manual
8.
Activate High Idle Switch:
When the Activate High Idle switch in turned on, the engine RPM will increase, if the transmission
is in neutral, without using any other push button controls.
9.
WIRED RITE CONTROL PANEL IN CAB
e
f
a
g
b
h
c
I
d
j
k
a. PTO Light
Indicates when PTO is engaged
b. PTO Switch
Turns on and off the PTO. On a constant mesh PTO, it activates the dry valve. On a “Hot Shift”
PTO, it engages and disengages the PTO.
c.
Tailgate Selector
Switches between left and right tailgate control.
Rev. 08/2010
SPOPERMAN09-e
21
SHU-PAK EQUIPMENT INC.
Operator’s Manual
d. Tailgate Unlatched Light And Alarm
Indicates whenever tailgate has become unlatched (warning light and audible signal)
e. Neutral Light
Indicates whenever transmission is in neutral
f.
Auto-Neutral Switch
When in the on position the transmission will automatically shift to neutral whenever the
work brake is applied, and return to range when work brake is deactivated with the service brake
applied. NOTE: THIS SWITCH IS ONLY USED WHEN THE CHASSIS IS NOT EQUIPPED
WITH A DASH MOUNTED SWITCH.
g. Packer Supply Switch
Sends electrical power to packer box to activate packer controls.
h. Flood Lamps (Optional)
Turns on and off work lights in packer loading area.
i.
Strobe Lights (Optional)
Turns power on and off to strobe control system.
j.
Spare
This switch is prewired from the factory. The spare wire is located under the rear sill of the unit. It
can be used to operate add on options if you so choose.
k.
Tailgate Open Light Or Body Up Light
Indicates when the body is not completely seated in the down position.
NOTE: panel may contain other switches depending on optional equipment installed.
Rev. 08/2010
SPOPERMAN09-e
22
SHU-PAK EQUIPMENT INC.
Operator’s Manual
SECTION 2.8
ACTIVATING HYDRAULIC SYSTEM
The following are to be performed with the vehicle engine running.
SECTION 2.8.1
AIR SHIFT P.T.O.
1.
With the vehicle stationary and the parking brake or work brake on, place the gear selector into
any drive range.
2.
Turn on the P.T.O. Switch found in cab.
3.
Bring the gear selector to neutral position.
4.
Hydraulic system in now ON.
SECTION 2.8.2
HOT SHIFT P.T.O.
1.
With the vehicle stationary, apply the parking brake or work brake.
2.
Turn on the P.T.O. switch found in cab.
NOTE: It is not necessary for the gear selector to be in any particular position. Engage
at low RPM (idle).
3.
The hydraulic system is now on, as indicated by light beside switch.
SECTION 2.8.3
1.
FRONT MOUNTED PUMP - (Dry Valve Assembly)
With the vehicle stationary, turn on the parking brake or work brake, engage pump air switch
mounted in cab.
NOTE: It is not necessary for the gear selector to be in any particular positions. Engage
at low RPM (idle).
2.
The hydraulic system is now on, as indicated by light.
NOTE: Some chassis manufacturers may equip their units with a neutral interlock
system in conjunction with the parking brake. The neutral interlock would have
to be switched on in order to have the pump circuit operational.
Rev. 08/2010
SPOPERMAN09-e
23
SHU-PAK EQUIPMENT INC.
Operator’s Manual
SECTION 2.9
OPERATION OF HYDRAULIC CONTROLS
This section refers to the hydraulic controls.
SECTION 2.9.1
CRUSHER PANEL
The Crusher panel is used when hopper contains bulky trash.
1.
Turn on the pump.
2.
Ensure the packer ram is retracted to the home position.
3.
Select either the Crusher (street side) or the Chute (curb side crusher/chute combo) using the
selector switch. Operate the control valve lever (labeled “Chute/Crusher”) as required, push down
on the lever to lower the crusher panel, push up to raise and release to stop.
Rev. 08/2010
SPOPERMAN09-e
24
SHU-PAK EQUIPMENT INC.
Operator’s Manual
4.
With the crusher panel down, the packer can be operated to push the trash into body.
5.
After using the crusher panel, operate the control valve lever to place it in the up position.
6.
This operation can be carried out as many times as necessary to flatten the trash in hopper.
NOTE: The crusher panel is used only when required, i.e. when cardboard or brush in
hopper is bridging and not being moved by the packer ram. Do Not crush
articles on the top of an extended ram.
NOTE: If extra force is required to lower the crusher panel, turn on the Activate High Idle
switch located on the MEC control box in the cab. This will increase the engine
RPM, increasing the force of the crusher panel. Once the operation is complete,
the operator should turn off the Activate High Idle switch.
SECTION 2.9.2
BODY HOIST
At the unloading site, the vehicle should be positioned on as level ground as possible.
W A R N I N G
ROLLOVER OR LATERAL TILT CAN CAUSE SEVERE INJURY OR DEATH AND /OR DAMAGE
THE UNIT AND CYLINDER.
1.
Turn on the pump.
2.
Make sure the packer ram is in the retracted home position.
3.
Squeeze the lock ring and lift up the control valve lever (labeled “Hoist”) until the body reaches
desired height and release lever.
Rev. 08/2010
SPOPERMAN09-e
25
SHU-PAK EQUIPMENT INC.
Operator’s Manual
4.
To lower the body, squeeze the lock ring and push down on the control valve. Hold the lever until
the body comes to the lower resting position.
5.
Trucks equipped with a body mounted valve bank have an auxiliary hoist control, located behind
the stand up drive cab. This procedure is only to be used for lowering the body in the event
of air pressure loss. With the truck shut off and the key out of the ignition, use your left hand to
shift the actuator arm to the left. This will allow the fluid in the hoist cylinders to drain thus
lowering the body. You must keep your right hand on the cab door and continue watching the
area under the body ensuring it remains clear until the body is completely lowered. The cylinders
are equipped with flow restrictors to prevent rapid drop.
Rev. 08/2010
SPOPERMAN09-e
26
SHU-PAK EQUIPMENT INC.
Operator’s Manual
I M P O R T A N T
N O T I C E
BEFORE USING THE METHOD CALL YOUR SUPERVISOR AND ADVISE THEM YOU NEED TO
MANUALLY LOWER THE BODY.
THE PHOTO BELOW ILLUSTRAITS THE ONLY SAFE WAY TO OPERATE THE VALVE. THIS
METHOD OF LOWERING THE BODY MUST ONLY BE USED IN AN EMERGENCY SITUATION.
IT IS HIGLY RECOMMENDED TO USE A SPOTTER WHEN USING THIS METHOD.
D A N G E R
BEFORE PERFORMING ANY SERVICE OR INSPECTION, WHEN THE BODY IS IN A RAISED
POSITION, ENSURE THAT THE BODY IS SUPPORTED BY THE BODY PROPS OR A SUITABLE
SUPPORT.
Rev. 08/2010
SPOPERMAN09-e
27
SHU-PAK EQUIPMENT INC.
Operator’s Manual
C A U T I O N
WHEN CLEANING AROUND TAILGATE, NEVER GO UNDERNEATH THE OPEN TAILGATE. IT
IS IMPERATIVE THAT A BRUSH/ BROOM WITH AN EXTENDED HANDLE, BE USED SO THAT
THE CLEANING MAY BE DONE FROM THE SIDE OF THE VEHICLE.
Rev. 08/2010
SPOPERMAN09-e
28
SHU-PAK EQUIPMENT INC.
Operator’s Manual
SECTION 2.9.3
TAILGATE
1.
Turn on the pump and make sure that the ACTIVATE HIGHT IDLE is
turned off.
2.
The tailgate will not rise until the lock pins have been removed. Walk to
the back of the vehicle and remove the lock pins.
NOTE: If the pins do not come out, the tailgate may not be fully closed.
Close the tailgate to free up the pins.
3.
Squeeze the lock ring and lift up on the valve lever (labeled “Tailgate”) to
raise tailgate. Release the lever when the tailgate reaches the desired
height.
NOTE: DO NOT use the Activate High idle switch for this function.
3a.
Bodies equipped with two (2) tailgates have a selector switch, which
allows the operator to open the right or left hand tailgate. The switch is
located on the MEC Control box. To operate the right hand tailgate,
move the selector lever to the right. To select the left hand tailgate, move the selector lever to the
left.
4.
To close the tailgate, squeeze the lock ring and push down on the valve lever until closed.
Reinstall the lock pins to lock the tailgate.
W A R N I N G
DO NOT RAISE TAILGATE UNTIL AREA BEHIND IS CLEAR OF PERSONS OR
OBSTRUCTIONS.
C A U T I O N
OPEN AND CLOSE TAILGATE AT LOW ENGINE RPM (IDLE)
ALWAYS INSERT SAFETY LOCK PINS AFTER TAILGATE IS CLOSED.
W A R N I N G
DO NOT STAND OR WORK UNDER A RAISED TAILGATE. IF IT IS NECESSARY TO BE
UNDERNEATH AN OPEN TAILGATE, ENSURE THAT A TAILGATE PROP OR A SECURE
SUPPORT IS HOLDING THE TAILGATE.
SECTION 2.10
Rev. 08/2010
SPOPERMAN09-e
29
SHU-PAK EQUIPMENT INC.
Operator’s Manual
LOADING HOPPER
1.
Throw light trash to far side of hopper (small boxes, plastic bags).
2.
Load the hopper as evenly as possible.
3.
Under normal operation, it is not required that the packer be operated after every load is dumped
into hopper. The packer should be operated when the hopper is full and needs to be moved into
body.
W A R N I N G
WHEN USING THE PACKER, WATCH FOR TYPES OF REFUSE TRASH THAT CAN EXPLODE,
(I.E. TV TUBES, FLORESCENT BULBS, PLASTIC OIL CONTAINERS, ETC.). IF THESE TYPES
OF REFUSE ARE PRESENT, LOWER THE CRUSHER PANEL BEFORE ACTIVATING THE
PACKER. SEE CRUSHER PANEL OPERATION.
4.
Move the Packer Control Selector Switch to the appropriate position. The right hand side when
loading the hopper from the right hand side, the left hand position when loading the hopper from
the left hand side.
5.
Turn on the Enable High Idle control switch.
6.
Push the Forward Packer Button (Green).
Rev. 08/2010
SPOPERMAN09-e
30
SHU-PAK EQUIPMENT INC.
Operator’s Manual
7.
The ram will extend, pushing trash into body and then reverse automatically. The packing cycle
will stop when the packer ram returns to its retracted home position. If it is necessary to operate
packer again, push Forward Packer Button again.
D A N G E R
STAY CLEAR OF THE HOPPER WHEN THE OPERATING HYDRAULICS.
KEEP CLEAR OF ALL MOVING PARTS.
W A R N I N G
DO NOT REACH BEHIND PACKER RAM OR CRUSHER PANEL WHILE THE HYDRAULIC
SYSTEM IS ACTIVATED.
Rev. 08/2010
SPOPERMAN09-e
31
SHU-PAK EQUIPMENT INC.
Operator’s Manual
SECTION 2.11
“PACKING OUT" BODY
1.
If the packer ram does not reverse automatically and
visible thru window, then the body is full.
trash is
NOTE: If it is necessary to reverse the ram, push the
Reverse Button (black) to retract the packer.
2.
If trash is NOT visible thru window, then body is not full and there is a temporary trash blockage
inside the body.
Window
3.
Continue to load hopper and cycle the packer ram, using the Reverse Packer Button (Black) to
reverse the ram. Continued operation of the packer ram should break up the trash blockage
inside the body.
Rev. 08/2010
SPOPERMAN09-e
32
SHU-PAK EQUIPMENT INC.
Operator’s Manual
Window
4.
When the body is full, lower the crusher panel (see Crusher Panel Instructions), extend ram
against the trash, and close the hopper doors.
Rev. 08/2010
SPOPERMAN09-e
33
SHU-PAK EQUIPMENT INC.
Operator’s Manual
5.
Turn off the hydraulic system.
Rev. 08/2010
SPOPERMAN09-e
34
SHU-PAK EQUIPMENT INC.
Operator’s Manual
SECTION 2.12
OPERATING YOUR SHU-PAK ON ROUTE:
W A R N I N G
KEEP THE RIGHT HAND STAND UP DRIVE STEP CLEAN TO PREVENT SLIPPING OFF THE
STEP WHEN ENTERING AND LEAVING THE VEHICLE.
C A U T I O N
THE RIGHT HAND STAND UP DRIVE FOR HOUSE-TO-HOUSE PICK-UP ONLY. THE
MAXIMUM SPEED FOR THE RIGHT HAND STAND UP DRIVE IS 20 MPH (32 KPH).
C A U T I O N
WATCH FOR CHILDREN AND OTHER PERSONS WHO MAY BE APPROACHING THE
VEHICLE FROM THE LEFT HAND SIDE. SET YOUR VIEW MIRROR ACCORDINGLY.
C A U T I O N
BOTH HANDS ON STEERING WHEEL WHEN DRIVING.
C A U T I O N
DO NOT LEAVE RIGHT HAND STAND UP DRIVE UNTIL THE VEHICLE HAS COME TO A
COMPLETE STOP AND WORK BRAKE IS FULLY LOCKED.
Rev. 08/2010
SPOPERMAN09-e
35
SHU-PAK EQUIPMENT INC.
Operator’s Manual
C A U T I O N
SET THE PARKING BRAKE IF MORE THAN 10 FEET FROM TRASH, OR ON A HILL.
W A R N I N G
WATCH YOUR STEP WHEN LEAVING THE RIGHT HAND STAND UP DRIVE.
DO NOT JUMP OR LEAP FROM THE VEHICLE.
Rev. 08/2010
SPOPERMAN09-e
36
SHU-PAK EQUIPMENT INC.
Operator’s Manual
SECTION 2.12.1
STARTING PICK-UP ROUTE.
1.
Set the parking brake.
2.
Move to the Right Hand Stand Up drive side.
3.
Switch over to right hand drive controls using the dash selector.
4.
Set and adjust the front mounted convex and rear view mirrors for correct viewing position, (see
Mirror Adjustment).
5.
Lock the service brake (work brake).
6.
Release the parking brake.
Left / Right
Drive Controls
Selector
SECTION 2.12.2
(Work Brake)
Service Brake Switch
Parking Brake
TO MOVE TO NEXT PICK-UP POINT
1.
Shift the transmission into drive.
2.
Release the brakes.
3.
Use the Right Hand Stand Up Drive foot throttle to accelerate the vehicle.
4.
Keep both hands on the steering wheel when driving.
5.
When approaching the next stop, apply the brake so that vehicle comes to a smooth stop. When
the vehicle has come to a complete stop, activate the work brake.
6.
Turn on the Enable High Idle.
Rev. 08/2010
SPOPERMAN09-e
37
SHU-PAK EQUIPMENT INC.
Operator’s Manual
All the previous hopper loading and packing cycles are now repeated from stop to stop, until body
is full.
SECTION 2.12.3
END OF PICK UP ROUTE
1.
Set the vehicle parking brake.
2.
Turn off the hydraulic system.
3.
Release the right hand side brake or switch the neutral interlock (if equipped) to off position.
4.
Move to the left hand driving position.
5.
Switch the dash drive selector back to left hand drive.
6.
Check and adjust the rear view mirrors as required.
7.
Release the parking brake.
8.
Proceed to the dumping facility.
SECTION 2.12.4
ARRIVAL AT DUMP FACILITY
1.
Set the vehicle parking brake on.
2.
Move to the right side of the vehicle and turn on the hydraulic system.
3.
Turn off the high idle switch.
4.
If the crusher panel is down, raise it.
5.
If the packer ram is extended, retract it by pushing the Packer Reverse Button (Black).
6.
Open tailgate.
a.
Ensure that there are no obstructions or persons behind the vehicle.
b.
Remove the safety lock pins from their secured positions. If the pins do not come out, the tailgate
may not be fully closed. Close the tailgate to free up the pins.
W A R N I N G
DO NOT RAISE THE TAILGATE UNTIL AREA BEHIND IS CLEAR OF PERSONS OR
OBSTRUCTIONS. DO NOT STAND UNDER TAILGATE WHEN OPEN.
c.
To Open Tailgate: Squeeze the locking ring and lift up on the control valve lever labeled
"Tailgate" and hold it. By doing so, the locks will automatically release and the tailgate will rise all
in one continuous motion.
Rev. 08/2010
SPOPERMAN09-e
38
SHU-PAK EQUIPMENT INC.
Operator’s Manual
i.
Bodies equipped with two (2) tailgates have a selector switch that allows the operator to open the
right or left hand tailgate. The switch is located on the top of the MEC Control box. To operate
the right hand tailgate, move the selector lever to the right. To select the left hand tailgate, move
the selector lever to the left.
d.
If dumping, hold the lever until the tailgate reaches its maximum opening angle, and then release
the lever and the tailgate will hold its position. Refer to Dumping Procedure.
C A U T I O N
OPEN AND CLOSE TAILGATE AT LOW ENGINE RPM (IDLE).
ALWAYS INSERT SAFETY LOCK PINS AFTER TAILGATE IS CLOSED.
e.
7A.
Cycle the packing ram as many times as necessary to break the load and clear hopper. If
necessary, use the crusher panel. (See instructions for these functions in manual if necessary).
RAISE AND LOWER PAC-KING BODY
W A R N I N G
BE SURE THE VEHICLE IS ON REASONABLY LEVEL AND FIRM GROUND BEFORE LIFTING
THE BODY.
a.
Squeeze the lock ring and lift up on the valve lever (labeled hoist) hold it until the body is all the
way up.
b.
Enter the Right Hand Stand Up drive. Close the cab door or hook up chain link on cab body.
c.
Release the vehicle parking brake.
d.
Rapid acceleration of the vehicle, for a very short distance, will assist in dislodging the remainder
of the trash in body.
C A U T I O N
USE EXTREME CARE WHEN DRIVING ON UNEVEN GROUND FROM THE RIGHT HAND SIDE.
Rev. 08/2010
SPOPERMAN09-e
39
SHU-PAK EQUIPMENT INC.
Operator’s Manual
W A R N I N G
WHEN DUMPING INTO A PIT, DO NOT ACCELERATE THE VEHICLE FORWARD.
THE TRASH WILL EVENTUALLY FALL OUT OF THE BODY ON ITS OWN
e.
Apply the vehicle parking brake.
W A R N I N G
DO NOT LEAVE THE VEHICLE BEFORE PARKING BRAKE IS SET.
W A R N I N G
DO NOT STAND OR WORK UNDER THE BODY IN WHEN IN A RAISED POSITION. IF IT IS
NECESSARY TO BE UNDERNEATH THE BODY IN A RAISED POSITION, ENSURE THAT THE
BODY PROPS OR A SECURE SUPPORT IS SUPPORTING THE BODY.
NOTE: The transmission must be in neutral.
f.
8.
Squeeze the lock ring and push down on the valve lever (labeled hoist). When body is completely
down release the lever.
Closing Tailgate.
a.
Ensure high idle is switched off.
b.
Before lowering the tailgate, ensure that nothing is in the path of the descending tailgate.
c.
Squeeze the lock ring and push down on the valve lever (labeled tailgate) and hold. The tailgate
will close and then the locks will activate in one continuous motion. Release the lever only when
the locks have come to a dead stop.
d.
Insert safety lock pins to their original inserted position.
C A U T I O N
OPEN AND CLOSE TAILGATE AT LOW ENGINE RPM (IDLE).
ALWAYS INSERT SAFETY LOCK PINS AFTER TAILGATE IS CLOSED.
9.
Turn off the hydraulic system.
Rev. 08/2010
SPOPERMAN09-e
40
SHU-PAK EQUIPMENT INC.
Operator’s Manual
10.
Move to the left hand side driving position and proceed to the next destination.
2.12.5
COMPLETION OF ROUTE - DAILY TASKS AND PROCEDURES
Cleanliness is critical to the vehicles maintenance and is key to the safe operation. Proper maintenance
of your Shu-Pak includes daily cleaning of the hopper and chassis. Daily cleaning will reduce vehicle
breakdowns and will expedite regular maintenance and repairs.
Ensuring all of the warning decals and lights are kept clean, will improve the overall appearance making it
easier for other vehicles and pedestrians to see and understand to keep clear of danger spots.
.
W A R N I N G
PROPER LOCKOUT / TAGOUT OF THE VEHICLE MUST BE COMPLETED PRIOR TO
CLEANING OR MAINTENANCE. IF YOU HAVE NOT BEEN TRAINED IN LOCKOUT / TAGOUT
SEE YOUR SUPERVISOR.
C A U T I O N
REGULAR CLEANING OF THE FLOORBOARDS AND STEPS ON BOTH THE LEFT AND RIGHT
SIDES OF YOUR TRUCK WILL REDUCE THE RISK OF SLIPS AND FALLS.
C A U T I O N
WHEN CLEANING AROUND TAILGATE, NEVER GO UNDERNEATH THE OPEN TAILGATE. IT
IS IMPERATIVE THAT A BRUSH/ BROOM WITH AN EXTENDED HANDLE, BE USED SO THAT
THE CLEANING MAY BE DONE FROM THE SIDE OF THE VEHICLE.
Rev. 08/2010
SPOPERMAN09-e
41
SHU-PAK EQUIPMENT INC.
Operator’s Manual
W A R N I N G
BEFORE PERFORMING ANY SERVICE OR INSPECTION, WHEN THE BODY IS IN A RAISED
POSITION, ENSURE THAT THE BODY IS SUPPORTED BY THE BODY PROPS OR A SUITABLE
SUPPORT.
The following cleaning schedule must be adhered to:
1) Throughout the day, ensure all truck lights and warning decals are kept clean.
2) At the end of every day, clean the chassis and hopper.
3) At least once a week the trucks exterior should be cleaned.
2.12.5a
DAILY HOPPER CLEANING
Cleaning of the hopper area on a daily basis is critical for safety and improves the serviceable life of your
new Shu-Pak. Removing compacted refuse from behind the packer will reduce unnecessary wear and
tear on your cylinders, hopper guides and shoes. It will also ensure full stroke of your cylinders allowing
you to load more in the hopper with each cycle. The following procedure must be followed:
•
•
•
•
Park your vehicle on level ground and set the parking brake.
Install wheels chocks
Raise the crusher panel.
Open both of the clean out sumps, located on the left and right sides of the hopper (labeled
DRAIN DAILY”), allow the water, and refuse to drain. Pulling out on the latch before unhooking it
will allow the water to drain and minimize splashing. Then wash out each of the compartments
with clean water. Leave the doors open.
Rev. 08/2010
SPOPERMAN09-e
42
SHU-PAK EQUIPMENT INC.
Operator’s Manual
•
Fully extend the packer ram into the body. This can be done by pressing the green cycle start
button to start the packer moving, when the packer is fully extended hit the emergency stop
button.
•
•
Now completely disable the vehicle using Lockout / Tagout.
Raise the hopper deflector doors and latch them in the open position. This will give access to the
rear of the packer ram.
•
Remove all large items from behind the packer ram and then using a long handled scrapper push
all the small items down and out of the clean out sumps.
Finish by pressure washing the entire hopper area.
Close the clean out sumps and clean up the area around the truck.
Remove the wheel chocks.
•
•
•
2.12.5b
DAILY CHASSIS CLEANING
•
•
Park your vehicle on level ground and set the parking brake.
Install wheels chocks
Rev. 08/2010
SPOPERMAN09-e
43
SHU-PAK EQUIPMENT INC.
Operator’s Manual
•
Remove locking pins from the tailgate locks.
•
Ensure the area behind the truck is clear and open the tailgate(s) approximately 36”.
•
Remove the tailgate prop securing pin, lift the tailgate safety prop and insert the securing pin to
keep it in the upright position.
•
Lower the tailgate(s) until it rests on the prop.
Rev. 08/2010
SPOPERMAN09-e
44
SHU-PAK EQUIPMENT INC.
Operator’s Manual
•
Lift the body approximately 40” or until you have clearance to raise the body props. Once both
props are up slowly lower the body until it just rest on them. Do not continue to hold the valve as it
will apply un-necessary pressure on the props. NEVER LEAN ACROSS THE FRAME TO RAISE
THE PROP ON THE OPPOSING SIDE, ALWAYS WALK AROUND THE TRUCK TO RAISE THE
OTHER PROP.
• Now completely disable the vehicle using
Lockout / Tagout.
• Using pressurized water wash under the
body, between and around the frame rails.
• Once you have completely removed all of
the debris from under the body and frame you can
remove the Lockout / Tagout.
• Start the truck and enable the PTO, raise
the body until the safety props will clear the
stirrups, lower the body props. Lower the body
back down on the frame.
• Ensure the area behind the truck is clear
slightly raise the tailgate(s) and manually lift the
tailgate props and insert the locking pins. Lower
the tailgates until the locks engage.
•
•
Wash the exterior of the truck.
Remove the wheel chocks.
2.12.5c
WATER TRAP BLEEDING DAILY
•
•
•
•
At the end of every shift, drain the water trap.
It is located in the cab attached to the right side of the mech box.
Cupping a rag in your hand (to capture the water) push up on the
black button on the bottom of the trap to release the water.
This is a simple maintenance step, which will help keep water out
of the air system.
Rev. 08/2010
SPOPERMAN09-e
45
SHU-PAK EQUIPMENT INC.
Operator’s Manual
SECTION 3.0
TROUBLE SHOOTING
Rev. 08/2010
SPOPERMAN09-e
46
SHU-PAK EQUIPMENT INC.
Operator’s Manual
SECTION 4.0
TROUBLE SHOOTING
The following section is to be used as preliminary trouble shooting guide.
SECTION 4.1
TROUBLE SHOOTING GUIDE
Nothing works:
1.
2.
3.
4.
5.
6.
7.
Check the Emergency stop button is out.
Check for electrical power.
Check the in cab fuses.
Check that the suction line gate valve, at the hydraulic reservoir, is fully opened.
Check that the suction strainer is not clogged.
Check the hydraulic reservoir for the correct oil level
Check the pump rotation, the drive shaft components, and for any air or oil leaks.
Pump operates - but noisy:
1.
2.
3.
4.
5.
6.
7.
Check that the suction line gate valve, at the hydraulic reservoir, is fully opened.
Check that the suction strainer is not clogged.
Check the hoses for any leaks.
Check that the clamps on the suction hose are tight.
Check the pump driveline for alignment, straightness and for worn universal joints.
Check for any loss of mounting bolts, nuts, etc.
Check that the crankshaft adapter is tight.
Packer ram operates slowly or not at all:
1.
2.
3.
4.
5.
Check that the packer ram or the cylinders are not binding.
Check that the air/electric controls in the cab are functioning properly.
Check the main valve for spool movement (may not be shifting fully).
Check that all the airlines are attached properly.
Check the in cab fuses.
All components operate erratically:
1.
2.
3.
4.
The most probable cause is air-entering system.
Check for low oil level, loose clamps on the suction hose, loose pipes, hoses or fittings.
Check for air entering the pump seal.
Check the pressure settings on the relief valves.
Body will not lift full load:
1.
2.
3.
4.
Check the pressure settings on the main relief valve.
Main relief pressure - check hydraulic schematic for correct setting.
Oil leaking past the cylinder piston packing.
Worn pump (no output flow or pressure).
Rev. 08/2010
SPOPERMAN09-e
47
SHU-PAK EQUIPMENT INC.
Operator’s Manual
SECTION 3.2
TROUBLE SHOOTING CHART
PROBLEM
POSSIBLE CAUSE
Pump unusually
noisy, cavitation.
a)
b)
c)
d)
e)
Pump takes too long
to respond or fails to
respond.
a) Low oil supply
b) Insufficient relief
c) Pump worn or damaged
Hydraulic oil heating
up, (200° F. or more)
a) Oil level too low
Packer continues
packing and does
not automatically
reverse.
Low oil supply
Oil too heavy
Dirty oil filter
Suction line too small
Restriction in suction line
POSSIBLE REMIDIES
i.
ii.
iii.
iv.
v.
Fill to proper level
Change to proper oil
Clean and replace filter
Increase size of suction line
Remove restriction
i. Fill to proper level
ii. Reset to correct pressure
iii. Inspect, repair or replace
i. Fill to proper level
ii. See FULL LOAD instructions.
b)
c)
d)
e)
Insufficient relief valve pressure
Relief valve pressure too high
High Idle RPM too high
Wrong oil
f) Dirty oil
g) Foreign matter lodged between the
relief valve plunger and relief valve seat
h) Pump worn or faulty (slippage)
Faulty cylinder.
Faulty relief valve.
iii.
iv.
v.
vi.
Check main relief pressure
Check main relief pressure
Check High Idle RPM
Drain and refill with proper oil. See
MAINTENANCE SECTION for
suggested oil.
vii. Drain, flush and refill with clean oil
viii. Inspect and remove foreign matter.
ix. Replace or repair. To check the oil
needs to be COLD. By-pass oil
over the relief continuously by
pushing both electric control
buttons. After a few minutes of
operation, touch the pump and the
packer cylinders. A faulty pump or
cylinder will be warmer than the
rest of the system components.
Oil foaming
a) Air leaking into suction line from tank to
pump.
b) Wrong kind of oil
c) Oil level too low
i. Tighten all connections
ii. Drain and refill with a non-foaming
type of hydraulic oil
iii. Fill to proper level
Body will not lift / tip
a) Shortage of oil
b) Clogged filter
i. Check oil level, fill as necessary.
ii. Close off at tank. Check cartridge
& replace if necessary
iii. Check service line from tank
c) Oil not reaching pump
Rev. 08/2010
SPOPERMAN09-e
48
SHU-PAK EQUIPMENT INC.
Operator’s Manual
d) Control valve spool clogged
e) Overload valve not set high enough
PROBLEM
POSSIBLE CAUSE
Body slowly creeps
downward
a) Dirt in valve
Sluggish Operation
a) Shortage of oil
b) Clogged filter
POSSIBLE REMIDIES
i. Flush valves by quickly operating
hoist control with pump running. If
problem continues, remove and
clean the valves thoroughly.
i. Check oil level, fill as necessary.
ii. Close off at tank. Check cartridge &
replace if necessary
iii. Tighten all joints
c) Leaking joints
Unit does not pack full a) Low hydraulic pressure
load.
i. Check for faulty component (pump,
relief valve, cylinders) and for
adjustment of relief valve.
ii. Check for faulty cylinder check.
iii. See "PACKING FULL LOAD".
b) Packer cylinders leaking
c) Improper loading
High idle does not
work
iv. Clean out valve thoroughly
v. Insert gauge and check - should be
1850 PSI.
a) Toggle switch on panel not switched ON.
Pack ram does not
return and shut off.
a) Trash jammed behind Packer is
preventing the ram from tripping limit
switch.
Excessive wear on
the wear plates, right
hand or left hand.
a) Packer guide plate is worn out.
b) Allen screws are not holding wear plate
securely.
Rev. 08/2010
i. Check position of toggle switch.
i. Clean behind packer blade. See
CLEANING BEHIND PACKER.
ii. Check packer guide plates as
shown in illustration.
When wear plates and guide plates
are not worn out the packer guide
plates should contact the side of
the hopper.
iii. Check Allen screws and tighten if
necessary.
SPOPERMAN09-e
49
SHU-PAK EQUIPMENT INC.
Operator’s Manual
Check These
Guide Rails
Check These
Wear Plates
Check These
Guide Rails
Check These
Guide Shoes
Check These
Wear Plates
Rev. 08/2010
SPOPERMAN09-e
50
SHU-PAK EQUIPMENT INC.
Operator’s Manual
APPENDIX A
SECTION A1.0
DEFINITIONS AND TERMINOLGY
SECTION A1.1
DEFINITION OF TERMS FOR SHU-PAK PACKER
SECTION A1.2
DEFINITIONS OF HYDRAULIC TERMINOLOGY
SECTION A1.3
LIST OF ABBREVIATIONS
SECTION A2.0
DEFINITIONS OF COMPONENTS
SECTION A2.1
TYPICAL SHU-PAK
SECTION A2.2
TYPICAL RIGHT HAND STAND UP DRIVE MODIFICATIONS
SECTION A2.3
TYPICAL RIGHT HAND STAND UP DRIVE TILT CAB OR CF109 MODEL
Rev. 07/08
SMM04-C
A1
SHU-PAK EQUIPMENT INC.
Operator’s Manual
SECTION A1.0
DEFINITIONS AND TERMINOLGY
SECTION A1.1
DEFINITION OF TERMS FOR SHU-PAK PACKER
Packer:
Mechanism located between the cab and the body consisting of a loading
hopper and packer ram.
Loading Hopper:
Area of the packer where trash is deposited.
Packer Ram:
Moving part of the packer that pushes trash out of loading hopper and
compacts it into the body. Packer ram is moved by two hydraulic cylinders
and is activated by the electrical controls. Ram cycle is 10 to 14 seconds.
Body:
Structure into which trash is compacted.
Hydraulic System:
Consists of a pump and hose system, which is powered by engine. Oil is
pumped through the control valve, directing the oil to the various components
selected by the operator. (Packer ram, hoist, crusher panel, etc....).
Hoist:
Hydraulic cylinders used to raise body and allow trash to be dumped.
Crusher Panel:
Hydraulically controlled device, attached to packer assembly, which is used
to pre-crush bulky trash in loading hopper.
Right Hand Stand Up Drive: Controls on right side of cab that enable driver to drive the vehicle from the
right hand side in a stand up position.
High idle:
Increasing the engine RPM that in turn, raises the hydraulic pump speed.
Transmissions are equipped with neutral lock out switches so that high idle
works only when transmission is in neutral position.
P.T.O.:
The Hydraulic pump is mounted to a power-take-off device installed to the
vehicle transmission. With a “Hot Shift” P.T.O., the pump will operate when
P.T.O. is turned on. With a Constant Mesh P.T.O., the pump will operate
whenever the engine is running.
Front Mounted Pump:
Hydraulic pump is mounted to the front of the chassis and coupled to the
engine’s crankshaft. The Pump operates whenever vehicle engine is
running.
Work Brake:
Located on the cab console, or the right hand stand up drive doorframe.
When switched on, the work brake activates the front and rear service brakes
(at 65 psi.) Use when briefly leaving the cab to load refuse into the hopper.
DO NOT USE AS A PARKING BRAKE OR WHEN STOPPING ON A HILL.
Work Brake w/Auto-Neutral: The transmission will automatically shift to neutral when the work brake is
applied. When the work brake is deactivated with the right hand service brake
applied, the transmission will automatically return to the range previously
selected, except reverse, in which case the transmission will remain in
neutral until range is manually selected.
Rev. 07/09
SMM04-C
B1
SHU-PAK EQUIPMENT INC.
Operator’s Manual
SECTION A1.2
DEFINITIONS OF HYDRAULIC TERMINOLOGY
Cylinder:
A device for converting fluid power into linear or circular motion. An
"actuator". Basic design types include piston and vane units.
Double-Acting Cylinder:
A cylinder in which fluid force can be applied to the movable element in either
direction.
Single-Acting Cylinder:
A cylinder in which fluid force can be applied to the movable element in only
one direction.
Displacement:
The volume of oil displaced by one complete stroke or revolution (of a pump,
motor, or cylinder).
Filter (oil):
A device that removes solids from a fluid.
Flow meter:
A testing device that gauges either flow rate, total flow, or both.
Flow rate:
The volume of fluid passing a point in a given time.
Open centre system:
A hydraulic system in which the control valves are open to continuous oil
flow, even in neutral. Pressure in this system is varied, but flow remains
constant.
Orifice:
A restricted passage in a hydraulic circuit. Usually a small drilled hole to limit
flow or to create a pressure differential in a circuit.
Pressure:
Force of a fluid per unit area, usually expressed in pounds per square inch
(psi).
Back Pressure:
The pressure encountered on the return side of a system.
Breakout Pressure:
The minimum pressure that starts an actuator moving.
Cracking Pressure:
The pressure at which a relief valve, etc., begins to open and pass fluid.
Differential Pressure:
The difference in pressure between any two points in a system or a
component. (Also called a "pressure drop".)
Full-Flow Pressure:
The pressure at which a valve is wide open and passes its full flow.
Operating Pressure:
The pressure at which a system is normally operated.
Pilot Pressure:
Auxiliary pressure used to actuate or control a component.
Rated Pressure:
The operating pressure that is recommended for a component or a system by
the manufacturer.
System Pressure:
The pressure that overcomes the total resistances in a system. It includes all
losses as well as useful work.
Working Pressure:
The pressure that overcomes the resistance of the working device.
Rev. 07/09
SMM04-C
B2
SHU-PAK EQUIPMENT INC.
Operator’s Manual
Restriction:
A reduced cross-sectional area in a line or passage, which normally causes a
pressure drop. (Examples: pinched lines or clogged passages, or an orifice
designed into a system.)
Solenoid:
An electro-magnetic device that positions a hydraulic valve.
Valve:
A device that controls either 1) pressure of fluid, 2) direction of fluid flow, or 3)
rate of flow.
Check Valve:
A valve that permits flow in only one direction.
Directional Control-Valve:
A valve that directs oil through selected passages. (Usually a spool or rotary
valve design.)
Flow Control Valve:
A valve that controls the rate of flow. (Sometimes called a "Volume control
valve").
Open Centre Valve:
a valve, in which the inlet and outlet ports are open in the neutral position,
allowing a continuous flow of oil from pump.
Pressure Control Valve:
A valve whose primary function is to control pressure. (Includes relief valves,
pressure reducing or sequencing valves, and unloading valves.)
Relief Valve:
A valve that limits the pressure in a system, usually by releasing excess oil.
Volume:
The amount of fluid flow per unit time. Usually given as gallons per minute
(gpm).
Rev. 07/09
SMM04-C
B3
SHU-PAK EQUIPMENT INC.
Operator’s Manual
SECTION A1.3
LIST OF ABBREVIATIONS
ASAE -
American Society of Agricultural Engineers (Sets standards for many hydraulic
components for agricultural use)
°F
-
degrees Fahrenheit (of temperature)
°C
-
degrees Celsius (of temperature)
Ft-lbs
-
foot-pounds (of torque or turning effort)
GPM
-
gallons per minute (of fluid flow)
Hp
-
horsepower
I.D.
-
inside diameter (as of a hose or tube)
O.D.
-
outside diameter (as of a hose or tube)
PSI
-
pounds per square inch (of pressure)
RPM
-
revolutions per minute
SAE
-
Society of Automotive Engineers (sets standards for many hydraulic components)
cu. in. -
cubic inch rev/revolution
Rev. 07/09
SMM04-C
B4
Tailgate
Automatic
Locks
Tailgate
Tailgate
Cylinder
Body
Safety
Prop
Body
Hoist
Cylinder
Packer Push Button
Controls
Ram
Clean-Out
Sump
Canopy Crusher Loading Hopper
Hopper Deflector
Door
Hydraulic
Control
Valve
Hopper
Door
TYPICAL SHU-PAK LAYOUT
Front View
Convex
Mirrors
Rear View
Mirrors
Right Hand
Stand Up Drive
Hydraulic
Reservoir
SHU-PAK EQUIPMENT INC.
Operator’s Manual
SECTION A2.0
DEFINITIONS OF COMPONENTS
SECTION A2.1
TYPICAL SHU-PAK LAYOUT
Rev. 07/09
B5
SMM04-C
SHU-PAK EQUIPMENT INC.
Operator’s Manual
SECTION A2.2
TYPICAL RIGHT HAND STAND UP DRIVE MODIFICATIONS
Transmission
Shift
Control
Parking
Brake
In-Tank
Oil Filter
Side View
Mirror Head
Gauge
Package
Air Pressure
Gauge
Tank Oil
Level Gauge
Work
Brake
Sliding
Door
Steering
Wheel
Crusher
Control
Brake
Pedal
Nylon Wear
Guard
Accel
Pedal
Retractable
Step
Rev. 07/09
SMM04-C
B6
SHU-PAK EQUIPMENT INC.
Operator’s Manual
APPENDIX B
OPTIONS
SECTION B1.0
CART DUMPING SYSTEM
Rev. 07/09
SMM04-C
B7
SHU-PAK EQUIPMENT INC.
Operator’s Manual
SECTION B1.0
CART DUMPING SYSTEM
SECTION B1.1
OPERATING INSTRUCTIONS
Position the lifter so the container may be rolled up to it with the lifting hook a few inches beneath the
container lip. Open the lid of the container. Center the container on the lifter.
Raise the lifter slowly, allowing the lifting hook to engage the container. The container locking fingers
should fully engage as the container is lifted.
Continue to raise the container allowing the container to empty. When the container is empty, lower the
container back to ground level. As the container is lowered, the locking will retract. The operator should
ensure that the container contacts the ground with minimum force and speed. Continue to lower the lifter
back to the pick-up position.
If there is material that is frozen or sticking inside the container, it is recommended that it be loosened
from the wall of the container before dumping. Shaking of the container repeatedly is more likely to
damage the container and not loosen the material.
SECTION B1.2
SAFETY PRECAUTIONS
The operation of your SHU-PAK is designed to be easy, however, it capable of exerting extremely large
forces from powerful hydraulic system. Strict safety precautions must be taken by operating personnel.
1.
Only trained personnel should be allowed to operate and maintain the dump unit. This requires
that the operator has read and understood the contents of this manual.
2.
Whenever operating the dump unit the operator must assure that, no one is underneath or in
close proximity to the unit.
3.
A maintenance program must be employed that checks all equipment on a regular basis for both
normal and abnormal wear, loosening and lubrication of parts.
4.
Relief and flow settings preset by SHU-PAK should not be changed except by trained personnel.
5.
This dump unit is designed to lift containers with a maximum load of 300 lbs. Loads that exceed
this are unsafe and may void both the cart and lifter warranties.
Rev. 07/09
SMM04-C
B8