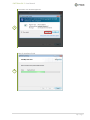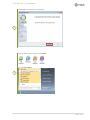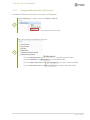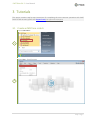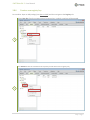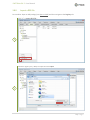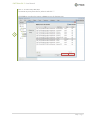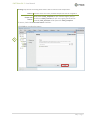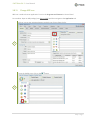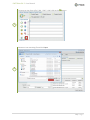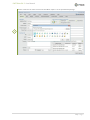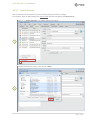
1
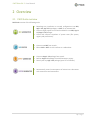
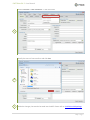
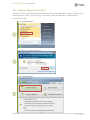
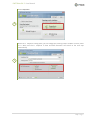
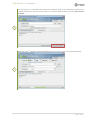
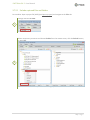
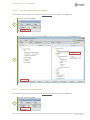
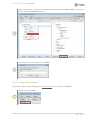
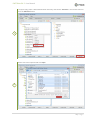
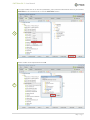
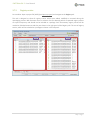
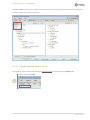
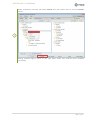
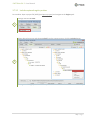
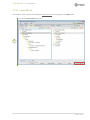
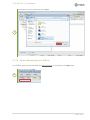
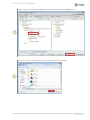
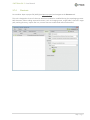
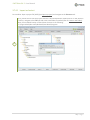
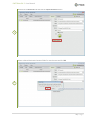
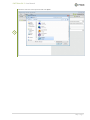
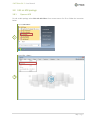
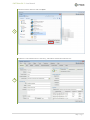
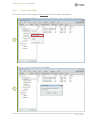
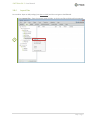
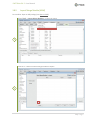
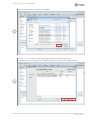
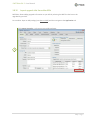
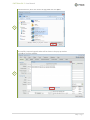
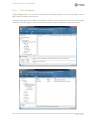
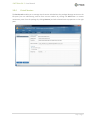
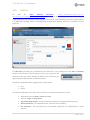
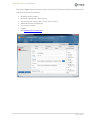
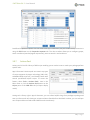
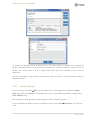
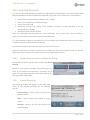
PACE Suite User Manual Version 3.4.2 Document version 20150417 PACE Suite 3.4.2 - User Manual Table of Contents 1 INTRODUCTION ............................................................................................................................. 3 1.1 ABOUT THIS USER MANUAL........................................................................................................................................ 3 1.2 GLOSSARY ................................................................................................................................................................... 3 2 OVERVIEW ..................................................................................................................................... 4 2.1 PACE SUITE OVERVIEW ............................................................................................................................................... 4 2.2 INSTALLATION & SYSTEM REQUIREMENTS ................................................................................................................. 5 2.2.1 Prerequisites .................................................................................................................................................... 5 2.2.2 Installing PACE Suite (MSI package)................................................................................................................. 5 2.2.3 Using portable distributive (ZIP archive) ....................................................................................................... 11 3 TUTORIALS ................................................................................................................................... 12 3.1 3.2 3.3 3.4 3.5 3.6 3.7 CREATE AN MSI FROM SCRATCH .............................................................................................................................. 12 CREATE APP-V 4.6 OR 5.0 FROM SCRATCH ............................................................................................................... 13 REPACKAGE EXE TO MSI............................................................................................................................................ 15 REPACKAGE EXE TO APP-V 4.6 OR 5.0 ...................................................................................................................... 19 CREATE AN MST FOR AN EXISTENT MSI .................................................................................................................... 20 CAPTURE CHANGES INTO AN MST ............................................................................................................................ 23 EDIT A PROJECT (MGP).............................................................................................................................................. 29 3.7.1 Open a project ............................................................................................................................................... 29 3.7.2 Files and folders ............................................................................................................................................. 30 3.7.2.1 Exclude captured files and folders ................................................................................................... 32 3.7.2.2 Include captured files and folders ................................................................................................... 33 3.7.2.3 Create a new empty folder .............................................................................................................. 33 3.7.2.4 Import files or folders ...................................................................................................................... 34 3.7.3 Registry entries .............................................................................................................................................. 37 3.7.3.1 Exclude captured registry entries .................................................................................................... 38 3.7.3.2 Include captured registry entries ..................................................................................................... 40 3.7.3.3 Import REG file................................................................................................................................. 41 3.7.3.4 Export captured registry to REG file ................................................................................................ 42 3.7.4 Shortcuts ........................................................................................................................................................ 44 3.7.4.1 Import a shortcut ............................................................................................................................. 45 3.8 EDIT AN MSI PACKAGE .............................................................................................................................................. 48 3.8.1 Open an MSI .................................................................................................................................................. 48 3.8.2 Add a Standard Folder ................................................................................................................................... 50 3.8.3 Create a new folder ....................................................................................................................................... 51 3.8.4 Import files..................................................................................................................................................... 52 3.8.5 Extract COM information from files .............................................................................................................. 56 3.8.6 Create a new registry key .............................................................................................................................. 57 3.8.7 Create a new registry value ........................................................................................................................... 58 3.8.8 Import a REG file ............................................................................................................................................ 59 3.8.9 Import Merge Module (MSM) ....................................................................................................................... 62 1|Page PACE Suite 3.4.2 - User Manual 3.8.10 Import upgrade info from older MSIs ............................................................................................................ 65 3.8.11 Change ARP icon ............................................................................................................................................ 67 3.8.12 Import shortcuts ............................................................................................................................................ 70 3.8.13 Create a new shortcut ................................................................................................................................... 71 3.8.14 Toggle non-advertised/advertised shortcut .................................................................................................. 73 3.9 EDIT AN APP-V 4.6 PACKAGE .................................................................................................................................... 74 3.9.1 Open an App-V 4.6 package........................................................................................................................... 74 3.9.2 Package options ............................................................................................................................................. 75 3.9.3 Files and Registry ........................................................................................................................................... 76 3.9.4 Virtual Services .............................................................................................................................................. 77 3.9.5 OSD Files ........................................................................................................................................................ 78 3.9.6 Properties Inspector ...................................................................................................................................... 80 3.9.7 Actions Pool ................................................................................................................................................... 81 3.9.8 Saving a Package ............................................................................................................................................ 82 3.10 USING DOCU GENERATOR ........................................................................................................................................ 84 3.10.1 Launch Docu Generator and Start Recording ................................................................................................ 84 3.10.2 Control Recording .......................................................................................................................................... 84 3.10.3 Take Screenshots ........................................................................................................................................... 85 3.10.4 Manage Screenshots ..................................................................................................................................... 85 3.10.5 Add Annotations ............................................................................................................................................ 85 3.10.6 Save results .................................................................................................................................................... 86 3.10.7 Use Document Templates ............................................................................................................................. 87 4 REFERENCES ................................................................................................................................ 88 4.1 MORE INFORMATION AND CONTACT ....................................................................................................................... 88 4.2 PACE SUITE IN SOCIAL AND PROFESSIONAL NETWORKS .......................................................................................... 88 2|Page PACE Suite 3.4.2 - User Manual 1 Introduction 1.1 About this User Manual This is a Getting Started document describing how to use Infopulse PACE Suite to perform common tasks related to application packaging. Please visit the Support Portal (http://pacesuite.com/support) for more documentation. 1.2 Glossary MSI is an installer package file format used by Windows. Its name comes from the program's original title, Microsoft Installer, which MSI has since changed to Windows Installer. MSI files are used for installation, storage, and removal of programs. MST is a settings file used by the Microsoft Windows Installer, a component of the Windows operating system that enables software MST installations. It contains software configuration options, allows custom parameters to be used for the installation. Microsoft Application Virtualization (also known as App-V; formerly App-V Softricity SoftGrid) is an application virtualization and application streaming solution from Microsoft. 3|Page PACE Suite 3.4.2 - User Manual 2 Overview 2.1 PACE Suite overview PACE Suite consists of the following tools: Repackage any installation or manual configuration into MSI, App-V 4.6, App-V 5.0 packages, or MST for an existent MSI. Create a single project from scratch and build it into MSI, App-V 4.6, App-V 5.0 packages. Create and compare snapshots of system state (file system, registry and permissions). Create a new MSI from scratch. Edit an MSI or MST via rich interface or a table editor. Create an App-V 4.6 package from scratch. Build an App-V 4.6 package from MSI Generator project. Directly edit any App-V 4.6 package (open SFT or OSD file). Automatically record a consequence of actions into a document with screenshots and annotations. 4|Page PACE Suite 3.4.2 - User Manual 2.2 Installation & System requirements 2.2.1 Prerequisites Be sure that a target system contains necessary software and hardware prerequisites: 32-bit (x86) or 64-bit (x64) processor at 2 GHz or greater Processor Note: To repackage 64-bit applications or create 64-bit App-V packages, use PACE Suite on a 64-bit Windows operating system. RAM 2 Gb 1 Gb Required free space on drive Note: Additional storage is required for your projects and packages and depends on their size and quantity. Display 1024 x 768 resolution or higher Operating System Windows 8.1, Windows 8, Windows 7, Windows XP SP3, Windows Server 2012, Windows Server 2008, Windows Server 2003. Middleware Microsoft .NET Framework 4.0 or higher. Privileges Administrative privileges on the system 2.2.2 Installing PACE Suite (MSI package) This type of installation is recommended because it checks for prerequisites, but it requires administrator privileges to be installed. Select Install in context menu of the PACE_v.3.4.2.msi 1 5|Page PACE Suite 3.4.2 - User Manual Click Next 2 Read and accept License Agreement and click Next 3 6|Page PACE Suite 3.4.2 - User Manual Change default installation location if needed and click Next 4 Enter a product key or select Skip entering a product key now to install evaluation version and click Next 5 7|Page PACE Suite 3.4.2 - User Manual Select which of PACE products will be installed on the target system 6 Click the Install button 7 8|Page PACE Suite 3.4.2 - User Manual Click Yes if UAC window appeared 8 Wait for installation finish 9 9|Page PACE Suite 3.4.2 - User Manual Click Finish to complete the installation 10 Find the PACE Suite’s shortcuts at Desktop: Or in the Start Menu: 11 10 | P a g e PACE Suite 3.4.2 - User Manual 2.2.3 Using portable distributive (ZIP archive) Portable distributive does not perform any checks for prerequisites. Select Extract All… in context menu of the PACE_v.3.4.2.zip 1 Then select a location where files from archive will be extracted. ZIP archive contains the following resources: 2 - To launch MSI Generator use - To launch MSI Editor use - To launch App-V Generator use - To launch Docu Generator use in the MSI Generator folder in the MSI Editor folder in the App-V Generator folder in the Docu Generator folder 11 | P a g e PACE Suite 3.4.2 - User Manual 3 Tutorials This section contains step-by-step instructions for completing the most common operations with PACE Suite. To find out more, please visit Support Portal (http://pacesuite.com/support). 3.1 Create an MSI from scratch Launch MSI Editor 1 Select New… from File menu 2 12 | P a g e PACE Suite 3.4.2 - User Manual Specify name and destination location for new MSI and click Save 3 3.2 Create App-V 4.6 or 5.0 from scratch Launch MSI Generator 1 Click Yes if UAC window appeared 2 13 | P a g e PACE Suite 3.4.2 - User Manual Select Create Package 3 Select Blank Project 4 Enter the project name and click Create 5 14 | P a g e PACE Suite 3.4.2 - User Manual The newly created blank project will be opened automatically. Set Package Type to App-V 4.6 or App-V 5.0. To build a package, click the Build App-V 5.0 (4.6) button. To find that package that was built package click the > button and containing folder will be opened in Windows Explorer. See instruction for how to Edit a project (.MGP) 6 3.3 Repackage EXE to MSI MSI Generator records any type of installation (EXE, MSI or Script) or any manual changes made to a system and reproduces them in an MSI package. There are two methods of recording: Snapshots (Recommended) MSI Generator scans the system before and after the installation and creates a package based on the difference between 1st and 2nd scans (snapshots). Monitoring (Quick) This method watches the installation and records changes to a package. Note Despite the differences between these two approaches, they have a very similar workflow and the following instruction covers only recommended record method – Snapshots. 15 | P a g e PACE Suite 3.4.2 - User Manual Launch MSI Generator 1 Click Yes if UAC window appeared 2 Select Create Package 3 16 | P a g e PACE Suite 3.4.2 - User Manual Select Snapshots 4 While the 1st snapshot is being taken, you can change the scanning areas if needed. If unsure, leave as is. Wait until the 1st snapshot is done and MSI Generator will switch to the next step automatically 5 17 | P a g e PACE Suite 3.4.2 - User Manual On this step run an installation and follow the installation steps of your software or perform any manual configuration and then click the Start Second Snapshot button 6 Wait until the 2nd snapshot is done and MSI Generator will switch to the next step automatically 7 18 | P a g e PACE Suite 3.4.2 - User Manual Specify Application Name, Publisher and application Version. Change INSTALLDIR property if needed and click the Build MSI button to generate an MSI package. To find the MSI that was built click the > button and containing folder will be opened in Windows Explorer. See instruction on how to Edit a project (.MGP) 8 3.4 Repackage EXE to App-V 4.6 or 5.0 MSI Generator records any type of installation (EXE, MSI and Script) or any manual changes made to a system and re-creates it in App-V 4.6 or App-V 5.0 package. 1 Use instruction on Repackage EXE to MSI from step 1 to 7 19 | P a g e PACE Suite 3.4.2 - User Manual Set Package Type to App-V 4.6 or App-V 5.0. Specify Application Name, Publisher and application Version. Change INSTALLDIR (Asset Dir) if needed and click the Build App-V 5.0 (4.6) button to generate an App-V package. To find the package that was built click the > button and containing folder will be opened in Windows Explorer. See instruction on how to Edit a project (.MGP) 2 3.5 Create an MST for an existent MSI Launch MSI Editor 1 20 | P a g e PACE Suite 3.4.2 - User Manual Open an MSI package, for which the new MST will be created 2 3 21 | P a g e PACE Suite 3.4.2 - User Manual Select Transform -> New Transform… in the main menu 4 Specify the name of new transform and click Save 5 6 Make the changes, that need to be saved into the MST. Please refer to 3.10 Edit an MSI package. 22 | P a g e PACE Suite 3.4.2 - User Manual 3.6 Capture changes into an MST MSI Generator allows capturing any changes made to system and to original MSI during its installation, and reproducing them in MST. This is useful e.g. if you need to record changes made in UI dialogs during installation of an MSI. Launch MSI Generator 1 Click Yes if UAC window appeared 2 Select Create Package 3 23 | P a g e PACE Suite 3.4.2 - User Manual Select Snapshots 4 While the 1st snapshot is being taken, you can change the scanning areas if needed. If unsure, leave as is. Wait until the 1st snapshot is done and MSI Generator will switch to the next step automatically 5 24 | P a g e PACE Suite 3.4.2 - User Manual On this step run an installation and follow the installation steps of your software or perform any manual configuration that should be saved to a transform (MST) and then click the Start Second Snapshot 6 Wait until the 2nd snapshot is done and MSI Generator will switch to the next step automatically 7 25 | P a g e PACE Suite 3.4.2 - User Manual Set Package Type to MST 8 Click the button next to MSI File Name to pick a target MSI, or choose it from a list. 9 26 | P a g e PACE Suite 3.4.2 - User Manual Choose which type of resources to be included to an MST: Properties MSI properties that were changed or added during the installation of an MSI, including those modified via UI dialogs Features MSI feature states and levels that were changed during the installation of an MSI Update Files Files which are present in MSI but were updated outside MSI (e.g. a config file which was populated during application launch) Add Files Captured files that do NOT exist in MSI (e.g. those installed via an EXE wrapper outside an MSI) Update Registry Files which are present in MSI but were updated outside MSI (e.g. if default value was overwritten during application launch) Add Registry Captured registry entries that do NOT exist in MSI (e.g. those installed via an EXE wrapper outside an MSI) Note To get a “response MST” (“InstallTailor”) leave checked only Properties and Featured checked. 11 27 | P a g e PACE Suite 3.4.2 - User Manual Change Application Name, Publisher and application Version, INSTALLDIR if needed and click the Build MST button to generate an MST for the selected MSI package. To find the MST that was generated click the > button next to MST File Name and a containing folder will be opened in Windows Explorer. Also see the instruction on how to Edit a project (MGP), 12 28 | P a g e PACE Suite 3.4.2 - User Manual 3.7 Edit a project (MGP) 3.7.1 Open a project To open an MSI Generator’s project file (.MGP), launch it via Windows Explorer, or follow the instruction below: Launch MSI Generator 1 Click Yes if this UAC window appeared 2 29 | P a g e PACE Suite 3.4.2 - User Manual Select Open Project 3 Choose a project file (*.MGP) and click Open 4 3.7.2 Files and folders Pre-condition: Open a project file (MGP) (see Open a project) and navigate to the Files tab. This tab is designed to show all files and folders which were added, modified or removed during the repackaging process. MSI Generator uses exclusion lists for detecting which of captured files are system temporary files and should not be included to a package. Such unnecessary files will be marked as Excluded resources and they are shown in the right panel of the File tab. The rest of files, which will be Included to a package are shown in the left panel. 30 | P a g e PACE Suite 3.4.2 - User Manual Use Tree View (left top corner) to get structured view of resources and have ability to perform Include and Exclude operations on folders, not only files. 31 | P a g e PACE Suite 3.4.2 - User Manual 3.7.2.1 Exclude captured files and folders Pre-condition: Open a project file (MGP) (see Open a project) and navigate to the Files tab. Change view to Tree View 1 Select unnecessary resources and choose Exclude from the context menu, click the Exclude button, or press Del. 2 When a resource is excluded, it is moved to the right panel. 32 | P a g e PACE Suite 3.4.2 - User Manual 3.7.2.2 Include captured files and folders Pre-condition: Open a project file (MGP) (see Open a project) and navigate to the Files tab. Change view to Tree View 1 Select desired resources and choose Include from the context menu or click the Include button. 2 When a resource is excluded, it is moved to the left panel. 3.7.2.3 Create a new empty folder Pre-condition: Open a project file (MGP) (see Open a project) and navigate to the Files tab. Change view to Tree View 1 33 | P a g e PACE Suite 3.4.2 - User Manual Select a parent folder in which new folder will be created and choose Create Folder in the context menu or click the Create Folder button 2 Enter the name of a new folder and click Create 3 3.7.2.4 Import files or folders Pre-condition: Open a project file (MGP) (see Open a project) and navigate to the Files tab. Change view to Tree View 1 34 | P a g e PACE Suite 3.4.2 - User Manual To import files, select a desired destination directory and choose Add Files in the context menu or click the Add Files button 2 Select files to be imported and click Open 3 35 | P a g e PACE Suite 3.4.2 - User Manual To import folder with all its files and subfolders, select a desired destination directory and choose Add Folder in the context menu or click the Add Folder button 4 Select a folder to be imported and click OK 5 36 | P a g e PACE Suite 3.4.2 - User Manual 3.7.3 Registry entries Pre-condition: Open a project file (MGP) (see Open a project) and navigate to the Registry tab. This tab is designed to show all registry entries which were added, modified or removed during the repackaging process. MSI Generator uses its exclusion lists for detecting which of captured registry entries are system temporary and should not be included to a package. Such unnecessary registry entries will be marked as Excluded resources and they are shown in the right panel of the Registry tab. The rest of registry entries, which will be Included to a package are shown in the left panel. 37 | P a g e PACE Suite 3.4.2 - User Manual Use Tree View (left top corner) to get structured view of resources and have ability to perform Include and Exclude operations on whole registry key. 3.7.3.1 Exclude captured registry entries Pre-condition: Open a project file (MGP) (see Open a project) and navigate to the Registry tab. Change view to Tree View 1 38 | P a g e PACE Suite 3.4.2 - User Manual Select unnecessary resources and choose Exclude from the context menu or click the Exclude button. 2 Moving selected registry entries to the right panel means that resources were excluded successfully. 39 | P a g e PACE Suite 3.4.2 - User Manual 3.7.3.2 Include captured registry entries Pre-condition: Open a project file (MGP) (see Open a project) and navigate to the Registry tab. Change view to Tree View 1 Select desired resources and choose Include from the context menu or click the Include button. 2 Moving selected registry entries to the left panel means that resources were included successfully. 40 | P a g e PACE Suite 3.4.2 - User Manual 3.7.3.3 Import REG file Pre-condition: Open a project file (MGP) (see Open a project) and navigate to the Registry tab. Click on the Import Registry button 1 41 | P a g e PACE Suite 3.4.2 - User Manual Choose REG file to be imported and click Open 2 3.7.3.4 Export captured registry to REG file Pre-condition: Open a project file (MGP) (see Open a project) and navigate to the Registry tab. Change view to Tree View 1 42 | P a g e PACE Suite 3.4.2 - User Manual Select a registry key and choose Export in the context menu of click the Export button 2 Select the name and destination location of a new REG file and click Save 3 43 | P a g e PACE Suite 3.4.2 - User Manual 3.7.4 Shortcuts Pre-condition: Open a project file (MGP) (see Open a project) and navigate to the Shortcuts tab. This tab is designed to show all shortcuts which were added or modified during the repackaging process. MSI Generator allows editing captured shortcuts, such as changing name, target folder, shortcut’s target path, working directory, import new icon, convert shortcut to advertised and non-advertised. 44 | P a g e PACE Suite 3.4.2 - User Manual 3.7.4.1 Import a shortcut Pre-condition: Open a project file (MGP) (see Open a project) and navigate to the Shortcuts tab. First, please ensure that the project contains a desired destination folder path for a new shortcut. To do so, navigate to the Files tab and create new folders if needed (refer to Create a new folder). Note, that standard location of Start Menu shortcuts is the following: C:\ProgramData\Microsoft\Windows\Start Menu\Programs 1 45 | P a g e PACE Suite 3.4.2 - User Manual Go back to the Shortcuts tab and click the Import Shortcuts button 2 Select a desired destination location folder for new shortcut and click OK 3 46 | P a g e PACE Suite 3.4.2 - User Manual Choose a shortcut to be imported and click Open 4 47 | P a g e PACE Suite 3.4.2 - User Manual 3.8 Edit an MSI package 3.8.1 Open an MSI To edit an MSI package select Edit with MSI Editor from context menu of a file or follow the instruction below: Launch MSI Editor 1 Select File -> Open… 2 48 | P a g e PACE Suite 3.4.2 - User Manual Choose an MSI or MST file and click Open 3 If MSI file is not locked and not “read-only”, MSI Editor window will look like this: 4 49 | P a g e PACE Suite 3.4.2 - User Manual 3.8.2 Add a Standard Folder Pre-condition: Open an MSI package (see Open an MSI) and then navigate to the Files tab Click “+” -> New Standard Folder and select desired standard MSI folder from list. This list contains only those folders that do not exist in the opened MSI. 1 50 | P a g e PACE Suite 3.4.2 - User Manual 3.8.3 Create a new folder Pre-condition: Open an MSI package (see Open an MSI) and then navigate to the Files tab. Select New Custom Folder from context menu of the folder, in which a new folder will be created. 1 Enter the name of a new folder and click Create 2 51 | P a g e PACE Suite 3.4.2 - User Manual 3.8.4 Import files Pre-condition: Open an MSI package (see Open an MSI) and then navigate to the Files tab. Select Import Files… from the context menu of folder, in which new files or folder will be imported. 1 52 | P a g e PACE Suite 3.4.2 - User Manual Select “+ “-> Select Files… to import one or more files, or “+” -> Select Folder… to import a folder with its complete content 2 Choose files to import and click Open 3 53 | P a g e PACE Suite 3.4.2 - User Manual Click Finish to complete the file import with default settings. Click Next to go the Settings step and select additional option such as target feature, media type and how to treat INI files. 4 54 | P a g e PACE Suite 3.4.2 - User Manual Settings step allows controlling how to install INI files, what feature will be used for new components and how to save imported files. The following settings are available (see screenshot below): Install standard INI files via IniFile table; nonstandard via Files table (recommended) Install all INI files via File table Install all INI files via File table and duplicate to IniFile table Feature Create new feature 5 Media type INI files that do not contain comments or duplicates will be saved to the IniFile table. All other INI files will be saved to the File table as regular files. All INI files will be saved only to the File table as regular files. All INI files files will be saved to the File table as regular files and additionally all these INI files will be duplicated to the IniFile table (comments won’t be saved to IniFile table; duplicated sections or keys will be merged). It allows update INI file values keeping initial order of the INI sections and file structure. An MSI feature where new components will be assigned to New feature PACE_Complete for per-machine files and feature PACE_UserPart for per-user files will be created. PACE_UserPart will be parent feature for PACE_Complete feature. New Cab file – compress imported files into external CAB file Uncompressed – copy imported files to the folder of MSI package Existing – compress imported files into existing external CAB file Click Finish to complete the file import with selected settings. Click Next to go the Import COM step to extract registration information from COM objects. 55 | P a g e PACE Suite 3.4.2 - User Manual MSI Editor extracts registration information of imported COM objects (.dll, ocx, .tlb) and shows it in the table. Check the Import COM information checkbox to import extracted information to MSI. Click Finish to complete the file import. 6 3.8.5 Extract COM information from files MSI Editor allows extracting registration information of COM objects from imported files (*.DLL, *.OCX, *.LTB). This feature is available via Import Files, please refer to Import files (pay attention to the last step). 56 | P a g e PACE Suite 3.4.2 - User Manual 3.8.6 Create a new registry key Pre-condition: Open an MSI package (see Open an MSI) and then navigate to the Registry tab. Select New Key from the context menu of a registry key, in which a new key will be created. 1 Use Rename from the context menu to specify a new name of the registry key 2 57 | P a g e PACE Suite 3.4.2 - User Manual 3.8.7 Create a new registry value Pre-condition: Open an MSI package (see Open an MSI) and then navigate to the Registry tab. Select New Value… from the context menu of a registry key, in which a new value will be created. 1 Enter the name, value, select value type and component from the list. Click Add to create the value. 2 58 | P a g e PACE Suite 3.4.2 - User Manual 3.8.8 Import a REG file Pre-condition: Open an MSI package (see Open an MSI) and then navigate to the Registry tab. Click “+” -> Import REG File… 1 Choose a registry file (*.REG) to import and click Open 2 59 | P a g e PACE Suite 3.4.2 - User Manual Click “+” to select more REG files. To remove any entry from the list, select it and click “-”. Click Finish to complete the import or Next to go to the Settings step. 3 60 | P a g e PACE Suite 3.4.2 - User Manual Settings step allows controlling what feature will be used for new components: Feature Feature where the newly created components will be assigned to New feature PACE_Complete for per-machine registry entries Create new and feature PACE_UserPart for per-user registry entries will be feature created. PACE_UserPart will be parent for PACE_Complete. If unsure, check the Create new feature checkbox. Click Finish to complete the import. 4 61 | P a g e PACE Suite 3.4.2 - User Manual 3.8.9 Import Merge Module (MSM) Pre-condition: Open an MSI package (see Open an MSI). Select Tools -> Import Merge Modules… in the main menu. 1 Click the “+” button to choose merge modules to import. 2 62 | P a g e PACE Suite 3.4.2 - User Manual Choose merge modules (*.MSM) and click Open 3 Use the “+” and “-” buttons to add more merge modules or remove selected ones. Click Next to go to the Settings step or Finish to complete the import with default settings. 4 63 | P a g e PACE Suite 3.4.2 - User Manual Settings step allows controlling what feature will be used for merge modules, directory for merge modules’ resources and media type: Root Directory A target directory for merge modules’ resources Primary Feature Feature to which merge modules’ components will be assigned. External Cab – compress merge modules’ resources into external CAB file. Media type Uncompressed – copy merge modules’ resources to the folder of MSI package If unsure, leave default settings. Click Finish to complete the Merge Module import. 5 64 | P a g e PACE Suite 3.4.2 - User Manual 3.8.10 Import upgrade info from older MSIs MSI Editor allows adding upgrade information to your MSI by selecting the MSI files that have to be upgraded by your MSI. Pre-condition: Open an MSI package (see Open an MSI) and then navigate to the Application tab. Click Import Upgrades… to choose previous MSI packages. 1 65 | P a g e PACE Suite 3.4.2 - User Manual Choose MSI files, which are need to be upgraded and click Open 2 Successfully imported upgrade codes will be shown in the pop-up window. Click Ok to close the window. 3 66 | P a g e PACE Suite 3.4.2 - User Manual 3.8.11 Change ARP icon ARP icon is used to show an application’s icon in the Programs and Features in Control Panel. Pre-condition: Open an MSI package (see Open an MSI) and then navigate to the Application tab. Click on icon to view existing elements and pick one of icons from the list. 1 To set the default icon, click on the button. 2 67 | P a g e PACE Suite 3.4.2 - User Manual To import an icon from a file (*.DLL, *.EXE, *.ICO), click on the button. 3 Choose an icon containing file and click Open 4 68 | P a g e PACE Suite 3.4.2 - User Manual Select a desired icon from the list and click OK to import it to the opened MSI package. 5 69 | P a g e PACE Suite 3.4.2 - User Manual 3.8.12 Import shortcuts Shortcuts which were installed on a system could be easily imported to a package. Pre-condition: Open an MSI package (see Open an MSI) and then navigate to the Shortcuts tab. Click “+” -> Import Shortcuts… to choose shortcuts to import. 1 Choose shortcut files (*.LNK, *.URL) and click Open 2 70 | P a g e PACE Suite 3.4.2 - User Manual 3.8.13 Create a new shortcut Pre-condition: Open an MSI package (see Open an MSI) and then navigate to the Shortcuts tab. Click “+” -> New Shortcut to File/Folder… to create a new shortcut to a file or folder inside the MSI. 1 71 | P a g e PACE Suite 3.4.2 - User Manual Choose a file or a folder as a shortcut target and click Select 2 Edit attributes and icon of newly created shortcut if needed 3 72 | P a g e PACE Suite 3.4.2 - User Manual 3.8.14 Toggle non-advertised/advertised shortcut An advertised shortcut is a special shortcut which triggers Windows Installer to validate (and “self-heal”, if missing or broken) the key resources associated with it, every time a shortcut is launched by a user. For more details, please refer to MSDN (https://msdn.microsoft.com/en-us/library/aa367548(v=vs.85).aspx) Pre-condition: Open an MSI package (see Open an MSI) and then navigate to the Shortcuts tab. Select a shortcut in the shortcut list and check the Advertised checkbox to convert it to an advertised one. 1 73 | P a g e PACE Suite 3.4.2 - User Manual 3.9 Edit an App-V 4.6 package 3.9.1 Open an App-V 4.6 package To edit an App-V 4.6 package, navigate to an SFT file and select “Open with App-V Generator” in its context menu, or follow the instruction below: Launch App-V Generator 1 Click Yes if this UAC window appeared 2 Select File -> Open and use the dialog box to select a file. 3 74 | P a g e PACE Suite 3.4.2 - User Manual 3.9.2 Package options The following options are available under the General tab: Package Name – the name of a target App-V package; Comments – optional field containing any information valuable for further reference when deploying or editing a package; Output Folder – a directory where the target package will be saved upon selecting File Save… Generate MSI Package – whether to generate an MSI installation package for a standalone package deployment. Please see “The Opening and Saving Packages” section below for more info. 75 | P a g e PACE Suite 3.4.2 - User Manual 3.9.3 Files and Registry Using the Files tab you can view, add, change, delete and import/export virtual files and folders and set App-V specific attributes for directories. The Registry tab gives you an ability to add, delete, modify or import registry keys and values and manage attributes of a virtual registry. Use the context menu options to perform operations upon any resource. 76 | P a g e PACE Suite 3.4.2 - User Manual 3.9.4 Virtual Services The Services tab enables you to manage virtual services included into the package. Manage services on the left pane (You can add existing services from current machine by clicking the Add button or remove unnecessary ones from the package by clicking Remove) and edit selected service properties on the right pane. 77 | P a g e PACE Suite 3.4.2 - User Manual 3.9.5 OSD Files Descriptor) (http://msdn.microsoft.com/enus/library/aa740951%28v=vs.85%29.aspx) contains all the data required to publish and run a single application sequenced into virtual package. There may be several OSD files (shortcuts to applications) in a single App-V package. When virtual application is deployed to desktop, OSD files are visible for user as shortcuts. An OSD file (Open Software The OSD Files tab allows you to add/remove the OSD files in your package (Use the Add and Remove buttons in the bottom of the left pane) as well as set up options and contents of each one. When selecting an OSD file in the left pane, the right pane gets populated with its data and options. The tab has two display modes, toggled with a special switch: User; Expert. User display mode gives you a quick access to the most commonly used options, such as: Application/shortcut Name, Version and Icon; Shortcut Target and Arguments; App-V Streaming options – protocol, hostname and port of an App-V streaming server; Shortcut locations – the standard location a shortcut to be placed to; File extensions – file associations with a virtualized application to be published on a client machine. 78 | P a g e PACE Suite 3.4.2 - User Manual Switching to Expert mode provides you with a full control of all extensive options and contents of an OSD file such as (but not limited to): Operating System visibility; Minimum required App-V client version; OSD scripting (see “Actions pool” section for more info); Advanced shortcuts management; Environment variables; ProgId's; DSC (Dynamic Suite Composition). 79 | P a g e PACE Suite 3.4.2 - User Manual 3.9.6 Properties Inspector Hard-coded values (any specific values that are expected to be different on other machine or in different conditions and should be replaced by dynamic variables – e.g. full file path, name of a user, hostname, database credentials etc.) inside a package may cause compatibility issues or even break functionality of a virtual application. App-V Generator’s “Properties Inspector” feature (accessible on the Properties Inspector tab) helps to identify such values by analyzing a package using a predefined (yet fully customizable) rule set (set of search settings and regular expressions). To do a search, press the “GO” button on the Properties Inspector tab, and the Results pane will be fed with found matches. For convenient analysis, the search results are grouped by the categories: Credentials, User Specific, Machine specific and Network specific (still categories are configurable – see below). In the Results pane, a context menu is available enabling you to exclude an item from the package or jump to a folder, file or registry entry to investigate and eliminate a hard-coded value. Some hard-coded values cannot be simply replaced by variables (e.g. they are located inside a file) and need to be eliminated by means of OSD scripting. Please see the “Actions pool” section for how is it done with App-V Generator. 80 | P a g e PACE Suite 3.4.2 - User Manual Predefined Properties Inspector rule set comes with App-V Generator, but you’re able to fully customize it using the Edit button on the Properties Inspector tab. The rule set editor allows you to configure groups, search conditions (matches/regular expressions), areas to search in and exclusions. 3.9.7 Actions Pool Actions pool is kind of a library of OSD scripts enabling you to resolve issues or make your package perform specific tasks. App-V Generator’s Actions pool can contain any types of scripts supporter by App-V technology (VBS, shell, embedded OSD scripts etc.) and already comes with several pre-defined helpful scripts. To access the feature, select Tools -> Actions Pool... item in the Main menu or click the Actions Pool button on the Scripts pane of the OSD Files tab (in Expert display mode). Having such a library right in App-V Generator, you can collect helpful things from package to package and ease you future work w/o having to reinvent solutions found before. With built-in editor, you can add your own scripts and do not need to edit OSD files each time directly. 81 | P a g e PACE Suite 3.4.2 - User Manual An example pre-defined script from Actions Pool is “File texts replace”. It enables you to dynamically replace hard-coded paths in virtual files of your package (see “Properties inspector” section for how to discover such values). When a script is selected and launch options are specified, you can enter its parameters. The “File Text Replace” script needs three parameters: Name of the file, a value that needs to replaced, replacement value. 3.9.8 Saving a Package To save a package, select File Save… from the main menu. The package will be saved In the Output folder specified on the General tab. If left empty then it is set to the default output folder, configurable in Tools Options menu. After a package is saved, App-V Generator will open its folder in Windows Explorer. To save a package with different name or to a different location, select File Save SFT as… from the main menu. 82 | P a g e PACE Suite 3.4.2 - User Manual Note. If a separate OSD has been opened then File Save… and File Save OSD as… menu commands serve to save a single OSD file, not a complete package. Output files When you save a package both the full and deployment-ready set of App-V package files is being generated. See table below for the output files listing. Output File Description <Package Name> Icons A folder containing icons for applications being published by the package OSD files you’ve set up on the OSD Files tab. An MSI installer file used for standalone deployment of an App-V package. Running this installer leads to streaming your virtual application on a single machine. This file is generated only if the Generate MSI Package checkbox is checked on the General tab. Binary file containing all assets and state organized into stream able feature blocks. Sequencing project with references to OSD, default package settings, list of all parser items, classifications and exclusions. Publishing parameters for all applications in a package. <App Name>.OSD <Package Name>.MSI <Package Name>.SFT <Package Name>.SPRJ <Package Name>_manifest.xml 83 | P a g e PACE Suite 3.4.2 - User Manual 3.10 Using Docu Generator To create an application package that fulfills the requirements and expectations, you need to know clearly how the application has to be installed and configured step-by-step. This includes (but is not limited to): Installer files to be launched and features to be installed Options to be specified in installation dialogs License keys to be used Application settings (e.g. startup screen disabled, connection settings specified) to be preconfigured by the package Desired shortcuts and their location. While this information may be obvious for some installations (e.g. a simple next…next one without a choice), its description is essential for another complicated ones. It is recommended to agree on a standard form of an Installation and configuration instruction and make it available along with original software installations. Docu Generator helps to automate the creation of such documentation. Follow the steps below to create an installation and configuration instruction with Docu Generator. Provide these steps to your requester if you wish to ask them to create such documents. 3.10.1 Launch Docu Generator and Start Recording Launch Docu Generator. On the Home screen, click Record Scenario. Scenario is user actions recorded by Docu Generator as a series of screenshots and annotations. A scenario can be saved in internal Docu Generator format (DSCN file) or as a document (DOC, HTML, MHT). 3.10.2 Control Recording The recording window will appear in the lower right corner of your desktop providing you the following controls: Pause/Continue – Click to pause recording. Click again to resume; Stop – stop recording and proceed to saving results; Hot Keys – Hover to see a hint of Hot Keys. Click to edit Hot Keys 84 | P a g e PACE Suite 3.4.2 - User Manual 3.10.3 Take Screenshots Now, do the actions you want to record into the document. Launch executables, go through dialogs, select options and enter values just telling Docu Generator when to take another screenshot, as described below. To take a screenshot: Window/Smart area screenshot Hold left Shift key when clicking. This will make Docu Generator grab a window or dialog/message box you’ve clicked on. If you’ve clicked outside any window (e.g. on desktop shortcut), then a smartly chosen rectangular area around mouse pointer will be grabbed. Executable path, a window title, names of clicked buttons or other controls, contents of text fields from a captured window are automatically grabbed into textual annotations. Yet inclusion of this information into a target document can be controlled when saving. Custom area screenshot Press Ctrl+Shift+PrintScreen, then click and drag the mouse pointer to select a rectangular area you want to grab. A screenshot is done when you release the mouse button. A preview of each new screenshot immediately appears in the Recording window. 3.10.4 Manage Screenshots Hover the mouse pointer over a preview of a screenshot in the Recording Window to access its options Edit annotation… – Edit an annotation for the screenshot; Copy to clipboard – Copy the screenshot to clipboard for immediate use; Remove – Delete the screenshot (preceded by a prompt). Hover the mouse pointer over a preview for another moment to view the screenshot enlarged. 3.10.5 Add Annotations To add a text annotation to the latest screenshot, click the Add Annotation button in Recording window or use the Ctrl+Alt+X hotkey. Enter annotation text in the “Add Annotation” window and click the Add button. 85 | P a g e PACE Suite 3.4.2 - User Manual 3.10.6 Save results When done, click Stop in the Recording window. The Save Results window will appear: Use the Save as switch to select the output format. The following output formats are supported: Word Document – the scenario will be saved as a series of screenshots and annotations into a DOC file; MHT/HTML File – the scenario will be saved as a series of screenshots and annotations into a HTML (Web page) or MHT (Web archive) file. A file type can be selected in a dialog box after clicking Save; Docu Generator Scenario – the scenario will be saved in internal Docu Generator format (DSCN file) which can be opened with Docu Generator and converted to an output document later. Note. To let you return to your scenario later, Docu Generator always creates DSCN file along with the output file in an output folder. Note. If Microsoft Word is unavailable on the machine, the option of saving DOC file is inactive, but you still can save a DSCN file and convert it on a machine with MS Office installed later. Use the Template field to point Docu Generator to a template to be used for the output document. Please see the next step for details. The Options pane allows controlling the following information inclusion to the output document: Save user actions – populate annotations with names of windows and controls clicked on; Show mouse position – show mouse pointer and highlight it with a red circle on screenshots; Show started application info – populate annotations with paths and command line arguments of applications run during recording; Show contents of edited fields – populate annotations with the contents of editable fields from captured windows and dialog boxes. 86 | P a g e PACE Suite 3.4.2 - User Manual Click the Save button to save the document. The document will be automatically opened in a default viewer, and Docu Generator will be closed. 3.10.7 Use Document Templates Docu Generator supports Microsoft Word (DOT/DOTX) and HTML/MHT templates to be used for document creation. To use a template, specify its file path in the “Save Results” window (see previous step). In order to mark a position where screenshots and comments are to be placed to, add the following textual placeholder into a template: [SCR] You can specify placeholder [SCR] in the existing table in a template. In this case the placeholder points to a cell where screenshots should start, while a column to the right of it will be populated with comments. If the placeholder is located outside a table, then a new table for screenshots and comments will be created. A Docu Generator-default table style will be used. If a placeholder is not found, screenshots and comments will be appended to the end of the template. You’ll be warned about this in the Save Results window: 87 | P a g e PACE Suite 3.4.2 - User Manual 4 References 4.1 More information and contact Product website http://pacesuite.com Support email [email protected] Support Portal http://pacesuite.com/support 4.2 PACE Suite in social and professional networks itninja.com/pace @pacesuite fb.com/pacesuite https://www.linkedin.com/groups/PACE-Suite-APS-community4765703 88 | P a g e