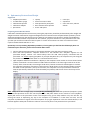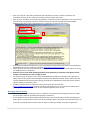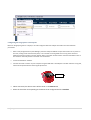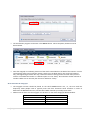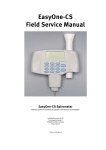
1
Project Viva
Early Teen (Age 12) In-Person Visit
Operations Manual
1|Page
Table of Contents
Section I. Introduction ......................................................................................................................... 4
Section II. Visit Scheduling .................................................................................................................... 5
a.
Early Teen (Age 12) Visit Types & Scheduling Options ................................................................... 5
b.
Scheduling Visits Using REDCap and Google Calendar................................................................... 7
c.
Proper Google Calendar Settings and Determining RA Availability .............................................. 12
d.
Proper Contact Log Notation ...................................................................................................... 14
e.
Visit Scheduling Scripts ............................................................................................................... 14
f.
Supporting Documents............................................................................................................... 19
e.
Scheduling and Conducting Travel Visits (>3 hours from Boston) ................................................ 20
Section III. Visit Preparation ................................................................................................................ 20
a.
Visit Confirmation ...................................................................................................................... 20
b.
Visit Folder Preparation.............................................................................................................. 25
c.
Meeting Participants for a Visit .................................................................................................. 26
d.
Post Visit Checklist ..................................................................................................................... 27
e.
Biospecimen Transport Protocol ................................................................................................ 29
f.
Sending Thank You Notes ........................................................................................................... 32
g.
Supporting Documents............................................................................................................... 32
a.
In-Person Visits .......................................................................................................................... 33
b.
Blood Visits ................................................................................................................................ 33
c.
Mailed Visits............................................................................................................................... 34
d.
Consent Form Scripts ................................................................................................................. 34
e.
Supporting Documents............................................................................................................... 38
Section V. Conducting the Visit – Child Portion ................................................................................... 39
a.
Phlebotomy Protocol & Script .................................................................................................... 39
b.
Biospecimen Protocol & Script ................................................................................................... 42
c.
Anthropometry Protocols and Scripts ......................................................................................... 48
d.
DXA Scan Protocol and Script ..................................................................................................... 62
e.
eNO Protocol and Script ............................................................................................................. 74
2|Page
f.
Blood Pressure Protocol and Script.................................................. Error! Bookmark not defined.
g.
Step Challenge Protocol and Script .............................................. Error! Bookmark not defined.80
h.
Spirometry Protocol and Script.................................................... Error! Bookmark not defined.84
i.
Questionnaire Protocol and Scripts ............................................................................................ 92
j.
Actigraphy and Accelerometry Protocol and Script ..................................................................... 94
Section VI. Conducting the Visit – Mom Portion ................................................................................ 108
a.
Mother Anthropometry Protocol and Scripts............................................................................ 108
b.
Questionnaires, Interview, Contact Information and Incentives................................................ 116
Section VII. Data Management ......................................................................................................... 122
a.
REDCap .................................................................................................................................... 122
b.
Paper Files................................................................................................................................ 122
Section VIII: Staff Training and Quality Control.................................................................................. 123
Additional Viva Protocols Pertaining to the Early Teen Visit: ............................................................. 124
3|Page
Section I. Introduction
This protocol is intended to outline the operational procedures for Project Viva’s Early Teen (Age 12) in-person
visit. This document includes an outline of the visit, as well as all protocols and scripts related to the visit. This
document does not include letters and forms related to the visit, but does make reference to them.
This in-person visit will be very similar to Viva’s Ages 3 and 7 in-person visits. 1630 participants are eligible for
the visit. Anyone not disenrolled from the study is eligible for the Early Teen visit. Our goal is to see 1120
mother-child pairs in-person and follow-up with another 280 by mail, for a total goal of 1400 Age 12 visits.
Visits preferably take place at the Kenmore HVMA site, but can be arranged at another location convenient for
the participant, such as their home or office within Massachusetts. Viva’s local travel visits will be to those
participants within a 3 hour driving radius of Boston. Driving radius for blood draws will be 1.5 hours from
Boston. Participants opting for a home visit will still be invited to our Kenmore office to complete the parts of
the visit we are unable to complete on the road. The maternal and early teen visit as well as the blood draw will
ideally take place at the same time. We can split the visit up if requested as long as there is a legal guardian
available to sign the early teen consent form at or before the time of the early teen visit, and if there will be an
adult present during the main visit.
Project Viva will continue to provide flexible scheduling options including early morning, evening, and weekend
appointment times. If the mother is no longer enrolled in the study, but the child is, the “key contact” will serve
as the point of contact for scheduling and providing data on the child, as applicable. No data on the key contact
will be collected, other than contact information.
We will likely not be able to see all participants when the child is exactly 12 years of age due to both staff and
participant scheduling. We therefore define the Early Teen visit to be any visit completed under this protocol.
Participants will become eligible when the child turns 11.5 years of age, and will continue to be eligible until the
visit is no longer being conducted, currently estimated to be July 2016. To avoid participant confusion on this
topic, we will simply refer to this visit as the “next in-person visit”.
Participants will be reimbursed a maximum of $185 in cash or check for their time. The amount they receive will
be based on the following completed visit components:
• $100 for the in-person visit
• $50 for the 7-day sleep and physical activity portions (to be mailed after we receive the equipment)
• $20 for travel reimbursement if they travel to the Kenmore location. They will not receive the $20 if the
visit is done at the participant’s home or if Viva provides a taxi voucher.
• $15 for the child blood draw
• Child participants will also receive a print out of their skeleton from the DXA scan, and a Viva T-shirt
along with a pair of scrubs to wear during the visit and take home after the visit is complete.
• Participants, who complete the visit by mail, will receive $20. $10 will be enclosed in each of the 1st
copies of the Early Teen Questionnaire for Parents and the Early Teen Questionnaire that are mailed
home to participants.
4|Page
Section II. Visit Scheduling
Project Viva participants will first be contacted via mail when the child turns 11.5 years of age to notify them of
the Age 12 visit. All contact with the participant, either via phone, email or mail will be recorded in the contact
log in REDCap. Contact logs will be managed and assigned to RAs by the Research Associate. The Research
Associate will also do spot checks on contact logs to make sure all follow-up and contact is compliant with our
protocol.
The initial contact and follow-up will take place as follows:
• Child turns 11.5 years of age:
o Age 12 To-Do will be triggered in REDCap and run by a work-study student. This To-Do will
create a label to mail the mother/key contact a letter notifying them it is time for the in-person
visit.
o After the To-Do has been run, the Research Associate will assign the contact log to RAs:
• One month later with no response:
o Postcard mailed to child by the RA assigned to the contact log
• Two weeks later with no response:
o RA begins phone follow-up. Follow-up will continue until the visit is scheduled/completed or
until the participant actively refuses the visit.
o RAs will contact participants no more than once every 7 days. A contact attempt is defined as
phone (all numbers on file), email or mail contact.
o The RA is permitted to call again within the 7 days only if directed to do so by either the
participant or another member of the household.
o If the RA is asked to not call back for a certain period of time (i.e. 2 months), he/she will note in
the contact log and abide by the participant’s wishes.
o After unsuccessfully being able to schedule the participant for one month of phone calls, the RA
will begin to contact the participant via email or mail, using IRB approved emails and letters.
o After 8 unsuccessful phone call or email scheduling attempts, the RA will send a text message to
those participants who have previously provided a cell phone number and permission to be
contacted on that number. The RA will use IRB approved language for the scheduling text
message.
a. Early Teen (Age 12) Visit Types & Scheduling Options
There are several types of Early Teen (Age 12) visits. These will be referenced in REDCap, the Google Calendar
and in day to day operations. These are listed in preferred order of completion.
1. FULL (Kenmore)
a. Visit that includes in-person visit components and biospecimen collection.
b. In Google Calendar a FULL visit should include both the visit and phleb calendars since a
phlebotomist is needed. If a phlebotomist is not available, the Kenmore HVMA lab can be used
during the following hours:
i. Weekdays: 8 am – 8 pm
ii. Saturday: 10 am – 5 pm
12 pm – 5 pm
iii. Sunday:
5|Page
c. No FULL visits should be scheduled after 1 pm due to the fasting blood draw.
2. NO BLOOD (Kenmore)
a. A visit that will take place at Kenmore, with no blood collection.
b. If the participant plans to participate in the blood collection, a separate BLOOD visit should be
scheduled at the participant’s home.
3. HOME (home or other convenient location)
a. An in-person visit that takes place at the participant’s home or another location convenient to
them.
b. Not all in-person components can be completed. We will offer to complete what we can at
home, and ask if the participant is willing to come to Kenmore to complete the other
components.
i. If the participant agrees we will schedule the additional components at Kenmore.
ii. If the participant is interested, but unsure, the contact log will remain open and we will
contact them no more than once per month to determine final interest and set up the
follow-up appointment if appropriate.
iii. If the participant refuses we will complete what we can, and the visit will be considered
complete.
4. BLOOD ONLY (Fasting morning home visit)
a. Scheduled if a participant has an afternoon NO BLOOD or HOME appointment.
b. A BLOOD ONLY visit seeks to collect fasting blood.
c. Some participants may be more willing to try the blood draw if it is scheduled after the inperson visit date to give the child a chance to get to know Viva and the RAs.
d. If the participant is unsure at the time of scheduling if the child will allow the blood draw it can
be discussed at the visit and scheduled for a later date. If this is the case, a NO BLOOD visit
should be scheduled so that we can collect what we can when we see the participant.
e. Phlebotomists can typically be at participant’s home as early as 7am.
f. No fasting blood draw should take place after 1 pm.
g. The visit usually takes around 20 minutes to complete. Make sure the participant has time
before the child goes to school, etc.
5. MAILED
a. A visit that involves filling out questionnaires and mailing them back to us, and participating in
the Age12 interview by phone.
b. This will include participants who live out of the area and local participants who do not wish to
complete an in-person visit.
6. Age 12 REFUSAL / DISENROLLMENT
a. If the participant refuses the MAILED visit, we will offer them the option of not completing this
visit. They will remain eligible for future participation. In this case the RA will complete the
enrollment forms indicating “Active Refusal” and close the contact log.
b. If the participant does not want to participate now or in the future, the RA will notify them that
his/her supervisor will be contacting them to complete the disenrollment process. The RA
6|Page
should be sure to alert the participant that we will need them to complete a form, due to
federal regulations, before they are actually disenrolled.
b. Scheduling Visits Using REDCap and Google Calendar
1. Login to REDCap using your username and password
(https://lnapp006.hphc.org:9080/redcap/index.php?action=myprojects).
2. Login to your Google Calendar account using your username and password (www.google.com/calendar).
Make sure all visit calendars are showing (that they are checked in the box in the lower left corner.)
3. After logging into REDCap, click on the “My Projects” tab (A), and then choose “Project Viva Contact
Logs” from your project list (B). [Note: there is a different REDCap contact log database for each visit.
You should choose the contact log database that corresponds to the visit that you are contacting the
participant about (e.g. Project Viva Contact Logs – Early Teen Visit).]
Step A
Step B
7|Page
4. Click on Data Entry on the left sidebar, under Data Collection (C).
5. This will take you to the data entry screen, where you will select
the record that you want to access and edit. There are 1791
records in the Early Teen Contact Log database. There is a contact
log for every participant who has not disenrolled at the time the
visit began (2670 - # of disenrolled participants = # of records). At
start of the Early Teen visit, 879 participants were disenrolled from
Project Viva, which means that there are 1791 contact logs for this
visit (2670 – 879 = 1791).
Step C
6. You can select the participant record (D) that you want to access either
by (i) entering the full study ID.
7.
You can also locate a record even if you don’t know the study ID by
searching a field in the record, such as mom’s first name (ii)
[Note: As of July 2013, this function is not working on our version of
REDCap. We may need to wait for a software upgrade.]
Step D (i)
Step D (ii)
8. Once you have located the record for the participant that you want to contact, you will see the event
grid for that participant. This lists all of the “events” for that particular visit, as well as the data collection
instruments (i.e. forms) associated with each event. Events are listed on the horizontal axis (as column
8|Page
headings), and instruments are listed on the vertical axis (as row headings). The “Participant
Information” form contains all of the contact and other key information for each participant, including
mom or key contact name, child name, child gender, child date of birth, address, phone numbers, and email address for key contact and child. This form is associated with the first (Visit Setup) event, but can
be accessed at any time.
9. Click on the buttons (which may be red, yellow, or green depending on the form status) to access the
forms for the participant whose ID is listed at the top of the grid (E).
Step E)
10. You will now see all of the contact and other key information for that participant. You may want to refer
to this form while accessing other forms in the database for this participant. To do this, you can open a
new tab in your browser, go to the REDCap site, and repeat steps A-D above to bring you to the event
grid for the same participant in your new tab. [Note: any changes that you make to the record and save
in one tab will be reflected immediately in all open tabs.]
11. Visit scheduling is a distinct visit event in the contact log database. This event includes forms to record
information on contact attempts as well as the information about visits that are scheduled for that
participant. The potential visits that can be scheduled for each participant include:
12. 1. Biospecimen Visit – this visit includes collection of a blood sample, and may also include collection of
urine and hair. The bio visit may be scheduled at the same time as the main visit, at a different time, or
not at all, but should always be recorded in the “Biospecimen Visit Information” form.
9|Page
13. 2. Main Visit – this refers to the study visit including all components except for biospecimen collection
(which may be scheduled at the same time, at a different time, or not at all). All information about the
main visit should be recorded in the Main Visit Information form.
14. 3. Extra Visit – participants will occasionally be scheduled for an “extra” visit to complete components of
the visit that could not be completed during the main visit. One common example might be when a
home visit is conducted and the participant agrees to come into the office for a DXA scan at another
time. The information for the DXA scan visit would be recorded on the “Extra Visit Information” form.
15. Most participants will not have an extra visit. This Extra Visit Information form is programmed with
branching logic. The Main Visit Information form includes this question: “Were any visit components
other than biospecimen collection scheduled for another time?” If the response is “No”, REDCap will not
automatically navigate to the Extra Visit Information form. If the response is “Yes”, the Extra Visit
Information form will be available once the Main Visit form is completed and saved.
16. Important: The Visit Information forms should always reflect the current scheduling status of that
participant’s visit. That means that the form can be changed if the visit status changes (e.g. from
“scheduled” to “to be rescheduled”). If the status changes, the form should be updated and the reason
for the update noted in the “Comments” section of the form (e.g. “Participant no-showed on 6/22/13;
visit status changed to “to be rescheduled”). Once the visit is completed, the status should be changed
to “Completed” and the form marked as “Unverified”. The Visit Information forms should be marked as
“Incomplete” until the visit has been completed. [Note: no one except the Project Manager or Data
Manager should ever mark a form as “Complete”. Once data entry for a particular form is complete, the
form should be marked as “unverified” for review by the PM or DM.]
10 | P a g e
Update status as needed
until visit is completed
Update details as needed
if visit is rescheduled or
assigned RAs change
Record details on why visit
information was updated
in Comments field
Mark form as “Unverified” once visit
is complete and no additional
updates will be made. Never mark a
form as “Complete!”
17. Enter Appointment into the Google Calendar
a. Click on the day and time you would like to schedule
b. Click edit event details
c. In the ‘What’ field enter visit information: Last 4 of the ID# - Mom/Child first names - visit type – zone (if
home visit), i.e.:
1. 0000 - Julie/Ringo – FULL
2. 0000 - Julie/Ringo – BLOOD ONLY– Zone 2
3. 0000 - Julie/Ringo – NO BLOOD
4. 0000 - Julie/Ringo – HOME – Zone 4
d. In the ‘When’ field make sure date, start time and duration are correct (duration for phleb appointments
should be entered as 1 hour (so they can be read on the screen), home visits as 1.5 hours and Kenmore
visits as 2.5 hours.
e. In the ‘Calendar’ field make sure you select the appropriate calendar.
f. Click Save.
11 | P a g e
18. Mail a reminder to the participant. The reminder should include:
a. A visit reminder with dates and times written in. *Cross out the reminder to fast if the child is not
completing a fasting blood draw.*
b. Directions to Kenmore. *Do not include the directions if the visit is taking place at the participant’s home.*
c. Medication list
19. Copy the event details from Google Calendar and send an email to all RA’s, Research Associates and the
Project Manager.
c. Proper Google Calendar Settings and Determining RA Availability
RAs will use the electronic contact log in REDCap to reach participants for scheduling. While the RA is on the
phone with the participant the Google Calendar should be opened and the RA should verify that there is
coverage available at the appropriate site. Calendars are available for each visit location.
Google Calendar access is managed by the Project Manager. She will be responsible for granting new staff
access and removing staff who are no longer involved in the study. Viva’s Field Supervisor will be responsible for
making sure we have adequate coverage for visits, and that all RAs are scheduled fairly.
1. Open Google Calendar by navigating to www.google.com/calendar and log in using your Google e-mail
address and the password. It is usually easiest to navigate if you view by “week.”
2. Identify the calendars you want to see. To make a calendar make sure it is shown in color (not grayed
out) in the “Other Calendars” box on the left hand side of the screen. The following are all of the Viva
calendars. It is generally easiest if you set your calendar colors to match.
Home Visit
Visit Room 1
Visit Room 2
Visit Room 3
Visit Room 4
Viva Phleb
Staff
Viva Training
Work Study
Visits that take place off site and involve more than biospecimen collection.
Visits that take place in Viva Visit Room 1, located in the Teaching Center. The RAs scheduled
in this block are available for late or home visits on that day.
th
Visits that take place in Viva Visit Room 2, located on the 5 floor across from the Teaching
Center. A conference room must also be reserved.
Visits that take place in conference rooms. A room must be reserved and noted in the
Google calendar and contact log.
Visits that take place in conference rooms. A room must be reserved and noted in the
Google calendar and contact log.
Visits that require a phlebotomist for biospecimen collection.
Staff events/meetings, such as days off, DACP holidays, meetings, etc.
Staff training events.
Work-study / Intern schedules
3. Determining Visit Availability:
a) Availabilty and time off for RAs and Phlebs that is outside of normal working hours of (8:30am –
5pm) will be listed in the “all day” boxes at the top of the screen. Visit blocks created by the
Field Supervisor will be placed in the calendar based on RA Coverage and Availability for all
months where we have a completed schedule and these time slots should then be followed as
closely as possible.
12 | P a g e
b) The Field Supervisor will assign RA’s to visit blocks as they are scheduled for the coming weeks.
The Primary RA (child RA) will be listed first and the Secondary RA (mom RA) will be listed
second.
1. The Primary RA is responsible for confirming the visit, preparing the folders, and
conducting the child portion.
2. The Secondary RA (Mom RA) is responsible for driving if it is a home visit and
conducting the mom portion.
c) Remember to allow for travel and lunch time when
scheduling multiple appointments in the same day.
d) Home BIO appointments should only be scheduled
on days there is phleb availability, indicated by the phleb calendar in the “all day” section at the
top of the day. The phleb is assumed to be available for visits from 7am – 10am for home blood
draws. If there is a request for an earlier visit, tentatively schedule it and email the phleb to
check availability. No fasting draws should be scheduled after 10am.
e) RAs scheduled 11:30am - 8pm are available for late or home visits. Late visits are any visit that
begins between 3pm and 6pm. Home visits are any visit located outside of HVMA (i.e, home,
office, grandparent’s house.) For standard scheduling we will drive up to 3 hours from Boston
(as estimated by Google maps). Travel visits (those more than 3 hours from Boston) will be
coordinated separately.
f) We will offer weekend home visits one weekend day per month. These visits should only be
scheduled if there are RAs in the home visit blocks listed in the ALL DAY section of a weekend
day. Otherwise, HOME visits must only be scheduled during the week.
g) Viva will make every attempt to fulfill a convenient appointment time requested by the
participant. Every visit is vital to the success of this project and every attempt should be made
to accommodate a participant’s request. If a participant wants to schedule an appointment
outside the normal coverage for that day:
1. Tentatively schedule the visit and let the participant know you will check if there is
coverage for that time. Put TENTATIVE before the ID number in Google Calendar and
be sure to record notes in REDCap.
2. Email the visit details to the Project Viva team, including the Project Manager.
3. RAs should respond to all when volunteering for a visit.
4. If there are volunteers, notify the participant the visit is confirmed and updated
Google Calendar and ADEPT as appropriate.
5. If there are no volunteers within 48 hours, email the Field Supervisor. The Field
Supervisor will determine if the visit needs to be rescheduled and will coordinate with
the RA who scheduled the visit.
h) If both VR1 and VR2 are booked and a participant is interested in a Kenmore Visit, look at
Google calendar and as long as there are RAs in the office, schedule the visit in VR3 or VR4.
Make sure to book conference rooms as needed. Before sending out the email to the group,
email the Lead Scheduling RA to assign RAs to the visit.
i) To reserve a conference room:
1. Navigate to the intranet:
https://intranet.hphc.org/portal/page?_pageid=1080,1&_dad=intranet&_schema=INT
RANET
13 | P a g e
2. Click on “Conference Room Scheduling” and choose the room you want to use.
3. Check availability. You will want to reserve the room 30 minutes before the visit start
time and allot 3 hours for the visit.
4. Write “Viva Visit” in the description.
5. Put the conference room into the “Where” section of the Google calendar event.
d. Proper Contact Log Notation
1. All times should be record using the 24 hour clock.
2. The following abbreviations can be used:
o NML: No message left
o LM: Left message
o NIS: Not in service (be sure to specify what number, H/W/O)
e. Visit Scheduling Scripts
The following script must be followed when scheduling. This ensures that all participants receive the same
information about the visit. Each and every visit is vital to the success of Project Viva. Every attempt should be
made to make the visit as convenient as possible for the participant. We can do the visit in parts, at their home,
whatever they need in order to feel like it will work for them. Ask about half days and school vacation days. If a
participant is too busy to schedule now, try to find out if there schedule will be better at another time (i.e. in
April ask if summer is better). Our visit set up is relatively flexible and we can be creative in the arrangement.
Early Teen Visit Scheduling Script
Hello, this is [RA] from Project Viva, may I please speak with [PART]?
Hi, this is [RA] from Project Viva. I’m calling to set up [CHILD’s] next in-person visit with us. Do you have a few
minutes now to discuss the visit?
IF NO: When would be a better time to call back?
Is this the best number to reach you at?
Thanks, I will try you then.
[IF REFUSES IN PERSON VISIT]
Would you be willing to complete a mailed only visit? This would involve a 15 minute phone interview
about you and your family’s health history and you and your child completing the two questionnaires
by mail or electronically. We will email you a link to the electronic questionnaires or mail the
questionnaires to you and your child directly along with $10 to thank each of you for your time.
IF WANTS TO DISENROLL:
We are sorry to hear that you would like to discontinue your and your child’s participation in Project
Viva. Because of Federal regulations regarding the protection of your private health information, you must
withdraw your consent in writing. We will need to have another member of our staff give you a call in the next
two weeks to get this paperwork process completed. Is there a best time to contact you?
IF YES:
14 | P a g e
[IF RESCHEDULING]: Do you remember the visit components?
[IF YES, SKIP TO INCENTIVE QUESTION. IF NO, CONTINUE BELOW.]
[FIRST TIME]: Great! This in-person visit is similar to what you may have done at ages 3 and 7 and
generally includes three parts: an in-person visit, a blood draw, and an activity monitor that your child will wear
at home for one week. We will reimburse you for your time just as we did at ages 3 and 7. We hope you will be
able to complete the in-person visit at our Kenmore HVMA location.
For the main portion of the visit, we will do several activities with [CHILD] and take some measurements
including his/her weight, height, waist, hip, and arm circumference, blood pressure, and skinfold measurements.
We will also ask your child to provide us a urine sample in a cup, obtain 8 nasal swabs (4 from each nostril), and
snip a small sample of hair about the thickness of a matchstick from the back of his/her head.
Similar to the age 7 visit, we will also measure your child’s breathing by having him/her blow into a clean
mouthpiece, take a scan called a DXA scan of his/her body to look at body composition and measure his/her
heart rate while performing a stepping activity. We will also ask [CHILD] to complete a questionnaire at the visit.
New to this visit is a week-long sleep and physical activity measurement which will be completed at home after
the visit is over. This will involve asking your child to wearing an activity monitor (Actigraph) on his/her wrist like
a watch. We will provide you with the equipment and a USPS mailer during the visit. We will show your child
how to wear the Actigraph and ask him/her to wear it for the following week. We will also ask you to return the
equipment to us in the USPS mailer after the week is over.
The blood collection part of the visit involves a fasting blood draw. For the blood draw we ask that your child be
fasting which means he/she cannot eat or drink anything other than water 8 hours before the visit. At the visit
we will draw less than 2 tablespoons of blood. After the blood draw we will offer your child a snack.
If you agree, we would also like to take some of these same measurements from you (for example your height,
weight, and waist circumference). We will also ask you to do a short interview about your family medical history
and fill out a questionnaire about your child’s daily behaviors and development.
Do you have any questions about the visit so far?
[IF RESCHEDULING]: Do you remember what you will receive as a thank you for your time?
[IF YES, SKIP NEXT PARAGRAPH. IF NO, CONTINUE BELOW.]
The in-person portion should take around two to two and a half hours to complete, and as a thank you for your
time we will give you $100 in cash for completing the in-person portion, $20 for travel reimbursement if you
come to our Kenmore office, and $15 for the blood draw and you will receive $50 when we receive the returned
physical activity monitor with the required amount of data. During the in-person visit, your child will also receive
a t-shirt and pair of scrubs to wear during the visit and keep, as well as a picture of his/her skeleton after he/she
does the body scan.
Our schedule is very flexible and includes early morning and weekend appointments at our Kenmore location.
We can also do the fasting blood draw at your home separate from the rest of the visit if that is easier for you.
What day works best for you to come to our Kenmore HVMA office?
15 | P a g e
[IF PART DOES NOT HAVE TRANSPORATION TO HVMA]
We would be happy to provide a cab voucher for you and [CHILD] to come to our Kenmore Harvard
Vanguard location. We would call a cab for you on the day of your scheduled visit. We would meet
you and the cab at the Kenmore Harvard Vanguard Clinic and give the voucher to the driver when you
arrive. When the visit is over, we will again call a cab for you, and will give the driver a voucher for
your return trip. If you choose this option we will not reimburse you $20 for travel. Would this work
for you?
[IF PART DOES NOT HAVE CHILDCARE]
You are welcome to bring other children with you. We just ask you also bring something to keep them
occupied while you and [CHILD] complete the visit.
[IF PART IS UNABLE/UNWILLING TO COME TO HVMA]
We are able to complete most of the visit at your home or another convenient place. If you live
outside of Massachusetts and plan to visit the area at a later time, let us know and we can schedule
around your trip. We will not reimburse you $20 for travel if we come to your home, but you will still
receive the other incentives. We are not be able to do the DXA scan of your child’s body composition,
or one of the breathing tests during home visits because the equipment isn’t portable, but you do have
the option of coming into our offices just to complete those at a later date if you wish. Would a home
visit work for you?
[IF YES]: Would you also be interested in scheduling a time to do the body scan and breathing test at
our Kenmore location at a later date?
[IF PART IS STILL HESISTANT]
It is very important to us and the research study that we see everyone in-person. Is there anything
that would make this visit more convenient for you?
Okay, so we’ll be meeting with you on [DAY], [DATE] at [TIME] at [LOCATION].
If you need to reschedule your appointment please call me so that we can find a more convenient time for you.
My direct line is 617-509-xxxx. If you can’t reach me, please call our study hotline at 1-800-598-4247, ext.
86067.
I will mail or email you a packet that includes a description of what will happen at the visit, our phone number, a
medication list for you to fill out before the visit and [SKIP FOR HOME VISITS] directions to the visit. Do you
have a preference if I mail or email you the packet? [CONFIRM ADDRESS OR EMAIL] Please give the completed
forms to the research assistant at your visit. We will be contacting you a day or two before your visit to remind
you that it’s approaching. How would you like to be reminded – by phone, email, or text message? [CONFIRM
NUMBER FOR PHONE CALL OR TEXT MESSAGE. DOCUMENT PREFERRED REMINDER METHOD IN REDCAP.]
We are almost done; I just have a few additional reminders for you.
1. We will be taking body measurements and it would be easiest if you wear or bring loose fitting clothing
to the visit. We will provide your child with a T-shirt and pair of scrubs he/she can wear during the visit
16 | P a g e
and bring home afterward. [If Child is Female - your daughter may be asked to either remove her bra or
to come to the visit wearing a sports bra or other soft cotton bra that can easily be maneuvered to
expose their shoulder blade during the subscapular skinfold measurement. It is also important that any
bra worn during the DXA scan does not contain any metal].
2. Does your child take asthma medication?
[IF YES]: We ask that he/she not take the asthma medication the day of the study visit unless he/she
has asthma symptoms or asthma exacerbation. This is so we can get the most accurate reading on
our breathing test. You can bring the medication with you to the visit and give it to him/her after the
breathing test.
[IF NO, MOVE ON]
3. To get the best reading for your body composition measurement, if possible we ask that you not
consume alcohol or participate in vigorous exercise 24 hrs before the visit.
4. [IF BLOOD DRAW SCHEDULED]: Please remember that [CHILD] should not eat or drink anything other
than water 8 hours before the visit. He/she can have water, and in fact if he/she is well hydrated it may
make the blood draw easier.
All of these instructions will also be in the packet we email/mail to you. Do you have any additional questions?
We look forward to seeing you and [CHILD] on [DAY], [DATE] at [TIME]. In the meantime, feel free to call us with
any questions or concerns about the visit. Thanks again your time!
Early Teen Visit Text Message Scheduling Script
"Hello [PART]. This is [RA] from Project Viva. We have been trying to reach you to schedule your child's next inperson visit with Project Viva. To schedule the visit, please call our study hotline at 1-800-598-2427, ext. 86067,
or email us at [email protected]. We look forward to hearing back from you! To maintain confidentiality,
do not share personal health information in text messages.”
Scheduling FAQs
Below are questions that frequently come up during scheduling. Please let your supervisor know if you are
commonly getting questions during scheduling and these will be updated.
1. How much longer is Project Viva going on for?
Project Viva will continue as long as we have funding and the support of Viva moms like you! Most of
our financial support comes from grants from the National Institutes of Health (NIH), and each grant
lasts for no more than 5 years. Every few years we apply for a new round of funding to continue the
study. The biggest rewards in studies like Project Viva come over the long term!
2. How many people are participating in Project Viva?
2,128 moms in Project Viva delivered a child who then became a Viva child, and almost 1700 are still
involved!
17 | P a g e
3. What are some of the research results?
We’ve already learned a lot from you and your child. Our results have been published in various medical
journals and publicized in the popular press, such as in the NY Times and NPR. Some highlights include
information about maternal nutritional status and childhood wheezing; weight-loss during pregnancy;
seafood consumption during pregnancy and outcomes on child growth and development; and other
information about pregnancy, breastfeeding, and nutrition during childhood. You can find a list of all of
our publications on our website.
4. I received a questionnaire in the mail a few months ago and was too busy to fill it out right away. Can
I still send in the questionnaire even if it is after the two week deadline?
We try to contact you as close to your Viva child’s birthday as possible. The two week deadline is a
gentle reminder that your participation is important to the study and we greatly appreciate your
responses. We understand that families are very busy, and we would still love to hear from you even if
it has been more than two weeks!
5. Can I enroll my other children?
Unfortunately with our current study design we cannot enroll your other children into Project Viva.
That's because some of Project Viva's main goals start with following your child even before birth! That's
how we can learn things like how a woman's diet during pregnancy affects the health of her child,
understand how stress in a woman's life influences her pregnancy, explore how infant nutrition shapes
children's growth and development, and examine how pregnancy nutrition, stress and hormone levels
influence the development of childhood obesity, asthma and allergies.
6. What is the purpose of:
a) the DXA scan? Is there radiation exposure?
The DXA is a scan used to measure body composition. We will ask your child to change into
loose fitting clothes and lay on an open table that slowly moves up and down. After they are
done they will receive a picture of their skeleton, which is most kids favorite part! The amount
of radiation they will receive is small. It is about the amount of radiation they would receive on
a flight from Boston to California!
b) Why do you take my blood? / urine? / hair?
In the blood, urine and hair samples we look for environmental and nutritional exposures.
7. Can we find out the results of tests that are done?
At your visit, you will receive a print out of your child’s weight and body composition, and are free to
write down height and other measurements if you wish. However, the results to other tests are used
for research rather than diagnostic purposes. If we find a measurement is greatly out of range, we will
let you know—but hope you understand that the purpose of Project Viva is strictly to obtain research
results.
Checklist after scheduling
1.
2.
3.
4.
5.
Put In-person visit into REDCap
Put Bio visit into REDCap
Put all comments into REDCap
Put In-person visit into Google Calendar
Put Bio visit into Google Calendar
18 | P a g e
6. Send-out mailed packet
7. Send e-mail that visit has been scheduled
f. Supporting Documents
1. Early Teen Welcome Letter
2. Early Teen Visit Reminder
19 | P a g e
3. Directions to the Visit
4. Medication List
e. Scheduling and Conducting Travel Visits (>3 hours from Boston)
This section will be completed and submitted as an amendment to the protocol at a later date.
Section III. Visit Preparation
a. Visit Confirmation
The Primary RA (Child RA) is responsible for confirming the visit through a phone call and email or text message,
if available. The RA will call all available numbers no more than 2 days prior to the visit to confirm. If an email
address is available the RA will also send an email confirmation. If the participant has agreed to text message
visit reminders, the RA will text the participant no more than 2 days prior to the visit to confirm. Record all visit
reminder attempts in REDCap.
Confirmation Phone Script
Hello, this is [RA] from Project Viva, may I please speak with [PART]?
I’m calling to confirm your and [CHILD’s] in-person visit with us on [DAY], [DATE] at [TIME] at [LOCATION]. We
very much appreciate your continued participation and are looking forward to seeing you.
There are a couple of things I would like to remind you about:
• First, if possible please do not to consume any alcohol or participate in vigorous exercise 24 hours prior
to the visit. This is so we can get the most accurate measurement of your body composition.
• [IF FASTING BLOOD DRAW]: And because [CHILD] will have a fasting blood draw completed at the visit,
we ask that he/she does not eat or drink anything other than water 8 hours before the visit. We will
have snacks available so [CHILD] can eat right after the blood draw.
• Try to remember to wear comfortable clothing because we will be taking multiple body measurements
on you and we will provide a Viva T-shirt and a pair of scrubs for [CHILD] to wear during the visit and
keep when we are done.
• If your child takes asthma medication, we ask that he/she not take the asthma medication the day of the
study visit unless he/she has asthma symptoms or asthma exacerbation. This is so we can get the best
reading on our breathing test. You can bring the medication with you to the visit and give it to him/her
after the breathing test.
• Lastly, as a thank you for your time we will give you $100 in cash, [IF NO CAB VOUCHER and KENMORE
VISIT] $20 for travel reimbursement, $15 for blood collection, and $50 when we receive the returned
physical activity monitor with the required amount of data. [CHILD] will also receive a picture of his/her
skeleton.
[FOR KENMORE VISITS] To get to the visit room you will:
o Take the North elevators to the 5th floor.
o When you step out of the elevators, walk to the registration desk and turn right.
o As you walk down the hall Surgical Specialties will be on your right, and then you will pass HPHC
Office of Sponsored Programs on your left-hand-side further down the hallway.
o We will be waiting at the end of that hallway. The door to our visit room will be on the righthand-side and has a sign above it that says “Project Viva Visit Room”.
o If you get to Visual Services, you’ve gone too far.
20 | P a g e
o
If you can’t find us please call me at 617-509-xxxx or our study hotline at 1-800-598-4247, ext.
86067
[IF PROVIDING A CAB VOUCHER]
We will call a cab for you the day of your visit. The cab will pick you up at home [OR SPECIFIED LOCATION] at
[TIME] and will bring you to the Kenmore Harvard Vanguard Clinic. We will meet you and the cab at the
entrance and will provide the driver with the voucher for your ride. After the visit, we will again call a cab for
you and will provide the driver with a voucher for your return trip.
Do you have any questions for me? If you are not able to make it to the visit, please call me at (617) 509-xxxx to
reschedule your appointment. We look forward to seeing you on [DATE] at [TIME]!
Confirmation Email
Hi, this is [RA] from Project Viva. I’m writing to confirm your and [CHILD’s] in-person visit with us on [DAY],
[DATE] at [TIME] at [LOCATION]. We very much appreciate your continued participation and we are looking
forward to seeing you then.
There are a couple of things I would like to remind you about:
• First, if possible please do not to consume any alcohol or participate in vigorous exercise 24 hours prior
to the visit. This is so we can get the most accurate measurement of your body composition.
• [IF FASTING BLOOD DRAW]: And because [CHILD] will have a fasting blood draw completed at the visit,
we ask that he/she does not eat or drink anything other than water 8 hours before the visit. We will
have snacks available so [CHILD] can eat right after the blood draw.
• Try to remember to wear comfortable clothing because we will be taking multiple body measurements
on you and we will provide a Viva T-shirt and a pair of scrubs for [CHILD] to wear during the visit and
keep when we are done.
• If your child takes asthma medication, we ask that he/she not take the asthma medication the day of the
study visit unless he/she has asthma symptoms or asthma exacerbation. This is so we can get the best
reading on our breathing test. You can bring the medication with you to the visit and give it to him/her
after the breathing test.
• Lastly, as a thank you for your time we will give you $100 in cash [IF NO CAB VOUCHER and KENMORE
VISIT] $20 for travel reimbursement, $15 for blood collection, and $50 when we receive the returned
physical activity monitor with the required amount of data. [CHILD] will also receive a picture of his/her
skeleton.
[FOR KENMORE VISITS] To get to the visit room you will:
o Take the North elevators to the 5th floor.
o When you step out of the elevators, walk to the registration desk and turn right.
o As you walk down the hall Surgical Specialties will be on your right, and then you will pass HPHC
Office of Sponsored Programs on your left-hand-side further down the hallway.
o We will be waiting at the end of that hallway. The door to our visit room will be on the righthand-side and has a sign above it that says “Project Viva Visit Room”.
o If you get to Visual Services, you’ve gone too far.
o If you can’t find us please call me at 617-509-xxxx or our study hotline at 1-800-598-4247, ext.
86067
21 | P a g e
[IF PROVIDING A CAB VOUCHER]
We will call a cab for you the day of your visit. The cab will pick you up at home [OR SPECIFIED LOCATION] at
[TIME] and will bring you to the Kenmore Harvard Vanguard Clinic. We will meet you and the cab at the
entrance and will provide the driver with the voucher for your ride. After the visit, we will again call a cab for
you and will provide the driver with a voucher for your return trip.
Do you have any questions for me? If you are not able to make it to the visit, please call me at (617) 509-xxxx to
reschedule your appointment. We look forward to seeing you on [DATE] at [TIME]!
Confirmation Text Message
Hi, this is [RA] from Project Viva. I’m texting to confirm your and [CHILD’s] in-person visit with us on [DAY],
[DATE] at [TIME] at [LOCATION]. Please respond to this message to either confirm or reschedule your
appointment. To maintain confidentiality, do not share personal health information in text messages.
Logging Reminder Calls in REDCap
Visit reminder calls are also a distinct even in the REDCap Contact Log Database. There are separate forms to
record the result of the main visit, biospecimen visit, and extra visit reminders.
22 | P a g e
When you call a participant to remind them about a visit, all information about the reminder call should be
recorded in the forms under the Visit Reminder Calls event. Before making a call or sending an e-mail or text
message, you should record all information about the reminder (date, time, your name, and the type of
reminder) on the form. The result of the reminder should also be recorded. Note: The “Result of Reminder
Attempt” should be updated as needed so that it reflects the “final” result of that reminder attempt, and the
reason for the update recorded in the “Comments” field for that reminder.
For example, you might call a participant and leave a message on their cell phone. You would indicate in the
“Result of Reminder Attempt” field that you are waiting for a response from the participant:
If the participant calls you back, you would update the “Result of Reminder 1 Attempt” to the “final” result, and
note in the Comments section when and why you updated that field:
23 | P a g e
Note: In this example, you have only contacted the participant once and therefore record all of this information
under one attempt. If the participant never called you back after you left a message and you tried calling them
again, you would leave the result of Reminder Attempt 1 as “Left message or sent e-mail, waiting for response”.
You would then record the information about the next contact under “Reminder Attempt 2” since you are
attempting to contact the participant a second time.
Cancelled / Rescheduled Visits
If a participant cancels or reschedules the visit, the visit is considered to be “cancelled.” Every effort should be
made to reschedule when you have a participant on the phone. The RA should update REDCap (write comments
in the Contact Log section and update the visit specific information), and write CANCELLED in the Google
calendar before the ID number. A CANCELLED visit is defined as any visit that we know will not take place prior
to the scheduled start time.
If the visit is rescheduled:
•
•
The visit scheduling protocol should be followed to document the new visit date.
The RA should send an email to all staff alerting them of both the cancelled and rescheduled visit dates.
24 | P a g e
•
If the folders have already been made, the sticky note on the participant’s folders should be updated
and the folders should be placed back in the “scheduled” section of the hanging folders.
If the visit is cancelled and not rescheduled:
•
•
The RA should send an email to the Rescheduling RA, Amy Louer, to alert her that visit cancelled.
If the folders have already been made, the sticky note should be removed from the folders, and the
folders should be placed in the “to be rescheduled” section of the hanging folders.
b. Visit Folder Preparation
After the visit is confirmed the primary RA should put together the folders. Folders are ideally made the day
before the visit. Copies of the most recent forms are stored in the form farm. Please notify a work-study
coordinator if the form farm is running low and a student will be assigned to make more copies. The forms in
the form farm are labeled and are in the order they should be included in the folders. If a work study student is
available, he/she may have pre-made folders which can be found on the window sill between the last set of Viva
cubes. If the visit is a reschedule, check the hanging folders to see if the visit folders have already been made.
The primary RA is still responsible for double checking the folders for accuracy.
Creating Folders
The following forms should be included in each folder in the following order. ID labels should be pulled from the
cabinets or printed from ADEPT. A label should be placed on each form, in the upper right hand corner. A label
should also be placed on the folder tabs. Each label for the Age 12 visit should be highlighted pink. The event,
date and RA fields should not be completed until after the visit in case the visit is cancelled or is a no show.
Mom Folder:
Early Teen Informed Consent and
Authorization Form
Early Teen Enrollment Form
Genetics Ancillary Study Child Informed
Consent and Authorization
Child Genetics Enrollment Form (CGEN)
Maternal Informed Consent and
Authorization
Maternal Enrollment Form (ME12)
Genetics Ancillary Study Maternal Informed
Consent and Authorization
Maternal Genetics Enrollment Form (GEN1)
Early Teen Anthropometry Form – Mom (MA12)
Early Teen Medical Information Sheet (MI12)
Early Teen Questionnaire for Parents (QU12)
Early Teen Interview (IN12)
Early Teen Visit Contact Info Sheet (CI12)
USPS Mailer
Child Folder:
Early Teen Anthropometry Form – Child (CA12)
Early Teen DXA Form (DX12)
Early Teen Blood Pressure Form (BP12)
Early Teen Step Challenge Form (ST12)
Early Teen Questionnaire (CQ12 – M/F)
Early Teen eNO Form (NO12)
Early Teen Spirometry Form (SP12)
Early Teen Sleep Journal (SJ12)
Child Blood Folder:
Early Teen Blood Collection Form (BL12)
Blood Delivery Log
Early Teen Urine Collection Form (PE12)
25 | P a g e
Urine Delivery Log
Early Teen Nasal Swab Collection Form (NS12)
Early Teen Hair Collection Form (HR12)
Early Teen Nasal Swab Delivery Log
Once the folders are prepped the RA should write on a small sticky note the information from Google calendar
about the visit, i.e. 0000 - Julie/Ringo – No Blood. The folders should then be rubber-banded together and
placed in Viva cabinet #4 in the 2nd drawer down in the “Scheduled” section.
c. Meeting Participants for a Visit
RAs are expected to be professional and courteous to all participants. Business casual attire is required when
conducting visits, regardless of HPHC work day attire.
For Kenmore visits
30 minutes before the scheduled start time of the visit, the RAs should collect the participant’s folders, the
incentive folder, and two pens, and head up to the visit room. The RAs should unlock the visit room, make sure
the room is clean and in order, calibrate equipment as needed and then sit outside of the main visit room on
the 5th floor to wait for the participant. When the participant arrives the RAs will greet them and introduce
themselves and direct the participant into the visit rooms for the visit to be conducted in privacy.
If a participant is 10 minutes late the RAs should check their voicemails and check the study hotline. If after 20
minutes, the participant has not arrived, the RAs should again check their voicemails and the hotline. If there
are no messages, the RA should login to ADEPT on the visit room computer and try calling the participant.
− If the participant answers and forgot about the visit, every attempt should be made to reschedule the
participant while she is on the phone.
− If the participant does not answer, the RA should leave a message with the visit room phone number
and wait 30 minutes after the scheduled visit start time.
If a participant has not shown up 1.5 hours after the expected visit start time she is considered to be “no show.”
If a participant calls to cancel the visit prior to the start time, the visit is considered to be “cancelled.” The RA
should update REDCap(write comments in the main visit section and change from “scheduled” to “to be
rescheduled”), and write NO SHOW or CANCELLED in the Google calendar before the ID number. The RA should
also send an email to all staff alerting them that visit was either a no show or cancelled. The participant’s
folders should be placed in the “To be Rescheduled” section of the hanging folders. It will be the responsibility
of the Rescheduling RA to continue contacting the participant to reschedule. CANCELLED and NO SHOW visits
are tracked separately and care should be taken when recording which it was.
For home visits
The RAs should plan to arrive at the participant’s home 5 minutes prior to the scheduled start time. If the RAs
anticipate they will be more than 5 minutes late, they should call and notify the participant. When arriving at
the house, the RAs should ring the doorbell before unloading the car so they can introduce themselves. They
should ask the participant where the best place in the house will be to set up the equipment, and let them know
if will take about 5-10 minutes to unload and set-up.
If a participant is not home when the RAs arrive they should check their voicemails, check the study hotline, and
check in with the office. If there are no messages, the RA should attempt to call the participant at all available
numbers. The RAs will wait in their car at the house for 20 minutes after the visit start time. If no one shows up,
the RAs will consider the visit a NO SHOW and return to the office.
26 | P a g e
When the RA s return to the office, the Primary RA should update REDCap(write comments in the main visit
section andchange from “scheduled” to “to be rescheduled”), and write NO SHOW in the Google calendar
before the ID number. The RA should also send an email to all staff alerting them that visit was a no show. The
participant’s folders should be placed in the “To be Rescheduled” section of the hanging folders. It will be the
responsibility of the Rescheduling RA to continue contacting the participant to reschedule. CANCELLED and NO
SHOW visits are tracked separately and care should be taken when recording which it was.
d. Post Visit Checklist
Following completion of a study visit (including a biospecimen visit, a main study visit, or an extra visit), the
secondary RA or phlebotomist should complete the following steps in REDCap:
1. The secondary RA should go to the Visit Information forms for all visits that were completed (Main Visit,
Biospecimen, Visit, and/or Extra Visit) and change the status from Scheduled to Completed. Check that all of
the information on the form accurately reflects what actually happened at the visit and make any necessary
updates. The Comments field on this form should not be used to record important information about the
participant that was discovered during the visit – this should instead be recorded in the Visit Completion
form (see below).
Once the form is reviewed for accuracy, updated if necessary, and indicates that the visit is completed, the
form should be marked as unverified and saved.
This should be done for all forms corresponding to visits that were completed.
•
•
•
•
•
If only a main visit was completed (no bio), the secondary RA should complete the Main Visit form
If only a bio visit was completed the phlebotomist assigned to that visit should complete the
Biospecimen Visit form
If both a main visit and a bio visit were completed at the same time (“full visit”), the secondary RA
should complete both the Main Visit and Biospecimen Visit forms
If an extra visit was completed, the RA who conducted the visit should complete the Extra Visit form
The Primary RA will be responsible for making sure all forms have been accurately updated in
RedCap after the visit is complete
2. The Secondary RA should go to the Participant Information form and make any necessary updates to the
participants’ contact information (this may also be done during the visit when verifying contact
information). This form should also be updated with any important information related to contacting the
participant that was discovered during the visit. This should be recorded in the “Important Participant
Information” field near the bottom of the form. Examples of information that might be recorded here
include:
“Participants’ house is in EAST Bridgewater - make sure to enter into GPS or it will take you to the wrong
address”
“Mom checks work e-mail address most frequently”
This field should be used to record any information that might be useful to know the next time someone
contacts this participant!!
27 | P a g e
3. Go to the Visit Completion form and check off all completed visit components (a). This form can be
updated as visits are completed. This form should also be used to record comments about the participant or
visit that might be useful to reference in the future (e.g. “child fainted during blood draw”; ““Participant noshowed twice before completing visit”)
Step 3a - Check off
visit components as
they are completed
Step 3b - Record important
info about the participant
here for future reference
Step 3c - Change to “Yes” once
Actigraph is returned
Step 3d - Mark as Unverified ONLY
once all components are complete.
DO NOT MARK AS COMPLETE!
4. Secondary RA will be responsible for scanning each consent form in after the visit is complete. To do so,
go to the Age 12 folder on the J drive named "Consent forms" (J:\vivafile\Age 12\Consent forms) where
the forms will be saved. Consent forms must be scanned double-sided.
Once forms have been scanned to your email follow the steps below:
• Go in to the "Consent form" folder within the Age 12 folder
• Create a new folder for the participant, naming it with the ID number, including the "C" (example:
C234567)
• Open the first consent form you scanned to your email
28 | P a g e
• Once you've clicked "File --> Save a Copy", find the new folder you just created for this participant
• Save the consent form, naming each form as follows:
o Early Teen Informed Consent and Authorization: EarlyTeen_234567.pdf
o Maternal Informed Consent and Authorization: MaternalConsent_234567.pdf
o Child Genetics & Epigenetics Ancillary Study: ChildGenetics_234567.pdf
o Maternal Genetics & Epigenetics Ancillary Study: MaternalGenetics_234567.pdf
Repeat these steps for each form.
After you've scanned all of the consent forms in, place each form in the bottom drawer of the hair sample
cabinet (behind Mia's desk), according to its color and the first initial of the mother's last name make sure that
all of the consent forms are signed and that selections have been made on the genetics/epigenetics forms
before you save them. If RA come across a participant who has two Early Teen Consent forms (if blood was
collected, for example). In this case, name the second document "EarlyTeen2_234567".
5. The Primary RA will be responsible for making sure all forms have been accurately updated in RedCap
after the visit was completed.
If the DXA scan was completed during the main visit, this component should also be checked off. “Actigraph”
should not be checked off until the Actigraph is received for that participant. Until the Actigraph is returned, the
form should be marked as “Incomplete” and the field that says “Is the Early Teen Visit complete for this
participant?” should be marked as “No”. Once the RA recording receipt of the Actigraph has marked the
Actigraph component as complete and verified that there are no other components still to be scheduled or
completed, that RA can indicate that the Early Teen Visit is complete (3c) and mark the form as Unverified (3d).
The PM/DM will then review all Early Teen Visit forms for this participant and “close” the visit once all forms are
verified.
e. Biospecimen Transport Protocol
Transporting Blood to the Channing Laboratory
Blood samples need to be delivered to the Channing lab on the day of the draw (with the exception of Sundays).
The Secondary RA is responsible for ensuring that samples are transported according to the procedures outlined
below.
Monday-Friday:
Samples should be transported to the Channing lab as soon as possible after collection. The phlebotomist or
will collect biospecimen samples (purple top tube, green top tube and gray top tube in ice slurry) and put them
in a Viva cooler with an ice pack. The phlebotomist or RA will deliver the cooler and delivery logs to the
Channing lab. Upon arrival at the Channing lab, the RA will put the samples in the refrigerator and clip the
delivery logs to the door. The gray-top tube should stay in the bottle containing the ice slurry. Please keep in
mind that samples need to be processed at the lab within 24 hours of collection. Samples collected in the
29 | P a g e
morning should be dropped off by 1pm in order to give the technicians time to process them that day. Samples
collected later in the day can be processed the next morning if needed, but should still be dropped off as soon as
possible.
*Note: If there are no blood collections scheduled for a Saturday, all blood collections from that Friday should
be dropped off by 1pm.
Saturdays:
All samples must be delivered before 1pm. On Thursday, the PM will email Roxanne Kelly
([email protected]) to confirm that there will be blood samples to deliver that Saturday.
Saturday Channing deliveries are ONLY for blood. Urine may also be dropped off if there are also blood
samples, but if there will not be blood on Saturday, Roxanne must be notified.
The secondary RA (the one conducting the mom portion of the visit) is responsible for coordinating the blood
transport and notification of cancelled blood drop-offs.
If blood visits are cancelled on the day of the visit or the participant does not show up, the secondary RA should
immediately:
• Call the Channing lab (617-732-5888) and leave a voicemail if no one answers. Let them know that there
will not be a blood drop-off that day.
• Call the Channing tech’s cell phone number (this will be provided on Friday by the PM) and let the tech
know that there will not be a blood drop-off that day.
If visits are conducted as scheduled:
The Mom RA packet will contain a reminder notice to check with the primary RA at the end of the mom portion
of the visit to see if blood was collected from the child as scheduled. If not, the following steps must be taken
immediately:
• Call the Channing lab (617-732-5888) and leave a voicemail if no one answers. Let them know that there
will not be a blood drop-off that day.
• Call the Channing tech’s cell phone number (this will be provided on Friday by the PM) and let the tech
know that there will not be a blood drop-off that day.
If blood is successfully collected at the visit, the secondary RA is responsible for ensuring that blood and urine
specimens are delivered to the Channing lab by 1pm. If there are multiple RAs conducting visits, a delivery RA
will be scheduled to drop off the blood samples. It is the responsibility of the secondary RA to make sure that
this happens. After confirming that blood was collected, the secondary RA should call the delivery RA and let her
know that the samples are ready for immediate transport.
Blood samples should be transported to Channing as early as possible. If blood will only be collected during the
early morning visit, the secondary RA for that visit should coordinate transport of blood as soon as the mom
portion of that visit is completed.
The security guard at the Channing lab will let the RA into Room 610 to deliver the samples. Remember to bring
your HPHC ID and signed in if asked.
30 | P a g e
Sundays:
The Channing lab will not be open to process samples on Sunday so any biospecimen samples collected on
Sunday should be stored in the HVMA lab for delivery on Monday morning by 10am.
Transporting Urine to the Channing Laboratory
Urine samples should be delivered within 48 hours of collection. The secondary RA is responsible for
coordinating delivery of urine samples.
General Considerations for Scheduling and Biospecimen Drop-Off
The Channing lab staff are busy, and in the case of Saturdays they will only be working in order to process Viva
samples. Please be considerate of their time and inform them of anything that may affect their schedule as
soon as you are aware of it. This includes:
•
•
Day-of visit cancellations and no-shows (the phlebotomist or secondary RA should notify the Channing
lab and scheduled tech of this as soon as they know, especially on Saturdays).
Delayed blood collections or drop-offs (i.e. participant is late or visit takes longer than expected)
o The drop-off cutoff time is 1pm. If there are extenuating circumstances necessitating a later
drop-off time, this should be communicated immediately. This should be a rare exception.
If you schedule a home visit with a blood collection and long travel time, please inform
the PM at the time of scheduling.
If you are conducting a visit and are concerned that you might not make the 1pm cutoff,
Roxanne or the scheduled tech (for Saturday visits) should be notified.
o Blood samples will not be accepted at the Channing lab after 4pm.
Transporting Nasal Swabs to the Baccarelli Lab at Harvard School of Public Health
Nasal Swabs should be transported to the lab as often as trips are made to Channing laboratory if there are
samples sitting in our fridge and freezer ready for transport. Nasal Swab tubes should be sorted in number order
by date of the visit. There is a numbered grid in the bottom of each nasal swab tube box to assist in organization.
Any RA transporting samples must verify that they have all delivery logs for each tube in the box, and that the
tubes are in date order prior to departing HVMA for the lab.
Monday-Friday:
The lab is only open Monday-Friday. Samples may only be transported on weekdays. Nasal swabs must be
transported in the frozen cooler and packed on ice. The RA will deliver the cooler and delivery logs to the
Baccarelli Lab (665 Huntington Avenue Building 1, Room B14). The RA must have their HPHC ID visable to the
security guard as you enter Harvard School of Public Health. RA’s will transport nasal swab samples on a
rotating basis, but samples can be taken over as often as blood and urine are transported to Channing as long as
there are transport boxes available.
DNA tubes:
Are deposited in the Viva bin stored in the DNA freezer outside of the lab.
RNA tubes:
Are deposited in the Viva bin located within the fridge on just as you enter the lab.
31 | P a g e
**Note: Lab managers at the Baccarelli lab will leave empty transport boxes on the top of the DNA freezer
outside the lab. Be sure to retrieve any empty boxes that are waiting for you each time you drop of samples.
Notification of Delivery:
When the delivery RA returns to DPM, they should send an e-mail confirmation to Kasey Brennan
[email protected] and CC the Viva Field Supervisor to confirm delivery of all samples including the
Delivery Date, and Courier’s initials as well as each sample’s Study ID, DOB, Collection Date, # RNA tubes, and #
DNA tubes. A Spreadsheet has been saved in J:\vivafile\Age 12\VISIT MATERIALS\Biospecimen Delivery Logs for
your convenience.
f. Sending Thank You Notes
Thank you letters will be sent to participants once Actigraphs are received in the mail.
g. Supporting Documents
1. Early Teen Enrollment Form (CE12)
2. Maternal Enrollment Form (ME12)
3. Genetics Ancillary Study Child Informed
Consent and Authorization
4. Child Genetics Enrollment Form (CGEN)
5. Genetics Ancillary Study Maternal Informed
Consent and Authorization
6. Maternal Genetics Enrollment Form (GEN1)
7. Early Teen Anthropometry Form – Mom (MA12)
8. Early Teen Medical Information Sheet (MI12)
9. Early Teen Questionnaire for Parents (QU12)
10. Early Teen Interview (IN12)
11. Early Teen Visit Contact Info Sheet (CI12)
12. Early Teen Anthropometry Form – Child (CA12)
13. Early Teen Urine Collection Form (PE12)
32 | P a g e
14.
15.
16.
17.
18.
19.
20.
21.
22.
23.
24.
25.
26.
27.
28.
Urine Delivery Log
Early Teen Nasal Swab Collection Form
Early Teen Nasal Swab Delivery Log
Early Teen Hair Collection Form (HR12)
Early Teen DXA Form (DX12)
Early Teen Blood Pressure Form (BP12)
Early Teen Step Challenge Form (ST12)
Early Teen Questionnaire (CQ12 – M/F)
Early Teen eNO Form (NO12)
Early Teen Spirometry Form (SP12)
Early Teen Sleep Journal (SJ12)
Actigraph Handout
Early Teen Blood Collection Form (BL12)
Blood Delivery Log
Early Teen Thank You Letter
Section IV. Consent
Prior to beginning any part of the Age 12 visit written informed consent will be obtained from all Project Viva
mothers (or legal guardians), and written assent will be obtained from children. During the consenting process
the mother/guardian or child can refuse any portion of the visit. The mother or child can also verbally decline
any portion of the visit after the visit has begun.
a. In-Person Visits
Mom participants who complete a full in-person visit will be presented with both a Maternal and an Early Teen
Informed Consent and Authorization. Once the mother/guardian has given her consent for their child’s
participation, the Primary RA will review what will happen during the visit and the risks with the child and ask if
he/she has any questions. If the child refuses or has questions, we will consult the mother/guardian. If the child
does not want to do a specific part of the visit we will not ask the child to complete that portion and will strike it
from the consent and have the mother/guardian initial. If the child agrees with the mother/guardian, the child
will be asked to sign the Early Teen Informed Consent and Authorization below the mother/guardian. The
Secondary RA will have a copy of each form, and will provide a copy to the mother/guardian and to review as
the Secondary RA walks through it. The RAs will follow the consent and authorization scripts for each.
The Secondary RA will administer the consent forms to the mother and child in the following order:
• Early Teen Informed Consent and Authorization
• Genetics Ancillary Study Consents for Mom and Child
• Maternal Informed Consent and Authorization
Once the Secondary RA obtains Child Consent from the mother/guardian, the child will be asked if they have
questions or concerns about the visit. If the mother/guardian or child declines to give consent for a particular
aspect of the visit, the RA will put a single line through that part of the visit description. Both the RA and the
mother/guardian or child will initial next to the strikethrough. Once the consent form script has been
completed the RA, the mother/guardian and child will print, sign and date both copies. One copy will go home
with the family and the other copy will remain in the visit folder to be filed later. When completing the early
teen enrollment form, the RA will take care to note anything crossed out on the consent form, and will be sure
to also fill out the blood enrollment form.
b. Blood Visits
Participants may prefer to complete the blood draw at a separate time from the main in-person visit. The
participant will be presented with an Early Teen Informed Consent and Authorization at the time of the blood
draw. If the blood draw takes place prior to the in person visit, the RA/Phlebotomist will take care to note the
portions of the consent relating to the blood draw and inform the participant that the remaining parts of the
visit will take place when participants come in for their in-person visit. Alternatively, the participant may decide
to schedule a blood draw after they have come in for their in person visit, in this instance they will be consented
for the blood draw during their in-person visit, and the RA/Phlebotomist will bring that consent form to the
blood draw at a later date. The RA will also fill in the Blood Enrollment form accordingly.
33 | P a g e
c. Mailed Visits
Participants of mailed visits will be mailed a single mailed visit consent form. The mailed visit letter asks
participants to read, sign and return one copy of the consent form with the mailed visit materials. Instructions
on how to strikethrough and refuse any part of the visit are also included. When completing the enrollment
form, the RA will take care to note anything crossed out on the consent form.
In the case we do not received the consent form, we will conduct follow-up for the consent form. However, if
we never receive the consent form we will determine that consent is implied for any forms that were returned,
or interviews that were completed over the phone. We will not have consent to obtain information from
medical records unless the consent form is signed, returned.
d. Consent Form Scripts
Introduction Script
Thank you for taking the time to meet with us today and for your continued participation in Project Viva. Before
we begin the visit, we need to go over the consent forms. Here are copies of the consent forms for you to follow
along with. We’ll start with the ...
Early Teen Informed Consent and Authorization Form Script
If you agree, today we would like to:
1. Measure your child’s:
a. Height while standing and sitting.
b. Weight and body composition. For body composition we will ask your child to stand on a special
scale (bioimpedance scale). Your child should not stand on this scale if he/she has a pacemaker.
c. Upper arm, waist and hip circumferences using a measuring tape.
d. Amount of fat on the arm and back using a pair of tongs (calipers).
e. Blood pressure using an automated blood pressure machine.
f. Body composition using a dual-energy x-ray absorptiometry machine (DXA). We will ask your
child to lie down on the DXA bed, and lie very still while breathing normally. Next, the DXA
scanner will pass over the bed without touching your child.
2. Collect a urine sample, 8 nasal swabs (4 swabs of each nostril) and snip a small, full-length sample of
hair (about the thickness of a match stick) from the back of your child’s head.
3. Do a step test. We will measure your child’s heart rate while he or she steps up and down on a sturdy
step for three minutes.
4. Ask your child to complete a 20-minute questionnaire about his/her health, home environment,
development and behavior.
5. Do a few breathing tests that involve your child breathing out into a clean mouthpiece. We will also
ask your child to inhale 2 puffs of a medicine, ProAir (a bronchodilator), from an inhaler. After
inhaling this medication your child will repeat one of the breathing tests.
6. Ask your child to wear an Actigraph, a device worn like a wristwatch that will measure sleep and
physical activity, for 7-days at home. Your child will also keep a sleep journal for this 7-day period.
7. Collect information from your child’s outpatient and hospital medical records and insurance claims
from birth through the end of the study, so that we may include factors related to your child’s
physical and behavioral health history in our research.
During the blood draw:
• A trained phlebotomist will collect less than 2 tablespoons of blood from your child. Your child has the
option to use a numbing cream before the blood draw, which may ease the discomfort of the needlestick.
34 | P a g e
The rest of the consent form is very similar to what you have seen in the past. There are just a few things I want
to go over with you.
[POINTING TO RISKS AND DISCOMFORTS]
The nasal swabs may cause mild discomfort or a tickling sensation in your child’s nose. Nosebleeds are rare with
the type of nasal swabbing we do, as we avoid contact with the septum (the central wall between the left and
right nostrils), which is the part of the nose that is most sensitive to bleeding.
The DXA scan uses radiation to take an image of your child’s body composition. The amount of radiation from a
DXA scan is very small —only a fraction of a standard chest x-ray. DXA gives about the amount of radiation you
would get by flying from Boston to California. There is no evidence about the risk to developing reproductive
organs from the small amount of radiation produced by a DXA scan, although any amount of radiation
exposure has the potential to cause damage. For safety purposes, we do not perform DXA scans on people who
have a pacemaker, have had an X-ray with contrast dye in the past week, or who may be pregnant. As with any
part of the visit, your child does not have to do the DXA scan if you or your child are not comfortable with it.
The breathing tests may make your child short of breath or feel mildly uncomfortable. Your child may also feel
shaky or like his/her heart is racing for a few minutes after receiving the ProAir inhaler. ProAir has been
associated with very rare side effects including irregular heartbeat (arrhythmia), high blood pressure
(hypertension), tremor, nausea, flushing, rash, cough, dizziness, and headache. In case they do occur we have
Project Viva physicians on call to answer any questions or concerns you may have. The peak effect of onset of
ProAir is not until 25 minutes after its administration, and the effects of the ProAir administered at the visit may
be felt hours after the session is completed.
There are also some risks and discomforts associated with the blood draw portion of the visit. You or your child
may feel anxious during your child’s blood draw. Rarely after drawing blood, the vein in which the needle has
been inserted to draw blood may become sore and red. The needlestick may sting. Your child may develop a
temporary "black and blue mark." Rarely, a child may feel dizzy or faint. The numbing cream has few associated
side effects, including redness and/or swelling, whitening of the skin, and abnormal sensation, all around the site
of application. The area to which the cream is applied may be numb for up to 4 hours after application. Use of
this cream is optional – your child may complete the visit and the blood draw without electing to use the cream.
[POINTING TO WHAT HAPPENS IF I DECIDE NOT TO TAKE PART IN THIS STUDY]
Your participation in Project Viva is voluntary. If you chose to withdraw from the study at any time we ask that you send
a letter to the Principal Investigator Dr. Matthew Gillman. His contact information is listed here.
[POINTING TO PHI SECTION]
This section describes the type of information we store in your research file. We store all identifying information in
locked files separately from the other information we collect, and as always we take every measure to ensure that your
information is kept strictly confidential.
Please take a moment to read through the consent form carefully, and let me know if you have any questions. If there is
a part of the study you do not want to complete please draw a line through it and initial in the margin.
35 | P a g e
Do you have any questions?
Please print your name, sign and date on the last page of both copies. I’ll take one copy for our records and you
can keep the other copy for your records.
Maternal Informed Consent and Authorization Form Script
If you agree, we'd also like to:
1. Measure your height, weight, waist circumference and body composition. For body composition we will
ask you to stand on a special scale (bioimpedance scale). You should not stand on this scale if you have a
pacemaker.
2. Complete an interview about your health and your family’s health.
3. Complete a 20-minute questionnaire about your health, your child’s health and your home.
We are also asking for your permission to continue to Collect information from your outpatient and hospital
medical records and insurance claims from 3 months prior to the pregnancy of your Project Viva child through
the end of the study, so that we may include factors related to your physical, reproductive and behavioral health
history in our research
The rest of the consent form is very similar to what you have seen in the past. There are just a few things I want
to go over with you.
[POINTING TO RISKS AND DISCOMFORTS]
Some of the questions we ask you may be sensitive in nature, but you are not required to answer anything that makes
you uncomfortable.
[POINTING TO WHAT HAPPENS IF I DECIDE NOT TO TAKE PART IN THIS STUDY]
Your participation in Project Viva is voluntary. If you chose to withdraw from the study at any time we ask that you send
a letter to the Principal Investigator Dr. Matthew Gillman. His contact information is listed here.
[POINTING TO PHI SECTION]
This section describes the type of information we store in your research file. We store all identifying information in
locked files separately from the other information we collect, and as always we take every measure to ensure that your
information is kept strictly confidential.
Please take a moment to read through the consent form carefully, and let me know if you have any questions. If there is
a part of the study you do not want to complete please draw a line through it and initial in the margin.
Do you have any questions?
Please print your name, sign and date on the last page of both copies. I’ll take one copy for our records and you
can keep the other copy for your records.
Maternal and Child Genetics Ancillary Study Informed Consent and Authorization Form Scripts
This next consent form(s) are to invite you and/or [CHILD’S NAME] to participate in an additional sub-study of
Project Viva. We would like to do genetic analyses on the biosamples that we have collected from you and/or
36 | P a g e
[CHILD’S NAME] in the past as well as any biospecimen samples we may collect in the future. We believe that the
combination of these biospecimen samples and other information collected through Project Viva will offer a
unique opportunity for research. For example, Project Viva could examine genetic material for certain gene
patterns or variations related to development of asthma, the origins of high blood pressure, growth patterns,
and other health conditions. Participation in this substudy does not require any additional effort or blood draws
on your part and is voluntary.
Project Viva is also interested in signals inside cells called epigenetics (Iiterally “on the genes”). These epigenetic
signals tell your child’s body which genes to turn on and off at different times, but they do not change the actual
genes. If genes are like the body’s “hardware” then epigenetics is like the “software.” We may analyze
epigenetics in samples collected at this and other study visits.
Unlike genetic sequence, which is fixed for any individual over his/her lifespan and is generally the same in every
cell of the body, epigenetic signals change over time, even over hours, with diet, stress and environment. Since
epigenetic markers change so frequently within individuals, they cannot identify you or your child. Epigenetic
markers do not determine risks for any specific diseases, or at least not any more than do other modifiable
characteristics like weight or cholesterol level.
[RA POINTS TO THE OPTIONS FOR CONSENT ON PAGE 4] There are 2 different levels of participation. The first
section refers to epigenetic study and allows you to select whether or not you would like to allow us to use
biosamples from you or your child for epigenetic study.
The second section refers to genetic study and allows us to use genetic material from you to look at all or some
of the following medical conditions. Even if you, or your child, do not have the conditions listed here your genetic
information may help answer important questions about those conditions. If you do not want Project Viva to use
your genetic material for certain conditions you can just check off either yes or no for each item. The only
difference between the consent form for you and for [CHILD’S NAME] is that for you we are also interested in
looking at length of pregnancy.
The rest of the consent is the same as the ones you just signed. I just want to remind you that this is completely
confidential. No information will ever be shared with insurance companies or employers and we even have a
confidentiality certificate that prevents disclosure of your information, even by a court subpoena. [RA POINTS TO
“How will my genetic information be protected?” and “How will you protect my Privacy?” SECTIONS ON PAGE 2]
I’ll let you read this over and let me know if you have any questions. I have two copies of the form, one for you
and one for me. Please sign and date in the spaces provided on the last page of both copies. I’ll take one copy for
our records and the other copy is for your records.
FAQs
•
•
•
Types of things Viva may look at:
o Learn about how genes from both mothers and children metabolize nutrients like vitamin D and
how this affects the risk of asthma in children.
o Investigate the influence maternal diet has on gene function and how this relates to how fast a
child gains weight.
o Study genes that relate to higher and lower birth weight or blood pressure.
Project Viva will not use your genetic information for paternity tests or cloning.
The tests we perform are for research purposes only and we will not provide individual results.
37 | P a g e
•
•
Health insurance companies and group health plans may not request your genetic information that we
get from this research.
If a participant has questions you are unable to answer, tell them that you will have a Viva investigator
contact them to explain further. Then alert your supervisor of this after the visit and make a note in the
contact log.
e.
Supporting Documents
1.
2.
3.
4.
Early Teen Informed Consent and Authorization
Maternal Informed Consent and Authorization
Genetics Ancillary Study Maternal Informed Consent and Authorization
Genetics Ancillary Study Child Informed Consent and Authorization
38 | P a g e
Section V. Conducting the Visit – Child Portion
Project Viva’s in-person visit will be composed of the following mom and child components. Visit components
are listed in ideal order of completion. Note that not all visit components can take place at home.
The Early Teen (Age 12) visit has the following components and questionnaires. If the following order is not
possible the RA should take note of the following guidelines:
• Blood pressure cannot be done after the step test or spirometry.
• If there is limited time the RA should conduct the Anthropometry, DXA and eNO if possible. All other
visit components can be completed at a home visit.
In Person Visit Components
Blood Draw – 3 tubes + RNA tube
Urine & Hair Biospecimen Collection
Nasal Swab
Anthropometry – Height, Sitting Height, Weight,
Bioimpedance, Skinfolds, MUAC, Waist & Hip
DXA Body Scan
eNO
Blood Pressure
Step Test
Spirometry
7-day Wrist Actigraphy and Accelerometry
Questionnaires
Child Questionnaire
Sleep Journal
Location
Kenmore or Home
Kenmore or Home
Kenmore Only
Kenmore or Home
Kenmore Only
Kenmore Only
Kenmore or Home
Kenmore or Home
Kenmore or Home
Kenmore or Home
Location
All
All
a. Phlebotomy Protocol & Script
Introduction
During the Early Teen visit we will collect less than 2 tablespoons of blood from the child. The phlebotomist will
be sure to use standard universal precautions to minimize the risk of exposure to blood. This includes the use of
protective barriers such as medical gloves. Gloves should be changed and disposed after contact with the
participant. The phlebotomist will use a sterile retractable butterfly needle that minimizes the risk of accidental
injury to the phlebotomist. Hands or other skin surfaces should be washed immediately if contaminated with
blood or other bodily fluids.
The phlebotomist will maintain a good rapport with the child throughout the blood draw to keep the child at
ease. The phlebotomist should calmly explain that they will be taking 4 tubes of blood and answer any other
question the child may have prior to commencing the blood draw. The phlebotomist will be sure to follow
protocols and scripts. If the child elects to use EMLA Cream (numbing cream) for the blood draw, the
phlebotomist will explain that the cream will numb the area of the arm where blood will be collected from. The
phlebotomist will monitor the application site for any changes in skin color or signs of irritation. During the
blood draw the phlebotomist will watch and address any sign of distress in the child. If helpful the phlebotomist
can recruit the mother for support and encouragement during the procedure.
39 | P a g e
Protocol
If the child is fasting, the blood draw should take place as soon as possible in order to allow the child to snack.
If the child is not fasting try to schedule a time for a home blood draw. If it is not possible to schedule another
blood draw because of scheduling conflicts or the participant refuses draw the blood but disregard the grey
tube. If the child elects to use EMLA cream, the cream should be applied to the needlestick site as soon as
possible after consent in order for the cream to reach its peak effect.
For child assent to be established the Phlebotomist/RA will talk to the child about what will take place. If the
child demonstrates concerns the Phlebotomist/RA will take the time necessary to alleviate fear and encourage
the draw. If the child becomes distraught and refuses the draw, the Phlebotomist/RA will mark this on the BL12
and move onto the next part of the visit protocol. (If after the visit is completed and the RA feels the child is
more comfortable, ask if the child would give the blood draw another try, schedule a home visit of attempt a
non fasting draw right there.)
If the child agrees the Phlebotomist will proceed to palpate for the best vein in the antecubital region, the region
of the arm in front of the elbow. If there is not a palatable vein ask the child for permission to try on another
part of the arm. Do not draw from the hand unless certain that the child is comfortable and the phlebotomist
feels confident in their ability to get a sample for that area.
Tips for a difficult stick:
1) Make sure to keep the child calm and build a good rapport with him or her. Being scared causes
vasoconstriction, smaller veins.
2) Stop to let the child drink some water. More liquid builds up blood volume; larger veins
3) Try the left arm it’s closest to the heart and should have a slightly higher blood volume than the right.
More blood larger veins.
4) Put the tourniquet on and let the arm dangle below the heart for a 10 seconds, bring it back up to a flat
surface and continue to palpate for veins. Gravity will bring more blood to the hand and enlarge the
veins. Never leave the tourniquet on for more than a minute a consecutive minute.
5) Have them pump there fist or wiggle their fingers like they are playing the piano. This action requires
more blood to travel to the area; larger veins.
6) Use a hot pack if one is available. Heat causes vasodilatation; larger veins.
Blood tubes should be drawn in the following order: Purple top, Green top, Gray top, RNA Tube. If the child is
not fasting, phlebotomist should not draw a gray-topped tube. The RA should make sure to fill the green top
and purple top tubes at least 3 quarters of the way before continuing to the next tube in the order. This is the
volume necessary for storage. The grey tube will only fill until the suction stops (around half way mark). It will
not fill to the top. All three tubes should be gently inverted 4-6 times .If phlebotomist is unable to get the blood
on the first try, he/she should only conduct a maximum of two more sticks if the child is willing before deeming
the draw unsuccessful (3 in total). Each blood tube should be labeled and inserted into a foam sleeve and
placed into a biospecimen bag. Remember to write the child date of birth on the label, as well as the date, RA
initials and the name of the visit. All this information should also be recorded on the blood collection form. The
second RA can begin filling out the labels and form while the phleb/RA is drawing the blood. Multiple tubes from
the same participant may be stored in the same biospecimen bag as long as there is one desiccant packet per
40 | P a g e
tube in the bag. The tubes should be stored in a cooler with an icepack until transport to the Channing
Laboratory or placed in the refrigerator at the HVMA site until there is an RA available to transport the sample
to the Channing Lab . Both urine and a blood delivery logs should be completed and placed in the delivery log
bin.
HVMA Lab Protocol
The RA will take the mom and child to the HVMA lab. The RA will tell the front desk they are from Viva, they
need a blood draw and that nothing should be logged. A participant’s Viva label should be filed in the Viva
notebook kept in the lab in order to track the number of draws performed in the lab for billing purposes. The RA
should instruct the lab to draw the tubes in the correct order. The RA should remain with the participants the
entire time. After the tubes are collected the RA should label them and place them in the Viva section of the
refrigerator in the lab until there is an available RA to take the samples over to the Channing lab.
Equipment
Gloves/ Purell
Tourniquets*
Alcohol wipes
Butterfly needles*
Band-Aids/ Gauze
Sharps Container
Blood tubes*
Labels*
Biospecimen Bag*
Cooler/ Icepack
Foam Sleeves*
Desiccant packets*
EMLA Cream**
* Starred items need to be brought to the Kenmore lab.
** For those participants who request its use and have provided consent.
Script
[If participant elects to use EMLA Cream] First, I’m going to put this cream on your arm to numb it a little bit
before I collect any blood from you. We have to give the cream some time to start working, so we will complete
the blood draw once this area of your arm feels numb.
Now I’m going to put this rubber band on your arm. It’s not going to hurt but it will feel tight. How does that
feel? Ok so now I’m going to feel around for a vein. That’s where the blood is. (Instruct the child accordantly if
needed; make fist; pump arm; wiggle fingers). Next you’ll feel a cool sponge on your arm that is going to make
sure your arm is nice and clean so no germs will get in.
I need your help to make this go quickly. Your job is to stay nice and still. You’re doing great! Hold your arm out
straight like this.
Now see this little butterfly? This is going to go in your vein and take a little bit of blood. Some kids say it feels
like a pinch and some kids say they don’t feel it at all.
Great Job! You did it. Thanks for your help. You were very brave!
Supporting Documents Not Included in the Protocol
1. Age 12 Child Blood Collection Form (BL12)
2. Blood Delivery Log
41 | P a g e
b. Biospecimen Protocol & Script
Introduction
The following protocols and scripts describe the preparation and procedures for the collection of urine, nasal
swabs and hair. Project Viva uses these biospecimens to look at nutritional, allergy, asthma and environmental
markers, as well as hormone levels.
Urine Collection
Protocol
The urine collection should be completed after the Child Early Teen Visit consent has been signed, and
when the child is able. Ideally the sample will be collected following the child’s 8-hr fast just before or
after the blood draw. If the child is fasting he/she should be encouraged to drink water so he/she will
not be dehydrated. If the child is not fasting the sample may be collected at any point in the visit. If
the child says he/she needs to go to the bathroom the urine collection procedure should be described
and administered immediately. If the child is able to provide a sample before the blood draw, the
phlebotomist should use this time to identify an appropriate area for the draw and set up the
equipment, as applicable.
The RA will place a child label on the urine cup prior to giving it to the child. Urine samples collected at
HVMA Kenmore should be stored in the HVMA lab refrigerator until transported to the Channing
Laboratory. If the sample was collected in the home the sample may be kept in a cooler with an ice
pack along with the blood tubes (if applicable) until transported to the Channing Laboratory.
Equipment
Sterile urine cup
Biospecimen bag
Labels
Script
[TO CHILD] It might sound strange, but we are going to need a urine sample. You may have done this
at the doctor’s office or even for Project Viva before. If you can, fill it up to the sticker.
After you go in the cup, make sure the lid is screwed on very tight, wipe the outside and put the cup into
this plastic bag. Then bring the bag back to me. Do you have any questions?
I’ll show you where the bathroom is.
[GIVE CUP AND BAG TO CHILD]
Nasal Swab Collection
Introduction
42 | P a g e
The nasal swabs should be completed after the Child Early Teen Visit consent has been signed. Ideally
the samples will be collected during the beginning of the visit when the other biosamples are collected
but prior to any of the breathing measurements.
Equipment
•
•
•
•
Scissors
Gloves
Sterile saline
8 swabs
•
•
•
Sharpie Marker
Box with 4 pre-filled tubes for swab collection (store
under room temperature)
4 blue-dot tubes with DNA lysis buffer
Preparing for the Sample Collection
Prior to collecting any samples the primary RA should clean his/her hands with soap and water, or sanitizer, and
put on gloves. Explain to the child that the cotton swabs about to be used may tickle their nose a little but
should not create any pain or discomfort. He/she should let you know if this does occur. Also, the participant
needs to understand that sitting still is very important to avoid any harm.
1) Label each of the 2mL capped tubes pre-filled with 750 µL of DNA lysis buffer (blue dot) with the ID and
date of collection. Label the tubes 1-L, 2-R, 3-L, and 4-R (“R” for right nostril and “L” for left nostril).
2) Sit the individual in a chair and instruct them to tilt their head back. The head should be at a
comfortable 30-45 degree angle. You should sit in a chair opposite to the subject as this will make
sample collection easier.
Protocol
1) The primary RA will open the tear-off top of the sterile saline solution and wet the cotton swab. Make
sure that all excess solution is removed from the swab. The sterile saline tube should then be propped
up in the test-tube rack and should never be put down on the desk.
2) Use your left hand on the outside of the subject’s nose and put a bit of pressure on the nose while
collecting the sample. Insert the swab into the left nostril until you reach the inferior turbinate (as far in
as the end of the cotton on the swab). Begin rotating the swab around the nasal cavity about half way
in to allow the child to adjust to the procedure before continuing deeper while also spinning the swab.
Complete five full rotations being sure to avoid contact with the center of the nose or septum (as there
are more blood vessels in this region and the risk of a nose bleed increases).
3) Put the tip in the 2mL tube with the blue dot labeled 1-L, and move it up and down several times to mix
with the DNA lysis buffer solution. Cut the tip of the cotton swab into the 2mL tubes (make sure you cut
the tip so that it is short enough for the top to close.).
4) Repeat with the other sterile cotton swab in the same left nostril. Both swabs can be stored in the
same tube.
43 | P a g e
5) Use a second pair of sterile cotton swabs and repeat steps 1-4, this time with the right nostril cutting
each swab into the 2mL tubes labeled 2-R.
6) Close each tube tightly.
7)
Repeat steps 1-6, cutting the first pair of swabs into the tubes labeled 3-L and the second pair into the
tubes labeled 4-R. When you are finished with the collection, you will have 4 tubes with 2 swabs each
(total of 8 swabs) – 4 collected from the left nostril and 4 collected from the right nostril. All swabs will
be placed into 2mL tubes labeled with a blue dot and pre-filled with DNA lysis buffer.
8) Keep the DNA tubes upright during transportation and storage prior to dropping off at the lab. DNA
samples should be placed immediately into the freezer at 2-6 degrees. For transportation all DNA
samples should be placed into a cooler that is kept in the visit room freezer.
Helpful tips:
•
Nasal swabs should not be collected from anyone who is actively sick as methylation changes with a
virus or cold. If the child appears to be sick the RA should make note of it in the comments on the NS12
form
•
If the child seems uneasy, RA’s may demonstrate the procedure on each other to give the child a better
idea of what will be happening during this portion of the visit.
•
Swabs containing any mucus or blood are okay to use and place directly into the buffer solutions.
•
If the child experiences a nose bleed during the nasal swab collection, stop collection and apply pressure
to the child’s nose for 5 minutes to stop the bleeding.
•
Also, if the child wants to stop the collection at any time, close up whatever samples have been
collected to that point and stop the collection. Be sure to mark the refusal on the NS12 form and note
any comments. Any collected samples should be used, even if the procedure was not completed.
Script
I’m going to clean out your nose a little using these q-tips. First I’m going to wet the q-tip in this saline
solution then I will twirl it around in your nose a few times to clean it out. It may tickle a little or make
you feel like you have to sneeze, but it should not hurt. It’s very important that you sit very still while
the q-tip is in your nose so that I don’t go too deep. I’m going to use 4 q-tips for each nostril so all
together there will be 8 q-tips when we’re done.
Are you ready? Let me know if you want to take a break or stop at any time. I’m just going to rest my
hand behind your head so that you keep sitting nice and straight.
Okay we’re ready to start. Keep holding still.
That’s it. You did a great job. I’m all done.
Supporting Documents Not Included in the Protocol
Early Teen Nasal Swab Collection Form (NS12)
44 | P a g e
Early Teen Nasal Swab Delivery Log
45 | P a g e
Hair Collection
Protocol
Hair collection will take place only if the Child Early Teen Visit consent form has been signed. This component
may be done at any point during the visit. The RA will choose a discrete place on the back of the child’s head for
the sample site. If the child is distressed and refuses, or if the child’s hair is in braids, dreadlocks, or hair
extensions, rendering it impossible for the RA to obtain an adequate sample, the RA will note this on the HR12
and move onto the next part of the visit protocol.
Prior to collecting a hair sample the RA will always clean the scissors with an alcohol wipe. RA puts on
gloves and separates a matchstick portion of the child’s hair. RA ties a thread around the sample ¼ to ½
inch from the scalp. If the child’s hair length is <1 inch, do not tie with thread, cut hair sample directly
into envelope. The RA will cut a sample of hair as close to the scalp as possible and places the sample
into a paper envelope. RA then seals the envelope with one label (Viva ID, visit, date and RA initials),
and places a second label on the front of the envelope (Viva ID, visit, date and RA initials).
Equipment
•
•
Scissors
Alcohol wipes
•
•
Envelopes
Gloves
•
Labels
Script
I’m going to cut a little bit of the hair from the back of your head using these scissors. It will be a small
piece and I’ll pick a place where no one will even notice. Can you sit nice and still for me?
I found the perfect spot! Keep holding still.
That’s it. I’m all done.
Supporting Documents
1. Early Teen Urine Collection Form (PE12)
2. Urine Delivery Log
3. Early Teen Nasal Swab Collection Form (NS12)
4. Nasal Swab Delivery Log
5. Early Teen Hair Collection Form (HR12)
46 | P a g e
47 | P a g e
c. Anthropometry Protocols and Scripts
Introduction
During the Age 12 Visit we will collect child’s height, weight, bioimpedance, circumferences and skinfolds.
Children will be asked to change into a Viva t-shirt and scrubs prior to the anthropometry measurements
If the Research Assistant has not already done so, she should wash his/her hands (or use hand sanitizer) and
remove any obstructive jewelry or sharp objects from his/her being, and confirm that a signed consent has been
obtained. The Research Assistant should carefully describe all measurements before working with the child and
should follow the protocols and scripts outlined below for each measurement. All measurements should be
read out loud and repeated until they are recorded on the form.
Good rapport with the child helps to secure a successful set of complete measurements. The Research Assistant
should maintain a warm demeanor and work at the child’s level, whenever possible. Additionally, the Research
Assistant should stay attuned to the child’s affective state. It is often helpful to recruit the mother for support
and encouragement. If the child becomes significantly distressed, the Research Assistant should stop the
measurement and turn to another part of the visit. While taking measurements in a standard order is preferred,
the Research Assistant should use her judgment in determining when breaks and/or changes in measurement
sequence are best.
Child Standing Height and Sitting Height, Weight/Bioimpedance
The child’s weight, bioimpedance, and height measurements are taken as a set because they require the child to
take off their shoes. Weight and bioimpedance is measured using a Tanita Scale. Height is measured using a
Shorr Height Board. Acquiring both a standing and sitting height, allows for a measure of long bone growth in
the child’s legs. This measurement will be compared to child measurements from earlier Viva visits. The child’s
weight and height are also used as markers of BMI, growth, and development.
Preparing for the Measurements
The equipment used for these measurements needs to be carefully handled and placed in the visit environment.
If the Research Assistant is working in the Viva offices, he/she should confirm that the equipment is assembled
and stationed correctly.
If working outside Viva offices the following should be noted:
• The scale should be placed on a hard, flat surface. Uneven and carpeted surfaces are unsuitable for the
scale measurement.
• After assembling the Shorr Board, it should be placed firmly against a flat wall or door, and on top of a
flat, hard surface. The Research Assistant should verify that the board is stable before taking any
measurements. Whenever possible, avoid placing the board against any protrusions in the wall, such as
molding. If placing the board against a door, the Research Assistant should take measures to assure that
the door will not be opened, and should recruit the mother’s help in assuring the door will remain
closed.
48 | P a g e
•
When taking the sitting height, a stool is placed directly under the Shorr Board and firmly against the
wall, also on a flat, hard surface so that the child’s knees are bent to a 90 degree angle and in a
comfortable seated position.
By this point in the visit the Research Assistant should have developed a good rapport with the child. These
measurements are considerably “easier” to participate in from the child’s perspective and lend themselves well
as a transitional phase of the visit. That said, the Research Assistant should still maintain fastidious attention to
detail in obtaining the measures.
Ideally, the weight, bioimpedance, height and skinfold measurements are taken while the child is wearing the
provided Viva t-shirt and scrubs, no shoes, and no barrettes, other hair-ornaments, or hats. Female participants
will be asked to either remove their bra or to come to the visit wearing a sports bra or other soft cotton bra that
can easily be maneuvered to expose their shoulder blade during the subscapular skinfold measurement. The
Research Assistant should never remove any of the child’s articles of clothing. Bulky clothing should be avoided
whenever possible, so as not to interfere with the height measurements. Additionally barrettes, or other hair
ornaments, and ponytails, or braids should be removed whenever possible. An optimal height is taken when the
measuring plate can rest flat against the top of the child’s head.
If the mother is unwilling or the child is unable to cooperate with the dress and hair requirements for any
reason, the Research Assistant should still take the measurements, noting the discrepancy in the comments
section. This includes using a small rigid ruler to estimate the difference in height caused by any hair obstruction.
Regardless, the Research Assistant should record the type of clothing the child was wearing directly on the Child
Anthropometry Form (CA12).
Measurement Protocols and Scripts
This set of measurements should be taken in the sequence indicated on the Child Anthropometry Form:
Standing Height, Sitting Height, Weight and Bioimpedance.
The weight and height measurements are the least intrusive and are often well received. At times, the
measuring plate that is placed against the top of the child’s head when taking a height measurement can
generate some concern for the child, and he/she should be allowed to look at and touch the plate before the
height measurement is taken. Standing height must be completed prior to bioimpedance, as height in
centimeters must be entered the Tanita scale.
Child Standing Height Protocol
•
•
•
•
•
The child should have his/her shoes off and be barefoot or wearing thin socks only.
Ask the participant to remove any of the child’s interfering barrettes, ponytails, hats etc.
Guide the child onto the board. The child’s feet should be flat against the base of the board so that
body weight is evenly distributed.
Stand to the right of the Shorr Board at a 45-degree angle to the board.
Make sure the child is standing in one of the following four configurations:
49 | P a g e
•
•
•
•
•
•
•
•
•
•
•
•
•
•
1. Both knees and feet together
2. Knees together and feet apart
3. Knees apart and feet together
4. Knees and feet apart, thighs together
Position the child’s arms so that they are hanging freely by his/her sides, with the palms facing the
thighs and ask the child to stand up straight.
After the legs and arms are positioned, move the feet so that the mid-axillary line is perpendicular to the
floor.
Ask the child to stand up straight. At this point, the child’s feet, head or buttocks may or may not be
touching the back of the board. Correct positioning does not always necessitate that all points come
into contact with the back of the board. Although, one point must touch the back of the board.
If necessary, have the assistant press on the child’s knees, with her left hand, and the child’s ankles, with
her right hand, as instructed above.
Be sure that the child is standing up straight, not leaning or slouching. Using your palms, pat up the
child’s body from knees to shoulder, helping her straighten out if necessary.
Firmly cup (with a rounded, not a “V” grasp) the child’s chin with the left hand so that your hand goes
around the child’s ear but is not covering the child’s ear, or the mouth. Your hand/arm should also not
be touching the child’s chest.
Using the fingertips of your right hand, gently grasp the back of the child’s head.
Place the child’s head into the Frankfort Plane. The Frankfort plane is determined by: Looking at the
side of the child’s head, draw an imaginary line from the bottom of the eye orbit to the child’s ear hole.
Position the head so that the imaginary line is parallel to the floor and perpendicular to the Shorr Board.
Before removing left hand from the child’s chin, re-check the positioning of the child’s head while
simultaneously picking up the headpiece with your right hand.
Once the positioning of the head is confirmed, position the headpiece firmly on top of the child’s head
with sufficient pressure to compress the hair and make contact is made with the skull.
Directly face the measuring index, when taking the reading. Measure the height in centimeters, to the
nearest millimeter.
Call the measurement out loud in a low, audible voice until recorded.
Remove headpiece and release grasp of child’s chin. Escort the child off of the board.
Check the recording for accuracy and legibility. Record any braids, hair ornaments, or hats that the child
was wearing when the measurement was taken.
Child Standing Height Script
Okay! We are going to start the visit today by taking some body measurement. First, let’s pick out a pair of Viva
scrubs and a T-shirt. You’ll be able to take these home with you at the end of the visit too. Let’s find a size that
fits, and then I’ll step out of the room and let you change.
Okay, let’s get started with the height measurement. Can you take off your shoes and remove your
hat/ponytail/barrettes (or any other obstructions that may be present)? This will allow us to get the most
accurate measurement possible.
50 | P a g e
Thanks! Now, I’d like you to step onto this board and face me, so we can see how tall you are.
Okay, now please move your feet all the way out to the sides of the boards.
Then walk your feet together until I tell you to stop [RA observes when thighs/knees or ankles are touching and
child is in position.]
Great! Now, let your arms hand down by your sides and stand up nice and tall. Now, stay just like that and keep
looking forward. I’m just going to check and make sure you are lined up from the side. Keep looking straight
ahead. [RA adjusts by asking the child to move feet forward or backward.]
Now I’m going to move your head a little. We are almost done. Good job.
I’m going to lower this headpiece. You’ll feel it touch your head lightly as I take the measurement.
Great job! We’re done with the measurement. You can step off the board.
Child Sitting Height Protocol
•
•
•
•
•
•
•
•
•
•
•
•
Place the Shorr Board on top of a sturdy stool or box and against a flat door or wall, making sure that the
board is stable. The stool should be high enough that the child’s legs dangle freely.
Ask the child to sit on the stool. Position the child so that the buttocks are touching the back of the
board.
Ask the child to sit as erect as possible. The child’s knees should be directed straight ahead.
The child should keep both hands on her thighs or knees, with arms relaxed.
Firmly cup (with a rounded, not a “V” grasp) the child’s chin with the left hand so that your hand goes
around the child’s ear but is not covering the child’s ear or mouth. Your hand should not be touching
the child’s chest.
Using the fingertips of your right hand, gently grasp the back of the child’s head.
Place the child’s head into the Frankfort Plane. The Frankfort plane is determined by: Looking at the
side of the child’s head, draw an imaginary line from the bottom of the eye orbit to the child’s ear hole.
Position the head so that the imaginary line is parallel to the floor and perpendicular to the Shorr Board.
Before removing left hand from the child’s chin, re-check the positioning of the child’s head while
simultaneously picking up the headpiece with your right hand.
Once the positioning of the head is confirmed, position the headpiece firmly on top of the child’s head
with sufficient pressure to compress the hair and make contact with the skull.
Directly face the measuring index, when taking the reading. Measure the height in centimeters, to the
nearest millimeter.
Call the measurement out loud in a low, audible voice until recorded.
Remove headpiece and release grasp of child’s chin.
51 | P a g e
•
•
Assist the child down from the stool.
Check the recording for accuracy and legibility. Record whether the child was wearing any braids, hair
ornaments, or hats when the measurement was taken.
Child Sitting Height Script
Now, we are going to do a similar measurement, but this time I am going to see how tall you are sitting down.
So, go ahead and take a seat right here. Put your hands on your knees like this. Good!
Now I’m going to move your head a little like I did before. .
Okay, you’ll feel the headpiece lightly touch your head while I take the reading. Great job!
Child Weight and Bioimpedance Protocol
•
•
•
•
•
•
•
•
•
•
•
•
•
Bioimpedance should not be attempted on any child who has a pacemaker. If a participant has a
pacemaker, mark it on the CA12 and go on to next measurement.
Make sure the Tanita scale is on a stable flat surface. Check the level gauge to make sure the air bubble
is in the center of the red circle. If the scale is not level either move to a new location or adjust the feet
to make it level.
If bioimpedance does not follow urine collection, instruct the child to go into the bathroom and empty
their bladder.
Clean metal footpads with an alcohol swab and turn the scale on.
The first prompt asks for the weight of the child’s clothing. Enter 0.0 for all participants.
Select either Standard Female or Standard Male.
Enter the child’s age in years (e.g. 12 for 12 yrs old)
Enter the child’s standing height in centimeters to the nearest centimeter. (.4 and below round down, .5
and above round up)
Enter 00 for goal fat %.
Ask the child to slowly step onto the scale and stand as stand as still as possible. It is essential that the
child stands on the metal plate with clean bare feet. Heels should be placed directly on the posterior
electrodes and the front part of the foot should be in contact with the anterior electrodes, with the feet
parallel. The child should be standing unassisted and without touching anything. Ask the child to look
straight ahead.
The child should stand up as straight as possible. Leaning to one side or forward can affect the weight
recorded.
Once the printer prints out the results, check for printing errors. If there are printer errors, fix and
repeat the measurement protocol. If there are no errors, instruct the child to step off of the scale and
give the child a copy of his/her print out.
Staple the printout to the weight section of the CA12. Either now, or after the visit, record the child’s
weight, impedance, % fat, fat mass, fat free mass and total body water to 2 decimal places onto the
CA12 using the printout results. Record the type of clothing the child was wearing during this
52 | P a g e
•
measurement on the form, as well. This should be Viva scrubs and tank top, unless the child refuses.
Also record any additional comments at this time.
Check the recording for accuracy and legibility.
Child Weight and Bioimpedance Script
The next thing we will do is measure your weight. This special scale will tell us how much you weigh and how
much the different parts of your body weigh like your bones and muscles.
[TO MOM]: It is recommended that no one with a pacemaker stand on this scale. Does [CHILD NAME] have
a pacemaker?
Before we do this next part of the visit it’s important that you try to go to the bathroom if you can because
our scale measures how much water is inside you. The bathroom is right over here. This will get all the extra
water out of your body.
In order for the scale to work, I also need you to take off your socks. It will only take a minute and you can
put your shoes and socks back on when we’re done.
Okay. Step onto the scale and let’s see how much you weigh. Put your left foot here and right foot here.
Good.
I need you to stand up nice and tall. When the scale is done it will print out two receipts! One is for you to
keep and one is for me.
Great job. You can step down now and put your shoes and socks back on. Here’s your receipt! It tells you a
bunch of things like how much you weigh and how much water is inside you.
[RA TO MOM] We can’t interpret these results for you but if you have any questions about what the letters
mean let me know.
• Body TypeStandard or Athletic based on resting heart rate. All kids are considered standard.
• HeightHeight in centimeters
• WeightWeight in kilograms
• BMIBody Mass Index, calculated using weight and height (kg/m2)
• Fat %Percent of body that is made of fat
• BMRBasal metabolic rate in both kilojoules and kilocalories.
•
ImpedanceMeasurement of the flow of electric current through the body, measured in ohms
• Fat MassWeight of the fat in the body
• FFMFat free mass, or weight of everything in the body except the fat
• TBWTotal body water, about how much the water in the body weighs
53 | P a g e
Troubleshooting
If the Tanita scale display indicates an error, and no other scales are available, the Research Assistant should still
take the measurement, indicating the problem in the comments section. After the visit the Research Assistant
should consult the user’s manual for possible interventions. At the very least, the RA should attempt to get a
weight measurement. This can be done by switching to the “weight only” function. The RA should note that
there is no printout for “weight only” and the weight must be recorded on the form at the time the
measurement is taken.
The Shorr Boards should be examined for any damage. These boards are made of wood and it is therefore
especially important to check for any potential splintering. Any damaged Shorr Board should be sent to Irwin
Shorr, Shorr Productions, 17802 Shotley Bridge Place, Olney, MD 20832 for repair, or replaced with a new
board.
Child Waist and Hip Circumferences
At the Age 12 Visit, the Research Assistant should measure the waist and hip circumference of enrolled Viva
child participants. These measurements are taken using a Gulick II plus measuring tape (a retractable measuring
tape with a tension sensing spring on the end) and will help to determine the child’s body mass index (BMI) and
waist-to-hip ratio, intended for use in future analyses.
Preparing for the Measurements
Ideally, the waist circumference measurements should be taken directly on the skin. The hip circumference
measurements should be taken over light clothing, such as the Viva provided incentive scrubs. The Research
Assistant should never remove any of the child’s articles of clothing without first receiving permission. The
Research Assistant should record whether each measurement was taken
Taking the Measurements
The ideal sequence for taking child circumference measurements is waist first, followed by hip. This acclimates
the child to the measurement procedure before the Research Assistant performs the more intrusive hip
circumference measurement.
The child may become agitated during the measurement procedures. It is important for the Research Assistant
to tell the child what will occur during the measurement. Giving the child consistent positive reinforcement will
often ease tension. The Research Assistant should work quickly, but not so fast that the accuracy of the
measurement is called into question. If the Research Assistant is not confident that the measurement is
accurate, and the child is upset, the measurement should be recorded on the form and the Research Assistant
should also record her concerns in the comments section. Whenever possible, the measurement should be
returned to at another time in the visit.
Waist Circumference Protocol
•
•
Position the child so that he/she is standing erect and still. The child should cross their arms in front of
their chest (holding shirt up if necessary) and abdomen relaxed.
Sit on the side of the participant.
54 | P a g e
•
•
•
•
•
•
•
•
•
•
•
Identify the top of the iliac crest along the mid-axillary line on one side of the participant by palpating
(with the pads of fingers) the pelvic bone.
Mark just above the site with a self-adhesive sticker.
Repeat the above instruction on the child’s other side.
Gently place the measuring tape over the two stickers. If needed, ask the child to hold one side of the
tape with a light pincer grasp. The mother can assist with this.
Adjust the tape so that it is in a level, horizontal plane.
Tighten the tape by simply pulling on the end of the tensioning mechanism until the calibration red bead
is just seen.
Re-check that the tape is in a level, horizontal plane.
At the end of the child’s natural exhalation, read the tape from the “zero line” to the nearest tenth of a
centimeter.
Call the measurement out loud until it is recorded.
Check the recorded measurement for accuracy and legibility.
Release the tape and remove the stickers.
Waist Circumference Script
I’m going to measure your waist now with this measuring tape. Can you lift up your shirt a little bit for me, just
so I can see your waist?
You can cross your arms and hold up your shirt, like this. Great, this won’t take long.
I’m going to find the top of your hip bone and mark it with a sticker on both sides. You can remove it once I’m
done measuring.
On side done, now onto the other side. Just breathe normally and relax your stomach. You’re doing great!
Now, I’m just going to wrap this tape around you and take the measurement.
Okay, all set. You can let go of your shirt and take off the stickers. Thank you!
Hip Circumference Protocol
•
•
•
•
•
•
The child should only light clothing, such as the provided Viva incentive scrubs.
Position the child so that he/she is standing erect, arms at their side and feet pressed together.
Sit or squat to the side of the child, so that eyes are level with the child’s hips.
Place the measuring tape around the hips, anchored at the maximum protuberance of the buttocks. If
necessary, ask the child to gather up any excess fabric towards the front of his/her body that may be
interfering with the measurement.
Adjust the tape so that it is in a horizontal plane.
Tighten the tape by simply pulling on the end of the tensioning mechanism until the calibration mark is
just seen.
55 | P a g e
•
•
•
•
Read the measurement to the nearest tenth of a centimeter.
Call out the measurement repeatedly until it is recorded.
Release the tape from the child’s body.
Check the recorded measurement for accuracy and legibility.
Hip Circumference Script
Now we’re going to measure your hips just like we did for your waist, using this measuring tape.
Your job is just to hold still, and I’m going to wrap this around your pants. That’s it! Thank you!
Troubleshooting
The Gulick II plus measuring tape must be free of kinks or tears in order to obtain an accurate measurement.
The Research Assistant should check the measuring tape prior to every visit. If any damage is present, the tape
should be replaced.
Child Mid-Upper Arm Circumference, Triceps Skinfold, and Subscapular Skinfold
The child’s mid-upper arm circumference (MUAC), Triceps skinfold, and back skinfold measurements are taken
as a set because the measurement sites are physically proximal on the body. The MUAC measurement is taken
using a MUAC tape and the skinfold measurements are taken using the Holtain Caliper. The data gathered
from these anthropometrical measures assist with future analyses that focus on body mass index (BMI), growth,
and development.
Preparing for the Measurements
Children often shy away from the caliper measurements and it is in the Research Assistant’s interest to spend a
few minutes preparing the child for the visit. In addition to recruiting the mother’s support, the Research
Assistant should explain each measurement to the child. Suggested language is noted throughout the text
below. Additionally, it is often helpful to let the child examine the caliper and to practice using it on his/her
finger.
Ideally, these measurements should be taken directly on the skin. The Research Assistant should record
whether each measurement was taken directly on skin or alternatively over clothing on the Child
Anthropometry Form (12CA). Any complications or departures from standard protocol should be noted in the
comments section. This includes whether the measurement was taken while Female participants were wearing a
bra. Female participants will be asked to either remove their bra or to come to the visit wearing a sports bra or
other soft cotton bra that can easily be maneuvered to expose their shoulder blade during the subscapular
skinfold measurement. If an RA is unable to obtain a subscapular skinfold measurement due to another type of
bra obstructing the site, this should be noted in the comments.
Taking the Measurements
The standard sequence for taking this set of measurements is: MUAC, Triceps skinfold, and subscapular (back)
skinfold. Before beginning the measurements, the Research Assistant should check to make sure that the
caliper is calibrated. Proper calibration is reflected when the needle of the caliper is aligned with the zero on the
56 | P a g e
face of the dial. The calibration block will also be used to verify that the tongs of the caliper align with the 5mm,
10mm and 20mm stop on the calibration block.
Per protocol, these measurements are taken on the child’s right side of the body. If for any reason, the
measurement cannot be taken on the right side, the Research Assistant should follow the same protocol and
measure the child’s left side. The Research Assistant should denote if she measured the child’s left or right side,
as indicated on the Child Anthropometry Form (12CA).
This set of measurements calls for precise positioning of the child’s body. Each measurement requires the
Research Assistant to follow a detailed set of instructions to ensure that the measurement data has integrity.
The Research Assistant is challenged to maintain rapport with the child while also paying careful heed to these
measurement protocols, drawing on her ability to multi-task but also focus attention. The Research Assistant
should use clear, simple language when giving instructions to the child. She should also work quickly, but not so
fast that the accuracy of the measurement is compromised. If the Research Assistant questions the
measurement’s accuracy, she should still record the measurement on the form, and note her concerns in the
comments section. In this case, whenever possible, she should return to this measurement and attempt to
obtain a more accurate reading later in the visit.
Child Mid-Upper Arm Circumference (MUAC) Protocol
•
•
•
•
•
•
•
•
•
•
•
•
Move behind the child
With the child standing, position his or her right arm so that it is flexed at a 90-degree angle at the
elbow. The child’s palm should be facing up and her fingertips pointing straight ahead.
Locate the acromial process on the right shoulder by palpating firmly with the pads of the index and
middle finger.
Place and hold the zero end of the open MUAC tape on the acromial process with left thumb.
Extend the tape down the midline of the back of the arm, past the tip of the olecranon process at the
elbow (taking care not to bend the tape around the elbow).
Measure the distance between the acromial process and the olecranon process to the nearest tenth of a
centimeter. This is your length (L).
Divide this number by two to obtain the vertical midpoint. (L/2= midpoint)
Replace thumb (on acromial process) with index (or middle) finger and slide thumb down the length of
the measuring tape and hold at the midpoint (olecranon process).
Place a sticker at the vertical midpoint.
Now, the sticker is at the vertical midpoint and the child’s arm is still bent. Kneeling directly behind the
child, move the reinforcer left or right so that it is also at the horizontal midpoint (the horizontal
midpoint (The midpoint is determined using visual judgment, not direct measurement).
Instruct the child to relax her arm and then position her arm so that it is extended down, and separated
slightly from the side of her body.
Standing to the right of the child, place a closed MUAC Tape (remember to use the small, colored tape
designated for children) around the upper arm, perpendicular to the long axis of the arm at the marked
point.
57 | P a g e
•
•
•
•
•
•
The MUAC measurement is taken with the tape held gently against the skin surface. To ensure an
accurate reading, the following steps (described below) should be taken: Focus, Secure, Inspect, and
Read.
o Focus: Hold the two ends of the tape with a pincer grasp (i.e., with index finger and thumb of
each hand). Get a feel for the tension of the tape around the arm by tugging the tape a few
times.
o Secure: Hold the tape with the pincer grasp, using your right hand, only at the junction where
the tape passes through the slot. The tape’s tension around the arm is now fixed and will not
move.
o Inspect: Look at and feel the tension of the tape around the arm for any noticeable gaps or
areas of constriction. If necessary, adjust the tension of the tape, re-secure and re-inspect.
o Read: If you are using a single-slotted (child) insertion tape, you will need both hands to take the
measurement. Use your left hand to lay the tab so that it is flush with the rest of the tape.
Make sure not to pull the tape as you read the measurement.
At eye-level, read the measurement from the side of the arm to the nearest millimeter.
Call the measurement out loud repeatedly until it is recorded.
Check the recorded measurement for accuracy and legibility.
Loosen the tape and remove from the child’s arm.
Do not remove the reinforcement stickers from the child’s arm as the midpoint placement is needed for
the Triceps skinfold measurement.
Child Mid-Upper Arm Circumference (MUAC) Script
Now I’m going to measure the distance around your arm (pointing to the arm). I need you to hold your arm like
this. Pretend you’re holding your favorite food in your hand.
I’m going to first find one of the bones in your shoulder and then I’ll measure down to your elbow! I’m going to
put a sticker in the middle of your arm and we’ll take it off as soon as I’m done measuring.
Okay, you can shake out your arm let it hang loosely now. I’m going to measure around your arm with this tape.
It goes up your arm sort of like a bracelet. Great job!
Child Triceps Skinfold Protocol
•
•
Make sure the caliper is calibrated (i.e. needle is aligned with zero point on the dial and all
measurements align with those on the calibration block)
Identify the midpoint on the back of the child’s arm (Note: The child Triceps skinfold requires
identification of the midpoint on the back of the child’s arm. This identification is made during the
MUAC measurement and once identified the same landmark can continue to be used. If for some
reason the MUAC measurement has not being taken, please reference the directions above (MUAC
measurement) for locating the midpoint.
58 | P a g e
•
•
•
•
•
•
•
•
•
•
•
Have the child stand upright with feet pressed together, shoulders relaxed, and arms hanging loosely by
their side. (If necessary, the child may sit in a chair on the mother’s lap for the triceps skinfold
measurement as long as the child is upright with his/her right arm hanging loose).
Standing behind the child, gently lift the Triceps skinfold with fingertips centered just above the
midpoint, as marked by a sticker. Pick the skinfold up with the left thumb and index finger
approximately 2 centimeters above the midpoint. Grasp firmly, about 1-2 centimeters into the skin,
making sure to separate fat from muscle.
Hold the skinfold parallel to the long axis of the upper arm.
Place the caliper jaw perpendicular to the length of the fold and around the marked midpoint.
Release grasp on skinfold just as you completely release grip on the caliper lever.
Count 4 seconds
Read the measurement, while the calipers are still on site, to the nearest 0.2 millimeter.
Call the measurement out loud while gently removing the calipers and Rub spot to soothe the skin.
Continuing calling the measurement out loud until recorded on the form.
Check the recording for accuracy and legibility.
Particular problems will be faced when measuring obese or muscular participants. In the case of obese
participants an assistant may pick up the fold with two hands, but this gives a larger reading than if one
hand is used.
Child Triceps Skinfold Script
Now we are going to measure your muscles. Stand up nice and tall and relax your arm.
To do this, I am going to use these calipers. Do you want to see what they feel like on your finger?
I’m going to do the first measurement on your arm, and the last measurement on your back. I need to hold them
for four seconds. Let’s get started.
Child Subscapular (Back) Skinfold Protocol
•
•
•
•
•
•
•
•
•
•
Position the child so that she is standing upright with her shoulders relaxed and arms hanging loosely at
her sides.
Stand behind the child and gently palpate the lowermost tip of the scapula (shoulder blade) with pads of
fingers, firmly so as not to tickle.
The measurement site is 1-2 centimeters below the lower tip of the scapula.
Gently lift the skinfold with the thumb and left index finger on a diagonal approximately 2 centimeters
above and to the left of the measurement site.
Place caliper jaws on the measurement site and perpendicular to the length of the skinfold.
While holding the skinfold, completely release your grip on the caliper’s lever.
Count 4 seconds before reading the measurement
Read the measurement to the nearest 0.2-millimeter while the calipers are still on the site.
Call out the measurement while removing the calipers gently; depress and release the caliper level
slowly. TAKE CARE NOT TO SNAP THE CALIPERS.
Release grasp on skinfold, rub the spot a few times to soothe the skin.
59 | P a g e
•
•
Continue to call out the measurement until recorded on the form.
Check the recording for accuracy and legibility.
Child Subscapular (Back) Skinfold Script
Now I’m going to measure one of your back muscle!
I’m going to feel for your shoulder blade. Now I’m going to measure your muscle like I did on your arm and am
going to count to four.
Great! We’re all done with the measurements. You did a fantastic job!
Troubleshooting
Both the Gulick II plus measuring tape and the MUAC tape must be free of kinks or tears in order to obtain an
accurate measurement. The Research Assistant should check the measuring tape prior to every visit. If any
damage is present, the tape should be replaced.
The Research Assistant should confirm that the calipers are calibrated before taking each skinfold measurement.
Proper calibration is reflected when the needle of the caliper is aligned with the zero on the face of the dial. If
this is not the case, the Research Assistant should turn the dial so that the needle is aligned with the zero.
Supporting Documents Not Included in the Protocol
1. Early Teen Anthropometry Form – Child (CA12)
2. Additional training materials:
a. Standing Height of Adults
b. Position of Head “Frankfort Plane”
c. Reading Height/Length Measurements
d. Bones of the Shoulder and Arm
e. Mid-Upper Arm Circumference (MUAC) Procedure
f. Holtain Skinfold Caliper
g. Location of the Subscapular Skinfold
h. One-Minute Mom Trainer
i. One-Minute Child Trainer
60 | P a g e
61 | P a g e
d. DXA Scan Protocol and Script
Introduction
Dual Energy X-Ray Absorptiometry (DXA) is a technology that uses a low-dose x-ray to evaluate an individual’s
body composition. DXA scans are of particular interest because of the accuracy in which various body tissues
(bone, muscle, fat, etc) can be distinguished and because of the ability to analyze body composition in specific
regions. DXA scans are in wide use by other federally funded research projects including the National Health
and Nutrition Examination Survey (NHANES). Project Viva investigators will use DXA scans as a direct measure of
adiposity when evaluating health outcomes.
The scan is a 3-minute open air scan that will only take place in the HVMA Kenmore office. At the RA’s direction,
the participant changes into a pair of Viva scrubs and T-shirt, removes all metal from his/her body (e.g. jewelry,
watches, hair ties), and then lays on the DXA bed as still as possible for the duration of the scan. The DXA bed
and arm (‘C-arm’) will move but nothing will touch the participant.
After completion of the scan, the RA will print a copy of the participant’s scan image for the participant to keep
as an incentive.
Materials:
•
•
•
Dosimeter (radiation
badge)
Lead Apron
QC Phantom
•
•
Medical Gown or Viva
scrubs/t-shirts
Medical Tape
Disinfectant Spray
•
•
Paper Towels
CDs for computer
DXA Safety:
The amount of radiation used in a DXA scan is minimal; however, RAs are encouraged to take
precaution when using the machine. The operator’s chair (where the primary-RA will sit while
administering the scan) is draped in a lead apron. While operating the scan, the RA should position the
chair so the apron is between the DXA bed and him/herself. The RA may also choose to wear the lead
apron while the scan is in progress. A second apron is hanging behind the DXA room door that leads
to the hallway for use by another individual in the room. Alternatively, individuals should stand at
least 3 feet away from the C-arm (preferably from the foot or head of the bed) to avoid exposure.
An area radiation badge (dosimeter) will be clipped to the lead apron draping the operator’s chair to measure
cumulative radiation exposure. Each RA will be provided with his/her own dosimeter that should be worn while
operating the DXA machine. The dosimeter should be worn at the collar of the shirt to be in proximity of the
thyroid. Dosimeters are stored in the Viva locker on the 5th floor and should be worn only during a visit to avoid
capturing radiation not associated with the DXA machine. Quarterly, the badges are sent back to the
manufacturer (Landauer, Inc.) for radiation readings. More information on the shipment and usage of the
dosimeters can be found in the Landauer service guide, located in the Operation Manager’s desk.
62 | P a g e
When the DXA’s X-ray is on and radiation is being emitted, the DXA bed will make a noise and a light on the DXA
bed’s control panel will turn on. An icon on the upper right of the scan screen will also blink indicating x-rays are
in use.
Exclusion Criteria:
Weight - The DXA bed can only support participants weighing less than 450lbs or 204kg.
Pregnancy - Despite the low levels of radiation used in a DXA scan, a scan should not be performed on a
participant who is pregnant.
Contraindications – Child has a pacemaker, or has had an X-ray in the past week
Preparing the DXA Machine:
Quality Control
The DXA machine performs two kinds of quality control scans. The first is a daily QC scan used to calibrate its
sensors. This QC requires a ‘phantom’ spine to be placed on the DXA bed and scanned (as outlined below). The
second is a weekly radiographic uniformity test which requires no assistance from the RA. Both must be
completed before participant scans can be performed. RAs should complete these tasks prior to participants
arriving for their visit.
Starting the DXA Machine and Performing QC
1. The RA should clip the dosimeter to his/her collar before operating the DXA machine.
2. Press the large power button on the computer tower to turn it on. At the login screen, choose ‘QDR’.
Windows will login and start the QDR software.
63 | P a g e
3. On the main QDR window, the ‘Daily QC’ button will be flashing. Click on the ‘QC’ button.
4. A window will pop-up stating the DXA machine is moving into position for the Daily QC. The C-arm on
the DXA machine will move into place and a laser will produce a red cross-hair on the DXA bed. Position
the phantom as follows:
a. Place the phantom so that the white dot is toward the foot end of the bed and the serial
number is toward the head end of the bed.
b. Position the white dot under the laser cross-hair making sure that the x-axis laser line bisects the
dot. Position the phantom so that the y-axis laser line extends up the phantom to bisect the
serial number (specifically, the laser should run along the vertical line on the number 4).
5. On the computer screen, click ‘continue’. A new screen will open showing the progress of the scan. The
RA may leave the room while the QC scan runs. The scan lasts approximately one minute.
6. After the scan is complete, a window will open indicating whether the QC has ‘passed system test’ or
‘failed system test’. If the machine fails, repeat the QC up to 3 times. If the machine continues to fail,
call Hologic for assistance (1-800-321-4659).
7. If a ‘passed system test’ message appears, click ‘plot’ in the window. A graph will appear displaying
values from the current scan (a black filled in circle) and previous QC scans (open black circles). Visually
inspect the graph and ensure the black dot falls in between the two red dotted lines on the top and
bottom of the graph. The black dot must fall within this range or the QC scan fails and must be
repeated.
8. If the QC scan has passed, click ‘continue’. If it has been less than a week since the last radiographic
uniformity test, the main QDR window will be opened. The DXA machine is now ready for use.
9. If it has been more than a week since the last radiographic uniformity test was run, a window will open
indicating the scan needs to be completed. Remove the spine phantom from the DXA bed and click
‘proceed’. The scan will automatically begin. The RA may leave the room while the scan proceeds.
10. When the scan has completed, a new window will open indicating whether the QC has ‘passed system
test’ or ‘failed system test’ and will provide results. If the scan has not passed, repeat up to 3 times. If
the machine continues to fail, call Hologic for assistance (1-800-321-4659).
11. If the ‘passed system test’ message appears, click ‘Ok’. The main QDR screen should appear. The DXA
machine is now ready for use.
Preparing Participants:
The RA will explain what the DXA machine is and how it works to the mother and child, pointing to the DXA
machine.
[RA TO MOM AND CHILD]: Now we would like to measure CHILD’S body composition using a machine
called a DXA machine. We’d like CHILD to change into a pair of Viva scrubs and t-shirt for this scan.
64 | P a g e
We’ll then have him/her lie down on the DXA bed and stay as still as possible for about 3 minutes while
the scan is being taken. The bed will slowly move up, down, forwards and backwards and the C-arm will
also move along the length of the bed, but nothing will ever touch CHILD. At the end of the scan, we’ll
print out a copy of the scan image for you and CHILD to take home. Do you have any questions?
The RA then asks the child to remove any metal from his/her body including jewelry, hair ties, or bras with
underwire or metal clasps. Sports bras free of metal clasps or tank tops will be available for participants to
insure that breast tissue is centered over the chest rather than to the sides. If there is any non-removable
jewelry or surgical metal, the RA should record the type of metal on the child’s body on the DX12 form.
[RA TO CHILD]: Please remove any metal you may be wearing when you change, you can place
everything in this bin and I’ll give it back to you as soon as the scan is over.
The RA will direct the child to a private room and instruct him/her to change into a pair of Viva scrubs and t-shirt
for the scan.
[RA TO CHILD]: Now we need you to change into this Viva scrubs and t-shirt. Here is a private room for
you to use. You may keep your underwear on.
Before the RA leaves the child to get dressed, the RA will privately ask the child if they have any of the following
contraindications: If the child answers yes to any of these conditions, they cannot have a DXA scan today
[RA TO CHILD]: For your safety, we do not perform DEXA scans on people who:
•
Have a pacemaker
•
Or have had an X-ray in the past week
•
[IF FEMALE] Are pregnant or think they could be pregnant
Do any of these apply to you?
Performing the DXA Scan:
Entering the biographical data:
1. On the computer, click ‘perform exam’ on the main QDR window.
2. A ‘Select a Patient Window’ will open. Sort the list by the Patient ID by clicking that column heading.
Locate the child’s ID in the list and select “edit patient” from the top right corner of the screen. If you
cannot locate the child’s ID select “new patient” and continue to step 3 below.
3. Enter the following information in the specified fields below:
a. Last name: Child’s last initial (if the child has two last names use the first letter of the first last
name)
b. First name: Child’s first initial
i. These initials should be recorded as is on the DX12
c. Patient ID: Child’s Viva ID, without the C
d. Ethnicity: select “White” for all scans.
e. Sex: Enter the participant’s gender
f. DOB: Enter participant’s month, day and year.
65 | P a g e
g. Weight : Enter participant’s weight in kilograms from the AN12 form
h. Height : Enter the participant’s height in centimeters from the AN12 form
i.
4. Do not enter the information into the following fields:
a. Identifier2
b. Referring Physician
c. Menopause age
Child’s last initial
Child’s first initial
NOTHING
Gender
Race
Month
Viva ID w/o C
Day
NOTHING
Year
NOTHING
NOTHING
Weight
Height
NOTHING
5. Click ‘ok’ to confirm. If the patient ID already exists in the system the RA will need to return to the
previous screen and select the participant’s age 7 visit scan and select “edit” to add the new Early Teen
Visit Scan to the same file.
6. The ‘Select a Patient Window’ will open up again, with the new patient highlighted. Click ‘ok’ in the
lower right-hand corner
7. A window will open asking for Patient Confirmation
MM-DD-YYYY-####
66 | P a g e
8. In the accession number field, enter the date of the scan in the format: MM-DD-YYYY followed by the
last four digits of the child’s viva ID (e.g. 02-08-2007-1234). Click ‘ok’.
9. The RA then chooses ‘Project Viva’ from the drop down menu. The computer is now ready for scanning.
Positioning:
The RA will now position the child on the bed.
[RA TO CHILD]: Now we are going to start the scan! You can sit up on the bed and then lie down on your
back with your heading facing the door and your feet facing the computer. I’m going to move your
arms, legs and head (and body?) so that you are in the right spot for the scan. Once I position you, I need
you to stay as still as you can until the scan is over.
1. The child will be supine with hands on his/her side with fingers stacked. The RA will make sure that the
shoulders do not roll inwards.
[RA TO CHILD]: Now I’m going to put your hands by your sides like this. Try not to move!
2. The RA will make sure the body is straight by using the head and foot center lines as a gauge. The head
should be positioned about 4 fingers distance from the top edge of the bed or 2 fingers distance from
the black guideline along the top edge of the scanner bed.
[RA TO CHILD]: I’m going to move your head and body just a little so you are nice and straight. Good job!
3. The RA will then rotate the child’s legs inward 25 degrees until the toes touch.
[RA TO CHILD]: Now I’m going to move your feet so that your big toes are touching. This is so the
scanner can see all the bones in your legs!
a. If the child has difficulty keeping his/her toes touching the RA will tape the feet together with
medical tape to secure them in place. [Optional, use tape only if child cannot hold position:]
[RA TO CHILD]: Now I am going to tape your feet together so they stay in the right spot.
4. The child’s entire body must be within the black guidelines along the edge of the bed. If the child does
not fit on the scan bed it is best to have their feet hang off the bottom on the bed. If a child is too big to
fit within the black boundary lines, the RA should allow the child’s left arm or left leg to come off the
bed. (If a limb is positioned off the bed, the secondary RA may need to support and hold the limb steady
as the scanning bed moves. The secondary RA should wear the lead vest that is hanging on the door to
the hallway of the visit room during this maneuver).
5. The RA tilts the child’s chin up slightly towards the ceiling.
[RA TO CHILD]: Look up just a little bit so the camera can see your neck! Nice job.
6. The RA then asks the child to remain as still as possible.
[RA TO CHILD]: Great job! Now your job is to stay very still so the scanner can get a good picture.
Remember that the bed is going to move, so it’s really important for you to stay really still and quiet. It’s
okay to look around with your eyes, but try not to move your head or your body. Ready? Here we go!
67 | P a g e
Scanning:
1. The RA starts the scan by clicking the ‘start scan’ button on the computer. The RA should pay attention
to the child and computer screen to ensure the child is staying still and the scan image is clear.
2. If at any point the scan must be stopped, the RA can click ‘abort’ on the computer or press the red
emergency button or the black runners lining each side of the bed. If the child has made any major
movements, the scan must be stopped and restarted. To restart a scan after aborting, see the next
section.
[RA TO CHILD] Remember to stay still like a statue. You’re doing a great job! Keep your toes together just
like that! Right now the scanner is taking a picture of the very right side of your body. Now it’s starting to
move over the middle part of your body. It’s taking a picture of your toes, and now your legs, now your
chest, and pretty soon you’ll it see right over your head! Remember to stay nice and still. Ok, we’re
almost done! The scanner is just going to peek over to get a picture of the left side of your body. Right
now it’s getting a picture of your shoulder, and your legs, and now your feet. Nice work! Your picture is
going to look great.
3. After the DXA machine has completed the scan, the bed will continue to move and reposition itself. The
RA should instruct the child that he/she may move but should not sit up or get off the table. Once the Carm and bed have finished repositioning, the RA should help the child off the table, and instruct him/her
to change back into regular clothing. The scan will stop automatically when finished. See next section
for instructions on printing the scan image.
[RA TO CHILD] Great job! The scan is finished now, so you can move out of the position I placed you in,
but don’t get up until the bed has finished moving. I can help you down from the table. You can go
change into your regular clothes now while I get your picture ready. Thanks for staying so still!
4. Next, the RA cleans the DXA bed with disinfectant (non bleach) spray/wipes and wipes down with a
paper towel. The RA then proceeds to the computer to print an image for the participant.
Aborting and restarting a scan:
1.
2.
Press ‘Abort’ button on screen.
Exit windows to return to the first screen seen after the QDR software is launched (this screen has
the QDR, Archive, System Backup buttons).
3.
Go to the ‘Utilities’ menu located at top of the screen.
4.
From the dropdown menu choose ‘AP Reposition.’
5.
On the DXA control pad (located at the head of the DXA bed), press and hold “Enable” button, which
will be flashing. This will start to reposition the DXA C-arm and bed to the original start position.
6.
If a ‘Timeout’ pop-up message appears on the computer screen, go back to step 3 and start again.
68 | P a g e
7.
Once the bed has returned to its original position, repeat steps from entering the biographical data
section above to restart scan.
8.
In the onscreen comments section and the comments section on the DX12, note that multiple scans
were performed and which scan is the scan to be analyzed.
Printing DXA image:
1. Click ‘analyze scan’ on the computer screen.
2. Click ‘Next’. A window displaying the DXA image will open.
69 | P a g e
3. Prepare the image for printing:
a. Click ‘regions’ to remove data from the screen
b. Click ‘sun/moon’ to remove analysis lines from the image
c. Use the Image Toolbox section to adjust the contrast to maximize the definition of the image.
d. Capture a screenshot by clicking ‘Ctrl’ and ‘Print Screen’ at the same time
e. Minimize the scan image
f. Open the WordPad file “Print DXA Image” on the desktop. The file should be in landscape
orientation with 0.5” margins on all four sides.
g. Paste the screenshot into WordPad by clicking ‘Ctrl’ and ‘V’ (or Edit > Paste)
h. Print the image by clicking File>Print.
i. Close the word pad document without saving changes
Note: Make sure that the picture given to the participant does not contain actual data.
[RA TO CHILD] Here is a picture for you to keep! You did a great job. I hope you had fun!
4. Navigate back to the QDR Program. Exit analysis mode by clicking ‘cancel’ on the image screen.
70 | P a g e
5. A window will open to verify exit of the analysis. Click ‘Yes’.
Analyzing the DXA image:
Project Viva RA’s will no longer perform DXA analysis or line placement. This task will be reserved for a fellow or
another individual who receives individual training from experienced operators. In the past, training has been
completed at the Children’s Hospital of Philadelphia.
Archiving Data:
At the end of each day, the RA archives all the new scans.
1. From the main window, the RA clicks ‘archiving’. The new scans will be listed under the ‘un-archived’ tab
on the top of the screen.
2. The RA sorts by date, and selects the scans from that day.
3. The RA inserts a CD in the CD drive and clicks ‘archive’.
4. After the archive is complete, the RA removes the first CD and inserts the second one.
5. The scans will now be located under the ‘archived once’ tab on the top of the screen. After locating the
scans, the RA clicks ‘archive’. In this mode, data and pictures are saved.
System Back Up
Once a week, the RA does a system backup. In this mode, only data is saved.
1. The RA clicks ‘system backup’ from the main window and inserts a CD into the CD drive.
2. The RA then clicks ‘archive’.
71 | P a g e
Troubleshooting
The DXA machine, like any other, intermittently experiences glitches and errors. RA’s should first exit the QDR
program and restart the computer and machine to see if this solves the problem at hand. If a problem persists,
contact the Project Manager or Data Manager. At this point, the OM or DM may refer to the Hologic QDR
Discovery Operator’s Manual or will contact Hologic directly for assistance. Hologic can be reached at the
following number:
Service/ User Support: 1-800-321-4659
Hologic , Inc- Belford, MA location: 781-999-7300
If the OM or DM is unavailable, the RA may troubleshoot the error to the best of his/her ability and may call the
support numbers listed above.
If a serious error that occurs and cannot be resolved by restarting the computer, a detailed description of the
error should be recorded in the DXA note pad above the computer. This information should also be e-mailed to
the RA’s supervisor for their record.
Supporting Documents Not Included in the Protocol
1. Early Teen DXA Form (DX12)
72 | P a g e
73 | P a g e
e. eNO Protocol and Script
Introduction
Nitric Oxide (NO) is a naturally occurring gas in the lungs that is associated with airway inflammation and
asthma. Nitric Oxide is measured non-invasively in the exhaled breath of an individual. Project Viva is
measuring exhaled NO (eNO) from child participants and ambient NO from the visit room or setting where the
in-person visit is held. All measurements will be performed using the Aerocrine NIOX MINO. Breathing
maneuvers are simple and require participants to breath into the mouthpiece of the NIOX MINO at a steady rate
for a few seconds. Measurement values will be displayed on the screen of the NIOX and recorded on the NO12
form by Research Assistants.
Preparing for the Measurements
•
The NIOX must be “warmed up” before being used for measurements. Plug the NIOX into an outlet and
allow approximately 10-15 minutes for the machine to warm-up. The machine will beep indicating it is
ready for use. The machine may be left idling after warm-up is complete, while the RA and participant
complete other visit components.
Equipment
Aerocrine NIOX MINO
Protocol
•
•
•
•
•
•
•
•
•
•
After the NIOX has warmed up, obtain an ambient NO reading:
o Tap the Menu Icon on the lower right-hand side of the screen
o Tap the Ambient Icon (3rd icon from the top on the right-hand side of the screen). See image
below:
Allow approximately 4 minutes for the machine to complete the measurement. Once complete, the
machine will beep and display the measurement on the screen. Record the results on the NO12. (Note:
Ambient measurements may be taken after the child has completed the maneuver).
Attach a new mouth piece to the back of the NIOX machine (the side without the screen).
Position the fold-out mirror facing the front of the machine. The mirror allows the participant to view the
visual incentive while completing the maneuver.
Explain the maneuver for completing the measurement. Use the demonstration feature to help explain the
visual incentive.
Once the participant is prepared, tap the Cloud Icon on the Home Screen to activate the machine.
Instruct the participant to exhale completely before placing his/her mouth onto the mouthpiece. Then
instruct the child to place his/her mouth on the mouthpiece and take a deep breath in. Instruct the
participant to exhale with a steady breath, and coach him/her to maintain an even pace.
When the measurement is complete, the machine will make a clipping sound and the screen will show a
timer and two clouds floating. Inform the participant that they can stop exhaling:
o Great job! You can stop breathing out now.
After approximately two minutes, the results of the measurement will be displayed on screen. Copy the
results onto the NO12.
Repeat the procedure above a second time.
After the measurement has been recorded, turn off the machine:
o Tap the Settings button on the lower left-hand side of the screen. See image below:
74 | P a g e
o
•
Tap the Controlled Power Off button. See image below:
o Select OK to confirm
Leave the Niox machine plugged into a power outlet whenever possible.
Script
[To Child} For this activity, you are going to take a breath in and breathe out, just like you normally would. Then,
before taking your next breath in, put your mouth on the mouthpiece and take a deep breath in through the
mouthpiece. As you inhale, you’ll see a cloud getting bigger on the screen. When you finish breathing in,
breathe out at a nice even pace (don’t blast out!). As you breathe out, you’ll see the cloud float higher or lower,
and the machine will make a steady sound. Your goal is to breathe at a nice, steady pace so the cloud stays right
in the middle, shaded area and so the machine doesn’t beep. When you hear a clip sound and see a timer on the
screen, which means you’re done! I’ll be helping you too, and will let you know if you should be breathing faster
or slower, and when you can stop. Do you have any questions?
To display the demonstration:
•
•
•
Tap the Menu Icon in the lower right-hand side of the screen
Tap the Demo Icon indicated by a D.
Tap the left arrow twice to return to the Home Screen after the demonstration is complete
Supporting Documents
1. Early Teen eNO form (NO12)
75 | P a g e
f.
Blood Pressure Protocol and Script
Introduction
At the Age 12 Visit, the Research Assistant should obtain one set of 5 blood pressure measurements, each oneminute apart, from the child participant using the Omron HEM-907XL automated blood pressure recorder. The
Research Assistant should note the time of day, room temperature, pulse and activity state of the child at the
time of measurement. Blood pressure varies from minute to minute, so it is necessary to take multiple readings.
The readings will be averaged for data analysis. Before taking any measurements, the Research Assistant should
first verify that a signed Consent Form has been obtained.
Blood pressure is measured as systolic pressure/diastolic pressure. Systolic pressure indicates the pressure of
the blood as it is pumped out of the heart and is the higher number displayed on the Omron monitor. Diastolic
pressure indicates the pressure of the blood when the heart is relaxed, and is the lower number displayed on
the monitor. While there is a single accepted normal range for blood pressure for adults, the range of normal
varies in children based on a child’s age, gender and height measurements.
Preparing for the Measurements
Blood pressure measurements should be taken with the child sitting quietly and with his/her right arm extended
in a manner that the brachial artery is perpendicular to her heart. This is easily accomplished by having the
child sit in a chair with the arm, resting, and palm facing up, on a table or desk. The arm should be kept straight
and prevented from moving during the measurements. Furthermore, the child should not speak during or
between measurements. If the right arm is not available for taking the reading (e.g. a cast is present) the
Research Assistant should attempt the measurement using the left arm. If this is unsuccessful, the Research
Assistant may take a blood pressure reading on the child’s calf. This attempt should begin with the right leg and
then follow to the left, if needed. If blood pressure is taken on any limb other than the right arm, this should be
noted in the comments section of the form.
The Omron HEM907XLOmronmachines come with blood pressure cuffs, an air tube, AC adapter, and battery
pack. The air tube, with the threaded connectors (“screw-in”) and cuffs will be used for the Age 12
measurements. The Research Assistant should attach the cord to the Omron machine.
The Omron cuffs come in 4 different sizes: Small, Medium, Large, and Extra Large. It is critical that blood
pressure measurements be taken with an appropriately sized cuff. A cuff that is too small can result in artificially
high readings and a cuff that is too large can result in difficulty obtaining measurements. The Research Assistant
should never assume that the child participant naturally fits into a medium-sized cuff. Rather, each child
participant must be “fitted” for the appropriate size cuff. To do this the Research Assistant should first use the
child’s MUAC measurement to select the proper cuff size. The MUAC measurement should fall within the range
printed on the outside of the Omrpn Cuff. If the child’s MUAC measurement is right at the cut point, select the
smaller sized cuff. Next the RA will locate the brachial artery on the inside of the right arm using two or three
extended fingers. The thumb should not be used to locate the artery. The brachial artery is located on the
inside of the elbow, just above the elbow crease between the elbow and shoulder and slightly medial to the
center of the arm (toward the body when arm is held palm up). The cuff should then be placed on a bare arm.
The Research Assistant should hold the arm steady with one hand, align the “ART” arrow on the cuff with the
76 | P a g e
child’s brachial artery, and wrap the cuff snugly around the arm (so that there is room for only 1 finger between
the cuff and the arm). If the straight white line on the outer edge of the cuff falls within the “size range”
indicated on the inside of the cuff, than the fit is correct. If the line is very close to or over the edge of the “size
range,” the Research Assistant should choose a cuff that is smaller or larger, as indicated. The fitting procedure
should be repeated until the Research Assistant finds a cuff that appropriately fits the child. It is important to
note that larger cuffs may sometimes cover the child’s elbow. This will not interfere with the measurement.
The Research Assistant should put the cuff on the child and then make sure the child is comfortable before
beginning the blood pressure measurement. The Research Assistant may demonstrate for the child by gently
squeezing over the cuff on the child’s arm. Optimally, blood pressure readings should be taken when the child is
calm and relaxed. As such, the Research Assistant should take the time necessary to acclimate the child to the
procedure.
Protocol
•
•
•
•
•
•
•
•
•
•
After the child has been sufficiently introduced to the procedure, the Research Assistant should connect
the cuff to the threaded connector on the gray cord.
Turn the machine on by pressing the ON/OFF power button.
Verify that the cuff and the child are positioned correctly. The child should be sitting quietly and should
be instructed not to speak during or between readings.
Use the MODE dial to “SINGLE” to set the machine.
Set the P-SET (inflation level setting) Knob to the target pressure value of 160 mmHg
For children, the blood pressure set point is 160 mmHg. This means that the cuff will inflate
with 160 mmHg of pressure before beginning to release pressure and take a reading. This set
point is 10mmHg lower than adults and is intended to ease discomfort that children may
experience when a higher amount of pressure is used.
Press the START button to begin the measurement procedure.
After each measurement, the machine will display the single blood pressure reading on the screen.
At that time, the Research Assistant should start the stop watch, record the state of the child, systolic
pressure, diastolic pressure, and pulse on the Child Blood Pressure Form (12BP).
The RA will then press the START button again one minute after the reading to take the next
measurement.
Repeat the measurement until five complete readings have been obtained each one minute apart, the
Research Assistant should then take the cuff off of the child and turn the machine off.
1. It is important to note that a set of five readings are required.
2. The Child Blood Pressure Form allows for ten possible measurement trials. Ten possible trials
allow the Research Assistant to effectively obtain a complete set of readings. It is important to
note that all measurements, including those with errors, should be recorded. If the machine
displays an error code during one of the trials, the Research Assistant should record “-9” and the
reason for the error in all applicable fields. The Research Assistant should similarly note the
error, and any specific error codes displayed, in the comments section and continue with the
measurements until five consecutive readings are obtained.
77 | P a g e
3. Example: If three blood pressure measurements are obtained, an error code is displayed on the
fourth trial, and then two successful measurements follow, the Research Assistant would code
six blood pressure readings in total. These readings would be recorded in order, in the first nine
fields: the three initial readings (fields 1, 2and 3), the error trial “-9” (field 4) and the two
consecutive readings (fields 5 and 6).
Script
Now I’m going to measure your blood pressure using this automated machine. You’ve probably had this done at
the doctor’s office before.
First, I’m going to wrap this around your arm, and when I turn on the machine you’ll feel a little pressure like this.
[RA squeezes directly over the cuff.]
The machine is going to take your blood pressure 5 times in a row with about a minute break in-between. I need
to you sit as quietly and as still as you can when the machine is running.
Only a few more to go. You’re doing great!
That’s it. We’re all done!
Troubleshooting
Any error code that the machine displays should be noted. The owner’s manual should be referred to for
possible interventions. Alternatively, customer service can be reached at 1-877-216-1336 and the machine
can be sent to Omron Healthcare, Inc. 1925 W. Field Court Lake Forest, IL 60045 for repairs. Each Omron
machine is sent for calibration on a biannual basis.
Supporting Documents Not Included in the Protocol
1. Early Teen Blood Pressure Form (BP12)
78 | P a g e
79 | P a g e
g. Step Challenge Protocol and Script
Introduction
The Step Challenge consists of a 3 minute step test where children step up and down on a 12-inch high sturdy step to the
sound of a beat or rhythm of a song and is used as a measure of cardio-respiratory function and physical fitness endurance.
Dyspnea is one of the cardinal symptoms of respiratory disease. The severity of Dyspnea can range from barely noticeable
to debilitating in some cases. We will use the Dalhouse Dyspnea Scale to allow children to match his/her feeling of dyspnea.
Preparing for the Measurements
The research assistant will place a 12-inch high sturdy bench/step against a wall or on a carpeted area to
prevent the bench from shifting while the child is doing the step test. The RA then demonstrates stepping in
time with the beat of the metronome or song with a tempo of 96 bpm.
[RA TO CHILD] Now we are going to do a stepping activity. Your job is to step up and down on this step
along with the beat. I’ll show you how it looks.
The RA will face the step, step one foot up on the first beat, step up with the second foot on the second beat,
step one foot down on the third beat, and bring the second foot down on the fourth beat. (The sequence
alternates feet, but it doesn’t matter if the lead foot changes).
[RA TO CHILD] Up… Up… Down… Down…Next, you’ll do it. Do you have any questions?
The research assistant then equips the child with a pulse oximeter. The sensor should be attached to the watch
portion and placed on the child’s right wrist. The RA should make sure the watch is secured then place the
child’s index finger into the sensor in the direction indicated by the picture.
[RA TO CHILD] Now I’m going to put this watch around your wrist and put this part on your pointer
finger. It tells us how fast your heart beats while you are stepping up and down. Afterwards I’m going to
have you sit in this chair with the watch on. It will show us how fast your heart beats when you’re not
exercising.
Equipment
•
•
12-inch high sturdy bench/step
Metronome set at 96 beats/minute
•
•
Stop watch
Pulse Oximeter
Script
First the RA turns on the metronome at 96 beats per minute. Also, the RA may offer the child a song to listen to
that matches the 96 beat per minute tempo. The RA makes sure to have the timer or stopwatch in hand and
ready to use.
Next, the RA positions the child in front of the step and helps him/her count out the beat in place. Make sure that
the child does not practice stepping onto the step because this will affect the heart rate.
[RA TO CHILD] When you hear the beat we’ll step like this: up, up, down, down, up, up, down, down…
Once the child understands the rhythms, start coaching.
80 | P a g e
RA TO CHILD] Are you ready to give it a try? Here we go! Up, up, down, down, up, up, down, down…
When the child starts stepping, the RA presses ‘start’ on the stopwatch or timer. Time the child for 3 minutes. Let
the child know when 1 and 2 minutes have passed. Feel free to count with the child and make sure to give
him/her plenty of encouragement to keep him/her stepping.
[RA TO CHILD] Great job! Keep going! You’re doing a great!
Make sure the child stays in time with the beat and does not go really fast or too slowly.
[RA TO CHILD] Try your best to stay with the beat- up up down down. Good. Keep going!
The RA should count out the final steps to help get a consistent reading.
[RA TO CHILD] Last step – up, up, down, down. Great job! Now take a seat over here and try to stay as
still and quiet as you can for 2 minutes.
RA records the heart rate from the pulse oximeter as soon as the step test is completed. The heart rate is
displayed on the bottom of the screen. The RA leaves the stopwatch or timer running in order to record the
child’s heart rate at one minute and at two minutes after the test is complete.
One minute after the end of the step test, the RA records the one-minute recovery heart rate from the pulse ox.
Since the stopwatch/timer is left running, this will be recorded when the stopwatch/timer reaches 4 minutes.
Next the RA records the two-minute recovery heart rate from the pulse ox. This is recorded when the
stopwatch/timer reaches 5 minutes.
The RA should then offer the child some water, remove the watch and clean the finger sensor with an alcohol
swab.
[RA TO CHILD] We can take this off now. You did a great job!
After the Step Test is complete the RA will administer the 3 pictoral scales for Dyspnea and the corresponding
question breathlessness scale from the ST12 form.
[RA TO CHILD] We would like to know how you felt during or immediately after the exercise test
that you just did. Please answer Yes or No to these descriptions of feelings. There are no right
or wrong answers
E1a.
E1b.
E1c.
E1d.
My breathing is heavy.
My chest feels tight.
I feel that my breathing is rapid.
I cannot get enough air.
[RA TO CHILD] We would like you to pick the picture that best describes how your breathing felt
during or immediately after the exercise test that you just did. There are no right or wrong
81 | P a g e
answers. The pictures in front of you show how your breathing might feel, from no difficulty
breathing at all, to the most difficulty breathing you can imagine.
A
1
2
3
4
5
6
7
1
2
3
4
5
6
7
1
2
3
4
5
6
7
B
C
E2a. Point to A: [RA TO CHILD] This scale simply asks you to tell how hard it was to breathe –
from nothing at all, to the hardest breathing imaginable. Please pick the picture that best
describes how you felt during or immediately after the exercise test.
E2b. Point to B: [RA TO CHILD] This scale about feelings in your chest. Please pick the picture
that best describes how you felt during or immediately after the exercise test.
E2c. Point to C: [RA TO CHILD} This scale about feelings in your throat. Please pick the picture
that best describes how you felt during or immediately after the exercise test.
[RA TO CHILD] Finally, we would like to know how you feel when you run as hard as you can.
Please answer Yes or No. There are no right or wrong answers
82 | P a g e
F1a.
My breathing is heavy.
1
YES
2
NO
F1b.
My chest feels tight.
1
YES
2
NO
F1c.
I feel that my breathing is rapid.
1
YES
2
NO
F1d.
I cannot get enough air.
1
YES
2
NO
The RA will record the child’s responses on the ST12 form.
Supporting Documents Not Included in the Protocol
1. Early Teen Step Challenge Form (ST12)
83 | P a g e
h. Spirometry Protocol and Script
Equipment
•
•
•
•
•
EasyOne spirometer
3L calibration syringe
Calibrationn Spirette
Calibration adapter
Spirometer
•
•
•
•
•
Laptop
Screen connector cable
New spirette for participant
RA’s demonstration spirette
Proair and spacer
•
•
•
nose clips
stopwatch
chair with arms, without
wheels
Preparing for the Measurements
Calibration should be performed once every testing day. Spirometry should be performed only after height and
weight have been measured as height and weight must be entered into the EasyOne before spirometry can be
administered. Administer the questions on the SP12 form to determine if spirometry and/or bronchodilation
should not be administered. For question B3 “Has a doctor, physician assistant or nurse practitioner ever told
you that your child has an abnormal heart rhythm?” a heart murmur does not count as an abnormal heart
rhythm. The RA should code this as “no”.
Spirometry is a very coaching dependant procedure, if at any point you feel that the child simply does not
understand your directions, please call on another RA to assist.
•
•
•
Connect the EasyOne Spirometer to the laptop computer using the white connector cable.
Press and hold spirometer “ON/OFF” button for a few seconds until “EasyOne” appears on the
spirometer display. Caution: You should always have the USB cable properly connected and the
spirometer “on” before opening EasyWare. If you open EasyWare first, the computer may not recognize
the presence of the spirometer when it is connected and turned on.
Open EasyWare Software and observe a display on the computer screen similar to the one shown below
(“Device connected” is shown instead of “USB Cradle connected” in the lower right hand corner of the
screen). After a few seconds, the message “SerNr xxxxx / Device connected” should appear to confirm
the computer/spirometer connection. Confirm that the SerNr shown on the computer display matches
the SerNr on the spirometer. (If they do not match, the computer has not yet sensed the connection
with the spirometer). Observe the records listed by Nr (number) and the set of icons at the top of the
display.
Note: Delays of 15 min or longer (very unusual) at any point during the use of the spirometer/computer system
will cause the spirometer to turn off. Use the spirometer “ON”/OFF” button to turn it back on. The “EasyWare”
display will return to the spirometer screen. The computer may go into sleep mode or may turn off also. Try
moving the curser or depressing any key on the computer to re-awaken it. If that does not work, use the
computer on/off button to regain use of the computer. As you gain experience in the use of both devices, it will
become apparent what path to follow in order to return to the point in the protocol where you left off.
84 | P a g e
Spirometry Demonstration:
• Explain and demonstrate the procedure to the child (see script below)
o Click on the “new patient” icon on the computer display and confirm that the “Edit Patient Data”
display appears (See section 8.4.1)
o Enter “Low Flow Ck” in the Patient ID field and your “Tech ID” in the Tech ID field.
Do not enter anything into the name field!
o Enter any number between 60 and 250 in the height field and any number in the weight field.
(Height, Weight, and Birth Date accuracy are not important for this particular maneuver, but
numbers must be entered to allow the technician maneuver to proceed).
o Next perform an FVC maneuver with you as the “participant” to confirm that the spirometer does
not “cut off” during the “low flow” period near the last of your maneuver.
o Use two trials to demonstrate to participant the proper techniques for achieving acceptable and
repeatable maneuvers. Go through the coaching points verbally as you coach yourself to the point
where the mouthpiece is properly situated. Two trials are enough if both are acceptable and
repeatable.
Note: Repeatability at 0.20L for both FVC and FEV1.0 is sufficient for Low Flow checks.
o Be sure to complete a maximal exhalation so that the computer display will show the spirometer’s
performance at low flows. The primary purpose of this maneuver is to confirm that the spirometer
does not prematurely “cut off” at low flows.
Pre-Bronchodilation Protocol
•
•
Partially open the wrapper around the spirette leaving the mouthpiece covered by the plastic wrap.
Place spirette into the spirometer aligning the arrows so they match.
Enter the demographic data by following these steps:
o Press and hold the ON/OFF button
o Select “New Patient Icon” which resembles an envelope with no address on it
o
o
85 | P a g e
Enter the child’s first and last initials without spaces, full Viva ID number, birthdate, child’s height in
centimeters, and weight.
Select child’s gender and ethnicity. Leave Asthma status as “NO” and Smoker as “Never Smoker”
•
[TO MOM] Now the machine wants me to enter CHILD’s ethnicity. Should I enter Caucasian, Asian,
Hispanic, African or Other?
•
Enter the initials of the RA performing the test then press ENTER or OK.
•
To begin the test, select the yellow spirometer Icon to begin communications with the EasyOne
Spirometer
•
Next, on the EasyOne select RECALL then Previous Test to begin testing. Select FVC (Expiratory) by
pressing ENTER on the Spirometer and proceed to the Demonstration Section Below
•
Alternatively if the Easy Ware software is Malfunctioning, the EasyOne Spirometer can be used without
the computer by following the following steps:
o “Perform Test” from the main menu by pressing ENTER.
o Press ENTER again to perform a test on a new subject.
o Enter the child’s full Viva ID number, then press ENTER.
o Enter the child’s first and last initials without spaces, then press ENTER.
o Enter the child’s current age, then press ENTER.
o Enter the child’s height in centimeters, then press ENTER.
o Enter the child’s weight,
o Select the child’s ethnicity by using < > keys to scroll through the choices, then press ENTER.
o Select the child’s gender, then press ENTER.
o Enter the child’s smoking status by using < > keys, enter NO for all kids then press ENTER.
o Enter the child’s asthma status by using < > keys, enter NO for all kids then press ENTER.
o Enter the initials of the RA performing the test then press ENTER.
The “Test” screen should now appear. Select FVC (Expiratory) by pressing ENTER.\
The EasyOne will show a prompt that says “Block spirette until prompted to blast out”. Do this by
making certain that the spirette wrapper remains on the mouthpiece. Then press ENTER. Hold the
spirometer steady and quietly while baseline is set. An audible signal will sound when the baseline has
been set. Now remove the wrapper from the spirette.
The EasyOne will then prompt the user to “Blast Out”. Hand it to the child, who should be sitting in a
chair with arms and no wheels. The child has about 15-20 seconds to start the effort before the
machine will time out. If it does time out the machine select RETRY and press ENTER.
Once the spirette is securely in the mouth, ask the child to blast out for as long as possible. Tell the child
to stop when the spirometer beeps after a plateau is reached.
At the end of the child’s effort the EasyOne/EasyWare Software will display a message indicating the
acceptability of the maneuver. If it was not acceptable the message will say “Retry”. Record the
acceptability on the data collection form. Also record the message displayed on the screen and any
additional observations in the comments field for each effort. Use the message on the screen to coach
the child on how to improve on the next try (if the maneuver was unacceptable).
If the child gets 3 trials below a C grade in the first 3 trials, this is an indication that additional help is
needed to coach the child. PLEASE CONTACT ANY AVAILABLE RA TO ASSIST.
[RA to child – for the next few tries, my friend is going to see if you can give her an even stronger breath]
•
•
•
•
•
•
86 | P a g e
•
•
•
Repeat until three acceptable efforts have been saved. If the EasyOne says “Session Complete” and you
have not yet reached 3 acceptable curves that are maximal efforts and reproducible, select the ADD
function to go on to additional tests. Regardless of how many good efforts have been saved do not
exceed eight attempts.
In order for an effort to be considered acceptable the following criteria must be met:
o The RA conducting the test must be certain that the participant understood the instructions and
performed the test with a smooth forceful maximal expiration.
o The participant should be asked if they felt they took as maximal an inhalation as possible and
gave a maximal exhalation.
o The RA conducting the test should provide encouragement to elicit the participant’s best
possible effort.
The following events can make a test unacceptable and should be monitored closely and documented
on the form 7SPI:
• Coughing during testing
• Early termination of expiration
• An obstructed mouthpiece (either with tongue or lips)
• Hesitation at the onset of exhalation
• Improper seal on mouthpiece
• Submaximal effort
• Taking an additional breath during the maneuver
• Nasal leakage
• Excessive variability between curves
Script
[RA TO MOM] Before we begin the breathing tests I have to ask you a few questions about your child.
RA then administers questions from Section B on the SP12 form
[RA TO CHILD] Now we’re going to see how strong your lungs are! This little machine measures how much air
you can blast out of your lungs. This is how it works. First you put your nose clip on like this. Then you take in a
deep full breath, making sure you fill your lungs up all the way. Next you put this mouthpiece into your mouth, in
between your teeth with your lips around it so no air can get out, like this. Then you blast out as hard and as fast
as you can until I tell you to stop! Even if it feels like you have no more air left, it’s important to try to keep
breathing out as long as you can so that the machine can measure every last bit of air in your lungs.
RA takes an exaggerated breath and blasts out into the demonstration spirette audibly and for as long as
possible.
[RA TO CHILD] OK! Let’s get started. Go ahead and put your nose clip on. That beep means the machine is
ready!
[RA TO CHILD] OK it’s your turn. Take a deep full breath all the way in, put this into your mouth and blast out as
hard and as fast as you can!
[RA TO CHILD] Blow out as hard and fast as you can! Go! Go! Go! Keep your chin up! Keep going keep going
keep going keep going… Great job!
[RA TO CHILD] Good job! Let’s do a few more until the machine says we have three good tries!
87 | P a g e
Pro-Air Administration Protocol
After Pre- broncodilation the participant will take two doses of Pro- Air from a meter dose inhaler as follows.
Only participants who have consent for Pro-Air and do not meet the contraindications listed on the SP12 form,
will be able to receive Pro-Air.
•
•
•
•
•
•
•
•
•
•
•
•
•
Take the cap off the inhaler and spacer.
Shake the inhaler several times, hard.
Attach the spacer to the inhaler mouthpiece.
Inform participant that we will be using the nose clips again.
Place nose clips on participant
Instruct participant to :
o Breathe out gently to empty their lungs
o Place the spacer between their teeth, and close their lips tightly around it.
o Keep their chin up and breathe in slowly through their mouth.
Spray 1 puff into the spacer by pressing down on the inhaler.
Instruct participant to:
o Keep breathing in slowly and as deep as they can.
o Then to hold their breath as you take the spacer out of their mouth and count them down from
10
Count to 10 out loud and then instruct participant to release their breath.
Set timer for 1min
Take nose clips off.
Repeat procedure for next dose
After second dose set timer for 15 min (child may work on his/her questionnaire during this time) then
perform post-bronchodilation maneuver.
Post-Bronchodilation Protocol
•
•
•
•
•
•
•
Wait 15 minutes after administering the Proair (Albuterol) (Child may work on his/her Early Teen
Questionnaire during this time), then perform post-bronchodilator maneuver.
Use the > button to select “Post” then press ENTER.
The “Block spirette” prompt will then appear. After blocking spirette with its original wrapper, press
ENTER. After baseline is set, remove the wrapper.
The unit then prompts the user to “Blast Out”. Hand it to the child, who should be wearing nose clips
and sitting in a chair with arms and no wheels.
Once the spirette is securely in the mouth, ask the child to blast out for as long as possible. Tell the child
to stop when the spirometer beeps after a plateau is reached
At the end of the maneuver, a message will appear on the display indicating the acceptability of the
maneuver.
The goal is to obtain at least three acceptable maneuvers . (See previous section for further description
on acceptability of maneuvers). Regardless of how many good efforts have been saved, do not exceed
eight tries.
Uploading Results to Dr. John Hankinson
•
After spirometry maneuvers, RA’s should open the EZUpload link on the desktop to facilitate
communication with Dr. Hankinson’s website.
88 | P a g e
•
•
•
•
•
•
•
Enter your tech ID = RA initials, followed by the site (Kenmore, Home, or Other), and enter any
comments you have for Dr. Hankinson related to the spirometry maneuvers.
Next, be sure “Compress and Encrypt File (Default)” is selected, and click Upload File. This will send only
files that have not yet been sent to Dr. Hankinson from the spirometry database and will enable
feedback to be sent to Viva’s Field Supervisor in response to a review of your curves
If the EZUpload software malfunctions, Viva’s Field Supervisor will open the shortcut on the desktop to
OCCCSPIRO to link to Dr. Hankinson’s website (https://www.occspiro.us/viva).
Select the tests that were performed at this visit (PRE and POST bronchodilation) and submit the curves
for feedback from Dr. Hankinson
Please be sure to note while uploading the data if the spirometry session had a sub-optimal result –
include as much details are you are able to recall
Dr. Hankinson will review the curves and provide feedback, including any alterations his algorithm is
able to make to the grade that the EasyOne and Easy Ware software provides. He will also include any
recommendations that the spirometry testing procedures are repeated at a later date for this child to
improve validity of spirometry data.
Feedback and data from Dr. Hankinson will be returned to the same sftp site
(https://www.occspiro.us/viva) used to submit the spirometry curves. Viva operations staff will then
review the feedback and disseminate to the child RA responsible for that visit.
Managing Adverse Events:
• Occasionally, children may become dizzy or complain of a headache from blowing out too fast. Allow
the participant sufficient time between expiratory maneuvers.
• Proair (albuterol) will be administered during spirometry. This commercially available, FDA-approved
drug is given by metered dose inhaler with an Aerochamber spacer. Toxicities associated with Proair are
transient tachycardia and tremulousness that require no therapy. Should a participant experience
89 | P a g e
•
•
difficulty due to side-effects from the albuterol, allow the child to rest. Explain to both participant and
family that the effects of the medication will usually diminish after an hour. Document any adverse
reactions on the SP12.
If the symptoms are severe, do not go away within an hour, or before the RA is finished with the
participant the RA should page the physician on-call. In rare instances where an allergy to albuterol is
suspected the RA should contact the physician on call.
If participant experiences severe difficulty breathing or chest tightness:
If the visit is at Kenmore HVMA:
• Dial x69111 to report a code blue
If the visit is at another site:
•
•
•
Dial 911.
If a participant experiences any of the other symptoms found on the SP7Y, and those symptoms
do not go away within the time of the visit or there are questions or concerns, the RA should
page/call the physician on call.
The Research Assistant should complete an Adverse Event Form if the physician on-call is paged
or if 911 or x69111 was called.
Script – Post-bronchodilation
[RA TO CHILD] OK, you remember what to do. Put your nose clips back on. Take a deep full breath all the way in
and then put this into your mouth.
[RA TO CHILD] Blow out as hard and fast as you can! Keep going keep going keep going keep going… Great job!
Supporting Documents Not Included in the Protocol
1. Early Teen Spirometry Form (SP12)
90 | P a g e
91 | P a g e
i. Questionnaire Protocol and Scripts
Introduction
At the Early Teen visit child participants will complete a self-administered questionnaire, similar to the
questionnaires they complete annually by mail. This visit component is also completed by participants who opt
only to participate via mail. The participant may also choose to complete an electronic questionnaire, which is
identical in content to the paper questionnaire, using the REDCap survey tool. To complete an electronic
questionnaire, the child’s mother or guardian must provide permission and email address to which the survey
link will be sent.
Script
[RA TO CHILD] Please mark one answer for each question and then return it to us when you are finished.
Remember you don’t have to answer any question that you don’t want to.
Supporting Documents Not Included in the Protocol
1. Early Teen Questionnaire (CQ12 – M/F)
92 | P a g e
93 | P a g e
j. Actigraphy and Accelerometry Protocol and Script
Introduction
The actigraphy and accelerometry visit components will be completed by child participants at their home for the
7 days after the Viva visit date. All participants will be given the equipment and directions at the in-person visit.
They will also be provided with a USPS prepaid mailer to return the equipment after the 7 days are over.
Actigraphy
Wrist actigraphy is a technique for measuring movements of a limb over an extended recording period (days to
weeks). The signals generated by wrist movement are sensed by a tiny micro-computer contained within the
“watch” and translated into “activity” counts. Algorithms have been developed to translate these activity
counts to “epochs” (or “periods”) that correspond to times when a person is likely to be asleep or wake.
Actigraphy provides the ability to estimate sleep duration, sleep patterns (including timing of sleep and napping)
and disturbed sleep (awakenings during the sleep period) more accurately than questionnaire. This information
is important given recent research that has shown that insufficient sleep is associated with risk factors for
stroke, including diabetes. Newer devices such as the ones that will be used in Project Viva also collect data on
environmental light, which can help researchers understand the conditions surrounding the monitoring.
The participant will be instructed to wear the watch on the non-dominant wrist for 7 24-hour periods (minimum
of 5 nights, including at least one weekend/non-work day period). The participant also will be instructed on
completing a sleep journal concurrently, recording times the watch was taken off and bed and wake times. This
will provide a “backup” in case there are questions about the recording.
Equipment
•
•
•
•
Actigraph GT3X-plus monitor
Velcro wrist straps
Two copies of the informational sheets
Sleep Journal
•
•
•
Return addressed pre-paid Fed-ex envelope
Two stickers with Project Viva participant’s
name printed
Red plastic triangular tool
Setting up the Actilife Software
ActiLife 6® is a Windows compatible program that is used to initialize the GT3X+® actigraphs and to download
data from the devices.
• The ActiLife 6® software can be downloaded from the following website:
http://www.theactigraph.com/actilife/introducing6/
• When prompted, enter the product key.
• Click File > Load Template… and locate Project Viva Template
o Template will set the Sample Rate to 100 Hz and set the Naming Convention to the Subject
Name for all participants.
94 | P a g e
Configuring the Actigraph for a Participant
Before an Actigraph is given to a subject, it must be configured with basic subject information and data collection
parameters.
•
Select a fully charged monitor (solid LED light) from the multiport USB hub. Inspect the monitor for any cracks in
the case, missing screws from the back plate, or for a broken or missing black disc or O ring. If the monitor is
defective, place the monitor in the bin marked “faulty” and select another monitor from the hub. Make a note of
the reason for the faulty monitor and attach it to the monitor.
•
Launch the ActiLife 6® software.
•
Connect the GT3X+® monitor to your computer using the USB cable. The USB port is located under the O-ring seal,
which can be opened with the red triangular plastic tool.
Step 2a
•
When connected, the device status will be shown in the Devices tab.
•
Select the check box corresponding to the device to be configured and click Initialize.
95 | P a g e
Step 3
Step 4b
Step 4a
•
In the following dialogue box, enter the Start Date and Start Time.
o Begin data collection on the evening of the scheduled home visit.
o Click Enter Subject Info.
Step 5a
Step 5b
•
Enter the Subject Name and click Initialize.
o The subject name is the ParticipantID_TechID_DateStarted “C123456_ABC_YYYMMDD”.
96 | P a g e
•
The initialization progress can be seen in the Status column. When complete, the device can be
disconnected.
•
Once the actigraph is initialized, place one of the child’s name labels on the back of the monitor. Use the
red triangular plastic tool to seal the monitor. Gently turn the black disc for one and a half rotations
only; over-tightening the black disc may create extra tension causing the disc to break away from the
monitor. If the black disc breaks or is defective place it in the “faulty” bin and select another monitor to
initialize. Make sure to note why the monitor is labeled as “faulty”.
Wrist Selection the Actigraph
•
•
The actigraph monitor should be placed on the child’s non-dominant arm, i.e., the arm used less
frequently. Most people tend to typically write with their dominant hand: therefore in order to
determine the non-dominant arm, ask the child “Which hand do you usually write with?”
Make a note of which arm the actigraph is to be worn on the child’s Actigraph Watch Handout.
If the dominant arm is:
Right
Left
Refused
SP Does not know
97 | P a g e
Place the monitor on the:
Left
Right
Left
Left
Fitting the Wrist Strap
•
•
•
•
•
If the child has a watch, jewelry, or any other device on the arm selected for the monitor placement, ask
them to remove these. They may wear them on the other arm or put them back on the same arm after
the physical activity monitor has been fitted.
Select the appropriate strap size, and attach it to the monitor by threading the Velcro strap with the
fuzzy side up through the side loops of the monitor. The strap should thread underneath so that the
back of the monitor is lying on top of the fuzzy side of the strap.
Place the actigraph on the dorsal side (top of the arm) of the child’s designated wrist, similar to wearing
a watch with the black disc facing toward the fingers. Note, if the monitor is placed on the child’s right
arm, the monitor’s appearance will seem backwards, however this IS the correct placement. The logo
and phone number should be upside down if the monitor is placed on the right arm.
The actigraph should fit snugly on the child’s wrist so there is no loose movement, but not too tight
where it restricts blood flow, causes redness, or discomfort. Make sure the child is comfortable with
the placement. If the child is not comfortable with the placement, adjust the strap to either loosen the
fit or tighten the fit as long as the physical activity monitor does not move freely on the child’s arm.
The dorsal side is the preferred side for the placement of the monitor, however if the child insists on
wearing it on the palmar side of the wrist that is okay too.
Filling out the Sleep Journal
•
The participant will start using the sleep journal on the night of at home sleep exam. They will
complete 7 days of the sleep journal (7 nights coinciding with GT3X+® data collection, the
evening of the Sleep Exam visit, and the morning that the Actiwatch is returned back to study
staff)
•
Show the journal to the participant. Begin by helping the participant fill out Day 1 of the Sleep
Journal. Explain that before bed that night and then every night for the subsequent 6 nights, he
will also enter the time he will be shutting the lights off before going to sleep at night. The date
and day of the week for each page should be filled out by the staff to aid in correct completion
of the journal. If the participant refuses to complete the journal, they should still be given an
actigraph to wear and should be encouraged to fill in as much data as possible.
98 | P a g e
•
As long as the participant has the Actiwatch, they will continue to wear it. The study aims to collect a minimum of
5 days and 5 nights (and one “weekend” night) of Actiwatch® data for ALL participants. If less data are collected,
attempt to have the participant repeat the recordings.
•
You may want to suggest that the participant keep the sleep journal by their bed or other convenient so that they
remember to fill it out. The journal should be completed every night prior to going to bed.
When to Wear the Actigraph/ Removing the Actigraph
The actigraph does not have to be removed when bathing and/or during water sports. It can be worn while
showering or bathing for up to 30 minutes. When the actigraph or band does get wet, remove the watch and
wipe the underlying skin dry to avoid possible irritation. Once skin is dry, the watch can be replaced on wrist
and worn as normal. However, when engaged in contact sports (football) the watch should be removed to avoid
damage.
The actiwatch should be worn from the time the participant is given the watch until the day that it is returned to the clinic
staff from participant’s home (usually a 7 day period). Participants should also be told when it is okay to stop wearing the
actigraph – the morning of the day that the actigraph is to being returned
Protocol
•
•
•
•
•
Participants should be provided with all of the equipment and forms at the Project Viva study visit.
Participants will be instructed on how to use the actigraph at the visit, as well as shown how to
complete the sleep journal.
Study staff should confirm that the Actigraph has already began collecting data before the end of the
visit– this can be done by making sure that there is a single flash of the green LED indicator light on the
Actigraph before the visit comes to an end.
Participants should also be told when it is okay to stop wearing the Actigraph – the morning of the day
that the Actigraph is to being returned. The participant should be reminded to return the equipment in
a timely manner, along with the sleep journal, and that not until the equipment is returned will they
receive their $50 incentive.
A summary of the above information with critical points should be provided to the participant. The
information sheet should be reviewed with the participant.
Script
You’ve done a great job today! We are almost done with the visit, but there are still a few things we’d like to ask
you to do at home over the next week. Let’s go see if your mom is done with her part and we can all talk about
this together.
As we mentioned, there is a part of the visit we’d like for [CHILD’S NAME] to complete at home. This involves
wearing a watch to measure sleep patterns, completing a sleep journal and wearing an accelerometer to
measure physical activity. We will get you set up with these today, and will send them home with you. We’ll also
give you a USPS prepaid mailer to mail the equipment back to us after the 7 days are over. Once we receive the
equipment, we will mail you $50 if the activity monitor contains the required amount of information about your
99 | P a g e
activity or $25 if you return the activity monitor, but it does not contain enough information. If we do not receive
the equipment back, you will not be paid.
Here’s a sheet that outlines this part of the visit. It includes FAQs, and our contact information. Here is a copy of
the sleep journal. We’ll fill the first day out together in a few minutes. Unless you have any questions, we’ll get
right into how to wear the equipment.
We would like to wear this special watch called an Actigraph. This watch measures how much activity your body
gets and how well you sleep. You want to keep this on at all times, day and night for the next week. You can
wear it is in the shower or bath! If you do take it off, make sure you put it back on right away, on the same wrist,
and with the black disk facing toward your fingers. You should be able to stick your pinky finger between your
wrist and the band. If you get it wet, you may want to dry your skin under the band so it’s not uncomfortable.
Don’t worry about remembering all of this. I know it’s a lot! You will have directions to take home with you.
Now, let’s fill out the first day of the sleep journal.
If you have to go through a metal detector, it is best to remove the devices and put them through the machine. If
the security officers have any questions, we’ve given you an explanation letter to show them. You can also show
this to your teacher or anyone else who has a question about it.
Receiving Returned Equipment and Forms
The participant will mail the Actigraph and sleep journal using the provided USPS prepaid mailer. When
Actigraph and sleep journal are received, staff should review material for completeness and ask subject about
any relevant missing information. When the Actigraph is returned log in the return date and note any problems
with data retrieval as noted below.
Note in the contact log that the Actigraph was received and note in the Actigraph tracker. Give the actigraph to
the data manager. Do not submit the contact log until the Data Manager confirms the data is okay.
After each participant, the Actigraph should be cleaned by soaking it in warm water and mild detergent for 5
minutes, rinsing it, and drying it with a soft cloth. (Do not use alcohol!) Return the actigraph and sleep journal
to the Data Manager for processing. If the watch band is especially soiled, it may be wiped more vigorously with
disinfectant wipes. The wipes may NOT be used on the watch portion of the device. If the watch band is still
soiled after thorough scrubbing, it may be replaced with a new band.
Retrieving Data from the Actigraph
• Creating an Actigraph Folder for all Project Viva participants
o On your desktop, right click your mouse.
o Select New > Folder.
o Name the new folder “Project Viva Actigraphy Data”. This folder will contain all Project Viva
actigraph data.
The first step needs to be performed only once. If more than one researcher is in charge of actigraph
data, make sure the Project Viva Actigraph Data folder is created in a folder that all research staff can
access.
• Creating a Actigraph Folder for a new Project Viva participant
100 | P a g e
Open Project Viva Actigraphy Data folder (created in the previous step).
Select File > New > Folder.
Name the new folder “C123456_ABC_YYYYMMDD” (“ParticipantID_TechID_DateStarted”). This
folder will contain the actigraph database for the participant and the participant’s sleep journal.
The second step is performed for each new Project Viva participant; essentially, a new data folder
(which will contain the participant’s actigraph data and sleep journal) is created for each participant.
o
o
o
Step 1
Step 2
•
•
•
•
Open the ActiLife 6 software.
Connect the GT3X+®actigraph.
Select the correct device, and click Download.
Download Options screen:
o Click Select Download Location.
Choose: Desktop > Project Viva Actigraphy Data > C123456_ABC_YYYYMMDD
and click OK.
o
o
101 | P a g e
Choose Epoch length 60 seconds.
i. Make sure Create AGD File is checked
Click Download All Devices.
Step 4a
Step 4b
•
Click finished downloading to view the data. Check that at least 5 nights were recorded.
102 | P a g e
Retrieving Sleep Journal From Participant
• Review over participant’s sleep journal and make sure all information is complete.
• Scan sleep journal into computer.
• Save as a .pdf file using “C123456_ABC_YYYYMMDD_SJ” as the naming convention
(“ParticipantID_TechID_DateStarted”).
• Save the sleep journal in the participant folder in which the participant’s actigraph data is located. (See
Section Retrieving data from the Actigraph)
Sending the Data to BWH Sleep Reading Center
Weekly actigraphy raw data will be sent to BWH using an encrypted zipped file. The scheduled day that data will
be sent should be coordinated with the BWH reading center.
The participant folder that will be encrypted, zipped, and sent to BWH Sleep Reading center should be found in
the Project Viva Actigraphy Data folder created in Section 7.
The encrypted zip file should include:
• The raw files created for the participant with collected data.
• A PDF of the Participant’s sleep journal.
It is important the folders and files sent to the reading center are named correctly to prevent loss or
replacement of important raw data. The standardized naming conventions for data to be sent to BWH are as
follows:
• ZIP file – “C123456_ABC_YYYYMMDD.zip”
The ZIP file should automatically have the same name as the folder being zipped.
• Folder [to be unzipped from ZIP file] – “C123456_ABC_YYYYMMDD”
• Data Files [found in folder]:
o Actigraph Data file – “C123456_ABC_YYYYMMDD.gt3x”
“C123456_ABC_YYYYMMDD30sec.agd”
o Sleep Journal –
“C123456_ABC_YYYYMMDD_SJ.pdf”
Before uploading any studies, a folder (e.g., pviva to FTP) is created on the computer’s hard drive to store
completed zip folders that are ready to be sent to the server.
Once the folder has been created, the technician right-clicks inside the folder and select New ► Compressed
(zipped) Folder
This zip folder should be labeled: ParticipantID_TechID_DateStarted
Drag and drop the study folder into the new zipped file. It may take several moments for all the files to be
compressed and added to the new zip file.
•
Username and Password
o Each clinical site will receive a designated username and password that will be used for data
upload. This password will be changed periodically to ensure security. Sites will be notified in
advance when a change is to occur. The user name and password will be sent to the site Project
Coordinator.
o Right click the zipped folder and choose Explore.
103 | P a g e
A new explorer window will pop up, with the zip folder still highlighted. In the upper left, go to
File and then Add a Password.
o A dialogue box will pop up asking for a password to be entered and confirmed. The password to
be entered will be provided separately by Sleep Reading Center staff and should be kept
securely and never provided in correspondence with the file name. Reenter to confirm and click
OK. (Note that this is case sensitive).
o The file is now ready to be transferred to the Sleep Reading Center via FTP.
SFTP Software and Connection
Uploading of data to the Sleep Reading Center will be done via Secure (SSH) File Transfer Protocol
(SFPT), which provides additional security for research data during transmittal. Sites uploading data will
need FTP client software installed on the designated computer and may need to configure their firewall
to allow outgoing traffic for SFTP on port 22. The site institution’s IT personnel should be able to assist
in this configuration.
o FTP Client Software
A number of FTP client software packages which support SFTP transfers are available free or for
purchase. The Sleep Reading Center recommends FileZilla, (http://filezillaproject.org/download.php) but this is not required. The installation and configuration of FTP
client software is the responsibility of the site.
o Once installed, open the program. Select File ► Site Manager
o From there, select New Site
o Under the General tab, fill in the following:
Host: phslxftp2.partners.org
Port: (blank)
Servertype: SFTP – SSH File Transfer Protocol
Logontype: Normal
User: pviva
Password: to be provided to each site by the Sleep Reading Center
Select Connect.
o
•
If all information was entered into site manager correctly FileZilla should connect to the remote server. There will
now be text in the status window stating directory listing successful.
Remote Site will now list the directory on the FTP server. This may appear blank if no studies have been
uploaded by the site yet.
The username and password will automatically route to the site’s own folder on the server.
To send files, select the zipped study folders to send from the site computer (the Local Site) and drag and drop
them to the Sleep Reading Center server (the Remote Site) in the data folder. A status bar will pop up at the
bottom while it transfers and the file should be visible in the remote site afterwards.
Transfer all future studies in the same manner by dropping them into the Remote Site. Once the study has been
successfully sent to the SRC, FileZilla can be closed.
104 | P a g e
Battery Management
The GT3X+® device has a rechargeable Lithium Ion Polymer battery. The battery can be charged simply by connecting the
GTX+® Actiwatch to a computer using the USB cable. When connected, the battery voltage and charge percentage is
displayed on the Devices tab and a green LED indicator light will flash when charging. A steady green light indicates a fully
charged device. Each device should be charged for three hours, until fully charged, within 24 hours of administering to
participants. After the device has been returned, it should be charged before storage to preserve battery life, and then
unplugged for storage.
Troubleshooting
Error Message or Condition
‘Disconnected’ is displayed
Solution
Check the cable connections on the docking station and the
computer.
Connect the docking station to a different USB port on your
computer.
Verify installation of the software drivers: Select Start >
Control Panel > System > Hardware tab > Device > Manager.
Two items should be listed with the name, ‘Actigraph
Spectrum Communications Dock’. If they are not listed, or if
they’re listed with yellow exclamation points, disconnect the
communications doc, uninstall Actiware and reinstall it from
the installation CD.
‘Too many docks’ is displayed
Caused when more than one Actigraph Spectrum®
communications dock is connected to the computer at the
same time.
‘Error’ is displayed
Disconnect the Actigraph Spectrum® communications dock
then reconnect it.
Logger not found, insert logger The Actigraph Spectrum® may not be docked properly. It
into communications dock
may be upside down, not pressed securely into place or
backwards. Verify that the Actigraph Spectrum is installed
exactly the same as the installation on the top of the
communications dock.
The Actigraph Spectrum® may have a weak or dead battery.
NOTE: Actigraph devices that do not keep time correctly may still be recording movement correctly. If time is
not being maintained correctly, transmit the data to the BWH Reading Center and note this. Arrangements will
be made to replace the watch.
Quality Assurance for the Actiwatch
Each research assistant charged with the responsibility of initializing, downloading or any other handling of the
Actiwatch will be required to meet performance standards that indicate an understanding of the Actiwatch’s
battery life, use of communications dock and software, and explaining the Actiwatch and sleep journal
completion to the participant. Only personnel who meet these standards will be certified and approved to
handle the GT3X+® devices and instruct the participants.
105 | P a g e
Personnel will be required to attend a training session, or undergo local training by a certified technician.
Training will consist of:
•
Overview of Actigraphy Operations Manual, including detailed use of Actiwatch, the software, and the
communications dock.
Certification
Each staff member handling the GT3X+ devices needs to successfully complete 3 initializations. These should be
done with a certified technician present. Actigraphy data for the certifications will be collected on healthy
volunteers for at least 24 hours.
Equipment Certification
All new GT3X+ devices should be tested before administering to participants. Each device should be worn for at
least 24 hours and data should be reviewed to confirm that each device is working properly.
Supporting Documents Not Included in the Protocol
1. Early Teen Sleep Journal (SJ12)
2. Actigraph Handout
106 | P a g e
107 | P a g e
Section VI. Conducting the Visit – Mom Portion
The Age 12 child visit has the following components and questionnaires. These are listed in the order they
should be conducted. If the mom has limited time, every effort should be made to get the anthropometry
measurements. The other visit components can be done via mail or over the phone.
Visit Component
Anthropometry – Height, Weight, Bioimpedance, Waist
Early Teen Interview – family medical history
Early Teen Questionnaire – For Parents
Location
Kenmore or Home
All
All
a. Mother Anthropometry Protocol and Scripts
Introduction
During the Age 12 Visit the following measurements will be collected from Viva Moms: height, waist
circumference, weight and bioimpedance.
If the Research Assistant has not already done so, she should wash his/her hands (or use hand sanitizer) and
remove any obstructive jewelry or sharp objects from his/her being, and confirm that a signed consent has been
obtained. The Research Assistant should carefully describe all measurements and should follow the protocols
and scripts outlined below for each measurement.
Good rapport helps to secure a successful set of complete measurements. The Research Assistant should
maintain a warm demeanor and be respectful of the mother’s personal space. While taking measurements in a
standard order is preferred, the Research Assistant should use her judgment in determining when breaks and/or
changes in measurement sequence are best.
The Research Assistant should verify that a signed consent form has been obtained before beginning any
measurement procedure. All measurements should be read out loud and repeated until they are record on the
form.
Adult Standing Height and Weight/Bioimpedance
The participant’s weight/bioimpedance and height measurements are taken as a set because they both require
the participant to take off her shoes. Weight is measured using a Tanita Scale. Height is measured using a Shorr
Length Board. These measurements will be compared to participant measurements from earlier Viva visits.
Similar to the aforementioned measurements, the participant’s weight and height are also used as markers of
BMI and will help to determine patterns of weight change after pregnancy.
Preparing for the Measurements
The equipment used for these measurements needs to be carefully handled and placed in the visit environment.
If the Research Assistant is working in the Viva offices, he/she should confirm that the equipment is assembled
and stationed correctly. If working outside Viva offices the following should be noted:
• The scale should be placed on a hard, flat surface. Uneven and carpeted surfaces are unsuitable for the
scale measurement.
108 | P a g e
•
•
After assembling the Shorr Board, it should be placed firmly against a flat wall or door, and on top of a
flat, hard surface. The Research Assistant should verify that the board is stable before taking any
measurements. Whenever possible, avoid placing the board against any protrusions in the wall, such as
molding. If placing the board against a door, the Research Assistant should take measures to assure that
the door will not be opened, and should recruit the mother’s help in assuring the door will remain
closed.
When taking the sitting height, a stool or steady box, is placed directly under the Shorr Board and firmly
against the wall, also on a flat, hard surface.
Optimally the participant should be in the lightest clothing possible, so as not to interfere with the weight
measurement. Bulky clothing should be avoided whenever possible, as well, so as not to interfere with both the
weight and height measurements. Additionally, barrettes or other hair ornaments, braids, or hats should be
removed whenever possible. An optimal height is taken when the measuring plate can rest flat against the top
of the participant’s head. If the participant is unwilling or unable to cooperate with the dress and hair
requirements for any reason, the Research Assistant should still take the measurements, noting the discrepancy
in the comments section. This includes using a small rigid ruler to estimate the difference in height caused by
any hair obstruction. Regardless, the Research Assistant should record the type of clothing the participant was
wearing directly on the Mother Anthropometry Form (12MA).
Taking the Measurements
This set of measurements should be taken in the sequence indicated on the Mother Anthropometry Form:
Standing Height, Weight and Bioimpedance. Standard protocol calls for the Research Assistant to work from the
right side of the participant’s body when reading measurements. Though the weight and height measurements
are the least intrusive, some participants will be reticent to have their weight taken. The Research Assistant
should use her best judgment in this case.
Adult Standing Height Protocol
•
•
•
•
•
•
Guiding by the elbow, assist the participant onto the board. The participant’s feet should be flat against
the base of the board so that her body weight is evenly distributed.
Stand to the right of the Shorr Board at a 45-degree angle to the board.
Ask the participant to position her feet and legs into one of the following configurations:
o Both knees and feet together
o Knees together and feet apart
o Knees apart and feet together
o Knees and feet apart, thighs together
Position the participant’s arms so that they are hanging freely by her sides, with the palms facing her
thighs.
After the legs and arms are positioned, move the feet so that the mid-axillary line is perpendicular to the
floor.
Ask the participant to stand up straight. At this point, the participant’s feet, head or buttocks may or
may not be touching the back of the board. Correct positioning does not always necessitate that all
points come into contact with the back of the board. Although, one point must touch the back of the
board. Similarly, the participant’s feet may not be on the base of the board with correct positioning.
109 | P a g e
•
•
•
•
•
•
•
•
Inform the participant that you are going to position her head. Firmly cup (with a rounded, not a “V”
grasp) the participant’s chin with the left hand so that your hand goes around the participant’s ear but is
not covering the participant’s ear or mouth. Your hand should also not be touching the participant’s
chest.
Using the fingertips of your right hand, gently grasp the back of the participant’s head.
Place the participant’s head into the Frankfort Plane. The Frankfort plane is determined by: Looking at
the side of the participant’s head, drawing an imaginary line from the bottom of the eye orbit to the
participant’s ear hole and then positioning the head so that the imaginary line is parallel to the floor and
perpendicular to the Shorr Board.
Before removing left hand from the participant’s chin, re-check the positioning of the participant’s head
while simultaneously picking up the headpiece with your right hand.
Once the positioning of the head is confirmed, remove hand and ask participant to maintain the
position. Then place the headpiece firmly on top of the participant’s head with sufficient pressure to
compress the hair and make contact with the skull.
Directly face the measuring index, when taking the reading. Measure the height in centimeters, to the
nearest millimeter.
Call the measurement out loud in a low, audible voice until recorded.
Check the recording for accuracy and legibility. Record the type of clothing and any braids, hair
ornaments, or hats that the participant was wearing when the measurement was taken.
Adult Standing Height Script
Okay! We are going to start the visit today by taking some body measurements. Let’s get started with the
height measurement. Can you take off your shoes and remove your hat/ponytail/barrettes? This will allow us to
get the most accurate measurement possible.
Thanks! Now, I’d like you to step onto this board and face me, so we can see how tall you are.
Okay, now please move you feet all the way out to the sides of the boards.
Then walk your feet together until you feel either your thighs, knees or ankles touching.
Great! Now, let your arms hand down by your sides. I’m just going to check and make sure you are lined up
from the side. Keep looking straight ahead. [RA adjusts by asking the mom to move feet forward or backward.]
Now I need to adjust your head. Is okay if I touch your face?
Here comes the headpiece. You’ll feel it touch your head lightly as I take the measurement.
Great! We’re done with the measurement. You can step off the board.
Adult Weight and Bioimpedance Protocol
•
Bioimpedance should not be attempted on anyone who has a pacemaker. If a participant has a
pacemaker, mark it on the 12MA and switch the Tanita scale to weight only before taking the weight
measurement.
110 | P a g e
•
•
•
•
•
•
•
•
•
•
•
•
Make sure the Tanita scale is on a stable flat surface. Check the level gauge to make sure the air bubble
is in the center of the red circle. If the scale is not level either move to a new location or adjust the feet
to make it level.
If the participant makes a comment about weight make note
Ask the participant to go into the bathroom and pass urine.
Clean metal footpads with an alcohol swab and turn the scale on.
The first prompt asks for the weight of the participant’s clothing. Enter 0.0 for all participants.
Select Standard Female.
Enter the mom’s age in years.
Enter the mom’s standing height in centimeters to the nearest centimeter. (.4 and below round down, .5
and above round up)
Enter 00 for goal fat %.
Ask the mom to slowly step onto the scale and stand as stand as still as possible. It is essential that the
mom stands on the metal plate with clean bare feet. If the mom is wearing nylons and does not wish to
remove them a drop of rubbing alcohol can be placed in the reservoirs on the footplates to facilitate the
reading. Heels should be placed directly on the posterior electrodes and the front part of the foot
should be in contact with the anterior electrodes, with the feet parallel. The mom should be standing
unassisted and without touching anything. Ask her to look straight ahead.
The mom should stand up as straight as possible. Leaning to one side or forward can affect the weight
recorded.
Once the printer prints out the results, check for printing errors. If there are printer errors, fix and
repeat the measurement protocol. If there are no errors, instruct the mom to step off of the scale.
Using the printout results, record the mom’s weight, impedance, % fat, fat mass, fat free mass and total
body water to 2 decimal places onto the 12MA. In addition, staple the printout onto the data sheet.
Record the type of clothing the mom was wearing during this measurement on the form, as well.
Check the recording for accuracy and legibility.
Adult Weight and Bioimpedance Script
The next thing we will do is measure your weight and body composition. It is recommended that no one with a
pacemaker stand on this scale. Do you have a pacemaker?
Since the scale measures total body water, in order to get the most accurate results possible it’s important that
you try to go to the bathroom if you can. Would you mind trying to use the restroom? [If the mom refuses, move
on and make a note on the form.]
In order for the scale to work, I also need you to take off your socks. It will only take a minute and you can put
your shoes and socks back on when we’re done.
Okay. Step right up here onto the scale with one foot on each metal footpad. Please stand up tall, and I’ll let you
know when you can step off.
Great job. You can step down now and put your shoes and socks back on. Here’s your receipt. We can’t interpret
these results for you but if you have any questions about what the letters mean let me know.
111 | P a g e
•
•
•
•
•
•
•
•
•
•
Body Type –
Height –
Weight –
BMI –
Fat % –
BMR –
Impedance –
Fat Mass –
FFM –
TBW –
Standard or Athletic based on resting heart rate. All kids are considered standard.
Height in centimeters
Weight in kilograms
Body Mass Index, calculated using weight and height (kg/m2)
Percent of body that is made of fat
Basal metabolic rate in both kilojoules and kilocalories.
Measurement of the flow of electric current through the body, measured in ohms
Weight of the fat in the body
Fat free mass, or weight of everything in the body except the fat
Total body water, about how much the water in the body weighs
Troubleshooting
If the Tanita scale display indicates an error, and no other scales are available, the Research Assistant should still
take the measurement, indicating the problem in the comments section. After the visit the Research Assistant
should consult the user’s manual for possible interventions. At the very least, the RA should attempt to get a
weight measurement. This can be done by switching to the “weight only” function. The RA should note that
there is no printout for “weight only” and the weight must be recorded on the form at the time the
measurement is taken
The Tanita Scale measures a maximum weight of 400lbs. If the participant is concerned that her weight is above
this threshold, the Research Assistant can suggest trying. If the participant is not willing, this should be coded on
the form. If she is willing, and the weight is indeed above threshold, this should be coded on the form as well.
For other participants, the Research Assistant can offer to have the participant stand on the scale with her eyes
closed for this measurement. The importance of getting a complete set of measurement data should be
stressed as the Research Assistant works to negotiate a comfortable compromise with the participant. As with
all measurements, the Research Assistant should inform the participant about each step before proceeding with
the protocol. Standing height must be completed prior to bioimpedance, as height in centimeters is necessary
information that must be entered the Tanita scale.
The Shorr Boards should be examined for any damage approximately once a month. These boards are made of
wood and it is therefore especially important to check for any potential splintering. Any damaged Shorr Board
should be sent to Irwin Shorr Corporation for repair, or replaced with a new board.
Adult Waist Circumference
The Research Assistant should measure the waist circumference of enrolled Viva mothers. This measurement is
taken using a Gulick measuring tape (a , retractable measuring tape with a tension sensing spring on the end)
and will help to determine the mother’s body mass index (BMI), intended for use in future analysis.
Preparing for the Measurements
Ideally, the waist circumference measurement should be taken directly on the skin. The Research Assistant
should explain the importance of standard and accurate measurement protocols and then ask the mother to
expose the pertinent areas for measurement. The Research Assistant should record whether the measurement
was taken directly on the skin or alternatively over clothing on the Mother Anthropometry Form (12MA).
112 | P a g e
Taking the Measurements
Participants may express some discomfort or embarrassment about the waist circumference measurement. The
Research Assistant should remain mindful of the “intrusive” nature of this measurement by ensuring privacy,
only asking the mother to undress or expose herself with minimal necessity, and maintaining a positive rapport.
It is important for the Research Assistant to tell the mother what will occur during each step of the
measurement. The Research Assistant should work quickly, but not so fast that the accuracy of the
measurement is called into question. If the Research Assistant is not confident that the measurement is
accurate, the Research Assistant should attempt to repeat the measurement. If this is not possible, any
concerns should be recorded in the comments section.
Waist Circumference Protocol
•
•
•
•
•
•
•
•
•
•
•
•
Ask the participant to stand erect and still with her arms crossed in front of her chest (hold shirt up if
necessary) and abdomen relaxed.
Sit on the right side of the participant.
Identify the top of the iliac crest along the mid-axillary line on one side of the participant by palpating
(with the pads of fingers) the pelvic bone. Mark just above the site with a self-adhesive reinforcer.
Repeat the above instruction on the mother’s left side.
Gently place the measuring tape over the two circles. Ask the mother to hold one side of the tape with
a light pincer grasp.
Adjust the tape so that it is in a level, horizontal plane.
Tighten the tape by simply pulling on the end of the tensioning mechanism until the calibration red bead
is just seen.
Re-check that the tape is in a level, horizontal plane.
At the end of the mother’s natural exhalation, read the tape to the nearest tenth of a centimeter.
Call the measurement out loud until it is recorded.
Check the recorded measurement for accuracy and legibility.
Release the tape and remove the stickers.
Waist Circumference Script
The last measurement is your waist circumference. If it’s okay, we’d like to take this measurement directly on
your skin.
Can you lift up your shirt a little bit for me, just so I can see your waist? You can cross your arms and hold up
your shirt, like this. Great, this won’t take long. [If mom has a belt or tight pants on, ask her to remove the belt
and/or undo the first pant button.]
I’m going to find the top of your hip bone and mark it with a sticker on both sides. Can you show me where you
think the top of your hip bone is on this side?
Great, can you turn this way so I can do the same thing on the other side? [RA guides the mom to turn away
from him/her.]
Just breathe normally and relax your stomach. Now, I’m just going to wrap this tape around you and take the
measurement.
113 | P a g e
Can you hold this side for me with a pincer grip so the tape can still slide through? Try not to push in.
Okay, all set. You can let go of your shirt and take off the stickers. Thank you!
Troubleshooting
The Gulick measuring tape must be free of kinks or tears in order to obtain an accurate measurement. The
Research Assistant should check the measuring tape prior to every visit. If any damage is present, the tape
should be replaced.
Supporting Documents
1. Age Mom Anthropometry Form (MA12)
114 | P a g e
115 | P a g e
b. Questionnaires, Interview, Contact Information and Incentives
Introduction
At the Age 12 visit Viva mothers will be asked to complete a general questionnaire, similar to the questionnaires
they complete annually, complete an RA administered interview, as well as update her and her child’s medical
and contact information. These visit components are also completed by participants who opt to only participate
via mail.
Protocol
Early Teen Interview
The Early Teen Interview (IN12) is to be completed with the participant in private, either at the Kenmore HVMA
site, at the participant’s home, or over the phone. When an interview is conducted over the phone, the
Research Assistant should select “9- Other” as the site at the top of the form. The date on the label should
correspond to the date the interview is completed, not the date of the visit.
Early Teen Visit Medical Information Sheet
The Age 12 Medical Information Sheet (MI12) will be administered by the Research Assistant after the interview.
The script for obtaining this information should be read directly off the form. In cases of mailed visits it is
completed at home by the participant and mailed in a pre-paid envelope back to us. The purpose of this form is
to collect information on whether the mother and child are HVMA and/or HPHC members.
Early Teen Visit Contact Information Sheet
The Age 12 Contact Information Sheet (CI12) will be administered by the Research Assistant after the medical
information sheet. The script for obtaining this information should be read directly off the form. For in-person
visits the RA will also have a print out of the first page of the contact log printed from ADEPT. The RA will ask
the participant if there are any changes or updates to the information we have on file. The purpose of this is to
reduce participant burden updating their contact information if nothing has changed. In cases of mailed visits it
is completed at home by the participant and mailed in a pre-paid envelope back to us. The purpose of this form
is to collect contact and primary care physician information for the mother and child.
Early Teen Questionnaire – For Parents
The Age 12 Questionnaire (QU12) will be completed by the participant at the end of the in-person visit, or in
cases of mailed visits it is completed at home by the participant and mailed in a pre-paid envelope back to us.
The participant may also choose to complete an electronic questionnaire, which is identical in content to the
paper questionnaire, using the REDCap survey tool. To complete an electronic questionnaire, a participant must
provide their permission and an email to which the survey link will be sent.
This questionnaire is very similar to the questionnaires completed annually by participants. At this point in the
visit, the mother’s data collection is complete and the Secondary RA is preparing to leave.
Incentives
Participants will be reimbursed a maximum of $185 in cash for their time. The amount they receive will be
based on the following completed visit components:
• $100 for the in-person visit
116 | P a g e
•
•
•
•
•
$50 for the 7-day sleep and physical activity portions; $25 for returning the Actigraph and another $25 if
the activity monitor contains the required amount of data (to be mailed in check form after we receive
the equipment)
$20 for travel reimbursement if they travel to the Kenmore location. They will not receive the $20 if the
visit is done at the participant’s home or if Viva provides a taxi voucher.
$15 for the child blood draw
Child participants will also receive a print out of their skeleton from the DXA scan, and a pair of scrubs
and Viva t-shirt.
Participants who complete the visit by mail, will receive $20. $10 will be enclosed with the first copy of
each mom and child questionnaire.
The Lead Finance RA prepares the incentives for the participant prior to the visit. She will store the money
paper clipped together with a sticky note on the front. The sticky note will contain the same visit information
and written in the same format as Google calendar. The envelope will be stored with the necessary receipt
paperwork in a folder in the cabinets. When the RA leaves for a visit he/she should bring the entire folder with
the other visit folders.
Documentation of money given to participants is very important. Receipts and extra cash must be returned to
the Lead Finance RA immediately. All money and incentive paperwork must always be locked in Project Viva’s
filing cabinets. If cash is not available for some reason, the RA must complete a check request form and give it
to the Lead Finance RA for immediate processing.
Documentation of incentives is done by the Secondary RA following the below steps:
1. Fill out the Age 12 Incentive Receipt with the Mom / Key Contact’s full name and the last 4 digits of the
ID number.
2. Check off what incentives you are giving to the participant on the Age 12 incentive receipt.
3. Remove the money from the envelope that has the participant’s information on it.
4. Count out the money for the participant, and ask her to sign the receipt.
5. Fill in the Age 12 incentive tracking log with the last 4 digits of the participant ID, the visit date, site
abbreviation (K = Kenmore, H= Home, O = Other), RA initials, and any additional notes. Make sure to
also check off the money that was given.
6. If there is not enough money for a participant, complete the Age 12 Check Request Form.
7. Put all documentation back in the folder. Make sure the sticky note with the participant information is
shredded.
Script after the Contact Information Sheet is Complete
Great! You’re portion of the visit is almost complete, but [CHILD’S NAME] will take a little longer. I’m going to
leave you with the Early Teen Questionnaire – For Parents to complete. This is similar to questionnaires you’ve
seen in the past and should take about 20 minutes to complete. You can leave it with [PRIMARY RA] when you
are done.
We would also like to offer you your incentives for completing the Early Teen visit today. Your participation is
very important to us, and we really appreciate you taking the time to meet with us today.
117 | P a g e
In-person Visit
To thank you for your time we would like to offer you $100 in cash. Also, we would like to offer you $20 for
travel [if no taxi voucher] and $15 for the blood collection [if completed]. [PRIMARY RA] will also talk to you and
[CHILD’S NAME] about the 7-day sleep and physical activity part of the visit we’d like [CHILD’S NAME] to
complete at home. If you choose to do this part of the visit we will also mail you $50 once we receive the
equipment with the required amount of data, or $25 if you return the Actigraph but it does not contain sufficient
data. Thank you again for taking the time to meet with us today.
Home Visit
To thank you for your time we would like to offer you $100 in cash and $15 for the blood collection [if
completed]. [PRIMARY RA] will also talk to you and [CHILD’S NAME] about the 7-day sleep and physical activity
part of the visit we’d like [CHILD’S NAME] to complete. If you choose to do this part of the visit we will also mail
you $50 once we receive the equipment with the required amount of data, or $25 if you return the Actigraph but
it does not contain sufficient data. Thank you again for taking the time to meet with us today.
Blood Only Visit
To thank you for your time we would like to offer you $15. Thank you again for taking the time to meet with us
today.
Interviewing Techniques
I. Standardized Interviewing Principles
In order to effectively administer a research interview it is important to understand the role of the interviewer
and the respondent. The interviewer must deal with his/her own self-consciousness so as not to lead the
respondent to answer in a particular way. All interviews must be administered in a standard way by all
interviewers.
A. Getting into Role as Interviewer
1.
2.
3.
4.
Forget about yourself and think of the participant.
Do not express own views or opinions.
Restrain, even when you disagree or agree, to give comment to a person’s answer.
Do not sympathize or agree with the respondent’s answers. Stay neutral and put up a (friendly) wall
between you and the respondent.
5. While it is important to remain neutral, find a balance between warmth and tactful neutrality.
B. Standardization
1.
2.
3.
4.
All interviewers must read the questions the same way to each participant.
All answers should be recorded as they are said.
Act as a reporter, record answers exactly as they are said.
If the RA is unsure how to code an answer notes should be written in the margin and the issue should be
addressed either through the QxQ or an inquiry.
118 | P a g e
C. Bias
Bias is any influence or temperament of outlook to influence; prejudice; any deviation from true measure.
Without realizing it an interviewer may impact the answers of the respondent. Bias is to be avoided. There are
three types of bias that appear most often during interviews.
Three types of bias:
1. Style- the way an interviewer looks, acts, and talks.
a. Try to look neutral and calm. Do not appear distracted, rushed, or anxious.
2. Non-verbal-body language, facial expressions.
a. Do not let your reactions show. Do not appear to agree or disagree with, approve or disapprove
of the respondent’s answers.
3. Verbal-said or implied.
a. Most interview bias is a result of mistakes in asking question. Do not add words or try to reword
the question. Do not make assumptions about a respondent’s ability to understand. Refer to
QxQs for more information on definitions and clarifications that are approved.
D. Leading
Leading gives clues as to how you want the respondent to respond to the questions you are asking.
Three ways to avoid leading:
1. Do not add words
2. Do not give any information not listed on form or the QxQs
3. Read the questions and leaders how they are written
E. Probing
Probing is a technique used to narrow a response or ask more information without leading the respondent to a
particular answer. A probe must be controlled and non-directive. Probing is the toughest part of standardized
interviewing. It combines the standardized interviewing principles of bias, leading and verbatim as well as indepth knowledge of study protocols.
Types of Probing:
1. Pausing- gives indication that the respondent hasn’t answered question
2. Re-read question- in a non-directive way, without emphasis on particular answers
The first probe that should always be used, is to re-read the question, emphasize key word/words
(underlined words in questions), and include parentheses (where applicable). This is the most effective
probe.
3. Ask for more information- be specific, but let the respondent do conversions. For example if the
question asks number of times per week, let the participant convert from “one a day” to “seven in seven
days”.
4. Stressing subjectivity- ask “what’s your opinion” or “best estimate”
5. Zeroing- get specific about month/time/year, if participant knows month, ask, “was it the beginning,
middle or end of month?”
II. Administering Project Viva Interviews
The following guidelines are specific to the interviews administered in Project Viva.
119 | P a g e
A. Recording Beginning and End Time of Interview
Time recorded should be in military time (00:00-24:00) at the beginning and end of interview. Time can be
written in standard hours underneath TIME START on the interview, but should later be converted to military
time when cleaning forms.
B. Capitals versus Lower-case Letters
When reading questions in the interview, sentences, phrases, or options to participant in lower-case letters
should always be read. Anything that is all capital letters should not be read aloud to a participant.
C. Question Leaders
For a set of YES/NO questions, a leader is read before the options are read.
1. The full leader should always be read for the first question in a group.
2. If a group of questions is on multiple pages an abbreviated leader should be read for the first question
on the top of each new page.
3. If a respondent answers yes to a question, an abbreviated leader should be read for the subsequent
question.
D. Skip Patterns
Mastering skip patterns in interviews is essential for efficient data collection. Skip patterns are always in capital
letters and direct Research Assistant to next appropriate question.
Supporting Documents
1.
2.
3.
4.
5.
6.
7.
8.
Early Teen Questionnaire – For Parents (QU12)
Early Teen Interview (IN12)
Early Teen Visit Contact Information Sheet (CI12)
Early Teen Medical Information Sheet (MI12)
Early Teen Mailed Visit Introduction Letter
Early Teen Incentive Receipt
Early Teen Travel Reimbursement Log
Early Teen Check Request Form
120 | P a g e
121 | P a g e
Section VII. Data Management
a. REDCap
REDCap is a secure, web-based research database and survey system developed by a multi-institutional
consortium and initiated at Vanderbilt University. The system is fully HIPAA compliant provided that
security features are utilized, and all study personnel will be trained on use of these features. REDCap
may only be accessed by authorized users who must log in to the system and can only view databases
that they have been given access to by the project administrator. Additionally, users can be given
varying levels of data access (for example, the ability to view de-identified data only, or rights to view
but not edit data). REDCap also uses Secure Sockets Layer (SSL) encryption of data, and provides
complete audit reports documenting details of all changes that are made to forms and individual fields.
HPHCI IT has reviewed and approved the software for use in our department.
Use of REDCap will allow us to increase the security of the data that we are collecting for Project Viva.
Research Assistants will enter data directly into the password-protected, web-based system during
study visits, which will eliminate the need for use, transport, and storage of paper data collection
forms. Additionally, we will no longer have to rely on an outside institution to house and maintain our
database. The database will be hosted on the HPHCI server and users must be logged in to the HPHCI
network before they are able to access the HPHCI REDCap system. Authorized Project Viva users (the
Project Manager and Data Manager) will have the ability to export data directly to statistical software
programs for analysis, and we can restrict data export by other users. Additionally, REDCap can export
completely de-identified datasets, which will allow us to eliminate the possibility of unauthorized
individuals inadvertently receiving PHI.
b. Paper Files
All data collected on paper forms will be stored and locked in file cabinets surrounding the Project Viva cubicles.
A schedule is in place for RAs to lock the cabinets nightly, and the schedule includes a back-up RA in case
someone is out of the office. The paper forms will be entered into ADEPT shortly after data collection. The
paper forms will remain in Project Viva’s office until all data in conjunction with the Age 12 visit has been
collected and cleaned.
122 | P a g e
Section VIII: Staff Training and Quality Control
Project Viva works under the train the trainer method. Staff trainings are hands-on, in-person trainings. Each
visit component has an assigned captain and co-captain. These two people are responsible for training the RA
on that visit component. The time spent on each visit component depends on the previous experience of the RA
in training, and the difficulty of the component. Hands-on experience is vital and other staff members may be
asked to volunteer as a practice subject. There will be more training required for the child portion of the visit
due to the additional and more complicated visit components.
After the RA has been added to Viva’s protocol he/she will sit in on at least 2 visits conducted by different RAs,
more if the RA and his/her supervisor feel it is appropriate. The Primary RA will inform the participant the
observing RA is in training, and will ask if it is okay for him/her to sit in on the visit. If the participant says no,
then the RA in training is not to observe the visit. The RA will need to observe 2 child visits and 2 mom visits
separately.
For child visits, the RA in training will then conduct at least 4 visits with a trained RA observing, at least one of
the observations must be by his/her supervisor. For mom visits, the RA in training will then conduct at least 2
visits with a trained RA observing, at least one of the observations must be by his/her supervisor. If the
observing RA sees the RA is making an error, he/she should correct the RA in training. As before, the participant
will be asked if it is okay.
The final step is the initial training process is a QC conducted by the RA’s supervisor for the mom and child visits
separately. In this visit the supervisor will observe, but will not intervene unless the RA is making a large
protocol violation. For this QC the supervisor will use the mom or child QC form, and will take diligent notes on
the conduct of the visit.
Within 1 week of the QC, the supervisor will type up the QC, meet with RA in training about the results and to
discuss any issues, and communicate any concerns with the Project Manager. If the supervisor feels the RA is
able to conduct the visit on his/her own, the supervisor will send an email to all staff, Matt Gillman and Emily
Oken notifying them that the RA is now able to complete visits on his/her own. At this point the RA is
considered to be an “RA in Training” for data collection purposes. If the RA in training needs additional training,
a schedule for this will be set up between the RA and supervisor, and the Project Manager will be notified of this
action. The RA in training’s supervisor should review the first 10 folders in detail to make sure the RA is not
making any systematic errors in protocol or data collection. The data manager may also randomly choose
folders to QC also to assess this.
Six months after the initial QC was passed, the supervisor will conduct a follow-up QC. This process will be the
same as the initial QC. After this QC, assuming no issues were identified, the RA is now considered to be a fully
trained RA and no longer needs to check “RA in Training” on forms. QCs will be conducted annually after this
point.
123 | P a g e
Additional Viva Protocols Pertaining to the Early
Teen Visit:
1. Data Entry Protocol
2. Tracking Protocol
3. Disenrollment Protocol
124 | P a g e