1
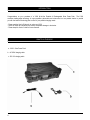
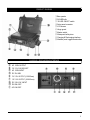
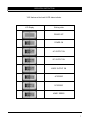
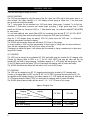
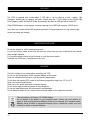
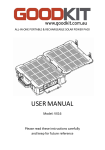
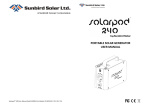
ALL-IN-ONE PORTABLE & RECHARGEABLE SOLAR POWER PACK
USER MANUAL
Model: VX32
Please read these instructions carefully
and keep for future reference
CONTENT
IMPORTANT SAFETY INSTRUCTION…………………………………………………………………..........….3
INTRODUCTION ……………………………………..………………………………………………………………4
WHAT’S IN THE BOX? ...……………………….....……………………………………………………………….4
PRODUCT DIAGRAM …………..………………..…………………………………………………………………5
CHARGING / DISCHARGING INTERFACE .…..…………………………………………………………………5
FEATURES ……………………………..…………………………………………………………………..………..6
SPECIFICATION ……………………………..………………………………………………………….…………..6
OPERATION INSTRUCTION ……………………………..……………………………………………..…………7
CHARGING YOUR VX32
……………………………..………………………………………...……………8
POWERING / CHARGING YOUR DEVICES ……………………………..………………………………….…9
LED LIGHT …………………………………..……………………………………………………………………...10
MAINTENANCE AND CARE ……………………………..……………………………………………………….10
CAUTIONS ……………………………..……………………………………………………………………….…..10
WARRANTY INFORMATION ……………………………..………………………………………………………11
2
IMPORTANT SAFETY INSTRUCTION
RISK OF ELECTRIC SHOCK, DO NOT REMOVE THE COVER.
To reduce the risk of electric shock, do not remove the cover. No user serviceable parts inside this unit. Refer servicing
to a qualified technician.
The lightning flash with the arrowhead symbol, within an equilateral triangle, is intended to alert the
user to the presence of un-insulated 'dangerous voltage' within the products in-closure, that may be
of sufficient magnitude to constitute a risk of electric shock.
The exclamation point within an equilateral triangle, is intended to alert the user to the presence of
important operating and maintenance (servicing) instruction in the literature accompanying the
appliance.
CAUTION: always read and observe all warnings and instructions given in the instruction manual and those marked on
the unit.
Read these instructions carefully and keep them in a safe place.
Do not use this appliance near water.
Clean only with a soft dry cloth.
Only use attachments/accessories specified by the manufacturer.
Unplug this unit during lightning storms or when not in use.
Refer all servicing to a qualified service personnel. Servicing is required when the appliance is damaged in anyway.
No object filled with liquids such as vases shall be placed on the appliance.
Do not place naked flame sources such as candles on the appliance.
Make sure all electrical connections are properly made in accordance with the manufacturer’s instructions. Switch off
and unplug from the mains before changing any connections.
Make sure the mains cord is routed so that it is not likely to be walked on, or subjected to water and heat. Should the
power cord need replacing, it must be replaced with a cord of the same type by a qualified technician.
Do not obstruct the vents with such things as newspapers, table cloths, curtains and so on.
Do not operate the appliance if you are in doubt about it working normally, or if it is damaged in any way. Make sure
there is adequate ventilation space around the appliance, at least 10 cm at the sides and on the top.
Always unplug from the mains when not in use.
The mains plug should not be obstructed and remain readily accessible during intended use.
The rating markings are located on the base of the unit.
Do not place this equipment in a confined space such as a book case or similar unit and e n s u r e u n i t remains in well
ventilation conditions. The ventilation should not be impeded by covering the ventilation openings with items such as
newspaper, table-clothes curtains etc.
WARNING: Please refer to the information on exterior bottom enclosure for electrical and safety information
before installing or operating the apparatus.
WARNING: While charging/discharging with power cords, do not expose this apparatus to rain or moisture. The apparatus
shall not be exposed to dripping or splashing and that objects filled with liquids, such as vases, shall not be placed on
apparatus.
WARNING: The battery (battery or batteries or battery pack) shall not be exposed to excessive heat such as direct
sunshine, fire or the like.
WARNING: The mains switch is used as the disconnect device, so the disconnect device shall remain readily operable.
3
INTRODUCTION
Congratulations on your purchase of a VX32 All-In-One Portable & Rechargeable Solar Power Pack. The VX32
combines leading-edge technology in mono-crystalline photovoltaic and electronics into one portable device to provide
you with the best that technology has to offer for your portable charging needs.
- Please read the User’s Guide prior to using your VX32.
- Failure to follow the instructions can result in irreparable damage to the device.
- Please keep this User’s Guide for future reference.
WHAT’S IN THE BOX?
a - VX32 - Solar Power Pack
b - AC 220V charging cable
c - DC 12V charging cable
4
PRODUCT DIAGRAM
Solar panels
3W LED bulb
3W LED ON/OFF switch
Solar panel connector
LCD screen
Hinge guard
Master switch
Waterproof safety door
Charging & Discharging interface
Weather proof rugged construction
CHARGING / DISCHARGING INTERFACE
Ⓐ
Ⓑ
Ⓒ
Ⓓ
Ⓔ
Ⓕ
Ⓖ
Ⓗ
Ⓘ
AC 230V OUTPUT
DC 12V CAR SOCKET
AC 230V INPUT
DC 5V USB
DC 12V OUTPUT (5.5X2.5mm)
DC 12V OUTPUT (5.5X2.5mm)
DC 12V~23V INPUT
DC ON /OFF
AC ON /OFF
5
FEATURES
Self-contained portable & rechargeable solar power pack for travel, outdoor activities and
emergency/disaster preparedness.
Folding up to a briefcase size with lightweight & self-contained with impact-resistance & IP65 waterproof
design, the VX32 is a rugged portable & rechargeable solar power source that can convert virtually
unlimited supply of solar energy to power all modern technologies and also provided power storage for
later use when needed.
AC & DC outputs for powering/charging multiple devices up to 350W, such as small appliances, lamps,
electric fans or TV, 12V car electronics, laptops, tablets, cell phones & other portable gadgets
simultaneously.
Charging the built-in 32/48Ah Lithium Polymer battery indoor or outdoor from:
- 5 x 10 watt mono-crystalline solar panels
- AC 220V wall socket using power cord included
- DC 12V car cigarette lighter socket using power cord included
- Additional external solar panels not included
Ingress Protection rating IP65 meaning totally protected against dust ingress and protected against low
pressure water jets from any direction. Limited ingress permitted.
Universal AC 220V socket that accepts British, NEMA USA, European plug and Australian power plugs.
Built-in super-bright 3 watt white LED bulb with 2 selectable modes, flashlight or SOS beacon light.
Back-lit LCD display with battery strength, input, output and operation status indicators.
SPECIFICATION
Model No.
Waterproof
Solar panels (Mono-crystalline)
Inverter (Pure Sine Wave)
Battery (Lithium Polymer)
Controller
LED
Outputs
Inputs
Dimensions
Weight
6
RSN-BX007
IP65
5 x 10W 16V
350W AC 220V
12V 32Ah/48Ah
12V 8A
3W Lighting with SOS feature
Universal AC 220V - 1 pc
DC 12V (5.5X2.5mm) - 2 pcs
DC 12V car socket - 1pc
DC 5V/2A USB - 2 pcs
AC 220V - 1 pc
DC 12-23V/4A - 1 pc
452*347*137mm
9.5/10.8kg
OPERATION INSTRUCTION
VX32 features a blue back-lit LCD status indicator.
LCD Display
Working state
POWER OFF
POWER ON
AC OUTPUT ON
DC OUTPUT ON
AC&DC OUTPUT ON
AC ERROR
DC ERROR
AC&DC ERROR
7
CHARGING YOUR VX32
There are three ways to charge your VX32.
SOLAR CHARGING
The VX32 can be charged by using the power of the Sun. Open your VX32 and for best results, place it in
direct sunlight. The battery capacity on
LCD display will start going up. Make sure
the solar panel
can get as much sunlight as possible.
The
solar panels can be detached from VX32 and placed further away if required. To do this first
disconnect
Solar panel connector next release hinge by pulling
Hinge guard away from
Solar
panels and lift them up. Reconnect VX32 to
Solar panels using 5m extension cable(NOT INCLUDED)
for solar panels.
You can add additional solar panels (Max.100W) by connecting them through
DC 12V~23V INPUT
connector and putting them under direct sunlight, to charge the VX32 faster (not included).
After the
LCD display shows the battery 100% full, please close the VX32 and / or disconnect
additional solar panels to protect the battery.
The 32/48Ah internal backup battery will take about 12/18 hours to fully charge.
In cloudy conditions, VX32 may take approximately 2 times longer to charge than the above mentioned
times, but this is depending on the time of year, density of cloud etc.
If charging from behind the glass, it will increase the time needed to charge, sometimes up to three times
longer than if outside.
AC CHARGING
The VX32 can be charged by any standard AC 220V wall outlet using the included (b) AC charging cable.
Connect (b) charging cable to VX32 in to
the AC 220V INPUT and plug the other end into any
standard AC wall outlet to begin charging. The battery capacity on LCD display will start going up. After
the LCD display shows the battery 100% full disconnect the charging cable to protect the battery.
The 32/48Ah internal backup battery will take about 6 to 9 hours to fully charge.
DC CHARGING
The VX32 can be charged by car DC 12V cigarette socket using the included (c) DC charging cable.
Connect (c) charging cable to VX32 in to the DC 12V-23V INPUT and plug the other end into DC 12V
car cigarette socket to begin charging. The battery capacity on LCD display will start going up. After the
LCD display shows the battery 100% full, disconnect the charging cable to protect the battery.
The 32/48Ah internal backup battery will take about 7 -12 / 10.5 - 18 hours to fully charge.
Approx. Charging Time
Approx.
charging
8
Battery
capacity
time
12V 32Ah
12V 48Ah
Charging method
AC charging
DC charging
50W solar charging
6 hours
7-12 hours
12 + hours
9 hours
10,5 - 18 hours
18 + hours
POWERING / CHARGING YOUR DEVICES
Turn
the master switch ON.
To use AC press the
AC ON/OFF button to turn it ON.
Connect AC 220V device to
AC 220V OUTPUT socket, make sure the load power is no bigger than
350W. Recommended continuous power load is 300W.
After finishing powering/charging, disconnect the device from the VX32 and press the
AC ON/OFF
button to turn off the AC power.
To use DC press the DC ON/OFF button to turn it ON.
Connect DC 12V device to
or
or
DC 12V OUTPUT socket, make sure the load power is no
bigger than 60W.
After finishing powering/charging, disconnect the device from the VX32 and press the
DC ON/OFF
button to turn off the DC power.
The Universal USB power ports allows you to charge mobile devices such as iPod®, iPhone®, iPad®,
Zune®, Samsung® and other devices which require special proprietary OEM cables. Simply connect your
OEM USB cable to your device and to the VX32 as described in the steps above.
You can use AC & DC power at the same time, but make sure the load power does not exceeds the limits.
Sample Items
CFL Bulb
Sample Items VX32 with 48Ah Battery Can Power On a Full Charge
Cumulative
Daily Working
Power
Daily Power
Continued
Load
Hours
Consumption
Working days
Quantity
15W
2
4
120Wh
4 Days
LED bulb
3W
4
4
48Wh
10 Days
LCD TV(28 inch)
60W
1
3
180Wh
2.7 Days
Laptop
60W
1
2
120Wh
4 Days
Inkjet printer
30W
1
0.5
15Wh
32 Days
Tablet
10W
1
6
60Wh
8 Days
Handheld console
6W
1
5
30Wh
16 Days
Radio
3W
1
6
18Wh
27 Days
Cell phone
2.5W
2
8
40Wh
12 Days
Hand vacuum
80W
1
2
160Wh
3 Days
Satellite Phone
12W
1
2
24Wh
20 Days
GPS
4W
1
4
16Wh
30 Days
Multiple Items Can Be Powered Simultaneously
9
LED LIGHT
The VX32 is equipped with a side-loaded
LED light. It can be used as a torch, reading light,
emergency backup light, for camping and more. Simply press the
LED switch to turn ON the light.
Press it again to switch ON the SOS mode. By pressing it third time the LED light will be turned OFF.
When 32/48Ah battery is fully charged, continuous working time of LED light is approx. 106/160 hours.
Avoid direct eye contact with the LED light during operation. Prolonged exposure to a high-intensity light
source may cause eye damage.
MAINTENANCE
AND CARE
Wipe the exterior surface with a damp cloth
and dry thoroughly
with a soft dry cloth prior to use.
Do not use abrasive or volatile cleaning compounds.
For the best results, please ensure that the solar cell is free from any dust or debris that may impede
direct sunlight exposure.
For long term storage, ensure the unit is placed in a cool dry indoor location.
Recharge your VX32 every 6 months when not in use.
CAUTIONS
Check the voltage of your device before connecting with VX32.
Do not use any devices above 350W to prevent damage of the inverter.
Keep in a safe place free from dust, liquid and extreme temperatures.
Do not store and operate VX32 outside of the following temperature range: from -5ºC to 45 ºC.
Keep out of reach of small children.
When not in use, please disconnect from power sources.
Do not drop or apply excessive pressure to the solar panels.
Do not use sharp objects near the solar panels to avoid damage.
Do not attempt to repair the unit, always contact technical support if you experience any faults.
This unit contains a Li-Polymer 12V 32/48Ah battery.
Do not dispose of this product in your household waste. Contact your local authority for
details of local recycling schemes Batteries should not be disposed of in household waste.
Batteries should be taken to appropriate disposal points or alternatively contact your local
authority for details on disposal schemes.
10
WARRANTY INFORMATION
Your VX32 is supplied with a 12 month warranty from the date of purchase against defects in material
and workmanship under normal use and service. Should your VX32 prove defective within 1 year from
the date of purchase, return the device product, freight prepaid along with a copy of the proof of purchase
and an explanation of the claim to Good Kit.
Good Kit does not accept liability for any 3rd party damage how so ever caused or any costs associated with
the return of faulty products.
Under this warranty Good Kit will replace or repair any parts found to be defective due to manufacturers
defect. This warranty extends only to personal use and does not extend to any product that has been used
for commercial use, rental use, or use which is not intended. There are no warranties other than that
expressly set forth herein. This warranty is not transferable.
Good Kit is not responsible in any way for damages, losses, or inconveniences cost by equipment failure or
by user negligence, abuse, or use in not accordance with the “User Manual” or any other additional safety,
use, or warnings included in the product materials.
Further, Good Kit is not liable for incidental, data loss, or consequential damages of any nature resulting
from the use of this product and any liability shall not exceed the purchase price of the product.
These warranty conditions in no way affect your statutory rights. A full set of Good Kit terms and conditions
are available on request.
For questions or warranty related inquiries, please contact us at: [email protected]
Please visit www.goodkit.com.au
11