1
USER MANUAL
M acro Notice
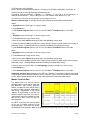
Feed Scheme contains Visual Basic code (commonly known as macros ) and any computer platform on which it is run must
have its Macro Security setting at Medium (see Excel menu Tools | Macro | Security | Security Level). When opening Feed
Scheme, click Enable Macros at the Security Warning.
{
}
M enu, Procedure and Display Notice
The menus, procedural steps and displays described in this document are derived from Windows XP Pro SP3 and the Excel
component of Microsoft Office Pro 2003 SP3. Users should expect to observe differences in these menus, procedures and
displays when running Feed Scheme on platforms employing other Microsoft Operating System and/or Office Suite products.
{
}
Overview
{
}
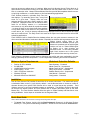
Feed Scheme is an off-line feed scheduling database utility
designed for use in the broadcast and cable television industry. It
tracks virtually all syndicated program and network feeds incoming
to a facility from a variety of distributors using numerous delivery
systems. Feed Scheme offers data import / export functionality
and, as a planning tool, is an adjunct to on-line feed scheduling and
control systems. Created by a veteran feed coordinator with in the
trenches experience handling 300+ weekly feeds (and the frantic
game of musical chairs that often accompanies their new season
rollouts and eleventh hour refeeds), Feed Scheme allows the user
to allocate and rearrange often limited dish / receiver / record
device resources into an efficient feed event acquisition scheme. In addition to conventional satellite
feeds, Feed Scheme allows for scheduling of events from sources such as Pathfire ® and other catch
servers, fixed resource network feeds, production control room feeds – in fact any feed that can be
found on any routing switcher crosspoint.
Feed Scheme runs on the widely available Microsoft ® Excel ® platform, making it a highly cost effective
tool when compared to Enterprise Class scheduling software such as ScheduALL®. Feed Scheme
can operate virtually anywhere the user has computer access: Home, office, on the road. And
because Feed Scheme does not tie up on-line scheduler resources, users may run endless what-if
scenarios to spot resource conflicts hours, days, weeks, months or years into the future.
Feed Scheme’s foundation lies in its Master Data input screen
where users may enter up to 26 data properties for each individual
feed event. Properties include a feed’s program title, its duration,
first feed date, last f eed date, its source dish and receiver, record
destination, the primary feed day / time / coordinates, first and
second backup feed day / time / coordinates, trouble numbers and
more. For users in multi-channel environments, Feed Scheme
also provides event properties for the broadcast channel on which
the feed will be telecast, the day and time of the telecast, the
feed’s Media ID or House # prefix and more. A variety of cell
highlight colors are employed to call a user’s attention to data or
conditions that might otherwise escape notice (expired last feed dates, selection of back up feeds,
excluded primary feed days, faulty restoration of previously excluded primary feed days, missing online record orders, important notes and OTO notes). A Master Data Sort screen provides users with
the ability to filter and sort Master Data by any one or multiple numbers of feed event properties. Such
Feed Scheme User Manual
Page 1
sorts can answer an endless array of questions: What are all the Monday through Friday feeds at 10
AM or what are all the feeds occurring on or after 9/8/2008 or how many feeds occur on SAT11 / Fixed
Dish 4, to name but a few. Master Data and Master Data Sort provide data templates that allow a user
to input high confidence, no conflict data to on-line feed scheduling applications.
Feed Scheme produces a printable Daily Feed List
that displays – by ascending time of day – every feed
event on a given date. Display dates are user
assigned and may look days, weeks, months or years
in advance. Displayed events can be filtered to show
feeds for all delivery streams in a multi-channel
environment or only those feeds for a particular stream
– to show all feeds or only those feeds from satellites
or only those feeds from a network or only feeds from
a catch server, etc. A built in detector evaluates every displayed event for device conflicts and flags
each such conflict found. The Daily Feed List is used as an adjunct and cross-check for on-line feed
scheduling applications.
Feed Scheme’s built-in Satellite-Receiver database allows the user quick access to answers in the
often convoluted allocation of receivers to dishes. Especially for facilities with large antenna farms but
without L-band routing, filters in the
Satellite-Receiver database provide quick
answers to questions such as which digital
receiver can see a C Band GDMX signal
on Galaxy 16 or what receivers are
allocated to Dish 1 or how many Standard
Agile Omni receivers are in the system
and on which dishes are they located, etc.
Feed Scheme is designed to make resource allocation less painful and more predictable in the fast
changing landscape of feed acquisitions. It is an indispensible scheduling tool for feed coordinators.
Minimum System Requirements
{
Pentium III CPU, 930MHz
512 MB RAM
10 MB Default drive free space
SVGA Display – 32 bit
1024 x 768 Screen resolution
Windows XP/Vista
Microsoft Office/Excel 2003/2007
Installation
{
}
Worksheet Protection Defaults
Data Summary – Protected
Master Feed List – Unprotected
Master Feed List Sort – Unprotected
Daily Feed List Sort – Protected
Satellite-Receiver List – Unprotected
User Manual – Protected
Configuration – Protected
}
Run the Feed Scheme EXE installer file and follow its on screen instructions. The installer will specify
a destination folder on the C:\ [root] drive by default – use the Browse button to choose or create an
alternate directory from which Feed Scheme will be used in normal day-to-day operation. Feed
Scheme must run on an Excel equipped computer or workstation. The directory chosen for the install
will become the default location for Feed Scheme and its support documents (such as this User
Manual file). The Feed Scheme installer offers the option to create Desktop and Start Menu icons
during installation. It also drops an uninstaller into the Programs folder.
Quick Start Guide
{
}
Refer to details elsewhere in this document concerning the following Quick Start steps
1. To launch Feed Scheme, double click the Feed Scheme.xls filename in its Windows Explorer
directory or – if any were created during installation – double click a Feed Scheme shortcut icon.
Feed Scheme User Manual
Page 2
2. At the Windows Security Warning, select Enable Macros. Failure to enable macros will inhibit
virtually all of Feed Scheme’s functionality.
3. At the Windows Password login…
a. Type fsuser in the Password field and click OK if intended changes to Feed Scheme data are
to be saved, then answer NO the Excel Read Only reminder message.
b. Click Read Only at the login if there are no changes intended to Feed Scheme data.
4. Review the Feed Scheme Data Summary page for any highlighted warnings or cautions. The
Data Summary page displays automatically whenever Feed Scheme is opened.
5. Click any one of six Go to… buttons to access its associated Feed Scheme data tab sheet.
6. First time users may go to the Configuration tab and Load Demo Data files that will populate all
resident data fields to better illustrate Feed Scheme’s features. Demo Data allows new users to
become acquainted with Feed Scheme and gain hands-on experience with its operation before
investing the time and effort to enter their own data. When no further use of Demo Data is
required, the Delete All Data feature on the Configuration tab clears all resident data fields in
preparation for user data entry.
a. oWarningo Load Demo Data and Delete All Data cause permanent data loss when these
features are executed. Users must deliberately permit data deletion by appropriate responses
to warning messages. Load Demo Data and Delete All Data can – and will – delete a user’s
own data if user data resides in target data fields when either of these two features is
executed.
7. Review, filter, sort, enter or revise data on any one or more Feed Scheme tab sheets that have
been selected. Print these sheets – if required – using Excel print icons, menus or shortcut keys
(e.g. Ctrl+P).
8. Save changes made to Feed Scheme data using Excel save icons, menus or shortcut keys (e.g.
Ctrl+S). Changes are saved to Feed Scheme’s original filename Feed Scheme.xls. Whenever a
new save occurs, Feed Scheme creates a backup of the previous file’s contents using the
filename Backup of Feed Scheme.xlk.
9. Exit Feed Scheme using Excel menus or the Close X box in Excel’s upper right corner or Alt+F4.
a. oNoteo If no changes were made – and even if Feed Scheme was opened in Read Only
mode – exiting the database will prompt an Excel message asking if the user wants to save
the changes made to Feed Scheme.xls. Even in the absence of changes, this save changes
message will appear because, when Feed Scheme opens, it automatically sets the Target
Date on the Daily Feed List Sort tab to the current system date. Users who have made no
changes to Feed Scheme simply answer NO to the save changes message as another new
system date will be automatically set for the Target Date at the next opening of Feed Scheme.
Operational Design, Features and Use
{
}
Launch and Macro Security
{
}
Feed Scheme launches from the directory to which its installation file was originally extracted. Use
either Windows Explorer to click on the filename Feed Scheme.xls or – if any shortcuts were created
during installation – click a Feed Scheme shortcut icon on a Desktop, Start Menu, etc.
Feed Scheme contains Visual Basic code
(commonly known as macros) and any
computer platform on which it is run must have
its Macro Security setting at Medium (see Excel
menu Tools | Macro | Security | Security Level).
When opening Feed Scheme, click Enable
Macros at the Security Warning. Failure to
enable macros will inhibit virtually all of Feed
Scheme’s functionality.
A deliberate decision was made not to obtain a
Feed Scheme User Manual
Page 3
digital (or root) certificate for Feed Scheme. Though such a certificate would eliminate the need to
deal with Macro Security Warnings whenever Feed Scheme is opened and would provide a
heightened sense of security among users, the certificate has two principal drawbacks: (1) Signing
Feed Scheme with a root certificate requires the computer on which this utility is run to have an active
Internet connection in order to permit Excel to check for any changes in Certificate Revocation Lists
(CRLs) whenever Feed Scheme is opened – such an on-line connection violates Feed Scheme’s offline functionality, (2) the time, hardware, acquisition and maintenance costs associated with obtaining
a root certificate and signing this utility with such a certificate would drive Feed Scheme’s purchase
price to an unacceptably high figure that might well place the product out of reach for many of its
intended users.
For users who wish to maintain a reasonable security posture while running this unsigned utility, a real
time antivirus application is recommended with file scanning of xls files enabled at every launch of
such documents. Further, users may wish to investigate a Microsoft Office Self-Signed Certificate as
a way around the Macro Security Warning when a Medium Security Level is in effect. While a selfsigned certificate does not guarantee code authenticity, it may act to alleviate Macro Security
Warnings on the specific computers to which “selfcerts” are deployed. For further information on
digital certificates, see Programs | Microsoft Office | Microsoft Office Tools | Digital Certificate for VBA
Projects or study Microsoft Knowledge Base article 820738 (http://support.microsoft.com/kb/820738/).
Password Login
{
}
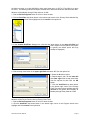
At the Windows Password login…
a. Type fsuser in the Password field and click OK if
intended changes to Feed Scheme data are to be
saved, then answer NO the Excel Read Only
reminder message that follows.
b. Click Read Only at the login if there are no
changes intended to Feed Scheme data.
A password is employed on Feed Scheme to inhibit the potential for unauthorized users to access and
alter the file’s data – whether such alterations are accidental or intentional in nature. A second Read
Only reminder displays immediately following a successful password login as a further caution against
careless or uninformed revisions to file data.
Data Summary
{
}
The Data Summary tab will load and
display whenever Feed Scheme is opened.
This behavior is automatic. Depending
upon the tab at which Feed Scheme was
last saved, the Data Summary display may
be briefly proceeded (~1-second or less) by
another tab’s display.
The purpose of the Data Summary tab is to
provide a snapshot overview of data
integrity. If any one of nine conditions exist
– data is missing, device conflicts are
detected, OTO notations are in effect,
scheduled primary feed days have been
excluded, on-line record orders are yet to
be written, special Notes exist for review,
new or revised program titles are present,
backup feed coordinates reside in the data
or defined configuration devices/strings are not present in master feed data – each such condition will
be flagged by color highlighting on the Data Summary tab thereby alerting the user to any data
mitigation that may be required prior to input of new or revised data. Generally speaking, if the Data
Summary tab displays without any color highlighting, then the user’s data is good to go.
Feed Scheme User Manual
Page 4
Click any one of the six Go to… buttons to access its associated Feed Scheme data tab sheet (tabs
may also be accessed with the keyboard shortcuts Ctrl+Page Up or Ctrl+Page Down).
Demo Data
{
}
First time users may go to the Configuration tab and Load Demo Data files that will populate all
resident fields with snapshot data from 9/18/2008 to better illustrate Feed Scheme’s features. Demo
Data allows new users to become acquainted with each Feed Scheme tab and gain hands-on
experience with its operation under a full data set – and to do so before pouring time and effort into
what could otherwise become trial and error entry of their own data. Once a user feels comfortable in
their understanding of Feed Scheme and no further use of Demo Data is required, the Delete All Data
feature on the Configuration tab clears all resident data fields in preparation for a user’s entry of their
own data. To execute the Load Demo Data or Delete All Data features of Feed Scheme, click the
appropriate button on the Configuration tab (see Configuration below for details).
oWarningo Load Demo Data and Delete All Data cause permanent data loss
when these features are executed. Users must deliberately permit data
deletion by appropriate responses to warning messages. Load Demo Data
and Delete All Data can – and will – delete a user’s own data if user data
resides in target data fields when either of these two features is executed.
Master Feed List
{
}
The Master Feed List tab (MFL) is the data foundation upon which Feed Scheme rests. On this tab,
users may enter up to 26 data properties for each individual feed event. Depending upon
circumstances, some feeds involve all 26 properties while others may have as few as 18.
There are four components to the MFL tab:
1. The Header (A1:Z1) describes each
data property column.
Cell A1 also
contains a feed counter of events in the
Active Data Area, a Re-Sort Programs
button and, when applicable, will change
color and display text alerting users to
missing on-line record orders. The MFL
window pane is frozen to Row 1 Column A
to allow Headers and event Program
names to be seen at all times during data
entry and scrolling. As long and freeze
pane is active, pressing the keys
Ctrl+Home from any cell in MFL will cause
Excel to place its focus on cell B2.
{
}
2. The Active Data area (A2:Z176) is the region into which feed properties for all currently active
feeds are entered. Feed events with incomplete properties must not be entered to the Active Data
area as doing so will corrupt filtered results elsewhere in Feed Scheme (see Pending New Events,
below). Feed events in the Active Data area can be sorted alphabetically by means of the Re-Sort
Programs button in cell A1. Conditional highlighting (described in detail below) takes place in the
Active Data area. In Excel’s named ranges, this area is defined as “Database”.
{
}
3. The Obsolete Events area (A180:Z298) is the region in
which expired feed events are stored. When an event in the
Active Area expires and its Last Feed Date turns red, a user
may either (a) delete the event from the Active Area with no
further action taken or (b) move the expired event to Obsolete
Events if the user feels the event has potential to be of some
future use (see detail on deleting or moving expired events,
below). These events can be sorted alphabetically by the ReSort Programs button in cell A179. Obsolete Events may be quickly accessed by pressing the F5 key
and selecting Obsolete_Events from the named range Go To list. This Go To will highlight the title
{
Feed Scheme User Manual
}
Page 5
Obsolete Events and the first 15 rows beneath – from there, a user can scroll to additional rows or
columns as required.
4. The Pending New Events area (A303:Z502) is the region into
which feed properties are entered for new or emerging events but
for which all details are not yet fully known. Feed events with
incomplete properties must not be entered to the Active Data
area as doing so will corrupt filtered results elsewhere in Feed
Scheme. Feeds in the Pending Events area are often evaluated
by which among them will occur first so, for this reason, these
events can be sorted by the Sort 1st Feed Date button in cell
A302. New season roll-out feeds are placed in the Pending area
as their details trickle in over the months, weeks or days prior to first feed. As each new detail on a
pending feed is received, it is added to the details on that same feed that had been previously entered.
Once all properties for an event have been entered, the feed event is moved from Pending to the MFL
Active area. For Quick access to Pending Events, press the F5 key and select Pending_New_Events
from the named range Go To list. This Go To will highlight the title Pending New Events in cell A300,
the Season subtitle in cell A301, the sort button and Event Counter in cell A302 and the next 31 rows
beneath – from there, a user can scroll to additional rows or columns as required.
{
}
Conditional Highlighting is used on the MFL tab to call attention to 7 data circumstances that may
require user attention lest they be overlooked. These conditions will also trigger highlights on the Data
Summary, Master Feed List Sort (MFLS) and Daily Feed List Sort (DFLS) tabs. The 7 conditions and
the highlights they will produce are as follows:
{
}
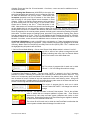
1. On-Line Record Order Missing – One or more Record Order Written entries in column Y are “No”.
(a) Cell A1 will turn from yellow to orange and text will
display indicating how many On-Line Record Orders
have a “No” status in the Active Data area.
(b) The column A program title for each row in which
column Y = “No” will change from white to orange.
2. Important Data Present in Notes – The text string “NOTE:” is present in the first 5 character
positions in column Z indicating an important (but not critical) note the user wants to stand out. Flag
notes are of a temporary nature and meant to be resolved in a relatively short period of time. A flag
note is entered in column Z ahead of any less important but often more enduring notes. A flag note
entry should end with // (double strokes) to set it apart from any other notes in the same cell that are to
survive once the flag note has been resolved and is removed.
The column A program title for each row in which
column Z starts with “NOTE:” will change from white to
orange.
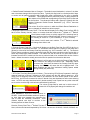
3. Last Feed Date has Expired – The last feed date in column D has expired. That is, the cell date
value is earlier than the computer platform’s system date. Feed Scheme
assumes that users keep accurate system calendars and clocks on their
computers. Rows with an expired Last Feed Date flag are eligible for deletion
or removal to the Obsolete Events area.
The column D cell for each row in which the Last Feed Date is earlier than the
current system calendar date will change from white to red.
Feed Scheme User Manual
Page 6
4. Default Record Destination New or Changed – The default record destination in column G is either
new or has been changed from its previous value. Typically this flag is set for a limited period of days
or weeks until all parties concerned with feeds have grown accustomed to the new or changed
destination. This highlight feature is particularly useful in calling attention to
new season roll-out feeds that are appearing on the Daily Feed List Sort tab
for the first time. To activate this feature add a [Space]+/+[Space]+N to the
existing 5-character Default Record Destination (e.g. “VR3-1” becomes
“VR3-1 / N”).
The column G cell for each row in which the Default Record Destination is
new or changed will switch from white to purple.
5. Displayed Feed is not Primary Feed – The feed that will display on the Daily Feed List Sort (DFLS)
tab is not the Primary feed but, rather, is a backup feed that is either the 1st Refeed or 2nd Refeed.
Feed Scheme makes it easy to quickly assign DFLS a backup feed in
place of a primary feed by changing the MFL column H value from a “0”
(for Primary) to a value of “1” (for 1st Refeed) or “2” (for 2nd Refeed).
The column H cell for each row in which a 1 st or 2nd Refeed is selected
will change from white to red.
6. Exclude Primary Feed Day – No feed will display on the Daily Feed List Sort (DFLS) tab for an
event row with an otherwise valid feed. To activate this feature add an x+[Space] to the head and a
[Space]+x to the tail of the Primary Feed Day text string (e.g. “M-F” becomes “x M-F x”). The Exclude
Primary feature provides a means to deal with feeds that have been canceled on short notice with no
same day backup feeds made available. The feature can also be used to run quick what-if tests to
illustrate what the DFLS would look like were a particular feed to be excluded from the list of active
feeds – without the need to actually remove the feed in question from the active data area.
The column L cell for each row in which the Primary Feed Day has
been “Xed-Out” will change from white to red. Additionally, failure
to remove the space from the head of the Primary Feed Day when
clearing Xed-Out days will cause the cell to highlight black. The
black highlight will also flag inadvertent leading spaces added
during Primary Day data entry.
7. OTO (One Time Only) Data Present in Notes – The text string OTO+[Space] is present in the first 4
character positions in column Z indicating an OTO (critical) note the user wants to stand out. OTO
notes are of a temporary nature and meant to be resolved in an even shorter period of time than a
NOTE: flag. An OTO note is entered in column Z ahead of any less important but often more enduring
notes. An OTO note entry should end with // (double strokes) to set it apart from any other notes that
are to survive once the flag note has been resolved and is removed.
The column Z Note field for each row in which column Z
starts with OTO+[Space] will change from white to red.
Input Validation is required in certain columns on
the MFL. Invalid time and date entries will produce
an input data error message box prompting the
user to make the necessary corrections. Feed
Scheme expects user input to conform to the
following formats in these columns:
{
}
Duration, Primary Feed Time, 1st Refeed Time and 2nd Refeed Time:
Hours, minutes and seconds separated by full colons – hh:mm:ss or 01:29:45, 13:00:00, 23:59:45, etc.
Feed Scheme User Manual
Page 7
First Feed Date, Last Feed Date:
Month, day and year separated by slashes – mm/dd/yyyy or 9/7/2008, 10/23/2008, 12/31/2050, etc.
Feed Source (when entering Receivers and Dish Antenna):
5-Character receiver mnemonic* + [Space] + “/” + [Space] + “F” for fixed or “S” for steerable + 2character dish mnemonic* – SAT01 / SD2, RCV11 / FD4, DSR20 / S0A, ASR03 / FC1, etc.
*One character of each Feed Source mnemonic must be a letter from A to Z
Delete and Move Events on the MFL tab using the following recommended procedural steps:
{
}
Delete:
1. Highlight columns A through Z on row(s) to delete
2. Press Delete key
st
3. Click Re-Sort Programs button in cell A1 or A179 or Sort 1 Feed Date button in cell A302
Copy:
1. Highlight columns A through Z on source row(s) to copy
2. Press Ctrl+C keys to copy source row(s)
3. Scroll to and select Column A cell at top left of the destination row(s) range
4. Press key sequence Alt,e,s,v (Edit menu, Paste Special, Values) to paste copied source row(s) to
destination row(s) – [Paste Special Values preserves formatting in the destination row(s)]
5. Click Re-Sort Programs button in cell A1 or A179 or Sort 1st Feed Date button in cell A302
Move:
1. Highlight columns A through Z on source row(s) to move
2. Press Ctrl+C keys to copy source row(s)
3. Scroll to and select Column A cell at top left of the destination row(s) range
4. Press key sequence Alt,e,s,v (Edit menu, Paste Special, Values) to paste copied source row(s) to
destination row(s) – [Pasting values preserves formatting in the destination row(s)]
5. Scroll to same row(s) from Step 1 and Re-Highlight columns A through Z on source row(s)
6. Press Delete key
7. Click Re-Sort Programs button in cell A1 or A179 or Sort 1st Feed Date button in cell A302
Garbage-In, Garbage-Out rules apply on the MFL tab. Because it is the data foundation upon which
Feed Scheme rests, unintended data entry errors, omissions, typos, deletions, etc that are committed
on MFL will be passed downstream to all other tabs and thereby compromise data integrity.
{
}
Master Feed List Sort
{
}
The Master Feed List Sort tab (MFLS)
duplicates data found on the MLS tab with
the difference that Excel’s AutoFilter
feature is enabled on each MFLS column
to permit virtually unlimited data filtering
and sorting. Independent of MFLS data
displays, all original data on the MFL tab
remains unaltered, free from risk of loss or
contamination and fully available to other
tabs (such as Daily Feed List Sort) for
other purposes.
On MFLS, users may filter and sort data
by any one or multiple numbers of feed
event properties. Such sorts can answer
an endless array of questions: What are all the Monday through Friday feeds at 10 AM or What are all
Feed Scheme User Manual
Page 8
the feeds occurring on or after 9/8/2008 or How many feeds occur on SAT11 / Fixed Dish 4, to name
but a few. The following filter/sort examples illustrate use of MFLS and AutoFilter with Demo file data:
{
}
What are all the Monday through Friday feeds at 10 AM?
1. Click the Re-Set Programs button in cell A1 to show all data
2. Click the AutoFilter drop down button in the bottom right corner of the Primary Feed Calendar Day
column then highlight and click Custom in the options list
3. In the Custom AutoFilter dialogue box, click the drop down button in the upper left field and
select equals from the options list (equals
is typically the default option and may
already be displayed)
4. Click the drop down button in the upper right field and select M-F from the options list
5. Select the Or button option
6. Repeat steps 3 and 4 for the lower left
and lower right fields except select Mon
from the options list then click the OK
button
7. Click the AutoFilter drop down button
in the bottom right corner of the Primary
Feed Time column then highlight and click
10:00:00 in the options list to display all
Monday through Friday feeds at 10 AM
What are all the Promo Feeds sorted by Primary Feed Time?
1. Click the Re-Set Programs button in cell A1 to show all data
2. Click the AutoFilter drop down button in the bottom right corner of the Program column then
highlight and click Custom in the options list
Feed Scheme User Manual
Page 9
3. In the Custom AutoFilter dialogue box, click the drop down button in the upper left field and
select contains from the options list
4. In the upper right field type promo then click the OK button
5. Click the AutoFilter drop down button in the bottom right corner of the Primary Feed Time column
then highlight and click Sort Ascending in the options list to display all feed
events with “promo” in their title sorted by ascending Primary Feed Time
Conditional Highlighting employed on the MFLS tab is identical to that used on the MFL tab and
calls attention to 7 data circumstances that may require user attention lest they be overlooked. For
details, refer to highlighting described for the MFL tab.
{
}
Counters are incorporated on two Header cells on the MFLS tab. The
Duration header in B1 contains a counter to total the duration of all events
visible in the current data filter while the Feeds Per Week header in J1
contains a counter to total the number of weekly feeds in all visible filtered
events.
{
}
A Sort Zero Index resides in MFLS column AA. This column operates behind the scenes and its
contents are not to be disturbed or altered in any way lest functionality of the Re-Sort Programs button
be inhibited.
{
}
Feed Scheme User Manual
Page 10
Daily Feed List Sort
{
}
The Daily Feed List Sort
tab (DFLS) is the primary
display of feed data laid
out in an ascending time
of day and one day at a
time format. It is the tab
on which what-if scenarios
are run and conflict
detection occurs. DFLS
also produces a Daily
Feed List printout. Days
and dates on this tab can
be user assigned and may
look days, weeks, months
or years into the future or
backward into the past.
Displayed events can be
filtered to show feeds for
all delivery streams in a
multi-channel environment
or only those feeds for a
particular stream – to
show all feeds or only those feeds from satellites or only those feeds from a network or only feeds
from a catch server, etc. DFLS contains three hidden columns (C, D and M) whose contents are used
for filter and sort procedures but are not made available for display.
There are four components to the DFLS tab:
1. The Data Filters (H1:K5) accept input of user criteria that will determine what existing events in the
MFL Active Data area will be
presented in the DFLS Event
Display. User criteria are entered
via three drop down lists (#1, #2
and #3) and one Target Date field.
Clicking the #4 Sort Data button
sends results to the Event Display
where feed events that match the
selected criteria can be observed,
analyzed and any conflicts noted.
Detail on the criteria options:
{
}
Select Airs On (#1) sets filter criteria to either one or all of the two supported delivery streams (or
channels). Criteria options in this list are defined on the Configuration tab (see Configuration below).
To view the list and select an option, click cell H2 to display the drop down button and the Select “Airs
On” Data message.
Click the drop down
button at the right edge
of the cell to display the
options
list
then
highlight and click on
the desired criteria from
the list to insert it in H2.
Once an Airs On criteria
option is present in cell
H2 it will remain in effect
indefinitely until it is
changed by the user.
{
}
Feed Scheme User Manual
Page 11
Select Feed Day (#2) sets filter criteria for each day of the week or all days at once. Criteria options
in this list are fixed
and
not
user
definable on the
Configuration tab.
To view the list and
select an option,
click cell I2 to
display the drop
down button and
the Select “Feed
Day”
Data
message. Click the
drop down button
at the right edge of the cell to display the options list then highlight and click on the desired criteria
from the list to insert it in I2. Once a Feed Day criteria option is present in cell I2 it will remain in effect
indefinitely until it is changed by the user.
{
}
Select Feed Source (#3) sets filter criteria to one of seven supported feed source options. Items in
this list are defined on the Configuration tab (see Configuration below). To view the list and select an
option, click cell J2 to display the drop down button and the Select “Feed Source” Data message.
Click
the
drop down
button at the
right edge of
the cell to
display the
options list
then
highlight and
click on the
desired
criteria from
the list to insert it in J2. Once a Feed Source criteria option is present in cell J2 it will remain in effect
indefinitely until it is changed by the user.
{
}
Target Date sets filter criteria to a given date that acts in conjunction with the Feed Day criteria. The
Target Date allows a user to run what-if scenarios far into the future or backward into
the past. The numeric value for this criterion is determined in one of two ways. First,
each time Feed Scheme is opened, the current system date is automatically entered
into cell J5 – to assure accuracy of this value, regular periodic synchronization of a
computer with a time server is recommended. Second, a user may override the
system date in J5 by editing the cell to define a target date other than the current system date – this
date may be days, weeks, months or years before or after the system date. Input Validation is
enabled on cell J5 causing invalid date entries to produce an input data error message prompting a
user to make the necessary corrections before proceeding. To enter a user defined Target Date,
highlight cell J5 and type the desired date using mm/dd/yyyy format. Once a Target Date is present in
cell J5 it will remain in effect until it is changed by the user or until Feed Scheme is closed and
reopened. Directly beneath the Target Date numeric field, cell J6 displays an abbreviation of the
target’s day of the week. The interrelationship between Target Date and Feed Day is as follows: A
feed day’s date shall be the first occurrence of that day on or after the target date. For example, if
the feed day is Thursday and the target date is 09/16/2008, then the feed day shall be defined as
Thursday 09/18/2008 because that is the first Thursday to occur on or after 09/16/2008.
{
}
Feeds Begin and Feeds End values contained in cells H5 and I5 are calculated dates that derive
from the Feed Day and Target Date. They are passed as criteria to the filter
engine. These values are not typically accessible by the user and no attempt
should be made to edit the content of these cells.
{
Feed Scheme User Manual
}
Page 12
Sort Data for # 1,2,3 (#4) in cell K1 is the control button that activates the filter engine and sorts MFL
Active Data events for only those that meet the criteria defined by the
Data Filters. Events satisfying the criteria are displayed in the DFLS
Event Display in ascending order by Feed Time. It is important to note
that each change – or group of changes – to data filter criteria requires a
subsequent click on #4 Sort Data in order for the change(s) to be
observed in the Event Display.
{
}
The next component on the DFLS tab:
2. Warning Cells or Clusters (A6, K3 and N1:O2) call attention to conditions that require user
intervention or merit scrutiny on the MFL tab.
Each warning is highlighted in keeping with the
same color scheme used on the DS, MFL and
MFLS tabs. Each highlight is accompanied by text
describing the condition that triggered the warning.
The user must make a determination as to the
severity of each warning, its point of origin and
whether or not immediate corrective action is
required to affect a solution. Some warnings (e.g.
Device Conflicts, OTO Feeds, Xed Out Days)
demand a prompt solution while others (e.g. Notes for Review, On Line Record Orders to be Written,
etc) may require nothing more than the user’s casual acknowledgement for the time being. In general,
if no warning cells or clusters are visible on the DFLS tab, then data in the Event Display is considered
to be reliable and ready for use.
{
}
3. An Event Display (A7:K184) presents the list of MFL Active feeds – sorted by ascending Feed
Time – that meet the criteria selected in the Data Filters. A one line text summary in Row 7 describes,
in plain language, the criteria selected while a Backup Feed flag notes the presence of events that are
not Primary feeds. Counters in cell A8 and B8 total the number of feeds in the display and the
cumulative total duration of those feeds, respectively. When DFLS is printed, it is the Event Display
that is sent to the printer.
{
}
Conditional Highlighting used in the Event Display calls attention to the following 6 data conditions:
{
}
Backup Feed is Present – DFLS columns H:K highlights black when the row’s feed event is a backup.
All other highlights for the same columns are overridden. The highlight condition is met when MFL
column H data is a value other than 0. In addition, a black Backup Feed flag appears in cell O7.
Primary Distribution Channel – The row is white when a feed event airs on the Primary Channel.
Feed Scheme User Manual
Page 13
Secondary Distribution Channel – The row is light gray when a feed event airs on the Secondary
Channel.
All Distribution Channels – Columns B:O are light blue and the text is italicized when a row’s feed
event airs on All Channels.
Device Conflict Present – Column A highlights red when a device conflict is detected in a row. All
other highlights for the column are overridden. In addition, a red Device Conflict(s) flag appears in cell
A6.
Default Record Destination New or Changed – DFLS Column A highlights purple when a row’s feed
event involves a new or changed record destination. In addition, a purple New or Revised Pgm Title
flag appears in cell A184. The highlight condition is met when MFL column G ends in “ / N”.
The final component on the DFLS tab:
4. A Conflict Detector (AH4:CR183) flags device conflicts between dish antenna, receivers and
destination record ports. The Conflict Detector may be quickly accessed by pressing the F5 key and
selecting Conflict_Detector from the named range Go To list. This Go To will highlight cells AE1:AV8
on the DFLS tab – from there, a user can scroll to additional rows or columns as required. Devices
labeled in rows 4 and 8 of the Conflict Detector are defined on the Configuration tab (see
Configuration below). If, for any reason, a row 4 value does not match its mirror value in row 8, the
row 4 value will highlight in red and corrective action must be undertaken at row 8 to correct the fault.
{
}
With two notable exceptions, the detector typically operates behind the scenes and is not visible to a
user. The two exceptions – Conflict Verification and False Positive Mitigation – are described as
follows:
Conflict Verification may be required when a user cannot precisely determine which devices are in
conflict by observing the Event Display itself, or when a user wants to verify the validity of a conclusion
reached regarding devices in conflict. In such circumstances, a user may refer to the Detector and
observe its findings as follows: Access the Conflict Detector using the named range Go To list as
described above. Column AF totals the number of conflicts detected on a given row – when the total
is greater than 0, the cell highlights black. A black highlighted cell in column AF correlates with the red
highlighted cell in column A of the Event Display for the same row.
To determine the device involved on a given conflict row, scroll
across the row between columns AH:CR and find the cell highlighted
black that contains the text “DC#” then refer to the column header in
{
}
Feed Scheme User Manual
Page 14
row 4 to identify the device. Because conflicts are time dependent events
involving two or more devices, at least one other nearby row will also
contain a black highlighted DC# cell. The black highlighted DC# cells
identify all the devices involved in the conflict. The number values in a DC#
cell (e.g. DC3, DC4, etc) are diagnostic in nature and may be disregarded
for purposes of this discussion. Conflicts are resolved by accessing the
MFL tab and revising conflicting device data for at least one of the feed events involved.
False Positive Mitigation is required when device allocations in a user facility are such that they
trigger false positives in the Conflict Detector’s algorithm. A false positive can occur when a facility
employs multiple receivers on a single fixed dish. Feed Scheme treats receivers and dishes as a
single data field (e.g. SAT01 / SD2) on the MFL tab but evaluates each separately in the DFLS conflict
detector. Because fixed dishes are static resources and do not routinely change satellites, the most
straightforward solution to a false positive is to disable conflict detection on those fixed dishes that
trigger false positives. To do this, access the Conflict Detector using the named range Go To list as
described above. Find the device code in row 4 of the dish to be disabled. Highlight the 3rd column in
{
}
row 5 of the selected device to display a drop down button and the Select CD Mode message. Click
the drop down button at the right edge of the cell to display the options list then highlight and click on
Disable CD from the list to insert it in the cell. Disable CD cells highlight black. Once a Disable CD
option is present for a device, it will remain in effect indefinitely until it is changed by the user and
conflict detection for the device will be disabled from that moment forward. The option to disable
conflict detection is available for all devices in the Conflict Detector. CD Enable/Disable settings must
be entered manually at all times – they are not retained in data or configuration backup files.
DFLS Printouts are produced by means of the Print icon in Excel’s menu bar or via the shortcut keys
Ctrl+P. The Print icon will direct a printout to whatever printer is the system’s current Default Printer.
The Ctrl+P keys will allow a user to select a printer from among all available printers on the system.
DFLS printouts are often distributed on a daily basis to operating personnel as a feed schedule in lieu
of – or in addition to – any such printouts as may also be available from a facility’s online scheduler.
{
}
Feed Scheme User Manual
Page 15
Satellite-Receiver List
{
}
The Satellite-Receiver List (SRL) is a built-in database to store device details that can be used to
quickly access and display information regarding the often convoluted allocation of receivers to dishes.
This tab can answer questions such as which digital receiver can see a C Band GDMX signal on
Galaxy 16 or what receivers are allocated to Dish 1 or how many Standard Agile Omni receivers are in
the system and on which dishes are they located, etc. SRL data is independent of MFL data and the
two do not directly interact. Users should think of SRL as a reference tab containing information that
may be beneficial when contemplating additions or revisions to MFL data.
A Show All Devices button quickly removes any active filter settings employed on SRL and displays
data on all existing devices.
A counter in cell A3 keeps track of the number of Receivers displayed vs. the total number of receivers
present in all existing data.
Data rows 4 to 50 in Show All mode are highlighted in alternating white and light gray. When data is
filtered, however, white and gray highlights may no longer be alternating.
Like the MFLS tab, Excel’s AutoFilter is enabled on SRL and functions in the same manner. The
following filter/sort examples illustrate use of SRL and AutoFilter with Demo file data:
{
}
Which receivers allocated to Dish 1 are used for syndication?
1. Click the Show All Devices button in merged cell A1 to show all data
2. Click the AutoFilter drop
down button in the bottom
right corner of the Source
Dish Number column then
highlight and click Dish 1 in
the options list
Feed Scheme User Manual
3. Click the AutoFilter
drop down button in the
bottom right corner of the
Principal Use column
then highlight and click
Syndication
in
the
options list to display all
Dish 1 Receivers used
for syndication
Page 16
Which receivers can access a GDMX signal on Galaxy 16?
1. Click the Show All Devices button in merged cell A1 to show all data
2. Click the AutoFilter drop down button in the bottom right corner of the Primary Satellite column
then highlight and click Custom in the options list
3. In the Custom AutoFilter dialogue box, click the drop down button in the
upper left field and
select contains from
the options list then
click the drop down
button in the upper
right field and select
Various (H,V) from
the options list
4. Select the
button option
Or
5. Repeat step 3 for the lower left and
lower right fields except select Galaxy 16
(H, V) from the lower right options list then
click the OK button
6. Click the AutoFilter drop down button in the bottom right corner of the Notes column then highlight
and click Custom in the options list
7. In the Custom AutoFilter dialogue box, click the drop down button in the
upper left field and
select contains from
the options list then
in the upper right
field type GDMX
and click the OK
button to show all
receivers capable of
receiving a GDMX
signal on Galaxy 16
User Manual
{
}
The User Manual tab
contains a hyperlink (cell
A7) to the directory in
which the Feed Scheme
User Manual and Feed
Scheme Quick Start PDF
files will typically reside.
The hyperlink assumes
the User Manual and
Quick Start files were
saved to the same directory to which Feed Scheme.xls was saved and from which it is currently
running. If that is not the case, the browser opened by the hyperlink is used to navigate to the location
where the PDF files were saved. The user is required to select and open the appropriate file from the
browser window. A hyperlink to an Adobe Reader download site is also provided on this tab.
Feed Scheme User Manual
Page 17
Configuration
{
}
The Configuration tab provides users with the ability to customize Feed Scheme to an individual
facility. Definitions entered into the boxed data cells on this tab are used throughout Feed Scheme in
a multiplicity of ways. So it is important that there be absolute consistency between data entered on
this tab and corresponding data entered on the MFL tab to, for example, avoid corrupt data filter
results. Obviously, it does no good to define a receiver as SAT12 on the Configuration tab while
defining the same receiver as RCV12 on the MFL tab. Yellow highlighting employed on the
Configuration tab alerts users to defined devices or character strings that are not currently reflected in
MFL data. Such highlighting does not, by itself, guarantee that data corruption does exist but merely
suggests the possibility that corruption could exist – thus providing the user with an opportunity to
further investigate the underlying conditions. The highlighting may also pinpoint under utilized devices.
Input Validation is required in 23 of the 37 data box
fields on the Configuration tab. These fields are flagged
with header text stating Enter between… or Enter
exactly… and failure to observe the required data entry
format will produce an input data error message box
prompting the user to make the necessary corrections.
Feed Scheme expects user input to conform to the
following formats in these fields:
{
}
Antennas:
2-Character mnemonic – D2, 0A, C1, etc.
Receivers/Sources and Recorders/Destinations:
5-Character receiver mnemonic – SAT01, RCV1A, DSRA2, ASR03, etc.
5-Character recorder mnemonic – VR3-1, SVR4A, DVR12, TAPE2, etc.
Naming Conventions employed on the Configuration tab’s Antennas, Receivers/Sources and
Recorders/Destinations input fields should, when possible, duplicate mnemonics used in a facility’s
existing routing switcher and other device addressable equipment. When duplication is not possible,
approximation will usually suffice. The Select Feed Source Options input fields pa ss data to the Cell
J2 list names and Advanced Filter used on the DFLS tab. Failure to correctly construct the Filter
String criteria in Column L will have adverse effects on the functional ability of DFLS. Whatever
naming conventions are ultimately used on the Configuration tab, they must adhere to Feed Scheme’s
input validation rules. It is highly recommended that users load Feed Scheme’s Demo Data files to
{
Feed Scheme User Manual
}
Page 18
observe the interrelationships between naming conventions used on the Configuration tab and data on
other tabs.
Data Import/Export and Deletion is also provided on the Configuration tab. These processes are
global in nature – meaning all data is imported or exported or all data is deleted – and selective
treatment of limited portions of the data is not supported.
{
}
Users may run global import, export and delete data processes with, of course, the customary
understanding that if the task is performed prematurely and/or incorrectly, irrevocable data loss can
result. To this end, a sequence of warning messages accompany all import/export and delete
procedures, each one of which is described below.
The Load Demo Data button allows users to load demo files containing data to illustrate Feed
Scheme features. Demo files are deliberately constructed to trigger every warning highlight built into
every tab in Feed Scheme. They portray the interrelationships between data entered on MFL and
other tabs and allow users to experiment with data entry, filtering, sorting and configuration settings
while they run their own what-if simulations to illustrate the consequences of their actions. Provided a
user’s permanent data is backed up beforehand for safekeeping and later retrieval (see Export
Backup Data and Load Backup Data), demo files can be reloaded at anytime a user desires to
further study or refresh one’s knowledge of Feed Scheme features.
{
}
During Feed Scheme installation, these demo files are typically extracted to the directory from which
Feed Scheme.xls runs. If, for any reason, a user chooses to locate these demo files in a directory
other than that from which the Feed Scheme.xls file runs, it will be necessary to navigate to the
directory containing the demo files in order to load them.
The following message boxes are displayed to guide the user through the demo file load process (the
screen shot samples illustrate demo loading through file #1 – similar messages appear for demo files
#2 and #3).
If data already resides in Feed Scheme, the user
is asked to OK the deletion of data that will occur
during the demo load. (If NO is selected, a
message will display confirming the demo load
process abort.)
If YES is selected in the previous message, the
user is given the filename of the #1 Demo file to
seek in the browser window that follows.
Feed Scheme User Manual
Page 19
When
OK
is
selected in the
previous message,
the user locates
and selects the #1
Demo Data file
name from the
browser
window
and clicks Open. If
demo files were
saved to another
directory than the
one presented in
the browser, the
browser is used to
navigate to that
directory.
When Open is clicked
in the browser, a
confirmation message
displays containing the
user’s
filename
selection and its path.
When OK is clicked in the previous message, the #1
Demo Data file loads and a load confirmation
message appears that also gives the user the
filename of the #2 Demo file to seek in the next
browser window. (Similar messages and browser
windows appear for the #2 and #3 Demo files.)
Once all three Demo Data files have
loaded, a load complete message displays.
When the OK button is clicked, DFLS and
MFLS are updated, a message about
disabling certain Conflict Detection settings
when using demo files appears, then the
Data Summary tab is displayed and the
user may begin to investigate Feed Scheme
features.
The Export Backup Data button allows users to save existing Master Feed List, Satellite-Receiver
List and Configuration data to backup files for safekeeping. This process is global in nature – meaning
all current data is exported – and selective treatment of limited portions of the data is not supported.
Five backup files are created in the C:\ [Root] directory under the filenames FSActiveData.csv,
FSConfigData.csv, FSObsoleteData.csv, FSPendingData.csv and FSSatRcvrData.csv.
These
filenames and their C:\[Root] path are embedded in Feed Scheme’s code and must not be altered.
{
Feed Scheme User Manual
}
Page 20
The following message boxes are displayed during the backup export process.
If Feed Scheme back up files already reside on
the system, the user is asked to OK the
overwrite of existing export files. (If NO is
selected, a message will display confirming the
export process abort.)
If YES is selected in the previous message, a Data Export
Complete message appears when the backup process has
concluded. Depending upon the quantity of data involved and
system speed, it may take several seconds for this message to
appear.
The Load Backup Data button allows users to load backup files created by the Export Backup Data
feature. This process is global in nature – meaning all backup data is imported – and selective
treatment of limited portions of the data is not supported. The five backup files are located in the C:\
[Root] directory under the filenames FSActiveData.csv, FSConfigData.csv, FSObsoleteData.csv,
FSPendingData.csv and FSSatRcvrData.csv. These filenames and their C:\[Root] path are embedded
in Feed Scheme’s code and must not be altered.
{
}
The following message boxes are displayed during the load backup data process.
If data already resides in Feed Scheme, the
user is asked to OK the deletion of data that will
occur during the backup load.
(If NO is
selected, a message will display confirming the
backup load process abort.)
If YES is selected in the previous message, the user is given a
second chance to abort the import process. (If CANCEL is
selected, a message will display confirming the backup load
process abort.)
When OK is selected in the previous
message and all five Backup Data
files are loaded, an import complete
message displays. When the OK
button is clicked, DFLS and MFLS
are updated then the Data Summary
tab is displayed and the user may
begin to utilize Feed Scheme.
Feed Scheme User Manual
Page 21
The Delete All Data button does just what it says – it deletes every bit of active data. It is intended for
such purposes as quick removal of demo data or a fast way to offload unwanted user data in order to
start fresh with a clean slate. Data deleted by this button is irrevocably lost and, for this reason, a
series of confirmations are required from the user in order to activate this feature.
{
}
The following message boxes are displayed during the Delete All Data process.
The user is asked twice – once to confirm and a second time to re-confirm – the decision to delete all
data. (If NO is selected on either occasion, a message will display confirming the delete all process
abort.)
If YES is selected in either of the
two previous messages, the delete
procedure begins. The process
selects each tab as its data is
removed. A confirmation message
is displayed following each data
offload requiring the user to click
OK to proceed to the next.
The final message confirms deletion of all
three data groups. A click on its OK
button exits the process on the
Configuration tab.
Save Changes
{
}
Changes made to Feed Scheme data are saved using Excel save icons, menus or shortcut keys (e.g.
Ctrl+S). Changes are saved to Feed Scheme’s original filename Feed Scheme.xls. Whenever a new
save occurs, Feed Scheme creates a backup of the previous file’s contents using the filename Backup
of Feed Scheme.xlk.
Exit
{
}
Exit Feed Scheme using Excel menus or the Close X box in Excel’s upper right corner or Alt+F4.
oNoteo If no changes were made – and even if Feed Scheme was opened in Read Only mode –
exiting the database will prompt an Excel message asking if the user wants to save changes made to
Feed Scheme.xls. Even in the absence of changes, this save changes message will appear because,
when Feed Scheme opens, it automatically sets the Target Date on the Daily Feed List Sort tab to the
current system date. Users who have made no changes to Feed Scheme simply answer NO to the
save changes message as another new system date will be automatically set for the Target Date at
the next opening of Feed Scheme.
Uninstall
{
}
Feed Scheme may be uninstalled via either the Programs folder or Add/Remove Programs. The
uninstaller removes all files and artifacts except the five backup files described in Export Backup Data.
Feed Scheme User Manual
Page 22
Help and Support
{
}
As described in its End User License Agreement, Feed Scheme does not provide users with a
dedicated Technical Support apparatus. While every effort has been made to assure the product’s
reliability when used on the platforms described in Minimum System Requirements, we recognize
that, being software, Feed Scheme is subject to all the same vulnerabilities as any other creation that
must rely on the configuration and integrity of each individual user’s operational environment.
Because we want its owners to have the best possible experience with Feed Scheme, we encourage
users who encounter problems with the product to contact us. We will analyze each reported problem
and determine its appropriate solution. Solutions offered may be either free of charge or fee based.
For example, if the problem is judged to lie wholly within the structure (including code, formulas, etc) of
our software product, a solution may be offered that is free of charge. If the problem is judged to have
its focus in the user’s operational environment, a fee based solution may be offered. If a mutually
acceptable solution to a reported problem cannot be achieved, the user’s purchase price will be
refunded upon receipt of satisfactory proof of purchase.
Contacts
{
}
Phone
303 681-2454
Email
[email protected]
Address Ron Anderson Services
4445 Sentinel Rock Terrace
Larkspur, CO 80118-8909
Website
www.ronandersonservices.com
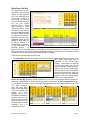
By The Numbers
{
}
Though by no means intended as an exhaustive review describing Feed Scheme’s totality, a by the
numbers tally of the product would include the following:
1970
1024 x 768
Earliest permissible user-defined year during data entry
Pixels in native (recommended) screen resolution
200
Maximum number of feed events in the pending data area
175
Maximum number of feed events in the active database
119
Maximum number of feed events in the obsolete data area
47
Number of pre-highlighted rows available for data entry in the Satellite-Receiver List
tab
26
Number of available and filterable properties per feed event
21
Number of devices monitored by Conflict Detection
14
Number of user-definable filter criteria Feed Source options supported
13
Number of parameters monitored on the Data Summary tab
10
Number of user-definable Receiver/Source devices supported
9
Number of monitored parameters with warning highlights on the Data summary tab
9
Number of available and filterable properties per Satellite-Receiver entry
7
Number of Worksheet tabs in the utility
7
Number of warning highlights for monitored parameters on the Daily Feed List Sort tab
6
Maximum number of characters in a user-definable distribution Channel (e.g.
MYKDMO, WDMO12, etc)
6
Number of user-definable Recorder/Destination devices supported
5
Number of user-definable Dish Antenna devices supported
Feed Scheme User Manual
Page 23
5
Required number of characters in a user-definable Source or Destination prefix
mnemonic (e.g. VR1-1, SVR-2, DVR-3, etc)
4
Minimum number of characters in a user-definable distribution Channel (e.g. WAAA,
K123, etc)
4
Number of user-definable Data Filter criteria on Daily Feed List Sort tab
4
Number of data Export, Load or Delete functions supported on the Configuration tab
3
Number of distribution Channels or Channel combinations highlighted on the Daily
Feed List Sort tab
2
Required number of characters in a user-definable Dish Antenna suffix mnemonic (e.g.
D1, D2, A3, A4, etc)
2
Number of discrete distribution Channels supported
Case Study
{
}
Feed Scheme and the Galaxy 26 Failure
On Sunday, June 29, 2008, Galaxy 26 – a widely used satellite distribution source for numerous
network and syndication entities (CBS, Fox, King World, Paramount, PMI, NBC Universal, etc) –
suffered a solar panel failure in orbit and lost numerous transponders. Users of Galaxy 26
transponder space began to rapidly offload their feeds to other orbital resources in what became a
torrent of short notice feed revisions. These revisions lasted well into the week of July 7th . Because
many primary notices of revision were temporary and stop gap in nature, they were followed within
several days to a week later by more permanent secondary notices – meaning the feed landscape
was in a constant state of flux for nearly two weeks.
Feed Scheme – with its ability to easily and quickly mount what-if studies of local resource allocations
– played a crucial role in reassigning assets to successfully weather this event without so much as a
single missed feed. The documented events in a case study of Feed Scheme’s use at one station
during the Galaxy 26 incident follow.
Early on Monday morning June 30th , as first word of lost feeds and refeeds began to surface, Feed
Scheme’s MFLS tab was utilized to identify all Galaxy 26 feeds at risk for the next two weeks. Of
some 572 feeds in the two week period, roughly half (270) were on Galaxy 26. A day-by-day list of
program distributors with Galaxy 26 feeds was printed from filtered MFLS data and used as a checkoff against receipt of each program distributor’s feed revision notices.
By mid morning on June 30th , data from Feed Scheme’s SRL had been utilized to study the most
efficient reallocation of dish antenna and receiver resources to handle the stream of new feed
coordinates being received from program distributors. Antennas that required realignment to other
satellite assets and receivers that must be reassigned to other antennas were identified and
preparations made to undertake the required physical and electrical changes.
By mid day on Monday, same-day and next-day revised feeds had been input to Feed Scheme’s MFL
data. Existing Galaxy 26 data for at risk feeds served as the template for building new MFL feed data
using simple copy and paste techniques. Once pasted, each new feed data row was revised to reflect
altered times, days and orbital coordinates for the replacement feed while existing – and now obsolete
– Galaxy 26 data rows had their primary feed days Xed out of MFL data so as to make them
transparent during resource allocation analysis. Multiple what-if simulations were run on Feed
Scheme’s DFLS to assess same-day and next-day consequences of the new feeds. When new feeds
caused device conflicts to be flagged on DFLS, alternate new and/or existing feeds were enabled
using 1st Refeed and 2 nd Refeed options in MFL data and the simulations re-run on DFLS until a
conflict free feed scheme had been obtained. Obsolete Galaxy 26 data rows were removed from
MFL’s Active Data area and placed in Obsolete Data for future reference and safekeeping.
Once a no-conflict schedule had been formulated and demonstrated in Feed Scheme, only then were
record orders for the on-line feed scheduler updated to reflect new feed events.
This process was repeated each day during the nearly two weeks that elapsed between receipt of the
first Galaxy 26 related feed revision of early Monday June 30 th and the last revision received from
Feed Scheme User Manual
Page 24
distributors on Thursday July 10th.
Bottom Line: Feed Scheme easily ran between 5 and 10 what-if simulations in the time it would take
to run a single simulation in the well known on-line scheduler deployed during this case study. Feed
Scheme provided the ability to project feed schedules two weeks (or more) into the future while the online scheduler was limited to, at best, only a seven day look ahead. Feed Scheme made available the
data necessary to determine the most efficient physical and electrical reallocation of dish antenna and
receiver resources during this event. Due in no small measure to Feed Scheme, of 270 feeds at risk
during the two week period of the Galaxy 26 failure in this case study, not a single feed was lost for
broadcast.
{
}
As used herein "Microsoft", “Office Pro”, "Excel", “Windows XP” and “Windows Vista” are registered trademarks or trade names
of Microsoft Corporation in the United States and/or other countries. All other trademark, trade names, product and service
names used herein are the property of their respective owners. Feed Scheme © 2009 Ron Anderson / Ron Anderson Services.
Feed Scheme User Manual
Page 25