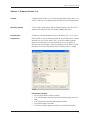
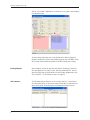
1
Animal Activity Monitor
March 2010
INSTRUCTION MANUAL
Activity Monitor for Raturn®
2 7 0 1 Ke n t Ave n u e
West Lafayette
Indiana 47906
www.BASInc.com
BASi products are trademarks of Bioanalytical Systems, Inc.
MANUFACTURER’S NOTE
This instrument, either wholly or in part, is manufactured for research purposes only. This instrument should be operated only by
trained laboratory personnel. Use for medical diagnosis is not intended, implied or recommended by the manufacturer. Use and
maintenance of this instrument and accountability for the same rests entirely with the user.
Bioanalytical Systems, Inc.
2701 Kent Avenue
West Lafayette, IN 47906
765.463.4527
www.BASInc.com on the web
BASI on the NASDAQ
Safety Precautions
The following general safety precautions must be observed during all phases of operation,
service, and repair of this instrument. Failure to comply with these precautions or with
specific WARNINGS, CAUTIONS, or NOTES elsewhere in this manual may impair the
protection provided by the equipment. Such noncompliance would also violate safety
standards of design, manufacture, and intended use of the instrument.
Bioanalytical Systems, Inc. assumes no liability for the customer’s failure to comply with
these requirements.
• For indoor use only.
• Ground the Instrument. To avoid electric shock, the instrument must be grounded with
the supplied power cable’s grounding prong.
• DO NOT exceed the operating input power, voltage, current level and signal type
appropriate for the instrument. Refer to the Installation Section for further information.
• Electrostatic discharge (ESD) can damage the highly sensitive microcircuits in your
instrument. ESD damage is most likely to occur as the I/O connectors are being
connected or disconnected. Protect them from ESD damage by wearing a grounding
strap that provides a high resistance path to ground. Alternatively, ground yourself to
discharge any static charge built-up by touching the outer shell of any grounded
instrument chassis before the I/O connectors are connected or disconnected.
• DO NOT place the instrument in fluid or expose the internal elements and/or back panel
to fluid.
• DO NOT Operate in an Explosive Atmosphere. Do not operate the instrument in the
presence of inflammable gasses or fumes. Operation of any electrical instrument in such
an environment clearly constitutes a safety hazard.
• Keep Away from Live Circuits. Operators must not remove instrument covers.
Component replacement and internal adjustments must be made by qualified
maintenance personnel. Do not replace components with the power cable connected.
Under certain conditions, dangerous voltage levels may exist even with the power cable
removed. To avoid injuries, always disconnect the power and discharge circuits before
touching them.
• DO NOT Service or Adjust Alone. Do not attempt internal service or adjustment unless
another person, capable of rendering first aid and resuscitation, is present.
• DO NOT Substitute Parts or Modify the Instrument. To avoid the danger of introducing
additional hazards, do not install substitute parts or perform unauthorized modifications
to the instrument. Return the instrument to the Bioanalytical Systems, Inc. Service
Department for service and repair to ensure that safety features are maintained in
operational condition.
If you notice any unusual conditions as listed below, immediately terminate operation and
disconnect the power cable. Contact the Bioanalytical Systems, Inc. Service Department for
repair of the instrument. If you continue to operate without repairing the instrument, there is
a potential for hazard or damage to both the equipment and the operator.
•
•
•
•
•
•
Instrument operates abnormally
Instrument emits abnormal noise, smell, smoke or a spark-like light during operation
Instrument generates high temperature or electrical shock during operation
Power cable, plug or receptacle on instrument is damaged
Foreign substance or liquid has penetrated the outer cover of the instrument.
LCD displays an ERROR message
Throughout the course of this manual, the following will be used to designate important
information:
WARNING - This signifies an extreme hazard. Not following the instructions may result in
serious injury or death.
CAUTION - Following information relates to a hazard. If instructions are not followed
properly, it can result in irrevocable damage to the instrument.
NOTE - This implies that the following instructions are essential for the user to understand
in order to operate the equipment effectively.
Symbols:
Caution: Risk of Danger. User’s Manual must be consulted in all cases where this
symbol is marked.
Alternating current.
Fuse.
On (Supply).
Off (Supply).
Complies with European Union Directives
The European Waste Electrical and Electronic Equipment (WEEE) Directive
TABLE OF CONTENTS
TABLE OF CONTENTS
Section 1. Introduction ..........................................................................................................1
This Manual ...................................................................................................................1
Product description .......................................................................................................1
Section 2. Installation ............................................................................................................2
Environment ...................................................................................................................2
Power Source Requirments ...........................................................................................2
Identification of Parts .....................................................................................................3
Installation Procedures ..................................................................................................4
Section 3. Software (Version 1.0) ..........................................................................................5
Purpose .........................................................................................................................5
Operating System ..........................................................................................................5
Initializing the Components ...........................................................................................5
Status Screen .................................................................................................................6
Load a Method ..............................................................................................................7
Run a Method ................................................................................................................7
Finding Reports .............................................................................................................8
AAA software .................................................................................................................8
Section 4. Contact BASi ......................................................................................................10
Contact Information .....................................................................................................10
Shipping Damage ........................................................................................................10
Limited Warranty ..........................................................................................................10
i
TABLE OF CONTENTS
ii
Section 1. Introduction
Section 1. Introduction
This Manual
This manual covers the installation and operation of the Animal Activity Monitor for the
Raturn System. Updates for the manual will be available to users on the Culex Users Forum
at the following URL: : http://www.basinc.com/nsrch/phpBB3/
Product description
The Animal Activity Monitor collects information on animal movement when an animal is
tethered in a Raturn Animal Containment System. The monitor records clockwise,
counterclockwise, and rearing activity.
• Collect data in a low stress manner
• Maintain the animal’s health and comfort throughout the study
• Maximize technician efficiency
• Work within animal care and use regulations
Features
• One system collects data from multiple Raturns
• Easy to use software with automatically generated electronic report
• Analysis software allows user defined data sorting.
Applications
• Pharmacodynamics
• Safety Pharmacology
• Behavioral Pharmacology
• Neuroscience
1
Section 2. Installation
Section 2. Installation
Environment
• For indoor use only
• Place on a stable, level surface
• Do not place instruments in direct sunlight
The Animal Activity Monitor is designed to operate under the following environmental
conditions:
• Temperature: 10° C to 35° C
• Humidity: 15% to 50% (relative humidity)
• Pressure: 75KPA – 106 KPA
• Altitude: < 2,000 meters
• Pollution Degree 2
CAUTION: The Animal Activity Monitor must be protected from temperature extremes that
could cause condensation within the instrument.
Power Source
Requirments
The Animal Activity Monitor requires a power source that meets the following
sepecifications:
• Voltage: 100-240 Volts VAC (auto select)
• Frequency: 50-60 Hz
• Power Consumption: 40 VA (max)
• Connections: The power cable uses a three-wire system in accordance with international
safety standards. When connected to an appropriate ac power outlet, this cable grounds
the instrument frame.
WARNING: To protect against electrical shock, the power cable grounding prong MUST
NOT be removed.
WARNING: Failure to comply with these requirements may result in injury to both the user
and the equipment.
2
Section 2. Installation
Identification of Parts
Activity Monitor
• Activity Monitor Controller
• 4 tan monitor cables
• 1 power cable
• 1 USB cable
Front Panel
A. USB port
B. Indicator Lights
Back Panel
A. Monitor ports
B. Socket for power cable
C. Power switch
3
Section 2. Installation
Installation Procedures
1.
Place the Activity Monitor controller on a stable, level surface.
2.
Connect a tan Raturn monitor cable from the monitor port on the back of each Raturn
controller (A) to one of the monitor ports on the back of the Activity Monitor controller. NOTE: If you have an older Raturn with three or four colored ports, you will need
to exchange the tan monitor cables for a cable with banana jacks (EW-7508 – three
port; EW-7514- four port). Please contact BASi to make the exchange.
Make sure that the power switch is in the OFF position. Plug one end of the power cable into the back of the Activity Monitor controller, and the other end into a grounded
outlet.
Connect the USB cable from the front of the Activity Monitor controller to a computer.
Turn on the Activity Monitor controller. The LED indicator lights on the front of the Activity Monitor controller will briefly flash to indicate that the power is ON.
3.
4.
5.
4
Section 3. Software (Version 1.0)
Section 3. Software (Version 1.0)
Purpose
The laptop computer functions as an archive for data gathered by the Raturns and as a user
interface. It allows the user to upload experimental methods to the Animal Activity Monitor.
Operating System
The User Interface Software operates under the Windows operating system. Win XP is the
standard, and the software will also run on Windows 2000 operating systems.
Initializing the
Components
The Raturns are registered and logged in by their station identity (A, B, C, or D). If all the
Raturn controllers are correctly connected and powered, the initialization process should be
completed in less than a minute, and the “Status” screen will be loaded. If anything is
wrong, the initialization process will stop and indicate the source of the problem. To
determine the source of the problem, consult the Initialization Checklist below. After fixing
the problem, click the Retry button and wait until the initialization process is complete.
Initialization Checklist
1. Does the Activity Monitor Controller have power?
2. Is the USB cable properly connected from the Activity Monitor controller to the computer?
3. Is the USB cables intact and undamaged throughout its length?
4. Do the Raturn controllers have power?
5. Are the Raturn controllers properly connected to the Activity Monitor controller?
5
Section 3. Software (Version 1.0)
Status Screen
Once initialization is complete, the Status screen will appear. A red light appears next to
each station that is available for programming. If a station is incomplete or disconnected,
no light will appear, and no method can be loaded to that station.
The top box of the Status screen displays animal activity summary information. This area
keeps count of how many times the animal has moved in a given direction, as well as the
maximum duration of movement in that direction, and the most recent movement. For the
purposes of animal activity, right refers to clockwise movement, and left refers to
counterclockwise movement.
The lower box of the Status Screen displays the data currently being collected from each
Raturn. To display data from individual Raturns, click on the appropriate button at the
bottom of the screen (Rt A, Rt, B, etc).
Reconnecting Raturns
To reconnect the software to the Animal Activity Monitor, or to reconnect to a Raturn
controller, click the Operational pulldown menu at the top of the status screen. To reconnect
the software to the Animal Activity Monitor, click “Reconnect AAM”. The Animal Activity
Monitor must be connected to the software in order to collect data from any Raturns.
CAUTION: Clicking “Reconnect AAM while the Animal Activity Monitor is still collecting
data will cause data to be lost from all Raturn stations.
To reconnect an individual Raturn, click “Check Raturns”. Use this option if a Raturn did
not initialize during startup, and you want to re-initialize that component, or if you are
adding a Raturn while collecting data from other Raturns. A Raturn must be connected to
6
Section 3. Software (Version 1.0)
the software in order to collect data from it. NOTE: Clicking “Check Raturn” will not affect
data collection in currently operating Raturns.
Defining Raturns
The Animal Activity Monitor can be used with older Raturn controllers, with the speed
adjust dial, or with newer Raturn controllers without the dial. To define which Raturn type
you have, go to the Operational pulldown menu and click on “Raturn”. Select Old or New
Raturn.
Load a Method
To specify the animal activity collection time and to assign a filename in which the data will
be saved, a method must be loaded for each Raturn station. To load a method for activity,
click on the Load button at the left of the Status screen. This will bring up the Load screen.
On the Load screen, input the length of the collection period. When inputting the hours and
seconds parameters, there must be two digits typed in each box. For example, for a run of
two hours and 5 minutes, type “02” and “05” in the boxes. NOTE: The maximum collection
period is 7 days, 12 hours, 33 minutes.
Select a report name for the file, and click on the appropriate Raturn (station ID A,B,C, or
D) to load the method. Each animal will have its own unique report file. Once the method is
loaded, the collection time will appear in the left-hand column, and the selected report file
name will appear in the right-hand column. Click Exit to return to the Status screen. NOTE:
the default directory for saving reports is the Reports subfolder in the AAM folder. To save a
report file in another directory, click “Select Report File”, choose the directory, and then
type the name of the file in which you wish to save your data.
Run a Method
Once a method has been loaded, the indicator light next to the station becomes yellow. To
run a method, click on the Run button for each station. The light now becomes green, and
the program is collecting data. The LED’s on the Activity Monitor controller associated with
each active station will be lit during the duration of the programmed collection period. For
each station, you can view the operational report and the animal activity report. The
operational report indicates the run time that has been programmed, the start time, and the
7
Section 3. Software (Version 1.0)
stop time. If the method is stopped by the user before the run has ended, a note will appear
in the operational report.
The animal activity report shows each sensor activation for the station. It indicates the
direction of activation, the relative time of activation (relative to start) in HH:MM:SS format
and in seconds, and the duration of activation (in HH:MM:SS format and in seconds).
Finding Reports
After a method has finished, the report files can be found in the directory in which they
were saved. Report files are saved as .txt files, and can be imported to Excel. To access
report files directly from the Activity Monitor, click on the Reports pulldown menus, and
select “Show/Print”. This will allow you to access any report file.
AAA software
The AAA software program allows the user to sum activity into “bins”, or time intervals.
Since many activity events are measured in seconds, binning data is a convenient way to
look for activity trends. To bin data, open the AAA program by clicking on the icon.
8
Section 3. Software (Version 1.0)
Before choosing a report file, select the bin parameters:
1. Select Type - Choose the type of data to analyze. Choosing L (left), R (right), or U
(up) will create a file with only that type of data. Choosing All will cause all movement
data to be binned with no differentiation between the type and direction of movement.
L,R,U creates a file with each type of data binned separately.
2. Time Interval - Enter the size of the bin. This must be a whole number, and is specified in minutes.
3. Header Information - Clicking this box will include the first part of the Culex report
file in the binned activity file, including the species, catheter type, author and notes,
and the Method File section of the report.
4. Automatic Name and Save – Checking this box will create a separate file with a
filename describing how the data was binned. The filename will include the name of
the original report file, the bin interval, and the type of data, and will be saved as a text
file. For example, a report file entitled RatA, binned into 30 minute segments, of type
L,R,U will have a filename of RatA_30min_LRU.txt. If you choose to name your own
file, do not check this box. You will be able to save the result file later. The default location for the file will be the same location as the original report file.
The binned activity file will be a text file (*.txt) which can be imported into Excel as a
comma delimited file. The table will contain the following data:
1. Which sensor was activated (left, right, or up), if it has been separated by direction
2. The time interval for the bin in minutes
3. The time interval for the bin in seconds
4. Total duration of all sensor activations for that bin (in seconds)
5. Total number of activations of that sensor for that bin (counts)
NOTE: It is possible to have a sensor activation with a duration of 0 seconds. The
software rounds to the nearest whole number. Any short activation (less than 0.5 seconds) will be recorded as 0. However, the activation itself will still be recorded. A series of short sensor activations can result in multiple counts in the “counts” column,
with a total duration of 0 seconds in the “duration” column.
9
Section 4. Contact BASi
Section 4. Contact BASi
Contact Information
For questions about basic operations of this instrument, or in case of equipment failure,
please contact BASi and ask for Culex product support. For instruments that are out of
warranty and not covered under a service plan, a cost estimate for repair will be provided.
Bioanalytical Systems, Inc. (BASi)
2701 Kent Ave
West Lafayette, IN 47906
TEL: (800) 845-4246
FAX: (765) 497-1102
EMAIL: [email protected]
Shipping Damage
Orders are normally shipped prepaid via a ground service and charges include an insurance
fee to cover loss or damage in transit. If you do not wish to pay for shipping insurance,
your order must also include a waiver saying that you take full responsibility for any
damage or loss incurred on the item once it leaves our dock. Claims on insured items
must be made within 30 days of the ship date.
1.
2.
3.
4.
Limited Warranty
For items shipped with insurance, please contact BASi order entry (800-845-4246 or
765-463-4527) for assistance.
Have the model and serial number of the damaged instrument available
Save the box and all packaging materials that accompanied the item for return shipment to BASi
You will be given a Return Authorization Number (RA#). This number must be placed
on all labels and documents accompanying the returned product.
BASi warrants equipment manufactured by the company to be free of defects in material
and workmanship for a period of one year from the date of shipment, except as provided
hereinafter. This assumes normal usage under commonly accepted operating parameters
and excludes consumable products.
BASi agrees either to repair or replace, at its sole option and free of part charges to the
buyer, any parts of such instrumentation which, under proper and normal conditions of use,
prove to be defective within 90 days from the date of shipment. This warranty and remedy
are given expressly and in lieu of all other warranties, expressed or implied, of
merchantability or fitness for a particular purpose and constitutes the only warranty made
by BASi.
BASi neither assumes nor authorizes any person to assume for it any other liability in
connection with the sale, installation, service or use of its instrumentation. BASi shall have
10
Section 4. Contact BASi
no liability whatsoever for special, consequential, or punitive damages of any kind from any
cause arising out of the sale, installation, service or use of its instrumentation.
All products manufactured by BASi are tested and inspected prior to shipment. Upon
prompt notification by the Buyer, BASi will correct any defect in warranted equipment of its
manufacture either, at its option, by return of the item to the factory, or shipment of a
repaired or replacement part. BASi will not be obliged, however, to replace or repair any
piece of equipment which has been abused, improperly installed, altered, damaged, or
repaired by others. Defects in equipment do not include decomposition, wear, or damage by
chemical action or corrosion, or damage incurred during shipment.
Limited Obligations Covered by this Warranty
1. In the case of instruments not of BASi manufacture, the original manufacturer’s warranty applies.
2. Shipping charges under warranty are covered only in one direction. The buyer is responsible for shipping charges to the factory if return of the part is required.
3. This warranty does not cover damage to valves, lamps, seals, or columns due to improper installation by the buyer.
4. Thin-layer amperometric cells and working electrodes are limited to 60 days.
5. Warranty for valves is limited to 30 days.
6. Expendable items, including but not limited to microdialysis probes, reference electrodes, chemical standards, prepared solutions, lights, fuses, O-rings, gaskets, glass
items, membranes and filters, are excluded from warranty.
7. Failure by the customer to perform normal and reasonable maintenance on instruments will void warranty claims.
8. If the original invoice for the instrument is issued to a company which is not the company of the end user, and not an authorized BASi distributor, then all requests for warranty must be processed through the company which sold the product to the end user,
and not through BASi or its distributors.
11


![TEMPLATE No1 [CPMP positive opinion full application]](http://vs1.manualzilla.com/store/data/005681628_1-1a3acb54fcca990dd8c826546eb4788f-150x150.png)