1
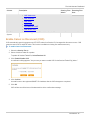
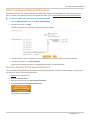
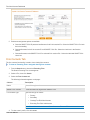
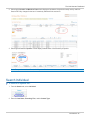
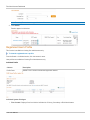
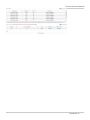
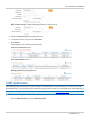
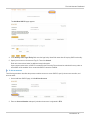
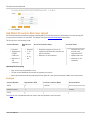
Firm Administrator Dashboard
User Manual
11/2/2015
Disclaimer
Futures trading is not suitable for all investors, and involves the risk of loss. Futures are a leveraged investment, and
because only a percentage of a contract's value is required to trade, it is possible to lose more than the amount of money
deposited for a futures position. Therefore, traders should only use funds that they can afford to lose without affecting their
lifestyles. And only a portion of those funds should be devoted to any one trade because they cannot expect to profit on every
trade.
All references to options refer to options on futures.
CME Group is a trademark of CME Group Inc. The Globe Logo, CME, Chicago Mercantile Exchange, Globex, iLink, E-mini,
CME EOS Trader, FirmSoft, CME DataSuite, and CME DataMine are trademarks of Chicago Mercantile Exchange Inc. New
York Mercantile Exchange, NYMEX, miNY, and ClearPort are registered trademarks of the New York Mercantile Exchange,
Inc. COMEX is a trademark of Commodity Exchange, Inc.
FIX™ and FAST™ are trademarks of FIX Protocol Limited. FIX/FASTsm is a service mark of FIX Protocol Limited.
Dow Jonessm, Dow Jones AIG Commodity Indexsm, The Dowsm, Dow Jones Industrial Averagesm, and DJIAsm are service
marks of Dow Jones & Company, Inc. and American International Group, Inc. (AIG) and have been licensed for use for
certain purposes by the Board of Trade of the City of Chicago, Inc (CBOT®). CBOT futures and options on futures contracts
based on the Dow Jones Industrial Averagesm are not sponsored, endorsed, sold or promoted by Dow Jonessm, and Dow
Jonessm makes no representation regarding the advisability of trading such product(s).
BM&FBOVESPA™ is a trademark of BM&FBOVESPA, KRX™ is a trademark of Korea Exchange, DME™ is a trademark of
Dubai Mercantile Exchange, BMD™ is a trademark of Bursa Malaysia, BMV™ is a trademark of Bolsa Mexicana De
Valores.
Standard & Poor’s, S&P®, S&P 500®, S&P-GSCI™, S&P-GSCI Spot Index™, S&P-GSCI Excess Return Index™, S&PGSCI Total Return Index™, S&P-GSCI Non-Energy Excess Return Index™, S&P-GSCI Light Energy Excess Return
Index™, S&P-GSCI Livestock Excess Return Index™, S&P-GSCI Industrial Metals Excess Return Index™, S&P-GSCI
Energy Excess Return Index™, S&P-GSCI WTI Oil Excess Return Index™, S&P-GSCI Natural Gas Excess Return
Index™, S&P-GSCI Grains Excess Return Index™, S&P-GSCI Agricultural Excess Return Index™, Standard & Poor’s®,
Standard & Poor’s 500™, 500™, S&P 100®, Standard & Poor’s 100™, S&P MidCap 400™ Index, S&P SmallCap 600™
Index, S&P 500/CITIGROUP Growth Index™,S&P 500/CITIGROUP Value Index™, Standard & Poor’s 500/CITIGROUP
Value Index™, S&P Energy Stock Price Index™, Standard & Poor’s Energy Stock Price Index™, Standard & Poor’s
Financial Stock Price Index™, S&P High Technology Stock Price Index™, Standard & Poor’s High Technology Stock Price
Index™, S&P Public Utility Stock Price Index™, Standard & Poor’s Public Utility Stock Price Index™, S&P Consumer
Staple Stock Price Index™, Standard & Poor’s Consumer Staple Stock Price Index™, S&P Transportation Stock Index™,
Standard & Poor’s Transportation Stock Price Index™, S&P Euro Index™, S&P Euro Plus Index™, S&P 500 GICS Sector
Indices™, SPDR®, Standard & Poor’s Depositary Receipts™, S&P Asia™, Bxy Trakrs™ are trademarks of The McGrawHill Companies, Inc. and have been licensed for use by Chicago Mercantile Exchange Inc.
Eris Exchange and the Eris Logo are registered trademarks of Eris Exchange, LLC. Eris SwapBook, Eris BlockBox, and Eris
PAI are trademarks of Eris Exchange, LLC.
All other trademarks are the property of their respective owners.
The information within this site has been compiled by CME Group for general purposes only. CME Group assumes no
responsibility for any errors or omissions. Additionally, all examples in this brochure are hypothetical situations, used for
explanation purposes only, and should not be considered investment advice or the results of actual market experience.
All matters pertaining to rules and specifications herein are made subject to and are superseded by official CME, CBOT, and
NYMEX rules. Current rules should be consulted in all cases concerning contract specifications.
Copyright © 2015 CME Group Inc. All rights reserved.
Table of Contents
Table of Contents
Getting Started
What's New
Obtaining Access
Logging In and Out
Webhelp/User Manual
Search
Search Executing Firm
Trader IDs Tab
Session IDs Tab
Enable Cancel on Disconnect (COD)
Enable COD for a Route through Session ID
Cancel a Pending COD Change
Unmask Session ID Password
Grant iLink Session Password Permission
Set iLink Session ID Password Entitlement
Firm Contacts Tab
Outbound Contacts Tab
CME Application Tab
Messaging Stats Tab
Session Stats Tab
Search Individual
Registered User's Profile
Individual Profile
Reports
Clearing Back Office
Messaging Efficiency Program
Administration
User Administration
Change Log
CME Application
MEP Contact Management
Self-Match Prevention
Self-Match Prevention Bulk User Upload
Uploaded File Processing
Example
4
4
5
7
8
9
11
12
13
15
16
17
18
19
19
20
22
22
23
24
25
26
26
28
29
31
33
33
36
37
38
40
44
44
44
User Manual - 3 -
Firm Administrator Dashboard
Please submit user experience feedback about this user manual system.
Getting Started
The Firm Administrator Dashboard (FADB) offers registered clearing and executing firm users access to user lists for a
variety of clearing and executing firm applications. Available applications lists include:
l
FirmSoft
l
GCC Outbound contacts
l
Messaging Efficiency Program Contacts and statistics
l
Clearing firm mapping
l
iLink session ID connectivity and volume
Clearing Firm Administrators with FADB access can:
l
Enable / Disable iLink session ID Cancel on Disconnect - View and Assign iLink session password viewing rights
l
Administer access to FADB
l
Add / Modify / Delete Messaging Efficiency Program Contacts
l
Request Self Match Prevention (SMP) IDs
Clearing firm back office managers assign privileges, at their discretion, to their staff to View :
l
Users' applications entitlements
l
Clearing activity
l
Sarbanes Oxley (SOx) report
For an overview of customer roles and permitted activities, refer to the CME Globex Customer Roles and Entitlement.
What's New
Date
Author Topic
Description
11/2/15
MR
Various
EOS Trader has been decommissioned. All related EOS Trader features and
options have been removed.
9/11/15
EE
Session Stats tab
Session Stats functionality displays and provides users with the ability to view
volume figures applicable to iLink Session ID Policy administration.
4/1/15
EE
Firm Contacts
Inbound Contacts changed to Firm Contacts.
9/18/14
MR
Outbound Contacts
Outbound Contacts are used to contact clearing and executing firm users
regarding error trades or technical issues.
9/8/14
MR
Registering for
SMART Click ID
SMART Click registration is required to access Firm Administrator Dashboard
(FADB).
5/29/14
MR
Various
Clearing and executing firm users can view and modify CME Europe
registration information. CME Europe firms are designated by the CMEEL
prefix.
Example:
- 4 - User Manual
Firm Administrator Dashboard
Date
Author Topic
Description
Search
Reports
User Administration
CME Application
Contact Management
4/14/14
MR
All
Updated links and edited to meet Help standards.
4/14/14
MR
Search
Common navigation toolbar and single login added.
4/4/14
MR
Reports
New report displays Outbound Contacts details.
4/4/14
MR
Outbound Contacts
Tab
New tab displays outbound contact information.
4/4/14
MR
Inbound Contacts
Tab
Contacts tab renamed to Inbound Contacts. Note: superseded by Firm
Contacts on 4/1/15.
2/28/14
MR
Various
l
Contact information.
l
Session ID Tab field definitions.
l
Contacts Tab field definitions.
l
Self-Match Prevention - Functionality description has been updated.
10/18/13 MR
Set Session
Password
Entitlements
Entitle all or specific users at an executing firm to unmask session passwords.
10/18/13 MR
Unmask Session ID
Password
Enables authorized users to unmask iLink session passwords.
8/20/13
MR
Self Match
Prevention Bulk
User Upload
Enables upload of a file that specifies account and tag 50 relationships to
common owners.
5/30/13
MR
All
This is the initial release of the Firm Administrator Dashboard (FADB) user
manual.
Obtaining Access
CME Clearing Firm Administrators gain access to the Firm Administrator Dashboard after registering for SMART Click, then
completing the Schedule 3 & 4, Exhibit A form. Contact Global Account Management (GAM) to request an exhibit A form or
to suggest future enhancements.
Executing Firm access is granted by CME Clearing Firm Administrators, which use the administration process to add new
users, update a users list of executing firms, edit a users status, or enable self-match prevention.
For support or questions, refer to the Contact Information page.
l
Global Account Management
l
North America
l
Europe
User Manual - 5 -
Firm Administrator Dashboard
l
Asia
l
Enterprise Application & System Entitlements (EASE)
l
General Customer and Back Office Support
l
SMART Click Support
- 6 - User Manual
Firm Administrator Dashboard
Logging In and Out
Firm Administrator Dashboard uses SMART Click to manage application authentication. SMART Click is a self-managed,
centralized user profile service that authenticates access to CME Group applications and services.
Prior to logging in, users should ensure the SMART Click registration procedures are completed.
To log in to the Dashboard:
1. Enter the following address in the browser address bar: https://login.cmegroup.com
The SMART Click login page appears.
Note: Bookmark the URL address by pressing CTRL + D.
2. Enter the SMART Click ID and Password and click Login.
3. Click Login.
For the initial login and from new devices, users may be required to enter a security code, which is sent to their
registered mobile device.
The login enables single login access to other SMART Click enabled applications, via the common navigation menu.
4. From the Administration menu, select Firm Admin Dashboard.
After a successful login, the Search Executing Firm window appears
To log out:
To log out of all SMART Click enabled applications, use the navigation menu.
1. Finalize the current task.
2. From the My Profile drop-down menu, click Logout.
Note: A session will automatically log out if no activity is detected for one hour.
User Manual - 7 -
Firm Administrator Dashboard
For issues with logging in, site navigation, or to update information, contact Enterprise Application & System Entitlements
(EASE).
Webhelp/User Manual
To access the webhelp system that provides instructional topics on FADB features, click the Webhelp User Manual tab.
- 8 - User Manual
Firm Administrator Dashboard
Search
The Main Menu refers to the list of tabs at the top of the window. The available tabs are based on your assigned system
privileges. The following functionality is available:
1. Navigation Bar
l
Access other SMART Click enabled applications from the Admin Center drop-down menu.
l
Logout - Log out of all SMART Click enabled applications.
2. Search
l
l
by Executing Firm - Search by executing firm and perform tasks related to:
l
Traders
l
Sessions
l
Firm Contacts
l
Outbound Contacts
l
System Entitlements
l
Messaging activity
by Individual - Search for individuals to view profile and system entitlements.
3. Reports - View system activity in a variety of reports. Available to clearing firm administrators only.
4. Administration
l
l
User Administration - Perform user maintenance. Administration features are available to certain users only.
Change Log - Audit cancel on disconnect or user administration activity. Available to clearing firm
administrators only.
l
CME Application - View executing firm entitlements for other CME Group applications.
l
Self-Match Prevention - Enables an executing firm to prevent buy and sell orders for the same account or
User Manual - 9 -
Firm Administrator Dashboard
common beneficial ownership from matching.
l
Contact Management - Add or delete MEP contacts to or from an executing firm. Available to clearing and
executing firm administrators only.
5. Messaging Program
l
Request for Waiver (RFW) - A clearing firm administrator or an executing firm representative may submit a
Request for Waiver (RFW) if they believe there is a justification for exceeding the messaging threshold. 6. User Manual/Webhelp - Access the online webhelp system or a printable user manual.
7. Logout - Log out of Firm Administrator Dashboard only.
8. Contact Us - Lists contact information for application assistance or Global Account Management (GAM).
9. Quick Links - Links to related systems and information resources.
- 10 - User Manual
Firm Administrator Dashboard
Search Executing Firm
The Search Executing Firm window appears after a successful login. Users can perform a variety of executing firm tasks
related to traders, sessions, contacts, user entitlements, and messaging.
To search for information relating to an Executing Firm:
1. From the Search menu, select Executing Firm.
2. Select an Executing Firm.
CME Europe executing firms are indicated by CMEEL prefix prior to the firm name.
3. Select a Sort option:
l
Firm ID
l
Firm Name
4. Click Search.
Matching results appear on the Trader IDs tab.
Additional tabs are available:
l
Session IDs
l
Firm Contacts
l
Outbound Contacts
l
CME Application
l
Messaging Stats
l
Session Stats
To export search details:
Executing firm details can be exported to an Excel spreadsheet.
User Manual - 11 -
Firm Administrator Dashboard
1. On the listed results, click Export to Excel.
2. On the File Download dialog, click Save.
3. Select a location (Save As dialog).
4. Click Save.
Trader IDs Tab
The Trader IDs functionality displays Executing Firm Globex Trader IDs.
Result can be sorted in ascending or descending order by clicking the arrow icon to the right of the Trader ID, Type, and
Effective Date column headers ( ).
Column
Description
Trader ID
Identifies the firm to the GCC
Type
l
FIX API
l
CME Direct
l
Mass Quote
Clearing
Mapping
The Clearing Mapping identifies the Clearing Exchange and Clearing Member affiliated with a particular
Trader ID
Effective Date
The date the trader ID was created.
To view clearing mapping information, click Details.
- 12 - User Manual
Firm Administrator Dashboard
Column
Description
Exchange
The exchange on which clearing mapping exists
Firm ID
Identifies the associated firm
Firm Name
The corresponding firm name
Effective Date
The date that the mapping was established
Session IDs Tab
The Session IDs functionality displays a session ID report summary. The following features are available, based on assigned
system privileges:
l
View Executing Firm Session IDs - Search for an executing firm.
l
Enable or Disable Cancel on Disconnect
l
Unmask Session ID Password
l
Set Session Password Entitlements
The following information is available on the Session IDs pane.
Note: To sort column data by ascending or descending order, click .
Column
Description
Select/Deselect
All
Checkboxes to select a session ID to perform additional
actions.
X
Connecting
Entity
Identifies the connecting entity, based on information gathered
when the Session ID was created.
X
X
Trading
Customer
The name of the customer trading through a given iLink session
ID as disclosed by the clearing firm.
X
X
Executing Firm
ID
The three-character alpha-numeric value transmitted in
positions 4 through 6 of iLink tag 49-SenderCompID on the
message to CME Globex and iLink tag 56-TargetCompID on
the message from CME Globex that identifies the executing
firm.
X
X
Trader ID
The alphanumeric ID associated with the iLink session and
derived from the execution firm ID.
X
X
Session ID
The first three characters of the iLink SenderCompID (Tag49). It
is the logical connection to CME Globex for order entry based
on the FIX protocol. It is the logical connection to CME Globex
for order entry based on the FIX protocol.
X
X
Sender Comp
A combination of the Session ID and the Executing Firm ID
sent by a market participant in iLink Tag 49.
X
X
Status
The existing state for an iLink session:
X
X
l
Clearing Firm
Admin
Executing Firm
User
Live - iLink session was created less than 6 months
User Manual - 13 -
Firm Administrator Dashboard
Column
Description
Clearing Firm
Admin
Executing Firm
User
ago, or had more than 100 messages in the past three
months.
l
l
l
l
Idle - No activity (order, cancel, modify, mass quote or
100 minimum messaging threshold) in the past three
months.
Idle Warning - iLink session that is in-scope for deletion
during the Auto-Delete process.
Password Changed - As part of the iLink session Auto
Delete process, one week prior to deletion, the
password associated with the iLink session ID is
changed and the associated iLink port is closed.
Queued for Delete - System generated request to
change the password for a specific iLink session. After
the request has been successfully processed, the
Status changes to “Password Changed”.
iLink Session
Password
Displays a user's iLink order routing interface password.
X
X
Live Date
Specifies the close of business date that the iLink session went
live.
X
X
Last Login
The last date the Session ID logged in.
X
X
Last Transaction
The last date the Session ID entered a new order, order
modification, order cancellation or recorded volume.
X
X
COD (Cancel on
Disconnect)
Clearing firm administrators can enable or disable this feature.
X
X
l
l
If COD (Cancel on Disconnect) is Enabled and an
ungraceful disconnect occurs, all non GTC/GTD orders
for the iLink Session ID will be canceled.
If COD (Cancel on Disconnect) status is Disabled and
an ungraceful disconnect occurs, non GTC/GTD orders
for the iLink Session ID will not be canceled.
Drop Copy Group
Lists Drop Copy groups in which this session is included.
X
X
Primary IP
The primary internet protocol address of the iLink session.
X
X
Backup IP
Alternate internet protocol address of the iLink session.
X
X
Port
The port number associated with the host IP address.
X
X
Connectivity
Type
Type of connectivity used to connect to the CME Group
network and FADB. Available choices:
X
X
- 14 - User Manual
l
CME DirectLink
l
Metropolitan Area Network
l
Client INTERNETLink
Firm Administrator Dashboard
Column
Front End
System
Description
l
CME Globex Hub
l
CME EConnect
l
CME GLink
l
Jackson Direct
l
Local Network - LNET
l
CME NYDC VPN
Clearing Firm
Admin
Certified front end application affiliated with a Session ID.
X
Executing Firm
User
X
Enable Cancel on Disconnect (COD)
COD automatically cancels in-progress non GTC/GTD orders for a Session ID if an ungraceful disconnect occurs. COD
cannot be used for GTC and GTD orders. This function is available to clearing firm administrators only.
To enable Cancel on Disconnect:
1. Select the Session IDs tab.
2. Select a Session/Trader ID to update.
To update all Session/Trader IDs, Select/Deselect All.
3. Click Enable/Disable COD.
A confirmation dialog appears. "Are you sure you want to enable COD for the Session/Trader ID(s) below."
4. Click Confirm.
An email is sent to the registered SMART Click address after the COD changes are completed.
5. Click OK.
COD will become effective as of the date and time in the confirmation message.
User Manual - 15 -
Firm Administrator Dashboard
After clicking OK, results appear with the updated COD status.
6. To enable a disabled Session/Trader ID, repeat the process and select Disable.
Enable COD for a Route through Session ID
A route through Session ID is a Session ID assigned to multiple Trader IDs. This function is available to clearing firm
administrators only.
To Enable Cancel on Disconnect for a Route through Session ID:
1. Search for an Executing Firm.
2. Select the Session IDs tab.
3. Select a Session/Trader ID to update.
To update all Session/Trader IDs, click Select/Deselect All.
4. Click Enable/Disable COD.
A confirmation dialog informs the user that the selection is a route through Session ID.
Note: A Route through Session ID can have multiple Trader IDs associated to it. Confirm the Trader IDs prior to
enabling.
5. Select additional Trader IDs to enable/disable COD.
6. Click Confirm.
A confirmation dialog asks to confirm the selected Trader ID/Session ID pairs.
- 16 - User Manual
Firm Administrator Dashboard
7. Click Confirm.
An email is sent to the registered SMART Click address after the COD changes are completed.
8. Click OK.
After clicking OK, results appear with the updated COD status.
Note: Only the last 10 days of COD changes are available for search.
9. Repeat the process to enable a disabled route through Session/Trader ID.
Cancel a Pending COD Change
This function is available to clearing firm administrators only. Any clearing firm administrator can cancel a pending COD
change.
To cancel a pending COD change:
1. Search for an Executing Firm.
2. Select the Session IDs tab.
3. Select a Session/Trader ID.
4. Click Enable/Disable COD.
A confirmation dialog appears.
5. To cancel the pending COD changes, click Confirm.
6. Click OK.
User Manual - 17 -
Firm Administrator Dashboard
A cancellation email is sent to the registered SMART Click ID address.
Unmask Session ID Password
Clearing firm administrators and executing firm users use this function to unmask iLink session passwords for iLink
sessions.
1. Search for an Executing Firm.
2. Select the Session IDs tab.
3. Move the mouse pointer over iLink Session Password.
4. Click Unmask Session Password.
A login dialog appears.
Note: User re-authentication is required to access this highly sensitive functionality.
5. Enter the SMART Click ID and password, then click Submit.
Upon re-authentication, active session passwords that you are authorized to view are unmasked.
iLink session passwords are masked when any of the following occurs:
l
User is not authorized to view session ID password for a particular executing firm
l
Session is not active
l
Browser is refreshed
l
User logs out and logs in again
l
System timeout
- 18 - User Manual
Firm Administrator Dashboard
Grant iLink Session Password Permission
Entitlement to unmask iLink sessions passwords is assigned by clearing firm administrators to clearing or executing firm
users. To modify existing assignments on an individual user basis, refer to: Set iLink Session ID Password Entitlement.
To enable or disable user permission to unmask passwords:
1. From the Administration menu, select User Administration.
2. In the Action column, click Edit.
The Edit Executing Firm User screen, for the selected user, appears.
3. To enable the firm's users to unmask iLink session passwords, select the checkbox on the right side pane.
4. To confirm the selection, click Save Changes.
All users at the selected executing firm are granted permission to unmask passwords.
Set iLink Session ID Password Entitlement
The iLink Session Password Entitlement enables clearing firm administrators to enable or disable clearing or executing firm
user access to specific iLink Session passwords.
1. Search for an Executing Firm.
2. Select the Session IDs tab.
3. Move the mouse pointer over iLink Session Password.
4. Click Update Session Password Entitlements.
The Entitlement page appears.
User Manual - 19 -
Firm Administrator Dashboard
5. Entitlement assignment options are available:
a. Grant the SMART Click ID password entitlements for all iLink session IDs - Select the SMART Click ID check
box in the heading
b. Grant entitlements for the iLink session ID to all SMART Click IDs - Select the check box in the Session
column
c. Grant entitlements to the SMART Click ID to selected iLink session IDs - Select the individual SMART Click
check box
Firm Contacts Tab
The firm contacts functionality is used to view clearing firm contacts.
To view an Executing Firm’s assigned clearing firm contacts:
1. From the Search menu, then select Executing Firm.
The Search Executing Firm screen appears.
2. Select a Firm, then click Search.
3. Select the Firm Contacts tab.
The following information appears on the page:
Column
Description
Name
Name of the registered contact.
SMART Click Contact
Profile information as registered in SMART Click.
Firm Contact Type
Specifies the type of contact:
l
Primary
l
Secondary
l
Clearing Firm Risk Administrator
l
Executing Firm Risk Administrator
Note: For additional information see Globex Customer Roles and Entitlements.
4. To view a user's profile, click their name.
- 20 - User Manual
Firm Administrator Dashboard
Note: Executing Firm users can only view their own profile. Links to other user profiles are disabled.
Selecting a user's profile displays GCC and SMART Click contact information and registration details.
l
Firm Contact - System entitlements for firms for which the individual is a clearing firm primary, secondary or
risk admin. is included on this page.
5. To view privileges for a particular system, click a Trader ID.
Note: The ability to view trader ID details is determined by assigned system privileges.
Information appears in a new tab.
User Manual - 21 -
Firm Administrator Dashboard
Outbound Contacts Tab
The Outbound GCC Contact functionality is used to view contact information, which is used to contact clearing and
executing firm users regarding error trades or technical issues, including:
l
Improper numbering sequence
l
Runaway Automated Trading System (ATS)
Outbound contact onboarding and maintenance is handled by CME Group Global Account Management.
The Firm contacts functionality is used to view executing firm user profiles.
To view Outbound GCC Contacts:
1. From the Search menu, select Executing Firm.
The Search Executing Firm screen appears.
2. From the Executing Firm drop-down menu, select a Firm, then click Search.
3. Click the Outbound Contacts tab.
Outbound Contact details appear in a list.
CME Application Tab
This CME Application functionality is used to search for a list of users entitlements by system.
Note: This functionality is also accessible from the Administration > CME Application.
To view other applications and entitlements:
1. Click the CME Application tab.
2. Select an Application.
3. Click Search.
- 22 - User Manual
Firm Administrator Dashboard
A list of users with application access appear in a list.
4. To view a user profile, click the User ID link.
User's entitlements by specific application appear.
Executing Firm View
The Executing Firm user’s view has fewer choices.
l
Firm Administrator Dashboard
l
FirmSoft (Note: FirmSoft users have inherent GCC Inbound Contact rights.)
Messaging Stats Tab
The Messaging Stats functionality is used to search for Messaging Efficiency Program statistics.
To view messaging statistics:
1. Click the Messaging Stats tab.
2. From the Search Messaging Program Statistics page, select the search criteria.
User Manual - 23 -
Firm Administrator Dashboard
3. Click Search.
Results appear in a list.
Note: Moving the mouse pointer over the symbol, on the Search Messaging Program Statistics screen,
displays descriptions of results data columns.
4. Click the Daily Breakdown link to view additional details.
Session Stats Tab
The Session Stats functionality displays and provides users with the ability to view volume figures applicable to iLink
Session ID Policy administration.
To view iLink session ID statistics:
1. Click the Session Stats tab. This automatically displays the Globex Firm ID’s Average Daily Volume (ADV) for the
last 2 quarters, corresponding MSGW iLink Session Allowance and MSGW iLink Session ID Excess Capacity
(ECC) Allowance. Please note that as documented in the iLink Session ID Policy and Operational Guidelines
documentation, starting September 11, all Globex Firm IDs will default in the FADB to display only 2 MSGW
sessions as that is the maximum allocation customers deploying a front end system which has certified to
MSGW functionality may request.
Effective Thursday, October 1, the Phase 1 launch period of the iLink Session Policy is scheduled to begin and
expected to last through February 2016 (subject to change). During Phase 1, a 30% MSGW iLink session ID
allocation limitation will be in effect.
Note: Moving the mouse pointer over the
session IDs as tooltips.
- 24 - User Manual
symbol, on the Session Stats Legend, displays descriptions of iLink
Firm Administrator Dashboard
2. Selecting the Session and Month to Date criteria displays a breakdown of historical monthly activity and iLink
Session ID Policy charges for the last 12 months by individual iLink session ID.
3. Selecting the Firm and <quarter> criteria displays a breakdown of tier allocation per quarter:
Note: To export the results to Excel, click Export to Excel.
Search Individual
To search for a registered user:
1. From the Search tab, select Individual.
2. Enter the Last Name, Executing Firm, and/or Contact Type.
User Manual - 25 -
Firm Administrator Dashboard
Note: Executing Firm and contact type defaults to ALL.
3. Click Search.
Results appear in a list below.
Registered User's Profile
This function is available to clearing firm administrators only.
To view the registered user’s profile:
From the Search > Individual results, click the contact's name.
User profiles are available to Clearing Firm Administrators only.
Individual Profile
Column
Description
Profile Pane
SMART Click Contact Information/Registration Details
Individual System Privileges
l
Firm Contact: Displays firms for which the individual is a Primary, Secondary or Risk Administrator.
- 26 - User Manual
Firm Administrator Dashboard
User Manual - 27 -
Firm Administrator Dashboard
Reports
Clearing firm administrators use report features to search for registration, system entitlements, and system details for their
clearing firm.
l
l
Clearing Firm Mapping - Identifies the Clearing Exchange and Clearing Member affiliated with a particular executing
firm.
Session IDs - A three-character alpha numeric string identifier. It is the logical connection to CME Globex for order
entry based on the FIX protocol.
l
Firm Registered Contacts - A registered primary or secondary firm administrator or risk administrator.
l
FirmSoft User - Lists authorized FirmSoft users. (Note: FirmSoft users have inherent GCC Inbound Contact rights.)
l
FirmSoft Entitlement - Lists authorized FirmSoft user specific entitlements.
l
Cancel on Disconnect - Lists Session/Trader ID pairs for which Cancel on Disconnect (COD) is enabled.
l
Firm Admin Dashboard User - Lists FADB users.
l
l
Messaging Surcharge Contacts - Lists clearing or executing firm contacts authorized to receive emailed MEP related
surcharge notifications.
Outbound Contacts - Lists outbound GCC contacts (categorized by error trade or technical contacts) for the selected
firm.
To request a report:
1. Click the Reports tab.
2. Select a Report from the drop-down list.
CME Europe clearing firm reports are indicated by CMEEL prefix prior to report name.
3. Click Submit.
The report appears on the Report Manager tab.
- 28 - User Manual
Firm Administrator Dashboard
After the report status changes from requested to ready, click the Report Name or Status link.
4. Click Open to open the file, or Save to specify a location to store the file.
The report displays in a Microsoft Excel workbook.
To view previously requested reports:
1. To view previously requested reports, click the Report Manager tab.
2. The list is automatically updated every ten seconds. To manually refresh the list, click the Refresh button.
3. Reports can be accessed for up to two weeks from the requested date. The in progress icon (
query is still processing.
) indicates the report
Clearing Back Office
The SOx Application functionality is used by back office managers to view users' system entitlements.
To run a SOx report:
1. Click the SOx Application Report tab.
2. Select the Clearing Firm and Executing Firm from the drop down list.
3. Select one more applications.
4. Click Search.
User IDs associated with each application appear in a list.
5. To view the user’s application entitlement, click the User ID link.
User Manual - 29 -
Firm Administrator Dashboard
Note: To generate an entitlement profile report for all users, click Download Excel Report.
- 30 - User Manual
Firm Administrator Dashboard
Messaging Efficiency Program
This functionality is used to submit Messaging Efficient Program requests for waivers if a customer feels there is justification
for exceeding the messaging threshold.
To search messaging program surcharge reports:
1. From the Messaging Programtab, select Request for Waiver.
2. Enter at least one search criteria:
l
Messaging Program Ticket Number - The ticket number is in the surcharge notification email.
l
Executing Firm
l
Date of Surcharge (To/From)
Note: Moving the mouse pointer over the
search results columns as tooltips.
symbol, on the Messaging Program page, displays descriptions of
3. Click Search.
Results appear in a list below.
User Manual - 31 -
Firm Administrator Dashboard
To submit a Request for Waiver:
1. Search for a Messaging Program Ticket.
2. From the Search Results, click Create.
3. Complete the following fields:
l
Reason for Waiver Request
l
E-Mail address
l
Steps to prevent future events
4. Click Submit.
- 32 - User Manual
Firm Administrator Dashboard
Administration
Administration functions are available to the following:
Functionality
Description
Clearing
Firm
Admin
User
Add new users, activate user status.
Administration
X
Change Log
View a record of administrative updates.
X
CME
Application
View user entitlements for CME Group applications.
X
Contact
Management
Assign a contact to an executing firm, or delete a contact.
X
Self-Match
Prevention
Optionally prevent orders with the same owner from trading with each other.
X
Executing
Firm User
X
X
User Administration
The user administration functionality is available to clearing firm administrators to search for executing firms by their Smart
Click ID.
The following functions can be performed:
l
Add new users
l
Edit a user's executing firm
l
Activate a pending user
To Access User Administration:
Select the Administration drop down menu, then select User Administration.
A list of Executing Firm Users appears.
User Manual - 33 -
Firm Administrator Dashboard
The Executing Firm User List contains the following information:
l
SMART Click ID
l
Name
l
Executing Firm
l
Status
To Add a New User:
1. From the Executing Firm User list, click Add New User.
The User Administration screen for adding a new user appears.
l
CME Europe firms are indicated by the CMEEL prefix.
2. Enter the user’s SMART Click ID and Token.
3. Select the Executing Firm to assign.
CME Europe firms are indicated by the CMEEL prefix.
4. Select a Sort option:
5. Click Submit.
6. Confirm the assignment.
An acknowledgment dialog appears.
7. On the confirmation dialog, click OK.
- 34 - User Manual
Firm Administrator Dashboard
The Executing Firm User List is updated with the user information.
To Edit a User’s Executing Firms List:
Only a Clearing Firm Administrator can remove an Executing Firm user’s access.
1. On the Executing Firm User List > Action column, click Edit.
2. Modify the user's Executing Firm and iLink Session/Trader ID selections by selecting or deselecting checkboxes.
3. Click Save Changes.
4. On the confirmation dialog, click Confirm.
5. On the acknowledgement dialog,click OK.
To Edit a Firm User’s Status:
A user’s access changes to Pending when the original firm changes its clearing firm. The new clearing firm’s administrator
must enable the user account.
1. On the Executing Firm User List > Action column, click Edit.
User Manual - 35 -
Firm Administrator Dashboard
2. Locate the Pending firm and click Enable.
The Executing Firm is enabled immediately.
3. To return to Executing Firm User List, click the Back button.
The user's status for the Executing Firm’s is set to Active.
Note: User status cannot be changed from Active to Pending.
Change Log
The change log functionality is available to clearing firm administrators to view executing firm activity.
To View the Change Log:
1. From the Administration tab, select Change Log.
2. Select the type of change to search:
Cancel on Disconnect - Displays executing firm Cancel on Disconnect activity.
User Administration - Displays a list of user administration activity.
- 36 - User Manual
Firm Administrator Dashboard
MEP Contact Change - Displays Messaging Efficiency Program activity.
3. Select the Executing Firm from the drop-down list.
4. To narrow the search, enter the user’s last name.
5. Click Search.
Results appear in a list, below the search criteria.
Cancel on Disconnect results
User administration results
Messaging Efficiency Programresults
CME Application
The CME Application functionality is used by Clearing Firm Administrators to view Executing Firm’s users for other CME
Group applications. This information can be viewed after selecting an Executing Firm or Individual profile and an Application.
Note: This functionality is also accessible from the Search > Executing Firm > CME Application tab.
To View a User's Application Entitlements:
1. From the Administration tab, select CME Application.
User Manual - 37 -
Firm Administrator Dashboard
2. Select an Executing Firm.
CME Europe firms are indicated by the CMEEL prefix.
3. Select at least one Application.
4. Click Search.
A list of users with application access appear in a list.
5. To view a user profile, click the User ID link.
User's entitlements by specific application appear.
MEP Contact Management
The contact management functionality is used to add or delete MEP contacts for a clearing or executing firm. This feature is
available to clearing firm and FADB administrators only.
To assign a Contact to an Executing Firm:
1. From the Administration tab, select Contact Management.
- 38 - User Manual
Firm Administrator Dashboard
The Assign Contact page appears.
Note: Moving the mouse pointer over the
contacts as tooltips.
symbol, on the Assign Contact page, displays descriptions of MEP
All fields are required.
2. Select an Executing Firm.
3. Select an Exchange.
To assign a contact to a CME Europe firm, select CMEEL from the list.
4. Select the Contact Type.
5. Enter the user’s SMART Click ID.
6. Enter the user’s SMART Click Token.
7. Click Submit.
To delete a contact:
1. From the Administration tab, select Contact Management.
2. Select the Manage Contact tab.
3. To find a user, select filter options:
l
Executing Firm
l
Exchange
l
Contact Type
4. Click Search.
Results appear in a list.
User Manual - 39 -
Firm Administrator Dashboard
5. To delete the user from the Executing Firm, click Delete.
Self-Match Prevention
CME Globex Self-Match Prevention is optional functionality that allows an executing firm to prevent the matching of orders
for accounts with common ownership if both the buy and sell orders contain the same Self Match Prevention Identifier (SMP
ID) and Executing Firm ID. Customers who opt to leverage Self Match Prevention functionality must register via the Firm
Administrator Dashboard to receive an SMP ID(s). The SMP ID(s) are then submitted in FIX tag 79281-Self MatchPrevention
ID on each quote and order message to prevent an executing firm from trading against its own opposite side order with the
same SMP ID and Executing Firm ID (subcomponent of tag 49-SenderCompID).
Note: The combination of SMP ID and Executing FirmID must be present on both the buy and sell orders in order to prevent a
match from occurring and to effect the quote or order cancel.
To Enable Self-Match Prevention:
The initial stage of registering for Self-Match prevention is to specify the executing firm, clearing firm, and beneficial owner of
the account. An account, or account and tag 50 can be specified.
Note: For additional information click the Self-Match Prevention Frequently Asked Questions link.
1. From the Administration tab, select Self-Match Prevention.
2. Select an Executing Firm.
3. In the upper right corner, click Add New SMP ID.
1Use of tag 7928 indicates that you do not wish to trade against yourself on Globex.
- 40 - User Manual
Firm Administrator Dashboard
The Add New SMP ID page appears.
4. In the Identity of the Legal Entity field, enter the legal entity/ beneficial owner that will employ SMP functionality.
5. Specify the Account or Account and Tag 50. Then click Submit.
Refer to the instructions below for additional setup information.
Upon customer submission, a SMP ID is created for the Executing Firm and must be submitted for every order on
which SMP will be enabled. Once created the SMP ID cannot be modified.
To link an account:
The following procedure describes the process to add an account to a new SMP ID, specify the account controller, and
account owner.
1. On the Add New SMP ID page, click Add New Account.
2. Enter an Account Number and specify whether the account is registered in EFS.
User Manual - 41 -
Firm Administrator Dashboard
3. If the account is not registered in EFS, enter the Account Controller Name.
`
4. Click Add Account Owner.
5. Enter the Account Owner Name.
6. Click Submit.
The account number is added to the list.
To link a tag 50:
The following procedure describes the process to enable SMP functionality for all or specific tag 50's that trade the accounts.
1. On the Add New SMP ID page, Specify whether the SMP ID will be used for all Tag 50's that trade for the account
(S).
If Yes, proceed to step 4.
- 42 - User Manual
Firm Administrator Dashboard
2. If the SMP ID will not be used for all tag 50's, enter a specific Tag 50.
3. Click Add.
The specified tag 50 appears in the list.
Repeat to add additional Tag 50's.
4. Click Submit.
To edit account information:
1. From the Administration tab, select Self-Match Prevention.
2. Select an Executing Firm.
3. From the list, select an SMP.
4. Click an Account Number.
5. Update account information.
Tag 50's can be added or deleted.
User Manual - 43 -
Firm Administrator Dashboard
6. Click Submit.
Self-Match Prevention Bulk User Upload
The Firm Administration Dashboard supports uploading MS Excel files that specify the relationship of accounts and tag 50s
to common account owners or controllers. This data is used by the self-match prevention functionality.
The file must be in the following format:
Account Number
l
l
l
Registered in
EFS
Required
Alphanumeric
UPPER
CASE text
l
l
l
Maximum of
100
characters
Account Controller Name
Required
l
Y - for
Yes
N - for
No
l
Required, when the account is not
registered in EFS and the controller has
power of attorney
Maximum of 100 characters
Account Owner
l
l
l
Required, when the
account is not
registered in EFS.
Alphanumeric text
Maximum of 100
characters
Uploaded File Processing
l
Only one file may be uploaded at a time.
l
The first row and additional columns will be ignored by the system.
l
Data is processed automatically beginning with the upper left corner and will stop when a blank row is encountered.
Example
Account Number
Registered in EFS
Account Controller Name
Account Owner
25624
N
Controller
Owner1
NEWACCOUNT
N
12345
Y
Click here to view a spreadsheet that can used to enter and upload account information.
- 44 - User Manual
Owner2