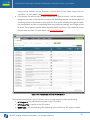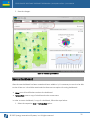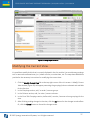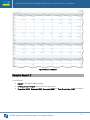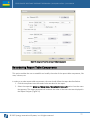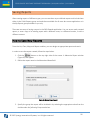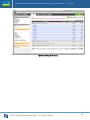
1
TABLE OF CONTETABLE OF CONT DEVELOPMENT ASSISTANCE DATABASE FOR RWANDA (DAD - RWANDA) ANALYTICAL INTERFACE USER MANUAL Version 3.5 DEVELOPMENT ASSISTANCE DATABASE FOR RWANDA | Analytical Interface | User Manual INTEGRATED CRIMINAL JUSTICE INFORMATION SYSTEM OF IRAQ | Personal Information | User Manual TABLE OF CONTENTS INTRODUCTION .................................................................................................................................................... 7 OVERVIEW ........................................................................................................................................................... 7 LOGGING INTO DAD RWANDA ............................................................................................................................. 9 REGISTERING A NEW USER .................................................................................................................................. 10 ACCESSING DAD RWANDA WITHOUT REGISTRATION................................................................................................ 12 DAD RWANDA ANALYTICS STRUCTURE............................................................................................................... 13 MY PORTFOLIO MODULE ................................................................................................................................... 16 MANAGING PROJECTS ........................................................................................................................................ 17 Adding a New Project ................................................................................................................................ 18 Viewing Project Details ............................................................................................................................. 18 MANAGING IATI PROJECTS ................................................................................................................................. 19 Linking Projects ......................................................................................................................................... 21 Transferring IATI Projects .......................................................................................................................... 22 Synchronising Projects .............................................................................................................................. 23 Importing Projects ..................................................................................................................................... 24 DASHBOARD MODULE ....................................................................................................................................... 25 KEY FEATURES ................................................................................................................................................... 25 ACCESSING THE DASHBOARD MODULE .................................................................................................................. 25 MAIN SCREEN AND ITS COMPONENTS ................................................................................................................... 26 DASHBOARD MANAGEMENT ................................................................................................................................ 27 Create a New Dashboard .......................................................................................................................... 27 Add an Item to a Dashboard ..................................................................................................................... 29 Edit a Dashboard Item .............................................................................................................................. 30 Remove a Dashboard Item ........................................................................................................................ 31 Print a Dashboard Item ............................................................................................................................. 31 Export a Dashboard Item .......................................................................................................................... 31 Customize a Dashboard ............................................................................................................................ 31 Save a Dashboard ..................................................................................................................................... 32 Delete a Dashboard................................................................................................................................... 33 Discard the Changes.................................................................................................................................. 33 Update Data.............................................................................................................................................. 33 LIST MODULE ..................................................................................................................................................... 34 ACCESSING THE LIST MODULE .............................................................................................................................. 34 © 2015 Synergy International Systems, Inc. All rights reserved. 1 DEVELOPMENT ASSISTANCE DATABASE FOR RWANDA | Analytical Interface | User Manual INTEGRATED CRIMINAL JUSTICE INFORMATION SYSTEM OF IRAQ | Personal Information | User Manual EXPANDING THE LIST ITEM .................................................................................................................................. 35 SORTING LIST ITEMS ........................................................................................................................................... 36 BROWSING AMONG LIST ITEMS ............................................................................................................................ 36 HIDING / SHOWING IMAGES IN THE LIST ................................................................................................................ 36 MODIFYING THE CURRENT VIEW .......................................................................................................................... 37 Adding List Groups / Columns / Column Groupings................................................................................... 38 Re-ordering Groups / Columns / Column Groupings ................................................................................. 38 Removing Groups / Columns / Column Groupings .................................................................................... 38 SAMPLE VIEWS .................................................................................................................................................. 39 Sample View 1 ........................................................................................................................................... 39 Sample View 2 ........................................................................................................................................... 40 CHART MODULE ................................................................................................................................................. 42 CHART MODULE KEY FEATURES ........................................................................................................................... 42 ACCESSING THE CHART MODULE .......................................................................................................................... 42 MAIN SCREEN AND ITS COMPONENTS ................................................................................................................... 43 VIEW SCREEN AND ITS COMPONENTS .................................................................................................................... 47 SAMPLE CHART REPORTS .................................................................................................................................... 48 Sample Chart Report 1 .............................................................................................................................. 48 Sample Chart Report 2 .............................................................................................................................. 49 MAP MODULE .................................................................................................................................................... 51 KEY FEATURES OF THE GIS TOOL .......................................................................................................................... 52 ACCESSING THE MAP MODULE ............................................................................................................................ 52 MAP MODULE SCREEN COMPONENTS................................................................................................................... 52 WORKING IN THE MAP MODULE .......................................................................................................................... 53 Zooming in / Zooming out ......................................................................................................................... 53 Measuring Distance .................................................................................................................................. 55 Buffered Zone Querying ............................................................................................................................ 56 Using Layers .............................................................................................................................................. 57 Setting Map Options ................................................................................................................................. 59 Viewing Legend ......................................................................................................................................... 61 Using Mini Map......................................................................................................................................... 61 Viewing the Data Displayed on the Map ................................................................................................... 62 SAMPLE MAP REPORTS ....................................................................................................................................... 63 Sample Map Report 1 ............................................................................................................................... 63 Sample Map Report 2 ............................................................................................................................... 64 REPORT MODULE ............................................................................................................................................... 66 ACCESSING THE REPORT MODULE ........................................................................................................................ 66 CREATING A REPORT .......................................................................................................................................... 67 © 2015 Synergy International Systems, Inc. All rights reserved. 2 DEVELOPMENT ASSISTANCE DATABASE FOR RWANDA | Analytical Interface | User Manual INTEGRATED CRIMINAL JUSTICE INFORMATION SYSTEM OF IRAQ | Personal Information | User Manual PREVIEWING A REPORT ....................................................................................................................................... 69 GENERATING A REPORT ...................................................................................................................................... 70 SAMPLE REPORTS .............................................................................................................................................. 70 Sample Report 1 ........................................................................................................................................ 70 Sample Report 2 ........................................................................................................................................ 72 CUSTOMIZING REPORTS ...................................................................................................................................... 74 Formatting/Styling Report Components.................................................................................................... 74 Re-ordering Report Table Components ..................................................................................................... 77 Sorting Report Table Components ............................................................................................................ 78 Removing a Report Table Component....................................................................................................... 79 Switching Report Table Components......................................................................................................... 79 SAMPLE REPORT FORMATTING ............................................................................................................................. 80 DETAILS SECTION ............................................................................................................................................... 82 ACCESSING THE DETAILS SECTION ......................................................................................................................... 83 BROWSING PROJECTS ......................................................................................................................................... 84 PRINTING PROJECTS DETAILS ............................................................................................................................... 84 ADDING A NEW PROJECT .................................................................................................................................... 84 EDITING AN EXISTING PROJECT ............................................................................................................................. 84 DELETING AN EXISTING PROJECT........................................................................................................................... 85 VIEWING BASKET FUND DETAILS .......................................................................................................................... 85 VIEWING INGO PROFILE DETAILS ......................................................................................................................... 87 CUSTOMIZED REPORTING .................................................................................................................................. 89 SETTING REPORT OPTIONS .................................................................................................................................. 89 SAVING REPORTS ............................................................................................................................................... 90 How to Save New Reports ......................................................................................................................... 90 How to Save a Copy of the Report ............................................................................................................. 91 RE-ORGANISING REPORTS ................................................................................................................................... 91 Renaming Reports and Report Groups ...................................................................................................... 92 Deleting Reports or Report Groups ........................................................................................................... 93 Adding a Sub-group................................................................................................................................... 93 Re-ordering Reports and Report Groups ................................................................................................... 93 Setting a Report as Default ....................................................................................................................... 93 VIEWING PRE-DEFINED REPORTS .......................................................................................................................... 94 EDITING PRE-DEFINED REPORTS ........................................................................................................................... 94 EXPORTING REPORTS .......................................................................................................................................... 95 PRINTING REPORTS ............................................................................................................................................ 95 FILTERING........................................................................................................................................................... 96 CREATING FILTERING CRITERIA ............................................................................................................................. 96 © 2015 Synergy International Systems, Inc. All rights reserved. 3 DEVELOPMENT ASSISTANCE DATABASE FOR RWANDA | Analytical Interface | User Manual INTEGRATED CRIMINAL JUSTICE INFORMATION SYSTEM OF IRAQ | Personal Information | User Manual SAMPLE FILTERING CRITERIA ................................................................................................................................ 99 SEARCH ............................................................................................................................................................ 101 SIMPLE SEARCH ............................................................................................................................................... 101 ADVANCED SEARCH.......................................................................................................................................... 101 SAMPLE SEARCH CRITERIA ................................................................................................................................. 102 LOGGING OUT .................................................................................................................................................. 104 REFERENCES ..................................................................................................................................................... 104 © 2015 Synergy International Systems, Inc. All rights reserved. 4 DEVELOPMENT ASSISTANCE DATABASE FOR RWANDA | Analytical Interface | User Manual INTEGRATED CRIMINAL JUSTICE INFORMATION SYSTEM OF IRAQ | Personal Information | User Manual TABLE OF FIGURES FIGURE 1: DAD RWANDA LOGIN SCREEN ..................................................................................................................... 9 FIGURE 2: USER REGISTRATION FORM ....................................................................................................................... 11 FIGURE 3: MY PROFILE SECTION ............................................................................................................................... 12 FIGURE 4: DAD RWANDA ANALYTICS STRUCTURE ....................................................................................................... 14 FIGURE 5: MY PORTFOLIO MODULE .......................................................................................................................... 16 FIGURE 6: PROJECT SECTION OF THE MY PORTFOLIO MODULE ...................................................................................... 18 FIGURE 7: IATI PROJECT SECTION OF THE MY PORTFOLIO MODULE................................................................................ 20 FIGURE 8: LINKING PROJECTS ................................................................................................................................... 21 FIGURE 9: TRANSFERRING AN IATI PROJECT TO DAD RWANDA ...................................................................................... 23 FIGURE 10: SYNCHRONISING IATI AND DAD RWANDA PROJECTS ................................................................................... 24 FIGURE 11: DASHBOARD MODULE............................................................................................................................ 26 FIGURE 12: ADDING A NEW DASHBOARD ................................................................................................................... 28 FIGURE 13: LIST OF PRE-DEFINED REPORTS ................................................................................................................ 29 FIGURE 14: ADDING A NEW REPORT ......................................................................................................................... 30 FIGURE 15: CUSTOMIZING A DASHBOARD .................................................................................................................. 32 FIGURE 16: LIST MODULE ....................................................................................................................................... 34 FIGURE 17: EXPANDING THE LIST ITEM LEVEL ............................................................................................................. 35 FIGURE 18: HIDING IMAGES IN THE LIST ..................................................................................................................... 37 FIGURE 19: MODIFYING THE CURRENT VIEW .............................................................................................................. 38 FIGURE 20: DEFINING LIST VIEW GROUPINGS FOR SAMPLE VIEW 1 ................................................................................ 39 FIGURE 21: DEFINING LIST VIEW COLUMNS FOR SAMPLE VIEW 1 ................................................................................... 39 FIGURE 22: SAMPLE VIEW 1 .................................................................................................................................... 40 FIGURE 23: DEFINING LIST VIEW GROUPINGS FOR SAMPLE VIEW 2 ................................................................................ 40 FIGURE 24: DEFINING LIST VIEW COLUMNS FOR SAMPLE VIEW 2 ................................................................................... 41 FIGURE 25: SAMPLE VIEW 2 .................................................................................................................................... 41 FIGURE 26: MAIN SCREEN OF THE CHART MODULE ..................................................................................................... 43 FIGURE 27: VIEW SCREEN OF THE CHART MODULE ...................................................................................................... 47 FIGURE 28: SAMPLE CHART REPORT 1 ....................................................................................................................... 49 FIGURE 29: SAMPLE CHART REPORT 2 ....................................................................................................................... 50 FIGURE 30: MAP MODULE ...................................................................................................................................... 51 FIGURE 31: INTELLIGENT SEARCHING ......................................................................................................................... 54 FIGURE 32: ZOOMING BY SELECTION ......................................................................................................................... 55 FIGURE 33: MEASURING DISTANCE ........................................................................................................................... 56 FIGURE 34: BUFFERED ZONE QUERYING .................................................................................................................... 57 FIGURE 35: SELECTING CHART TYPE .......................................................................................................................... 58 FIGURE 36: SELECTING SCALING RANGE..................................................................................................................... 60 FIGURE 37: VIEWING MAP LEGEND .......................................................................................................................... 61 © 2015 Synergy International Systems, Inc. All rights reserved. 5 DEVELOPMENT ASSISTANCE DATABASE FOR RWANDA | Analytical Interface | User Manual INTEGRATED CRIMINAL JUSTICE INFORMATION SYSTEM OF IRAQ | Personal Information | User Manual FIGURE 38: USING MINI MAP .................................................................................................................................. 62 FIGURE 39: VIEWING THE DATA DISPLAYED ON THE MAP ............................................................................................. 63 FIGURE 40: SAMPLE MAP REPORT 1 ......................................................................................................................... 64 FIGURE 41: SAMPLE MAP REPORT 2 ......................................................................................................................... 65 FIGURE 42: REPORT MODULE .................................................................................................................................. 66 FIGURE 43: SELECTING A GROUPING FOR A REPORT ..................................................................................................... 68 FIGURE 44: COMPATIBILITY MATRIX .......................................................................................................................... 69 FIGURE 45: PREVIEWING THE REPORT ....................................................................................................................... 70 FIGURE 46: CREATING REPORT 1 .............................................................................................................................. 71 FIGURE 47: SAMPLE LIST REPORT 1 .......................................................................................................................... 72 FIGURE 48: CREATING REPORT 2 .............................................................................................................................. 73 FIGURE 49: SAMPLE LIST REPORT 2 .......................................................................................................................... 74 FIGURE 50: REPORTS WINDOW WITH PROPERTIES FOCUS ON THE TITLE FIELD ................................................................. 75 FIGURE 51: FORMATTING/STYLING TEXT ENTRIES........................................................................................................ 75 FIGURE 52: REPORTS WINDOW WITH PROPERTIES FOCUS ON THE COLUMN .................................................................... 76 FIGURE 53: ASSIGNING PROPERTIES TO REPORT TABLE COMPONENTS ............................................................................ 77 FIGURE 54: RE-ORDERING REPORT TABLE COMPONENTS .............................................................................................. 78 FIGURE 55: DEFINING THE SORTING ORDER................................................................................................................ 78 FIGURE 56: SWITCHING REPORT TABLE COMPONENTS ................................................................................................. 79 FIGURE 57: CREATING AND FORMATTING A REPORT .................................................................................................... 80 FIGURE 58: SAMPLE FORMATTED REPORT .................................................................................................................. 81 FIGURE 59: PROJECT DETAILS SECTION ...................................................................................................................... 82 FIGURE 60: VIEWING BASKET FUND PROFILE DETAILS .................................................................................................. 86 FIGURE 61: VIEWING INGO PROFILE DETAILS............................................................................................................. 87 FIGURE 62: SETTING THE REPORT OPTIONS ................................................................................................................ 89 FIGURE 63: MEMORIZING A REPORT ......................................................................................................................... 90 FIGURE 64: ORGANISING THE REPORTS...................................................................................................................... 92 FIGURE 65: CREATING A FILTERING CRITERIA .............................................................................................................. 96 FIGURE 66: SEARCHING FOR A CATEGORY ITEM ........................................................................................................... 98 FIGURE 67: SELECTING A FILTERING CATEGORY ITEM ................................................................................................... 99 FIGURE 68: VIEWING FILTERING RESULTS ................................................................................................................. 100 FIGURE 69: CREATING A SEARCH CRITERIA ............................................................................................................... 102 FIGURE 70: DEFINING SEARCH CRITERIA .................................................................................................................. 102 FIGURE 71: VIEWING SEARCH RESULTS .................................................................................................................... 103 © 2015 Synergy International Systems, Inc. All rights reserved. 6 DEVELOPMENT ASSISTANCE DATABASE FOR RWANDA | Analytical Interface | User Manual INTEGRATED CRIMINAL JUSTICE INFORMATION SYSTEM OF IRAQ | Personal Information | User Manual INTRODUCTION The purpose of this document is to describe how the Development Assistance Database for Rwanda (DAD Rwanda) functions and to provide the necessary instructions to ensure successful work with the application. Use of this document and compliance with the standards specified herein is mandatory for anyone working with the mentioned application. OVERVIEW The Development Assistance Database for Rwanda (DAD Rwanda) is an automated information management system which is designed to improve efficiency and coordination of donor activities in Rwanda. It is also a powerful tool for tracking and analyzing aid flows. The system serves as the main database and data collection and reporting system as it ensures effective access to the development data. The main objective of DAD Rwanda is to serve as a reliable and credible source of information on external aid offered to Rwanda and to support the Government in effectively managing development assistance and promoting the accountable and transparent use of resources. DAD Rwanda is a powerful tool to view project data organised into lists, reports, charts, and maps, present the project data in the form of list, chart and map reports, memorize/save the reports, print them, and export them into various formats. DAD Rwanda is designed to provide quick access to the project and aid data remotely via Internet. Once you have accessed the application, you can view the project data stored in the database, add new projects, edit existing ones, etc. In the current design, DAD Rwanda consists of the following applications, each dealing with a different dataset: ● Project – this application is designed to track the projects that are financed from external sources, e.g. donor agency, international NGOs, etc. Once you have accessed this application, you are able to view project details, track aid flows to the country, and create analytical reports in the List, Chart, Map and Report modules. Moreover, in this application you can add new projects or modify the information of existing projects. © 2015 Synergy International Systems, Inc. All rights reserved. 7 DEVELOPMENT ASSISTANCE DATABASE FOR RWANDA | Analytical Interface | User Manual INTEGRATED CRIMINAL JUSTICE INFORMATION SYSTEM OF IRAQ | Personal Information | User Manual ● Donor Profile - this application is designed to track information on both donor agency profile and related basket funds. Moreover, it is used to follow the donor agency’s involvement in the particular sector of economy, the amount of assistance provided to the country, etc. Once you access this application, you can create different list-style analytical reports over the information in this application. ● CDF Transfers – this application is designed to track information on total commitments and disbursements made by donor organisations to the Community Development Funds (CDF). Once you have accessed this application, you are able to view transfer details, track transferred and expended amounts allocation according to the location, and create analytical reports in the List, Chart, and Report modules. ● IATI Projects – this application is designed to link the project data transferred from the IATI Repository with the DAD Rwanda projects and make them available for viewing and reporting purposes. Once you have accessed this application, you are able to view IATI project details and create analytical reports in the List, Chart, Map, and Report modules. ● INGO Profile - this application is designed to store the organisation data transferred from the International Non-governmental Organisation Online Services (INGO Online Services) application. Once you have accessed this application from DAD Rwanda, you are able to view the profiles of the international non-governmental organisations acting in the country. Moreover, you will be able to create analytical reports in the List, Chart, Map, and Report modules. DAD Rwanda provides a web-based user interface and requires a web browser pre-installed. © 2015 Synergy International Systems, Inc. All rights reserved. 8 DEVELOPMENT ASSISTANCE DATABASE FOR RWANDA | Analytical Interface | User Manual INTEGRATED CRIMINAL JUSTICE INFORMATION SYSTEM OF IRAQ | Personal Information | User Manual LOGGING INTO DAD RWANDA The starting screen of the DAD Rwanda application is the Login Screen (Figure 1). To log in, you should validate yourself with the username and password and then click the Login button. Note: The password is case sensitive. Note: If you have failed to log in several times, the system will be blocked. Contact your system administrator in order to unlock your user access. The number of unsuccessful login attempts is configured from the Administration Center (see the DAD Rwanda Administration Center User Manual in REFERENCES). Figure 1: DAD Rwanda Login Screen © 2015 Synergy International Systems, Inc. All rights reserved. 9 DEVELOPMENT ASSISTANCE DATABASE FOR RWANDA | Analytical Interface | User Manual INTEGRATED CRIMINAL JUSTICE INFORMATION SYSTEM OF IRAQ | Personal Information | User Manual A successful login directs you to the My Portfolio module. Note: If you have forgotten your password, you can retrieve it by clicking the Forgot your password? link in the Login Screen and confirming your identity. After submitting your identity information, you will receive a password to the e-mail account indicated. Registering a New User If you are new to the system and you need a personal account, sign up for a username and password to start using the system. In order to register in the system, follow the steps below: 1. Click the Request a new account link in the Login Screen. A User Registration Form (Figure 2) appears. 2. Fill in the information requested. 3. Click the Submit button to submit the inserted information. © 2015 Synergy International Systems, Inc. All rights reserved. 10 DEVELOPMENT ASSISTANCE DATABASE FOR RWANDA | Analytical Interface | User Manual INTEGRATED CRIMINAL JUSTICE INFORMATION SYSTEM OF IRAQ | Personal Information | User Manual Figure 2: User Registration Form Once you submit the registration form, the DAD Rwanda administrator receives a notification. The administrator will review the information submitted and either approve the application or reject it. In case the application is approved, you will receive an e-mail message to the provided e-mail address. The e-mail will contain your login information details (username and automatically generated password). Once logged in with the received username/password, you can manage your details, i.e. change personal data and the password. To edit personal details, log into the application, go to the My Profile section (Figure 3) and make the appropriate changes. © 2015 Synergy International Systems, Inc. All rights reserved. 11 DEVELOPMENT ASSISTANCE DATABASE FOR RWANDA | Analytical Interface | User Manual INTEGRATED CRIMINAL JUSTICE INFORMATION SYSTEM OF IRAQ | Personal Information | User Manual Figure 3: My Profile Section Accessing DAD Rwanda without Registration To ensure more flexibility and to provide access to a wider range of users, the system is designed in such a way that it allows public users to enter it without registration. Public users wishing to view data should click the Enter as Public User button in the login screen (Figure 1). They will be directed to the List module of the application. © 2015 Synergy International Systems, Inc. All rights reserved. 12 DEVELOPMENT ASSISTANCE DATABASE FOR RWANDA | Analytical Interface | User Manual INTEGRATED CRIMINAL JUSTICE INFORMATION SYSTEM OF IRAQ | Personal Information | User Manual DAD RWANDA ANALYTICS STRUCTURE The following applications are available in the current design of DAD Rwanda: • Project – serves as a main information hub of all submitted projects. • Donor Profile – contains all donor agency and basket fund related information. • CDF Transfers – provides details on donor commitments to CDFs. • IATI Projects – provides details on projects transferred from the IATI Repository. • INGO Profile – provides details on INGO profiles transferred from the INGO Online Services application. The first two applications contain a built-in online data entry sub-system, which is designed to allow entering the corresponding data online from your web browser. DAD Rwanda consists of the following main sections: • MY PORTFOLIO MODULE – used for quick access to the projects registered in the DAD Rwanda system by the user’s group. • DASHBOARD MODULE – used for quick access to the data registered in the DAD Rwanda system. • LIST MODULE– used to create and execute ad-hoc queries on the data and acquire results in the form of a list. • CHART MODULE – used to filter and display the data in a chart form. • MAP MODULE – used to filter and display the data in a map form. • REPORT MODULE – used to generate complex reports over one or more criteria and presents the output in the printable and user-friendly format. The DAD Rwanda main window has a complex preview as it is shown in Figure 4. © 2015 Synergy International Systems, Inc. All rights reserved. 13 DEVELOPMENT ASSISTANCE DATABASE FOR RWANDA | Analytical Interface | User Manual INTEGRATED CRIMINAL JUSTICE INFORMATION SYSTEM OF IRAQ | Personal Information | User Manual Figure 4: DAD Rwanda Analytics Structure It contains the following components: Component Name Header Main Toolbar Description This is the application header that contains the application name and the DAD Rwanda logo. On the right side, the following functions are available: • Contact us – contact details (e-mail address and phone numbers) of the DAD Rwanda System Administrator. • My Profile – this opens your personal settings and details. For details, see Registering a New User. • About – opens the DAD Rwanda information window. • Log Off – this button is used to log off the application. This is the main toolbar of the DAD Rwanda application. The following tabs are available here: • My Portfolio – opens the MY PORTFOLIO MODULE to manage user specific projects. © 2015 Synergy International Systems, Inc. All rights reserved. 14 DEVELOPMENT ASSISTANCE DATABASE FOR RWANDA | Analytical Interface | User Manual INTEGRATED CRIMINAL JUSTICE INFORMATION SYSTEM OF IRAQ | Personal Information | User Manual Main Menu Bar • Dashboard – opens the DASHBOARD MODULE of the selected application (see the Main Menu description below). • List – opens the LIST MODULE. • Chart – opens the CHART MODULE. • Map – opens the MAP MODULE. • Report – opens the REPORT MODULE. • Help – opens the DAD Rwanda application help. This menu contains sections with main functions of the DAD Rwanda application: • Applications – lists all applications present in DAD Rwanda. • Search – contains a common search and advanced search function among the selected application list. For details, see SEARCH. • Filters – contains filtering options. For details, see FILTERING. • Public Views/Charts/Maps/Reports – memorized views / charts / maps / reports (depending on the opened module) available to all users of the application. • My Views/Charts/Maps/Reports – memorized views / charts / maps / reports (depending on the opened module) created by and available to the current user only. Main Menu Manipulation Buttons Workspace • Left/Right arrows ( • Up/Down arrows ( Main Menu bar. • Frame Divider ( ) – used to adjust the width of the Main Menu bar. ) – used to hide/open the Main Menu bar. ) – used to collapse/expand the section in the In this frame, all applications and modules are managed. Here are filtering and search results displayed. © 2015 Synergy International Systems, Inc. All rights reserved. 15 DEVELOPMENT ASSISTANCE DATABASE FOR RWANDA | Analytical Interface | User Manual INTEGRATED CRIMINAL JUSTICE INFORMATION SYSTEM OF IRAQ | Personal Information | User Manual MY PORTFOLIO MODULE The My Portfolio section (Figure 5) of the DAD Rwanda application provides quick access to the projects added by the corresponding user. In order to access the My Portfolio module, click the My Portfolio tab in the Main Toolbar of the DAD Rwanda application. Editing permissions for records in My Portfolio can be based on the user (whether the user has created the record) or user’s group (whether someone from the group user belongs to has created the record). All these permissions are granted and managed from DAD Rwanda Administration Center (see DAD Rwanda Administration Center User Manual in REFERENCES). Figure 5: My Portfolio Module The My Portfolio module consists of the following sections (Figure 5): ● Project – this section is used to create project drafts and submit them when all the necessary information is included into them. For more details, see Managing Projects. © 2015 Synergy International Systems, Inc. All rights reserved. 16 DEVELOPMENT ASSISTANCE DATABASE FOR RWANDA | Analytical Interface | User Manual INTEGRATED CRIMINAL JUSTICE INFORMATION SYSTEM OF IRAQ | Personal Information | User Manual ● IATI Project – this section is used to track the projects that have been transferred into DAD Rwanda from the IATI Repository and to link them with their counterparts in DAD Rwanda. For more details, see Managing IATI Projects. Managing Projects In the Project section of the My Portfolio module, you may see a list of draft and submitted projects/disbursement approvals. Each project created in DAD Rwanda either from the My Portfolio module or from the application should get submitted first in order to become public and official. Below is the procedure of project submission: ● A user adds a project. It is saved as a draft in the user’s portfolio, in the My Draft Projects section (Figure 6). Drafts may also be viewed and edited by others users who have the corresponding permissions. Further, drafts should be revised by the user or by the corresponding project manager. ● If all mandatory fields are filled in the project form, then the draft gets a ‘Ready’ state in the Ready for Submission? column of the drafts table. If at least one mandatory field is not yet filled, the draft has the ‘Not Ready’ state. ● Only drafts with the ‘Ready’ state can be submitted. To submit the draft, press the Submit button ( ) in the My Draft Projects table. Note: Only submitted projects are displayed in the List table (see LIST MODULE) and accessible to other users of the DAD Rwanda application. The information displayed in the Project section for each project includes the following: ● Project ID – the project identification number, ● Project Title – the title of the project, ● Updated By – last update author, ● Updated On – last update date, ● Submitted On – the date of the project submission. ● Ready for Submission? – whether the project is ready for submission. In this module, a project may be created; details of the existing projects can be viewed and edited. Note: In the My Portfolio module, you have the possibility of filtering the entire project list and displaying only the ones that have been transferred from the SmartFMS government financial system and are subject to disbursement approval before they can be integrated into DAD Rwanda. In order © 2015 Synergy International Systems, Inc. All rights reserved. 17 DEVELOPMENT ASSISTANCE DATABASE FOR RWANDA | Analytical Interface | User Manual INTEGRATED CRIMINAL JUSTICE INFORMATION SYSTEM OF IRAQ | Personal Information | User Manual to view the list of projects pending disbursement approval, select the View Projects subject to Disbursement Approval checkbox. Figure 6: Project Section of the My Portfolio Module Adding a New Project To add a new project from the My Portfolio module, follow the steps below: 1. Click the Create New Project button (Figure 6). This will open the Add Project form which is described in the DAD Rwanda Project Application User Manual, see REFERENCES. 2. Fill in the information requested. Viewing Project Details Depending on your permissions, you may also view or edit projects added by other users. To view details of draft and submitted projects in the My Portfolio module, follow the steps below: 1. Go to the My Portfolio module. © 2015 Synergy International Systems, Inc. All rights reserved. 18 DEVELOPMENT ASSISTANCE DATABASE FOR RWANDA | Analytical Interface | User Manual INTEGRATED CRIMINAL JUSTICE INFORMATION SYSTEM OF IRAQ | Personal Information | User Manual 2. Expand the corresponding My Draft Projects or My Submitted Projects list (Figure 6). 3. Click the project you wish to see the details for. This will open project details. For more information, see DETAILS SECTION. Managing IATI Projects The DAD Rwanda application is equipped with a robust and flexible data import mechanism that allows transferring project data from the IATI Repository used by the Government of Rwanda to get data from multiple donor systems, convert it into one common standard format (the draft IATI format), and automatically exchange with country systems. Because DAD Rwanda serves as a reliable and credible source of information on external aid offered to Rwanda and supports the Government in effectively managing development assistance and promoting the accountable and transparent use of resources, it is essential that project data are transferred from the IATI database into DAD Rwanda, thus giving the Government officials and other stakeholders more grounds for effective and informed decision-making. In DAD Rwanda, all project records transferred from the IATI Repository are managed in the IATI Project section of the My Portfolio module (Figure 7). The section lists all the project records that are transferred from the IATI Repository and will be imported into DAD Rwanda after they have passed validation checks. It also ensures that data integrity and consistency are preserved. As soon as the project record is presented in the IATI Project section of the My Portfolio module, it may be selected and linked to a relevant DAD Rwanda project. Only after the project record has been verified, it will be transferred to the DAD Rwanda application. The process of project linking, validation and transfer is presented below: ● IATI projects should be linked to DAD Rwanda projects for comparison. For more details, see Linking Projects. ● If the respective linked project is validated, it exists in DAD Rwanda and is ready to be transferred, it will be marked in green, exported from IATI and imported to DAD Rwanda upon clicking the Transfer button in the Transfer/Merge Projects window. For more details, see Transferring IATI Projects. ● If the project record exists in DAD Rwanda, but is not ready to be transferred because of existing conflicts, the project is marked in red and passed to the next phase of the workflow, where the data discrepancy between IATI and DAD Rwanda project files is presented. In this phase of the transfer, the project files should be synchronised field by field. Once the synchronisation is over, the project records pass through another validation phase. The © 2015 Synergy International Systems, Inc. All rights reserved. 19 DEVELOPMENT ASSISTANCE DATABASE FOR RWANDA | Analytical Interface | User Manual INTEGRATED CRIMINAL JUSTICE INFORMATION SYSTEM OF IRAQ | Personal Information | User Manual project record transfer may be executed if all the fields in the linked project files are consistent. For more details, see Synchronising Projects. ● If the project file does not exist in DAD Rwanda and is listed as invalid, it will be marked in orange and will open in the data entry mode in DAD Rwanda giving the user the possibility of addressing all the issues present in the project file. Once all the validation messages are taken into consideration and the corresponding fields are modified accordingly, the changes should be saved. The project file transfer will be executed if all the conflicts in the respective project file have been resolved. For more details, see Importing Projects. Figure 7: IATI Project Section of the My Portfolio Module The information displayed in the IATI Project section for each project includes the following: ● IATI Project ID – the identification number of the IATI project, ● IATI Project Title – the title of the IATI project, ● DAD Project – the corresponding DAD Rwanda project to which the IATI project is linked, © 2015 Synergy International Systems, Inc. All rights reserved. 20 DEVELOPMENT ASSISTANCE DATABASE FOR RWANDA | Analytical Interface | User Manual INTEGRATED CRIMINAL JUSTICE INFORMATION SYSTEM OF IRAQ | Personal Information | User Manual Last Imported On – the date when the last import took place, ● Last Transferred On – the date when the project data were last transferred. ● Note: In the IATI Project section, you have the possibility of filtering the entire IATI project list and displaying only the ones that have been imported or transferred from IATI to DAD Rwanda during a specific period of time by specifying the respective date periods of last project data import and transfer. Linking Projects In order to link an IATI project to a DAD Rwanda project, follow the steps below: 1. In the IATI Project section, click the (Link) button next to the respective IATI project. This will open the Link Project form (Figure 8). Figure 8: Linking Projects 2. Locate the appropriate DAD Rwanda project by making use of the search mechanism that will find and display all projects that match the selected search criteria. The following search options are available: • Donor Agency © 2015 Synergy International Systems, Inc. All rights reserved. 21 DEVELOPMENT ASSISTANCE DATABASE FOR RWANDA | Analytical Interface | User Manual INTEGRATED CRIMINAL JUSTICE INFORMATION SYSTEM OF IRAQ | Personal Information | User Manual • 1st Level Implementer • Sector Note: You can also select to search for a definite project by entering a keyword to be searched in the Project ID, Project Title and Project Description fields. 3. Search for the respective project by clicking the Search button. All records that match the search criteria will be displayed in the table. Note: You may clear the defined search criteria by clicking on the Reset button. 4. Select the project that you want link the IATI project to by activating the respective radio button. Please note that you can view the details of the selected record to make sure that it is the correct file. For more details, see DETAILS SECTION. 5. Click the Link Selected button. The record will appear in the DAD Project column of the My IATI Projects table (Figure 7). Transferring IATI Projects If the IATI project record has passed all the validation checks and is consistent with the respective DAD Rwanda project, then it may be transferred. In order to transfer an IATI Project to DAD Rwanda, follow the steps below: 1. In the IATI Project section, select the IATI project to be transferred (Figure 7). This will open the Transfer/Merge Projects form (Figure 9). Note: You may select several projects at a time. In order to unselect all the selected projects, click the Deselect All button above the My IATI Projects table (Figure 7). 2. Select the project to be transferred by ticking the respective checkbox. 3. Click the Transfer button. The selected project will be exported from IATI and imported to DAD Rwanda. © 2015 Synergy International Systems, Inc. All rights reserved. 22 DEVELOPMENT ASSISTANCE DATABASE FOR RWANDA | Analytical Interface | User Manual INTEGRATED CRIMINAL JUSTICE INFORMATION SYSTEM OF IRAQ | Personal Information | User Manual Figure 9: Transferring an IATI Project to DAD Rwanda Synchronising Projects If the project record is linked to an existing DAD Rwanda project, but there is data inconsistency between the two project files, it needs to be synchronised and validated. In order to synchronise IATI and DAD Rwanda projects, follow the steps below: 1. In the Transfer/Merge Projects window, click the project to be transferred. The Transfer/Merge Projects comparison form will open (Figure 10). 2. Expand the inconsistent sections marked with the 3. Use the and/or the inequality icon. (Move Right) button to transfer the missing fields to the DAD Rwanda project (Remove) button to remove the unnecessary fields. You may undo the recent changes by clicking the (Revert) button before saving the modifications made. 4. Click the Proceed button. You will be redirected to the data entry form of the respective project. For more details, see DETAILS SECTION. 5. Make the appropriate modifications, if needed, and then click the OK button. The Transfer/Merge Projects window will open with the project file ready to be transferred. 6. Click the Transfer button. The selected project will be exported from IATI and imported to DAD Rwanda. © 2015 Synergy International Systems, Inc. All rights reserved. 23 DEVELOPMENT ASSISTANCE DATABASE FOR RWANDA | Analytical Interface | User Manual INTEGRATED CRIMINAL JUSTICE INFORMATION SYSTEM OF IRAQ | Personal Information | User Manual Figure 10: Synchronising IATI and DAD Rwanda Projects Importing Projects If the project record does not exist in DAD Rwanda and, therefore, cannot be linked to any existing project, it needs to be imported into the system. In order to import an IATI project into DAD Rwanda, follow the steps below: 1. In the Transfer/Merge Projects window, click the project to be transferred. You will be directed to the DETAILS SECTION. 2. Make the appropriate modifications in the project data, if needed, and then click the OK button. The Transfer/Merge Projects window will open with the project ready to be imported. 3. Click the Transfer button. The selected project will be exported from IATI and imported to DAD Rwanda. © 2015 Synergy International Systems, Inc. All rights reserved. 24 DEVELOPMENT ASSISTANCE DATABASE FOR RWANDA | Analytical Interface | User Manual INTEGRATED CRIMINAL JUSTICE INFORMATION SYSTEM OF IRAQ | Personal Information | User Manual DASHBOARD MODULE The Dashboard module of the DAD Rwanda application serves as a powerful decision support tool for high-level executives by providing a completely personalized workspace with one-click access to upto-date information on project data included in the memorized reports, lists, charts, and maps. This module fulfills the information needs of project managers and executive level decision-makers that require seeing an aggregate summary of the information available in the system in various formats, simultaneously, in one screen. Dashboards are a convenient way to display data analytics in lists, maps, charts, and reports and use the flexible previews during presentations, meetings, and conferences. The Dashboard module allows creating new informative dashboards, customizing the existing dashboards, adding new items to them, renaming and saving the dashboards and updating the data that are shown. Key Features You can make use of the following key features of the Dashboard tool in DAD Rwanda: An intuitive drag-and-drop environment that turns adding reports to a dashboard into an easily manageable task. Fully resizable report windows. Better visualization of the information presented in graph reports. The ability to print reports for future reference. The ability to export reports on the dashboard in MS Word, MS Excel, and Adobe PDF formats. Accessing the Dashboard Module In order to access the Dashboard module of the system, you should click the Dashboard tab. This will navigate you to the Dashboard module. In this module, you can create dashboards, include reports under them, etc. © 2015 Synergy International Systems, Inc. All rights reserved. 25 DEVELOPMENT ASSISTANCE DATABASE FOR RWANDA | Analytical Interface | User Manual INTEGRATED CRIMINAL JUSTICE INFORMATION SYSTEM OF IRAQ | Personal Information | User Manual Main Screen and Its Components Figure 11: Dashboard Module ● Dashboard Selector - contains a list of pre-defined dashboards. By choosing a definite dashboard from this list, you can view the reports stored in the selected dashboard. ● Customize - allows performing the following operations: o Name - displays the dashboard name. o Save - saves a dashboard so that it can be shared with other users. o Save as New - saves a dashboard as a new one. This option is especially useful if you need to make modifications in a definite dashboard while keeping the source information intact. This way overwriting of the original dashboard is prevented. o Remove - deletes a dashboard together with its contents. © 2015 Synergy International Systems, Inc. All rights reserved. 26 DEVELOPMENT ASSISTANCE DATABASE FOR RWANDA | Analytical Interface | User Manual INTEGRATED CRIMINAL JUSTICE INFORMATION SYSTEM OF IRAQ | Personal Information | User Manual o o o Cancel - discards the modifications made to the dashboard currently displayed on the screen. Public – makes the dashboard available to other users as well if selected. Scroll Mode – toggles the scrollbar thus allowing additional space for adding reports to the dashboard. ● Update all - loads the latest data from the database. ● New - creates a new dashboard. ● Add New Item - adds a new report under the definite dashboard from the list of all predefined reports previously created. ● Dashboard Workspace - the main screen of the Dashboard module where the content of a definite dashboard is viewed. Dashboard Management Create a New Dashboard In order to create a new dashboard, follow the steps below: © 2015 Synergy International Systems, Inc. All rights reserved. 27 DEVELOPMENT ASSISTANCE DATABASE FOR RWANDA | Analytical Interface | User Manual INTEGRATED CRIMINAL JUSTICE INFORMATION SYSTEM OF IRAQ | Personal Information | User Manual Figure 12: Adding a New Dashboard 1. Click the New button at the upper right corner of the screen (Figure 12). A new field appears in the left part of the screen to give a name other than the default one to the dashboard and to save it. Also, the list of all existing pre-defined reports is used to add new items to the dashboard (Figure 13). 2. Give the desired name to the dashboard. 3. Add reports to the dashboard, see Add an Item to a Dashboard. 4. Save it. © 2015 Synergy International Systems, Inc. All rights reserved. 28 DEVELOPMENT ASSISTANCE DATABASE FOR RWANDA | Analytical Interface | User Manual INTEGRATED CRIMINAL JUSTICE INFORMATION SYSTEM OF IRAQ | Personal Information | User Manual Figure 13: List of Pre-defined Reports Add an Item to a Dashboard In order to add a report to a dashboard, follow the steps described below: 1. Click the Add New Item link. The list of all reports previously saved reports will appear (Figure 13). 2. Select a report to add to a dashboard and drag-and-drop it onto the main screen. 3. If you want to add another report to the dashboard, select it in the list, drag it onto the main screen and hold the left mouse button until a green rectangle appears on the screen indicating an area where the new report can be placed. Keep the mouse button pressed until the green rectangle turns blue and release it (Figure 14). 4. You may add multiple reports to the dashboard. © 2015 Synergy International Systems, Inc. All rights reserved. 29 DEVELOPMENT ASSISTANCE DATABASE FOR RWANDA | Analytical Interface | User Manual INTEGRATED CRIMINAL JUSTICE INFORMATION SYSTEM OF IRAQ | Personal Information | User Manual Note: The reports can be arranged either in vertical or in horizontal order. Once the place for the report is selected, it cannot be changed. Figure 14: Adding a New Report Edit a Dashboard Item In order to edit a dashboard report, follow the steps below: 1. Select the dashboard the report of which you want to edit. 2. Select the Edit option from the actions menu in the top toolbar of the report screen. You will be directed to the analytical module where the selected report structure will be displayed. Note: The selection of the analytical module will be determined by the type of the report that you want to edit. For example, if you select to edit a map report, you will be navigated to the Map module. 3. Make the necessary changes and save them. © 2015 Synergy International Systems, Inc. All rights reserved. 30 DEVELOPMENT ASSISTANCE DATABASE FOR RWANDA | Analytical Interface | User Manual INTEGRATED CRIMINAL JUSTICE INFORMATION SYSTEM OF IRAQ | Personal Information | User Manual Remove a Dashboard Item In order to delete a dashboard report, follow the steps below: 1. Select the dashboard that you want to delete a report from. 2. Select the Remove option from the actions menu in the top toolbar of the report screen. The selected dashboard item will no longer display in the dashboard. Print a Dashboard Item In order to print a dashboard report, follow the steps below: 1. Select the dashboard the report of which you want to print. 2. Click the (Print) button in the top toolbar above the report screen. A separate window will open. 3. Select the Print option. Export a Dashboard Item In order to export a dashboard report in the PDF, MS Word and MS Excel formats, follow the steps below: 1. Select the dashboard the report of which you want to export. 2. Click the respective (Export in PDF format) / (Export in MS Word format) / (Export in MS Excel format) button in the top toolbar above the report screen. The respective report will be downloaded in the selected format on your local PC. Customize a Dashboard In the Dashboard module, you can customize any dashboard created, i.e. rename the dashboard, save the changes made to it, save a copy of the dashboard, delete a dashboard, and/or discard the changes made. In order to customize a dashboard, follow the steps below: 1. Click the Customize button. A new section will appear displaying all customizable options in the Dashboard module (Figure 15). 2. Take the necessary action. © 2015 Synergy International Systems, Inc. All rights reserved. 31 DEVELOPMENT ASSISTANCE DATABASE FOR RWANDA | Analytical Interface | User Manual INTEGRATED CRIMINAL JUSTICE INFORMATION SYSTEM OF IRAQ | Personal Information | User Manual 3. Save the changes. Figure 15: Customizing a Dashboard Save a Dashboard After the new dashboard has been created and items added to it, it is necessary to save it to be able to view it later on. It should be mentioned that there are two options for saving dashboards: Save: saves all modifications made to the dashboard. ● Save as New: saves a copy of a dashboard under a new name. ● In order to save a dashboard / a copy of a dashboard, follow the steps below: 1. Select the respective Save or Save as New option. © 2015 Synergy International Systems, Inc. All rights reserved. 32 DEVELOPMENT ASSISTANCE DATABASE FOR RWANDA | Analytical Interface | User Manual INTEGRATED CRIMINAL JUSTICE INFORMATION SYSTEM OF IRAQ | Personal Information | User Manual 2. Click Ok in the message window indicating the dashboard / the changes to it have been saved successfully. Delete a Dashboard In order to delete a dashboard, follow the steps below: 1. Select the dashboard that you want to delete. Its contents will be displayed on the main screen. 2. Click the Remove link. The selected dashboard will be deleted. Discard the Changes In order to discard the changes made to the dashboard currently displayed on the screen, follow the steps below: 1. Click the Cancel link. 2. Confirm that you want to discard all changes made to the dashboard by clicking Ok in the warning message window that appears. Update Data For decision makers, it is very important to have access to the latest data available. This is why the Dashboard module allows you to update all reports included in various dashboards. In order to load the latest data from the database, select the Update All option. If you want to update the data in an individual report, click Refresh button in the top toolbar of the report screen. The latest data for the selected report will be loaded from the database. © 2015 Synergy International Systems, Inc. All rights reserved. 33 DEVELOPMENT ASSISTANCE DATABASE FOR RWANDA | Analytical Interface | User Manual INTEGRATED CRIMINAL JUSTICE INFORMATION SYSTEM OF IRAQ | Personal Information | User Manual LIST MODULE In the List module (Figure 16) of the DAD Rwanda application, you can create and execute ad-hoc queries on the data and acquire the results in the form of a list. Figure 16: List Module Accessing the List Module A list consists of at least one group and one column, but the actual quantity of groups and columns is defined by the user’s choice of view. Please, see Modifying the Current View for more details on how to define groups / columns of a list. © 2015 Synergy International Systems, Inc. All rights reserved. 34 DEVELOPMENT ASSISTANCE DATABASE FOR RWANDA | Analytical Interface | User Manual INTEGRATED CRIMINAL JUSTICE INFORMATION SYSTEM OF IRAQ | Personal Information | User Manual In order to access the List module, click the List tab. You will be navigated to the List module. In this module, you can view data organised according to the selected groupings and columns, modify the currently used list, save it as a pre-defined report, include it under a definite group, etc. Expanding the List Item It is possible to expand the list item level to view the information of the sub-level(s). In order to expand the list item level, click the ‘+’ sign next to the name of the list item. This will expand the list item group level displaying the first sub-level (Figure 17). This can further be expanded unless there are no more sub-levels to be displayed. Note: You can expand only one group level at a time. If you expand the group level of another list item, the previously expanded group level will get collapsed. Figure 17: Expanding the List Item Level © 2015 Synergy International Systems, Inc. All rights reserved. 35 DEVELOPMENT ASSISTANCE DATABASE FOR RWANDA | Analytical Interface | User Manual INTEGRATED CRIMINAL JUSTICE INFORMATION SYSTEM OF IRAQ | Personal Information | User Manual Sorting List Items Entries may be sorted by the column value. To achieve that, click the name of the column. This will sort the list alphabetically or numerically depending on the type of data entered into that column. The arrow that appears on the column can reverse the order of the list. Browsing among List Items You can browse among the list items by clicking the number link of the page you want to navigate to. The (First), (Previous), (Next) and (Last) buttons are used to navigate back and forth through the pages. Hiding / Showing Images in the List In order to make the list load quicker, you can choose to hide the images which are displayed in the list. These images can be country flags, sector icons, etc. To hide the images in the list, click the the screen will not display. Note: Clicking the button located at the top of the screen. All the images in button will show the images (Figure 18). © 2015 Synergy International Systems, Inc. All rights reserved. 36 DEVELOPMENT ASSISTANCE DATABASE FOR RWANDA | Analytical Interface | User Manual INTEGRATED CRIMINAL JUSTICE INFORMATION SYSTEM OF IRAQ | Personal Information | User Manual Figure 18: Hiding Images in the List Modifying the Current View It is possible to modify the list that is currently displayed in the List module. You can add new groupings to it or remove the selected ones, (un-) select columns, re-order them, etc. The steps described below provide for the necessary instructions for modifying the current view. 1. Click the Modify Current View link at the top right corner of the List screen. A Modify Current View window (Figure 19) will appear presenting the groupings/columns selected and available for the list view. 2. In the Groupings section, add / re-order / remove groups. 3. In the Columns section, add / re-order / remove columns. 4. In the Cross Tab Groupings section, define add / re-order / remove column groupings for the view. 5. After finishing making changes in the view, click the Ok button for the changes to take effect. Or, click the Cancel button to discard the changes made. © 2015 Synergy International Systems, Inc. All rights reserved. 37 DEVELOPMENT ASSISTANCE DATABASE FOR RWANDA | Analytical Interface | User Manual INTEGRATED CRIMINAL JUSTICE INFORMATION SYSTEM OF IRAQ | Personal Information | User Manual Figure 19: Modifying the Current View Adding List Groups / Columns / Column Groupings In order to add a group / column / column grouping to the list, follow the steps below: 1. In the Available Groups / Columns panel, select the group / column / column grouping to be added to the list. Note: It is possible to select several groups / columns by means of the Shift or Ctrl keyboard buttons. 2. Click the (Select) button. The selected group(s) / column(s) will appear in the Selected Groups / Columns panel. Re-ordering Groups / Columns / Column Groupings In order to re-order the selected groups / columns / column groupings, follow the steps below: 1. Select the group / column / column grouping that needs to be re-ordered in the Selected Groups / Columns panel. 2. Click the Move Up / Move Down button. Removing Groups / Columns / Column Groupings In order to remove the selected groups/columns/column groupings from the list, follow the steps below: © 2015 Synergy International Systems, Inc. All rights reserved. 38 DEVELOPMENT ASSISTANCE DATABASE FOR RWANDA | Analytical Interface | User Manual INTEGRATED CRIMINAL JUSTICE INFORMATION SYSTEM OF IRAQ | Personal Information | User Manual 1. In the Selected Groups/Columns panel, select the group/column/column grouping that needs to be removed from the list. 2. Click the (Unselect) button. The selected group(s)/column(s)/column grouping(s) will be removed from the Selected Groups/Columns panel. Sample Views In the following chapters, you can see several samples on list reports. Sample View 1 Figure 20: Defining List View Groupings for Sample View 1 Figure 21: Defining List View Columns for Sample View 1 © 2015 Synergy International Systems, Inc. All rights reserved. 39 DEVELOPMENT ASSISTANCE DATABASE FOR RWANDA | Analytical Interface | User Manual INTEGRATED CRIMINAL JUSTICE INFORMATION SYSTEM OF IRAQ | Personal Information | User Manual If you indicate Implementation Status / Project hierarchy as a grouping (Figure 20) and # of Projects / Total Project Cost (USD) / Committed (USD) / Disbursed (USD) as columns (Figure 21), the following list view will appear (Figure 22): Figure 22: Sample View 1 Sample View 2 Figure 23: Defining List View Groupings for Sample View 2 © 2015 Synergy International Systems, Inc. All rights reserved. 40 DEVELOPMENT ASSISTANCE DATABASE FOR RWANDA | Analytical Interface | User Manual INTEGRATED CRIMINAL JUSTICE INFORMATION SYSTEM OF IRAQ | Personal Information | User Manual Figure 24: Defining List View Columns for Sample View 2 If you indicate District / Project hierarchy as a grouping (Figure 23) and # of Projects / Project Cost (USD) / Committed (USD) / Disbursed (USD) as columns (Figure 24), the following list view will appear (Figure 25): Figure 25: Sample View 2 © 2015 Synergy International Systems, Inc. All rights reserved. 41 DEVELOPMENT ASSISTANCE DATABASE FOR RWANDA | Analytical Interface | User Manual INTEGRATED CRIMINAL JUSTICE INFORMATION SYSTEM OF IRAQ | Personal Information | User Manual CHART MODULE The DAD Rwanda application is equipped with a powerful chart designer that empowers you with all necessary tools to create charts for professionally looking presentations and reports. A user-friendly interface, great number of visual effects and pre-defined chart types, flexible chart components selection, and on-screen real-time chart visualization make using the chart designer an easy and delightful experience. Chart Module Key Features You can make use of the following key features of the Chart tool in the DAD Rwanda: Rich user interface that supports movable windows for arranging the screen as desired. The ability to resize the charts directly in the workspace. The ability to show or hide the data labels and legends. The ability to customize the coloring, or choose pattern-filled charts for black and white printing. Accessing the Chart Module As it has been stated above, the system provides for the opportunity to present data in the form of different charts. In order to access the Chart module of the system, click the Chart tab. The Chart module appears where a pre-defined chart is displayed. © 2015 Synergy International Systems, Inc. All rights reserved. 42 DEVELOPMENT ASSISTANCE DATABASE FOR RWANDA | Analytical Interface | User Manual INTEGRATED CRIMINAL JUSTICE INFORMATION SYSTEM OF IRAQ | Personal Information | User Manual Main Screen and Its Components Figure 26: Main Screen of the Chart Module 1. Category - allows selecting one of the options provided in the Category drop-down menu located at the top of the Chart window. The selected category will define one of the chart axes. Selection of a category for the chart report is required. 2. Series - allows selecting one of the options provided in the Series drop-down menu located at the top of the Chart window. The selected series will define the chart legend. Selection of a series for the chart report is optional. Note: Clicking the (Swap) button allows switching places of category and series selections. 3. Chart Types - allows defining the chart type. The following options are available: © 2015 Synergy International Systems, Inc. All rights reserved. 43 DEVELOPMENT ASSISTANCE DATABASE FOR RWANDA | Analytical Interface | User Manual INTEGRATED CRIMINAL JUSTICE INFORMATION SYSTEM OF IRAQ | Personal Information | User Manual Chart Type Example 1. Bar 2. Column 3. 3D Bar 4. 3D Column © 2015 Synergy International Systems, Inc. All rights reserved. 44 DEVELOPMENT ASSISTANCE DATABASE FOR RWANDA | Analytical Interface | User Manual INTEGRATED CRIMINAL JUSTICE INFORMATION SYSTEM OF IRAQ | Personal Information | User Manual 5. Stacked Bar 6. Stacked Column 7. Stacked 3D Bar 8. Stacked 3D Column 9. Pie © 2015 Synergy International Systems, Inc. All rights reserved. 45 DEVELOPMENT ASSISTANCE DATABASE FOR RWANDA | Analytical Interface | User Manual INTEGRATED CRIMINAL JUSTICE INFORMATION SYSTEM OF IRAQ | Personal Information | User Manual 10. 3D Pie 11. Line 4. Show Top <Number> - indicates the maximal number of category items to be displayed in the chart. 5. Show Top <Number> on Secondary Axis - indicates the maximal number of series items that should be displayed on the secondary axis in the chart. Becomes available only if a Series is selected. This option is disabled if you have selected the pie or line chart types. 6. Char Count - limits the number of characters to be used to display the category item names to the value set in this field. 7. Values - allows selecting a value from the list that will define the main chart criteria. 8. Update - loads the latest data from the database and displays them on the chart. 9. Reset default - loads the default chart built according to the default chart category and chart type. 10. Workspace - the main working area in the Chart module where the chart designed is displayed. © 2015 Synergy International Systems, Inc. All rights reserved. 46 DEVELOPMENT ASSISTANCE DATABASE FOR RWANDA | Analytical Interface | User Manual INTEGRATED CRIMINAL JUSTICE INFORMATION SYSTEM OF IRAQ | Personal Information | User Manual View Screen and Its Components Figure 27: View Screen of the Chart Module 1. Show - allows selecting one or several of the following options: • Data Table - presents the information contained in the chart in a grid or matrix. • Data Label - shows the actual values of each chart cell. This option is disabled if you have selected the pie or line chart types. • Legend - explains the categories and data series displayed on the chart. • Pattern - allows choosing a pattern-filled chart for black and white printing. • Coloring Option - allows defining whether the chart should be displayed in multiple colors or in one of the colors available. • Show In - allows defining how the numeric values will be displayed on the chart. To avoid large number occupying too much space, you can choose to view the numbers in thousands / millions / billions. 2. Title – a text box to enter the chart report title. 3. Note - a text box to enter additional information about the chart report. © 2015 Synergy International Systems, Inc. All rights reserved. 47 DEVELOPMENT ASSISTANCE DATABASE FOR RWANDA | Analytical Interface | User Manual INTEGRATED CRIMINAL JUSTICE INFORMATION SYSTEM OF IRAQ | Personal Information | User Manual 4. Footer - a text box to insert a portion of text that will appear in the bottom area of the chart report. 5. Subtitle - a text box to enter a subtitle for the chart report. 6. Font - allows selecting the font the chart report title/subtitle/footer/note will appear in. 7. Size - allows selecting the font size the chart report title/subtitle/footer/note will appear in. 8. Workspace - the main working area in the Chart module where the chart designed is displayed. Sample Chart Reports In the following chapters, you can see several samples on chart reports. Sample Chart Report 1 If you select Implementation Status as a chart category, # of Projects, Total Project Cost (USD), Committed (USD), and Disbursed (USD) as values to be shown on the chart, click the 3D Column chart button to specify the chart type, and activate the Data Table and Legend options in the View window, the following chart report will appear (Figure 28): © 2015 Synergy International Systems, Inc. All rights reserved. 48 DEVELOPMENT ASSISTANCE DATABASE FOR RWANDA | Analytical Interface | User Manual INTEGRATED CRIMINAL JUSTICE INFORMATION SYSTEM OF IRAQ | Personal Information | User Manual Figure 28: Sample Chart Report 1 Sample Chart Report 2 If you select Province as a chart category, Total Project Cost (USD), Committed (USD), and Disbursed (USD) as values to be shown on the chart, click the 3D Bar chart button to specify the chart type, and activate the Data Table and Legend options in the View window, the following chart report will appear (Figure 29): © 2015 Synergy International Systems, Inc. All rights reserved. 49 DEVELOPMENT ASSISTANCE DATABASE FOR RWANDA | Analytical Interface | User Manual INTEGRATED CRIMINAL JUSTICE INFORMATION SYSTEM OF IRAQ | Personal Information | User Manual Figure 29: Sample Chart Report 2 © 2015 Synergy International Systems, Inc. All rights reserved. 50 DEVELOPMENT ASSISTANCE DATABASE FOR RWANDA | Analytical Interface | User Manual INTEGRATED CRIMINAL JUSTICE INFORMATION SYSTEM OF IRAQ | Personal Information | User Manual MAP MODULE In the Map module of the DAD Rwanda application, you can make use of an advanced GIS tool for data visualization. The GIS tool brings together maps, data and different data layers for informed decision making, data analysis and reporting. It is a practical tool to visualize data from the geospatial perspective as it enables precise, real-time mapping and visualization of all data associated with various data sets in the system. The resulting data visualizations will allow to quickly and easily draw out key findings from the data on the map. Figure 30: Map Module Moreover, the GIS tool offers an impressive array of state-of-the-art features that allow plotting different data series on the map of Rwanda and generate map reports for data analysis. They also give you the opportunity to query, aggregate, disaggregate, filter, and edit data on a map, visually capture data at any desired level, from the most general to the most detailed one. Moreover, you have the ability to zoom freely; to select a point on a map and ask the system to display any category of data within a given radius (‘buffered zone querying’); to measure distance between any two points on the map, etc. © 2015 Synergy International Systems, Inc. All rights reserved. 51 DEVELOPMENT ASSISTANCE DATABASE FOR RWANDA | Analytical Interface | User Manual INTEGRATED CRIMINAL JUSTICE INFORMATION SYSTEM OF IRAQ | Personal Information | User Manual Key Features of the GIS Tool You can make use of the following key features of the Map module in DAD Rwanda: The ability to visualize data analysis results on a map; A rich set of data visualization options; The ability to create map reports and integrate them into larger reports; The ability to print reports for future reference or export them in the desired format; The possibility of plotting graphs on the map; Display of dynamic legends depending on the selection of layers; The ability to measure distance between any two points on the map and to create buffered zones; Coloring of administrative territories based on dynamic scaling. Accessing the Map Module The system provides for the opportunity to present data on the map of the country. In order to access the Map module of the system, click the Map tab. You will be navigated to the Map module where the map of the country is displayed. In the Map module, you can choose to view different data sets displayed on the map, create and display reports, save them as pre-defined reports, arrange them in the desired way, print them, etc. Map Module Screen Components The following figure describes some of the features available in the main screen of the Map module (Figure 30): 1. Zoom to panel - allows free zooming to the desired administrative unit (province or district). 2. Navigation controls - a set of tools that provide common navigation functions, such as panning and zooming, measuring distance and creating buffered zones. Please note that the navigation controls pane is constantly present on the screen for easy access to the map navigation options. However, it can be toggled to allow a better view of the map. 3. Map - the map of the country. © 2015 Synergy International Systems, Inc. All rights reserved. 52 DEVELOPMENT ASSISTANCE DATABASE FOR RWANDA | Analytical Interface | User Manual INTEGRATED CRIMINAL JUSTICE INFORMATION SYSTEM OF IRAQ | Personal Information | User Manual 4. Scale Bar - allows you to work out the distances on the map. The distances are expressed both in the metric and English units of measure. 5. Mini Map - an overview map of the entire country displayed in a small window allowing quick navigation to a desired location with one click without having to zoom out, find the new location and zoom in again. 6. Categories Layer – provides a variety of categories to choose to display on the map. 7. Scaling Layer - provides a variety of data series to choose from to display on a scaling map. 8. Chart Layer – provides a variety of data series to choose from to plot on a map in the form of bar or pie charts. 9. Selected Options – displays an array of options (categories, scaling, chart, and border) that have been selected for the map report. 10. Options Panel – allows defining additional characteristics for the map report. These characteristics can include the type of the chart to be plotted, border options, etc. In this panel, you can also define custom coloring patterns for a scaling map. 11. Legend Panel - explains the categories and data series displayed on the map. 12. Location information section - displays the name of the administrative unit when it is pointed on the map. 13. Cursor position section - displays the geographic coordinates (expressed as latitude and longitude) for any point on the map. Working in the Map Module Zooming in / Zooming out The GIS tool is equipped with the advanced zooming capabilities used to enlarge or reduce the view of the map on the screen. The following zooming options are available: © 2015 Synergy International Systems, Inc. All rights reserved. 53 DEVELOPMENT ASSISTANCE DATABASE FOR RWANDA | Analytical Interface | User Manual INTEGRATED CRIMINAL JUSTICE INFORMATION SYSTEM OF IRAQ | Personal Information | User Manual Free zoom in / zoom out This option allows you to easily explore the data through Intelligent Searching. To be able to do it, you should click the (Search) icon in the Location Information section and enter any combination of letters to search for. The results will return all administrative territories that match the search criteria. You can select the administrative territory to navigate to from the list containing the search results (Figure 31). The selected item will be magnified and displayed in the main screen. Figure 31: Intelligent Searching Scaled zoom in / zoom out This option allows zooming in / zooming out using the scale tool available in the Advanced GIS. This means that when changing the zoom scales by clicking either or reduce the viewport according to the scale value. © 2015 Synergy International Systems, Inc. All rights reserved. or , you can magnify 54 DEVELOPMENT ASSISTANCE DATABASE FOR RWANDA | Analytical Interface | User Manual INTEGRATED CRIMINAL JUSTICE INFORMATION SYSTEM OF IRAQ | Personal Information | User Manual Mouse wheel-based zoom-in/zoom-out This option supports mouse wheel-based zooming in / zooming out. In order to enlarge or reduce the viewport using the scroll wheel button of the mouse, you should click anywhere on the map and use the wheel button in the backward motion to zoom in and in the forward motion to zoom out. Zoom by Selection This option allows magnifying the original viewport or a portion of it using the mouse. To be able to enlarge an area on the map, you should activate the Zoom by Selection option by clicking the button then select a region on the map to magnify (Figure 32). Figure 32: Zooming by Selection Measuring Distance In the Map module, you can measure the distance between two points on the map. © 2015 Synergy International Systems, Inc. All rights reserved. 55 DEVELOPMENT ASSISTANCE DATABASE FOR RWANDA | Analytical Interface | User Manual INTEGRATED CRIMINAL JUSTICE INFORMATION SYSTEM OF IRAQ | Personal Information | User Manual To do this, click the button, select the point on the map and drag the mouse to the second point to trace a path to measure (Figure 33). The measured distance will be expressed both in metric and English units of measure. Note: Measuring is calculated using the latitude and longitude coordinates from point to point and does not consider elevation. Figure 33: Measuring Distance Buffered Zone Querying This feature in the Advanced GIS tool is used to select a point on a map and display any type of data within a given radius. In addition, the tool is easily navigable through a Mini Map, Navigation Bar and Intelligent Search Tools. To be able to create a buffered zone to view data for, select the button, and then select the region on the map to highlight. The selected area will be activated while the rest of the screen will be disabled (Figure 34). This tool may be useful for presentations on screenshots to mark the selected area on the map. © 2015 Synergy International Systems, Inc. All rights reserved. 56 DEVELOPMENT ASSISTANCE DATABASE FOR RWANDA | Analytical Interface | User Manual INTEGRATED CRIMINAL JUSTICE INFORMATION SYSTEM OF IRAQ | Personal Information | User Manual Figure 34: Buffered Zone Querying Using Layers The Layers feature in the Map module provides a variety of data to select to display over the viewing area. You can use the Layers feature to display the following information: ● Display categories; ● Choose to view data on a scaling map; ● Plot data in the form of different graphs (pie chart or bar chart); The following layers can be applied in DAD Rwanda: Categories This option is used to plot category data on the map and to view them in form of different icons / images. To enable this option, expand the Categories Layer and select one of the categories listed. Note: When pointing the mouse cursor on a respective icon/image on the map, you can view the details for the selected category. © 2015 Synergy International Systems, Inc. All rights reserved. 57 DEVELOPMENT ASSISTANCE DATABASE FOR RWANDA | Analytical Interface | User Manual INTEGRATED CRIMINAL JUSTICE INFORMATION SYSTEM OF IRAQ | Personal Information | User Manual Scaling This option is used to view the data on a scaling map. This means that the selected data series will not be displayed in form of graphs, but the administrative territories will be colored according to the selected scaling category instead. The scaling legend at the bottom left side of the map prompts on the coloring pattern used. To enable this option, expand the Scaling Layer panel and select one of the possible alternatives listed. Chart You can plot different data series on a map and view them in the form of different graphs, such as pie charts or bar charts. You can turn on this option by expanding the Chart Layer panel and selecting the chart categories to be displayed on the map. By default, the selected categories will appear in the form of a pie chart. However, you can choose the view the data in the form of a bar chart by activating the respective radio button (Figure 35). Note: When pointing the mouse cursor on any of the chart constituents, you can view the data that stands behind it. Figure 35: Selecting Chart Type © 2015 Synergy International Systems, Inc. All rights reserved. 58 DEVELOPMENT ASSISTANCE DATABASE FOR RWANDA | Analytical Interface | User Manual INTEGRATED CRIMINAL JUSTICE INFORMATION SYSTEM OF IRAQ | Personal Information | User Manual Setting Map Options In the Map module, you can define the map options that will override the default values currently set for any map report created. You can use the Options section to define the following values: ● Indicate whether the data plotted on the map should display in the form of a bar chart or pie chart; ● Define custom scaling options for the map report; ● Display border information for all territorial units in the country. Chart Type As it has been stated in the chapters above, you can plot different data series on the map and display them in the form of a pie or bar chart. By default, the data series selected in the Chart Layer section will be available in the form of a pie chart. However, you can set the chart type to a bar chart in the Options section. In order to display your data series in the form of a bar chart, follow the steps below: 1. Expand the Options section. 2. Select the Bar Chart radio button. Scaling Mode In the Map module of the DAD Rwanda application, you can plot data on a scaling map for better data visualization and analysis. You may choose between the two options that the platform offers: you may use one of the pre-defined coloring patterns or you may create a customized scaling map where you will have to define the coloring options for each range of values that you want to plot on the map. To view the data on a scaling map, follow the steps below: 1. Expand the Scaling Layer panel. 2. Select one of the possible alternatives. In order to view the data on a customized scaling map, follow the steps below: 1. Expand the Options panel. 2. Set the Scaling Mode to Manual by activating the respective radio button (Figure 36). 3. Click the Add button. 4. Specify the Coloring options for each data range and specify the values that stand behind it. © 2015 Synergy International Systems, Inc. All rights reserved. 59 DEVELOPMENT ASSISTANCE DATABASE FOR RWANDA | Analytical Interface | User Manual INTEGRATED CRIMINAL JUSTICE INFORMATION SYSTEM OF IRAQ | Personal Information | User Manual 5. Click the Apply button for the changes to take effect. Note: You can remove a custom scaling option by clicking the defined scaling options by clicking the Remove All button. icon. Or, you can remove all the Figure 36: Selecting Scaling Range Borders You can turn on border information by expanding the Options panel and selecting one of the following options: ● Auto - displays border information for all territorial units when the zoom in is selected. For example, if you zoom in to district level, the border information for both provinces and districts will be displayed on the map. ● Province - displays the border information for all provinces. ● District – displays the border information for all districts. © 2015 Synergy International Systems, Inc. All rights reserved. 60 DEVELOPMENT ASSISTANCE DATABASE FOR RWANDA | Analytical Interface | User Manual INTEGRATED CRIMINAL JUSTICE INFORMATION SYSTEM OF IRAQ | Personal Information | User Manual Viewing Legend To explain the data series or categories on the map, the legend is used to identify the patterns or colors that are assigned to the selected categories (Figure 37). It is worth mentioning that each data series or category is represented by a unique pattern or color in the map legend, which is displayed in the following ways: ● In the Legend section if you have chosen to apply any category to the map. ● At the bottom left side of the map if you have selected to view data on the scaling map. Figure 37: Viewing Map Legend Using Mini Map The Mini Map window feature displays an additional view of the country map with a position indicator that corresponds to the current view inside the main screen (Figure 38). One of the main features of the Mini Map is that while the Mini Map window responds to position adjustments in the main screen, you can also interact directly with it. Double-clicking any area within the window or dragging the position cursor to the desired place will adjust position both in the Mini Map and in the main screen to the point in the Mini Map window that the user selects. © 2015 Synergy International Systems, Inc. All rights reserved. 61 DEVELOPMENT ASSISTANCE DATABASE FOR RWANDA | Analytical Interface | User Manual INTEGRATED CRIMINAL JUSTICE INFORMATION SYSTEM OF IRAQ | Personal Information | User Manual Figure 38: Using Mini Map Viewing the Data Displayed on the Map The Advanced GIS tool is used to view the data referring to definite territorial units – provinces and/or districts when zoomed in to this level. In order to access the data for a specific territorial unit, click the name of the respective territorial unit (Figure 39). The information that is displayed in the information window includes but is not limited to # of projects implemented in the selected location, total project cost, etc. If you have plotted any chart category on the map, the chart category details appear in the information window as well. Also, you can view information on unspecified and unallocated projects that do not have any territorial unit reference. To view data on these projects, click the respective Unspecified or Unallocated section. Note: Clicking the View Projects link at the bottom of the information window will take you to the Details section of the application. For more information about the actions that can be taken in this section, see DETAILS SECTION. © 2015 Synergy International Systems, Inc. All rights reserved. 62 DEVELOPMENT ASSISTANCE DATABASE FOR RWANDA | Analytical Interface | User Manual INTEGRATED CRIMINAL JUSTICE INFORMATION SYSTEM OF IRAQ | Personal Information | User Manual Figure 39: Viewing the Data Displayed on the Map Sample Map Reports In the following chapters, you can see several map report samples. Sample Map Report 1 If you select Sector as a map category and open the Legend panel, the following map report will appear (Figure 40): © 2015 Synergy International Systems, Inc. All rights reserved. 63 DEVELOPMENT ASSISTANCE DATABASE FOR RWANDA | Analytical Interface | User Manual INTEGRATED CRIMINAL JUSTICE INFORMATION SYSTEM OF IRAQ | Personal Information | User Manual Figure 40: Sample Map Report 1 Sample Map Report 2 If you select Implementation Status as a map category and # of Projects as a map scale, the following map report will appear (Figure 41): © 2015 Synergy International Systems, Inc. All rights reserved. 64 DEVELOPMENT ASSISTANCE DATABASE FOR RWANDA | Analytical Interface | User Manual INTEGRATED CRIMINAL JUSTICE INFORMATION SYSTEM OF IRAQ | Personal Information | User Manual Figure 41: Sample Map Report 2 © 2015 Synergy International Systems, Inc. All rights reserved. 65 DEVELOPMENT ASSISTANCE DATABASE FOR RWANDA | Analytical Interface | User Manual INTEGRATED CRIMINAL JUSTICE INFORMATION SYSTEM OF IRAQ | Personal Information | User Manual REPORT MODULE In the Report module of the DAD Rwanda application you can create and execute ad-hoc queries on the data and acquire the results in the form of different reports. Accessing the Report Module As it has been stated above, the system provides for the opportunity to create different sorts of table reports. In order to access the Report module of the system, click the Report tab. You will be navigated to the Report module of the application where the Report Designer (Figure 42) will open. In this module, you can create list reports, save them as pre-defined reports, arrange them in the desired way, print them, etc. Figure 42: Report Module © 2015 Synergy International Systems, Inc. All rights reserved. 66 DEVELOPMENT ASSISTANCE DATABASE FOR RWANDA | Analytical Interface | User Manual INTEGRATED CRIMINAL JUSTICE INFORMATION SYSTEM OF IRAQ | Personal Information | User Manual Creating a Report In order to create a report, i.e. to structure the report table and choose what information should appear in the rows and columns of the table, add report components, which are: • Text entries – title, subtitle, header, and footer. For these fields, the expected input is a free text. Note: By default, the Report Designer gives you the possibility of adding report titles. However, you can change the default view to make adjustments for other text entry components (subtitle, header and footer) as well. To be able to provide additional textual information to the report, you will have to click the Show details link (Figure 42) and provide the appropriate information the fields that emerge. Clicking the Hide Details link will collapse the text entry fields displaying only the Title. • Report grouping - allows grouping data according to a specific category. Grouped data appear in different tables. Each table contains data that fall under one group of the category specified. • Rows - group data within the report table. • Columns - show details specific to each table row. • Sub-columns - divide the row details displayed under each column. In order to add report components, follow the steps below: 1. Type the text that should appear as the report title in the Title text box. 2. Enter a Subtitle, Header, and Footer if needed. 3. In the Group Report by section, specify the category, which will be used to group data into different tables. To add a report grouping, click the Add Grouping link in the Group Report by section and select the appropriate category from the menu that appears (Figure 43). Note: The report will be divided into as many tables as there are table groupings selected. 4. Select table rows by clicking the Add Row link and selecting the appropriate item from the menu that appears. Please note that it is possible to select one row at a time from the list of available rows. 5. Select table columns by clicking the Add Column link and selecting the appropriate item from the menu that appears. Please note that it is possible to select one column at a time from the list of available columns. Note: Once you have selected a report column, an Add Sub-column link becomes available under the selected column. It allows indicating how the row details displayed under each column will be divided. © 2015 Synergy International Systems, Inc. All rights reserved. 67 DEVELOPMENT ASSISTANCE DATABASE FOR RWANDA | Analytical Interface | User Manual INTEGRATED CRIMINAL JUSTICE INFORMATION SYSTEM OF IRAQ | Personal Information | User Manual Figure 43: Selecting a Grouping for a Report Note: At any point it is possible to remove all components selected for the report and design a new report from scratch by clicking the (Reset) button. Note: If you have defined a report which has incompatible columns (columns over which reports cannot be generated), they will be marked in red and an error message will occur. To make your reports productive, use the link (as marked in red, Figure 43) to open the Compatibility Matrix table (Figure 44). This is a table that displays the compatibility between all categories and measures in the database to display them in the report. © 2015 Synergy International Systems, Inc. All rights reserved. 68 DEVELOPMENT ASSISTANCE DATABASE FOR RWANDA | Analytical Interface | User Manual INTEGRATED CRIMINAL JUSTICE INFORMATION SYSTEM OF IRAQ | Personal Information | User Manual Figure 44: Compatibility Matrix Previewing a Report At any time during the process of creating a report, look in the Preview section at the bottom of the page, in order to view the final structure of the report (Figure 45). The Preview will not be ready for viewing unless the user has at least one table row defined. All your added report components and structuring results will be displayed in the Preview section which helps you to check whether the report matches the required output or not. This section can be expanded in order to display the entire information. © 2015 Synergy International Systems, Inc. All rights reserved. 69 DEVELOPMENT ASSISTANCE DATABASE FOR RWANDA | Analytical Interface | User Manual INTEGRATED CRIMINAL JUSTICE INFORMATION SYSTEM OF IRAQ | Personal Information | User Manual Figure 45: Previewing the Report Generating a Report The final step in the process of creating a report is report generation. By clicking the (Submit) button, a request to the Reporting Engine is submitted in order to access the database, gather the required data and present it in the manner required. The report containing all the real data appears in a new window. Sample Reports In the following chapters, you can see several report samples. Sample Report 1 If you indicate: ● Funding Source as the report table grouping; ● Modality as the report row; © 2015 Synergy International Systems, Inc. All rights reserved. 70 DEVELOPMENT ASSISTANCE DATABASE FOR RWANDA | Analytical Interface | User Manual INTEGRATED CRIMINAL JUSTICE INFORMATION SYSTEM OF IRAQ | Personal Information | User Manual Financial Year as a column; ● Committed (USD) and Disbursed (USD) as sub-columns; ● Apply filtering to view the data for 2009-2015 years (Figure 46); ● Figure 46: Creating Report 1 You will have the following result (Figure 47): © 2015 Synergy International Systems, Inc. All rights reserved. 71 DEVELOPMENT ASSISTANCE DATABASE FOR RWANDA | Analytical Interface | User Manual INTEGRATED CRIMINAL JUSTICE INFORMATION SYSTEM OF IRAQ | Personal Information | User Manual Figure 47: Sample List Report 1 Sample Report 2 If you indicate: ● District as the report table grouping; ● Funding Source / Project hierarchy as the report rows; ● Committed (USD), Disbursed (USD), Expended (USD) and Total Project Cost (USD) as columns; © 2015 Synergy International Systems, Inc. All rights reserved. 72 DEVELOPMENT ASSISTANCE DATABASE FOR RWANDA | Analytical Interface | User Manual INTEGRATED CRIMINAL JUSTICE INFORMATION SYSTEM OF IRAQ | Personal Information | User Manual Figure 48: Creating Report 2 You will have the following result (Figure 49): © 2015 Synergy International Systems, Inc. All rights reserved. 73 DEVELOPMENT ASSISTANCE DATABASE FOR RWANDA | Analytical Interface | User Manual INTEGRATED CRIMINAL JUSTICE INFORMATION SYSTEM OF IRAQ | Personal Information | User Manual Figure 49: Sample List Report 2 Customizing Reports You can customize the reports by assigning font characteristics to report components, re-ordering rows and columns, etc. The sections below will describe how to customize the reports. Formatting/Styling Report Components You may format/style the text entries as well as main report table captions and values by assigning to them value characteristics such as font, font size, font color, background color, alignment (i.e. left, center, or right), etc. In order to format/style a report component, follow the steps below: 1. Click the report component that needs to be formatted / styled. 2. Select the Properties option from the actions list that appears (Figure 50). © 2015 Synergy International Systems, Inc. All rights reserved. 74 DEVELOPMENT ASSISTANCE DATABASE FOR RWANDA | Analytical Interface | User Manual INTEGRATED CRIMINAL JUSTICE INFORMATION SYSTEM OF IRAQ | Personal Information | User Manual Figure 50: Reports Window with Properties Focus on the Title Field The Properties window will appear. Please note that for text entries the Properties window includes text formatting buttons and a text area (Figure 51). For other report components, like rows, columns, etc., the Properties window also allows assigning additional characteristics (Figure 53), e.g. sorting order, reference text, etc. Figure 51: Formatting/Styling Text Entries 3. Change the properties as needed. Note: To prevent you navigating away from the section every time when modifying the properties of a different report table component, the Properties window allows selecting the © 2015 Synergy International Systems, Inc. All rights reserved. 75 DEVELOPMENT ASSISTANCE DATABASE FOR RWANDA | Analytical Interface | User Manual INTEGRATED CRIMINAL JUSTICE INFORMATION SYSTEM OF IRAQ | Personal Information | User Manual next item to be modified. To do that, you need to select the appropriate instance from the Items drop-down list in the Properties window. The list contains the previously selected report table components. 4. Click the Apply button for the changes to take effect. Clicking the Ok button will close the window and navigate you to the Report module. Figure 52: Reports Window with Properties Focus on the Column © 2015 Synergy International Systems, Inc. All rights reserved. 76 DEVELOPMENT ASSISTANCE DATABASE FOR RWANDA | Analytical Interface | User Manual INTEGRATED CRIMINAL JUSTICE INFORMATION SYSTEM OF IRAQ | Personal Information | User Manual Figure 53: Assigning Properties to Report Table Components Re-ordering Report Table Components This option enables the user to establish and modify the order of the report table components, like rows, columns, etc. In order to re-order report table components, the user should follow the steps described below. 1. Click the component item that needs to be reordered in the report. 2. Select the respective Move Up / Move Down / Move Right / Move Left option from the menu that appears. The report generated will maintain the order of the items that was displayed in the Report Designer (Figure 54). © 2015 Synergy International Systems, Inc. All rights reserved. 77 DEVELOPMENT ASSISTANCE DATABASE FOR RWANDA | Analytical Interface | User Manual INTEGRATED CRIMINAL JUSTICE INFORMATION SYSTEM OF IRAQ | Personal Information | User Manual Figure 54: Re-ordering Report Table Components Note: If any of these actions is not available, the respective option will be disabled in the menu. Sorting Report Table Components You may change the order in which the table components will appear in the final report. The report table components can be sorted either in an Ascending (A-Z) or a Descending (Z-A) order. In order to alphabetically sort the report table components, follow the steps below: 1. Click the component item for which the sorting order needs to be changed. 2. Select the Sorting Order option from the actions list (Figure 55). 3. Define whether the report item values should be sorted in the ascending or descending order. Please note that selecting the None option from the list removes the sorting criteria. Figure 55: Defining the Sorting Order Note: The sorting order for the report components can also be defined from within the Properties window. © 2015 Synergy International Systems, Inc. All rights reserved. 78 DEVELOPMENT ASSISTANCE DATABASE FOR RWANDA | Analytical Interface | User Manual INTEGRATED CRIMINAL JUSTICE INFORMATION SYSTEM OF IRAQ | Personal Information | User Manual Removing a Report Table Component It is possible to remove a report table component from being included in the report, if this is necessary. In order to remove a report table component, follow the steps below: 1. Click the component item that needs to be removed. 2. Select the Remove option from the menu that appears. The selected grouping value will be removed. Switching Report Table Components The report table components may be switched between report grouping, rows and columns. If there are sub-columns selected, switching between table groupings / rows and columns is disabled. It is possible to switch between table groupings / rows and sub-columns. In order to switch report table components, follow the steps below: 1. Click the component item that needs to be switched. 2. Select the Switch Place With option from the menu that appears (Figure 56). Figure 56: Switching Report Table Components © 2015 Synergy International Systems, Inc. All rights reserved. 79 DEVELOPMENT ASSISTANCE DATABASE FOR RWANDA | Analytical Interface | User Manual INTEGRATED CRIMINAL JUSTICE INFORMATION SYSTEM OF IRAQ | Personal Information | User Manual 3. Define what component item the selected instance needs to switch place with. The selected component item will be removed from its current position and added as an item to the specified component. For instance, if it is selected to switch between table grouping and row, the selected table grouping item will be removed from table grouping and added as the row item, while the row item will ‘trade’ places with the table grouping item. Sample Report Formatting If you indicate: ● Projects by Sectors as the report title; ● Sector and Province as the report table grouping and sort the provinces in ascending order; ● Project as the report row; ● Start Date, End Date, Implementation Status and Total Project Cost (USD) as columns and arrange the projects in descending order according to the project cost; ● Assign some value characteristics (e.g. font size, background color, etc.) (Figure 57); Figure 57: Creating and Formatting a Report You will have the following result (Figure 58): © 2015 Synergy International Systems, Inc. All rights reserved. 80 DEVELOPMENT ASSISTANCE DATABASE FOR RWANDA | Analytical Interface | User Manual INTEGRATED CRIMINAL JUSTICE INFORMATION SYSTEM OF IRAQ | Personal Information | User Manual Figure 58: Sample Formatted Report © 2015 Synergy International Systems, Inc. All rights reserved. 81 DEVELOPMENT ASSISTANCE DATABASE FOR RWANDA | Analytical Interface | User Manual INTEGRATED CRIMINAL JUSTICE INFORMATION SYSTEM OF IRAQ | Personal Information | User Manual DETAILS SECTION The DAD Rwanda application has a built-in Details section, where you can view detailed information about the items (e.g. projects, etc.) managed in the application. Figure 59: Project Details Section © 2015 Synergy International Systems, Inc. All rights reserved. 82 DEVELOPMENT ASSISTANCE DATABASE FOR RWANDA | Analytical Interface | User Manual INTEGRATED CRIMINAL JUSTICE INFORMATION SYSTEM OF IRAQ | Personal Information | User Manual The Details section can be accessed from the List, Chart, Map, and Report modules. In the Details section, you can view detailed item information, browse among other items listed under the same parent item, etc. If you have the corresponding permissions, you can also add new items, edit and delete the existing ones. Accessing the Details Section In order to access the Details section, follow the steps below: 1. Access the Details section by clicking on the one of the following: • In the My Portfolio module: Click the respective project. You will be directed to the Project Details section (Figure 59). • In the List module: Click the project for the details to be displayed. This will open the Details section of the application where more detailed information about the item will be displayed. Note: Depending on the list representation settings, additional expanding the list items may be required to reach the item. • In the Chart module: Click the chart for the details to be displayed (e.g., click a relevant bar to see what it consists of). This will open the Details section of the application where all items matching the selection will be listed. Click the respective link for the details of the selected item to be displayed. This will open the Details section. • In the Map module: Point the mouse cursor on the object on the map. The project information window will appear. In order to access the project details section select the View Projects link. This will open the Details section. Note: You can also choose to view the detailed information on all the projects that are in progress in the given territorial unit by pointing the mouse cursor on the button. • In the Report module: Create a report indicating project as a value for the report row and click the Submit button. For more details on how to create and generate reports, please see Creating a Report. In the report generated, click the respective link. 2. Take the necessary actions (review the provided information, update and improve as needed, etc.) You may also want to print the project details, see Printing Projects Details for details. The Close button is used to return to the main screen. © 2015 Synergy International Systems, Inc. All rights reserved. 83 DEVELOPMENT ASSISTANCE DATABASE FOR RWANDA | Analytical Interface | User Manual INTEGRATED CRIMINAL JUSTICE INFORMATION SYSTEM OF IRAQ | Personal Information | User Manual Browsing Projects If you are accessing the Details section from the Chart or Map modules, you should locate the project for which you want to see detailed information in the table displayed on the screen and click it to open its details. To easily locate the project that you are looking for, you can browse among the projects in the table. To browse projects, use the corresponding page number or and (First), (Previous), (Next), (Last) buttons at the bottom of the project table. Printing Projects Details In the Details section, you can print out the details of the selected project. In order to print out the selected project details, follow the steps below: 1. Click the (Print) button in the top toolbar. A window with printer settings appears. 2. Choose the printer settings as needed and press Print. Adding a New Project In the Details section, you may add new projects if you have been granted with the appropriate permissions. In order to add a new project, follow the steps below: 1. Click the New button at the top of the Details window. This will open a data entry form described in the DAD Rwanda Project Application User Manual in REFERENCES. 2. Make the appropriate changes in the data input window and save. Editing an Existing Project In the Details section, you may edit those existing projects that have been either created by yourself or you have permissions to manage. In order to edit existing projects, follow the steps below: © 2015 Synergy International Systems, Inc. All rights reserved. 84 DEVELOPMENT ASSISTANCE DATABASE FOR RWANDA | Analytical Interface | User Manual INTEGRATED CRIMINAL JUSTICE INFORMATION SYSTEM OF IRAQ | Personal Information | User Manual 1. Click the Edit button at the top of the Details window. This will open a data entry form described in the DAD Rwanda Project Application User Manual in REFERENCES. 2. Make the appropriate changes in the data input window and save. Deleting an Existing Project In the Details section, you may delete those existing projects that have been either created by yourself or you have permissions to manage. In order to delete an existing project, click the Delete button at the top of the Details window. The selected project will permanently be removed from the system. Viewing Basket Fund Details In addition to the project details, you can also view detailed information about basket funds recorded in the DAD Rwanda application. The information that is displayed in a basket fund profile includes but is not limited to its mission and vision statement, geographic locations that it extends its activities in, etc. On top of this information, an existing basket fund profile additionally consolidates and displays information about the donor agencies associated with the basket fund, top 5 projects with the largest total commitment, top 5 implementing partners, top 5 sectors that the basket fund supports, etc. This information is automatically generated based on the project data provided in the Project application (see DAD Rwanda Project Application User Manual in REFERENCES). In order to view basket fund profile details, follow the steps below: 1. In the Donor Profile application, set the MTEF Projection Basket Fund grouping as a list report row. For more details, see Modifying the Current View. 2. Click the basket fund for the details to be displayed. This will open the Details section of the application where more detailed information about the item will be displayed (Figure 60). When viewing financial data in the basket fund profile, you can select whether you want to view the amounts either in RWF (Rwandan Franc) or USD (US Dollar). To switch between these options, select the appropriate value from the All amounts are displayed in: drop-down list. © 2015 Synergy International Systems, Inc. All rights reserved. 85 DEVELOPMENT ASSISTANCE DATABASE FOR RWANDA | Analytical Interface | User Manual INTEGRATED CRIMINAL JUSTICE INFORMATION SYSTEM OF IRAQ | Personal Information | User Manual Note: For all amounts in the donor profile, you may see the amount converted to RWF or USD by hovering the mouse cursor on the corresponding amount. If the RWF amount is displayed, the tooltip will show the USD equivalent; and vice versa, if the USD amount is displayed, the tooltip will show the RWF equivalent. Figure 60: Viewing Basket Fund Profile Details © 2015 Synergy International Systems, Inc. All rights reserved. 86 DEVELOPMENT ASSISTANCE DATABASE FOR RWANDA | Analytical Interface | User Manual INTEGRATED CRIMINAL JUSTICE INFORMATION SYSTEM OF IRAQ | Personal Information | User Manual Viewing INGO Profile Details In addition to the project details, you can also view detailed information on the profiles of the International NGOs that extend their activities in Rwanda. The information that is displayed in an INGO profile record includes but is not limited to its name and abbreviation, registration information, international head office details, local office details and contacts, etc. Moreover, an existing INGO profile consolidates and displays information on the NGO activity monitoring. This information includes Action Plans and Annual Reports. Figure 61: Viewing INGO Profile Details In order to view INGO profile details, follow the steps below: © 2015 Synergy International Systems, Inc. All rights reserved. 87 DEVELOPMENT ASSISTANCE DATABASE FOR RWANDA | Analytical Interface | User Manual INTEGRATED CRIMINAL JUSTICE INFORMATION SYSTEM OF IRAQ | Personal Information | User Manual 1. Click the INGO Profile link in the Applications pane of the List module. The list of all the INGO profiles present in DAD Rwanda will be displayed. 2. Click the name of the INGO that you want to view details for. This will open the Details section of the application where more detailed information about the item will be displayed (Figure 61). Note: The data in the Activities Monitoring tab of the INGO Profile details form can be filtered by Financial Year. In order to view the action plans and annual reports for a specific FY, select the corresponding instance from the Financial Year drop-down list. © 2015 Synergy International Systems, Inc. All rights reserved. 88 DEVELOPMENT ASSISTANCE DATABASE FOR RWANDA | Analytical Interface | User Manual INTEGRATED CRIMINAL JUSTICE INFORMATION SYSTEM OF IRAQ | Personal Information | User Manual CUSTOMIZED REPORTING The DAD Rwanda application allows you to customize the already-created reports in the List, Chart, Map, and Report modules, i.e. to define the way the numeric values can be displayed, their format, the number of the items to be displayed, etc. You may also re-organise the reports in the desired way, i.e. include it into a group of reports or create a new report group for it, rename the report, etc. The DAD Rwanda application can also export the reports to the desired format (Word, Excel, etc.) or print them out. Setting Report Options In the List and Report modules, you can set the report options, i.e. define whether the numeric values should be displayed in thousands, millions, etc. In order to set the report options, follow the steps below: 1. Click the (Set Options) button in the top toolbar. An Options window (Figure 62) will appear. 2. Define the format in which the numeric values should be displayed, i.e. whether the original values should be displayed or they should be shown in thousands, millions, etc. This prevents large numeric values represented by many zeroes from taking a lot of space in the report. 3. After finishing, click the OK button for the changes to take effect. Or, click the Cancel button to discard the changes made. Figure 62: Setting the Report Options © 2015 Synergy International Systems, Inc. All rights reserved. 89 DEVELOPMENT ASSISTANCE DATABASE FOR RWANDA | Analytical Interface | User Manual INTEGRATED CRIMINAL JUSTICE INFORMATION SYSTEM OF IRAQ | Personal Information | User Manual Saving Reports After creating reports of different types, you can save them as pre-defined reports and include them either in the Public Reports group and make them available for all users who access application or in the My Reports group available to you only. There are two ways of saving a report in the DAD Rwanda application. You can save a newly-created report, or save a copy of an existing report with a different name, in a different location, or with a different content. How to Save New Reports From the List, Chart, Map, and Report modules, you can design an appropriate report and save it. In order to save the report created, follow the steps below: 1. Click the button on the top right side of the screen. A Memorize Report window (Figure 63) will appear. 2. Define the report name in the Memorized Name field. Figure 63: Memorizing a Report 3. Specify the group the report will be included in by selecting the appropriate value from the Include under the following Group combo box. © 2015 Synergy International Systems, Inc. All rights reserved. 90 DEVELOPMENT ASSISTANCE DATABASE FOR RWANDA | Analytical Interface | User Manual INTEGRATED CRIMINAL JUSTICE INFORMATION SYSTEM OF IRAQ | Personal Information | User Manual 4. Check the Include currently selected filters checkbox to save filtering defined along with the report. 5. Click the Ok button to save the report for future reference or click Cancel to discard the changes made. How to Save a Copy of the Report In the DAD Rwanda application, you can save a copy of an existing report. The copy of the report can be saved in a different location, with a different name or edited content. In order to save a copy of a report, follow the steps below: 1. Click the button on the top right side of the screen. A Memorize Report window (Figure 63) will appear. 2. Save the report by the steps described in the section above. Re-organising Reports You can organise the reports in the desired way, i.e. rename the reports, create groups to include reports under, etc. From the List, Chart, Map, and Report modules, you can design appropriate reports and organise them in the preferred way. In order to organise the reports, click the respective (Organise Views / Charts / Maps / Reports) button at the top right side of the screen. An Organise Reports window (Figure 64) will appear. You may perform the following actions: • Renaming Reports and Report Groups • Deleting Reports or Report Groups • Adding a Sub-group • Re-ordering Reports and Report Groups • Setting a Report as Default © 2015 Synergy International Systems, Inc. All rights reserved. 91 DEVELOPMENT ASSISTANCE DATABASE FOR RWANDA | Analytical Interface | User Manual INTEGRATED CRIMINAL JUSTICE INFORMATION SYSTEM OF IRAQ | Personal Information | User Manual Figure 64: Organising the Reports Renaming Reports and Report Groups In order to rename a report / report group, follow the steps below: 1. Highlight the report / report group to be renamed. 2. Click the Rename button. 3. Fill in the desired name for the report / report group. 4. Click the Ok button to confirm renaming. Note: The Public Reports and My Reports groups cannot be renamed. © 2015 Synergy International Systems, Inc. All rights reserved. 92 DEVELOPMENT ASSISTANCE DATABASE FOR RWANDA | Analytical Interface | User Manual INTEGRATED CRIMINAL JUSTICE INFORMATION SYSTEM OF IRAQ | Personal Information | User Manual Deleting Reports or Report Groups In order to delete a report / report group, follow the steps below: 1. Highlight the report / report group to be deleted. 2. Click the Delete button. 3. Click the Ok button to confirm deletion. Note: The Public Reports and My Reports groups cannot be deleted. Adding a Sub-group In order to add a sub-group, follow the steps below: 1. Click the Add Group button. 2. Fill in the desired name for the sub-group. 3. Click the Ok button to confirm adding. Re-ordering Reports and Report Groups In order to re-order reports / report groups, follow the steps below: 1. Highlight the report / report group the sorting order of which needs to be changed. 2. Click the Move Up / Move Down button. Setting a Report as Default In order to set a report as default, follow the steps below: 1. Highlight the report to be displayed in the respective module when you access it. 2. Click the Set as Default button. The selected report will be marked with the (default for me) option. 3. If you need to set the report as default for public user access, click the Set as Default for Public Users button. The selected report will be marked with the (default for public users) option. 4. If you need to set the report as default for registered users, click the Set as Default for Registered Users button. The selected report will be marked with the (default for registered users) option. Note: This option is available only in the List, Chart and Map modules. © 2015 Synergy International Systems, Inc. All rights reserved. 93 DEVELOPMENT ASSISTANCE DATABASE FOR RWANDA | Analytical Interface | User Manual INTEGRATED CRIMINAL JUSTICE INFORMATION SYSTEM OF IRAQ | Personal Information | User Manual Viewing Pre-defined Reports In the List, Chart, Map, and Report modules, you can view the pre-defined reports stored under Public Views/Charts/Maps/Reports or My Views/Charts/Maps/Reports section (see Main Menu Bar description in DAD RWANDA ANALYTICS STRUCTURE) for data analysis and comparison. For this purpose, select the report to display and click one of the following Generate Report buttons to the left of the report name: • - in the List module; • - in the Chart module; • - in the Map module; • - in the Report module. The selected report will open in the application window (List, Chart, and Map modules) or a new window (Report module). The same results can be achieved if you click the report name. Editing Pre-defined Reports To save you the time and the effort of structuring a report from the scratch when it is necessary to introduce some modifications in any of the pre-defined reports stored under Public Reports or My Reports, the Edit option has been designed in the Report module. In order to edit reports, click the (Edit) button to the left of the report to edit. The selected report structure will be loaded in the application window giving you the possibility of formatting and styling it in the desired way. For more details on how to apply formatting to the reports, see Customizing Reports. The pre-defined List, Chart, and Map reports stored in Public Views/Charts/Maps or My Views/Charts/Maps can also be edited after you have selected to view them (see Viewing Pre-defined Reports). Once the selected report is loaded in the application window, make the appropriate changes and save them. If you wish to keep the modifications, do not forget to save the modified report, see Saving Reports. © 2015 Synergy International Systems, Inc. All rights reserved. 94 DEVELOPMENT ASSISTANCE DATABASE FOR RWANDA | Analytical Interface | User Manual INTEGRATED CRIMINAL JUSTICE INFORMATION SYSTEM OF IRAQ | Personal Information | User Manual Exporting Reports From the Chart, Map, and Report modules, you can design appropriate reports and export them in the PDF, MS Word and MS Excel formats. In order to export the reports in the PDF, MS Word and MS Excel formats, follow the steps below: 1. Click the respective (Export in PDF format) / (Export in MS Word format) / in MS Excel format) button. A separate window will open. 2. Make changes, if necessary. (Export Printing Reports From the Chart, Map, and Report modules, you can design appropriate reports and print them out. In order to print out the selected report, follow the steps below: 1. Click the (Print) button on the top toolbar in the right side of the screen. A separate window will open. 2. Select the Print option. © 2015 Synergy International Systems, Inc. All rights reserved. 95 DEVELOPMENT ASSISTANCE DATABASE FOR RWANDA | Analytical Interface | User Manual INTEGRATED CRIMINAL JUSTICE INFORMATION SYSTEM OF IRAQ | Personal Information | User Manual FILTERING The system provides an option for data filtration. Filtering is used to narrow down the information displayed in the reports. The filtration works in a Step-by-Step technology, which enables the implementation of new filtering over the results of the previous one. This option reduces the size of the reports and makes them easier to read. Filters can be added to new or existing reports. Defined filtering is applicable to lists, reports, charts, and maps. The list of the most frequently used filter categories is displayed under the Filter By: section. The list of all available filter categories is displayed when clicking the More Filters link. Creating Filtering Criteria Follow the instructions below to create filtering criteria: Figure 65: Creating a Filtering Criteria 1. Click the hyperlink under the Filters section that represents the Category according to which the filtering will be carried out. A Filters window (Figure 65) will appear having the Category © 2015 Synergy International Systems, Inc. All rights reserved. 96 DEVELOPMENT ASSISTANCE DATABASE FOR RWANDA | Analytical Interface | User Manual INTEGRATED CRIMINAL JUSTICE INFORMATION SYSTEM OF IRAQ | Personal Information | User Manual 2. 3. 4. 5. Item pull down menu set to the selected Category. The first text area holds a list of all the available Category items that the report could display, whereas the second text area holds a sub-set list of the first one. You may only edit the sub-set list in the second text area. At the end of the filtering, if the sub-set list is empty, all the Category items will be included in the report. If, however, the sub-set is non-empty, only the items in the sub-set list will be included in the report. At the bottom of the pop-up window the selection criteria from all categories are presented. This view is also available from the main screen after clicking the View Criteria button. Select a Category item from the list in the first text area. Note: In case the category items list is long and hard to browse in, you can search for a specific item(s) by providing search criteria in the respective field. The search result will return all possible matches (Figure 66). Click the downward-pointing arrow button to add the item selected to the list in the second text area. Repeat steps 2 and 3 to add more than one Category item. Note: If a Category item needs to be removed from the second text area, select it from the list in the second text area and click the upward-pointing arrow button. Click the Ok button to apply the filtering to the ad-hoc query and to the screen that was active prior to the filtering alterations (i.e. List, Chart, or Map). The system will regenerate and download, to the client’s side, an updated report that applies the updated filtering criteria. © 2015 Synergy International Systems, Inc. All rights reserved. 97 DEVELOPMENT ASSISTANCE DATABASE FOR RWANDA | Analytical Interface | User Manual INTEGRATED CRIMINAL JUSTICE INFORMATION SYSTEM OF IRAQ | Personal Information | User Manual Figure 66: Searching for a Category Item Note: It is possible to exclude a Category item(s) from being included into the filtering criteria to be created. In this case, tick the Exclude checkbox. All the Category items that appear in the second text area will be excluded from the filtering criteria to be created. © 2015 Synergy International Systems, Inc. All rights reserved. 98 DEVELOPMENT ASSISTANCE DATABASE FOR RWANDA | Analytical Interface | User Manual INTEGRATED CRIMINAL JUSTICE INFORMATION SYSTEM OF IRAQ | Personal Information | User Manual Figure 67: Selecting a Filtering Category Item Sample Filtering Criteria If the following is selected for the view: ● 2010/2011, 2011/2012, 2012/2013 as financial years; ● Pipeline as an implementation status (Figure 67); The following results will be acquired (Figure 68): © 2015 Synergy International Systems, Inc. All rights reserved. 99 DEVELOPMENT ASSISTANCE DATABASE FOR RWANDA | Analytical Interface | User Manual INTEGRATED CRIMINAL JUSTICE INFORMATION SYSTEM OF IRAQ | Personal Information | User Manual Figure 68: Viewing Filtering Results © 2015 Synergy International Systems, Inc. All rights reserved. 100 DEVELOPMENT ASSISTANCE DATABASE FOR RWANDA | Analytical Interface | User Manual INTEGRATED CRIMINAL JUSTICE INFORMATION SYSTEM OF IRAQ | Personal Information | User Manual SEARCH The DAD Rwanda application is equipped with a comprehensive search mechanism, which allows searching for any relevant information. Simple Search The simple search interface is available to find any relevant information quickly and easily within the integrated DAD Rwanda content. Simple search implies that you can type search operators directly into the search box. Note: The simple search (searching on all fields) is also available at the bottom of the Filers section. Advanced Search In addition to providing easy access to the content, the DAD Rwanda application has a number of specific features that is used to find exactly what is looked for. One of these features is advanced search that allows setting different complex conditions using the Advanced Search form. It gives several additional fields which may be used to qualify searches by such criteria as district, sub-sector, project title, etc. Follow the instructions below to create search criteria: 1. Click the Advanced Search link under the Search section. The Advanced Search form appears (Figure 69). 2. Define the text to search for in the appropriate field. 3. Specify the fields to look in by selecting the appropriate checkboxes. 4. Click the Ok button to apply the search criteria to the ad-hoc query and to the screen that was active prior to the filtering alterations (i.e. List, Chart, or Map). © 2015 Synergy International Systems, Inc. All rights reserved. 101 DEVELOPMENT ASSISTANCE DATABASE FOR RWANDA | Analytical Interface | User Manual INTEGRATED CRIMINAL JUSTICE INFORMATION SYSTEM OF IRAQ | Personal Information | User Manual Figure 69: Creating a Search Criteria Sample Search Criteria Figure 70: Defining Search Criteria If Finance is selected to be searched among sectors, project titles, and donor agencies (Figure 70), the following results will be displayed (Figure 71): © 2015 Synergy International Systems, Inc. All rights reserved. 102 DEVELOPMENT ASSISTANCE DATABASE FOR RWANDA | Analytical Interface | User Manual INTEGRATED CRIMINAL JUSTICE INFORMATION SYSTEM OF IRAQ | Personal Information | User Manual Figure 71: Viewing Search Results © 2015 Synergy International Systems, Inc. All rights reserved. 103 DEVELOPMENT ASSISTANCE DATABASE FOR RWANDA | Analytical Interface | User Manual INTEGRATED CRIMINAL JUSTICE INFORMATION SYSTEM OF IRAQ | Personal Information | User Manual LOGGING OUT Once you have finished using the DAD Rwanda application, it is necessary to terminate the session and log off. In order to log off from the application, press the Log Off link in the upper right corner of the application window. REFERENCES Please refer to the following DAD Rwanda related documents: • DAD Rwanda Project Application User Manual • DAD Rwanda Donor Profile Application User Manual • DAD Rwanda Administration Center User Manual © 2015 Synergy International Systems, Inc. All rights reserved. 104