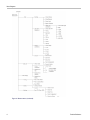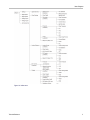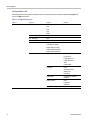
1
WFM6100, WFM7000, and WFM7100
Waveform Monitors
Technical Reference
www.tektronix.com
071-1894-00
Copyright © Tektronix. All rights reserved. Licensed software products are owned by Tektronix or its subsidiaries or suppliers, and are
protected by national copyright laws and international treaty provisions.
Tektronix products are covered by U.S. and foreign patents, issued and pending. Information in this publication supersedes that in all
previously published material. Specifications and price change privileges reserved.
TEKTRONIX and TEK are registered trademarks of Tektronix, Inc.
Contacting Tektronix
Tektronix, Inc.
14200 SW Karl Braun Drive
P.O. Box 500
Beaverton, OR 97077
USA
For product information, sales, service, and technical support:
In North America, call 1-800-833-9200.
Worldwide, visit www.tektronix.com to find contacts in your area.
Warranty 2
Tektronix warrants that this product will be free from defects in materials and workmanship for a period of one (1) year from the date of
shipment. If any such product proves defective during this warranty period, Tektronix, at its option, either will repair the defective
product without charge for parts and labor, or will provide a replacement in exchange for the defective product. Parts, modules and
replacement products used by Tektronix for warranty work may be new or reconditioned to like new performance. All replaced
parts, modules and products become the property of Tektronix.
In order to obtain service under this warranty, Customer must notify Tektronix of the defect before the expiration of the warranty period
and make suitable arrangements for the performance of service. Customer shall be responsible for packaging and shipping the
defective product to the service center designated by Tektronix, with shipping charges prepaid. Tektronix shall pay for the return of the
product to Customer if the shipment is to a location within the country in which the Tektronix service center is located. Customer shall
be responsible for paying all shipping charges, duties, taxes, and any other charges for products returned to any other locations.
This warranty shall not apply to any defect, failure or damage caused by improper use or improper or inadequate maintenance and
care. Tektronix shall not be obligated to furnish service under this warranty a) to repair damage resulting from attempts by personnel
other than Tektronix representatives to install, repair or service the product; b) to repair damage resulting from improper use or
connection to incompatible equipment; c) to repair any damage or malfunction caused by the use of non-Tektronix supplies; or
d) to service a product that has been modified or integrated with other products when the effect of such modification or integration
increases the time or difficulty of servicing the product.
THIS WARRANTY IS GIVEN BY TEKTRONIX WITH RESPECT TO THE PRODUCT IN LIEU OF ANY OTHER WARRANTIES,
EXPRESS OR IMPLIED. TEKTRONIX AND ITS VENDORS DISCLAIM ANY IMPLIED WARRANTIES OF MERCHANTABILITY OR
FITNESS FOR A PARTICULAR PURPOSE. TEKTRONIX’ RESPONSIBILITY TO REPAIR OR REPLACE DEFECTIVE PRODUCTS
IS THE SOLE AND EXCLUSIVE REMEDY PROVIDED TO THE CUSTOMER FOR BREACH OF THIS WARRANTY. TEKTRONIX
AND ITS VENDORS WILL NOT BE LIABLE FOR ANY INDIRECT, SPECIAL, INCIDENTAL, OR CONSEQUENTIAL DAMAGES
IRRESPECTIVE OF WHETHER TEKTRONIX OR THE VENDOR HAS ADVANCE NOTICE OF THE POSSIBILITY OF SUCH
DAMAGES.
Table of Contents
Table of Contents
General Safety Summary . .. . .. . .. . .. . .. . .. . .. . .. . .. . .. . .. . .. . .. . .. . .. . .. . .. . .. . .. . .. . .. . .. . .. . .. . .. . .. . .. . .. . .. . .. . .. . .. . .. . .. . .. . . . .
Preface .. . .. . .. . .. . .. . .. . .. . .. . .. . .. . .. . .. . .. . .. . .. . .. . .. . .. . .. . .. . .. . .. . .. . .. . .. . .. . .. . .. . .. . .. . .. . .. . .. . .. . .. . .. . .. . .. . .. . .. . .. . .. . .. .
Documentation . .. . .. . .. . .. . .. . .. . .. . .. . .. . .. . .. . .. . .. . .. . .. . .. . .. . .. . .. . .. . .. . .. . .. . .. . .. . .. . .. . .. . .. . .. . .. . .. . .. . .. . .. . .. . .. . .. .
Incoming Inspection . .. . .. . .. . .. . .. . .. . .. . .. . .. . .. . .. . .. . .. . .. . .. . .. . .. . .. . .. . .. . .. . .. . .. . .. . .. . .. . .. . .. . .. . .. . .. . .. . .. . .. . .. . .. . .. . .. .
Menu Diagrams .. . .. . .. . .. . .. . .. . .. . .. . .. . .. . .. . .. . .. . .. . .. . .. . .. . .. . .. . .. . .. . .. . .. . .. . .. . .. . .. . .. . .. . .. . .. . .. . .. . .. . .. . .. . .. . .. . . . . .. .
Alarms. .. . .. . .. . .. . .. . .. . .. . .. . .. . .. . .. . .. . .. . .. . .. . .. . .. . .. . .. . .. . .. . .. . .. . .. . .. . .. . .. . .. . .. . .. . .. . .. . .. . .. . .. . .. . .. . .. . .. . .. . .. . .. . ..
Configuring Alarms.. . .. . .. . .. . .. . .. . .. . .. . .. . .. . .. . .. . .. . .. . .. . .. . .. . .. . .. . .. . .. . .. . .. . .. . .. . .. . .. . .. . .. . .. . .. . .. . .. . .. . .. . .. . ..
Possible Alarm Responses. .. . .. . .. . .. . .. . .. . .. . .. . .. . .. . .. . .. . .. . .. . .. . .. . .. . .. . .. . .. . .. . .. . .. . .. . .. . .. . .. . .. . .. . .. . .. . ..
Monitoring Alarms . .. . .. . .. . .. . .. . .. . .. . .. . .. . .. . .. . .. . .. . .. . .. . .. . .. . .. . .. . .. . .. . .. . .. . .. . .. . .. . .. . .. . .. . .. . .. . .. . .. . .. . .. . .. . ..
Logging .. . .. . .. . .. . .. . .. . .. . .. . .. . .. . .. . .. . .. . .. . .. . .. . .. . .. . .. . .. . .. . .. . .. . .. . .. . .. . .. . .. . .. . .. . .. . .. . .. . .. . .. . .. . .. . .. . .. . .. . ..
ARIB Displays. . .. . .. . .. . .. . .. . .. . .. . .. . .. . .. . .. . .. . .. . .. . .. . .. . .. . .. . .. . .. . .. . .. . .. . .. . .. . .. . .. . .. . .. . .. . .. . .. . .. . .. . .. . .. . .. . .. . .. . ..
Monitoring Dolby-Based Surround Sound . . .. . .. . .. . .. . .. . .. . .. . .. . .. . .. . .. . .. . .. . .. . .. . .. . .. . .. . .. . .. . .. . .. . .. . .. . .. . .. . .. . .. . .. . ..
Audio Menu. . .. . .. . .. . .. . .. . .. . .. . .. . .. . .. . .. . .. . .. . .. . .. . .. . .. . .. . .. . .. . .. . .. . .. . .. . .. . .. . .. . .. . .. . .. . .. . .. . .. . .. . .. . .. . .. . .. . ..
Configuring Dolby Inputs.. . .. . .. . .. . .. . .. . .. . .. . .. . .. . .. . .. . .. . .. . .. . .. . .. . .. . .. . .. . .. . .. . .. . .. . .. . .. . .. . .. . .. . .. . .. . .. . .. . .. . ..
Displaying Dolby Inputs . .. . .. . .. . .. . .. . .. . .. . .. . .. . .. . .. . .. . .. . .. . .. . .. . .. . .. . .. . .. . .. . .. . .. . .. . .. . .. . .. . .. . .. . .. . .. . .. . .. . .. . ..
Viewing Dolby Metadata .. . .. . .. . .. . .. . .. . .. . .. . .. . .. . .. . .. . .. . .. . .. . .. . .. . .. . .. . .. . .. . .. . .. . .. . .. . .. . .. . .. . .. . .. . .. . .. . .. . .. . ..
Usage Notes. .. . .. . .. . .. . .. . .. . .. . .. . .. . .. . .. . .. . .. . .. . .. . .. . .. . .. . .. . .. . .. . .. . .. . .. . .. . .. . .. . .. . .. . .. . .. . .. . .. . .. . .. . .. . .. . .. . ..
Basic Listening Modes . . .. . .. . .. . .. . .. . .. . .. . .. . .. . .. . .. . .. . .. . .. . .. . .. . .. . .. . .. . .. . .. . .. . .. . .. . .. . .. . .. . .. . .. . .. . .. . .. . ..
Pro Logic Listening Modes . .. . .. . .. . .. . .. . .. . .. . .. . .. . .. . .. . .. . .. . .. . .. . .. . .. . .. . .. . .. . .. . .. . .. . .. . .. . .. . .. . .. . .. . .. . .. . ..
Audio Bar Mapping versus Dolby E Metadata Program Configuration.. . .. . .. . .. . .. . .. . .. . .. . .. . .. . .. . .. . .. . .. . .. . .. . ..
Other Auxiliary Data . .. . .. . .. . .. . .. . .. . .. . .. . .. . .. . .. . .. . .. . .. . .. . .. . .. . .. . .. . .. . .. . .. . .. . .. . .. . .. . .. . .. . .. . .. . .. . .. . .. . .. . .. . .. . .. . ..
Monitoring Closed Captioning (CC) .. . .. . .. . .. . .. . .. . .. . .. . .. . .. . .. . .. . .. . .. . .. . .. . .. . .. . .. . .. . .. . .. . .. . .. . .. . .. . .. . .. . .. . .. . ..
Monitoring for Safe Area Compliance . .. . .. . .. . .. . .. . .. . .. . .. . .. . .. . .. . .. . .. . .. . .. . .. . .. . .. . .. . .. . .. . .. . .. . .. . .. . .. . .. . .. . .. . ..
Index
Technical Reference
iii
v
v
1
3
18
18
20
22
24
25
34
35
36
43
43
44
44
44
47
49
50
53
i
Table of Contents
ii
Technical Reference
General Safety Summary
General Safety Summary
Review the following safety precautions to avoid injury and prevent damage to this product or any products connected to it.
To avoid potential hazards, use this product only as specified.
Only qualified personnel should perform service procedures.
While using this product, you may need to access other parts of a larger system. Read the safety sections of the other
component manuals for warnings and cautions related to operating the system.
To Avoid Fire or Personal Injury
Use Proper Power Cord. Use only the power cord specified for this product and certified for the country of use.
Connect and Disconnect Properly. Connect the probe output to the measurement instrument before connecting the
probe to the circuit under test. Connect the probe reference lead to the circuit under test before connecting the probe
input. Disconnect the probe input and the probe reference lead from the circuit under test before disconnecting the probe
from the measurement instrument.
Ground the Product. This product is grounded through the grounding conductor of the power cord. To avoid electric
shock, the grounding conductor must be connected to earth ground. Before making connections to the input or output
terminals of the product, ensure that the product is properly grounded.
Observe All Terminal Ratings. To avoid fire or shock hazard, observe all ratings and markings on the product. Consult
the product manual for further ratings information before making connections to the product.
Do not apply a potential to any terminal, including the common terminal, that exceeds the maximum rating of that terminal.
Power Disconnect. The power cord disconnects the product from the power source. Do not block the power cord; it
must remain accessible to the user at all times.
Do Not Operate Without Covers. Do not operate this product with covers or panels removed.
Do Not Operate With Suspected Failures. If you suspect that there is damage to this product, have it inspected by
qualified service personnel.
Avoid Exposed Circuitry. Do not touch exposed connections and components when power is present.
Use Proper Fuse. Use only the fuse type and rating specified for this product.
Do Not Operate in Wet/Damp Conditions.
Do Not Operate in an Explosive Atmosphere.
Keep Product Surfaces Clean and Dry.
Provide Proper Ventilation. Refer to the manual’s installation instructions for details on installing the product so it has
proper ventilation.
Technical Reference
iii
General Safety Summary
Terms in this Manual
These terms may appear in this manual:
WARNING. Warning statements identify conditions or practices that could result in injury or loss of life.
CAUTION. Caution statements identify conditions or practices that could result in damage to this product or other property.
Symbols and Terms on the Product
These terms may appear on the product:
DANGER indicates an injury hazard immediately accessible as you read the marking.
WARNING indicates an injury hazard not immediately accessible as you read the marking.
CAUTION indicates a hazard to property including the product.
The following symbols may appear on the product:
iv
Technical Reference
Preface
Preface
This manual contains user reference information that supplements the information in the WFM6100, WFM7000, and
WFM7100 Quick Start User Manual.
Documentation
Item
Purpose
WFM6100, WFM7000, &
WFM7100 Series Waveform Monitors
User Technical Reference
Supplemental in-depth descriptions of
instrument operation.
WFM6100, WFM7000, &
WFM7100 Series Waveform Monitors
Quick Start User Manual
Installation and high-level operational
overview.
WFM6100, WFM7000, &
WFM7100 Series Online Help
Context-sensitive operation and user
interface help.
WFM6100, WFM7000, &
WFM7100 Series Waveform
Monitors Performance Verification and
Specifications
Procedure for checking performance
and list of specifications.
WFM Series Programmer Manual
Programmers command reference for
controlling the instrument.
WFM6100, WFM7000, &
WFM7100 Series Waveform Monitors
Service Manual
Optional manual supporting
module-level servicing of the
instrument.
Technical Reference
Location
v
Preface
vi
Technical Reference
Incoming Inspection
Incoming Inspection
This section contains procedures to check the basic functionality of your WFM6100, WFM7000, or WFM7100 Waveform
Monitor. To conduct a more comprehensive check, refer to the WFM6100, WFM7000, and WFM7100 Waveform Monitors
Specifications and Performance Verification manual (Tektronix part number 071-1897-xx).
Basic Turn On and Self Test
1. Connect the AC line cord to the rear of the instrument and to a 100 to 240 VAC source. There is no power switch on the
waveform monitor, so the instrument will turn on as soon as you apply power.
2. Look at the front panel immediately after you apply power. The PICTURE, PRESETS, and IN/OUT buttons should be lit.
The other front-panel buttons will light one at a time, in sequence. Verify that all buttons do light. The sequence will
repeat until the Boot Loader process completes (approximately 30 seconds).
3. After about 50 seconds, the power-on diagnostics page should appear.
4. Verify that all self tests pass. Any failures are shown in red. The results of the power-on diagnostics are erased from
the screen, but you can view the results by selecting Main > Config > Diagnostics > Diagnostics Log after the
instrument has finished booting.
5. After the diagnostics are finished, the instrument state will be restored. When the progress indicator in the upper middle
part of the screen is finished, the instrument has finished initializing.
Reset to Factory Presets
Follow these steps to reset the waveform monitor to the Factory Presets:
1. Press the Presets button.
2. Press the Settings soft key.
3. Press the Recall Preset soft key.
4. Press the Factory soft key.
Front Panel Test
1. Set the waveform monitor to the Factory Presets, see Reset to Factory Presets. Wait for the process to complete as
indicated by the progress indicator.
2. Connect an SDI color bars signal to the SDI A input (or a composite color bars signal to the composite input if you have
CPS only). Use a signal type appropriate to the unit under test:
WFM7100 or WFM7000 with Option HD (1080i 59.94 color bars from HDVG1)
WFM6100, WFM7100, or WFM7000 with Option SD (525/270 color bars from DVG1)
3. Set the waveform tile (the portion of the screen where the waveform is displayed) to full screen:
Touch the waveform tile to select it.
Press the DISPLAY button to make the waveform the full screen display.
4. Touch the V Gain readout on the display, and then use the GENERAL knob to adjust the gain. Verify that the gain
does change.
Technical Reference
1
Incoming Inspection
5. Press the SELECT button and verify that the H Mag readout is now selected.
6. Press all the other buttons and check that the display and/or soft keys change for each one.
7. Press the WFM button.
8. Turn the HORIZONTAL and VERTICAL knobs and verify that the waveform moves appropriately.
Fan Test
You should be able to hear the fans and feel air coming out the back of the instrument. At low temperatures, the fans
will turn slowly and be very quiet.
2
Technical Reference
Menu Diagrams
Menu Diagrams
Use the menu diagrams in this section as guides to help you navigate through menu layers and help familiarize you with
your instrument and some of its menu functions. Each diagram shows the relationship of various submenus to one of the
front panel buttons shown below. The front panel button is represented in each diagram as a rectangular shape with
the button name on it. The first set of branches to the right of the front panel button is the first menu layer; consecutive
sets of branches are submenus.
NOTE. Some detailed lists and options are not mapped in some menu diagrams. When absent, they are often referred
to in italicized font.
Figure 1: Front Panel
Technical Reference
3
Menu Diagrams
Figure 2: Main menu
4
Technical Reference
Menu Diagrams
Figure 3: Waveform menu
Technical Reference
5
Menu Diagrams
Figure 4: Picture menu
6
Technical Reference
Menu Diagrams
Figure 5: Measure menu
Technical Reference
7
Menu Diagrams
Figure 6: Measure menu (continued)
8
Technical Reference
Menu Diagrams
Figure 7: Status menu
Figure 8: Vector menu, SDI input
Figure 9: Vector menu, composite input
Figure 10: Arrowhead menu
Technical Reference
9
Menu Diagrams
Figure 11: Diamond menu
Figure 12: Presets menu
Figure 13: Capture menu
10
Technical Reference
Menu Diagrams
Figure 14: In/Out menu
Technical Reference
11
Menu Diagrams
Configure Menu Table
The following table shows the primary Configure submenus. These submenus are accessed by pressing the Configure soft
key from the Main button menu.
Table 1: Configure menu layers
Layer 1
Layer 2
Layer 3
Layer 4
Diagnostics
Diagnostics Log
Prev
Next
First
Last
Reset
Run Power Up
Run
Run Advanced
Run
Front Panel LED
LED On
Monitor and Display
Diagnostics Monitor
Color Map Test Panel
Display Size Test Panel
Display Panel Solid White
Display Panel Solid Black
Calibration
Eye
Eye Gain
HD Clock Ext
Cable Meter Ch A
Cable Meter Ch B
Tests
Pattern Delay
Composite
Save
Adjust Black Level
White Level
Freq Resp
Analog Audio
Analog Audio Channel 1
through 6
Analog PixMon
Save
Composite
RGB/YUV
Touch Screen Calibration
12
Technical Reference
Menu Diagrams
Table 1: Configure menu layers (cont.)
Layer 1
Layer 2
Layer 3
Colors and Intensity
Trace Color
Green
White
Grat Color
Gold
Blue
Red
Layer 4
Grat Intensity
Default All
Trace Intensity
Pix Brightness
Readouts and Brightups
Capture Trace
All Tiles
Active Tile
Custom Safe Area
Safe Action1
Safe Title1
Safe Action2
Safe Title2
Pix Brightup Line On/Off
Pix Brightup RGB Gamut
On/Off
Pix Brightup Cmp. Gamut
On/Off
Pix Brightup Luma Gamut
On/Off
Technical Reference
13
Menu Diagrams
Table 1: Configure menu layers (cont.)
Layer 1
Layer 2
Layer 3
Closed Caption
CC Type
Auto
CEA 608 VBI
CEA 608 ANC
CEA 608 708 ANC
VBI CC Line Mode
Auto
Manual
Layer 4
VBI CC Line
Utilities
EIA 608 Line 21 Timing
Normal
Early
Late
608 Service Monitor
All
CC1
CC2
CC3
CC4
TXT1
TXT2
TXT3
TXT4
View HW/SW Version
View Instmt Options
Set Clock
Display Levels
Button Intensity
VGA Lvl 700mV | VGA Lvl
1 Volt
LCD Backlight
Communications
Config Mode
Manual
DHCP
Network Setup
IP Address
Remote Control Port
Enable/Disable
Remote Web Interface
Enable/Disable
Subnet Mask
Gateway Address
SNMP Setup
SNMP Traps
Enable/Disable
Instrument Name
System Upgrade
14
Technical Reference
Menu Diagrams
Table 1: Configure menu layers (cont.)
Layer 1
Layer 2
Layer 3
Layer 4
Alarm Setup
NOTE. Alarm Setup menu layers are shown in the next table. (See Table 2.)
The Alarm Setup menu layers are described in the following table. (See Table 2.)It can be accessed from the Configure
menu. The submenu layers you see may differ from those shown depending on the options installed on your instrument.
Table 2: Alarm Setup menu layers
Layer 1
Layer 2
Video Content
RGB Gamut
Composite Gamut
Luma Gamut
Video Format
Video Format Change
Video Format Mismatch
Ref Format Mismatch
Video Ref Mismatch
Vid Not HD
Line Length Error
Field Length Error
EAV Placement Error
SAV Placement Error
Line Number Error
SDI Input
SDI Input Missing
SDI Input Unlocked
AP CRC Alarm
FF CRC Alarm
EDH Alarm
Y Chan CRC Error
C Chan CRC Error
Y Anc Checksum Error
C ANC Checksum Error
Y Anc Parity Error
C Anc Parity Error
SMPTE 352M Missing
Composite Input
Input Missing
Input Unlocked
Technical Reference
15
Menu Diagrams
Table 2: Alarm Setup menu layers (cont.)
16
Layer 1
Layer 2
General
External Reference Missing
External Reference Unlocked
LTC Invalid
LTC Missing
VITC Invalid
VITC Missing
Anc TC Invalid
Anc TC Missing
General Audio
Audio Clip
Audio Mute
Audio Over
Audio Silence
AES and Embedded
AES Lock
AES CRC Error
AES Validity Bit
AES Parity Error
AES Frame Sync
Audio/Video Sync
Embedded Audio Specific
Audio Stream Missing
Checksum
Group Sample Phase
Parity
Dolby Specific
Format Mismatch
Closed Captions Metadata
Closed Captions MIssing
VBI (Line 21) CC Missing
ANC (SMPTE 334M) CC Missing
CC Service(s) Missing
EIA608 Caption Error
V-Chip Presence Error
V-Chip Format Error
Extended Data Services Error
Caption Data Packet Error
TSID Missing
TSID Format Error
Technical Reference
Menu Diagrams
Table 2: Alarm Setup menu layers (cont.)
Layer 1
Layer 2
ARIB Specific
ITU-R BT-1685 Missing
ARIB STD B.39 Missing
ARIB STD B.37Missing
ARIB STD B.35 Missing
ARIB STD TR-B.23 (1) Missing
ARIB STD TR-B.23 (2) Missing
ARIB STD TR-B.22 Missing
Physical Layer
Jitter 1 Level
Jitter 2 Level
Cable Length
Cable Loss
Source Level
Eye Unlocked
Eye Amplitude
Eye Rise Time
Eye Fall Time
Eye Rise Over
Eye Fall Over
Eye Rise-Fall Delta
Set All Alarms to This Mask
TXT / Icon
Log
Beep
SNMP
GC
Enable Alarms On/Off
Technical Reference
17
Alarms
Alarms
The waveform monitor can be set up to automatically check parameters when they exceed limits, and report them as alarms.
The procedures that follow describe how to configure response types for individual alarms, how to enable them, and how to
monitor them. The Menu Diagrams section in this manual shows a map of the Alarm Setup Menu. (See Table 2 on page 15.)
Configuring Alarms
Alarms may need to be configured in the CONFIG menu before you use them. Do this (or at least check that the alarms
are configured to your needs) before doing the audio monitoring procedures.
NOTE. Alarms are originally set to factory defaults. Your instrument alarm options may vary from the list below. The list
you see is dependent upon which options were purchased with your instrument.
Select alarms in the following categories and select which error conditions you will monitor and how you will be notified in
the event of an error:
Video Content
Video Format
SDI Input
Composite Input
General
General Audio
AES and Embedded
Embedded Audio Specific
Dolby Specific
Closed Captions/Metadata
ARIB Specific
Physical Layer
18
Technical Reference
Alarms
To Set Alarm Responses
1. From the Main button menu, press
Config > Alarm Setup. The menu
shown at right will appear.
2. Press the soft key that corresponds to
the alarm category for which you want to
set alarms; for example, Video Format.
The selected category menu table will
appear.
3. For each alarm listed in the table, touch
the box to place (or remove) an X in the
box under each response that you want
enabled (or disabled) for that alarm.
4. Press Save and Close when you are
finished.
5. Repeat the above steps to configure as
many types of alarms as you want.
Technical Reference
19
Alarms
To Enable or Suspend Global
Alarm Responses
1. To enable the alarms you have
configured, check the Enable Alarms
box on the Alarm Setup menu.
To Set All Alarms to a Single
Reporting Method
1. From the Main button menu, press
Config > Alarm Setup > Set All Alarms
to This Mask.
2. Check (or uncheck) the boxes of the
masks you want to enable (or disable).
3. Press Save and Close. This sets alarms
for all alarm categories to the setting on
the global mask.
4. To globally enable alarms, check the
box next to Enable Alarms on the
Alarm Setup menu. This turns on all
alarms that are individually enabled and
provides a quick way to switch them on
and off without changing their individual
settings.
Possible Alarm Responses
For each available alarm, you can select up to five of the following responses:
NOTE. If you do not select a notification method for an error, you will be able to see the error in the error reporting log, but
you will not receive an alarm notification that the error occurred.
Screen Text/Icon. An icon appears on the current display. This notification method is disabled when the Configure menu
is open. This option also enables alarm reporting with color on the Status screen.
20
Technical Reference
Alarms
Logging. The instrument makes an entry in the Event Log.
Beep. The instrument makes an audible alarm.
SNMP Trap. The instrument sends an SNMP trap out the Ethernet port for a remote notification that an alarm condition
occurred. You must enable and configure the instrument for SNMP control using the Network Settings submenu of the
Config menu before SNMP traps can be sent. Refer to the WFM Series Waveform Monitors and WVR Series Waveform
Rasterizers Management Information Base (MIB) Technical Reference (located on the Product Documentation CD) for
more information about using SNMP alarm notifications.
Ground Closure. The instrument sends a signal out the remote port for a remote notification that an alarm condition
occurred. You must enable the Remote Control Port in the Communications submenu of the Configure menu before
notifications can be sent.
To Enable Audio Alarms
The channels for which you enable alarms
trigger your previously defined alarm
responses.
1. Press the Audio button on the front
panel and press Audio Settings >
Audio Inputs and Outputs.
2. Press the soft key of the Audio I/O type
you want to configure.
3. Check (or uncheck) the boxes in the
Current Bar Configuration menu located
at the bottom of the screen. This will
enable (or disable) the alarm for the
specified input.
Technical Reference
21
Alarms
To Set Limits or Qualifications
Some audio alarms also require setting a
threshold or condition that triggers the alarm.
1. From the Audio button menu, press
Audio Settings > Digital Audio
Display. The menu shown at right will
appear.
2. To set a value, press a soft key, such as #
samples for clip. Turn the general knob
to change this value. For each value
selection, set the following alarm levels
that trigger an alarm when exceeded:
Clip Samples: number of consecutive
samples at the all-high level.
Mute Samples: number of
consecutive all-zero samples.
Silence Level: The level below which
audio is considered not present.
Silence Duration: The length of audio
silence time allowed.
Over Level: the too-loud audio level.
Over Duration: The length of time
limit for the too loud audio.
3. Repeat these steps for Audio Analog
Displays.
Monitoring Alarms
After defining and enabling alarms, you can quickly check if any error condition exists by looking (or listening) for the
notification you defined (text, icon, logging, SNMP trap, beep). Selecting audible response (Beep) or the Ground Closure
output response can help you notice alarms that you may miss if the notification is text or icon only. The latter can be used to
drive a light or audible alarm when one or more alarms are triggered.
If you want to check the condition of a specific alarm, press the Status button. In the Status menu, select Alarm Status. You
will see one or more of the following:
22
Indicator
Description
Disabled (gray)
Alarm is not selected for reporting
OK (green)
Alarm is enabled for reporting and has not detected errors
for at least 5 seconds
Error (yellow)
Alarm condition cleared for less than 5 seconds
Error (red)
Alarm triggered now
Technical Reference
Alarms
NOTE. To monitor alarms remotely, use a PC to monitor SNMP traps over the Ethernet port (the PC must have SNMP
trap service installed). Before SNMP traps can be sent, you must enable and configure the instrument for SNMP control
using the Network Settings submenu of the CONFIG menu.
When RGB and/or Composite Gamut errors are detected, the associated lines in the Alarm Status display have characters
that indicate which gamut threshold(s) are exceeded for each component. The following error codes that may be displayed:
Indicator
Description
R
r
Signal exceeds the high gamut limit for the red component (RGB gamut)
G
g
Signal exceeds the high gamut limit for the green component (RGB gamut)
B
Signal exceeds the high gamut limit for the blue component (RGB gamut)
b
Signal exceeds the low gamut limit for the blue component (RGB gamut)
C
Signal exceeds the high gamut limit for the chroma component (composite gamut from
SDI input)
c
Signal exceeds the low gamut limit for the chroma component (composite gamut from
SDI input)
Y
Signal exceeds the high gamut limit for the luma component (composite gamut from
SDI input)
y
Signal exceeds the low gamut limit for the luma component (composite gamut from
SDI input)
Technical Reference
Signal exceeds the low gamut limit for the red component (RGB gamut)
Signal exceeds the low gamut limit for the green component (RGB gamut)
23
Alarms
Logging
The waveform monitor contains two log files: diagnostics and events. You can use the Remote Web Server interface to
download the contents of either log file.
Diagnostics Log
This log contains the results of diagnostics tests, boot-ups, and advanced diagnostics that were performed. View the log
directly on the instrument by pressing Config > Diagnostics > Diagnostics Log, or by clicking on the Diagnostics Log link
on the Remote Web page.
Event (Error) Log
The instrument maintains an event log (also called the error log) in which every logged entry is time-stamped. When you
enable Timecode, events are time-stamped with the timecode embedded in the video (or LTC) signal. You can enable
Timecode from the In/Out button menu. Press the input for which you want to enable Timecode and press Settings. From
there, press the corresponding submenu button and then Timecode; for example, Digital Submenu > Timecode. View the
log directly on the instrument by pressing Status > Error Log, or by clicking on the Event Log link on the Remote Web page.
CAUTION. The time of day time stamps in the Event Log are based on the system time of the instrument when the
logging process starts. Changing the system time of the instrument while the Event Log is in the Running mode does not
change the time stamps in the running event log. You must stop and restart the Event Log before the Event Log will
use the new system time.
Controlling the size of the event log. The event log can contain up to 10,000 entries. Recording each individual event
separately would quickly fill the log. To handle this problem, the instrument classifies log entries as one of the following:
Single shot. One isolated occurrence is logged as one entry.
Continuous. Uninterrupted sequence of occurrences is logged as two entries marking the beginning and end of the
sequence.
By default, alarms are not enabled for logging. Use the Alarm Setup submenu of the Configure menu to select the number of
monitored error conditions.
24
Technical Reference
ARIB Displays
ARIB Displays
To Enable ARIB Content Displays
1. Press the Main button and then the
ARIB soft key in the pop-up menu.
2. Select the ARIB standard you want to
view. For some standards, you will be
able to press the Settings soft key to
make configuration selections.
ARIB Displays
The waveform monitor supports conformance to ARIB data standards contained in the signal source. You can find this
information in the following screen displays:
ARIB STD-B.39 Display (inter-stationary control data)
ARIB STD-B.37 Display (closed caption data)
ARIB STD-B.35 Display (trigger signal data)
ARIB TR-B.23 (1) Display (guidelines for inter-stationary control data transport, group 1)
ARIB TR-B.23 (2) Display (guidelines for inter-stationary control data transport, group 2)
ARIB TR-B.22 Display (guidelines for ancillary data transport)
The following DID and SDID values are defined for common types of ARIB compliant data:
Ancillary Data Type
DID value
SDID value
ARIB TR-B.22, Sub Information of transmitting materials
0x5F
0xE0
ARIB TR-B.23, Line 20 User Data - 1
0x5F
0xFC
ARIB TR-B.23, Line 20 User Data - 2
0x5F
0xFB
ARIB STD-B.35 Trigger Signal for Data Broadcasting
0x5F
0xFD
ARIB STD-B.37 Closed Captioning
Analog signal
SD signal
HD signal
Mobile signal
0x5F
0x5F
0x5F
0xDD
0xDE
0xDF
0xDC
0x5F
0x43
0xFE
0x01
ARIB STD-B.39 Inter Stationary Control Data
ARIB specification
ITU specification
Technical Reference
25
ARIB Displays
ARIB STD-B.39 Display
The ARIB STD-B.39 display shows the decoded data for video signals using ancillary data compliant with ARIB STD-B.39.
When this display is selected, the instrument searches the signal for ARIB STD-B.39 packets using the DID/SDID
combinations defined by either the ITU or ARIB standards organizations. The decoded ancillary data includes the following:
Table 3: Decoded ancillary data for ARIB STD-B.39
26
Ancillary Data Type
Description
Related Specification (if applicable)
DID
Data Identifier of the requested
interstationary control packet
Can be any of the following:
ARIB — 0x5F
ITU — 0x43
Type
Type of the ANC Data packet
Type 2 packet (DID less than 0x80),
as defined by SMPTE 291M. The
actual value (with parity bits added) is
displayed in parentheses.
SDID
Secondary Data Identifier of the
requested interstationary control
packet
Can be any of the following:
ARIB — 0xFE
ITU — 0x01
Line
The line of video within the field from
which the packet was acquired
Stream
Indicates whether the ancillary packet
was acquired from the Y or C data
streams
Status
Indicates whether packet(s) of the
desired type are present in the video,
Checksum or CRC errors
Checksum
Indicates the checksum word that was
recovered from the acquired packet
Should be
Indicates the checksum word
computed by the instrument based on
the packet’s data
Format
Indicates the name of the ancillary
data type or standard
Inter-Station Ctrl Header
A header byte indicating packet
continuity and the presence or
absence of the error correcting code
Transmitting Station Code
The name of the transmitting station.
The instrument supports the display of
Japanese characters.
Transmitting Station Time
The broadcast time at the transmitting
station
Current Video Mode
The video format of the current
program
Next Video Mode
The video format of the next scheduled
programming
SMPTE 292M (for HD only)
Technical Reference
ARIB Displays
Table 3: Decoded ancillary data for ARIB STD-B.39 (cont.)
Ancillary Data Type
Description
Related Specification (if applicable)
Video Mode Countdown
A countdown timer indicating an
upcoming change in video mode
Counts down from 254 (0xFE).
A value of 0xFF indicates that no
format change is pending within the
next several seconds.
Current Downmix/Audio Mode
Indicates the audio downmix and
soundstage configuration of the
current program
Next Downmix/Audio Mode
Indicates the audio downmix and
soundstage configuration of the next
scheduled program
Audio Mode Countdown
A countdown timer indicating an
upcoming change in audio mode
Trigger Bits (Q8..Q1 Q16..Q9)
Together with trigger bits Q24..Q17
Q32..Q25, 32 bits that can be used
to indicate changes in the program;
usage is user-defined.
Trigger Bits (Q24..Q17 Q32..Q25)
Together with trigger bits Q8..Q1
Q16..Q9; 32 bits that can be used
to indicate changes in the program;
usage is user-defined.
Trigger Counter
Increments when bits Q1-Q4 go from
0 to 1
Wraps from 254 (0xFE) to zero.
Value of 0xFF indicates the trigger
counter is not used.
Trigger Countdown
A countdown timer indicating an
upcoming change in trigger bits
Q1-Q4
Counts down from 254 (0xFE).
A value of 0xFF indicates that no
format change is pending within the
next several seconds.
Status Bits (S8..S1 S16..S9)
16 user-defined status bits
Error Correcting Code
A six-word, Reed-Solomon error
correcting code
Technical Reference
Counts down from 254 (0xFE).
A value of 0xFF indicates that no
format change is pending within the
next several seconds.
Used to verify the integrity of the ARIB
B.39 or ITU-R BT.1685 packet.
27
ARIB Displays
ARIB STD-B.37 Display
The ARIB STD-B.37 display shows the decoded data for video signals using ancillary data compliant with ARIB STD-B.37.
When this display is selected, the instrument searches the signal for ARIB STD-B.37 packets using the DID/SDID
combinations defined by ARIB. The decoded ancillary data includes the following:
Table 4: Decoded ancillary data for ARIB STD-B.37
28
Related Specification Information
(if applicable)
Ancillary Data Type
Description
DID
Data Identifier of the requested closed
captioning packet
Can be any of the following:
Analog signal — 0x5F
SD — 0x5
HD — 0x5F
SDID
Secondary Data Identifier of the
requested interstationary control
packet
Can be any of the following:
Analog signal — 0x5F
SD — 0x5
HD — 0x5F
Mobile signal — 0xDC
Field/Line
The field or line of video within the field
from which the packet was acquired
Displays 1 for progressive formats
The Line field turns red if the ARIB
packets are not on the line as defined
by ARIB TR-B.23.
Format
Indicates the name of the ancillary
data type or standard
Header 1st
Displays the first of four User Data
Words of the corresponding packet,
in binary
Header 2nd
Displays the second of four User Data
Words of the corresponding packet,
in binary
Header 3rd
Displays the third of four User Data
Words of the corresponding packet,
in binary
Header 4th
Displays the fourth of four User Data
Words of the corresponding packet,
in binary
ECC Status
Indicates the presence or absence of
Error Correcting Code information in
the payload
Format ID
Indicates whether the packet is for
HD, SD, Analog, or Mobile captions
Language
Indicates the language code (1st
through 8th) of the packet
Technical Reference
ARIB Displays
Table 4: Decoded ancillary data for ARIB STD-B.37 (cont.)
Ancillary Data Type
Description
CC Data ID
Indicates the CC Data ID of the packet
Set Mode
Mode can be either Sequential or
Buffer
Packet Flags
Indicates whether the packet is
Leading, End, Intermediate, or Single
Checksum
Indicates the checksum word that was
recovered from the acquired packet
Placement
Can display either OK or ERROR
Related Specification Information
(if applicable)
Can be any of the following:
Exchange format CC
Exchange format PMI
Exchange format Page 1
Exchange format Page 2
Short Form Management Data
Short Form Text
Undefined or Dummy Data
Indicates whether the ARIB B.37
packets are present in the allowable
configuration(s) specified in ARIB
TR-B.23
ARIB STD-B.35 Display
The ARIB STD-B.35 display shows the decoded data for video signals using ancillary data compliant with ARIB STD-B.35.
When this display is selected, the instrument searches the signal for ARIB STD-B.35 packets using the DID/SDID
combinations defined by ARIB. The decoded ancillary data includes the following:
Table 5: Decoded ancillary data for ARIB STD-B.35
Related Specification Information
(if applicable)
Ancillary Data Type
Description
DID
Data Identifier of the requested closed
captioning packet
Can be any of the following:
Analog signal — 0x5F
SD — 0x5
HD — 0x5F
SDID
(only appears when Type 2 packet
selected)
Secondary Data Identifier of the
requested packet
Permissible value range:
0– 0xFF (255) inclusive
Actual value (with parity bits added)
is displayed in parentheses, in
hexadecimal
Technical Reference
29
ARIB Displays
Table 5: Decoded ancillary data for ARIB STD-B.35 (cont.)
30
Related Specification Information
(if applicable)
Ancillary Data Type
Description
DC
Data Count word of the acquired
packet
Number of User Data words displayed
in decimal
Actual value (with parity bits added)
is displayed in parentheses, in
hexadecimal
Type
Type of the ANC Data packet
SMPTE 291M defined value: Type 2
packet (DID less than 0x80)
Actual value (with parity bits added) is
displayed in parentheses
Field
The field of video from which the
packet was acquired
Displays 1 for progressive formats
Line
The line of video within the field from
which the packet was acquired
Format
Indicates the name of the ancillary
data type or standard
Status
Indicates whether the packets of the
desired type are present in the video;
also indicates Checksum or CRC
errors
Should be
Indicates the Checksum word
computed by the instrument, based
on the data in the packet
Checksum
Indicates the checksum word that was
recovered from the acquired packet
Stream
(HD only)
Indicates whether the ancillary packet
was acquired from the Y or C data
streams
User Data Words
Contains the payload of the ancillary
data packet, displayed in hexadecimal.
All 10 bits are displayed.
Indicates whether the ARIB B.37
packets are present in the allowable
configuration(s) specified in ARIB
TR-B.23
Technical Reference
ARIB Displays
ARIB TR-B.23 (1) Display
The ARIB TR-B.23 (1) display shows the decoded data for video signals using ancillary data compliant with ARIB TR-B.23
(1). When this display is selected, the instrument searches the signal for ARIB TR-B.23 (1) packets using the DID/SDID
combinations defined by ARIB. The decoded ancillary data includes the following:
Table 6: Decoded ancillary data for ARIB TR-B.23 (1)
Ancillary Data Type
Description
Related Specification Information
(if applicable)
DID
Data Identifier of the requested closed
captioning packet
Permissible value range:
1 – 0xFF (255) inclusive
SDID
(only appears when Type 2 packet
selected)
Secondary Data Identifier of the
requested packet
Permissible value range:
0 – 0xFF (255) inclusive
Actual value (with parity bits added) is
displayed in parentheses
DC
Data Count word of the acquired
packet
Number of User Data words displayed
in decimal
Actual value (with parity bits added)
is displayed in parentheses, in
hexadecimal
Type
Type of the ANC Data packet
SMPTE 291M defined value: Type 2
packet (DID less than 0x80)
Actual value (with parity bits added) is
displayed in parentheses
Field
The field of video from which the
packet was acquired
Displays 1 for progressive formats
Line
The line of video within the field from
which the packet was acquired
Format
Indicates the name of the ancillary
data type or standard
Status
Indicates whether the packets of the
desired type are present in the video;
also indicates Checksum or CRC
errors
Should be
Indicates the Checksum word
computed by the instrument, based
on the data in the packet
Checksum
Indicates the checksum word that was
recovered from the acquired packet
Stream
(HD only)
Indicates whether the ancillary packet
was acquired from the Y or C data
streams
User Data Words
Contains the payload of the ancillary
data packet, displayed in hexadecimal.
All 10 bits are displayed.
Technical Reference
SMPTE 292M
31
ARIB Displays
ARIB TR-B.23 (2) Display
The ARIB TR-B.23 (2) display shows the decoded data for video signals using ancillary data compliant with ARIB TR-B.23
(2). When this display is selected, the instrument searches the signal for ARIB TR-B.23 (2) packets using the DID/SDID
combinations defined by ARIB. The decoded ancillary data includes the following:
Table 7: Decoded ancillary data for ARIB TR-B.23 (2)
32
Ancillary Data Type
Description
Related Specification Information
(if applicable)
DID
Data Identifier of the requested closed
captioning packet
Permissible value range:
1 – 0xFF (255) inclusive
SDID
(only appears when Type 2 packet
selected)
Secondary Data Identifier of the
requested packet
Permissible value range:
0 – 0xFF (255) inclusive
Actual value (with parity bits added) is
displayed in parentheses
DC
Data Count word of the acquired
packet
Number of User Data words displayed
in decimal
Actual value (with parity bits added)
is displayed in parentheses, in
hexadecimal
Type
Type of the ANC Data packet
SMPTE 291M defined value: Type 2
packet (DID less than 0x80)
Actual value (with parity bits added) is
displayed in parentheses
Field
The field of video from which the
packet was acquired
Displays 1 for progressive formats
Line
The line of video within the field from
which the packet was acquired
Format
Indicates the name of the ancillary
data type or standard
Status
Indicates whether the packets of the
desired type are present in the video;
also indicates Checksum or CRC
errors
Should be
Indicates the Checksum word
computed by the instrument, based
on the data in the packet
Checksum
Indicates the checksum word that was
recovered from the acquired packet
Stream
(HD only)
Indicates whether the ancillary packet
was acquired from the Y or C data
streams
User Data Words
Contains the payload of the ancillary
data packet, displayed in hexadecimal.
All 10 bits are displayed.
SMPTE 292M
Technical Reference
ARIB Displays
ARIB TR-B.22 Display and Status Screens
The ARIB TR-B.22 display shows the decoded data for video signals using ancillary data compliant with ARIB TR-B.22.
When this display is selected, the instrument searches the signal for ARIB TR-B.22 packets using the DID/SDID combinations
defined by ARIB. The decoded ancillary data includes the following:
Table 8: Decoded ancillary data for ARIB TR-B.22
Ancillary Data Type
Description
Related Specification Information
(if applicable)
DID
Data Identifier of the requested closed
captioning packet
Permissible value range:
1 – 0xFF (255) inclusive
SDID
(only appears when Type 2 packet
selected)
Secondary Data Identifier of the
requested packet
Permissible value range:
0 – 0xFF (255) inclusive
Actual value (with parity bits added) is
displayed in parentheses
DC
Data Count word of the acquired
packet
Number of User Data words displayed
in decimal
Actual value (with parity bits added)
is displayed in parentheses, in
hexadecimal
Type
Type of the ANC Data packet
SMPTE 291M defined value: Type 2
packet (DID less than 0x80)
Actual value (with parity bits added) is
displayed in parentheses
Field
The field of video from which the
packet was acquired
Displays 1 for progressive formats
Line
The line of video within the field from
which the packet was acquired
Format
Indicates the name of the ancillary
data type or standard
Status
Indicates whether the packets of the
desired type are present in the video;
also indicates Checksum or CRC
errors
Should be
Indicates the Checksum word
computed by the instrument, based
on the data in the packet
Checksum
Indicates the checksum word that was
recovered from the acquired packet
Stream
(HD only)
Indicates whether the ancillary packet
was acquired from the Y or C data
streams
User Data Words
Contains the payload of the ancillary
data packet, displayed in hexadecimal.
All 10 bits are displayed.
Technical Reference
SMPTE 292M
33
Monitoring Dolby-Based Surround Sound
Monitoring Dolby-Based Surround Sound
When equipped with the proper options (see NOTE below), the waveform monitor can decode and monitor audio signals
that are based on Dolby digital surround sound formats. These formats are Dolby D (AC-3 ) compression, designed for
distribution, and/or Dolby E compression, designed for production. You can specify and configure the Dolby input sources,
measure signal levels and monitor phase between Dolby components, and display these relationships in the AUDIO display.
NOTE. The audio monitoring features described in this chapter require that either Option DD or Option DDE be installed,
depending on the feature. Note that the options listed with a prefix WFM6UP (for the WFM6100 options) or WFM7UP (for
the WFM7100 options) support upgrades to previously purchased instruments.
For a list of the options that are installed on your product, press the CONFIG button, and select View Instrument Options in
the Utilities menu.
34
Technical Reference
Monitoring Dolby-Based Surround Sound
Audio Menu
The following table shows the Audio submenus. These submenus are accessed by pressing the Audio button on the front
panel. The menus on your instrument may vary slightly from this table depending on your instrument options.
Table 9: Audio submenus
Layer 1
Layer 2
Layer 3
Layer 4
Audio Settings
Audio Inputs and Outputs
AES A
AES B
EMBA
EMB B
Analog A
Analog B
Ref
Bar Format
Headphone
Dolby 1
Dolby 2
Dolby 3
Dolby 4
Headphone
NOTE. User Defined Bar Labels,
Input to Bar Map, and Audio Output
Mapping are also menus accessible
from this layer. Each of these menus
brings up a separate menu screen.
Analog Display
Settings
Technical Reference
Digital Display
Settings
Ballistics
Peak Program
Test Level
Set 0dB Mark to
Scale Height Scale Offset
Scale Step
Set MeterType to (analog
only)
Peak Hold Time
Error Hold Time
Peak Held Segment On/Off
Silence Level
Duration for Silence
Over Level
Duration for Over
Correlation Speed
Liss AGC On/Off
# Samples for Clips (digital
only)
# Samples for Mute (digital
only)
Use Validity Bit / Ignore
Validity Bit (digital only)
35
Monitoring Dolby-Based Surround Sound
Table 9: Audio submenus (cont.)
Layer 1
Layer 2
Layer 3
Layer 4
Audio Settings
Video to Audio Map
SDI A
SDI B
Analog A
Analog B
AES A
AES B
Analog A
Analog B
EMB A (SDI A only)
EMB B (SDI B only)
Dolby 1
Dolby 2
Dolby 3
Dolby 4
Dolby Setup
Dolby Downmix Mode
None
Lt/Rt
Attenuate Audio Out
Aux Display
Off
Phase
Surround
Audio Input
Follows Video
AES A
AES B
Embedded
Analog A
Analog B
Dolby 1
Dolby 2
Dolby 3
Dolby 4
Configuring Dolby Inputs
Before monitoring Dolby signals, you will need to configure inputs to Dolby. When you configure an input to Dolby, you are
specifying on which physical input the Dolby will arrive: the instrument will map the physical port to a virtual configuration
set. You can save up to four of these Dolby configuration sets. Check that the configuration is as you want it before doing
the Dolby-related procedures in this section. Your setup here determines, in part, the Dolby audio-signal characteristics
that are displayed.
NOTE. Dolby configuration sets are set to factory defaults until changed by a user.
36
Technical Reference
Monitoring Dolby-Based Surround Sound
To Set Up Dolby Configuration Set
Parameters
1. Press the Audio button to display the
Audio menu.
2. Press Audio Settings > Audio Inputs
and Outputs. The menu at right will
appear.
3. Select the Dolby set that you want to
configure (one of Dolby 1 - Dolby 4).
4. Press Configure Dolby and the menu
shown at right will appear.
Technical Reference
37
Monitoring Dolby-Based Surround Sound
5. Press Select Dolby Stream Input and
choose the embedded or AES input
signal pair as the signal source to be
decoded for your Dolby set.
6. In the Dolby Channel Allow Alarm
area, select the channels that you want
monitored for basic audio alarms like
Mutes and Clips.
Option DDE only: Press Dolby Format
Expected and select the expected Dolby
format. A Dolby Format alarm will be
triggered if any non-selected audio format
is encountered.
NOTE. The waveform monitor auto-selects
and decodes the Dolby Format, depending
on the Dolby option installed.
38
Technical Reference
Monitoring Dolby-Based Surround Sound
7. Option DDE only: From the Audio
Inputs and Outputs menu, select Audio
Output Mapping > Map Analog
Outputs. In the menu, specify which
inputs (if any) are routed to the analog
outputs in the map that appears. To
disable an output, select Audio Input
[None] and then select the output to be
disabled.
8. Option DDE only: Select the Map AES
Output and assign specific bar pairs to
the AES outputs in the map that appears.
The AES bank must be configured as
outputs. To route the undecoded Dolby
Digital or Dolby E source to the AES
outputs, select the Undecoded source
button and then select the desired AES
output
NOTE. When a Dolby input is active,
channel labels (L, R, Ls, and so on) appear
in addition to the channel numbers.
9. Option DD only: Select and configure the Output Map to assign a specific bar pair to the Analog and Digital Outputs.
The outputs are limited to a single pair.
10. Option DDE only: Select Dolby D Input and select the AES channel for Dolby content in which the subframes carry
two Dolby streams (in Dolby Professional 16-bit mode).
11. Option DDE only: Select Dolby D Input and select the stream for Dolby content in which there can be multiple Dolby
digital streams embedded. Auto stream selects the lowest numbered active stream.
12. Option DDE only: Select Dolby E Dmix and select the program from which the downmix is derived.
NOTE. Although multiple programs are listed, the number of active programs depends on the Dolby E Program Configuration
detected in the metadata of the Dolby input.
Technical Reference
39
Monitoring Dolby-Based Surround Sound
1. Check (or uncheck) the AES Ref box
to enable (or disable) AES reference.
This box is in the bottom right corner
of the screen. If it is enabled and the
Dolby Source is set to an AES input,
the waveform monitor triggers the AES
Frame Sync Alarm if the AES input is
not locked to and in phase with the AES
reference.
2. Repeat all of these steps for other Dolby
configuration sets as needed.
40
Technical Reference
Monitoring Dolby-Based Surround Sound
To Set Up Dolby Global Parameters
Do the following steps to set parameters that apply to all four Dolby configuration sets:
1. Press the Audio button to display the Audio menu.
2. Select Audio Settings > Dolby Setup.
3. Option DDE only: Select the Dolby D Listening Mode, which controls how the Dolby sound channels map to the level
bars and surround-sound elements in the Audio Display and outputs.
4. Option DDE only: Choose Full or a mode to downmix to.
NOTE. Dolby content of the signal at the Dolby input must be sufficient to downmix to the mode selected or the setting
has no effect.
5. Option DDE only: Select Dolby D Dial/DynRng.
6. Option DDE only: Select Off or choose Dialnorm Only, Dialnorm+RF, or DialNorm+Line. RF and Line are modes
of Dynamic Range Control (compression) factors that are applied when decoding Dolby content for monitoring or
output. Option DD is always in Dialnorm+Line mode.
7. Option DDE only: Select Dolby D Downmix.
8. Option DDE only: Toggle to Line or RF. These Dynamic Range Control (compression) factors are applied when
downmixing to the various Dolby D Listening Modes.
9. Option DDE only: Select Dolby E Dialnorm and toggle on or off. When on, the dialog normalization is applied to the
audio bars and the analog and digital outputs.
10. Option DDE only: Select Dolby E Pulldown and toggle on or off. When on, pulldown decoding is applied to the
audio bars and the analog and digital outputs.
11. Select Dolby Downmix Mode. Each downmix mode combines multiple separate audio channels into a mix that provides
compatibility for users with only mono or stereo systems, or with older analog surround sound systems.
Technical Reference
41
Monitoring Dolby-Based Surround Sound
Choose one of the following modes to
configure the downmix bars in the Audio
Display (Option DD is always in Lt/Rt mode):
Select None to get no downmix.
Select Mono to get the downmix shown
right.
Select Lo/Ro (Left-only/Right only) to
get a standard stereo downmix.
Select Lt/Rt (Left-total/Right-total) to get
a Dolby Pro-Logic compatible stereo mix.
42
Technical Reference
Monitoring Dolby-Based Surround Sound
Displaying Dolby Inputs
After you have configured a Dolby input, you can display its levels and other characteristics in the Audio Display.
1. Press the Audio button on the
instrument front panel. The audio display
for monitoring Dolby is shown at right.
2. The six leftmost level bars are for Dolby
channels. The selected listening mode
determines how many bars are active.
3. The two rightmost level bars are for the
selected Dolby Downmix mode.
4. Dolby setup information is shown at the
top of the screen.
5. The right half of the screen can be
configured to show either a lissajous or
a surround sound display.
Viewing Dolby Metadata
The Dolby-option equipped waveform monitor can decode and display in a Dolby Audio Status screen the metadata
parameters present in the Dolby D or Dolby E bitstream that you select. To display the data for the currently selected
input, do the following procedure:
1. With the Audio Display on the screen,
press the Status button on the instrument
front panel.
2. Select Dolby Status as shown at right.
3.
Note the following:
A Dolby option must be installed for
Dolby Audio Status to display.
The Dolby format will match that of
the selected input.
Technical Reference
43
Monitoring Dolby-Based Surround Sound
Usage Notes
With the DDE option installed, the waveform monitor determines the downmix based on several parameters within the
Dolby metadata combined with Dolby downmix selection. For example, if a Lt/Rt downmix is selected and the Dolby
Audio Status screen shows Extended Bitstream information indicating that the preferred downmix is Lt/Rt, the center
channel is attenuated by the Lt/Rt center mix level and the surround channels are attenuated by the Lt/Rt surround mix
level before they are combined into the stereo downmix.
With the DD option installed, the downmix is always Lt/Rt and the attenuation coefficients are fixed and not dependent on
the metadata.
The listening modes can be used to monitor any multichannel Dolby Digital audio program with a user-selectable number
of channels. You can select among several basic and Pro Logic listening modes, the descriptions of which follow.
Depending on the Channel Mode, these listening modes affect the content displayed on the Audio Display level bars.
Basic Listening Modes
NOTE. Listening mode selection is only available with the DDE option. With the DD option, Full listening mode is always
enabled.
EX. Use EX if the two surround channels have been matrix encoded with a back channel. If the EX listening mode is
selected and there are two surround channels present, the bar display will add two back channels, Lb and Rb, to create a
7.1 channel display.
Full. Full does not modify the number of channels indicated by the channel mode in either the display or the outputs.
3 Stereo. Use 3 Stereo to monitor the Dolby Digital signal with only the left, center and right channels. In this mode, if
there are surround channels present, they are mixed into the left and right channels with the surround mix level attenuation.
Phantom. When using Phantom, the center channel, if present, gets attenuated with the center mix level value and
then added into the left and right channels.
Stereo. Stereo always creates a Lo/Ro downmix using the center and surround mix levels contained in the metadata.
The Lfe is disabled.
Mono. Mono mode will always mix down to a single center channel usually by creating a Lo/Ro downmix and adding Lo to
Ro. The Lfe is disabled.
Pro Logic Listening Modes
Pro Logic listening modes perform different functions depending on what the source material is. If the source is a Dolby
Digital stream with three or more channels, then a surround compatible Lt/Rt downmix is created and then decoded into a
selectable number of channels. If the source is a 2/0 Dolby Digital stream, then these Pro Logic modes will do a Pro Logic
decode to produce the number of channels requested by the listening mode. If the source is PCM, then a full Pro Logic
decode is provided regardless of the specific Pro Logic mode selected.
Pro Logic Full. Pro Logic Full will create a Lt/Rt downmix of any input with three or more channels. This Lt/Rt downmix
will then be Pro Logic decoded to produce a LCRS output where the surround channel is reduced 3dB and reproduced in
both the Ls and Rs bars.
44
Technical Reference
Monitoring Dolby-Based Surround Sound
A 2/0 encoded Dolby stream will be assumed to be Pro Logic encoded already and will be Pro Logic decoded to produce a
LCRS output. Again, the surround channel is reduced 3dB and reproduced in both the Ls and Rs bars.
Any PCM input will be decoded the same as a 2/0 Dolby Digital input.
Pro Logic 3 Stereo. Pro Logic 3 Stereo will create a Lt/Rt downmix of any input with three or more channels. This Lt/Rt
downmix will then use Pro Logic decoding to produce a center channel and provide LCR bars.
A 2/0 encoded Dolby stream will be assumed to be Pro Logic encoded already and will be Pro Logic decoded to produce a
LCR output.
Any PCM input will be decoded to provide LCRS channels where the surround channel is reduced 3dB and reproduced in
both the Ls and Rs bars.
Pro Logic Phantom. Pro Logic Phantom will create a Lt/Rt downmix of any input with three or more channels. This
Lt/Rt downmix will then use Pro Logic decoding to produce a surround channel and provide LCS surround channels. This
surround channel is reduced 3dB and reproduced in both the Ls and Rs bars.
A 2/0 encoded Dolby stream will be assumed to be Pro Logic encoded already and will be Pro Logic decoded to produce a
LRS output. Again, the surround channel is reduced 3dB and reproduced in both the Ls and Rs bars.
Any PCM input will be decoded to provide LCRS channels where the surround channel is reduced 3dB and reproduced in
both the Ls and Rs bars.
Table 10: Channel Mode versus Listening Modes
Channel Mode
Listening Mode
Main Channel Output Function
3/2
EX
All 3/2 channels + EX decode of back surround
Full
All 3/2 channels
3 Stereo
3 Stereo downmix of 3/2 channels
Phantom
Phantom downmix of 3/2 channels
Stereo
Lo/Ro downmix
Mono
Lo+Ro
PL Full
LCRS from Lt/Rt downmix
2/2
Technical Reference
PL 3 Stereo
3 Stereo from Lt/Rt
PL Phantom
Phantom from Lt/Rt
EX
All 2/2 channels + EX decode of back surround
Full
All 2/2 channels
3 Stereo
Default to Stereo mode
Phantom
Default to Full mode
Stereo
Lo/Ro downmix
Mono
Lo+Ro
PL Full
LCRS from Lt/Rt downmix
PL 3 Stereo
3 Stereo from Lt/Rt
PL Phantom
Phantom from Lt/Rt
45
Monitoring Dolby-Based Surround Sound
Table 10: Channel Mode versus Listening Modes (cont.)
Channel Mode
Listening Mode
Main Channel Output Function
3/1
EX
Default to Full mode
Full
All 3/1 channels
3 Stereo
S mixed into L and R with smix coefficient
Phantom
C mixed into L and R with cmix coefficient
Stereo
Lo/Ro downmix
Mono
Lo+Ro
2/1
3/0
2/0
46
PL Full
LCRS from Lt/Rt downmix
PL 3 Stereo
3 Stereo from Lt/Rt
PL Phantom
Phantom from Lt/Rt
EX
Default to Full mode
Full
All 2/1 channels
3 Stereo
S mixed into L and R with smix coefficient
Phantom
Default to Full mode
Stereo
Lo/Ro downmix
Mono
Lo+Ro
PL Full
LCRS from Lt/Rt downmix
PL 3 Stereo
3 Stereo from Lt/Rt
PL Phantom
Phantom from Lt/Rt
EX
Default to 3 Stereo mode
Full
Default to 3 Stereo mode
3 Stereo
All 3/0 channels
Phantom
C mixed into L and R with cmix coefficient
Stereo
Lo/Ro downmix
Mono
Lo+Ro
PL Full
LCRS from Lt/Rt downmix
PL 3 Stereo
3 Stereo from Lt/Rt
PL Phantom
Phantom from Lt/Rt
EX
Default to Stereo mode
Full
Default to Stereo mode
3 Stereo
Default to Stereo mode
Phantom
Default to Stereo mode
Stereo
2/0 channels
Mono
L+R
PL Full
LCRS from 2/0 channels
PL 3 Stereo
3 Stereo from 2/0 channels
PL Phantom
Phantom from 2/0 channels
Technical Reference
Monitoring Dolby-Based Surround Sound
Table 10: Channel Mode versus Listening Modes (cont.)
Channel Mode
Listening Mode
Main Channel Output Function
1/0
EX
Default to Mono mode
Full
Default to Mono mode
3 Stereo
Default to Mono mode
Phantom
Default to Mono mode
Stereo
Default to Mono mode
Mono
Mono center channel output
PL Full
Default to Mono mode
PL 3 Stereo
Default to Mono mode
PL Phantom
Default to Mono mode
Audio Bar Mapping versus Dolby E Metadata Program Configuration
For option DDE equipped waveform monitors that are decoding Dolby E audio, the bars in the Audio Display are mapped as
follows. The mapping derives from the Dolby E Program Configuration detected in the metadata of the Dolby input. If you
select a Downmix Program, the two downmix level bars in the Audio Display reflect that program selection.
Dolby E Program Configuration
Audio Bar Mapping 1
Number of Programs Available
5.1 + 2
L, C, R, Ls, Rs, LFE L1, R1
2
5.1 + 2x1
L, C, R, Ls, Rs, LFE M2, M3
3
4+4
L1, C1, R1, S, L2, R2, C2, S
2
4+2+2
L1, C1, R1, S, L1, R1, L2, R2
3
4 + 2 + 2x1
L1, C1, R1, S, L1, R1, M1, M2
4
4 + 4x1
L1, C1, R1, S, M2 M3 M4, M5
5
2+2+2+2
L1, R1, L2, R2, L3, R3, L4, R4
4
2 + 2 + 2 + 2x1
L1, R1, L2, R2, L3, R3, M4, M5
6
2 + 2 + 4x1
L1, R1, L2, R2, M3, M4, M5, M6
6
2 + 6x1
L1, R1, M2, M3, M4, M5, M6, M7
7
8x1 = 1+1+1+1+1+1+1+1
M1, M2, M3, M4, M5, M6, M7, M8
8
5.1
L, C, R, Ls, Rs, LFE
1
4+2
L1, C1, R1, S, L2, R2
2
4 + 2x1
L1, C1, R1, S, M2, M3
3
2+2+2
L1, R1, L2, R2, L3, R3
3
2 + 2 + 2x1
L1, R1, L2, R2, M3, M4
4
2 + 4x1
L1, R1, M2, M3, M4, M5
5
6x1
M1, M2, M3, M4, M5, M6
6
4
L1, C1, R1, S
1
2 + 2x1
L1, R1, M2, M3
3
4x1
M1, M2, M3, M4
4
Technical Reference
47
Monitoring Dolby-Based Surround Sound
Dolby E Program Configuration
Audio Bar Mapping 1
Number of Programs Available
7.1
L, C, R, Ls, Rs, LFE, Lb, Rb
1
7.1 Screen
L, C, R, Ls, Rs, LFE, Le, Re
1
1
48
L = Left, R = Right, C = Center, M = Mono, S = Surround, e = extra (Le and Re and Ex encoded channels), b = back, LFE = Low Frequency Effects
Technical Reference
Other Auxiliary Data
Other Auxiliary Data
The waveform monitor can monitor for any CC data, including V-Chip ratings, present in the selected signal and display the
data overlaid on the Picture display. EIA-608-Line21 (VBI), EIA-608 (ANC), and EIA-608 (708) closed caption transports
are supported.
The waveform monitor can also display Safe Action and Safe Title graticules to let you monitor for incorrect placement of
graphics, logos, and other branding elements, to ensure that they do not obscure text or essential action. SMPTE, ITU,
and ARIB TR-B.4 standards are supported.
Picture Menu
To display the Picture menu, press the Picture button on the front panel. This menu enables you to specify the closed caption
service type and set safe areas. From the Settings submenu, you can set the aspect ratio (SD only) and choose whether to
display only the active picture portion of the signal or the full-frame picture. With Active Picture selected, only the active video
portion of the signal is displayed and the aspect ratio is correct. With Full Frame selected, elements of the signal outside the
active video are visible (for SDI signals) and you can see user data, embedded audio, and elements in the vertical interval.
NOTE. You can see signal elements outside the active video only when the Picture display is set to FULL (SDI inputs only).
You will not be able to see sync signal elements on Composite signals.
Technical Reference
49
Other Auxiliary Data
Monitoring Closed Captioning (CC)
To Configure Closed Captioning
Before using Closed Captions, press the
Picture button to bring up the picture display,
and then configure the closed caption from
the Config menu as follows:
1. From the Main button menu, press
Config > Closed Caption to display the
Closed Caption menu.
2. Press CC Type and select one; or you
can select AUTO to search for closed
caption streams in the following order
and present the text of the first stream
type detected:
For Composite:
CEA 608 (VBI)
For SD:
CEA 608 (VBI)
CEA 608 (ANC)
CEA 608 (708)
For HD:
CEA 608 (ANC)
CEA 608 (708)
3. Select VBI CC Line Mode and choose
Manual if you want to choose the line, or
Auto if you want the waveform monitor
to select it automatically.
4. If in Manual mode, select VBI CC Line
and adjust the line number (using the
general knob) to the transport assumed
when displaying closed captioning.
5. Select EIA 608 Line 21 Timing and
choose Normal. You can also choose
Early or Late, if the CC information is
inserted early or late in the video signal.
6. Select 608 Service Monitor. The menu
shown at right will appear.
7. Select which service types trigger
alarms when they are missing from the
608 stream.
8. Press Close 608 Service Monitor when
you are finished.
50
Technical Reference
Other Auxiliary Data
To View Closed Captioning Status
1. Press the STATUS button to select the
Status display mode.
2. Select Aux Status and the display
shown at right will appear. This display
shows the status of closed caption data.
Technical Reference
51
Other Auxiliary Data
To Display Closed Captioning
1. Press the Picture button to display the
Picture menu.
2. Select CC 608 Service and choose
one of the CC channels 1–4 or text
channels 1–4.
NOTE. If there is no CC information, you will
see the CA: Missing text, as shown at right.
The Picture display includes Closed
Captioning in the area designated by the
Closed Caption data.
Usage Notes
PICT displays in individual tiles allow their CEA 608 CC Service to be selected independently.
CC text is not captured with the Picture image when using Freeze.
CC setups are also stored when saved with Presets and restored on power up.
The CC alarms are available in the CONFIG Alarms menu under Closed Caption.
52
Technical Reference
Other Auxiliary Data
Monitoring for Safe Area Compliance
To display graticules for monitoring for incorrect placements of nonessential elements relative to essential ones, set global
settings in the CONFIG menu, and turn on up to four Safe Area graticules, each with independent settings, in the PICT menu.
To Configure Safe Area Graticules
Before using Safe Area Graticules, configure
them from the Picture menu:
1. Press the Picture button and then press
Safe Area. The selection you choose
will be the graticule used when AUTO
is chosen for any of the four Safe Area
Graticules, accessed in the PICT menu.
2. Adjust all other options in the Safe Area
submenu.
To Display Safe Area Graticules
1. From the Safe Area submenu,
select Safe Area Action 1.
2. Select one of the following choices:
Auto to let the waveform
monitor automatically select
the size and offsets of the safe
area.
4x3, 14x9, or 16x9 to set the
safe area size and offsets
appropriate for these aspect
ratios based on the selected
standard.
Custom_1 or Custom_2 to set
the safe area size and offsets to
match custom settings.
Technical Reference
53
Other Auxiliary Data
Usage Notes
The Safe Action Area denotes
the maximum image area within
which all significant action should
be contained; the Safe Title Area
denotes the maximum image area
within which all significant titles
should be contained.
Safe Area Graticules can globally
be configured to comply to accepted
standards in the CONFIG menu.
Custom selections for vertical
and horizontal size and offset of
the Save Areas can be set in the
CONFIG menu.
54
Technical Reference
Index
Index
A
D
L
Alarms
Allowed responses, 20
Setup menu, 15
To configure, 18
To enable, 21
To monitor, 22
To set all alarms to a single
reporting method, 20
To set limits or qualify, 22
To set responses, 19
ARIB STD-B.35 display, 29
ARIB STD-B.37 display, 28
ARIB STD-B.39 display, 26
ARIB TR-B.22 display, 33
ARIB TR-B.23 (1) display, 31
ARIB TR-B.23 (2) display, 32
Audio
Configuring and monitoring
Dolby, 34
Dolby audio
Basic Listening Modes, 44
Pro Logic Listening Modes, 44
To configure AES B Output
map, 39
To configure Analog Output
Map, 39
To configure global
parameters, 41
To display a Dolby input, 43
To select listening mode, 41
To select the downmix
mode, 41
To set up configuration set, 37
To view metadata, 43
Logging
Diagnostics Log, 24
Event (Error) Log, 24
C
Closed Captioning
Configuring and monitoring, 49
To compensate for transport
timing, 50
To display, 52
To view status, 51
Technical Reference
H
How to...
Conduct an incoming
inspection, 1
Configure and monitor
Dolby, 34
Monitor alarms, 22
Monitor Closed Captioning, 49
M
Menus, 3
audio menu, 35
Monitoring CC and Safe Area
Compliance, 49
Monitoring Dolby Audio, 34
S
Safe Area
To monitor for compliance, 53
Safe Area Graticules
To configure, 53
To display, 53
Safety Summary, iii
55