1
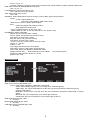
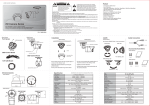
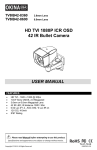
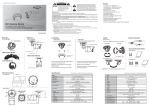
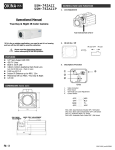
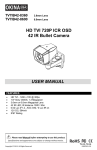
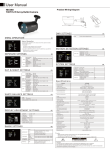
HD21D12-940
HD SDI 1080p WDR DNR 12 IR OSD
Indoor Dome Camera
USER MANUAL
FEATURES
•
•
•
•
•
•
•
•
SDI 1080p - 1920 x 1080
1/2.9" Sony Exmor
4.0mm Fixed Lens
0.5 Lux
12 IR LED
IR distance up to 25ft / 7.5m
700mA max
12V DC
Please read the Manual before attempting to use this product.
Specifications and appearance are subject to change without notice.
Copyright © 2013. All Rights Reserved.
HDC-30
R201311-V18
Disposal of Old Electrical & Electronic Equipment (Applicable in the European Union and other
European countries with separate collection systems.)
This symbol on the product or on its packaging indicates that this product shall not be treated as household waste.
Instead it shall be handed over to the applicable collection point for the recycling of electrical and electronic
equipment. By ensuring this product is disposed of correctly, you will help prevent potential negative
consequences for the environment and human health, which could otherwise be caused by inappropriate waste
handling of this product. The recycling of materials will help to conserve natural resources. For more detailed
information about recycling of this product, please contact your local city office, your household waste disposal
service or the shop where you purchased the product.
CAUTION
1. Never point the camera toward the sun
Do not expose the lens directly to the sun or to strong light as this may damage the pick-up device.
2. Handle this camera with care
Avoid any shock or bumping of the camera. Improper handling could damage the camera.
3. Requires a proper operating environment
This camera is designed for indoor use. The allowable temperature range for operation of this camera is
between 14°F ~ 122°F / -10°C ~ 50°C.
4. Clean the front face or lens
It is recommended that the surface be cleaned every 3~6 months. Cleaning should be done by using a
chamois, a very fine soft cloth, lens tissue, or cotton tipped applicator and ethanol to carefully remove any
fingerprint or dust.
5. Check the power source voltage
The power source voltage should be within the specified range. (Camera must meet the specifications).
Camera must be connected to a surge protector at all times.
6. Objects and liquid entry
Never push objects of any kind into this camera as this may touch dangerous voltage points of short out parts
that could result in a fire or electric shock. Never spill any kind of liquid on the video product.
7. Servicing
Do not attempt to service this video product by yourself as opening or removing covers may expose you to
dangerous voltage or other hazards. Refer all service to qualified servicing personnel.
8. Damage requiring service
Unplug this video product from the wall outlet and refer service to qualified servicing personnel under the
following conditions:
a. When the power supply cord or plug is damaged.
b. If liquid has been spilled, or objects have fallen into the video product.
c. If the video product has been exposed to rain or water.
d. If the video product has been dropped or the cabinet has been damaged.
e. When the video product exhibits a distinct change in performance.
LIMITED WARRANTY
OKINA USA products are covered under warranty for one (1) years from the date of purchase. The warranty will
automatically be voided if any of the following occurs:
1. Camera sticker is removed
If the camera sticker is removed, we will not be able to confirm any information regarding when and where the
product was purchased. We have no other way to verify the purchase record without the serial number on the
camera sticker; therefore, it should not be removed.
2. Camera is modified in any way
If the camera is scratched, damaged, or modified in a manner not described in this manual, the warranty will be
voided immediately. It is the customer’s responsibility to keep the camera in good condition.
3. Video or power cable is cut
The video cable and the power cable should not be tampered with. Cutting or modifying of the cables will result
in termination of the warranty.
2
PACKAGE CONTENTS
1.
2.
3.
One (1) HD21D12-940 Camera
Two (2) Mounting Screws
One (1) User Manual
1.
DIMENSIONS
2.
3.
* For any returns, please include all
components listed above with original
packaging in Resalable Condition.
Absolutely No Returns will be accepted if
any component is missing/damaged.
(Unit: inches / mm)
PARTS AND FUNCTIONS
OSD Control Board
IR LED Board
INSTALLATION
1.
2.
3.
3
Fix the base housing with the
supplied 2pcs of screws on the
ceiling or wall.
Adjust the camera direction by
turning the gimbal bracket.
Firmly fix the decoration ring
into the base.
3-AXIS
Set Camera DIRECTION (3-axis movement)
Set Camera DIRECTION (3-axis movement)
CABLE CONNECTION
HD-SDI
12V DC
OSD
NOTE: Camera menu is subject to change without prior notice.
MAIN MENU
Functions can be setup using the “Menu Key Command” from the Visca
protocol.
The menu consists of the “Main Menu” and “Sub Menu”.
The main menu is displayed where 6 camera functions can be selected.
The sub-menu is displayed after selecting a main menu item.
If you want to save the menu, select [SAVE].
If you do not want to save the menu, select [EXIT] then Power off -> on.
If you want to set the menu to default, select [DFLT].
EXPOSURE
MODE: Select LENS type
NORMAL, DEBLUR
BRIGHTNESS: Adjust brightness level
0(dark) ~ 20(bright) steps
SHUT SPEED: Can be set in AUTO or MANUAL
4
AUTO / x2, x3, x4,
1/30(25),1/60(50),1/120(100),1/240,1/500,1/1000,1/2000,1/4000,1/8000,1/16000,1/30000,1/60000 sec
DSS: Select maximum DSS(Digital Slow Shutter)
OFF / x2, x3, x4
FLICKERLESS: Select Flickerless mode
OFF / ON (remove screen flicker)
AGC: Select Auto Gain Control
OFF / ON
WDR/BLC: Select WDR (Wide Dynamic Range) or BLC (Back Light Compensation)
WDR↵
LEVEL: Adjust WDR level.
LOW, MID-LOW, MIDDLE, MID-HIGH, HIGH
*WDR doesn’t work in Shutter Manual Mode.
BLC↵
POSITION: Adjust the window position
SIZE: Adjust the window size
*Can’t use WDR and BLC at the same time.
(When WDR On, BLC is Off. And when BLC is On, WDR is Off)
DAY&NIGHT: Select Day&Night
MODE: AUTO / EXT-IN / DAY / NIGHT
AUTO↵ (When using D&N and COLOR model)
POLARITY: ACTIVE LOW / HIGH
EXT-IN↵ (When using IR-CDS model)
POLARITY: ACTIVE LOW / HIGH
*To turn on the IR, set the mode to ACTIVE LOW.
DELAY: 0 ~ 255 sec
THRS: 0 ~ 28
Day↔Night switching level in Auto Mode.
Switching in lower lux with higher threshold level.
GAP: LOW, MID-LOW, MIDDLE, MID-HIGH, HIGH
Margin between Day → Night switching level and Night → Day switching level.
ANTI-SAT: LED saturation improves. (0~20)
BURST: OFF / ON
WHITE BALANCE
AWB: Select WHITE BALANCE mode
AUTO / ONE PUSH / MANUAL / INDOOR / OUTDOOR
AUTO: Automatically adjusts color according to the available lighting.
ONE PUSH: It is a fixed white balance mode that may be automatically readjusted only by
pressing ONE PUSH
MANUAL↵: Color can be corrected when the user increases or decreases “RED GAIN” or “BLUE
GAIN”.
INDOOR: Set color temperature to be Indoor light (3700°K)
OUTDOOR: Set color temperature to be Outdoor light (5100°K)
RED GAIN: Adjust R gain value
0 ~ 20 steps
BLUE GAIN: Adjust B gain value
0 ~ 20 steps
CHROMA: Adjust CHROMA gain value
0 ~ 20 steps
5
IMAGE
HLC: Select High Light Compensation.
When extremely bright light is projected to the camera masking is used on the portion to prevent partial saturation
on the monitor.
MODE: OFF / ON / NIGHT
LEVEL: 0 ~ 20 steps
COLOR: 0 ~ 13 steps
DNR: Select Digital Noise Reduction
AUTO / OFF / LOW / MIDDLE / HIGH
MIRROR: Select a flip mode
OFF / H / V / H&V
H: You can flip the picture horizontally on the screen
V: You can flip the picture vertically on the screen
H&V : You can flip the picture horizontally & vertically on the screen
SHARPNESS: Adjust sharpness level
0 ~ 10 steps
ACE: Select Digital WDR (Wide Dynamic Range)
OFF / LOW / MIDDLE / HIGH
DEFOG: Carry out defog function
OFF / ON↵
MODE: AUTO / MANUAL
LEVEL: LOW / MIDDLE / HIGH
*Can’t use DEFOG and ACE at the same time
(When ACE On, DEFOG is Off. And when DEFOG is On, ACE is Off)
FREEZE: Select real or still mode
OFF / ON
GAMMA: Select GAMMA
0.45 / 0.50 / 0.55 / 0.60 / 0.65
E.ZOOM
OFF / ON
LIMIT: Max x2 ~ x19, x21, x23, x25, x28, x32
POSITION: Select maximum digital zoom magnification.
*Can’t use Digital Zoom when the motion detection is turned on.
INTELLIGENCE
PRIVACY: Hide an area you want to hide on the screen
OFF / ON↵
MASK: Select mask area number (1 ~ 24)
MODE: Mask enable or disable (OFF / ON)
6
POSITION: Adjust the mask position
SIZE: Adjust the mask size
COLOR: Select mask color (0 ~ 13)
TRANS: Select mask transparency level (0 ~ 4)
MOTION: When there is movement of the subject in the screen, there will be a motion detection.
OFF / ON↵
AREA#: Setting 3 areas(1~3) of motion detection
MODE: OFF / ON (Limit and define areas of motion detection)
SENSITIVITY: Adjust sensitivity of MD (0 ~ 20 steps) More sensitive to setting to low step with
sensitivity
POSITION: Adjust the Area position
SIZE: Adjust the Area size
INTERVAL TIME: Select the alarm interval time (0 ~ 255sec)
DWELL TIME: Select the duration time about changing MD mode (0 ~ 255sec)
SPECIAL FUNCTIONS
DEFECT: Compensates for bad pixels that may occur. Occurs when the whole screen is in full black or if there is
bad pixelation and it changes the THRS values until the screen is fixed.
SYSTEM: Select NTSC (30fps) or PAL(25fps). (NTSC / PAL)
HD FORMAT: Select Digital output 1080P or 720P. (1080P / 720P)
COMM: Set up the camera ID, baud rate, protocol
ID: Select the camera ID
1 ~ 255
BAUD RATE: Select serial communication speed
2400 / 4800 / 9600 / 19200 / 38400 / 57600 / 115200bps
PROTOCOL: Select operating protocol
VISCA / PELCO-D / PELCO-P / UPDATE
DISPLAY
DISP SEL: Select display item.
OFF / ON↵
ID: OFF / ON
TITLE: OFF / ON
ZOOM RATIO: OFF / ON
SYSTEM MSG: OFF / ON (MD Alarm and Wait message)
SET TITLE: Select camera title menu (Text edit)
INIT SEL: Select display initial message.
OFF / ON↵
7
ID: OFF / ON
BAUDRATE: OFF / ON
PROTOCOL: OFF / ON
VERSION: OFF / ON
INIT MSG: OFF / ON
SET INIT MSG: modify initial message. (Text edit)
SPECIFICATION
Model
Image Sensor
Resolution
Total Pixels
Active Pixels
Scanning System
Min. Illumination
Video output
IR LED
IR Distance
Lens
Lens Mount
S/N Ratio
Brightness
Shutter Speed
Flickerless
DSS
AGC
WDR / BLC
Day & Night
White Balance
Sharpness
Mirror
Freeze
E.Zoom
HLC
ACE
DNR
D.Compress
Privacy
Motion
Shading Det
Shading
Defect Det
Defog
HD Format
Language
Power Source
Power Consumption
Power Input
Operation Temperature
Storage Temperature
Dimensions
Net Weight
HD21D12-940
1/2.9” Sony Exmor CMOS Sensor
Digital; 1920x1080p (1080p/30fps)
1280x720p (720p/60fps)
2,000(H) x 1,121(V), 2.24M Pixels
1,936(H) x 1,105(V), 2.12M Pixels
Progressive
Color: 0.5 lux , BW : 0.1 lux
Color DSS: 0.002 lux , BW DSS: 0.001 lux
HD-SDI
12 IR LED
Up to 25ft / 7.5m
4.0mm Fixed Lens
DC / Manual
More than 50dB (AGC Off)
0 ~ 20 steps
Auto / Manual ( 1/30(1/25) ~ 1/60000 )
Off / On
Off / x2 / x3 / x4
Off / On
Off / WDR / BLC
Auto / Day / Night / Ext
Auto / One Push / Manual / Indoor / Outdoor
0 ~ 10 steps
Off / H / V / H&V
Off / On
Off / Max x2 ~ x23
Off / On
Off / Low / Middle / High
Off / Low / Middle / High / Auto
Off / On
Off / On (24 points)
Off / On (3 points)
Off / On
Off / On
One Push (Enter)
Off / On
1080P / 720P
English, Japanese, Chinese
12V DC + 10%
700mA max
Connector
14°F ~ 122°F / -10°C ~ +50°C
Humidity: 0%RH ~ 80%RH
-4°F ~ 140°F / -20°C ~ +60°C
Humidity: 0%RH ~ 90%RH
Ø4.13(W) x 3.17(H) inches / Ø105 x 80.5(H) mm
4 oz / 113 g
* Specifications are subject to change without notice.
MADE IN KOREA
Copyright © 2013. All Rights Reserved.
www.okinausa.com
8
HDC-30
R201311-V18