1
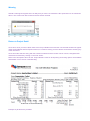
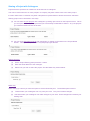
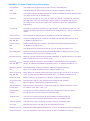
FAN COIL UNIT SELECTION PROGRAM User Manual Version 3.0, April 2015 FAN COIL UNIT SELECTION PROGRAM - User Manual CONTENTS Introduction……………………………………………………....…………3 Getting Started and Log In……………………………………………….4 Projects……………………………………….…………...…………………5 Project Detail…………………………..……………………………………6 Project Zones & Zone Templates….……………………………………7 Selection Conditions Summer…………………………..………………8 Selection Conditions Winter ……………………………………………9 Things to Do (incorrect/missing Information)………………….……10 Proposed Units……………………………………………………………11 Warning/Return to Project Detail………………………….…………...12 Sharing of Projects………….……………………………………….…...14 FAN COIL UNIT SELECTION PROGRAM - User Manual While all care has been taken to ensure correct operation of the Fan Coil Selection program, Temperzone Ltd. offers no warranty as to the performance, whether implied or stated, or accuracy of the program, associated data files or documentation. Neither Temperzone Ltd nor Temperzone Australia Pty Ltd shall in any event be liable for any damages, direct or indirect, arising or resulting from the correct or incorrect use or application of this program, documentation or data files. Introduction The Fan Coil Selection program has been written in conjunction with Temperzone engineers to simplify the task of choosing a chilled or hot water fan coil or air handling unit. The program has been designed to be simple and intuitive to use. It is a selection tool, not an engineering tool. Anyone who deals frequently with the selection of fan coil units will find the program will save hours of repetitive calculations. The user should have some experience with specifying fan coil units since the program's selections are only recommendations. The user then calls upon his/her specialised knowledge to select the most appropriate fan coil unit for the job. The program is freely available to anyone who may have a use for it. The program is web based and simply requires connection to the internet and a Microsoft account to log in to. Provision has been made with a link to open a Microsoft account should the user not already have one. Program Features: • Easy to follow layout. • Internet web based program accessible from temperzone’s web site www.temperzone.biz . • Full and summary printouts. • Over 250 units to select from. • On-line prompt information at every step. • Ability to export selection data to Excel spreadsheet or PDF format to enable saving and/or printing. • Both ducted and under ceiling units included. • Includes units containing PSC and EC fan motors and multizone EC fan motor units. • Always current - no requirement to personally update. Program Methodology: This program uses a chilled water and low pressure hot water rifle tube heat transfer coil selection program running in the background to establish the cooling and heating duty performances. The heat transfer coil program used has been the basis of temperzone computer coil selections for over 35 years (before that it was slide rules and calculators) and is a trusted selection program that is used with great confidence. The program makes multiple selections using the entered data and iterates until it finds all the selections that are close to or exceed the requirements. It is important to be aware that the entered LWT (Leaving Water Temperature) that is entered is used as a starting point in the heat transfer coil calculations but the actual LWT that achieves the performance requirements may well be different unless the LWT parameters are specifically set or limited such that it is not allowed to be any other figure. This will of course limit the available options of unit selections. Refer ‘Selection Conditions - Entering Data Parameters' later in the manual. Getting Started System Requirements For the program to run one of the following browsers should be used; Internet Explorer 10 or later, Google Chrome, Safari or Firefox. The program will not run on earlier versions of Internet Explorer. Log In To Log on to the program visit our web site www.temperzone.biz, select the country in which you are located in (Australia or New Zealand - for Asian and Pacific Island regions use the New Zealand site although it makes no difference to the selections). Find the tab "Selection Programs" and on the drop down menu select FCUSP (Fan Coil Unit Selection Program), this will take you to the Login screen. If you have a Microsoft Account or have used the program previously than just click on the 'Microsoft' button If you do not have a Microsoft Account then you will be invited to set one up which will take you just a few minutes on first time access. Please ensure all the information has been completed to activate this account. You will then be taken to the Projects screen which will list your previous projects, empty of course on your first visit apart from the column headings. Projects The common headings will appear as: Project Name Client Name Action Any previously saved projects will be listed here thus; Auntie Mary's Hotel ACME A/C Edit/Delete/Excel/PDF There is also a 'New Project' button to use if you are not going to go back to an existing previously selected project and are starting afresh. Existing Project Four options are available: Edit; Takes you to the 'Project Detail' page showing a list of zones on that project allowing selection of any of the existing zones to be re-selected with new/changed data or a new additional zone to be added. Delete; A complete project may be deleted if desired. A warning box will appear so that deletion cannot be done accidentally - once deleted the selection information is irretrievable. Excel; Previous selections made and saved will appear on an excel sheet that can be printed, saved or transferred as desired. PDF; Previous selections made and saved will appear in PDF format that can be printed, saved or transferred as desired. New Project Press the New Project button and you will be required to enter a project name and a client name. Once this is information is entered, you will be taken to the 'Project Detail' page. Project Detail Once at the Project Detail screen, the common headings will appear as: Zone Description Engineer Unit Name Fan Speed Action 1500RPM Insert/Duplicate/Copy/Edit/Delete Any previously saved projects will be listed here thus; Downstairs Toilet Mick Jagger IMD135Y 4/1 Five options are then available: Insert; Allows for an extra zone to be inserted above the zone line currently selected. Duplicate; Duplicates the existing selection completely which can then be worked on as an alternative selection for the same zone. Copy; Allows for a selected zone detail to be copied to one or many other zones that have already been created. This option saves the user having to re-enter repetitive data time and again. Edit; Takes you to the particular zone details page showing allowing the data of the existing zones to be viewed, re-selected with new/changed data or a new additional zone to be added. Delete; An individual zone can be deleted. A warning box will appear so that deletion cannot be done accidentally - once deleted the selection information is irretrievable. There are four other buttons at the top of the screen page. This button takes you back to the previous screen, do not try and use the forward and return arrows at the very top of your screen as you will cause an error and need to reload the program. Excel; Creates an Excel worksheet that reports on the zones that make up the project. The Excel workbook can be printed and/or saved. PDF; Creates a summary report of the project in PDF format. The PDF can be printed and/or saved. New Zone; Creates a new zone that forms part of the project. (Refer note below about Zone Templates). A Zone name will need to be assigned. Zone Template When creating a new zone, the data that makes up the new zone is extracted from a zone template. The zone template is a nominated zone that has already been created and added to the project. By default the first zone created is the zone template. You can change the zone template by editing another zone and ticking the zone template at the top of the page. If you change the data on an existing zone template, then thereafter all newly created zones will reflect the change. New Project Zones The Project Name, the Client Name and the Engineer's Name (presumably your name) fields will already be populated. These can be changed at any time using the 'Change' prompt next to each text box. Enter a Zone name and using the Tab key, tab through the rest of the required entries. Unit type can be selected from a drop down menu; options include: Ducted Cooling + Heating (Water) (this Is the default) Ducted Cooling Only Ducted Heating Only (Water) Ducted Cooling + Heating (Electric) Under Ceiling Only Under Ceiling Cooling + Heating (Water) Motor type can be selected or de-selected as required; options include: Induction Motor (standard units with induction motors can be selected from, IMDL, IMD, IJD, GMW) EC Motor (IMD and IMDL 'Y' models may be selected from) Multizone (IXDL 'Y' model units with multiple separated zones may be selected from) Air Flows and Minimum static pressure (resistance) external to the unit may be entered next. Return and Fresh Air are entered separately, fresh Air may well be zero but entering too much fresh air, beyond about 20% will probably result in no units being able to be selected. Higher fresh air requirements need the help of temperzone engineering to make selections. Filter (clean) can be selected or de-selected (default is selected). If selected this makes an allowance for some static resistance therefore the fan speed requirements may be higher and options of units available may be reduced. If de-selected then filter resistances need to be added to the external static pressure entered. Selection Conditions - Entering Data Parameters The desired conditions, requirements and parameters should now be entered using the Tab key to move from one data box field to another. Entry data options are: - Summer/Cooling Total Duty; Default Is 0kW, Range allowed is 1 to 230kW. Sensible Duty; Default Is 0kW, Range allowed is 1.6 up to the Total Duty entered kW. EWT (Entering Water Temperature); Default is 6.0°C, Range allowed is 4 - 12°C. LWT (Leaving Water Temperature); Default is 12.0°C, Range allowed is dependant on EWT entered. Allowed LWT Range Minimum and Maximum; Default is 10.0°C and 16.0°C respectively. Allows some adjustment of what is to be allowed, setting both fields to the same LWT locks the LWT to only one temperature - required for some projects where EWT and LWT are both to be fixed. Raising these figures will allow selections with lower water flows and larger temperature differences. The ranges that can be selected is dependant on and limited by what EWT and LWT are selected in the first place. Return Air DB (Dry Bulb); Default is 23.0°Cdb, Range allowed is 15.0 to 35.0°Cdb Return Air WB (Wet Bulb); Default is 17.0°Cdb, Range allowed is 13.0 to 23.0°Cdb Return Air RH (Relative Humidity); Default is 55.1%, Range allowed is 30 to 100% Fresh Air DB (Dry Bulb); Default is 30.0°Cdb, Range allowed is 0.0 to 50.0°Cdb Fresh Air WB (Wet Bulb); Default is 22.0°Cdb, Range allowed is 15.7 to 30.0°Cdb Fresh Air RH (Relative Humidity); Default is 55.1%, Range allowed is 30 to 100% When the Dry and Wet bulb temperatures are entered the Relative Humidity will automatically be entered to match. Changing the Relative Humidity later will change the entered Wet bulb temperature accordingly. Minimum LADB (Leaving Air Dry Bulb); Default is 10.0°C Range allowed is from 7 to 29°C. Mixed Air temperatures are the result of entered data and cannot be entered in their own right. Winter/Heating Duty; Default Is 0kW, Range allowed is 0.5 to 250kW. EWT (Entering Water Temperature); Default is 80.0°C, Range allowed is 40 - 90°C. LWT (Leaving Water Temperature); Default is 60.0°C, Range allowed is dependant on EWT entered. Allowed LWT Range Minimum and Maximum; Default is 75.0°C and 50.0°C respectively. Allows some adjustment of what is to be allowed, setting both fields to the same LWT locks the LWT to only one temperature - required for some projects where EWT and LWT are both to be fixed. Raising these figures will allow selections with lower water flows and larger temperature differences. The ranges that can be selected is dependant on and limited by what EWT and LWT are selected in the first place. Return Air DB (Dry Bulb); Default is 21.0°Cdb, Range allowed is 15.0 to 35.0°Cdb Fresh Air DB (Dry Bulb); Default is 8.0°Cdb, Range allowed is 0.0 to 50.0°Cdb Minimum LADB (Leaving Air Dry Bulb); Default is 35.0°C Range allowed is from 20 to 55°C. Mixed Air temperatures are the result of entered data and cannot be entered in their own right. Things to Do Should this appear below the entered data it will be indicating what entry data may be incorrect or missing, pointing you to correct this before any selections can be made. The instruction should be clear enough to understand and must be corrected before any unit selections will appear. Consider these 'things to do' as warnings of incorrect or missing entries. Many of the entry fields will have information of acceptable ranges available if you hover your mouse over the entry field. This will be helpful in correcting incorrect fields. Proposed Units If the data entered has been accepted and 'Things To Do' as described above Is not present then one or more unit selections will appear in a list below this heading and on the same screen with performance details and achieved results. Highlighting or checking the tick-box of the unit that best satisfies your requirements will show the performance in more detail below this list for both Cooling and Heating cycles. Once satisfied that this is the nearest selection to what is desired then it will be necessary to check the tick-box of the fan speed required. There may only be one option or there may be multiple options with different external static pressures, select the one that most satisfies your requirements. At the top of the screen click on Save. Warning Should a warning box appear then it is likely that you have not checked the fan speed tick-box as mentioned above. The screen shot above shows both tick-boxes checked. Return to Project Detail Once this is done you will be taken back to the Project Detail screen and the unit selected should now appear under the Unit Name and Fan Speed columns, if not then it is likely you have tried to save without checking any of the tick-boxes. Once saved the selection along with the entered conditions and the results can be viewed, changed and/or reselected as desired by clicking on the ‘Edit’ action. Refer to the description above for the ‘Project Detail’ screen for what printing and saving options are available and addition of new zones or backtracking. Example of pdf file that is printable. Sharing a Project with Colleagues Projects that the operator has created can be shared out to colleagues. This can be useful when two or more people in a company may both need access to the same project. It is also useful when a customer may want a temperzone representative to double check their selections. Sharing project can be achieved in two ways. (a) You can share all your projects with colleagues, by setting up the share on the Projects screen. When you set up the share all your projects that you have already created will be shared. Any new projects you create thereafter will also be shared. (b) You can share individual projects with colleagues, by setting up the share on the Project Detail Screen. When you set up the share only that project gets shared. Sharing Projects (1) On the Project Sharing panel press the + button. (2) Enter the email address of the colleague. (3) Select how you wish to share the project. See the Read Only section below. Read Only When setting up a share you have the option to tick the Read Only box. The default option is ticked. (a) (b) Ticked means your colleagues can only view your work. They cannot make changes. Unticked means your colleagues can make changes to your work. These changes will overwrite your existing work. Appendix - Field and Terminology Descriptions Duty (Winter) The heating duty required from the fan coil unit, in kilowatts (kW). EWT The temperature of water entering the fan coil unit, in degrees Celsius (°C). Ext. Static The maximum External Static Pressure or resistance available for a particular fan speed at a given air flow rate, in Pascals (Pa). Face Vel. Velocity of air through the unit's coil, in metres per second – important for assessing potential water carry-over, especially in high humidity environments. Be wary of exceeding 2.5 m/s and do not exceed 2.8 m/s without reference to Temperzone Engineering. Fan Speed The fixed or variable fan speeds (e.g. High, Medium, Low), RPM of the fan (e.g. 700, 1000) if a variable pulley drive is used or the low voltage input (0 – 10V) for variable EC motors. Fresh Air Flow Fresh (outside) air entering the air conditioner, in litres per second (l/s). Fresh Air (Summer) DB, WB, RH Summer outside (fresh) air conditions. Dry Bulb and Wet Bulb temperatures are in °C; Relative Humidity is in %. Fresh Air (Winter) DB Winter outside (fresh) air conditions. Dry Bulb and Wet Bulb temperatures are in °C; Relative Humidity is in %. LWT The temperature of water leaving the fan coil unit, in degrees Celsius (°C). Max LADB (Winter) Maximum Leaving (exhaust) Air temperature allowable, in degrees Celsius (°C) dry bulb, when the fan coil unit is on its heating cycle. Min LADB (Summer) Minimum Leaving (exhaust) Air temperature allowable, in degrees Celsius (°C) dry bulb, when the fan coil unit is on its cooling cycle. Mixed Air (Summer) Summer mixed air conditions. These fields are calculated and cannot be edited DB, WB, RH directly. Dry Bulb and Wet Bulb temperatures are in °C; Relative Humidity is in %. Mixed Air (Winter) DB Calculated Winter mixed air conditions. Made up of Winter fresh and return air. Dry Bulb temperatures are in degrees Celsius (°C) Return Air (Summer) DB, WB, RH Room Return air conditions during Summer, when the fan coil unit is on its cooling cycle. Dry Bulb and Wet Bulb temperatures are in °C, Relative Humidity is in %. Return Air Flow Return (room) air entering the air conditioner, in litres per second (l/s). Sound Power Levels (SWL) Sound levels in dB re 1 pW, measured in accordance with JIS 8616. Direct method of measurement (reverberant room). Sound Pressure Levels (SPL) Sound Pressure measured at 1 metre from supply air outlet in decibels re 20 Pa. For outdoor units, SWL = SPL + 13. Sensible Duty (Summer) The amount of Cooling required to change the temperature of the air passing through the unit's coil, as measured in kilowatts (kW). Total Air Flow The sum of the return and fresh air flow quantities in litres/second (l/s). Air flow is the same for Winter and Summer. This is a calculated value. Total Duty (Summer) The total cooling duty required from the fan coil unit, in kilowatts (kW). Unit Type Describes the type of unit which can be selected for this zone. Water Pressure Drop Resistance to water passing through a fan coil unit, as measured in kilo-Pascals (kPa). Zone Description This is a description of the area (or Zone) the fan coil unit will be located in.