1
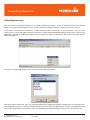
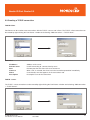
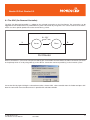
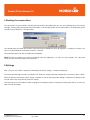
USER MANUAL
Nordic ID
Port Router 2.0
Contents
Notes
4
System requirement:
5
Software Installation:
5
1 The basics
6
2 Creating an entry
7
2.1 Creating a Serial Connection
8
2.2 Creating a Bluetooth Connection
8
Bluetooth client:
8
Bluetooth Server:
9
2.3 Creating a TCP/IP connection
10
TCP/IP Client:
10
TCP/IP –server:
10
2.4 File writer
11
3 Modifying the connections
11
3.1 The ODC (On-Demand-Controller)
12
4 Routing the connections
13
5 Settings
13
6 System Menu
14
7 The “Connections” Tab
14
8 The “Routes” Tab
15
9 Bluetooth tab
15
10 Technical Support
15
�������������������������
Notes
Information in this guide is subject to change. Nordic ID assumes no responsibility regarding the information presented
in this guide.
Nordic ID Oy owns all rights to this manual. All rights reserved. Copying this manual without the written permission from
the manufacturer by printing, copying, recording or by any other means or the full or partial translation of the manual to
any other language including all programming languages using any electrical, mechanical, magnetic, optical, manual or
other methods or devices is forbidden.
Nordic ID reserves the right to change the technical specifications or functions of its products or to discontinue
manufacturing of any of its products without any written announcement and urges customers to ensure that the information
at their disposal is valid.
Nordic ID products have not been designed, intended nor inspected to be used in any life support related applications
nor as a part of any other critical system and are not granted functional warranty if used in any such applications.
Nordic ID urges its customers to arrange proper and adequate user training, which includes safety issues to any personnel
using or otherwise handling Nordic ID PortRouter.
Nordic ID and the Nordic ID logo are all registered trademarks of Nordic ID Oy. All terms mentioned in this User’s Guide
that are known to be trademarks or service marks have been appropriately marked in the list below with either the ©, ®
or the ™ symbol or starting with capital letter. Nordic ID cannot attest to the accuracy of this information. Use of a term
in this guide should not be regarded as affecting the validity of any trademark or copyright.
Trademark
Company
Bluetooth
Bluetooth SIG
Table 1. Identified Trademarks in this guide.
For latest information and on possible changes to this manual please check www.nordicid.com.
© 2006 Nordic ID Oy
Port Router 2.0 User Manual
4
June 2006
�������������������������
System requirement:
• Windows XP sp2
(Microsoft –Bluetooth stack, recommended)
• Windows 2000, XP (Widcomm –Bluetooth stack)
• 50 MB of free disk space
Software Installation:
The Port Router software can be installed with any computer using Miscrosoft Windows 2000 or XP operating system. The
person who is installing the software must have an administrator level rights to the computer. The Port Router supports
Microsoft Bluetooth stack with Windows XP sp2 and Widcomm BT stack with other supported operating systems.
© 2006 Nordic ID Oy
Port Router 2.0 User Manual
5
June 2006
�������������������������
1 The basics
The Nordic ID PortRouter software connects several communication methods with each other. With the Port Router it
is quick and easy to create and manage the routes between the connections. Currently the Port Router supports the
following connection methods:
• Bluetooth
• Serial port
• TCP/IP
All the connections can be set as a client or a host, depending on the application. The Port Router also supports Virtual
Com-port mapping, which can be installed as a plug-in (plug-ins can be requested from [email protected]).
Creating communication entities and routing the information consists of following steps:
1. Create the entries needed
2. Route created entries as necessary
3. Connect the entries
Steps 2 and 3 can be done in any order.
The Port Router does not either modify or add the routed data in any way. The Port Router connects the devices together
acting as an invisible bridge between these two devices.
������
���������
������
���������
������
�����������
������
Examples of the connections routed together.
© 2006 Nordic ID Oy
Port Router 2.0 User Manual
6
June 2006
�������������������������
2 Creating an entry
First time when the Port Router software is launched the blank Connections –screen is displayed (shown in the picture
below). Press right mousebutton to access to menu and choose “Add connection” –button to create a new entry.
These entries, also called as connections, can be routed with other connections at the Connections -tab. The Port
Router acts as a connector table, where the connections can be created and routed together. At the basic version of the
software the Port Router supports Bluetooth-, Serial- and TCP/IP -types of connections. Other connection types can be
added with plug-ins.
Then, from the appearing dialog, select a communication type to the device.
After choosing the connection type, the connection depending configuration window is displayed. The connection must
be configured to match the settings of the device connected. Then the Port Router asks to connect immediately to the
connection. If declined, the connection can be connected later by double clicking the entry at the connections -tab.
© 2006 Nordic ID Oy
Port Router 2.0 User Manual
7
June 2006
�������������������������
2.1 Creating a Serial Connection
Create serial connection by right-clicking the Port Router –window and select “Add connection -> Serial port. Fill the port
properties to correspond your attached serial device.
Semantics:
COM Port:
Baud rate:
Data size:
Parity:
Stop:
Flow Control:
Transmit delay:
Name:
Serial port to be used, i.e. COM<number>
Speed of the serial connection
Size of the data bits in the frame (5-8)
Setting of a parity bit (Even, Odd, None, Mark, Space)
Stop bits of the frame (1, 1.5, 2)
Flow control of the data (Xon/Xoff, Hardware, None)
The delay before transmitting the data frame to the device (value in msec).
The name of the connection which will be displayed in the Connections –tab of the application.
2.2 Creating a Bluetooth Connection
The Port Router software supports client- or server -type of Bluetooth connection. The difference between these two
modes is that the initiator of the communication is called as a client and the other end which is contacted to, is the
server.
Bluetooth client:
The Bluetooth client can be added to connections in two different ways:
The first one is to launch a Bluetooth inquiry by clicking the Bluetooth-tab on the Port Router –application or right-clicking
the connections –tab and choosing the “Start Inquiry” from the opening dialog or by using the Tools –menu and selecting
the Bluetooth Inquiry from there.
The result of the inquiry is a list of the Bluetooth devices within reach. By choosing the desired BT device and doubleclicking it, the BT Client Connection Properties dialog pops up showing the selected BT device’s REAL Bluetooth address
(in hexadecimal form), the RFComm channel and authentication and secure connection –checkboxes. Also the name of
the device (which is shown ONLY in the Port Router –application) can be changed.
© 2006 Nordic ID Oy
Port Router 2.0 User Manual
8
June 2006
�������������������������
By clicking the OK –button, the device is added to the Connections –tab at the application.
Bluetooth Server:
The Bluetooth server can be created by right-clicking the Port Router –window and selecting “Add connection -> BT
Server”
Note: The authentication and secure connection –options are not recommended to use with Microsoft Bluetooth -stack.
The When selecting a BT device listed in the Bluetooth –tab with right mouse click, the following menu is displayed:
Semantics:
Address:
Name:
RFCOMM Channel:
© 2006 Nordic ID Oy
Port Router 2.0 User Manual
Address in Bluetooth notation as in picture
This is the name that appears in the connections tab.
The bluetooth channel, in which the BT connection is operating. See for your BT-device
for further info how to set the BT channel on the device.
9
June 2006
�������������������������
2.3 Creating a TCP/IP connection
TCP/IP Client:
Port Router can be used to create connections with the TCP/IP –servers and –clients. The TCP/IP –client connection can
be created by right-clicking the Port Router –window and selecting “Add connection -> TCP/IP Client”.
Semantics:
IP address:
Remote name:
Port:
Connect:
Name:
Description:
Address of the server
Used if connecting to a remote host by name
Remote port that this client wishes to connect to.
When “OK” is selected, the client starts the connection procedure immediately
User-friendly name that appears in the connections tab.
Descriptive name of the connection.
TCP/IP –server:
The TCP/IP –server connection can be created by right-clicking the Port Router –window and selecting “Add connection
-> TCP/IP Server”.
© 2006 Nordic ID Oy
Port Router 2.0 User Manual
10
June 2006
�������������������������
Semantics:
TCP port:
Start to listen:
Name:
Description:
The port that the server listens to
The server listening is started when “OK” is selected.
Local name that appears in the connections tab
Descriptive name of the connection.
2.4 File writer
The file writer can be used to log all the data traffic on the connection to the file. This can be useful if debugging the
connection. The saved data is the raw data of the traffic of the connection.
3 Modifying the connections
Entries can be modified in several ways while added to the Port Router. By pressing the right mouse button opens the
following listbox. The listbox items are described below.
Connect / Disconnect : The entries can be individually connected/disconnected by choosing
connect / disconnect –option from the listbox.
ODC: Sets the On-Demand-Controller to selected connection. See more about ODC in the
chapter 3.1.
Modify: This opens a properties window of the connection where the properties of the
connection can be modified.
Stats: Stats displays the connection statistics; the transmitted bytes in/out and the number of
possible reconnections.
Delete: Delete deletes by selected connection. Note that this also removes all the routes that
the entries were associated with.
Duplicate: Duplicate creates a copy of the connection and displays the copied connection properties (for modification).
© 2006 Nordic ID Oy
Port Router 2.0 User Manual
11
June 2006
�������������������������
3.1 The ODC (On-Demand-Controller)
The ODC (On-Demand Controller) is a trigger to the selected connection on the Port Router. The connection can be
triggered to connect/disconnect in parallel with any other connection by using ODC. This can be used to create routes,
which use some specific protocol to create connection e.g. telnet.
2. ���
1.
������
������
3.
�����������
When a connection 1. (The server in the picture above) gets connected in the Port Router, the other connection (The client
in the picture) which is set by using ODC (2.) to the Server -connection connects parallel (3.) to the external system.
Create the ODC by right-clicking the selected connection, choose ODC, select controller from the listbox and press OK.
Now the connection connects/disconnects in parallel with selected controller.
© 2006 Nordic ID Oy
Port Router 2.0 User Manual
12
June 2006
�������������������������
4 Routing the connections
The connection can be routed by selecting two connections (by holding the Ctrl –key and selecting them with mouse)
and right –clicking and selecting route from the listbox. From the pop-up the route can be made uni- or bi-directional and
change the route direction, if uni-directional.
The created routes are listed at the Router –tab and may be modified from there by rightclick -> modify on the route. The
routes may be deleted by choosing the remove –selection.
The Port Router does not alter or modify the routed data.
NOTE: TCP/IP connections are currently not routed within the application, i.e. if the user has created a TCP client and
server, the two cannot be routed with each other.
5 Settings
From system menu at Edit – Settings the following Port Router settings –window is displayed.
The Port Router Settings include a checkboxes for Automatic startup after boot and Restore connections upon startup.
When the Restore connections upon startup –checkbox is chosen the Startup file –dialog is enabled. This dialog can be
used to choose the setup-file for automatic startup.
The Port Router has also option to hide the program immediately after the startup by checking the Hide to system tray
upon startup –checkbox.
© 2006 Nordic ID Oy
Port Router 2.0 User Manual
13
June 2006
�������������������������
6 System Menu
File
Load file
Save file
Hide
Exit
Opens a file loading dialog –window. This is used to load saved connection.
Saves current configuration to a file
Hides the Port Router to taskbar icons. Same function
Closes the application.
Add connections
Settings
Opens the Add connection –dialog.
Opens the Settings menu (see settings –topic)
Connections
Routes
Bluetooth
Changes the view to the Connections –tab.
Changes the view to the Routes –tab.
Changes the view to the Bluetooth –tab.
Bluetooth Inquiry
Starts a Bluetooth inquiry and changes the view to the Bluetooth –tab.
Help
System info
Log folder
Displays this document.
Displays the system information and installed plug-ins.
The Port Router automatically logs the
Edit
View
Tools
Help
7 The “Connections” Tab
The connection tab shows the status of the each connection.
• ID:
The small icon and identification number of the connection. The icon displays the type and status of the
connection. Active connections are colored with green.
• Name:
• Type:
• Address:
• ODC:
• Status:
“Friendly” name of the connection
Connection type: Bluetooth, TCP/Client/Server, COM, etc
Connection address
The ODC status and trigged connection ID.
Current status of the connection. Also displays the latest error.
© 2006 Nordic ID Oy
Port Router 2.0 User Manual
14
June 2006
�������������������������
8 The “Routes” Tab
The routing tab only provides information about the created routes and a possibility to modify the route information.
9 Bluetooth tab
The Bluetooth tab includes the information about the Bluetooth inquiry. The Bluetooth entries can also be paired or
unpaired from here (if using Microsoft Bluetooth –stack).
10 Technical Support
The supplier of the PortRouter or your local Nordic ID dealer primarily provides all other non-service related technical
support.
Please use the e-mail address provided at www.nordicid.com or other contact information for requesting direct support
from Nordic ID.
© 2006 Nordic ID Oy
Port Router 2.0 User Manual
15
June 2006
�������������������������
Nordic ID Oy owns all rights to this manual. All rights reserved. Copying this manual without the written permission from the manufacturer
by printing, copying, recording or by any other means or the full or partial translation of the manual to any other language including all
programming languages using any electrical, mechanical, magnetic, optical, manual or other methods or devices is forbidden.
Nordic ID reserves the right to change the technical specifications or functions of its products or to discontinue manufacturing of any
of its products without any written announcement and urges customers to ensure that the information at their disposal is valid.
© Nordic ID Oy 2006