1
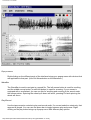
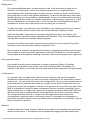
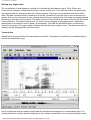
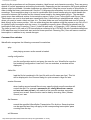
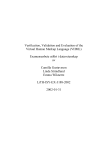
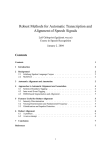
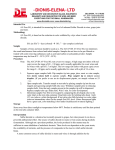
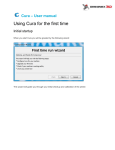
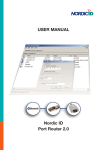
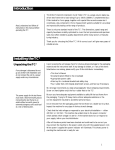
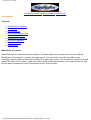
WaveSurfer User Manual
©2005 Kåre Sjölander and Jonas Beskow
Introduction Download Documentation Links Forum
User Manual
Contents
●
●
●
●
●
●
●
●
●
WaveSurfer at a glance
Sound files
Sound analysis
Plotting time aligned data
Transcription facilities
Command line switches
Site wide installation
Large sound files
Key bindings
WaveSurfer at a glance
WaveSurfer has a simple but powerful interface. The basic document you work with is a sound. When
WaveSurfer is first started, it contains an empty sound. You can load a sound file from disk or start
recording, using the tape-recorder like controls in the upper right corner. You can add any number of sounds
(using File | New or File | Open). Each sound has a small arrow-shaped button in the upper left corner, that
can be used to collapse the view of the sound into only a blue titlebar.
http://www.speech.kth.se/wavesurfer/man.html (1 de 9) [20/03/2006 11:27:56]
WaveSurfer User Manual
http://www.speech.kth.se/wavesurfer/man.html (2 de 9) [20/03/2006 11:27:56]
WaveSurfer User Manual
Popup menus
Right-clicking on the different parts of the interface brings up a popup menu with choices that
are applicable to that part. (Use Ctrl-Mousebutton on the Macintosh.)
WaveBar
The WaveBar is used to navigate in a sound file. The left mouse button is used for scrolling
and the middle mouse button (or shift-left button) is used for zooming. If your mouse is
equipped with a scrollwheel, you can use this for scrolling and zooming in the sound under
the mouse pointer: Spinning the wheel up & down will scroll, pressing Ctrl and spinning the
wheel will zoom.
Play/Record
Use the tape recorder controls to play and record audio. If a current selection exists only that
segment is played. You can use the space bar to toggle between play and pause. Rightclicking on the play button brings up a popup menu with different play options.
http://www.speech.kth.se/wavesurfer/man.html (3 de 9) [20/03/2006 11:27:56]
WaveSurfer User Manual
Adding panes
For more sophisticated tasks, a single waveform view of the whole sound might not be
sufficient. You might want to zoom in to look at small portions, you might want other
representations such as spectrograms or pitch-curves, or maybe you have a multi-channel
sound and want to look at each channel individually. To allow for this and many other tasks,
WaveSurfer gives you the possibility of adding panes. A pane is a window stacked on top of
the WaveBar that can contain for example a waveform, a spectrogram, a pitch-curve, a time
axis or a transcription or something else. (In fact, through the use of WaveSurfer's plug-in
architechture, a pane can contain pretty much anything you can think of!)
To add a new pane, you right-click on the WaveBar or any existing pane where you want to
insert the new pane, select Create Pane, and choose what type of pane you want.
Unlike the WaveBar, a pane will not necessarily display the whole sound. Rather it will
display a portion of the sound that is specified in the WaveBar. Think of the WaveBar as an
overview and the pane as a variable magnifying glass.
A sound can contain any number of panes (as long as they fit on the screen) They will be
stacked on top of each other and always be aligned in time.
Once the pane is created it can be resized vertically by dragging the handle below the pane.
(Some panes such as transcription and time axis can not be resized) You can also control
many properties of the pane by selecting Properties | Pane from the popup menu (right-click).
Pane properties dialog
It is possible to modify various properties of a pane by selecting Popup | Properties.
Depending on the specific type of pane, there will be different tabs in the dialog. For
example, it will allow you to modify the color scale and analysis parameters of a spectrogram.
Configurations
For a certain task, you might want a specific set-up of panes, with specific properties.
WaveSurfer comes with a set of ready-to-use pane configurations, for transcription, speech
analysis, etc. You can easily define your own configurations. Once you have created a set of
panes and set their properties as needed, you simply choose Save Configuration from the
popup menu. Once the configration is saved, it will appear as a choice when you select File |
New. It is possible to change the pane configuration used for a sound by selecting Popup |
Apply Configuration. A configuration does not only specify what panes should be visible, but
also their sizes and everything else that can be specified in the Popup | Properties dialog.
The configuration files reside in ~/.wavesurfer/1.8/configurations/ and under some
circumstances it might be useful to edit them by hand. For example, the configuration nwaveforms has been created in this way. Examine that configuration in a text editor to get an
idea of how this can be done.
Selection
All panes share the current selection. Selections are made in the standard way, press-dragrelease mouse button 1. The selection can be adjusted by dragging the bars marking the
http://www.speech.kth.se/wavesurfer/man.html (4 de 9) [20/03/2006 11:27:56]
WaveSurfer User Manual
endpoints or by pressing shift and clicking mouse button 1. Clicking the play button causes
the marked region to be played. The endpoints of the current selection can be adjusted to the
nearest zero crossing using Edit | Zero Cross Adjust.
Basic editing and processing
The Edit menu contains basic editing functions such as cut, copy, and paste. The Transform
menu contains transformation functions for conversions, amplification, normalization etc. On
the View menu zoom functions can be found. The Master Sound option makes it possible for
one window to control the zoom-level and scroll position of other windows.
Sound conversion
You can convert properties such as frequency, number of channels, and sample encoding
format using the dialog in Popup | Properties | Sound.
Printing
WaveSurfer creates postscript files for printing. See the FAQ for information on how to print
these on Windows.
Preferences dialog
The preferences dialog (File | Preferences...) is used to specify global properties of
WaveSurfer. These include
●
●
●
●
●
●
●
●
commands used to print and preview
key-bindings
interpretation of raw sound data from file name extension
method of sound storage management
maximum recording time
automatic scroll during playback
temporary work directory
maximum zoom-in level
Mixer dialog (Unix versions)
The mixer dialog (File | Mixer...) is used to control volume and select output/input jacks.
Sound files
WaveSurfer can read a number of sound file formats including WAV, AU, AIFF, MP3, CSL, and SD. It can
also save files in several formats, including WAV, AU, and AIFF. There are separate plug-ins to handle
Ogg/Vorbis and NIST/Sphere files. For raw sound files (headerless PCM, etc) WaveSurfer tries to guess
some properties and displays a dialog giving the user a chance to modify these. It is possible to associate
the filename extension with these settings for future use. WaveSurfer reads files by analyzing their headers
regardless of filename extension. When saving files, the file format to use is decided from the filename
extension specified, e.g., to save a file in AU format specify a filename like myfile.au.
http://www.speech.kth.se/wavesurfer/man.html (5 de 9) [20/03/2006 11:27:56]
WaveSurfer User Manual
Sound analysis
WaveSurfer can be used to visualize and analyze sound in several ways. The standard analysis plug-in can
display Waveform, Spectrogram, Pitch, Power or Formant panes, as shown in the image below.
Many properties of these panes can be adjusted using Popup | Properties. In addition, a spectrum window
can be opened using Popup | Spectrum Section. Special control windows are available for Waveforms and
Spectrograms, which allows the user to make quick modifications. A special enlarged waveform window,
which is centered around the cursor, can be opened using Popup | Waveform Blow-up. This is useful for
detailed inspection and adjustment.
http://www.speech.kth.se/wavesurfer/man.html (6 de 9) [20/03/2006 11:27:56]
WaveSurfer User Manual
Plotting time aligned data
The visualization of data related to a sound file is handled by the dataplot plug-in. Pitch, Power and
Formants are examples of data that this plug-in can be used to plot. It can also be used to visualize other
time aligned data, for example output from other programs. The plug-in plots tabulated numerical ASCII
data. The data values should be contained in a text file, formated in rows with one or more columns to be
plotted. One row for each point in time, starting with the first row typically at 0.0 seconds and equally spaced
according to the frame interval option. The name of this text file should be the same as the sound file except
for the extension. The default extension is .txt, which can be changed in the property pane. Optionally a
spectrogram or a waveform can be drawn as a backdrop. The data can be plotted either as continuous
curves or using dots. For large number of data points the dots style might be slow. The data values can be
edited by simply dragging them with the mouse.
Transcription
WaveSurfer has many facilities for transcribing sound files. Transcription is handled by a dedicated plug-in
and it's associated pane type.
Use the properties-dialog to specify which label file that should be displayed in a transcription pane. It is
usually practical to create a special configuration for a certain combination of sound and transcription files,
http://www.speech.kth.se/wavesurfer/man.html (7 de 9) [20/03/2006 11:27:56]
WaveSurfer User Manual
specifying file properties such as filename extension, label format, and character encoding. There are many
options to control appearance and editing functionality. Depending on the transcription file format additional
options might be available. Unicode characters are supported if using the source version of WaveSurfer, in
order to keep the binary versions small. See the Tcl language documentation for a list of available character
encodings. The transcription plug-in is used in combination with format handler plug-ins which handle the
conversion between file formats and the internal format used by the transcription plug-in. The standard
popup menu has additional entries for transcription panes. Popup | Load Transcription and Popup | Save
Transcription are used to load and save transcription files. Label editing is straightforward, simply click
where you want to insert a label and type it in. The label fields are user-configurable and used to insert a
label directly at the cursor position. You can either drag time boundaries using the mouse or use Ctrl-r/Ctrl-l
to right/left justify boundaries with the cursor. It is possible to specify where WaveSurfer should look for
transcription files using Properties | Trans1 | Label file path entry, or Properties | HTK | Master Label File.
The latter is used in the case of HTK transcriptions contained in an HTK MLF-file with immediate definitions.
HTK label files need to have both start and end times specified. Choosing File | Save will save a modified
transcription in addition to any sound changes.
Command line switches
WaveSurfer recognizes the following command line switches
-play
start playing as soon as the sound is loaded.
-config configuration
use the configuration and do not query the user for one. WaveSurfer uses the
first matching configuration it can find. If no one matches, a wavebar will be
displayed.
-filelist file
load the file list contained in file (text file with one file name per line). This list
will be displayed in the Chooser dialog for quick access in large file sets.
-master filename
when loading several sound files at once, specify which sound's wavebar will
control the rest. For example, wavesurfer.tcl -config Waveform -master
ex1.wav ex1.wav ex2.wav, will make the first sound's wavebar control the
second one as well. Same function can be had by choosing View | Master
Sound | ex1.wav.
-tfa filename
search the specified WaveSurfer Transcription File Archive. Several options
can be specified and they will apply to the corresponding transcription pane
counting from the top.
-mlf filename
http://www.speech.kth.se/wavesurfer/man.html (8 de 9) [20/03/2006 11:27:56]
WaveSurfer User Manual
search the specified HTK Master Label File (only for HTK format transcription
panes). Several options can be specified and they will apply to the
corresponding transcription pane counting from the top.
-filelist file
load the file list contained in file (text file with one file name per line). This list
will be displayed in the Chooser dialog for quick access in large file sets.
-debug level
generate a debug trace which is useful when trying to track down bugs. Use
with a value of 6 for the level parameter in order to generate the trace file
wsurf.log.
Site wide installation
WaveSurfer can be installed on a central server. Several users can share configurations and plug-ins by
copying them from each other and installing them in ~/.wavesurfer/1.8/configurations/ or
~/.wavesurfer/1.8/plugins/. From a system administration point of view a better solution is to keep such files
in common directories and to use the environment variables WSCONFIGDIR and WSPLUGINDIR to point to
these. Windows administrators can use the registry entry
HKEY_LOCAL_MACHINE\SOFTWARE\CTT\WAVESURFER\1.8 and set the keys WSCONFIGDIR and
WSPLUGINDIR.
Large sound files
Very large sound files can be handled by choosing "keep on disk" in Preferences | Miscellaneous | Sound
storage. This choice will make WaveSurfer access sound data on disk as needed instead of loading them all
into memory. The first time a file is opened it is scanned and its waveform shape is computed and stored on
disk. Next time the file is opened, WaveSurfer will only load this pre-computed file, which gives almost
instantaneous access. Note that currently WaveSurfer cannot edit sound files in this mode.
Key bindings
It is possible to customize most key/event bindings in the preferences and pane properties dialogs. Here are
some examples of how such event bindings might look
●
●
●
●
●
ButtonPress-3
Shift-Control-ButtonPress-1
Control-space
F1
Alt-a
Last updated [an error occurred while processing this directive].
http://www.speech.kth.se/wavesurfer/man.html (9 de 9) [20/03/2006 11:27:56]