1
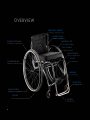
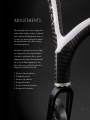
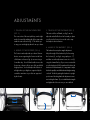
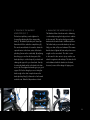
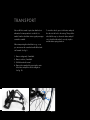
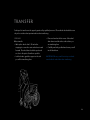
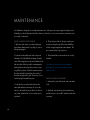
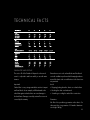
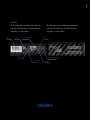
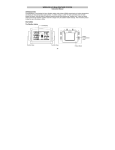
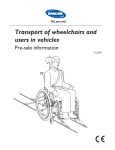
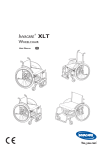
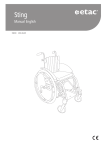
USER MANUAL
PA N T H E R A X
C O N G R AT U L AT I O N S !
You are now the owner of a Panthera X – the world’s lightest wheelchair. Invented,
designed and manufactured in Sweden, the Panthera X boasts an advanced
composite carbon fiber structure, giving it the rigidity, strength and super-low
weight normally associated with aerospace and Formula 1 equipment.
And now, wheelchairs. Have fun!
The Panthera team
INTENDED USE
To get the most out of your Panthera X, it needs
Panthera X is a wheelchair made for very expe-
to be adjusted and adapted to your requirements
rienced and active users who are comfortable
– by you or together with your prescriber. Please
handling a ”tippy” wheelchair without tip protec-
study the instructions carefully.
tors. The design is optimized for easy handling
in and out of cars and has extremely good riding
characteristics. The very sleek and minimalistic
design gives experienced and active users great
opportunity to improve everyday life.
Panthera X is not equipped with tip protectors, since
it would impare the agility of the chair. It’s important
that you feel comfortable handling the unique behaviour and characteristics of such a lightly balanced
wheelchair before using it in a ”live” environment.
As always, practice makes perfect.
CONTENT
4
TECHNICAL INFORMATION
– CARBON FIBRE
6
SAFETY
8
OVERVIEW
9
ADJUSTMENTS
12
TRANSPORT
13
TRANSFER
14
MAINTENANCE
15
TECHNICAL FACTS
CE-MARKING
GUARANTEE
CARBON FIBRE
The Panthera X is made from Advanced Carbon
differently when damaged. Metal structures will
Fibre Reinforced Plastics, CFRP, which can be
bend and deform during failure. When a CFRP
moulded into just about any shape. It may sound
structure fails, it will lose most of its strength and
simple, but is in fact a small technological wonder.
rigidity, but without some of the telltale signs of
Carbon fibre is a fantastic material. But it’s a material
metal, such as bending and buckling.
which works best with smooth, curved shapes that
better distribute the force of high loads. Finding the
CFRP structures are vulnerable to damage done
perfect cross-section between smooth, strong shapes
by sharp edges, sudden impacts and unusually,
and ergonomic, practical design was an engineering
local forces. If you suspect that your wheelchair
challenge requiring years of development, experi-
has been damaged, please inspect the entire
mentation and practical testing. The result is the
structure thoroughly or let a specialist inspect it.
strongest and lightest wheelchair ever built.
IMPORTANT
FINALLY, A CAR FRIENDLY WHEELCHAIR
Advanced Carbon Fibre Reinforced Plastics are
Getting your wheelchair in and out of your car
very strong and light materials, but also sensitive
can be a real bother. But not anymore. Apart from
to sudden impacts and sharp objects. Cracks and
being the lightest wheelchair in the world, the
other damages to the carbon fibre structure, for
Panthera X is designed with space-saving dimensions
example as a result of the wheelchair tipping over
and ergonomic grips – making the chair easy to
onto a hard surface, may lead to sudden breaks.
load and stowe. Most people can actually lift the
wheelchair with one hand.
Avoid:
• Dropping the chassis onto hard surfaces
CARBON FIBRE CARE AND SERVICE
Carbon Fibre Reinforced Plastics are stronger,
lighter and more durable than metals, but behave
4
• Scratching and scraping the carbon ibre
structure
INSPECT YOUR WHEELCHAIR REGULARLY
Press on areas you suspect have been damaged
– watch for unusual flexing, bending or cracks.
Run your hand over the chassis surface to check for
cracks or loose fibres. Use slow, careful movements,
to avoid getting any splinters in your hand.
If you find anything that indicates damage, please
contact Panthera AB. DO NOT try to repair the
wheelchair by yourself.
5
SAFETY
CONDUCT A TECHNICAL INSPECTION
quickly to the actions you perform. If you perform
OF THE CHAIR AND MAKE SURE THAT:
the wrong actions the chair can tip backwards. The
•
The rear wheel axles should move smoothly
chair can potentially tip up and it is not possible to
in and out of the casing
issue a warning regarding all the circumstances in
The button at the hub should spring out
which that might occur. The most important safety
when the rear wheels have been inserted
measures you can take include ensuring that you
•
All four wheels should touch the ground
have tested the chair thoroughly and spend time
•
The caster fork can be easily rotated
practicing your wheelchair technique.
•
The backrest folds down easily
•
If you have any questions about wheelchair techniBALANCE AND TIPPING CAPACITY
que you should contact the person who prescribed
The position of the backrest, the angle and the
the chair / your therapist. If they are unable to
adjustment of the backrest upholstery are the
help you, please do not hesitate to contact us at
most significant factors affecting the wheelchair’s
Panthera AB.
tendency to tip. After adapting your chair you
6
should check that you feel safe with the balance of
BRAKES
the chair. If you feel unsure, you should move the
Remember that the brakes do not work as effectively
backrest forward. The tipping capacity of the chair
on tyres with poor air pressure or on worn tyres.
is also affected by: hanging a bag on the backrest,
If you change to a new brand of tyre you should
leaning / stretching backwards, worn tyres, poorly
always check the brakes since the dimensions may
pumped tyres and unforeseen changes in the surface
be different. The brakes are designed as parking
you are driving on.
brakes and not for braking when in motion.
WARNING!
NOTE!
A Panthera wheelchair is designed to be as easy
For the brakes to work properly make sure the tires
to drive as possible and because of this it reacts
have the right airpressure. See technical facts.
SITTING POSTURE
TRANSFERS / LIFTING CHAIR AND USER
The wrong sitting posture can cause pressure sores.
The chair is lightweight and for this reason it can
If you are unsure you should contact your prescriber
move sideways when the brakes are on and you
straight away. Check that the side guards do not
transfer from the side. If you are unsure you should
exert too much pressure on your thighs since this
practice this activity with your prescriber or thera-
can cause pressure sores. If the side guards exert
pist. If the wheelchair is lifted with you sitting in it,
too much pressure, the chair is either too narrow
the chair should always be lifted holding the frame
or the side guards need to be adjusted. The seat is
and not the backrest, the wheels or any other parts.
designed to be used with a cushion.
See fig.1 below.
DRIVING
If the distance between the lowest point of the
footrest and the surface is small (less than 40 mm)
the footrest can get caught on bumps in the surface
and cause you to fall forwards.
CARBON FIBRE
Carbon fibre in free state is unhealthy but in bound
form like in the Panthera X chassis, harmless. But if
you make mechanical interventions on the chassis
with a drill, saw or similar, carbon fibre particles can
be exposed and harm your health if you don´t use
professional safety equipment. Therefore all processing of the chassis on your own is not allowed. Partly
because of health issues and partly because the
strength of the chassis can be undermine strongly.
FIG. 1
7
OVERVIEW
UPHOLSTERY – BACKREST
BACKREST FRAME
BACKREST ATTACHMENT
REARWHEEL – TIRE
SEAT - CUSHION
BRAKE LOCATION
CHASSIS
QUICKRELEASE HUB
CALF BAND
CASTOR FORK
BRAKE LOCATION
PUSH RIM
FOOTREST
8
ADJUSTMENTS
When ajusting the chair to suit your sitting position
and provide the mobility you require, it is important
that you make the following adjustments in the correct order. First, adjust the sitting position and after
that, adjust the balance of the chair according to
your mobility requirements.
The sequence is important since when you change
your sitting position you also change the balance
of the chair. Consider that the effort you put into
adapting your chair will provide long-term benefits
later on. Try out different adaptations for a few
days to make sure you really have found the best
sitting posture and balance of the chair:
1. The tension of the seat upholstery
2. The height of the footrest
3. The tension of the calf band
4. The angle of the backrest
5. The tension of the backrest upholstery
6. The balance of the wheelchair
9
ADJUSTMENTS
1. TENSION OF THE SEAT UPHOLSTERY
3. TENSION OF THE CALF BAND (FIG. 5)
(FIG. 3)
The tension of the calf band, see fig.5, can be
The rear section of the seat upholstery can be tight-
adjusted and will affect how far forward you place
ened or loosened by adjusting the Velcro strap under-
your feet on the footrest. Loosen the velcro strap
neath the seat as shown in fig. 3. This allows you
and adjust to desired tension.
to vary your seat height by about 2 cm up or down.
4. ANGLE OF THE BACKREST (FIG. 6)
2. HEIGHT OF THE FOOTREST (FIG. 4)
The backrest has a stepless angle adjustment.
The footrest can be adjusted up or down. Remove
Adjust the angle of the backrest by first loosening
the two screws supporting the footrest on the front
the lock nuts (1), see fig.6, using cap key no. 17,
of the frame as shown in fig. 4, unscrew using a
and then screw the adjustment screws in or out (2)
3 mm allen key. You will then be able to move the
using the 4 mm allen key. If you screw counterclock-
footrest up or down to fit into one of the pre drilled
wise the backrest will tilt forward and clockwise the
height positions. You should adjust the footrest at
backrest will tilt backwards. It is important to adjust
a height where your thighs are supported by the
both sides equally to avoid the backrest tubing becoming
seat at the same time as your feet are supported
crooked. Test this by putting the backrest in upright
by the footrest.
position and checking that both adjustment screws
are touching the frame. Try out suitable backrest angles
and tighten the lock nuts once you are satisfied.
FIG. 3
FIG. 4
FIG. 5
5
5. TENSION OF THE BACKREST
6. BALANCING THE WHEELCHAIR (FIG. 8)
UPHOLSTERY (FIG. 7)
The Panthera X has a fixed rear axle so balancing
The backrest upholstery can be tightened or
is achieved by moving the body position in relation
loosened by adjusting the Velcro straps at the
to the rear axle. This can be done by moving the
back (1). The backrest upholstery also has a flap
backrest which can be fixed in 4 different positions.
fastened with Velcro under the seatupholstery (2).
The further back you mount the backrest, the more
This can be moved back or forwards to obtain the
likely your chair will tip over backward. This means
required tension in the lower section of the back
that the chair is light at the front and you have more
upholstery (known as the seat bucket). By adjusting
weight over the rear wheels. The chair is easier
these things you can form the lower part of the
to drive and it is also easier to tip up onto the rear
back upholstery to suit the shape of your back and
wheels to negotiate curbs and steps. The chair should
obtain good support for your lower back. Start by
not be balanced with the backrest too far back,
loosening the band and sit as far back in the chair
however, because of the danger of tipping over.
as you can. Then tighten the band to give you good
support. If it feels as though you are not sitting far
back enough in the chair it may be because the
back upholstery flap (2) is fastened too far forward
under the seat. Relax this flap and move it back.
1
1
2
3
4
1
1
2
1
Fig. 7.
FIG. 6
2
11
FIG. 7
FIG. 8
TRANSPORT
We would like to make it quite clear that the best
To insert the wheels, press in the button and push
alternative for transportation in a vehicle is to
the axle into the hole in the casing. Then push the
transfer from the wheelchair into a regular passenger
wheel all the way in, release the button and pull
seat with a seatbelt.
out to check that the wheel is securely in place
and the button springs back out.
When transporting the wheelchair in e.g. a car,
you can remove the rearwheels and fold the backrest forward. See fig. 9.
1. Remove sideguards, if available.
2. Remove cushion, if available.
3. Fold the backrest forward.
4. Remove the rearwheels by pressing the center
of the hubs and pull the wheels straight out.
See fig. 10.
1
FIG. 9
FIG. 10
TRANSFER
Techniques for transfer must be properly practiced by qualified personnel. The methods described below are
only to be considered as important advice when transferring.
SIDEWAYS
•
chair chassis and the other on the surface you
Before transfer:
•
Back up the wheel chair 5-10 cm before
stopping it to ensure the castor wheels are turned
forward. The wheel chair should be positioned
Place one hand on the far corner of the wheel
are transfering from.
•
Carefully and with good balance heave yourself
into till wheelchair.
as close to the point of transfer as possible.
•
Lock the brakes, grab the support on the side
IMPORTANT! Be very careful not to tip over back-
you will be transferring from.
wards with the wheelchair when transferring.
13
MAINTENANCE
Your Panthera is designed to be virtually maintenance free. A few parts do require regular checking however.
(Naturally you should clean and check the chair more often if you use it in more extreme environments such
as in sand or salt water)
ONCE A MONTH YOU SHOULD:
4. Fill up the tyres with air. The tyres can be pum-
1. Wipe the chair chassis over with washing-up
ped by screwing the top off the valve and filling
liquid and a damp cloth. If very dirty you can use
with air using an appropriate valve adapter. The
a degreasing agent.
tyre can take 8 bar / kg of pressure.
2. Lubricate all moveable parts with a universal
5. Check that all the screws and nuts are securely
lubricant (5-56, WD-40) after cleaning. Clean the
fastened.
caster fork casing (between the wheel and the fork).
Hair and dust collect here which can damage the
Check that the chair has not been damaged.
bearing. Remove the wheel by loosen the screws
If damage has occurred, immediately contact
using allen key 4 mm. Clean the washers between
Panthera AB.
the wheel and the fork and wipe the outside of
the wheel bearing with a cloth. Drop some oil into
each bearing. Reassemble the parts.
TWICE A YEAR YOU SHOULD:
1. Lubricate the joints of the brake with some drops
3. Lubricate the rear wheel axles. Remove the
of oil.
wheel and distribute some drops of oil over the
14
axle. You should do this more often if you drive in
2. Wash the seat upholstery, the back upholstery
rain, sand, salt and slush or if you rarely remove
and the cushion cover in 40°C machine wash when
the wheels.
necessary.
T E C H N I C A L FA C T S
GUARANTEE AND LIFETIME
The service life of the Panthera X depends on how much
External accessories such as hand bikes and fixed back-
wear it is subjected to and how careful you are with main-
rests with installation performed with clamping hardware
tenance.
around the chassis tube or modifications to the chassis are
not permitted.
Important!
Avoid:
Carbon fibre is a very strong material but sensitive to impact
• Dropping/putting down the chassis on a hard surface
and hard shocks. As an example, a fall backwards in the
• Knocking the chair over backwards
wheelchair against a hard surface can cause damage to
• Scratching or eroding the carbon ibre construction
the back frame. Damages caused by external forces are not
covered by the warranty.
Guarantee:
We offer a five year factory guarantee on the chassis. For
other parts there is a guarantee of 12 months. Maximum
userweight: 100 kg.
15
MARKING
The CE marking and serial number are located on the
The manufacturer’s contact information is located on the
under side of the wheel chair, to the left on the chassi
under side of the wheel chair, to the left on the chassi
joining tubes. See picture below.
joining tubes. See picture below.
EAN CODE
CE MARK
MANUFACTURING DATE
SERIAL NO.
MODEL
MAXIMUM USER'S WEIGHT
ARTICLE NUMBER
SEAT WIDTH