1
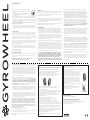
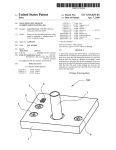
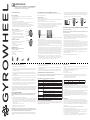
GYROWHEEL
USER MANUAL
IMPORTANT! KEEP THIS USER MANUAL FOR FUTURE REFERENCE.
please read your bike ’ s user manual and the gyrobike ™ gyrowheel user
manual before installing or operating gyrowheel .
PRODUCT INTRODUCTION
TOOLS REQUIRED TO INSTALL GYROWHEEL (NOT INCLUDED)
WHAT IS GYROWHEEL?
A 1/2 inch crescent wrench, 1/2 inch socket wrench or adjustable crescent wrench is needed, although two
wrenches will make installation easier.
•• Gyrowheel adds stability and balance and is designed to fit most standard kids’ bikes
that have 12 inch wheels.
•• Gyrowheel is a replacement to training wheels; it is not a supplemental device to be used
with training wheels.
•• Gyrowheel operates through a rechargeable battery.
•• Gyrowheel has three levels of stability controlled by one on/off button: Low; Medium; and High.
•• When the power is not activated, Gyrowheel works like a regular wheel.
•• While Gyrowheel has been designed for durability, no product lasts forever or will operate
if misused or abused. The useful life of this product will vary due to type and length of operation,
road conditions, rider competence and other factors beyond the control of Gyrobike.
INSTALLATION STEPS
1. Remove training wheels (if applicable).
2. Remove the existing front wheel of the 12 inch kids’ bike (if the bike is already assembled). Gyrowheel will
replace the existing front wheel.
3. Do not remove the nuts, or any parts, that come secured to Gyrowheel’s axle.
4. Examine Gyrowheel and find the “L” marking the left side and the “R” marking the right side of Gyrowheel.
5. As if the rider were seated facing forward on the bike, line up Gyrowheel with the front fork of the bike so
that the “L” is on the rider’s left side and the “R” is on the on the rider’s right side.
6. Place Gyrowheel’s axle in the notches at the bottom of the front bike fork in the same
manner that the original wheel was (or would have been) installed.
LEFT SIDE OF GYROWHEEL
You will see the following on the left side of Gyrowheel:
•• An “L” marking (for “left side of the rider”)
•• On/off button
•• Indicator light visible through triangular window
•• Air valve (“valve”) with 1 valve extender attached
•• Rubber door that protects the power port and valve
•• If you pull out the rubber door, you will see the power
port and valve.
RIGHT SIDE OF GYROWHEEL
You will see the following on the right side of Gyrowheel:
•• An “R” marking (for “right side of the rider”)
•• View windows
•• Inner disk with a dot or spiral pattern visible
through the view windows
STEP 9
FLANGE NUT
SAFETY WASHER
STEP 10
STEP 11
PROPER CHARGE OF BATTERY, INFLATION OF WHEEL, AND OPERATION OF GYROWHEEL
LIGHT INDICATOR
NOTCH OPENINGS AT THE
BOTTOM OF FRONT BIKE
RUBBER DOOR
RIGHT SIDE
VIEW WINDOW
AXLE
1 Gyrowheel with built-in rechargeable batteries
1 Charger
1 User Manual
Gyro-extras packet:
10 washers
ADD WASHERS HERE
IF NEEDED
IMPORTANT: Please see important battery and electronics warnings below. Gyrobike does not warranty batteries or electronics if
used contrary to these instructions.
ON/OFF BUTTON
IMPORTANT: use only genuine gyrobike™ parts with and on your gyrowheel.
use of other parts voids all warranties.
1 valve extender
FIG. A
HOW TO CHARGE GYROWHEEL
LEFT SIDE
PARTS INCLUDED
••
••
••
••
12.Pick up the front of the bike by lifting the handlebars high enough that Gyrowheel is off the ground. Spin
Gyrowheel a few times to ensure it is attached securely to the fork of the bike and is able to spin freely. If
Gyrowheel appears or feels wobbly, stuck, or falls out of the fork do not operate Gyrowheel. Review and
repeat the previous steps in this User Manual or call Gyrobike for assistance.
2 safety washers
NOTCH
7. If there is space between the forks and the nuts that come installed on Gyrowheel, then follow steps 8 and 9
below; if not, then skip to step 10.
8. Remove Gyrowheel from the front fork of the bike and install the necessary number of washers (included
in the Gyro-extras packet) onto the axle on either side of the nuts already on the axle to eliminate any
extra space described in step 7. The number of additional washers should either be equal on both sides of
the axle, or there should be only one more washer on one side than the other. (Remember, do not remove
the nuts that come secured to Gyrowheel’s axle.)
9. Place Gyrowheel’s axle back in the notches at the bottom of the front bike fork. Make sure that the added
washers are snug against Gyrowheel on each side of the fork and fit within the inside of the fork, between
the fork and the nuts. There should not be more than a few millimeters of space visible on Gyrowheel’s
axle between the fork and the washers. If necessary, remove Gyrowheel and repeat steps 5-8 to adjust the
number of washers until there is as little space as possible between the fork and the nuts. [SEE FIG. A]
10. Once the fit is correct, slip a safety washer on each side of the axle on the outside of each side of the fork
with the safety washer’s hook facing inward toward the bike fork. Locate the small hole in the bike fork into which the safety washer’s hook fits. Fit the safety washer hooks into each opening. [SEE FIG. A]
11. Place a flange nut on each end of the axle, and tighten firmly using a 1/2 inch crescent wrench, 1/2 inch
socket wrench or adjustable crescent wrench. If you have two wrenches, you may find it easier to use one
wrench on each flange nut at the same time in order to firmly tighten the flange nuts. When doing so,
make sure that the safety washer's hooks are still in the correct position. [SEE FIG. A]
1. Open the rubber door that is on the left side of Gyrowheel. The left side is marked with an “L.”
2. Behind the rubber door is the power port. Insert the plug of the charger into the power port and plug the
charger into a standard AC power outlet. After a few seconds, the light in the small window on the left side
of Gyrowheel will start pulsing red to indicate that Gyrowheel is charging. The charger is an “overnight”
charger; it takes up to 16 hours to charge Gyrowheel.
3. When fully charged, the light changes from pulsing red to solid green.
4. Close the rubber door securely. After securing the door in place, press firmly in the center of the door until
you feel it click into place. If you are having trouble clicking the door into place, or if you find that the bike
fork is rubbing against the rubber door as Gyrowheel spins, open the door and make sure the door leash is
facing in the correct direction as indicated by the drawing on the inside of the door. If necessary, you can
remove the silver valve extender that is attached to the air valve by unscrewing it. However, we recommend
that you leave the valve extender in place if you don’t absolutely need to remove it.
5. When the battery is low, Gyrowheel makes a beeping sound and its light illuminates solid red. Immediately
stop use, turn off Gyrowheel by pressing the on/off button, and recharge Gyrowheel fully before the next
use. Gyrowheel should be turned off when it is not in use.
6. When fully charged, Gyrowheel will run for about 2 hours on the high stability level, and longer on the
medium and low stability level.
TIP: For optimal battery life, charge the battery fully after each use.
2 flange nuts
HOW TO INFLATE GYROWHEEL’S TIRE
1. Open the rubber door located on the left side of Gyrowheel.
2. Locate the silver valve extender inside the rubber door compartment. Use a bike tire pump to inflate the
wheel. Your pump should be compatible with Schrader valves. We recommend 36 PSI for the tire that
comes standard on Gyrowheel.
3. Depending on the design of your bike pump you may need to use the spare valve extender from your
Gyro-extras packet. Screw the spare valve extender onto the primary valve extender clockwise until firmly
attached. Repeat step 2.
3. The disk inside Gyrowheel will begin to spin after you turn it on, and the light will pulse green while the
disk spins up to the stability setting you select.
4. The light will stop pulsing and turn solid green once Gyrowheel’s disk has reached full speed and is ready
to ride with the added stability.
5. To deactivate Gyrowheel once Gyrowheel is running, press the on/off button. It will beep once and the
green light will turn off. The disk inside will begin to slow down and after a few minutes come to a stop.
IMPORTANT WARNING: GYROWHEEL DOES NOT ADD STABILITY WHEN IT IS TURNED OFF.
4. After inflating the tire, remove the pump. If you previously attached the spare valve extender, remove it now.
NOTE: If during use the rider desires to change the stability setting, turn Gyrowheel off and allow it to come
to a stop. Then start the wheel again as described above starting with step 2.
5. Close the rubber door securely. After securing the door in place, press very firmly in the center of the door
until you feel it click into place.
QUICK REFERENCE GUIDE FOR SOUND AND LIGHT INDICATORS
6. If you are having trouble clicking the door into place, or if you find that the bike fork is rubbing against
the rubber door as Gyrowheel spins, open the door and make sure the door leash is facing in the correct
direction as indicated by the drawing on the inside of the door. If necessary, you can remove the silver
valve extender that is attached to the air valve by unscrewing it. However, we recommend that you leave
the valve extender in place if you don’t absolutely need to remove it.
TIP: If you remove both valve extenders in order to securely close the rubber door, you may need to deflate most of
the air out of the tire tube in order to put the first valve extender back on. To do this, carefully apply pressure from
a pointed object (such as a small screwdriver) onto the tip of the valve, allowing air to escape. Once the tire tube
is relatively empty, press the tire in toward the rim of the wheel, allowing the valve to protrude further through the
hole in the shell.
1. Ensure Gyrowheel is properly installed and properly inflated.
2. Gyrowheel has three levels of stability. It is simple to adjust the level using the on/off button. Each time you
press the on/off button, the indicator light will pulse green once and Gyrowheel will beep once to indicate
an increase in stability level. (Note: If you do not see the light pulse green or hear a beep, you may have
pressed the button too fast or too gently. If this problem persists, it is likely that the battery is low and
needs to be recharged.)
—— Low stability: Press the on/off button one (1) time
—— Medium stability: Press the on/off button two (2) times
—— High stability: Press the on/off button three (3) times
IMPORTANT NOTE: The initial press turns Gyrowheel on and sets the stability level on the low stability setting, a second press
within 3 seconds will set the stability at medium, a third press within 3 seconds will set the stability to its highest level. (A press
after the 3 second window of time will turn Gyrowheel off, no matter what the stability setting was.)
TIP: We recommend starting out on "high stability" when the rider is first learning. As he or she becomes more
comfortable, you can gradually decrease the stability level. Visit thegyrobike.com for additional training tips using
Gyrowheel.
1. Read this User Manual and your bike’s user manual completely and check all local regulations governing
bike riding.
2. We strongly recommend that all riders wear a helmet when sitting on and operating a bike. Follow the user
manual that accompanies the rider’s helmet to ensure proper fit.
3. Check local bike laws before the bike is ridden.
4. Do not ride at night.
5. Bikes should have reflectors installed.
6. New riders should wear sturdy footwear. We recommend that persons teaching a new rider wear comfortable street shoes, such as sneakers. Riders and people teaching the rider should not wear loose
clothing that may catch in handlebars, brakes or gears.
7. Ensure that the bike is the correct size for the rider.
STATE
LIGHT/SOUND INDICATION
OFF
Indicator light is off (unless plugged in for charging).
ON POSITION
Indicator light remains solid green when on and adding stability.
LOW BATTERIES
Indicator light is red and Gyrowheel beeps.
NOTE: Suggested age and rider height range are approximate.
CHARGING
Indicator light pulses red when plugged in and charging.
FULLY CHARGED
Indicator light is solid green.
TURNING DISK ON
Indicator light pulses green and Gyrowheel beeps with each press of the on/off
button.
8. Adjust the seat height appropriately. An experienced rider should be able to put both sets of toes on the
ground (“tippy-toe” style) while straddling the bike seat. For new riders, we recommend lowering the seat
so that both feet are comfortably flat-footed on the ground while straddling the bike seat. A slight bend in
the knee is ideal.
9. For riders that are beginners, you may want to remove the pedals from the child’s bike and allow the rider
to push along the ground with his/her feet to scoot the bike. See below for more details.
10. Riding environment is important! Choose a location free of obstacles and distractions, including siblings,
pets and road hazards. Ideally the ground should have a very slight downhill slant, though flat ground
works well too. Be sure the area is free of bumps, gravel and loose debris. Soft ground is ok as long it is not
too soft, loose, or uneven.
• Low stability: Press the on/off button one (1) time
• Medium stability: Press the on/off button two (2) times
HOW TO OPERATE GYROWHEEL
IMPORTANT WARNING: Read the following instructions before sitting on or operating a bike with Gyrowheel. Failure to operate
Gyrowheel in accordance with these instructions may result in personal injury, up to and including death, and/or property
damage.
BEFORE RIDING
• High stability: Press the on/off button three (3) times
DISK SPINNING UP
Indicator light pulses green.
TURNING DISK OFF
Gyrowheel beeps once and indicator light turns off.
DISK SPINNING DOWN
Indicator light is off; wheels slows down to a stop in a few minutes.
STARTING TIPS FOR TEACHING NEW RIDERS
Please see your bike’s user manual for additional suggestions. The following suggestions are not exhaustive
and are for informational purposes only. You are solely responsible for using good judgment when riding a
bike and for following all local bike riding regulations.
Age
Rider Height
Maximum Rider Weight
Bike/Wheel Size
3+ years
34-46 inches
88 lbs.
12 inch.
START RIDING
1. Allow the rider to gain comfort and confidence by simply sitting on the bike seat and holding onto the
handle bars. Encourage the rider to push along the ground with his/her feet to scoot the bike around like
a seated scooter. This exercise is meant to build confidence and balance. It can be practiced with Gyrowheel
powered on or off, depending on the child’s confidence and balance. Allow the rider to practice scooting
until he/she is very comfortable pushing off the ground with his/her feet and is able to pick his/her feet up
from time to time.
NOTE: This exercise is most effective if the bike’s pedals have been temporarily removed.
2. Ensure that the pedals are securely attached to the bike.
3. Assuming the bike has foot brakes, be sure that the rider understands that pedaling forward will make the
bike move forward and that pedaling backward will slow or stop the bike.
4. Find a good starting location. An open area with a slight decline is ideal, though flat ground works well
too. Check for and remove any debris, obstacles or road hazards.
5. Follow the directions in the How to Operate Gyrowheel section to turn on your Gyrowheel. Wait until the
light becomes solid green, indicating that Gyrowheel’s disk is up to speed and ready for use.
GYROWHEEL
6 CONTINUED FROM OTHER SIDE
6. Align the pedals so that each is the same distance from the ground (rather
than one being significantly higher or lower, as that position is more difficult
to start from).
7. Have the rider mount the bike, hold the handlebars, and put his/her foot
on the pedal farthest forward. The other foot should remain on the ground
PEDALS IN CORRECT POSITION
before starting to pedal.
8. Support the rider by standing beside and slightly behind the rider, with your hands on the rider’s back.
We recommend supporting the rider under one or both underarms, around the shoulder blades, initially.
9. Encourage the rider to start pedaling and assist as needed during the initial takeoff, moving with the bike
for support. Each trial should be a bit better, and as the rider gets the hang of riding, you can release
your supporting hand(s) from the rider’s back.
Note: Some riders can start riding with Gyrowheel without any assistance. If the rider is confident to start
without support, we encourage this approach.
10. Verbally encourage and repeat “look ahead,” “look up,” “keep pedaling,” and “keep your hands in front
of you” when the rider is moving. These are critical ingredients to successful initial attempts. Vocal
encouragement and patience is essential during this phase of riding. Compliment the rider for doing a
good job.
TIPS FOR SUCCESS
If the rider has experience on a bike with training wheels, he or she has likely learned some bad habits
that hinder correct riding technique. Specifically, training wheels encourage riders to lean away from the
direction in which the bike is turning and also allow the rider to permanently lean to one side, relying on
the training wheel – rather than the rider’s own stability – to keep the bike upright. If you notice these signs,
encourage the rider to sit up straight, to not lean to the side, and to keep his/her hands in front of him/her.
Gyrowheel is usually quite effective in helping riders unlearn poor riding technique.
Some riders, particularly those who have tried unsuccessfully to remove training wheels in the past, have a
tendency to put a foot down at the slightest tip of the bike. This action needs to be unlearned as well. Once
Gyrowheel is installed, encourage these riders to “keep pedaling” and to “look up and ahead.” Discourage
riders from frequently putting a foot down.
When the rider gets tired or discouraged, take a break and relax. However, we recommend trying again
soon. It is important to end a session on a positive note and reinforce the rider’s success after the
session, but it is also important that new riders get adequate time to rest and absorb what they learn. We
recommend snacks and lots of high fives!
For more riding tips, please visit thegyrobike.com.
HOW TO CLEAN GYROWHEEL
We recommend applying a non-toxic all-purpose spray cleaner to a rag or paper towel and then wiping the
outer surface of Gyrowheel. Method’s all-purpose spray cleaners are a great choice and can be found at
methodhome.com.
IMPORTANT WARNING: Keep Gyrowheel away from water, moisture and out of the rain as much as possible.
Gyrowheel is water resistant; however warranty and returns do not cover water damage.
9. DISPUTE RESOLUTION, VENUE, AND CONSENT TO JURISDICTION: Each party to this Limited Warranty,
to the extent permitted by law, knowingly, voluntarily and intentionally waives its right to trial by jury in
an action or other legal proceeding arising out of or relating to this Limited Warranty. This waiver applies
to any action or legal proceeding, whether sounding in contract, tort, or otherwise. Any legal action or
proceeding by Purchaser arising out of or relating to the Limited Warranty shall be brought in state or
federal court in the State of California sitting in San Francisco County. Further, the parties agree to have
all disputes resolved by binding arbitration before a retired Superior Court Judge in the County of San
Francisco, California. The parties agree that any decision of the arbitrator shall be final, and in accordance
with California law. Purchaser stipulates to specific personal jurisdiction in California for any disputes
arising out of or relating to this Limited Warranty.
10. MERGER: Any oral statements about the product covered by this transaction made by Gyrobike’s
representatives, or statements contained in Gyrobike’s general advertising, pamphlets, brochures, other
printed materials, or internet advertisements, do not constitute warranties. THIS WRITING IS INTENDED
BY THE PARTIES AS A FINAL EXPRESSION OF THEIR AGREEMENT WITH RESPECT TO WARRANTIES,
AND SUPERSEDES ALL PRIOR AND CONTEMPORANEOUS NEGOTIATIONS OR EXPRESSIONS WITH
RESPECT TO WARRANTIES. This Limited Warranty may not be amended, modified, or rescinded, except
by written agreement signed by an authorized representative of Gyrobike.
11. SEVERABILITY: If any provision of this Limited Warranty is held by a court of law to be illegal, invalid, or
unenforceable, (a) that provision shall be deemed amended to achieve as nearly as possible the same
economic effect as the original provision; and (b) the legality, validity and enforceability of the remaining
provisions of this Limited Warranty shall not be affected or impaired thereby.
12. WAIVER: No term or provision hereof will be considered waived, and no breach excused, by either party,
unless such waiver or consent is in writing signed by the party against whom such waiver or consent is
asserted. The waiver by either party of, or consent of either party to, a breach of any provision of this
Limited Warranty by the other party shall not operate or be construed as a waiver of, consent to, or excuse
of any other or subsequent breach by the other party.
NOTE: This equipment has been tested and found to comply with the limits for a Class B digital device,
pursuant to Part 15 of the FCC Rules. These limits are designed to provide reasonable protection against
harmful interference in a residential installation. This equipment generates, uses, and can radiate radio
frequency energy and, if not installed and used in accordance with the instructions, may cause harmful
interference to radio communications. However, there is no guarantee that interference will not occur in a
particular installation. If this equipment does cause harmful interference to radio or television reception,
which can be determined by turning the equipment off and on, the user is encouraged to try to correct the
interference by one or more of the following measures:
••
••
••
••
Reorient or relocate the receiving antenna.
Increase the separation between the equipment and receiver.
Connect the equipment into an outlet on a circuit different from that to which the receiver is connected.
Consult the dealer or an experienced radio/TV technician for help.
Caution, changes or modifications not expressly approved by Gyrobike could void the user's authority to
operate the equipment.
RETURN POLICY
If you purchased Gyrowheel online directly from Gyrobike and you wish to return it, you may do so within
30 days of purchase. Gyrowheel must be returned in the unopened original packaging with no signs of use.
All returns must have a Return Authorization Number. Contact Gyrobike at (888) 489-9790 or email us at
[email protected] to obtain a return authorization form.
Please package the product securely. Unfortunately, Gyrobike cannot be held responsible for returns that are
lost by the package delivery company; therefore, we recommend purchasing proof of delivery if sending by
the US Postal Service. In the package, please include your Return Authorization Form. If this information is
not included, Gyrobike cannot ensure a refund.
If you purchased Gyrowheel from a store, please follow the store’s return policy for returns. Unfortunately,
Gyrobike cannot issue a refund for a return of a store-bought Gyrowheel.
4. EXCLUSIVE REMEDY: THE PURCHASER AGREES THAT EXCEPT WHERE SUCH LIMITATIONS AND
EXCLUSIONS ARE SPECIFICALLY PROHIBITED BY APPLICABLE LAW, THE PURCHASER'S SOLE AND
EXCLUSIVE REMEDY AGAINST GYROBIKE SHALL BE FOR THE REPAIR OR REPLACEMENT OF THE
GYROWHEEL, AND THAT NO OTHER REMEDY (INCLUDING BUT NOT LIMITED TO INCIDENTAL, SPECIAL,
INDIRECT, OR CONSEQUENTIAL DAMAGES OR CLAIMS FOR LOST PROFITS, LOST SALES, INJURY
TO PERSONS OR PROPERTY, OR ANY OTHER LOSS) SHALL BE AVAILABLE TO THE PURCHASER,
WHETHER THE REMEDY IS BASED UPON DIRECT ACTION, SUIT FOR CONTRIBUTION OR INDEMNITY,
OR OTHERWISE, WHETHER ARISING OUT OF CONTRACT, TORT, STATUTE, PRODUCT LIABILITY, STRICT
LIABILITY IN TORT, OR OTHERWISE. This exclusive remedy shall not be deemed to have failed of its
essential purpose as long as Gyrobike is willing and able to repair or replace the defective Gyrowheel
(subject to the limitations set forth above). In the event of repair or replacement under the terms of this
Limited Warranty, the warranty on the repaired or replacement Gyrowheel will extend for the balance of
the warranty period in effect at the time the original Gyrowheel proves defective. SOME STATES DO NOT
ALLOW THE EXCLUSION OR LIMITATION OF INCIDENTAL OR CONSEQUENTIAL DAMAGES, SO THE
ABOVE LIMITATIONS MAY NOT APPLY TO YOU.
LIMITED WARRANTY
1. LIMITED WARRANTY: The Gyrobike, Inc. (“Gyrobike”) warrants to the original Consumer Purchaser
(“Purchaser”) that Gyrowheel is free from defects in materials and workmanship on the date of purchase.
This Limited Warranty does not extend to any bike component or part other than Gyrowheel and the
components provided with the Gyrowheel. If a defect in materials or workmanship that was present on the
date of purchase manifests within ninety (90) days from the date of purchase, Gyrobike will correct these
defects by repair, or at Gyrobike’s sole discretion, replace the Gyrowheel. Gyrobike’s obligations under
this Limited Warranty are contingent upon Gyrobike’s determination, at its sole discretion, that the defect
is a covered defect in materials or workmanship. Gyrobike’s obligation under this Limited Warranty shall
not include costs associated with removal or installation of the Gyrowheel or any shipping charges. This
Limited Warranty is applicable only to the original Purchaser.
2. CONDITIONS OF WARRANTY COVERAGE: Gyrobike does not warrant: (a) defects and/or damage caused
by misuse, abuse, negligence, improper storage, neglect, or the mishandling of the Gyrowheel; (b) defects
and/or damage caused by the use of the Gyrowheel for purposes other than those for which it was
designed or intended; (c) damage and/or defects caused by any improper installation; (d) damage and/or
defects caused by unauthorized and/or improper attempts to repair, alternate, disassemble, or otherwise
modify the Gyrowheel; (e) damage and/or defects caused by improper electrical connection, exposure to
chemicals, water, or excessive temperatures; (f) damage and/or defects caused by failure to comply with
the instructions and warnings set forth in the User Manual; and (g) any defect, damage, and/or failure as a
result of accident, earthquake, fire, flood, or other casualty or acts of God.
3. LIMITATIONS: ALL EXPRESS AND IMPLIED WARRANTIES ON THE GYROWHEEL, INCLUDING BUT
NOT LIMITED TO ANY IMPLIED WARRANTY OF MERCHANTABILITY OR FITNESS FOR A PARTICULAR
PURPOSE, ARE LIMITED IN TIME TO THE TERM OF THIS LIMITED WARRANTY. NO WARRANTIES,
WHETHER EXPRESS OR IMPLIED, WILL APPLY AFTER THE EXPIRATION OF THE LIMITED WARRANTY
PERIOD. SOME STATES DO NOT ALLOW FOR THE EXCLUSION OR LIMITATION OF IMPLIED
WARRANTIES, SO THE ABOVE LIMITATIONS MAY NOT APPLY TO YOU. THIS WARRANTY GIVES YOU
SPECIFIC LEGAL RIGHTS AND YOU MAY ALSO HAVE OTHER LEGAL RIGHTS WHICH VARY FROM STATE
TO STATE.
5. LIMITATION OF DAMAGES: The Purchaser agrees that in no event shall Gyrobike’s liability for any claim or
combination of claims under this Limited Warranty exceed the original purchase price of the Gyrowheel.
Gyrobike is not responsible for labor costs or other expenses required to replace or repair damage
resulting from the use of the defective Gyrowheel. Purchaser acknowledges that these limitations of
damages are reasonable in light of the anticipated harm caused by any breach of this Limited Warranty,
the difficulties of proof of loss, and the inconvenience or non-feasibility of otherwise obtaining an
adequate remedy.
6. OBTAINING WARRANTY SERVICE: Gyrobike must receive written notification of an alleged failure within
the applicable warranty period. TIME IS OF THE ESSENCE IN PROVIDING THIS NOTICE, AND RECEIPT
OF SUCH TIMELY NOTICE IS A CONDITION PRECEDENT TO ANY PERFORMANCE BY GYROBIKE UNDER
THIS LIMITED WARRANTY. To obtain warranty service, Purchaser must send the Gyrowheel and all
components provided with the Gyrowheel, postage prepaid, and include a Return Authorization Form and
proof of purchase to the following address: OHL, Gyrobike Returns Department, 475 Lillard Drive, Sparks,
NV 89434. Contact Gyrobike at (888) 489-9790 or email us at [email protected] to obtain a return
authorization form. Purchaser is responsible for payment of the shipping of the Gyrowheel to Gyrobike.
Package the product securely; damage incurred during shipment is not covered by this Limited Warranty.
Purchaser is responsible for payment of any insurance for the shipment of the Gyrowheel to Gyrobike.
7. COMMENCEMENT OF SUIT: No action arising out of any claimed breach of warranty or breach of any
remedial promise arising out of or relating to this Limited Warranty may be brought more than one (1) year
after the cause of action has accrued.
8. CHOICE OF LAW: The laws of the State of California (without giving effect to its conflicts of law principles)
govern all matters arising out of or relating to this Limited Warranty, including without limitation, its
validity, interpretation, construction, performance, and enforcement. The United Nations Convention on
Contracts for the International Sale of Goods is expressly disclaimed from application to this Limited
Warranty in all respects.
IMPORTANT SAFETY WARNINGS
PLEASE READ ALL WARNINGS AND INSTRUCTIONS CAREFULLY BEFORE INSTALLING OR USING GYROWHEEL. Failure to read,
follow or abide by these instructions may result in personal injury, up to and including death, and/or property damage.
•• Do not activate Gyrowheel until it is properly installed in accordance with the instructions below.
•• IMPORTANT: GYROWHEEL MUST BE INSTALLED IN THE CORRECT DIRECTION.
—— The direction in which Gyrowheel is installed and oriented on the bike is critical.
—— When the rider is seated on the bike facing forward, make sure that the side of Gyrowheel marked
with an “L” is on the rider’s left side and the “R” is on the rider’s right side.
LEFT SIDE
RIGHT SIDE
••
••
••
••
••
••
•• Gyrowheel is built for standard 12 inch kids’ bikes in good working order. Please refer to the user
manual for the 12 inch bike for further information regarding proper bike operation.
•• Do not open or take Gyrowheel apart.
•• Do not sit on the bike or place any object or material on the bike during installation of Gyrowheel.
•• Gyrowheel is an electronic device. It does not function as a stabilizing device unless it is turned on. It
functions as a standard bike wheel and does not add stability when turned off.
•• Once Gyrowheel is installed on your bike, do not sit on, use or operate the bike while Gyrowheel is
plugged into an outlet for charging. Do not use Gyrowheel until it is fully charged.
•• Keep Gyrowheel away from water.
—— Do not place, rest, submerge or immerse Gyrowheel in water.
—— Do not plug in Gyrowheel if Gyrowheel or the bike is located in or near water.
—— Do not stand in water while plugging in Gyrowheel.
—— Keep Gyrowheel away from water, moisture and out of the rain as much as possible.
—— Gyrowheel is water resistant; however warranty and returns do not cover water damage.
•• Do not overload your electric outlet while charging Gyrowheel. Use the Gyrowheel charger only with
compatible outlets and electrical systems. Do not use any other charger to charge Gyrowheel other
than the one that came packaged with Gyrowheel. Gyrowheel charger is compatible with North
American power outlets and can be used with an adaptor in most places on other continents. (100240 VAC, 47 to 63 Hz)
•• Gyrowheel is not intended to be operated as a toy or a science experiment or in any manner other
than as expressly provided in this User Manual. Any other uses void all warranties and may result in
personal injury, up to and including death, and/or property damage.
•• Bike riding is an inherently dangerous activity!
—— All bike riders, but especially new bike riders, must be carefully supervised and instructed on the
rules of the road.
••
—— Gyrobike highly recommends that reflectors be installed on all bikes and that all riders wear helmets
and appropriate biking gear and clothing.
—— Please see your bike manufacturer’s user manual for additional instructions and cautions.
Do not wear loose clothing when riding a bike. Loose clothing may catch in the bike’s gears or other
objects and cause an accident or injury.
Gyrowheel does not prevent accidents or provide any protection in an accident.
The rubber door on the left side of Gyrowheel protects Gyrowheel’s
electronic components from water, dirt and other environmental hazards.
Be sure the rubber door is securely shut when in use by the rider. Failure
to keep the rubber door securely shut may result in product failure,
property damage, and/or personal injury, up to and including death.
Only use 12 inch Gyrowheel as the front wheel of a 12 inch kids’ bike.
Gyrowheel is built to accommodate up to 88 lbs of rider weight on the
12 inch bicycle. Failure to adhere to this warning may result in personal
KEEP RUBBER DOOR SHUT
injury, up to and including death, and/or property damage, and voids any
applicable warranties.
Be sure the tire of Gyrowheel is properly inflated before use by following the
instructions set forth within this User Manual.
Gyrowheel should not be used at the same time as training wheels.
Please ensure that the training wheels have been removed from the
bicycle before operating Gyrowheel.
DO NOT USE TRAINING WHEELS
WITH GYROWHEEL
CONTACT INFORMATION
Contact us at [email protected] or (888) 489-9790.
PLEASE KEEP ALL INSTRUCTIONS FOR FUTURE USE
Designed, assembled and tested in the USA of US and foreign materials.
Protected by US Patent No. 7,314,225 and 7,597,337. Other US and international patents pending.
GYROBIKE is the registered trademark of Gyrobike, Inc. All rights reserved.
©2009 Gyrobike, Inc. All rights reserved.