1
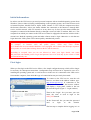
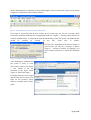
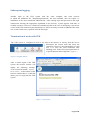
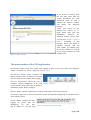
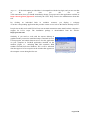
Instructions for use the VPN at the
Warsaw School of Economics
Dariusz Jaruga.
ver. 1.1 (19-01-2011)
Introduction
VPN is the abbreviation for Virtual Personal Network which allows you to connect your
computer physically located outside of SGH campus to SGH local area network
securely via an encrypted transmission channel. When you connect your computer to the VPN service
there is a logical "transfer" to SGH local computer network, as if the computer was physically in SGH.
VPN provides access to many services, which today can be used only and exclusively inside SGH.
VPN system allows for remote access to the resources. A detailed list is available on the website at:
www.sgh.waw.pl/ogolnouczelniane/biblioteka/bazy/
In addition to the systems indicated by the Library, VPN will enable work in the WorkFlowGen
system and with other systems based on remote desktop or terminal text, provided that it is allowed by
a license or terms of agreement to use the software / system.
According to the manufacturer's assurance VPN can be used with virtually any operating system like
Windows, Mac, Linux, and various mobile devices including iPhone, Windows Mobile, Symbian and
Android.
Detailed
technical
data
for
the
implemented
device
http://www.juniper.net/us/en/products-services/security/sa-series/sa4500/
can
be
found
at:
Page 2 of 8
Initial information.
In order to use the VPN service you need a personal computer with an installed operating system from
Windows, Linux or Mac OS family, and depending on the operating system, one of the browsers such
as Internet Explorer, Mozilla FireFox, Opera, Safari, Chrome. To use VPN, the computer must have
the Internet connection. It does not matter whether the connection to the Internet is through DSL
service, mobile network, cable TV network or in any other way. It does not also matter whether the
computer is connected to the Internet directly or through a router (of cable TV modem, DSL, etc.). The
computer from which you connect to the VPN service must be equipped with antivirus software with a
current base. Both the operating system and other software must be legal. Otherwise we risk that our
login data to the VPN system will be intercepted by unauthorized persons.
When
using
the
VPN
service
you
must
be
wary
of
using
computers
for example, in Internet cafes and public places, which may cause doubts
as to whether the above-mentioned hardware is not equipped with software that intercepts sequences
of keystrokes or records data exchange between the PC and the network.
According to accepted rules you are not allowed to share your login details, user name
and password with another person. Login and password are to be used only by the owner of VPN
account and nobody else.
First login
When you first login to the VPN service follow a few simple configuration steps, which will no longer
be necessary for subsequent connections. Configuration steps will need to be repeated in case of reinstalling the operating system and / or web browser or in the case of a connection to the VPN service
from another computer, from which this type of connection has not previously been made.
To connect to the VPN service, start the web
browser, and then in the address window type:
http://brama.sgh.waw.pl. If connection to the
VPN server is successful, the browser window
will display a login panel, similar to the one
shown in the figure (Figure 1 - Login window).
Then in the "Login:" box you enter your user
name, the same as used to login to the
SGH_NET domain.
In the "Password" box you enter the password
used
to
login
to
the
domain.
Figure 1 – Login window
The last step to complete before logging in is to
Page 3 of 8
choose the department in which the user has defined rights. All users of the VPN system are by default
assigned to a department called "domain Library".
Figure 2 – Message about the need to install an additional file
If the login is successful in the browser window on top of the page you will see a message about
the need to install the additional file "JuniperSetupClient.cab" (Figure 2 - Message about the need to
install an additional file). To fully benefit from the functionality of the VPN system, the additional file
should
be
installed
by
clicking
on
the
link
"Click
here
to
install."
In some cases, depending on the current settings of
your browser you may get a message as shown
(Figure 3 - Consent to install). If it happens, you
must confirm permission to install the additional
file.
Figure 3 – Consent to install the additional file
After installing the additional file
the system is ready to work.
The browser window will display
a view similar to the one
presented in the figure below
(Figure 4 - Panel after login).
From this moment you are logged
into the VPN service and you can
fully use the resources whose
links are available in the "Home"
panel.
Page 4 of 8
The VPN system provides access to indicated internal websites, access to remote PC desktop to work
in a graphical environment, access
to the terminal session enabling
Figure 4 - Panel after logging in
remote working in the text mode.
Moreover, it is possible to access
the internal storage resources
identified by the administrator.
When logging into the VPN
system is not successful due to
mistakenly given username or
password, the browser screen will
display the following message
"Invalid username or password.
Please
re-enter
your
user
information” (Figure 5 - message
about
incorrect
login
or
password.). This means that an
Figure 5 - message about incorrect login or password.
error occurred when typing, and
you must once again enter your
user name and password. While re-entering the password, make sure that the CAPS LOCK is off.
Another common error message
which you may encounter is lack of
access permission to a given
department.
If in the login panel the user name
and password is given correctly, but
the
department
is
selected
mistakenly, the browser screen will
display the following message: "You
are not allowed to sign in. Please
contact your administrator" (Figure 6
- no access permission to the
department). In this case you must reenter your login and password to the
Figure 6 - no permission to the department
login panel and then select a
correct department. All users of the
VPN system are by default assigned to a department called "domain Library".
Page 5 of 8
Subsequent logging.
Another login to the VPN system with the same computer and same browser
in which the additional file "JuniperSetupClient.cab" has been installed, does not require reinstallation of the above-mentioned additional file. After entering login and password in the login
window and selecting the appropriate department in the browser, a panel appears with links to
available resources. However, it should be remembered, that in the case of developing a next newer
version of the VPN software by the manufacturer, it will be necessary to install an additional file in the
new version. In this case, repeat all as for the first login.
Termination of work with VPN.
The VPN system is configured in such a way that in the absence of activity from the user it
disconnects the session itself and closes the
connection. However, the responsibility of each
user is to close the VPN connection after
finishing work. In the VPN system panel there is
a special function called "Sign Out". (Figure 6 – ).
Figure 6 – navigation buttons
After a correct logout of the VPN
system, the browser window will
display the following message:
"Your session has ended." (Figure 7 –
end of session). At the bottom of the
browser window there is a link that
allows you to re-login into the VPN
system.
Figure 7 – end of session
Page 6 of 8
In the absence of activity from
the user after some time the
system disconnects the VPN
connection itself. In such a
situation the browser window
will display the following
message:
"Sorry, your session on this
machine has expired. To relogin, please enter your user
information,
otherwise
for
increased security please close
your browser" (Figure 9 - expiry of
session).
According to the
message, unless you intend to
continue working with the
VPN system, you should close
the browser window or re-log in
if you want to continue to work
with the VPN.
Figure 8 – expiry of session
The main window of the VPN application.
In the main window of the VPN system after logging in there are four keys at the user's disposal:
"Home", "Preferences", "Help", "Sign Out" (Figure 9 – keys).
The first key "Home" opens a window with
shared resources; this is a default view that the
user has in his browser window after logging.
The key "Preferences" allows the user to
configure selected components of the VPN Figure 9 – main keys
system interface such as the order of display of
information on the "Home" webpage.
The key "Help" contains a detailed user’s manual in the field of VPN system support.
The last key "Sign Out" is used to exit the VPN system and should be obligatorily chosen at the end of
work with the system.
On the "Home" webpage just after
logging in, please note the
information
on
the
time
Figure 10 – information about the last login
and IP address of your last login
Page 7 of 8
(Figure 10 – ).
If the information provided there is incompatible with the last login, and you are sure that
at
the
given
time
you
did
not
use
VPN connections, then you should immediately change your password in the application available at
https://akson.sgh.waw.pl/passwd/ and notify the Users’ Help Team or the administrator about this
fact.
By clicking on individual links in available resources you display a webpage
or run the corresponding application that provides remote access such as the Remote Desktop service.
People who in their work with VPN will use text terminal connections must install on their computer a
support for JAVA script. The installation package is downloadable from the website:
http://java.sun.com/
Similarly, if you need to work with the remote desktop in
graphical mode you need to install the Juniper Terminal Services
Client program, and unlock Internet access for this application
on your computer in FireWall application installed on the
machine (Figure 11 – unlocking VNC VNC terminal). With
standard Firewall built into Windows XP it will be unlocked
after the approval of an exception in the window that appears on
the computer screen during the first run.
Figure 11 – unlocking VNC terminal
Page 8 of 8