1
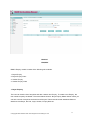
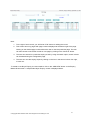
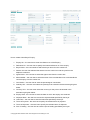
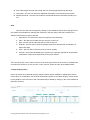
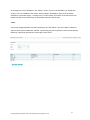
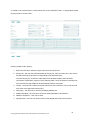
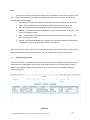
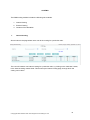
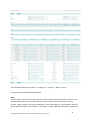
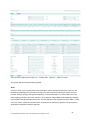
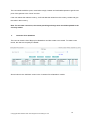
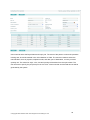
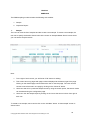
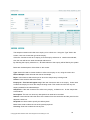
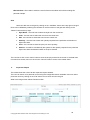
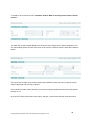
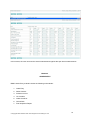
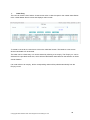
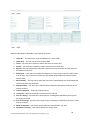
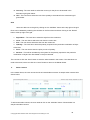
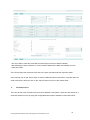
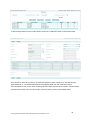
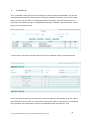
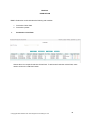
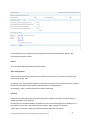
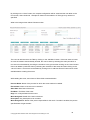
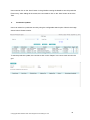
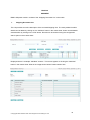
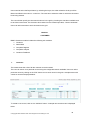
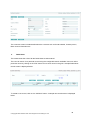
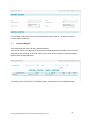
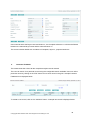
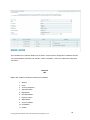
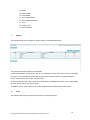
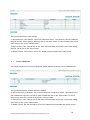
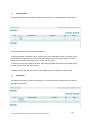
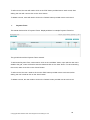
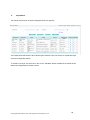
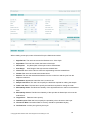
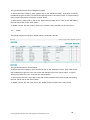
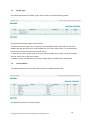
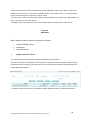
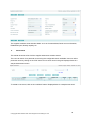
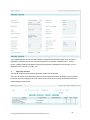
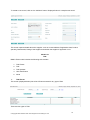
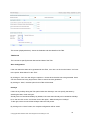
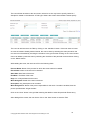
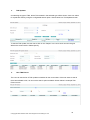
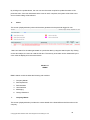
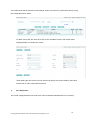
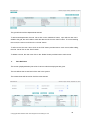
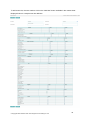
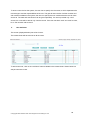
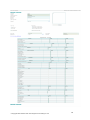
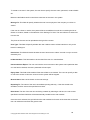
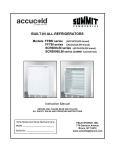
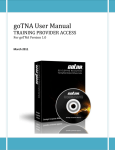
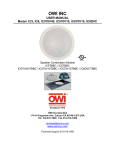
REACH Merchandising Manager
USER MANUAL
enabling collaborative partnerships across the soft goods value chain
REACH
Merchandising
Manager (RMM)
USER MANUAL
Copyright © 2009. REACH Sewn Technologies & Consulting Pvt. Ltd.
All rights reserved. No part of this book may be reproduced or distributed or transmitted in any form or by any means, or stored
in a database or retrieval system without the prior written permission of the publisher.
Published by REACH Sewn Technologies & Consulting Pvt. Ltd.
49, 1st Main, 9th Cross, Sarakki Industrial Layout, 3rd Phase, JP Nagar, Bangalore - 560 078.
Tel: +91-80-65996111/112/113 Fax: +91-80-26585744
www.reach-tech.com I [email protected]
© Copyright 2009. REACH Sewn Technologies and Consulting Pvt. Ltd.
1
Overview of REACH Merchandising Manager
REACH Merchandising Manager (RMM) is tailored to ensure that you are highly competitive in the
marketplace; after all, trends are created overnight and fashions change without warning in the sewn
product manufacturing and merchandising marketplace.
RMM streamlines sampling, merchandising, production and quality processes and integrating
customer service with optimal utilization of resources across the enterprise.
RMM allows you to automate a large number of routine events without human
involvement. Most importantly, the software can prompt you to intervene when exceptional events
demand it. In short, your Merchandising value chain becomes more efficient, responsive and
profitable.
REACH Merchandising Manager will, thus, enable you to ‘manage your company by exception’
directing your employees’ attention where it is needed: to the out-of-the ordinary business situations
that present the most risk and the greatest opportunity.
RMM has a 3-pronged impact on your business:
Impact on Revenues
End-to-End integration of company data ensures that all parties have the latest and most accurate
information. This leads to less wastage and shorter time-to-market cycles for new collections and
styles, while accelerating your Return On Investment (ROI).
© Copyright 2009. REACH Sewn Technologies and Consulting Pvt. Ltd.
2
Impact on Costs
RMM helps you cut inventory volumes, eliminate production backlog and lower the expense of
working with partners, resulting in greater efficiency with dramatically lower costs.
Impact on Strategy
Rapid analysis of critical business data from all parts of your value chain enables faster and more
accurate planning of budgets and forecasts.
REACH Merchandising Manager Modules
•
Enquiry
•
Costing
•
Sampling
•
Order processing
•
Production
•
Shipment
•
Customer
•
(Master Input Table) MIT
•
Supplier
•
(Time & Action) TNA
•
Admin
© Copyright 2009. REACH Sewn Technologies and Consulting Pvt. Ltd.
3
Module 1
ENQUIRY
RMM’s Enquiry module consists of the following sub-modules:
1. Buyer Enquiry
2. Buyer Enquiry Chart
3. Vendor Enquiry
4. Vendor Enquiry Chart
1. Buyer Enquiry
The user can view the list of enquiries and also create a new Enquiry. To create a new Enquiry, the
user needs to specify the details. The screen below shows a “Buyer Enquiry Master Sheet” where you
can see a record of enquiries received from all buyers. These records include standard reference
details such as Buyer, Ref. No., Style, Season, Enquiry Date etc.
© Copyright 2009. REACH Sewn Technologies and Consulting Pvt. Ltd.
4
Note:
1. To the right of each record, you will find an “Edit” button for editing the record.
2. This screen has many pages with page numbers displayed at the bottom right of the page.
Clicking on the desired page number allows the user to view that particular page. The user
can also choose to see all the records on one page by clicking on the “Show all” button.
3. The user can search for a particular enquiry record by using the search option; search criteria
can be altered using the configuration page.
4. The user can view the enquiry report by clicking on the icon in the second column fron right,
in each row.
To create a new Buyer Enquiry, the user needs to click on the “ADD NEW” button on the Enquiry
Master Sheet screen. A sample New Buyer Enquiry screen is displayed below.
© Copyright 2009. REACH Sewn Technologies and Consulting Pvt. Ltd.
5
How to create a New Buyer Enquiry:
1. Enquiry No – the user has to enter the reference no of the Enquiry.
2. Reference No – the user has to specify the internal reference no of the enquiry.
3. Buyer Name – the user needs to select the buyer name from the combo box.
4. Season: the user has selected the season from the combo box and the year from the
adjacent combo box.
5. Agent Name – the user has to select the agent name from the combo box.
6. Merchandiser – the user has to select the name of the merchandiser who would handle the
current enquiry from the combo box.
7. Commission – the user has to enter the percentage of commission.
8. Quantity Unit – the user must select the quantity to be entered in the assortment grid given
below.
9. Currency Unit – the user must select the currency for the price to be entered in the
assortment grid given below.
10. Enquiry Date - the user has to enter the date on which the enquiry was received.
11. Shipment Date – the user has to enter the shipment date specified by the buyer.
12. Lead Time – the user has to enter the lead time specified by the buyer.
13. Terms of Payment - the user has to specify the relevant terms of payment.
14. Terms of Shipment – the user has to specify the relevant terms of shipment.
15. Port of Loading – the user has to enter the port of loading specified by the buyer.
© Copyright 2009. REACH Sewn Technologies and Consulting Pvt. Ltd.
6
16. Port of Discharge- the user has to enter the port of Discharge specified by the buyer.
17. Comments – the user can enter any additional information to be recorded in the system.
18. Sample Received – the user has to select if the sample has been received by the Buyer or
not.
Grid
The user can add rows to the grid by clicking on the “Add More” button at the top right of the
grid. Rows can be deleted by selecting the checkbox in the first column and then clicking on the
“Delete” button at the top right of the grid.
1. Style Name – the user has to select the style from the combo box.
2. Color - the user has to select the color from the combo box.
3. Size - the user has to select the size from the combo box.
4. Quantity – the user has to enter the quantity required for the particular combination of
Style-Color-Size.
5. Price – the user has to enter the price per unit of quantity.
6. Amount – this will be calculated by the system for the quantity required for the particular
combination of Style-Color-Size based on the price entered.
The user has to click on the “Save” button to save the enquiry entered in the screen. If the data does
not need to be saved, he or she can click on the “Cancel” button to return to the Master Sheet.
2. Buyer Enquiry Chart
Users can search for a particular enquiry using the search option available by selecting the search
criteria which is configurable. The list of all the entered enquiries in the “Buyer Enquiry” will be shown
here by default. Users can refer to the Trims/Sketch/Spec details by clicking on the Icons available in
respective columns.
© Copyright 2009. REACH Sewn Technologies and Consulting Pvt. Ltd.
7
By clicking on the icons available in the “History” column, the user can add history for a particular
enquiry. The icon available in the column “History Report” will display a report of all the history
entered for a particular enquiry. Clicking on the “Confirm Order” icon shown in the last column will
redirect the user to the Order Entry for all the data relevant to that enquiry.
Trims:
This screen (displayed below) will show the Enquiry No. and Season. The user needs to select the
style for which the trim details are required. By selecting the style required, the user can see the trim
details for a particular style and the consumption of the same.
© Copyright 2009. REACH Sewn Technologies and Consulting Pvt. Ltd.
8
Sketch:
This screen (displayed below) will show the Enquiry No. and Season. The user needs to select the
style for which the sketch is required.
© Copyright 2009. REACH Sewn Technologies and Consulting Pvt. Ltd.
9
Spec:
This screen (displayed below) will show the Enquiry No. and Season. The user needs to select the
style for which the spec details are required. By selecting the style required, the user can see the
spec detail for a particular style and the consumption of the same.
History:
The history screen (displayed below) will show all the history details available for a particular enquiry.
The user can create a new entry by clicking on the “New” button and delete a record by selecting the
checkbox on the first column of the grid and then clicking on the “Delete” button.
© Copyright 2009. REACH Sewn Technologies and Consulting Pvt. Ltd.
10
New History:
This screen (displayed below) will show the Enquiry No. Name of the user who is entering the data
and Date of entry. The user has to enter the History/Remarks that have to be documented. Users can
click on the “Clear” button to clear the data entered in the screen and on “Cancel” button to close the
window.
© Copyright 2009. REACH Sewn Technologies and Consulting Pvt. Ltd.
11
3. Vendor Enquiry
The user can view the list of enquiries and also create a new Enquiry. To create a new Enquiry, the
user has to specify the details. Show below is a “Vendor Enquiry Master Sheet” screen where you
can see the record of enquiries. These records have some standard reference details such as Buyer,
Ref. No., Vendor, Season, Enquiry Date etc.
Note :
1. To the right of each record, you will find an “Edit” button for editing it.
2. This screen has many pages with page numbers displayed at the bottom right of the page.
Clicking on the desired page number helps the user to view that particular page. Users can
also choose to see all the records in one page by clicking on the “Show all” button.
3. Users can search for a particular Enquiry record by using the search option; the search
criteria can be altered using the configuration page.
4. Users can view the enquiry report by clicking on the icon at the second column from right in
each row.
© Copyright 2009. REACH Sewn Technologies and Consulting Pvt. Ltd.
12
To create a new Vendor Enquiry, users should click on the “Add New” button. A sample New Vendor
Enquiry screen is shown below.
Creating a New Vendor Enquiry:
1. Buyer the user has to select the buyer name from the combo box.
2. Enquiry No - the user has selected the Buyer Enquiry No. from the combo box. (The combo
box will have only the enquiries corresponding to the selected buyer).
Once the Enquiry No. is selected, other fields such as Merchandiser, Date, Remarks,
Commission, Destination, Payment Terms, Delivery Date, Terms of shipment, Quantity Unit,
Price Unit and the grid details will be automatically filled by the system.
3. Vendor – the user has to select the vendor name from the combo box. (The combo box will
have a list of the approved vendors only.)
4. Packaging – the user has to enter the packaging details here.
5. Quality Standards - the user has to enter the quality standards to be followed.
6. Details of Inspection – User has to enter.
7. Special Notes – the user can enter here any other details that need to be recorded.
© Copyright 2009. REACH Sewn Technologies and Consulting Pvt. Ltd.
13
Grid
The user can add rows to the grid by clicking on the “Add More” button at the top right of the
grid; rows can be deleted by selecting the checkbox in the first column and then clicking on the
“Delete” button at the top right.
1. Style Name – this field will be filled automatically once the user selects the Enquiry No.
2. Color - this field will be filled automatically once the user selects the Enquiry No.
3. Size - this field will be filled automatically once the user selects the Enquiry No.
4. Quantity – this field will be filled automatically once the user selects the Enquiry No. , but
users can change the value.
5. Price – this field will be filled automatically once the user selects the Enquiry No. , but
users can change the value.
6. Amount – this will be calculated by the system for the quantity required for the particular
combination of Style-Color-Size based on the price entered.
The user has to click on the “Save” button to save the enquiry entered in the screen. To return to the
Master Sheet without saving the data entered, the user needs to click on the “Cancel” button.
4
Vendor Enquiry Chart
The user can search for a particular enquiry using the search option available by selecting the search
criteria (which is configurable). The list of all the entered enquiries in the “Vendor Enquiry” will be
shown here by default. Users can refer to the report by clicking on the icon available in the last
column of the grid.
Module 2
© Copyright 2009. REACH Sewn Technologies and Consulting Pvt. Ltd.
14
COSTING
The RMM costing module includes the following sub-modules:
1. Internal Costing
2. External Costing
3. Customer Price Quotation
1.
Internal Costing
Shown below is the page where users can do the costing for a particular order.
The user will create a new internal costing for a particular order, by clicking on the “Add New” button,
in the internal costing master sheet. This throws up an internal costing page, through which the
costing can be done.
© Copyright 2009. REACH Sewn Technologies and Consulting Pvt. Ltd.
15
The user has to specify the “Order no.”, “Costing Unit”, “Style no.”, “Date” & “Count”.
The system will generate the following details.
Shell
The term ‘Shell’ in this context refers to the main fabric used to develop the garment. Fabric ref. will
be automatically taken from the order module. The user needs to specify the cost for the yarn
process, knitting, dyeing, printing and compacting, if it is a knitted fabric. For woven fabrics, the user
should specify the fabric cost in “Others 1” and “Others 2” fields. RMM will automatically calculate the
© Copyright 2009. REACH Sewn Technologies and Consulting Pvt. Ltd.
16
processes and generate the fabric price. The user will also have to specify the fabric width, width unit
(cms, inches, meters etc) and the fabric consumption for making one garment, so that the system can
generate the shell fabric value per garment.
Trim
The term ‘Trim’ in this context refers to the trim fabric used to develop the garment. The details to be
specified are the same as mentioned for ‘Shell’.
Lining
The term ‘Lining’ in this context refers to the lining fabric used to develop the garment. The details to
be specified are the same as mentioned for ‘Shell’.
Padding
The term ‘Padding’ in this context refers to the padding used in the garment. The user will have to
specify the fabric price, fabric width, fabric width unit, fabric consumption and fabric consumption unit;
the system will generate the padding fabric value.
Trim details & cost of it and their cost will be taken from the style menu of MIT.
Other terms used in this sub-module include: Total Fabric value: The system will generate the value
by adding the values for shell, trim, lining and padding.
Total Trim value: The system will add all trim costs and give the total amount.
CM: Cutting and Making charges for one garment.
Emb: Embroidery charge for one garment.
Washing: Washing charge for one garment.
Total GMT Cost: Total cost of the garment including total fabric cost, total trim cost, CM, Finishing and
Packing, Emb and Washing.
Quota: “Quota premium” cost incurred per garment.
Mark Up %: Markup price for the organization.
Commission: Percentage of commission over quotation price (in enquiry) is added for the garment
costing.
© Copyright 2009. REACH Sewn Technologies and Consulting Pvt. Ltd.
17
Users will need to specify the embroidery, print, sequence, washing, packing and forwarding costs.
Any other expenses involved can be specified in the “Others” column. CMT will be auto calculated.
The user needs to add the quote, commission margin, interest and overhead expenses to get the cost
price of the garment in the “Count” text box.
If the user selects the relevant currency, it will calculate the values from the currency master and give
the value in that currency.
2.
External Costing
Displayed below is the page to be used for costing for a particular Enquiry.
The user will create a new external costing for a particular enquiry, by clicking on the “Add New”
button in the external costing master sheet. This pulls up an external costing page, through which the
costing can be done.
© Copyright 2009. REACH Sewn Technologies and Consulting Pvt. Ltd.
18
The user has to specify the “Enquiry no.”, “Costing Unit”, “Style no.”, “Date” & “Count”.
The system will generate the following details:
Shell:
The term ‘Shell’ in this context refers to the main fabric used to develop the garment. Fabric ref. will
be taken automatically from the enquiry module. The user will need to specify the cost for the yarn
process, knitting, dyeing, printing and compacting, if it is a knitted fabric. For woven fabric, the user
should specify the fabric cost in the “Others 1” and “Others 2” fields. RMM will automatically calculate
the processes and generate the fabric price. The user will also have to specify the fabric width, c width
unit (cms, inches, meters etc) and the fabric consumption for making one garment, for the system to
generate the shell fabric value per garment.
© Copyright 2009. REACH Sewn Technologies and Consulting Pvt. Ltd.
19
Trim
The term ‘Trim’ in this context refers to the Trim fabric used to develop the garment. The details to be
specified are the same as mentioned for ‘Shell’.
Lining
The term ‘Lining’ in this context refers to the lining fabric used to develop the garment. The details to
be specified are the same as mentioned for ‘Shell’.
Padding
The term ‘Padding’ in this context refers to the padding used in the garment. The user will need to
specify the fabric price, fabric width, fabric width unit, fabric consumption and fabric consumption unit;
the system will generate the padding fabric value.
Trim details and their cost will be taken from the style menu of MIT.
Other terms used in this sub-module include:
Total Fabric value: Here the system will generate the value by adding the values of shell, trim, lining
and padding.
Total Trim value: The system will add all trim costs and give the total amount.
CM: Cutting and Making charges for one garment.
Emb: Embroidery charge for one garment.
Washing: Washing charge for one garment.
Total GMT Cost: Total cost of the garment including total fabric cost, total trim cost, CM, Finishing and
Packing, Emb and Washing.
Quota: “Quota premium” cost incurred per garment.
Mark Up %: Markup price for the organization.
Commission: Percentage of commission over quotation price (in enquiry) is added for the garment
costing.
The user will need to specify the embroidery, print, sequence, washing, packing and forwarding costs.
Any other expenses involved can be specified in the “Others” column. CMT will be auto calculated.
© Copyright 2009. REACH Sewn Technologies and Consulting Pvt. Ltd.
20
The user needs to add the quota, commission margin, interest and overhead expenses to get the cost
price of the garment in the “Count” text box.
If the user selects the relevant currency, it will calculate the values from the currency master and give
the value in that currency.
Note: For accurate conversion, the current prevailing exchange rates should be updated in the
currency master.
3.
Customer Price Quotation
The user can view the list of Buyer price Quotations and also create a new record. To create a new
record, the user has to specify the details.
Shown below is the “Add New” screen in the “Customer Price Quotation” module.
© Copyright 2009. REACH Sewn Technologies and Consulting Pvt. Ltd.
21
Users need to select the Buyer Name and Inquiry No. The name of the person to whom the quotation
is being sent, should be entered in the “Kind Attention to” field. The user then needs to select the
merchandiser, terms of payment, shipment mode, and date, port of destination, currency unit and
quantity unit. The values for style, color, size and quantity will be taken from the style master. The
user will have to specify the per piece price in the “Price” column text bar and the total amount will be
generated by the system.
© Copyright 2009. REACH Sewn Technologies and Consulting Pvt. Ltd.
22
Module 3
SAMPLING
The RMM sampling module includes the following sub-modules:
1. Sample
2. Inspection Report
1.
Sample
The user can view the list of samples and also create a new sample. To create a new sample, the
user has to specify the details. Shown below is the screen of “Sample Master Sheet” screen where
you can see the sample records.
Note:
1. To the right of each record, you will find an “Edit” button for editing.
2. This screen has many pages with page numbers displayed at the bottom right of the page.
Clicking on the desired page number allows the user to view that page. The user can also
choose to see all records in one page by clicking on the “Show all” button.
3. Users can search for a particular sample record by using the search option; the search criteria
can be altered using the configuration page.
4. Users can view the sample report by clicking on the icon at the second column from right in
each row.
To create a new sample, users need to click on the “Add New” button. A “New sample” screen is
shown below.
© Copyright 2009. REACH Sewn Technologies and Consulting Pvt. Ltd.
23
The samples entered could refer to an enquiry or be a fresh one. Using the “Type” field in the
screen, users can choose the type of the enquiry.
If the user chooses to refer to an enquiry, then the enquiry reference no. needs to be selected;
else, the user will have to enter the sample reference no.
By selecting the enquiry reference no., all fields relevant to the enquiry will be filled by the system.
Below are the descriptions of the fields on this screen:
Type: Users will need to choose whether to refer to an enquiry or not, using the combo box.
Date of Sample: Users will enter the date of the sample.
Buyer: Users have to select the buyer for whom the sample entry is being made.
Vendor: Users need to select the vendor.
Enquiry No.: This field will appear only if the user chooses to refer to an enquiry. Users need
to select the enquiry for which this sample is being made. This combo box will have only the
enquiry entered for the selected buyer.
Sample No.: If the user chooses not to refer to any enquiry, a reference no. for the sample has
to be entered.
Description: The user can enter any description that needs to be recorded.
Season: Users need to select the name of the season from the combo box and the year from the
adjacent combo box.
Required on: Users need to specify the delivery date.
Unit: Users need to select the unit of the quantity required.
Currency: User has to select the unit of price.
© Copyright 2009. REACH Sewn Technologies and Consulting Pvt. Ltd.
24
Merchandiser: User needs to select the name of the merchandiser who will be handing this
particular sample.
Grid
Users can add rows to the grid by clicking on the “Add More” button at the top right of the grid.
Rows can be deleted by selecting the checkbox in the first column of the grid and clicking on the
“Delete” button at the top right.
1. Style Name – the user has to select the style from the combo box.
2. Color - the user has to select the color from the combo box.
3. Size - the user has to select the size from the combo box.
4. Quantity – the user has to enter the quantity required for the particular combination of
Style-Color-Size.
5. Price – the user has to enter the price per unit of quantity.
6. Amount – this will be calculated by the system for the quantity required for the particular
Style-Color-Size combination based on the price entered.
The user has to click on the “Save” button to save the enquiry entered in the screen. If the data does
not need to be saved, users can click on the “Cancel” button to return to the master sheet.
2.
Inspection Report
The master sheet has a list of all the Inspection reports entered.
The user can search for a particular record using the configurable search available. Users can edit a
particular record by clicking on the “Edit” button next to each record in the grid.
What is the image shown below? Please mention.
© Copyright 2009. REACH Sewn Technologies and Consulting Pvt. Ltd.
25
To create a new record click on the “Add New” button. What is the image shown below? Please
mention.
The “Add new” screen includes details such as Buyer name, Sample ref.no. Date of inspection, Unit
etc. After entering these, the user has to click on the “Save to continue” button to enter the inspection
details.
The next screen includes a list of all the styles, with textboxes to enter how many of pieces of each
style are approved and how many rejected.
Users can also include vendor and buyer comments and specify whether the test report has passed
the style or not.
By click on the spec button next to each style in the grid, a new window will open as shown below.
© Copyright 2009. REACH Sewn Technologies and Consulting Pvt. Ltd.
26
In this screen, the user can enter the actual measurements against the spec sheet measurements.
Module 4
ORDER ENTRY
RMM’s Order Entry module includes the following sub-modules:
1. Order Entry
2. Sales Contract
3. Proforma Invoice
4. LC Checklist
5. Order CheckList
6. Critical Path
7. Final Inspection Report
© Copyright 2009. REACH Sewn Technologies and Consulting Pvt. Ltd.
27
1.
Order Entry
The user can view the list of orders. Create a new order or view the report in the master sheet. Below
Is the “Order Master Sheet” screen that displays order records.
To create a new order, the user has to click on the “Add New” button. This leads to a new screen
where order details can be entered.
The order can be a fresh entry or it can be entered by referring to an enquiry. The Enquiry no. can be
selected in the provided combo box, which will have the filtered value based on the selection of ClientVendor-Season.
If an order refers to an enquiry, all the corresponding values will be pulled automatically from the
Enquiry record.
© Copyright 2009. REACH Sewn Technologies and Consulting Pvt. Ltd.
28
Below are the details of the fields in the Order Entry Screen.
1. Order No. – The user has to enter the reference no. of the Order.
2. Order Date – The user has to enter the order date.
3. Client – The user has to select the client name from the combo box.
4. Vendor – The user has to select the vendor name from the combo box.
5. Season: User has selected the name of the season from the combo box and the year from
the adjacent combo box.
6. Enquiry No. – The user has to select the reference no. of the enquiry only if the order refers
to an enquiry. The combo box will have only the filtered value based on the Client-Vendor–
Season value.
7. Merchandiser – The user has to select the name of the merchandiser who would handle the
current order from the combo box.
8. Shipment Date – The user has to enter the date of shipment specified by the buyer for the
enquiry received.
9. Terms of Payment - User has to specify like LC
10. Incoterms - User has to specify incoterms like Fob, CNF etc
11. Port of Loading – The user has to enter the port of loading date specified by the buyer for
the enquiry received.
12. Port of Discharge- The user has to enter the port of discharge specified by the buyer for the
enquiry received.
13. Mode of Shipment - User has to specify shipment mode like Sea, Air, road.
14. Destination Country – User has to specify the country name
© Copyright 2009. REACH Sewn Technologies and Consulting Pvt. Ltd.
29
15. Currency– The user needs to select the currency for the price to be entered in the
assortment grid given below.
16. Unit – The user has to select the unit of the quantity to be entered in the assortment grid
given below.
Grid
Users can add rows to the grid by clicking on the “Add More” button at the top right of the grid.
Rows can be deleted by selecting the checkbox in the first column and then clicking on the “Delete”
button at the top right of the grid.
1. Style Name – The user has to select the style from the combo box.
2. Color - The user has to select the color from the combo box.
3. Size - The user has to select the size from the combo box.
4. Quantity – The user has to enter the quantity required for the particular combination of StyleColor-Size.
5. Price – The user has to enter the price per unit of quantity.
6. Amount – This will be calculated by the system for the quantity required for the particular
combination of Style-Color-Size based on the price entered.
The user has to click the “Save” button to save the order entered in the screen. If the data does not
need to be saved, users can click the “Cancel” button to return to the Master Sheet.
2.
Sales Contract
In the master sheet, the user can see the list of entered sales contracts. A sample sales contract list is
shown below.
To add a new sales contract, the user needs to click on the “Add New” button. Shown below is a
sample new sales contract.
© Copyright 2009. REACH Sewn Technologies and Consulting Pvt. Ltd.
30
The user needs to enter the order date and select buyer and order reference details.
After selecting the order reference no. all the relevant details will be filled automatically from the
order entry sheet.
The user will select the document to be sent to the buyer and also enter the inspection dates.
Users need to click on the “Save” button to save the Sales Contract in the screen. If the data does not
need to be saved, Users can click on the “Cancel” button to return to the master sheet.
3.
Proforma Invoice
The user can see a list of all the proforma invoices entered in the system. Users can also search for a
particular proforma invoice by using the configurable search option available in the master sheet.
© Copyright 2009. REACH Sewn Technologies and Consulting Pvt. Ltd.
31
To add a new proforma invoice, users need to click on the “Add New” button in the master sheet.
The user has to enter the Invoice no. and date and select the order reference no. By selecting the
order reference no., the relevant data will be automatically filled from the order entry screen.
The user needs to click on the “Save” button to save the Sales Contract in the screen. If the data does
not need to be saved, users can click on the “Cancel” button to return to the master sheet.
© Copyright 2009. REACH Sewn Technologies and Consulting Pvt. Ltd.
32
4.
LC Check List
The LC Checklist screen gives a one line description of the enclosed checklist details. You can edit
the details entered earlier by clicking on the “Edit” button available next to each record in the master
sheet. The user can see all the LC Checklists entered in the system. Users can also search for a
particular LC Checklist by using the configurable search option available in the master sheet. Shown
below is an LC Checklist screen.
To add a new LC Checklist, the user needs to click on the “Add New” button in the master sheet.
Users need to select the buyer name from the combo box. Based on the selected buyer, the order no.
will be filled in the order combo box. Users have to specify the order no. for which the LC Checklist is
being prepared. Users also need to select the merchandiser name and enter the LC No.
© Copyright 2009. REACH Sewn Technologies and Consulting Pvt. Ltd.
33
The check list displayed will be taken from the Master Input Table, “Check List Master”.
Users will select the checklist using the check box available in the grid and can also add comments
for each checklist.
5.
Order Check List
The Order Checklist screen gives a one line description of the enclosed checklist details. You can edit
details entered earlier by clicking on the “Edit” button available next to each record in the master
sheet. The user can see a list of all the order checklists entered in the system. Users can also search
for a particular order checklist by using the configurable search option available in the master sheet. A
sample order checklist screen is shown below.
To add a new order checklist, the user needs to click on the “Add New” button in the master sheet. A
sample new order checklist is shown below.
© Copyright 2009. REACH Sewn Technologies and Consulting Pvt. Ltd.
34
Users need to select the buyer name from the combo box. Based on the selected buyer, the order no.
will be filled in the order combo box. Users need to specify the order no. for which the order checklist
is being prepared. Users also need to select the merchandiser name.
The checklist displayed will be taken from the Master Input Table, “Check List Master”.
Users need to select the checklist using the check box available in the grid; they can also add
comments for each checklist.
6.
Critical Path
User can see all the critical path records entered for orders in the master sheet. They can search for
a critical path entered for a particular order by using the configurable search option available in the
master sheet. A sample critical path record screen is shown below.
To add a new critical path record. the user needs to click on the “Add New” button in the master
sheet. A sample new critical path record is shown below.
Users need to select the buyer name from the combo box available, post which all the orders
corresponding to the selected buyer will be filled in the order combo box. The user will then select a
particular order for which the critical path has to be entered.
© Copyright 2009. REACH Sewn Technologies and Consulting Pvt. Ltd.
35
By selecting the order no. the delivery date and vendor name will be automatically filled.
Users will click on the “Save to continue” button to enter the critical path details.
In this screen above, all the styles entered for the selected order are shown in the grid; next to each
style, there is a button available to enter the details as shown in the image above.
By clicking on the “Details” button, screens will popup as below.
© Copyright 2009. REACH Sewn Technologies and Consulting Pvt. Ltd.
36
The user needs to enter the data for each of the sample type required and save the record.
7.
Final Inspection Report
Users can see all the Final Inspection records entered in the master sheet. Users can also search for
a particular Final Inspection entered by using the configurable search option available in the master
sheet.
A sample Final Inspection records screen is displayed below.
© Copyright 2009. REACH Sewn Technologies and Consulting Pvt. Ltd.
37
To add a new record, the user has to click on the “Add New” button in the master sheet, and then
specify the Inspection reference no. and the inspection date.
Users will select the Buyer and order no.; by doing so, all the available data will be automatically filled
from the Order sheet.
Users will specify the presented quantity in the assortment grid, and record the relevant fault and
severity of the fault.
User will specify if the inspection has passed the sample or not and the (Acceptable quality level) AQL
followed.
© Copyright 2009. REACH Sewn Technologies and Consulting Pvt. Ltd.
38
© Copyright 2009. REACH Sewn Technologies and Consulting Pvt. Ltd.
39
Module 5
PRODUCTION
RMM’s Production module includes the following sub-modules:
1. Production Critical Path
2. Production updates
1.
Production Critical Path
Shown above is a sample Production Critical Path. To add a new Production critical Path, users
need to click on the “Add New” button.
© Copyright 2009. REACH Sewn Technologies and Consulting Pvt. Ltd.
40
This screen above is a sample screen that shows the Calendar and Alert details. Below is the
procedure for using this screen.
Period
The user has to specify the start date and end date.
Alert Configuration
Users who want alerts to be generated for this TNA can click on the “Yes” button next to the option
“Want Alerts for this TNA”.
On clicking “Yes”, users will get 4 options to choose when the alert is to be generated. Users can also
decide how many days before / after an event the alert has to be generated.
By clicking on “Save”, the alert option for this TNA will be saved.
Holidays
If there is any holiday during the TNA period (other than Sundays), the user can specify these by
selecting the date, month and year.
Sundays are not considered holidays by default, so if the user wants Sundays to be holidays, he or
she needs to click on the “Yes” button next to the option “Make Sundays as Holidays”.
To the right of the screen, users can see all the holidays within the TNA period.
© Copyright 2009. REACH Sewn Technologies and Consulting Pvt. Ltd.
41
By clicking on the “Save” button, the complete configuration will be saved and the user taken to the
next screen, where Order No. / Sample No. based on the selection of TNA type may need to be
specified.
What is the image shown below? Please mention.
The user can add events to the TNA by clicking on the “Add More” button. If the user wants to insert
an event in between events already entered, this can be done by selecting the event post which a
new event is to be added by checking the checkbox in the grid and then clicking on the “Insert” button.
Users can delete a particular event by selecting the checkbox of that event and then clicking on the
“cancel” button. A new event can be added by clicking on the” Add New Events” button which will be
available before creating the events.
While adding the event, users have to fill the fields mentioned below.
Process Name: Name of the process for which the event needs to be added.
Event Name: Name of the event to be inserted.
Start Date: Start Date of the event.
End Date: End Date of the event.
Days: No. of days allotted for this event.
Work Assigned: Details of the work to be done.
Description: Any description to be recorded.
Work Assigned To: Name of the person responsible for this work. If an alert is enabled, the person
specified here will get the alert.
© Copyright 2009. REACH Sewn Technologies and Consulting Pvt. Ltd.
42
Users need to click on the “Save” button in the grid after entering the details to save this particular
Events entry. After adding all the events, the user needs to click on the “Save” button to save the
TNA.
2.
Production Updates
Users can select for a particular record by using the configurable search option. What is the image
shown below? Please mention.
To see the production update, the user has to click on the “Report” icon next to each record in the
grid.
© Copyright 2009. REACH Sewn Technologies and Consulting Pvt. Ltd.
43
Module 6
SHIPMENT
RMM’s Shipment module consists of the “Shipping Document List” sub-module.
1.
Shipping Document List
This List provides a one line description of the enclosed Shipping Docs. The newly added checklist
details can be added by clicking on the “Add New” button in the master sheet. Users can edit details
entered earlier by clicking on the “Edit” button. Records can be searched using the configuration
search option in the master sheet.
Displayed above is a sample “Add New” screens. This screen appears on clicking the “Add New”
button in the master sheet. What is the image shown below? Please mention here.
© Copyright 2009. REACH Sewn Technologies and Consulting Pvt. Ltd.
44
Users need to select the Buyer Name; by selecting the buyer, the order related to the buyer will be
filtered and filled in the order no. combo box. The user has to select the order for which the document
list is being entered.
The user will then specify the document list shown in the grid by checking the checkbox available next
to each document name. The document list is taken from the master input table, “Check List Master”.
Users can add comments to each document in the grid.
Module 7
CUSTOMER
RMM’s Customer module includes the following sub-modules:
1. Customer
2. Debit Notes
3. Complaint Register
4. Complaint Analysis
5. Customer Feedback
1.
Customer
The master sheet has a list of all the customer records entered.
The user can search for a particular record using the configurable search available. Users can edit a
particular record by clicking on the “Edit” button next to each record in the grid. A sample screen with
customer records is displayed below.
To create a new record, click on the “Add New” button. A sample new record screen is displayed
below.
© Copyright 2009. REACH Sewn Technologies and Consulting Pvt. Ltd.
45
The customer screen includes details about the customer such as Contact details, Contact person,
Bank account information etc.
2.
Debit Notes
The master sheet has a list of all the Debit Notes records entered.
The user can search for a particular record using the configurable search available. Users can edit a
particular record by clicking on the “Edit” button next to each record in the grid. A sample Debit Notes
record screen is displayed below.
To create a new record, click on the “Add New” button. A sample new record screen is displayed
below.
© Copyright 2009. REACH Sewn Technologies and Consulting Pvt. Ltd.
46
In a new debit notes record, users can specify the Buyer name, Order no., Quantity and amount
involved, Nature of debit etc.
3.
Complaint Register
The master sheet has a list of all the complaints entered.
The user can search for a particular record using the configurable search available. Users can edit a
particular record by clicking on the “Edit” button next to each record in the grid. A sample complaint
register screen is displayed below.
To create a new record, click on the “Add New” button. A sample new record is displayed below.
© Copyright 2009. REACH Sewn Technologies and Consulting Pvt. Ltd.
47
The complaint register includes details such as Buyer, Order no., Date of complaint, Quantity, Person
responsible, Corrective action taken, Claim value etc.
4.
Complaint Analysis
The master sheet has a list of all the complaint analysis records entered.
The user can search for a particular record using the configurable search available. Users can edit a
particular record by clicking on the “Edit” button next to each record in the grid. A sample Complaint
Analysis screen is displayed below.
To create a new record, click on the “Add New” button. A sample new record is displayed below.
© Copyright 2009. REACH Sewn Technologies and Consulting Pvt. Ltd.
48
Users need to select the Buyer name and Order no.; the Complaint reference no. will then be filtered
based on the selected buyer name and the order reference no.
The screen includes details such as Nature of Complaint, Style no., proposed action etc.
5.
Customer Feedback
The master sheet has a list of all the complaint analysis records entered.
The user can search for a particular record using the configurable search available. Users can edit a
particular record by clicking on the “Edit” button next to each record in the grid. A sample Customer
Feedback list is displayed below.
To create a new record, click on the “Add New” button. A sample new record is displayed below.
© Copyright 2009. REACH Sewn Technologies and Consulting Pvt. Ltd.
49
The Feedback form captures details such as Client, Contact person, Designation, Feedback date etc.
The grid parameters are taken from the MIT “Check List Master.” Users can submit their rating with
comments.
Module 8
MIT
RMM’s MIT module includes the following sub-modules:
1. Season
2. Ports
3. Terms of Shipment
4. Shipment Mode
5. Department
6. Checklist Master
7. Payment Terms
8. Style Master
9. Currency Master
10. Unit Master
11. Vendor
© Copyright 2009. REACH Sewn Technologies and Consulting Pvt. Ltd.
50
12. Agent
13. Fabric Master
14. Color Master
15. Trims Types Master
16. Trim Categories Master
17. Trims
18. Vendor Type
19. Country Master
1.
Season
This master list has a list of seasons. Shown below is a sample seasons list.
The grid will show all the seasons add entered.
To add a new season, users need to click on the “Add More” button, upon which a new row is added
to the grid. Users will then enter the data and click on the “Save” button. To cancel entering the
record, users need to click on the “Cancel” button.
To edit a record, the user has to click on the “Edit” button provided next to each record; after editing
the user has to click on the “Save” button.
To delete a record, users need to click on the “Delete” button provided next to each record.
2.
Ports
This master list has a list of ports. Shown below is a sample ports list.
© Copyright 2009. REACH Sewn Technologies and Consulting Pvt. Ltd.
51
The grid will show all the ports entered.
To add a new port, users need to click on the “Add More” button, upon which a new row is added to
the grid; the user has to enter the data and click on the “Save” button. To cancel entering the record,
users need to click on the “Cancel” button.
To edit a record, users need to click on the “Edit” button provided next to each record; after editing,
the user has to click on the “Save” button.
To delete a record, users need to click on the “Delete” button provided next to each record.
3.
Terms of Shipment
This master list has a list of Terms of Shipment. Shown below is a sample Terms of Shipment list.
The grid will show all the Terms of Shipment entered.
To add a new Terms of Shipment, users need to click on the “Add More” button, upon which a new
row is added to the grid; the user has to enter the data and click on the “Save” button. To cancel
entering the record, the user has to click on the “Cancel” button.
To edit a record, users need to click on the “Edit” button provided next to each record; after editing,
users have to click on the “Save” button.
To delete a record, the user will need to click on the “Delete” button provided next to each record.
© Copyright 2009. REACH Sewn Technologies and Consulting Pvt. Ltd.
52
4.
Shipment Mode
This master list has a list of Modes of Shipment. Shown below is a sample Modes of Shipment list.
The grid will show all the Shipment Modes entered.
To add a new Mode of Shipment, users need to click on the “Add More” button, upon which a new
row is added to the grid; the user has to enter the data and click on the “Save” button. To cancel
entering the record, the user needs to click on the “Cancel” button.
To edit a record, the user needs to click the “Edit” button provided next to each record; after editing,
the user has to click on the “Save” button.
To delete a record, the user has to click on the “Delete” button provided next to each record.
5.
Department
This master list has a list of various Departments, i.e. kinds of garments. Shown below is a sample
Departments list screen.
© Copyright 2009. REACH Sewn Technologies and Consulting Pvt. Ltd.
53
The grid will show all the Departments entered.
To add a new department, users need to click on the “Add More” button, upon which a new row is
added to the grid; the user has to enter the data and click on the “Save” button. To cancel entering the
record, the user needs to click on the “Cancel” button.
To edit a record, users need to click on the “Edit” button provided next to each record; after editing,
users have to click on the “Save” button.
To delete a record, the user has to click on the “Delete” button provided next to each record.
6.
Check List Master
This master list has a list of Check Lists for Letter of Credit, Order, Shipment Documents and
Customer Feedback criteria. Shown below is a sample Check List Master.
The grid will show all the Checklists entered.
To add a new Check List, users need to click on the “Add More” button, upon which a new row is
added to the grid; the user has to enter the data and click on the “Save” button. To cancel entering
the record, the user has to click on the “Cancel” button.
Users need to select the type of checklist, i.e. mention whether the checklist is for LC, Order,
Shipment or Customer Feedback criteria.
© Copyright 2009. REACH Sewn Technologies and Consulting Pvt. Ltd.
54
To edit a record, the user will need to click on the “Edit” button provided next to each record; after
editing, the user will need to click on the “Save” button.
To delete a record, users will need to click on the “Delete” button provided next to each record.
7.
Payment Terms
This master list has a list of Payment Terms. Displayed below is a sample Payment Terms list.
The grid will show all the Payment Terms entered.
To add a new Payment Term, users need to click on the “Add More” button, upon which a new row is
added to the grid; users will need to enter the data and click on the “Save” button. To cancel entering
the record, users must click on the “Cancel” button.
To edit a record, the user needs to click on the “Edit” button provided next to each record; after
editing, the user needs to click on the “Save” button.
To delete a record, the user needs to click on the “Delete” button provided next to each record.
© Copyright 2009. REACH Sewn Technologies and Consulting Pvt. Ltd.
55
8.
Style Master
This master list has a list of Styles. Displayed below is a Style list.
The master sheet will show the list of all the styles entered. Users can search for a particular style
using the configurable search.
To create a new style, the user has to click on the “Add New” button available in the master sheet.
What is the image below? Please mention.
© Copyright 2009. REACH Sewn Technologies and Consulting Pvt. Ltd.
56
When creating a new style, users will need to fill up the fields shown below:
1. Style Ref. No: The user has to enter the Reference no. of the Style.
2. Style Name: The user has to enter the Name of the Style.
3. Description:
Any Description of the style must be entered here.
4. Size Range:
Size Range of the style must be entered here.
5. Client: The name of the Client to whom the style belongs must be entered here.
6. Vendor: The user has to select the Vendor Name.
7. Season: The user has selected the Season from the combo box and the year from the
adjacent combo box.
8. Department: department name like men’s, woman’s etc
9. Sample Lead Time: The user has to specify the lead time required for making the sample
10. Order Lead Time: The user has to specify the lead time required for closing the order
11. Min.Quantity Order: The Minimum Quantity of the style allowed in an order must be entered
here.
12. Min.Quantity Colour: The Minimum Quantity of the style that is allowed per color must be
entered here.
13. Target Price:
The user has to specify
14. Quotation price: The user has to specify the quotation price to be sent to the buyer
15. Conversion Rate: Conversion Rate of currency should be uploaded everyday
16. Confirm Price: confirm price given by the buyer
© Copyright 2009. REACH Sewn Technologies and Consulting Pvt. Ltd.
57
17. Comments: Any comments/details that are not covered in the above fields can be entered
here.
Grid Data
1. Fabric Type: The Type of fabric used in the style must be entered here.
2. Fabric Name: The user has to specify the name of the fabric.
3. Color: The user has to specify the color of the garment from the dropdown box
4. Combo: The user has to specify if there is a combo color.
After entering these details, the user has to click on the “Save” button to save the record. Then, on
the master sheet, the user has to click on the “Edit ” button next to the record to view it in edit mode;
The buttons for Trims, Sketch and Spec Sheet will now be available.
By clicking on each of these buttons, separate screens will popup allowing the user to enter the
respective details.
Trims:
The user can select multiple trims/accessories and specify the consumption of each and the cost per
unit of the particular trim/accessory.
Sketch:
© Copyright 2009. REACH Sewn Technologies and Consulting Pvt. Ltd.
58
The user can upload multiple images of the sketch here.
Spec Sheet:
© Copyright 2009. REACH Sewn Technologies and Consulting Pvt. Ltd.
59
The user can upload the spec sheet here. Users can enter the specification manually by entering the
no. of parts and no. of sizes in the available fields. By entering the no. of parts and sizes, the system
will generate a grid where the user can enter the spec sheet data.
9.
Currency Master
This master list has a list of currencies. Shown below is a sample Currency Master.
The grid will show all the Currencies entered.
To add a new Currency, users need to click on the “Add More” button, upon which a new row is
added to the grid; the user needs to enter the data and click on the “Save” button. To cancel entering
the record, the user has to click on the “Cancel” button.
© Copyright 2009. REACH Sewn Technologies and Consulting Pvt. Ltd.
60
To edit a record, users will need to click on the “Edit” button provided next to each record; after
editing, users must click on the “Save” button.
To delete a record, the user needs to click on the “Delete” button provided next to each record.
10.
Unit Master
This master list has a list of units. It has separate grids for order units and other units. Shown below is
a sample Unit Master.
The grid will show all the units entered.
To add a new unit, users will need to click on the “Add More” button, upon which a new row is added
to the grid; the user will need to enter the data and click on the “Save” button. To cancel entering the
record, the user has to click on the “Cancel” button.
To edit a record, users need to click on the “Edit” button provided next to each record; after editing
the user has to click on the “Save” button.
To delete a record, users will need to click on the “Delete” button provided next to each record.
© Copyright 2009. REACH Sewn Technologies and Consulting Pvt. Ltd.
61
11.
Vendor
This master sheet will show the list of vendors entered.
The user can search for a particular vendor using the configurable search. Shown below is a sample
Vendor master sheet. (Screenshot below needs to be replaced – shows other tabs.).
To add a new record, the user will need to click on the “Add New” button. Shown below is a sample
new record.
The user has to specify the Name and Contact details of the vendor in the available fields. The screen
also allows the user to specify the bank account details of the vendor.
© Copyright 2009. REACH Sewn Technologies and Consulting Pvt. Ltd.
62
12.
Agent
This master sheet will show a list of agents entered.
The user can search for a particular agent using the configurable search. Shown below is a sample
Agent list.
To add a new record, the user needs to click on the “Add New” button.
Shown below is a sample new record screen.
The user has to specify the Name and Contact details of the agent in the available fields. The screen
also allows the user to specify the bank account details of the agent.
© Copyright 2009. REACH Sewn Technologies and Consulting Pvt. Ltd.
63
13.
Fabric Master
This master list will have a list of Fabrics.
The grid will show all the Fabrics entered.
To add a new fabric, users will need to click on the “Add More” button, upon which a new row is
added to the grid; the user has to enter the data and click on the “Save” button. To cancel entering the
record, the user will need to click on the “Cancel” button.
To edit a record, the user will need to click on the “Edit” button provided next to each record; after
editing, the user has to click on the “Save” button.
To delete a record, the user has to click on the “Delete” button provided next to each record.
14.
Color Master
This master list has a list of Colors. Shown below is a sample Color Master.
© Copyright 2009. REACH Sewn Technologies and Consulting Pvt. Ltd.
64
The grid will show all the Colors entered.
To add a new color, users need to click on the “Add More” button, upon which a new row is added to
the grid; the user has to enter the data and click on the “Save” button. To cancel entering the record,
the user has to click on the “Cancel” button.
To edit a record, users will need to click on the “Edit” button provided next to each record; after
editing, the user needs to click on the “Save” button.
To delete a record, the user needs to click on the “Delete” button provided next to each record.
15.
Trims Type Master
This master list has a list of Trims Types. Shown below is a sample Trims Type Master.
The grid will show all the Trims Types entered.
To add a new Trims type, users need to click on the “Add More” button, upon which a new row is
added to the grid; the user has to enter the data and click on the “Save” button. To cancel entering
the record, the user will need to click on the “Cancel” button.
To edit a record, users need to click on the “Edit” button provided next to each record; after editing,
the user will need to click on the “Save” button.
To delete a record, the user has to click on the “Delete” button provided next to each record.
16.
Trim Category Master
This master list has a list of Trims Categories. Shown below is a sample Trim Category Master.
© Copyright 2009. REACH Sewn Technologies and Consulting Pvt. Ltd.
65
The grid will show all the Trims Categories entered.
To add a new Trims Category, users need to click on the “Add More” button, upon which a new row
is added to the grid; the user has to enter the data and click on the “Save” button. To cancel entering
the record, the user has to click on the “Cancel” button.
To edit a record, users need to click on the “Edit” button provided next to each record; after editing,
the user has to click on the “Save” button.
To delete a record, the user needs to click on the “Delete” button provided next to each record.
17.
Trims
This master list has a list of Trims. Shown below is a sample Trims list.
The grid will show all the Trims entered.
To add a new Trims Category, users will need to click on the “Add More” button, upon which a new
row is added to the grid; the user has to enter the data and click on the “Save” button. To cancel
entering the record, the user must click the “Cancel” button.
To edit a record, the user must click on the “Edit” button provided next to each record; after editing,
the user has to click on the “Save” button.
To delete a record, the user must click on the “Delete” button provided next to each record.
© Copyright 2009. REACH Sewn Technologies and Consulting Pvt. Ltd.
66
18.
Vendor Type
This master list has a list of Vendor Types. Shown below is a sample Vendor Type list.
The grid will show all the Vendor Types entered.
To add a new Vendor Type, users must click on the “Add More” button, upon which a new row is
added to the grid; the user has to enter the data and click on the “Save” button. To cancel entering
the record, the user must click on the “Cancel” button.
To edit a record, users have to click on the “Edit” button provided next to each record; after editing,
the user has to click on the “Save” button.
To delete a record, the user has to click on the “Delete” button provided next to each record.
19.
Country Master
This master list has a list of Countries. Shown below is a sample Countries list.
The grid will show all the Countries entered.
© Copyright 2009. REACH Sewn Technologies and Consulting Pvt. Ltd.
67
To add a new Country, users will need to click on the “Add More” button, upon which a new row is
added to the grid; the user has to enter the data and click on the “Save” button. To cancel entering
the record, the user has to click on the “Cancel” button.
To edit a record, users must click on the “Edit” button provided next to each record; after editing, the
user has to click on the “Save” button.
To delete a record, the user has to click on the “Delete” button provided next to each record.
Module 9
SUPPLIER
RMM’s Supplier module includes the following sub-modules:
1. Supplier Evaluation Sheet
2. Assessment
3. Approved Vendors
1.
Supplier Evaluation Sheet
This master sheet has a list of all the supplier evaluation records entered.
The user can search for a particular record using the configurable search available. Users can edit a
particular record by clicking on the “Edit” button next to each record in the grid. Displayed below is a
sample Evaluation Master.
To create a new record, click on the “Add New” button. Displayed below is a sample new record.
© Copyright 2009. REACH Sewn Technologies and Consulting Pvt. Ltd.
68
The supplier evaluation sheet includes details such as Contact address, Bank account information,
Established year, Monthly capacity etc.
2.
Assessment
This master sheet has a list of all the supplier assessment records entered.
The user can search for a particular record using the configurable search available. Users can edit a
particular record by clicking on the “Edit” button next to each record in the grid. Displayed below is a
sample Assessment screen.
To create a new record, click on the “Add New” button. Displayed below is a sample new record.
© Copyright 2009. REACH Sewn Technologies and Consulting Pvt. Ltd.
69
The supplier assessment form includes details of suppliers and what they supply such as Date of
registration, Introduced by whom, and other details such as Address, Telephone Nos., Contact
person, Weekly holidays and details of Government approval certificates such as SSI No., excise
registration No., PAN No., CST No., etc.
3.
Approved Vendors
This master sheet has a list of all the approved vendor records entered.
The user can search for a particular record using the configurable search available. Users can edit a
particular record by clicking on the “Edit” button next to each record in the grid. Displayed below is a
sample Approved Vendor list.
© Copyright 2009. REACH Sewn Technologies and Consulting Pvt. Ltd.
70
To create a new record, click on the “Add New” button. Displayed below is a sample new record.
This screen captures details about the supplier such as Contact address, Registration date, Product
specialty, Bank details, Rating of the supplier and whether the supplier is approved or not.
Module 10
TNA
RMM’s TNA module includes the following sub-modules:
1. TNA Events
2. TNA
3. TNA Updates
4. User TNA Events
5. Alerts
1.
TNA Events
This screen (displayed below) has a list of Events entered for any type of TNA.
There are four types of TNA:
© Copyright 2009. REACH Sewn Technologies and Consulting Pvt. Ltd.
71
a. Order TNA
b. Sampling TNA
c.
Production TNA and
d. General TNA
For each of these TNA types, the process has to be added separately.
By clicking on the “New” button next to the “Process” combo box, the user can add the processes.
To add an event to a process in any type of TNA, the steps to be followed are detailed below.
•
Select “Type of TNA”
•
Select “Process”
•
Click on the “Add New Events” button
•
Enter the Name of the event and the Number of days it takes
•
Click on the “Save” button
If the user wants to add multiple events at a time, he or she can specify how many events are to be
added in the field next to the “Add More” button and then click the “Add new Button”.
2.
TNA
In this screen (displayed below), the user can create all four types of TNA. Users can select for a
particular TNA by first selecting “Type of TNA” and then specifying the search criteria.
To add a new TNA, first select the type of TNA to be created; then click on the “Add New” button.
© Copyright 2009. REACH Sewn Technologies and Consulting Pvt. Ltd.
72
This screen (displayed above) shows the Calendar and Alert details of the TNA.
TNA Period
The user has to specify the start date and end date of the TNA.
Alert Configuration
If the user wants the alerts to be generated for this TNA, he or she can click on the button “Yes” next
to the option “Want Alerts For this TNA”.
By clicking on “Yes”, the user will get 4 options to choose when the alert has to be generated. Users
can also decide how many days before / after an event has to be generated.
By clicking on “Save”, the alert option for this TNA will be saved.
Holidays
If there is any holiday during the TNA period other than Sundays, user can specify the same by
selecting the date, month and year.
Sundays are not considered holidays by default; if the user wants Sundays to be treated as holidays,
he or she can click on the “Yes” button next to the option, “Make Sundays as Holidays”.
To the right, users can see all the holidays within the TNA period.
By clicking on the “Save” button, the complete configuration will be saved.
© Copyright 2009. REACH Sewn Technologies and Consulting Pvt. Ltd.
73
The user will then be taken to the next screen, where he or she may have to specify Order No. /
Sample No. based on the selection of TNA type. What is the screen shown below? Please specify.
The user can add events to the TNA by clicking on the “Add More” button. If the user wants to insert
an event in between already entered events, this can be done by selecting the event post which the
new event is to be added by checking the checkbox in the grid and then clicking on the “Insert” button.
Users can delete a particular event by selecting the checkbox of the particular event and then clicking
on the “Delete” button.
While adding the event, the user has to fill in the following fields:
Process Name: Name of the process for which the event needs to be added.
Event Name: Name of the event to be inserted.
Start Date: Start Date of the event.
End Date: End Date of the event.
Days: No. of days allotted for this event.
Work Assigned: Details of the work to be done.
Description: Any description to be recorded.
Work Assigned To: Name of the person responsible for this work. If an alert is enabled, then the
person specified here will get the alert.
Click on the “Save” button in the grid after entering the details to save this particular Events entry.
After adding all the events, the user has to click on the “Save” button to save the TNA.
© Copyright 2009. REACH Sewn Technologies and Consulting Pvt. Ltd.
74
3.
TNA Updates
On selecting the type of TNA, all the TNA entered in the selected type will be shown. Users can select
for a particular TNA by using the configurable search option. Shown below is a TNA Updates screen.
To see the TNA update, the user has to click on the “Report” icon next to each record in the grid.
What is the screen below? Please specify.
4.
User TNA Events
The user can see the list of TNA updates scheduled for the current date. If the user wants to see all
the events allotted to him, he can use the search option available. Shown below is a sample TNA
Events screen.
© Copyright 2009. REACH Sewn Technologies and Consulting Pvt. Ltd.
75
By clicking on the update button, the user can see the screen required to update the status of the
particular event; if the user indicates that the event is 100% complete, the system will lock the event
and no further editing will be allowed.
5.
Alerts
This screen (displayed below) shows all the alerts generated for the particular logged in user.
Users can search for the alerts generated on a particular date by using the search option. By clicking
on the alert subject, the user can read the full alert. The severity of the alert can be understood by the
color codes as displayed on the screen above.
Module 11
ADMIN
RMM’s Admin module includes the following sub-modules:
1. Company Master
2. Role Department
3. Role Definition
4. User Definition
5. Messaging
6. Change Password
1.
Company Master
This screen (displayed below) includes the contact details of the Head Office and all branches of the
company.
© Copyright 2009. REACH Sewn Technologies and Consulting Pvt. Ltd.
76
The master sheet will have all the records entered. Users can search for a particular branch by using
the configurable search option.
To add a new record, the user has to click on the “Add New” button in the master sheet.
Displayed below is a sample new record.
When adding the new record, the user will have to specify the contact details of the branch
and the branch code of the particular branch.
2.
Role Department
This screen (displayed below) has a list of the various operational departments in the company.
© Copyright 2009. REACH Sewn Technologies and Consulting Pvt. Ltd.
77
The grid will show all the departments entered.
To add a new department, the user has to click on the “Add More” button, upon which a new row is
added to the grid; the user needs to enter the data and click on the “Save” button. To cancel entering
the record, the user must click on the “Cancel” button.
To edit a record, the user has to click on the “Edit” button provided next to each record; after editing,
the user has to click on the “Save” button.
To delete a record, the user must click on the “Delete” button provided next to each record.
3.
Role Definition
This screen (displayed below) has a list of various roles that employees are given.
The role defines the access level of the user in the system.
The master sheet will have a list of all the roles entered.
© Copyright 2009. REACH Sewn Technologies and Consulting Pvt. Ltd.
78
To add a new role, the user needs to click on the “Add New” button available in the master sheet.
Displayed below is a sample new role definition.
© Copyright 2009. REACH Sewn Technologies and Consulting Pvt. Ltd.
79
To enter a new role into the system, the user has to specify the role name, to which department the
role belongs to and the responsibilities of the role. The grid will have the list of all the modules and
sub-modules available in the system; the user can specify the sub- modules that the role can have
access to. The read and write access can be given separately. If a user is provided only “read”
access, he or she will be able to only view the record. If the user has both “read” and “write” access,
he or she can add / edit a record.
4.
User definition
This screen (displayed below) has a list of users.
The master sheet will have the list of all the users.
To add a new user, click on the “Add New” button available in the master sheet. Shown below is a
sample new user screen.
© Copyright 2009. REACH Sewn Technologies and Consulting Pvt. Ltd.
80
© Copyright 2009. REACH Sewn Technologies and Consulting Pvt. Ltd.
81
To create a new user in the system, the user has to specify the user name, password, contact details
etc.
Below are the fields that will control the access level of the user in the system.
Belongs To: This field will specify whether the user is an employee of the company or a client or
vendor.
If the user is a client or vendor, the system will show an additional combo box containing the list of
Clients or Vendors, based on the selection of the “Belongs To” field. The user will have to select one
from this list.
The photo of the user can be uploaded to the right of the screen.
User Type: This field will specify whether the user needs access to all the branches or only to the
branch he belongs to.
Permission: This field will decide whether the user has access to others’ records or only to records
entered by him.
Is Merchandiser: This field needs to be checked if the user is a merchandiser.
Password Never Expire: The user can limit the account access to the system until a particular date
or if this field is checked, the user’s password will not expire.
Expiry Date: This field will be enabled if the above field is not checked. The user can specify a date
on which the access of this user account into the system will be stopped.
Branch Name: Name of the branch to the user belongs.
Reporting To: The name of the user’s immediate reporting authority. If the alert needs to be
escalated, it will be sent to the specified name here.
Role Name: The role of the user account being created. By selecting a role here, the role access
specified in the Role Definition will be automatically loaded into the sub-modules.
Once the role is selected, the grid will show the sub-modules list for each of the branches so that the
user can select the branches and grant access.
© Copyright 2009. REACH Sewn Technologies and Consulting Pvt. Ltd.
82
5.
Messaging
This master sheet will show a list of messages. Users can search for a particular message based on
date. To create a new message, the user will have click on the “Compose” button. What is the screen
shown below? Please mention.
By clicking on the “To”, the user can select the recipients.
“Subject” has to be specified by the user; the body of the content can contain any plain text. What is
the screen shown below? Please mention.
Users can save the message as a template.
In the template combo box, all the saved templates will be available.
© Copyright 2009. REACH Sewn Technologies and Consulting Pvt. Ltd.
83
6.
Change password
User can change their login password using this screen (displayed below).
Users will have to confirm the current password.
7.
Logout.
The users can logout of the system by clicking on it.
Another option is to click on the logout link provided to the right of the title bar, just below the top
banner.
© Copyright 2009. REACH Sewn Technologies and Consulting Pvt. Ltd.
84
FEEDBACK FORM
Dear REACH Merchandising Manager User,
We hope that the REACH Merchandising Manager User Manual has been as fulfilling for you as it has
been for us in bringing it to you.
We value your feedback. Do let us know if you have come across any of the below, (kindly mention
page numbers)
a) Typographical errors:
b) Misleading/Confusing Explanation:
c) Sections/Features that need elaboration:
d) Any other suggestions:
Your contribution will be rewarded with a special edition REACH Diary and also acknowledged in
the future editions of this manual.
Please tear away this form and mail it to us at:
REACH Technologies
49, 1st Main, 9th Cross, Sarakki Industrial Layout,
3rd Phase, JP Nagar, Bangalore - 560 078.
Tel: +91-80-65996111/112/113 Fax: +91-80-26585744
www.reach-tech.com I [email protected]
© Copyright 2009. REACH Sewn Technologies and Consulting Pvt. Ltd.
85
REACH Style Manager
REACH Style Manager
REACH Style Manager
REACH Style Manager
L T KARLE