1
Fedora Core 6
User Guide
Matt Bird
Code DeHaan
Damien Durand
John Babich
Paul W. Frields
User Guide
Fedora Core 6 User Guide
Edition 2.0
Author
Author
Author
Author
Author
Editor
Editor
Matt Bird
Code DeHaan
Damien Durand
John Babich
Paul W. Frields
Dimitris Glezos
Bart Couvreur
Copyright © 2008 Red Hat, Inc. and Others.
The text of and illustrations in this document are licensed by Red Hat under a Creative Commons
Attribution–Share Alike 3.0 Unported license ("CC-BY-SA"). An explanation of CC-BY-SA is available
at http://creativecommons.org/licenses/by-sa/3.0/. The original authors of this document, and Red Hat,
designate the Fedora Project as the "Attribution Party" for purposes of CC-BY-SA. In accordance with
CC-BY-SA, if you distribute this document or an adaptation of it, you must provide the URL for the
original version.
Red Hat, as the licensor of this document, waives the right to enforce, and agrees not to assert,
Section 4d of CC-BY-SA to the fullest extent permitted by applicable law.
Red Hat, Red Hat Enterprise Linux, the Shadowman logo, JBoss, MetaMatrix, Fedora, the Infinity
Logo, and RHCE are trademarks of Red Hat, Inc., registered in the United States and other countries.
For guidelines on the permitted uses of the Fedora trademarks, refer to https://fedoraproject.org/wiki/
Legal:Trademark_guidelines.
Linux® is the registered trademark of Linus Torvalds in the United States and other countries.
Java® is a registered trademark of Oracle and/or its affiliates.
XFS® is a trademark of Silicon Graphics International Corp. or its subsidiaries in the United States
and/or other countries.
All other trademarks are the property of their respective owners.
Preface
v
1. Document Conventions ................................................................................................... v
1.1. Typographic Conventions ...................................................................................... v
1.2. Pull-quote Conventions ........................................................................................ vi
1.3. Notes and Warnings ............................................................................................ vii
2. We Need Feedback! ...................................................................................................... vii
1. Introduction
1
1.1. About this Document .................................................................................................... 1
2. Logging into the Desktop
3
2.1. Logging In: An Explanation ........................................................................................... 4
2.2. I Cannot Login: HELP! ................................................................................................. 5
3. Tour of the Desktop
7
3.1. View of the Default Desktop ......................................................................................... 7
3.2. The Menu Panel .......................................................................................................... 8
3.3. The Desktop Area ........................................................................................................ 9
3.4. The Window List Panel ............................................................................................... 10
4. Using
4.1.
4.2.
4.3.
4.4.
Media
Understanding ............................................................................................................
Exploring Media .........................................................................................................
Writing CDs or DVDs .................................................................................................
Using a USB Drive .....................................................................................................
11
11
11
11
11
5. Accessing the Web
13
5.1. Starting Firefox ........................................................................................................... 13
5.2. Going Further ............................................................................................................. 13
6. Communications (Email, IM)
6.1. Setting Up Your Email ................................................................................................
6.2. Setting up Instant Messaging ......................................................................................
6.3. Using Gaim ................................................................................................................
15
15
25
30
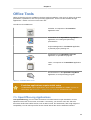
7. Office Tools
33
7.1. OpenOffice.org Applications ........................................................................................ 33
7.2. For Further Information ............................................................................................... 34
8. Playing Multimedia (Music & Video)
8.1. Playing Audio CDs .....................................................................................................
8.2. Converting Audio CDs to Music Files ..........................................................................
8.3. Organizing your Multimedia Files .................................................................................
8.4. Playing Videos ...........................................................................................................
8.5. Fedora Project's Approach to Multimedia Support .........................................................
8.6. MP3, DVD, and Other Excluded Multimedia .................................................................
8.7. For Further Information ...............................................................................................
35
35
35
36
36
36
36
37
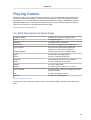
9. Playing Games
39
9.1. Brief Description of Each Game .................................................................................. 39
10. Managing Photos
10.1. Connecting Your Camera ..........................................................................................
10.2. Organizing and Importing Photos ...............................................................................
10.2.1. Selecting a Filing Method ...............................................................................
10.2.2. Categorizing Your Photos ...............................................................................
41
41
41
41
42
iii
User Guide
11. Sharing Your Desktop
43
12. Customizing the Desktop
12.1. Changing the Theme ................................................................................................
12.2. Changing the Background .........................................................................................
12.3. Customizing File Browsing Behavior ..........................................................................
45
45
45
46
iv
Preface
1. Document Conventions
This manual uses several conventions to highlight certain words and phrases and draw attention to
specific pieces of information.
1
In PDF and paper editions, this manual uses typefaces drawn from the Liberation Fonts set. The
Liberation Fonts set is also used in HTML editions if the set is installed on your system. If not,
alternative but equivalent typefaces are displayed. Note: Red Hat Enterprise Linux 5 and later includes
the Liberation Fonts set by default.
1.1. Typographic Conventions
Four typographic conventions are used to call attention to specific words and phrases. These
conventions, and the circumstances they apply to, are as follows.
Mono-spaced Bold
Used to highlight system input, including shell commands, file names and paths. Also used to highlight
keycaps and key combinations. For example:
To see the contents of the file my_next_bestselling_novel in your current
working directory, enter the cat my_next_bestselling_novel command at the
shell prompt and press Enter to execute the command.
The above includes a file name, a shell command and a keycap, all presented in mono-spaced bold
and all distinguishable thanks to context.
Key combinations can be distinguished from keycaps by the hyphen connecting each part of a key
combination. For example:
Press Enter to execute the command.
Press Ctrl+Alt+F1 to switch to the first virtual terminal. Press Ctrl+Alt+F7 to
return to your X-Windows session.
The first paragraph highlights the particular keycap to press. The second highlights two key
combinations (each a set of three keycaps with each set pressed simultaneously).
If source code is discussed, class names, methods, functions, variable names and returned values
mentioned within a paragraph will be presented as above, in mono-spaced bold. For example:
File-related classes include filesystem for file systems, file for files, and dir for
directories. Each class has its own associated set of permissions.
Proportional Bold
This denotes words or phrases encountered on a system, including application names; dialog box text;
labeled buttons; check-box and radio button labels; menu titles and sub-menu titles. For example:
1
https://fedorahosted.org/liberation-fonts/
v
Preface
Choose System → Preferences → Mouse from the main menu bar to launch Mouse
Preferences. In the Buttons tab, click the Left-handed mouse check box and click
Close to switch the primary mouse button from the left to the right (making the mouse
suitable for use in the left hand).
To insert a special character into a gedit file, choose Applications → Accessories
→ Character Map from the main menu bar. Next, choose Search → Find… from the
Character Map menu bar, type the name of the character in the Search field and click
Next. The character you sought will be highlighted in the Character Table. Doubleclick this highlighted character to place it in the Text to copy field and then click the
Copy button. Now switch back to your document and choose Edit → Paste from the
gedit menu bar.
The above text includes application names; system-wide menu names and items; application-specific
menu names; and buttons and text found within a GUI interface, all presented in proportional bold and
all distinguishable by context.
Mono-spaced Bold Italic or Proportional Bold Italic
Whether mono-spaced bold or proportional bold, the addition of italics indicates replaceable or
variable text. Italics denotes text you do not input literally or displayed text that changes depending on
circumstance. For example:
To connect to a remote machine using ssh, type ssh [email protected] at
a shell prompt. If the remote machine is example.com and your username on that
machine is john, type ssh [email protected].
The mount -o remount file-system command remounts the named file
system. For example, to remount the /home file system, the command is mount -o
remount /home.
To see the version of a currently installed package, use the rpm -q package
command. It will return a result as follows: package-version-release.
Note the words in bold italics above — username, domain.name, file-system, package, version and
release. Each word is a placeholder, either for text you enter when issuing a command or for text
displayed by the system.
Aside from standard usage for presenting the title of a work, italics denotes the first use of a new and
important term. For example:
Publican is a DocBook publishing system.
1.2. Pull-quote Conventions
Terminal output and source code listings are set off visually from the surrounding text.
Output sent to a terminal is set in mono-spaced roman and presented thus:
books
books_tests
vi
Desktop
Desktop1
documentation
downloads
drafts
images
mss
notes
photos
scripts
stuff
svgs
svn
Notes and Warnings
Source-code listings are also set in mono-spaced roman but add syntax highlighting as follows:
package org.jboss.book.jca.ex1;
import javax.naming.InitialContext;
public class ExClient
{
public static void main(String args[])
throws Exception
{
InitialContext iniCtx = new InitialContext();
Object
ref
= iniCtx.lookup("EchoBean");
EchoHome
home
= (EchoHome) ref;
Echo
echo
= home.create();
System.out.println("Created Echo");
System.out.println("Echo.echo('Hello') = " + echo.echo("Hello"));
}
}
1.3. Notes and Warnings
Finally, we use three visual styles to draw attention to information that might otherwise be overlooked.
Note
Notes are tips, shortcuts or alternative approaches to the task at hand. Ignoring a note
should have no negative consequences, but you might miss out on a trick that makes your
life easier.
Important
Important boxes detail things that are easily missed: configuration changes that only
apply to the current session, or services that need restarting before an update will apply.
Ignoring a box labeled 'Important' won't cause data loss but may cause irritation and
frustration.
Warning
Warnings should not be ignored. Ignoring warnings will most likely cause data loss.
2. We Need Feedback!
If you find a typographical error in this manual, or if you have thought of a way to make this manual
better, we would love to hear from you! Please submit a report in Bugzilla: http://bugzilla.redhat.com/
bugzilla/ against the product Fedora Documentation.
When submitting a bug report, be sure to mention the manual's identifier: user-guide
vii
Preface
If you have a suggestion for improving the documentation, try to be as specific as possible when
describing it. If you have found an error, please include the section number and some of the
surrounding text so we can find it easily.
viii
Chapter 1.
Introduction
Welcome to the Fedora Core 6 Desktop User Guide! This guide is intended for users, with a working
Fedora Core 6 system, who are able to use a mouse and keyboard. This guide shows:
• How to login to your computer
• The layout of the default Fedora desktop
• How to use Nautilus, a file and system navigator
• How to use Evolution, an e-mail client
• How to use Gaim, an instant messenger client
• How to use Firefox, a web-browser
• How to use OpenOffice, an office suite
• How to customize your new Fedora desktop
1.1. About this Document
Volunteer contributors from the Fedora Documentation Project created this guide, and many others,
for each release of Fedora. If you have questions or suggestions about Fedora documentation, or if
you would like to help document Fedora, please visit the Fedora Documentation Project web site:
http://fedoraproject.org/wiki/DocsProject
For assistance installing Fedora Core 6, please read the Fedora Core Installation Guide:
http://fedora.redhat.com/docs/install-guide/fc6/
Thank you for choosing Fedora.
1
2
Chapter 2.
Logging into the Desktop
This section of the Fedora Desktop User Guide explains how to login to your system. The user
account and the password created during the installation process is necessary to complete this
step. If you have forgotten your user account, your password, or both, read Section 2.2, “I Cannot
Login: HELP!”. For additional information about the login process, read Section 2.1, “Logging In: An
Explanation”. This first section covers the login process.
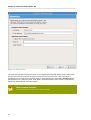
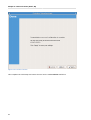
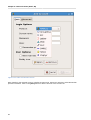
Any user can now login when the display looks similar to the picture below:
Figure 2.1. Login Screen
To login, type your username into the horizontal field containing a blinking black bar (the cursor). Next,
press the [Enter] key. Next, type your password into the same field you typed your username, then
press the [Enter] key.
Password display
For security reasons, a dot is displayed for every character entered in the password
field.
Keep your password private
As with any password, your Fedora account password should be kept private and
not shared with anyone or written down in plain view.
3
Chapter 2. Logging into the Desktop
Each computer user should be assigned a unique username and password. With unique
user accounts, the system is more secure, and Fedora automatically stores files and other
sensitive information separately from other users.
Your username and password are case-sensitive.
A correct username and password is required to login to the system. Common errors
include mis-typed fields or the [Caps Lock] feature is on. Remember, usernames and
passwords are case-sensitive. This means that 'user' is not the same as 'USER' or 'uSeR'.
If problems persist, read the section Section 2.2, “I Cannot Login: HELP!”
After a correct username and password are entered, the login screen will be replaced by the
splash screen. After this, the splash screen should be replaced by the default Fedora 6 desktop.
Congratulations! The computer is now ready for use.
2.1. Logging In: An Explanation
Fedora is a multi-user operating system. In short, this means multiple users can be logged into the
computer at the same time. Three distinct groups, normal user, system user and administrative
accounts exist on your Fedora system. By default, your account is created as a normal user account.
Normal users have permission to run a desktop and related desktop applications. System users have
permission to programs running in the background, often with elevated privileges, that help maintain
your computer system. One example of a system account is the Xscreensaver program.
Modify Default Login Procedure with Xscreensaver.
The Fedora login process is regulated by a system user called Xscreensaver.
Xscreensaver secures your desktop when it is unattended and can be configured by
accessing the following menu options: System > Preferences > Screensaver.
Administrative accounts are accounts with elevated privileges, such as the root account, that enable
the user to perform tasks to alter the behavior and ability of other users on the computer system. The
root user is considered the "ultimate" administrative account as it has domain over the entire machine.
For more information about these different levels, permissions, and user provisioning, please refer to
1
the Fedora Administration Guide .
Day-to-day tasks do not require root level access.
Do not log into your desktop as root, as it is potentially dangerous. When the need
arises to perform maintenance duties such as installing software, removing software, or
updating the system, the tool can be run as the root user. This is done in this guide with
the command form su -c 'command-to-be-run-as-root'. Programs that require
root privileges will to prompt you for the root password before the program starts.
1
http://fedoraproject.org/wiki/Docs/Drafts/AdministrationGuide
4
I Cannot Login: HELP!
2.2. I Cannot Login: HELP!
Recovering or replacing a password for a user account is not hard, but it is beyond the scope of this
guide. For an explanation and details on how to do this, please refer to the Fedora Administration
2
3
Guide , which has a section on user accounts, and password recovery .
2
3
http://fedoraproject.org/wiki/Docs/Drafts/AdministrationGuide
http://fedoraproject.org/wiki/Docs/Drafts/AdministrationGuide/UserAccounts
5
6
Chapter 3.
Tour of the Desktop
This chapter introduces the default desktop environment in Fedora. By providing a common
terminology for the elements on the desktop, it is easier to explain how to use the desktop throughout
this guide.
3.1. View of the Default Desktop
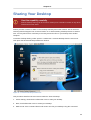
Upon the initial login into Fedora, you will see default desktop shown here:
Figure 3.1. Default Fedora Desktop
The default desktop has three distinct areas. From top to bottom, the areas are:
• The menu panel
• The desktop area
• The window list panel
The layout location of these items can be customized, but the term used for each of them remains the
same.
The menu panel stretches across the top of the screen. It contains three menus and a number of
default icons that start software applications. It also provides a clock, volume control applet, and a
notification area.
7
Chapter 3. Tour of the Desktop
The desktop area is the screen space between the menu panel and the window list panel. The
Computer, Home Directory, and Trash icons are located in the top left corner of this area. Those users
more familiar with Microsoft Windows may equate these icons to the My Computer, My Documents,
and Recycle Bin, respectively.
The window list panel is located at the bottom of the screen. It features the Show Desktop icon,
running applications as icons, and it gives access to the workplace switcher and the trash.
The following sections discuss the menu panel, desktop area, and window list panel in further detail.
3.2. The Menu Panel
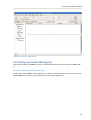
Figure 3.2. Gnome Menu Panel
• Applications - The Applications menu contains a variety of icons that start software applications. The
icons are ordered by category. It is similar to the Microsoft Windows Start menu.
• Places - The Places menu contains a customizable list of directories, mounted volumes, recent
documents, and a Search function. Volumes that are mounted may be external USB drives (flash,
hard disk, CD, etc.), directories shared across a network, or other media devices such as a portable
music player. Read more about this in Chapter 4, Using Media.
• System - The System menu contains a variety of items. Log Out, About, and Help are selfexplanatory. Lock Screen starts the screen saver or blanks the screen and prevents the desktop
from being used until a password is entered. Preferences contains tools for configuring peripherals
and the desktop. System Settings also contains configuration tools that are for administrative
purposes and usually require root access; that is, when those applications are started, the root
password must be entered to continue.
In addition to the menus, the menu panel contains a number of icons for common software.
Mozilla Firefox web browser.
Evolution mail client and personal information
manager.
OpenOffice.org Writer is a word processing
program.
OpenOffice.org Impress is for creating and
giving presentations.
8
The Desktop Area
OpenOffice.org Calc is a spreadsheet tool.
Table 3.1. Some Desktop Icons
Office and Productivity Tools
Writer, Impress, and Calc are displayed only if Office and Productivity Tools was selected
during installation. The Add/Remove program application, Pirut, can be used to install
these office tools at any time.
You can add program icons that start an application to the menu panel. These icons are called
launchers. Right-click on the panel, and select Add to Panel.
Alternative
There is another way to add an application launcher to the menu panel if the application
is already listed in the Applications menu. Navigate to the application in the Applications
menu, right-click on the application, and select Add this launcher to panel.
The appearance of the panel can also be customized. Right-click on the panel and select Properties.
3.3. The Desktop Area
Before any additional icons are added to the desktop, the desktop area contains three icons by
default:
1. Computer - This contains all volumes (or disks) mounted on the computer. These are also listed in
the Places menu. Computer is equivalent to My Computer on Microsoft Windows.
2. Home - This is where the logged-in user stores all files by default, such as music, movies, and
documents. There is a different home directory for each user, and by default users cannot access
each others' home directories. Home is equivalent to My Documents on Microsoft Windows.
3. Trash - Deleted files are moved to Trash. Empty Trash by right-clicking the icon and clicking Empty
Trash.
Permanently deleting files
To permanently delete a file and bypass the file's move to Trash, hold down the [Shift] key
when deleting the file.
Right-clicking on the desktop presents a menu of actions related to the desktop area. For example,
clicking on Change Desktop Background lets you choose a different image or photograph to display on
the desktop. This is similar to changing the desktop wallpaper on a Microsoft Windows desktop. It is
possible to choose not to have any desktop background.
9
Chapter 3. Tour of the Desktop
3.4. The Window List Panel
Figure 3.3. Fedora Window List
The window list panel has three components:
• The Show Desktop button
• The Workspace Switcher
• The Trash icon
Clicking on the show desktop button hides all open windows and shows the desktop area. This is
useful when the number of open applications windows becomes cluttered. The windows are minimized
and can be displayed by clicking on the minimized window in the window list panel.
Open applications appear as button icons in the middle part of the window list panel; these are the
open windows being listed.
The application window that has focus appears as a depressed button. Usually, this is the application
whose window is on top of all the others on the screen. Switch from one running application to another
by clicking on the desired application's button in the window list.
Use the key combination [Alt]+[Tab] to switch between open
windows.
Holding down the [Alt] key while you tap the [Tab] key allows you to cycle through all
open applications.
The workspace switcher is situated on the far right. Workspaces have long been a feature of UNIX
and Linux desktop environments. Each workspace provides a separate desktop where applications
can be organized. The workspace switcher allows you to switch from one workspace to another. Each
workspace has separate desktop areas with a matching window list panel. However, the menu panel
and background image is the same on all desktops.
The Trash icon on the right end of the window list panel works the same as the Trash icon in the
desktop area.
10
Chapter 4.
Using Media
This chapter covers how to use media such as hard drives, DVDs, CDs, and flash drives in Fedora.
When these media are mounted, they are called volumes.
4.1. Understanding
When you insert media into your computer, Fedora automatically detects the volume. An icon is placed
both on your desktop and in the Places menu.
System hard disk is already mounted
The hard disk drive that Fedora is installed on is mounted during system boot and cannot
be removed or ejected the way other media can. Access this drive through the Computer
icon on the desktop or through Places > Computer.
When you are finished using your media, alert Fedora that you would like to remove this volume. To do
this, right-click on the device's icon and then select Unmount Volume or Eject, depending on what type
of media you are using.
4.2. Exploring Media
To view the contents of a volume, double-click on the icon on the desktop, or choose the volume name
from the Places menu.
All of the contents of your volume are displayed in the window.
4.3. Writing CDs or DVDs
Fedora includes support for writing to CDs and DVDs. To write to a CD or DVD:
1. Open a Nautilus window, such as Home or Computer. Nautilus is the graphical file manager.
2. Select Places > CD/DVD Creator.
3. Drag and drop the files you wish to burn into this new empty window.
4. Click Write to Disc.
5. In the dialog box, you can change the name of the disc and the write speed if they are incorrect.
6. Click Write.
4.4. Using a USB Drive
When you plug in a USB drive, Fedora automatically detects this and puts an icon on your desktop.
You may then use your USB drive as you would any other volume.
11
12
Chapter 5.
Accessing the Web
Fedora uses Mozilla Firefox by default to access the World Wide Web (Web). Firefox is a multi
platform, standards-compliant Web browser.
Features of Mozilla Firefox include:
• Tabbed Browsing: Separate tabs for each Webpage are provided, all within one Firefox window.
• Extensions and Plugins: Various extensions and plugins are available that support new features,
such as search fields directly in the toolbar.
• Small and Fast: By focusing on providing an extendable Web browser, Firefox is smaller and faster
than other browers
5.1. Starting Firefox
You can start Firefox by selecting Applications > Internet > Firefox Web Browser or by using the menu
panel icon:
Figure 5.1. Browser Icon
5.2. Going Further
Firefox has support for different plugins that extend its capabilities. This framework allows anyone to
create extensions and plugins.
You can find more information on Firefox at:
http://www.mozilla.org/support/firefox/
13
14
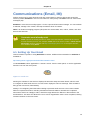
Chapter 6.
Communications (Email, IM)
Fedora can be used to send electronic mail and communicate in real time with people around the
world. By default, Evolution is used to send electronic mail (email), and Gaim is used to send instant
messages (IM).
Evolution is more than an email program. It is also a personal information manager. You can maintain
a calendar, manage a list of tasks, and keep an address book of contacts.
Gaim is an instant messaging program (client) that can access MSN, AOL, Yahoo!, Jabber, and other
IM and chat networks.
Accounts must already exist
Gaim requires an existing account on each of the IM networks, created via the normal
account creation process. For example, Gaim cannot be used to create a Yahoo Instant
Messenger account. Instead, visit http://messenger.yahoo.com to set up the account,
then access it using Gaim.
6.1. Setting Up Your Email
This information is specific to using Evolution on Fedora. Additional documentation for Evolution is
available at:
http://www.gnome.org/projects/evolution/documentation.shtml
To start Evolution, select Applications > Internet > Email from the menu panel, or use the application
launcher icon from the menu panel:
Figure 6.1. E-mail Icon
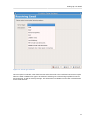
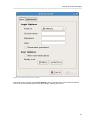
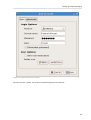
Running the software for the first time displays the Evolution Setup Assistant wizard, which is used
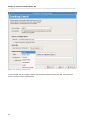
to configure an initial email account. The first screen displays a welcome message. Click Forward to
bring up the next screen, titled Identity.
Identity is for configuring the initial values relating to personal email accounts. The screen contains
fields for required information, including Full Name and Email Address. Beneath this is Optional
Information, which has a Reply to value, should the reply address be different to that entered in the
Email Address. This area also allows the user to add an Organization name. Once completed, clicking
Forward continues to the next screen.
15
Chapter 6. Communications (Email, IM)
Figure 6.2. Identity screen
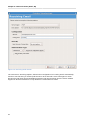
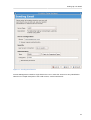
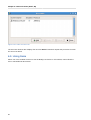
The next screen is Receiving Email, which is for configuring the retrieval settings for the initial email
account. The user must choose the type of server from a drop down menu. This information is
supplied by your internet service provider (ISP) or email administrator. By default, Evolution allows
the following to be configured: None, Hula, IMAP, Novell GroupWise, POP, UseNet, Local Delivery,
MH-format, Maildir-format, and mbox spools.
Most popular formats
The most popular mail formats are POP and IMAP.
16
Setting Up Your Email
Figure 6.3. Server type selection
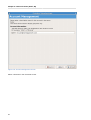
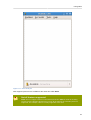
Once an option is selected, other fields become active that need to be considered. Most users require
either the POP or IMAP server type to be selected. Selecting one of them brings up fields for Server
and Username, as well as security settings. This information is available from the ISP or administrator
for the email account.
17
Chapter 6. Communications (Email, IM)
Figure 6.4. Recieving Email Screen
The next screen, Receiving Options, allows further configuration for incoming email. Automatically
check for new mail every X minutes polls the server at set intervals. Leave messages on server
prevents the mail client from downloading messages and removing them from the server. Disable
support for all POP3 extensions is only needed in a small number of cases.
18
Setting Up Your Email
Figure 6.5. Recieving Options Screen
The Sending Email screen is for configuring servers and settings for outgoing messages. The user
may select SMTP or Sendmail; SMTP, or simple mail transport protocol, is most common. Server
Configuration requires a hostname under Server and is where potential authentication settings are
entered. These settings, when used, are provided by the ISP or administrator for the email account.
19
Chapter 6. Communications (Email, IM)
Figure 6.6. Sending Email Screen
In this example, the server type is SMTP and the authentication method is PLAIN. The username
fcuser is used for server authentication.
20
Setting Up Your Email
Figure 6.7. Sending Email Screen
Account Management contains a single field for the user to name the account for easy identification.
Often this is a simple description of the email account, such as Work Email.
21
Chapter 6. Communications (Email, IM)
Figure 6.8. Account Management Screen
Select a timezone in the Timezone screen.
22
Setting Up Your Email
Figure 6.9. Timezone Screen
The final screen, Done, indicates that the account setup is complete. Clicking on the [Apply] button
completes the setup process.
23
Chapter 6. Communications (Email, IM)
Figure 6.10. Finished Screen
This completes the initial setup and enters the user into the main Evolution mail client.
24
Setting up Instant Messaging
Figure 6.11. Evolution Main Screen
6.2. Setting up Instant Messaging
This section is specific for Gaim in Fedora. For further information and documentation on Gaim, refer
to:
http://gaim.sourceforge.net/documentation.php
To start and configure Gaim, select Applications > Internet > Internet Messenger from the menu panel.
Starting Gaim for the first time goes directly into the Accounts configuration:
25
Chapter 6. Communications (Email, IM)
Figure 6.12. Gaim Accounts Screen
Click on the [Add] button to bring up the Add Account window:
26
Setting up Instant Messaging
Figure 6.13. Gaim Add Account Screen
In the Add Account window, under Login Options, click on the right side of the Protocol dropdown
menu to show the available protocols. In this example, AIM/ICQ is selected.
27
Chapter 6. Communications (Email, IM)
Figure 6.14. Gaim Add Account Screen
Enter details for the selected account, including Screen name, Password, and Alias. Select Remember
password if desired. Click on the [Save] button to add the account to the account list.
28
Setting up Instant Messaging
Figure 6.15. Gaim Add Account Screen
Once the account is added, the Accounts windows displays the new account:
29
Chapter 6. Communications (Email, IM)
Figure 6.16. Gaim Accounts List
The Accounts windows also displays the next time Gaim is launched. Repeat this procedure for each
account to be added.
6.3. Using Gaim
Select one of the enabled accounts to see the Buddy List window. In this window, menus allow the
user to add additional IM contacts.
30
Using Gaim
Figure 6.17. Gaim Buddylist
All 9 supported protocols are available at the same time within Gaim.
Not all features supported
Gaim does not support features of all included protocols. Gaim is useful for chatting
via text across 9 different IM protocols, but not all the features in each IM system are
supported. For example, video is not fully supported at this time.
31
32
Chapter 7.
Office Tools
Office productivity tools are available in the base Fedora installation. This group of office tools include
presentation, spreadsheet, and word processing applications. These tools are available through
Applications > Office or as icons on the menu bar.
The office tools available are:
Calendar, a component of the Evolution
application suite.
Presentation is the OpenOffice.org Impress
application, for creating and performing
presentations.
Project Management is the Planner application,
a powerful project planning tool.
Spreadsheet is the OpenOffice.org Calc
application, a spreadsheet program.
Tasks, a component of the Evolution application
suite.
Word Processor is the OpenOffice.org Writer
application, a word processing program.
Table 7.1. Available Office Tools
Evolution applications require initial setup
The Evolution suite of applications, which includes Calendar and Tasks, requires an
initial setup. See Section 6.1, “Setting Up Your Email” for detailed directions.
7.1. OpenOffice.org Applications
With OpenOffice.org, you can create documents in formats based on open standards, such as
OpenDocument, Rich Text Format, and HTML. If necessary, you can also read, edit, and write
documents in Microsoft Office formats, such as Word, Excel, and PowerPoint, with a high degree of
compatibility. You can also export files in PDF format without the need of additional software.
33
Chapter 7. Office Tools
OpenOffice.org is available for many computer platforms
The OpenOffice.org suite is also available without cost for other Linux distributions, Sun
Solaris, FreeBSD, Microsoft Windows and Mac OS X under X11. This makes it possible to
publish documents which are compatible across many different computer platforms.
7.2. For Further Information
For more information on using OpenOffice.org, refer to the following documentation and support
pages:
• http://documentation.openoffice.org/
• http://support.openoffice.org/index.html
• http://user-faq.openoffice.org/
For more information on using Planner, refer to the following official project documentation and
support site:
http://live.gnome.org/Planner
For more information on using Evolution, refer to the following official project documentation and
support site:
http://www.gnome.org/projects/evolution/
34
Chapter 8.
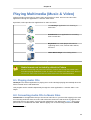
Playing Multimedia (Music & Video)
Fedora includes several tools for viewing video and listening to audio. Access sound and video
applications through the Applications > Sound & Video menu.
By default, Fedora provides four applications for audio and video:
The CD Player application is for listening to
audio CDs.
Sound Juicer is an application for converting
CDs to music files.
Rhythmbox is a music player with tools for
organizing music, CDs, Internet radio stations,
and more.
Totem Movie Player is for viewing videos.
Table 8.1. Multimedia applications
Media formats not included by default in Fedora
Because of licensing and patent encumbrance, Fedora cannot ship with certain audio
and video playing capabilities, known as codecs. An example is the MP3 codec. Refer to
Section 8.6, “MP3, DVD, and Other Excluded Multimedia” for more information.
8.1. Playing Audio CDs
CD Player is the default application for playing CDs. Audio CDs begin playing automatically when the
disk is inserted into the CD-ROM drive.
This program can be started independently through the menu Applications > Sound & Video > CD
Player.
8.2. Converting Audio CDs to Music Files
Sound Juicer is the application that rips the CD into audio files on your hard disk. Ripping is the word
for converting audio files from CD to file, with each music track on the CD saved as a single file. The
1
default file format is Ogg Vorbis, a free and open alternative to the MP3 format. Vorbis offers better
performance in a smaller file than MP3. When a ripping from a commercially produced CD, Sound
1
http://www.vorbis.com/
35
Chapter 8. Playing Multimedia (Music & Video)
Juicer displays the music track names, downloading the information from a free database on the
Internet.
Vorbis is a lossy format
Similar to MP3, Vorbis compresses the music track to a smaller file with very little loss of
musical range or quality. Files can also be saved in the lossless WAV or FLAC formats.
However, the resulting files are much larger.
The Sound Juicer Manual is available in the application, by going through Help > Contents.
8.3. Organizing your Multimedia Files
One can organize multimedia files using Rhythmbox. Access this through Applications > Sound &
Video > Rhythmbox Music Player. Rhythmbox provides a front-end for music services, Internet radio
stations, podcasts, and your own library of multimedia.
To learn more about using Rhythmbox, you can access the Rhythmbox Music Player Manual through
the Help > Contents menu.
8.4. Playing Videos
The Totem Movie Player can play a variety of videos. Found at Applications > Sound & Video >
Movie Player, Totem plays any format that can be legally supplied with Fedora. For usage help, the
Totem Movie Player Manual is accessed through the Help > Contents menu.
8.5. Fedora Project's Approach to Multimedia Support
The Fedora Project encourages the use of open formats in place of restricted ones.
Fedora includes complete support for many freely-distributable formats. These are the Ogg media
format, Vorbis audio, Theora video, Speex audio, and FLAC audio formats. These freely-distributable
formats are not encumbered by patent or license restrictions. They provide powerful and flexible
alternatives to more popular, restricted formats such as MP3.
8.6. MP3, DVD, and Other Excluded Multimedia
Fedora cannot include support for MP3 or DVD video playback or recording. MP3 formats are
patented, and the patent holders have not provided the necessary licenses. DVD video formats
are also patented and equipped with an encryption scheme. Again, the patent holders have not
provided the necessary licenses, and the code needed to decrypt CSS-encrypted discs may violate
the Digital Millennium Copyright Act, a copyright law of the United States. Fedora also excludes other
multimedia software due to patent, copyright, or license restrictions, such as Adobe Flash Player and
RealNetworks RealPlayer.
While other MP3 options may be available for Fedora, Fluendo now offers an MP3 plugin that
is properly licensed for end users. This plugin enables MP3 support in applications that use the
GStreamer framework as a backend. Fedora does not include this plugin for licensing reasons, but
Fluendo offers one solution to playing MP3 in Fedora.
36
For Further Information
8.7. For Further Information
For additional information about multimedia in Fedora, refer to the Multimedia section of the Fedora
Project website:
http://fedoraproject.org/wiki/Multimedia
For more information on freely-distributable formats and how to use them, refer to the Xiph.Org
Foundation's web site at:
http://www.xiph.org/
For more on licensed and copyrighted formats, please refer to:
http://fedoraproject.org/wiki/ForbiddenItems
For more information on Fluendo, visit Fluendo's website at
http://www.fluendo.com
37
38
Chapter 9.
Playing Games
By default, Fedora comes with a selection of 15 games. There are additional game packages that
can be selected during installation. In addition, the Fedora Extras project has packages for many
more games. You can install additional games after installation by using the Add/Remove program
application, Pirut, and the Fedora Extras software repository. More information about this games
repository can be found on the Fedora Extras Games Wiki:
http://fedoraproject.org/wiki/Games
9.1. Brief Description of Each Game
AisleRiot Solitaire
A collection of dozens of solitaire games
Ataxx
A disk-flipping game
Blackjack
The classic casino card game
Five or More
A version of the popular Color Lines game
Four-in-a-Row
A four-in-a-row game played against the
computer or another human opponent
FreeCell Solitaire
Another huge collection of solitaire games
Iagno
A Reversi-like disk flipping game
Klotski
A group of sliding block puzzles
Mahjongg
A tile-matching game with many variations
Mines
A clone of a popular puzzle game
Nibbles
A worm or snake game
Robots
The classic game of robots out of control
Same GNOME
A puzzle game involving the strategic removal of
groups of marbles
Tali
A poker game played with dice
Tetravex
A simple tile-matching game
Table 9.1. Games on Fedora
For information about using these games, refer to the individual Help > Contents menu within each
game.
39
40
Chapter 10.
Managing Photos
Most USB-compatible cameras will work automatically with Fedora and require very little configuration.
If your digital camera offers a choice of USB connection types, set the camera's USB setting to PTP,
or point-to-point mode, before continuing with this tutorial. Consult your camera's user manual to
determine if this option is available and how to choose it. If it is not available, the default settings
should be sufficient.
10.1. Connecting Your Camera
To properly connect the camera to your Fedora system:
1. Make sure your camera is powered off.
2. Connect a USB cable from the camera to your computer.
3. If your camera requires you to select a knob or dial setting before connecting it to a computer,
make that selection now.
4. Power the camera on.
After your camera powers on, an informational window should appear on your desktop. If you would
like to continue to import photos from the camera, select the Import Photos button. If you decide you
do not want to import photos, select the Ignore button. If you do not want to see this dialog each time
you connect a camera, you can select the Always perform this action option in conjunction with the
Import Photos or Ignore button to make one of the choices permanent.
10.2. Organizing and Importing Photos
After you make your selection, Fedora loads thumbnails, or previews, of the photos from your camera
into a new window. From this new window, you can tell Fedora the destination of the imported images
and how you want your images organized as it loads them from your camera. In this dialog, you can
select and/or deselect photo(s) to import by clicking on the corresponding thumbnail. To select all
photos, click any photo and then press the key combination [Ctrl]+[A]. To deselect all photos, press
[Ctrl]+[Shift]+[A]. Once all desired photos for import are selected, click the Import button. To cancel
the entire import process, click the Cancel button. For a more detailed explanation of the options
available when importing images, see the information below.
What to do if you accidentally disconnect your camera.
The camera button allows you to reload the thumbnails in case your camera is
accidentally disconnected from the computer. If that happens, Fedora may display an
additional dialog returning you to the previous step. It is safe to select Ignore in that dialog,
return to this one, and click the camera button again.
10.2.1. Selecting a Filing Method
Use Destination to select a folder in which to keep your photo images. Within a destination folder, you
can further organize your photos by date and time, or by any other method you wish. If you enter text
into the Film box, Fedora uses this text to label and organize the photos you import.
41
Chapter 10. Managing Photos
If you want Fedora to delete the images from your camera after it imports them, select Delete imported
images from the camera. If you want it to use the filenames from the camera, select Keep original
filenames. If you do not select this box, Fedora automatically numbers your images using the order it
imports them, starting with "00001."
10.2.2. Categorizing Your Photos
The Categories box shows any special category labels you select to mark the photos you import.
If you want to select any categories for your photos, click the ... button, which makes the category
selection dialog appear.
To label your images with a category, click the checkbox next to the category name. Select as many as
you wish. If you do not see a category name you like, select the New button and enter a new category
name to add to the list. If you want to remove a category name permanently from the list, select the
category by clicking on its name and then select Delete.
As you select categories, they appear in the Selected categories box. When you are finished, select
OK to save the category names, or Cancel to forget any category selection(s).
Selecting a category using a checkbox protects filing choices.
It is easy to accidentally misfile images due to a typing mistake. By using checkbox
selection, images are correctly categorized every time.
42
Chapter 11.
Sharing Your Desktop
Use this capability carefully
Remote desktop sharing can be a serious security risk. It should be turned on only when
needed and not left active.
Fedora provides a means to share a user's desktop remotely across the network. This is useful for
receiving technical support from a remote location or for demonstrating a desktop feature to another
user. You may also find it a useful way to remotely access the files on your desktop from another
computer.
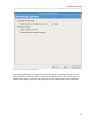
To activate desktop sharing, select System > Preferences > Remote Desktop from the user menu.
This opens the Remote Desktop Preferences window:
Figure 11.1. Remote Desktop Preferences
This procedure describes the most secure method to share a desktop.
1. Under Sharing, check the box Allow other users to view your desktop.
2. Next, check Allow other users to control your desktop.
3. Make a note of the command listed under Users can view your desktop using this command:
43
Chapter 11. Sharing Your Desktop
4. Under Security, check the box Ask you for confirmation.
5. Next, check Require the user to enter this password and enter a password.
6. Finally, click on the Close button.
Be sure to inform the person performing remote technical support/viewing the command from step
three, as well as the assigned password. When the person connects to your desktop, click on the Yes
button when asked for confirmation.
Once the remote viewing feature is no longer needed, turn off desktop sharing:
1. Select System > Preferences > Remote Desktop
2. Uncheck the Allow other users to view your desktop box
3. Click on the Close button.
This turns off the remote desktop sharing feature.
44
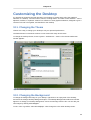
Chapter 12.
Customizing the Desktop
It is possible to customize the look and feel of your desktop in several ways. All of the graphical
elements of a desktop - window borders, buttons, scrolling sliders, and other control elements - can be
adjusted, modified, or replaced. A theme is a collection of such graphical elements, designed to give a
common look and to fit together, and bundled for the desktop.
12.1. Changing the Theme
Themes are a way to change your desktop to suit your personal preferences.
The default theme is Clearlooks. Fedora Core 6 comes with many other themes.
To change the desktop theme, choose System > Preferences > Theme. The Theme Preferences
window appears:
Figure 12.1. Change the Desktop Theme
12.2. Changing the Background
To change the background image on your desktop, right-click on an empty area of the desktop,
and select the Change Desktop Background option. The Desktop Background Preferences window
appears. To change your desktop background, choose a new image form the list. You can add your
own images by clicking Add Wallpaper.
To set a color or gradient, select No Wallpaper. Then change the color under Desktop Colors.
45
Chapter 12. Customizing the Desktop
Alternative
Another way to change the desktop background is to choose System > Preferences >
Desktop Background from the menu panel.
12.3. Customizing File Browsing Behavior
By default, Fedora uses the Nautilus file manager, which opens a new window each time you open a
folder. You can change this behavior to use one window with Forward and Back buttons.
To change this, double-click on Computer on the desktop, click Edit and then Preferences. You can
also select Places > Computer > Edit > Preferences from the menu panel. Click the Behavior tab and
click on the box next to the text Always open in browser windows.
46