1
Communicator User Manual
COPYRIGHT
©2010~2011 Samsung Telecommunications America
All rights reserved. No part of this manual may be reproduced in any form or by any means—graphic, electronic
or mechanical, including recording, taping, photocopying or information retrieval systems—without express
written permission of the publisher of this material.
TRADEMARKS
Adobe is a trademark and Adobe Acrobat is a registered trademark of Adobe Systems Incorporated.
Install Shield is a registered trademark of Install Shield Software Corporation. Exchange, Internet Explorer,
Microsoft, SQL 2005 Express, SQL 2008 Express, SQL 2005 Express Management Studio, SQL 2008 Express
Management Studio, Windows, Windows 2000 Server, Windows 2003 Server, Windows NT, and Windows XP
are registered trademarks of Microsoft Corporation. Netscape and Netscape Navigator are registered trademarks
of Netscape Communication Corporation in the United States and other countries.
OfficeServ is the trademark of SAMSUNG Electronics Co., Ltd. All other company and product names may be
trademarks of the respective companies with which they are associated.
Every effort has been made to eliminate errors and ambiguities in the information contained in this guide. Any
questions concerning information presented here should be directed to SAMSUNG TELECOMMUNICATIONS
AMERICA. SAMSUNG TELECOMMUNICATIONS AMERICA disclaims all liabilities for damages arising from the
erroneous interpretation or use of information presented in this guide.
PRINTED IN USA
09/11
ABOUT THE MANUAL
Purpose
This document describes the required specifications and outlines the steps required to successfully install
and use the OfficeServ Communicator.
Document Organization
This document laid you to walk the user through the installation steps and use of all the functionality of the
OfficeServ Communicator.
Information on the OfficeServ Communicator User Manual
This OfficeServ Communicator User Manual was written based on the products working in Korea and
operating in the Professional mode. Because the products used overseas and the products in Korea
have different functions, some of the information provided in this manual may not correspond to the
products used overseas.
Revision History
3
EDITION
DATE OF ISSUE
REMARKS
01
05.2010
First Edition
02
09.2011
Second Edition
© Samsung Telecommunications America
Conventions & Safety Concerns
The following types of paragraphs contain special information that must be carefully read and thoroughly understood.
To ensure product safety and proper operation, information followed by the following icons should be carefully read
before installing or using the product:
Symbols
WARNING
Provides information or instructions that the reader should follow in order to avoid personal injury or fatality.
CAUTION
Provides information or instructions that the reader should follow in order to avoid a service failure or damage to the
system.
Restriction
Indication for prohibiting an action for a product
Instruction
Indication for commanding a specifically required action
Note
Indication for emphasizing a point or specific information
CHECKPOINT
Provides the operator with checkpoints for stable system operation.
NOTE
Indicates additional information for reference.
4
© Samsung Telecommunications America
TABLE OF CONTENTS
ABOUT THE MANUAL
3
Conventions & Safety Concerns .................................................................................................................4
TABLE OF CONTENTS
5
CHAPTER 1: INTRODUCTION
9
What is the OfficeServ Communicator? ......................................................................................................9
Understanding the OSC ............................................................................................................................10
OfficeServ Communicator Installation Modes ........................................................................................... 11
OfficeServ Communicator Phone/Device Modes ......................................................................................12
OfficeServ Communicator Feature Compatibility Table.............................................................................13
CHAPTER 2: INSTALLING THE OFFICESERV COMMUNICATOR
14
System Requirements ..............................................................................................................................14
Installing the Web Cam Driver ..................................................................................................................15
For UCPhone Operation (The OSC is connecting to an SMT-i Series Phone) .........................................15
1.
Checking Whether the LAN Cards Are Running Normally...............................................................15
2.
Checking Whether the UC Phone Is Running Normally ..................................................................16
Checkpoint ................................................................................................................................................17
Installing the Update Server and Configuring Environment ......................................................................18
Configuring the OSCAutoUpdate Environment .........................................................................................23
Installing the Software ..............................................................................................................................24
Configuring the Initial OfficeServ Communicator Settings ........................................................................32
Device Mode: UCPhone ...........................................................................................................................33
Device Mode: DeskPhone ........................................................................................................................34
Device Mode: SoftPhone ..........................................................................................................................35
OfficeServ Communicator UC Main Control (Full View)............................................................................39
CHAPTER 3: CONTROLS AND CONFIGURATION
42
OSC Controls............................................................................................................................................42
OSC Control Details .................................................................................................................................48
Windows System Tray OSC Menu ............................................................................................................52
Configuring the OfficeServ Communicator Options ..................................................................................54
© Samsung Telecommunications America
5
CHAPTER 4: GETTING STARTED
72
MAKING A CALL
72
Before Making a Call ................................................................................................................................72
Making a Call ............................................................................................................................................74
ANSWERING A CALL
76
Before Answering a Call ...........................................................................................................................76
Answering a Call .......................................................................................................................................79
CONVENIENT FUNCTIONS
80
Functions Available during a Call ..............................................................................................................80
Video Call .................................................................................................................................................86
Microsoft Outlook Add-in Phone Function .................................................................................................88
Outlook CID POP-UP ...............................................................................................................................90
Drag & Drop Call/Message Function ........................................................................................................95
MENU FUNCTIONS
97
Buddylist ...................................................................................................................................................97
Phonebook................................................................................................................................................97
Messages/Call History ............................................................................................................................ 122
Call History ............................................................................................................................................. 124
Messages ............................................................................................................................................... 126
Easyset ................................................................................................................................................... 132
Viewing Recordings ................................................................................................................................ 134
Schedule ................................................................................................................................................. 136
DDE ........................................................................................................................................................ 143
IM/PS
146
Starting the Messenger ........................................................................................................................... 146
Managing Your Buddies .......................................................................................................................... 160
Chatting .................................................................................................................................................. 165
Connecting a Video ................................................................................................................................ 174
Sending and Receiving Files .................................................................................................................. 177
Whiteboard ............................................................................................................................................. 183
6
© Samsung Telecommunications America
CALL CONTROL INTEROPERATING WITH THE OFFICESERV LINK
195
Call Control Service ................................................................................................................................ 195
UC PHONE MODE FUNCTIONS
206
Sending Phone Content .......................................................................................................................... 206
Starting ................................................................................................................................................... 206
TROUBLESHOOTING
215
When Logging in to a Server from the OfficeServ Communicator .......................................................... 215
When Operating the OfficeServ Communicator ...................................................................................... 216
ANNEX
217
Speaker and Microphone Setting (System Setting) ................................................................................ 217
UNINSTALL
224
1. Beginning Uninstallation ..................................................................................................................... 224
2. Uninstallation Error ............................................................................................................................. 224
3. Uninstallation Confirmation ................................................................................................................. 224
4. Rebooting after Uninstallation ............................................................................................................. 225
COMMON FUNCTIONS AND TERMINOLOGY (AS IT APPLIES TO THE OSC.)
226
Q&A
230
ABBREVIATIONS (USED THROUGHOUT THIS AND OTHER SAMSUNG BUSINESS
TELEPHONE MANUALS)
235
© Samsung Telecommunications America
7
This page is intentionally left blank.
8
© Samsung Telecommunications America
Chapter 1: Introduction
What is the OfficeServ Communicator?
The OfficeServ Communicator (OSC) is an integrated client communications application that brings together
two devices; your Business PC and your Business Telephone. This enables subscribers/users on the same
phone system to communicate via Voice and Video as well as share Information, and view Presence
Awareness, when the OSC is licensed in combination with the OfficeServ Messenger Application. We call this
Unified Communications.
The OSC can be installed in one of two Operation Modes; Basic and Professional. Basic provides three Device
Modes; SoftPhone, UCPhone, and DeskPhone. These device Modes determine which device the OSC will be
working with as your telephone device.
In SoftPhone Mode the PC/Laptop becomes the telephone device. In UCPhone Mode the OSC connects with
the SMT-i Series Phones, while in DeskPhone Mode it connects with all other Samsung model phones†.
NOTE
†
:With the exception is the DS-24D the OSC DeskPhone Mode can connect to all Samsung Business
model phones available at the time of this writing.
The Professional installation Mode includes all the same functionality as with Basic Mode and adds to it the
OfficeServ Messenger functionality. The functionality added by OfficeServ Messenger are Presence
Awareness, Instant Messaging, and information sharing like Chat & Video Chat, White Boarding, Screen
Sharing, and File Sharing.
The various modes are sold, purchased, and installed by user licenses based on the functionality required by
the user. Some users may need all five licenses based on how they wish to control and unify their
communications. Though the licenses are based on user functionality, the actual licenses get installed on either
the Switch MP, the OfficeServ Link Server, and/or the OfficeServ Messenger Server.
NOTE
Details of each of the Modes, functionality, and licensing are discussed in later sections in this manual.
© Samsung Telecommunications America
9
Understanding the OSC
The OSC is Unified Communications Client software running on a client PC that takes the functionality
commonly used and understood on our telephones and puts it at your finger tips and Screens on your PC.
The OSC can be run in three different Device Modes. The OSC can be a Stand-alone device when in the
SoftPhone Mode, when in UCPhone Mode it can work in connection to a UCPhone (SMT-i Series) device, or it
can be run in DeskPhone Mode where it is connected to other Model Samsung business telephone proprietary
devices. All of which empowering the user, when connected, to make/receive calls to/from anywhere in the
world as authorized by the organization.
10
© Samsung Telecommunications America
OfficeServ Communicator Installation Modes
During the installation the person installing the software was asked if they wanted to install OSC Basic or OSC
Professional.
IMPORTANT NOTE
These options can only be selected during the OSC software installation and cannot be changed
unless you uninstall and then re-install so that it asks to select these options again.
BASIC
With OSC BASIC, the user can select for the OSC to run in one of three different device Modes;
SoftPhone, UCPhone, and DeskPhone. Each gives the user control over:
Audio Conference†
Missed Call Notification
†
Audio Recording
Phonebook
Answering/Making Calls
Schedule
Call Control: (Transfer, Hold,
Screen Pop Contact List (both from
Forwarding, Speed Dial, etc…)
OSC Phonebook and Outlook)
Call/Missed Call Logs
Dial from Outlook Contact List(s)
†
(Access to) Easyset
Free Dial
SMS/Text Messages
Video Calls‡
And more…
(Not Available in DeskPhone Mode)
PROFESSIONAL
With OSC PROFESSIONAL, the OfficeServ Communicator provides not only the BASIC functions listed
above but adds collaboration† to an OfficeServ Messenger Server. Some of the collaboration‡ added
functions are:
Buddy List (requires SMT-i5243 Phone)
Chat
File Sharing
Phone Contents (SMT-i5243 Phone ONLY)
Presence Awareness
Screen Sharing
Video Chat (up to 5 members)
White Boarding
And More...
†
: Requires the OS Link/Easyset V3 License
‡
: to and/or from others on the same system
© Samsung Telecommunications America
11
OfficeServ Communicator Phone/Device Modes
SoftPhone Mode (PC Phone Integration Device)
The SoftPhone Mode is also known as a PC Phone device. In this mode, the OSC SoftPhone is the device the user
uses to make/receive all their calls. The OSC SoftPhone is a software device that emulates a Samsung business
telephone. The OSC SoftPhone is registered to the Samsung switch installed at the Corporate office empowering the
user, when connected, to make/receive calls to/from anywhere in the world as authorized by the organization, all through
their PC and PC’s Multi-Media functionality (PC MUST be equipped with Internal or external Mic and Speakers and/or
headset).
UCPhone Mode (Samsung SMT-i Series Device Integration Only)
In this mode, the OfficeServ Communicator interoperates directly with a telephone device such as the SMT-i5243
terminal. In this mode, telephone functionality can be performed from either the PC or telephone device. However unlike
the OSC SoftPhone Mode while in UCPhone Mode you MUST use the SMT-i Series device to talk with the caller. When
the OSC PROFESSIONAL UCPhone Mode is paired with the SMT-i5243 device, phone contents and Buddy List viewing
functions are provided by the Collaboration with the OfficeServ Messenger Server.
DeskPhone Mode (Samsung Digital and IP Device integration)
12
In this mode, the OfficeServ Communicator controls existing digital phones through the OfficeServ Link V3. The functions
provided in the OSC DeskPhone and the ways that they are provided are identical to the existing OfficeServ Call.
Similarly to the OSC UCPhone Mode, while in DeskPhone Mode you MUST use a Samsung Digital or IP device to talk
with the caller.
© Samsung Telecommunications America
OfficeServ Communicator Feature Compatibility Table
An “✔” indicates that the corresponding feature is compatible with its corresponding Operational Mode.
OfficeServ Communicator (OSC)
OSC FEATURES
Basic1
Soft
Phone
Mode2
UC
Phone
Mode2
SMT-i Phones
Professional1
Desk
Phone
Mode2
Soft
Phone
Mode2
UC
Phone
Mode2
Desk
Phone
Mode2
3105
5210
5220
5230
5243
Phone Contents
✔
✔
✔
— Background Images
— Custom Ring Tones
Sync Phonebook
(Between OSC & Phone)
Buddy List
— Requires i5243 Phone(s) only
— No Client software required
OSC Integrated Call Recording
(Voice Only)
Video Call
Video Recording
(Voice & Video)
Chat3/Instant Messaging (IM)3
(Text Chat – No Audio)
✔
✔
✔
✔
✔
✔
✔
✔
✔
File Sharing
Presence Awareness
Screen Sharing
Video Chat3/IM with Video3
— Up to 5 Members [You + 4]
— Text Chat [No Audio]
White Boarding
Access to EasySet
Audio Conferencing
Call Control (Transfer, Hold,
Forwarding, Speed Dial)
Called / Missed Call Logs
Dial from Outlook Contact
List(s)
Free Dial
Make and Answer Calls
Missed Call Notification
OSC Phonebook
OSC Calendar / Schedule
Screen Pop Contact List (from
OSC Phonebook and/or Outlook)
SMS3 / Text Messages3
Sync Phonebook
(Between OSC & Phone)
✔
✔
✔
✔
✔
✔
✔
✔
✔
✔
✔
✔
✔
✔
✔
✔
✔
✔
✔
✔
✔
✔
✔
✔
✔
✔
✔
✔
✔
✔
✔
✔
✔
✔
✔
✔
✔
✔
✔
✔
✔
✔
✔
✔
✔
✔
✔
✔
✔
✔
✔
✔
✔
✔
✔
✔
✔
✔
✔
✔
✔
✔
✔
✔
✔
✔
✔
✔
✔
✔
✔
✔
✔
✔
✔
✔
✔
✔
✔
✔
✔
✔
✔
✔
✔
✔
✔
✔
✔
✔
✔
✔
✔
✔
✔
✔
✔
✔
✔
✔
✔
✔
✔
✔
✔
✔
✔
✔
✔
✔
✔
✔
✔
✔
✔
✔
✔
✔
✔
✔
✔
✔
✔
✔
✔
✔
✔
✔
✔
✔
✔
✔
✔
✔
✔
✔
✔
✔
✔
✔
✔
✔
✔
✔
✔
✔
✔
✔
✔
✔
✔
✔
✔
✔
✔
✔
✔
✔
✔
✔
✔
✔
✔
✔
✔
✔
✔
✔
✔
✔
✔
✔
✔
✔
✔
✔
✔
✔
✔
✔
✔
✔
✔
✔
✔
✔
✔
✔
✔
✔
✔
✔
✔
✔
✔
✔
✔
✔
✔
✔
✔
✔
✔
✔
✔
✔
✔
✔
✔
✔
✔
✔
✔
✔
✔
✔
✔
Table 1: Feature Compatibility 1
Installation Mode – Whether to run Basic or Professional must be decided at the time of the OSC Client software is being installed. If it needs to be changed, the OSC Client software must be uninstalled and then installed again from the beginning. 2 Operational Mode – Within an Installation Mode the Subscriber/User/Client can switch between Operational Modes while they are logged out of the OSC. 3 OSC features such as Video, Chat, IM, SMS and Text Messaging are internal features; Subscriber to Subscriber. All Subscribers must be on the same network LAN as well as the same Phone system. © Samsung Telecommunications America
13
Chapter 2: Installing the OfficeServ Communicator
Preparations before Installation
The following items should be checked before installing the OfficeServ Communicator.
System Requirements
o
Before installing the OfficeServ Communicator (OSC) on your PC, you should check whether it meets the
minimum system requirements listed below.
Item
Operating
System
Specification
Windows XP Professional SP2
Windows Vista, Windows Vista SP1
Windows 7, both 32 and 64 bit versions
Processor (CPU)
Pentium 4 1 GHz (when only using the Audio mode)
Pentium 4 2 GHz (when using the Video mode)
Memory
* When using the OSC Basic Installation Mode
512 MB (Minimum requirement: 256 MB) (when only using the Audio mode)
1 GB (Minimum requirement: 512 MB) (when using the Video mode)
* When using the OSC Professional Installation Mode
1 GB (Minimum requirement: 512 MB) (when only using the Audio mode)
2 GB (Minimum requirement: 512 MB) (when using the Video mode)
HDD
Network
Interface Card
14
300 MB free disk space
10/100BASE-T
Sound Card
A full-duplex sound card
Video Camera
A video camera for the PC (when using the Camera mode)
Other
A headset (or a microphone and speaker)
© Samsung Telecommunications America
Installing the Web Cam Driver
To make a video call using the video call function of the OSC while you are talking, a camera must have been
installed in your Windows operating system. If you install the camera driver while the OfficeServ Communicator
is running, an error will occur. Make sure to install a camera either prior to or after exiting the OSC installation
program. Make sure to use it after checking whether it operates normally.
For UCPhone Operation (The OSC is connecting to an SMT-i Series Phone)
1. Checking Whether the LAN Cards Are Running Normally
If two or more LAN cards (hereafter, NIC) are installed, the NIC with the same gateway as the UC
phone must be set as the default NIC for network connections to be processed normally.
© Samsung Telecommunications America
15
2. Checking Whether the UC Phone Is Running Normally
In Windows XP SP2 or later, the network functions may be restricted by a firewall function or an
antivirus program. Before installing the OSC, click Start -> Run. Run cmd.exe and then execute 'ping
<phone's IP address>' to check whether the UC phone is running and the network connection is
normal.
16
© Samsung Telecommunications America
Checkpoint
During the OSC Software Installation you will be asked three questions that you must be prepared to answer.
Setup type Screen #1:
English [This one used in US/Canada Market]
Korean
Italian
Setup type Screen #2:
SCM (Domestic) – NOT used in the US/Canada
OfficeServ 7000 Series [This one used in US/Canada Market]
Setup type Screen #3:
Basic
Professional
These can NOT be changed after installation has started.
To change, you must uninstall and
re-install and than select a different option at that time. Please select carefully.
Setup type Screen #4:
UCPhone
SoftPhone
DeskPhone
These options can be changed at any time after the installation. The selection during the
Installation simply selects the the Mode that begins when the installation has completed.
After installing the OSC client program, you will need some and/or all of the following information to complete
the configuration setup:
Station ID: __________________________
Password: __________________________ (1234 - default)
OfficeServ MP IP Address: __________________________ [SoftPhone Mode Only]
System Port: __________________________ (6000 – default) [SoftPhone Mode Only]
Link IP: __________________________ [DeskPhone Mode Only]
Link port: __________________________ (6000 – default) [DeskPhone Mode Only]
If installing OSC Professional you will need the following in addition to the above:
Messenger
ID: __________________________
Password: __________________________
Server IP: __________________________
Server Port: __________________________ (5070 - default)
Local (Client) Port: __________________________ (5070 - default)
© Samsung Telecommunications America
17
Installing the Update Server and Configuring Environment
For the OSC to perform auto update, the update server must have been configured. A web server is used as the
update server. The OSC and the update server communicate via the HTTP protocol (port 80). When installing
the OSC, you will set the URL of the update server.
The operation procedure for auto update is below. When the OSC is started, it connects to the URL of the
update server and takes OSCVersionInfo from it. When an update is needed, the OSC runs
OSCAutoUpdate.exe and exits itself. Then the OSCAutoUpdate downloads and installs a patch file and then
runs the OSC automatically.
Below is the procedure for configuring the update server.
1) Click Control Panel -> Administrative Tools -> Internet Information Services. Select Web Sites -> Default
Web Site.
2) Right-click on the default web site and select New -> Virtual Directory from the menu displayed. The Virtual
Directory Creation Wizard is displayed, as shown in the figure below. Click [Next].
18
© Samsung Telecommunications America
3)
Enter "OSCUpdate" as an alias for your virtual directory then Click [Next].
4) Click Browse and select the folder you want to connect to the OSCUpdate virtual directory. Click [Next].
© Samsung Telecommunications America
19
5) Select the Read and Run scripts checkboxes (default) as the permissions settings for the virtual directory.
Click [Next].
6) Click Finish to complete the wizard. Click [Next].
20
© Samsung Telecommunications America
7) In the Internet Information Services window, select the OSCUpdate folder and click the Properties icon. In
the OSCUpdate Properties window, select the HTTP Header tab.
8) Click MIME Types and register file extensions.
© Samsung Telecommunications America
21
9) Click OK to finish registering file extensions.
From now on, you must manage the update server so that the OSCUpdate virtual directory of the update
server contains the latest versions of the following two files.
Below is the content of OSCVersionInfo.txt file.
The Version parameter contains the value of the version property of an OSC setup file that will be
distributed. This parameter value must always be the latest OSC version.
The URL parameter value contains the URL of the update file to download from the update server.
22
© Samsung Telecommunications America
To check whether the update server operates normally, follow the steps below.
1) In Internet Explorer, enter "http://165.213.89.106/OSCUpdate/OSCVersionInfo.txt" in the Address box. The
following answer will be received.
2) Enter the URL parameter value in the Address box to check whether the update file can be downloaded.
3) If the File Download window is displayed, click Save to check whether the update file can be downloaded
and saved normally.
Configuring the OSCAutoUpdate Environment
After installing the OSC, if the update server is changed or you need to change the file download location, edit
the OSCAutoUpdate.ini file manually in the Config folder under the OSC installation folder.
© Samsung Telecommunications America
23
Installing the Software
The following demonstrates the installation procedures for installing the OfficeServ Communicator software.
Information required
Before installing the OfficeServ Communicator on your PC, you must have access to the Install program
and know where the IP Address of the Auto Update Server. The on site System Administrator should have
been given that information during server installation. It is often the same IP as the OfficeServ LINK and/or
OfficeServ Messenger Server IP.
Running the Setup File
Run the OSC setup file (Samsung OfficeServ Communicator.exe).
Select [Run].
24
© Samsung Telecommunications America
Select [Run] to install.
The Install Wizard should open automatically after running the setup.
The Samsung OfficeServ Communicator Setup screen is displayed, as shown in the figure below.
Select [Next].
© Samsung Telecommunications America
25
The License Agreement screen is displayed. After reading through the agreement select the "I accept the terms of
the license agreement" option.
Now select [Next].
In the User Information screen, enter your name and company name. This may be auto populated by registry.
Once there is a User Name and Company Name entered the [Next] button will become available.
Select [Next].
26
© Samsung Telecommunications America
Select a Language for the list. This list may grow as the product is deployed in many countries. Select English
for the US and all North American markets.
Then select [Next].
This list may grow as the product is deployed in many countries on different systems. Select OfficeServ 7000
Series for the US and all North American markets.
Select [Next].
© Samsung Telecommunications America
27
Set the operation Mode for the OSC. Both Basic and Professional provide access to the UC Phone, Desk Phone,
and Soft Phone applications. However, only Professional integrates these applications with OfficeServ
Messenger. This can NOT be changed later. To change from Basic to Professional you MUST uninstall and reinstall the software. If you believe you will be using OfficeServ Messenger at any point in the future select
Professional.
Select the appropriate option for this installation and then select [Next].
Select the Device type. UCPhone is compatible with OfficeServ SMT-i52xx model phones. All others should
select DeskPhone. SoftPhone is to be used as a stand alone device and requires a SoftPhone License. These
options CAN be changed at anytime by the user.
28
© Samsung Telecommunications America
Select the most appropriate option to start off with for this installation and then select [Next].
In the Set Auto Update Information screen, enter the IP Address of the update server.
Select [Next].
That concludes the Setup portion of the Software installation. In the next few steps the software will get written to
the drive.
© Samsung Telecommunications America
29
Start the Software Installation Process
Click the Install button to start the installation.
Select [Install]
During the installation, files are copied to the specified location.
Installing status indicator screen.
30
© Samsung Telecommunications America
Even though it does not request that you reboot, it is best to close all open applications and reboot the PC.
Uncheck the check box in the middle of the Installation Wizard screen before selecting [Finish].
Instruction
The OfficeServ Communicator installation Wizard has been completed. Before continuing
onto the configuration, close all open programs and REBOOT THE PC NOW so that all
changes made by the installation may take effect.
© Samsung Telecommunications America
31
Configuring the Initial OfficeServ Communicator Settings
This section describes how to configure the login information when you use the OfficeServ Communicator for the
first time after installation.
Information required
Before configuring the OfficeServ Communicator, access to certain information may be required.
Station/Device ID & Password:
PC IP address
IP Phone’s IP address
Link Server IP Address
MP System IP Address:
Messenger Server IP Address:
Messenger ID & Password:
IP Address of the Auto Update Server:
Contact your onsite System Administrator if you are not aware of any of the above information. The onsite
System Administrator should have been given that information during server installation.
Configuring the Initial OfficeServ Communicator Settings
- When you run the OfficeServ Communicator for the first time after installation, you must first configure the
login information to use the various functions provided by the OfficeServ Communicator.
To Begin
1.
2.
Double-click on the "Samsung OfficeServ Communicator" shortcut icon on the Windows Desktop, which
was created when you were installing the OfficeServ Communicator program, or click [Start] [Programs] >
[Samsung Electronics] > [OfficeServ Communicator] > [Samsung OfficeServ Communicator].
When you run the OfficeServ Communicator for the first time after installation, the Login Information
screen opens so you can configure the login information for the device Mode you selected during the
installation.
Configuring the OfficeServ Communicator Login Information
You must enter the correct OfficeServ Communicator login information to run the OfficeServ
Communicator normally.
32
© Samsung Telecommunications America
Device Mode: UCPhone
Device
Station ID:
3.
is the OfficeServ SMT-i52xx Series Extension number that will be tied to this
UCPhone connection
Password: is the Station password (this is not to be confused with the Mailbox password. The
Station password is set in MMC 101)
Computer IP: is the IP address of the PC where the softare is being installed and configured.
Select Auto and it will populate the field with the current IP address of the PC.
Auto
Manual
Drop Down allows you to select one IP address form a list of IP addresses if multiple
NIC cards are enabled.
Phone IP:
Select Manual and use Phone’s IP address. For example from a SMT-i5243 select
MENU > Settings > Network Information > IP Address
Auto
Manual
Messenger
ID:
is the user’s Messenger ID usually: {username}@osm.com
Password: is the user’s Messenger password. This is assigned when the ID is created.
Server IP:
is the IP address of the Serv Messenger Server
Server Port: default is 5070
Client Port: default is 5070
Update
Server IP:
is the IP address of the server containing the OfficeServ Communicator updates
Once all settings have been entered there are two options
1.
If only using one Device Mode or you have applied all configurations settings, press
[OK] to Save, Exit the Configuration, and login.
2.
If needing to configure another device Mode, press [Apply] and then select the next
Device Mode to configure.
Device Mode Settings
- Most users will use only one Device Mode. In some cases they will use two when they have both a Desk
phone and a SoftPhone requirement.
© Samsung Telecommunications America
33
Device Mode: DeskPhone
Device
Device ID: is the Extension number that will be tied to this Desk Phone connection
Password: is the Station password (this is not to be confused with the Mailbox password. The
Station password is set in MMC 101)
Link IP:
is the IP address of the OfficeServ LINK Server
Link Port: default is 6000
Messenger
ID:
is the user’s Messenger ID usually: {name}@osm.com
Password: is the user’s Messenger password. This is assigned when the ID is created.
Server IP: is the IP address of the OfficeServ Messenger Server
Server Port: default is 5070
Client Port: default is 5070
Update
Server IP: is the IP address of the server containing the OfficeServ Communicator updates
3.
Once all settings have been entered there are two options
1. If only using one Device Mode or you have applied all configurations settings, press [OK] to Save, Exit
the Configuration, and login.
2. If needing to configure another device Mode, press [Apply] and then select the next Device Mode to
configure.
Device Mode Settings
- Most users will use only one Device Mode. In some cases they will use two when they have both a Desk
phone and a SoftPhone requirement.
34
© Samsung Telecommunications America
Device Mode: SoftPhone
Device
Station ID:
is the SoftPhone Extension number assigned/licensed in the OfficeServ 7000 MP for
this user.
Password:
is the Station password (this is not to be confused with the Mailbox password. The
Station password is set in MMC 101)
Computer IP: is the IP address of the Local PC
Drop Down allows you to select one IP address form a list of IP addresses if multiple
NIC cards are enabled.
System IP:
is the IP address of the OfficeServ 7000 series MP
System Port: default is 6000
Messenger
ID:
is the user’s Messenger ID usually: {name}@osm.com
Password:
is the user’s Messenger password. This is assigned when the ID is created.
Server IP:
is the IP address of the OfficeServ Messenger Server
Server Port: default is 5070
Client Port:
default is 5070
Update
Server IP: is the IP address of the server containing the OfficeServ Communicator updates
3.
Once all settings have been entered there are two options
1. If only using one Device Mode or you have applied all configurations settings, press [OK] to Save, Exit
the Configuration, and login.
2. If needing to configure another device Mode, press [Apply] and then select the next Device Mode to
configure.
Device Mode Settings
- Most users will use only one Device Mode. In some cases they will use two when they have both a Desk
phone and a SoftPhone requirement.
© Samsung Telecommunications America
35
4.
Once you have pressed [OK] in the configuration the Login screen will pop up. It’s fields should be
populated with the Device Mode last selected before pressing the [OK] button. (This will be explained more
in future chapters)
5. From the Login window press [Login] to start the Communicator for the device mode selected.
Reference NOTES
Computer IP:
Phone IP:
Select Auto to enter the local IP address of the Client PC. If multiple LAN cards are
installed in the PC or there are multiple IP addresses configured, a list of IP addresses is
displayed in the combo box. Select the IP address you want to use. If you cannot enter the
IP address you want to use using the Auto method, select Manual and enter the IP address
directly.
Select Auto to enter the IP address of the phone. If an antivirus program is installed in your
computer, the Blocking Warning window may be displayed, as shown in the figure below.
Click "Apply" to allow access to the network.
If access to the network is blocked, the following message box is displayed.
In this case, click OK to close the message box. Then, in the Phone IP item, select Manual
and then select Auto again. If the phone IP address can be retrieved successfully, it is
displayed in the deactivated window. If an error notification window is still displayed, check
the UP phone status and try again, or select "Manual" and enter the IP address of the
phone directly.
36
© Samsung Telecommunications America
Changing to a different Device Mode
4.
If the Login ID: in step
is not in the Device Mode you wish you can change between modes. This requires
that you logout, select a new Device Mode, and then login.
To logout right click on the OfficeServ Communicator icon in the
Task Bar.
Then select Logout as indicated by the RED arrow in Figure 4 on
the right.
Figure 1: OfficeServ Communicator Task Bar Option [LogOut]
You can now open the OfficeServ Communicator configuration
to change the Device Mode selection.
To do this, again right click on the OfficeServ Communicator
icon in the Task Bar.
Now select Configuration as indicated by the RED arrow in
Figure 5 on the left.
Figure 5: OfficeServ Communicator Task Bar Option [Configuration]
© Samsung Telecommunications America
37
Select the Device Mode for the communicator. For review; Soft Phone mode is used as an independent
device that must be licensed on the switch, UC Phone mode is typically used in conjunction with SMT-i52xx
Series model phones (can be used with limited functionality with SMT-i3105), and the Deck Phone mode is
used with all other phone model types. In the example below UC Phone Mode is selected.
Once you have selected the Device Mode Click [OK] and this will close the configuration.
Now again right click on the OfficeServ Communicator icon in
the Task Bar and this time select Login.
To do this, right click on the OfficeServ Communicator icon in
the Task Bar.
Now select Configuration as indicated by the RED arrow in
Figure 6 on the left.
Figure 4: OfficeServ Communicator Task Bar Option [Login]
38
© Samsung Telecommunications America
OfficeServ Communicator UC Main Control (Full View)
Once logged in the OSC UC Main Control will be displayed your PC. The figures
below and on the next page show examples of the OfficeServ UC Main Control for the
Device Mode you last selected during the install and setup procedures. (Full View shown
below. Alternate views and Device mode details are explained in other sections of this manual.)
SoftPhone Mode (PC Phone Integration Device)
Figure 5: When OfficeServ is in BLUE (see RED Arrow above) that indicates it is in Soft Phone Mode.
UCPhone Mode (Samsung SMT-i Series Device Integration Only)
Figure 6: When OfficeServ is in ORANGE (see RED Arrow above) that indicates it is in UC Phone Mode.
DeskPhone Mode (Samsung DLI & ITP Device integration)
Figure 7: When OfficeServ is in GREEN (see RED Arrow above) that indicates it is in Desk Phone Mode.
© Samsung Telecommunications America
39
Applying the OfficeServ Communicator Login Information
You must restart your OfficeServ Communicator to apply the login information you configured.
OfficeServ Communicator License Check
Every time you log in to the OfficeServ system using your OfficeServ Communicator, the OfficeServ
system checks the license for your OfficeServ Communicator. If a license error occurs, you cannot log in to
the OfficeServ system using your OfficeServ Communicator. In this case, consult your OfficeServ system
administrator.
40
© Samsung Telecommunications America
This page is intentionally left blank.
© Samsung Telecommunications America
41
Chapter 3: Controls and Configuration
OSC Controls
OfficeServ Communicator SideBar
The OSC SideBar is displayed at the Left of the PC's screen when login to the OSC
system is successful. You can click on the SideBar and it will slide open so you can
select from the functionality offered. Simply moving your cursor off of the Sidebar
will cause it to slide closed.
SideBar operation and location can be controlled by the user through the OSC
Configuration:
GENERAL
Show SideBar on Mouse Click (Checked - Default)
(Uncheck to Show Sidebar on Mouse Over)
SIDEBAR POSITION
Left (Default)
Right
The sliding operation is provided to enable easy use. This allows the menus
contained within it to display either when clicked or when a mouse pointer is
moved over it.
42
© Samsung Telecommunications America
OfficeServ Communicator UC Main Control(Full View)
LED Indicator for Operation
Icons indicating the terminal's settings
UC Main Display
Minimize button
Shrink UC Main Control button
Hide button
Show/Hide Dial pad button
User Assignable button
Function buttons
Show/Hide Call List button
Call/End/Redial/Hold/Forward/Pickup
Animated icon indicating phone status
Animated icon indicating user status
© Samsung Telecommunications America
43
Control Descriptions
LED Indicator for Operation Status
Displays the current status of the OfficeServ Communicator (busy, station ringing, etc.) using different
LED colors. The LED indicator for operation status operates as described in the table below,
depending on the OSC function being used.
Description
Item
During a call
The LED indicator is on Solid.
When a station call
rings
The LED indicator blinks.
When a trunk call rings
The LED indicator blinks.
Icons indicating the terminal's settings
Displays the icons indicating how the terminal functions are currently configured.
Description
Icon
Boss/Secretary setting state
Auto Answer state or Broadcasting Answer state in the Answer mode
Auto Answer state or Broadcasting Answer state in the Boss Answer mode
(This icon is displayed only if the Answer mode is set to Ringing.)
There is at least one station message.
When there is a VM
(Displayed when there is no station message)
Mute state
Calling is locked.
Both calling and receiving are locked.
There is at least one unread SMS message.
The absence message function is enabled.
Video mode state
Video mode state but the video scenes are blocked.
The DND function is enabled.
The call forwarding function is enabled.
44
© Samsung Telecommunications America
Main Display
The Main Display shows the call processing status and the various messages.
Minimize button
Minimizes the OfficeServ Communicator window.
Shrink UC Main Control button
Reduces the size of the OfficeServ Communicator UC Main Control. The OSC provides three different sized forms of the
UC Main Control.
To shrink the size of the currently displayed main screen, click the
of the shrunken UC Main Control, click the
button at the top right of the main screen. To enlarge the size
button at the top right of the UC Main Control.
The Full View is the factory defaukt setting. Through Configuration > Options users can sellect the View they wantg to see when the
OSC opens.
The pictures below show examples of the three forms of the main screen.
(Full View) - Default UC Main Control screen size
(Mini)
(MiniBar)
© Samsung Telecommunications America
45
Hide button
Hides the OSC window and displays an icon in the Windows system tray.
Show/Hide Dialpad button
Shows or hides the Dialpad screen of the OSC.
Customized menus
Using the Configuration screen of the OSC you can assign up to 4 menus to customize your UC Main
Control. (details for each of the below options are discussed later in this manual.)
- [Messenger Contacts]: Allows access and Visibility of Status indication to all contacts on the
OfficeServ Messenger server. (Default)
- [PhoneBook]: Allows access to the Phonebook menu. (Default)
- [Call Log]: Allows access to the Call History menu. (Default)
- [Messages]: Allows access to the Messages menu. (Default)
- [Schedule]: Allows access to the Schedule menu.
- [View Recordings]: Allows access to the View Recordings menu.
NOTE
Customized menus are only available when the UC Main Control is in Full View.
Function buttons
- [Video Window]: Opens the video window. Video calls can be made between users registered on the
same system.
- [Conference]: Allows access to the Voice Conference function.
- [Option Menu]: Allows the Option menu to be used during a call.
Memo: Opens a memo window allowing you to type some notes or comments
that will be saved with the call reference in the Call Log.
SMS: Opens the SMS window so you can send a text message to another
subscriber.
Start Recording: Starts the OSC recorder allowing to you to record the current
conversation.
Start Video Recording: Starts the OSC video recorder allowing to you to record a
video session between you and another user on the same system.
- [Hold] button: Allows a current call to be held temporarily.
- [Program Key]: Displays the programable keys currently assigned.
- [Soft Key]: Allows access to the Soft keys available while talking on the phone of logged into VM.
Show/Hide Call List button
Shows or hides the Call List screen.
(This can only be used when in the DeskPhone mode.)
46
© Samsung Telecommunications America
[Call]/[End]/[Redial]/[Hold]/[Transfer]/[Pickup]
- [Call]: press to mak e a call or when your phone is ringing answer a call.
- [End]: press to end/terminate a call.
- [Redial]: press to call the most recently dialed number.
- [Hold]: Allows the user to place a caller on hold.
- [Transfer]: Allows a call to be forwarded to other person during a call.
- [Pickup]: Allows a call which is ringing on other person's phone to be answered.
Animated icon indicating phone status
- Displays the phone's status with an animated icon. If the little blue arrow to the right of the Phone
Status icon is pressed a Functions Menu Window opens with additional functionality. (details on the
Functions Menu Window are discussed later in this manual)
Idle
On the Phone
DND
Animated icon indicating user status
Displays the user status with an animated icon. This is used for Presence
Awareness. When the little blue arrow to the right of the User Status icon
is pressed the user can select the Presence Status they want displayed to
other OfficeServ Messenger users on the system.
© Samsung Telecommunications America
47
OSC Control Details
Video Window
As it’s name would imply, the Video Window displays both your video stream as well as the video stream of the user you
are speaking with. Both users MUST be using either Communicator in Video mode or an SMT-i5243 phone with an
optional USB Video camera installed. Both users MUST be on the same system.
The Video screen is displayed when you click the
receive a video call. To close the Video screen, click the
button during a video call or is displayed automatically when you make or
button located at the top right.
Video Call Function To use the Video Call function, the call mode must be set to [Video Mode]. For more
information on the call mode, refer to the 'Video Tab' section of the 'Configuring the OfficeServ
Communicator Options' section.
Picture In Picture (PIP)
The PIP screen refers to a small screen displayed on top of the Video screen during a video call. The large
screen displayed during a call shows the scenes being received from the opposite party. The small screen,
displayed on top of the large screen, shows the scenes being sent to the opposite party.
48
© Samsung Telecommunications America
Program Key Window
The Program Key Window displays various functions provided by the system as shortcut
buttons. These buttons were assigned to a user by a system administrator. A function
can be run by clicking the corresponding button. There can be as many as 5 pages of 20
buttons each.
To show the Program Key Window in the standby state or during a call, click
the
button.
To close the Program Keys screen, click the
right.
button located at the top
This Program Key Window us also often refered to as the AOM.
Items Displayed in the Program Keys Screen
The items displayed in the Program Keys screen are often different dfor every
user depending on the functions enabled in the system.
Soft Key Window
Much like Program Keys & the Function Menu, the Soft key window gives the user easy access to
functions and features they may require. The Soft Key window(s) is only available when the user is on
the phone. The Soft Keys available will
change based on the call type. Options may
be different depending if you the user is on an
Intercom call, a Trunk call, connected to their
VM listening to a message, etc….
The two figures to the left are an example of a
Soft Key window displayed during a Trunk call.
© Samsung Telecommunications America
49
Functions Menu Window
The Functions Menu Window displays convenient commonly used features of the system.
The OSC lists them as a menu item. Simply Click a menu item to use a specific function.
The figures below are an example of the Functions Menu Window displayed by clicking the blue arrow to
the right of the Phone status indicator.
50
© Samsung Telecommunications America
Boss Status Display Window
This window is displayed only for OSC where the Exec/Secretary function is
set.
Administrative Assistances (formerly referred to as Secretaries when
the original feature was 1st developed) can conveniently manage the absent
status of the Boss.
This window can be opened by clicking
when
enabled on the OSC SideBar where the Exec/Secretary function is
configured.
© Samsung Telecommunications America
51
Windows System Tray OSC Menu
If you right-click on the OfficeServ Communicator icon (
) in the Windows system tray, the following
context menu is displayed. Since it is used in a similar way with similar functionality as the Sidebar they will
be explained together.
Windows System Tray context menu
OSC SideBar
Description
Item
SideBar
Displays the SideBar
Configuration
Allows you to configure various OSC options.
For more information, refer to the 'General Tab' section of the 'Configuring the OfficeServ
Communicator Options' section.
UC Main
Pops open and/or assigns focus to the UC Main Control when the OSC UC Main is
closed or not visiable behind another program.
Messenger Contacts
Opens the OSC Messenger Contacts status monitor. Users can see the Status of other
Messenger Users on the system. It will also provide a BLF condition for those users.
For more information, refer to the 'IM/PS' chapter.
NOTE: This menu item is only shown in the OSC Professional Installation Mode.
52
© Samsung Telecommunications America
PhoneBook
Opens the OSC Information Box to the PhoneBook section.
For more information, refer to the 'Phonebook' section of the 'Menu Functions' chapter.
Call Log
Opens the OSC Information Box to the Call Logs section. Allows access to the Call
History.
For more information, refer to the 'Call History' section of the 'Menu Functions ' chapter.
Message
Opens the OSC Information Box to the Messages section. Allows access to the
SMS/Text Message History for that user..
For more information, refer to the 'Messages' section of the 'Menu Functions ' chapter.
Exec./Secr.
Opens the Boss Status Display Window.
NOTE: This menu item is enabled only if the Exec./Secr. function is enabled for the ID in
the system.
Easyset
If the Easyset URL has been listed in OSC Configuration > ETC. Clicking this Easyset
button will connect the user to the Link Server V3
For more information, refer to the Easyset section of the 'Menu Functions' chapter.
Audio Conf.
Opens the Audio Conference Window.
For more information, refer to the 'Voice Conference' section.
View Recordings
Activates the View Recordings screen during a call.
For more information, refer to the 'View Recordings' section of the 'Menu Functions' chapter.
Phone Contents
Opens the Contents Management window. From here users can move images to and from the
SMT-i5243 Phone. These images can be used for Wallpaper, PhoneBook icons, and as the the
telephone’s Screen Saver. In addition ringtones can be uplaoded to the SMT-i5243 as well.
NOTE: This item is only available if the user is running in either OSC Basic or Professional UCPhone
Mode
Schedule
Allows access to the Schedule menu.
For more information, refer to the 'Schedule' section of the 'Menu Functions' chapter.
DDE
Allows the user to Connect or Disconnect to/from the DDE Server. Slecting Connect to
DDE opens the DDE Server Configuration Window.
Presence
This is only available in OSC Professional Insrtalation Mode. From here the user can
select their current Status: Online, Away, Busy, Conference, Lunch, DND, and Appear
Offline.
OSC Information
Displays the Copyright and Version information of the OfficeServ Communicator
Help
Opens a searchable User Manual
NOTE: This searchable User Manual was not written specifically for the US market. It
may contain references to items not available in the US, and may not have all items
currently being offered in the US.
Login/Logout
Logs the user In/Out of the OfficeServ Communicator.
Exit
Logs the user out of the OSC, closes the UC Main Control and exits the application.
© Samsung Telecommunications America
53
Configuring the OfficeServ Communicator Options
The OSC Configuration contains all the user defined parameters and settings to required to have the OSC
connect with the System and various other Servers. In the the next few pages we will discuss those
parameters and settings and the Tabs in the Configuration wheer you can find them. First we need to open
the OSC Configuration.
1.
Click the [Configuration] icon in either the OSC SideBar (shown on the
right) or the Windows System Tray OSC Menu (not shown).
Option Tab
The [Option] tab contains the settings for how the user interfaces with the UC Main Control.
2. Select the [Option] tab in the Configuration screen.
Item
General
54
Option
Description
Run OSC when the
computer starts
When checked, the OfficeServ Communicator is run automatically when
the computer starts.
Run Auto-Login
When checked, the OSC will not ask for OSC login credentials.
Auto Login when server
recovers
When checked, the OSC will reconnect to the OfficeServ Messenger
server if the server or service stops and restarts for any reason.
Show SideBar on Mouse
click.
When checked, the Sidebar will slide open only when it is clicked. When
unchecked the SideBar will slide open on a Mouse Over event.
© Samsung Telecommunications America
Notification
On Missed Call
When checked, if a call is received while you are away from your desk the
OfficeServ Communicator pops a notification window letting you know
you missed a call(s).
On Incoming Call
When checked, the OSC pops a window with CID information if CID
received. The OSC will make effort to refernce that CID with information
you have entered in your PhoneBook.
View Message on Arrival
When checked, if an SMS is received the OfficeServ Communicator
notifies you of it.
Use the notification
sound.
When checked, the notification sound is enabled.
When Contacts come
online
When checked, if a user registered in your Buddylist logs in to the server,
the OfficeServ Communicator notifies you of it.
Pop Main on incoming
call
Opens or brings the UC Main Control forward when an incoming call is
ringing.
Beeps when phone is
ringing
When checked, if a call or message is received the OfficeServ
Communicator beeps (with the PC speaker tones) to notify the user. If this
checkbox is checked in your OfficeServ Communicator and a call or
message is received to it, other persons can know of it easily and pick it
up for you with their OfficeServ Communicator.
Minimize main when call
is finished
When checked, the UC Main Control will automatically minimize when the
call has ended.
Pop Memo when call is
connected
When checked, if you are connected to an opposite party, the Memo
window is displayed automatically.
Program
Language
Language
Select the desired language for the OSC PC Interface. If you cahnge from
One language to another, you must exit the OSC and then launch it
again.
UC Main
UC Main Control Mode
Sets the initial mode of theUC Main Control Mode; Full, Mini, or MiniBar.
Custom Buttons
Sets the custom buttons the user will have available from the UC Main
Control Full version.
Call Option
© Samsung Telecommunications America
55
Phone Tab
In the Phone tab, the options related to the Phone function of the OfficeServ Communicator can be configured.
3. Select the [Phone] tab in the Configuration screen.
The functions in this section are all system functions. Therefore, they only operate normally if they are enabled in
the OfficeServ system.
Item
Function
Select
Option
Dial Mode
Description
Select the Dial mode. (Select either Batch mode or Sequential mode.)
- Enbloc: A call is made when you first enter a phone number and click
the [Call] button. If you enter a wrong number, you can delete it and
enter the correct number again.
- Overlap: A call is made immediately as a phone number is entered. If a
wrong number is entered, the [End] button has to be clicked to
disconnect the call and enter the correct number again.
Answering Mode
Set the desired Answer mode of the OfficeServ Communicator to be
used when a call is received.
- Ringing: The phone rings when a call is received.
- Auto Answer: When a call is received, it is connected automatically.
- Announcement Answer: When a call is received, the speaker turns itself
on so that the voice of the caller can be heard. At this time, the
listener's voice is not heard by the caller. If the receiver or the [Speaker]
button is pressed, the caller is connected to the listener and they can
speak.
56
Station Name
Sets the name that other users see when thy call you or you call them.
Language
Changes the display language of the SMT-i Series phone
© Samsung Telecommunications America
Item
Option
Description
Boss Answering
This function is available only in an OfficeServ Communicator set as a
director (secretary). Set the Director Answer mode of the OfficeServ
Communicator.
Internal Call Display
Set what is displayed on the station buttons in the Program Keys screen.
- Number: Displays station numbers in the Program Keys screen.
- Name: Displays station names in the Program Keys screen.
Station
On/Off
AUTO HOLD
When checked, if a different trunk is selected while the you are talking on
a trunk call, this existing trunk call is held automatically.
DISPLAY SPD
NAME
When checked, if you make a call using a system speed dial, the name of
the speed dial is displayed.
AUTO TIMER
When checked, if a specific period time is passed when you are talking
on a trunk call, the call duration is displayed automatically.
AUTO CAMPON
When checked, if another trunk call is received while you are talking on a
trunk call, the OfficeServ Communicator automatically makes that call
wait without playing the busy tone to the person who made it.
CID REVIEW ALL
When checked, the function which displays the caller identification when
a call is received is enabled.
AME PASSWORD
When checked, you have to enter the password to change the Announce
MEssage (AME) status.
AUTO ANS CO
CALL
When checked, trunk calls are automatically answered.
© Samsung Telecommunications America
57
Phone Status Tab
In the [Phone Status] tab, you can configure the various options related to the system.
4. Select the [Phone Status] tab in the Configuration screen.
Option
Item
Call Forward
58
Description
Clear
Disables/clears Call Forwarding on the Phone for that user. It does not
clear the Forwarding destinations.
All Calls
Forwards all received calls.
On Busy
Forwards only the calls received while you are already talking on the
phone.
On No Answer
Forwards calls only if they are not answered.
On Busy/On No
Answer
Forwards calls if they are received during a call or are not answered.
DND Forward
Select this option when you do not want to answer the received calls
and forward all of them to another phone or VM.
Follow Me
If other OSC (or keyphone) user sets the call forwarding function that
the calls received to his OfficeServ Communicator are to be forwarded
to your OfficeServ Communicator, his phone number is displayed in the
input field next to this option button.
Phone
Password
Change
Allows the user to change the user password of their SMT-i Series
phone
Absence
Message
Clear
You can set a message to be displayed for the calling user when you
are absent. You can also enable or disable this function.
© Samsung Telecommunications America
Absent Msg Edit
Note
Some absent messages are user definable. Click the edit button to
edit definable messages.
Absence Message
The messages 1 to 15 are the system messages registered in the system. The messages 16 to 20 are the
custom messages you can modify. To modify the absence message, select one of the messages 16 to 20
and enter the new message text. Then click the [Modify] button.
© Samsung Telecommunications America
59
Login Info Tab
In the [Connection] tab, you can configure the various environmental settings related to connecting your OfficeServ
Communicator to the aprropriate server(s) and system.
Note
OSC must be Logged Off to make changes to the Login Info Tab
Only the Update Server IP can be changed on this tab while the OSC is logged in.
5. Select the [Login Info] tab in the Configuration screen.
<SoftPhone Mode>
60
© Samsung Telecommunications America
<UCPhone Mode>
<DeskPhone Mode>
© Samsung Telecommunications America
61
Option
Item
Phone
Information
Description
Station ID
The Station ID to be used by the OfficeServ Communicator that
represents the user. Usually their extension number.
Device ID
The Device ID to be used by the OfficeServ Communicator that
represents the user. Usually their extension number.
Password
The password corresponding to the users Station ID
Link IP
Enter the IP address of the OfficeServ Link server.
Link Port
Enter the number of the OfficeServ Link server port.
- The default is 6000.
System IP
Enter the IP address of the OfficeServ System.
System Port
Enter the number of the OfficeServ Link server port.
- The default is 6000.
Messenger
Computer IP
Enter the IP address of the user’s PC.
Phone IP
Enter the IP address of the user’s UC Phone.
ID
The ID to be used when logging in to the OfficeServ Messenger
server.
Password
The password to be used when logging in to the OfficeServ
Messenger server.
Server IP
Enter the IP address of the OfficeServ Messenger server.
Server Port
Enter the number of the OfficeServ Messenger server port.
- The default is set to 5070.
Local Port
Enter the number of the port through which data is to be received to
the user’s PC from the OfficeServ Messenger server.
- The default is set to 5070.
62
© Samsung Telecommunications America
This page is intentionally left blank.
© Samsung Telecommunications America
63
Audio Tab
In the [Audio] tab, you can configure the devices to use on the PC where your OfficeServ Communicator is installed and
set the various sound volumes.
6. Select the [Audio] tab in the Configuration screen.
Option
Item
Sound Devices
Speaker
Select the audio output device (speaker) to be used by the OSC.
Mic. (Microphone)
Select the audio input device (microphone) to be used by the
OSC.
AGC
When checked, the Auto Microphone Volume Control function is
enabled.
Ringer Device
Ringer
Select the audio output device (speaker) to be used by the OSC
when a call is ringing.
Voice
Noise Surpression
Set one of four levels of noise supression; Off. Low, Mid, High.
Noise surpression reduces the microphone noises during a call.
Echo Cancellation
When on it reduces and/or removes echoes during a call.
Ringtone Vol.
Adjust the ringtone volume.
Speaker Vol.
Adjust the speaker volume to use while you are talking. The
speaker volume control displayed in the Dialpad of the UC Main
Control is the same as this Speaker Volume control.
Mic. Vol.
Adjust the microphone volume.
Tone Vol.
Adjust the volume of the system tones, such as Hold tone and
DND tone, etc.
Volume
64
Description
© Samsung Telecommunications America
Video Tab
In the [Video] tab, you can configure the video call environment for the PC where your OfficeServ Communicator is
installed.
7. Select the Video tab in the Configuration screen.
Option
Item
Call Mode
Camera
Description
Video Mode
Uses the Inter-Station Video Call function in the OfficeServ
Communicator.
Audio Mode
Uses the Audio Call function only in the OSC, without using the
Inter-Station Video Call function.
Capture Device
Shows a list of installed cameras.
Video Codec
Select the video codec to apply when a video call is received.
* The H.264 codec is applied to only the video calls between OSC
users.
Capture Frame
Set the capture frame size of the camera to apply in a video call.
* Preferentially, the capture frame is adjusted automatically
according to the CPU load rate.
© Samsung Telecommunications America
65
Etc. Tab
In the [Etc.] tab, you can set your avatar and configure other environmental settings for your OfficeServ Communicator.
8. Select the [ETC] tab in the Configuration screen.
Option
Item
66
Description
Location of the
Main Bar
Left
Displays the Main Bar at the left of the screen.
Right
Displays the Main Bar at the right of the screen.
CID Search
OSC Address Book
Searches the OSC’s Internal PhoneBook Contacts based on the
incoming CID received.
Outlook [Mask]
Sets the mask variable used to match incomming CID against
stored contact phone numbers
Outlook [Contacts]
Searches Microsoft Outlook Contacts based on the incoming CID
received.
LDAP
Searches the LDAP based on the incoming CID received.
Save file path
Path
Sets the path to a location used by the OSC to save files when it
receives a file or captures screens for a video call.
Avatar
Set the avatar to be shown to the opposite party during a video call if user’s Camera is off
or when in a chat session.
Easyset
Enter the Easyset server URL. Also if you wish to not have to login into Easyset and use
the Station ID and Password as set in the Login Info tab as your login credentials for Easy
set place a check in the check box for Auto Login.
© Samsung Telecommunications America
Dialing Rule Tab
In the [Dialing Rule] tab, you can modify the PC dialing rules as set in Control Panel.
9. Select the [Dialing Rule] tab in the Configuration screen.
Item
Dialing Position
Dialing Rule
67
Option
Description
Country/Region
Select the country to pull the dial plan from.
Area Code
Enter your local Area Code
Access Code for
Local Calls
Enter the code required by the System for making a Local call
Access Code for
Long Distance Calls
Enter the code required by the System for making a Long
Distance call
Carrier Code for
Long Distance Calls
Enter the code required by the Carrier for making Long Distance
calls
Carrier Code for
International Calls
Enter the code required by the Carrier for making International
calls
© Samsung Telecommunications America
HotKey Tab
In the [HotKey] tab, you can assign HotKeys to functionality you may want easy asscess to. 214-207-2632
10.
Select the [HotKey] tab in the Configuration screen.
Scroll through the action buttons available and assign a combination of keys to the functionality desired.
68
© Samsung Telecommunications America
DDE
In the [DDE] tab, you can configure the DDE program.
11. Select the [DDE] tab in the Configuration screen.
Option
Item
Enable DDE
Description
For Incoming Internal
Sets whether to use station lines when using DDE.
For Incoming
External
Sets whether to use external lines when using DDE.
Search for
Sets the item to search for. Select either Using Caller’s ID or Using DNIS.
DDE Program
Program
Select either Other or Goldmine for Windows
Path
Sets the paths of the DDE programs..
© Samsung Telecommunications America
69
A.
B.
70
You can select "Goldmine" or "Other" as the DDE program.
If you have selected "Goldmine" as the DDE program, you can click the "…" button next to the
"Location" field and set the path of the selected program so that it can be run automatically when
DDE initialization is performed.
© Samsung Telecommunications America
C.
You can set phone number formats by clicking the "Change" button next to the "DDE Program
Mask" field. An "x" denotes a digit.
For example, assume that a 7-digit phone number is saved in the xxx-xxxx format in the Goldmine
program. But, since the OSC program transmits a CID in the xxxxxxx format, when it transmits a
phone number to the Goldmine program, it must transmit it after changing it to the xxx-xxxx format so
that the Goldmine can display the user information. Therefore, in this case, in the "Phone Number
Format Setting" window, you have to set the mask 'xxx-xxxx' that matches 7 digits and then click the
"OK" button.
D.
Click the "OK" or "Apply" button to apply the changed settings. If you have changed the DDE
program, the following message box is displayed.
© Samsung Telecommunications America
71
Chapter 4: Getting Started
Making A Call
Before Making a Call
This section describes the functions used for making calls. For information on each function, refer to each
function description section.
Category
Intercom Call
External Call
Functions
- Making an Intercom Call
- Making an External call
- Busy Station Callback
- Redial
- Camp On
- Busy CO line Callback
- Connecting to an Operator
- Redialing a CO line
- Parking Orbit
- Saving Phone Numbers
- Making a Call to the Saved Phone Number
- Dialing the Most Recently Called Number
- Making a call using the Recent Call Log
- Making a call using a system speed dial number
- Making a call using Personal directory dial number
- Making a Call Using a Directory Name
72
© Samsung Telecommunications America
Making Calls
This section describes the functions for making calls using OfficeServ SoftPhone.
This user guide describes how to make a call in the [Enbloc] mode by using the [Send] or [End] button.
Making Calls by Using the [Send], [Speaker], or [End] Button
Click [Send] to make a call. Click [End] to end the call.
Making Calls by Using the Keyboard
1.
Enter a phone number in a wait state by using the keyboard.
2.
Press the [Enter] key in the keyboard or click the [Send] button to make a call.
3.
After a call is completed, press the [Esc] key in the keyboard or click the [End] button.
Making Calls by Using the Dial Buttons on the Numpad
1.
Enter a phone number in a wait state by using the dial buttons on the numpad.
If the numpad window is not displayed, click the
© Samsung Telecommunications America
button to display the numpad window.
73
2.
Click the [Send] button to make a call.
Making a Call
This function allows you to make a call.
Making a Call
Follow the steps below to make a call:
1.
2.
3.
Enter the target station number while in standby state.
Click [Send]. The ring-back tone rings.
Speak to the recipient when the recipient answers the call.
Hello~
Dial Mode
- When the ‘Enbloc mode’ is set in OfficeServ SoftPhone, press a phone number and click [Send] to make
a call. When the ‘Overlap mode’ is set, only press the phone number to make a call. This user guide mainly
describes cases where the dial mode is ‘Enbloc’.
- For details on the dial mode, refer to [System Config.] tab of ‘OfficeServ SoftPhone Option Settings’.
74
© Samsung Telecommunications America
Making a Call from the Recent Call History
You can make a call from your recent call history.
1.
2.
3.
Click the [Call] button in the standby state
The phone numbers of the recently received or sent calls are
displayed sequentially starting from the most recent.
To make a call, select a history entry and click the [Make Call] button
or right-click on it and click [Make Call] from the menu displayed.
Making a Call from a Call List
For more information on how to make a call from the Recent Call List/Dialed Call List/Received Call List,
refer to the 'Call History' section of the 'Menu Functions' chapter.
Saving a Phone Number
To save a phone number from the recent call history, select a history entry and click the Save Number
button.
© Samsung Telecommunications America
75
Answering A Call
Before Answering a Call
This section describes functions for answering calls. For information on each function, refer to each function
description section.
Category
Functions
Intercom Call
External call
- Answering an Intercom Call
- Answering an External call
- Answering a Call in Auto Answer Mode
- Answering an External Call Using a Night
Service Bell
- Answering a Call in Page Answer Mode
- Call pickup
- Group call pickup
- Answering a camp on call
76
© Samsung Telecommunications America
Answering a Call
A call can be answered by using one of the following methods in the OfficeServ Communicator. This manual mainly
describes how to answer a call using the Call and End buttons.
Answering a Call Using the Call, Speaker, and End buttons.
When a call is received, you can answer it by clicking the [Call] button
by clicking the [End] button
. After finishing your conversation, you can end the call
.
Answering a Call from the Received Call Notification Screen
When the OfficeServ Communicator screen is hidden, the Received Call Notification screen is displayed to notify you that there is a
call just received.
1.
When a call is received, the Received Call Notification screen is displayed.
2.
If the number of the caller is registered in the phonebook, two bars are displayed at the bottom of the
main screen. These can be clicked to view the information on the opposite party (the Opposite Party
Information screen) and the recent call history to and from that number (the Recent Call History screen)
77
© Samsung Telecommunications America
3.
Click
to answer the call, i.e., to connect to the opposite party.
Opposite Party Information Screen
The Opposite Party Information screen displays, by default, the name, email address, and phone number,
etc. of the opposite party registered in the phonebook.
The Opposite Party Information bar which you can click to show the Opposite Party Information screen is
displayed only if the opposite party is a user registered in your phonebook.
78
© Samsung Telecommunications America
Answering a Call
This function allows you to answer the call .
Answering a Call
This function allows you to answer the call.
1.
OfficeServ SoftPhone rings and displays a message notifying
you that a call has arrived.
If the ring volume is set to minimum, OfficeServ SoftPhone will display
only a message.
2.
Click [Send] to answer the call.
Click [Speaker] or receiver to answer the call.
3.
Click [End] to end the call.
I f the call was answered by clicking the receiver, click the receiver
again to end the call.
© Samsung Telecommunications America
79
Convenient Functions
Functions Available during a Call
This section describes the functions you can use while you are talking on a station or trunk call using the
OfficeServ Communicator.
Holding a Call
If an urgent job occurs or another call is received during a call, the current call can be held for a while and then reconnected after the urgent work or other call is finished.
Holding a Station Call
1.
To hold a station call while you are talking on it, click the [Hold] button.
2.
The "HOLD ON" message is displayed on the main screen.
3.
80
If the station number is registered in the Program Keys screen, the
corresponding station number button blinks.
In the main screen of the opposite party, a message showing that you are
holding his call is displayed.
To connect to the held call again, click the [Call Button] wher the caller
is holding.
© Samsung Telecommunications America
Call Transfer
This function allows you to transfer a caller to another user on the system.
Unconditional Call Transfer
1.
2.
Click [Transfer] during an external call.
Enter the station number or CO line number to be transferred.
3.
While the transfer bell is ringing, click [End] and hang up the
phone to transfer the call immediately.
Click [Speaker] or the receiver.
© Samsung Telecommunications America
81
Conditional Call Transfer
1.
2.
Click [Transfer] during an external call.
Enter the target station number or CO line number, and wait
until the other party answers the call.
3.
Once the party to be transferred answers the call, speak to
the person and click [End] to hang up the phone.
Click [Speaker] or the receiver.
Transferring an incoming call directly to a voice mailbox
Select [Voice Mail Box] from the AOM window and enter the voice mailbox number to transfer an incoming
call to a voice mailbox. Note that the Samsung SMVi card should be installed in the phone system and that
the system administrator should already set the voice mailbox function by using the MMC program.
82
© Samsung Telecommunications America
Mute (Blocking Sound to the Caller)
This function allows you to hear the voice of the caller but to prevent the caller from hearing your voice during a
call.
1.
2.
© Samsung Telecommunications America
Click [Mute] or select [MUTE] from the Soft Menu window while
calling.
Click [Mute] again or select [mute(off)] from the Soft Menu
window to disable the mute function.
83
Conference Call
This function allows up to five persons (stations or trunks) to participate in a conference call. You can initiate a
conference call and invite up to other four persons to it.
1.
2.
Click the [Conference] button in the standby state. Alternately, click
the [Open Audio Conference] button in the menu bar.
Enter the phone number to invite to the conference in an input field
and check the [Select] checkbox next to it.
3.
4.
If there is a registered group, this can be selected.
Click the [Start Audio Conference] button to make calls to the
specified persons.
Begin and continue the conference when they are connected.
Hello~
84
© Samsung Telecommunications America
5.
6.
To disconnect the connection for one person during the conference,
click the [Disconnect] button next to the input field where his phone
number is entered.
To invite another additional person during the conference, enter his
phone number in an empty input field and click the [Request] button
next to it.
7.
© Samsung Telecommunications America
When the phone of the invited party rings, the Request button changes to
become the Stop button.
The connection request can be cancelled by clicking the Stop button
before the invited party answers it.
To end the conference call, click the [End Conference Call] button.
85
Video Call
PIP Function
You can check and change the position of the PIP screen displaying you during a call.
1.
2.
Click the [PIP] button in the Video Call screen.
Each time the [PIP] button is pressed, the position of the PIP screen
display changes its order.
The position of the PIP screen is changed in the order of bottom right, top
right, top left, bottom left, and no display.
PIP Function
To use the PIP function during a call, the size of Video Call screen must be the CIF size (352*288).
Otherwise it cannot be activated. You can change, during a call, the size of the Video Call screen where the
opposite party is displayed.
86
© Samsung Telecommunications America
Block Video Function
The user can stop snding his/her Video transmission at any time.
1.
Click the [Stop Sending] button before making a call or during a call.
2. To make scenes display on the phone of the opposite party, click the
[Start Sending] button again.
© Samsung Telecommunications America
If the [Stop Sending button] is pressed during a call, the Block Video
function is applied to that call only. If the [Stop Sending] button is pressed
while in the standby screen, the Block Video function is enabled for all
calls by default. To disable the Block Video function enabled for all calls
by default, click the [Start Sending] button again.
In the UC Phone mode, the [Stop Sending] button is enabled only during
a call and the Block Video function is applied to that call only, that is, you
cannot enable it for all calls.
When the Block Video function is enabled or applied, the Video Call icon
is hidden in the OfficeServ Communicator LCD screen.
87
Microsoft Outlook Add-in Phone Function
Microsoft Outlook Add-in Screen
If you install the OfficeServ Communicator in a PC where Microsoft Outlook is installed, the OfficeServ Communicator
toolbar is added to it.
Making a Call from Microsoft Outlook
You can make a call using the OfficeServ Communicator from Microsoft Outlook.
Making a Call Using the OfficeServ Communicator Toolbar
1. In the OfficeServ Communicator toolbar, enter a phone number
in the Phone Number combo box and then press the Enter key, or
select a previously entered phone number from it.
2. Click the [Make Call] in OfficeServ Communicator toolbar.
88
© Samsung Telecommunications America
Making a Call from Contacts
1.
2.
© Samsung Telecommunications America
Right-click on a contact entry and point to [Make
Call Using OfficeServ Communicator] on the
displayed menu.
Select a phone number from the displayed sub
menu to which you want to make a call.
89
Hang Up a Call from Microsoft Outlook
You can hang up a call using the OfficeServ Communicator from Microsoft Outlook.
1. Click the Hang Up button in the OfficeServ Communicator toolbar.
Forwarding a Call from Microsoft Outlook
You can forward a call using the OfficeServ Communicator from Microsoft Outlook.
1. While you are talking via your OfficeServ Communicator, in the
OfficeServ Communicator toolbar of Microsoft Outlook, enter a phone
number in the Phone Number combo box and then press the Enter
key, or select a previously entered phone number from it.
2. Click the [Forward button] in the OfficeServ Communicator toolbar.
Outlook CID POP-UP
What is the Outlook CID POP-UP?
The Outlook CID POP-UP function allows you to view the Outlook contact information when a call is made to or
received from an Outlook contact.
(To use this function, Microsoft Office Outlook must be installed on your PC.)
Since each user may use a different method to register contact information, a configuration window where the
user can define the patterns directly is provided.
90
© Samsung Telecommunications America
Enabling the Outlook CID POP-UP
OSC: Configuration > Etc. > CID Search
To enable the Outlook CID POP-UP, select the Outlook checkbox in the CID Search section of the Configuration
screen.
© Samsung Telecommunications America
91
Adding an Outlook Contact
Enter the contact information for the contact for which the Outlook CID POP-UP will be used.
Checking the Outlook CID POP-UP
Enter a contact that can be displayed in the Contact pane and then make a call to that contact.
When the call is made, the contact information is displayed as shown in the figure below.
92
© Samsung Telecommunications America
Outlook MASK
If the contact information is not displayed normally, each user can set his masks.
The masks frequently used by users are provided by default (called built-in masks). For other masks, each user
can set them using the corresponding configuration window.
MASK
A mask is a pattern used to analyze phone numbers. For example, when a call is received from "0234591234" and
"(02) 3459-1234" is stored in the Outlook Contacts, the user can specify the mask (AA) XXXX-XXXX
to display
the Outlook contact that matches the call number.
Where each of the letters ‘A’, ‘C’, ‘D’, and ‘X’ are recognized as a phone number digits and ‘+’, ‘(‘,’)’, and ‘-‘ are
valid symbols.
A= Any number representing Area Code
C=Any number representing Country Code
D=Delete/Ignore any number in that position
X= Any number
Built-in Masks
Below are the built-in masks defined in the system.
XXX XXXX, XXXX XXXX, XXX-XXXX, XXXX-XXXX,
(A) XXXXXXX, (AA) XXXXXXX, (AAA) XXXXXXX, (AAA) XXX-XXXX, (AAA) XXXX-XXXX
(A)XXXXXXX, (AA)XXXXXXX, (AAA)XXXXXXX, (AAA)XXX-XXXX, (AAA)XXXX-XXXX
AAA-XXX-XXXX, AAA-XXXX-XXXX, AAA-XXXXXXX, AAA-XXXXXXXX
A XXXXXXX, A XXXXXXXX, AA XXXXXXX, AA XXXXXXXX, AAA XXXXXXX, AAA XXXXXXXX
+CC (A) XXXXXXX, +CC (A) XXXXXXXX, +CC (AA) XXXXXXX, +CC (AA) XXXXXXXX,
+CC (AAA) XXXXXXX, +C (AAA) XXXXXXX
© Samsung Telecommunications America
93
Setting User Masks
In the Configuration > Etc. > CID Search section, click the Mask button next to the Outlook checkbox.
Enter a mask in the mask input field and then click the Add button. Use the letters X, A, and C when entering a
mask. Other letters are processed as characters when the pattern is analyzed. However, one of the other letters
matches a digit of the phone number of a received call in the same position, that digit is regarded as a phone
number.
When the mask shown above is entered, the Outlook contacts with the phone number format [010] 222-3333 can
be searched.
94
© Samsung Telecommunications America
Drag & Drop Call/Message Function
This section describes the Drag & Drop Call/Message function of the OfficeServ Communicator.
Drag & Drop Call Function
If you drag and drop a phone number from the Call History, Message Window, Phonebook, Buddylist, or
Organization Chart to the main window, it is displayed on the main window and then
you can make a call to it by clicking the Make Call button.
© Samsung Telecommunications America
95
Drag & Drop Message Function
If you drag and drop a phone number from the Call History, Message Window, Phonebook, Buddylist, or
Organization Chart to the Recipient Number list of the New Message window,
it is displayed in the Recipient Number list and then the message is sent to that number when you click the Send
button.
96
© Samsung Telecommunications America
Menu Functions
This chapter describes how to use the Buddylist, Phonebook, Messages, Call History, VCS, and View
Recordings menus of the OfficeServ Communicator.
Buddylist
You can perform various functions of the OfficeServ Communicator using the Buddylist menu.
For more information, refer to the 'IM/PS' chapter.
Phonebook
You can use the Contacts function of the OfficeServ Communicator using the Phonebook menu.
Click Phonebook in the Main Bar of the OfficeServ Communicator. (You can also select Phonebook
from the system tray menu.) The phonebook is displayed in the Information Management Box window,
as shown in the figure below.
© Samsung Telecommunications America
97
Adding a Contact
You can add a contact to the phonebook. You can register the home phone, cell phone, or office phone numbers for a
contact. You can also register the personal information, such as fax number, email address, and company name, etc.
98
1.
In the Phonebook screen, click the
2.
Enter the information on the user whose contact you want to add.
3.
The contact information entered is displayed in the list.
button.
© Samsung Telecommunications America
Adding a Contact Group
You can create a contact group where you can add contacts later.
1.
Click the
2.
Enter the name of the new contact group to add.
3.
Click the
© Samsung Telecommunications America
button.
button to add the new contact group to the phonebook.
99
Deleting a Contact Group
You can delete a contact group. If you delete a contact group, all the contacts contained in it are deleted too.
1.
2.
Select the contact group to delete.
Click the
button to delete the selected contact group. (Note that all the contacts
contained in it are also deleted. )
Deleting All the Contacts and Contact Groups
To delete all the contacts and contact groups from the phonebook, select All from the Phonebook menu.
Then click the Delete Group button.
100
© Samsung Telecommunications America
Modifying a Contact
You can modify a contact registered in the phonebook.
1.
In the Phonebook screen, double-click on the contact to modify. The Detailed Information window is
displayed, as shown in the figure below. The detailed information for the selected contact is shown in this.
2. Click the
button. The Modify Contact window is displayed, as shown in the figure below.
You can modify the information for the contact.
© Samsung Telecommunications America
101
3.
Click the
button to apply the changes made.
Deleting a Contact
You can delete a contact from the phonebook.
1.
Select the contact to delete.
2.
Click the
3.
Confirm the deletion.
button.
You Cannot Recover a Deleted Contact
Once a contact is deleted from the phonebook, it cannot be recovered. Therefore, take care not to delete a
contact that contains important data.
102
© Samsung Telecommunications America
Making a Call from the Phonebook
You can make a call directly from the phonebook.
Making a Call Using the Make Call Button
1.
2.
In the Phonebook screen, select the contact to call and click the
button.
Point to Make Call from the displayed popup menu. Then select a phone number from the displayed sub
menu.
Making a Call Using the Context Menu
1.
2.
In the Phonebook screen, right-click on the contact that needs to be called.
Point to Make Call from the displayed popup menu. Then select a phone number from the displayed sub
menu.
© Samsung Telecommunications America
103
Making a Call Using the Detailed Information Window
1.
2.
104
In the Phonebook screen, double-click on the contact that needs to be called. The Detailed Information
window is displayed.
Click the
button next to the phone number that needs to be called.
© Samsung Telecommunications America
Finding a Contact
In the Phonebook screen, you can search the phonebook for a contact using a name or phone number as the search
key.
1.
2.
3.
In the Phonebook screen, select the search key.
To search the phonebook using name as the search key, select Name from the Search Key combo box.
Then enter a part or the whole of the name to find into the input box next to it.
For example, to find the contact of the person named 'Francis Bacon' , enter only his first name 'Francis'.
After entering the name to find, click the [
] button or press the Enter key without leaving the input
box. All matched contacts are listed in the Phonebook screen.
© Samsung Telecommunications America
105
Synchronizing Contacts
You can synchronize the contacts contained in the phonebook of your OfficeServ Communicator with an external
program, such as Microsoft Outlook, Microsoft Excel, or etc.
Contacts Compatible with Microsoft Outlook
To use the OfficeServ Communicator contacts compatible with Microsoft Outlook, Microsoft Outlook must
be installed in the PC where the OfficeServ Communicator is installed and must be configured so that the
OfficeServ Communicator can use Microsoft Outlook.
Importing Contacts from Microsoft Outlook
1.
In the Phonebook screen, click the
2.
The Synchronize Contacts window is displayed.
button.
Outlook tab: Allows you to synchronize contacts with Microsoft Outlook.
Export tab: Allows you to export the contacts stored in the phonebook of your OfficeServ Communicator as
a file in the format of an external program.
Import tab: Allows you to import contacts from a file of an external program.
LDAP tab: Allows you to import contacts from an LDAP server.
Phone tab: Allows you to synchronize contacts with an SMT-i5243 IP phone.
3.
106
Select the Outlook tab and click the
button in the Outlook pane.
You can be prompted with a message box asking you to confirm the access to the contacts of Microsoft
Outlook, as shown in the figure below. In this case, you have to check the Allow access for checkbox and
specify a period.
© Samsung Telecommunications America
4.
5.
6.
When connected to Microsoft Outlook successfully, the contacts stored in Microsoft Outlook are displayed
under the All Contacts item in the list of the Outlook pane.
Select the contacts wanted to import from Microsoft Outlook. You can select specific contacts using the Ctrl
key.
To import the selected contacts, click the
© Samsung Telecommunications America
button. To import all contacts, click the
button.
107
Check that the selected/all contacts are added under the Contacts to Apply item in the list of the PC pane,
as shown in the figure below.
7.
Click the
button to actually copy the contacts from Microsoft Outlook to the OfficeServ
Communicator. When performed normally, a progress bar is displayed at the bottom of the screen and
the progression is displayed, as shown in the figure. When the importing operation is finished, you will be
prompted with a message box.
108
© Samsung Telecommunications America
Exporting Contacts to Microsoft Outlook
1.
In the Phonebook screen, click the
2.
The Synchronize Contacts window is displayed.
2.
Select the contacts to export to Microsoft Outlook.
© Samsung Telecommunications America
button.
109
3.
4.
5.
110
To export the selected contacts, click the
button. To export all contacts, click the
button.
When performing normally, the selected/all contacts are displayed in the list of the Outlook pane.
Click the
button to export the contacts to Microsoft Outlook actually. You can be
prompted with a message box asking you to confirm the access to the contacts of Microsoft Outlook, as
shown in the figure below. In this case, you have to check the Allow access for checkbox and specify
a period and click Yes.
When the contacts are exported to Microsoft Outlook successfully, you will be prompted with a
message box, as shown in the figure below.
© Samsung Telecommunications America
If the message 'Microsoft Outlook is not installed or is not configured properly after installed.' is
displayed
If the message above is displayed when you try to import or export contacts to or from Microsoft Outlook,
check whether it is installed normally and configured properly.
Exporting Contacts to an Excel/MDB File
1.
In the Phonebook screen, click the
2.
The Synchronize Contacts window is displayed.
3.
Select the Export tab.
© Samsung Telecommunications America
button.
111
4.
5.
6.
112
Select the contacts to export in the list of the PC pane.
Configure a list of the contacts to export using the Move button (
). You can click the Move All
button (
) if you want to export all contacts in the list of the PC pane.
Click the Export button (
displayed.
) or Save button (
). The Export Contacts window is
© Samsung Telecommunications America
7.
Specify the name and type of file to which the contacts are to be exported.
8.
Click the Export button (
© Samsung Telecommunications America
).
113
Importing Contacts from an Excel/MDB File
114
1.
In the Phonebook screen, click the
2.
Select the Import tab in the Synchronize Contacts screen.
3.
Select a file and click the Import button (
button.
) in the Import Contacts window.
© Samsung Telecommunications America
4. When the contacts stored in the file are read successfully, they are displayed as a list in the Import pane,
as shown in the figure below.
5.
Click the Move All button (
© Samsung Telecommunications America
), or select the contacts to import and click the Move button (
).
115
6.
7.
You must click the Save button (
Communicator.
) to actually import the contacts to your OfficeServ
When the contacts are imported successfully, they are displayed in the list of the PC pane, as shown in
the figure below.
Creating an Excel Contacts File
To import contacts from an Excel file, you must enter contacts in an Excel file which was created initially
using the Export Contacts function. Furthermore, the field values of each contact must be entered in the
Text format to be imported successfully by the OfficeServ Communicator.
116
© Samsung Telecommunications America
Importing Contacts from the LDAP
Interoperation with the LDAP Contacts
To use the OfficeServ Communicator and LDAP Contacts Interoperation function, the LDAP server
environments that have contacts must have been configured.
1.
In the Phonebook screen, click the
2.
The Synchronize Contacts window is displayed.
3.
Select the LDAP tab (
© Samsung Telecommunications America
button.
).
117
4.
5.
118
Click the Import button (
). The "Connect LDAP Service" window is displayed.
Enter the connection information for the LDAP from which contacts will be imported and then click the
Connect button (
).
© Samsung Telecommunications America
To save a frequently used LDAP connection information entry as a preset, click the Save button (
To delete an unused preset, select it and click the Del button (
6.
).
).
When the contacts are read successfully, they are displayed in the list in the LDAP pane, as shown in
the figure below.
© Samsung Telecommunications America
119
7.
8.
120
Click the Move All button (
(
).
You must click the Save button (
), or select the contacts you want to import and click the Move button
) to actually import the contacts to your OfficeServ Communicator.
© Samsung Telecommunications America
9.
When the contacts are imported successfully, they are displayed in the list in the PC pane, as shown in the
figure below.
g
© Samsung Telecommunications America
121
Messages/Call History
You can use the Contacts function of the OfficeServ Communicator using the Messages menu. And also, you
can view and manage the call history of the OfficeServ Communicator using the Call History menu.
122
© Samsung Telecommunications America
© Samsung Telecommunications America
123
Call History
You can view the call history of the OfficeServ Communicator using the Call History menu.
Recent Call List
1.
In the Information Management Box window, click Recent Call List under the Call History menu.
2.
A list of recent dialed and received calls is displayed.
To make a call to the user of the selected history entry, use the Make Call button.
To send a message to the user of the selected history entry, use the Send Message button.
To delete the selected history entry, click the Delete button. To delete all recent history entries, click the Delete
All button. If you click the Delete All button, you will be prompted to confirm the deletion.
124
© Samsung Telecommunications America
Received Call List
In the Information Management Box window, click Received Call List under the Call History menu. A list of recent
received calls is displayed.
This function is the same as in the Recent Call List.
Dialed Call List
In the Information Management Box window, click Dialed Call List under the Call History menu. A list of recent dialed
calls is displayed.
This function is the same as in the Recent Call List.
Missed Call List
In the Information Management Box window, click Missed Call List under the Call History menu. A list of recent
missed calls is displayed.
This function is the same as in the Recent Call List.
© Samsung Telecommunications America
125
Messages
You can send and receive messages to and from other OfficeServ Communicator users.
Sending a Message
126
1.
In the Information Management Box window, click the
2.
In the New Message window, enter the station number of the recipient and write the text to send.
3.
Click the
button.
button to send the message.
© Samsung Telecommunications America
All Messages
1.
In the Information Management Box window, click All Messages under the Messages menu.
2.
A list of all messages is displayed.
To make a call to a person who sent a message, select it and click the Make Call button.
To reply to a person who sent a message, select it and click the Send Message button.
To delete a message, select it and click the Delete button.
© Samsung Telecommunications America
127
Received Messages
1.
In the Information Management Box window, click Received Messages under the Messages menu.
2.
A list of the received messages is displayed.
To make a call to a person who sent a message, select it and click the Make Call button.
To reply to a person who sent a message, select it and click the Send Message button.
To delete a message, select it and click the Delete button.
To delete all the received messages, click the Delete All button.
128
© Samsung Telecommunications America
Sent Messages
1.
In the Information Management Box window, click Send Messages under the Messages menu.
2.
A list of the sent messages is displayed.
To make a call to a person from a message was sent previously, select it and click the Make Call button.
To send a new message to a person to whom a message was sent previously, select it and click the Send
Message button.
To delete a message, select it and click the Delete button.
To delete all the sent messages, click the Delete All button.
© Samsung Telecommunications America
129
Sentence Box
1. In the View Details window for a message, you can save a message to the Sentence Box by clicking the
(Save to Sentence Box) button.
2. In the Information Management Box window, click Sentence Box under the Messages menu. A list of the
stored sentences is displayed.
130
© Samsung Telecommunications America
3. Double-click an entry to view it in the View Details window for a sentence.
4. Click the
(Send Message) button to send the sentence as a message using the New Message
window.
© Samsung Telecommunications America
131
Easyset
You can use the Easyset using the Easyset menu.
This function is not supported in the SCMv2 system for Korea.
Configuring the Easyset
1. Click the [Configuration] icon (
) in the OfficeServ Communicator menu bar. The
following screen is displayed.
2. Enter a correct value in each Easyset setting item. Below are the descriptions of the Easyset setting
items.
Server Information
Enter the IP address and virtual directory name of the computer where the Easyset web server is installed.
For example, if the IP address of the Easyset web server is 10.254.168.152 and the virtual directory name is
'easyset' (default), enter 'http://10.254.168.152/easyset'.
System Number
Enter the system ID of the OfficeServ Link to which the Easyset is connected. The default is 1.
Selecting the Phone Color
Select the phone color you want to use. (White/Black)
132
© Samsung Telecommunications America
Selecting to Use the Phone Screen
Specify if you want to use the phone screen. (Used/Unused)
Using Easyset
1. Click the [Easyset] icon (
) in the OfficeServ Communicator menu bar. You are logged in
to the system automatically and then the following screen is displayed.
Easyset Screen Once You Have Successfully Logged In
2. If the configuration is incorrect, you are taken to the Easyset login screen. Enter the phone number and
password and then log in to the Easyset system manually.
© Samsung Telecommunications America
133
Easyset Login Screen
OfficeServ Communicator Easyset
* Regardless of whether you use Easyset, you should ask the administrator for more information including
whether Easyset is available and the URL. For more information on how to use Easyset, refer to the
OfficeServ EasySet manual.
* This function is supported only in the OfficeServ Communicator Professional mode. Moreover, this
function is not supported in the SCMv2 system for Korea.
Viewing Recordings
Using the View Recordings menu in the menu bar, you can view the recordings made while you were talking on
the OfficeServ Communicator.
1.
Click
in the OfficeServ Communicator menu bar. The following screen is displayed.
2. Select the period of time during which the recordings you want to view were made and click the [Query]
button.
134
© Samsung Telecommunications America
3. To play an entry in the list, select it and click the [Play] button.
© Samsung Telecommunications America
135
Schedule
You can use the Schedule functions of the OfficeServ Communicator using the Schedule menu.
Viewing the Monthly Schedule
1. Click the [Schedule] icon (
[Schedule] (
) in the OfficeServ Communicator menu bar or select
) from the system tray menu. The following screen is displayed.
2. The Monthly Schedule tab is selected by default. Today's date is highlighted.
Viewing the Daily Schedule
1. Select the Daily Schedule tab in the Schedule screen. The following screen is displayed. Today's
schedules are displayed by hour.
136
© Samsung Telecommunications America
Viewing a Schedule
1. Select the Schedule tab in the Schedule screen. The following screen is displayed.
Today's date is displayed and selected in the calendar. You can view the schedules registered for today
in chronological order.
2. To view the previous or next schedule, click the [Previous] or [Next] button respectively.
3. To modify the current schedule, click the Modify button (
). The <Modify Schedule> window is
displayed. You can modify the information for the schedule.
4. To delete the current schedule, click the [Delete] button (
). The <Schedule Deletion
Confirmation> window is displayed to ask you whether to delete the selected schedule. Click [Yes] to
delete the selected schedule.
© Samsung Telecommunications America
137
Adding a Schedule
1. Click the [Add Schedule] button in the Schedule screen. The following screen is displayed.
The Add New Schedule window consists of the following items.
Title
Start date and time
End date and time
Color option
All Day option
Repetition option
Alarm time
Schedule type
Description
2. Click the [Save] button to save the new schedule in your computer. Click the [Cancel] button to close the
window without saving the new schedule.
138
© Samsung Telecommunications America
Viewing a Schedule
1. While the <Monthly Schedule> tab is selected, if you move your mouse pointer over a schedule entry, a
tooltip is displayed to show the details of it, as shown in the figure below. To display the <Schedule
Details> window, double-click a schedule entry.
2. The <Schedule Details> window shows the details of the selected schedule. To modify the selected
schedule, click the [Modify] button (
). The <Modify Schedule> window is displayed. You
can modify the information for the selected schedule.
3. To delete the selected schedule, click the [Delete] button (
4. To close the <Modify Schedule> window, click the [OK] button (
© Samsung Telecommunications America
).
).
139
Modifying a Schedule
1. Click the [Modify] button in <Schedule Details> window. The <Modify Schedule> window is displayed.
You can change the details of the selected schedule and save the changes in your computer.
Deleting a Schedule
1. Click the [Delete] button in the <Schedule Details> window to delete the selected schedule. The
<Schedule Deletion Confirmation> window is displayed to ask you whether to delete the selected
schedule. Click [Yes] to delete the selected schedule.
140
© Samsung Telecommunications America
Synchronizing the Data
1. Click the [Synchronize Data] button (
) at the bottom of the Schedule screen. The
following window is displayed.
The <Synchronization> window consists of the following two tabs:
UC <-> Phone
UC <-> Outlook
2. Set a period and click the [View] button (
). The schedules are displayed in two lists. To set a
period, click the [Set Start Date]/[Set End Date] (
) button. The <Calendar> window is displayed, as
shown in the figure below, so that you can select a date.
To display all schedules of the entire period, select the [All] checkbox (
) and then click the [View]
button.
© Samsung Telecommunications America
141
3. If you select an entry in the list in the <Outlook> pane and click the [Move to PC] button (
), the
selected entry is saved to your computer and is displayed in the list in the <PC> pane.
4. If you select an entry in the list in the <PC> pane and click the [Move to Outlook] button (
), the
selected entry is saved to your Microsoft Outlook and is displayed in the list in the <Outlook> pane.
5. To save all entries in the <Outlook> pane list to your computer, click the Move All to PC button (
).
All entries of the Outlook pane list are displayed in the <PC> pane list. While the entries are being
moved, the movement progression is displayed in the progress bar. When the movement operation has
finished, the progression is displayed as 100%.
6. To save all entries in the <PC> pane list to your Microsoft Outlook, click the [Move All to Outlook] button
(
). All entries of the <PC> pane list are displayed in the <Outlook> pane list. While the entries are
being moved, the movement progression is displayed in the progress bar. When the movement
operation has finished, the progression is displayed as 100%.
142
© Samsung Telecommunications America
DDE
The DDE function is when the OSC receives a call, the DDE program (e.g. Goldmine) that interoperates with it
displays the information for the received phone number to the user.
Initializing the DDE Function
1. Select DDE -> Initialize DDE from the system tray menu.
2. A configuration window where the user can enter the information required for DDE initialization is
displayed. However, the information that must be entered differs according to the program type
("Goldmine" or "Other") selected in the DDE program section of the Configuration menu screen.
You must enter the ID and password registered
when installing the Goldmine program. They are
required to run the Goldmine program.
-
When set to "Goldmine"
© Samsung Telecommunications America
143
Enter the service name, topic name, and command.
(Note: The service name, topic name, and command
differ according to the DDE program. Therefore, to
configure these settings, refer to the user manual of
the DDE program.)
- When set to "Other"
3. Click the "OK" button to initialize the DDE function with the settings you entered. (Note that if the
currently selected DDE program is Goldmine, it will automatically run.)
Using the DDE
1.
When the received call number is registered in the DDE program, its detailed information is displayed
on the screen.
Closing the DDE Function
1.
Select the DDE -> Close DDE from the system tray menu.
2. The DDE function stops.
144
© Samsung Telecommunications America
Configuring the DDE
1. For more information on how to configure the DDE, refer to the "DDE" section of the "Configuring the
OfficeServ Communicator Options" section.
© Samsung Telecommunications America
145
IM/PS
This chapter describes the messenger function provided in the Professional mode.
By using the messenger function, you can improve the business environment of your company because you
can use the phone, chatting, video call, file transfer, and white board functions conveniently.
Starting the Messenger
Click the [Buddy List] icon (
screen is displayed.
) in the OfficeServ Communicator menu bar. The following
The main screen consists of the following four sections:
My Information
Toolbar
Tabs
Tab Content
© Samsung Telecommunications America
146
My Information
Your information is displayed in the My Information section at the top of the window, as shown in the figure below.
The My Information section consists of the following three items:
Messenger status
Phone status
Your chat name
© Samsung Telecommunications America
147
Below are the possible messenger statuses.
Icon
Status
Icon
Status
Online
Busy
Offline
In conference
Away
In taking a meal
-
DND
-
Below are the possible phone statuses. When you move your cursor over a buddy, his phone status and
messenger status are displayed in a tooltip.
Icon
Status
Icon
Status
Standby
Busy
Incoming
rejected,
unavailable
call
Unknown
(when a phone call
failed to be
connected)
For your chat name, the name you entered in the Configure My Information window is used. Your chat name
is displayed in the screen of other users.
148
© Samsung Telecommunications America
Toolbar
The toolbar below the My Information section allows you to control a call or open a conference.
Below are the functions of the toolbar icons.
Icon
Function
Makes a call to the selected buddy if your phone is in the standby
status. Or answers a call if a call is incoming.
Hangs up the call.
Begins chat with the selected buddy.
Displays a list of the stored chats.
Opens a conference.
Sets a contact, absence message, etc. and manages the list of
chat buddies.
© Samsung Telecommunications America
149
Call Icon
Makes a call to the selected buddy if your phone is in the standby status. Or answers a call if it is incoming to
your phone.
To make a call, select the other party to which you want make the call in a tab and click the Make Call button.
The call is made to the station number of the selected party.
Disconnect Icon
Cancels a call if it is being sent. Or disconnects a call if you are taking part in one. This icon does not work in
the standby status.
Chat Icon
By clicking this icon, you can begin to chat with the buddy you selected in a tab. For more information, refer to
the 'Chatting' section.
If the buddy is offline or in the Do Not Disturb status, you cannot chat with him.
Show Chat List Icon
Displays the chatting content you saved. If you click the Show Chat List icon, the View Previous Chat Content
window that shows a list of the saved files is displayed. If you select a file in the list, the chat content
contained in it is displayed. You can select and delete multiple files or you can delete all files in the list.
150
© Samsung Telecommunications America
Open Conference Icon
Displays a list of the users with whom you have chatted or have had a conference. The Recent List displays
the users with whom you have chatted or have had a conference recently. You cannot change or delete the
listed entries.
Configure My Information
Displays a list of the users with whom you have chatted or have had a conference. The Recent List displays
the users with whom you have chatted or have had a conference recently. You cannot change or delete the
listed entries.
1) Contact
- Name, Extension, Department, Job Position: You can change these items in the OfficeServ Messenger
Server Administrator screen. Standard users can only view these items.
- Chat Name: View or change your chat name that is displayed in the Buddy List screen, a buddy entry, or
Chat window.
- Email: Enter your email address.
- Contact when absent: Enter the contact you want to use when you are not online.
2) Set absence time
- If there is no keyboard or mouse input for the specified period of time, the messenger status is changed to
Absent.
3) Absence message
- Enter the message you want to display to your buddies when you are not online.
4) Manage buddies
- When a user wants to register you as his buddy, set whether to accept his buddy registration request. If
you select the Accept always automatically option, any registration request is accepted. If you select the
© Samsung Telecommunications America
151
Conform whether to accept option, when a registration request is received, a notification window is
displayed so that you can accept or reject it.
- Allowed buddies: Displays a list of the users who registered you as his buddy. Their buddy registration
requests were accepted because the Accept always automatically option was selected or you accepted
each of them by clicking the Accept button in the notification window displayed when he sent that request.
- Blocked buddies: Displays a list of the users whose buddy registration request you rejected. Their
registration requests were rejected because you rejected each of them by clicking the Reject button in the
notification window displayed when he sent that request. For the users in the Blocked buddies list, your
status is displayed as offline in their screens. You cannot chat or have a conference with them.
152
© Samsung Telecommunications America
Selecting a Tab
The main screen contains four tabs used to display all buddies, recent buddies, buddies that belong to Favorite Group
1, and buddies that belong to Favorite Group 2. Select the tab that contains a list of the buddies you want to view.
© Samsung Telecommunications America
153
Content of the Tabs
The main screen contains the following four tabs.
All Tab
Displays all of your buddies you registered to chat with. Initially, only groups are displayed in the tab. If you
click a group, the buddies that belong to it are displayed, as shown in the figure below.
Each user you registered to chat with is displayed as offline until you receive an acceptance from him.
In the All tab, select and right-click on a group or user. A context menu displayed. This context menu contains
different menu items depending on whether the selected entry is a group or user.
When a group is selected, the context menu contains the menu items as shown in the figure below.
154
© Samsung Telecommunications America
- Add Group…: Adds a new group to the Buddy List.
- Add Buddy…: Registers a buddy to the selected group. For more information, refer to the 'Managing
Buddies' section.
- Rename Group…: Changes the name of the selected group.
- Set as Favorite Group: Sets the selected as Favorite Group 1 or Favorite Group 2. You can view a list of the
buddies that belong to the group that is set as Favorite Group 1 or Favorite Group 2 in the Favorite Group 1
or Favorite Group 2 tab.
- Delete: Deletes the selected group. If it contains a buddy, you will be prompted to confirm the deletion.
© Samsung Telecommunications America
155
When a user is selected, the context menu contains the menu items as shown in the figure below.
- Details…: Displays the detailed information for the selected user. In the Detailed Information window, the
phone status, messenger status, name, chat name, extension number, department, job position, email, and
contact for absence are displayed. You can make a call to, begin to chat with, or send an email to the
selected buddy.
156
© Samsung Telecommunications America
- Make Call: Makes a call to the extension number of the selected buddy.
- Chat…: Begins chat with the selected buddy. For more information, refer to the 'Chatting' section.
- Email…: Runs Microsoft Outlook and enters the email address of the selected buddy in its 'Recipient' input
box.
- Send Message…: Sends a message to the selected buddy. If he is logged off, it is sent to him when he logs
in to the server the next time.
If you select Send Message, the New Message window is displayed, as shown in the figure below, so that
you can enter your message. For more information, refer to the 'Messages' section.
- Move Group To: Moves the selected buddy to a different group.
If you point to the Move Group To menu item, a group list is displayed as a sub menu. The group to which
the selected buddy belongs is displayed as checked. Select an unchecked group. The selected buddy will
be moved to the selected group.
- Delete: Deletes the selected buddy.
Selecting Multiple Buddies and the Related Context Menu
* You can select multiple buddies by holding down the Ctrl key and selecting them.
* If more than one buddy is selected, only the Make Call, Chat, Send Message, and Delete menu items
are available.
© Samsung Telecommunications America
157
Recent Buddies Tab
Displays a list of the users with whom you have chatted or have had a conference. The Recent List displays
the users with whom you have chatted or have had a conference recently. You cannot change or delete the
listed entries.
158
© Samsung Telecommunications America
Favorite Group 1 and Favorite Group 2 Tabs
You can register a group displayed in the All tab that you use frequently as Favorite Group 1 or Favorite
Group 2. Each of the Favorite Group 1 and Favorite Group 2 tabs displays a list of the users that belong to the
corresponding group.
© Samsung Telecommunications America
159
Managing Your Buddies
You can register the users you contact frequently to a group in the OfficeServ Communicator Buddy List.
Viewing Your Buddies
You can view all of your buddies in the All tab of the Buddy List window.
The All tab displays the groups you created and the users that belong to each group. For a buddy entry, his
phone status and messenger status are displayed as icons. His chat name and messenger status are
displayed as text on the right of those icons.
160
© Samsung Telecommunications America
Adding a Buddy
To add a buddy to your Buddy List, click the Add Buddy button.
If you click the Add Buddy button, the Add Buddy window is displayed. Select the criteria you want to use for
searching, enter text you want to search for, and click the Search button. A list of the users that match the
condition you specified is displayed.
If you want to add them to an existing group, select the 'Add to Existing Group' option and then select the
group from the combo box to the right of it.
If you want to create a new group and add them to it, select the 'Add to New Group' option and then enter the
name of the new group in the text box to the right of it.
© Samsung Telecommunications America
161
Select the users you want to add to the specified group and then click the OK button. The added buddies will
be displayed in the All tab.
162
© Samsung Telecommunications America
Buddy Registration Notification Window
When you log in to the server successfully, the Buddy Registration Notification window is displayed for each of the
buddy registration requests received before your login time and the buddy registration requests you received, but
have not answered yet.
If you click the Accept button, you will be registered as a buddy of the user that sent that request and will be
displayed in the All tab of his Buddy List. If you click the Reject button, you are still displayed in his Buddy List,
but your status is displayed as offline.
If you click the Close button ( ), the Buddy Registration Notification window will be displayed again for that
user when you log in to the server next time.
© Samsung Telecommunications America
163
Deleting a Buddy
To delete a buddy from your Buddy List, select and right-click on that buddy entry in the list and click Delete from the
displayed menu.
You will be prompted to confirm the deletion. Click the OK button in the Deletion Confirmation message box.
The selected buddy is then removed from the All tab list.
If the selected buddy is contained in Favorite Group 1 or Favorite Group 2, he is also removed from the
respective Favorite Group list. However, he is still displayed in the list of the Recent Buddies tab.
164
© Samsung Telecommunications America
Chatting
You can chat with a buddy by selecting him in the Buddy List and clicking the Chat button or menu. The
Chatting window is displayed so that you can chat with him.
Structure of the Chatting window
The structure of the Chatting window is described below.
The Chatting window consists of four sections.
Toolbar
Chat conversations
Text input field and Status
Chat buddy list and My Avatar
Each of the four sections is described below.
© Samsung Telecommunications America
165
Toolbar
The toolbar contains the buttons you can use to control a call, the buttons for data communication, and the buttons for
inviting or deleting a buddy to or from a conference.
Each button is described below.
Button
Function
Makes a call. Only the master of the Chatting window can use
this button. If a call is connected currently, this button is
displayed as
.
Disconnects a call.
Begins a video conference. Only the master of the Chatting
window can use this button.
Sends a file.
Shares a whiteboard. Only the master of the Chatting window
can use this button.
Invites a new chat buddy. Only the master of the Chatting
window can use this button.
Forces a chat buddy out of a conference. Only the master of the
Chatting window can use this button.
166
© Samsung Telecommunications America
Shows or hides the Video screen You can control the Video
screen only if the Video Conference function is being used.
Saves the chat conversations.
The master of the Chatting window is the user to open a conference and invite a buddy to it. If the current
master exits the conference, the next master is determined among the remaining buddies participating in
the conference.
Chat Conversations
The Chat Conversations box on the bottom left of the tool bar displays the conversations you have made with your
chat buddies.
© Samsung Telecommunications America
167
Moreover, it is used to display a notification when a buddy enters or exits a conference, as shown in the
figure below. It is also used to display messages for file transfer and joining a whiteboard.
168
© Samsung Telecommunications America
Text Input Field
This text input field is located below the Chat Conversations box. You can enter text to send to your chat buddy in this
field.
To send a message to your chat buddy, enter the text you want to send and press the Enter key or click the
[Send] button. To enter a line break, hold down the Shift key and press the Enter key.
If you click the Font button (
© Samsung Telecommunications America
), the Font window is displayed where you can select a font.
169
Chat Buddy List and My Avatar
The 'Chat Buddy List' section is located to the right of the Chatting window. A list of your buddies participating in the
conference and their avatars are displayed in it. Your avatar is displayed in the 'My Avatar' section at the bottom right
of the Chatting window.
The Chat Buddy List displays the information for the buddies participating in the conference and their
conference status. In a buddy entry, the avatar set by the buddy is displayed on the left and his chat name
is displayed to the right above his avatar. The phone, file transfer, and whiteboard statuses of the buddy are
displayed as icons below his chat name. And, if you move your cursor over his chat name, his user ID,
extension number, messenger status, and phone status are displayed as a tooltip.
You can hide the Chat Buddy List using the Hide Chat Buddy List button (
using the Show Chat Buddy List button ( ).
170
). You can display it again
© Samsung Telecommunications America
Chatting
To send a message to your chat buddy, enter the text you want to send in the Text input field and press the Enter key
or click the [Send] button. If there is no buddy to receive your message, the [Send] button is disabled. Even if you
press the Enter key, you cannot send the message.
While your buddy is entering a message to send to you, a message that he is entering a message is
displayed in the status bar. After receiving a new message from him, the time that it (the last message) is
received is displayed.
© Samsung Telecommunications America
171
Inviting a Buddy
While chatting, you can invite other users to the chat. Only the master of the conference can invite users.
1.
2.
3.
4.
172
If you want to invite a chat buddy, click the [Add Member] button in the toolbar of the Chatting
window.
If you click the [Add Member] button, the Add Member window where you can invite other
users is displayed, as shown in the figure below. Select the criteria you want to use for
searching, enter text you want to search for, and click the Search button.
A list of the users that match the condition you specified is displayed. The users that cannot
be invited to a conference because they are in the offline or DND status are not included in
the search results.
Select a user you want to invite and click the [OK] button. The selected user is invited to the
conference.
© Samsung Telecommunications America
Saving Chat Conversations
You can save the conversations you made with your chat buddy as a file in your computer. To save the chat
conversations, click the Save Chat Conversations button.
If there is no chat conversation to save, a notification message box is displayed. If the chat conversations
are saved successfully, the location where the file is saved and the message notifying that the file was
saved successfully are displayed in the Chat Conversations box.
The location where files are saved is the "ChatLog" folder under the path set in the "File Saving Paths"
option in the Other tab of the Configuration screen. You can view the saved files using the [View Previous
Chat Conversations] in the Buddy List window.
© Samsung Telecommunications America
173
Connecting a Video
You can send your video scenes to your buddy through the connected video.
Sending Videos
When a camera is installed and the master of a conference has started a video conference, you can send your video scenes
to your buddy using the toolbar buttons of the Chatting window.
To send your video scenes, click the Camera ON button in the Video window. When your video scenes start to be
sent, your video is displayed in the area where your avatar is shown and the Camera ON button changes to the
Camera OFF button, as shown in the figure below.
If no video camera is installed in your computer or the camera is not recognized, the message 'There is no available
camera' is displayed, as shown in the figure below.
Sending Videos
* While you are using your camera in the Chatting window, even if a video call is received no video is displayed
on the Video window.
* Subscribers must be on the same network and system.
© Samsung Telecommunications America
174
Stopping Sending Videos
To stop sending videos, click the Camera OFF button in the Video window. When sending is stopped, your avatar is
displayed again.
© Samsung Telecommunications America
175
Video Window Layout
If you click the Change Layout button, the locations of the video areas in the Video window are changed. The layout is set in
the order of diagonal, horizontal, and vertical directions starting from the current window layout.
Below is an example of the vertical layout.
176
© Samsung Telecommunications America
Sending and Receiving Files
You can send or receive files when both you and your buddy are connected through the Chatting window.
If you click the Send Files button on the toolbar of the Chatting window, the Send Files window where you can
send files is displayed.
© Samsung Telecommunications America
177
Selecting Files to Send
To add a file to the list of files to send, click the Add button (
).
The Open dialog box is displayed. Select the file you want to add to the list and click Open.
The added file is displayed with the information on it in the list of the Send Files window, as shown in the figure
below.
178
© Samsung Telecommunications America
The information on the file includes file name, status, path, and size. The status is displayed as Wait, Send, or Done.
The Wait status means that the file is waiting to be sent, the Send status means that the file is being sent, and the
Done status means that the sending of the file has completed.
To delete a file from the list of the Send Files window, click the Delete button (
of the Send Files window, click Reset ( ).
). To delete all files from the list
Sending Files
If the files you want to send are listed in the list of the Send Files window, click the Start Sending button. Once sending has
started, you can no longer add or delete files. To cancel sending the files, click the Cancel button.
© Samsung Telecommunications America
179
Receiving Files
When your buddy has started sending files, a message asking you whether to receive the files your buddy sent is displayed
in the Chat Conversations box.
If you click the Accept link in the message displayed in the Chat Conversations box, the Receive Files window is displayed.
In contrast to the Send Files window, in the Receive Files
window, you can only change the saving path and start or
cancel receiving the files. When the Receive Files window is
displayed, specify the path to save the files by clicking the
Browse button and then click the Start Receiving button. To
cancel receiving the files, click the Cancel button.
180
© Samsung Telecommunications America
The receiving progression is displayed for each file in the Receive Files window.
When the files have been received completely, the "Browse" button is changed to the "Open" button. You can
open the folder directly where the received files are saved by clicking the Open button.
© Samsung Telecommunications America
181
Closing the Windows Automatically After Sending or Receiving Files
The Send Files and Receive Files windows have a checkbox at the bottom of them that you can use to specify whether to
close the window after sending or receiving files.
If this checkbox is selected, the Send Files or Receive Files window is closed automatically after sending or receiving files
has finished.
182
© Samsung Telecommunications America
Whiteboard
You can share a figure or program screen while chatting with your buddy using a whiteboard.
Structure of the Whiteboard
The structure of the whiteboard is described below.
The whiteboard consists of five sections.
Toolbar
Drawing toolbar
Page bar
Drawing canvas
Status bar
Each of the four sections is described below.
© Samsung Telecommunications America
183
Toolbar
The figure below shows the toolbar.
184
Save Page: Saves the current page. If you click the Save Page button, the window where you can
specify the location to save the current page to is displayed. If you select a folder, the current
page is saved in it as a JPG or html file.
Open Memo Window: Displays the Memo window to add a memo to the page. You can add a
memo to each page. The memo is saved together when saving the page.
Share Screen: Refreshes and shares the specified program screen automatically in accordance
with the set refresh period.
Share File: A dialog where you can select a file is displayed. If you select a file, the program is run.
Then it refreshes and shares the screen automatically in accordance with the set refresh period. If
a program that is the same kind of the selected file is already running or you close the program
being shared, the sharing function quits.
Refresh Period: Sets the interval with which the screen is refreshed while screen sharing or file
sharing is running. The refresh period can be set to either one second or three seconds.
© Samsung Telecommunications America
Drawing Toolbar
The Drawing toolbar is located at the bottom left of the whiteboard. The Drawing toolbar contains the drawing
tools with which you can draw a figure, share the screen, and manage pages, etc.
Button
Name
Function
Straight line
Draws a straight line in the currently set line color.
Free curve
Draws a curve in the currently set line color.
Arrow
Draws an arrow in the currently set line color.
Rectangle
Draws a rectangle in the currently set line color. The left
button is used to draw a rectangle without filling the inside.
The right button is used to draw a rectangle and then fill the
inside with the fill color.
Ellipse
Draws an ellipse in the currently set line color. The left
button is used to draw an ellipse without filling the inside.
The right button is used to draw an ellipse and then fill the
inside with the fill color.
© Samsung Telecommunications America
185
Round
Rectangle
Draws a round rectangle in the currently set line color. The
left button is used to draw a round rectangle without filling
the inside. The right button is used to draw a round
rectangle and then fill the inside with the fill color.
Text
Enters text with the currently set line settings.
Erase
Erases objects added to the whiteboard.
Line
Thickness
Sets the line thickness.
Share
Image File
Shares the specified image file.
Share
Desktop
Shares the entire desktop.
Share
Program
Screen
Manually (A
program is
specified.)
Shares the screen of the specified program. If you click this
button, the Find Program Screen tool ( ) is displayed. If
you select a program using this tool, the current screen of
the selected program is sent to all users who are using the
whiteboard.
Share
Program
Screen
Manually (A
program is
specified.)
When the specified file is open, move to the page you want
to share and then start sharing the file screen. Use the
button to select a file. Use the
button to share
the file screen. To end the sharing, use the
button.
Add Page
186
Adds a page. You can add up to 100 pages.
Delete
Page
Deletes a page.
Color
The left button sets the line color. The right button sets the
fill color. If you double-click on a Color button, the Color
window where you can set the line color or fill color is
displayed.
© Samsung Telecommunications America
Page Bar
The page bar is located to the right of the whiteboard and below the toolbar. The page bar contains the buttons
you can use to navigate pages.
Button
Name
Scroll
Down
Scroll Up
Page
Buttons
© Samsung Telecommunications America
Function
Scrolls the page list downward.
Scrolls the page list upward.
The same number of buttons as the number of added
pages is displayed. If you click a page button, the selected
page is displayed on the drawing canvas.
187
Drawing Canvas
The drawing area that displays the figures added by you and other users is located below the toolbar.
188
© Samsung Telecommunications America
Status Bar
The status bar that displays the whiteboard status including the number of participating members is located below
the drawing canvas.
© Samsung Telecommunications America
189
Starting the Whiteboard
If you as the master of a conference click the Whiteboard (
) button, the whiteboard is displayed, as shown in
the figure below, and a join request is sent to other members.
When a user receives the request to join the whiteboard, a message asking you whether to join the whiteboard is
displayed in the Chat Conversations box of his Chatting window. If he clicks the 'Join' link, the whiteboard is
displayed and shared with him. Later, if he has closed the whiteboard, he can join the whiteboard again using the
whiteboard button in the toolbar.
190
© Samsung Telecommunications America
Drawing
You can click a tool button, such as the Line, Free Curve, or Arrow button, etc. in the drawing toolbar and draw
the corresponding object in the drawing canvas, as shown in the figure below.
© Samsung Telecommunications America
191
Screen Sharing
You can share a specified program screen with other members using the screen sharing function.
If you click the Share Screen button, the Find Program Screen tool (
screen to share is displayed.
) with which you can specify a program
If you drag the Find Program Screen tool, the cursor changes as shown in the figure below.
192
© Samsung Telecommunications America
If you drag the changed cursor to a program screen, the area to be shared is displayed with a red rectangle.
When the area you want to share is selected, release the mouse button. The drawing toolbar and page bar are
hidden and the selected area is displayed in the drawing canvas shown in full mode. If there is a change made to
the specified program screen, it is updated to the whiteboard automatically in accordance with the screen refresh
period. The refresh period can be set to either one second or three seconds.
© Samsung Telecommunications America
193
While the Screen Sharing function is being performed, you cannot use any drawing tool. If you click the Share
Screen button again, the automated sharing of the program screen ends.
194
© Samsung Telecommunications America
Call Control Interoperating with the OfficeServ Link
This chapter describes the call control service that interoperates with the OfficeServ Link.
Call Control Service
You can use this function only in the Deskphone mode.
Call Display screen
As shown in the figure below, the area displayed below the OfficeServ Communicator screen is called the <Call Display>
screen. The <Call Display> screen is used for the call control service.
The <Call Display> screen displays the call list for the phones connected to the OfficeServ Communicator.
The items of the Call Display screen are described below.
Item
Phone
number
Function
In the event of external calls, the caller ID or Dialed Number Identification Services (DNIS)
is displayed if they are provided.
In the event of station calls, the extension number is displayed.
Name
Displays the name of the opposite party connected. The name is displayed only when
the contact information exists or the caller's name is provided with the caller ID.
Status
Displays the call status.
© Samsung Telecommunications America
195
Call Control Button (Main Screen)
The call control buttons in the main screen are described below.
Button
Function
Makes or receives a call.
Ends the current call.
Makes a call again to the most recent number you dialed.
Holds the current call or reconnects a held call.
Forwards the all current calls to another station.
Makes a conference call.
Picks up a call that is ringing on another station.
Call Control Menu
You can control a call using the context menu displayed when you right-click on the main screen.
This menu is displayed only in Deskphone mode.
A call can be controlled using this menu. This menu is not displayed in SoftPhone mode.
196
© Samsung Telecommunications America
The menu items of this menu are described below.
Option
Function
Trunk Redial
Makes a new call externally on the connected trunk.
Redial Continuously
Makes a call continuously to the most recent number you dialed until the
opposite party answers.
Forward to Another
Station
Forwards a received call to another station without answering it.
Co-Hold
Means a received external call can be held at another station.
Pickup Station Call
When a call received by another station is not answered, you can pick it up.
Pickup Group Call
When a call received by other trunk is not answered, you can pick it up.
Forward Immediately
As soon as your phone rings, the call is forwarded to another station.
Forward after Making
a Call
First you will make a call to the person to whom you want to forward a received
call and ask whether he agrees to answer the call. Upon his consent, you will
forward the call to his station.
© Samsung Telecommunications America
197
Option
Function
Exchange Calls
Exchanges the connected call and held call.
Announcement
Makes an announcement to a particular area.
Callback
Reserves a call when the called station is busy or does not answer.
Leave Message
Leaves a message when the called station is busy or does not answer.
Reserve Station
When the called station is busy, this notifies it that you will enter the Waiting
mode.
OHVA
Participates in a call that a station is talking on.
Voicemail Box
Connects the opposite party to your voicemail box.
Leave Voice
Message
Allows the opposite party to leave a voice message.
Forward to Voicemail
Box
Forwards the connected call to the voicemail box of a specified station.
Record Call in
Voicemail Box
Records the connected call in your Voicemail box.
Message List
Allows you to check whether other stations have left a message while your
station was busy or did not answer.
Callback Status
Checks the callback status.
Reverse Forward
Allows other stations to forward calls to your station.
Redial Continuously
If you select 'Redial Continuously' from the Call menu, a call is continuously made to the most recent number you
dialed until the opposite party receives it or you click the Stop button.
To make a call again before the time limit expires, click the Redial button. If the opposite party is a station subscriber,
the Redial Continuously function stops automatically when connected. If the opposite party is an external subscriber,
you must click the Stop button to stop the Redial Continuously function when connected.
198
© Samsung Telecommunications America
Forward to Another Station
When a call is received, you can forward it to another station without answering it by selecting Forward to Other
Station from the Call Control menu.
If you select Forward to Other Station from the Call Control menu, the Forward to Other Station window is displayed.
Enter the number to which you want to forward the call and click the Make Call button. The call will be forwarded to
the specified number.
Pickup Station Call
You can pick up a call that is ringing on another station.
If you select Pickup Station Call from the Call Control menu, the Pickup Station Call window is displayed.
Enter the extension number whose call you want to pick up and click the Make Call button.
Pickup Group Call
You can pick up a call that is ringing on another station that is a member of a group.
If you select Pickup Group Call from the Call Control menu, the Pickup Group Call window is displayed.
Enter the group number and click the Make Call button.
© Samsung Telecommunications America
199
Forward Immediately
You can forward the current call to another station.
As soon as your phone rings, the call is forwarded to a specified station.
If you select 'Forward Immediately' from the [Call Control] menu, the [Forward Immediately] window is displayed.
Enter the station number to which you want to forward the call and click the [Forward] button.
Processing When a Forwarded Call Is Not Answered
If the person to whom a call was forwarded is absent or does not answer it while his station rings several times,
the call is returned to the person that forwarded the call.
Forward after Making a Call
You can forward the current call to another station.
First you will make a call to the person to whom you want to forward a received call and ask whether he agrees to
answer the call. Upon his consent, you will forward the call to his station.
If you select Forward after Making a Call from the Call Control menu, the Forward after Making a Call window is
displayed.
Enter the station number to which you want to make a call and click the Forward button.
200
© Samsung Telecommunications America
While you are asking him whether he agrees to answer the previously received call, it remains on Hold during
Forwarding mode.
If you click the Disconnect button, the current call is disconnected and the previous call is forwarded to his station.
Exchange Calls
During the Forward after Making a Call function, you can exchange the call on which you are talking to the
connected party and the previous call that is on Hold during Forwarding mode.
After the call you made to the person to whom you had wanted to forward the previous call is connected, select
Exchange Calls from the Call Control menu.
The current call is changed to Hold mode, and the previous call that has been on hold is changed to the Connected
mode and is displayed in the <Call Display> screen.
© Samsung Telecommunications America
201
Announcement
If you select Announcement from the Call Control menu, the Announcement Area window where you can select the
area you want to make an announcement to is displayed.
Select a particular area you want to make an announcement to.
Before Using the Announcement Function
To use the Announcement function, you must pick up the receiver before making an announcement.
Callback
If you have made a call to a station that is busy or does not answer, you can request a callback call.
Select 'Callback' from the [Call Control] menu. If the station that has received your callback request returns to the
status where it can make a call, it makes a call to your station. You can view the callback requests you have made in
the [Callback Status] list.
Leave Message
If you have made a call to a station that is busy or does not answer, you can leave a message. Select Leave
Message from the Call Control menu.
202
© Samsung Telecommunications America
OHVA (Urgent Announcement)
If you want to make a voice announcement to a station while it is talking on a call, select OHVA from the Call Control
menu. The station that is talking on a call can then receive the OHVA on another call that is waiting.
Station in DND Mode
The station for which the DND function is enabled cannot receive an OHVA.
Message List
By selecting Message List from the [Call Control] menu, you can check whether other stations have left a message
while your station was busy or did not answer. This menu item is available only if at least one different station left a
message. The extension numbers of the stations that left a message are displayed in the Message List.
To make a callback call to a station in the Message List, select it and click the [Make Call] button. To delete a
message from the Message List, select it and click the [Delete] button.
© Samsung Telecommunications America
203
Callback Status
By selecting 'Callback Status' from the [Call Control] menu, you can check the callback requests you made to other
stations.
This menu item is available only if you made a 'Callback' request to at least a different station. The Callback window
displayed shows a list of the stations to which you made a callback request.
To delete a 'Callback' request from the list, select it and click the [Delete] button.
Conference
When there is a call connected, enter the phone number of a member that will participate in the conference and click
the Conference (
) button.
If he answers the call, the <Call Display> screen is changed as shown in the figure below.
Click the Conference [
] button again. The main screen changes to Conference Call mode.
The figure below shows the status of stations 3008 (the master of conference), 3017, and 3010 when participating in
a conference.
204
© Samsung Telecommunications America
You can add other users in the same way while holding the conference.
If a member shown in the call list participated but is not participating in the conference, his call status is set to 'Hold
(Conference)' mode until he enters the conference again. You can add up to five members to a conference.
To remove a member from a conference, select and right-click on him and select 'Disconnect' from the menu
displayed.
© Samsung Telecommunications America
205
UC Phone Mode Functions
This chapter describes the data interoperation function between the UC phones that interoperate with the OfficeServ
Communicator.
Sending Phone Content
This function operates only in the Basic/Professional UC Phone mode, between OfficeServ Communicator and
SMT-i5243 phones. This feature is used to send background images, phonebook images, screensavers, and to
manage ringtones from your PC to your SMT-i5243 phone.
Starting
Click the Send Phone Content icon (
) in the OfficeServ Communicator menu bar. The
following screen is displayed.
206
© Samsung Telecommunications America
Background Image Tab
The <Background Image> tab displays a list of the background images saved in the computer and phone.
Folder Location
Click the [Browse] button (
). The [Browse for Folder] window is displayed for you to change the
currently specified default folder for the background image.
Select a folder other than the current default folder and click [OK]. The default folder is changed to the selected
folder. The selected folder will be used as the default folder until you change it again. If you click the [Cancel] button,
the [Browse for Folder] window is closed and the current default folder does not change.
Loading a List
Click the [Load List] button (
) to load a list of background images saved in the phone. The
summarized information on the loaded images is displayed using a popup window for about three seconds and it is
displayed in the Phone pane list.
© Samsung Telecommunications America
207
The summary consists of the following three pieces of information.
Total number and size of images
Used number and size of images
Available number and size of images
Deleting an Image
In the list of the Phone pane, select the image you want to delete and click the [Delete] button (
). The
image saved in the phone is deleted, the deletion results are displayed in the Requested Information popup window,
and the final results are displayed in the list of the Phone pane.
Applying an Image as Background Image Immediately
In the list of the Phone pane, select the image you want to use as the background image and click the Apply as
[Background Image Immediately] button (
image of the phone screen.
). The selected image is displayed as the background
Importing an Image from PC to Phone
In the list of the PC pane, select the image you want to import to the phone and click the [Import] button (
). The
selected image is copied to the phone. Before importing an image to the phone, it needs to be processed by the
"image conversion" process so that a correct image can be copied to the phone.
Exporting an Image from Phone to PC
In the list of the Phone pane, select the image you want to export to the phone and click the Export button (
).
The selected image is copied to the PC.
Converting an Image
If you select an image in the list of the PC pane, the selected image is displayed in the Image Preview area. If you
click the [Convert Image] button (
208
), the Convert Image window is displayed.
© Samsung Telecommunications America
Setting the Conversion Option
There are the following three conversion options.
Fit to Screen
Fit to Largest
Fit to Smallest
© Samsung Telecommunications America
209
Converting an Image
After selecting the conversion option, click the [Convert] button (
). The selected image is
converted in accordance with the selected conversion option.
Specifying the Saving Folder
To specify the folder where you want to save the converted image, click the [Browse] button (
Folder Location field.
) next to the
Saving the Converted Image
To save the converted image, click the [Save Converted Image] button (
). The "Save As"
window is displayed. Enter a file name and click the [Save] button. The converted image is saved as the specified
file.
210
© Samsung Telecommunications America
© Samsung Telecommunications America
211
Phonebook Image Tab
The Phonebook Image tab displays a list of the phonebook images saved in the computer and phone.
There is a difference in the image size and the total size of images that can be saved in the phone and other
functions are the same as in the "Background Image" tab.
212
© Samsung Telecommunications America
Screensaver Tab
The Screensaver tab displays a list of the screensaver images saved in the computer and phone.
There is a difference in the image size and the total size of images that can be saved in the phone and other
functions are the same as in the "Background Image" tab.
© Samsung Telecommunications America
213
Ringtone Management
The Ringtone Management tab displays a list of the ringtone files saved in the computer and phone. (MMF file
format is supported only.)
Listening to Ringtones
To preview a ringtone, click a ringtone file in the PC pane list and click the Play button. You can hear the selected
ringtone from the speaker connected to your PC.
Other functions are the same as in the Background Image tab.
214
© Samsung Telecommunications America
Troubleshooting
When Logging in to a Server from the OfficeServ Communicator
Symptom or Error Message
Invalid IPP Regist User ID
Reasons and Actions
- When the phone number is an unavailable one
- When you enter a phone number that is being used
Enter a correct phone number registered in the system.
In SoftPhone + Link mode, only SoftPhones
succeed in initialization.
- When the connection information used to connect to the OfficeServ
Link is incorrect
Select Configuration > Connection tab. Check the link IP address and
link port number.
- When the OfficeServ Link is not running
Check whether the OfficeServ Link is operating normally.
Call Initialization Fail
- When the phone number is not a correct number registered in the
system
Check whether the phone number is a number that can be used in the
system.
- When the connection information used to connect to the OfficeServ
Link is incorrect
Select Configuration > Connection tab > Link IP address. Check link port
number.
Messenger Authentication Fail
In Professional mode, this error may occur in one of the following cases:
- When the connection information used to connect to the messenger
server is incorrect
- When the login information (ID and password) for the messenger server
is incorrect
Select Configuration > Connection tab. In the Messenger section, check
the ID, password, server IP address, server port number, and local
port number.
VCS Authentication Fail
In Professional mode, this error may occur in one of the following cases:
- When the connection information used to connect to the VCS server is
incorrect
Select Configuration > Connection tab. In the VCS section, check the
server IP address.
- When you cannot register a service to the VCS server
To use the VCS function, the system must have been configured
properly. Consult your system administrator about whether the settings
for using the VCS function are configured properly.
© Samsung Telecommunications America
215
When Operating the OfficeServ Communicator
Symptom or Error Message
The Buddy List menu is disabled in the main
bar
Reasons and Actions
- In Professional mode, if you failed to log in to the
messenger server, check the connection information
used to connect to the messenger server.
- In Professional mode, if the Buddy List function is
being used, check the operation status of the
messenger server.
The VCS menu is disabled in the main bar
- In Professional mode, if you failed to log in to the VCS
server,
check the connection information used to connect to the
VCS server.
DND Fail
- When the corresponding service is disabled in the
system
(Program 701 > USE FEATURE > 12: DND: YES)
Forward fail
- When the corresponding service is disabled in the
system
(Program 701 > USE FEATURE > 23: FORWARD:
YES)
Absence message setting fail
- When the corresponding service is disabled in the
system
(Program 701 > USE FEATURE > 50: PGM MSG: YES)
Announcement fail (Page fail)
- No member is assigned to the page area
At least one member must be assigned to a page area
of the system. (Program 604, 605)
- When the receiver is not picked up
You must pick up the receiver before making an
announcement.
When the voicemail box-related function
does not work
- When the SVMi card is not installed
The main bar is not displayed on Windows
desktop.
Select Main Bar from the system tray menu.
Cannot make a video call
When you can hear only sound without video
Install the SVMi card in the system and then perform the
function again.
- Select Configuration > Video tab. Check whether the
"Video Mode" checkbox is selected.
- Check whether a video camera is installed in your
computer. Moreover, select Configuration > Video tab.
Then check whether the camera information is set
correctly.
216
© Samsung Telecommunications America
ANNEX
Speaker and Microphone Setting (System Setting)
Users of OfficeServ SoftPhone can make or answer calls in a Windows environment by setting the speaker and
microphone status.
Speaker Setting
1.
Click [Start] [Settings(S)] [Control Panel(C)] [Sounds and Audio Devices] from the Windows
desktop.
2.
Select [Audio] from Sound and Multimedia Properties.
© Samsung Telecommunications America
217
218
3.
Click [Volume...] from Play Sound.
4.
Select [Options] [Registration Info(R)] from Volume Control.
© Samsung Telecommunications America
5.
Check if the ‘Master Volume’, ‘Wave’, and ‘Microphone’ items of Volume Control in the Registration Info
window are marked. If not, mark the items.
6.
Click
7.
Clear the Mute options checked for ‘Volume Control’ and ‘Wave’, and set the Volumes.
.
© Samsung Telecommunications America
219
Speaker Volume Control
Volume Control allows you to set the speaker volume of OfficeServ SoftPhone in the ‘Master Volume ’ and
‘Wave’ items. Set the volumes of the items to the maximum.
8.
Mark the ‘Mute’ of ‘Microphone’.
9.
Select [Exit(X)] from [Options(P)].
Microphone Mute Setting
If the ‘Mute’ of ‘Microphone’ is not marked, your voice can be heard through a speaker when you speak.
220
© Samsung Telecommunications America
Microphone Setting
1.
Click [Start] [Settings(S)] [Control Panel(C)] [Sounds and Audio Devices] in the Windows2000
desktop.
2.
Select [Audio] from Sound and Multimedia Properties.
© Samsung Telecommunications America
221
3.
4.
222
Click [Volume…] from Sound recording.
Select [Options(P)] [Registration Info(R)] from Record Control.
© Samsung Telecommunications America
5.
Check if ‘Microphone’ among the Volume Control items is marked. If not, mark the item.
6.
Click
7.
Mark ‘Microphone’ in Record Control.
8.
Select [Exit(X)] from [Options].
.
© Samsung Telecommunications America
223
Uninstall
1. Beginning Uninstallation
To uninstall the OSC, you can select one of the following two methods.
-
Click Start -> All Programs -> Samsung Electronics -> OfficeServ Communicator -> Uninstall Samsung
OfficeServ Communicator.
-
Or, click Start -> Control Panel -> Add/Remove Programs -> Samsung OfficeServ Communicator, and then click
the "Remove" button.
2. Uninstallation Error
-
If you attempt to uninstall the OSC while it is running, a warning message box is displayed, as shown in the
figure below. Exit the OSC and then begin to uninstall it.
3. Uninstallation Confirmation
-
224
The "uninstallation confirmation" window is displayed to confirm with you again that you want to uninstall the
OSC. Click "Yes" to begin the uninstallation, or click No to cancel the uninstallation.
© Samsung Telecommunications America
-
The Setup program will remove the installed OSC, as shown in the figure below.
4. Rebooting after Uninstallation
-
The window notifying that the OSC has been uninstalled successfully is displayed and asks you if you want to
restart your PC now.
If you want to reinstall the OSC, select "Yes, restart my computer now" and click "OK."
If you reinstall the OSC after selecting "No," the OSC may not be installed normally because the previously
installed program has not been fully removed.
© Samsung Telecommunications America
225
Common Functions and Terminology (as it applies to the OSC.)
Speed Dial
AOM
Users can save frequently dialed numbers as speed dial numbers
and make a call just by pressing the corresponding speed dial button.
Call Pickup
Call Pickup allows you to pick up a call ringing at another user’s phone.
Automatic Redial
Automatic Redial is used when calling an outside number and you
receive a busy signal. When a busy is received and Automatic Redial
is pressed the system will reserve a trunk and keep calling the number
for you.
Call Hold & Call Transfer
The Call Hold or Call Transfer functions allow the user to hold a call for
a short time or to transfer the call to another person based on the needs
of the caller.
226
© Samsung Telecommunications America
Conference
Call Conferencing allows up to 5 people to speak to one another at the
same time over a phone connection.
Call Forwarding
Call Forwarding allows you to automatically pass control of incoming
calls to another station or device such as VoiceMail when you cannot
answer the calls.
Callback
Callback is used by station to station calls when the called station is
busy (off hook).
When a busy is received and Callback is pressed the
system will monitor the busy station and notify the calling user when the
busy station becomes available.
DND
Do-Not-Disturb automatically rejects all incoming calls and when set
can forward them to another station or device such as VoiceMail.
Page
Page
Page allows the user to deliver an announcement to both OfficeServ
SoftPhone(or keyphone) users and external users at the same time.
Boss/Secretary
This function allows a secretary to transfer an external call to the boss
conveniently.
Caller Identification Display (CID)
When a call is received, the phone number and name of its caller are displayed
on both the main screen and telephone display so that you can know who is
calling. NOTE: not all calls are delivered with CID
© Samsung Telecommunications America
227
Video Call
Provides the Inter-Station Video Call function when the call mode of the OSC is
set to the Video mode.
Viewing Recordings
Allows you to view the list of Call & Video Call Recordings and play them.
* This function is not supported when the user environment of the
OfficeServ Communicator is set to the DeskPhone mode.
228
© Samsung Telecommunications America
Intercom Calls
Making an intercom call means that the OfficeServ SoftPhone user who is connected to the phone system at
the user’s office makes a call to another internal OfficeServ SoftPhone(or keyphone) user.
External Calls
Making an external call means that the user makes a call to outside places (e.g., home) or answers a call from
outside places by using the OfficeServ SoftPhone(or keyphone) directly connected to the PBX of the central
office.
© Samsung Telecommunications America
229
Q&A
Q1. During installation, the message "Unsupported OS Version" is displayed.
A1. The OSC runs on Windows XP SP2 or later. Therefore, if your operating system is Windows XP SP1 or earlier,
the OSC cannot be installed.
In this case, upgrade it to Windows XP SP2 or later and then reinstall the OSC.
Q2. During installation, I entered the address of the auto update server incorrectly.
A2.
In this case, the OSC cannot be updated. Therefore, you must reinstall it.
Q3. During installation, I configured system information or the OSC operation type incorrectly.
A3.
The provided functions are different depending on the system type or OSC operation type. To ensure that the
OSC operates normally, check the correct system type and OSC operation type and then reinstall the OSC.
Q4. During installation, I selected the phone type incorrectly.
A4.
You can change the phone type before logging in to the system using the OSC. Follow these steps to change
the phone type.
1) Run the OSC.
2) Click [Configuration] from the system tray menu or in the main bar to display the Configuration screen.
3) Select the phone type you want to use in the "Environment Mode" section at the top right of the
Configuration screen.
4) The "Connection" tab where you can set the connection information is displayed.
5) Set the phone information, system information, OfficeServ Link information, etc. according to the phone
type you selected.
Q5. When logging in to the system in Deskphone mode, the message "Cannot connect to a line" is
displayed on the main screen.
A5.
Check the following items.
1) Click Start > Control Panel > Administrative Tools > Services. In the Services window, check whether the
Remote Access Connection Manager service is set to "Disabled".
2) If the Remote Access Connection Manager service is set to "Started", you must change the start type of
the service to "Disabled" and then restart your computer to actually apply the changes.
230
© Samsung Telecommunications America
3) Check whether the Link IP and Link Pork are set correctly in the "Connection" tab of the Configuration
screen.
Q6. When logging in to the system in Deskphone mode, the message "Cannot connect to the selected
line" is displayed on the main screen.
A6.
If you are not connected to a specific line in Deskphone mode, request the OfficeServ Link administrator to:
1) Check the number of the line that will be connected in the [Line Status] screen of the OfficeServ Link.
2) Check whether the [OAI] item is displayed as "0".
Check whether "OAI terminal" for the line is selected in the SCM v2 system.
If "OAI Terminal" is not selected, select it and restart the OfficeServ Link.
When the [OAI] item is displayed as "1", the OfficeServ Link can be connected.
3) Check whether the Port Status item is displayed as "0".
Check the status of the phone that has the number.
When the Port Status item is displayed as 1, the OfficeServ Link can be connected.
Q7. When logging in to the system in SoftPhone mode, a connection error message is displayed on the
main screen.
A7.
When the SoftPhone connection information is set incorrectly or the system does not operate, you cannot log
in to the system. Check the following items.
1) Check whether the system IP address and system port are set correctly in the "Connection" tab of the
[Configuration] screen.
2) Check the network connection status.
3) Consult your system administrator about the error message displayed on the main screen.
Q8. When logging in to the system in UC Phone mode, the message "Connecting UC Phone" is displayed
on the main screen.
A8.
If the message continues to be displayed for more than 30 seconds, select the Logout or exit menu to cancel
the login and then check the following items.
1) Check the UC phone operation status. If the UC phone is set to busy, you cannot log in to the system and
the related warning window is displayed.
2) When logging to the system while the UC phone is in Idle mode, if the same symptom occurs, reset the
power or network connection of the UC phone and then retry to log in to the system.
© Samsung Telecommunications America
231
Q9. When logging in to the messenger server, an error message is displayed.
A9.
When the messenger connection information is set incorrectly or the messenger server does not operate, you
cannot log in to the server. Check the following items.
-
If the message "Check the messenger local port" is displayed
1. Run the OSC.
2. Click [Configuration] from the system tray menu or in the main bar to display the Configuration screen.
3. Click the "Connection" tab in the Configuration screen.
4. Change the value of the "Local Port" item in the "Messenger" section to a 4-digit value of 5000 to
6000 except 5060.
5. Log in to the messenger server again.
-
If the message "Failed in authentication" is displayed
1. Run the OSC.
2. Click [Configuration] from the system tray menu or in the main bar to display the Configuration screen.
3. Click the "Connection" tab in the Configuration screen.
4. Set the ID and password again in the Messenger section. If you need to check the ID and password,
contact your administrator.
5. Log in to the messenger server again.
-
If the message "Failed to connect to the messenger server" is displayed
1. Contact your administrator to check the operation status of the messenger server.
2. Check the network connection status.
Q10. When logging in to the VCS server, the message "VCS usage error" is displayed.
A10. When the VCS connection information is set incorrectly or the VCS server does not operate, you cannot log in
to the server. Check the following items.
232
-
Checking the connection information
1. Run the OSC.
2. Click [Configuration] from the system tray menu or in the main bar to display the Configuration screen.
3. Click the "Connection" tab in the Configuration screen.
4. Check whether the server IP address is entered in the VCS section.
5. Log in to the VCS server again.
-
Checking the VCS server operation status
1. Contact your administrator to check the operation status of the VCS server.
2. Check the network connection status.
© Samsung Telecommunications America
Q11. While operating the OSC, the Memory Buffer Overrun warning window is displayed.
A11. During installation, run the Anti-Virus program to scan virus. If there is a virus program in your computer, it can
cause a memory fault while the OSC is running.
Q12. In a video call, no scene is displayed in the My Screen area.
A12. Scenes may not be displayed depending on the call mode and camera settings. Check the following items.
-
Checking the phone mode
1. Run the OSC.
2. Click [Configuration] from the system tray menu or in the main bar to display the Configuration screen.
3. If "Deskphone" is selected in the "Environment Mode" at the top right of the Configuration screen, no
scene is displayed during a call.
-
Checking the call mode
1. Run OSC.
2. Log in to the system.
3. Click [Configuration] from the system tray menu or in the main bar to display the Configuration screen.
4. Click the Video tab in the Configuration screen.
5. Check whether Video mode is selected in the Call Mode Setting section. If Voice mode is selected,
select Video mode and click the OK or Apply button at the bottom right of the screen.
6. Connect a call again and check the My Screen area.
-
Checking the camera settings
1. Run OSC.
2. Log in to the system.
3. Click [Configuration] from the system tray menu or in the main bar to display the Configuration screen.
4. Click the Video tab in the Configuration screen.
5. Check whether a camera is selected in the Capture Camera combo box. If there is no camera
selected, select a camera to use from the combo box and click the OK or Apply button at the bottom
right of the screen.
6. If there is no camera listed in the combo box, check the installation status of your camera. After
setting the camera, connect a call again and check the My Screen area.
Q13. Voice cannot be heard during a video call. (Sound card setting error)
A13. Voice may not be heard depending on the phone mode and sound settings. Check the following items.
-
Checking the phone mode
1. Run the OSC.
2. Click [Configuration] from the system tray menu or in the main bar to display the Configuration screen.
© Samsung Telecommunications America
233
3. If "Deskphone" is selected in the "Environment Mode" at the top right of the Configuration screen, you
can make or receive a call only by using your phone.
-
234
Checking the speaker settings
1. Run the OSC.
2. Log in to the system.
3. Click [Configuration] from the system tray menu or in the main bar to display the Configuration screen.
4. Click the Audio tab in the Configuration screen.
5. Check whether a speaker device is selected in the Speaker combo box. If there is no speaker device
selected, select a speaker device to use from the combo box.
6. If there is no speaker device listed in the combo box, check the installation status of your sound card.
7. After setting the speaker, click the Apply button at the bottom right of the Configuration screen.
8. Check the sound playback status by clicking the Test buttons in the Volume Settings section to the
right of the tab.
© Samsung Telecommunications America
ABBREVIATIONS
(used throughout this and other Samsung Business Telephone manuals)
A
AA
Auto Attendant
AAA
Authentication Authorization and Accounting
AGI
Application Graphical Interface
AMIS
Audio Messaging Interchange Specification
ANI
Automatic Number Indentification
ANN
Announcement Block
AOM
Add on Modual
AS
[A]ll Forward [S]tation (technically: [A]nything other than Busy or No-answer [S]tation)
AT
[A]ll Forward [T]runk (technically: [A]nything other than Busy or No-answer [T]runk)
AXL
Audiotext Librarian Block
BCS
Business Communications Systems
B
BS
[B]usy [S]tation
BT
[B]usy [T]runk
BYE
Bye Block
C
CID
Caller ID
COP
Caller Options Processor
CPE
Customer Provided Equipment
CRS
Call Routing Solution
DAL
Dial Block
DB
Database
db
decibles
DND
Do Not Disturb
DOW
Day of Week
DS
[D]irect [S]tation
DT
[D]irect [T]runk
DTL
Document Librarian Block
D
© Samsung Telecommunications America
235
E
ECL
EClass Block
EM
E-mail Message
EMG
E-mail Gateway
EXT
Extenstion Block
FAX
FAX Block
F
FID
Forward ID
FWDID
Forward ID
GB
Giga Bytes
GUI
Graphical User Interface
G
I
ICA
Interactive Call Automation
IMAP4
Internet Massaging Access Protocol 4
IP
Internet Protocol
LAN
Local Area Network
LST
List Block
MB
MegaBytes
MBX
Mailbox Block
MCL
MClass Block
MGI
Media Gateway Interface
L
M
MNU
Menu Block
MOD
Mode Block
MSG
Messege
MTA
Mail Transfer Agent
MUA
Mail User Agent
NMX
Network Mailbox (AMIS) Block
N
236
NS
[N]o-Answer [S]tation
NT
[N]o-Answer [T]runk
© Samsung Telecommunications America
O
OCS
Microsoft’s Office Communication Server
OSC
Samsung’s OfficeServTM Communicator
P
POP3
Post Office Protocol 3
PRT
Port Block
PSN
Packet Switch Network
PSTN
Public Subscriber Telephone Network
QRY
Query BLock
RC
[R]ecord [C]all or [R]ecord [C]onversation
RTP
Real-time Transmission Protocol
SIP
Session Initiation Protocol
SMTP
Simple Mail transfer Protocol
SPK
Speak Block
STA
Samsung Telecommunications America
Q
R
S
STA
Station Block
SVM
Samsung Voice Mail
SVMi
Samsung Voice Mail in-skin
SWP
System Wide Parameters
TCP/IP
Transmission Control Protocol/Internet Protocol
T
TS
[T]ransfer [S]tation
TT
[T]ransfer [T]runk
TTS
Text To Speech
TUI
Telephone User Interface
UMS
Unified Messaging Service
U
© Samsung Telecommunications America
237
V
VM
Voice Message
VMS
Voice Messaging Service
VoIP
Voice Over Internet Protocol
WAN
Wide Area Network
W
WEBDAV WEB based Distributed Authoring and Versioning
WWW
238
World Wide Web
© Samsung Telecommunications America
This page is intentionally left blank.
© Samsung Telecommunications America
239
© Samsung Telecommunications America
240

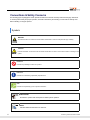
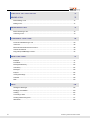
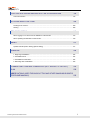

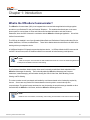

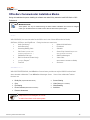

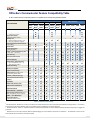

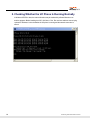
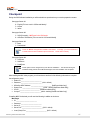

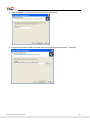

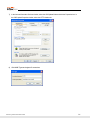


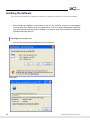


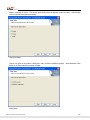
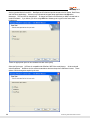
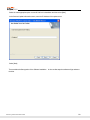


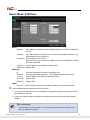

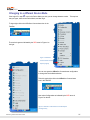


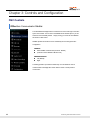


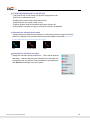

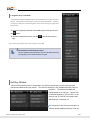
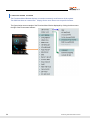

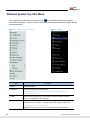
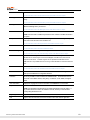
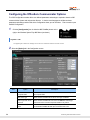


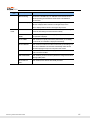


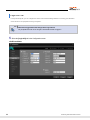
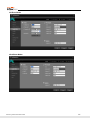
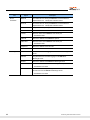


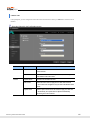

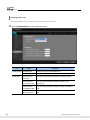
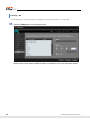


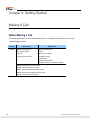

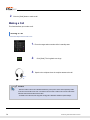


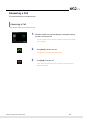
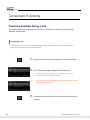
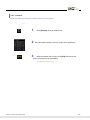


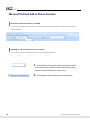


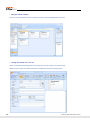


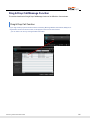
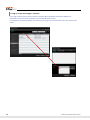

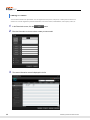

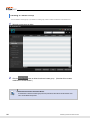
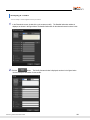
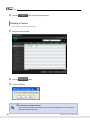


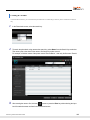
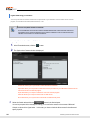
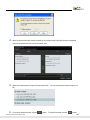
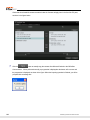


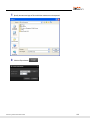
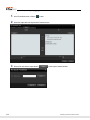

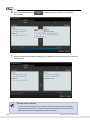
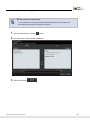
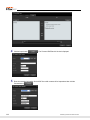


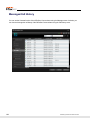

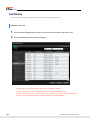


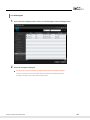

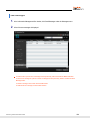
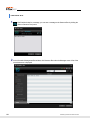
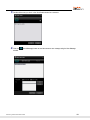

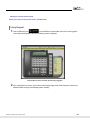


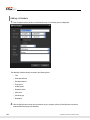
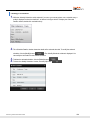
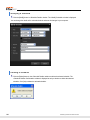
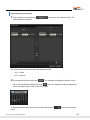


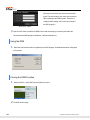


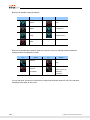
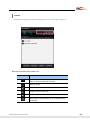
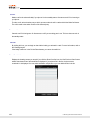
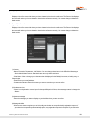


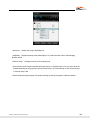

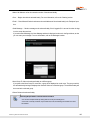

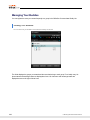
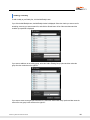


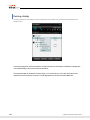
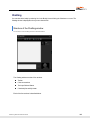

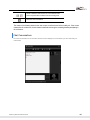


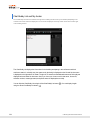
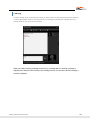
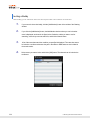
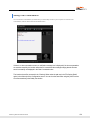
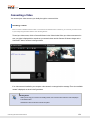


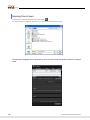
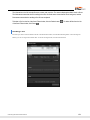

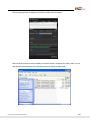

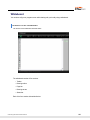
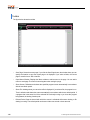

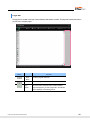


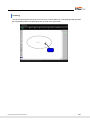
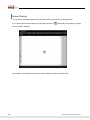


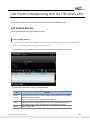

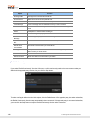

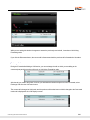
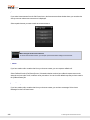

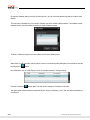
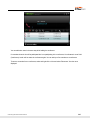

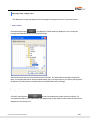

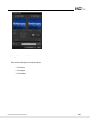
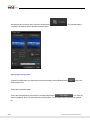
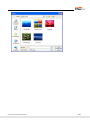
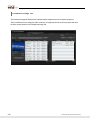
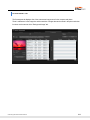


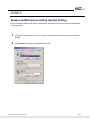


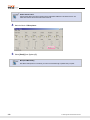
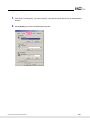
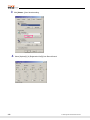
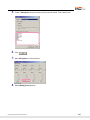
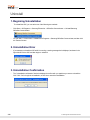


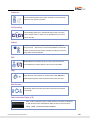
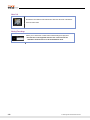
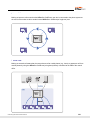


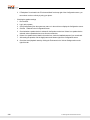


![SamsungProdBulletin_211_4_4x_Software_Release[1]](http://vs1.manualzilla.com/store/data/005825179_1-598976db56b1ef1012f4b9b7fb2b917f-150x150.png)