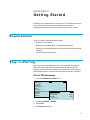
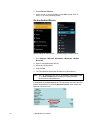
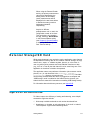
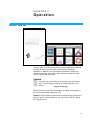
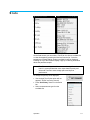
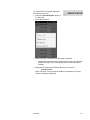
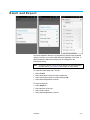
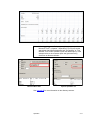
1
LOGDAT MOBILE USER’S MANUAL P/N 6006833, REVISION A MAY 2013 ___________________ Portions of this page are reproduced from work created and shared by Google and used according to terms described in the Creative Commons 3.0 Attribution License. LOGDAT MOBILE USER’S MANUAL P/N 6006833, REVISION A MAY 2013 SHIP TO/MAIL TO: TSI Incorporated 500 Cardigan Road Shoreview, MN 55126-3996 USA U.S. Technical Support: (800) 874-2811/(651) 490-2811 Fax: (651) 490-3824 \ E-mail address: [email protected] Website: http://www.tsi.com INTERNATIONAL Technical Support: (001 651) 490-2811 Fax: (001 651) 490-3824 Manual History The following is a manual history of the LogDat Mobile User’s Manual (P/N 6006833). ii Revision Date A May 2013 LogDat Mobile User’s Manual Warranty Part Number Copyright Address Fax No. E-mail Address Limitation of Warranty and Liability (effective June 2011) 6006833 / Revision A / May 2013 ©TSI Incorporated / 2013 / All rights reserved. TSI Incorporated / 500 Cardigan Road / Shoreview, MN 55126 / USA 651-490-3824 [email protected] (For country-specific terms and conditions outside of the USA, please visit www.tsi.com.) Seller warrants the goods sold hereunder, under normal use and service as described in the operator's manual, shall be free from defects in workmanship and material for twenty-four (24) months, or if less, the length of time specified in the operator's manual, from the date of shipment to the customer. This warranty period is inclusive of any statutory warranty. This limited warranty is subject to the following exclusions and exceptions: a. Hot-wire or hot-film sensors used with research anemometers, and certain other components when indicated in specifications, are warranted for 90 days from the date of shipment; b. Pumps are warranted for one year or 3000 hours; whichever comes first; c. Parts repaired or replaced as a result of repair services are warranted to be free from defects in workmanship and material, under normal use, for 90 days from the date of shipment; d. Seller does not provide any warranty on finished goods manufactured by others or on any fuses, batteries or other consumable materials. Only the original manufacturer's warranty applies; e. Unless specifically authorized in a separate writing by Seller, Seller makes no warranty with respect to, and shall have no liability in connection with, goods which are incorporated into other products or equipment, or which are modified by any person other than Seller. The foregoing is IN LIEU OF all other warranties and is subject to the LIMITATIONS stated herein. NO OTHER EXPRESS OR IMPLIED WARRANTY OF FITNESS FOR PARTICULAR PURPOSE OR MERCHANTABILITY IS MADE. WITH RESPECT TO SELLER’S BREACH OF THE IMPLIED WARRANTY AGAINST INFRINGEMENT, SAID WARRANTY IS LIMITED TO CLAIMS OF DIRECT INFRINGEMENT AND EXCLUDES CLAIMS OF CONTRIBUTORY OR INDUCED INFRINGEMENTS. BUYER’S EXCLUSIVE REMEDY SHALL BE THE RETURN OF THE PURCHASE PRICE DISCOUNTED FOR REASONABLE WEAR AND TEAR OR AT SELLER’S OPTION REPLACEMENT OF THE GOODS WITH NON-INFRINGING GOODS. TO THE EXTENT PERMITTED BY LAW, THE EXCLUSIVE REMEDY OF THE USER OR BUYER, AND THE LIMIT OF SELLER'S LIABILITY FOR ANY AND ALL LOSSES, INJURIES, OR DAMAGES CONCERNING THE GOODS (INCLUDING CLAIMS BASED ON CONTRACT, NEGLIGENCE, TORT, STRICT LIABILITY OR OTHERWISE) SHALL BE THE RETURN OF GOODS TO SELLER AND THE REFUND OF THE PURCHASE PRICE, OR, AT THE OPTION OF SELLER, THE REPAIR OR REPLACEMENT OF THE GOODS. IN THE CASE OF SOFTWARE, SELLER WILL REPAIR OR REPLACE DEFECTIVE SOFTWARE OR IF UNABLE TO DO SO, WILL REFUND THE PURCHASE PRICE OF THE SOFTWARE. IN NO EVENT SHALL SELLER BE LIABLE FOR LOST PROFITS OR ANY SPECIAL, CONSEQUENTIAL OR INCIDENTAL DAMAGES. SELLER SHALL NOT BE RESPONSIBLE FOR INSTALLATION, DISMANTLING OR REINSTALLATION iii COSTS OR CHARGES. No Action, regardless of form, may be brought against Seller more than 12 months after a cause of action has accrued. The goods returned under warranty to Seller's factory shall be at Buyer's risk of loss, and will be returned, if at all, at Seller's risk of loss. Buyer and all users are deemed to have accepted this LIMITATION OF WARRANTY AND LIABILITY, which contains the complete and exclusive limited warranty of Seller. This LIMITATION OF WARRANTY AND LIABILITY may not be amended, modified or its terms waived, except by writing signed by an Officer of Seller. Trademarks LogDat is a trademark of TSI Incorporated. TSI and the TSI logo are registered trademarks of TSI Incorporated. Microsoft, Excel, Windows, and Vista are registered trademarks of Microsoft Corporation. Apache and OpenOffice are trademarks of The Apache Software Foundation. iv LogDat Mobile User’s Manual Contents Manual History ............................................................................................ ii Warranty ..................................................................................................... iii CHAPTER 1 Introduction ........................................................................1-1 CHAPTER 2 Getting Started ...................................................................2-1 Requirements ......................................................................................2-1 Step 1—Pairing ...................................................................................2-1 On the TSI Instrument .....................................................................2-1 On the Android Device.....................................................................2-2 Step 2—Prepare the TSI Instrument...................................................2-3 Step 3—Connecting to a Compatible TSI Instrument .........................2-4 On the TSI Instrument .....................................................................2-4 On the Android Device.....................................................................2-4 External Storage/SD Card...................................................................2-5 Optional Accessories ..........................................................................2-5 CHAPTER 3 Operation ............................................................................3-1 Main Menu...........................................................................................3-1 Camera ............................................................................................3-1 Voice Notes .....................................................................................3-2 Saving ..............................................................................................3-2 Remote Reader ...................................................................................3-3 Test IDs ............................................................................................3-3 Manual or Automatic Read Mode ....................................................3-4 Taking Measurements .....................................................................3-4 Scan for Devices .................................................................................3-6 Stats ....................................................................................................3-7 Email and Export ...............................................................................3-11 Duct Traverse ....................................................................................3-12 Setup..............................................................................................3-13 Measuring ......................................................................................3-14 Finalizing ........................................................................................3-16 Preferences .......................................................................................3-18 Graph ................................................................................................3-19 CHAPTER 4 Troubleshooting .................................................................4-1 CHAPTER 5 References and Links ........................................................5-1 APPENDIX A List of all Preferences and their Default Value ............. A-1 APPENDIX B Directory Structure .......................................................... B-1 i (This page intentionally left blank) ii LogDat Mobile User’s Manual CHAPTER 1 Introduction LogDat Mobile provides a wireless interface to TSI instruments via Bluetooth. The application can display readings remotely as well as organize, save, and export reports to make testing, adjusting, and balancing processes easier and more efficient. The app is designed to be used in conjunction with the following TSI models: • EBT730 • 8380 • EBT731 • 8715 • PH730 • PH731 The examples and instructions in this manual were taken while running Android 4.0.3. The application is compatible with versions 2.3.3 and higher, but layouts, icons, and terminology may differ slightly between versions and devices. Example: Android versions prior to 3.0 do not have an “action bar.” On these devices, items in the action bar can be accessed by pressing the device’s “menu” button. 1-1 (This page intentionally left blank) 1-2 LogDat Mobile User’s Manual CHAPTER 2 G e t t i n g S ta r t e d Preparing your Android device to work with a TSI instrument should be a quick and painless process. Outlined below is a checklist of requirements and a step-by-step procedure to get your device ready. Requirements Verify your device meets these requirements: Android 2.3.3 and higher Bluetooth (must support SPP—most Android devices do) External or media storage such as a SD card (required for saving and exporting) Camera (required for pictures) Step 1—Pairing Before you can use the application with a TSI instrument, the Android device will need to pair to the instrument to store the Bluetooth MAC address. This process is only necessary the first time the Android device communicates with the TSI instrument (when the devices are “unpaired”). On the TSI Instrument 1. Go to the Bluetooth Functions menu. MENU Pressure Tool Display Setup Flow Setup Actual/Std Setup Settings Data Logging Bluetooth Functions Applications Cf Selection Calibration BLUETOOTH FUNCT. Discover Devices Discoverability PINcode # AutoConnects Enable 0000 1 2. Set Discoverability to Enable. 3. Set the PIN. 4. Set Autoconn tries to 0. 2-1 5. Select Discover Devices. 6. When the list of devices displays, press ESC several times to return to the main measuring screen. On the Android Device System settings in Android 2.3.4. System settings in Android 4.0.3 1. Go to Settings Wireless & Networks Bluetooth Enable Bluetooth. 2. Scan for nearby Bluetooth devices. 3. Select the TSI instrument. 4. Enter the PIN. 5. The TSI instrument should then be listed as a “paired device.” Note: The TSI instrument may not be immediately discoverable. Allow up to three minutes before scanning for nearby Bluetooth devices from the Android device. If the Android device does not find the TSI Instrument, have the instrument find the Android device by selecting Discover Devices in the instruments Bluetooth Functions menu. 2-2 LogDat Mobile User’s Manual Once the devices are paired, you may want to disable discoverability on the TSI instrument. If so, on the TSI instrument: 1. Go to the Bluetooth Functions menu. 2. Set Discoverability to Disable. Step 2—Prepare the TSI Instrument On the TSI instrument (the menu screens may differ in appearance): In the Data Logging menu: o Set Log/Display Mode to Manual/RunAvg. DATA LOGGING Measurements Log Mode/Display Mode Log Settings Choose Test Name Test View Data Delete Data % Memory In the Settings menu: o Set Auto Off to Disable. o LogDat Mobile sample time stamps are based on the date and time set on the TSI instrument. The app will format timestamps using the instrument’s Time and Date format. Manual/RunAvg Test 001 SETTINGS ---- ---Time Format 12 hr Date Format MM/DD/YY Number Format XX,XXX.YY Backlight Auto Auto Off Disable RS232 Baud Rate 9600 ---- ---- Note: The Number Format on the TSI instrument must be set to: XX,XXX.YY (the decimal separator (Number Format) displayed on the Android device will correspond to the language setting of the Android device). To change language, go to Settings Language and Input Language on the Android device. Getting Started 2-3 Step 3—Connecting to a Compatible TSI Instrument Once the devices are paired and are properly configured (see Step 1— Pairing and Step 2—Prepare the TSI Instrument), LogDat Mobile can connect. On the TSI Instrument 1. Exit out of all menus (press ESC until at measuring screen). 2. Make sure the instrument is in the main measurement screen. On the Android Device 1. Start LogDat Mobile. 2. If this is the first time LogDat Mobile has been launched, you will need to agree to the TSI Software License Agreement. 3. At the main menu, press the Scan Devices. 4. Select the instrument you want to connect to. 5. After a moment, a message should appear on the Android device indicating either success or failure. If the connection is successfully established, the Bluetooth logo will appear on the TSI instrument’s display and the application’s message will indicate success. 6. Once connected, the application will communicate with the instrument to detect what pressure tools are being used, what probes are attached, and what the unit settings on the instrument are. A semitransparent popup displays once the measurement types are detected. Select the primary measurement and optional secondary measurements. 2-4 LogDat Mobile User’s Manual When using the Remote Reader activity, the primary measurement value will be displayed by the analog meter; the secondary (extra) measurements will be displayed in the text boxes below or beside the meter (portrait or landscape orientation, respectively). Anytime a different probe/pressure tool is used, the configuration needs to be reset. This can be done by restarting the app, selecting “Reset Model” in the Remote Reader activity (see Chapter 3, Remote Reader), or selecting “Set Primary” in the Duct Traverse activity. E x t e r na l S t ora g e / S D Ca r d While external storage is not required to run the application, many features are dependent on storing data to files. Without external storage, the app cannot save, export, or validate any data, pictures, or voice notes. A user can perform duct traverses and view statistical functions on data (e.g., AVG of a Test ID) but that data will not be saved long term if the application is closed nor is it able to be exported. The application stores non-preference information (duct traverse results, pictures, etc.) in sub directories in the <external storage location>/TSI directory (on most devices: /sdcard/TSI). This folder can be easily accessed when the device is plugged into a computer and “USB Storage” mode is enabled on the Android device (consult your Android device’s manual for instructions on enabling USB Storage mode). For information about the directory structure, see Appendix B. Opt i o n a l A c ce s s or i es To further improve the efficiency of testing and balancing, some helpful accessories might also include: Wrist strap or athletic armband so work can be done hands-free. Headphones or headset to take advantage of the built in Android Text-to-Speech engine without disturbing others. Getting Started 2-5 (This page intentionally left blank) 2-6 LogDat Mobile User’s Manual CHAPTER 3 Operation M a i n M e nu The main menu is the first screen you see once the application is finished loading and ready to be used. Each icon launches its respective application. In addition to the eight activities (described in detail in the succeeding sections), there are two other features accessible from this screen—camera and voice notes. Camera Press the icon on the action bar to launch the device’s Camera app. The picture will be saved in the /TSI/Img directory in the form of: img-id-<T>-<N>.jpg Where <T> is the current Test ID and <N> is an integer corresponding to the next unused number starting from zero. Example: The first picture of test ID 0 will be called id-0-0.jpg; the second picture of test ID 2 will be called id-2-1.jpg. The fourth of test ID 1 will be id-1-3.jpg and so on. 3-1 In Android’s Gallery application, an album called “Img” will contain all the pictures taken with LogDat Mobile with the most recently taken picture displayed first. See Appendix B for information about the directory structure. Voice Notes Press the microphone icon to record a voice note. Press the “Begin recording” button to start recording. Press “Stop recording” to save the recorded note in the /TSI/Audio directory in the form of: voice-id-<T>-<N>.amr Where <T> is the current test ID and <N> is an integer corresponding to the next unused number starting from zero. See Appendix B for information about the directory structure. Saving To make sure your sample data is saved, always use the “Back” button on the Android device to exit the main screen when exiting the application. This will ensure that any updated Test IDs will be saved to external storage. Note: 3-2 Pressing the “Home” button on the Android device will skip the saving routine. LogDat Mobile User’s Manual Remote Reader The Remote Reader screen shows real-time readings of the TSI instrument in five customizable displays. The main display area shows the primary measurement along with an analog meter and up to four other measurements. Test IDs Samples are stored in the Android device’s external memory in groups called “Test IDs.” All samples in a test ID must be taken from the same instrument, probe, language setting, pressure tool, and unit configurations. If changes are made to the instrument’s configuration, it will be necessary to either change Test IDs or delete the existing Test ID before more samples can be saved. The current test ID can be changed in the Preferences activity or in Remote Reader activity. To change the current Test ID in the Remote Reader activity: Press “Next Test ID” on the action bar. Use the plus and minus buttons to select the desired Test ID. Press Save to change Test ID. Operation 3-3 Manual or Automatic Read Mode The Remote reader can be configured to display readings automatically (continuous update of measurements) or manually (discrete or single measurement with Read button press). To change the “Read Mode,” go to the “Preferences” menu. Taking Measurements To take a measurement using the Action Bar/Menu (Method 1): Connect to a TSI instrument (see Chapter 2, Step 3— Connecting to a Compatible TSI Instrument for more information). Press the “Read” button on the Action Bar. The icon will change to a pause button. To take a measurement by shaking (Method 2): 3-4 Connect to a TSI instrument (see Chapter 2, Step 3—Connecting to a Compatible TSI Instrument for more information). Enable “Shake” gestures (see Preferences for more information). On the remote reader screen, briefly shake the smart device. If successful, a progress bar in the upper right corner will appear indicating that the application is communicating with the device. LogDat Mobile User’s Manual To take a measurement by swiping (Method 3): Connect to a TSI instrument (see Chapter 2, Step 3—Connecting to a Compatible TSI Instrument for more information). Swipe your finger top-to-bottom in the display area covered by the analog meter (not on text). Swipe area If successful, a progress bar in the upper right corner will appear indicating that the application is communicating with the device. To stop reading a measurement: Request a read (any method described above) while the device is reading to stop reading. Or, back out of the Remote Reader screen. To save a measurement manually by swiping (Method 1): Take a reading. Press the “Save” button on the Action Bar. To save a measurement manually by swiping (Method 2): Take a reading. Swipe from left-to-right over the same display area mentioned in “To take a measurement by swiping” above. Swipe area To change what type of measurement is displayed: Touch a text box to make a dialog appear. Select the desired measurement types from the scrollable lists for each text box and primary measurement. To rename or view statistics on the current Test ID (Method 1): Press the “STATS” button on the Action Bar. To rename or view statistics on the current Test ID (Method 2): Touch the name of the “Test ID” or the word “Samples.” Operation 3-5 To change the range values on the analog meter: Press “Set Range” on the action bar. Enter min and max values. Press “Save” to change the meter’s range. To reset/refresh the configuration: Connect to a TSI instrument (see Chapter 2, Step 3—Connecting to a Compatible TSI Instrument for more information). Any time a change is made on the model, press the “Reset Model” button on the action bar to synch the application with the current mode of the instrument. (The Reset Model button may be in an overflow menu.) To turn Text-to-Speech (TTS) on or off: Press “Toggle TTS” on the action bar. If TTS is on, it will disable it; if TTS is off, it will enable it. S c a n f or D ev i c es To connect to a Bluetooth enabled TSI instrument: At the main screen, press “Scan devices.” Select the desired device from the scrollable list of paired devices. After a moment, a message will be displayed indicating success or failure to connect. 3-6 LogDat Mobile User’s Manual Stats On the Stats screen you can select a Test ID to view from a scrollable list or view all samples by pressing the first item from the list. Once the samples are finished loading, another scrollable list will be displayed. Pressing on any of the items will display a pop up containing information about that particular sample. Note: Test IDs containing a lot of elements can take significant time to load. It is recommended that users export data frequently and delete old Test IDs to save storage space and improve performance. To change the primary value displayed: View a single Test ID (the option will not appear if “All IDs” are being viewed). Press “Set Primary” button on the action bar. Select a measurement type from the scrollable list. Operation 3-7 To view statistical information about a Test ID, rename it, or add a comment to it: View a single Test ID (the option will not appear if “All IDs” are being viewed). Press “Settings” button on the action bar. Use text boxes to change name or add additional comment. 3-8 LogDat Mobile User’s Manual To export Test ID to delimiter separated formats and/or raw text: Press the “Generate Report” button on the action bar. Select desired option. Select a primary measurement for the report if prompted. o All data will be generated in the report, but the primary will also have computed average, sum, standard deviation, min and max values included. Report will be saved to the /TSI/Stats directory in the form of: test-id-<T>.<E> where <T> is the Test ID number and <E> is the extension (txt for text and csv for delimiter separated). Operation 3-9 Generating a report will overwrite the previous report for the same ID. It is recommended that users export their reports as soon as they are generated to avoid accidental data loss. See Email and Export section for exporting information. For more information on directory structure, see Appendix B. 3-10 LogDat Mobile User’s Manual E ma i l a nd E x p o r t The Email application allows for quickly attaching sample data, generated reports, pictures or voice notes made within the application to an email. A default destination address and subject can be configured in the Preferences activity. Note: In order to export a Test ID, a report must first be generated using the Stats activity. See “Stats” in this chapter for more details. To export files associated with a Test ID: Select Test ID. Select the desired Test ID from the scrollable list. Check which types of files to include and press OK. Select desired application to launch. To export a single file: Select Single file. Select directory of file type. Select a file to export. Select desired application to launch. Operation 3-11 Note: Not all applications listed may be compatible—Gmail and Google Drive are recommended and supported by this app. Also note that, for email applications, attachment size limitations may be an issue if sending more than a few images. If the files cannot be sent, try sending all desired types except images and send images one at a time using the Single File export option. Note: The Duct Traverse activity is only available in English. D uct T r a v e r se The Duct Traverse application can assist a TAB technician in determining the average air velocity or volume using the log-Tchebycheff method. Both round and rectangular ducts are supported. There are three parts to using the Duct Traverse application: Setup, Measuring, and Finalizing. 3-12 LogDat Mobile User’s Manual Setup To begin a new duct traverse: Select duct shape. Select a size or choose custom and enter the dimensions manually. Press OK. To restore the most recent duct traverse, press the “Load Rect” or “Load Round” buttons on the action bar. Note: Duct traverse are only saved when the first data point was read (if the first point is not read or skipped, the duct traverse will not be saved). To add more duct sizes: Press the “Custom Duct Sizes” button on the action bar. Select Add. Select a shape. Select desired units. Enter in dimensions and press Add. Operation 3-13 To remove saved duct sizes: Press the Custom Duct Sizes button on the action bar. Select Remove. Scroll through the list and select the desired duct size to be removed. Press “Yes.” Measuring 3-14 LogDat Mobile User’s Manual Traverse points based on the duct shape and dimensions will be displayed in a scrollable list, rounded to the nearest 32nd inch when using inches or up to the third decimal in centimeters after the Setup step is complete. Press the Back button when finished viewing them. To see these again, press the “Dimensions” button on the action bar. The currently selected point is colored yellow; points that have readings saved are colored green; points that do not have any data saved are colored red. Use the Next and Previous buttons to navigate the points; press Read to request a reading from the TSI instrument. If you press Read on a point that has a measurement, that measurement will be overwritten with the new one. Note: Although the points can be recorded in any order, always record the first one selected so that, should you need to stop the traverse or bump the “Back” button, the duct traverse can be saved. (See the note in, “To restore the most recent duct traversal” in Duct Traverse/Setup). To change the primary measurement: Select “Set Primary” from the action bar. Wait for a select primary dialog and select the new primary measurement. To verify whether or not a reading is reasonable: Select “Target Value” from the action bar. Enter a desired “Target value” (V). Enter a positive “Threshold” (T). Select either required for export or not required for export to enable bounds checking. (See Duct Traverse/Finalizing for more details.) Operation 3-15 Once enabled, samples (S) that are within the threshold (V-T ≤ S ≤ V+T) will be black and readings that are outside will appear red. The Blue Line option provides a visual aid that highlights the current point. Toggle it on/off using the corresponding action bar button. Finalizing Once all of the points have readings, select “Finalize” on the action bar. If the average of the values is not within the “target value” (see “To verify whether or not a reading is reasonable” in the Duct Traverse/Measuring section) then an alert will pop up and show the average, desired value, and threshold. If the average is within the desired range, an export menu will be displayed. Input a title, filename, and optional comment; select desired export format; specify which values to include in the report along besides the actual data points themselves. Then press OK at the bottom. A report will be generated and saved to /TSI/DuctTraverse/ directory in the form of: <FILENAME>.csv The exported .csv file can easily be imported into a spreadsheet program like Microsoft® Excel® or Apache™ OpenOffice™. Delimiters supported are comma, semicolon, and tab. 3-16 LogDat Mobile User’s Manual Note: When importing a .csv file into a spreadsheet program (such as Microsoft® Excel® or Apache™ OpenOffice™) be sure to set the appropriate data delimiter/separator and “Text qualifier” or “Text delimiter” to be double quotations (often the default option). In the example below, a duct traverse report was generated using Semicolon as the data delimiter. Microsoft Excel 2007 Apache OpenOffice 3.3 See Appendix B for more information on the directory structure. Operation 3-17 Pr e f e r e nce s Use the Preferences application to modify and configure how the application should communicate with the TSI instrument, interpret, store, and export data, and miscellaneous customizations. The categories are General, Data, Email, Duct Traverse, and Graph. For more detailed information on customizable options, see Appendix A for an alphabetized list of all the options. Click on “More Settings” for options regarding validating Test IDs and duct traverse reports and deleting test id data. Validation compares the checksum value of the data file(s) to contents/sample data. If the sample data files have been modified outside of LogDat Mobile, the test ID or duct traverse in question will be marked as “invalid.” Deleting a test ID will remove its invalid status. Note: Deleting a test ID will delete all pictures and voice notes associated with that test ID. Files exported from Stats (.txt and .csv) will not be deleted. IMPORTANT It is important that users copy/export their test ID and duct traverse files off the smart device and archive them on backup storage. To use the export functions, see Duct Traverse/Finalizing, Stats, and Email and Export sections in this chapter. For copying the files by USB cable, see Appendix B for more information. 3-18 LogDat Mobile User’s Manual Note: Everything in preferences is saved to the device’s local memory (not on the SD card). Graph The graph application plots up to three Test IDs at the same time. Test IDs for each series to compare can be set by pressing the “Edit Graph” button on the action bar. The primary measurement can be set by pressing “Set Primary” on the action bar. Other graphing options can be found in the Preferences activity. If there is at least one sample in Series 1, all plotted series must match the configuration of the Test ID used in Series 1 (they must have the same model, serial, revision, calibration date, and same probes/tools and unit settings). If there are no samples in Series 1, then Series 2 will be used. If none in Series 2, only Series 3 will be plotted. If a series is not plotted, it either has no samples, is outside the boundaries (when not in dynamic mode), or the configuration is different (e.g., different tools or units or instruments were used). Operation 3-19 (This page intentionally left blank) 3-20 LogDat Mobile User’s Manual CHAPTER 4 Tr o u b l e s h o o t i n g Why Can’t I Connect to the TSI Instrument? It could be a variety of reasons, but to cover most of the bases follow these steps: 1. Start LogDat Mobile. 2. In Preferences, disable “auto connect.” 3. Exit out of the app by pressing the device’s Back button. 4. Turn the TSI instrument and the Android device off and then on again. 5. On the TSI instrument, under Bluetooth Functions. a. Set Discoverable to Enable. b. Set the PIN to 0000. c. Set Autoconn tries to 0. 6. On the TSI instrument, return to the main screen (not a menu screen). 7. On the Android device, go into Settings Wireless and disable Bluetooth and then enable it again. 8. If the TSI instrument is paired to the Android device, unpair it on the Android device (consult your Android device’s manual if needed). 9. Scan for nearby Bluetooth devices, select the TSI instrument, and enter the PIN. 10. Once paired, exit the Android settings and start LogDat Mobile. 11. Press Scan Devices and select the TSI instrument from the scrollable list. 4-1 4-2 Why is the Instrument Not Responding to Commands Even Though I am Connected to it? Most TSI instruments only listen for commands at the main measuring screen. Make sure that: 1. The TSI instrument is on the main screen (not a menu screen). 2. The Bluetooth logo is displayed on the instrument when the Android device says it is connected. 3. The instrument is one of the supported models. A list of supported models can be found in Chapter1, Introduction of this manual. 4. The Android device is within range (keep in mind dense walls and doors will affect the signal strength). 5. If it still fails, follow the steps in the “Why can’t I connect to the TSI instrument?” question above and repair completely. A Test ID (or Duct Traverse) is Invalid— What Do I Do? An invalid Test ID cannot be made valid unless its contents are deleted. It is advised to export reports as soon as all the data samples are recorded. Some possible causes of invalid Test IDs: 1. Data files were edited outside LogDat Mobile. 2. The “Data Checksum” preference is disabled. 3. The app was force-closed during a critical period in the saving/restoring process. 4. The Android device ran out of battery or was turned off without saving all of the data properly. What does “Dissimilarity in configuration detected” in a Stats report mean? “Dissimilarity in configuration detected” means that the sample does not match the measurements of the first sample in the Test ID. This could be because: 1. The probes/pressure tool was changed without starting a new test ID. 2. The language or locality of the Android device was changed and the measurement and unit names do not match the original language’s names. What Does “This Data May Not be Accurate” Mean in the Duct Traverse Activity? The sample data saved in the duct traverse file opened does not match the checksum in the file. Some possible causes: 1. Duct traverse data files were edited outside the LogDat Mobile. 2. The app was force-closed during a critical period in the saving/restoring process. 3. The Android device ran out of battery or was turned off without saving all of the data properly. LogDat Mobile User’s Manual CHAPTER 5 References and Links TSI Inc. website: www.tsi.com Contact TSI: www.tsi.com/contactus TSI YouTube Channel: www.youtube.com/user/TSICorporate Log-T factors for round duct traverses. Values for 6, 8, and 10 traverse points per diameter. 1 2 3 4 5 6 7 8 6 0.032 0.135 0.321 0.679 0.865 0.968 8 0.021 0.117 0.184 0.345 0.655 0.816 0.883 0.979 10 0.019 0.077 0.153 0.217 0.361 0.639 0.783 0.847 9 10 0.923 0.981 Log-T factors for rectangular duct traverses. Values for 5, 6, and 7 traverse points per dimension. < 30 in 30-36 in > 36 in 1 2 3 4 5 6 0.074 0.288 0.500 0.712 0.926 0.061 0.235 0.437 0.563 0.765 0.939 0.053 0.203 0.366 0.500 0.634 0.797 7 0.947 5-1 (This page intentionally left blank) 5-2 LogDat Mobile User’s Manual APPENDIX A List of all Preferences a n d t h e i r D e f a u l t Va l u e This appendix contains a list of all preferences (alphabetically) and their default value (if applicable). Preference Category Default Value Description Auto-connect General Enabled When enabled, whenever the application enters the main screen and is not connected to an instrument, the application will attempt to connect to the most recently connected device. Auto-save General Disabled When enabled, every averaged sample will be saved to the current Test ID. The number of readings making up an “averaged sample” is determined by the Readings per Sample value. Concentric Circles Duct Traverse 4 (8 points per traverse) The number of concentric circles to use when doing a round duct. CSV Delimiter Data Tab The delimiter format to be used for .csv files when exporting in Stats. Test ID General 0 The current Test ID that new readings will be saved under. Valid IDs are 0 through 100. Default Comment Duct Traverse Default comment given to a duct traverse report (can be edited before report is generated). Default Title Duct Traverse Default title given to a duct traverse report (can be edited before report is generated). Delete Test ID More Settings Select a Test ID from the list and then press “Delete Test ID” to delete. The items in the list have the following structure: (<TEST ID>) <TEST ID NAME> (<NUMBER OF SAMPLES>) Drop Fraction Data >100 Never drop fraction Never truncate the trailing decimal values (does not modify the number in any way). >1 For values greater than 1, drop the decimal (e.g., 0.9 will be stored as 0.9 but 1.1 will be stored as 1). >10 For values greater than 10, drop the decimal (e.g., 9.9 will be stored as 9.9 but 10.1 will be stored as 10). >100 For values greater than 100, drop the decimal (e.g., 99.9 will be stored as 99.9 but 100.1 will be stored as 100). >1000 For values greater than 1000, drop the decimal (e.g., 999.9 will be stored as 999.9 but 1000.1 will be stored as 1000). Always drop fraction Always drops the fractional portion (only keep integer portion). A-1 Preference Category Default Value Description Dynamic Range Graph Enabled The range of the graph (Y-axis) auto-adjusts to the samples’ values. Email Address Email <blank> The email address to enter by default when exporting to an email. Email Subject Email Gestures General Disabled When enabled, Android’s built in accelerometer will detect “shaking” motions. When connected to a device, this will issue a read request (or cancel a request if already reading). Max Range Graph 1000 When Dynamic Range is disabled, this sets the maximum Y value. Sets the range to be [0, M] where M is Max Range. Plot All Samples Graph Enabled The domain (X-axis) will be [0,N] where N is the size of the largest (number of samples) test ID being plotted. Readings per Sample General 1 The number of unique readings needed to average together before it can be stored in a Test ID. Read Mode General Manual Manual When a read is requested, the application will request N unique readings, average them together, and stop. (N = “Number of readings to take”) Automatic The same as Single except that, after a reading is averaged, another reading will be immediately requested. Samples to Plot Graph 250 Number of samples to plot when “Plot All Samples” is disabled. Sets the domain (X-axis) to be [0,S] where S is Samples to Plot. Shaker Sensitivity General 5 Determines how much force is needed for the accelerometer to detect a “shake.” Significant Figures Data 4 How many significant figures (digits) to keep track of. Text-to-Speech (TTS) General Disabled When enabled, Android’s built in TTS engine will speak the primary reading when in Remote Reader Timestamp Email Enabled Whether a timestamp should be placed when exporting to an email. Validate Duct Traverse More Settings Browses the duct traverse folder and validates the selected traverse. Validation checks the information stored in the file with the checksum and determines whether or not the file data has been changed outside of LogDat Mobile. Validate Test IDs More Settings Writes all Test ID data to external storage, computes checksum, and then reads the files back into memory. Then a list is displayed containing all the valid and invalid Test IDs. Validation checks the information stored in the file with the checksum and determines whether or not the file data has been changed outside of the LogDat Mobile. Vibrator General A-2 The default subject line when exporting to an email. Disabled When enabled, if the device is equipped with a vibrator it will vibrate whenever a reading is received in Remote Reader LogDat Mobile User’s Manual APPENDIX B Directory Structure Preference options are stored on the application’s local memory and cannot be exported to another device. Everything else is saved in external storage (such as an SD card or built-in “media” storage). This includes: Samples in Test IDs (Data folder) Voice recordings (Audio folder) Pictures taken within the application (Img folder) Duct traverse reports, most recent round and rectangular duct traverses, and saved duct sizes (DuctTraverse folder) Test ID exports from the Stats application (Stats folder) These folders can be copied from the Android device onto (or from) a computer using a USB cable and enabling USB Storage mode. Consult the Android device’s manual for information how to enable “USB Storage” mode. B-1 (This page intentionally left blank) B-2 LogDat Mobile User’s Manual TSI Incorporated – Visit our website www.tsi.com for more information. USA UK France Germany Tel: +1 800 874 2811 Tel: +44 149 4 459200 Tel: +33 4 91 11 87 64 Tel: +49 241 523030 P/N 6006833 Rev A India China Singapore ©2013 TSI Incorporated Tel: +91 80 67877200 Tel: +86 10 8219 7688 Tel: +65 6595 6388 Printed in U.S.A.