1
Welcome to WinJewel
WinJewel was designed by a jeweler specifically for use in a jewelry store. It is easy to use and can
help you keep track of everything that goes on in the store. It is not a generic bookkeeping
program, but a comprehensive tool designed to improve the operation of your jewelry business.
To use WinJewel, you will need Microsoft Windows (95, 98, NT, 2000, ME, XP or Vista) on your
computer. It helps if you are comfortable with the Windows operating system, but that is not a
requirement. This manual and the built-in Help throughout WinJewel will make it very easy to
learn and use the system.
WinJewel is modular so you can use only what you need. By this we mean you don't have to use
all the functions of the program, only those you feel will help your individual store. Start slow and
add elements one by one. This will be easier on you and your entire staff.
This manual includes a detailed description of all of the components of the program. Each chapter
represents a major function you do in your store. They also correspond to the individual icon
pictures that are always displayed across the top of the WinJewel screen (Sales, Inventory,
Customers, etc.).
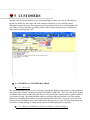
This text is designed to be reviewed while you are looking at the corresponding WinJewel screen.
To assist with this, the manual will show items in ALL BOLD LETTERS when the selections or
words are exactly the same as those that appear on the screen. We hope this will help you find each
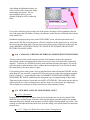
item. For example, if the manual says: “Select REPORTS, CUSTOMERS, CUSTOMER LIST,”
this means you need to make three separate selections. First, click on the REPORTS icon located at
the top right hand side of the screen, then click on the circle located next to CUSTOMERS which
will display all of the options for that selection in the large white box and finally put the cursor on
the fourth item down which says CUSTOMER LIST and click.
WinJewel also includes built-in help throughout the system. If you hold the cursor over any entry
box or a gray selection button, a brief explanation of that item will be displayed. In addition, when
you are changing system settings or options, WinJewel will give on-screen explanations as to what
the individual selections mean. As an added protection, the system will also display “Are you sure”
and “Do you want to….” messages whenever you may have forgotten to save entries or you are
making a selection that is not the standard way of doing things.
This manual is also designed to be used along with the WinJewel Quick Start which describes a
basic step-by-step implementation process that you can use in your store to get started. You can
find the Quick Start by selecting the HELP button located at the top right hand side of the screen.
Contents at a Glance
Welcome to WinJewel...................................................................................................................................................................1
1 HARDWARE, WINDOWS and WINJEWEL OVERVIEW.................................................................................................8
2 INITIAL WINJEWEL SET-UP............................................................................................................................................15
3 SALES...................................................................................................................................................................................28
4 INVENTORY........................................................................................................................................................................69
5 CUSTOMERS.......................................................................................................................................................................95
6 ORDERS.............................................................................................................................................................................109
7 SERVICE ENVELOPES.....................................................................................................................................................114
8 APPRAISALS.....................................................................................................................................................................118
9 STAFF & TIMECARDS.....................................................................................................................................................122
10 INVOICES........................................................................................................................................................................133
11 SUPPLIERS......................................................................................................................................................................136
12 CHECKBOOK..................................................................................................................................................................139
13 GENERAL LEDGER and BUDGETING.........................................................................................................................143
14 PRINTING REPORTS, TAGS, LETTERS AND LABELS.............................................................................................146
15 MAINTENANCE and BACKUP......................................................................................................................................154
16 MULTIPLE STORE OPERATION..................................................................................................................................163
17 FILE FORMATS...............................................................................................................................................................165
18 PRINTER AND SCANNER SETUP................................................................................................................................174
Appendix A: Network Drives...................................................................................................................................................197
Appendix B: Terminal Services...............................................................................................................................................199
Appendix C: QUICKLISTS.....................................................................................................................................................200
Appendix D: Firewalls.............................................................................................................................................................207
INDEX......................................................................................................................................................................................208
2
Table of Contents
Welcome to WinJewel...................................................................................................................................................................1
1 HARDWARE, WINDOWS and WINJEWEL OVERVIEW.................................................................................................8
1.1
1.2
1.3
1.4
1.5
1.6
1.7
1.8
MINIMUM HARDWARE REQUIREMENTS...................................................................................................................................... 8
WORKING WITH MICROSOFT WINDOWS..................................................................................................................................... 9
NAVIGATING WITHIN WINJEWEL.................................................................................................................................................. 9
USING HELP........................................................................................................................................................................................ 12
USING THE CANCEL BUTTON........................................................................................................................................................ 12
USING FIND BY.................................................................................................................................................................................. 12
USING THE BUILT-IN CALCULATOR............................................................................................................................................ 14
CHANGING THE BACKGROUND COLORS OF EACH SCREEN................................................................................................ 14
2 INITIAL WINJEWEL SET-UP............................................................................................................................................15
2.1 INSTALLING WINJEWEL................................................................................................................................................................. 15
2.1.1 Discussion: ........................................................................................................................................................................................................15
2.1.2 Install from the WinJewel CD – Single and Multi User Versions ......................................................................................................................15
2.1.3 Install Your Logo/License..................................................................................................................................................................................15
2.1.3.2 Discussion: .....................................................................................................................................................................................................15
2.1.4 Update and Sort:.................................................................................................................................................................................................16
2.1.5 Complete the Multi-User Version Installation....................................................................................................................................................17
2.2
2.3
2.4
2.5
2.6
2.7
2.8
YOUR STORE LOGO.......................................................................................................................................................................... 21
SET UP DEPARTMENTS.................................................................................................................................................................... 21
SET UP SUPPLIERS............................................................................................................................................................................ 23
SET UP GENERAL LEDGER ACCOUNTS SET UP SUPPLIERS................................................................................................... 24
SET UP STAFF..................................................................................................................................................................................... 24
SYSTEM AND PRINTER SETTINGS................................................................................................................................................ 25
SETTING UP A TRAINING PROGRAM........................................................................................................................................... 25
2.8.1 Discussion: ........................................................................................................................................................................................................25
2.8.2 Make a Training Copy:.......................................................................................................................................................................................26
2.9 SET SCREEN APPEARANCE ........................................................................................................................................................... 26
2.10 GETTING SPECIAL ASSISTANCE................................................................................................................................................. 27
3 SALES...................................................................................................................................................................................28
3.1 HOW TO WRITE UP A SALES SLIP................................................................................................................................................. 28
3.1.1
3.1.2
3.1.3
3.1.4
3.1.5
3.1.6
3.1.7
3.1.8
3.1.9
3.2
3.3
3.4
3.5
3.6
3.7
3.8
Discussion: ........................................................................................................................................................................................................28
Things you Should Do or Know Before Starting: ..............................................................................................................................................28
Enter the Customer Information: .......................................................................................................................................................................29
Select a Salesperson: .........................................................................................................................................................................................30
Enter the Item Description: ................................................................................................................................................................................31
Select a Payment Type: .....................................................................................................................................................................................31
End the Line: .....................................................................................................................................................................................................31
End the Slip: ......................................................................................................................................................................................................31
Confirm Payment Options: .................................................................................................................................................................................32
PRINTING SALES SLIPS.................................................................................................................................................................... 33
SPECIAL CUSTOMER INFORMATION ON SALES SCREEN......................................................................................................33
SALES REPORTS................................................................................................................................................................................ 34
WRITING A SALES SLIP FOR AN ENVELOPE.............................................................................................................................. 34
REPRINTING A SALES SLIP............................................................................................................................................................. 34
DELETING A SALES SLIP YOU ARE WORKING ON................................................................................................................... 35
REVERSING / ERASING A SALES SLIP.......................................................................................................................................... 35
3.8.1 Discussion..........................................................................................................................................................................................................35
3.8.2 Reverse a Sales Slip: .........................................................................................................................................................................................35
3.8.3 Erase a Sales Slip:..............................................................................................................................................................................................35
3.9 CHANGING A SALES SLIP - SEE OR CHANGE ...........................................................................................................................36
3.10 MOVING A SALES SLIP.................................................................................................................................................................. 37
3.11 FINDING AN OLD SALES SLIP...................................................................................................................................................... 37
3.12 WRITING A SALES SLIP RETURN, DISCOUNT OR CREDIT.................................................................................................... 37
3.12.1
3.12.2
3.12.3
3.12.4
Return (one item at a time) for credit or refund................................................................................................................................................37
Reverse (an entire slip).....................................................................................................................................................................................41
Discounts:.........................................................................................................................................................................................................41
Credits:.............................................................................................................................................................................................................41
3.13 AUTOMATE THE DISCOUNT PROCESS...................................................................................................................................... 42
3.14 LAYAWAYS: WRITING AND BOOKKEEPING .......................................................................................................................... 43
3.14.1
3.14.2
3.14.3
3.14.4
3.14.5
3.14.6
3.14.7
Discussion: ......................................................................................................................................................................................................43
Recording.........................................................................................................................................................................................................43
Start a Layaway (Multi-Unit Items):.................................................................................................................................................................43
Start a Layaway (Item is Entered into Inventory with Unique Number) ..........................................................................................................44
Make a Payment to a Layaway:........................................................................................................................................................................46
Start a Layaway (Item is not Entered in Inventory)..........................................................................................................................................47
Reverse a Layaway:..........................................................................................................................................................................................48
3
3.14.8 Erase a Layaway...............................................................................................................................................................................................51
3.14.9 Return a Layaway.............................................................................................................................................................................................51
3.14.10 Convert a Layaway into a Charge...................................................................................................................................................................52
3.14.11 Layaway Settings............................................................................................................................................................................................53
3.14.12 Layaway Reports...........................................................................................................................................................................................54
3.15
3.16
3.17
3.18
3.19
3.20
3.21
3.22
3.23
3.24
3.25
3.26
3.27
GIFT CERTIFICATES....................................................................................................................................................................... 62
CASH CUSTOMER........................................................................................................................................................................... 63
SPECIAL CANADIAN TAX RATES............................................................................................................................................... 63
EXTENDED SERVICE PLANS........................................................................................................................................................ 63
SPECIAL ORDERS............................................................................................................................................................................ 64
ADDING A CASH DRAWER TO THE WINJEWEL PROGRAM.................................................................................................. 64
SPECIAL SALES SCREEN OPTIONS / SETTINGS....................................................................................................................... 65
WRITING CHARGE ACCOUNT CONTRACTS............................................................................................................................. 66
TRACKING SALES BY SPECIAL CATEGORY............................................................................................................................ 66
USING A SECOND PRICE ON SALES SCREEN........................................................................................................................... 66
CREATING MEMO SALES ITEMS................................................................................................................................................. 67
DONATION SALES SLIPS............................................................................................................................................................... 67
PARKING A SALE ........................................................................................................................................................................... 67
4 INVENTORY........................................................................................................................................................................69
4.1 ENTERING NEW INVENTORY........................................................................................................................................................ 69
4.1.1
4.1.2
4.1.3
4.1.4
4.1.5
Discussion: ........................................................................................................................................................................................................69
Things you Should Do or Know Before Starting:...............................................................................................................................................70
Entering Inventory:.............................................................................................................................................................................................70
Enter Item Information: .....................................................................................................................................................................................71
Save Item: required.............................................................................................................................................................................................73
4.2 MULTIPLE ITEMS FROM ONE SUPPLIER..................................................................................................................................... 73
4.2.1
4.2.2
4.2.3
4.2.4
4.2.5
4.2.6
See From Orders: ................................................................................................................................................................................................74
Next: ..................................................................................................................................................................................................................74
Rep Last:............................................................................................................................................................................................................74
Reorder Number: ...............................................................................................................................................................................................74
Print Invoice:......................................................................................................................................................................................................74
Transfer to Invoice:............................................................................................................................................................................................74
4.3 VIEWING INVENTORY ITEMS........................................................................................................................................................ 75
4.4 FINDING AN INVENTORY ITEM..................................................................................................................................................... 75
4.4.1
4.4.2
4.4.3
4.4.4
4.5
4.6
4.7
4.8
4.9
Find By Button – First Click: ............................................................................................................................................................................75
Select/Enter your Search Criteria:......................................................................................................................................................................75
Find By Button – Second Click:.........................................................................................................................................................................75
Print the List.......................................................................................................................................................................................................76
MAKING A NOTE ON AN INVENTORY ITEM.............................................................................................................................. 77
DELETING INVENTORY................................................................................................................................................................... 77
COMBINING INVENTORY ITEMS.................................................................................................................................................. 77
MULTI-UNIT ITEMS.......................................................................................................................................................................... 78
INVENTORY PICTURES.................................................................................................................................................................... 78
4.9.1
4.9.2
4.9.3
4.9.4
Discussion:.........................................................................................................................................................................................................78
Save the Pictures from Your Camera onto Your Computer:...............................................................................................................................79
SAVE THE PICTURE ON YOUR COUPUTER INTO WINJEWEL:..............................................................................................................79
Multiple Views of Same Item:............................................................................................................................................................................81
4.10 CATALOGS - PRINTING PICTURES OF SELECTED INVENTORY ITEMS.............................................................................82
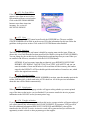
4.11 BUILDING A MAP OF YOUR STORE LAYOUT.......................................................................................................................... 82
4.11.1
4.11.2
4.11.3
4.11.4
4.11.5
Discussion: ......................................................................................................................................................................................................82
Things You Should Do or Know Before Getting Started..................................................................................................................................82
Use a Store Map:..............................................................................................................................................................................................83
Mark the Location of the Item:.........................................................................................................................................................................83
Modify the Map:...............................................................................................................................................................................................83
4.12 CONSIGNMENT/MEMO ITEMS..................................................................................................................................................... 88
4.12.1 Discussion: ......................................................................................................................................................................................................88
4.12.2 Take in Items from a Regular Supplier:............................................................................................................................................................88
4.12.3 Take in Items from a Non Regular Supplier:....................................................................................................................................................89
4.13 PRINTING PRICE TAGS.................................................................................................................................................................. 89
4.13.1 Dedicated Tag Printer: .....................................................................................................................................................................................89
4.13.2 General Purpose Printer: ..................................................................................................................................................................................90
4.14 SPECIAL INFORMATION ON PRICE TAGS – TAG LAYOUT................................................................................................... 90
4.15 TAKING INVENTORY..................................................................................................................................................................... 91
4.15.1
4.15.2
4.15.3
4.15.4
Check off Items from a Printed List to Identify Inventory Unaccounted For: ..................................................................................................91
Enter Each Item Into WinJewel and WinJewel will Report Inventory Unaccounted For: ...............................................................................91
Start Taking Inventory: ....................................................................................................................................................................................91
Reports After Taking Inventory: ......................................................................................................................................................................92
4.16 DOING A QUICK INVENTORY BY CASE.................................................................................................................................... 92
4.17 GETTING REPORTS ON INVENTORY.......................................................................................................................................... 92
4.17.1 Inventory listings..............................................................................................................................................................................................92
4.17.2 Sold inventory reports......................................................................................................................................................................................93
4
4.17.3 Special reports..................................................................................................................................................................................................93
4.17.4 Custom printouts..............................................................................................................................................................................................93
4.18 USING OLD TAG NUMBERS.......................................................................................................................................................... 93
4.19 ADJUSTING THE PRICES OF INVENTORY ITEMS.................................................................................................................... 93
4.19.1
4.19.2
4.19.3
4.19.4
Change Retail Price of One Department: .........................................................................................................................................................94
Change Price by Gold Weight: ........................................................................................................................................................................94
Adjust Cost Factor:...........................................................................................................................................................................................94
Change Price of Inventory of One Supplier......................................................................................................................................................94
4.20 SECOND COST AND RETAIL PRICE OPTION............................................................................................................................. 94
5 CUSTOMERS.......................................................................................................................................................................95
5.1 BUILDING A CUSTOMER DATABASE........................................................................................................................................... 95
5.1.1 Discussion..........................................................................................................................................................................................................95
5.1.2 Things you should know/do before building a customer database:.....................................................................................................................95
5.1.3 Enter a New Customer:.......................................................................................................................................................................................96
5.2 THE CUSTOMER PROFILE OPTION............................................................................................................................................... 98
5.3 FIND BY FOR CUSTOMERS............................................................................................................................................................. 99
5.4 SENDING CUSTOMER STATEMENTS.......................................................................................................................................... 102
5.4.1 Discussion:.......................................................................................................................................................................................................102
5.4.2 Things You Should Do or Know Before Starting:............................................................................................................................................102
5.4.3 Posting Interest.................................................................................................................................................................................................103
5.5 REMOVING INTEREST CHARGES FROM AN ACCOUNT........................................................................................................ 104
5.6 SPECIAL OPTIONS FOR PAST DUE CUSTOMERS..................................................................................................................... 104
5.7 CUSTOMER REPORTS..................................................................................................................................................................... 104
5.8 SENDING CUSTOMER LETTERS.................................................................................................................................................. 105
5.9 CREATE, EDIT OR ERASE A FORM LETTER.............................................................................................................................. 106
5.10 USING THE CUSTOMER FOLLOWUP FEATURE..................................................................................................................... 106
5.11 DELETING CUSTOMERS FROM THE FILE............................................................................................................................... 107
5.12 TO MARK A CUSTOMER AS A WHOLESALE CUSTOMER.................................................................................................... 107
5.13 DIALING AUTOMATICALLY....................................................................................................................................................... 107
5.14 USING CITY NAME SHORTCUTS............................................................................................................................................... 108
5.15 SHOWING PICTURES OF CUSTOMERS .................................................................................................................................... 108
5.16 A WISH LIST, GIFT OR BRIDAL REGISTRY ............................................................................................................................ 108
6 ORDERS.............................................................................................................................................................................109
6.1
6.2
6.3
6.4
6.5
ENTERING ORDERS FOR SUPPLIERS.......................................................................................................................................... 109
TRACKING ORDERS....................................................................................................................................................................... 110
RECEIVING ORDERS....................................................................................................................................................................... 110
ORDER REPORTS............................................................................................................................................................................. 111
ORDER REPORT SETTINGS........................................................................................................................................................... 112
7 SERVICE ENVELOPES.....................................................................................................................................................114
7.1
7.2
7.3
7.4
7.5
PREPARING A SERVICE ENVELOPE........................................................................................................................................... 114
RECORDING THE CONDITION OF THE ITEM............................................................................................................................ 115
TRACKING ACTIVITY ON SERVICE ENVELOPES ................................................................................................................... 116
ENVELOPE REPORTS...................................................................................................................................................................... 116
ENVELOPE MAINTENANCE.......................................................................................................................................................... 117
8 APPRAISALS.....................................................................................................................................................................118
8.1 DOING A QUICK APPRAISAL........................................................................................................................................................ 119
8.1 DOING A DIAMOND GRADING REPORT.................................................................................................................................... 120
9 STAFF & TIMECARDS.....................................................................................................................................................122
9.1 ENTERING STAFF ........................................................................................................................................................................... 122
9.1.1 Description ......................................................................................................................................................................................................122
9.1.2 Give Yourself Permission to All:......................................................................................................................................................................123
9.2 LIMITING EMPLOYEE ACCESS TO FUNCTIONS...................................................................................................................... 125
9.2.1 Discussion: ......................................................................................................................................................................................................125
9.2.2 Set Protection: .................................................................................................................................................................................................126
9.3
9.4
9.5
9.6
9.7
9.8
9.9
PUNCHING IN AND OUT USING THE TIMECARD FEATURE................................................................................................. 128
CLOSING PAY PERIODS AND CORRECTING TIME CARDS................................................................................................... 129
ADJUSTING TIMECARDS FOR BREAK TIMES.......................................................................................................................... 130
LEAVING AN EMPLOYEE A MESSAGE...................................................................................................................................... 130
STICKY NOTES................................................................................................................................................................................. 130
EMPLOYEE WORK SCHEDULE.................................................................................................................................................... 130
FOREIGN CURRENCY RATES....................................................................................................................................................... 132
10 INVOICES........................................................................................................................................................................133
10.1
10.2
10.3
10.4
10.5
CREATING INVOICES................................................................................................................................................................... 133
TURNING ON OR OFF THE AUTOMATIC BILL REMINDER.................................................................................................. 134
INVOICE REPORTS........................................................................................................................................................................ 134
EDITING INVOICES....................................................................................................................................................................... 135
KEEPING TRACK OF SPECIAL PROJECTS................................................................................................................................ 135
5
11 SUPPLIERS......................................................................................................................................................................136
11.1
11.2
11.3
11.4
11.5
11.6
ENTERING SUPPLIERS................................................................................................................................................................. 136
SUPPLIER LETTER OR LABELS.................................................................................................................................................. 137
SUPPLIER REPORTS...................................................................................................................................................................... 137
BUYING GROUPS........................................................................................................................................................................... 137
ADJUSTING PRICES FOR A SUPPLIER...................................................................................................................................... 137
ADJUSTING INVENTORY STOCK NUMBERS.......................................................................................................................... 138
12 CHECKBOOK..................................................................................................................................................................139
12.1
12.2
12.3
12.4
12.5
12.6
12.7
ISSUING A CHECK......................................................................................................................................................................... 139
PRINTING A CHECK...................................................................................................................................................................... 140
ENTERING DEPOSITS................................................................................................................................................................... 140
USING THE CHECKBOOK............................................................................................................................................................ 140
SPLIT-PAY AN INVOICE............................................................................................................................................................... 141
PAID OUTS (PETTY CASH).......................................................................................................................................................... 141
BALANCE CASH DRAWER.......................................................................................................................................................... 142
13 GENERAL LEDGER and BUDGETING.........................................................................................................................143
13.1
13.2
13.3
13.4
SETTING UP THE GENERAL LEDGER....................................................................................................................................... 143
RUNNING MONTH END REPORTS............................................................................................................................................. 143
CASH FLOW ANALYSIS .............................................................................................................................................................. 144
PREPARING BUDGETS................................................................................................................................................................. 145
14 PRINTING REPORTS, TAGS, LETTERS AND LABELS.............................................................................................146
14.1
14.2
14.3
14.4
14.6
14.7
14.7
14.8
14.9
PRINTER SET UP............................................................................................................................................................................ 146
PRINTING YOUR STORE’S LOGO............................................................................................................................................... 147
SPECIAL PRINTING SETTINGS................................................................................................................................................... 148
PRINTING AND ALIGNING PRICE TAGS.................................................................................................................................. 148
USING SPECIALIZED TAG PRINTERS....................................................................................................................................... 150
SETTING TAG LAYOUTS............................................................................................................................................................. 150
PRINTING MAILING LABELS...................................................................................................................................................... 151
PRINTING SERVICE ENVELOPES............................................................................................................................................... 152
APPOINTMENT SCHEDULER...................................................................................................................................................... 152
15 MAINTENANCE and BACKUP......................................................................................................................................154
15.1 BACKING UP YOUR DATA.......................................................................................................................................................... 154
15.1.1
15.1.2
15.1.3
15.1.5
15.2
15.3
15.4
15.5
15.6
15.6
Discussion:.....................................................................................................................................................................................................154
What is Backup:.............................................................................................................................................................................................154
How to backup your WinJewel data...............................................................................................................................................................155
Restoring data from a backup.........................................................................................................................................................................158
SORTING THE FILES..................................................................................................................................................................... 159
DOING AN UPDATE OF WINJEWEL........................................................................................................................................... 159
CHANGING THE HEADINGS AND LABELS THAT YOU SEE ON EACH SCREEN.............................................................160
UNLOCKING A FILE IN THE MULTI-USER MODE.................................................................................................................. 160
SPECIAL WINJEWEL SETTINGS................................................................................................................................................. 161
TO MAKE THE PROGRAM GO FASTER.................................................................................................................................... 162
16 MULTIPLE STORE OPERATION..................................................................................................................................163
16.1 SETTING UP MULTIPLE STORES............................................................................................................................................... 163
16.3 BRANCH STORE FILE TRANSFERRING.................................................................................................................................... 163
16.4 MOVING INVENTORY FROM ONE STORE TO ANOTHER.................................................................................................... 164
17 FILE FORMATS...............................................................................................................................................................165
17.1 CONVERTING FILES TO ACCESS FORMAT............................................................................................................................. 165
17.2 FILE FORMATS............................................................................................................................................................................... 165
17.3 RECEIVING FILES VIA MODEM................................................................................................................................................... 172
18 PRINTER AND SCANNER SETUP................................................................................................................................174
18.1 DISCUSSION:.................................................................................................................................................................................. 174
18.1.1 Things you should do or know before getting started.....................................................................................................................................174
18.1.2 Which Software to Use:..................................................................................................................................................................................174
18.1.3 Barcodes:........................................................................................................................................................................................................175
18.2
18.3
18.4
18.5
18.6
DIRECTIONS FOR SETTING UP A SYMBOL LS 2106 BARCODE SCANNER......................................................................176
ZEBRA/ELTRON 2642 PRINTER.................................................................................................................................................. 179
ZEBRA/ELTRON 2742 PRINTER.................................................................................................................................................. 181
ZEBRA/ELTRON 2844 PRINTER ................................................................................................................................................. 183
OTHER TAG PRINTERS................................................................................................................................................................ 196
Appendix A: Network Drives...................................................................................................................................................197
Appendix B: Terminal Services...............................................................................................................................................199
Appendix C: QUICKLISTS.....................................................................................................................................................200
Appendix D: Firewalls.............................................................................................................................................................207
INDEX......................................................................................................................................................................................208
6
7
1 HARDWARE, WINDOWS and
WINJEWEL OVERVIEW
1.1 MINIMUM HARDWARE REQUIREMENTS
Before you start using WinJewel, be sure your hardware meets or exceeds the following
requirements:
(1) IBM compatible computer with at least a 486 CPU.
(2) Minimum 128 Megabytes of RAM. Your local computer store can add RAM to your system if
needed and you will find that more RAM will increase the speed that your computer runs
Windows.
(3) A hard drive with at least 100 Megabytes of free space. (More disk space will be required for
larger volume stores. If you plan to store digital images of inventory items, a 10 to 15 Gig hard
drive may be required.
(4) A Color Monitor. (Although it is not recommended, WinJewel can use a black and white
monitor. If that is all you have, go to the REPORTS, SYSTEM SETTINGS, SET
BACKGROUND COLORS FOR EACH SCREEN and then select SET ALL COLORS TO
GRAY. This will make the screen easier to read on a black and white monitor.)
(5) Microsoft Windows 95, 98, NT, 2000, ME or XP & a compatible Mouse.
(6) A Windows compatible printer, preferably ink jet or laser quality. The "driver" for this printer
must be a one that was written to work with the version of Windows you are running. This is very
important. Unlike most word-processing programs, WinJewel does not have it's own printer
drivers, but relies on the driver that is supplied with the particular printer you are using. (WinJewel
does have its own built-in drivers for the specialized tag printers.
(7) If you are running the "multi-user" version of WinJewel (on more than one PC within the
store), you will need to have a working network system to connect your computers together.
Appendix A includes a very basic process for mapping a network drive. It is beyond the scope of
this manual to discuss all of the possible computer networks. If you need help, please consult a
local computer expert or call us and we will try to advise you. Once you have a properly working
Local Area Network (LAN), then the multi-user version of WinJewel will be able to handle all of
the file sharing, file locking and record locking that is necessary to prevent two people from trying
to update the same file. In most cases, the built in network capabilities of the Windows operating
system are adequate without any other software being necessary. However, you will need cabling
and a network card installed on each computer.
(8) If you are running the multi-store version of WinJewel (more than one location), you will need
a phone line connected to at least one computer in each store and we strongly recommend a DSL
internet connection.
8
(9) All WinJewel installations must have internet access so you can visit our website to download
the latest version of WinJewel. You should click on the selection “update from web” on the Main
Menu screen of WinJewel.
1.2 WORKING WITH MICROSOFT WINDOWS
WinJewel is written as a subset of Microsoft Windows and the program uses all of the
functionality of Windows. You can select particular items on the screen at any time by using the
mouse. Simply move the mouse around until the pointer is on the item you want and press the left
button on the mouse one time and that item will be chosen. This is called a “click” and WinJewel
only requires a single click to select items.
In addition to the mouse, there are a couple of standard keyboard functions of Windows that you
will need to use:
•
ENTER or TAB is hit after entering information. The cursor will automatically move to the
next field.
•
SHIFT-TAB (Hold down the SHIFT key and hit TAB) will take you back to the previous
field.
•
BACKSPACE will move back one space within a field and delete the character in that
space.
•
DELETE will delete the character to the right of the cursor. If you select an entire entry
with the mouse (put the cursor to one side of what you want to select, hold down the left
mouse button and drag the mouse over the entire selection. Windows will highlight your
selection), delete will erase everything highlighted. If you have selected a portion of any
text, anything that you type will replace what you selected.
•
ESC (the escape key) will always take you back to the WinJewel main menu. (You can
also click on the “X” under HELP to get back to the main menu.)
You can also access the icons located across the top of the screen using the F-keys located along
the top of your keyboard. Hitting F1 is the same as clicking on the SALES icon. Each of the icons
responds to the F-key that is in the same relative position on the keyboard.
1.3 NAVIGATING WITHIN WINJEWEL
You will get used to the different items you see on the screen. There are basically six items you
will use. Each is shaped and colored like other items of the same type. Once you have mastered
these six items, you can do anything within the WinJewel program. Here is a list and example of
each of the 6 types of items:
ICONS and LINKS
9
An icon is a small picture that will take you to another screen when you click on it. There is
usually a written descriptor under the icon.. There is a row of icons at the top of each screen. Point
to the icon and click the left button on the mouse one time only.
A link (or hyperlink) is similar to an icon. A hyperlink is a underlined word. Click on the link with
the left mouse button one time only.
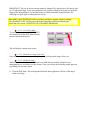
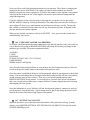
GREY BUTTON
A gray button will help you to choose an option or a procedure.
Point to the button with the mouse and left click one time. This is
the END SLIP button which is used to end a sales slip.
DATA BOX
A data box will display information for you. If the cursor is
blinking in it or the box has a red border around it, it is said to
have the "focus." This means that you can type information on
the keyboard and it will be put into that box. You can choose a
box ("give it the focus") by putting the pointer in the box and
clicking the mouse.
Once a data box is chosen, it will respond to whatever you enter using the keyboard keys. You can
use the ENTER or TAB key at the end of entering or changing the information in a data box. The
focus will go to the next box.
It is possible to put a longer entry into a data box than will show in that box. When the program
saves this information, it will sometimes be cut off at the maximum length allowed for that
particular information. Experiment with the BACKSPACE, DELETE and the CURSOR keys to
see how they effect the information in the box. Remember that each box, no matter where in the
program, will respond the same.
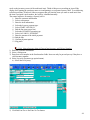
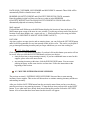
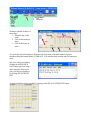
DROP DOWN BOX
10
A drop-down list box has a small arrow to the right. If
you click on that arrow, a list of possible entries for that
box will drop down from the box. If you point to any
entry and click, that entry will be entered into the box.
If the list is longer than the box can show at one time, a
bar with two arrows will appear on the right of the box.
Use this bar and arrows to see more of the list.
A Drop-Down Box can also be typed into instead of
choosing something from the list with the mouse. What
you type must be on the list for it to be valid.
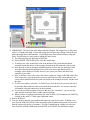
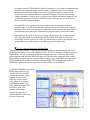
LIST BOX
A list box may have a list of
items from which to choose. If
the list is longer than the box
can show at one time, a bar
with two arrows will appear on
the right of the box. Use this
bar and arrows to see more of
the list. Point and click at the
item that you want to choose.
There is a slider button showing if the scroll bar is visible. This button can be used to quickly scroll
through the list. Place the mouse pointer over the slider button, hold down the left button on the
mouse and move the mouse. (For reference, the height of the slider button is proportional to the
size of the list that you are able to see at any one time.)
Many of the list boxes have a long gray button along the left edge of the box. If you see one of
these and click on it you will see the box expand to full screen size. This will make it possible to
see more information in the box. If you click again on the same long gray button, the box will
return to its regular size.
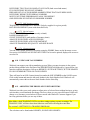
CHOICE BUTTON
A choice button will allow you to choose one choice from a series of
choices. Point and click on the small round circle just to the left of the
label. The button will turn dark to show that it has been chosen. Any
previous buttons that are dark will be canceled and will turn white to
indicate that.
In addition to these choices, a couple of other items will make using WinJewel easy.
11
1.4 USING HELP
WinJewel includes a complete Help function that is available from a variety of sources. You can
click on the HELP icon in the upper right hand corner of the WinJewel screen. This will give you
access to all of the help capabilities of WinJewel including Quick Start describing the
implementation process, this Users Manual and a valuable search function called “HOW DO I?”
which gives you a fast method of looking for specific items.
You can print out additional copies of any of these manuals by using the PRINT function. Be
careful as it will take quite a while and a lot of paper for the entire WinJewel manual. You can stop
your printer from printing the entire HELP document by pressing the cancel button on the printer..
If you want to print sections of the Manual you can select the desired page range (ex.; 6 – 22) or
you can use the Copy and Paste functions of Microsoft Word (highlight the section you want to
print, hold down the CTRL key and hit “C” to copy, go to a blank page in Word and hit CTRL “V”
to paste. Individual pages of HOW DO I can be printed by using the PRINT SCREEN function in
WinJewel.)
The program also has an abbreviated Help function built into every screen. Simply hold the mouse
pointer directly over any data entry box, choice button or gray bar and a short message describing
that particular function will be displayed.
WinJewel also displays special built-in screen descriptions when you have several selections to
make. You should get in the habit of carefully reading each screen before making a selection to be
certain you are doing what you want. WinJewel also notifies you when you may be doing
something that might be incorrect or have not filled in something that is required, such as leaving
an input screen before saving the record. When this is detected, the program will display a message
reminding you to complete the function.
1.5 USING THE CANCEL BUTTON
In the upper right hand corner of the screen just below the HELP selection is a button with an “X.”
Whenever you click on this, WinJewel will cancel the screen you are on and return you to the Main
Menu. As an added protection to the user, if there is data on the screen you are using, WinJewel
will ask whether you want to save it before it deletes that screen.
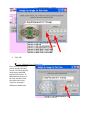
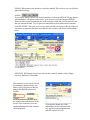
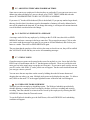
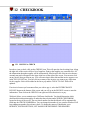
1.6 USING FIND BY
One of the most valuable tools of WinJewel is FIND BY. This button appears on many screens and
provides a quick method to find customers, inventory items, reports, settings and just about
anything else you are looking for. You should be comfortable with using the FIND BY feature as it
represents a very powerful component of WinJewel.
This section is only a discussion of FIND BY. Each chapter of this manual will go into FIND BY
more specifically.
12
A FIND BY button is included on the SALES, INVENTORY, CUSTOMER, SERVICE,
INVOICES, SUPPLIER and REPORTS screens. This feature allows you to find entries in the
WinJewel database that match certain criteria you enter. To use FIND BY, simply click on that
button and then fill in one or more of the fields on the screen with the characteristics you are
looking for and then click on the Find By button again. All matches will be displayed and you can
select the one or ones you want to see. For example, if you wanted to know how many ruby rings
you had sold during the last three months for a price between $300 and $500, you would select the
INVENTORY screen, click on FIND BY, type the word “Ruby” in the DESCRIPTION field,
300.00 in the RETAIL box, today’s date in the DATE SOLD field and then hit END FINDBY.
WinJewel will then ask you specific questions to zero in on the dollar amounts and date ranges you
desire. When you have answered these questions, all matches will be displayed in the large white
box in the lower right portion of the screen. Simply click the item or items you want to look at and
the full record will be displayed. As you look at each of the matches, WinJewel will mark those
that have been reviewed with a tick mark.
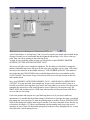
FIND BY also allows you to search for items that do not have entries in a given field. For example,
if you are looking for inventory items and type the word “Empty” in the DATE SOLD field,
WinJewel will only look for items that have not been sold. If you leave this field blank, the FIND
BY will look for both sold and unsold items. Another way to limit your search results on the
inventory screen is to put a check mark in SOLD, UNSOLD or ALL. These check boxes appear
when you first click on FIND BY. They will limit the list that is produced to only what you have
checked.
FIND BY can also be used as a report writer program. Using FIND BY from the CUSTOMER
screen, you can search the full customer database for names, specific notes, customer profiles, or
amount purchased and then use that database selection to send letters or look at special customer
records. A list can then be printed from the matches from the FIND BY.
There are many, many selections under SYSTEM SETTINGS and PRINTER SETTINGS and
finding the one you want is made easy with the FIND BY. Simply type in a key word or phrase,
like the word “tag” when you are looking at specific settings for tag printing, and WinJewel will
search the entire database and give you all the matches that include that word. You can page
through one by one until you find the one you want. If the program does not find a match, try to
use another similar word and look for matches. When using this manual, all references to
selections in SYSTEM or PRINTER SETTINGS will be listed exactly as they appear in the
system. Just enter one of the words in that phrase when you use FIND BY and page through until
the exact selection appears. FIND BY is not case sensitive but it will only find words that are exact
matches.
13
1.7 USING THE BUILT-IN CALCULATOR
If you click on the picture of the calculator in the upper left-hand corner of the screen, a small
calculator will appear. Use the mouse to click on the keys or use the keyboard keys as you would
any small calculator. A running tape of the transaction is maintained and can be printed. When you
are finished, click SAVE/CLOSE to leave the calculator.
Hint: The answer to any calculation done with the calculator can be pasted into any dollars
and cents box on any screen in WinJewel. This answer is available as many times as you
want to use it until you use the calculator again. Just double click where you want the
amount to be pasted.
1.8 CHANGING THE BACKGROUND COLORS OF EACH SCREEN
The background color of each screen can be changed by going to the REPORTS screen and
choosing SYSTEM SETTINGS. Then click on SET BACKGROUND COLORS FOR EACH
SCREEN. You can click on the name of the screen that you want to change and a selection of
colors will appear. Simply click on the color that you want to choose. You can also reset the
original colors by selecting the “Set all colors back to default colors” option.
14
2 INITIAL WINJEWEL SET-UP
Use this chapter as a checklist for setting up WinJewel in your business
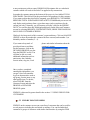
2.1 INSTALLING WINJEWEL
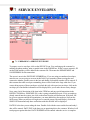
2.1.1 Discussion:
The WinJewel software program needs to be installed on every PC in your network that will be
using the system. WinJewel comes in either a single-user or a multiple-user version. The singleuser version is designed to work on a single PC and the program and all the data is stored on that
PC. The multi-user version is designed to run on a network of several PC’s. Each PC will have a
copy of the WinJewel program stored locally, but the data will reside on a Server PC to be jointly
shared by all of the workstations. The single user version WILL NOT work in a multiple user
environment and data will be lost, so be certain you are using the correct version. To verify the
version you are on, click on SYSTEM ANALYSIS located under SETTINGS on the main
WinJewel screen. This screen now will list all of the current settings for WinJewel including
whether it is the “single or multi-user mode.”
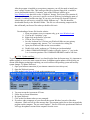
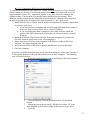
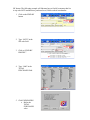
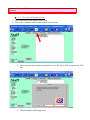
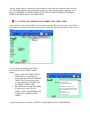
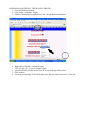
2.1.2 Install from the WinJewel CD – Single and Multi User Versions
SINGLE USER INSTALL - Put the CD in the single PC. It will start the install program
automatically. Choose the SINGLE choice and it will load automatically. Just follow the on
screen directions. The default for the installation program is to create a folder called
C:\WINJEWEL.
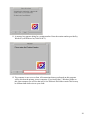
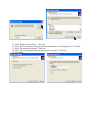
SERVER INSTALL – Put the CD in the computer that is to be the server and it will start the install
program automatically. Choose SERVER. The default for the installation program is to create a
folder called C:\WJServer\WinJewel. WinJewel can be installed into other locations on your hard
drive but please call and discuss this with the support staff at WinJewel before doing this. The
installation process will direct you through this and you should be very careful when changing any
of the default settings. If you have any questions, please consult WinJewel customer support.
CLIENT INSTALL - If you are running the Multi-User version of WinJewel, you should install
WinJewel onto the other computers in your network by using the CLIENT version of the install
program.
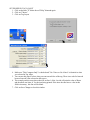
2.1.3 Install Your Logo/License
SINGLE USER - The logo/license must be installed on the single user computer in the WinJewel
folder.
MULTI USER - In a multi-user environment the logo/license must be installed in the WinJewel
folder of the server computer ONLY.
2.1.3.2 Discussion:
After the program is installed on your primary computer, you will also need to install your
store’s unique License Files. This can be provided on a separate floppy disk, e-mailed to
you or downloaded from the “Customize” page of the WinJewel website (go to
www.WinJewel.com then click on the “Customize” button). This License File contains all
of the special security for your store’s specific version of WinJewel, including the name of
the store, it’s address and the store logo. If you copy your license file from the WinJewel
website then you will receive a single file called “makeone.exe”. This file should be
downloaded directly to the WinJewel folder. This file is a self-extracting compressed file
that will install your license files when you double-click on it..
Downloading a license file from the website:
i. From your primary (server) computer only, go to www.WinJewel.com
ii. Click on the “Customize” page
iii. Right click on the link for your store.
iv. Click on "Save Target As,..."
v. Save the "makeone.exe" file into your WinJewel folder on your primary
(server) computer only. Answer “Yes” to overwrite the existing file.
vi. Open your WinJewel folder on the server machine.
vii. Double click on the “makeone.exe” file that you just downloaded.
viii. A black COMMAND PROMPT window will open. Answer “y” (yes) to the
3 or 4 overwrite questions. The COMMAND PROMPT window will close.
2.1.4 Update and Sort:
To get the most current version of WinJewel you should update from the Internet now. It is important to
update regularly to receive the most current revisions. In addition regular updates will help keep you
current with changing technologies and help you avoid conflicts with operating system and security
system changes. To update WinJewel:
1. Open your Internet connection (if your internet connection is not always on).
2. Open the WinJewel proram.
3. Click on the Update from Web link on the opening screen.
4.
5.
6.
7.
8.
You must accept the Agreement of Terms.
Follow the on screen instructions.
Re-Open WinJewel.
Click on the Sort button when you are prompted.
If you have other computers on your network then restart WinJewel on each of the other
computers. WinJewel will give the message that “The program on the Server does not match the
program on this computer. Do you want to update?” Answer YES to the question and WinJewel
will copy the updated version to that computer from the server.
16
2.1.5 Complete the Multi-User Version Installation
To complete the installation of the Multi-User version, you must have the Local Area Network
(LAN) working in your store. You must map network drives from each client to the server (we
suggest using drive letter “W”). Appendix A includes a very basic process for setting up the
required network. You may need to get outside help to install the physical network. These
directions assume you have already installed the network hardware, connected each computer to
the network and that drives are mapped from each client to the C:\ drive of the server.
1. Install WinJewel Server Version from the WinJewel installation CD onto the computer that
is to become your server.
a. If you have less than 6 computers and are NOT running the Multi-Store version of
WinJewel, then you do not need a server version of Windows.
b. If you are running more than 6 computers or have other locations outside the
premises that will be accessing this server then you will need a server version of
Windows.
2. Install the WinJewel Client Version into each of the other computers in your network.
(Do NOT install the logo/license on any client computers.)
3. Map a drive from each of any client computers to the WJServer folder on the server
computer. We suggest using the letter W.
4. Run WinJewel on each of the client computers and follow the on screen directions.
5. Close My Computer.
If you have not followed the directions exactly when first running any of the client versions of
WinJewel then WinJewel will not be linked to the server on these computers. The following
steps will correct the error.
1 - Right click on the WinJewel icon on the desktop of the client computer
2
3
4
- Click on Properties. Click on the Shortcut tab if it is not already
selected.
- Change the Start In box to read W:\WinJewel.exe where “W” is the
letter identified as the WJServer folder on the server in step 3 above.
- Click OK.
17
When you start WinJewel on a client computer for the first time or just after the server has been
updated to a new version of WinJewel then you may see the following information box:
The above message is normal when setting up a client machine. It is warning you that
proceeding with opening WinJewel will modify the data files on this machine. This is exactly
what we want to do when installing a client to a network. Click OK and wait (10 seconds or
more) for the next message.
Click OK. WinJewel will close.
A black COMMAND PROMPT window will open. Click any key to start the copy process. It
may take 30 seconds or more depending on the speed of your network to complete copying.
18
6. When the copy process is done the next message will appear.
7. Press any key on the keyboard to continue. The COMMAND PROMPT window will close
8. Start WinJewel again by double clicking on the WinJewel icon from the desktop, click OK
on the message box
9. If the words “Set To Be Slave” appear on the screen as show below then click on the “Set
to be Slave” link to finish. If this line does NOT appear then you can go to step 12 below
and skip the next few steps.
10. The following message box appears. Click OK
19
11. A message box appears asking for a routine number. Enter the routine number provided by
WinJewel (call WinJewel at (360-658-9875).
12. The computer is now set as a client. All transactions that are performed on this computer
will be saved on the primary (server) computer. If you look in the C:\WinJewel folder on
this client computer you will see that only a few WinJewel file/folders remain This list may
be different than what exists on your client.
20
13. All computers on the network should have the same Time and Date style setting. To verify
this, go to the Windows desktop and select MY COMPUTER, CONTROL PANEL and
check that the Style settings for both TIME and DATE are identical. You should also verify
that each PC has the correct date and approximately the same time. Without this, WinJewel
will not be able to verify that all PC’s are running the same version of the program.
You are now ready to run WinJewel in your store.
2.2 YOUR STORE LOGO
One of the first things you should do is verify that your store name and logo are correct. The store
name and logo appear on all screens and print on all sales receipts, letters and order forms in
WinJewel. If the logo is not correct, please contact WinJewel and they will generate a new one. If
your store address or telephone number changes, you cannot change these fields in the License File
yourself, but must contact WinJewel for a new License File.
2.3 SET UP DEPARTMENTS
Setting up Departments is required before entering inventory because the Department is a
mandatory field when entering inventory. Departments are the logical divisions of merchandise
types sold in the store. The first three characters (numbers or letters) of each department name
must be different from the first three characters of any other department name.
A sample list of departments is provided. You can keep, modify or delete any of these sample
departments. Click on the REPORTS icon and then the DEPARTMENTS choice button. Click on
the SEE/CHANGE button. Click on the top line CLICK THIS LINE TO ADD NEW
DEPARTMENTS or click on any department you want to change. Fill in or change the department
name. Remember that the first three characters must be unique. This sometimes takes a little
creativity.
21
You will then be asked to establish several selections for each department:
NORMALLY NOT TAXABLE – Click this check box only if this particular department is not
taxable. The default is taxable if unchecked. You can override this setting anytime you are
writing a sales slip.
INCLUDE WITH SUB TOTAL – This will allow departments to be grouped into sub totals of
departments that will show these subtotals when print sales reports. This is an optional thing
and sub totals are not required.
CATEGORY – This provides WinJewel with information about where the General Ledger is
effected by this department
EDIT CATEGORIES LIST – This will allow you to add other categories and define them.
OPEN TO BUY – This lets you track the inventory level for each individual department. If you
want your current inventory level to remain the same, enter “0.” If you want to increase your
inventory, enter the desired dollar amount. Each time you enter an order for a department, the
cost will be deducted from the Open to Buy amount and each time you sell something, the cost
will be added to this amount.
AVERAGE COST AS A % OF RETAIL – The percentage of the retail price that will be used as a
default if no cost is given or no retail price is entered for a particular inventory item (“50”
would mean keystone).
SALES COMMISSION RATE – WinJewel can track the sales commissions by department. Enter
three digits without the decimal point (Example: 015 would be 1 ½ percent).
MIN. % ABOVE COST TO DISCOUNT – This will limit any employee’s ability to discount to
this percentage above the cost of any item in this department.
LABEL FOR MULTI-USE FIELD – This label will be used for the Multi-Use box when entering
or seeing any item in this department on the inventory screen.
22
Check Boxes:
TURN ON AUTO DISCOUNT – This will cause all all items that are in this department to be
discounted automatically when they are sold.
NORMALLY NOT TAXABLE – By default all items are marked as normally taxable. If this box
is checked then items from this department will be marked as not taxable.
LAUNCH GIFT CERTIFICATES – If you want to account for gift certificates, it is best to
establish one unique department for these certificates. When you do this, click on LAUNCH
GIFT CERTIFICATE to tell WinJewel this department is for gift certificates. Only one
department can be designated for gift certificates.
REMOVE SALES TAX – This is only used by retail stores that are near the border and need to
remove the sales tax from sales when the paperwork has been sent back from the other country
and just the tax then needs to be removed from a sale. This department would then be used
when removing sales tax.
USE LOOSE DIA LAYOUT – This will change the inventory screen when any department with
this box checked is used. It will add the information that is expected for loose diamonds.
USE AS DEPT IF NONE GIVEN – This will make this department be chosen when no department
was indicated on the sales screen. Only one department can be marked for this feature.
SPECIAL NOTE FOR THIS DEPARTMENT – If you click this button then you will enter a note
that is to be printed on sales that are made to this department.
If you do NOT want to have some fields visible on the inventory screen when viewing an item that
is marked in this department then put a check next to that field name. This can be very helpful
to clean up the inventory screen of boxes that do not need to be filled in for any one
department.
If you want to totally eliminate a department, click on that department and select ERASE THIS
ONE DEPARTMENT and WinJewel will eliminate it on the next sort. You can also delete all
departments with the ERASE ALL DEPARTMENTS selection.
When you are finished entering data, remember to click on SAVE/EXIT so WinJewel will save
your changes.
2.4 SET UP SUPPLIERS
Setting up Suppliers is required before entering inventory because the supplier number is part of
the stock number. Each of your suppliers must be assigned a 3 digit number between 001 and 997.
Number 998 should be reserved for temporary suppliers (suppliers that you use infrequently) and
number 999 is reserved for removing suppliers. To enter a supplier go to the SUPPLIERS screen,
double click in the NUMBER field to auto assign the next available number or enter the three digit
number of your choice. Enter the supplier name. All other information is optional. Once all
suppliers have been entered and given a number, you can choose whether to display them
alphabetically or in number sequence by selecting that appropriate gray bar on the screen. See
chapter 11 for a more detailed overview of suppliers.
If you have inventory that you already own and do not have supplier information, you can establish
yourself as a supplier.
23
Once an item is saved, the supplier number cannot be changed from the inventory screen. There is
however a special Inventory Report that allows you to change part or all of a stock number on
individual items.
2.5 SET UP GENERAL LEDGER ACCOUNTS SET UP SUPPLIERS
A 3 to 5 digit number must be assigned to each general ledger account. The general ledger
accounts should correspond to the ones you are currently using with your present accounting
system. You can see the sample list of general account numbers that is provided under REPORTS,
G/L ACCOUNTS, SHOW OR CHANGE EXISTING NAMES AND NUMBERS.
You can change these G/L accounts by clicking on one of the entries and changing the fields. The
GL number can be any number up to 99999. CATEGORY is a unique set of three letters.
Providing a category description will result in getting a total for all of the general ledger accounts
within that category. For example, if you create a category called “CAS” to total all of the separate
cash general ledger accounts.
If you need more accounts than are available now, click on G/L ACCOUNTS again but this time
follow it by clicking on ADD NEW ACCOUNT NAME AND NUMBER. When you are finished
adding accounts click on the SORT G/L ACCOUNTS BY NUMBER selection to get them in the
proper number order.
Remember, it is best to use the same numbers that your accountant has been using so you can
compare historical costs to your old bookkeeping system.
2.6 SET UP STAFF
At this time you can enter all employees but you should enter yourself and give yourself
permission to all screens.
When you enter each employee, give them each a unique password and establish which features of
WinJewel they will be allowed to use. Click on the STAFF icon to access the employee/security
portion of WinJewel. For now you can leave security turned off but you should give yourself
permission to access all screens. The next paragraph describes how to add yourself to the STAFF
list and how to give yourself permission to access all screens. You should do this now to prevent
accidentally locking yourself out later when you do set up permissions.
Click on the STAFF icon. Click on the ADD ONE button. Enter your initials (first and last name),
click OK. Enter your name in the NAME fields. Click in the CODE field. Enter your initials again.
For now you are only using your initials as a permissions code (you can change this at a later time
after reading chapter 9 STAFF AND TIMECARDS). Place a check mark in every check box (17)
on this screen. INVENTORY SEE and INV CHANGE/SEE are options, only one can be selected.
You should check INV CHANGE/SEE. Click on the SAVE CHANGE button.
The previous paragraph has set yourself up for full access to all the features available in WinJewel.
Refer to the chapter 9 STAFF AND TIMECARDS of this manual for detailed instructions.
24
2.7 SYSTEM AND PRINTER SETTINGS
There are many system and printer settings, but there are several you should set now prior to using
WinJewel.
1. Set the sales tax rate for your store location. WinJewel will automatically compute sales
tax on items. Select REPORTS, SYSTEM SETTINGS, click on the second item SET TAX
RATE and enter the sales tax rate in the format x.xxx. If you have no sales tax in your
state, enter “0”.
2. Set SALES SLIP printer settings. Select REPORTS, PRINTER SETTINGS for these next
4 printer settings.
a. Chose to print or not print sales slips. The first item listed (SET SALES SLIPS TO
PRINT NORMALLY) has an “>” next to it signifying that it is turned on. This is
the default setting. If you do not want WinJewel to print the sales slips (you may
want to continue using manual sales slips for now and only enter the information
into WinJewel at the end of the day), click on the second item, SET SALES SLIPS
TO SAVE BUT NOT PRINT, and it will now have the “>”.
b. Choose the quantity of sales slips you want to print. Click on “SET DEFAULT
NUMBER OF COPIES OF SALES SLIPS TO PRINT” (the third line down) and
set how many copies you want to print as the default. You might consider setting
this at “2”, one for the customer and one for your store records.
c. Set the marketing message that prints on each slip. Click on “SET THE NOTE TO
BE MADE ON EACH SALES SLIP”. If you do not want any message, just enter a
couple of blank spaces.
d. Establish what type of printer you are using: The default is WINDOWS
COMPATIBLE and this is normally what you should select. You must have at least
one Windows printer installed for WinJewel to use.
i. If you are using a Windows compatible (ink-jet) printer you are done with
printer set-up.
ii. If you are using a Non-graphics text-type (impact) printer, Click on “SET
ALL PRINT OUTPUT TO PRINT NON-GRAPHICS STYLE”.
1. Setting this item does not replace the printer driver used by
Windows, it simply lets WinJewel use the clearest style of output
for your type of printer.
2.8 SETTING UP A TRAINING PROGRAM
2.8.1 Discussion:
It is important for you and your staff to spend time entering items and to become comfortable with
the various components of the program before they use it in a live environment. WinJewel allows
you to set up a special training program for just this purpose. The training program is a special
copy of the WinJewel program with a copy of the current data. The training program can be
created, deleted and used regularly to make trail runs of new print and system settings. Make
certain you have enough free disk space on your hard drive to add another version of WinJewel.
Generally, you will need at least 100 MB and this may be larger depending on how many
inventory items have been added.
You will see this Hint Box throughout this manual.
Hint: Make a fresh TRAINING COPY to try these procedures, options, reports or settings.
25
The TRAINING COPY will show how these functions work before effecting the actual
data. See section 2.8 SETTING UP A TRAINING PROGRAM.
It presence is a suggestion that the associated instructions should be tried out in a non-critical
environment, such as the training copy. This way the outcome of changes will be known before
making changes to your actual system. The training copy can be made at any time throughout the
life of WinJewel program.
2.8.2 Make a Training Copy:
1. Click on REPORTS, SYSTEM SETTINGS.
2. Click on the gray button on the right that says MAKE TRAINING PROGRAM.
a. A second copy of WinJewel will be created. It will have it’s own Icon on your
Windows desktop entitled WINJEWEL TRAINING and all of the WinJewel
screens will be displayed in gray as opposed to color (to reduce the uncertainty as
to which system is which). It is on this training system that you want your staff to
play with different screens and explore what happens when they select different
options.
At the same time your staff is trying to “break” the training system, you can be loading inventory,
suppliers, staff, etc. to set up the real system for production. As often as you want, you can select
MAKE TRAINING PROGRAM again and all of these real system changes you made will be
copied to the training system.
When you are ready for your first “go-live” day, you should delete the training program folder.
Use Windows Explorer or My Computer on your desktop to delete the entire folder entitled
“C:\WJTraining.”
2.9 SET SCREEN APPEARANCE
Resolution is the size of the screen picture. A higher resolution is a smaller picture but will show more.
WinJewel recommends 1024x768. This is done in Windows, not WinJewel.
To set the screen resolution:
1. Right click on the desktop.
2. Left click on Properties.
3. Left click on Settings.
a. Move the “Screen Resolution” scroll bar to the desired resolution..
WinJewel also recommends that you set your taskbar to not be “Always on Top.” To change the task bar
settings:
1. Right click on the “Start” button
2. Left click on “Properties”
3. Left click on the “Taskbar” tab near the top of the properties window.
4. Uncheck the “Keep the Taskbar on top of other windows” option.
a. WinJewel recommends uncheck all 5 Taskbar Appearance checkboxes.
5. Click OK
26
2.10 GETTING SPECIAL ASSISTANCE
A NOTE OF CAUTION. There are many special settings in WinJewel that are not specifically
referenced in this manual. Do not select any of these items without first discussing this with
WinJewel Customer Support. You can try these settings out in a Training Copy yourself but make
sure you understand what a setting does before making changes in your real WinJewel program.
As part of your annual maintenance fee, you have access to WinJewel’s staff for assistance. There
are 3 ways to ask questions. (Additionally answers to many questions are available in the “HOW
DO I” list of the HELP screen to see if the question is already answered there.)
1 - Call direct to WinJewel's office at (360) 658-9875. Our normal office hours are Monday –
Friday 7 A.M. to 5 P.M. Pacific Time. Someone is usually available to answer calls outside of the
normal office hours 24 hours/day, 7 days/week. If you get a recording, please leave a message and
we will get back to you as soon as we can.
2 - Email your question to [email protected]. We will respond to all e-mails within 24 hours
with a detailed answer.
3 - Fax your question to WinJewel (360) 651-8716.
27
3 SALES
3.1 HOW TO WRITE UP A SALES SLIP
3.1.1 Discussion:
Completing a basic sales transaction in WinJewel is simple and straight forward. More
complicated sales transactions may require a little more training time but are also easy once you
know how to handle them. This first section of the this chapter describes a basic sale in detail.
Other transaction types follow.
3.1.2 Things you Should Do or Know Before Starting:
•
•
•
•
•
•
You do not need to click in the LAST NAME field to enter a name for searching the
customer database. Click once on the SALES icon. This will display the sales slip form.
The cursor is blinking in the PHONE box. To start a sale you can enter either the
customer’s name or phone number immediately.
Make sure that the NumLock (N/Lock) on your keyboard is on (light is illuminated). The
10 key number portion of your keyboard acts as navigation buttons when NumLock is off
and may cause peculiar behavior.
Follow the sequence of entering information. WinJewel will prevent you from completing
a transaction that is missing information such as a salesperson, but this process will force
you to jump around the screen in an inefficient manner.
Set up the printing preferences as described in section 2.7 SYSTEM AND PRINTER
SETTINGS before making any sales.
The sales tax rate is displayed just below the END SLIP button. If this is not the correct
rate, go to REPORTS, SYSTEM SETTINGS, SET TAX RATE.
QUICKLISTS in appendix C provides a condensed breakdown of common tasks.
The normal sequence for entering a regular sale is:
1. Enter the customer information.
2. Select a salesperson.
3. Enter the item information.
4. Select the payment type.
5. End the line (start a new line).
6. End the Slip.
7. Confirm payment options.
8. Slip prints.
This sequence may change slightly for special sales types such as layaways or in-store charges.
3.1.3 Enter the Customer Information:
DISCUSSION: ALWAYS CHECK TO SEE IF THE CUSTOMER ALREADY EXISTS
IN THE CUSTOMER FILE. The first step to starting a sale is to select a customer or click
on the NO NAME button if the customer is anonymous. Existing customers can be
retrieved from the sales screen. As a convenience new customers can be added from the
sales screen also. Because customers can be added it is important that existing customer
information is not typed in completely but instead must be retrieved from the existing
customer file. Any customer information saved on the sales screen will create a new
customer record, even if the information is identical to the existing customer record. This
will create a second entry of the customer that is independent of the existing customer
record.
There are two methods to retrieve an existing customer from the sales screen. You can either:
•
•
Enter a customer’s phone number in
the PHONE field.
Enter a customer’s last name (or
partial last name) in the PHONE box.
When you enter letters in the PHONE
field, WinJewel knows to check for a
last name instead of a phone number.
29
You can also do a FIND BY search of the customer’s FIRST NAME, or ADDRESS by using the
FIND BY button.
Press the ENTER key, TAB key or Click into another field (when you do this the letters of the
name will be copied into the LAST NAME field). If the phone number or name is already in the
system, WinJewel will display the name and address of all the matches. Click once on the correct
entry and all the customer information will be automatically filled in.
If this is a new customer with no previously entered data, fill in the rest of the information in each
field. The ENTER or the TAB key will move you from box to box.
3.1.4 Select a Salesperson:
With the cursor blinking in the SALESPERSON box, select a salesperson. There are two ways to
select a salesperson’s name.
• Click once on the small arrow to the right of the box to display the names. Click one time
on a name.
• Enter the sales person’s unique code (discussed in the chapter STAFF AND TIMECARDS)
and hit ENTER. If entered correctly the full name will be displayed in the box.
This name will be printed on the Sales Slip given to the customer and also tracked for reporting
and commission purposes.
OPTIONS: The system allows sales credit to be equally split between up to 5 salespersons.
To enable this option, go to REPORTS, SYSTEMS SETTINGS, SET SALES TO SPLIT
BETWEEN SALESPEOPLE. When this option is turned on a SPLIT SALE line will be
added to the bottom of the salesperson list on the SALES screen. To split a sale select this
line, then select the staff names that will split the commission.
OPTIONS: A default staff member can be chosen for sales. This staff member’s name will
appear on the sales screen and all printed sales transactions unless changed at the time of
sale. This will eliminate a step during sale transactions if there is only one salesperson. To
enable this option, go to STAFF, STAFF MEMBER (select the staff member’s name),
check the box USE THIS NAME IF NO NAME GIVEN.
30
3.1.5 Enter the Item Description:
The cursor should now be blinking on the first STOCK NUMBER box. Enter the first three digits
of the stock number then press the ENTER key. The cursor will now be blinking in the second
STOCK NUMBER box. Enter the next 5 digits of the stock number and press the ENTER key
(you can also enter the entire 8 digit stock number into the first STOCK NUMBER box). If the
computer finds a match for this stock number the DESCRIPTION, PRICE and DEPARTMENT
boxes will be filled in automatically. If no match is found you should enter these yourself. If you
are using bar-coded tags, you can simply scan the bar code of the item you are selling and
complete item information will be filled in (the cursor must be blinking in the first STOCK
NUMBER box to do this).
3.1.6 Select a Payment Type:
You must now choose a payment option button along the right side of the screen labeled CASH,
CHECK, BANCKARD, (CHARGE, PAYMENT, LAYAWAY and MEMO if memo is turned on).
Click on the small circle just to the left of each label. Notice how the last one that you clicked is
black. If it doesn’t turn black move your mouse arrow and click it again.
3.1.7 End the Line:
Ending the line completes this one item and prepares WinJewel for the next item or for ending the
sale. There are two choices for ending the line, END LINE TAX and END LINE NO TAX. Either
will end this line. The correct choice depends on the item type (taxable or non-taxable). If you
choose END LINE TAX the sales tax will be calculated and shown on the sales item. After you
choose an END LINE button, the cursor will move to the first STOCK NUMBER box, ready for
the next item. If you have another item for this sales slip, enter the numbers now.
OPTIONS: WinJewel assigns a SALES SLIP number to each transaction. This is just a
consecutive assignment of numbers to each transaction. You can change this number (to
match your pre-numbered or handwritten slips) by clicking on the words “SLIP
NUMBER”. This can be done at any time during the sale but must be done before clicking
on END SLIP. Enter the number that you want printed on the slip. Changing the number
will not effect the starting point of the next slip number. WinJewel will skip to the next
available number if the consecutive number has already been used. If you want to change
the starting point of sales slip numbers (to be consistent with your old way of accounting),
go to REPORTS, SALES REPORTS, SET NEXT SALES SLIP NUMBER and enter the
number you want.
OPTIONS: WinJewel allows you to choose the number of slips you want printed. You can
change this number for one transaction or for all transactions. To change the quantity for
one transaction only click on the NUMBER OF COPIES button near the top of the screen.
This must be done before clicking on END SLIP. To change the quantity for all
transactions see the instructions in section 2.7 SYSTEM AND PRINTER SETTINGS.
3.1.8 End the Slip:
If you are finished with this sale, just point to the END SLIP bar and click.
31
3.1.9 Confirm Payment Options:
After ending the slip the you will have
an opportunity to change/confirm the
payment option. The following screen
will appear. You can accept the entry
or change the payment types as
desired.
Point and click with the mouse on any
item that you want to change and enter
the amount (you can now split
payments such as taking a portion by
check and a portion in cash).
As you are making changes, if the
entries go out of balance to the total,
you can correct this by clicking on the
BALANCE button next to the
category you want to use to balance
When you are finished, click on END.
OPTIONS: If the customer is paying with a check, the system will provide you a field to
enter the check number and this information can be used when you are preparing your daily
deposit by selecting REPORTS, SALES REPORTS, SHOW CHECKS RECEIVED. This
field can be left blank.
32
OPTIONS: WinJewel can also request the entry of the customer’s drivers license number
(go to REPORTS, SYSTEM SETTINGS, SET DRIVERS LICENSE NUMBER TO BE
ASKED FOR. If you have previously entered the number for this customer, WinJewel will
display it for verification). When entered, the customer’s drivers license number will be
displayed in a customer note. This field can be left blank.
SLIP PRINTS:
The sales slip will print according to your printing preferences.
3.2 PRINTING SALES SLIPS
Before you hit the END button on the sales slip, you should make certain that your printer is turned
on and supplied with paper. The sales slip will now print. Normally, sales slips will print on half of
an 8 1/2 x 11 piece of paper. You may want to have some half pages available for printing.
The number of sales slips printed for this transaction will be determined by the NUMBER OF
COPIES field located on the top portion of the SALES screen. This can be set for any number of
sales slip copies. The standard default is established by selecting REPORTS, PRINTER
SETTINGS, SET DEFAULT NUMBER OF COPIES OF SALES SLIP TO PRINT. However, on
any given sales slip, this number can be changed by putting the cursor in that box and typing in any
number desired. This must be done before you hit the END SLIP button.
The Sales Slip will include the date, your store logo, the slip number, the customer’s name and
address, the form of payment, a full description of the item including the Stock Number, the
amount, the customer’s current balance, the salesperson and a special message line. To set the
special message line, select REPORTS, PRINTER SETTINGS, SET THE NOTE TO BE MADE
ON EACH SALES SLIP. The unique customer number will also print on the Sales Slip. You can
undo this by selecting REPORTS, SYSTEM SETTINGS, SET THE CUSTOMER NUMBER TO
PRINT ON SALES SLIPS.
3.3 SPECIAL CUSTOMER INFORMATION ON SALES SCREEN
Anytime that you have a customer filled in on the screen, several additional information items are
available. At the bottom of the screen are several gray bars that can be selected. SEE NOTES will
show all notes previously entered for this customer. You can also make a new note by selecting
MAKE NOTE. To close the note press the “Enter” key or click in the gray border around the note.
All previous sales slips for this customer will be displayed with the PREVIOUS selection as well
as the customer’s PROFILE screen and any outstanding REPAIR envelopes. You will note that
when you make any of these selections, the PREVIOUS button changes to now say SEE SLIP (For
PROFILE, hit END PROFILE). When you are finished looking at the items, this selection will
return you to the sales slip.
Once the customer has been identified, the SALES screen will also display some valuable
information about this particular customer. If the customer has an outstanding balance, that amount
33
will be displayed just above the address field. In addition, the credit limit and agreed payment
amount will also be displayed.
3.4 SALES REPORTS
WinJewel provides complete daily, monthly and special sales reporting. At the end of each day,
you should go to REPORTS, SALES REPORTS and select the DAILY SALES REPORT. This
will give you a complete printout of a day’s activity including a list of each sale, the salesperson
responsible, the stock number of the item sold, the description, the department, the customer and
the amount and format (cash, check, etc) of the sale. In addition, you will get the daily totals for
total sales, sales tax collected, cash collected and total sales by department and salesperson.
This report should be saved and filed away in a safe place. If anything ever happens to your system
and you have not completed a recent backup, you can fully reconstruct sales activity from this
report.
The following additional sales reports are available by selecting REPORTS, SALES REPORTS
and the desired report:
MONTHLY SALES REPORT (monthly totals of sales by payment type, salesperson and
department)
SPECIFIED TIME PERIOD SALES REPORT (sales details and totals for any date range
desired)
ANALYZE SALES IN A GIVEN PERIOD BY DEPARTMENT
3.5 WRITING A SALES SLIP FOR AN ENVELOPE
BY ENVELOPE NUMBER: If you want to write a sales slip for a repair envelope, enter an “E” "
in the phone box and it will be automatically transferred to the first stock number box and focus
will move to the second stock number box where you can enter the envelope number. Everything
that was entered when the envelope was made out will be filled in on the screen, including the
customer's information, description, price, department and salesperson.
BY CUSTOMER NAME: Enter the customer’s information then select a salesperson. Click on the
REPAIR button at the bottom of the sales screen. A list of open envelopes for this customer
appears. Select the envelope.
3.6 REPRINTING A SALES SLIP
Sometimes the printer will jam or for some reason you want another copy of a sales slip. On the
SALES screen, bring up the customer that the slip was written for. Then click on the PREVIOUS
gray bar. All of the slips that have ever been written for this customer using WinJewel will be
displayed in the large white box at the bottom of the screen. The most recent one should be listed
at the bottom. Point with the mouse and click on that slip. You will be asked if you want to reprint
or reverse this slip. Click on the REPRINT button and another slip will be printed.
34
3.7 DELETING A SALES SLIP YOU ARE WORKING ON
If you need to erase a sales slip that is in the process of being written but not finished, click on the
small “X” in the upper right hand corner of the screen. All data for this slip will be erased and you
can now start over.
DELETE ONE LINE: If you need to change a line already entered on the sales slip, simply click
on the detail line you want to change from the large white box and it will be automatically reentered in the entry boxes above. Change the incorrect field to what you want and hit the END
LINE button again and the correct information will now display in the large white box.
3.8 REVERSING / ERASING A SALES SLIP
Go to the LAYAWAY section of this manual (chapter 3.14) to reverse a layaway.
Go to section 3.12 WRITING A SALES SLIP RETURN, DISCOUNT OR CREDIT to return
merchandise from a previous sale to the store and to give the customer a refund.
3.8.1 Discussion
WinJewel provides three ways to undo a sales slip that needs to be removed for any reason other
than a return of merchandise (for example it was entered incorrectly). This paragraph describes two
of those methods. The third method, SEE OR CHANGE ONE DAY should only be performed by
advanced users or with the assistance of WinJewel support. The two methods (REVERSE and
ERASE), create a record that is opposite of the original transaction, adjusts account balances and
restores inventory files to their original position.
Hint: Make a fresh TRAINING COPY to try these procedures, options, reports or settings.
The TRAINING COPY will show how these functions work before affecting the actual
data. See section 2.8 SETTING UP A TRAINING PROGRAM.
3.8.2 Reverse a Sales Slip:
1. Enter the customer information on the SALES screen.
2. Select a Salesperson.
3. Click on the PREVIOUS button near the bottom of the screen. A list of previous
transactions will appear for this customer.
4. Adjust the date on the Sales Screen (upper left corner) to match the date of the original
sale.
a. Double click in the DATE field (upper left corner) and select the desired date. The
daily and monthly reports will be adjusted on this date.
5. Click on the slip to be reversed and click on REVERSE. This will create another slip with
exactly the opposite information and restore the account balances and inventory files to
their original position.
3.8.3 Erase a Sales Slip:
Erasing a slip removes the original transaction, adjusts account balances and restores inventory
files to their original position. Erasing a slip is similar to reversing a slip with three exceptions:
35
•
•
•
The transactions (original and erasing) will not appear in any sales reports.
You must be authorized (STAFF permission) to ERASE.
A record of the erase will be entered into a separate file. To view these go to REPORTS,
SALES REPORTS and click on LIST OF ERASED SALES BY TIME PERIOD.
To erase a sales slip:
1. Enter the customer information on the SALES screen.
2. Select a Salesperson.
3. Click on the PREVIOUS button near the bottom of the screen. A list of previous
transactions will appear for this customer.
4. The date does not need to be adjusted but can be for recording purposes.
a. To change the date, double click in the DATE field (upper left corner) and select
the desired date. The daily and monthly reports will be adjusted on this date.
5. With the right mouse button, click on the slip to be erased.
a. A message box will appear asking for your staff permission code. Enter you code. (You
must be authorized to ERASE on the STAFF screen).
b. A another message box will appear warning you that the next slip you click on will be
ERASED.
6. With the left mouse button, click on the slip to be erased. It is now erased. It will not appear in any
sales reports or customer sales history. A record will be created recording the erase, account
balances will be restored and inventory files will returned to their original position.
3.9 CHANGING A SALES SLIP - SEE OR CHANGE
WARNING: This process should only be performed by advanced users or with the assistance of
WinJewel support.
If you find you have entered sales slip information incorrectly, it is usually best to totally
reverse/erase the incorrect slip (see above) and then write up a whole new slip with the correct
information.
Hint: Make a fresh TRAINING COPY to try these procedures, options, reports or settings.
The TRAINING COPY will show how these functions work before effecting the actual
data. See section 2.8 SETTING UP A TRAINING PROGRAM.
However, sometimes you may find that you need to go back and change an old slip. To do this, go
to REPORTS, SALES REPORTS, SEE OR CHANGE ONE DAY. It is important to remember
that this process does NOT automatically change the customer’s balance and the inventory records.
It does change the totals on any day or month report if you run that report again. Be very careful
making any change because very few of the checks and balances safeguards that are normally built
into the WinJewel system will be working.
From the SEE OR CHANGE ONE DAY SCREEN, enter the date for the slip that you want to
change. Point and click on the line of that day that you want to change. Each separate part of the
sales slip will display in a window box and allow you to change it. After you have completed
making the changes, you will be given one last chance to not change the slip. Enter SAVE if you
want to make the change permanent.
36
3.10 MOVING A SALES SLIP
If you want to move a sales slip from one customer's account to another, go to REPORTS,
CUSTOMERS, MOVE SALES SLIP FROM ONE CUSTOMER TO ANOTHER. Enter the
customer number of the “from” customer in the FIRST CUSTOMER NUMBER BOX and hit
ENTER. If you don’t know the number, click on FIND A CUSTOMER NUMBER BY NAME
and enter the customer’s name. Next, enter the ‘to” customer number in the SECOND
CUSTOMER NUMBER box. Now, click on the slip or slips you want to move and click on the
down arrow button. You will see the items move between customers. If you make a mistake, just
click on the item again and click on the up arrow button and it will move back. When you click
END TRANSFER, the system will automatically re-link the sales slip history.
3.11 FINDING AN OLD SALES SLIP
If you know an item has been sold, but you cannot remember the item number, for how much and
to whom, you can find the sales slip by using a special FIND BY selection. Go to REPORTS,
SALES REPORTS, FIND A SALE BY WORD OR PHRASE IN SALES DESCRIPTION. Enter a
starting and ending date to search and a portion of the item description which would have printed
in the description field on the sales slip and WinJewel will find all of the matches.
You can also search for old sales slips by dollar amount. Go to REPORTS, SALES REPORTS,
FIND A SALES SLIP BY SLIP AMOUNT and you can search by date or date range, specific
amount or range of dollar amounts and whether you want to look for the amount with or without
sales tax. All matches will be displayed and you can look at each one to determine if it is the one
you want.
IF you know the slip number, you can find the record in WinJewel by going to REPORTS, SALES
REPORTS, FIND SALES SLIPS BY SLIP NUMBER.
3.12 WRITING A SALES SLIP RETURN, DISCOUNT OR CREDIT
Go to the LAYAWAY section of this manual (chapter 3.14) to reverse a layaway.
Go to section 3.8 REVERSING / ERASING A SALES SLIP to undo a slip that was entered
incorrectly.
WinJewel provides a two ways to return an item to inventory and refund the customer.
• RETURN (one item at a time) allows you to choose how to refund the customer (payout or
store credit). It is recorded by creating a new sales slip.
• REVERSE (an entire slip) returns all items on one slip to inventory, and refunds the
customer payment type exactly as it was on the original slip. It also is recorded by creating
a new sales slip. If the original transaction was a store CHARGE the balance will be
adjusted. If it was a BANKCARD payment you must also run a refund transaction on their
bank card. CASH and CHECK payment types can be paid out in cash.
3.12.1 Return (one item at a time) for credit or refund
1. Enter the customer information on the SALES screen.
37
2. Select a Salesperson.
3. Enter the item (stock) number of the item to be returned.
a. NOTE: If the item does not have a stock number;
i. Enter the description in the description field
ii. Enter the retail price (no tax) in the price field (-102.00) as a minus amount.
iii. Select a department.
iv. Skip steps 4-5.
38
4. A
message
box
appears
telling
you that
the item is
already
sold.
Click OK.
5. Another
message
box
appears
asking “Is
this a
return?”
Click
YES. A
negative
amount
for the
original
sale will
be placed
in the
PRICE
field.
6. Select a payment type.
a. GIVE A STORE CREDIT INSTEAD OF A REFUND: WinJewel allows you to
return an item and give the customer a store credit instead of refunding cash.
Hint: Make a fresh TRAINING COPY to try these procedures, options, reports or settings.
The TRAINING COPY will show how these functions work before effecting the actual
data. See section 2.8 SETTING UP A TRAINING PROGRAM.
i. Use this procedure if the customer;
1. is only returning items and the difference will be given in a store
credit.
39
2. OR, is purchasing at the same time AND the purchase amount is
less than the refund amount AND the refund will be given in a store
credit.
3. OR, is purchasing at the same time AND the customer will be
charging (store charge not bankcard) the sale.
ii. Click on the CHARGE payment type.
iii. Click on END LINE TAX or END LINE NO TAX.
1. Notice the customer
balance has been adjusted
when payment type is
CHARGE.
iv. Enter next item (purchase or return) or click on END SLIP.
b. REFUND WITH A PAYOUT: You may also take in a return and refund the
payment to the customer.
i. Use this procedure if the customer;
1. is only returning items and the refund will be paid out.
2. OR is purchasing at the same time AND the refund purchase amount
is less than the refund amount AND the refund will be paid out.
40
3. OR, is purchasing at the same time AND the purchase amount is
more than the refund amount AND the purchase will be paid in full.
ii. Click on the desired payment type (CASH, CHECK, BANKCARD).
iii. Click on END LINE TAX or END LINE NO TAX.
iv. Enter next item (purchase or return) or click on END SLIP.
3.12.2 Reverse (an entire slip)
Hint: Make a fresh TRAINING COPY to try these procedures, options, reports or settings.
The TRAINING COPY will show how these functions work before effecting the actual
data. See section 2.8 SETTING UP A TRAINING PROGRAM.
1. Enter the customer information on the SALES screen.
2. Select a Salesperson.
3. Click on the PREVIOUS button near the bottom of the screen. A list of previous
transactions will appear for this customer.
4. NOTE: the date should not be adjusted for proper recording of the return.
5. Click on the slip to be reversed and click on REVERSE.
3.12.3 Discounts:
There are three ways to discount a price at the point of sale. Two are discussed in this section. The
third is discussed in section 3.13 AUTOMATE THE DISCOUNT PROCESS.
METHOD 1
When entering an item on the sales screen, change the amount in the price box to the amount you
wish to sell it for (before clicking on END LINE...).
METHOD 2
When entering an item on the sales screen, enter the item as normal and click on END LINE...,
then enter a second line with no stock number but with the description box reading something like
“Less Discount”. Enter the dollar amount you want to discount as a (-20.00) negative amount. Use
the END LINE NO TAX button if you do not want sales tax computed on this amount.
3.12.4 Credits:
WARNING: Charges and Layaways are discussed in greater detail in their respective sections. But
because we are discussing credits (using CHARGE and PAYMENT option types) in this section
you should note that Charges and Layaways are two separate types of transactions. A payment to a
charge is not the same as a payment to a layaway. A layaway is connected to an actual inventory
item where a charge only creates a store balance/credit for the customer. Do not use (REG. or
DOWN) PAYMENT types for layaway transactions.
CREDIT: A credit is recorded as a negative number in the customer’s balance box on the customer
screen (or between the FIRST NAME and ADDRESS box on the sale screen). A credit to a
customer is written by making the amount in the PRICE box minus and clicking on the CHARGE
option for the type of sale.
USE A CREDIT: To use a credit to pay for a purchase (or part of a purchase):
1. Enter the customer information on the sales screen.
2. Select a Salesperson.
41
3.
4.
5.
6.
7.
8.
9.
Enter the item(s) that the customer is purchasing. Repeat for each item.
Click on CHARGE payment type.
Click on END LINE TAX or END LINE NO TAX.
Click on PAYMENT.
Click on REG. PAYMENT.
Enter the amount (of the existing credit) to be used as a negative number (-25.00).
Click on END LINE NO TAX.
a. Notice that the customer balance has been adjusted.
10. Click on END SLIP.
REFUND A CREDIT: If the customer has a negative balance (credit) and you want to refund cash;
1. Enter the customer information.
2. Select a Salesperson.
3. Click on PAYMENT.
a. Click on REG. PAYMENT.
4. Enter the amount (of the existing credit) to be used as a negative number (-25.00).
5. You can edit the DESCRIPTION field (for example PAYMENT REFUND – TO BE
APPLIED TO SLIP 1234).
6. Click END LINE NO TAX.
7. Click END SLIP.
GIVE A STORE CREDIT.
1. Enter customer information.
2. Select a salesperson.
3. Click on the “PAYMENT” payment option button.
4. Click on “REG. PAYMENT”.
5. You can edit the description. Add “STORE CREDIT”.
6. Enter amount of the credit to be given.
7. Click on END LINE NO TAX.
8. Click on END SLIP.
CASH REFUND: If for any reason you owe a customer money that is not associated with a return
or a credit you can simply start a sales slip, enter a meaningful description (this will be your only
record so it should explain the payout clearly), and enter the amount to be refunded as a negative.
Click on the appropriate payment option for the type of sale (CASH, CHECK, BANKCARD).
Click END LINE NO TAX, then END SLIP.
3.13 AUTOMATE THE DISCOUNT PROCESS
You can add a special DISCOUNT gray button on the SALES screen by going to the REPORTS,
SYSTEM SETTINGS, SET DISCOUNT BUTTON TO BE ALLOWED ON SALES SCREEN.
Once this button is visible, you can click on it when you are making a sale and the system will
automatically compute the discount by percentage, a set dollar amount or the exact sales tax for the
item.
For example: If you had just clicked on END LINE TAX for an item that was $100 and you
wanted to discount that item 20%, you would click on DISCOUNT then enter 20 (just a number,
42
no “%” sign) in the DISCOUNT THE LAST LINE BY box. Finish discounting by hitting the
POST button.
3.14 LAYAWAYS: WRITING AND BOOKKEEPING
3.14.1 Discussion:
Layaways should be done as separate sales slips. Layaways should not be combined with other transaction
types. A separate Layaway ticket for each item enables better Layaway management, for example;
individual items on one layaway slip with multiple items cannot be paid off individually. Another example
is individual items on one layaway slip with multiple items cannot be reversed (cancelled) with out
canceling the entire slip.
When an item is put on layaway it is considered pending by WinJewel (unless you have chosen the
alternate recording method). The sale will show on the sales report but will not be added into Total Sales
and will not be assigned to either an individual department or salesperson. The inventory record for this
item will include a special note stating “Item on Layaway,” the date the layaway was started will appear in
the DATE SOLD field and the customer’s name preceded by a “~” symbol will display in the
CUSTOMER field. Doing a FIND BY using the “~” symbol in the Customer box of the INVENTORY
screen will produce a list of all items that are on Layaway.
WARNING: Charges and Layaways are two separate types of transactions. A payment to a charge is not
the same as a payment to a layaway. A layaway is connected to an actual inventory item where a charge
only creates a store balance/credit for that customer. Do not use (REG. or DOWN) PAYMENT types for
any layaway transactions.
Hint: Make a fresh TRAINING COPY to try these procedures, options, reports or settings.
The TRAINING COPY will show how these functions work before effecting the actual
data. See section 2.8 SETTING UP A TRAINING PROGRAM.
3.14.2 Recording
There are two methods for handling layaways. Under the default method in WinJewel, the sale is not
recorded until the item is picked up by the customer. The item stays in inventory and no sales tax or
commissions is recorded. You do not need to make any changes to the system to record layaways this way.
For the alternative method, see the explanation at the end of this section.
The alternative way for recording layaways in WinJewel is to book the sale at the time of the transaction
even though the item may stay in the store. Recording a layaway this way removes the item from
inventory and both commissions and sales taxes are computed as due. To use this method, go to
REPORTS, SYSTEM SETTINGS, SET LAYAWAYS TO BE HANDLED AS A SALE AT THE TIME
OF THE TRANSACTION. The procedures for doing layaway transactions either way are identical, only
the reporting is different.
3.14.3 Start a Layaway (Multi-Unit Items):
DISCUSSION: Items that are multi-unit are not marked with unique identifiers in WinJewel. The stock
number of multi-unit items only track quantity. To put a multi-unit item on layaway, that item must be
given a unique identifier. WinJewel does not do this for you. You can do this manually by auto assigning a
stock number to the item at the point of sale, then manually adjusting (subtract one from) the quantity in
43
stock on the inventory screen (of the multi-unit item). Think of this process as taking an item off the
display shelf, putting the customers name on it and putting it on a separate layaway shelf. To avoid having
to do this procedure, WinJewel Software suggests that you limit the items you enter as multi-unit. Once
the item is assigned a stock number, the layaway is handled normally.
The normal sequence for starting a layaway sale is:
1. Enter the customer information.
2. Select a salesperson.
3. Enter the item information.
4. Select the layaway payment type.
5. Select START LAYAWAY.
6. End the line (start a new line).
7. Select the PAYMENT payment type.
8. Select LAYAWAY PAYMENT.
9. Enter the amount of the initial payment.
10. End the Slip.
11. Confirm payment options.
12. Slip prints.
3.14.4 Start a Layaway (Item is Entered into Inventory with Unique Number)
1) Enter the customer information.
2) Select a Salesperson.
3) Enter Item stock number in the Stock number fields. Items can only be put on layaway if they have a
valid inventory number.
4) Select Layaway (Payment type option button).
a) Select Start a Layaway.
5) Click End LineTax or End Line No Tax button.
44
6) Select Payment (Payment type option button).
a) Click on Layaway payment.
b) A Layaway popup window opens. There will be a window for each open layaway transaction.
c) Make sure the correct layaway is selected.
i) Click on the Pay On button
d) Enter the amount of the down payment and click OK.
45
e) Note that the customer account balance has been posted below the customer name boxes. The
balance does not reflect the payment you are about to make.
7) Click End Line No Tax button (the tax has already been applied).
8) DO NOT select any other payment type option buttons at this time. If the customer wants to use a
charge card you will make that choice after selecting the End Slip button.
9) Click End Slip
a) In the next popup window either click on the Balance button corresponding to the payment type
(cash, check, bankcard) to automatically enter the payment amount or enter the amount in the
appropriate box(es). The balance buttons will only appear when the total amount entered into each
box does not equal the amount this slip calls for.
i) Click End. Complete other payment/customer fields as required depending on your system
settings.
b) In the popup window enter the agreed minimum payment amount. This amount is only a reminder.
It is used to determine (behind) payment status.
i) Click OK
10) At this point you may go to the Inventory Screen and do a Findby for the item. The sales information
will be displayed in the gray fields near the lower left corner. The price sold will reflect the price of the
item, not the balance or payments.
3.14.5 Make a Payment to a Layaway:
Layaway payments should not be combined with other transactions. If the customer wishes to apply a store
credit or gift certificate to the layaway item, process a refund of the credit or gift certificate on a separate
sales slip prior to the layaway payment, then apply the amount of the refund to a layaway payment.
1) Enter the customer information.
2) Select salesperson
3) Select Payment (Payment type option button).
a) Click on Layaway Pmt from the popup menu.
46
b) PAY ON
i) A Layaway popup window will open.
(1) Click on the Pay On button.
(2) Enter the amount of the payment and click OK.
(3) Note that the customer balance now reflects this payment amount.
ii) Click on the End Line No Tax button. DO NOT select any other payment type option buttons
at this time. If the customer wants to use a charge card you will make that choice after selecting
the End Slip button.
iii) Click on the End Slip button.
iv) In the next popup window either select the Balance button corresponding to the payment type
(cash, check, bankcard) to automatically enter the payment amount or enter the amount in the
appropriate box.
v) Click End
c) PAY OFF
i) A Layaway popup window will open.
(1) Select the Pay Off button.
(2) Note that the customer balance now reflects this payment amount.
ii) Click on the End Slip button to complete the transaction.
iii) A popup window opens.
(1) Select the payment type by clicking on the appropriate Balance button or by entering the
amount in the appropriate field(‘s).
(2) Click End
3.14.6 Start a Layaway (Item is not Entered in Inventory)
47
A item that is not entered into inventory can be put on layaway from the sales screen. WinJewel will
automatically assign an inventory number to the item. The layaway will be processed normally once the
inventory number is assigned. The inventory number assigned will be in the format “998” “XXXXX”,
where 998 is the temporary vendor number and XXXXX is the next available stock number.
1)
2)
3)
4)
5)
6)
7)
8)
9)
Enter the customer information
Select a salesperson
SKIP over the stock number boxes.
Enter the item “Description”.
Enter the total price of the item.
Select a department.
Click on the Layaway payment type.
Click on “Start Layaway”.
Click on the “End Line Tax” or “End Line No Tax” button.
a. A message box will pop up telling you that an item can not be put on layaway if it does not
have an inventory number. Click on the Auto # button.
b. An inventory number is assigned and the item is posted on the slip.
10) Complete the layaway with the normal method (by clicking on the “Payment” button to enter the
amount to be paid).
3.14.7 Reverse a Layaway:
Hint: Make a fresh TRAINING COPY to try these procedures, options, reports or settings.
The TRAINING COPY will show how these functions work before effecting the actual
data. See section 2.8 SETTING UP A TRAINING PROGRAM.
Reversing a layaway will return the item to inventory and will return the money back to the customer.
When reversing a layaway all payments must be reversed along with the original “Start Layaway” slip.
The original “Start Layaway” slip should be reversed last.
1. Enter the customer information.
2. Select a salesperson.
3. Click on the “Previous” button at the bottom of the sales screen.
48
a. All previous slips for this customer will appear on the sales screen.
b. The “Previous” button changes to “This Slip”
i. Clicking on “This Slip” will allow you to continue the sale.
4. Click on a line that is part of the slip you want to reverse.
49
a. A message box appears.
5. Click on the “Reverse” button.
a. This slip is now reversed. All corresponding payments must be reversed now.
50
3.14.8 Erase a Layaway
Erasing a layaway will return the item to inventory and will adjust customer balances. When erasing a
layaway all payments must be erased along with the original “Start Layaway” slip. The original “Start
Layaway” slip should be erased last.
1. Enter the customer information.
2. Select a salesperson.
3. Click on the “Previous” button at the bottom of the sales screen.
a. All previous slips for this customer will appear on the sales screen.
b. The “Previous” button changes to “This Slip”.
i. Clicking on “This Slip” will allow you to continue the sale..
4. Right click on the line that is part of the slip that you want to erase.
5. A message box appears asking you for your personal identification code.
6. Enter your personal password..
a. If you have not been given permission to do this process you will be told so and will return
to the previous screen.
7. A message box will appear warning you that the you are about to erase a sales slip. Click OK.
8. Right click on the line that is part of the slip that you want to erase.
9. The slip is now erased from the sales record. It will not show up in any sales reports or customer
reports. Any slips that have been erased can be viewed from “Reports” / “Sales Reports”.
3.14.9 Return a Layaway
Returning a layaway will return the item to inventory and will give the customer a store credit equal to the
amount paid.
1) Enter the customer information.
51
2) Select a salesperson.
3) Enter the stock number of the item to be returned.
a. A message box will pop up stating that the item is on layaway for the customer. Verify the
customer name is the same. Click OK
b. The next message box ask if this is a “Pick up” or a “Return”
c. Click Return
d. The item amount is posted in the “Price” field as a negative (minus sign and in red,
depending on your WinJewel version).
4) Click a payment type, i.e.,... “Cash”
5) Click on “End Line Tax” or “End Line No Tax”, (this choice should match original sales slip).
6) Click “End Slip” to complete the slip normally.
7) The item will be returned to inventory and the customer’s balance will be adjusted.
3.14.10 Convert a Layaway into a Charge
To convert a layaway into a charge, bring up the customer on the Sales screen and select PREVIOUS.
Click on the layaway item and select REVERSE. Now re-enter the item on a new sales slip with the
payment type of CHARGE.
Hint: Make a fresh TRAINING COPY to try these procedures, options, reports or settings.
The TRAINING COPY will show how these functions work before effecting the actual
data. See section 2.8 SETTING UP A TRAINING PROGRAM.
52
3.14.11 Layaway Settings
To change the following settings go to SYSTEM SETTINGS. To make finding these settings from the list
easier, use the “Findby” button at the bottom of the screen.
SET THE NOTE TO BE MADE ONLY ON LAYAWAY SALES SLIPS. Sets a special note outlining
your layaway policy printed on the Start Layaway sales slip. To set this, go to SYSTEM SETTINGS, SET
THE NOTE TO BE MADE ONLY ON LAYAWAY SALES SLIPS. The limit to the length of this note
varies with your printing, font and layout styles.
SET LAYAWAYS TO BE HANDLED AS A SALE AT THE TIME OF THE TRANSACTION. Sets
WinJewel to use (or not use) the alternate recording method.
SET THE OLDEST LAYAWAY DATE TO SHOW ON SALES SCREEN. Improves system response
time when retrieving layaway records by skipping old records. This is most useful if there is a large history
of layaway transactions.
TURN OFF THE ASKING FOR MINUMUM PAYMENT WHEN WRITING A LAYAWAY. Turns on
(or off) the message box that asks (or displays) the expected minimum monthly payment. The minimum
payment is the amount you expect the customer to pay each month. It is used as a reminder and in
calculating payment standing. Payment standing can be seen in the “Behind” field on the CUSTOMER
screen.
SET HOW DATE PURCHASED IS HANDLED WHEN LAYAWAYS ARE PICKED UP. Sets
WinJewel to use either the “Pick Up” date or the “Put On” date in the “Date Sold” field on the Inventory
Screen.
53
3.14.12 Layaway Reports
ITEMS ON LAYAWAY. To see a list of all items on layaway:
1. Go the Inventory screen.
2. Click on the “Findby” button.
3. Type a “~” (tilde) into the customer field.
4. Click the “Findby” button again.
A list will be displayed. If you wish to print or see details of this list click on “Click this line to Print the
list” (the top line of the list). If you select “New” format the wizard will give you choices to print or
display this list. “Last” will use the last format used.
DAILY (and MONTHLY) SALES REPORT. The following examples are used to illustrate how a
layaway is recorded on sales reports and how layaway transactions affect sales and tax totals. The
examples occur over a four day period. A MONTHLY report is illustrated for each day in this example.
This example reflects the normal (default) method for handling layaways. The alternative method is not
illustrated in any of these examples.
54
DAY 1 A regular sales is made. The layaway will occur on day 2. The item on day 1 is a men’s watch
with a retail price of $153.00, sales tax of $11.09 and total of $164.09. Notice that the Total of taxable
sales, Total of all sales, Gross Profit, Total of all tax, Total of all tax and sales, and Total of all Deposits
DO reflect the cash transaction.
Sales Slip - Day 1
Monthly Report –Day 1 (Daily report is identical on this day because there is only one transaction).
55
DAY 2 A layaway sale is made. The item is put on layaway and a payment of $20.00 is made. Notice that
the Total of taxable sales, Total of all sales, Gross Profit, Total of all tax, Total of all tax and sales, and
Total of all Deposits DO NOT reflect the layaway transaction. The Cash, Wlayaway Pmt, ~Start Layaway,
and Total of all Cash & Cash Equivalents DO reflect the layaway transaction.
Sales Slip – Day 2
Daily Report – Day 2
56
Monthly Report – Day 2
57
DAY 3 A layaway payment is made. Notice that the Total of taxable sales, Total of all sales, Gross Profit,
Total of all tax, Total of all tax and sales, and Total of all Deposits DO NOT reflect the layaway
transaction. The Cash, Wlayaway Pmt, ~Start Layaway, and Total of all Cash & Cash Equivalents DO
reflect the layaway transaction.
Sales Slip – Day 3
Daily Report – Day 3
58
Monthly Report – Day 3
59
DAY 4 The layaway is paid off and picked up. Notice that all totals now reflect the layaway transaction.
The layaway pickup is also reported.
Sales Slip – Day 4
Daily Report – Day 4
60
Monthly Report – Day 4
61
3.15 GIFT CERTIFICATES
DISCUSSION: If your store uses gift certificates on a regular basis, it is best to create a separate
department called “Certificates-Gift.” You can create one at any time. As you set up this
department you must check the LAUNCH GIFT CERTIFICATE box. You would normally
include this in the SALES category and certificates are usually not taxable (check with your
accountant) so check the NORMALLY NOT TAXABLE box.
SELL A GIFT CERTIFICATE:
1. Enter the customer information on the Sales Screen.
2. Select a salesperson.
3. Enter “Gift Certificate” in the DESCRIPTION field.
4. Select your gift certificate department in the DEPARTMENT field.
5. Select the type of payment.
6. Click END LINE NO TAX, a box will appear confirming that you are selling a gift
certificate. Respond YES and a new Gift Certificate screen will appear.
7. Fill in the fields including establishing a Gift Certificate number. To let WinJewel
establish these numbers just select INCREMENT and the next available number will be
used.
8. Important Note: If this is the first time you will be printing WinJewel Gift Certificates you
must set the note that prints at the bottom of the printed Gift Certificate. To set the note
click on SET NOTE and type in the message you want to appear.
a. If you want one of WinJewel’s printed Gift Certificates, click PRINT and a Gift
Certificate will be printed.
b. If you have your own separate Gift Certificates, click on the POST ONLY field.
REDEEM A GIFT CERTIFICATE:
1. Enter the customer information on the Sales screen.
2. Select a salesperson.
3. Enter each item of the sale as normal.
4. Enter the gift certificate as the last item.
a. Enter the words “Use Gift Certificate” in the DESCRIPTION field
b. Enter the amount to be used from the Gift Certificate in the AMOUNT field
proceeded by a minus sign (for example –50).
c. Select the Gift Certificate department.
d. Click on END LINE NO TAX.
i. A message box will ask you to enter the Gift Certificate number.
ii. A complete recap of how this item is being paid with outstanding
certificates will be displayed. Select POST and WinJewel will adjust the
accounting for outstanding Certificates.
ERASE A GIFT CERTIFICATE:
The balance on Gift Certificates can only be reduced. There are occasions that may require adding
to the balance of a Gift Certificate though, for example if a sale is reversed. In this case you must
create a new Gift Certificate for the amount of the refund. One additional option is to completing
erase the existing Gift Certificate and create a new one with the correct balance.
62
To erase a Gift Certificate go to REPORTS, SALES REPORT, GIFT CERTIFICATES.
REPRINT A GIFT CERTIFICATE is also available from the REPORTS, SALES REPORTS
screen.
VIEW USED AND UNUSED GIFT CERTIFICATES: To see the status of your Gift Certificates, select
REPORTS, CUSTOMERS, SHOW GIFT CERTIFICATES and you can look at all UNUSED or USED
certificates.
3.16 CASH CUSTOMER
If you are writing a cash sale and you do not want to enter the customer's name into the computer,
you should click on the NO NAME gray bar located below the PHONE box.
Important Note: If the customer information boxes do not turn grey then you have not entered a
customer to use when clicking on NO NAME. Each computer that wants to use the NO NAME
button must have selected a customer to use for this feature. We suggest that each computer uses a
different no name customer. You can enter a customer on the CUSTOMER screen to use for this
feature and it can be any name that you want to use. Note the CUSTOMER NUMBER of the
customer that you want to use then go to the SALES screen and click on SETUP. Enter the
customer number into the box labeled CUSTOMER # FOR NO NAME.
The sales reports will show this item as the name you have chosen for the customer name and all
of the other totals will include it as a normal sale. If you need to reprint or reverse a sales slip,
click on NO NAME then enter a salesperson and click the PREVIOUS button and the last 100
slips will be displayed for the required action.
There is one other fake customer in the customer file. It is last name "ZZZZZZZZ" with a first
name of "ZZZZZZ". The phone number is "999-999-9999". This customer should not be used, but
it must stay in the file to mark the highest name & phone number. DO NOT ERASE THIS
CUSTOMER RECORD.
3.17 SPECIAL CANADIAN TAX RATES
If your store is located in Canada and you need to account for the additional providence tax rates,
select REPORTS, SYSTEMS SETTINGS, SET YES OR NO FOR CANADIAN STYLE FOR
TAX SYSTEM. You can now enter additional tax rates that will also be automatically computed
on the sale.
3.18 EXTENDED SERVICE PLANS
WinJewel provides the opportunity to establish an extended service plan option for items sold.
First, you need to create a special department for these items, such as “ESP.” Next, select
REPORTS, SYSTEM SETTINGS, TURN ON/OFF THE EXTENDED SERVICE PLAN ON
SALES SCREEN.
63
A price matrix is provided so you can set different price points depending on the size of the sale.
Next you can establish the message text that will be printed on the sales slip and the department to
be assigned (ESP or whatever you called it). You can also establish a special reminder message
that will appear if the salesperson does not select the plan for this particular sale. Remember to hit
SAVE.
There will now be an EXTENDED SERVICE PLAN selection box located at the top of the
SALES screen. This box can be clicked on at any time prior to hitting END SLIP. When it is
checked, a new line will be added to the sales slip with the description and correct amount. If it is
not clicked, there will still be a notice for the salesperson reminding them to ask the customer
about the Extended Service Plan.
3.19 SPECIAL ORDERS
If you want to designate that a particular sales transaction is for an item that was special ordered,
you can turn on a check box on the SALES screen which will say SPECIAL ORDER. When
checked, the sale will be marked as Special Order, both in the WinJewel record and on the printed
Sales Slip. To turn on this feature, go to REPORTS, SYSTEM SETTINGS, SET THE SPECIAL
ORDER BUTTON TO BE ALLOWED ON THE SALES SCREEN.
Because this item takes the same position on the SALES screen, it cannot be used in conjunction
with the Extended Service option. You must choose one or the other.
3.20 ADDING A CASH DRAWER TO THE WINJEWEL PROGRAM
Many companies manufacture a cash drawer that can work directly with a computer. To do this
with WinJewel, you must create a file in the WINJEWEL directory called "TILL.BAT". Place the
command or list of commands that will open the drawer in that file. Each manufacturer has a
different way of accessing the drawer. Read the instructions that come with your drawer. If you are
having trouble, please give us a call and we will try to help
After the file has been added, go to REPORTS, SYSTEMS SETTINGS, SET THE CASH
DRAWER FUNCTION TO ON/OFF. When the selection is turned on, WinJewel will
automatically open the drawer for all appropriate transactions (everything except a CHARGE
transaction). The program also will now display a small yellow button under the “X” icon with a
“T” (Upper right hand corner). Clicking on this button will also open the cash drawer and can be
used for No Sale type transactions.
Remember that if you ever disconnect the cash drawer from the system, you must go in and reset
this function to OFF. If you forget, WinJewel will go crazy trying to open a non-existent drawer.
If you are using an APG Vasario brand of cash drawer, go to SYSTEM SETTINGS, TURN ON
APG BRAND OF CASH DRAWER and WinJewel will automatically create the TILL.BAT file
and enter the correct commands.
64
3.21 SPECIAL SALES SCREEN OPTIONS / SETTINGS
There are many optional settings you can use with Sales transactions. Some of these can be found
by going to REPORTS, SALES REPORTS and selecting the appropriate category:
SET SALES REPORTS TO SHOW GROSS PROFIT
SALES BY DEPARTMENT BY SALESPERSON IN A GIVEN PERIOD
WRITE A DONATION SALES SLIP (Provides special tracking for these transactions)
FIND A SALES SLIP BY SLIP NUMBER
FIND A SALES SLIP BY SLIP AMOUNT
FIND A SALE BY WORD OR PHRASE IN SALES DESCRIPTION (Allows searching old
sales slips to find customers with similar buying habits)
COMMISSION REPORT BY TIME PERIOD
In addition, the following options can be set using SYSTEM SETTINGS:
SALES SLIP PRINTING:
SET THE NOTE TO BE MADE ONLY ON LAYAWAY SALES
SLIPS (will substitute special marketing message on these slips).
SHOW THE CUSTOMERS PHONE NUMBER ON SALES SLIPS.
SET THE CUSTOMERS BALANCE TO PRINT OR NOT ON SALES SLIPS.
SALES SCREEN DISPLAY:
SET DRIVERS LICENSE NUMBER TO BE ASKED FOR ON SALES SLIP.
SET THE SPECIAL ORDER BUTTON TO BE ALLOWED ON SALES SCREEN.
SET THE SEARCH BY OLD NUMBER BUTTON ON SALES SCREEN (See Inventory section
for using this option),
SET SALES SLIPS TO DEFAULT TO CASH (cash payments will be the default. This can still be
changed during the sale).
SET ALL SLIPS TO DEFAULT TO CHARGE.
FORCE ENTRY OF A SALES SLIP DATE (Requires entry of a date instead of defaulting to
today’s date).
FORCE ENTRY OF A SALES SLIP NUMBER (For use with preprinted sales slips)
SET THE ORDER THAT SALES SLIPS SHOW IN THE LIST BOX (The default setting is to
have the most recent entry at the top).
SET THE ORDER THAT NOTES SHOW ON THE LIST BOX (The default setting is to have the
most recent entry at the top).
TURN ON OR OFF ASKING REASON FOR NO TAX.
EDIT THE LIST OF REASONS FOR NO TAX.
ALLOW A MEMO BUTTON ON SALES SCREEN (allows items to be put on memo for
customers).
ALLOW FOR PRINT LABEL BUTTON ON SALES SCREEN (Provides a button to print a
customer mailing label).
SET SALES SCREEN TO ASK FOR CREDIT CARD NUMBER.
TURN ON OR OFF THE PICTURE OF THE ITEM ON SALES SCREEN.
65
3.22 WRITING CHARGE ACCOUNT CONTRACTS
If you issue a separate charge account contract when you extend credit, you can make this a part of
the Sales Slip process. Select REPORTS, SYSTEM SETTINGS, ALLOW THE PRINTING OF A
CHARGE ACCOUNT CONTRACT. You can now place a special button on the SALES screen
that, when selected, will automatically print your pre-established contract. This contract needs to
be loaded into a WinJewel directory called “contract.dat.” As an alternative, you can also select to
have the contract printed automatically every time that “Charge” is chosen as the payment type.
3.23 TRACKING SALES BY SPECIAL CATEGORY
If you need to track sales by special categories, WinJewel provides this capability. This can be
particularly helpful if you have referral arrangements with other retailers such as hotels, cruise
ships or other unique situations. A special field will be added to the Sales screen and the Customer
screen and detailed reports of sales by these special categories for a given time period can be
generated.
To activate this feature, go to SYSTEM SETTINGS, ACTIVATE OR EDIT THE SPECIAL LIST
ON SALES SCREEN. You will be asked for a name to appear for this field on the Sales screen
and to provide individual selections to be displayed in the drop down menu. WinJewel will also
ask for a unique number for each item, but this field is only used internally by the program. Once
set, this new field will be displayed just below the LAST NAME on the Sales screen.
As required, go to REPORTS, SALES REPORTS, SALES REPORT BY TIME PERIOD BY
SPECIAL FIELD and enter the starting and ending date and WinJewel will prepare a detailed list
of all transactions and a total for each category.
3.24 USING A SECOND PRICE ON SALES SCREEN
WinJewel allows you to set the Sales Screen to provide the option to select from two retail prices.
This is often used with wholesale or special customers where you will sell the item at a different
price. To use this option, you must first turn on a second price field on the Inventory Screen by
selecting SYSTEM SETTINGS, ALLOW FOR SECOND RETAIL PRICE ON INVENTORY.
Now, when you go to the Inventory record, there will be a second field.
Next, you need to go to SYSTEM SETTINGS, SET WHICH OF 2 PRICE FIELDS TO USE
WHEN WRITING A SALE. You will be asked which of the two prices entered in inventory
should be used as the default. It will also ask whether you want to automatically use the second
price if this customer is designated as a Wholesale customer.
Once these selections are made, there will be a new series of buttons, labeled 1 and 2, displayed
just above the ZIP CODE field on the Sales Screen. When an inventory item is entered, based on
the settings you established, the PRICE box will fill with the default value. The salesperson also
has the option to change the price at this time by simply clicking on the other price button.
66
3.25 CREATING MEMO SALES ITEMS
If you want to create special memo sales items, select SYSTEM SETTINGS, ALLOW FOR
MEMO BUTTON ON SALES SCREEN. You can now establish special wording for the opening
and closing of the special memo slip. When you modify the opening and closing statements,
WinJewel is using Notepad so you must select FILE, SAVE or your changes will not be saved.
Now, the Sales Screen will display a new payment type selection located right under LAYAWAY
entitled MEMO. After the customer and salesperson are entered, select MEMO and a special
screen will appear where you can enter a memo number (or double click and WinJewel will assign
a number), and the stock numbers of the items (click ADD ITEM) you want on this particular
Memo. When you are finished, select PRINT or SAVE and a return date and time will be
requested. The printed Memo will list all of the items.
At any time, you can bring up the customer on the sales screen and select Memo to see all of the
outstanding Memos. When items are returned, you can check them back in using the same method.
You can also bring up the item on the Inventory Screen and the date, name of the customer, memo
number and word “Memo” will be displayed.
3.26 DONATION SALES SLIPS
To create a special sales slip for a donation, go to REPORTS, SALES REPORTS, WRITE A
DONATION SALES SLIP. This option requires the user to have an authority level that will allow
access to the STAFF screen (which is generally limited to supervisory personnel). Next, complete
the Sales screen like normal and the sales slip will specifically designate a donation.
3.27 PARKING A SALE
If you are in the middle of writing up a sale and you want to do something else then you can click
on the PARK button. This will save the slip as far as you have gone and allow you to unpark it at a
later time. A parked slip is saved to the local computer only. You can not unpark a slip that was
parked on another computer. Another way to park a slip is to click on the small letter X that is
directly under the HELP icon in the upper right of the WinJewel screen. If you do this and you
have entered any item on this slip then you will be prompted if you want to save the slip that you
are working on. This too will place the slip into the park file so that you can retrieve it later.
While a slip is parked, you or other users of WinJewel can write other slips without bothering the
slip or slips that are in park.
67
To unpark a slip click on
the UNPARK button.
This will show a list of
any slips that are in the
park file. Click on the
slip that you want to
unpark. The UNPARK
button is only visible
when slips are in the park
file. This is your way of
telling that slips are
there.
68
4 INVENTORY
4.1 ENTERING NEW INVENTORY
4.1.1 Discussion:
The inventory screen provides all the information about a particular item in your inventory.
Besides being the one place that inventory can be entered, it provides a large variety of ways to
sort and view information about the inventory already entered. One of the key features on the
inventory screen that helps you manage your inventory is the FIND BY button. FIND BY lets you
find items by any criteria for example;
• all unsold items by a particular supplier.
• all items purchased by a particular customer.
• all items recorded during the last inventory (taking inventory).
• all items in a particular display case.
Additionally the lists that are generated during a FIND BY can be printed, displayed on the screen,
saved to a file or used in conjunction with functions on the INVENTORY REPORTS screen (in
REPORTS). You can also choose what information you want printed from these lists. A detailed
discussion of the FIND BY function is located in section 4.4 FINDING AN INVENTORY ITEM.
•
•
•
•
•
•
4.1.2 Things you Should Do or Know Before Starting:
WinJewel assigns an item number (the second part of the stock number) to each item as it
is entered. Never enter your own number into either SUPPLIER or STOCK NUMBER
fields when you are entering inventory. If you have your own stock number system you
should enter this into the MULTI USE field. If the stock number sequence must be changed
(for example after changing departments) go to REPORTS: SUPPLIER REPORTS: SET
HIGHEST NUMBER USED.
There must always be at least one item in the inventory record. Do not delete the existing
inventory item (100-01111 MANS 18K AMETHYST RING) until you have entered your
own inventory.
Departments should be set up before entering inventory for the first time. When you enter
inventory, you will be required to select a department. If you enter inventory then enter
your departments you will have to go back and change the department of each piece.
Suppliers must also be entered into WinJewel before entering inventory.
WinJewel Software recommends that retail stores do not enter items as MULTI UNIT
ITEMS (with the exception of generic items such as batteries). WinJewel provides many
customer, and inventory reports that only work with items that are entered as single unit
items.
QUICKLISTS in appendix C provides a condensed breakdown of common tasks.
The normal sequence for entering inventory is:
1. Enter invoice information from your supplier.
2. Enter item information.
3. Enter additional items.
4. End invoice.
Steps 1 and 2 are discussed in this section. Steps 3 and 4 are discussed in the next section 4.2
MULTIPLE ITEMS FROM ONE SUPPLIER.
4.1.3 Entering Inventory:
ENTER INVOICE INFORMATION FROM YOUR SUPPLIER:
To start entering inventory go to the inventory screen (click on the INVEN. icon and the Inventory
Screen will appear).
1. Click on the gray button in the lower left corner of the screen labeled NEW INV. A new
window will appear.
2. Enter the INVOICE NUMBER (up to 15 digits).
3. Enter the INVOICE DATE. You can click in the DATE box and a calendar will appear
with today’s date selected. Click APPLY or change the date and click APPLY to paste a
date into the DATE field.
4. Click on a SUPPLIER name.
OPTIONS: The ADJUSTMENT FACTOR button allows you to add an additional
percentage to the COST of each item. This added cost could be shipping, duty or
other additional costs you accrued while acquiring the items.
OPTIONS: The PER GRAM COST button will calculate your cost based on the
items weight per gram and paste it into the COST field.
OPTIONS: The RESTART button will let you continue a previous invoice that you
ended but still had items to be entered.
5. Click on the ENTER INVENTORY button. The supplier number will be entered into the
SUPPLIER box and the next available number will be entered into the STOCK NUMBER
box. You will notice that the DATE PURCHASED and INVOICE NUMBER boxes are
automatically filled in.
4.1.4 Enter Item Information:
Remember that you can move from field to field by pressing the TAB or ENTER keys on the
keyboard.
DISCRIPTION
Type in a physical description of the item in the DESCRIPTION box. The words you enter in this
box will be used in a couple of places. The full description will print on the sales slip when the
item is sold. In addition, the first few words (about 14 to 20 characters depending on the tag set-up)
will print on the inventory tag. Remember to take these two factors into consideration when
describing the item.
LAST INV: Last Inv number is not used when entering inventory and will be discussed in greater
detail in section 4.15 TAKING INVENTORY.
MEMO: optional
Used to identify items that come in on consignment. Memo items will be discussed in greater
detail in section 4.12 CONSIGNMENT/MEMO ITEMS.
MULTI-USE (STYLE if Wholesale version) : optional
The MULTI-USE/STYLE box is optional. Enter any information about the item you wish such as
the serial number. This field can be used as you wish.
CENTER STONE: optional
Enter the size of the CENTER STONE in carats (Example: .22 would be a twenty-two pointer), by
dimension, color or any designation you want.
CT TOTAL WT: optional
Enter the total weight of the side stones (Note: This should not be the total weight of all stones
unless there is no center stone).
CLARITY, SHAPE, COLOR and CUT GRADE: optional
Use the drop down menus are provided (do not type in the code letter). Just click on the small
arrow and click on one of the selections.
OPTIONS: To change the selection options in these drop down menus, go to REPORTS,
SYSTEM SETTINGS, SET LIST FOR STONE DESCRIPTIONS (Color, Clarity, Cut or
Shape). As with most items in WinJewel, each heading must start with a unique letter)
REORDER NUMBER: optional
This is the order number you use to reorder the item. Enter the number that the factory would need
to reorder this style.
OPTIONS: The AUTO button located above the reorder number can be used to mark items
that you want to re-order. After the items are marked go to REPORTS, INVENTORY
REPORTS, PREPARE LIST OF AUTO-REORDER MARKED ITEMS THAT HAVE
BEEN SOLD and get a list of all items that should be reordered.
GRAMS, KARAT and COLOR: optional
Enter the weight of the gold in grams and the karat of the gold in the KARAT box (Example: 14).
Do not follow the number with a "K". Enter the COLOR by making a selection from the drop
down menu (do not type in the color code).
DEPARTMENT: required
Select the department you want to assign this item to.
TAXABLE or NON-TAXABLE: required.
The default is taxable but if for some reason this item should be treated as non-taxable, you should
make that selection by clicking on the circle.
MULTIPLE UNIT ITEM: optional
WinJewel software recommends that retailers do not use this field for individual items. Check this
field for a quantity of identical items. When this box is checked a new drop down menu will
appear. Select P for recording quantity or W for recording weight. The sale history boxes will also
be change. The DATE SOLD, CUSTOMER, SLIP#, SOLD PRICE and WHO fields will be
replaced with REORDER QUANTITY/WEIGHT and QUANTITY/WEIGHT IN STOCK..
DATE PURCHASED and INVOICE NUMBER: required
The information you entered when first starting this inventory are copied into these fields. Skip or
change these fields as required.
COST: required
Do not use the "$" dollar sign. when entering cost. The cost will be converted to code by the
computer when you tab or click into another field. If you want to view the actual cost click in the
cost field (so that is outlined in red) and click on the gray DECODE bar.
OPTIONS: If you clicked on the PER GRAM COST button when you first started this
inventory, the calculated COST based on the items weight per gram will be calculated and
copied into this field.
OPTIONS: If you clicked on the ADJUSTMENT FACTOR button when you first started
this inventory, the amount of the adjustment factor will be added to COST and will be
pasted in this field.
RETAIL: required
Do not use the “$” sign when entering retail. Enter the retail price you will sell this item for.
OPTIONS: To calculate a fixed markup, enter "x" or "*" followed by the markup that you
want to take. For example, if your cost had been entered as 100.00 then and you entered
“x2.5” in the RETAIL box, the markup would be computed and the box would now have
“250.00.”
OPTIONS: To calculate the fixed markup you established in your department setup (COST
FACTOR), just hit ENTER.
DATE SOLD, CUSTOMER, SLIP NUMBER and SOLD PRICE: automatic These fields will be
automatically filled in when the item is sold.
REORDER QUANTITY/WEIGHT and QUANTITY/WEIGHT IN STOCK: automatic
Enter the quantity/weight level that you want to re-order at in the REORDER
QUANTITY/WEIGHT field. The field QUANTITY/WEIGHT IN STOCK field will be
automatically adjusted as inventory fluctuates.
MAP: optional
If selected the small field next to the MAP button displays the location of items in the store. The
MAP button opens a map of the store in a new window. Use this map to keep track of the physical
location of each item (display case , repair, safe etc,...). WinJewel allows you to map your entire
store (See 4.11 BUILDING A MAP OF YOUR STORE LAYOUT)
LIST NEW:
Any time you have an open invoice and are entering items, you can click on the LIST NEW button
and a list will be generated of every item entered on this invoice so far. This can be very helpful if
you get interrupted entering inventory and you forget which item you were last working on.
4.1.5 Save Item: required
Click on the SAVE ITEM button (Remember: if you don't click on this button your entries will not
be saved). After you click the SAVE ITEM button you have two choices;
• enter the next item or stop entering inventory. If you have additional items to enter for this
supplier, please refer to the next section.
• stop entering inventory at this time, click the END INVOICE button. You can restart
entering inventory on this same invoice at a later time. Follow the instructions at the
beginning of this section.
4.2 MULTIPLE ITEMS FROM ONE SUPPLIER
The previous section 4.1 ENTERING NEW INVENTORY discussed how to start entering
inventory from a supplier. This section will discuss how to continue entering inventory and how to
end entering inventory.
After you click the SAVE ITEM button from the previously entered item you have two choices,
enter the next item or stop entering inventory. To enter the next item you must click on the NEXT
button. To see what items have already been entered during this session click on the LIST NEW
button. A list of items that have been entered on this invoice will appear.
4.2.1 See From Orders:
If the SEE FROM ORDERS button
appears, items from an invoice have
been transferred from received orders.
Click on the SEE FROM ORDERS
button to enter those items into
inventory. See section 6.3
RECEIVING ORDERS.
4.2.2 Next:
When you click on the NEXT button located beside the SUPPLIER box. The next available
STOCK NUMBER will be filled in on the screen. Fill in the information for this item follow the
guidelines in the previous section. Click on the SAVE ITEM button when finished.
4.2.3 Rep Last:
The REP. LAST (for Repeat Last) button is helpful for entering many similar items. When you
choose this, every field from the last item entered will be filled in (except the STOCK NUMBER).
You can change any box at this time by clicking that box and entering what you want. When you
are satisfied with all boxes, remember to click the SAVE ITEM button.
OPTIONS: If you have many items that are identical, go to REPORTS, INVENTORY
REPORTS, SET REPEAT LAST BUTTON TO ACCEPT A QUANTITY and you can
enter the number of items and WinJewel will record them all into inventory (the number
entered in the REPEAT LAST box should equal the total number of items less one, which
will be the original item entered).
4.2.4 Reorder Number:
If you have previously entered a REORDER NUMBER for an item, enter that number again in the
reorder field then place a check mark in the AUTO check box. All of the previous information
about this item will be filled in automatically.
4.2.5 Print Invoice:
When you click on END INV. a popup window will appear asking whether you want a printed
copy of the items on the invoice you just finished. If you want to transfer the invoice payment
information to the INVOICE screen you must print a copy.
4.2.6 Transfer to Invoice:
If you printed a copy of the inventory entered on this invoice a popup window will appear asking if
you want to transfer this information to the INVOICE SCREEN. If you answer YES you will be
asked for additional information (DISCOUNT, DATE DUE and SHIPPING), then will be
transferred to the INVOICE screen. An invoice record will be generated and you will have the
opportunity to make a check or other payment type to the supplier.
4.3 VIEWING INVENTORY ITEMS
Any time that you want to see or change an item that is already saved, just enter the SUPPLIER
and STOCK NUMBER and hit ENTER. The complete inventory record will be displayed. You can
change any box by clicking that box and entering what you want. When you are satisfied with your
changes, click on SAVE ITEM.
4.4 FINDING AN INVENTORY ITEM
The INVENTORY screen (as well as many other screens), provides a simple method for retrieving
information entered into WinJewel. This is the FIND BY function. “FIND BY’ is WinJewel’s
phrase for searching. In WinJewel there are 3 basic steps to performing a FIND BY search.
1. Click on the FIND BY button (FIND BY BUTTON – FIRST CLICK).
2. Select/enter your search criteria(SELECT/ENTER YOUR SEARCH CRITERIA).
3. Click on the FIND BY button again(FIND BY BUTTON – SECOND CLICK).
4.4.1 Find By Button – First Click:
If not already there, go to the INVEN screen. Click on the FIND BY button
. This
button prepares WinJewel to start a search. When you click on the FIND BY button (first time you
click during a search) the screen’s colored background will turn gray.
4.4.2 Select/Enter your Search Criteria:
This is your opportunity to limit the number if items found (shorten the list). Enter information in
any one or more fields that you want to search for.
4.4.3 Find By Button – Second Click:
The second time you click on the FIND BY button a search of WinJewel’s databases will be
started. When WinJewel is done searching a list that contains all of the records that matched the
search criteria will be displayed.
That’s it! A basic search only requires these 3 steps. WinJewel does provide additional functions
for searching and additional things you can do with the search results. Additionally, there is no
limit to limiting a search. For example to get a list of all items from one supplier that were sold on
the previous Saturday with a retail price of more than $100.
1.
2.
3.
4.
Click on the FIND BY button.
Enter the supplier number in the supplier box.
Enter 100 in the RETAIL box.
Double click in the DATE SOLD box. Click on last Saturday from the calendar that pops
up.
5. Click on the FIND BY button again.
6. A pop up window will ask you if the (RETAIL) amount is more than, less than, equal to or
between the value you entered. (If you choose “between” a new set of boxes will ask you
for a low limit and high limit. Another window will popup asking you to clarify you to
clarify the date. WinJewel will always ask you to clarify your date and amount values
during a FIND BY search.
A list of all items in inventory that are exact matches to what you entered will appear in the large
white box. If you want to see one of the items, just click on that item in the list.
Please note that doing a FIND BY will use an exact match of the word or number you entered so
using the word “Ruby” as opposed to “Rubies” will give you a different list of items. A better
choice would be “Rub”.
OPTIONS: Putting a “~” in the CUSTOMER field will find all items that are on Layaway.
4.4.4 Print the List
To print a complete listing of all of the items on the list, point and click on the first line of the list
“Click this line to print the list”. This will walk you through a series of pop up windows. You must
choose to print a list or a series of pictures. Then you must choose to use a new format or the last
format selected. The NEW format will open the following window.
Starting in the lower right corner you can select to print the list, display it on screen or save it to
file. You can also select paper orientation and font size. In the lower left corner you can sort it by
the first field. You can also select to show the cost code or the cost dollar amount. Along the very
bottom of the screen you can save your layout or reload a previously saved layout.
To select what inventory information to
include in this printout enter, change or
delete the number in the “Col” box. For
example to omit the supplier number delete
the number “1” in the upper left corner as
shown in this image.
After deleting the number from this box
press the TAB or ENTER key on the
keyboard or use the mouse and click into
another “Col” field. The numbers in the
other “Col” fields will automatically adjust.
When you are done making your choices click on the OK button. Your list will either print, display
on the screen or save to file.
SEE LAST FINDBY: Once you have completed a FIND BY, WinJewel will store the results and
you can easily get back to them by selecting the SEE LAST FINDBY button located just below the
Reorder Number box.
4.5 MAKING A NOTE ON AN INVENTORY ITEM
If you want to make notes about an individual inventory item, click on the gray bar that says
MAKE NOTE when you have the inventory item on the screen. Any notes will be displayed
whenever you click on the SEE NOTES gray bar if you have this item on the screen. Note that the
normal FIND BY does not work with inventory notes and you must go to REPORTS,
INVENTORY REPORTS, FIND INVENTORY BY NOTES to do a search on these notes.
4.6 DELETING INVENTORY
Inventory items can be deleted by hitting the ERASE gray bar on the INVENTORY screen. The
system will ask for a special code (See the STAFF section of this manual). The item will be
eliminated with the next sort. You can get a listing of all items that have been removed from the
inventory list by selecting REPORTS, INVENTORY REPORTS, SHOW REMOVED
INVENTORY ON SCREEN.
There must always be at least one item in the inventory record. Do not delete the existing inventory
item (100-01111 MANS 18K AMETHYST RING) until you have entered your own inventory.
4.7 COMBINING INVENTORY ITEMS
Hint: Make a fresh TRAINING COPY to try these procedures, options, reports or settings.
The TRAINING COPY will show how these functions work before effecting the actual
data. See section 2.8 SETTING UP A TRAINING PROGRAM.
If you are mounting a stone into a ring or putting any two inventory items together, go to the
INVENTORY screen and click on the COMBINE gray bar and follow the instructions. You will
first be asked to enter the item that will remain a valid inventory number (the item to survive), then
click SAVE ITEM. Next, enter the item to be merged with the first item and click SAVE ITEM
again. The merged item will now show on the screen with the cost, retail and center stone
information merged. You can now make any further changes in the item if you want but you must
click on SAVE ITEM whether you make any further changes or not.
The second item will show a sales slip number of 99999, a date sold of the date that the pieces
were combined, and the number of the item it was merged with in the CUSTOMER box.
4.8 MULTI-UNIT ITEMS
If you have inventory items that are identical, like batteries and findings, or things that are handled
by weight, like gold, loose diamonds or chains, you can give them all the same inventory number.
When you are entering the inventory record, click on the MULTIPLE UNIT ITEM button located
above the INVOICE NUMBER box. You then need to select whether you want this item to be
stored per piece (P) or by weight (W).
If you select the P, two additional boxes will appear near the bottom of the screen. You should
enter the quantity of items you are adding in the QUANTITY IN STOCK box and the level you
want to reorder in the REORDER QUANTITY box. Each time one of these inventory items is
sold, the QUANTITY field will be reduced by one. The COST and RETAIL fields must be entered
as the dollar amount per item (not total quantity).
If you selected W for weight, enter the total weight in the WEIGHT IN STOCK box and the point
at which you want to reorder in the REORDER WEIGHT field. The COST and RETAIL figures
should now be entered as the price per weight measure. When you sell an item by weight,
WinJewel will ask you to enter the weight you are selling and this will be included as the first part
of the description field. The program will also do the math to compute the PRICE field.
When the amount in stock equals the reorder level, the program will set a special flag. When you
select REPORTS, INVENTORY REPORTS, MULTI-UNIT REORDER LEVEL REPORT, a list
of all items that have reached or are below the minimum reorder level will be listed.
4.9 INVENTORY PICTURES
4.9.1 Discussion:
A digital camera or scanner can capture a picture of any inventory item and it can be included in
the inventory record, printed on sales slips and used in promotional catalogs or special mailings.
There are two groups of steps when using pictures in WinJewel.
1. Save the pictures from your camera onto your computer.
2. Save the picture on your computer into WinJewel.
You can store up to 5 pictures for one inventory item. This is useful for different views of the item.
PLANNING: FILE MANAGEMENT (getting organized). When you save a picture to an
inventory item in WinJewel a copy of your original picture (the one you saved from your
camera) will be made, renamed and saved into the c:\WinJewel\Pictures\Supp# folder,
where Supp# is the number of the supplier for that item. The picture will be renamed to the
second part of the item’s stock number, for example a picture saved to item 100-00001 will
be saved as file 00001.bmp in folder 100. Folder 100 is in the pictures folder, which is in
the WinJewel folder on the c:\ drive. If you save more than one picture the second picture
will have the same number followed by a “B”. Once you have saved the picture to
WinJewel you don’t need the picture you saved from your camera to be on your computer
hard drive. Picture use a lot of storage space. If you are going to use many pictures it will
help your computer performance if you save the original pictures to a separate location
such as a CD. Additionally, picture format types matter. The most common format types
are jpg, jpeg, gif, bmp. Using these format types will eliminate possible format conflicts
with your current or future application software.
4.9.2 Save the Pictures from Your Camera onto Your Computer:
Follow the instructions from your camera to save pictures. With newer operating systems, the
process is very simple. In some cases you may only need to plug the camera or disc into your
computer and COPY and PASTE the files into the folder (on your hard drive, network drive or
CD) of your choice. In other cases a Windows wizard may launch that will help you transfer the
pictures. Your process will vary with your camera, computer and software requirements. If you
need assistance contact your camera manufacturer for assistance.
4.9.3 SAVE THE PICTURE ON YOUR COUPUTER INTO WINJEWEL:
Once the pictures are saved you can attach them to inventory items. You can do this as you are
entering inventory or after inventory has been entered. To copy the image into the inventory
record for this item, bring up the item on the INVENTORY screen then;
1. Click on the gray IMAGE button located on the top portion of the screen (if you are
attaching pictures while you are entering inventory this button will not be visible until after
you fill in the cost and retail fields). A pop up window opens.
2. Click on the BROWSE button to find the picture on your PC. The area that accepts the
name and location will be filled in with the last picture name and location that you used, so
if you use the same name and location each time you save new pictures, then you won't
have to enter it again. Click OPEN to select the picture.
3. Click on the next available letter (if this is the first picture for this item click A.
4. Click OK.
4.9.4 Multiple Views of Same Item:
Once you have copied the
picture into the Inventory
record, it will be displayed
in the upper right hand
portion of the screen. To
add additional pictures to
the same inventory item
repeat the above steps
except for choosing a
different available letter.
After adding the additional pictures you
will see a lettered box next to the image
representing each picture. The box
representing the picture you are
currently looking at will be outlined in
black.
If you click on the long gray bar on the left of the picture, the image will be expanded to the full
size of the image that is available. Clicking a second time on the same bar will shrink it back down
to the smaller size.
In addition to displaying the picture on the INVENTORY screen, when this particular item is
entered on the SALES screen, the picture will also be displayed so the salesperson can verify that
the correct entry has been made. You may also want to print a picture of the item on the sales slip
(Select REPORTS, SYSTEM SETTINGS, SET SALES SLIPS TO PRINT OR NOT PRINT
PICTURES ON SALES SLIPS).
4.10 CATALOGS - PRINTING PICTURES OF SELECTED INVENTORY ITEMS
You may want to create a small catalog of pictures of all inventory items with a particular
characteristic (such as a diamond center stone in excess of 3 carets or all items from a particular
supplier). To do this, do a FIND BY for those items and then select the print option. You will be
given the option to print the items with or without the associated picture. You will also be asked
how many items you want to print on a page.
If you want to print a catalog with a series of unrelated items where the normal FIND BY will not
group them all, you can create a separate NOTE for each item you want with a unique description
such as “Catalog #1” or something like that. Use REPORTS, INVENTORY REPORTS, FIND
INVENTORY BY NOTES with this special description to get a complete listing of these items.
Then return to the Inventory Screen and select SEE LAST FIND BY. Click on the top line and you
will be asked if you want to include pictures and how many you want to print on a single page.
This will print out a catalogue of all the selected items along with their pictures.
4.11 BUILDING A MAP OF YOUR STORE LAYOUT
4.11.1 Discussion:
Keeping track of where your inventory items are located in the store can be very helpful. With
WinJewel, you can build a map of the store showing each display case and assign a case number
and name that can be attached to the inventory record by simply clicking on that case picture. This
can help you find individual items in the store, track hot selling cases and do limited inventories by
selected cases.
4.11.2 Things You Should Do or Know Before Getting Started
IMPORTANT: The size of the store image cannot be changed. The original size is 406 pixels wide
by 351 high pixels high. If your store image does not open after editing it check the size under the
Image menu, then attributes. Use the Help menu for detailed assistance using MS Paint. The
following is a quick guide to editing the store layout.
Hint: Make a fresh TRAINING COPY to try these procedures, options, reports or settings.
The TRAINING COPY will let you see how these functions work before effecting the
actual data. See section 2.8 SETTING UP A TRAINING PROGRAM.
4.11.3 Use a Store Map:
To use this feature, go to the INVENTORY
screen and click on the MAP button located
near the bottom of the screen.
This will display a sample store layout.
4.11.4 Mark the Location of the Item:
Select the location the item is (or will be) located by clicking on the image of the case.
4.11.5 Modify the Map:
WinJewel uses the Paint function of Windows to build this layout and it is helpful if you
understand how to use Paint to use this feature. If not, you can use the following simple approach
to building you own store layout.
1) Click on EDIT MAP. This will open the Microsoft Paint application. The file of the map is
called store1.bmp.
2) IMPORTANT: The size of the store image cannot be changed. The original size is 406 pixels
wide by 351 high pixels high. If your store image does not open after editing it check the size
under the Image menu, then attributes. Use the Help menu for detailed assistance using MS
Paint. The following is a quick guide to editing the store layout.
a) The following steps are done only in MS Paint.
b) Select IMAGE, CLEAR IMAGE to erase the sample map.
c) To build a case, click on the black color at the bottom of the screen and then hit the
rectangle button (the picture of the rectangle located on the left hand side of the screen).
d) Now more the cursor to the upper right hand portion of where the case should go, hold
down the left mouse button and move the cursor to the lower right hand position. A
rectangle will be displayed. Do this for all of your cases (you can use the other form
examples if you want).
e) Now, to fill these cases with a color, click on the “paint can” image (called Fill with Color),
click on the color you want from the selections at the bottom of the screen and move the
cursor (which should look like the paint can) inside to the rectangle and click. Do this to all
the cases.
f) To add a case number, select the “A”(Called Text), click on the color you want the text to
be (probably black) and move the cursor inside the box and click. You can now enter the
case number using the number keys on the keyboard.
g) If you want special descriptions of areas of the store, like “front door,” you can use this
same function to describe doors or other special locations.
h) When you have everything entered that you want, hit FILE, SAVE and then exit PAINT by
clicking on the small “x” in the upper right hand corner.
3) Back to WinJewel.
4) You now need to enter the case numbers and names for each of your cases. If adding a new
case click on NEW LOCATION. Enter the number of the location starting with case one and
then the system will ask for a case name. Click OK. If modifying an existing case select the
case from LOCATION NAME then click on EDIT LOCATION. The following example
illustrates how to change an existing location. The hot spot for case number 3 is too small. It
will be enlarged.
Select the LOCATION.
Click on EDIT LOCATION
Click OK to keep the number or change the number and click OK.
Click OK to keep the name or change the name and click OK.
Click on the upper left corner of the new hot spot (where you want it to be). A red dot will indicate
where you clicked. If this is not where you want the upper left corner to be, click again (to simulate
the lower right corner) to finish the routine and start over.
Click on the lower right corner of the new hot spot (where you want it to be). The hot spot will
always be a rectangular shape.
5) If you want a printed copy, click on PRINT MAP.
When you have done this for all of the cases, click on the END button.
4.12 CONSIGNMENT/MEMO ITEMS
4.12.1 Discussion:
Consignment/memo items are items that you sell from your business that you do not own or will
not pay for until the item is sold. There are two categories of consignments.
• Take in items from a Regular supplier. Regular suppliers can include established
manufactures, wholesalers, retailers.
• Take in items from a Non Regular supplier. Non regular suppliers can include walk-ins and
other non established supply sources.
One major difference between the two categories is Regular suppliers have paperwork and
established business processes to facilitate consignment/memos, whereas Non Regular suppliers
have none.
4.12.2 Take in Items from a Regular Supplier:
1. Enter a department for consignments (REPORTS, DEPARTMENTS) if you wish to do so.
2. Enter the supplier on the SUPPLIER screen if not already entered.
3. On the INVENTORY screen, hit NEW INVOICE, a new window opens.
a. Type the word “MEMO” in the Invoice box (and invoice number if you have one),
enter the date and select the supplier. Click ENTER INVENTORY.
4. Click on the box MEMO ITEM (for each item entered) located on the top portion of the
screen.
5. Enter the information about the items like normal.
4.12.3 Take in Items from a Non Regular Supplier:
PRELIMINARY STEPS:
1. Enter a department for consignments (REPORTS, DEPARTMENTS).
2. Enter a supplier on the SUPPLIER screen. All non regular suppliers must be grouped into
one supplier name. WinJewel will record specific source information at the point of
consignment.
3. Set WinJewel to record consignments (SYSTEM SETTINGS, TURN ON OR OFF THE
CONSIGNMENT FEATURE).
a. Enter the supplier number and department code.
b. Enter the disclaimer that will appear at the bottom of the invoice. This disclaimer is
your policy for handling the consignment.
DO A CONSIGNMENT TRANSACTION:
1. On the SALES screen enter the suppliers name and address information as required.
2. Select a SALESPERSON.
3. Click on the CONSIGN payment option. The next available stock number for the
consignment supplier (identified in SYSTEM SETTINGS) is created.
4. Enter a description of the item.
5. Enter an amount in the PRICE field. This is the amount you will buy this item for if it sells.
The description and amount will be copied to the INVENTORY screen.
6. Click on END LINE NO TAX.
7. An invoice of the consignment will printed at this time.
8. On the INVENTORY screen bring up the item number. Enter the amount you will sell this
item for. A tag may be printed at this time. If a RETAIL price is not determined until the
point of sale, enter the amount after the item is sold. If no amount is recorded in this field,
various reports will provide incorrect totals (such as gross profit).
WinJewel does not add these items into the inventory totals, but they will be listed on all of the
inventory reports. To find any sales of these items to report to the consignment supplier, do a
FIND BY with the SUPPLIER NUMBER, and today’s date in the DATE SOLD field. All sales up
to and including today will be displayed. If you select the UNSOLD option
, all consignment items still on display but unsold will be listed on
the FIND BY list. The SALES REPORTS, DAILY SALES REPORT BY DEPARTMENT
provides additional sale information.
Once consignment items are entered into Inventory, they are sold normally.
4.13 PRINTING PRICE TAGS
There are two methods of printing price tags. The most common method today is the dedicated
price tag printer. The second method is using a general purpose inkjet or laser printer with
specialty paper.
4.13.1 Dedicated Tag Printer:
If you have a dedicated tag printer attached to the system (such as an Eltron, Allegro, Zebra, C.Itoh
or Datamax brand of printers), you can print the item’s price tag by clicking on the TAG button
located below the REORDER NUMBER box on the INVENTORY screen. Before you do this, be
certain your printer is set up correctly by referring to chapter 18 PRINTER AND SCANNER
SETUP of this user manual.
4.13.2 General Purpose Printer:
If you are using a general-purpose ink-jet or laser printer for your tags, then it is best to store the
tags and print a batch of them at once. This will allow you to get the most effective utilization of
your tags by being able to print a whole page at one time. Whenever you enter a new item into
stock (or change an existing item's information), the system stores the tag information for printing.
Before you print any tags, refer to Printing and Aligning Price Tags portion of the Printing Reports
and Tags section of this manual. When your printer and tag options are finalized, you can print the
tags by selecting REPORTS, INVENTORY REPORTS, TAGS - ADD, REMOVE OR PRINT
PRICE TAG LIST. The list of tags waiting to print are listed in the long white box.
If you want to add tags to this list, enter the SUPPLIER and STOCK NUMBER and click on the
ADD ONE button. ADD MULTIPLE lets you generate several tags with the same number. To
remove a tag from the list, click on REMOVE ONE and then select the tag you want to remove.
TAG ALL will create a tag for every unsold inventory item in the store. It is used when you want
to re-tag the entire store. If you select DEPARTMENT, SUPPLIER or LOCATION, WinJewel
will generate tags for every item listed under that category. EMPTY will erase all of the tags in this
file.
4.14 SPECIAL INFORMATION ON PRICE TAGS – TAG LAYOUT
To change which information is printed on price tags, select REPORTS, INVENTORY
REPORTS, TAGS-SET LAYOUT OF TAGS (DEFAULT & EACH DEPARTMENT). This is
also accessible from TAGS – SET ALIGNMENT ON PRICE TAGS and then click on CHANGE
ORDER. The large white box lists all of the options you have to print on the tags and the number
of positions available. Below that box is a picture of a dumbbell tag with the items positioned how
they will print. To change this, delete the items on the picture of the tag and replace with what you
want to print. This part of WinJewel is case sensitive so be certain you use capital letters.
If you have a specialized tag printer and you select to print barcodes on your tags, WinJewel will
use the right hand portion of the tag for the barcode, so you cannot use that area. The barcode is
also the Vendor # (111) and the Stock # (2222) so you do not need to repeat these on the left hand
side of the tag. Generally, you will want the Description (3333333) to print across the middle of
the tag so you get the most information printed that you can.
You can also establish a different tag layout for each department. This allows you to print different
things for diamonds than for clocks, for example.
If selected for the tag, the Cost of the item will be printed in code. The default code in WinJewel is
a very simple conversion (A is 1, B is 2, etc). If you want to change this code to something a little
more complicated, go to REPORTS, SYSTEM SETTINGS, CHANGE THE STORES COST
CODE FOR INVENTORY. Tags can also print the age of an item (month and year it was placed
in inventory) by choosing the Age field. This also prints in code with the default being a=Jan, b=b
and the year represented by a capital letter starting with A=91, B=92 etc. You can change these
year codes by going to INVENTORY REPORTS, TAGS –SET CODE FOR INVENTORY AGE.
If you have a tag layout that is not the standard dumbbell style, you can still use the CHANGE
ORDER screen but you need to use your imagination to fill in spaces that are not displayed on the
screen. For example, if you have a tag with a long tail on the top line, just enter more data than
will display on the top line of the tag layout (into the “gray” space) and WinJewel will actually
print that information on the tag. If you need any help with special tags, please call WinJewel
customer support.
4.15 TAKING INVENTORY
There are a two methods to taking inventory with the WinJewel program.
• Check of items from a printed list to identify inventory in stock and exceptions.
• Enter each item into WinJewel and WinJewel will report inventory in stock and exceptions.
4.15.1 Check off Items from a Printed List to Identify Inventory Unaccounted For:
One of the simplest ways is to do a printout of all inventory by going to the REPORTS,
INVENTORY REPORTS, FULL LIST OF ALL INVENTORY. Then you can check off each item
as you find it in your store. Inventory will be listed in number order so it will be easy to find on the
printout. Any unchecked items at the end of the process will be missing. Any items not on the
printout will need to be added to the inventory file.
You can also print special inventories by specific supplier, department or location (display case) by
selecting those options under INVENTORY REPORTS. You can check the items off the list as
you find them.
4.15.2 Enter Each Item Into WinJewel and WinJewel will Report Inventory Unaccounted
For:
A physical inventory can be done by entering items into WinJewel using a barcode scanner or
entering stock numbers with the keyboard. The first step for recording your (taking) inventory is to
set up an (taking) inventory identification code called LAST IN STOCK code.
1. Click on SYSTEM SETTINGS from the opening screen or the REPORTS screen.
2. Click on the FIND BY button.
a. Type “taking” and click OK. (Hint: When using Findby, fewer letters will return
more results.)
3. Click on SET “LAST IN STOCK” CODES. and establish a code letter or number to
represent this inventory process along with the date.
The LAST IN STOCK code must be set each time you take inventory. This is how WinJewel
differentiates the inventory taken at this time as opposed to inventory taken at some other time.
4.15.3 Start Taking Inventory:
1. Go to the REPORTS screen.
2. Click on the FINDBY button. Type “taking” and click OK.
3. Click on TAKE INVENTORY. This will start a routine that asks for the entry method
(scanner or keyboard), the LAST IN STOCK code and price verification. An option to
record a location is also asked.
4. WinJewel will now display the inventory screen with a white background so you will know
you are doing a special task. WinJewel will place the code letter in the LAST
INVENTORY box located at the top of the INVENTORY screen as items are entered (this
is how WinJewel checks off items found in the store). To leave the inventory taking
routine, click on STOP TAKING INVENTORY.
4.15.4 Reports After Taking Inventory:
When the inventory is complete, go to INVENTORY REPORTS, LIST OF INVENTORY BY
“LAST IN STOCK”. A complete list of all items from the inventory including the number of
multi-unit items found will be identified. There are two types of exceptions for inventory
reporting.
• AFTER TAKING INVENTORY SHORT LIST – items not found.
• AFTER TAKING INVENTORY LONG LIST – items found that WinJewel shows as not
in stock.
Each of the items found on these exception reports should be researched and the WinJewel
inventory record should be corrected.
4.16 DOING A QUICK INVENTORY BY CASE
Sometimes it is convenient to do a quick inventory of a particular display case. To do this, select
REPORTS, INVENTORY REPORTS, QUICK INVENTORY OF ONE CASE (map location must
be set up to do this. See section 4.11 BUILDING A MAP OF YOUR STORE LAYOUT). Enter
the case number and then manually enter each stock number or scan all the tags with a tag reader.
All matches will be displayed green and anything not found will remain in black. You will also be
notified of any items that are not supposed to be in this case by displaying them in red in a separate
box. You can print lists showing the LONG for extra items, SHORT for missing items and CASE
for those items that match.
4.17 GETTING REPORTS ON INVENTORY
WinJewel provides a great number of reports on the inventory records. These are all available
under REPORTS, INVENTORY REPORTS. A list of the selections available are as follows:
4.17.1 Inventory listings
FULL LIST OF ALL INVENTORY (both sold and unsold)
INVENTORY BY SUPPLIER
INVENTORY BY DEPARTMENT
INVENTORY BY LOCATION
TOTAL COST AND RETAIL OF INVENTORY BY DEPARTMENTS
AGING OF INVENTORY REPORT (by year)
INVENTORY ENTERED IN ANY TIME PERIOD
INVENTORY ENTERED IN ANY TIME PERIOD (by department)
INVENTORY TOTALS BY SUPPLIER
INVENTORY TOTALS BY DEPARTMENT
LIST BY PRE-SET LIST OF SUPPLIER’S
LIST BY PRE-SET LIST OF DEPARTMENTS
LIST OF INVENTORY BY “LAST IN STOCK” (listing by special inventory codes)
INVENTORY THAT WAS ON HAND AT ANY DATE (both owned and memo)
FULL INVENTORY BY INVOICE NUMBER
PREPARE LIST OF AUTO REORDER MARKED ITEMS THAT HAVE BEEN SOLD
INVENTORY REPORT WITH SERIAL NUMBERS
MULTI-UNIT ITEMS PERFORMANCE ANALYSIS REPORT
ONE SUPPLIERS INVENTORY BY REORDER NUMBER
4.17.2 Sold inventory reports
TRAVELING SALESPERSON’S REPORT (Sales by supplier for a given period)
HOT SELLERS REPORT (items with short shelf lives)
4.17.3 Special reports
GRAPH INVENTORY (inventory currently on hand)
LOOSE DIAMOND LIST
COUNT INVENTORY (total number of inventory items)
ANALYZE INVENTORY AGE BY SUPPLIER
ANALYZE INVENTORY AGE BY DEPARTMENT
ANALYZE DIAMONDS BY QUALITY AND SIZE RANGE
4.17.4 Custom printouts
You can create custom printouts of inventory using the FINDBY feature on the Inventory screen.
See section 4.4 FINDING AN INVENTORY ITEM. The list can be printed, displayed on screen or
saved to file.
4.18 USING OLD TAG NUMBERS
WinJewel can support your old tag numbering system. When you enter inventory in the system,
put the old tag number as the first part of the DESCRIPTION field followed by a space before you
enter the complete description. Next go to REPORTS, SYSTEM SETTINGS, SET THE SEARCH
BY OLD NUMBER BUTTON ON SALES SCREEN.
There will now be an OLD # button located just under the SLIP NUMBER on the SALES screen.
Click on this button and enter the old stock number in the Stock Number field. WinJewel will
automatically convert this to the new Stock Number for the Sales Slip.
4.19 ADJUSTING THE PRICES OF INVENTORY ITEMS
WinJewel provides you several options to adjust prices of selected items without having to go into
each inventory record and make the change. However, these are very powerful features which will
change every inventory record selected. Please consult with WinJewel Customer Support if you
have any questions before you use any of them.
Hint: Make a fresh TRAINING COPY to try these settings options, reports or settings. The
TRAINING COPY will show how these functions work before effecting the actual data.
See section 2.8 SETTING UP A TRAINING PROGRAM.
The selections can be found under REPORTS, INVENTORY REPORTS.
4.19.1 Change Retail Price of One Department:
This will change the retail price of every item in a given department by a percentage. For example,
you could increase the price of every item in the Black Hills Gold department by 10% and the
retail price for every item in that department will be adjusted.
4.19.2 Change Price by Gold Weight:
This will allow you to specify an amount to charge based on the price per gram of gold and
WinJewel will adjust that number based on the entry in the GRAMS field of the inventory record.
4.19.3 Adjust Cost Factor:
This lets you change the cost that prints on the tag by a set markup amount. Once this feature is
turned on, all tags will print this way until it is turned off.
4.19.4 Change Price of Inventory of One Supplier
This lets you change the markup of every inventory item for a given supplier. Remember to print
up a new price tag.
4.20 SECOND COST AND RETAIL PRICE OPTION
WinJewel allows you to maintain two costs and two retail prices for each inventory item. To use
this option, go to REPORTS, SYSTEM SETTINGS, ALLOW A SECOND RETAIL PRICE ON
INVENTORY or ALLOW A SECOND COST PRICE ON INVENTORY.
The inventory record will now show two separate fields. When these items are sold, the
salesperson will have the option to select which of the two prices to use. If the customer has the
Wholesale flag set within their customer record, WinJewel will automatically use the second price
field for sales.
5 CUSTOMERS
Building a good customer database is one of the best things a jewelry store can do. The ability to
quickly see all that you have done with each customer will improve service and allow better
individual customer decisions. Knowing their previous purchase history, their credit standing with
you, letters you have sent them, appraisals you have done, and any special notes or warnings can
really assist in making better sales.
5.1 BUILDING A CUSTOMER DATABASE
5.1.1 Discussion
The customer database keeps a record of all names entered into WinJewel and assigns a unique number to
each record. This number is displayed just below the FIRST NAME field. There are some special features
in WinJewel that use this number but generally you will only need the customer name or phone number to
use customer records. Special information can be saved along with each customer record for example
anniversary or birthday dates. Balances, payment standing and credit limits can also be saved with each
customer record. In addition, notes can be attached for any purpose you want. All of this information can
be used for creating mailings, tracking special requests and identifying special customers.
5.1.2 Things you should know/do before building a customer database:
Customers can be added from any screen that has customer input fields. Customer’s are assigned a unique
number. Customers must have a LAST NAME. All other information is optional. It is important to
remember this when retrieving existing customers. Existing customer names should always be retrieved
from the list, not re-entered. Re-entering an existing customer’s information will create a second (separate)
entry for this customer.
5.1.3 Enter a New Customer:
Click on the CUST. icon and the customer screen will be displayed. To enter a new customer all
you have to do is fill in the phone number, name and address information and click SAVE CUST.
OPTIONS: A second phone number field can be added to the customer record. This option
is found under SYSTEM SETTINGS, TURN ON/OFF SECOND PHONE DROPDOWN
BOX OR EDIT LIST.
Hint: Make a fresh TRAINING COPY to try these procedures, options, reports or settings.
The TRAINING COPY will show how these functions work before effecting the actual
data. See section 2.8 SETTING UP A TRAINING PROGRAM.
OPTIONS: To see what other options are available go to SYSTEM SETTINGS, Click on
the FIND BY button, type “CUST”, or “PHONE” , or “NAME” then click OK. This will
pull the options that are available from the SYSTEM SETTINGS list. Try the same
procedure with PRINTER SETTINGS.
ADDITIONAL FIELDS:
CREDIT LIMIT and an AGREED PAYMENT:
These fields will be used to provide special notices to the salesperson when a sale is being
made. Requires a special code that is found on the Staff screen.
BALANCE:
Automatically updated by WinJewel every time there is a sale or payment. Requires a
special code that is found on the Staff screen.
MONTHS NO INT:
Used for customers that have a charge account but have been granted a waiver of interest
for a given number of months. You can put any number between 1 and 99 in this box. Each
month when the interest is added to other accounts, no interest will be added to any account
which has a number in this box and the number will be reduced by one. When the number
reaches zero, the account will again be charged interest like any other account. If a charge
is made close to the date that interest is to be charged, or if you just don't want to charge
interest on the first month of a charge, place a 1 in this box. If you want interest the first
month, place a 0.
BEHIND:
Displays the number of months a customer is behind on their payment schedule.
E-MAIL: When entered, the options to e-mail are enabled. This can be a very cost effective
approach to mailings.
NOTES:
If you want to make a special note for this customer, click on the NEW NOTE gray button.
An outlined box will appear on the screen. Type whatever you want and press ENTER.
This note will become a permanent part of the customer record and it will be stored by the
date you entered the note. To view previous notes that have been made on this customer
click SEE NOTES. The notes are in reverse order with the newest note at the top of the list.
Any letters or appraisals that have been done for this customer will also be listed with the
notes.
SEE SLIPS: Will display the previous sales for this customer, whether Cash, Charge,
Layaway, Bankcard, or Payments.
The customer’s record can be viewed
by entering the phone number, last
name or just a few letters of the last
name in the PHONE box and hit
ENTER.
All of the matches will show up in
the large list box at the bottom of the
screen. Click on the one you want
and the information for that customer
will be displayed.
If you need to change any of the
information, put the cursor into that
box, type the corrected information
and click on SAVE CUST.
IMPORTANT: When a new customer comes into the store to make a purchase, you
do not need to go to the Customer screen. Any data entered for a new customer on
the Sales screen will automatically create a new customer record. Remember to
retrieve existing customer’s from the list to avoid creating duplicate customer
records.
5.2 THE CUSTOMER PROFILE OPTION
If you want to record additional information about your customers, click on the
PROFILE gray bar and a profile screen will appear. Simply check one selection
under each category.
You can customize the categories and components that appear on this screen to be
specific to your needs. Go to REPORTS, SYSTEM SETTINGS, CHANGE
LABELS FOR CUSTOMER PROFILE. Each line under the individual section
headings will be listed one at a time and you can change the description to anything
you want. It is sometimes easier if you do a screen print of the PROFILE screen
before you make changes so you know where you are. You will probably want to
change AREA LIVE section for your particular market area. Any changes to these
labels does not change the information already in the file but simply re-labels it, so
it is best for consistency to make all changes before you start entering customer
data.
Across the top of the PROFILE screen are some important selections you can set
for this customer. NO STATEMENTS will exclude them from any statement
printing. NO MAILINGS will exclude them from all mailings. NO CHARGES will
display a special message on the SALES screen when this customer is entered
notifying the salesperson that we do not want to accept any more charges. NO
CHECKS notifies the salesperson not to accept checks. NEVER INTEREST means
to not post interest to this account. WHOLESALE designates this as a wholesale
customer which will result in No Sales Tax applied to any transactions.
Just under the customer name at the bottom of the screen is a box labeled TOTAL
PURCHASES. This field will list the grand total of all purchases for this customer.
If you want to adjust how this field is computed, go to REPORTS, CUSTOMERS,
REFIGURE TOTAL PURCHASES FOR EACH CUSTOMER and you can set it to
only display total purchases from a given date range (such as purchases for the
current year only). Normally, you will want to use today’s date for the ENDING
DATE. You can also have this field displayed directly on the Sales and Customer
screens by selecting REPORTS, SYSTEM SETTINGS, SHOW PURCHASES ON
SALES AND CUSTOMER SCREENS.
WinJewel also keeps track of this customer’s payment history. Click on ANALYZE
CREDIT to show the months this customer has been current (under number 1) or
behind by number of months (2 – 9).
If you want to keep track of
special preferences and dates
for this customer, click on the
DETAILED PROFILE gray bar
from the PROFILE screen. You
will then be able to record
additional information such as
anniversary date, birthday,
favorite stone, ring size, work
phone and similar information about the
customer’s partner.
Once you have completed
entering this information, you
can get a list of all customers
by given characteristics such as
age group, favorite stone or any
other profile item. To do this,
select FIND BY from the
Customer Screen and select the
PROFILE or DETAILED
PROFILE option.
FIND BY is discussed in greater detail in the section: 5.3 USING FIND BY FOR
CUSTOMERS.
5.3 FIND BY FOR CUSTOMERS
FIND BY on the customer screen can create lists of customers that can be used for
several purposes including but not limited to mailings. You can find individual
customers or groups of customers with similar characteristics by using the FIND
BY button. The following example will illustrate how to find all customers that live
in zip code 98270 and that have purchased over $1000 worth of merchandise.
1. Click on the FIND BY
button.
2. Type “98270” in the
ZIP code field.
3. Click on “FIND BY
PROFILE”.
4. Type “1000” in the
TOTAL
PURCHASES field.
5. Click END PROFILE.
a. Refine the
TOTAL
PURCHASES
value.
6. Click END FIND BY.
a. Refine the TOTAL PURCHASES value and the ZIP code range.
The results of the
search will be
displayed in the list. In
this case there was one
customer that matched
the search results.
Now that a find by list
has been created, you
can go to REPORTS:
MAILING LABELS:
LABELS BY LAST
FIND BY to create
labels based on this
list.
NOTES can be a valuable way to separate customers. For example, you might want to enter a note
on each of your special customers with the words “Premier Customer” and then you could access
all of them by searching notes for that key word.
Once the system has identified a single or group of customers that match, you can send each
person in this group a special letter. To do this, select REPORTS, CUSTOMERS, A LETTER TO
ALL ON FINDBY LIST and pick the appropriate letter to send.
In addition to the FIND BY button, you can also find a customer by clicking on REPORTS,
CUSTOMERS and selecting SEARCH CUSTOMERS BY ADDRESS or SEARCH
CUSTOMERS BY NOTES.
5.4 SENDING CUSTOMER STATEMENTS
5.4.1 Discussion:
Statements for monthly billing are created based on the information stored in the customer’s BALANCE,
MONTHS NO INTEREST and BEHIND fields. Customer balances are created whenever the payment
types CHARGE or LAYAWAY are used. WinJewel gives the option to omit LAYAWAY balances from
statements. The printed statement is designed to show the customer’s name and address in a standard
window envelope so mailing labels are not needed.
5.4.2 Things You Should Do or Know Before Starting:
The notes that appear on the statements must be set for the first time. To set the notes that appear on the
printed statements go to REPORTS:ACCTS RECEIVABLE:
SET UNIVERSAL MESSAGE AND SET TO APPEAR ON EACH STATEMENT will turn on a note at the
bottom of the statement. SET UNIVERSAL MESSAGE NOT TO APPEAR ON STATEMENTS will turn
this note off.
Hint: Make a fresh TRAINING COPY to try these procedures, options, reports or settings.
The TRAINING COPY will show how these functions work before effecting the actual
data. See section 2.8 SETTING UP A TRAINING PROGRAM.
CREDIT RATING notes will print according to a customers specific credit rating (based on MOS
BEHIND). To set and turn these notes on go to REPORTS: ACCTS RECEIVABLE: POST
INTEREST TO ACCOUNTS. Click on the SET NOTES button. Click on each NOTE NUMBER
line to set the note for each credit rating. CLICK THIS LINE TO END CHANGING NOTES will
return you to the POSTING INTEREST TO CHARGE ACCOUNTS screen. Click CANCEL /
EXIT to return to WinJewel without posting interest.
Layaway amounts are included in the customer’s balance. To exclude layaway amounts from
posting interest go to REPORTS; ACCTS RECEIVABLE: POST INTEREST TO ACCOUNTS.
Statements for customer’s with Layaway accounts will print unless turned off. To turn off printing
statements with layaways go to REPORTS; ACCTS RECEIVABLE: SET STATEMENTS TO
NOT PRINT LAYAWAYS.
5.4.3 Posting Interest
Before statements are printed, interest should be posted to accounts with a balance due. To post
interest click REPORTS, ACCOUNTS RECEIVABLE, POST INTEREST TO ACCOUNTS and
you will be given the option to post monthly or daily. The normal method is to post interest
MONTHLY. Posting interest DAILY requires running the POST INTEREST routine every day.
Once selected, the next screen will show the last settings used for posting. DATE FOR POSTING
will default to today’s date. The MINIMUM FINANCE CHARGE field can be used to establish a
minimum payment that you will require on all accounts regardless of the amount computed as due
(the customer will be billed the greater amount). The MONTHLY PERCENTAGE FOR
POSTING is the annualized interest rate (take the annual rate and divide by 12 to get a monthly
rate or by 365 to get a daily rate). SET NOTES lets you establish a special note that will appear on
the customer’s statement depending on the payment history shown under their credit rating. You
can also choose DO NOT POST INTEREST TO LAYAWAYS by checking that box.
When you are comfortable with all of the fields, click POST INTEREST. The interest will be
added to each account. A report will print showing all customers accounts that were adjusted. This
routine may take some time depending on how many accounts you have and should only be run
when nothing else is running in WinJewel. Also, do not interrupt this routine for any reason.
When interest is posted, any account that has an amount in the BALANCE field and a zero in the
MONTHS NO INTEREST input box will receive an interest charge. After posting, the current
number in MONTHS NO INTEREST will be decremented by one number (Example: if there is a 3
in the box it will become a 2).
You can establish a minimum payment amount by selecting REPORTS, ACCOUNTS
RECEIVABLE, SET THE MINIMUM PAYMENT ON ALL CUSTOMERS. This routine will run
through every customer record and the adjust the AGREED PAYMENT
amount
(on the customer screen). It is not the same as the MINIMUM FINANCE CHARGE. This routine
will recalculate each customer’s account and will raise AGREED PAYMENTS accordingly. This
routine will not lower any AGREED PAYMENTS.
Once the interest is calculated, you should determine how you want your statements to look. The
following selections are available under REPORTS, ACCOUNTS RECEIVABLE:
SET MINIMUM PAYMENT TO SHOW (or NOT show) ON STATEMENTS
SET STORE LOGO TO PRINT ON EACH STATEMENT
SET STORE NAME AND ADDRESS TO PRINT ON EACH
STATEMENT (this will print the name and address instead of the logo.
You must first turn off logo printing)
SET NUMBER OF DAYS TO SHOW ON STATEMENTS (this
limits how much history will appear on the statement. The default is
all activity since credit was extended)
CHANGE THE WORDING OF “AGREED PAYMENT” ON STATEMENTS
CHARGE ACCOUNT AGING REPORT
Now you can print statements by going to REPORTS, ACCOUNTS RECEIVABLE, PRINT ALL
STATEMENTS. Be certain you have enough paper in your printer.
Sometimes you may need to create a single statement for just one customer. To do this, bring up
the CUSTOMER screen and select the customer you want. Click on the STATEMENT gray bar
and an individual statement will be printed.
5.5 REMOVING INTEREST CHARGES FROM AN ACCOUNT
If you want to remove the interest charged to any one account, click on REPORTS, ACCOUNTS
RECEIVABLE, POST INTEREST TO ACCOUNTS and then click on the gray bar at the bottom
which says REMOVE INTEREST FROM 1. You will be asked for the customer number of the
account that you want to remove interest. The customer number can be found by looking just
below the FIRST NAME field on the customer screen.
You will be shown each interest posting for this account one by one and asked YES or NO to
remove it. At the end of the account you will be shown a total of the number of interest postings
that were removed.
5.6 SPECIAL OPTIONS FOR PAST DUE CUSTOMERS
You can send special collection letters to past-due customers based on the number of months in the
BEHIND field. Select REPORTS, ACCTS RECEIVABLE, SEND AUTOMATIC LATE
LETTERS FOR ACCOUNTS and determine which letter you want to send.
WinJewel also allows you to post special late charges to accounts. Select REPORTS, ACCTS
RECEIVABLE, POST LATE CHARGES TO ACCOUNTS and you can assess a special dollar
charge to accounts based on the number of months in the BEHIND field (respond NO to the
question to reset the parameters).
You can also send more frequent statements to past due customers by selecting REPORTS,
ACCTS RECEIVABLE, STATEMENTS TO ACCOUNTS BASED ON BEHIND.
5.7 CUSTOMER REPORTS
WinJewel has many pre-established reports that can be selected to get detailed information about
the customer base. These reports can be found be selecting REPORTS, CUSTOMERS and the
following:
COUNT ZIP CODES (A total of customers by Zip code)
CUSTOMER LIST (Provides many selections including a list by
name, by name and address, name and phone number and by
balance due)
CUSTOMER COUNT (total number of customer records)
CHARGE ACCOUNT AGING REPORT (total number of customers
and balance due by credit rating)
CUSTOMERS BY LAST TRANSACTION DATE (allows selection
before or after a set date)
CUSTOMERS WHO HAVE PURCHASED OVER DESIGNATED
AMOUNT IN A PERIOD
CUSTOMERS WITH A NEGATIVE BALANCE
CUSTOMERS WITH A ZERO BALANCE
CUSTOMER LIST IN COLUMN FORMAT
CUSTOMER LIST SHOWING PROJECTED PAID-OFF DATE
NEW CUSTOMERS IN A TIME PERIOD BY ZIP CODE
LIST CUSTOMERS WITH EMAIL ADDRESSES
5.8 SENDING CUSTOMER LETTERS
If you want to send a form letter or an Email to the customer, you must first bring that customer
record up on the CUSTOMER screen. Now click on the SEND LETTER gray bar. A list of form
letters that you have previously written and saved will appear in the large box at the bottom of the
screen. Point to the one that you want to send and click. You will be asked if you want to PRINT
or EMAIL the letter. A printed letter will go into a window envelope and an Emailed note will be
sent to the Email address in the Customer record. In addition, a Note will be created for this
customer identifying which letter was sent and the date.
For the Email option to work correctly, you must be on-line to your Internet provider or have your
own server connection. In addition, the Email feature only works if you have a Windows
compliant Email program and it is correctly configured.
If you do not want to use an existing letter as is, click on the EDIT LETTER gray bar. WinJewel’s
own Formletter Writer program will now appear. Select the QUICK button if you want to write a
special one-time letter that you do not plan on saving for future use. The cursor will appear in the
far-left top corner of the white writing area. You should start your letter with the body of the letter
because the Form letter Writer will automatically fill in the heading, customer name and address
and date, so you don't want to duplicate. The program does not fill in the salutation and writer's
name at the bottom so you must enter these items. When you are finished, click on END QUICK
LETTER.
If you want to modify an existing letter or create a new one for future use, select the FORM button
and then select to create a NEW LETTER of OPEN LETTER and make the changes you want.
Remember to hit SAVE LETTER if you want to save your letter for future use.
You can have the Formletter Writer place specific customer information within the body of the
letter by using a special capitalized word between the < and > symbols in body of your letter. For
example, having the words “You currently owe $<BALANCE> and have agreed to monthly
payments of $<AGREED PAYMENT>.”, will be converted into “You currently owe $1235 and
have agreed to monthly payments $500 (or whatever amounts are in the customer record). These
substitute words must be entered exactly as shown to be replaced. You should include a space (and
the $ for dollar amounts) just before each and just after each word to be replaced. The keywords
you can use are:
<LAST NAME> will replace with the last name
<FIRST NAME> will replace with the first name
<ADDRESS> will replace with the street address
<CITY> will replace with the city name
<STATE> will replace with the state 2 initials
<ZIP> will replace with the zip code
<BALANCE> will replace with the current balance
<AGREED PAYMENT> will replace with agreed payment
<CREDIT LIMIT> will replace with the credit limit
<PHONE> will replace with the first phone number
5.9 CREATE, EDIT OR ERASE A FORM LETTER
These selections can be found by using the procedure above or selecting REPORTS, SYSTEM
SETTING and either CREATE OR EDIT A FORM LETTER or ERASE A FORM LETTER.
WinJewel normally stores customer names and addresses with all capitalized letters. However, the
default setting in WinJewel for Statements, Letters and Appraisals will be upper and lower case.
You can change this setting by going to REPORTS, SYSTEM SETTINGS, SET PRINTED
CORRESPONDENCE NAMES AND ADDRESSES TO UPPER/LOWERCASE.
5.10 USING THE CUSTOMER FOLLOWUP FEATURE
WinJewel provides a special notification system that allows you to record and be reminded of
special things you need to do for a particular customer. To activate this, go to REPORTS,
SYSTEM SETTINGS, TURN ON OR OFF THE TIMED FOLLOWUP FEATURE. Once
activated, a new FOLLOWUP gray bar will be displayed on the SALES, CUSTOMER and
SERVICE screens. Anytime you have a customer entered on these screens, you can click on
FOLLOWUP and record an action, a specific message and the date and time you want to be
reminded. You can change the action items listed by going to SYSTEM SETTINGS, SET THE
LIST OF REASONS TO APPEAR ON FOLLOWUP.
When the date or time arrives, a special reminder box will be displayed on top of whatever you are
doing in WinJewel reminding you of the customer message. You can either take action at that time
or delay the notification and instruct the system to make it reappear at a later time. When that time
occurs, the message will display again. When closing a Followup message, using CANCEL will
delete it totally. If you select SEE/CANCEL, the Followup will be cancelled but WinJewel will
bring up the customer record on the CUSTOMER screen so you can review balances, notes,
information and create letters.
To review all messages, bring up a blank CUSTOMER screen and click on the SEE FOLLOWUPS
gray bar located at the top. All followups will be displayed. If you click on any specific one, the
CUSTOMER screen will be filled with the Customer record and the Followup will be deleted.
IMPORTANT NOTE TO NETWORK USERS: Followups are unique to each computer in your
network. Followups that are made on a specific computer are not available on other computers.
This is by design. For example: Followups that are done at the computer in the Accounts Payable
section will be different than the follow-ups that are done at the take-in desk of the repair
department.
5.11 DELETING CUSTOMERS FROM THE FILE
A customer can be deleted from the file by going to the CUSTOMER screen and bringing up the
customer. Click on REMOVE CUSTOMER and the system will eliminate the customer from the
file the next time that you run a sort.
IT IS NOT A GOOD IDEA TO DELETE CUSTOMERS. This will stop you from ever looking up
the information about this customer (notes, sales and repairs) and may leave attached records
orphaned in the system which may cause problems. If this was an active customer, be certain to
move all slips and envelopes to another customer before you delete the customer.
Because deleting them can cause problems, it is usually better to make a note on the account as to
why they shouldn't be used and change the address to something like: "Do not use customer” or
"Duplicate, use other name", or some other notice that will prevent inadvertently using this
customer record.
5.12 TO MARK A CUSTOMER AS A WHOLESALE CUSTOMER
If a customer always buys wholesale (with no sales tax), you can mark this customer by going to
the CUSTOMER screen, clicking on PROFILE, and putting a check mark in the WHOLESALE
box. This will cause that customer to always be treated as a "no sales tax" status.
5.13 DIALING AUTOMATICALLY
If you have a modem that is capable of dialing, you can double click on any phone number in
WinJewel and that number will be dialed automatically. To hang up the phone, double click on the
same phone box that you started the dialing process with.
To activate this feature, go to REPORTS, DIALER SETTINGS and turn the feature “ON.” You
must also set the modem connections from the same screen by clicking on SET MODEM
PARAMETERS and SET MODEM PORT.
5.14 USING CITY NAME SHORTCUTS
Whenever you are entering the city of a customer you have the option of just entering a single
character. You first have to define the shortcut you want to use by selecting REPORTS,
SHORTCUTS and picking the SINGLE or DOUBLE CHARACTER option. Whenever you use
this character in the city field the full city name, state and as much of the zip as you have defined
will be automatically filled in the appropriate boxes. If the city has more than one zip code, you
will have to fill in the balance of the zip code field.
You can also establish a shortcut for zip codes. Select SHORTCUTS, ZIP CODE TO CITY AND
STATE NAME. Now, when you enter a zip code, the city and state fields will automatically be
filled in.
5.15 SHOWING PICTURES OF CUSTOMERS
You can store and display digital pictures of your customers by going to REPORTS, SYSTEM
SETTINGS, SET THE ABILITY TO SAVE AND SHOW CUSTOMER’S PICTURES and
turning that feature on. You will now have an ADD PICTURE gray bar displayed on the
CUSTOMER screen. With the customer’s record displayed, simply click and add the picture by
using the BROWSE feature to find the picture on your hard drive. Now, any time you display that
customer record, their picture will be displayed.
This picture will also show whenever this customer is entered on a SALES screen. This is a good
way to verify the identity of the purchaser.
5.16 A WISH LIST, GIFT OR BRIDAL REGISTRY
You can store a gift registry for any customer by clicking on the GIFT REGISTRY button on the
CUSTOMER screen. If the GIFT REGISTRY button is white then the customer currently on the
screen has entries in the registry.
6 ORDERS
6.1 ENTERING ORDERS FOR SUPPLIERS
To place an order with one of your suppliers, click on the ORDERS icon. A list of suppliers will be
displayed in the large white list box in the bottom right corner of the screen. Select the supplier
you want to order from and click. If the supplier is not on the list, you must go to the SUPPLIER
icon and enter them into the system. Once you click on the supplier you want, their name and
normal terms will be automatically filled in the appropriate boxes on the screen.
The cursor will be blinking in the QTY (Quantity) box. Enter the number of pieces ordered (If “1”
you can just skip over this field by hitting ENTER). Next enter the supplier’s item number in the
STYLE NUMBER box and fill in the DESCRIPTION OF ITEM(S) box. Next enter the COST
EACH and the DEPARTMENT you want to assign it to. Once the department is selected, the Open
to Buy amount will be displayed for your information. If you want to enter some extra information
for the supplier, fill in the SPECIAL INSTRUCTIONS box. This information will print right
below the description of the item on the Order Form. You can have separate instructions for each
item.
If this order is not for a specific customer, skip the Customer information and hit END LINE. The
system will ask if you want to use a special order number or you want WinJewel to assign the next
available number. Now the cursor is back in the QTY box and you can enter more items for this
supplier.
When you have everything entered, go to the DUE DATE box and enter the date you want shown
on the printed order form. If you want to change the ORDER DATE to something other than
today’s date, you can do that also. When everything is as you want, hit END ORDER/PRINT and
the complete Order Form will be printed for mailing or Fax.
If the order is for a particular customer, it is usually best to create a separate order (do not combine
with other items). Enter the information about that customer. To automatically fill in existing
customer information, enter the phone number, last name or partial name in the CUSTOMERS
PHONE box and click on the customer you want. To fully track the item, you can also fill in the
CUST. PRICE box (This does not print on the Order Form). With a particular customer order, it is
important to fill out the DUE DATE field. When the item comes in, call up the Order record and
fill in the IN DATE box and then you can notify the customer. The TO CUST DATE is the date
that the merchandise is given to the retail customer.
6.2 TRACKING ORDERS
To see the list of orders outstanding for any given supplier, bring up the ORDER screen, select the
supplier you want and hit SEE ALL ORDERS. This will list by order number and total amount
every order that is outstanding at this time. To look at a particular order, click on it and the
information will be displayed on the screen.
If you want to find an order that was made for a particular customer, select the BY CUSTOMER
button and enter the customer’s name. Any outstanding orders will be listed and if you click on
one, all the information will be displayed.
At any time, you can click on SEE ALL ORDERS and a complete list will be displayed. To
remove any old orders from the system that have been received, select ORDER REPORTS,
REMOVE OLD ORDERS.
6.3 RECEIVING ORDERS
When the order comes in and it is correct, select MARK A WHOLE ORDER IN and enter the
Order Number. It will be removed from the outstanding order list.
Items can be marked in individually on an order. Click on the item number from the detail view of
the order then click on the MARK ITEM IN button.
WinJewel will ask you if you want to add these items to the inventory. If you select yes, the item
information will be copied to the inventory screen the next time you enter inventory for the same
supplier. See section 4.2.1 SEE FROM ORDERS.
6.4 ORDER REPORTS
Selecting REPORTS, ORDER REPORTS lets you get the following:
ORDERS PAST DUE REPORT (Orders not marked in where the current date is later than the due
date)
ALL ORDERS IN COMPUTER
6.5 ORDER REPORT SETTINGS
Go to SYSTEM SETTINGS, click on the Find By button and type “order”, click OK.
7 SERVICE ENVELOPES
7.1 PREPARING A SERVICE ENVELOPE
To prepare a service envelope, click on the SERVICE icon. You can bring up the customer by
entering the phone number, name or partial name in the PHONE box. If this is a new customer, fill
out the fields and they will be added to the customer file. Then enter the DEPARTMENT and
SALESPERSON for this transaction.
The cursor is now in the ENVELOPE NUMBER box. If you are using pre-numbered envelopes,
enter the one you are going to use next in this field. If you want the system to assign the next
consecutive number, put the cursor in the box and double click and the number will be entered. If
this customer has other envelopes outstanding, those will be listed in the large white box. If you
want to bring up any of those envelopes or include this job with a previous envelope, click on the
envelope you want and the information will be displayed for you to make the necessary changes.
Next, enter a brief description of the item in the ITEM box and any special instructions in the
INSTRUCTIONS box. ASSIGNED TO is who is going to handle this repair. If it is an employee
already entered into the system, just click on the name from the pull-down menu. If the item will
be given to someone outside the organization, you must add them to the employee list from the
Staff screen. When you add service employees or outside groups (like trade shops), click on the
SHOP LIST button and only those staff names with this checked will be displayed.
DATE IN is the date you are taking the item. Double click with the cursor on this box and today’s
date will be entered. DATE DUE is the date you are promising this to the customer. WinJewel will
track progress against this date. DATE FINISHED will be entered when the service is complete
and waiting for the customer to pick it up. DATE OUT is the date they pick up the item. It will be
filled in automatically when a Sales Slip is recorded for this envelope. COST is for internal use
only and will be encoded. LOCATION is where the item will be placed (You know how easy it
can be to lose envelopes!), ESTIMATE will be filled in if you are not certain of what the service
will cost. PRICE is the quote you are giving to the customer. SALES SLIP will be filled in later by
the system.
The cursor will now be in the DECLARED VALUE box. You can enter an amount here or leave it
blank (If you enter an amount, it will be printed on the envelope). You can also make a special note
for this envelope by clicking on NOTE ON ENVELOPE and entering the message. These notes
can be viewed by clicking the SEE NOTE gray bar.
When you have completed all of the entries, click on PRT/SAVE and a copy of the information
will be printed on standard blank paper. If you need additional copies, click on the NUMBER OF
COPIES box and enter the number you want. If you want to regularly print additional copies, go
to REPORTS, ENVELOPE REPORTS, SET DEFAULT NUMBER OF COPIES TO PRINT and
this amount will become the default.
You can also print this information directly to an physical job envelope by using the setting
PRINTER SETTINGS, SET REPAIR ENVELOPES TO PRINT ON BLANK ENVELOPES. If
you want a special note to appear on the bottom of the Repair envelope, this can be done by
selecting REPORTS, PRINTER SETTINGS, SET NOTE FOR BOTTOM OF ENVELOPES.
You can also set WinJewel to print the barcode on the repair envelope. Then, any time you are
moving it, recording new information or closing it out with a sales slip, you will just have to scan
the barcode and all of the envelope information will automatically be entered. To set this, go to
REPORTS, PRINTER SETTINGS, TURN ON/OFF THE BARCODE TO BE PRINTED ON
REPAIR ENVELOPES. You will then need to set up the special Interleaved 2 of 5 font for the
barcode. Go to Control Panel on your Windows desktop and select Fonts and then File, Install New
Font and select the WinJewel directory. Click on Interleaved 2 of 5 and select OK. You can now
print barcodes.
At any time, you can recall an envelope by bringing up the SERVICE screen and typing the
Envelope Number in the PHONE box. You can also enter the customer on the SERVICE screen
and click on the envelope you want displayed in the white box.
Later when you are ready to write a sales slip, enter E in the first STOCK NUMBER box and the
envelope number in the second box. The name and all other information will be automatically
filled in on the sales slip and the system will close out this envelope as being picked up and paid.
7.2 RECORDING THE CONDITION OF THE ITEM
If you want to record specifics about the service item you are taking in, click on the COND. gray
bar located just above the SAVE button and a CONDITION screen will appear. Click on the type
of item at the top and a series of description categories appropriate for that type of item will be
displayed. Simply check all of the boxes that apply (you can unselect a box by clicking on it a
second time). Recording things now such as scratches or missing or broken components can make
later confirmation of the condition when the item arrived much easier. Everything on the
CONDITION screen can be changed by clicking on the CHANGE LABEL gray bar and change
the headings or descriptions.
When you are finished filling out the screen, click on the PRINT button and print a copy of the
condition description that can be attached to the Envelope and/or given to the customer. This
information will also remain with Envelope record in WinJewel.
If you find it necessary, you can also attach an image of the item to the record. Click on the
IMAGE button and a digital picture can be attached.
7.3 TRACKING ACTIVITY ON SERVICE ENVELOPES
WinJewel provides several features that will assist you in keeping track of activity on service and
job envelopes. There are two gray bars located just above your store logo that say ADD PART and
ADD LABOR. When a part is required that you have in inventory, you can click on the ADD
PART button and enter the stock number for that part. The cost of that item will be added to the
COST field to assist in determining the final cost of the service.
ADD LABOR allows you to create a list of service activities (watch cleaning, adding links to
chains, melle head, etc.) with a set cost, retail price, person assigned and number of days to
complete. You can just click on any one of these services and the fields will be automatically filled
in. You can access the ADD LABOR screen by also clicking on the small arrow located to the
right of the INSTRUCTIONS box. You can print this list be going to REPORTS, ENVELOPE
REPORTS, PRINT THE ENVELOPE PRE-DEFINED LIST.
You can also keep track of the actual service time logged for this envelope by clicking on the
TIME button located just below the LOCATION box. A list will be displayed of all staff with the
SHOP LIST box checked as part of their employee record. When service is being performed on
this job/envelope, the employee can click on their name and click on the START button. WinJewel
will keep track of the time elapsed until they click on the STOP button. For a lengthy process,
several different time sequences can be tracked and the system will total the time by individual.
There are also several shortcuts that can make using the SERVICE screen easier. Selecting
REPORTS, ENVELOPE REPORTS, SET DEFAULT DEPARTMENT FOR ENVELOPES will
allow you to skip over that field when entering data and the system will fill in that department
automatically. Selecting REPORTS, ENVELOPE REPORTS, SET DEFAULT NUMBER OF
DAYS BETWEEN IN AND DUE will let you set the average number of days to complete service
items. When established, double click on the DATE DUE field and the system will compute and
fill in that date.
7.4 ENVELOPE REPORTS
The following reports are available by selecting REPORTS, ENVELOPE REPORTS:
ENVELOPE PAST DUE REPORT (All envelopes where today’s date is past the Due Date and no
Date Finished has been entered)
ENVELOPES FINISHED BUT NOT PAID (Finished but no Date Out entered)
ENVELOPES BY WORKER (All active envelopes by Assigned To)
LIST OF ENVELOPES THAT SHOW PAID BUT NO DATE OUT
ENVELOPES THAT ARE NOT PICKED UP (By envelope number)
ENVELOPES THAT HAVE BEEN PICKED UP (By envelope number)
FIND ENVELOPES WITH A NUMBER HIGHER THAN ???? (Searches for all envelopes above
a set number)
7.5 ENVELOPE MAINTENANCE
Several selections under REPORTS, ENVELOPE REPORTS will help you maintain your
envelope files.
REMOVE ALL ENVELOPES will allow you to move old envelopes that are finished and picked
up from the active to the archive files. These can still be reviewed by clicking on the SEE OLD
button.
RESET HIGHEST ENVELOPE NUMBER USED will let you establish the next number that will
be automatically generated by the system. WinJewel finds the largest envelope number in the
system and starts generating numbers after that. This option lets you ignore some of those old
envelope numbers and start counting where you want.
CHANGE AN ENVELOPE FROM ONE CUSTOMER TO ANOTHER lets you transfer
envelopes.
TURN ON OR OFF THE “TOO MANY DIGITS REMINDER will notify you if more than 5
digits are entered for the envelope number.
BUILD A LIST OF UNUSED ENVELOPE NUMBERS will display all of the blank numbers that
were never used by the system. You can then use these numbers by manually entering them on
Service screen.
8 APPRAISALS
In order to do an appraisal you must start by going to the APPR. icon. Enter the customer
information using the PHONE field like with the other screens. Now click on the DO
APPRAISAL button.
The appraisal worksheet will appear on the screen. WinJewel only uses this worksheet as a
shortcut method for entering data to print an appraisal document for the customer. As you
complete the appraisal process, you will be given the opportunity to edit the final document and
only a copy of that document will be saved in the Customer record.
A list of any appraisals for this customer that are on file will be listed in the white box along with
the date that the appraisal was last worked on. If you want to review, change or reprint one of
these, just click on that record. If you want to do a new appraisal, start entering the characteristics
of the item in the appropriate fields remembering that each of these selections will be converted
into words on the appraisal document.
If the item has a stone or stones, click on the ADD A STONE button. First, describe the center
stone by clicking on appropriate items or filling in boxes. The small "c" button is a calculator for
putting in dimensions of diamonds and letting the program do the math to figure the weight. If you
use this feature, be careful to alter the weight that is the answer because the girdle thickness or
other cutting abnormalities just as you would if you were figuring the weight yourself. You can
enter CLARITY, COLOR and CUT, point to the slide bar for that item and while holding the left
mouse button down, slide the bar to the appropriate setting. If you don't move a slide bar for any
particular entry, then no grade will be shown in the text for that stone. Therefore if you want to
show the highest grade for any stone, you must first move the slide to the right and then move it
back to the far left.
When you are finished, click on the END STONE button. If you want to add other stones to the
description, click on ADD A STONE again. If you are entering multiple stones at one time (such
as with side stones that are all similar) enter the total weight, not the per-stone weight in the
CARAT box.
When you have finished entering any and all stones for this item, click on END THIS ITEM and
the program will create an appraisal letter. To see this letter, hit the SEE TEXT button. This is
presented in typical word processor format so all you have to do to make changes is move the
cursor to the section you want to change and add, change or delete anything on the page, including
the spacing. You can also select a different format and size by clicking on FONT and making the
changes. When you are finished, don’t forget to SAVE the item so a copy of the appraisal letter
will be attached to the customer record.
When you are ready to print the appraisal form, click PRINT and enter the number of copies you
need. If you want to include a picture of the item, select YES when asked and search for location
of the item on your system. (If this was an inventory item that you previously stored with a picture,
you can find it by searching the WinJewel folder, Pictures folder, folder number for the supplier
and then selecting the stock number.) The picture will print on a separate piece of paper.
The Appraisal letter includes some standard language that you may want to customize to your
particular store. Clicking on the FORMAT button will let you change various lines as well as the
spacing, border and whether you want your logo to print or not. When you SAVE these changes,
they become the default setting for the next appraisal letter.
When you are finished, be sure to hit SAVE if you want to save the appraisal document in the
customer record. To exit the appraisal part of WinJewel, select EXIT/NO SAVE.
8.1 DOING A QUICK APPRAISAL
If you want to have the ability to do a quick appraisal at the time of a sale, go to SYSTEMS
SETTINGS, ALLOW “DO APPRAISAL” BUTTON ON SALES SCREEN.
Click on Find By.
Type “appr.”.
Click OK.
Click on “Allow for “Do
Appraisal” button on the
sales screen”.
A special button will now display on the Sales Screen when a valid stock number is entered.
When this is selected, WinJewel will take as much information as it can from the Inventory record
for the item and prepare an appraisal document including using the Retail Price for the PRICE
field. You still will have the ability to edit this document and change any of the fields before
printing.
OPTIONS: At the top of the Invent screen is a small “A.” button. Click on this to prepare
the appraisal document in advance (to use when the item is sold).
8.1 DOING A DIAMOND GRADING REPORT
If you are in the ADD A STONE routine and you choose diamond as the type of stone then a
button will appear titled “Diamond Grading Report”. Clicking on this button will show the
following screen:
The RELOAD OLD REPORT button will show a list of previous Diamond Grading Reports that
were done for this customer. Clicking on one from this list will reload the old report including any
diagram mapping the identifying characteristics.
After you have filled out this screen, you can click on CONTINUE TO DIAGRAM to map
identifying characteristics of the stone on the following screen:
The shape of stone that you have indicated will be displayed on the screen.
You can now draw on the diagram by using the mouse. Hold the left mouse button down to draw.
Move the mouse slowly to draw a solid line. Move the mouse more quickly to draw a dotted line.
You can choose the color to draw with by clicking on one of the 4 colors on the left. The white
color is used only to erase previous marks from the diagram that were drawn during this session of
the mapping process. You can also click on CLEAR PENCIL to remove all marks drawn during
this session of the mapping process. If you do not have a color printer then the diagram will not
print in color and we suggest that you use the black color for all drawing.
The PRINT button will print a Diamond Grading Report.
The SAVE button will save a copy of this report which can be reloaded at a later time by clicking
on RELOAD OLD REPORT on the first screen of the Diamond Grading Report routine.
The BACK button will take you to the first screen of the Diamond Grading Report routine.
The CLOSE button will close the Diamond Grading Report routine.
9 STAFF & TIMECARDS
9.1 ENTERING STAFF
9.1.1 Description
The STAFF selection gives you access to WinJewel’s employee and security system. From the
STAFF screen you can edit passwords, set security settings, manage timecards and create work
schedules.
Staff members are listed on the STAFF screen. Each staff member is represented by one or two
key letters. These key letters are chosen by you while entering new staff. They are used to identify
the staff member on the various screens and data records. The key letters must be unique for each
staff member. One option is to use letters that reference the staff member's name, such as their
initials.
Important: It is possible to lock yourself out of WinJewel. Please read this section
completely before changing permission settings. Before you activate Permissions,
Unlock Codes or Passwords, you must give yourself access to the STAFF screen and
write down/remember your code.
There are two processes to enabling staff security:
1. Set permissions (who can do what).
a. Give yourself permission to all.
b. Give your staff permission to some/all.
2. Set protection (what requires a password).
Important: Give yourself Permission to access the system before telling the system to ask for a
password.
9.1.2 Give Yourself Permission to All:
1. Click on the Staff icon to open the Staff screen.
2. Click on the “Add One” button to add yourself to the Staff list.
a. Enter two letters (for example your initials) as a user ID. This is NOT your password. Click
OK
b. The Staff member profile page opens.
c. Give yourself permission to the “Special Permissions” by clicking in each checkbox next to
“Change Customer Balances”, “Unlock Record”, “See Cost on Repairs and Calc.”,
“Remove Item or Discount”, “Erase Sale”.
d. Check each WinJewel screen checkbox:
i. “Inventory See” and “Inv Change/See” are options. You may only check one of
these. Because you are giving yourself full access, click on “Inv Change/See”.
ii. When you click on the “Reports” checkbox a list of reports will open. Click on
“Click on this line to allow full category access” (2nd from the bottom). This will
change each entry to “Yes” except “Daily Report Only”. Leave this alone, you have
access to all “Sales Reports”.
e. Enter your name in the “Name” field.
f. Enter a personal password in the Codes field. WRITE IT DOWN. When you move to the
next field your Codes will be replaced with “*”’s. You can view your Codes by clicking in
the Codes field again. Codes can be no more than 15 characters and should be changed
anytime you feel it is necessary. For staff members it is often best to let them choose their
own code.
g. Complete any personal information fields.
h. The choices below the personal information are as follows:
i. “Use this name if no name is given” (your name will be the default for all sales
until another salesperson is selected).
ii. “Use this name in Envelope “assigned to” list” (your name will appear as a choice
on the Service Screen for repairs).
1. Note: If no staff member has this option checked, all staff members will
appear on the envelope assigned to list. If one staff member has this option
checked only this staff member will appear on the envelope assigned to list.
iii. “Don’t use this name in Sales” (your name will NOT appear as a Salesperson on
the Sales screen).
iv. “Maintain call log on customer screen”.
GIVE YOUR STAFF PERMISSION TO SOME/ALL: Typical permissions for staff members would
be SALES SLIPS, INVENTORY SEE, CUSTOMERS and DAILY REPORT ONLY (the bottom
selection under REPORTS).
1. Click on the Staff icon to open the Staff screen.
2. Click on the “Add One” button to add a staff member to the Staff list. Enter two letters as a user
ID. Click OK
a. Check/Uncheck the “Special Permissions” boxes for the processes you want this staff
member to have.
b. Check/Uncheck each WinJewel screen checkbox for the screens that you want this staff
member to have access to.
i. Be careful who you give permission to the staff screen. All permission settings for
all staff members can be changed by anyone who has access/permission to the staff
screen.
c. Enter the staff members personal information in the appropriate fields.
d. Enter a password in the password field. WRITE IT DOWN. Give this number to your staff
member.
i. The staff member can change their code at any time by going to the Timecard
feature, selecting their name and hitting the CHANGE MY PASSWORD button.
9.2 LIMITING EMPLOYEE ACCESS TO FUNCTIONS
9.2.1 Discussion:
The previous steps have not enabled screen security, but have created the permission levels for
each staff member if security was turned on. The following steps will actually establish the screen
access restrictions.
Some stores allow every employee access to everything in WinJewel, while others are very
selective. To limit employee access based on the settings you made under each of their employee
records, bring up the STAFF screen and click on the “WHICH SCREENS PROTECTED” button.
It is important that before you activate this function you assure that you personally have access to
the STAFF screen and you remember your code.
You can now check those functions where you want to limit access. If you do not select a box here,
any employee will have access to that screen regardless of what you set in their employee record.
Many stores limit access to Staff, Orders, Appraise, Invoices, Checks and Budgets as these are
specialized or management functions. When you click and place a check mark next to a specific
function, the employee code must be entered before WinJewel will bring up that screen. Unless
you have specifically given them access in their employee record, even entering their code when
asked will not work.
Any screen or processes check (or filled in) on during this process will be protected. The user will be
asked to enter their personal code when clicking on a screen icon that is protected. Setting Protection
means that you are going to lock out people from opening specific screens or doing certain processes. For
example if you want to prevent any staff member from looking at the customer screen without entering a
personal code first, you would set the “Cust.” (Customer) screen to be protected (Check the “Cust” box on
the “Which Screens Protected” screen). Each time the “Cust.” screen icon is click, the user will be asked to
enter their personal code. If you want to restrict who can change customer balances, you would put a
password (code) in the “Change Customer Balances” box under Special Settings.
The following definitions explain each “SPECIAL SETTINGS”.
• CHANGE CUSTOMER BALANCES code is needed if you want to change the Credit Limit,
Agreed Payment, Balance, Months No interest or Behind fields on the CUSTOMER screen.
• UNLOCK RECORD code is used for multiple PC environments. Two people cannot access certain
records in WinJewel at the same time and one will be locked out. When this occurs, you can
override this control by entering this special code.
• The cost of a repair item is coded on the SERVICE screen and you will need the special code
labeled SEE COST ON REPAIRS to see that cost.
• REMOVE ITEM code is just a double check to assure that an item should be removed from
inventory. If you want to, you can change these codes by clicking on the box and typing in the
code you want.
• ERASE code is used when erasing a sales slip (similar to reversing but deletes the sales record and
makes a record of the erase in a separate file).
9.2.2 Set Protection:
Now that you have set permissions, you must set protection.
OR
1. Click on the “Which Screens
Protected” button.
a. A message box opens
reminding you to know
your password before
changing restrictions.
Click OK only if you
know your password
and you have given
yourself permission to
access the staff screen.
2. You do not have to change the “Special Settings” code. If you choose to do so you can change the
“Special Settings” password by typing in a different series of characters. To remove the restriction
from one of the “Special Settings”, leave the code field blank.
3. Check/Uncheck each screen that you want to protect (require a personal code).
4. Check/Uncheck “Require Password to Start Program” option. This will require your personal code
to open WinJewel. When this is checked, WinJewel will require the employee to enter their code
every time they start the program.
5. In the above example Roy Watch Fixer can access the “Cust”, “Service” and “Appraisal” screens
by entering his personal password. Roy will also have access the “Sales” screen because it is not
protected (checked) on “WHICH SCREENS PROTECTED”. Roy will be able to “Unlock Record”
’s and “See cost on repairs and calc” by entering the Special Code. He will not be able to “Change
Customer Balances” or “Remove Item or Discount” or “Erase Sale”. A code will not be required to
open the WinJewel program.
9.3 PUNCHING IN AND OUT USING THE TIMECARD FEATURE
Any staff member who is working on an hourly basis
can use WinJewel to punch in and out. Simply click
on the CLOCK Icon located in the upper left corner
of the screen and a timecard screen will appear in the
center of the viewing area no matter what else is
being done by the WinJewel program at the time. No
other files are affected.
A list of the employees will appear in alphabetical order in the white box that is part of the
timecard screen. Select the correct name and then click on the CHECK IN or the CHECK OUT
gray bar. If the last check was an IN then only the OUT gray bar will show. If the last check was
an OUT then only the IN gray bar will show. At any time, clicking on the PRINT CARD button
will create a hardcopy of the time card.
The WHO’S IN/OUT button will provide a quick overview of check in and out status for today.
You can set this feature to require the special employee code each time a timecard entry is made.
This would help minimize the potential for employees to sign in and out other employees. To set
this, go to REPORTS, SYSTEM SETTINGS, SET YES/NO FOR ENTERING PASSWORD
WHEN CHECKING IN/OUT ON TIMECARDS.
9.4 CLOSING PAY PERIODS AND CORRECTING TIME CARDS
Each employee’s time card should be reviewed and corrected at the end of each pay period. When
corrections are complete, time cards can be printed. Time cards can be printed one at a time or as a
group.
To close the pay period go to the STAFF
screen and click on the TIME CARDS
button.
1. Click on SEE ONE EMPLOYEE’S
TIMECARD for each employee
working that period and select PRINT
CARD. If you see an obvious error,
you can CHANGE AN ENTRY ON
A CURRENT TIME CARD.
2. When finished reviewing and printing
all of the active cards, click on
START A NEW PAY PERIOD AND
CLEAR ALL CURRENT TIME
CARDS.
To get a previous time card click on PRINT A CARD FROM A PAST TIME PERIOD.
9.5 ADJUSTING TIMECARDS FOR BREAK TIMES
Some stores want to pay employees for the time they are on breaks. If you want your store to not
deduct time when an employee is out on a break, go to STAFF, TIME CARDS and select the
choice SET MAXIMUM TIME TO BE CALCULATED AS A BREAK.
If you enter “0,” breaks will be deducted (This is the default). If you put any number larger than 0,
then any check-in that is less than or equal to that number of minutes will not be deducted and a
note will be printed on the timecard. If you change this setting, it will impact all current timecards
even if the break was taken before the change.
9.6 LEAVING AN EMPLOYEE A MESSAGE
A message can be left for any employee by clicking on the CLOCK icon, then click on SEND
MESSAGE and enter a message in the large center box. This creates the message. Click on who
you want to send the message to (as many as you want or All Staff Members) and click on your
name as a sender. Then click on SEND MESSAGE again.
The next time that the employee clicks on his or her name to check in or out, they will be notified
that YOU HAVE MAIL and they can review all outstanding messages.
9.7 STICKY NOTES
General messages or notes can be pasted to the screen for anybody to view. Just to the left of the
HELP icon is a small button with an “S” that designates stick notes. These are just like the stick
notes you buy in the supply store except they are electronic. If you want to paste a sticky note on
your PC screen, click on the “S” and a yellow note will appear. Put the cursor inside the note and
you can type a note to yourself.
You can move the note anywhere on the screen by holding down the left mouse button and
dragging the note where you want. Multiple sticky notes can be displayed at one time. To delete a
note, check on the small “X” in the upper right hand corner of the note and it will disappear.
9.8 EMPLOYEE WORK SCHEDULE
WinJewel provides an employee scheduling system. The WinJewel scheduler provides daily
schedule printing, a summary of staff coverage by the hour, sick leave recording and vacation
recording. Once the schedule is written it can be viewed by the employees by selecting the SEE
SCHEDULE button from the Timecards screen.
To use the WinJewel scheduler go to the Staff Screen, click on SCHEDULE and a scheduling
worksheet will appear.
Writing a schedule is done in 3
basic steps:
1. Select the day of the
week.
2. Click on the employee
name.
3. Click on the hours to
work.
As you do this for each employee, WinJewel will keep track of the total number of people
scheduled along the bottom under COVERAGE. You can also track vacation and sick time those
items.
Sick leave can be recorded by
clicking the ENTER SICK
DAY button (previous image)
and a summary of the entire
years sick days are displayed
by clicking SEE SICK DAY
LIST.
Vacation schedules can be recorded by clicking on the SEE VACATION LIST button.
9.9 FOREIGN CURRENCY RATES
WinJewel provides the capability of loading up to nine different currency exchange rates and
provides an easy method to convert other currencies into the store’s primary currency. To activate
this feature, click on the EXCHANGE RATES selection from the STAFF screen.
You should first establish the store’s primary currency. WinJewel will record all transactions in
this currency. Place the cursor in the PRIMARY CURRENCY box and enter the symbol for your
primary currency. Next, click on the ADD CURRENCY NAME box and enter the name, the
conversion rate for that currency into the primary currency (IN) and the rate to convert the primary
currency into that foreign currency (OUT). When you have entered all of the currencies you want
to track, hit SAVE/CLOSE. You will note that the date and time you made this entry will be
recorded at the top of the Exchange Rates box labeled “Last Updated.” You can update these rates
as frequently as you want.
WinJewel uses these exchange rates as part of the built in calculator. Click on the picture of the
calculator located in the upper left hand corner of the screen. Enter the amount you want to
convert, either the primary currency or the foreign currency, and click on the currency symbol
located at the bottom right hand corner of the calculator. Now, select the currency you are
converting and then click on whether you are converting into or out of that currency. WinJewel
will do the math and present the answer using as many significant digits as necessary. The
salesperson will need to round the answer to the appropriate cents. (Remember, every time you use
the calculator, WinJewel stores the last total computed. If you double click on any dollar field, that
amount will automatically be filled into that box. Caution must be used with this feature when you
are dealing with foreign exchange because the calculator answer may not be the primary currency)
10 INVOICES
10.1 CREATING INVOICES
WinJewel is designed to require an invoice record for checks issued by the system. When you
enter new inventory, you create an invoice and an accounts payable record for those items. The
final step of that process is to display the INVOICE screen. You can also get to the INVOICE
screen by clicking directly on the INVOICE icon.
If this invoice is part of the entering inventory, the INVOICE NUMBER, DATE, AMOUNT,
DEPARTMENT and SUPPLIER information is already filled in on the INVOICE screen. If this is
a new invoice, you will need to enter that data manually. First, select the Supplier from the list
displayed in the large white box. Everyone you regularly pay checks to should be entered as a
supplier. If the one you need is not listed, click on the NEW SUP. gray bar at the bottom and the
system will take you to the SUPPLIER section so you can set them up. Generally, you should use
the Temporary supplier number only for one-time invoices.
The cursor will now be positioned in the INVOICE NUMBER box and you need to enter an
invoice number or some other unique identifier for this payment (like the account number for a
credit card payment). Next, enter the DATE of the invoice or double click on that box and today’s
date will be automatically filled in. The DATE DUE field should correspond to the date that the
invoice is expected to be paid taking into consideration discounts and when that date arrives, this
item will appear on the Invoices Due Report.
The next box is the total AMOUNT for the invoice (Usually not including shipping, etc.). Enter in
DISCOUNT the amount in dollars that can be taken off if this invoice is paid by the due date. If
you find it easier, you can enter the percentage to discount followed by the “%” symbol and
WinJewel will convert it to dollars. Next, enter either the DEPARTMENT for inventory items or
the ACCOUNT for the specific G/L account this invoice should be charged against. Lastly, enter
the SHIPPING charges, if any.
If this invoice was prepaid, you would enter the DATE PAID and the CHECK NUMBER in the
next boxes, but usually these are left empty and will be completed by the checkbook program when
the invoice is paid.
Don't forget to click on SAVE INVOICE to save what you have entered.
There are a couple of shortcut selections available on the INVOICE screen. Just below the
DEPARTMENT OR ACCOUNT box is a box labeled MONTHLY. If this is a recurring invoice,
such as rent, you can click on that field and an invoice will automatically be created to be paid on
the same day of the following month and each month thereafter.
CLEAR PDOUTS allows you to clear out all petty cash paid outs with a single invoice and check.
TRANSFER TO NOTE would be used if you had a note with your supplier and you wanted to
transfer the balance on this invoice to that note. ERASE INVOICE will totally eliminate the
invoice record. When a supplier is selected, you can click on SEE OPEN or SEE PAID to see all
open or paid invoices for this supplier. Lastly, at the very bottom of the screen is the WRITE
CHECK gray bar. Selecting this will take you into the Checks portion of WinJewel.
10.2 TURNING ON OR OFF THE AUTOMATIC BILL REMINDER
If you would like to have the system remind you that there are invoices due in the invoice file that
are not paid yet, go to SYSTEM SETTINGS, TURN ON OR OFF AUTOMATIC BILL
REMINDER. Each time you start the WinJewel program, you will be shown all of the invoices
that are due. You can then decide if you want to pay them. If you do, go to the CHECKS screen
and write checks for the due bills.
10.3 INVOICE REPORTS
The following reports are available by selecting REPORTS, INVOICE REPORTS:
INVOICES DUE REPORT (Unpaid invoices where today’s date is equal to or later than the date
due)
INVOICES BY SUPPLIER REPORT (Either current invoices due or all invoices entered for this
supplier)
LIST OF OPEN INVOICES (All unpaid invoices)
INVOICES FOR A SUPPLIER IN A TIME PERIOD
INVOICES PAID IN A TIME PERIOD
10.4 EDITING INVOICES
There are a couple of editing features that are also available under REPORTS, INVOICE
REPORTS that may be helpful. SET CHECKS TO PRINT OR NOT PRINT will automatically
send the check information to the printer to print the check. If you turn this on, you will need to go
to PRINTER SETTINGS, SET THE SPACING ON CHECKS to format the printing.
CHANGE INVOICES FROM ONE SUPPLIER TO ANOTHER lets you shift records between
suppliers. ELIMINATE PAID INVOICES OLDER THAN A CERTAIN DATE lets you eliminate
old invoices from showing on the supplier record.
10.5 KEEPING TRACK OF SPECIAL PROJECTS
WinJewel lets you establish project accounts and track all costs relating to special promotions or
specific programs. Select REPORTS, INVOICE REPORTS, EDIT OR START PROJECT
ACCOUNTS and establish a three letter code and a project name for the project. The INVOICE
screen will now have a special selection entitled PROJECT where you can assign any invoice to
that project category. This does not effect the G/L but will simply give you totals by project.
You can now see the activity for a given project by selecting REPORTS, INVOICE REPORTS,
PROJECT ACCOUNT BALANCES and selecting the details or the totals for each project.
11 SUPPLIERS
11.1 ENTERING SUPPLIERS
All of the suppliers used by your store should be entered into WinJewel. Select the SUPPLIER
icon and you will be asked to provide a supplier number for each supplier. This is just a unique
reference number (It will correspond to the first three digits of the stock number for all inventory
items). If you want WinJewel to assign a Supplier number, just double click on that field. You can
select how you want suppliers to be listed by clicking on either the ALPHABETICAL or the
NUMERIC.
Now you should enter all of the information about this supplier including their normal terms and
salesperson information. If you have additional information you want to record, you can make a
note using the MAKE NOTE selection. Remember to hit SAVE ENTRY when you are finished.
If you need to remove a supplier from the list, click on the REMOVE SUPPLIER button.
However, you should be very cautious with this selection because if there are inventory items in
the file or outstanding invoices, you may have difficulty finding the records. Be certain that all of
these items are transferred before you delete the supplier.
You can also use the FIND BY feature to search for suppliers by any of the fields. If you
remembered the salesperson’s name but had forgot their affiliation or phone number, a simple
FIND BY can connect them to the supplier record.
11.2 SUPPLIER LETTER OR LABELS
To send a letter to a supplier, go to the SUPPLIER screen and click on SEND LETTER. You can
then type the body of a letter and a closing. The heading, date, name and address will all be printed
automatically, so you do not have to enter them.
You can also PRINT LABELS FOR SELECTED SUPPLIERS or PRINT MULTIPLE LABELS
FOR ONE SUPPLIER by making those selections under REPORTS, SUPPLIERS REPORTS.
11.3 SUPPLIER REPORTS
From REPORTS, SUPPLIERS REPORTS, you can get the following:
SUPPLIER LIST BY ALPHA
SUPPLIER LIST BY NUMBER
SALES BY SUPPLIER IN A TIME PERIOD
SUPPLIER LIST WITH ADDRESS, PHONE, CONTACT & ACCT #
11.4 BUYING GROUPS
If you belong to one or two buying groups that require you to pay your invoices to the buying
group, you can still mark the suppliers that are to be paid.
First, define the name and address of each buying group by going to REPORTS, SUPPLIERS
REPORTS, SET NAME AND ADDRESS TO PAY ASTERISK INVOICES (or DOUBLE
ASTERISK INVOICES). Now, mark each supplier that belongs to a group by adding either a
single “*” or a double “**” at the end of the name that you entered for that supplier.
When you pay invoices for any supplier with a single or double "*" at the end of their name, the
computer will substitute the name and address of the buying group for the suppliers name and
address when it prints a check.
11.5 ADJUSTING PRICES FOR A SUPPLIER
If you want to adjust the cost or the retail price for all inventory items for a particular supplier, go
to REPORTS, SUPPLIERS REPORTS, CHANGE THE PRICE OF INVENTORY FOR ONE
SUPPLIER. You can now change these fields for every item in the active inventory for that
supplier by a set percentage. Entering “1.05” would increase all the retail prices by 5% and using “.
95” would decrease all of the prices by 5%. You can also get a printed report of reflecting all of the
changes by inventory item.
When you are finished, you should go to the INVENTORY screen, do a FIND BY for that supplier
and print up new tags for all of the inventory items.
11.6 ADJUSTING INVENTORY STOCK NUMBERS
If you do not let WinJewel automatically assign consecutive stock numbers for each supplier or
you renumber inventory items, it is best to reset the WinJewel counters. SUPPLER REPORTS,
LIST OF SUPPLIERS WITH HIGHEST NUMBER USED will display the highest stock number
used. If you find that some very large numbers were used and you have skipped a lot of space, it is
best to renumber these to a lower stock number. Then, run SUPPLIER REPORTS, SET THE
HIGHEST NUMBER USED and WinJewel will reestablish a counter just above the last number
used.
12 CHECKBOOK
12.1 ISSUING A CHECK
In order to issue a check, click on the CHECKS icon. This will open the check writing form. Along
the right side of the screen will be a list of suppliers. Point to the supplier you want and click. All
the information about that supplier will be automatically filled in and a list of the invoices that are
currently not paid will appear in the large white box on the right of the screen. You can now click
on any invoice that you want to pay. You will notice that it turns dark and the invoice appears over
in the TO PAY LIST box. You can click on as many of the invoices you want to pay at this time
for this supplier. Each will be added to the list to pay and the TOTAL TO PAY field will be
updated.
If an invoice has not yet been entered but you wish to pay it, select the ENTER/CHANGE
INVOICE button at the bottom of the screen and you will go to the INVOICE screen to enter the
information. Then click on the CHECKS icon again and select that invoice to pay.
WinJewel allows you to maintain up to 5 different checkbooks. You should determine which
checkbook this transaction applies to and make that selection under WHICH CHECKBOOK,
located at the top of the screen. The next check number for that checkbook will be automatically
filled into the CHECK NUMBER box. You can change this number if you want but WinJewel will
keep adding one number for each new check. To change the names of checkbooks, go to
REPORTS, SYSTEM SETTINGS, SET NAMES FOR DIFFERENT CHECKBOOKS.
When you are satisfied with what you want to pay, click on the POST or PRINT CHECK gray bar
(one or the other will be displayed depending on the setting). You will be asked to verify the date
and the entry will be posted into the checkbook you selected.
12.2 PRINTING A CHECK
WinJewel can print a check for you on your check stock. If you go to REPORTS, PRINTER
SETTINGS, SET CHECKS TO PRINT OR NOT PRINT and select the print option, the POST
CHECK gray bar on the CHECKS screen will change to read PRINT CHECKS. Now when you
make this selection, WinJewel will post the item and print a check.
To set the printing format to be consistent with your check stock, go to REPORTS, PRINTER
SETTINGS, SET THE SPACING ON CHECKS and follow the instructions. This may require a
little “trial and error” testing and you will need to experiment with different settings until you are
satisfied with the results.
When you are finished entering all of the check information, click on the PRINT CHECK gray bar.
You will be asked to verify the date and to put a check form in the printer. Click on the "OK" gray
bar and the check will be printed.
If you have already written the check or, for some other reason, you do not wish to print a check
for this entry, click on the box labeled POST ONLY. The entry will be made in the checkbook but
no check will be printed.
12.3 ENTERING DEPOSITS
To record a deposit from the CHECKS screen, click on ENTER DEPOSIT gray bar. Today’s date
will be entered in the date field but this can be changed if you want. Click on the type of deposit
you are making and enter the amount (you can change the deposit types listed by using the NEW
and REMOVE DEPOSIT TYPE buttons). The total will be displayed at the bottom. An entry for
each deposit type entered will be made in the Checkbook. If you need to make a change, just click
on that item again and make the change and that new entry will be recorded in the checkbook for
the date and listed on the Daily Sales Report.
You can also enter a deposit by clicking on REPORTS, DEPOSITS/PAID OUTS, POST
DEPOSIT TO CHECK BOOK AND DAILY SALES REPORT. This will bring up the same
deposit screen but if you are using multiple checkbooks, you will need to select the correct one.
The WinJewel program can handle any number of deposits for one day. Just put the same date in
for that deposit and it will show on that day's Daily Sales Report.
12.4 USING THE CHECKBOOK
To view the checkbook, click on the SEE CHECKBOOK gray bar. You have several options. If
you find an error in the checkbook, you can change it just like using an eraser or whiteout in your
manual checkbook. Point to the cell you want to change, click and make the correction and then hit
ENTER. If this was an amount field, click on RE-DO MATH and the totals will be recomputed.
To mark a check as having cleared the bank, click on the cell for that item under the "ST" (for
status) column and a "#" symbol should appear. To remove it, click again. It is important to
remember that the starting balance of the next month's checkbook is only brought forward when
you look at the checkbook. If you enter a check in an older month, but don't look at the check
book, the balance forward on the next month's check book will not reflect the change until you
look at the checkbook for the month that the check was written.
You can also RECONCILE your checkbook by clicking that selection and entering information
from the bank statement. WinJewel acts as a reconcilement system helping you track items,
refigure balances, enter interest and service charges and balance your account. The SORT selection
allows you to sort the checkbook by check number, date, supplier or account. You can review
previous month’s checkbook entries by selecting the PREV MONTH button. The checkbook can
also be printed.
Sometimes you will want to issue a check even if there is not an invoice in the file. To do this, go
to the CHECKS screen and select a supplier (or use the Temporary selection) and then click on the
QUICK CHECK gray bar. A picture of a check will appear and you can fill in the Amount, Invoice
or Reference number and the Reason. Then click on the PRINT or POST CHECK button.
WinJewel will automatically create an invoice record for this transaction.
The QUICK CHECK option can only be used if there is a single invoice for a single department or
G/L account. Also, project tracking is not provided.
12.5 SPLIT-PAY AN INVOICE
If you want to pay only a portion of an invoice, after you have selected the invoice and it is listed
in the TO PAY box, click on the SPLIT PAY gray bar. Enter the amount that you want to pay on
that particular invoice and that amount will be entered. In addition, a new invoice will be added to
the invoice list for this supplier with the same invoice number but with the amount equating to the
remaining balance after this payment.
You can now write the check as usual by clicking on the PRINT CHECK or POST CHECK
button. If you didn't want to write the check at this time, you can leave the CHECKBOOK screen
and the invoice will stay split for later payment.
12.6 PAID OUTS (PETTY CASH)
To make a paid-out, go to the REPORTS screen and click on DEPOSITS/PAID OUTS, PAID
OUT. Enter the date of the paid-out, the G/L account where the item should be charged, a brief
description, who it was paid to and the amount. This paid out will show on the Daily Sales Report.
To clear the paid-outs from the system, you need to convert them to an invoice and write a check
to "Cash." To see the pending paid outs, select REPORTS, DEPOSITS/PAID OUTS, SEE
WAITING PAID OUTS. When you are ready to clear these items, go to the INVOICE screen and
click on CLEAR PDOUTS.. You will be asked if you want a printout of the list. Answer, "Yes"
and file the list with the paid-out receipts for an audit trail. A separate invoice will automatically be
made for each separate account that the paid outs were assigned. In other words, one invoice might
represent the total of many individual paid-outs, but if the paid-outs represent 3 different G/L
accounts, 3 invoices will be created.
The invoices that are automatically generated are assigned to supplier 998. This is the supplier
called "Temporary". To write a check for these invoices, go to the CHECKS screen and click on
supplier 998 -TEMPORARY. Then click on each invoice that you want to pay from the list. Enter
the word "Cash" when asked who to make the check out to.
12.7 BALANCE CASH DRAWER
WinJewel provides a simple tool to assist in counting your cash drawer. Select REPORTS,
DEPOSITS/PAID OUTS, BALANCE CASH DRAWER AND PREPARE DEPOSIT SLIP and a
worksheet will be displayed.
To count the cash to remain in the cash drawer, enter the number of bills and coins for each
denomination in the appropriate white box and when the desired total is reached, enter that amount
in the box at the top of the screen. Now hit CLEAR COUNT and enter the items to be made in the
bank deposit. For checks, click on the SEE CHECKS and verify that all of the checks in the cash
drawer have been entered in the system. For each denomination of currency, simply count the
number of bills or coins and enter in the appropriate box. The program will do the math
automatically and give you a grand total. When everything is entered, click PRINT and a report
listing all the items will be created that you can attach to the deposit slip.
13 GENERAL LEDGER and BUDGETING
13.1 SETTING UP THE GENERAL LEDGER
You should set up the general ledger in WinJewel to be consistent with the one you have been
using in your store. To edit the list of general ledger accounts provided, go to REPORTS, G/L
ACCOUNTS, SHOW OR CHANGE EXISTING ACCOUNT NAMES AND NUMBERS. To
make changes, click on an account and a screen will display all of the components of that account.
You can change the account number to be any five digits (you can use a decimal point if you want)
and give the account any ACCOUNT NAME you want.
CATEGORY defines the sub-totaling options of the system. The sample list of categories can be
seen by clicking on the small arrow to the right of the CATEGORY box. If you want to create a
new category such as a sub total of all of the cash accounts, you first create a new category called
“Cash.” Click on the bar EDIT CATEGORIES LIST and a new screen will appear. Type the
category name remembering that the first three letters of all names must be unique. Now you must
select under which of the fixed General Ledger Titles this category belongs. These General Ledger
Titles define the subtotals that will always appear on every WinJewel balance sheet and income
statement report.
Every General Ledger account must be assigned to a category (which in turn is assigned to a Fixed
General Ledger Title) or directly to a Fixed General Ledger Title without a specific category.
13.2 RUNNING MONTH END REPORTS
At the end of each month, a series of reports should be run to give to your accountant and to keep
on file for yourself. These reports are found on the REPORTS, END OF MONTH. If the report has
not been run this month, there will be a designation “Not Run Yet” next to the name. Each of these
reports will give a recap of all the activity for the month and year that you select.
SALES REPORT
CHECKBOOK REPORT
ACCOUNTS PAYABLE REPORT
INVENTORY REPORTS
MONTHLY PURCHASES REPORT
ACCOUNTS RECEIVABLE REPORT
GENERAL LEDGER REPORT
MONTHLY BALANCE SHEET
These reports contain the total of all activity recorded by WinJewel for this accounting period. If
you are using a separate bookkeeping system, these reports will provide you all of the information
you will need to post entries to that system.
WinJewel also provides it’s own accounting system. The information from the above listed reports
will automatically be posted to the internal accounting system. Sales, cost of goods sold, inventory
totals, accounts payable etc. will be moved to the appropriate lines on the Income Statement and
Balance Sheet. Before the statements are complete for the month, you may need to also post
additional entries, such as depreciation, bad debt expense, etc. To do this, select REPORTS, G/L
ACCOUNTS, G/L JOURNAL ENTRIES and a separate posting screen will appear. You will be
asked for the month to post and then an entry worksheet will be displayed. WinJewel becomes
very basic here and relies on the fact that the person entering the data understands basis
accounting. We do not force debit entries to equal credit entries and we use words like AMOUNT
IN to signify an increase to this account. If you don’t remember the exact general ledger account,
click on the ACCT # heading and a drop down box will appear that you can scan to find the
account. Just click on it and it will be entered in the appropriate field.
Once you have reviewed all your end of the month reports and are satisfied that all entries have
been made, you can click on the lines MONTHLY BALANCE SHEET and get a trial balance
sheet and MONTHLY INCOME STATEMENT for an income statement. You should look at the
difference between the Assets and Liabilities plus Capital and compare this to the Net Income
figure. If these amounts are the same, you are in balance and can click on the line CLICK THIS
LINE TO BALANCE BALANCE SHEET for an entry to Retained Earnings. If they are not the
same, you should go back through your journal entries and check that debits equaled credits.
13.3 CASH FLOW ANALYSIS
You can get a graph of your cash flow and an itemized list of future bills that are in the computer
by clicking on the BUDGETING icon and then clicking on the CASH FLOW gray bar. You will
first be asked to project your normal incoming daily cash flow and then the starting cash balance.
These entries will remain there until you change them.
You should now click on REGULAR MONTHLY ITEMS and record any monthly payments (rent,
payroll, utilities) that are not currently listed as unpaid invoices. Enter an identifying name and the
normal day of the month you make the payment and the amount. You can also enter any holidays
in the upcoming period by clicking where you will not have any cash flow by clicking on the
HOLIDAYS selection. You should also click on the EXCLUDE box for those days of the week
you are closed.
When all of the entries have been made and you are ready to see the projection, click on
COMPUTE CASH FLOW. You will be asked it you want a printed list and the number of days
into the future that you want to project. You will then be shown a graph of future cash flow. If you
want a printed copy of the graph, click on PRINT COPY.
You should try different assumptions to see how it will affect your cash flow. You can also go
back to the INVOICE screen and adjust the due date on individual invoices. Even if it means
losing discounts. Sometimes you may even need to call suppliers and tell them that you need to be
a little late. Calling ahead of time will often get an OK from your supplier and they will respect
you if you meet your projection.
13.4 PREPARING BUDGETS
Selecting BUDGET YEAR lets you establish budgets for each department and each cost account.
Budgets must be completely re-entered if you change a department or cost account so you should
be careful to get these two lists entered correctly.
To set up a budget, click on the BUDGET YEAR button and enter the two digit year identifier
(“02” for 2002). A Spread Sheet will be displayed with Departments and Cost Centers listed along
the left hand side and a column for each month of the year across the top. Each column will total at
the bottom and a grand total for the year will be in the bottom-right corner.
To enter any item in the spreadsheet, point to the square you want, click and enter the dollar
amount. After you enter or change any amount, click on the REDO MATH selection to have the
totals updated. When you are finished making entries, don’t forget to hit the SAVE button.
Budgeting is vital to any well-run business. Use thought in arriving at your budget. It will give you
goals and a direction to your business.
14 PRINTING REPORTS, TAGS, LETTERS
AND LABELS
There are many options available for printing and many options on how to print with WinJewel. Because
printing has a direct effect on the presentation of your business the following section should be reviewed
regularly. WinJewel software also recommends using the TRAINING COPY to try out new printing
layouts before changing your settings.
14.1 PRINTER SET UP
This section describes the set up of a general purpose printer and\or receipt printer. Dedicated price
tag printers are discussed in section 14.6 USING SPECIALIZED TAG PRINTERS and chapter
18 PRINTER AND SCANNER SETUP.
The WinJewel Program can be set to work with two different types of printers, Windows
compatible or non-graphic printers. Click on REPORTS, PRINTER SETTINGS and you can select
from two general types of printers:
WINDOWS COMPATIBLE PRINTER
NON-GRAPHICS STYLE PRINTER
This selection in WinJewel does not replace the specific printer driver that has been entered in
Windows (“driver” means software that runs the printer or other hardware). It simply establishes a
style of output that the program will use. The printer driver for your printer should be supplied by
the manufacturer. The driver you use must be the one that matches the version of Windows you are
using. This is very important and if you upgrade Windows (like from 98 to 2000) you will also
need to upgrade your printer driver. This can be done by going to the printer manufacturer’s Web
site and downloading the latest driver for your model of printer and version of Windows.
You also will need to select the printer WinJewel
will print to. Click on the small red button with a “P”
on the WinJewel screen located just below HELP.
Click on CHOOSE.
Use the scroll bar next
to the printer name to
see the name of the
printer that you want
to use and point and
click on that printer.
Do not select a DEDICATED TAG PRINTER from this screen yet. It is very important to
follow the setup instructions for your specific tag printer. Sending a print job to a
dedicated tag printer that was intended to print on a general purpose printer can result in a
fault that can only be reset by the dedicated tag printer manufacturer. DO NOT EVER
attempt to print anything to your dedicated tag printer except price tags.
(You can also click on REPORTS, PRINTER SETTINGS, SET WHICH “WINDOWS PRINTER
DRIVER” TO PRINT and make the selection). Download the latest driver for your model of
printer and version of Windows as stated in the above paragraph.
14.2 PRINTING YOUR STORE’S LOGO
Because different companies write the printer drivers, there may be a big difference in how large a
graphic image is printed from printer to printer. If your logo does not print as you would like, you
can adjust it’s size by selecting REPORTS, PRINTER SETTINGS, SET THE SIZE OF PRINTED
LOGO FOR ALL PRINTED OUTPUT. Now, you can change the relative size by changing a
number. 1 is the default size. Any number smaller than 1 (but larger than 0) will make the image
smaller. Any number larger than 1 will make the image larger (Example: .85 would be smaller and
1.25 would be larger). You will have to play with the numbers and print samples to find the correct
size for your printer and driver. Once it is set it will remain the same until you change it again.
As you print material with WinJewel, you may decide that you do not want your logo to print. The
default on all printed items is to print the logo, but you can easily change this by selecting the
following under REPORTS, PRINTER SETTINGS:
SET THE LOGO NOT TO PRINT AT THE TOP OF LETTERS/APPRAISALS
SET LOGO NOT TO PRINT EVER (This will substitute words for the store name and address)
TURN OFF THE LOGO ON PRINTED SALES RECEIPTS
TURN OFF THE LOGO ON PRINTED APPRAISALS
SET STORE NAME TO PRINT OR NOT ON REPAIR ENVELOPES
14.3 SPECIAL PRINTING SETTINGS
Unfortunately, all printers are not identical and many printer drivers work slightly differently.
WinJewel has been designed to work correctly with most printers but you may find it necessary to
make spacing, font and alignment changes to make the printed output look the way you want.
These settings are generally easy to make and with a little “trial and error” sampling of different
options, you can quickly find the desired setting.
The following adjustments can be found under PRINTER SETTINGS:
SET FONT AND LAYOUT OF FORM LETTERS
SET THE FONTSIZE AND LEFT MARGIN FOR MOST PRINTED REPORTS
SET THE FONTSIZE FOR SALES SLIP AND ENVELOPES
SET THE FONT SIZE FOR FINDBY REPORTS
SET EXTRA SPACES BEFORE SUPPLIER NAME ON CHECKS
SET FONT AND LEFT MARGIN FOR STATEMENTS
SET WIDTH AND HEIGHT OF SALES SLIP AND APPRAISALPRINTING
SET STATEMENT NAMES TO PRINT FURTHER DOWN THE PAGE
SET THE POSITION OF NOTE ON THE BOTTOM OF ENVELOPES
SET SALES SLIP SIZE TO LARGER SIZE
You can also set the printing of some items to appear in a different mode with the following:
SET THE SIZE OF FULL PAGE INVOICE STYLE TO FIT PAPER (for printing on other than 8
½ x 11 paper).
SET SALES SLIPS TWO TO A 8 ½ X 11 INCH PAPER (will print two copies on one piece of
paper)
SET RECEIPT PRINTER TO 40 COLUMN PRINTER FORMAT
SET THE SALES SLIPS TO PRINT IN LANDSCAPE MODE
SET REPAIR SLIPS TO PRINT IN LANDSCAPE MODE
SET SALES SLIPS TO PRINT LONG OR SHORT FORM (long will fill the whole page, short is
a half page and is the default)
SET ALIGNMENT OPTIONS WHEN PRINTING STATEMENTS
SET PRINTED CORRESPONDENCE NAMES AND ADDRESSES TO UPPER/LOWER CASE
14.4 PRINTING AND ALIGNING PRICE TAGS
If you are printing price tags on your general purpose system printer, you will need to align the
settings each time that you change the type of printer or the style of tags. If you have a specialized
tag printer, skip down to the next section titled 14.6 USING SPECIALIZED TAG PRINTERS
A lot of what follows is “trial and error” and it is best if you print your sample tags on blank sheets
of paper first until you are comfortable that the alignment and spacing is very close to what you
want. Then you can try printing on the actual tag sheets.
To align for your particular printer and tags you should click on the REPORTS, PRINTER
SETTINGS, SET THE SPACING ON PRICE TAGS.
This screen will allow you to change the alignment. The first thing you should do is change the
number of dumbbell tags across the top to be the same as the tag pages you are using. Click on the
last entry in the white box in the middle which says “THE NUMBER ACROSS.” The number is
now loaded into the CHANGE BOX and you should change this to the correct number and hit
SAVE CHANGE. The pictures of tags across the top of the screen will also change to show the
same number listed.
Now, go to REPORTS, INVENTORY REPORTS, TAGS – ADD REMOVE or PRINT PRICE
TAG LIST. If no tags are listed, enter enough tags for previously entered inventory items to at
least fill several lines of the tag sheet (You can use the same number over and over for this test but
remember that it must be a valid, unsold inventory item or WinJewel will not print a tag). Hit
PRINT NOW, OK and then select LATER when asked and this will keep the items in the file to
use over and over for testing.
Look at the printout and compare it to your blank tag sheet to see if you need to make any
adjustments. It is possible that the default settings in WinJewel are just right, but if not, you should
first change the vertical spacing. To make the printing larger or smaller, click on THE FONT SIZE
NOW IS and change the number either larger or smaller. You can use decimals for the font size up
to two places (Example: 6.25). Keep experimenting with this number until you get the vertical
spacing to be exact. (Note: the horizontal spacing may be thrown off by changing font size, so only
worry about the vertical spacing for now.
Next you will set each of the horizontal positions for your tag sheet. This is done by changing the
settings for the various POSITIONS. The settings can only be whole numbers (no decimals
allowed), so again you need to experiment. If you have the settings to close together, some printers
will wrap the text to the next line. If this happens, increase the space between settings until the
wrap stops happening.
If you are unable to get the vertical spacing exactly right for your printer you can turn on the
MICRO-ADJUST feature by clicking on that button. The number that you enter after clicking on
micro-adjust will insert a very small amount (one dot) between each tag vertically. The amount
that is added is consistent for each printer but will vary from printer to printer. It depends on the
dots-per-inch that your printer supports.
When you are finished, remember to click on SAVE/EXIT. Next, proceed to the section below
entitled Setting Tag Layouts.
14.6 USING SPECIALIZED TAG PRINTERS
If you have a dedicated printer that only handles price tags and will print bar codes, you need to set
it up in WinJewel by going to PRINTER SETTINGS and setting the inventory tag output to that
particular type of printer. The printers supported include:
ALLEGRO
C.ITOH
DATAMAX
ELTRON LPT 2022, 2642, 2722, 2742;2844
LABELWRITER
ZEBRA model 95 and flip-flop
Note: Recently Zebra purchased Eltron so some printers may have both names and you will need
to look at the specific model number to determine which option to select.
Once this printer is established, WinJewel will automatically adjust the tag alignment to the default
setting. You can still change this by altering the individual settings and this will move the printing
around on the tag (See previous section). There are several special printing options under
PRINTER SETTINGS for tag printers. If you need help or you have some special circumstance
that is not covered in this manual, please contact WinJewel Customer Support instead of selecting
and sampling all of the options.
Once this information is saved, WinJewel will ask which port the printer is connected to and give
you the option to not print barcodes. Special instructions for physically setting up printers can be
found in the Scanner and Printer Setup chapter of this manual.
14.7 SETTING TAG LAYOUTS
WinJewel also allows you to determine what information will be printed on each tag. To make
changes, select PRINTER SETTINGS, SET THE SPACING ON PRICE TAGS and click on the
CHANGE ORDER gray bar.
The DEFAULT format will be shown. You can establish a different tag format for each
department. If you do not specify a layout for an individual department, the DEFAULT format will
be printed for their tags.
The large white box shows all of the things that can be printed on the tag, the number of characters
and a special code (a number or a letter) used to specify that particular item. Below that box is a
picture of a tag and how the items selected are going to appear on that tag. To make any changes,
simply put the cursor in the tag layout picture and change any of the numbers or letters.
If you are using a specialized tag printer that prints barcodes, only enter information on the left
hand side of the tag. The right hand portion will be used to print the bar code number. Note: the
barcode number will display in both code and in numbers so you do not need to include the Vendor
number and Stock number on the left hand side.
You may want to experiment with different settings and see what they look like on the tags. If you
have a tag layout that is not the standard dumbbell style like is displayed in the picture, you can
still use the CHANGE ORDER screen but you need to use your imagination to fill in spaces that
are not displayed on the screen. For example, if you have a tag with a long tail on the top line, just
enter more data than will display on the top line of the tag layout (into the “gray” space) and
WinJewel will actually print that information on the tag. If you need any help with special tags,
please call WinJewel customer support.
14.7 PRINTING MAILING LABELS
The labels routine can be found by clicking on REPORTS, MAILING LABELS. You have several
printing choices including labels for every customer in your database, selected labels for customers
in a specific city or zip code and labels for those customers identified by using a FIND BY.
You can also use the label program to print postcards or envelopes. When you make that selection,
you will need to set location settings so the name and address will print exactly where you want it
to on the form.
To change the printing format for labels, you will need to select REPORTS, MAILING LABELS,
SET SPACING FOR LABELS and a formatting screen will appear. If you are using Avery labels,
you can select the predefined Avery tag layouts from the “Pre-defined layouts” drop down box. If
your label is not listed you can define your own settings. Print a few labels to sample and then use
the “trail and error” method to make changes until the labels print exactly the way you want. You
should first adjust the size of the font so that the vertical spacing is correct and then the POSITION
number for the horizontal spacing.
Once you have adjusted the first two labels to print correctly, enter the number of labels across and
the number of rows on your label sheet and WinJewel will adjust the remaining part of the page.
Hit SAVE/EXIT when you are finished. If you use several different types of labels, you should
write down the settings for each as you will have to reset them before you print.
14.8 PRINTING SERVICE ENVELOPES
There are several alternatives for printing service envelopes. The normal default way is for
WinJewel to print the envelope information on a single piece of paper. You can simply place this
paper in a clear zip-lock type bag. This is the default way of printing in WinJewel.
You can also have WinJewel print the information directly onto an envelope. To use this, select
PRINTER SETTINGS, SET REPAIR ENVELOPES TO PRINT ON BLANK ENVELOPES. You
will be given a series of settings to choose (this is another trial and error process) including spacing
on the envelope, whether you want the envelopes printed in landscape or portrait mode and which
tray the envelopes are in (if your printer has multiple trays). If you are using a single tray, you can
also select to pause between printing envelopes which allows time to assure the envelope is in the
appropriate position for printing.
WinJewel also has programmed a special three across envelope that is made by Impact Specialties,
Inc. This special paper stock has an actual envelope as one third of the page and two receipts. All
three pieces are printed with the same information. When printed, the item can be placed directly
in the envelope side and the receipts separated with one given to the customer and the other
retained for the store records. Please contact WinJewel if you would like more information about
this option.
14.9 APPOINTMENT SCHEDULER
The small gray button with the letter “A” that is near the HELP icon will launch the WinJewel
Appointment Scheduler. The purpose of the Scheduler is to have a way to keep track of either
store-wide appointments or appointments for a specific staff member.
When the “A” is clicked then you will be asked for a personal code or to enter “XX”. If a code is
entered that is a staff members code then that staff member’s appointment list will be shown. If
the store wants to have one master list of appointments then “XX” should be entered to bring up
the list.
Once the appointment schedule is on the screen you will see that appointments are entered to the
closest half hour during the day. You can click on the “A” near any time slot and find a name
quickly from the customer list in the same manner that you would bring up a customer on any
other screen in WinJewel. You can also just click to any time slot and type a name or information.
To move one day in either direction, click on the > or < . To move one month in either direction,
click on the >> or <<. To print the schedule, click on the PRINT button.
15 MAINTENANCE and BACKUP
15.1 BACKING UP YOUR DATA
15.1.1 Discussion:
An old insurance industry saying is that “you can never have too much insurance”. This little
adage probably sold a lot of insurance because it is true. Insurance is only important when you
need it. The same can be said about data backup. Data backup is your responsibility. Having a
recovery plan is your responsibility. Following your plan is your responsibility. No one will do
these things for you and no computer professional, including the staff at WinJewel can help you
recover your data if a system failure occurs and you don’t have a current backup.
Computers are man made machines. Today’s computers and software systems are very reliable but
are not trouble free. Hard drives crash, networks go down, printers wear out, software gets
outdated. In addition to the computer system itself, human error must be considered. Backups are
your protection against all of the things that could go wrong with any computer system.
15.1.2 What is Backup:
A simple question with many approaches but only one goal. A backup is an insurance policy
against the loss of information (your records) if a failure occurs.
The purpose of this discussion is an attempt to help you understand the importance of backup. It is
very important to back up your data on a regular basis. You should decide how often to do this but
remember that if you have a failure of your system, you will have to reenter everything since the
last backup. We recommend backing up daily, at the least weekly. It is a good idea to keep
multiple backups with each one clearly dated in a safe place.
PLANNING: FILE MANAGEMENT (getting organized):
It is recommended that you create a folder on the C:\ drive of your primary computer and
name it “WJSupport”. You can save copies of important files here, for example a back-up
“copy” of your WinJewel folder (for convenience only). Back-up data should always be
saved to a removable disk (or other removable media to protect against computer failure).
Creating a separate folder (WJSupport) is not a requirement but it is suggested that you use
some type of organization for your files. You should not save any files directly into the
WinJewel folder unless told to do so by the WinJewel staff.
The reasons that may require you to restore from backup data are too numerous to list in this
manual. But a few of the most common failures are discussed here.
Computer Crash: This can be anything that results in your computer not working anymore.
A Computer Crash could be a hardware failure or operating system failure. This is the most
devastating type of failure but can be the easiest to recover from if you have a current
backup and a sound recovery plan.
Update Failure: WinJewel updates are done by downloading files over the Internet.
Although rare, it is possible that the download process can malfunction due to reasons
beyond the control of The WinJewel Software Company or you. Updates are important and
should be taken regularly (daily, weekly, monthly). Updates are part of your support
package and are the most reliable way to resolve application software issues on your
system. The entire computer industry is constantly changing. WinJewel Software also
changes constantly in order to keep up with growing demand and industry standards. Take
your updates regularly but always remember to make a backup copy of your WinJewel
folder just before starting the update.
Corrupted Files: Every program on your computer relies on instructions written in
computer code. This code is stored in files and these files are saved onto your computer
hard drive. Files can become corrupted or unreadable by the computer processor. There is
not much that can be done with a corrupted file except to replace it from your backup.
Operator Error: We all do it. We get click happy with the mouse, we try things that we
don’t fully understand, we accidentally delete files. Most of the time we survive but
occasionally we pass a point of no return. It is much easier to restore your program from a
backup then to try to undue whatever you did to get yourself in this mess.
15.1.3 How to backup your WinJewel data.
There are two basic methods for backing up your data; running the backup through WinJewel
REPORTS and making a copy of the WinJewel folder. There are advantages and disadvantages to
both methods. There is no reason to not do both although either one is sufficient. The backup
process done through WinJewel REPORTS takes all of the data files, compresses them (makes
them smaller), and saves them in a separate folder. Making a copy of the WinJewel folder copies
all files within WinJewel and saves them in a separate folder. The backup through WinJewel
REPORTS is smaller in size, the copy of the WinJewel folder is more complete.
WINJEWEL REPORTS: BACKUP:
Before doing a back up, you
must decide where you will
save the backup data. In this
example we will create a
folder for each day of the
week, which are in a folder
called Backup which is in a
folder called WJSupport. The
location or “path” will
required when doing a
backup. The path can be
found in the blue border along
the top of any screen.
To backup your data using
WinJewel, Click on
REPORTS, BACKUP and
you will be asked which drive
you want to use for the
backup. In this example we
are backing up to other. The
basic process is the same
regardless of the location or
drive.
Enter the path where you
want the backup to be saved.
The slashes that separate each
folder name are “back
slashes” and are located on
the number row of your
keyboard above the “Enter”
key.
If there are any files already
in your destination path they
will be erased during the back
up process. This results in
copying only the latest
WinJewel files.
A black COMMAND
PROMPT window will open
and close showing you the
progress of the backup.
When the backup is complete
a summary will be displayed.
Click on the bottom line
“Backup is complete”, then
close the window (click on
the “X” in the upper right
corner). You will be returned
to the WinJewel REPORTS
screen.
You will be returned to the
WinJewel REPORTS screen.
Today’s date will be
displayed in the NEW
BACKUP field.
MAKING A COPY OF THE WINJEWEL FOLDER. An alternate method for backing up your
data is to make a copy of the WinJewel folder using the utilities available in Windows. Unlike the
WinJewel BACKUP above, this will copy both the WinJewel program as well as all of the data
files.
This is the only way to make a backup to a write-able CD. Write-able CD drives require additional
processes that prevent the WinJewel copy process from saving directly to the CD (through
WinJewel REPORTS, BACKUP). There are more than one way to copy and paste folders in
Microsoft Windows. The basic process is to highlight the folder to copy (WinJewel), copy the
folder, select your destination then paste the folder. The following is a brief illustration of copy and
paste.
If there is a previous backup
copy of WinJewel, delete it
before copying the new back
up. Do not overwrite one copy
WinJewel onto another.
Copy the C:\WinJewel folder
from the server machine only.
Select the destination that the
copy will be saved.
The WinJewel folder is
copied to the destination.
15.1.5 Restoring data from a backup.
If you ever need to restore your data to the computer, the choices are also on the REPORTS,
BACKUP screen. Be careful using the RESTORE option. You will lose all work that has been
done since the last backup. You must also do a SORT EVERYTHING after restoring the files.
Please call WinJewel Support for assistance restoring your data files.
15.2 SORTING THE FILES
All records in WinJewel are stored in order, either alphabetical or numerical. Storing files in order
facilitates quicker search and retrieval response times. When new items (inventory, customers, etc)
are added to an existing database in WinJewel, they are added to the bottom of the database. The
SORT processes runs through the entire database and places these new items into their respective
positions. If an item is marked for deletion the SORT removes them from their respective position.
It is very important to the speed of the program that you periodically sort the files. Any item can be
found in the computer whether it is sorted or not but it will speed up the system significantly if a
sort has been done.
Click on REPORTS, SORTS to see the options available. While you can sort individual files, it is
usually best to use the SORT EVERYTHING NOW selection. When you run this, the system will
remind you that this could take a long time if you have a lot of information stored in the computer.
WARNING: All other processes must be stopped while WinJewel is SORTING. Do not
attempt to perform any transactions or access any screen while the SORT is in progress.
WinJewel should be closed on all other network client machines to prevent accidental
interruption of the SORT.
Because SORTING rewrites the entire database, there is the potential for errors to occur. If a
problem does occur, restoring from your backup is the best resolution. It is your
responsibility to do a backup before SORTING.
An automatic SORT can be set to run after business hours. Doing this will help prevent accidental
interruption of the SORT. Go to REPORTS, SORTS, SET AUTOMATIC SORT TIME SET TO
START AT (time). In order for the automatic sort to work the Microsoft Windows power saver
modes (sleep, hibernate) must be set so that the computer does not turn off. Also, no other
automatic processes (Windows update, anti-virus s/w, etc,...) should be set to start during the same
time period.
15.3 DOING AN UPDATE OF WINJEWEL
Updates to the WinJewel program are available to all customers who are current on their annual
maintenance payments. This is a simple process but a very important one. WinJewel is improved
constantly in response to customer calls and requests. Updates provide you with the most current
version of WinJewel. You must have Internet connection to receive the updates.
WARNING: All other processes must be stopped while WinJewel is UPDATING. Do not
attempt to perform any transactions or access any screen while the UPDATE is in progress.
WinJewel should be closed on all other network client machines to prevent accidental
interruption of the UPDATE.
Click on UPDATE FROM WEB from the main screen of WinJewel. This will automatically start
the UPDATE process.
WARNING: Updates are downloaded from the Internet. Because it is possible to encounter an error
during the download process it is important to always make a backup copy of the WinJewel folder
before starting an UPDATE.
You have an option to copy the update file to your computer without automatically initiating the
UPDATE process. This may be necessary if you have a dial-up Internet connection that prevents
you from downloading large files or if your version of WinJewel is 6.00 (a1a) or older. This option
is available from the UPDATE link on the WinJewel website (www.WinJewel.com). You will
required to enter your User Name and Password. Your User Name is your store name and your
password is your license number. Both of these items can be viewed from SYSTEM ANALYSIS.
Spelling must be exact and is case sensitive. If you need to get your updates this way, call
WinJewel support for assistance.
If you updated to the server, each PC on the network will also have to be updated. This is done
automatically when WinJewel is started on each of these PC’s. A message will appear that says an
update has been done and do you want to update. Respond YES. On older versions, you will need
to go to SYSTEM SETTINGS, UPDATE “WINJEWEL.EXE” FROM SERVER IF THIS IS A
NETWORK and the update will be performed.
15.4 CHANGING THE HEADINGS AND LABELS THAT YOU SEE ON EACH SCREEN
WinJewel allows you to customize almost every screen in the program. You can change the
descriptions of the icons across the top of the screen by selecting REPORTS, SYSTEM
SETTINGS, SET THE CAPTIONS FOR EACH ICON. Just change the word to something that
makes more sense to you remembering that space is limited and long words may have the ending
characters cut off.
You can also customize the labels that appear on each screen. To do this you go to the screen that
you want to change and type the words "CHANGE LABELS" into the first box that is large
enough to take the words (On some screens this is not the first box.) and hit ENTER.
Each label will now be displayed one-by-one with the current name that appears for that item.
Enter the new name and hit OK. If you want to make no change for that label, simply hit the OK
button with no changes. You can see the labels changing as you enter each one. If you want to set
the labels back to the default settings, go to the REPORTS, SYSTEM SETTINGS and select the
RESET ALL SCREEN LABELS TO DEFAULT SETTINGS. You can also change only one
screen back by selecting the RESET button for that particular screen.
15.5 UNLOCKING A FILE IN THE MULTI-USER MODE
If you are running WinJewel on a network, leaving the program in an unexpected way (such as by
turning off the computer or experiencing a power failure or system error) may lock the file(s) you
are working on. You will get a message saying the record is locked if you try to access a file.
This is the normal notice you will get if someone is accessing the same file or record on one of the
other computers on your network. However, if you are sure that no one else is using the system or
has left the computer with a file open on the screen, you can unlock a file in the following way:
Click on the UNLOCK choice and enter the code to unlock. This code is set on the STAFF screen.
Always be sure that no other computer is using the file. This could lead to lost data in the file.
15.6 SPECIAL WINJEWEL SETTINGS
There are several special things that can be done from WinJewel’s Main Menu screen:
Hint: Make a fresh TRAINING COPY to try these procedures, options, reports or settings.
The TRAINING COPY will show how these functions work before effecting the actual
program data. See section 2.8 SETTING UP A TRAINING PROGRAM.
SYSTEM SETTINGS and PRINTER SETTINGS provides lists with options that allow you to
modify the way WinJewel works. There are many options available within these two settings
screens and more options are added regularly as WinJewel is updated. The most recent additions
will be located at the bottom of the list. The easiest way to find an option for your needs is to click
on the “Findby” button at the bottom if the screen, type in a word or partial word of the option you
want to find, then click OK. A list of search results will be displayed. Read through all of the
returned results before clicking on one. There may be more that one result with similar but
different descriptions. For example to change the note at the bottom of a sales receipt go to printer
settings, click on the “Findby” button, type in the word “note”, click “OK”. The list of search
results is displayed. The first item is “Set the not to be made on each statement”. This is not the
correct choice for changing the note on the sales slip. The second item is “Set the note to be made
on each sales slip”. This is the correct choice.
SYSTEM ANALYSIS will provide a recap of some of your current WinJewel settings. You can
also review your business information and current license number. When you click OK you will
get a Drive Analyzer that will show your free disk space (to close this window, click on the “x”)
SHOW HINT displays random tips on operating WinJewel.
WWW.WINJEWELCOM is a link to the WinJewel website. It will open your Internet browser and
take to WinJewel website if your Internet connection is on.
UPDATE FROM WEB will initiate the update process to your WinJewel program. You should
have a current sort and backup before clicking on this link. It will take approximately 5 minutes
with a high speed connection to 60 minutes with a dial-up connection.
MANUAL FROM WEB is a link to the WinJewel website “User Manual Page”
IP ADDRESS will display the ip address of your computer/router. This number is needed when
setting up a NetMeeting.
OBSERVATORY TIME will dial in and automatically set your time and date to the correct
readings.
NETMEETING is a special program to allow file transfer and control of your computer by the
support people at WinJewel. This is helpful when WinJewel Customer Support needs to
troubleshoot configuration problems with your computer.
In addition, there are some special settings in WinJewel that are found under SYSTEM
SETTINGS:
SET SYSTEM TIME and SET SYSTEM DATE (These are shortcuts to the Windows screens for
making these changes).
TURN ON OR OFF AUTOMATIC PHONE DIALER (Allows integration of WinJewel’s
telephone number database into a phone dialer)
ACTIVATE THE HINT SCREEN (Displays a brief tip for using WinJewel at each start up).
CHANGE PICTURE ON OPENING SCREEN (Allows you to display another picture on the
WinJewel main menu screen).
SET DATE STYLE (Allows the date format to be changed from the default North American
style).
15.6 TO MAKE THE PROGRAM GO FASTER
Any or all of these will make the WinJewel program run faster:
1 - Add more memory to your computer.
2 – Upgrade your processor. (486 to Pentium)
3 - Change to a faster megahertz CPU.
4 - Run sorts of the files more often. (WinJewel can find things very quickly even in large lists if
they are sorted because it uses a very sophisticated binary search technique.)
5 - Run DEFRAG and SCANDISK more often. (These must be done after closing WinJewel)
6 - If the printer seems to be slowing down, add more memory to the printer or add a separate
dedicated print buffer with memory.
7 - Install a faster hard disk drive.
8 - Install a large enough hard disk to not have to use a disk compression program.
16 MULTIPLE STORE OPERATION
16.1 SETTING UP MULTIPLE STORES
If you are using WinJewel in several different store locations, you will need to make some special
settings. One location will need to be designated as the Main Store where all of the functions of the
program will be available. The other locations will be referred to as Branch stores and they will
only use the SALES, CUSTOMER, SERVICE, STAFF and REPORTS portions of WinJewel.
First, go to SYSTEM SETTINGS on the main store’s Server PC and select the SET THIS STORE
TO BE A MAIN STORE option. In each branch location, you will need to select SET THIS
STORE TO BE A BRANCH STORE. You then need to assign each store a store number from 1 to
99 (The Main store will be store 0). These settings will enable WinJewel to keep track of items and
manage the flow of data between your locations.
When defining deposit types for branch stores, use a “(1)” or “(2)” as part of the name of the
deposit type to denote which store the deposits are to be credited. Example: Main(1), Main(2),
Main(3), Credit Card(1), Credit Card(2) etc.
16.2 ASSIGNING SLIP, ENVELOPE AND CUSTOMER NUMBERS TO EACH
STORE
You will need to establish a series of Sales Slip, Customer and Envelope numbers unique to each
branch store. These numbers can only be set at the Main Store for each branch. First, you need to
select SYSTEM SETTINGS, SET THE SALESSLIP NUMBER RANGE FOR EACH BRANCH.
You will be asked for the branch number, how many slip numbers to assign and the starting slip
number for that store. You will not specifically assign numbers to the Main Store, so you should
leave enough numbers for them, usually at the beginning.
Next, go to SYSTEM SETTINGS, ASSIGN NUMBERS FOR BRANCH STORES and do the
same thing for Customer numbers, Envelope numbers and Note numbers (customer notes). These
numbers are only used internally by WinJewel but they still need to be set so the program can track
entries.
16.3 BRANCH STORE FILE TRANSFERRING
WinJewel uses the Internet to update branch store operations from and to the main store. These
transfers are handled automatically and will eliminate long distance charges if you have local
Internet service. You will need the" Internet Transfer Module" from the WinJewel Company. This
module takes advantage of the Internet to keep each store's records updated at any interval that you
choose. The user can set the intervals from 1 to 1440 minutes. (1440 is the number of minutes in a
24-hour day)
If the other store is not available because the phone line or other Internet connection line is out,
then the information is stored and re-sent when the other store is back on line.
The "Internet Transfer Module" is supplied when you buy the Multi-user version of WinJewel.
This module must run in the background on one computer in each store on a computer that has
access to the Internet. It can be minimized and still work correctly. The transfer process does not
effect other operations on this computer and other computers on the local network, which is on a
separate "Thread" of the operating system.
The phone line will only be used each time that the module connects to the Internet. We
recommend a separate phone line be used. By this we mean NOT the regular voice line for the
store. A line that is also used for the fax machine can be shared easily. The phone line that the store
uses to clear credit card sales is not recommended.
You will need to supply the Internet Email address of each of the other stores. When a transaction
is transferred to the receiving store then the inventory, customer and sales files will be updated
automatically. Accounts payable, repair and checkbook transactions are not transferred.
16.4 MOVING INVENTORY FROM ONE STORE TO ANOTHER
When you set up inventory for multiple stores, it is easiest if you establish unique case numbers for
each store (For example, use case numbers xx for the main store, 1xx for store number 1, 2xx for
store number 2, and so forth). Then, when you enter the item’s Stock Number, the LOCATION
field will tell you both the store and case location for the item. If you move the item from one
location to another, bring it up on the Inventory Screen, click on the LOCATION field and enter
the new location of the item.
If you want to move several items from one location to another, select REPORTS, INVENTORY
REPORTS, MOVE SELECTED INVENTORY TO ANOTHER LOCATION. A transfer screen
will appear where you can enter the location you are moving items TO and then enter the STOCK
NUMBER for each item to be moved. WinJewel will create a transmittal form listing each item
number, its description and price and the location WinJewel is moving it from. If you do not have
time to enter everything, select CLOSE and the form will be saved. If you make a mistake on a
given item, just click on it and you can erase it from the transmittal. When you are finished, click
on END/PRINT and the transmittal form will be printed so it can accompany the items and be
signed when the items are checked in at the new location. Each transfer has a unique transfer
number and the PRINT OLD button will allow you to reprint transmittal forms.
If you want to move the entire case of items from one location to another (such a taking it to a
show), select REPORTS, INVENTORY REPORTS, MOVE ALL INVENTORY FROM ONE
LOCATION TO ANOTHER. The system will ask you to enter the “from” and the “to” location
and all items will be transferred automatically. However, this method does not print a transmittal
form.
17 FILE FORMATS
17.1 CONVERTING FILES TO ACCESS FORMAT
There may be occasions when you want to take the WinJewel database files and use them in other
programs. You can convert most of the files to a Microsoft Access format by going to SYSTEM
SETTINGS, CONVERT FILES TO ACCESS FORMAT. Access files are so commonly used
today that they can very easily be converted to almost all other databases.
17.2 FILE FORMATS
This information is provided for users who want technical information about how the WinJewel
data is stored. It has no use for people who just want to use WinJewel to access the files but is
provided for technicians who want to use other programs, spreadsheets or text editors to access the
data.
Most files for WinJewel are stored in ASCII format for ease of export. The file itself usually ends
in “.DAT” and the corresponding file with the pointer information is stored with a suffix of either
“.PT”, “PTN”,”PT2” or “.PT3.” The first number in the pointer file is the total number of records
in the primary file. The second number represents the number of records in the primary file the last
time that the file was indexed (sorted).
Since these are relative files, position means everything. It is very important that you do not
replace any information in a file with information of a different length. All records in the file could
be affected. It is always best to make a copy of the file and work with the copy.
FILE: INVENT.DAT
POINTER: INVENT.PT5
Ven1
With 3
Num1
With 5
Desc1
With 252
MinQuantity1
With 3
Center1
With 5
StoneColor1
With 1
Clarity1
With 4
Cut1
With 3
Shape1
With 1
Tax1
With 1
TW1
With 5
Reord1
With 20
Grams1
With 6
Karat1
With 2
Color1
With 1
DatePur1 With 8
InvNum1
With 15
DateSold1
With 8
Cust1
With 20
Multiple1
With 1
LastNote1
With 6
CustNum1
With
SlipNum1
With
Memo1
With 1
Dept1
With
Cost1
With
Retail1
With
SoldFor1
With
SerialNum1
With
AutoReorder1
With
QuantityStore0
With
QuantityStore1
With
QuantityStore2
With
QuantityStore3
With
QuantityStore4
With
QuantityStore5
With
QuantityStore6
With
QuantityStore7
With
QuantityStore8
With
QuantityStore9
With
QuantityStore10 With
QuantityStore11 With
QuantityStore12 With
QuantityStore13 With
QuantityStore14 With
QuantityStore15 With
QuantityStore16 With
QuantityStore17 With
QuantityStore18 With
QuantityStore19 With
QuantityStore20 With
Retail2
With
Retail3
With
LastInv1
With
PerPieceOrWeight With
Status1
With
Locked1
With
LastBuild1
With
Girdle1
With
Culet1
With
Polish1
With
Symetry1
With
Floresence1
With
Who1
With
MultiInvent1
With
OnOrder1
With
Location1
With
FromEnvelope1 With
QuanOutMemo1 With
DateOutLine1
With
Expansion1
With
5
7
3
18
18
18
20
1
5
5
5
5
5
5
5
5
5
5
5
5
5
5
5
5
5
5
5
5
5
18
18
1
1
1
1
10
10
10
10
10
10
2
4
5
13
8
6
8
100
FILE: MMYY.DAT
FILE: MMYY.PT
Clerk2
With 2
cust2
With 10
date2
With 8
Days2
With 3
Dept2
With 3
Desc2
With 250
Hotel2
With 3
LastMMYY2
With 4
LastSlip2
With 8
Price2
With 18
Quantity2
With 10
Reference2
With 20
Shipper1
With 2
ShipTo2
With 10
ShipTracking2
With 20
SlipNum2
With 8
Split2
With 10
Stocknum2
With 5
Taxable2
With 12
Taxable3
With 12
Taxable4
With 12
TaxCode2
With 1
Terms2
With 20
Type2
With 1
Ven2
With 3
ClickThruOrDirect2 With 1
PaidOnInvoice2 With 12
DiscountTaken2 With 12
Expansion2
With 75
FILE CUST.DAT
POINTER CUST.PT2
LastName3
With
FirstName3
With
Address3 With 30
Status3
With
City3
With
State3
With
Zip3
With
LastMmYy3
With
LastSlip3
With
Balance3
With
AgreedPmt3
With
Phone3
With
30
35
1
30
2
15
4
10
15
15
20
PhoneTwo3
LastNote3
CredLimit3
Number3
profile3
behind3
NoInterest3
InterestRate3
Address31
Email3
TypeOfBilling3
StatementDate3
DueDate3
DueDateTwo3
Wholesale3
Type3
Purchases3
Assigned3
LastContact3
LastDetailed3
Mailing3
CurrencyType3
CountryCode3
VatYN3
StandardTerms3
NormalDiscount3
Expansion3
With
With
With
With
With
With
With
With
With
With
With
With
With
With
With
With
With
With
With
With
With
With
With
With
With
With
With
FILE: SUPP.DAT
POINTER: SUPP.PT2
Name4
With
Address4 With 40
Address24
With
City4
With
State4
With
Zip4
With
Phone4
With
Fax4
With
LastNum4
With
Balance4
With
LastInv4
With
Terms4
With
LastNote4
With
Number4
With
AcctNum4
With
SalesPerson4
With
SalesPersonPhone4 With
MailingLabels4
With
AddressTwo4
With
Address2Two4
With
20
8
15
10
8
4
2
6
30
40
1
2
2
2
20
1
15
2
8
5
1
1
2
1
16
8
72
25
40
20
2
10
12
12
6
8
8
14
6
3
15
25
12
1
40
39
CreditCard2
CityTwo4
StateTwo4
ZipTwo4
Email4
www4
DefaultGL
Percentage4
locked4
CurrencyType4
Country4
Expansion4
FILE: NOTE.DAT
POINTER: NOTE.PT
custsupnum5
newnote5
clerk5
lastnotnum5
date5
With
With
With
With
With
With
With
With
With
With
With
With
1
20
2
10
40
44
6
5
1
1
3
35
With
With
With
With
With
5
78
2
6
8
FILE: REPAIR.DAT
POINTER: REPAIR.PTN
Cust6
With 17
Dept6
With 3
CNum6
With 5
Item6
With 250
Instr6
With 242
LastPart6
With 8
OldSalesperson6 With 1
Who6
With 2
InDate6
With 8
OutDate6
With 8
DueDate6
With 8
FinDate6
With 8
Where6
With 6
Est6
With 8
Price6
With 8
LastNote6
With 6
EnvNumber6
With 6
SalesSlip6
With 6
Cost6
With 10
SalesPerson6
With 2
Condition6
With 12
ConditionType6 With 1
RemoveCode6
With 1
DeclaredValue
With 10
LastAddItem6
With 4
MultiItemPrice6
FILE: STAFF.DAT
POINTER: STAFF.PT
code7
initial7
name7
access7
With
ssnum7
address7
city7
state7
zip7
Phone7
exemptions7
status7
reportaccess7
mailinglabels
ShopList7
BillingRate7
UseAdDefault7
DontUseInSales7
SpecialCode1
SpecialCode2
SpecialCode3
SpecialCode4
SpecialCode5
KeepCallLog7
Location7
expansion7
With 30
With
With
With
12
With
With
With
With
With
With
With
With
With
With
With
With
With
With
With
With
With
With
With
With
With
With
FILE: INVOICE.DAT
POINTER: INVOICE.PTN
number8
With
date8
With
datedue8
With
OldAmount8
With
discount8
With
dept8
With
shipping8
With
datepaid8
With
cknum8
With
name8
With
supNumber8
With
canada8
With
dept2part8
With
monthly8
With
project8
With 3
Amount8
With
15
2
25
12
25
20
2
10
12
2
2
21
1
1
6
1
1
1
1
1
1
1
1
3
6
25
8
8
8
8
3
8
8
6
25
3
8
3
1
15
Canada9
With 8
FILE: DEPT.DAT
POINTER: NUMDEPT.DAT
Commision9
With
Longdept9
With
GiftCert9
With
NoTax9
With
Category9
With
OldPercentage9
With
BalanceDept9
With
MinPercentDisc9 With
DiscountPercent9 With
ShowSerialNum With
ShowCenter
With
ShowTW
With
ShowClairty
With
ShowStoneColor With
ShowShape
With
ShowCut
With
ShowGrams
With
ShowKarat
With
ShowColor With 1
ShowExpansion0 With
ShowExpansion1 With
ShowExpansion2 With
ShowExpansion3 With
ShowExpansion4 With
ShowExpansion5 With
UseLooseDia9
With
MultiUseLabel
With
Percentage9
With
SubTotal9
With
Expansion9
With
corrected9
With
3
40
1
1
3
2
8
8
3
1
1
1
1
1
1
1
1
1
1
1
1
1
1
1
1
20
5
2
2
1
FILE AP.DAT
POINTER AP.PTN
name10
number10
balance10
budget10
category10
assigned10
expan10
With
With
With
With
With
With
With
FILE CBMMYY.DAT
POINTER CBMMYY.PTN
supnumber11
name11
invnumber11
With 3
With 25
With 25
50
6
12
12
3
1
16
account11
With
cknumber11
With
datepaid11
With
amount11
With
discount11
With
shipping11
With
status11
With 1
expand11
With
FILE ORDER.DAT
POINTER ORDER.PTN
supnumber12
With
ordernumber12
With
orderdate12
With
promisedate12
With
indate12
With
deliverdate12
With
instruct12
With
item12
With 40
StyleNumber12
With
terms12
With
cust12
With
cost12
With
dept12
With
custPrice12
With
quantity12
With
quantityIn12
With
expansion12
With
6
6
8
12
12
8
20
3
5
8
8
8
8
25
15
14
5
12
3
12
4
4
21
17.3 RECEIVING FILES VIA MODEM
To receive an update of the WinJewel program or any other file immediately, if you have a modem
in your computer, you can click on the REPORTS, UPDATE from the list. One of the choices you
will be given is to update via modem. This can be used to get any file from the folks at WinJewel.
To transfer files we need to have the same settings on your computer that we have at WinJewel:
Click on SETTINGS
Click on BINARY TRANSFERS
Click on XMODEM/CRC
Click on OK
Click on SETTINGS
Click on COMMUNICATIONS
Click on COM1 (or whichever your modem is attached to)
Click on 2400 BAUD RATE
Click on 8 DATA BITS
Click on 1 STOP BIT
Click on PARITY NONE
Click on FLOW CONTROL Xon Xoff
Choose PARITY CHECK
Choose CARRIER DETECT
Click on OK
Click on TRANSFERS
Click on RECEIVE BINARY FILES
When computer asks for file name enter : WJZ.EXE
18 PRINTER AND SCANNER SETUP
18.1 DISCUSSION:
Scanners and tag printers will greatly increase the efficiency of the WinJewel system. Please remember
that these are specialty equipment. Although WinJewel is designed to work with scanners and tag printers,
whenever external equipment is added to a computer system, the system becomes more complicated.
Setup for scanners and tag printers is normally a simple process that takes little time but occasionally
issues arise that greatly increase the time required to set up this external equipment. WinJewel support will
help you install this equipment but issues may arise that are out of the WinJewel Software Company’s
control. Please keep in mind that you may be required to contact the manufacturer of your external
equipment for additional support.
Most scanners use a wedge connector that plugs into your computer at the key board connector. The
keyboard plugs into the scanner wedge. Your scanner may require additional setup steps to work with your
keyboard. If your keyboard no longer works after connecting the scanner, refer to the scanner’s user
manual or contact your scanner manufacturer for support. The typical fix is to scan the appropriate barcode
in your scanner’s user manual.
PLEASE NOTE: The tag printer you order may not come with ribbon or labels. Contact your printer
supplier or other suppliers such as www.archcrown.com (800 526-8353) for printer supplies. Ribbons
and Tags are printer specific. You need to provide the supplier with your printer information when
ordering tags/ribbons. If you need to contact WinJewel support for assistance with your tag printer please
have model number and tag style number ready. We will need this information to provide support.
18.1.1 Things you should do or know before getting started.
WinJewel requires that a printer be installed on your computer system. There must be a default printer
available to each computer to handle normal printing jobs. Installing a tag printer on a computer with no
other printer available could cause damage to your tag printer. The tag printer should NEVER be selected
as the default printer.
Your tag printer may come with a CD or other software. If your printer connects to your computer with a
serial or parallel, you do not need to install this software onto your computer. WinJewel will support your
printer directly. If your printer connects with a USB connector you will need to install external software.
Read which software to use before installing any tag printer software.
18.1.2 Which Software to Use:
There are two methods for making your tag printer work with WinJewel.
• WinJewel driver (software)
• Other driver (software)
The WinJewel driver handles most printing requirements and is the easiest to set up. If the WinJewel
driver is used, no external software should be installed onto your computer (printers and faxes) for this
particular tag printer. The WinJewel driver should be tried first. If this does not satisfy your tag printing
needs, then consider using the other drivers available for your tag printer.
Other drivers will be required for any tag printer that uses a USB connector. Datamax provides software
that is designed by Seagull. You may install this software from your Datamax CD. If you have a
Zebra/Eltron printer, do not install the software supplied with your printer. Use the Seagull driver available
from the WinJewel website, (www.WinJewel.com, bottom of the Customize page). If you have (or are
considering) another printer brand, please contact WinJewel support.
18.1.3 Barcodes:
In order to print barcodes a special font must be installed on the computer. If you are using the WinJewel
driver for your tag printer, you do not need to take any further action. If you are using another driver for
your tag printer (Seagull), you must install a font into Microsoft Windows Fonts.
DOWNLOAD AND INSTALL BARCODE FONTS
1. Go to the WinJewel website.
2. Click on the “Customize” button.
3. Find the “WJInterleaved 2 of 5 font (New Version)” and “WinJewel Interleaved 2 of 5 font” link.
(Scroll down approximately halfway).
4. Right click on these links. A submenu opens.
5. Click on “Save As”. A Save As window opens.
6. Select the WinJewel folder in the “Save in” box near the top of the screen.
7. Click on Save.
8. You may get a message “This file already exists. Do you want to overwrite?” Click Yes.
9. When this file has completed downloading, open Control Panel.
10. Double click on Fonts
11. Click on the file menu.
12. Click on “Install New Font”
13. Highlight the WinJewel folder in the “Folders” box.
14. Interleaved 2of5 (True Type) and WJInterleaved 2 of 5(true type) will appear in the “List of fonts”
box. Hold down the control key and click on each one time to highlight them.
15. Click on OK
16. WJInterleaved and Interleaved 2of5 are now installed.
18.2 DIRECTIONS FOR SETTING UP A SYMBOL LS 2106 BARCODE SCANNER
Connections: scanner reference guide, page 1-4, using the Keyboard Wedge:
Unpack all of the items in the scanner package.
With the computer OFF, plug in the telephone – type connector into the bottom of the scanner.
Unplug the Keyboard connector from the computer. Plug the appropriate end of the split connector into the
computer where the keyboard was. Plug the other end onto the end of the keyboard cable. The plugs are
different, and cannot be plugged into the wrong place.
The scanner must now be programmed by scanning in 5 scanner codes from the scanner reference guide,
or from the codes shown below. If you use the bar codes below, hold the scanner about 12 –18” from
the paper, since the barcodes are so large. During normal scanning of tags this won’t be necessary.
These are the barcodes that need to be scanned from your Symbol users manual. The pages are
approximate.
1. On page 4-7, scan the item labeled “SET ALL DEFAULTS”. You should hear two sets of two tones.
2. On page 4-35, scan the item labeled “ENABLE INTERLEAVED 2 OF 5”. You should hear two sets
of two tones.
3. On page 4-36, scan the item labeled “I 2 OF 5 – ONE DISCRETE LENGTH”. You should hear one
set of two tones.
4. On page 4-57, scan the item labeled “0”. You should hear one set of two tones.
5. On page 4-58, scan the item labeled “8”. You should hear two sets of two tones.
Your scanner should now be fully operational!
18.3 ZEBRA/ELTRON 2642 PRINTER
ASSEMBLE AND CONNECT THE PRINTER:
Open the printer by depressing the two green tabs on the sides of the printer.
Assemble the label roll guide with the label roll in the middle of the roller. Place it in the label roller slots,
with the labels feeding off of the top toward the front of the printer.
Pull the green lever on the right front of the label assembly all the way forward to release the assembly.
Lift the assembly up until it locks in the upward position.
Feed the labels into the LOWEST possible slot behind the ribbon assembly. The labels should appear
UNDER label sensor in the middle of the roller area.
Adjust the label guides by turning the green gear wheel located low on the LEFT side in the area between
the rollers and the edge of the case. This will move the guides toward the labels, and eventually close
enough to slide over the labels and hold them in place. Adjust so that the labels have only a tiny amount of
slack on each side.
Firmly push down on the label assembly where indicated by the two arrows until the assembly is locked
into place. Close the cover.
WITH THE POWER SWITCH OFF on the printer, plug in the power supply cord, and connect the printer
cable to the computer. The computer cable usually connects to the COM1 Serial port, located below or
next to the keyboard plug (depending on your particular computer).
PROGRAMMING:
WHILE HOLDING THE GREEN BUTTON on the left side of the printer down, turn on the power switch
on the right side of the printer. After the diode by the left button blinks RED, release the button.
The printer will move the labels around for a minute, finally printing a long string of labels, then stopping.
AFTER IT STOPS, you must push the green button ONCE. This completes the automatic programming.
NOTE: Programming must be done WHENEVER power to the printer is restored.
WINJEWEL SETUP:
Start WinJewel.
Select PRINTER SETTINGS, SET SPECIAL ELTRON PRINTER TLP2642
Click YES to use Eltron.
Set the “left/right” to 490, set “up/down” to 0 (zero)
Set line 1 to 210 and 0.
Set line 2 to 210 and 25.
Set line 3 to 210 and 50.
Set printing darkness to 7 or less.
Click on “go to dumbbell style tags” in the upper left corner.
Repeat the above settings.
Click on “save changes”.
Click on “com1 port (9 pin connector)” or as appropriate for your computer.
Click on “ok”, click “yes” to show barcodes, and click “ok”.
Click “end WinJewel settings”. And click “ok” to restart.
The printer is now ready!
PLEASE NOTE: The Eltron printer as shipped from the factory DOES NOT come with labels. If you
have ordered a printer from WinJewel, we will mail you tags to get you started.
Labels can be ordered from Arch Crown, 800 526-8353, part number TT-345. Be sure to ask for them on
one-inch cores.
WARRANTY INFORMATION:
WinJewel does not do warranty repairs. To determine if the printer needs to be sent in you will need to
contact Eltron at: 1-805-579-1800 ext. 7002.
If you are certain that the printer is bad then contact Eltron at: 1-805-579-1800 ext. 1201
or by e-mail at [email protected] to get an RMA number and directions on how to ship the printer.
18.4 ZEBRA/ELTRON 2742 PRINTER
ASSEMBLE AND CONNECT THE PRINTER:
Open the printer by depressing the two green tabs on the sides of the printer.
Assemble the label roll guide with the label roll in the middle of the roller. Place it in the label roller slots,
with the labels feeding off of the top toward the front of the printer.
Pull the green lever on the right front of the ribbon assembly all the way forward to release the assembly.
Lift the assembly up until it locks in the upward position.
Feed the labels into the LOWEST possible slot behind the ribbon assembly. The labels should appear
UNDER label sensor in the middle of the roller area.
Adjust the label guides by turning the green gear wheel located low on the LEFT side in the area between
the rollers and the edge of the case. This will move the guides toward the labels, and eventually close
enough to slide over the labels and hold them in place. Adjust so that the labels have only a tiny amount of
slack on each side.
Take the empty ribbon roll and place it on the FRONT roll spindle, with the slotted end to the RIGHT.
Push the spindle ends firmly into the roll. You may need to turn the roll to line up the slots properly.
Open and remove the tape from the ribbon without tearing off or ruining the tape. The tape will be used to
secure the ribbon on the empty spool. Start the ribbon leader from the top of the role towards the back of
the rollers, and feed it behind and under the ribbon assembly. It should appear ABOVE the label sensor.
Bring it up and around the metal edge, and tape it evenly onto the empty roller. It should appear flat and
smooth on the bottom of the roller assembly.
Wind the ribbon onto the empty spool by turning the empty spool roller from the right end of the shaft
near the spring. Turn until the inked ribbon appears at the front of the assembly.
Firmly push down on the ribbon assembly where indicated by the two arrows until the assembly is locked
into place. Close the cover.
WITH THE POWER SWITCH OFF on the printer, plug in the power supply cord, and connect the printer
cable to the computer. The computer cable usually connects to the COM1 Serial port, located below or
next to the keyboard plug (depending on your particular computer).
PROGRAMMING:
WHILE HOLDING THE GREEN BUTTON on the left side of the printer down, turn on the power switch
on the right side of the printer. After the diode by the left button blinks RED, release the button.
The printer will move the labels around for a minute, finally printing a long string of labels, then stopping.
AFTER IT STOPS, you must push the green button ONCE. This completes the automatic programming.
NOTE: Programming must be done WHENEVER power to the printer is restored.
WINJEWEL SETUP:
Start WinJewel.
Select PRINTER SETTINGS, SET SPECIAL ELTRON PRINTER TO TLP 2722 OR TLP 2742.
Click YES to use Eltron.
Set the “left/right” to 490, set “up/down” to 0 (zero)
Set line 1 to 210 and 0.
Set line 2 to 210 and 25 (or try 20).
Set line 3 to 210 and 50 (or try 40).
Set printing darkness to 7 or less.
Click on “go to dumbbell style tags” in the upper left corner.
Repeat the above settings.
Click on “save changes”.
Click on “com1 port (9 pin connector)” or as appropriate for your computer.
Click on “ok”, click “yes” to show barcodes, and click “ok”.
Click “end WinJewel settings”. And click “ok” to restart.
The printer is now ready!
PLEASE NOTE: The Eltron printer as shipped from the factory DOES NOT come with a ribbon or labels.
If you have ordered a printer from WinJewel, we will mail you a ribbon and tags to get you started.
Labels can be ordered from Arch Crown, 800 526-8353, part number TT-345. Be sure to ask for them on
one-inch cores.
Ribbons must be Thermal Transfer, Polyester Resin. 110mm x 91mm. The Eltron part number is
800007-004. If you order ribbons from Arch Crown, be certain to get Polyester Resin ribbons for the most
resiliency and print quality.
Warranty Information:
WinJewel does not do warranty repairs. To determine if the printer needs to be sent in you will need to
contact Eltron at: 1-805-579-1800 ext. 7002.
If you are certain that the printer is bad then contact Eltron at: 1-805-579-1800 ext. 1201
or by e-mail at [email protected]
to get an RMA number and directions on how to ship the printer.
18.5 ZEBRA/ELTRON 2844 PRINTER
WARRANTY INFORMATION:
WinJewel does not do warranty repairs. To determine if the printer needs to be sent in you will need to
contact Eltron at: 1-805-579-1800 ext. 7002.
If you are certain that the printer is bad then contact Eltron at: 1-805-579-1800 ext. 1201
or by e-mail at [email protected] to get an RMA number and directions on how to ship the printer.
ASSEMBLE AND CONNECT THE PRINTER.
1. Open the printer by depressing the two green tabs on the sides of the printer.
2. Assemble the label roll guide with the label roll in the middle of the roller. Place it in the label
roller slots, with the labels feeding off of the top toward the front of the printer
3. Pull the green lever on the right front of the ribbon assembly all the way forward to release the
assembly. Lift the assembly up until it locks in the upward position
4. Feed the labels into the LOWEST possible slot behind the ribbon assembly. The labels should
appear UNDER label sensor in the middle of the roller area
5. Adjust the label guides by turning the green gear wheel located low on the LEFT side in the area
between the rollers and the edge of the case. This will move the guides toward the labels, and
eventually close enough to slide over the labels and hold them in place. Adjust so that the labels
have only a tiny amount of slack on each side
6. Take the empty ribbon roll and place it on the FRONT roll spindle, with the slotted end to the
RIGHT. Push the spindle ends firmly into the roll. You may need to turn the roll to line up the slots
properly
7. Open and remove the tape from the ribbon without tearing off or ruining the tape. The tape will be
used to secure the ribbon on the empty spool. Start the ribbon leader from the top of the role
towards the back of the rollers, and feed it behind and under the ribbon assembly. It should appear
ABOVE the label sensor. Bring it up and around the metal edge, and tape it evenly onto the empty
roller. It should appear flat and smooth on the bottom of the roller assembly.
8. Wind the ribbon onto the empty spool by turning the empty spool roller from the right end of the
shaft near the spring. Turn until the inked ribbon appears at the front of the assembly.
9. Firmly push down on the ribbon assembly where indicated by the two arrows until the assembly is
locked into place. Close the cover.
10. Plug in the power cord to an outlet and the USB (LPT or COM) connector to the computer per mfg
instructions.
11. Calibrate the printer: Refer to your printer manual for specific instructions
a. Turn the printer off.
b. Hold down the green button. Turn on the printer. The green button will turn red and flash.
Release the green button.
c. Some labels will print out. (5 – 10).
12. After this is done press the green button one time. One label should feed out.
DOWNLOAD AND INSTALL THE SEAGULL DRIVER
1. Go to the WinJewel website.
2. Click on the “Customize” button.
3. Find the “Download of Seagull drivers” link. (Scroll down to the bottom).
4.
5.
6.
7.
8.
Right click on this link. A submenu opens.
Click on “Save As”. A save as window opens.
Select the WinJewel folder in the “Save in” box near the top of the screen.
Click on Save.
You may get a message “This file already exists. Do you want to overwrite?” Click Yes.
9. When this file has completed downloading, open My Computer, double click on local disk (C:),
open the WinJewel folder.
10. Find the Zebra_6.5.4.exe file. Double click on it. This will launch the Install wizard to install the
Seagull driver.
11. This will create a folder on the "c" drive called Seagull.
ADD THE SEAGULL PRINTER DRIVER FOR YOUR ZEBRA TLP2844 PRINTER.
1. Go to Windows "Printer and Faxes" to install the Seagull program.
2. Click on the "File" menu.
3. Click on "Add printer". This starts the Add a Printer Wizard.
4. Do NOT select the "Auto Detect Plug and Play Printers".
5. Select your USB printer port.
6. Highlight your printer (if it is present), then select the "Have Disk" button.
7. Browse to the new "Seagull" folder on the (C) drive
8. Select the file called " usbprint.inf".
9. Click OK to "Install From Disk"
10. Click Next
11. Select "Replace existing driver" , click Next
12. Select "No" to the question “Do you want to use this printer as the default printer?” Click Next
13. Select "Do not share this printer", Click next
14. Select "No" to the question “Do you want to print a test page?” Click Next
15. Click Finish
16. Click "Continue Anyway" to the Windows compatibility warning message.
SET UP THE SEAGULL DRIVER PRINTER SETTINGS FOR YOUR ZEBRA PRINTER.
1. Right click on the Zebra TLP2844 printer icon in Printers and Faxes. A submenu opens up.
2. Click on "Properties"
3. The Seagull properties window opens.
4.
5.
6.
7.
Click on the "General" tab near the upper left corner.
Click on the "Printing Preferences" button near the bottom.
Click on "Page Setup".
Click on "New".
8. Type your tag style number into the Name box. For example; "TT306N" (or any name you wish to
give these tag settings such as Tags for Rings)
9. For Tag style TT306 use dimensions 3.50 wide and 0.55 high.
10. Click OK
11. Click OK
12. Click "Print a Test Tag" If a tag is ejected from the printer and the print is visible the printer is
installed correctly. The test label that is printed may not be centered and the font size may be very
large. This is okay. Alignment and font size will be set within WinJewel. If a tag is ejected but
nothing is printed there is a problem with your ink film and or tag roll. If a tag is not ejected from
the printer you must change settings such as "Ports" until you computer sees this printer.
SET UP WINJEWEL TAG ALIGNMENT.
1. Click on the small "P" that is below the red "Help" diamond on any WinJewel screen
2. Click on "Choose"
3. Use the drop down list to select your printer in the "Dedicated price tag printer" box if it is not
already there.
4. Click on the “Tag Align” button in the lower left corner.
5. Click on the "Reload Layout by Name" button.
6. Click on the line of the tag type. For example the DTMX_TT306.
7. The numbers in the white boxes are the x-y coordinates of each line that will be printed on the tag.
8. "This Computer Only" must be checked. You should not use a tag printer across a network.
9. Check the appropriate boxes for your tags. (Use Bar Code, 3 lines or 4 lines)
10. The Note in red letters is a reminder that Interleaved 2 of 5 must be installed. This message will
always appear when "Use Bar Code" is checked. If you have already installed the font ignore this
note.
11. Click Save/Set to use
12. Click OK
13. Click OK
SET WINJEWEL TAG LAYOUT
1. Click on the little "P" below the red "Help" diamond again.
2. Click on "Choose"
3. Click on Tag Layout
4. Make sure "This Computer Only" is checked and "Use 3 lines or Use 4 lines" is identical to what
you selected in Tag Align.
5. You can use this page to select what you want on each line of the tag. There is no code for barcode
because barcode is not selected on this screen.
6. The example on this screen shows that 99k on line 1 of the 1st side will print the value of Karat
and the small case letter ‘k’ for the item being printed. If the item does not have a value in this
field in inventory, this line will be blank.
7. Click on Save Change to close this window.
Make sure "This Computer
Only" is checked and "Use 3
lines or Use 4 lines" is identical
to what you selected in Tag
Align.
You can use this page to select
what you want on each line of
the tag. There is no code for
barcode because barcode is not
selected on this screen
The example on this screen
shows that 99k line 1 on the 1st
side will print the value of Karat
for the item being printed. If the
item does not have a value in
this field in inventory, this line
will be blank.
18.6 OTHER TAG PRINTERS
Install the software supplied by your tag printer. The setup may be slightly different but follows a similar
process as the ZEBRA/ELTRON 2844. Refer to SET UP THE SEAGULL DRIVER PRINTER
SETTINGS FOR YOUR ZEBRA PRINTER for generalized instructions. Contact WinJewel support for
further assistance.
Appendix A: Network Drives
How to connect and disconnect a network drive in Windows XP
Article ID : 308582 Microsoft Support
Last Review : June 7, 2004
Revision
: 2.0
This article was previously published under Q308582
INTRODUCTION
To connect and disconnect a network drive in Microsoft Windows XP, you can use one of the three
methods that are described in this article. You can map a drive letter to any shared resource on a network.
For each mapped drive, an icon appears in My Computer and a listing appears in the left pane of Windows
Explorer.
SET THE SERVER TO SHARE
The computer that will be used as the server (where the WinJewel data is stored) must be set to share so
the clients (the other computers) can access it. On the server computer go to My Computer and right click
on the C:\ drive. Click on “Sharing and Security”. Put a check mark in “Share this folder on the network”
and Allow network user to change my files”. If not already there, make the share name “C”. Click “OK”.
Connect the clients to the Server: Connect a drive from My Computer or Windows Explorer
The following steps need to be done on each client computer.
1. To connect a drive from My Computer, click Start, right-click My Computer, and then click
Explore.
To connect a drive from Windows Explorer, right-click Start, and then click Explore.
2. On the Tools menu, click Map Network Drive.
3. In the Drive box, click a drive letter.
In the Folder box, type the UNC path for the server and shared resource in the following format:
4.
\\server name\share name. You can also click Browse to find the computer and shared resource.
You can map shared drives and shared folders. When you access a shared drive or folder you can also
access subfolders if you have the appropriate permissions. However, you cannot map a drive for a
subfolder that is not explicitly configured as a shared resource.
If network drives are not available from My Computer: Connect a drive from My Network Places
Click Start, click My Network Places, click Entire Network, and then double-click Microsoft
1.
Windows Network.
2. Double-click the domain that you want to open.
Double-click the computer that has the shared resource you want to map. All the shared resources for
3.
that computer automatically appear in the window.
4. Right-click the shared drive or folder that you want to map, and then click Map Network Drive.
Click the drive letter that you want to use, and then specify whether you want to reconnect every time
that you log on to your computer.
5.
Note Network drives are mapped by using letters starting from the letter Z. This is the default drive
letter for the first mapped drive you create. However, you can select another letter if you want to use a
letter other than Z.
Click Finish.
6.
A windows opens that displays the contents of the resource you mapped.
Included for general information only: Disconnect from a mapped network drive
1. Click Start, and then click My Computer.
2. Right-click the icon for the mapped drive.
3. Click Disconnect.
Note When you disconnect from a mapped drive, you remove the mapped drive letter that you
assigned to the shared resource. You can still access the resource from My Network Places.
APPLIES TO
• Microsoft Windows XP Professional Edition
• Microsoft Windows XP Home Edition
Appendix B: Terminal Services
1. Set the WAN flag to true in WinJewel.
a. SYSTEM SETTINGS
b. SET YES OR NO TO RUNNING IN WAN MODE.
i. Answer “YES”.
2. Copy the license files from the server to the local WinJewel folders of all client workstations not
using terminal services.
3. Create a unique folder on the server for each person that will log into the server remotely using
Terminal Services.
a. Copy WinJewel.exe from the server to the unique folder.
b. Copy license files from the server to the unique folder.
4. Define sales slip ranges
a. Main Store ___________________________
b. Branch ______________________________
5. Set up sales slip numbers.
a. Set sales slip number to load locally on the clients using Remote Desktop.
i. SYSTEM SETTINGS
1. SET SALES SLIP NUMBER TO BE LOADED FROM DRIVE C:
2. Starting Slip __________________
b. Set the sales slip rangers for each branch store
i. SYSTEM SETTINGS
1. SET THE SALES SLIP NUMBER RANGE FOR EACH BRANCH.
2. Starting Slip __________________
Appendix C: QUICKLISTS
Photo copy and use these lists for reference aides at your computer terminal.
SALES: Regular SALE WITH STOCK NUMBER:
1. Enter the customer information.
2. Select a salesperson.
3. Enter the item stock number.
4. Select the payment type.
5. Click on End Line (Tax or No Tax).
6. Repeat step 3 - 5 for more items.
7. Click on End Slip.
8. Confirm payment options.
9. Slip prints.
SALES: Regular SALE WITH NO STOCK NUMBER:
1. Enter the customer information.
2. Select a salesperson.
3. Leave stock number boxes blank.
4. Enter the item description, price and department.
5. Select the payment type.
6. Click on End Line (Tax or No Tax).
7. Click on End Slip.
8. Confirm payment options.
9. Slip prints.
SALES: Regular SALE - AUTO ASSIGN a stock number:
1. Enter the customer information.
2. Select a salesperson.
3. Double click in the first stock number box.
4. Select a supplier from the list.
5. Select the payment type.
6. Click on End Line (Tax or No Tax).
7. Click on End Slip.
8. Confirm payment options.
9. Slip prints.
10. Go to the INVENTORY screen.
11. Bring up the item number.
12. Enter the amount you paid for this item. If no amount is recorded in this field, various reports will
provide incorrect totals (such as gross profit).
SALES: Regular SALE WITH DISCOUNT
1. Enter customer information
2. Select salesperson
3. Enter stock number.
4. Select payment type.
5. Click on End Line (Tax or No Tax).
6. Click on DISCOUNT button.
7. Enter type and amount of discount.
8. Click POST.
9. Click on End Slip
SALES: Remove ONE ITEM from a sale in progress:
1. Click on the item to be removed from the sales slip. This pastes the item info in the fields above.
2. Delete the STOCK NUMBER, DESCRIPTION and PRICE fields.
3. Click on End Line (Tax or No Tax).
4. Answer YES to the message box; DO YOU REALLY WANT THIS ITEM TO BE FOR NO PRICE.
5. This item is now removed. Continue entering items or end slip.
SALES: VOID or PARK an unfinished slip:
1. If no items have been posted click on END SLIP or click the blue “X” below the red help diamond.
2. If items have been posted click the blue “X” below the red help diamond.
a. To void the slip click the VOID button.
b. To park the slip click the PARK button. This slip will be saved on this computer only.
SALES: REVERSE a SALES slip
1. Enter the customer information.
2. Select a Salesperson.
3. Click on the PREVIOUS button near the bottom of the screen.
4. Click on the slip to be reversed and click on REVERSE.
a. Click on the ADJ DATE button to change the recorded date of the reversal.
b. Click on the REVERSE button to reverse the slip on current date.
SALES: ERASE a SALES slip.
1. Enter the customer information.
2. Select a Salesperson.
3. Click on the PREVIOUS button near the bottom of the screen.
4. Adjust the date if required or desired.
5. With the right mouse button, click on the slip to be erased.
6. Enter your code (you must have permission in STAFF).
7. With the left mouse button, click on the slip to be erased.
8. It is now erased.
SALES: RETURN an item.
1. Enter customer information.
2. Select a salesperson.
3. Enter the item stock number.
4. Click on RETURN when the message box appears.
5. If refunding the total to the customer click on CASH, CHECK, BANKCARD payment types
6. If giving a store credit instead of a refund click on CHARGE.
7. Click on End Line (Tax or No Tax).
8. Click on End Slip
SALES: REVERSING a sales slip that included payment with a GIFT CERTIFICATE:
1. Gift Certificates can not be refunded (their value can not be increased).
2. After reversing the slip;
a. Method 1; issue a new gift certificate for the amount refunded.
b. Method 2; erase the entire gift certificate and issue a new gift certificate for the entire amount.
i. To erase click on REPORTS: SALES REPORTS: GIFT CERTIFICATES.
SALES: SELL A GIFT CERTIFICATE (must have a Department marked for Gift Certificates)
1. Enter customer information.
2. Select a salesperson.
3. Enter description “GIFT CERTIFICATE”
4. Enter amount of gift certificate.
5. Select department GIFT CERTIFICATE”
6. Select payment type.
7. Click on End Line No Tax.
8. Enter TO/FROM/MESSAGE information.
9. Click on INCREMENT for next available number or enter a number.
10. Click on note to change / enter the general note at bottom of gift certificate.
11. Click on PRINT/POST.
12. Gift certificate prints at same time as receipt.
SALES: USE A GIFT CERTIFICATE
1. Enter customer information.
2. Select a salesperson
3. Enter stock number of item to be sold.
4. Select payment type.
5. Click on End Line (Tax or No Tax).
6. Enter description “USE GIFT CERTIFICATE”.
7. Enter amount as a negative number (-50).
8. Select department GIFT CERTIFICATE.
9. Click on End Line No Tax.
10. Click OK if no changes.
11. Click on End slip.
SALES: START A LAYAWAY:
1. Enter the customer information.
2. Select a salesperson.
3. Enter the item information.
4. Select the layaway payment type.
5. Select START LAYAWAY.
6. Click on End Line (Tax or No Tax).
7. Select the PAYMENT payment type.
8. Select LAYAWAY PAYMENT.
9. Select PAY ON.
10. Enter the amount of the initial payment.
11. Click on End Slip.
12. Confirm payment options.
13. Slip prints.
SALES: PAYING ON A LAYAWAY:
1. Enter the customer information.
2. Select a salesperson.
3. Select the PAYMENT payment type.
4. Select LAYAWAY PAYMENT.
5. Select PAY ON.
6. Enter the amount of the payment.
7. Click on End Slip.
8. Confirm payment options.
9. Slip prints.
SALES: PAYING OFF A LAYAWAY:
1. Enter the customer information.
2. Select a salesperson.
3. Select the PAYMENT payment type.
4. Select LAYAWAY PAYMENT.
5. Select PAY OFF.
6. End the Slip.
7. Confirm payment options.
8. Slip prints.
SALES: REFUND a STORE CREDIT.
1. Enter customer information.
2. Select a salesperson.
3. Select PAYMENT payment option.
4. Click on REGULAR PAYMENT.
5. Enter amount as a negative number (-100).
6. Change the description field to REFUND STORE CREDIT.
7. Click on End Line (No Tax).
8. Click on End Slip.
SALES: CHARGE a SALE (store charge NOT a credit card)
1. Enter customer information.
2. Select a salesperson.
3. Enter stock number.
4. Select CHARGE payment type.
5. Click on End Line (Tax or No Tax).
6. Click on PAYMENT payment type.
7. Click on DOWN PAYMENT.
8. Enter amount of down payment.
9. Click on End Line No Tax.
10. Click on End Slip.
SALES: PAYMENT to a store CHARGE
1. Enter customer information.
2. Select a salesperson
3. Click on PAYMENT.
4. Click on REGULAR PAYMENT.
5. Enter amount of payment.
6. Click on End Line No Tax.
7. Click on End Slip.
SALES: ENVELOPE sale BY ENVELOPE NUMBER:
1. Type the letter ‘E’ in the first phone box, press “Enter” on the keyboard.
2. Type in the rest of the Envelope number in the second stock number field.
(Alternatively you can scan the barcode on the envelope)
3. Select the payment type.
4.
5.
6.
7.
Click on End Line (Tax or No Tax).
Click on End Slip.
Confirm payment options.
Slip prints
SALES: ENVELOPE sale BY CUSTOMER NAME:
1. Enter the customer information.
2. Select a salesperson.
3. Click on the REPAIR button at the bottom of the screen.
4. Select the repair envelope.
5. Select the payment type.
6. Click on End Line (Tax or No Tax).
7. Click on End Slip.
8. Confirm payment options.
9. Slip prints.
SALES: ENVELOPE from SERVICE Screen:
1. When the envelope is on the SERVICE screen then click to the ENVELOPE NUMBER box.
2. You will be taken to the sales screen and the envelope will be filled in on that screen.
3. Select the payment type.
4. Click on End Line (Tax or No Tax).
5. Click on End Slip.
6. Confirm payment options.
7. Slip prints.
1.
SALES: SEND OUT a MEMO item (Memo option must be turned on in SYSTEM SETTINGS):
1. Enter customer information.
2. Select a sales person.
3. Click on MEMO payment type.
4. Double click in memo number box.
5. Enter date due and item information.
6. Click on PRINT.
7. Click on Save/Exit.
SALES: RETURN AN ITEM OUT ON MEMO:
1. Enter customer information.
2. Select a sales person.
3. Click on MEMO payment type.
4. Select the memo number from list (upper right corner).
5. Click on ERASE ENTIRE MEMO or REMOVE ONE ITEM.
6. Click Save/Exit.
SALES: TAKE IN a CONSIGNMENT (If this option has been turned on in SYSTEM SETTINGS)
1. Enter the suppliers name and address information in the customer fields.
2. Select a SALESPERSON.
3. Click on the CONSIGN payment option. The next available stock number for the consignment
supplier (identified in SYSTEM SETTINGS) is created.
4. Enter a description of the item.
5. Enter an amount in the PRICE field. This is the amount you will buy this item for if it sells. The
description and amount will be copied to the cost field on the INVENTORY screen.
6. Click on END LINE NO TAX.
7. An invoice of the consignment will printed at this time.
8. Go to the INVENTORY screen.
9. Bring up the item number.
10. Enter the amount you will sell this item for. If a RETAIL price is not determined until the point of
sale, enter the amount after the item is sold. If no amount is recorded in this field, various reports
will provide incorrect totals (such as gross profit).
11. Print a tag.
INVENTORY: ENTER Inventory:
1. Go to the INVENTORY screen.
2. Click on ENT INV.
3. Enter Invoice Number.
4. Enter Invoice Date.
5. Choose a Supplier or click on NEW SUPPLIER button to add a new supplier at this time.
6. Optionally, enter the MERCHANDISE TOTAL for this invoice.
7. Click ENTER INVENTORY.
8. Enter DESCRIPTION, DEPARTMENT, COST, RETAIL. Other fields are optional.
9. When finished entering information for one item then click SAVE ITEM.
10. To enter the next item click NEXT.
a. If you want to repeat a similar item then click REPEAT.
b. If you want to add more of exactly the same item then click QUANTITY.
c. If you are finished with entering for this invoice then click END. You will be prompted to print the
invoice. You will then be prompted to add the invoice to Accounts Payable.
INVENTORY: TAKE Full Inventory:
1. Go to the INVENTORY screen.
2. Click on TAKE INVENTORY.
3. Choose FULL INV.
4. Set a code to represent this taking of inventory.
5. Enter stock numbers by keyboard or scanner.
6. Click STOP TAKING INVENTORY.
7. Click on REPORTS
8. Click on AFTER TAKING INVENTORY LONG REPORT.
9. Click on AFTER TAKING INVENTORY SHORT REPORT.
INVENTORY: TAKE One Case, Department or Supplier:
1. Go to the INVENTORY screen.
2. Click on TAKE INVENTORY.
3. Choose desired type.
4. You will be taken to the QUICK INVENTORY screen.
5. The items that should be in this criteria will be displayed.
6. Enter the item numbers or scan the barcodes. Each item will turn green.
7. Any item that is scanned that it not marked in this criteria will be added in red.
8. When you are done scanning all items, All items should be green with no red and no black.
INVENTORY: FIND/PRINT Inventory:
1. Click on FIND BY button.
2. Enter search criteria.
3. Click on END FIND BY button.
4. Click on Click this line to print this list.
5. Click on LIST.
6. Click on NEW.
7. Select fields to print.
8. Click “Print” in lower right hand corner.
9. Click END.
INVENTORY: Add an IMAGE to an item:
1. Bring up Inventory Item.
2. Click on IMAGE button.
3. Click on BROWSE button.
4. Select the image saved from your camera/scanner.
5. Select the view letter for this image (A – F). (If no letter is clicked the A choice will be used)
6. Click OK.
DEPARTMENTS: Add a NEW DEPARTMENT:
1. Click on REPORTS.
2. Click on DEPARTMENTS.
3. Click on SEE/CHANGE.
4. Click on CLICK THIS LINE TO ADD NEW DEPARTMENT.
5. Enter the new department name.
6. Enter any other customization details for the new department.
7. Click on SAVE EXIT.
CUSTOMERS: Find a customer from customer screen.
1. Click on CUST screen.
2. Enter the first few letters of the customer’s last name in the phone field.
3. Press the ENTER, or TAB key on the keyboard.
4. Select the customer’s name from the list.
5. Click the SAVE CUST button.
CUSTOMERS: Find a customer’s balance from SALES screen.
1. Click on SALES screen.
2. Enter the first few letters of the customer’s last name in the phone field.
3. Press the ENTER, or TAB key on the keyboard.
4. Select the customer’s name from the list.
5. If the customer has a balance the balance will show between the NAME and first STEET
ADDRESS.
MAILING LABELS for customers that have purchased over a designated amount in a time period.
1. If first time with new labels click on REPORTS: MAILING LABELS.
2. Click on SET SPACING ON LABELS.
3. Use drop down menu to select pre-defined Avery label formats.
4. Click Save/Exit
5. Click on REPORTS: CUSTOMER REPORTS
6. Click on CUSTOMERS THAT HAVE PURCHASED OVER DESIGNATED AMOUNT IN A PERIOD. This
creates a find by list.
7. Click on REPORTS: MAILING LABELS
8. Click on LABELS BY FIND BY LIST
9. Select Print or File.
MAILING LABELS : SEE a list of customers before printing MAILING LABELS.
1. Customer Screen
2. Click on the Find By button.
3. Enter search criteria. For designated amount click on “Click here to find by profile”.
4. Click on the End Find By button.
5. The top of the list shows the quantity of results.
6. Click on REPORTS: MAILING LABELS
7. Click on LABELS BY FIND BY LIST
8. Select Print or File.
Appendix D: Firewalls
How Do I Turn on the Firewall in Windows XP?
WinJewel strongly recommends that you have a firewall installed and working on your computer.
Windows XP comes with it’s own firewall. You do not need to purchase an additional firewall, but if you
do, you should turn the Windows firewall off. If you're using Windows XP SP2, the firewall is typically
turned on by default. (Some computer manufacturers and network administrators might choose to turn it
off.) You can confirm its status by opening Windows Security Center:
1. Click Start, click Control Panel, and then click Security Center.
2. If the firewall is turned off, click Recommendations.
3. Click Enable Now in the window that recommends you turn on the firewall. A second window will
open confirming that the firewall is now active.
If you're still using the original or SP1 releases of Windows XP, WinJewel strongly suggests that you
upgrade to Windows XP SP2, which includes a variety of important security enhancements in addition to
firewall protection. In the meantime, you'll want to turn on the firewall even before you upgrade in order
to protect your computer until SP2 has been successfully installed. The firewall can be accessed in
Network connections. Right click on the Internet LAN connection, left click on Properties, then left click
on the Advanced tab.
Note that earlier versions of Windows, such as Windows 2000 and Windows 98, did not include a built-in
firewall. If you have a computer running one of these operating systems, you should add a third-party
firewall. A third-party firewall can either be a software program you install or a device such as a
broadband router or wireless access point with a built-in firewall.
INDEX
Accounts Payable......................................................................................................................................................................143
Add One Button.....................................................................................................................................................................24, 90
Agreed Payment................................................................................................................................................................106, 126
Annual Maintenance Fee.....................................................................................................................................................27, 159
Appendix A.............................................................................................................................................................8, 17, 197, 207
Appendix D XE ........................................................................................................................................................................207
Appointment Scheduler.............................................................................................................................................................152
Appraisals......................................................................................................................................................95, 97, 118, 119, 120
Add a Stone....................................................................................................................................................................................118, 119, 120
Do Appraisals.................................................................................................................................................................................................118
Doing a Diamond Grading Report.................................................................................................................................................................120
Doing a Quick Appraisal................................................................................................................................................................................119
Form...............................................................................................................................................................................................................119
Background Color.......................................................................................................................................................................14
Backup.........................................................................................................................34, 154, 155, 156, 157, 158, 159, 160, 161
Barcode............................................................................................................................................................................................
Font.................................................................................................................................................................................................................175
Scanner...........................................................................................................................................................................................................176
Behind..........................................................................................................................................................................96, 102, 104
Calculator....................................................................................................................................................................14, 118, 132
Calculator........................................................................................................................................................................................
Definition..........................................................................................................................................................................................................14
Cameras and Scanners.................................................................................................................................................................79
Carat..........................................................................................................................................................................................119
Cash Drawer................................................................................................................................................................................64
Catalogs.......................................................................................................................................................................................82
Center Stone............................................................................................................................................................71, 78, 82, 118
Change Labels.....................................................................................................................................................................98, 160
Characteristics...............................................................................................................................................13, 99, 118, 120, 121
Check Number...................................................................................................................................................................134, 139
Checkbooks...............................................................................................................................................................................140
Cash Drawer.........................................................................................................................................................................................................
Balance...........................................................................................................................................................................................................................142
Check Number..................................................................................................................................................................................32, 139, 141
Deposits..........................................................................................................................................................................................................140
Invoices................................................................................................................................................................................................................
Split Pay.........................................................................................................................................................................................................................141
Issuing a Check..............................................................................................................................................................................................139
Paying and Entering Invoices Simultaneously...............................................................................................................................................139
Paying Invoices..............................................................................................................................................................................................139
Quick Check...................................................................................................................................................................................................141
Clarity..................................................................................................................................................................................71, 119
Clear Pencil...............................................................................................................................................................................121
Code.................................................................................................................................................................24, 66, 91, 105, 108
Color....................................................................................................................................................................8, 71, 72, 84, 119
Combining.......................................................................................................................................................................................
Layaways..........................................................................................................................................................................................................43
Consignment................................................................................................................................................................................88
Credit Limit...............................................................................................................................................................................126
Currency............................................................................................................................................................................132, 142
Customers.......1, 27, 29, 37, 43, 63, 65, 66, 93, 95, 96, 97, 98, 99, 102, 103, 104, 105, 107, 109, 110, 118, 124, 125, 126, 128,
150, 162, 163, 167, 206, 207
Customers........................................................................................................................................................................................
Agreed Payment...................................................................................................................................................34, 46, 96, 103, 104, 105, 106
Analyze Credit..................................................................................................................................................................................................99
Building a Customers Database.......................................................................................................................................................................95
City Name Shortcuts......................................................................................................................................................................................108
Create, Edit Or Erase a Form Letter...............................................................................................................................................................106
Credit Limit..............................................................................................................................................................................................96, 106
Customers Profile Option.................................................................................................................................................................................98
Detailed Profile.................................................................................................................................................................................................99
Dialing Automatically....................................................................................................................................................................................107
Find By.............................................................................................................................................................................................................99
Find By For Customers....................................................................................................................................................................................99
Mark a Customer as Wholesale......................................................................................................................................................................107
New........................................................................................................................................................................................29, 30, 96, 98, 114
No Checks........................................................................................................................................................................................................98
No Mailings......................................................................................................................................................................................................98
No Statements...................................................................................................................................................................................................98
Notes at Point of Sale.......................................................................................................................................................................................33
Number.............................................................................................................................................................................................................33
Pictures of.......................................................................................................................................................................................................108
Profile...............................................................................................................................................................................................................98
Removing Interest Charges from an Account................................................................................................................................................104
See Notes..............................................................................................................................................................................................33, 77, 97
See Slips...........................................................................................................................................................................................................97
Send Letter.............................................................................................................................................................................................105, 137
Sending Customer Letters..............................................................................................................................................................................105
Special Options for Past Due Customers.......................................................................................................................................................104
Statements......................................................................................................................................................................................................102
Logo...............................................................................................................................................................................................................................103
Minimum payment.........................................................................................................................................................................................................103
Number of Days.............................................................................................................................................................................................................103
The Customer Followup Feature....................................................................................................................................................................106
Total Purchases.................................................................................................................................................................................99, 100, 101
Wish List, Gift or Bridal Registry..................................................................................................................................................................108
Cut.........................................................................................................................................................................10, 71, 119, 160
Date Sold.......................................................................................................................................................13, 43, 72, 73, 75, 89
Deleting...........................................................................................................................................................................................
Training Program.............................................................................................................................................................................................26
Departments...........................................................21, 31, 62, 65, 70, 72, 89, 90, 92, 93, 109, 114, 116, 133, 134, 145, 205, 206
Diagrams............................................................................................................................................................................120, 121
Diamond..........................................................................................................................................................................................
Grading Report.......................................................................................................................................................................................120, 121
Grading Report.....................................................................................................................................................................................................
Reload Old Report..................................................................................................................................................................................................120, 121
Discounts.....................................................................................................................................................................................41
Draw..........................................................................................................................................................................................121
E-Mail..........................................................................................................................................................................................97
Empty..........................................................................................................................................................................................13
End Line No Tax...................................................................................................................................31, 40, 41, 42, 62, 89, 205
End Line Tax.........................................................................................................................................................................48, 52
End Slip.....................................................................................................................................10, 29, 31, 33, 40, 41, 42, 64, 201
End Stone...................................................................................................................................................................................119
End This Item............................................................................................................................................................................119
Erase....................................................................................................................9, 35, 36, 51, 62, 63, 84, 90, 121, 126, 164, 201
Erasing.............................................................................................................................................................................................
Code................................................................................................................................................................................................................126
Customers.......................................................................................................................................................................................................107
Departments......................................................................................................................................................................................................23
Sales Slips.............................................................................................................................................................................................35, 36, 51
Exchange Rate...........................................................................................................................................................................132
Exchange Rates.........................................................................................................................................................................132
File Formats...............................................................................................................................................................................165
File Formats.....................................................................................................................................................................................
Converting to Access format..........................................................................................................................................................................165
Find By............................12, 13, 30, 37, 43, 69, 75, 76, 77, 82, 89, 91, 93, 96, 99, 100, 101, 102, 137, 138, 151, 205, 206, 207
Find By............................................................................................................................................................................................
Definition....................................................................................................................................................................................................12, 99
Firewall......................................................................................................................................................................................207
Followup Notices.......................................................................................................................................................................106
Font....................................................................................................................................................................................119, 149
Format........................................................................................................................................................................105, 119, 165
General Ledger............................................................................................................................24, 134, 135, 141, 142, 143, 144
General Ledger and Budgeting..................................................................................................................................................143
Accounting...................................................................................................................................................................................24, 31, 62, 143
Accounts Payable...................................................................................................................................................................................133, 143
Amount In......................................................................................................................................................................................105, 144, 206
Assets..............................................................................................................................................................................................................144
Balance Sheet.................................................................................................................................................................................................144
Budget Year....................................................................................................................................................................................................145
Budgeting.......................................................................................................................................................................................................144
Capital............................................................................................................................................................................................................144
Cash Flow Analysis........................................................................................................................................................................................144
Compute Cash Flow.......................................................................................................................................................................................144
Depreciations..................................................................................................................................................................................................144
Exclude...........................................................................................................................................................................................................144
Liabilities........................................................................................................................................................................................................144
Month End Reports........................................................................................................................................................................................143
Accounts Payable...........................................................................................................................................................................................................143
Accounts Receivable......................................................................................................................................................................................................143
Checkbook.....................................................................................................................................................................................................................143
Monthly Balance Sheet...........................................................................................................................................................................................143, 144
Monthly Purchases.........................................................................................................................................................................................................143
Sales......................................................................................................................................................31, 32, 34, 36, 37, 54, 63, 65, 66, 67, 89, 143, 201
Preparig Budgets............................................................................................................................................................................................145
Regular Monthly Items...................................................................................................................................................................................144
Set Up.............................................................................................................................................................................................................143
Gift...........................................................................................................................................................23, 46, 62, 108, 201, 202
Gift...................................................................................................................................................................................................
Registry..........................................................................................................................................................................................................108
Girdle.........................................................................................................................................................................................119
Grams....................................................................................................................................................................................72, 94
Graph.........................................................................................................................................................................................144
Hardware, Windows and WinJewel Overview...............................................................................................................................
Cancel Button...................................................................................................................................................................................................12
Help..................................................................................................................................................................................................................12
Requirements......................................................................................................................................................................................................8
Windows.............................................................................................................................................................................................................9
Help.................................................................................................................................................................................................
Contact..................................................................................................................................................................................................................
Hours................................................................................................................................................................................................................................27
How Do I....................................................................................................................................................................................................12, 27
Income Statement......................................................................................................................................................................143
Initial WinJewel Setup................................................................................................................................................................15
Instructions........................................................................................................................................................................114, 116
Interest.......................................................................................................................................................................................103
Never................................................................................................................................................................................................................98
No Charge.........................................................................................................................................................................................96, 102, 103
Interleaved 2 of 5.......................................................................................................................................................................176
Inventory...13, 24, 43, 66, 69, 71, 72, 74, 75, 77, 78, 79, 82, 83, 88, 89, 90, 91, 92, 93, 125, 137, 138, 143, 149, 164, 200, 204,
205, 206
Inventory..........................................................................................................................................................................................
Adjusting the Prices of Inventory Items...........................................................................................................................................................93
Age.......................................................................................................................................................................................................90, 93, 99
Also See Printing Price Tags............................................................................................................................................................................89
Catalogs............................................................................................................................................................................................................82
Combining Inventory Items.............................................................................................................................................................................77
Consignment/Memo Items.........................................................................................................................................................................71, 88
Cost Code.........................................................................................................................................................................................................90
Deleting Inventory............................................................................................................................................................................................77
Finding an Inventory Item....................................................................................................................................................................69, 75, 93
Invoice..................................................................................................................................................................................................................
New..................................................................................................................................................................................................................................88
Map.......................................................................................................................................................................................................73, 82, 92
Multi-Unit Items.........................................................................................................................................................................................78, 93
Multiple Items From One Supplier............................................................................................................................................................70, 73
New............................................................................................................................................................................................................69, 73
Notes.................................................................................................................................................................................................................77
Reports...............................................................................................................................69, 72, 74, 77, 78, 82, 90, 91, 92, 93, 143, 149, 164
Second Cost and Retail Price Option...............................................................................................................................................................94
SEE FROM ORDERS..............................................................................................................................................................................74, 111
Special Information on Price Tags...................................................................................................................................................................90
Supplier/Stock Number....................................................................................................................................................................................71
Taking Inventory..........................................................................................................................................................................71, 91, 92, 205
Using Old Tag Numbers...................................................................................................................................................................................93
Viewing Inventory Items..................................................................................................................................................................................75
Deleting.....................................................................................................................................................................................................70, 77
3.Invoice................................................................................................................................................................74, 88, 141, 205
Number...........................................................................................................................................................................................................205
Invoices................................................................................................................................................................13, 133, 134, 137
Automatic Bill Reminders..............................................................................................................................................................................134
Checks....................................................................................................................................................................................................135, 140
Creating Invoices............................................................................................................................................................................................133
Date Due...................................................................................................................................................................................74, 114, 116, 133
Discount......................................................................................................................................................................................42, 74, 134, 200
Due Report.....................................................................................................................................................................................................133
Editing Invoices..............................................................................................................................................................................................135
From One Supplier to Another.......................................................................................................................................................................135
Invoice Number................................................................................................................................................................70, 71, 72, 78, 93, 133
Old..................................................................................................................................................................................................................135
Petty Cash...............................................................................................................................................................................................134, 141
Reports....................................................................................................................................................................................................134, 135
Reports..................................................................................................................................................................................................................
Invoices by Supplier Report...........................................................................................................................................................................................134
Invoices Due Report.......................................................................................................................................................................................................134
Invoices for a Supplier in a Time Period........................................................................................................................................................................134
Invoices Paid in a Time Period.......................................................................................................................................................................................134
List of Open Invoices.....................................................................................................................................................................................................134
Save Invoice...................................................................................................................................................................................................134
Set Checks..............................................................................................................................................................................................135, 140
Shipping Costs..........................................................................................................................................................................................70, 134
Special Projects..............................................................................................................................................................................................135
Layaways.................................................................................41, 43, 44, 45, 46, 47, 48, 51, 52, 53, 54, 56, 58, 76, 97, 102, 103
Alternate Reporting Method.......................................................................................................................................................................43, 53
Do Not Post Interest to Layaways..................................................................................................................................................................103
Minimum Payment...........................................................................................................................................................................................53
Note on Sales Slip............................................................................................................................................................................................53
Old....................................................................................................................................................................................................................53
Reporting Date.................................................................................................................................................................................................53
Start a Layaway..............................................................................................................................................................................................202
Letter................................................................................................................................................................................................
Appraisal........................................................................................................................................................................................................119
Main Store.........................................................................................................................................................................163, 199
Maintenance and Backup..........................................................................................................................................................154
Backing up Data.............................................................................................................................................................................................154
Screen...................................................................................................................................................................................................................
Custom Layout...............................................................................................................................................................................................................160
Custom Layout:Icons:....................................................................................................................................................................................................160
Custom Layout:Labels...................................................................................................................................................................................................160
Sort.................................................................................................................................................................................................................159
Special WinJewel Settings.............................................................................................................................................................................161
IP Address......................................................................................................................................................................................................................161
License....................................................................................................................................................................................15, 16, 17, 33, 160, 161, 199
Manual from Web..........................................................................................................................................................................................................161
NetMeeting.....................................................................................................................................................................................................................162
Observatory Time...........................................................................................................................................................................................................161
Printer Settings..................................................................................13, 25, 33, 96, 115, 135, 140, 146, 147, 148, 149, 150, 152, 161, 179, 182, 189, 196
Show Hint......................................................................................................................................................................................................................161
System Analysis...............................................................................................................................................................................................15, 160, 161
System Settings.....8, 13, 14, 25, 26, 29, 33, 42, 43, 53, 63, 64, 65, 66, 67, 71, 82, 89, 90, 91, 93, 94, 96, 98, 99, 106, 108, 112, 129, 134, 139, 160, 161,
162, 163, 165, 199, 204
Update from Web...................................................................................................................................................................................................160, 161
WWW.WinJewel.com....................................................................................................................................................................................................161
Updates...........................................................................................................................................................................................................159
Map....................................................................................................................................8, 17, 73, 82, 83, 84, 92, 120, 121, 197
Print..................................................................................................................................................................................................................88
Store..........................................................................................................................................................................................................83, 197
Monthly Income Statements......................................................................................................................................................144
Months No interest....................................................................................................................................................................126
Multi User..................................................................................................................................................................................164
Multiple Stores..........................................................................................................................................................................163
File Transfers..................................................................................................................................................................................................163
Moving Inventory form one store to the other...............................................................................................................................................164
Set Up.............................................................................................................................................................................................................163
Slip, Envelope and Customer Numbers.........................................................................................................................................................163
Network...................................................................................8, 15, 17, 18, 21, 79, 107, 159, 160, 161, 164, 193, 197, 198, 207
Notes............................................46, 47, 62, 63, 65, 71, 77, 82, 97, 102, 103, 105, 125, 149, 150, 151, 163, 193, 197, 198, 207
Notes................................................................................................................................................................................................
New..................................................................................................................................................................................................................97
NumLock.....................................................................................................................................................................................29
Orders..........................................................................................................................................................74, 109, 110, 112, 126
Orders..............................................................................................................................................................................................
Entering Orders for Suppliers........................................................................................................................................................................109
MARK ITEM IN............................................................................................................................................................................................110
Past Due Reports............................................................................................................................................................................................112
Remove Old....................................................................................................................................................................................................110
Reports....................................................................................................................................................................................................110, 111
See All Orders................................................................................................................................................................................................110
Special Instructions........................................................................................................................................................................................109
Tracking..........................................................................................................................................................................................................110
Park/Unpark...................................................................................................................................................................67, 68, 201
Password....................................................................................................................................................................122, 127, 160
Petty Cash..........................................................................................................................................................................134, 141
Pictures............................................................................................................................................................................................
Inventory..........................................................................................................................................................................................................78
Pictures, Photos and Images............................................................................................................................79, 83, 84, 119, 200
Price Tags......................................................................................................................................89, 90, 150, 174, 191, 192, 194
Printers and Scanners......................................................................................................................................................................
Allegro..............................................................................................................................................................................................................89
Datamax....................................................................................................................................................................................................89, 175
Eltron................................................................................................................................................................89, 150, 175, 179, 180, 182, 183
Setup.................................................................................................................................................................................................90, 146, 174
Zebra/Eltron 2642 Printer...............................................................................................................................................................................179
Zebra/Eltron 2742 Printer...............................................................................................................................................................................181
Zebra/Eltron 2844 Printer...............................................................................................................................................................................183
Zebra................................................................................................................................................................................89, 150, 175, 185, 189
Printing............................................................................................................................................................................................
Barcodes.............................................................................................................................................90, 91, 115, 150, 151, 174, 175, 176, 194
Correspondence....................................................................................................................................................................................................
Names and Address:Upper Case/Lower Case................................................................................................................................................................148
Logo Size........................................................................................................................................................................................................147
Mailing Labels........................................................................................................................................................................................151, 152
Avery Label Settings......................................................................................................................................................................................................152
Non-Graphics Style Printer............................................................................................................................................................................146
Price Tags.............................................................................................................................................................................................................
Barcode..................................................................................................................................................................................................................180, 182
Dedicated Tag Printer..............................................................................................................8, 89, 90, 146, 147, 148, 150, 151, 174, 175, 192, 193, 196
Dumbbell....................................................................................................................................................................................90, 91, 149, 151, 180, 182
Non-Dedicated Tag Printer.............................................................................................................................................................................................149
Non-Dedicated Tag Printer:Alignment...........................................................................................................................................................................148
Non-Dedicated Tag Printer:Set Spacing.................................................................................................................................................................149, 150
Printer Set Up.................................................................................................................................................................................................146
Reports, Tags, Letters and Labels..................................................................................................................................................................146
Service Envelopes..........................................................................................................................................................................................152
Settings.................................................................................................................................................................................................................
Price Tags.......................................................................................................................................................................................................................148
Repair Slip:Landscape....................................................................................................................................................................................................148
Sales Slip:Landscape or Portrait.....................................................................................................................................................................................148
Sales Slip:Long or Short.................................................................................................................................................................................................148
Special Settings..............................................................................................................................................................................................148
Aligning Price Tags........................................................................................................................................................................................................148
Findby Reports:Font Size...............................................................................................................................................................................................148
Most Printed Reports:Font and Left Margin...................................................................................................................................................................148
Sales Slip and Repair Envelopes:Font Size....................................................................................................................................................................148
Statements:Font & Left Margin......................................................................................................................................................................................148
Checks :Extra Spaces before Supplier Name on............................................................................................................................................................148
Form Letters: Font & Layout of....................................................................................................................................................................................148
Repair Envelopes:Font Size..........................................................................................................................................................................................148
Turn Off Logo......................................................................................................................................................................................................
Appraisals......................................................................................................................................................................................................................147
Letters/Appraisals..........................................................................................................................................................................................................147
Repair Envelopes...........................................................................................................................................................................................................148
Sales Receipts................................................................................................................................................................................................................147
Windows Compatible.....................................................................................................................................................................................146
Your Store Logo.............................................................................................................................................................................................147
Printing Settings..............................................................................................................................................................................
Statements............................................................................................................................................................................................................
Alignment Options.........................................................................................................................................................................................................148
Profile........................................................................................................................................13, 33, 98, 99, 100, 107, 123, 207
Rent....................................................................................................................................................................................134, 144
Reorder Number........................................................................................................................................................71, 74, 90, 93
Reports.............................................................................................................................................................................................
Accounts Receivable............................................................................................................................................................................................
Post Interest to Accounts................................................................................................................................................................................102, 103, 104
Click This Line to Balance Balance Sheet.....................................................................................................................................................144
General Ledger and Bugeting...............................................................................................................................................................................
Journal Entries................................................................................................................................................................................................................144
Inventory..............................................................................................................................................................................................................
Full List of All Inventory...........................................................................................................................................................................................91, 92
Second Cost Price Option.................................................................................................................................................................................................94
Second Retail Price Option..............................................................................................................................................................................................94
Shortcuts.........................................................................................................................................................................................................108
Rip. Last......................................................................................................................................................................................74
Sales......9, 13, 22, 25, 28, 29, 30, 31, 32, 33, 34, 35, 36, 37, 41, 42, 53, 54, 62, 63, 64, 65, 66, 67, 82, 89, 93, 98, 99, 106, 108,
115, 125, 137, 143, 148, 163, 199, 200, 201, 202, 203, 204, 206
Sales.................................................................................................................................................................................................
Adding a Cash Drawer to the WinJewel Program...........................................................................................................................................64
Appraisals.......................................................................................................................................................................................................119
Automate the Discount Process..................................................................................................................................................................41, 42
Canadian Tax Rates..........................................................................................................................................................................................63
Cash Customer.................................................................................................................................................................................................63
Changing a Sales Slip.......................................................................................................................................................................................36
Commission Rate.............................................................................................................................................................................................22
Creating Memo Sales Items.............................................................................................................................................................................67
Deleting................................................................................................................................................................................................................
One Line..........................................................................................................................................................................................................................35
Deleting a Sales Slip You Are Working On....................................................................................................................................................35
Donation Sales Slips.........................................................................................................................................................................................67
Extended Service PlanS....................................................................................................................................................................................63
Finding an Old Sales Slip.................................................................................................................................................................................37
Gift Certificates..................................................................................................................................................................................62, 63, 201
Layaways..............................................................................................................................................................................................................
Writing and Bookkeeping................................................................................................................................................................................................43
Moving a Sales Slip..........................................................................................................................................................................................37
Parking a Sale...................................................................................................................................................................................................67
Reports..................................................................................................................................................................................................................
Daily...................................................................................................................................................................................................................34, 89, 140
Monthly............................................................................................................................................................................................................................34
Time Periods....................................................................................................................................................................................................................34
Time Periods by Department............................................................................................................................................................................................34
Reprinting a Sales Slip.....................................................................................................................................................................................34
Reversing / Erasing a Sales Slip.................................................................................................................................................................35, 37
See Change One Day..................................................................................................................................................................................35, 36
Slip...............................................................................................................................................25, 31, 37, 53, 65, 67, 82, 115, 125, 148, 199
Slip........................................................................................................................................................................................................................
How To Write a................................................................................................................................................................................................................28
Marketing Message....................................................................................................................................................................................................25, 65
Number............................................................................................................................................................................................................................31
Number of Copies............................................................................................................................................................................................................33
Number of Copies:Changing............................................................................................................................................................................................33
Printing.............................................................................................................................................................................................................................33
Special Message...............................................................................................................................................................................................................33
Special Orders..................................................................................................................................................................................................64
Special Sales Screen Options / Settings...........................................................................................................................................................65
Tracking Sales by Special Category.................................................................................................................................................................66
Using a Second Price on Sales Screen.............................................................................................................................................................66
Writing a Sales Slip for an Envelope...............................................................................................................................................................34
Writing a Sales Slip Return, Discount or Credit........................................................................................................................................35, 37
Writing Charge Account Contracts..................................................................................................................................................................66
Special Customers Information on Sales Screen.............................................................................................................................................33
Stock Number............................................................................................................................................................................................31, 71
Salesperson................................................................................................................................................30, 65, 89, 93, 114, 204
Scanners...........................................................................................................................................................................................
See Cameras and Scanners.....................................................................................................................................................................150, 174
Serial Number..............................................................................................................................................................................93
5.Service..............................................................................................................................................................64, 117, 125, 128
Envelopes...............................................................................................................................................................114, 115, 116, 125, 163, 203
Envelopes.............................................................................................................................................................................................................
Assigned To...................................................................................................................................................................................................................114
Barcode..........................................................................................................................................................................................................................115
Change Label....................................................................................................................................................................................................98, 116, 160
Condition........................................................................................................................................................................................................................115
Cost on Repairs..............................................................................................................................................................................................................126
Declared Value...............................................................................................................................................................................................................115
Default Number of Copies to Pring................................................................................................................................................................................115
Envelope Maintenance...................................................................................................................................................................................................117
Note on Envelope...........................................................................................................................................................................................................115
Number.............................................................................................................................................................................................................34, 114, 203
Recording the Condition of the Item..............................................................................................................................................................................115
Reports...........................................................................................................................................................................................................115, 116, 117
Reports: Build a List of Unused Envelope Numbers......................................................................................................................................................117
Reports:Above Number?................................................................................................................................................................................................117
Reports:By Envelope......................................................................................................................................................................................................117
Reports:By Worker........................................................................................................................................................................................................117
Reports:Change an Envelope from One Customer to Another.......................................................................................................................................117
Reports:Finished but not Paid.........................................................................................................................................................................................116
Reports:Not Picked Up...................................................................................................................................................................................................117
Reports:Paid but no Date Out.........................................................................................................................................................................................117
Reports:Past Due............................................................................................................................................................................................................116
Reports:Picked Up.........................................................................................................................................................................................................117
Reports:Reset Highest Envelope Number Used.............................................................................................................................................................117
Sales Slip........................................................................................................................................................................................................................115
See Old...........................................................................................................................................................................................................................117
Traicking Activity on Service Envelopes.......................................................................................................................................................................116
Preparing Service Envelopes..........................................................................................................................................................................114
Repair Envelopes..............................................................................................................................................................................................33
Shop List.................................................................................................................................................................................................114, 116
Setup................................................................................................................................................................................................
Departments......................................................................................................................................................................................................21
Average Cost as a % of Retail..........................................................................................................................................................................................22
Category.............................................................................................................................................................................................................22, 24, 143
Example...........................................................................................................................................................................................................................21
Gift Certificates................................................................................................................................................................................................................23
Normally Not Taxable................................................................................................................................................................................................22, 62
Open To Buy....................................................................................................................................................................................................................22
Sales Commission Rate....................................................................................................................................................................................................22
General Ledger Accounts.................................................................................................................................................................................24
Adding.............................................................................................................................................................................................................................24
Example...........................................................................................................................................................................................................................24
Modifying........................................................................................................................................................................................................................24
Installation........................................................................................................................................................................................................15
License File................................................................................................................................................................................................16, 21
Multi Users.......................................................................................................................................................................................................17
Store Logo........................................................................................................................................................................................................21
Suppliers.....................................................................................................................................................................................................23, 24
System and Printer Settings..................................................................................................................................................................25, 29, 31
System and Printer Settings..................................................................................................................................................................................
Printing.............................................................................................................................................................................................................................25
Shape...........................................................................................................................................................................................71
Side Stones..........................................................................................................................................................................71, 119
Sold Price...............................................................................................................................................................................72, 73
Sort Everything Now.................................................................................................................................................................159
Special Assistance.......................................................................................................................................................................27
Split Payments.............................................................................................................................................................................32
Staff & Timecards.....................................................................................................................................................................122
Change Password...........................................................................................................................................................................................125
Clock......................................................................................................................................................................................................128, 130
Clock....................................................................................................................................................................................................................
Password Protection.......................................................................................................................................................................................................129
Commission......................................................................................................................................................................................................30
Commission..........................................................................................................................................................................................................
Split..................................................................................................................................................................................................................................30
Coverage.........................................................................................................................................................................................................131
Employee Work Schedule..............................................................................................................................................................................130
Enter Staff.......................................................................................................................................................................................................122
Exchange Rates..............................................................................................................................................................................................132
Foreign Currency Rates..................................................................................................................................................................................132
Foriegn Currency Rates........................................................................................................................................................................................
Caustion.........................................................................................................................................................................................................................132
Pay Period.............................................................................................................................................................................................................
Closing & Correcting.....................................................................................................................................................................................................129
New................................................................................................................................................................................................................................129
Primary Currency...........................................................................................................................................................................................132
Punching In and Out using the Timecard Feature..........................................................................................................................................128
Remove Item..................................................................................................................................................................................................126
Screen Protection....................................................................................................................................................................................125, 128
Staff..........................................................................................................................24, 30, 36, 67, 77, 122, 125, 129, 130, 132, 161, 163, 170
Staff......................................................................................................................................................................................................................
Setup................................................................................................................................................................................................................................24
Sticky Notes...................................................................................................................................................................................................130
Timecards.......................................................................................................................................................................................125, 129, 130
Timecards.............................................................................................................................................................................................................
Adjusting for Breaks......................................................................................................................................................................................................130
Messages........................................................................................................................................................................................................................130
Previous Time Period.....................................................................................................................................................................................................129
See Schedule..................................................................................................................................................................................................130
Statements..................................................................................................................................................................102, 103, 106
Stock Number........................................................................................................................31, 70, 71, 74, 75, 90, 164, 200, 201
Stones..............................................................................................................................................71, 78, 99, 118, 119, 120, 121
Style Number.............................................................................................................................................................................109
Suppliers..................................................................................13, 23, 70, 71, 74, 75, 88, 89, 90, 92, 93, 109, 133, 136, 137, 138
Adjusting Prices.............................................................................................................................................................................................137
Buying Groups...............................................................................................................................................................................................137
Changing Stock Numbers...............................................................................................................................................................................138
Deleting..........................................................................................................................................................................................................136
Entering New Suppliers.................................................................................................................................................................................136
Letters and Labels..........................................................................................................................................................................................137
Reports..............................................................................................................................................................................................70, 137, 138
Tax...................................................................................................................................................................................................
Rate.............................................................................................................................................................................................................25, 29
Sales............................................................................................................................................................................................................25, 29
Taxable........................................................................................................................................................................................72
Training Program.............................................................................................................................................................................
Set up..................................................................................................................14, 25, 26, 35, 36, 39, 41, 43, 48, 52, 78, 83, 93, 96, 102, 161
Transfer....................................................................................................................................14, 74, 79, 117, 134, 162, 164, 172
Transfer to Note.........................................................................................................................................................................134
Unlock...............................................................................................................................................................122, 124, 128, 160
Unlock.............................................................................................................................................................................................
Records...........................................................................................................................................................................................................126
Update..............................................................................................................................................................................................
Replacing Program Files................................................................................................................................................................................172
Wholesale..........................................................................................................................................................66, 71, 94, 99, 107
WJInterleaved............................................................................................................................................................115, 175, 193