1
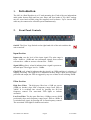
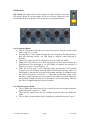
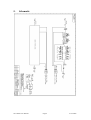
Neve 8803 Dual EQ User Manual 527 –370 Issue 1 !!!Please read – includes important safety instructions!!! © 2006 AMS Neve Ltd own the copyright of all information and drawings contained in this manual which are not to be copied or reproduced by any means or disclosed in part or whole to any third party without written permission. As part of our policy of continual product improvement, we reserve the right to alter specifications without notice but with due regard to all current legislation. Disclaimer: The information in this manual has been carefully checked and is believed to be accurate at the time of publication. However, no responsibility is taken by us for inaccuracies, errors or omissions nor any liability assumed for any loss or damage resulting either directly or indirectly from use of the information contained within it. Trademarks: All trademarks are the property of their respective owners and are hereby acknowledged. AMS NEVE LTD BILLINGTON ROAD • BURNLEY LANCS • BB11 5UB • ENGLAND PHONE +44 (0)1282 457011 FAX +44 (0)1282 417282 [email protected] www.ams-neve.com www.neve.eu Neve 8803 User Manual Page 1 21/11/2006 Safety Notice For your own safety and for the protection of others please observe the following safety instructions: • Read these instructions • Keep these instructions • Heed all safety warnings • Do not use near water • Clean only with a dry cloth • Do not install near heat sources • Do not block ventilation openings • Protect the power cord • Only use accessories specified by the manufacturer • Unplug during storms, or when unused for long periods • Refer all servicing to qualified personnel only Neve 8803 User Manual Page 2 21/11/2006 Index Health and Safety Notice...…………………………………………………………..2 Index…………………………………………………………………………………..3 1. Introduction…………………………………………………………………..4 2. Front Panel…………………………………………………………………...4 Power Switch Input Section Filter Section EQ Section 3. Rear Panel…………………………………………………………………….7 Audio Connections USB Connection Earthing Connections and Switch Fuse Power Connection 4. Specifications…………………………………………………………………8 Audio Measurements Dimensions Weight 5. Schematic…….……………………………………………………………….9 6. Recall Software……………………………………………………………..10 Neve 8803 User Manual Page 3 21/11/2006 1. Introduction The 8803 is a Dual Equaliser in a 1U rack mounting box. Each of the two independent audio paths features high and low pass filters and four bands of EQ. 8803 settings may be stored and recalled using the supplied recall software. Up to sixteen 8803 units may be connected to a Recall system simultaneously. 2. Front Panel Controls On/Off: The Neve Logo Switch on the right hand side of the unit switches the unit on and off. Input Section Input trim: sets the level of the input signal. The trim range is from –20dB to +20dB and can encompass signals from sources referenced to +4dBu or sources referenced to –10dBV. Signal LED (yellow): when lit indicates that a signal is present at the unit input. The trigger level is –30dBu. Clip LED (red): when lit indicates that the signal is at 25dBu and there is a danger of clipping occurring. The signal level is monitored at three stages: input pre-trim, input post-trim and output, the LED is triggered by any one of these levels reaching 25dBu. Filter Section High Pass Filter: The high pass filter has a 12dB per octave (20dB per decade) slope and a frequency range from 30Hz to 300Hz. It is switched into circuit by pressing the Hi Pass frequency control. The associated LED lights to indicate activation. Low Pass Filter: The low pass filter has a 12dB per octave (20dB per decade) slope and a frequency range from 1.5kHz to 18kHz. It is switched into circuit by pressing the Lo Passfrequency control. The associated LED lights to indicate activation. Neve 8803 User Manual Page 4 21/11/2006 EQ Section EQ Switch: The square EQ switch beneath the input LEDs activates the EQ section. When lit, all four bands of EQ are in circuit. When un-lit all four bands of EQ are bypassed. This switch does not bypass the filters. Low Frequency Band: • The LF Gain control sets the cut or boost for the low frequency band of EQ with a range of +/-18dB. • Pressing the LF Gain control switches the Low Frequency EQ band between Bell and Shelving modes. An LED lights to indicate when Shelving is selected. • The LF Hz control sets the low frequency between 33Hz and 440Hz. • When the LF EQ band is set to Bell, pressing the LF Hz control switches the band between Low and High Q. An LED lights to indicate the selection of High Q. Low Q is 0.7 and High Q is 1.8. • When the LF EQ band is set to Shelving mode, pressing the LF Hz control switches between Standard shelving mode and Resonant shelving mode. An LED lights to indicate the selection of Resonant shelving. In Standard mode the selected frequency will be the +/- 3dB point. In Resonant mode, when boosting a slight extra lift occurs in frequencies around the selected frequency, when cutting a slight extra dip occurs around the selected frequency. This has the effect of emphasising the selected frequency. Low Mid Frequency Band: • The Lo Mid Gain control sets the cut or boost for the low medium frequency band of EQ with a range of +/-18dB. • The LMF Hz control sets the low medium frequency between 120Hz and 2kHz. • The Lo Mid Q control adjusts the Q continuously variable between 0.3 and 7. Neve 8803 User Manual Page 5 21/11/2006 High Mid Frequency Band: • The Hi Mid Gain control sets the cut or boost for the high medium frequency band of EQ with a range of +/-18dB. • The HMF Hz control sets the high medium frequency between 800Hz and 9kHz. • The Hi Mid Q control adjusts the Q continuously variable between 0.3 and 7. High Frequency Band: • The HF Gain control sets the cut or boost for the low frequency band of EQ with a range of +/-18dB. • Pressing the HF Gain control switches the High Frequency EQ band between Bell and Shelving modes. An LED lights to indicate when Shelving is selected. • The HF Hz control sets the high frequency between 1.5kHz and 18kHz. • When the HF EQ band is set to Bell, pressing the HF Hz control switches the band between Low and High Q. An LED lights to indicate the selection of High Q. Low Q is 0.7 and High Q is 1.8. • When the HF EQ band is set to Shelving mode, pressing the HF Hz control switches between Standard shelving mode and Resonant shelving mode. An LED lights to indicate the selection of Resonant shelving. In Standard mode the selected frequency will be the +/- 3dB point. In Resonant mode, when boosting a slight extra lift occurs in frequencies around the selected frequency, when cutting a slight extra dip occurs around the selected frequency. This has the effect of emphasising the selected frequency. Neve 8803 User Manual Page 6 21/11/2006 3. Rear Panel Audio Connections • Audio Inputs: the input combo socket for each channel accepts input signals from either male XLR or male ¼” Jack connectors. Connection can be balanced or unbalanced on Jack and XLR • Audio Outputs: separate male XLR socket and female ¼” Jack socket for each channel provide simultaneous output to female XLR and male Jack connectors. Connection can be balanced or unbalanced on Jack and XLR USB: the USB socket is a Type B connector used to connect the 8803 to a PC or Mac for Recall store and recall of unit settings. Technical Earth Switch: The grounding of the unit can be set to two different points: 1) the mains earth from the power supply 2) the studio technical earth via the CHASSIS screw on the back of the unit With the switch in the OFF position the chassis of the unit is connected to the Mains earth via the power supply. With the switch in the ON position the chassis of the unit should be connected to the studio technical earth using the CHASSIS screw on the back of the unit. For safety reasons the chassis is NOT disconnected from the main Earth but is connected through a filter (a 10 Ohms resistor in parallel with a 680nF capacitor). !!!WARNING!!!! Connections to the technical earth and changes to the unit grounding should only be carried out by qualified personnel. Fuse: The removable fuse holder houses a 1.6 AT fuse Power DIN socket: The 8 pin DIN socket should only be used to connect the power supply provided with the 8803 unit. PLEASE NOTE: for technical reasons the orientation of the socket is the opposite way up to normal. The “top” of the DIN connector will therefore be underneath. It is not possible to connect the plug the wrong way up. Neve 8803 User Manual Page 7 21/11/2006 4. Specifications Audio Specifications: • Max output level: +26dBu • Frequency response: +/- 0.3 dB 10Hz to 20 kHz +/- 0.5 dB 10Hz to 35 kHz • Distortion: < 0.006% (10Hz to 20kHz, using a measurement window of 10Hz to 80 kHz) • Noise: < 80dB 20Hz to 20kHz (using a measurement window of 10 Hz to 22 kHz) • Input impedance: > 20k Ohms • Output impedance: 50 Ohms Dimensions: • • • Width 48.2 cm - 19 inches Height 4.4 cm - 1.75 inches (1U) Depth 24 cm - 9.5 inches (without the power socket plugged in) Weight: 2.5 kg - 5.5 lbs Neve 8803 User Manual Page 8 21/11/2006 5. Schematic Neve 8803 User Manual Page 9 21/11/2006 6. Recall Software Neve Recall software allows settings from the 8803 to be stored on a PC or Mac and recalled for later use. Recall can be used for all the units in the 88 range including 8801, 8802, 8803, 8804 and 8816. Multiple units can be stored and recalled together. Please see the Recall Manual for further details. This may be downloaded from the Neve web site at: http://www.ams-neve.com/html/downloads/index.php Neve 8803 User Manual Page 10 21/11/2006