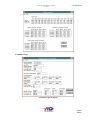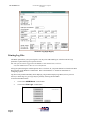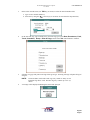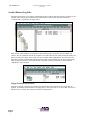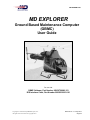
1
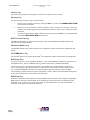
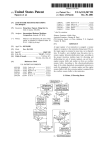
CSP-900RMM-2 S1 MD EXPLORER Ground Based Maintenance Computer (GBMC) User Guide For use with: GBMC Software, Part Number 900G9720006-103 IIDS Interface Cable, Part Number 900G8930003-101 Copyright © 1999-2014 By MD Helicopters, Inc. All rights reserved under the copyright laws. Reissue: No. 1: 1 May 2014 Original MD HELICOPTERS, INC. TECHNICAL PUBLICATIONS RECOMMENDED CHANGE REPORT This manual has been prepared and distributed by the Technical Publications Department and is intended for use by personnel responsible for the maintenance of MDHI Helicopters. Periodic revision of this manual will be made to incorporate the latest information. If, in the opinion of the reader, any information has been omitted or requires clarification, please direct your comments to this office via this form (or a duplicate). An endeavor will be made to include such information in future revisions. MD Helicopters, Inc. Bldg 615 M/S G048 4555 East McDowell Road Mesa, AZ 85215-9734 Telephone: (800) 310-8539 Technical Publications Order Desk: (480) 346-6372; FAX: (480) 346-6821 Technical Publications Changes: (480) 346-6212; FAX: (480) 346-6809 Date: Originator: Address: E-Mail: Manual Title: Page Number(s): Chapter Title: Paragraph Number(s): ATA Section Number: Step Number(s): Issue Date: Figure Number(s): Revision No. and Date: Table Number(s): Remarks / Instructions: This Page Intentionally Left Blank CSP-900RMM-2 S1 Ground Based Maintenance Computer User Guide Record of Temporary Revisions Ground Based Maintenance Computer (GBMC) User Guide Rev. No. Date Inserted By Date Removed Rev. No. Date Inserted By Date Removed TR i Original CSP-900RMM-2 S1 Ground Based Maintenance Computer User Guide This Page Intentionally Left Blank TR ii Original CSP-900RMM-2 S1 Ground Based Maintenance Computer User Guide List of Effective Pages Insert last changed pages, discard superseded pages. The highest revision number indicates pages changed, added or removed by the current change. Date of original and change pages are: Original (Reissue No. 1) .......... 1 May 2014 Cover List of Effective Pages N/A ......................................................... Original LOEP i and LOEP ii ............................... Original Change Request Table of Contents N/A ......................................................... Original TOC i and TOC ii ................................... Original Temporary Revision Manual TR i and TR ii ......................................... Original Page 1 thru Page 44 ................................ Original Appendix Page A-1 thru Page A-8 .......................... Original LOEP i Original CSP-900RMM-2 S1 Ground Based Maintenance Computer User Guide This Page Intentionally Left Blank LOEP ii Original Ground Based Maintenance Computer User Guide CSP-900RMM-2 S1 Table Of Contents IIDS FUNCTIONS ........................................................................................................................ 1 PHILOSOPHY FOR USE OF IIDS/GBMC FOR MAINTENANCE AND RECORDS KEEPING ...........................................1 GROUND BASED MAINTENANCE COMPUTER FUNCTIONS ........................................................................................2 ASCM LOG FILES ...................................................................................................................................................2 Data Log ..........................................................................................................................................................3 Exceedance Log ...............................................................................................................................................3 Fault Log .........................................................................................................................................................3 Trend Log ........................................................................................................................................................3 Cumulative Log ...............................................................................................................................................3 Setup Log .........................................................................................................................................................3 BMS DATA FILES ....................................................................................................................................................3 Advisory Log ....................................................................................................................................................4 Spectrum Log ...................................................................................................................................................4 BMS Version/Fault Log ...................................................................................................................................4 Main Rotor Balance Log .................................................................................................................................4 NOTAR Balance Log .....................................................................................................................................4 BMS Setup Files...............................................................................................................................................4 BMS Setup Log ................................................................................................................................................4 GBMC USER LEVELS ..............................................................................................................................................5 Limited User Functions ...................................................................................................................................5 Full User Functions .........................................................................................................................................5 System Administrator Functions ......................................................................................................................5 PROGRAM INSTALLATION REQUIREMENTS .................................................................. 6 SETUP ............................................................................................................................................ 6 IDDSGP Setup Dialog .....................................................................................................................................6 Program Manager Group ................................................................................................................................6 CREATING BMS DIRECTORY ...................................................................................................................................6 GBMC MAIN MENU SCREEN .................................................................................................. 7 PASSWORD UTILITIES............................................................................................................. 7 CHANGE PASSWORDS ..............................................................................................................................................7 ADD NEW USERS .....................................................................................................................................................8 DELETE USERS ........................................................................................................................................................9 RESET PASSWORDS................................................................................................................................................10 CONNECTING THE GBMC COMPUTER TO THE IIDS .................................................. 12 TOC i Original CSP-900RMM-2 S1 Ground Based Maintenance Computer User Guide AIRCRAFT SYSTEMS CONDITION MONITOR (ASCM) MENU .................................... 13 DOWNLOADING FILES FROM THE IIDS ................................................................................................................. 13 UPLOADING FILES TO THE IIDS ........................................................................................................................... 15 DISPLAYING LOG FILES ........................................................................................................ 17 SETUP LOG DISPLAYS ........................................................................................................................................... 19 CUMULATIVE LOG DISPLAYS ................................................................................................................................ 20 DATA LOG DISPLAY FORMATS ............................................................................................................................. 21 DATA LOG DISPLAYS ............................................................................................................................................ 21 FAULT LOG DISPLAYS........................................................................................................................................... 22 TREND LOG DISPLAYS .......................................................................................................................................... 22 EXCEEDANCE LOG DISPLAYS................................................................................................................................ 23 CREATING OR MODIFYING UPLOADABLE SETUP OR CUMULATIVE DATA FILES .................................................. 24 Create New Setup or Cumulative Data File.................................................................................................. 24 Editing an Existing Setup or Cumulative Data File ...................................................................................... 25 Setup Log Screens ......................................................................................................................................... 26 Cumulative Logs ........................................................................................................................................... 27 PRINTING LOG FILES ............................................................................................................................................. 28 ARCHIVE/RESTORE LOG FILES.............................................................................................................................. 30 Floppy Disk Historical Archives ................................................................................................................... 30 Hard Disk Historical Archives ...................................................................................................................... 31 Generating ASCII Files ................................................................................................................................. 32 To Archive Files: ........................................................................................................................................... 32 To Restore Files: ........................................................................................................................................... 33 Generate ASCII Files: ................................................................................................................................... 35 ECTM MENU........................................................................................................................................................ 36 BALANCE MONITOR SYSTEM (BMS) MENU ......................................................................................................... 39 Downloading BMS Logs ............................................................................................................................... 39 Clearing BMS Logs ....................................................................................................................................... 41 Uploading BMS Model OR Setup Configuration .......................................................................................... 41 ASCM LOG DEFINITION TABLES.......................................................................................... 1 SETUP LOG.............................................................................................................................................................. 1 CUMULATIVE LOG .................................................................................................................................................. 3 DATA LOG .............................................................................................................................................................. 4 FAULT LOG ............................................................................................................................................................. 5 TREND LOG ............................................................................................................................................................. 6 EXCEEDANCE LOG .................................................................................................................................................. 6 BMS LOG DEFINITION TABLES ............................................................................................. 7 BMS SETUP LOG .................................................................................................................................................... 7 VIBRATION/BALANCE MODEL LOG ........................................................................................................................ 7 TOC ii Original Ground Based Maintenance Computer User Guide CSP-900RMM-2 S1 IIDS Functions The Integrated Instrumentation Display System (IIDS) provides for the monitoring and display of aircraft system parameters along with the caution and warning annunciation requirements to meet FAR Part 27 certification requirements. Additionally, the IIDS, in conjunction with the Electronic Engine Controller (EEC), has access to information about aircraft system parameters and retains this data in non-volatile memory. The Aircraft Systems Condition Monitoring (ASCM) function collects data about the operation of the aircraft and makes this data available to the operator for direct display viewing or download to the GBMC for maintenance recording and trend analysis. Specifically, engine parameters can be monitored during any engine operating condition and used for computerized tracking of engine hours and cycles. The decision to monitor any of these additional conditions is based on the operator's economic evaluation and experience. Engine parameter data is used by the Helicopter Engine Condition and Trend Monitoring (HECTM) program within the GBMC. The Balance Monitoring System (BMS) function within the IIDS provides for input signal conditioning, computations, data storage, and communication with ground based computer systems for main rotor and NOTAR fan balance monitoring. The primary purpose of the BMS is to provide the helicopter user the with a simple and convenient means of acquiring the information needed to minimize cabin vibration caused by mass and aerodynamic imbalance in the main rotor and NOTAR fan system. Philosophy For Use Of IIDS/GBMC For Maintenance And Records Keeping A philosophy for using the aircraft system data from the IIDS ASCM and BMS functions to support helicopter maintenance and records keeping is described below. NOTE: The GBMC program is provided to assist the Owner/Operator in maintaining the MD Explorer and is not intended as a substitute for the maintenance of Rotorcraft and Engine records or for the performance of procedures as outlined in the operator or maintenance manuals for the Rotorcraft, Engines or other installed equipment. 1. The IIDS does not take on the function of the "Electronic Log Book"; the Engine and Aircraft Log Books are the primary records of the aircraft. The engine operational analysis data that the IIDS provides will help the operator in maintaining his engine and aircraft log books with a minimum of effort. 2. Exceedance events as recorded and annunciated by the IIDS will alert the operator, at which time the operator will log the exceedance in the log books and reference the maintenance manual for the appropriate maintenance action. 3. The IIDS assists in meeting the FAR requirement for providing a means to perform power assurance checks (if required by an operating rule) on the aircraft engines by providing for the data collection, calculation, and display of power assurance margins. The results can then be recorded in the engine log book. 4. The IIDS provides engine component life accounting by providing for the data collection, calculation, and display of engine component cycle counts. The Maintenance Manual and/or the Service Bulletin will outline the appropriate maintenance action. 5. The IIDS BMS functions assist in Main Rotor and NOTAR smoothing by providing for the data collection, calculation, and display of balance corrective action adjustments and vibration alerts. The results can then be recorded in the aircraft log book. Page 1 Original CSP-900RMM-2 S1 6. Ground Based Maintenance Computer User Guide The use of the IIDS to perform ASCM and BMS functions is not essential to aircraft operation since these functions can be performed manually as per the Aircraft and/or Engine Maintenance Manuals. The aircraft can be dispatched without these functions operating. In this case, all essential functions will have to be performed per procedures in the Aircraft and Engine Maintenance Manuals. The IIDS data base should then be updated with the current aircraft operational data when the IIDS function is repaired. The essential functions that can be performed by the IIDS or manually are the following maintenance practices: a. b. c. d. e. f. g. Engine parameter exceedance reporting Engine power assurance checks Component life usage assessment Engine and Aircraft Log Book entries Transmission parameter exceedance reporting Rotor parameter exceedance reporting Rotor/NOTAR vibration alerts 7. The use of this data collected by the IIDS is at the discretion of the operator. No requirement is imposed on the operator to view this data on the IIDS display or download it to a ground based computer. The ground based computer system contains the Helicopter Engine Condition Trend Monitoring (HECTM) program that is developed by the engine manufacturer. Therefore, any download requirement for the ASCM data to support the HECTM function is determined by the engine manufacturer. 8. Initialization of the IIDS Setup Data is not required for aircraft operation. The IIDS can perform its systems monitoring and display functions without being initialized. However, if not initialized, various engine related ASCM functions (exceedance, fault, and power assurance) will be disabled. This is to provide IIDS replacement and aircraft dispatchability in remote locations. The IIDS can be initialized (setup) at a later date when a ground based computer becomes available. Ground Based Maintenance Computer Functions The GBMC program provide Owner/Operators with the ability to upload, download, display, and archive Integrated Instrument Display System (IIDS) data logs. In addition, the Setup Log and the Cumulative Log are editable by persons with Full User or System Administrator access to allow uploading of initialization and configuration data. ASCM Log Files Setup Log and Cumulative Log contents are cover in more detail in the Creating Or Modifying Uploadable Setup Or Cumulative Data Files paragraphs. There are six types of data records maintained by the ASCM: 1) Data Log, 2) Exceedance Log, 3) Fault Log, 4) Trend Log, 5) Cumulative Log, and 6) Setup Log. The content of these records can be downloaded to a PC through a RS-232C interface, using the GBMC program. A subset of these records can be displayed on the alphanumeric display on the IIDS (Ref. Rotorcraft Maintenance Manual) Page 2 Original Ground Based Maintenance Computer User Guide CSP-900RMM-2 S1 Data Log This type of record provides one and a half (1.5) minutes of data collection. The data is recorded in a continuous memory buffer "loop" and will be continuously overwritten unless an exceedance occurs, or when a discrete signal from the crew (REC key on IIDS) requests a record of an event . This record is meant to provide a "window" in time by allowing a more detailed look at events around an exceedance or other incident. The capability is provided to store up to five of these Data Logs. A description of this log can be found in the Appendix. Exceedance Log An Exceedance Log provides a "snapshot" record of the parameter data at a particular moment in time. This type of record occurs whenever a parameter exceedance is detected. The capability is provided to store up to 100 of these Exceedance Logs. A description of this log can be found in the Appendix. Fault Log This Fault Log contains data associated with the fault discrete data from the EECs and a BIT failure that was detected in the IIDS, BMS, or aircraft transducers/sensors. This type of log is recorded whenever an IIDS or EEC fault is detected. The capability is provided to store up to 100 of these Fault Logs. A description of this log can be found in the Appendix. Trend Log The Trend Log is another "snapshot" type record that records certain aircraft data under given operational conditions and is generated by a Power Assurance check request. After the aircraft has reached the specific operational condition, data is taken for 30 seconds (Pratt and Whitney) or two minutes (Turbomeca), averaged over 15 seconds, and placed in the Trend Log. The data sample rate during this one minute collection period is one per second. This data serves three purposes: data for ground based trending of aircraft parameters, engine performance analysis, and vibration spectrums. Trend spectrums are generated by the BMS via a request to perform a Power Assurance check. These spectrums are linked to the Trend Logs and become part of the trending data used by the ground based computer. The capability is provided to store up to 100 of these Trend Logs (excluding the trend Spectrum Logs). A description of this log can be found in the Appendix. Cumulative Log The Cumulative Log contains data associated with the aircraft configuration and operational analysis. A description of this log can be found in the Appendix. Setup Log The IIDS is initialized by entering information through the RS-232C Maintenance Computer interface, J1. Initialization parameters and their ranges of values described in the Appendix. A copy of the Setup Data information can be downloaded, but will not be overwritten except when specifically updated or erased. Suitable password protection and/or queries requesting confirmation is provided in the GBMC software to prevent accidental deletion or modification of data. BMS Data Files There are seven types of data files maintained by the BMS: 1) Advisory Log, 2) Spectrum Log, 3) BMS Version/Fault Log, 4) Main Rotor Balance Log, 5) NOTAR Balance Log, and 6) two setup files, the BMS Setup Log and Vibration/Balance Model Log. All logs can be transferred to the Ground based Maintenance Computer (GBMC) via the IIDS RS-232C serial link, while a subset of these records can be displayed on the alphanumeric display on the IIDS (Ref. CSP-900RMM-3, Rotorcraft Maintenance Manual) All data records are time and date stamped. Page 3 Original CSP-900RMM-2 S1 Ground Based Maintenance Computer User Guide Advisory Log The Advisory Log contains alert messages for vibration levels that have been exceeded. Spectrum Log The Spectrum Log contains two types of spectrum data. 1. 400 line spectra (random) recorded by pressing the REC key while in the RANDOM SPECTRUM menu selection on the IIDS. 2. Reduced set of FFT frequencies (trend) recorded by a Power Assurance check request. This log is "linked" to the Trend Log generated by the Maintenance Processor when a Power Assurance check is performed. 3. Trend spectra based upon set flight conditions recorded by pressing the REC key (on the IIDS) while in the IIDS TREND SPECTRUM menu selection. BMS Version/Fault Log The BMS Version/Fault Log contains failure messages/codes from the BMS BIT and BMS hardware and software versions and part numbers. Main Rotor Balance Log The Main Rotor Balance Log contains the main rotor configuration, balance measurements, adjustments, and options. NOTAR Balance Log The NOTAR Balance Log contains the NOTAR fan configuration, balance measurements, and adjustments. BMS Setup Files Two types of setup files can be uploaded to the BMS: (1) The Vibration/Balance Model Log, which resides in Flash ROM memory, and (2) The BMS Setup Log, which resides in battery-backed RAM memory. The setup files can only be transferred to the IIDS via the GBMC (System Administrator level password access). The integrity of this upload operation is verified by the overall memory checksum which is always zero. The BMS VERSION LOG menu is accessed through the IIDS front panel keys and/or the BMS Version/Fault Log (which contains all system configuration versions), which can be downloaded and inspected for the correct part numbers, version numbers and checksums. BMS Setup Log Definition of the spectrum data acquisition (Trend, Random and PA spectrums) can be changed by uploading a BMS Setup Log into battery-backed RAM. Once uploaded, these operations become the default unless the RAM data is lost. In this case, the operations revert back to the defaults that were stored in Flash ROM. A description of this log can be found in the Appendix. Page 4 Original Ground Based Maintenance Computer User Guide CSP-900RMM-2 S1 GBMC User Levels Limited User Functions Functions are provided at three different levels. The base level of functionality provides for download only (Limited User level). This allows maintenance personnel to extract all the available (downloadable data) into the GBMC to assist in logbook management and rotorcraft/engine maintenance. Users at this level are not allowed to upload any data to the IIDS from the GBMC. Full User Functions This level of functionality provides the Owner /Operator with all the limited user functions, plus the ability to modify or create Setup Data files and upload this data into the IIDS. This level user can also perform file archive and restore operations. System Administrator Functions This level of functionality is reserved for authorized MDHI personnel only. It is intended to provide the capability of uploading BMS balance models used by the IIDS to perform Main Rotor/NOTAR Fan balance calculations. This function can only be performed by MDHI authorized personnel. Page 5 Original CSP-900RMM-2 S1 Ground Based Maintenance Computer User Guide Program Installation Requirements This software is designed to run on a computer running the Windows XP Operating System or newer. The computer must have a hard disk drive with a minimum of 20 megabytes of free disk space and a minimum of 4 megabytes of RAM. While the program is designed to be used with either a keyboard or mouse, a mouse is strongly recommended. Setup Insert the disk containing the Ground Based Maintenance Computer (GBMC) program in drive “A:” and select the “Run” command from the windows File Manager. In the dialog box, type “SETUP.EXE” and press ENTER. The program will begin to install and a dialog box will prompt you for the directory name you wish to install the program to. If you do not have a specific location to install to, accept the default directory and press the continue button. The “Setup” program will create an “IIDSGP” and “IIDS” directory on your hard disk. NOTE: If you do not know where to install the program, follow the directions on the screen and accept the default settings. The “IIDSGP” directory contains the GBMC programs and the “IIDS” directory will be used to store the rotorcraft log and setup data files. When the installation program is complete, there will be a new “group” in the Program Manager window titled IIDSGP. This group will contain the GBMC program icon. IDDSGP Setup Dialog Program Manager Group Creating BMS Directory The GBMC software requires that a “BMS” directory be created to store files for the Chandwick-Helmuth Balance Monitoring System application (separate files on the GBMC disk). To create this directory: Page 6 Original 1. Select from the "File" menu, the "Create Directory" option, type directory name "C:\BMS" and press ENTER key. 2. Select from the "File" menu, the "Copy" option and type in the 'From' field "A:\BMS\*.*" and type in the "To" field "C:\BMS\*.*" 3. Press the ENTER key. Ground Based Maintenance Computer User Guide CSP-900RMM-2 S1 GBMC Main Menu Screen When logon is successful, the GBMC main menu is visible. From here you can select all the function available in the application. The menu consists of buttons for accessing the: BMS Menus, ECTM Menus, ASCM Menus, Password Utils and Exit The BMS Menus and ECTM Menus buttons provide the ability to launch the Chandwick-Helmuth BMS program and the Pratt & Whitney programs respectively. The ASCM Menus button accesses the IIDS maintenance functions. Password Utilities Change Passwords TIP: The operator can be logged into the IIDSGP as either Limited User, Full User or System Administrator to have access to this function. This function is used to allow established users (logon privileges already assigned) to change their existing passwords to new passwords. 1. Click on the "Password Utils" control button. 2. Click on the "Change Password" control button. 3. Use TAB key (or mouse) to select User ID field 4. Enter User ID Page 7 Original CSP-900RMM-2 S1 Ground Based Maintenance Computer User Guide 5. Use TAB key (or mouse) to select Old Password field 6. Enter current password 7. Use TAB key (or mouse) to select New Password field 8. Enter new password 9. Use TAB key (or mouse) to select re-type New Password field 10. Enter new password 11. Click on the "Ok" control button 12. A status message will be displayed, indicating the success of the password change. Add New Users TIP: The operator must be logged into the IIDSGP as either a Full User or System Administrator to have access to this function. The Full User may only add a new user as “Full User” or “Limited User” access. This function allows the system administrator to authorize personnel as Limited Users, Full Users or System Administrators. Personnel that have Full User authorization can establish others as Limited Users or Full Users. 1. Click on the "Password Utils" control button. 2. Click on the "Add New User" control button. 3. Use TAB key (or mouse) to select User ID field 4. Type in new user's ID 5. Use TAB key (or mouse) to select User Level field 6. Use ( ) arrows keys to select user level (Limited User, Full User, or System Administrator) 7. Click on the "Ok" control button. 8. A status message will be displayed, indicating the success of the addition of the user. NOTE: Page 8 Original The user will have the default password, “PASSWORD”. Ground Based Maintenance Computer User Guide CSP-900RMM-2 S1 Delete Users TIP: The operator must be logged into the IIDSGP as either a Full User or System Administrator to have access to this function. The Full User may only delete a Limited User or Full User access. This function allows the System Administrator to delete “all levels of users” from the access authorization list. Personnel that have Full User authorization can delete “Limited User” or “Full Users” from the access authorization list. 1. Click on the "Password Utils" control button. 2. Click on the "Delete User" control button. 3. Use TAB key (or mouse) to select User ID field. 4. Use ( ) arrows keys to select user ID that is to be deleted. 5. Click on the "Ok" control button. Page 9 Original CSP-900RMM-2 S1 6. Ground Based Maintenance Computer User Guide A status message will be displayed, indicating the success of the deletion of the use user. Reset Passwords TIP: The operator must be logged into the IIDSGP as either a Full User or System Administrator to have access to this function. The Full User may only reset the password of a “Limited User” or “Full User”. This function allows the System Administrator to reset “all levels of user passwords”. Personnel that have Full User authorization can reset “Limited User” or “Full Users” passwords. The default password will be “PASSWORD”. After resetting the password, the user should change his or her password to something other than the default “PASSWORD” Page 10 Original 1. From the GBMC Main Menu, Click on the “Password Utils” control button. 2. Click on the “Reset Password” control button. 3. Use TAB key (or mouse) to select User ID field. 4. Use ( ) arrows keys to select user ID that is to have their password reset. 5. Click on the "Ok" control button. Ground Based Maintenance Computer User Guide 6. A status message will be displayed, indicating the success of the password resetting. NOTE: 7. CSP-900RMM-2 S1 The default password after being reset is PASSWORD. The user whose password has been reset to the default “PASSWORD” should now enter a new password by following the steps in the Change Passwords paragraph above. Page 11 Original CSP-900RMM-2 S1 Ground Based Maintenance Computer User Guide Connecting The GBMC Computer To The IIDS The GBMC must be connected to the IIDS using the IIDS Interface Cable (Part Number 900G8930003-101), to perform upload and download functions. To connect the GBMC: NOTE: A USB to Serial converter cable may be used with computers that do not have a 9 Pin (RS-232) connector. The GBMC software has been tested to work with the IOGear USB to Serial RS-232 Adapter Model GUC232A. Other adaptor brands may work but have not been tested. Install the software for the GUC232A before using the GBMC software. 1. Connect the 9 Pin connector to the back of the computer at serial port “1”. 2. Connect the special round serial port cable connector to the J1 port on the front of the IIDS display. NOTE: Refer to the appropriate sections of this guide for procedures on uploading and downloading files. IIDS Serial Port Connector 9 Pin Connector (typical) IIDS/GBMC Serial Port (J1) Page 12 Original Ground Based Maintenance Computer User Guide CSP-900RMM-2 S1 Aircraft Systems Condition Monitor (ASCM) Menu The ASCM menu provides functions for downloading, uploading, modify/create, displaying and archiving of logs. NOTE: The Upload Logs and Modify/Create Logs menu selections will be disabled (not selectable) to users logged on as “Limited Users”. Downloading Files From The IIDS This procedure provides functions for downloading Data Logs, Exceedance Logs, Fault Logs, Trend Logs, Cumulative Logs and Setup Logs from the IIDS. To download BMS logs, refer to the BMS Menu Paragraphs. TIP: The operator must be logged into the IIDSGP as either Limited User, Full User or System Administrator to have access to this function. 1. Connect the GBMC to the IIDS (Ref. Connecting the GBMC Computer To The IIDS). 2. Click on the "ASCM Menus" control button. 3. Click on the "Download Logs" control button. Select Aircraft Screen 4. In the Select Aircraft Screen, use TAB key (or mouse) to select the Aircraft Number field. 5. Either type in a new aircraft number or select one from the drop down list. 6. Press Ok. Page 13 Original CSP-900RMM-2 S1 7. Ground Based Maintenance Computer User Guide In the Download ASCM Logs Screen, either: a. Click on the "All Logs" control button to download all logs of all log types from the IIDS or: b. Click on the "Select Specific Logs" control button to download all the logs of a specific type. c. Select the type of file to download; Data, Exceedance, Fault, Trend, Cumulative or Setup, and click on the "Exit" control button. Visible to SysAdmin Only "Select Logs Types" Screen "Download Logs" Screen TIP:When logged in as a System Administrator, click on the "Do Not Erase Logs In IIDS" control button if you DO NOT want to erase the logs in the IIDS. By default all Data, Exceedance, Fault and Trend Logs will be erased from IIDS memory after they are downloaded. d. Click on the "Download Logs" control button. The Download Logs screen will reappear and the Communications Status bars will indicate the progress of the download. When complete a message box will appear confirming successful completion. NOTE: When logs are downloaded from the IIDS and log files already exist in the aircraft database for the specified Aircraft number, the original files are labeled " *.bak " and the newly downloaded files are labeled "*.dn". Communications Status Page 14 Original 8. After the files have transferred the IIDS alpha-numeric display will show the message “DATA XFER CMPL”. Press Exit to return to the ASCM Main Menu. 9. Disconnect the GBMC from the IIDS. Ground Based Maintenance Computer User Guide CSP-900RMM-2 S1 Uploading Files To The IIDS File upload is used to initialize a new or replacement IIDS with the basic rotorcraft and engine parameters and installed components data. This function is also used when an engine or other installed equipment is changed. NOTE: You must perform the download procedures for the Setup Log or Cumulative Log before you can perform an upload. Each time a download is performed, a file is generated for the downloaded log with the “<log name>.dn” extension. If a file already exists with this name, a backup file with the “<log name>.bak” file name extension is generated for the existing “<log file>.dn”. If a “<log name>.bak” file already exists, it will be overwritten! To prevent the inadvertent loss of a downloaded log file, you should archive the files after each download. TIP: The operator must be logged into the IIDSGP as either Full User or System Administrator to have access to this function. 1. Connect the GBMC to the IIDS (Ref. Connecting the GBMC Computer To The IIDS). 2. Click on the "ASCM Menus" control button. 3. Click on the "Upload Logs" control button. 4. In the Select Aircraft Screen, user TAB key (or mouse) to select the Aircraft Number field. 5. Either type in a new aircraft number or select an old one by using the ( ) arrow keys (or use mouse to select via the drop down list). Page 15 Original CSP-900RMM-2 S1 6. Click on the "Select Log to Upload" control button. NOTE: 7. The Start Upload button will be disabled until a log has been selected to upload. Select the type of file to upload (Cumulative or Setup log) and click on the "Ok" control button. NOTE: Page 16 Original Ground Based Maintenance Computer User Guide By default, all uploadable logs are named " *.up " in the aircraft database. Refer to the Modify/Create Log paragraphs for procedures on generating a setup or cumulative log to upload. Ground Based Maintenance Computer User Guide 8. CSP-900RMM-2 S1 Click on the "Start Upload" control button and wait for the indication that the communications has been completed successfully. When file transfer is complete the message “DATA XFER CMPL” will appear on the IIDS alpha-numeric display. Alpha-Numeric Display IIDS Alpha-Numeric Display NOTE: 9. The IIDS must be rebooted to allow any changed parameters in the newly uploaded Setup or Cumulative log to become effective. Turn electrical power off then on again to reboot the IIDS processor. Disconnect the GBMC from the IIDS. Displaying Log Files The Display Logs option on the ASCM menu allows you to view the Data, Exceedance, Fault, Trend, Cumulative and Setup logs on the GBMC screen. This is a view only capability. A copy of the log being viewed can be printed from this function. The file can also be converted from its native binary format to an ACSII format for export. Converting the log to ACSII allows the Owner/Operator to incorporate the log data into other applications that support ASCII file formats. For a description of each log file type, refer to the Introduction section and the Appendix of this guide. NOTE: Printing or ASCII conversion of logs being viewed applies only to the specific log displayed. For example, the Fault log can contain as many as 100 “logs” (entries). To print the entire contents of these types of logs, use the ASCM Print Logs menu selection. TIP: The operator must be logged into the IIDSGP as either Limited User, Full User or System Administrator to have access to this function. 1. Click on the "ASCM Menus" control button. 2. Click on the "Display Logs" control button. ASCM Menu Screen 3. In the Select Aircraft Screen, use TAB key (or mouse) to select the Aircraft Number field. Page 17 Original CSP-900RMM-2 S1 Ground Based Maintenance Computer User Guide 4. Either type in a new aircraft number or select one by using the ( ) arrow keys (or use mouse to select via the drop down list). 5. In the Select the “Type Of Log To Display” screen, select the log type to display, Data, Exceedance, Fault, Trend, Cumulative or Setup and click the “Ok” control button to continue. The Select File To Display Screen will become visible. 6. Either select the desired file with the mouse or : Use TAB key to select the file list control. Use ( ) arrow keys to select the desired file to edit. 7. Click on the "Ok" control button to begin viewing logs. A display screen will appear containing the current data for each parameter. NOTE: Page 18 Original For the Setup and Cumulative log types two screens are required to display the complete log. Select the "Sheet 2" control button in the case of the "Setup Log" and the "Right Engine" control button in the case of the "Cumulative Log" to get to the second page. Ground Based Maintenance Computer User Guide CSP-900RMM-2 S1 Setup Log Displays Setup Log Display (Sheet 1 of 2) Setup Log Display (Sheet 2 of 2) Page 19 Original CSP-900RMM-2 S1 Ground Based Maintenance Computer User Guide Cumulative Log Displays Cumulative Log Display (Left Engine) Cumulative Log Display (Right Engine) Page 20 Original Ground Based Maintenance Computer User Guide CSP-900RMM-2 S1 Data Log Display Formats For the Data log type, the contents are displayed in three screens, 4Hz Data, 1Hz Data and Discrete Data. Note: For the Data, Fault, Trend and Exceedance Log types there is a possibility of having more than a single log to be displayed. There is a drop down list control in the upper right hand corner of the screen that is used to select a new log number to be displayed. This may be accessed using the mouse or ( ) arrow keys. 8. Displayed log maybe printed by pressing the <ctrl>+P keys. 9. An ASCII file may be generated for the displayed log by typing <ctrl>+F. 10. Click the on the "Exit" control button to complete the log viewing function. Data Log Displays Page 21 Original CSP-900RMM-2 S1 Fault Log Displays Trend Log Displays Page 22 Original Ground Based Maintenance Computer User Guide Ground Based Maintenance Computer User Guide CSP-900RMM-2 S1 Exceedance Log Displays Page 23 Original CSP-900RMM-2 S1 Ground Based Maintenance Computer User Guide Creating Or Modifying Uploadable Setup Or Cumulative Data Files The Menu option allows you to create a new log file or to edit an existing log file for upload to the IIDS. This function will be typically used when replacing components that have data elements in the setup or cumulative logs. When updates to the IIDS setup to cumulative log are performed for component replacements, it may be faster to perform the download procedures for the affected log and edit the appropriate component information than to create a new log. TIP: The operator must be logged into the IIDSGP as either Full User or System Administrator to have access to this function 1. From the GBMC Main Menu, Click on the "ASCM Menus" control button. 2. Click on the "Modify\Create Logs" control button. 3. In the Select Aircraft Screen, use TAB key (or mouse) to select the Aircraft Number field. 4. Either type in a new aircraft number or select one by using the ( or ) arrow keys or: use mouse to select from the drop down list. 5. Click Ok button Select Aircraft Screen Create New Setup or Cumulative Data File TIP: In many cases it is faster and more accurate to edit an existing log than to create a new log from scratch. Existing logs can be restored from an archive for this purpose. To create a new "Setup Data" file or "Cumulative Data" file containing default values: 1. Click the "Create New Log" option check box and select the log type to be generated (Cumulative or Setup). 2. Click "Ok" to continue. Select Log Type Screen Page 24 Original Ground Based Maintenance Computer User Guide 3. CSP-900RMM-2 S1 Enter the appropriate values into the boxes next to the data field names (Ref. Editing an Existing Setup or Cumulative Data File to see the data fields). NOTE: Shaded boxes indicate the field is editable only by the personnel authorized as System Administrators. Both log types contain two screens of information that make up the complete log. Select the "Sheet 2" control button in the case of the "Setup Log" and the "Right Engine" control button in the case of the "Cumulative Log" to get to the second page. To select a parameter to enter either select with mouse or use the TAB or SHIFT+TAB keys to cycle through the field until reaching the desired field. When all data entry has been completed click on the "Exit" control button. If any field has been changed, the operator will be given the option to either save the file as "*.up" (Ok), discard file (No), or cancel and return to editing file. If no data has been entered, then a dialog box will prompt you that the file will not be saved. Editing an Existing Setup or Cumulative Data File To modify an existing “Setup Data” file (either setup.dn, setup.up or setup.bak) or “Cumulative Data” file (cum.dn, cum.up or cum.bak): NOTE: Only the file types with the “.dn”, “.up”, or “.bak” extensions can be used for editing purposes. EXAMPLE: To create an upload file for the Setup Data Log, select a file from the file list in the “Select File To Display” screen titled “setup.dn”, “setup.up” or “setup.bak” 1. Select the log type (Cumulative or Setup) and DO NOT click the "Create New Log" option check box. 2. Click "Ok" to continue. 3. Select the log to be modified by clicking on the log name. Select File To Display Screen 4. The Select File To Display Screen will become visible. Page 25 Original CSP-900RMM-2 S1 5. Ground Based Maintenance Computer User Guide Select the desired file with the mouse or: a. 6. Use TAB key to select the rectangle displaying possible files. b. Use ( or ) arrow keys to select the desired file to edit. Click on the "Ok" control button to begin editing. A display screen will appear containing the current data for each parameter. Any parameter that has a box surrounding the data field, that is not shaded, maybe edited or new values inserted. Shaded boxes are only available for editing at the System Administrator security level. NOTE: Both log types contain two screens of information that make up the complete log. Select the "Sheet 2" control button in the case of the "Setup Log" and the "Right Engine" control button in the case of the "Cumulative Log" to get to the second page. To select a parameter to edit either select with mouse or use the TAB or SHIFT+TAB keys to cycle through the field until reaching the desired field. When all editing has been completed click on the "Exit" control button. If the field has been changed, the operator will be given the option to either save the file as "*.up" (Ok), discard file (No), or cancel and return to editing file. If there has been no changes, then a dialog box will prompt you that the file will not be saved. NOTE: The two editable logs are the Setup and Cumulative logs. Setup Log Screens Edit Setup Log (Sheet 1) Screen Page 26 Original Ground Based Maintenance Computer User Guide CSP-900RMM-2 S1 Edit Setup Log (Sheet 2) Screen Cumulative Logs Cumulative Log (Left Engine) Page 27 Original CSP-900RMM-2 S1 Ground Based Maintenance Computer User Guide Cumulative Log (Right Engine) Printing Log Files The Menu option allows you to print log files. You may select individual logs or select the Print All Logs option box to print all the logs for a specific aircraft. TIP: The operator must be logged into the IIDSGP as either Limited User, Full User or System Administrator to have access to this function. All logs are printed using the windows printer drivers. The drive for your printer MUST be selected in the Print Driver Section of the Windows Control Panel. Refer to the Window's 3.1 manual for instructions on configuring a printer. Log files can be printed individually while displaying a log from the Display Logs Menu (refer to previous section), or all the logs of a given type may be printed by selecting the Print Menu. To use the Print Menu follow: Page 28 Original 1. Click on the "ASCM Menus" control button. 2. Click on the "Print Logs" control button. Ground Based Maintenance Computer User Guide 3. CSP-900RMM-2 S1 In the Select Aircraft Screen, use TAB key (or mouse) to select the Aircraft Number field. a. Type in a new aircraft number or; b. Select one by using the ( ) arrow keys (or use mouse to select from the drop down list). 4. In the Select the Log Type To Print screen, select the log type to print Data, Exceedance, Fault, Trend, Cumulative, Setup or Print All Logs, and click the "Ok" control button to continue. 5. Selecting a log type will print out all logs of that given type. Selecting All Logs will print all logs of all types. NOTE: 6. The Exceedance, Fault and Trend Logs may contain as many as 100 individual log entries each. The Data log may contain up to five (5) entries. A message will be displayed indicating the status of the print job. Page 29 Original CSP-900RMM-2 S1 Ground Based Maintenance Computer User Guide Archive/Restore Log Files This menu option allows you to archive downloaded aircraft records for historical purposes. The archives are a snapshot of the existing aircraft subdirectories and the log files contain in the aircraft’s folder under “C:\iids\aircraft\” as pictured in the figure below. Each “aircraft” folder contains several folders in which different types of log files are stored. When you “archive” files for a particular aircraft, the complete set of folders (the aircraft’s folder and all sub folders and files are copied to the “target” archive disk. If a top level folder named “AIRCRAFT” does not exist on the target disk, it will be created and the individual aircraft folders and sub folders/files will be placed under this folder. If different aircraft are archived to the same target disk, each aircraft will have a folder under the “AIRCRAFT” top level folder. Floppy Disk Historical Archives Each time an aircraft is archived, the contents of the aircrafts directories and files on the “target” disk are replaced. To maintain a historical archive on floppy disks, it will be necessary to use a new disk each time an aircraft archive is created. This will prevent the loss of historical data. Page 30 Original Ground Based Maintenance Computer User Guide CSP-900RMM-2 S1 Hard Disk Historical Archives Saving historical data on a hard disk will require you to create your own directory structure into which the archived records can be stored. It you create a directory structure as pictured below, you can create a folder for each instance of an aircraft’s archive. Labeling subfolders in this archive by date/instance will allow you to locate historical data more quickly. The method pictured here uses the following code to establish subdirectory names; The first three digits of the directory name represent the month. The fourth and fifth digits represent the day of the month. The sixth and seventh digits represent the year. Add an extension (“.001, .002, etc.”) sequentially, to identify each instance. NOTE: The archive function allows you to select the target disk to archive to only!. This will create the “AIRCRAFT” folder in the root directory of this disk. Each time the archive is performed, the contents of the “AIRCRAFT” folder in this root directory will be replaced with the new archive files. After creating the “HISTORY” directory structure, move the aircraft’s folder from the “AIRCRAFT” folder in the root directory to the historical folder you just created for this archive instance. NOTE: For the Restore archive function to work, the historical files must be copied back to the “AIRCRAFT” root directory. Page 31 Original CSP-900RMM-2 S1 Ground Based Maintenance Computer User Guide Generating ASCII Files This function allows you to generate ASCII files of a specific aircraft’s logs. These files can then be utilized in other programs for analysis or documentation. For example, data in the Cumulative log could be imported into a spreadsheet or database application to produce reports or graphs on flight times vs engine cycle counts to help project cost based on mission profiles. Engine/airframe usage data could be collected and used to produce maintenance projection reports based on usage information such as cycle counting. Other uses might be to produce computer generated logbooks. This function is provided to allow owners/operators to easily incorporate the collected data into their own systems. NOTE: The generated ASCII files will be written to the target disk in the root directory of the disk. The generated ASCII files, for the selected aircraft will replace those presently on the disk. To Archive Files: TIP: The operator must be logged into the IIDSGP as either Full User or System Administrator to have access to this function. Page 32 Original 1. Click on the "ASCM Menus" control button. 2. Click on the "Archive Aircraft Logs" control button. Ground Based Maintenance Computer User Guide CSP-900RMM-2 S1 3. In the Archive Or Restore Aircraft Logs Screen select to “Archive”. 4. Using the TAB key (or mouse) select the Drive field. Use the ( ) arrow keys to select drive to either store data or retrieve data. NOTE: The archive function allows you to select the target disk to archive to only!. This will create the “AIRCRAFT” folder in the root directory of this disk. Each time the archive is performed, the contents of the “AIRCRAFT” folder in this root directory will be replaced with the new archive files. 5. Using the TAB key (or mouse) select the Aircraft No. field. Use the ( ) arrow keys to select the aircraft number to archive. 6. Click "Ok" To Restore Files: TIP: The operator must be logged into the IIDSGP as either Full User or System Administrator to have access to this function. 1. Click on the "ASCM Menus" control button. 2. Click on the "Archive Aircraft Logs" control button. Page 33 Original CSP-900RMM-2 S1 Ground Based Maintenance Computer User Guide TIP: Be sure the log files presently on the GBMC hard drive, for the aircraft being restored, are archived first. They will be overwritten by the restore process. 3. In the Archive Or Restore Aircraft Logs Screen select “Restore”. 4. Using the TAB key (or mouse) select the Drive field. Use the ( ) arrow keys to select drive to retrieve archive data from. NOTE: Page 34 Original The archive function allows you to select the target disk to restore archives from only!. If you are restoring files from a historical archive (on a hard disk) as described above, you must copy the required archive folder back into the “AIRCRAFT” root directory in order to make it accessible to the restore function. The restored aircraft’s files will replace those presently on the GBMC’s hard disk. If the files (logs for the selected aircraft) presently on the GBMC hard disk have not yet been archived they will be lost! 5. Using the TAB key (or mouse) select the Aircraft No. field. Use the ( ) arrow keys to select the aircraft number to restore. 6. Click "Ok" Ground Based Maintenance Computer User Guide CSP-900RMM-2 S1 Generate ASCII Files: TIP: The operator must be logged into the IIDSGP as either Full User or System Administrator to have access to this function. 1. Click on the "ASCM Menus" control button. 2. Click on the "Archive Aircraft Logs" control button. TIP: Be sure the log files presently on the GBMC hard drive, for the aircraft being restored, are archived first. They will be overwritten by the restore process. 3. In the Archive Or Restore Aircraft Logs Screen select “Generate ASCII Files”. NOTE: The “Generate ASCII Files” function allows you to select the target disk to write the ACSII files to. The generated ASCII files will be written to the target disk root directory. The generated ASCII files, for the selected aircraft will replace those presently on the disk. 4. Using the TAB key (or mouse) select the Drive field. Use the ( ) arrow keys to select drive to write ASCII data files to. 5. Using the TAB key (or mouse) select the Aircraft No. field. Use the ( ) arrow keys to select the aircraft number to identify the files to convert to ASCII. 6. Click "Ok" Page 35 Original CSP-900RMM-2 S1 Ground Based Maintenance Computer User Guide ECTM Menu Ref. Pratt & Whitney user guide and reference manual for the Helicopter Engine Condition and Trend Monitor (HECTM) program (Version 1.00) for instructions. This Menu option generates an HECTM standard file format for a selected aircraft from the downloaded Trend Log file. The program will then launch the HECTM application using the standard file that was just generated. TIP: The operator must be logged into the IIDSGP as either Limited User, Full User or System Administrator to have access to this function. 1. Select HECTM Menu from the GBMC Main Menu. 2. In the Select Aircraft Screen, use TAB key (or mouse) to select the Aircraft Number field. a. Type in an aircraft number or; b. Select one by using the ( ) arrow keys (or use mouse to select from the drop down list). Page 36 Original Ground Based Maintenance Computer User Guide CSP-900RMM-2 S1 3. Press OK. The HECTM Menu screen will appear. 4. Select the Generate/Load HECTM Standard File button. 5. The GBMC program will automatically select the aircraft Trend Log directory based on the aircraft you selected. Select the trend log file you wish to use (typically “<log file>.dn”) and press OK. 6. The GBMC program will generate a standard file format compatible with the Pratt & Whitney HECTM application. A dialog box will be displayed indicating the standard file has been created. 7. Press OK. The HECTM Menu screen will reappear. Page 37 Original CSP-900RMM-2 S1 8. Page 38 Original Ground Based Maintenance Computer User Guide Select Activate Pratt and Whitney HECTM Software button. The HECTM application will be launched. Refer to the HECTM user manual for further instructions. Ground Based Maintenance Computer User Guide CSP-900RMM-2 S1 Balance Monitor System (BMS) Menu The Chadwick-Helmuth BMS Transfer program is a DOS based program. Selecting this option will change the display mode of your computer to “character mode”. This program is used to Download Logs from BMS, Clear BMS Logs, Run VibraLog for Windows, and Upload to BMS. 1. To start the BMS Program, select BMS Menu from the GBMC main menu screen. 2. Select the helicopter to use for this BMS session. 3. The following dialog box will appear. Select OK to launch the BMS program. NOTE: The screen will now switch to character mode for the BMS program and the BMS menu will appear. This screen is shown as it appears when the user is logged on as System Administrator. Menu item “4. Upload to BMS”, Is only available at the System Administrator level. If you are logged on as either a Full User or Limited User, this menu item will not appear. Downloading BMS Logs This menu option allows you to download BMS logs. These logs are the BMS Fault Log, Spectrum Log, Main Rotor Balance Log, NOTAR Balance Log, and the Advisory Log. Refer to the Introduction paragraphs for a description of these logs. Page 39 Original CSP-900RMM-2 S1 Ground Based Maintenance Computer User Guide TIP: The operator must be logged into the IIDSGP as either Limited User, Full User or System Administrator to have access to this function. This procedure is for downloading individual logs or all logs from the BMS system. Page 40 Original 1. Connect the GBMC to the IIDS (Ref. Connecting the GBMC Computer To The IIDS). 2. Select DownLoad Log from BMS option bar using the ( ) arrow keys and press the ENTER key or, press the number “1” and press ENTER. 3. Select log to download using the ( ) arrow keys, or press the menu option number (1, 2, 3, etc.), and press the ENTER key. 4. A status screen will appear indicating the download progress of each log being transferred. Verify that “OK” appear after each log file name when “Download Complete” flashes at the bottom of the screen. Ground Based Maintenance Computer User Guide 5. Press the Escape key (Esc) twice to return to the main BMS menu. 6. Disconnect the GBMC from the IIDS. CSP-900RMM-2 S1 Clearing BMS Logs TIP: The operator must be logged into the IIDSGP as either Limited User, Full User or System Administrator to have access to this function. This procedure is for clearing individual logs or all logs from the BMS system (memory in IIDS). 1. Connect the GBMC to the IIDS (Ref. Connecting the GBMC Computer To The IIDS). 2. Select Clear BMS Log option bar using the ( ) arrow keys and press the ENTER key or pressing the number “2” and press ENTER. 3. Select log to clear using the ( ) arrow keys, or press the menu option number (1, 2, 3, etc.), and press the ENTER key. 4. A dialog box will indicate the log clearing status. When complete, the message “DATA XFER CMPL” is displayed on the IIDS alpha-numeric display, the logs have been cleared. 5. Pressing the CLR button on the IIDS will Clear the message from the alpha-numeric display. 6. Disconnect the GBMC from the IIDS. Uploading BMS Model OR Setup Configuration This menu option is used to upload the balance model used to perform Main Rotor and NOTAR Fan balance calculation or the BMS Setup configuration file. This option is restricted to MDHI authorized personnel only and requires a special System Administrator password to complete the operation. Contact your MDHI Field Service Representative for assistance in performing this function. TIP: The operator must be logged into the IIDSGP as System Administrator to have access to this function. This procedure applies to uploading either a BMS balance model or new/changed BMS configuration data. Page 41 Original CSP-900RMM-2 S1 Ground Based Maintenance Computer User Guide 1. Connect the GBMC to the IIDS (Ref. Connecting the GBMC Computer To The IIDS). 2. Select Upload to BMS option bar using the ( ) arrow keys and press the ENTER key or; pressing the number “4” and press ENTER. Page 42 Original 3. Select BMS Balance Model or Setup Configuration to upload using the ( ) arrow keys, or press the menu option number (1, 2, 3, etc.), and press the ENTER key. 4. If you are uploading a Setup Configuration file, the following screen will appear and prompt you to enter the name of the file to upload. This defaults to “BMSSETUP.CFG”. Press ENTER to confirm. 5. A dialog box will display a message “Overwrite Existing File?”. Press ENTER to confirm. 6. The BMS Upload Status screen will appear and ask you to enter your ID. Enter your ID and press ENTER. Ground Based Maintenance Computer User Guide 7. CSP-900RMM-2 S1 You will then be prompted to enter your password. Enter your password and press ENTER. The BMS Status portion of the screen will display the upload progress. 8. At the “Upload Done OK” prompt, press ENTER then ESC. A Warning message will appear stating “Upload Aborted OK”. This is normal. Press ESC to return to the main menu. Page 43 Original CSP-900RMM-2 S1 9. Ground Based Maintenance Computer User Guide Verify that the message “DATA XFER CMPL” is displayed on the IIDS alpha-numeric display. Pressing the CLR button on the IIDS will clear the message from the alpha-numeric display. 10. Page 44 Original Disconnect the GBMC from the IIDS. Ground Based Maintenance Computer User Guide CSP-900RMM-2 S1 APPENDIX ASCM Log Definition Tables Setup Log PARAMETER RANGE OF VALUES Aircraft: 3 3 3 3 3 3 Engine Installation IPS Installation Heat/Defog Installation Rotor Brake Installation Fwd Fuel Probe Calibration Code Aft Fuel Probe Calibration Code Serial No. PWC or TEC Installed or not installed Installed or not installed Installed or not installed 3 Alphanumeric characters 3 Alphanumeric characters Alphanumeric, up to 8 characters Engine Left: 1 1 1 1 1 1 1 1 1 1 2 2 2 2 Max Ng Norm (K2) Ng Cor Factor (K3) Ng Bias Flt Cor (K4A) Ng Bias Alt Flt Cor (K4B) Max EGT Norm (K5) EGT Cor Factor (K6) EGT Bias Flt Cor (K7A) EGT Bias Alt Flt Cor (K7B) Ng Gain Flt Cor (K8) EGT Gain Flt Cor (K9) Torque Bias Torque Gain EGT Bias EGT Gain 0 to XX.XX, Numeric 0 to XX.X, Numeric 0 to X.XXX, Numeric 0 to X.XXX, Numeric 0 to XXX.X, Numeric 0 to XX.X, Numeric 0 to X.XXX, Numeric 0 to X.XXX, Numeric 0 to X.XXX, Numeric 0 to X.XXX, Numeric 0 to 50 0.000 to 1.000 -50 to 50 0.000 to 1.000 Engine Right: 1 1 1 1 1 1 1 1 1 1 2 2 2 2 3 3 3 3 3 3 Max Ng Norm (K2) Ng Cor Factor (K3) Ng Bias Flt Cor (K4A) Ng Bias Alt Flt Cor (K4B) Max EGT Norm (K5) EGT Cor Factor (K6) EGT Bias Flt Cor (K7A) EGT Bias Alt Flt Cor (K7B) Ng Gain Flt Cor (K8) EGT Gain Flt Cor (K9) Torque Bias Torque Gain EGT Bias EGT Gain Top Level Software Part Number Operational Software Part Number Maintenance Software Part Number BMSOP Software Part Number BMSBP Software Part Number BMSBM Software Part Number 0 to XX.XX, Numeric 0 to XX.X, Numeric 0 to X.XXX, Numeric 0 to X.XXX, Numeric 0 to XXX.X, Numeric 0 to XX.X, Numeric 0 to X.XXX, Numeric 0 to X.XXX, Numeric 0 to X.XXX, Numeric 0 to X.XXX, Numeric 0 to 50 0.000 to 1.000 -50 to 50 0.000 to 1.000 12 Characters 12 Characters 12 Characters 12 Characters 12 Characters 12 Characters Original Appendix A - 1 CSP-900RMM-2 S1 Ground Based Maintenance Computer User Guide Setup Data ID Setup Data Config Change Time Setup Data Config Change Date (Mo, Da, Yr) Cycle Factors:1 ECF MCF1 Impeller X.XX X.XX Comp Turb X.XX X.XX Power Turb X.XX X.XX MCF2 X.XX X.XX X.XX MCF3 X.XX X.XX X.XX MCF4 X.XX X.XX X.XX MCF5 X.XX X.XX X.XX Impeller Parameter Thresholds:1 EGT (deg C) Threshold 1 XXX.X Threshold 2 XXX.X Threshold 3 XXX.X Threshold 4 XXX.X Threshold 5 XXX.X EGT (deg C) XXX.X XXX.X XXX.X XXX.X XXX.X Power Turbine Parameter Thresholds:1 EGT (deg C) XXX.X XXX.X XXX.X XXX.X XXX.X Threshold 1 Threshold 2 Threshold 3 Threshold 4 Threshold 5 Cycle Factors:2 NgK1 Impeller NgK3 Comp Turb Ng (%) XXX.X XXX.X XXX.X XXX.X XXX.X Ql (%) XXX.X XXX.X XXX.X XXX.X XXX.X Np (%) XXX.X XXX.X XXX.X XXX.X XXX.X Ng (%) XXX.X XXX.X XXX.X XXX.X XXX.X Ql (%) XXX.X XXX.X XXX.X XXX.X XXX.X Np (%) XXX.X XXX.X XXX.X XXX.X XXX.X 99 X.XX 98 X.XX X.XX X.XX X.XX X.XX X.XX X.XX X.XX 111 X.XX 110 X.XX 109 X.XX 108 X.XX 107 X.XX 99 X.XX 98 X.XX 97 X.XX 96 X.XX 95 X.XX Compressor Turbine NgK2 X.XX NgK4 X.XX NpK2 X.XX Notes: 1. PWC Cycle Counting 2. Turbomeca Cycle Counting Original Appendix A - 2 Ng(max) Threshold (%) 97 96 95 94 X.XX X.XX X.XX X.XX 100 X.XX Impeller ACF3 XX.X XX.X XX.X Ql (%) XXX.X XXX.X XXX.X XXX.X XXX.X 101 X.XX Np(max) Threshold (%) 112 NpK1 X.XX Power Turb 100 NpK1 X.XX Power Turb Power Turbine ACF2 XX.X XX.X XX.X Ng (%) XXX.X XXX.X XXX.X XXX.X XXX.X XXX.X XXX.X XXX.X XXX.X XXX.X Compressor Turbine Parameter Thresholds:1 Threshold 1 Threshold 2 Threshold 3 Threshold 4 Threshold 5 ACF1 XX.X XX.X XX.X 8 Characters 0 to 23:59, 4 Characters Numeric, 6 Characters NgHT XX % NgHT XX % NpHT XX % ACF4 XX.X XX.X XX.X ACF5 XX.X XX.X XX.X FCF RTCF X.XX X.XX X.XX X.XX X.XX X.XX Np (%) 93 92 X.XX X.XX 91 <=90 X.XX X.XX X.XX X.XX X.XX X.XX X.XX 106 X.XX 105 X.XX 104 103 X.XX X.XX 102 101 X.XX X.XX 94 X.XX 93 X.XX 92 91 X.XX X.XX <=90 X.XX NgLT XX % NgLT XX % NpLT XX % CSP-900RMM-2 S1 Ground Based Maintenance Computer User Guide 3. Data reported by IIDS, not changeable from GBMC Cumulative Log Date Time Aircraft No. Number of Flights Total Flight Time Last Flight Time Xmsn Chip Burn Cnts Engine Left: Serial No. Dec 19 1990 13:27:46 12345678 2111 3056.1 1.5 2 12376 Gear Box Module: Serial No. Accum SSO 12345 567 Accum FSO 552 Accum TSO 1343.1 Accum TSN 4020.2 Power Module: Serial No. 12354 Accum FSO 552 Accum TSO 1343.1 Accum TSN 4020.2 2.5 OEI Excruns Total Time 2.5 OEI 104% Excruns Total Time 104% Impeller, Centrfgl Disk Comp Turb Disk Power Turb Accum SSO 567 10 14.7 min 126 1430 min Serial No. Accum'd 234570 234571 234572 Engine Right: Serial No. Total Cycles Last Flt 7854 6674 8121 Cycles Accum'd 2 1.7 1.9 Accum FSO 112 Accum 567.1 Power Module: Serial No. Accum SSO 12364 123 Accum FSO 112 Accum TSO 567.1 TSO Accum TSN 567.2 Accum TSN 567.2 15 4.7 min 126 1430 min Serial No. Impeller, Centrfgl Disk Comp Turb Disk Power Turb 12898 11300 13234 12367 Gear Box Module: Serial No. Accum SSO 12346 123 2.5 OEI Excurns Total Time 2.5 OEI 104% Excruns Total Time 104% Total Hours 234570 234571 234572 Total Cycles Accum'd 7854 6674 8121 Cycles Last Flt 2 1.7 1.9 Total Hours Accum'd 12898 11300 13234 Original Appendix A - 3 CSP-900RMM-2 S1 Ground Based Maintenance Computer User Guide The definitions of the data fields in the Cumulative Log are listed below. Engine: Serial No. Alphanumeric, up to 12 characters Gear Box Module: Serial No. Time Since New (TSN) Time Since Overhaul (TSO) Time Between Overhaul (TBO) Starts Since Overhaul (SSO) Flights Since Overhaul (FSO) Alphanumeric, up to 12 characters 0 to 50,000.0 0 to 50,000.0 0 to 50,000.0 0 to 9999 0 to 9999 Power Module: Serial No. Time Since New (TSN) Time Since Overhaul (TSO) 1 Time Between Overhaul (TBO) Starts Since Overhaul (SSO) Flights Since Overhaul (FSO) 2.5 OEI Excursions Accum 2.5 OEI Time 104% Excursions Accum 104% Time Alphanumeric, up to 12 characters 0 to 50,000.0 0 to 50,000.0 0 to 50,000.0 0 to 9999 0 to 9999 0 to 999 0 to 999 0 to 999 0 to 999 1 Serial No. Impeller, Centrifugal Disk, Compressor Turbine Disk, Power Turbine 12 Char 12 Char 12 Char Accum Life Cycles 6 Char 6 Char 6 Char Hours 6 Char 6 Char 6 Char Notes: 1. Turbomeca only Data Log 3 2 2 1 Original Appendix A - 4 Parameter Recording Rate Gas Generator Speed, Ng, % (Left/Right) 4 per second Power Turbine Speed, Np, % (Left/Right) 4 per second Rotor Speed, Nr, % 4 per second Torque Local, Ql, % (Left/Right) 4 per second Exhaust Gas Temp, EGT, Deg C (Left/Right) 4 per second Collective Posn, CLP, % 4 per second Engine Oil Temp, EOT, Deg C (Left/Right) 1 per second Engine Oil Press, EOP, PSI (Left/Right) 1 per second Transmission Oil Temp, XOT, Deg C 1 per second Transmission Oil Press, XOP, PSI 1 per second Generator Load, % (Left/Right) 1 per second Battery Bus Voltage 1 per second Ground Based Maintenance Computer User Guide Hydraulic Oil Press, HOP, PSI (1/2) Aircraft Discrete Input Data Outside Air Temp, OAT, Deg C Pressure Altitude, P0, feet CSP-900RMM-2 S1 1 per second 1 per second 1 per second 1 per second Notes: 1. Data on RS-422 serial bus 2. Data on RS-422 serial bus for PWC and analog input for TEC 3. Corrected Ng for Turbomeca Fault Log Fault Log Number Aircraft No. Engine Left S/N Engine Right S/N Date Time IIDS Fault Words: 12 12345678 12345 12346 Dec 19 1990 13:27:46 IIDSFALT1 IIDSFALT2 ACFTFALT SENSFALT BMSFALT Aircraft Fault Word Sensor Fault Word BMS Fault Word Pratt & Whitney: Engine Left EEC Fault Words: DSCWD1, NCFAL1, NCFAL2, NCFAL3, CFAIL Engine Right EEC Fault Words: DSCWD1, NCFAL1, NCFAL2, NCFAL3, CFAIL OR Turbomeca: Engine Left EEC Fault Words: MAINTENANCE 1, 2; LOGICAL INPUT, OUTPUT Engine Right EEC Fault Words: MAINTENANCE 1, 2; LOGICAL INPUT, OUTPUT Original Appendix A - 5 CSP-900RMM-2 S1 Ground Based Maintenance Computer User Guide Trend Log PRATT AND WHITNEY: * * 3 * * * 1 1 * 1 * 1 * * * 2 * 2 * 3 3 Trend Log Number TIME DATE (MMDDYY) Engine Left or Right Engine Serial Number Engine TSO Np (Power Turbine Speed) T1 (Inlet Temperature) Torque (Qt) Ng (Gas Generator Speed) EGT (Exhaust Gas Temperature) EOP (Engine Oil Pressure) EOT (Engine Oil Temperature) Nr (Rotor Speed) XOP (Transmission Oil Pressure) XOT (Transmission Oil Temperature) HOP 1/2 (Hydraulic Oil Pressure) P0 (Pressure Altitude in feet) Outside Air Temp (OAT) Ng Performance Margin EGT Performance Margin Ng correction factor from Initial Calibration (K3) EGT correction factor from Initial Calibration (K6) * Data in Standard (STD) File to HECTM Exceedance Log Exceedance Log Number Exceedance Parameter Type Aircraft No. Engine Left S/N Engine Right S/N Date Time Peak Value Time to Peak Time above 88.4% Time to 100% Time above 100% Time to 102.57% Time above 102.57% Time to 113.97% Time above 113.97% Data Log File Number Original Appendix A - 6 35 Left Eng Torque 12345678 12345 N/A Dec 19 1990 13:27:46 120% 23 Sec 54 Sec 8 Sec 45 Sec 6 Sec 31 Sec 10 Sec 15 Sec 3 CSP-900RMM-2 S1 Ground Based Maintenance Computer User Guide BMS Log Definition Tables BMS Setup Log PARAMETER Spectrum Log Type Log Version Log Name Set Number Set Name Low Frequency High Frequency OCCURRENCES One per Log Type One per Log Type One per Log Type One per Set in Log One per Set in Log One per Group in Set One per Group in Set Number of Averages Number of Bins Azimuth Channel Signal Conditioning Window Type One per Group in Set One per Group in Set One per Group in Set One per Group in Set One per Group in Set Output Scale Factor Output Units Spectrum Number Spectrum Name Vibration Channel One per Group in Set One per Group in Set One per Spectrum in Group One per Spectrum in Group One per Spectrum in Group RANGE Trend, Random, or PA 6 alphanumeric characters 10 alphanumeric characters 1 to 99 12 alphanumeric characters Must be zero Hz Hz (10, 20, 50, 100, 200, 500, 1000, 2000, 5000, 10000, 20000) 1 to 32 400 1 to 7 AC, DC, DC Attenuated Flattop only 10-3 only IPS only 1 to 999 12 alphanumeric characters 1 to 13 Vibration/Balance Model Log Vibration Monitor Setup Parameters: PARAMETER Vibration Monitor Version Main Rotor Level 1 Trigger Level Main Rotor Level 1 Trigger Time Store data on MR Level 1 Alarm Notify IIDS on MR Level 1 Alarm Main Rotor Level 2 Trigger Level Main Rotor Level 2 Trigger Time Store data on MR Level 2 Alarm Notify IIDS on MR Level 2 Alarm NOTAR Level 1 Trigger Level NOTAR Level 1 Trigger Time Store data on NOTAR Level 1 Alarm Notify IIDS on NOTAR Level 1 Alarm NOTAR Level 2 Trigger Level NOTAR Level 2 Trigger Time Store data on NOTAR Level 2 Alarm Notify IIDS on NOTAR Level 2 Alarm RANGE 6 alphanumeric chars 0 to 32 IPS 0 to 32,000 seconds Yes or No Yes or No 0 to 32 IPS 0 to 32,000 seconds Yes or No Yes or No 0 to 32 IPS 0 to 32,000 seconds Yes or No Yes or No 0 to 32 IPS 0 to 32,000 seconds Yes or No Yes or No Original Appendix A - 7 CSP-900RMM-2 S1 Ground Based Maintenance Computer User Guide Main Rotor Balance Model Parameters: PARAMETER OCCURRENCES Change Type Name One per Change Type Change Type Max Value One per Change Type Change Type Min Value One per Change Type Change Type Constrained One per Change Type Change Type Editable One per Change Type Change Type Cost Factor One per Change Type Balance Point Name One per Balance Point Flight Regime Name One per Flight Regime Azimuth Channel Number One per Flight Regime Measurement Name One per meas in regime Harmonic (nP) Number One per meas in regime Vibration Channel Number One per meas in regime Component RPM One per meas in regime Change Sensitivity One per blade per meas Change Phase Angle One per blade per meas Initial Vibration Goal One per meas in regime Vibration Goal Increment One per meas in regime RANGE xx alphanumeric chars floating point number floating point number Yes or No Yes or No floating point number xx alphanumeric chars xx alphanumeric chars 1 to 7 xx alphanumeric chars 1 to 4 1 to 13 60 to 300,000 RPM floating point number 0 to 360 degrees floating point number floating point number NOTAR Balance Model Parameters: PARAMETER OCCURRENCES Change Type Name One Change Type (weight) Change Type Max Value One Change Type (weight) Change Type Min Value One Change Type (weight) Change Type Constrained One Change Type (weight) Change Type Editable One Change Type (weight) Change Type Cost Factor One Change Type (weight) Balance Point Name One per Balance Point Flight Regime Name One Flight Regime (100% Gnd) Azimuth Channel Number One Flight Regime (100% Gnd) Measurement Name One meas in regime Harmonic (nP) Number One meas in regime Vibration Channel Number One meas in regime Component RPM One meas in regime Change Sensitivity One per blade per meas Change Phase Angle One per blade per meas Initial Vibration Goal One Only Vibration Goal Increment One Only RANGE xx alphanumeric chars floating point number floating point number Yes or No Yes or No floating point number xx alphanumeric chars xx alphanumeric chars 1 to 7 xx alphanumeric chars 1 to 4 1 to 13 60 to 300,000 RPM floating point number 0 to 360 degrees floating point number floating point number Original Appendix A - 8