1
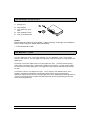
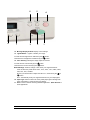
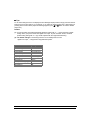
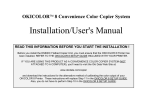
KWIK- KOPY
TM
Table of Contents
PACKAGE CONTENTS........................................................................................3
INTRODUCTION ..................................................................................................3
USING COLOR DIGITAL SCAN COPIER WITH A PRINTER AS A COLOR DIGITAL
COPIER...................................................................................................................4
SETTING UP THE COLOR DIGITAL SCAN COPIER.....................................4
THE CONTROL PANEL .....................................................................................6
BEFORE MAKING COPIES .............................................................................10
MAKING SIMPLE COPIES ..............................................................................10
MAKING COPIES WITH COPY FEATURES .................................................11
MIRROR FUNCTION.....................................................................................11
ENLARGING OR REDUCING YOUR ORIGINAL.........................................12
AUTO ZOOMING YOUR ORIGINAL ............................................................13
CHANGING YOUR COPY DENSITY.............................................................14
CHANGING COLOR INTENSITY ..................................................................14
CHOOSING YOUR COPY QUANTITY ..........................................................14
ENHANCING YOUR COPY QUALITY ..........................................................16
FOCUS ON PHOTO COPY, TEXT COPY, OR ..............................................17
MIXED PHOTO&TEXT COPY ......................................................................17
MAKING COPIES OF A 3D OBJECT ...........................................................18
AUTOMATIC POWER SAVING.....................................................................19
USING COLOR DIGITAL SCAN COPIER AS A SCANNER........................20
SETTING UP THE COLOR DIGITAL SCAN COPIER...................................20
INSTALLING THE SOFTWARE......................................................................21
USING BUNDLED APPLICATIONS ...............................................................22
IN WINDOWS 95 , 98 & NT4.0 ......................................................................22
MORE INFORMATION ....................................................................................29
KWIK-KOPY
1
Technical Support
KOPYKAKE ENTERPRISES.
th
3699 W 240 Street
Torrance, CA 90505
TEL: (310) 373-8906
FAX: (310) 375-5275
TECH: 800-9977470
Web Site: http://www.kopykake.com
E-mail: [email protected]
2
KWIK-KOPY
PACKAGE CONTENTS
1. Software CD **
2. Power Adapter
3. color digital scan copier
1
2
3
4
Cable
4. Quick Installation Guide
5. main unit of KWIK-KOPY
5
➣ Note:
Please check the contents of your package. If there is any sign of damage, do not attempt to
install. Please notify your nearest dealer immediately.
** To be released fall of 1999
INTRODUCTION
The color digital scan copier, as the name suggests, is a color digitalized copier , which could be
used as a color scanner. The color digital scan copier plus a laser printer gives you a high quality color
digital copier.
Introducing an innovative digital solution, the color digital scan copier, produces far better printing
quality and is maintenance-free, compared with a traditional copy machine. The high printing quality,
free maintenance and affordability of this color digital scan copier make itself the best copier solution
for office.
Connected to a PC, the color digital scan copier, can be used as a color flatbed scanner, which
bundles a comprehensive application suite including Quick Selector (the scanning-assistant
application), PaperCom (the document manager application), Xerox TextBridge (the OCR application to
convert your document image to editable text), MGI PhotoSuite SE (the image-editing and personal
photo retouching application).
KWIK-KOPY
3
USING COLOR DIGITAL SCAN COPIER WITH A PRINTER AS
A COLOR DIGITAL COPIER
SETTING UP THE KWIK-KOPY COLOR DIGITAL SCAN
COPIER
Setting up the color digital scan copier with your printer is very easy. It is similar to the way in which
you connect a PC to a normal printer.
1.
Unlock your color digital scan
copier by moving the lock
switch beneath the color digital
scan copier to the “Unlock”
position. (Refer to the
Lock/Unlock figure on the right
side.)
2.
Plug one end of the printer
cable to the port marked “to
printer” on the back of your
color digital scan copier and
plug the other end to your
printer.
3.
Plug the small end of the power
cable to the power jack on the
back of your color digital scan
copier .
4.
Plug the large end of the power
cable to the power outlet.
5.
You have now successfully set
up your new color digital scan
copier and can start copying.
4
1.
Lock Unlock
3.
4.
2.
KWIK-KOPY
Connectivity
The color digital scan copier, has a built-in Centronics parallel port, which supports the following
printer types with their printer languages.
Printer Type
EPSON
(740, 850)
Printer
Language
ESC/P
MINOLTA
(Color Page Pro)
PCL
CANON 2000
PCL
KWIK-KOPY
5
12
14
17
16
13
15
11
10
9
THE CONTROL PANEL
1. Copy(Color): Press to start color copy.
2. Copy(B/W): Press to start black-and-white copy
3. Power/Copy LED: The LED indicator turns green when power is on and
turns flashing during copying.
4. All Clear: Clear your current settings and return to the default settings.
5. Document Type: Press to respectively concentrate on photo, text, or auto
copying.
6. Copy Quality: Select your Copy quality: Normal (300 dpi), or Quality (600
dpi).
7. Copy Count: Choose the number of copies from 1 to 99.
value of the numeric entries by the (
( ) button.
Increase the
) button or decrease the value by the
8. Select/Resume: Press to select your desired setting. (A star sign, "*",
appearing in the right-hand side indicates the latest selection you make .)
9.
: Go to the previous item dispalyed in the Message Display window or
increase the value of the numeric entries.
10.
: Go to the next item displayed in the Message Display window or
decrease the value of the numeric entries.
11. Menu: Select a paper size, a printer type, a printer language, an image
pattern, or the Mirror function.
6
KWIK-KOPY
6
8
7
2
5
3
4
1
12. Message Display window: Display current settings.
13. Lighter/Darker: Lighten or darken your image.
Increase level of brightness or darkness by the ( ) button.
Decrease level of brightness or darkness by the ( ) button.
14. Color Intensity: Intensify the image copied or scanned.
Increase level of color intensity by the ( ) button.
Decrease level of color intensity by the ( ) button.
Reduce/Enlarge: Reduce, enlarge or auto zoom your original document.
Press to select the preset ratios: 100%, 115%, 122%, 141%, 200%, 400%,
Auto, 25%, 50%, and 86%.
Choose your desired ratio or adjust the ratio in 1% increment by the ( ) or
( ) button.
Auto: Automatically scale your original document to fit your output paper.
16. Paper Type: Press to select one of the preset paper types including Plain
paper, transparency, Premium Inkjet, and Glossy.
17. Scan: Press to start the scanning-assistant application - Quick Selector or
other applications.
KWIK-KOPY
7
☛ Tips:
To use other settings than the one displayed in the Message Display window, simply press the relavent
button(s) to set up other options. (For example, if you intend to change a paper size, after keeping on
or
button to select a desired
pressing “Menu” button till the paper-size message appears, push
paper size.)
➣ Note:
(1). An item message in the Message Display Windows ending with a “∗ “ means the latest update
setting. When you power off the color digital scan copier or push “All Clear” button, the latest
update setting ending with a “*” sign will be replaced with the original default setting.
(2). The default settings: The following functions are set initially when the color
digital scan copier, is shipped from Kopykake Enterprises.
Button
Copy Count
Document Type
Copy Quality
Lighter/Darker
Color Intensity
Reduce/Enlarge
Paper Type
Menu(Paper size)
Menu(Printer)
Menu(Printer Language)
Menu(Pattern)
Menu(Mirror)
8
Setting
1 copy
Auto
Normal Mode
The fourth level
The fourth level
Ratio: AUTO
Premium paper
Letter
Canon
ESC/P
Half tone
Off
KWIK-KOPY
IMPORTANT!
Printer Memory
To make good use of color digital scan copier , it is recommended to install at least 1 MB of memory in
your printer. If you want to print your document using Quality mode - 600 dpi as your Copy Quality,
you need to add more RAM for your printer as using this feature requires more processing time and
memory.
We strongly recommend you to refer to the following table to ensure a successful print out.
Copy Quality
Normal
Quality
Document Size
Letter Size
Legal Size
Letter Size
Legal Size
Min. Printer Memory
4MB
8 MB
16MB
20MB
If there is not enough memory in your printer, you may probably encounter the following results:
1.
The printer does not print.
2.
The Printing quality is bad.
KWIK-KOPY
9
BEFORE MAKING COPIES
The color digital scan copier provides three paper sizes, A4, letter, and legal. Check or select the
paper size to match your paper supply to ensure smooth operations. Only « letter » should be used,
when using the KWIK-KOPY Sytem to print on Frosting Sheets.
To check or select paper size,
1.
Press Menu button and select “Paper Size” item. The Message window displays “Letter” as a
default setting. If your current paper supply is Letter size, you can skip the following steps.
Otherwise, please do the following steps.
2.
Keep on pushing
or
button till a desired paper size appears. When the desired paper size
message is shown in Message Display window, this update paper-size setting is done. In order to
help you distinguish every new setting you make from the other preset settings, press Select
button and a “ * “ sign will appear on the right-hand side of the displayed message.
•
•
Suppose you want a A4 size, please press Select button when the “Paper Size: A4” appears
in Message Display window. This means you have successfully changed the default size to
A4.
or
button till Letter
If Letter size is your current paper supply, please keep on pressing
size appears. And then, press Select button to make a “*” sign shown next to the displayed
message on the right side to distinguish the desired paper size, Letter, from the others.
➣ Note:
Each time when you press All Clear button or power off the color digital scan copier, the color digital
scan copier automatically returns to the factory default setting. As a result, you have to change the
factory default setting each time when you power on the color digital scan copier.
MAKING SIMPLE COPIES
The Operating Steps:
1.
2.
Place your original face-down on the document glass.
Press the Copy button either of Color or of Black and White.The Message window displays “Color
copy…” for pushing Color button or “ Mono copy…” for B/W button ,and the Ready LED is flashing.
Within a few seconds, the copying is done. The Message window then displays “1 Copy @
AUTO” and the Ready LED is now steadily on until next task.
The Auto setting is desinged to place the enlarged / reduced image to best fit the 7 ½ »X 10 «
usable area of the Frosting Sheet.
3.
4.
10
KWIK-KOPY
MAKING COPIES WITH COPY FEATURES
MIRROR FUNCTION
This function allows you to horizontally flip the copied image as if the image were reflected in a
mirror.
The Operating Steps
1.
2.
3.
4.
Place your document face-down on the document glass.
Keep on pressing Menu button till the message, “Mirror: off”,appears.
Press the
or
button to get the message, “Mirror: on”.
Press Copy button.The printout shows the original image is flipped horizontally as if it were
reflected in a mirror.
Mirror function is off
KWIK-KOPY
Mirror function is on
11
ENLARGING OR REDUCING YOUR ORIGINAL
Like a normal copier, the color digital scan copier also features auto enlargement/reduction function
to resize your original.
The Operating Steps:
1.
2.
3.
4.
Place your document face-down on the document glass.
Press the “Reduce/Enlarge” button, the Message window displays “Ratio:100%”.
Repress the button to see more options. For example, if you need 150% enlargement, select
“141%” then press the “▲” button to increase the percentage to 150 in 1% increment.
Press the Copy button. And then the printout shows enlargement of 150% of your original.
Ratio:100%
Ratio: 150%
➣ Note:
•
•
12
Another option to reduce your original is to firstly repeat the enlargement or reduction steps 1 to
3 and then press the “▼” button to decrease the percentage in 1% increment.
The magnification rate is up to 400% while the reduction rate limits to 25%.
KWIK-KOPY
AUTO ZOOMING YOUR ORIGINAL
Auto Zoom is a convenient function to resize your original without giving additional thought to
whether the magnification or reduction will be larger than the existing paper size.
The Operating Steps:
1.
2.
3.
Repeat the above Enlargement Step 1 & 2.
Repress the “Enlarge/Reduce” button until the Message window displays “Auto ”.
Press the Copy button. The printout shows your original automatically scales to your paper size.
Before Auto Zoom (Ratio:100%)
KWIK-KOPY
After Auto Zoom
13
CHANGING YOUR COPY DENSITY
Copy density refers to the degree of darkness which the digital copier has reproduced. There are
times when your original is unsatisfactorily darker or lighter. It is of great advantage to use the
density feature to compensate the unsatisfactory original.
The Operating Steps:
1.
2.
3.
4.
Place your original face down on the document glass.
Press the “Lighter/Darker” button. The Message window displays the default degree of
darkness.
Repress the “Lighter/Darker” button to select one of the other levels. Or you may press the “▲”
to increase the level, press the “▼” button to decrease the level.
Press the Copy button. Your printout shows the darkness or brightness has been compensated.
CHANGING COLOR INTENSITY
Color intensity refers to the saturation of color which the digital copier has reproduced. There are
times when the saturation of the original image doesn’t fit your preference. By making a great use of
this function, you could get the most optimal color preference desired.
The Operating Steps:
1.
2.
3.
4.
Place your original face-down on the document glass.
Press the “Color Intensity” button. The Message window displays the default saturation.
Repress the “Color Intensity” button to select one of the other levels. Or you may press the “▲”
to increase the level, press the “▼” button to decrease the level.
Press the Copy button. Your printout shows the color saturation of image meets your
preference.
CHOOSING YOUR COPY QUANTITY
The Operating Steps:
1.
2.
3.
4.
14
Place your original face-down on the document glass.
The default copy count is 1. If you need to make 3 copies, for example, press the “Copy Count”
button and the Message window displays “2 copy @100%”.
Repress the “Copy Count” button and the Message Window displays “3 copy …”.
Press the Copy button. After a few seconds, you have 3 copies from your printer.
KWIK-KOPY
➣ Note:
•
•
Another option to change your copy quantity is to press the “▲” button to increase the number or
the “▼“ button to decrease the number.
The maximum copy quantity is 99 at one time.
KWIK-KOPY
15
ENHANCING YOUR COPY QUALITY
The color digital scan copier provides “Quality mode” option to improve your copy quality particularly
when your original comes with a photo in it. Quality mode allows your printout to impressively
reveals more image(photo) details.
The Operating Steps:
1.
2.
3.
4.
Place your document face-down on the document glass.
Press the “Copy Quality” button. The Message window displays “Normal mode”.
Repress the “Copy Quality” button and the Message window displays “Quality mode”.
Press the Copy button. The copying begins processing with the Quality mode.
See following photo/text reproduction between normal copier v.s. color digital scan
copier in quality mode.
Make copies with a normal copier
Make copies with a color digital scan copier in quality
mode
➣ Note:
•
16
To proceed copies using quality mode, make sure your printer has at least 4M memory as this
requires more processing time.
KWIK-KOPY
FOCUS ON PHOTO COPY, TEXT COPY, OR
MIXED PHOTO&TEXT COPY
If the content in the original is occupied by photo images only or by photo images with a little text on
it, press to select the Photo function to get a photo-concentrated image copy. On the contrary, the
Text function helps you get a text-concentrated copy. However, if the proportion of the photo image
is almost the same as that of text in the original to be copied, it is recommended to utilize the Auto
function from Document Type button in order to get the most optimal printout with photo and text
mixed.
The Operating Steps:
1.
2.
3.
Place your document face-down on the document glass.
Keep on pressing “Document Type” button to select any one of these 3 document-type
functions, called Photo, Text, and Auto.
Press the Copy button, and the printout shows the best reproduction with the document-type
concentration selected.
KWIK-KOPY
17
MAKING COPIES OF A 3D OBJECT
The digital copy solution improves your copy reproduction significantly and even makes a 3D object
copies amazingly clear.
The Operating Steps:
1.
2.
3.
4.
Place your 3D object on the document glass.
Press the “Copy Quality” button and the Message window displays “Normal mode”.
Repress the “Copy Quality” and the Message window displays “Quality mode”.
Press the Copy button. Your 3D object copy is done.
The 3D copy using a normal copier
18
The amazing 3D copy using color digital scan copier
KWIK-KOPY
AUTOMATIC POWER SAVING
The color digital scan copier features automatic power saving without unplugging the power cable. If
you have not used the color digital scan copier over an hour, the color digital scan copier
automatically turns into power saving status to save the power. At this moment, the Message
window displays “Power Saving…” while the Ready LED is flashing.
To resume the ready status, press any one of the button on the Control Panel. The Message
window displays “Warming up…” and then “1 Copy @100%”, the ready status. The Ready LED
now turns steadily on.
KWIK-KOPY
19
USING COLOR DIGITAL SCAN COPIER AS A
SCANNER
SETTING UP THE COLOR DIGITAL SCAN COPIER
The color digital scan copier is also a color scanner. Connect the color digital scan copier to your
computer as shown below:
1.
Unlock your color digital scan copier
by moving the lock switch (under the
color digital scan copier ) to the
“Unlock” position.
2.
Disconnect the computer power
cable.
3.
Remove the printer cable from the
parallel port of your computer and
plug it into the printer port of the
color digital scan copier. Leave the
other end connected to your printer.
1.
Lock
Unlock
5.
6.
4.
4.
Plug one end of the color digital
scan copier’s cable to the parallel
port of the color digital scan copier
and plug the other end into your PC
where the printer port cable was
plugging in.
5.
Connect the small end of the power adapter into the power jack on the back of the color digital
scan copier .
6.
Plug the large end of the power adapter to the power outlet. Now, the color digital scan copier will
be automatically powered on.
7.
Turn on your computer. Now it's time to install your software.
20
3.
KWIK-KOPY
INSTALLING THE SOFTWARE
1. Insert the supplied CD into your
CD-ROM drive and run “setup.exe”,
an installation menu will
automatically pop up.
2. Click “Install Software” to install the color digital scan copier’s driver and bundled applications and
follow the on-screen instruction to complete the installation.
The bundled software includes Xerox TextBridge Classic 2.0 (the optical character recognition OCR software), MGI PhotoSuite SE (the image editing and personal photo retouching application),
or PaperCom (the office document management application).
3. Click “View Manual” to view or print the user manual for color digital scan copier and bundled
software respectively.
➣ Note:
The color digital scan copier does not provide a power switch. When the power cable has been
connected, the power LED at the front of the color digital scan copier will be automatically turned on.
To turn off the color digital scan copier , disconnect the power adapter and unplug the power cable
from the power jack. The color digital scan copier provides an auto power saving function for you to
save the power without unplugging the power cable or turning the power switch off. If you have not
used the color digital scan copier over an hour, the color digital scan copier automatically returns to
power-saving status.
KWIK-KOPY
21
USING BUNDLED APPLICATIONS
IN WINDOWS 95 , 98 & NT4.0
WORKING WITH QUICK SELECTOR
Quick Selector: Using Quick Selector, you can instantly scan and link your scanned image to one of
selected applications without going through a number of time-consuming steps (For example, you don’t
need to start the application first, then select TWAIN source, choose “acquire” ,and so on).
Starting Quick Selector
Press the Scan button at the left end of the Control Panel. The Quick Selector main window is
displayed.
Quick Selector main window
Function Description:
Copy: The Copy button allows you to
print your scanned image.
Find: The Find button allows you to
start the Document Manager application
and search for file stored in the
application.
Fax: The Fax button allows you to fax
your scanned image to your
correspondent.
File: The File button allows you to start
Document Manager application and
display your scanned image in the
application’s window.
OCR: The OCR button allows you to
start Xerox TextBridge (an application to
read and edit text ), and display your
scanned text in a word processor.
Edit: The Edit button allows you to start
MGI PhotoSuite (an image editor and
photo retouching application), and
display your scanned image in MGI
PhotoSuite’s window to do photo
retouching.
WWW : The scanned image will be
displayed in your web browser screen.
You can paste the scanned image to
your homepage.
E-mail: The E-mail button allows you to
e-mail your scanned image to your
correspondent.
22
KWIK-KOPY
Before using Quick Selector
It is highly recommanded to customize Quick Selector before using it.
Click the Setup button to display the Setup dialog. The Setup dialog allows you to customize your
application setting and color digital scan copier setting to suit your own needs.
For example, select which printer to be used when you have more than one printer drivers installed on
your computer, or browse to locate your application path if you prefer other application rather than our
bundled application, or change your color digital scan copier settings when you want to use different
paper size, resolution, image type and so on.
The following is an example on how to Set-up your Fax in Quick Selector. (Similar steps applies to the Email, Editor, Printer software)
(1). Click Setup button in Quick Selector’s main window to display the Setup
dialog.
(2). Click Fax software icon button in the Application Bar. The Fax software
settings and the default color digital scan copier settings for Fax are displayed.
Application
setting area
Select your Fax
software from
the list
The Fax icon
button
color digital
scan copier
settings area
(3). Select your Fax software location in Application setting area of the dialog.
(4). Select your Resolution, Paper Size, or Image Type in the Digital Scan
Copier color digital scan copier setting area. (Refer to item#7 in Tip Sec.)
KWIK-KOPY
23
Using Quick Selector
1.
Get a Preview image: Click the Preview button in Quick Selector’s main window to get a rough
scan image (low resolution) and to allocate your final scan area.
2.
Select your Application: Move your mouse pointer to your desired application.
3.
Scan and Link to your Application: Click your desired application icon button. Quick Selector
bring you efficiency to start the application and display your scanned image.
➣ Note:
1.
You can start Quick Selector without pressing the Scan button. Click the Quick Selector
Controller icon and choose Restore from the pop-up menu.
Choose Restore from the pop-up
menu to dispaly Quick Selector
main window
Quick Selector Controller icon
Or choose Start>Programs>PaperCom Quick Selector>PaperCom Quick Selector.
2.
You can also start the bundled application (for example, the MGI PhotoSuite or Xerox TextBridge)
individually without starting Quick Selector. Go to the Start button and choose MGI PhotoSuite SE
or TextBridge Classic from the Programs group.
3.
Install Fax/E-mail software and modem before using these features.
24
KWIK-KOPY
YOUR FIRST SCAN WITH PAPERCOM
Welcome to PaperCom: a filling cabinet by your desktop. With PaperCom, you can keep your photos,
newspaper clippings, doctoor’s bill, business cards or legal contract electronically. Above all, you can
link your documents to various applications such as fax, e-mail, image-editing, or OCR with the click of
a button. For more information, please refer to the on-line help on the CD.
1.
Click the Scan button at the left end of the Control Panel or choose Start>Programs>PaperCom
Document Manager>Document Manager. Quick Selector main window appears.
The File application
button
2.
Click the File application button.
3.
Place your image on the document glass of color digital scan copier and click the Scan button to
start your first scan with PaperCom. Or learn more details in the following page.
The Scan button
Click “Preference”
on the File menu
to change color
digital scan copier
setting.
Double-click
the thumbnail
to view and
annotate the
documents.
Add new folder
by choosing File
>New Folder>(Type folder
name)>OK. And
store your image
to the folder by
dragging the
thumbnail to the
folder.
Trash Can (Drag the
unwanted documents into
trash can).
KWIK-KOPY
Application Bar (Drag the documents to
either one of the applications bar for further
processing).
25
color digital scan copier Settings in “Setup” dialog.
4
Click “Apply”
button to save all
the changes
before closing
Setup.
3
Select the proper
settings for your
scan. (Refer to
item# 7 in the
following Tip
Sec. ).
2
5
Select one of the
Application icon to change
the color digital scan copier
setting and designate the
location of your
applicatioon.
1
Check “Display
TWAIN Dialog” for
more color digital
scan copier settings.
Select proper color digital
scan copier source if you
have more than one color
digital scan copier.
WORKING WITHOUT QUICK SELECTOR
If you wish to work with various bundled software applications individually without starting Quick
Selector, you can launch each of the bundled applications through the Programs group from the Start
menu. For basic knowledge to use the bundled applications, see the following Windows 3.1x section.
For further details, see “Manual” in the CD.
26
KWIK-KOPY
The bundled applications, MGI PhotoSuite, Xerox TextBridge, and PaperCom, can still be started
individually through the Programs group from the Start menu.
YOUR FIRST PHOTO SCAN WITH PHOTOSUITE
Welcome to the World of PC Photography.
Using PhotoSuite, you can enhance your photo by altering color, making collages, and more. You can
also put your photo into frames to create posters, calendars, greeting card, sports card, and your own
photo album. For more information, please refer the on-line help on the CD.
1.
Open the “MGI PhotoSuite SE” group, double click the “MGI PhotoSuite SE” icon.
2.
Click “Work on your own” ->File->Get
Photos From->Select Source to select the
TWAIN source. Select “DS600C /32 Vx.xx”
as your driver, then click “OK”.
➣ Note: You need to select the TWAIN
source for just once. After restarting
Windows or turning on your computer, you do
not have to reselect the source.
3.
Click on File->Get Photos
From->Camera/color digital
scan copier . The TWAIN
Vx.xx scanning dialog box
appears. This dialog box
allows you to change the
setting of the scan (image
type, resolution, scan area,
etc.), and also to use some
special functions (color
matching, descreen, etc.)
Open the color digital scan copier document
cover, place a picture or a document face down
on the glass of the color digital scan copier .
5. Click on “PREVIEW”. The color digital scan
copier will scan your image for preview on
screen.
6. Use your mouse to drag the margin handles to
properly frame the picture, select image type,
resolution etc. and click on “SCAN”. (For a
color photo, choose resolution to be 100
dpi)
7. After the scanning is complete, you can go
back to PhotoSuite and play with your first
scanned photo.
4.
KWIK-KOPY
27
123
YOUR FIRST OCR SCAN WITH TEXTBRIDGE
Welcome to Xerox’s TextBridge.
TextBridge is a program for scanning your text and editing your text with a text editor or word
processor. This is most useful when you need to retype a text document. Scan the text and save it in
your computer. For more information, please refer to the on-line help on the CD.
1.
Open the TextBridge Classic group, double click the “TextBridge Classic” icon.
(i) Select “TWAIN” as the type of color digital scan copier driver.
(ii) Select “DS600C /32 Vx.xx” as the color digital scan copier source.
2.
Place a document in your color
digital scan copier .
Click the “Auto” button
in
TextBridge. The MrScan dialog box
will show up.
4. Click the Preview button. The color
digital scan copier will scan your
image for preview on the screen.
5. Select the scanning area, set Line
3.
Art ( ), 300dpi(resolution) and
click the Scan button.
28
KWIK-KOPY
6.
Once the scanning is complete, TextBridge will automatically convert the image into text, and then
let you save it to a file.
7.
Start your word processor to edit the file.
MORE INFORMATION
For more information on how to operate the color digital scan copier , please refer to the user manual
contained in the CD.
KWIK-KOPY
29
☛ Tips
1. Access the color digital scan copier Utility.
The color digital scan copier Utility is a program automatically installed during the installation of the
color digital scan copier driver. The color digital scan copier Utility has one major function - to test the
color digital scan copier connection.
If the color digital scan copier has been connected successfully, a color digital scan copier icon
will appear at the lower-right corner of the taskbar. Double-click the color digital scan copier icon to
bring up the color digital scan copier Utility dialog box.
The status lamp will
turn green if the color
digital scan copier
connection is correct.
➣ Note: The color digital scan copier Utility is available only in Windows 95 and NT4.0.
2. Quick solution to some common error codes
Error Code/Status
Error code 2:
Indicates Bad
Connection
Quick Solution
Please check if
a. your power cable has been plugged into the power
jack on the back of your color digital scan copier .
b. your color digital scan copier has been correctly
connected with your computer with the color digital
scan copier cable(supplied). (See step 1-5 in Sec. 2
Setup your color digital scan copier .)
Error code 10:
Indicates the color
digital scan copier
has not been
unlocked.
Error code 11:
Indicates Scan
without installing the
transparency kit
Unlock your color digital scan copier by moving the lock
switch on the bottom of the color digital scan copier to the
“Unlock” position. (See step 6 in Sec. 2 Setup your color
digital scan copier )
30
Do not scan or preview under Transparency option if you
have not installed the Transparency kit. Counsel your
nearest dealer if you want to buy the transparency kit.
KWIK-KOPY
3.
You have problem to print your document.
a. Make sure the power cable has been firmly connected and that the power LED at the front of the
color digital scan copier is on.
b. The color digital scan copier ’s pass-through printing allow you to print your document while attach
your color digital scan copier and printer to a single printer port on your computer. Yet you can
not do printing and scanning at the same time. Stop printing while you are scanning or stop
scanning while you are printing.
Note that pass-through printing can not function if you disconnect the power adapter from the power
outlet or unplug the power cable from the power jack of the color digital scan copier .
4.
Connect Zip drive and color digital scan copier through a single parallel port.
Please use your Zip drive cable to connect your Zip drive to your PC parallel port. Plug the male
connector of the color digital scan copier cable(supplied) to the printer port of your Zip drive and plug
the female connector of the color digital scan copier cable to the port (mark “To PC Parallel Port)of
your color digital scan copier .
5.
The Disk space consumed in scanning a color image.
An A4 color image scanned at 300 dpi (resolution) under True Color (image type) will take
approximately 25 MB of disk space. Normally, a color image scanned at 100 dpi (resolution) under
True Color will produce good details of an image on the screen. A higher resolution (over 600 dpi) will
only be recommended when you need to scan a small area under True Color.
6. The image type for TextBridge
When you scan plain text with TextBridge, be sure to choose Line Art as your image type. Any other
image type as Gray, Halftone, 256 Color, or True Color you choose will bring up an error message.
KWIK-KOPY
31
7.
Reference Table for color digital scan copier Settings( as a scanner)
copier Settings
color digital scan
Image Type
(dpi)
Application
File, Fax, E-mail Your Document
Copy, Edit Your Color Picture
OCR Your Document
8.
Resolution
Line Art
200
True Color
100
Line Art
300
Print Speed/Print Quality/Print Color or Black & White
Please bear in mind that the higher resolution, the slower print speed as a higher resolution requires
more processing time. Likewise, to print color is longer than to print B & W, as color contains greater
volumn of data. Therefore, if you want to print color and requires high quality, it is highly recommended
to turn your printer off and add more memory to your printer.
32
KWIK-KOPY