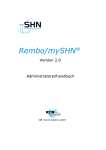
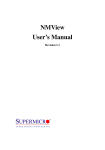
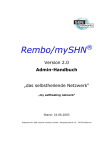
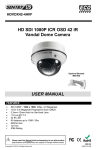
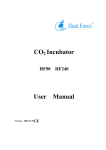
1
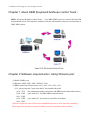
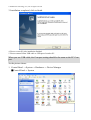
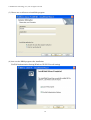
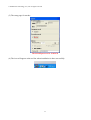
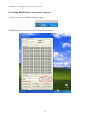
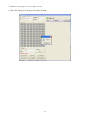
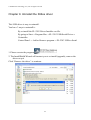
© 2008 Sinew Technology Co., Ltd. All rights reserved.
KBM
User’s Manual
1
© 2008 Sinew Technology Co., Ltd. All rights reserved.
Index
Chapter 1 About KBM (Keyboard & Mouse control Tools) --------------- 3
Chapter 2 Software requirements / Using Winsock port --------------------- 3
Chapter 3 Installations Guide ----------------------------------------------------- 4
Chapter 4 Install R-Box driver --------------------------------------------------- 5
Chapter 5 DBS system with R-Box Connection ------------------------------- 8
Chapter 6 KBM-Master installation --------------------------------------------- 9
6-1 Teacher PC installation for Windows Xp ------------------------------------------------- 9
6-2 Setting KBM-Master connection Com port --------------------------------------------- 12
6-3 Student PC installation --------------------------------------------------------------------- 15
Chapter 7 KBM control operation ---------------------------------------------- 19
Chapter 8 Backup Student ID --------------------------------------------------- 20
Chapter 9. Uninstall the R-Box driver ----------------------------------------- 25
2
© 2008 Sinew Technology Co., Ltd. All rights reserved.
Chapter 1 About KBM (Keyboard & Mouse control Tools)
KBM( Keyboard & Mouse control Tools)
is for DBS/ MBS system to control P/S2 and USB
keyboard and mouse. The firmware combines software and hardware, improves the functions of
DBS/ MBS system.
Chapter 2 Software requirements / Using Winsock port
(1)RAM 128MB or up
(2)Windows 98SE / ME / 2000 / XP/2003 /Vista
(3)KBM-control uses Winsock port 1618, 1620, 1621, 1622, 1623
(P.S.: please open the 5 port when the PC has installed firewall)
1618 --TCP
(for student and teacher connection and KBM interior data achievement)
1620 --UDP
(pair with 1621, for DBS/ MBS communication)
1621 --UDP
1622 --UDP
(pair with 1623, for teacher to send files to students)
1623 – UDP
(4)Please temporarily turn off firewall or add KBM software to white list before installing.
Please ignore the possible warning for software control component while installing.
3
© 2008 Sinew Technology Co., Ltd. All rights reserved.
Chapter 3 Installations Guide
Install R-Box Driver
Insert R-Box to Teacher PC
Page 5
DBS system with R-Box Connection
Page 8
Install KBM-Master software
For Teacher PC
Page 9
Setting KBM-Master
Comm Port
Page 12
Install KBM-Client for Student PC
Page 15
Checking KBM-Client connection
Page 17
Start to operate KBM function
Page 19
4
© 2008 Sinew Technology Co., Ltd. All rights reserved.
Chapter 4 Install R-Box driver
System require:
_ Windows 98, Windows Me, Windows 2000, Windows XP and Windows Vista
_ AMD or Intel Pentium133MHz and up
_ USB 1.1 or up
_ RS-232 PORT
Installation for Windows XP / Vista
Insert the driver CD-ROM, or go to http://www.sinew.com.tw/e_download.html
Download R-box driver for Windows XP or Vista version
1. Run the program
2. The InstallShield Wizard shows as below, please click “Next” to continue.
5
© 2008 Sinew Technology Co., Ltd. All rights reserved.
3. Installation completed, click to finish.
4. Please re-start PC after installation finished.
5. Please connect R-Box USB cable to USB port of teacher PC.
When you use USB cable, the Com port setting should be the same as the PC Com
port.
As the picture shows:
1. Control Panel → System → Hardware → Device Manager
■ Control Panel→ System
6
© 2008 Sinew Technology Co., Ltd. All rights reserved.
■ System → Hardware
■ Hardware → Device Manager
When the USB Cable is connected to PC, you will
find a simulated USB Com Port (COM3) in device
manager. The software should set at Com 3, too
7
© 2008 Sinew Technology Co., Ltd. All rights reserved.
Chapter 5 DBS system with R-Box Connection
DM 400
Teacher
PC
B
COM Port
USB (B)
VGA
2232
TR
LED
UTP-A
DM-3162DA5S
UTP-B
B
USB
BT-2088
A
B
SB-1082A5S
SB-1082A5S
SB-1082A5S
SB-1082A5S
SB-1082A5S
SB-1082A5S
8
© 2008 Sinew Technology Co., Ltd. All rights reserved.
Chapter 6 KBM-Master installation
6-1 Teacher PC installation for Windows Xp
(1) Install CD-ROM files “KBM-Master (2.4D)-En.exe”
(2) Welcome page for installation
9
© 2008 Sinew Technology Co., Ltd. All rights reserved.
(3) Choose one or all users to install this program
(4) Auto-run the KBM program after installation
FireWall Authentication Setting(Windows XP SP2 Firewall setting)
10
© 2008 Sinew Technology Co., Ltd. All rights reserved.
(5) The setup page for teacher
The default password is 12345678
(6) The icon will appear at the tool bar when installation is done successfully.
11
© 2008 Sinew Technology Co., Ltd. All rights reserved.
6-2 Setting KBM-Master connection Com port
(1)Click Tool bar to open KBM-Master program.
(2)KBM Program: Choose Com Port Setting and set Com port.
12
© 2008 Sinew Technology Co., Ltd. All rights reserved.
(3)Confirm R-Box Com port is added from Device Manager of Teacher PC
Start → Control Panel → System → Hardware → Device Manager
(4) Choose Com Port Setting from KBM program. Then select R-Box Com port. It will show green
light which means status is OK if selected correctly.
13
© 2008 Sinew Technology Co., Ltd. All rights reserved.
(5) Save the setting of Com port: Press Save Setting.
14
© 2008 Sinew Technology Co., Ltd. All rights reserved.
6-3 Student PC installation
(1) Install CD-ROM files “KBM-Client (2.1C)-En.exe”
(2) Installation steps are the same as teacher’
s
(3) The setup page for student.
Notice: Please make sure the Slave Box ID and Master PC (Teacher PC) IP Address is correct.
Slave Box ID input: Please input ID as following list.
15
© 2008 Sinew Technology Co., Ltd. All rights reserved.
DBS Panel ID and KBM Slave ID Comparison
Panel / ID
01 / 0
For Example: DBS Panel Student ID 01, KBM-Client Slave Box ID input 0.
Teacher ID: 250
Panel/ID
Panel/ID
Panel/ID
Panel/ID
Panel/ID
Panel/ID
Panel/ID
Panel/ID
10 / 9
20 / 19
30 / 29
40 / 39
50 / 49
60 / 59
70 / 69
80 / 79
09 / 8
19 / 18
29 / 28
39 / 38
49 / 48
59 / 58
69 / 68
79 / 78
08 / 7
18 / 17
28 / 27
38 / 37
48 / 47
58 / 57
68 / 67
78 / 77
07 / 6
17 / 16
27 / 26
37 / 36
47 / 46
57 / 56
67 / 66
77 / 76
06 / 5
16 / 15
26 / 25
36 / 35
46 / 45
56 / 55
66 / 65
76 / 75
05 / 4
15 / 14
25 / 24
35 / 34
45 / 44
55 / 54
65 / 64
75 / 74
04 / 3
14 / 13
24 / 23
34 / 33
44 / 43
54 / 53
64 / 63
74 / 73
03 / 2
13 / 12
23 / 22
33 / 32
43 / 42
53 / 52
63 / 62
73 / 72
01 / 1
12 / 11
22 / 21
32 / 31
42 / 41
52 / 51
62 / 61
72 / 71
01 / 0
11 / 10
21 / 20
31 / 30
41 / 40
51 / 50
61 / 60
71 / 70
16
© 2008 Sinew Technology Co., Ltd. All rights reserved.
PS: when you click “Recovery”, the client will automatically refresh ID according to
C:\BSNT\id.ini contents. (This is for recovery card environment, such as Rembo card or branded
recovery cards.)
(4) The icon will appear at the tool bar when installation is done successfully.
(5) This image shows the normal connection with Master (Connecting)
PS: 1. “ID” is the Master ID value.
2. Mode =1 means the “Recovery” mode is valid, and you must copy the id.ini to the
directory C:\BSNT
3. Mode=0 means normal mode
4. Lan Info =ok means the LAN card is normal
5. IP Info =ok means the client has IP address (LAN cable is well-connected)
Note: After installing KBM-Client 2.1C for student PC successfully, the status “Connecting” will
shows up to indicate the connection between KBM and Master side is OK.
17
© 2008 Sinew Technology Co., Ltd. All rights reserved.
(6) This image will show when the client’
s LAN cable is pulled out, (IP info: error)
(7) This image will show when the client’
s networks is stopped, (Lan info: error)
18
© 2008 Sinew Technology Co., Ltd. All rights reserved.
Chapter 7 KBM control operation
KBM Control support 3-directions remote control function: teacher to student, student to teacher,
and student to student.
[ Teacher to student ]
Press selected ” STUDENT ID” à” OBSERVE”
à” KBM”
[ Student to Teacher ]
” TEACHER” à
Press selected ” student ID” à ” KBM”
[ Student to Student]
Press selected student IDà” STUDENT” à” EXECUTE” à Press selected STUDENT
IDà” KBM”
Notice: There will be a green light glittering to show which student was selected
when pressing “ STUDENT ID” .
19
© 2008 Sinew Technology Co., Ltd. All rights reserved.
Chapter 8 Backup Student ID
(I) Student ID setup (single ID, PC Name to ID, file to ID, ID-Setup)
(1) Single ID: Change the student ID when the student PC is moved.
Steps: Select the student in PC Table, insert new ID to the PC Detail’
s ID column, click
“Update”; after 5 seconds, click “Run” to update the ID.
20
© 2007 Sinew Technology Co., Ltd. All rights reserved.
(2) PCName to ID: When the student PC is named according to DBS/ MBS panel numbers; for
example ClassA-11.
Steps: from the ID Setup mean, select “Name to ID”, and click “Collect ID” to create the id.ini
file. Click “Send ID” to send the “id.ini” file to all the students’c:\ share. After 5 seconds, click
“Run” to update students ID.
(3) ID: Reserve the current students ID
Steps: click “Collect ID” to create id.ini file, save this file.
(4) Files : use file mode (when O/S is re-installed).
Steps: browse id.ini file, click “Send ID” to send the “id.ini” file to all the students’c:\ share.
After 5 seconds, click “Run” to update students ID.
© 2008 Sinew Technology Co., Ltd. All rights reserved.
(5) ID Setup: open the student ID setup mode
Steps: Click ID-Setup to open the mode. Click again to stop it. It will create the id.ini file. Click
Send ID to send”id.ini” file to all the students’c:\ share. After 5 seconds, click “ Run” to update
the students’ID.
1. Open the setup mode of student ID
2. Click “NEW ID”, to insert the number on MBS/ DBS teacher panel, and click “OK” to send
the data back to teacher.
22
© 2008 Sinew Technology Co., Ltd. All rights reserved.
3. click “STOP” to create “id.ini” file, click “Send ID” to send it to all the students’c:\ share .
After 5 seconds, click “ Run” to update the students’ID.
23
© 2008 Sinew Technology Co., Ltd. All rights reserved.
(II) Other functions
List: Show student ID and setup mode.
Set password : change password mode (for all the on-line students).
Com port setting: setup the teacher unit and PC Com port.
PC-Shutdown: Shutdown the selected PC.
PC-Restart: Restart the on-line PC.
All-PC-Shutdown: Shutdown all the on-line PC.
24
© 2008 Sinew Technology Co., Ltd. All rights reserved.
Chapter 9. Uninstall the R-Box driver
This USB driver is easy to uninstall.
You have 3 ways to uninstall it:
By re-install the PL-2303 Driver Installer.exe file.
By going to Start→ Program files → PL-2303 USB-Serial Driver→
Uninstaller
Control Panel → Add or Remove program→ PL-2303 USB-to-Serial
1. Please execute the program
2. The InstallShield Wizard will instruct you to re-install (upgrade), remove the
driver or quit.
Click “Remove the driver” to continue.
25
© 2008 Sinew Technology Co., Ltd. All rights reserved.
2. The InstallShield Wizard will instruct you to restart Windows.
Click “Finish” to restart.
26