1
Powerful Virtual Machine Software for the Technical Professional
User’s Manual
Please note that you can always find the most up-to-date technical documentation on our Web site at http://www.vmware.com/support/.
VMware, Inc.
3145 Porter Drive
Palo Alto, CA 94304
www.vmware.com
The VMware Web site also provides the latest product updates.
Copyright © 1998-2006 VMware, Inc. All rights reserved. Protected by one or more of U.S. Patent Nos. 6,397,242,
6,496,847, 6,704,925, 6,711,672, 6,725,289, 6,735,601, 6,785,886, 6,789,156 and 6,795,966; patents pending.
VMware, the VMware “boxes” logo and design, Virtual SMP and VMotion are registered trademarks or
trademarks of VMware, Inc. in the United States and/or other jurisdictions. Microsoft, Windows and Windows
NT are registered trademarks of Microsoft Corporation. Linux is a registered trademark of Linus Torvalds. All
other marks and names mentioned herein may be trademarks of their respective companies.
Revision: 20060111 Version: 5.5 Item: WS-ENG-Q305-137
Table of Contents
Introduction and System Requirements __________________________ 17
Product Overview ______________________________________________ 18
Powerful Virtual Machine Software for the Technical Professional _______ 18
Overview of This Manual ______________________________________ 20
About the Host and Guest Computers ____________________________ 20
What’s New in Version 5 _________________________________________ 21
Multiple Snapshots ___________________________________________ 21
Enhanced Snapshot Management (New in v5.5) ____________________ 21
Teams _____________________________________________________ 21
Clones_____________________________________________________ 22
VMware Player (New in v5.5)____________________________________ 22
Improved Performance for Virtual Machines Running Concurrently _____ 22
Improved Networking Performance ______________________________ 23
Improved Suspend/Resume and Snapshot Operations _______________ 23
New Host Operating System Support_____________________________ 23
New Guest Operating System Support____________________________ 24
Full Support for 64-Bit Guest Operating Systems (New in v5.5) _________ 24
Improved 64-Bit Host Support __________________________________ 25
New Gigabit Virtual Adapter for 64-Bit Guests (New in v5.5)____________ 26
Experimental Support for Two-Way Virtual SMP (New in v5.5) __________ 26
Isochronous USB support ______________________________________ 26
Command Line Interface ______________________________________ 26
Enhanced Command Line Interface (New in v5.5) ___________________ 26
Autodetect Functionality for More Devices (New in v5.5)______________ 26
Enhanced Autoconnect Automatically Reconnects Manually Connected USB
Devices (New in v5.5) _________________________________________ 27
Movie Record and Playback ____________________________________ 27
Improved Linux User Interface __________________________________ 27
Easier Upgrades and VMware Tools Installation Improvements _________ 27
Support for NX bit____________________________________________ 27
Experimental Support for Direct3D_______________________________ 28
Experimental Support for Guest ACPI S1 Sleep______________________ 28
VMware Virtual Machine Importer (Windows Hosts Only) _____________ 28
Virtual Machine Importer Incorporated into Workstation (New in v5.5,
Windows Hosts Only) _________________________________________ 28
3
Virtual Machine Importer Imports LiveState Recovery System Images (New in
v5.5) ______________________________________________________ 28
Toolbar Customization (New in v5.5) _____________________________ 29
Disable Memory Page Trimming in the User Interface (New in v5.5) _____ 29
Support on Linux Hosts for Wireless Ethernet Adapters Used in Bridged
Networking (New in v5.5) ______________________________________ 29
Support for Display Resizing Features for Linux Guests (New in v5.5) _____ 29
Enhanced Product Update Checking (New in v5.5) __________________ 29
Host System Requirements _______________________________________ 30
PC Hardware ________________________________________________ 30
Memory ___________________________________________________ 31
Display ____________________________________________________ 31
Disk Drives _________________________________________________ 31
Local Area Networking (Optional) _______________________________ 31
Host Operating System________________________________________ 32
Virtual Machine Specifications_____________________________________ 34
Processor __________________________________________________ 34
Chip Set ___________________________________________________ 34
BIOS ______________________________________________________ 34
Memory ___________________________________________________ 34
Graphics ___________________________________________________ 34
IDE Drives __________________________________________________ 34
SCSI Devices ________________________________________________ 35
Floppy Drives _______________________________________________ 35
Serial (COM) Ports ____________________________________________ 35
Parallel (LPT) Ports____________________________________________ 35
USB ports __________________________________________________ 35
Keyboard __________________________________________________ 35
Mouse and Drawing Tablets ____________________________________ 36
Ethernet Card _______________________________________________ 36
Sound _____________________________________________________ 36
Virtual Networking ___________________________________________ 36
Supported Guest Operating Systems _______________________________ 37
Support for 64-Bit Guest Operating Systems _______________________ 37
Microsoft Windows 32-Bit______________________________________ 38
Microsoft Windows 64-Bit______________________________________ 38
Microsoft MS-DOS ___________________________________________ 38
Linux 32-Bit _________________________________________________ 39
4
www.vmware.com
Linux 64-Bit _________________________________________________
Novell Netware ______________________________________________
FreeBSD 32-Bit ______________________________________________
FreeBSD 64-Bit ______________________________________________
Sun Solaris 32-Bit ____________________________________________
Sun Solaris 64-Bit ____________________________________________
Technical Support Resources______________________________________
Self-Service Support __________________________________________
Online and Telephone Support _________________________________
Support Offerings ____________________________________________
Reporting Problems __________________________________________
Experimental Support_________________________________________
Where to Go Next ______________________________________________
39
40
40
40
40
40
41
41
41
41
41
43
44
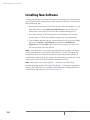
Installing VMware Workstation __________________________________
Selecting Your Host System_______________________________________
Upgrading from Previous Versions _______________________________
Workstation Cannot Share a Host with Other VMware Products ________
Installing VMware Workstation 5 on a Windows Host ___________________
Installing Workstation on a Windows Host _________________________
Installing VMware Workstation Silently ____________________________
Uninstalling VMware Workstation 5 on a Windows Host ______________
Installing VMware Workstation 5 on a Linux Host ______________________
Before Installing on a Linux Host_________________________________
Installing Workstation on a Linux Host ____________________________
Configuring with vmware-config.pl ______________________________
Web Browser Required ________________________________________
Uninstalling VMware Workstation 5 on a Linux Host _________________
Where to Go Next ______________________________________________
45
46
46
46
47
48
51
53
54
55
55
57
58
58
59
Upgrading VMware Workstation ________________________________
Preparing for the Upgrade________________________________________
Before You Install VMware Workstation 5 __________________________
Upgrading on a Windows Host ____________________________________
Upgrading from Version 4 or an Earlier Version 5 Release______________
Upgrading from Version 3 to Version 5 ____________________________
Upgrading on a Linux Host _______________________________________
Using Workstation 4 Virtual Machines in Workstation 5__________________
Create Everything New from the Start ____________________________
61
62
62
65
65
65
66
67
67
5
Use a Legacy Virtual Machine without Upgrading ___________________ 67
Use a Legacy Virtual Machine with Upgrade _______________________ 68
Where to Go Next ______________________________________________ 70
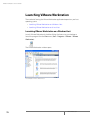
Learning VMware Workstation Basics ____________________________ 71
Launching VMware Workstation ___________________________________ 72
Launching VMware Workstation on a Windows Host _________________ 72
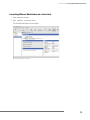
Launching VMware Workstation on a Linux Host ____________________ 73
Overview of the VMware Workstation Window________________________ 74
The Home Page, Summary View, and Console View__________________ 76
The Toolbar_________________________________________________ 79
The Favorites List_____________________________________________ 83
Checking for Product Updates_____________________________________ 86
Setting Preferences for VMware Workstation__________________________ 87
Workspace _________________________________________________ 88
Input ______________________________________________________ 89
Hot Keys ___________________________________________________ 89
Display ____________________________________________________ 90
Memory ___________________________________________________ 91
Priority ____________________________________________________ 92
Lockout (Windows Hosts Only)__________________________________ 93
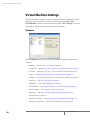
Virtual Machine Settings _________________________________________ 94
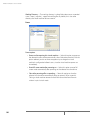
Hardware __________________________________________________ 94
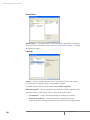
Options____________________________________________________ 95
Command Line Reference _______________________________________ 102
Startup Options on a Linux Host________________________________ 102
Startup Options on a Windows Host ____________________________ 103
Command Line Application ___________________________________ 104
Keyboard Shortcuts ___________________________________________ 107
What Files Make Up a Virtual Machine? _____________________________ 108
Where to Go Next _____________________________________________ 111
Creating a New Virtual Machine ________________________________
Setting Up a New Virtual Machine_________________________________
Importing Virtual Machines and System Images from Other Formats______
Virtual Machine Importer: Overview_____________________________
Importer Requirements ______________________________________
How Virtual Machine and System Image Settings Are Affected ________
Opening and Importing a Virtual Machine or System Image __________
6
113
114
125
126
126
127
128
www.vmware.com
Troubleshooting the Importer _________________________________ 134
Installing a Guest Operating System and VMware Tools ________________ 137
Example: Installing Windows XP as a Guest Operating System_________ 138
Installing VMware Tools _________________________________________ 140
Upgrading VMware Tools _____________________________________ 140
VMware Tools for Windows Guests ______________________________ 141
VMware Tools for Linux Guests _________________________________ 142
VMware Tools for FreeBSD Guests_______________________________ 146
Installing VMware Tools in a NetWare Virtual Machine _______________ 147
VMware Tools Configuration Options ______________________________ 149
Using the Control Panel to Configure VMware Tools ________________ 149
Using the System Console to Configure VMware Tools in a NetWare Guest
Operating System ___________________________________________ 153
Where to Go Next _____________________________________________ 155
Running VMware Workstation _________________________________
Starting a Virtual Machine _______________________________________
Virtual Machine Location _____________________________________
Checking the Status of VMware Tools ______________________________
Suspending and Resuming Virtual Machines ________________________
Shutting Down a Virtual Machine _________________________________
Power Off vs. Shut Down _____________________________________
Resetting a Virtual Machine ______________________________________
Reset vs. Restart ____________________________________________
Taking and Reverting to a Snapshot _______________________________
Cloning a Virtual Machine _______________________________________
Deleting a Virtual Machine ______________________________________
Using Virtual Machine Teams_____________________________________
Controlling the Display _________________________________________
Using Full Screen Mode ______________________________________
Using Quick Switch Mode_____________________________________
Taking Advantage of Multiple Monitors __________________________
Fitting the Workstation Console to the Virtual Machine Display ________
Nonstandard Resolutions _____________________________________
Simplifying the Screen Display _________________________________
157
159
159
160
161
162
162
163
163
164
165
166
167
168
168
169
169
170
172
172
7
8
Installing New Software_________________________________________
Cutting, Copying and Pasting Text_________________________________
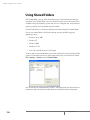
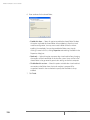
Using Shared Folders ___________________________________________
Viewing a Shared Folder ______________________________________
Using Drag and Drop___________________________________________
Using Devices in a Virtual Machine ________________________________
Adding, Configuring, and Removing Devices in a Virtual Machine______
Connecting and Disconnecting Removable Devices ________________
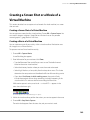
Creating a Screen Shot or a Movie of a Virtual Machine ________________
Creating a Screen Shot of a Virtual Machine _______________________
Creating a Movie of a Virtual Machine ___________________________
Where to Go Next _____________________________________________
174
175
176
180
181
182
182
182
183
183
183
185
Moving and Sharing Virtual Machines ___________________________
Virtual Machine Identifier — UUID ________________________________
The UUID Location and Format ________________________________
The UUID and Moving Virtual Machines __________________________
Specifying a UUID for a Virtual Machine __________________________
Setting the UUID for a Virtual Machine that Is Being Moved___________
Moving a VMware Workstation 5 Virtual Machine _____________________
Hosts with Different Hardware _________________________________
Virtual Machines Use Relative Paths _____________________________
Preparing a Workstation 5 Virtual Machine for a Move _______________
Moving a Workstation 5 Virtual Machine to a New Host______________
Moving a VMware Workstation 4 Virtual Machine _____________________
Preparing Your Workstation 4 Virtual Machine for the Move __________
Moving a Workstation 4 Virtual Machine to a New Host Machine ______
Moving an Older Virtual Machine _________________________________
Moving VMware Workstation 3.0 Virtual Machines__________________
Moving VMware Workstation 2.x Virtual Machines __________________
Considerations for Moving Workstation Disks in Undoable Mode ______
Sharing Virtual Machines with Other Users __________________________
Moving Linked Clones __________________________________________
Sharing Virtual Machines with VMware Player________________________
Running VMware Player ______________________________________
Configuring VMware Player ___________________________________
Closing VMware Player _______________________________________
Setting Up Virtual Machines for Use with VMware Player _____________
187
188
188
189
190
190
191
191
193
193
194
195
196
197
198
198
200
201
203
204
205
205
206
207
207
www.vmware.com
Using Disks _________________________________________________ 209
Configuring Hard Disk Storage in a Virtual Machine ___________________ 210
Disk Types: Virtual and Physical_________________________________ 210
Disk Files __________________________________________________ 213
Lock Files__________________________________________________ 214
Defragmenting Virtual Disks ___________________________________ 215
Shrinking Virtual Disks________________________________________ 215
Adding Drives to a Virtual Machine ________________________________ 219
Adding a New Virtual Disk to a Virtual Machine ____________________ 219
Adding Physical Disks to a Virtual Machine________________________ 223
Adding DVD or CD Drives to a Virtual Machine ____________________ 226
Adding Floppy Drives to a Virtual Machine________________________ 228
Connecting a CD-ROM or Floppy Drive to an Image File _____________ 229
Using VMware Virtual Disk Manager _______________________________ 230
Running the VMware Virtual Disk Manager Utility __________________ 231
Shrinking Virtual Disks with VMware Virtual Disk Manager ____________ 234
Examples Using the VMware Virtual Disk Manager__________________ 235
Configuring a Dual-Boot Computer for Use with a Virtual Machine _______ 237
Using the Same Operating System in a Virtual Machine and on the Host
Computer _________________________________________________ 238
Before You Begin____________________________________________ 239
Configuring Dual- or Multiple-Boot Systems to Run with Workstation___ 241
Setting Up Hardware Profiles in Virtual Machines ___________________ 247
Running a Windows 2000, Windows XP or Windows Server 2003 Virtual
Machine from an Existing Multiple-Boot Installation ________________ 252
Setting Up the SVGA Video Driver for a Windows 95 Guest Operating System
Booted from a Physical Disk ___________________________________ 252
Setting Up the SVGA Video Driver for Use with a Windows 98 Guest Operating
System Booted from a Physical Disk _____________________________ 254
Do Not Use Windows 2000, Windows XP and Windows Server 2003 Dynamic
Disks as Physical Disks ________________________________________ 256
Configuring Dual- or Multiple-Boot SCSI Systems to Run with VMware
Workstation on a Linux Host ___________________________________ 257
Known Issues and Background Information on Using SCSI Physical Disks 260
Installing an Operating System on a Physical Partition from a Virtual Machine 263
Configuring a Windows Host __________________________________ 264
Configuring a Linux Host _____________________________________ 266
9
10
Legacy Virtual Disks ____________________________________________
Upgrading a Legacy Virtual Machine for New Features of Workstation 5 _
Using a Legacy Virtual Machine without Upgrading ________________
Creating a Legacy Virtual Machine with Workstation 5_______________
268
269
269
269
Preserving the State of a Virtual Machine ________________________
Using Suspend and Resume _____________________________________
Using Snapshots ______________________________________________
Understanding Snapshots ____________________________________
Examples of Using Snapshots __________________________________
What Is Captured by a Snapshot? _______________________________
Taking a Snapshot___________________________________________
The Snapshot Manager_______________________________________
Restoring a Snapshot: Revert or Go To? __________________________
Deleting Snapshots _________________________________________
Making a Clone from a Snapshot _______________________________
Virtual Machine Settings for Snapshots __________________________
Snapshots and Legacy Virtual Machines__________________________
271
272
273
274
276
277
278
280
285
286
286
287
288
Cloning a Virtual Machine _____________________________________
Understanding Clones _________________________________________
Why Make a Clone?__________________________________________
Full and Linked Clones _______________________________________
Full Clones and Snapshots of the Parent__________________________
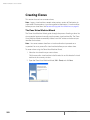
Creating Clones _______________________________________________
The Clone Virtual Machine Wizard ______________________________
Working with Clones ___________________________________________
Making a Linked Clone of a Linked Clone_________________________
Making a Full Clone of a Linked Clone ___________________________
Network Identity for a Clone___________________________________
The Linked Clone Snapshot ___________________________________
Linked Clones and Access to the Parent Virtual Machine _____________
289
290
290
291
291
292
292
295
295
295
295
296
296
Configuring Teams ___________________________________________
Teams Overview ______________________________________________
Creating and Deleting Teams ____________________________________
Making a New Team _________________________________________
Opening a Team ____________________________________________
Closing a Team _____________________________________________
299
300
301
301
305
305
www.vmware.com
Deleting a Team ____________________________________________
Adding and Removing Virtual Machines ____________________________
Adding an Existing Virtual Machine to a Team _____________________
Removing a Virtual Machine from a Team ________________________
Cloning and Taking Snapshots of Team Members_____________________
Cloning a Virtual Machine in a Team_____________________________
Taking Snapshots of Individual Virtual Machines in a Team ___________
Starting and Stopping Teams ____________________________________
Powering On a Team_________________________________________
Powering Off a Team_________________________________________
Suspending a Team _________________________________________
Resuming a Team ___________________________________________
Power Operations for Individual Members of a Team ________________
Working with Team Networks ____________________________________
LAN Segment Requirements __________________________________
Creating a Team LAN Segment_________________________________
Connecting to or Changing a LAN Segment ______________________
Renaming a LAN Segment ____________________________________
Deleting a LAN Segment _____________________________________
The Startup Sequence __________________________________________
Understanding the Start-Up Sequence Delay______________________
Working with the Team Console View ______________________________
Displaying Teams ___________________________________________
The Active Virtual Machine ____________________________________
Using Full Screen with Teams __________________________________
Editing Team Settings __________________________________________
Connections _______________________________________________
Virtual Machines ____________________________________________
LAN Segments _____________________________________________
Options___________________________________________________
Command Line for Teams _______________________________________
306
307
307
307
309
309
309
310
310
310
311
311
311
313
313
314
314
315
315
316
316
317
317
318
318
319
319
320
321
322
323
Configuring a Virtual Network _________________________________
Network Basics _______________________________________________
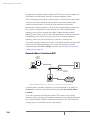
Components of the Virtual Network _______________________________
Virtual switch ______________________________________________
Bridge ____________________________________________________
Host Virtual Adapter _________________________________________
325
326
327
327
327
328
11
NAT Device ________________________________________________
DHCP Server _______________________________________________
Network Adapter ___________________________________________
Common Networking Configurations ______________________________
Bridged Networking _________________________________________
Network Address Translation (NAT) _____________________________
Host-Only Networking _______________________________________
Custom Networking Configurations _______________________________
Changing the Networking Configuration ___________________________
Adding and Modifying Virtual Network Adapters ___________________
Configuring Bridged Networking Options on a Windows Host ________
Enabling, Disabling, Adding, and Removing Host Virtual Adapters _____
Advanced Networking Topics ____________________________________
Selecting IP Addresses on a Host-only Network or NAT Configuration___
Avoiding IP Packet Leakage in a Host-Only Network ________________
Maintaining and Changing the MAC Address of a Virtual Machine _____
Controlling Routing Information for a Host-only Network on a Linux Host
Other Potential Issues with Host-Only Networking on a Linux Host_____
Setting Up a Second Bridged Network Interface on a Linux Host ______
Setting Up Two Separate Host-Only Networks _____________________
Routing between Two Host-Only Networks _______________________
Using Virtual Ethernet Adapters in Promiscuous Mode on a Linux Host__
Understanding NAT ___________________________________________
Using NAT _________________________________________________
The Host Computer and the NAT Network ________________________
DHCP on the NAT Network ____________________________________
DNS on the NAT Network _____________________________________
External Access from the NAT Network___________________________
Advanced NAT Configuration __________________________________
Custom NAT and DHCP Configuration on a Windows Host ___________
Considerations for Using NAT __________________________________
Using NAT with NetLogon ____________________________________
Sample Linux vmnetnat.conf File _______________________________
Using Samba with Workstation ___________________________________
Modifying Your Samba Configuration ___________________________
Using a Samba Server for Both Bridged and Host-Only Networks ______
Using Samba without Network Access ___________________________
12
328
328
328
329
329
330
332
333
336
336
338
343
346
347
350
352
354
355
356
357
360
364
365
366
366
366
367
367
368
372
373
373
375
378
378
378
378
www.vmware.com
Configuring Video and Sound __________________________________ 379
Setting Screen Color Depth______________________________________ 380
Changing Screen Color Depth on the Host _______________________ 380
Changing Screen Color Depth in the Virtual Machine _______________ 381
Using Full Screen Mode on a Linux Host ___________________________ 382
Experimental Support for Direct3D ________________________________ 383
Audience for Direct3D Experimental Support _____________________ 383
Accelerated 3-D Limitations ___________________________________ 384
Enabling Accelerated 3-D _____________________________________ 384
Known Issues ______________________________________________ 387
Helping VMware with Experimental Support ______________________ 388
Configuring Sound ____________________________________________ 389
Installing Sound Drivers in Windows 9x and Windows NT Guest Operating
Systems___________________________________________________ 389
Connecting Devices __________________________________________
Using Parallel Ports ____________________________________________
Parallel Ports _______________________________________________
Installation in Guest Operating Systems __________________________
Configuring a Parallel Port on a Linux Host________________________
Special Notes for the Iomega Zip Drive __________________________
Using Serial Ports ______________________________________________
Using a Serial Port on the Host Computer ________________________
Using a File on the Host Computer______________________________
Connecting an Application on the Host to a Virtual Machine _________
Connecting Two Virtual Machines ______________________________
Special Configuration Options for Advanced Users _________________
Examples: Debugging over a Virtual Serial Port ____________________
Keyboard Mapping on a Linux Host _______________________________
Quick Answers _____________________________________________
The Longer Story ___________________________________________
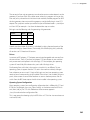
V-Scan Code Table __________________________________________
Using USB Devices in a Virtual Machine ____________________________
Notes on USB Support in Version 5______________________________
Enabling and Disabling the USB Controller________________________
Connecting USB Devices _____________________________________
Using USB with a Windows Host________________________________
Replacing USB 2.0 Drivers on a Windows 2000 Host_________________
391
392
392
392
393
396
397
397
398
400
402
405
407
409
409
409
413
417
417
418
418
419
419
13
Using USB with a Linux Host___________________________________
What Has Control over a USB Device?____________________________
Disconnecting USB Devices from a Virtual Machine _________________
Human Interface Devices _____________________________________
Connecting to a Generic SCSI Device ______________________________
Generic SCSI on a Windows Host Operating System ________________
Generic SCSI on a Linux Host Operating System ___________________
Using Two-Way Virtual Symmetric Multiprocessing (Experimental) _______
Moving SMP Virtual Machines between Workstation and ESX Server ___
420
420
421
421
422
422
426
429
430
Performance Tuning __________________________________________
Configuring and Maintaining the Host Computer_____________________
Location of the Working Directory ______________________________
Defragmentation of Disk Drives ________________________________
Adequate Free Disk Space ____________________________________
Overcommitting the Host Processors ____________________________
NIC Interrupt Coalescing______________________________________
Configuring VMware Workstation _________________________________
General VMware Workstation Options ___________________________
VMware Workstation on a Windows Host_________________________
VMware Workstation on a Linux Host ____________________________
Monitoring Virtual Machine Performance ___________________________
Memory Usage Notes __________________________________________
Virtual Machine Memory Size __________________________________
Memory Use on the Host _____________________________________
Using More Than 1GB of Memory on a Linux Host __________________
Improving Performance for Guest Operating Systems _________________
Windows 95 and Windows 98 Guest Operating System Performance Tips
Windows 2000, Windows XP and Windows Server 2003 Guest Operating
System Performance Tips _____________________________________
Windows NT Disk Performance on Multiprocessor Hosts _____________
Linux Guest Operating System Performance Tips___________________
Disk I/O Performance Tips _______________________________________
Memory Trimming __________________________________________
Page Sharing_______________________________________________
431
432
432
432
433
433
434
435
435
438
440
441
443
443
444
447
449
449
451
452
452
454
454
454
Special-Purpose Configuration Options _________________________ 455
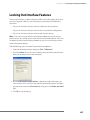
Locking Out Interface Features ___________________________________ 457
Removing a Forgotten Password _______________________________ 458
14
www.vmware.com
Restricting the User Interface ____________________________________
Automatically Returning to a Snapshot with a Restricted User Interface _
Using Full Screen Switch Mode ___________________________________
Creating a Virtual Machine for Use in Full Screen Switch Mode ________
Moving a Virtual Machine to the User’s Computer __________________
Setting Configuration Options on the User’s Computer ______________
Starting and Stopping Virtual Machines on the User’s Computer_______
Guest ACPI S1 Sleep____________________________________________
459
460
462
462
463
463
467
470
Glossary ____________________________________________________ 471
Index ______________________________________________________ 477
15
16
www.vmware.com
CHAPTER
Introduction and System
Requirements
1
This chapter discusses the following topics:
• Product Overview on page 18
• What’s New in Version 5 on page 21
• Host System Requirements on page 30
• Virtual Machine Specifications on page 34
• Supported Guest Operating Systems on page 37
• Technical Support Resources on page 41
17
VMware Workstation 5 User’s Manual
Product Overview
Thank you for choosing VMware® Workstation, the powerful virtual machine software
for enterprise IT professionals.
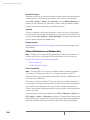
Run the operating systems and applications you need — all on a single desktop
Powerful Virtual Machine Software for the Technical
Professional
VMware Workstation is desktop software for developers and IT professionals that
allows you to run multiple x86-based desktop and server operating systems
simultaneously on a single PC, in fully networked, portable virtual machines — with
no rebooting or hard drive partitioning required.
With VMware Workstation, you spend less time procuring and configuring, and more
time testing and deploying. Over three million software development, quality
assurance, and IT professionals worldwide find VMware Workstation an indispensable
tool.
Key benefits include:
• Run multiple operating systems simultaneously on a single physical
machine — VMware Workstation is desktop software for software developers
and IT professionals that allows a single PC to simultaneously run multiple x86based operating systems, including Windows, Linux, and NetWare, and their
applications in fully networked, portable virtual machines - without rebooting or
hard drive partitioning. The result is reduced hardware expenditures and quicker
access to different computing environments. Additionally, VMware Workstation
lets users avoid platform lock-in and preserve the freedom and flexibility to
deploy the most appropriate platforms for their needs.
18
www.vmware.com
C H A P T E R 1 Introduction and System Requirements
• Revolutionize software development and testing — VMware Workstation
streamlines software development and testing by letting users create multiple
development and testing environments as virtual machines on a single PC.
Developers can create a library of virtual machines and use them to easily
develop and test applications on multiple operating systems, or to quickly create
and test “real-world” multi-tier configurations or virtual networks. Developers
can also use the multiple snapshot capabilities of Workstation to capture and
manage point-in-time configurations to facilitate debugging and give a
developer the ability to easily revert back to stable configurations should an
error occur during testing. VMware Workstation enables developers to reduce
configuration and set-up time, and instead focus on development and testing.
• Enhance productivity of enterprise IT professionals — VMware Workstation
allows system administrators, system engineers, and other enterprise IT
professionals to create and test multiple computing environments as virtual
machines on a single PC prior to deploying these environments on physical PCs
or servers in a production environment. This dramatically reduces hardware
costs and the time and risk associated with IT tasks such as deploying new
applications, application updates, and operating system patches. Additionally, IT
help desk departments can create a virtual library of corporate desktop and
server configurations that they can quickly access and manipulate (and then
“undo” if necessary), thereby improving their responsiveness and effectiveness
when troubleshooting end-user problems.
• Facilitate team collaboration — VMware Workstation lets users easily
collaborate with their colleagues and share virtual machines. Once a computing
environment — OS, associated applications, disk images, memory, etc. — has
been turned into a virtual machine, it becomes a set of hardware-independent,
encapsulated files that are highly portable and can be shared with any other
Workstation user. A virtual machine can be placed on a shared drive where
others can quickly access and upload it. Features in Workstation such as linked
clones and video capture further facilitate team collaboration.
• Introduce Virtual Infrastructure to your enterprise — Virtual machines
created in Workstation can be deployed to the other desktop and server
virtualization platforms offered by VMware. Introducing VMware Workstation
virtualization to the desktop is an ideal first step to transforming your physical IT
infrastructure into virtual infrastructure.
19
VMware Workstation 5 User’s Manual
Overview of This Manual
If you’re a veteran user of VMware products, take a few minutes to see What’s New in
Version 5 on page 21, and check out Upgrading VMware Workstation on page 61.
If you’re new to VMware Workstation, this is the place to start.
• The first chapters of this manual — through Running VMware Workstation on
page 157 — introduce you to some of the things you can do with VMware
Workstation and guide you through the key steps for installing the software and
putting it to work.
• Later chapters provide in-depth reference material for getting the most out of
the sophisticated features of VMware Workstation.
About the Host and Guest Computers
The terms host and guest describe your physical and virtual machines:
• The physical computer on which you install the VMware Workstation software is
called the host computer, and its operating system is called the host operating
system.
• The operating system running inside a virtual machine is called a guest
operating system.
• For definitions of these and other special terms, see Glossary on page 471.
20
www.vmware.com
C H A P T E R 1 Introduction and System Requirements
What’s New in Version 5
Unless otherwise noted the features in the following sections were introduced in
version 5.0. Features that were introduced after version 5.0 are noted.
Multiple Snapshots
VMware Workstation 5 greatly enhances the snapshot functionality available in
previous releases of the product by allowing you to take a series of point-in-time,
saved-to-disk snapshots of running virtual machines. This makes it easier to capture
and switch between multiple configurations and accelerates testing and debugging.
Should a problem arise during testing, you can easily revert to a prior, stable snapshot.
The new snapshot manager displays thumbnails of all your snapshots on a single
screen, making it easy for you to track and revert to a previously saved snapshot. Also,
when reverting to a previously saved snapshot, Workstation creates a new branch
automatically, so other snapshots continue to be available. See Using Snapshots on
page 273.
Enhanced Snapshot Management (New in v5.5)
In the snapshot manager, you can now select and delete multiple snapshots at once.
See Selecting a Snapshot on page 280.
Workstation 5.5 also enhances the command line interface (vmrun) so you can
manage snapshots of virtual machines more easily. With simple vmrun commands,
you can now quickly create, delete, list, and go to specific snapshots. See Command
Line Application on page 104.
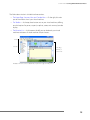
Teams
Teams functionality makes it easier to manage connected virtual machines and
simulate “real-world” multitier configurations. A team is your designated group of
virtual machines and the private networks that connect them.
Teams allow you to configure power operations, such as powering on and off and
suspending or resuming virtual machines, in the exact sequence you desire. You
determine network characteristics between the virtual machines in a team, including
network bandwidth and packet loss percentages. The console view displays active
thumbnails of all the virtual machines in a team, allowing you to easily identify and
switch between any of the virtual machines on your team. See Configuring Teams on
page 299.
21
VMware Workstation 5 User’s Manual
Clones
Clones simplify the process of copying a virtual machine. Clones facilitate
collaborative testing and debugging, and let colleagues share virtual machines more
easily. You can duplicate a virtual machine as a linked clone or a full clone.
• Linked clones make it easy to set up a library of baseline virtual machines on a
shared drive, to be accessed and shared by you and others, without using
unnecessary disk space on local machines.
• A full clone — a complete copy — is also available when you need an identical
virtual machine without the need to locate files within the host file system or to
tediously install everything required to duplicate an existing guest configuration.
See Cloning a Virtual Machine on page 289.
VMware Player (New in v5.5)
VMware Player is an application that opens and plays virtual machines created with
VMware Workstation 4 and Workstation 5, GSX Server, and ESX Server. On Windows
hosts, the player also opens and plays Microsoft Virtual PC and Virtual Server virtual
machines and Symantec LiveState Recovery system images. VMware Player makes
your VMware virtual machines accessible to colleagues, partners, customers, and
clients who do not own VMware products. VMware Player is included with
Workstation version 5.5.
VMware Player gives software developers and vendors great flexibility in marketing
and distributing products. You can package complex, sophisticated applications,
complete with a full working environment, in a virtual machine that is playable by
anyone who has VMware Player.
You can also use VMware Player to access the growing library of virtual machines
available from the VMware Technology Network (VMTN) Web site at
www.vmware.com/vmtn/vm/. This library includes virtual machines from various
software vendors, as well as virtual machines that are preconfigured with popular
open source software.
See Sharing Virtual Machines with VMware Player on page 205.
Improved Performance for Virtual Machines Running
Concurrently
Workstation 5 includes significant improvements in memory utilization when virtual
machines are used concurrently. This allows you to efficiently run multiple virtual
machines with much less total memory.
22
www.vmware.com
C H A P T E R 1 Introduction and System Requirements
Improved Networking Performance
Workstation 5 offers optional, enhanced networking performance by leveraging
VMware's custom network driver. Once you install the updated VMware Tools, the
necessary network drivers integrate seamlessly to offer significantly improved
network performance.
Improved Suspend/Resume and Snapshot Operations
Workstation 5 performs significantly faster suspend/resume and snapshot operations,
enabling you to spend more time testing and less time waiting for power operations
to execute.
New Host Operating System Support
See also Improved 64-Bit Host Support on page 25
• SUSE Linux Pro 9.2
• SUSE Linux 10
• SUSE Linux Enterprise Server 9.0
• Mandrake Linux 10
• Windows Server 2003 SP1
• Red Hat Enterprise Linux 4.0
• Experimental support for Ubuntu Linux 5.10
• Experimental support for Ubuntu Linux 5.04
23
VMware Workstation 5 User’s Manual
New Guest Operating System Support
See also Full Support for 64-Bit Guest Operating Systems (New in v5.5) on page 24
• Windows Small Business Server 2000
• Red Hat Linux Advanced Server 3.0
• Red Hat Enterprise Linux 4.0 beta
• SUSE Linux 9.3
• SUSE Linux Pro 9.2
• SUSE Linux Enterprise Server 9.0
• SUSE Linux Enterprise Server 9 SP1 (experimental support)
• Mandrake Linux 10
• Novell NetWare 6.5 SP3
• Novell NetWare 5.1 SP8
• Novell Linux Desktop 9
• Sun Java Desktop System
• Windows Server 2003 SP1
• FreeBSD 5.3
• Ubuntu Linux 5.10
• Ubuntu Linux 5.04
• Turbolinux Desktop 10
• Various other service pack updates and kernel updates
Full Support for 64-Bit Guest Operating Systems (New in v5.5)
Workstation 5.5 introduces full support for virtual machines with 64-bit guest
operating systems, running on host machines with the following processors:
• AMD™ Athlon™ 64, revision D or later
• AMD Opteron™, revision E or later
• AMD Turion™ 64, revision E or later
• AMD Sempron™, 64-bit-capable revision D or later (experimental support)
• Intel® EM64T VT-capable processors (experimental support)
24
www.vmware.com
C H A P T E R 1 Introduction and System Requirements
Workstation supports virtual machines with 64-bit guest operating systems only on
host machines that have one of the supported 64-bit processors.
Workstation 5.5 supports the following operating systems for 64-bit guests
• Experimental support for Windows Vista x64 Edition
• Windows Server 2003 x64 Edition SP1
• Windows XP Professional x64 Edition SP1
• Red Hat Enterprise Linux 4
• Red Hat Enterprise Linux 3
• SUSE Linux Enterprise Server 9
• SUSE Linux Pro 9.3
• SUSE Linux Pro 9.2
• SUSE Linux Pro 9.1
• Solaris 10 (experimental)
• FreeBSD 5.3
• Ubuntu Linux 5.10 (experimental)
• Ubuntu Linux 5.04 (experimental)
For more about Workstation support for 64-bit guest operating systems, see Support
for 64-Bit Guest Operating Systems on page 37.
Improved 64-Bit Host Support
• Workstation 5 includes hardware support for the following 64-bit processors:
AMD™ Opteron™, AMD Turion™ 64, AMD Athlon™ 64, AMD Sempron™
(experimental), and Intel® EM64T VT-capable processors (experimental).
• Software support includes 64-bit host operating systems:
• Windows XP Professional x64 Edition SP1
• Red Hat Enterprise Linux 3.0
• SUSE Linux Enterprise Server 7, 8, 9
• SUSE Linux 10
• SUSE Linux Pro 9.3
• Windows Server 2003 x64 Edition SP1
• Red Hat Enterprise Linux 4.0
25
VMware Workstation 5 User’s Manual
New Gigabit Virtual Adapter for 64-Bit Guests (New in v5.5)
For Workstation virtual machines with supported 64-bit guest operating systems,
Workstation 5.5 emulates a new Ethernet adapter type: the Intel® PRO/1000 MT Server
Adapter. This virtual adapter type is supported only for 64-bit guests.
Experimental Support for Two-Way Virtual SMP (New in v5.5)
For all supported configurations of 32-bit and 64-bit host and guest operating
systems running on multiprocessor host machines, Workstation provides
experimental support for two-way virtual Symmetric Multiprocessing (SMP). This
enables you to assign two virtual processors to a virtual machine. You can assign two
processors to the virtual machine if the host machine has at least two logical
processors. See Using Two-Way Virtual Symmetric Multiprocessing (Experimental) on
page 429.
Isochronous USB support
Workstation 5 offers support for isochronous USB input devices such as Web cameras
and microphones, as well as output devices such as speakers. Use your webcam or
work with multitrack audio within your guest operating system.
Command Line Interface
Workstation 5 offers a new command line interface, enabling you to create scripts to
automate certain manual steps. See Command Line Reference on page 102.
Enhanced Command Line Interface (New in v5.5)
Workstation 5.5 enhances the command line interface (vmrun) so you can manage
snapshots of virtual machines more easily. With simple vmrun commands, you can
now quickly create, delete, list, and go to specific snapshots. See Command Line
Application on page 104.
Autodetect Functionality for More Devices (New in v5.5)
Workstation extends existing autodetect support for CD-ROM drives to other
hardware devices. In the virtual machine settings editor (VM > Settings), you can now
set a virtual machine to detect the following hardware devices automatically:
• CD-ROM drive
• Floppy drive
• Sound adapter
• Parallel port
• Serial port
26
www.vmware.com
C H A P T E R 1 Introduction and System Requirements
Enhanced Autoconnect Automatically Reconnects Manually
Connected USB Devices (New in v5.5)
When you manually connect a USB device in Workstation 5.5, Workstation retains the
virtual machine’s connection to the affected port on the host machine. You can then
suspend or power off the virtual machine, or unplug the device. When you plug the
device back in or resume the virtual machine, Workstation reconnects the device
automatically. See Automatic Reconnection of USB Devices on page 418.
Movie Record and Playback
Workstation 5 offers the ability to record your actions within a virtual machine and
save the movie in an AVI format, facilitating team collaboration. Replay the resulting
AVI file on any PC equipped with an AVI player. A free Windows player is available for
download from the VMware Web site.
Record steps to reproduce defects in a particular configuration, or record
configuration steps prior to running an application. Share the movie with colleagues
to enable team collaboration. See Creating a Movie of a Virtual Machine on page 183.
Improved Linux User Interface
Workstation 5 offers a new GTK+, version 2-based user interface on Linux, which
provides an improved look and feel, and enhanced usability.
Easier Upgrades and VMware Tools Installation Improvements
Starting with Workstation 5, on Windows hosts you can automatically install a new
release over an existing Workstation release. The installer automatically uninstalls the
previous version before installing the new version. Workstation 5 also streamlines
VMware Tools installation for Linux virtual machines by allowing users to install
VMware Tools without exiting the X session. See Upgrading VMware Workstation on
page 61, and Installing VMware Tools on page 140.
Support for NX bit
Support for the NX bit and XD bit improves security for guest operating systems that
take advantage of the feature.
Workstation 5 now supports the no execute and execute disable bit for guest
operating systems that can leverage it. Aimed at thwarting malicious buffer overruns,
NX and XD allow properly written applications to designate memory space as
nonexecutable, so that no code can be executed from that memory space.
27
VMware Workstation 5 User’s Manual
Experimental Support for Direct3D
Workstation 5 includes experimental support for Direct3D video acceleration. This
feature is not fully functional. For information on configuring a virtual machine for 3-D
support, see Experimental Support for Direct3D on page 383
Experimental Support for Guest ACPI S1 Sleep
Workstation 5 VMware Tools provide experimental support for guest operating
systems that enable ACPI S1 sleep. (This feature requires you to have the latest
VMware Tools installed.) For detailed configuration options, see Guest ACPI S1 Sleep
on page 470.
VMware Virtual Machine Importer (Windows Hosts Only)
For Windows hosts, this standalone utility allows you to convert your Microsoft® virtual
machines — from either Virtual PC or Microsoft Virtual Server — into a VMware virtual
machine. The VMware virtual machine is compatible with Workstation 4 or 5,
completely independent of the previous format, ready to use with all the enhanced
VMware Workstation functionality. The original file remains intact. In Workstation 5.5,
the importer is incorporated into Workstation and enhanced with the ability to create
VMware virtual machines from system images created with Symantec® LiveState
Recovery. See Importing Virtual Machines and System Images from Other Formats on
page 125.
Virtual Machine Importer Incorporated into Workstation (New
in v5.5, Windows Hosts Only)
In Workstation release version 5.5, the importer is incorporated into the Workstation
program for Windows hosts. When you upgrade to Workstation version 5.5, you no
longer need the separate VMware Virtual Machine Importer application to convert a
Microsoft Virtual PC virtual machine or Symantec LiveState Recovery system image to
a VMware virtual machine: you can now open and convert virtual machines and
system images directly from Workstation. See Importing Virtual Machines and System
Images from Other Formats on page 125.
Virtual Machine Importer Imports LiveState Recovery System
Images (New in v5.5)
In Workstation release version 5.5, the importer is enhanced with the ability to create
VMware virtual machines from system images created with Symantec® LiveState
Recovery. See Importing Virtual Machines and System Images from Other Formats on
page 125.
28
www.vmware.com
C H A P T E R 1 Introduction and System Requirements
Toolbar Customization (New in v5.5)
On Windows hosts, you can now customize Workstation toolbars by adding,
removing, and rearranging toolbar buttons. See Customizing the Toolbar on page 81.
Disable Memory Page Trimming in the User Interface (New in
v5.5)
To improve performance, you can now disable memory page trimming from the user
interface, in VM > Settings > Options > Advanced. See Advanced on page 100.
Support on Linux Hosts for Wireless Ethernet Adapters Used in
Bridged Networking (New in v5.5)
Workstation 5.5 adds support on Linux hosts for wireless Ethernet adapters used in
bridged networking. Support for wireless Ethernet adapters is already present for
Workstation on Windows hosts.
Support for Display Resizing Features for Linux Guests (New in
v5.5)
Workstation 5.5 extends the display resizing features Autofit Guest and Fit Guest Now
to Linux guests. These features are already supported for Windows guests. See Fitting
the Workstation Console to the Virtual Machine Display on page 170 and Special
Considerations for Display Resizing in Linux Guests on page 171.
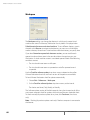
Enhanced Product Update Checking (New in v5.5)
Automatic checking for Workstation product updates has been enhanced. In
Edit > Preferences, the Workspace tab now shows the time and result of the most
recent automatic check for updates, and the time of the next scheduled check. On
Linux hosts, the Workspace tab also now includes a Check now button, so you can
check for product updates manually at any time from Edit > Preferences. See
Workspace on page 88.
29
VMware Workstation 5 User’s Manual
Host System Requirements
What do you need to get the most out of VMware Workstation 5? Take the following
list of requirements as a starting point. Like physical computers, the virtual machines
running under VMware Workstation generally perform better if they have faster
processors and more memory.
PC Hardware
• Standard x86-compatible or x86-64-compatible personal computer
• 400 MHz or faster CPU minimum (500 MHz recommended)
Compatible processors include
• Intel®: Celeron®, Pentium® II, Pentium III, Pentium 4, Pentium M (including
computers with Centrino™ mobile technology), Xeon™ (including “Prestonia”),
EM64T
• AMD™: Athlon™, Athlon MP, Athlon XP, Athlon 64, Duron™, Opteron™,
Turion™ 64
• Experimental support for AMD Sempron™
For additional information, including notes on processors that are not
compatible, see the VMware knowledge base at
www.vmware.com/support/kb/enduser/std_adp.php?p_faqid=967.
• Multiprocessor systems supported
• AMD Opteron, AMD Athlon 64, AMD Turion 64, AMD Sempron, Intel EM64T;
support for 64-bit guest operating systems is available only on the following
specific versions of these processors:
• AMD Athlon 64, revision D or later
• AMD Opteron, revision E or later
• AMD Turion 64, revision E or later
• AMD Sempron, 64-bit-capable revision D or later (experimental support)
• Intel EM64T VT-capable processors (experimental support)
30
www.vmware.com
C H A P T E R 1 Introduction and System Requirements
Memory
• 128 MB minimum (256 MB recommended)
You must have enough memory to run the host operating system, plus the memory
required for each guest operating system and for applications on the host and guest.
See your guest operating system and application documentation for their memory
requirements.
Display
• 16-bit or 32-bit display adapter recommended
Disk Drives
Guest operating systems can reside on physical disk partitions or in virtual disk files.
Hard Disk
• IDE and SCSI hard drives supported, up to 950GB capacity
• At least 1GB free disk space recommended for each guest operating system and
the application software used with it; if you use a default setup, the actual disk
space needs are approximately the same as those for installing and running the
guest operating system and applications on a physical computer.
• For Installation — 80MB (Linux) or 250MB (Windows) free disk space required
for basic installation. You can delete the installer afterwards to reclaim disk space.
Optical CD-ROM/DVD-ROM Drive
• IDE and SCSI optical drives supported
• CD-ROM and DVD-ROM drives supported
• ISO disk image files supported
Local Area Networking (Optional)
• Any Ethernet controller supported by the host operating system
• Non-Ethernet networks supported using built-in network address translation
(NAT) or using a combination of host-only networking plus routing software on
the host operating system
31
VMware Workstation 5 User’s Manual
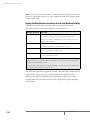
Host Operating System
VMware Workstation is available for both Windows and Linux host operating systems.
Windows Host Operating Systems (32-Bit)
Workstation supports the following Windows 32-bit host operating systems.
• Windows Server 2003 Web Edition, Windows Server 2003 Standard Edition,
Windows Server 2003 Enterprise Edition, Service Pack 1 (Listed versions are also
supported with no service pack.)
• Windows XP Professional and Windows XP Home Edition Service Pack 1 or 2
• Windows 2000 Professional Service Pack 3 or 4, Windows 2000 Server Service
Pack 3 or 4, Windows 2000 Advanced Server Service Pack 3 or 4
Windows Host Operating Systems (64-Bit)
• Windows Server 2003 x64 Edition SP1
• Windows XP Professional x64 Edition SP1
Internet Explorer 4.0 or higher is required for the Windows online help system.
Linux Host Operating Systems
Supported distributions and kernels are listed below. VMware Workstation may not
run on systems that do not meet these requirements.
Note: As newer Linux kernels and distributions are released, VMware modifies and
tests its products for stability and reliability on those host platforms. We make every
effort to add support for new kernels and distributions in a timely manner, but until a
kernel or distribution is added to the list below, its use with our products is not
supported. Look for newer prebuilt modules in the download area of our Web site. Go
to www.vmware.com/download/.
• Mandrake Linux 10 — stock 2.6.3-7
• Mandrake Linux 9.0 — stock 2.4.19
• Red Hat Enterprise Linux AS/ES/WS 4.0 — stock 2.6.9-5, 64-bit
• Red Hat Enterprise Linux 4.0 — update 2 (beta), 64-bit, 32-bit
• Red Hat Enterprise Linux AS/ES/WS 3.0 — stock 2.4.21, update 2.4.21-15.EL, 64bit
• Red Hat Enterprise Linux 2.1 — stock 2.4.9-e3
• Red Hat Linux Advanced Server 2.1 — stock 2.4.9-e3
• Red Hat Linux 9.0 — stock 2.4.20-8, upgrade 2.4.20-20.9
32
www.vmware.com
C H A P T E R 1 Introduction and System Requirements
• Red Hat Linux 8.0 — stock 2.4.18
• Red Hat Linux 7.3 — stock 2.4.18
• Red Hat Linux 7.2 — stock 2.4.7-10, upgrade 2.4.9-7, upgrade 2.4.9-13, upgrade
2.4.9-21, upgrade 2.4.9-31
• SUSE Linux Pro 9.3 — stock 9.3-2.6.11.4, 32-bit, 64-bit
• SUSE Linux 9.2 — stock 9.2-2.6.8-24.11
• SUSE Linux 9.1 — stock 2.6.4-52
• SUSE Linux 9.0 — stock 2.4.21-99
• SUSE Linux 10 — stock 2.6.13, 64-bit, 32-bit
• Experimental support for SUSE Linux Enterprise Server 9 — SP3 (beta)
• SUSE Linux Enterprise Server 9.0 — stock 2.6.5-797, 32-bit, 64-bit, SP1(listed
versions also supported with no service pack)
• SUSE Linux Enterprise Server 8 — stock 2.4.19, 64-bit
• SUSE Linux 8.2 — stock 2.4.20
• SUSE Linux 8.1 — stock 2.4.19
• SUSE Linux 8.0 — stock 2.4.18
• SUSE Linux 7.3 — stock 2.4.10
• Novell Linux Desktop 9 — SP2 (beta)
• Experimental support for Ubuntu Linux 5.10, 32-bit, 64-bit
• Experimental support for Ubuntu Linux 5.04, 32-bit, 64-bit
Platforms not listed above are not supported.
A Web browser is required for the Help system.
33
VMware Workstation 5 User’s Manual
Virtual Machine Specifications
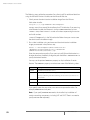
Each virtual machine created with VMware Workstation 5 provides a platform that
includes the following devices that your guest operating system can see.
Processor
• Same processor as that on host computer
• One virtual processor on a host with one or more logical processors
• Two virtual processors (two-way virtual symmetric multiprocessing, or Virtual
SMP) on a host with at least two logical processors.
Note: The following are all considered to have two logical processors:
• A single-processor host with hyperthreading enabled
• A single-processor host with a dual-core CPU
• A multiprocessor host with two CPUs, neither of which are dual-core or have
hyperthreading enabled
See Using Two-Way Virtual Symmetric Multiprocessing (Experimental) on page 429.
Chip Set
• Intel 440BX-based motherboard
• NS338 SIO
• 82093AA IOAPIC
BIOS
• PhoenixBIOS™ 4.0 Release 6 with VESA BIOS
Memory
• Up to 3.6GB, depending on host memory
• Maximum of 4GB total available for all virtual machines
Graphics
• VGA and SVGA support
IDE Drives
• Up to four devices — disks, CD-ROM or DVD-ROM (DVD drives can be used to
read data DVD-ROM discs; DVD video is not supported)
• Hard disks can be virtual disks or physical disks
34
www.vmware.com
C H A P T E R 1 Introduction and System Requirements
• IDE virtual disks up to 950GB
• CD-ROM can be a physical device or an ISO image file
SCSI Devices
• Up to seven devices
• SCSI virtual disks up to 950GB
• Hard disks can be virtual disks or physical disks
• Generic SCSI support allows devices to be used without need for drivers in the
host operating system. Works with scanners, CD-ROM, DVD-ROM, tape drives
and other SCSI devices
• LSI Logic® LSI53C10xx Ultra320 SCSI I/O controller
• Mylex® (BusLogic) BT-958 compatible host bus adapter (requires add-on driver
from VMware for Windows XP and Windows Server 2003)
Floppy Drives
• Up to two 1.44MB floppy devices
• Physical drives or floppy image files
Serial (COM) Ports
• Up to four serial (COM) ports
• Output to serial ports, Windows or Linux files, or named pipes
Parallel (LPT) Ports
• Up to three bidirectional parallel (LPT) ports
• Output to parallel ports or host operating system files
USB ports
• Two-port USB 1.1 UHCI controller
• Supports most devices including USB printers, scanners, PDAs, hard disk drives,
memory card readers and digital cameras, as well as streaming devices such as
webcams, speakers, and microphones.
Keyboard
• 104-key Windows 95/98 enhanced
35
VMware Workstation 5 User’s Manual
Mouse and Drawing Tablets
• PS/2 mouse
• Serial tablets supported
Ethernet Card
• Up to three virtual Ethernet cards
• AMD PCnet-PCI II compatible
• For 64-bit guests: Intel Pro/1000 MT Server Adapter compatible
Sound
• Sound output and input
• Emulates Creative Labs Sound Blaster AudioPCI (MIDI input, game controllers
and joysticks are not supported, except for USB devices)
Virtual Networking
• Support for nine or more virtual Ethernet switches, depending on the host
operating system. Three switches are configured by default for bridged, hostonly, and NAT networking.
• Support for most Ethernet-based protocols, including TCP/IP, NetBEUI, Microsoft
Networking, Samba, Novell Netware, and Network File System.
• Built-in NAT supports client software using TCP/IP, FTP, DNS, HTTP, and Telnet,
including VPN support for PPTP over NAT.
36
www.vmware.com
C H A P T E R 1 Introduction and System Requirements
Supported Guest Operating Systems
The operating systems listed here have been tested in VMware Workstation 5 virtual
machines and are officially supported. For notes on installing the most common guest
operating systems, see the VMware Guest Operating System Installation Guide, available
from the VMware web site at www.vmware.com/pdf/GuestOS_guide.pdf or from the
Help menu.
Operating systems that are not listed are not supported for use in a VMware
Workstation virtual machine. For the most recent list of supported guest operating
systems, see the following page from the online Workstation 5 documentation on the
VMware Web site, www.vmware.com/support/ws55/doc/intro_supguest_ws.html.
Support for 64-Bit Guest Operating Systems
Workstation 5.5 introduces full support for virtual machines with 64-bit guest
operating systems, running on host machines with the following processors:
• AMD™ Athlon™ 64, revision D or later
• AMD Opteron™, revision E or later
• AMD Turion™ 64, revision E or later
• AMD Sempron™, 64-bit-capable revision D or later (experimental support)
• Intel® EM64T VT-capable processors (experimental support)
Workstation supports virtual machines with 64-bit guest operating systems only on
host machines that have one of the supported 64-bit processors. When you power on
a virtual machine with a 64-bit guest operating system, Workstation performs an
internal check: if the host CPU is not a supported 64-bit processor, you cannot power
on the virtual machine. VMware also provides a standalone utility that you can use
without Workstation to perform the same check and determine whether your CPU is
supported for Workstation virtual machines with 64-bit guest operating systems. You
can download the 64-bit processor check utility from the VMware web site at
www.vmware.com/download. Workstation supports virtual machines with 64-bit guest
operating systems only in versions 5.5 and later. If your version of Workstation is 5.0 or
earlier, you must upgrade to version 5.5 or later for 64-bit guest operating system
support. A virtual machine created in Workstation version 5.5 with a 64-bit operating
system cannot be powered on or resumed in Workstation versions 5.0 and earlier.
Also, virtual machines with 64-bit operating systems are not supported for VMware
products other than Workstation.
37
VMware Workstation 5 User’s Manual
Microsoft Windows 32-Bit
• Experimental support for Windows Vista
• Windows Server 2003 Web Edition, Standard Edition, Enterprise Edition, Small
Business Server 2003; Service Pack 1 (listed versions also supported with no
service pack)
• Windows XP Professional and Home Edition Service Pack 1 or 2 (listed versions
also supported with no service pack)
• Windows 2000 Professional and Server Service Pack 1, 2, 3 or 4 (listed versions
also supported with no service pack), Windows 2000 Advanced Server Service
Pack 3 or 4
• Windows NT® Workstation and Server 4.0 Service Pack 6a required, Windows NT
4.0 Terminal Server Edition Service Pack 6 required
• Windows Me
• Windows 98 (including all Customer Service Packs) and Windows 98 SE
• Windows 95 (including Service Pack 1 and all OSR releases)
• Windows for Workgroups 3.11
• Windows 3.1
Microsoft Windows 64-Bit
• Experimental support for Windows Vista x64 Edition
• Windows Server 2003 x64 Edition SP1
• Windows XP Professional x64 Edition SP1
Microsoft MS-DOS
• MS-DOS 6.x
38
www.vmware.com
C H A P T E R 1 Introduction and System Requirements
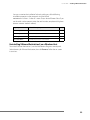
Linux 32-Bit
• Mandrake Linux 8.2, 9.0, 9.1, 9.2, 10, 10.1
• Red Hat Linux 7.0, 7.1, 7.2, 7.3, 8.0, 9.0
• Red Hat Enterprise Linux AS/ES/WS 4.0 (32-bit)
• Red Hat Enterprise Linux 4.0 update 2 (beta)
• Red Hat Enterprise Linux AS/ES/WS 2.1, 3.0, 3.0 update 6
• Red Hat Enterprise Linux Advanced Server 2.1
• SUSE Linux 7.3, 8.0, 8.1, 8.2, 9.0, 9.1, 9.2, 9.3
• SUSE Linux Enterprise Server 7, 7 patch 2, 8, 9, 9 SP1
• Experimental support for SUSE Linux Enterprise Server 9 SP3 (beta)
• SUSE Linux 10
• Turbolinux 7.0, Enterprise Server 8, Workstation 8
• Novell Linux Desktop 9
• Experimental support for Novell Linux Desktop 9 SP2 (beta)
• Sun Java Desktop System (JDS) 2
• Turbolinux Desktop 10
• Ubuntu Linux 5.10
• Ubuntu Linux 5.04
Linux 64-Bit
• Red Hat Enterprise Linux 4
• Red Hat Enterprise Linux 4.0 update 2 (beta)
• Red Hat Enterprise Linux 3
• SUSE Linux 10
• SUSE Linux Enterprise Server 9
• SUSE Linux Pro 9.3
• SUSE Linux Pro 9.2
• SUSE Linux Pro 9.1
• Experimental support for Ubuntu Linux 5.10
• Experimental support for Ubuntu Linux 5.04
39
VMware Workstation 5 User’s Manual
Novell Netware
• Netware Server 5.1 SP8, 6.0 SP4, 6.5 SP3
FreeBSD 32-Bit
• FreeBSD 4.0, 4.1, 4.2, 4.3, 4.4, 4.5, 4.6.2, 4.8, 5.0, 5.1, 5.2, 5.3, 5.4
Note: If you use SCSI virtual disks larger than 2GB with FreeBSD 4.0–4.3, there
are known problems, and the guest operating system does not boot. To work
around this issue, see the VMware Guest Operating System Installation Guide,
available from the VMware Web site or from the Help menu.
FreeBSD 64-Bit
• Experimental support for FreeBSD 5.3, 5.4
Sun Solaris 32-Bit
• Experimental support for Solaris x86 Platform Edition 9, 10 beta
Sun Solaris 64-Bit
• Experimental support for Solaris 10
40
www.vmware.com
C H A P T E R 1 Introduction and System Requirements
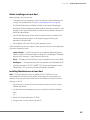
Technical Support Resources
The following sections describe various technical support resources available to you.
• Self-Service Support
• Online and Telephone Support
• Support Offerings
• Reporting Problems
• Experimental Support
Self-Service Support
Use the VMware Technology Network for self help tools and technical information:
• Product Information — www.vmware.com/support/resources
• Technology Information — www.vmware.com/vcommunity/technology
• Documentation — www.vmware.com/support/pubs
• Knowledge Base — www.vmware.com/support/kb
• Discussion Forums — www.vmware.com/community
• User Groups — www.vmware.com/vcommunity/usergroups.html
For more information about the VMware Technology Network, go to www.vmtn.net.
Online and Telephone Support
Use online support to submit technical support requests, view your product and
contract information, and register your products. Go to www.vmware.com/support.
Use phone support for the fastest response on priority 1 issues for customers with
appropriate support contracts. Go to www.vmware.com/support/phone_support.html.
Support Offerings
Find out how VMware's support offerings can help you meet your business needs. Go
to www.vmware.com/support/services.
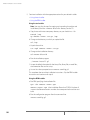
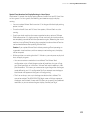
Reporting Problems
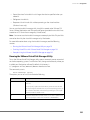
If you have problems while running VMware Workstation, please report them to the
VMware support team.
These guidelines describe the information we need from you to diagnose problems.
41
VMware Workstation 5 User’s Manual
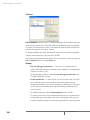
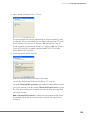
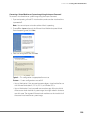
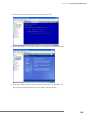
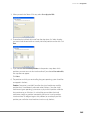
If a virtual machine exits abnormally or crashes, please run the support script to
collect the appropriate log files and system information. Follow the steps below that
apply to your host computer.
Windows Host
1. Open a command prompt.
2. Change to the VMware Workstation program directory.
C:
cd \Program Files\VMware\VMware Workstation
If you did not install the program in the default directory, use the appropriate
drive letter and path in the cd command above.
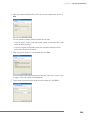
3. Run the support script.
cscript vm-support.vbs
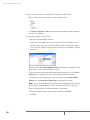
4. After the script runs, it displays the name of the directory where it has stored its
output. Use a file compression utility such as WinZip or PKZIP to zip that
directory, and include the zip file with your support request.
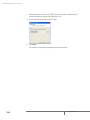
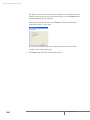
Linux Host
1. Open a terminal.
2. Run the support script as the user who is running the virtual machine.
vm-support
If you are not running the script as root, the script displays messages indicating
that it cannot collect some information. This is normal. If the VMware support
team needs that information, a support representative will ask you to run the
script again as root.
3. The script creates a compressed .tgz file in the current directory. Include that
output file with your support request.
If you are reporting a problem you encountered while installing VMware Workstation,
it is also helpful to have your installation log file.
On a Windows host, the file is VMInst.log. It is saved in your temp folder. On a
Windows 2000, Windows XP or Windows Server 2003 host, the default location is
C:\Documents and Settings\<username>\Local Settings\Temp.
You can use the command cd %temp% to locate the Local Settings folder,
which is hidden by default. To see its contents, open My Computer, go to Tools >
Folder Options, click the View tab and select Show Hidden Files and Folders.
42
www.vmware.com
C H A P T E R 1 Introduction and System Requirements
Be sure to register your serial number. You may then report your problems by
submitting a support request at www.vmware.com/requestsupport.
Experimental Support
For some features that are not fully developed, VMware Workstation includes
experimental support, so that advanced customers can explore an in-progress
implementation of these features.
Caution: You should not use experimentally supported features on production
systems.
VMware may not respond individually to all support requests for features that are
supported experimentally. VMware is interested in
• Catastrophic failures that cause Workstation or the guest operating system to
crash
• Specific problems you are having when using the experimentally supported
feature
• Specific directions in which you want to see VMware technology evolve
Specific and detailed reports can help speed features from experimental support to
full functionality. Please include as many details about your configuration, relevant
applications, and hardware as you can.
43
VMware Workstation 5 User’s Manual
Where to Go Next
• Installing VMware Workstation on page 45
• Upgrading VMware Workstation on page 61
44
www.vmware.com
CHAPTER
2
Installing VMware Workstation
This chapter discusses how to install VMware Workstation on your Linux or Windows
host system:
• Selecting Your Host System on page 46
• Upgrading from Previous Versions on page 46
• Installing VMware Workstation 5 on a Windows Host on page 47
• Installing Workstation on a Windows Host on page 48
• Installing VMware Workstation Silently on page 51
• Uninstalling VMware Workstation 5 on a Windows Host on page 53
• Installing VMware Workstation 5 on a Linux Host on page 54
• Before Installing on a Linux Host on page 55
• Installing Workstation on a Linux Host on page 55
• Configuring with vmware-config.pl on page 57
• Web Browser Required on page 58
• Uninstalling VMware Workstation 5 on a Linux Host on page 58
45
VMware Workstation 5 User’s Manual
Selecting Your Host System
VMware Workstation is available for both Windows and Linux host computers. The
installation files for both host platforms are included on the same CD-ROM.
Your serial number allows you to use VMware Workstation only on the host operating
system for which you licensed the software. If you have a serial number for a Windows
host, you cannot run the software on a Linux host, and vice versa.
To use VMware Workstation on a different host operating system — for example, to
use it on a Linux host if you have licensed the software for a Windows host —
purchase a license on the VMware Web site. You may also get an evaluation license at
no charge for a 30-day evaluation of the software. For more information, see
www.vmware.com/download/.
• To install on a supported Windows host computer, see Installing VMware
Workstation 5 on a Windows Host on page 47.
• To install on a Linux host computer, see Installing VMware Workstation 5 on a
Linux Host on page 54.
Upgrading from Previous Versions
If you are upgrading from a previous version of VMware Workstation, read Upgrading
VMware Workstation on page 61 before you begin.
Workstation Cannot Share a Host with Other VMware Products
You cannot have VMware Workstation installed on the same host machine with
another VMware product, such as VMware GSX Server, VMware ACE, or the VMware
Virtual Machine Console. The only VMware product that can share a host machine
with Workstation is the VMware VirtualCenter client software. If you plan to install
VMware Workstation on a host machine that already contains another VMware
product, you must uninstall that product first.
46
www.vmware.com
C H A P T E R 2 Installing VMware Workstation
Installing VMware Workstation 5
on a Windows Host
Getting started with VMware Workstation is simple. The key steps are
1. Install the VMware Workstation software as described in Installing Workstation
on a Windows Host on page 48.
2. Start VMware Workstation and enter your serial number.
You need to do this only once — during the installation process when prompted
or through Help > Enter Serial Number.
If you don't already have a serial number from a previous installation, the installer
prompts you for the serial number during installation. If you choose not to enter
the serial number during installation, you can enter it later by going to
Help > Enter Serial Number.
3. Create a virtual machine using the New Virtual Machine Wizard. See Creating a
New Virtual Machine on page 113.
4. Install a guest operating system in the new virtual machine. You need the
installation media (CD-ROM or floppy disks) for your guest operating system. See
Installing a Guest Operating System and VMware Tools on page 137.
5. Install the VMware Tools package in your virtual machine for enhanced
performance. See Installing VMware Tools on page 140.
6. Start using your virtual machine.
Before you begin, be sure you have
• A computer and host operating system that meet the system requirements for
running VMware Workstation. See Host System Requirements on page 30.
• The VMware Workstation installation software. If you bought the packaged
distribution of VMware Workstation, the installation software is on the CD in your
package. If you bought the electronic distribution, the installation software is in
the file you downloaded.
• Your VMware Workstation serial number. The serial number is included in the
VMware Workstation package or in the email message confirming your
electronic distribution order.
• The installation CD or disks for your guest operating system.
47
VMware Workstation 5 User’s Manual
Installing Workstation on a Windows Host
1. Log on to your Microsoft Windows host as the Administrator user or as a user
who is a member of the Windows Administrators group.
Note: To install Workstation on a Windows XP or Windows Server 2003 host
computer, you must log on as local administrator (that is, not be logged on to
the domain, unless your domain account is also a local administrator).
Although an administrator must install Workstation on Windows XP or Windows
Server 2003, a normal user — without administrative privileges — can run the
program after it is installed.
Note: Keep in mind that you need one license for each user.
2. If you are installing from a CD, from the Start menu, choose Run and enter
D:\setup.exe, where D: is the drive letter for your CD-ROM drive.
If you are installing from a downloaded file, from the Start menu, choose Run,
browse to the directory where you saved the downloaded installer file and run
the installer. (The filename is similar to VMwareWorkstation<xxxx>.exe, where <xxxx> is a series of numbers representing the version
and build numbers.)
3. Click Next to dismiss the Welcome dialog box.
48
www.vmware.com
C H A P T E R 2 Installing VMware Workstation
4. Acknowledge the end user license agreement (EULA).
Select the Yes, I accept the terms in the license agreement option, then click
Next.
5. Choose the directory in which to install VMware Workstation.
To install it in a directory other than the default, click Change and browse to your
directory of choice. If the directory does not exist, the installer creates it for you.
Click Next.
Caution: Do not install VMware Workstation on a network drive.
Note: Windows and the Microsoft Installer limit the length of a path to a folder
on a local drive to 255 characters. For a path to a folder on a mapped or shared
drive, the limit is 240 characters. If the path to the VMware Workstation program
folder exceeds this limit, an error message appears. You must select or enter a
shorter path.
49
VMware Workstation 5 User’s Manual
6. Select the shortcuts that you want the installer to create.
Choices include Desktop, Start menu, and Quick Launch toolbar. Deselect any
shortcuts you do not want the installer to create.
7. If the installer detects that the Windows CD-ROM autorun feature is enabled, you
see a message that gives you the option to disable this feature. Disabling
autorun prevents undesirable interactions with the virtual machines you install
on this system.
8. The installer has gathered the necessary information and is ready to begin
installing the software.
If you want to change any settings or information you provided, now is the time
to make those changes. Click Back until you reach the dialog box containing the
information you want to change.
If you do not need to make any changes, click Install. The installer begins
copying files to your computer.
50
www.vmware.com
C H A P T E R 2 Installing VMware Workstation
9. (Optional) Enter your name, company name and serial number, then click Next.
Your serial number is on the registration card in your package. The user and
company information you enter here is then made available in the About box
(Help > About VMware Workstation).
Note: If you skip this step, you must enter your serial number later, before you
can power on a virtual machine.
10. Click Finish. The VMware Workstation software is installed.
11. Some installations may require that you reboot your PC. Reboot now to allow
VMware Workstation to complete the installation correctly.
Installing VMware Workstation Silently
If you are installing VMware Workstation on a number of Windows host computers —
in a corporate environment, for example — you may want to use the silent installation
features of the Microsoft Windows Installer.
Before installing VMware Workstation silently, you must ensure that the host
computer has version 2.0 or higher of the MSI runtime engine. This version of the
installer is available in versions of Windows beginning with Windows XP and is
available separately from Microsoft.
51
VMware Workstation 5 User’s Manual
The following steps outline the procedures for a silent install. For additional details on
using the Microsoft Windows Installer, see the Microsoft Web site.
1. Silently extract the administrative installation image from the VMware
Workstation installer:
setup.exe /a /s /v"/qn TARGETDIR=<InstallTempPath>"
setup.exe is the name of the installer on the CD distribution. If you are using
a downloaded installer, the filename is similar to VMwareWorkstation<xxxx>.exe, where <xxxx> is a series of numbers representing the version
and build numbers.
<InstallTempPath> is the full path to the folder where you want to store
the administrative installation image.
2. Run a silent installation using msiexec and the administrative installation
image you extracted in the previous step:
msiexec -i "<InstallTempPath>\VMware Workstation.msi"
[INSTALLDIR="<PathToProgramDirectory>"] ADDLOCAL=ALL
[REMOVE=<featurename,featurename>] /qn
Enter the command on one line. If you want to install VMware Workstation in a
location other than the default, change the path that follows INSTALLDIR= to
specify the desired location.
You may use the optional REMOVE= property to skip installation of certain
features. The REMOVE= property can take one or more of the following values:
Value
Description
Authd
The VMware authorization service
Network
Networking components including the virtual bridge and the host adapters for
host only networking and NAT networking; do not remove if you want to use
NAT or DHCP
DHCP
The virtual DHCP server
NAT
The virtual NAT device
If you specify more than one value, use a comma to separate the values. For
example, REMOVE=Authd,NAT.
Note: If you specify REMOVE=Network, the installer skips installation of
certain networking components, including NAT and DHCP. There is no need to
specify DHCP or NAT separately.
52
www.vmware.com
C H A P T E R 2 Installing VMware Workstation
You may customize the installation further by adding any of the following
installation properties to the command using the format
PROPERTY="value". A value of 1 means true; a value of 0 means false. If you
use the serial number property, enter the serial number, complete with hyphens
(xxxxx-xxxxx-xxxxx-xxxxx).
Property
Effect of the Property
Default
DESKTOP_SHORTCUT
Installs a shortcut on the desktop
1
DISABLE_AUTORUN
Disables CD autorun on the host
1
REMOVE_LICENSE
(Uninstall only) Removes all stored licenses at uninstall
0
SERIALNUMBER
Automatically enters the serial number
Uninstalling VMware Workstation 5 on a Windows Host
To uninstall VMware Workstation 5, use the Add/Remove Programs control panel.
Select the entry for VMware Workstation, then click Remove. Follow the on-screen
instructions.
53
VMware Workstation 5 User’s Manual
Installing VMware Workstation 5
on a Linux Host
Getting started with VMware Workstation is simple. The key steps are
1. Install the VMware Workstation software as described in Installing Workstation
on a Linux Host on page 55.
2. Start VMware Workstation
3. Enter your serial number.
You need to do this only once. If you don't already have a serial number
configured from a previous installation, you are prompted for the serial number
when you start Workstation. To enter the serial number choose
Help > Enter Serial Number.
Note: You can install Workstation without a serial number. However you cannot
power on a virtual machine without entering a serial number.
4. Create a virtual machine using the New Virtual Machine Wizard. See Creating a
New Virtual Machine on page 113.
5. Install a guest operating system in the new virtual machine. You need the
installation media (CD-ROM or floppy disks) for your guest operating system. See
Installing a Guest Operating System and VMware Tools on page 137.
6. Install the VMware Tools package in your virtual machine for enhanced
performance. See Installing VMware Tools on page 140.
7. Start using your virtual machine.
54
www.vmware.com
C H A P T E R 2 Installing VMware Workstation
Before Installing on a Linux Host
Before you begin, be sure you have
• A computer and host operating system that meet the system requirements for
running VMware Workstation. See Host System Requirements on page 30.
• The VMware Workstation installation software. If you bought the packaged
distribution of VMware Workstation, the installation software is on the CD in your
package. If you bought the electronic distribution, the installation software is in
the file you downloaded.
• Your VMware Workstation serial number. The serial number is included in the
VMware Workstation package or in the email message confirming your
electronic distribution order.
• The installation CD or disks for your guest operating system.
Check the following notes and make any necessary adjustments to the configuration
of your host operating system.
• vmware-distrib — If you have a previous tar installation, delete the previous
vmware-distrib directory before installing from a tar file again. The default
location of this directory is /tmp/vmware-distrib
• Clock — The real-time clock function must be compiled into your Linux kernel.
• Parallel port — VMware Workstation for Linux requires that the parallel port PCstyle hardware option (CONFIG_PARPORT_PC) be built and loaded as a kernel
module (that is, it must be set to m when the kernel is compiled).
Installing Workstation on a Linux Host
Note: The steps below describe an installation from a CD-ROM disc. If you
downloaded the software, the steps are the same except that you start from the
directory where you saved the installer file you downloaded, not from the Linux
directory on the CD.
1. Log on to your Linux host with the user name you plan to use when running
VMware Workstation.
2. In a terminal window, become root so you can perform the initial installation
steps.
su 3. Mount the VMware Workstation CD-ROM.
4. Change to the Linux directory on the CD.
55
VMware Workstation 5 User’s Manual
5. Continue installation with the appropriate section for your desired installer:
• Using the tar Installer
• Using the RPM Installer
Using the tar Installer
Note: You may skip the steps for copying and unpacking the archive and
install directly from the vmware-distrib directory on the CD.
a. Copy the tar archive to a temporary directory on your hard drive — for
example, /tmp.
cp VMware-<xxxx>.tar.gz /tmp
b. Change to the directory to which you copied the file.
cd /tmp
c. Unpack the archive.
tar zxpf VMware-<xxxx>.tar.gz
d. Change to the installation directory.
cd vmware-distrib
e. Run the installation program.
./vmware-install.pl
f. Accept the default directories for the binary files, library files, manual files,
documentation files and init script.
g. Answer Yes when prompted to run vmware-config.pl.
This completes the tar archive installation instructions. Skip the RPM installer
instructions and continue with step 6.
Using the RPM Installer
a. Run RPM specifying the installation file.
rpm -Uhv VMware-<xxxx>.rpm
VMware-<xxxx>.rpm is the installation file on the CD-ROM. In place of
<xxxx> the filename contains numbers that correspond to the version and
build.
b. Run the configuration program from the command line.
vmware-config.pl
56
www.vmware.com
C H A P T E R 2 Installing VMware Workstation
6. Press Enter to read the end user license agreement (EULA). You may page
through it faster by pressing the space bar. If the Do you accept prompt
doesn’t appear, press Q to get to the next prompt.
7. The remaining prompts are worded in such a way that, in most cases, the default
response is appropriate.
Note: If you do not enable host-only networking when you install Workstation,
you cannot allow a virtual machine to use both bridged and host-only
networking.
8. The configuration program displays a message saying the configuration
completed successfully. If it does not display this message, run the configuration
program again.
9. When done, exit from the root account.
exit
Install VMware Tools after you install a guest operating system. See Installing VMware
Tools on page 140.
Configuring with vmware-config.pl
Use vmware-config.pl to configure your installation of VMware Workstation.
Note: If you run the RPM installer, you need to run this program separately from the
command line. If you install from the tar archive, the installer offers to launch the
configuration program for you. Answer Yes when you see the prompt.
Required Configuration Changes
Configuration with vmware-config.pl is required in the following
circumstances:
• When you install VMware Workstation the first time.
• When you upgrade your version of Workstation.
• When you upgrade your host operating system kernel. (It is not necessary to
reinstall VMware Workstation after you upgrade your kernel.)
• To reconfigure the networking options for VMware Workstation — for example,
to add or remove host-only networking.
Location of vmware-config.pl
The installer places vmware-config.pl in /usr/bin. If /usr/bin is not in
your default path, run the program with the following command:
/usr/bin/vmware-config.pl
57
VMware Workstation 5 User’s Manual
Web Browser Required
To use the VMware Workstation Help system, you must have a Web browser installed
on your host computer.
Uninstalling VMware Workstation 5 on a Linux Host
Uninstalling an RPM Installation of Workstation
If you used the RPM installer to install VMware Workstation, remove the software from
your system by running
rpm -e VMwareWorkstation<xxxx>
Where <xxxx> is a series of numbers representing the version and build. If you have
VMware Workstation properly installed, you can find the VMware Workstation build
number by running
rpm -qa | grep VM
Uninstalling a tar Installation of Workstation
If you used the tar installer to install VMware Workstation, remove the software from
your system by running
vmware-uninstall.pl
58
www.vmware.com
C H A P T E R 2 Installing VMware Workstation
Where to Go Next
• Learning VMware Workstation Basics on page 71
• Creating a New Virtual Machine on page 113
• Running VMware Workstation on page 157
59
VMware Workstation 5 User’s Manual
60
www.vmware.com
CHAPTER
3
Upgrading VMware Workstation
This chapter discusses how to upgrade VMware Workstation 3 or 4 on your Linux or
Windows host system, and how to use existing virtual machines under VMware
Workstation 5:
• Preparing for the Upgrade on page 62
• Upgrading on a Windows Host on page 65
• Upgrading on a Linux Host on page 66
• Using Workstation 4 Virtual Machines in Workstation 5 on page 67
61
VMware Workstation 5 User’s Manual
Preparing for the Upgrade
Before You Install VMware Workstation 5
There are a few steps you should take — while your previous version of VMware
Workstation is still on your computer and before you install VMware Workstation 5 —
to ensure the best possible upgrade experience.
Resume and Shut Down Suspended Virtual Machines
If you plan to use virtual machines created in an earlier version of VMware Workstation
5, be sure they have been shut down completely before you remove the release you
used to create them.
If the virtual machine is suspended, resume it in the earlier release, shut down the
guest operating system, then power off the virtual machine.
Note: If you attempt to resume a virtual machine that was suspended under a
different VMware product or a different version of VMware Workstation, a dialog box
gives you the choice of discarding or keeping the file that stores the suspended state.
To recover the suspended state, you must click Keep, then resume the virtual machine
under the correct VMware product. If you click Discard, you can power on normally,
but the suspended state is lost.
Remove Snapshots
If the virtual machine you are upgrading has a snapshot, remove the snapshot before
upgrading.
62
www.vmware.com
C H A P T E R 3 Upgrading VMware Workstation
Make Sure All Disks Are in the Same Mode (Workstation 3 Only)
For upgrades from VMware Workstation 3 to Workstation 5:
• If you have an existing virtual machine with one or more virtual disks and all the
disks use persistent or undoable mode, upgrading is straightforward.
• If you have an existing virtual machine with one or more virtual disks and all the
disks use nonpersistent mode, you need to take a few special steps when you
upgrade VMware Tools. See www.vmware.com/info?id=44.
• If you plan to use an existing virtual machine that has disks in undoable mode,
you must commit or discard any changes to the virtual disks before you remove
the Workstation 3 software that you used to create them.
• Resume or power on the virtual machine in the earlier release, shut down the
guest operating system, power off the virtual machine and either commit or
discard changes to the disk in undoable mode when prompted.
• If the disks are in persistent or nonpersistent mode, be sure the virtual machine is
completely shut down. If it is suspended, resume it, shut down the guest
operating system and power off the virtual machine.
• If you have an existing virtual machine that has multiple virtual disks and the
disks are in multiple modes, the simplest approach to upgrading is to convert all
the disks to persistent mode. Resume or power on the virtual machine in the
earlier release, shut down the guest operating system, power off the virtual
machine and either commit or discard changes to any undoable mode disks
when prompted. Then open the configuration editor and change all disks to
persistent mode.
If you need to preserve special functionality that requires disks in multiple modes,
review the information at www.vmware.com/info?id=40 before you upgrade.
Back Up Virtual Machines
As a precaution, back up all the files in your virtual machine directories — including
the .vmdk or .dsk, .vmx or .cfg, and nvram files — for any existing virtual
machines you plan to migrate to VMware Workstation 5. Depending on your upgrade
path, you may not be able to run your virtual machines under both VMware
Workstation 5 and your previous version of VMware Workstation.
Workstation 2 to 5 — Upgrading Workstation 2 virtual machines requires that you
first upgrade to Workstation 3 or 4. Direct upgrades from a Workstation 2 virtual
machine are not supported in Workstation 5.
63
VMware Workstation 5 User’s Manual
Workstation 3 to 5 — Virtual machines created under Workstation 3 must be
upgraded before they can run under Workstation 5. Once they are upgraded, they
cannot be run under Workstation 3.
Workstation 4 to 5 — Virtual machines created under Workstation 4 — or updated
to Workstation 4 — offer two options.
• You may update the virtual machine for full compatibility with Workstation 5.
However, a virtual machine upgraded to Workstation 5 can no longer be used
under Workstation 4.
• You may choose not to update the virtual machine. In that case, you can run the
virtual machine under both Workstation 4 and Workstation 5, but you do not
enable new features provided by Workstation 5. For example, you cannot take
multiple snapshots.
Removing Version 3 or 4 to Install Version 5
There is a key precaution you should take when you remove VMware Workstation 3 or
4 — or an earlier version of VMware Workstation 5 — to install VMware Workstation 5.
• Leave the existing license in place.
VMware Workstation installation procedures for your host may require that you run an
uninstaller to remove a previous version.
• On a Windows host, the uninstaller may ask if it should remove licenses from
your registry. Do not allow the uninstaller to remove the licenses. You can safely
keep licenses for multiple VMware products on the computer at the same time.
• On a Linux host, the license remains in place. You do not need to take any special
action. You may safely leave the license where it is.
The actual upgrade installation depends on your host operating system:
• Upgrading on a Windows Host on page 65
• Upgrading on a Linux Host on page 66
64
www.vmware.com
C H A P T E R 3 Upgrading VMware Workstation
Upgrading on a Windows Host
• You may upgrade from Workstation 4 to version 5 using the VMware Workstation
5 upgrade product.
• To upgrade from version 3 to version 5, you must have the full VMware
Workstation 5 product.
Upgrading from Version 4 or an Earlier Version 5 Release
1. Launch the Workstation 5 installer from your download directory or CD-ROM.
2. Reboot your computer if you are prompted to do so.
3. Allow the installer to complete the installation.
Upgrading from Version 3 to Version 5
1. Uninstall the Workstation version now installed on your computer. For details,
see Removing Version 3 on page 65.
Note: The uninstaller may offer to remove licenses from your registry. Do not
remove the licenses.
2. Reboot your computer.
3. Install version 5.
Note: When you are upgrading with an upgrade serial number, the installer
checks for the presence of a version 4 license on the computer. If it finds no
version 4 license, it prompts you to enter your version 4 serial number.
4. Reboot your computer.
Removing Version 3
1. Launch the VMware Workstation uninstaller.
Start > Programs > VMware > VMware Workstation Uninstallation
2. Click Yes.
3. Follow the on-screen instructions. You need to keep your existing license in the
Windows registry.
After you reboot, follow the instructions in Installing VMware Workstation 5 on a
Windows Host on page 47.
65
VMware Workstation 5 User’s Manual
Upgrading on a Linux Host
You may upgrade from version 4 to version 5 using the upgrade version of VMware
Workstation 5. To upgrade from version 3 to version 5, you must have the full version
of VMware Workstation 5. Upgrades from earlier versions of VMware Workstation are
not supported.
Note: When you are upgrading with the upgrade product, the installer checks for
the presence of a license on the computer. If it finds no license, it prompts you to
enter your previous version serial number.
Note: Starting with Workstation 5, Samba is no longer automatically configured
when you run vmware-config.pl.
The tar Upgrade Process
If you used the tar installer to install version 3 or 4 — or an earlier release of version 5
— and you plan to use the tar installer for version 5, you do not need to take any
special steps to uninstall the older version. Just follow the installation instructions
Installing VMware Workstation 5 on a Linux Host on page 54.
The RPM Upgrade Process
Take the following steps to upgrade to version 5 if you used the RPM installer to install
Workstation 3 or 4 — or an earlier release of version 5.
If you are currently using version 3.0, you need to uninstall the RPM package of
prebuilt modules that was installed with 3.0 before you uninstall the 3.0 software. You
do not need to take this step if you are currently using version 3.1.
1. Uninstall any previous version as root:
If you are running version 3.0, uninstall the prebuilt modules as root, then
uninstall VMware Workstation by running
rpm -e VMwareWorkstationKernelModules
rpm -e VMwareWorkstation
If you are running version 3.1, 3.2 or 4, or an earlier release of version 5, uninstall it
as root by running
rpm -e VMwareWorkstation*
Note: The asterisk symbol * is a wild card to account for the version number of
Workstation that was previously installed.
2. Install version 5 following the instructions in Installing VMware Workstation 5 on
a Linux Host on page 54.
66
www.vmware.com
C H A P T E R 3 Upgrading VMware Workstation
Using Workstation 4 Virtual
Machines in Workstation 5
There are, broadly speaking, three approaches you can take when you set up virtual
machines. Choose one of these approaches.
• Create Everything New from the Start on page 67
• Use a Legacy Virtual Machine without Upgrading on page 67
• Use a Legacy Virtual Machine with Upgrade on page 68
Only the latter two apply to virtual machines created under previous versions of
VMware Workstation.
Create Everything New from the Start
Use the New Virtual Machine Wizard to set up a new virtual machine and install a
guest operating system in the virtual machine as described in Creating a New Virtual
Machine on page 113. If you set up your virtual machines in this way, you are using
the latest technology and enjoy the performance benefits of the newest features.
Use a Legacy Virtual Machine without Upgrading
A legacy virtual machine is a virtual machine created in Workstation 4.x, GSX Server 3.x
and ESX Server 2.x. You can use such a virtual machine in Workstation 5.
• Upgrade VMware Tools to the new version following the instructions for your
guest operating system in Installing VMware Tools on page 140. You should not
remove the older version of VMware Tools before installing the new version.
• A VMware Workstation 4 virtual machine set up in this way should run without
problems. However, you will not have the benefits of certain new features,
including multiple snapshots, streaming USB devices, and performance
improvements.
67
VMware Workstation 5 User’s Manual
Use a Legacy Virtual Machine with Upgrade
If you upgrade an existing virtual machine from Workstation 4.x, GSX Server 3.x or ESX
Server 2.x, you gain access to new features and enjoy the performance benefits of the
new virtual machine, including:
• Multiple snapshots
• Streaming USB input devices
• Increased network bandwidth, optimized disk and memory cache
• Support for 64-bit guest operating systems (Workstation version 5.5 and later).
Note: If your virtual machine was created in Workstation 5.0, you do not need to
upgrade the virtual machine for 64-bit guest support. However, you do need to
upgrade the Workstation 5.0 program software to version 5.5. You can install the
Workstation 5.5 software directly over the Workstation 5.0 software.
Notes on Upgrading a Virtual Machine
• If you previously installed the version of VMware Tools included in Workstation 5,
you must reinstall after the virtual machine upgrade and choose the “Repair”
option.
• If you are upgrading a virtual machine that runs from a physical disk, rather than
a virtual disk, you may see the following error message while VMware
Workstation is upgrading the virtual machine: “Unable to upgrade <drivename>.
One of the supplied parameters is invalid.” You may safely click OK to continue
the upgrade process.
• When you update a Windows XP or Windows Server 2003 virtual machine, the
Microsoft product activation feature requires you to reactivate the guest
operating system.
• The virtual machine upgrade is irreversible: Virtual machines upgraded to
Workstation 5 are incompatible with VMware Workstation 3, Workstation 4.x, GSX
Server 3.x and ESX Server 2.x. Make backup copies of your virtual disks before
starting the upgrade.
68
www.vmware.com
C H A P T E R 3 Upgrading VMware Workstation
Procedure to Upgrade Virtual Machines
1. Shut down the guest operating system and power off the virtual machine,
2. Choose VM > Upgrade Virtual Machine.
A dialog box appears, warning that the upgrade process cannot be reversed.
3. Click Yes to continue, then follow the on-screen directions.
4. Power on the virtual machine in Workstation 5.
5. Upgrade VMware Tools to the new version
Refer to Installing VMware Tools on page 140. Do not remove the older version
of VMware Tools before installing the new version.
Note: If you are upgrading a virtual machine that runs from a physical disk,
rather than a virtual disk, you may safely ignore the message: “Unable to upgrade
<drivename>. One of the supplied parameters is invalid.” Click OK to continue
the upgrade.
69
VMware Workstation 5 User’s Manual
Where to Go Next
• Learning VMware Workstation Basics on page 71
• Creating a New Virtual Machine on page 113
• Running VMware Workstation on page 157
70
www.vmware.com
CHAPTER
4
Learning VMware Workstation
Basics
This chapter discusses launching the VMware Workstation program, and introduces
the VMware Workstation window.
• Launching VMware Workstation on page 72
• Overview of the VMware Workstation Window on page 74
• Checking for Product Updates on page 86
• Setting Preferences for VMware Workstation on page 87
• Virtual Machine Settings on page 94
• Command Line Reference on page 102
• Keyboard Shortcuts on page 107
• What Files Make Up a Virtual Machine? on page 108
The illustrations in these sections show a Windows XP guest operating system. Some
commands used in the illustrations are different from those used in other guest
operating systems.
71
VMware Workstation 5 User’s Manual
Launching VMware Workstation
The method of starting the VMware Workstation application depends on your host
operating system.
• Launching VMware Workstation on a Windows Host
• Launching VMware Workstation on a Linux Host
Launching VMware Workstation on a Windows Host
Launch VMware Workstation by double-clicking the shortcut on your desktop or
launch the program from the Start menu (Start > Programs > VMware > VMware
Workstation).
The VMware Workstation window opens.
The Workstation window: Windows host
72
www.vmware.com
C H A P T E R 4 Learning VMware Workstation Basics
Launching VMware Workstation on a Linux Host
1. Open a terminal window.
2. Type vmware & and press Enter.
The VMware Workstation window opens.
The Workstation window: Linux host
73
VMware Workstation 5 User’s Manual
Overview of the VMware Workstation
Window
A VMware Workstation virtual machine is like a separate computer that runs in a
window on your physical computer. However, VMware Workstation displays more
than the screen of a physical computer. From the Workstation window, you can access
and run your virtual machines and teams, and switch easily from one to another.
This section shows you how to navigate and use the VMware Workstation window,
and how to set up a list of favorites — virtual machines and teams that you use often
and want to access quickly
• The Home Page, Summary View, and Console View on page 76
• The Toolbar on page 79
• The Favorites List on page 83
To open the Workstation application, see Launching VMware Workstation on page 72.
To create a new virtual machine and install a guest operating system, see Creating a
New Virtual Machine on page 113.
One Window or Many — Your Choice
In VMware Workstation 5, you can open multiple virtual machines in the same
Workstation window. Or you can launch multiple instances of VMware Workstation.
You can even run multiple instances of VMware Workstation and have more than one
virtual machine in each window. Just be sure you have enough memory and
processor power to handle the number of virtual machines you want to run.
74
www.vmware.com
C H A P T E R 4 Learning VMware Workstation Basics
The Workstation window is divided into three sections.
• The Home Page, Summary View, and Console View — On the right, this main
part of the window shows your virtual machines.
• The Toolbar — At the top, these buttons act on your virtual machines, offering
one-click options for power, suspend, snapshot, screen, and summary/console
display.
• The Favorites List — In this area on the left, you can bookmark your virtual
machines and teams of virtual machines for quick access.
Toolbar
Favorites
,
Home Page,
Summary, or
Console view
Workstation window sections: toolbar, favorites list, and home page/summary/console
75
VMware Workstation 5 User’s Manual
The Home Page, Summary View, and Console View
VMware Workstation displays three views in the main part of the window:
• Displaying the Home Page on page 76
• Displaying the Summary View on page 76
• Displaying the Console View on page 78
Displaying the Home Page
In the Workstation window, select the Home tab to display the Workstation home
page. Use the icons on the home page to start creating a new virtual machine or open
an existing virtual machine.
To close the home page, click the X to the right of the tabs on a Windows host or the
X on the tab on a Linux host. To display the home page again, choose View > Go to
Home Tab.
Displaying the Summary View
When you select a tab for a powered-off virtual machine or team, Workstation displays
a summary of the configuration information about that item. Workstation also
displays a summary for a suspended virtual machine or team.
Summary toolbar button
Summary view for a virtual machine (Windows host)
You can examine settings in the Summary view at any time by clicking the Summary
toolbar button. However, some settings can be changed only when the virtual
machine or team is powered off (not running or suspended). See Adding, Configuring,
and Removing Devices in a Virtual Machine on page 182 or Editing Team Settings on
page 319 for information about editing settings.
76
www.vmware.com
C H A P T E R 4 Learning VMware Workstation Basics
Note: Summary tabs are displayed only for virtual machines that are currently open.
To open a virtual machine that is not displayed, choose File > Open >
Virtual Machine, navigate to the virtual machine’s .vmx file, and select Open. The
summary/console tab remains visible as long as the virtual machine remains open.
The Status Bar — In the Summary view, messages from VMware Workstation
appear in the status bar, at the bottom left of the summary window.
The status bar
For example, the status bar displays an alert if the version of VMware Tools in a virtual
machine does not match your version of Workstation.
The status bar displays an icon for each removable device. On a Windows host, you
can right-click an icon to disconnect it or edit its configuration.
77
VMware Workstation 5 User’s Manual
Displaying the Console View
The console view for an active virtual machine is like the monitor screen of a hardware
PC.
-+
Windows host console window
Linux host console window
When a virtual machine is active, the name of the virtual machine — or the name of
the team it is on, if any — is always displayed in a tab at the top of the console. To
switch from the active virtual machine or team, click the tab of another virtual
machine or team. You can use the console tabs in the windowed view, and also in the
quick switch view.
Tabs make it easy to switch among active virtual machines (Windows host)
78
www.vmware.com
C H A P T E R 4 Learning VMware Workstation Basics
Displaying Multiple Virtual Machines at the Same Time
If you want to view more than one virtual machine when they are not all on the same
team, you can open multiple Workstation windows and launch one or more virtual
machines in each Workstation window. Alternately you can use a team to coordinate
and use multiple virtual machines within a single console window. See Displaying
Teams on page 317 for a complete description of the console view for teams.
The Toolbar
The toolbar area at the top of the Workstation window contains buttons you can click
to power your virtual machines on and off, change the Workstation display, and
manage snapshots. The following sections describe the toolbar buttons. To customize
the toolbar display, see Customizing the Toolbar on page 81.
Toolbar for virtual machine (Windows host)
Caution: When a team is active, clicking the power on, power off, suspend, resume, or
reset button affects all the virtual machines on that team.
Power Off
This button turns off the active virtual machine or team like the power button on a
hardware PC. You can configure Workstation for a soft power off (called shut down) or
a hard power off, (called power off ). See Shutting Down a Virtual Machine on
page 162, or Starting and Stopping Teams on page 310 for a description of this
feature.
Suspend
This button stops a virtual machine or team in a manner that allows you to resume
your work later, as if you never left. You may be familiar with the concept of
suspending your work on a laptop. See Using Suspend and Resume on page 272 for a
description of this feature.
Power On or Resume
This button powers on a selected virtual machine or team that is powered off, or
resumes a virtual machine or team that is suspended.
• Power on — See Starting a Virtual Machine on page 159, or Starting and
Stopping Teams on page 310 for a description.
• Resume — See Using Suspend and Resume on page 272 for a description.
79
VMware Workstation 5 User’s Manual
Reset
This button resets a virtual machine or team, like the reset button on a physical PC.
Snapshot
This button allows you to save the state of a virtual machine in the same manner you
might save a word-processing document. You can come back later to that state if you
make a mistake with the Revert button. See Using Snapshots on page 273 for a
description of this feature.
Revert
This button allows you to return a virtual machine to the parent state, a state
previously preserved by taking a snapshot. See Using Snapshots on page 273 for a
description of this feature.
Manage Snapshots
This button opens the snapshot manager, where you can view the virtual machine’s
existing snapshots, revert to a snapshot, take a new snapshot, and make a clone from
a snapshot. For more on the snapshot manager, see The Snapshot Manager Window
on page 282.
Full Screen
This button enlarges the virtual machine display to cover the entire host monitor. The
virtual machine no longer appears in a window.
Note: Workstation menus and toolbar are not visible in full screen mode. Press CtrlAlt to restore the Workstation window.
Note: If you are unable to enter fullscreen mode when the guest's display mode is
smaller than the host's display mode, try adding the following line to the virtual
machine’s configuration (.vmx) file:
mks.maxRefreshRate=1000
See What Files Make Up a Virtual Machine? for a description of this file.
Quick Switch
This button enlarges the Workstation console to cover the entire host monitor.
Console tabs are visible, allowing you to switch between your virtual machines and
teams with a single click.
Note: Workstation menus and toolbar are not visible in quick switch mode. Move
your cursor to the top of the screen to show the menu and toolbar momentarily.
80
www.vmware.com
C H A P T E R 4 Learning VMware Workstation Basics
Summary
This button displays the summary view. See Displaying the Summary View on page 76
for a description of this view.
Console
This button displays the console view. See Displaying the Console View on page 78 for
a description of this view.
Customizing the Toolbar
You can customize the Workstation toolbar, by adding, removing, and rearranging
toolbar buttons. On a Windows host, the toolbar buttons are arranged in three
separate toolbars, for power buttons, snapshot buttons, and view buttons. On a Linux
host, all the buttons are contained in a single toolbar.
To customize the toolbar display (Linux host)
1. Right-click any part of the toolbar to display a toolbar menu.
2. Choose Power, Snapshot, or View to add or remove the corresponding toolbar
buttons. When a choice is checked, the corresponding buttons are displayed.
3. In the lower part of the menu, choose the display style for toolbar buttons.
81
VMware Workstation 5 User’s Manual
To add or remove the power, snapshot, or view toolbar (Windows host)
1. Right-click any part of the toolbar to display a toolbar menu.
2. Click Power, Snapshot, or View to add or remove that toolbar. When a toolbar is
checked, it is displayed.
To customize a toolbar (Windows host)
1. Open the Customize Toolbar window.
• Right-click in the toolbar you want to customize (power, snapshot, or view)
The illustration shows the Customize Toolbar window for the power toolbar.
The Customize Toolbar windows for the snapshot and view toolbars work the
same way.
Buttons listed under Current toolbar buttons are displayed in the toolbar, in the
order shown in the Customize Toolbars window.
2. To add or remove a button from the toolbar, select the button and click Add or
Remove. Add a separator to display a vertical line between the buttons.
To change the order of the buttons, select any button under Current toolbar
buttons and click Move Up or Move Down to rearrange the buttons.
Note: You can also change the order of the currently displayed buttons without
opening the Customize Toolbar window: Hold down the Shift key while you
drag and drop a button to a different location in the toolbar.
To restore the default setup, with all buttons displayed, click Reset.
3. Click Close.
82
www.vmware.com
C H A P T E R 4 Learning VMware Workstation Basics
The Favorites List
This section describes the following topics:
• Overview of the Favorites List on page 83
• Adding an Item to the Favorites List on page 84
• Adding the Active Virtual Machine to the Favorites List on page 84
• Removing an Item from the Favorites List on page 84
• Removing the Active Virtual Machine from the Favorites List on page 84
• Changing the Name of a Favorite List Item on page 85
• Organizing Favorites into Folders on page 85
• Hiding and Displaying the Favorites List on page 85
Overview of the Favorites List
The Favorites list gives you a convenient way to organize and access frequently-used
items.
Legacy virtual
machine icon
Powered on icon
Suspended icon
The Favorites list
• Fast access — Like bookmarks in a web browser, the Favorites list helps you
quickly access frequently-used items. With your virtual machines and teams on
the Favorites list, you can open them without browsing the host file system. Also
like browser bookmarks, Favorites list icons can be organized in folders, added,
rearranged, or deleted — without affecting the items they open.
• Status — The Favorites list displays the status of virtual machines and teams by
using different icons. A Favorites list icon indicates whether the team or virtual
machine is powered off, powered on, or suspended. The icon also indicates
83
VMware Workstation 5 User’s Manual
whether the virtual machine is a legacy virtual machine that needs to be
upgraded to use all the features of the current Workstation version.
• Right-click commands — You can right-click on a Favorites icon to display a
menu of commands you can use for that virtual machine or team. You can also
click elsewhere in the Favorites list (that is, not on a virtual machine or team) to
display a context menu from which you can choose to create a new virtual
machine, team, or folder, or open an existing virtual machine, team, Microsoft
Virtual PC or Virtual Server virtual machine, or Symantec LiveState Recovery
system image.
Adding an Item to the Favorites List
To add a virtual machine or team entry to the Favorites list
1. Open the virtual machine or team that you want to add.
Choose (File > Open) and browse to the location of the virtual machine (.vmx
file) or team (.vmtm file) you want as a favorite.
2. Choose File > Add to Favorites.
The virtual machine or team name appears in the Favorites list.
Adding the Active Virtual Machine to the Favorites List
To add the currently open virtual machine, Choose File > Add to Favorites.
The virtual machine name appears in the Favorites list.
Removing an Item from the Favorites List
You can remove the name of a virtual machine from the Favorites list at any time.
Removing the name from the list does not affect the virtual machine’s files or
operation. You can add the virtual machine to the list again at any time.
To remove a name from the Favorites list, take these steps.
1. Click a name in the list to select it.
2. Choose File > Remove from Favorites.
The virtual machine name is removed from the Favorites list.
Removing the Active Virtual Machine from the Favorites List
To remove the currently open virtual machine from the Favorites list:
Choose File > Remove from Favorites.
The virtual machine is removed from the Favorites list.
84
www.vmware.com
C H A P T E R 4 Learning VMware Workstation Basics
Changing the Name of a Favorite List Item
You can rename the Favorites list entry for a virtual machine or team.
To rename a Favorite list entry:
1. Right-click the Favorite you want to rename.
2. Select Rename from the pop-up menu.
3. Type the new name for the Favorite and press Enter.
Note: This change is for display only, and does not rename the virtual machine files
on the host.
Organizing Favorites into Folders
You can arrange your virtual machines and teams in folders.
To create a folder:
1. Right-click in the Favorites list.
2. Select New > Folder from the pop-up menu.
3. Type a name for the folder and press enter.
4. Drag and drop your virtual machine or team favorites into the new folder as
desired.
Hiding and Displaying the Favorites List
To toggle the display of the Favorites list on or off:
1. Choose View > Favorites.
If the Favorites list was visible, it becomes hidden. If it was hidden, now it is visible.
85
VMware Workstation 5 User’s Manual
Checking for Product Updates
VMware Workstation checks automatically to see if updates for the product are
available. By default, it checks once a week, at the time you launch Workstation. You
can change the interval for the automatic checks, and you can check manually at any
time by choosing Help > Check for Updates on the Web, or by clicking Check now in
Edit > Preferences > Workspace.
To have VMware Workstation check for updates automatically.
1. Choose Edit > Preferences > Workspace.
2. On the Check for software Updates drop-down menu, set the interval.
The choices are: Never, Daily, Weekly, or Monthly.
On Linux hosts, the Software updates section of the Workspace tab shows the time
and result of the most recent automatic check for updates, and the time of the next
scheduled check. To check manually for product updates at any time, click Check
now.
Note: Checking for product updates works only if the host computer is connected to
the Internet.
86
www.vmware.com
C H A P T E R 4 Learning VMware Workstation Basics
Setting Preferences for VMware
Workstation
The Preferences dialog box allows you to change a number of settings that apply to
VMware Workstation itself, no matter what virtual machine you are running.
Note: On a Linux host, you must be logged in as root to save global preference
changes.
The settings on the Workspace, Input and Hot Keys tabs apply to the user currently
logged on to the host computer. They do not affect settings made by any other user
on the computer. The settings on the Display, Memory and Lockout tabs apply no
matter what virtual machine is running or who is logged on to the host computer. The
settings on the Priority tab apply to all virtual machines for the user currently logged
on to the host computer. They do not affect settings made by any other user on the
computer.
To make changes to these settings, choose Edit > Preferences.
87
VMware Workstation 5 User’s Manual
Workspace
The Workspace tab lets you change the directory in which newly created virtual
machines are stored. The directory Workstation uses by default is displayed under
Default location for teams and virtual machines. To set a different directory, type in
the path or click Browse to navigate to the directory you want to use. Workstation
creates a directory for each new virtual machine under the directory you specify here.
If you select Remember opened tabs between sessions, you see a tab for each
opened virtual machine or team in the console window the next time you start
Workstation. A virtual machine or team is considered opened if both of the following
conditions are true:
• The virtual machine or team was left open.
• The virtual machine or team was powered on and off or powered on and
suspended.
Use the Check for software updates drop-down menu to determine how often
VMware Workstation checks to see if new versions of the product are available.
To have VMware Workstation check for updates automatically.
1. Choose Edit > Preferences > Workspace.
2. On the Check for software Updates drop-down menu, set the interval.
The choices are: Never, Daily, Weekly, or Monthly.
The Software updates section of the Workspace tab shows the time and result of the
most recent automatic check for updates, and the time of the next scheduled check.
To check manually for product updates at any time, click Check now (Linux hosts
only).
Note: Checking for product updates works only if the host computer is connected to
the Internet.
88
www.vmware.com
C H A P T E R 4 Learning VMware Workstation Basics
Input
.
The Input tab lets you adjust the way that the virtual machine captures control of
keyboard and mouse.
Note: The option Grab when cursor enters window allows you to move the mouse
pointer back into the virtual machine window easily if you have been working in the
virtual machine, then temporarily moved the mouse pointer outside the virtual
machine window. The mouse pointer is grabbed only when VMware Workstation has
focus (is the active application). Also, if you release the mouse pointer by pressing a
hot-key combination — Ctrl-Alt by default — you must click inside the virtual
machine window to make VMware Workstation grab the mouse pointer again.
Hot Keys
The Hot Key tab lets you change the key combination that determines whether
certain combinations of keys are passed to the guest operating system or intercepted
by VMware Workstation.
Note: Because Ctrl-Alt is the key combination used to tell VMware Workstation to
release (ungrab) mouse and keyboard input, combinations that include Ctrl-Alt are
not passed to the guest operating system. If you need to use such a combination —
89
VMware Workstation 5 User’s Manual
for example, use Ctrl-Alt-<Fkey> to switch between Linux workspaces in a virtual
machine — press Ctrl-Alt-Space, release Space without releasing Ctrl and Alt, then
press the third key of the key combination you want to send to the guest.
Using this dialog box, you can also construct your own custom hot-key combination.
Display
The Display tab lets you adjust the manner in which the console and the host display
accommodate a different guest operating system display resolution.
Autofit
Use Autofit preferences to control how the console window behaves when Autofit is
active.
• Select Autofit window to have Workstation change the console window size to
match the guest operating system screen resolution. This is the same as
choosing View > Autofit Window.
• Select Autofit guest to have Workstation change the guest operating system
display resolution to match the console window size. This is the same as
choosing View > Autofit Guest.
Note: Selecting Autofit guest also activates Autofit window.
90
www.vmware.com
C H A P T E R 4 Learning VMware Workstation Basics
Full Screen
Use Full Screen preferences to configure how the host and guest display settings
interact when you enter full screen mode on the host.
• Select Resize host to change the host display settings to match the display
settings of the guest while the guest is in full screen mode.
• Select Resize guest to change the guest’s display settings to match the host
display settings while the guest is in full screen mode.
• Select Don’t resize to have both host and guest retain their own display settings
while the guest is in full screen mode.
Memory
The Memory tab lets you adjust the amount of physical RAM that can be used by all
running virtual machines. It also lets you adjust how much virtual machine memory
may be swapped to disk, allowing you to run more or larger virtual machines if you are
willing to accept slower performance.
For details on adjusting memory settings in VMware Workstation, see Memory Usage
Notes on page 443.
91
VMware Workstation 5 User’s Manual
Priority
Process Priority (Windows Hosts Only)
Process priority determines the precedence that the Windows process scheduler
gives to your virtual machines when mouse and keyboard input are going to a
particular virtual machine and when input is not going to that virtual machine.
You can adjust these settings to improve overall system performance based on the
relative priority of work you are doing in various virtual machines and on the host
computer.
To change the settings for a particular virtual machine, and override the global
settings, open the virtual machine you want to adjust, choose VM > Settings, click the
Options tab, select Advanced, then use the drop-down lists under Process priorities
to make the setting you want for that virtual machine.
There is no corresponding setting on a Linux host.
Snapshots
If you select Take and restore snapshots in the background, you can continue using
your virtual machine even when Workstation is taking or restoring a snapshot.
Enabling background snapshots for a host with slow hard disks may affect
performance. If you experience significant performance problems when taking or
restoring snapshots, turn off this option.
Workstation supports only one background snapshot process at a time for a virtual
machine. If you take or restore a second snapshot before a previous snapshot
operation completes for the same virtual machine, Workstation displays a progress
bar until the previous snapshot operation completes. Then the second snapshot
operation continues in the background.
A virtual machine that is powered on does not recognize any change to this check
box until you restart that virtual machine.
92
www.vmware.com
C H A P T E R 4 Learning VMware Workstation Basics
Lockout (Windows Hosts Only)
The Lockout tab lets you restrict who can create new virtual machines, edit virtual
machine configurations and change networking settings. For details, see Locking Out
Interface Features on page 457.
There are no corresponding settings on a Linux host.
93
VMware Workstation 5 User’s Manual
Virtual Machine Settings
VMware Workstation configures a newly created virtual machine based on the guest
operating system you select in the New Virtual Machine Wizard (File > New >
Virtual Machine). Use the virtual machine settings editor (VM > Settings) if you want
to change any configuration options from the wizard defaults.
Hardware
Use the Hardware tab to add, remove, and configure virtual devices for the virtual
machine.
• Memory — See Memory Usage Notes on page 443.
• Virtual Disk — See Adding a New Virtual Disk to a Virtual Machine on page 219.
• CD-ROM — See Adding DVD or CD Drives to a Virtual Machine on page 226.
• Floppy — See Adding Floppy Drives to a Virtual Machine on page 228.
• Ethernet — See Adding and Modifying Virtual Network Adapters on page 336.
• Serial Port — See Using Serial Ports on page 397.
• Parallel Port — See Using Parallel Ports on page 392.
• USB Controller — See Using USB Devices in a Virtual Machine on page 417.
• Sound Adapter — See Configuring Sound on page 389.
• Processors — See Using Two-Way Virtual Symmetric Multiprocessing
(Experimental) on page 429
• Generic SCSI Device — See Setting Up a New Virtual Machine on page 114.
• Mouse (Linux host only) — See Human Interface Devices on page 421.
94
www.vmware.com
C H A P T E R 4 Learning VMware Workstation Basics
Options
The Options tab lets you adjust characteristics of the selected virtual machine.
General
Virtual Machine Name — Use this setting to change the virtual machine name. Type
a new name in the field and click OK.
This field affects the virtual machine name only as it appears in the console tab and
Favorites list. Changing the virtual machine name here does not change the names of
the virtual machine files.
Virtual Machine Configuration File (Windows only) — This read-only field displays
the path to the file that contains configuration information for the selected virtual
machine.
Guest Operating System — Workstation optimizes the virtual machine for the
operating system you choose in this field.
Version — Use this field to change the setting for the guest operating system version
in the virtual machine's configuration file. This setting does not actually change the
guest operating system itself.
When you set the guest operating system type in the New Virtual Machine Wizard,
Workstation chooses configuration defaults based on the guest type you choose.
Changing the guest type in this field simply changes the guest type setting in the
configuration file.
The Version field is useful when you are upgrading the guest operating system
installed in the virtual machine, and you want to change the guest operating system
version.
95
VMware Workstation 5 User’s Manual
Working Directory — The working directory is where Workstation stores suspended
state (.vmss), snapshot (.vmsn) and redo log files. By default, this is the same
directory the virtual machine files are stored in.
Power
Power options
• Power on after opening this virtual machine — Select this option to power on
the selected virtual machine automatically when Workstation launches. With this
option selected, you do not have an opportunity to change the virtual
machine's configuration before it starts, since the virtual machine powers on
immediately.
• Enter full screen mode after powering on — Select this option to enter full
screen mode automatically after powering on the selected virtual machine.
• Close after powering off or suspending — Select this option to close the
selected virtual machine automatically after you power it off or suspend it.
Closing a virtual machine removes the tab for that machine from the main
window in quick switch mode.
96
www.vmware.com
C H A P T E R 4 Learning VMware Workstation Basics
Power Controls
Note: Settings in Power Controls apply only to the active virtual machine.
•
You can configure this button to turn off a virtual machine or team in two
ways. Select Power Off if you want this button to work the way a power switch
works on a power supply. The virtual machine is abruptly powered off, with no
consideration for work in progress. Select Shut Down Guest if you want this
button to send a shut down signal to the guest operating system. An operating
system that recognizes this signal shuts down gracefully.
Note: Not all guest operating systems respond to a shut down signal from this
button. If your operating system does not respond to a shut down signal, shut
down from within the operating system, as you would with a physical machine.
•
The suspend button is not configurable.
•
The power on or resume button is not configurable.
•
You can configure this button to reset a virtual machine or restart a guest
operating system. Select Reset if you want this button to work as a reset switch.
The virtual machine is abruptly reset, with no consideration for work in progress.
Select Restart Guest if you want this button to send a restart signal to the guest
operating system. An operating system that recognizes this signal shuts down
gracefully and restarts.
Note: Not all guest operating systems respond to a restart signal from this
button. If your operating system does not respond to a restart signal, restart from
within the operating system, as you would with a physical machine.
Run VMware Tools Scripts — This option allows you to run scripts when you power
on a virtual machine. See Command Line Reference on page 102 for help with
scripting.
97
VMware Workstation 5 User’s Manual
Shared Folders
Shared Folders — This option allows a virtual machine to share a folder with the host
file system for convenient file transfers. See Using Shared Folders on page 176 for help
configuring this option.
Snapshots
General — You can disable snapshots for the virtual machine. The virtual machine
must not have any snapshots if you want to disable snapshots.
To disable snapshots for this virtual machine, select Disable snapshots.
When powering off — You can specify the way Workstation handles snapshots when
you power off the virtual machine. Options when powering off include:
• Just power off — powers off without making any changes to snapshots.
• Revert to the snapshot — reverts to the parent snapshot of the virtual
machine’s current state (that is, the parent snapshot of the You Are Here position
98
www.vmware.com
C H A P T E R 4 Learning VMware Workstation Basics
in the Snapshot Manager window) so the virtual machine always starts in the
state it was in when the parent snapshot was taken.
• Take a new snapshot — takes a new snapshot of the virtual machine state after
it is powered off.
• Ask me — always asks what you want to do with snapshots when you power off.
See Using Snapshots on page 273 for more information on setting these options.
Guest Isolation (Windows only)
Enable drag and drop to and from this virtual machine — Select this option if you
want to drag and drop files from the host to the virtual machine and vice versa. One
reason to leave the drag and drop feature disabled is to prevent files from accidentally
being transferred between the virtual machine and the host.
Enable copy and paste to and from the virtual machine — Select this option if you
want to copy and paste files from the host to the virtual machine and vice versa.
99
VMware Workstation 5 User’s Manual
Advanced
Process priorities (Windows only) — VMware Workstation sets the default priority for
virtual machine processing as Normal for both Input grabbed and Input ungrabbed.
This means that the processes within virtual machines contend equally for resources
with all other processes running on the host.
To change the default priority for the selected virtual machine, overriding the global
priorities, choose the priority you want, then click OK.
You can also set the global priorities directly from a Workstation window by choosing
Edit > Preferences and clicking the Priority tab.
Settings
• Run with debugging information — You can run a virtual machine so it
collects additional debugging information that is helpful to VMware technical
support in resolving issues.
To turn debugging mode on, select Run with debugging information, then
click OK to apply your changes
• Disable acceleration — In rare instances, you may find that when you install
or run software inside a virtual machine, Workstation appears to hang.
Generally, the problem occurs early in the program's execution. In many cases,
you can get past the problem by temporarily disabling acceleration in the
virtual machine.
To disable acceleration, select Disable acceleration, then click OK.
This setting slows down virtual machine performance, so it is recommended
only for getting past the problem with running the program. After you pass
the point where the program was encountering problems, try returning to the
100
www.vmware.com
C H A P T E R 4 Learning VMware Workstation Basics
virtual machine settings editor and removing the check beside Disable
acceleration. You may then be able to run the program with acceleration.
• Disable memory page trimming — Select this option to disable memory
page trimming and page sharing.
VMware uses a memory trimming technique to return unused virtual
machine guest memory to the host machine for other uses. While trimming
usually has little impact on performance and may be needed in low-memory
situations, the I/O engendered by memory trimming can sometimes interfere
with disk-oriented workload performance in a guest.
• Log virtual machine progress periodically — This special configuration
option increases logging information for debugging and troubleshooting
purposes. When you select this option, you do not have to edit a
configuration file or restart the virtual machine to extract more detailed
logging for technical support.
• Enable Template mode (to be used for cloning) — See Linked Clones and
Access to the Parent Virtual Machine on page 296 for help configuring this
option.
File locations
The read-only fields in this section show the location of the virtual machine’s
Workstation configuration and log files.
101
VMware Workstation 5 User’s Manual
Command Line Reference
The following sections describe command line options that are available when you
launch VMware Workstation and keyboard shortcuts you can use while VMware
Workstation is running.
Startup Options on a Linux Host
The following list describes various options available when you run VMware
Workstation from the command line on a Linux host operating system.
/usr/bin/vmware [-x] [-X] [-q] [-s <variablename>=<value>]
[-m] [-v]
[/<path_to_virtual_machine>/<virtual_machine_name>.vmx]
[X toolkit options]
You can type these commands manually in a terminal window, or create scripts to run
multiple commands.
102
Option
Description
-x
Automatically powers on the virtual machine
when VMware Workstation starts. This is
equivalent to clicking the Power On button in
the VMware Workstation toolbar.
-X
Automatically powers on the virtual machine,
then switches the VMware Workstation window
to full screen mode.
-q
Closes the virtual machine’s tab when the virtual
machine powers off. If no other virtual machine is
open, it also exits VMware Workstation. This is
particularly useful when the guest operating
system is capable of powering off the virtual
machine.
-s
Sets the specified variable to the specified value.
Any variable names and values that are valid in
the configuration file may be specified on the
command line with the -s switch.
-m
Starts the program in quick switch mode on a
Linux host.
-v
Displays the product name, version and build
number.
/<path_to_virtual_machine>/
<virtual_machine_name>.vmx
Launches a virtual machine using the specified
configuration file.
www.vmware.com
C H A P T E R 4 Learning VMware Workstation Basics
X toolkit options can be passed as arguments, although some of them (most notably
the size and title of the VMware Workstation window) cannot be overridden.
X toolkit options are not relevant on a Windows host.
Startup Options on a Windows Host
Most of the switches described in Startup Options on a Linux Host can also be used
on a Windows host. The -m switch is for Linux hosts only. The most convenient way to
use the switches is to incorporate them into the command generated by a Windows
shortcut.
Create the shortcut, right-click the shortcut, then click Properties. In the Target field,
add any switches you want to use after the vmware.exe filename. For example, the
following command launches the Windows Me virtual machine specified, powers it
on automatically and switches to full screen mode.
"C:\Program Files\VMware\VMware Workstation\Programs\vmware.exe -X
C:\Documents and Settings\<username>\My Documents\My Virtual
Machines\Windows Me\Windows Me.vmx"
Be sure to enclose the entire command string in quotation marks.
Note: The configuration file has a .vmx extension by default.
103
VMware Workstation 5 User’s Manual
Command Line Application
VMware Workstation includes a separate application, vmrun, for operating teams or
virtual machines from the command line.
To launch the vmrun application, from the command prompt, enter:
vmrun COMMAND [OPTION]
Valid vmrun commands and options are described in the following table:
Command
Description
Option
list
Lists all running virtual machines.
None
start
Start a virtual machine
[Path to .vmx file]
stop
Stop a virtual machine or team.
[Path to .vmx file (virtual
machine)]
or
[Path to .vmtm file (team)]
reset
Reset a virtual machine or team.
[Path to .vmx file (virtual
machine)]
or
[Path to .vmtm file (team)]
suspend
Suspend a virtual machine or team.
[Path to .vmx file (virtual
machine)]
or
[Path to .vmtm file (team)]
104
upgradevm
Upgrade a virtual machine to the current
Workstation version.
[Path to .vmx file]
installtools
Install VMware Tools in the guest operating
system. In Windows guests, the VMware Tools
installer runs automatically. In Linux guests,
this command connects the virtual machine’s
virtual CD-ROM drive to the VMware Tools ISO
image for that guest, but the installer does
not start automatically: you must complete
the installation with additional manual steps,
as described in VMware Tools for Linux Guests
on page 142.
[Path to .vmx file]
snapshot
Create a snapshot of a virtual machine
[Path to .vmx file]
[snapshot name]
listSnapshots
List all snapshots in a virtual machine
[Path to .vmx file]
www.vmware.com
C H A P T E R 4 Learning VMware Workstation Basics
Command
Description
Option
deleteSnapshot
Remove a snapshot from a virtual machine
[Path to .vmx file]
[snapshot name]
revertToSnapshot
Go to a snapshot in a virtual machine.
[Path to .vmx file]
[snapshot name]
If a snapshot has a unique name within a
virtual machine, you can revert to that
snapshot simply by specifying the path to the
virtual machine’s configuration file and the
snapshot name:
[Path to .vmx file][snapshot name]
or
[Path to .vmx file]
[snapshot name1/
snapshot name2]
If several snapshots have the same name, you
can still specify a snapshot by including a
"pathname" for the snapshot name. A
pathname is a series of snapshot names,
separated by forward slash characters ("/").
Each name specifies a different snapshot in
the tree, and together the names in a
pathname will specify a path from the root
snapshot to the snapshot you are naming.
For example, suppose you include the
pathname "snap1/snap2". This will identify a
snapshot named "snap2" that was taken from
the state of a root snapshot named "snap1".
Because the forward slash can be used in a
pathname to specify a particular snapshot in
the revertToSnapshot command, it is
recommended that you avoid using the slash
character when you name a snapshot, since
this will make it difficult for you to predict
which snapshot a pathname will identify.
Note: Before running this command on a Windows host, you must do one of the
following:
• Change your working directory to the VMware Workstation directory. The
default location is:
c:\Program Files\VMware\VMware Workstation
• Add the VMware Workstation directory to the system path. On Windows 2000
and XP, this setting is changed from
Control Panels > System > Advanced > Environment Variables > System
variables > Path
105
VMware Workstation 5 User’s Manual
Examples for vmrun
For example, to start a virtual machine:
• In a Linux terminal, enter
vmrun start /usr/local/VMs/<virtual_machine_name>.vmx
• On the Windows command line, enter:
vmrun start c:\My Virtual Machines\<virtual_machine_name>.vmx
With virtual machines that require input through a VMware Workstation dialog box,
vmrun may time out and fail. To disable Workstation dialog boxes, insert the following
line into the .vmx configuration file for a virtual machine:
msg.autoAnswer = TRUE
106
www.vmware.com
C H A P T E R 4 Learning VMware Workstation Basics
Keyboard Shortcuts
If you prefer to work from the keyboard as much as possible, you may find the
following keyboard shortcuts handy. If you have changed the Preferences setting for
the hot-key combination, substitute your new setting for Ctrl-Alt as needed in the
shortcuts listed here.
Shortcut
Action
Ctrl-B
Power on.
Ctrl-E
Power off.
Ctrl-R
Reset the power.
Ctrl-Z
Suspend.
Ctrl-N
Create a new virtual machine.
Ctrl-O
Open a virtual machine.
Ctrl-F4
Close the summary/console view for the selected virtual machine.
A confirmation dialog appears only if the virtual machine is powered on.
Ctrl-D
Edit the virtual machine’s configuration.
Ctrl-G
Grab input from keyboard and mouse.
Ctrl-P
Edit preferences.
Ctrl-Alt-Enter
Go to full screen mode.
Ctrl-Alt
Return to normal (windowed) mode.
Ctrl-Alt-Tab
Switch among open virtual machines while mouse and keyboard input are
grabbed.
Ctrl-Tab
Switch among open virtual machines while mouse and keyboard input are not
grabbed. VMware Workstation must be the active application.
Ctrl-Shift-Tab
Switch among open virtual machines while mouse and keyboard input are not
grabbed. VMware Workstation must be the active application.
107
VMware Workstation 5 User’s Manual
What Files Make Up a Virtual Machine?
You may never need to know the file names or locations for your virtual machine files.
Virtual machine file management is performed by VMware Workstation. If the behind
the scenes file structure is not interesting to you, skip this section.
A virtual machine typically is stored on the host computer in a set of files, usually in a
directory created by Workstation for that specific virtual machine.
The key files are listed here by extension. In these examples, <vmname> is the name
of your virtual machine
Extension
File Name
Description
.log
<vmname>.log
This is the file that keeps a log of key VMware
Workstation activity. This file can be useful in
troubleshooting if you encounter problems. This
file is stored in the directory that holds the
configuration (.vmx) file of the virtual machine.
or
vmware.log
.nvram
<vmname>.nvram
or
This is the file that stores the state of the virtual
machine’s BIOS.
nvram
108
www.vmware.com
C H A P T E R 4 Learning VMware Workstation Basics
Extension
File Name
Description
.vmdk
<vmname>.vmdk
This is a virtual disk file, which stores the contents
of the virtual machine’s hard disk drive.
A virtual disk is made up of one or more .vmdk
files. If you have specified that the virtual disk
should be split into 2GB chunks, the number of
.vmdk files depends on the size of the virtual
disk. As data is added to a virtual disk, the .vmdk
files grow in size, to a maximum of 2GB each. (If
you specify that all space should be allocated
when you create the disk, these files start at the
maximum size and do not grow.) Almost all of a
.vmdk file’s content is the virtual machine’s data,
with a small portion allotted to virtual machine
overhead.
If the virtual machine is connected directly to a
physical disk, rather than to a virtual disk, the
.vmdk file stores information about the
partitions the virtual machine is allowed to
access.
Earlier VMware products used the extension
.dsk for virtual disk files.
.vmem
.vmsd
<diskname>-<###>.vmdk
This is a redo-log file, created automatically when
a virtual machine has one or more snapshots.
This file stores changes made to a virtual disk
while the virtual machine is running. There may
be more than one such file. The ### indicates a
unique suffix added automatically by VMware
Workstation to avoid duplicate file names.
<uuid>.vmem
The virtual machine’s paging file, which backs up
the guest main memory on the host file system.
This file exists only when the virtual machine is
running, or if the virtual machine has crashed.
<snapshotnameandnumber>
Each snapshot of a virtual machine that is
powered on has an associated .vmem file, which
contains the guest’s main memory, saved as part
of the snapshot.
<vmname>.vmsd
This is a centralized file for storing information
and metadata about snapshots.
109
VMware Workstation 5 User’s Manual
Extension
File Name
Description
.vmsn
<vmname>-Snapshot.vmsn
This is the snapshot state file, which stores the
running state of a virtual machine at the time
you take that snapshot
<vmname>-Snapshot<###>.vmsn
This is the file which stores the state of a
snapshot
<vmname>.vmss
This is the suspended state file, which stores the
state of a suspended virtual machine
.vmss
.Some earlier VMware products used the
extension .std for suspended state files
.vmtm
<vmname>.vmtm
This is the configuration file containing team
data.
.vmx
<vmname>.vmx
This is the primary configuration file, which
stores settings chosen in the New Virtual
Machine Wizard or virtual machine settings
editor. If you created the virtual machine under
an earlier version of VMware Workstation on a
Linux host, this file may have a .cfg extension
.vmxf
<vmname>.vmxf
This is a supplemental configuration file for
virtual machines that are in a team. Note that the
.vmxf file remains if a virtual machine is
removed from the team.
There can be other files in the directory, some of which are present only while a virtual
machine is running.
110
www.vmware.com
C H A P T E R 4 Learning VMware Workstation Basics
Where to Go Next
• Creating a New Virtual Machine on page 113
• Running VMware Workstation on page 157
111
VMware Workstation 5 User’s Manual
112
www.vmware.com
CHAPTER
5
Creating a New Virtual Machine
This chapter discusses how to create a new virtual machine and install VMware Tools:
• Setting Up a New Virtual Machine on page 114
• Importing Virtual Machines and System Images from Other Formats on page 125
• Installing a Guest Operating System and VMware Tools on page 137
• Installing VMware Tools on page 140
• VMware Tools for Windows Guests on page 141
• VMware Tools for Linux Guests on page 142
• VMware Tools for FreeBSD Guests on page 146
• Installing VMware Tools in a NetWare Virtual Machine on page 147
• VMware Tools Configuration Options on page 149
• Using the System Console to Configure VMware Tools in a NetWare Guest
Operating System on page 153
113
VMware Workstation 5 User’s Manual
Setting Up a New Virtual Machine
The New Virtual Machine Wizard guides you through the key steps for setting up a
new virtual machine, helping you set various options and parameters. You can then
use the virtual machine settings editor (VM > Settings) if you need to make any
changes to your virtual machine’s setup.
By default, the new virtual machine uses an IDE disk for Windows 95, Windows 98,
Windows Me, Windows XP, Windows Server 2003, NetWare and FreeBSD guests. The
default for other guest operating systems is a SCSI disk.
Follow these steps to create a virtual machine using a virtual disk.
1. Start VMware Workstation.
Windows hosts: Double-click the VMware Workstation icon on your desktop or
use the Start menu (Start > Programs > VMware > VMware Workstation).
Linux hosts: In a terminal window, enter the command
vmware &
Note: On Linux hosts, the Workstation installer adds an entry to the Start menu
for VMware Workstation. However, this menu entry is located in different
submenus, depending on your Linux distribution. For example:
• SUSE Linux 9.1 — Start > System > More Programs > VMware Workstation
• Red Hat Enterprise Linux AS/WS Release 3 — Start > System Tools > More
System Tools > VMware Workstation
2. If this is the first time you have launched VMware Workstation and you did not
enter the serial number when you installed the product (an option available on a
Windows host), you are prompted to enter it. The serial number is on the
registration card in your package or in the email message confirming your
electronic distribution order. Enter your serial number and click OK.
114
www.vmware.com
C H A P T E R 5 Creating a New Virtual Machine
The serial number you enter is saved and VMware Workstation does not ask you
for it again. For your convenience, VMware Workstation automatically sends the
serial number to the VMware Web site when you use certain Web links built into
the product (for example, Help > VMware on the Web > Register Now! and
Help > VMware on the Web > Request Support). This allows us to direct you to
the correct Web page to register and get support for your product.
3. Start the New Virtual Machine Wizard.
When you start VMware Workstation, you can open an existing virtual machine
or create a new one. Choose File > New > Virtual Machine to begin creating
your virtual machine.
4. The New Virtual Machine Wizard presents you with a series of screens that you
navigate using the Next and Prev buttons at the bottom of each screen. At each
screen, follow the instructions, then click Next to proceed to the next screen.
115
VMware Workstation 5 User’s Manual
5. Select the method you want to use for configuring your virtual machine.
If you select Typical, the wizard prompts you to specify or accept defaults for the
following choices:
• The guest operating system
• The virtual machine name and the location of the virtual machine’s files
• The network connection type
• Whether to allocate all the space for a virtual disk at the time you create it
• Whether to split a virtual disk into 2GB files
If you select Custom, you also can specify how to set up your disk — create a
new virtual disk, use an existing virtual disk or use a physical disk — and specify
the settings needed for the type of disk you select. There is also an option to
create a legacy virtual disk for use in environments with other VMware products.
Select Custom if you want to
• Make a legacy virtual machine that is compatible with Workstation 4.x, GSX
Server 3.x, ESX Server 2.x and VMware ACE 1.x.
• Store your virtual disk’s files in a particular location
• Use an IDE virtual disk for a guest operating system that would otherwise have
a SCSI virtual disk created by default
• Use a physical disk rather than a virtual disk (for expert users)
• Set memory options that are different from the defaults
• Assign more than one virtual processor to the virtual machine
116
www.vmware.com
C H A P T E R 5 Creating a New Virtual Machine
6. If you selected Typical as your configuration path, skip to step 7.
If you selected Custom as your configuration path, you may create a virtual
machine that fully supports all Workstation 5 features or a legacy virtual machine
compatible with specific VMware products.
This screen asks whether you want to create a Workstation 5 virtual machine or a
legacy virtual machine. See Legacy Virtual Disks on page 268 for more
information.
7. Select a guest operating system.
This screen asks which operating system you plan to install in the virtual
machine. Select both an operating system and a version. The New Virtual
Machine Wizard uses this information to
• Select appropriate default values, such as the amount of memory needed
• Name files associated with the virtual machine
• Adjust settings for optimal performance
• Work around special behaviors and bugs within a guest operating system
If the operating system you plan to use is not listed, select Other for both guest
operating system and version.
117
VMware Workstation 5 User’s Manual
Note: Workstation supports 64-bit guest operating systems only in Workstation
versions 5.5 and later, and only on host machines with supported processors. For
the list of processors Workstation supports for 64-bit guest operating systems,
see Support for 64-Bit Guest Operating Systems on page 37.
Caution: Do not attempt to install a 64-bit operating system after selecting a 32bit guest operating system type here.
The remaining steps assume you plan to install a Windows XP Professional guest
operating system. You can find detailed installation notes for this and other
guest operating systems in the VMware Guest Operating System Installation Guide,
available from the VMware Web site or from the Help menu.
8. Select a name and folder for the virtual machine.
The name specified here is used if you add this virtual machine to the VMware
Workstation Favorites list. This name is also used as the name of the folder where
the files associated with this virtual machine are stored.
Each virtual machine should have its own folder. All associated files, such as the
configuration file and the disk file, are placed in this folder.
Windows hosts: On Windows 2000, Windows XP and Windows Server 2003, the
default folder for this Windows XP Professional virtual machine is
C:\Documents and Settings\<username>\My Documents\My
Virtual Machines\Windows XP Professional. On Windows NT,
the default folder is C:\WINNT\Profiles\<username>\Personal\My
Virtual Machines\Windows XP Professional.
Linux hosts: The default location for this Windows XP Professional virtual
machine is <homedir>/vmware/winXPPro, where <homedir> is the
home directory of the user who is currently logged on.
Virtual machine performance may be slower if your virtual hard disk is on a
network drive. For best performance, be sure the virtual machine’s folder is on a
118
www.vmware.com
C H A P T E R 5 Creating a New Virtual Machine
local drive. However, if other users need to access this virtual machine, you
should consider placing the virtual machine files in a location that is accessible
to them. For more information, see Sharing Virtual Machines with Other Users on
page 203.
9. Specify the number of processors for the virtual machine. The setting Two is
supported only for host machines with at least two logical processors.
Note: The following are all considered to have two logical processors:
• A single-processor host with hyperthreading enabled
• A single-processor host with a dual-core CPU
• A multiprocessor host with two CPUs, neither of which are dual-core or have
hyperthreading enabled
If the host does not have at least two logical processors, assigning two virtual
processors is neither supported nor recommended: a warning message will
appear. You can disregard this message and assign two virtual processors to the
virtual machine, but, once you have finished creating the virtual machine, you
will not be able to power it on unless you move it to a host machine with at least
two logical processors. For more about Workstation support for virtual
Symmetric Multiprocessing (SMP), see Using Two-Way Virtual Symmetric
Multiprocessing (Experimental) on page 429.
10. If you selected Typical as your configuration path, skip to step 11.
119
VMware Workstation 5 User’s Manual
If you selected Custom as your configuration path, you may adjust the memory
settings or accept the defaults, then click Next to continue.
In most cases, it is best to keep the default memory setting. If you plan to use the
virtual machine to run many applications or applications that need high
amounts of memory, you may want to use a higher memory setting. For more
information, see Virtual Machine Memory Size on page 443.
Note: You cannot allocate more than 2GB of memory to a virtual machine if the
virtual machine’s files are stored on a file system such as FAT32 that does not
support files greater than 2GB.
11. Configure the networking capabilities of the virtual machine.
If your host computer is on a network and you have a separate IP address for
your virtual machine (or can get one automatically from a DHCP server), select
Use bridged networking.
If you do not have a separate IP address for your virtual machine but you want to
be able to connect to the Internet, select Use network address translation
(NAT). NAT allows you to share files between the virtual machine and the host
operating system.
120
www.vmware.com
C H A P T E R 5 Creating a New Virtual Machine
For more details about VMware Workstation networking options, see
Configuring a Virtual Network on page 325.
12. If you selected Typical as your configuration path, click Finish and the wizard
sets up the files needed for your virtual machine.
If you selected Custom as your configuration path, continue with the steps
below to configure a disk for your virtual machine.
13. Select the type of SCSI adapter you want to use with the virtual machine.
An IDE and a SCSI adapter are installed in the virtual machine. The IDE adapter is
always ATAPI. You can choose a BusLogic or an LSI Logic SCSI adapter. The
default for your guest operating system is already selected. All guests except for
Windows Server 2003, Red Hat Enterprise Linux 3 and NetWare default to the
BusLogic adapter.
The LSI Logic adapter has improved performance and works better with generic
SCSI devices. The LSI Logic adapter is also supported by ESX Server 2.0 and
higher. Keep this in mind if you plan to migrate the virtual machine to another
VMware product.
Your choice of SCSI adapter does not affect your decision to make your virtual
disk an IDE or SCSI disk. However, some guest operating systems — such as
Windows XP — do not include a driver for the Buslogic or LSI Logic adapter. You
must download the driver from the LSI Logic Web site.
Note: Drivers for a Mylex (BusLogic) compatible host bus adapter are not
obvious on the LSI Logic Web site. Search the support area for the numeric string
in the model number. For example, search for “958” for BT/KT-958 drivers.
See the VMware Guest Operating System Installation Guide for details about the
driver and the guest operating system you plan to install in this virtual machine.
121
VMware Workstation 5 User’s Manual
14. Select the disk you want to use with the virtual machine.
Select Create a new virtual disk.
Virtual disks are the best choice for most virtual machines. They are quick and
easy to set up and can be moved to new locations on the same host computer
or to different host computers. By default, virtual disks start as small files on the
host computer’s hard drive, then expand as needed — up to the size you specify
in the next step. The next step also allows you to allocate all the disk space when
the virtual disk is created, if you wish.
To use an existing operating system on a physical hard disk (a “raw” disk), read
Configuring a Dual-Boot Computer for Use with a Virtual Machine on page 237.
To install your guest operating system directly on an existing IDE disk partition,
read the reference note Installing an Operating System on a Physical Partition
from a Virtual Machine on page 263.
Note: Physical disk configurations are recommended only for expert users.
Caution: If you are using a Windows Server 2003, Windows XP or Windows 2000
host, see Do Not Use Windows 2000, Windows XP and Windows Server 2003
Dynamic Disks as Physical Disks on page 256.
To install the guest operating system on a IDE physical disk, select Existing IDE
Disk Partition. To use a SCSI physical disk, add it to the virtual machine later with
the virtual machine settings editor. Booting from a SCSI physical disk is not
supported. For a discussion of some of the issues involved in using a SCSI
physical disk, see Configuring Dual- or Multiple-Boot SCSI Systems to Run with
VMware Workstation on a Linux Host on page 257.
122
www.vmware.com
C H A P T E R 5 Creating a New Virtual Machine
15. Select whether to create an IDE or SCSI disk.
The wizard recommends the best choice based on the guest operating system
you selected. All Linux distributions you can select in the wizard use SCSI virtual
disks by default, as do Windows NT, Windows 2000, and Windows Vista. All
Windows operating systems except Windows NT, Windows 2000, and Windows
Vista use IDE virtual disks by default; NetWare, FreeBSD, MS-DOS and other
guests default to IDE virtual disks.
16. Specify the capacity of the virtual disk.
Enter the size of the virtual disk that you wish to create.
You can set a size between 0.1GB and 950 GB for a SCSI virtual disk.
The option Allocate all disk space now gives somewhat better performance for
your virtual machine. If you do not select Allocate all disk space now, the virtual
disk’s files start small and grow as needed, but they can never grow larger than
the size you set here.
Note: Allocate all disk space now is a time-consuming operation that cannot
be cancelled, and requires as much physical disk space as you specify for the
virtual disk.
123
VMware Workstation 5 User’s Manual
Select the option Split disk into 2GB files if your virtual disk is stored on a file
system that does not support files larger than 2GB.
17. Specify the location of the virtual disk’s files.
18. Click Finish.
The wizard sets up the files needed for your virtual machine.
124
www.vmware.com
C H A P T E R 5 Creating a New Virtual Machine
Importing Virtual Machines and System
Images from Other Formats
To accompany Workstation release version 5.0, VMware introduced the VMware
Virtual Machine Importer, a separate downloadable application for Windows hosts
that creates a new VMware virtual machine from a Microsoft Virtual PC or Virtual
Server virtual machine. In Workstation release version 5.5, the importer is incorporated
into the Workstation program for Windows hosts, and enhanced with the ability to
create VMware virtual machines from system images created with Symantec LiveState
Recovery.
If you have upgraded Workstation to version 5.5, you no longer need the standalone
VMware Virtual Machine Importer application: you can import virtual machines and
system images directly from Workstation, as described in the following sections.
If you have not upgraded your Workstation program to version 5.5, the standalone
VMware Virtual Machine Importer is available as a download from the VMware Web
site at www.vmware.com/download/. You can download the user’s manual that
accompanies the standalone importer at
www.vmware.com/pdf/vm_importer_manual.pdf.
Note: Although Workstation version 5.5 includes the importer, the standalone
VMware Virtual Machine Importer v1.5 is compatible with Workstation 5.5. You can
install both programs on the same machine. The Windows control panel Add or
Remove Programs will contain entries for VMware Virtual Machine Importer 1.5 and
Workstation 5.5. The Virtual Machine Importer files will remain until you uninstall both
the importer and Workstation applications.
Caution: The standalone VMware Virtual Machine Importer v1.0 is not compatible
with Workstation 5.5. If you currently have Workstation 5.5 installed, do not attempt to
install VMware Virtual Machine Importer v1.0. The version 1.0 importer cannot be
installed over Workstation 5.5. Attempting this installation will damage the
Workstation installation and disable the import capability built into Workstation 5.5.
125
VMware Workstation 5 User’s Manual
Virtual Machine Importer: Overview
The VMware Virtual Machine Importer allows you to import virtual machines from
Microsoft® Virtual Server and Virtual PC, and Symantec® LiveState Recovery system
images to the following VMware platforms:
• Workstation 5.0
• Legacy Virtual Machines (for example, virtual machines compatible with
Workstation 4.x, GSX Server 3.x, ESX Server 2.x, and ACE 1.x)
The importer is a wizard that outputs a completely new VMware virtual machine
based on the input virtual machine or system image. The newly-migrated VMware
virtual machine retains the configuration of the original virtual machine or image.
The migration process is non-destructive, so you can continue to use the original
virtual machine with Virtual PC, or the original system image with LiveState Recovery.
However, if you plan to run a new VMware virtual machine on the same network as
the original Virtual PC virtual machine, you must modify the network name and IP
address on one of the virtual machines, so the original and new virtual machines can
coexist properly.
Benefits of the Importer
The importer lets you convert existing Virtual PC virtual machines and LiveState
Recovery system images to VMware virtual machines, allowing you to:
• Avoid reinstalling operating systems and applications for system configurations
you use often.
• Overcome legacy migration barriers — certain legacy systems may be
impossible to recreate through reinstallation.
Importer Requirements
Importer — Application Requirements
The importer runs on the following Microsoft Windows operating systems:
Windows NT, Windows 2000, Windows 2003, and Windows XP Professional.
Note: Although the importer operates only on Windows, after the migration you can
transfer the virtual machine to the VMware-supported host platform of your choice.
126
www.vmware.com
C H A P T E R 5 Creating a New Virtual Machine
Virtual Machine and System Image — Input Requirements
• System images can be imported from Symantec LiveState Recovery.
• Virtual machines can be imported from Microsoft Virtual PC version 7 and later.
• Virtual machines can be imported from any version of Microsoft Virtual Server.
• Virtual machines from Macintosh versions of Virtual PC are not supported.
• Virtual machines must be powered off before you attempt the migration
process. Suspended virtual machines cannot be migrated.
• The operating system on the source Virtual PC or Virtual Server virtual machine
must be a Windows guest operating system — but not Windows 9x —
supported by the intended VMware platform (for example, VMware Workstation
4 or 5). See the VMware Web site for a list of supported operating systems:
www.vmware.com/support/guestnotes/doc/index.html
Note: Virtual PC and Virtual Server virtual machines with Windows 9x, and nonWindows guest operating systems (for example, Linux and DOS), are not
compatible with VMware Virtual Machine Importer. This is true even when the
destination VMware platform otherwise supports that guest operating system.
The VMware Virtual Machine — Output Compatibility
• The resulting VMware virtual machine can be used with Workstation 4.x or
Workstation 5.x.
Note: Workstation 4 virtual machines are compatible with VMware GSX Server
3.0, ESX Server 2.x, and ACE 1.x.
How Virtual Machine and System Image Settings Are Affected
The VMware virtual machine created by the importer contains an exact copy of the
disk state from your source virtual machine or system image, with the exception of
some hardware-dependent drivers and, sometimes, the mapped drive letters.
Settings from the source computer that remain identical include:
• Operating system configuration (computer name, security ID, user accounts,
profiles and preferences, and so forth)
• Applications and data files
• Each disk partition’s volume serial number
Since the target and the source virtual machines or system images have the same
identities (name, SID, and so on), running both on the same network can result in
conflicts. If you are planning to redeploy the source virtual machine or system image,
127
VMware Workstation 5 User’s Manual
be aware of this issue and do not run both the source and target images or virtual
machines on the same network at the same time.
You can resolve the duplicate ID problem by using additional tools, such as the
Windows 2000 System Preparation Tool (Sysprep). For example, if you use Virtual
Machine Importer to test the viability of running a Virtual PC virtual machine as a
VMware virtual machine without first decommissioning the original Virtual PC
machine, you need to resolve the duplicate ID problem.
Refer to Changes to Virtual Hardware — on page 134 for a discussion of possible
migration issues.
Opening and Importing a Virtual Machine or System Image
Workstation provides two ways to convert a virtual machine or system image:
• Use the File > Open command to convert and open a virtual machine or system
image quickly. Workstation uses default settings to make the conversion
automatically, with no input required from you.
• Use the File > Import command to specify a number of options for the
converted virtual machine: the converted virtual machine’s location, whether or
not the converted virtual machine shares virtual disks with the original virtual
machine or system image, and whether the converted virtual machine is to be
compatible with Workstation 5, or a legacy virtual machine that is compatible
with Workstation 4, ESX 2.x, GSX Server 3.x, or VMware ACE 1.x.
Converting a Virtual Machine or System Image Using the Open Command
To convert a virtual machine or system image using the Open command:
1. Choose File > Open.
2. In the File name field, enter the name of the configuration (.vmx, .vmc, or
.sv2i) file for the virtual machine or system image to convert. You can use the
field Files of type to filter the files displayed by file extension, so you can browse
to the configuration file.
3. Click Open. Workstation automatically creates a VMware virtual machine, with a
VMware configuration file (.vmx) for the converted virtual machine or system
image. The converted virtual machine links to the virtual disks of the original
virtual machine or system image. The original Virtual PC or LiveState Recovery
configuration (.vmc or .sv2i) file is unchanged.
128
www.vmware.com
C H A P T E R 5 Creating a New Virtual Machine
Converting a Virtual Machine or System Image Using the Import Command
To convert a virtual machine or system image using the Import command:
1. If you are importing a Virtual PC virtual machine, make sure the virtual machine
is powered off.
Note: You cannot import a virtual machine while it is operating.
2. Choose File > Import to launch the VMware Virtual Machine Importer Wizard.
From the opening panel, click Next.
3. Select the configuration and click Next.
Typical — This configuration is appropriate for most use.
Custom — Custom configurations are useful if
• You run Workstation 5, but you need to create a legacy virtual machine for use
with VMware Workstation 4, GSX 3.x, ESX 2.x, or VMware ACE1.x.
• You run Workstation 5, and you prefer not to make a copy of the virtual disks
of the source virtual machine or system image. You might make this choice to
save disk space. The migrated VMware virtual machine uses the virtual disks of
the source virtual machine or system image.
129
VMware Workstation 5 User’s Manual
4. Browse (or type the path) to the source virtual machine or system image. Click
Next.
The importer inspects the file.
Note: If you are running Workstation on a system running Microsoft Windows
2000 or later, and you are importing a Microsoft Windows NT 4.0 virtual machine
or image, a warning panel is displayed, advising that the import process will
upgrade any NTFS partitions in the resulting virtual machine to a newer version
of the NTFS file system. An upgraded file system is compatible with Windows 4.0.
The operating system and applications will work normally. However, some
utilities shipped with Windows NT 4.0, including chkdsk and defrag, will not
operate properly. Microsoft provides hotfix 872952 for this issue. To avoid
upgrading your file system in this case, press Cancel to end the import, and run
the importer from a computer running Windows NT to import the virtual
machine or image.
5. Browse or type the path to the location you want for the VMware virtual
machine and click Next.
130
www.vmware.com
C H A P T E R 5 Creating a New Virtual Machine
Steps 6 and 7 refer to the custom configuration. If you selected the typical
configuration in step3, skip to step 8.
6. Select the format of the virtual machine.
• Select New if you want to use the virtual machine only with Workstation 5.x.
• Select Legacy if you want to use the virtual machine with Workstation 4,
ESX 2.x, GSX Server 3.x or VMware ACE 1.x.
Click Next.
7. Select the import options for the new virtual machine
• Make a complete copy of the source virtual machine — This creates a
VMware virtual machine with no dependencies on the original virtual
machine or system image.
• Link to the existing virtual machine — This creates a VMware virtual
machine that shares the virtual disk of the source virtual machine or system
image. If you chose to create a legacy virtual machine in step 6, this option is
disabled.
Note: If you choose to link to the existing virtual machine for a Virtual PC virtual
machine, opening the original source virtual machine in Virtual PC may
invalidate the imported virtual machine.
Click Next.
131
VMware Workstation 5 User’s Manual
Review the settings. To make changes, click Back. To proceed, click Next.
Virtual Machine Importer creates a VMware virtual machine from the source
virtual machine or system image.
A progress bar appears. To stop the migration, click Cancel.
The import process can often take more than a minute per gigabyte of disk
space of the migrated virtual machine. When the migration is complete, the
wizard displays a completion panel.
8. Click Finish.
132
www.vmware.com
C H A P T E R 5 Creating a New Virtual Machine
If the migration is not successful, the wizard displays a panel like the following. To
see the log file for the unsuccessful migration, click Show the logfile.
Importing a Virtual Machine or System Image from the Command Line
To import a virtual machine or system image from the Windows command line, use
the following syntax:
v2vapp [sourceVMimagepath] [targetVMname] [targetVMpath]
[options]
The following table shows the options available.
Option
Name
Description
-a
(auto)
Launch the virtual machine after migration.
-f
(fast)
Share the virtual disk of the virtual machine or system image. This option requires
Workstation 5.
-lxxx
(log)
Write the logfile to xxx.
133
VMware Workstation 5 User’s Manual
Troubleshooting the Importer
This section describes known issues with the importer.
Importer Installation Issues
Importer Installation Wizard Interrupted — Installation can fail with a message
saying that the installation was interrupted.
The following are possible workarounds.
• Verify that you do not have a previous installation of the importer.
If you have a previous installation of the importer, use the Add/Remove
Programs control panel to remove the previous installation.
Remove any references to Virtual Machine Importer from the registry entry:
HKEY_LOCAL_MACHINE\SOFTWARE\VMware, Inc.
• Delete any previous failed installation source files or folders from your Temp
directory, or move the Temp directory to another folder during the installation.
Virtual Machine Migration Issues
Changes to Virtual Hardware — Most migrated applications should function
correctly in the VMware virtual machine because their configuration and data files
have the same location as the source virtual machine. However, applications might
not work if they depend on the specific characteristics of the underlying hardware —
such as the serial number or the device manufacturer.
When troubleshooting after migration, keep in mind the following hardware changes:
• The CPU model and serial number (if activated) may be different after the
migration. They correspond to the physical computer hosting the VMware
virtual machine.
• The Ethernet adapter is different (AMD™ PCNet™ or VMXnet) with a different
MAC address. Each interface’s IP address has to be individually reconfigured.
• The graphics card is different (VMware SVGA card).
• The number of disks and partitions is the same, but each disk device has a
different model and different manufacturer strings.
• The primary disk controllers are likely to be different from the source machine’s.
• Applications may not work if they depend on devices that are not available from
within a virtual machine.
134
www.vmware.com
C H A P T E R 5 Creating a New Virtual Machine
Importer Fails to Import Virtual Machine or System Image with More Than
Six PCI Devices — The importer supports migration of only six PCI devices. If you
have a virtual machine or system image with more than six PCI devices, the importer
does not import all of them.
Workaround: Remove the default audio controller or another virtual PCI device you
don't require before you import a virtual machine or system image with the importer.
Virtual Machine or System Image Shared Folder Settings Not Migrated —
The importer does not support the migration of shared folders.
Workaround: Recreate shared folders in your VMware virtual machine after migration.
Windows NT4 Ethernet Adapter Not Migrated Correctly — If your virtual
machine or system image does not have an AMD PCnet-PCI-II compatible Ethernet
adapter, it can migrate improperly.
Workaround: After you import a Windows NT4 virtual machine, install a new virtual
Ethernet adapter, and then install VMware Tools.
Failed to Impersonate Client — After you select the .vmc or .sv2i file, the
wizard could finish with the error: Failed to impersonate client
before deleting drive letter.
Workaround: Not available.
No Keyboard or Mouse in Imported Virtual Machine — After you import a
virtual machine or system image to VMware, the mouse and keyboard do not work in
the new machine. The mouse and keyboard are not available in the guest operating
system, but they are available in the BIOS.
Workaround: Reset the virtual machine.
Importer Reports Error When Converting Virtual PC Disk Files with
Duplicate Names — During the import process, the importer writes all the Virtual
PC disk files to the same target folder. If the Virtual PC virtual machine has virtual disk
files (*.vhd) of the same name on different paths, the import process fails when it
attempts to write target virtual disks with duplicate names into the destination folder.
The completion panel of the VMware Virtual Machine Importer Wizard displays the
message: The Virtual Machine Importer encountered a problem
while copying the disks of the source virtual machine. The
log file shows the error message The file already exists.
135
VMware Workstation 5 User’s Manual
Workaround: Ensure that each source .vhd file has a unique name:
1. In Virtual PC Console, remove the disk you wish to rename (set the hard disk
value to None).
2. Rename the.vhd file corresponding to the disk you just removed.
3. In Virtual PC Console, add the renamed disk file.
4. Close Virtual PC Console.
The importer should successfully convert all the disks.
136
www.vmware.com
C H A P T E R 5 Creating a New Virtual Machine
Installing a Guest Operating System
and VMware Tools
A new virtual machine is like a physical computer with a blank hard disk. Before you
can use it, you need to partition and format the virtual disk and install an operating
system. The operating system’s installation program may handle the partitioning and
formatting steps for you.
Installing a guest operating system inside your VMware Workstation virtual machine is
essentially the same as installing it on a physical computer. The basic steps for a typical
operating system are:
1. Start VMware Workstation.
2. Insert the installation CD-ROM or floppy disk for your guest operating system.
Note: In some host configurations, the virtual machine is not able to boot from
the installation CD-ROM. You can work around that problem by creating an ISO
image file from the installation CD-ROM. Use the virtual machine settings editor
to connect the virtual machine’s CD drive to the ISO image file, then power on
the virtual machine.
3. Power on your virtual machine by clicking the Power On button.
4. Follow the instructions provided by the operating system vendor.
The next section provides notes on installing a Windows XP guest operating system.
The screen shots illustrate the process on a Windows host. The steps are the same on
a Linux host.
For information on installing other guest operating systems, see the VMware Guest
Operating System Installation Guide, available from the VMware Web site or from the
Help menu.
Note: Workstation supports 64-bit guest operating systems only in Workstation
versions 5.5 and later, and only on host machines with supported processors. For the
list of processors Workstation supports for 64-bit guest operating systems, see
Support for 64-Bit Guest Operating Systems on page 37.
137
VMware Workstation 5 User’s Manual
Example: Installing Windows XP as a Guest Operating System
You can install Windows XP Home Edition or Windows XP Professional in a virtual
machine using the full installation CD.
Before installing the operating system, be sure that you have already created a new
virtual machine and configured it using the New Virtual Machine Wizard. See Setting
Up a New Virtual Machine on page 114.
Note: To use SCSI disks in a Windows XP virtual machine, you need a special SCSI
driver available from the download section of the VMware Web site. Follow the
instructions on the Web site to use the driver with a fresh installation of Windows XP.
Installation Steps
1. Insert the Windows XP CD in the CD-ROM drive
If you prefer, you can connect to an ISO image of an installation disk. See
Connecting a CD-ROM or Floppy Drive to an Image File on page 229.
Note: If you plan to use a PXE server to install the guest operating system over a
network connection, you do not need the operating system installation media.
When you power on the virtual machine in the next step, the virtual machine
detects the PXE server.
VMware Workstation detects a PXE server on boot
138
www.vmware.com
C H A P T E R 5 Creating a New Virtual Machine
2. Power on the virtual machine to start installing Windows XP.
3. Follow the Windows XP installation steps as you would for a physical computer.
4. When the installer is finished, you have a virtual machine running Windows XP.
Don’t forget to install VMware Tools, as described in the next section.
139
VMware Workstation 5 User’s Manual
Installing VMware Tools
Don’t Forget VMware Tools
It is very important that you install VMware Tools in the guest operating system.
With the VMware Tools SVGA driver installed, Workstation supports significantly faster
graphics performance.
The VMware Tools package provides support required for shared folders and for drag
and drop operations.
Other tools in the package support synchronization of time in the guest operating
system with time on the host, automatic grabbing and releasing of the mouse cursor,
copying and pasting between guest and host, and improved mouse performance in
some guest operating systems.
The installers for VMware Tools for Windows, Linux, FreeBSD, and NetWare guest
operating systems are built into VMware Workstation as ISO image files. (An ISO image
file looks like a CD-ROM to your guest operating system and even appears as a CDROM in Windows Explorer. You do not use an actual CD-ROM to install VMware Tools,
nor do you need to download the CD-ROM image or burn a physical CD-ROM of this
image file.)
When you choose VM > Install VMware Tools from the VMware Workstation menu,
VMware Workstation temporarily connects the virtual machine’s first virtual CD-ROM
drive to the ISO image file that contains the VMware Tools installer for your guest
operating system and you are ready to begin the installation process.
Upgrading VMware Tools
Now you can upgrade VMware Tools without uninstalling the previous version.
However, it is a good idea to upgrade the virtual machine first. See Procedure to
Upgrade Virtual Machines on page 69
To upgrade VMware Tools, follow the installation procedure for your guest operating
system in the next sections.
140
www.vmware.com
C H A P T E R 5 Creating a New Virtual Machine
VMware Tools for Windows Guests
VMware Tools for Windows supports Windows 95, Windows 98, Windows Me,
Windows NT 4.0, Windows 2000, Windows XP and Windows Server 2003 guest
operating systems.
The detailed steps for installing VMware Tools depend on the version of Windows you
are running. The steps that follow show how to install VMware Tools in a Windows XP
guest. Some steps that are automated in newer versions of Windows must be
performed manually in Windows 9x and Windows NT.
Note: If you are running VMware Workstation on a Windows host and your virtual
machine has only one CD-ROM drive, the CD-ROM drive must be configured as an IDE
or SCSI CD-ROM drive. It cannot be configured as a generic SCSI device.
To add an IDE or SCSI CD-ROM drive, see Adding, Configuring, and Removing Devices
in a Virtual Machine on page 182. For information about generic SCSI, see Connecting
to a Generic SCSI Device on page 422.
Installing VMware Tools in a Windows Guest Operating System
1. Power on the virtual machine.
2. When the guest operating system starts, select VM > Install VMware Tools.
The remaining steps take place inside the virtual machine.
Note: You must log on to a Windows NT, Windows 2000, Windows XP, Windows
Server 2003, or Windows Vista guest operating system as an administrator in
order to install VMware Tools. Any user can install VMware Tools in a Windows 95,
Windows 98 or Windows Me guest operating system.
3. If you have autorun enabled in your guest operating system (the default setting
for Windows operating systems), a dialog box appears after a few seconds. It asks
if you want to install VMware Tools. Click Yes to launch the InstallShield wizard.
If autorun is not enabled, the dialog box does not appear automatically. If it
doesn’t appear, run the VMware Tools installer. Click Start > Run and enter
D:\setup\setup.exe where D: is your first virtual CD-ROM drive.
4. Follow the on-screen instructions.
• On Windows Server 2003, Windows Me, Windows 98 SE and Windows 98
guests, the SVGA driver is installed automatically and the guest operating
system uses it after it reboots.
• With Windows 2000 and Windows XP guests, you do not have to reboot to
use the new driver.
141
VMware Workstation 5 User’s Manual
VMware Tools for Linux Guests
On a Linux guest, you can install VMware Tools within X or from the command line
• Installing VMware Tools within X on page 142
• Installing VMware Tools from the Command Line with the Tar Installer on
page 143
• Installing VMware Tools from the Command Line with the RPM Installer on
page 144
Installing VMware Tools within X
You can install VMware Tools within X using the .tar installer in a terminal window. See
Installing VMware Tools from the Command Line with the Tar Installer on page 143.
To install VMware Tools from X with the RPM installer:
1. Choose VM > Install VMware Tools.
The guest operating system mounts the VMware Tools installation virtual CD.
2. Double-click the VMware Tools CD icon on the desktop.
Note: In some Linux distributions, the VMware Tools CD icon may fail to appear
when you install VMware Tools within an X windows session on a guest. In this
case, you should continue installing VMware Tools as described in Installing
VMware Tools from the Command Line with the Tar Installer on page 143,
beginning with step 3.
3. Double-click the RPM installer in the root of the CD-ROM.
4. Enter the root password.
5. Click Continue.
The installer prepares the packages.
6. Click Continue when the installer presents a dialog box saying Completed
System Preparation.
A dialog appears for Updating system, with a progress bar. When the installer is
done, VMware Tools are installed. There is no confirmation or finish button.
7. In an X terminal, as root (su -), configure VMware Tools.
vmware-config-tools.pl
Respond to the questions the installer displays on the screen. Press Enter to
accept the default value.
Note: Be sure to respond yes when the installer offers to run the configuration
program.
142
www.vmware.com
C H A P T E R 5 Creating a New Virtual Machine
8. Launch the VMware Tools background application:
vmware-toolbox &
Note: Some guest operating systems require a reboot for full functionality.
Installing VMware Tools from the Command Line with the Tar Installer
The first steps are performed on the host, within Workstation menus:
1. Power on the virtual machine.
2. After the guest operating system has started, prepare your virtual machine to
install VMware Tools.
Choose VM > Install VMware Tools.
The remaining steps take place inside the virtual machine.
3. As root (su -), mount the VMware Tools virtual CD-ROM image, change to a
working directory (for example, /tmp), uncompress the installer, then unmount
the CD-ROM image.
Note: Some Linux distributions automatically mount CD-ROMs. If your
distribution uses automounting, do not use the mount and umount commands
below. You still must untar the VMware Tools installer to /tmp.
Some Linux distributions use different device names or organize the /dev
directory differently. If your CD-ROM drive is not /dev/cdrom or if the mount
point for a CD-ROM is not /mnt/cdrom, you must modify the following
commands to reflect the conventions used by your distribution.
mount /dev/cdrom /mnt/cdrom
cd /tmp
Note: If you have a previous installation, delete the previous vmware-distrib
directory before installing. The default location of this directory is
/tmp/vmware-tools-distrib.
4. Untar the VMware Tools tar file:
tar zxpf /mnt/cdrom/VMwareTools-5.0.0-<xxxx>.tar.gz
umount /dev/cdrom
Where <xxxx> is the build/revision number of the VMware Workstation
release.
Note: If you attempt to install a tar installation over an rpm installation —
or the reverse — the installer detects the previous installation and must convert
the installer database format before continuing.
143
VMware Workstation 5 User’s Manual
5. Run the VMware Tools tar installer:
cd vmware-tools-distrib
./vmware-install.pl
Respond to the configuration questions on the screen. Press Enter to accept
the default value.
6. Log off of the root account.
exit
7. Start X and your graphical environment.
8. In an X terminal, launch the VMware Tools background application.
vmware-toolbox &
Note: You may run VMware Tools as root or as a normal user. To shrink virtual
disks, you must run VMware Tools as root (su -).
Installing VMware Tools from the Command Line with the RPM Installer
The first steps are performed on the host, within Workstation menus:
1. Power on the virtual machine.
2. After the guest operating system has started, prepare your virtual machine to
install VMware Tools.
Choose VM > Install VMware Tools.
The remaining steps take place inside the virtual machine.
3. As root (su -), mount the VMware Tools virtual CD-ROM image, change to a
working directory (for example, /tmp), uncompress the installer, then unmount
the CD-ROM image.
Note: Some Linux distributions automatically mount CD-ROMs. If your
distribution uses automounting, do not use the mount and umount commands
below. You still must untar the VMware Tools installer to /tmp.
Some Linux distributions use different device names or organize the /dev
directory differently. If your CD-ROM drive is not /dev/cdrom or if the mount
point for a CD-ROM is not /mnt/cdrom, you must modify the following
commands to reflect the conventions used by your distribution.
mount /dev/cdrom /mnt/cdrom
cd /tmp
Note: If you have a previous installation, delete the previous vmware-distrib
directory before installing. The default location of this directory is
/tmp/vmware-tools-distrib.
144
www.vmware.com
C H A P T E R 5 Creating a New Virtual Machine
4. At the command prompt, enter:
rpm -Uhv /mnt/cdrom/VMwareTools-5.0.0<xxxx>.i386.rpm
umount /dev/cdrom
Where <xxxx> is the build/revision number of the VMware Workstation
release.
Note: If you attempt to install an rpm installation over a tar installation —
or the reverse — the installer detects the previous installation and must convert
the installer database format before continuing.
5. Configure VMware Tools:
vmware-config-tools.pl
Respond to the questions the installer displays on the screen. Press Enter to
accept the default value.
6. Log off of the root account.
exit
7. Start X and your graphical environment.
8. In an X terminal, launch the VMware Tools background application.
vmware-toolbox &
Note: You may run VMware Tools as root or as a normal user. To shrink virtual
disks, you must run VMware Tools as root (su -).
Starting VMware Tools Automatically
You may find it helpful to configure your guest operating system so VMware Tools
starts when you start your X server. The steps for doing so vary depending on your
Linux distribution and your desktop environment. Check your operating system
documentation for the appropriate steps to take.
For example, in a Red Hat Linux 7.1 guest using GNOME, follow these steps.
1. Open the Startup Programs panel in the GNOME Control Center.
Main Menu (click the foot icon in the lower left corner of the screen) > Programs
> Settings > Session > Startup Programs
2. Click Add.
3. In the Startup Command field, enter vmware-toolbox.
4. Click OK, click OK again, then close the GNOME Control Center.
The next time you start X, VMware Tools starts automatically.
145
VMware Workstation 5 User’s Manual
Uninstalling VMware Tools
To remove VMware Tools from your Linux guest operating system, log on as root (su
-) and enter the following command:
• From a tar install
vmware-uninstall-tools.pl
• From an RPM install
rpm -e VMwareTools
VMware Tools for FreeBSD Guests
1. Power on the virtual machine.
2. Select VM > Install VMware Tools.
The remaining steps take place inside the virtual machine, not on the host computer.
3. Be sure the guest operating system is running in text mode. You cannot install
VMware Tools while X is running.
4. As root (su -), mount the VMware Tools virtual CD-ROM image, change to a
working directory (for example, /tmp), uncompress the installer, then unmount
the CD-ROM image.
Note: You do not use an actual CD-ROM to install VMware Tools, nor do you
need to download the CD-ROM image or burn a physical CD-ROM of this image
file. The VMware Workstation software contains an ISO image that looks like a
CD-ROM to your guest operating system. This image contains all the files needed
to install VMware Tools in your guest operating system.
Note: Some FreeBSD distributions automatically mount CD-ROMs. If your
distribution uses automounting, do not use the mount and umount commands
below. You still must untar the VMware Tools installer to /tmp.
mount /cdrom
cd /tmp
Untar the VMware Tools tar file:
tar zxpf /cdrom/vmware-freebsd-tools.tar.gz
umount /cdrom
5. Run the VMware Tools installer.
cd vmware-tools-distrib
./vmware-install.pl
146
www.vmware.com
C H A P T E R 5 Creating a New Virtual Machine
6. Log out of the root account.
exit
7. Start X and your graphical environment
8. In an X terminal, launch the VMware Tools background application.
vmware-toolbox &
Note: You may run VMware Tools as root or as a normal user. To shrink virtual
disks, you must run VMware Tools as root (su -).
Note: In a FreeBSD 4.5 guest operating system, sometimes VMware Tools does not
start after you install VMware Tools, reboot the guest operating system or start
VMware Tools on the command line in the guest. An error message appears:
Shared object 'libc.so.3' not found.
The required library was not installed. This does not happen with full installations of
FreeBSD 4.5, but does occur for minimal installations. To fix the problem of the missing
library, take the following steps:
1. Insert and mount the FreeBSD 4.5 installation CD or access the ISO image file.
2. Change directories and run the installation script.
cd /cdrom/compat3x
./install.sh
Installing VMware Tools in a NetWare Virtual Machine
1. Power on the virtual machine.
2. Select VM > Install VMware Tools.
The remaining steps take place inside the virtual machine.
3. Load the CD-ROM driver so the CD-ROM device mounts the ISO image as a
volume. Do one of the following.
• In the system console for a NetWare 6.5 virtual machine, type
LOAD CDDVD
• In the system console for a NetWare 6.0 or NetWare 5.1 virtual machine, type
LOAD CD9660.NSS
4. When the driver finishes loading, you can begin installing VMware Tools. In the
system console, type
vmwtools:\setup.ncf
147
VMware Workstation 5 User’s Manual
When the installation finishes, the message VMware Tools for NetWare
are now running appears in the Logger Screen (NetWare 6.5 and NetWare
6.0 guests) or the Console Screen (NetWare 5.1 guests).
5. Restart the guest operating system. In the system console, type
restart server
After you install VMware Tools, make sure the VMware Tools virtual CD-ROM image
(netware.iso) is not attached to the virtual machine. If it is, disconnect it. Rightclick the CD-ROM icon in the status bar of the console window and select Disconnect.
148
www.vmware.com
C H A P T E R 5 Creating a New Virtual Machine
VMware Tools Configuration Options
This section discusses VMware Tools configuration options in the following topics.
• Using the Control Panel to Configure VMware Tools on page 149
• Using the System Console to Configure VMware Tools in a NetWare Guest
Operating System on page 153
Using the Control Panel to Configure VMware Tools
This section shows the options available in a Windows XP guest operating system.
Similar configuration options are available in VMware Tools for other guest operating
systems.
When VMware Tools is running, an icon with the VMware boxes logo appears in the
guest operating system’s system tray.
To open the VMware Tools control panel, double-click the VMware Tools icon in the
system tray.
If the VMware Tools icon does not appear in the system tray, go to Start > Control
Panel. Locate the VMware Tools icon and double-click it.
Tabs in the VMware Tools control panel are described in the following sections.
149
VMware Workstation 5 User’s Manual
The Options Tab
The Options tab shows the Miscellaneous Options.
• Time synchronization between the virtual machine and the host operating
system
Note: You can synchronize the time in the guest operating system with the
time on the host operating system only when you set the clock in the guest
operating system to a time earlier than the time set on the host.
Under some circumstances, the virtual machine may synchronize time with the
host even though this item is not selected. If you want to disable time
synchronization completely, open the virtual machine's configuration file
(.vmx) in a text editor and set the following options to FALSE.
tools.syncTime
tools.synchronize.restore
time.synchronize.resume.disk
time.synchronize.continue
time.synchronize.shrink
• Show VMware Tools in the taskbar
150
www.vmware.com
C H A P T E R 5 Creating a New Virtual Machine
The Devices Tab
The Devices tab allows you to enable or disable removable devices. (You can also
enable or disable removable devices in VM > Removable Devices.)
The Scripts Tab
Use the Scripts tab to enable, disable, and run scripts for the Suspend, Resume, Power
On, and Power Off buttons.
Windows hosts: If the virtual machine is configured to use DHCP, the script executed
when suspending a virtual machine releases the IP address of the virtual machine. The
script executed when resuming a virtual machine renews the IP address of the virtual
machine.
Linux hosts: The script executed when suspending a virtual machine stops
networking for the virtual machine. The script executed when resuming a virtual
machine starts networking for the virtual machine.
To run one of these scripts at some other time, select the script you want from the
drop-down menu, then click Run Now.
To disable all scripts, deselect Use Scripts.
Note: Scripts cannot be run in Windows 95, NetWare, and FreeBSD guest operating
systems.
Note: Scripts in Windows NT and Windows Me guest operating systems do not
release and renew the IP address.
151
VMware Workstation 5 User’s Manual
The Shared Folders Tab
The Shared Folders tab provides information on where to find your shared folders.
For more information on shared folders, see Using Shared Folders on page 176.
The Shrink Tab
Shrink disk enabled: supported partitions
The Shrink tab gives you access to controls that reclaim unused space in a virtual disk.
However, some configurations do not allow you to shrink a virtual disk. For more
information, see Shrinking Virtual Disks on page 215.
The About Tab
The About tab displays version and copyright information. In Windows guests, this tab
also shows the status of the VMware Tools Service.
152
www.vmware.com
C H A P T E R 5 Creating a New Virtual Machine
Using the System Console to Configure VMware Tools in a
NetWare Guest Operating System
You can configure certain virtual machine options such as time synchronization, CPU
idling and device configuration with VMware Tools in a NetWare virtual machine
using the system console. The VMware Tools command line program is called
vmwtool. To see the options associated with this command, at the system console,
type
vmwtool help
Summary of VMware Tools Commands for a NetWare Guest
Each command in the following table must be entered into the system console after
the VMware Tools command vmwtool. Use the following format:
vmwtool <command>
vmwtool Command
Definition
help
Displays a summary of VMware Tools commands and options in
a NetWare guest.
partitonlist
Displays a list of all disk partitions in the virtual disk and whether
or not a partition can be shrunk.
shrink <partition>
Shrinks the listed partitions. If no partitions are specified, then all
partitions in the virtual disk are shrunk.
The status of the shrink process appears at the bottom of the
system console.
devicelist
Lists each removable device in the virtual machine, its device ID
and whether the device is enabled or disabled. Removable
devices include the virtual network adapter, CD-ROM and
floppy drives.
disabledevice <device
name>
Disables the specified device or devices in the virtual machine.
If no device is specified, then all removable devices in the virtual
machine are disabled.
enabledevice <device
name>
Enables the specified device or devices in the virtual machine. If
no device is specified, then all removable devices in the virtual
machine are enabled.
153
VMware Workstation 5 User’s Manual
vmwtool Command
Definition
synctime [on|off]
Lets you turn on or off synchronization of time in the guest
operating system with time on the host operating system. By
default, time synchronization is turned off.
Use this command without any options to view the current
time synchronization status.
You can synchronize the time in the guest operating system
with time on the host operating system only when the time in
the guest operating system is earlier than the time set in the
host.
idle [on|off]
Lets you turn the CPU idler on or off. By default, the idler is
turned on. The CPU idler program is included in VMware Tools
for NetWare guests.
The idler program is needed because NetWare servers do not
idle the CPU when the operating system is idle. As a result, a
virtual machine takes CPU time from the host regardless of
whether the NetWare server software is idle or busy.
154
www.vmware.com
C H A P T E R 5 Creating a New Virtual Machine
Where to Go Next
• Running VMware Workstation on page 157
• Using Disks on page 209
• Moving and Sharing Virtual Machines on page 187
• Preserving the State of a Virtual Machine on page 271
• Cloning a Virtual Machine on page 289
• Configuring Teams on page 299
• Configuring a Virtual Network on page 325
• Configuring Video and Sound on page 379
• Connecting Devices on page 391
• Performance Tuning on page 431
155
VMware Workstation 5 User’s Manual
156
www.vmware.com
CHAPTER
6
Running VMware Workstation
This chapter discusses launching the VMware Workstation program and various tasks
you may want to perform in daily use, after you have installed VMware Workstation, a
guest operating system and VMware Tools.
• Starting a Virtual Machine on page 159
• Checking the Status of VMware Tools on page 160
• Suspending and Resuming Virtual Machines on page 161
• Shutting Down a Virtual Machine on page 162
• Resetting a Virtual Machine on page 163
• Taking and Reverting to a Snapshot on page 164
• Cloning a Virtual Machine on page 165
• Deleting a Virtual Machine on page 166
• Using Virtual Machine Teams on page 167
157
VMware Workstation 5 User’s Manual
• Controlling the Display on page 168
• Installing New Software on page 174
• Cutting, Copying and Pasting Text on page 175
• Using Shared Folders on page 176
• Using Drag and Drop on page 181
• Using Devices in a Virtual Machine on page 182
• Creating a Screen Shot or a Movie of a Virtual Machine on page 183
The illustrations in these sections show a Windows XP guest operating system. Some
commands used in the illustrations are different from those used in other guest
operating systems.
158
www.vmware.com
C H A P T E R 6 Running VMware Workstation
Starting a Virtual Machine
To start a virtual machine
1. Start Workstation. For instructions, see Launching VMware Workstation on
page 72.
1. Select the name of the virtual machine you want to use in the Favorites list at the
left of the Workstation window.
If the virtual machine you want to use is not shown there, choose File > Open
and browse to the configuration (.vmx) file for the virtual machine you want to
use.
Refer to Virtual Machine Location on page 159 for help finding virtual machines
on your host operating system.
2. Click the Power On button to start the virtual machine.
3. Click anywhere inside the virtual machine window to give the virtual machine
control of your mouse and keyboard.
4. If you need to log on, type your name and password just as you would on a
physical computer.
Note: If your Windows guest operating system asks you to press Ctrl-Alt-Del
before logging in, press Ctrl-Alt-Ins, instead.
Virtual Machine Location
On Windows hosts VMware Workstation stores virtual machines in the
My Documents folder of the user who is logged on when the virtual machine is
created.
On Windows Server 2003, Windows XP and Windows 2000, the default folder is
C:\Documents and Settings\<username>\My Documents\My
Virtual Machines\<guestOSname>.
On Linux hosts VMware Workstation stores virtual machines in <homedir>/
VMware/<guestOSname>, where <homedir> is the home directory of the user
who is logged on when the virtual machine is created.
159
VMware Workstation 5 User’s Manual
Checking the Status of VMware Tools
For best performance, it is important to have VMware Tools installed and running in
your virtual machine.
After you install VMware Tools in a Windows virtual machine, the VMware Tools
services start automatically when you start the guest operating system.
When VMware Tools is running in a Windows virtual machine, the VMware Tools icon appears in the system
tray unless you disable the icon.
If the VMware Tools icon is not displayed in the system tray, you can use the VMware
Tools control panel in the guest operating system. Go to Start > Settings > Control
Panel or Start > Control Panel, depending on the version of Windows you are using,
locate the VMware Tools icon and double-click it to change settings for VMware Tools.
You can also reactivate the system tray icon. On the Options tab, select Show
VMware Tools in the taskbar.
In a Linux or FreeBSD virtual machine, boot the guest operating system, start X and
launch your graphical environment. Then you can launch the VMware Tools
background application with this command:
vmware-toolbox &
You may run VMware Tools as root or as a normal user. To shrink virtual disks, you must
run VMware Tools as root (su -).
With some window managers, you can place the command to start VMware Tools in a
startup configuration so VMware Tools starts automatically when you start your
graphical environment. Consult your window manager’s documentation for details.
160
www.vmware.com
C H A P T E R 6 Running VMware Workstation
Suspending and Resuming Virtual
Machines
You can save the current state of your virtual machine by suspending it. Later, you can
resume the virtual machine to pick up work quickly, right where you stopped — with
all documents you were working on open and all applications in the same state as
they were at the time you suspended the virtual machine.
To suspend a virtual machine
1. If your virtual machine is running in full screen mode, return to window mode by
pressing the Ctrl-Alt key combination.
2. Click Suspend on the VMware Workstation toolbar.
3. When VMware Workstation has completed the suspend operation, it is safe to
exit VMware Workstation.
File > Exit (Windows)
or
File > Quit (Linux)
To resume a virtual machine that you have suspended:
1. Start VMware Workstation and choose a virtual machine you have suspended.
The process is the same as that described in Starting a Virtual Machine on
page 159.
2. Click Resume on the VMware Workstation toolbar.
Note that any applications you were running at the time you suspended the
virtual machine are running and the content is the same as it was when you
suspended the virtual machine.
For more information, see Using Suspend and Resume on page 272.
161
VMware Workstation 5 User’s Manual
Shutting Down a Virtual Machine
As with physical computers, you need to shut down your guest operating system
before you power off your virtual machine or team. For example, in a Windows guest
operating system, take these steps:
1. Choose Shut Down from the Start menu of the guest operating system (inside
the virtual machine).
2. Choose Shut Down, then click OK.
3. After the guest operating system shuts down, you can turn off the virtual
machine. Click Power Off.
Now it is safe to exit VMware Workstation or power off a team.
If you are using a different guest operating system, the procedure is similar. Follow the
usual steps to shut down the guest operating system inside your virtual machine,
then turn off the virtual machine with the Power Off button.
Power Off vs. Shut Down
You can configure the Power Off button to turn off a virtual machine or team in two
ways:
• You can set the Power Off button to work as a power switch works on a power
supply. The virtual machine is abruptly powered off, with no consideration for
work in progress.
Caution: If a virtual machine is writing to disk when it receives a Power Off
command, data corruption may occur.
• You can also set the Power Off button to send a shut down signal to the guest
operating system. An operating system that recognizes this signal shuts down
gracefully.
Note: Not all guest operating systems respond to a shut down signal from this
button. If your operating system does not respond to a shut down signal, shut
down from within the operating system, as you would with a physical machine.
For instructions on configuring the Power Off button, see Power Controls in the
section Power on page 96.
162
www.vmware.com
C H A P T E R 6 Running VMware Workstation
Resetting a Virtual Machine
As with physical computers, you may need to reset a guest operating system that has
become unresponsive. This is generally not recommended: If you reset a virtual
machine while the virtual disk is being written to, data may be lost or corrupted.
To reset a virtual machine, click the Reset button on the toolbar.
Reset vs. Restart
You can configure the Reset button to reset or restart a virtual machine or team.
• You can set the Reset button to work as a reset switch, so that it resets the virtual
machine abruptly, with no consideration for work in progress.
• You can also set the Reset button to send a restart signal to the guest operating
system. An operating system that recognizes this signal shuts down gracefully
and restarts.
Not all guest operating systems respond to a restart signal from this button. If your
operating system does not respond to a restart signal, restart from within the
operating system, as you would with a physical machine.
For instructions on configuring the Reset button, see Power Controls in the section
Power on page 96.
163
VMware Workstation 5 User’s Manual
Taking and Reverting to a Snapshot
VMware Workstation lets you take snapshots of a virtual machine at any time. A
snapshot preserves the state of all virtual machine disks and the virtual machine’s
power state: powered on, powered off, or suspended.
You can take a new snapshot or revert to any previous snapshot at any time. When
you revert to a snapshot, you discard all changes made to the virtual machine since
the most recent snapshot. Multiple snapshots allow you to preserve different states of
the same virtual machine.
Use the buttons Take Snapshot of the Virtual Machine and Revert Virtual Machine
to its Parent Snapshot on the Workstation toolbar to take a snapshot and revert to it
later. For more information, including examples of ways you can use snapshots, see
Using Snapshots on page 273.
164
www.vmware.com
C H A P T E R 6 Running VMware Workstation
Cloning a Virtual Machine
A clone is a copy of a virtual machine. You can do anything with a clone that you
could with the original virtual machine.
Installing a guest operating system and applications can be time consuming. By
cloning a virtual machine, you can easily deploy many copies of a fully configured
virtual machine, without the need to install the same operating system and
applications in each copy.
Clones may be linked or full:
• A full clone is an independent copy of a virtual machine that shares nothing with
the parent virtual machine after the cloning operation. Ongoing operation of a
full clone is entirely separate from the parent virtual machine.
• A linked clone is a copy of a virtual machine that shares virtual disks with the
parent virtual machine in an ongoing manner. This conserves disk space, and
allows multiple virtual machines to use the same software installation.
The Clone Virtual Machine Wizard automatically copies everything required for a
duplicate virtual machine. You don’t have to locate the original virtual machine files,
identify the files needed, and copy them manually. The Clone Virtual Machine Wizard
automatically creates a new MAC address and other unique identifiers for the
duplicate virtual machine.
Refer to Cloning a Virtual Machine on page 289 for more information regarding
clones.
165
VMware Workstation 5 User’s Manual
Deleting a Virtual Machine
Workstation 5 includes commands to remove a virtual machine from the Favorites list
or completely delete the virtual machine. You do not need to manipulate files in the
host file system to delete a virtual machine.
• To remove a virtual machine or team name from the Favorites list, right-click the
name and choose Remove from Favorites. This choice does not affect the
virtual machine itself; all virtual machine and team files remain intact on the host
computer file system.
• To delete a virtual machine from the host computer, right-click the name of the
virtual machine in the Favorites list and select Delete from Disk; or, select the
virtual machine and choose VM > Delete from disk.
VMware Workstation allows you to delete a virtual machine even if it is a member of a
team. To delete a team itself, see Closing a Team on page 305.
166
www.vmware.com
C H A P T E R 6 Running VMware Workstation
Using Virtual Machine Teams
A team is a group of networked virtual machines that act together. Power operations
are applied to an entire team, with startup order and delay time before startup fully
configurable for each virtual machine on the team.
Teams are useful for multitier application development, testing, demonstration, and
deployment. LAN segments allow you to create private virtual networks for
performance testing and security.
The New Team Wizard guides you through creation of a new team. Add virtual
machines and LAN segments to deploy a completely private testing environment or
one that interacts with your network as usual.
Refer to the Configuring Teams on page 299 for a complete description of teams.
167
VMware Workstation 5 User’s Manual
Controlling the Display
You can control the VMware Workstation display in a variety of ways to suit the way
you prefer to work with your virtual machines.
• Using Full Screen Mode on page 168
• Using Quick Switch Mode on page 169
• Taking Advantage of Multiple Monitors on page 169
• Fitting the Workstation Console to the Virtual Machine Display on page 170
• Nonstandard Resolutions on page 172
• Simplifying the Screen Display on page 172
Using Full Screen Mode
In full screen mode, the VMware Workstation virtual machine display fills the screen,
so you no longer see the borders of the VMware Workstation window. To enter full
screen mode, click the Full Screen button on the toolbar, or press Ctrl-Alt-Enter.
To switch from full screen mode back to normal mode, which shows your virtual
machine inside a VMware Workstation window again, press Ctrl-Alt.
Virtual machines run faster in full screen mode.
Linux hosts: You can switch between virtual machines without leaving full screen
mode by using a Ctrl-Alt-Fn key combination, where Fn is a function key
corresponding to the virtual machine you want to see. To find out what function key
to use for a particular virtual machine, check the title bar of the virtual machine while
it is running in a window.
Windows hosts: For similar functionality, see Using Full Screen Switch Mode on
page 462.
Note: VMware Workstation does not support running virtual machines in full screen
mode on dual-monitor systems.
168
www.vmware.com
C H A P T E R 6 Running VMware Workstation
Using Quick Switch Mode
Quick switch mode is similar to full screen mode with the addition of tabs at the top of
the screen for switching from one active virtual machine to another. The virtual
machine’s screen is resized to fill the screen completely, except for the space occupied
by the tabs.
To enter quick switch mode, choose View > Quick Switch.
To view the VMware Workstation menu and toolbar while you are using quick switch
mode, move the mouse pointer to the top of the screen.
To resize a guest operating system’s display so it fills as much of the screen as possible
in quick switch mode, choose View > Fit Guest Now. The Fit Guest Now option works
only if you have the current version of VMware Tools installed in the guest operating
system.
Note: When you choose Fit Guest Now, VMware Workstation adjusts the display
settings of your guest operating system as needed. If you subsequently run the virtual
machine in normal mode, you may want to change the display settings back to their
previous values.
To get out of quick switch mode, move the mouse pointer to the top of the screen to
activate the menu, then choose View > Quick Switch.
Taking Advantage of Multiple Monitors
If your host has a standard multiple monitor display, you can run separate sets of
virtual machines on each of the monitors. To use two monitors, launch two instances
of VMware Workstation. Start one or more virtual machines in each VMware
Workstation window, then drag each VMware Workstation window to the monitor on
which you want to use it. For the largest possible screen display, switch each of the
windows to quick switch mode (View > Quick Switch).
To switch mouse and keyboard input from the virtual machine on the first screen to
the virtual machine on the second screen, move the mouse pointer from one to the
other. You do not need to take any special steps if VMware Tools is running in both
guest operating systems and if you are using the default settings for grabbing input. If
you have changed the defaults, you may need to press Ctrl-Alt to release the mouse
pointer from the first virtual machine, move it to the second virtual machine, then
click in the second virtual machine so it will grab control of mouse and keyboard
input.
Note: Multiple monitor support is experimental in this release of VMware
Workstation. It does not work properly with some third-party desktop management
software or display drivers.
169
VMware Workstation 5 User’s Manual
Note: If you switch to full screen mode, VMware Workstation always uses the primary
display. To use multiple monitors, you must use either the normal (windowed) mode
or quick switch mode.
Fitting the Workstation Console to the Virtual Machine Display
The View menu autofit and fit commands allow you to match the VMware
Workstation console with the guest operating system display size.
View Menu Command
Description
Autofit Window†
This command causes the Workstation console to maintain the size of the
virtual machine’s display resolution. If the guest operating system
changes its resolution, the Workstation console automatically resizes to
match the new resolution.
Autofit Guest†
This command causes the virtual machine to resize the guest display
resolution to match the size of the Workstation console.
Fit Window Now‡
This command causes the Workstation console to match the current
display size of the guest operating system.
Fit Guest Now‡
This command causes the guest operating system display size to match
the current Workstation console.
† An autofit command is toggled on or off each time you select it. If both Autofit commands are
toggled on, then you can manually resize the Workstation console, but the guest operating system
can also resize the Workstation console
‡ This command is redundant when one of the autofit options is active, because the console and the
guest operating system display are the same size.
With both autofit commands toggled off, VMware Workstation does not automatically
match window sizes as you work. Scroll bars appear in the console when the
Workstation console is smaller than the guest operating system display. A black
border appears in the console when the console is larger than the guest operating
system display.
170
www.vmware.com
C H A P T E R 6 Running VMware Workstation
Special Considerations for Display Resizing in Linux Guests
Workstation 5.5 extends the display resizing features Autofit Guest and Fit Guest Now
to Linux guests. For Linux guests, the following considerations apply to display
resizing:
• You must update VMware Tools to version 5.5 in the guest for the display resizing
options to work.
• To use the Autofit Guest and Fit Guest Now options, VMware Tools must be
running.
• If you have virtual machines that were suspended under a version of VMware
Tools before version 5.5, display resizing will not work until the virtual machines
are completely powered off and then powered on again. (Rebooting the virtual
machine is not sufficient.) Powering the suspended virtual machines off and on
can be done before or after updating VMware Tools.
Caution: If you update VMware Tools without powering off and powering on
suspended virtual machines, and then attempt to resize the guest, the display
will be corrupted
• All the restrictions on resizing that the X11 Windows system imposes on physical
hosts still apply to guests.
• You cannot resize to a mode that is not defined. The VMware Tools
configuration script will add a large number of mode lines, but you will not
get 1-pixel granularity as in Windows. VMware Tools adds modelines in 100pixel increments. This means you cannot resize a guest larger than the largest
mode defined in your X11 configuration file. If you attempt to resize larger, a
black border will appear and the guest will stop growing.
• The X server always starts up in the largest resolution that is defined. This
cannot be avoided. The XDM/KDM/GDM login screen will always appear at
the largest size. But both Gnome and KDE allow you to specify your preferred
resolution, so you can reduce the guest display size after you log in.
171
VMware Workstation 5 User’s Manual
Nonstandard Resolutions
A guest operating system — and its applications — may react unexpectedly when
the Workstation console size is not a standard VESA resolution (e.g. 640×480, 800×600,
1024×768, etc.).
For example, the Autofit Guest and Fit Guest commands allow your guest operating
system screen resolution to be set smaller 640×480, and some installers do not run at
resolutions smaller than 640×480. Programs may refuse to run. Error messages may
include such phrases as “VGA Required To Install” or “You must have VGA to install.”
There are two ways to work around this problem with nonstandard resolutions.
• If your host computer's screen resolution is high enough, you can enlarge the
window, then choose Fit Guest.
• If your host computer's screen resolution does not allow you to enlarge the
Workstation console sufficiently, you can manually set the guest operating
system's screen resolution to 640×480 or larger.
Simplifying the Screen Display
If you prefer, you can turn off display of many of the controls visible in the VMware
Workstation window.
Use the View menu to toggle the following controls on or off:
• Favorites
• Toolbar
• Status bar
• Virtual machine tabs
On a Windows host, you can also hide the menu bar. To do so, click the title bar icon,
then choose Hide Controls.
Hiding the menu bar on a Windows host
Choosing Hide Controls hides the menu bar, the toolbar, the status bar and the
Favorites list.
172
www.vmware.com
C H A P T E R 6 Running VMware Workstation
For the simplest possible VMware Workstation window on a Windows host, first
choose View > Tabs to turn off the tabs. Then, from the title bar icon shortcut menu,
choose Hide Controls.
With controls hidden, a virtual machine appears as a host
Using the View menu and the title bar icon shortcut menu, you can remove all visible
controls from the VMware Workstation window.
173
VMware Workstation 5 User’s Manual
Installing New Software
Installing new software in a VMware Workstation virtual machine is just like installing it
on a physical computer. For example, to install software in a Windows virtual machine,
take the following steps:
1. Be sure you have started the virtual machine and, if necessary, logged on. On the
Workstation menus, choose VM > Removable Devices to be sure the virtual
machine has access to the CD-ROM drive and, if needed, the floppy drive.
2. Insert the installation CD-ROM or floppy disk into the proper drive. If you are
installing from a CD-ROM, the installation program may start automatically.
3. If the installation program does not start automatically, click the Windows Start
button, go to Settings > Control Panel, then double-click Add/Remove
Programs and click the Install button. Follow the instructions on screen and in
the user manual for your new software.
Note: Some applications use a product activation feature that creates a key, based
on the virtual hardware in the virtual machine where it is installed. Changes in the
configuration of the virtual machine may require you to reactivate the software. To
minimize the number of significant changes, set the final memory size for your virtual
machine and install VMware Tools before you activate the software.
Note: When you try to run a few programs — including the installer for the
Japanese-language version of Trend Micro Virus Buster — Workstation may appear to
hang. For the workaround to this problem, see the following knowledge base article
on the VMware Web site at www.vmware.com/info?id=30.
174
www.vmware.com
C H A P T E R 6 Running VMware Workstation
Cutting, Copying and Pasting Text
When VMware Tools is running, you can cut (or copy) and paste text between
applications in the virtual machine and the host computer or between two virtual
machines. Use the normal hot keys or menu choices to cut, copy and paste.
To turn off this feature — to prevent accidental copying and pasting from one
environment to another — change your preferences.
Choose Edit > Preferences. On the Input tab, clear the check box beside Enable copy
and paste to and from virtual machine.
175
VMware Workstation 5 User’s Manual
Using Shared Folders
With shared folders, you can easily share files among virtual machines and the host
computer. To use shared folders, you must have the current version of VMware Tools
installed in the guest operating system and you must configure your virtual machine
settings to specify which directories are to be shared.
VMware Workstation 5 includes new performance enhancements for shared folders.
You can use shared folders with virtual machines running the following guest
operating systems:
• Windows Server 2003
• Windows XP
• Windows 2000
• Windows NT 4.0
• Linux with a kernel version of 2.4 or higher
To set up one or more shared folders for a virtual machine, be sure the virtual machine
is open in Workstation and click its tab to make it the active virtual machine. Choose
VM > Settings > Options and click Shared folders.
You can add one or more directories to the list. Those directories may be on the host
computer or they may be network directories accessible from the host computer.
176
www.vmware.com
C H A P T E R 6 Running VMware Workstation
Adding a Shared Folder on a Windows Host
(To add a shared folder on a Linux host, see Adding a Shared Folder on a Linux Host on
page 179.)
1. Choose VM > Settings
2. Select Options
3. Click Shared Folders
4. Click Add to open the Add Shared Folder Wizard and click Next
5. Enter a name and location for the shared folder and click Next
• Name — This is the name that appears inside the virtual machine.
• Host folder — The path on the host to the directory you want to share. Type
in the full path or browse to the directory.
177
VMware Workstation 5 User’s Manual
6. Enter attributes for the shared folder.
• Enable this share — Select this option to enable the shared folder. Deselect
this option to disable the shared folder without deleting it from the virtual
machine configuration. You may want to add a folder to the list without
enabling it immediately. You can then enable the folder at any time by
clicking its name in this list, clicking Properties and enabling the folder in the
Properties dialog box.
• Read-only — Select this option to prevent the virtual machine from changing
the contents of the shared folder in the host file system. Access to files in the
shared folder is also governed by permission settings on the host computer.
• Disable after this session — Select this option to disable the virtual machine’s
connection to the folder when the virtual machine is powered off or
suspended. Leave this box unchecked to specify that the folder is always
enabled.
7. Click Finish.
178
www.vmware.com
C H A P T E R 6 Running VMware Workstation
Adding a Shared Folder on a Linux Host
(To add a shared folder on a Windows host, see Adding a Shared Folder on a Windows
Host on page 177.)
1. Choose VM > Settings
2. Select Options
3. Click Shared Folders
4. Click Add to open the Shared Folder Properties dialog box.
5. Enter the following information for the shared folder.
• Name — This is the name that appears inside the virtual machine.
• Host folder — The path on the host to the directory you want to share. Type in
the full path or browse to the directory.
• Enable this share — Select this option to enable the shared folder. Deselect
this option to disable the shared folder without deleting it from the virtual
machine configuration. You may want to add a folder to the list without
enabling it immediately. You can then enable the folder at any time by
clicking its name in this list, clicking Properties and enabling the folder in the
Properties dialog box.
• Read-only — Select this option to prevent the virtual machine from changing
the contents of the shared folder in the host file system. Access to files in the
shared folder is also governed by permission settings on the host computer.
• Disable after this session — Select this option to disable the virtual machine’s
connection to the folder when the virtual machine is powered off or
suspended. Deselect this option to specify that the folder is always enabled.
6. Click OK.
179
VMware Workstation 5 User’s Manual
Viewing a Shared Folder
Shared folders appear differently, depending on the guest operating system. The
following sections describe viewing shared folders in Windows and Linux guests.
Note: You can use shared folders to share any type of file. However, Windows
shortcuts and Linux symbolic links do not work correctly if you try to use them via
shared folders.
Caution: Do not open a file in a shared folder from more than one application at a
time. For example, you should not open the same file using an application on the host
operating system and another application in the guest operating system. In some
circumstances, doing so could cause data corruption in the file.
Viewing Shared Folders in a Windows Guest
In a Windows guest operating system, you can view shared folders using Windows
Explorer. Look in My Network Places (Network Neighborhood for a Windows NT guest)
under VMware Shared Folders.
Note: If you have trouble finding a shared folder when using the desktop icon for My
Network Places (or Network Neighborhood in Windows NT), instead open Windows
Explorer and look in My Network Places (Network Neighborhood). The Windows
desktop icon does not display an option for Entire Network.
For example, if you specify the name Test files for one of your shared folders,
you can navigate to it by opening My Network Places > VMware Shared Folders >
.host > Shared Folders > Test files.
You can also go directly to the folder using the UNC path
\\.host\Shared Folders\Test files.
You can map a shared folder to a drive letter just as you would with a network share.
Note: If your guest operating system has VMware Tools from Workstation 4.0, shared
folders appear as folders on a designated drive letter.
Viewing Shared Folders in a Linux Guest
In a Linux virtual machine, shared folders appear under /mnt/hgfs.
To change the settings for a shared folder on the list, click the folder’s name to
highlight it, then click Properties. The Properties dialog box appears.
Change any settings you wish, then click OK.
Note: Even though the hgfs folder permission settings may seem to indicate that
you must have root privileges (-rw------- root.root) to write to the folder,
any user can write to the shared folder, whether logged in as root or not.
180
www.vmware.com
C H A P T E R 6 Running VMware Workstation
Using Drag and Drop
With the drag and drop features of VMware Workstation 5, you can move files easily
between a Windows host and a Windows virtual machine. You can drag and drop
individual files or entire directories.
You can drag and drop files or folders from a file manager, such as Windows Explorer,
on the host to a file manager in the virtual machine or vice versa. You can also drag
files from a file manager to an application that supports drag and drop — or from
applications such as zip file managers that support drag-and-drop extraction of
individual files.
When you drag a file or folder from host to virtual machine or from virtual machine to
host, Workstation copies the file or folder to the location where you drop it. This
means, for example, that if you drop a file on the desktop icon of a word processor, the
word processor opens with a copy of the original file. The original file does not reflect
any changes you make to the copy.
Initially, the application opens using a copy of the file that is stored in your temp
directory (as specified in the %TEMP% environment variable). To protect any changes
you make, choose File > Save As from the application’s menu and save the file in a
different directory. Otherwise it may be overwritten or deleted by mistake.
To disable or enable drag and drop for a virtual machine
1. Open the virtual machine settings editor (VM > Settings), click the Options tab
and select Guest isolation.
2. Select Disable drag and drop to and from this virtual machine to disable the
feature. Deselect it to enable the feature.
181
VMware Workstation 5 User’s Manual
Using Devices in a Virtual Machine
Follow the guidelines in this section to add, remove, configure, connect, and
disconnect your virtual machine’s devices.
Adding, Configuring, and Removing Devices in a Virtual
Machine
In the virtual machine settings editor (VM > Settings), you can add and remove
devices for a virtual machine, and change device settings.
To add a new device to a virtual machine, open the virtual machine settings editor,
click Add, and follow the instructions in the Add New Hardware Wizard. Click OK to
save your changes and close the virtual machine settings editor.
To change settings for a device, open the virtual machine settings editor, select the
device, and make your changes. Click OK to save your changes and close the virtual
machine settings editor.
To remove a device, open the virtual machine settings editor, click the name of the
device, and click Remove. Click OK to close the virtual machine settings editor.
Connecting and Disconnecting Removable Devices
Choose VM > Removable Devices to connect and disconnect removable devices that
you have configured for your virtual machine — including floppy drives, DVD/CDROM drives, USB devices, and Ethernet adapters — while the virtual machine is
running.
When you choose VM > Removable Devices, a submenu appears. Choose a device
from that menu to connect or disconnect it and to edit device settings. If you choose
Edit, a dialog box appears. Make all the changes you want to make, then click OK.
182
www.vmware.com
C H A P T E R 6 Running VMware Workstation
Creating a Screen Shot or a Movie of a
Virtual Machine
This section describes how to capture a visual record of a virtual machine, in a screen
shot or movie.
Creating a Screen Shot of a Virtual Machine
You can capture a screen shot of a virtual machine. Choose VM > Capture Screen. You
can save this image as a bitmap (.bmp) file on a Windows host or as a portable
network graphics (.png) file on a Linux host.
Creating a Movie of a Virtual Machine
You can capture a movie of your activity within a virtual machine. Workstation saves
this image as an .avi file on the host.
To capture a movie of virtual machine activity
1. Choose VM > Capture Movie.
A save file dialog box appears.
2. Enter information for your movie and click Save.
• Type the filename of the movie file you want to save. The default name is
based on the active virtual machine.
• Select the directory location where you want the movie to be stored.
• Select High, Medium, or Low quality from the drop-down menu. This choice
determines the compression and therefore the file size of the resulting movie.
• If you select Omit frames in which nothing occurs, the movie will only
include those periods of time when something is actually happening in the
virtual machine. This reduces the file size and length of the movie.
While movie capture is active, a red circle — a virtual LED — appears in the
status bar at the lower right.
An indicator appears on the status bar during movie capture
3. Within the virtual machine, perform the actions you want to appear in the move.
4. Choose VM > Stop Movie Capture.
The red circle disappears from the status bar, and your movie is saved.
183
VMware Workstation 5 User’s Manual
Playing a Movie Requires VMware CODEC
You can play back your movie in any compatible media player. However, a VMware
CODEC (coder-decoder) must be installed. This CODEC is automatically installed on a
machine with VMware Workstation. A separately downloadable installer is also
available for playback of movies on machines without VMware Workstation.
184
www.vmware.com
C H A P T E R 6 Running VMware Workstation
Where to Go Next
• Using Disks on page 209
• Moving and Sharing Virtual Machines on page 187
• Preserving the State of a Virtual Machine on page 271
• Cloning a Virtual Machine on page 289
• Configuring Teams on page 299
• Configuring a Virtual Network on page 325
• Configuring Video and Sound on page 379
• Connecting Devices on page 391
• Performance Tuning on page 431
185
VMware Workstation 5 User’s Manual
186
www.vmware.com
CHAPTER
Moving and Sharing Virtual
Machines
7
The following sections provide information on how to move your virtual machines
from one host to another, or elsewhere on the same host, plus recommendations on
how to share virtual machines with other users:
• Virtual Machine Identifier — UUID on page 188
• Moving a VMware Workstation 5 Virtual Machine on page 191
• Moving a VMware Workstation 4 Virtual Machine on page 195
• Moving an Older Virtual Machine on page 198
• Sharing Virtual Machines with Other Users on page 203
• Moving Linked Clones on page 204
• Sharing Virtual Machines with VMware Player on page 205
Note: When you move a virtual machine to a new host computer or to a different
directory on the same host computer — or when you rename a directory in the path
to the virtual machine’s configuration file — VMware Workstation generates a
different MAC address for the virtual Ethernet adapter. For additional information, see
Maintaining and Changing the MAC Address of a Virtual Machine on page 352.
187
VMware Workstation 5 User’s Manual
Virtual Machine Identifier — UUID
To ensure all virtual machines are identified properly, each virtual machine is
automatically assigned a universal unique identifier (UUID).
If you move or copy a virtual machine, Workstation offers the choice of creating a new
UUID the first time you power on the virtual machine. This new UUID is based on the
physical computer's identifier and the path to the virtual machine's configuration file
in its new location.
This section discusses the following topics:
• The UUID Location and Format on page 188
• The UUID and Moving Virtual Machines on page 189
• Specifying a UUID for a Virtual Machine on page 190
• Setting the UUID for a Virtual Machine that Is Being Moved on page 190
The UUID Location and Format
The UUID is stored in the SMBIOS system information descriptor. It can be accessed by
standard SMBIOS scanning software — for example SiSoftware Sandra or the IBM
utility smbios2 — and used for system management in the same way you use the
UUID of a physical computer.
The UUID is a 128-bit integer. The 16 bytes of this value are separated by spaces,
except for a dash between the eighth and ninth hexadecimal pairs. An example UUID
looks like this:
00 11 22 33 44 55 66 77-88 99 aa bb cc dd ee ff
The UUID is based on the physical computer's identifier and the path to the virtual
machine's configuration file. This UUID is generated when you power on or reset the
virtual machine. As long as you do not move or copy the virtual machine to another
location, the UUID remains constant.
188
www.vmware.com
C H A P T E R 7 Moving and Sharing Virtual Machines
The UUID and Moving Virtual Machines
When you power on a virtual machine that was moved or copied to a new location,
the following message appears:
The virtual machine's configuration file has changed its location since its last
poweron. Do you want to create a new unique identifier (UUID) for the virtual
machine, or keep the old one?
You have four options: Create, Keep, Always Create, Always Keep. The proper selection
depends on the cause for the changed UUID.
• If you moved this virtual machine, you can choose to keep the UUID. Select
Keep, then click OK to continue powering on the virtual machine.
• If you copied this virtual machine to a new location, you should create a new
UUID, since the copy of the virtual machine is using the same UUID as the
original virtual machine. Select Create, then click OK to continue powering on
the virtual machine.
• If the original virtual machine is being used as a master copy for more virtual
machines, you can choose to create a new UUID the first time you power on
each copy. After you configure the virtual machine and are ready to make it a
master copy, move it to a new location and power it on. When the message
appears after you power on, select Always Create, then click OK to continue
powering on the virtual machine. The virtual machine is set up to create a new
UUID every time it is moved. Power off the virtual machine and begin using it as
a master copy by copying the virtual machine files to other locations.
• If you intend to move the virtual machine numerous times and want to keep the
same UUID each time the virtual machine moves, select Always Keep and click
OK to continue powering on the virtual machine.
Note: If you want to change the Always Keep or Always Create setting, power off the
virtual machine and edit its configuration file (.vmx). Delete the line that contains
uuid.action = "create"
or
uuid.action = "keep"
Suspending and resuming a virtual machine does not trigger the process that
generates a UUID. Thus, the UUID in use at the time the virtual machine was
suspended remains in use when the virtual machine is resumed, even if it has been
copied or moved. However, the next time the virtual machine is rebooted, the
message appears, so you can choose to create a new UUID or keep the existing one.
189
VMware Workstation 5 User’s Manual
Specifying a UUID for a Virtual Machine
In some circumstances you may want to assign a specific UUID to the virtual machine.
To do this, you need to override the automatically generated UUID value. Power off
the virtual machine and edit its configuration file (.vmx) to set the value of the UUID
parameter. Use a text editor to edit the configuration file. The format for the line is:
uuid.bios = <uuidvalue>
The UUID value must be surrounded by quotation marks. A sample configuration line
looks like:
uuid.bios = "00 11 22 33 44 55 66 77-88 99 aa bb cc dd ee ff"
After adding this line to the configuration file, power on the virtual machine. The new
UUID is used when the virtual machine boots.
Setting the UUID for a Virtual Machine that Is Being Moved
If you plan to move a virtual machine and want it to have the same UUID it did before
the move, you must note the UUID being used before the move and add that UUID to
the configuration file after the move. Follow these steps:
1. Before moving the virtual machine, examine its configuration file. You need to
use a text editor. The configuration file is located in your virtual machine's
directory; the file has a .vmx extension.
2. If the virtual machine's UUID has been set to a specific value, the configuration
file has a line that begins with uuid.bios. Note the 128-bit hexadecimal value
that follows. This is the value you should use in the new location.
3. If there is no line beginning with uuid.bios, look for the line that begins with
uuid.location and note the 128-bit hexadecimal value that follows it.
4. Move the virtual machine's files to the new location.
5. Start the virtual machine, then shut it down.
6. Edit the virtual machine's configuration file to add a uuid.bios line, as
described in Specifying a UUID for a Virtual Machine on page 190. Set the value
of uuid.bios to the value you recorded in step 2.
7. Start the virtual machine. It should now have the same UUID as it did before the
move.
190
www.vmware.com
C H A P T E R 7 Moving and Sharing Virtual Machines
Moving a VMware Workstation 5
Virtual Machine
What do you do if you have created a virtual machine using VMware Workstation and
you want to move it to a different computer? Or even somewhere else on the same
computer? The process is not difficult, and in most cases you can even move your
virtual machine from a Windows host to a Linux host — or vice versa. If the virtual
machine was created under VMware Workstation 5, follow the directions in this
section.
These instructions assume that you are using a virtual disk — stored in a set of .vmdk
files on your host computer.
Caution: It’s always safest to make backup copies of all the files in your virtual
machine’s directory before you start a process like this.
This section discusses the following topics:
• Hosts with Different Hardware on page 191
• Virtual Machines Use Relative Paths on page 193
• Preparing a Workstation 5 Virtual Machine for a Move on page 193
• Moving a Workstation 5 Virtual Machine to a New Host on page 194
Hosts with Different Hardware
If you move a virtual machine to a host with significant hardware differences, the
guest operating system may no longer work correctly.
Moving between 64-Bit and 32-Bit Hosts
Moving a virtual machine from a 64-bit host to a 32-bit host can require that you
recompile the kernel in your Linux guest operating system.
Note: Workstation supports 64-bit guest operating systems only in Workstation
versions 5.5 and later, and only on host machines with supported processors. When
you power on a virtual machine with a 64-bit guest operating system, Workstation
performs an internal check: if the host CPU is not a supported 64-bit processor, you
cannot power on the virtual machine. For the list of processors Workstation supports
for 64-bit guest operating systems, see Support for 64-Bit Guest Operating Systems on
page 37.
191
VMware Workstation 5 User’s Manual
Moving Virtual Machines between Multiprocessor and Uniprocessor Hosts
For all supported configurations of 32-bit and 64-bit host and guest operating
systems running on multiprocessor host machines, versions 5.5 and later of
Workstation support two-way virtual Symmetric Multiprocessing (SMP). This enables
you to assign two virtual processors to a virtual machine. This is supported only for
host machines with at least two logical processors.
Note: If the host is a uniprocessor machine, assigning two processors is neither
supported nor recommended: a warning message will appear. You can disregard this
message and assign two processors to the virtual machine, but, once you have
finished creating the virtual machine, you will not be able to power it on unless you
move it to a host machine with at least two logical processors.
You can use Workstation 5.5 or later, running on a multiprocessor host machine, to
open a virtual machine, created in VMware ESX Server, that has one or more virtual
processors. However, in Workstation only two virtual processors will be assigned to
the virtual machine, even if more processors were assigned when the virtual machine
was created in ESX Server. In this case, in the Workstation virtual machine settings
editor (VM > Settings), in the Hardware tab under Processors, the field Number of
Processors will display the entry Other (x), where x is the number of processors
originally assigned in ESX Server. Workstation preserves the original configuration
setting for the number of processors. You can change this setting. However, once you
commit a change to this setting, by clicking OK in VM > Settings, the original
configuration setting for number of processors is discarded, and no longer appears as
an option in VM > Settings.
If you move a virtual machine created in VMware ESX Server or Workstation with more
than one virtual processor to a uniprocessor host, the guest operating system
consumes 100% of the host CPU’s processing capacity, even when the guest
operating system is essentially idle. To prevent this, in the Workstation virtual machine
settings editor (VM > Settings), in the Hardware tab under Processors, change the
setting for Number of Processors to 1.
For more about Workstation support for virtual Symmetric Multiprocessing (SMP), see
Using Two-Way Virtual Symmetric Multiprocessing (Experimental) on page 429.
192
www.vmware.com
C H A P T E R 7 Moving and Sharing Virtual Machines
Virtual Machines Use Relative Paths
The path names for all files associated with a VMware Workstation 5 virtual machine
are relative, meaning the path to each file is relative to the currently active directory.
For example, if you are in the virtual machine’s directory, the relative path to the virtual
disk file is <machine name>.vmdk.
Preparing a Workstation 5 Virtual Machine for a Move
1. Shut down the guest operating system and power off the virtual machine. If the
virtual machine is suspended, resume it, then shut down the guest operating
system.
2. Do one of the following:
• If you are moving the virtual machine to a new host and have a network
connection between the original host machine and the new host, you are
finished with the preparations on the original host.
Otherwise, you need to have a way of moving the virtual disk (.vmdk) files
from the virtual machine’s directory to the new host. You could move them to
a shared network directory, for example, or burn them to CD-ROMs if they are
not too large.
Once you know how you are going to move the virtual machine, go to
Moving a Workstation 5 Virtual Machine to a New Host on page 194.
• If you are moving this virtual machine to another directory on this host, then
you are ready to make the move. Copy all the files in the virtual machine’s
original directory to the new location.
If you stored any files in directories other than the virtual machine directory,
be sure to move them into a directory of the same name and same position
relative to the location of the virtual machine.
Start VMware Workstation and open the new virtual machine you just created.
Choose File > Open, then browse to the virtual machine’s configuration
(.vmx) file.
193
VMware Workstation 5 User’s Manual
Moving a Workstation 5 Virtual Machine to a New Host
1. Make sure VMware Workstation is installed and working correctly on the new
host computer.
2. Create a directory for the virtual machine you are moving. Locate the virtual disk
files you are moving and copy them into the new directory. Be sure to copy all
the files in the virtual machine’s original directory. If you stored any files in
directories other than the virtual machine directory, be sure to move them into a
directory of the same name and same position relative to the location of the
virtual machine.
If, for some reason, you are not moving a file, make sure you do not have any
paths pointing to that file. Use the virtual machine settings editor and check to
see if your virtual machine is pointing to the correct location for files you do not
move. In the virtual machine settings editor, select each device and be sure that
any devices with associated files are pointed to the correct files. Also, check the
Options tab to be sure the location for the redo-log file is correct.
Note: If you have taken a snapshot of the virtual machine, be sure to move all
files in the virtual machine’s directory.
3. Start VMware Workstation and open the virtual machine you just moved. Choose
File > Open, then browse to the virtual machine’s configuration (.vmx) file.
See What Files Make Up a Virtual Machine? on page 108 for a description of the files
that you are moving.
194
www.vmware.com
C H A P T E R 7 Moving and Sharing Virtual Machines
Moving a VMware Workstation 4 Virtual
Machine
Note: This section discusses virtual machines created with Workstation 4. However,
the discussion applies equally to virtual machines created with all these VMware
products:
• Workstation 4.x
• GSX Server 3.x
• ESX Server 2.x
• VMware ACE 1.x
See Legacy Virtual Disks on page 268 for more information on virtual machine formats
from older VMware products.
If you want to move a virtual machine created with Workstation 4, you may prefer to
upgrade it for full compatibility with VMware Workstation 5 before moving it. To do so,
power on the virtual machine under VMware Workstation 5 and choose
VM > Upgrade Virtual Machine. You can then follow the instructions in Moving a
VMware Workstation 5 Virtual Machine on page 191.
If you upgrade the virtual machine, you can no longer run it under VMware
Workstation 4. If you need to run the virtual machine under both VMware
Workstation 4 and VMware Workstation 5, do not upgrade the virtual machine. Follow
the instructions in this section.
These instructions assume that you are using a virtual disk — stored in a set of .vmdk
files on your host computer.
Caution: It’s always safest to make backup copies of all the files in your virtual
machine’s directory before you start a process like this.
This section discusses the following topics regarding moving a Workstation 4 virtual
machine:
• Preparing Your Workstation 4 Virtual Machine for the Move on page 196
• Moving a Workstation 4 Virtual Machine to a New Host Machine on page 197
195
VMware Workstation 5 User’s Manual
Preparing Your Workstation 4 Virtual Machine for the Move
1. Use VMware Workstation 4 to open the virtual machine.
2. Be sure the guest operating system is completely shut down. If the virtual
machine is suspended, resume it, then shut down the guest operating system.
3. Do one of the following:
• If you are moving the virtual machine to a new host and have a network
connection between the original host machine and the new host, you are
finished with the preparations on the original host. Otherwise, you need to
have a way of moving the virtual disk (.vmdk) files from the virtual machine’s
directory to the new host. You could move them to a shared network
directory, for example, or burn them to CD-ROMs if they are not too large.
Once you know how you are going to move the virtual machine, go to
Moving a Workstation 4 Virtual Machine to a New Host Machine on page 197.
• If you are moving this virtual machine to another directory on the same host,
you are ready to make the move. Copy all the files in the virtual machine’s
original directory to the new location. If you stored any files in directories
other than the virtual machine directory, be sure to move them into a
directory of the same name and same position relative to the location of the
virtual machine.
4. Start VMware Workstation 5 and open the virtual machine you just moved.
Choose File > Open, then browse to the virtual machine’s configuration (.vmx)
file.
196
www.vmware.com
C H A P T E R 7 Moving and Sharing Virtual Machines
Moving a Workstation 4 Virtual Machine to a New Host
Machine
1. Make sure VMware Workstation 5 is installed and working correctly on the new
host computer.
2. Locate the virtual disk files you are moving and copy them into the new virtual
machine directory. Be sure to copy all the files in the virtual machine’s original
directory. If you stored any files in directories other than the virtual machine
directory, be sure to move them into a directory of the same name and same
position relative to the location of the virtual machine.
If, for some reason, you are not moving a file, make sure you do not have any
relative or absolute paths pointing to that file. Use the virtual machine settings
editor and check to see if your virtual machine is pointing to the correct location
for files you do not move. In the virtual machine settings editor, select each
device and be sure that any devices with associated files are pointed to the
correct files. Also, check the Options tab to be sure the location for the redo-log
file is correct.
In addition, if you have any absolute paths pointing to any files you are moving,
change them to relative paths.
3. Start VMware Workstation 5 and open the virtual machine you just moved.
Choose File > Open, then browse to the virtual machine’s configuration (.vmx)
file.
197
VMware Workstation 5 User’s Manual
Moving an Older Virtual Machine
This section describes the following topics
• Moving VMware Workstation 3.0 Virtual Machines on page 198
• Moving VMware Workstation 2.x Virtual Machines on page 200
• Considerations for Moving Workstation Disks in Undoable Mode on page 201
Moving VMware Workstation 3.0 Virtual Machines
If you have created a virtual machine using VMware Workstation 3.0, or another
VMware product, and you want to move it to a different computer or to another
directory on your host, you need to perform the tasks outlined in this section.
These instructions assume that you are using a virtual disk — stored in a set of .vmdk
files on your host computer.
Caution: It’s always safest to make backup copies of all the files in your virtual
machine’s directory before you start a process like this.
This section discusses the following topics regarding moving a Workstation 3 virtual
machine:
• Preparing Your Workstation 3 Virtual Machine for the Move on page 199
• Preparing the Workstation 5 Host Machine for a Workstation 3 Virtual Machine
on page 200
198
www.vmware.com
C H A P T E R 7 Moving and Sharing Virtual Machines
Preparing Your Workstation 3 Virtual Machine for the Move
1. Use VMware Workstation 3 to open the virtual machine. If the virtual machine
has more than one virtual disk and if the virtual disks use different disk modes,
you must use the Virtual Machine Control Panel to change one or more of the
virtual disks so they all use the same mode.
2. Be sure you know whether the virtual disk is set up as an IDE disk or a SCSI disk.
You can check this in the Virtual Machine Control Panel.
Also, note the size of the virtual disk you are moving. You need this information
when you prepare the new host machine, as described in the next section.
3. Be sure the guest operating system is completely shut down. If the virtual
machine is suspended, resume it using the VMware product with which you
created the virtual machine, then shut down the guest operating system.
Note: Do not move a suspended virtual machine from one host to another.
4. If your virtual machine is using disks in undoable mode, it is best to commit or
discard the changes when the guest operating system shuts down. If you cannot
commit or discard the changes to your disk, read Considerations for Moving
Workstation Disks in Undoable Mode on page 201.
5. If you have a network connection between the original host machine and the
new host, you are finished with the preparations on the original host. Otherwise,
you need to have a way of moving the virtual disk (.vmdk) files from the virtual
machine’s directory to the new host. You could move them to a shared network
directory, for example, or burn them to CD-ROMs if they are not too large.
Note: If your disks are using undoable mode and you have not committed or
discarded your changes, you must also move the redo-log (.REDO) files to the
new host computer.
199
VMware Workstation 5 User’s Manual
Preparing the Workstation 5 Host Machine for a Workstation 3 Virtual Machine
1. Make sure VMware Workstation 5 is installed and working correctly on the new
host computer.
2. Run the New Virtual Machine Wizard and select the appropriate guest operating
system for the virtual machine you are moving.
• Choose a virtual disk for your hard drive and use a drive size and type (IDE or
SCSI) that matches the size and type of the virtual disk you plan to move.
• Select all appropriate network, floppy and CD-ROM settings. Do not make any
changes in the virtual machine settings editor at this point.
• Save your settings and close VMware Workstation.
3. In the directory just created for the new virtual machine, delete the brand new
.vmdk files that were just created.
4. Locate the virtual disk files you are moving and copy them into the new virtual
machine directory.
Note: If your virtual machine is using disks in undoable mode and you did not
commit or discard your changes before the move, you must also move the redolog (.REDO) files to the new host computer.
5. Start VMware Workstation 5 again and open the new virtual machine you just
created. Choose VM > Settings.
6. Be sure the virtual machine is configured to use the virtual disk files you moved
from the original host. You need to confirm that the new disk’s settings — IDE or
SCSI and the file name for the first .vmdk file — match those that were used on
the original host machine.
The device listing for the hard drive shows whether it is SCSI or IDE. If that setting
does not match the virtual disk you are moving, select the hard disk and click
Remove. Then click Add and use the Add Hardware Wizard to add an IDE or SCSI
disk as appropriate. To specify IDE or SCSI, when you reach the Disk File screen in
the wizard, click the Advanced button.
Be sure the filename and path for the virtual disk match the actual filename and
location for the first .vmdk file used by the virtual machine you are moving.
Moving VMware Workstation 2.x Virtual Machines
If you have created a virtual machine using VMware Workstation 2.x, you must
upgrade it under VMware Workstation 3 or 4. VMware Workstation 5 does not support
VMware Workstation 2 virtual machines.
200
www.vmware.com
C H A P T E R 7 Moving and Sharing Virtual Machines
Considerations for Moving Workstation Disks in Undoable
Mode
Once you commit or discard changes made to a disk in undoable mode, you can
move your disk between Linux and Windows host operating systems. You can also
move your disk to different locations on your computer and to other computers with
the same host operating system.
However, if you cannot or do not want to commit or discard the changes made to
your undoable disk, note the following:
• You can always move a disk in undoable mode between host operating systems
of the same general type (for example, between two Microsoft Windows
systems, or between two Linux systems). Depending upon how the disk was first
set up, you may have to place the disk and its redo log in a directory that has a
path name identical to that of the current directory.
• You may be able to move the disk in undoable mode between Windows and
Linux host systems, or move the disk to a different directory on your current
system, if there is no path name information in the virtual machine’s
configuration file. This is true for virtual machines created under VMware
Workstation 3.1 or higher; however, virtual machines created with older versions
of Workstation contain full path names.
Follow these steps to check the configuration and see whether or not you can move
your undoable disk without committing or discarding changes:
1. Start VMware Workstation 3.
If you are moving a disk in undoable mode from one computer to another
computer, start VMware Workstation 3 on the computer that currently has your
disk.
2. Open the configuration file for the virtual machine that uses the undoable mode
disk you wish to move.
In the VMware Workstation window, select File > Open and choose the
configuration file of the virtual machine with the disk you want to move.
3. Open the Virtual Machine Control Panel.
201
VMware Workstation 5 User’s Manual
4. Examine the entry for your virtual disk to see whether it includes a full path to
the first virtual disk file. For example, on a Windows host, you might see a disk file
listing like this:
My Documents\My Virtual Machines\Windows Me\Windows Me.vmdk
Entries for SCSI disks are similar.
If your disk file information resembles the example above (with a full path to the
first disk file) and you have not committed or discarded changes to the undoable
disk, the following rules apply:
• You can move the disk to another computer of the same type (Windows to
Windows or Linux to Linux).
• You must place the virtual machine’s other files (including .vmx and .REDO
on Windows, .vmx or .cfg and .REDO on Linux) in the same relative
location on the new computer. In other words, if the virtual machine’s files
reside in
My Documents\My Virtual Machines\Windows Me\
on the original host computer, you must place them in that same location on
the new host computer.
• You cannot move the disk to a computer of a different type (Windows to
Linux or vice versa).
• You cannot move the disk to another directory on the current system.
If your disk file information does not contain a path, it looks like this:
Windows Me.vmdk
If your disk entry resembles the one above (just a filename with a .vmdk
extension), you can move the disk and redo log anywhere you wish.
202
www.vmware.com
C H A P T E R 7 Moving and Sharing Virtual Machines
Sharing Virtual Machines
with Other Users
If other users access your virtual machines, you should consider the following points:
• On Windows hosts, the virtual machine files should be relocated to a directory
that is accessible to all appropriate users. The default location for a Windows host
is not typically accessible to other users:
C:\Documents and Settings\<user name>\My Documents\My Virtual
Machines
When you configure the virtual machine in the New Virtual Machine Wizard, you
can specify a location for the virtual machine elsewhere on your system or on a
network volume.
• On Linux hosts, permissions for the virtual machine files — especially the
configuration file (.vmx) and virtual disks (.vmdk) — should be set for other
users according to how you want them to use the virtual machine.
For example, if you want users to run a virtual machine but not be able to modify
its configuration, do not make the configuration file writable.
Other users can also share a virtual machine by making a linked clone of it— a copy
that uses the same virtual disks as the parent virtual machine it was copied from. See
Cloning a Virtual Machine on page 289
203
VMware Workstation 5 User’s Manual
Moving Linked Clones
You can move a linked clone as you would an ordinary Workstation 5 virtual machine.
However, if you move a linked clone (or if you move its parent virtual machine), make
certain the clone can access the parent virtual machine, for example using a shared
directory or networked file server.
When you power on a linked clone that has been moved, be prepared to update the
file system path to the parent virtual machine location.
Caution: You cannot power on a linked clone if Workstation cannot locate the
original virtual machine.
204
www.vmware.com
C H A P T E R 7 Moving and Sharing Virtual Machines
Sharing Virtual Machines with VMware
Player
VMware Player is an application that opens and plays virtual machines created with
VMware Workstation 4 and Workstation 5, GSX Server, and ESX Server. On Windows
hosts, the player also opens and plays Microsoft Virtual PC and Virtual Server virtual
machines and Symantec LiveState Recovery system images. VMware Player makes
your VMware virtual machines accessible to colleagues, partners, customers, and
clients who do not own VMware products. VMware Player is included with
Workstation versions 5.5 and later.
Note: Use of VMware Player is subject to the VMware Player End User License terms
and no support (including Support and Subscription) will be provided by VMware for
VMware Player. For self-help resources, see the VMware Player FAQ at
www.vmware.com/products/player/faqs.html. You may also want to check the VMware
Player Discussion Forum on the VMware VMTN Web site, at
www.vmware.com/community/forum.jspa?forumID=123. The Forum is a site where
VMTN members can exchange information, questions, and comments with each
other regarding VMware products, services, and product support issues.
Running VMware Player
VMware Player is included in the Workstation 5.5 distribution. When you install
Workstation 5.5, the application file, vmplayer.exe (Windows) or vmplayer
(Linux), is stored with the rest of your Workstation program files.
To run VMware Player:
1. Open VMware Player.
Select VMware Player from the Start > Programs menu in Windows, or from the
corresponding program menu in a Linux X session.
or
Open VMware Player from a command line:
In Windows, enter <path>vmplayer.exe
In Linux, enter <path>vmplayer
where <path> is the appropriate path on your system to the application file.
2. Open a virtual machine. When you launch the player, it displays a dialog box in
which you can enter or browse for the configuration file of the virtual machine
205
VMware Workstation 5 User’s Manual
you want to play. You can use the field Files of type to filter the files displayed by
file extension, so you can browse to the configuration file more easily.
When you have entered or selected a virtual machine configuration file, click
Open. The player automatically opens the virtual machine and powers it on.
You can also open a virtual machine by right-clicking its configuration file to
display a context menu in which you can choose whether to open the virtual
machine in Workstation or in VMware Player.
Note: VMware Player can play only one virtual machine at a time. You must close the
virtual machine currently running in VMware Player before you can open another
virtual machine.
Configuring VMware Player
VMware Player is primarily a vehicle for playing virtual machines, and does not contain
the full feature set found in Workstation and other VMware products.
VMware Player does provide the following features.
• You can connect and disconnect any Workstation-supported devices in the
virtual machine.
• You can change the amount of memory allocated to the virtual machine.
• You can set the type of network connection for the virtual machine: bridged,
host-only, or NAT.
• You can copy and paste from the virtual machine to the host and vice versa. To
use this feature, you must have VMware Tools installed.
• You can drag and drop files from the virtual machine to the host and vice versa.
To use this feature, you must have VMware Tools installed.
• You can set preferences for how commands are displayed in the player interface,
and for how the player closes a virtual machine (by powering it off or by
suspending it), when you exit VMware Player.
For instructions on using these features, see the online help provided in VMware
Player (Player > Help).
206
www.vmware.com
C H A P T E R 7 Moving and Sharing Virtual Machines
Closing VMware Player
To close VMware Player:
• Shut down the guest operating system in the virtual machine. The player closes
automatically after the guest operating system shuts down, or
• In VMware Player, choose Player > Exit (Windows) or Player > Quit (Linux). The
player will either suspend or power off the virtual machine, depending on the
preference you have set for exit behavior in Player > Preferences.
Setting Up Virtual Machines for Use with VMware Player
You should take special care when you create virtual machines that you intend to be
distributed and played by VMware Player. You will want to configure the virtual
machine for maximum compatibility with all expected host machines and systems.
Because the player’s configuration options are limited, users are limited in their ability
to make changes in a virtual machine so that it is compatible with their host systems.
Following are a number of recommendations to help you configure virtual machines
for maximum compatibility with VMware Player and with the widest range of host
machines.
• Think carefully about what virtual devices are actually required and don't include
any that are not needed or useful for the software you are distributing via virtual
machine and VMware Player. For example, generic SCSI devices are extremely
unlikely to be appropriate.
• If you want to connect a physical device to a virtual device, always use the
autodetect option when configuring the virtual machine. The autodetect option
allows the virtual machine to adapt to the user's system, and works whether the
host operating system is Windows or Linux. Note that users who actually have
no physical device at all, will receive a warning message.
• If you want to connect a CD-ROM or floppy to an image file that you ship with
the virtual machine, make sure the image file is in the same directory as the
virtual machine and that the virtual machine uses a relative path to access the
image file. Absolute paths will probably not work on a user's machine and vary
depending on the host operating system.
• If you want both a physical CD-ROM and an image, you should provide two
virtual CD-ROM devices in the virtual machine. VMware Player does not provide
a way in the user interface to switch a single CD-ROM device between a physical
CD-ROM and an image. This also means that, in the unlikely case that you want
to ship multiple images, the user will not be able to switch between them.
207
VMware Workstation 5 User’s Manual
• Choose a reasonable amount of memory to allocate to the virtual machine. If the
user’s host machine does not have enough physical memory to support the
memory allocation, the player cannot power on the virtual machine.
• Be sure to install VMware Tools in the virtual machine. VMware Tools significantly
improves the user’s experience working with the virtual machine.
• Choose a reasonable screen resolution for the guest. A user is likely to find it
easier to increase the resolution manually than to deal with a display that
exceeds the user’s physical screen size. Note that the player cannot automatically
resize the display for Linux guests as it can for Windows guests.
• Some host operating systems do not support CD-ROMs in non-legacy mode. To
ensure that CD-ROMs work properly in virtual machines that you intend to be
distributed and played on VMware Player, you should configure CD-ROM devices
in legacy mode.
• Shared folders should not be enabled. VMware Player does not support shared
folders.
• Make sure all of the power options are turned off in the virtual machine settings
editor (VM > Settings > Options > Power > Power options). These options are:
• Power on after opening this virtual machine
• Enter full screen mode after powering on
• Close after powering off or suspending
• Make an appropriate setting in VM > Settings > Options > Snapshots > When
powering off. You should set this option to Just power off, Revert to snapshot,
or Ask me. The option Take a new snapshot is inappropriate for virtual machines
running in VMware Player, because the player does not provide a way to access
the resulting snapshot. The option Revert to snapshot is useful if you want to
distribute a demo that resets itself to a clean state when powered off. If you
select Ask Me, Workstation will prompt you to choose among these options
each time you power off.
208
www.vmware.com
CHAPTER
Using Disks
8
The following sections provide information on configuring your virtual machine’s hard
disk storage so it best meets your needs:
• Configuring Hard Disk Storage in a Virtual Machine on page 210
• Adding Drives to a Virtual Machine on page 219
• Using VMware Virtual Disk Manager on page 230
• Configuring a Dual-Boot Computer for Use with a Virtual Machine on page 237
• Installing an Operating System on a Physical Partition from a Virtual Machine on
page 263
• Legacy Virtual Disks on page 268
209
VMware Workstation 5 User’s Manual
Configuring Hard Disk Storage
in a Virtual Machine
Like a physical computer, a VMware Workstation virtual machine stores its operating
system, programs and data files on one or more hard disks. Unlike a physical
computer, VMware Workstation gives you options for undoing changes to the virtual
machine’s hard disk.
The New Virtual Machine Wizard creates a virtual machine with one disk drive. You can
use the virtual machine settings editor (VM > Settings) to add more disk drives to
your virtual machine, to remove disk drives from your virtual machine or to change
certain settings for the existing disk drives.
This section describes the choices you can make in setting up hard disk storage for
your virtual machine.
• Disk Types: Virtual and Physical on page 210
• Adding a New Virtual Disk to a Virtual Machine on page 219
• Defragmenting Virtual Disks on page 215
• Shrinking Virtual Disks on page 215
Disk Types: Virtual and Physical
In the most common configurations, VMware Workstation creates virtual hard disks,
which are made up of files that are typically stored on your host computer’s hard disk.
In some circumstances, you may need to give your virtual machine direct access to a
physical hard drive on your host computer.
• Virtual Disk on page 210
• Physical Disk on page 212
Virtual Disk
A virtual disk is a file or set of files that appears as a physical disk drive to a guest
operating system. The files can be on the host machine or on a remote computer.
When you configure a virtual machine with a virtual disk, you can install a new
operating system onto the virtual disk without repartitioning a physical disk or
rebooting the host.
Virtual disks can be as large as 950GB (IDE or SCSI). Depending on the size of the
virtual disk and the host operating system, VMware Workstation creates one or more
files to hold each virtual disk.
By default, the actual files used by the virtual disk start out small and grow to their
maximum size as needed. The main advantage of this approach is the smaller file size.
210
www.vmware.com
C H A P T E R 8 Using Disks
Smaller files require less storage space and are easier to move if you want to move the
virtual machine to a new location. However, it takes longer to write data to a disk
configured in this way.
You may also configure virtual disks so all the disk space is allocated at the time the
virtual disk is created. This approach provides enhanced performance and is useful if
you are running performance-sensitive applications in the virtual machine.
Virtual disks can be set up as IDE disks for any guest operating system. They can be set
up as SCSI disks for any guest operating system that has a driver for the LSI Logic or
BusLogic SCSI adapter available in a VMware Workstation virtual machine. You
determine which SCSI adapter to use at the time you create the virtual machine.
Note: To use SCSI disks in a Windows XP virtual machine, you need a special SCSI
driver available from the download section of the VMware Web site at
www.vmware.com/download. Follow the instructions on the Web site to use the driver
with a fresh installation of Windows XP.
A virtual disk of either type can be stored on either type of physical hard disk. That is,
the files that make up an IDE virtual disk can be stored on either an IDE hard disk or a
SCSI hard disk. So can the files that make up a SCSI virtual disk. They can also be stored
on other types of fast-access storage media, such as DVD or CD-ROM discs.
A key advantage of virtual disks is their portability. Because the virtual disks are stored
as files on the host machine or a remote computer, you can move them easily to a
new location on the same computer or to a different computer. You can also use
VMware Workstation on a Windows host to create virtual disks, then move them to a
Linux computer and use them under VMware Workstation for Linux — or vice versa.
For information about moving virtual disks, see Moving and Sharing Virtual Machines
on page 187.
211
VMware Workstation 5 User’s Manual
Physical Disk
A physical disk directly accesses an existing local disk or partition. You can use physical
disks if you want VMware Workstation to run one or more guest operating systems
from existing disk partitions. While virtual disks are limited to 950GB, physical disks
may be set up on both IDE and SCSI devices of up to 2TB capacity. At this time,
however, booting from an operating system already set up on an existing SCSI disk or
partition is not supported.
Caution: If you run an operating system natively on the host computer, then switch
to running it inside a virtual machine, the change is like pulling the hard drive out of
one computer and installing it in a second computer with a different motherboard
and other hardware. You need to prepare carefully for such a switch. The specific steps
you need to take depend on the operating system you want to use inside the virtual
machine. For details, see Configuring a Dual-Boot Computer for Use with a Virtual
Machine on page 237.
You can also create a new virtual machine using a physical disk. For details, see
Installing an Operating System on a Physical Partition from a Virtual Machine on
page 263. In most cases, however, it is better to use a virtual disk.
Only expert users should attempt physical disk configurations.
Note: You should not use a physical disk to share files between host and guest
operating systems. It is not safe to make the same partition visible to both host and
guest. You can cause data corruption if you do this. To share files between host and
guest operating systems, use shared folders. For details, see Using Shared Folders on
page 176.
212
www.vmware.com
C H A P T E R 8 Using Disks
Disk Files
In the virtual machine settings editor (VM > Settings), you can choose the disk files for
a virtual machine. See What Files Make Up a Virtual Machine? on page 108 for a
comprehensive list of the other files.
You may want to choose a file other than the one created by the New Virtual Machine
Wizard if you are using a virtual disk that you created in a different location or if you are
moving the automatically created disk files to a new location.
The disk files for a virtual disk store the information that you write to a virtual
machine’s hard disk — the operating system, the program files and the data files. The
virtual disk files have a .vmdk extension.
A virtual disk is made up of one or more .vmdk files.
On Windows hosts, each virtual disk is contained in one file by default. You may, as an
option, configure the virtual disk to use a set of files limited to 2GB per file. Use this
option if you plan to move the virtual disk to a file system that does not support files
larger than 2GB.
You must set this option at the time the virtual disk is created.
If you are setting up a new virtual machine, in the New Virtual Machine Wizard, follow
the Custom path. In the screen that allows you to specify the virtual disk’s capacity,
select Split disk into 2GB files.
If you are adding a virtual disk to an existing virtual machine, follow the steps in the
Add Hardware Wizard. In the screen that allows you to specify the virtual disk’s
capacity, select Split disk into 2GB files.
When a disk is split into multiple files, larger virtual disks have more .vmdk files.
The first .vmdk file for each disk is small and contains pointers to the other files that
make up the virtual disk. The other .vmdk files contain data stored by your virtual
machine and use a small amount of space for virtual machine overhead.
If you chose to allocate space for the virtual disk in advance, the file sizes are fixed, and
most of the files are 2GB. As mentioned above, the first file is small. The last file in the
series may also be smaller than 2GB.
If you did not allocate the space in advance, the .vmdk files grow as data is added, to
a maximum of 2GB each — except for the first file in the set, which remains small.
The virtual machine settings editor shows the name of the first file in the set — the
one that contains pointers to the other files in the set. The other files used for that disk
are automatically given names based on the first file’s name.
213
VMware Workstation 5 User’s Manual
For example, a Windows XP Professional virtual machine using the default
configuration, with files that grow as needed, stores the disk in files named Windows
XP Professional.vmdk, Windows XP Professional-s001.vmdk,
Windows XP Professional-s002.vmdk and so on.
If the disk space is allocated in advance, the names are similar, except that they
include an f instead of an s — for example, Windows XP Professionalf001.vmdk.
If you are using a physical disk, the .vmdk file stores information about the physical
disk or partition used by the virtual machine.
Lock Files
A running virtual machine creates lock files to prevent consistency problems on
virtual disks. If the virtual machine did not use locks, multiple virtual machines might
read and write to the disk, causing data corruption.
Lock files are always created in the same directory as the .vmdk files.
The locking methods used by VMware Workstation on Windows and Linux hosts are
different, so files shared between them are not fully protected. If you use a common
file repository that provides files to users on both Windows and Linux hosts, be sure
that each virtual machine is run by only one user at a time.
When a virtual machine is powered off, it removes the lock files it created. If it cannot
remove the lock, a stale lock file is left protecting the .vmdk file. For example, if the
host machine crashes before the virtual machine has a chance to remove its lock file, a
stale lock remains.
If a stale lock file remains when the virtual machine is started again, the virtual
machine tries to remove the stale lock. To make sure that no virtual machine could be
using the lock file, the virtual machine checks the lock file to see if
1. The lock was created on the same host where the virtual machine is running.
2. The process that created the lock is not running.
If those two conditions are true, the virtual machine can safely remove the stale lock. If
either of those conditions is not true, a dialog box appears, warning you that the
virtual machine cannot be powered on. If you are sure it is safe to do so, you may
delete the lock files manually. On Windows hosts, the filenames of the lock files end in
.lck. On Linux hosts, the filenames of the lock files end in .WRITELOCK.
Physical disk partitions are also protected by locks. However, the host operating
system is not aware of this locking convention and thus does not respect it. For this
214
www.vmware.com
C H A P T E R 8 Using Disks
reason, VMware strongly recommends that the physical disk for a virtual machine not
be installed on the same physical disk as the host operating system.
Defragmenting Virtual Disks
Like physical disk drives, virtual disks can become fragmented. Defragmenting disks
rearranges files, programs, and unused space on the virtual disk so that programs run
faster and files open more quickly. Defragmenting does not reclaim unused space on
a virtual disk; to reclaim unused space, shrink the disk.
For best disk performance, follow these steps:
1. Run a disk defragmentation utility inside the virtual machine.
2. Power off the virtual machine, then defragment its virtual disks from the virtual
machine settings editor (VM > Settings). Select the virtual disk you want to
defragment, then click Defragment.
Note: This capability works only with virtual disks, not physical or plain disks.
3. Run a disk defragmentation utility on the host computer
Defragmenting disks may take considerable time.
Note: The defragmentation process requires free working space on the host
computer’s disk. If your virtual disk is contained in a single file, for example, you need
free space equal to the size of the virtual disk file. Other virtual disk configurations
require less free space.
Shrinking Virtual Disks
If you have a virtual disk that grows as data is added, you can shrink it as described in
this section. If you allocated all the space for your virtual disk at the time you created it,
you cannot shrink it.
Note: The maximum benefit occurs when you defragment a virtual disk before you
shrink it. See Defragmenting Virtual Disks on page 215.
Shrinking a virtual disk reclaims unused space in the virtual disk. If there is empty
space in the disk, this process reduces the amount of space the virtual disk occupies
on the host drive.
Shrinking a virtual disk is a convenient way to convert a virtual disk to the format
supported by Workstation. Virtual disks created in the new format can be recognized
only by VMware Workstation 3.0 and higher.
This section describes the following topics:
• Restrictions and Requirements on page 216
215
VMware Workstation 5 User’s Manual
• The Shrinking Process on page 216
• Unsupported and Disabled Partitions on page 218
Restrictions and Requirements
Shrinking requires free disk space on the host equal to the size of the virtual disk you
are shrinking.
Shrinking applies only to virtual disks. You cannot shrink physical disks or CD-ROMs.
The shrink feature is not enabled if the virtual machine
• Contains a snapshot
• Is a parent of a linked clone
• Is a linked clone
The shrink feature is not enabled for a virtual machine if any of its virtual disks are
• Preallocated when created
• Not used in independent-persistent mode
• Legacy disks that are not in persistent mode
• Booted as independent disks
Note: You can change the mode of a virtual disk before the virtual machine is
powered on. See Excluding Disks from Snapshots on page 278 for a discussion of
independent disks.
The Shrinking Process
Shrinking a disk is a two-step process:
• In the first step, called wiping, VMware Tools reclaims all unused portions of disk
partitions (such as deleted files) and prepares them for shrinking. Wiping takes
place in the guest operating system.
• The second step is the shrinking process itself, which takes place on the host.
Workstation reduces the size of the disk’s files by the amount of disk space
reclaimed in the wipe process.
When a virtual machine is powered on, you shrink its virtual disks from the VMware
Tools control panel. You cannot shrink virtual disks if a snapshot exists. To remove the
snapshot if one exists, choose VM > Snapshot > Snapshot Manager > Delete. See
Unsupported and Disabled Partitions on page 218.
In a Linux or FreeBSD guest operating system, to prepare virtual disks for shrinking,
you should run VMware Tools as the root user. This way, you ensure the whole virtual
216
www.vmware.com
C H A P T E R 8 Using Disks
disk is shrunk. Otherwise, if you shrink disks as a nonroot user you cannot wipe the
parts of the virtual disk that require root-level permissions.
To shrink a virtual disk:
1. Launch the control panel.
• Windows guest — double-click the VMware Tools icon in the system tray, or
choose Start > Settings > Control Panel, then double-click VMware Tools.
• Linux or FreeBSD guest — become root (su -), then run vmwaretoolbox.
2. Click the Shrink tab.
3. Select the virtual disks you want to shrink, then click Prepare to Shrink.
A dialog box tracks the progress of the wiping process.
Note: If you deselect some partitions, the whole disk is still shrunk. However,
those partitions are not wiped for shrinking, and the shrink process does not
reduce the size of the virtual disk as much as it could with all partitions selected.
4. Click Yes when VMware Tools finishes wiping the selected disk partitions.
A dialog box tracks the progress of the shrinking process. Shrinking disks may
take considerable time.
217
VMware Workstation 5 User’s Manual
5. Click OK to finish.
Unsupported and Disabled Partitions
In some configurations, it is not possible to shrink virtual disks. If your virtual machine
uses such a configuration, the Shrink tab displays information explaining why you
cannot shrink your virtual disks.
For example, you cannot shrink a virtual disk if
• You preallocated disk space when you created the disk. Preallocating disk space
is the default option for both typical and custom virtual machine creation paths.
• The virtual machine has any snapshots. To delete a snapshot, choose VM >
Snapshot > Snapshot Manager > Delete.
• The virtual machine contains physical disks.
• The virtual disk is not an independent disk in persistent mode.
• The virtual disk is stored on a CD-ROM.
218
www.vmware.com
C H A P T E R 8 Using Disks
Adding Drives to a Virtual Machine
VMware Workstation virtual machines can use up to four IDE devices and up to seven
SCSI devices. Any of these devices can be a virtual hard disk or DVD or CD-ROM drive.
A virtual machine can read data from a DVD disc. VMware Workstation does not
support playing DVD movies in a virtual machine.
Many other SCSI devices can be connected to a virtual machine using the host
operating system’s generic SCSI driver. For details on connecting these devices, see
Connecting to a Generic SCSI Device on page 422.
This section discusses the following topics:
• Adding a New Virtual Disk to a Virtual Machine on page 219
• Removing a Virtual Disk from a Virtual Machine on page 222
• Adding Physical Disks to a Virtual Machine on page 223
• Adding DVD or CD Drives to a Virtual Machine on page 226
• Adding Floppy Drives to a Virtual Machine on page 228
• Connecting a CD-ROM or Floppy Drive to an Image File on page 229
Adding a New Virtual Disk to a Virtual Machine
Virtual disks are stored as files on the host computer or on a network file server. It does
not matter whether the physical disk that holds the files is IDE or SCSI. A virtual IDE
drive can be stored on an IDE drive or on a SCSI drive. So can a virtual SCSI drive.
Use the virtual machine settings editor (VM > Settings) to add a new virtual disk to
your virtual machine. To add an existing virtual disk to the virtual machine, see Adding
an Existing Virtual Disk to a Virtual Machine on page 221. The virtual machine must be
powered off before you begin. If it is not, shut down the guest operating system
normally, then click Power Off on the VMware Workstation toolbar.
Note: If you have a Windows NT 4.0 guest with a SCSI virtual disk, you cannot add
both an additional SCSI disk and an IDE disk to the configuration.
219
VMware Workstation 5 User’s Manual
1. Open the virtual machine settings editor (VM > Settings) and click Add. The Add
Hardware Wizard guides you through the steps to create your virtual disk.
2. Click Hard Disk, then click Next.
3. Select Create a new virtual disk, then click Next.
4. Choose whether you want the virtual disk to be an IDE disk or a SCSI disk.
5. Set the capacity for the new virtual disk.
If you wish, select Allocate all disk space now.
Allocating all the space at the time you create the virtual disk gives somewhat
better performance, but it requires as much disk space as the size you specify for
the virtual disk.
If you do not select this option, the virtual disk’s files start small and grow as
needed, but they can never grow larger than the size you set here.
You can set a size between 0.1GB and 950GB for a virtual disk.
You may also specify whether you want the virtual disk created as one large file
or split into a set of 2GB files. You should split your virtual disk if it is stored on a
file system that does not support files larger than 2GB.
6. Accept the default filename and location for the virtual disk file or change it, if
you want to use a different name or location. To find a different folder, click
Browse.
If you want to specify a device node for your virtual disk, click Advanced.
On the advanced settings screen, you can also specify a disk mode. This is useful
in certain special-purpose configurations in which you want to exclude disks
from snapshots. For more information on the snapshot feature, see Using
Snapshots on page 273.
220
www.vmware.com
C H A P T E R 8 Using Disks
Normal disks are included in snapshots. In most cases, this is the setting you
want — with Independent deselected.
Independent disks are not included in snapshots. If you select Independent, you
have the following options:
• Persistent — changes are immediately and permanently written to the disk.
• Nonpersistent — changes to the disk are discarded when you power off or
revert to a snapshot.
When you have set the filename and location you want to use and have made
any selections you want to make on the advanced settings screen, click Finish.
7. The wizard creates the new virtual disk. It appears to your guest operating
system as a new, blank hard disk. Use the guest operating system’s tools to
partition and format the new drive for use.
Adding an Existing Virtual Disk to a Virtual Machine
You can reconnect an existing virtual disk that has been removed from a virtual
machine (see Removing a Virtual Disk from a Virtual Machine on page 222). The virtual
machine must be powered off before you begin.
1. Open the virtual machine settings editor (VM > Settings) and click Add. The Add
Hardware Wizard guides you through the steps to create your virtual disk.
2. Click Hard Disk, then click Next.
3. Select Use an existing virtual disk, then click Next.
4. Enter the path and filename for the existing disk file, or click Browse to navigate
to the file.
5. Click OK.
221
VMware Workstation 5 User’s Manual
Removing a Virtual Disk from a Virtual Machine
Use the virtual machine settings editor to disconnect a virtual disk from a virtual
machine.
To remove a virtual disk from a virtual machine:
1. Select a virtual machine and choose VM > Settings.
Note: A virtual machine must be powered off before you can remove a virtual
disk. You cannot remove a virtual disk if the virtual machine is suspended.
2. Select the virtual disk you want to remove.
3. Click Remove.
The virtual disk is disconnected from virtual machine.
Note: The Remove command does not delete files from the host file system. You can
delete virtual disk files manually. You can also retain the virtual disk files and reconnect
the virtual disk to the virtual machine later. See Adding an Existing Virtual Disk to a
Virtual Machine on page 221.
222
www.vmware.com
C H A P T E R 8 Using Disks
Adding Physical Disks to a Virtual Machine
Use the virtual machine settings editor (VM > Settings) to add a new physical disk to
your virtual machine. The virtual machine should be powered off before you begin. If
it is not, shut down the guest operating system normally, then click Power Off on the
VMware Workstation toolbar.
Caution: Physical disks are an advanced feature and should be configured only by
expert users.
1. Open the virtual machine settings editor (VM > Settings) and click Add. The Add
Hardware Wizard guides you through the steps to create your virtual disk.
2. Click Hard Disk, then click Next.
3. Select Use a physical disk, then click Next.
A warning appears. Click OK.
4. Select the physical disk characteristics and click Next.
223
VMware Workstation 5 User’s Manual
• Choose the physical hard disk to use from the drop-down list. VMware
Workstation supports physical disks up to 2TB.
• Select whether you want to use the entire disk or use only individual partitions
on the disk. If you select Use entire disk, continue with step 6.
5. If you selected Use entire disk in step 4, this step does not appear.
If you selected Use individual partitions in step 4, now select which partitions
you want to use in the virtual machine.
Only the partitions you select in this step are visible to the virtual machine. All
other partitions are hidden from it.
Click Next.
224
www.vmware.com
C H A P T E R 8 Using Disks
6. Accept the default filename and location for the file that stores access
information for this physical disk — or change it, if you want to use a different
name or location. To find a different directory, click Browse.
Click Advanced if you want to specify the virtual machine SCSI or IDE device
node to which this disk is connected.
On the advanced settings screen, you can also specify a disk mode. This is useful
in certain special-purpose configurations in which you want to exclude disks
from a snapshot. For more information on the snapshot feature, see Using
Snapshots on page 273.
Normal disks are included in snapshots. In most cases, this is the setting you
want — with Independent deselected.
Independent disks are not included in snapshots. If you select Independent, you
have the following options:
• Persistent — changes are immediately and permanently written to the disk.
• Nonpersistent — changes to the disk are discarded when you power off or
revert to a snapshot.
When you have set the filename and location you want to use and have made
any selections you want to make on the advanced settings screen, click Finish.
7. The wizard configures the new physical disk. If the partitions used on the
physical disk are not formatted for your guest operating system, use the guest
operating system’s tools to format them.
Caution: After you create a physical disk using one or more partitions on a physical
disk, you should never modify the partition tables by running fdisk or a similar
utility in the guest operating system.
Note: If you use fdisk or a similar utility on the host operating system to modify
the partition table of the physical disk, you must recreate the virtual machine’s
physical disk.
225
VMware Workstation 5 User’s Manual
Adding DVD or CD Drives to a Virtual Machine
You can add one or more DVD or CD drives to your virtual machine. You can connect
the virtual machine’s drive to a physical drive on the host machine or to an ISO image
file.
You can configure the virtual DVD or CD drive as either IDE or SCSI, no matter what
kind of physical drive you connect it to. In other words, if your host computer has an
IDE CD drive, you can set up the virtual machine’s drive as either SCSI or IDE and
connect it to the host’s drive. The same is true if the host’s physical drive is a SCSI drive.
Adding a DVD or CD Drive
1. Open the virtual machine settings editor (VM > Settings) and click Add to start
the Add Hardware Wizard.
2. Click DVD/CD-ROM Drive, then click Next.
3. Select Use physical drive if you want to connect the virtual machine’s drive to a
physical drive on the host computer. Select Use ISO Image if you want to
connect the virtual machine’s drive to an ISO image file.
4. Do one of the following:
• If you selected Use physical drive, choose the drive you want to use from the
drop-down list or choose Auto detect.
If you do not want the CD drive connected when the virtual machine starts,
deselect Connect at power on.
Click Advanced if you want to specify the device node the drive should use in
the virtual machine.
On the advanced settings screen you may also select Legacy emulation. This
is necessary only if you have had problems using normal mode. The legacy
emulation mode does not support all the capabilities of normal mode. For
example, if you are using legacy emulation mode, you cannot record CDs, you
cannot read multisession CDs, you cannot extract digital audio from a CD and
you cannot read or write DVDs. For details, see Legacy Emulation for DVD and
CD Drives on page 227.
After you have made any desired changes in these settings, click Finish.
• If you selected Use ISO Image, enter the path and filename for the image file
or click Browse to navigate to the file.
If you do not want the CD drive connected when the virtual machine starts,
deselect Connect at power on.
226
www.vmware.com
C H A P T E R 8 Using Disks
Click Advanced if you want to specify the device node the drive should use in
the virtual machine.
After you have made any desired changes in these settings, click Finish.
5. The drive is set up initially so it appears to the guest operating system as an IDE
drive. If you want it to appear to the guest operating system as a SCSI drive, click
the drive’s entry in the virtual machine settings editor and make that change in
the settings panel on the right.
Legacy Emulation for DVD and CD Drives
The virtual machine settings editor (VM > Settings) provides a Legacy emulation
option for DVD and CD drives attached to the virtual machine.
On Windows hosts, this option is deselected by default.
On Linux hosts with IDE drives, the default setting for this option depends on whether
the ide-scsi module is loaded in your kernel. The ide-scsi module must be loaded —
or you must be using a physical SCSI drive — if you want to connect directly to the
DVD or CD drive.
If you encounter problems using your DVD or CD drive, try selecting Legacy
emulation.
Note that in legacy emulation mode, you can read from data discs in the DVD or CD
drive, but some other functions are not available.
When Legacy emulation is deselected, the guest operating system communicates
directly with the drive. This direct communication enables capabilities that are not
possible in legacy emulation mode, such as using CD and DVD writers to burn discs,
reading multisession CDs, performing digital audio extraction and viewing video.
However, in some cases, the DVD or CD drive and drivers may not work correctly
when the guest operating system is communicating directly with the drive. Selecting
Legacy emulation is a way to work around these problems.
If you run more than one virtual machine at a time, and if their CD drives are in legacy
emulation mode, you may prefer to start the virtual machines with their CD drives
disconnected. This ensures that you do not have multiple virtual machines connected
to the CD drive at the same time.
227
VMware Workstation 5 User’s Manual
Adding Floppy Drives to a Virtual Machine
You can add floppy drives to your virtual machine, to a total of two floppy drives. A
virtual floppy drive can connect to a physical floppy drive on the host computer, to an
existing floppy image file or to a blank floppy image file.
Adding a Floppy Drive
1. Open the virtual machine settings editor (VM > Settings) and click Add to start
the Add Hardware Wizard.
2. Click Floppy Drive, then click Next.
3. Select what you want to connect to — a physical floppy drive on the host
computer, an existing floppy image file or a new floppy image file. Click Next.
4. If you selected Use a physical floppy drive, choose the drive’s letter (on a
Windows host) or device name (on a Linux host) from the drop-down list, then
click Finish.
If you selected Use a floppy image, type the path and filename for the floppy
image file you want to use or click Browse to navigate to the file. Click Finish.
If you selected Create a blank floppy image, use the default path and filename
or type in a new one. To navigate to a location, click Browse. When the field
contains the path and filename you want to use for the new floppy image file,
click Finish.
Note: By default, only one floppy drive is enabled in the virtual machine’s BIOS. If you
are adding a second floppy drive to the virtual machine, click inside the virtual
machine window and press F2 as the virtual machine boots to enter the BIOS setup
utility. On the main screen, choose Legacy Diskette B: and use the plus (+) and minus
(-) keys on the numerical keypad to select the type of floppy drive you want to use.
Then press F10 to save your changes and close the BIOS setup utility.
228
www.vmware.com
C H A P T E R 8 Using Disks
Connecting a CD-ROM or Floppy Drive to an Image File
You can use the virtual machine settings editor to connect an existing virtual CD-ROM
or floppy drive to an image file.
You can connect a virtual CD-ROM drive to an ISO image file.
Connecting to an ISO Image File
1. Open the virtual machine settings editor (VM > Settings) and select the DVD/
CD-ROM drive you want to connect to the image file.
2. Select Use ISO Image and enter the path and filename for the image file or click
Browse to navigate to the file.
3. Click OK to save the configuration and close the virtual machine settings editor.
Connecting to a Floppy Image File
1. Open the virtual machine settings editor (VM > Settings) and select the floppy
drive you want to connect to an image file.
2. Type the path and filename for the floppy image file you want to use or click
Browse to navigate to the file.
If you want to create a new image file, click Create. Use the default filename and
folder or change them as you wish.
3. Click Finish.
229
VMware Workstation 5 User’s Manual
Using VMware Virtual Disk Manager
VMware Virtual Disk Manager is a utility in VMware Workstation that allows you to
create, manage and modify virtual disk files from the command line or within scripts.
One key feature is the ability to enlarge a virtual disk so its maximum capacity is larger
than it was when you created it. This way, if you find you need more disk space in a
given virtual machine, but you do not want to add another virtual disk or use ghosting
software to transfer the data on a virtual disk to a larger virtual disk, you can instead
change the maximum size of the virtual disk. This is something you cannot do with
physical hard drives.
Another feature allows you to change disk types. When you create a virtual machine,
you specify how disk space is allocated. You select one of the following:
• All space for the virtual disk is allocated in advance. This corresponds to what the
virtual disk manager calls the preallocated disk type.
• Space allocated for the virtual disk begins small and grows as needed. This
corresponds to what the virtual disk manager calls the growable disk type.
With virtual disk manager you can change whether the virtual disk type is
preallocated or growable and whether the virtual disk is stored in a single file or split
into 2GB files. For example, you may have allocated all the disk space for a virtual disk,
then find that you need to reclaim some hard disk space on the host. You can convert
the preallocated virtual disk into a growable disk, then remove the original virtual disk
file. The new virtual disk is large enough to contain all the data in the original virtual
disk. The virtual disk grows in size as you add data to it.
These features and the ability to use scripting to automate management of virtual
disks were added to VMware Workstation in version 5.0.
You can use the virtual disk manager for the following tasks:
• Automate the management of virtual disks with scripts.
• Create virtual disks that are not associated with a particular virtual machine, for
example to be used as templates.
• Switch the virtual disk type from preallocated to growable, or vice versa. When
you change the disk type to growable, you reclaim some disk space. You can
shrink the virtual disk to reclaim even more disk space.
230
www.vmware.com
C H A P T E R 8 Using Disks
• Expand the size of a virtual disk so it is larger than the size specified when you
created it.
• Defragment virtual disks.
• Prepare and shrink virtual disks without powering on the virtual machine
(Windows hosts only).
You can use the virtual disk manager with virtual disks created under VMware GSX
Server, VMware Workstation and VMware VirtualCenter (provided the virtual disk was
created on a GSX Server host managed by VirtualCenter).
Note: You cannot use the virtual disk manager to create physical disks. Physical disks
cannot be shrunk by the virtual disk manager or by Workstation.
For more information about using the virtual disk manager, read the following
sections:
• Running the VMware Virtual Disk Manager Utility on page 231
• Shrinking Virtual Disks with VMware Virtual Disk Manager on page 234
• Examples Using the VMware Virtual Disk Manager on page 235
Running the VMware Virtual Disk Manager Utility
To run the VMware Virtual Disk Manager utility, open a command prompt or terminal
on the host operating system. On a Windows host, change to the directory where you
installed your Workstation software. By default, this directory is
C:\Program Files\VMware\VMware Workstation.
The command syntax is:
vmware-vdiskmanager [options]
The options you can or must use include the following:
Options and Parameters
Description
<diskname>
The name of the virtual disk file. The virtual disk file must have a .vmdk
extension.
You can specify a path to the folder where you want to store the disk
files. If you mapped a network share on your host operating system, you
can create the virtual disk on that share by providing the correct path
information with the disk file name.
-c
Creates the virtual disk. You must use the -a, -s and -t options, and
you must specify the name of the virtual disk (<diskname>).
231
VMware Workstation 5 User’s Manual
Options and Parameters
Description
-r
<sourcediskname>
Converts the specified virtual disk, creating a new virtual disk as a result.
You must use the -t option to specify the disk type to which the virtual
disk is converted and you must specify the name of the target virtual
disk (<targetdiskname>).
Once the conversion is completed and you have tested the converted
virtual disk to make sure it works as expected, you can delete the
original virtual disk file.
In order for the virtual machine to recognize the converted virtual disk,
you should use the virtual machine settings editor to remove the
existing virtual disk from the virtual machine, then add the converted
disk to the virtual machine. For information on adding virtual disks to a
virtual machine, see Adding Drives to a Virtual Machine on page 219.
-x <n>[GB|MB]
<diskname>
Expands the virtual disk to the specified capacity. You must specify the
new, larger size of the virtual disk in gigabytes or megabytes. You
cannot change the size of a physical disk.
Caution: Before running the virtual disk manager utility, you should
back up your virtual disk files.
-d <diskname>
Defragments the specified virtual disk. You can defragment only
growable virtual disks. You cannot defragment preallocated virtual
disks.
-p <mountpoint>
Prepares a virtual disk for shrinking. If the virtual disk is partitioned into
volumes, each volume must be prepared separately. The volume (C: or
D:, for example) must be mounted by VMware DiskMount at
<mountpoint>. For information on mounting and unmounting
virtual disk volumes with DiskMount, see the VMware DiskMount user’s
manual, available from the VMware Web site at www.vmware.com/pdf/
VMwareDiskMount.pdf. The VMware DiskMount Utility is available as a
free download at www.vmware.com/download/diskmount.html.
After you prepare the volume, unmount it with VMware DiskMount.
Continue mounting each volume of the virtual disk and preparing it for
shrinking until you complete this process for all the volumes of the
virtual disk.
You can mount only one volume of a virtual disk at a time with VMware
DiskMount. You can prepare volumes of virtual disks for shrinking on
Windows hosts only.
232
www.vmware.com
C H A P T E R 8 Using Disks
Options and Parameters
Description
-k <diskname>
Shrinks the specified virtual disk. You can shrink only growable virtual
disks. You can shrink virtual disks on Windows hosts only.
You cannot shrink a virtual disk if the virtual machine has a snapshot. To
keep the virtual disk in its current state, use the snapshot manager to
delete all snapshots. To discard changes made since you took the
snapshot, revert to the snapshot.
-a [ide|buslogic|
lsilogic]
Specifies the disk adapter type. You must specify an adapter type when
creating a new virtual disk. Choose one of the following types:
• ide — for an IDE adapter.
• buslogic — for a BusLogic SCSI adapter.
• lsilogic — for an LSI Logic SCSI adapter.
-s <n>[GB|MB]
Specifies the size of the virtual disk. Specify whether the size <n> is in
GB (gigabytes) or MB (megabytes). You must specify the size of a virtual
disk when you create it.
Even though you must specify the size of a virtual disk when you
expand it, you do not use the -s option.
-t [0|1|2|3]
You must specify the type of virtual disk when you create a new one or
reconfigure an existing one. Specify one of the following disk types:
0 — to create a growable virtual disk contained in a single virtual disk
file
1 — to create a growable virtual disk split into 2GB files
2 — to create a preallocated virtual disk contained in a single virtual
disk file
3 — to create a preallocated virtual disk split into 2GB files
-q
Disables virtual disk manager logging.
If you keep logging enabled, messages generated by the virtual disk
manager are stored in a log file. The name and location of the log file
appear in the command prompt or terminal window after the virtual
disk manager command is run.
233
VMware Workstation 5 User’s Manual
Shrinking Virtual Disks with VMware Virtual Disk Manager
On a Windows host, you can use the virtual disk manager to prepare and shrink virtual
disks. You cannot use the virtual disk manager to prepare or shrink virtual disks located
on a Linux host. You cannot use the virtual disk manager to shrink physical disks.
Shrinking a virtual disk does not reduce the maximum capacity of the virtual disk itself.
For more information about shrinking, see Shrinking Virtual Disks on page 215.
Caution: You cannot shrink a virtual disk if the virtual machine has snapshots. To keep
the virtual disk in its current state, use the snapshot manager to delete all snapshots.
To discard changes made since you took a snapshot, revert to the snapshot.
You must prepare each volume of the virtual disk (drive C: or D:, for example) for
shrinking before you can shrink the disk. To prepare a volume for shrinking, you must
first mount it. To mount the volume, use the VMware DiskMount Utility, available as a
free download from the VMware Web site. Go to www.vmware.com/download/
diskmount.html.
The VMware DiskMount user’s manual is available from the VMware Web site at
www.vmware.com/pdf/VMwareDiskMount.pdf. It contains instructions on mounting
and unmounting virtual disk volumes with DiskMount.
VMware DiskMount mounts individual volumes of a virtual disk. For the best results
when you shrink a virtual disk, you should mount all the volumes and prepare them
for shrinking.
After you mount a virtual disk volume, use the virtual disk manager to prepare the
volume for shrinking. Once you prepare a volume, unmount it, then repeat the
process for each volume of the virtual disk. After you prepare all the volumes of the
virtual disk, you can shrink the virtual disk. For examples, see Preparing a Virtual Disk
for Shrinking on page 236 and Shrinking a Virtual Disk on page 236.
234
www.vmware.com
C H A P T E R 8 Using Disks
Examples Using the VMware Virtual Disk Manager
The following examples illustrate how to use the virtual disk manager. You run the
virtual disk manager from a command prompt.
Creating a Virtual Disk
To create a new virtual disk, use a command like the following:
vmware-vdiskmanager -c -t 0 -s 40GB -a ide myDisk.vmdk
This creates a 40GB IDE virtual disk named myDisk.vmdk. The virtual disk is
contained in a single .vmdk file. The disk space is not preallocated.
Converting a Virtual Disk
To convert a virtual disk from preallocated to growable, use a command like the
following:
vmware-vdiskmanager -r sourceDisk.vmdk -t 0 targetDisk.vmdk
This converts the disk from its original preallocated type to a growable virtual disk
consisting of a single virtual disk file. The virtual disk space is no longer preallocated,
and the virtual disk manager reclaims some disk space in the virtual disk so it is only as
large as the data contained within it.
Expand the Size of an Existing Virtual Disk
To expand the size of a virtual disk, use a command like the following:
vmware-vdiskmanager -x 40GB myDisk.vmdk
This increases the maximum capacity of the virtual disk to 40GB.
Renaming a Virtual Disk
To rename a virtual disk, first remove it from any virtual machine that contains the disk
(choose VM > Settings > <virtualdisk>, then click Remove).
Then use the following:
vmware-vdiskmanager -n myDisk.vmdk myNewDisk.vmdk
To rename the disk and locate it in a different directory, use:
vmware-vdiskmanager -n myDisk.vmdk ..\<new-path>\myNewDisk.vmdk
Note: The paths used in these examples assume a Windows host.
To locate the disk in a different directory but keep the same name, use:
vmware-vdiskmanager -n myDisk.vmdk ..\<new-path>\myDisk.vmdk
After you rename or relocate the virtual disk, add it back to any virtual machines that
use it. Choose VM > Settings, click Add, then follow the wizard to add this existing
virtual disk.
235
VMware Workstation 5 User’s Manual
Defragmenting a Virtual Disk
To defragment a virtual disk, use a command like the following:
vmware-vdiskmanager -d myDisk.vmdk
Remember, you cannot defragment a virtual disk if you allocated all the disk space
when you created the virtual disk. You cannot defragment a physical disk.
See Defragmentation of Disk Drives on page 432 for a discussion of the performance
impact of defragmenting drives.
Preparing a Virtual Disk for Shrinking
Before you can shrink a virtual disk, you must prepare each volume on the disk (C: or
D:, for example) for shrinking. To prepare a volume, it must be located on a Windows
host. First you must mount the volume. To mount the volume, use the VMware
DiskMount Utility, available as a free download from the VMware Web site. For
information about downloading and using VMware DiskMount, see the VMware
DiskMount user’s manual, available from the VMware Web site at www.vmware.com/
pdf/VMwareDiskMount.pdf. The VMware DiskMount Utility is available as a free
download at www.vmware.com/download/diskmount.html.
VMware DiskMount mounts individual volumes of a virtual disk. For the best results
when you shrink a virtual disk, you should mount all the volumes and shrink them.
After you mount a virtual disk volume, use the virtual disk manager to prepare the disk
for shrinking. To prepare the volume mounted as the M: drive for shrinking, use the
following command:
vmware-vdiskmanager -p M:
Once the preparations are complete, unmount the volume. Repeat this process for
each volume of the virtual disk. After you prepare all the volumes for shrinking, you
can shrink the virtual disk.
Shrinking a Virtual Disk
To shrink a virtual disk, it must be located on a Windows host. Before you can shrink
the virtual disk, make sure you prepare all the volumes of the virtual disk for shrinking.
Then use a command like the following:
vmware-vdiskmanager -k myDisk.vmdk
Remember, you cannot shrink a virtual disk if you allocated all the disk space when
you created the virtual disk. You cannot shrink a physical disk.
If the virtual disk has any snapshots, you cannot shrink the virtual disk. You must
delete all snapshots before you shrink the virtual disk.
236
www.vmware.com
C H A P T E R 8 Using Disks
Configuring a Dual-Boot Computer
for Use with a Virtual Machine
Many users install VMware Workstation on a dual-boot or multiple-boot computer so
they can run one or more of the existing operating systems in a virtual machine. If you
are doing this, you may want to use the existing installation of an operating system
rather than reinstall it in a virtual machine.
To support such installations, VMware Workstation makes it possible for you to use a
physical IDE disk or partition, also known as a physical disk, inside a virtual machine.
Note: VMware Workstation supports booting from physical disk partitions only on
IDE drives. Booting guest operating systems from physical SCSI drives is not
supported. For a discussion of the issues on a Linux host, see Configuring Dual- or
Multiple-Boot SCSI Systems to Run with VMware Workstation on a Linux Host on
page 257.
Setting up a physical disk configuration for a virtual machine is more complicated
than using a virtual disk. Virtual disks are recommended unless you have a specific
need to run directly from a physical disk or partition.
Caution: physical disks are an advanced feature and should be configured only by
expert users.
This section describes the following topics
• Using the Same Operating System in a Virtual Machine and on the Host
Computer on page 238
• Before You Begin on page 239
• Configuring Dual- or Multiple-Boot Systems to Run with Workstation on
page 241
• Setting Up Hardware Profiles in Virtual Machines on page 247
• Running a Windows 2000, Windows XP or Windows Server 2003 Virtual Machine
from an Existing Multiple-Boot Installation on page 252
• Setting Up the SVGA Video Driver for a Windows 95 Guest Operating System
Booted from a Physical Disk on page 252
• Setting Up the SVGA Video Driver for Use with a Windows 98 Guest Operating
System Booted from a Physical Disk on page 254
• Do Not Use Windows 2000, Windows XP and Windows Server 2003 Dynamic
Disks as Physical Disks on page 256
237
VMware Workstation 5 User’s Manual
• Configuring Dual- or Multiple-Boot SCSI Systems to Run with VMware
Workstation on a Linux Host on page 257
• Known Issues and Background Information on Using SCSI Physical Disks on
page 260
Using the Same Operating System in a Virtual Machine and on
the Host Computer
You may sometimes want to run an operating system inside a virtual machine and at
other times want to run that same installation of the operating system by booting the
host computer directly into that operating system. If you want to use this approach,
you must be aware of some special considerations
The issues arise because the virtual hardware that the operating system sees when it
is running in a virtual machine is different from the physical hardware it sees when it is
running directly on the host computer. It is as if you were removing the boot drive
from one physical computer and running the operating system installed there in a
second computer with a different motherboard, video card and other peripherals —
then moving it back and forth between the two systems.
The general approach for resolving these issues is to set up profiles for each of the two
operating environments — the virtual machine and the physical computer. You can
then choose the appropriate profile when you start the operating system. On some
hardware, however, booting a previously installed operating system within a virtual
machine may not work.
Technical notes in this section document the issues most commonly encountered
with various guest operating systems. Read the notes that apply to your guest
operating system before you begin to set up your virtual machine.
238
www.vmware.com
C H A P T E R 8 Using Disks
Before You Begin
Before you begin, be sure to read all the sections listed under the name of the
operating system you intend to run as a guest in a virtual machine.
Windows Server 2003
Caution: Running a Windows Server 2003 guest from a physical disk is not supported.
You should not test a Windows Server 2003 physical disk configuration in a
production environment.
• Configuring Dual- or Multiple-Boot Systems to Run with Workstation on
page 241
• Running a Windows 2000, Windows XP or Windows Server 2003 Virtual Machine
from an Existing Multiple-Boot Installation on page 252
• Do Not Use Windows 2000, Windows XP and Windows Server 2003 Dynamic
Disks as Physical Disks on page 256
Windows XP
Caution: Running a Windows XP guest from a physical disk is not supported. You
should not test a Windows XP physical disk configuration in a production
environment.
• Configuring Dual- or Multiple-Boot Systems to Run with Workstation on
page 241
• Running a Windows 2000, Windows XP or Windows Server 2003 Virtual Machine
from an Existing Multiple-Boot Installation on page 252
• Do Not Use Windows 2000, Windows XP and Windows Server 2003 Dynamic
Disks as Physical Disks on page 256
Windows 2000
• Configuring Dual- or Multiple-Boot Systems to Run with Workstation on
page 241
• Running a Windows 2000, Windows XP or Windows Server 2003 Virtual Machine
from an Existing Multiple-Boot Installation on page 252
• Do Not Use Windows 2000, Windows XP and Windows Server 2003 Dynamic
Disks as Physical Disks on page 256
Windows NT
• Configuring Dual- or Multiple-Boot Systems to Run with Workstation on
page 241
239
VMware Workstation 5 User’s Manual
Windows 98
• Configuring Dual- or Multiple-Boot Systems to Run with Workstation on
page 241
• Setting Up the SVGA Video Driver for Use with a Windows 98 Guest Operating
System Booted from a Physical Disk on page 254
Windows 95
• Configuring Dual- or Multiple-Boot Systems to Run with Workstation on
page 241
• Setting Up the SVGA Video Driver for a Windows 95 Guest Operating System
Booted from a Physical Disk on page 252
SCSI Systems Using a Linux Host
• Configuring Dual- or Multiple-Boot SCSI Systems to Run with VMware
Workstation on a Linux Host on page 257
Other Uses of Physical Disks
It is also possible to install a guest operating system on a physical disk when you plan
to use that disk only within a virtual machine. For details on setting up a such a
configuration, see Installing an Operating System on a Physical Partition from a Virtual
Machine on page 263.
240
www.vmware.com
C H A P T E R 8 Using Disks
Configuring Dual- or Multiple-Boot Systems to Run
with Workstation
VMware Workstation uses description files to control access to each physical IDE
device on the system. These description files contain access privilege information that
controls a virtual machine's access to certain partitions on the disks. This mechanism
prevents users from accidentally running the host operating system again as a guest
or running a guest operating system that the virtual machine was not configured to
use. The description file also prevents accidental corruption of physical disk partitions
by badly behaved operating systems or applications.
Use the New Virtual Machine Wizard to configure VMware Workstation to use existing
physical disk partitions. The wizard guides you though creating a configuration for a
new virtual machine including configuring the physical disk description files. Typically,
you rerun the wizard to create a separate configuration for each guest operating
system installed on a physical partition.
If a boot manager is installed on the computer system, the boot manager runs inside
the virtual machine and presents you with the choice of guest operating systems to
run. You must manually choose the guest operating system that this configuration
was intended to run.
This section continues with the following topics:
• Windows 2000, Windows XP and Windows Server 2003 Dynamic Disks on
page 241
• Using the LILO Boot Loader on page 242
• Configuring a Windows Host on page 242
• Configuring a Linux Host on page 244
Windows 2000, Windows XP and Windows Server 2003 Dynamic Disks
If your host is running Windows 2000, Windows XP or Windows Server 2003 and is
using dynamic disks, see Do Not Use Windows 2000, Windows XP and Windows
Server 2003 Dynamic Disks as Physical Disks on page 256.
241
VMware Workstation 5 User’s Manual
Using the LILO Boot Loader
If you are using the LILO boot loader and try to boot a virtual machine from an existing
physical partition, you may see L 01 01 01 01 01 01 … instead of a LILO:
prompt. This can happen regardless of the host operating system. As part of booting a
physical PC or a virtual machine, the BIOS passes control to code located in the master
boot record (MBR) of the boot device. LILO begins running from the MBR, and in order
to finish running correctly, it needs access to the native Linux partition where the rest
of LILO is located — usually the partition with the /boot directory. If LILO can't
access the rest of itself, an error message like the one above appears.
To avoid the problem, follow the configuration steps below and be sure to select the
native Linux partition where the rest of LILO is located. The next time the virtual
machine tries to boot, the LILO code in the MBR should be able to access the rest of
LILO and display the normal LILO: prompt.
Configuring a Windows Host
Use the following steps to run a guest operating system from a physical disk.
Note: If you use a Windows host’s IDE disk in a physical disk configuration, you must
not configure it as the slave on the secondary IDE channel if the master on that
channel is a CD-ROM drive.
1. If you are running a Windows guest operating system, read Setting Up Hardware
Profiles in Virtual Machines on page 247. You should boot the guest operating
system natively on the computer and create a hardware profile for the virtual
machine before proceeding.
2. Create a separate configuration for each guest operating system.
To configure a virtual machine to run from a physical disk or disk partition, start
the New Virtual Machine Wizard (File > New > Virtual Machine) and select
Custom.
242
www.vmware.com
C H A P T E R 8 Using Disks
3. When you reach the Select a Disk step, select Use a physical disk.
4. Complete the wizard steps, specifying the appropriate disk or partition to use for
this virtual machine.
Note: The maximum size of an IDE disk in a virtual machine is 950 GB.
5. To run multiple guest operating systems from different physical disk partitions,
unmap these partitions on the host.
On a Windows NT host, use the Disk Administrator (Start > Programs >
Administrative Tools). First highlight the partition that contains the guest
operating system, then select Assign Drive Letter from the Tools menu. In this
form, choose Do not assign a drive letter for the partition and click OK. The
unmapping happens immediately.
On a Windows Server 2003, Windows XP or Windows 2000 host, use Disk
Management (Start > Settings > Control Panel > Administrative Tools >
Computer Management > Storage > Disk Management). Select the partition
you want to unmap, then from the Action menu select All Tasks > Change
Drive Letter and Path. Click the Remove button.
6. Use the virtual machine settings editor (VM > Settings) if you want to change
any configuration options from the wizard defaults — for example, to change
the amount of memory allocated to the guest operating system.
7. If you have multiple IDE drives configured on a system, the VMware BIOS
normally attempts to boot them in this sequence:
a. Primary master
b. Primary slave
c. Secondary master
d. Secondary slave
If you have multiple SCSI drives configured on a system, the VMware BIOS
normally attempts to boot them in the order of the SCSI device number.
If you have both SCSI and IDE drives configured, the VMware BIOS normally
attempts to boot SCSI drives followed by IDE drives, in the order described
above.
The boot sequence can be changed in the Boot menu of the virtual machine's
Phoenix BIOS. After powering on the virtual machine, press F2 during the BIOS
boot in the virtual machine to enter the BIOS setup menu.
243
VMware Workstation 5 User’s Manual
8. Power on the virtual machine. Click the Power On button. The virtual machine
starts, runs the Phoenix BIOS, then boots from the master boot record (MBR).
Choose the target operating system from the list of options offered by the boot
manager.
9. Remember that your virtual machine hardware environment, which the guest
operating system is about to run in for the first time, probably differs significantly
from the physical hardware of your host computer.
For Windows guest operating systems, Plug and Play reconfigures Windows. Set
up your virtual hardware profile with the devices found and configured by Plug
and Play. See Setting Up Hardware Profiles in Virtual Machines on page 247 for
more information.
10. Install VMware Tools in your guest operating system.
Warning: If you take snapshots while using your physical disk, before you reboot your
guest operating system natively you must either:
• Revert to a snapshot and delete all other snapshots.
• Delete all snapshots.
This is necessary because any changes to sectors on the physical disk that have been
modified on the disk invalidate all snapshots for the disk.
Configuring a Linux Host
1. If you are running a Windows guest operating system, read Setting Up Hardware
Profiles in Virtual Machines on page 247. You should boot the guest operating
system natively on the computer and create a hardware profile for the virtual
machine before proceeding.
2. Create a separate configuration for each guest operating system.
3. Check operating system partition mounts. Be sure the existing disk partitions
that you plan to configure the virtual machine to use are not mounted by Linux.
244
www.vmware.com
C H A P T E R 8 Using Disks
4. Set the device group membership or device ownership.
The master physical disk device or devices need to be readable and writable by
the user who runs VMware Workstation. On most distributions, the physical
devices, such as /dev/hda (IDE physical disk) and /dev/sda (SCSI physical
disk) belong to group-id disk. If this is the case, you can add VMware
Workstation users to the disk group. Another option is to change the owner of
the device. Please think carefully about security issues when exploring different
options here.
Often, the most convenient approach is to grant VMware Workstation users
access to all /dev/hd[abcd] physical devices that contain operating systems
or boot managers and then rely on VMware Workstation’s physical disk
configuration files to guard access. This provides boot managers access to
configuration files and other files they may need to boot the operating systems.
For example, LILO needs to read /boot on a Linux partition to boot a non-Linux
operating system that may be on another drive. As noted above, you should
consider the security implications of the configuration you choose.
5. If you plan to run a second Linux installation from an existing partition as a guest
operating system and your physical computer’s /etc/lilo.conf has a
memory register statement such as Append= "mem…", you may want to
adjust the append memory parameter or create a new entry in LILO for running
Linux in a virtual machine.
If the amount of memory configured in lilo.conf exceeds the amount of
memory assigned to the virtual machine, then when the virtual machine tries to
boot the second Linux installation, the guest operating system will most likely
panic.
You can create another entry in lilo.conf for running Linux in a virtual
machine by specifying a different amount of memory than what would normally
be recognized when Linux boots directly on the physical machine.
6. To configure a virtual machine to run from a physical disk partition, start the New
Virtual Machine Wizard (File > New > Virtual Machine) and select Custom.
7. When you reach the Select a Disk step, select Use a physical disk.
245
VMware Workstation 5 User’s Manual
8. Complete the wizard steps, specifying the appropriate disk or partition to use for
this virtual machine.
Caution: Corruption is possible if you allow the virtual machine to modify a
partition that is simultaneously mounted under Linux. Since the virtual machine
and guest operating system access an existing partition while the host
continues to run Linux, it is critical that the virtual machine not be allowed to
modify any partition mounted under Linux or in use by another virtual machine.
To safeguard against this problem, be sure the partition you use in the virtual
machine is not mounted under the Linux host.
9. Complete the remaining steps in the wizard.
10. If you have multiple IDE drives configured on a system, the VMware BIOS
normally attempts to boot them in this sequence:
a. Primary master
b. Primary slave
c. Secondary master
d. Secondary slave
If you have multiple SCSI drives configured on a system, the VMware BIOS
normally attempts to boot them in the order of the SCSI device number.
If you have both SCSI and IDE drives configured, the VMware BIOS normally
attempts to boot SCSI drives followed by IDE drives, in the order described
above.
You can change the boot sequence using the Boot menu of the virtual
machine’s Phoenix BIOS. To enter the BIOS setup utility, power on the virtual
machine and press F2 as the virtual machine begins to boot.
11. Power on the virtual machine. Click the Power On button. The virtual machine
starts, runs the Phoenix BIOS, then boots from the master boot record (MBR).
Choose the target operating system from the list of options offered by the boot
manager.
246
www.vmware.com
C H A P T E R 8 Using Disks
12. Remember that your virtual machine hardware environment, which the guest
operating system is about to run in for the first time, probably differs significantly
from the physical hardware of your machine.
For Windows guest operating systems, Plug and Play reconfigures Windows. Set
up your virtual hardware profile with the devices found and configured by Plug
and Play. See Setting Up Hardware Profiles in Virtual Machines on page 247 for
more information.
13. Install VMware Tools in your guest operating system.
Warning: If you take snapshots while using your physical disk, before you reboot your
guest operating system natively you must either:
• Revert to a snapshot and delete all other snapshots.
• Delete all snapshots.
This is necessary because any changes to sectors on the physical disk that have been
modified on the disk invalidate all snapshots for the disk.
Setting Up Hardware Profiles in Virtual Machines
Certain operating systems use hardware profiles to load the appropriate drivers for a
given set of hardware devices. If you have a dual-boot system and want to use a
virtual machine to boot a previously installed operating system from an existing
partition, you must set up “physical” and “virtual” hardware profiles.
Only users who are familiar with VMware Workstation virtual machines and the
Windows hardware profiles concept should attempt this.
If you haven't already done so, review Configuring Dual- or Multiple-Boot Systems to
Run with Workstation on page 241 before proceeding.
247
VMware Workstation 5 User’s Manual
Each virtual machine provides a platform that consists of the following set of virtual
devices:
• Virtual DVD/CD-ROM
• Virtual IDE and SCSI hard disk drives
• Standard PCI graphics adapter
• Standard floppy disk drive
• Intel 82371 PCI Bus Master IDE controller
(includes primary and secondary IDE controllers)
• BusLogic BT-958 compatible SCSI host adapter
• Standard 101/102-key keyboard
• PS/2-compatible mouse
• AMD PCnet-PCI II compatible Ethernet adapter
• For 64-bit guests: Intel Pro/1000 MT Server Adapter compatible
• Serial ports (COM1 – COM4)
• Parallel ports (LPT1 – LPT3)
• Two-port USB hub
• Sound card compatible with the Sound Blaster AudioPCI
• 82093AA IOAPIC
• Processor: same processor as that on host computer
• One virtual processor on a host with one or more logical processors
• Two virtual processors (two-way virtual symmetric multiprocessing, or Virtual
SMP) on a host with at least two logical processors. See Using Two-Way Virtual
Symmetric Multiprocessing (Experimental) on page 429.
This set of virtual devices is different from the set of physical hardware devices on the
host computer and is independent of the underlying hardware with a few exceptions
(the processor itself is such an exception). This feature provides a stable platform and
allows operating system images installed within a virtual machine to be migrated to
other physical machines, regardless of the configuration of the physical machine.
If an operating system is installed directly into a VMware Workstation virtual machine,
the operating system properly detects all the virtual devices by scanning the
hardware. However, if an operating system is already installed on the physical
computer (for example, in a dual-boot configuration), the operating system already is
configured to use the physical hardware devices. In order to boot such a preinstalled
248
www.vmware.com
C H A P T E R 8 Using Disks
operating system in a virtual machine, you need to create separate hardware profiles
in order to simplify the boot process.
Microsoft Windows operating systems, beginning with Windows 95 and Windows NT
4.0, allow you to create hardware profiles. Each hardware profile is associated with a
set of known devices. If more than one hardware profile exists, the system prompts
the user to choose between different hardware profiles at boot time.
Windows 95, Windows 98, Windows Me, Windows 2000, Windows XP and Windows
Server 2003 use Plug and Play at boot time to confirm that the actual devices match
the chosen hardware profile. Mismatches lead to the automatic detection of new
devices. Although this operation succeeds, it can be fairly slow.
Windows NT does not have Plug and Play support and uses the hardware profiles to
initialize its devices. Mismatches lead to errors reported by the device drivers and the
devices are disabled.
In order to set up hardware profiles for your physical and virtual machines, follow
these steps:
1. Before running VMware Workstation to boot an operating system previously
installed on a disk partition, boot the operating system natively and create two
hardware profiles, which you can call Physical Machine and Virtual Machine. To
do this, open Control Panel > System, then click the Hardware Profiles tab — or
click the Hardware tab, then click Hardware Profiles, depending on the
operating system. Click the Copy button and name the copies appropriately.
2. Windows NT only: While still running the operating system natively, use the
Device Manager to disable some devices from the Virtual Machine hardware
profile. To do this, open Control Panel > Devices, then select the individual
devices to disable. Devices to disable in the Virtual Machine hardware profile
include audio, MIDI and joystick devices, Ethernet and other network devices
and USB devices. Remember to disable them in the Virtual Machine hardware
profile only.
Skip this step if you are running Windows 95, Windows 98, Windows Me,
Windows 2000, Windows XP or Windows Server 2003. The initial Plug and Play
phase detects device mismatches.
3. Reboot the computer into your intended host operating system — for example,
into Linux if you are running VMware Workstation on a Linux host.
4. Use the New Virtual Machine Wizard to configure your virtual machine as
described in Configuring Dual- or Multiple-Boot Systems to Run with
Workstation on page 241.
249
VMware Workstation 5 User’s Manual
5. Boot the virtual machine and use your existing boot manager to select the guest
operating system. Choose Virtual Machine at the hardware profile menu prompt.
You encounter device failure messages and delays during this initial boot.
6. Windows Server 2003, Windows XP and Windows 2000 guests: After you log
on to Windows Server 2003, Windows XP or Windows 2000 (now running as a
guest operating system) you should see a Found New Hardware dialog box for
the video controller as Plug and Play runs and discovers the virtual hardware. Do
not install drivers at this time. Click Cancel to close the Found New Hardware
dialog box.
Do not reboot the virtual machine. Click No in the System Settings Change/
Reboot dialog box.
Windows Server 2003, Windows XP or Windows 2000 automatically detects and
loads the driver for the AMD PCnet PCI Ethernet card. At this point, you should
install VMware Tools inside the virtual machine. Allow the virtual machine to
reboot after VMware Tools has been installed. Once Windows Server 2003,
Windows XP or Windows 2000 reboots inside the virtual machine, select a new
SVGA resolution from the Settings tab of the Display Properties dialog box to
increase the size of the virtual machine’s display window.
Windows 95 and Windows 98 guests: You should see New Hardware
Detected dialog boxes as Plug and Play runs and discovers the virtual hardware.
Windows prompts you for locations to search for device drivers. Most of the
device drivers are available in the existing operating system installation, but you
may need the installation CD-ROM for some networking device drivers.
Windows also asks you to reboot your system several times as it installs the
device drivers.
In some instances, Windows may not recognize the CD-ROM drive when it
prompts you to insert the CD-ROM to look for device drivers during the initial
hardware detection. In such cases, you can cancel the installation of the
particular device or try pointing to C:\windows\system\ to search for
device drivers on the hard disk. Any failed device installations may be performed
at a later time after the CD-ROM drive is recognized.
After Windows has installed the virtual hardware and its drivers, you can remove
the failed devices corresponding to the physical hardware using the Device
Manager (Control Panel > System > Device Manager).
Select the device, then click the Remove button. If a device appears in multiple
hardware profiles, you can select the hardware profile or profiles from which to
remove the device.
250
www.vmware.com
C H A P T E R 8 Using Disks
If you want to enable the virtual machine’s sound adapter to work inside the
Windows 9x guest operating system, finish the remaining steps in this section,
then refer to Configuring Sound on page 389.
Windows NT guests only: After the operating system has finished booting in
the virtual machine, view the event log to see which physical devices have failed
to start properly. You can disable them from the Virtual Hardware profile using
the Device Manager (Control Panel > Devices).
If you want to enable the virtual machine’s sound adapter to work inside the
Windows NT guest operating system, finish the remaining steps in this section,
then refer to Configuring Sound on page 389.
7. Confirm that your virtual devices — specifically, the network adapter — are
working properly.
Windows 95 and Windows 98 guests: If any virtual device is missing, you can
detect it by running Control Panel > Add New Hardware.
8. Install VMware Tools. VMware Tools appears and runs in both hardware
configurations but affects only the virtual machine.
Note: The next time you reboot Windows natively using the Physical Machine
hardware profile, some virtual devices may appear in the device list. You can
disable or remove these virtual devices from the Physical Machine hardware
profile in the same way that you removed physical devices from the virtual
machine hardware profile in step 6, above.
251
VMware Workstation 5 User’s Manual
Running a Windows 2000, Windows XP or Windows Server
2003 Virtual Machine from an Existing Multiple-Boot
Installation
If you have installed Windows 2000, Windows XP or Windows Server 2003 on a
computer, then try to run that same installation of the operating system as a VMware
Workstation virtual machine running from a physical disk, the virtual machine may fail
with an error message reporting an inaccessible boot device.
The problem occurs because the physical computer and the virtual machine require
different IDE drivers. The Windows plug and play feature, which handles drivers for
many hardware devices, does not install new IDE drivers.
If you encounter this problem, VMware recommends that you install your Windows
2000, Windows XP or Windows Server 2003 guest operating system in a virtual disk,
rather than running it from a physical disk.
If you encounter this problem but it is important for you to run the virtual machine
from the existing physical disk configuration, you can set up separate hardware
profiles (described in Setting Up Hardware Profiles in Virtual Machines on page 247)
and manually update the IDE driver in the profile for the virtual machine. For a
detailed description of the workaround, see the VMware knowledge base
(www.vmware.com/info?id=41).
Setting Up the SVGA Video Driver for a Windows 95 Guest
Operating System Booted from a Physical Disk
This section explains how to configure the video driver in a Windows 95 physical disk
installation using VMware Workstation. The steps below assume you are using
Windows 95 as one of the operating systems in a dual-boot or multiple-boot
configuration. Following these steps, you create separate hardware profiles for your
virtual machine and your physical machine. For more details on hardware profiles, see
Setting Up Hardware Profiles in Virtual Machines on page 247.
1. Boot Windows 95 natively (not in a virtual machine).
2. Right-click the My Computer icon on the desktop, then select Properties.
3. Click the Hardware Profiles tab.
4. Highlight the Original Configuration profile, then click Copy.
5. Name the profile Virtual Machine, then click OK.
You may also want to rename the Original Configuration profile to Physical
Machine.
252
www.vmware.com
C H A P T E R 8 Using Disks
6. Click OK to close the System Properties dialog box.
7. Shut down Windows 95 and reboot the system.
8. Boot into your host operating system (Linux, Windows NT, Windows 2000,
Windows XP or Windows Server 2003).
9. Start the Windows 95 virtual machine.
10. Select Virtual Machine from the list of profiles when prompted.
11. If you are prompted to select the CPU Bridge, accept the default, then click OK.
12. Restart Windows 95 when prompted.
13. Again, select Virtual Machine from the list of profiles when prompted.
14. When the video card is detected, you are prompted to select which driver you
want to install for your new hardware. Click the Select from a list of alternate
drivers radio button, then click OK.
15. Select Display Adapters from the Select Hardware Type dialog box.
16. Select Standard Display Adapter (VGA) from the device list, then click OK.
17. Restart Windows 95 when prompted.
18. Install VMware Tools as outlined in Installing a Guest Operating System and
VMware Tools on page 137, then restart the virtual machine.
19. Start the Device Manager and expand the Display adapters tree.
20. Highlight VMware SVGA. Click Properties.
21. Uncheck Physical Machine, then click OK. Click Close.
22. Shut down Windows 95 and power off the virtual machine.
23. Shut down your host operating system (Linux, Windows NT, Windows 2000,
Windows XP or Windows Server 2003) and reboot into Windows 95.
24. Select the Physical Machine profile when prompted.
25. Repeat steps 19 through 21 and uncheck Virtual Machine, leaving Physical
Machine checked.
253
VMware Workstation 5 User’s Manual
Setting Up the SVGA Video Driver for Use with a Windows 98
Guest Operating System Booted from a Physical Disk
This section explains how to configure the video driver in a Windows 98 physical disk
installation using VMware Workstation. The steps below assume you are using
Windows 98 as one of the operating systems in a dual-boot or multiple-boot
configuration. Following these steps, you create separate hardware profiles for your
virtual machine and your physical machine. For more details on hardware profiles, see
Setting Up Hardware Profiles in Virtual Machines on page 247.
1. Boot Windows 98 natively (not in a virtual machine).
2. Right-click the My Computer icon on the desktop, then select Properties.
3. Click the Hardware Profiles tab.
4. Highlight the Original Configuration profile, then click Copy.
5. Name the profile Virtual Machine, then click OK.
You may also want to rename the Original Configuration profile to Physical
Machine.
6. Click OK to close the System Properties dialog box.
7. Shut down Windows 98 and reboot the system.
8. Boot into your host operating system (Linux, Windows NT, Windows 2000,
Windows XP or Windows Server 2003).
9. Select Virtual Machine from the list of profiles when prompted.
10. Windows 98 auto-detects the virtual machine’s devices and installs the device
drivers.
11. When Windows detects the video card driver, select Search for the best driver.
12. When prompted to reboot, click No. The AMD PCNET driver is installed, followed
by the IDE controller drivers.
13. When prompted to reboot, click Yes.
14. Select the Virtual Machine hardware profile.
15. After Windows 98 has completed booting, start the Add New Hardware wizard
from the Control Panel.
16. Click Next, then Next again.
17. Select No, the device isn't in the list.
18. Click Yes, then click Next.
254
www.vmware.com
C H A P T E R 8 Using Disks
19. After all devices have been detected, click the Details button to list the detected
non-Plug and Play devices.
20. Click Finish, then reboot the virtual machine when prompted.
21. Select the VMware Workstation configuration profile. Notice that an unknown
monitor is detected and installed.
22. Install VMware Tools as outlined in Installing a Guest Operating System and
VMware Tools on page 137.
23. Open the Device Manager. It should show that you have
• Standard PCI Graphics Adapter
• VMware SVGA Display Adapter
24. Shut down the Windows 98 virtual machine and your host operating system.
25. Boot natively into Windows 98, then start the Device Manager.
26. Select the VMware SVGA device if listed, then click Remove.
27. Select the Remove from Specific Configuration radio button, then select
Physical Machine from the configuration list.
28. Click OK, then reboot Windows 98 when prompted.
29. Boot into Windows 98 natively and verify the display settings. You should be able
to use the display driver that you installed natively before starting this procedure.
255
VMware Workstation 5 User’s Manual
Do Not Use Windows 2000, Windows XP and Windows Server
2003 Dynamic Disks as Physical Disks
Windows 2000, Windows XP and Windows Server 2003 support a disk type called a
dynamic disk. Dynamic disks use a proprietary Microsoft format for recording partition
information. This format is not publicly documented and thus is not supported for use
in physical disk configurations under VMware Workstation.
Windows 2000, Windows XP and Windows Server 2003 also support the older type of
partition table. Disks that use this type of partition table are called basic disks.
You can use the disk management tool to check the type of disk used on your
Windows 2000, Windows XP or Windows Server 2003 host and, if it is a dynamic disk,
change it to basic.
Caution: If you change a dynamic disk to a basic disk, you lose all data on the disk.
Use this procedure to convert a dynamic disk to a basic disk.
1. Open the disk management tool.
Start > Settings > Control Panel > Administrative Tools > Computer
Management > Disk Management
2. Delete all logical volumes on the disk. This destroys all data on the disk.
3. Right-click the disk icon and select Revert to Basic Disk.
4. Create the partitions you want on the disk.
256
www.vmware.com
C H A P T E R 8 Using Disks
Configuring Dual- or Multiple-Boot SCSI Systems to Run
with VMware Workstation on a Linux Host
It may be possible to configure VMware Workstation so that you can use an operating
system already installed and configured on a SCSI disk as a guest operating system
inside a VMware Workstation virtual machine.
Using an existing SCSI disk — or SCSI physical disk — inside a virtual machine is
supported only if the host has an LSI Logic or BusLogic SCSI adapter. LSI Logic is the
preferred choice because it is easier to find drivers for LSI Logic adapters. It may be
possible to configure a host with a different SCSI adapter so the same operating
system can be booted both natively and inside a virtual machine, but this approach is
not supported by VMware. For details on some of the key issues involved, see Known
Issues and Background Information on Using SCSI Physical Disks on page 260.
Before You Create the Virtual Machine Configuration
You must create a separate configuration for each guest operating system. Allow read
and write access to the partitions used by that operating system only.
1. Before starting, if you are running a Windows guest operating system you should
read Setting Up Hardware Profiles in Virtual Machines on page 247. You should
boot the guest operating system natively on the computer and create a
hardware profile for the virtual machine before proceeding.
2. Check to see what SCSI ID is set for the drive you plan to use in the virtual
machine.
3. Make certain that in addition to any SCSI drivers you have configured for the
host, you have also installed the driver for the LSI Logic or BusLogic virtual
adapter you plan to use in the virtual machine.
Drivers for LSI Logic controllers are available from the LSI Logic Web site —
www.lsilogic.com. In the download area of the site, find a driver for any of the
adapters in the LSI53C10xx Ultra320 SCSI I/O controller series — for example, the
LSI53C1000.
Note: Drivers for a Mylex (BusLogic) compatible host bus adapter are not
obvious on the LSI Logic Web site. Search the support area for the numeric string
in the model number. For example, search for “958” for BT/KT-958 drivers.
The LSI Logic or BusLogic driver needs to be installed in the profile for the guest
operating system.
257
VMware Workstation 5 User’s Manual
Note: To use the virtual BusLogic SCSI adapter in a Windows XP or Windows
Server 2003 virtual machine, you need a special SCSI driver available from the
download section of the VMware Web site www.vmware.com/download.
4. Check operating system partition mounts. Be sure the existing physical disk
partitions that you plan to configure the virtual machine to use are not mounted
by the Linux host.
Caution: A physical disk partition should not be used (mounted) simultaneously
by the host and the guest operating system. Because each operating system is
unaware of the other, data corruption may occur if both operating systems read
or write to the same partition. It is critical that the virtual machine not be allowed
to modify any partition mounted under the Linux host or in use by another
virtual machine. To safeguard against this problem, be sure the partition you use
for the virtual machine is not mounted under the Linux host.
5. Set the device group membership or device ownership. The master physical disk
devices must be readable and writable by the user who runs VMware
Workstation. On most distributions, the physical devices (such as /dev/hda
and
/dev/hdb) belong to group-id disk. If this is the case, you can add VMware
Workstation users to the disk group. Another option is to change the owner of
the device. Please think carefully about security issues when you explore
different options here.
It is typically a good idea to grant VMware Workstation users access to all
/dev/hd[abcd] physical devices that contain operating systems or boot
managers and then rely on VMware Workstation’s physical disk configuration
files to guard access. This provides boot managers access to configuration and
other files they may need to boot the operating systems. For example, LILO
needs to read /boot on a Linux partition to boot a non-Linux operating system
that may be on another drive.
6. If you plan to run a second Linux installation from an existing partition as a guest
operating system, and your physical machine’s /etc/lilo.conf has a
memory register statement such as Append= "mem…", you may want to
adjust the append memory parameter or create a new entry in LILO for running
Linux in a virtual machine.
258
www.vmware.com
C H A P T E R 8 Using Disks
Many newer Linux distributions recognize all physical memory in the physical
machine, whereas many older Linux distributions see only the first 64MB of
memory by default. Machines with more than 64MB of memory that run the
older distributions may have the Append= "mem=…" parameter added under
the Image=… section of lilo.conf to tell Linux to look for more memory
than seen by default.
If the amount of memory configured in lilo.conf exceeds the amount of
memory assigned to the virtual machine, the guest operating system is likely to
panic when the virtual machine tries to boot the second Linux installation.
You can create another entry in lilo.conf for running Linux in a virtual
machine by specifying a different amount of memory than what should
normally be recognized when Linux boots directly on the physical machine.
Setting Up the Virtual Machine Configuration
1. Start VMware Workstation.
2. Start the New Virtual Machine Wizard (File > New > Virtual Machine) and select
Custom.
3. When you reach the Select I/O Adapter Types step, select the SCSI adapter type
that matches the driver you installed in the virtual machine profile.
4. When you reach the Select a Disk step, select Use a physical disk.
5. In the Device list, select the physical drive.
Under Usage, select whether to use the entire disk or individual partitions.
If you selected Use entire disk, click Next then go to step 6.
If you selected Use individual partitions, the Select Physical Disk Partitions panel
appears.
Select the partitions you want the virtual machine to use, then click Next.
6. In the entry field, enter a name of your choice for the physical disk.
Caution: If you browse to place the disk file in another directory, do not select
an existing virtual disk file.
To specify a device ID for the physical disk, click Advanced. In the Virtual device
node list, select the SCSI ID that corresponds to the one used by your SCSI drive.
For example, if your SCSI drive has SCSI ID 2, select SCSI 0:2. If you do not know
the SCSI ID set on your physical SCSI drive, try using SCSI 0:0.
259
VMware Workstation 5 User’s Manual
On the advanced settings screen, you can also specify a disk mode. This is useful
in certain special-purpose configurations in which you want to exclude disks
from snapshots. For more information on the snapshot feature, see Using
Snapshots on page 273.
Normal disks are included in snapshots. In most cases, this is the setting you
want.
Independent disks are not included in snapshots. You have the following options
for an independent disk:
• Persistent — changes are immediately and permanently written to the disk.
• Nonpersistent — changes to the disk are discarded when you power off or
revert to a snapshot.
When you have set the filename and location you want to use and have made
any selections you want to make on the advanced settings screen, click Finish.
7. Begin using your virtual machine.
Known Issues and Background Information on Using SCSI
Physical Disks
Size
VMware Workstation supports physical disk sizes up to 2.0TB. Reported size is not
accurate with larger physical disks.
Geometry
In some cases, it is not possible to boot a physical SCSI drive inside a virtual machine
because the SCSI adapter in the physical computer and the BusLogic adapter in the
virtual machine describe the drive in different ways. The virtual machine might hang
during the boot, VMware Workstation might crash or VMware Workstation might fail
with an ASSERT or other error message.
This problem is most likely to affect smaller drives — less than 2GB.
In order to share the same BIOS interface used by IDE disks (which is required in order
to boot), all SCSI disks need to have a geometry, which is a fabricated value for the
number of cylinders, sectors and heads on the disk.
In fact, a SCSI disk appears to a computer as a single flat entity from sector 1 up to the
highest sector on the disk. As a result, every SCSI vendor has its own approach to
taking the capacity of a SCSI disk and generating a geometry to use for booting.
260
www.vmware.com
C H A P T E R 8 Using Disks
The conversion from a given geometry to an absolute sector number depends on the
geometry. If you have a disk with a boot sector written by a program running on the
host and you try to boot that disk inside a virtual machine, the boot program can fail if
the host geometry does not match the geometry used by the BusLogic virtual SCSI
adapter. The symptoms are that you see the first part of the boot loader — possibly an
LI from LILO, for example — but then the boot either stops or crashes.
BusLogic uses the following rules for generating disk geometries:
Disk size
Heads
Sectors
<= 1GB
64
32
> 1GB and <= 2GB
128
32
> 2GB
255
63
In each case the number of cylinders is calculated by taking the total capacity of the
disk and dividing by (heads*sectors). Fortunately, for sufficiently big disks, practically
all vendors use 255 heads and 63 sectors.
Drivers
In contrast to IDE adapters, SCSI adapters are not interchangeable and cannot all use
the same drivers. That is, if you have an Adaptec SCSI host adapter in your machine
and you remove it and replace it with a BusLogic SCSI host adapter, your operating
system will most likely fail to boot unless you install a BusLogic driver.
Dual booting from a disk that is also used as a virtual disk is no different. To your
operating system, it appears that the SCSI card in the machine suddenly changed
from whatever you own to an LSI Logic or BusLogic card, and your operating system
needs to have a corresponding driver installed. If that driver is not installed, you get a
panic, a blue screen or some similar fatal error as soon as the boot process tries to
switch from the BIOS bootstrap to the disk driver installed in the operating system.
Operating System Configuration
Many operating systems have configuration information that is different for SCSI and
IDE drives. For example, Linux uses /dev/hd[x] as the device name for IDE disks
and /dev/sd[x] for SCSI disks. References to these names appear in
/etc/fstab and other configuration files.
This is one reason that booting a physical IDE disk as a SCSI disk or vice versa does not
work well (if at all).
261
VMware Workstation 5 User’s Manual
However, even when you are dealing only with SCSI devices, it is possible for an
operating system to encode information in a way that causes problems when you are
dual booting. For example, Solaris names its SCSI disks /dev/c[x]t[y]d[z]s0,
where the y represents the SCSI ID. So if you had a physical disk configured as SCSI ID
3 on the host and as SCSI ID 0 in your VMware Workstation configuration file, it would
move if you were running Solaris, and most likely Solaris would not boot.
The precise dependencies in various operating systems can be complex. That is why it
is safest to configure SCSI physical disks in a virtual machine using the same SCSI ID as
they use on the host.
262
www.vmware.com
C H A P T E R 8 Using Disks
Installing an Operating System on a
Physical Partition from a Virtual Machine
In some situations, you may want to install a guest operating system directly on a
physical disk or partition even if you do not need to boot that disk on the host, outside
of the virtual machine.
It is possible to use either an unused partition or a completely unused disk on the host
as a disk in the virtual machine. However, it is important to be aware that an operating
system installed in this setting probably cannot boot outside of the virtual machine,
even though the data is available to the host.
If you have a dual-boot system and want to configure a virtual machine to boot from
an existing partition, see Configuring a Dual-Boot Computer for Use with a Virtual
Machine on page 237. The instructions in this section do not apply to a disk with a
previously installed operating system.
Caution: Physical disks are an advanced feature and should be configured only by
expert users.
VMware Workstation uses description files to control access to each physical disk on
the system. These description files contain access privilege information that controls a
virtual machine’s access to certain partitions on the disks. This mechanism prevents
users from accidentally running the host operating system again as a guest or running
a guest operating system that the virtual machine is not configured to use. The
description file also prevents accidental writes to physical disk partitions from badly
behaved operating systems or applications.
Use the New Virtual Machine Wizard to configure VMware Workstation to use existing
physical disk partitions. The wizard guides you though creating a new virtual machine
including configuring the physical disk description files. Rerun the wizard to create a
separate configuration for each guest operating system installed on a physical
partition.
• Configuring a Windows Host on page 264
• Configuring a Linux Host on page 266
263
VMware Workstation 5 User’s Manual
Configuring a Windows Host
Windows 2000, Windows XP and Windows Server 2003 Dynamic Disks
If your host is running Windows 2000, Windows XP or Windows Server 2003 and is
using dynamic disks, see Do Not Use Windows 2000, Windows XP and Windows
Server 2003 Dynamic Disks as Physical Disks on page 256.
Configuring the Virtual Machine to Use a Physical Disk
Use the following steps to run a guest operating system from a physical disk.
Note: If you use a Windows host’s IDE disk in a physical disk configuration, it cannot
be configured as the slave on the secondary IDE channel if the master on that channel
is a CD-ROM drive.
1. Identify the physical partition on which you plan to install the guest operating
system.
Check the guest operating system documentation regarding the type of
partition on which the operating system can be installed. For example, operating
systems like DOS, Windows 95 and Windows 98 must be installed on the first
primary partition while others, like Linux, can be installed on a primary or
extended partition on any part of the drive.
Identify an appropriate physical partition or disk for the guest operating system
to use. Be sure that the physical partition is not mounted by the Windows host
and not in use by others. Also, be sure the physical partition or disk does not
have data you will need in the future; if it does, back up that data now.
2. Start the New Virtual Machine Wizard (File > New > Virtual Machine) and select
Custom.
264
www.vmware.com
C H A P T E R 8 Using Disks
3. When you reach the Select a Disk step, select Use a physical disk.
4. Choose the physical hard disk to use from the drop-down list. Select whether
you want to use the entire disk or use only individual partitions on the disk. Click
Next.
5. If you selected Use individual partitions in the previous step, select which
partitions you want to use in the virtual machine. If you selected Use entire disk,
this step does not appear.
Click Next.
6. The partition on which you are installing the guest operating system should be
unmapped in the host.
Caution: Corruption is possible if you allow the virtual machine to modify a
partition that is simultaneously mounted under Windows. Since the virtual
machine and guest operating system access a physical disk partition while the
host continues to run Windows, it is critical that you not allow the virtual
machine to modify any partition mounted by the host or in use by another
virtual machine. To safeguard against this problem, be sure the physical disk
partition you use for the virtual machine is not in use by the host.
265
VMware Workstation 5 User’s Manual
Windows Server 2003, Windows XP or Windows 2000 host: Use Disk
Management (Start > Settings > Control Panel > Administrative Tools >
Computer Management > Storage > Disk Management). Select the partition
you want to unmap, then choose Action > All Tasks > Change Drive Letter and
Path. Click the Remove button.
7. Use the virtual machine settings editor (VM > Settings) if you want to change
any configuration options from the wizard defaults — for example, to change
the amount of memory allocated to the guest operating system.
8. At this point you are ready to begin installing the guest operating system onto
the physical disk you configured for the virtual machine. For more details, read
the installation notes for various guest operating systems in the VMware Guest
Operating System Installation Guide, available from the VMware Web site or from
the Help menu.
Configuring a Linux Host
1. Identify the physical partition on which the guest operating system will be
installed.
Check the guest operating system documentation regarding the type of
partition on which the operating system can be installed. For example, operating
systems like DOS, Windows 95 and Windows 98 must be installed on the first
primary partition while others, like Linux, can be installed on a primary or
extended partition on any part of the drive.
Identify an appropriate physical partition or disk for the guest operating system
to use. Check that the physical partition is not mounted by the Linux host and
not in use by others. Also, be sure the physical partition or disk does not have
data you will need in the future; if it does, back up that data now.
2. Check the operating system partition mounts. Be sure the existing disk partitions
that you plan to use in the virtual machine are not mounted by Linux.
3. Set the device group membership or device ownership.
The master physical disk device or devices need to be readable and writable by
the user who runs VMware Workstation. On most distributions, the physical
devices, such as /dev/hda (IDE physical disk) and /dev/sdb (SCSI physical
disk) belong to group-id disk. If this is the case, you can add VMware
Workstation users to the disk group. Another option is to change the owner of
the device. Please think carefully about security issues when you explore
different options here.
266
www.vmware.com
C H A P T E R 8 Using Disks
It is a good idea to grant VMware Workstation users access to all
/dev/hd[abcd] physical devices that contain operating systems or boot
managers, then rely on VMware Workstation’s physical disk configuration files to
guard access. This provides boot managers access to configuration and other
files they may need to boot the operating systems. For example, LILO needs to
read /boot on a Linux partition to boot a non-Linux operating system that may
be on another drive.
4. Start the New Virtual Machine Wizard (File > New > Virtual Machine) and select
Custom.
5. When you reach the Select a Disk step, select Use a physical disk.
6. If the physical disk you plan to use has multiple partitions on it already, be aware
that certain operating systems (DOS, Windows 95, Windows 98) must be
installed on the first primary partition.
Caution: Corruption is possible if you allow the virtual machine to modify a
partition that is simultaneously mounted under the Linux host operating system.
Since the virtual machine and guest operating system access an existing
partition while the host continues to run Linux, it is critical that the virtual
machine not be allowed to modify any partition mounted by the host or in use
by another virtual machine.
To safeguard against this problem, be sure the partition you use for the virtual
machine is not mounted under the Linux host.
7. At this point you are ready to begin installing the guest operating system on the
physical disk you configured for the virtual machine. For more details, read the
installation notes for various guest operating systems in the VMware Guest
Operating System Installation Guide, available from the VMware Web site or from
the Help menu.
267
VMware Workstation 5 User’s Manual
Legacy Virtual Disks
VMware Workstation 5 introduces features that were not available in previously
released VMware products. See What’s New in Version 5 on page 21 for a list of these
features.
Workstation 5 achieves its new functionality by using a new virtual machine format, a
format that is not compatible with the legacy disk format used by these VMware
applications:
• Workstation 4.x
• GSX Server 3.x
• ESX Server 2.x
• VMware ACE 1.x
VMware Workstation 5 does work with legacy virtual disks, allowing easy integration
into environments using these other VMware products.
The following sections discuss your options for using Workstation 5 in a mixed
environment with legacy virtual machines created in Workstation 4.x, GSX Server 3.x,
ESX Server 2.x or VMware ACE 1.x.
• Upgrading a Legacy Virtual Machine for New Features of Workstation 5 on
page 269
• Using a Legacy Virtual Machine without Upgrading on page 269
• Creating a Legacy Virtual Machine with Workstation 5 on page 269
268
www.vmware.com
C H A P T E R 8 Using Disks
Upgrading a Legacy Virtual Machine for New Features of
Workstation 5
In order to use features of Workstation 5 with legacy virtual machines, you must
upgrade the virtual machine hardware, as described in Use a Legacy Virtual Machine
with Upgrade on page 68.
Note: After the upgrade, the virtual machine is fully compatible with virtual
machines created in Workstation 5. You cannot use the upgraded virtual machine in
Workstation 4.x, GSX Server 3.x, ESX Server 2.x or VMware ACE 1.x.
Legacy Virtual Machines and Workstation Support for 64-Bit Guest Operating
Systems
Workstation versions 5.5 and later support 64-bit guest operating systems. As with
other Workstation version 5 features, you must upgrade legacy virtual machines, as
described in Use a Legacy Virtual Machine with Upgrade on page 68.
If your virtual machine was created in Workstation 5.0, you do not need to upgrade
the virtual machine to version 5.5 for 64-bit guest support. However, you do need to
upgrade the Workstation 5.0 program software to version 5.5. You can install the
Workstation 5.5 software directly over the Workstation 5.0 software.
Using a Legacy Virtual Machine without Upgrading
Workstation 5 can power on an unmodified legacy virtual machine, allowing you to
share a virtual machine with users of Workstation 4.x, GSX Server 3.x, ESX Server 2.x
and ACE 1.x. However, Workstation 5 features are not available in this legacy virtual
machine.
Note: When you are running a legacy virtual machine, Workstation 5 indicates that
VMware Tools is out of date. Do not upgrade your VMware Tools if you want to
continue using the virtual machine on Workstation 4.x, GSX Server 3.x, ESX Server 2.x
and VMware ACE 1.x.
Creating a Legacy Virtual Machine with Workstation 5
Workstation 5 can create a new virtual machine to use in Workstation 4.x, GSX Server
3.x, ESX Server 2.x and VMware ACE 1.x. However, the new features of Workstation 5
are not available in this legacy virtual machine.
See Setting Up a New Virtual Machine on page 114 for a discussion of creating a new
virtual machine using Workstation 5.
269
VMware Workstation 5 User’s Manual
270
www.vmware.com
CHAPTER
9
Preserving the State of a Virtual
Machine
VMware Workstation 5 provides two ways to preserve the state of a virtual machine:
you can Suspend the virtual machine, or take a Snapshot of it. This chapter describes
the Suspend and Snapshot features and helps you understand when to use them.
• Using Suspend and Resume on page 272
• Using Snapshots on page 273
• Examples of Using Snapshots on page 276
• What Is Captured by a Snapshot? on page 277
• Taking a Snapshot on page 278
• The Snapshot Manager on page 280
• Restoring a Snapshot: Revert or Go To? on page 285
• Deleting Snapshots on page 286
• Making a Clone from a Snapshot on page 286
• Virtual Machine Settings for Snapshots on page 287
271
VMware Workstation 5 User’s Manual
Using Suspend and Resume
The suspend and resume feature is useful when you want to save the current state of
your virtual machine, and continue work later from the same state.
Once you resume and do additional work in the virtual machine, there is no way to
return to the state the virtual machine was in at the time you suspended. To preserve
the state of the virtual machine so you can return to the same state repeatedly, take a
snapshot. For details, see Using Snapshots on page 273.
The speed of the suspend and resume operations depends on how much data has
changed while the virtual machine has been running. In general, the first suspend
operation takes a bit longer than later suspend operations do.
When you suspend a virtual machine, a file with a .vmss extension is created. This
file contains the entire state of the virtual machine. When you resume the virtual
machine, its state is restored from the .vmss file.
To suspend a virtual machine:
1. If your virtual machine is running in full screen mode, return to window mode by
pressing the Ctrl-Alt key combination.
2. Click Suspend on the VMware Workstation toolbar.
3. When VMware Workstation has completed the suspend operation, it is safe to
exit VMware Workstation.
File > Exit (Windows)
or
File > Quit (Linux)
To resume a virtual machine that you have suspended:
1. Start VMware Workstation and choose a virtual machine you have suspended.
2. Click Resume on the VMware Workstation toolbar.
Note that any applications you were running at the time you suspended the
virtual machine are running and the content is the same as it was when you
suspended the virtual machine.
272
www.vmware.com
C H A P T E R 9 Preserving the State of a Virtual Machine
Using Snapshots
VMware Workstation snapshots allow you to preserve the state of the virtual machine
so you can return to the same state repeatedly. Version 5 introduces multiple
snapshots and the snapshot manager.
This section discusses snapshots in the following topics:
• Understanding Snapshots on page 274
• Examples of Using Snapshots on page 276
• What Is Captured by a Snapshot? on page 277
• Snapshots and Other Activity in the Virtual Machine on page 277
• Taking a Snapshot on page 278
• The Snapshot Manager on page 280
• Restoring a Snapshot: Revert or Go To? on page 285
• Virtual Machine Settings for Snapshots on page 287
• Deleting Snapshots on page 286
• Making a Clone from a Snapshot on page 286
• Snapshots and Legacy Virtual Machines on page 288
273
VMware Workstation 5 User’s Manual
Understanding Snapshots
Taking a snapshot saves the current state of the virtual machine, so you can return to it
at any time. Snapshots are useful when you need to revert a virtual machine
repeatedly to the same state, but you don’t want to create multiple virtual machines.
If you simply want to save the current state of your virtual machine temporarily, so you
can continue work later from the same state, see Using Suspend and Resume on
page 272.
You can take multiple snapshots of a virtual machine, to save any state you might
want to return to.
Note: To take snapshots of multiple virtual machines — for example, taking
snapshots for all members of a team — requires that you take a separate a snapshot of
each team member.
Snapshots in a Linear Process
One common use of snapshots is in a development process, as a way to save each
step in a linear process. That way, as you add new, untested code to a project, you can
always revert to a prior known working state of the project when newly added code
does not work as expected.
Another example of using snapshots is a linear process is a computerized training
course. You can take snapshots of each lesson starting point, so you can instantly
revert to the appropriate place for each student — skipping lengthy computer
preparation time.
Snapshots as restore points in a linear process
VMware Workstation supports over 100 snapshots per linear process.
Snapshots in a Process Tree
Another way to use snapshots is shown in the following figure. Here, instead of saving
each step of a process in a single long sequence, you are saving a number of
sequences, as branches from a single baseline. This strategy is often used in testing
274
www.vmware.com
C H A P T E R 9 Preserving the State of a Virtual Machine
software, for example. You can take a snapshot before installing different versions of a
program to ensure each different installation begins from an identical baseline.
Snapshots as restore points in a process tree
VMware Workstation supports over 100 snapshots per branch in a process tree.
Relationship Between Snapshots
The relationship between snapshots is like parent to child.
• In a linear process, each snapshot has one parent and one child, except for the
last snapshot, which has no children.
• In a process tree, each snapshot has one parent, but one snapshot may have
more than one child. Many snapshots have no children.
275
VMware Workstation 5 User’s Manual
Examples of Using Snapshots
Using Snapshots as Protection from Risky Changes
If you plan to make risky changes in a virtual machine (for example, testing new
software or examining a virus), take a snapshot before you begin. If you encounter a
problem, you can restore the virtual machine to the state preserved in that snapshot.
If your risky actions cause no problems you can take another snapshot of the virtual
machine in its new state. Snapshots can minimize lost work if something goes wrong.
With multiple snapshots of saved positions, you can return at any time to any
important position when you discover a problem.
Starting a Virtual Machine Repeatedly in the Same State
You can configure the virtual machine to revert to a snapshot any time it is powered
off. You might use this feature, for example, in setting up student virtual machines to
power on for each new class at the beginning of the lesson, discarding previous
student work. See Reverting at Power Off on page 285 for the procedure.
Automatically Recording Milestone Status
You can configure a virtual machine to take a snapshot any time it is powered off,
preserving a virtual audit trail as work progresses. See Virtual Machine Settings for
Snapshots on page 287 for configuring automatic snapshots at power off.
Disabling Snapshots for Better Performance
VMware Workstation operates more efficiently with snapshots disabled. If you do not
need to use snapshot functionality, you should disable it for better performance. See
Virtual Machine Settings for Snapshots on page 287.
276
www.vmware.com
C H A P T E R 9 Preserving the State of a Virtual Machine
What Is Captured by a Snapshot?
A snapshot captures the entire state of the virtual machine at the time you take the
snapshot. This includes:
• Memory state — The contents of the virtual machine’s memory
• Settings state — The virtual machine settings
• Disk state — The state of all the virtual machine’s virtual disks
Snapshots operate on individual virtual machines. In a team of virtual machines,
taking a snapshot preserves only the active virtual machine’s state. See The Active
Virtual Machine on page 318.
When you revert to a snapshot, you return the virtual machine’s memory, settings, and
virtual disks, to the state they were in when you took the snapshot. If you want the
virtual machine to be suspended, powered on, or powered off when you launch it, be
sure it is in the desired state when you take the snapshot.
Note: The state of a physical disk or independent disk is not preserved when you
take a snapshot.
Snapshots and Other Activity in the Virtual Machine
When you take a snapshot, be aware of other activity going on in the virtual machine
and the likely impact of reverting to that snapshot. In general, it is best to take a
snapshot when no applications in the virtual machine are communicating with other
computers. The potential for problems is greatest if the virtual machine is
communicating with another computer, especially in a production environment.
Consider a case in which you take a snapshot while the virtual machine is
downloading a file from a server on the network. After you take the snapshot, the
virtual machine continues downloading the file, communicating its progress to the
server. If you revert to the snapshot, communications between the virtual machine
and the server are confused and the file transfer fails.
Or consider a case in which you take a snapshot while an application in the virtual
machine is sending a transaction to a database on a separate machine. If you revert to
that snapshot — especially if you revert after the transaction starts but before it has
been committed — the database is likely to be confused.
See Snapshot Actions as Background Activity on page 278.
277
VMware Workstation 5 User’s Manual
Excluding Disks from Snapshots
In certain configurations, you may want to have some disks revert to a snapshot while
other disks retain all changes. You can exclude virtual disks from a snapshot by
changing the disk mode.
For example, you may want a snapshot to preserve a disk with your operating system
and applications, while always keeping the changes to a disk with your documents.
For the procedure, see Changing Disk Mode to Exclude Virtual Disks from Snapshots
on page 279.
Taking a Snapshot
Use the Snapshot menu on the Workstation toolbar to take a snapshot.
1. Choose VM > Snapshot > Take Snapshot
2. Type a name for your snapshot.
Every snapshot must have a unique name. If you type the name of an existing
snapshot, a warning appears and you must enter a different name.
3. If you wish, you may type a description for your snapshot.
Descriptions are useful to identify differences between similarly-named
snapshots. Descriptions appear in the snapshot manager.
4. Click OK.
Snapshot Actions as Background Activity
Taking a snapshot is not instantaneous. When you take a snapshot, you can continue
working while VMware Workstation preserves the snapshot in the background. You
can enable background snapshots in the Priority tab of the Preferences window. See
Snapshots on page 92. Enabling background snapshots for a host with slow hard disks
may affect performance. If you experience significant performance problems when
taking or restoring snapshots, turn off this option.
If you take another snapshot or revert to one before Workstation completes a pending
snapshot operation, a progress dialog box appears. When this occurs, you must wait
for the pending snapshot operation to finish before the next snapshot or resume
operation begins.
Note: If you select a snapshot in the snapshot manager before that snapshot is
complete, Workstation displays an error message: The screen shot of the snapshot
does not yet exist. This message does not indicate a permanent problem. When the
snapshot is complete, a screen shot for the snapshot becomes visible in the snapshot
manager, and no warning appears when you select that snapshot.
278
www.vmware.com
C H A P T E R 9 Preserving the State of a Virtual Machine
When Can I Take a Snapshot?
You can take a snapshot while a virtual machine is powered on, powered off, or
suspended. If you are suspending a virtual machine, wait until the suspend operation
has finished before taking a snapshot.
For legacy virtual machines and multiple disks in different modes, the following
exceptions apply.
• Snapshots and legacy virtual machines — you must upgrade a legacy virtual
machine to Workstation 5 before taking a snapshot. For information on
upgrading the virtual machine, see Upgrading VMware Workstation on page 61.
For more information about using Workstation 5 with virtual machines and
snapshots created under Workstation versions 3 and 4, see Snapshots and
Legacy Virtual Machines on page 288.
• Snapshots and multiple disks in different modes — You must power off the
virtual machine before taking a snapshot if the virtual machine has multiple
disks in different disk modes. For example, if you have a special purpose
configuration that requires you to use an independent disk, you must power off
the virtual machine before taking a snapshot.
Changing Disk Mode to Exclude Virtual Disks from Snapshots
Before you attempt to change the disk mode, you must power off the virtual machine
and delete any existing snapshots.
To exclude a disk from all snapshots.
1. Choose VM > Settings.
2. Select the drive you want to exclude.
3. Click Advanced.
4. Select Independent on the advanced settings panel. You have the following
options for an independent disk:
• Persistent — changes are immediately and permanently written to the disk.
All changes to an independent disk in persistent mode remain, even when
you revert to a snapshot.
• Nonpersistent — current changes to the disk are discarded when you power
off or revert to a snapshot.
279
VMware Workstation 5 User’s Manual
The Snapshot Manager
In the snapshot manager (VM > Snapshot > Snapshot Manager), you can review all
snapshots for the active virtual machine and act on them directly.
The snapshot manager: Windows host (left) and Linux host (right)
Selecting a Snapshot
In the snapshot manager, select a snapshot by clicking it. To select more than one
snapshot, hold down the Ctrl key while clicking snapshots one by one.
Double-clicking a snapshot is the same as selecting that snapshot and clicking Go To
Snapshot.
Going to a Snapshot
Use the Go To button to restore the virtual machine to the currently selected
snapshot.
1. Choose VM > Snapshot > Snapshot Manager
2. Select the desired snapshot.
3. Click Go to.
4. Click Yes in the confirmation dialog box.
Making a Clone from a Snapshot
In the snapshot manager, you can clone a virtual machine from any snapshot taken
while the virtual machine is powered off. See Making a Clone from a Snapshot on
page 286.
280
www.vmware.com
C H A P T E R 9 Preserving the State of a Virtual Machine
Deleting Snapshots
Use the Delete button to permanently remove snapshots from Workstation.
1. Choose VM > Snapshot > Snapshot Manager.
2. Select one or more snapshots.
3. Click Delete.
4. Click OK in the confirmation dialog box.
Editing Snapshot Name and Description
You can edit the name and description of a snapshot by typing in the appropriate
field.
1. Choose VM > Snapshot > Snapshot Manager.
2. Select the desired snapshot.
3. Click within the Name or Description field to change that field.
Type your changes. When your cursor leaves the field, Workstation verifies your
entry for length, duplicate names, and invalid characters.
Note: Pressing Esc accepts any edit in progress and closes the snapshot manager
without confirmation.
281
VMware Workstation 5 User’s Manual
The Snapshot Manager Window
The following figures show the elements of the snapshot manager window. These
elements are described in the following sections.
• Snapshot Tree on page 283
• Details Region on page 283
• Command Buttons on page 284
• Navigation Region on page 284
• You Are Here Icon on page 284
Snapshot tree
You Are Here icon
Thumbnail of selected
snapshot’s display
Details
Command buttons
The snapshot manager: Windows host
Command toolbar
You Are Here icon
Snapshot tree
Details
Thumbnail of selected
snapshot’s display
The snapshot manager: Linux host
282
www.vmware.com
C H A P T E R 9 Preserving the State of a Virtual Machine
Snapshot Tree — The snapshot tree shows all snapshots for the active virtual
machine.
Linux hosts have a zoom feature to change the magnification of the tree.
• Click Zoom In to increase magnification for the snapshot tree display.
• Click Zoom out to decrease magnification for the snapshot tree display. If you
have many snapshots, this feature allows you to view the whole snapshot tree.
You can act directly on snapshots in the snapshot tree.
Action
Description
Click a snapshot
Selects that snapshot. To act on the selected snapshots, click one of the
command buttons: Take Snapshot, Delete, and Clone. See Command
Buttons on page 284
Double-click a
snapshot
Reverts to that snapshot and restores the power state of the virtual machine
at the time the snapshot was taken.
Right-click a snapshot Displays a pop-up menu with commands available to that snapshot.
• Go to Snapshot — This command opens the selected snapshot as if you
clicked the Go To Snapshot button.
• Clone This snapshot — This command creates a stand-alone virtual
machine called a clone. Refer to Cloning a Virtual Machine on page 289 for
a description of clones.
• Delete — This command deletes the selected snapshots.
Move the cursor over
a snapshot (without
clicking)
Displays the complete name of that snapshot. This is useful when a long
name is truncated in the snapshot tree display.
Details Region — This area displays information about the selected snapshot:
name, description, and thumbnail screenshot. If you have not selected a snapshot,
these fields are blank.
283
VMware Workstation 5 User’s Manual
Command Buttons — The snapshot manager has three command buttons: Take
Snapshot, Delete, and Clone.
Note: In the Linux snapshot manager, command buttons are displayed at the top. In
the Windows snapshot manager, command buttons are on the right side.
Button
Description
Delete
Removes the selected snapshots. The state of the virtual machine
represented by that snapshot is no longer available.
Clone
Creates a completely independent copy of the virtual machine from the
selected snapshot. See Cloning a Virtual Machine on page 289.
Take Snapshot
Creates a snapshot. See Taking a Snapshot on page 278.
Navigation Region — This area contains buttons to navigate out of the dialog box.
• Go To — opens the selected snapshot and powers on the virtual machine,
discarding the current state.
• Close — closes the snapshot manager.
• Help — opens the Workstation help system.
You Are Here Icon — The You Are Here icon always represents the current and
active state of the virtual machine. The You Are Here icon is always selected and
visible when you open the snapshot manager.
You cannot go to or select the You Are Here state. The You Are Here icon does not
represent a snapshot, but rather the virtual machine state after the parent snapshot
(see The Parent Snapshot on page 285). A snapshot is always a static record of a virtual
machine state. The You Are Here state can be operational and changing.
284
www.vmware.com
C H A P T E R 9 Preserving the State of a Virtual Machine
Restoring a Snapshot: Revert or Go To?
You can restore a snapshot in VMware Workstation by using the Revert and Go to
commands. The following sections explain how these commands work.
The Parent Snapshot
The parent snapshot of a virtual machine is the snapshot on which the current state
(the You Are Here position) is based. After you take a snapshot, that stored state — the
parent snapshot of the current state — is the parent snapshot of the virtual machine.
If you revert or go to an earlier snapshot, the earlier snapshot becomes the parent
snapshot of the virtual machine.
Revert to Snapshot
Revert is essentially a shortcut for Go to the parent snapshot of the virtual machine —
that is, the parent snapshot of the You Are Here position. Revert immediately activates
the parent snapshot of the current state of the virtual machine. The current disk and
memory states are discarded, and the virtual machine reverts to the disk and memory
states of the parent snapshot.
To Revert to the parent snapshot, choose VM > Snapshot > Revert to Snapshot, or
click the revert button on the toolbar.
Go to Snapshot
This command activates the snapshot currently selected in the snapshot manager.
Unlike Revert, the Go To command is not limited to the parent snapshot of the current
state. You can choose any snapshot.
To go to a snapshot, choose VM > Snapshot and select the snapshot by name; or, in
the snapshot manager, select a snapshot and click Go To.
Reverting at Power Off
This setting causes the virtual machine to revert automatically to the parent snapshot
any time it is powered off. The parent snapshot of a virtual machine is the snapshot on
which the current state (the You Are Here position) is based (see The Parent Snapshot
on page 285).
1. Choose VM > Settings > Options > Snapshots.
2. In the section When powering off, select Revert to snapshot.
285
VMware Workstation 5 User’s Manual
Deleting Snapshots
You can delete a snapshot any time. Deleting snapshots does not affect other
snapshots or the current state of the virtual machine.
To delete snapshots
1. Choose VM > Snapshot > Snapshot Manager.
2. Select one or more snapshots.
3. Click Delete.
4. Click OK in the confirmation dialog box.
Note: You cannot delete the snapshot if the associated virtual machine is designated
as a template for cloning. See Linked Clones and Access to the Parent Virtual Machine
on page 296 for a description of template settings for linked clones.
Making a Clone from a Snapshot
VMware Workstation 5 snapshots are stored as changes from the parent state. To
create a fully independent copy of a virtual machine from a snapshot, you can make a
clone.
Note: The snapshot must be from a virtual machine that is powered off. You cannot
make a clone from a snapshot of a virtual machine that is powered on.
1. Choose VM > Snapshot > Snapshot Manager.
2. Select the snapshot to clone.
3. Click Clone.
4. Click OK in the confirmation dialog box.
See Cloning a Virtual Machine on page 289.
286
www.vmware.com
C H A P T E R 9 Preserving the State of a Virtual Machine
Virtual Machine Settings for Snapshots
In the virtual machine settings editor, you can disable snapshots and set the virtual
machine to revert to a snapshot when you power off. The following sections describe
these options.
Disabling Snapshots
VMware Workstation speed and response times are improved when snapshots are
disabled. However, all changes made to a virtual machine are permanent and you
cannot restore an earlier state.
To disable snapshots, go to VM > Settings > Options > Snapshots.
• If no snapshots exist for the selected virtual machine, you can disable snapshot
functionality by selecting Disable snapshots.
• If one or more snapshots exist for the selected virtual machine, the Disable
snapshots option is disabled. If you want to disable snapshot functionality, you
must first delete all snapshots for the current virtual machine. Refer to Deleting
Snapshots on page 286.
287
VMware Workstation 5 User’s Manual
Revert to a Snapshot When Powering Off
To set the virtual machine to revert to a snapshot when you power off, go to VM >
Settings > Options > Snapshots. You have the following options when you power off
a virtual machine that has a snapshot:
• Just power off — powers off the virtual machine without any change to its
snapshots. This is the default setting.
• Revert to snapshot — reverts to the virtual machine’s parent snapshot, that is,
the parent snapshot of the current You Are Here position. With this setting, a
virtual machine always starts in the same state. Reverting to the snapshot
discards changes. For example, an instructor may need to discard student
answers for a computer lesson when a virtual machine is powered off at the end
of class.
• Take a new snapshot — takes a new snapshot of the virtual machine state after
it is powered off. This is useful to preserve milestones automatically. The
snapshot is displayed in the snapshot manager. The name of this snapshot is the
date and time the virtual machine was powered off. The description is
“Automatic snapshot created when powering off.”
• Ask me — asks what you want to do with a snapshot each time you power off.
Snapshots and Legacy Virtual Machines
When you power on a virtual machine created in Workstation 3 or 4, a dialog box
gives you the choice to upgrade the virtual machine or to leave the virtual machine
unchanged. For full Workstation 5 functionality, you must upgrade. If you do not
upgrade, whenever you power on the legacy virtual machine, Workstation 5 offers
you the choice to upgrade.
Upgrading Legacy Virtual Machines to Workstation 5
You can upgrade a legacy virtual machine from Workstation 3 or Workstation 4 to
VMware Workstation 5. Any snapshot of the upgraded virtual machine is upgraded,
and commands for multiple snapshots become available.
Note: An upgraded snapshot retains disk contents, but discards memory contents.
When you power on that snapshot, it appears as if the virtual machine has crashed.
Using Legacy Virtual Machines without Upgrading
If you choose not to upgrade, you preserve the ability to use the virtual machine in
older Workstation 3 or 4, but in Workstation 5 there is no snapshot functionality
allowed. When you open a legacy virtual machine in Workstation 5, you see a warning
message to this effect.
288
www.vmware.com
CHAPTER
10
Cloning a Virtual Machine
The following sections describe clones and configuring a clone:
• Understanding Clones on page 290
• Why Make a Clone? on page 290
• Full and Linked Clones on page 291
• Full Clones and Snapshots of the Parent on page 291
• Creating Clones on page 292
• The Clone Virtual Machine Wizard on page 292
• Making a Linked Clone of a Linked Clone on page 295
• Making a Full Clone of a Linked Clone on page 295
• Working with Clones on page 295
• Network Identity for a Clone on page 295
• The Linked Clone Snapshot on page 296
• Linked Clones and Access to the Parent Virtual Machine on page 296
289
VMware Workstation 5 User’s Manual
Understanding Clones
A clone is a copy of an existing virtual machine. The existing virtual machine is called
the parent of the clone. When the cloning operation is complete, the clone is a
separate virtual machine — though it may share virtual disks with the parent virtual
machine: see Full and Linked Clones on page 291).
• Changes made to a clone do not affect the parent virtual machine. Changes
made to the parent virtual machine do not appear in a clone.
• A clone’s MAC address and UUID are different from those of the parent virtual
machine.
If you want to save the current state of the virtual machine, so you can revert to that
state in case you make a mistake, take a snapshot. If you want to make a copy of a
virtual machine for separate use, create a clone.
Why Make a Clone?
Installing a guest operating system and applications can be time consuming. With
clones, you can make many copies of a virtual machine from a single installation and
configuration process.
Clones are useful when you must deploy many identical virtual machines to a group.
For example:
• An MIS department can clone a virtual machine for each employee, with a suite
of preconfigured office applications.
• A virtual machine can be configured with a complete development
environment and then cloned repeatedly as a baseline configuration for
software testing.
• A teacher can clone a virtual machine for each student, with all the lessons and
labs required for the term.
With clones you can conveniently make complete copies of a virtual machine,
without browsing a host file system or worrying if you have located all the
configuration files.
290
www.vmware.com
C H A P T E R 1 0 Cloning a Virtual Machine
Full and Linked Clones
There are two types of clone:
• A full clone is an independent copy of a virtual machine that shares nothing with
the parent virtual machine after the cloning operation. Ongoing operation of a
full clone is entirely separate from the parent virtual machine.
• A linked clone is a copy of a virtual machine that shares virtual disks with the
parent virtual machine in an ongoing manner. This conserves disk space, and
allows multiple virtual machines to use the same software installation.
Full Clones
A full clone is an independent virtual machine, with no need to access the parent. Full
clones do not require an ongoing connection to the parent virtual machine. Because
a full clone does not share virtual disks with the parent virtual machine, full clones
generally perform better than linked clones. However, full clones take longer to create
than linked clones. Creating a full clone can take several minutes if the files involved
are large.
Linked Clones
A linked clone is made from a snapshot of the parent. (See Understanding Snapshots
on page 274.) All files available on the parent at the moment of the snapshot continue
to remain available to the linked clone. Ongoing changes to the virtual disk of the
parent do not affect the linked clone, and changes to the disk of the linked clone do
not affect the parent.
A linked clone must have access to the parent. Without access to the parent, a linked
clone is disabled. See Linked Clones and Access to the Parent Virtual Machine on
page 296
Linked clones are created swiftly, so you can easily create a unique virtual machine for
each task you have. You can also easily share a virtual machine with other users by
storing the virtual machine on your local network, where other users can quickly
make a linked clone. This facilitates collaboration: for example, a support team can
reproduce a bug in a virtual machine, and an engineer can quickly make a linked
clone of that virtual machine to work on the bug.
Full Clones and Snapshots of the Parent
A full clone is a complete and independent copy of a virtual machine. However, the
full clone duplicates only the state of the virtual machine at the instant of the cloning
operation. Thus the full clone does not have access to any snapshots that may exist of
the parent virtual machine.
291
VMware Workstation 5 User’s Manual
Creating Clones
This section discusses how to create a clone.
Note: Legacy virtual machines created under previous versions of Workstation (or
under other VMware products) must be upgraded to Workstation 5 virtual machines
before you can clone them. See Procedure to Upgrade Virtual Machines on page 69.
The Clone Virtual Machine Wizard
The Clone Virtual Machine Wizard guides through the process of making a clone. You
do not need to locate and manually copy the parent virtual machine files. The Clone
Virtual Machine Wizard automatically creates a new MAC address and other unique
identifiers for the clone.
Note: You cannot create a clone from a virtual machine that is powered on or
suspended. You must power off a virtual machine before you can make a clone.
To create a clone using the Clone Virtual Machine Wizard:.
1. Select the virtual machine you want to clone.
Click the name of a virtual machine in the Favorites list or click the tab of a virtual
machine in the summary window.
2. Open the Clone Virtual Machine Wizard (VM > Clone) and click Next.
292
www.vmware.com
C H A P T E R 1 0 Cloning a Virtual Machine
3. Select the state of the parent from which you want to create a clone, and click
Next.
You can choose to create a clone from either of two states.
• From the parent’s current state (Workstation creates a snapshot of the virtual
machine before cloning it)
• From any snapshot of the parent: select the snapshot name from a dropdown menu of existing snapshots.
4. Select the type of clone you want to create and click Next.
You can choose to make a full clone or a linked clone. See Full and Linked Clones
on page 291 for a description of the differences.
5. Type a name and a path for the cloned virtual machine, and click Finish.
293
VMware Workstation 5 User’s Manual
The default name and path are based on the original virtual machine name and
location. You can type a new entry for name and path, or use the Browse button
to locate a directory for the clone files.
After you have verified your entries, click Finish. The Clone Virtual Machine
Wizard then displays a status page.
A full clone can take many minutes to create, depending on the size of the
virtual disk that is being duplicated.
6. Click Done to exit the Clone Virtual Machine Wizard.
294
www.vmware.com
C H A P T E R 1 0 Cloning a Virtual Machine
Working with Clones
This section discusses the following topics:
• Making a Linked Clone of a Linked Clone on page 295
• Making a Full Clone of a Linked Clone on page 295
• Network Identity for a Clone on page 295
• The Linked Clone Snapshot on page 296
• Linked Clones and Access to the Parent Virtual Machine on page 296
Making a Linked Clone of a Linked Clone
It is possible to make a linked clone from a linked clone, using the Clone Virtual
Machine Wizard. Keep these cautions in mind:
• Performance degrades when you do this. When possible, make a linked clone of
the parent virtual machine.
• To power on — and to work with — a linked clone of a linked clone, Workstation
must be able to locate all ancestors in the chain. Refer to Linked Clones and
Access to the Parent Virtual Machine on page 296.
Making a Full Clone of a Linked Clone
It is possible to make a full clone from a linked clone, using the Clone Virtual Machine
Wizard.
• The linked clone can be used as before.
• The full clone created with this action is an independent virtual machine that
does not require access to the linked clone or its ancestors.
Note: To make a full clone from a linked clone, Workstation must have access to the
linked clone and all ancestors at the time you run the Clone Virtual Machine Wizard.
Refer to Linked Clones and Access to the Parent Virtual Machine on page 296.
Network Identity for a Clone
The Clone Virtual Machine Wizard creates a new MAC address for the cloned virtual
machine. Other configuration information is identical to that of the parent virtual
machine. For example, a machine’s name and static IP address configuration are not
altered by the Clone Virtual Machine Wizard.
To prevent conflict with static IP addressing, change the clone‘s static IP before the
clone connects to the network. Refer to Selecting IP Addresses on a Host-only
295
VMware Workstation 5 User’s Manual
Network or NAT Configuration on page 347 for a discussion regarding static IP address
configuration.
The Linked Clone Snapshot
When you create a linked clone, Workstation 5 creates a snapshot of the parent virtual
machine. This snapshot preserves the exact state of the virtual machine when you
create the clone.
Caution: You cannot delete this snapshot without destroying the linked clone. It is
safe to delete this snapshot if you have deleted the clone depending on it.
The snapshot manager allows you to rename any snapshot. If you rename a snapshot
for a cloned virtual machine, you may want to use the Description field to aid you in
future identification. Refer to The Snapshot Manager on page 280 for more
information on renaming snapshots.
Linked Clones and Access to the Parent Virtual Machine
You cannot power on — or resume — a linked clone if Workstation fails to locate the
parent virtual machine. This section discusses the following topics:
• Moving a Linked Clone on page 296
• Protecting the Parent of Linked Clones on page 297
Moving a Linked Clone
You can move a linked clone or its parent within a file system or network, but you
must ensure VMware Workstation can continue to access the clone and the parent
virtual machine. For example, place the parent in a shared directory or on a network
file server so Workstation can use the linked clone from any host computer with
network access.
See Moving and Sharing Virtual Machines on page 187 for a discussion of moving
virtual machines.
Example: Using a Linked Clone on a Disconnected Laptop
If you put a linked clone on a laptop, and the parent remains on another machine, the
clone can be used only when the laptop connects to the network or drive where the
parent is stored. If you want to use a cloned virtual machine on a disconnected laptop,
you must use a full clone or you must move the parent virtual machine to the laptop.
296
www.vmware.com
C H A P T E R 1 0 Cloning a Virtual Machine
Protecting the Parent of Linked Clones
To prevent anyone from deleting the parent virtual machine for a linked clone, you
can designate the parent as a template. The two parts of the process are discussed in
the following sections:
• Enabling Template Mode for the Parent on page 297
• Creating a Linked Clone From a Template on page 298
Enabling Template Mode for the Parent — You can avoid inadvertently
deleting the parent of linked clones by designating the parent virtual machine as a
template. To designate a virtual machine as a template, enable template mode in the
virtual machine settings editor:
1. Select the virtual machine.
2. Choose VM > Settings
3. Select Options
4. Click Advanced
5. Select Enable Template mode (to be used for cloning).
6. Click OK.
With template mode enabled, a virtual machine cannot be deleted or added to a
team, and the virtual machine’s snapshots cannot be deleted.
297
VMware Workstation 5 User’s Manual
Creating a Linked Clone From a Template — When you create a linked clone of
a template virtual machine, the Clone Virtual Machine Wizard includes several special
options.
To create a linked clone from a template:
1. Select the virtual machine to use as a parent of your linked clone.
2. Verify that the parent has at least one snapshot. Open the snapshot manager
and create a snapshot if none exists.
3. Verify that template mode has been enabled.
See Protecting the Parent of Linked Clones on page 297.
4. With the virtual machine still selected, launch the Clone Virtual Machine Wizard.
5. Click Next to display the Clone Source panel.
6. Select a snapshot from the drop-down menu and click Next.
Note: The wizard does not allow you to clone from the current state when the
virtual machine has template mode enabled.
7. Name the linked clone and click Finish.
Workstation creates the linked clone and displays a status panel.
8. Click Done to exit the wizard.
298
www.vmware.com
CHAPTER
Configuring Teams
11
The following sections describe virtual machine teams:
• Teams Overview on page 300
• Creating and Deleting Teams on page 301
• Adding and Removing Virtual Machines on page 307
• Starting and Stopping Teams on page 310
• Working with Team Networks on page 313
• The Startup Sequence on page 316
• Working with the Team Console View on page 317
• Editing Team Settings on page 319
• Command Line for Teams on page 323
299
VMware Workstation 5 User’s Manual
Teams Overview
VMware Workstation teams allow you to set up a virtual computer lab on one host
computer. You can now power on multiple associated virtual machines with a single
click.
Team virtual machines can use networking just as other virtual machines can. In
addition, team members can communicate in private networks called LAN segments.
LAN segments are completely independent of — and invisible to — the host
computer’s network.
Team settings control the start-up order and timing for team virtual machines. you
can set up specific delays between booting virtual machines so the host CPU load is
spread out. Teams automatically launch virtual machines in the right order, with
delays that you specify to ensure that each virtual machine stabilizes before the next
virtual machine boots.
You can use teams to
• Virtualize multitier environments — Start separate client, server, and database
virtual machines with one click. Configure start-up delay times so clients don’t
submit queries before the server is ready.
• Virtualize multiple-machine testing environments — Set up a software package
for QA on a virtual machine, and configure automation on other virtual
machines to test the first.
• Virtualize network performance and security — LAN segments offer enhanced
performance and security. A team LAN segment is fully contained —
undetectable and inaccessible from any other network, inside or outside the
team. Team networking lets you
• Isolate a team completely from the host network
• Create a virtual DMZ or proxy server to securely bridge the team members to
the outside network
• Allow specific network bandwidth and packet loss to each virtual machine on
the team
• Connect all team members fully to host resources
You control all traffic allowed between the host network and team virtual
machines
• Monitor multiple virtual machines — Use thumbnail views of the virtual
machine displays to review activity on team virtual machines simultaneously.
300
www.vmware.com
C H A P T E R 1 1 Configuring Teams
Creating and Deleting Teams
This section discusses the following topics:
• Making a New Team on page 301
• Opening a Team on page 305
• Closing a Team on page 305
• Deleting a Team on page 306
Making a New Team
Use the New Team Wizard to create a team, then add virtual machines.
1. Open the New Team Wizard.
Choose File > New > Team.
2. Click Next to confirm the wizard.
3. Type a name and path for the team and click Next.
301
VMware Workstation 5 User’s Manual
The default name and path are based on your default Virtual Machine location.
You can type a new entry for name and path, or use the Browse button to find
the directory where you want to store the team files.
After you have verified your entries, click Next.
4. If you wish, you can add virtual machines to your team.
Click Next.
If you select No, I will add virtual machines later, skip to step 9.
If you select Yes, the wizard continues.
5. Click Add to add virtual machines to your team.
A drop-down menu appears, with three options.
• New Virtual Machine — Select this option to launch the New Virtual Machine
Wizard. See Setting Up a New Virtual Machine on page 114.
• Existing Virtual Machine — Select this option to open a file browser from
which you can navigate the host file system to locate an existing .vmx file.
When you add a virtual machine to a team it can no longer be accessed
outside the team. See Adding an Existing Virtual Machine to a Team on
page 307.
302
www.vmware.com
C H A P T E R 1 1 Configuring Teams
• New Clone of Virtual Machine — Select this option to open a file browser
from which you can navigate the host file system to locate an existing .vmx
file. After you select a virtual machine, Workstation launches the Clone Virtual
Machine Wizard. See The Clone Virtual Machine Wizard on page 292.
Click Next.
6. If you wish, add LAN segments to your team.
If you select No, I will add LAN segments later, skip to step 9.
If you select Yes, the wizard continues.
For for information about LAN segments, see Working with Team Networks on
page 313
Click Next.
7. Click Add to create a LAN segment.
You can change default names and bandwidth later. See LAN Segments on
page 321 for the procedure.
Click Next.
303
VMware Workstation 5 User’s Manual
8. Select the network connections for each virtual machine on the team.
Network Virtual Machines panel, Windows host.
Network Virtual Machines panel, Linux host.
Select a network connection for each virtual machine Ethernet adapter. Each
virtual machine can have one network connection per virtual Ethernet adapter.
• If you are running Workstation on a Linux host, you can add and remove
virtual Ethernet adapters, using the Add Adapter and Remove Adapter
buttons.
• If you are running Workstation on a Windows host, you can add or remove
virtual Ethernet adapters later. See Network Adapter on page 313.
• You can change connections later. See Connecting to or Changing a LAN
Segment on page 314.
9. Click Finish to exit the New Team Wizard.
304
www.vmware.com
C H A P T E R 1 1 Configuring Teams
Opening a Team
To open a team in VMware Workstation:
1. Choose File > Open.
2. Browse to the location of the .vmtm file for the desired team.
3. Select the file and click Open.
The selected team appears as a tabbed item in the summary window. To add the
team to the Favorites list, see Adding an Item to the Favorites List on page 84.
Closing a Team
Closing a team removes its summary window. The team and virtual machine
members can no longer be seen in VMware Workstation, but you can open the team
from the File menu. The team and virtual machine files remain on the host file system.
To delete a team permanently, see Deleting a Team on page 306.
To close a team
1. Make sure the team is powered off.
2. Select the team to close.
Click the summary/console tab for the desired team, or select the team name in
the favorites list.
3. Choose File > Close.
The closed team is removed from the summary window. To remove the team from the
Favorites list, see Removing an Item from the Favorites List on page 84.
305
VMware Workstation 5 User’s Manual
Deleting a Team
When you delete a team, you can choose to delete
• only the team (retaining the virtual machines in the team)
• the team and the virtual machines in the team
Caution: Deleting a team permanently removes the team files from the host file
system and removes associated LAN segments from all virtual machines. Deleting the
team’s virtual machines along with the team removes the virtual machine files
permanently.
To remove a team from the Workstation window without deleting the team, see
Closing a Team on page 305.
To delete a team permanently
1. Make sure the team is powered off.
2. Select the team to delete.
Click the summary or console tab for the desired team, or select the team name
in the Favorites list.
3. Choose Team > Delete from Disk.
4. To delete the team without deleting the virtual machines in it, choose Delete. To
delete the team and the virtual machines in it, choose Delete Team and VMs.
When you delete a team, you also delete all team LAN segments. The virtual
ethernet adapters associated with deleted LAN segments become
disconnected. Bridged, host-only, NAT and custom configurations remain
unchanged.
5. Click OK.
The team is removed permanently from VMware Workstation and the host file system.
If you chose Delete Team and VMs in step 4, the virtual machines in the team are also
removed permanently from VMware Workstation and the host file system.
306
www.vmware.com
C H A P T E R 1 1 Configuring Teams
Adding and Removing Virtual Machines
• Adding an Existing Virtual Machine to a Team on page 307
• Removing a Virtual Machine from a Team on page 307
Adding an Existing Virtual Machine to a Team
To add an existing virtual machine to a team:
1. Select Team > Add > Existing Virtual Machine.
A file open dialog box appears.
2. Browse to the folder with the .vmx file for the virtual machine you want to
add.
3. Select the .vmx file and click Open.
The virtual machine is added to the team.
There are some issues to consider when you add a virtual machine to a team.
• A virtual machine is not powered on when you add it to a running team. You
must power on the added virtual machine manually to use it during the current
session. However, the added virtual machine is thereafter powered on or off with
the rest of the team.
• When you add a virtual machine to a team, you can no longer operate the virtual
machine outside the team. Adding a virtual machine to a team therefore
removes it from the Favorites list.
Removing a Virtual Machine from a Team
To remove a virtual machine from a team
1. Select the team with the virtual machine you want to remove.
Click the summary or console tab for the desired team, or select the team name
in the Favorites list.
2. Choose Team > Remove > <virtual machine name>.
The selected virtual machine is removed from the team. You can now use it
independently
307
VMware Workstation 5 User’s Manual
Note: When you remove a virtual machine from a team, you also remove it from
team LAN segments. Virtual network adapters associated with LAN segments become
disconnected. Bridged, host-only, NAT and vmnet configurations remain unchanged.
If you want to completely delete a virtual machine and erase its files from the host file
system, see Deleting a Virtual Machine on page 166.
Teams and the Favorites List
When you add a virtual machine to a team, it is automatically deleted from the
Favorites list. However, a virtual machine is not automatically added to the Favorites
list when you remove it from a team. You must manually add a virtual machine to the
Favorites list after removing it from a team. See Adding an Item to the Favorites List on
page 84.
308
www.vmware.com
C H A P T E R 1 1 Configuring Teams
Cloning and Taking Snapshots of Team
Members
Cloning a Virtual Machine in a Team
You can clone a virtual machine in a team in the same way you clone any other virtual
machine. See Creating Clones on page 292. When you clone a virtual machine in a
team
• The resulting clone is not part of the team.
• The clone automatically appears on the Favorites list as well as in a summary
window.
• If the parent virtual machine is configured for a LAN segment, the virtual
Ethernet adapter for that LAN segment on the clone is disconnected. To connect
to a network, you must reconfigure the virtual Ethernet adapter manually.
Taking Snapshots of Individual Virtual Machines in a Team
Snapshots operate on virtual machines, not on the whole team. When a team is
active, the Snapshot button on the toolbar takes a snapshot of only the active virtual
machine.
If you want to preserve the state of all virtual machines on a team, power off the team,
then take a snapshot of each virtual machine before you power on the team again.
309
VMware Workstation 5 User’s Manual
Starting and Stopping Teams
Power operations for teams are much the same as those for an individual virtual
machine. However, for a team, you can also configure the sequence in which the
members of a team power on and off. See Changing the Start-Up Sequence for a
Team on page 320.
• Powering On a Team on page 310
• Powering Off a Team on page 310
• Suspending a Team on page 311
• Resuming a Team on page 311
Note: You cannot close VMware Workstation if a team is powered on.
Powering On a Team
To power on a team
1. Select the team to power on: select the team from the Favorites list, or click the
summary tab for the team.
2. Click the Power On button on the toolbar.
The team begins to power on in the sequence specified in Team > Settings. See The
Startup Sequence on page 316 for more information.
Powering Off a Team
To power off a team
1. Select the team to power off: select the team from the Favorites list, or click the
summary tab for the team.
2. Click the Power Off button on the toolbar.
The team begins to power off in the sequence specified in Team > Settings. See The
Startup Sequence on page 316 for more information.
Shutting Down a Virtual Machine When You Power Off a Team
When you power off a team, the default settings for a virtual machine can cause the
guest operating system to terminate abruptly. For information about configuring your
virtual machine to recognize the shut down guest command when you power off a
team, see Shutting Down a Virtual Machine on page 162.
310
www.vmware.com
C H A P T E R 1 1 Configuring Teams
Suspending a Team
When you suspend a team, the virtual machines in the team are suspended.
To suspend a team of virtual machines
1. Select the team to suspend: select the team from the Favorites list, or click the
summary tab for the team.
2. Click the Suspend button on the toolbar.
All team virtual machines start suspending simultaneously. A progress indicator
appears for each team member. To see the progress of a particular team member,
choose Team > Switch To > <virtual machine name>.
The time to complete the operation varies with the size of the virtual machines.
Resuming a Team
To resume a team of virtual machines
1. Select the team to resume: select the team from the Favorites list, or click the
summary tab for the team.
2. Click the Power On button on the toolbar.
A progress indicator appears. The time to complete the operation varies with the size
of the virtual machines.
The startup sequence determines the order in which virtual machines are suspended
and resumed, and the time Workstation delays after each team member is resumed,
before resuming the next team member. See Changing the Start-Up Sequence for a
Team on page 320.
Note: If you attempt to close VMware Workstation while the team suspend/resume
operation is still in progress, a warning dialog appears.
Power Operations for Individual Members of a Team
To perform power operations for a single virtual machine in a team
1. Select the virtual machine from the teams console.
2. Choose the appropriate command from the VM > Power menu.
• Power On — see Starting a Virtual Machine on page 159 for a description. This
command starts the active virtual machine, just as a power switch starts a
physical PC.
• Power Off — see Shutting Down a Virtual Machine on page 162 for a
description. This command turns off the active virtual machine, just as a
power switch turns off a physical PC.
311
VMware Workstation 5 User’s Manual
Caution: If a virtual machine is writing to disk when it receives a Power Off
command, data may be corrupted. See Shutting Down a Virtual Machine on
page 162 for more information.
• Suspend and Resume — see Suspending and Resuming Virtual Machines on
page 161 for a description.
• Reset — see Resetting a Virtual Machine on page 163 for a description. This
command resets the active virtual machine, just as pressing the hardware
reset button resets a physical PC.
Caution: If a virtual machine is writing to disk when it receives a reset command,
data may be corrupted. See Resetting a Virtual Machine on page 163 for more
information.
• Shut Down Guest — This command sends a shut down signal to the guest
operating system. Some guest operating systems do not respond to this
command.
• Restart Guest — This command sends a restart signal to the guest operating
system. Some guest operating systems do not respond to this command.
• Suspend after running script — This command prompts you for a script to
execute before suspending the guest operating system. See Command Line
Reference on page 102 for information about scripts.
• Resume and run script — This command prompts you for a script to execute
after resuming the guest operating system. See Command Line Reference on
page 102 for information about scripts.
• Power on and run script — This command prompts you for a script to execute
after powering on the guest operating system. See Command Line Reference
on page 102 for information about scripts.
312
www.vmware.com
C H A P T E R 1 1 Configuring Teams
Working with Team Networks
One of the special advantages of teams is the ability to isolate virtual machines in
private virtual networks, called LAN segments. This can be useful with multitier
testing, network performance analysis, and situations where isolation and packet loss
are important.
LAN Segment Requirements
The following sections describe the requirements for virtual machines connecting to a
LAN segment.
Network Adapter
A physical PC must have a network adapter for each physical network connection.
Similarly, a virtual machine must be configured with a virtual network adapter for each
LAN segment it interacts with. To connect a virtual machine to multiple LAN
segments simultaneously, you must configure that virtual machine with multiple
network adapters.
LAN Segment IP Addresses
Each network client must have an IP address for TCP/IP networking. Unlike host-only
and NAT networking, LAN segments have no DHCP server provided automatically by
VMware Workstation. Therefore you must manually configure IP addressing for team
virtual machines on a LAN segment. There are two choices.
• DHCP — Configure a DHCP server on your LAN segment to allocate IP addresses
to your virtual machines.
• Static IP — Configure a fixed IP address for each virtual machine on the LAN
segment.
Note: When you add an existing virtual machine to a team, the virtual machine may
be configured to expect an IP address from a DHCP server. A DHCP server is not
automatically provided for a virtual LAN segment. You must provide a DHCP server on
the LAN segment, or reconfigure the virtual machine to use a static IP address. See
Configuring a Virtual Network on page 325.
313
VMware Workstation 5 User’s Manual
Creating a Team LAN Segment
To create a virtual network for a team:
1. Choose Team > Add > LAN Segment.
2. Enter a name for the private network.
The LAN segment is added to the team.
Connecting to or Changing a LAN Segment
To connect a virtual machine to a LAN segment
1. Choose Team > Settings
The team settings editor opens to the Connections tab. Each virtual Ethernet
adapter is displayed in a separate row.
2. For each virtual Ethernet adapter, select a LAN segment.
Check one box on each row to set the type of network connection for that
virtual Ethernet adapter.
3. Click OK.
The virtual machine is now connected to the selected LAN segment.
314
www.vmware.com
C H A P T E R 1 1 Configuring Teams
Renaming a LAN Segment
To rename an existing LAN segment
1. Choose Team > Settings
2. Click LAN Segments.
3. Select the LAN segment you want to rename.
4. Type a new name in the Name field.
5. Click OK.
The LAN segment now has the new name.
Deleting a LAN Segment
To delete a LAN segment from a team:
1. Choose Team > Settings
2. Click the LAN Segments tab.
3. Select the LAN segment you want to delete.
4. Click Remove.
The LAN segment is removed.
Note: Deleting a LAN segment disconnects all virtual Ethernet adapters that are
configured for that LAN segment. When you remove a virtual machine from a team,
you must manually configure its disconnected virtual Ethernet adapter if you want to
reconnect the virtual machine to a network.
315
VMware Workstation 5 User’s Manual
The Startup Sequence
In the start-up sequence, you can specify
• The order in which team virtual machines start and stop — Team virtual
machines start one at a time, in the order you set in the start-up sequence.
Setting the start-up sequence is useful, for example, if you have a virtual machine
that runs an application to be tested and you want it to start before the virtual
machines running an automated testing script.
• The delay between team members in the sequence — You can set the time that
Workstation delays after starting or stopping a virtual machine, before starting or
stopping the next virtual machine in the sequence. This delay can be useful to
reduce the load on the host CPU, and to allow applications on a virtual machine
to launch before another team virtual machine attempts to connect.
The start-up sequence applies to power on, power off, suspend, and resume
operations.
• Power on and resume operations for virtual machines occur in the order of the
sequence shown in the team settings list.
• Power off and suspend operations for virtual machines occur in the reverse of
the order shown in the team settings list.
To set the start-up sequence for a team, see Changing the Start-Up Sequence for a
Team on page 320.
Understanding the Start-Up Sequence Delay
You can set a delay between the sequential start-ups of virtual machines in a team.
This delay is useful to avoid overloading the CPU when multiple team virtual
machines start. You might also use this delay to ensure that a virtual machine
functioning as a server completes its start-up before client virtual machines start.
If your virtual machine team depends on precise start-up timing, you may need to
experiment to determine how much time your host and guest operating
environments and applications need to launch.
316
www.vmware.com
C H A P T E R 1 1 Configuring Teams
Working with the Team Console View
The team console view shows each virtual machine in the team. From the team
console view, you can select any team virtual machine to work with.
Displaying Teams
VMware Workstation displays teams in a summary view or console view.
• The summary view is available at any time. See Displaying the Summary View on
page 76 for more information about the summary view
• The console view is available only when a team is powered on. The console view
displays the team in two areas. The main part of the display shows the active
virtual machine. The area just below the Workstation summary tabs shows
thumbnail views of all virtual machines in the team. A grab bar allows you to
resize the areas.
Console window for a team (Windows host)
317
VMware Workstation 5 User’s Manual
The Active Virtual Machine
Team Thumbnails
When a team is powered on, the team console displays thumbnail views of all team
members in a row at the top of the console. You may have to scroll the thumbnails to
view all your virtual machines on a large team. The thumbnails are displayed in the
same order as the team’s start-up sequence, starting on the left with the first virtual
machine in the sequence.
Workstation updates thumbnails in real time, to display the actual content of the
virtual machine screens. The active virtual machine — the one appearing in the lower
pane of the console — is represented by the VMware icon.
Workstation menus and commands directly affect only the active virtual machine, and
you can use the mouse and keyboard to interact directly with the active virtual
machine.
Changing the Active Virtual Machine
Click a thumbnail of a virtual machine to make the virtual machine active. The virtual
machine you clicked appears in the lower pane of the console, and its thumbnail
becomes the VMware icon.
Using Full Screen with Teams
In full screen mode, Workstation displays only the active virtual machine. See Using
Full Screen Mode on page 168.
318
www.vmware.com
C H A P T E R 1 1 Configuring Teams
Editing Team Settings
To review or change team properties, choose Team > Settings. You can configure the
virtual machines in the team, review the team LAN segments, or rename the team
using the following tabs:
• Connections
• Virtual Machines
• LAN Segments
• Options
Connections
To review and configure network connections
1. Choose Team > Settings.
2. Click Connections.
From this tab you can review the virtual machine name and the network and LAN
segment associations for each member of the team. You can also change network
settings from this screen.
319
VMware Workstation 5 User’s Manual
Virtual Machines
To change the start-up sequence and delay
1. Choose Team > Settings.
2. Click Virtual Machines.
From this tab you can add and remove virtual machines, and change the virtual
machine startup sequence.
The list of virtual machines associated with the team is displayed on the left, in the
order of the start-up sequence: the virtual machine at the top of the list is the first in
the start-up sequence; the virtual machine at the bottom of the list is the last in the
sequence.
Changing the Start-Up Sequence for a Team
To set the start-up sequence for members of a team
1. Choose Team > Settings.
2. Click Virtual Machines.
3. Arrange the virtual machine start order.
Select any virtual machine and use the Up or Down buttons to change the
sequence.
4. Set the delay time between virtual machines.
Under Startup details you can set a delay time between each virtual machine
and the next virtual machine in the start-up sequence. This delay is applied to
power on, power off, suspend, and resume operations. The default delay is 10
seconds.
To change the delay, use the up and down arrows or type a number into the
field. See Understanding the Start-Up Sequence Delay on page 316 for a
discussion of this option.
320
www.vmware.com
C H A P T E R 1 1 Configuring Teams
5. Click OK
Your changes are saved.
Note: The start-up sequence applies to team suspend and resume operations as
well as power on and power off operations:
• Team virtual machines power off and suspend in the reverse order of the startup sequence, with the delays you set in Startup details.
• Team virtual machines power on and resume in the order of the sequence, with
the delays you set in Startup details.
LAN Segments
To configure LAN segments
1. Choose Team > Settings.
2. Click LAN Segments.
From this tab you can add, remove, and rename the LAN segments configured for the
team. You can also configure network transmission properties for the LAN segment
from this tab.
The list in the left pane displays LAN segments associated with the team. Click a name
to select the LAN segment you want to configure.
The right pane displays parameters for the physical properties of the emulated LAN
segment link.
• Name — The name of the LAN segment.
To change the name, type a new name in the Name field.
• Bandwidth — A drop-down menu of bandwidths for typical network links.
To change the bandwidth by connection type, choose another connection type
from the drop-down menu.
321
VMware Workstation 5 User’s Manual
• Kbps — In this field you can set a custom bandwidth — one that is different
from the choices in the Bandwidth menu. Changes here are overwritten when
you make a selection from the Bandwidth menu.
To change the bandwidth, type a number into the field.
• Packet Loss — A specification of the efficiency or faultiness of the link, measured
in the percentage of packets lost from the total number of packets transmitted.
To change the packet loss setting, type a number into the field.
Click OK to save your changes. Click Cancel to discard your changes.
Note: LAN settings changes are ignored by virtual machines that are currently
running. Changes to LAN settings become active for a given virtual machine only after
that virtual machine is powered on, reset, or resumed.
Options
To change the name of a team
1. Choose Team > Settings.
2. Click Options.
3. Type a new name in the Team name field.
4. Click OK.
322
www.vmware.com
C H A P T E R 1 1 Configuring Teams
Command Line for Teams
VMware Workstation now includes a command line application for scripting certain
operations for teams. See Command Line Application on page 104 for more
information.
323
VMware Workstation 5 User’s Manual
324
www.vmware.com
CHAPTER
12
Configuring a Virtual Network
The first topics in this section give you a quick look at the virtual networking
components that VMware Workstation provides and show how you can use them
with your virtual machine. The rest of the section provides more detail on some
networking capabilities and specialized configurations.
• Network Basics on page 326
• Components of the Virtual Network on page 327
• Common Networking Configurations on page 329
• Custom Networking Configurations on page 333
• Changing the Networking Configuration on page 336
• Advanced Networking Topics on page 346
• Understanding NAT on page 365
• Using Samba with Workstation on page 378
325
VMware Workstation 5 User’s Manual
Network Basics
VMware Workstation provides several ways you can configure a virtual machine for
virtual networking.
• Bridged networking configures your virtual machine as a unique identity on the
network, separate and unrelated to its host. See Bridged Networking on
page 329.
• Network address translation (NAT) configures your virtual machine to share the
IP and MAC addresses of the host. The virtual machine and the host share a
single network identity that is not visible outside the network. NAT can be useful
when you are allowed a single IP address or MAC address by your network
administrator. You might also use NAT to configure separate virtual machines for
handling http and ftp requests, with both virtual machines running off the same
IP address or domain. See Network Address Translation (NAT) on page 330.
• Host-only networking configures your virtual machine to allow network access
only to the host. This can be useful when you want a secure virtual machine that
is connected to the host network, but available only through the host machine.
See Host-Only Networking on page 332.
• Custom networking lets you configure your virtual machine’s network
connection manually.
If you select the Typical setup path in the New Virtual Machine Wizard when you
create a virtual machine, the wizard sets up bridged networking for the virtual
machine. You can choose any of the common configurations — bridged networking,
network address translation (NAT) and host-only networking — by selecting the
Custom setup path. The wizard then connects the virtual machine to the appropriate
virtual network.
You can set up more specialized configurations by choosing the appropriate settings
in the virtual machine settings editor, in the virtual network editor (on Windows hosts)
and on your host computer.
On a Windows host, the software needed for all networking configurations is installed
when you install VMware Workstation. On a Linux host, when you install Workstation,
you can choose whether to have bridged and host-only networking available to your
virtual machines: you must choose both options during the Workstation installation to
make all networking configurations available for your virtual machines.
326
www.vmware.com
C H A P T E R 1 2 Configuring a Virtual Network
Components of the Virtual Network
The following sections describe the devices that make up a virtual network.
Virtual switch
Like a physical switch, a virtual switch lets you connect other networking components
together. Virtual switches are created as needed by the VMware Workstation software,
up to a total of nine switches. You can connect one or more virtual machines to a
switch.
By default, a few of the switches and the networks associated with them are used for
special named configurations:
• The bridged network uses VMnet0.
• The host-only network uses VMnet1.
• The NAT network uses VMnet8.
The other available networks are simply named VMnet2, VMnet3, VMnet4, and so on.
To connect a virtual machine to a switch: In the virtual machine settings editor, select
the virtual network adapter to connect, and then configure the adapter to use the
desired virtual network.
Bridge
The bridge lets you connect your virtual machine to the LAN used by your host
computer. It connects the virtual network adapter in your virtual machine to the
physical Ethernet adapter in your host computer.
The bridge is installed during VMware Workstation installation (on a Linux host, you
must choose to make bridged networking available to your virtual machines). When
you create a new virtual machine using bridged networking, the bridge is set up
automatically.
You can set up additional virtual bridges for custom configurations that require
connections to more than one physical Ethernet adapter on the host computer.
327
VMware Workstation 5 User’s Manual
Host Virtual Adapter
The host virtual adapter is a virtual Ethernet adapter that appears to your host
operating system as a VMware virtual Ethernet adapter on a Windows host and as a
host-only interface on a Linux host. The host virtual adapter allows you to
communicate between your host computer and the virtual machines on that host
computer. The host virtual adapter is used in host-only and NAT configurations.
The host virtual adapter is not connected to any external network unless you set up
special software on the host computer — a proxy server, for example — to connect
the host-only adapter to the physical network adapter.
The software that creates the host virtual adapter is installed when you install VMware
Workstation (on a Linux host, you must choose to make host-only networking
available to your virtual machines). A host virtual adapter is then created automatically
when you boot the host computer.
You can set up additional host virtual adapters as needed.
NAT Device
The NAT (network address translation) device allows you to connect your virtual
machines to an external network when you have only one IP network address on the
physical network, and that address is used by the host computer. You can, for
example, use NAT to connect your virtual machines to the Internet through a dial-up
connection on the host computer, through the host computer’s Ethernet adapter, or
through a wireless Ethernet adapter. NAT is also useful when you need to connect to a
non-Ethernet network, such as Token Ring or ATM.
The NAT device is set up automatically when you install VMware Workstation. (On a
Linux host, you must choose to make NAT available to your virtual machines.)
DHCP Server
The DHCP (dynamic host configuration protocol) server provides IP network
addresses to virtual machines in configurations that are not bridged to an external
network — for example, host-only and NAT configurations.
Network Adapter
One virtual network adapter is set up for your virtual machine when you create it with
the New Virtual Machine Wizard using any type of networking. It appears to the guest
operating system as an AMD PCNET PCI adapter.
You can create and configure up to three virtual network adapters in each virtual
machine using the virtual machine settings editor.
328
www.vmware.com
C H A P T E R 1 2 Configuring a Virtual Network
Common Networking Configurations
The following sections illustrate the networking configurations that are set up for you
automatically when you choose the standard networking options in the New Virtual
Machine Wizard or virtual machine settings editor.
Only one virtual machine is shown in each example, but multiple virtual machines can
be connected to the same virtual Ethernet switch. On a Windows host, you can
connect an unlimited number of virtual network devices to a virtual switch. On a
Linux host, you can connect up to 32 devices.
Bridged Networking
Virtual
Ethernet
adapter
Virtual machine
Virtual Ethernet switch
(VMnet0)
Virtual bridge
Host
Ethernet
adapter
Bridged networking connects a virtual machine to a network using the host computer’s Ethernet adapter.
Bridged networking is set up automatically if you select Use bridged networking in
the New Virtual Machine Wizard or if you select the Typical setup path. This selection
is available on a Linux host only if you enable the bridged networking option when
you install VMware Workstation.
If your host computer is on an Ethernet network, this is often the easiest way to give
your virtual machine access to that network. Linux and Windows hosts can use
bridged networking to connect to both wired and wireless networks.
If you use bridged networking, your virtual machine needs to have its own identity on
the network. For example, on a TCP/IP network, the virtual machine needs its own IP
address. Your network administrator can tell you whether IP addresses are available for
your virtual machine and what networking settings you should use in the guest
operating system. Generally, your guest operating system may acquire an IP address
329
VMware Workstation 5 User’s Manual
and other network details automatically from a DHCP server, or you may need to set
the IP address and other details manually in the guest operating system.
If you use bridged networking, the virtual machine is a full participant in the network.
It has access to other machines on the network and can be contacted by other
machines on the network as if it were a physical computer on the network.
Be aware that if the host computer is set up to boot multiple operating systems and
you run one or more of them in virtual machines, you need to configure each
operating system with a unique network address. People who boot multiple
operating systems often assign all systems the same address, since they assume only
one operating system will be running at a time. If you use one or more of the
operating systems in a virtual machine, this assumption is no longer true.
If you make some other selection in the New Virtual Machine Wizard and later decide
you want to use bridged networking, you can make that change in the virtual
machine settings editor (VM > Settings). For details, see Changing the Networking
Configuration on page 336.
Network Address Translation (NAT)
Virtual
Ethernet
adapter
Virtual machine
DHCP server
Virtual Ethernet switch
(VMnet8)
Network
NAT device
NAT gives a virtual machine access to network resources using the host computer’s IP address.
A network address translation connection is set up automatically if you follow the
Custom path in the New Virtual Machine Wizard and select Use network address
translation.
If you want to connect to the Internet or other TCP/IP network using the host
computer’s dial-up networking or broadband connection and you are not able to give
your virtual machine an IP address on the external network, NAT is often the easiest
way to give your virtual machine access to that network.
330
www.vmware.com
C H A P T E R 1 2 Configuring a Virtual Network
NAT also allows you to connect to a TCP/IP network using a Token Ring adapter on the
host computer.
If you use NAT, your virtual machine does not have its own IP address on the external
network. Instead, a separate private network is set up on the host computer. Your
virtual machine gets an address on that network from the VMware virtual DHCP
server. The VMware NAT device passes network data between one or more virtual
machines and the external network. It identifies incoming data packets intended for
each virtual machine and sends them to the correct destination.
If you select NAT, the virtual machine can use many standard TCP/IP protocols to
connect to other machines on the external network. For example, you can use HTTP
to browse Web sites, FTP to transfer files and Telnet to log on to other computers. In
the default configuration, computers on the external network cannot initiate
connections to the virtual machine. That means, for example, that the default
configuration does not let you use the virtual machine as a Web server to send Web
pages to computers on the external network.
If you make some other selection in the New Virtual Machine Wizard and later decide
you want to use NAT, you can make that change in the virtual machine settings editor
(VM > Settings). For details, see Changing the Networking Configuration on
page 336.
331
VMware Workstation 5 User’s Manual
Host-Only Networking
Virtual
Ethernet
adapter
Virtual machine
DHCP server
Virtual Ethernet switch
(VMnet1)
Host virtual
adapter
Host-only networking creates a network that is completely contained within the host computer.
A host-only network is set up automatically if you select Use Host-only Networking in
the New Virtual Machine Wizard. On Linux hosts, this selection is available only if you
enabled the host-only networking option when you installed VMware Workstation.
Host-only networking provides a network connection between the virtual machine
and the host computer, using a virtual Ethernet adapter that is visible to the host
operating system. This approach can be useful if you need to set up an isolated virtual
network.
If you use host-only networking, your virtual machine and the host virtual adapter are
connected to a private Ethernet network. Addresses on this network are provided by
the VMware DHCP server.
If you make some other selection in the New Virtual Machine Wizard and later decide
you want to use host-only networking, you can make that change in the virtual
machine settings editor (VM > Settings). For details, see Changing the Networking
Configuration on page 336.
Routing and Connection Sharing
If you install the proper routing or proxy software on your host computer, you can
establish a connection between the host virtual Ethernet adapter and a physical
network adapter on the host computer. This allows you, for example, to connect the
virtual machine to a Token Ring or other non-Ethernet network.
On a Windows 2000, Windows XP or Windows Server 2003 host computer, you can
use host-only networking in combination with the Internet connection sharing
feature in Windows to allow a virtual machine to use the host’s dial-up networking
adapter or other connection to the Internet. See your Windows documentation for
details on configuring Internet connection sharing.
332
www.vmware.com
C H A P T E R 1 2 Configuring a Virtual Network
Custom Networking Configurations
The virtual networking components provided by VMware Workstation make it
possible for you to create sophisticated virtual networks. The virtual networks can be
connected to one or more external networks, or they may run entirely on the host
computer.
Setting up networking components for your custom virtual network is a
straightforward process. Before attempting to set up complex virtual networks, you
should have a good understanding of how to configure network devices in your host
and guest operating systems.
The sample configuration described in this section illustrates many of the ways you
can combine devices on a virtual network. Other custom configurations are described
in Advanced Networking Topics on page 346 and Understanding NAT on page 365.
.
Host's
Ethernet
adapter
Virtual
Ethernet switch
(VMnet0)
Virtual
Bridge
bridge
Virtual
Ethernet
adapter
Virtual
Ethernet
adapter
Virtual
Ethernet
adapter
Virtual machine 2
Web server
Virtual
Ethernet
adapter
Virtual
Ethernet switch
(VMnet2)
Virtual machine 1
Firewall
Virtual
Ethernet
adapter
Virtual
Ethernet switch
(VMnet3)
Virtual machine 3
Firewall
Virtual
Ethernet
adapter
Virtual machine 4
“Internal” PC
In this custom configuration, a Web server connects through a firewall to an external network. An administrator’s
computer can connect to the Web server through a second firewall.
333
VMware Workstation 5 User’s Manual
To set up this configuration, you must create four virtual machines and use the virtual
machine settings editor to adjust the settings for their virtual Ethernet adapters. You
also need to install the appropriate guest operating systems and application software
in each virtual machine and make the appropriate networking settings in each virtual
machine.
1. Set up four virtual machines using the New Virtual Machine Wizard.
Create the first virtual machine with bridged networking so it can connect to an
external network using the host computer’s Ethernet adapter.
Create the other three virtual machines without networking. You will set up their
virtual Ethernet adapters in later steps.
2. Start VMware Workstation and open virtual machine 1. Do not power on the
virtual machine.
Use the virtual machine settings editor (VM > Settings) to add a second virtual
network adapter, as described in Changing the Networking Configuration on
page 336. Connect the second adapter to Custom (VMnet2).
Click OK to save the configuration and close the virtual machine settings editor.
3. If VMware Workstation is not running, start it. Open virtual machine 2. Do not
power on the virtual machine.
Use the virtual machine settings editor (VM > Settings) to add a virtual network
adapter. Connect the adapter to Custom (VMnet2).
Click OK to save the configuration and close the virtual machine settings editor.
4. If VMware Workstation is not running, start it. Open virtual machine 3. Do not
power on the virtual machine.
Use the virtual machine settings editor (VM > Settings) to add a virtual network
adapter. Connect the adapter to Custom (VMnet2).
Use the virtual machine settings editor to add a second virtual network adapter.
Connect the adapter to Custom (VMnet3).
Click OK to save the configuration and close the virtual machine settings editor.
5. If VMware Workstation is not running, start it. Open virtual machine 4. Do not
power on the virtual machine.
Use the virtual machine settings editor (VM > Settings) to add a virtual network
adapter. Connect the adapter to Custom (VMnet3).
Click OK to save the configuration and close the virtual machine settings editor.
334
www.vmware.com
C H A P T E R 1 2 Configuring a Virtual Network
6. Determine the network addresses used for VMnet2 and VMnet3.
Note: On a Windows host, you may skip the steps for configuring network
addresses manually and, instead, use Workstation’s DHCP server. Go to Edit >
Virtual Network Settings > DHCP and add VMnet2 and VMnet3 to the list of
virtual networks served by the virtual DHCP server. Then skip to step 9.
On a Windows host, open a command prompt on the host computer and run
ipconfig /all. Note the network addresses used by each virtual adapter.
On a Linux host, run ifconfig at the console or in a terminal window on the
host computer. Note the network addresses used by each virtual switch.
7. Start VMware Workstation, open each virtual machine in turn and install the
appropriate guest operating system.
8. Configure the networking in each guest operating system.
For the bridged Ethernet adapter in virtual machine 1, use the networking
settings needed for a connection to the external network. If the virtual machine
gets its IP address from a DHCP server on the external network, the default
settings should work.
For the second Ethernet adapter in virtual machine 1, manually assign an IP
address in the range you are using with VMnet2.
In virtual machine 2, assign an IP address in the range you are using with
VMnet2.
In virtual machine 3, network adapters are connected to VMnet2 and VMnet3.
Assign each adapter an IP address in the range you are using with the virtual
network to which it is connected.
In virtual machine 4, assign an IP address in the range you are using with
VMnet3.
9. Install the necessary application software in each virtual machine.
335
VMware Workstation 5 User’s Manual
Changing the Networking Configuration
Using the virtual machine settings editor (VM > Settings), you can add virtual
Ethernet adapters to your virtual machine and change the configuration of existing
adapters. This section contains the following topics:
• Adding and Modifying Virtual Network Adapters on page 336
• Configuring Bridged Networking Options on a Windows Host on page 338
• Enabling, Disabling, Adding, and Removing Host Virtual Adapters on page 343
Adding and Modifying Virtual Network Adapters
To add a new virtual Ethernet adapter, follow these steps.
1. Be sure the virtual machine to which you want to add the adapter is powered off.
2. Open the virtual machine settings editor (VM > Settings).
3. Click Add.
4. The Add Hardware Wizard starts. Select Network Adapter. Click Next.
5. Select the network type you want to use — Bridged, NAT, Host-only or Custom.
6. If you select Custom, choose the VMnet network you want to use from the dropdown list.
Note: Although VMnet0, VMnet1 and VMnet8 are available in this list, they are
normally used for bridged, host-only and NAT configurations, respectively.
Special steps are required to make them available for use in custom
configurations. You should choose one of the other switches.
7. Click Finish. The new adapter is added.
8. Click OK to save your configuration and close the virtual machine settings editor.
336
www.vmware.com
C H A P T E R 1 2 Configuring a Virtual Network
To change the configuration of an existing virtual network adapter, follow these steps.
1. Open the virtual machine settings editor (VM > Settings).
2. Select the adapter you want to modify.
3. Select the network type you want to use — Bridged, NAT, Host-only or Custom.
4. If you select Custom, choose the VMnet virtual network you want to use for the
network from the drop-down list.
5. Click OK to save your changes and close the virtual machine settings editor.
6. Be sure the guest operating system is configured to use an appropriate IP
address on the new network. If the guest is using DHCP, release and renew the
lease. If the IP address is set statically, be sure the guest has an address on the
correct virtual network.
337
VMware Workstation 5 User’s Manual
Configuring Bridged Networking Options on a Windows Host
Note: The virtual network editor is not available on a Linux host.
Use the virtual network editor to configure bridged networking. You can
• View and change the settings for bridged networking on your host
• Determine which network adapters on your host to use for bridged networking
• Map specific network adapters to specific virtual networks, called VMnets
Note: The changes you make to bridged networking affect all virtual machines using
bridged networking on the host.
Configuring VMnet0 Bridged Networking
1. Choose Edit > Virtual Network Settings.
The virtual network editor appears, with the Summary tab active.
By default, the VMnet0 virtual network is set up in bridged mode and bridges to
one of the active Ethernet adapters on the host computer.
2. Click the Automatic Bridging tab.
338
www.vmware.com
C H A P T E R 1 2 Configuring a Virtual Network
3. Check the box for Automatically choose an available physical adapter.
On host systems with more than one physical Ethernet adapter installed, the
choice of which adapter Workstation uses is arbitrary. If you want to place
restrictions on the choice, see the following section, Excluding a Host Ethernet
Adapter from VMnet0 Bridged Networking.
4. Click OK to save your changes and close the virtual network editor.
Excluding a Host Ethernet Adapter from VMnet0 Bridged Networking
You can exclude a host Ethernet adapter from the list of adapters Workstation uses for
automatic bridged networking on VMnet0. To exclude one or more physical Ethernet
adapters:
1. Choose Edit > Virtual Network Settings.
2. Click the Automatic Bridging tab.
3. Click Add to put the physical adapter in the list of excluded devices.
339
VMware Workstation 5 User’s Manual
4. In the Add Excluded Adapters dialog box, select the listing for the adapter you
want to exclude, then click OK.
5. Click OK to save your changes and close the virtual network editor.
Removing a Host Ethernet Adapter from the Excluded Adapters List
To remove an adapter from the list of excluded adapters:
1. Choose Edit > Virtual Network Settings.
2. Click the Automatic Bridging tab.
3. Select the name of the adapter you want to remove.
4. Click Remove.
5. Click OK to save your changes and close the virtual network editor.
Choosing a Host Ethernet Adapter for Custom Bridged Networking
You can create a custom bridged network on virtual switches VMnet2 to VMnet7. To
designate a physical Ethernet adapter to bridge to custom virtual switches
1. Choose Edit > Virtual Network Settings.
2. Click the Host Virtual Network Mapping tab.
3. Choose an adapter from the drop-down list beside the name of the virtual
switch you want to use.
Caution: Be careful when you change the bridged adapter mappings. If you reassign a physical Ethernet adapter to a different virtual network, any virtual
machine using the original network loses its network connectivity via that
network. You must then change the setting for each affected virtual machine’s
network adapter individually. This can be especially troublesome if your host has
only one physical Ethernet adapter and you reassign it to a VMnet other than
340
www.vmware.com
C H A P T E R 1 2 Configuring a Virtual Network
VMnet0; even though the VMnet still appears to be bridged to an automatically
chosen adapter, the only adapter it can use has been assigned to another VMnet.
4. Click OK to save your changes and close the virtual network editor.
Changing Subnet or DHCP Settings for a Virtual Network
To make changes to the subnet or the DHCP settings for a virtual network,
1. Click the button on the right that corresponds to the virtual network you want to
configure.
2. Choose Subnet or DHCP.
• In the Subnet dialog box, you can change the subnet’s IP address and the
subnet mask
The address should specify a valid network address that is suitable for use with
the subnet mask.
The default subnet mask is 255.255.255.0 (a class-C network). Typically, this
means you should modify only the third number in the IP address — for
example, x in 192.168.x.0 or 172.16.x.0. In general, you should not change the
subnet mask. Certain virtual network services may not work as well with a
customized subnet mask.
When you modify the network address or subnet mask, VMware Workstation
automatically updates the IP address settings for other components — such
as DHCP, NAT and host virtual adapter — on that virtual network to reflect the
new settings. The specific settings that are automatically updated include
DHCP lease range, DHCP server address, NAT gateway address and host virtual
341
VMware Workstation 5 User’s Manual
adapter IP address. However, if you have changed any of these settings from
its default value — even if you have later changed the setting back to the
default — VMware Workstation does not update that setting automatically.
Workstation presumes that custom settings are not to be modified.
• In the DHCP settings dialog box, you can change the range of IP addresses
provided by the VMware Workstation DHCP server on a particular virtual
network.
You can also use this dialog box to set the duration of DHCP leases provided
to clients on the virtual network.
3. Click OK to save your changes and close the virtual network editor.
342
www.vmware.com
C H A P T E R 1 2 Configuring a Virtual Network
Enabling, Disabling, Adding, and Removing
Host Virtual Adapters
When you install VMware Workstation, two network adapters are added to the
configuration of your host operating system — one that allows the host to connect to
the host-only network and one that allows the host to connect to the NAT network.
If you are not using a virtual network adapter, you may wish to remove it. On a
Windows host, you can also choose to disable an adapter.
The presence of virtual network adapters has a slight performance cost, because
broadcast packets must go to the extra adapters. On Windows networks, browsing
your network may be slower than usual. And in some cases, these adapters interact
with the host computer’s networking configuration in undesirable ways.
Disabling a Host Virtual Adapter on a Windows Host
Use the virtual network editor to disable any unwanted adapters.
1. Choose Edit > Virtual Network Settings
2. Click Host Virtual Adapters.
3. Select the adapter you want to disable.
4. Click Disable.
5. Click OK.
343
VMware Workstation 5 User’s Manual
Enabling a Disabled Host Virtual Adapter on a Windows Host
Follow these steps to enable a host virtual adapter on a Windows host.
1. Go to Edit > Virtual Network Settings > Host Virtual Adapters.
2. Select the disabled adapter you want to enable.
3. Click Enable.
4. Click OK.
Adding a Host Virtual Adapter on a Windows Host
Follow these steps to add a host virtual adapter on a Windows host.
1. Go to Edit > Virtual Network Settings > Host Virtual Adapters.
2. Click Add new adapter.
3. Choose the virtual network on which you want to use the adapter and click OK.
4. Click Apply or OK.
• Click Apply to enable the adapter without closing the window, allowing
further configuration changes.
• Click OK to close the virtual network editor.
Removing a Host Virtual Adapter on a Windows Host
1. Go to Edit > Virtual Network Settings > Host Virtual Adapters.
2. Select the adapter you want to remove, then click Remove adapter.
3. Click OK.
344
www.vmware.com
C H A P T E R 1 2 Configuring a Virtual Network
Removing a Host Virtual Adapter on a Linux Host
1. Become root and run the VMware Workstation configuration program.
su vmware-config.pl
2. Watch for the following question
Do you want networking for your Virtual Machines? (yes/
no/help) [yes]
Answer Yes if you still want to use any networking in your virtual machines, then
continue to the next question.
Otherwise, answer No to remove all networking.
3. If you answer Yes, the program prompts you to select the wizard or editor to edit
your network configuration. Select editor. This is the only way to delete virtual
network adapters without removing all of them.
Would you prefer to modify your existing networking
configuration using the wizard or the editor? (wizard/
editor/help) [wizard] editor
4. You see a list of virtual networks that have been configured. Select the network
corresponding to the adapter you wish to disable.
The following virtual networks have been defined:
. vmnet0 is bridged to eth0
. vmnet1 is a host-only network on subnet 172.16.155.0.
. vmnet8 is NAT network on a private subnet 172.16.107.0.
Which virtual network do you wish to configure? (0-99) 1
5. You may be prompted to keep this virtual network. If you are sure you want to
remove it, answer Yes to the question.
The network vmnet1 has been reserved for a host-only
network. You may change it, but it is highly recommended
that you use it as a host-only network. Are you sure you
want to modify it? (yes/no) [no] yes
6. When prompted about the type of virtual network, select None and the virtual
network will be removed.
What type of virtual network do you wish to set vmnet1?
(bridged,hostonly,nat,none) [hostonly] none
345
VMware Workstation 5 User’s Manual
Advanced Networking Topics
The following sections describe advanced networking topics:
• Selecting IP Addresses on a Host-only Network or NAT Configuration on
page 347
• Avoiding IP Packet Leakage in a Host-Only Network on page 350
• Maintaining and Changing the MAC Address of a Virtual Machine on page 352
• Controlling Routing Information for a Host-only Network on a Linux Host on
page 354
• Other Potential Issues with Host-Only Networking on a Linux Host on page 355
• Setting Up a Second Bridged Network Interface on a Linux Host on page 356
• Setting Up Two Separate Host-Only Networks on page 357
• Routing between Two Host-Only Networks on page 360
• Using Virtual Ethernet Adapters in Promiscuous Mode on a Linux Host on
page 364
346
www.vmware.com
C H A P T E R 1 2 Configuring a Virtual Network
Selecting IP Addresses on a Host-only Network or NAT
Configuration
A host-only network uses a private virtual network. The host and all virtual machines
configured for host-only networking are connected to the network through a virtual
switch. Typically, all the parties on this private network use the TCP/IP protocol suite,
although other communication protocols may be used.
A network address translation (NAT) configuration also sets up a private network,
which must be a TCP/IP network. The virtual machines configured for NAT are
connected to that network through a virtual switch. The host computer is also
connected to the private network used for NAT via a host virtual adapter.
Each virtual machine and the host must be assigned addresses on the private
network. This is typically done using the DHCP server that comes with VMware
Workstation. Note that this server does not service virtual (or physical) machines
residing on bridged networks.
Addresses can also be assigned statically from a pool of addresses that are not
assigned by the DHCP server.
When host-only networking is enabled at the time VMware Workstation is installed,
the network number to use for the virtual network is automatically selected as an
unused private IP network number. To find out what network is used on a Windows
host, choose Edit > Virtual Network Settings and check the subnet number
associated with the virtual network. On a Linux host, run ifconfig in a terminal.
A NAT configuration also uses an unused private network automatically selected
when you install VMware Workstation. To find out what network is used on a Windows
host, choose Edit > Virtual Network Settings and check the subnet number
associated with the virtual network. On a Linux host, run ifconfig in a terminal.
Using DHCP to assign IP addresses is simpler and more automatic than statically
assigning them. Most Windows operating systems, for example, come preconfigured
to use DHCP at boot time, so Windows virtual machines can connect to the network
the first time they are booted, without additional configuration. If you want your
virtual machines to communicate with each other using names instead of IP
addresses, however, you must set up a naming convention, a name server on the
private network, or both. In that case it may be simpler to use static IP addresses.
In general, if you have virtual machines you intend to use frequently or for extended
periods of time, it is probably most convenient to assign them static IP addresses or
configure the VMware DHCP server to always assign the same IP address to each of
these virtual machines.
347
VMware Workstation 5 User’s Manual
Configuring the DHCP Server on a Linux Host
On a Linux host, you configure the host-only DHCP server by editing the DHCP
configuration file for VMnet1 (/etc/vmware/vmnet1/dhcp/dhcp.conf ). To
configure the DHCP server for the NAT network, edit the configuration file for VMnet8
(/etc/vmware/vmnet8/dhcp/dhcp.conf ).
Editing the DHCP server configuration file requires information that is best obtained
directly from the DHCP server documentation. Consult the manual pages dhcpd(8)
and dhcpd.conf(8).
Configuring the DHCP Server on a Windows Host
On a Windows host, use the virtual network editor to configure the DHCP server (Edit
> Virtual Network Settings > DHCP).
Select the virtual network for which you want to change settings and click Properties.
Make the desired changes, then click OK.
348
www.vmware.com
C H A P T E R 1 2 Configuring a Virtual Network
Choosing the Method for Assigning IP Addresses
For virtual machines that you do not expect to keep for long, use DHCP and let it
allocate an IP address.
For each host-only or NAT network, the available IP addresses are split up using the
conventions shown in the tables below, where <net> is the network number
assigned to your host-only or NAT network. VMware Workstation always uses a Class C
address for host-only and NAT networks.
Address Use on a Host-Only Network
Range
Address use
Example
<net>.1
Host machine
192.168.0.1
<net>.2–<net>.127
Static addresses
192.168.0.2–192.168.0.127
<net>.128–<net>.253
DHCP-assigned
192.168.0.128–192.168.0.253
<net>.254
DHCP server
192.168.0.254
<net>.255
Broadcasting
192.168.0.255
Address Use on a NAT Network
Range
Address use
Example
<net>.1
Host machine
192.168.0.1
<net>.2
NAT device
192.168.0.2
<net>.3–<net>.127
Static addresses
192.168.0.3–192.168.0.127
<net>.128–<net>.253
DHCP-assigned
192.168.0.128–192.168.0.253
<net>.254
DHCP server
192.168.0.254
<net>.255
Broadcasting
192.168.0.255
349
VMware Workstation 5 User’s Manual
Avoiding IP Packet Leakage in a Host-Only Network
By design, each host-only network should be confined to the host machine on which
it is set up. That is, no packets sent by virtual machines on this network should leak out
to a physical network attached to the host. Packet leakage can occur only if a machine
actively forwards packets. It is possible for the host machine or any virtual machine
running on the host-only network to be configured in a way that permits packet
leakage.
Windows Hosts
Systems using server versions of Windows 2000 are capable of forwarding IP packets
that are not addressed to them. By default, however, these systems come with IP
packet forwarding disabled. IP forwarding is not an issue on Windows 2000
Professional, Windows XP Professional or Windows XP Home Edition hosts.
If you find packets leaking out of a host-only network on a Windows 2000 host
computer, check to see if forwarding has been enabled on the host machine. If it is
enabled, disable it.
On a Windows 2000 or Windows Server 2003 host, go to Start > Programs >
Administrative Tools > Routing and Remote Access. An icon on the left is labeled
with the host name. If a green dot appears over the icon, IP forwarding is turned on. To
turn it off, right-click the icon and disable Routing and Remote Access. A red dot
appears, indicating that IP forwarding is disabled.
Windows 2000 Professional Users: The Windows 2000 Administration Tools are not
installed on a Windows 2000 Professional system. However, you can install these tools
from a Windows 2000 Server or Windows 2000 Advanced Server CD-ROM.
To install Windows 2000 Administration Tools on a local computer:
1. Open the i386 folder on the applicable Windows 2000 Server disc.
2. Double-click the adminpak.msi file. Follow the instructions that appear in
the Windows 2000 Administration Tools Setup wizard.
3. After Windows 2000 Administration Tools are installed, you can access most of
the server administrative tools by choosing Start > Programs > Administrative
Tools.
350
www.vmware.com
C H A P T E R 1 2 Configuring a Virtual Network
Linux Hosts
If you find packets leaking out of a host-only network on a Linux host computer, check
to see if forwarding has mistakenly been enabled on the host machine. If it is enabled,
disable it.
For many Linux systems, disable forwarding by writing a 0 (zero) to the special file
/proc/sys/net/ipv4/ip_forward. As root, enter this command:
echo 0 > /proc/sys/net/ipv4/ip_forward
Other Linux systems have a system configuration option that you can set. The method
depends on your Linux distribution. You may use a control panel, specify a setting at
the time you compile your kernel, or possibly enter a specification when you boot
your system. Consult your operating system documentation for details on the method
to use with your particular distribution.
Using Filtering
If the host computer has multiple network adapters, it may be intentionally
configured to do IP forwarding. If that is the case, you do not want to disable
forwarding. In that case, to avoid packet leakage you must enable a packet filtering
facility and specify that packets from the host-only network should not be sent
outside the host computer. Consult your operating system documentation for details
on how to configure packet filtering.
Leaks from a Virtual Machine
Virtual machines may leak packets, as well. For example, if you use Dial-Up Networking
support in a virtual machine and packet forwarding is enabled, host-only network
traffic may leak out through the dial-up connection.
To prevent the leakage, be sure packet forwarding is disabled in your guest operating
system.
351
VMware Workstation 5 User’s Manual
Maintaining and Changing the MAC Address
of a Virtual Machine
When a virtual machine is powered on, VMware Workstation automatically assigns
each of its virtual network adapters an Ethernet MAC address. MAC stands for media
access control. A MAC address is the unique address assigned to each Ethernet
network device.
The software guarantees that virtual machines are assigned unique MAC addresses
within a given host system. In most cases, the virtual machine is assigned the same
MAC address every time it is powered on, so long as the virtual machine is not moved
(the path and filename for the virtual machine’s configuration file must remain the
same) and no changes are made to certain settings in the configuration file.
In addition, VMware Workstation does its best, but cannot guarantee, to automatically
assign unique MAC addresses for virtual machines running on multiple host systems.
Avoiding MAC Changes
To avoid changes in the MAC address automatically assigned to a virtual machine, you
must not move the virtual machine’s configuration file. Moving it to a different host
computer or even moving it to a different location on the same host computer
changes the MAC address.
You also need to be sure not to change certain settings in the virtual machine’s
configuration files. If you never edit the configuration file by hand and do not remove
the virtual Ethernet adapter, these settings remain untouched. If you do edit the
configuration file by hand, be sure not to remove or change the following options:
ethernet[n].generatedAddress
ethernet[n].addressType
ethernet[n].generatedAddressOffset
uuid.location
uuid.bios
ethernet[n].present
In these options, [n] is the number of the virtual Ethernet adapter, for example
ethernet0.
Note: To preserve a virtual Ethernet adapter’s MAC address, you also must be careful
not to remove the adapter. If you remove the adapter, then recreate it, the adapter
may receive a different MAC address.
352
www.vmware.com
C H A P T E R 1 2 Configuring a Virtual Network
Manually Assigning a MAC Address
If you want to guarantee that the same MAC address is assigned to a given virtual
machine every time, even if the virtual machine is moved, or if you want to guarantee
a unique MAC address for each virtual machine within a networked environment, you
can assign the address manually instead of allowing VMware Workstation to assign it
automatically.
To assign the same, unique MAC address to any virtual machine manually, use a text
editor to remove three lines from the configuration file and add one line. The
configuration file has a.vmx extension at the end of the filename. On a Linux host, a
virtual machine created with an earlier VMware product may have a configuration file
with a .cfg extension.
Remove the three lines that begin with the following from the configuration file:
ethernet[n].generatedAddress
ethernet[n].addressType
ethernet[n].generatedAddressOffset
In these options, [n] is the number of the virtual Ethernet adapter — for example
ethernet0.
Add the following line to the configuration file:
ethernet[n].address = 00:50:56:XX:YY:ZZ
In this line, XX must be a valid hexadecimal number between 00h and 3Fh, and YY
and ZZ must be valid hexadecimal numbers between 00h and FFh. Because
VMware Workstation virtual machines do not support arbitrary MAC addresses, you
must use the above format.
So long as you choose a value for XX:YY:ZZ that is unique among your hard-coded
addresses (where XX is a valid hexadecimal number between 00h and 3Fh, and YY
and ZZ are valid hexadecimal numbers between 00h and FFh), conflicts between
the automatically assigned MAC addresses and the manually assigned addresses
should never occur.
353
VMware Workstation 5 User’s Manual
Controlling Routing Information for a Host-only Network on a
Linux Host
A host-only network is a full-fledged network. It has a network interface associated
with it (VMnet1) that is marked “up” at the time the host operating system is booted.
Consequently, routing server processes that operate on the host operating system,
such as routed and gated, automatically discover it and propagate information on
how to reach it unless you explicitly configure them not to do so.
If either of these programs is being run only to receive routing information, the easiest
solution is to run it with a -q option so that it does not supply routing information,
only receives it.
If, however, they are running because they are to supply routing information, then you
need to configure them so they do not advertise routes to the host-only network.
Unfortunately, the version of routed that comes with many distributions of Linux
has no support for specifying that an interface should not be advertised. Consult the
routed(8) manual page for your system in case you have a more contemporary
version of the software.
For gated, configuration is involved. You need to explicitly exclude the VMnet1
interface from any protocol activity. If you need to run virtual machines on a host-only
network on a multihomed system where gated is used and have problems doing so,
please contact VMware technical support by submitting a support request at
www.vmware.com/requestsupport.
354
www.vmware.com
C H A P T E R 1 2 Configuring a Virtual Network
Other Potential Issues with Host-Only Networking
on a Linux Host
The following are common issues you may encounter when you are configuring a
host-only network.
DHCPD on the Linux Host Does Not Work after VMware Workstation Installation
If you were running the DHCP server program dhcpd on your machine before
installing VMware Workstation, it probably was configured to respond to DHCP
requests from clients on any network interface present on the machine. When hostonly networking is configured, an additional network interface, VMnet1, is marked
“up” and available for use, and dhcpd may notice this.
In such cases, some dhcpd implementations abort if their configuration files do not
include a subnet specification for the interface — even if dhcpd is not supposed to
respond to messages that arrive through the interface.
The best solution to this problem is to add a line in the following format to the dhcpd
configuration file:
subnet <net>.0 netmask 255.255.255.0 {}
<net> is the network number assigned to your host-only network — for example,
192.168.0. This line in the configuration file informs dhcpd about the host-only
network and tells it explicitly not to respond to any DHCP requests it sees coming
from it.
An alternative solution is to explicitly state the set of network interfaces that you want
dhcpd to listen to each time you start the program. For example, if your machine has
one Ethernet interface, eth0, then each time you start dhcpd, list it on the
command line:
dhcpd eth0
This keeps dhcpd from probing for all available network interfaces.
If the above solutions do not work for your DHCP server program, then it likely is old.
You can try upgrading to a more current version such as the DHCP software available
from the ISC (www.isc.org).
355
VMware Workstation 5 User’s Manual
DHCP and Dynamic Domain Name Service (DDNS)
DHCP can be used to hand out IP addresses as well as other information, such as the
identity of a host running a name server and the nearest router or gateway. The DHCP
server in VMware Workstation 5 does not provide a means to dynamically establish a
relationship between the IP address it assigns and a client’s name (that is, to update a
DNS server using DDNS).
If you want to use names to communicate with other virtual machines you must
either edit the DHCP configuration file for VMnet1
(/etc/vmware/vmnet1.conf ) or use IP addresses that are statically bound to a
host name. Editing the DHCP server configuration file requires information that is best
obtained directly from the DHCP server documentation. Consult the manual pages
dhcpd(8) and dhcpd.conf(8).
Setting Up a Second Bridged Network Interface on a Linux Host
If you have two Ethernet adapters installed on your host computer, connected to two
different networks, you may want your virtual machines on that host computer to
bridge to both Ethernet adapters so the virtual machines can access either or both
physical networks.
When you install VMware Workstation on a host computer with multiple Ethernet
adapters, you have the option of configuring more than one bridged network. You
can also configure additional bridged networks at any time by rerunning
vmware-config.pl.
1. On the host computer, become root (su -) and run the VMware Workstation
configuration program.
vmware-config.pl
2. If you have more than one physical Ethernet adapter, one of the prompts you
see is similar to this:
The following bridged networks have been defined:
. vmnet0 is bridged to eth0
Do you wish to configure another bridged network? (yes/no) [no]
Enter yes.
3. If you have additional physical Ethernet adapters not yet connected to a bridged
network, the prompt is repeated, showing information about all currently
configured bridged networks.
4. When you have set up all the bridged networks you want, enter no.
356
www.vmware.com
C H A P T E R 1 2 Configuring a Virtual Network
Setting Up Two Separate Host-Only Networks
For some configurations, you may need to set up more than one host-only network
on the same host computer.
You may, for example, want to have two virtual machines connected to one host-only
network, and at the same time have other virtual machines connected to another
host-only network so the network traffic on each network is isolated.
Or you may want to test routing between two virtual networks. Or test a virtual
machine with multiple network interface cards — without using any physical
Ethernet adapters.
On Windows hosts, the first host-only network is set up automatically when you install
VMware Workstation.
On Linux hosts, the first host-only network is set up when you run the vmwareconfig.pl program after you install VMware Workstation, provided you agree to
install host-only networking. If you did not agree to use host-only networking, you
need to run the program again to set up host-only networking.
To set up the second host-only network, follow the steps outlined below for your host
operating system.
Setting Up the Second Host-Only Interface on a Windows Host
Follow these steps to set up the second host-only interface on a Windows host.
1. Go to Edit > Virtual Network Settings > Host Virtual Adapters.
2. Click Add new adapter.
3. Choose the virtual network on which you want to use the adapter and click OK.
4. Click Apply.
5. Click OK to close the virtual network editor.
357
VMware Workstation 5 User’s Manual
Setting Up the Second Host-Only Interface on a Linux Host
1. As root (su -), run the VMware Workstation configuration program.
/usr/bin/vmware-config.pl
2. Use the wizard to modify your configuration. After asking about a NAT network,
the program asks:
Do you want to be able to use host-only networking in your virtual
machines?
Answer Yes.
The wizard reports on host-only networks that you have already set up on the
host or, if none is present, configures the first host-only network.
3. The wizard asks:
Do you wish to configure another host-only network?
Answer Yes.
Repeat this step until you have as many host-only networks as you want. Then
answer No.
4. Complete the remaining steps in the wizard. When it is finished, it restarts all
services used by VMware Workstation.
5. Run ifconfig. You should see at least four network interfaces — eth0, lo,
vmnet1 and vmnet2. If the VMnet interfaces do not show up immediately,
wait for a minute, then run the command again. These four interfaces should
have different IP address on separate subnets.
Configuring the Virtual Machines
Now you have two host-only interfaces (VMnet1 and VMnet2). You are ready to set up
your virtual machines for one of the following configurations:
1. The virtual machine is configured with one virtual Ethernet adapter, and that
virtual adapter is connected to the default host-only interface (VMnet 1).
2. The virtual machine is configured with one virtual Ethernet adapter, and that
virtual adapter is connected to the newly created host-only interface (VMnet2).
3. The virtual machine is configured with two virtual Ethernet adapters. One virtual
adapter is connected to the default host-only interface (VMnet1) and the other
virtual adapter is connected to the newly created host-only interface (VMnet2).
358
www.vmware.com
C H A P T E R 1 2 Configuring a Virtual Network
Configuration 1 – Connect to the Default Host-Only Interface
1. Create the virtual machine using the New Virtual Machine Wizard or use an
existing virtual machine.
2. Launch VMware Workstation and open the virtual machine.
3. Edit the configuration using the virtual machine settings editor (VM > Settings).
Select Network Adapter, then choose Host-only (VMnet1) from the drop-down
list on the right.
If no network adapter is shown in the list of devices, click Add, then use the Add
Hardware Wizard to add an adapter.
Configuration 2 – Connect to the Newly Created Host-Only Interface
1. Create the virtual machine using the New Virtual Machine Wizard or use an
existing virtual machine.
2. Launch VMware Workstation and open the virtual machine.
3. Edit the configuration using the virtual machine settings editor (VM > Settings).
Select Network Adapter, then choose Custom (VMnet2) from the drop-down
list on the right.
If no network adapter is shown in the list of devices, click Add, then use the Add
Hardware Wizard to add an adapter.
Configuration 3 – Connect to Two Host-Only Interfaces
1. Create the virtual machine using the New Virtual Machine Wizard or use an
existing virtual machine.
2. Launch VMware Workstation and open the virtual machine.
3. Edit the configuration using the virtual machine settings editor (VM > Settings).
Select the first network adapter in the list of devices, then choose Host-only
(VMnet1) from the drop-down list on the right. Select the second network
adapter in the list of devices, then choose Custom (VMnet2) from the dropdown list on the right.
If you need to add one or more network adapters, click Add, then use the Add
Hardware Wizard to add an adapter.
359
VMware Workstation 5 User’s Manual
At this point you can power on the virtual machine and install your guest operating
system. In configurations 1 and 2 you see one AMD PCNet Family Adapter. In
configuration 3 you see two AMD PCNet Family Adapters within the guest. Configure
the Ethernet adapters as you would physical adapters on a physical computer, giving
each an IP address on the appropriate VMnet subnet.
On Windows hosts, you can open a command prompt and run ipconfig /all to
see what IP addresses each host-only network is using.
On Linux hosts, you can open a terminal and run ifconfig to see what IP addresses
each host-only network is using.
Routing between Two Host-Only Networks
If you are setting up a complex test network using virtual machines, you may want to
have two independent host-only networks with a router between them.
There are two basic approaches. In one, the router software runs on the host
computer. In the other, the router software runs in its own virtual machine. In both
cases, you need two host-only interfaces.
The examples described here outline the simplest case, with one virtual machine on
each of the host-only networks. For more complex configurations, you can add more
virtual machines and host-only networks as appropriate.
Setting Up the First Host-Only Interface
On Windows hosts, the first host-only network is set up automatically when you install
VMware Workstation.
On Linux hosts, the first host-only network was set up when you ran the vmwareconfig.pl program after you installed VMware Workstation, provided you agreed
to install host-only networking. If you did not agree to use host-only networking, you
need to run the program again to set up host-only networking.
Setting Up the Second Host-Only Interface — Windows Host
Follow these steps to set up the second host-only interface on a Windows host.
1. Go to Edit > Virtual Network Settings > Host Virtual Adapters.
2. Click Add new adapter.
3. Choose the virtual network on which you want to use the adapter and click OK.
4. Click Apply.
5. Click OK to close the virtual network editor.
360
www.vmware.com
C H A P T E R 1 2 Configuring a Virtual Network
Setting Up the Second Host-Only Interface — Linux Host
1. As root (su -), run the VMware Workstation configuration program.
/usr/bin/vmware-config.pl
2. Use the wizard to modify your configuration. After asking about a NAT network,
the program asks:
Do you want to be able to use host-only networking in your virtual
machines?
Answer Yes.
The wizard reports on host-only networks that you have already set up on the
host or, if none is present, configures the first host-only network.
3. The wizard asks:
Do you wish to configure another host-only network?
Answer Yes.
Repeat this step until you have as many host-only networks as you want. Then
answer No.
4. Complete the wizard. When it is finished, it restarts all services used by VMware
Workstation.
5. Run ifconfig. You should see at least four network interfaces — eth0, lo,
vmnet1 and vmnet2. If the VMnet interfaces do not show up immediately,
wait for a minute, then run the command again. These four interfaces should
have different IP address on separate subnets.
Setting Up the Virtual Machines
Now you have two host-only network adapters on the host computer. Each is
connected to its own virtual switch (VMnet1 and VMnet2). You are ready to create and
configure your virtual machines and connect them to the appropriate virtual
switches.
Virtual Machine 1 – Connected to the Default Host-only Interface
1. Create the virtual machine using the New Virtual Machine Wizard or use an
existing virtual machine.
2. Launch VMware Workstation and open the virtual machine.
3. Edit the configuration using the virtual machine settings editor (VM > Settings).
Select Network Adapter and select Host-only (VMnet1) from the drop-down
list on the right.
If no network adapter is shown in the list of devices, click Add, then use the Add
Hardware Wizard to add an adapter.
361
VMware Workstation 5 User’s Manual
Virtual Machine 2 – Connected to the Newly Created Host-Only Interface
1. Create the virtual machine using the New Virtual Machine Wizard or use an
existing virtual machine.
2. Launch VMware Workstation and open the virtual machine.
3. Edit the configuration using the virtual machine settings editor (VM > Settings).
Select Network Adapter and choose Custom (VMnet2) from the drop-down list
on the right. If no network adapter is shown in the list of devices, click Add, then
use the Add Hardware Wizard to add an adapter.
If you plan to run the router software on your host computer, you can skip the next
section.
Virtual Machine 3 – Connected to Both Host-Only Interfaces
If you plan to run the router software on a virtual machine, set up a third virtual
machine for that purpose.
1. Create the virtual machine using the New Virtual Machine Wizard or use an
existing virtual machine.
2. Launch VMware Workstation and open the virtual machine.
3. Edit the configuration using the virtual machine settings editor (VM > Settings).
Select the first network adapter in the list of devices and choose Host-only
(VMnet1) from the drop-down list on the right. Select the second network
adapter in the list of devices, then select Custom (VMnet2) from the drop-down
list on the right.
If you need to add one or more network adapters, click Add, then use the Add
Hardware Wizard to add an adapter.
Now you need to configure the networking components on the host and in the
virtual machines. The recommended approach uses static IP addresses for all the
virtual machines.
1. Stop the VMnet DHCP server service.
Windows host: Choose Edit > Virtual Network Settings > DHCP and click Stop
service.
Linux host: Stop the vmnet-dhcpd service.
killall -TERM vmnet-dhcpd
2. Install guest operating systems in each of the virtual machines.
3. Install the router software — on the host computer or in the third virtual
machine, depending on the approach you are using.
362
www.vmware.com
C H A P T E R 1 2 Configuring a Virtual Network
4. Configure networking in the first two virtual machines to use addresses on the
appropriate host-only network.
On Windows hosts, you can open a command prompt and run
ipconfig /all to see what IP addresses each host-only network is using.
On Linux hosts, you can open a terminal and run ifconfig to see what IP
addresses each host-only network is using.
5. If you are running the router on the host computer, assign default router
addresses based on the addresses of the host-only adapters on the host
computer. In the first virtual machine’s networking configuration, the default
router address should be the IP address for the host-only adapter connected to
VMnet1. In the second virtual machine’s networking configuration, the default
router address should be the IP address for the host-only adapter connected to
VMnet2.
If you are running the router software in the third virtual machine, set the default
router addresses in the first two virtual machines based on those used by the
third virtual machine. In the first virtual machine’s networking configuration, the
default router address should be the IP address for the third virtual machine’s
Ethernet adapter connected to VMnet1. In the second virtual machine’s
networking configuration, the default router address should be the IP address for
the third virtual machine’s Ethernet adapter connected to VMnet2.
At this point you should be able to ping the router machine from virtual machines
one and two. And if the router software is set up correctly, you should be able to
communicate between the first and second virtual machines.
363
VMware Workstation 5 User’s Manual
Using Virtual Ethernet Adapters in Promiscuous Mode
on a Linux Host
VMware Workstation does not allow the virtual Ethernet adapter to go into
promiscuous mode unless the user running VMware Workstation has permission to
make that setting. This follows the standard Linux practice that only root can put a
network interface into promiscuous mode.
When you install and configure VMware Workstation, you must run the installation as
root. VMware Workstation creates the VMnet devices with root ownership and root
group ownership, which means that only root has read and write permissions to the
devices.
To set the virtual machine’s Ethernet adapter to promiscuous mode, you must launch
VMware Workstation as root because you must have read and write access to the
VMnet device. For example, if you are using bridged networking, you must have
access to /dev/vmnet0.
To grant selected other users read and write access to the VMnet device, you can
create a new group, add the appropriate users to the group and grant that group read
and write access to the appropriate device. You must make these changes on the host
operating system as root (su -). For example, you can enter the following
commands:
chgrp <newgroup> /dev/vmnet0
chmod g+rw /dev/vmnet0
<newgroup> is the group that should have the ability to set vmnet0 to
promiscuous mode.
If you want all users to be able to set the virtual Ethernet adapter (/dev/vmnet0 in
our example) to promiscuous mode, run the following command on the host
operating system as root:
chmod a+rw /dev/vmnet0
364
www.vmware.com
C H A P T E R 1 2 Configuring a Virtual Network
Understanding NAT
Network address translation — or NAT — provides a simple way for virtual machines
to use most client applications over almost any type of network connection available
to the host. The only requirement is that the network connection must support TCP/
IP.
NAT is useful when you have a limited supply of IP addresses or are connected to the
network through a non-Ethernet network adapter. NAT works by translating addresses
of virtual machines in a private VMnet network to that of the host machine. When a
virtual machine sends a request to access a network resource, it appears to the
network resource as if the request came from the host machine.
NAT uses the host’s own network resources to connect to the external network. Thus,
any TCP/IP network resource to which the host has access should be available
through the NAT connection.
The chief advantage of NAT is that it provides a transparent, easy to configure way for
virtual machines to gain access to network resources.
This section discusses the following topics:
• Using NAT on page 366
• The Host Computer and the NAT Network on page 366
• DHCP on the NAT Network on page 366
• DNS on the NAT Network on page 367
• External Access from the NAT Network on page 367
• Advanced NAT Configuration on page 368
• Custom NAT and DHCP Configuration on a Windows Host on page 372
• Considerations for Using NAT on page 373
• Using NAT with NetLogon on page 373
• Sample Linux vmnetnat.conf File on page 375
365
VMware Workstation 5 User’s Manual
Using NAT
The NAT device is connected to the VMnet8 virtual switch. Virtual machines
connected to the NAT network also use the VMnet8 virtual switch.
The NAT device waits for packets coming from virtual machines on the VMnet8 virtual
network. When a packet arrives, the NAT device translates the address of the virtual
machine to that of the host before forwarding the packet to the external network.
When data arrives from the external network for the virtual machine on the private
network, the NAT device receives the data, replaces the network address with that of
the virtual machine and forwards the data to the virtual machine on the virtual
network. This translation occurs automatically and requires minimal configuration on
the guest and the host.
The Host Computer and the NAT Network
The host computer has a host virtual adapter on the NAT network (identical to the
host virtual adapter on the host-only network). This adapter allows the host and the
virtual machines to communicate with each other for such purposes as file sharing.
The NAT device never forwards traffic from the host virtual adapter.
DHCP on the NAT Network
In order to make networking configuration easy, a DHCP server is automatically
installed when you install VMware Workstation. Virtual machines running on the
network with the NAT device can dynamically obtain their IP addresses by sending
out DHCP requests. The DHCP server on the NAT network, which is also used in hostonly networking configurations, dynamically allocates IP addresses in the range of
<net>.128 through <net>.254, where <net> is the network number assigned to your
NAT network. VMware Workstation always uses a Class C address for NAT networks. IP
addresses <net>.3 through <net>.127 can be used for static IP addresses. IP address
<net>.1 is reserved for the host adapter; <net>.2 is reserved for the NAT device.
In addition to the IP address, the DHCP server on the NAT network also sends out
additional configuration information that enables the virtual machine to operate
automatically. This information includes the default gateway and the DNS server. In
the DHCP response, the NAT device instructs the virtual machine to use the IP address
<net>.2 as the default gateway and DNS server. This causes all IP packets destined for
the external network and DNS requests to be forwarded to the NAT device.
366
www.vmware.com
C H A P T E R 1 2 Configuring a Virtual Network
DNS on the NAT Network
The NAT device acts as a DNS server for the virtual machines on the NAT network.
Actually, the NAT device is a DNS proxy and merely forwards DNS requests from the
virtual machines to a DNS server that is known by the host. Responses come back to
the NAT device, which then forwards them to the virtual machines.
If they get their configuration information from DHCP, the virtual machines on the NAT
network automatically use the NAT device as the DNS server. However, the virtual
machines can be statically configured to use another DNS server.
The virtual machines in the private NAT network are not, themselves, accessible via
DNS. If you want the virtual machines running on the NAT network to access each
other by DNS names, you must set up a private DNS server connected to the NAT
network.
External Access from the NAT Network
In general, any protocol using TCP or UDP can be used automatically by a virtual
machine on the NAT network so long as the virtual machine initiates the network
connection. This is true for most client applications such as Web browsing, Telnet,
passive-mode FTP and downloading streaming video. Additional protocol support
has been built into the NAT device to allow FTP and ICMP echo (ping) to work
completely transparently through the NAT.
On the external network to which the host is connected, any virtual machine on the
NAT network appears to be the host itself, because its network traffic uses the host’s IP
address. It is able to send and receive data using TCP/IP to any machine that is
accessible from the host.
Before any such communication can occur, the NAT device must set up a mapping
between the virtual machine’s address on the private NAT network and the host’s
network address on the external network.
When a virtual machine initiates a network connection with another network
resource, this mapping is created automatically. The operation is perfectly transparent
to the user of the virtual machine on the NAT network. No additional work needs to
be done to let the virtual machine access the external network.
The same cannot be said for network connections that are initiated from the external
network to a virtual machine on the NAT network.
When a machine on the external network attempts to initiate a connection with a
virtual machine on the NAT network, it cannot reach the virtual machine because the
NAT device does not forward the request. Network connections that are initiated from
outside the NAT network are not transparent.
367
VMware Workstation 5 User’s Manual
However, it is possible to configure port forwarding manually on the NAT device so
network traffic destined for a certain port can still be forwarded automatically to a
virtual machine on the NAT network. For details, see Advanced NAT Configuration
below.
File sharing of the type used by Windows operating systems and Samba is possible
among computers on the NAT network — including virtual machines and the host
computer. If you are using WINS servers on your network, a virtual machine using NAT
networking can access shared files and folders on the host that are known by the
WINS server so long as those shared files and folders are in the same workgroup or
domain.
Advanced NAT Configuration
Windows Host
Configure the NAT device using the virtual network editor (Edit > Virtual Network
Settings > NAT).
You can stop and start the virtual NAT device by clicking the appropriate buttons.
368
www.vmware.com
C H A P T E R 1 2 Configuring a Virtual Network
To edit NAT settings for a virtual network, choose it from the drop-down menu, then
click Edit.
Change any NAT settings you wish. Click the appropriate button to set up or change
port forwarding or to specify DNS servers the virtual NAT device should use.
Linux Host
Use the NAT configuration file on the host to configure the NAT device. This file is
/etc/vmware/vmnet8/nat/nat.conf.
The configuration file is divided into sections. Each section configures a part of the
NAT device. Text surrounded by square brackets — such as [host] — marks the
beginning of a section. In each section is a configuration parameter that can be set.
The configuration parameters take the form ip = 192.168.27.1/24.
For an example of a NAT configuration file, see Sample Linux vmnetnat.conf File on
page 375. The configuration file variables are described below.
The [host] Section
ip
The IP address that the NAT device should use. It can optionally be followed by a slash
and the number of bits in the subnet.
netmask
The subnet mask to use for the NAT network. DHCP addresses are allocated from this
range of addresses.
configport
A port that can be used to access status information about the NAT device.
device
The VMnet device to use. Windows devices are of the form VMnet<x> where <x> is
the number of the VMnet. Linux devices are of the form /dev/vmnet<x>.
369
VMware Workstation 5 User’s Manual
activeFTP
Flag to indicate if active FTP is to be allowed. Active FTP allows incoming connections
to be opened by the remote FTP server. Turning this off means that only passive mode
FTP works. Set to 0 to turn it off.
The [udp] Section
timeout
Number of minutes to keep the UDP mapping for the NAT network.
The [dns] Section
This section is for Windows hosts only. Linux does not use this section.
policy
Policy to use for DNS forwarding. Accepted values include order, rotate, and
burst.
• order — send one DNS request at a time in order of the name servers
• rotate — send one DNS request at a time and rotate through the DNS servers
• burst — send to three servers and wait for the first one to respond
timeout
Time in seconds before retrying a DNS request.
retries
Number of retries before the NAT device gives up on a DNS request.
autodetect
Flag to indicate if the NAT device should automatically detect the DNS servers
available to the host.
nameserver1
IP address of a DNS server to use.
nameserver2
IP address of a DNS server to use.
nameserver3
IP address of a DNS server to use.
If autodetect is on and some name servers are specified, the DNS servers specified in
nameserver1, nameserver2 and nameserver3 are added before the list of
detected DNS servers.
370
www.vmware.com
C H A P T E R 1 2 Configuring a Virtual Network
The [netbios] Section
This section applies to Windows hosts only. Linux does not use this section.
nbnsTimeout = 2
Timeout for NBNS queries.
nbnsRetries = 3
Number of retries for each NBNS query.
nbdsTimeout = 3
Timeout for NBDS queries.
The [incomingtcp] Section
This section is used to configure TCP port forwarding for NAT. In this section, you can
assign a port number to an IP address and port number on a virtual machine.
The following line shows the format used in this section.
8887 = 192.168.27.128:21
This example creates a mapping from port 8887 on the host to the IP address
192.168.27.128 and port 21. When this mapping is set and an external machine
connects to the host at port 8887, the network packets are automatically forwarded to
port 21 (the standard port for FTP) on the virtual machine with IP address
192.168.27.128.
The [incomingudp] Section
This section is used to configure UDP port forwarding for NAT. In this section, you can
assign a port number to an IP address and port number on a virtual machine.
The following line shows the format used in this section. It illustrates a way to forward
X server traffic from the host port 6000 to the virtual machine’s port 6001.
6000 = 192.168.27.128:6001
This example creates a mapping from port 6000 on the host to the IP address
192.168.27.128 and port 6001. When this mapping is set and an external machine
connects to the host at port 6000, the network packets are automatically forwarded to
port 6001 on the virtual machine with IP address 192.168.27.128.
371
VMware Workstation 5 User’s Manual
Custom NAT and DHCP Configuration on a Windows Host
If you are an advanced user on a Windows host computer, you may wish to make
custom configuration settings by editing the NAT and DHCP configuration files. If your
host operating system is installed on the C drive, the configuration files for NAT and
DHCP are in the following locations:
• NAT: C:\Documents and Settings\All Users\Application
Data\VMware\vmnetnat.conf
• DHCP: C:\Documents and Settings\All Users\Application
Data\VMware\vmnetdhcp.conf
Note: In VMware Workstation 5, you can change many key NAT and DCHP settings
using the virtual network editor (Edit > Virtual Network Settings). However, if you
have made manual changes to the configuration files, some or all of those changes
may be lost when you use the virtual network editor. If you have made manual
changes, you should make backup copies of the files before changing any settings in
the virtual network editor. After making changes in the virtual network editor, you can
copy your manual changes back into the appropriate configuration files.
Specifying Connections from Ports below 1024
When a client machine makes a TCP or UDP connection to a server, the connection
comes from a particular port on the client (the source port) and connects to a
particular port on the server (the destination port). For security reasons, some servers
accept connections only from source ports below 1024. You may see this
configuration on machines used as NFS file servers, for example.
If a virtual machine using NAT attempts to connect to a server that requires the client
to use a source port below 1024, it is important that the NAT device forward the
request from a port below 1024. You can specify this behavior in the
vmnetnat.conf file.
This behavior is controlled by entries in sections headed [privilegedUDP] and
[privilegedTCP]. You may need to add settings to or modify settings in either or
both of these sections, depending on the kind of connection you need to make.
You can set two parameters, each of which appears on a separate line.
autodetect = <n>
The autodetect setting determines whether the VMware NAT device automatically
attempts to map virtual machine source ports below 1024 to NAT source ports below
1024. A setting of 1 means true. A setting of 0 means false. On a Windows host, the
default is 1 (true). On a Linux host, the default is 0 (false).
372
www.vmware.com
C H A P T E R 1 2 Configuring a Virtual Network
port = <n>
The port setting specifies a destination port (where <n> is the port on the server that
accepts the connection from the client). Whenever a virtual machine connects to the
specified port on any server, the NAT device attempts to make the connection from a
source port below 1024. You may include one or more port settings in the
[privilegedUDP] or [privilegedTCP] section or in both sections, as
required for the connections you need to make. Enter each port setting on a separate
line.
Considerations for Using NAT
Because NAT requires that every packet sent and received from virtual machines is in
the NAT network, there is an unavoidable performance penalty. Our experiments
show that the penalty is minor for dial-up and DSL connections and performance is
adequate for most VMware Workstation uses.
NAT is not perfectly transparent. It does not normally allow connections to be initiated
from outside the network, although you can set up server connections by manually
configuring the NAT device. The practical result is that some TCP and UDP protocols
that require a connection be initiated from the server machine — some peer to peer
applications, for example — do not work automatically, and some may not work at all.
A standard NAT configuration provides basic-level firewall protection because the NAT
device can initiate connections from the private NAT network, but devices on the
external network cannot normally initiate connections to the private NAT network.
Using NAT with NetLogon
When using NAT networking in a virtual machine with a Windows guest operating
system running on a Windows host, you can use NetLogon to log on to a Windows
domain from the virtual machine. You can then access file shares known by the WINS
server in the domain.
To use NetLogon, you need to know how WINS servers and Windows domain
controllers work. This section explains how to set up the virtual machine to use
NetLogon. The setup process is similar to the way you set up a physical computer on
one LAN that is using a domain controller on another LAN.
In order to log on to a Windows domain outside the virtual NAT network, the virtual
machine needs access to a WINS server for that domain. There are two ways you can
connect the virtual machine to a WINS server. You can connect to the WINS server
provided by the DHCP server used on the NAT network, provided that the WINS server
is already set up on the host. If you want to connect from the virtual machine to a
373
VMware Workstation 5 User’s Manual
WINS server not set up on the host, you can manually enter the IP address of the WINS
server.
Using NAT to Connect to an Existing WINS Server Already Set Up on the Host
In order to use this method, a WINS server in the same workgroup or domain must be
set up on the host. These steps use Windows 2000, Windows XP or Windows Server
2003 as a guide. The process is similar for Windows NT, Windows Me and Windows 9x
guests.
1. In the virtual machine, right-click on My Network Places and choose Properties.
2. In the Network Connections window, right-click the virtual network adapter and
choose Properties.
3. In the Properties dialog box, select Internet Protocol (TCP/IP), then click
Properties.
4. In the TCP/IP Properties dialog box, click Advanced.
5. Click the WINS tab, then under NetBIOS setting, select Use NetBIOS setting
from DHCP Server.
6. Click OK twice, then click Close.
Manually Entering the IP Address of a WINS Server
Use this method to connect to a WINS server in the same workgroup or domain that is
not already set up on the host.
1. In the virtual machine, right-click on My Network Places and choose Properties.
2. In the Network Connections window, right-click the virtual network adapter and
choose Properties.
3. In the Properties dialog box, select Internet Protocol (TCP/IP), then click
Properties.
4. In the TCP/IP Properties dialog box, click Advanced.
5. Click the WINS tab, then click Add.
6. In the TCP/IP WINS Server dialog box, enter the IP address for the WINS server in
the WINS server field, then click OK. The IP address of the WINS server appears in
the WINS addresses list on the WINS tab.
Repeat steps 5 and 6 for each WINS server to which you want to connect from
this virtual machine.
7. Click OK twice, then click Close.
374
www.vmware.com
C H A P T E R 1 2 Configuring a Virtual Network
Now that the virtual machine has an IP address for a WINS server, you use NetLogon in
the virtual machine to log on to a domain and access shares in that domain.
For example, if the WINS server covers a domain with a domain controller it is possible
to access that domain controller from the virtual machine and add the virtual
machine to the domain. You need to know the user ID and password of the
Administrator on the domain controller.
Note: Your access is limited to shares of virtual machines that are on the same NAT
network or are bridged on the same domain.
Sample Linux vmnetnat.conf File
# Linux NAT configuration file
[host]
# NAT gateway address
ip = 192.168.237.2/24
hostMAC = 00:50:56:C0:00:08
# enable configuration; disabled by default for security reasons
#configport = 33445
# VMnet device if not specified on command line
device = VMnet8
# Allow PORT/EPRT FTP commands (they need incoming TCP stream...)
activeFTP = 1
# Allows the source to have any OUI. Turn this one if you change the OUI
# in the MAC address of your virtual machines.
#allowAnyOUI = 1
[udp]
# Timeout in seconds, 0 = no timeout, default = 60; real value might
# be up to 100% longer
timeout = 30
[dns]
# This section applies only to Windows.
#
# Policy to use for DNS forwarding. Accepted values include order,
# rotate, burst.
#
# order: send one DNS request at a time in order of the name servers
# rotate: send one DNS request at a time, rotate through the DNS servers
375
VMware Workstation 5 User’s Manual
# burst: send to three servers and wait for the first one to respond
policy = order;
# Timeout in seconds before retrying DNS request.
timeout = 2
# Retries before giving up on DNS request
retries = 3
# Automatically detect the DNS servers (not supported in Windows NT)
autodetect = 1
# List of DNS servers to use. Up to three may be specified
#nameserver1 = 208.23.14.2
#nameserver2 = 63.93.12.3
#nameserver3 = 208.23.14.4
[netbios]
# This section applies only to Windows.
# Timeout for NBNS queries.
nbnsTimeout = 2
# Number of retries for each NBNS query.
nbnsRetries = 3
# Timeout for NBDS queries.
nbdsTimeout = 3
[incomingtcp]
# Use these with care - anyone can enter into your virtual machine through
# these...
# FTP (both active and passive FTP is always enabled)
#
ftp localhost 8887
#8887 = 192.168.27.128:21
# WEB (make sure that if you are using named webhosting, names point to
#
your host, not to guest... And if you are forwarding port other
#
than 80 make sure that your server copes with mismatched port
#
number in Host: header)
#
lynx http://localhost:8888
#8888 = 192.168.27.128:80
# SSH
#
ssh -p 8889 root@localhost
#8889 = 192.168.27.128:22
376
www.vmware.com
C H A P T E R 1 2 Configuring a Virtual Network
[incomingudp]
# UDP port forwarding example
#6000 = 192.168.27.128:6001
377
VMware Workstation 5 User’s Manual
Using Samba with Workstation
If you have Samba running on your Linux host, there are several things you can do to
configure Samba so that it works with Workstation, as described in this section.
Modifying Your Samba Configuration
Be sure to modify your Samba configuration so it includes the IP subnet used by the
VMware Workstation virtual Ethernet adapter, VMnet1.
To determine what subnet is being used by VMnet1, run
/sbin/ifconfig vmnet1
Make sure the Samba password file includes entries for all users of the virtual machine
who will access the host’s file system. The user names and passwords in the Samba
password file must match those used for logging on to the guest operating system.
You may add user names and passwords to the Samba password file at any time from
a terminal window on your Linux host computer.
1. Log on to the root account.
su
2. Run the Samba password command.
smbpasswd -a <username>
<username> is the user name to add. Follow the instructions on the screen.
3. Log out of the root account.
exit
Using a Samba Server for Both Bridged and Host-Only
Networks
To use your Samba server for both host-only and bridged networking, you must
modify one parameter in the smb.conf file. You can define the interface
parameter so your Samba server serves multiple interfaces. An example of this is:
interface = eth0 vmnet1
This example tells the Samba server to listen to and use both the eth0 and vmnet1
interfaces — the interfaces used by bridged and host-only networking, respectively.
Using Samba without Network Access
To make Samba inaccessible from your physical Ethernet interface, add this line:
interfaces = vmnet*
to /etc/samba/smb.conf and restart Samba.
378
www.vmware.com
CHAPTER
13
Configuring Video and Sound
The following sections provide information on configuring the video display and
sound for VMware Workstation.
• Setting Screen Color Depth on page 380
• Changing Screen Color Depth on the Host on page 380
• Changing Screen Color Depth in the Virtual Machine on page 381
• Using Full Screen Mode on a Linux Host on page 382
• Experimental Support for Direct3D on page 383
• Configuring Sound on page 389
• Installing Sound Drivers in Windows 9x and Windows NT Guest Operating
Systems on page 389
379
VMware Workstation 5 User’s Manual
Setting Screen Color Depth
The number of screen colors available in the guest operating system depends on the
screen color setting of the host operating system.
Virtual machines support
• 16-color (VGA) mode
• 8-bit pseudocolor
• 16 bits per pixel (16 significant bits per pixel)
• 32 bits per pixel (24 significant bits per pixel)
If the host is in 15-bit color mode, the guest operating system’s color setting controls
offer 15-bit mode in place of 16-bit mode.
If the host is in 24-bit color mode, the guest operating system’s color setting controls
offer 24-bit mode in place of 32-bit mode.
If you run a guest operating system set for a greater number of colors than your host
operating system is using, you can encounter various problems. In some cases, for
example, the colors in the guest are not correct. In others, the guest operating system
is not able to use a graphical interface.
In such a case, you can either increase the number of colors available on the host or
decrease the number of colors used in the guest.
For best performance, use the same number of colors in the guest and on the host.
Changing Screen Color Depth on the Host
If you choose to change the color settings on your host operating system, you should
first shut down all guest operating systems, power off the virtual machines and close
VMware Workstation.
Follow standard procedures for changing the color settings on your host operating
system, then restart VMware Workstation and the virtual machines.
380
www.vmware.com
C H A P T E R 1 3 Configuring Video and Sound
Changing Screen Color Depth in the Virtual Machine
If you choose to change the color settings in the guest operating system, the
approach you take depends on the guest operating system.
Follow the normal process for changing screen colors in your guest operating system.
In a Windows guest, the Display Properties control panel offers only those settings
that are supported.
In a Linux or FreeBSD guest, you must change the color depth before you start the X
server or restart the X server after making the changes.
381
VMware Workstation 5 User’s Manual
Using Full Screen Mode
on a Linux Host
When you switch to full screen mode, VMware Workstation changes the full screen
display resolution to better match the resolution set in the guest operating system.
On a Linux host, VMware Workstation uses the VidMode or DGA2 extension from the
XFree86 Project or XiG’s Xfs to match the host resolution to the one requested by the
guest running in the virtual machine.
In a few cases, VMware Workstation may not find the best resolution.
When VMware Workstation switches to full screen mode, it can choose only those
resolutions that are already configured for the host’s X server. If a virtual machine runs
at a resolution that does not match a mode listed in host’s X server configuration, then
VMware Workstation chooses the closest larger mode (and uses black borders) for full
screen mode or else simply does not offer full screen mode at all.
It is possible to have bad modes configured for the X server on your host. If your host’s
X configuration was automatically generated, or if you never tested all modes with
your current monitor and video card, it is possible that some enabled modes do not
work with your monitor. However, the mode-switching code in VMware Workstation
has no way of knowing this and a virtual machine that tries to use a resolution with a
bad mode line can cause your display to fail to display correctly.
If this happens, immediately leave full screen mode by pressing Ctrl-Alt, then fix your X
server configuration and restart X. However, if the only problem is that the image is off
center or is not quite the right size on the monitor, you can usually correct it using the
controls on your monitor. Note that most modern monitors are capable of storing
separate settings for each resolution, so changing the settings for a new mode should
not impair the settings for the host resolution.
382
www.vmware.com
C H A P T E R 1 3 Configuring Video and Sound
Experimental Support for Direct3D
VMware Workstation includes experimental support for Direct3D video acceleration.
This feature is not fully functional.
Caution: Features with experimental support are not intended to be enabled on
production systems. Enabling 3-D acceleration may cause the host or guest to crash,
causing you to lose data, even if 3-D applications are not active.
Note: To take advantage of the experimental 3-D capabilities of Workstation, the
virtual machine must be running the version of VMware Tools that corresponds to the
version of Workstation you are using to run it. So a virtual machine running on
Workstation 5.0 must be running the version of VMware Tools provided with
Workstation 5.0. A virtual machine running on Workstation 5.5 must be running the
version of VMware Tools provided with Workstation 5.5. If you move the virtual
machine and want to use the 3-D capabilities, be sure you have the correct version of
VMware Tools installed.
Experimental support for Direct3D acceleration is described in the following sections:
• Audience for Direct3D Experimental Support on page 383
• Accelerated 3-D Limitations on page 384
• Enabling Accelerated 3-D on page 384
• Known Issues on page 387
• Helping VMware with Experimental Support on page 388
Audience for Direct3D Experimental Support
Workstation provides this feature for advanced customers who want to explore an inprogress implementation of 3-D acceleration.
Technical support for accelerated 3-D is not yet provided for Workstation. However,
we encourage you to file a Support Request so we can evaluate problems you might
experience with accelerated 3-D. Please review Helping VMware with Experimental
Support on page 388 before you file a support request.
383
VMware Workstation 5 User’s Manual
Accelerated 3-D Limitations
Experimental support for Direct3D applies only to Windows 2000 and Windows XP
guests, on hosts running Windows 2000, Windows XP, or Linux.
Experimental support has the following limitations:
• Workstation accelerates DirectX 8 applications, and DirectX 9 applications that
use only the subset of DirectX 8.
• Support for 3-D applications is not optimized for performance.
• OpenGL applications run in software emulation mode.
Not all aspects of 3-D acceleration are enabled. The following 3-D features are not
accelerated:
• Pixel and vertex shaders
• Multiple vertex streams
• Hardware bump-mapping, environment mapping
• Projected textures
• Textures with one, three, or four dimensions
Enabling Accelerated 3-D
Caution: Features with experimental support are not intended for production
systems.
By default, Direct3D technology is disabled. You must prepare the host first, the virtual
machine second, and the guest operating system last.
384
www.vmware.com
C H A P T E R 1 3 Configuring Video and Sound
Enabling Accelerated 3-D for a Host
To enable a host for accelerated 3-D:
Hardware — Use a host video card with support for accelerated OpenGL, such as
NVIDIA TNT, GeForce and Quadro cards, or ATI FireGL and Radeon 8500 (or higher)
video cards. If you are unsure, check with your hardware manufacturer.
Software — Upgrade the video drivers for your host to the latest available.
• NVIDIA drivers are available at
www.nvidia.com/content/drivers/drivers.asp
• ATI drivers are available at
www.ati.com/support/driver.html
• (Linux only) — NVIDIA GPUs support the features used in Direct3D acceleration.
Linux open source drivers are not enabled. However, if you have a video card
with an Radeon 8500 (or better) GPU, you can attempt to use the Direct3D
acceleration using the ATI driver available at
www.ati.com/support/drivers/linux/radeon-linux.html
Windows — Perform these steps to prepare a Windows 2000 or Windows XP host.
Make sure hardware acceleration is turned up in the display properties.
1. Right-click the desktop and choose
Properties > Settings > Advanced > Troubleshoot.
2. Move the Hardware Acceleration slider all the way to the Full position.
Linux — Perform these steps to test your Linux host for compatibility:
1. To verify that direct rendering is enabled, run
glxinfo | grep direct
2. To ensure that 3-D applications work on your host, run
glxgears
After your host is configured, configure a virtual machine for accelerated 3-D.
385
VMware Workstation 5 User’s Manual
Enabling Accelerated 3-D for a Virtual Machine
To enable a virtual machine for accelerated 3-D
1. Choose a virtual machine with Windows 2000 or XP guest operating system.
Note: Do not enable Direct3D on a virtual machine that is powered on or
suspended.
2. Add the following to the configuration (.vmx) file for the virtual machine:
mks.enable3d = TRUE
This line enables accelerated 3-D on the host. It is required to support
accelerated 3-D in the guest and also enables the host to accelerate 2-D
portions of the guest display.
3. You may also add one or both of the following optional lines:
svga.vramSize = 67108864
This line increases the amount of VRAM on the virtual display card to 64 MB.
Adding more VRAM helps to reduce thrashing in the guest. The maximum
value is 128 MB.
vmmouse.present = FALSE
This line disables the absolute pointing device in the guest. Applications
which require DirectInput relative mode need to turn off the absolute
pointing device in the guest. In practice, this is only required for a certain class
of full screen 3-D applications (for example, real-time games like first-person
shooters).
Note: If you set the vmmouse.present option, you should also turn off the
preference for motion ungrabbing in the Input tab of the Preferences settings
dialog.
To turn off ungrabbing for vmouse.present:
a. Choose Edit > Preferences.
b. Click Input.
c. Deselect Ungrab when cursor leaves window.
386
www.vmware.com
C H A P T E R 1 3 Configuring Video and Sound
Enabling Accelerated 3-D for a Guest Operating System
To enable the guest operating system for accelerated 3-D
1. Power on the virtual machine.
2. Install VMware Tools.
Note: It is critical for stability that you install the version of VMware Tools that
matches the version of VMware Workstation you are running.
3. Install DirectX 9.0c End User Runtime
This download is available from Microsoft at
www.microsoft.com/downloads/search.aspx?displaylang=en&categoryid=2
4. Install and run your 3-D applications.
Known Issues
Common problems for Direct3-D experimental support include the following:
• Switching tabs in the VMware Workstation console does not work while 3-D
applications are running.
• Switching between full screen and windowed mode does not work while 3-D
applications are running.
• Running multiple 3-D applications simultaneously may crash the Workstation
application.
• When a 3-D application is running, you cannot suspend or resume the virtual
machine, and you cannot take snapshots.
• Graphical corruption occurs, such as:
• Screenshot or movie capture displays graphical corruption for the 3-D area of
the screen.
• The guest cursor occasionally has a halo of corruption (usually white) when
mousing over 3-D regions in the guest operating system.
387
VMware Workstation 5 User’s Manual
Helping VMware with Experimental Support
VMware offers only experimental support for Direct3D acceleration. VMware may not
respond personally to all support requests regarding Direct3D acceleration.
VMware is interested in
• Catastrophic failures such as bluescreening the guest, or 3-D applications that
crash VMware Workstation
• Testing reports about ATI 8500 (and later) video cards (whether or not they work)
• Testing reports about Linux host operating systems (whether or not they work).
• Testing reports about specific DirectX8 and DX9 applications you are using
(whether or not they work)
• Specific problems you are having when running 3-D
• Specific directions you want to see VMware 3-D technology evolve
Specific and detailed reports can help speed this feature from experimental support
to full functionality. Please include as many details about your configuration, 3-D
applications, and hardware as you can.
388
www.vmware.com
C H A P T E R 1 3 Configuring Video and Sound
Configuring Sound
VMware Workstation provides a sound device compatible with the Sound Blaster
AudioPCI and supports sound in Windows 95, Windows 98, Windows Me, Windows
NT, Windows 2000, Windows XP, Windows Server 2003 and Linux guest operating
systems. The VMware Workstation sound device is enabled by default.
Sound support includes PCM (pulse code modulation) output and input. For example,
you can play .wav files, MP3 audio and Real Media audio. MIDI output from Windows
guests is supported through the Windows software synthesizer. MIDI input is not
supported, and no MIDI support is available for Linux guests.
Windows 2000, Windows XP and most recent Linux distributions automatically detect
the sound device and install appropriate drivers for it.
Installing Sound Drivers in Windows 9x and Windows NT Guest
Operating Systems
Windows 95, Windows 98, Windows 98SE and Windows NT 4.0 do not have drivers for
the Sound Blaster AudioPCI adapter. To use sound in these guest operating systems,
you must download the driver from the Creative Labs Web site (www.creative.com)
and install it in the guest operating system.
Creative Labs has a number of Web sites serving various regions of the world. The
adapter name varies, depending on the region, but usually includes PCI 128.
389
VMware Workstation 5 User’s Manual
390
www.vmware.com
CHAPTER
Connecting Devices
14
The following sections describe how to use various devices with a virtual machine:
• Using Parallel Ports on page 392
• Using Serial Ports on page 397
• Keyboard Mapping on a Linux Host on page 409
• Using USB Devices in a Virtual Machine on page 417
• Connecting to a Generic SCSI Device on page 422
• Using Two-Way Virtual Symmetric Multiprocessing (Experimental) on page 429
391
VMware Workstation 5 User’s Manual
Using Parallel Ports
VMware Workstation supports a partial emulation of bidirectional PS/2-style ports.
On Linux hosts, VMware Workstation requires that the parallel port “PC-style
hardware” option (CONFIG_PARPORT_PC) be built and loaded as a kernel module
(that is, it must be set to “m”). VMware Workstation is unable to use parallel port
devices if CONFIG_PARPORT_PC is built directly (compiled) into the kernel. This
limitation exists because CONFIG_PARPORT_PC does not correctly export its symbols.
Parallel Ports
Parallel ports are used by a variety of devices, including printers, scanners, dongles
and disk drives.
Currently, VMware Workstation provides only partial emulation of PS/2 hardware.
Specifically, interrupts requested by a device connected to the physical port are not
passed to the virtual machine. Also, the guest operating system cannot use DMA
(direct memory access) to move data to or from the port. For this reason, not all
devices that attach to the parallel port are guaranteed to work correctly.
Installation in Guest Operating Systems
If the virtual machine is configured with a parallel port, most guest operating systems
automatically detect it at installation time and install the required drivers. Some
operating systems, including Linux, Windows NT and Windows 2000, automatically
detect the ports at boot time. Others, like Windows 95 and Windows 98, do not.
To add a parallel port to the virtual machine’s configuration, take these steps with the
virtual machine powered off.
1. Open the virtual machine settings editor.
VM > Settings
2. Click Add to start the New Hardware Wizard.
3. Select Parallel Port, then click Next.
4. Make the appropriate selection to use a physical parallel port or connect the
virtual parallel port to a file.
5. If you selected Use physical port, choose the port from the drop-down list.
If you selected Use output file, enter the path and filename or browse to the
location of the file.
Under Device status, the default setting is Connect at power on. Clear the
check box if you want to deselect this setting.
392
www.vmware.com
C H A P T E R 1 4 Connecting Devices
6. Click Finish.
In a Windows 95 or Windows 98 guest, after you add the port, run the guest operating
system’s Add New Hardware Wizard (Start > Settings > Control Panel > Add New
Hardware) and let Windows detect the new device.
Configuring a Parallel Port on a Linux Host
For the parallel port to work properly in a guest, it must first be configured properly on
the host. Most issues involving parallel port functionality are a result of the host
configuration. Check these areas of concern: the version of your Linux kernel, your
device access permissions and the required modules.
• Parallel Ports and Linux 2.2.x Kernels on page 393
• Parallel Ports and Linux 2.4.x Kernels on page 394
• Parallel Ports and Linux 2.6.x Kernels on page 395
• Device Permissions on page 396
Parallel Ports and Linux 2.2.x Kernels
The 2.2.x kernels that support parallel ports use the parport, parport_pc and
vmppuser modules. Be sure that PC Style Hardware (CONFIG_PARPORT_PC) is
loaded as a module, as mentioned at the beginning of Using Parallel Ports on
page 392. The vmppuser module is supplied by VMware Workstation to give virtual
machines user-level access to the parallel port.
To see if these modules are installed and running on your system, run the lsmod
command as the root user. These three modules should be included in the listing of
running modules. You can also look at the /proc/modules file for the same list.
To load the proper modules, run this command:
insmod –k <modulename>
If none of the listed parallel port modules is running, use this command:
insmod –k parport_pc
This command inserts the three modules needed for a parallel port.
If you continue to see problems, it is possible that the lp module is running. If it is, the
virtual machine cannot use the parallel port correctly. To remove the lp module, run
this command as the root user:
rmmod lp
You should also ensure that the line referring to the lp module in the /etc/
modules.conf or /etc/conf.modules file is removed or commented out by
inserting a hash character (#) at the beginning of the line. The name of the
configuration file depends on the Linux distribution you are using. When you reboot
393
VMware Workstation 5 User’s Manual
the host after removing this line, the configuration file no longer starts the lp
module.
To ensure that the proper modules for the parallel port are loaded at boot time, add
this line to the /etc/modules.conf or /etc/conf.modules file:
alias parport_lowlevel parport_pc
Parallel Ports and Linux 2.4.x Kernels
Be sure that PC Style Hardware (CONFIG_PARPORT_PC) is loaded as a module as
mentioned at the beginning of Using Parallel Ports on page 392. If you are using a
2.4.x kernel, the modules that provide parallel port functionality are parport,
parport_pc and ppdev.
To see if these modules are installed and running on your system, run the lsmod
command as the root user. These three modules should be included in the listing of
running modules. You can also look at the /proc/modules file for the same list.
To load the proper modules, run this command:
insmod –k <modulename>
If none of the listed parallel port modules is running, use this command:
insmod –k parport_pc
This command inserts the three modules needed for a parallel port.
If you continue to see problems, it is possible that the lp module is running. If it is, the
virtual machine cannot use the parallel port correctly. To remove the lp module, run
this command as the root user:
rmmod lp
You should also ensure that the line referring to the lp module in the /etc/
modules.conf or /etc/conf.modules file is removed or commented out by
inserting a hash character (#) at the beginning of the line. The name of the
configuration file depends on the Linux distribution you are using. When you reboot
the host after removing this line, the configuration file no longer starts the lp
module.
To ensure that the proper modules for the parallel port are loaded at boot time, add
this line to the /etc/modules.conf or /etc/conf.modules file:
alias parport_lowlevel parport_pc
Linux kernels in the 2.4.x series also use a special arbitrator that allows access to the
parallel port hardware. If the parallel port is in use by the host, the guest cannot use it.
If a virtual machine is using the parallel port, the host and any users accessing the host
are not given access to the device. VMware Workstation puts a lock on the device, and
this lock restricts access so only the virtual machine can use the port.
394
www.vmware.com
C H A P T E R 1 4 Connecting Devices
You can choose VM > Removable Devices to disconnect the parallel port from the
virtual machine and reconnect it.
Parallel Ports and Linux 2.6.x Kernels
Be sure that PC Style Hardware (CONFIG_PARPORT_PC) is loaded as a module as
mentioned at the beginning of Using Parallel Ports on page 392. If you are using a
2.6.x kernel, the modules that provide parallel port functionality are modprobe
<modulename> and modprobe parport_pc.
To see if these modules are installed and running on your system, run the lsmod
command as the root user. You can also look at the /proc/modules file for the
same list.
With 2.6.x, loading parport_pc does not load all three modules. If none of the
listed parallel port modules is running, use this command:
modprobe parport_pc && modprobe ppdev
This command inserts the three modules needed for a parallel port.
If you continue to see problems, it is possible that the lp module is running. If it is, the
virtual machine cannot use the parallel port correctly. To remove the lp module, run
this command as the root user:
rmmod lp
You should also ensure that the line referring to the lp module in the /etc/
modules.conf or /etc/conf.modules file is removed or commented out by
inserting a hash character (#) at the beginning of the line. The name of the
configuration file depends on the Linux distribution you are using. When you reboot
the host after removing this line, the configuration file no longer starts the lp
module.
To ensure that the proper modules for the parallel port are loaded at boot time, add
this line to the /etc/modules.conf or /etc/conf.modules file:
alias parport_lowlevel parport_pc
Linux kernels in the 2.6.x series also use a special arbitrator that allows access to the
parallel port hardware. If the parallel port is in use by the host, the guest cannot use it.
If a virtual machine is using the parallel port, the host and any users accessing the host
are not given access to the device. VMware Workstation puts a lock on the device, and
this lock restricts access so only the virtual machine can use the port.
You can choose VM > Removable Devices to disconnect the parallel port from the
virtual machine and reconnect it.
395
VMware Workstation 5 User’s Manual
Device Permissions
Some Linux distributions by default do not grant the virtual machine access to the lp
and parport devices. In most of these cases, the owner of the device is root and
the associated group is lp. To allow the VMware user to access the device, add the
user to the associated group. To view the owner and group of the device, run this
command:
ls –la /dev/parport0
The third and fourth columns of the output show the owner and group, respectively.
To add the user to the device group, edit the /etc/group file. On the line starting
with lp, which defines the lp group, add the VMware Workstation user’s user name.
You must make this change as the root user. The following line provides an example
for a user whose user name is userj.
lp::7:daemon,lp,userj
The next time the user logs on to the host, the changes take effect.
Special Notes for the Iomega Zip Drive
On Windows 95 or Windows 98, use of older drivers for the Iomega Zip drive may
cause the guest operating system to lock up intermittently at boot time or during
installation of the guest operating system. The newest Iomega drivers work reliably in
our tests. They are available at www.iomega.com/software/index.html.
396
www.vmware.com
C H A P T E R 1 4 Connecting Devices
Using Serial Ports
A VMware Workstation virtual machine can use up to four virtual serial ports. The
virtual serial ports can be configured in several ways.
• You can connect a virtual serial port to a physical serial port on the host
computer.
• You can connect a virtual serial port to a file on the host computer.
• You can make a direct connection between two virtual machines or between a
virtual machine and an application running on the host computer.
You can also select whether to connect the virtual serial port when you power on the
virtual machine.
Using a Serial Port on the Host Computer
You can set up the virtual serial port in a virtual machine to use a physical serial port
on the host computer. This is useful, for example, if you want to use an external
modem or a hand-held device in your virtual machine.
To install a virtual serial port that connects to a physical serial port on the host
computer, take the following steps:
1. Open the virtual machine settings editor (VM > Settings).
2. Click Add to start the Add Hardware Wizard.
3. Select Serial Port, then click Next.
397
VMware Workstation 5 User’s Manual
4. Select Use physical serial port on the host, then click Next.
5. Choose the port on the host computer that you want to use for this serial
connection. By default, the device status setting is Connect at power on. You
may deselect this setting if you wish.
Click Advanced if you want to configure this serial port to use polled mode. This
option is of interest primarily to developers who are using debugging tools that
communicate over a serial connection. For more information, see Special
Configuration Options for Advanced Users on page 405.
6. Click Finish, then click OK to close the virtual machine settings editor.
7. Power on the virtual machine.
Using a File on the Host Computer
You can set up the virtual serial port in a virtual machine to send its output to a file on
the host computer. This is useful, for example, if you want to capture the data a
program running in the virtual machine sends to the virtual serial port or if you need a
quick way to transfer a file from the guest to the host.
To install a virtual serial port that connects to a file on the host computer, take the
following steps:
1. Open the virtual machine settings editor (VM > Settings).
2. Click Add to start the Add Hardware Wizard.
398
www.vmware.com
C H A P T E R 1 4 Connecting Devices
3. Select Serial Port, then click Next.
4. Select Output to file, then click Next.
5. Browse to the file on the host computer that you want to use to store the output
of the virtual serial port. By default, the device status setting is Connect at power
on. You may deselect this setting if you wish.
Click Advanced if you want to configure this serial port to use polled mode. This
option is of interest primarily to developers who are using debugging tools that
communicate over a serial connection. For more information, see Special
Configuration Options for Advanced Users on page 405.
6. Click Finish, then click OK to close the virtual machine settings editor.
7. Power on the virtual machine.
399
VMware Workstation 5 User’s Manual
Connecting an Application on the Host to a Virtual Machine
You can set up the virtual serial port in a virtual machine to connect to an application
on the host computer. This is useful, for example, if you want to use an application on
the host to capture debugging information sent from the virtual machine’s serial port.
To install a direct serial connection between an application on the host and a virtual
machine, take the following steps:
Windows Host
1. Open the virtual machine settings editor (VM > Settings).
2. Click Add to start the Add Hardware Wizard.
3. Select Serial Port, then click Next.
4. Select Output to named pipe, then click Next.
5. Use the default pipe name, or enter another pipe name of your choice. The pipe
name must follow the form \\.\pipe\<namedpipe> — that is, it must
begin with \\.\pipe\.
6. Select This end is the server or This end is the client. In general, select This end
is the server if you plan to start this end of the connection first.
7. Select The other end is an application.
400
www.vmware.com
C H A P T E R 1 4 Connecting Devices
8. By default, the device status setting is Connect at power on. You may deselect
this setting if you wish.
Click Advanced if you want to configure this serial port to use polled mode. This
option is of interest primarily to developers who are using debugging tools that
communicate over a serial connection. For more information, see Special
Configuration Options for Advanced Users on page 405.
9. Click Finish, then click OK to close the virtual machine settings editor.
10. On your host computer, configure the application that communicates with the
virtual machine to use the same pipe name.
11. Power on the virtual machine.
Linux Host
1. Open the virtual machine settings editor (VM > Settings).
2. Click Add to start the Add Hardware Wizard.
3. Select Serial Port, then click Next.
4. Select Output to named pipe, then click Next.
5. In the Path field, enter /tmp/<socket> or another Unix socket name of your
choice.
6. Select This end is the server or This end is the client. In general, select This end
is the server if you plan to start this end of the connection first.
7. Select The other end is an application.
8. By default, the device status setting is Connect at power on. You may deselect
this setting if you wish.
Click Advanced if you want to configure this serial port to use polled mode. This
option is of interest primarily to developers who are using debugging tools that
communicate over a serial connection. For more information, see Special
Configuration Options for Advanced Users on page 405.
9. Click Finish.
10. Click OK to save your configuration and close the virtual machine settings editor.
11. On your host computer, configure the application that communicates with the
virtual machine to use the same Unix socket name.
12. Power on the virtual machine.
401
VMware Workstation 5 User’s Manual
Connecting Two Virtual Machines
You can set up the virtual serial ports in two virtual machines to connect to each
other. This is useful, for example, if you want to use an application in one virtual
machine to capture debugging information sent from the other virtual machine’s
serial port.
To install a direct serial connection between two virtual machines (a server and a
client), take the following steps:
Windows Host
In the server virtual machine
1. Open the virtual machine settings editor (VM > Settings).
2. Click Add to start the Add Hardware Wizard.
3. Select Serial Port, then click Next.
4. Select Output to named pipe, then click Next.
5. Use the default pipe name, or enter another pipe name of your choice. The pipe
name must follow the form \\.\pipe\<namedpipe> — that is, it must
begin with \\.\pipe\.
6. Select This end is the server.
402
www.vmware.com
C H A P T E R 1 4 Connecting Devices
7. Select The other end is a virtual machine.
8. By default, the device status setting is Connect at power on. You may deselect
this setting if you wish.
Click Advanced if you want to configure this serial port to use polled mode. This
option is of interest primarily to developers who are using debugging tools that
communicate over a serial connection. For more information, see Special
Configuration Options for Advanced Users on page 405.
9. Click Finish, then click OK to close the virtual machine settings editor.
In the client virtual machine
1. Open the virtual machine settings editor (VM > Settings).
2. Click Add to start the Add Hardware Wizard.
3. Select Serial Port, then click Next.
4. Select Use named pipe.
5. Use the default name, or enter another pipe name of your choice. The pipe
name must follow the form \\.\pipe\<namedpipe> — that is, it must
begin with \\.\pipe\. The pipe name must be the same on both server and
client.
6. Select This end is the client.
7. Select The other end is a virtual machine.
8. By default, the device status setting is Connect at power on. You may deselect
this setting if you wish.
Click Advanced if you want to configure this serial port to use polled mode. This
option is of interest primarily to developers who are using debugging tools that
communicate over a serial connection. For more information, see Special
Configuration Options for Advanced Users on page 405.
403
VMware Workstation 5 User’s Manual
9. Click Finish, then click OK to close the virtual machine settings editor.
Linux Host
In the server virtual machine
1. Open the virtual machine settings editor (VM > Settings).
2. Click Add to start the Add Hardware Wizard.
3. Select Serial Port, then click Next.
4. Select Output to named pipe, then click Next.
5. In the Path field, enter /tmp/<socket> or another Unix socket name of your
choice.
6. Select This end is the server.
7. Select The other end is a virtual machine.
8. By default, the device status setting is Connect at power on. You may deselect
this setting if you wish.
Click Advanced if you want to configure this serial port to use polled mode. This
option is of interest primarily to developers who are using debugging tools that
communicate over a serial connection. For more information, see Special
Configuration Options for Advanced Users on page 405.
9. Click Finish, then click OK to save your configuration and close the virtual
machine settings editor.
In the client virtual machine
1. Open the virtual machine settings editor (VM > Settings).
2. Click Add to start the Add Hardware Wizard.
3. Select Serial Port, then click Next.
4. Select Output to named pipe, then click Next.
5. In the Path field, enter /tmp/<socket> or another Unix socket name of your
choice. The pipe name must be the same on both server and client.
6. Select This end is the client.
7. Select The other end is a virtual machine.
404
www.vmware.com
C H A P T E R 1 4 Connecting Devices
8. By default, the device status setting is Connect at power on. You may deselect
this setting if you wish.
Click Advanced if you want to configure this serial port to use polled mode. This
option is of interest primarily to developers who are using debugging tools that
communicate over a serial connection. For more information, see Special
Configuration Options for Advanced Users on page 405.
9. Click Finish, then click OK to save your configuration and close the virtual
machine settings editor.
Special Configuration Options for Advanced Users
Two special configuration options are available for serial connections between a
virtual machine and the host or between two virtual machines. These options are of
interest primarily to developers who are using debugging tools that communicate
over a serial connection.
Improving CPU Performance when Debugging
The first option must be set in the virtual machine settings editor. This option is useful
when the serial port is being used by the guest operating system in polled mode as
opposed to interrupt mode. Polled mode causes the virtual machine to consume a
disproportionate share of CPU time. This makes the host and other guests run
sluggishly.
To restore performance for applications on the host, in the virtual machine settings
editor, select the virtual serial port, and check the Yield CPU on poll check box. This
configuration option forces the affected virtual machine to yield processor time if the
only task it is trying to do is poll the virtual serial port.
405
VMware Workstation 5 User’s Manual
Changing the Input Speed of the Serial Connection
To use the second option, power off the virtual machine and close the VMware
Workstation window, then use a text editor to add the following line to your virtual
machine’s configuration file:
serial<n>.pipe.charTimePercent = <x>
This option is useful if you want to squeeze every possible bit of speed from your serial
connection over a pipe to the virtual machine. In principle, there is no limit on the
output speed — the speed at which the virtual machine sends data through the
virtual serial port. In practice, the output speed depends on how fast the application
at the other end of the pipe reads data inbound to it.
<n> is the number of the serial port, starting from 0. So the first serial port is
serial0.
<x> is any positive integer. It specifies the time taken to transmit a character,
expressed as a percentage of the default speed set for the serial port in the guest
operating system. For example, a setting of 200 forces the port to take twice as long
per character, or send data at half the default speed. A setting of 50 forces the port to
take only half as long per character, or send data at twice the default speed.
You should first use the guest operating system to configure the serial port for the
highest setting supported by the application you are running in the virtual machine.
Once the serial port speed is set appropriately in the guest operating system,
experiment with this setting. Start with a value of 100 and gradually decrease it until
you find the highest speed at which your connection works reliably.
406
www.vmware.com
C H A P T E R 1 4 Connecting Devices
Examples: Debugging over a Virtual Serial Port
You can use Debugging Tools for Windows (WinDbg) or Kernel Debugger (KD) to
debug kernel code in a virtual machine over a virtual serial port. You can download
Debugging Tools for Windows from the Windows DDK Web site at
www.microsoft.com/whdc/devtools/debugging/default.mspx.
The following two examples illustrate how to use a virtual serial port to debug kernel
code in a virtual machine:
• With the debugging application on the VMware Workstation host (Windows
hosts only)
• With the debugging application in another virtual machine on the same
VMware Workstation host (useful on a Linux host and can also be done on a
Windows host)
Using either of these methods lets you debug kernel code on one system, without the
need for two physical computers, a modem or serial cable.
Debugging an Application in a Virtual Machine from the Windows Host
In this example, you have kernel code to debug in a virtual machine (called the target
virtual machine) and are running WinDbg or KD on your Windows host.
To prepare the target virtual machine, follow the steps for a Windows host in
Connecting an Application on the Host to a Virtual Machine on page 400. Make sure
you configure the virtual machine’s virtual serial port as follows:
• Select This end is the server
• Under I/O Mode, select the Yield CPU on poll check box, as the kernel in the
target virtual machine uses the virtual serial port in polled mode, not interrupt
mode
To prepare the host, make sure you have a recent version of Debugging Tools for
Windows — one that supports debugging over a pipe. You need version 5.0.18.0 or
higher.
407
VMware Workstation 5 User’s Manual
When you are ready to begin, complete the following steps:
1. Power on the virtual machine.
2. Check to make sure the serial port is connected. Choose choose VM >
Removable Devices. On that menu, serial<n> should be reported as
\\.\pipe\<namedpipe> (on Windows hosts) or /tmp/<socket> (on Linux hosts).
If the serial port is not connected, choose the virtual serial port, then Connect.
3. On the host, open a Command Prompt window and do one of the following:
• If you are using WinDbg, type the following:
windbg -k com:port=\\.\pipe\<namedpipe>,pipe
• If you are using KD, type the following:
kd -k com:port=\\.\pipe\<namedpipe>,pipe
Then press Enter to start debugging.
Debugging an Application in a Virtual Machine from another Virtual Machine
In this situation, you have kernel code to debug in a virtual machine (called the target
virtual machine) and are running Debugging Tools for Windows (WinDbg) or Kernel
Debugger (KD) in another virtual machine (called the debugger virtual machine) on
the same host.
This is useful if you are running VMware Workstation on a Linux host. The debugger
virtual machine must be running Debugging Tools for Windows (WinDbg) or Kernel
Debugger (KD) in a Windows guest operating system.
To prepare the target virtual machine, follow the steps for the server virtual machine
for the appropriate host in Connecting Two Virtual Machines on page 402. Make sure
when you configure the target virtual machine’s virtual serial port that you select the
Yield CPU on poll check box, as the kernel in the target virtual machine uses the
virtual serial port in polled mode, not interrupt mode.
To prepare the debugger virtual machine, make sure you have downloaded
Debugging Tools for Windows. Then follow the steps for the client virtual machine in
Connecting Two Virtual Machines on page 402.
When you are ready to begin, complete the following steps:
1. Power on both virtual machines.
2. Check to make sure the serial port is connected. Choose choose VM >
Removable Devices. If the serial port is not connected, choose the virtual serial
port, then Connect.
3. In the debugger virtual machine, start debugging with WinDbg or KD normally.
408
www.vmware.com
C H A P T E R 1 4 Connecting Devices
Keyboard Mapping on a Linux Host
This section addresses the following issues and provides additional details on
keyboard mapping in Linux:
• My (language-specific) keyboard is not supported by VMware Workstation.
• Some of the keys on my keyboard don’t work right in the virtual machine.
• My keyboard works fine when I run a virtual machine locally, but not when I run
the same virtual machine with a remote X server.
Quick Answers
If your keyboard works correctly with a local X server, and you just want the same
behavior with a remote X server (which is also an XFree86 server running on a PC), just
power off the virtual machine and close the VMware Workstation window, then add
the line
xkeymap.usekeycodeMapIfXFree86 = true
to the virtual machine configuration file or to ~/.vmware/config. Make this
change on the host machine, where you run the virtual machine, not on the machine
with the remote X server.
If you are using an XFree86-based server that VMware Workstation does not recognize
as an XFree86 server, use this instead:
xkeymap.usekeycodeMap = true
If you are using an XFree86 server running locally, and the keyboard does not work
correctly, please report the problem to the VMware technical support department.
The Longer Story
Unfortunately, keyboard support for the PC (virtual or otherwise) is a complex affair. To
do it justice, we have to start with some background information — greatly simplified.
Pressing a key on the PC keyboard generates a scan code based roughly on the
position of the key. For example, the Z key on a German keyboard generates the same
code as the Y key on an English keyboard, because they are in the same position on
the keyboard. Most keys have one-byte scan codes, but some keys have two-byte
scan codes with prefix 0xe0.
Internally, VMware Workstation uses a simplified version of the PC scan code that is a
single nine-bit numeric value, called a v-scan code. A v-scan code is written as a threedigit hexadecimal number. The first digit is 0 or 1. For example, the left-hand Ctrl key
has a one-byte scan code (0x1d); its v-scan code is 0x01d. The right-hand Ctrl key scan
code is two bytes (0xe0, 0x1d); its v-scan code is 0x11d.
409
VMware Workstation 5 User’s Manual
An X server uses a two-level encoding of keys. An X key code is a one-byte value. The
assignment of key codes to keys depends on the X server implementation and the
physical keyboard. As a result, an X application normally cannot use key codes directly.
Instead, the key codes are mapped into keysyms that have names like space, escape, x
and 2. The mapping can be controlled by an X application via the function
XChangeKeyboardMapping() or by the program xmodmap. To explore
keyboard mappings, you can use xev, which shows the key codes and keysyms for
keys typed into its window.
To recap, a key code corresponds roughly to a physical key, while a keysym
corresponds to the symbol on the key top. For example, with an XFree86 server
running on a PC, the Z key on the German keyboard has the same key code as the Y
key on an English keyboard. The German Z keysym, however, is the same as the
English Z keysym, and different from the English Y keysym.
For an XFree86 server on a PC, there is a one-to-one mapping from X key codes to PC
scan codes (or v-scan codes, which is what VMware Workstation really uses). VMware
Workstation takes advantage of this fact. When it is using an XFree86 server on the
local host, it uses the built-in mapping from X key codes to v-scan codes. This
mapping is keyboard independent and should be correct for most, if not all,
languages. In other cases (not an XFree86 server or not a local server), VMware
Workstation must map keysyms to v-scan codes, using a set of keyboard-specific
tables.
Key code mapping is simple, automatic and foolproof. (Keysym mapping is more
complex and described later.) However, because the program cannot tell whether a
remote server is running on a PC or on some other kind of computer, it errs on the safe
side and uses key code mapping only with local X servers. This is often too
conservative and has undesirable effects. Luckily, this and other behavior related to
key code-mapping can be controlled by powering off the virtual machine and closing
the VMware Workstation window, then using a text editor to add configuration
settings to the virtual machine’s configuration file.
• xkeymap.usekeycodeMapIfXFree86 = true
Use key code mapping if you are using an XFree86 server, even if it is remote.
• xkeymap.usekeycodeMap = true
Always use key code mapping regardless of server type.
410
www.vmware.com
C H A P T E R 1 4 Connecting Devices
• xkeymap.nokeycodeMap = true
Never use key code mapping.
• xkeymap.keycode.<code> = <v-scan code>
If using key code mapping, map key code <code> to <v-scan code>. In
this example, <code> must be a decimal number and <v-scan code>
should be a C-syntax hexadecimal number (for example, 0x001).
The easiest way to find the X key code for a key is to run xev or xmodmap -pk. Most
of the v-scan codes are covered in V-Scan Code Table on page 413. The keysym
mapping tables described in this section are also helpful.
Use this feature to make small modifications to the mapping. For example, to swap
left Ctrl and Caps Lock, use the following lines:
xkeymap.keycode.64 = 0x01d # X Caps_Lock -> VM left ctrl
xkeymap.keycode.37 = 0x03a # X Control_L -> VM caps lock
These configuration lines can be added to the individual virtual machine
configuration, to your personal VMware Workstation configuration (~/.vmware/
config), or even to the host-wide (/etc/vmware/config) or installation-wide
(usually /usr/local/lib/vmware/config) configuration.
When key code mapping cannot be used (or is disabled), VMware Workstation maps
keysyms to v-scan codes. It does this using one of the tables in the xkeymap
directory in the VMware Workstation installation (usually /usr/local/lib/
vmware).
Which table you should use depends on the keyboard layout. The normal distribution
includes tables for PC keyboards for the United States and a number of European
countries and languages. And for most of these, there are both the 101-key (or 102key) and the 104-key (or 105-key) variants.
VMware Workstation automatically determines which table to use by examining the
current X keymap. However, its decision-making process may sometimes fail. In
addition, each mapping is fixed and may not be completely right for any given
keyboard and X key code-to-keysym mapping. For example, a user may have
swapped Ctrl and Caps Lock using xmodmap. This means the keys are swapped in the
virtual machine when using a remote server (keysym mapping) but unswapped when
using a local server (key code mapping).
411
VMware Workstation 5 User’s Manual
Therefore, keysym mapping is necessarily imperfect. To make up for this defect, you
can change most of the behavior using configuration settings:
• xkeymap.language = <keyboard-type>
Use this if VMware Workstation has a table in xkeymap for your keyboard but
can’t detect it. <keyboard-type> must be one of the tables in the
xkeymap directory. (See above for location.) However, the failure to detect the
keyboard probably means the table isn’t completely correct for you.
• xkeymap.keysym.<sym> = <v-scan code>
If you use keysym mapping, map keysym <sym> to <v-scan code>. When
you do, <sym> must be an X keysym name and <v-scan code> should be a
C-syntax hexadecimal number (for example, 0x001).
The easiest way to find the keysym name for a key is to run xev or
xmodmap -pk.
The X header file /usr/X11R6/include/X11/keysymdef.h has a
complete list of keysyms. (The name of a keysym is the same as its C constant
without the XK_ prefix.) Most v-scan codes are in V-Scan Code Table on
page 413.
The xkeymap tables themselves are also helpful. Use them to fix small errors in
an existing mapping.
• xkeymap.fileName = <file-path>
Use the keysym mapping table in <file-path>. A table is a sequence of
configuration lines of the form
<sym> = <v-scan code>
where <sym> is an X keysym name, and <v-scan code> is a C-syntax
hexadecimal number (for example, 0x001). (See the explanation of
xkeymap.keysym above for tips on finding the keysyms and v-scan codes for
your keyboard.)
Compiling a complete keysym mapping is difficult. It is best to start with an
existing table and make small changes.
412
www.vmware.com
C H A P T E R 1 4 Connecting Devices
V-Scan Code Table
These are the v-scan codes for the 104-key U.S. keyboard:
Symbol
Shifted symbol
Location
Esc
V-scan code
0x001
1
!
0x002
2
@
0x003
3
#
0x004
4
$
0x005
5
%
0x006
6
^
0x007
7
&
0x008
8
*
0x009
9
(
0x00a
0
)
0x00b
-
_
0x00c
=
+
0x00d
Backspace
0x00e
Tab
0x00f
Q
0x010
W
0x011
E
0x012
R
0x013
T
0x014
Y
0x015
U
0x016
I
0x017
O
0x018
P
0x019
[
{
0x01a
]
}
0x01b
Enter
Ctrl
0x01c
left
0x01d
413
VMware Workstation 5 User’s Manual
Symbol
Shifted symbol
Location
0x01e
S
0x01f
D
0x020
F
0x021
G
0x022
H
0x023
J
0x024
K
0x025
L
0x026
;
0x027
'
0x028
`
0x029
Shift
\
left
|
0x02a
0x02b
Z
0x02c
X
0x02d
C
0x02e
V
0x02f
B
0x030
N
0x031
M
0x032
,
<
0x033
.
>
0x034
/
?
0x035
Shift
right
0x036
*
numeric pad
0x037
Alt
left
0x038
Space bar
414
V-scan code
A
0x039
Caps Lock
0x03a
F1
0x03b
F2
0x03c
www.vmware.com
C H A P T E R 1 4 Connecting Devices
Symbol
Shifted symbol
Location
V-scan code
F3
0x03d
F4
0x03e
F5
0x03f
F6
0x040
F7
0x041
F8
0x042
F9
0x043
F10
0x044
Num Lock
numeric pad
Scroll Lock
0x045
0x046
Home
7
numeric pad
0x047
Up arrow
8
numeric pad
0x048
PgUp
9
Left arrow
4
5
Right arrow
6
+
numeric pad
0x049
numeric pad
0x04a
numeric pad
0x04b
numeric pad
0x04c
numeric pad
0x04d
numeric pad
0x04e
End
1
numeric pad
0x04f
Down arrow
2
numeric pad
0x050
PgDn
3
numeric pad
0x051
Ins
0
numeric pad
0x052
numeric pad
0x053
Del
F11
0x057
F12
0x058
Break
Pause
0x100
Enter
numeric pad
0x11c
Ctrl
right
0x11d
numeric pad
0x135
/
SysRq
Alt
Print Scrn
0x137
right
0x138
415
VMware Workstation 5 User’s Manual
Symbol
Shifted symbol
Location
V-scan code
Home
function pad 0x147
Up arrow
function pad 0x148
Page Up
function pad 0x149
Left arrow
function pad 0x14b
Right arrow
function pad 0x14d
End
function pad 0x14f
Down arrow
function pad 0x150
Page Down
function pad 0x151
Insert
function pad 0x152
Delete
function pad 0x153
Windows
left
0x15b
Windows
right
0x15c
Menu
0x15d
The 84-key keyboard has a Sys Req key on the numeric pad:
Symbol
Shifted symbol
Sys Req
Location
V-scan code
numeric pad
0x054
Keyboards outside the U.S. usually have an extra key (often < > or < > | ) next to the
left shift key:
416
Symbol
Shifted symbol
<
>
Location
V-scan code
0x056
www.vmware.com
C H A P T E R 1 4 Connecting Devices
Using USB Devices in a Virtual Machine
VMware Workstation 5 provides a two-port USB 1.1 controller. You can use up to two
USB devices in your virtual machine if both your host operating system and your
guest operating system support USB. If your host computer supports USB 2.0 devices,
you can use those devices in the virtual machine, with the appropriate device drivers
installed in the guest.
Note: When a USB device and the host controller both support USB 2.0, the device
will automatically operate in USB 2.0 mode. This should usually work correctly, even
though the transaction must proceed through the USB 1.1 controller in the guest.
However, in some cases the guest UHCI (USB 1.0) drivers may not be able to handle
certain USB 2.0-specific transactions or features, for example, the larger USB 2.0 packet
size. This may cause the guest to crash. To work around this problem, plug the device
into a USB 1.0 hub. This will force the device to use the USB 1.0 packet size.
Experimental support is provided for isochronous USB devices, such as webcams,
speakers, and microphones.
Note: Windows NT and Linux kernels older than 2.2.17 do not support USB.
Although your host operating system must support USB, you do not need to install
device-specific drivers for your USB devices in the host operating system if you want
to use those devices only in the virtual machine.
On a Windows 2000 host computer with USB 2.0 support, be sure you are using the
Microsoft USB 2.0 driver for the USB controller. Third-party USB 2.0 drivers, such as
those provided by some motherboard manufacturers, are not supported. For notes on
replacing the third-party drivers, see Replacing USB 2.0 Drivers on a Windows 2000
Host on page 419.
Notes on USB Support in Version 5
We have tested a variety of USB devices with this release. In general, if the guest
operating system has appropriate drivers, you should be able to use PDAs, printers,
storage (disk) devices, scanners, MP3 players, digital cameras and memory card
readers.
Modems and certain streaming data devices, such as speakers and Web cams, do not
work properly.
417
VMware Workstation 5 User’s Manual
Enabling and Disabling the USB Controller
The virtual machine’s USB ports are enabled by default. If you will not be using USB
devices in a virtual machine, you can disable its USB controller using the virtual
machine settings editor.
Connecting USB Devices
Autoconnecting USB Devices
When a virtual machine is running, its window is the active window and a USB device
is plugged into the host computer, the device automatically connects to the guest
instead of the host. This autoconnect feature can be disabled in the USB Controller
panel of the virtual machine settings editor (VM > Settings). If all of the virtual
machine’s USB ports are already occupied when it is trying to connect automatically
to a new device, a dialog box gives you a choice: you can either disconnect one of the
existing USB devices to free its port or ignore the new device, allowing the device to
connect to the host.
Connecting USB Devices Manually
Choose VM > Removable Devices to connect specific USB devices to your virtual
machine. You can connect up to two USB devices at a time. If the physical USB devices
are connected to the host computer through a hub, the virtual machine sees only the
USB devices, not the hub.
There is a menu item for each of the USB ports. Move the mouse over one of these
items to see a cascading menu of devices that are plugged into your host computer
and available for use. To connect a device to the virtual machine, click its name.
If a device is already connected to that port, click the name of a new device to release
the first device and connect the new one.
To release a connected device, click None on the cascading menu for the port to
which it is connected.
If you physically plug a new device into the host computer and the autoconnect
feature does not connect it to a virtual machine, the device is initially connected to
the host. Its name is also added to the VM > Removable Devices menu so you can
connect it to the virtual machine manually.
Automatic Reconnection of USB Devices
When you manually connect a USB device (VM > Removable Devices), Workstation
retains the virtual machine’s connection to the affected port on the host machine. You
can then suspend or power off the virtual machine, or unplug the device. When you
plug the device back in or resume the virtual machine, Workstation reconnects the
418
www.vmware.com
C H A P T E R 1 4 Connecting Devices
device automatically. Workstation retains the connection by writing an autoconnect
entry to the virtual machine’s configuration (.vmx) file.
If Workstation is unable to reconnect to the device (for example, because the device
has been disconnected or moved to another port), the device is removed, and a
message is displayed indicating that Workstation is unable to connect to the device.
You can connect manually to the device, if it is still available.
Using USB with a Windows Host
Windows 2000, Windows XP and Windows Server 2003 hosts: When a particular
USB device is connected to a virtual machine for the first time, the host detects it as a
new device named VMware USB Device and installs the appropriate VMware driver.
Windows XP and Windows Server 2003 hosts: User confirmation is required in the
Found New Hardware Wizard. Select the default action — Install the software
automatically. Once the software is installed, the guest operating system detects the
USB device and searches for a suitable driver.
When you are synchronizing a PDA, such as a Palm handheld or Handspring Visor, to a
virtual machine for the first time, the total time required to load the VMware USB
device driver in the host and the PDA driver in the guest may exceed the device’s
connection timeout value. This causes the device to disconnect itself from the
computer before the guest can synchronize with it. If this occurs, let the guest finish
installing the PDA driver, dismiss any connection error warnings, then try
synchronizing the PDA again. The second attempt should succeed.
Replacing USB 2.0 Drivers on a Windows 2000 Host
To use VMware Workstation 5 on a Windows 2000 host that has USB 2.0 ports, you
must use the Microsoft USB 2.0 drivers for the USB controller in the host operating
system. If your host operating system is using a third-party driver — a driver supplied
by your motherboard vendor, for example — you must replace it.
Take the following steps to check the provider of your driver:
1. Go to the Device Manager. Right-click My Computer, choose Properties, click
the Hardware tab, then click Device Manager.
2. Expand the listing for Universal Serial Bus controllers.
3. Right-click the listing for the controller and choose Properties.
4. Click the Driver tab. If the driver provider shown on that page is Microsoft, you
have the correct driver already.
419
VMware Workstation 5 User’s Manual
If the driver provider is not Microsoft, download the latest USB driver for your host
operating system from the Microsoft Web site and follow the Microsoft instructions to
install it. Details are available in Microsoft knowledge base article 319973.
Using USB with a Linux Host
On Linux hosts, VMware Workstation uses the USB device file system to connect to
USB devices. In most Linux systems that support USB, the USB device file system is at
/proc/bus/usb.
If your host operating system uses a different path to the USB device file system, you
can change it in the virtual machine configuration .vmx file. Add the following line
to change the default usb device file system path:
usb.generic.devfsPath = "<your_path_to_usbdevfs>"
What Has Control over a USB Device?
Only one computer — host or guest — can have control of a USB device at any one
time.
Device Control on a Windows Host
When you connect a device to a virtual machine, it is “unplugged” from the host or
from the virtual machine that previously had control of the device. When you
disconnect a device from a virtual machine, it is “plugged in” to the host.
Caution: On Windows 2000, Windows XP and Windows Server 2003 hosts, you need
to take a special step to disconnect USB network and storage devices from the host.
There is a system tray icon called Eject Hardware on Windows 2000 and Safely Remove
Hardware on Windows XP and Windows Server 2003. Use this icon to disconnect the
device from the host before connecting it to a virtual machine.
Device Control on a Linux Host
On Linux hosts, guest operating systems can use devices that are not already in use by
the host — that is, devices that are not claimed by a host operating system driver.
If your device is in use by the host and you try to connect it to the guest using the VM
> Removable Devices menu, a dialog box appears, informing you that there is a
problem connecting to the device.
To disconnect the device from the host, you must unload the device driver. You can
unload the driver manually as root (su) using the rmmod command. Or, if the driver
was automatically loaded by hotplug, you can disable it in the hotplug
configuration files in the /etc/hotplug directory. See your Linux distribution’s
documentation for details on editing these configuration files.
420
www.vmware.com
C H A P T E R 1 4 Connecting Devices
A related issue sometimes affects devices that rely on automatic connection (as PDAs
often do).
If you have successfully used autoconnection to connect the device to your virtual
machine, then experience problems with the connection to the device, take the
following steps:
1. Disconnect and reconnect the device. You can either unplug it physically, then
plug it back in or use the VM > Removable Devices menu to disconnect it and
reconnect it.
2. If you see a dialog box warning that the device is in use, disable it in the
hotplug configuration files in the /etc/hotplug directory.
Disconnecting USB Devices from a Virtual Machine
Before unplugging a USB device or using the VM > Removable Devices menu to
disconnect it from a virtual machine, be sure it is in a safe state.
You should follow the procedures the device manufacturer specifies for unplugging
the device from a physical computer. This is true whether you are physically
unplugging it, moving it from host to virtual machine, moving it between virtual
machines or moving it from virtual machine to host.
This is particularly important with data storage devices (a Zip drive, for example). If you
move a data storage device too soon after saving a file and the operating system has
not actually written the data to the disk, you can lose data.
Human Interface Devices
USB human interface devices, such as the keyboard and mouse, are not handled
though the virtual machine’s USB controller. Instead, they appear in the virtual
machine as a standard PS/2 keyboard and mouse, even though they are plugged into
USB ports on the host.
421
VMware Workstation 5 User’s Manual
Connecting to a Generic SCSI Device
Generic SCSI lets a virtual machine run any SCSI device that is supported by the guest
operating system in the virtual machine. Generic SCSI gives the guest operating
system direct access to SCSI devices connected to the host, such as scanners and tape
drives.
Generic SCSI on a Windows Host Operating System
Using the SCSI Generic driver in Windows, VMware Workstation allows your guest
operating system to operate generic SCSI devices — including scanners, tape drives
and other data storage devices — in a virtual machine.
Note: In order to access host SCSI devices as Generic SCSI devices from within a
virtual machine, you must run VMware Workstation as a user with administrator
access.
Device Support
In theory, generic SCSI is completely device independent, but VMware has discovered
it is sensitive to the guest operating system, device class and specific SCSI hardware.
We encourage you to try any SCSI hardware you want to use and report problems to
VMware technical support.
Note: If you are using generic SCSI devices in a Windows 95, Windows 98 or
Windows Me guest operating system and are experiencing problems with the
devices, download the latest Mylex® (BusLogic) BT/KT-958 compatible host bus
adapter from www.lsilogic.com. This driver overrides what Windows chooses as the
best driver, but it corrects known problems.
Preparing a Windows XP or Windows Server 2003 Guest Operating System to
Use SCSI Devices
To use SCSI devices in a Windows XP or Windows Server 2003 virtual machine, you
need a special SCSI driver available from the download section of the VMware Web
site www.vmware.com/download. Follow the instructions on the Web site to install the
driver.
422
www.vmware.com
C H A P T E R 1 4 Connecting Devices
Preparing a Windows NT 4.0 Guest Operating System to Use SCSI Devices
Generic SCSI devices use the virtual Mylex (BusLogic) BT/KT-958 compatible host bus
adapter provided by the virtual machine. Some guest operating systems guide you
through installing the drivers after you install the first SCSI device in the virtual
machine. On Windows NT 4.0, however, you may need to install the driver manually, if
it is not already installed for a virtual SCSI disk. You should do so before you add a
generic SCSI device.
To install the BusLogic driver in a Windows NT 4.0 guest, have your Windows NT
installation CD available and follow these steps.
1. Open the SCSI Adapters control panel.
Start > Settings > Control Panel > SCSI Adapters
2. Click the Drivers tab.
3. Click Add.
4. In the list of vendors on the left, select BusLogic.
5. In the list of drivers on the right, select BusLogic MultiMaster PCI SCSI Host
Adapters.
6. Click OK.
7. Insert the Windows NT CD when you are prompted. Click OK.
8. Reboot when you are prompted.
Adding a Generic SCSI Device to a Virtual Machine
You can add generic SCSI devices to your virtual machine in the virtual machine
settings editor. When you set up a generic SCSI device, the virtual machine must be
powered off.
1. If it is not already running, launch VMware Workstation.
Start > Programs > VMware > VMware Workstation
2. Open the virtual machine in which you want to use the generic SCSI device.
Make sure the virtual machine is powered off.
3. From the VMware Workstation window, choose VM > Settings. The virtual
machine settings editor opens.
4. Click Add to start the Add Hardware Wizard. Click Next.
5. Select Generic SCSI Device, then click Next.
423
VMware Workstation 5 User’s Manual
6. Choose the name of the physical device you want to use.
Then choose the virtual device node where you want this device to appear in
the virtual machine.
A check box under Device status allows you to specify whether the device
should be connected each time the virtual machine is powered on.
7. Click Finish to install the new device.
8. Click OK to save the configuration and close the virtual machine settings editor.
To remove this device, launch the virtual machine settings editor, select the generic
SCSI device, then click Remove.
Adding a Generic SCSI Device Not Detected by Workstation (Advanced Users)
When you want to add a generic SCSI device to a virtual machine, if Workstation does
not display the device you want to add (for example, scanners on a Windows 2000
host or some tape backup devices), you need to add the device manually to the
virtual machine’s configuration file (.vmx).
Reasons Workstation cannot detect a device include:
• A driver for that device is not installed on the host.
• A driver on the host prevents the device from being detected.
• The virtual machine uses a device for which there are no drivers available to the
host operating system.
Before you attempt the steps below, first verify whether the device driver is installed
on the host. If the driver is not installed, install it then see if the device appears
correctly to Workstation. If it does not appear correctly, or if you cannot or do not want
to install the driver on the host, then you need to add the device manually to the
virtual machine.
When adding a device manually to the virtual machine, use scsiX:Y notation to
refer to the device on the host instead of a device name Workstation uses like
CdRom0. For this type of notation, X is the SCSI bus on which the device is located on
the host and Y is the target ID the device uses on the host.
Caution: Adding a device in this manner is recommended for advanced users only.
Caution: Before you add the device, you must disable the original SCSI device driver
on the host. Some Windows operating systems do not process the send command
from the adapter if the device driver is owning the device.
There are a few circumstances requiring you to add or configure the device manually.
Follow the steps that match your circumstance. In each case, power off the virtual
424
www.vmware.com
C H A P T E R 1 4 Connecting Devices
machine, and then open the virtual machine’s configuration file (.vmx) in a text
editor and make the changes as described below.
1. The virtual machine does not contain any SCSI adapters or devices, or you want
to add a generic SCSI device to a new virtual SCSI adapter in the virtual machine.
In this case, to add the device to the virtual machine, you need to add the
following lines to the virtual machine’s configuration file:
scsiZ:Y.present = "true"
scsiZ:Y.deviceType = "scsi-passthru"
scsiZ:Y.fileName = "scsiX:Y"
scsiZ.present = "true"
Define X, Y and Z as follows:
• X is the SCSI bus the device uses on the host system.
• Y is the target ID the device uses in the virtual machine and on the host. Use
the same target ID in the virtual machine that the host already uses for the
device to allow the device to work correctly.
• Z is the SCSI bus the device uses in the virtual machine.
2. The virtual machine has a SCSI adapter and a SCSI device and you want to use
the same device as a generic SCSI device.
In this case, to configure the device as a generic SCSI device, you need to add the
following lines to the virtual machine’s configuration file:
scsiZ:Y.deviceType = "scsi-passthru"
scsiZ:Y.fileName = "scsiX:Y"
Define X, Y and Z as follows:
• X is the SCSI bus the device uses on the host system.
• Y is the target ID the device uses in the virtual machine and on the host. Use
the same target ID in the virtual machine that the host already uses for the
device to allow the device to work correctly.
• Z is the SCSI bus the device uses in the virtual machine.
3. The virtual machine has a SCSI adapter and generic SCSI device, but Workstation
does not recognize the device when the virtual machine is powered on.
In this case, you need to look for a line in the configuration file that looks like:
scsiZ:Y.fileName = "<deviceName>"
Change the line to:
scsiZ:Y.fileName = "scsiX:Y"
425
VMware Workstation 5 User’s Manual
Define X, Y and Z as follows:
• X is the SCSI bus the device uses on the host system.
• Y is the target ID the device uses in the virtual machine and on the host. Use
the same target ID in the virtual machine that the host already uses for the
device to allow the device to work correctly.
• Z is the SCSI bus the device uses in the virtual machine.
For example, if the problematic device is a CD-ROM drive, the entry in the
configuration file might be:
scsi0:4.fileName = "CdRom0"
If the device on the host is located on bus 2 with target ID 4, you should change
this line to:
scsi0:4.fileName = "scsi2:4"
The target ID the device uses in the virtual machine must be the same as the
target ID the device uses on the host system.
Note: The SCSI bus is assigned a number by the host operating system after all IDE
buses have been assigned numbers. For example, if you have 2 IDE buses, they are
numbered 0 and 1. The first SCSI bus is assigned bus number 2. In the example above,
you use 2 for X.
If you cannot determine the SCSI bus number on your own, you can try using a thirdparty tool like winobj (which you can download for free from www.sysinternals.com)
to determine this information.
The device target ID is usually set by some jumpers or switches on the device. Refer to
the owner’s manual for the device for information on how to determine the target ID.
Generic SCSI on a Linux Host Operating System
Using the SCSI Generic driver in Linux, VMware Workstation allows your guest
operating system to operate generic SCSI devices within a virtual machine. The SCSI
Generic driver sets up a mapping for each SCSI device in /dev. Each entry starts with
sg (for the SCSI Generic driver) followed by a letter. For example, /dev/sga is the
first generic SCSI device.
Each entry corresponds to a SCSI device, in the order specified in
/proc/scsi/scsi, from the lowest device ID on the lowest adapter to the
highest device ID on the lowest adapter, and so on to the highest device ID on the
highest adapter. Do not enter /dev/st0 or /dev/scd0.
426
www.vmware.com
C H A P T E R 1 4 Connecting Devices
Note: When setting up a generic SCSI device in the virtual machine settings editor,
as described later in this section, you specify the device you wish to install in the
virtual machine by typing its /dev/sg entry in the Connection field. You must be
logged on as a user who has permissions to use the device.
Requirements
Generic SCSI requires version 2.1.36 of the SCSI Generic (sg.o) driver, which comes
with kernel 2.2.14 and higher.
Avoiding Concurrent Access to a Generic SCSI Device
Under Linux some devices — specifically tape drives, disk drives and CD-ROM drives
— already have a designated /dev entry (traditionally, st, sd and scd, respectively).
When the SCSI Generic driver is installed, Linux also identifies these devices with
corresponding sg entries in /dev — in addition to their traditional entries. VMware
Workstation ensures that multiple programs are not using the same /dev/sg entry
at the same time but cannot always ensure that multiple programs are not using the
/dev/sg and the traditional /dev entry at the same time. It is important that you
do not attempt to use the same device in both host and guest. This can cause
unexpected behavior and may cause loss or corruption of data.
Permissions on a Generic SCSI Device
You must have read and write permissions on a given generic SCSI device in order to
use the device within a virtual machine, even if the device is a read-only device such
as a CD-ROM drive. These devices typically default to root-only permissions. Your
administrator should create a group with access to read and write to these devices,
then add the appropriate users to that group.
Device Support
In theory, generic SCSI is completely device independent, but VMware has discovered
it is sensitive to the guest operating system, device class and specific SCSI hardware.
We encourage you to try any SCSI hardware you want to use and report problems to
VMware technical support.
Note: If you are using generic SCSI devices in a Windows 95, Windows 98 or
Windows Me guest operating system and are experiencing problems with the
devices, download the latest Mylex (BusLogic) BT/KT-958 compatible host bus adapter
from www.lsilogic.com. This driver overrides what Windows chooses as the best driver,
but it corrects known problems. To use SCSI devices in a Windows XP or Windows
Server 2003 virtual machine, you need a special SCSI driver available from the
download section of the VMware Web site at www.vmware.com/download.
427
VMware Workstation 5 User’s Manual
Adding a Generic SCSI Device to a Virtual Machine
You can add generic SCSI devices to your virtual machine in the virtual machine
settings editor. The virtual machine settings editor lets you map virtual SCSI devices to
physical generic SCSI devices on the host.
When you set up a generic SCSI device, the virtual machine must be powered off.
1. Launch VMware Workstation and select the virtual machine. Make sure the
virtual machine is powered off.
2. Choose VM > Settings. The virtual machine settings editor opens.
3. Click Add to start the Add Hardware Wizard. Select Generic SCSI Device, then
click Next.
4. Choose the name of the physical device you want to use.
Then choose the virtual device node where you want this device to appear in
the virtual machine.
A check box under Device status allows you to specify whether the device
should be connected each time the virtual machine is powered on.
5. Click Finish to install the new device.
6. Click OK to save the configuration and close the virtual machine settings editor.
To remove this device, launch the virtual machine settings editor, select the generic
SCSI device, then click Remove.
428
www.vmware.com
C H A P T E R 1 4 Connecting Devices
Using Two-Way Virtual Symmetric
Multiprocessing (Experimental)
For all supported configurations of 32-bit and 64-bit host and guest operating
systems running on multiprocessor host machines, Workstation versions 5.5 and later
provide experimental support for two-way virtual Symmetric Multiprocessing (Virtual
SMP). This enables you to assign two virtual processors to a virtual machine on any
host machine that has at least two logical processors.
Note: The following are all considered to have two logical processors:
• A single-processor host with hyperthreading enabled
• A single-processor host with a dual-core CPU
• A multiprocessor host with two CPUs, neither of which are dual-core or have
hyperthreading enabled
Note: On hyperthreaded uniprocessor hosts, performance of virtual machines
with Virtual SMP may be subpar.
Guests with more than two virtual processors are not supported in Workstation.
However, you can power on and run multiple dual-processor virtual machines
concurrently.
You can set the number of processors for the virtual machine in the virtual machine
settings editor (VM > Settings), in the Hardware tab under Processors. The number of
virtual processors is also displayed in the summary view of the virtual machine. You
can also set the number of virtual processors when you create a virtual machine in the
New Virtual Machine Wizard. This setting is available only if you choose to create a
custom configuration; it does not appear in the typical configuration.
If the host is a uniprocessor machine and is not hyperthreaded, assigning two
processors is neither supported nor recommended: a warning message will appear.
You can disregard this message and assign two processors to the virtual machine, but,
once you have finished creating the virtual machine, you will not be able to power it
on unless you move it to a host machine with at least two logical processors.
Virtual machines with SMP are supported only for Workstation versions 5.5 and later. A
virtual machine created in Workstation version 5.5 with two virtual processors cannot
be powered on or resumed in Workstation versions 5.0 and earlier. Also, if you suspend
an SMP guest in Workstation 5.5, you cannot resume the virtual machine in
Workstation versions 5.0 and earlier.
429
VMware Workstation 5 User’s Manual
Moving SMP Virtual Machines between Workstation and ESX
Server
You can use Workstation 5.5 or later, running on a multiprocessor host machine, to
open a virtual machine, created in VMware ESX Server, that has one or more virtual
processors. However, in Workstation you cannot power on or resume a virtual
machine that has more than two virtual processors assigned, even if more processors
were assigned when the virtual machine was created in ESX Server.
If you use Workstation to open a virtual machine that has more than two virtual
processors assigned, the virtual machine’s summary view and the virtual machine
settings editor (VM > Settings) will display the number of processors as Other (x),
where x is the number of processors originally assigned in ESX Server. Workstation
preserves this original configuration setting for the number of processors, even
though two is the maximum number of processors supported. You must change this
setting to two processors before you can power on the virtual machine in
Workstation. Note that once you commit a change to this setting, by clicking OK in VM
> Settings, the original setting for number of processors is discarded, and no longer
appears as an option in VM > Settings.
430
www.vmware.com
CHAPTER
Performance Tuning
15
The following sections offer suggestions for getting the best performance from
VMware Workstation and your virtual machines:
• Configuring and Maintaining the Host Computer on page 432
• Configuring VMware Workstation on page 435
• Monitoring Virtual Machine Performance on page 441
• Memory Usage Notes on page 443
• Improving Performance for Guest Operating Systems on page 449
• Disk I/O Performance Tips on page 454
431
VMware Workstation 5 User’s Manual
Configuring and Maintaining the Host
Computer
The host computer is an obvious place to look to improve performance. This section
discusses these key areas:
• Location of the Working Directory on page 432
• Defragmentation of Disk Drives on page 432
• Adequate Free Disk Space on page 433
• NIC Interrupt Coalescing on page 434
Location of the Working Directory
The installer locates the working directory — holding the virtual disk files — on the
host computer. You can customize your configuration to place the working directory
or the virtual disk files on a different physical computer. There may be performance
advantages to such customization.
Defragmentation of Disk Drives
Host disks, virtual disks and guest disks all affect the performance of VMware
Workstation. See Defragmenting Virtual Disks on page 215 for the procedures.
Host Hard Drives
Performance is weakened by fragmentation on the physical disk holding the virtual
machine’s working directory or virtual disk files. Fragmentation of the host disk can
affect any or all of the following:
• The files that hold a virtual disk
• The files that store newly saved data when you have a snapshot
• The files that hold information used in suspending and resuming a virtual
machine
If you are experiencing slow disk performance in the virtual machine, or if you want to
improve the speed of suspend and resume operations, check to be sure the host disk
that holds the virtual machine’s working directory and virtual disk files is not badly
fragmented. If it is fragmented, you can improve performance by running a
defragmentation utility to reduce fragmentation on that host disk.
432
www.vmware.com
C H A P T E R 1 5 Performance Tuning
Virtual Drives
Use the Workstation application to defragment virtual disks. See Defragmenting
Virtual Disks on page 215.
Guest Operating System Drives
It is strongly recommended that you defragment using a guest operating system
mechanism before taking the first snapshot (or linked clone).
• Workstation makes all its changes to the redo log, not to the original disk, when
you run a defragmenting program on the guest after a snapshot. You lose the
ability to defragment inside the original disk forever.
• Every sector that moves is copied to the redo log, making the virtual machine
redo log extremely large when the disk is heavily fragmented and you run
defragmentation after a snapshot.
Performance Impact of Defragmenting Snapshots and Linked Clones
There may be a performance impact when you defragment a linked clone or a virtual
machine with a snapshot. Exact performance degradation depends on:
• The fragmentation of the parent virtual machine disk when you created the
snapshot or linked clone.
• The nature of the subsequent updates to the parent virtual machine disk.
Defragmentation tends to make the redo file grow. The redo file itself can become
defragmented with respect to the host file system. If your use of virtual machines is
strongly performance oriented, you should avoid defragmenting — or using — linked
clones and snapshots.
Adequate Free Disk Space
For better performance, avoid the situation of very low free space on the host disk.
Performance can degrade considerably when VMware Workstation has to use a
nearly-full host hard disk to write guest sparse disk, snapshot, checkpoint, or redo files.
Overcommitting the Host Processors
The performance of virtual machines depends on the capacity of the host machine’s
processor or processors, and may degrade significantly if you overcommit the
processors by running too many virtual machines at the same time.
433
VMware Workstation 5 User’s Manual
NIC Interrupt Coalescing
Increasing host NIC interrupt coalescing can improve performance for workloads
involving heavy network traffic into the guest. Interrupt coalescing is a feature
implemented in hardware under driver control on high-performance NICs, allowing
the reception of a group of network frames to be notified to the operating system
kernel via a single hardware interrupt.
434
www.vmware.com
C H A P T E R 1 5 Performance Tuning
Configuring VMware Workstation
This section offers advice and information about factors that can affect the
performance of VMware Workstation itself. This section does not address performance
of the guest operating system or the host operating system.
Note: In addition to the VMware Workstation configuration options discussed below,
you should always install VMware Tools in any guest operating system for which a
VMware Tools package exists. Installing VMware Tools provides better video and
mouse performance and also greatly improves the usability of the virtual machine. For
details, see Installing VMware Tools on page 140.
General VMware Workstation Options
Guest Operating System Selection
Make certain you select the correct guest operating system for each of your virtual
machines. To check the guest operating system setting, choose VM > Settings >
Options > General.
VMware Workstation optimizes certain internal configurations on the basis of this
selection. For this reason, it is important to set the guest operating system correctly.
The optimizations can greatly aid the operating system they target, but they may
cause significant performance degradation if there is a mismatch between the
selection and the operating system actually running in the virtual machine. (Selecting
the wrong guest operating system should not cause a virtual machine to run
incorrectly, but it may degrade the virtual machine’s performance.)
Memory Settings
Make sure to choose a reasonable amount of memory for your virtual machine. Many
modern operating systems have a growing need for memory, so assigning a generous
amount is a good thing.
The same holds true for the host operating system, especially a Windows host.
The New Virtual Machine Wizard automatically selects a reasonable starting point for
the virtual machine’s memory, but you may be able to improve performance by
adjusting the settings in the virtual machine settings editor (VM > Settings >
Memory).
435
VMware Workstation 5 User’s Manual
If you plan to run one virtual machine at a time most of the time, a good starting point
is to give the virtual machine half the memory available on the host.
Adjusting the application memory settings may also help. Go to Edit > Preferences >
Memory.
For additional information, see Memory Usage Notes on page 443.
Debugging Mode
VMware Workstation can run in two modes — normal mode and a mode that
provides extra debugging information. The debugging mode is slower than normal
mode.
For normal use, check to be sure you are not running in debugging mode. Choose VM
> Settings > Options and select Advanced. In the Advanced Options section, be sure
there is no check in the Run with debugging information check box.
CD-ROM Drive Polling
Some operating systems — including Windows NT and Windows 98 — poll the CDROM drive every second or so to see whether a disc is present. (This allows them to
run autorun programs.) This polling can cause VMware Workstation to connect to the
host CD-ROM drive, which can make it spin up while the virtual machine appears to
pause.
If you have a CD-ROM drive that takes especially long to spin up, there are two ways
you can eliminate these pauses.
• You can disable the polling inside your guest operating system. The method
varies by operating system. For recent Microsoft Windows operating systems,
the easiest way is to use TweakUI from the PowerToys utilities.
For information on finding TweakUI and installing it in your guest operating
system, go to www.microsoft.com and search for TweakUI. Specific instructions
depend on your operating system.
• Another approach is to configure your virtual CD-ROM drive to start
disconnected. The drive appears in the virtual machine, but it always appears to
contain no disc (and VMware Workstation does not connect to your host CDROM drive).
To make this change, choose VM > Settings. Click the DVD/CD-ROM item in the
Device list. Then clear the Connect at Power On check box.
When you want to use a CD-ROM in the virtual machine, choose VM >
Removable Devices menu and connect the CD-ROM drive.
436
www.vmware.com
C H A P T E R 1 5 Performance Tuning
Disk Options
The various disk options (SCSI versus IDE) and types (virtual or physical) affect
performance in a number of ways.
Inside a virtual machine, SCSI disks and IDE disks that use direct memory access (DMA)
have approximately the same performance. However, IDE disks can be very slow in a
guest operating system that either cannot use or is not set to use DMA.
The easiest way to configure a Linux guest to use DMA for IDE drive access is to install
VMware Tools (VM > Install VMware Tools). Among other things, the installation
process automatically sets IDE virtual drives to use DMA.
In Windows 2000, DMA access is enabled by default. In other Windows guest
operating systems, the method for changing the setting varies with the operating
system. See the following technical notes for details.
• Windows NT Disk Performance on Multiprocessor Hosts on page 452
• Windows 95 and Windows 98 Guest Operating System Performance Tips on
page 449
When a snapshot exists, virtual disks often have very good performance for random or
nonsequential access. But they can potentially become so fragmented that
performance is affected. In order to defragment the disk, you must first delete the
snapshot (VM > Snapshot > Snapshot Manager > Delete).
When no snapshot exists, physical disks and virtual disks with all the space allocated in
advance both use flat files that mimic the sequential and random access performance
of the underlying disk. When a snapshot exists and you have made changes since
powering on the virtual machine, any access to those changed files performs at a level
similar to the performance of a virtual disk that does not have all space allocated in
advance. If you delete the snapshot, performance is again similar to that of the
underlying disk.
Overall, if no snapshot exists and you are using physical disks or virtual disks with all
the space allocated in advance, you see somewhat better performance than that
provided by other configurations.
Disk writes may be slower for virtual disks that do not have all space allocated in
advance. However, you can improve performance for these disks by defragmenting
them from the virtual machine settings editor. Choose VM > Settings, select the disk
you want to defragment, then click Defragment.
437
VMware Workstation 5 User’s Manual
Remote Disk Access
Whenever possible, do not use disks that are on remote machines and accessed over
the network unless you have a very fast network. If you must run disks remotely,
choose VM > Settings > Options, select General and set the Working directory to a
directory on your local hard disk. Then take a snapshot. After you take the snapshot,
changes you make are stored locally in the working directory.
Snapshot
If you do not need to use the snapshot feature, it is best to run your virtual machine
with no snapshot. This provides best performance. To be sure a virtual machine has no
snapshot, choose VM > Snapshot > Snapshot Manager. If you see a snapshot you do
not want, select it and click the Delete button.
Defragmentation
See Defragmentation of Disk Drives on page 432 for information about keeping disk
drives efficient.
VMware Workstation on a Windows Host
Note: The items in this section describe performance of VMware Workstation on a
Windows host. For tips on configuring VMware Workstation on a Linux host, see
VMware Workstation on a Linux Host on page 440.
• Process Scheduling
• Windows Host Disk Caching
Process Scheduling
Note: The information in this section was created to address scheduling problems
with Windows NT. Although Windows NT is no longer supported as a host OS,
VMware currently has no corresponding information for Windows 2000, Windows XP
or Windows Server 2003 hosts.
The process scheduler on Windows NT does not necessarily schedule processes in a
way that allows you to get the best performance from your particular combination of
virtual machines and applications running on the host. VMware Workstation on a
Windows host provides configuration options that let you adjust scheduling priorities
to meet your needs.
These configuration options are available from the Edit > Preferences > Priority and
VM > Settings > Options > Advanced menu options. These menu items allow you to
specify either high or normal priority when the mouse and keyboard are grabbed by
the virtual machine and either normal or low priority when they are not grabbed.
438
www.vmware.com
C H A P T E R 1 5 Performance Tuning
Global priority is taken as the default across all virtual machines. Local priority
overrides the global settings for just the specific virtual machine where you make the
changes.
Pay particular attention to the grabbed: HIGH – ungrabbed: NORMAL and grabbed:
NORMAL – ungrabbed: LOW settings.
The grabbed: HIGH – ungrabbed: NORMAL setting is useful if you have many
background processes or applications and you do not care if they run with fairly low
relative priority while VMware Workstation is in the foreground. In return, you get a
very noticeable performance boost using a VMware Workstation virtual machine
while another virtual machine is running or while some other processor-intensive task
(a compile, for example) is running in the background.
The reverse is true of the grabbed: NORMAL – ungrabbed: LOW setting. If your host
machine feels too sluggish when a virtual machine is running in the background, you
can direct the virtual machine to drop its priority when it does not have control of the
mouse and keyboard. As with the high setting, this is a heavy-handed change of
priority, so the virtual machine and any background applications run much more
slowly.
Windows Host Disk Caching
On Windows Host, the Disk Properties Policies page associated with each hard drive
provides a checkbox concerning enabling write caching on the disk and, in some
cases, enabling advanced performance on the disk. Checking one or both of these
boxes can improve host disk performance in general, and checking them for the host
disks containing VMware virtual disk files can improve VMware disk performance in
particular, especially when VMware is making heavy use of the disk.
Caution: Power outage or equipment failure could result in data loss or corruption
with this option enabled.
439
VMware Workstation 5 User’s Manual
VMware Workstation on a Linux Host
Note: The items in this section describe performance of VMware Workstation on a
Linux host. For tips on configuring VMware Workstation on a Windows host, see
VMware Workstation on a Windows Host on page 438.
Using Full Screen Mode
Full screen mode is faster than window mode. As a result, if you do not need to have
your virtual machine and your host sharing the screen, try switching to full screen
mode.
Note: The extreme case of this is VGA mode. VGA mode is any mode in which the
screen is in text mode (DOS, for example, or Linux virtual terminals), or 16-color 640 x
480 graphics mode (for example, the Windows 95 or Windows 98 clouds boot screen
or any guest operating system that is running without the SVGA driver provided by
VMware Tools).
On a Linux host, full screen VGA mode uses the underlying video card directly, so
graphics performance is quite close to that of the host. By contrast, window mode
VGA requires more computer resources to emulate than window mode SVGA. As a
result, if you need to run for an extended period of time in VGA mode (for example,
when you are installing an operating system using a graphical installer) you should
see a significant performance boost if you run in full screen mode.
440
www.vmware.com
C H A P T E R 1 5 Performance Tuning
Monitoring Virtual Machine
Performance
VMware Workstation incorporates a set of performance counters that work with
Microsoft’s Performance console so you can collect performance data from running
virtual machines.
Note: The Performance console is available only on Windows hosts. You cannot
monitor performance for virtual machines on Linux hosts. However, you can monitor
the performance of any virtual machines running on the Windows host, including
those running Linux guest operating systems.
The VMware Workstation performance counters can monitor the following data from
a running virtual machine:
• Reading and writing to virtual disks
• Memory used by the virtual machine
• Virtual network traffic
You can track virtual machine performance only when a virtual machine is running.
The performance counters reflect the state of the virtual machine, not the guest
operating system. For example, the counters can record how often a virtual machine
reads from a virtual disk, but they cannot track how many processes are running
inside the guest operating system. An explanation of each counter appears in the
Performance console.
To add counters to track virtual machine performance, use the Windows Performance
console. Take the following steps.
1. Open the Administrative Tools control panel and double-click Performance. The
Performance console opens.
441
VMware Workstation 5 User’s Manual
2. Click the plus (+) sign on the toolbar. The Add Counters dialog box appears.
3. In the Performance object list, select VMware.
4. Decide whether you want to add all counters or select specific counters from the
list.
5. To use these counters for all running virtual machines, select All instances. To
use the counters for specific virtual machines, select Select instances from list,
then choose the virtual machines you want. The names shown in the list
correspond to the display names of running virtual machines.
Note: For a brief description of each counter, click Explain. When you select a
counter from the list, a description appears below the Add Counters dialog box.
6. Click Add to add the counters to the Performance console.
For more information about using the Performance console, choose Action > Help in
the Performance console or go to the Microsoft Web site.
442
www.vmware.com
C H A P T E R 1 5 Performance Tuning
Memory Usage Notes
VMware Workstation allows you to make the following memory-related settings:
• The memory size of a particular virtual machine
• The amount of the host computer’s RAM that can be used for virtual machines.
• The extent to which you want to allow the host operating system’s memory
manager to swap virtual machines out of physical RAM
By adjusting these three settings, you can affect both virtual machine and overall
system performance.
This section describes how VMware Workstation uses the memory configuration
parameters to manage virtual machines and system memory properly.
Virtual Machine Memory Size
The first configuration parameter you can set is the size of an individual virtual
machine’s memory. Set this configuration parameter for the virtual machine in the
virtual machine settings editor (VM > Settings > Memory). The guest memory size
should not be set lower than the minimum recommendations of the operating
system provider.
The New Virtual Machine Wizard sets reasonable defaults for the memory size of a
virtual machine, based on the type of the guest operating system and the amount of
memory in the host computer. This value also appears in the virtual machine settings
editor as the recommended memory value.
The virtual machine settings editor also shows a value for the maximum amount of
memory for best performance. If you have only one virtual machine running on the
host and you set virtual machine memory to this value, the virtual machine can run
entirely in RAM. A virtual machine running completely in RAM performs better than a
virtual machine that must swap some of its memory to disk.
The actual memory size you should give to a virtual machine depends on a few
practical considerations:
• What kinds of applications will run in the virtual machine
• What other virtual machines will contend with this virtual machine for memory
resources
• What applications will run on the host at the same time as the virtual machine
443
VMware Workstation 5 User’s Manual
Note: You cannot allocate more than 2 GB of memory to a virtual machine when the
virtual machine’s files are stored on a host file system that does not support files
greater than 2 GB — for example, FAT.
The total amount of memory you assign to all virtual machines running on a single
host may not exceed 4 GB.
Memory Use on the Host
Host operating systems do not behave well when they run low on free memory for
their own use. When a Windows or Linux host operating system does not have
enough RAM for its own use, it thrashes — it constantly swaps parts of itself between
RAM and its paging file on disk. To help guard against virtual machines causing the
host to thrash, VMware Workstation enforces a limit on the total amount of RAM that
may be consumed by virtual machines.
Some memory must be kept available on the host to ensure the host is able to
operate properly while virtual machines are running. The amount of memory reserved
for the host depends on the host operating system and the size of the host
computer’s memory.
Memory Sharing
Many workloads present opportunities for sharing memory across virtual machines.
For example, several virtual machines may be running instances of the same guest
operating system, have the same applications or components loaded or contain
common data.
VMware Workstation uses a proprietary transparent page sharing technique to
securely eliminate redundant copies of memory pages. With memory sharing, a
workload often consumes less memory than it would when running on a physical
machine. As a result, the system can support higher levels of overcommitment
efficiently. The amount of memory saved by memory sharing is highly dependent on
workload characteristics. A workload consisting of many nearly-identical virtual
machines may free up more than 30 percent of memory, while a more diverse
workload may result in savings of less than 5 percent of memory.
VMware Workstation memory sharing runs as a background activity that scans for
sharing opportunities over time. The amount of memory saved may vary over time;
for a fairly constant workload, the amount generally increases slowly until all sharing
opportunities are exploited.
444
www.vmware.com
C H A P T E R 1 5 Performance Tuning
Specifying How Much RAM Is Used by All Virtual Machines
The second configuration parameter you can set is the amount of RAM that VMware
Workstation is allowed to reserve for all running virtual machines combined. To set
this parameter, go to Edit > Preferences > Memory.
The reserved memory setting specifies a maximum amount of RAM that VMware
Workstation is allowed to use. But this memory is not allocated in advance. Even if
multiple virtual machines are running at the same time, VMware Workstation may be
using only a fraction of the RAM you specify here. Any unused RAM is available to be
used by other applications. If all the RAM you specify here is in use by one or more
virtual machines, the host operating system cannot use this RAM itself or allow other
applications to use it.
The RAM used by VMware Workstation includes the RAM made available to the guest
operating systems plus a small amount of overhead memory associated with running
a virtual machine.
The amount of RAM actually used for a particular virtual machine varies dynamically as
a virtual machine runs. If multiple virtual machines run simultaneously, they work
together to manage the memory.
The recommended amount of RAM to specify for all running virtual machines is
calculated on the basis of the host computer’s physical memory and appears in the
reserved memory control — Edit > Preferences > Memory. If you want VMware
Workstation to use more or less RAM, move this slider to change the amount.
If you set this value too high, the host may thrash when other applications are run on
the host. If you set this value too low, virtual machines may perform very poorly and
you cannot run as many virtual machines at once.
445
VMware Workstation 5 User’s Manual
Using Additional Memory
By default, VMware Workstation limits the number of virtual machines that can run at
once based on the amount of memory specified in the application settings. This
prevents virtual machines from causing each other to perform poorly.
To allow more or larger virtual machines to run, you can adjust a third setting — the
amount of virtual machine memory that the host operating system may swap to disk.
To change this setting, go to Edit > Preferences > Memory and change the additional
memory setting. Select one of the following radio buttons:
• Fit all virtual machine memory into reserved host RAM — Strictly apply the
reserved memory limit set in the top of the panel. This setting imposes the
tightest restrictions on the number and memory size of virtual machines that
may run at a given time. Because the virtual machines are running entirely in
RAM, they have the best possible performance.
• Allow some virtual machine memory to be swapped — Allow the host
operating system to swap a moderate amount of virtual machine memory to
disk if necessary. This setting allows you to increase the number or memory size
of virtual machines that can run on the host computer at a given time. It may
also result in reduced performance if virtual machine memory must be shifted
between RAM and disk.
• Allow most virtual machine memory to be swapped — Allow the host
operating system to swap as much virtual machine memory to disk as it wants.
This setting allows you to run even more virtual machines with even more
memory than the intermediate setting does. In this case, too, performance may
be lower if virtual machine memory must be shifted between RAM and disk.
446
www.vmware.com
C H A P T E R 1 5 Performance Tuning
Using More Than 1GB of Memory on a Linux Host
By default, Linux kernels in the 2.2.x series support 1GB of physical memory. If you
want to use more memory in Linux, you can take one of several approaches.
• Upgrade to a 2.4.x series kernel that allows for more physical memory.
• Recompile your kernel as a 2GB kernel using the CONFIG_2GB option.
• Enable the CONFIG_BIGMEM option to map more physical memory. (This
approach requires special steps, described in detail in the Workarounds section
below, to work with VMware products.)
The CONFIG_2GB option calls for recompiling your kernel as a 2GB kernel. You do this
by recompiling your kernel with CONFIG_2GB enabled. This allows Linux to support
nearly 2GB of physical memory by dividing the address space into a 2GB user section
and a 2GB kernel section (as opposed to the normal division of 3GB for user and 1GB
for kernel).
The third approach uses the CONFIG_BIGMEM option in Linux. With the
CONFIG_BIGMEM option enabled, the kernel does not directly address all of physical
memory and it can then map 1GB (or 2GB) of physical memory into the address space
at a time. This allows the use of all of physical memory at the cost of changing the
semantics the kernel uses to map virtual to physical addresses. However, VMware
products expect physical memory to be mapped directly in the kernel’s address space
and thus do not work properly with the CONFIG_BIGMEM option enabled.
Workarounds
If you are using a 1GB kernel with CONFIG_BIGMEM enabled and have 960MB to
1983MB of memory, VMware Workstation does not run. To work around this issue, you
can either:
• Recompile the kernel as a 2GB kernel by enabling the CONFIG_2GB option. This
allows for 100 percent use of physical memory.
• Pass the boot-time switch mem=959M at the LILO prompt, or add it to
lilo.conf, to disable CONFIG_BIGMEM and thus allow you to run VMware
Workstation. To do this:
• At the LILO prompt, type linux-2.2.16xxx mem=959M.
• Or, edit lilo.conf. In the kernel section, add this line:
append mem="959M"
If you have a 1GB kernel with CONFIG_BIGMEM enabled and have more than 1983MB
of memory, you can do one of the following:
447
VMware Workstation 5 User’s Manual
• Recompile the kernel as a 2GB kernel by enabling the CONFIG_2GB option and
either pass the boot-time switch mem=1983M at the LILO prompt or add it to
lilo.conf. To use the switch:
• At the LILO prompt, type linux-2.2.16xxx mem=1983M.
• Or, edit lilo.conf. In the kernel section, add this line:
append mem="1983M"
• Pass the boot-time switch mem=959M at the LILO prompt or add it to
lilo.conf to disable CONFIG_BIGMEM. To use the switch:
• At the LILO prompt, type linux-2.2.16xxx mem=959M.
• Or, edit lilo.conf. In the kernel section, add this line:
append mem="959M"
If you are using a 2GB kernel with CONFIG_BIGMEM enabled and have 1984MB or
more memory, VMware Workstation does not run. You can either pass the boot-time
switch mem=1983M at the LILO prompt, or add it to lilo.conf to disable
CONFIG_BIGMEM and thus allow you to run VMware Workstation. To use the switch:
448
•
At the LILO prompt, type linux-2.2.16xxx mem=1983M.
•
Or, edit lilo.conf. In the kernel section, add this line:
append mem="1983M"
www.vmware.com
C H A P T E R 1 5 Performance Tuning
Improving Performance for Guest
Operating Systems
The tips in this section help you make adjustments to improve performance for
particular guest operating systems running inside a virtual machine.
• Windows 95 and Windows 98 Guest Operating System Performance Tips on
page 449
• Windows 2000, Windows XP and Windows Server 2003 Guest Operating System
Performance Tips on page 451
• Windows NT Disk Performance on Multiprocessor Hosts on page 452
• Linux Guest Operating System Performance Tips on page 452
See Defragmentation of Disk Drives on page 432 for information about keeping disk
drives efficient for all guest operating systems.
Windows 95 and Windows 98 Guest Operating System
Performance Tips
This section offers advice for configuring a Windows 95 or Windows 98 guest
operating system for better performance inside a VMware Workstation virtual
machine.
Note: This document pertains to the guest operating system that is running inside a
VMware Workstation virtual machine. It does not describe actions that should be
taken on the host.
Guest Operating System Selection
Make certain you have selected the correct guest operating system in the virtual
machine settings editor — VM > Settings > Options.
VMware Tools
Make certain VMware Tools is installed. VMware Tools provides an optimized SVGA
driver and sets up the VMware Tools service to run automatically when the system
starts. Among other things, the VMware Tools service allows you to synchronize the
virtual machine’s clock with the host computer’s clock, which can improve
performance for some functions. You can install VMware Tools by choosing VM >
Install VMware Tools.
449
VMware Workstation 5 User’s Manual
DMA Mode for IDE Disks
Windows 95 OSR2 and later (including Windows 98) can use direct memory access
(DMA) for faster access to IDE hard disks. However, this feature may not be enabled by
default.
You can turn on DMA access using the guest operating system’s Device Manager.
1. Right-click My Computer and choose Properties from the pop-up menu.
2. Click the + sign beside Disk Drives to show your virtual machine’s individual
drives.
3. Right-click the entry for each IDE drive to open its Properties dialog box.
4. Under Settings, check the box labeled DMA and accept any warning Windows
displays.
5. Restart Windows for the new settings to take effect.
Full Screen Mode
Run your virtual machine in full screen mode. Click the Full Screen button on the
VMware Workstation toolbar.
Swap File Usage
In your system.ini file, in the [386enh] section, add the following line:
ConservativeSwapFileUsage=1
Visual Effects
Windows 98 has a number of visual effects, designed to be attractive, that place
unnecessary demands on the graphics emulation in VMware Workstation. Some users
have seen performance improvements when they turn off these special effects.
To modify these settings, right-click on the desktop of your virtual machine, then
select Properties from the pop-up menu. Click the Effects tab and uncheck the
Animate windows, menus, and lists check box.
Also, if you have Show window contents while dragging checked, try unchecking
that check box.
450
www.vmware.com
C H A P T E R 1 5 Performance Tuning
Windows 2000, Windows XP and Windows Server 2003 Guest
Operating System Performance Tips
This section offers advice for configuring a Windows 2000, Windows XP or Windows
Server 2003 guest operating system for better performance inside a VMware
Workstation virtual machine.
Note: This document pertains to the guest operating system that is running inside a
VMware Workstation virtual machine. It does not describe actions that should be
taken on Windows 2000, Windows XP or Windows Server 2003 running on the host
computer.
Guest Operating System Selection
Make certain you have selected the correct guest operating system in the virtual
machine settings editor — VM > Settings > Options.
VMware Tools
Make certain VMware Tools is installed. VMware Tools provides an optimized SVGA
driver and sets up the VMware Tools service to run automatically when the system
starts. Among other things, the VMware Tools service allows you to synchronize the
virtual machine’s clock with the host computer’s clock, which can improve
performance for some functions. You can install VMware Tools by choosing VM >
Install VMware Tools.
Visual Effects
The fade effects that Windows 2000, Windows XP and Windows Server 2003 use when
displaying menus can be somewhat slow and make the virtual machine seem less
responsive.
To disable the fade effects, right-click the guest operating system desktop, then
choose Properties > Appearance > Effects (on Windows XP or Windows Server 2003)
or Properties > Effects (on Windows 2000) and uncheck Use transition effects for
menus and tool tips.
Full Screen Mode
Run your virtual machine in full screen mode. Click the Full Screen button on the
VMware Workstation toolbar.
451
VMware Workstation 5 User’s Manual
Windows NT Disk Performance on Multiprocessor Hosts
Some users have seen a problem in a VMware Workstation virtual machine using IDE
virtual disks on a multiprocessor host computer. The I/O issue is especially noticeable
when the virtual machine is booting.
Note: Performance in Windows NT guest operating systems may also be affected by
disk fragmentation on the host computer. For details, see Configuring and
Maintaining the Host Computer on page 432.
Improving Performance
You may increase performance by enabling DMA (direct memory access) on the
virtual hard disk’s IDE channel in the virtual machine.
If you have a virtual disk and a DVD/CD-ROM attached as master and slave to the
primary IDE controller (channel 0) and you want to enable DMA, power off the virtual
machine and use the virtual machine settings editor (VM > Settings) to move the
DVD/CD-ROM drive to the secondary IDE controller (channel 1) at IDE 1:0.
You can enable the DMA feature after you finish installing Windows NT. You must
install Service Pack 6a. Download DMACHECK.EXE from the Microsoft Web site
(support.microsoft.com/support/kb/articles/Q191/7/74.ASP) and run it.
Click the Enabled option for the IDE controller and channel configured for the virtual
disk. Typically, this is channel 0 only, unless you have the virtual machine configured
with multiple virtual disks and no virtual DVD/CD-ROM drive.
As noted above, you should not enable DMA on an IDE channel with a virtual DVD/
CD-ROM drive attached.
Linux Guest Operating System Performance Tips
This section offers advice for configuring a Linux guest operating system for better
performance inside a VMware Workstation virtual machine.
Note: This document pertains to the guest operating system that is running inside a
VMware Workstation virtual machine. It does not describe actions that should be
taken on Linux running on the host.
Guest Operating System Selection
Make certain you have selected the correct guest operating system in the virtual
machine settings editor — VM > Settings > Options.
VMware Tools
Make certain VMware Tools is installed. VMware Tools provides an optimized SVGA
driver and sets up the VMware Tools service to run automatically when the system
452
www.vmware.com
C H A P T E R 1 5 Performance Tuning
starts. Among other things, the VMware Tools service allows you to synchronize the
virtual machine’s clock with the host computer’s clock, which can improve
performance for some functions. You can install VMware Tools by choosing VM >
Install VMware Tools.
Disconnect CD-ROM
Using the VM > Removable Devices menu, disconnect your CD-ROM drive if you do
not need to use it. Disconnecting CD-ROM devices reduces CPU usage.
Install in Text Mode
When you are installing your Linux guest operating system, use the text-mode
installer instead of the graphical installer if you have a choice. This makes the
installation process faster.
If you do use a graphical installer and if you are using a Linux host computer, try to run
VMware Workstation in full screen mode during the installation.
Full Screen Mode
Run your virtual machine in full screen mode. Click the Full Screen button on the
VMware Workstation toolbar.
453
VMware Workstation 5 User’s Manual
Disk I/O Performance Tips
Memory Trimming
Workstation uses a memory trimming technique to return unused virtual machine
memory to the host machine for other uses. While trimming usually has little impact
on performance and may be needed in low memory situations, the I/O caused by
memory trimming can sometimes interfere with disk-oriented workload performance
in a guest.
You can disable memory trimming for a guest in the virtual machine settings editor
(VM > Settings > Options > Advanced). In the Settings section of the Advanced
panel, select Disable memory page trimming.
Page Sharing
VMware uses a page sharing technique to allow guest memory pages with identical
contents to be stored as a single copy-on-write page. Page sharing decreases host
memory usage, but consumes system resources, potentially including I/O bandwidth.
You may want to avoid this overhead for guests for which host memory is plentiful
and I/O latency is important. To disable page sharing, add the following line to the
virtual machine configuration (.vmx) file:
sched.mem.pshare.enable=FALSE option
454
www.vmware.com
CHAPTER
16
Special-Purpose Configuration
Options
The following sections describe how to use special-purpose configuration options:
• Locking Out Interface Features on page 457
• Restricting the User Interface on page 459
• Using Full Screen Switch Mode on page 462
• Guest ACPI S1 Sleep on page 470
In some situations you may find it useful to restrict a user’s ability to reconfigure virtual
machines and to simplify the user interface for inexperienced users. In a classroom, for
example, you may want to ensure that virtual machine configurations remain
consistent from one class session to the next.
The special-purpose configuration options available on Windows hosts meet these
needs.
455
VMware Workstation 5 User’s Manual
Administrative lockout is a global setting for VMware Workstation itself and affects all
virtual machines. Restricted user interface affects only the specific virtual machines for
which the setting has been made. Full screen switch mode affects the way VMware
Workstation itself runs and, as a result, affects all virtual machines.
These options are available on Windows hosts only.
456
www.vmware.com
C H A P T E R 1 6 Special-Purpose Configuration Options
Locking Out Interface Features
Administrative lockout is a global setting that affects all virtual machines for all users
on a host computer. It allows a user to impose any combination of the following
restrictions:
• Only a user who knows the password can create new virtual machines.
• Only a user who knows the password can edit virtual machine configurations.
• Only a user who knows the password can edit network settings.
Note: If no user has yet set administrative lockout preferences, any user may set
them and set a password for access to the administrative lockout features. If any user
has already set administrative lockout preferences, you must know the password in
order to change the settings.
Take the following steps to set administrative lockout preferences:
1. Open the Application Settings dialog box (Edit > Preferences).
2. Click the Lockout tab. If a password is already set for the administrative lockout
feature, enter the password when prompted.
3. Be sure Enable administrative lockout is selected and select the actions you
want to restrict. If this is the first time administrative lockout options have been
set, enter a password in the Password field and again in the Confirm password
field.
4. Click OK to save the settings.
457
VMware Workstation 5 User’s Manual
Removing a Forgotten Password
If you cannot remember the password and want to remove it, you must uninstall
Workstation. Be sure to click Yes when asked if you want to remove the administrative
lockout settings. After you reinstall Workstation, you may enable the administrative
lockout features again and set a new password.
458
www.vmware.com
C H A P T E R 1 6 Special-Purpose Configuration Options
Restricting the User Interface
The restricted user interface affects only the specific virtual machines for which the
setting has been made. The following changes are made when you enable the
restricted user interface:
• The toolbar is always hidden.
• All functions on the Power menu are disabled.
• All functions on the Snapshot menu and snapshot functions on the toolbar are
disabled.
• There is no access to the virtual machine settings editor from the VMware
Workstation window.
• The user cannot change virtual networking settings.
• The user starts the virtual machine by double-clicking the configuration file
(.vmx file) or a desktop shortcut to that file. The virtual machine powers on
automatically. At the end of the working session, the user shuts down by closing
the virtual machine (File > Exit).
It is also possible to launch VMware Workstation, then open a restricted-interface
virtual machine from the virtual machine list or the File menu.
The changes needed to enable the restricted user interface must be made by a user
with sufficient privileges to edit the virtual machine’s configuration file and to set file
permissions as described below.
Take the following steps to enable the restricted user interface.
1. Power off the virtual machine and close the VMware Workstation window, then
open the virtual machine’s configuration file (.vmx file) in Notepad or another
text editor. Add the following line anywhere in the file:
gui.restricted = "true"
2. You may wish to set file permissions on the configuration file to give normal
users of the system only read access to the file, so they cannot manually modify
the configuration.
3. For the convenience of users, create a shortcut to the configuration file on the
desktop and give it an appropriate name.
459
VMware Workstation 5 User’s Manual
Note: Although the restricted user interface provides no access to menu and toolbar
controls for the snapshot, you may choose to give the user limited snapshot control. If
you set up a snapshot for the restricted virtual machine and set the power-off option
to Ask me, the user sees the standard dialog box when shutting down a virtual
machine and has the opportunity to choose Just power off, Take snapshot or Revert
to snapshot.
Automatically Returning to a Snapshot with a Restricted
User Interface
You can combine a restricted user interface with a snapshot to ensure that users’
virtual machines always start in the same state. Typically, users running a virtual
machine with a restricted user interface can power it on and off only, and the virtual
machine boots when powered on. When the virtual machine has a snapshot set and
is configured to return to that snapshot when powered off, the user can only start and
power off the virtual machine. The virtual machine always starts from the snapshot.
Since you can restrict the user interface only on Windows hosts, this combination
works only with virtual machines running on Windows hosts.
To set up a virtual machine with restricted user interface and a snapshot as described
above, take the following steps:
1. Power on the virtual machine and be sure it is in the state you want, then take
the snapshot.
2. Configure the virtual machine to return to the snapshot any time it is powered
off. To do so, choose VM > Settings > Options > Snapshots and select After
powering off and Revert to snapshot.
3. With the virtual machine powered off, restrict the user interface. Close the
VMware Workstation window, then open the virtual machine’s configuration file
(.vmx file) in Notepad or another text editor. Add the following line anywhere in
the file.
gui.restricted = "true"
4. You may wish to set file permissions on the configuration file to give normal
users of the system only read access to the file, so they cannot manually modify
the configuration.
5. For the convenience of users, create a shortcut to the configuration file on the
desktop and give it an appropriate name.
460
www.vmware.com
C H A P T E R 1 6 Special-Purpose Configuration Options
The user runs this virtual machine by double-clicking the shortcut to the
configuration file. The virtual machine starts at the snapshot, with the user interface
restricted — with no toolbar and no access to the Power menu or the virtual machine
settings editor.
When the user is finished working with this virtual machine, he or she closes it by
choosing File > Close. The virtual machine powers off, and the next time a user
powers it on, it returns to the snapshot.
To remove the restriction on the interface, take the following steps.
1. Power off the virtual machine and close the VMware Workstation window.
2. Open the configuration file (.vmx) file and do one of the following:
• Set gui.restricted = "false".
• Remove or comment out the gui.restricted = "true" line.
Save the changes to the configuration file and close it.
3. Start the virtual machine by double-clicking the shortcut. The virtual machine
starts at the snapshot, and the interface is not restricted.
461
VMware Workstation 5 User’s Manual
Using Full Screen Switch Mode
Full screen switch mode is a run-time option for the VMware Workstation program on
Windows Hosts. When VMware Workstation is running in full screen switch mode, the
user has no access to the VMware Workstation user interface. The user cannot create,
reconfigure or launch virtual machines. A system administrator performs these
functions.
When VMware Workstation is running in full screen switch mode, one or more virtual
machines may be running and you can use hot keys to switch from one to another.
You may also provide hot key access to the host operating system.
Note: Full screen switch mode is enabled for Windows hosts only. Linux hosts do not
have full screen switch mode.
Creating a Virtual Machine for Use in Full Screen Switch Mode
To create new virtual machines, you must run VMware Workstation in standard mode.
The instructions in this section assume that you are creating the virtual machines on a
separate administrative computer. However you may, if you prefer, create the virtual
machines directly on the user’s computer.
Create the new virtual machine following the instructions in Creating a New Virtual
Machine on page 113. Be sure to make the following choices:
• In step 5, select Custom to perform a custom installation.
• In step 8, make a note of the folder in which you create the virtual machine. You
must copy all the files in this folder to the user’s computer after you finish
creating and configuring the virtual machine.
• In step 16, specify the desired size for the virtual disk and select Allocate all disk
space now. This selection is not required, but it is strongly recommended. If you
do not make this selection and the host computer’s hard disk runs out of space
for a growing virtual disk file, the user sees no warning message and does not
know what is causing the problem in the virtual machine.
Make all needed configuration settings before you configure the user’s computer to
launch VMware Workstation when the computer starts. You cannot change Virtual
Machine Settings using the virtual machine settings editor when VMware Workstation
is running in full screen switch mode. You may find it most convenient to finish
configuring the virtual machine and to install the guest operating system and
application software before you move the virtual machine to the user’s computer.
462
www.vmware.com
C H A P T E R 1 6 Special-Purpose Configuration Options
Moving a Virtual Machine to the User’s Computer
The easiest way to move the virtual machine to the user’s computer is to use a
network connection to copy all the files in the virtual machine directory to a directory
on the user’s computer. You may also move it using a DVD or other removable media
large enough to store the files.
Each virtual machine should be in its own separate directory.
Setting Configuration Options on the User’s Computer
Global Configuration Settings
Global configuration settings are made in the VMware Workstation global
configuration file, created by default in the following locations:
• Windows Host:
C:\Documents and Settings\All Users\Application Data\VMware\VMware
Workstation\config.ini.
• Linux Host:
/etc/vmware/config
Note: Full screen switch mode is enabled for Windows hosts only. This Linux
configuration file path is provided for clarity and completeness.
You can edit this file with a text editor. You should set permissions on this file so the
user cannot change it.
Local Configuration Settings
Local configuration settings are made in the configuration file for a particular virtual
machine. The local configuration file is in the virtual machine’s directory; the filename
has a .vmx extension.
The format for an entry in either configuration file is
option = "value"
Entries in the configuration files can appear in any order.
The hot key entries described in this section require you to enter a virtual key code as
part of the value for an option. Virtual key codes are entered in hexadecimal format —
as a hexadecimal number preceded by 0x. For example, to use the virtual key code of
5A as a value, type 0x5A.
Microsoft provides a reference list of virtual key codes on the MSDN Web site. At the
time this manual was written, the reference list was at msdn.microsoft.com/library/enus/winui/WinUI/WindowsUserInterface/UserInput/VirtualKeyCodes.asp.
463
VMware Workstation 5 User’s Manual
The hot key entries also include modifier keys. The modifier keys are Ctrl, Alt and Shift,
or a combination of those keys.
Modifier key
Value
No modifier
0x0
Alt
0x1
Ctrl
0x2
Shift
0x4
Ctrl-Alt
0x3
Alt-Shift
0x5
Ctrl-Shift
0x6
Ctrl-Alt-Shift
0x7
When listing a key plus a modifier, type the virtual key code for the key followed by a
comma, then type the value for the modifier key or keys. For example, the value entry
for Ctrl-Shift-F1 is 0x70,0x6.
Note: Keep the following limitations in mind when defining cycle keys and switch
keys:
• Do not use the Pause key with the Ctrl key. You may use the Pause key with other
modifier keys.
• If you use F12, you must use one or more modifier keys. You cannot use F12
alone.
• You cannot use combinations that include only the Shift, Ctrl and Alt keys. These
keys may be used only as modifiers in combination with some other key.
Hot Key for Cycling Through Virtual Machines and the Host Computer
You can specify a hot key or hot key combination for cycling through the available
virtual machines on a host computer. Each time you press the specified hot key, the
screen displays the next virtual machine in order. You may also include the host
operating system in the cycle.
If any particular virtual machine is not running, it is skipped.
If only one virtual machine is running and the host operating system is not included in
the cycle, pressing the hot key has no effect.
464
www.vmware.com
C H A P T E R 1 6 Special-Purpose Configuration Options
The hot key for cycling through virtual machines is defined in the global configuration
file (config.ini).
Two options control cycling.
FullScreenSwitch.cycleKey
The value of this option defines the hot key. It is specified as <key>,<modifier>.
There is no default.
For example, to use the Pause key with no modifier to cycle through virtual machines,
add the following line to the config.ini file, or modify its value if the option is
already listed.
FullScreenSwitch.cycleKey = "0x13,0x0"
FullScreenSwitch.cycleHost
The value of this option determines whether the host operating system is included in
the cycle. Possible values are true and false. The default value is false.
For example, to include the host operating system in the cycle, add the following line
to the config.ini file, or modify its value if the option is already listed:
FullScreenSwitch.cycleHost = "TRUE"
Hot Keys for Switching Directly to Virtual Machines and the Host Computer
You can specify a hot key or hot key combination for switching directly to any
available virtual machine on a host computer. Each time you press the specified hot
key, the screen display switches to that of the specified virtual machine. You may also
specify a hot key for switching directly to the host operating system.
If any particular virtual machine is not running, pressing the hot key for that virtual
machine has no effect.
You define the hot key used to switch to a virtual machine by adding a line to the
target virtual machine’s configuration (.vmx) file. The value of this option defines the
hot key. It is specified as <key>,<modifier>. There is no default.
For example, to use Ctrl-Shift-F1 to switch to a particular virtual machine, add the
following line to that virtual machine’s .vmx file, or modify its value if the option is
already listed.
FullScreenSwitch.directKey = "0x70,0x6"
You define the hot key used to switch to the host operating system by adding a line to
the global configuration file (config.ini). The value of this option defines the hot
key. It is specified as <key>,<modifier>. There is no default. For example, to use
Ctrl-Shift-F9 to switch to the host operating system, add the following line to the
config.ini file, or modify its value if the option is already listed.
FullScreenSwitch.hostDirectKey = "0x78,0x6"
465
VMware Workstation 5 User’s Manual
Other Entries in the Global Configuration File
The following entries in the global configuration file (config.ini) are optional.
They enable you to control certain functions of the virtual machine that are important
in work environments where virtual machines need to be isolated from each other
and from the host computer.
Isolation.tools.copy.enable
The value of this option determines whether data in one virtual machine or the host
operating system can be copied in a way that allows it to be transferred to another
virtual machine or to the host operating system. Possible values are true (such
copying is allowed) and false (such copying is not allowed). The default value is true.
The setting for this option should be the same as the setting for
Isolation.tools.paste.enable (below).
Isolation.tools.paste.enable
The value of this option determines whether data copied in one virtual machine or
the host operating system can be pasted into another virtual machine or the host
operating system. Possible values are true (such pasting is allowed) and false (such
pasting is not allowed). The default value is true. The setting for this option should be
the same as the setting for Isolation.tools.copy.enable (above).
Isolation.tools.HGFS.disable
The value of this option determines whether virtual machines can be configured with
shared folders, for sharing files among virtual machines and with the host computer.
Possible values are true (shared folders are disabled) and false (shared folders are
enabled). The default value is false.
The following entries are required in the global configuration file (config.ini) and
must not be changed:
mks.ctlAltDel.ignore = "TRUE"
mks.fullscreen.allowScreenSaver = "TRUE"
fullScreenSwitch.onSeparateDesktop = "TRUE"
msg.autoAnswer = "TRUE"
466
www.vmware.com
C H A P T E R 1 6 Special-Purpose Configuration Options
Starting and Stopping Virtual Machines on the User’s
Computer
Use the vmware-fullscreen command to run VMware Workstation in full screen
switch mode and to start and stop virtual machines on a user’s computer. The
command can pass certain information to the virtual machine when it starts.
As administrator, you must decide how to issue the command. For example, you may
use a custom application or script running on the host operating system to issue one
or more vmware-fullscreen commands. Or you can include the command to
start a virtual machine in a shortcut in the host operating system’s startup group, so
the virtual machine starts automatically when the user logs on to the host computer.
The vmware-fullscreen command must be issued once for each virtual
machine you want to start or stop.
vmware-fullscreen -poweron [-s variable=value]
[-name=<alias>] [-directkey=<keyspec>] [-fullscreen]
"<config-file>"
When you use the optional switches shown here, the -poweron switch is required
and must be the first switch after the vmware-fullscreen command. Provide
the full path to the virtual machine’s configuration (.vmx) file at the end of the
command line. The complete command must be entered on one line.
Use the -s switch to pass a variable name and value to be used in configuring the
virtual machine. You may include multiple variable=value pairs in the
command. Each variable=value pair must be preceded by -s.
Use -name=<alias> to give a name to the virtual machine. You can the use that
alias in -switchto and -poweroff commands.
Use -directkey=<keyspec> to specify the virtual machine’s direct-switch key. If
a direct-switch key is specified in the virtual machine’s configuration file, the one
specified on the command line overrides the one in the configuration file.
For example, to start a virtual machine and specify that its direct-switch key
combination is Ctrl-Shift-F1, use the following command:
vmware-fullscreen -poweron -directkey=0x70,0x6 "<config-file>"
The complete command must be entered on one line.
Use -fullscreen to start a virtual machine and go straight to full screen switch
mode. The virtual machine takes over the display immediately, instead of running
invisibly until the user switches to it later.
467
VMware Workstation 5 User’s Manual
Starting a Virtual Machine
vmware-fullscreen -poweron "<config-file>"
Use this command to power on the virtual machine without passing any additional
information to the virtual machine. Provide the full path to the virtual machine’s
configuration (.vmx) file.
The user sees no immediate indication that the virtual machine has started, but the
user can switch to the virtual machine with its direct-switch key or with the cycle key.
Stopping a Virtual Machine
vmware-fullscreen -poweroff "<config-file>"
vmware-fullscreen -poweroff <alias>
Use this command to shut down the specified virtual machine. You can specify the
path to the configuration (.vmx) file, or you can specify the alias if you used -name=
when you started the virtual machine.
Stopping All Virtual Machines
vmware-fullscreen -exit
Use this command to power off all virtual machines cleanly. VMware Workstation exits
as soon as all the virtual machines have powered off.
Switching Among Virtual Machines and the Host
vmware-fullscreen -switchto "<config-file>"
vmware-fullscreen -switchto <alias>
vmware-fullscreen -switchto host
vmware-fullscreen -switchto next
Use this command to switch to the specified virtual machine, to the host operating
system, or to the next machine (virtual machine or host) in the cycling order. A virtual
machine must already be powered on before you can switch to it. When specifying a
virtual machine, you can specify the path to the configuration (.vmx) file, or you can
specify the alias if you used -name= when you started the virtual machine.
Checking the Status of VMware Workstation
vmware-fullscreen -query
This command tells you if VMware Workstation is already running in full screen switch
mode. If it is, the response to this command also reports its process ID and window
handle.
468
www.vmware.com
C H A P T E R 1 6 Special-Purpose Configuration Options
Listing All the Virtual Machines Currently Powered On
vmware-fullscreen -listvms
This command lists all the virtual machines that are currently powered on. The list is
added to the vmware-fullscreen log file.
The vmware-fullscreen Log File
The vmware-fullscreen program writes to a log file. This log file records errors
reported by vmware-fullscreen itself as it starts, stops and passes other
commands to VMware Workstation. It is separate from the vmware.log file, which
stores information on the running virtual machines.
The name of the vmware-fullscreen log file is vmware-<username><pid>.log. By default, the vmware-fullscreen log file is in the temp directory
for the user logged on to the host computer. This location may be specified in the
TEMP environment variable; by default, the location is C:\Documents and
Settings\<username>\Local Settings\Temp.
The administrator can specify a different location for this log file by adding the
following line to the VMware Workstation global configuration file (config.ini):
fullScreenSwitch.log.filename="<path>"
It is best to use a full path. If you use a relative path, the location is relative to the
directory that is active when the vmware-fullscreen command is issued for the
first time after the host computer reboots.
469
VMware Workstation 5 User’s Manual
Guest ACPI S1 Sleep
Workstation 5 provides experimental support for guest operating system ACPI S1
sleep. Not all guest operating systems support this feature. Common guest operating
system interfaces for entering standby are supported.
By default, ACPI S1 sleep is implemented within Workstation as suspend. The
Workstation resume button can be used to wake the guest.
With the following entry in the (.vmx) configuration file for a virtual machine:
chipset.onlineStandby = TRUE
ACPI S1 sleep is instead implemented as power-on suspend. The guest operating
system is not fully powered down. You can awaken the virtual machine:
• Using keyboard input
• Using mouse input
• Through programming the CMOS external timer
This feature can be useful for test and development scenarios.
470
www.vmware.com
CHAPTER
Glossary
17
Administrative Lockout — a global setting providing password protection for
Windows hosts. Administrative lockout restricts users from creating new virtual
machines, editing virtual machine configurations, and changing network settings.
Bridged networking — A type of network connection between a virtual machine
and the rest of the world. Under bridged networking, a virtual machine appears as an
additional computer on the same physical Ethernet network as the host.
See also Host-only networking.
Clone — A duplicate copy of a virtual machine.
See also Full clone and Linked clone.
Clone Virtual Machine wizard — A point-and-click interface for convenient, easy
duplication of a virtual machine within VMware Workstation.
See also Full clone, and Linked clone
Configuration — See Virtual machine configuration file.
Custom networking — Any type of network connection between virtual machines
and the host that does not use the default bridged, host-only or network address
translation (NAT) networking configurations. For instance, different virtual machines
471
VMware Workstation 5 User’s Manual
can be connected to the host by separate networks or connected to each other and
not to the host. Any network topology is possible.
Drag and drop — With the drag and drop feature of VMware Workstation, you can
move files easily between a Windows host and a Windows virtual machine. You can
drag and drop individual files or entire directories.
Existing partition — A partition on a physical disk in the host machine.
See also Physical disk.
Full clone — A complete copy of the original virtual machine plus all associated
virtual disks.
See also Linked clone.
Full screen mode — A display mode in which the virtual machine’s display fills the
entire screen.
See also Full screen switch mode, Quick switch mode.
Full screen switch mode — A display mode in which the virtual machine’s display
fills the entire screen, and the user has no access to the VMware Workstation user
interface. The user cannot create, reconfigure or launch virtual machines. A system
administrator performs these function
See also Full screen mode.
Favorites list — A list in the left panel of the main VMware Workstation screen that
shows the names of virtual machines that a user has added to the list. The Favorites list
makes it easy to launch a virtual machine or to connect to the virtual machine’s
configuration file in order to make changes in the virtual machine settings.
Go to Snapshot — Go to a snapshot allows you to restore any snapshot of the
active virtual machine.
See also Revert to snapshot.
Guest operating system — An operating system that runs inside a virtual
machine.
See also Host operating system.
Host-only networking — A type of network connection between a virtual
machine and the host. Under host-only networking, a virtual machine is connected to
the host on a private network, which normally is not visible outside the host. Multiple
virtual machines configured with host-only networking on the same host are on the
same network.
See also Bridged networking, Custom networking, and Network address translation
(NAT).
472
www.vmware.com
C H A P T E R 1 7 Glossary
Host machine — The physical computer on which the VMware Workstation
software is installed. It hosts the VMware Workstation virtual machines.
Host operating system — An operating system that runs on the host machine.
See also Guest operating system.
LAN segment — A private virtual network that is available only to virtual machines
within the same team.
See also Virtual Network, and Teams
Legacy virtual machine — A virtual machine created for use in Workstation 4.x,
GSX Server 3.x or ESX Server 2.x. You can use and create legacy virtual machines
within Workstation 5, but new Workstation 5 features are not usable. For example:
clones, multiple snapshots, and teams are not compatible with a legacy virtual
machine.
Linked clone — A copy of the original virtual machine that shares the virtual disks
with the original virtual machine in an ongoing manner.
See also Full clone.
Lockout — see Administrative Lockout.
Network address translation (NAT) — A type of network connection that allows
you to connect your virtual machines to an external network when you have only one
IP network address, and that address is used by the host computer. If you use NAT,
your virtual machine does not have its own IP address on the external network.
Instead, a separate private network is set up on the host computer. Your virtual
machine gets an address on that network from the VMware virtual DHCP server. The
VMware NAT device passes network data between one or more virtual machines and
the external network. It identifies incoming data packets intended for each virtual
machine and sends them to the correct destination.
New Virtual Machine wizard — A point-and-click interface for convenient, easy
creation of a virtual machine configuration. It creates files that define the virtual
machine, including a virtual machine configuration file and (optionally) a virtual disk
or physical disk file.
See also Virtual machine settings editor.
Parent — The source or “original” virtual machine from which you take a snapshot or
make a clone. A full clone has no continued link to its parent, but a linked clone and a
snapshot each depend on the parent in an ongoing manner. If you delete the parent
virtual machine, any linked clone or snapshot becomes permanently disabled. To
prevent deletion, you can create a template virtual machine.
See also Full clone, Linked clone, Snapshot, and Template.
473
VMware Workstation 5 User’s Manual
Physical disk — A hard disk in a virtual machine that is mapped to a physical disk
drive or a partition of a drive on the host machine. A physical disk is also referred to as
a raw disk. A virtual machine’s disk can be stored as a file on the host file system (see
Virtual disk) or on a local hard disk. When a virtual machine is configured to use a
physical disk, VMware Workstation directly accesses the local disk or partition as a
physical device (not as a file on a file system). It is possible to boot a previously
installed operating system on an existing partition within a virtual machine
environment. The only limitation is that the existing partition must reside on a local
IDE or SCSI drive.
See also Virtual disk.
Quick switch mode — A display mode in which the virtual machine’s display fills
most of the screen. In this mode, tabs at the top of the screen allow you to switch
quickly from one running virtual machine to another.
See also Full screen mode.
Resume — Return a virtual machine to operation from its suspended state. When
you resume a suspended virtual machine, all applications are in the same state they
were when the virtual machine was suspended.
See also Suspend.
Revert to snapshot — Reverting to a snapshot restores the status of the active
virtual machine to its immediate parent snapshot. This parent is represented in the
snapshot manager by the snapshot appearing to the immediate left of the You Are
Here icon.
See also Go to Snapshot, Snapshot manager, and You Are Here (icon).
Shared folder — A shared folder is a folder on the host computer — or on a
network drive accessible from the host computer — that can be used by both the
host computer and one or more virtual machines. It provides a simple way of sharing
files between host and guest or among virtual machines. In a Windows virtual
machine, shared folders appear as folders on a designated drive letter. In a Linux
virtual machine, shared folders appear under a specified mount point.
Snapshot — A snapshot preserves the virtual machine just as it was when you took
that snapshot — the state of the data on all the virtual machine’s disks and whether
the virtual machine was powered on, powered off or suspended. VMware Workstation
lets you take snapshots of a virtual machine at any time and revert to that snapshot at
any time. You can take a snapshot when a virtual machine is powered on, powered off
or suspended. Configurations are available to exclude a disk from snapshots.
474
www.vmware.com
C H A P T E R 1 7 Glossary
Snapshot manager — The snapshot manager is a window that allows you to take
actions on any of the snapshots associated with the selected virtual machine.
See also Snapshot.
Suspend — Saves the current state of a running virtual machine. To return a
suspended virtual machine to operation, you use the resume feature.
See also Resume.
Teams — A group of virtual machines that are configured to operate as one object.
You can power on, power off, and suspend a team with one command. You can
configure a team to communicate independently of any other virtual or real network
by setting up a LAN segment.
See also LAN segment, Virtual Network.
Template — A virtual machine that cannot be deleted or added to a team. Setting a
virtual machine as a template protects any linked clone or snapshots from being
disabled inadvertently.
See also Linked clone, Parent, and Snapshot.
Virtual disk — A file or set of files appearing as a physical disk drive to a guest
operating system. These files can be on the host machine or on a remote file system.
When you configure a virtual machine with a virtual disk, you can install a new
operating system into the disk file without the need to repartition a physical disk or
reboot the host.
See also Physical disk.
Virtual machine — A virtualized x86 PC environment in which a guest operating
system and associated application software can run. Multiple virtual machines can
operate on the same host machine concurrently.
Virtual machine configuration — The specification of what virtual devices (disks,
memory size, etc.) are present in a virtual machine and how they are mapped to host
files and devices.
Virtual machine configuration file — A file containing a virtual machine
configuration. It is created by the New Virtual Machine Wizard. It is used by VMware
Workstation to identify and run a specific virtual machine.
Virtual machine settings editor — A point-and-click editor used to view and
modify the settings of a virtual machine after its initial creation.
See also New Virtual Machine wizard.
Virtual Network — A network between virtual machines with no dependence on
real-world hardware connections. For example, you can create a virtual network
between a virtual machine and a host that has no external network connections. You
475
VMware Workstation 5 User’s Manual
can also create a LAN segment for communications between virtual machines on a
team
See also LAN segment, and Teams.
Virtual Network Editor — A point-and-click editor used to view and modify the
networking settings for the virtual networks created by VMware Workstation.
VMware Tools — A suite of utilities and drivers that enhances the performance and
functionality of your guest operating system. Key features of VMware Tools include
some or all of the following, depending on your guest operating system: an SVGA
driver, a mouse driver, the VMware Tools control panel and support for such features
as shared folders, drag and drop in Windows guests, shrinking virtual disks, time
synchronization with the host, VMware Tools scripts, and connecting and
disconnecting devices while the virtual machine is running.
You Are Here (icon) — A special icon appearing in the snapshot manager that
indicates the current status of the active virtual machine. This can be important when
deciding whether to revert to, or go to a snapshot.
See also Snapshot manager, Revert to snapshot, and Go to Snapshot.
476
www.vmware.com
Index
File extensions
Administrative lockout 457
.bmp 183
AMD
Athlon 24, 30
Opteron 24, 30
Sempron 24, 30
Turion 24, 30
.cfg 110
.dsk 109
.log 108
.nvram 108
.png 183
.REDO 109
AMD Athlon 64 processor
supported for 64-bit guest 37
.std 110
AMD Opteron processor
supported for 64-bit guest 37
.sv2i file
importing 125
AMD Sempron processor
supported for 64-bit guest 37
.tar 144
AMD Turion processor
supported for 64-bit guest 37
.vmc file
importing 125
.vmdk 109, 191, 195, 198, 213
.vmem 109
.vmsd 109
.vmsn 110
.vmss 110
Assign
drive letter 243
IP address 347
MAC address 352
network port number in NAT 371
Athlon 24, 30
.vmtm 110
Athlon 64 processor
supported for 64-bit guest 37
.vmx 110, 454
locating for clone 303
Audio
See Sound
.vmxf 110
Audio controller 135
.wav 389
AudioPCI 389
A
Autofit 170
guest 170
ACPI 470
Adapter
enabling, disabling, adding, and
removing host virtual adapter 343
host virtual 328
in promiscuous mode on a Linux
host 364
virtual Ethernet 336
Address
assigning IP 349
assigning MAC manually 353
IP in virtual machine 120
IP on virtual network 347
MAC 352
network address translation 365
using DHCP to assign on a virtual
network 347
autofit
window 170
Automatic bridging 338
Autorun
disable 50
B
Bandwidth
LAN segment 303
bandwidth
LAN segment 321
Basic disks
on Windows host 256
BIOS
file in virtual machine 108
477
Boot loader
LILO 242, 245, 258
Clone of clone
full clone of linked clone 295
Linked clone of linked clone 295
Boot sequence
in VMware BIOS 243, 246
Clone template
not on team 297
Bridge 327
Clone, linked
snapshot 296
provided in virtual machine 34
Bridged networking
configuring options 338
defined 471
Browser
configuring on Linux host 58
BSD
supported 32-bit guest operating
systems 40
supported 64-bit guest operating
systems 40
BT-958 121, 257
BusLogic 35, 121, 257, 422, 427
C
Capacity
disk 210, 212, 224, 260
Capture
screenshot 183
CD
adding drive to virtual machine 226
CD-ROM image file 35
Celeron 30
Centrino 30
Change
team name 322
virtual machine name 95
Clock
real-time on Linux host 55
synchronize guest and host 150
Clone
creating 292
creating clone in New Team Wizard
303
enable template mode 297
full 291
linked 291
network identity 295
new 292
overview 290
snapshot (for linked clone) 296
478
CODEC
movie 184
Color
screen colors in a virtual machine
380
Comm port
See Serial connection, Serial port
Command line
vmrun 104
VMware 102
workstation 102
Commands
keyboard shortcuts 107
on the command line 102
Connect
USB devices 418
Controls
hiding 172
Copy
text 175
virtual machine 193, 194, 196, 197,
200
virtual machine--see clone 290
CPU 134
host requirement 30
provided in virtual machine 34
Creative Labs 36, 389
Ctrl-Alt 89
Cut
text 175
D
Date
See Time
DDNS 356
Default
team location 302
team path 302
www.vmware.com
Defragment
virtual disks 215
Delete
virtual machine 166
Devices
adding a generic SCSI device 423
adding a generic SCSI device not
detected by Workstation 424
adding, configuring and removing
182
connecting and disconnecting 77,
151, 182
disconnecting from USB controller
421
generic SCSI device, adding 428
in virtual machine 182
processor 34
provided in virtual machine 34
USB 417
Devices tab
tools 151
DHCP
assigning IP addresses on a virtual
network 347
changing settings 341
configuring on a Linux host 348
configuring on a Windows host 348
DHCPD 355
lease 342
on a virtual network with NAT 366
server 328, 342
server on virtual network 331, 332
stopping 362
troubleshooting on a Linux host 355
Dial-up connection 351
Direct memory access
See DMA
Disable
interface features 455
Disk 134
files on host 213
independent 216, 279
performance 454
physical, defined 474
size 210, 212, 224, 260
space required on host computer 31
Disks
adding virtual disks 219
available in virtual machine 34
defragmenting 215
DMA and performance 450
dynamic 256
existing partition 472
physical 212, 223
physical, access to 263
physical, controlling access to 241
physical, do not use Windows
dynamic disks 256
physical, installing guest operating
system on 263
physical, SCSI issues 257
physical, using in new virtual
machine 116
See also Virtual disk
shrinking 160, 215, 234
virtual 210, 475
virtual disk files 109
virtual disk manager 230
Display
color depth 380
fitting window to virtual machine
170
full screen 168
multiple monitor 169
resolution on a Linux host 382
switching virtual machines 169
DMA
and disk performance 450, 452
DMZ 300
DNS 367
Drag and drop 181, 472
enabling and disabling 181
Driver
SCSI 422
sound 389
Drives
See Disks
tape 422, 427
Dual-boot
and SCSI disks 257
configuring for use in virtual
machine 237, 241
479
Dual-monitor display 169
DVD
adding drive to virtual machine 226
Dynamic domain name service 356
E
EM64T 24, 30
EM64T processor
supported for 64-bit guest 37
Enable
template mode for clone 297
Ethernet
virtual adapter 328
Ethernet adapter
adding to virtual machine 336
migrating with Virtual Machine
Importer 135
promiscuous mode on a Linux host
364
Virtual Machine importer 134
Existing disk
using in a virtual machine 212
Experimental support 43
F
Favorites
defined 472
hide 172
overview 83
removing from list 84
Files
BIOS in virtual machine 108
location of virtual disk files 116
redo log 109, 197, 199, 202
Samba and file sharing on a Linux
host 378
sharing among virtual machines and
host 181
snapshot 110
suspended state 110
used by a virtual machine 108
used by snapshot 109
virtual disk files 109
virtual machine 159
Firewall 373
Fit
guest 170
window to virtual machine 170
480
fit
window 170
Floppy
drives in virtual machine 35
image file 35, 229
Floppy drive
adding to virtual machine 228
Floppy image file
connecting to 229
creating 229
Folder
shared, see Shared folder
FreeBSD
supported 32-bit guest operating
systems 40
supported 64-bit guest operating
systems 40
VMware Tools for 146
FTP 367
Full clone 291
Full screen mode
defined 472
switching between virtual machines
168
using 168
Full screen switch mode 462
log file 469
G
Gated
host network 354
Global configuration file 463
Go To
snapshot 285
Grab
keyboard and mouse input 89
Graphics
See also Display
support in virtual machine 34, 380
Graphics card 134
Guest
autofit 170
defined 20
fit 170
Guest operating system
defined 472
installing 137
www.vmware.com
installing on physical disk 263
support for 64-bit 37
supported 37
supported FreeBSD 32-bit 40
supported FreeBSD 64-bit 40
supported Linux 32-bit 39
supported Linux 64-bit 39
supported MS-DOS 38
supported Solaris 32-bit 40
supported Solaris 64-bit 40
supported Windows 32-bit 38
supported Windows 64-bit 38
H
Hardware profiles 247
Help
configuring Web browser for, on
Linux host 58
Host
defined 20
virtual adapter, enabling, disabling,
adding, and removing 343
Host computer 473
system requirements 30
Host operating system 473
Host virtual adapter
adding 343
defined 328
disabling 343
enabling 343
removing 343
Host virtual network mapping 340
Host-only networking
basic configuration 332
defined 472
selecting IP addresses 347
Hot key
for full screen switch mode 464, 465
Importer
see Virtual Machine Importer
importing a virtual machine or system
image 129
Independent disk 216, 279
Input
capturing from keyboard and
mouse 89
Install
guest operating system 137
on Linux host 54
on Windows host 47
software in a virtual machine 174
VMware Tools 140
VMware Workstation 45
Intel
EM64T 24, 30
Xeon 30
Intel EM64T 30
Intel EM64T processor
supported for 64-bit guest 37
Iomega
parallel port Zip drives 396
IP address
assigning 349
clone 295
in virtual machine 120
static 347
IP forwarding 351
IP packet forwarding
disabling 350
ISO image file 35, 226, 229
K
Kbps
for LAN segment 322
Hot keys 89
for full screen switch mode 464
Kernel
reconfiguring Workstation after
Linux kernel upgrade 57
I
Key code mapping 411
ICMP 367
Keyboard
mapping on a Linux host 409
sending input to virtual machine 89
shortcuts 107
USB 421
IDE
drives in virtual machine 34
Image file
floppy 35, 229
ISO 35, 226, 229
Keysym
defined 410
481
mapping 412
LSI Logic 35, 121, 257, 422, 427
KT-958 121, 257
M
L
MAC address 290
assigning manually 353
clone 295
of virtual Ethernet adapter 352
LAN segment
changing name 321
New Team Wizard 303
setting bandwidth 303, 321
setting Kbps 322
setting packet loss 322
Launch
virtual machine 159
Leak
IP packets in a virtual machine 351
IP packets in host-only network 350
LILO 242, 245, 258
Link
symbolic link does not work in
shared folder 180
Linked clone 291
parent 296
parent as template 297
snapshot 296
template mode 297
Linux
installing on Linux host 54
supported 32-bit guest operating
systems 39
supported 64-bit guest operating
systems 39
supported host operating systems
32
uninstalling Workstation on Linux
host 58
upgrading on Linux host 66
VMware Tools for 142
LiveState Recovery system image
importing 125
Map
key code 411
keyboard 409
keysym 412
Memory
amount required on host 31
available in virtual machine 34
choosing for best performance 435
more than 1GB on a Linux host 447
reserved memory 445
setting size 443
swapping 91
virtual machine memory size 443
Memory trimming
Disk performance 454
MIDI 389
Migrate
disks in undoable mode 201
virtual machine 67, 198
Mode
full screen 168, 472
quick switch 169, 474
Modifier keys
for full screen switch mode 464
Mouse
sending input to virtual machine 89
USB 421
Move
virtual machine 187
LiveState system image
importing 125
Movie
capture 183
CODEC 184
playback 184
Location of virtual machine files 159
MP3 389
Lock files 214
MS-DOS
supported guest operating systems
38
Lockout
for some interface features 457
482
Log files 469
Knowledge base 41
www.vmware.com
Multi-tier team 300
Mylex 35, 121, 257, 422, 427
N
Name
changing LAN segment name 321
changing team name 322
changing virtual machine name 95
Named pipe 400, 401, 402
NAT
advanced configuration 368
and DHCP 366
and DNS 367
and the host computer 366
defined 473
external access from a NAT network
367
on virtual network 330, 365
port forwarding 371, 376, 377
sample configuration file for Linux
host 375
selecting IP addresses 347
specifying connection from port
below 1024 372
virtual device 328
when creating a virtual machine 120
NAT.conf 369, 375
NetLogon 373
NetWare
See Novell NetWare
Network
adding and modifying virtual Ethernet adapters 336
automatic bridging 338
bridge 327
bridged networking 471
changing DHCP settings 341
changing subnet settings 341
changing the configuration 336
common configurations 329
components 327
configuring bridged networking
options 338
custom configurations 333
custom networking 471
DHCP 347
DHCP server 328
dial-up connection 351
dynamic domain name service 356
hardware address 352
host virtual adapter 328
host virtual network mapping 340
host-only 332, 472
host-only subnet 347
identity, clone 295
IP forwarding 351
IP packet leaks 350, 351
locking out access to settings 457
MAC address 352
NAT 330, 365, 473
NAT as firewall 373
NAT device 328
NAT subnet 347
packet filtering 351
performance 300
promiscuous mode on a Linux host
364
routing between two host-only networks 360
routing on a Linux host 354
Samba 378
second bridged network on a Linux
host 356
switch 327
Token Ring 331
troubleshooting DHCP on a Linux
host 355
two host-only networks 357
virtual DHCP server 331, 332
virtual Ethernet adapter 328
virtual network editor 338, 343, 348,
476
virtual switch 327
Network address translation
defined 473
See NAT
New
clone 292
team 301
New team Wizard
adding LAN segment 303
New team wizard
creating clone 303
483
New Virtual Machine Wizard 115, 210,
473
NFS
specifying connection from port
below 1024 372
Novell NetWare
supported guest operating systems
40
VMware Tools for 147
NT4 Ethernet adapter 135
NVRAM 108
O
Operating system
FreeBSD 32-bit guest 40
FreeBSD 64-bit guest 40
guest 472
host 473
installing guest 137
Linux 32-bit guest 39
Linux 64-bit guest 39
MS-DOS guest 38
Solaris 32-bit guest 40
Solaris 64-bit guest 40
support for 64-bit guest 37
supported 32-bit Windows host 32
supported 64-bit Windows host 32
supported guest 37
supported Linux host 32
supported Windows 32-bit 38
supported Windows 64-bit 38
Opteron 24, 30
Opteron processor
supported for 64-bit guest 37
Options tab
tools 150
Overview
clone 290
team 300
P
Packet
filtering 351
leaks 350, 351
Packet loss
LAN segment 322
Page sharing 454
disk performance 454
484
Parallel ports
and Iomega Zip drives 396
and the Linux kernel 55, 392
configuring on a Linux host 393
in a virtual machine 392
installing in virtual machines 392
Parent
clone template 297
linked clone 296
snapshot 285
Partition
existing 472
partitions, Unsupported and disabled
shrink disk 218
Passwords
and administrative lockout 457
removing forgotten password 458
Paste
text 175
PCI devices 135
Pentium 30
Performance
CD-ROM drive polling 436
debugging mode 436
disk options 437
DMA and disks 450
guest operating system selection
435
Linux guest 452
memory settings 435
memory usage 443
process scheduling on a Windows
host 438
remote disk access 438
using full screen mode on a Linux
host 440
using the Windows Performance
console 441
Windows 2000 guest 451
Windows 95 and Windows 98 guests
449
Performance monitoring 441
Physical disk
configuring virtual machine on dualboot computer 237
using in a virtual machine 212
www.vmware.com
Ping 367
Restricted user interface 459
Pipe
named 400, 401, 402
Resume
defined 474
team 311
virtual machine 161, 272
Port
TCP and UDP below 1024 372
Port forwarding 371, 376, 377
Power menu
disable functions 459
Power Off
revert to snapshot 285, 288
team 310
Power On
team 310
Revert
at power off 285, 288
snapshot 285
Routing
between two host-only networks
360
for a host-only network on a Linux
host 354
host only 354
Preferences
hot keys 89
memory 91
process priority 92
setting for Workstation 87
Run
suspended virtual machine 272
Priorities
for virtual machines on Windows
host 92
Samba
and file sharing on a Linux host 378
modifying configuration for Workstation 378
on both bridged and host-only networks 378
Process scheduler 92
Processor
host requirement 30
provided in virtual machine 34
Promiscuous mode 364
Q
Quick switch mode 169, 474
R
RAM
amount required on host 31
available in virtual machine 34
Raw disk
see Disks, physical
Real Media 389
S
S1 470
Save
state of virtual machine 161, 164,
272, 273
Scan code 409
Scanner 422
Screen
colors 380
Screen modes
full screen 168
quick switch 169
Screen resolution 172
Real-time clock
requirement on Linux host 55
Screenshot
capture 183
capturing 183
Reclaim
disk space 152, 153
Scripts
enabling, disabling, and running 151
Redo-log file 109, 197, 199, 202
Scripts tab
tools 151
Registration 43
Registry 134
Restore
suspended virtual machine 161
SCSI
adding a generic SCSI device 423,
428
485
adding a generic SCSI device not
detected by Workstation 424
and dual-boot configurations 257
avoiding concurrent access on a
Linux host 427
connecting to generic SCSI device
422
devices in virtual machine 35
disk geometry 260
driver for Windows NT guest 423
driver for Windows Server 2003
guest 258, 422
driver for Windows XP guest 258,
422
drivers 121, 257, 261, 422, 427
generic SCSI on a Linux host 426
generic SCSI on a Windows host 422
permissions for a generic SCSI
device on a Linux host 427
Sempron 24, 30
Sempron processor
supported for 64-bit guest 37
Serial connection
between host application and virtual machine 400
between two virtual machines 402
to a serial port on the host 397
Serial number 47, 54, 115
Serial port
installing and using 397
Server
DHCP 328, 335, 341, 348, 355, 366,
373
DNS 356, 366, 367, 369
WINS 368
Settings 94
Settings editor
virtual machine 182, 475
Share
drag and drop 472
files on a Linux host with Samba 378
Shared folder
adding on a Linux host 179
adding on a Windows host 177
and Linux symbolic link 180
and Windows shortcut 180
defined 474
486
enable and disable 178
enabling and disabling 179
linux 180
settings not migrated by importer
135
using 176
viewing 180
Shared Folders
tab in tools 152
Shortcut
does not work in shared folder 180
Shortcuts
keyboard 107
Shrink
tab in tools 152
unsupported and disabled partitions 218
virtual disks 152, 153, 160, 215, 234
Shut down
a virtual machine 162
Size
disk 210, 212, 224, 260
virtual disk 35, 123
virtual machine window 170
Sleep, ACPI 470
SMP
see Virtual SMP
Snapshot
defined 474
disabling 287
disabling menu functions 459
files 110
Go To 285
linked clone 296
parent 285
removing 286
revert 285
team 309
using 164
virtual machine 273
ways of using 276
what is saved in 277
Snapshots
disabling 287
Solaris
supported 32-bit guest operating
systems 40
www.vmware.com
supported 64-bit guest operating
systems 40
Sound
configuring 389
drivers for Windows 9x and Windows NT guest operating systems
389
Sound Blaster 389
support in guest 36
Specifications
virtual machine platform 34
Start
suspended virtual machine 161, 272
virtual machine 159
VMware Tools 160
Static IP 362, 366
clone 295
Status bar
hide 172
Subnet
changing settings 341
in NAT configuration 347
on host-only network 347
Sun Solaris
supported 32-bit guest operating
systems 40
supported 64-bit guest operating
systems 40
Support
experimental 43
technical support resources 41
Suspend
defined 475
files 110
team 311
virtual machine 161, 272
System requirements 30
display 31
memory 31
PC hardware 30
T
Tabs
hide 172
Tape drive 422, 427
Team 167
adding virtual machines 302
default directory 302
multi-tier 300
name change 322
network 300
new 301
no clone template 297
overview 300
power off 310
power on 310
resume 311
snapshot 309
suspend 311
Telnet 367
Template
parent of linked clone 297
Template mode
linked clone 297
Text
cutting, copying and pasting 175
Time
synchronize guest and host 150
Token Ring 331
Toolbar
customizing 81
hide 172, 459
Switch
virtual network 327
workspaces in Linux guest 90
Tools
devices tab 151
installing VMware Tools 140
options tab 150
scripts tab 151
Shared Folders tab 152
shrink tab 152
starting VMware Tools 160
VMware Tools 476
Symmetric Multiprocessing
see Virtual SMP
Trend Micro Virus Buster
installation issues 174
SVGA
in a Windows 95 guest on a physical
disk 252
in a Windows 98 guest on a raw disk
254
487
troubleshooting 134
Turion 24, 30
Turion processor
supported for 64-bit guest 37
U
Undoable mode
migrating 201
Uninstall
host virtual adapter 343
on Linux host 58
on Windows host 53
Upgrade
Linux kernel, reconfiguring Workstation after upgrade 57
on Linux host 66
on Windows host 65
virtual machine 67, 69
VMware Workstation 61
USB
connecting devices 418
control of devices by host and guest
420
controller, enabling and disabling
418
devices in a virtual machine 417
disconnecting devices 421
keyboard and mouse 421
on a Linux host 420
on a Windows host 419
supported device types 417
User groups 41
User interface
overview 74
restricted 459
UUID 188, 290
format 188
location 188
specifying 190
specifying for moved virtual
machine 190
V
VGA 172
Video
resolution on a Linux host 382
See also Display
488
Viewing
shared folder 180
Virtual adapter
enabling, disabling, adding, and
removing host virtual adapter 343
Virtual disk
add to virtual machine 219
defined 210, 475
location 116
See also Disks
shrinking 215
size 35, 123, 220
Virtual hardware 134
Virtual machine 159
adding a virtual disk 219
adding floppy drive 228
adding or modifying an Ethernet
adapter 336
adding to team 302
and SMP 429
capturing screenshot 183
constituent files 108
creating 113
creating a clone 292
defined 475
delete 166
importing other formats 125
installing software in 174
migrating 198
moving 187
moving SMP virtual machines
between Workstation and ESX
Server 430
name change 95
platform specifications 34
removing from Favorites list 84
resuming 161, 272
settings 94
shutting down 162, 163
starting 159
starting in full screen mode 467
suspending 161, 272
taking and restoring snapshot 164
upgrading 67
upgrading procedure 69
window size 170
virtual machine 94
output capability 127
www.vmware.com
Virtual machine settings editor
defined 475
restricting access 457, 459
using 182
VMware Tools
configuring 149
defined 476
for FreeBSD guests 146
for Linux guests 142
for NetWare guests 147
for Windows guests 141
installing 140
installing from the command line
with the RPM installer 144
installing from the command line
with the tar installer 143
starting 160
Virtual network editor 476
VMware Virtual Disk Manager 230
Virtual PC
importing 125, 129
version support 127
VMware-config.pl 56
Virtual Server
importing 125
version support 127
V-scan code
defined 409
table of codes 413
Virtual SMP
moving SMP virtual machines
between Workstation and ESX
Server 430
processors in virtual machine hardware profile 248
using
W
Virtual Machine Importer 125, 129, 134
benefits 126
command line 133
Open and Import commands 128
overview 126
requirements 126
shared folder settings 135
source settings affected by conversion 127
Virtual switch 327
Virtual Symmetric Multiprocessing
See Virtual SMP
VirtualCenter
and virtual disk manager 231
Virus Buster
See Trend Micro Virus Buster
VMnet1 356
VMnet8 366
vmrun 104
VMware
command line 102
VMware community forums 41
VMware Player
closing 207
configuring 206
running 205
sharing virtual machines with 205
vmware-fullscreen
log file 469
window
autofit 170
fit 170
Window size 170, 172
Windows
installing on Windows host 47
supported 32-bit guest operating
systems 38
supported 64-bit guest operating
systems 38
uninstalling on Windows host 53
upgrading on Windows host 65
VMware Tools for 141
Windows 95
sound driver 389
SVGA driver in a physical disk configuration 252
Windows 98
sound driver 389
SVGA driver in a raw disk configuration 254
Windows NT
SCSI driver for guest 423
sound driver 389
Windows Server 2003
SCSI driver for guest 258, 422
489
Windows XP
installing guest operating system
138
SCSI driver for guest 258, 422
Wizard
add new hardware 182
clone virtual machine 292
new team 301
new virtual machine 115, 213, 473
Workspaces
switching in Linux guest 90
X
X server
and keyboard mapping 409
Xeon 30
XFree86
and keyboard mapping 409
Z
Zip drives
on a parallel port 396
490
www.vmware.com