1
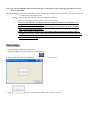
User Manual of Wireless Digital A/V Motion Alarm
Function Features
1. Microcomputer control, steady performance
2. PIR Wide-Angle detecting, automatic audio & video recording upon motion trigger and generates into and
real time and date A/V files and saved.
3.Large capacity, data can be saved even when power-cut, can be connected to the PC to review saved files.
4.AC/DC available, with backup battery which can works up to 4 hours.
5. Alarm volume is adjustable.
6. Greeting voice "Hello, welcome!" can be in Chinese or in English.
Specifications:
1. Input power:100~240VAC 50HZ/60HZ
2. Wide-angle PIR detecting:110° 10 * 10M
3. Rechargeable battery: 4.8VDC 500mA
4. Wireless Frequency:: 433Mhz
5. Resolution: 300,000 pixel
6. File format: AVI Format
7. Transmitting way: USB 2.0(Hs)
8. Storage capacity: 4GB
9. Supported player: Storm Player
10. Product dimension: 129 * 69 * 55 mm
Operation:
Alarm Front Side
PCA of Alarm Front Side
PCA of Alarm Back Side
1、 Turns on and Starts:Open the back cover of the alarm, slide the "Backup Battery Switch" to "ON" on the PCB of
alarm back side and then close the cover. Connect the external power, install the alarm by the bracket and
adjust the angle.
Note:After connecting the alarm to the power, it will beep four times, the alarming indicator will keep on for
5 seconds and then off after flashing for 10 seconds to get into the standby status. It will start recording upon motion
trigger (5 minutes for each recording),the real time and date would be powerful crime evidence for the police.
2、Arming:Press the "Arm" button on the remote controller, the alarm beep once and get into the standby status after 15
seconds. If the alarm is triggered at this time, it will goes off and start recording, at the same time the
lampholer turns on automatically, the alarming indicator will keep flashing all the time when
recordingand then stop after recording finished. Files will be saved with the name including the time of
start recording and stopping recording.
3. Disarming:Press the "Disarm" button on the remote controller, the alarm will beep twice to indicate a successful
disarming.
Note:It can be also disarmed while it is recording, at the same time, it will stop recording automatically.
4. Automatic recording: It will start a 5 minutes on-site audio and video recording upon motion trigger when standby.
The alarming indicator will keep flashing all the time when recording and will off automatically after finish recording.
Files will be saved automatically with a name including the starting time and stopping time of recording.
5. Remote recording:Press "Emergency" button on the remote controller, it will start a 5-minute on-site A/V recording
immediately. During this period, you can stop recording by pressing the "Disarm" button on the remote controller.
6. Volume adjusting:Adjust the volume by revolving the orange button of volume. (Left--lower, Right--Higer)
7. Language options: Greeting voice of "Hello, welcome!" Connecting jumper line 1 and 2 is for Chinese, 2 and 3 is for
English.
Note:Remove the jumper and greeting message will be not be available.If don't need the greeting message, just please
remove the jumper.
8:How to program the remote lampholder
Connect the remote lampholder to the power, press the learning switch on the PCB of the lampholder, then press the PIR
learning switch on the PCB of the alarm front side five times after you hear a beep sound.The lampholder beeps five
times indicates a successful learning, beeps twice indicates failure and exit.
Note: The light keeps on for 5 minutes and off automatically.
9. Installation and fixture:Fix the attached bracket on the proper position of the wall. (1.8~2.5 meters is suggested.)
Note: The remote lampholder must be in the same space as the motion camera, the suggested distance between
them is within 20M.
10. File reviewing:In the status of standby, connect the alarm to a computer by the USB cable,and then find and click
the video files in the disk to review.
Note:1. Don't do any other operation while reviewing the video files.
2. Need to install supported video player , such as Storm Player.
3. Need to refresh the time according to the time setting instructions every time before you
remove the alarm from the computer.
4. Disconnect the power and switch it off every time after you remove it from the computer,
otherwise it can not work normally.
5. Make sure to charge it when power is not enough (make sure the power switch is "ON" ).
Anytime when it can't work normally, please disconnect the external power first, then switch
it off and switch on again (at the same time, make sure the battery has certain power),then
connect the external power!
Time Setting:
1. To decompress the RAR file "GetSysTime".
2. Connect the PIR camera, you will see the removable disk.
3. Open the decompressed file "GetSysTime"
4. Click
GetSysTime.exe
(see the photo):
and you will see below window (may need 3~5 seconds):
5. Click "确定(OK)", then open the removable disk, you will see a file like this ,
,it means
a
successful time refreshing. Remove the camera, new time will be showed in the newly generated video files.
Note: The light keeps on for 5 minutes and off automatically.
Cautions:
1. Please abide by the applicable laws and regulations. Do not use this unit for other illegal purposes or you should bear
all responsibility.
2. Please do not use it at the ambient humidity which human can not fit and do not place it in a humid operating
condition,
this product is not waterproof.
3. Please do not face the camera to the sun or other strong light to avoid damaging optics parts.
4. Please do not use it under a dusty condition so as to keep its lens and other parts from dust or void video affection.
5. Please clean the lens with lens wiping paper or glass towel periodically.
6. This product is precision electronic product and do not make it subject to any impact or strong shake, do not use in
strong magnetic field or electric field.