1
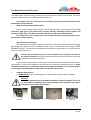
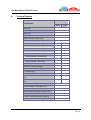
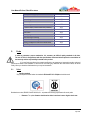
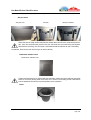
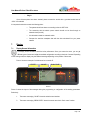
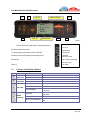
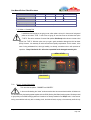
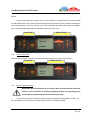
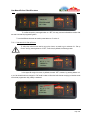
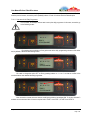
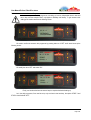
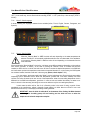
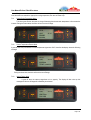
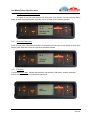
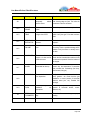
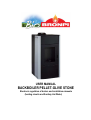
USER MANUAL
BACKBOILER PELLET-OLIVE STONE
Electronic regulation of boilers and installation elements
(heating circuits and Sanitary Hot Water)
User Manual Boilers Pellet-Olive stone
Bronpi Calefacción S.L.
Page 1/46
User Manual Boilers Pellet-Olive stone
INDEX
1
Index ........................................................................................................................................................................................................................... 2
2
Symbol Description .................................................................................................................................................................................................. 4
3
Safety Recommendations ....................................................................................................................................................................................... 4
3.1 Safety Devices ................................................................................................................................................................................................................ 4
4
5
Technical Features ................................................................................................................................................................................................... 7
Fuels ............................................................................................................................................................................................................................ 9
5.1 Pellet .................................................................................................................................................................................................................................. 9
5.2 Olive stone .................................................................................................................................................................................................................... 10
6
7
Start-up .................................................................................................................................................................................................................... 10
Display ..................................................................................................................................................................................................................... 12
7.1 Display General Information ................................................................................................................................................................................... 12
7.2 Functions of the Display's Buttons ........................................................................................................................................................................ 13
7.3 Menu ............................................................................................................................................................................................................................... 14
7.3.1 User Menu .......................................................................................................................................................................................................... 14
7.3.2 Menu 1. Choosing Fuel .................................................................................................................................................................................. 15
7.3.3 Menu 2. Summer/Winter Mode. ................................................................................................................................................................. 16
7.3.4 Menu 3. Set up Clock ...................................................................................................................................................................................... 16
7.3.5 Menú 4. Programme Setting ........................................................................................................................................................................ 16
7.3.5.1 Sub-menu 04.01. Set up Chrono ......................................................................................................................................................... 17
7.3.5.2 Sub-menu 04.02. Daily Programme .................................................................................................................................................... 18
7.3.5.3 Sub-menu 04.03. Weekly Programme ............................................................................................................................................... 21
7.3.5.4 Sub-menu 04.04. Weekend Programme........................................................................................................................................... 23
7.3.6 Menu 5. Select Language .............................................................................................................................................................................. 24
7.3.7 Menu 6. Stand-by Mode ................................................................................................................................................................................. 24
7.3.8 Menu 7. Sound Mode ..................................................................................................................................................................................... 25
7.3.9 Menu 8. Initial Load ......................................................................................................................................................................................... 25
7.3.10 Menu 9. Boiler State ...................................................................................................................................................................................... 26
7.4 User Mode ..................................................................................................................................................................................................................... 27
7.4.1 Boiler's Ignition .................................................................................................................................................................................................. 27
7.4.2 Boiler in Operation .......................................................................................................................................................................................... 27
7.4.3 Change Water Temperature Set.................................................................................................................................................................. 28
7.4.4 Water Temperature Reaches Temperature Fixed by the User .......................................................................................................... 28
7.4.5 Burner Cleaning................................................................................................................................................................................................ 29
7.4.6 Turning off the Boiler ...................................................................................................................................................................................... 29
7.4.7 Boiler Turned off ............................................................................................................................................................................................... 30
7.4.8 Re-ignition of the Boiler .................................................................................................................................................................................. 30
7.5 What happens if…? ..................................................................................................................................................................................................... 30
7.5.1 The Fuel Does not Light ................................................................................................................................................................................. 30
7.5.2 Power Supply Failure (Black Out) ............................................................................................................................................................... 31
7.6 Alarms ............................................................................................................................................................................................................................. 31
7.6.1 Smoke Temperature Probe Alarm............................................................................................................................................................... 31
7.6.2 Smoke Temperature Excess Alarm.............................................................................................................................................................. 32
7.6.3 Ignition Failure Alarm ..................................................................................................................................................................................... 32
7.6.4 Switching-off Failure during Working Phase .......................................................................................................................................... 32
7.6.5 Pressure Alarm .................................................................................................................................................................................................. 33
Bronpi Calefacción S.L.
Page 2/46
User Manual Boilers Pellet-Olive stone
7.6.6 Damaged Smoke Ex traction Fan Alarm................................................................................................................................................... 33
7.6.7 Worm Gear Failure Alarm ............................................................................................................................................................................. 34
8
Maintenance and Care......................................................................................................................................................................................... 36
8.1 Burner Cleaning ........................................................................................................................................................................................................... 36
8.2 Scraper Use ................................................................................................................................................................................................................... 36
8.3 Ash Pan Cleaning........................................................................................................................................................................................................ 36
8.4 Joints of the Ash Pan Door and the Burner ....................................................................................................................................................... 37
8.5 Smoke Pipes Cleaning ............................................................................................................................................................................................... 37
8.6 Glass Cleaning.............................................................................................................................................................................................................. 37
8.7 External Cleaning........................................................................................................................................................................................................ 37
8.8 Seasonal Stoppages ................................................................................................................................................................................................... 37
9
Sanitary Hot Water Tank...................................................................................................................................................................................... 38
10 General Measurements ........................................................................................................................................................................................ 40
11 Maintenance .......................................................................................................................................................................................................... 42
Bronpi Calefacción S.L.
Page 3/46
User Manual Boilers Pellet-Olive stone
2.
Symbol Description
This symbol highlights those parts of the text that try to avoid mistakes when handling the boiler. The
omission of these instructions could cause material damages and harm your health in case of wrong
handling.
This symbol highlights those parts of the text that try to help with a better understanding of the boiler
regulation or the heating circuit.
3.
Safety Recommendations
•
•
•
•
•
•
•
•
•
•
•
•
3.1.
Do not open the combustion chamber or the ash pan door during the working process.
Do not allow making operations with the boiler to people who are not familiar with it or do not have training
related to the installation and to the Bronpi boilers.
Prevent children from being alone in the heating room without any supervision!
Keep animals away!
If you notice visible damages (e.g. water leaks, thermal deformations, smoke or fire traces, mechanical
imperfections, etc.) you should neither continue with the service nor restart it. The faults need to be
repaired. In case of any doubt, please contact a specialized technician or the technical service.
If the installation remains stopped during a long period of time you should guarantee an absolute antifreeze
protection in every part where the water is stored in.
Bronpi boilers should not be submitted to any external mechanical load (e.g. tray, rise means, support, or
similar.) This remark also applies to its individual components (door, cover, etc.)
During the working process you can only touch the door handles. The temperature could reach very high
values in some other parts (smoke pipe, ash pan door, etc.)
Use fireproof gloves when restocking the combustible material.
Bronpi boilers will exclusively be used under prescriptions given by the planning, installation, rules, laws,
and instructions related to the product. Either the manufacturer or distributor is not responsible for the
damages or the consequences attributable to an incorrect installation, application, or handling or to an
insufficient maintenance or cleaning.
Regarding the legionnaire’s disease, current general technical rules must be respected.
Note: UK HETAS regulations as stated in document J combustion appliances and fuel storage
systems.
Safety Devices
Bronpi boilers have several safety systems that guarantee a safe and an appropriate operation and
protect both the boiler and the user. Some of them are described below. If in doubt, see sections 7.5 and
7.6.
Bronpi Calefacción S.L.
Page 4/46
User Manual Boilers Pellet-Olive stone
•
Ignition Failure
If it does not appear a flame during the ignition process, the equipment will show in the display the message
“IGNITION FAILURE.” If you try again to ignite the machine, the display will show the message “WAITING
COOLING.”
This function serves to remind that before carrying out the starting up it is necessary to check that the burner is
completely clear and clean.
•
Smoke Pipe Breakdown
If the extractor stops, the electronic card automatically blocks the pellet or the olive stone supply.
•
Fuel Load Motor Breakdown
If the geared motor stops, the boiler keeps on working (only the smoke extractor) until the minimum working
smoke temperature goes down and stops.
In the case that the geared motor spins continuously, the boiler will cut its electrical supply. In the event of this
happening, the boiler will go into an alarm state.
•
Electricity Temporary Failure
After a short lack of electricity, the equipment restarts up automatically. In the event of a lack of electricity
the boiler could give off a reduced amount of smoke during a period of time of 3-5 minutes. THIS DOES NOT
ENTAIL ANY SAFETY RISK. This is why Bronpi advises, whenever possible, to connect the primary air inlet pipe
with the exterior of the house in order to assure that the boiler cannot give off smokes after the mentioned lack of
electricity.
•
Electrical Protection
The boiler is protected against abrupt electricity oscillations through a general fuse placed in the back part of
the boiler. (4A250V Retarded) (Picture 1).
•
Exhaust Stack Protection
An electronic pressure switch blocks the operation of the boiler in the event of an abrupt change in the
pressure inside the combustion chamber (door opening, smoke extraction motor breakdown…). In the event of this
happening, the boiler will go into an alarm state. (Picture 2).
•
Protection for High Temperature Inside the Fuel Storage Tank (Hopper -80 ºC)
Bronpi Calefacción S.L.
Page 5/46
User Manual Boilers Pellet-Olive stone
In the event of an overheating of the internal part of the tank, this device blocks the operation of the boiler.
The restart needs to be done manually, dismantling its black protection and pressing the white switch. This manual
restoration needs to be done by an authorised technician (Picture 3.)
The restoration of the 80 ºC safety device is not included in the warranty unless the support service
demonstrates a faulty component.
•
Water Over Temperature Protection (90 ºC)
When the water temperature inside the boiler circuit is near about 100ºC, the fuel loading is blocked. If the
temperature gauge goes off, the restart needs to be done manually, dismantling its black protection and
pressing the white switch. This manual restoration needs to be done by an authorised technician.
The restoration of the 90 ºC safety device is not included in the warranty unless the support service
demonstrates a faulty component.
•
Hydraulic Pressure Transducer
If the pressure inside the hydraulic installation is lower than 0.4 bars, the fuel loading motor electricity supply
gets blocked. If the pressure inside the installation exceeds 2.5 bars, the display will show the alarm “WATER
PRESSURE FAILURE”. The restoration of the safety device will be done by pressing button no. 4 (On/Off) during, at
least, 3 or 4 seconds (Picture 4.)
Warning: the occasional presence of air in the installation can provoke the intervention of
the pressure transducer. If the device intervenes blocking the fuel load in the machine, the alarms
related to the lack of fuel may activates.
In order to get a proper performance of the product, the ideal pressure of the installation should be tared in,
approximately, 1.0 bars when the installation is cold; furthermore, it is necessary the absolute absence of air. Bronpi
Calefacción advises to have an adequate air purged circuit inside the installation. The occasional operation
of air purging inside the installation or the product is not included in the warranty.
•
Installation Safety Devices
It is COMPULSORY to have a pressure gauge to visualize the water pressure during the installation.
Warning!!!
The closed expansion tank of the installation should have a dimension between 4 and 6% of
the total volume of installation; this is why the standard closed expansion tank could be
inadequate in case of higher water volumes.
Picture 1
Picture 2
Picture 3
Picture 4
Bronpi Calefacción S.L.
Page 6/46
User Manual Boilers Pellet-Olive stone
4.
Technical Features
KARINA
Characteristics
Olive
Stone
Pellet
Weight (Kg.)
263
Height (mm)
1402
Width (mm)
660
Depth (mm)
716
Smoke outlet pipe diameter (mm)
100
Air inlet pipe diameter (mm)
60
Performance at nominal power (%)
93
94
Performance at reduced power (%)
96
-
Maximum global thermal power (Kw)
27,6
27,6
Maximum usable thermal power (Kw)
27,6
27,6
- Power transferred to the air (Kw)
1,9
2,2
- Power transferred to the water (Kw)
25,7
25,4
Minimum usable thermal power (Kw)
9
-
- Power transferred to the air (Kw)
1
-
- Power transferred to the water ( Kw)
8
-
Minimum fuel consumption Kg/h
1,9
-
Maximum fuel consumption Kg/h
6
6,5
100
110
53 / 16
17
± 12
± 12
Tank capacity (Kg)
Minimum/maximum power autonomy (h)
Recommended draw at maximum usable power
(Pa)
Recommended draw at minimum usable power
(Pa)
Power consumption (W)
± 12
-
150-250
Power consumption during ignition (W)
500
Water inlet/outlet connection diameter
1"
Maximum working hydrological pressure (bar)
2,5
Working hydrological pressure (bar)
1,5
Volumen of the closed expansion vessel (l)
8l
Maximum service temperature (ºC)
80
Bronpi Calefacción S.L.
Page 7/46
User Manual Boilers Pellet-Olive stone
5.
Heating circulating pump
YES
Cast-iron interior
NO
Automatic ignition
YES
Fuel safety thermostat
YES
Water safety thermostat
YES
Pressure switch (maximum/mínimum pressure)
YES
Safety valve 3 bar
YES
Drain valve
YES
Weekly programmer
YES
Heat exchangers cleaning
YES
Automatic burner cleaning
YES
Heating management and Hot Domestic Water
YES
OASYS System
YES
Fuels
In order to guarantee a proper combustion, it is necessary to fulfill all quality standards in all fuels.
The use of fuels in disagreement with the specifications mentioned below implies the cancellation of
the warranty and the responsibility bounded to the product.
If you use fuels according to the present specification, we guarantee an impeccable working and good
performance values of the installation. In the event of not knowing any distributor who meet these criteria, we would
kindly inform you about the distributors that you may be interested in.
5.1.
Pellet
- Quality standard
Only wood pellet certified under the standards Ö-Norm M7135 or DINplus should be used.
Besides these rules, BRONPI CALEFACCIÓN, S.L. stipulates the following requirements for wood pellet:
o
Diameter: The pellet diameter should not be either lower than 6 mm or higher than 8 mm.
Bronpi Calefacción S.L.
Page 8/46
User Manual Boilers Pellet-Olive stone
o
Minimum length: The weight proportion corresponding to those wood pellets with a length
lower than 10 mm should not exceed 20% of the total combustible mass.
o
Additional requirements to fuels:
Ashes sintering point: The ashes sintering point should be higher than 1100°C.
Ashes fusion point: The ashes fusion point should be higher than 1200°C.
Ashes softening point: The ashes softening point should be higher than 1150°C.
- Transport and storage
However, the really important thing is to fulfill the transportation rules, since it is possible to damage good quality
pellets just by handling them in the wrong way during the transportation or the pouring in the hopper. The pellets
transportation to the final customer, or to the intermediate distributor, and the subsequent distribution are ruled by the
“ÖNorm 7136 pellets transportation and storage.” Based on this rule, it is the symbol “DIN approved pellets
logistics specialised company”. Please, only choose suppliers who transport and storage pellets according to the
“ÖNorm 7136 Transport” or certified with the symbol “DIN approved pellets logistics specialised company.”
5.2.
Olive stone
6.
-
Humidity: The level of humidity in the pit should be between 6 and 8%. If the fuel does not have the
appropriate humidity it could generate some oils during the combustion. This will make the chambers of
the stove get dirty and it generates corrosion.
-
Dimensions: The grain size of the pit should be between 3 and 4 mm. The combustion burner has to
be the right one for the olive stone combustion. Normally, the olive stone generates a bigger waste of
ashes and non-burnt pieces than the pellet. This is why it is so important to clean the burner daily and
to do a deep cleaning of the stove every 6 months rather than once a year.
Start-up
Configuration of the electronic regulation is very important regarding energy saving. During the starting-up,
it is convenient to have the first configuration done by a specialised technician. At the same time, in order to
guarantee an optimal output, the boiler and its components have to be received in situ by an authorised
specialised technician.
Before connecting the boiler to the voltage, you need to check every point of the following list:
-
Assembly instructions observation:
Bronpi Calefacción S.L.
Page 9/46
User Manual Boilers Pellet-Olive stone
Has every assembly step been properly done according to the instructions?
Ash pan control:
-
Ash pan door
Ash pan
Ash pan chamber
Check there are not foreign bodies inside both the chamber where the ash pan is placed and the interior.
Also, check the vermiculite parts placed on the door and inside have not moved during the shipment.
While the boiler is working, none of its parts or instruments should be inside the ash pan or the loading
compartment. Close the door and check that you can close it perfectly.
-
Combustion chamber control
Combustion chamber door
Please check that there are no objects inside the combustion chamber and place inside the appropriate
burner for the chosen working mode of the boiler as it is shown in the following pictures. Note that the
incorrect placement of the burner may cause problems in the combustion.
-
Burner
Bronpi Calefacción S.L.
Page 10/46
User Manual Boilers Pellet-Olive stone
-
Plug in
Once all these points have been checked, please connect the socket with a grounded socket base of
~230V/ 10A retarded.
It is important to take into account the following points:
o
The system should have been run according to the rule VDE 0100.
o
The connection with the electric power network should not be done through an
extension lead (fire risk!)
o
It is advisable to install an automatic switch.
o
Compare the machine nameplate data with the data calculated from your power
network.
7.
Display
7.1.
Display General Information
The display shows information about the boiler performance. Once you access the menu, you can get
different types of screen and adjust the available configuration according to the level of access. Depending
on the working mode, the display may has different meanings depending on the position of the screen.
Picture 1 shows an example of a boiler turned on or turned off.
STATE
VALUE
DIALOGUE
14:24
OFF
Picture 1
Picture 2 shows the layout of the messages during the programming or configuration of the working parameters.
Particularly:
1.
The screen area saying “VALUE” shows the value that we introduce.
2.
The screen area saying “MENU LEVEL” shows the current menu level. Check “menu” section.
Bronpi Calefacción S.L.
Page 11/46
User Manual Boilers Pellet-Olive stone
1
3
VALUE
6
MENU LEVEL
08:10
M - 4 - 3 - 01
START
PROG - 1
STATE
2
DIALOGUE
4
5
Picture 2
Picture 3 shows the meaning of the symbols appearing on
CLOCK
the left hand side of the screen.
RESISTOR
The screen lighting in the section “status” shows the
ENDLESS
activation of the corresponding device according to the
SMOKE
EXTRACTOR
following list.
HEAT EXCHANGER
NOT IN USE
Picture 3
7.2.
Functions of the Display’s Buttons
Button Description
Increases
1
Temperature
Decreases
2
Temperature
3
ALARM
Menu (Set)
Modality
PROGRAMMING
ON/OFF
PROGRAMMING
ON/OFF
MENU
PROGRAMMING
WORKING
4
ON/OFF
Unblocking
UNBLOCKING
MENU / PROGRAMMING
Performance Description
Modifies/Increases the value of the selected menu.
Increases the ambient thermostat temperature value.
Modifies/Decreases the value of the selected menu.
Decreases the ambient thermostat temperature value.
Access the menu.
Access the following level in the submenu.
Confirms the selected value and move to the following option
in the menu.
It switches on or off the boiler during 2 seconds, as
appropriate.
Unblocks the boiler and switches it off.
Goes back to the previous level menu and saves the modified
data.
Bronpi Calefacción S.L.
Page 12/46
User Manual Boilers Pellet-Olive stone
5
6
7.3.
ON/OFF
Decreases the output value of the boiler.
MENU
Moves to the previous menu option.
PROGRAMMING
Goes back to the previous submenu value.
ON/OFF
Increases the output value of the boiler.
Increases
MENU
Moves to the following menu option.
Power
PROGRAMMING
Moves to the following submenu option.
(NOTE:) You can gain access to the water temperature adjustment by pressing button nº1 just once.
Decreases
Power
Menu
By pressing button no. 3 we can access the MENU. It is divided into several sections and levels that allow
accessing the configuration and programming of the boiler.
The elements of the menu that allow the access to the technical programming of the boiler are protected by
a password. These parameters should be modified only by an authorised technician. (The changes in these
parameters could cause a wrong running in the boiler and the subsequent lost of the warranty.)
7.3.1.
User Menu
The following table briefly describes the menu structure in the boiler. In the attached table, only the options
available to the user are specified.
Level 1
Level 2
Level 3
Level 4
01 – Choose fuel
See chapter 7.3.2. of this manual
02 – Season state
Value
Summer/Winter
03 – Clock adjustments
04 – Programme adjustment
01- Day
Week Day
02- Hour
Hour
03- Minute
Minute
04- Day
Month Day
05- Month
Month
06- Year
Year
See chapter 7.3.5 of this manual
05 – Select language
01 - Italian
Set
02 - French
Set
03 - English
Set
04 - German
Set
05 - Portuguese
Set
06 - Spanish
Set
Bronpi Calefacción S.L.
Page 13/46
User Manual Boilers Pellet-Olive stone
06 – Stand-by mode
On/Off
07 – Sound mode
On/Off
08 – Initial load
Set
09 – Boiler state
Provides information on the status of the boiler.
10 – Technical adjustment
Exclusive access to authorised personnel.
7.3.2 Menu 1. Choosing Fuel
It establishes the fuel that we are going to use, either pellet or olive pit. In the event of using wood
pellet we will select “TYPE 1” while if we are going to use olive stone we will select the option
“TYPE 2”. Due to the existence of several fuel qualities, Bio-Bronpi boilers allow to choose a third
type of fuel “TYPE 3”. With this option, we try to get a good combustion although the fuel has lower
quality. However, it is necessary to reach some mínimum quality requirements. For this reason, in the
case of using adulterated fuel, with high humidity, low density, anomalous size or with presence of
impurities… Bronpi Calefacción S.L. will not be responsible for the damaged caused by this.
MENU LEVEL
Menu 01
TYPE 1
FUEL
DIALOGUE
7.3.3
Menu 2. Summer/Winter Mode
This menu has two options: “SUMMER” and “WINTER.”
In the event of selecting the “winter” mode we need to take into account that the boiler will allow us to
use simultaneously the heating system together with the SHW (Sanitary Hot Water) heating system. We always need
to give priority to the SHW heating system and it needs to be directly installed to our Bronpi boiler. In the event of
having connected the boiler only with our heating circuit, the boiler will work, anyway, in the same way and it will only
Bronpi Calefacción S.L.
Page 14/46
User Manual Boilers Pellet-Olive stone
regulate the performance with the values we want. It is advisable to use this working mode during the coldest
periods.
In the event of selecting the “summer” mode, a proper operation is only guaranteed when we have installed
an SHW heating system. This is due to the fact that during the summer season the boiler considers unnecessary the
use of heating systems, so it will be only work in the case of demanding hot sanitary water. When our installation
does not have the SHW heating system it is advisable to select the “winter” mode.
DIALOGUE
MENU LEVEL
Menu 02
SUMMER
7.3.4
Menu 3. Set up Clock
It sets up the time and date. The card has a lithium battery that allows the clock to work during 3/5 years.
DIALOGUE
MENU LEVEL
Menu 03
SET UP
CLOCK
7.3.5
Menu 4. Programme Setting
IMPORTANT: Before proceeding to set up the boiler, please check that the time and the date
shown are correct; otherwise, the selected programming would be set up depending on the
time and date set by default and this could not satisfy your needs.
In order to set up our boiler, we need to access the programming menu by pressing button no.3 “SET” only
once. With buttons no.5 and no.6 we can move through the menu no.2 “Programme Setting”:
Bronpi Calefacción S.L.
Page 15/46
User Manual Boilers Pellet-Olive stone
Menu 04
PROGRAMME
SETTING
To confirm this option, press again button no. “SET”; this way, we have indicated the machine that
we want to access the programming menu.
To see the different submenus we need to press buttons no. 5 and no. 6.
7.3.5.1 Sub-menu 04.01. Set up Chrono
To inform the boiler that we need to set up the chrono, we need to go to submenu 3-1 “Set up
Chrono” and, by pressing button no.3 “SET”, it will show, by default, the following screen:
OFF
M - 4 - 1 - 01
HABILITA
CRONO
In the upper left margin it is shown, by default, the word “OFF”; however, by pressing buttons no.1
or no.2 we should be able to change it to “ON” mode in order to inform the boiler that we are trying to introduce some
of the three programmes: daily, weekly or weekend.
ON
M - 4 - 1 - 01
SET UP
CHRONO
Bronpi Calefacción S.L.
Page 16/46
User Manual Boilers Pellet-Olive stone
After this, we need to choose the programme that we want to introduce: daily, weekly or weekend. To do so,
from the previous screen, we need to press repeatedly buttons nº5 and nº6 until we reach the desired option.
7.3.5.2 Sub-menu 04.02. Daily Programme
Let’s consider, for example, that we want to set up the daily programme. In this case, we need to go
to the following screen:
M-4-2
DAILY
PROGRAMME
By pressing just once button no.3 we gain access to the daily programming submenu of the boiler
and, by default, it will show the following screen:
OFF
M - 4 - 2 - 01
DAILY
PROGRAMME
We need to change the option OFF to ON by pressing buttons no. 1 or no. 2 so that we confirm to the
machine that we have selected the daily programme:
ON
M - 4 - 2 - 01
DAILY
PROGRAMME
Now we need to choose the hours that we would like the boiler to be switched ON. To do this, there are 2
available hours to start and other 2 hours to stop the boiler: START 1 and STOP 1, START 2 and STOP 2.
Bronpi Calefacción S.L.
Page 17/46
User Manual Boilers Pellet-Olive stone
For example:
-
Start at 09:00 hours / stop at 14:30 hours
-
Start at 20:30 / stop at 23:00 hours
From the previous screen, we press button nº6 and it will show up
OFF
M - 4 - 2 - 02
START 1
DIA
By pressing buttons no. 1 and no. 2 we modify the value “OFF” and we set the time of the first start:
09:00
M - 4 - 2 - 02
START 1
DIA
In this same way we can proceed to set the first time to stop:
OFF
M - 4 - 2 - 03
STOP 1
DAY
Bronpi Calefacción S.L.
Page 18/46
User Manual Boilers Pellet-Olive stone
14:30
M - 4 - 2 - 03
STOP 1
DAY
In order to set up the values of the second time to start and stop, we need to follow the same steps as
before:
20:30
M - 4 - 2 - 04
START 2
DAY
23:00
M - 4 - 2 - 05
STOP 2
DAY
After this we have already set up the daily programming of the boiler with 2 hours to start and 2 to stop. In
case that you may want to set up just one time to start and stop, the options START 2 and STOP 2 should be “OFF.”
It is also possible to set up just one time for START 1 (08:00 hours) and stops it manually (STOP 2: “OFF.”)
Equally, starts it manually (START 1: “OFF”) and one time for STOP 1: 22:00 hours.
Bronpi Calefacción S.L.
Page 19/46
User Manual Boilers Pellet-Olive stone
7.3.5.3 Sub-menu 04.03. Weekly Programme
NOTE: Please, make the set up carefully in order to avoid hour’ superposition and/or
inactivate the same day in different programmes.
If we intend to make a weekly set up of the boiler we need to take into account that, in this occasion,
we have 4 different hours to start and stop, so we need to ascribe to every day of the week the activation or not, as
appropriate. In order to activate them we need to start from the following screen:
M-4-3
WEEKLY
PROGRAMME
By pressing only once button no. 3, we access to the weekly programme sub-menu of the boiler and, by
default, it will show up the following screen:
OFF
M - 4 - 3 - 01
WEEKLY
PROGRAMME
We need to change option “OFF” with “ON” by pressing buttons no.1 and no.2. This way we are confirming
that the weekly set up has been selected:
ON
M - 4 - 3 - 01
WEEKLY
PROGRAMME
Now, we only need to choose the times; we have 4 different times available to start and stop:
Bronpi Calefacción S.L.
Page 20/46
User Manual Boilers Pellet-Olive stone
- PROGRAMME 1: START 1 and STOP 1
- PROGRAMME 2: START 2 and STOP 2
- PROGRAMME 3: START 3 and STOP 3
- PROGRAMME 4: START 4 and STOP 4
12:00
M - 4 - 3 - 02
START
PROG - 1
After this, we need to select the activation or deactivation of each programme depending on the day of the week, for
example:
- Programme 1: Monday (ON), Tuesday (ON), Wednesday (OFF), Thursday (OFF), Friday (ON), Saturday
(ON), and Sunday (OFF.)
-
Programme 2: Monday (OFF), Tuesday (OFF), Wednesday (ON), Thursday (OFF), Friday (OFF), Saturday
(ON), and Sunday (ON.)
-
Programme 3: Monday (OFF), Tuesday (ON), Wednesday (ON), Thursday (ON), Friday (ON), Saturday
(ON), and Sunday (OFF.)
-
Programme 4: Monday (ON), Tuesday (ON), Wednesday (OFF), Thursday (OFF), Friday (OFF), Saturday
(OFF), and Sunday (ON.)
ON
M - 4 - 3 - 04
MONDAY
PROG - 1
Thanks to this type of setting we can combine 4 different times throughout the days of the week,
but always keeping in mind not to superimpose the times.
Bronpi Calefacción S.L.
Page 21/46
User Manual Boilers Pellet-Olive stone
7.3.5.4 Sub-menu 04.04. Weekend Programme
In the same way as in the daily programme, this setting up has two independent times to start and
two to stop, with the exception that it only applies to Saturday and Sunday. To gain access to this
setting up we need to start from the following screen:
M-4-4
WEEKEND
PROGRAMME
We need to confirm the access to this programme by pressing button no.3 “SET” and it should show up the
following screen:
OFF
M - 4 - 4 - 01
START
PROG - 1
We modify the value “OFF” and select “ON”:
ON
M - 4 - 4 - 01
STOP
PROG - 1
Finally, we introduce the times to start and stop to complete the desired setting up.
As in the daily programme, if we need to set up only one time to start and stop, the options START 2 and
STOP 2 should indicate “OFF.”
Bronpi Calefacción S.L.
Page 22/46
User Manual Boilers Pellet-Olive stone
It is also possible to set up one time to start (START 1: 08.00 h) and stop the boiler manually (STOP 2:
“OFF.”) In the same way, we can start the boiler manually (START 1: “OFF”) and set up a time to stop it (STOP 1:
22.00h.)
7.3.6
Menu 5. Select Language
It allows selecting the languages between those available (Italian, French, English, German, Portuguese, and
Spanish.)
MENU LEVEL
Menu 05
SPANISH
LANGUAGE
DIALOGUE
7.3.7
Menu 6. Stand-by Mode
When the “Stand-by Mode” is “OFF” the boiler will work depending on the water temperatura set
selected. Therefore, it will not attend posible demands from the room thermostat of the installation.
In the case the “Stand-by Mode” is “ON” the boiler will work depending on the demands from the
room thermostat.
When activating the “Stand-by Mode” in the boiler, it will show up two different situations depending on the mode we
have chosen (“Summer” or “Winter”.) In the case of choosing the “Summer” mode, on condition that we have
installed an SHW circuit to our boiler, the boiler turns off when it reaches the desired temperature in the SHW tank
and it will restart up when this temperature comes back to the marked threshold. If, on the contrary, the SHW system
has not been installed, the boiler could work in the wrong way (Please, check chapter 7.3.3.)
If, on the contrary, the chosen mode is the “Winter” one, the boiler does turn off once both the room setting
temperature plus a differential and the SHW tank temperature (provided that it has been installed) have been
reached. The boiler will restart up as soon as one of the temperatures, either the room setting temperature minus a
differential or the SHW tank temperature, goes down. In case we have not installed the sanitary hot water to our
boiler, it will work in the same way, but taking into account as reference only the room setting temperature.
In both cases the boiler will be, first of all, in Stand-by mode. In the event of having a period of time,
established by the manufacturer, without a demand of water heating, our boiler does turn off until it has a new
demand and it will show up in the display the message “Waiting Demand.”
IMPORTANT: when the boiler is switched-off, at the moment of the Sanitary Hot Water demand
or heating, the circulating pump will start working and the boiler will turn on when the
temperature is below the temperature setpoint.
Bronpi Calefacción S.L.
Page 23/46
User Manual Boilers Pellet-Olive stone
17:43
H2O
54 ºC
WAITING
DEMAND
7.3.8
Menu 7. Sound Mode
By activating this modality, the boiler will emit a sound when the system detects a fault and goes
into the alarm state.
7.3.9
Menu 8. Initial Load
When the boiler is OFF and cold we can make a pellet pre-load during a period of time previously
set by the manufacturer. To start the load, please press button 1 and to stop it press button 4
1
TIME
WATER TEMPERATURE
76”
H2O
22º C
INITIAL
LOAD
DIALOGUE
4
Bronpi Calefacción S.L.
Page 24/46
User Manual Boilers Pellet-Olive stone
7.3.10 Menu 9. Boiler State
It shows up the current state of the boiler and provides information about the devices connected.
TIME 1
REMAINING TIME
10”
82’
R. ALARM 30
STATE
4
STATE
OPERATIONAL STATE
ALARM DELAY
STATE OF THE HEAT EXCHANGER 2&3
SMOKE EXTRACTION SPEED
SMOKE TEMPERATURE
117 ºC
1100
V1 – 2
STATE
STATE
INSTANT POWER
P4
V3 –
4
HEAT EXCHANGER SPEED 2
HEAT EXCHANGER SPEED 3
OPERATIONAL STATE
ASPIRATION
FAILURE
STATE
ALARM IN PROCESS
Bronpi Calefacción S.L.
Page 25/46
User Manual Boilers Pellet-Olive stone
7.4
User Mode
Below is a description of the display normal operation according to the available fonctions.
Before the ignition of the boiler, the display shows the following screen:
HOUR
DIALOGUE
WATER TEMPERATURE
14:24
H2O
36 ºC
OFF
7.4.1
Boiler’s Ignition
In order to ignite the boiler, press button no.4 during a few seconds. The display will show the ignition state
as follows:
HOUR
DIALOGUE
WATER TEMPERATURE
4
14:24
H2O
35 ºC
IGNITION
The maximum lenght of the ignition phase is 25 minutes. After this time, if there is no visible flame,
the boiler will automatically goes into the alarm state and the display will show the message “Ignition Failure.”
Bronpi Calefacción S.L.
Page 26/46
User Manual Boilers Pellet-Olive stone
7.4.2 Boiler in Operation
Once the smoke temperature set has been reached, the boiler is working. First of all, it will be in the
state “Fire Present” and this will last just a few minutes before considering the boiler totally ignited. In this moment,
the display will show the message “Work.” After this, our boiler will be working normally.
HOUR
WATER TEMPERATURE
POWER SET
14:24
H2O
35 ºC
WORK
DIALOGUE
7.4.2
5
1
INSTANT POWER
Change Water Temperature Set
In order to modify the water setting temperature, please press button 1 and the display will show
the current water setting temperature. We can modify the temperature by pressing buttons number 1 and 2 to
increase or decrease it respectively.
DIALOGUE
1
IMPOSED VALUE
2
H2O
65 ºC
WATER TEMP.
VALUE
Bronpi Calefacción S.L.
Page 27/46
User Manual Boilers Pellet-Olive stone
7.4.4
Water Temperature Reaches Temperature Fixed by the User
HOUR
DIALOGUE
WATER TEMPERATURE
14:24
H2O
65 ºC
MODULATION
WORK
In the same way as in the room temperature, if the Stand-by mode is ON, once the water
temperature reaches the temperature set by the user plus a differential, the boiler will be automatically turned off. In
this moment, the boiler will be on hold until the water temperature falls to the set temperature minus a differential.
7.4.5
Burner cleaning
While the boiler is working normally, some automatic cleanings of the burner take place. Mainly,
this process consists on cleaning the rest of pellet or olive pit remaining in the burner in order to guarantee a proper
working of the boiler.
DIALOGUE
HOUR
WATER TEMPERATURE
14:24
H2O
54 ºC
BURNER
CLEANING
.
7.4.6
Turning off the Boiler
To turn the boiler off we just need to press button 4 for a few seconds. Once it has been turned off,
the boiler will start the final cleaning stage, in which the pellet/olive pit supply stops and the smoke extractor will be
working to the maximum speed. This stage would not finish until the boiler has reached the appropriate cooling
temperature.
Bronpi Calefacción S.L.
Page 28/46
User Manual Boilers Pellet-Olive stone
HOUR
DIALOGUE
WATER TEMPERATURE
14:24
H2O
54 ºC
FINAL
CLEANING
7.4.7
Boiler Turned off
When the boiler is turned off, the display shows the following information:
HOUR
DIALOGUE
WATER TEMPERATURE
14:35
H2O
54 ºC
TURNED OFF
7.4.8
Re-ignition of the Boiler
Once the boiler is turned off it would not be possible to restart it up until some safety time
goes by and the boiler is cold enough. If you try to start-up the boiler, the display will show up the
following information:
HOUR
DIALOGUE
WATER TEMPERATURE
14:35
H2O
54 ºC
WAITING
COOLING
Bronpi Calefacción S.L.
Page 29/46
User Manual Boilers Pellet-Olive stone
7.5
What happens if…?
7.5.1
The Fuel Does not Light
In the event of a start-up failure, the display will show up an alarm as follows:
HOUR
DIALOGUE
WATER TEMPERATURE
14:35
H2O
54 ºC
IGNITION
FAILURE
In order to deactivate the alarm, please press button 4 and the boiler will be back to normal.
7.5.2
Power Supply Failure (Black Out)
In the event of a power supply cut-off, when the boiler restarts up it goes straight to the Final Cleaning stage
until the boiler temperature reaches the appropriate cooling temperature. Once the final cleaning has finished, the
boiler will turn off until the user ignite it again.
HOUR
DIALOGUE
WATER TEMPERATURE
14:24
H2O
54 ºC
FINAL
CLEANING
7.6
Alarms
In case of an anomaly during the working, the electronics of the boiler intervenes and highlights the regularities
that have taken place in the different ways of working, depending on the type of fault. Therefore, the boiler could
show up different alarms.
Bronpi Calefacción S.L.
Page 30/46
User Manual Boilers Pellet-Olive stone
Every alarm situation makes the boiler to be automatically blocked. By pressing button 4 we can unblock it.
Once the boiler has reached the appropriate cooling temperature, the user can restart it up.
7.6.1
Smoke Probe Temperature Alarm
This alarm goes off when the probe in charge of detecting the exhaust stack temperature is disconnected or
it breaks. During the alarm status, the boiler will be in the turn-off stage.
14:24
H2O
35 ºC
PROBE
ALARM
7.6.2
Smoke Temperature Excess Alarm
It goes off when the probe detects a smoke temperature higher than 220°C; therefore the display shows the following
message:
14:24
H2O
35 ºC
ALARMA
TEMP. HUMOS
During the alarm state, the boiler will be in the turn-off stage.
7.6.3
Ignition Failure Alarm
It goes off when the start-up stage does not run properly. The display will then show up this
message and the turn-off stage will immediately be activated.
14:24
H2O
35 ºC
IGNITION
FAILURE
Bronpi Calefacción S.L.
Page 31/46
User Manual Boilers Pellet-Olive stone
7.6.4
Switching-off Failure during Working Phase
If the flame extinguishes during the working stage and the smoke temperature goes lower than the minimum
working threshold, the alarm does go off and the turn-off stage will be immediately activated.
14:24
H2O
35 ºC
NO FIRE
ALARM
7.6.5
Pressure Alarm
Circuit hydraulic pressure
It goes off when the pressure transducer detects a wrong pressure, either lower than 0.4 bars or higher than 2.5
bars. The system does automatically interrupt the pellet supply and the display will show up in the screen an alarm.
Right after, the turn-off stage is activated.
AL E
WATER
PRESSURE
Combustion chamber pressure
It happens when there is a pressure change in the combustion chamber. The pellet supply is interrupted and the
turn-off stage will be immediately activated.
AL 8
PRESSURE
FAILURE
Bronpi Calefacción S.L.
Page 32/46
User Manual Boilers Pellet-Olive stone
7.6.6
Damaged Smoke Extraction Fan Alarm
Oc It goes off when the smoke extraction fan breaks down. If this happens, the boiler does stop and the
display will show up the following alarm. Right after, the turn-off stage will be immediately activated.
14:24
22 ºC
35 ºC
ASPIRATION
FAILURE
7.6.7
Worm Gear Failure Alarm
It goes off in the event of the endless breakdown. If this happens, the boiler stops and the display will show up the
following alarm. Right after, the turn-off stage will be immediately activated.
AL b
YESNFÍN
ERROR
7.6.8
End service
This message is not a alarm,. Means that the boiler was working 1200 hours and the technical
service must to make the maintenance operations.
END
SERVICE
Bronpi Calefacción S.L.
Page 33/46
User Manual Boilers Pellet-Olive stone
Alarm Code
Description
Problem
BLACK OUT
The boiler has been Press button 4 for a few seconds and let the
temporarily
without final cleaning stage to finish. The boiler will
electric current.
come back to the turn-off status.
SMOKE
PROBE
Problem with the smoke Check the probe connection or replace it.
probe.
SMOKE
TEMP.
The smoke temperature Regulate the pellet drop and/or the extractor
speed. Verify the type of fuel that has been
is higher than 270ºC.
used.
BREAKDOWN
EXTRACTOR
Problem with the smoke Check the extractor electrical connection or
extractor.
replace it.
START-UP
FAILURE
The fuel does not fall or Check the geared motor and the resistor way
of working. Check a possible blockage of the
burn.
endless. Verify that there is actually fuel in
the tank.
NO PELLET
There is no fuel in the Refill tank. Check the endless working.
hopper or it does not fall Check the fuel characteristics and that it has
not become compacted. Clean the bottom of
inside the burner.
the hopper.
THERMAL
ALARM
The fuel thermal security Restart the thermostat manually. Check the
reason why the temperature is excessive
thermostat has shot up.
and provoked the overheating (fuel drop,
draw excess, fuel type.)
DEPRESSION
The combustion chamber Verify that the chamber is hermetic : check
locks, gaskets… etc. Check that the gas
is on depression.
installation is correct (excess of horizontal
sections, elbow joint, etc). Possible fuel
blockage.
AL1
AL 2
AL 3
AL 4
AL 5
AL 6
AL 7
AL 8
AL 9
LACK
FLOW
Possible Solution
OF Lack of primary air or Check the primary air inlet. Verify installation
installation
not (excess of horizontal section, curves,
appropriate.
dirtiness, etc).
AL
DIRTY
FLOWMETER
The flowmeter sensor is Clean the flow sensor to get a proper
dirty.
reading.
AL
FLOWMETER
The
flow
sensor
is Replace the flow sensor.
Bronpi Calefacción S.L.
Page 34/46
User Manual Boilers Pellet-Olive stone
AL b
AL
AL A
AL E
8
FAILURE
broken.
ENDLESS
ERROR
The
endless
continuously.
WATER
PROBE
Problem with the water Check the probe connection or replace it.
probe.
HOT WATER
The water temperature is Check the pump working. Check the
high.
hydraulic installation. Purge properly.
WATER
PRESSURE
Problems
with
the Check the hydraulic pressure of the
hydraulic circuit pressure. installation, which should be between 1 and
Pressure over 2.5 bars or 1,5 bars.
under 0.4 bars.
spins Verify the electrical connection of the
endless.
Maintenance and Care
The maintenance operations guarantee a proper working of the product during a long time. Not making
these maintenance operations will affect the security of the product.
8.1. Burner Cleaning
The cleaning of the burner should be made daily:
-
Remove the burner from its place and unblock the holes with the corresponding poker, which
comes together with the boiler.
-
Use a vacuum to get rid of the ashes in the burner.
-
Hoover the ashes which are inside the burner place.
8.2. Use of the Scraper
A clean smoke chamber guarantees a constant thermal performance during a long time. This type of
maintenance should be done, at least, once a day. To do so, you just need to use the corresponding scrapers by
activating the handle placed in the side part of the boiler making a backward-forward movement repeatedly.
8.3. Ash Pan Cleaning
The ash pan should be emptied when necessary. The boiler should not be working without having the ash
pan inside. In the event of using olive pit as fuel, we need to bear in mind that the amount of ashes will be bigger
than those produced by wood pellet. In this case the ash pan cleaning should be done more frequently.
8.4. Joints of the Ash Pan Door and the Burner
The joints guarantee the boiler hermetic nature and, thus, a proper performance. It is necessary to check
them regularly; if they are worn-out or damaged they should be replaced immediately. These operations should be
done exclusively by an authorised technician.
Bronpi Calefacción S.L.
Page 35/46
User Manual Boilers Pellet-Olive stone
In order to guarantee a proper performance of the boiler, an authorised technical service should
make the maintenance operations, at least, once a year.
If the power cable is damaged it has to be replaced by the technical support service or, in any case, by a
qualified technician in order to avoid unnecessary risks.
8.5. Smoke Pipes Cleaning
During the normal use, the boiler does not suffer any damages. When the pellet/olive pit is burnt, some tar
and organic steam are slowly produced and these, combined with the humidity, create creosote (soot.) An excessive
accumulation of soot could cause problems in the smoke outlet or even provoke a fire in the exhaust stack pipe.
The cleaning should be done, exclusively, when the machine is cold. This operation needs to be done by a
chimney sweeper who, at the same time, could do an inspection (it is advisable to keep record of the cleaning dates.)
8.6. Glass Cleaning
IMPORTANT: The glass cleaning has to be done, exclusively, when the machine is cold in order
to avoid an explosion. To clean the boiler, please use specific products (you may find these
products in your usual distributor.)
GLASS BREAKING: The glasses resist a thermal rise up to 750°C because they are glass-ceramic but they
are not subjected to thermal shocks. A glass breaking can only be caused by mechanical crashes (crashes
or forceful door closings, etc.) Therefore, replacements of the glasses are not covered by the warranty.
8.7. External Cleaning
Do not clean the external surface of the boiler with water or abrasive products because it could be
damaged. It is advisable to use a feather duster or a wet cloth.
8.8. Seasonal Stoppages
After cleaning the boiler, the chimney, and the exhaust stack pipe and having got rid of the ashes and other
residues, please close the boiler’s door and the corresponding settings. It is advisable to clean up the exhaust stack
pipe, at least, once a year. Meanwhile, please check the status of the joint because in the event of not being
absolutely complete (that is, if they do not fit the door) they do not guarantee a proper performance of the machine! It
would be, then, necessary to replace them. If the place where the boiler has been installed is damp, please put some
absorbing salt inside the boiler. Please, protect the interior with neutral petroleum jelly in order to maintain over time
the aesthetic appearance without any alteration.
It is also advisable to check and clean, at least once a year, the existing ashes in the lower part of the boiler.
In addition, in the event of seasonal shutdowns and, above all, in those places where the water lime content
is high, it is necessary to unblock the pump. This operation should be done by an authorised technician.
The boiler has an electric bell available for preventive maintenance operations which is establish to go off
after 1200 hours performing. This will remind you the need of cleaning the boiler deposits. To make this operation
you would need to contact an authorised technician.
This message is not an alarm, but a reminder or warning; therefore, it will allow you to use satisfactorily
the boiler while this message is shown in the display.
Bronpi Calefacción S.L.
Page 36/46
User Manual Boilers Pellet-Olive stone
User
Technici
an
Yearly
Monthly
Weekly
CLEANING TASKS
Daily
Please, bear in mind that the boiler could need to be cleaned before this 1200 hours established by default
or even after them. This depends on the quality of the fuel used, the smoke installation, and the proper regulation of
the boiler.
Move away the burner from the compartment and clean up the
holes using the poker provided. Hoover the ashes with a vacuum.
*
*
Hoover the ashes settled in the burner compartment.
*
*
Scrapers cleaning.
*
Empty the ash pan or hoover the ashes compartment when
necessary.
*
*
Vacuum the bottom of the pellet tank whenever necessary.
*
*
Clean up the interior of the combustion chamber by hoovering the
walls with an appropriate vacuum.
*
*
Clean up the smoke extraction motor, the entire combustion
chamber, pellet tank, whole replacement of the joints and new
silicone where necessary, smoke pipe, deposits…
*
Check all electronic components (electronic nameplate, display…)
*
Check all electric components (resistor, smoke extraction motor,
circulating pump…)
*
9
Sanitary Hot Water Tank (SHW)
If we have connected to our boiler an SHW tank we may have to take into consideration the following points:
-
Our boiler can only regulate an SHW tank, so it does not guarantee a proper performance in the
event of replacing this system with other alternatives.
-
This tank should have been provided with a thermostat, which will measure the inner temperature
and will regulate the exchange water temperature when necessary.
-
During the seasons of the year that the user would not consider necessary the simultaneous use of
heating and the SHW system (that is, when the user prefers to use only the boiler) we may need to
Bronpi Calefacción S.L.
Page 37/46
User Manual Boilers Pellet-Olive stone
go to the control panel (Display) and set the “Summer” mode. This way, the boiler will work only
when there is a demand from the tank (Please, check chapter 7.3.3.)
-
When the boiler is performing in the “Winter” mode we may bear in mind that it gives priority to the
heating of the SHW tank. This is why all the transmission power goes to this purpose and,
therefore, it stops the transmission to the heating circuit until the first one has reached the point of
demand.
The installer or Technical Assistance Service, during the ignition of the boiler and inside the
technical menu (MENU 10), will have to choose the power (1, 2, 3, 4 or 5) that the boiler must have
under the hot sanitary water demand according to the power of the heat exchanger. This means
that, whatever the working power at heating power, under the sanitary hot water demand, the boiler will always work
at the power established by the installer or technician. Also, once the sanitary hot water temperature has been
reached, it will enter into the working power corresponding to the heating mode. The following messages are shown
when the heating system of sanitary hot water starts working:
HOUR
DIALOGUE
BOILER WATER TEMPERATURE
14:24
H2O
54 ºC
SANITARY
WATER
HOUR
DIALOGUE
BOILER WATER TEMPERATURE
14:24
H2O
WORK
IMPOSED POWER
54 ºC
1
5
WORKING POWER
Bronpi Calefacción S.L.
Page 38/46
User Manual Boilers Pellet-Olive stone
10
General Measurements
Measurements in milimeters
Carlota-MF
Bronpi Calefacción S.L.
Page 39/46
User Manual Boilers Pellet-Olive stone
11
Maintenance
Date
Comments
Adopted Solution
Bronpi Calefacción S.L.
Page 40/46
User Manual Boilers Pellet-Olive stone
Date
Comments
Adopted Solution
Bronpi Calefacción S.L.
Page 41/46
User Manual Boilers Pellet-Olive stone
BRONPI CALEFACCION S.L.
For any other inquiry, please,
contact your distributor.
Bronpi Calefacción S.L.
Page 42/46